virtual instruments magazine vol. 04 no. 02 march-april 2008
DESCRIPTION
Virtual Instruments Magazine Vol. 04 No. 02 March-April 2008TRANSCRIPT
USA $5.99CANADA $5.99
FREE drum library from Chocolate Audio for the first 9000 readers!www.VirtualInstrumentsMag.com
M A R C H 2 0 0 8 - V O L . 4 N O . 2
the Very Deep Clinic
AppleAppleMainstageMainstagethe Very Deep Clinic
expanding its role as a completemusic production system
AbletonLive 7AbletonLive 7expanding its role as a completemusic production system
REVIEWS:BassVI Anthony Jackson Contrabass libraryGalaxy II Grand Piano CollectionImage-Line MorphineKirk Hunter Ruby orchestra libraryVir2 SyntaxWaves Guitar Tool Rack 3Zero-G/EastWest Carnival Drums Spirit of Brazil

V I R T U A L I N S T R U M E N T S 5
From the
Virtual Instruments is published bi-monthly for $16.95/year, $26.95/twoyears by Virtual Instruments, Inc., 3849 Ventura Canyon, Sherman
Oaks, CA 91423-4710. 818/905-9101, 1-877/[email protected]. Periodicals Postage Rates are paid atVan Nuys, CA, and at additional mailing offices under USPS # 023-464.
POSTMASTER: please send address changes to VIRTUAL INSTRUMENTS, 3849 VENTURA CANYON, SHERMAN
OAKS, CA 91423-4710.
Editor
Editor/publisher: Nick Batzdorf
Art director: Lachlan Westfall/Quiet Earth Design
Advertising/Marketing manager: Laurie Marans
Web designer: Denise Young/DMY Studios
Contributors: Jim Aikin, Jason Scott Alexander, Thomas J.
Bergersen, Peter Buick, David Das, Bob DeMaa, Peter Dines,
Doyle Donehoo, Gary Eskow, Jerry Gerber, Paul Gilreath, David
Govett, Jean-Stephane Guitton, Ashif “King Idiot” Hakik, Mattias
Henningson, Mark Jenkins, Hilgrove Kenrick, Michael Marans,
Monte McGuire, Orren Merton, Chris Meyer, Dave Moulton,
Zack Price, Frederick Russ, Bruce Richardson, Craig Sharmat,
Lee Sherman, Dietz Tinhof, Jesse White, George Whitty.
Advertising contact: Laurie Marans 818/590-0018.
Subscriptions/Address changes: 818/905-9101,
1-877/ViMagzn,
[email protected]. The best method is to
subscribe via our website:
www.VirtualInstrumentsMag.com.
Letters to the editor: [email protected],
or fax: 818/905-5434.
Writing for Virtual Instruments Magazine: query
[email protected] or call 818/905-9101.
Welcome to the 16th issue of VI, and welcome to theNAMM Show if you picked up the magazine in Anaheim.
I’d like to call your attention to the center of the first 9000copies of this issue. There you’ll find a card with an activation num-ber for a free drum library from Chocolate Audio. In case you werewondering, this is a real product, not junk, and Chocolate Audio isan excellent developer (the same people responsible for ScarbeeImperial Drums). It’s promotional, sure, but I’d definitely encourageyou to take advantage of this opportunity.
By the way, if you’re one of our few hundred internationaldownload-only subscribers, we’re working on a solution (but wecan’t actually promise one yet). Please watch our www.VImag.netforum for announcements, in fact everyone might want stop bythere for announcements and industry news in general. You canreach the forum through our website(www.VirtualInstrumentsMag.com) as well.
Distributor: Rider Circulation Services, 3700 Eagle Rock Blvd., Los Angeles,
CA 90065.
323/344-1200. Bipad: 05792, UPC: 0 744 70 05792 5 05
Standard disclaimer: Virtual Instruments Magazine and its staff can’t be held
legally responsible for the magazine’s contents or guarantee the return of
articles and graphics submitted. Reasonable care is taken to ensure accura-
cy. All trademarks belong to their owners. Everything in here is subject to
international copyright protection, and you may not copy or imitate anything
without permission.
© 2007 Virtual Instruments, Inc.
Speaking of the center of this issue, I’m pleased to announce thatwe’ve launched a new division: VI Products. Our first product is theVI Composer’s Desk, and we have a couple more things up oursleeves under development. The concept is simple: cool productsthat there’s a need for and that aren’t available anywhere else. It’sjust another way to help support the magazine.
Finally, we’d like to encourage you to write to us, either throughthe VImag.net forum or by email. Please feel free to give us feed-back, tell us what you’d like to see covered, comment on the stateof our universe, just ask technical questions, or anything else. We doread everything and value your input.
Enjoy the issue.-NB
6 V I R T U A L I N S T R U M E N T S
48 MIDI MockupMicroscope by Frederick Russ
In this installment of our series on composers and how theydid their MIDI programming, composer/sample developerAlex Pfeffer discusses two of his cues.
V E R Y D E E P C L I N I C :
iZotope Ozone By Bob DeMaa
Tips on mastering V.I.-based compositions using this highlycapable suite of tools.
Letters
Launch
Introductions, updates, news
8 3612
March 2008
V4.N2
V E R Y D E E P C L I N I C :
Apple Mainstage By Jean-Stephane Guitton
This live performance host comes with Logic 8 as part of theLogic Studio suite of programs. It’s a surprisingly capabletool. 64 Trends: Predictions
What to watch for this year
20
V I R T U A L I N S T R U M E N T S 7
VIcontentsMarch 2008
V4.N2
VIreviews
14 42
5218
28
Ableton Live 7Suite by Chris Meyer
Live expands its role as a completemusic production station.
Bass VI TheAnthony JacksonContrabassGuitar library by Nick Batzdorf
A massive 6-string bass library featur-ing one of New York’s best jazz andsession players
Three Bass Plug-Ins By Jim Aikin
Waves GTR3 by Craig Sharmat
Is this really the best sounding virtualguitar amp effects software in theworld?
Big Products,Little Reviews by Jason Scott Alexander
Galaxy II Grand Piano Collection,Zero G Carnival Drums The Spirit ofBrazil, and Vir2 Syntax
Kirk HunterDiamondOrchestraLibrary By Nick Batzdorf
This orchestra is designed to providea good “out of box” experience withvery little fuss. It succeeds.
Image-LineMorphine By Peter Dines
An interesting additive synth fromthe developers of FL Studio.
30
54
8 V I R T U A L I N S T R U M E N T S
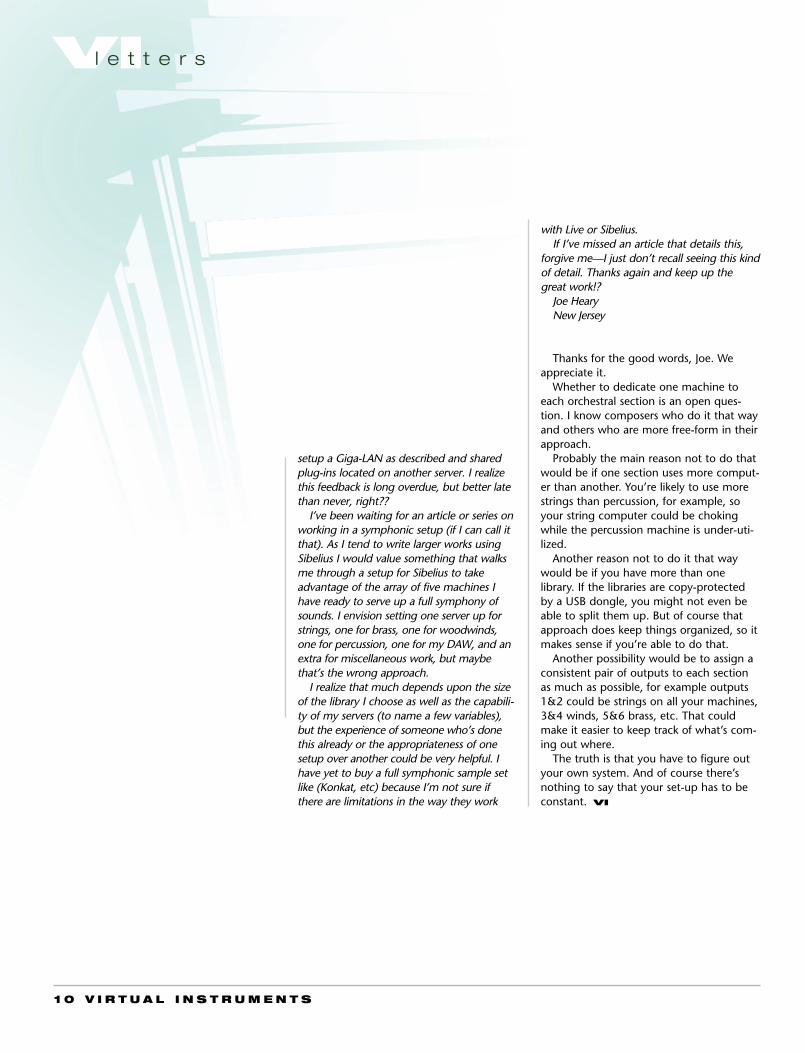
who wrote a book on Logic (Logic 7Power). The answer is…double-click on theCPU indication in the transport. See Fig. 1.
2. Keyswitches are on-the-fly programchanges triggered from an unused part ofthe keyboard (usually the top or bottomoctave). Sample libraries use them toswitch between articulations, for exam-ple—a very simple example—you mighthave short, medium, and long piccoloarticulations loaded, and then you’dkeyswitch to bring up the right one asyou’re playing.
Well, you probably don’t want a bunchof low C-1s showing up in the score foryour piccolo part. Logic 8 lets you filterthese notes out, a feature that every pro-gram should really have at this point, giventhat keyswitches are now so common.
Furthermore, it would be great ifsequencers made it easy to edit keyswitchnotes. They should be in some sort of edit-ing lane like other controllers.
Symphonic set-upYou and the folks at VI are doing fantastic
work. I’ve introduced a number of fellow pro-fessionals to VI and eagerly anticipate eachissue.
I have spent the last year building a proj-ect studio based on Ableton Live (currentlyV6.x) controlled via a Tascam FW-1884interface/controller and an array of comput-ers used to support numerous plug-ins. If itweren’t for your article series, “First DAW,”along with the article, “Lay of the LAN” inthe second issue, I’d be scratching my headfor months trying to figure out how to getstarted and why I was getting “pops” and“drop-outs” once I got going.
I suppose there’s a way I could have deter-mined that my machine was overburdened,but since it was a fairly hefty dual-coreprocessor with 4GB of memory, I was quitesurprised how everything cleaned up when I
VIl e t t e r s
LettersPlease send your questions and comments [email protected]
Logic 8I had a couple of questions about your
Logic 8 article in the November 07 issue.1. How did you get the System
Performance window? Is it renamed? I onlysee a small readout in the new Transport.
2. What do you mean by “keyswitch”(“You can now keep keyswitch notes out ofthe score display”)?
Thanks for packing so much into that tinypreview.
Steven SmithJacksonville, FL
Thanks Steven.1. Yes, the System Performance window
isn’t in the instructions, in fact I admit tocalling up and asking writer Orren Merton,
Fig. 1: The CPU window in Logic 8 (fka System Performance in Logic 7) is opened by double-clicking onthe miniature CPU indicator on the transport (enclosed in the orange box—and that’s our box, notLogic’s). That’s not in the manual.
1 0 V I R T U A L I N S T R U M E N T S
VIl e t t e r s
setup a Giga-LAN as described and sharedplug-ins located on another server. I realizethis feedback is long overdue, but better latethan never, right??
I’ve been waiting for an article or series onworking in a symphonic setup (if I can call itthat). As I tend to write larger works usingSibelius I would value something that walksme through a setup for Sibelius to takeadvantage of the array of five machines Ihave ready to serve up a full symphony ofsounds. I envision setting one server up forstrings, one for brass, one for woodwinds,one for percussion, one for my DAW, and anextra for miscellaneous work, but maybethat’s the wrong approach.
I realize that much depends upon the sizeof the library I choose as well as the capabili-ty of my servers (to name a few variables),but the experience of someone who’s donethis already or the appropriateness of onesetup over another could be very helpful. Ihave yet to buy a full symphonic sample setlike (Konkat, etc) because I’m not sure ifthere are limitations in the way they work
with Live or Sibelius.If I’ve missed an article that details this,
forgive me—I just don’t recall seeing this kindof detail. Thanks again and keep up thegreat work!?
Joe HearyNew Jersey
Thanks for the good words, Joe. Weappreciate it.
Whether to dedicate one machine toeach orchestral section is an open ques-tion. I know composers who do it that wayand others who are more free-form in theirapproach.
Probably the main reason not to do thatwould be if one section uses more comput-er than another. You’re likely to use morestrings than percussion, for example, soyour string computer could be chokingwhile the percussion machine is under-uti-lized.
Another reason not to do it that waywould be if you have more than onelibrary. If the libraries are copy-protectedby a USB dongle, you might not even beable to split them up. But of course thatapproach does keep things organized, so itmakes sense if you’re able to do that.
Another possibility would be to assign aconsistent pair of outputs to each sectionas much as possible, for example outputs1&2 could be strings on all your machines,3&4 winds, 5&6 brass, etc. That couldmake it easier to keep track of what’s com-ing out where.
The truth is that you have to figure outyour own system. And of course there’snothing to say that your set-up has to beconstant. VI

1 2 V I R T U A L I N S T R U M E N T S
LaunchIntroductions, updates, news
VIl a u n c h
Jazzmutant makes two multi-touch controllers, one (the Lemur)
that can be configured freely tosend any message you want, another
(the Dexter) preset for mixing on allthe popular DAW programs.Well, they have new Dual Mode soft-
ware for Dexter that includes the Lemursoftware, so you can start up the device in
either mode. The update is free for Dexter,and EUR390 for Lemur users.www.jazzmutant.com
Magic VoxMusicrow Magic Vox ($99) is an
effects processing plug-in that usessampled guitar harmonics as the basisfor its sounds. It can produce a widevariety of sounds and has its own syn-thesis engine, but it also includes effectssuch as rotator, granular effect, chorus,delay, reverb, etc.
www.mcrow.net
Puremagnetik TechnosphereThis “sound design toolbox” includes over 100 sonic textures and composer
effects, made out of live field recordings, studio instruments, and intensive effectsprocessing. The sounds are categorized into “Creaturely,” “Environments,” “Swells,”and Slams.”
Puremagnetik.com is a subscription download site.www.Puremagketik.com VSL
AppassionataStrings II
VSL’s second volume in this largestring section library ($515) featureslarge muted string ensembles. It includesalmost all the articulations in the first vol-ume, only played “con sordino.”
These instruments are intended toprovide a “broad cinematic sound for avariety of musical styles, from pop envi-ronments to symphonic arrangements,from heart-tugging ballads to films,from pure string beds to completeorchestral scores.”
In addition to Legato Performances,ASII includes accented interval notes,spiccatos, staccatos, RepetitionPerformances, trills, and more.
www.VSL.co.at
Jazzmutant Dual Mode
V I R T U A L I N S T R U M E N T S 1 3
VIl a u n c h
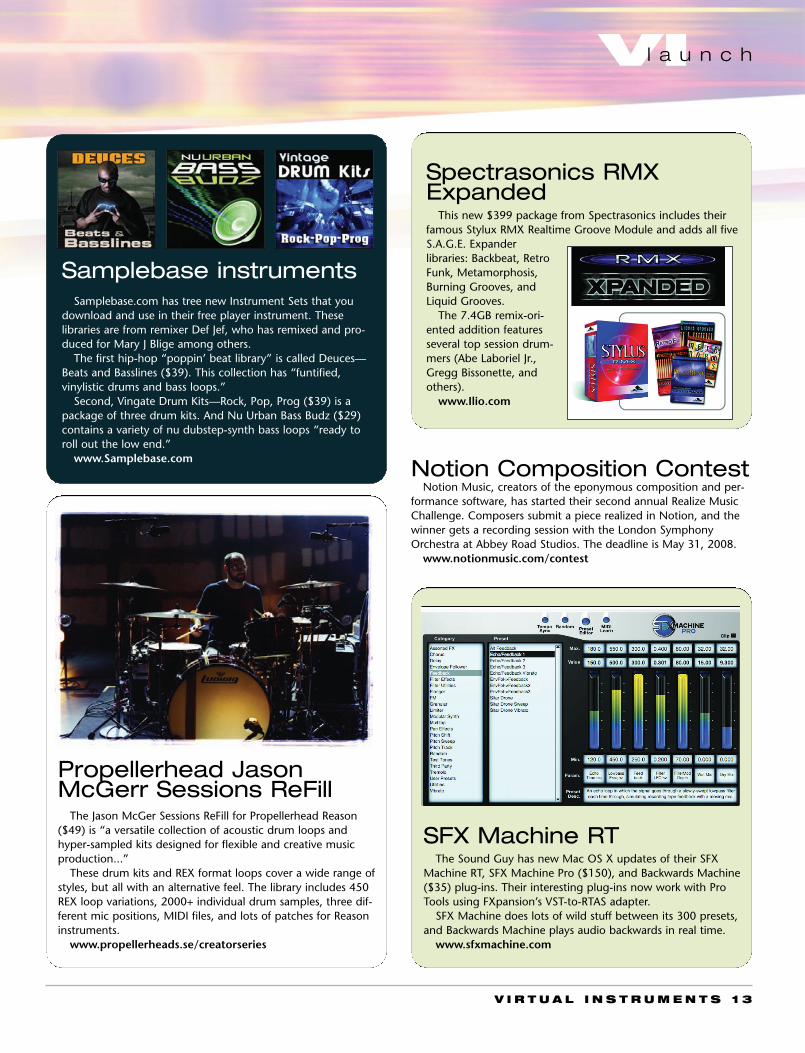
Samplebase instrumentsSamplebase.com has tree new Instrument Sets that you
download and use in their free player instrument. Theselibraries are from remixer Def Jef, who has remixed and pro-duced for Mary J Blige among others.
The first hip-hop “poppin’ beat library” is called Deuces—Beats and Basslines ($39). This collection has “funtified,vinylistic drums and bass loops.”
Second, Vingate Drum Kits—Rock, Pop, Prog ($39) is apackage of three drum kits. And Nu Urban Bass Budz ($29)contains a variety of nu dubstep-synth bass loops “ready toroll out the low end.”
www.Samplebase.com
Propellerhead JasonMcGerr Sessions ReFill
The Jason McGer Sessions ReFill for Propellerhead Reason($49) is “a versatile collection of acoustic drum loops andhyper-sampled kits designed for flexible and creative musicproduction...”
These drum kits and REX format loops cover a wide range ofstyles, but all with an alternative feel. The library includes 450REX loop variations, 2000+ individual drum samples, three dif-ferent mic positions, MIDI files, and lots of patches for Reasoninstruments.
www.propellerheads.se/creatorseries
Notion Composition ContestNotion Music, creators of the eponymous composition and per-
formance software, has started their second annual Realize MusicChallenge. Composers submit a piece realized in Notion, and thewinner gets a recording session with the London SymphonyOrchestra at Abbey Road Studios. The deadline is May 31, 2008.
www.notionmusic.com/contest
Spectrasonics RMXExpanded
This new $399 package from Spectrasonics includes theirfamous Stylux RMX Realtime Groove Module and adds all fiveS.A.G.E. Expanderlibraries: Backbeat, RetroFunk, Metamorphosis,Burning Grooves, andLiquid Grooves.
The 7.4GB remix-ori-ented addition featuresseveral top session drum-mers (Abe Laboriel Jr.,Gregg Bissonette, andothers).
www.Ilio.com
SFX Machine RTThe Sound Guy has new Mac OS X updates of their SFX
Machine RT, SFX Machine Pro ($150), and Backwards Machine($35) plug-ins. Their interesting plug-ins now work with ProTools using FXpansion’s VST-to-RTAS adapter.
SFX Machine does lots of wild stuff between its 300 presets,and Backwards Machine plays audio backwards in real time.
www.sfxmachine.com
VIr e v i e w
1 4 V I R T U A L I N S T R U M E N T S
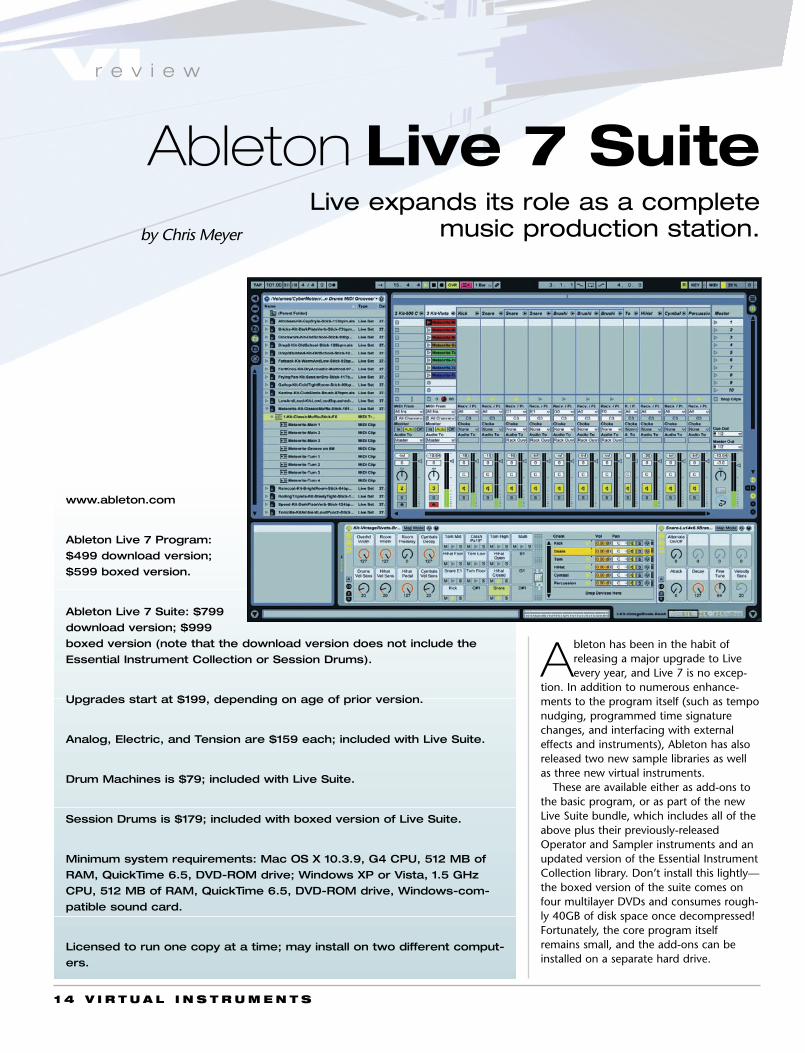
Ableton has been in the habit ofreleasing a major upgrade to Liveevery year, and Live 7 is no excep-
tion. In addition to numerous enhance-ments to the program itself (such as temponudging, programmed time signaturechanges, and interfacing with externaleffects and instruments), Ableton has alsoreleased two new sample libraries as wellas three new virtual instruments.
These are available either as add-ons tothe basic program, or as part of the newLive Suite bundle, which includes all of theabove plus their previously-releasedOperator and Sampler instruments and anupdated version of the Essential InstrumentCollection library. Don’t install this lightly—the boxed version of the suite comes onfour multilayer DVDs and consumes rough-ly 40GB of disk space once decompressed!Fortunately, the core program itselfremains small, and the add-ons can beinstalled on a separate hard drive.
Ableton Live 7 Suite
www.ableton.com
Ableton Live 7 Program:
$499 download version;
$599 boxed version.
Ableton Live 7 Suite: $799
download version; $999
boxed version (note that the download version does not include the
Essential Instrument Collection or Session Drums).
Upgrades start at $199, depending on age of prior version.
Analog, Electric, and Tension are $159 each; included with Live Suite.
Drum Machines is $79; included with Live Suite.
Session Drums is $179; included with boxed version of Live Suite.
Minimum system requirements: Mac OS X 10.3.9, G4 CPU, 512 MB of
RAM, QuickTime 6.5, DVD-ROM drive; Windows XP or Vista, 1.5 GHz
CPU, 512 MB of RAM, QuickTime 6.5, DVD-ROM drive, Windows-com-
patible sound card.
Licensed to run one copy at a time; may install on two different comput-
ers.
Live expands its role as a completemusic production station.by Chris Meyer
V I R T U A L I N S T R U M E N T S 1 5
Let’s dive into some of the major newfeatures in Live 7:
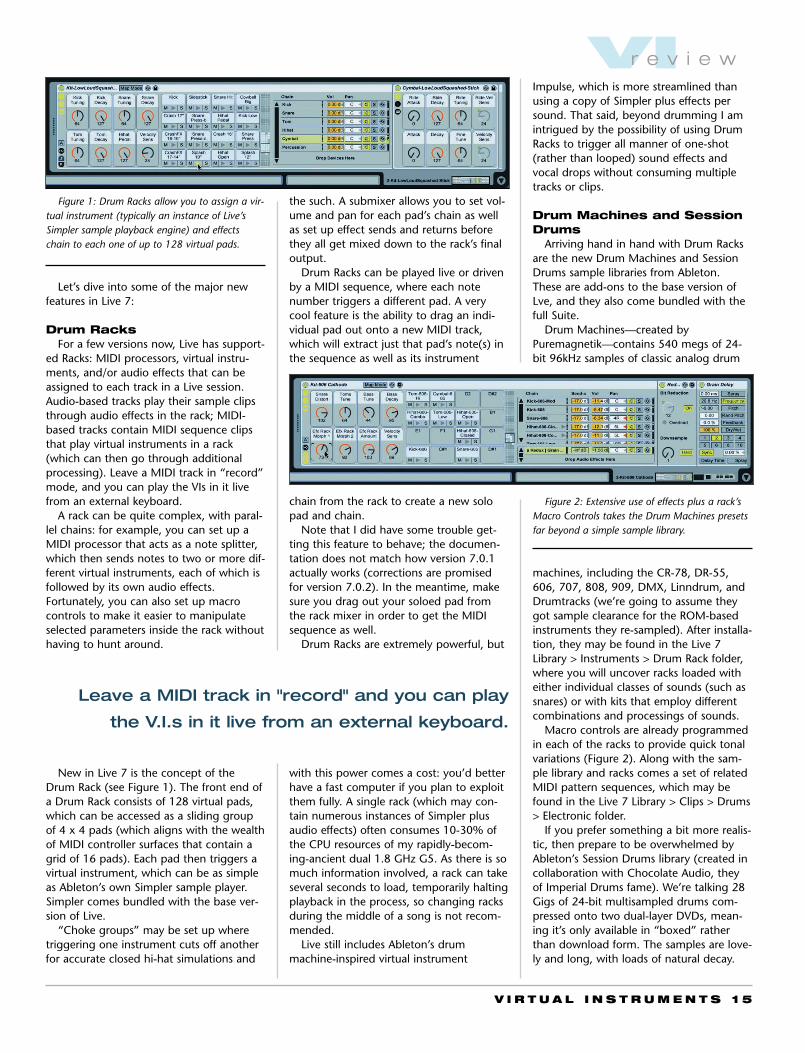
Drum RacksFor a few versions now, Live has support-
ed Racks: MIDI processors, virtual instru-ments, and/or audio effects that can beassigned to each track in a Live session.Audio-based tracks play their sample clipsthrough audio effects in the rack; MIDI-based tracks contain MIDI sequence clipsthat play virtual instruments in a rack(which can then go through additionalprocessing). Leave a MIDI track in “record”mode, and you can play the VIs in it livefrom an external keyboard.
A rack can be quite complex, with paral-lel chains: for example, you can set up aMIDI processor that acts as a note splitter,which then sends notes to two or more dif-ferent virtual instruments, each of which isfollowed by its own audio effects.Fortunately, you can also set up macrocontrols to make it easier to manipulateselected parameters inside the rack withouthaving to hunt around.
New in Live 7 is the concept of theDrum Rack (see Figure 1). The front end ofa Drum Rack consists of 128 virtual pads,which can be accessed as a sliding groupof 4 x 4 pads (which aligns with the wealthof MIDI controller surfaces that contain agrid of 16 pads). Each pad then triggers avirtual instrument, which can be as simpleas Ableton’s own Simpler sample player.Simpler comes bundled with the base ver-sion of Live.
“Choke groups” may be set up wheretriggering one instrument cuts off anotherfor accurate closed hi-hat simulations and
the such. A submixer allows you to set vol-ume and pan for each pad’s chain as wellas set up effect sends and returns beforethey all get mixed down to the rack’s finaloutput.
Drum Racks can be played live or drivenby a MIDI sequence, where each notenumber triggers a different pad. A verycool feature is the ability to drag an indi-vidual pad out onto a new MIDI track,which will extract just that pad’s note(s) inthe sequence as well as its instrument
chain from the rack to create a new solopad and chain.
Note that I did have some trouble get-ting this feature to behave; the documen-tation does not match how version 7.0.1actually works (corrections are promisedfor version 7.0.2). In the meantime, makesure you drag out your soloed pad fromthe rack mixer in order to get the MIDIsequence as well.
Drum Racks are extremely powerful, but
with this power comes a cost: you’d betterhave a fast computer if you plan to exploitthem fully. A single rack (which may con-tain numerous instances of Simpler plusaudio effects) often consumes 10-30% ofthe CPU resources of my rapidly-becom-ing-ancient dual 1.8 GHz G5. As there is somuch information involved, a rack can takeseveral seconds to load, temporarily haltingplayback in the process, so changing racksduring the middle of a song is not recom-mended.
Live still includes Ableton’s drummachine-inspired virtual instrument
Impulse, which is more streamlined thanusing a copy of Simpler plus effects persound. That said, beyond drumming I amintrigued by the possibility of using DrumRacks to trigger all manner of one-shot(rather than looped) sound effects andvocal drops without consuming multipletracks or clips.
Drum Machines and SessionDrums
Arriving hand in hand with Drum Racksare the new Drum Machines and SessionDrums sample libraries from Ableton.These are add-ons to the base version ofLve, and they also come bundled with thefull Suite.
Drum Machines—created byPuremagnetik—contains 540 megs of 24-bit 96kHz samples of classic analog drum
machines, including the CR-78, DR-55,606, 707, 808, 909, DMX, Linndrum, andDrumtracks (we’re going to assume theygot sample clearance for the ROM-basedinstruments they re-sampled). After installa-tion, they may be found in the Live 7Library > Instruments > Drum Rack folder,where you will uncover racks loaded witheither individual classes of sounds (such assnares) or with kits that employ differentcombinations and processings of sounds.
Macro controls are already programmedin each of the racks to provide quick tonalvariations (Figure 2). Along with the sam-ple library and racks comes a set of relatedMIDI pattern sequences, which may befound in the Live 7 Library > Clips > Drums> Electronic folder.
If you prefer something a bit more realis-tic, then prepare to be overwhelmed byAbleton’s Session Drums library (created incollaboration with Chocolate Audio, theyof Imperial Drums fame). We’re talking 28Gigs of 24-bit multisampled drums com-pressed onto two dual-layer DVDs, mean-ing it’s only available in “boxed” ratherthan download form. The samples are love-ly and long, with loads of natural decay.
VIr e v i e w
Figure 1: Drum Racks allow you to assign a vir-tual instrument (typically an instance of Live’sSimpler sample playback engine) and effectschain to each one of up to 128 virtual pads.
Figure 2: Extensive use of effects plus a rack’sMacro Controls takes the Drum Machines presetsfar beyond a simple sample library.
Leave a MIDI track in "record" and you can play
the V.I.s in it live from an external keyboard.
1 6 V I R T U A L I N S T R U M E N T S
[Be sure to download the free ChocolateAudio drum library, as detailed on the card inthe middle of this issue.]
As with Drum Machines, you can loadDrum Racks of individual drums or pre-arranged kits. Most are presented in stereo;
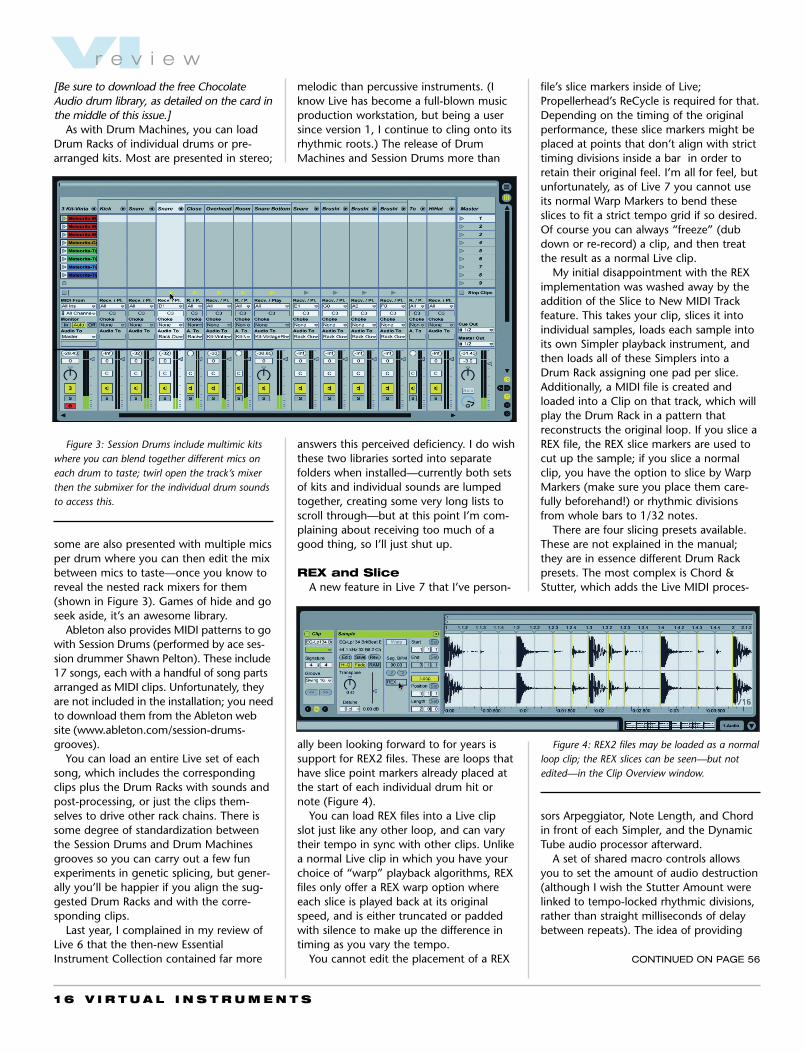
some are also presented with multiple micsper drum where you can then edit the mixbetween mics to taste—once you know toreveal the nested rack mixers for them(shown in Figure 3). Games of hide and goseek aside, it’s an awesome library.
Ableton also provides MIDI patterns to gowith Session Drums (performed by ace ses-sion drummer Shawn Pelton). These include17 songs, each with a handful of song partsarranged as MIDI clips. Unfortunately, theyare not included in the installation; you needto download them from the Ableton website (www.ableton.com/session-drums-grooves).
You can load an entire Live set of eachsong, which includes the correspondingclips plus the Drum Racks with sounds andpost-processing, or just the clips them-selves to drive other rack chains. There issome degree of standardization betweenthe Session Drums and Drum Machinesgrooves so you can carry out a few funexperiments in genetic splicing, but gener-ally you’ll be happier if you align the sug-gested Drum Racks and with the corre-sponding clips.
Last year, I complained in my review ofLive 6 that the then-new EssentialInstrument Collection contained far more
melodic than percussive instruments. (Iknow Live has become a full-blown musicproduction workstation, but being a usersince version 1, I continue to cling onto itsrhythmic roots.) The release of DrumMachines and Session Drums more than
answers this perceived deficiency. I do wishthese two libraries sorted into separatefolders when installed—currently both setsof kits and individual sounds are lumpedtogether, creating some very long lists toscroll through—but at this point I’m com-plaining about receiving too much of agood thing, so I’ll just shut up.
REX and SliceA new feature in Live 7 that I’ve person-
ally been looking forward to for years issupport for REX2 files. These are loops thathave slice point markers already placed atthe start of each individual drum hit ornote (Figure 4).
You can load REX files into a Live clipslot just like any other loop, and can varytheir tempo in sync with other clips. Unlikea normal Live clip in which you have yourchoice of “warp” playback algorithms, REXfiles only offer a REX warp option whereeach slice is played back at its originalspeed, and is either truncated or paddedwith silence to make up the difference intiming as you vary the tempo.
You cannot edit the placement of a REX
file’s slice markers inside of Live;Propellerhead’s ReCycle is required for that.Depending on the timing of the originalperformance, these slice markers might beplaced at points that don’t align with stricttiming divisions inside a bar in order toretain their original feel. I’m all for feel, butunfortunately, as of Live 7 you cannot useits normal Warp Markers to bend theseslices to fit a strict tempo grid if so desired.Of course you can always “freeze” (dubdown or re-record) a clip, and then treatthe result as a normal Live clip.
My initial disappointment with the REXimplementation was washed away by theaddition of the Slice to New MIDI Trackfeature. This takes your clip, slices it intoindividual samples, loads each sample intoits own Simpler playback instrument, andthen loads all of these Simplers into aDrum Rack assigning one pad per slice.Additionally, a MIDI file is created andloaded into a Clip on that track, which willplay the Drum Rack in a pattern thatreconstructs the original loop. If you slice aREX file, the REX slice markers are used tocut up the sample; if you slice a normalclip, you have the option to slice by WarpMarkers (make sure you place them care-fully beforehand!) or rhythmic divisionsfrom whole bars to 1/32 notes.
There are four slicing presets available.These are not explained in the manual;they are in essence different Drum Rackpresets. The most complex is Chord &Stutter, which adds the Live MIDI proces-
sors Arpeggiator, Note Length, and Chordin front of each Simpler, and the DynamicTube audio processor afterward.
A set of shared macro controls allowsyou to set the amount of audio destruction(although I wish the Stutter Amount werelinked to tempo-locked rhythmic divisions,rather than straight milliseconds of delaybetween repeats). The idea of providing
VIr e v i e w
CONTINUED ON PAGE 56
Figure 3: Session Drums include multimic kitswhere you can blend together different mics oneach drum to taste; twirl open the track’s mixerthen the submixer for the individual drum soundsto access this.
Figure 4: REX2 files may be loaded as a normalloop clip; the REX slices can be seen—but notedited—in the Clip Overview window.
1 8 V I R T U A L I N S T R U M E N T S
VIr e v i e w
Review by Nick Batzdorf
The concept of “signature” librariesfeaturing famous players certainlyisn’t new. Submersible Drumcore cer-
tainly does that with their drummer packs,Spectrasonics’ Bass Legends library fromyears ago featured some…yes, legends,there was a Will Lee bass library, to namejust a few… But given that the mostimportant aspect of any sample library isthe performance, it’s surprising that thepractice isn’t more widespread.
Bass VI is a new developer who appearsto agree. Their first product is the AnthonyJackson Contrabass Guitar library, a massive38GB set of very high quality samples ofthe great bass player. AJCG is available inEmagic EXS24 format, but we worked withthe version that comes embedded in anOEM TASCAM GVI player. For this reviewwe used a custom 2.8GHz Pentium 4 PCfrom VisionDAW, which being three yearsold is only just up to spec—but it per-formed just fine.
BassVI The AnthonyJackson Contrabass
Guitar library
Bass VI The Anthony Jackson
Contrabass Guitar library,
$400/425 EXS24/Tascam GVI.
Personally signed versions in a
laser engraved wood box $25
extra.
www.BassSix.com
Formats: Apple EX24 (Mac,
Logic Pro only) or Tascam GVI
player (Windows only, but a
Mac version of the GVI player
is dangerously close to
release…)
Copy protection: GVI version
uses Syncrosoft USB dongle
A massive 6-string bass library featuring oneof New York’s best jazz and session players
V I R T U A L I N S T R U M E N T S 1 9
use of this feature—the lower notes aresimply thicker and you can just use it forcreative control.
AJCG also includes fingered and pickedmuted notes, available in four string posi-tions rather than three for the regularnotes. Bass VI tells us they’re working onour most urgent suggestion: a programwith keyswitches between the regular andmuted notes. You can create that yourselfin the EXS version very easily, but the GVIversion is locked down.
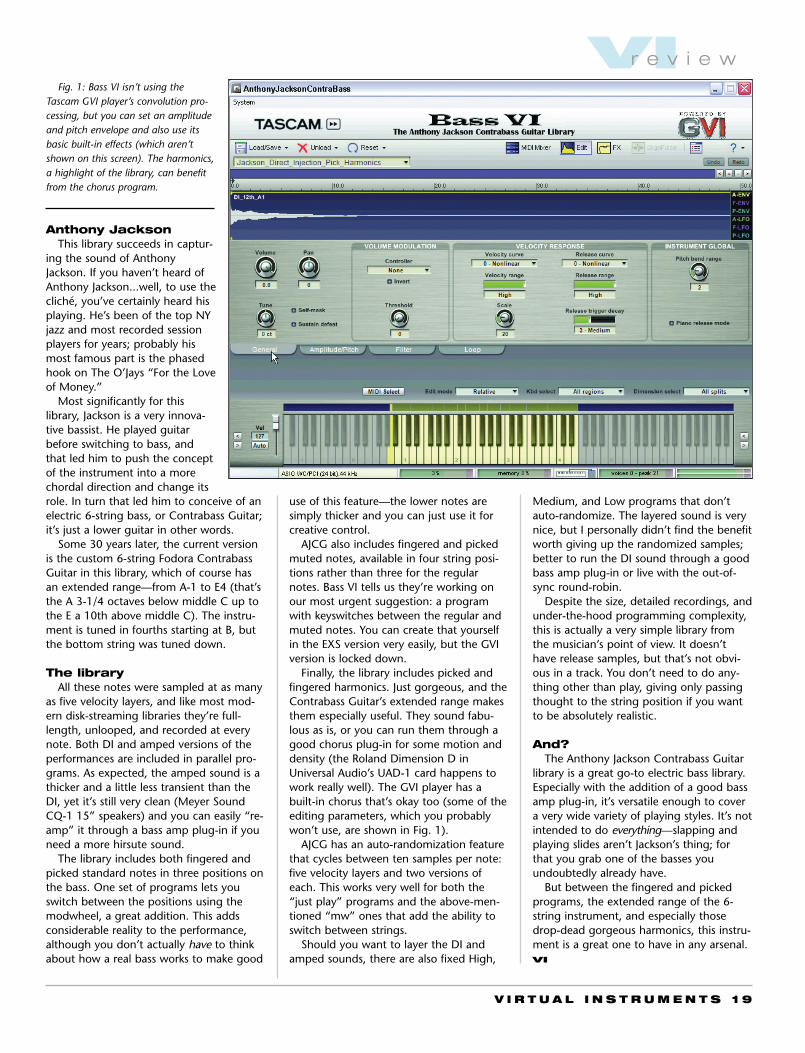
Finally, the library includes picked andfingered harmonics. Just gorgeous, and theContrabass Guitar’s extended range makesthem especially useful. They sound fabu-lous as is, or you can run them through agood chorus plug-in for some motion anddensity (the Roland Dimension D inUniversal Audio’s UAD-1 card happens towork really well). The GVI player has abuilt-in chorus that’s okay too (some of theediting parameters, which you probablywon’t use, are shown in Fig. 1).
AJCG has an auto-randomization featurethat cycles between ten samples per note:five velocity layers and two versions ofeach. This works very well for both the“just play” programs and the above-men-tioned “mw” ones that add the ability toswitch between strings.
Should you want to layer the DI andamped sounds, there are also fixed High,
Medium, and Low programs that don’tauto-randomize. The layered sound is verynice, but I personally didn’t find the benefitworth giving up the randomized samples;better to run the DI sound through a goodbass amp plug-in or live with the out-of-sync round-robin.
Despite the size, detailed recordings, andunder-the-hood programming complexity,this is actually a very simple library fromthe musician’s point of view. It doesn’thave release samples, but that’s not obvi-ous in a track. You don’t need to do any-thing other than play, giving only passingthought to the string position if you wantto be absolutely realistic.
And?The Anthony Jackson Contrabass Guitar
library is a great go-to electric bass library.Especially with the addition of a good bassamp plug-in, it’s versatile enough to covera very wide variety of playing styles. It’s notintended to do everything—slapping andplaying slides aren’t Jackson’s thing; forthat you grab one of the basses youundoubtedly already have.
But between the fingered and pickedprograms, the extended range of the 6-string instrument, and especially thosedrop-dead gorgeous harmonics, this instru-ment is a great one to have in any arsenal.VI
Anthony JacksonThis library succeeds in captur-
ing the sound of AnthonyJackson. If you haven’t heard ofAnthony Jackson...well, to use thecliché, you’ve certainly heard hisplaying. He’s been of the top NYjazz and most recorded sessionplayers for years; probably hismost famous part is the phasedhook on The O’Jays “For the Loveof Money.”
Most significantly for thislibrary, Jackson is a very innova-tive bassist. He played guitarbefore switching to bass, andthat led him to push the conceptof the instrument into a morechordal direction and change itsrole. In turn that led him to conceive of anelectric 6-string bass, or Contrabass Guitar;it’s just a lower guitar in other words.
Some 30 years later, the current versionis the custom 6-string Fodora ContrabassGuitar in this library, which of course hasan extended range—from A-1 to E4 (that’sthe A 3-1/4 octaves below middle C up tothe E a 10th above middle C). The instru-ment is tuned in fourths starting at B, butthe bottom string was tuned down.
The libraryAll these notes were sampled at as many
as five velocity layers, and like most mod-ern disk-streaming libraries they’re full-length, unlooped, and recorded at everynote. Both DI and amped versions of theperformances are included in parallel pro-grams. As expected, the amped sound is athicker and a little less transient than theDI, yet it’s still very clean (Meyer SoundCQ-1 15” speakers) and you can easily “re-amp” it through a bass amp plug-in if youneed a more hirsute sound.
The library includes both fingered andpicked standard notes in three positions onthe bass. One set of programs lets youswitch between the positions using themodwheel, a great addition. This addsconsiderable reality to the performance,although you don’t actually have to thinkabout how a real bass works to make good
VIr e v i e wFig. 1: Bass VI isn’t using the
Tascam GVI player’s convolution pro-cessing, but you can set an amplitudeand pitch envelope and also use itsbasic built-in effects (which aren’tshown on this screen). The harmonics,a highlight of the library, can benefitfrom the chorus program.
2 0 V I R T U A L I N S T R U M E N T S
VIv e r y d e e p c l i n i c
V E R Y D E E P C L I N I C :
by Jean-Stephane Guitton
moreonline
www.virtualinstrumentsmag.com
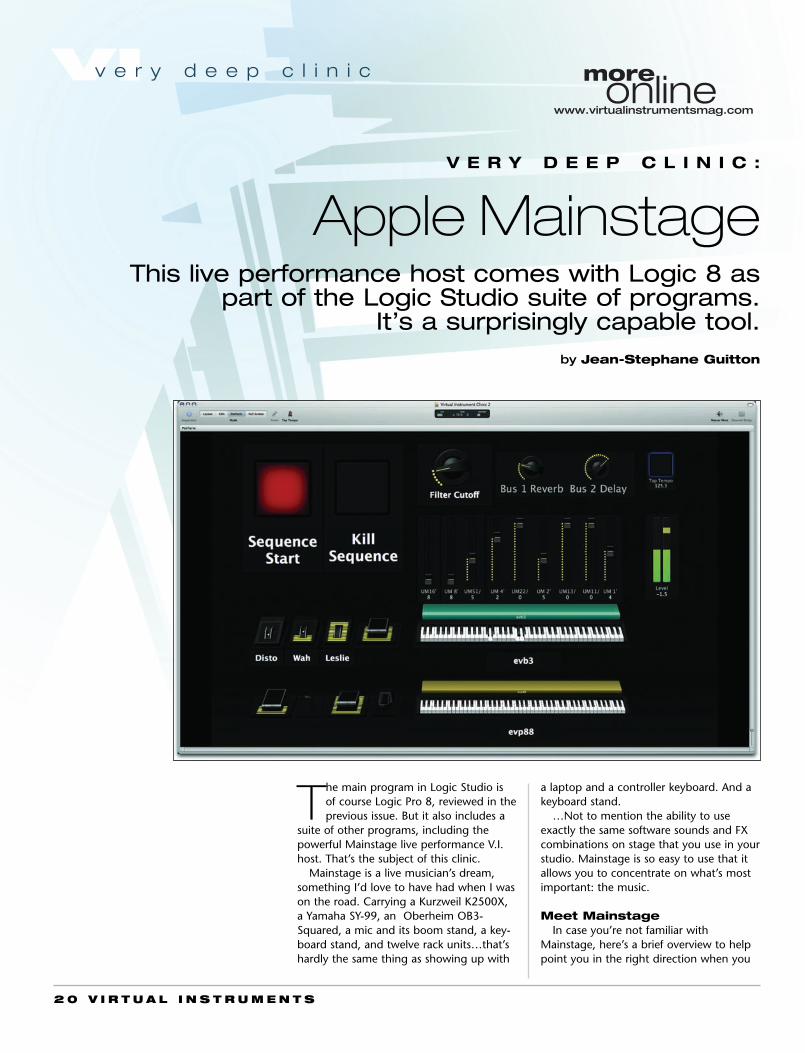
The main program in Logic Studio isof course Logic Pro 8, reviewed in theprevious issue. But it also includes a
suite of other programs, including thepowerful Mainstage live performance V.I.host. That’s the subject of this clinic.
Mainstage is a live musician’s dream,something I’d love to have had when I wason the road. Carrying a Kurzweil K2500X,a Yamaha SY-99, an Oberheim OB3-Squared, a mic and its boom stand, a key-board stand, and twelve rack units…that’shardly the same thing as showing up with
a laptop and a controller keyboard. And akeyboard stand.
…Not to mention the ability to useexactly the same software sounds and FXcombinations on stage that you use in yourstudio. Mainstage is so easy to use that itallows you to concentrate on what’s mostimportant: the music.
Meet MainstageIn case you’re not familiar with
Mainstage, here’s a brief overview to helppoint you in the right direction when you
Apple MainstageThis live performance host comes with Logic 8 as
part of the Logic Studio suite of programs. It’s a surprisingly capable tool.
V I R T U A L I N S T R U M E N T S 2 1
VIv e r y d e e p c l i n i cfirst start poking around the program.
The first thing to do is create a ChannelStrip and open the settings you saved inLogic. This works with third-party effectand instrument plug-ins.
Assigning MIDI controllers is very easy.You into Layout mode and drag & dropwhatever controls you need, then havethem learn your physical MIDI controllersby selecting one and wiggling the knob,fader, or whatever you want to control it.
Then in Edit mode assign the controls toa MIDI channel, effect, or any of the avail-able “action” parameters provided. All theavailable parameters are shown in thelower window.
You’re ready to go to the Perfom pageto…perform.
If you’re using several keyboards, youcan create soft stacks, layers, and splits, allindependent and each with its own exter-nal MIDI hardware. Imagine the ultimatepad synth with up to 20 layers, each withits own MIDI filtering, key range, set ofcontrollers, and velocity response.
Since each layer is a full Channel Strip, ithas its own effects path, bus sends, and soon. Mainstage can be the ultimate live“synth.”
After that you can change your presetson the fly. If a note is sounding, it contin-ues to play while you change presets.
You can open as many Channel Strips asyou need, the limit being the computer’spower and RAM. Be aware that you’remanaging live performances and you’llwant to set very low latencies, which putsmore weight on the computer’s back.Mainstage probably wants a good soundcard, plenty of RAM (which you want forrunning V.I.s anyway), and a good qualityaudio interface.
Finally, here’s a quick reminder of theterminology. Patches (an ensemble of set-tings) are grouped in Sets, which aregrouped in a Concert. For example: YourFavorite Rhodes (a Patch) in Electric Pianos(a Set) in Keyboards (a Concert).
Multitimbral instrumentsNone of the Logic instruments is multi-
timbral in the sense that you open differentprograms in one instance of the instrumentand address them on separate MIDI chan-nels. So let’s say you open a NativeInstruments Kontakt-series sampler—whichis multitimbral—and open one program onchannel 1 and another on channel 2.
First, do not create a Keyboard. If your
master keyboard is set to channels 1 and 2,you can play both sounds.
Now you can add buttons in Layout andhave them learn physical controllers onmultiple keyboards if you want. (If youhave 16 keyboards, you can play them all.)The only problem is that the Kontakt con-trols are numbered rather than named,which makes them hard to identify.
Another example would be if you open aLogic evb3 organ (again without creating aKeyboard), you can play the upper andlower manuals from different MIDI key-boards. You can also create controllers toadd the missing ninth drawbar.
The main thing to avoid in this particularsitation is creating a Keyboard, since twokeyboard sources can’t be assigned to thesame instrument as soon as you have
assigned one in Mainstage. But faders andother controls can. When you don’t createKeyboards, Mainstage accepts all incomingMIDI events and routes them by default tothe Channel Strips.
If you have a master controller keyboardthat allows splits or velocity sending on dif-ferent MIDI channels, then create aKeyboard, make it recognize your con-troller, and change the Channel toAll…then if you open a Kontakt on aChannel Strip, each MIDI part on the hard-ware keyboard will play the appropriatechannel in Kontakt.
Play a sequenceEven if Mainstage is really complete, it
can’t directly play MIDI or audiosequences. There are some scripts tolaunch iTunes in response to a specifiedMIDI message, but it is not as flexible aswe’d like in order to manage sequences.This works (almost) fine if you just need toplay an audio file straight through frombeginning to end without interrupting.
But sometimes script behaviors can be alittle risky. Start/Pause, for example: there’sno way to pause.
For MIDI sequences, however, it’s anoth-er story. If you absolutely need a flexibletempo, and if you’re kind of a recklessmusician, you could always try to launch aLogic sequence in the background.
But be careful with incoming MIDI mes-sages—they could easily go where theywere not intended to. That’s especially truesince Logic is not scriptable (whileSoundtrack Pro is, iTunes is, etc. So you’ll
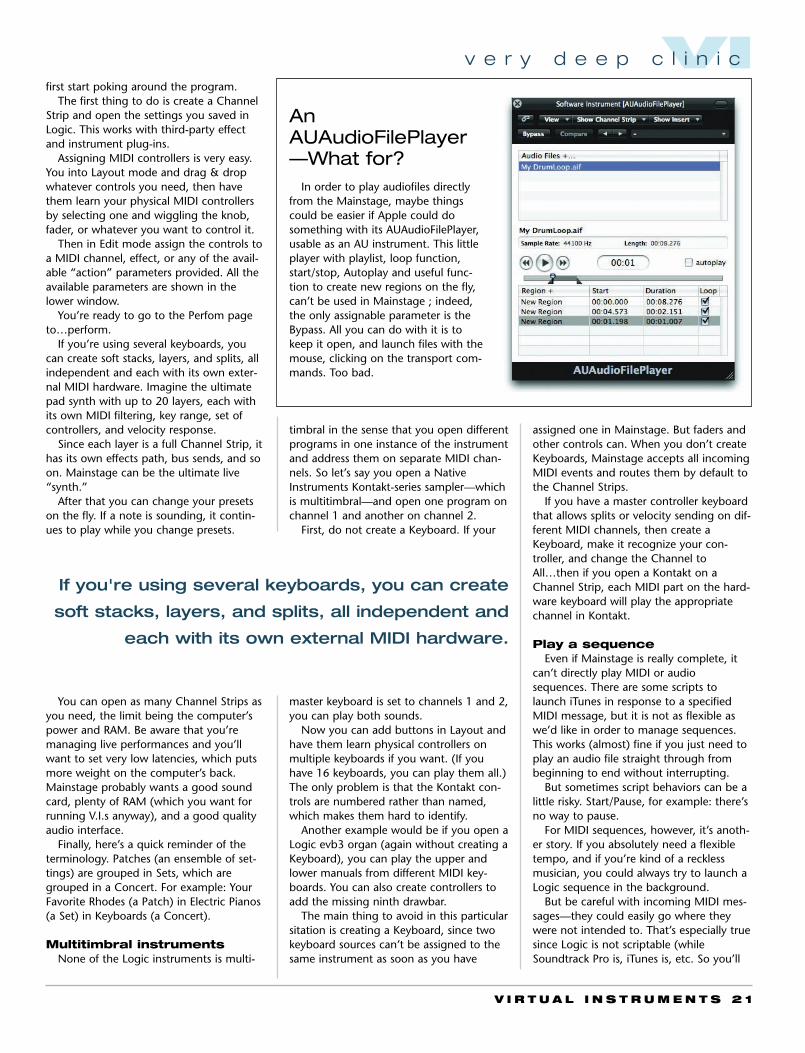
AnAUAudioFilePlayer—What for?
In order to play audiofiles directlyfrom the Mainstage, maybe thingscould be easier if Apple could dosomething with its AUAudioFilePlayer,usable as an AU instrument. This littleplayer with playlist, loop function,start/stop, Autoplay and useful func-tion to create new regions on the fly,can’t be used in Mainstage ; indeed,the only assignable parameter is theBypass. All you can do with it is tokeep it open, and launch files with themouse, clicking on the transport com-mands. Too bad.
If you're using several keyboards, you can create
soft stacks, layers, and splits, all independent and
each with its own external MIDI hardware.
2 2 V I R T U A L I N S T R U M E N T S
VIv e r y d e e p c l i n i c
have to jump from one program to another. Don’t be fooled by the “iTunes - Go to Logicsongs” script in
Mainstage. This opens the Logicsongs playlist in iTunes—but only ifyou have created one with this name. And it only plays whateveraudio you’ve put in there.
For the purposes of this clinic we’re only going to use the includ-ed plug-ins and instruments. There are many third-party ones, but
we’ll see what we can do with what’s in the box.Trick 1: Play an audio fileIf you only need to play an audio sequence straight through, you
use the exs24 sampler built into Logic. As there are 128 MIDI notes(0 to 127), even if you use an 88 note keyboard you have plenty ofnotes available not being used for playing.
The idea is to create an exs instance dedicated to playing audiosequences that can be launched by your external controller’sknobs, buttons, and faders. Or you could dedicate an otherwiseunused octave of your controller keyboard if you prefer. We’regoing to use use knobs and buttons.
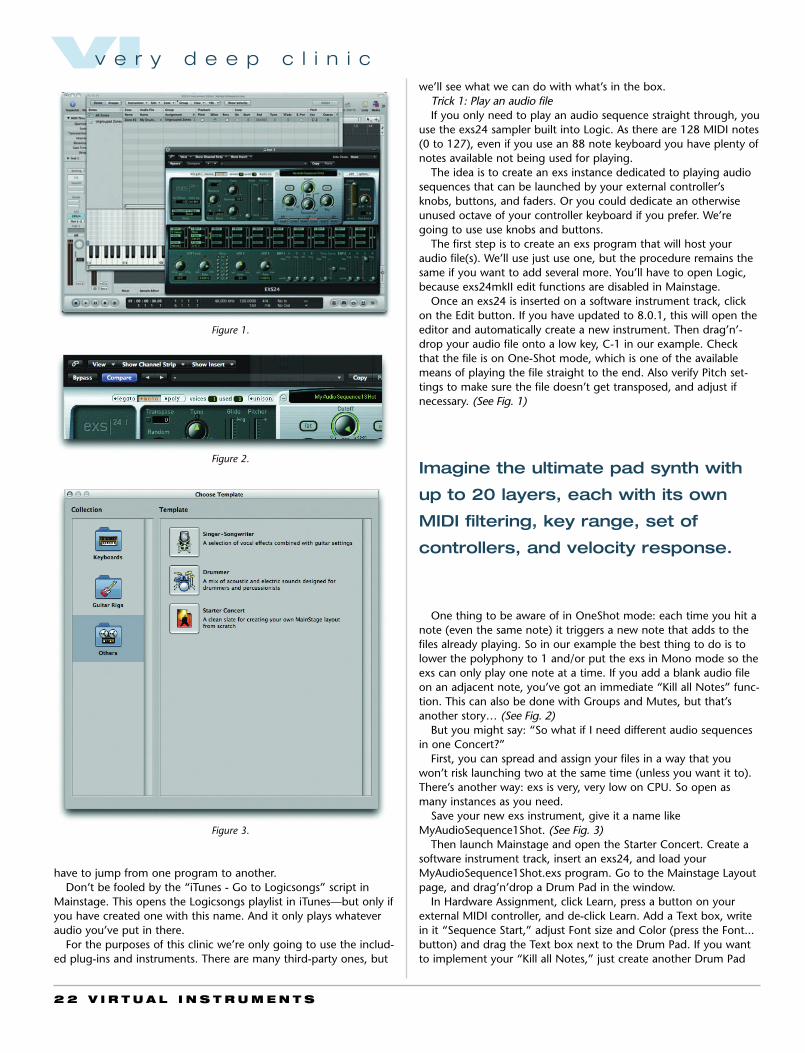
The first step is to create an exs program that will host youraudio file(s). We’ll use just use one, but the procedure remains thesame if you want to add several more. You’ll have to open Logic,because exs24mkII edit functions are disabled in Mainstage.
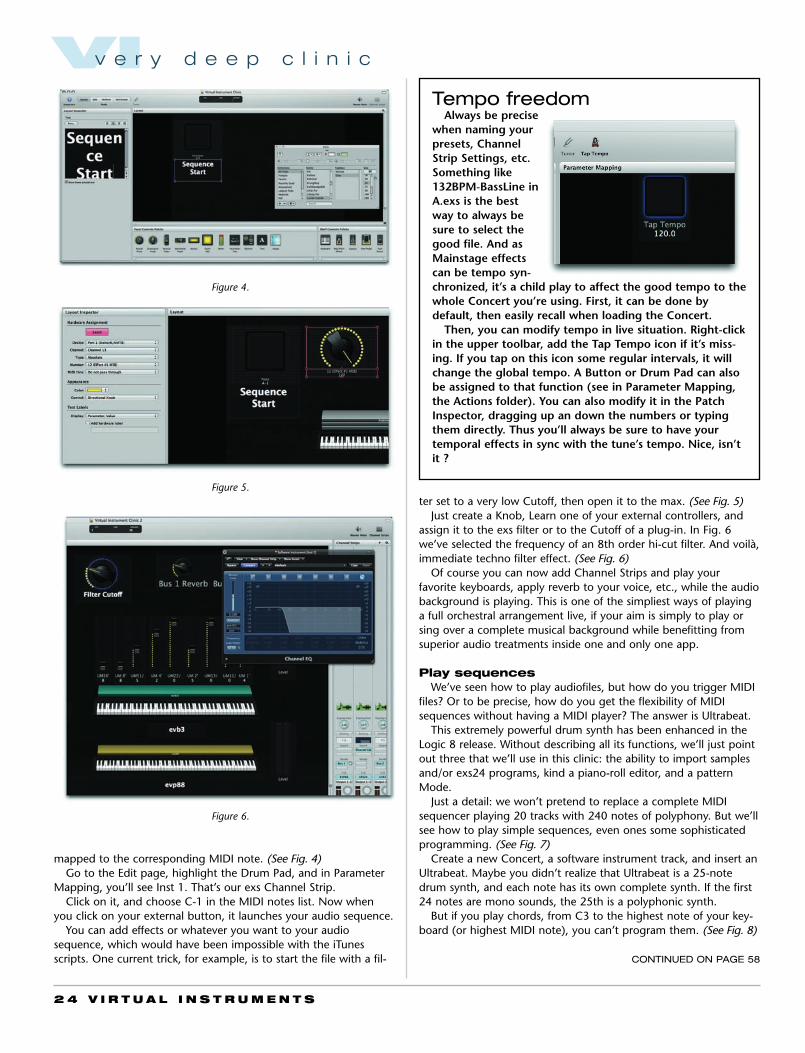
Once an exs24 is inserted on a software instrument track, clickon the Edit button. If you have updated to 8.0.1, this will open theeditor and automatically create a new instrument. Then drag’n’-drop your audio file onto a low key, C-1 in our example. Checkthat the file is on One-Shot mode, which is one of the availablemeans of playing the file straight to the end. Also verify Pitch set-tings to make sure the file doesn’t get transposed, and adjust ifnecessary. (See Fig. 1)
One thing to be aware of in OneShot mode: each time you hit anote (even the same note) it triggers a new note that adds to thefiles already playing. So in our example the best thing to do is tolower the polyphony to 1 and/or put the exs in Mono mode so theexs can only play one note at a time. If you add a blank audio fileon an adjacent note, you’ve got an immediate “Kill all Notes” func-tion. This can also be done with Groups and Mutes, but that’sanother story… (See Fig. 2)
But you might say: “So what if I need different audio sequencesin one Concert?”
First, you can spread and assign your files in a way that youwon’t risk launching two at the same time (unless you want it to).There’s another way: exs is very, very low on CPU. So open asmany instances as you need.
Save your new exs instrument, give it a name likeMyAudioSequence1Shot. (See Fig. 3)
Then launch Mainstage and open the Starter Concert. Create asoftware instrument track, insert an exs24, and load yourMyAudioSequence1Shot.exs program. Go to the Mainstage Layoutpage, and drag’n’drop a Drum Pad in the window.
In Hardware Assignment, click Learn, press a button on yourexternal MIDI controller, and de-click Learn. Add a Text box, writein it “Sequence Start,” adjust Font size and Color (press the Font...button) and drag the Text box next to the Drum Pad. If you wantto implement your “Kill all Notes,” just create another Drum Pad
Figure 1.
Figure 2.
Figure 3.
Imagine the ultimate pad synth with
up to 20 layers, each with its own
MIDI filtering, key range, set of
controllers, and velocity response.
2 4 V I R T U A L I N S T R U M E N T S
VIv e r y d e e p c l i n i c
mapped to the corresponding MIDI note. (See Fig. 4)Go to the Edit page, highlight the Drum Pad, and in Parameter
Mapping, you’ll see Inst 1. That’s our exs Channel Strip.Click on it, and choose C-1 in the MIDI notes list. Now when
you click on your external button, it launches your audio sequence.You can add effects or whatever you want to your audio
sequence, which would have been impossible with the iTunesscripts. One current trick, for example, is to start the file with a fil- CONTINUED ON PAGE 58
Figure 4.
Figure 5.
Figure 6.
ter set to a very low Cutoff, then open it to the max. (See Fig. 5)Just create a Knob, Learn one of your external controllers, and
assign it to the exs filter or to the Cutoff of a plug-in. In Fig. 6we’ve selected the frequency of an 8th order hi-cut filter. And voilà,immediate techno filter effect. (See Fig. 6)
Of course you can now add Channel Strips and play yourfavorite keyboards, apply reverb to your voice, etc., while the audiobackground is playing. This is one of the simpliest ways of playinga full orchestral arrangement live, if your aim is simply to play orsing over a complete musical background while benefitting fromsuperior audio treatments inside one and only one app.
Play sequencesWe’ve seen how to play audiofiles, but how do you trigger MIDI
files? Or to be precise, how do you get the flexibility of MIDIsequences without having a MIDI player? The answer is Ultrabeat.
This extremely powerful drum synth has been enhanced in theLogic 8 release. Without describing all its functions, we’ll just pointout three that we’ll use in this clinic: the ability to import samplesand/or exs24 programs, kind a piano-roll editor, and a patternMode.
Just a detail: we won’t pretend to replace a complete MIDIsequencer playing 20 tracks with 240 notes of polyphony. But we’llsee how to play simple sequences, even ones some sophisticatedprogramming. (See Fig. 7)
Create a new Concert, a software instrument track, and insert anUltrabeat. Maybe you didn’t realize that Ultrabeat is a 25-notedrum synth, and each note has its own complete synth. If the first24 notes are mono sounds, the 25th is a polyphonic synth.
But if you play chords, from C3 to the highest note of your key-board (or highest MIDI note), you can’t program them. (See Fig. 8)
Tempo freedomAlways be precise
when naming yourpresets, ChannelStrip Settings, etc.Something like132BPM-BassLine inA.exs is the bestway to always besure to select thegood file. And asMainstage effectscan be tempo syn-chronized, it’s a child play to affect the good tempo to thewhole Concert you’re using. First, it can be done bydefault, then easily recall when loading the Concert.
Then, you can modify tempo in live situation. Right-clickin the upper toolbar, add the Tap Tempo icon if it’s miss-ing. If you tap on this icon some regular intervals, it willchange the global tempo. A Button or Drum Pad can alsobe assigned to that function (see in Parameter Mapping,the Actions folder). You can also modify it in the PatchInspector, dragging up an down the numbers or typingthem directly. Thus you’ll always be sure to have yourtemporal effects in sync with the tune’s tempo. Nice, isn’tit ?
VIr e v i e w
2 6 V I R T U A L I N S T R U M E N T S
Three Bass Plug-Ins:Spectrasonics Trilogy, Bornemark Broomstick
Bass, and Steinberg Virtual Bassist
review by Jim Aikin
Afew weeks ago I had the good for-tune to hear Michael Manring play atwo-hour set in a small room with
great acoustics. Without meaning any dis-respect to Michael’s virtuoso bass work, Ithink it’s fair to say that most bass partstend to be strictly functional. The bassanchors the harmony and keeps therhythm moving forward, and often notmuch else. So it may be perfectly feasibleto use a V.I. for the bass track in a mix,even when some or all of the rest of theband is played using fingers, sticks, picks,metal tubes with reeds clamped to oneend, and so forth.
There are at least three “strictly bass”plug-ins on the market. In this round-up I’ll
take a look at them, with the caveat thatthis magazine is going to be at the WinterNAMM Convention and there are rumorsabout new products that may render this alittle out of date. Many synth plug-ins offer
a few bass patches (or a lot of them).Some of these bass sounds are excellent,but there are so many products thatincluding them in the round-up wouldn’tbe practical.
If you’re an accomplished arranger or abass player yourself, you may prefer a V.I.that lets you write and record your ownMIDI bass tracks one note at a time. Theleading program for this purpose isSpectrasonics Trilogy(www.spectrasonics.net). Alternatively, youmay want a program that comes with abunch of realistic bass patterns in variousmusical styles already installed, allowingyou to lay down a plausible-sounding partwith a minimum of effort and little or noknowledge of bass playing. If so, SteinbergVirtual Bassist (www.steinberg.net) willinterest you. Bornemark Broomstick Bass(www.bornemark.se) can be used in eithermode.
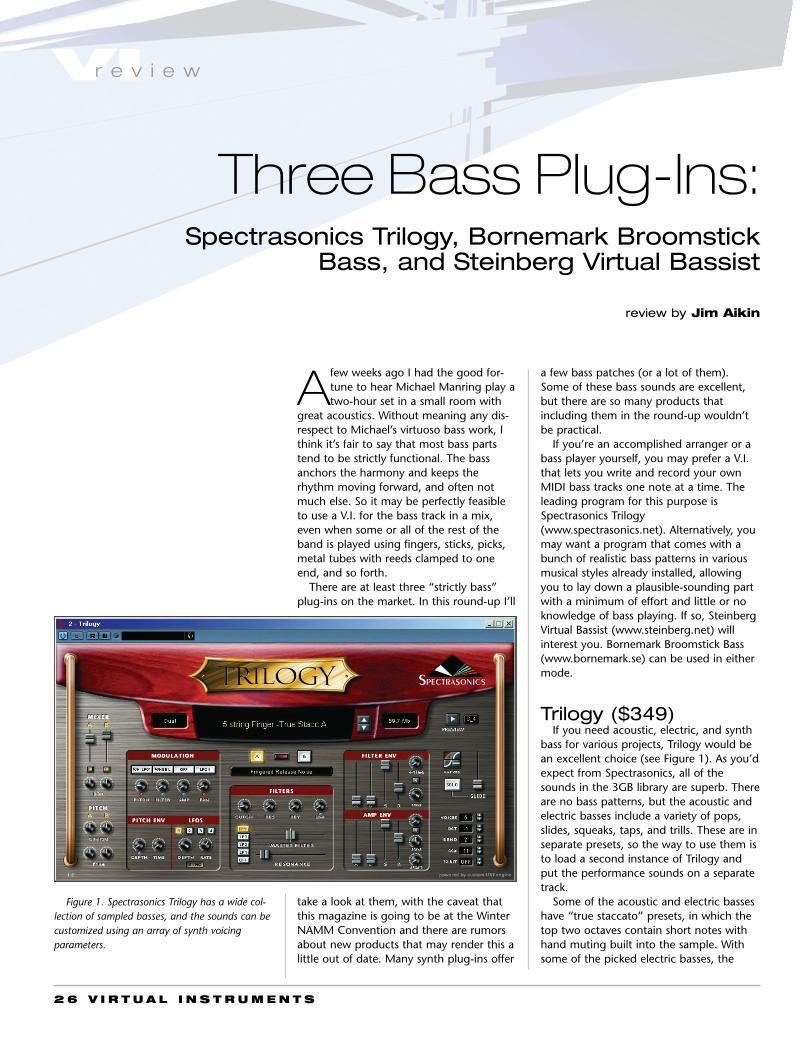
Trilogy ($349)If you need acoustic, electric, and synth
bass for various projects, Trilogy would bean excellent choice (see Figure 1). As you’dexpect from Spectrasonics, all of thesounds in the 3GB library are superb. Thereare no bass patterns, but the acoustic andelectric basses include a variety of pops,slides, squeaks, taps, and trills. These are inseparate presets, so the way to use them isto load a second instance of Trilogy andput the performance sounds on a separatetrack.
Some of the acoustic and electric basseshave “true staccato” presets, in which thetop two octaves contain short notes withhand muting built into the sample. Withsome of the picked electric basses, the
Figure 1. Spectrasonics Trilogy has a wide col-lection of sampled basses, and the sounds can becustomized using an array of synth voicingparameters.
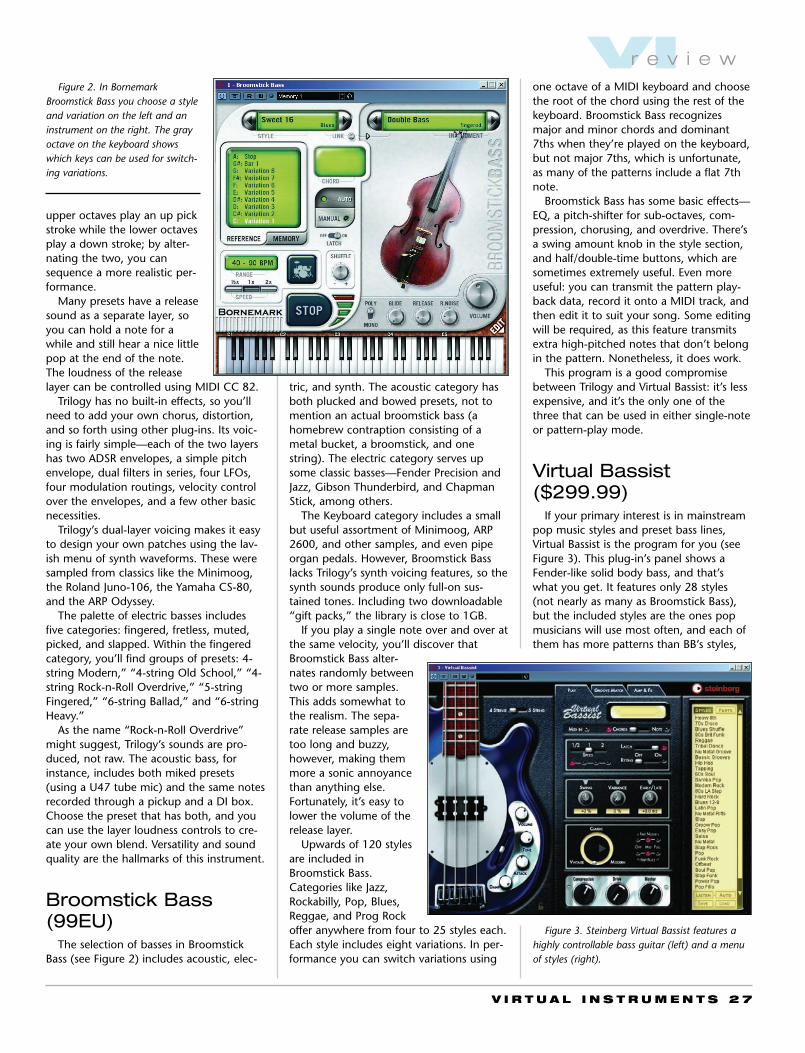
Figure 2. In BornemarkBroomstick Bass you choose a styleand variation on the left and aninstrument on the right. The grayoctave on the keyboard showswhich keys can be used for switch-ing variations.
V I R T U A L I N S T R U M E N T S 2 7
upper octaves play an up pickstroke while the lower octavesplay a down stroke; by alter-nating the two, you cansequence a more realistic per-formance.
Many presets have a releasesound as a separate layer, soyou can hold a note for awhile and still hear a nice littlepop at the end of the note.The loudness of the releaselayer can be controlled using MIDI CC 82.
Trilogy has no built-in effects, so you’llneed to add your own chorus, distortion,and so forth using other plug-ins. Its voic-ing is fairly simple—each of the two layershas two ADSR envelopes, a simple pitchenvelope, dual filters in series, four LFOs,four modulation routings, velocity controlover the envelopes, and a few other basicnecessities.
Trilogy’s dual-layer voicing makes it easyto design your own patches using the lav-ish menu of synth waveforms. These weresampled from classics like the Minimoog,the Roland Juno-106, the Yamaha CS-80,and the ARP Odyssey.
The palette of electric basses includesfive categories: fingered, fretless, muted,picked, and slapped. Within the fingeredcategory, you’ll find groups of presets: 4-string Modern,” “4-string Old School,” “4-string Rock-n-Roll Overdrive,” “5-stringFingered,” “6-string Ballad,” and “6-stringHeavy.”
As the name “Rock-n-Roll Overdrive”might suggest, Trilogy’s sounds are pro-duced, not raw. The acoustic bass, forinstance, includes both miked presets(using a U47 tube mic) and the same notesrecorded through a pickup and a DI box.Choose the preset that has both, and youcan use the layer loudness controls to cre-ate your own blend. Versatility and soundquality are the hallmarks of this instrument.
Broomstick Bass(99EU)
The selection of basses in BroomstickBass (see Figure 2) includes acoustic, elec-
tric, and synth. The acoustic category hasboth plucked and bowed presets, not tomention an actual broomstick bass (ahomebrew contraption consisting of ametal bucket, a broomstick, and onestring). The electric category serves upsome classic basses—Fender Precision andJazz, Gibson Thunderbird, and ChapmanStick, among others.
The Keyboard category includes a smallbut useful assortment of Minimoog, ARP2600, and other samples, and even pipeorgan pedals. However, Broomstick Basslacks Trilogy’s synth voicing features, so thesynth sounds produce only full-on sus-tained tones. Including two downloadable“gift packs,” the library is close to 1GB.
If you play a single note over and over atthe same velocity, you’ll discover thatBroomstick Bass alter-nates randomly betweentwo or more samples.This adds somewhat tothe realism. The sepa-rate release samples aretoo long and buzzy,however, making themmore a sonic annoyancethan anything else.Fortunately, it’s easy tolower the volume of therelease layer.
Upwards of 120 stylesare included inBroomstick Bass.Categories like Jazz,Rockabilly, Pop, Blues,Reggae, and Prog Rockoffer anywhere from four to 25 styles each.Each style includes eight variations. In per-formance you can switch variations using
one octave of a MIDI keyboard and choosethe root of the chord using the rest of thekeyboard. Broomstick Bass recognizesmajor and minor chords and dominant7ths when they’re played on the keyboard,but not major 7ths, which is unfortunate,as many of the patterns include a flat 7thnote.
Broomstick Bass has some basic effects—EQ, a pitch-shifter for sub-octaves, com-pression, chorusing, and overdrive. There’sa swing amount knob in the style section,and half/double-time buttons, which aresometimes extremely useful. Even moreuseful: you can transmit the pattern play-back data, record it onto a MIDI track, andthen edit it to suit your song. Some editingwill be required, as this feature transmitsextra high-pitched notes that don’t belongin the pattern. Nonetheless, it does work.
This program is a good compromisebetween Trilogy and Virtual Bassist: it’s lessexpensive, and it’s the only one of thethree that can be used in either single-noteor pattern-play mode.
Virtual Bassist($299.99)
If your primary interest is in mainstreampop music styles and preset bass lines,Virtual Bassist is the program for you (seeFigure 3). This plug-in’s panel shows aFender-like solid body bass, and that’swhat you get. It features only 28 styles(not nearly as many as Broomstick Bass),but the included styles are the ones popmusicians will use most often, and each ofthem has more patterns than BB’s styles,
VIr e v i e w
Figure 3. Steinberg Virtual Bassist features ahighly controllable bass guitar (left) and a menuof styles (right).
2 8 V I R T U A L I N S T R U M E N T S
VIr e v i e w
including half a dozen fills that segue backautomatically to the most recently selectedpattern.
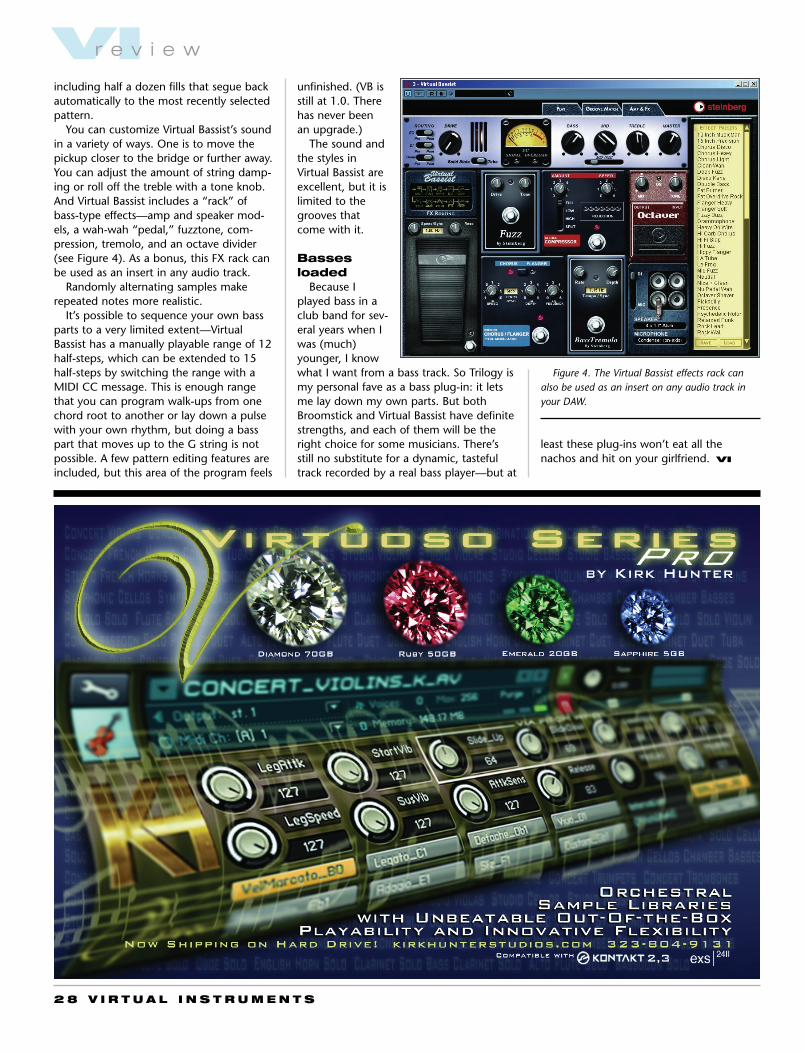
You can customize Virtual Bassist’s soundin a variety of ways. One is to move thepickup closer to the bridge or further away.You can adjust the amount of string damp-ing or roll off the treble with a tone knob.And Virtual Bassist includes a “rack” ofbass-type effects—amp and speaker mod-els, a wah-wah “pedal,” fuzztone, com-pression, tremolo, and an octave divider(see Figure 4). As a bonus, this FX rack canbe used as an insert in any audio track.
Randomly alternating samples makerepeated notes more realistic.
It’s possible to sequence your own bassparts to a very limited extent—VirtualBassist has a manually playable range of 12half-steps, which can be extended to 15half-steps by switching the range with aMIDI CC message. This is enough rangethat you can program walk-ups from onechord root to another or lay down a pulsewith your own rhythm, but doing a basspart that moves up to the G string is notpossible. A few pattern editing features areincluded, but this area of the program feels
unfinished. (VB isstill at 1.0. Therehas never beenan upgrade.)
The sound andthe styles inVirtual Bassist areexcellent, but it islimited to thegrooves thatcome with it.
Bassesloaded
Because Iplayed bass in aclub band for sev-eral years when Iwas (much)younger, I knowwhat I want from a bass track. So Trilogy ismy personal fave as a bass plug-in: it letsme lay down my own parts. But bothBroomstick and Virtual Bassist have definitestrengths, and each of them will be theright choice for some musicians. There’sstill no substitute for a dynamic, tastefultrack recorded by a real bass player—but at
least these plug-ins won’t eat all thenachos and hit on your girlfriend. VI
Figure 4. The Virtual Bassist effects rack canalso be used as an insert on any audio track inyour DAW.
VIr e v i e w
3 0 V I R T U A L I N S T R U M E N T S
Is this really the best sounding virtual guitar ampeffects software in the world?
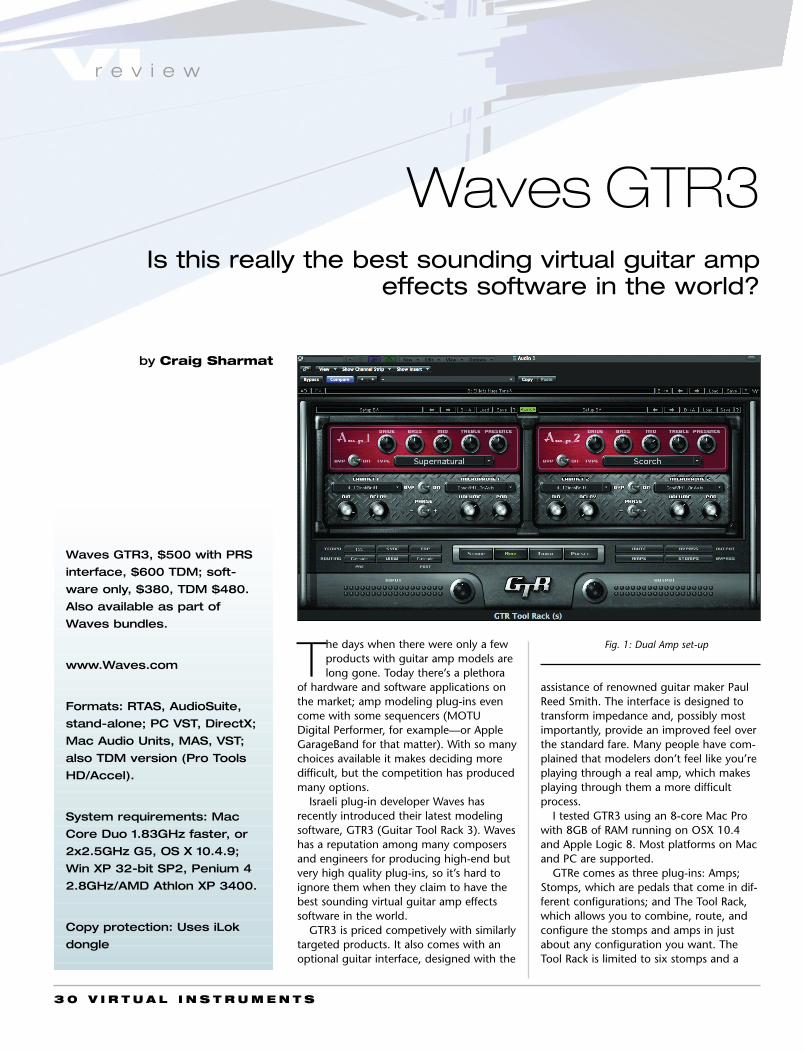
by Craig Sharmat
The days when there were only a fewproducts with guitar amp models arelong gone. Today there’s a plethora
of hardware and software applications onthe market; amp modeling plug-ins evencome with some sequencers (MOTUDigital Performer, for example—or AppleGarageBand for that matter). With so manychoices available it makes deciding moredifficult, but the competition has producedmany options.
Israeli plug-in developer Waves hasrecently introduced their latest modelingsoftware, GTR3 (Guitar Tool Rack 3). Waveshas a reputation among many composersand engineers for producing high-end butvery high quality plug-ins, so it’s hard toignore them when they claim to have thebest sounding virtual guitar amp effectssoftware in the world.
GTR3 is priced competively with similarlytargeted products. It also comes with anoptional guitar interface, designed with the
assistance of renowned guitar maker PaulReed Smith. The interface is designed totransform impedance and, possibly mostimportantly, provide an improved feel overthe standard fare. Many people have com-plained that modelers don’t feel like you’replaying through a real amp, which makesplaying through them a more difficultprocess.
I tested GTR3 using an 8-core Mac Prowith 8GB of RAM running on OSX 10.4and Apple Logic 8. Most platforms on Macand PC are supported.
GTRe comes as three plug-ins: Amps;Stomps, which are pedals that come in dif-ferent configurations; and The Tool Rack,which allows you to combine, route, andconfigure the stomps and amps in justabout any configuration you want. TheTool Rack is limited to six stomps and a
Waves GTR3
Fig. 1: Dual Amp set-up
Waves GTR3, $500 with PRS
interface, $600 TDM; soft-
ware only, $380, TDM $480.
Also available as part of
Waves bundles.
www.Waves.com
Formats: RTAS, AudioSuite,
stand-alone; PC VST, DirectX;
Mac Audio Units, MAS, VST;
also TDM version (Pro Tools
HD/Accel).
System requirements: Mac
Core Duo 1.83GHz faster, or
2x2.5GHz G5, OS X 10.4.9;
Win XP 32-bit SP2, Penium 4
2.8GHz/AMD Athlon XP 3400.
Copy protection: Uses iLok
dongle
V I R T U A L I N S T R U M E N T S 3 1
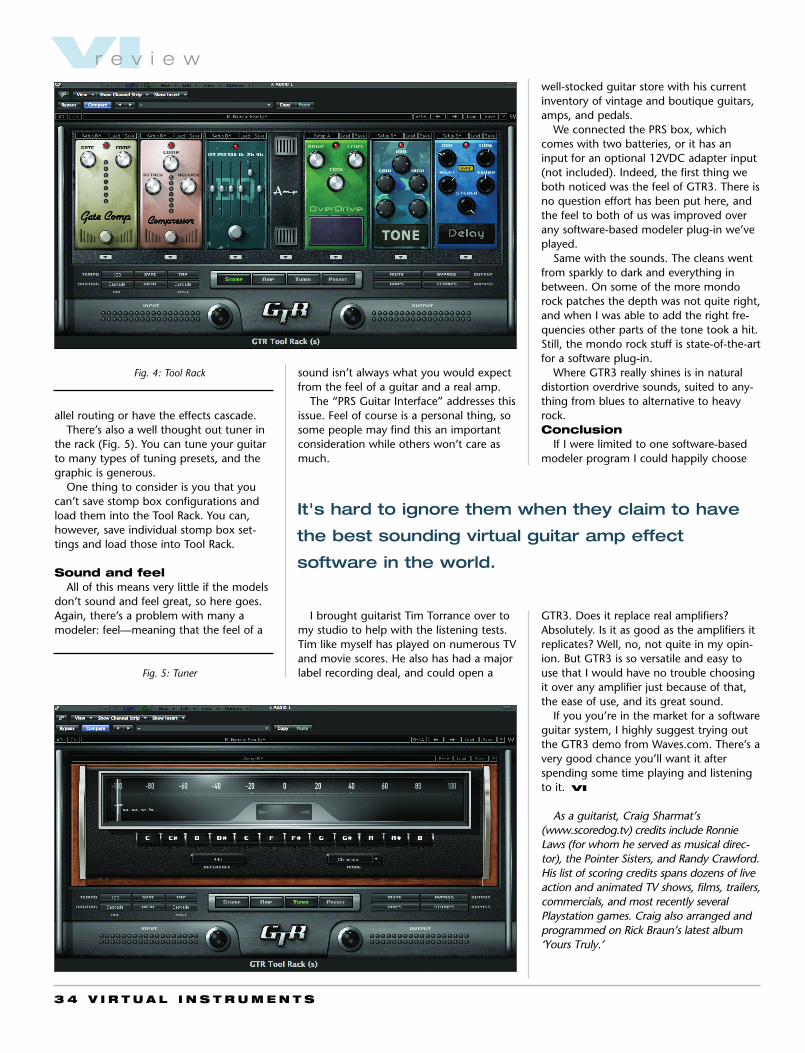
mono or stereo amp, but if for some rea-son you needed more stomps you couldadd another rack as a plug-in.
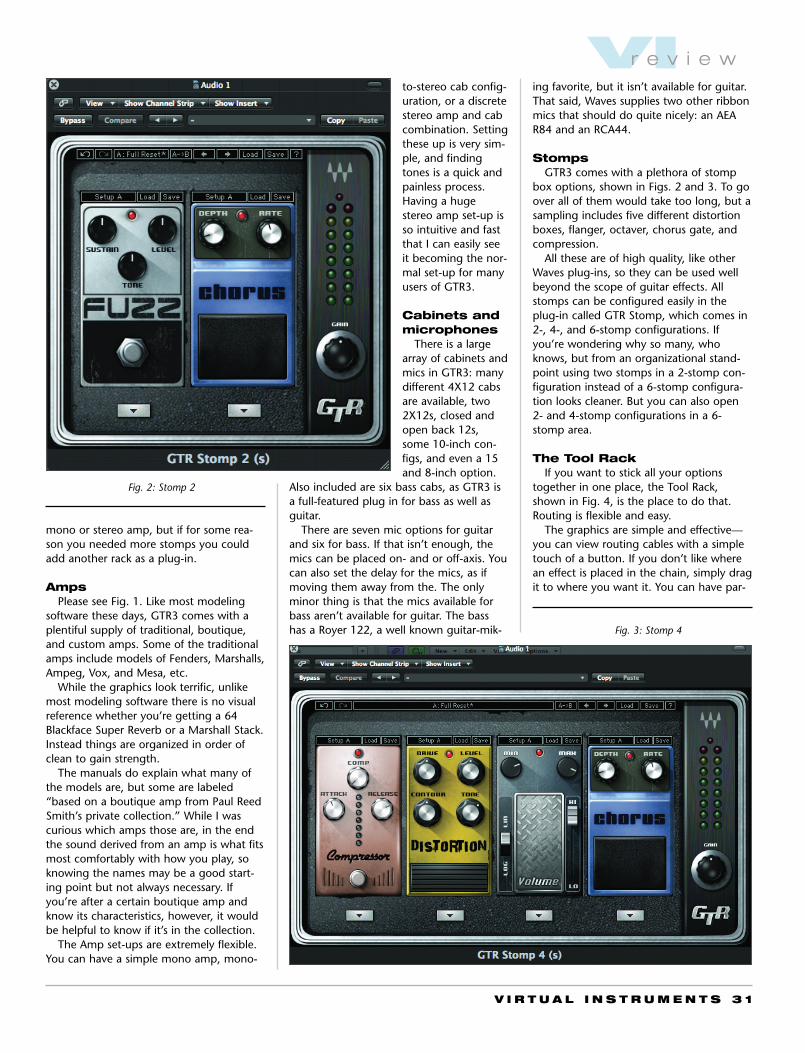
AmpsPlease see Fig. 1. Like most modeling
software these days, GTR3 comes with aplentiful supply of traditional, boutique,and custom amps. Some of the traditionalamps include models of Fenders, Marshalls,Ampeg, Vox, and Mesa, etc.
While the graphics look terrific, unlikemost modeling software there is no visualreference whether you’re getting a 64Blackface Super Reverb or a Marshall Stack.Instead things are organized in order ofclean to gain strength.
The manuals do explain what many ofthe models are, but some are labeled“based on a boutique amp from Paul ReedSmith’s private collection.” While I wascurious which amps those are, in the endthe sound derived from an amp is what fitsmost comfortably with how you play, soknowing the names may be a good start-ing point but not always necessary. Ifyou’re after a certain boutique amp andknow its characteristics, however, it wouldbe helpful to know if it’s in the collection.
The Amp set-ups are extremely flexible.You can have a simple mono amp, mono-
to-stereo cab config-uration, or a discretestereo amp and cabcombination. Settingthese up is very sim-ple, and findingtones is a quick andpainless process.Having a hugestereo amp set-up isso intuitive and fastthat I can easily seeit becoming the nor-mal set-up for manyusers of GTR3.
Cabinets andmicrophones
There is a largearray of cabinets andmics in GTR3: manydifferent 4X12 cabsare available, two2X12s, closed andopen back 12s,some 10-inch con-figs, and even a 15and 8-inch option.
Also included are six bass cabs, as GTR3 isa full-featured plug in for bass as well asguitar.
There are seven mic options for guitarand six for bass. If that isn’t enough, themics can be placed on- and or off-axis. Youcan also set the delay for the mics, as ifmoving them away from the. The onlyminor thing is that the mics available forbass aren’t available for guitar. The basshas a Royer 122, a well known guitar-mik-
ing favorite, but it isn’t available for guitar.That said, Waves supplies two other ribbonmics that should do quite nicely: an AEAR84 and an RCA44.
StompsGTR3 comes with a plethora of stomp
box options, shown in Figs. 2 and 3. To goover all of them would take too long, but asampling includes five different distortionboxes, flanger, octaver, chorus gate, andcompression.
All these are of high quality, like otherWaves plug-ins, so they can be used wellbeyond the scope of guitar effects. Allstomps can be configured easily in theplug-in called GTR Stomp, which comes in2-, 4-, and 6-stomp configurations. Ifyou’re wondering why so many, whoknows, but from an organizational stand-point using two stomps in a 2-stomp con-figuration instead of a 6-stomp configura-tion looks cleaner. But you can also open2- and 4-stomp configurations in a 6-stomp area.
The Tool RackIf you want to stick all your options
together in one place, the Tool Rack,shown in Fig. 4, is the place to do that.Routing is flexible and easy.
The graphics are simple and effective—you can view routing cables with a simpletouch of a button. If you don’t like wherean effect is placed in the chain, simply dragit to where you want it. You can have par-
VIr e v i e w
Fig. 2: Stomp 2
Fig. 3: Stomp 4
Are you playing
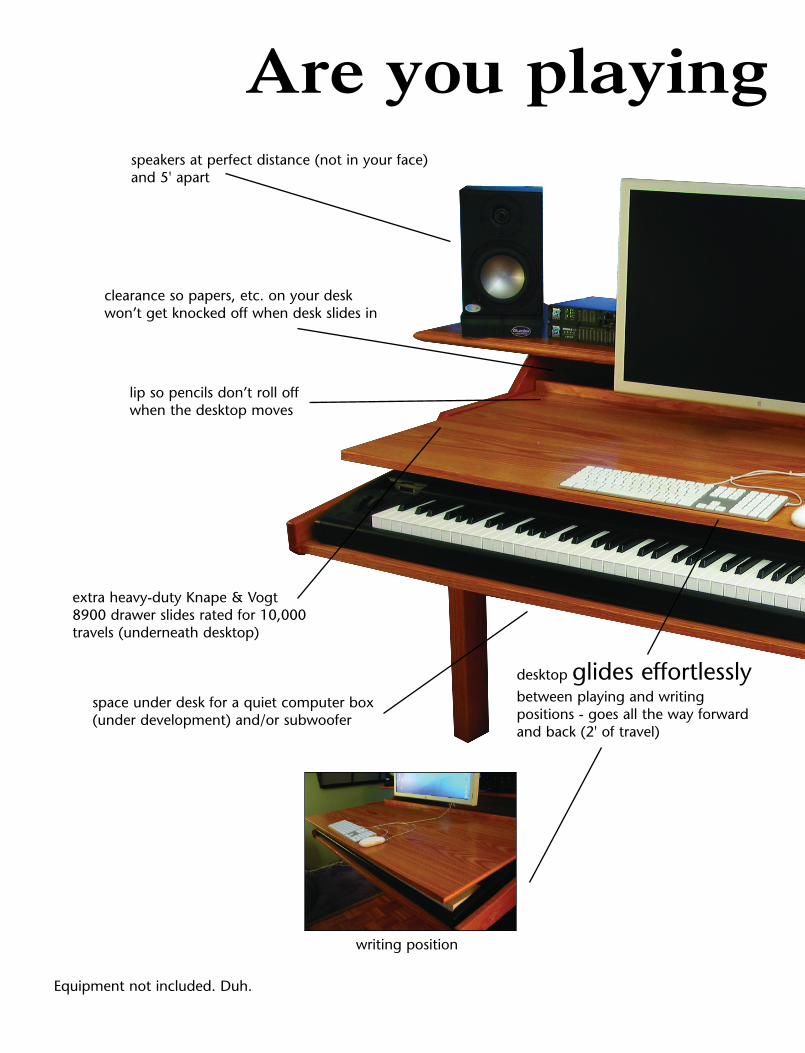
desktop glides effortlesslybetween playing and writing positions - goes all the way forwardand back (2' of travel)
space under desk for a quiet computer box(under development) and/or subwoofer
extra heavy-duty Knape & Vogt8900 drawer slides rated for 10,000travels (underneath desktop)
lip so pencils don’t roll offwhen the desktop moves
clearance so papers, etc. on your deskwon’t get knocked off when desk slides in
speakers at perfect distance (not in your face)and 5' apart
Equipment not included. Duh.
writing position
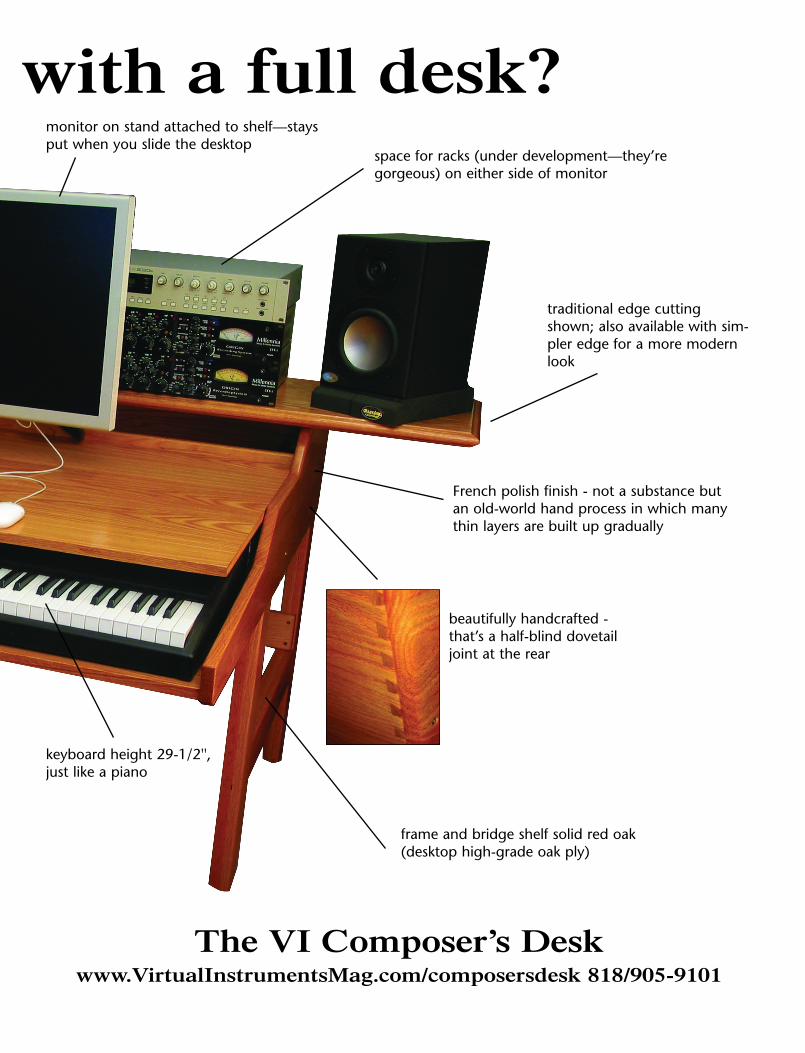
with a full desk?monitor on stand attached to shelf—staysput when you slide the desktop
space for racks (under development—they’re gorgeous) on either side of monitor
traditional edge cuttingshown; also available with sim-pler edge for a more modernlook
French polish finish - not a substance butan old-world hand process in which manythin layers are built up gradually
beautifully handcrafted -that’s a half-blind dovetailjoint at the rear
frame and bridge shelf solid red oak(desktop high-grade oak ply)
keyboard height 29-1/2'',just like a piano
The VI Composer’s Deskwww.VirtualInstrumentsMag.com/composersdesk 818/905-9101
3 4 V I R T U A L I N S T R U M E N T S
allel routing or have the effects cascade.There’s also a well thought out tuner in
the rack (Fig. 5). You can tune your guitarto many types of tuning presets, and thegraphic is generous.
One thing to consider is you that youcan’t save stomp box configurations andload them into the Tool Rack. You can,however, save individual stomp box set-tings and load those into Tool Rack.
Sound and feelAll of this means very little if the models
don’t sound and feel great, so here goes.Again, there’s a problem with many amodeler: feel—meaning that the feel of a
sound isn’t always what you would expectfrom the feel of a guitar and a real amp.
The “PRS Guitar Interface” addresses thisissue. Feel of course is a personal thing, sosome people may find this an importantconsideration while others won’t care asmuch.
I brought guitarist Tim Torrance over tomy studio to help with the listening tests.Tim like myself has played on numerous TVand movie scores. He also has had a majorlabel recording deal, and could open a
well-stocked guitar store with his currentinventory of vintage and boutique guitars,amps, and pedals.
We connected the PRS box, whichcomes with two batteries, or it has aninput for an optional 12VDC adapter input(not included). Indeed, the first thing weboth noticed was the feel of GTR3. There isno question effort has been put here, andthe feel to both of us was improved overany software-based modeler plug-in we’veplayed.
Same with the sounds. The cleans wentfrom sparkly to dark and everything inbetween. On some of the more mondorock patches the depth was not quite right,and when I was able to add the right fre-quencies other parts of the tone took a hit.Still, the mondo rock stuff is state-of-the-artfor a software plug-in.
Where GTR3 really shines is in naturaldistortion overdrive sounds, suited to any-thing from blues to alternative to heavyrock. Conclusion
If I were limited to one software-basedmodeler program I could happily choose
GTR3. Does it replace real amplifiers?Absolutely. Is it as good as the amplifiers itreplicates? Well, no, not quite in my opin-ion. But GTR3 is so versatile and easy touse that I would have no trouble choosingit over any amplifier just because of that,the ease of use, and its great sound.
If you you’re in the market for a softwareguitar system, I highly suggest trying outthe GTR3 demo from Waves.com. There’s avery good chance you’ll want it afterspending some time playing and listeningto it. VI
As a guitarist, Craig Sharmat’s(www.scoredog.tv) credits include RonnieLaws (for whom he served as musical direc-tor), the Pointer Sisters, and Randy Crawford.His list of scoring credits spans dozens of liveaction and animated TV shows, films, trailers,commercials, and most recently severalPlaystation games. Craig also arranged andprogrammed on Rick Braun’s latest album‘Yours Truly.’
VIr e v i e w
It's hard to ignore them when they claim to have
the best sounding virtual guitar amp effect
software in the world.
Fig. 4: Tool Rack
Fig. 5: Tuner

3 6 V I R T U A L I N S T R U M E N T S V I R T U A L I N S T R U M E N T S 3 6
VIv e r y d e e p c l i n i c
V E R Y D E E P C L I N I C :
by Bob DeMaa
moreonline
www.virtualinstrumentsmag.com
iZotope Ozone
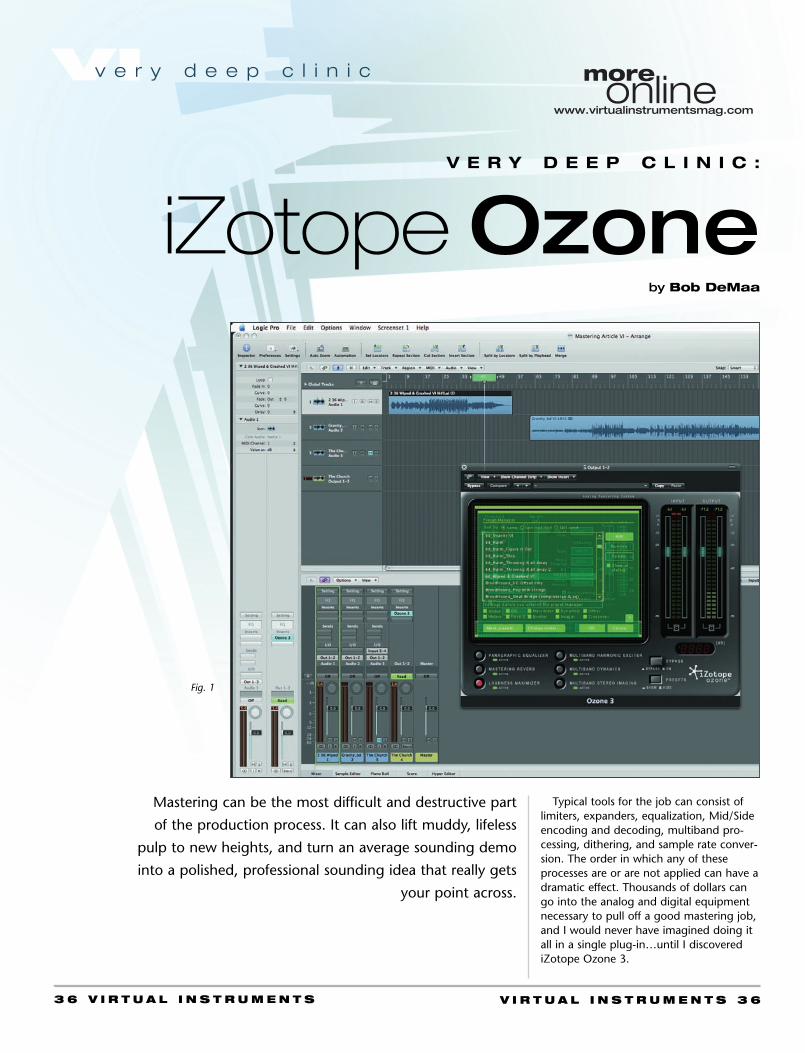
Typical tools for the job can consist oflimiters, expanders, equalization, Mid/Sideencoding and decoding, multiband pro-cessing, dithering, and sample rate conver-sion. The order in which any of theseprocesses are or are not applied can have adramatic effect. Thousands of dollars cango into the analog and digital equipmentnecessary to pull off a good mastering job,and I would never have imagined doing itall in a single plug-in…until I discoverediZotope Ozone 3.
Mastering can be the most difficult and destructive part
of the production process. It can also lift muddy, lifeless
pulp to new heights, and turn an average sounding demo
into a polished, professional sounding idea that really gets
your point across.
Fig. 1
V I R T U A L I N S T R U M E N T S 3 7
Short of having a mastering engineershow up to your doorstep with a rack ofgear in tow, Ozone 3 sets out to providejust about everything most people wouldneed to create an excellent sounding mas-ter. This is accomplished, in part, by notdiluting any of the control. Everythingfrom start to finish is designed for maxi-mum versatility and quality, and it man-ages to make what could be an incrediblycomplicated process fairly straightforwardand relatively easy to understand.
The Goal of this clinic is to take you stepby step through a process of masteringyour mix, focusing on key areas withinOzone 3 which you can hopefully apply toany style of music.
Please go towww.VirtualInstrumentsMag.com and clickon More Online to access a few presetsand examples of what the different stagessound like.
Getting started…with the mixDifferent people work different ways, but
when I mix a song, I focus on making itsound as good as possible without usingcorrective EQ or dynamics processing onthe master fader. When I do use plug-inson the master fader, I print two versions ofthe mix—one version with plug-ins, and asecond version without.
One reason for this is so I can go backand master the song later with fresh ears.Another reason is to be able to master themusic in context to other tracks it will windup next to on a CD. Having anunprocessed stereo mix will also make iteasier to control dynamics and use equal-ization without worrying too much aboutthe bad distortion or clipping that canoccur when working with music that mayhave already been over-compressed orequalized for the room as opposed to themix.
Ozone 3 can be very processor-inten-sive—that’s usually the price of quality pro-cessing—and for this clinic we will be usingit to its fullest, which might not sit verywell in a session with a lot of plug-ins andaudio already placing demands on the
CPU. For that reason it’s a good idea tobounce your song out first.
I’ll be using Logic Pro 8, but Ozone 3supports VST, AU, RTAS, MAS & Direct X.Regardless of your DAW or platform, you’llbe able to do everything in this clinic.
Before we get started, pull out a fewCDs of music that you would consider tobe in the sonic ballpark of where you wantyour mixes to be. We’re going to be takingadvantage of the Matching EQ feature a lit-tle later.
Set up the sessionCreate a new session and import your
mixes into it. Picking a sample rate mightbe a little tricky depending on the sample
rate of the original mix or mixes you areworking on. As a general rule, don’t con-vert down to master, but converting up isfine. For example, if you have two mixes at44.1k or 48k and another at 96k, createthe mastering session at 96k and let any-thing that doesn’t match convert up to96k. Working at higher sampling ratestends to reveal a smoother, more naturalsound at higher frequencies.
Take a moment now to bring in any
tracks from the audio CDs you pulled out.Avoid using mp3s, as there is typically abrick wall filter at about 15kHz that willinterfere with our matching EQ results.
Place your mix onto a track in the ses-sion, and insert Ozone 3 on the MasterFader (Fig. 1). Load the preset called“Default” to reset the plug-in, and turn offall the modules. Or you could load theVIMag_bobdemaa preset and use it to fol-low along and make tweaks with yoursong as we go.
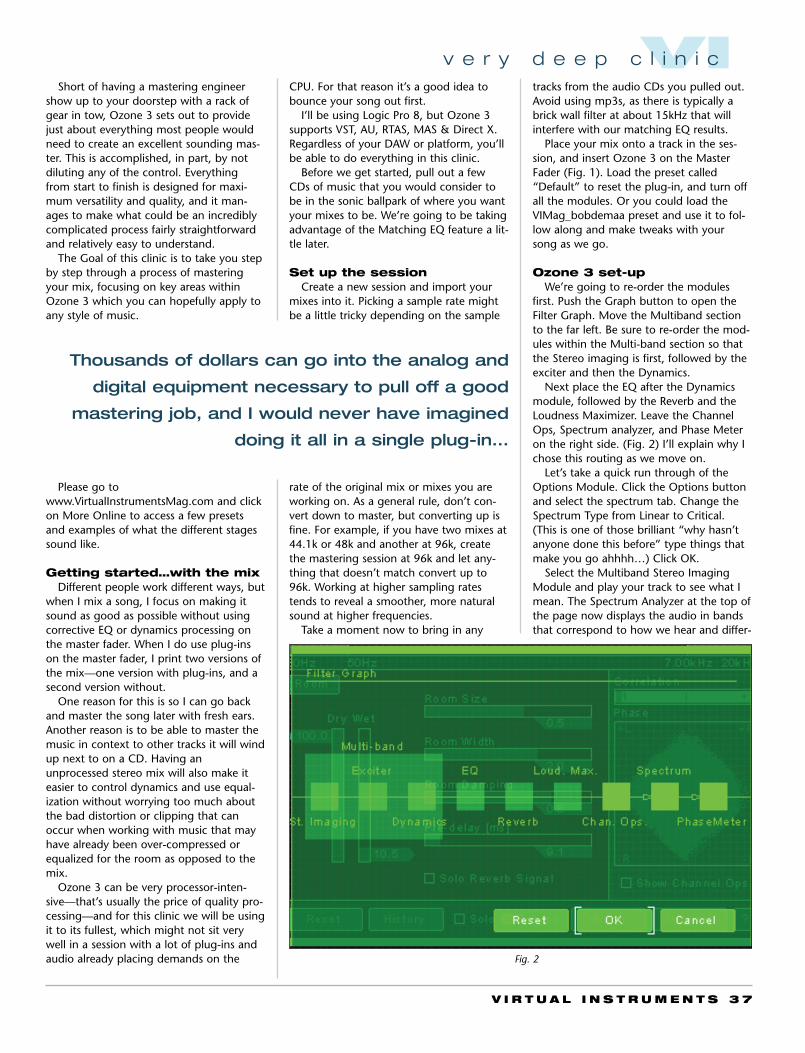
Ozone 3 set-upWe’re going to re-order the modules
first. Push the Graph button to open theFilter Graph. Move the Multiband sectionto the far left. Be sure to re-order the mod-ules within the Multi-band section so thatthe Stereo imaging is first, followed by theexciter and then the Dynamics.
Next place the EQ after the Dynamicsmodule, followed by the Reverb and theLoudness Maximizer. Leave the ChannelOps, Spectrum analyzer, and Phase Meteron the right side. (Fig. 2) I’ll explain why Ichose this routing as we move on.
Let’s take a quick run through of theOptions Module. Click the Options buttonand select the spectrum tab. Change theSpectrum Type from Linear to Critical.(This is one of those brilliant “why hasn’tanyone done this before” type things thatmake you go ahhhh…) Click OK.
Select the Multiband Stereo ImagingModule and play your track to see what Imean. The Spectrum Analyzer at the top ofthe page now displays the audio in bandsthat correspond to how we hear and differ-
Fig. 2
Thousands of dollars can go into the analog and
digital equipment necessary to pull off a good
mastering job, and I would never have imagined
doing it all in a single plug-in...
VIv e r y d e e p c l i n i c
3 8 V I R T U A L I N S T R U M E N T S
opened up yet; there will be a cumulativeeffect as we go. Also, try to do this withspeakers as opposed to headphones wherethe effect will not be easily heard.
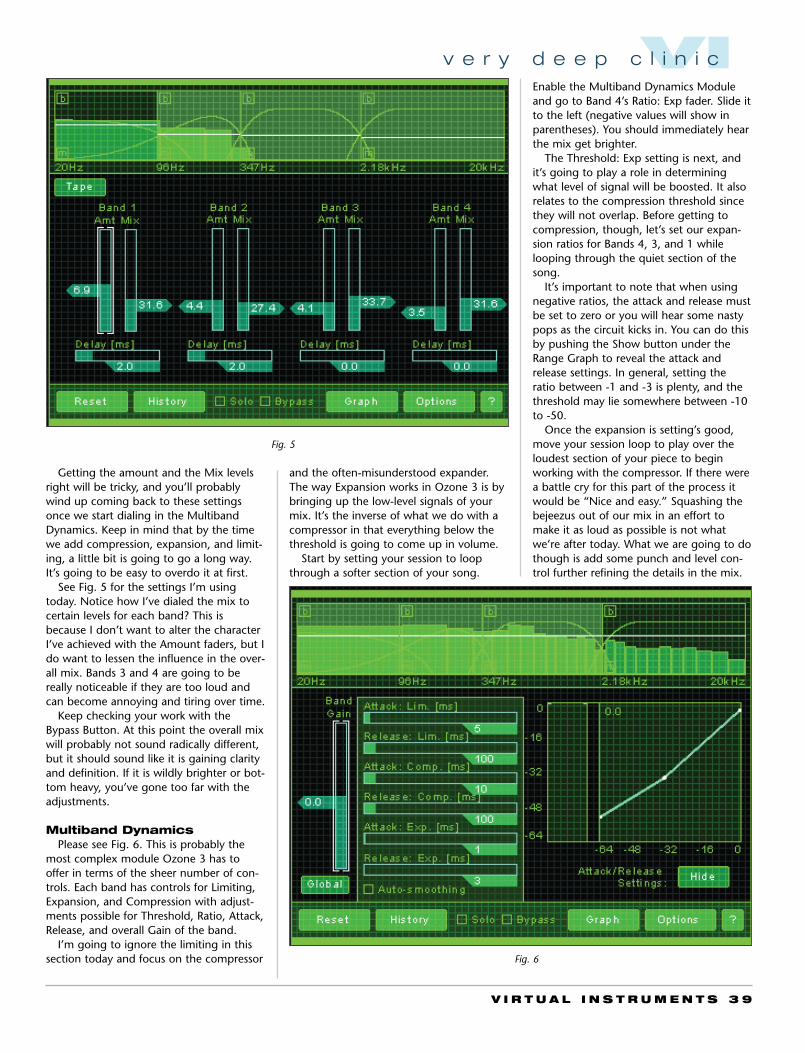
Multiband Harmonic ExciterPlease see Fig. 5. Exciters are often used
to add or create additional harmonics andor distortion in musical amounts to makeaudio sound brighter or… more exciting.Ozone gives a few flavors of excitement inthis module: a Tube setting that will pro-vide an emulation for the effect of saturat-ing tubes to generate even order harmon-ics (Dynamic, Transient, clean sounding);and Tape, which is a slightly more aggres-sive sound, generating more odd harmon-ics (saturated sounding). This module alsofeatures a phase delay for offsetting phasein the bands relative to one another.
Be sure to activate the MultibandHarmonic Exciter Module and set themode to Tape. Turn the Amount fader ofBand 1 up until the effect is a little much.Now adjust the delay amount until youhear the low end tighten up bit. Now backdown the Amount fader quite a bit. Do thesame thing for Band 2.
You should notice that some instrumentsin the low mids start to reveal some detail.It will depend on the mix, but oftentimesthis is true. Go back to Band 1 and checkthat it still sounds right relative to Band 2.Leave the phase delay settings for Bands 3and 4 alone for now.
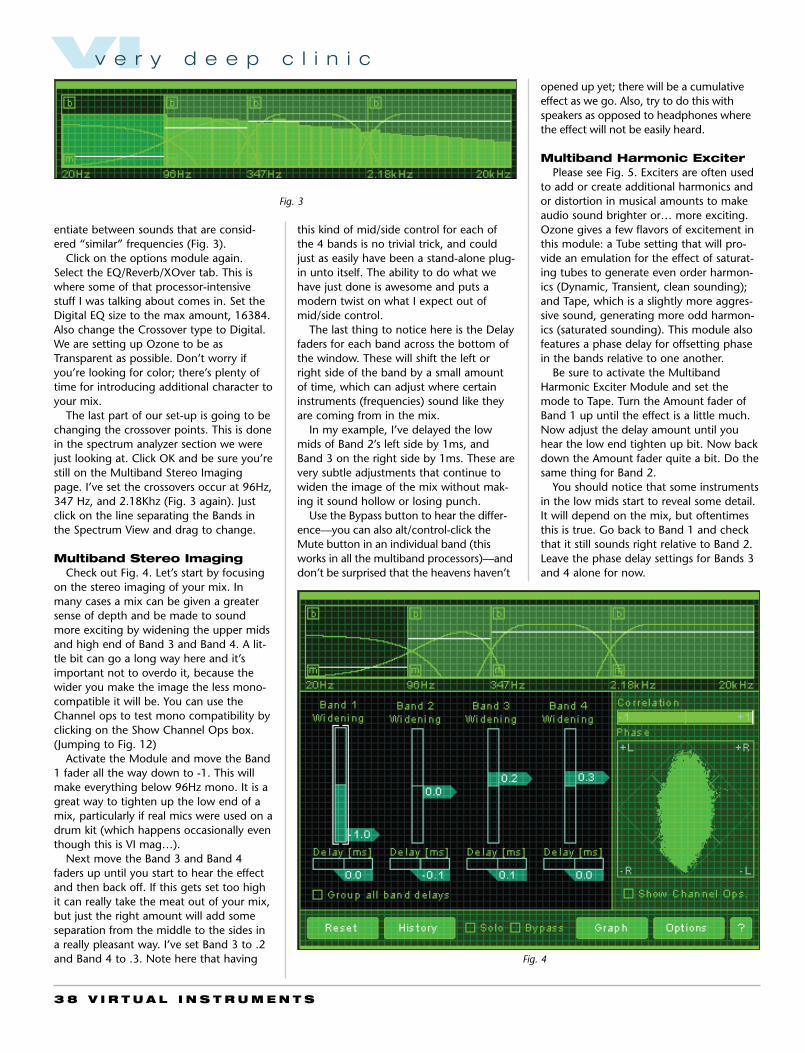
entiate between sounds that are consid-ered “similar” frequencies (Fig. 3).
Click on the options module again.Select the EQ/Reverb/XOver tab. This iswhere some of that processor-intensivestuff I was talking about comes in. Set theDigital EQ size to the max amount, 16384.Also change the Crossover type to Digital.We are setting up Ozone to be asTransparent as possible. Don’t worry ifyou’re looking for color; there’s plenty oftime for introducing additional character toyour mix.
The last part of our set-up is going to bechanging the crossover points. This is donein the spectrum analyzer section we werejust looking at. Click OK and be sure you’restill on the Multiband Stereo Imagingpage. I’ve set the crossovers occur at 96Hz,347 Hz, and 2.18Khz (Fig. 3 again). Justclick on the line separating the Bands inthe Spectrum View and drag to change.
Multiband Stereo ImagingCheck out Fig. 4. Let’s start by focusing
on the stereo imaging of your mix. Inmany cases a mix can be given a greatersense of depth and be made to soundmore exciting by widening the upper midsand high end of Band 3 and Band 4. A lit-tle bit can go a long way here and it’simportant not to overdo it, because thewider you make the image the less mono-compatible it will be. You can use theChannel ops to test mono compatibility byclicking on the Show Channel Ops box.(Jumping to Fig. 12)
Activate the Module and move the Band1 fader all the way down to -1. This willmake everything below 96Hz mono. It is agreat way to tighten up the low end of amix, particularly if real mics were used on adrum kit (which happens occasionally eventhough this is VI mag…).
Next move the Band 3 and Band 4faders up until you start to hear the effectand then back off. If this gets set too highit can really take the meat out of your mix,but just the right amount will add someseparation from the middle to the sides ina really pleasant way. I’ve set Band 3 to .2and Band 4 to .3. Note here that having
this kind of mid/side control for each ofthe 4 bands is no trivial trick, and couldjust as easily have been a stand-alone plug-in unto itself. The ability to do what wehave just done is awesome and puts amodern twist on what I expect out ofmid/side control.
The last thing to notice here is the Delayfaders for each band across the bottom ofthe window. These will shift the left orright side of the band by a small amountof time, which can adjust where certaininstruments (frequencies) sound like theyare coming from in the mix.
In my example, I’ve delayed the lowmids of Band 2’s left side by 1ms, andBand 3 on the right side by 1ms. These arevery subtle adjustments that continue towiden the image of the mix without mak-ing it sound hollow or losing punch.
Use the Bypass button to hear the differ-ence—you can also alt/control-click theMute button in an individual band (thisworks in all the multiband processors)—anddon’t be surprised that the heavens haven’t
Fig. 3
Fig. 4
VIv e r y d e e p c l i n i c
V I R T U A L I N S T R U M E N T S 3 9
Getting the amount and the Mix levelsright will be tricky, and you’ll probablywind up coming back to these settingsonce we start dialing in the MultibandDynamics. Keep in mind that by the timewe add compression, expansion, and limit-ing, a little bit is going to go a long way.It’s going to be easy to overdo it at first.
See Fig. 5 for the settings I’m usingtoday. Notice how I’ve dialed the mix tocertain levels for each band? This isbecause I don’t want to alter the characterI’ve achieved with the Amount faders, but Ido want to lessen the influence in the over-all mix. Bands 3 and 4 are going to bereally noticeable if they are too loud andcan become annoying and tiring over time.
Keep checking your work with theBypass Button. At this point the overall mixwill probably not sound radically different,but it should sound like it is gaining clarityand definition. If it is wildly brighter or bot-tom heavy, you’ve gone too far with theadjustments.
Multiband DynamicsPlease see Fig. 6. This is probably the
most complex module Ozone 3 has tooffer in terms of the sheer number of con-trols. Each band has controls for Limiting,Expansion, and Compression with adjust-ments possible for Threshold, Ratio, Attack,Release, and overall Gain of the band.
I’m going to ignore the limiting in thissection today and focus on the compressor
and the often-misunderstood expander.The way Expansion works in Ozone 3 is bybringing up the low-level signals of yourmix. It’s the inverse of what we do with acompressor in that everything below thethreshold is going to come up in volume.
Start by setting your session to loopthrough a softer section of your song.
Enable the Multiband Dynamics Moduleand go to Band 4’s Ratio: Exp fader. Slide itto the left (negative values will show inparentheses). You should immediately hearthe mix get brighter.
The Threshold: Exp setting is next, andit’s going to play a role in determiningwhat level of signal will be boosted. It alsorelates to the compression threshold sincethey will not overlap. Before getting tocompression, though, let’s set our expan-sion ratios for Bands 4, 3, and 1 whilelooping through the quiet section of thesong.
It’s important to note that when usingnegative ratios, the attack and release mustbe set to zero or you will hear some nastypops as the circuit kicks in. You can do thisby pushing the Show button under theRange Graph to reveal the attack andrelease settings. In general, setting theratio between -1 and -3 is plenty, and thethreshold may lie somewhere between -10to -50.
Once the expansion is setting’s good,move your session loop to play over theloudest section of your piece to beginworking with the compressor. If there werea battle cry for this part of the process itwould be “Nice and easy.” Squashing thebejeezus out of our mix in an effort tomake it as loud as possible is not whatwe’re after today. What we are going to dothough is add some punch and level con-trol further refining the details in the mix.
Fig. 5
Fig. 6
VIv e r y d e e p c l i n i c
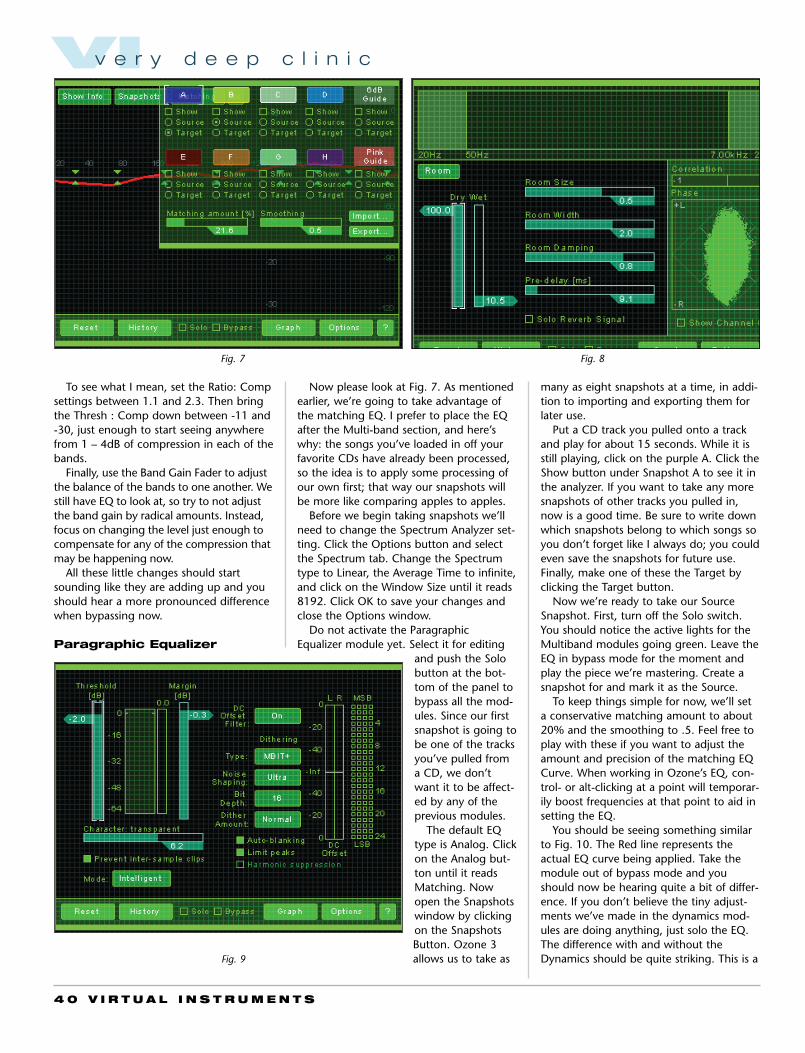
4 0 V I R T U A L I N S T R U M E N T S
To see what I mean, set the Ratio: Compsettings between 1.1 and 2.3. Then bringthe Thresh : Comp down between -11 and-30, just enough to start seeing anywherefrom 1 – 4dB of compression in each of thebands.
Finally, use the Band Gain Fader to adjustthe balance of the bands to one another. Westill have EQ to look at, so try to not adjustthe band gain by radical amounts. Instead,focus on changing the level just enough tocompensate for any of the compression thatmay be happening now.
All these little changes should startsounding like they are adding up and youshould hear a more pronounced differencewhen bypassing now.
Paragraphic Equalizer
Now please look at Fig. 7. As mentionedearlier, we’re going to take advantage ofthe matching EQ. I prefer to place the EQafter the Multi-band section, and here’swhy: the songs you’ve loaded in off yourfavorite CDs have already been processed,so the idea is to apply some processing ofour own first; that way our snapshots willbe more like comparing apples to apples.
Before we begin taking snapshots we’llneed to change the Spectrum Analyzer set-ting. Click the Options button and selectthe Spectrum tab. Change the Spectrumtype to Linear, the Average Time to infinite,and click on the Window Size until it reads8192. Click OK to save your changes andclose the Options window.
Do not activate the ParagraphicEqualizer module yet. Select it for editing
and push the Solobutton at the bot-tom of the panel tobypass all the mod-ules. Since our firstsnapshot is going tobe one of the tracksyou’ve pulled froma CD, we don’twant it to be affect-ed by any of theprevious modules.
The default EQtype is Analog. Clickon the Analog but-ton until it readsMatching. Nowopen the Snapshotswindow by clickingon the SnapshotsButton. Ozone 3allows us to take as
many as eight snapshots at a time, in addi-tion to importing and exporting them forlater use.
Put a CD track you pulled onto a trackand play for about 15 seconds. While it isstill playing, click on the purple A. Click theShow button under Snapshot A to see it inthe analyzer. If you want to take any moresnapshots of other tracks you pulled in,now is a good time. Be sure to write downwhich snapshots belong to which songs soyou don’t forget like I always do; you couldeven save the snapshots for future use.Finally, make one of these the Target byclicking the Target button.
Now we’re ready to take our SourceSnapshot. First, turn off the Solo switch.You should notice the active lights for theMultiband modules going green. Leave theEQ in bypass mode for the moment andplay the piece we’re mastering. Create asnapshot for and mark it as the Source.
To keep things simple for now, we’ll seta conservative matching amount to about20% and the smoothing to .5. Feel free toplay with these if you want to adjust theamount and precision of the matching EQCurve. When working in Ozone’s EQ, con-trol- or alt-clicking at a point will temporar-ily boost frequencies at that point to aid insetting the EQ.
You should be seeing something similarto Fig. 10. The Red line represents theactual EQ curve being applied. Take themodule out of bypass mode and youshould now be hearing quite a bit of differ-ence. If you don’t believe the tiny adjust-ments we’ve made in the dynamics mod-ules are doing anything, just solo the EQ.The difference with and without theDynamics should be quite striking. This is a
Fig. 7 Fig. 8
Fig. 9
VIv e r y d e e p c l i n i c
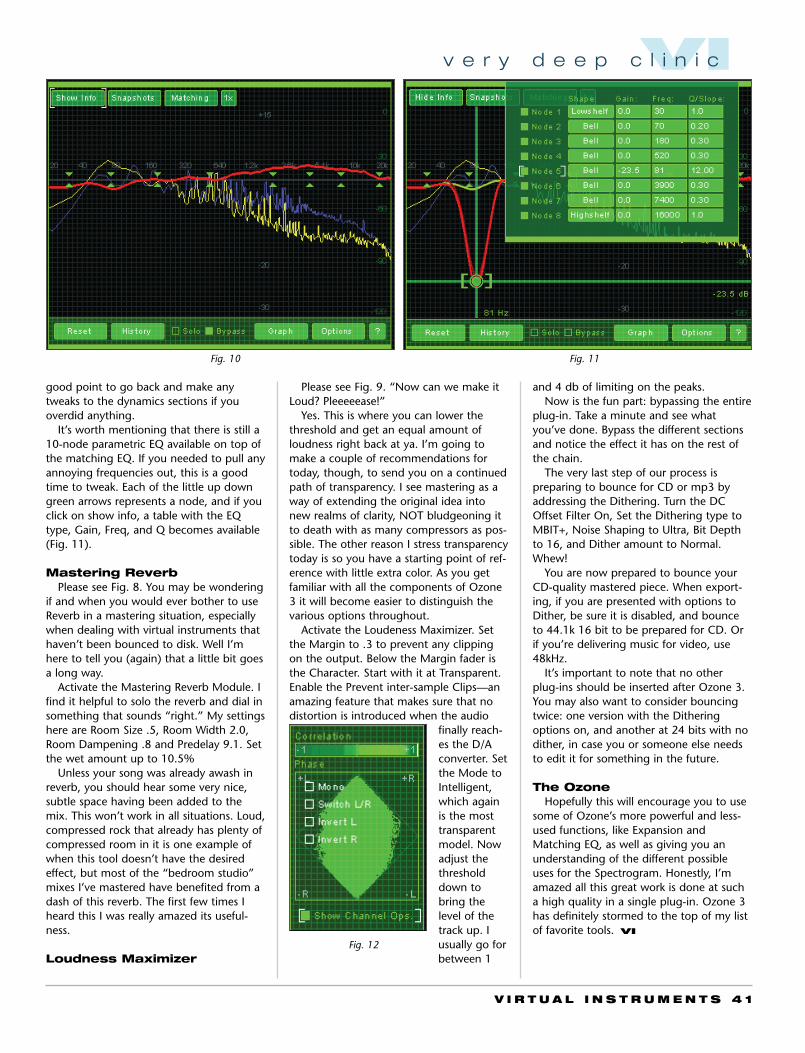
V I R T U A L I N S T R U M E N T S 4 1
good point to go back and make anytweaks to the dynamics sections if youoverdid anything.
It’s worth mentioning that there is still a10-node parametric EQ available on top ofthe matching EQ. If you needed to pull anyannoying frequencies out, this is a goodtime to tweak. Each of the little up downgreen arrows represents a node, and if youclick on show info, a table with the EQtype, Gain, Freq, and Q becomes available(Fig. 11).
Mastering ReverbPlease see Fig. 8. You may be wondering
if and when you would ever bother to useReverb in a mastering situation, especiallywhen dealing with virtual instruments thathaven’t been bounced to disk. Well I’mhere to tell you (again) that a little bit goesa long way.
Activate the Mastering Reverb Module. Ifind it helpful to solo the reverb and dial insomething that sounds “right.” My settingshere are Room Size .5, Room Width 2.0,Room Dampening .8 and Predelay 9.1. Setthe wet amount up to 10.5%
Unless your song was already awash inreverb, you should hear some very nice,subtle space having been added to themix. This won’t work in all situations. Loud,compressed rock that already has plenty ofcompressed room in it is one example ofwhen this tool doesn’t have the desiredeffect, but most of the “bedroom studio”mixes I’ve mastered have benefited from adash of this reverb. The first few times Iheard this I was really amazed its useful-ness.
Loudness Maximizer
Please see Fig. 9. “Now can we make itLoud? Pleeeeease!”
Yes. This is where you can lower thethreshold and get an equal amount ofloudness right back at ya. I’m going tomake a couple of recommendations fortoday, though, to send you on a continuedpath of transparency. I see mastering as away of extending the original idea intonew realms of clarity, NOT bludgeoning itto death with as many compressors as pos-sible. The other reason I stress transparencytoday is so you have a starting point of ref-erence with little extra color. As you getfamiliar with all the components of Ozone3 it will become easier to distinguish thevarious options throughout.
Activate the Loudeness Maximizer. Setthe Margin to .3 to prevent any clippingon the output. Below the Margin fader isthe Character. Start with it at Transparent.Enable the Prevent inter-sample Clips—anamazing feature that makes sure that nodistortion is introduced when the audio
finally reach-es the D/Aconverter. Setthe Mode toIntelligent,which againis the mosttransparentmodel. Nowadjust thethresholddown tobring thelevel of thetrack up. Iusually go forbetween 1
and 4 db of limiting on the peaks. Now is the fun part: bypassing the entire
plug-in. Take a minute and see whatyou’ve done. Bypass the different sectionsand notice the effect it has on the rest ofthe chain.
The very last step of our process ispreparing to bounce for CD or mp3 byaddressing the Dithering. Turn the DCOffset Filter On, Set the Dithering type toMBIT+, Noise Shaping to Ultra, Bit Depthto 16, and Dither amount to Normal.Whew!
You are now prepared to bounce yourCD-quality mastered piece. When export-ing, if you are presented with options toDither, be sure it is disabled, and bounceto 44.1k 16 bit to be prepared for CD. Orif you’re delivering music for video, use48kHz.
It’s important to note that no otherplug-ins should be inserted after Ozone 3.You may also want to consider bouncingtwice: one version with the Ditheringoptions on, and another at 24 bits with nodither, in case you or someone else needsto edit it for something in the future.
The OzoneHopefully this will encourage you to use
some of Ozone’s more powerful and less-used functions, like Expansion andMatching EQ, as well as giving you anunderstanding of the different possibleuses for the Spectrogram. Honestly, I’mamazed all this great work is done at sucha high quality in a single plug-in. Ozone 3has definitely stormed to the top of my listof favorite tools. VI
Fig. 10 Fig. 11
Fig. 12
VIv e r y d e e p c l i n i c
4 2 V I R T U A L I N S T R U M E N T S
VIr e v i e w
Big Products, Little ReviewsGalaxy II Grand Piano Collection,
Zero G Carnival Drums The Spirit ofBrazil, and Vir2 Syntax
Galaxy Instruments
Galaxy II Grand PianoCollection$285
www.galaxypianos.com
US distributor EastWest:
www.soundsonline.com
Format: Kontakt Player 2, stand-
alone and plug-in works in all
Mac and Windows formats (AU,
VST, RTAS, DXi).
This long awaited successor to the2004 release of Galaxy Steinway 5.1adds two more world class pianos:
the Bösendorfer 290 Imperial and a super-
rare BlüthnerModel 150 tothe originalSteinway ModelD 270. But whatmakes Galaxy IIso great is itsunprecedentedlevel of realisticplaying controland creativesound design.
This 30GBlibrary comes onfive DVDs anduses a NativeInstrumentsKontakt 2 Player.It contains morethan 6,000 24-
bit samples, chromatically recorded andmapped in up to 13 velocity zones withsustain, resonance, and release samples atmultiple velocities and timing. Sympatheticstring resonance (with real overtones),adjustable hammer, pedal, damper andstring noises, sostenuto, and redampersamples have also been captured andincorporated using advanced customKontakt scripting.
The main menu displays a condensedview of more commonly used parameterspulled from the five sub-menus. There aresome pleasant surprises behind these tabs.
The Tone menu, for example, appears tohave familiar controls: color, resonance,warmth, loudness, etc. Based on otherproducts we’ve seen, one would expectthese to be variants of simple EQs and fil-ters. Instead, the Color knob actually mapsbetween softer and harder samples, thebenefit being that you lose none of thedynamics you would to EQ, and the vol-ume remains constant between soft and
by Jason Scott Alexander
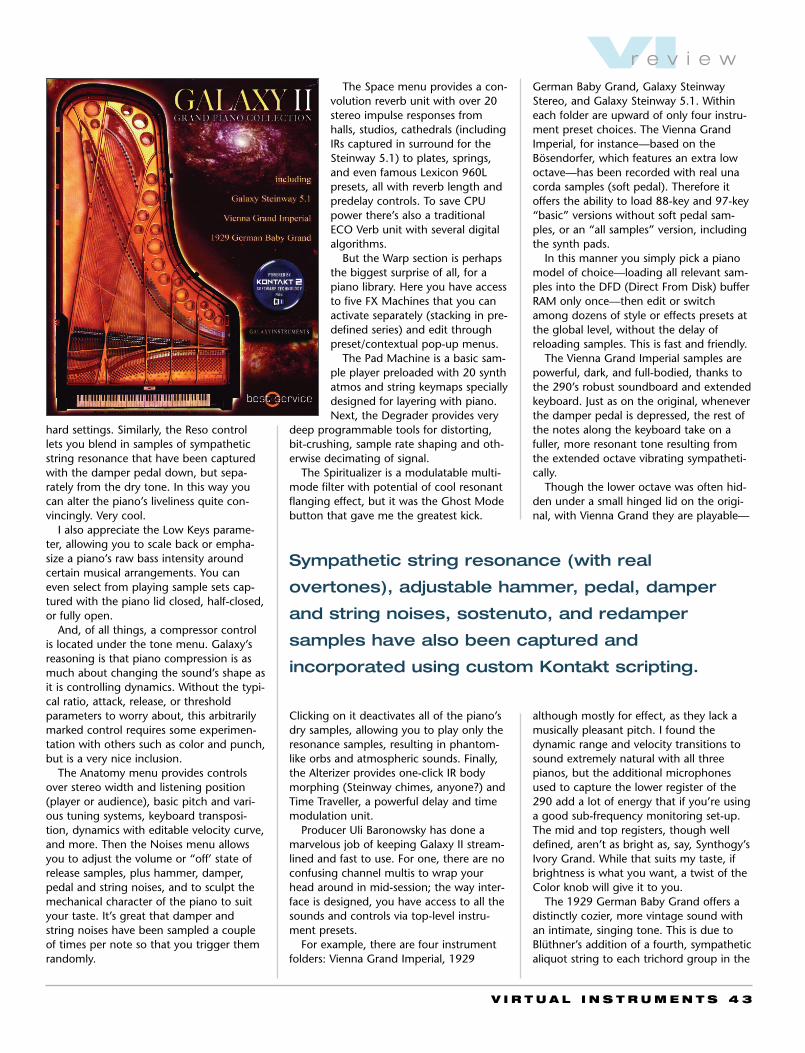
V I R T U A L I N S T R U M E N T S 4 3
hard settings. Similarly, the Reso controllets you blend in samples of sympatheticstring resonance that have been capturedwith the damper pedal down, but sepa-rately from the dry tone. In this way youcan alter the piano’s liveliness quite con-vincingly. Very cool.
I also appreciate the Low Keys parame-ter, allowing you to scale back or empha-size a piano’s raw bass intensity aroundcertain musical arrangements. You caneven select from playing sample sets cap-tured with the piano lid closed, half-closed,or fully open.
And, of all things, a compressor controlis located under the tone menu. Galaxy’sreasoning is that piano compression is asmuch about changing the sound’s shape asit is controlling dynamics. Without the typi-cal ratio, attack, release, or thresholdparameters to worry about, this arbitrarilymarked control requires some experimen-tation with others such as color and punch,but is a very nice inclusion.
The Anatomy menu provides controlsover stereo width and listening position(player or audience), basic pitch and vari-ous tuning systems, keyboard transposi-tion, dynamics with editable velocity curve,and more. Then the Noises menu allowsyou to adjust the volume or “off’ state ofrelease samples, plus hammer, damper,pedal and string noises, and to sculpt themechanical character of the piano to suityour taste. It’s great that damper andstring noises have been sampled a coupleof times per note so that you trigger themrandomly.
The Space menu provides a con-volution reverb unit with over 20stereo impulse responses fromhalls, studios, cathedrals (includingIRs captured in surround for theSteinway 5.1) to plates, springs,and even famous Lexicon 960Lpresets, all with reverb length andpredelay controls. To save CPUpower there’s also a traditionalECO Verb unit with several digitalalgorithms.
But the Warp section is perhapsthe biggest surprise of all, for apiano library. Here you have accessto five FX Machines that you canactivate separately (stacking in pre-defined series) and edit throughpreset/contextual pop-up menus.
The Pad Machine is a basic sam-ple player preloaded with 20 synthatmos and string keymaps speciallydesigned for layering with piano.Next, the Degrader provides very
deep programmable tools for distorting,bit-crushing, sample rate shaping and oth-erwise decimating of signal.
The Spiritualizer is a modulatable multi-mode filter with potential of cool resonantflanging effect, but it was the Ghost Modebutton that gave me the greatest kick.
Clicking on it deactivates all of the piano’sdry samples, allowing you to play only theresonance samples, resulting in phantom-like orbs and atmospheric sounds. Finally,the Alterizer provides one-click IR bodymorphing (Steinway chimes, anyone?) andTime Traveller, a powerful delay and timemodulation unit.
Producer Uli Baronowsky has done amarvelous job of keeping Galaxy II stream-lined and fast to use. For one, there are noconfusing channel multis to wrap yourhead around in mid-session; the way inter-face is designed, you have access to all thesounds and controls via top-level instru-ment presets.
For example, there are four instrumentfolders: Vienna Grand Imperial, 1929
German Baby Grand, Galaxy SteinwayStereo, and Galaxy Steinway 5.1. Withineach folder are upward of only four instru-ment preset choices. The Vienna GrandImperial, for instance—based on theBösendorfer, which features an extra lowoctave—has been recorded with real unacorda samples (soft pedal). Therefore itoffers the ability to load 88-key and 97-key“basic” versions without soft pedal sam-ples, or an “all samples” version, includingthe synth pads.
In this manner you simply pick a pianomodel of choice—loading all relevant sam-ples into the DFD (Direct From Disk) bufferRAM only once—then edit or switchamong dozens of style or effects presets atthe global level, without the delay ofreloading samples. This is fast and friendly.
The Vienna Grand Imperial samples arepowerful, dark, and full-bodied, thanks tothe 290’s robust soundboard and extendedkeyboard. Just as on the original, wheneverthe damper pedal is depressed, the rest ofthe notes along the keyboard take on afuller, more resonant tone resulting fromthe extended octave vibrating sympatheti-cally.
Though the lower octave was often hid-den under a small hinged lid on the origi-nal, with Vienna Grand they are playable—
although mostly for effect, as they lack amusically pleasant pitch. I found thedynamic range and velocity transitions tosound extremely natural with all threepianos, but the additional microphonesused to capture the lower register of the290 add a lot of energy that if you’re usinga good sub-frequency monitoring set-up.The mid and top registers, though welldefined, aren’t as bright as, say, Synthogy’sIvory Grand. While that suits my taste, ifbrightness is what you want, a twist of theColor knob will give it to you.
The 1929 German Baby Grand offers adistinctly cozier, more vintage sound withan intimate, singing tone. This is due toBlüthner’s addition of a fourth, sympatheticaliquot string to each trichord group in the
VIr e v i e w
Sympathetic string resonance (with real
overtones), adjustable hammer, pedal, damper
and string noises, sostenuto, and redamper
samples have also been captured and
incorporated using custom Kontakt scripting.
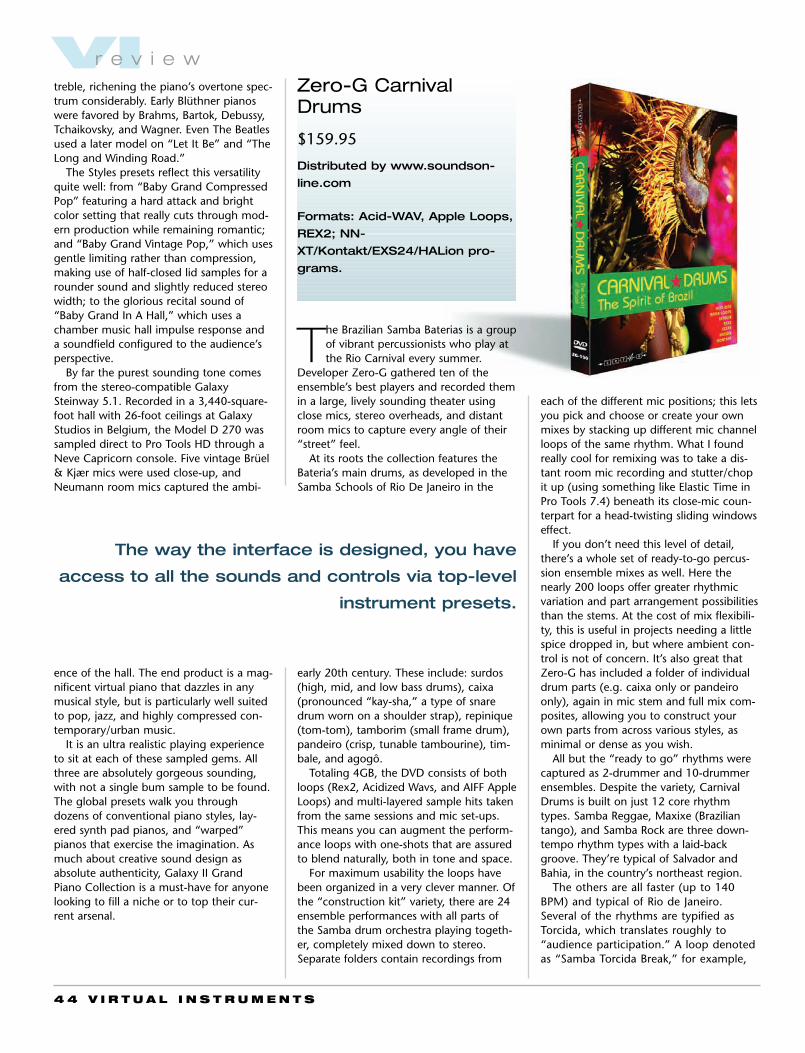
4 4 V I R T U A L I N S T R U M E N T S
treble, richening the piano’s overtone spec-trum considerably. Early Blüthner pianoswere favored by Brahms, Bartok, Debussy,Tchaikovsky, and Wagner. Even The Beatlesused a later model on “Let It Be” and “TheLong and Winding Road.”
The Styles presets reflect this versatilityquite well: from “Baby Grand CompressedPop” featuring a hard attack and brightcolor setting that really cuts through mod-ern production while remaining romantic;and “Baby Grand Vintage Pop,” which usesgentle limiting rather than compression,making use of half-closed lid samples for arounder sound and slightly reduced stereowidth; to the glorious recital sound of“Baby Grand In A Hall,” which uses achamber music hall impulse response anda soundfield configured to the audience’sperspective.
By far the purest sounding tone comesfrom the stereo-compatible GalaxySteinway 5.1. Recorded in a 3,440-square-foot hall with 26-foot ceilings at GalaxyStudios in Belgium, the Model D 270 wassampled direct to Pro Tools HD through aNeve Capricorn console. Five vintage Brüel& Kjær mics were used close-up, andNeumann room mics captured the ambi-
ence of the hall. The end product is a mag-nificent virtual piano that dazzles in anymusical style, but is particularly well suitedto pop, jazz, and highly compressed con-temporary/urban music.
It is an ultra realistic playing experienceto sit at each of these sampled gems. Allthree are absolutely gorgeous sounding,with not a single bum sample to be found.The global presets walk you throughdozens of conventional piano styles, lay-ered synth pad pianos, and “warped”pianos that exercise the imagination. Asmuch about creative sound design asabsolute authenticity, Galaxy II GrandPiano Collection is a must-have for anyonelooking to fill a niche or to top their cur-rent arsenal.
Zero-G CarnivalDrums
$159.95
Distributed by www.soundson-
line.com
Formats: Acid-WAV, Apple Loops,
REX2; NN-
XT/Kontakt/EXS24/HALion pro-
grams.
The Brazilian Samba Baterias is a groupof vibrant percussionists who play atthe Rio Carnival every summer.
Developer Zero-G gathered ten of theensemble’s best players and recorded themin a large, lively sounding theater usingclose mics, stereo overheads, and distantroom mics to capture every angle of their“street” feel.
At its roots the collection features theBateria’s main drums, as developed in theSamba Schools of Rio De Janeiro in the
early 20th century. These include: surdos(high, mid, and low bass drums), caixa(pronounced “kay-sha,” a type of snaredrum worn on a shoulder strap), repinique(tom-tom), tamborim (small frame drum),pandeiro (crisp, tunable tambourine), tim-bale, and agogô.
Totaling 4GB, the DVD consists of bothloops (Rex2, Acidized Wavs, and AIFF AppleLoops) and multi-layered sample hits takenfrom the same sessions and mic set-ups.This means you can augment the perform-ance loops with one-shots that are assuredto blend naturally, both in tone and space.
For maximum usability the loops havebeen organized in a very clever manner. Ofthe “construction kit” variety, there are 24ensemble performances with all parts ofthe Samba drum orchestra playing togeth-er, completely mixed down to stereo.Separate folders contain recordings from
each of the different mic positions; this letsyou pick and choose or create your ownmixes by stacking up different mic channelloops of the same rhythm. What I foundreally cool for remixing was to take a dis-tant room mic recording and stutter/chopit up (using something like Elastic Time inPro Tools 7.4) beneath its close-mic coun-terpart for a head-twisting sliding windowseffect.
If you don’t need this level of detail,there’s a whole set of ready-to-go percus-sion ensemble mixes as well. Here thenearly 200 loops offer greater rhythmicvariation and part arrangement possibilitiesthan the stems. At the cost of mix flexibili-ty, this is useful in projects needing a littlespice dropped in, but where ambient con-trol is not of concern. It’s also great thatZero-G has included a folder of individualdrum parts (e.g. caixa only or pandeiroonly), again in mic stem and full mix com-posites, allowing you to construct yourown parts from across various styles, asminimal or dense as you wish.
All but the “ready to go” rhythms werecaptured as 2-drummer and 10-drummerensembles. Despite the variety, CarnivalDrums is built on just 12 core rhythmtypes. Samba Reggae, Maxixe (Braziliantango), and Samba Rock are three down-tempo rhythm types with a laid-backgroove. They’re typical of Salvador andBahia, in the country’s northeast region.
The others are all faster (up to 140BPM) and typical of Rio de Janeiro.Several of the rhythms are typified asTorcida, which translates roughly to“audience participation.” A loop denotedas “Samba Torcida Break,” for example,
VIr e v i e w
The way the interface is designed, you have
access to all the sounds and controls via top-level
instrument presets.

V I R T U A L I N S T R U M E N T S 4 5
would be the moment in the carnival thatthe rhythm breaks down and draws theaudience to cheer and clap along. Theirsound is amazingly powerful and exhila-rating, to say the least.
The overhead mic tracks extract spa-ciousness and enormous energy frominstruments such as the Surdo dePrimeira—the largest of the bass drums,the basis of the samba rhythm and primarybeat the listener concentrates on. But if awide soundstage is what you’re after,boosting the room track recordings canadd a reverb-like dimension the will shakeany lazy spirits loose.
Mixing in the close-mic channels bringsyour ear closer to the intimacy of handdrumming and reveals just how crisp andaccurate the attack transients are in thislibrary. Conversely, the wall of shufflingwhite noise that a handful of caixa loops
can set up is downright invigorating.Keeping polyrhythms moving, the timbal
tracks are vibrant and provide deeper,more forceful thuds than your typicalconga line. Played with the hand ratherthan sticks, the pandeiro has a deep chant-like rattling sound that melds extremelywell with punch and shape offered by uni-son tamborim loops.
Provided in Reason NN-XT, Kontakt,EXS24 and KALion formats, there are acouple of bonus percussion kit programs toload into your sampler: “Samba Big” and“Samba Dry.” The former has ten drum-mers on every hit, while the latter has onlytwo.
Not being of the samba school, I neverwould have thought to include both 10-and 2-drummer versions of all the loopsand hits, though it’s amazing how realisticalternating between the two variations cansound. And because each of the ten drum-mers plays in unison, mixing loops with,say, 15 different drum parts can have thesonic force of 150 carnival drummers.That’s a street party!
Vir2 InstrumentssyntAX$199.95
www.vir2.com
Format: Native Instrument
Kontakt Player 2, stand-alone and
plug-in works in all Mac and
Windows formats (AU, VST, RTAS,
DXi).
There’s certainly no shortage of do-it-all sample playback instruments onthe market, but syntAX falls interest-
ingly askew of the curve. Featuring custom
time-base morphing tools, this instrumentdoes cover the standard areas: basses,leads, strings, pads, drums, etc. However,its sounds are 100% synthetic or electroni-cally sourced.
Running under a Native InstrumentsKontakt Player 2, the 3.6 GB collection wasconceived and produced by Sigmund
Droid of harcore Bunker 8 Digital Labsfame. Subjectively, the tone is a little dark,quite twisted, and often filled with angst.
Over 2000 complex synthesis patches arespread across a wide variety of folders. Thefolders are given unique names, but as withother instruments containing scads of syn-thetic sounds, it’s hard to distinguishbetween “Pads,” “Atmospheres,” “Phat andFiltered,” “Textures,” and so on; you justhave to browse and identify sounds you like.
In a word, Droid’s programming skillsare amazing. Unless you pay special atten-tion while the sample files of each presetload, you’d never know that the mountainof patches is actually based on a muchmore limited sample pool. TheSyntOrchestra folder, for example, drawsfrom the same dozen or so keymaps to fuelwell over 120 programs.
Here you have a full assortment oforchestral string- and brass-type programs,each with a distinctly synthy feel. You’llfind everything from slow and resonantcello-like swells, haunting solo and ensem-ble violins, powerful trumpet and majesticflugelhorns to clear staccatos and spikyplucks.
As an indication of the level of diversity,there’s even a modern sounding Mellotron-esque string section, complete with faux
take-up on release; and a wonderful wood-wind lead patch that mimics “A ThousandMoogs,” each with their square oscillatorsdetuned slightly. Gorgeous stuff. Otherfolders include perky sounding attack tran-sients intended for arpeggiator use, tonaland sub-basses, harsh mechanical and elec-tro distortions, leads, FX and hits, blips andmore.
But it’s that hodge-podge of unusualtextures and atmospheres that will keep
I never would have thought to include both 10- and
2-drummer versions of all the loops and hits,
though it's amazing how realistic alternating
between the two variations can sound.
In a word, Droid's programing skills are amazing.
You'd never know that the mountain of patches is
actually based on a much more limited sample
pool.
VIr e v i e w
you auditioning sounds for hours on end.On one program, you listen as chips ofanalog and digital color toss and tumblelike an aural kaleidoscope. Another pro-gram revisits the early 80s with pseudo-Fairlight glassy textures that feature sharpharmonics and brittle pressure modulation.
Thick Solina soundscapes bring Jean
Michel Jarre compositions right into 2008,while ghostly voices that sound as thoughthey’re emanating from a 1930s radio willget your spook on. Are you looking for hol-low pads, vacuous space-sucks, sparklinginterplanetary transmissions, trashed circuits,steaming bogs of mysterious rising vapor,extra-terrestrial garden insects, or hundredsof ethereal, more euphoric textures?
The crazy thing is that because the sam-
ple set has been purpose-built to soundhybrid for flexibility’s sake, nearly all of thecool motion and timbral characteristicsthat make these presets stand out are pro-gramed at the patch level. This allows, forexample, a simple synth string keymap tosound like a razor sharp skate blade etch-ing pirouettes on a sheet of ice in slow
motion. While the KP2 interface doesn’tallow for digging in and editing any ofthese advanced parameters, users of theKontakt 2 or 3 full version can load syntAXinstruments and combinations with fulltweaking privileges.
However, syntAX does provide two verycool custom effects engines. Collectivelyreferred to as scatterFX, they can functionindependently or in unison to provide real-
VIr e v i e wtime manipulation and sound morphingcontrols. The first component is the scatFXengine, which generates a type of rhyth-mic stutter from a pattern graph. You havecontrol over the stutter interval (fromwhole note to 64th triplet) as well as therelease or duration of each bar in thegraph. A gate knob determines, by per-centage, the overall depth of the stuttereffect—between maximum volume andsilence. The second component is thestepFX engine, an advanced pattern-basedmodulator that lets you apply melodies orarpeggiations of up to 64 steps. Bothengines lock to tempo and can be con-trolled by external controllers.
The scatterFX are far more than icing onthe syntAX cake. They can become as inte-gral to the synth’s identity as vector pathsand sequence lists were to the KorgWavestation. If sound design is your game,and you prefer inspiration handed to youon a silver platter, syntAX delivers all thesound of complex synthesis with very littleeffort. VI
Thick Solina soundscapes bring Jean Michel Jarre
compositions right into 2008, while ghostly voices
that sound as though they're emanating from a
1930s radio will get your spook on.
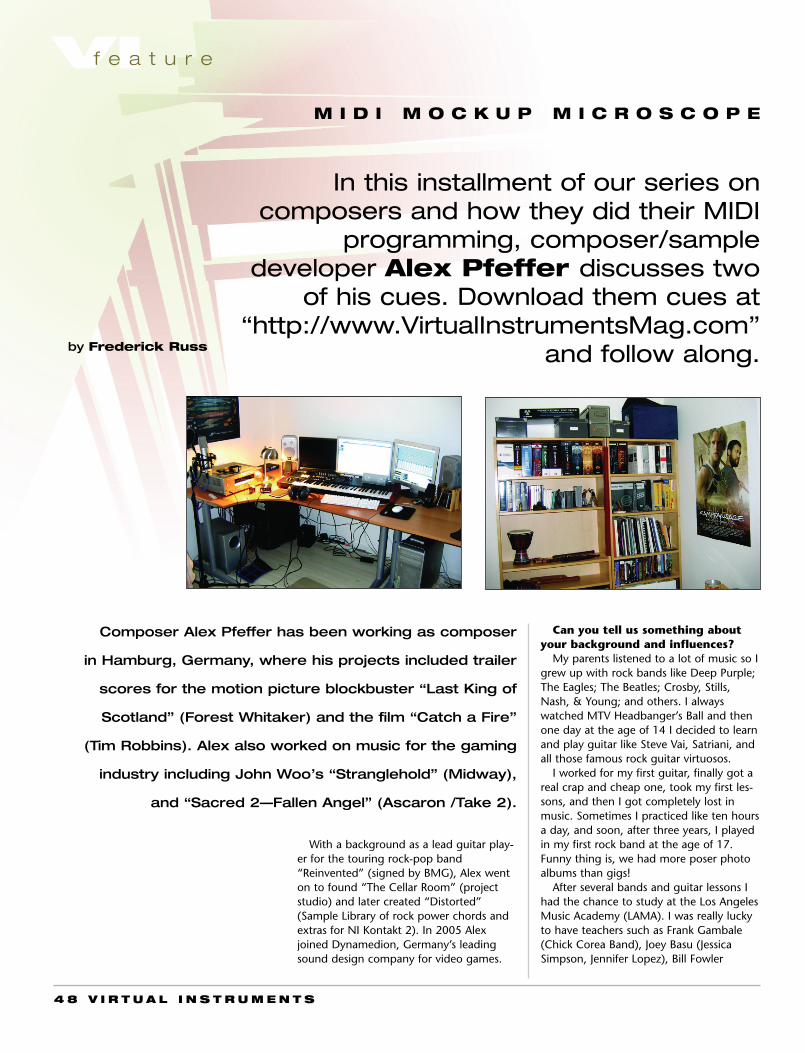
VIf e a t u r e
by Frederick Russ
4 8 V I R T U A L I N S T R U M E N T S
M I D I M O C K U P M I C R O S C O P E
With a background as a lead guitar play-er for the touring rock-pop band“Reinvented” (signed by BMG), Alex wenton to found “The Cellar Room” (projectstudio) and later created “Distorted”(Sample Library of rock power chords andextras for NI Kontakt 2). In 2005 Alexjoined Dynamedion, Germany’s leadingsound design company for video games.
In this installment of our series on composers and how they did their MIDI
programming, composer/sample developer Alex Pfeffer discusses two
of his cues. Download them cues at“http://www.VirtualInstrumentsMag.com”
and follow along.
Composer Alex Pfeffer has been working as composer
in Hamburg, Germany, where his projects included trailer
scores for the motion picture blockbuster “Last King of
Scotland” (Forest Whitaker) and the film “Catch a Fire”
(Tim Robbins). Alex also worked on music for the gaming
industry including John Woo’s “Stranglehold” (Midway),
and “Sacred 2—Fallen Angel” (Ascaron /Take 2).
Can you tell us something aboutyour background and influences?
My parents listened to a lot of music so Igrew up with rock bands like Deep Purple;The Eagles; The Beatles; Crosby, Stills,Nash, & Young; and others. I alwayswatched MTV Headbanger’s Ball and thenone day at the age of 14 I decided to learnand play guitar like Steve Vai, Satriani, andall those famous rock guitar virtuosos.
I worked for my first guitar, finally got areal crap and cheap one, took my first les-sons, and then I got completely lost inmusic. Sometimes I practiced like ten hoursa day, and soon, after three years, I playedin my first rock band at the age of 17.Funny thing is, we had more poser photoalbums than gigs!
After several bands and guitar lessons Ihad the chance to study at the Los AngelesMusic Academy (LAMA). I was really luckyto have teachers such as Frank Gambale(Chick Corea Band), Joey Basu (JessicaSimpson, Jennifer Lopez), Bill Fowler
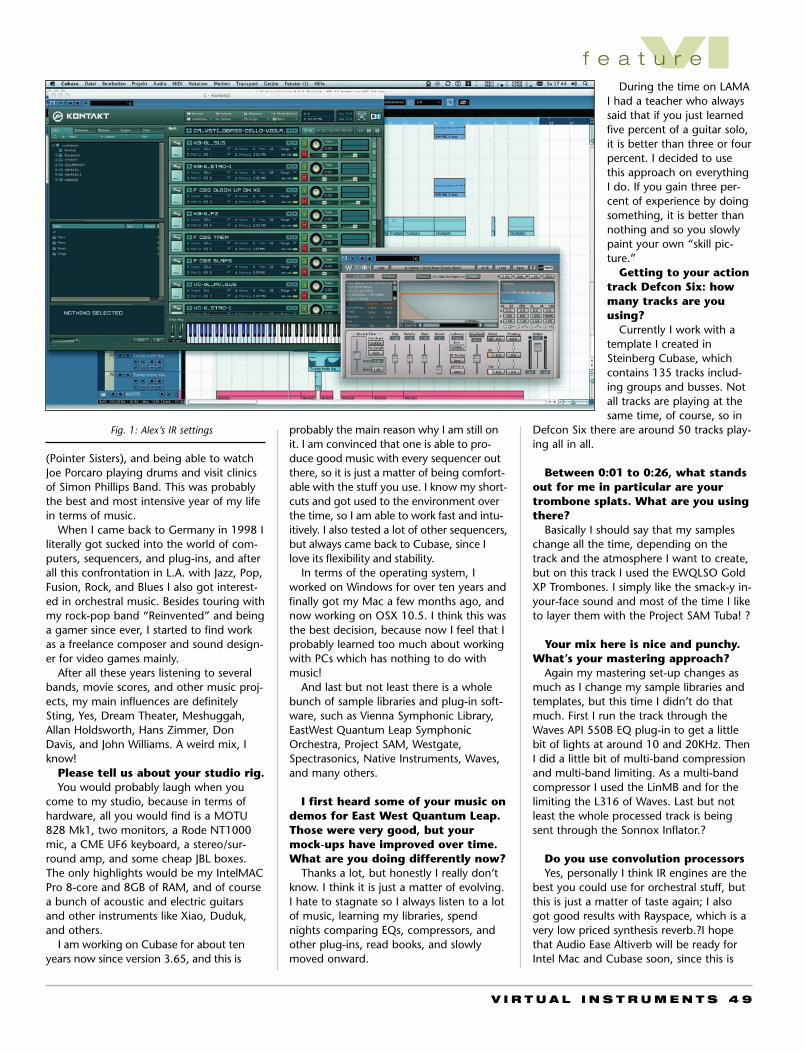
V I R T U A L I N S T R U M E N T S 4 9
(Pointer Sisters), and being able to watchJoe Porcaro playing drums and visit clinicsof Simon Phillips Band. This was probablythe best and most intensive year of my lifein terms of music.
When I came back to Germany in 1998 Iliterally got sucked into the world of com-puters, sequencers, and plug-ins, and afterall this confrontation in L.A. with Jazz, Pop,Fusion, Rock, and Blues I also got interest-ed in orchestral music. Besides touring withmy rock-pop band “Reinvented” and beinga gamer since ever, I started to find workas a freelance composer and sound design-er for video games mainly.
After all these years listening to severalbands, movie scores, and other music proj-ects, my main influences are definitelySting, Yes, Dream Theater, Meshuggah,Allan Holdsworth, Hans Zimmer, DonDavis, and John Williams. A weird mix, Iknow!
Please tell us about your studio rig.You would probably laugh when you
come to my studio, because in terms ofhardware, all you would find is a MOTU828 Mk1, two monitors, a Rode NT1000mic, a CME UF6 keyboard, a stereo/sur-round amp, and some cheap JBL boxes.The only highlights would be my IntelMACPro 8-core and 8GB of RAM, and of coursea bunch of acoustic and electric guitarsand other instruments like Xiao, Duduk,and others.
I am working on Cubase for about tenyears now since version 3.65, and this is
probably the main reason why I am still onit. I am convinced that one is able to pro-duce good music with every sequencer outthere, so it is just a matter of being comfort-able with the stuff you use. I know my short-cuts and got used to the environment overthe time, so I am able to work fast and intu-itively. I also tested a lot of other sequencers,but always came back to Cubase, since Ilove its flexibility and stability.
In terms of the operating system, Iworked on Windows for over ten years andfinally got my Mac a few months ago, andnow working on OSX 10.5. I think this wasthe best decision, because now I feel that Iprobably learned too much about workingwith PCs which has nothing to do withmusic!
And last but not least there is a wholebunch of sample libraries and plug-in soft-ware, such as Vienna Symphonic Library,EastWest Quantum Leap SymphonicOrchestra, Project SAM, Westgate,Spectrasonics, Native Instruments, Waves,and many others.
I first heard some of your music ondemos for East West Quantum Leap.Those were very good, but yourmock-ups have improved over time.What are you doing differently now?
Thanks a lot, but honestly I really don’tknow. I think it is just a matter of evolving.I hate to stagnate so I always listen to a lotof music, learning my libraries, spendnights comparing EQs, compressors, andother plug-ins, read books, and slowlymoved onward.
During the time on LAMAI had a teacher who alwayssaid that if you just learnedfive percent of a guitar solo,it is better than three or fourpercent. I decided to usethis approach on everythingI do. If you gain three per-cent of experience by doingsomething, it is better thannothing and so you slowlypaint your own “skill pic-ture.”
Getting to your actiontrack Defcon Six: howmany tracks are youusing?
Currently I work with atemplate I created inSteinberg Cubase, whichcontains 135 tracks includ-ing groups and busses. Notall tracks are playing at thesame time, of course, so in
Defcon Six there are around 50 tracks play-ing all in all.
Between 0:01 to 0:26, what standsout for me in particular are yourtrombone splats. What are you usingthere?
Basically I should say that my sampleschange all the time, depending on thetrack and the atmosphere I want to create,but on this track I used the EWQLSO GoldXP Trombones. I simply like the smack-y in-your-face sound and most of the time I liketo layer them with the Project SAM Tuba! ?
Your mix here is nice and punchy.What’s your mastering approach?
Again my mastering set-up changes asmuch as I change my sample libraries andtemplates, but this time I didn’t do thatmuch. First I run the track through theWaves API 550B EQ plug-in to get a littlebit of lights at around 10 and 20KHz. ThenI did a little bit of multi-band compressionand multi-band limiting. As a multi-bandcompressor I used the LinMB and for thelimiting the L316 of Waves. Last but notleast the whole processed track is beingsent through the Sonnox Inflator.?
Do you use convolution processorsYes, personally I think IR engines are the
best you could use for orchestral stuff, butthis is just a matter of taste again; I alsogot good results with Rayspace, which is avery low priced synthesis reverb.?I hopethat Audio Ease Altiverb will be ready forIntel Mac and Cubase soon, since this is
VIf e a t u r e
Fig. 1: Alex’s IR settings

5 0 V I R T U A L I N S T R U M E N T S
my main reverb plug-in. Currently I use theIR1 of Waves, which also has a lot of awe-some IRs and adjustments. I end up layer-ing quite a few reverb instances for eachsection. Just loading up a room or a halldoesn’t do it for me.?
Between 0:27 and 0:45 seconds in:cool progressions and set-up for thenext part. What’s happening here??
Key-wise, for this part we move from eminor to an f# minor “something” to bringup a little bit of tension. I write “some-thing” because it isn’t just plain, melodic,or harmonic minor, but basically minor andincluding a lot of chromatic and dim 5ths.
To be honest, most of the time I go byear. Of course I am familiar with lots of har-mony and theory, but sometimes I don’tlike to stay in the “cage of theoretic laws,”which means moving in a certain progres-sion or staying in one key (of course itdepends on the project you are workingon).
Personally I think someone should learntheory and harmony so that your mindand your ears finally completely adaptwhat you have learned. Like driving a car—you don’t tell yourself to hit the brake inorder to driver slower, you just do it.
In terms of rhythm I like to use severalpatterns to create a whole rhythmic motifinstead of just using plain 3/4 or 4/4. Onthis track I did 9/4, 4/4, 12/4. Not tosound complicated or important, but I feltthe motif needed it. I think the most natu-ral is (of course it again depends on thejob you do) to always use measures to cre-
ate patterns or rhythmic motifs—not createmusic that has to fit in, e.g. 4/4.
Another very important thing is to pre-pare the following part. Sometimes youhear pieces that simply consist of a part A,B, and C. Then the tune goes from A to B,back to A and C twice. I prefer to put ele-ments of the upcoming part into the previ-ous one. So you get prepared for whatcomes along. By doing this you can “con-nect” nearly every part.?
Between 0:46 and 1:04 secs: thetrumpets sound great. Your writingis very good here. Which library?
I used the EWQLSO XP 2 trumpet patch-es on this one. Also I recognized that I getbetter results by layering the staccato withthe repetition patches. It gives a more nat-ural feeling…at least I think it does!
At 1:05 to 1:13, nice string figurehere. What violins are you using??
These are simply the VSL violin runs. Iuse them in a specific way in order to cre-ate live-ish parts. A little trick is to do awide overlap when going from one to thenext MIDI event. By doing this it doesn’tsound just like samples.?
Between 1:14 to 1:33, great end-
VIf e a t u r eFig. 2: Potpourri of Alex’s favorite plug-ins. Alex
is also a beta tester for Waves.
Fig. 3: Steinberg CuBase mixer—heavy VSLContrabass EQ cut settings using Waves Q10based on SvK’s EQ settings from VI-Control.net.
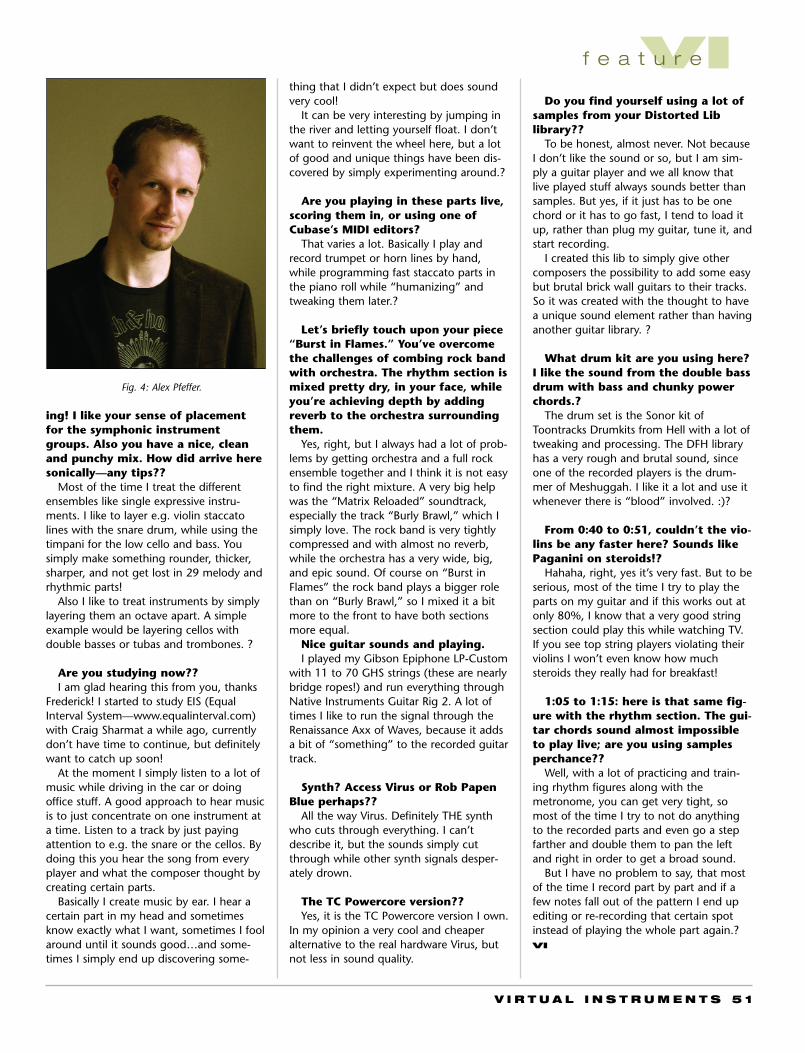
V I R T U A L I N S T R U M E N T S 5 1
ing! I like your sense of placementfor the symphonic instrumentgroups. Also you have a nice, cleanand punchy mix. How did arrive heresonically—any tips??
Most of the time I treat the differentensembles like single expressive instru-ments. I like to layer e.g. violin staccatolines with the snare drum, while using thetimpani for the low cello and bass. Yousimply make something rounder, thicker,sharper, and not get lost in 29 melody andrhythmic parts!
Also I like to treat instruments by simplylayering them an octave apart. A simpleexample would be layering cellos withdouble basses or tubas and trombones. ?
Are you studying now??I am glad hearing this from you, thanks
Frederick! I started to study EIS (EqualInterval System—www.equalinterval.com)with Craig Sharmat a while ago, currentlydon’t have time to continue, but definitelywant to catch up soon!
At the moment I simply listen to a lot ofmusic while driving in the car or doingoffice stuff. A good approach to hear musicis to just concentrate on one instrument ata time. Listen to a track by just payingattention to e.g. the snare or the cellos. Bydoing this you hear the song from everyplayer and what the composer thought bycreating certain parts.
Basically I create music by ear. I hear acertain part in my head and sometimesknow exactly what I want, sometimes I foolaround until it sounds good…and some-times I simply end up discovering some-
thing that I didn’t expect but does soundvery cool!
It can be very interesting by jumping inthe river and letting yourself float. I don’twant to reinvent the wheel here, but a lotof good and unique things have been dis-covered by simply experimenting around.?
Are you playing in these parts live,scoring them in, or using one ofCubase’s MIDI editors?
That varies a lot. Basically I play andrecord trumpet or horn lines by hand,while programming fast staccato parts inthe piano roll while “humanizing” andtweaking them later.?
Let’s briefly touch upon your piece“Burst in Flames.” You’ve overcomethe challenges of combing rock bandwith orchestra. The rhythm section ismixed pretty dry, in your face, whileyou’re achieving depth by addingreverb to the orchestra surroundingthem.
Yes, right, but I always had a lot of prob-lems by getting orchestra and a full rockensemble together and I think it is not easyto find the right mixture. A very big helpwas the “Matrix Reloaded” soundtrack,especially the track “Burly Brawl,” which Isimply love. The rock band is very tightlycompressed and with almost no reverb,while the orchestra has a very wide, big,and epic sound. Of course on “Burst inFlames” the rock band plays a bigger rolethan on “Burly Brawl,” so I mixed it a bitmore to the front to have both sectionsmore equal.
Nice guitar sounds and playing.I played my Gibson Epiphone LP-Custom
with 11 to 70 GHS strings (these are nearlybridge ropes!) and run everything throughNative Instruments Guitar Rig 2. A lot oftimes I like to run the signal through theRenaissance Axx of Waves, because it addsa bit of “something” to the recorded guitartrack.
Synth? Access Virus or Rob PapenBlue perhaps??
All the way Virus. Definitely THE synthwho cuts through everything. I can’tdescribe it, but the sounds simply cutthrough while other synth signals desper-ately drown.
The TC Powercore version??Yes, it is the TC Powercore version I own.
In my opinion a very cool and cheaperalternative to the real hardware Virus, butnot less in sound quality.
Do you find yourself using a lot ofsamples from your Distorted Liblibrary??
To be honest, almost never. Not becauseI don’t like the sound or so, but I am sim-ply a guitar player and we all know thatlive played stuff always sounds better thansamples. But yes, if it just has to be onechord or it has to go fast, I tend to load itup, rather than plug my guitar, tune it, andstart recording.
I created this lib to simply give othercomposers the possibility to add some easybut brutal brick wall guitars to their tracks.So it was created with the thought to havea unique sound element rather than havinganother guitar library. ?
What drum kit are you using here?I like the sound from the double bassdrum with bass and chunky powerchords.?
The drum set is the Sonor kit ofToontracks Drumkits from Hell with a lot oftweaking and processing. The DFH libraryhas a very rough and brutal sound, sinceone of the recorded players is the drum-mer of Meshuggah. I like it a lot and use itwhenever there is “blood” involved. :)?
From 0:40 to 0:51, couldn’t the vio-lins be any faster here? Sounds likePaganini on steroids!?
Hahaha, right, yes it’s very fast. But to beserious, most of the time I try to play theparts on my guitar and if this works out atonly 80%, I know that a very good stringsection could play this while watching TV.If you see top string players violating theirviolins I won’t even know how muchsteroids they really had for breakfast!
1:05 to 1:15: here is that same fig-ure with the rhythm section. The gui-tar chords sound almost impossibleto play live; are you using samplesperchance??
Well, with a lot of practicing and train-ing rhythm figures along with themetronome, you can get very tight, somost of the time I try to not do anythingto the recorded parts and even go a stepfarther and double them to pan the leftand right in order to get a broad sound.
But I have no problem to say, that mostof the time I record part by part and if afew notes fall out of the pattern I end upediting or re-recording that certain spotinstead of playing the whole part again.?VI
VIf e a t u r e
Fig. 4: Alex Pfeffer.
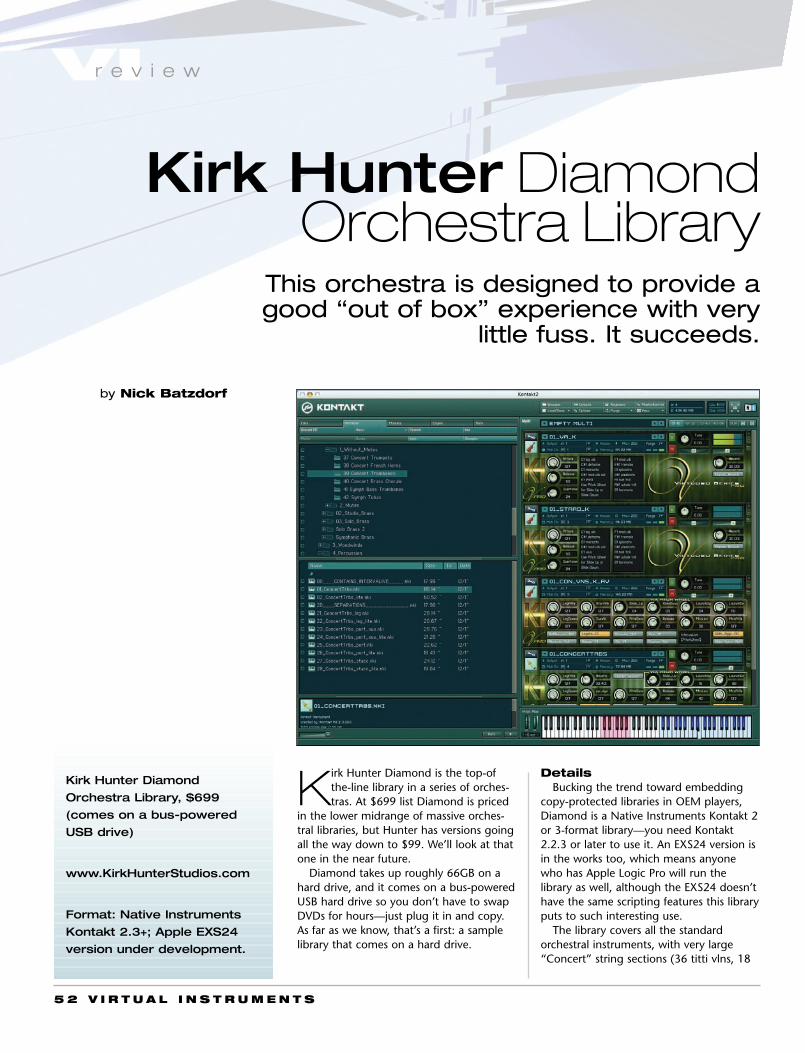
5 2 V I R T U A L I N S T R U M E N T S
Kirk Hunter Diamond is the top-ofthe-line library in a series of orches-tras. At $699 list Diamond is priced
in the lower midrange of massive orches-tral libraries, but Hunter has versions goingall the way down to $99. We’ll look at thatone in the near future.
Diamond takes up roughly 66GB on ahard drive, and it comes on a bus-poweredUSB hard drive so you don’t have to swapDVDs for hours—just plug it in and copy.As far as we know, that’s a first: a samplelibrary that comes on a hard drive.
DetailsBucking the trend toward embedding
copy-protected libraries in OEM players,Diamond is a Native Instruments Kontakt 2or 3-format library—you need Kontakt2.2.3 or later to use it. An EXS24 version isin the works too, which means anyonewho has Apple Logic Pro will run thelibrary as well, although the EXS24 doesn’thave the same scripting features this libraryputs to such interesting use.
The library covers all the standardorchestral instruments, with very large“Concert” string sections (36 titti vlns, 18
VIr e v i e w
Kirk Hunter Diamond
Orchestra Library, $699
(comes on a bus-powered
USB drive)
www.KirkHunterStudios.com
Format: Native Instruments
Kontakt 2.3+; Apple EXS24
version under development.
Kirk Hunter DiamondOrchestra Library
This orchestra is designed to provide agood “out of box” experience with very
little fuss. It succeeds.
by Nick Batzdorf
V I R T U A L I N S T R U M E N T S 5 3
first vlns, 8 2nds, 10 vlas, 9 vlcs, 6 CB),large “Symphonic” strings (24 tutti, 10 firstvlns, 10 2nds, 16 vlas, 12 vls, 6 CBs),smaller “Studio” string sections (9-9-6-5-3), and both chamber and solo strings.
Similarly, the brass is available in Concertensembles (4 trumpets, horns, and trom-bones; 3 bass trombones; and 2 tubas;),Symphonic ensembles (6 tpts, 6 hns, 5 trbs,3 bass trbs, and 2 tubas), and also Studiobrass; two each trumpets, horns, and tenortrombones, and tuba; and solo instruments.
Both muted and unmuted versions of thestrings and brass are included.
The winds—including alto flute and con-trabassoon—are available in solos and/orduets. Finally, there’s orchestral percussion,celesta, harpsichord, and a piano.
The library uses a consistent set ofkeyswitches across all the instrument fami-lies, and it relies extensively on program-ming. If you load the full-on Concert cellosection, for example, you’ll find keyswitch-es for velocity-sensitive marcato, marcato,legato, adagio, detaché, sforzando, pizz,trills, tremolo, and more. If you load thefull violin 1 section, you’ll find the samekeyswitched articulations available as forthe cellos. A similar scheme is availableacross the whole library.
As far as computer impact, Diamond isequivalent to any modern streaming sam-ple library. The full solo viola program, forexample, uses about 96MB of memory atthe default Kontakt streaming settings.
You can also load lighter versions of allthe instruments, and individual articula-tions are available. Finally, there are ensem-ble programs—all the strings on one key-board, for example. Rather than havingyou load up all the instruments and use uplots of polyphony for these programs,there are sets of “Bonus” programs madeup of combined sections that have beenmerged into one set of samples.
Diamond has an interesting program-ming feature called IntervaLive™ that’sused for connected notes. Raising or lower-ing the pitch wheel triggers manufacturedrelease samples that bend up or down tolead into the target note. This takes a littlepractice, but it’s not too difficult. Used full-bore, the effect is almost portmento; used
more subtly it just adds a realistic transitionbetween two notes. The farther you movethe pitch wheel, the louder the transitioneffect. You can also dial the amount ofbend up or down using onscreen controls.
Another programming feature inDiamond is the gradual pitch correction(which they call Human Pitch Correction).The notes start a little out and then gradu-ally adjust, simulating what real players do.You can control the amount of this effect—a good thing, because the default setting
can be a little too much in some cases(solo violin for example); turning it downadds a lot of realism.
Playing itKirk Hunter touts the out-of-the-box
playability of his libraries, and indeed that’sdefinitely their strength. You don’t have tolearn a lot of articulations and figure outwhich ones to load—at the top of the listunder every category is a big enchiladaprogram with all of the articulations.
Then the keyswitches are all labeled veryclearly on the Kontakt 2 (or 3) interface; ifyou want to tweak the attacks, basic con-trols are provided. The mod wheel alwayscontrols volume, unless it’s set up to con-trol vibrato; between that, velocity, and the
pitch wheel-controlled transitions, this is avery playable orchestra. It auto-alternatesbetween samples without user interven-tion.
Obviously, this kind of (relative) simplici-ty means that you don’t have the samekinds of specialized articulation choices asin the mega orchestral libraries, but thenDiamond isn’t priced at the same leveleither. However, you do have a lot of stringsection choices, and the included articula-tions can do pretty much everything you’d
need them to, in fact the articulations tendto cover a lot of ground; I found myselfkeyswitching less than I’m accustomed todoing in other libraries.
SoundNow we get to the subjective part of this
review. In general I like that this librarydoesn’t sound artificially clean—an effectthat Hunter has cultivated very carefully.Even the included custom convolutionimpulses add an intangible and really nice“grit” to the sound.
Frankly, I was very pleasantly surprisedby Diamond’s overall sound. The transi-tions between sample layers are smooth,and it’s been programmed and mapped tothe keyboard very well.
If I had to pick highlights, I’d start withthe solo strings. That takes nothing awayfrom the ensemble strings, which don’tsound synthy even at the top of the violins,but I found the violin and cello especiallyhighly addictive.
The brass and woodwinds are just fine,recorded in a way that makes them workwell for ensemble writing. I’d have to saythat the percussion and harp aren’t consis-tently sampled at the same level of detailas the strings, but they’re okay for basicparts. However, there are some standoutshere too. The muted glock program isexcellent, for example, and it’s not an easyinstrument to record well at all.
ThusThis is an easy, good-sounding orchestra
that would work very well as an onlyorchestra library or as an additional one to
layer with others. It has some effective pro-gramming features, it’s—especially whenyou factor in the USB drive it comes on—priced fairly…and it has solo violin andcello programs to die for. Check out thedemos. VI
As far as we know, that's a first: a sample library
that comes on a hard drive.
IntervaLive™: raising or lowering the pitch wheel
triggers manufactured release samples that bend
up or down to lead into the target note.
VIr e v i e w
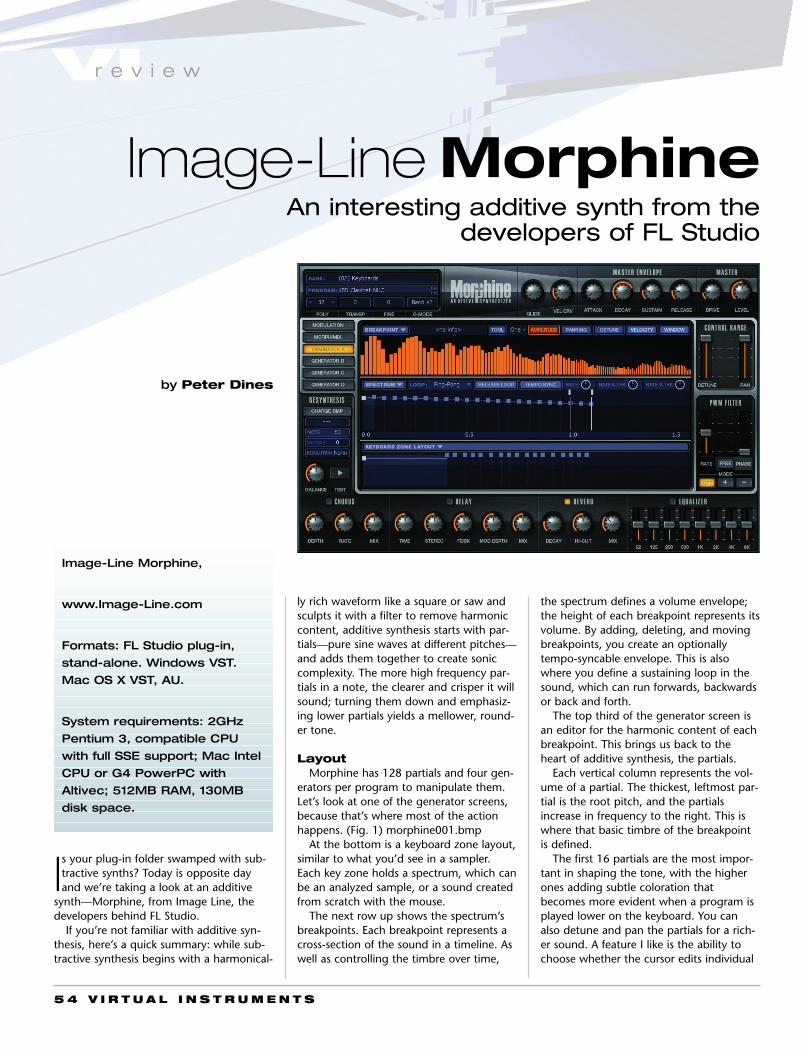
5 4 V I R T U A L I N S T R U M E N T S
VIr e v i e w
Image-Line Morphine,
www.Image-Line.com
Formats: FL Studio plug-in,
stand-alone. Windows VST.
Mac OS X VST, AU.
System requirements: 2GHz
Pentium 3, compatible CPU
with full SSE support; Mac Intel
CPU or G4 PowerPC with
Altivec; 512MB RAM, 130MB
disk space.
Is your plug-in folder swamped with sub-tractive synths? Today is opposite dayand we’re taking a look at an additive
synth—Morphine, from Image Line, thedevelopers behind FL Studio.
If you’re not familiar with additive syn-thesis, here’s a quick summary: while sub-tractive synthesis begins with a harmonical-
the spectrum defines a volume envelope;the height of each breakpoint represents itsvolume. By adding, deleting, and movingbreakpoints, you create an optionallytempo-syncable envelope. This is alsowhere you define a sustaining loop in thesound, which can run forwards, backwardsor back and forth.
The top third of the generator screen isan editor for the harmonic content of eachbreakpoint. This brings us back to theheart of additive synthesis, the partials.
Each vertical column represents the vol-ume of a partial. The thickest, leftmost par-tial is the root pitch, and the partialsincrease in frequency to the right. This iswhere that basic timbre of the breakpointis defined.
The first 16 partials are the most impor-tant in shaping the tone, with the higherones adding subtle coloration thatbecomes more evident when a program isplayed lower on the keyboard. You canalso detune and pan the partials for a rich-er sound. A feature I like is the ability tochoose whether the cursor edits individual
Image-Line MorphineAn interesting additive synth from the
developers of FL Studio
by Peter Dines
ly rich waveform like a square or saw andsculpts it with a filter to remove harmoniccontent, additive synthesis starts with par-tials—pure sine waves at different pitches—and adds them together to create soniccomplexity. The more high frequency par-tials in a note, the clearer and crisper it willsound; turning them down and emphasiz-ing lower partials yields a mellower, round-er tone.
LayoutMorphine has 128 partials and four gen-
erators per program to manipulate them.Let’s look at one of the generator screens,because that’s where most of the actionhappens. (Fig. 1) morphine001.bmp
At the bottom is a keyboard zone layout,similar to what you’d see in a sampler.Each key zone holds a spectrum, which canbe an analyzed sample, or a sound createdfrom scratch with the mouse.
The next row up shows the spectrum’sbreakpoints. Each breakpoint represents across-section of the sound in a timeline. Aswell as controlling the timbre over time,
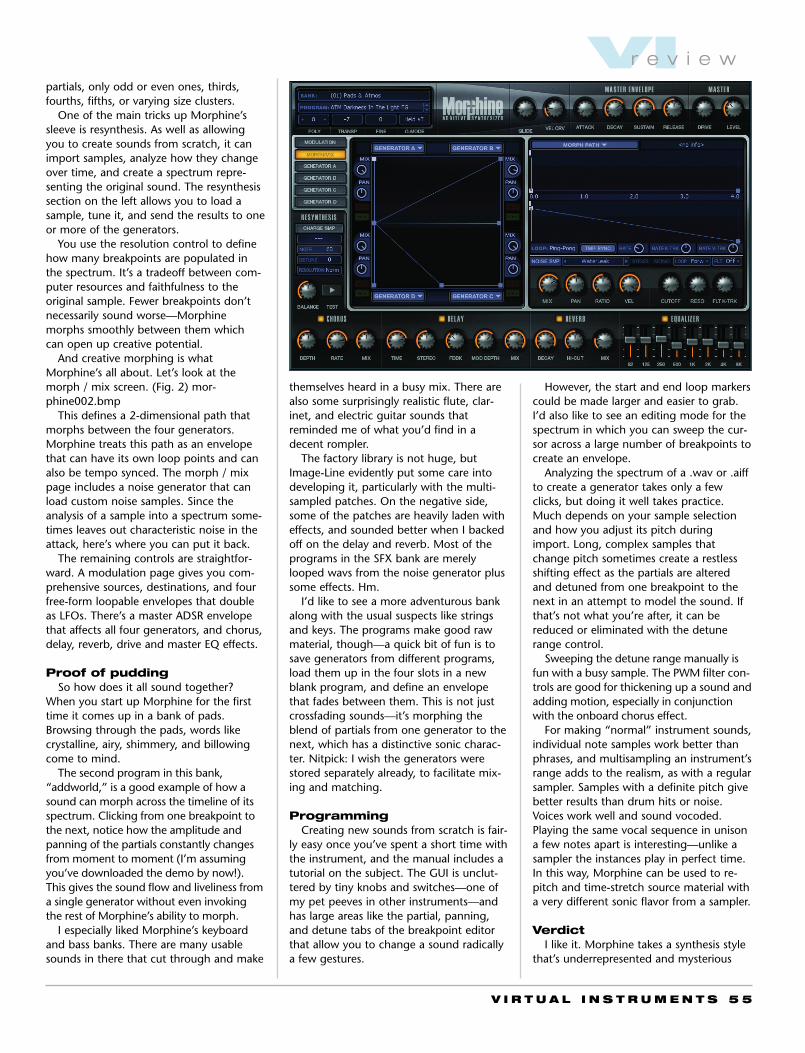
V I R T U A L I N S T R U M E N T S 5 5
VIr e v i e wpartials, only odd or even ones, thirds,fourths, fifths, or varying size clusters.
One of the main tricks up Morphine’ssleeve is resynthesis. As well as allowingyou to create sounds from scratch, it canimport samples, analyze how they changeover time, and create a spectrum repre-senting the original sound. The resynthesissection on the left allows you to load asample, tune it, and send the results to oneor more of the generators.
You use the resolution control to definehow many breakpoints are populated inthe spectrum. It’s a tradeoff between com-puter resources and faithfulness to theoriginal sample. Fewer breakpoints don’tnecessarily sound worse—Morphinemorphs smoothly between them whichcan open up creative potential.
And creative morphing is whatMorphine’s all about. Let’s look at themorph / mix screen. (Fig. 2) mor-phine002.bmp
This defines a 2-dimensional path thatmorphs between the four generators.Morphine treats this path as an envelopethat can have its own loop points and canalso be tempo synced. The morph / mixpage includes a noise generator that canload custom noise samples. Since theanalysis of a sample into a spectrum some-times leaves out characteristic noise in theattack, here’s where you can put it back.
The remaining controls are straightfor-ward. A modulation page gives you com-prehensive sources, destinations, and fourfree-form loopable envelopes that doubleas LFOs. There’s a master ADSR envelopethat affects all four generators, and chorus,delay, reverb, drive and master EQ effects.
Proof of puddingSo how does it all sound together?
When you start up Morphine for the firsttime it comes up in a bank of pads.Browsing through the pads, words likecrystalline, airy, shimmery, and billowingcome to mind.
The second program in this bank,“addworld,” is a good example of how asound can morph across the timeline of itsspectrum. Clicking from one breakpoint tothe next, notice how the amplitude andpanning of the partials constantly changesfrom moment to moment (I’m assumingyou’ve downloaded the demo by now!).This gives the sound flow and liveliness froma single generator without even invokingthe rest of Morphine’s ability to morph.
I especially liked Morphine’s keyboardand bass banks. There are many usablesounds in there that cut through and make
themselves heard in a busy mix. There arealso some surprisingly realistic flute, clar-inet, and electric guitar sounds thatreminded me of what you’d find in adecent rompler.
The factory library is not huge, butImage-Line evidently put some care intodeveloping it, particularly with the multi-sampled patches. On the negative side,some of the patches are heavily laden witheffects, and sounded better when I backedoff on the delay and reverb. Most of theprograms in the SFX bank are merelylooped wavs from the noise generator plussome effects. Hm.
I’d like to see a more adventurous bankalong with the usual suspects like stringsand keys. The programs make good rawmaterial, though—a quick bit of fun is tosave generators from different programs,load them up in the four slots in a newblank program, and define an envelopethat fades between them. This is not justcrossfading sounds—it’s morphing theblend of partials from one generator to thenext, which has a distinctive sonic charac-ter. Nitpick: I wish the generators werestored separately already, to facilitate mix-ing and matching.
ProgrammingCreating new sounds from scratch is fair-
ly easy once you’ve spent a short time withthe instrument, and the manual includes atutorial on the subject. The GUI is unclut-tered by tiny knobs and switches—one ofmy pet peeves in other instruments—andhas large areas like the partial, panning,and detune tabs of the breakpoint editorthat allow you to change a sound radicallya few gestures.
However, the start and end loop markerscould be made larger and easier to grab.I’d also like to see an editing mode for thespectrum in which you can sweep the cur-sor across a large number of breakpoints tocreate an envelope.
Analyzing the spectrum of a .wav or .aiffto create a generator takes only a fewclicks, but doing it well takes practice.Much depends on your sample selectionand how you adjust its pitch duringimport. Long, complex samples thatchange pitch sometimes create a restlessshifting effect as the partials are alteredand detuned from one breakpoint to thenext in an attempt to model the sound. Ifthat’s not what you’re after, it can bereduced or eliminated with the detunerange control.
Sweeping the detune range manually isfun with a busy sample. The PWM filter con-trols are good for thickening up a sound andadding motion, especially in conjunctionwith the onboard chorus effect.
For making “normal” instrument sounds,individual note samples work better thanphrases, and multisampling an instrument’srange adds to the realism, as with a regularsampler. Samples with a definite pitch givebetter results than drum hits or noise.Voices work well and sound vocoded.Playing the same vocal sequence in unisona few notes apart is interesting—unlike asampler the instances play in perfect time.In this way, Morphine can be used to re-pitch and time-stretch source material witha very different sonic flavor from a sampler.
VerdictI like it. Morphine takes a synthesis style
that’s underrepresented and mysterious
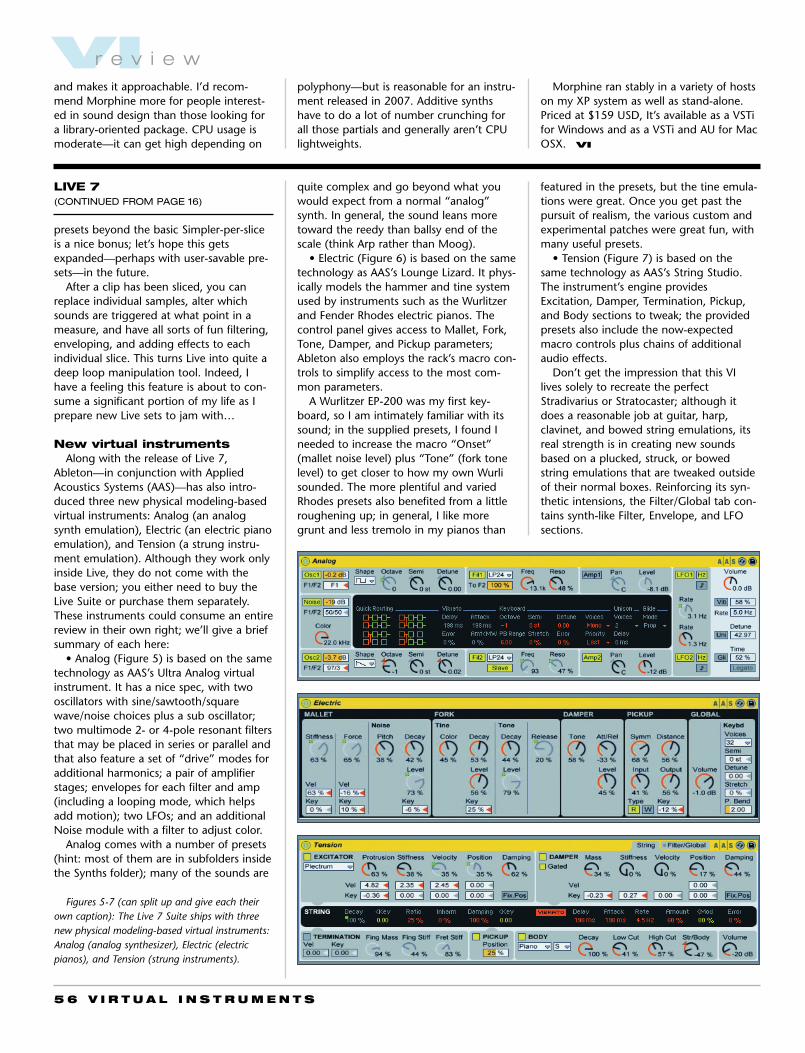
5 6 V I R T U A L I N S T R U M E N T S
and makes it approachable. I’d recom-mend Morphine more for people interest-ed in sound design than those looking fora library-oriented package. CPU usage ismoderate—it can get high depending on
presets beyond the basic Simpler-per-sliceis a nice bonus; let’s hope this getsexpanded—perhaps with user-savable pre-sets—in the future.
After a clip has been sliced, you canreplace individual samples, alter whichsounds are triggered at what point in ameasure, and have all sorts of fun filtering,enveloping, and adding effects to eachindividual slice. This turns Live into quite adeep loop manipulation tool. Indeed, Ihave a feeling this feature is about to con-sume a significant portion of my life as Iprepare new Live sets to jam with…
New virtual instrumentsAlong with the release of Live 7,
Ableton—in conjunction with AppliedAcoustics Systems (AAS)—has also intro-duced three new physical modeling-basedvirtual instruments: Analog (an analogsynth emulation), Electric (an electric pianoemulation), and Tension (a strung instru-ment emulation). Although they work onlyinside Live, they do not come with thebase version; you either need to buy theLive Suite or purchase them separately.These instruments could consume an entirereview in their own right; we’ll give a briefsummary of each here:
• Analog (Figure 5) is based on the sametechnology as AAS’s Ultra Analog virtualinstrument. It has a nice spec, with twooscillators with sine/sawtooth/squarewave/noise choices plus a sub oscillator;two multimode 2- or 4-pole resonant filtersthat may be placed in series or parallel andthat also feature a set of “drive” modes foradditional harmonics; a pair of amplifierstages; envelopes for each filter and amp(including a looping mode, which helpsadd motion); two LFOs; and an additionalNoise module with a filter to adjust color.
Analog comes with a number of presets(hint: most of them are in subfolders insidethe Synths folder); many of the sounds are
quite complex and go beyond what youwould expect from a normal “analog”synth. In general, the sound leans moretoward the reedy than ballsy end of thescale (think Arp rather than Moog).
• Electric (Figure 6) is based on the sametechnology as AAS’s Lounge Lizard. It phys-ically models the hammer and tine systemused by instruments such as the Wurlitzerand Fender Rhodes electric pianos. Thecontrol panel gives access to Mallet, Fork,Tone, Damper, and Pickup parameters;Ableton also employs the rack’s macro con-trols to simplify access to the most com-mon parameters.
A Wurlitzer EP-200 was my first key-board, so I am intimately familiar with itssound; in the supplied presets, I found Ineeded to increase the macro “Onset”(mallet noise level) plus “Tone” (fork tonelevel) to get closer to how my own Wurlisounded. The more plentiful and variedRhodes presets also benefited from a littleroughening up; in general, I like moregrunt and less tremolo in my pianos than
VIr e v i e w
featured in the presets, but the tine emula-tions were great. Once you get past thepursuit of realism, the various custom andexperimental patches were great fun, withmany useful presets.
• Tension (Figure 7) is based on thesame technology as AAS’s String Studio.The instrument’s engine providesExcitation, Damper, Termination, Pickup,and Body sections to tweak; the providedpresets also include the now-expectedmacro controls plus chains of additionalaudio effects.
Don’t get the impression that this VIlives solely to recreate the perfectStradivarius or Stratocaster; although itdoes a reasonable job at guitar, harp,clavinet, and bowed string emulations, itsreal strength is in creating new soundsbased on a plucked, struck, or bowedstring emulations that are tweaked outsideof their normal boxes. Reinforcing its syn-thetic intensions, the Filter/Global tab con-tains synth-like Filter, Envelope, and LFOsections.
polyphony—but is reasonable for an instru-ment released in 2007. Additive synthshave to do a lot of number crunching forall those partials and generally aren’t CPUlightweights.
Morphine ran stably in a variety of hostson my XP system as well as stand-alone.Priced at $159 USD, It’s available as a VSTifor Windows and as a VSTi and AU for MacOSX. VI
LIVE 7(CONTINUED FROM PAGE 16)
Figures 5-7 (can split up and give each theirown caption): The Live 7 Suite ships with threenew physical modeling-based virtual instruments:Analog (analog synthesizer), Electric (electricpianos), and Tension (strung instruments).
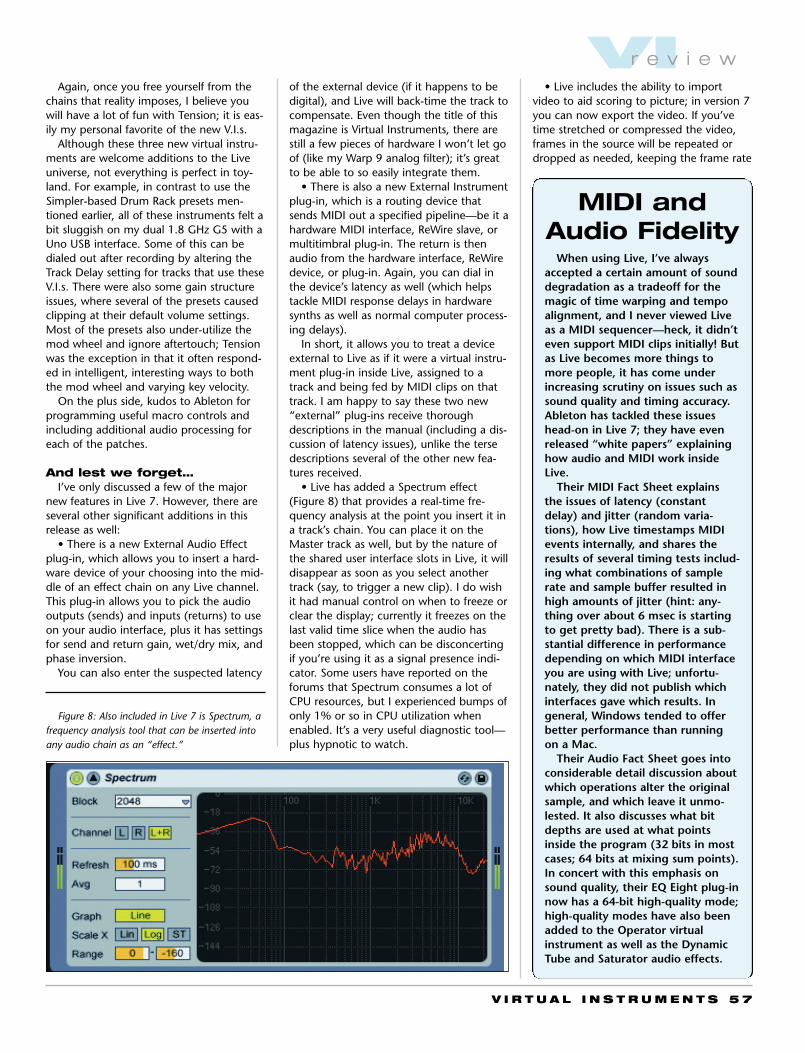
V I R T U A L I N S T R U M E N T S 5 7
Again, once you free yourself from thechains that reality imposes, I believe youwill have a lot of fun with Tension; it is eas-ily my personal favorite of the new V.I.s.
Although these three new virtual instru-ments are welcome additions to the Liveuniverse, not everything is perfect in toy-land. For example, in contrast to use theSimpler-based Drum Rack presets men-tioned earlier, all of these instruments felt abit sluggish on my dual 1.8 GHz G5 with aUno USB interface. Some of this can bedialed out after recording by altering theTrack Delay setting for tracks that use theseV.I.s. There were also some gain structureissues, where several of the presets causedclipping at their default volume settings.Most of the presets also under-utilize themod wheel and ignore aftertouch; Tensionwas the exception in that it often respond-ed in intelligent, interesting ways to boththe mod wheel and varying key velocity.
On the plus side, kudos to Ableton forprogramming useful macro controls andincluding additional audio processing foreach of the patches.
And lest we forget…I’ve only discussed a few of the major
new features in Live 7. However, there areseveral other significant additions in thisrelease as well:
• There is a new External Audio Effectplug-in, which allows you to insert a hard-ware device of your choosing into the mid-dle of an effect chain on any Live channel.This plug-in allows you to pick the audiooutputs (sends) and inputs (returns) to useon your audio interface, plus it has settingsfor send and return gain, wet/dry mix, andphase inversion.
You can also enter the suspected latency
of the external device (if it happens to bedigital), and Live will back-time the track tocompensate. Even though the title of thismagazine is Virtual Instruments, there arestill a few pieces of hardware I won’t let goof (like my Warp 9 analog filter); it’s greatto be able to so easily integrate them.
• There is also a new External Instrumentplug-in, which is a routing device thatsends MIDI out a specified pipeline—be it ahardware MIDI interface, ReWire slave, ormultitimbral plug-in. The return is thenaudio from the hardware interface, ReWiredevice, or plug-in. Again, you can dial inthe device’s latency as well (which helpstackle MIDI response delays in hardwaresynths as well as normal computer process-ing delays).
In short, it allows you to treat a deviceexternal to Live as if it were a virtual instru-ment plug-in inside Live, assigned to atrack and being fed by MIDI clips on thattrack. I am happy to say these two new“external” plug-ins receive thoroughdescriptions in the manual (including a dis-cussion of latency issues), unlike the tersedescriptions several of the other new fea-tures received.
• Live has added a Spectrum effect(Figure 8) that provides a real-time fre-quency analysis at the point you insert it ina track’s chain. You can place it on theMaster track as well, but by the nature ofthe shared user interface slots in Live, it willdisappear as soon as you select anothertrack (say, to trigger a new clip). I do wishit had manual control on when to freeze orclear the display; currently it freezes on thelast valid time slice when the audio hasbeen stopped, which can be disconcertingif you’re using it as a signal presence indi-cator. Some users have reported on theforums that Spectrum consumes a lot ofCPU resources, but I experienced bumps ofonly 1% or so in CPU utilization whenenabled. It’s a very useful diagnostic tool—plus hypnotic to watch.
When using Live, I’ve alwaysaccepted a certain amount of sounddegradation as a tradeoff for themagic of time warping and tempoalignment, and I never viewed Liveas a MIDI sequencer—heck, it didn’teven support MIDI clips initially! Butas Live becomes more things tomore people, it has come underincreasing scrutiny on issues such assound quality and timing accuracy.Ableton has tackled these issueshead-on in Live 7; they have evenreleased “white papers” explaininghow audio and MIDI work insideLive.
Their MIDI Fact Sheet explainsthe issues of latency (constantdelay) and jitter (random varia-tions), how Live timestamps MIDIevents internally, and shares theresults of several timing tests includ-ing what combinations of samplerate and sample buffer resulted inhigh amounts of jitter (hint: any-thing over about 6 msec is startingto get pretty bad). There is a sub-stantial difference in performancedepending on which MIDI interfaceyou are using with Live; unfortu-nately, they did not publish whichinterfaces gave which results. Ingeneral, Windows tended to offerbetter performance than runningon a Mac.
Their Audio Fact Sheet goes intoconsiderable detail discussion aboutwhich operations alter the originalsample, and which leave it unmo-lested. It also discusses what bitdepths are used at what pointsinside the program (32 bits in mostcases; 64 bits at mixing sum points).In concert with this emphasis onsound quality, their EQ Eight plug-innow has a 64-bit high-quality mode;high-quality modes have also beenadded to the Operator virtualinstrument as well as the DynamicTube and Saturator audio effects.
MIDI andAudio Fidelity
• Live includes the ability to importvideo to aid scoring to picture; in version 7you can now export the video. If you’vetime stretched or compressed the video,frames in the source will be repeated ordropped as needed, keeping the frame rate
Figure 8: Also included in Live 7 is Spectrum, afrequency analysis tool that can be inserted intoany audio chain as an “effect.”
VIr e v i e w
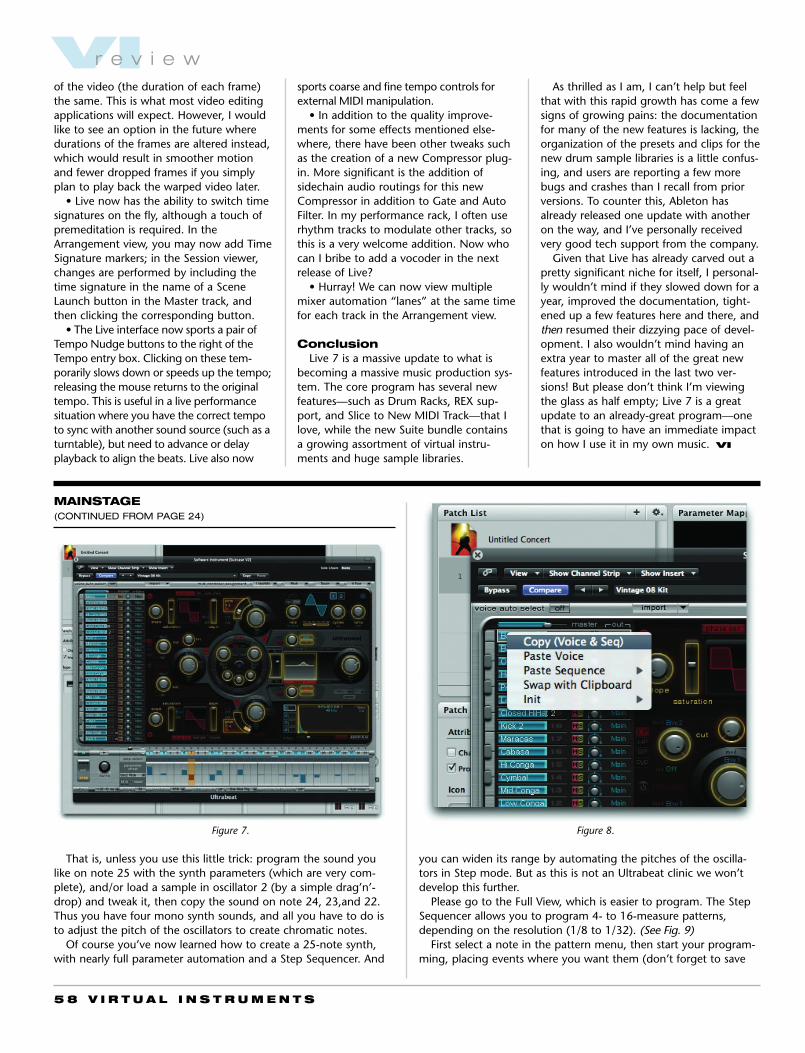
5 8 V I R T U A L I N S T R U M E N T S
MAINSTAGE(CONTINUED FROM PAGE 24)
That is, unless you use this little trick: program the sound youlike on note 25 with the synth parameters (which are very com-plete), and/or load a sample in oscillator 2 (by a simple drag’n’-drop) and tweak it, then copy the sound on note 24, 23,and 22.Thus you have four mono synth sounds, and all you have to do isto adjust the pitch of the oscillators to create chromatic notes.
Of course you’ve now learned how to create a 25-note synth,with nearly full parameter automation and a Step Sequencer. And
Figure 7. Figure 8.
of the video (the duration of each frame)the same. This is what most video editingapplications will expect. However, I wouldlike to see an option in the future wheredurations of the frames are altered instead,which would result in smoother motionand fewer dropped frames if you simplyplan to play back the warped video later.
• Live now has the ability to switch timesignatures on the fly, although a touch ofpremeditation is required. In theArrangement view, you may now add TimeSignature markers; in the Session viewer,changes are performed by including thetime signature in the name of a SceneLaunch button in the Master track, andthen clicking the corresponding button.
• The Live interface now sports a pair ofTempo Nudge buttons to the right of theTempo entry box. Clicking on these tem-porarily slows down or speeds up the tempo;releasing the mouse returns to the originaltempo. This is useful in a live performancesituation where you have the correct tempoto sync with another sound source (such as aturntable), but need to advance or delayplayback to align the beats. Live also now
sports coarse and fine tempo controls forexternal MIDI manipulation.
• In addition to the quality improve-ments for some effects mentioned else-where, there have been other tweaks suchas the creation of a new Compressor plug-in. More significant is the addition ofsidechain audio routings for this newCompressor in addition to Gate and AutoFilter. In my performance rack, I often userhythm tracks to modulate other tracks, sothis is a very welcome addition. Now whocan I bribe to add a vocoder in the nextrelease of Live?
• Hurray! We can now view multiplemixer automation “lanes” at the same timefor each track in the Arrangement view.
ConclusionLive 7 is a massive update to what is
becoming a massive music production sys-tem. The core program has several newfeatures—such as Drum Racks, REX sup-port, and Slice to New MIDI Track—that Ilove, while the new Suite bundle containsa growing assortment of virtual instru-ments and huge sample libraries.
As thrilled as I am, I can’t help but feelthat with this rapid growth has come a fewsigns of growing pains: the documentationfor many of the new features is lacking, theorganization of the presets and clips for thenew drum sample libraries is a little confus-ing, and users are reporting a few morebugs and crashes than I recall from priorversions. To counter this, Ableton hasalready released one update with anotheron the way, and I’ve personally receivedvery good tech support from the company.
Given that Live has already carved out apretty significant niche for itself, I personal-ly wouldn’t mind if they slowed down for ayear, improved the documentation, tight-ened up a few features here and there, andthen resumed their dizzying pace of devel-opment. I also wouldn’t mind having anextra year to master all of the great newfeatures introduced in the last two ver-sions! But please don’t think I’m viewingthe glass as half empty; Live 7 is a greatupdate to an already-great program—onethat is going to have an immediate impacton how I use it in my own music. VI
VIr e v i e w
you can widen its range by automating the pitches of the oscilla-tors in Step mode. But as this is not an Ultrabeat clinic we won’tdevelop this further.
Please go to the Full View, which is easier to program. The StepSequencer allows you to program 4- to 16-measure patterns,depending on the resolution (1/8 to 1/32). (See Fig. 9)
First select a note in the pattern menu, then start your program-ming, placing events where you want them (don’t forget to save

V I R T U A L I N S T R U M E N T S 5 9
VI
other shwag also available.
www.VirtualInstrumentsMag.com/shwag
1-877/VImagzn
Shwag?
Are you in the mood for some
VI Mag Organic Cotton Tee
$23.79VI Mag Large Mug
$16.79
VI Mag Cap
$18.19
VI Mag 2.25" Button (10 pack)
$14.00 VI Mag Messenger Bag
$26.59
VI Mag Women's Light T-Shirt
$20.99
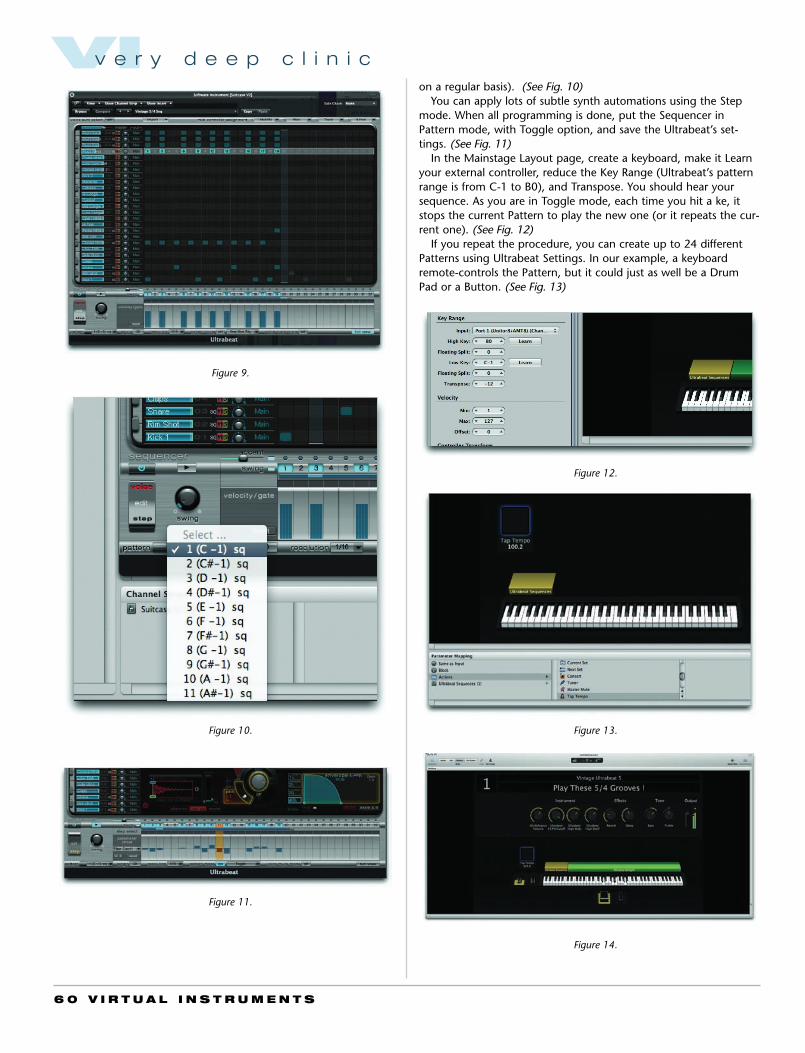
6 0 V I R T U A L I N S T R U M E N T S
on a regular basis). (See Fig. 10)You can apply lots of subtle synth automations using the Step
mode. When all programming is done, put the Sequencer inPattern mode, with Toggle option, and save the Ultrabeat’s set-tings. (See Fig. 11)
In the Mainstage Layout page, create a keyboard, make it Learnyour external controller, reduce the Key Range (Ultrabeat’s patternrange is from C-1 to B0), and Transpose. You should hear yoursequence. As you are in Toggle mode, each time you hit a ke, itstops the current Pattern to play the new one (or it repeats the cur-rent one). (See Fig. 12)
If you repeat the procedure, you can create up to 24 differentPatterns using Ultrabeat Settings. In our example, a keyboardremote-controls the Pattern, but it could just as well be a DrumPad or a Button. (See Fig. 13)
Figure 9.
Figure 10.
Figure 11.
Figure 12.
Figure 13.
Figure 14.
VIv e r y d e e p c l i n i c

VIfocus
A programthat gives yougolden ears.
wwwKIQproductions.com
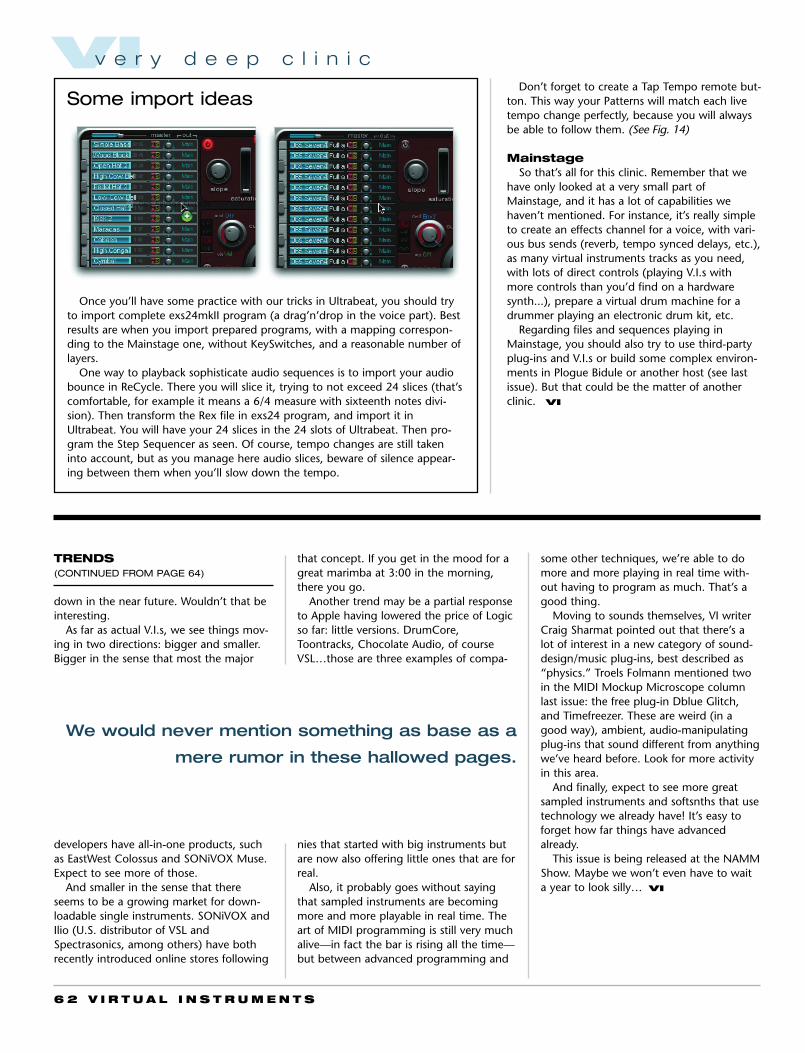
6 2 V I R T U A L I N S T R U M E N T S
down in the near future. Wouldn’t that beinteresting.
As far as actual V.I.s, we see things mov-ing in two directions: bigger and smaller.Bigger in the sense that most the major
developers have all-in-one products, suchas EastWest Colossus and SONiVOX Muse.Expect to see more of those.
And smaller in the sense that thereseems to be a growing market for down-loadable single instruments. SONiVOX andIlio (U.S. distributor of VSL andSpectrasonics, among others) have bothrecently introduced online stores following
that concept. If you get in the mood for agreat marimba at 3:00 in the morning,there you go.
Another trend may be a partial responseto Apple having lowered the price of Logicso far: little versions. DrumCore,Toontracks, Chocolate Audio, of courseVSL…those are three examples of compa-
nies that started with big instruments butare now also offering little ones that are forreal.
Also, it probably goes without sayingthat sampled instruments are becomingmore and more playable in real time. Theart of MIDI programming is still very muchalive—in fact the bar is rising all the time—but between advanced programming and
TRENDS(CONTINUED FROM PAGE 64)
some other techniques, we’re able to domore and more playing in real time with-out having to program as much. That’s agood thing.
Moving to sounds themselves, VI writerCraig Sharmat pointed out that there’s alot of interest in a new category of sound-design/music plug-ins, best described as“physics.” Troels Folmann mentioned twoin the MIDI Mockup Microscope columnlast issue: the free plug-in Dblue Glitch,and Timefreezer. These are weird (in agood way), ambient, audio-manipulatingplug-ins that sound different from anythingwe’ve heard before. Look for more activityin this area.
And finally, expect to see more greatsampled instruments and softsnths that usetechnology we already have! It’s easy toforget how far things have advancedalready.
This issue is being released at the NAMMShow. Maybe we won’t even have to waita year to look silly… VI
Some import ideas
Once you’ll have some practice with our tricks in Ultrabeat, you should tryto import complete exs24mkII program (a drag’n’drop in the voice part). Bestresults are when you import prepared programs, with a mapping correspon-ding to the Mainstage one, without KeySwitches, and a reasonable number oflayers.
One way to playback sophisticate audio sequences is to import your audiobounce in ReCycle. There you will slice it, trying to not exceed 24 slices (that’scomfortable, for example it means a 6/4 measure with sixteenth notes divi-sion). Then transform the Rex file in exs24 program, and import it inUltrabeat. You will have your 24 slices in the 24 slots of Ultrabeat. Then pro-gram the Step Sequencer as seen. Of course, tempo changes are still takeninto account, but as you manage here audio slices, beware of silence appear-ing between them when you’ll slow down the tempo.
Don’t forget to create a Tap Tempo remote but-ton. This way your Patterns will match each livetempo change perfectly, because you will alwaysbe able to follow them. (See Fig. 14)
MainstageSo that’s all for this clinic. Remember that we
have only looked at a very small part ofMainstage, and it has a lot of capabilities wehaven’t mentioned. For instance, it’s really simpleto create an effects channel for a voice, with vari-ous bus sends (reverb, tempo synced delays, etc.),as many virtual instruments tracks as you need,with lots of direct controls (playing V.I.s withmore controls than you’d find on a hardwaresynth...), prepare a virtual drum machine for adrummer playing an electronic drum kit, etc.
Regarding files and sequences playing inMainstage, you should also try to use third-partyplug-ins and V.I.s or build some complex environ-ments in Plogue Bidule or another host (see lastissue). But that could be the matter of anotherclinic. VI
We would never mention something as base as a
mere rumor in these hallowed pages.
VIv e r y d e e p c l i n i c
V I R T U A L I N S T R U M E N T S 6 3
Are you missing any of these?V.I. back issues: $5 each + $5 shipping/handling for the order (regardless of howmany). Premier issue: $20 + $5 s/h. International shipping/handling by quote.
www.VirtualInstrumentsMag.com,1-877-ViMagzn
6 4 V I R T U A L I N S T R U M E N T S
The first thing to look for concerns sam-pling. You know how we’re constantlygoing on about how we really need muchmore RAM access in order to be able toload large, streaming sample libraries andhave them cued up to play? Well, thatproblem is finally disappearing, as we men-tioned in the last issue. 64-bit memoryaccess is eliminating the issue; so farEastWest, VSL, and Apple have releasedsample players that can access all thememory you have installed in a machine,and others will almost certainly follow.
But this year we may see another wayaround the problem: static RAM. StaticRAM is the type you find in memory cardsand USB memory sticks. It delivers dataalmost as fast as standard memory; what ifyou could use it in place of a hard drive? Ifyou could use it for storing sample stream-ing libraries, our samplers wouldn’t have touse nearly as large a RAM buffer, whichmeans far less memory access would berequired.
So far USB memory sticks have been waytoo small for that; 4GB is a waste of timewhen you’re looking at a 50GB samplelibrary. But if we could afford to stick acouple or few 32GB ones on our machines,then we’d be talking.
Sony already has laptops that use staticRAM in place of hard drives, and they’rejust “on”—there’s no start-up time. Rumorsabound about static RAM-based Appleproducts about to be introduced as well.While we would never mention somethingas base as a mere rumor in these hallowedpages, it does seem reasonable to expectlarge static RAM “drives” to come way
VI t r e n d s
Predictions
(CONTINUED ON PAGE 62)
Has VI finally lost it? Making predic-tions about our industry rightbefore the Winter NAMM Show?
The answer is probably yes, but we don’tmind looking silly.
Since we discussed 2007 in our lastissue, it’s only fitting that we take a lookforward. We’ll read at this column a yearfrom now and either pat ourselves on theback or else have a good laugh at our-selves.
What to watch for this yearby Nick Batzdorf