virtuoso vial identification system user guide · virtuoso vial identification system user guide...
TRANSCRIPT

Virtuoso Vial Identification SystemUser Guide
XX20933-E 02/14S Revision A July 2014

© 2014 Thermo Fisher Scientific Inc. All rights reserved.
Virtuoso is a trademark, and Thermo Scientific is a registered trademark of Thermo Fisher Scientific Inc. in the United States.
The following are registered trademarks in the United States and other countries: Microsoft and Windows are registered trademarks of Microsoft Corporation.
The following are registered trademarks in the United States and possibly other countries: Bluetooth is a registered trademark of Bluetooth SIG, Inc. Liquinox is a registered trademark of Alconox, Inc.
All other trademarks are the property of Thermo Fisher Scientific Inc. and its subsidiaries.
Thermo Fisher Scientific Inc. provides this document to its customers with a product purchase to use in the product operation. This document is copyright protected and any reproduction of the whole or any part of this document is strictly prohibited, except with the written authorization of Thermo Fisher Scientific Inc.
The contents of this document are subject to change without notice. All technical information in this document is for reference purposes only. System configurations and specifications in this document supersede all previous information received by the purchaser.
This document is not part of any sales contract between Thermo Fisher Scientific Inc. and a purchaser. This document shall in no way govern or modify any Terms and Conditions of Sale, which Terms and Conditions of Sale shall govern all conflicting information between the two documents.
Release history: Revision A, July 2014
Touch-screen software version: 1.01 and later
For Research Use Only. Not for use in diagnostic procedures.
Regulatory Compliance
Thermo Fisher Scientific performs complete testing and evaluation of its products to ensure full compliance with applicable domestic and international regulations. When the system is delivered to you, it meets all pertinent electromagnetic compatibility (EMC) and safety standards as described in the next section or sections by product name.
Changes that you make to your system may void compliance with one or more of these EMC and safety standards. Changes to your system include replacing a part or adding components, options, or peripherals not specifically authorized and qualified by Thermo Fisher Scientific. To ensure continued compliance with EMC and safety standards, replacement parts and additional components, options, and peripherals must be ordered from Thermo Fisher Scientific or one of its authorized representatives.
EMC Directive 2004/108/EC
EMC compliance has been evaluated by Intertek Testing and Certification Ltd. (United Kingdom).
Low Voltage Safety Compliance
This device complies with Low Voltage Directive 2006/95/EC and harmonized standard IEC 61010-1:2010 (3rd Edition).
EN 55011:2009, A1: 2010 EN 61000-4-5: 2006
EN 61000-3-2: 2006, A2: 2009 EN 61000-4-6: 2009
EN 61000-3-3: 2008 EN 61000-4-8: 2010
EN 61000-4-2: 2009 EN 61000-4-11: 2004
EN 61000-4-3: 2006, A1: 2008, A2: 2010 IEC 61326-1: 2012
EN 61000-4-4: 2004, A1: 2010 CFR 47, FCC Part 15, Subpart B, Class A: 2009

FCC Compliance Statement
Notice on the Proper Use ofThermo Scientific Instruments
In compliance with international regulations: This instrument must be used in the manner specified by Thermo Fisher Scientific to ensure protections provided by the instrument are not impaired. Deviations from specified instructions on the proper use of the instrument include changes to the system and part replacement. Accordingly, order replacement parts from Thermo Fisher Scientific or one of its authorized representatives.
THIS DEVICE COMPLIES WITH PART 15 OF THE FCC RULES. OPERATION IS SUBJECT TO THE FOLLOWING TWO CONDITIONS: (1) THIS DEVICE MAY NOT CAUSE HARMFUL INTERFERENCE, AND (2) THIS DEVICE MUST ACCEPT ANY INTERFERENCE RECEIVED, INCLUDING INTERFERENCE THAT MAY CAUSE UNDESIRED OPERATION.
CAUTION Read and understand the various precautionary notes, signs, and symbols contained inside this manual pertaining to the safe use and operation of this product before using the device.

WEEE ComplianceThis product complies with the European Union’s Waste Electrical & Electronic Equipment (WEEE) Directive2002/96/EC. It is marked with the following symbol:
Thermo Fisher Scientific is registered with B2B Compliance (B2Bcompliance.org.uk) in the UK and with the European Recycling Platform (ERP-recycling.org) in all other countries of the European Union and in Norway.
If this product is located in Europe and you want to participate in the Thermo Fisher Scientific Business-to-Business (B2B) Recycling Program, send an email request to [email protected] with the following information:
• WEEE product class
• Name of the manufacturer or distributor (where you purchased the product)
• Number of product pieces, and the estimated total weight and volume
• Pick-up address and contact person (include contact information)
• Appropriate pick-up time
• Declaration of decontamination, stating that all hazardous fluids or material have been removed from the product
For additional information about the Restriction on Hazardous Substances (RoHS) Directive for the European Union, search for RoHS on the Thermo Fisher Scientific European language websites.
IMPORTANT This recycling program is not for biological hazard products or for products that have been medically contaminated. You must treat these types of products as biohazard waste and dispose of them in accordance with your local regulations.

Conformité DEEECe produit est conforme avec la directive européenne (2002/96/EC) des Déchets d'Equipements Electriques et Electroniques (DEEE). Il est marqué par le symbole suivant:
Thermo Fisher Scientific s'est associé avec une ou plusieurs sociétés de recyclage dans chaque état membre de l’Union Européenne et ce produit devrait être collecté ou recyclé par celle(s)-ci. Pour davantage d'informations, rendez-vous sur la page www.thermoscientific.fr/rohs.
WEEE KonformitätDieses Produkt entspricht der EU Waste Electrical & Electronic Equipment (WEEE) Richtlinie 2002/96/EC. Es ist mit dem folgenden Symbol gekennzeichnet:
Thermo Fisher Scientific hat Vereinbarungen mit Verwertungs-/Entsorgungsfirmen in allen EU-Mitgliedsstaaten getroffen, damit dieses Produkt durch diese Firmen wiederverwertet oder entsorgt werden kann. Weitere Informationen finden Sie unter www.thermoscientific.de/rohs.

Thermo Scientific Virtuoso Vial Identification System User Guide vii
C
Preface . . . . . . . . . . . . . . . . . . . . . . . . . . . . . . . . . . . . . . . . . . . . . . . . . . . . . . . . . . . . . . ixAccessories . . . . . . . . . . . . . . . . . . . . . . . . . . . . . . . . . . . . . . . . . . . . . . . . . . . . .ixCautions and Special Notices . . . . . . . . . . . . . . . . . . . . . . . . . . . . . . . . . . . . . . . xSafety Precautions . . . . . . . . . . . . . . . . . . . . . . . . . . . . . . . . . . . . . . . . . . . . . . . .xiContacting Us . . . . . . . . . . . . . . . . . . . . . . . . . . . . . . . . . . . . . . . . . . . . . . . . . .xi
Chapter 1 Getting Connected. . . . . . . . . . . . . . . . . . . . . . . . . . . . . . . . . . . . . . . . . . . . . . . . . . . . . .1Laboratory Requirements . . . . . . . . . . . . . . . . . . . . . . . . . . . . . . . . . . . . . . . . . . 1
Line Power . . . . . . . . . . . . . . . . . . . . . . . . . . . . . . . . . . . . . . . . . . . . . . . . . . . 1Earth Ground . . . . . . . . . . . . . . . . . . . . . . . . . . . . . . . . . . . . . . . . . . . . . . . . . 2Electrical Wall Outlet . . . . . . . . . . . . . . . . . . . . . . . . . . . . . . . . . . . . . . . . . . . 2Environmental Requirements . . . . . . . . . . . . . . . . . . . . . . . . . . . . . . . . . . . . . 2
Installing the Virtuoso Vial Identification System . . . . . . . . . . . . . . . . . . . . . . . . 3Assembling the Virtuoso System . . . . . . . . . . . . . . . . . . . . . . . . . . . . . . . . . . . 3Connecting the Virtuoso System to Line Power . . . . . . . . . . . . . . . . . . . . . . . 3Disconnecting the Virtuoso System from Line Power . . . . . . . . . . . . . . . . . . . 4
Chapter 2 Getting Started. . . . . . . . . . . . . . . . . . . . . . . . . . . . . . . . . . . . . . . . . . . . . . . . . . . . . . . . .5Functional Description . . . . . . . . . . . . . . . . . . . . . . . . . . . . . . . . . . . . . . . . . . . . 5Touch Screen . . . . . . . . . . . . . . . . . . . . . . . . . . . . . . . . . . . . . . . . . . . . . . . . . . . 6
Icons and Keyboard. . . . . . . . . . . . . . . . . . . . . . . . . . . . . . . . . . . . . . . . . . . . . 7Error Messages. . . . . . . . . . . . . . . . . . . . . . . . . . . . . . . . . . . . . . . . . . . . . . . . . 7
Back Panel. . . . . . . . . . . . . . . . . . . . . . . . . . . . . . . . . . . . . . . . . . . . . . . . . . . . . . 8Vial Printer Test . . . . . . . . . . . . . . . . . . . . . . . . . . . . . . . . . . . . . . . . . . . . . . . . . 8
Printing a Test Vial . . . . . . . . . . . . . . . . . . . . . . . . . . . . . . . . . . . . . . . . . . . . . 9Scanning the Test Vial Label . . . . . . . . . . . . . . . . . . . . . . . . . . . . . . . . . . . . . 10
Chapter 3 Creating Labels, Sequences, and Protocols . . . . . . . . . . . . . . . . . . . . . . . . . . . . . .11Creating a Vial Label . . . . . . . . . . . . . . . . . . . . . . . . . . . . . . . . . . . . . . . . . . . . . 11Creating a Vial Sequence . . . . . . . . . . . . . . . . . . . . . . . . . . . . . . . . . . . . . . . . . . 12Saving a Vial Sequence as a Protocol . . . . . . . . . . . . . . . . . . . . . . . . . . . . . . . . . 14Selecting a Saved Protocol . . . . . . . . . . . . . . . . . . . . . . . . . . . . . . . . . . . . . . . . . 15
Contents
Contents
viii Virtuoso Vial Identification System User Guide Thermo Scientific
Chapter 4 Editing Labels, Sequences, and Protocols . . . . . . . . . . . . . . . . . . . . . . . . . . . . . . . .17Editing the Label Data Fields . . . . . . . . . . . . . . . . . . . . . . . . . . . . . . . . . . . . . . 17Changing the Template. . . . . . . . . . . . . . . . . . . . . . . . . . . . . . . . . . . . . . . . . . . 18Editing a Vial in a Sequence . . . . . . . . . . . . . . . . . . . . . . . . . . . . . . . . . . . . . . . 19Deleting a Vial from a Sequence . . . . . . . . . . . . . . . . . . . . . . . . . . . . . . . . . . . . 20
Chapter 5 Printing Labels on Vials . . . . . . . . . . . . . . . . . . . . . . . . . . . . . . . . . . . . . . . . . . . . . . . .21Printing a Vial Label . . . . . . . . . . . . . . . . . . . . . . . . . . . . . . . . . . . . . . . . . . . . . 22Printing a Sequence of Vial Labels. . . . . . . . . . . . . . . . . . . . . . . . . . . . . . . . . . . 23Printing a Vial Label Within a Sequence . . . . . . . . . . . . . . . . . . . . . . . . . . . . . . 23
Chapter 6 Administrator Settings . . . . . . . . . . . . . . . . . . . . . . . . . . . . . . . . . . . . . . . . . . . . . . . . .25Settings Menu . . . . . . . . . . . . . . . . . . . . . . . . . . . . . . . . . . . . . . . . . . . . . . . . . . 26General Menu . . . . . . . . . . . . . . . . . . . . . . . . . . . . . . . . . . . . . . . . . . . . . . . . . . 29Data Menu . . . . . . . . . . . . . . . . . . . . . . . . . . . . . . . . . . . . . . . . . . . . . . . . . . . . 31Using the Data Commands . . . . . . . . . . . . . . . . . . . . . . . . . . . . . . . . . . . . . . . . 31
Data Items. . . . . . . . . . . . . . . . . . . . . . . . . . . . . . . . . . . . . . . . . . . . . . . . . . . 32Data Translators . . . . . . . . . . . . . . . . . . . . . . . . . . . . . . . . . . . . . . . . . . . . . . 35Templates . . . . . . . . . . . . . . . . . . . . . . . . . . . . . . . . . . . . . . . . . . . . . . . . . . . 40
Chapter 7 Maintenance . . . . . . . . . . . . . . . . . . . . . . . . . . . . . . . . . . . . . . . . . . . . . . . . . . . . . . . . .47Cleaning the System . . . . . . . . . . . . . . . . . . . . . . . . . . . . . . . . . . . . . . . . . . . . . 47Replacing the Printer Tape . . . . . . . . . . . . . . . . . . . . . . . . . . . . . . . . . . . . . . . . 47
Chapter 8 Replaceable Parts. . . . . . . . . . . . . . . . . . . . . . . . . . . . . . . . . . . . . . . . . . . . . . . . . . . . .49Spare Parts. . . . . . . . . . . . . . . . . . . . . . . . . . . . . . . . . . . . . . . . . . . . . . . . . . . . . 49Accessories. . . . . . . . . . . . . . . . . . . . . . . . . . . . . . . . . . . . . . . . . . . . . . . . . . . . . 49Consumables . . . . . . . . . . . . . . . . . . . . . . . . . . . . . . . . . . . . . . . . . . . . . . . . . . . 49
Appendix A Icons . . . . . . . . . . . . . . . . . . . . . . . . . . . . . . . . . . . . . . . . . . . . . . . . . . . . . . . . . . . . . . . .51Printer Status. . . . . . . . . . . . . . . . . . . . . . . . . . . . . . . . . . . . . . . . . . . . . . . . . . . 51Commands . . . . . . . . . . . . . . . . . . . . . . . . . . . . . . . . . . . . . . . . . . . . . . . . . . . . 52Settings Menu . . . . . . . . . . . . . . . . . . . . . . . . . . . . . . . . . . . . . . . . . . . . . . . . . . 52General Menu . . . . . . . . . . . . . . . . . . . . . . . . . . . . . . . . . . . . . . . . . . . . . . . . . . 53Data Menu . . . . . . . . . . . . . . . . . . . . . . . . . . . . . . . . . . . . . . . . . . . . . . . . . . . . 53
Appendix B Printer Specifications . . . . . . . . . . . . . . . . . . . . . . . . . . . . . . . . . . . . . . . . . . . . . . . . .55
Index . . . . . . . . . . . . . . . . . . . . . . . . . . . . . . . . . . . . . . . . . . . . . . . . . . . . . . . . . . . . . . . .57

Thermo Scientific Virtuoso Vial Identification System User Guide ix
P
Preface
The Virtuoso Vial Identification System User Guide describes how to operate the Thermo Scientific™ Virtuoso™ Vial Identification System to print custom label information directly onto a Thermo Scientific Virtuoso glass vial.
AccessoriesThe Virtuoso Vial Identification System ships with the following accessories (Table 1).
Contents
• Accessories
• Cautions and Special Notices
• Safety Precautions
• Contacting Us
Table 1. Virtuoso accessories
Accessory Quantity Part number
Virtuoso 9 mm wide opening screw thread vial, 2 mL, clear glass with V-patch and ivory polytetrafluoroethylene (PTFE)/ red rubber septum
1 60180-VT401
Power supply assembly: • AC power adapter• Power supply cord
1 SP50008
Virtuoso multivial holder, 33 cm (13 in.) long (empty, holds 10 vials), and vial guide attachment
2 60180-VT501
Virtuoso replacement tape 1 60180-VT500
Virtuoso vial collection tray 2 60180-VT502

Preface
x Virtuoso Vial Identification System User Guide Thermo Scientific
Cautions and Special NoticesMake sure you follow the cautions and special notices presented in this guide. Cautions and special notices appear in boxes; those concerning safety or possible system damage also have corresponding caution symbols.
This guide uses the following types of cautions and special notices.
CAUTION Highlights hazards to humans, property, or the environment. Each CAUTION notice is accompanied by an appropriate CAUTION symbol.
CAUTION Risk of electric shock. This system uses voltages that can cause electric shock and/or personal injury. Before servicing, shut down the system and disconnect it from line power. While operating the system, keep covers on.
CAUTION Trip obstacle: Be aware of cords or other objects located on the floor.
IMPORTANT Highlights information necessary to prevent damage to software, loss of data, or invalid test results; or might contain information that is critical for optimal performance of the system.
Note Highlights information of general interest.
Tip Highlights helpful information that can make a task easier.
Preface
Thermo Scientific Virtuoso Vial Identification System User Guide xi
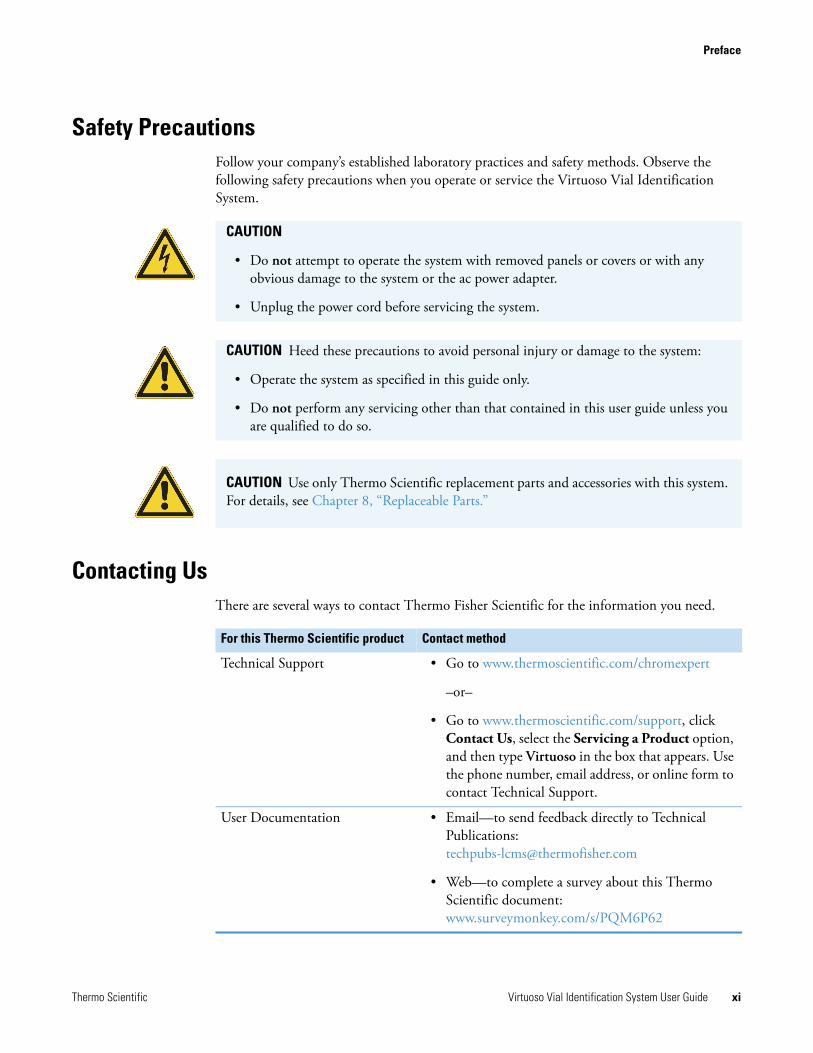
Safety PrecautionsFollow your company’s established laboratory practices and safety methods. Observe the following safety precautions when you operate or service the Virtuoso Vial Identification System.
Contacting UsThere are several ways to contact Thermo Fisher Scientific for the information you need.
CAUTION
• Do not attempt to operate the system with removed panels or covers or with any obvious damage to the system or the ac power adapter.
• Unplug the power cord before servicing the system.
CAUTION Heed these precautions to avoid personal injury or damage to the system:
• Operate the system as specified in this guide only.
• Do not perform any servicing other than that contained in this user guide unless you are qualified to do so.
CAUTION Use only Thermo Scientific replacement parts and accessories with this system. For details, see Chapter 8, “Replaceable Parts.”
For this Thermo Scientific product Contact method
Technical Support • Go to www.thermoscientific.com/chromexpert
–or–
• Go to www.thermoscientific.com/support, click Contact Us, select the Servicing a Product option, and then type Virtuoso in the box that appears. Use the phone number, email address, or online form to contact Technical Support.
User Documentation • Email—to send feedback directly to Technical Publications: [email protected]
• Web—to complete a survey about this Thermo Scientific document: www.surveymonkey.com/s/PQM6P62

Thermo Scientific Virtuoso Vial Identification System User Guide 1
1
Getting Connected
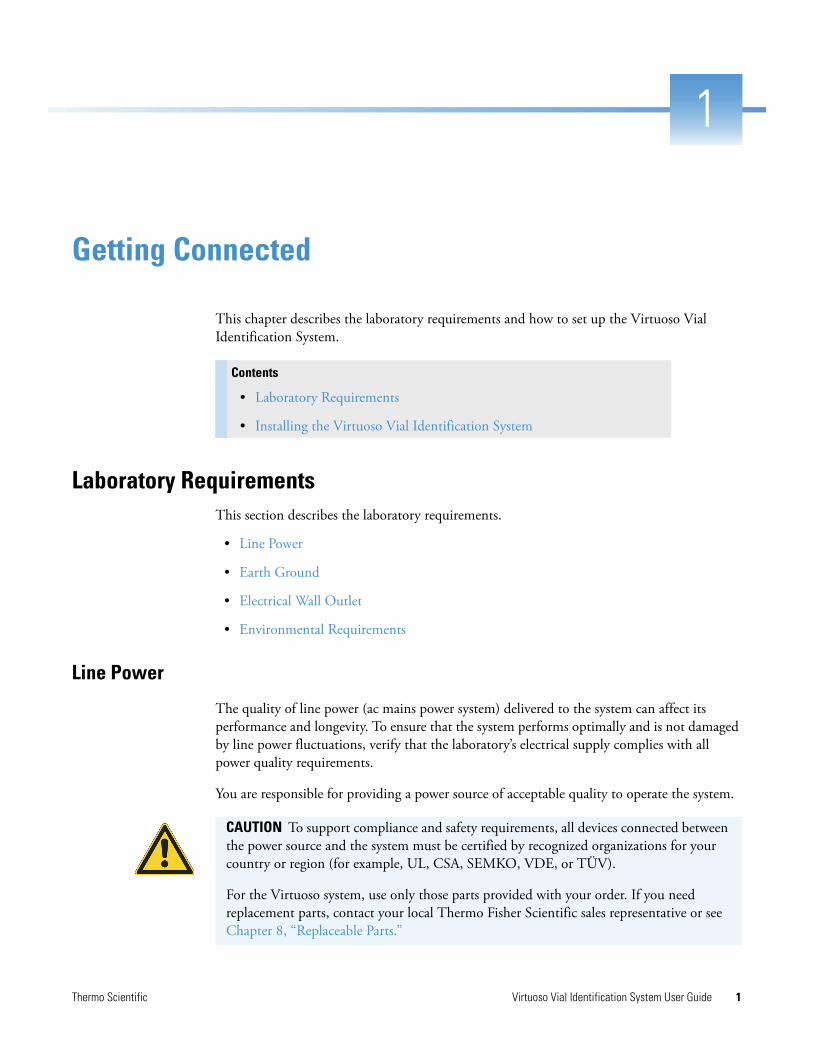
This chapter describes the laboratory requirements and how to set up the Virtuoso Vial Identification System.
Laboratory RequirementsThis section describes the laboratory requirements.
• Line Power
• Earth Ground
• Electrical Wall Outlet
• Environmental Requirements
Line Power
The quality of line power (ac mains power system) delivered to the system can affect its performance and longevity. To ensure that the system performs optimally and is not damaged by line power fluctuations, verify that the laboratory’s electrical supply complies with all power quality requirements.
You are responsible for providing a power source of acceptable quality to operate the system.
Contents
• Laboratory Requirements
• Installing the Virtuoso Vial Identification System
CAUTION To support compliance and safety requirements, all devices connected between the power source and the system must be certified by recognized organizations for your country or region (for example, UL, CSA, SEMKO, VDE, or TÜV).
For the Virtuoso system, use only those parts provided with your order. If you need replacement parts, contact your local Thermo Fisher Scientific sales representative or see Chapter 8, “Replaceable Parts.”
1 Getting ConnectedLaboratory Requirements
2 Virtuoso Vial Identification System User Guide Thermo Scientific
Earth Ground
Make sure that the earth ground connections in the laboratory are hardwired to the same ground used for the main circuit breaker panel. Multiple external ground points can cause noise current to flow through the ground loop that is formed.
Electrical Wall Outlet
Make sure that the electrical wall outlet intended for the Virtuoso system is suitably rated and connects to earth ground. To prevent overloading the outlets, select outlets with a load rating that is suitable for the expected total current per outlet.
Environmental Requirements
To ensure proper performance of the Virtuoso system, verify the environmental specifications listed in Table 2.
CAUTION To avoid an electric shock, always have a certified electrician install any new wall outlets.
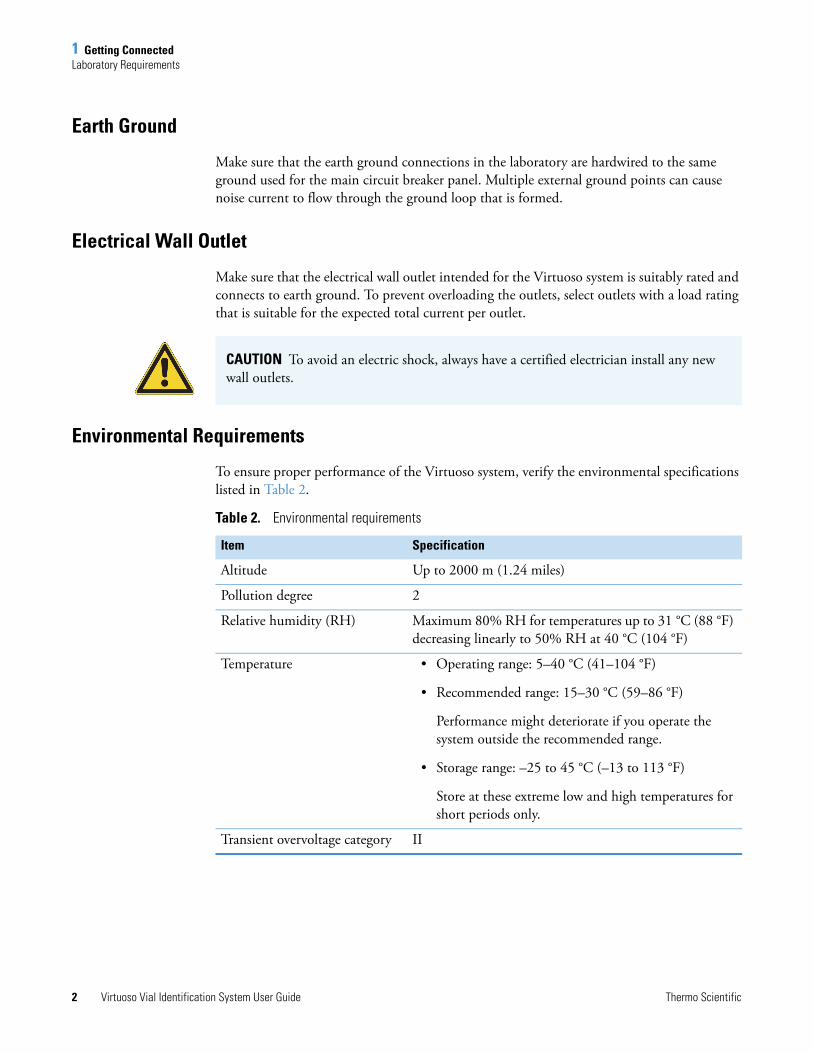
Table 2. Environmental requirements
Item Specification
Altitude Up to 2000 m (1.24 miles)
Pollution degree 2
Relative humidity (RH) Maximum 80% RH for temperatures up to 31 °C (88 °F) decreasing linearly to 50% RH at 40 °C (104 °F)
Temperature • Operating range: 5–40 °C (41–104 °F)
• Recommended range: 15–30 °C (59–86 °F)
Performance might deteriorate if you operate the system outside the recommended range.
• Storage range: –25 to 45 °C (–13 to 113 °F)
Store at these extreme low and high temperatures for short periods only.
Transient overvoltage category II

1 Getting ConnectedInstalling the Virtuoso Vial Identification System
Thermo Scientific Virtuoso Vial Identification System User Guide 3
Installing the Virtuoso Vial Identification SystemThis section describes how to install the Virtuoso system in the designated laboratory.
• Assembling the Virtuoso System
• Connecting the Virtuoso System to Line Power
• Disconnecting the Virtuoso System from Line Power
Assembling the Virtuoso System
Before you start labeling vials, insert the collection tray to the right side of the system base. You can optionally insert the multivial holder into the vial guide at the top of the system. For assembly locations, see Figure 1 on page 6.
Connecting the Virtuoso System to Line Power
Place the system on a clean surface near a user-accessible wall outlet. Have the power supply assembly available (see “Accessories” on page ix).
To connect the Virtuoso system to line power
1. If it is not already connected, connect the detachable power cord to the ac power adapter.
2. Connect the output cable to the input power socket located on the back of the system.
3. Plug the power cord into a suitably rated, earth-grounded electrical wall outlet.
4. Turn on the system by pressing the power button located on the back.
The system turns on and the initialization process starts, which takes approximately 30–45 seconds.
CAUTION To avoid an electric shock, always use a detachable power cord that is appropriate for your country or region.
CAUTION After you complete the cord and cable connections, route them so that they are not a trip hazard.
1 Getting ConnectedInstalling the Virtuoso Vial Identification System
4 Virtuoso Vial Identification System User Guide Thermo Scientific
Disconnecting the Virtuoso System from Line Power
Use the following procedure when you must shut down the system.
To disconnect the Virtuoso system from line power
1. Turn off the system by pressing the power button located on the back for 5 seconds.
2. Unplug the ac adapter unit from the wall outlet, and then you can disconnect the output cable from the system.

Thermo Scientific Virtuoso Vial Identification System User Guide 5
2
Getting Started
This chapter describes the basic features of the Virtuoso Vial Identification System and how to print a test label on a Thermo Scientific Virtuoso glass vial.
Functional DescriptionThe Virtuoso Vial Identification System, shown in Figure 1, is a compact printer that prints custom label information directly on the white label on the Virtuoso glass vial. The approximate size of the main label area is 17.5 mm (0.7 in.) wide by 13 mm (0.5 in.) high. Printed labels can contain barcodes and text—use the predefined label templates or create your own templates for repeated use. You operate the printer and create the label information from the touch-screen display.
To print on one vial or multiple vials from a defined sequence, you can load either one vial or up to 10 vials at a time by connecting the multivial holder to the top of the system. Each label takes approximately 5 seconds to print, and each finished vial collects in the tray at the base below the display.
The system emits a sound when you tap the display keys, scan a barcode, or trigger a warning (for example, tapping an incorrect key or inserting the vial upside down).
The back of the system has two Type 2.0 USB ports. Use these ports if you want to export the system settings to a USB drive. (Cables and devices are not provided.) For additional information, see “Settings Menu” on page 26.
Contents
• Functional Description
• Touch Screen
• Back Panel
• Vial Printer Test
2 Getting StartedTouch Screen
6 Virtuoso Vial Identification System User Guide Thermo Scientific
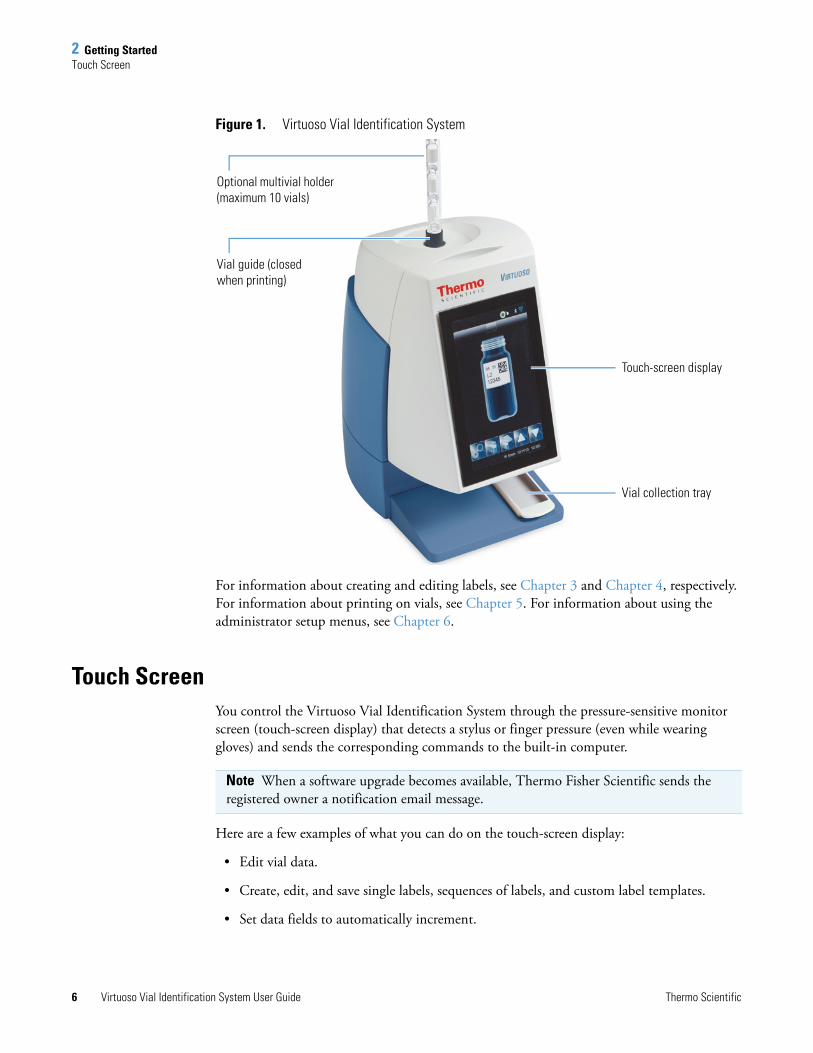
Figure 1. Virtuoso Vial Identification System
For information about creating and editing labels, see Chapter 3 and Chapter 4, respectively. For information about printing on vials, see Chapter 5. For information about using the administrator setup menus, see Chapter 6.
Touch ScreenYou control the Virtuoso Vial Identification System through the pressure-sensitive monitor screen (touch-screen display) that detects a stylus or finger pressure (even while wearing gloves) and sends the corresponding commands to the built-in computer.
Here are a few examples of what you can do on the touch-screen display:
• Edit vial data.
• Create, edit, and save single labels, sequences of labels, and custom label templates.
• Set data fields to automatically increment.
Vial collection tray
Touch-screen display
Optional multivial holder (maximum 10 vials)
Vial guide (closed when printing)
Note When a software upgrade becomes available, Thermo Fisher Scientific sends the registered owner a notification email message.

2 Getting StartedTouch Screen
Thermo Scientific Virtuoso Vial Identification System User Guide 7
• Set templates to accept input data from scanned barcodes or laboratory information management systems (LIMSs).
• Design and edit custom templates that use different fonts, barcode types, or graphics.
• Print on individual vials, on a sequence of vials, or on individual vials within a sequence.
• Edit and delete vial labels within a sequence.
• Save a sequence of vials as a protocol for repeated use.
Icons and Keyboard
In most cases, you tap an icon on the touch screen to carry out a specific command. As you move from screen to screen, the icons change to display the screen-specific commands. For descriptions of the various icons, see Appendix A, “Icons.”
When a screen requires text or numeric input, it displays a keyboard.
• To move horizontally, tap the Back and Forward arrow keys.
• To move to the next line, tap TAB.
• To enter an uppercase letter, tap CASE.
• To delete the character, tap DEL.
Error Messages
The touch screen shows error messages in a sub-window. Some of the messages require user interaction to clear the condition. The others disappear after a given period of time. Common conditions that trigger an error message include the following:
• Vial is not found.
• Vial is not a Thermo Scientific Virtuoso vial.
• Multivial holder is empty, which applies only when the holder is connected.
• Possible mechanical fault condition.

2 Getting StartedBack Panel
8 Virtuoso Vial Identification System User Guide Thermo Scientific
Back PanelTable 3 describes the Virtuoso system’s back panel connections. These signal connections are suitable only for connections to equipment meeting the requirements of clause 6.3 of IEC 61010-1 or SELV (safety extra-low voltage) requirements of IEC 60950-1:2014.
Vial Printer TestBefore you start normal operation of the Virtuoso Vial Identification System, test the label printing and scanning functions.
• Printing a Test Vial
• Scanning the Test Vial Label
Table 3. Back panel connections
Image Description
On/Off power button
Turns the system on and off.
USB-to-PC
Connects a Microsoft™ Windows™ computer or gateway application to the Virtuoso system.
Network
Connects a computer running the gateway to the Virtuoso system.
USB ports (Type 2.0)
Connects a USB drive or an external keyboard to the Virtuoso system.
Accessory interface
Connects the system controlled accessories.
24 Vdc input
Connects the ac power adapter to the Virtuoso system.
2 Getting StartedVial Printer Test
Thermo Scientific Virtuoso Vial Identification System User Guide 9
Printing a Test Vial
To print a test vial
1. Follow the procedures in “Installing the Virtuoso Vial Identification System” on page 3.
The Home screen displays the default single vial template (Figure 4).
2. Ensure the following for the new glass sample vial:
• Measures overall 12 × 32 mm (0.5 × 1.26 in.)
• Contains a white, Virtuoso-designed marking area.
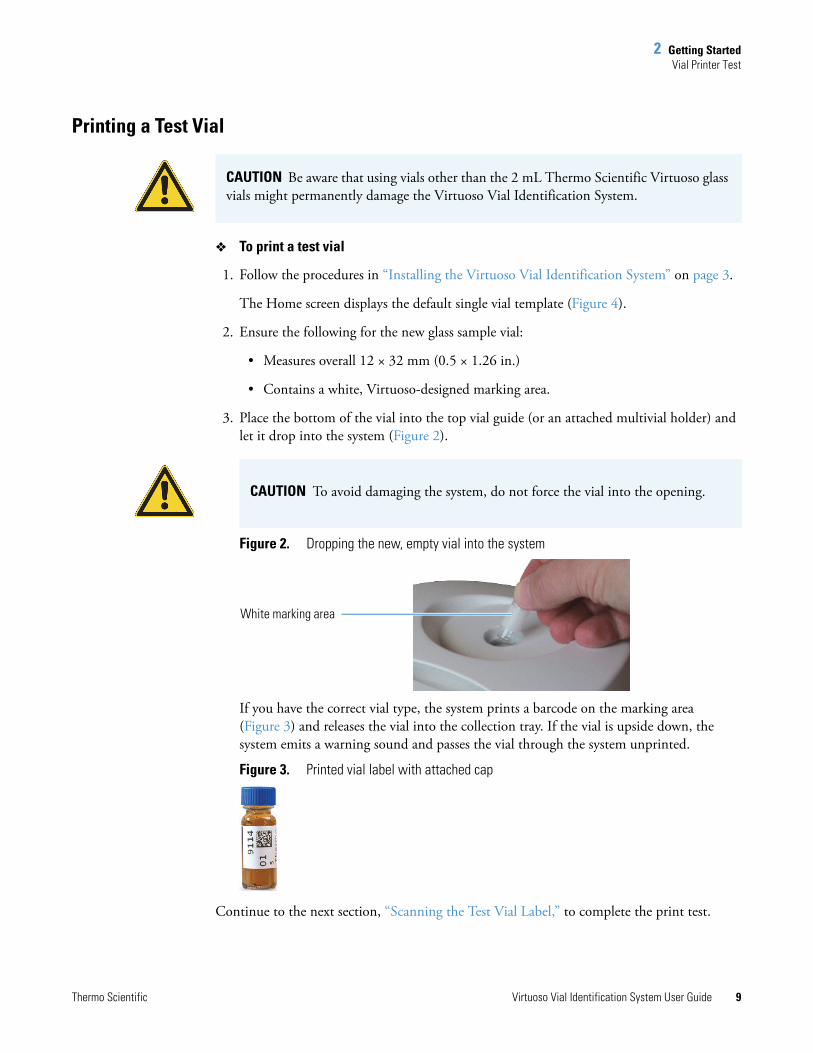
3. Place the bottom of the vial into the top vial guide (or an attached multivial holder) and let it drop into the system (Figure 2).
Figure 2. Dropping the new, empty vial into the system
If you have the correct vial type, the system prints a barcode on the marking area (Figure 3) and releases the vial into the collection tray. If the vial is upside down, the system emits a warning sound and passes the vial through the system unprinted.
Figure 3. Printed vial label with attached cap
Continue to the next section, “Scanning the Test Vial Label,” to complete the print test.
CAUTION Be aware that using vials other than the 2 mL Thermo Scientific Virtuoso glass vials might permanently damage the Virtuoso Vial Identification System.
CAUTION To avoid damaging the system, do not force the vial into the opening.
White marking area

2 Getting StartedVial Printer Test
10 Virtuoso Vial Identification System User Guide Thermo Scientific
Scanning the Test Vial Label
To scan the test vial
1. With the barcode facing upward, place the test vial under the left side of the display.
The screen displays blue target lines to help align the vial under the scanner.
2. Do one of the following:
• If the scanner can read the barcode, the data appears in the barcode field at the top of the screen (Figure 4). Keep the test vial as a record of this test.
Figure 4. Home screen
–or–
• If the scanner cannot read the barcode, check that the printing tape is correctly loaded and is not loose (see “Replacing the Printer Tape” on page 47). Then, print another test vial (see “Printing a Test Vial” on page 9).
If after a few attempts the scanner cannot read the barcode, contact Thermo Fisher Scientific Technical Support; see “Contacting Us” on page xi.
Barcode field
Touch-screen area for the label template
Home screen buttonPrinter status icons

Thermo Scientific Virtuoso Vial Identification System User Guide 11
3
Creating Labels, Sequences, and Protocols
This chapter describes how to create a vial label and a vial sequence, how to save a vial sequence as a protocol, and how to select a protocol.
Creating a Vial LabelUse the following procedure to create a single vial label.
To create a vial label
1. Make sure that the Home screen displays a single vial (default template).
2. Do any of the tasks described in Table 4.
Tip See page 51 for icon descriptions.
Contents
• Creating a Vial Label
• Creating a Vial Sequence
• Saving a Vial Sequence as a Protocol
• Selecting a Saved Protocol
Table 4. Possible tasks
Task Procedure Icon
Edit the label data field. See “Editing the Label Data Fields” on page 17.
–
Change the label template. See “Changing the Template” on page 18.
Print the vial label. See “Printing a Vial Label” on page 22. –

3 Creating Labels, Sequences, and ProtocolsCreating a Vial Sequence
12 Virtuoso Vial Identification System User Guide Thermo Scientific
Creating a Vial SequenceUse the following procedure to create a series (sequence) of two or more vial labels. You can optionally save the sequence as a protocol (see the next section).
To create a vial sequence
1. On the Home screen, tap the Sequence icon, , to display the Create Sequence screen.
2. Tap the right side of the data field and enter the last value for the sequence (Figure 5).
Figure 5. Create Sequence screen
3. Do one of the following:
• To accept the sequence range, tap the Accept icon, .
The Home screen appears with a graphic representation of the sequence (Figure 6).
• To exit without saving and return to the previous screen, tap the Cancel icon, .
The system does not save the sequence data when you cancel the function.
Tap the field to enter data.
Row of command icons for this screen
Home screen button

3 Creating Labels, Sequences, and ProtocolsCreating a Vial Sequence
Thermo Scientific Virtuoso Vial Identification System User Guide 13
Figure 6. Vial sequence
4. Do one of the tasks described in Table 5.
Table 5. Possible tasks
Task Procedure Icon
Save the sequence as a protocol. See “Saving a Vial Sequence as a Protocol” on page 14.
Print one or more vial labels in the sequence.
See Chapter 5, “Printing Labels on Vials.”
–
Exit the Sequence function and return to the previous screen.
Tap the Cancel icon.
Delete a vial from the sequence. See “Deleting a Vial from a Sequence” on page 20.
Tap the Forward arrow to advance to the next label in the sequence.
3 Creating Labels, Sequences, and ProtocolsSaving a Vial Sequence as a Protocol
14 Virtuoso Vial Identification System User Guide Thermo Scientific
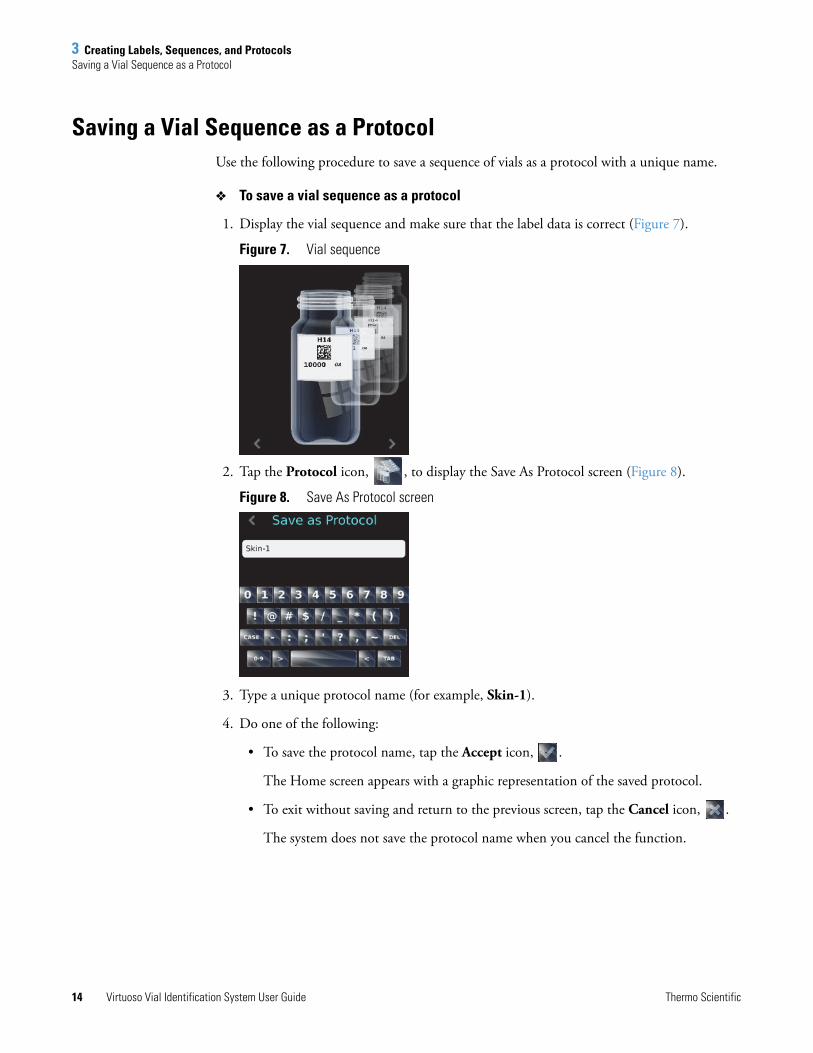
Saving a Vial Sequence as a ProtocolUse the following procedure to save a sequence of vials as a protocol with a unique name.
To save a vial sequence as a protocol
1. Display the vial sequence and make sure that the label data is correct (Figure 7).
Figure 7. Vial sequence
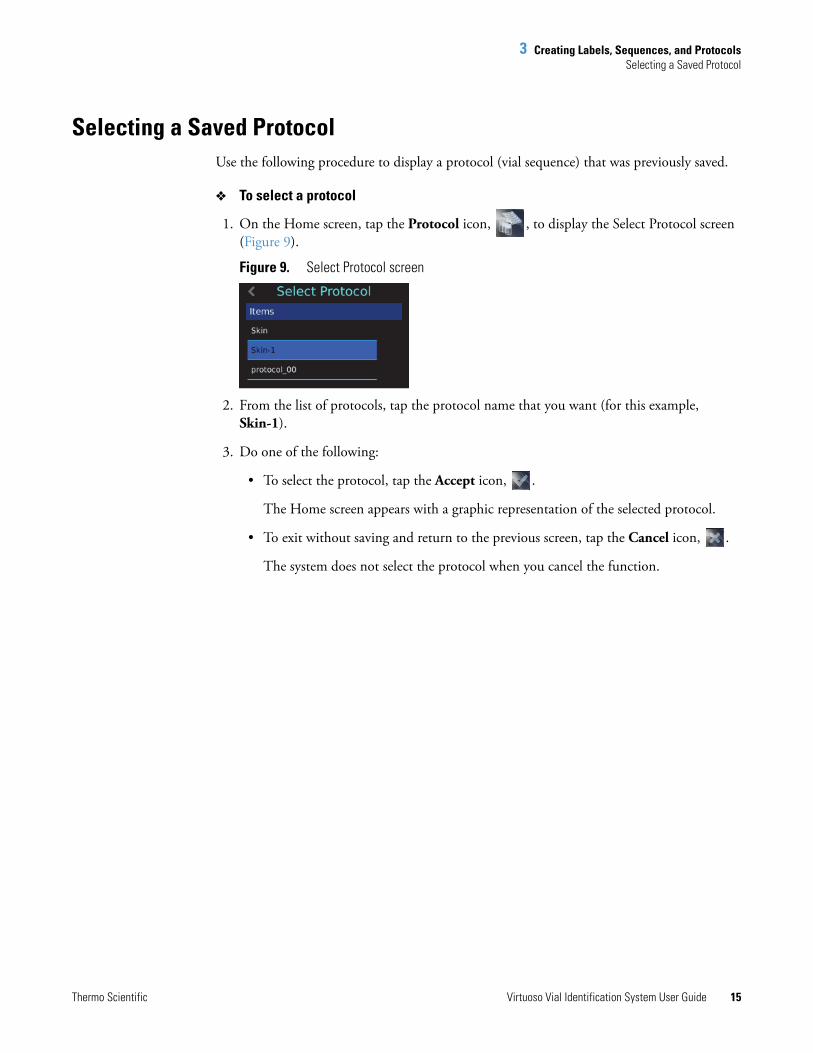
2. Tap the Protocol icon, , to display the Save As Protocol screen (Figure 8).
Figure 8. Save As Protocol screen
3. Type a unique protocol name (for example, Skin-1).
4. Do one of the following:
• To save the protocol name, tap the Accept icon, .
The Home screen appears with a graphic representation of the saved protocol.
• To exit without saving and return to the previous screen, tap the Cancel icon, .
The system does not save the protocol name when you cancel the function.
3 Creating Labels, Sequences, and ProtocolsSelecting a Saved Protocol
Thermo Scientific Virtuoso Vial Identification System User Guide 15
Selecting a Saved ProtocolUse the following procedure to display a protocol (vial sequence) that was previously saved.
To select a protocol
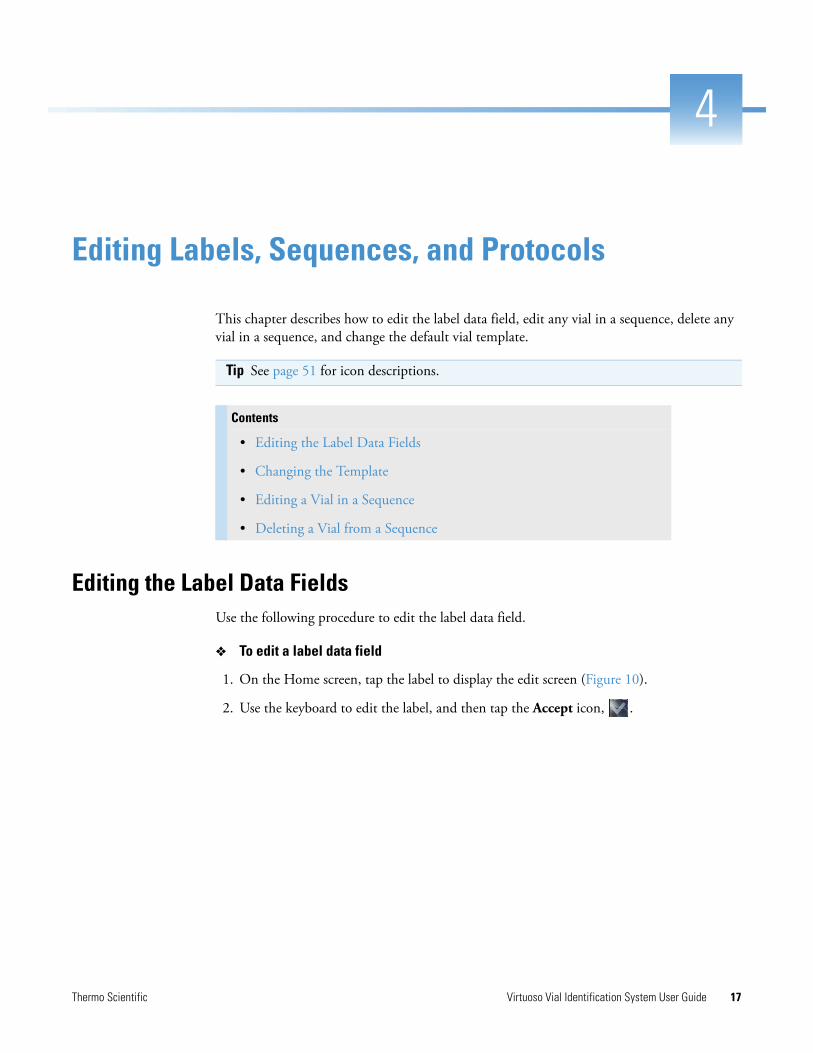
1. On the Home screen, tap the Protocol icon, , to display the Select Protocol screen (Figure 9).
Figure 9. Select Protocol screen
2. From the list of protocols, tap the protocol name that you want (for this example, Skin-1).
3. Do one of the following:
• To select the protocol, tap the Accept icon, .
The Home screen appears with a graphic representation of the selected protocol.
• To exit without saving and return to the previous screen, tap the Cancel icon, .
The system does not select the protocol when you cancel the function.

Thermo Scientific Virtuoso Vial Identification System User Guide 17
4
Editing Labels, Sequences, and Protocols
This chapter describes how to edit the label data field, edit any vial in a sequence, delete any vial in a sequence, and change the default vial template.
Editing the Label Data FieldsUse the following procedure to edit the label data field.
To edit a label data field
1. On the Home screen, tap the label to display the edit screen (Figure 10).
2. Use the keyboard to edit the label, and then tap the Accept icon, .
Tip See page 51 for icon descriptions.
Contents
• Editing the Label Data Fields
• Changing the Template
• Editing a Vial in a Sequence
• Deleting a Vial from a Sequence
4 Editing Labels, Sequences, and ProtocolsChanging the Template
18 Virtuoso Vial Identification System User Guide Thermo Scientific
Changing the TemplateUse the following procedure to change the default template to a different format.
To change the label template
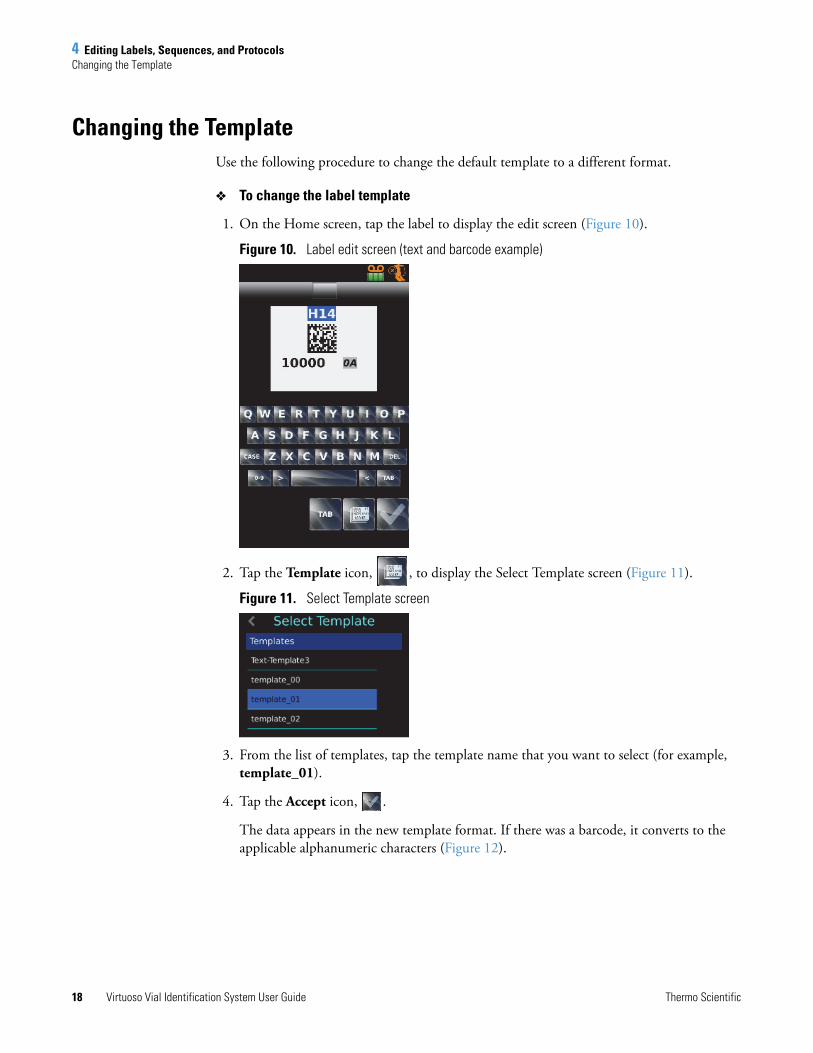
1. On the Home screen, tap the label to display the edit screen (Figure 10).
Figure 10. Label edit screen (text and barcode example)
2. Tap the Template icon, , to display the Select Template screen (Figure 11).
Figure 11. Select Template screen
3. From the list of templates, tap the template name that you want to select (for example, template_01).
4. Tap the Accept icon, .
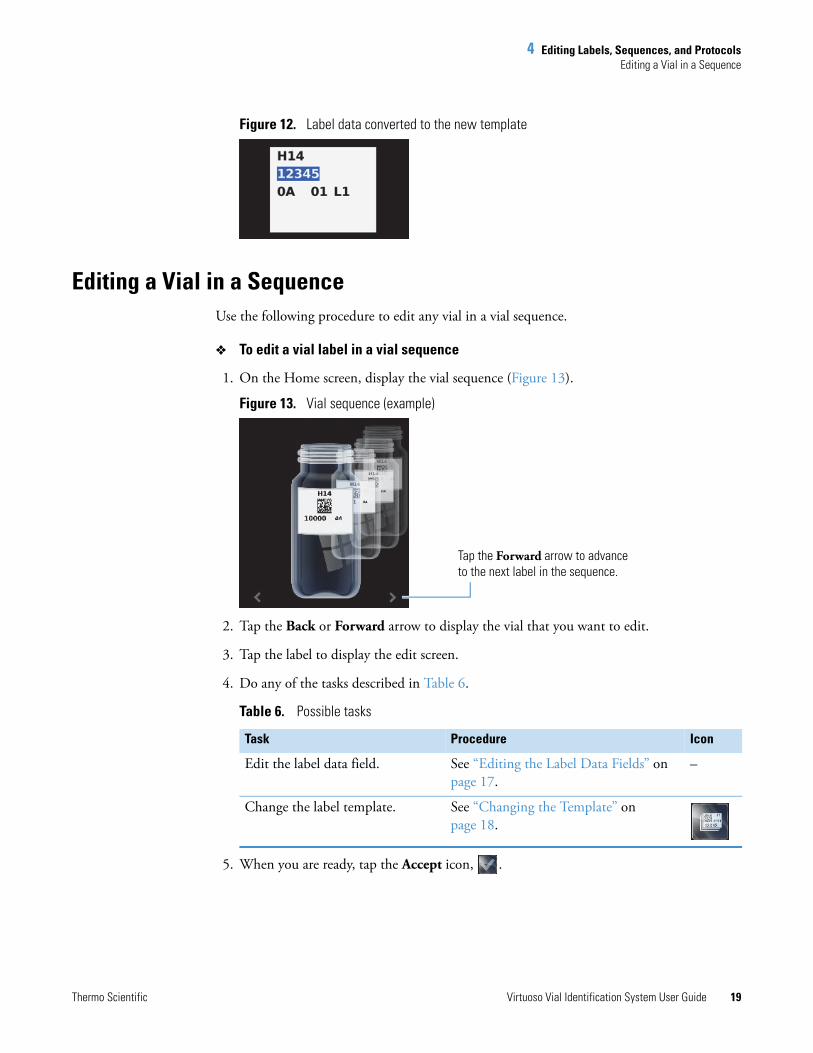
The data appears in the new template format. If there was a barcode, it converts to the applicable alphanumeric characters (Figure 12).
4 Editing Labels, Sequences, and ProtocolsEditing a Vial in a Sequence
Thermo Scientific Virtuoso Vial Identification System User Guide 19
Figure 12. Label data converted to the new template
Editing a Vial in a SequenceUse the following procedure to edit any vial in a vial sequence.
To edit a vial label in a vial sequence
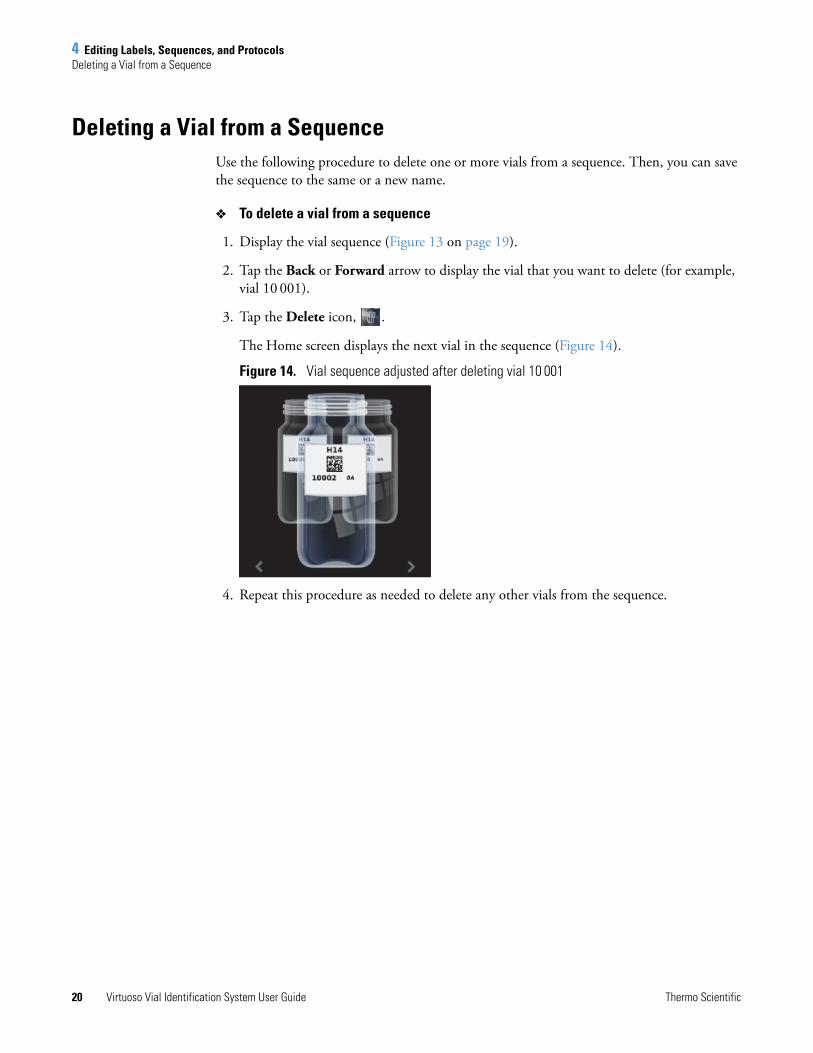
1. On the Home screen, display the vial sequence (Figure 13).
Figure 13. Vial sequence (example)
2. Tap the Back or Forward arrow to display the vial that you want to edit.
3. Tap the label to display the edit screen.
4. Do any of the tasks described in Table 6.
5. When you are ready, tap the Accept icon, .
Table 6. Possible tasks
Task Procedure Icon
Edit the label data field. See “Editing the Label Data Fields” on page 17.
–
Change the label template. See “Changing the Template” on page 18.
Tap the Forward arrow to advance to the next label in the sequence.
4 Editing Labels, Sequences, and ProtocolsDeleting a Vial from a Sequence
20 Virtuoso Vial Identification System User Guide Thermo Scientific
Deleting a Vial from a SequenceUse the following procedure to delete one or more vials from a sequence. Then, you can save the sequence to the same or a new name.
To delete a vial from a sequence
1. Display the vial sequence (Figure 13 on page 19).
2. Tap the Back or Forward arrow to display the vial that you want to delete (for example, vial 10 001).
3. Tap the Delete icon, .
The Home screen displays the next vial in the sequence (Figure 14).
Figure 14. Vial sequence adjusted after deleting vial 10 001
4. Repeat this procedure as needed to delete any other vials from the sequence.
Thermo Scientific Virtuoso Vial Identification System User Guide 21
5
Printing Labels on Vials
This chapter describes how to print individual vial labels, an entire sequence of vial labels, or specific vial labels within a sequence.
CAUTION Be aware that using vials other than the 2 mL Thermo Scientific Virtuoso glass vials might permanently damage the Virtuoso Vial Identification System.
Tip See page 51 for icon descriptions.
Contents
• Printing a Vial Label
• Printing a Sequence of Vial Labels
• Printing a Vial Label Within a Sequence
5 Printing Labels on VialsPrinting a Vial Label
22 Virtuoso Vial Identification System User Guide Thermo Scientific
Printing a Vial LabelUse the following procedure to print a label on one vial.
To print one vial label
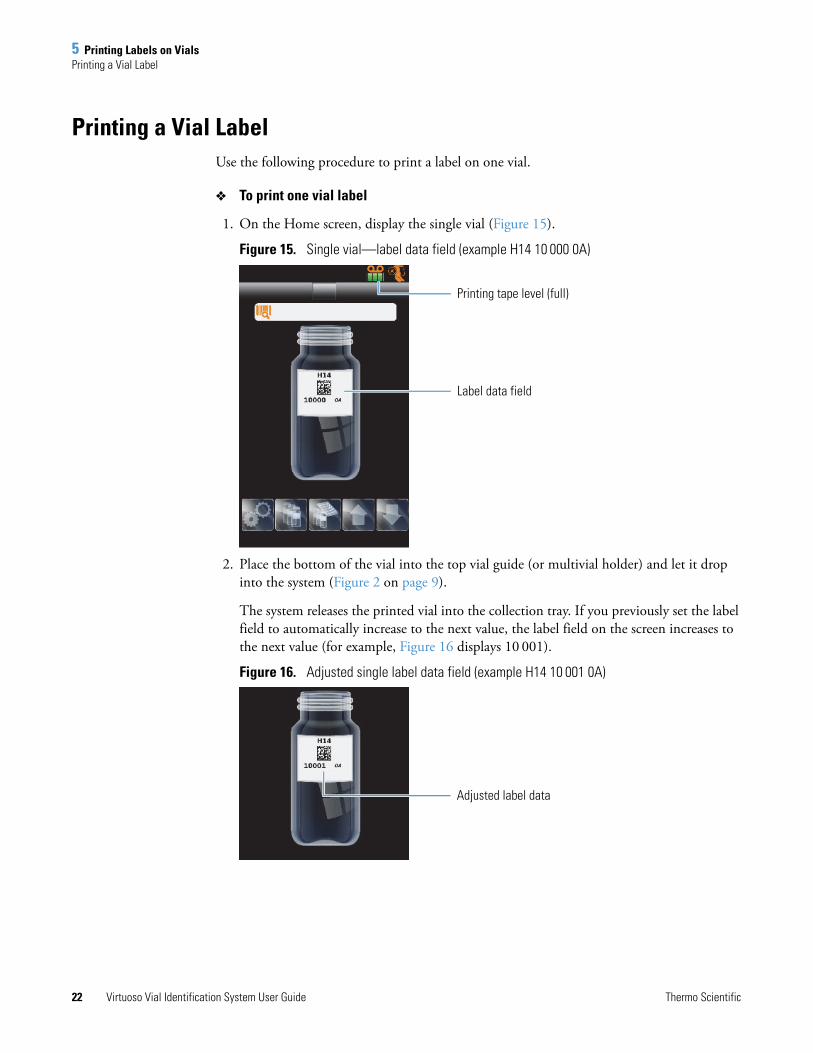
1. On the Home screen, display the single vial (Figure 15).
Figure 15. Single vial—label data field (example H14 10 000 0A)
2. Place the bottom of the vial into the top vial guide (or multivial holder) and let it drop into the system (Figure 2 on page 9).
The system releases the printed vial into the collection tray. If you previously set the label field to automatically increase to the next value, the label field on the screen increases to the next value (for example, Figure 16 displays 10 001).
Figure 16. Adjusted single label data field (example H14 10 001 0A)
Printing tape level (full)
Label data field
Adjusted label data

5 Printing Labels on VialsPrinting a Sequence of Vial Labels
Thermo Scientific Virtuoso Vial Identification System User Guide 23
Printing a Sequence of Vial LabelsUse the following procedure to print a sequence of vial labels. You can load each vial into the system one at a time or use the multivial holder to automatically load the vials.
To print a sequence of vials
1. Display the vial sequence (Figure 13 on page 19).
2. Do one of the following:
• Manually load each vial into the system. Place the bottom of the vial into the top vial guide and let it drop into the system.
The system releases the printed vial into the collection tray. The Home screen displays the next vial in the sequence.
• Automatically load the vials into the system as follows:
i. Install up to 10 vials into the multivial holder—top opening first.
ii. Attach the vial guide to the open end of the filled holder.
iii. Turn the holder over and insert it into the system’s top opening.
The system releases each printed vial into the collection tray.
Printing a Vial Label Within a SequenceUse the following procedure to print a specific vial label within a sequence.
To print a specific vial label within a sequence
1. On the Home screen, display the vial sequence.
2. Tap the Back or Forward arrow to display the vial that you want to print (for example, Figure 17 displays vial 10 001).
Figure 17. Selected vial 10 001 in the vial sequence
The selected vial is 10 001. Vial 10 002 is next in the sequence (shown behind/right).
5 Printing Labels on VialsPrinting a Vial Label Within a Sequence
24 Virtuoso Vial Identification System User Guide Thermo Scientific
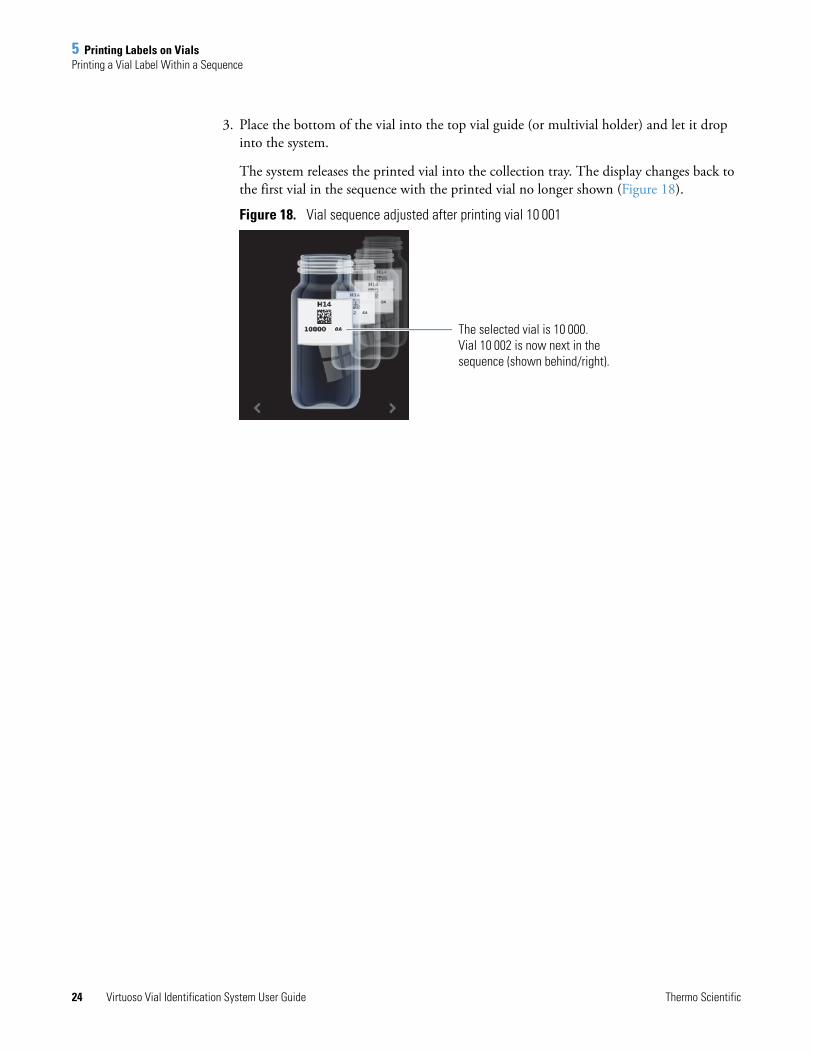
3. Place the bottom of the vial into the top vial guide (or multivial holder) and let it drop into the system.
The system releases the printed vial into the collection tray. The display changes back to the first vial in the sequence with the printed vial no longer shown (Figure 18).
Figure 18. Vial sequence adjusted after printing vial 10 001
The selected vial is 10 000. Vial 10 002 is now next in the sequence (shown behind/right).
Thermo Scientific Virtuoso Vial Identification System User Guide 25
6
Administrator Settings
This chapter describes the administrator Settings menu for the Virtuoso Vial Identification System.
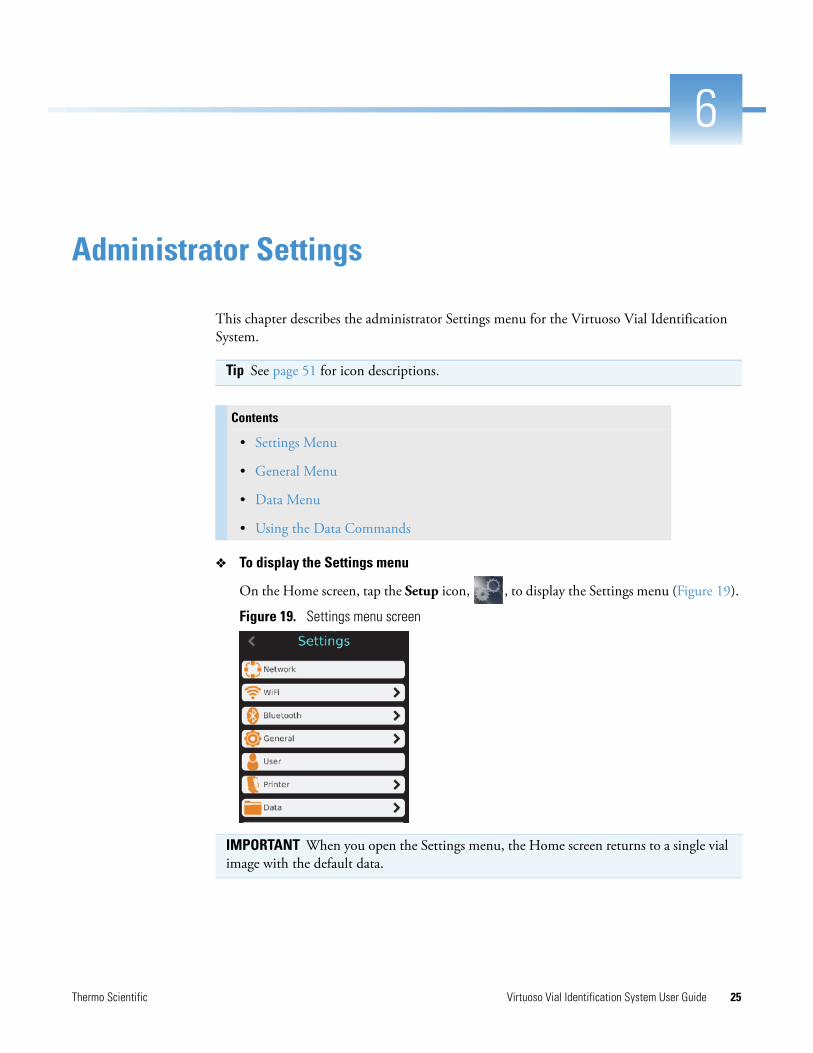
To display the Settings menu
On the Home screen, tap the Setup icon, , to display the Settings menu (Figure 19).
Figure 19. Settings menu screen
Tip See page 51 for icon descriptions.
Contents
• Settings Menu
• General Menu
• Data Menu
• Using the Data Commands
IMPORTANT When you open the Settings menu, the Home screen returns to a single vial image with the default data.
6 Administrator SettingsSettings Menu
26 Virtuoso Vial Identification System User Guide Thermo Scientific
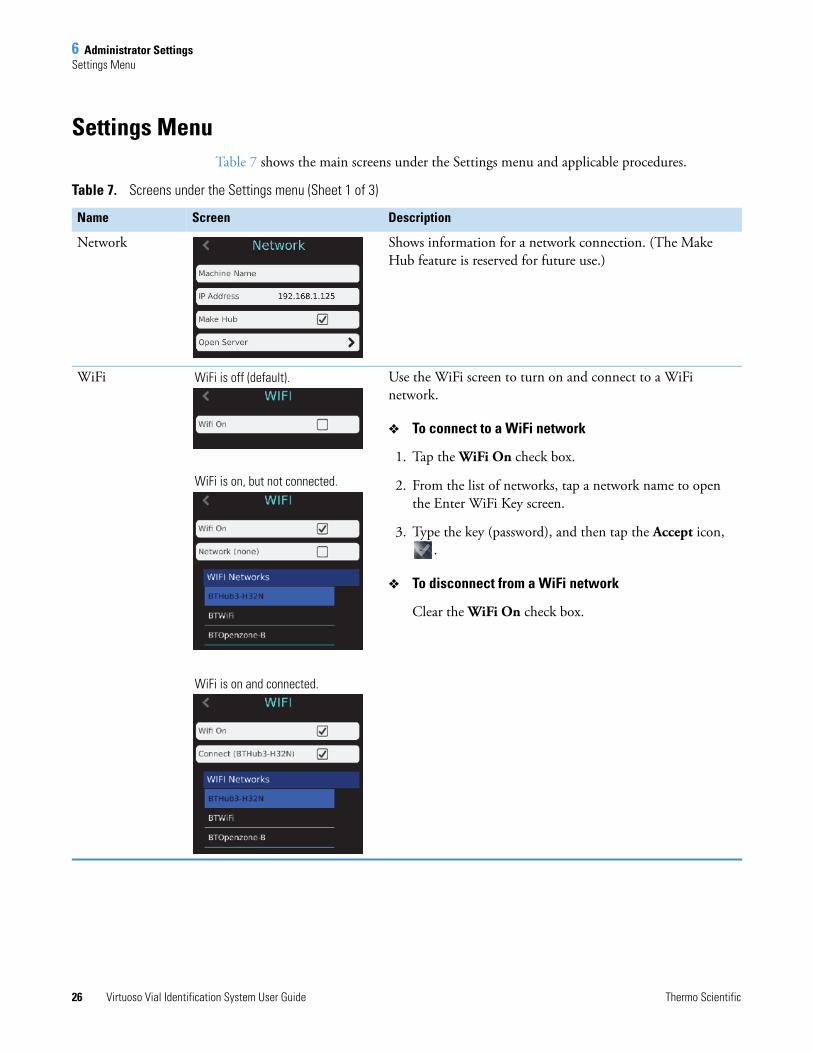
Settings MenuTable 7 shows the main screens under the Settings menu and applicable procedures.
Table 7. Screens under the Settings menu (Sheet 1 of 3)
Name Screen Description
Network Shows information for a network connection. (The Make Hub feature is reserved for future use.)
WiFi Use the WiFi screen to turn on and connect to a WiFi network.
To connect to a WiFi network
1. Tap the WiFi On check box.
2. From the list of networks, tap a network name to open the Enter WiFi Key screen.
3. Type the key (password), and then tap the Accept icon, .
To disconnect from a WiFi network
Clear the WiFi On check box.
WiFi is off (default).
WiFi is on, but not connected.
WiFi is on and connected.
6 Administrator SettingsSettings Menu
Thermo Scientific Virtuoso Vial Identification System User Guide 27
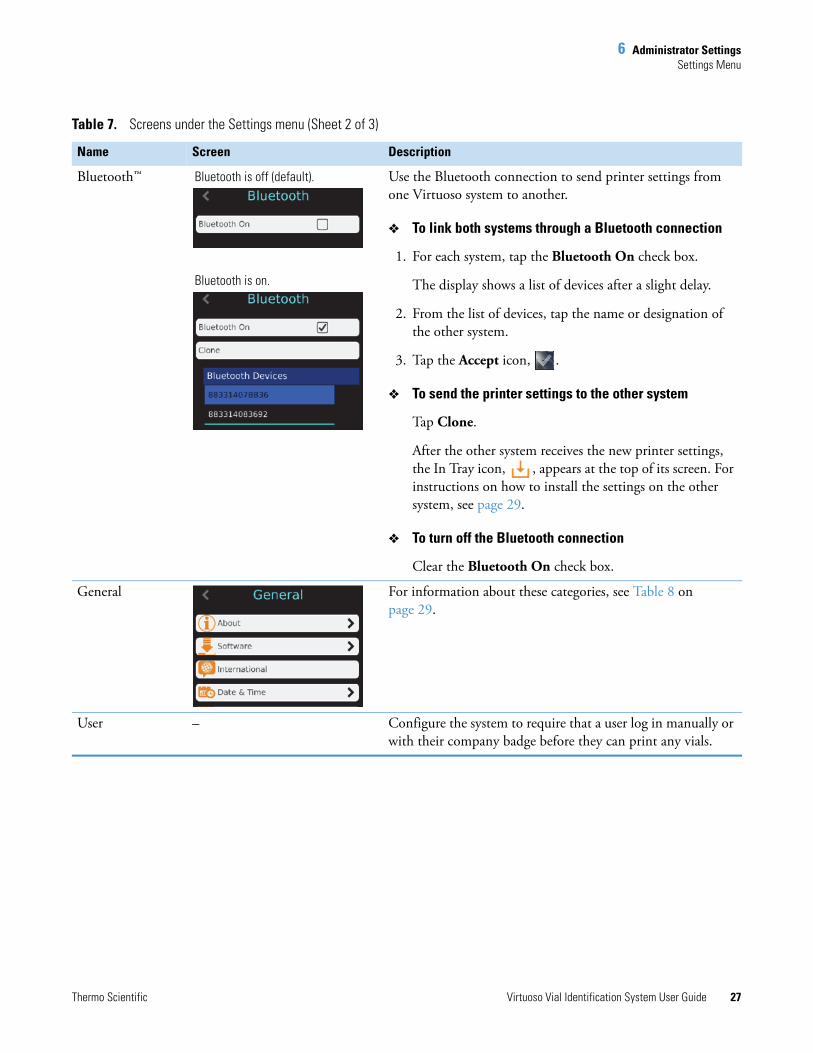
Bluetooth™ Use the Bluetooth connection to send printer settings from one Virtuoso system to another.
To link both systems through a Bluetooth connection
1. For each system, tap the Bluetooth On check box.
The display shows a list of devices after a slight delay.
2. From the list of devices, tap the name or designation of the other system.
3. Tap the Accept icon, .
To send the printer settings to the other system
Tap Clone.
After the other system receives the new printer settings, the In Tray icon, , appears at the top of its screen. For instructions on how to install the settings on the other system, see page 29.
To turn off the Bluetooth connection
Clear the Bluetooth On check box.
General For information about these categories, see Table 8 on page 29.
User – Configure the system to require that a user log in manually or with their company badge before they can print any vials.
Table 7. Screens under the Settings menu (Sheet 2 of 3)
Name Screen Description
Bluetooth is off (default).
Bluetooth is on.

6 Administrator SettingsSettings Menu
28 Virtuoso Vial Identification System User Guide Thermo Scientific
Printer Use the Printer screen to set the label text darkness, reset the printer, and access other options.
Data For information about these categories, see Table 9 on page 31.
For instructions, see “Using the Data Commands” on page 31.
Table 7. Screens under the Settings menu (Sheet 3 of 3)
Name Screen Description
6 Administrator SettingsGeneral Menu
Thermo Scientific Virtuoso Vial Identification System User Guide 29
General MenuTable 8 shows the main screens under the General menu and applicable procedures.
Table 8. Screens under the General menu (Sheet 1 of 2)
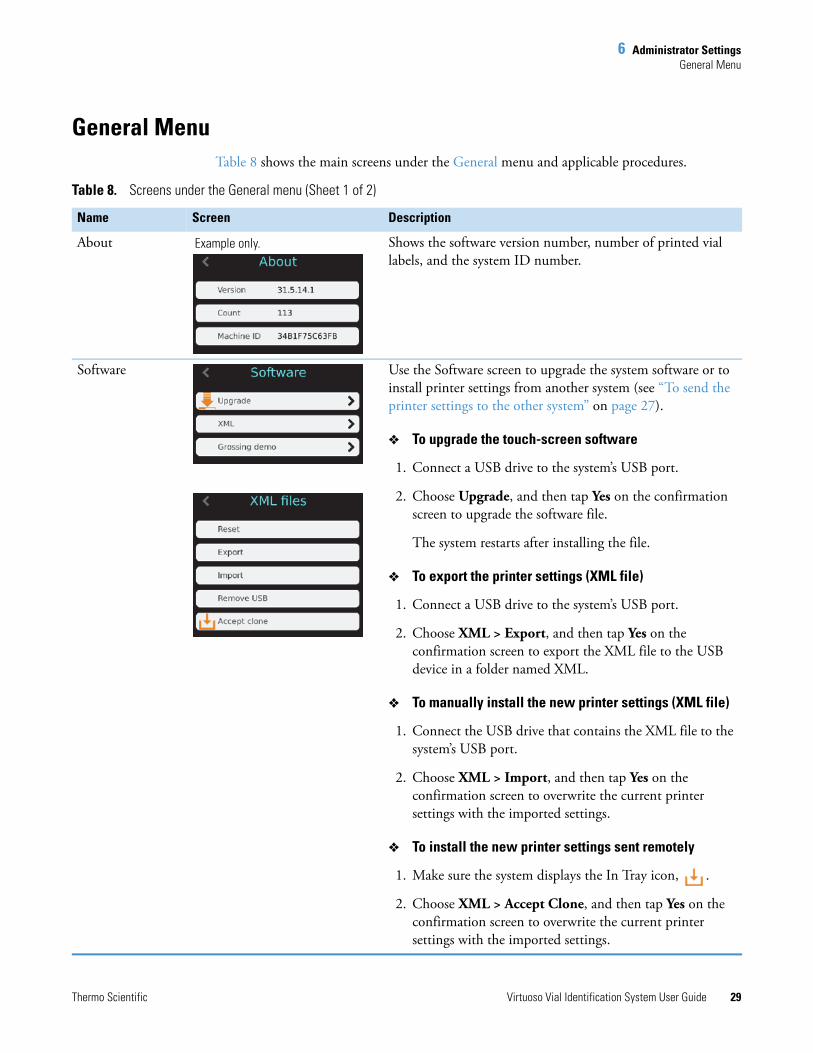
Name Screen Description
About Shows the software version number, number of printed vial labels, and the system ID number.
Software Use the Software screen to upgrade the system software or to install printer settings from another system (see “To send the printer settings to the other system” on page 27).
To upgrade the touch-screen software
1. Connect a USB drive to the system’s USB port.
2. Choose Upgrade, and then tap Yes on the confirmation screen to upgrade the software file.
The system restarts after installing the file.
To export the printer settings (XML file)
1. Connect a USB drive to the system’s USB port.
2. Choose XML > Export, and then tap Yes on the confirmation screen to export the XML file to the USB device in a folder named XML.
To manually install the new printer settings (XML file)
1. Connect the USB drive that contains the XML file to the system’s USB port.
2. Choose XML > Import, and then tap Yes on the confirmation screen to overwrite the current printer settings with the imported settings.
To install the new printer settings sent remotely
1. Make sure the system displays the In Tray icon, .
2. Choose XML > Accept Clone, and then tap Yes on the confirmation screen to overwrite the current printer settings with the imported settings.
Example only.
6 Administrator SettingsGeneral Menu
30 Virtuoso Vial Identification System User Guide Thermo Scientific
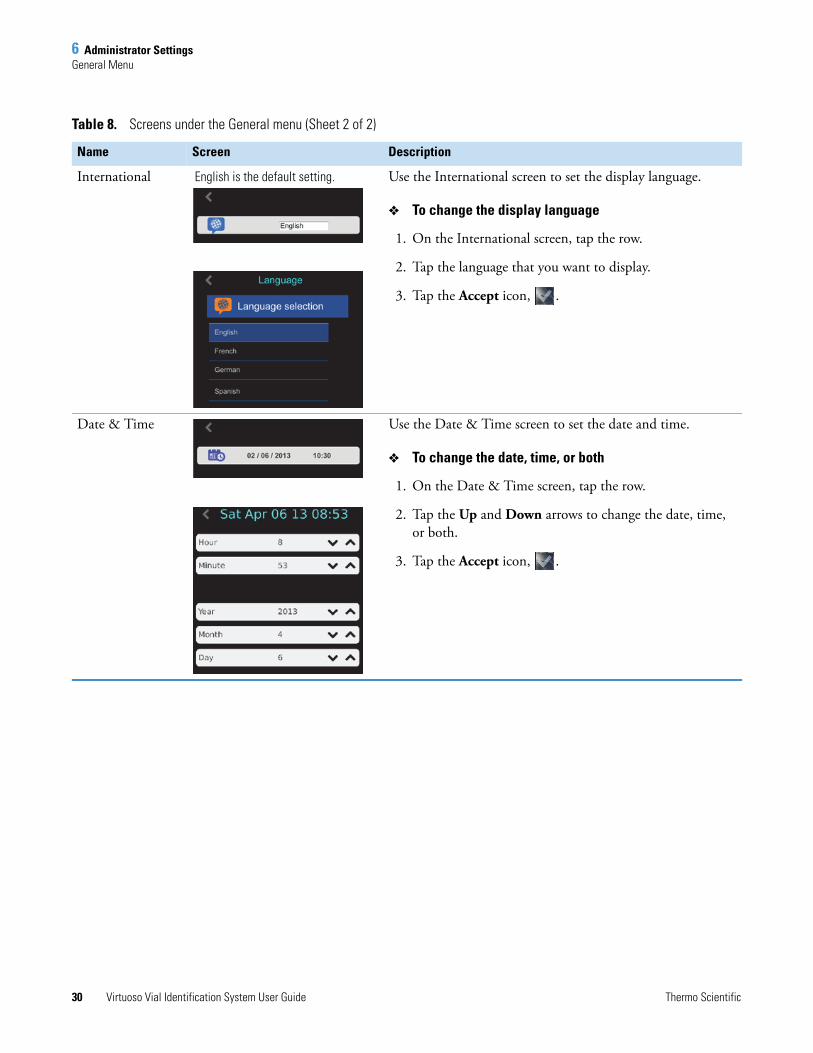
International Use the International screen to set the display language.
To change the display language
1. On the International screen, tap the row.
2. Tap the language that you want to display.
3. Tap the Accept icon, .
Date & Time Use the Date & Time screen to set the date and time.
To change the date, time, or both
1. On the Date & Time screen, tap the row.
2. Tap the Up and Down arrows to change the date, time, or both.
3. Tap the Accept icon, .
Table 8. Screens under the General menu (Sheet 2 of 2)
Name Screen Description
English is the default setting.
6 Administrator SettingsData Menu
Thermo Scientific Virtuoso Vial Identification System User Guide 31
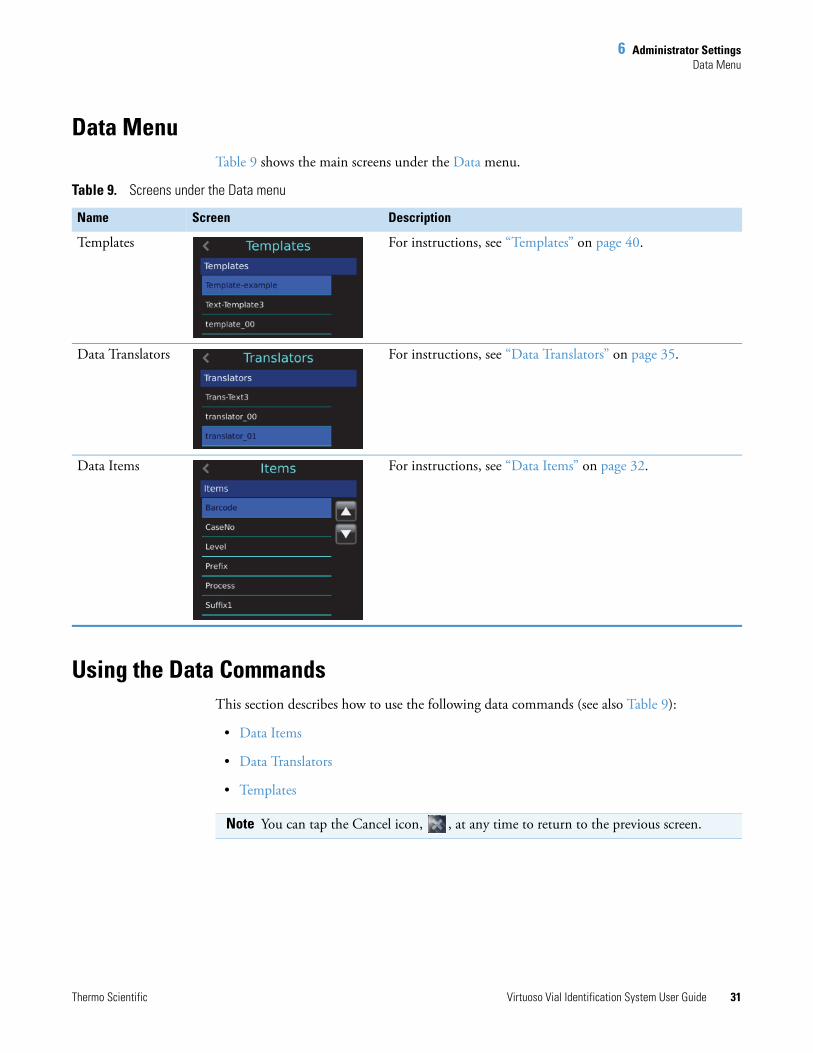
Data MenuTable 9 shows the main screens under the Data menu.
Using the Data CommandsThis section describes how to use the following data commands (see also Table 9):
• Data Items
• Data Translators
• Templates
Table 9. Screens under the Data menu
Name Screen Description
Templates For instructions, see “Templates” on page 40.
Data Translators For instructions, see “Data Translators” on page 35.
Data Items For instructions, see “Data Items” on page 32.
Note You can tap the Cancel icon, , at any time to return to the previous screen.

6 Administrator SettingsUsing the Data Commands
32 Virtuoso Vial Identification System User Guide Thermo Scientific
Data Items
Use data items to store various types of data that appear in the templates. For example, the following procedure creates a new data item (barcode).
To add a barcode item
1. On the Home screen, tap the Setup icon, , and then choose Data > Data Items to display the Items screen (Figure 20).
Figure 20. Items screen (Barcode item selected)
2. Tap Barcode, and then tap the Add icon, , to display the Item Name screen (Figure 21).
Figure 21. Item Name screen
3. Type a name for the new item (for example, Hospital).
Up and down scroll buttons
Barcode is selected.
Back (previous screen)
6 Administrator SettingsUsing the Data Commands
Thermo Scientific Virtuoso Vial Identification System User Guide 33
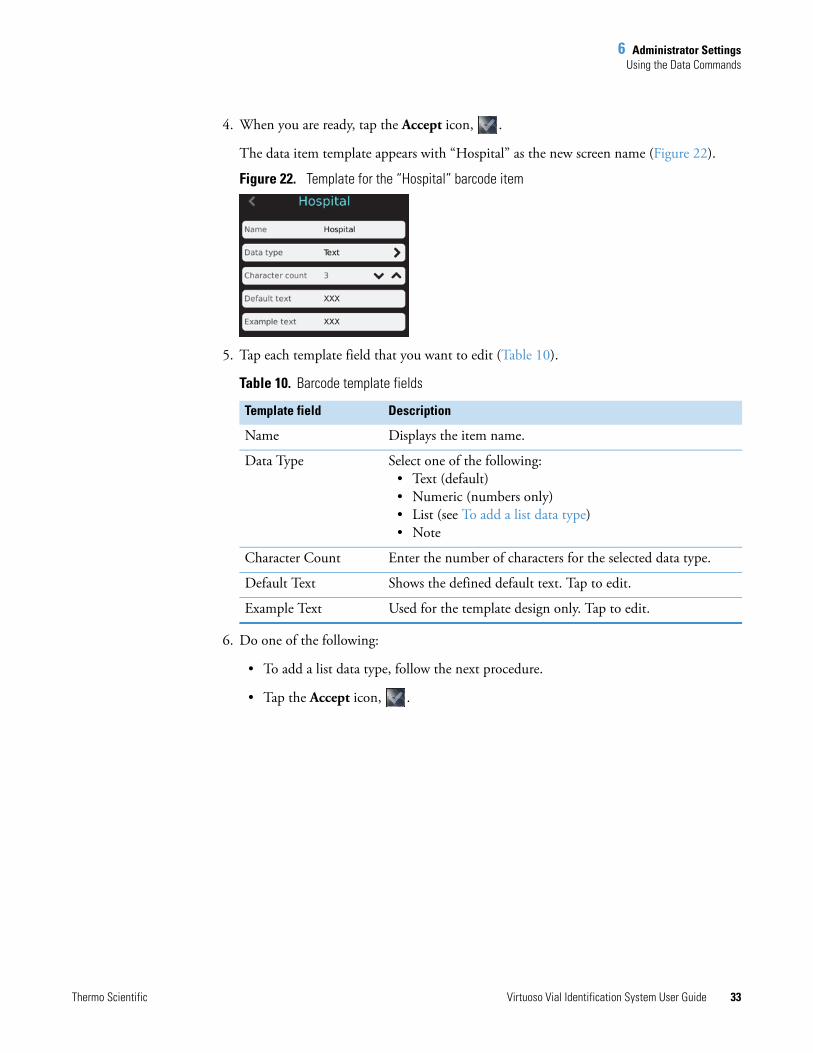
4. When you are ready, tap the Accept icon, .
The data item template appears with “Hospital” as the new screen name (Figure 22).
Figure 22. Template for the “Hospital” barcode item
5. Tap each template field that you want to edit (Table 10).
6. Do one of the following:
• To add a list data type, follow the next procedure.
• Tap the Accept icon, .
Table 10. Barcode template fields
Template field Description
Name Displays the item name.
Data Type Select one of the following:• Text (default)• Numeric (numbers only)• List (see To add a list data type)• Note
Character Count Enter the number of characters for the selected data type.
Default Text Shows the defined default text. Tap to edit.
Example Text Used for the template design only. Tap to edit.
6 Administrator SettingsUsing the Data Commands
34 Virtuoso Vial Identification System User Guide Thermo Scientific
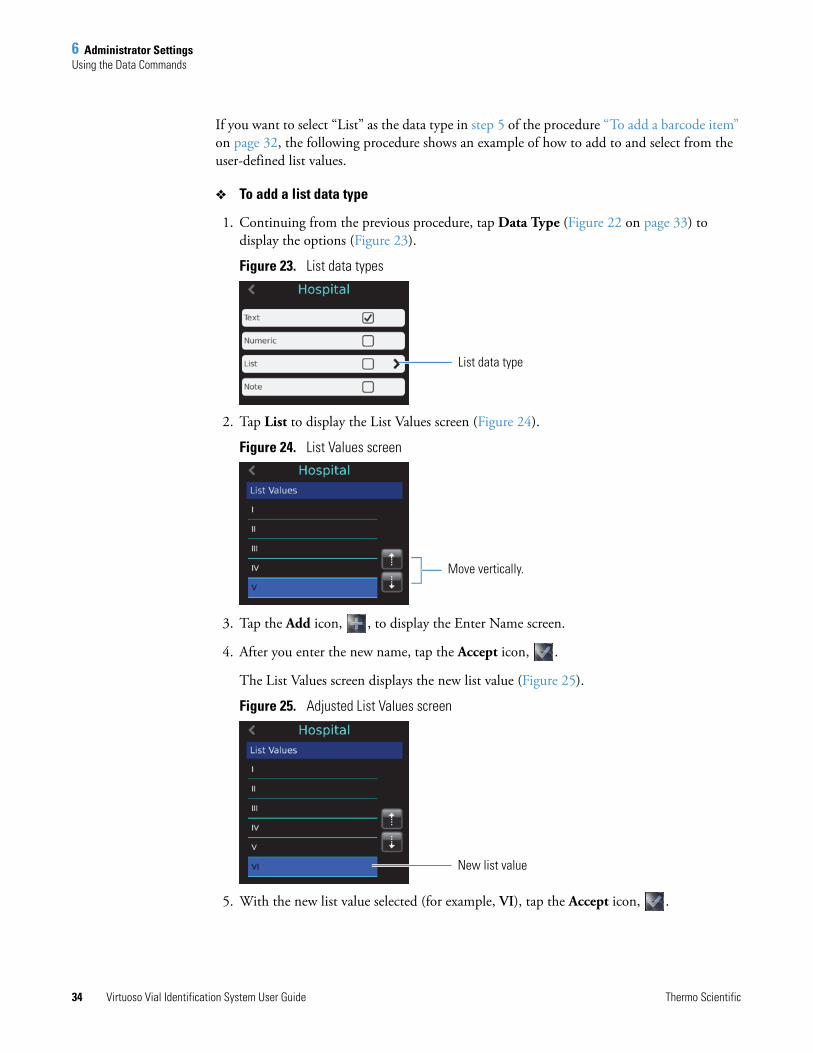
If you want to select “List” as the data type in step 5 of the procedure “To add a barcode item” on page 32, the following procedure shows an example of how to add to and select from the user-defined list values.
To add a list data type
1. Continuing from the previous procedure, tap Data Type (Figure 22 on page 33) to display the options (Figure 23).
Figure 23. List data types
2. Tap List to display the List Values screen (Figure 24).
Figure 24. List Values screen
3. Tap the Add icon, , to display the Enter Name screen.
4. After you enter the new name, tap the Accept icon, .
The List Values screen displays the new list value (Figure 25).
Figure 25. Adjusted List Values screen
5. With the new list value selected (for example, VI), tap the Accept icon, .
List data type
Move vertically.
New list value

6 Administrator SettingsUsing the Data Commands
Thermo Scientific Virtuoso Vial Identification System User Guide 35
Data Translators
Use the data translators to control how the system filters and formats incoming and outgoing data. As incoming data passes through the translator, it extracts sections and moves them into data items. For outgoing data, the translator builds a text string that consists of data items with or without delimiters (hyphens).
Delimited Data
Delimiters separate the data elements, which can vary in length, for example, H14-12345-01-0A.
• Incoming data example: “H14-12345-01-0A” scanned from a barcode translates into the following four data items.
• Outgoing data example: The text string “H14-12345-01-0A” translates to the following barcode.
Nondelimited Data
Data elements have fixed lengths (number of characters), for example, H1412345010A.
Adding a Translator for Delimited Data
Use the following procedure to add a data translator for delimited data.
To add a translator for delimited data
1. On the Home screen, tap the Setup icon, , and then choose Data > Data Translators to display the Translators screen (Figure 26).
Figure 26. Translators screen
2. Tap the Add icon, , to display the Translator Name screen.
Prefix: H14 Suffix1: 01
CaseNo: 12345 Suffix2: 0A

6 Administrator SettingsUsing the Data Commands
36 Virtuoso Vial Identification System User Guide Thermo Scientific
3. Type a name (for example, translator_02), and then tap the Accept icon, , to display the Scan or Enter Code screen.
4. Scan the code or manually enter it (for example, H14-12345-01-0A), inserting hyphens for the delimiter locations (Figure 27).
Figure 27. Scan or Enter Code screen (example H14-12345-01-0A)
5. When you are ready, tap the Accept icon, , to display the translator data fields (Figure 28).
Figure 28. Translator template fields
6. Tap Item Assignments to display the Data Assignment screen (Figure 29).
Figure 29. Data Assignment screen (with delimiters)
7. Make sure that the code separates into the correct data item fields.
Figure 29 shows the example code separated into the default data items.

6 Administrator SettingsUsing the Data Commands
Thermo Scientific Virtuoso Vial Identification System User Guide 37
8. If you need to edit the item name for a field, tap the field (for example, Prefix), and then tap the Edit icon, , to display the Target Item screen (Figure 30).
Figure 30. Target Item screen
9. Tap the new item name (for example, Process), and then tap the Accept icon, .
The Data Assignment screen now shows “Process” as the item name for “H14” (Figure 31).
Figure 31. Adjusted Data Assignment screen
Adding a Translator for Fixed Length Data
Use the following procedure to add a data translator for fixed length data.
To add a translator for delimited data
1. On the Home screen, tap the Setup icon, , and then choose Data > Data Translators to display the Translators screen (Figure 26 on page 35).
2. Tap the Add icon, , to display the Translator Name screen.
3. Type a translator name, and then tap the Accept icon, , to display the Scan or Enter Code screen.
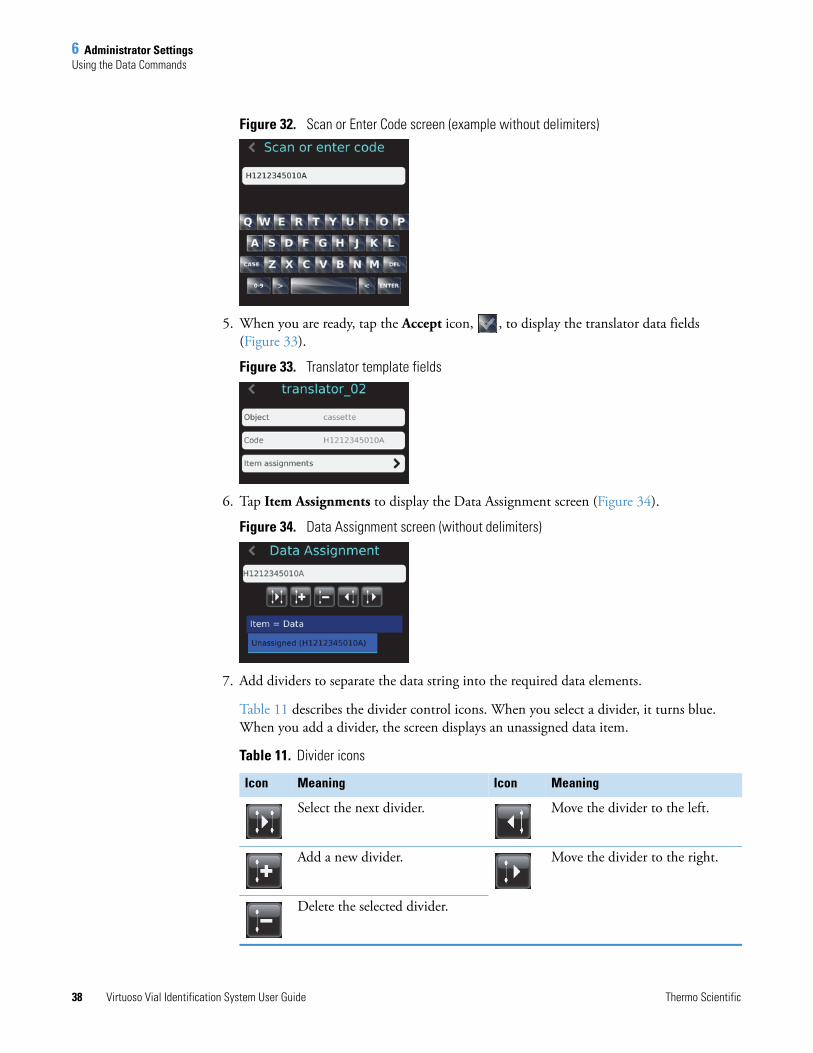
4. Scan the code or manually enter it (for example, H1212345010A) (Figure 32).
6 Administrator SettingsUsing the Data Commands
38 Virtuoso Vial Identification System User Guide Thermo Scientific
Figure 32. Scan or Enter Code screen (example without delimiters)
5. When you are ready, tap the Accept icon, , to display the translator data fields (Figure 33).
Figure 33. Translator template fields
6. Tap Item Assignments to display the Data Assignment screen (Figure 34).
Figure 34. Data Assignment screen (without delimiters)
7. Add dividers to separate the data string into the required data elements.
Table 11 describes the divider control icons. When you select a divider, it turns blue. When you add a divider, the screen displays an unassigned data item.
Table 11. Divider icons
Icon Meaning Icon Meaning
Select the next divider. Move the divider to the left.
Add a new divider. Move the divider to the right.
Delete the selected divider.

6 Administrator SettingsUsing the Data Commands
Thermo Scientific Virtuoso Vial Identification System User Guide 39
Figure 35. Data Assignment screen showing dividers and unassigned item types
8. Assign a data item (name) to each data element as follows:
a. Tap an unassigned data item, and then tap the Edit icon, , to display the Target Item screen.
b. Tap the applicable item name (for this example, Prefix), and then tap the Accept icon, .
c. Repeat step 8a and step 8b to assign the remaining item types.
Figure 36 shows the assigned data items.
Figure 36. Data Assignment screen showing dividers and assigned item types
9. Tap the Accept icon, .
Selected unassigned data item

6 Administrator SettingsUsing the Data Commands
40 Virtuoso Vial Identification System User Guide Thermo Scientific
Templates
Use the templates to control how the system prints the data fields and barcodes. You can change the template design by using different fonts, font sizes, and barcodes.
• Adding a Template
• Editing a Template
Adding a Template
Use the following procedure to add a template design.
To add a template
1. On the Home screen, tap the Setup icon, , and then choose Data > Templates to display the Templates screen (Figure 37).
Figure 37. Templates screen
2. Tap the Add icon, , to display the Template Name screen.
3. Type a template name (for example, NEW-Template), and then tap the Accept icon, , to display the Translators screen.
4. Tap the translator that you want to use, and then tap the Accept icon, , to display the template edit screen (Figure 38).
Selected template
6 Administrator SettingsUsing the Data Commands
Thermo Scientific Virtuoso Vial Identification System User Guide 41
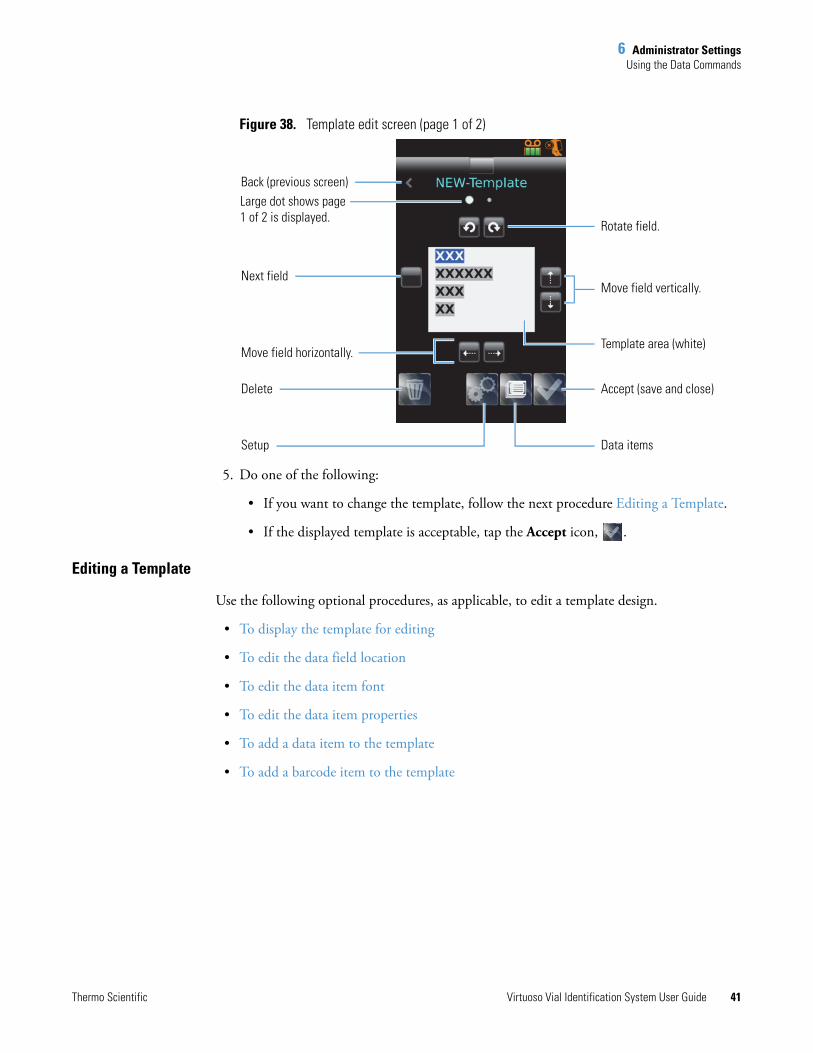
Figure 38. Template edit screen (page 1 of 2)
5. Do one of the following:
• If you want to change the template, follow the next procedure Editing a Template.
• If the displayed template is acceptable, tap the Accept icon, .
Editing a Template
Use the following optional procedures, as applicable, to edit a template design.
• To display the template for editing
• To edit the data field location
• To edit the data item font
• To edit the data item properties
• To add a data item to the template
• To add a barcode item to the template
Move field vertically.
Delete Accept (save and close)
Data itemsSetup
Back (previous screen)Large dot shows page 1 of 2 is displayed.
Next field
Template area (white)Move field horizontally.
Rotate field.
6 Administrator SettingsUsing the Data Commands
42 Virtuoso Vial Identification System User Guide Thermo Scientific
To display the template for editing
1. On the Home screen, tap the Setup icon, , and then choose Data > Templates to display the Templates screen.
2. Tap the template that you want to edit, and then tap the Edit icon, , to display the template edit screen.
To edit the data field location
1. Follow the procedure To display the template for editing to display the template edit screen.
2. Select and move the data fields as needed (Figure 38 on page 41).
3. If you have other edits to make, see “Editing a Template” on page 41.
4. After you finish the edits, tap the Accept icon, .
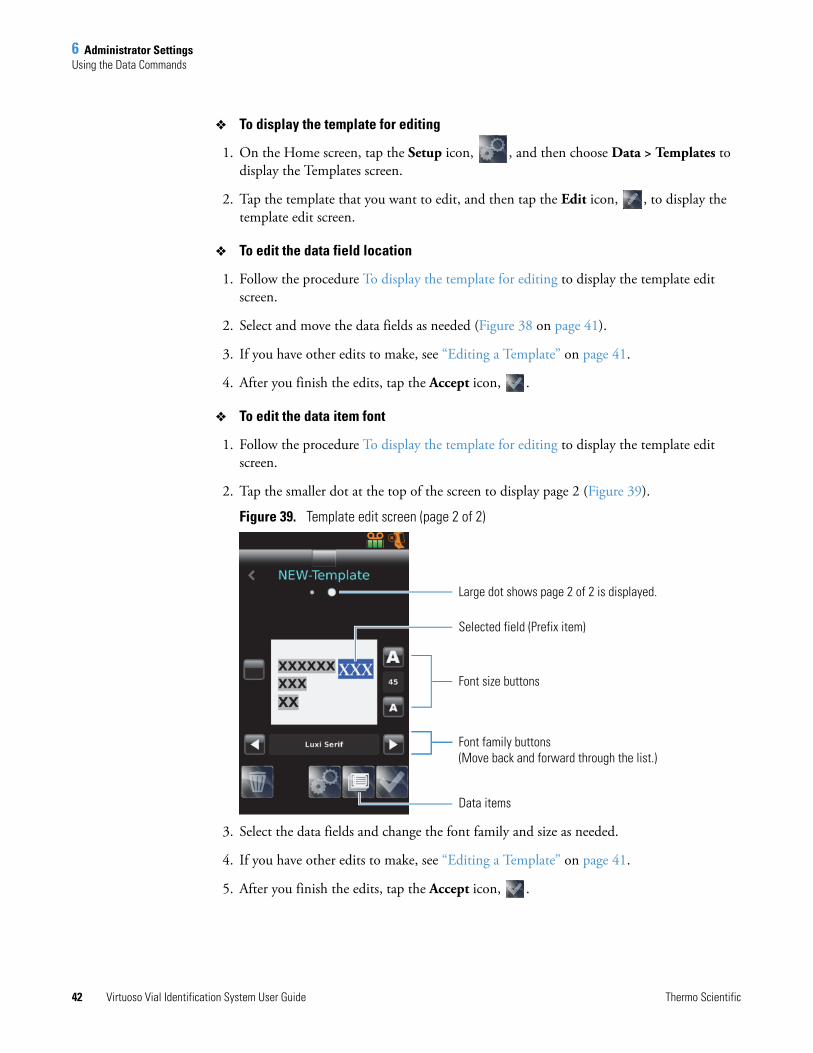
To edit the data item font
1. Follow the procedure To display the template for editing to display the template edit screen.
2. Tap the smaller dot at the top of the screen to display page 2 (Figure 39).
Figure 39. Template edit screen (page 2 of 2)
3. Select the data fields and change the font family and size as needed.
4. If you have other edits to make, see “Editing a Template” on page 41.
5. After you finish the edits, tap the Accept icon, .
Large dot shows page 2 of 2 is displayed.
Font size buttons
Font family buttons (Move back and forward through the list.)
Selected field (Prefix item)
Data items

6 Administrator SettingsUsing the Data Commands
Thermo Scientific Virtuoso Vial Identification System User Guide 43
To edit the data item properties
1. Follow the procedure “To display the template for editing” on page 42 to display the template edit screen.
2. Tap the data item to check the item assignment that is displayed at the bottom of the screen1 (not shown for this example, Prefix).
3. Tap the Data Items icon, , to display the Template Items screen with the template item selected (for this example, Prefix in Figure 40).
Figure 40. Template Items screen
4. Tap the Edit icon, , to display the available properties for this item (Figure 41).
Figure 41. Prefix item properties
5. Tap the check box for the item setting that you want.
For the barcode item, see To add a barcode item to the template for the additional settings.
6. If you have other edits to make, see “Editing a Template” on page 41.
7. After you finish the edits, tap the Accept icon, .
1 This document excludes the bottom of the screen information from all figures.
Selected template item
6 Administrator SettingsUsing the Data Commands
44 Virtuoso Vial Identification System User Guide Thermo Scientific
To add a data item to the template
1. Follow the procedure “To display the template for editing” on page 42 to display the New Template screen.
2. Tap the Data Items icon, , to display the Template Items screen (Figure 40 on page 43).
3. Tap the Add icon, , to display the Select Item screen.
4. Tap the data item that you want to add, and then tap the Accept icon, .
5. If you have other edits to make, see “Editing a Template” on page 41.
6. After you finish the edits, tap the Accept icon, .
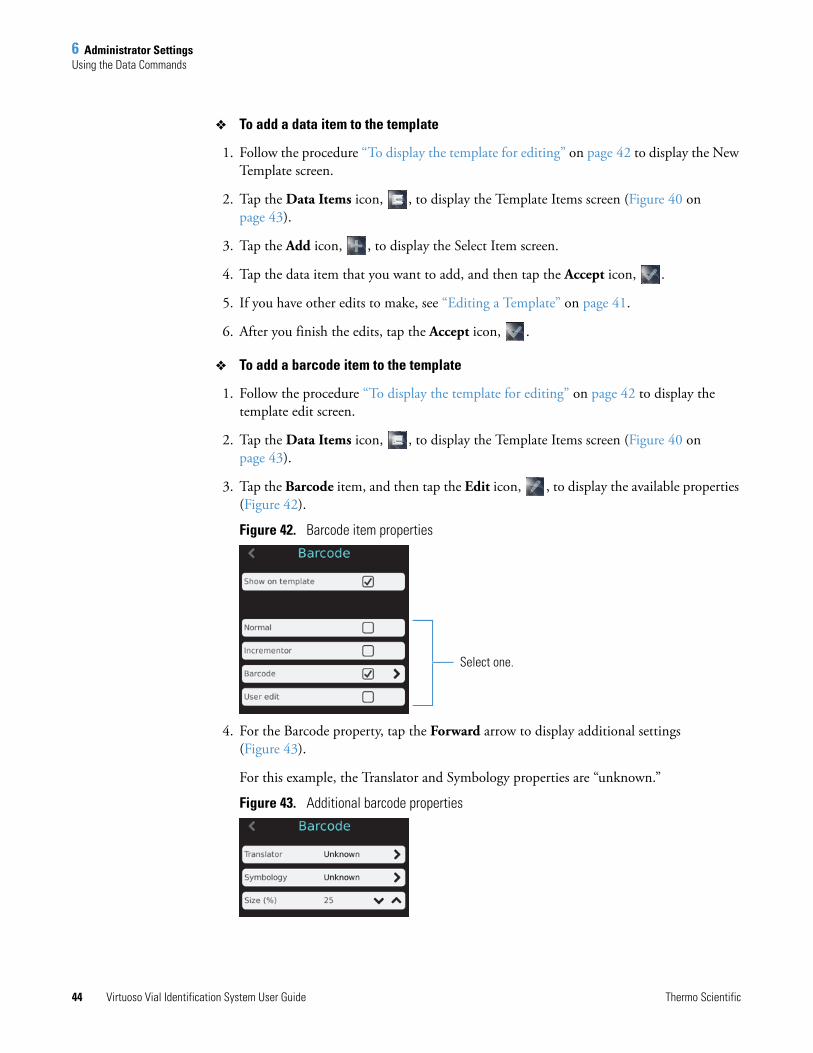
To add a barcode item to the template
1. Follow the procedure “To display the template for editing” on page 42 to display the template edit screen.
2. Tap the Data Items icon, , to display the Template Items screen (Figure 40 on page 43).
3. Tap the Barcode item, and then tap the Edit icon, , to display the available properties (Figure 42).
Figure 42. Barcode item properties
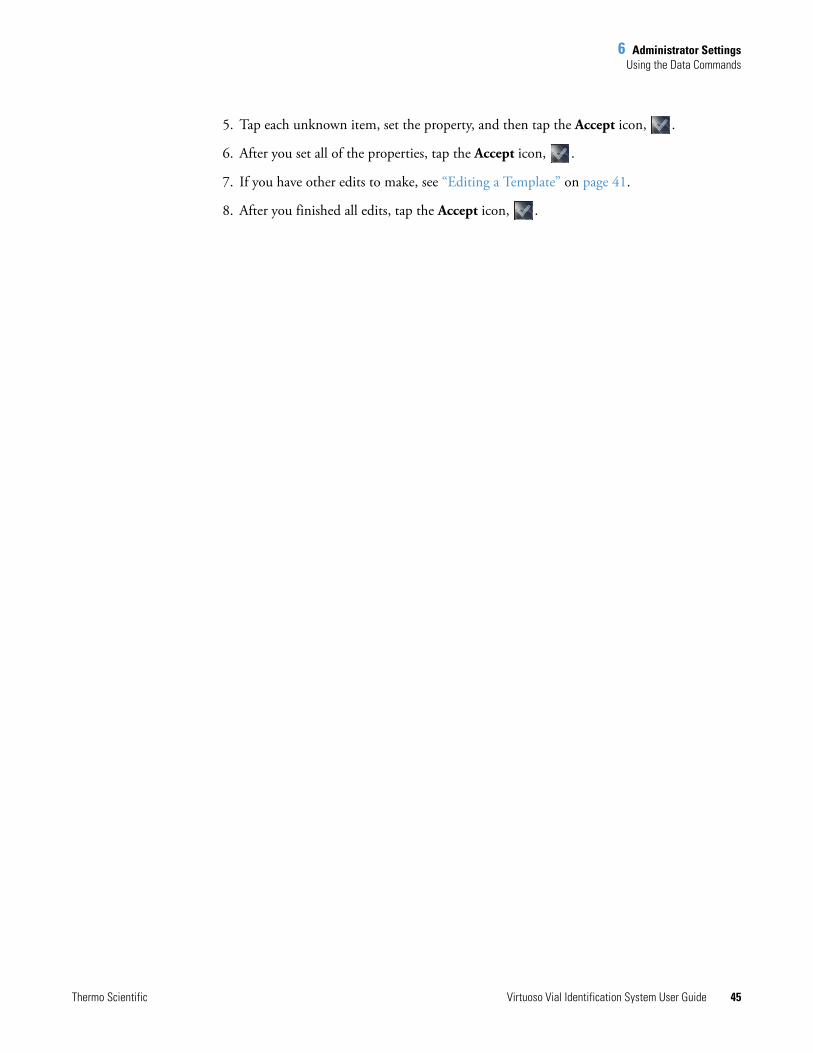
4. For the Barcode property, tap the Forward arrow to display additional settings (Figure 43).
For this example, the Translator and Symbology properties are “unknown.”
Figure 43. Additional barcode properties
Select one.
6 Administrator SettingsUsing the Data Commands
Thermo Scientific Virtuoso Vial Identification System User Guide 45
5. Tap each unknown item, set the property, and then tap the Accept icon, .
6. After you set all of the properties, tap the Accept icon, .
7. If you have other edits to make, see “Editing a Template” on page 41.
8. After you finished all edits, tap the Accept icon, .

Thermo Scientific Virtuoso Vial Identification System User Guide 47
7
Maintenance
This chapter describes the maintenance tasks for the Virtuoso Vial Identification System.
Cleaning the SystemFollow these procedures as needed.
To clean the system
1. Unplug the system from the wall outlet.
2. Clean the areas of the system as follows:
• For the touch-screen display and barcode scanner window, use a soft cloth or paper towel with a suitable screen cleaner.
• For the enclosure, use a soft cloth or paper towel with warm water and mild detergent (for example, Liquinox™).
Replacing the Printer TapeTo check the tape level or replace the used tape, follow this procedure. To order more tape, see Chapter 8, “Replaceable Parts.”
To replace the printer tape
1. Unplug the system from the wall outlet.
2. Open the top of the system (a tool is not required).
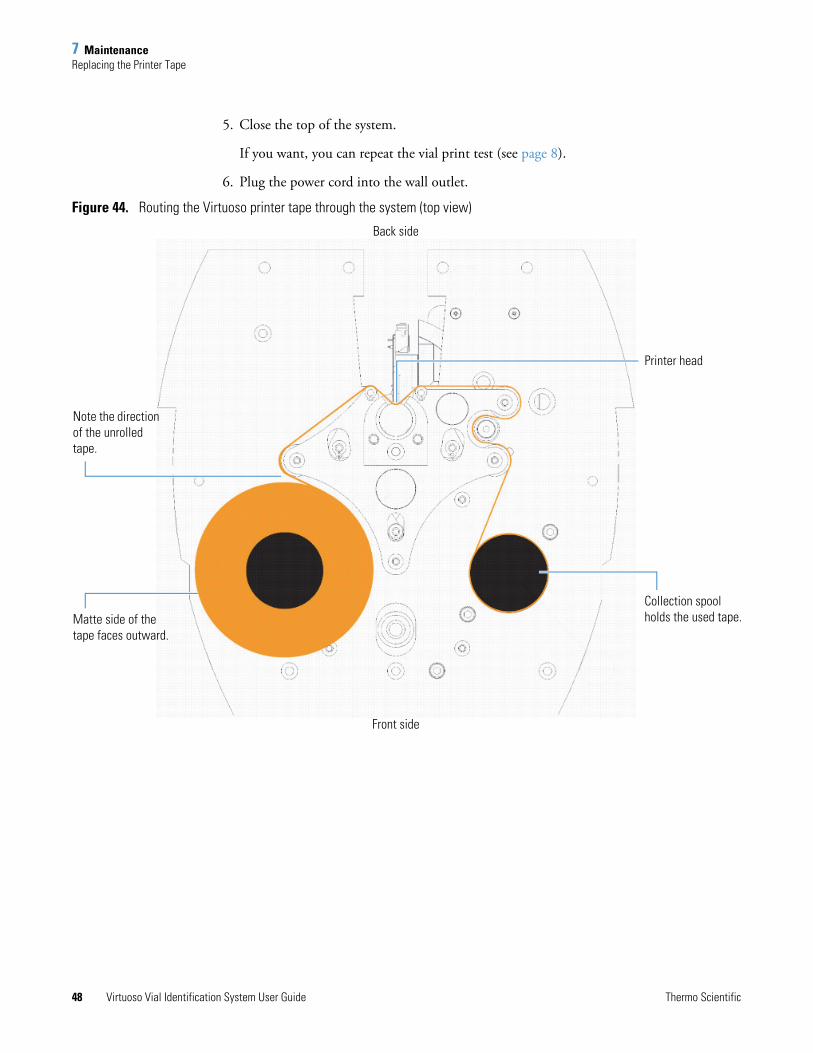
3. Lift up the used tape from the collection spool (Figure 44) and discard.
4. Carefully feed the new tape into the system as shown in Figure 44.
Contents
• Cleaning the System
• Replacing the Printer Tape
7 MaintenanceReplacing the Printer Tape
48 Virtuoso Vial Identification System User Guide Thermo Scientific
5. Close the top of the system.
If you want, you can repeat the vial print test (see page 8).
6. Plug the power cord into the wall outlet.
Figure 44. Routing the Virtuoso printer tape through the system (top view)
Collection spool holds the used tape.
Back side
Front side
Note the direction of the unrolled tape.
Printer head
Matte side of the tape faces outward.
Thermo Scientific Virtuoso Vial Identification System User Guide 49
8
Replaceable Parts
This chapter lists the consumable and replaceable parts for the Virtuoso Vial Identification System and their corresponding part numbers. To order any of these parts, contact your local Thermo Fisher Scientific service representative or go to www.thermoscientific.com/virtuoso.
Spare PartsMultivial holder, holds 10 vials, 33 cm (13 in.) long . . . . . . . . . . . . . . . . . . 60180-VT501Printer tape, black . . . . . . . . . . . . . . . . . . . . . . . . . . . . . . . . . . . . . . . . . . . . 60180-VT500Vial collection tray . . . . . . . . . . . . . . . . . . . . . . . . . . . . . . . . . . . . . . . . . . . . 60180-VT502
AccessoriesAC power adapter . . . . . . . . . . . . . . . . . . . . . . . . . . . . . . . . . . . . . . . . . . . . . . . . SP50008Power supply cord
Europe: CEE 7 plug . . . . . . . . . . . . . . . . . . . . . . . . . . . . . . . . . . . . . . . . . . . SP50010United Kingdom: BS 1363 plug . . . . . . . . . . . . . . . . . . . . . . . . . . . . . . . . . . SP50009United States: NEMA 5-15 plug . . . . . . . . . . . . . . . . . . . . . . . . . . . . . . . . . . SP50007
ConsumablesDetergent, Liquinox, 4.5 L (1 gal) . . . . . . . . . . . . . . . . . . . . . Fisher Scientific 50-821-298Screen guard (stick-on material for scanner window) . . . . . . . . . . . . . . . . . . 60180-VT503Vials, glass, 2 mL . . . . . . . . . . . . . . . . . . . . . . . . . . . . . www.thermoscientific.com/virtuoso
Contents
• Spare Parts
• Accessories
• Consumables

Thermo Scientific Virtuoso Vial Identification System User Guide 51
A
Icons
This appendix defines the main touch-screen icons for the Virtuoso Vial Identification System.
• Printer Status
• Commands
• Settings Menu
• General Menu
• Data Menu
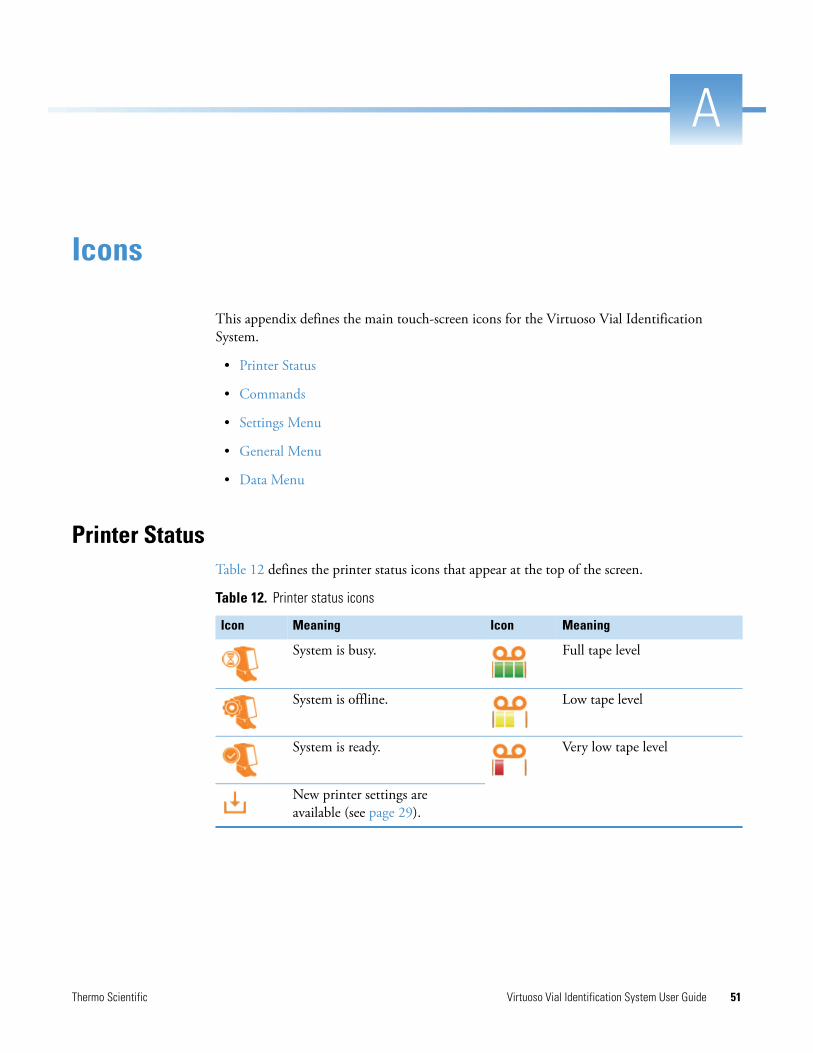
Printer StatusTable 12 defines the printer status icons that appear at the top of the screen.
Table 12. Printer status icons
Icon Meaning Icon Meaning
System is busy. Full tape level
System is offline. Low tape level
System is ready. Very low tape level
New printer settings are available (see page 29).

A IconsCommands
52 Virtuoso Vial Identification System User Guide Thermo Scientific
CommandsTable 13 defines the command icons that appear at the bottom of the screen.
Settings MenuTable 14 defines the icons that appear in the Settings menu. When the system connects to a WiFi or Bluetooth network, the corresponding icon appears in the printer status area.
Table 13. Command icons
Icon Meaning Icon Meaning
Opens the administrator Settings menu (see Table 14).
Index field: Increase
Creates a sequence. Index field: Decrease
Opens a protocol. Go to the previous screen. (Back)a
a These icons also appear near the top of the screen.
Change a template. Go to the next screen. (Forward)a
Displays the Template (data) Items screen.
Adds an item.
Accepts the change, and then returns the display to the previous screen.
Edits the selected item.
Cancels the screen changes. Deletes the selected item.
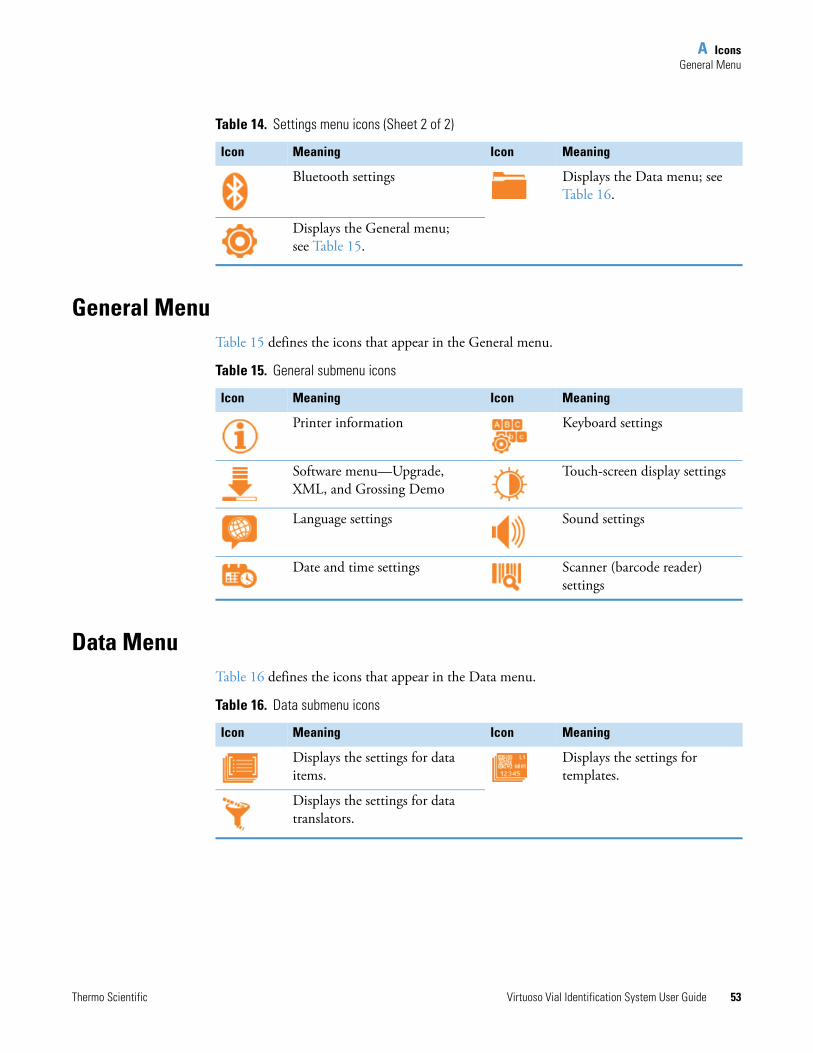
Table 14. Settings menu icons (Sheet 1 of 2)
Icon Meaning Icon Meaning
Network settings User settings
WiFi settings Printer settings
A IconsGeneral Menu
Thermo Scientific Virtuoso Vial Identification System User Guide 53
General MenuTable 15 defines the icons that appear in the General menu.
Data MenuTable 16 defines the icons that appear in the Data menu.
Bluetooth settings Displays the Data menu; see Table 16.
Displays the General menu; see Table 15.
Table 14. Settings menu icons (Sheet 2 of 2)
Icon Meaning Icon Meaning
Table 15. General submenu icons
Icon Meaning Icon Meaning
Printer information Keyboard settings
Software menu—Upgrade, XML, and Grossing Demo
Touch-screen display settings
Language settings Sound settings
Date and time settings Scanner (barcode reader) settings
Table 16. Data submenu icons
Icon Meaning Icon Meaning
Displays the settings for data items.
Displays the settings for templates.
Displays the settings for data translators.

Thermo Scientific Virtuoso Vial Identification System User Guide 55
B
Printer Specifications
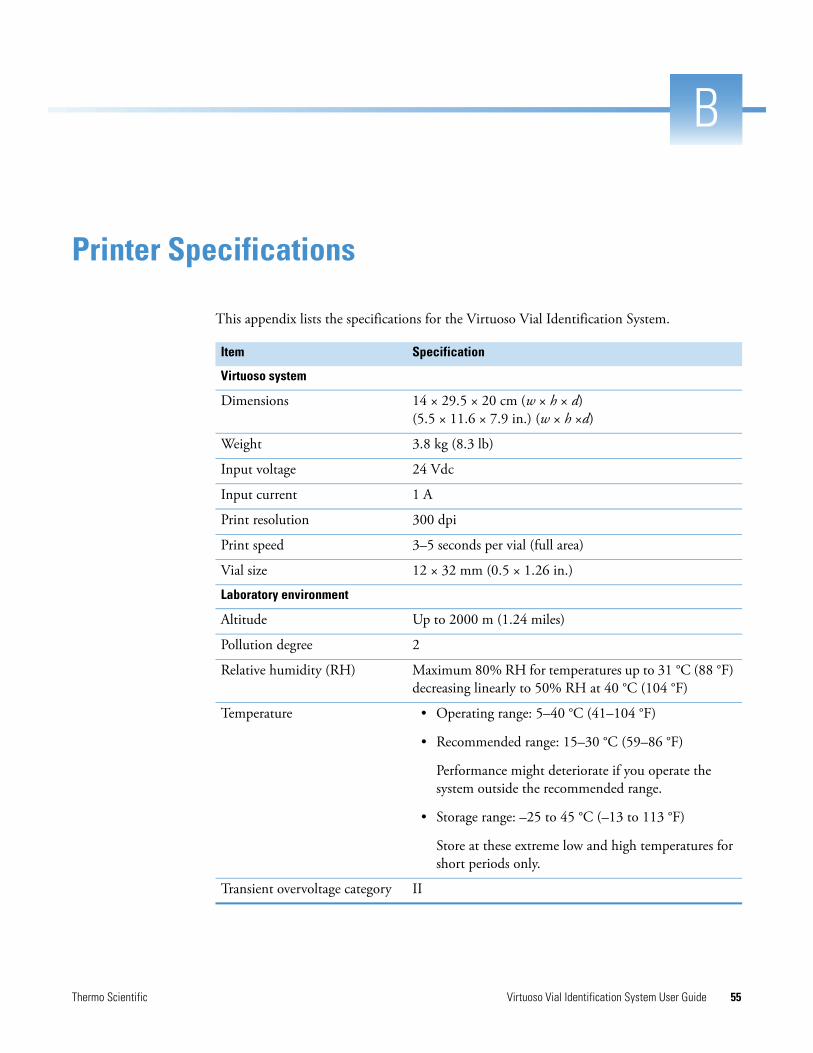
This appendix lists the specifications for the Virtuoso Vial Identification System.
Item Specification
Virtuoso system
Dimensions 14 × 29.5 × 20 cm (w × h × d) (5.5 × 11.6 × 7.9 in.) (w × h ×d)
Weight 3.8 kg (8.3 lb)
Input voltage 24 Vdc
Input current 1 A
Print resolution 300 dpi
Print speed 3–5 seconds per vial (full area)
Vial size 12 × 32 mm (0.5 × 1.26 in.)
Laboratory environment
Altitude Up to 2000 m (1.24 miles)
Pollution degree 2
Relative humidity (RH) Maximum 80% RH for temperatures up to 31 °C (88 °F) decreasing linearly to 50% RH at 40 °C (104 °F)
Temperature • Operating range: 5–40 °C (41–104 °F)
• Recommended range: 15–30 °C (59–86 °F)
Performance might deteriorate if you operate the system outside the recommended range.
• Storage range: –25 to 45 °C (–13 to 113 °F)
Store at these extreme low and high temperatures for short periods only.
Transient overvoltage category II

Thermo Scientific Virtuoso Vial Identification System User Guide 57
I
Index
Aaccessories 49administrator menus
DataData Items 32Data Translators 35Templates 40
General 27Settings 25–26
Bback panel connections 8barcode field, location 10Bluetooth, connection 27
Ccleaning the system 47collection tray, installing 3command icons
See icons, commandcompliance
FCC ivregulatory iiiWEEE v
connectionsback panel connectors 8back panel requirements 8
consumable parts 49contacting us xicopying printer settings to another system 27customer responsibility, power source 1
Ddata assignments, changing 37data items
adding a barcode 44
adding an item 44editing the font 42editing the properties 43moving the fields 42
delimiters, using in data translators 35
Eearth ground 2electromagnetic compatibility iiienvironmental requirements 2error messages 7
FFCC compliance ivfont
See data items, editing the font
Ggloves, using with touch screen 6
HHome screen
return to button location 10single vial view (default) 10
Iicons
command 52descriptions 51menus
Data 53General 53Settings 52
printer status 10, 51using 7
initialization process, upon start-up 3

58 Virtuoso Vial Identification System User Guide Thermo Scientific
Index: K
Kkeyboard
external, using 8touch screen, using 7
Llabel data field
changing the template 18editing 17
laboratory requirementsearth ground 2electrical wall outlets 2environment 2line power 1
line powerconnecting to 3disconnecting from 4
Mmaintenance
cleaning the system 47replacing the tape 47
marking area, label dimensions 5menu icons
Data 53General 53Settings 52
multivial holder, installing 3
Ppower
turning off 4turning on 3–4
printer settingscloning (copying) 27importing 29
printingone vial
not in a sequence 22within a sequence 23
sequence of vials 23
Rregulatory compliance iiireplaceable parts 1, 49
Ssafety standards iiisequences
See vial sequencessoftware upgrade
instructions 29notification email 6
spare parts 49status icons
See icons, printer statussystem sound, warning 9
Ttape, routing inside the system 48template edit screen
page 1 41page 2 42
templates, adding 40templates, editing 42testing the printer 8touch screen
Create Sequence screen 12label data field
changing the template 18editing 17
UUSB ports 5
Vvial sequences
creating 12deleting a vial 20editing 19labels 6printing 22–23
vialsmain marking area, dimensions 5required dimensions 9
Wwall outlets 2warning sound, system 9WEEE compliance vWiFi connection 26