visionslive - how to create and run your first live session
TRANSCRIPT

Creating and Running a Live
Session
Prepared for:
First time users of VisionsLive V+ Focus Groups and IDI’s
Document History: Version1.1 – 3
rd September 2015
Prepared by – R.Maunder VisionsLive Limited© VisionsLive Ltd 2009-2015

Creating your first focus group This is a short guide on how to create and run your first live session, and will include:
• How a session room is prepared – including loading and preparation of stimulus on the whiteboards (including video and images)
• Loading of the discussion guide
• How you save a template of your Session Room to use the same content for other groups and focus groups.
1. Getting started
> Log in at https://portal.visionslive.com

2. Entering the session room
> After you have created your session, you may view your pending sessions by logging into your
account.
> Moderators can log into the session once it is created at any point to upload stimulus. This can
be done by clicking on the “Content” button on the project dashboard.
3. Preparing the session room I. Creating the Discussion Guide
> Once in the session room, project stimulus can be loaded prior to the live session from within
the session room itself.
> Moderators can load the Discussion Guide by clicking on the drop down menu at the top right
of the page.

> To add an entire discussion guide in bulk, you can do this by selecting the “Edit” button on the
bottom of the discussion guide drop down menu and copy and paste into the text box.
> To differentiate between a chat message and a moderator instruction message, you must enter
“Moderator instruction:” in front of the moderator instructions.
> You must then click “Save” to confirm the entered discussion guide.

> When entering the discussion guide manually, you have the option of entering a “Chat
message” – which will be sent to all participants and other moderators – or a “Moderator
Instruction” – which will only be visible to the moderators within the session.
> Messages can be edited and deleted easily from the discussion guide drop down menu, by
hovering over the message and selecting the pencil (edit) or dustbin (delete) options.
> You can scroll through the discussion guide by clicking on the “Next item” chevron by the
discussion guide drop down.
> Items can be re-ordered from within the discussion guide menu by dragging and dropping to
you preferred order.

II. Creating the Whiteboard Slides
> Slides can be added by selecting the drop down option to the centre left of the screen, titled
“Slide 1”.
> From here you can edit the first default by selecting the pencil icon, as well as adding others
through selecting the “Add” option at the bottom of the page.
> Slides can also be duplicated and deleted through selecting the page and dustbin options,
respectively.
> Once again, items can be re-ordered from within the slide list by dragging and dropping to your
preferred order.
> You can scroll through the discussion guide by clicking on the “Next item” chevron by the slide
drop down.

III. Adding Media to Your Slides
> From within a slide, a moderator can upload
images and videos by clicking on the “Image
library” icon towards the top left of the screen and then selecting “Upload an image”.
> Once a picture has been uploaded it can be added to the slide by selecting the “Add image to
whiteboard” option.

> Once an image has been added to the whiteboard, there are numerous editing options. An
image can be re-sized by clicking on the image and expanding and compressing it.
> Shapes and images can also be locked by selecting the “Lock / Unlock shape” option along
the bottom of the whiteboard; locking a shape means that respondents cannot move or interact
with them. Borders can also be added by selecting the “Border” option.
> Videos can also be uploaded to the whiteboard. This can be done through selecting the
“Video library” icon and then selecting “Upload a video”.

> From here you must enter a video title and upload your video through selecting “Browse”.
Adding a description can also be done, but is optional. You can also specify the video size and
quality. Finally, select “Upload Video”.

> Once the video is uploaded it will be saved within your video library and ready for you to play to
the respondents on the day of the session. To play the video during the live session, you need to
click on the video library icon, hover over the video you which to play and select the play icon.
IV. Creating Polls
> Polls can either be made in advance or set-up during a session. Click on the “Polls” button to
access the polls manager. From here you can set up the type of poll you want (choose from single-
select, mulit-select, agreement or text-prompt poll). Once created you can run the poll at any time by
clicking the green “run poll” icon next to the poll’s name. A full tutorial of how to use polls can be found
at http://download.visionslive.com/143aa22586_v

V. Respondent Tools
> When running respondent engagement exercises, the respondent whiteboard tools are a great
way for respondents to be clear and be creative in their responses. The toolset contains:
selector, pencil, line, image upload, text box, tick and cross boxes, highlighter, rectangle and
circle options.
> To enable the tools for respondents, you must select the “Edit Toolset” cog icon (you can find
this beneath all of the tool icons) and turning the respondent tools to “ON”.
> From here you can select which tools you would like the respondent to be able to use by
ticking and un-ticking your toolset preferences.

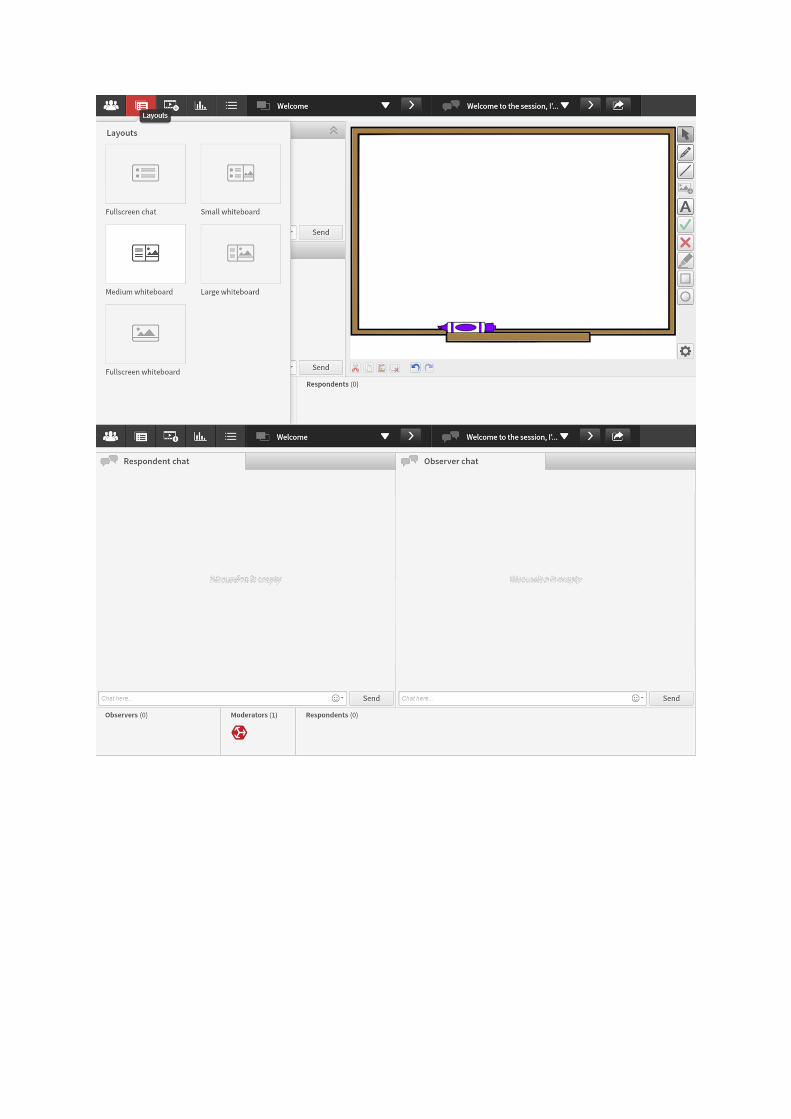
VI. Whiteboard Layout
> As a moderator you are able to change the whiteboard layout for each slide by selecting the
“Layouts” option near the top left of the screen. There are numerous options for moderators to
choose from, depending on the activity they are setting for respondents. There are four different
whiteboard sizes, as well as a full screen chat option (see below). Chat can be hidden altogether
through selecting the full screen whiteboard option.

VII. Saving a Template
> Once the session room has its discussion guide and stimulus set-up as required, a template of
the session can be saved so that future sessions can be created with the same content. Click on
the options button at the top of the screen and select “Save template”. You will be prompted to
enter a name and a description of you template.
4. Running the session room I. Participant links
> On the day of the session, if any of the participants are having trouble getting into the session
room, their links can be retrieved from within the project dashboard by selecting the “Links”
option.

> Once in the participant links page, links can be easily copied and pasted by selecting the
“copy” option next to the link you wish to retrieve. This can now be pasted and sent to the
necessary participants.
> Please note that respondent links are unique. Each link is associated with a single participant
login and also cannot be used by more than person at any time.

II. The waiting room
> Once the respondents have received their email to join the session and used their link, they will
be placed into the waiting room. As a moderator, you will see when respondents are in the
waiting room as the “Waiting Room” icon will begin to flash.
> Once you click on this icon, you will have the option of either inviting the waiting respondents
into the session, or alternatively going to greet them in the waiting room by selecting the “Go to
the Waiting Room” option. Typically moderators wait until all respondents are in the waiting
room before inviting them into the session, as to not begin the session before everybody is
ready. As soon as one respondent enters the session room, the session will begin.
> Once the respondents are in the waiting room, the session will begin. You can find the timer to
keep track of how long the session has been running for in the top right of the screen.
> Once all of the respondents are in the waiting room, the moderator can invite them to the
session room in mass by selecting the “Invite All” option.

> From inside the waiting room you can speak with the respondents to prepare them for the
session, or just chat with them while you’re waiting for the other participants to join.
> You also have the option of inviting specific respondents to the session on a one-by-one basis,
rather than all at the same time. You can do this by selecting the “Invite to session” button next
to the respondent you wish to invite.
> To get back into the session room, select the “Back to session room” icon in the top left of
the screen.

III. Moderating the live session
> You will be able to see the number of the participants in the session by seeing the
“Respondents” icon at the bottom of the page. Each participant is colour coded as it easily
differentiates between each response from each respondent.
> Your pre-prepared discussion guide messages can be sent to the respondents by scrolling
through and entering your chosen message, by selecting the “Next item” and “Enter” icons,
respectively.
> Once you send a message, it will then be visible to the respondents.

> Respondent responses can easily be deleted by hovering over the message you wish to delete
and selecting the dustbin option.
> Respondents can use the toolset to engage with your questions. Again, as each respondent
has a colour, all responses can be easily differentiated.

> If you wish to respond to respondent questions, or add anything that has not been pre-
prepared within your discussion guide, this can be done by entering your messages into the text
box to the left of the screen.

IV. Ending the session
> To end this session, this can be done by selecting the “End session” icon, which is visable by
hovering above the cross symbol at the top right of the screen.
V. Generating Snapshots
> Once you have ended the session, you will be asked if you would like to generate the snaphots of
the session. This will save as images all the slides, and their annotations, from your session.
VI. Finish
> You are now free to close your browser, the session has finished.
