vm05 - opentext vendor invoice management 6.0.0 - configuration guide english (vim060000-cgd-en-4)
DESCRIPTION
VM05 - OpenText Vendor Invoice Management 6.0.0 - Configuration Guide English (VIM060000-CGD-EN-4TRANSCRIPT
OpenText Vendor Invoice Management
Configuration Guide
The OpenText Vendor Invoice Management Configuration Guide describes the technical aspects of configuring OpenText Vendor Invoice Management 6.0.
VIM060000-CGD-EN-4
OpenText Vendor Invoice Management Configuration Guide VIM060000-CGD-EN-4 Rev.: 07. Feb. 2012
This documentation has been created for software version 6.0. It is also valid for subsequent software versions as long as no new document version is shipped with the product or is published at https://knowledge.opentext.com.
Open Text Corporation
275 Frank Tompa Drive, Waterloo, Ontario, Canada, N2L 0A1
Tel: +1-519-888-7111 Toll Free Canada/USA: 1-800-499-6544 International: +800-4996-5440 Fax: +1-519-888-0677 Email: [email protected] FTP: ftp://ftp.opentext.com For more information, visit http://www.opentext.com
Copyright © by Open Text Corporation, Open Text Inc.
Open Text Corporation is the owner of the trademarks Open Text, OpenText, The Content Experts, OpenText ECM Suite, OpenText eDOCS, eDOCS, OpenText FirstClass, FirstClass, OpenText Exceed, OpenText HostExplorer, OpenText Exceed OnDemand, OpenText Exceed 3D, OpenText Exceed Freedom, OpenText Exceed PowerSuite, OpenText Exceed XDK, OpenText NFS Solo, OpenText NFS Client, OpenText NFS Server, OpenText NFS Gateway, OpenText Everywhere, OpenText Real Time, OpenText Eloquent Media Server, OpenText Integrated Document Management, OpenText IDM, OpenText DocuLink, Livelink, Livelink ECM, Artesia, RedDot, RightFax, RKYV, DOMEA, Alchemy, Vignette, Vizible, Nstein, LegalKEY, Picdar, Hummingbird, IXOS, Alis Gist-in-Time, Eurocortex, Gauss, Captaris, Spicer, Genio, Vista Plus, Burntsand, New Generation Consulting, Momentum Systems, DOKuStar, and RecoStar among others. This list is not exhaustive.
All other products or company names are used for identification purposes only, and are trademarks of their respective own-ers. All rights reserved.
VIM060000-CGD-EN-4 OpenText Vendor Invoice Management iii
Table of Contents
PRE Introduction 7 i About Vendor Invoice Management......................................................... 7 ii About This Document............................................................................... 9 iii Contact Information................................................................................ 11
1 Understanding Vendor Invoice Management ........................ 13
2 Preparing the Configuration ................................................... 17
Part 1 Configuration 19
3 ArchiveLink Document Type Configuration .......................... 21 3.1 Configuring ArchiveLink Document Types............................................. 21 3.2 Linking SAP Business Objects to ArchiveLink Document Types .......... 27
4 Roles ........................................................................................ 29 4.1 Defining Roles........................................................................................ 29 4.2 Defining Role Templates........................................................................ 31 4.3 Assigning Templates to Roles ............................................................... 35 4.4 Maintaining Role Determination Settings............................................... 37
5 Document Processing Process Configuration...................... 41 5.1 Configuring DP Document Types .......................................................... 44 5.2 Roles in Document Processing.............................................................. 70 5.3 Configuring DP Process Options ........................................................... 70 5.4 Invoice Processing Plug-ins................................................................... 83 5.5 Extending Document Data ..................................................................... 85 5.6 Mapping External System Data (OCR/IDoc) ......................................... 86 5.7 Configuring the Process Type................................................................ 88 5.8 Configuring Indexing Line Matching from OCR Results ........................ 94 5.9 Additional Process Configurations ....................................................... 111 5.10 Configuring Global Parameters............................................................ 115
6 PO Parking Process Configuration ...................................... 121 6.1 Defining Rollout Criteria ....................................................................... 123
Table of Contents
iv OpenText Vendor Invoice Management VIM060000-CGD-EN-4
6.2 Configuring Process Options ............................................................... 126 6.3 Configuring Parking Reasons .............................................................. 130 6.4 Configuring Global Parameters............................................................ 135
7 PO Blocking Process Configuration.....................................149 7.1 Defining Rollout Criteria ....................................................................... 151 7.2 Configuring Process Options ............................................................... 153 7.3 Configuring Blocking Reasons............................................................. 155 7.4 Configuring Global Parameters............................................................ 157
8 Non PO Parking Process Configuration...............................171 8.1 Defining Rollout Criteria ....................................................................... 173 8.2 Configuring Parking Reasons .............................................................. 176 8.3 Configuring Global Parameters............................................................ 181
9 Invoice Approval ....................................................................195 9.1 Overview .............................................................................................. 196 9.2 Configuring the Process Type.............................................................. 198 9.3 Configuring the Parking Reason.......................................................... 198 9.4 IAP Process Basics.............................................................................. 200 9.5 Roles in the IAP Process ..................................................................... 216 9.6 Maintaining Chart of Authority.............................................................. 223 9.7 Coding Validation ................................................................................. 233 9.8 Defining Rejection Reasons................................................................. 243 9.9 Image Display Infrastructure ................................................................ 244 9.10 Configuring Global Parameters............................................................ 245 9.11 Configuring the Bulk Approval Validation Exit ..................................... 260 9.12 Configuring Posted Approval ............................................................... 260
10 Approval on a Mobile Device ................................................275 10.1 Activating Logical Systems .................................................................. 276 10.2 Configuring Screen Buttons ................................................................. 277 10.3 Configuring Extended Labels............................................................... 278 10.4 Configuring Extended Class ................................................................ 279 10.5 Configuring the Default Invoice List ..................................................... 279 10.6 Configuring Invoice List Fields ............................................................. 280 10.7 Configuring PO Header Fields and GL Header Fields......................... 281 10.8 Configuring Header Field Labels ......................................................... 283 10.9 Configuring PO Item Fields and GL Item Fields .................................. 283 10.10 Configuring Item Labels ....................................................................... 284 10.11 Additional Customizing ........................................................................ 285
Table of Contents
VIM060000-CGD-EN-4 Configuration Guide v
11 OpenText Approval Portal .................................................... 287
12 KPI Dashboard....................................................................... 289 12.1 User Interface of the KPI Dashboard ................................................... 290 12.2 KPI Dashboard Definitions................................................................... 291 12.3 Periodic Jobs - Collection and Aggregation......................................... 292 12.4 Customizing Settings ........................................................................... 301 12.5 SAP Web Dynpro Settings................................................................... 320 12.6 Secure Connection............................................................................... 325 12.7 SAP NetWeaver Portal Integration ...................................................... 326 12.8 Technical and Functional Restrictions ................................................. 330
13 VIM Reporting Module........................................................... 333 13.1 VIM Analytics ....................................................................................... 333
14 Tools ...................................................................................... 343 14.1 Notification Infrastructure ..................................................................... 343 14.2 Testing Roles ....................................................................................... 346 14.3 Changing the Work Item Text .............................................................. 350
15 Country Specific Configuration............................................ 353 15.1 Introduction .......................................................................................... 353 15.2 Invoice Categories, Category Groups, and Mapping........................... 357 15.3 Process Types ..................................................................................... 361 15.4 Z Constants.......................................................................................... 374 15.5 Configuration Specific for India ............................................................ 374 15.6 Configuration Specific for Canada ....................................................... 377
16 ICC Integration....................................................................... 385 16.1 ICC Dispatcher..................................................................................... 385 16.2 Early Archiving ..................................................................................... 387 16.3 Maximum Allowed Time for Extraction and Validation......................... 404 16.4 Validation Framework .......................................................................... 406 16.5 Document Type Determination Rules Engine...................................... 416 16.6 Periodic Jobs for ICC Dispatcher......................................................... 420
17 Multiple Backend System ..................................................... 421 17.1 Defining Logical Systems..................................................................... 422 17.2 Assigning Clients to Logical Systems .................................................. 424 17.3 Maintaining RFC Destinations ............................................................. 425 17.4 Working with the System Landscape Directory (SLD)......................... 427 17.5 Maintaining Channels........................................................................... 430 17.6 Maintaining Mapping IDs ..................................................................... 432 17.7 Maintaining the System Determination ................................................ 433
Table of Contents
vi OpenText Vendor Invoice Management VIM060000-CGD-EN-4
18 SSF Integration ......................................................................437 18.1 SSF Integration Activities..................................................................... 437 18.2 Maintaining the Initialization Procedure for Service Requests [ERP] .. 481 18.3 Mapping the Initialization Procedure to the Service Request Creation
Points [ERP]......................................................................................... 483 18.4 Defining Application Areas for Service Request [CRM]....................... 484
19 EDI Configuration ..................................................................487 19.1 Configuring General Settings............................................................... 487 19.2 Configuring the Mapping...................................................................... 492 19.3 Determining System by Company Code for Multiple Backend
Systems ............................................................................................... 495 19.4 Configuring Global Parameters............................................................ 496
20 E-Invoicing Support...............................................................499 20.1 Interface Remote Functions................................................................. 500
21 Central Reporting Infrastructure...........................................507 21.1 Configuring the System Landscape Directory (SLD) ........................... 508 21.2 Configuring Backend Systems for Report Analytics ............................ 509 21.3 Activating Central Reporting Baseline ................................................. 509
22 Individual Report Configuration ...........................................511 22.1 Configuring the Integrated Invoice Cockpit.......................................... 511 22.2 Configuring the Summary Report ........................................................ 522
23 System Log ............................................................................525
24 Archiving Configuration........................................................527 24.1 Configuring Archiving of DP Documents ............................................. 527 24.2 Configuring Archiving of Central Reporting Information ...................... 530
25 Supplier Relationship Management (SRM) Integration .......535 25.1 Use Cases............................................................................................ 535 25.2 Determining Purchase Order Types .................................................... 538 25.3 Configuring SRM Purchase Orders ..................................................... 539 25.4 Configuring the SRM Mail Infrastructure.............................................. 546
GLS Glossary 553
IDX Index 561

VIM060000-CGD-EN-4 OpenText Vendor Invoice Management vii
Preface Introduction
i About Vendor Invoice Management VIM is an abbreviation for SAP Invoice Management by OpenText.
• VIM is a packaged business solution.
• VIM solves a business problem - paying correct amount to vendors on time and with the lowest cost.
• VIM delivers not technology but best-practice business processes.
• VIM provides values to customers in process efficiency, visibility and compliance.
VIM is SAP centric.
• VIM is an add-on to your SAP system, the majority of the functions and processes run inside your SAP system.
• VIM deals only with invoices that will be posted to SAP ERP.
• VIM uses SAP technology: ABAP, Workflow, and SAP NetWeaver Portal.
• VIM integrates with standard SAP functions: Invoice Verification, Financial Processing, etc
Introduction
viii OpenText Vendor Invoice Management VIM060000-CGD-EN-4
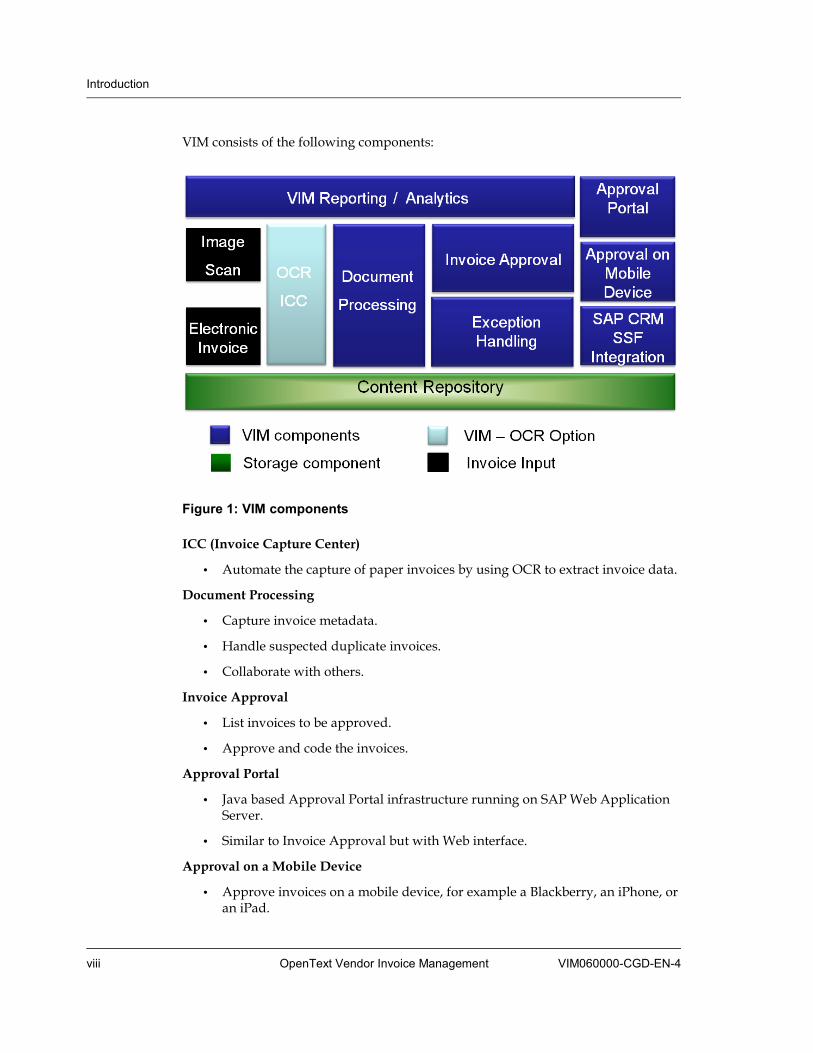
VIM consists of the following components:
Figure 1: VIM components
ICC (Invoice Capture Center)
• Automate the capture of paper invoices by using OCR to extract invoice data.
Document Processing
• Capture invoice metadata.
• Handle suspected duplicate invoices.
• Collaborate with others.
Invoice Approval
• List invoices to be approved.
• Approve and code the invoices.
Approval Portal
• Java based Approval Portal infrastructure running on SAP Web Application Server.
• Similar to Invoice Approval but with Web interface.
Approval on a Mobile Device
• Approve invoices on a mobile device, for example a Blackberry, an iPhone, or an iPad.
Introduction
VIM060000-CGD-EN-4 Configuration Guide ix
Exception Handling (Invoice Exception)
• Handle the exceptions that arise after a SAP invoice is created.
VIM Reporting / VIM Analytics
• VIM Reporting: Use various reports to analyze the status of invoices in your system.
• VIM Analytics: Overlook the invoices in progress in a unified dashboard.
SAP CRM SSF Integration
• Integrate VIM with the SAP CRM SSF component to create Service Requests from VIM dashboards.
• Provide VIM invoice information in Vendor Factsheet inside the Accounting Interaction Center (AIC).
Processing blocks
From a technical and functional perspective, the overall processing comprises the following processing blocks: Document Processing (DP)
for front-end SAP document creation
PO parking processing for handling parked PO invoices
PO blocking processing for handling blocked PO invoices
Non-PO parking processing for handling parked non-PO FI invoices
Invoice Approval for approving and coding invoices
ii About This Document This document describes the configuration of each of the processing blocks (see “Processing blocks” on page 9). It also describes the various implementation aspects of configuring VIM to suit the specific business requirements for any organization. VIM is designed to be highly configurable to accommodate varied business scenarios.
ii.i Target Audience This document addresses those who participate in the customization and implementation of Vendor Invoice Management (VIM). This includes:
• SAP Basis Administrators
• SAP Workflow Administrators
• SAP Configuration and Development Support

Introduction
x OpenText Vendor Invoice Management VIM060000-CGD-EN-4
ii.ii Conventions In general, this documentation uses the following typographical conventions:
User interface This format is used for elements in the graphical user interface (GUI), such as buttons, names of icons, menu items, and fields.
Filenames, commands, and sample data This format is used for file names, paths, URLs, and commands at the command prompt. It is also used for example data, text to be entered in text boxes, and other literals.
Note: If you copy command line examples from a PDF, be aware that PDFs can contain hidden characters. OpenText recommends copying from the HTML version of the document, if it is available.
KEY NAMES Key names appear in ALL CAPS, for example: Press CTRL+V.
<Variable name>Angled brackets < > are used to denote a variable or placeholder. The user replaces the brackets and the descriptive content with the appropriate value. For example, <server_name> becomes serv01.
Internal cross-references Click the cross-reference to go directly to the reference target in the current document.
External cross-references External cross-references are usually text references to other documents. However, if a document is available in HTML format, for example, in the Knowledge Center, external references may be active links to a specific section in the referenced document.
Warnings, notes, and tips
Caution Cautions help you avoid irreversible problems. Read this information carefully and follow all instructions.
Important
Important notes help you avoid major problems.
Note: Notes provide additional information about a task.
Tip: Tips offer you quicker or easier ways of performing a task.
Introduction
VIM060000-CGD-EN-4 Configuration Guide xi
iii Contact Information OpenText Online (http://online.opentext.com/) is a single point of access for the product information provided by OpenText. You can access the following support sources through OpenText Online:
• Communities
• Knowledge Center
OpenText Online Communities (http://communities.opentext.com/communities/livelink.exe/open/OpenTextOnlineCommunity) provide the following resources:
• Usage tips, help files, and best practices for customers and partners.
• Information on product releases.
• User groups and forums where you can ask questions of OpenText experts.
The OpenText Knowledge Center (https://knowledge.opentext.com) is OpenText's corporate extranet and primary site for technical support. The Knowledge Center is the official source for the following:
• Product downloads, patches, and documentation including Release Notes.
• Discussion forums, Online Communities, and the Knowledge Base.
• OpenText Developer Network (OTDN), which includes developer documentation and programming samples for OpenText products.
If you need additional assistance, you can find OpenText Corporate Support Contacts at http://support.opentext.com/.

VIM060000-CGD-EN-4 OpenText Vendor Invoice Management 13
Chapter 1 Understanding Vendor Invoice Management
Process steps The Vendor Invoice Management (VIM) business process typically includes the following main steps: 1. An OCR process (optional) sends metadata and invoice image to VIM. On a
system without OCR, the invoice images go through a standard SAP ArchiveLink early archiving scenario.
2. The Document Processing (DP) component validates the metadata and identifies exceptions.
3. Invoice Exception workflows address the exception issues.
4. After validating the data and handling data exceptions, VIM creates an SAP invoice.
• If no business rules are violated, VIM posts the invoice.
• Otherwise, VIM parks the invoice for further processing.
5. If needed, VIM triggers the parking exception process workflow.
6. Once the parking workflow is complete and everything is correct, VIM posts the invoice. Otherwise, VIM deletes or cancels the invoice.
Swimlanes
Business blue print sessions result in a set of finalized swimlane diagrams representing the to-be process. Figure 1-1 on page 15 is an example of such a process swimlane that is delivered with the VIM Baseline Configuration. A swimlane diagram comprises the following main items:
Process Description The description in the headline represents the process scenario.
Roles Each lane represents a business role, a unique grouping of people required to collaborate to complete the process.
Dashboard The dashboard is the user interface for the actors in the process. The dashboard type identifies the VIM component that is used to realize a specific functionality. The following dashboard types are available:
DP dashboard The DP dashboard represents a process as implemented in the Document Processing component of VIM.
Chapter 1 Understanding Vendor Invoice Management
14 OpenText Vendor Invoice Management VIM060000-CGD-EN-4
See section 3 "Working with the DP Dashboard" in OpenText Vendor Invoice Management - User Guide (VIM-UGD).
VIM dashboard The VIM dashboard represents a process as implemented in the Invoice Exception component of VIM for parked invoices.
See section 4.1 "Working with the PO Parked Invoice Dashboard" in OpenText Vendor Invoice Management - User Guide (VIM-UGD) and section 4.3 "Working with the Non-PO Invoice Dashboard" in OpenText Vendor Invoice Management - User Guide (VIM-UGD).
VIM line dashboard The VIM line dashboard represents a process as implemented in the Invoice Exception component of VIM for blocked PO based invoices for line level blocks.
See section 4.2.2 "Working with the PO Invoice Dashboard (Line Level)" in OpenText Vendor Invoice Management - User Guide (VIM-UGD).
VIM header dashboard The VIM header dashboard represents a process as implemented in the Invoice Exception component of VIM for blocked PO based invoices for header level processes.
See section 4.2.3 "Working with the PO Invoice Dashboard (Header WF)" in OpenText Vendor Invoice Management - User Guide (VIM-UGD).
Options Various options are available to the actors during the processing of invoices. These are represented as individual items next to the dashboard block.

VIM060000-CGD-EN-4 Configuration Guide 15
Figure 1-1: Swimlane example

VIM060000-CGD-EN-4 OpenText Vendor Invoice Management 17
Chapter 2 Preparing the Configuration
This section describes the activities that need to be done prior to implementing VIM. For detailed installation steps, refer to OpenText Vendor Invoice Management - Installation Guide (VIM-IGD).
• Install and configure an archiving system that supports SAP Content Server HTTP Interface.
• Complete business process blueprint sessions: Final process design swimlane diagrams are available.
• Create User IDs with appropriate developer and configuration authorizations. Authorizations need to include developer as well as workflow administrator authorizations.
• Create ArchiveLink document types or at least finalize the list of the document types etc.
• Check for any existing BAdI implementations for definition INVOICE_UPDATE.Check to see if there is any conflicting code that could prevent parking reasons in PO/Non PO invoices from showing up.
• Complete appropriate FI and MM-Purchasing customizations, so FI and logistics invoices can be created in the system.


Part 1 Configuration
Part 1 Configuration
20 OpenText Vendor Invoice Management VIM060000-CGD-EN-4
This part describes the particular configuration steps for Vendor Invoice Management (VIM). It covers the following chapters:
• “ArchiveLink Document Type Configuration” on page 21
• “Roles” on page 29
• “Document Processing Process Configuration” on page 41
• “PO Parking Process Configuration” on page 121
• “PO Blocking Process Configuration” on page 149
• “Non PO Parking Process Configuration” on page 171
• “Invoice Approval” on page 195
• “Approval on a Mobile Device” on page 275
• “OpenText Approval Portal” on page 287
• “KPI Dashboard” on page 289
• “VIM Reporting Module” on page 333
• “Tools” on page 343
• “Country Specific Configuration” on page 353
• “ICC Integration” on page 385
• “Multiple Backend System” on page 421
• “SSF Integration” on page 437
• “EDI Configuration” on page 487
• “E-Invoicing Support” on page 499
• “Central Reporting Infrastructure” on page 507
• “Individual Report Configuration” on page 511
• “System Log” on page 525
• “Archiving Configuration” on page 527
• “Supplier Relationship Management (SRM) Integration” on page 535
VIM060000-CGD-EN-4 OpenText Vendor Invoice Management 21
Chapter 3 ArchiveLink Document Type Configuration
This section describes the steps needed to configure SAP ArchiveLink document types. You need to do this configuration once the context repository is installed and the basic ArchiveLink settings are completed. Depending on the customer requirements, the number and attributes of the ArchiveLink settings might be different.
Note: For further details about ArchiveLink refer to the SAP documentation.
3.1 Configuring ArchiveLink Document Types Assignment to workflow tasks
Verify that ArchiveLink document types are assigned to the following workflow tasks, using the SOA0 transaction: Non ICC Early Archiving scenarios:
Object Type /OPT/V1001
Task WS00275271
Method PREPROCESS_NON_OCR
ICC OCR based Early Archiving scenarios:
Object Type /OPT/V1001
Task WS00275270
Method PREPROCESS_OCR
To configure ArchiveLink document types:
1. Execute the OAD5 transaction.
The ArchiveLink: Document Type Customizing Wizard dialog opens.
Chapter 3 ArchiveLink Document Type Configuration
22 OpenText Vendor Invoice Management VIM060000-CGD-EN-4
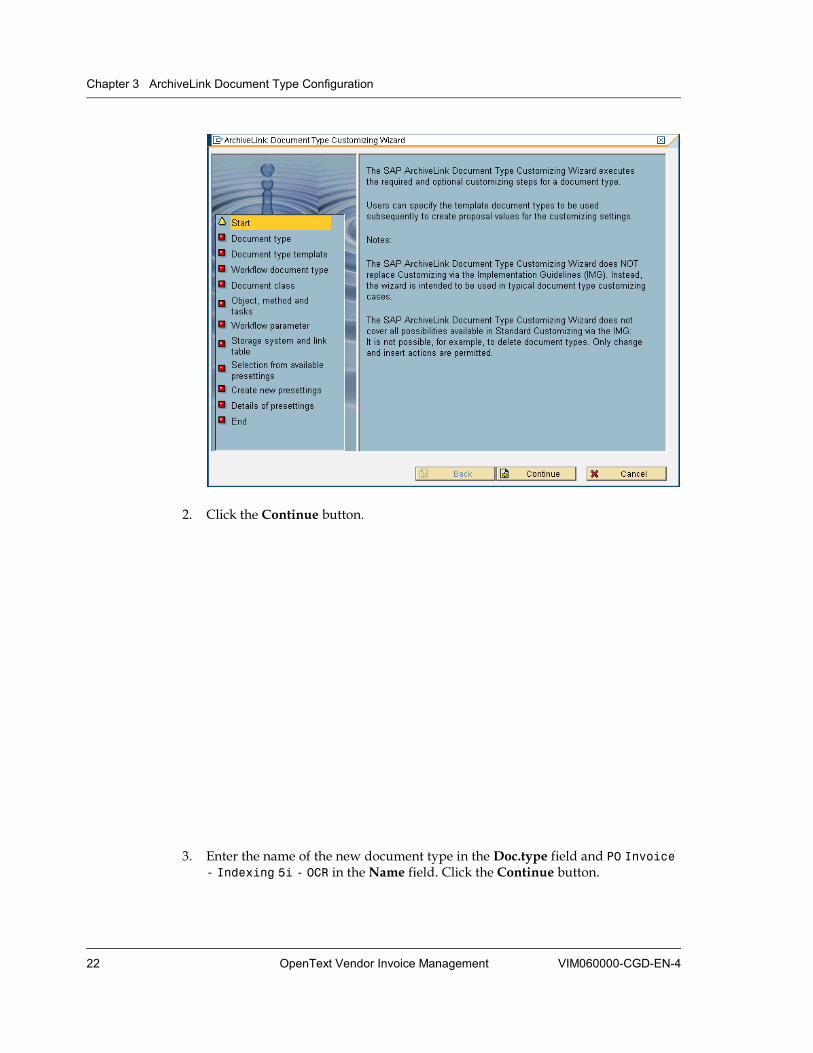
2. Click the Continue button.
3. Enter the name of the new document type in the Doc.type field and PO Invoice - Indexing 5i - OCR in the Name field. Click the Continue button.
3.1 Configuring ArchiveLink Document Types
VIM060000-CGD-EN-4 Configuration Guide 23
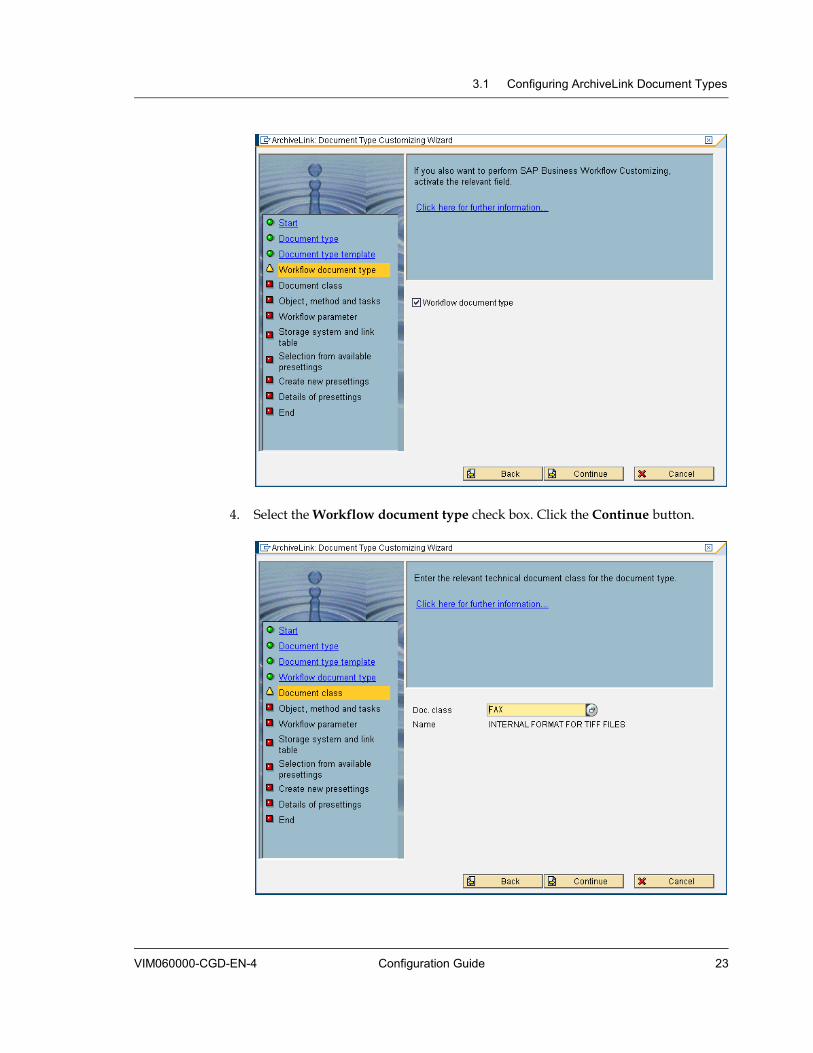
4. Select the Workflow document type check box. Click the Continue button.
Chapter 3 ArchiveLink Document Type Configuration
24 OpenText Vendor Invoice Management VIM060000-CGD-EN-4
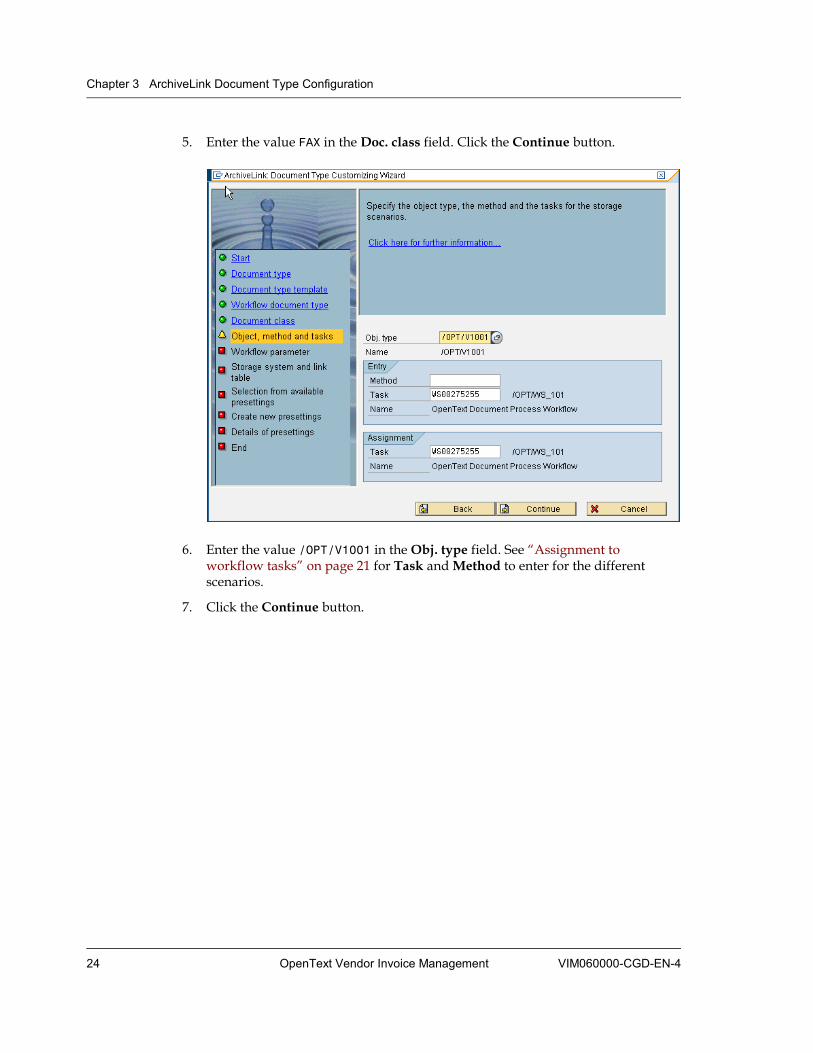
5. Enter the value FAX in the Doc. class field. Click the Continue button.
6. Enter the value /OPT/V1001 in the Obj. type field. See “Assignment to workflow tasks” on page 21 for Task and Method to enter for the different scenarios.
7. Click the Continue button.
3.1 Configuring ArchiveLink Document Types
VIM060000-CGD-EN-4 Configuration Guide 25
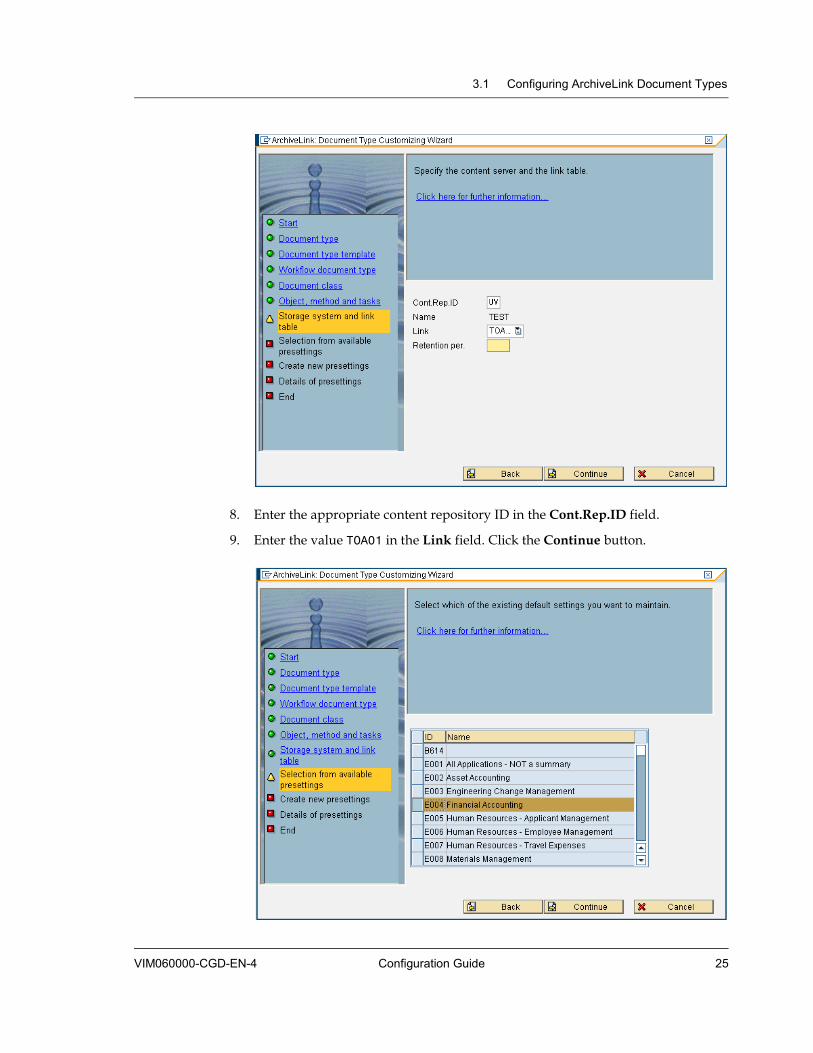
8. Enter the appropriate content repository ID in the Cont.Rep.ID field.
9. Enter the value TOA01 in the Link field. Click the Continue button.
Chapter 3 ArchiveLink Document Type Configuration
26 OpenText Vendor Invoice Management VIM060000-CGD-EN-4
10. Select Financial Accounting. Click the Continue button.
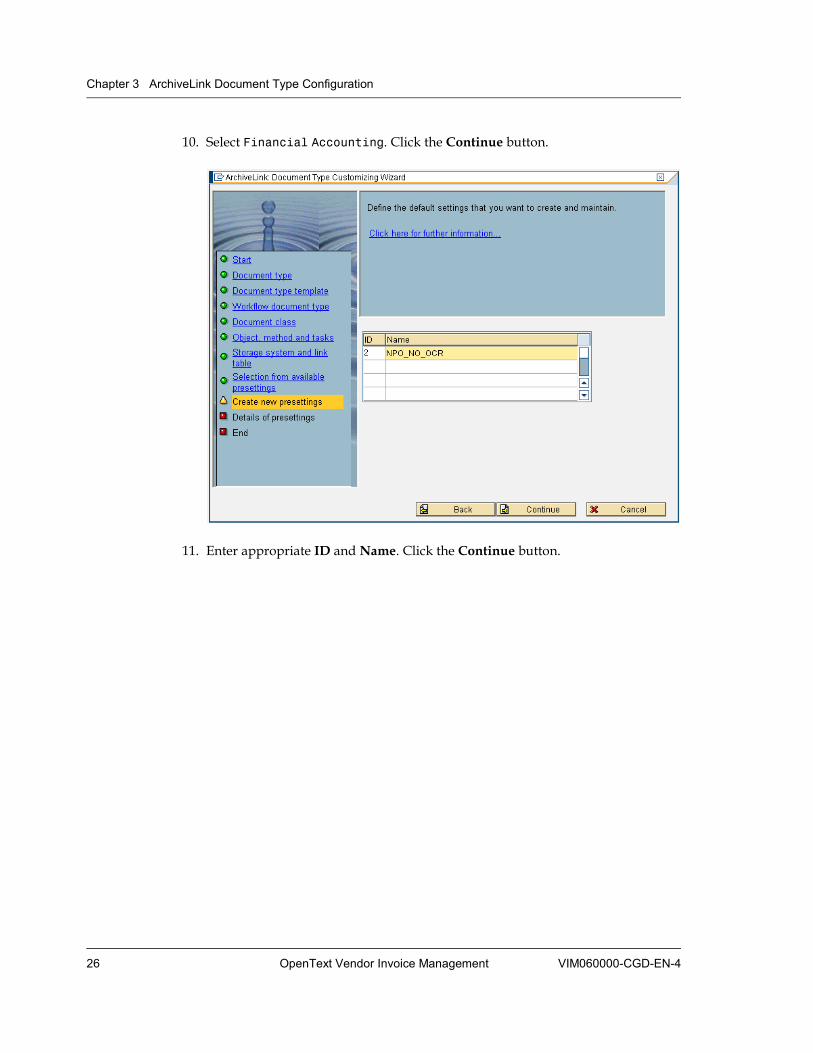
11. Enter appropriate ID and Name. Click the Continue button.

3.2 Linking SAP Business Objects to ArchiveLink Document Types
VIM060000-CGD-EN-4 Configuration Guide 27
12. Enter the relevant information and click the Continue button.
13. Click the Complete button to finish the wizard.
3.2 Linking SAP Business Objects to ArchiveLink Document Types This section describes the steps needed to map the SAP business objects to the ArchiveLink document types you have created.
To link SAP business objects to ArchiveLink document types:
1. Execute the OAC3 transaction.
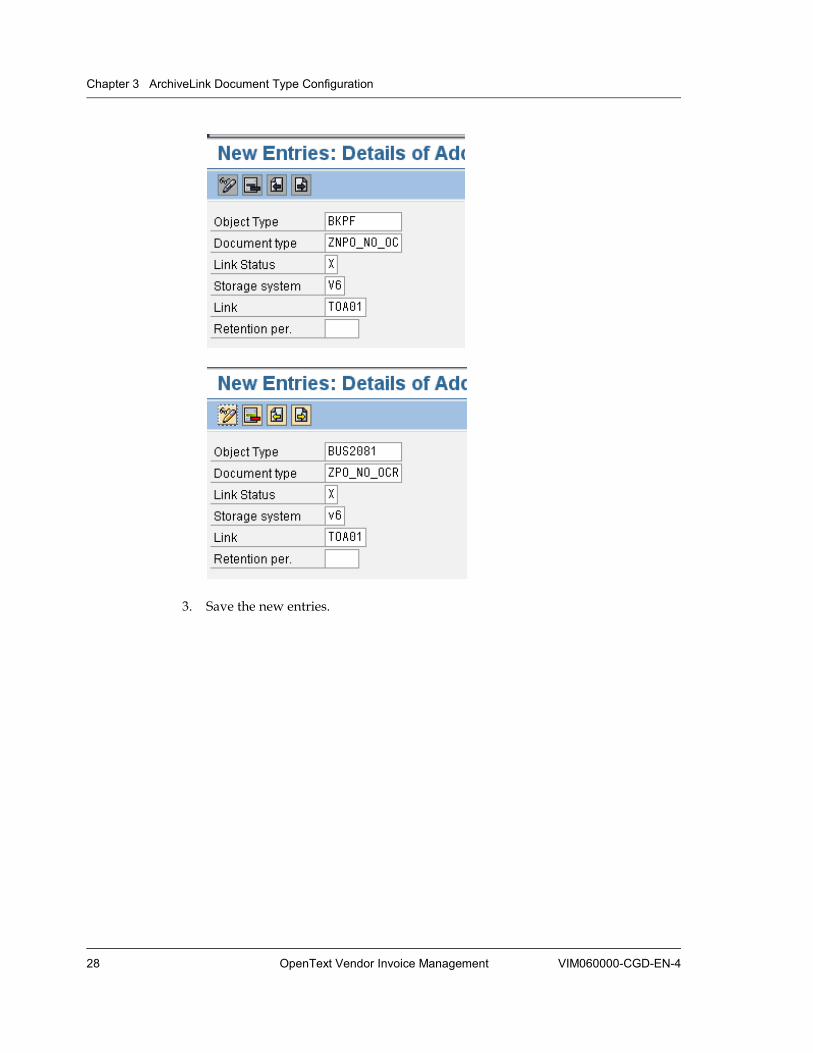
2. Create new entries, as shown in the following screenshots. The first one is BKPF for Non-PO invoices and the second one is BUS2081 for PO invoices.
Chapter 3 ArchiveLink Document Type Configuration
28 OpenText Vendor Invoice Management VIM060000-CGD-EN-4
3. Save the new entries.
VIM060000-CGD-EN-4 OpenText Vendor Invoice Management 29
Chapter 4 Roles
Roles refer to the grouping of various business users according to their business activity. In the swimlane diagrams, roles represent the title for each of the lanes. Vendor Invoice Management (VIM) has a comprehensive framework for realizing various requirements in the area of role definition. You can define roles as granular as needed.
The VIM role framework comprises the following main concepts:
Role In VIM terminology, role stands for a Process Agent. Role is not the same as SAP WF technical role.
Note: The workflows are delivered by OpenText and hence cannot be changed at client side.
Template Any role bases on a template.
Template fields Templates can have fields that determine the granular logic used in determining the final set of users. For example, the grouping of roles can base on the company code or the purchasing organization.
This section describes the steps required to create and configure roles needed for implementing VIM business scenarios. To configure roles, the following steps are required:
• “Defining Roles” on page 29
• “Defining Role Templates” on page 31
• “Assigning Templates to Roles” on page 35
• “Maintaining Role Determination Settings” on page 37
4.1 Defining Roles The first step in creating a role is to define the role. Roles in VIM base on product codes that are defined in VIM. The following product codes are available:
005 Document Processing (DP) based product codes
LIX LIV based product codes (both for PO parking and PO blocking workflows)
Chapter 4 Roles
30 OpenText Vendor Invoice Management VIM060000-CGD-EN-4
PIR Product codes for Non-PO parking workflows
Every assignment bases on the product code/role combination. For example, to create a role called BUYER in a PO parking process, create a role BUYER with product code LIX.
OpenText delivers standard roles used in most process scenarios. You can define your own roles if needed.
To maintain roles:
1. Execute the /OPT/CP_9CX5 transaction.
Alternatively, follow OpenText LiveLink VIM Menu > SAP menu> Roles > Role Maintenance.
2. Maintain the role data, using the following parameters:
Product Code Enter the product code such as 005, LIX, PIR. Refer to OpenText product codes for applicable product code.
Responsible Party Enter the responsible party (role).

4.2 Defining Role Templates
VIM060000-CGD-EN-4 Configuration Guide 31
Description Enter the description of the role.
Role Function Module Enter function module for the role. Refer to enhancements in roles for interface structure and details.
Key Determination Select the check box, if the role is defined by object information – the context in which the role is used.
Deactivate the check box, if the role is fixed and defined by organization data, for example: if you want to determine the role by company code, scan location, or plant.
Object Type Maintain the object type, based on the workflow.
4.2 Defining Role Templates This section describes the creation and maintenance of role templates. Every VIM role is based on a role template. Templates determine the options that control how a role is resolved finally by the workflow runtime system.
The following types of templates are available:
Key determination (Static)
• Combination of columns
• Depends on the business object attributes.
Example: Company code, scan location and plant define the AP Processor role.
Function Module (Dynamic)
• Set of custom functions that extend baseline functions
Example: Buyer is PO creator that FM extracts from PO.
SAP HR org structure (Semi-Dynamic)
• Always send to the structure such as a position or work center.
Example: Tax Experts are users attached to a single work center.
OpenText delivers standard role templates that are used in most process scenarios. You can define your own role templates if needed.
4.2.1 Maintaining Role Templates
To maintain templates:
1. Execute the /opt/cp_9cx2 transaction.
Chapter 4 Roles
32 OpenText Vendor Invoice Management VIM060000-CGD-EN-4
Alternatively, follow OpenText LiveLink VIM Menu > SAP menu > Roles > Template Maintenance.
2. In the Product Role Templates Configuration Overview screen, double-click Template Definition in the navigation pane.
3. Maintain templates using the following parameters:
Template Id Enter meaningful character value that identifies the template.
Description Enter the template description.
Type Select the template type. The following template types are available:
Function Module Based If you select Function Module Based, the agents for the role are determined using a function module.
Org Unit If you select Org Unit, the agents for the role are determined from a fixed org unit (User, Position, Work Center, and so on)
Key Determination Based If you select Key Determination Based, the agents for the role are determined using runtime values of fields in the object data.
For further information on how templates resolve users, refer to “Maintaining Role Determination Settings” on page 37.
4.2 Defining Role Templates
VIM060000-CGD-EN-4 Configuration Guide 33
Allow Org For Key Determination Based templates, only: If the Allow Org flag is set, you can set an Org Unit instead of a fixed SAP User ID while maintaining agents for role template in the role determination transaction.
Object Type For Org Unit based templates only: Select the default value for Agent Type (User, Position, and Work Center etc.).
Agent Id For Org Unit based templates only: Select the agent ID.
Function Module For Function Module Based based templates only: Select the function module that is used to determine agents for this template. The interface value for the function module can be found in the OpenText delivered function /OPT/BL_ROLE_SELF_DIRECTED.
4.2.2 Maintaining Template Fields Role templates can have template fields that determine the granularity of how the role is resolved at run time. This sub section describes the steps required for creating fields for role templates.
To maintain template fields:
1. In the Template Definition Overview screen, select a template from the list and double-click Template Fields in the navigation pane.
2. Maintain the template fields, using the following parameters:
Field Id Enter a freely defined field Id which describes the usage of the field.
Ref. Table/Ref. Field Select reference table and reference field. When maintaining values for the field, the system can check the values and provide F4 help for the field using reference table and reference field.
Chapter 4 Roles
34 OpenText Vendor Invoice Management VIM060000-CGD-EN-4
Search Help Select the search help. When maintaining values for the field in the role determination transaction, the system uses this value to provide F4 help for the field.
Allow Range Select this check box to allow ranges. The values can have a range from “Low Value” to “High Value”. The system checks the runtime data for the product code in which the template is used to validate if it can resolve the field.
Wild Card Select this check box to allow the wild card character *. Users can define a wild card for values in the role determination transaction for the product code in which the template is used.
Example: If all company codes starting with 10 should be considered to resolve a role, 10* can be maintained if wild card is selected. If the check box is not set, the system checks to match the entry as is.
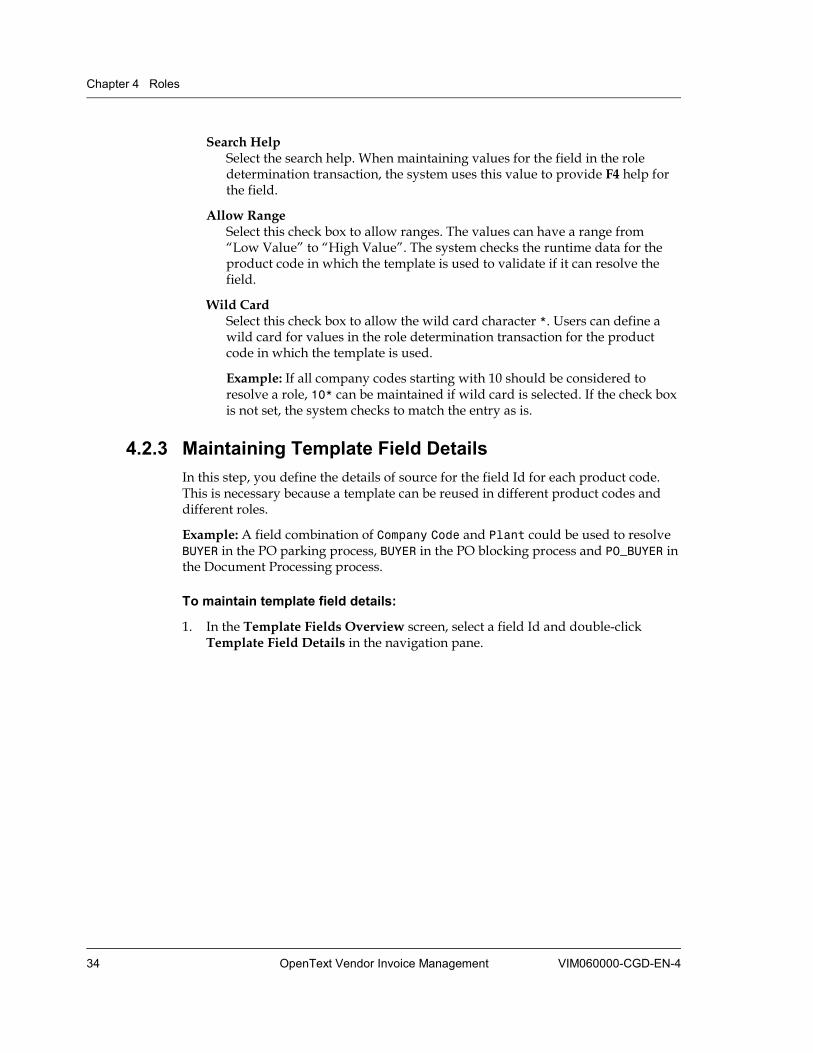
4.2.3 Maintaining Template Field Details In this step, you define the details of source for the field Id for each product code. This is necessary because a template can be reused in different product codes and different roles.
Example: A field combination of Company Code and Plant could be used to resolve BUYER in the PO parking process, BUYER in the PO blocking process and PO_BUYER in the Document Processing process.
To maintain template field details:
1. In the Template Fields Overview screen, select a field Id and double-click Template Field Details in the navigation pane.
4.3 Assigning Templates to Roles
VIM060000-CGD-EN-4 Configuration Guide 35
2. In the Template Fields Details Overview screen, maintain the Template Field Details, using the following parameters:
Product Code Select the OpenText product code in which the template is used.
Object Type Select the object type. Object types are defined for each OpenText product code. You can however create a subtype for the OpenText Object Type to define your own attributes. At runtime, the system instantiates the object with the object key. The type should be compatible to the OpenText object type for the given product code.
Attribute Select the attribute the system uses for the given OpenText product code for getting the runtime value for the given field Id.
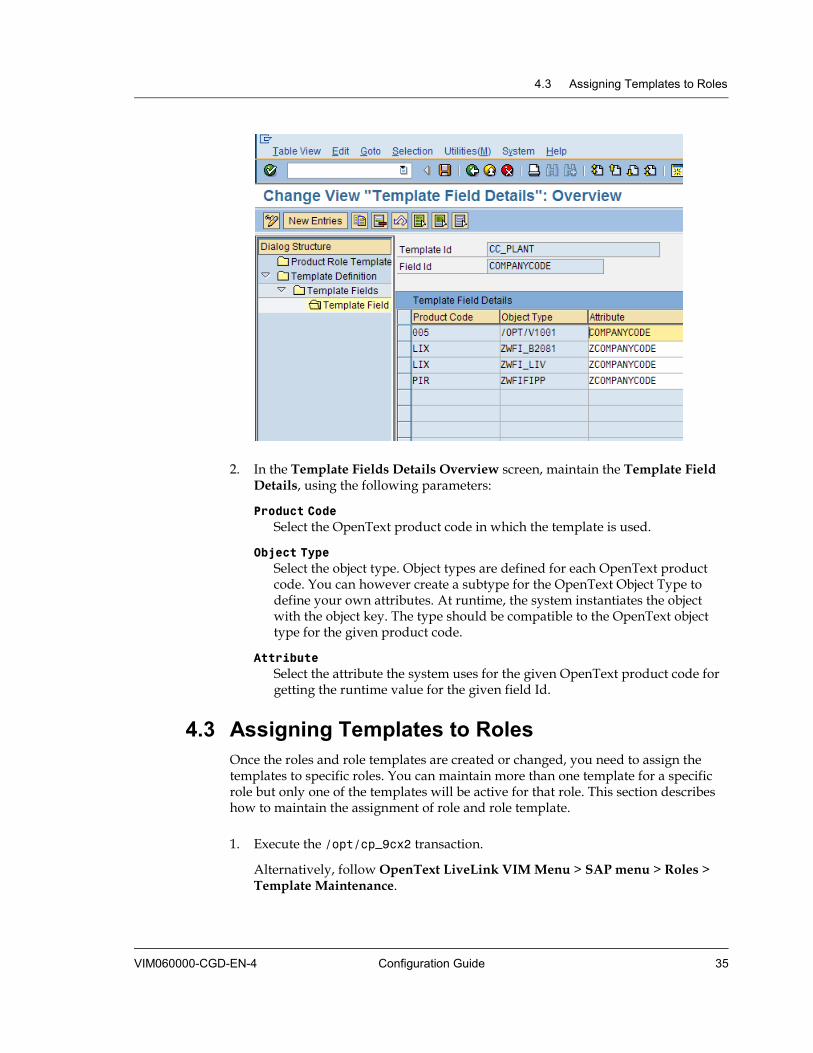
4.3 Assigning Templates to Roles Once the roles and role templates are created or changed, you need to assign the templates to specific roles. You can maintain more than one template for a specific role but only one of the templates will be active for that role. This section describes how to maintain the assignment of role and role template.
1. Execute the /opt/cp_9cx2 transaction.
Alternatively, follow OpenText LiveLink VIM Menu > SAP menu > Roles > Template Maintenance.
Chapter 4 Roles
36 OpenText Vendor Invoice Management VIM060000-CGD-EN-4
2. In the Product Role Templates Configuration Overview screen, maintain the Product Role Templates, using the following parameters:
Product Code OpenText product code
Responsible Party OpenText role
Key Determination Template Id Template Id defined
Active check box Select the Active check box to assign the template defined to the product role combination. The template will be used in determining agents for the role in OpenText processes. You can only have one active template for a given product role.
4.4 Maintaining Role Determination Settings
VIM060000-CGD-EN-4 Configuration Guide 37
4.4 Maintaining Role Determination Settings Once all the roles, role templates and role/role template assignments are maintained, the next step is to maintain the actual settings for the roles by specific user IDs or other objects required by the template definition. In this step, you define the runtime values that the system uses to resolve roles for a given product.
To maintain the role determination settings:
1. Execute the /opt/cp_9cx4 transaction.
Alternatively, follow OpenText LiveLink VIM Menu > SAP menu > Roles > Simple Mode Role Maintenance.
2. Maintain the role determination settings, according to the template type.
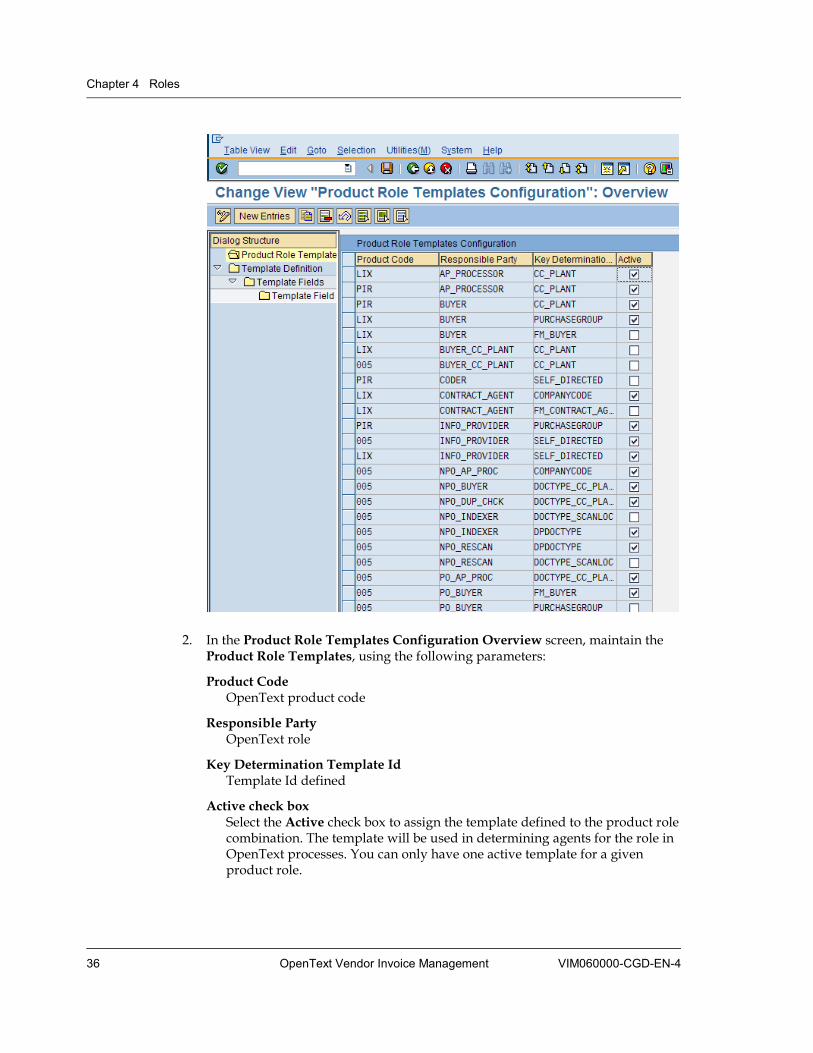
Template type Key Determination Based
• The fields in a key determination based role depend on the template definition.
• Maintain values for the fields displayed.
Chapter 4 Roles
38 OpenText Vendor Invoice Management VIM060000-CGD-EN-4
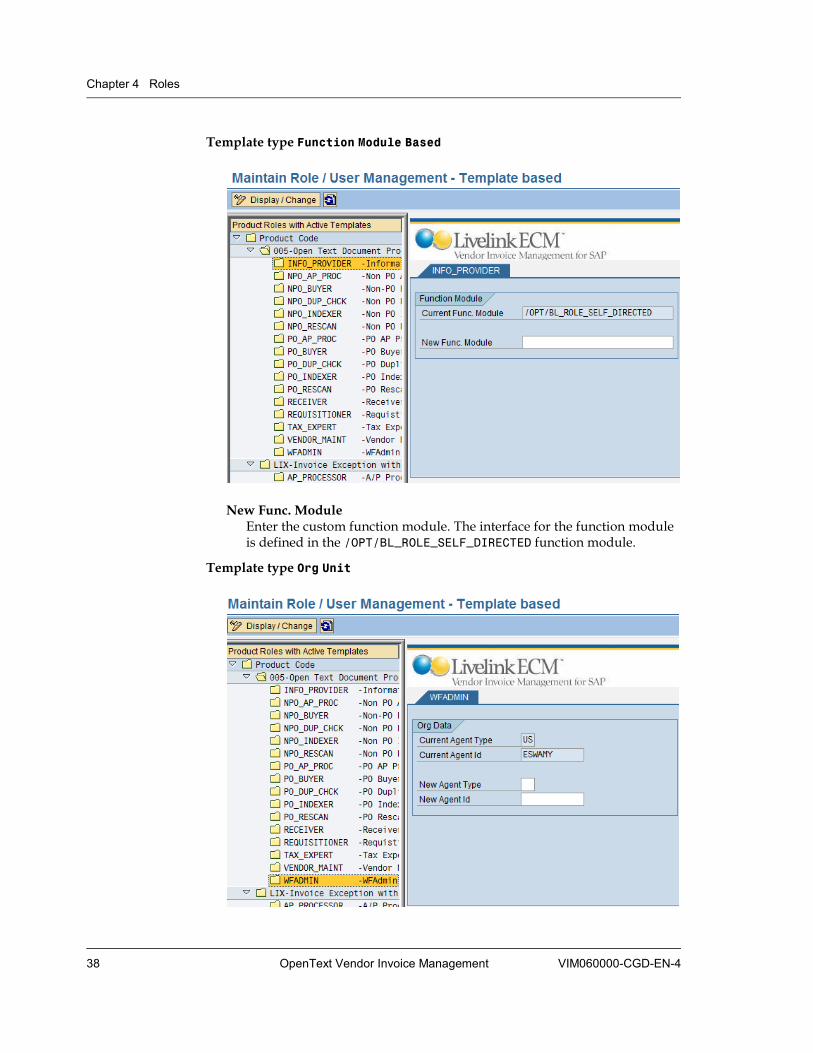
Template type Function Module Based
New Func. Module Enter the custom function module. The interface for the function module is defined in the /OPT/BL_ROLE_SELF_DIRECTED function module.
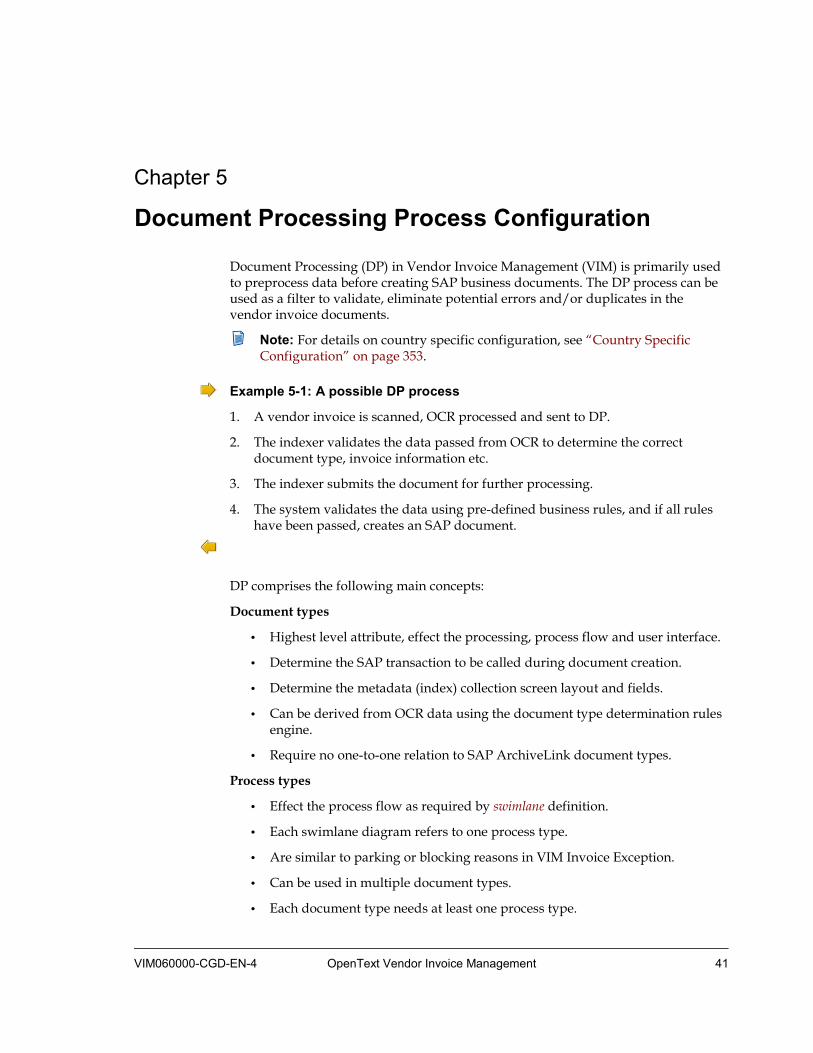
Template type Org Unit

4.4 Maintaining Role Determination Settings
VIM060000-CGD-EN-4 Configuration Guide 39
New Agent Type Select the agent type (US for user Id, S for position etc).
New Agent Id Depending on the agent type, select the agent Id (SAP user Id, position etc.).

VIM060000-CGD-EN-4 OpenText Vendor Invoice Management 41
Chapter 5 Document Processing Process Configuration
Document Processing (DP) in Vendor Invoice Management (VIM) is primarily used to preprocess data before creating SAP business documents. The DP process can be used as a filter to validate, eliminate potential errors and/or duplicates in the vendor invoice documents.
Note: For details on country specific configuration, see “Country Specific Configuration” on page 353.
Example 5-1: A possible DP process
1. A vendor invoice is scanned, OCR processed and sent to DP.
2. The indexer validates the data passed from OCR to determine the correct document type, invoice information etc.
3. The indexer submits the document for further processing.
4. The system validates the data using pre-defined business rules, and if all rules have been passed, creates an SAP document.
DP comprises the following main concepts:
Document types
• Highest level attribute, effect the processing, process flow and user interface.
• Determine the SAP transaction to be called during document creation.
• Determine the metadata (index) collection screen layout and fields.
• Can be derived from OCR data using the document type determination rules engine.
• Require no one-to-one relation to SAP ArchiveLink document types.
Process types
• Effect the process flow as required by swimlane definition.
• Each swimlane diagram refers to one process type.
• Are similar to parking or blocking reasons in VIM Invoice Exception.
• Can be used in multiple document types.
• Each document type needs at least one process type.
Chapter 5 Document Processing Process Configuration
42 OpenText Vendor Invoice Management VIM060000-CGD-EN-4
• Determine the initial actor and various collaboration options available to the various actors during the process flow.
Business rules
• Represent a rudimentary engine for determining
• process type
• document type (in case of OCR or external data input)
• Use configuration to apply logical conditions.
• Allow defining of multiple criteria.
• Can be specified regarding order and exclusivity.
• Can be used for validating data from external systems (OCR).
• Can be automatically applied to the metadata to effect the process flow.
• Can be configured to be called at multiple stages in the process flow.
Roles
• Use the standard OpenText role/actor infrastructure.
• Can use the standard key determination infrastructure to configure complex actor determination logic without programming.
Options and option types
• Comprise the following main types of options:
• Actions
Actions can be based on transactions or class method or workflow tasks.
• Referrals (for collaboration)
• Can effect the processing logic.
• Can effect the user experience.
• Can trigger the workflow engine to re-run the rules on the most current metadata to effect the process flow.
• Can be configured to change the document status.
BDC IDs
• Build a powerful infrastructure for pre-populating data into SAP transactions without programming.
• Are optimized for both dialog processing and background processing.
• Allow to set dynamic parameter IDs.
• Can be used to configure new user collaboration actions.
4.4 Maintaining Role Determination Settings
VIM060000-CGD-EN-4 Configuration Guide 43
• Eliminate the need to code parameterized transactions.
• Allow to configure BDC success messages.
Duplicate check infrastructure
• Builds a comprehensive infrastructure for configuring different duplicate check logic.
• Allows specifying multi-step duplicate check logic.
Main steps Implementing process scenarios in the DP workflow component of VIM comprises the following main steps: 1. Identify the list of DP document types that are needed.
2. Create and configure the association between DP document types and SAP ArchiveLink process types.
3. Identify the various process types that are required for realization of the process scenarios.
4. Identify and configure Indexing screen fields.
5. Identify the various roles and configure the roles in the appropriate process types.
6. Identify and configure the process options according to the swimlanes.
7. Identify and configure the business rules to be executed to identify exception processing.
8. Configure global customization setting as per customer requirements.
Chapter 5 Document Processing Process Configuration
44 OpenText Vendor Invoice Management VIM060000-CGD-EN-4
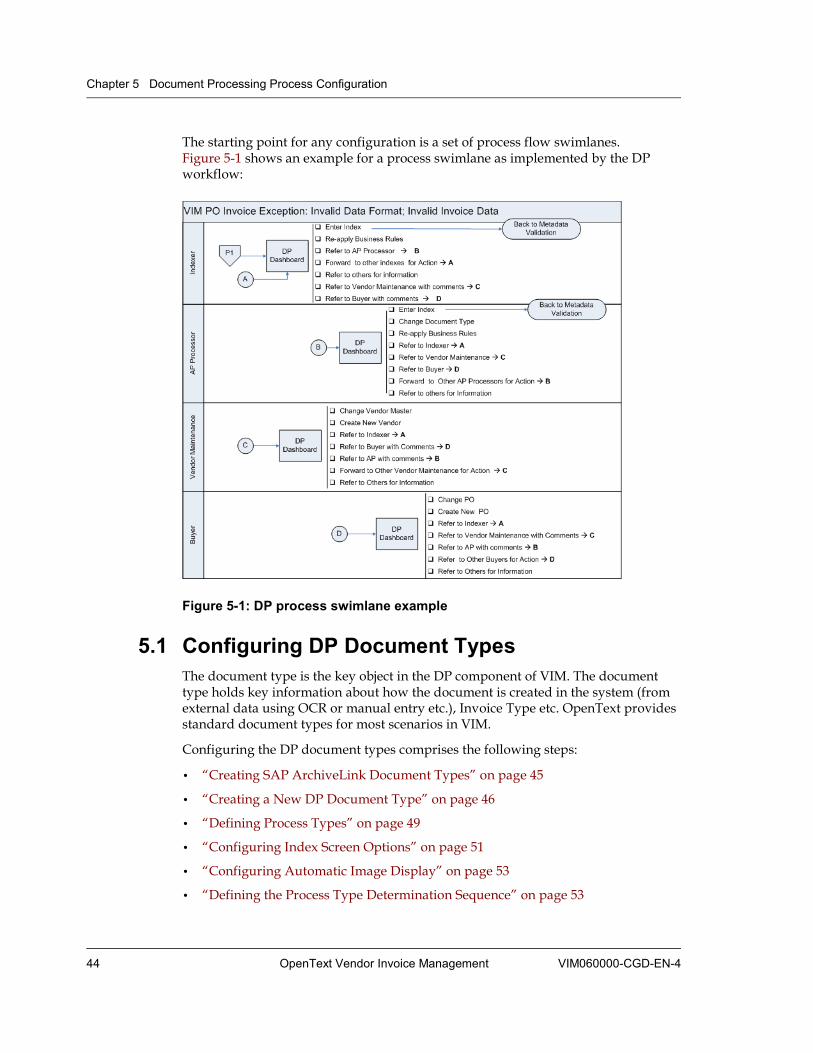
The starting point for any configuration is a set of process flow swimlanes. Figure 5-1 shows an example for a process swimlane as implemented by the DP workflow:
Figure 5-1: DP process swimlane example
5.1 Configuring DP Document Types The document type is the key object in the DP component of VIM. The document type holds key information about how the document is created in the system (from external data using OCR or manual entry etc.), Invoice Type etc. OpenText provides standard document types for most scenarios in VIM.
Configuring the DP document types comprises the following steps:
• “Creating SAP ArchiveLink Document Types” on page 45
• “Creating a New DP Document Type” on page 46
• “Defining Process Types” on page 49
• “Configuring Index Screen Options” on page 51
• “Configuring Automatic Image Display” on page 53
• “Defining the Process Type Determination Sequence” on page 53
5.1 Configuring DP Document Types
VIM060000-CGD-EN-4 Configuration Guide 45
• “Maintaining the PO Line Determination” on page 56
• “Maintaining Tax Code Determination” on page 60
• “Configuring Duplicate Check” on page 67
• “Determining PO Invoices by Vendor Table” on page 69
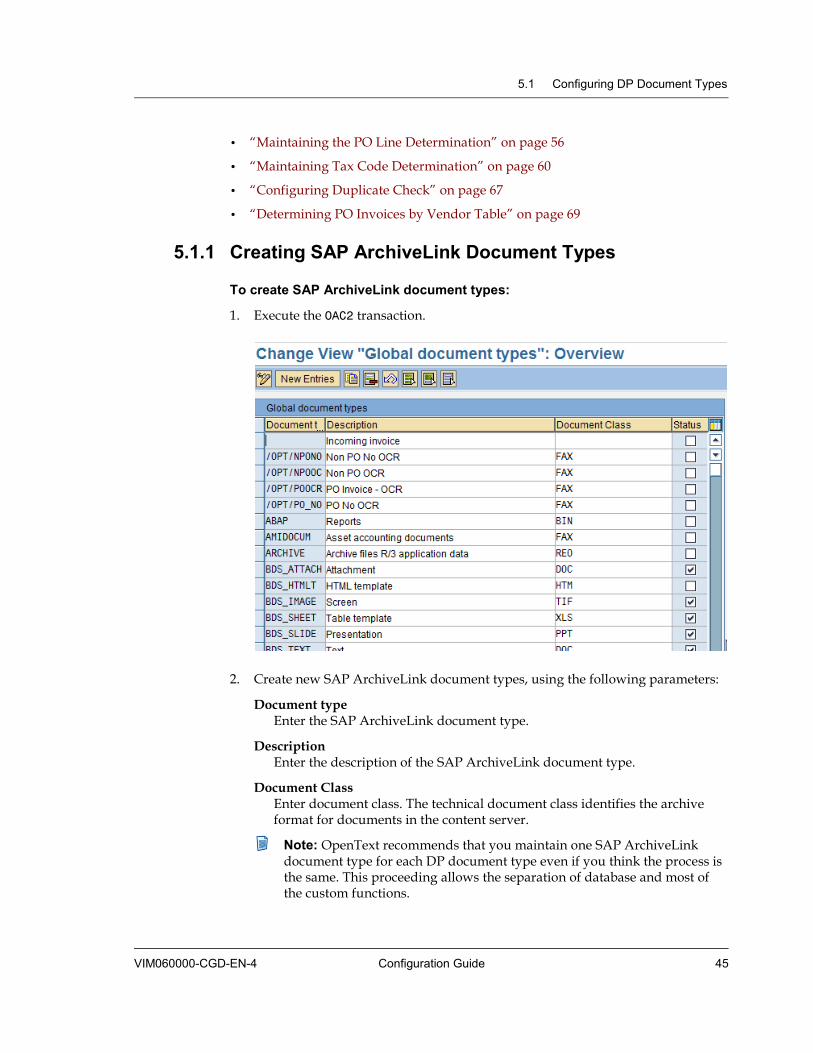
5.1.1 Creating SAP ArchiveLink Document Types
To create SAP ArchiveLink document types:
1. Execute the OAC2 transaction.
2. Create new SAP ArchiveLink document types, using the following parameters:
Document type Enter the SAP ArchiveLink document type.
Description Enter the description of the SAP ArchiveLink document type.
Document Class Enter document class. The technical document class identifies the archive format for documents in the content server.
Note: OpenText recommends that you maintain one SAP ArchiveLink document type for each DP document type even if you think the process is the same. This proceeding allows the separation of database and most of the custom functions.
Chapter 5 Document Processing Process Configuration
46 OpenText Vendor Invoice Management VIM060000-CGD-EN-4
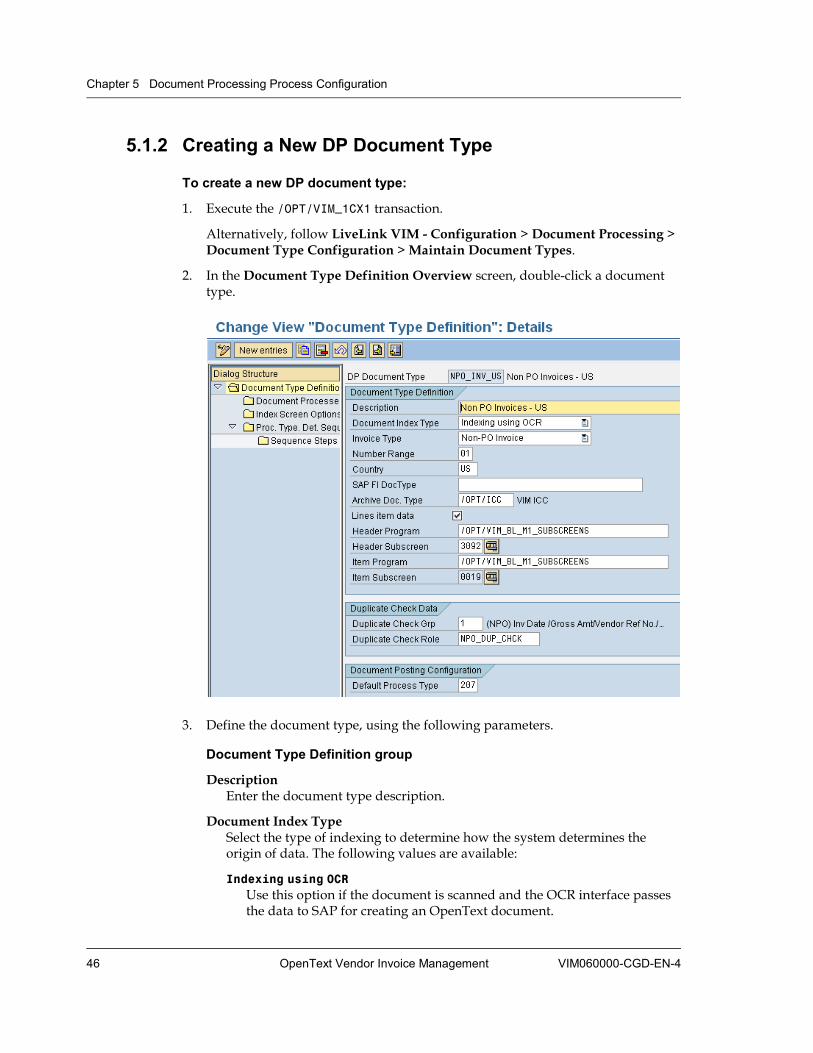
5.1.2 Creating a New DP Document Type
To create a new DP document type:
1. Execute the /OPT/VIM_1CX1 transaction.
Alternatively, follow LiveLink VIM - Configuration > Document Processing > Document Type Configuration > Maintain Document Types.
2. In the Document Type Definition Overview screen, double-click a document type.
3. Define the document type, using the following parameters.
Document Type Definition group
Description Enter the document type description.
Document Index Type Select the type of indexing to determine how the system determines the origin of data. The following values are available:
Indexing using OCR Use this option if the document is scanned and the OCR interface passes the data to SAP for creating an OpenText document.

5.1 Configuring DP Document Types
VIM060000-CGD-EN-4 Configuration Guide 47
Online Indexing Use this option if archiving a document using the SAP ArchiveLink Early Archiving process. Indexing is manual and the person responsible maintains the data and submits for further processing.
No Indexing Use this option if there is no indexing required and the document is directly processed. Use this option if there is no scanned image and the process is triggered using an API provided by OpenText.
Indexing using Idoc This is not supported at the moment.
Invoice Type Decide whether the document generates a Non PO Invoice or a PO Invoice.
Number Range Enter the number range for the number range object. If a custom number range object is not defined in global configuration, you can maintain the number range for object /OPT/DOCID in the Maintain Number Ranges step, see “Configuring Global Parameters” on page 115.
SAP FI DocType To determine the SAP document type in the background, enter a fixed document type or a custom function module.
If you use a function module, enter FM:<Function Module Name>. As the interface for the function module, use the template /OPT/BL_IF_DETERMINE_SAP_DTYPE.
From VIM 5.2 SP4 onwards, you can configure separate FI document types for invoices and credit memos at the DP document type level. Fill the SAP FI DocType field with two separate FI document types, separated by comma.
Example: If the value in the field is AA,BB, the system will set the FI document type AA for invoice and BB for credit memos.
You can still configure a custom function module to determine the FI document type.
Archive Doc. Type Select the archive doc type defined in the SAP ArchiveLink process, see “Creating SAP ArchiveLink Document Types” on page 45. We strongly recommend that each OpenText document type has a unique archive doc type.
Lines item data Select the check box if line item data is used that needs to be managed for the document (for example PO lines).
Header Program/Header Subscreen OpenText provides subscreens for managing index data both at header level and item level. If the layout or information on the subscreen is inadequate to
Chapter 5 Document Processing Process Configuration
48 OpenText Vendor Invoice Management VIM060000-CGD-EN-4
the business process, you can define your own header program and custom subscreen.
Note: The sections Header Fields and Item Fields in this transaction are not supported in this VIM version.
Item Program/Item Subscreen OpenText provides subscreens for managing index data both at header level and item level. If the layout or information on the subscreen is inadequate to the business process, you can define your own item program and custom subscreen.
Note: The sections Header Fields and Item Fields in this transaction are not supported in this VIM version.
Duplicate Check Data group
Duplicate Check Grp Select the duplicate check group defined.
Duplicate Check Role Select the role that gets the work item if the duplicate check fails and system identifies the document as a potential duplicate.
Document Posting Configuration group
Default Process Type Select the process type the system uses if the initial business rule check fails to result in a valid process type.
Usage – This process type is used if no other process type is determined.
Example: If a document has no errors and should directly be created in SAP, you select a default process type for creating the document.
Dialog Posting Step Options group
Posting Role Select the role that is responsible for posting the document finally. If the posting of the document fails in background, this role gets the work item to post the document in dialog.
Note: A valid role must be already defined, see “Defining Roles” on page 29.
Display Index Data Select this check box to display the index document in a separate session while document posting so the user is able to reference back the index data.
Note: At least one session must be available for display.
Skip Dashboard Select this check box to skip the dashboard step. The system creates the SAP document directly during the document posting process for the posting user.

5.1 Configuring DP Document Types
VIM060000-CGD-EN-4 Configuration Guide 49
Example: If the document is all okay, the user might want to post it directly, without displaying the document data.
Display Image Select this check box to display the archived image linked to the document in a separate session when the user processes the work item.
Note: Archiving must be active in the system.
Rescan Data group
Rescan Role Select the role that receives the work item if the document data is not legible or if the user decides to send the document for rescanning.
Note: A valid role must be already defined, see “Defining Roles” on page 29.
For a description of further fields in the Document Type Definition Details screen, see “Tax calculation Group” on page 62, “Maintaining Tax Code Determination” on page 60, and “Maintaining the PO Line Determination” on page 56.
5.1.3 Defining Process Types In this step, you define the valid process types for document types and the BDC Id for each process type.
1. Execute the /OPT/VIM_1CX1 transaction.
Alternatively, follow LiveLink VIM - Configuration > Document Processing > Document Type Configuration > Maintain Document Types.
2. In the Document Type Definition Overview screen, select a document type and double-click Document Processes.
3. In the Document Processes Overview screen, select a process type and click the button in the application bar.
Chapter 5 Document Processing Process Configuration
50 OpenText Vendor Invoice Management VIM060000-CGD-EN-4
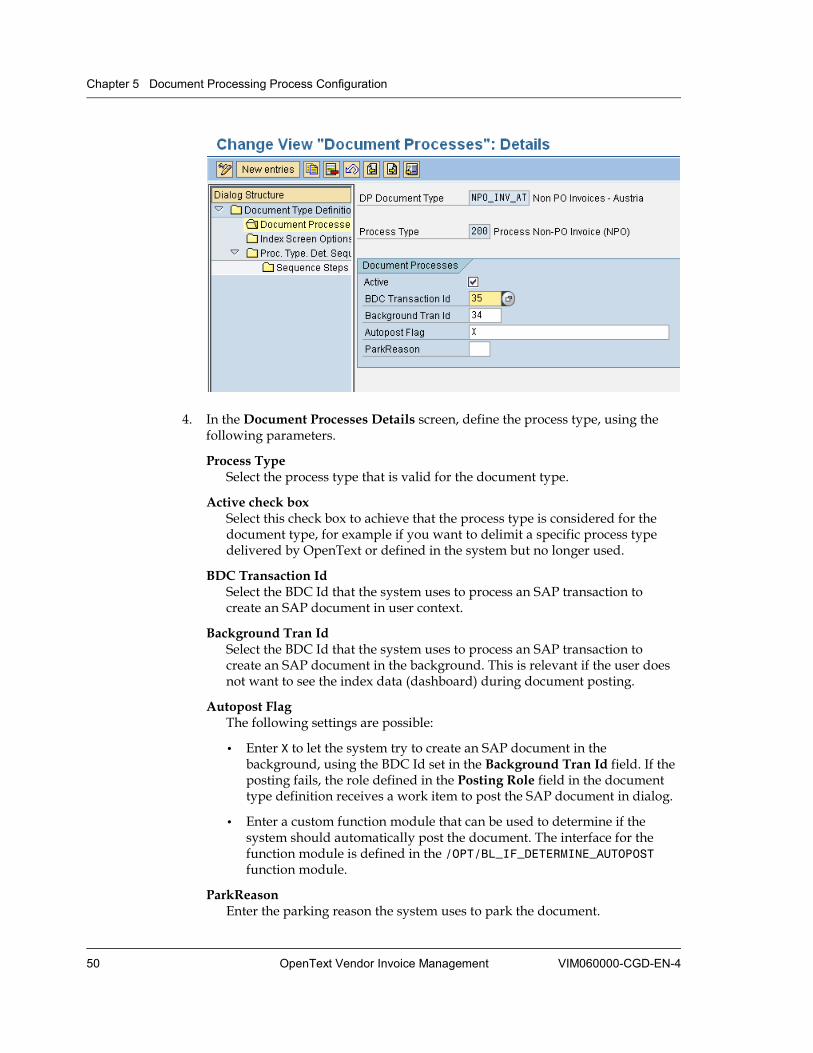
4. In the Document Processes Details screen, define the process type, using the following parameters.
Process Type Select the process type that is valid for the document type.
Active check box Select this check box to achieve that the process type is considered for the document type, for example if you want to delimit a specific process type delivered by OpenText or defined in the system but no longer used.
BDC Transaction Id Select the BDC Id that the system uses to process an SAP transaction to create an SAP document in user context.
Background Tran Id Select the BDC Id that the system uses to process an SAP transaction to create an SAP document in the background. This is relevant if the user does not want to see the index data (dashboard) during document posting.
Autopost Flag The following settings are possible:
• Enter X to let the system try to create an SAP document in the background, using the BDC Id set in the Background Tran Id field. If the posting fails, the role defined in the Posting Role field in the document type definition receives a work item to post the SAP document in dialog.
• Enter a custom function module that can be used to determine if the system should automatically post the document. The interface for the function module is defined in the /OPT/BL_IF_DETERMINE_AUTOPOST function module.
ParkReason Enter the parking reason the system uses to park the document.
5.1 Configuring DP Document Types
VIM060000-CGD-EN-4 Configuration Guide 51
Prerequisites
• The BDC Id defined for Document Create is used for parking the document.
• A valid parking reason is defined in the Maintain Parking Reasons step for Non PO or PO documents, see “Configuring Parking Reasons” on page 130 and “Configuring Parking Reasons” on page 176.
Example: If the process type determined is to park a PO invoice for missing or invalid information, create a parking reason and enter that parking reason here.
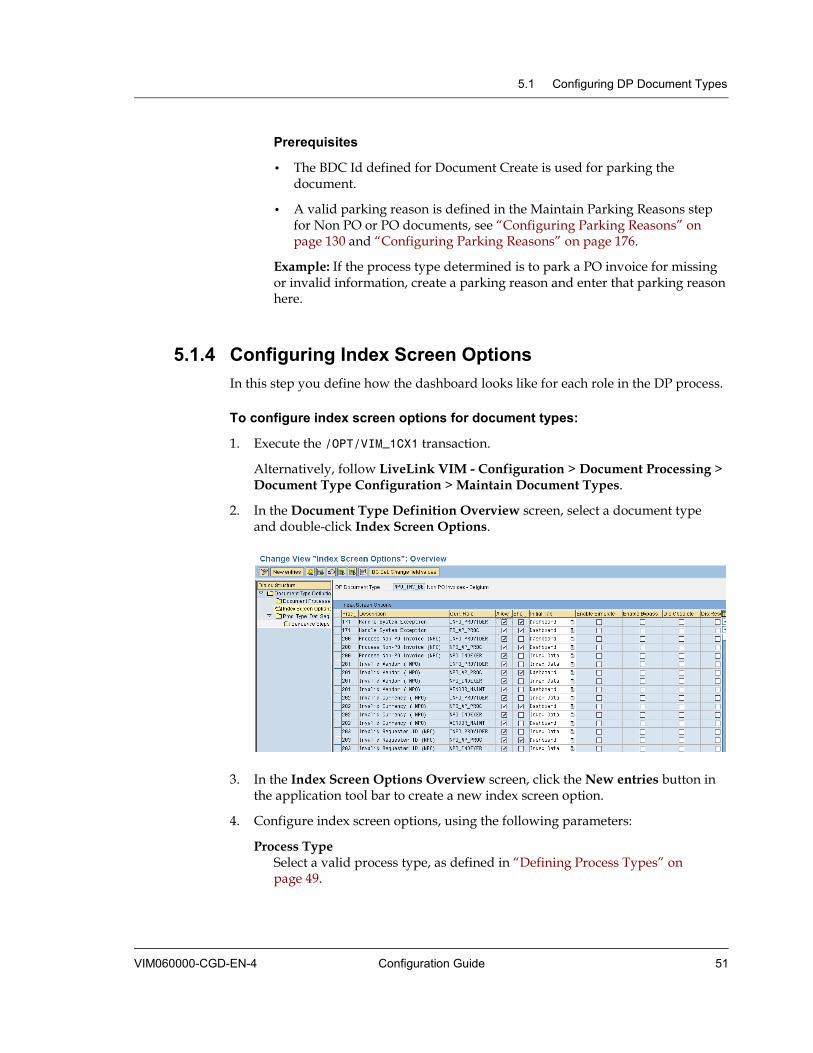
5.1.4 Configuring Index Screen Options In this step you define how the dashboard looks like for each role in the DP process.
To configure index screen options for document types:
1. Execute the /OPT/VIM_1CX1 transaction.
Alternatively, follow LiveLink VIM - Configuration > Document Processing > Document Type Configuration > Maintain Document Types.
2. In the Document Type Definition Overview screen, select a document type and double-click Index Screen Options.
3. In the Index Screen Options Overview screen, click the New entries button in the application tool bar to create a new index screen option.
4. Configure index screen options, using the following parameters:
Process Type Select a valid process type, as defined in “Defining Process Types” on page 49.
Chapter 5 Document Processing Process Configuration
52 OpenText Vendor Invoice Management VIM060000-CGD-EN-4
Description Description of the selected process type
Current role Role which processes the work item
Allow Changes Select this check box for a given role to allow all users in the role defined to change the index data.
Prerequisite – The document should not have been submitted, yet.
Example: If INDEXER and AP_PROCESSOR roles should be able to change index data, select the Allow changes check box in the Index Screen Options screen for INDEXER and AP_PROCESSOR roles.
Show Duplicates Select this check box to achieve that the duplicates identified by the system are displayed below the index data screen for the role that is processing the work item.
Example: It might be relevant for the DUP_CHECKER role to look at the duplicates to decide whether the document is actually a duplicate. For the AP_PROCESSOR role, showing duplicates might not be that important as the document might have already completed the duplicate check process and might be ready to be posted or parked.
Initial Tab Select the initial tab in document processing. The following values are available:
Dashboard The user processing the work item in the role gets to see the Dashboard (Process Options, Log etc.) subscreen first. However, users can switch between screens themselves.
Index Data The user processing the work item in the role gets to see the Index Data subscreen first. However, users can switch between screens themselves.
Simulate and Bypass
Note: These parameters are introduced with VIM 5.2 SP1, as an enhancement to the DP Dashboard. See also section 3.2.2 "Application Toolbar" in OpenText Vendor Invoice Management - User Guide (VIM-UGD).
Enable Simulate Select this check box to simulate skipping certain business rules. The Simulate process will check the relevant business rules.
Example: If any DP document got an exception Invalid Vendor (PO),you can simulate this by selecting the current role and selecting Enable Simulate.
5.1 Configuring DP Document Types
VIM060000-CGD-EN-4 Configuration Guide 53
Enable Bypass Select this check box to bypass the business rules.
Example: If any DP document got an exception Invalid Vendor (PO),you can bypass this by selecting the current role and selecting Enable Simulate and Enable Bypass.
Dis.Obsolete Select this check box to hide the Obsolete button in the DP Dashboard for the selected DP document type and the current role.
Dis.Rescan Select this check box to hide the Rescan button in the DP Dashboard for the selected DP document type and the current role.
5.1.5 Configuring Automatic Image Display VIM 5.2 SP5 introduces the following new feature: You can configure that images are automatically displayed when the DP Dashboard or the indexing screen is opened.
To configure automatic image display:
1. Execute the SM30 transaction.
2. Enter /PTGWFI/Z_CONST in Table/view and click Maintain.
3. In the WebFlow Constant Table, under Product Code 005, double-click the Constant DASHBOARD_IMAGE_AUTO.
4. Enter Constant Value X and save.
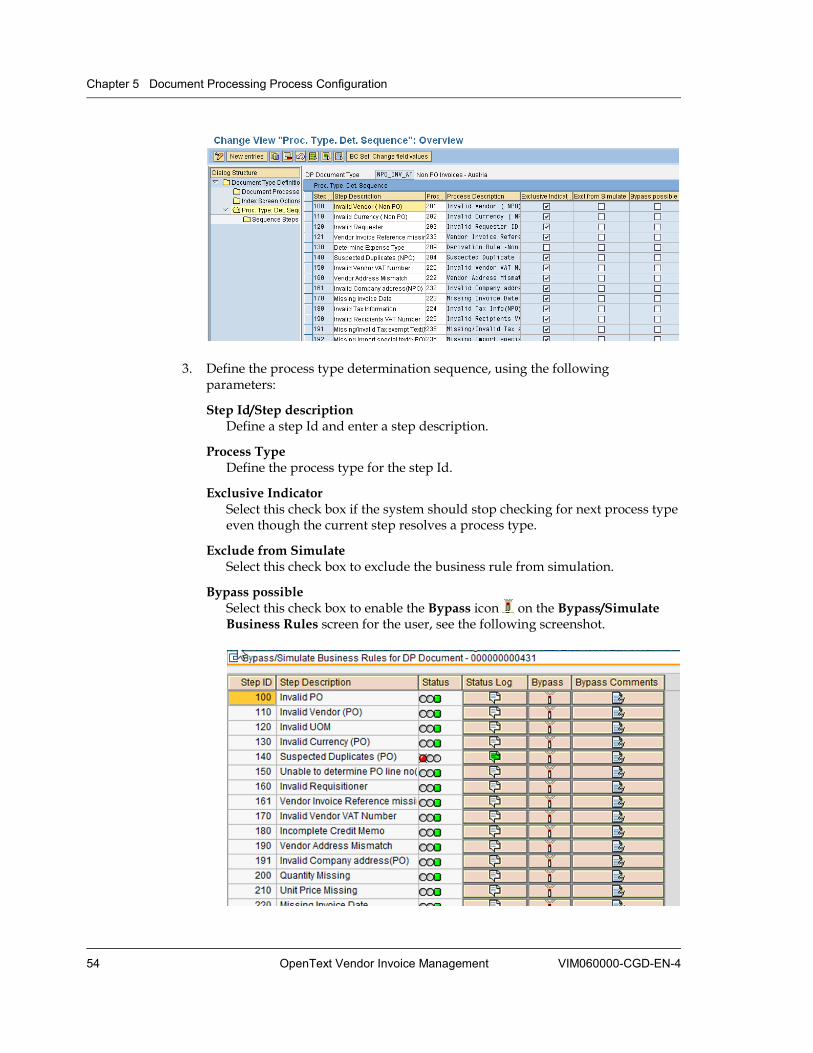
5.1.6 Defining the Process Type Determination Sequence In this step, you define how the system determines a process type for a given document type. The system validates each step defined here, and if the step fails, the process type defined against that step is determined. These process-type determination rules are also referred to as business rules. These steps serve the purpose of parsing the invoice metadata and of determining any business rules that are violated.
To define the process type determination sequence:
1. Execute the /OPT/VIM_1CX1 transaction.
Alternatively, follow LiveLink VIM - Configuration > Document Processing > Document Type Configuration > Maintain Document Types.
2. In the Document Type Definition Overview screen, select a document type and double-click Proc. Type. Det. Sequence.
Chapter 5 Document Processing Process Configuration
54 OpenText Vendor Invoice Management VIM060000-CGD-EN-4
3. Define the process type determination sequence, using the following parameters:
Step Id/Step description Define a step Id and enter a step description.
Process Type Define the process type for the step Id.
Exclusive Indicator Select this check box if the system should stop checking for next process type even though the current step resolves a process type.
Exclude from Simulate Select this check box to exclude the business rule from simulation.
Bypass possible Select this check box to enable the Bypass icon on the Bypass/Simulate Business Rules screen for the user, see the following screenshot.
5.1 Configuring DP Document Types
VIM060000-CGD-EN-4 Configuration Guide 55
Run in Central This column appears in satellite systems, only.
Select this check box for any business rule to have it run in the central system by an RFC call from the satellite system. Some business rules are centralized. Satellite systems can use such centralized rules by this option.
Example:
If a PO number is missing or invalid, the system should determine process type 101 (Invalid PO number).
In the document processes, you can configure the initial role that gets the work item to resolve the exception (defined in the definition of the process type).
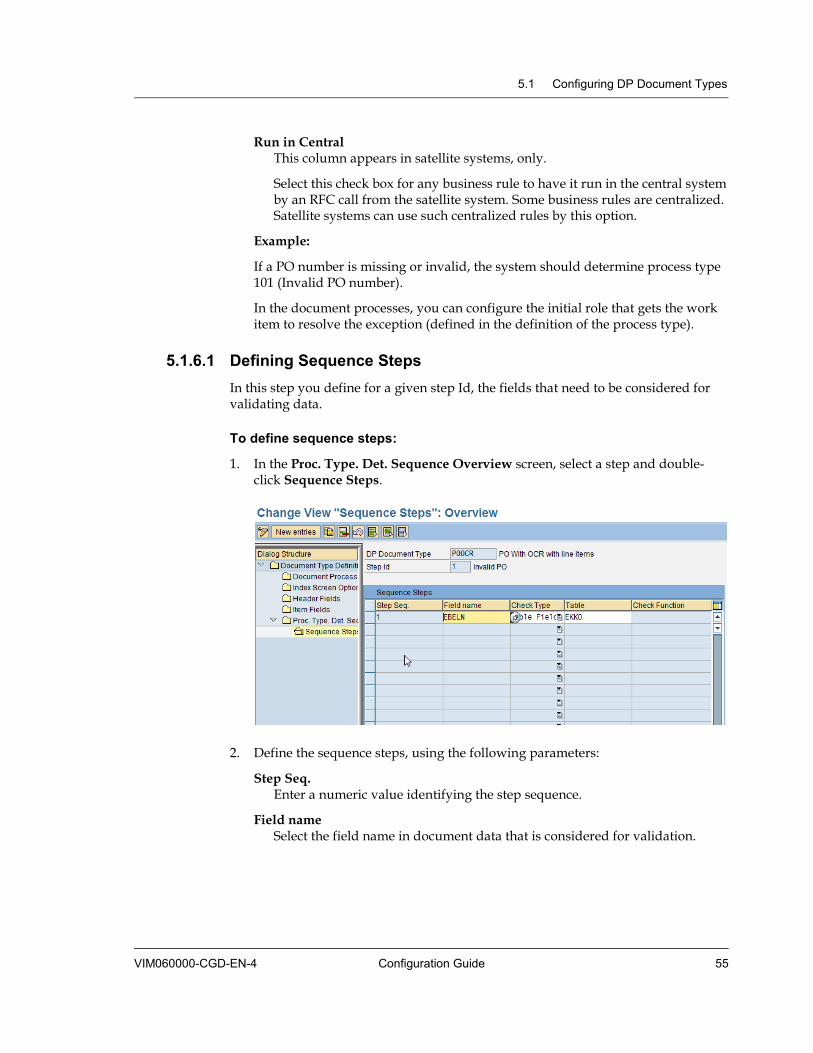
5.1.6.1 Defining Sequence Steps In this step you define for a given step Id, the fields that need to be considered for validating data.
To define sequence steps:
1. In the Proc. Type. Det. Sequence Overview screen, select a step and double-click Sequence Steps.
2. Define the sequence steps, using the following parameters:
Step Seq. Enter a numeric value identifying the step sequence.
Field name Select the field name in document data that is considered for validation.
Chapter 5 Document Processing Process Configuration
56 OpenText Vendor Invoice Management VIM060000-CGD-EN-4
Check Type Select the type of check to be performed:
• If Table Field is selected, the system validates that the value of the document field at runtime exists in the check table mentioned in the Table field. If the value does not exist, the step is considered to be successful and the system will determine the process type.
You have to maintain the Table field.
• If Check Function is selected, you can define your own check against the document field. If the function raises an exception the step is considered to be successful and the system will determine the process type.
You have to maintain the Check Function field.
• If Constant Value is selected, you can define a constant value against which the runtime data of the document is compared. If the runtime value matches the configured value, the step is considered to be successful and the system will determine the process type.
You have to maintain the value of the constant in the Check Val field.
• If Required Field is selected and if there is blank data in the document field, it is considered as meeting the criteria. The step is considered to be successful and the system will determine the process type.
You have to maintain the Required Field field.
Note: VIM 5.2 SP6 introduces a business rule check function library. This library offers additional check function modules that are not directly delivered as pre-customized business rules. You can use the function modules as new business rules depending on your needs. The new library is located in function group /OPT/VIM_PROC_TYPE_LIBRARY which has been created to collect such function modules.
If you want to activate one of the library function modules as a new business rule for any VIM document type, perform the following customizing steps:
1. To create a new process type depending on your specific needs, execute the /n/OPT/VIM_8CX1 transaction. Assign suitable process options and an initial actor to the new process type.
2. To integrate the newly created process type within the VIM document type maintenance, execute the /n/OPT/VIM_1CX1 transaction.
5.1.7 Maintaining the PO Line Determination Note: VIM provides a feature to maintain the PO line determination. PO line numbers are important for PO invoices but when data is captured from external system like OCR systems, the PO line number often is not supplied.
5.1 Configuring DP Document Types
VIM060000-CGD-EN-4 Configuration Guide 57
The Maintain PO Line Determination Procedures help the system to determine the PO line numbers.
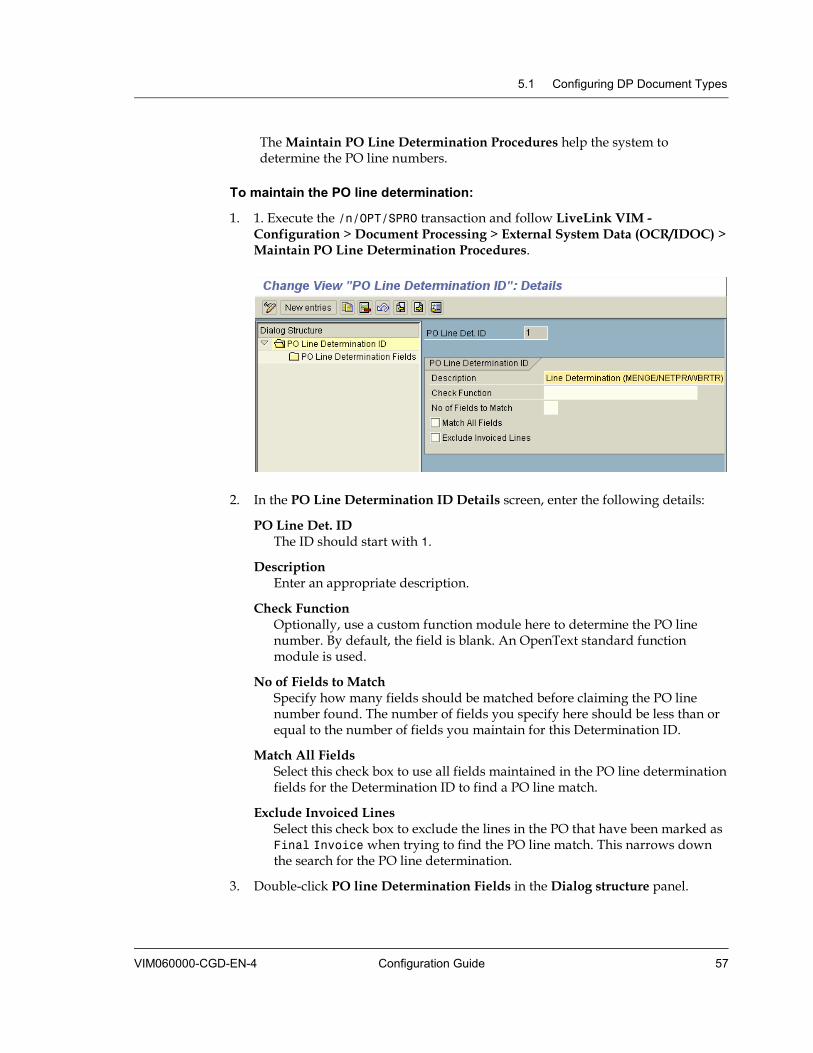
To maintain the PO line determination:
1. 1. Execute the /n/OPT/SPRO transaction and follow LiveLink VIM - Configuration > Document Processing > External System Data (OCR/IDOC) > Maintain PO Line Determination Procedures.
2. In the PO Line Determination ID Details screen, enter the following details:
PO Line Det. ID The ID should start with 1.
Description Enter an appropriate description.
Check Function Optionally, use a custom function module here to determine the PO line number. By default, the field is blank. An OpenText standard function module is used.
No of Fields to Match Specify how many fields should be matched before claiming the PO line number found. The number of fields you specify here should be less than or equal to the number of fields you maintain for this Determination ID.
Match All Fields Select this check box to use all fields maintained in the PO line determination fields for the Determination ID to find a PO line match.
Exclude Invoiced Lines Select this check box to exclude the lines in the PO that have been marked as Final Invoice when trying to find the PO line match. This narrows down the search for the PO line determination.
3. Double-click PO line Determination Fields in the Dialog structure panel.

Chapter 5 Document Processing Process Configuration
58 OpenText Vendor Invoice Management VIM060000-CGD-EN-4
4. Maintain the fields you want to use for the PO line determination.
In the example screenshot, MENGE (Quantity), NETPR (Unit Price) and WBRTR (Amount) have been maintained for determining the PO line match in the baseline configuration.
5. Click to save your settings.
6. Continue with DP Document Type configuration: Execute the /n/OPT/SPRO transaction and follow LiveLink VIM - Configuration > Document Processing > Document Type Configuration > Maintain Document Types.
7. Double-click a line to open the Document Type Definition Details screen.
5.1 Configuring DP Document Types
VIM060000-CGD-EN-4 Configuration Guide 59
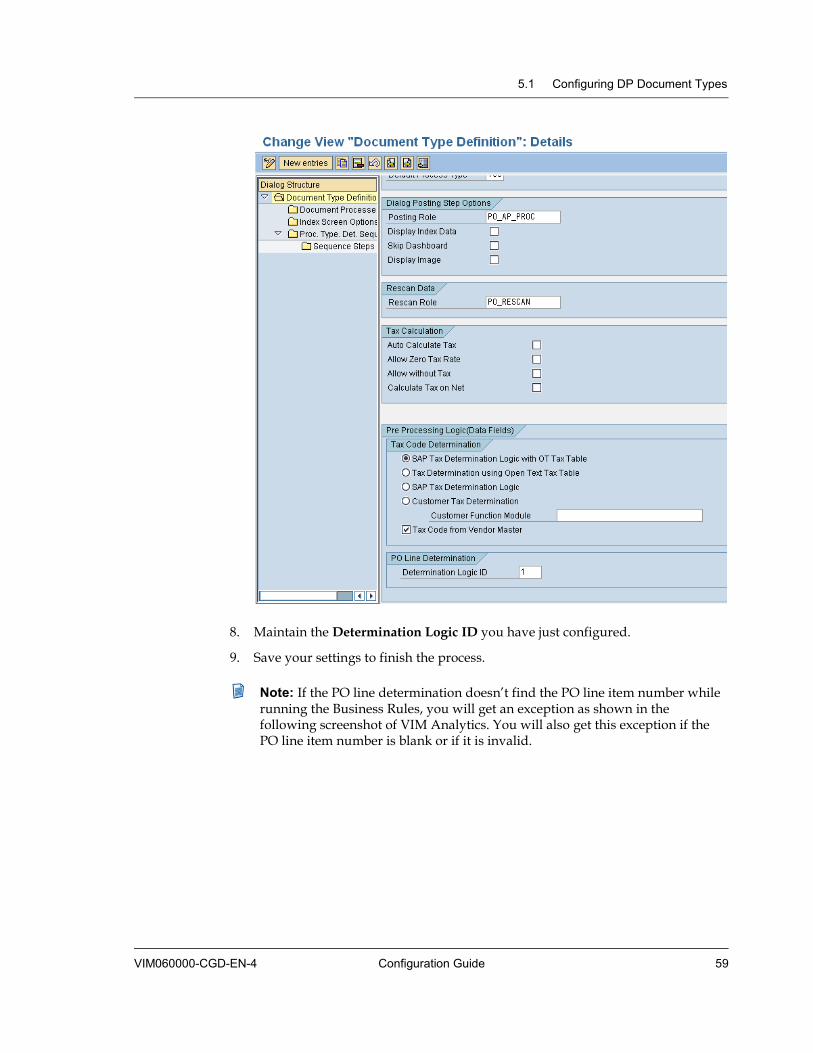
8. Maintain the Determination Logic ID you have just configured.
9. Save your settings to finish the process.
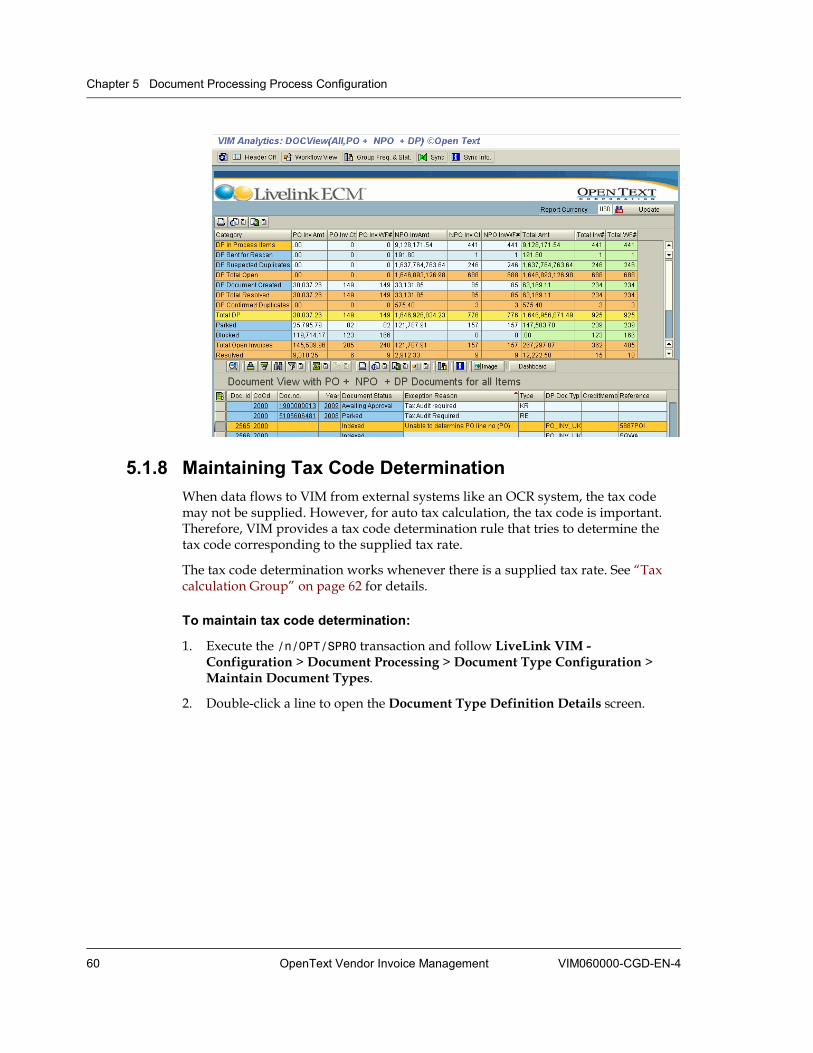
Note: If the PO line determination doesn’t find the PO line item number while running the Business Rules, you will get an exception as shown in the following screenshot of VIM Analytics. You will also get this exception if the PO line item number is blank or if it is invalid.
Chapter 5 Document Processing Process Configuration
60 OpenText Vendor Invoice Management VIM060000-CGD-EN-4
5.1.8 Maintaining Tax Code Determination When data flows to VIM from external systems like an OCR system, the tax code may not be supplied. However, for auto tax calculation, the tax code is important. Therefore, VIM provides a tax code determination rule that tries to determine the tax code corresponding to the supplied tax rate.
The tax code determination works whenever there is a supplied tax rate. See “Tax calculation Group” on page 62 for details.
To maintain tax code determination:
1. Execute the /n/OPT/SPRO transaction and follow LiveLink VIM - Configuration > Document Processing > Document Type Configuration > Maintain Document Types.
2. Double-click a line to open the Document Type Definition Details screen.

5.1 Configuring DP Document Types
VIM060000-CGD-EN-4 Configuration Guide 61
In the Tax Code Determination group, the options for tax code determination are displayed. The following options are available:
• “SAP Tax Determination Logic with OT Tax Table (Simple Maintenance)” on page 64
• “Tax Determination using OpenText Tax Table (Simple Maintenance)” on page 65
• “SAP Tax Determination Logic” on page 66
• “Customer Tax Determination” on page 66
Note: Select the Tax Code from Vendor Master check box to retrieve the tax code from Vendor Master in case any of the other options fails to retrieve the tax code.
Chapter 5 Document Processing Process Configuration
62 OpenText Vendor Invoice Management VIM060000-CGD-EN-4
Tax calculation Group
In the Tax calculation group of the Document Type Definition Details screen (see screenshot above), you define the tax calculation options for the DP document type. The following options are available:
Auto Calculate Tax Select this check box if you want the system to calculate the tax based on the tax code either supplied explicitly during the indexing stage or determined by the system from the supplied tax rate.
Allow Zero Tax Rate Select this check box if you want the system to determine the tax code for a 0.00 tax rate (zero tax rate). If blank or empty is supplied, the system cannot determine the tax code, so the value should be 0.00 or greater.
Allow without Tax Select this check box for scenarios without input tax, that means, nothing is supplied from tax perspective and you still want the system to carry it forward.
Note: This option only works if Auto Calculate Tax is not selected.
Calculate Tax on Net New feature with VIM 5.2 SP6 for Non PO DP Approval: Use this check box if you want the system to differentiate between gross and net. The check box is document type specific instead of user specific, because approval might be accomplished by several different users.
As a prerequisite, you must configure the global constant CALC_TAX_ON_NET. See “Configuring Tax Calculation on Net Amount” on page 259 for details.
If the global constant CALC_TAX_ON_NET is set to D, you can define Calculate Tax on Net document type specific in the Document Type Definition Details screen:
• Select the Calculate Tax on Net check box to define that G/L account amounts are to be entered net.
• Clear the Calculate Tax on Net check box to define that G/L account amounts are to be entered gross.
SAP has two different tax flags that control the line amount and balance on the Non PO parking screen and VIM Non PO parked approval:
• auto_calc tax flag that is document specific.
• calculate-tax-on-net-amount flag that is user specific.
In the past, VIM had only the auto-calc tax flag for Non PO DP approval. The calculate-on-net-amount tax flag, known from Non PO processing, was not available for DP documents. VIM interpreted the missing second flag as being empty. If the auto-calc flag was selected, the gross amount was expected in the Non PO DP line items.
The following combinations are possible with the two tax flags:
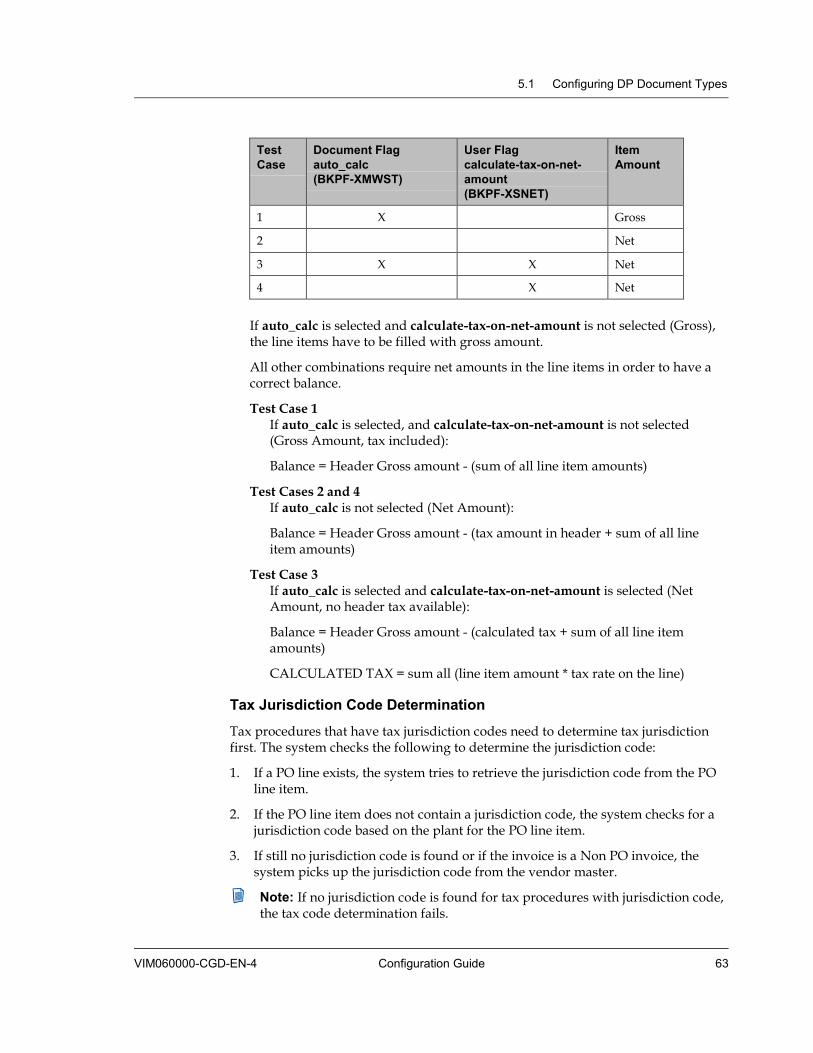
5.1 Configuring DP Document Types
VIM060000-CGD-EN-4 Configuration Guide 63
Test Case
Document Flag auto_calc (BKPF-XMWST)
User Flag calculate-tax-on-net-amount (BKPF-XSNET)
Item Amount
1 X Gross
2 Net
3 X X Net
4 X Net
If auto_calc is selected and calculate-tax-on-net-amount is not selected (Gross), the line items have to be filled with gross amount.
All other combinations require net amounts in the line items in order to have a correct balance.
Test Case 1 If auto_calc is selected, and calculate-tax-on-net-amount is not selected (Gross Amount, tax included):
Balance = Header Gross amount - (sum of all line item amounts)
Test Cases 2 and 4 If auto_calc is not selected (Net Amount):
Balance = Header Gross amount - (tax amount in header + sum of all line item amounts)
Test Case 3 If auto_calc is selected and calculate-tax-on-net-amount is selected (Net Amount, no header tax available):
Balance = Header Gross amount - (calculated tax + sum of all line item amounts)
CALCULATED TAX = sum all (line item amount * tax rate on the line)
Tax Jurisdiction Code Determination
Tax procedures that have tax jurisdiction codes need to determine tax jurisdiction first. The system checks the following to determine the jurisdiction code:
1. If a PO line exists, the system tries to retrieve the jurisdiction code from the PO line item.
2. If the PO line item does not contain a jurisdiction code, the system checks for a jurisdiction code based on the plant for the PO line item.
3. If still no jurisdiction code is found or if the invoice is a Non PO invoice, the system picks up the jurisdiction code from the vendor master.
Note: If no jurisdiction code is found for tax procedures with jurisdiction code, the tax code determination fails.

Chapter 5 Document Processing Process Configuration
64 OpenText Vendor Invoice Management VIM060000-CGD-EN-4
Possible Reasons for Tax Code Determination Failures
If the tax code determination fails, consider the following possible reasons:
• The PO line item tax code does not match the tax rate supplied.
• There are multiple tax codes belonging to the same tax rate supplied.
• A tax rate may match with one tax code but the tax code contains multiple rates.
• The tax jurisdiction code has not been determined, in case a tax procedure with jurisdiction code is used.
For example, the United States have the TAXUSJ tax procedure with jurisdiction code.
If the tax code determination fails, an Invalid Tax Info exception is raised in the VIM Analytics report, see screenshot below. In this case, the workflow is routed to the Tax Expert for further actions.
5.1.8.1 SAP Tax Determination Logic with OT Tax Table (Simple Maintenance) This option uses the following logic:
1. The system reads the tax code from the PO line and checks if the tax rate supplied by the external system matches uniquely. If the tax code exists in the PO line item and no match is found, the tax code is considered to not determine and the system stops checking further.
2. If the tax code does not exist in the PO line or the invoice is not a PO invoice, the system proceeds as follows:
a. The system checks all tax codes of input tax type for the country and checks if the tax rate supplied matches uniquely with only one tax code. If no match is found, the system proceeds further.
b. The system selects the tax code from the OpenText table based on the tax rate (Simple Maintenance). See “Tax Determination using OpenText Tax Table (Simple Maintenance)” on page 65.
c. If the above step does not result in a tax code match, the system retrieves the tax code from Vendor Master if the Tax Code from Vendor Master check box is selected in the DP configuration. The system checks if the vendor tax code contains only one tax rate and if that tax rate matches with the tax rate supplied. If it matches, the tax code is determined.
5.1 Configuring DP Document Types
VIM060000-CGD-EN-4 Configuration Guide 65
Note: If the tax procedure with tax jurisdiction is used, the jurisdiction code is determined first and this code is used in conjunction with tax code to retrieve the match. For details on the jurisdiction code determination, see “Tax Jurisdiction Code Determination” on page 63.
5.1.8.2 Tax Determination using OpenText Tax Table (Simple Maintenance) This option uses the following logic:
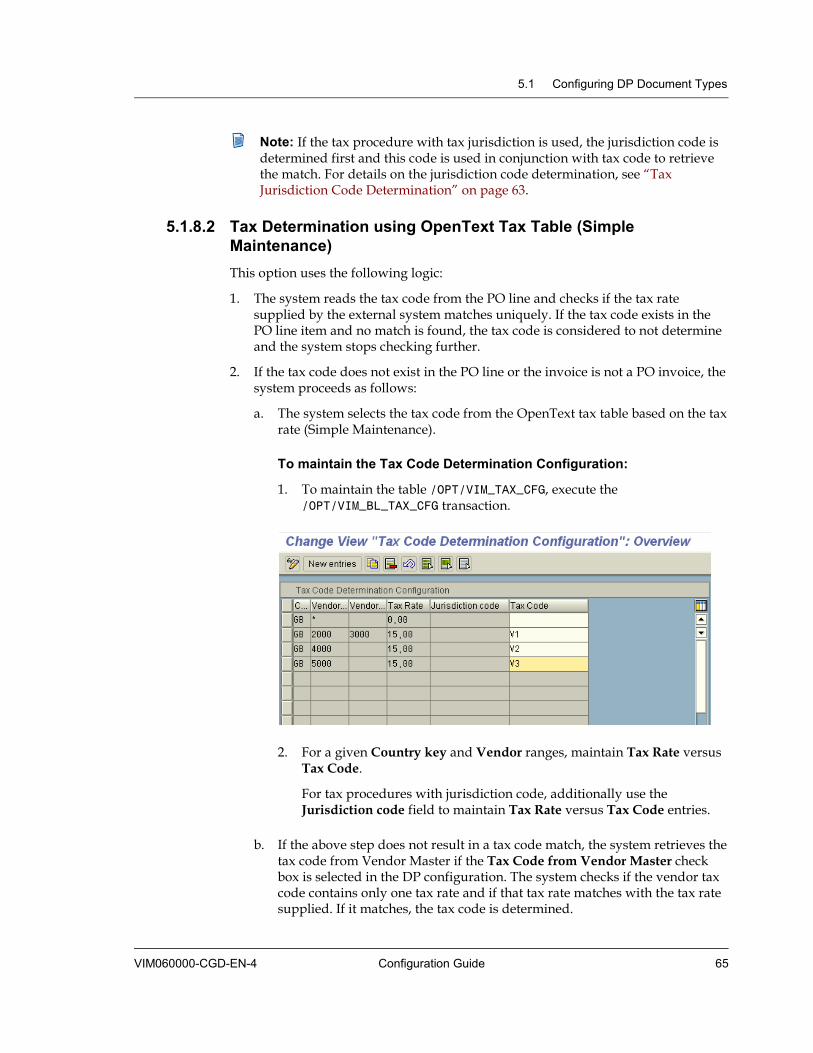
1. The system reads the tax code from the PO line and checks if the tax rate supplied by the external system matches uniquely. If the tax code exists in the PO line item and no match is found, the tax code is considered to not determine and the system stops checking further.
2. If the tax code does not exist in the PO line or the invoice is not a PO invoice, the system proceeds as follows:
a. The system selects the tax code from the OpenText tax table based on the tax rate (Simple Maintenance).
To maintain the Tax Code Determination Configuration:
1. To maintain the table /OPT/VIM_TAX_CFG, execute the /OPT/VIM_BL_TAX_CFG transaction.
2. For a given Country key and Vendor ranges, maintain Tax Rate versus Tax Code.
For tax procedures with jurisdiction code, additionally use the Jurisdiction code field to maintain Tax Rate versus Tax Code entries.
b. If the above step does not result in a tax code match, the system retrieves the tax code from Vendor Master if the Tax Code from Vendor Master check box is selected in the DP configuration. The system checks if the vendor tax code contains only one tax rate and if that tax rate matches with the tax rate supplied. If it matches, the tax code is determined.
Chapter 5 Document Processing Process Configuration
66 OpenText Vendor Invoice Management VIM060000-CGD-EN-4
Note: If the tax procedure with tax jurisdiction is used, the jurisdiction code is determined first and this code is used in conjunction with tax code to retrieve the match. For details on the jurisdiction code determination, see “Tax Jurisdiction Code Determination” on page 63.
5.1.8.3 SAP Tax Determination Logic This option uses the following logic:
1. The system reads the tax code from the PO line and checks if the tax rate supplied by the external system matches uniquely. If the tax code exists in the PO line item and no match is found, the tax code is considered to not determine and the system stops checking further.
2. If the tax code does not exist in the PO line or the invoice is not a PO invoice, the system proceeds as follows:
a. The system checks all tax codes of input tax type for the country and checks if the tax rate supplied matches uniquely with only one tax code. If no match is found, the system proceeds further.
b. If the above step does not result in a tax code match, the system retrieves the tax code from Vendor Master if the Tax Code from Vendor Master check box is selected in the DP configuration. The system checks if the vendor tax code contains only one tax rate and if that tax rate matches with the tax rate supplied. If it matches, the tax code is determined.
Note: If the tax procedure with tax jurisdiction is used, the jurisdiction code is determined first and this code is used in conjunction with tax code to retrieve the match. For details on the jurisdiction code determination, see “Tax Jurisdiction Code Determination” on page 63.
5.1.8.4 Customer Tax Determination You can use a Custom Function Module to determine the tax code. The function module must be compatible with the interface of the function module /OPT/VIM_TAX_CODE_DETERMINE:
*"-------------------------------------------------------- *"*"Local interface: *" IMPORTING *" REFERENCE(LOCATION) TYPE CHAR1 OPTIONAL *" TABLES *" INDEX_ITEM STRUCTURE /OPT/VIM_1ITEM *" CHANGING *" REFERENCE(INDEX_DATA) TYPE /OPT/VIM_1HEAD OPTIONAL *"--------------------------------------------------------
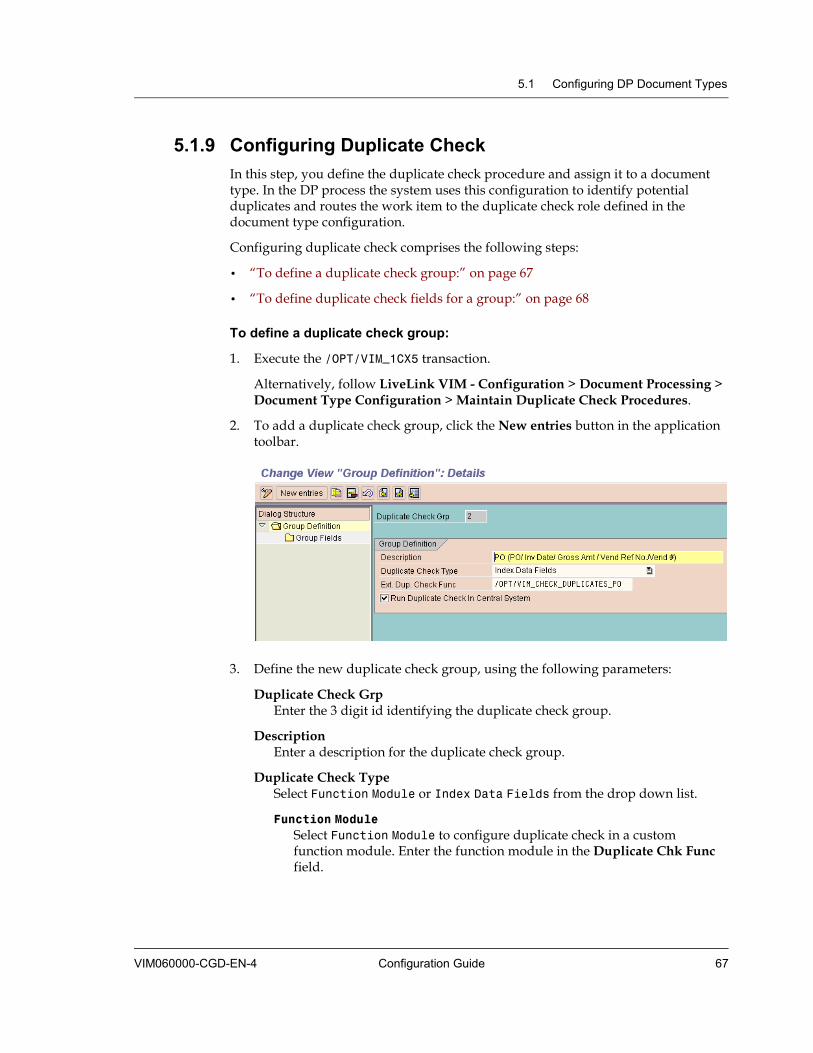
5.1 Configuring DP Document Types
VIM060000-CGD-EN-4 Configuration Guide 67
5.1.9 Configuring Duplicate Check In this step, you define the duplicate check procedure and assign it to a document type. In the DP process the system uses this configuration to identify potential duplicates and routes the work item to the duplicate check role defined in the document type configuration.
Configuring duplicate check comprises the following steps:
• “To define a duplicate check group:” on page 67
• “To define duplicate check fields for a group:” on page 68
To define a duplicate check group:
1. Execute the /OPT/VIM_1CX5 transaction.
Alternatively, follow LiveLink VIM - Configuration > Document Processing > Document Type Configuration > Maintain Duplicate Check Procedures.
2. To add a duplicate check group, click the New entries button in the application toolbar.
3. Define the new duplicate check group, using the following parameters:
Duplicate Check Grp Enter the 3 digit id identifying the duplicate check group.
Description Enter a description for the duplicate check group.
Duplicate Check Type Select Function Module or Index Data Fields from the drop down list.
Function Module Select Function Module to configure duplicate check in a custom function module. Enter the function module in the Duplicate Chk Func field.
Chapter 5 Document Processing Process Configuration
68 OpenText Vendor Invoice Management VIM060000-CGD-EN-4
Index Data Fields Select Index Data Fields to configure duplicate check based on the fields defined in the Group Fields. See “To define duplicate check fields for a group:” on page 68.
Ext. Dup. Check Func Define a function module to define extended duplicate check to check SAP documents. The interface for the function module is the following:
FUNCTION <FUNCTION>. IMPORTING REFERENCE(I_INDEX_DATA) TYPE /OPT/VIM_1HEAD EXPORTING REFERENCE(O_DUPLICATES) TYPE /OPT/VIM_1HEAD_T
TABLES INDEX_ITEM STRUCTURE /OPT/VIM_1ITEM OPTIONAL
Run Duplicate Check in Central System This check box appears in satellite systems, only.
In multiple systems scenario, select this check box in any satellite system to scan for duplicates through all DP documents of all systems in the landscape, central as well as satellite systems.
The configuration data for Run Duplicate Check in Central System does not have to be centralized. Local configuration can work without the need of centralizing configuration data.
Note: The Aggregation Report batch job for the OTH_VMHEAD group runs periodically and synchronizes the data of SAP IM documents to the central system. The frequency of the batch job can be adjusted as needed. Run Duplicate Check in Central System yields desired results only after the batch job synchronized data with up to date information. See section 18.9 "Scheduling the Aggregation Report" in OpenText Vendor Invoice Management - Administration Guide (VIM-AGD) for details.
To define duplicate check fields for a group:
In this step, you define the fields that need to be considered to define a duplicate check. You can define multiple groups by maintaining them in the same step id.
1. In the Group Definition Overview screen, select a group and double-click Group Fields in the navigation pane.
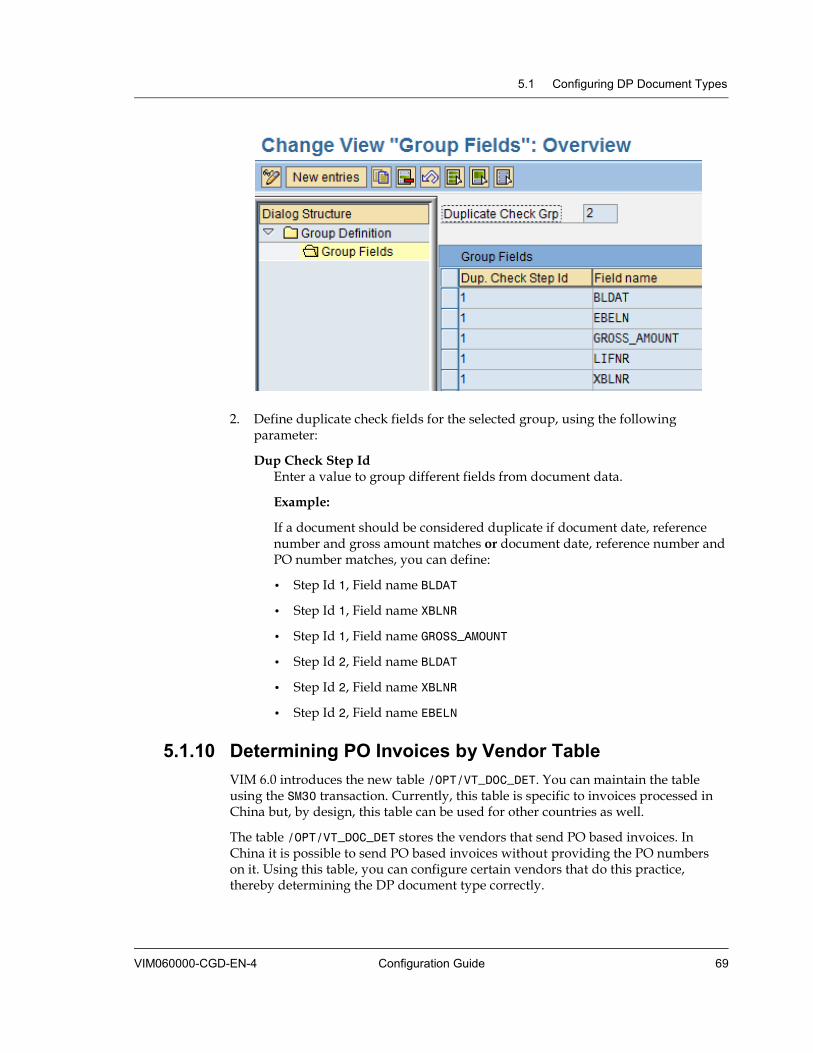
5.1 Configuring DP Document Types
VIM060000-CGD-EN-4 Configuration Guide 69
2. Define duplicate check fields for the selected group, using the following parameter:
Dup Check Step Id Enter a value to group different fields from document data.
Example:
If a document should be considered duplicate if document date, reference number and gross amount matches or document date, reference number and PO number matches, you can define:
• Step Id 1, Field name BLDAT
• Step Id 1, Field name XBLNR
• Step Id 1, Field name GROSS_AMOUNT
• Step Id 2, Field name BLDAT
• Step Id 2, Field name XBLNR
• Step Id 2, Field name EBELN
5.1.10 Determining PO Invoices by Vendor Table VIM 6.0 introduces the new table /OPT/VT_DOC_DET. You can maintain the table using the SM30 transaction. Currently, this table is specific to invoices processed in China but, by design, this table can be used for other countries as well.
The table /OPT/VT_DOC_DET stores the vendors that send PO based invoices. In China it is possible to send PO based invoices without providing the PO numbers on it. Using this table, you can configure certain vendors that do this practice, thereby determining the DP document type correctly.

Chapter 5 Document Processing Process Configuration
70 OpenText Vendor Invoice Management VIM060000-CGD-EN-4
The system first checks the entries in table /OPT/VT_DOC_DET. If the vendor is found, the DP document is considered as a PO based invoice. If no vendor entry is found, the system checks for the existence of any PO numbers on the invoice.
You can maintain vendors per company code and also ranges of company code and vendor combinations.
5.2 Roles in Document Processing OpenText delivers standard roles for Document Processing (DP) in the baseline.
To display the table of roles, execute the /OPT/CP_9CX5 transaction.
Alternatively, follow OpenText LiveLink VIM Menu > SAP menu > Roles > Role Maintenance.
To create a new role, follow the process described in “Defining Roles” on page 29,with product code 005.
5.3 Configuring DP Process Options In this step, you define the process options that a role gets to see on the DP dashboard during the DP process. These options are available for use in any process type configuration.

5.3 Configuring DP Process Options
VIM060000-CGD-EN-4 Configuration Guide 71
To configure DP process options:
1. Execute the /OPT/VIM_8CX2 transaction.
Alternatively, follow LiveLink VIM - Configuration > Document Processing > Process Configuration > Maintain Process Options.
2. Configure DP process options using the following parameters:
Option Id Enter a 5 digit number identifying the process option.
Option Button Text Enter the text that appears on the button for this option in the users’ dashboard.
Option Text Enter a description that describes the option in detail.
Option Type Select the type of option:
BDC Action A BDC ID is executed if the user chooses this option.
Note: If you select BDC Action you have to maintain the BDC Configuration Id.
Referral User can refer the work item to a target role for further processing.
Note: If the Override Res. Actor check box is selected, the user has an option to send the work item to users other than the ones determined by the system for the target role.
Chapter 5 Document Processing Process Configuration
72 OpenText Vendor Invoice Management VIM060000-CGD-EN-4
Class Method At this point, this is not supported.
Call Transaction The system calls the transaction that is defined in the Transaction Code field.
Note: If you select Call Transaction you have to maintain the Transaction Code field.
Workflow Task The system calls a (sub) workflow or task before continuing the process. Select Workflow Task to define any custom post processing steps for a given option.
Auto Action Required Select this check box to let the system try to post the document (create SAP document) in background. The transaction that is called for posting depends on the process type configuration.
Recheck Proc Type Select this check box to let the system try to run the business rules as defined.
Confirm Check Rules Select this check box to let the system try to get a confirmation from the user to rerun the business rules.
Confirm Execute Select this check box to let the system get a confirmation from the user to execute the option.
Confirm Completion Select this check box to let the system get a confirmation from the user that the option is successfully executed.
Display Index Data New since VIM 5.2 SP6. Select this check box to let the system display indexing data of the DP in a separate window while executing this process option.
Note: After Display Index Data is selected for a certain Process Option, the feature is applied to all Document Types.
Document Status Select the status set for the document if the option is executed successfully.
5.3.1 Using the BDC ID Infrastructure In VIM, many processes base on configuring the system to execute a sequence of operations. This concept is implemented by configuring a BDC ID, a very flexible infrastructure that allows to:
• execute a transaction code without any configuration

5.3 Configuring DP Process Options
VIM060000-CGD-EN-4 Configuration Guide 73
• execute a transaction code pre-populating process data without having to code how the data is read
• configure a custom function module to be executed to achieve the process option
The substeps in the definition of a BDC ID are the following:
• “Defining a BDC ID” on page 73
• “Defining Parameters” on page 75
• “Defining Transaction Data” on page 77
• “Defining Success Messages” on page 81
5.3.1.1 Defining a BDC ID
To define a BDC ID:
1. Execute the /OPT/CP_9CX1 transaction.
Alternatively, follow LiveLink VIM - Configuration > Document Processing > Document Type Configuration > Maintain BDC Procedures.
2. In the BDC Definition Overview screen, double-click a BDC configuration Id.
3. Define the BDC ID, using the following parameters:

Chapter 5 Document Processing Process Configuration
74 OpenText Vendor Invoice Management VIM060000-CGD-EN-4
Note: If the Custom BDC Function at the bottom of the screen is maintained, the system ignores all other BDC Definition settings.
Description Enter a meaningful description for the action.
Transaction Code Enter the related SAP transaction code.
Data Area Enter Indexing for DP
Processing Mode Select settings for processing:
Display all screens Use this option to display all screens.
Display errors BDC mode E: Stops at Error screen.
Background processing BDC Mode N: Use this option for background processes.
Background processing; debugging possible Not used
Update Select the Update mode to call transaction. Possible values: Local,Synchronous, or Asynchronous.
CATT Mode Select the CATT mode. The following values are possible:
No CATT ’ ’ No CATT active
CATT without individual screen control ‘N’ CATT without single-screen control
CATT with individual screen control ‘A’ CATT with single-screen control (can be selected for running in MIRO in background)
Default Size Select this check box to use the default window size.
Continue after Commit Select this check box to specify that the transaction does not end at COMMIT WORK.
Not a BI Session Select this check box to specify no batch input mode, that is, SY-BINPT =SPACE.
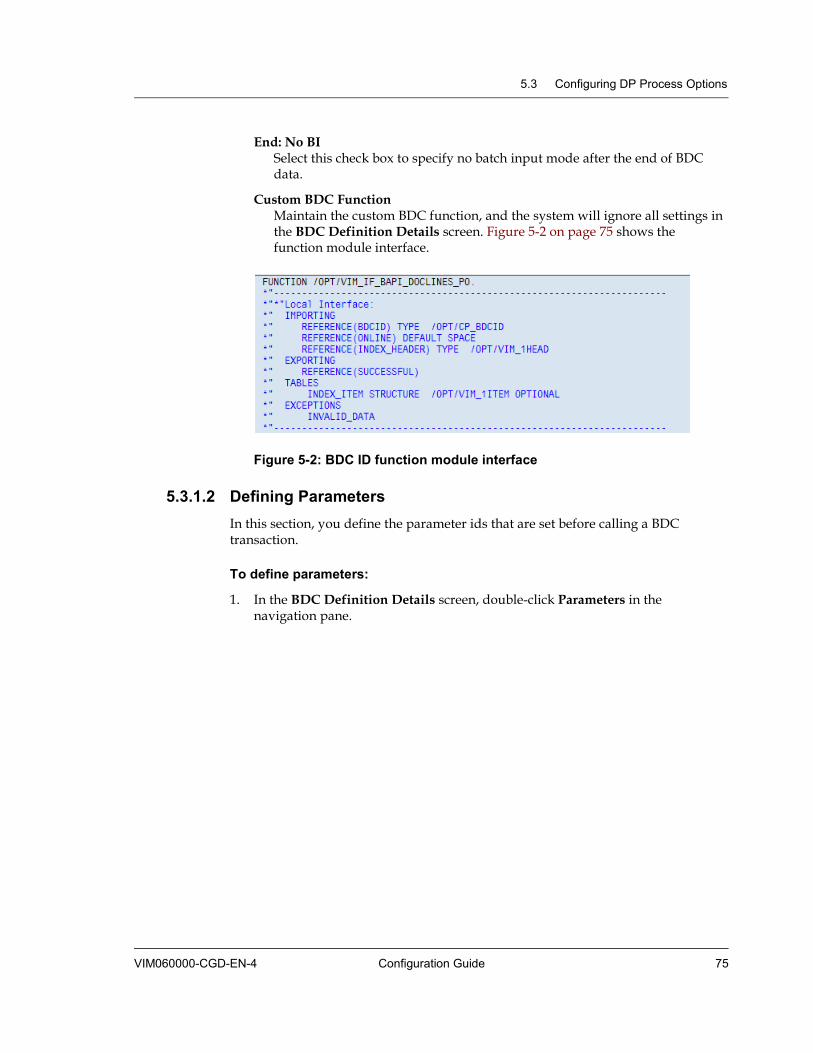
5.3 Configuring DP Process Options
VIM060000-CGD-EN-4 Configuration Guide 75
End: No BI Select this check box to specify no batch input mode after the end of BDC data.
Custom BDC Function Maintain the custom BDC function, and the system will ignore all settings in the BDC Definition Details screen. Figure 5-2 on page 75 shows the function module interface.
Figure 5-2: BDC ID function module interface
5.3.1.2 Defining Parameters In this section, you define the parameter ids that are set before calling a BDC transaction.
To define parameters:
1. In the BDC Definition Details screen, double-click Parameters in the navigation pane.
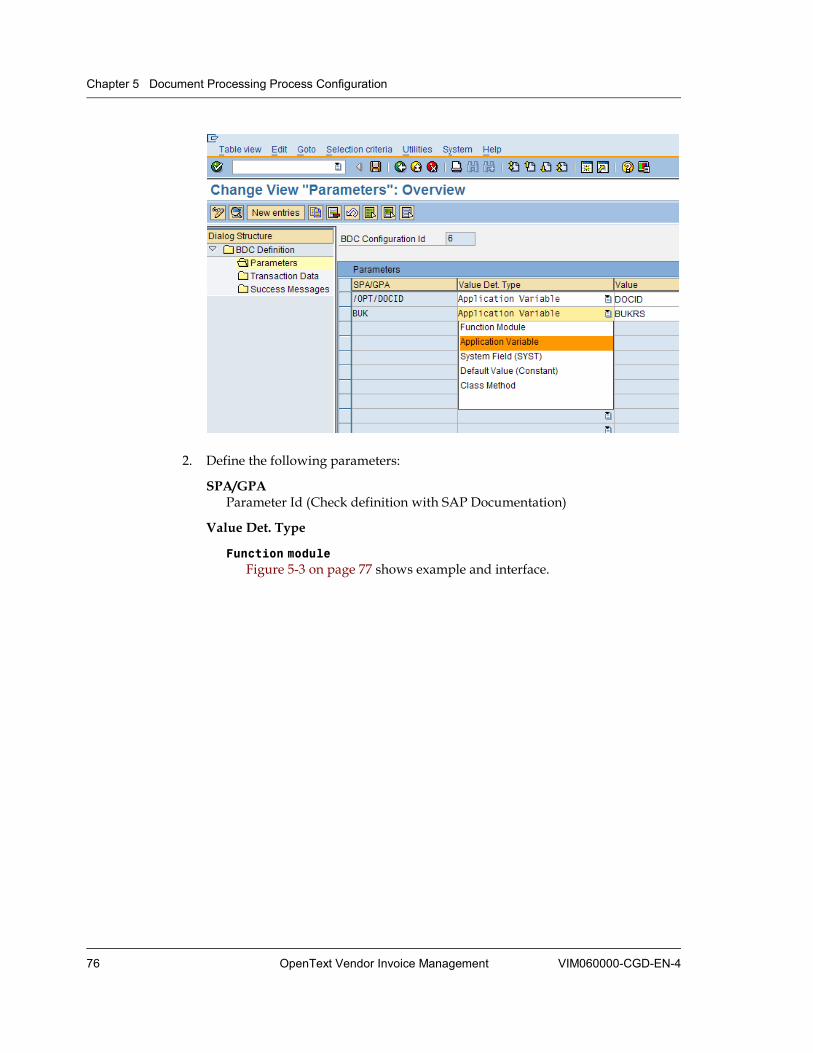
Chapter 5 Document Processing Process Configuration
76 OpenText Vendor Invoice Management VIM060000-CGD-EN-4
2. Define the following parameters:
SPA/GPA Parameter Id (Check definition with SAP Documentation)
Value Det. Type
Function module Figure 5-3 on page 77 shows example and interface.
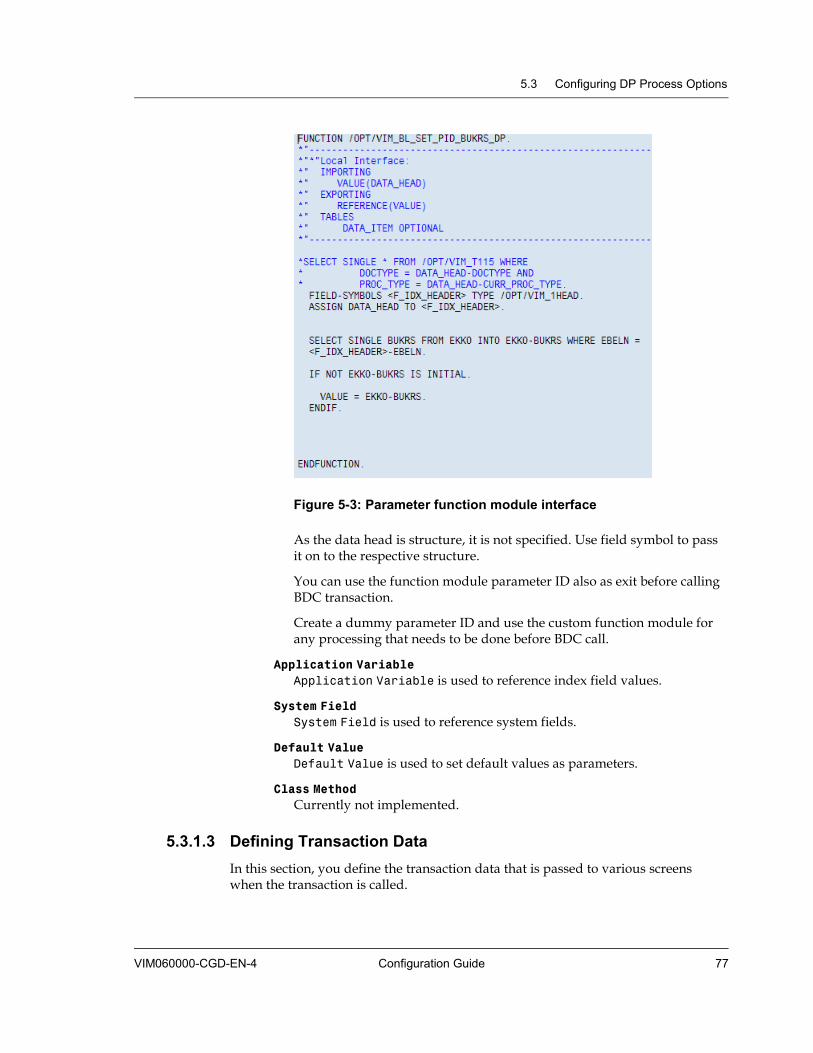
5.3 Configuring DP Process Options
VIM060000-CGD-EN-4 Configuration Guide 77
Figure 5-3: Parameter function module interface
As the data head is structure, it is not specified. Use field symbol to pass it on to the respective structure.
You can use the function module parameter ID also as exit before calling BDC transaction.
Create a dummy parameter ID and use the custom function module for any processing that needs to be done before BDC call.
Application Variable Application Variable is used to reference index field values.
System Field System Field is used to reference system fields.
Default Value Default Value is used to set default values as parameters.
Class Method Currently not implemented.
5.3.1.3 Defining Transaction Data In this section, you define the transaction data that is passed to various screens when the transaction is called.
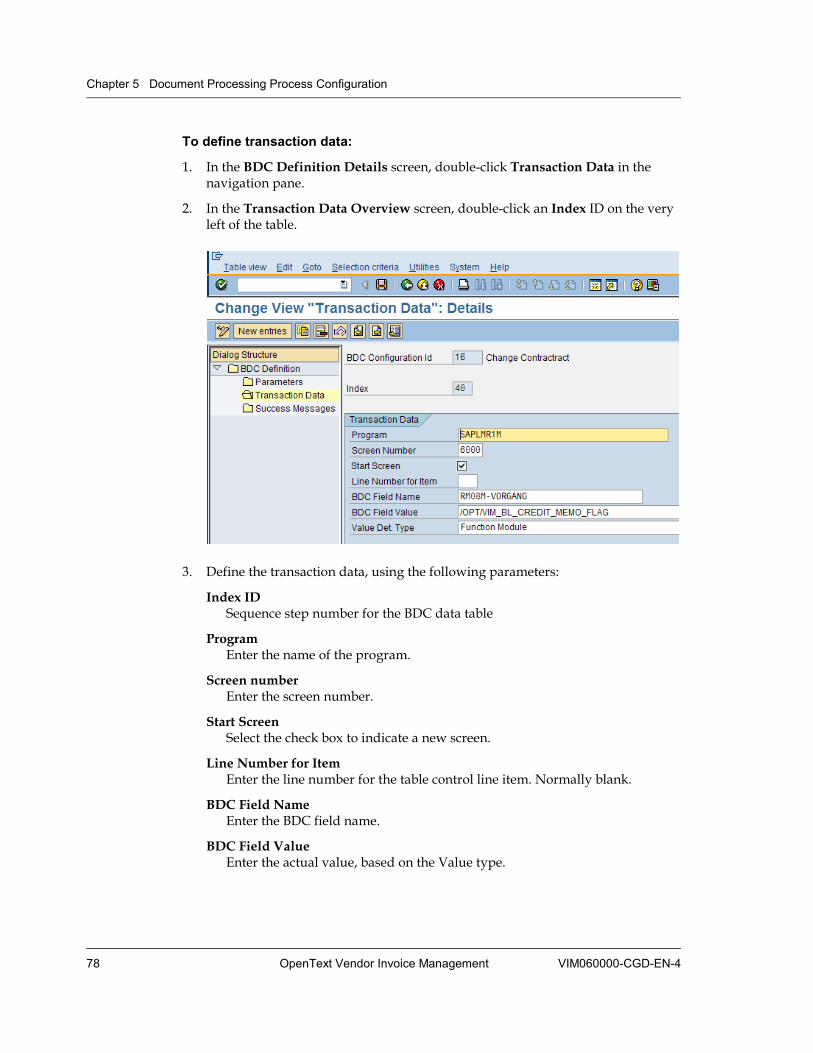
Chapter 5 Document Processing Process Configuration
78 OpenText Vendor Invoice Management VIM060000-CGD-EN-4
To define transaction data:
1. In the BDC Definition Details screen, double-click Transaction Data in the navigation pane.
2. In the Transaction Data Overview screen, double-click an Index ID on the very left of the table.
3. Define the transaction data, using the following parameters:
Index ID Sequence step number for the BDC data table
Program Enter the name of the program.
Screen number Enter the screen number.
Start Screen Select the check box to indicate a new screen.
Line Number for Item Enter the line number for the table control line item. Normally blank.
BDC Field Name Enter the BDC field name.
BDC Field Value Enter the actual value, based on the Value type.
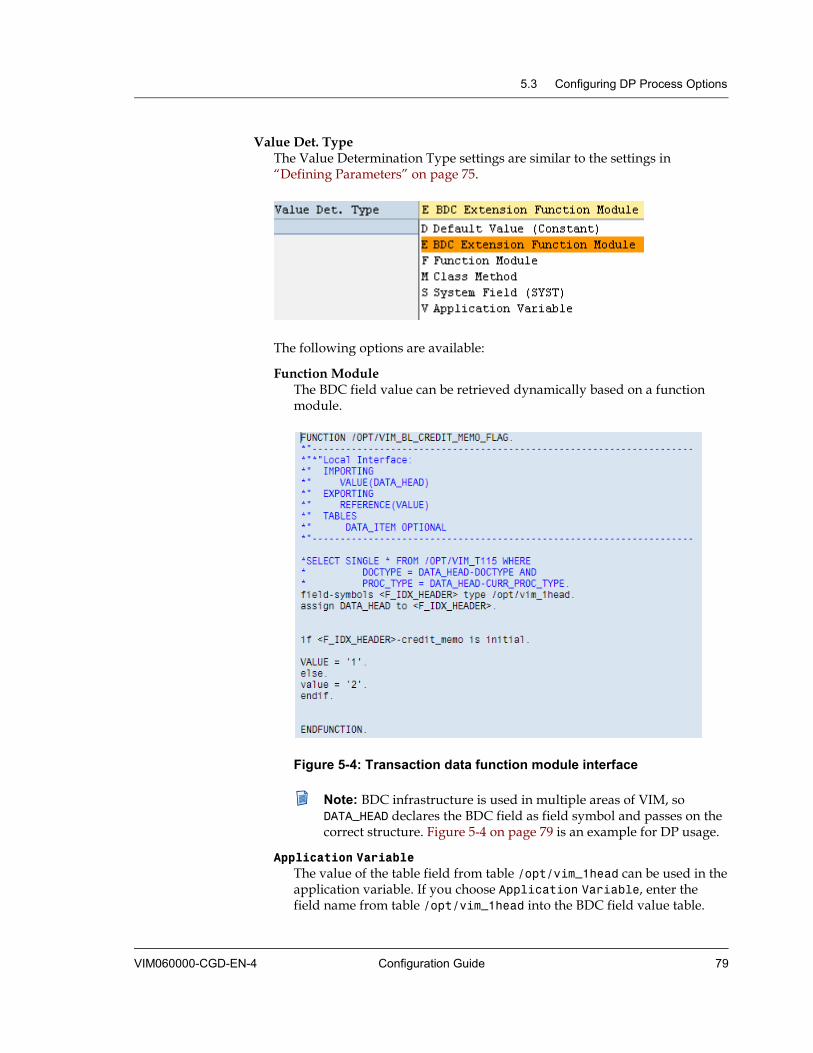
5.3 Configuring DP Process Options
VIM060000-CGD-EN-4 Configuration Guide 79
Value Det. Type The Value Determination Type settings are similar to the settings in “Defining Parameters” on page 75.
The following options are available:
Function Module The BDC field value can be retrieved dynamically based on a function module.
Figure 5-4: Transaction data function module interface
Note: BDC infrastructure is used in multiple areas of VIM, so DATA_HEAD declares the BDC field as field symbol and passes on the correct structure. Figure 5-4 on page 79 is an example for DP usage.
Application Variable The value of the table field from table /opt/vim_1head can be used in the application variable. If you choose Application Variable, enter the field name from table /opt/vim_1head into the BDC field value table.
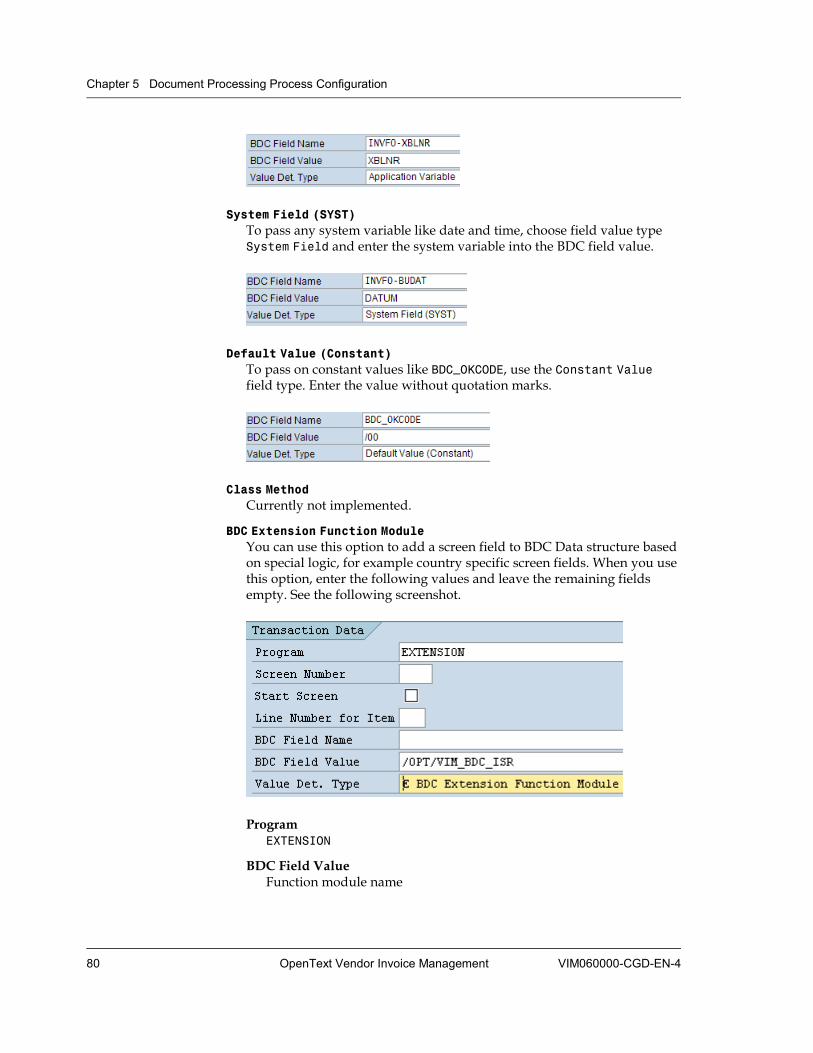
Chapter 5 Document Processing Process Configuration
80 OpenText Vendor Invoice Management VIM060000-CGD-EN-4
System Field (SYST) To pass any system variable like date and time, choose field value type System Field and enter the system variable into the BDC field value.
Default Value (Constant) To pass on constant values like BDC_OKCODE, use the Constant Value field type. Enter the value without quotation marks.
Class Method Currently not implemented.
BDC Extension Function Module You can use this option to add a screen field to BDC Data structure based on special logic, for example country specific screen fields. When you use this option, enter the following values and leave the remaining fields empty. See the following screenshot.
Program EXTENSION
BDC Field Value Function module name

5.3 Configuring DP Process Options
VIM060000-CGD-EN-4 Configuration Guide 81
The function module interface must be like the one shown in the following screenshot. Append the BDC field information to the table BDCDATA for each field.
5.3.1.4 Defining Success Messages In this step, you define the success messages issued by the system to indicate the successful completion of the process.
If success messages are maintained, the system checks for the messages at the end of the transaction, and if they match any other messages returned from BDC, the system treats it as transaction completed.
To define success messages:
1. In the BDC definition screen, select a BDC Configuration Id and double-click Success Messages in the navigation pane.
2. Define success messages using the following parameters:
Index Sequential line item number
Application Area Select the message class.
Message ID Select the message number.
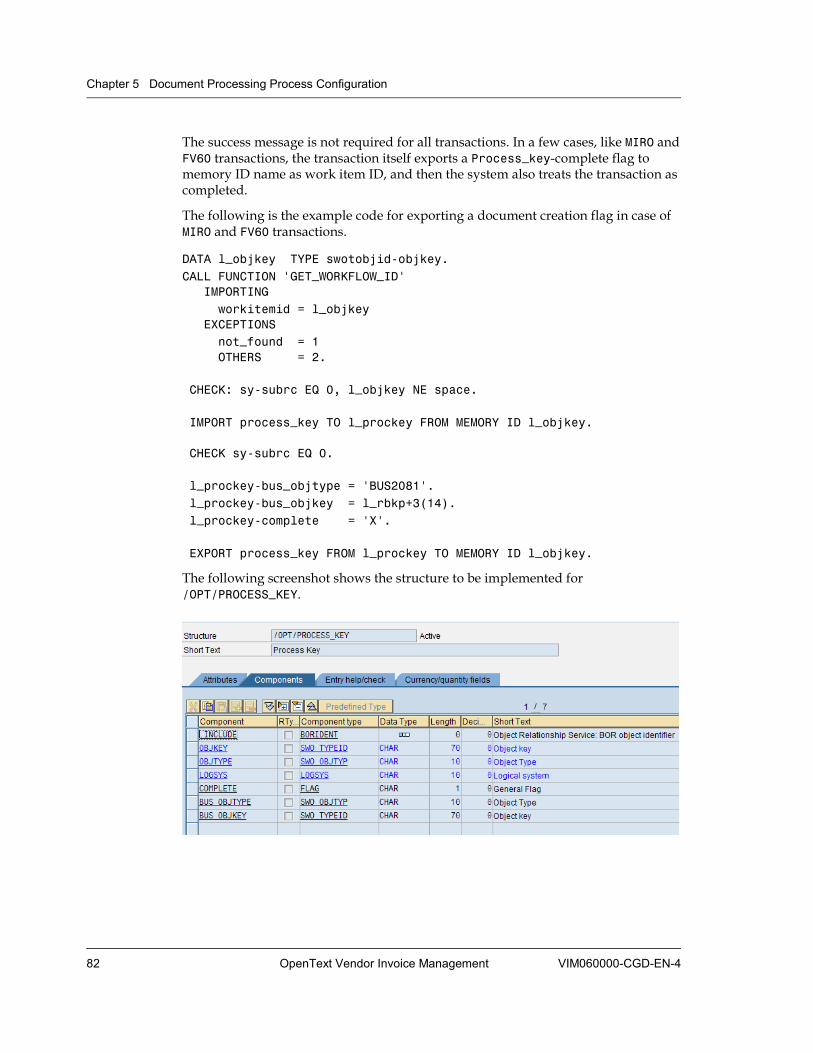
Chapter 5 Document Processing Process Configuration
82 OpenText Vendor Invoice Management VIM060000-CGD-EN-4
The success message is not required for all transactions. In a few cases, like MIRO and FV60 transactions, the transaction itself exports a Process_key-complete flag to memory ID name as work item ID, and then the system also treats the transaction as completed.
The following is the example code for exporting a document creation flag in case of MIRO and FV60 transactions.
DATA l_objkey TYPE swotobjid-objkey. CALL FUNCTION 'GET_WORKFLOW_ID' IMPORTING workitemid = l_objkey EXCEPTIONS not_found = 1 OTHERS = 2. CHECK: sy-subrc EQ 0, l_objkey NE space. IMPORT process_key TO l_prockey FROM MEMORY ID l_objkey. CHECK sy-subrc EQ 0. l_prockey-bus_objtype = 'BUS2081'. l_prockey-bus_objkey = l_rbkp+3(14). l_prockey-complete = 'X'. EXPORT process_key FROM l_prockey TO MEMORY ID l_objkey.
The following screenshot shows the structure to be implemented for /OPT/PROCESS_KEY.
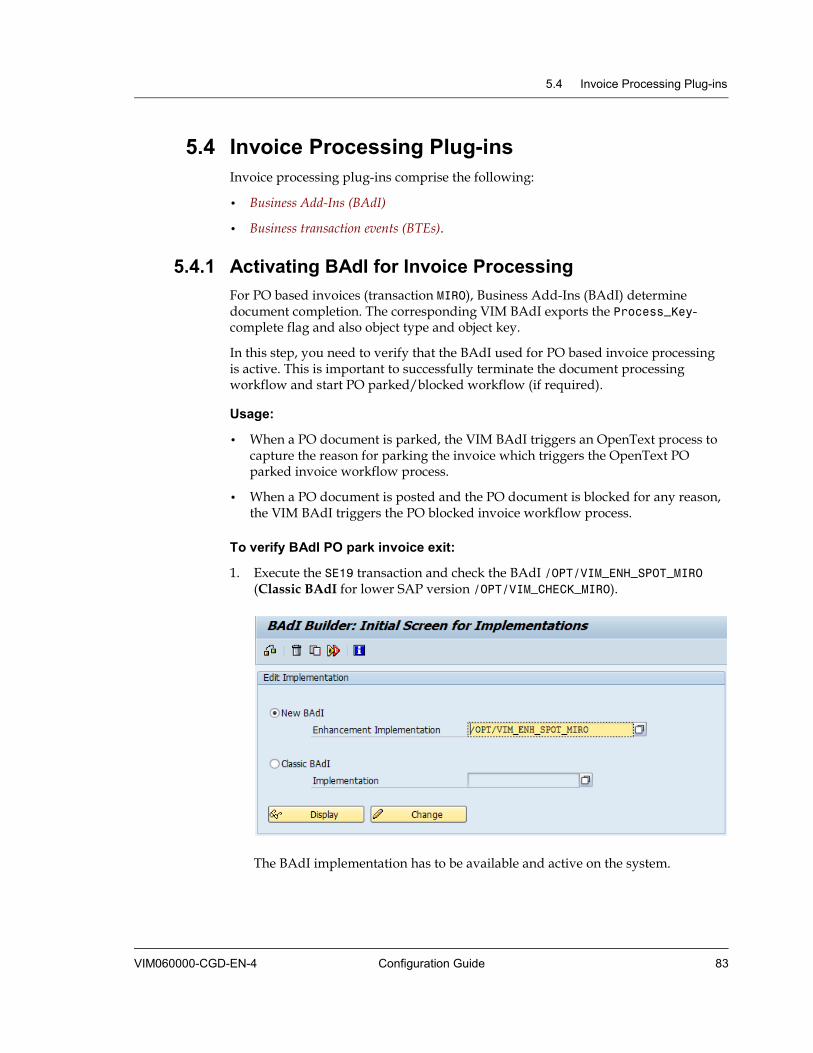
5.4 Invoice Processing Plug-ins
VIM060000-CGD-EN-4 Configuration Guide 83
5.4 Invoice Processing Plug-ins Invoice processing plug-ins comprise the following:
• Business Add-Ins (BAdI)
• Business transaction events (BTEs).
5.4.1 Activating BAdI for Invoice Processing For PO based invoices (transaction MIRO), Business Add-Ins (BAdI) determine document completion. The corresponding VIM BAdI exports the Process_Key-complete flag and also object type and object key.
In this step, you need to verify that the BAdI used for PO based invoice processing is active. This is important to successfully terminate the document processing workflow and start PO parked/blocked workflow (if required).
Usage:
• When a PO document is parked, the VIM BAdI triggers an OpenText process to capture the reason for parking the invoice which triggers the OpenText PO parked invoice workflow process.
• When a PO document is posted and the PO document is blocked for any reason, the VIM BAdI triggers the PO blocked invoice workflow process.
To verify BAdI PO park invoice exit:
1. Execute the SE19 transaction and check the BAdI /OPT/VIM_ENH_SPOT_MIRO (Classic BAdI for lower SAP version /OPT/VIM_CHECK_MIRO).
The BAdI implementation has to be available and active on the system.
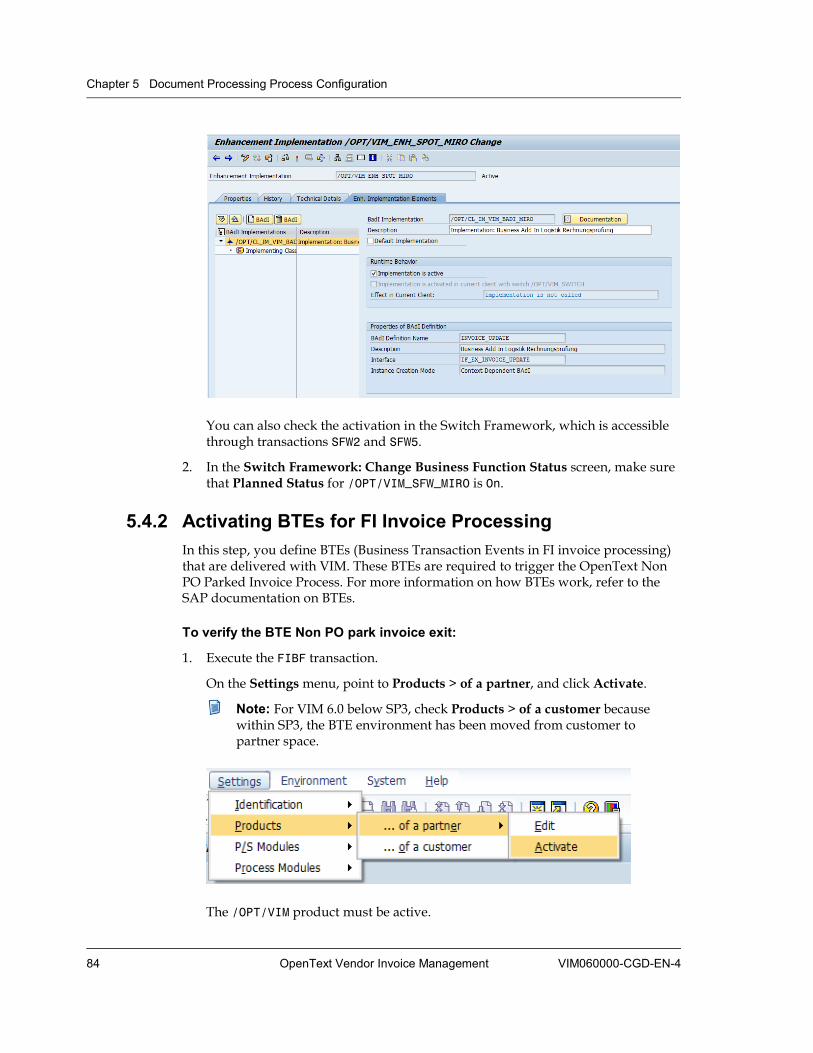
Chapter 5 Document Processing Process Configuration
84 OpenText Vendor Invoice Management VIM060000-CGD-EN-4
You can also check the activation in the Switch Framework, which is accessible through transactions SFW2 and SFW5.
2. In the Switch Framework: Change Business Function Status screen, make sure that Planned Status for /OPT/VIM_SFW_MIRO is On.
5.4.2 Activating BTEs for FI Invoice Processing In this step, you define BTEs (Business Transaction Events in FI invoice processing) that are delivered with VIM. These BTEs are required to trigger the OpenText Non PO Parked Invoice Process. For more information on how BTEs work, refer to the SAP documentation on BTEs.
To verify the BTE Non PO park invoice exit:
1. Execute the FIBF transaction.
On the Settings menu, point to Products > of a partner, and click Activate.
Note: For VIM 6.0 below SP3, check Products > of a customer because within SP3, the BTE environment has been moved from customer to partner space.
The /OPT/VIM product must be active.
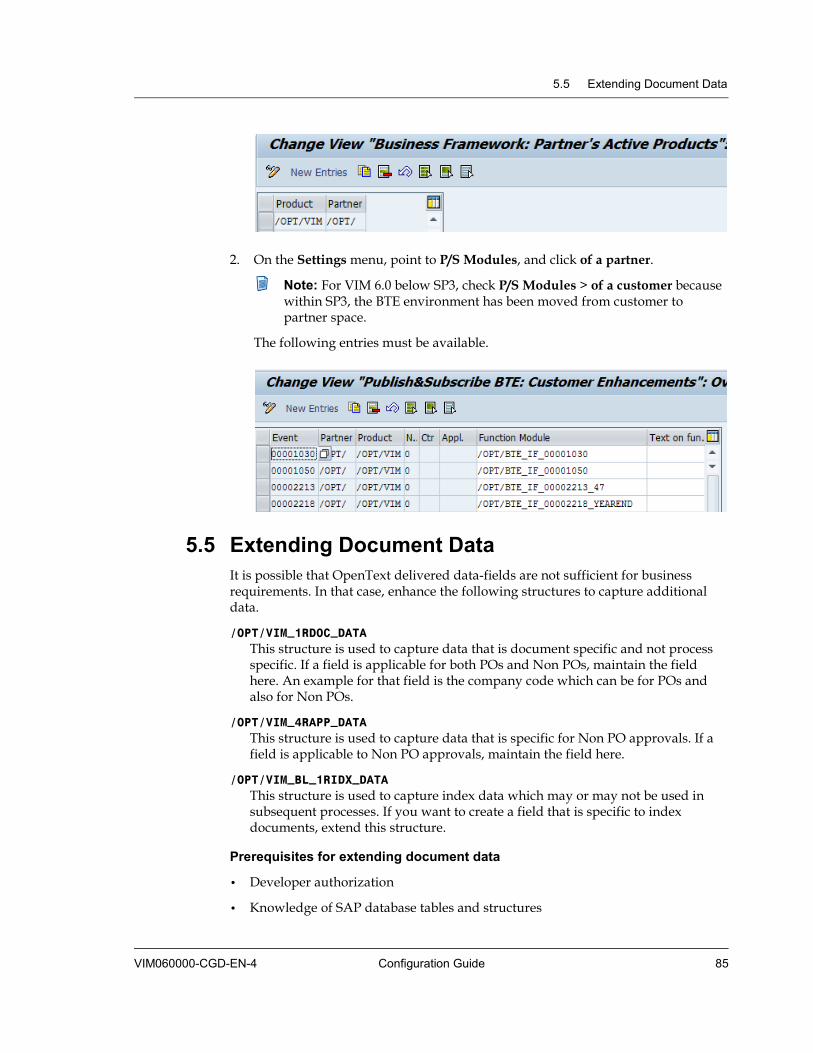
5.5 Extending Document Data
VIM060000-CGD-EN-4 Configuration Guide 85
2. On the Settings menu, point to P/S Modules, and click of a partner.
Note: For VIM 6.0 below SP3, check P/S Modules > of a customer because within SP3, the BTE environment has been moved from customer to partner space.
The following entries must be available.
5.5 Extending Document Data It is possible that OpenText delivered data-fields are not sufficient for business requirements. In that case, enhance the following structures to capture additional data.
/OPT/VIM_1RDOC_DATA This structure is used to capture data that is document specific and not process specific. If a field is applicable for both POs and Non POs, maintain the field here. An example for that field is the company code which can be for POs and also for Non POs.
/OPT/VIM_4RAPP_DATA This structure is used to capture data that is specific for Non PO approvals. If a field is applicable to Non PO approvals, maintain the field here.
/OPT/VIM_BL_1RIDX_DATA This structure is used to capture index data which may or may not be used in subsequent processes. If you want to create a field that is specific to index documents, extend this structure.
Prerequisites for extending document data
• Developer authorization
• Knowledge of SAP database tables and structures
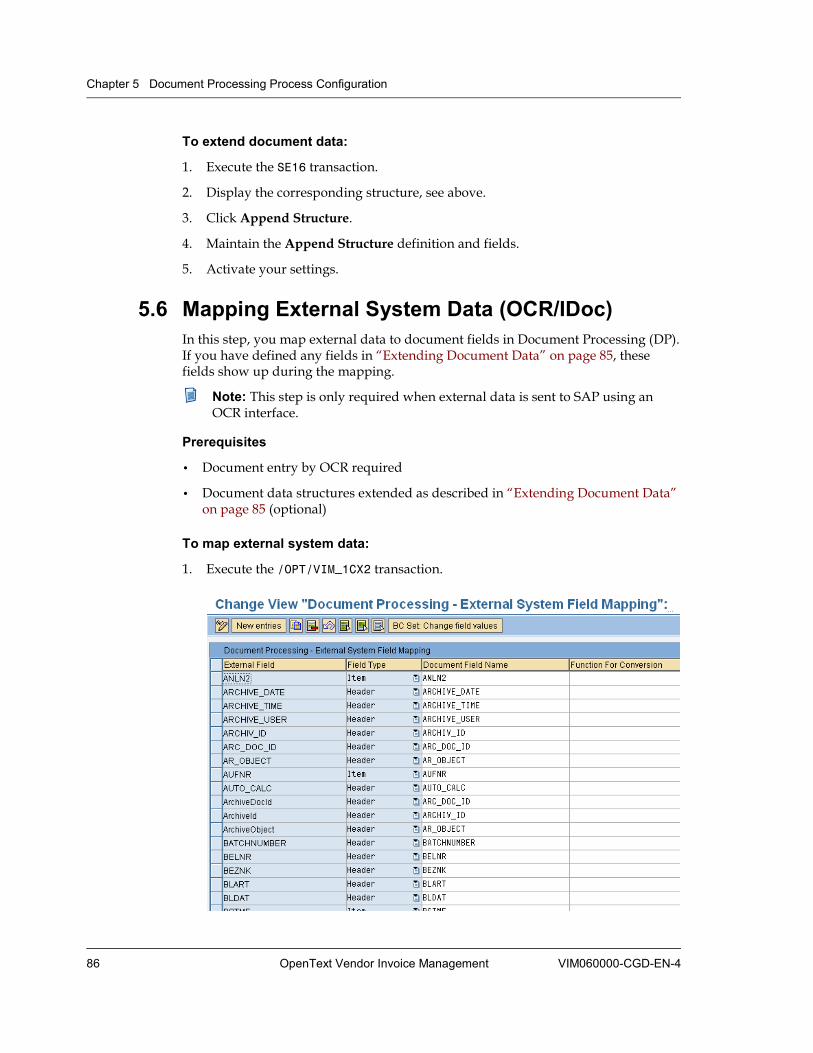
Chapter 5 Document Processing Process Configuration
86 OpenText Vendor Invoice Management VIM060000-CGD-EN-4
To extend document data:
1. Execute the SE16 transaction.
2. Display the corresponding structure, see above.
3. Click Append Structure.
4. Maintain the Append Structure definition and fields.
5. Activate your settings.
5.6 Mapping External System Data (OCR/IDoc) In this step, you map external data to document fields in Document Processing (DP). If you have defined any fields in “Extending Document Data” on page 85, these fields show up during the mapping.
Note: This step is only required when external data is sent to SAP using an OCR interface.
Prerequisites
• Document entry by OCR required
• Document data structures extended as described in “Extending Document Data” on page 85 (optional)
To map external system data:
1. Execute the /OPT/VIM_1CX2 transaction.
5.6 Mapping External System Data (OCR/IDoc)
VIM060000-CGD-EN-4 Configuration Guide 87
2. Create entries to map external data fields to index document fields.
External field The value in this field is case sensitive.
Field type Select Header or Item.
Document Field Name Select the field in document data that will be mapped to.
Function for Conversion If there is any necessity to convert the format of the data coming from the external system, enter a conversion function module. Any function module that you enter here, whether SAP standard or a custom one, should be compatible with the interface of function module CONVERSION_EXIT_ALPHA_INPUT.
5.6.1 Configuring Line Item Fields for External System Data Note: If you only use Baseline DP document types and Baseline fields for the DP document types, you can skip this section.
You might want to add line item fields to the indexing screen for DP document types, for example to map certain fields from external system input like OCR. In this case, you must perform the following configuration for these fields to allow them getting values from the external system. Fields that are not configured here will remain blank even if data is exported from the external system.
Tip: You can also use this configuration to define how any line item field is displayed on the indexing screen.
To configure DP line item fields:
1. Execute the /n/OPT/VIM_BL_ITEM_SCR transaction.
Alternatively, follow LiveLink VIM - Configuration > Document Processing > Country Specific Localization > Screen config for Document Type indexing item screens
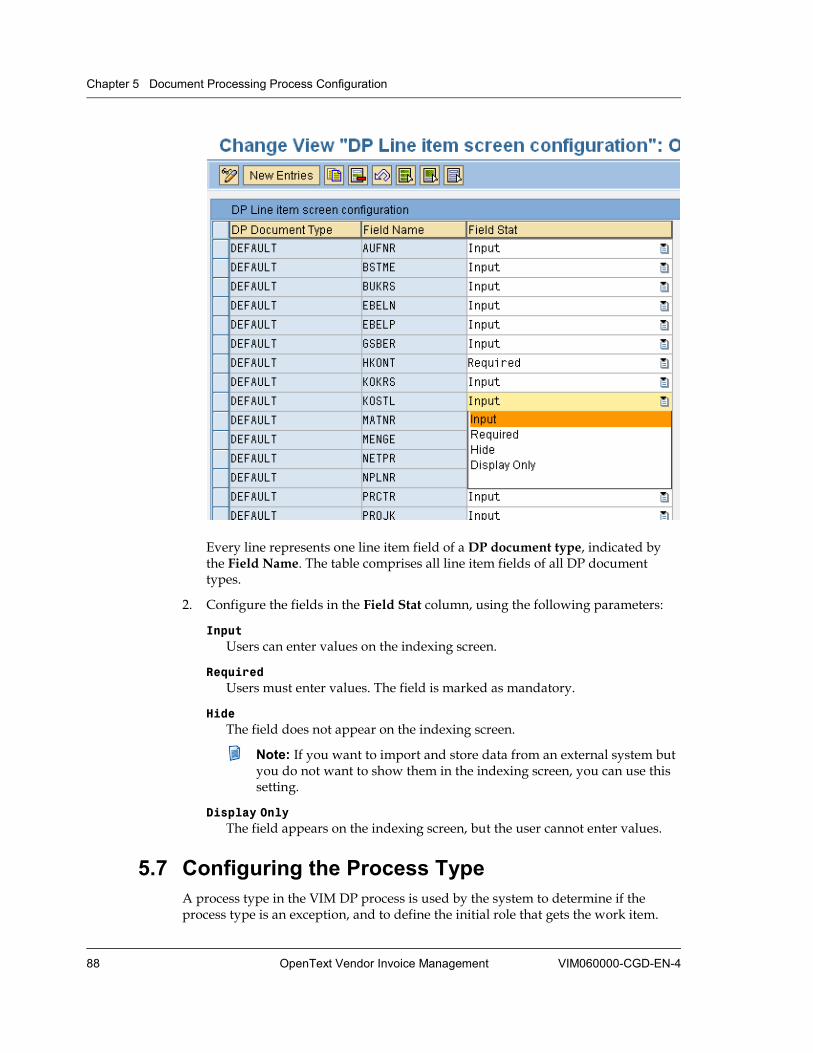
Chapter 5 Document Processing Process Configuration
88 OpenText Vendor Invoice Management VIM060000-CGD-EN-4
Every line represents one line item field of a DP document type, indicated by the Field Name. The table comprises all line item fields of all DP document types.
2. Configure the fields in the Field Stat column, using the following parameters:
Input Users can enter values on the indexing screen.
Required Users must enter values. The field is marked as mandatory.
Hide The field does not appear on the indexing screen.
Note: If you want to import and store data from an external system but you do not want to show them in the indexing screen, you can use this setting.
Display Only The field appears on the indexing screen, but the user cannot enter values.
5.7 Configuring the Process Type A process type in the VIM DP process is used by the system to determine if the process type is an exception, and to define the initial role that gets the work item.

5.7 Configuring the Process Type
VIM060000-CGD-EN-4 Configuration Guide 89
The user process options for each role define the options on the dashboard for each role.
5.7.1 Defining the Process Type
To define the process type:
1. Execute the /n/OPT/VIM_8CX1 transaction.
Alternatively, follow LiveLink VIM - Configuration > Document Processing > Process Configuration > Maintain Process Types.
2. Define the process types using the following parameters:
Process Type Number 5 digit unique number identifying the process type.
Process Type Description of the process type.
Chapter 5 Document Processing Process Configuration
90 OpenText Vendor Invoice Management VIM060000-CGD-EN-4
Initial Actor Select the initial role that gets the work item.
Initial Actor Function Select a custom function module to determine the initial role. The system first checks if there is an initial actor. If there is no initial actor, the system tries to get the initial actor from the function module.
Is Exception Select this check box to mark the process type as exception. If this check box is selected, the process type is not relevant for automatic background document posting.
Auto Start Relevant for DP based approval workflow. If the process type corresponding to the approval workflow is determined, the system checks whether the Auto Start check box is enabled. If yes, the system starts the approval workflow if it is enabled. If Auto Start is not enabled, processing continues with the initial actor assigned to the current process type. The initial actor will manually start the approval workflow.
Create SR Relevant for the SSF integration. This column is only available if VIM is integrated with CRM SSF. See “SSF Integration” on page 437.
Select this check box to configure that an automatic Service Request is created in background when this process type is triggered.
Country Check Relevant for country specific configuration, for the following kinds of process types:
• Process types that are specific to a single country or multiple countries
• Process types that need to be checked for specific invoice categories in specific countries only
• Custom process types that need to be executed only for certain invoice categories of a country
Select this check box for these process types.
This check box tells the VIM system to check the country configurations also before the check defined in the process types is executed on the invoice.
Baseline configuration provides the check box as selected for the baseline process types that need additional checks to be performed for the country configuration.
See “Process Types” on page 361
Workflow Type Select Opentext Approval Workflow from the drop down list to start the DP based approval workflow. With Opentext Approval Workflow selected, it is possible to select or clear the Auto Start check box, as the case may be.

5.7 Configuring the Process Type
VIM060000-CGD-EN-4 Configuration Guide 91
Select External Workflow from the drop down list to run any external workflow (based on SAP technology) outside SAP IM workflows as a part of any business rule. With External Workflow selected, the Auto Start option is always enabled.
Select SRM System Integration from the drop down list for SRM scenarios or any other external systems where an email will be sent and the workflow will be in wait status. See “Supplier Relationship Management (SRM) Integration” on page 535.
Task ID Enter the workflow template to be triggered. The workflow template container can be of any interface as the binding is controlled by a custom binding function module.
Binding Function Enter the Workflow Binding function module.
It must be implemented in the system where the SAP IM workflow is running, to pass appropriate data to the external workflow. The function module should have an interface as /OPT/VIM_DASHBOARD_BINDING. Inside the custom function, in this case, implement Dataflow = E (Inward Binding). You can access the complete container elements of the DP workflow from the table parameter CALLING_CONTAINER. Regarding how actual to implement the binding function, you can refer /OPT/VIM_DASHBOARD_BINDING.
As a simple implementation, element INDEXDOCUMENT can be accessed from the container CALLING_CONTAINER. DP (Document Processing number) can be retrieved and other indexing information can be extracted and passed to the elements of the CALLED_CONTAINER container, which is the container of the external workflow. The external workflow must also raise the event /OPT/V1001.PSS_COMPLETED at the end in the system where the SAP IM workflow runs so that the SAP IM workflow proceeds further.
Example 5-2: Sample code for the Workflow Binding function module
FUNCTION Z_SHV_BINDING. *"----------------------------------------------------------- *"*"Local interface: *" IMPORTING *" VALUE(DATAFLOW) LIKE SWABINDEF-DATAFLOW *" TABLES *" CALLED_CONTAINER STRUCTURE SWCONT *" CALLING_CONTAINER STRUCTURE SWCONT *"----------------------------------------------------------- include <cntn01>. DATA : lcl_indexer TYPE REF TO /opt/cl_vim_doc_processor, l_curr_role type SWCONT-VALUE. data : l_head type /opt/vim_1head, lo_v1001 TYPE swc_object,

Chapter 5 Document Processing Process Configuration
92 OpenText Vendor Invoice Management VIM060000-CGD-EN-4
l_objkey TYPE swotobjid-objkey, l_docid TYPE /opt/docid, l_bus2012 TYPE swc_object. IF DATAFLOW = 'E'. " Task Container <== Workflow Container " Called_Container -- Calling_container **************************************************************** * The binding is as follows * External Workflow Container <=== VIM Workflow Container * ===================== <=== ======================= **************************************************************** * Convert the Calling Container to Persistent SWC_CONTAINER_TO_RUNTIME CALLING_CONTAINER. swc_get_element calling_container: 'IndexDocument' lo_v1001 .
swc_get_object_key lo_v1001 l_objkey. l_docid = l_objkey.
select single * into l_head from /opt/vim_1head where docid = l_docid.
swc_set_element called_container: 'HEAD' l_head. swc_create_object l_bus2012 'BUS2012' l_head-ebeln.
swc_set_element called_container: 'PurchaseOrder' l_bus2012.
SWC_CONTAINER_TO_RUNTIME called_container. SWC_CONTAINER_TO_PERSISTENT called_container. *
ELSEIF DATAFLOW = 'I'. " Task Container ==> Workflow Container " Called_Container -- Calling_container **************************************************************** * The binding is as follows * External Workflow Container ===> VIM Workflow Container * ===================== ======================= **************************************************************** * Convert the Called Container to Persistent SWC_CONTAINER_TO_RUNTIME CALLED_CONTAINER.
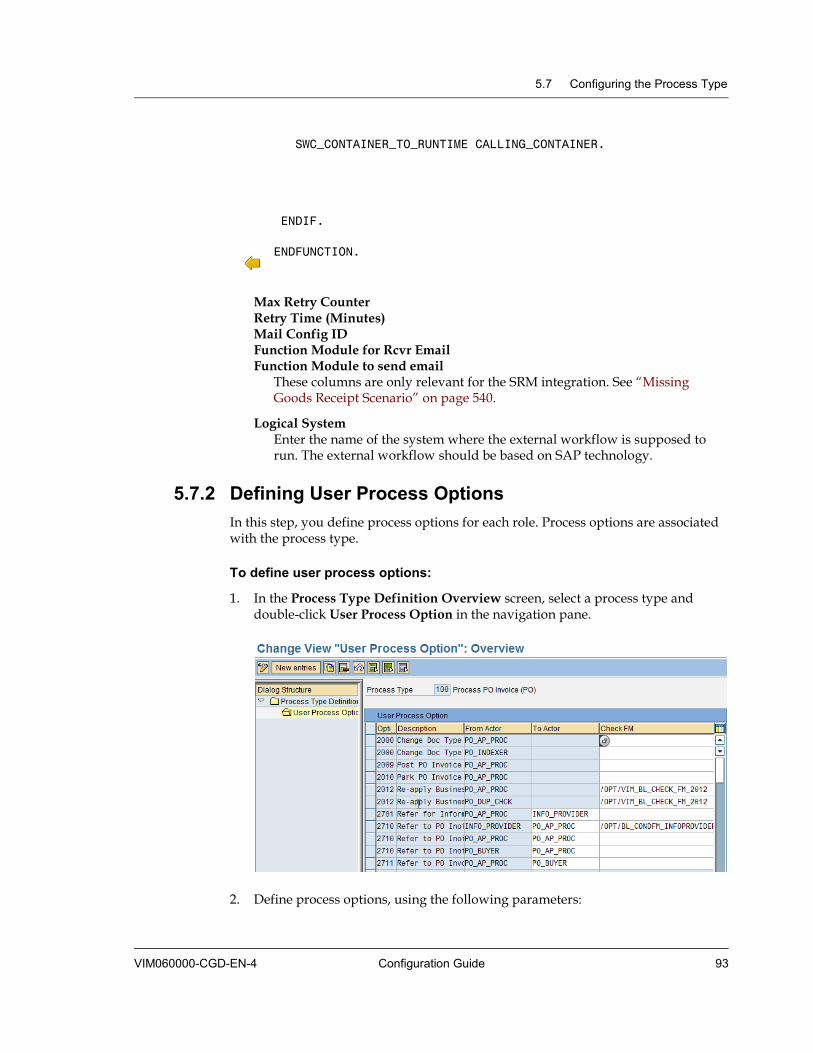
5.7 Configuring the Process Type
VIM060000-CGD-EN-4 Configuration Guide 93
SWC_CONTAINER_TO_RUNTIME CALLING_CONTAINER.
ENDIF. ENDFUNCTION.
Max Retry Counter Retry Time (Minutes) Mail Config ID Function Module for Rcvr Email Function Module to send email
These columns are only relevant for the SRM integration. See “Missing Goods Receipt Scenario” on page 540.
Logical System Enter the name of the system where the external workflow is supposed to run. The external workflow should be based on SAP technology.
5.7.2 Defining User Process Options In this step, you define process options for each role. Process options are associated with the process type.
To define user process options:
1. In the Process Type Definition Overview screen, select a process type and double-click User Process Option in the navigation pane.
2. Define process options, using the following parameters:
Chapter 5 Document Processing Process Configuration
94 OpenText Vendor Invoice Management VIM060000-CGD-EN-4
Option Id Process option identifier
Description Description of the option
From Actor Select the source role that gets the work item.
To Actor Select the target role that receives the work item if the action is performed. This is only available if the option is a referral.
Check FM Enter a check function module to restrict the option for a role. You find the interface for the check function module using /OPT/VIM_BL_CHECK_FM_2012.
5.8 Configuring Indexing Line Matching from OCR Results With VIM 5.2 SP3 and higher, OCR can provide all purchase orders and all delivery notes that are found in one invoice on header level. Previously, the business rule Unable to Determine PO Line no was used to derive PO item numbers for the indexing lines. As an extension for the feature of line determination for invoicing, VIM 5.2 SP3 introduces a new business rule Manual Check Needed for indexing lines. The former rule Unable to Determine PO Line no stays valid as it complements the line determination.
The new business rule allows deriving all billable lines that are based on purchase orders or delivery notes at header level. The automatic derivation runs as a background process in the following cases:
• OCR did not supply any line items.
• OCR supplied incomplete line items.
Line items whose mandatory fields are empty are treated as incomplete.
OCR lines
• If no OCR lines are supplied, the entire proposal that is based on reference documents is used to form indexing lines, based either on PO orders in the documents or on Delivery Notes, but not on both.
• If OCR lines are supplied, and all lines’ mandatory fields are filled, no business exception occurs.
• If OCR lines are supplied, but some lines have empty mandatory fields, these lines are considered as incomplete.
Incomplete OCR lines are checked if certain fields are complete. According to the configuration, either the lines proposed by the MIRO transaction or the OCR supplied lines can then form the basis for indexing lines. See “To configure Z
5.8 Configuring Indexing Line Matching from OCR Results
VIM060000-CGD-EN-4 Configuration Guide 95
constants for the business rule Manual Check Needed for Indexing Lines:” on page 97.
Business exception
A business exception occurs under the following conditions:
• When a line is still considered incomplete due to missing mandatory fields.
• When the system automatically derives a line or a field value.
Completeness check for indexing lines
Indexing lines that contain Non GR-IV based PO line items have the following mandatory fields:
• PO Number
• PO Item
• Quantity
• Amount
• UOM
Indexing lines that contain GR-IV based PO line items have the following mandatory fields:
• PO Number
• PO Item
• Delivery Note /GR Reference Document
• Quantity
• Amount
• UOM
• Net Price
Once the system has determined that indexing lines are incomplete, the system derives the missing mandatory fields based on the configuration described in “To configure Z constants for the business rule Manual Check Needed for Indexing Lines:” on page 97.
To implement the derivation of indexing lines, you need to perform the following configurations:
• “Setting Up the Derivation Infrastructure” on page 96
• “Enhancing the DP Dashboard” on page 100
• “Enhancing MIRO for Pre-population of Data During Online Invoice Creation” on page 101
• “Changing BAPI Configuration” on page 106
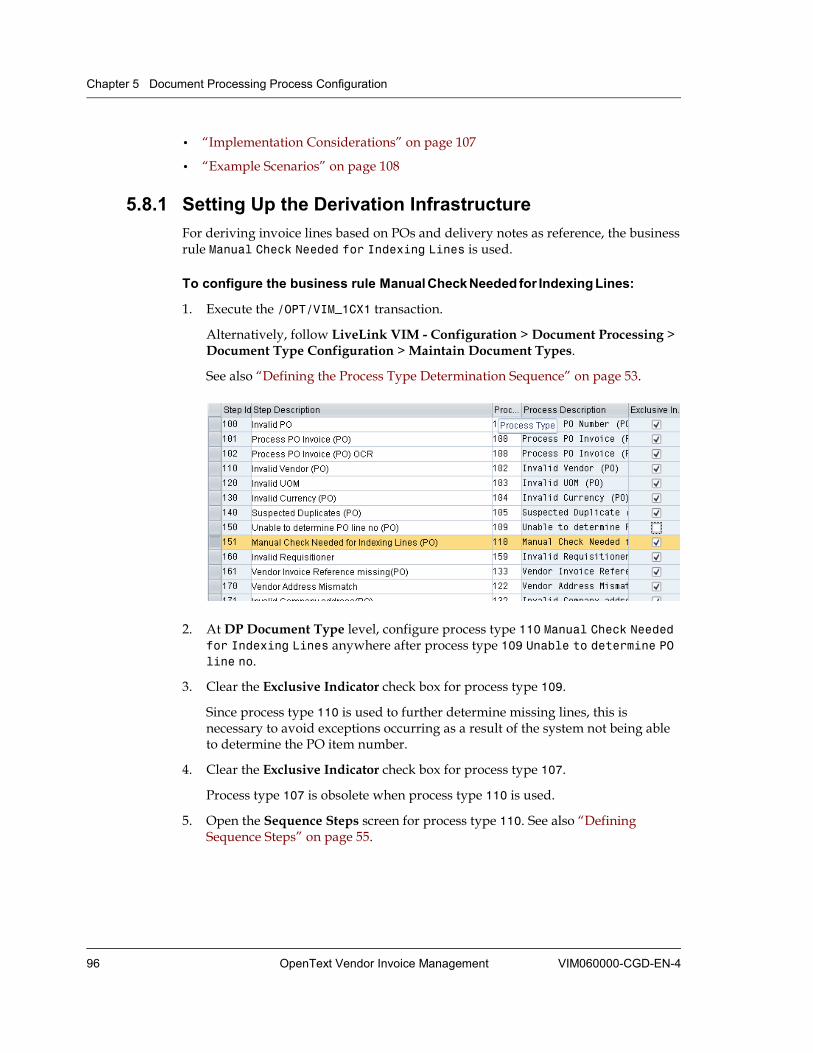
Chapter 5 Document Processing Process Configuration
96 OpenText Vendor Invoice Management VIM060000-CGD-EN-4
• “Implementation Considerations” on page 107
• “Example Scenarios” on page 108
5.8.1 Setting Up the Derivation Infrastructure For deriving invoice lines based on POs and delivery notes as reference, the business rule Manual Check Needed for Indexing Lines is used.
To configure the business rule Manual Check Needed for Indexing Lines:
1. Execute the /OPT/VIM_1CX1 transaction.
Alternatively, follow LiveLink VIM - Configuration > Document Processing > Document Type Configuration > Maintain Document Types.
See also “Defining the Process Type Determination Sequence” on page 53.
2. At DP Document Type level, configure process type 110 Manual Check Needed for Indexing Lines anywhere after process type 109 Unable to determine PO line no.
3. Clear the Exclusive Indicator check box for process type 109.
Since process type 110 is used to further determine missing lines, this is necessary to avoid exceptions occurring as a result of the system not being able to determine the PO item number.
4. Clear the Exclusive Indicator check box for process type 107.
Process type 107 is obsolete when process type 110 is used.
5. Open the Sequence Steps screen for process type 110. See also “Defining Sequence Steps” on page 55.
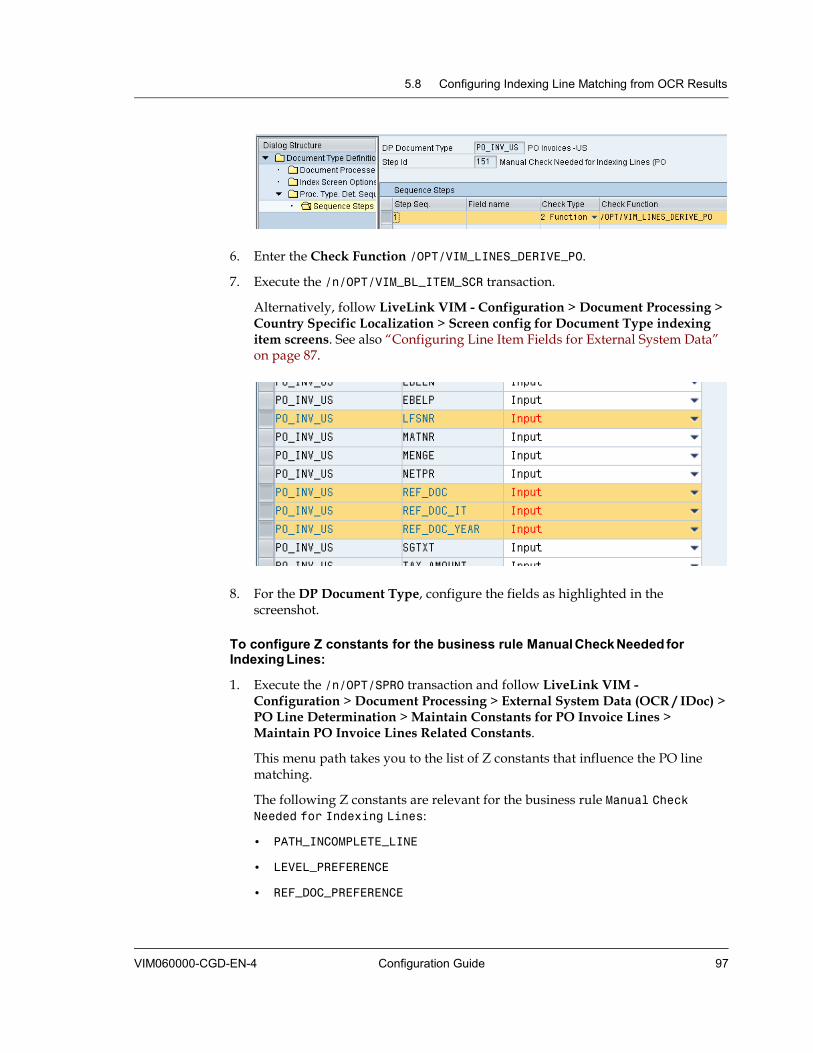
5.8 Configuring Indexing Line Matching from OCR Results
VIM060000-CGD-EN-4 Configuration Guide 97
6. Enter the Check Function /OPT/VIM_LINES_DERIVE_PO.
7. Execute the /n/OPT/VIM_BL_ITEM_SCR transaction.
Alternatively, follow LiveLink VIM - Configuration > Document Processing > Country Specific Localization > Screen config for Document Type indexing item screens. See also “Configuring Line Item Fields for External System Data” on page 87.
8. For the DP Document Type, configure the fields as highlighted in the screenshot.
To configure Z constants for the business rule Manual Check Needed for Indexing Lines:
1. Execute the /n/OPT/SPRO transaction and follow LiveLink VIM - Configuration > Document Processing > External System Data (OCR / IDoc) > PO Line Determination > Maintain Constants for PO Invoice Lines > Maintain PO Invoice Lines Related Constants.
This menu path takes you to the list of Z constants that influence the PO line matching.
The following Z constants are relevant for the business rule Manual Check Needed for Indexing Lines:
• PATH_INCOMPLETE_LINE
• LEVEL_PREFERENCE
• REF_DOC_PREFERENCE
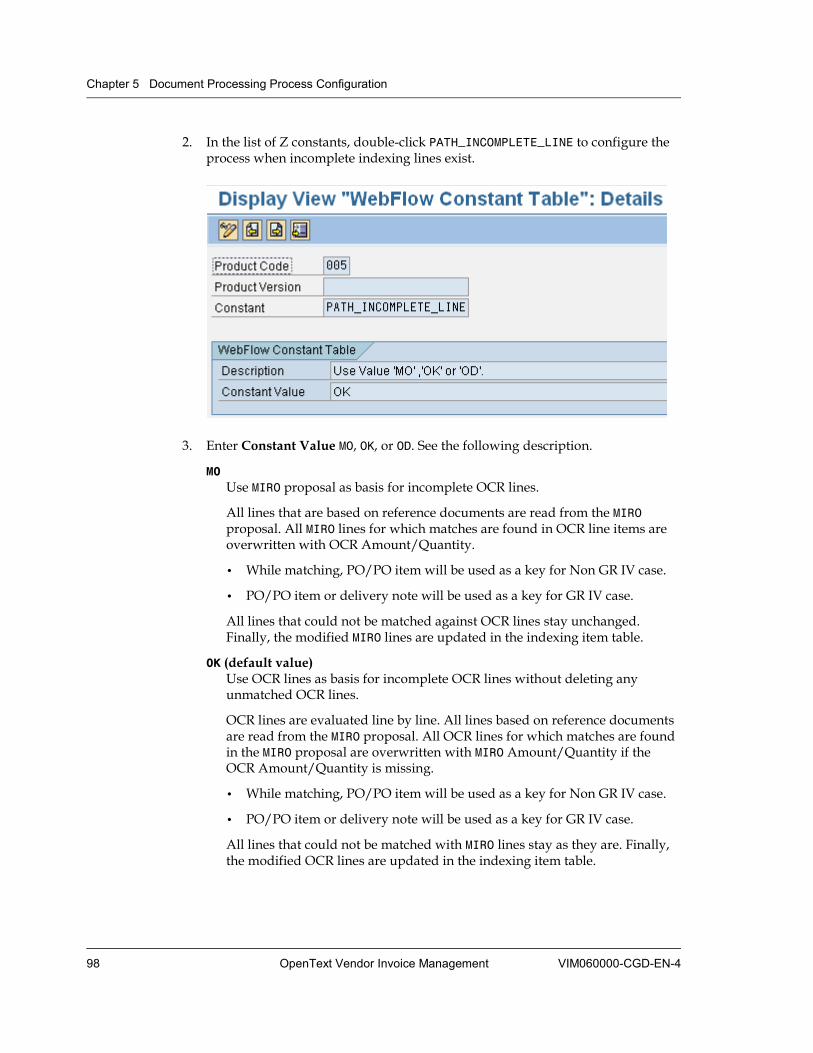
Chapter 5 Document Processing Process Configuration
98 OpenText Vendor Invoice Management VIM060000-CGD-EN-4
2. In the list of Z constants, double-click PATH_INCOMPLETE_LINE to configure the process when incomplete indexing lines exist.
3. Enter Constant Value MO, OK, or OD. See the following description.
MO Use MIRO proposal as basis for incomplete OCR lines.
All lines that are based on reference documents are read from the MIRO proposal. All MIRO lines for which matches are found in OCR line items are overwritten with OCR Amount/Quantity.
• While matching, PO/PO item will be used as a key for Non GR IV case.
• PO/PO item or delivery note will be used as a key for GR IV case.
All lines that could not be matched against OCR lines stay unchanged. Finally, the modified MIRO lines are updated in the indexing item table.
OK (default value) Use OCR lines as basis for incomplete OCR lines without deleting any unmatched OCR lines.
OCR lines are evaluated line by line. All lines based on reference documents are read from the MIRO proposal. All OCR lines for which matches are found in the MIRO proposal are overwritten with MIRO Amount/Quantity if the OCR Amount/Quantity is missing.
• While matching, PO/PO item will be used as a key for Non GR IV case.
• PO/PO item or delivery note will be used as a key for GR IV case.
All lines that could not be matched with MIRO lines stay as they are. Finally, the modified OCR lines are updated in the indexing item table.
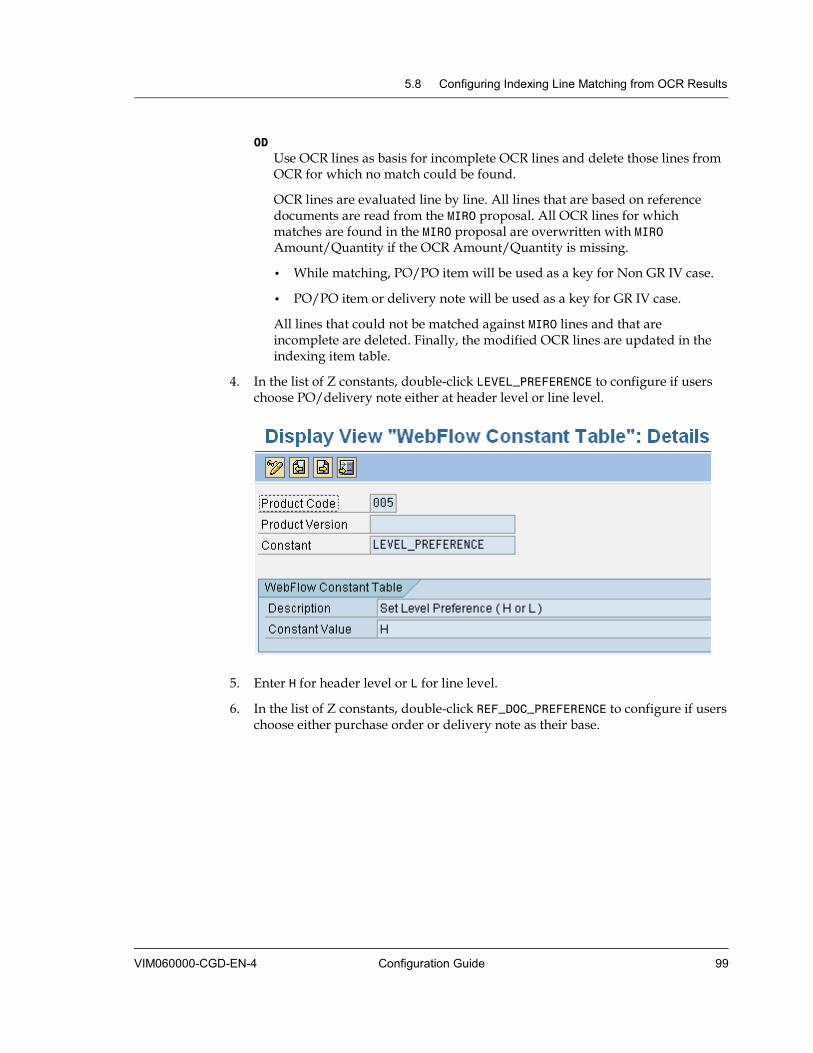
5.8 Configuring Indexing Line Matching from OCR Results
VIM060000-CGD-EN-4 Configuration Guide 99
OD Use OCR lines as basis for incomplete OCR lines and delete those lines from OCR for which no match could be found.
OCR lines are evaluated line by line. All lines that are based on reference documents are read from the MIRO proposal. All OCR lines for which matches are found in the MIRO proposal are overwritten with MIRO Amount/Quantity if the OCR Amount/Quantity is missing.
• While matching, PO/PO item will be used as a key for Non GR IV case.
• PO/PO item or delivery note will be used as a key for GR IV case.
All lines that could not be matched against MIRO lines and that are incomplete are deleted. Finally, the modified OCR lines are updated in the indexing item table.
4. In the list of Z constants, double-click LEVEL_PREFERENCE to configure if users choose PO/delivery note either at header level or line level.
5. Enter H for header level or L for line level.
6. In the list of Z constants, double-click REF_DOC_PREFERENCE to configure if users choose either purchase order or delivery note as their base.
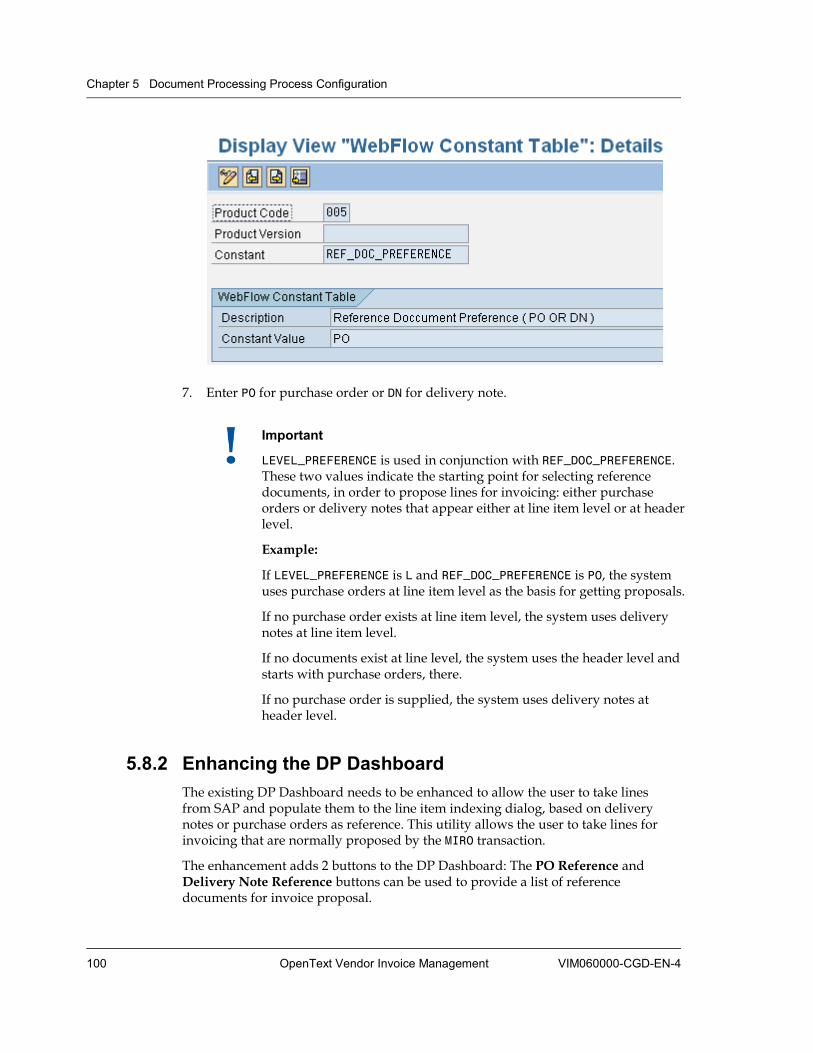
Chapter 5 Document Processing Process Configuration
100 OpenText Vendor Invoice Management VIM060000-CGD-EN-4
7. Enter PO for purchase order or DN for delivery note.
Important
LEVEL_PREFERENCE is used in conjunction with REF_DOC_PREFERENCE.These two values indicate the starting point for selecting reference documents, in order to propose lines for invoicing: either purchase orders or delivery notes that appear either at line item level or at header level.
Example:
If LEVEL_PREFERENCE is L and REF_DOC_PREFERENCE is PO, the system uses purchase orders at line item level as the basis for getting proposals.
If no purchase order exists at line item level, the system uses delivery notes at line item level.
If no documents exist at line level, the system uses the header level and starts with purchase orders, there.
If no purchase order is supplied, the system uses delivery notes at header level.
5.8.2 Enhancing the DP Dashboard The existing DP Dashboard needs to be enhanced to allow the user to take lines from SAP and populate them to the line item indexing dialog, based on delivery notes or purchase orders as reference. This utility allows the user to take lines for invoicing that are normally proposed by the MIRO transaction.
The enhancement adds 2 buttons to the DP Dashboard: The PO Reference and Delivery Note Reference buttons can be used to provide a list of reference documents for invoice proposal.

5.8 Configuring Indexing Line Matching from OCR Results
VIM060000-CGD-EN-4 Configuration Guide 101
To activate reference buttons in the DP Dashboard:
1. Execute the /n/OPT/SPRO transaction and follow LiveLink VIM - Configuration > Document Processing > External System Data (OCR / IDoc) > PO Line Determination > Maintain Constants for PO Invoice Lines > Maintain PO Invoice Lines Related Constants.
2. Double-click ENABLE_MATCHING_SCR.
3. Enter Constant Value X to activate the buttons in the DP Dashboard.
5.8.3 Enhancing MIRO for Pre-population of Data During Online Invoice Creation This covers the aspects related to online posting via the MIRO transaction via Enhancement Points (for ECC 6.0 version). Currently, the line items from the indexing dialog window are lost when a user executes online postings. Due to the complexity of MIRO, normal BDC is not possible to pass lines from the indexing screen. The following configurations are necessary:
To ensure that BDC Configuration ID 200 exists in the system:
1. Execute the /OPT/CP_9CX1 transaction.
Alternatively, follow LiveLink VIM - Configuration > Document Processing > Document Type Configuration > Maintain BDC Procedures. See also “Defining a BDC ID” on page 73.
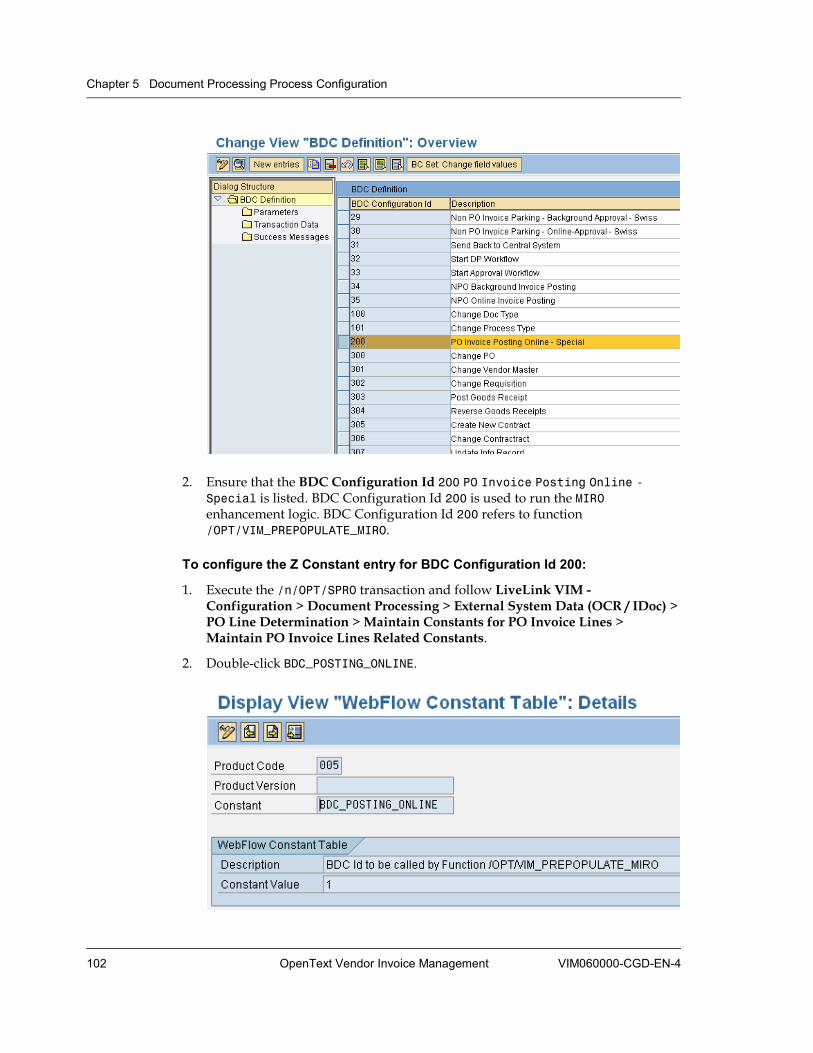
Chapter 5 Document Processing Process Configuration
102 OpenText Vendor Invoice Management VIM060000-CGD-EN-4
2. Ensure that the BDC Configuration Id 200 PO Invoice Posting Online -Special is listed. BDC Configuration Id 200 is used to run the MIRO enhancement logic. BDC Configuration Id 200 refers to function /OPT/VIM_PREPOPULATE_MIRO.
To configure the Z Constant entry for BDC Configuration Id 200:
1. Execute the /n/OPT/SPRO transaction and follow LiveLink VIM - Configuration > Document Processing > External System Data (OCR / IDoc) > PO Line Determination > Maintain Constants for PO Invoice Lines > Maintain PO Invoice Lines Related Constants.
2. Double-click BDC_POSTING_ONLINE.
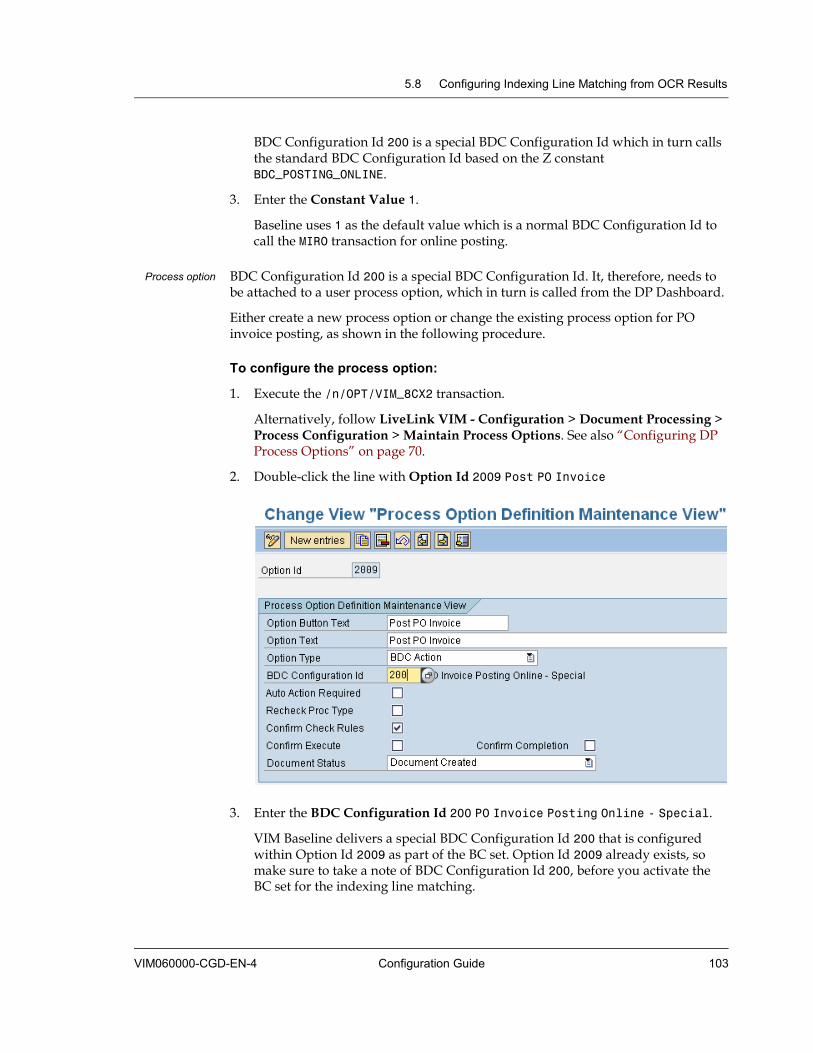
5.8 Configuring Indexing Line Matching from OCR Results
VIM060000-CGD-EN-4 Configuration Guide 103
BDC Configuration Id 200 is a special BDC Configuration Id which in turn calls the standard BDC Configuration Id based on the Z constant BDC_POSTING_ONLINE.
3. Enter the Constant Value 1.
Baseline uses 1 as the default value which is a normal BDC Configuration Id to call the MIRO transaction for online posting.
Process option BDC Configuration Id 200 is a special BDC Configuration Id. It, therefore, needs to be attached to a user process option, which in turn is called from the DP Dashboard.
Either create a new process option or change the existing process option for PO invoice posting, as shown in the following procedure.
To configure the process option:
1. Execute the /n/OPT/VIM_8CX2 transaction.
Alternatively, follow LiveLink VIM - Configuration > Document Processing > Process Configuration > Maintain Process Options. See also “Configuring DP Process Options” on page 70.
2. Double-click the line with Option Id 2009 Post PO Invoice
3. Enter the BDC Configuration Id 200 PO Invoice Posting Online - Special.
VIM Baseline delivers a special BDC Configuration Id 200 that is configured within Option Id 2009 as part of the BC set. Option Id 2009 already exists, so make sure to take a note of BDC Configuration Id 200, before you activate the BC set for the indexing line matching.
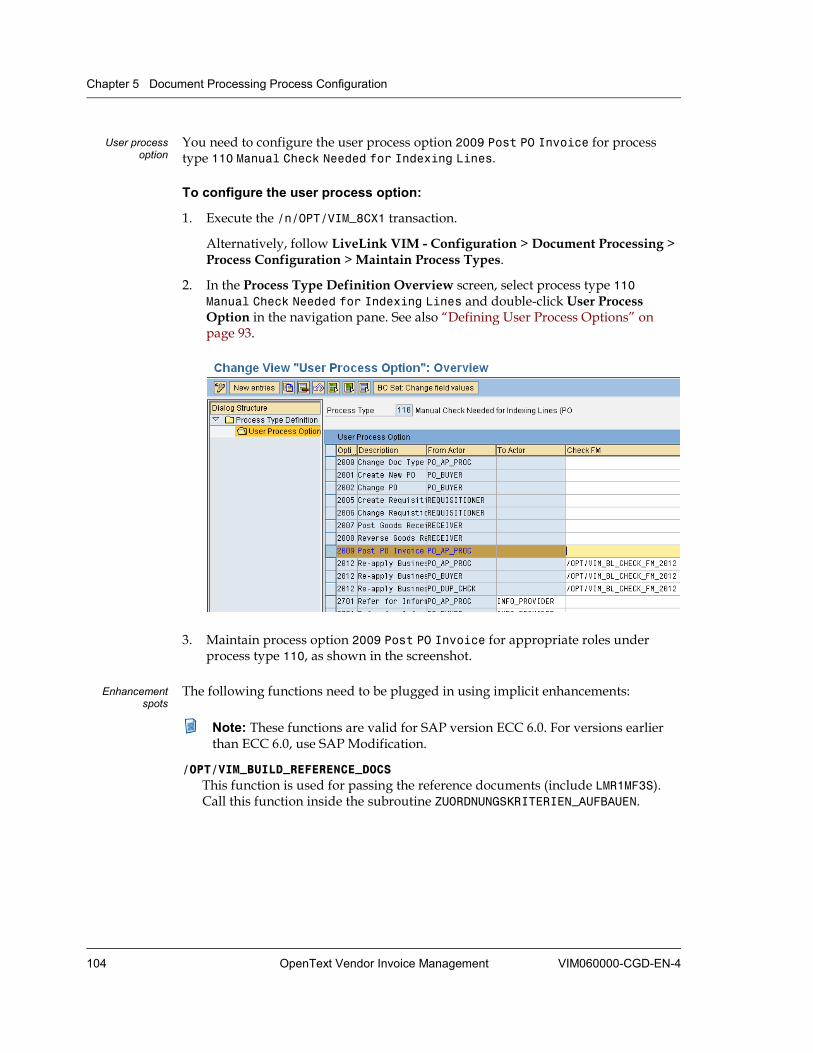
Chapter 5 Document Processing Process Configuration
104 OpenText Vendor Invoice Management VIM060000-CGD-EN-4
User process option
You need to configure the user process option 2009 Post PO Invoice for process type 110 Manual Check Needed for Indexing Lines.
To configure the user process option:
1. Execute the /n/OPT/VIM_8CX1 transaction.
Alternatively, follow LiveLink VIM - Configuration > Document Processing > Process Configuration > Maintain Process Types.
2. In the Process Type Definition Overview screen, select process type 110 Manual Check Needed for Indexing Lines and double-click User Process Option in the navigation pane. See also “Defining User Process Options” on page 93.
3. Maintain process option 2009 Post PO Invoice for appropriate roles under process type 110, as shown in the screenshot.
Enhancement spots
The following functions need to be plugged in using implicit enhancements:
Note: These functions are valid for SAP version ECC 6.0. For versions earlier than ECC 6.0, use SAP Modification.
/OPT/VIM_BUILD_REFERENCE_DOCS This function is used for passing the reference documents (include LMR1MF3S). Call this function inside the subroutine ZUORDNUNGSKRITERIEN_AUFBAUEN.
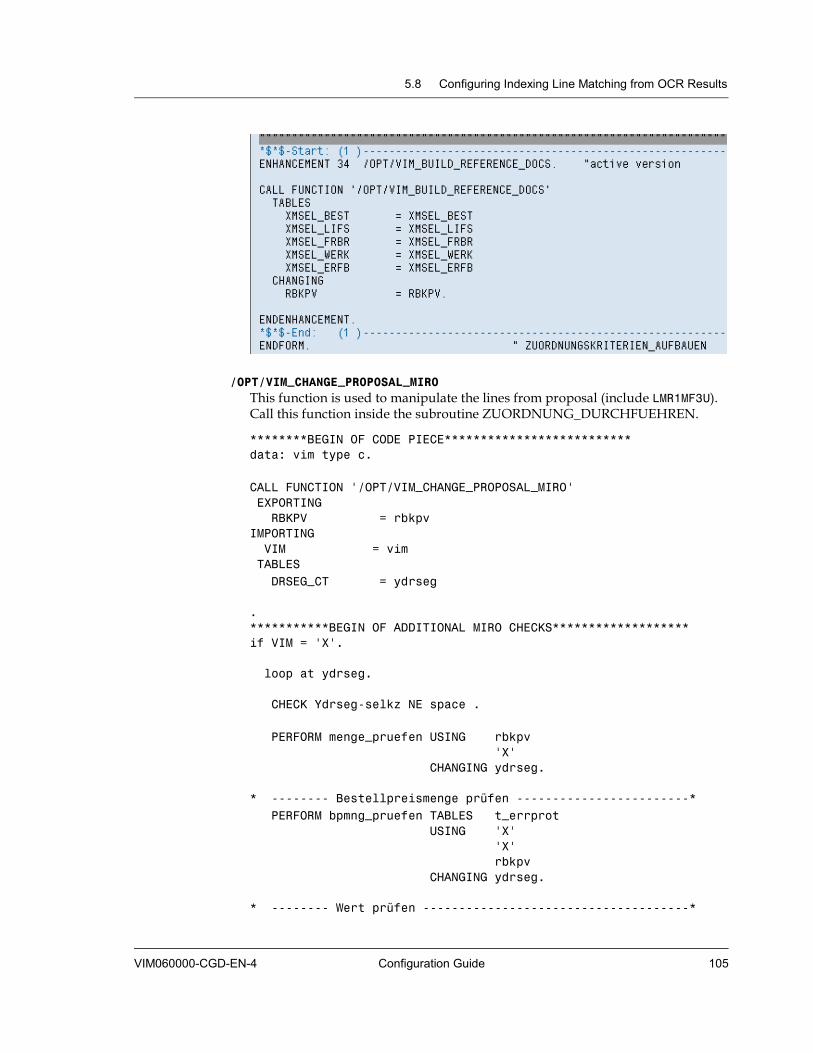
5.8 Configuring Indexing Line Matching from OCR Results
VIM060000-CGD-EN-4 Configuration Guide 105
/OPT/VIM_CHANGE_PROPOSAL_MIRO This function is used to manipulate the lines from proposal (include LMR1MF3U). Call this function inside the subroutine ZUORDNUNG_DURCHFUEHREN.
********BEGIN OF CODE PIECE************************** data: vim type c. CALL FUNCTION '/OPT/VIM_CHANGE_PROPOSAL_MIRO' EXPORTING RBKPV = rbkpv IMPORTING VIM = vim TABLES DRSEG_CT = ydrseg .***********BEGIN OF ADDITIONAL MIRO CHECKS******************* if VIM = 'X'. loop at ydrseg.
CHECK Ydrseg-selkz NE space .
PERFORM menge_pruefen USING rbkpv
'X' CHANGING ydrseg. * -------- Bestellpreismenge prüfen ------------------------* PERFORM bpmng_pruefen TABLES t_errprot USING 'X' 'X' rbkpv CHANGING ydrseg. * -------- Wert prüfen -------------------------------------*
Chapter 5 Document Processing Process Configuration
106 OpenText Vendor Invoice Management VIM060000-CGD-EN-4
PERFORM wert_pruefen TABLES t_errprot USING rbkpv space CHANGING ydrseg. modify ydrseg. endloop. endif. ***********END OF ADDITIONAL MIRO CHECKS*********************** ********END OF CODE PIECE**************************
5.8.4 Changing BAPI Configuration If you need to change the configuration for certain BAPIs and configure a plug-in custom function module in BAPI, perform the following steps.
To change the BAPI configuration:
1. Execute the /OPT/CP_9CX1 transaction.
Alternatively, follow LiveLink VIM - Configuration > Document Processing > Document Type Configuration > Maintain BDC Procedures. See also “Defining a BDC ID” on page 73.
2. Double-click BDC Configuration Id 6.
3. Replace the existing BAPI with custom BAPI compatible to interface /OPT/VIM_52_BAPI_DOCLINES_PO.
4. Return to the BDC Definition Overview screen, and double-click BDC Configuration Id 11.
5. Replace the existing BAPI with custom BAPI compatible to interface /OPT/VIM_52_BAPI_PO_PARK.
You might not want to entirely overwrite the BAPIs with custom BAPIs as described above. The other way to allow some custom modifications is to use a custom plug-in function module.
To configure a plug-in custom function module in BAPI:
1. Execute the /n/OPT/SPRO transaction and follow LiveLink VIM - Configuration > Document Processing > External System Data (OCR / IDoc) > PO Line Determination > Maintain Constants for PO Invoice Lines > Maintain PO Invoice Lines Related Constants.
2. Double-click CUSTOM_FM_PLUGIN.
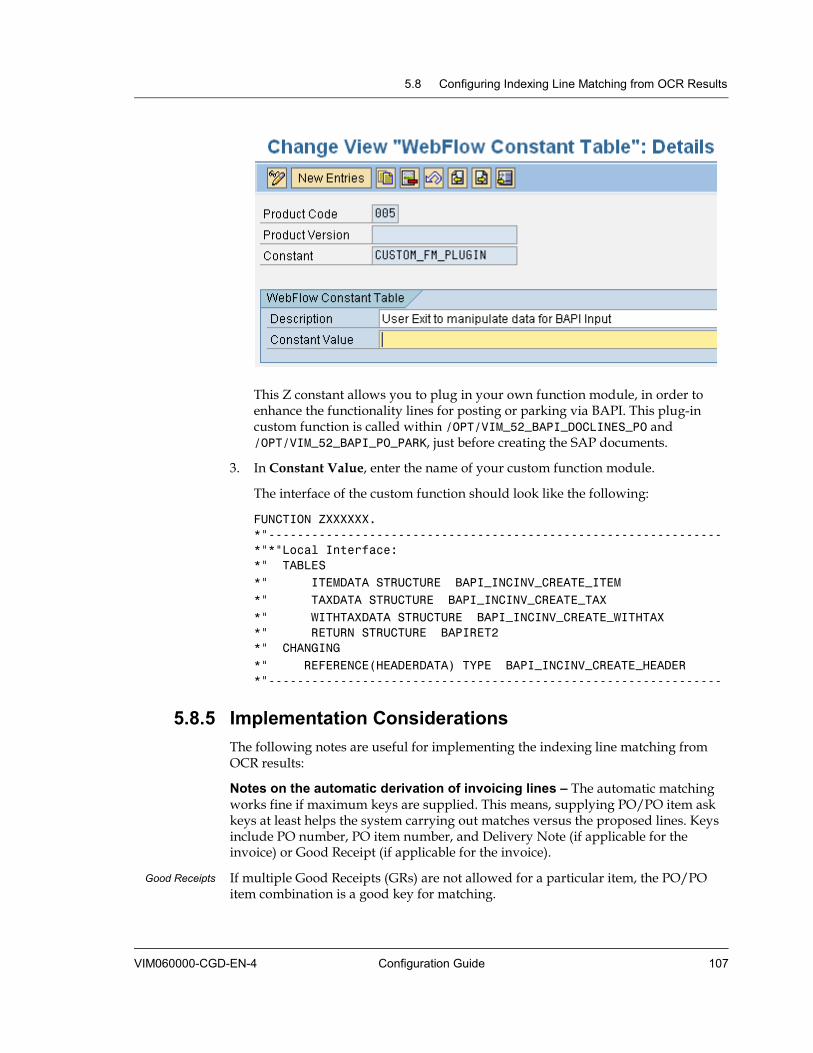
5.8 Configuring Indexing Line Matching from OCR Results
VIM060000-CGD-EN-4 Configuration Guide 107
This Z constant allows you to plug in your own function module, in order to enhance the functionality lines for posting or parking via BAPI. This plug-in custom function is called within /OPT/VIM_52_BAPI_DOCLINES_PO and /OPT/VIM_52_BAPI_PO_PARK, just before creating the SAP documents.
3. In Constant Value, enter the name of your custom function module.
The interface of the custom function should look like the following:
FUNCTION ZXXXXXX. *"--------------------------------------------------------------- *"*"Local Interface: *" TABLES *" ITEMDATA STRUCTURE BAPI_INCINV_CREATE_ITEM *" TAXDATA STRUCTURE BAPI_INCINV_CREATE_TAX *" WITHTAXDATA STRUCTURE BAPI_INCINV_CREATE_WITHTAX *" RETURN STRUCTURE BAPIRET2 *" CHANGING *" REFERENCE(HEADERDATA) TYPE BAPI_INCINV_CREATE_HEADER *"---------------------------------------------------------------
5.8.5 Implementation Considerations The following notes are useful for implementing the indexing line matching from OCR results:
Notes on the automatic derivation of invoicing lines – The automatic matching works fine if maximum keys are supplied. This means, supplying PO/PO item ask keys at least helps the system carrying out matches versus the proposed lines. Keys include PO number, PO item number, and Delivery Note (if applicable for the invoice) or Good Receipt (if applicable for the invoice).
Good Receipts If multiple Good Receipts (GRs) are not allowed for a particular item, the PO/PO item combination is a good key for matching.
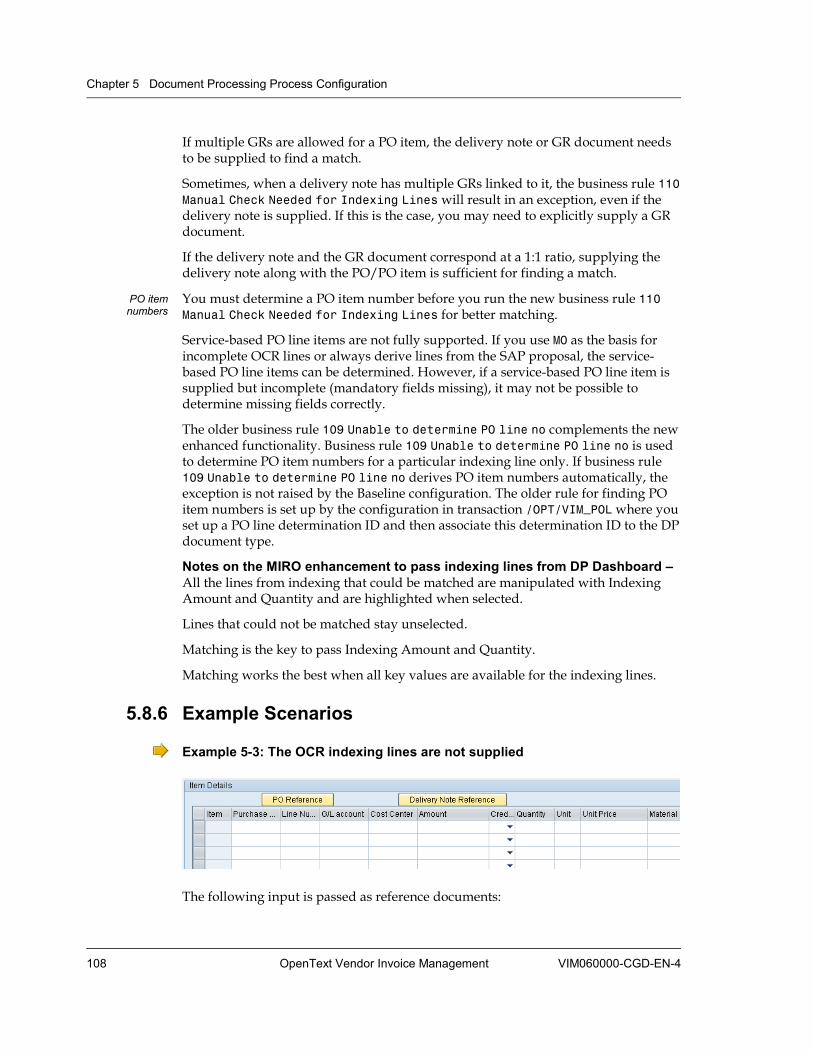
Chapter 5 Document Processing Process Configuration
108 OpenText Vendor Invoice Management VIM060000-CGD-EN-4
If multiple GRs are allowed for a PO item, the delivery note or GR document needs to be supplied to find a match.
Sometimes, when a delivery note has multiple GRs linked to it, the business rule 110 Manual Check Needed for Indexing Lines will result in an exception, even if the delivery note is supplied. If this is the case, you may need to explicitly supply a GR document.
If the delivery note and the GR document correspond at a 1:1 ratio, supplying the delivery note along with the PO/PO item is sufficient for finding a match.
PO item numbers
You must determine a PO item number before you run the new business rule 110 Manual Check Needed for Indexing Lines for better matching. Service-based PO line items are not fully supported. If you use MO as the basis for incomplete OCR lines or always derive lines from the SAP proposal, the service-based PO line items can be determined. However, if a service-based PO line item is supplied but incomplete (mandatory fields missing), it may not be possible to determine missing fields correctly.
The older business rule 109 Unable to determine PO line no complements the new enhanced functionality. Business rule 109 Unable to determine PO line no is used to determine PO item numbers for a particular indexing line only. If business rule 109 Unable to determine PO line no derives PO item numbers automatically, the exception is not raised by the Baseline configuration. The older rule for finding PO item numbers is set up by the configuration in transaction /OPT/VIM_POL where you set up a PO line determination ID and then associate this determination ID to the DP document type.
Notes on the MIRO enhancement to pass indexing lines from DP Dashboard – All the lines from indexing that could be matched are manipulated with Indexing Amount and Quantity and are highlighted when selected.
Lines that could not be matched stay unselected.
Matching is the key to pass Indexing Amount and Quantity.
Matching works the best when all key values are available for the indexing lines.
5.8.6 Example Scenarios
Example 5-3: The OCR indexing lines are not supplied
The following input is passed as reference documents:
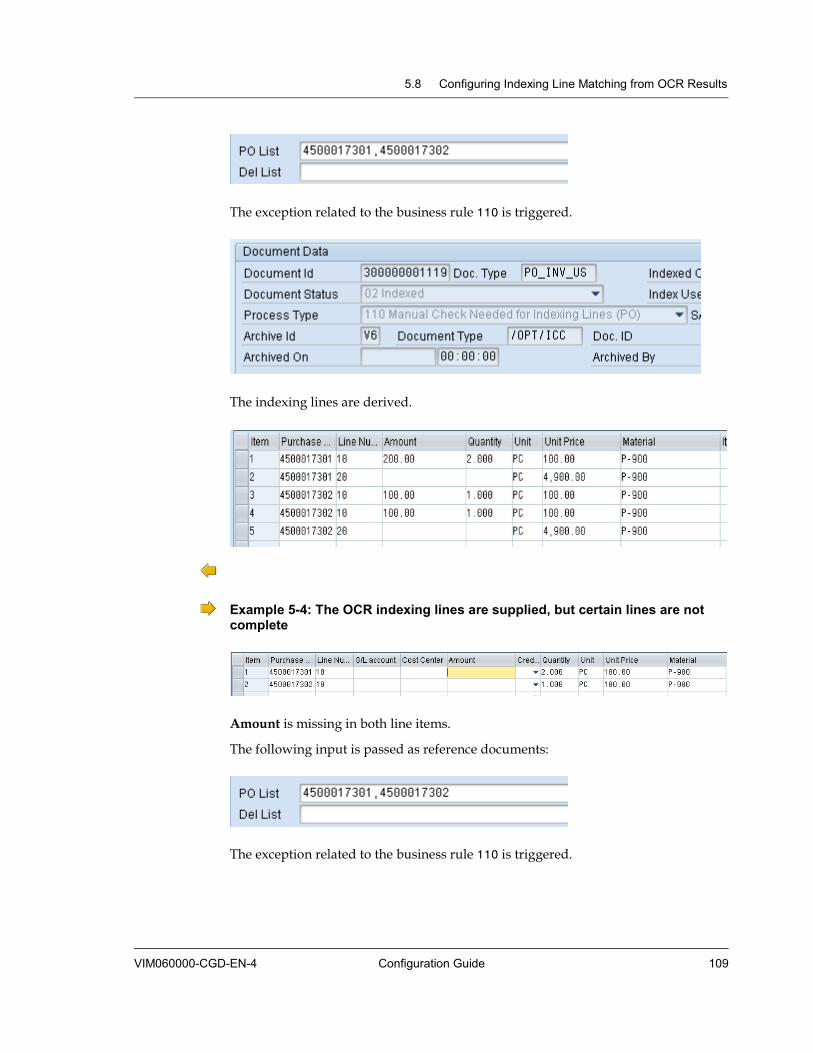
5.8 Configuring Indexing Line Matching from OCR Results
VIM060000-CGD-EN-4 Configuration Guide 109
The exception related to the business rule 110 is triggered.
The indexing lines are derived.
Example 5-4: The OCR indexing lines are supplied, but certain lines are not complete
Amount is missing in both line items.
The following input is passed as reference documents:
The exception related to the business rule 110 is triggered.
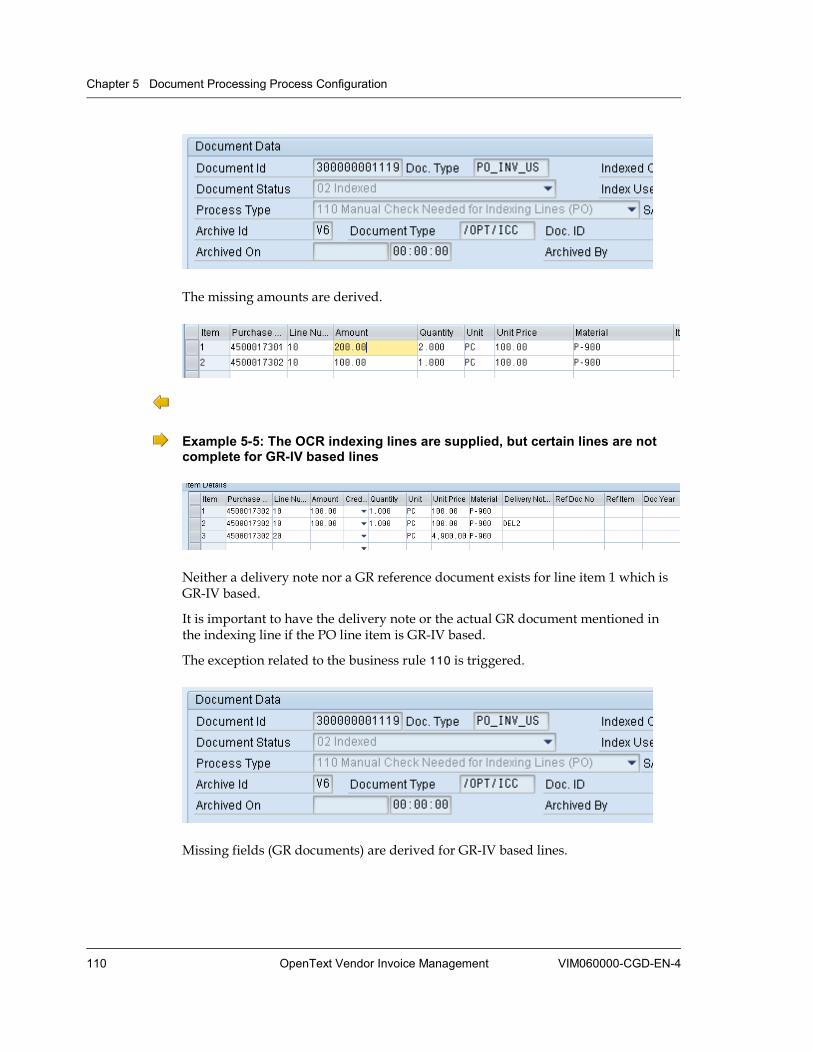
Chapter 5 Document Processing Process Configuration
110 OpenText Vendor Invoice Management VIM060000-CGD-EN-4
The missing amounts are derived.
Example 5-5: The OCR indexing lines are supplied, but certain lines are not complete for GR-IV based lines
Neither a delivery note nor a GR reference document exists for line item 1 which is GR-IV based.
It is important to have the delivery note or the actual GR document mentioned in the indexing line if the PO line item is GR-IV based.
The exception related to the business rule 110 is triggered.
Missing fields (GR documents) are derived for GR-IV based lines.
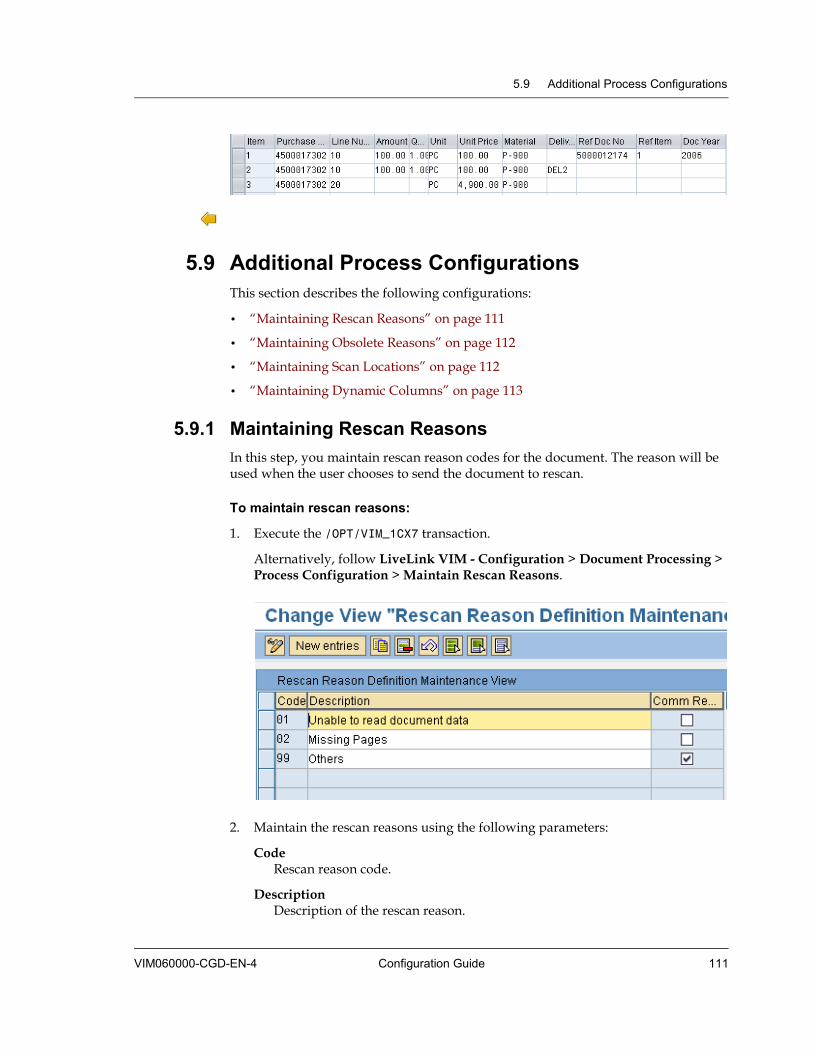
5.9 Additional Process Configurations
VIM060000-CGD-EN-4 Configuration Guide 111
5.9 Additional Process Configurations This section describes the following configurations:
• “Maintaining Rescan Reasons” on page 111
• “Maintaining Obsolete Reasons” on page 112
• “Maintaining Scan Locations” on page 112
• “Maintaining Dynamic Columns” on page 113
5.9.1 Maintaining Rescan Reasons In this step, you maintain rescan reason codes for the document. The reason will be used when the user chooses to send the document to rescan.
To maintain rescan reasons:
1. Execute the /OPT/VIM_1CX7 transaction.
Alternatively, follow LiveLink VIM - Configuration > Document Processing > Process Configuration > Maintain Rescan Reasons.
2. Maintain the rescan reasons using the following parameters:
Code Rescan reason code.
Description Description of the rescan reason.
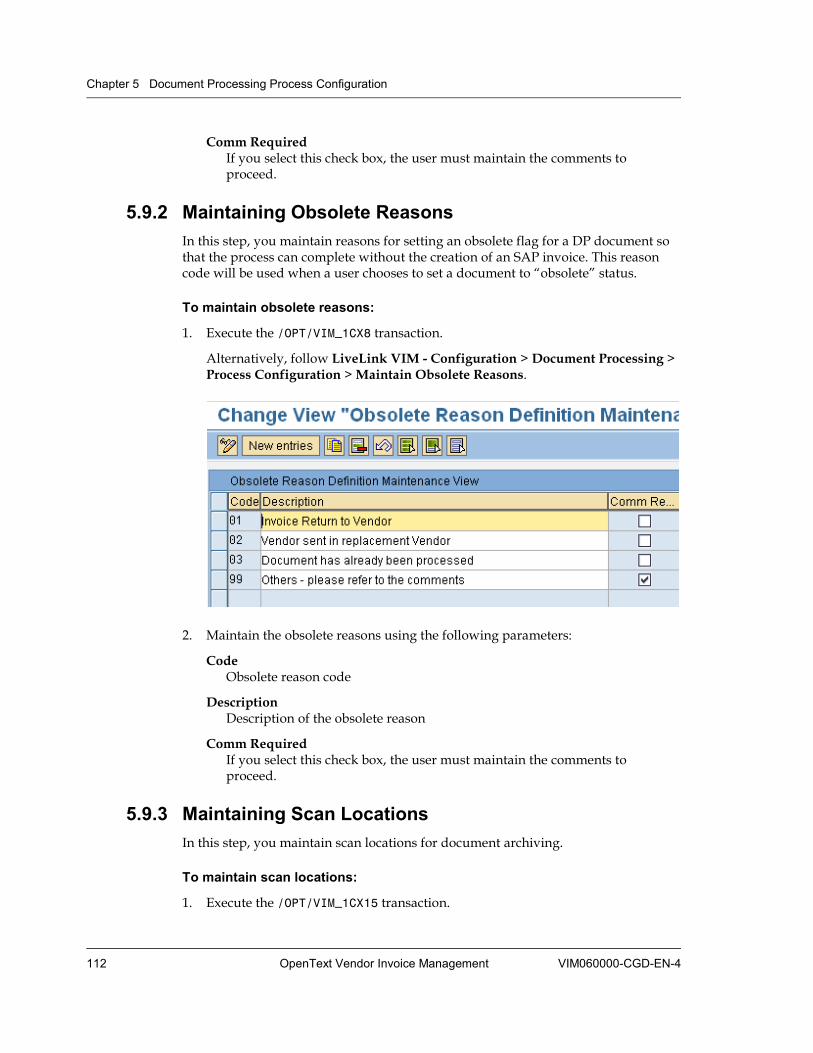
Chapter 5 Document Processing Process Configuration
112 OpenText Vendor Invoice Management VIM060000-CGD-EN-4
Comm Required If you select this check box, the user must maintain the comments to proceed.
5.9.2 Maintaining Obsolete Reasons In this step, you maintain reasons for setting an obsolete flag for a DP document so that the process can complete without the creation of an SAP invoice. This reason code will be used when a user chooses to set a document to “obsolete” status.
To maintain obsolete reasons:
1. Execute the /OPT/VIM_1CX8 transaction.
Alternatively, follow LiveLink VIM - Configuration > Document Processing > Process Configuration > Maintain Obsolete Reasons.
2. Maintain the obsolete reasons using the following parameters:
Code Obsolete reason code
Description Description of the obsolete reason
Comm Required If you select this check box, the user must maintain the comments to proceed.
5.9.3 Maintaining Scan Locations In this step, you maintain scan locations for document archiving.
To maintain scan locations:
1. Execute the /OPT/VIM_1CX15 transaction.
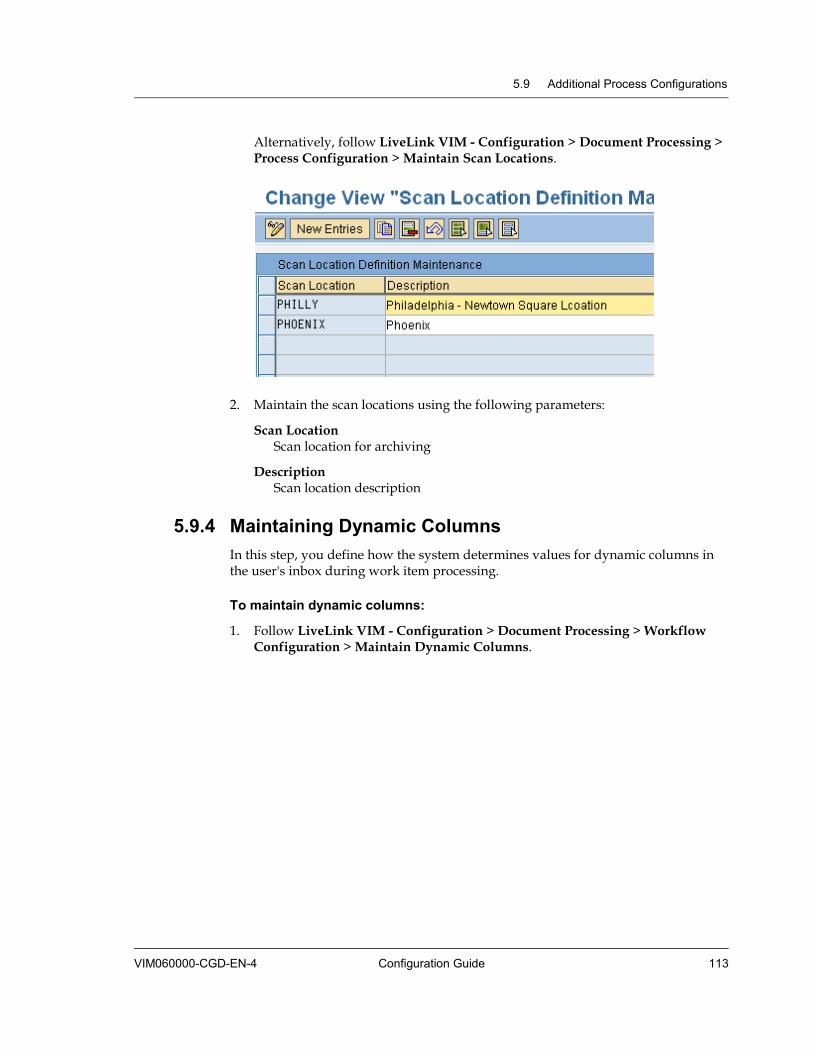
5.9 Additional Process Configurations
VIM060000-CGD-EN-4 Configuration Guide 113
Alternatively, follow LiveLink VIM - Configuration > Document Processing > Process Configuration > Maintain Scan Locations.
2. Maintain the scan locations using the following parameters:
Scan Location Scan location for archiving
Description Scan location description
5.9.4 Maintaining Dynamic Columns In this step, you define how the system determines values for dynamic columns in the user's inbox during work item processing.
To maintain dynamic columns:
1. Follow LiveLink VIM - Configuration > Document Processing > Workflow Configuration > Maintain Dynamic Columns.
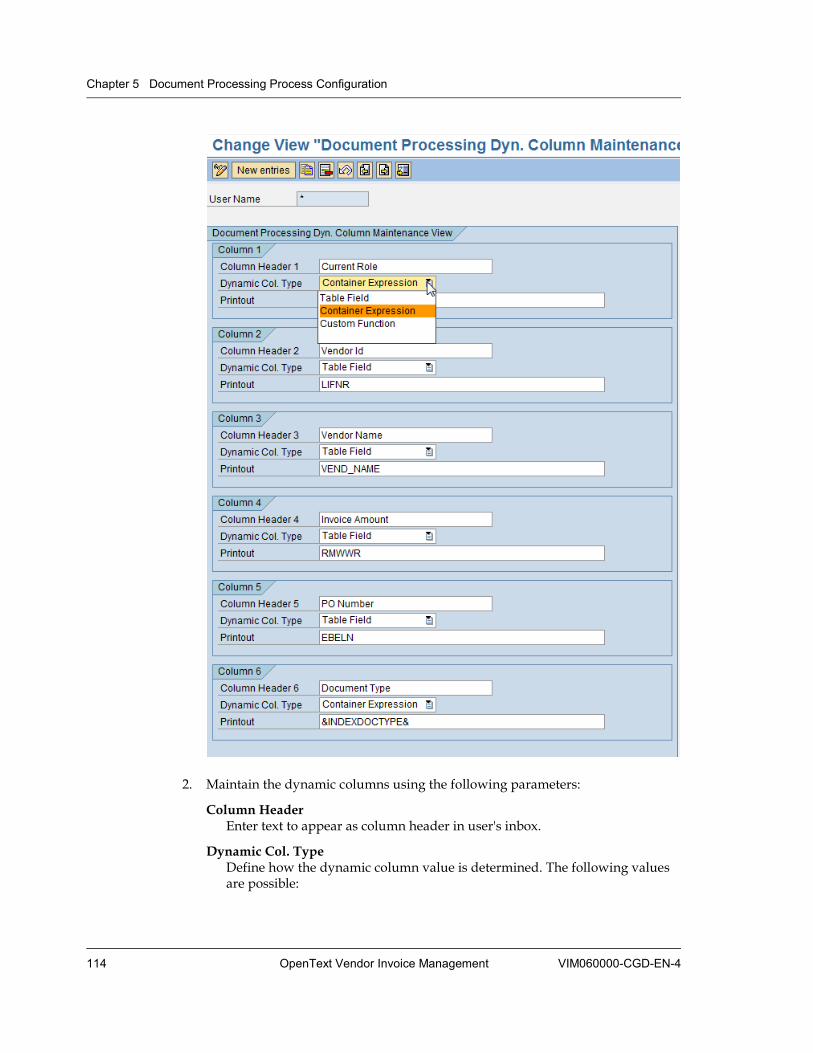
Chapter 5 Document Processing Process Configuration
114 OpenText Vendor Invoice Management VIM060000-CGD-EN-4
2. Maintain the dynamic columns using the following parameters:
Column Header Enter text to appear as column header in user's inbox.
Dynamic Col. Type Define how the dynamic column value is determined. The following values are possible:

5.10 Configuring Global Parameters
VIM060000-CGD-EN-4 Configuration Guide 115
Table Field Data will be populated from the /OPT/VIM_1HEAD table.
Container Expression Data will be populated from container data from task TS9578003.
Custom Function Data is derived using a custom function module. A sample interface can be found from function module /OPT/BL_IF_SET_DYNAMIC_COLUMN.
5.10 Configuring Global Parameters Document Processing (DP) provides enhanced functionality. For this purpose, global configuration parameters are used.
Important
Take care when you change the global configuration parameters. Changes can affect the functionality of the process.
To configure global parameters:
1. Execute the /OPT/VIM_1CX12 transaction.
Alternatively, follow LiveLink VIM - Configuration > Document Processing > General Configuration > Global Configuration.
2. The following list defines the usage of each of these constants:
Chapter 5 Document Processing Process Configuration
116 OpenText Vendor Invoice Management VIM060000-CGD-EN-4
GR_CHECK_EXIT
Usage This constant defines the function that is called to check if the Goods Receipt (GR) for the PO is already done.
This constant is only applicable for Brazil.
Default value /OPT/VIM_BL_CHECK_GR_EXIT
GR_MOVEMENT_TYPE
Usage This constant defines the movement type to be used when posting the goods receipt (GR) document in background. It can either be a fixed value or a function module name.
This constant is only applicable for Brazil.
Default value For a fixed value, just mention the movement type in the constant value, for example: 101.
For a function module, use the format FM: <function_name>.
GR_POST_BAPI_EXIT
Usage This user exit bases on a function module. The function module defined in this constant is called by the standard program before the SAP BAPI is called while posting the goods receipt (GR). You can use this user exit to change values being passed to the BAPI.
This constant is only applicable for Brazil.
Default value None
The interface of the custom function module must be the same as /OPT/DPPO_GR_BAPI_POST_EXIT.
DP_NPO_POSTING_EXIT
Usage This user exit bases on a function module. The function module is called before calling the non PO invoice posting BAPI BAPI_ACC_DOCUMENT_POST in function module /OPT/DNONPO_INVOICE_BAPI. You can use this user exit to modify the baseline data in BAPI structures.
This constant is applicable for all countries.
Default value None

5.10 Configuring Global Parameters
VIM060000-CGD-EN-4 Configuration Guide 117
The interface of the custom function module must be the same as /OPT/DNONPO_INVOICE_BAPI_EXIT.
APP_DOCU_URL
Usage The custom help URL for the DP dashboard. You can provide custom help for users to look up processing steps they need to take when they are processing the DP dashboard.
Default value www.opentext.com
IMG_DOCU_URL
Usage The custom help URL for OpenText IMG. Do not change this constant.
Default value www.opentext.com
MAIN_WF_TEMPLATE
Usage The default workflow template that will be triggered for DP. Do not change this value.
Default value WS00275255
NUMBER_RANGE_OBJECT
Usage The default number range object for DP is /OPT/DOCID. If you want to define a custom number range object for document number ranges, define the value of the number range object here.
Default value None
Note: If you change this value, you will have to maintain the number ranges for the documents separately. The OpenText delivered /OPT/VIM_1CX6 transaction will not work in this case for maintaining number ranges.
PREPROCESS_EXIT_FM
Usage A custom function module can be used as a value for this constant to change the document values (Index Data etc.) before the workflow starts.
Default value None
Chapter 5 Document Processing Process Configuration
118 OpenText Vendor Invoice Management VIM060000-CGD-EN-4
Interface
CALL FUNCTION <CONSTANT> CHANGING INDEXER = LCL_INDEXER TYPE REF TO /OPT/CL_VIM_DOC_PROCESSOR
REMINDER_USER_EXIT
Usage This configuration value is used to maintain a custom function allowing to format e-mail content when sending reminders to users holding work items.
Default value /OPT/VIM_NOTIF_USER_EXIT_TEMP
Interface
CALL FUNCTION <CONSTANT> TABLES OUT_DATA STRUCTURE /OPT/VIM_S1_REMINDER_DISPLAY FIELDS_CATALOG STRUCTURE LVC_S_FCAT SORT_FIELDS STRUCTURE LVC_S_SORT
SERVICE_ENTRY_BSART
Usage This configuration value is relevant for service entry processing: The service entry document type.
Default value None
SERVICE_ENTRY_BSTYP
Usage This configuration value is relevant for service entry processing: Purchase document category for service entry.
Default value None
WI_TEXT_FM
Usage This configuration value is used to maintain a custom function allowing to format the work item text.
Prerequisite Knowledge about work item data
Default value /OPT/BL_IF_DETERMINE_WI_TEXT
5.10 Configuring Global Parameters
VIM060000-CGD-EN-4 Configuration Guide 119
Interface
CALL FUNCTION <CONSTANT> EXPORTING VALUE(INDEX_DOCID) TYPE /OPT/DOCID IMPORTING REFERENCE(WI_TEXT) TYPE SWW_WITEXT
DP_DASHBOARD_TASKID
Usage This configuration value is used to determine the dashboard task in DP. The task should be compatible to task TS00275257.
Prerequisite Knowledge about workflow tasks
Default value TS00275257
Note: Do not change this value as a change affects the behavior of the application.
DUP_CHECK_DELIMIT
Usage This configuration value is used to determine which characters in the document reference number are considered as delimiter to determine a document as a duplicate.
Default value /-
Example If a document with reference number REF-1 should be considered as a duplicate for REF, the delimiter that should be maintained is -.
LIST_WF_STATUSES
Usage This configuration value is used to determine at which document statuses the PO parked workflow should be triggered. The document status in question is the SAP document status.
Default value A
Note: Do not change this value.
WFDOCTYPE
Usage This configuration value is used to determine for which SAP document types the PO/Non PO workflow is triggered. This eliminates the
Chapter 5 Document Processing Process Configuration
120 OpenText Vendor Invoice Management VIM060000-CGD-EN-4
triggering of the workflow for unwanted document types. Separate the values by comma.
Default value KR,RE,KG
Example If you want to trigger the workflow for GL documents (document type AB) maintain value AB here.
WFTRGPLANT
Usage This configuration value is used to determine for which plants the PO / Non PO workflow is triggered. This eliminates the triggering of the workflow for unwanted plants. If you want to consider all plants, maintain the value * here.
Default value *
Example If you want to stop triggering the workflow for plant 0001, maintain all plants different from 0001 here.
VIM060000-CGD-EN-4 OpenText Vendor Invoice Management 121
Chapter 6 PO Parking Process Configuration
Note: In VIM 5.2, the Baseline implementation of handling parked PO and Non PO invoices has switched to the DP document. This change applies to the entire exception handling (except price and quantity block on the posted document) and to Invoice Approval.
Vendor Invoice Management (VIM) provides functionality for managing parked PO invoices (MIRO transaction) and exceptions therein.
The main processing concept involved in managing parked PO invoices is the concept of “parking reasons”. Parking reasons define the overall processing of the invoice as required by the process swimlane.
Main concepts
Parking reasons
• Parking reasons effect the process flow as required by the swimlane definition.
• Each swimlane diagram translates to one parking reason.
• Parking reasons determine the initial actor and various collaboration options available to the various actors during the process flow.
Roles
• Roles use the standard OpenText role/actor infrastructure.
• Roles can use the standard key determination infrastructure to configure complex actor determination logic without programming.
• For the PO parking process, the role concept uses the product code LIX.
Options and option types
• The following main types of options are available:
• Actions
• Referrals (for collaboration)
• Actions can base on transactions or class methods or workflow tasks.
• Options and option types can effect the processing logic.
• Options and option types can effect the user experience.
• Options and option types can make the workflow engine rerun the rules on the most current metadata to effect the process flow.
Chapter 6 PO Parking Process Configuration
122 OpenText Vendor Invoice Management VIM060000-CGD-EN-4
• Options and option types can be configured to change the document status.
BDC IDs
• BDC IDs build a powerful infrastructure for pre-populating data into SAP transactions without programming.
• BDC IDs are optimized for both dialog processing and background processing.
• BDC IDs can be used to set dynamic Parameter IDs.
• BDC IDs can be used to configure new user collaboration actions.
• BDC IDs eliminate the need to code parameterized transactions.
• BDC IDs can be used to configure BDC success messages.
Main steps The following are the main steps involved in implementing process scenarios in the PO parking process: 1. Identify the various parking reasons that are required for the realization of the
process scenarios.
2. Identify the subscreen to be called during the document parking process.
3. Identify the roll out criteria.
4. Identify the various roles and configure the roles in the appropriate process types.
5. Identify and configure the process options according to the swimlanes.
6. Configure global customization setting as per customer requirements.
The starting point for any configuration is a set of process flow swimlanes. The following swimlane is an example of such a process as implemented by the PO invoice parking workflow:

6.1 Defining Rollout Criteria
VIM060000-CGD-EN-4 Configuration Guide 123
The following sections describe the main steps of the PO parking process configuration:
• “Defining Rollout Criteria” on page 123
• “Configuring Process Options” on page 126
• “Configuring Parking Reasons” on page 130
• “Configuring Global Parameters” on page 135
6.1 Defining Rollout Criteria In this step, you define when the VIM PO parked document process needs to be triggered. To completely disallow the PO parked document process, deactivate the event linkage as described in “Event Linkages” on page 125.
Note: Company codes are part of the rollout criteria, besides document types and plants, for the PO parking process, the PO blocking process, and the Non PO parking process.
• Plants and document types maintenance for rollout has been moved to tables from constant table.
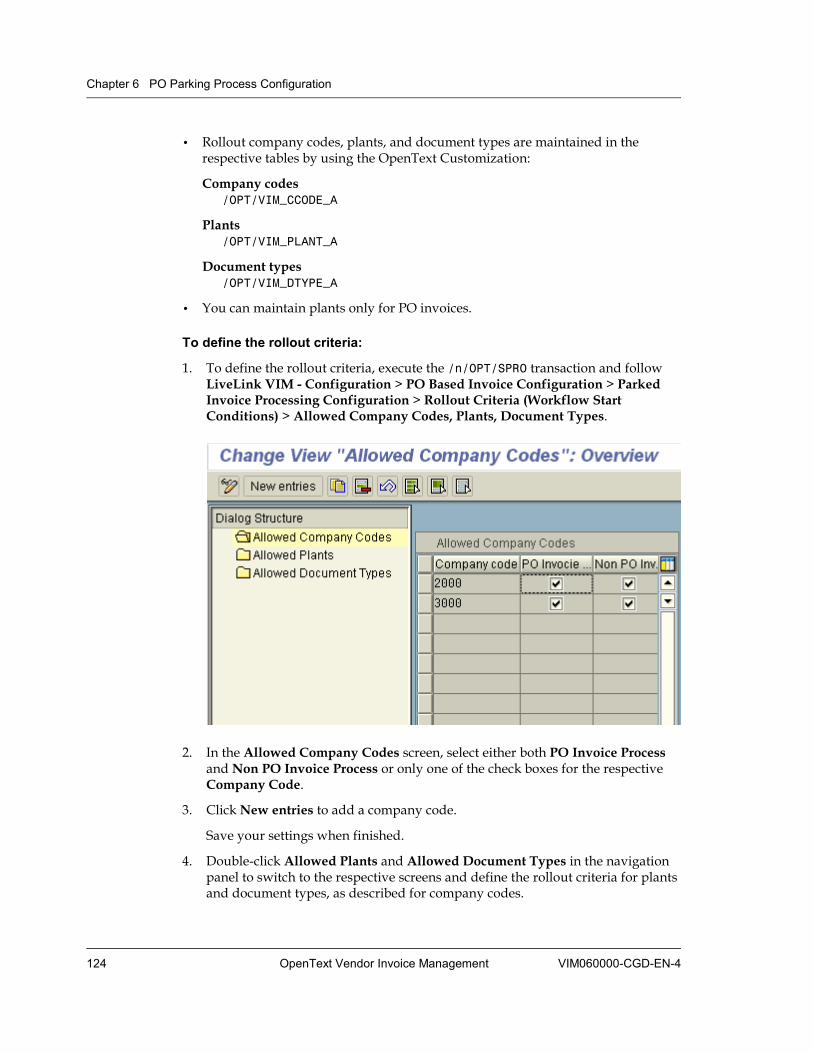
Chapter 6 PO Parking Process Configuration
124 OpenText Vendor Invoice Management VIM060000-CGD-EN-4
• Rollout company codes, plants, and document types are maintained in the respective tables by using the OpenText Customization:
Company codes /OPT/VIM_CCODE_A
Plants /OPT/VIM_PLANT_A
Document types /OPT/VIM_DTYPE_A
• You can maintain plants only for PO invoices.
To define the rollout criteria:
1. To define the rollout criteria, execute the /n/OPT/SPRO transaction and follow LiveLink VIM - Configuration > PO Based Invoice Configuration > Parked Invoice Processing Configuration > Rollout Criteria (Workflow Start Conditions) > Allowed Company Codes, Plants, Document Types.
2. In the Allowed Company Codes screen, select either both PO Invoice Process and Non PO Invoice Process or only one of the check boxes for the respective Company Code.
3. Click New entries to add a company code.
Save your settings when finished.
4. Double-click Allowed Plants and Allowed Document Types in the navigation panel to switch to the respective screens and define the rollout criteria for plants and document types, as described for company codes.

6.1 Defining Rollout Criteria
VIM060000-CGD-EN-4 Configuration Guide 125
The respective receiver function module triggers the workflow based on the data in the tables. The workflow is triggered when there is no data maintained in the table(s) or the data meets all the conditions such as company code, document type and plant (only for PO invoices).
6.1.1 Event Linkages In this step, you define the standard event linkage delivered by OpenText as active.
Caution If you change the configuration in this section, the PO parking process might not trigger at all.
To define the standard event linkage as active:
1. To access the Event Type Linkages screen, execute the /OPT/VIM_IMG241 transaction.
Alternatively, follow LiveLink VIM - Configuration > PO Based Invoice Configuration > Parked Invoice Processing Configuration > Rollout Criteria > Event Linkages (PO Parked Invoices).
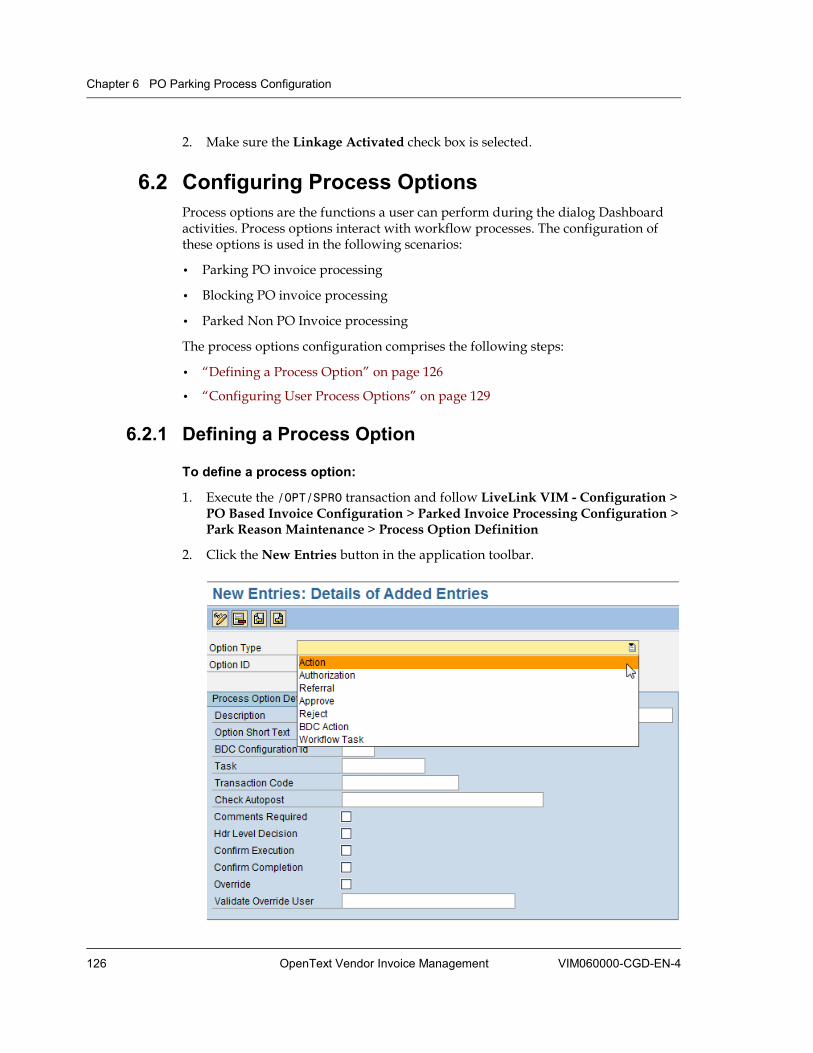
Chapter 6 PO Parking Process Configuration
126 OpenText Vendor Invoice Management VIM060000-CGD-EN-4
2. Make sure the Linkage Activated check box is selected.
6.2 Configuring Process Options Process options are the functions a user can perform during the dialog Dashboard activities. Process options interact with workflow processes. The configuration of these options is used in the following scenarios:
• Parking PO invoice processing
• Blocking PO invoice processing
• Parked Non PO Invoice processing
The process options configuration comprises the following steps:
• “Defining a Process Option” on page 126
• “Configuring User Process Options” on page 129
6.2.1 Defining a Process Option
To define a process option:
1. Execute the /OPT/SPRO transaction and follow LiveLink VIM - Configuration > PO Based Invoice Configuration > Parked Invoice Processing Configuration > Park Reason Maintenance > Process Option Definition
2. Click the New Entries button in the application toolbar.
6.2 Configuring Process Options
VIM060000-CGD-EN-4 Configuration Guide 127
3. Define the process option, using the following parameters:
Option Type Select the option type:
Action The system executes an SAP transaction code defined against this action.
Authorization This option type is relevant only if the option selected is a PO blocked scenario. It allows the user to complete the line level workflow and the target role to execute the transaction code defined against the authorization option.
Referral The work item is forwarded to the target role defined in the user process options configuration.
Approve/Reject The Approve/Reject option type has more relevance in the Invoice Approval process as these are predefined options.
BDC Action Similar to the Action option type, but the transaction/execution has more flexibility to be configured in the BDC ID defined here.
Workflow Task Triggers a custom (sub) workflow when the user selects the option.
Note: Some of the following parameters are only available for certain option types.
Option ID Enter a 5 digit numeric ID that represents the option.
Description Enter a description.
Option Short Text Enter the description that is shown on the button in the user dashboard for this option.
BDC Configuration Id Select the BDC ID that will be called when the user selects the option for execution. This field is applicable only if the option type is BDC Action.
Task Enter the (sub) workflow/task to be triggered when the user selects the option. The task must be compatible to OpenText workflow task.
Transaction Code Define a transaction code to be called when the user executes the option. This is only relevant if the option type is Action or Authorization.

Chapter 6 PO Parking Process Configuration
128 OpenText Vendor Invoice Management VIM060000-CGD-EN-4
Check Autopost Define if the system shall try to post a parked document in background after successful execution of the option:
• Enter X to enable automatic posting.
• Enter FM:<FUNCTION> where <FUNCTION> is a custom function module to determine if the document will be posted. This is relevant when it is difficult for the system to define the auto-post criteria directly.
Comments Required Select this check box to force the user to maintain comments once this option is executed.
Hdr Level Decision Select this check box to achieve that the system applies the decision to the entire document rather than to the current line item in the process. This is applicable in the PO blocked invoice processing scenario where there may be options that need to be applied to the entire PO invoice and not just the line item that is being worked on.
Confirm Execution Select this check box to achieve that the user will be prompted to confirm the option selected.
Example: If an option deletes the SAP document, a confirmation from the user to really perform the action makes sense.
Confirm Completion Select this check box to achieve that the user will be prompted to confirm successful completion of the option.
Override Select this check box to achieve that the user will be able to select any SAP user in the system as the user(s) that will receive the work item when it is referred, and not just the users the system proposes after running the role resolution process. This parameter is applicable only in the Referral option type.
Validate Override User Select a function module that is used to validate the users that the current user overrides.
Example: If a work item needs to be sent for approval, which is technically a referral, and the user is allowed to change the proposed users, this custom validation is required to disallow users to choose anyone they want.
Run Inv. Verification Select this check box to run invoice verification when the current process ends.
Process Complete Select this check box to end the current process and start the next process.
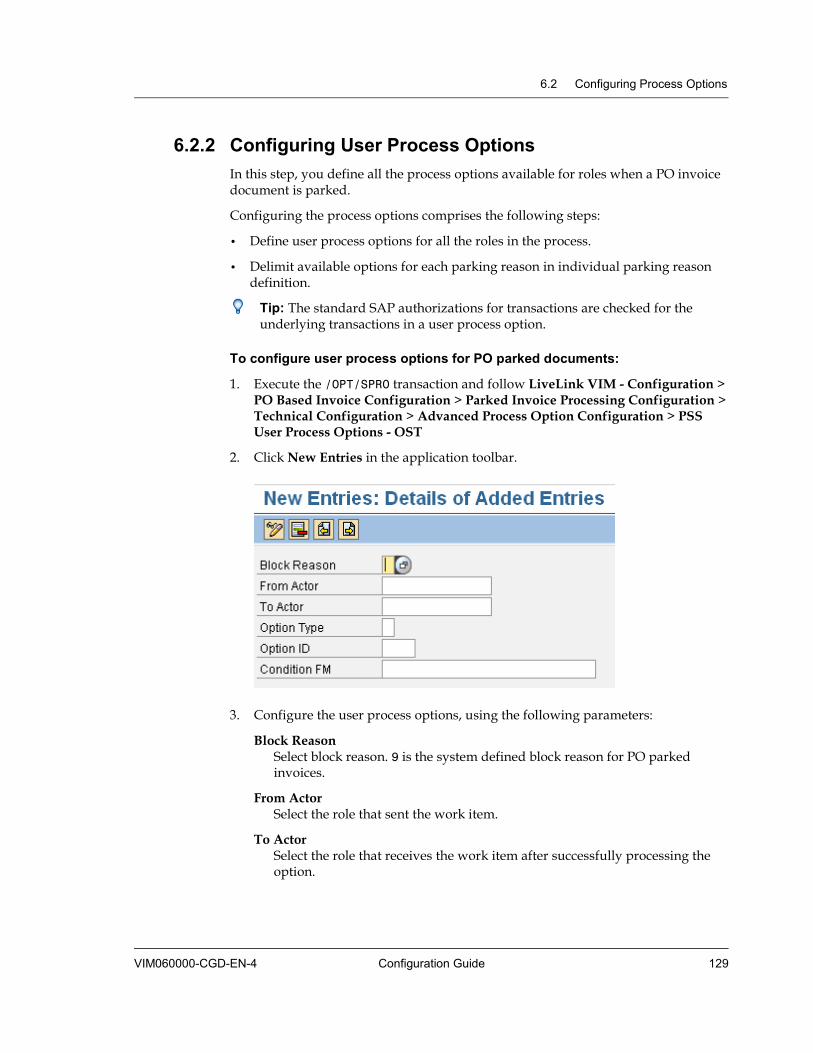
6.2 Configuring Process Options
VIM060000-CGD-EN-4 Configuration Guide 129
6.2.2 Configuring User Process Options In this step, you define all the process options available for roles when a PO invoice document is parked.
Configuring the process options comprises the following steps:
• Define user process options for all the roles in the process.
• Delimit available options for each parking reason in individual parking reason definition.
Tip: The standard SAP authorizations for transactions are checked for the underlying transactions in a user process option.
To configure user process options for PO parked documents:
1. Execute the /OPT/SPRO transaction and follow LiveLink VIM - Configuration > PO Based Invoice Configuration > Parked Invoice Processing Configuration > Technical Configuration > Advanced Process Option Configuration > PSS User Process Options - OST
2. Click New Entries in the application toolbar.
3. Configure the user process options, using the following parameters:
Block Reason Select block reason. 9 is the system defined block reason for PO parked invoices.
From Actor Select the role that sent the work item.
To Actor Select the role that receives the work item after successfully processing the option.
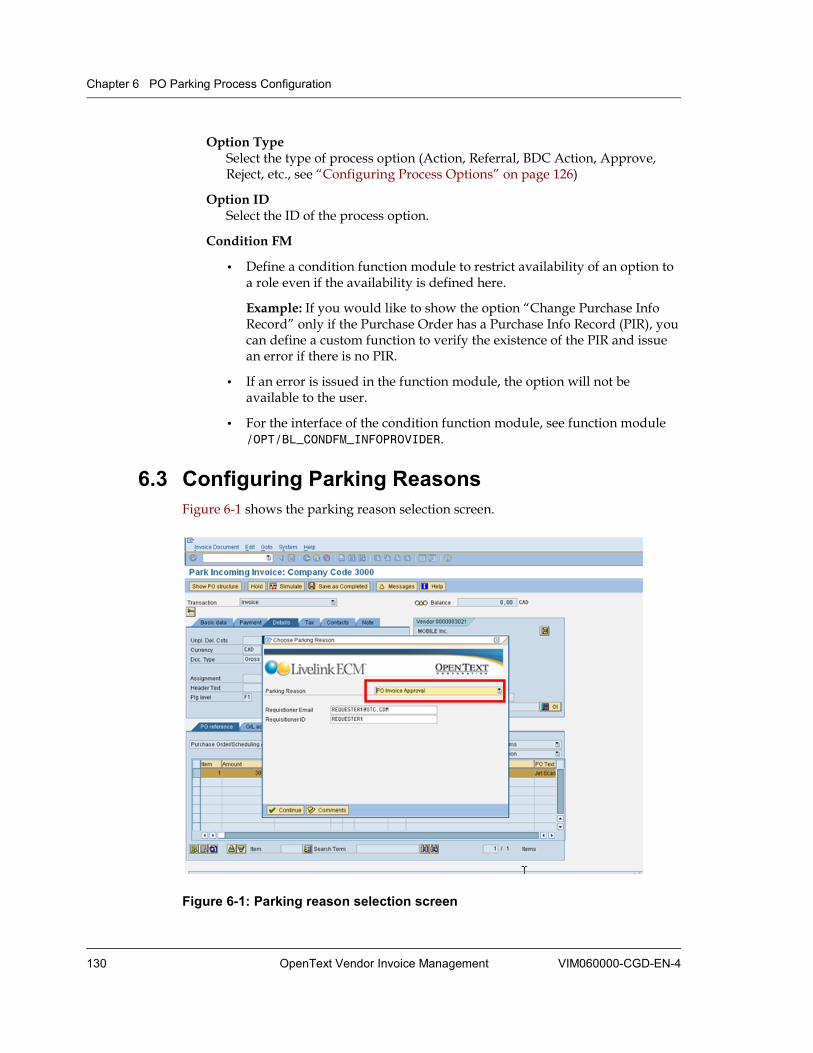
Chapter 6 PO Parking Process Configuration
130 OpenText Vendor Invoice Management VIM060000-CGD-EN-4
Option Type Select the type of process option (Action, Referral, BDC Action, Approve, Reject, etc., see “Configuring Process Options” on page 126)
Option ID Select the ID of the process option.
Condition FM
• Define a condition function module to restrict availability of an option to a role even if the availability is defined here.
Example: If you would like to show the option “Change Purchase Info Record” only if the Purchase Order has a Purchase Info Record (PIR), you can define a custom function to verify the existence of the PIR and issue an error if there is no PIR.
• If an error is issued in the function module, the option will not be available to the user.
• For the interface of the condition function module, see function module /OPT/BL_CONDFM_INFOPROVIDER.
6.3 Configuring Parking Reasons Figure 6-1 shows the parking reason selection screen.
Figure 6-1: Parking reason selection screen
6.3 Configuring Parking Reasons
VIM060000-CGD-EN-4 Configuration Guide 131
In this step, you define the valid parking reasons. Each parking reason represents a process scenario as represented in a swimlane diagram.
Configuring a parking reason comprises the following actions:
• Define the parking reason.
• Define the roles that are responsible for receiving the first work item in the process, for posting the PO invoice, and the initial approver.
• Define if the process triggering needs to be delayed.
• Delimit the available options for the parking reason.
To configure a parking reason:
1. Execute the /OPT/SPRO transaction and follow LiveLink VIM - Configuration > PO Based Invoice Configuration > Parked Invoice Processing Configuration > Park Reason Maintenance > Parking Reason Definition Maintenance
2. Select a parking reason and click in the application bar.

Chapter 6 PO Parking Process Configuration
132 OpenText Vendor Invoice Management VIM060000-CGD-EN-4
3. Define the parking reason, using the following parameters:
Description Enter a description for the parking reason.
Active Indicator Select this check box to achieve that the user can select the parking reason during parking of a PO invoice.
Approval Required Select this check box to achieve that the parking reason will be considered for the Invoice Approval process. For details on the Invoice Approval process in VIM, see “Invoice Approval” on page 195.
6.3 Configuring Parking Reasons
VIM060000-CGD-EN-4 Configuration Guide 133
Subscreen Program/Screen Number Select a subscreen that can be configured to capture additional information from the user when the user chooses a particular parking reason.
• You can extend the structure /PTGWFI/M_PRKMTR to capture additional data during parking a PO invoice.
Example: If a PO invoice needs to be parked for “Service Entry Sheet Required”, the system needs to know who is the Service Requisitioner. This additional information can be programmed in a custom subscreen for the parking reason “Service Entry Sheet Required”.
• Copy the OpenText delivered subscreen program and screen number to ensure that the common part include /PTGWFI/PRK_COMMON_PART is defined and data read/transferred properly.

Chapter 6 PO Parking Process Configuration
134 OpenText Vendor Invoice Management VIM060000-CGD-EN-4
Autopost Select this check box to achieve that the system tries to post the parked invoice after the routing is complete.
Posting Actor Define the role responsible for posting the invoice and also responsible for handling errors if the posting in background fails.
Initial Actor Define the role who receives the first work item in the process when the current parking reason is selected.
6.4 Configuring Global Parameters
VIM060000-CGD-EN-4 Configuration Guide 135
Example: If a PO invoice is parked for “Currency Mismatch”, the initial role that needs to look at the invoice is the BUYER to correct the PO. Maintain BUYER as initial actor.
Initial Actor FM You can define a custom function module to determine the initial actor.
Example:
A PO is parked for a reason that is applicable to BUYER or REQUISITIONER depending on the availability of a value REQUESTER in Purchase Info Record or Goods Receipt. You can then define a custom function module to determine the availability of value for REQUESTER in Purchase Info Record or Goods Receipt and set the initial actor accordingly.
For the interface of the function module, see function module /OPT/BL_Q_INIT_ACT_FM.
Available Options Define the options that are available for the role on the dashboard during PO parked invoice process for the current parking reason. Separate the options by semicolon. The option format is AXXXX where A is the option type and XXXX is the 4 digit value representing the option ID.
The system uses these values in conjunction with the user process options defined in “Configuring User Process Options” on page 129 to determine which options show up for the role’s dashboard.
Initial Approver Define the role of the initial approver if the invoice document is sent for approval.
Delay Function
• Define the custom function module that can be used to restrict the immediate triggering of the PO parking process even if the user selected the current parking reason when the invoice is parked.
Example: The PO is parked for “Credit Memo Required” and you know that Credit Memo is on its way and will not show up for the next two days. You might then want to send the work item to the AP's inbox not before two days. For this purpose, you can define a custom function to restrict the triggering of the work item for the user for the next two days.
• For the interface of the delay function module, see function module /OPT/BL_P_DELAYFM_SRM.
6.4 Configuring Global Parameters This section describes the various global customization parameters that are available. Global parameters control various aspects of the processing logic for PO invoice parking process flows.
Chapter 6 PO Parking Process Configuration
136 OpenText Vendor Invoice Management VIM060000-CGD-EN-4
Important
Take care when you change the global configuration parameters. Changes can affect the functionality of the process.
Configuring global parameters comprises the following actions:
• “Configuring Transactions to Create Parked Invoices” on page 136
• “Configuring Screen Exits” on page 137
• “Configuring the Option Order” on page 139
• “Defining a Preprocess (Sub)workflow” on page 140
• “Configuring Binding Function Exits” on page 141
• “Configuring the Pre-dashboard Method Exit” on page 142
• “Configuring the Post-dashboard Method Exit” on page 143
• “Configuring a Post Process (Sub)workflow” on page 143
• “Configuring an Autopost Exit” on page 144
• “Configuring a Parked Document Posting Exit” on page 145
• “Configuring the Image Display Function” on page 146
• “Configuring Automatic Image Display” on page 146
• “Configuring the Parking Functionality” on page 147
• “Configuring Populating Screens for Re-enter Options” on page 147
6.4.1 Configuring Transactions to Create Parked Invoices In this step, you configure the transactions that create parked PO invoices.
To configure transactions to create parked invoices:
1. Execute the SM30 transaction.
2. Enter /PTGWFI/Z_CONST in Table/view and click Maintain.
3. In the WebFlow Constant Table, under Product Code PIR, double-click the Constant PO_BASED_INV_TCODE.
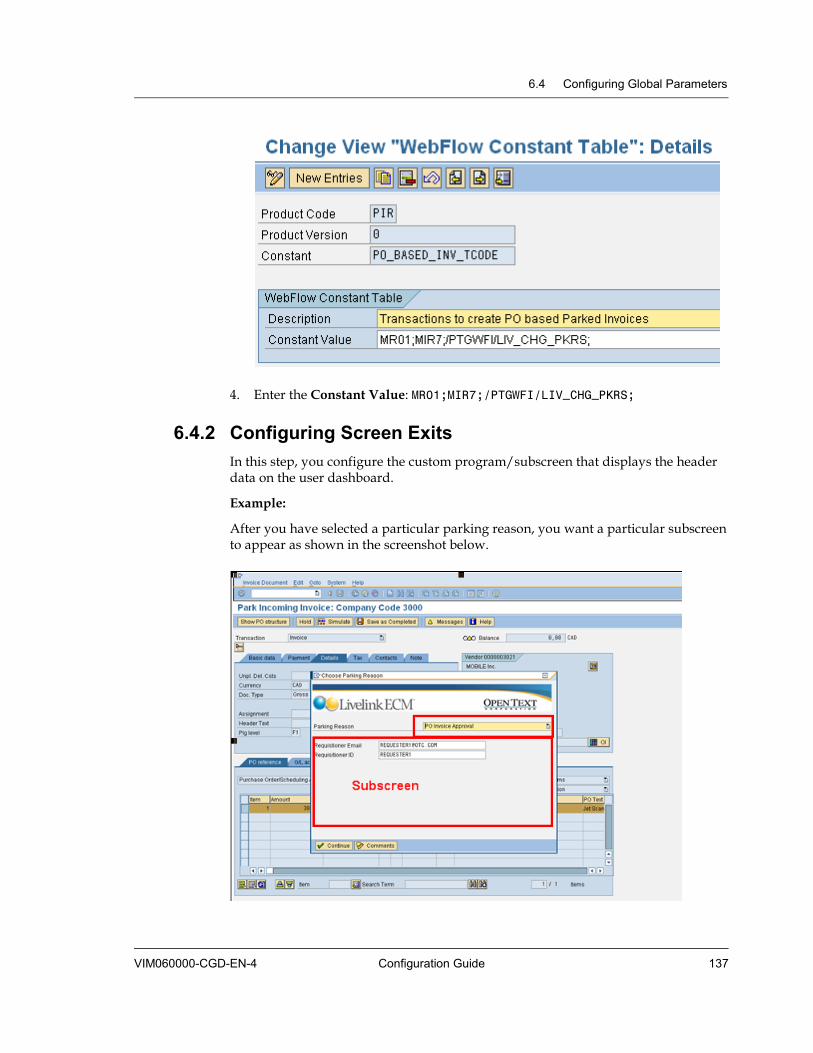
6.4 Configuring Global Parameters
VIM060000-CGD-EN-4 Configuration Guide 137
4. Enter the Constant Value: MR01;MIR7;/PTGWFI/LIV_CHG_PKRS;
6.4.2 Configuring Screen Exits In this step, you configure the custom program/subscreen that displays the header data on the user dashboard.
Example:
After you have selected a particular parking reason, you want a particular subscreen to appear as shown in the screenshot below.
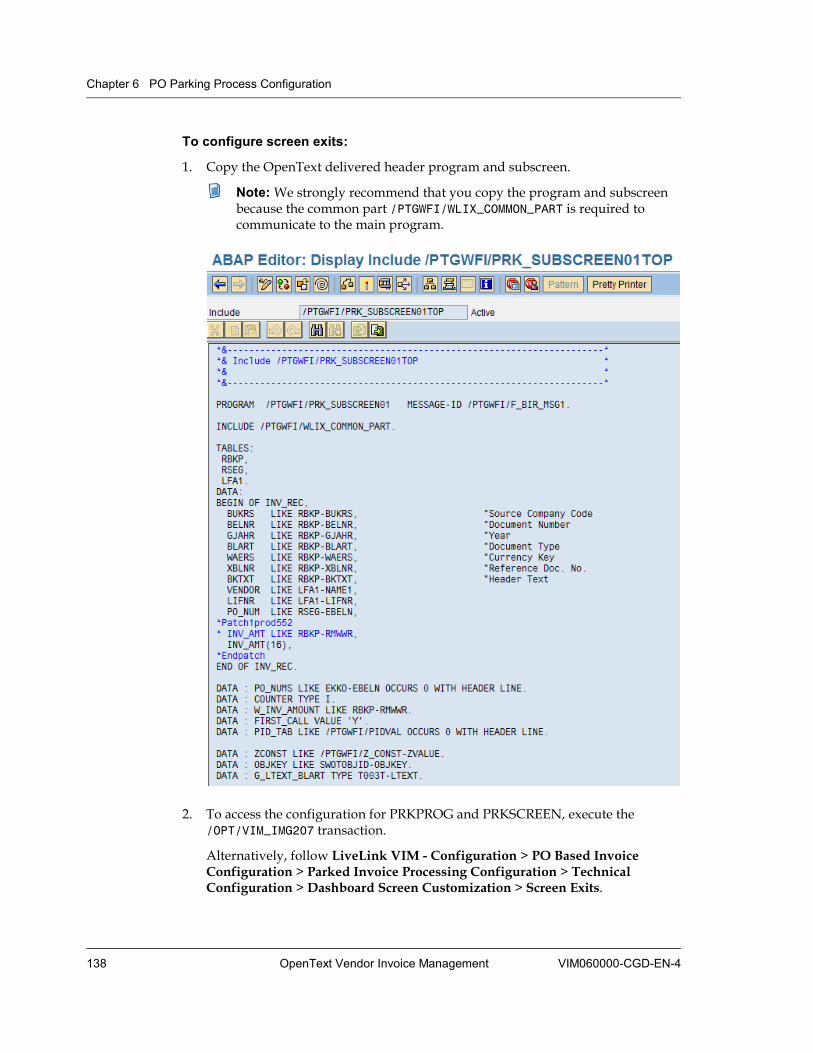
Chapter 6 PO Parking Process Configuration
138 OpenText Vendor Invoice Management VIM060000-CGD-EN-4
To configure screen exits:
1. Copy the OpenText delivered header program and subscreen.
Note: We strongly recommend that you copy the program and subscreen because the common part /PTGWFI/WLIX_COMMON_PART is required to communicate to the main program.
2. To access the configuration for PRKPROG and PRKSCREEN, execute the /OPT/VIM_IMG207 transaction.
Alternatively, follow LiveLink VIM - Configuration > PO Based Invoice Configuration > Parked Invoice Processing Configuration > Technical Configuration > Dashboard Screen Customization > Screen Exits.
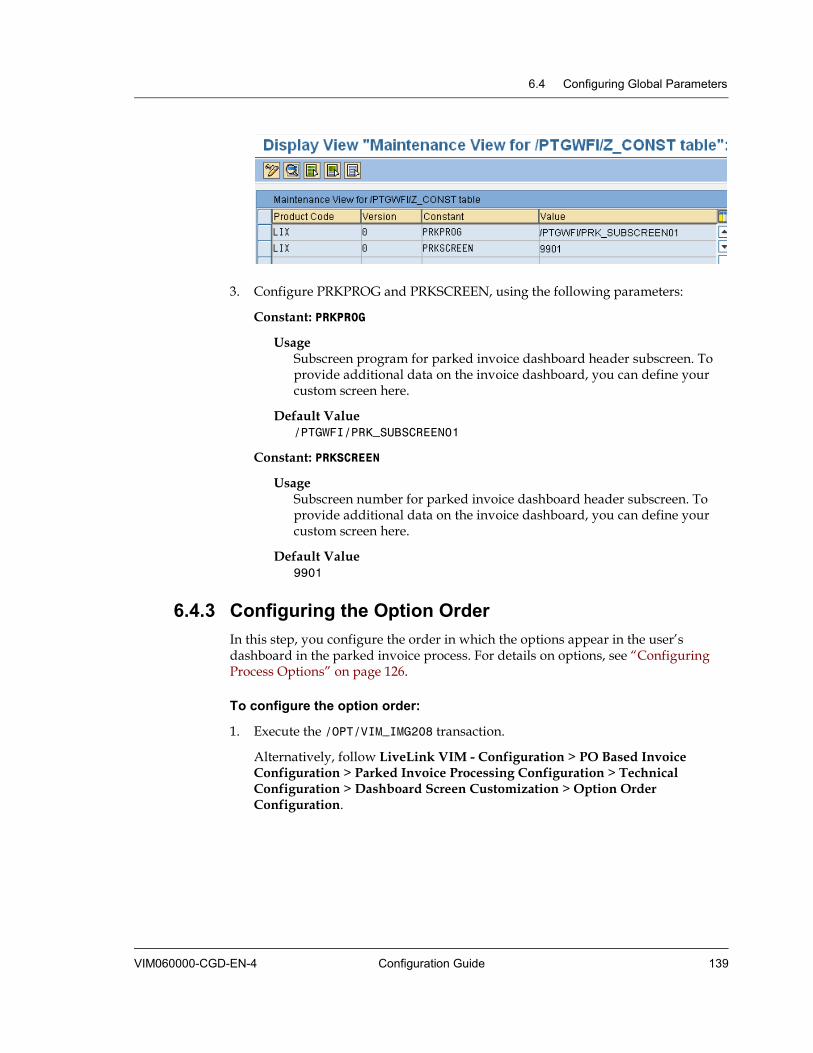
6.4 Configuring Global Parameters
VIM060000-CGD-EN-4 Configuration Guide 139
3. Configure PRKPROG and PRKSCREEN, using the following parameters:
Constant: PRKPROG
Usage Subscreen program for parked invoice dashboard header subscreen. To provide additional data on the invoice dashboard, you can define your custom screen here.
Default Value /PTGWFI/PRK_SUBSCREEN01
Constant: PRKSCREEN
Usage Subscreen number for parked invoice dashboard header subscreen. To provide additional data on the invoice dashboard, you can define your custom screen here.
Default Value 9901
6.4.3 Configuring the Option Order In this step, you configure the order in which the options appear in the user’s dashboard in the parked invoice process. For details on options, see “Configuring Process Options” on page 126.
To configure the option order:
1. Execute the /OPT/VIM_IMG208 transaction.
Alternatively, follow LiveLink VIM - Configuration > PO Based Invoice Configuration > Parked Invoice Processing Configuration > Technical Configuration > Dashboard Screen Customization > Option Order Configuration.

Chapter 6 PO Parking Process Configuration
140 OpenText Vendor Invoice Management VIM060000-CGD-EN-4
2. Configure the order in which the options will appear in the user’s dashboard, using the following parameters:
Description Enter a description of the option order.
Constant Value Value for the option order. Default value: 10ATR
Example: If you want all actions to show up first, maintain A10TR. The options will be shown in order actions, approvals, rejections, authorizations and referrals.
6.4.4 Defining a Preprocess (Sub)workflow In this step, you define a custom (sub)workflow that needs to be triggered before the PO parking workflow process is triggered.
To define a preprocess (sub)workflow:
1. Execute the /OPT/VIM_IMG221 transaction.
Alternatively, follow LiveLink VIM - Configuration > PO Based Invoice Configuration > Parked Invoice Processing Configuration > Technical Configuration > Advanced Process Customization > Pre Process (sub)Workflow – Parked Invoices.
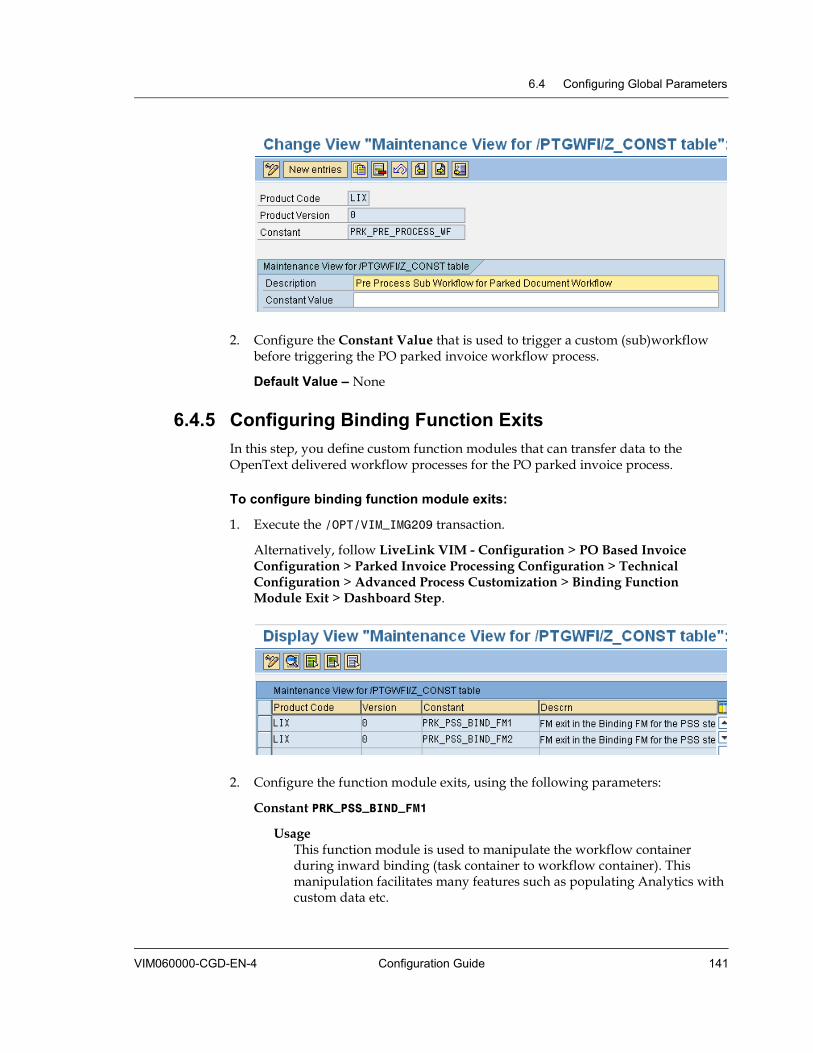
6.4 Configuring Global Parameters
VIM060000-CGD-EN-4 Configuration Guide 141
2. Configure the Constant Value that is used to trigger a custom (sub)workflow before triggering the PO parked invoice workflow process.
Default Value – None
6.4.5 Configuring Binding Function Exits In this step, you define custom function modules that can transfer data to the OpenText delivered workflow processes for the PO parked invoice process.
To configure binding function module exits:
1. Execute the /OPT/VIM_IMG209 transaction.
Alternatively, follow LiveLink VIM - Configuration > PO Based Invoice Configuration > Parked Invoice Processing Configuration > Technical Configuration > Advanced Process Customization > Binding Function Module Exit > Dashboard Step.
2. Configure the function module exits, using the following parameters:
Constant PRK_PSS_BIND_FM1
Usage This function module is used to manipulate the workflow container during inward binding (task container to workflow container). This manipulation facilitates many features such as populating Analytics with custom data etc.
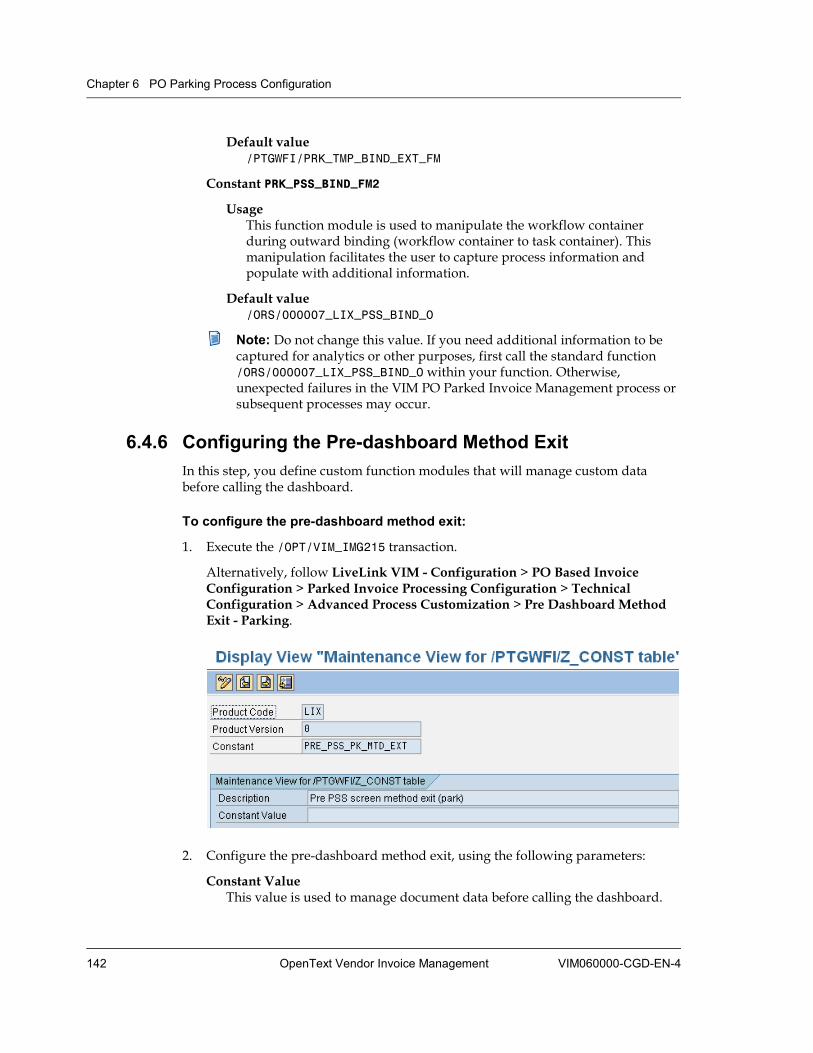
Chapter 6 PO Parking Process Configuration
142 OpenText Vendor Invoice Management VIM060000-CGD-EN-4
Default value /PTGWFI/PRK_TMP_BIND_EXT_FM
Constant PRK_PSS_BIND_FM2
Usage This function module is used to manipulate the workflow container during outward binding (workflow container to task container). This manipulation facilitates the user to capture process information and populate with additional information.
Default value /ORS/000007_LIX_PSS_BIND_O
Note: Do not change this value. If you need additional information to be captured for analytics or other purposes, first call the standard function /ORS/000007_LIX_PSS_BIND_O within your function. Otherwise, unexpected failures in the VIM PO Parked Invoice Management process or subsequent processes may occur.
6.4.6 Configuring the Pre-dashboard Method Exit In this step, you define custom function modules that will manage custom data before calling the dashboard.
To configure the pre-dashboard method exit:
1. Execute the /OPT/VIM_IMG215 transaction.
Alternatively, follow LiveLink VIM - Configuration > PO Based Invoice Configuration > Parked Invoice Processing Configuration > Technical Configuration > Advanced Process Customization > Pre Dashboard Method Exit - Parking.
2. Configure the pre-dashboard method exit, using the following parameters:
Constant Value This value is used to manage document data before calling the dashboard.
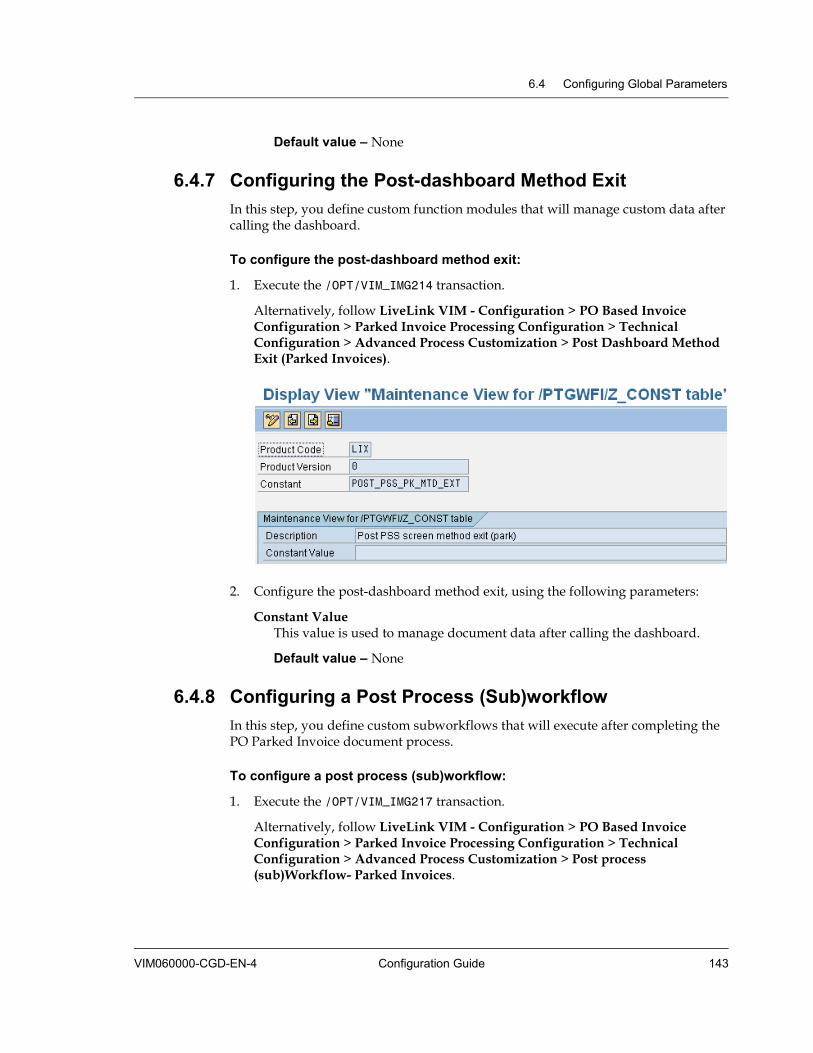
6.4 Configuring Global Parameters
VIM060000-CGD-EN-4 Configuration Guide 143
Default value – None
6.4.7 Configuring the Post-dashboard Method Exit In this step, you define custom function modules that will manage custom data after calling the dashboard.
To configure the post-dashboard method exit:
1. Execute the /OPT/VIM_IMG214 transaction.
Alternatively, follow LiveLink VIM - Configuration > PO Based Invoice Configuration > Parked Invoice Processing Configuration > Technical Configuration > Advanced Process Customization > Post Dashboard Method Exit (Parked Invoices).
2. Configure the post-dashboard method exit, using the following parameters:
Constant Value This value is used to manage document data after calling the dashboard.
Default value – None
6.4.8 Configuring a Post Process (Sub)workflow In this step, you define custom subworkflows that will execute after completing the PO Parked Invoice document process.
To configure a post process (sub)workflow:
1. Execute the /OPT/VIM_IMG217 transaction.
Alternatively, follow LiveLink VIM - Configuration > PO Based Invoice Configuration > Parked Invoice Processing Configuration > Technical Configuration > Advanced Process Customization > Post process (sub)Workflow- Parked Invoices.
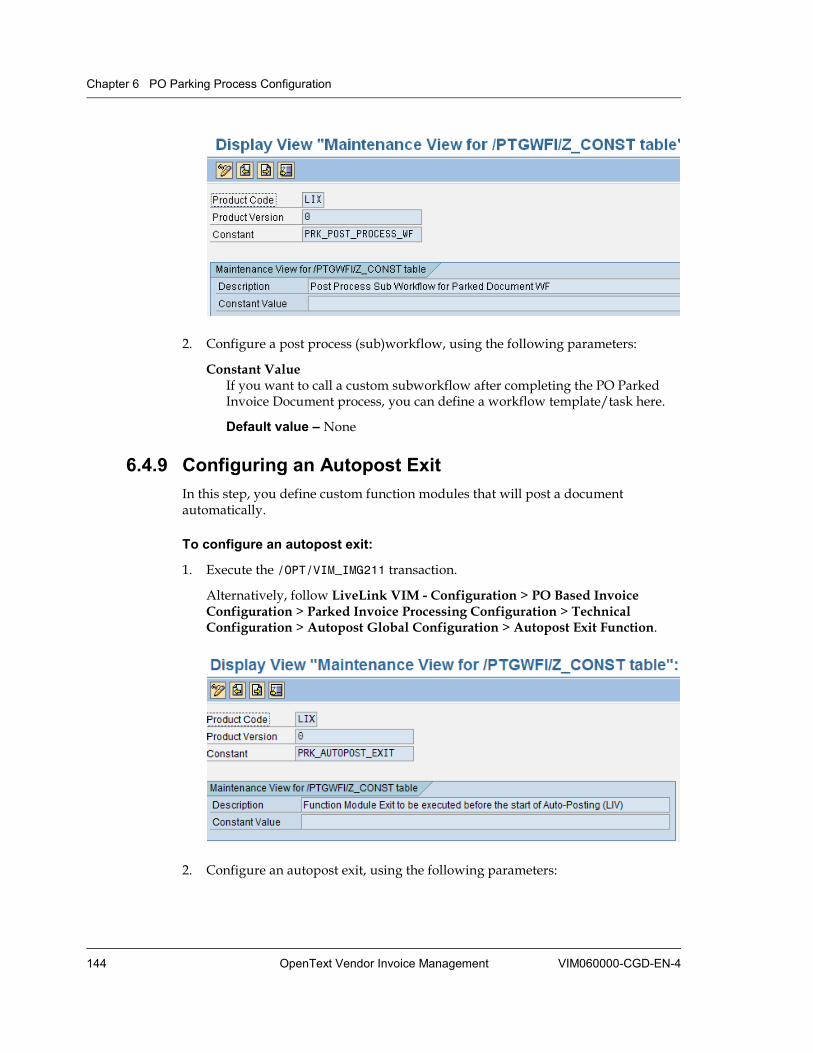
Chapter 6 PO Parking Process Configuration
144 OpenText Vendor Invoice Management VIM060000-CGD-EN-4
2. Configure a post process (sub)workflow, using the following parameters:
Constant Value If you want to call a custom subworkflow after completing the PO Parked Invoice Document process, you can define a workflow template/task here.
Default value – None
6.4.9 Configuring an Autopost Exit In this step, you define custom function modules that will post a document automatically.
To configure an autopost exit:
1. Execute the /OPT/VIM_IMG211 transaction.
Alternatively, follow LiveLink VIM - Configuration > PO Based Invoice Configuration > Parked Invoice Processing Configuration > Technical Configuration > Autopost Global Configuration > Autopost Exit Function.
2. Configure an autopost exit, using the following parameters:
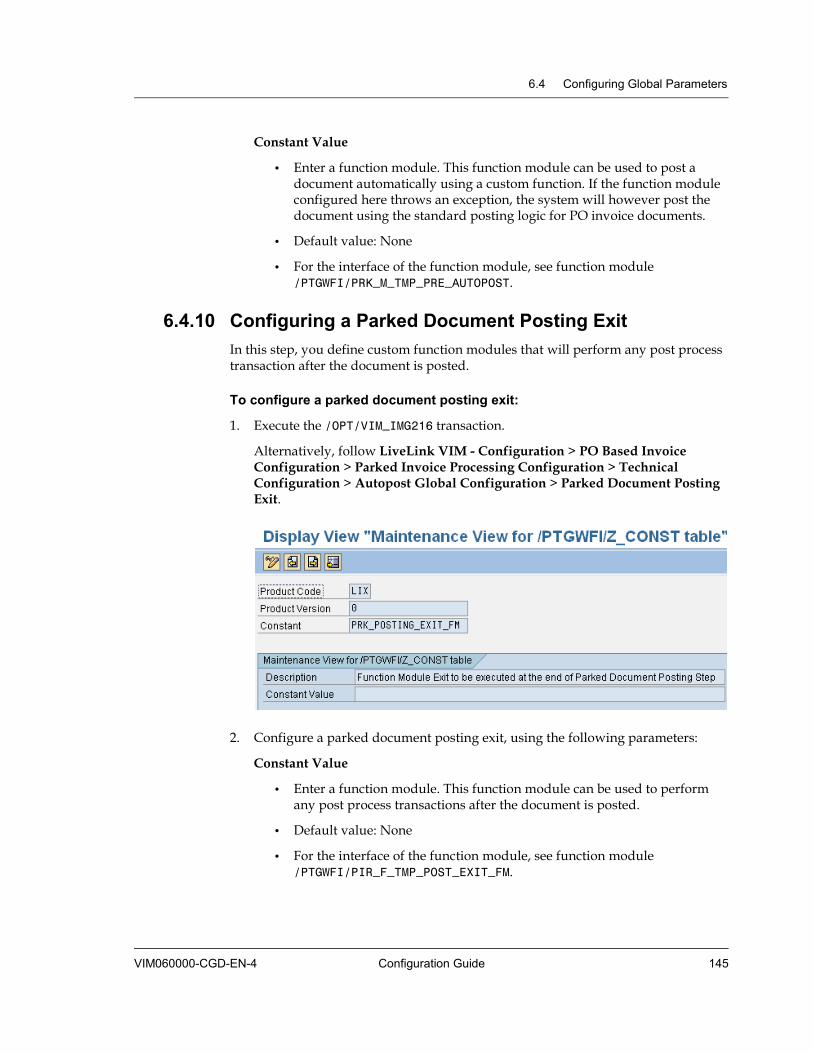
6.4 Configuring Global Parameters
VIM060000-CGD-EN-4 Configuration Guide 145
Constant Value
• Enter a function module. This function module can be used to post a document automatically using a custom function. If the function module configured here throws an exception, the system will however post the document using the standard posting logic for PO invoice documents.
• Default value: None
• For the interface of the function module, see function module /PTGWFI/PRK_M_TMP_PRE_AUTOPOST.
6.4.10 Configuring a Parked Document Posting Exit In this step, you define custom function modules that will perform any post process transaction after the document is posted.
To configure a parked document posting exit:
1. Execute the /OPT/VIM_IMG216 transaction.
Alternatively, follow LiveLink VIM - Configuration > PO Based Invoice Configuration > Parked Invoice Processing Configuration > Technical Configuration > Autopost Global Configuration > Parked Document Posting Exit.
2. Configure a parked document posting exit, using the following parameters:
Constant Value
• Enter a function module. This function module can be used to perform any post process transactions after the document is posted.
• Default value: None
• For the interface of the function module, see function module /PTGWFI/PIR_F_TMP_POST_EXIT_FM.
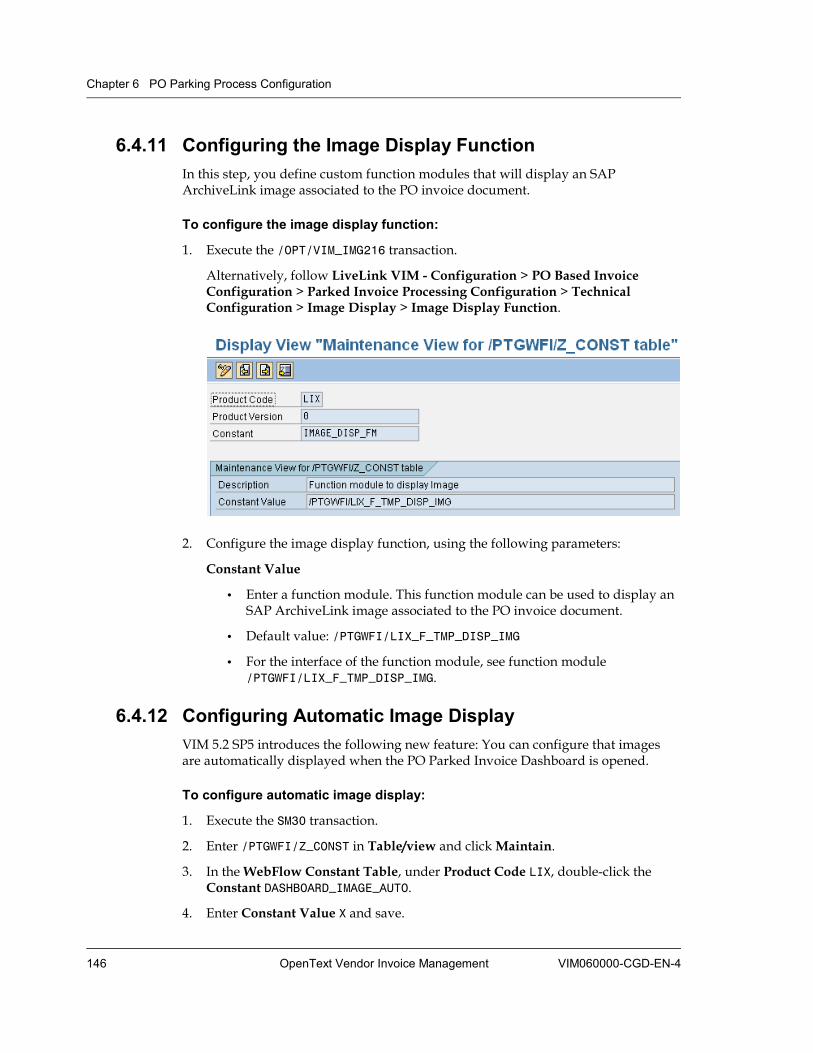
Chapter 6 PO Parking Process Configuration
146 OpenText Vendor Invoice Management VIM060000-CGD-EN-4
6.4.11 Configuring the Image Display Function In this step, you define custom function modules that will display an SAP ArchiveLink image associated to the PO invoice document.
To configure the image display function:
1. Execute the /OPT/VIM_IMG216 transaction.
Alternatively, follow LiveLink VIM - Configuration > PO Based Invoice Configuration > Parked Invoice Processing Configuration > Technical Configuration > Image Display > Image Display Function.
2. Configure the image display function, using the following parameters:
Constant Value
• Enter a function module. This function module can be used to display an SAP ArchiveLink image associated to the PO invoice document.
• Default value: /PTGWFI/LIX_F_TMP_DISP_IMG
• For the interface of the function module, see function module /PTGWFI/LIX_F_TMP_DISP_IMG.
6.4.12 Configuring Automatic Image Display VIM 5.2 SP5 introduces the following new feature: You can configure that images are automatically displayed when the PO Parked Invoice Dashboard is opened.
To configure automatic image display:
1. Execute the SM30 transaction.
2. Enter /PTGWFI/Z_CONST in Table/view and click Maintain.
3. In the WebFlow Constant Table, under Product Code LIX, double-click the Constant DASHBOARD_IMAGE_AUTO.
4. Enter Constant Value X and save.

6.4 Configuring Global Parameters
VIM060000-CGD-EN-4 Configuration Guide 147
6.4.13 Configuring the Parking Functionality In this step, you define custom function modules that activate the parking functionality. The previous version of VIM has enabled this by default.
To configure parking functionality:
1. Execute the SM30 transaction.
2. Enter /PTGWFI/Z_CONST in Table/view and click Maintain.
3. Look for Product Code LIX and Constant USR_EXIT_GET_DATA_FM and double-click the line.
4. Configure the parking functionality, using the following parameter:
Constant Value Enter a function module to be used to activate the parking of PO invoice documents.
Default value: Blank.
Baseline does not offer parking.
Optional value: /PTGWFI/PRK_M_GET_PARK_DATA_N
This is the standard parking implementation function module.
6.4.14 Configuring Populating Screens for Re-enter Options In exceptions workflows (parking or blocking), the following options are available to processors: Delete and re-enter as PO/NPO invoice or Cancel and re-enter as PO/NPO invoice. Currently, these options delete the existing invoice, then open a window with the invoice image and open another window with a SAP transaction, so that users are supposed to enter all information manually.
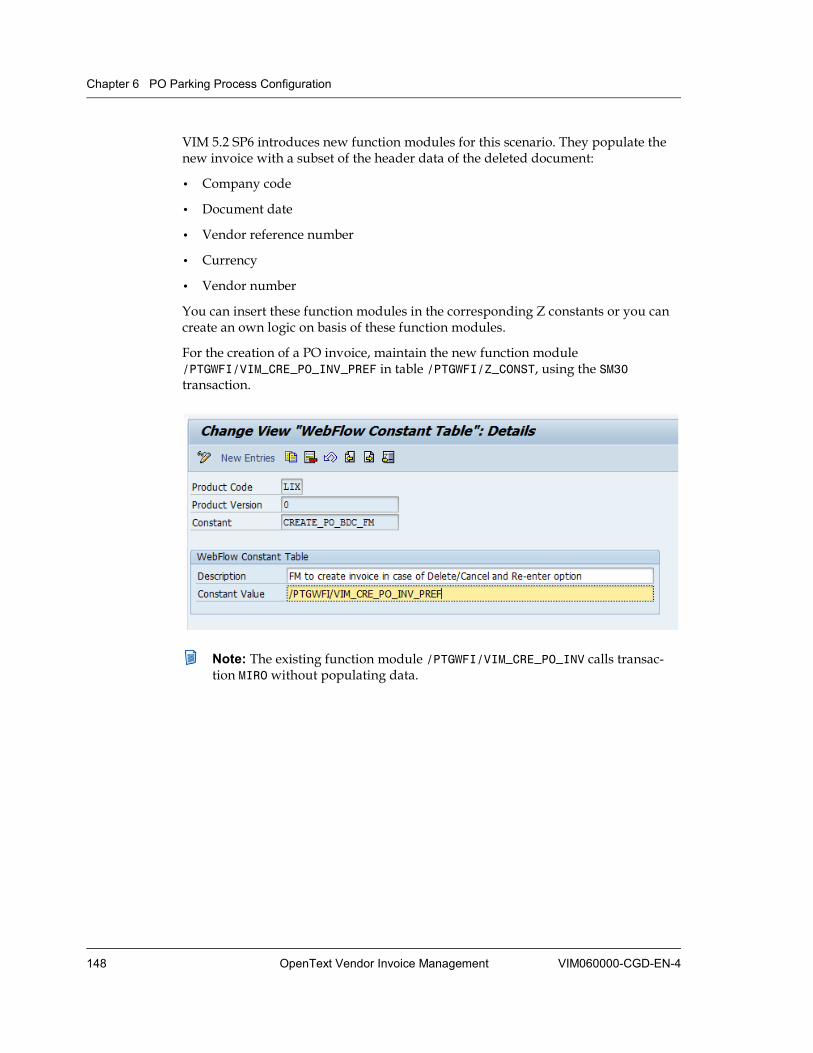
Chapter 6 PO Parking Process Configuration
148 OpenText Vendor Invoice Management VIM060000-CGD-EN-4
VIM 5.2 SP6 introduces new function modules for this scenario. They populate the new invoice with a subset of the header data of the deleted document:
• Company code
• Document date
• Vendor reference number
• Currency
• Vendor number
You can insert these function modules in the corresponding Z constants or you can create an own logic on basis of these function modules.
For the creation of a PO invoice, maintain the new function module /PTGWFI/VIM_CRE_PO_INV_PREF in table /PTGWFI/Z_CONST, using the SM30 transaction.
Note: The existing function module /PTGWFI/VIM_CRE_PO_INV calls transac-tion MIRO without populating data.
VIM060000-CGD-EN-4 OpenText Vendor Invoice Management 149
Chapter 7 PO Blocking Process Configuration
Vendor Invoice Management (VIM) provides functionality for managing blocked PO invoices (based on MIRO transaction) and exceptions therein. Invoices are blocked if they show discrepancies, for example a price discrepancy, that prevent the invoice from posting.
The main processing concept involved in managing blocked PO invoices is the concept of “blocking reasons”. Blocking reasons define the overall processing of the invoice as required by the process swimlane. Unlike parking reasons, blocking reasons are fixed by SAP. The most important reasons are price block and quantity block reasons.
Main concepts
Blocking reasons
• Blocking reasons effect the process flow as required by the swimlane definition.
• Each swimlane diagram translates to one blocking reason.
• Blocking reasons determine the initial actor and various collaboration options available to the various actors during the process flow.
Roles
• Roles use the standard OpenText role/actor infrastructure.
• Roles can use the standard key determination infrastructure to configure complex actor determination logic without programming.
• The role concept uses the product code LIX, same as for PO invoice parking scenarios described in “PO Parking Process Configuration” on page 121.
Options and option types
• The following main types of options are available:
• Actions
• Referrals (for collaboration)
• Actions can base on transactions or class methods or workflow tasks.
• Options and option types can effect the processing logic.
• Options and option types can also effect the user experience.
Chapter 7 PO Blocking Process Configuration
150 OpenText Vendor Invoice Management VIM060000-CGD-EN-4
• Options and option types can make the workflow engine rerun the rules on the most current metadata to effect the process flow.
• Options and option types can be configured to change the document status.
BDC IDs
• BDC IDs build a powerful infrastructure for pre-populating data into SAP transactions without programming.
• BDC IDs are optimized for both dialog processing and background processing.
• BDC IDs can be used to set dynamic Parameter IDs.
• BDC IDs can be used to configure new user collaboration actions.
• BDC IDs eliminate the need to code parameterized transactions.
• BDC IDs can be used to configure BDC success messages.
Main steps The following are the main steps involved in implementing process scenarios in the blocked PO invoice process configuration: 1. Identify the various blocking reasons that are required for the realization of the
process scenarios.
2. Identify the roll out criteria.
3. Identify the various roles and configure the roles in the appropriate process types.
4. Identify and configure the process options according to the swimlanes.
5. Configure global customization setting as per customer requirements.
The starting point for any configuration is a set of process flow swimlanes. The following swimlane is an example of such a process swimlane, as implemented by the blocked PO invoice processing workflow:
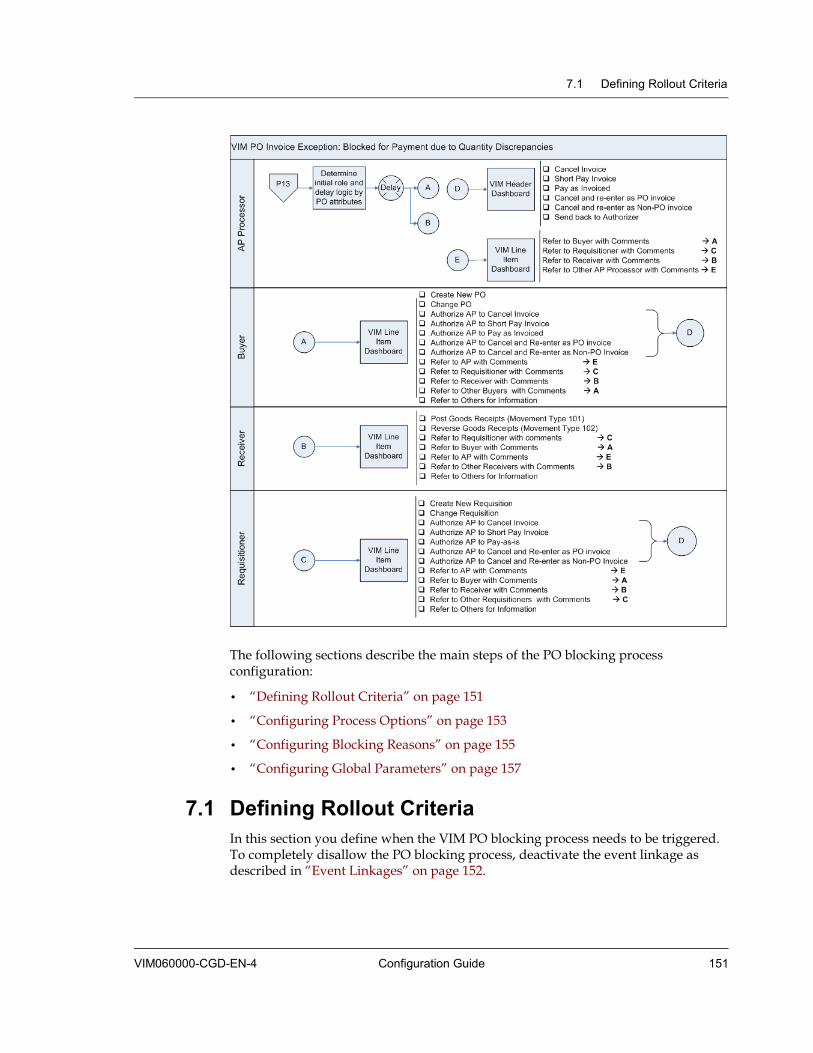
7.1 Defining Rollout Criteria
VIM060000-CGD-EN-4 Configuration Guide 151
The following sections describe the main steps of the PO blocking process configuration:
• “Defining Rollout Criteria” on page 151
• “Configuring Process Options” on page 153
• “Configuring Blocking Reasons” on page 155
• “Configuring Global Parameters” on page 157
7.1 Defining Rollout Criteria In this section you define when the VIM PO blocking process needs to be triggered. To completely disallow the PO blocking process, deactivate the event linkage as described in “Event Linkages” on page 152.
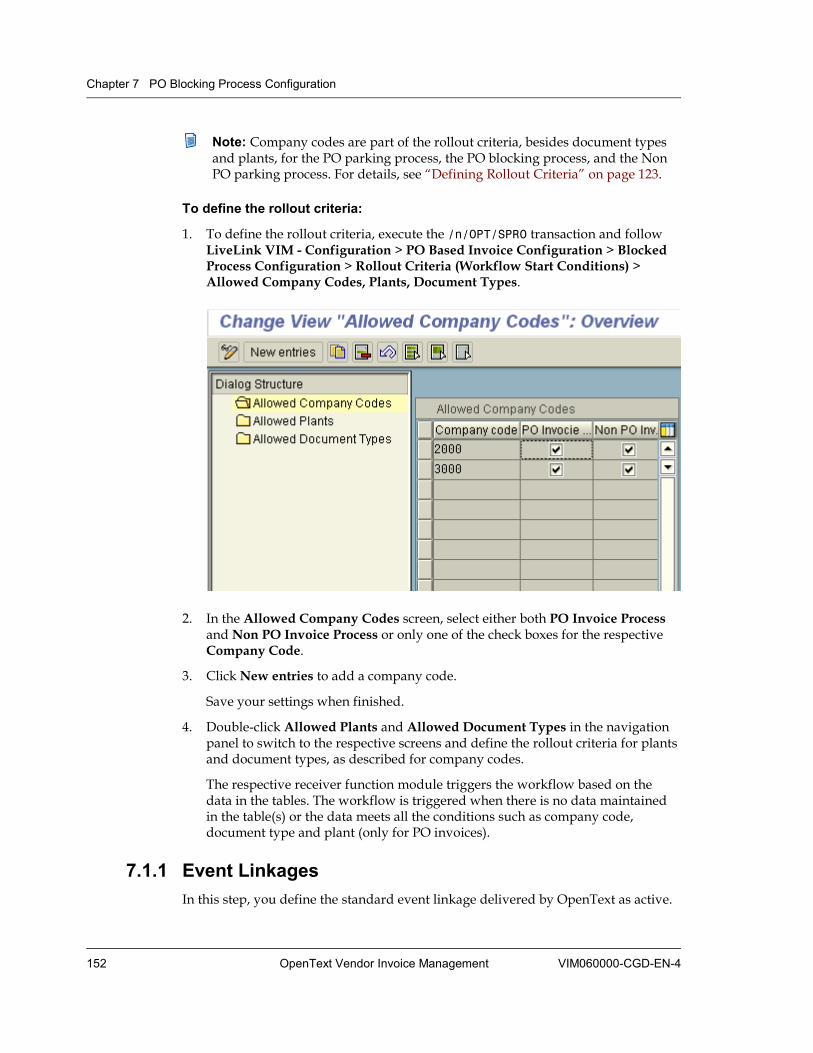
Chapter 7 PO Blocking Process Configuration
152 OpenText Vendor Invoice Management VIM060000-CGD-EN-4
Note: Company codes are part of the rollout criteria, besides document types and plants, for the PO parking process, the PO blocking process, and the Non PO parking process. For details, see “Defining Rollout Criteria” on page 123.
To define the rollout criteria:
1. To define the rollout criteria, execute the /n/OPT/SPRO transaction and follow LiveLink VIM - Configuration > PO Based Invoice Configuration > Blocked Process Configuration > Rollout Criteria (Workflow Start Conditions) > Allowed Company Codes, Plants, Document Types.
2. In the Allowed Company Codes screen, select either both PO Invoice Process and Non PO Invoice Process or only one of the check boxes for the respective Company Code.
3. Click New entries to add a company code.
Save your settings when finished.
4. Double-click Allowed Plants and Allowed Document Types in the navigation panel to switch to the respective screens and define the rollout criteria for plants and document types, as described for company codes.
The respective receiver function module triggers the workflow based on the data in the tables. The workflow is triggered when there is no data maintained in the table(s) or the data meets all the conditions such as company code, document type and plant (only for PO invoices).
7.1.1 Event Linkages In this step, you define the standard event linkage delivered by OpenText as active.
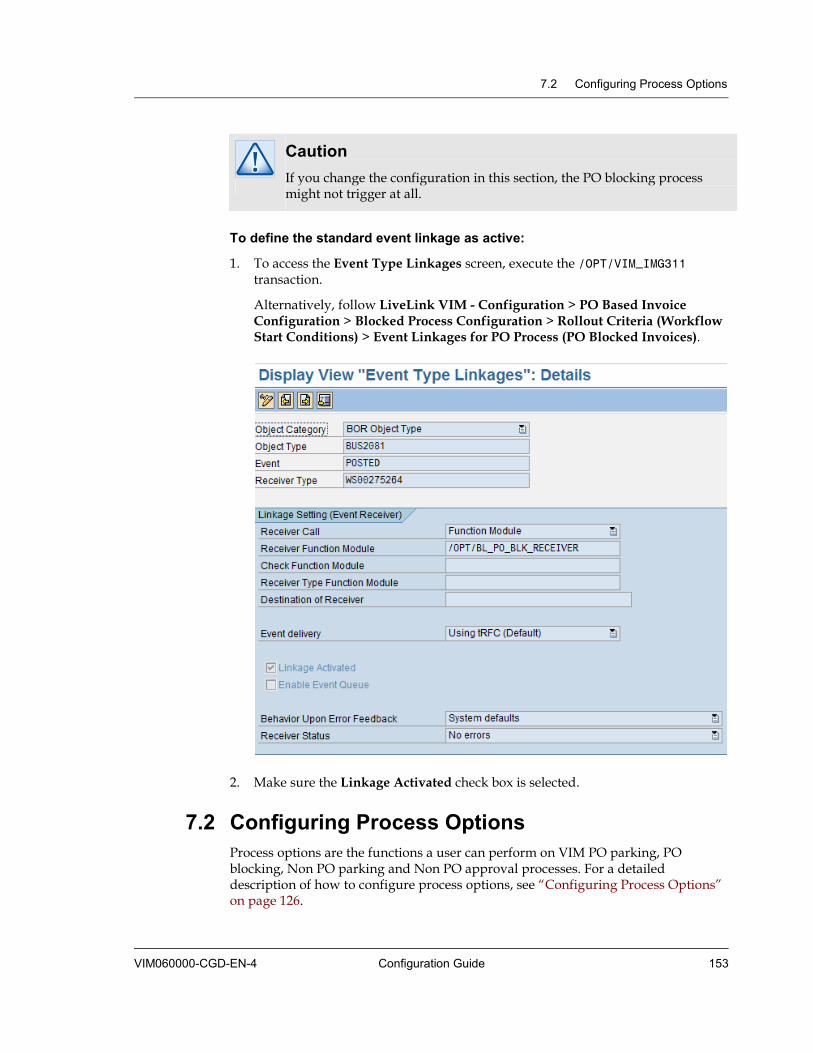
7.2 Configuring Process Options
VIM060000-CGD-EN-4 Configuration Guide 153
Caution If you change the configuration in this section, the PO blocking process might not trigger at all.
To define the standard event linkage as active:
1. To access the Event Type Linkages screen, execute the /OPT/VIM_IMG311 transaction.
Alternatively, follow LiveLink VIM - Configuration > PO Based Invoice Configuration > Blocked Process Configuration > Rollout Criteria (Workflow Start Conditions) > Event Linkages for PO Process (PO Blocked Invoices).
2. Make sure the Linkage Activated check box is selected.
7.2 Configuring Process Options Process options are the functions a user can perform on VIM PO parking, PO blocking, Non PO parking and Non PO approval processes. For a detailed description of how to configure process options, see “Configuring Process Options” on page 126.
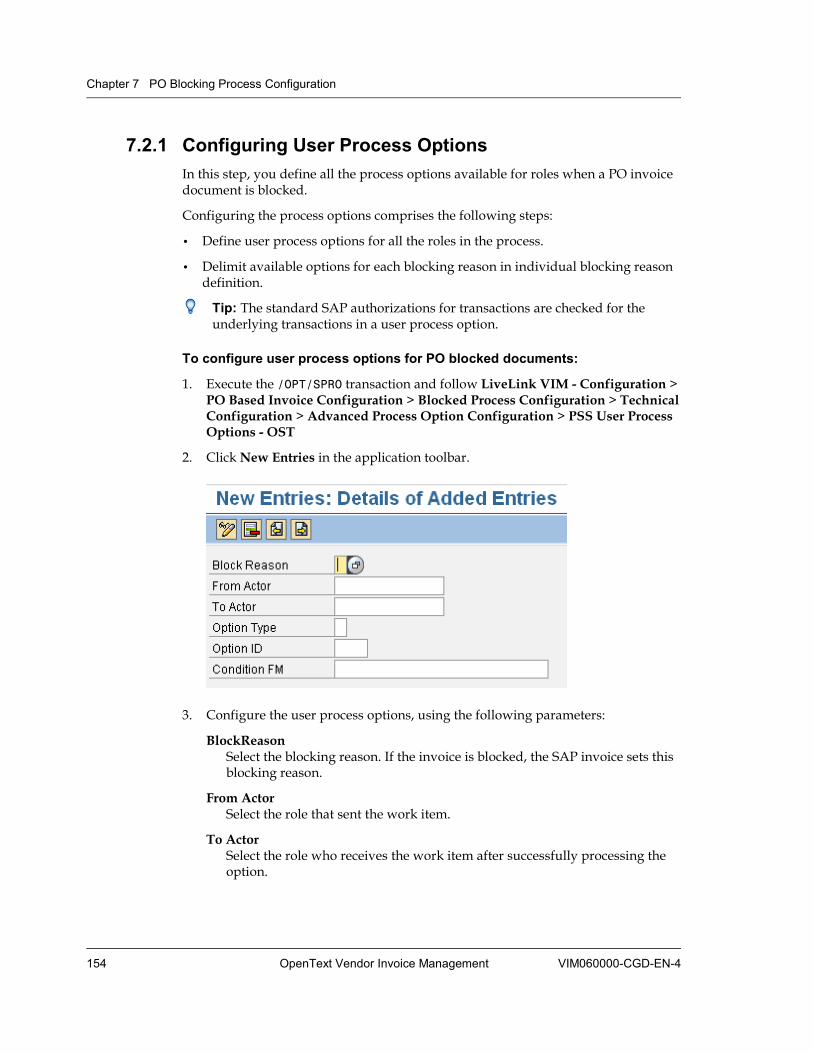
Chapter 7 PO Blocking Process Configuration
154 OpenText Vendor Invoice Management VIM060000-CGD-EN-4
7.2.1 Configuring User Process Options In this step, you define all the process options available for roles when a PO invoice document is blocked.
Configuring the process options comprises the following steps:
• Define user process options for all the roles in the process.
• Delimit available options for each blocking reason in individual blocking reason definition.
Tip: The standard SAP authorizations for transactions are checked for the underlying transactions in a user process option.
To configure user process options for PO blocked documents:
1. Execute the /OPT/SPRO transaction and follow LiveLink VIM - Configuration > PO Based Invoice Configuration > Blocked Process Configuration > Technical Configuration > Advanced Process Option Configuration > PSS User Process Options - OST
2. Click New Entries in the application toolbar.
3. Configure the user process options, using the following parameters:
BlockReason Select the blocking reason. If the invoice is blocked, the SAP invoice sets this blocking reason.
From Actor Select the role that sent the work item.
To Actor Select the role who receives the work item after successfully processing the option.
7.3 Configuring Blocking Reasons
VIM060000-CGD-EN-4 Configuration Guide 155
Option Type Select the type of process option (Action, Referral, BDC Action, Approve, Reject, etc., see “Configuring Process Options” on page 126)
Option ID Select the ID of the process option.
Condition FM
• Define a condition function module to restrict availability of an option to a role even if the availability is defined here.
•
Example: If you would like to show the option “Change Purchase Info Record” only if the Purchase Order has a Purchase Info Record (PIR), you can define a custom function to verify the existence of the PIR and raise an error if there is no PIR.
• If an error is raised in the function module, the option will not be available to the user.
• For the interface of the function module, see function module /OPT/BL_CONDFM_INFOPROVIDER.
7.3 Configuring Blocking Reasons In this step, you configure the valid blocking reasons in the VIM PO blocking process. The main steps are the following:
• Define the blocking reason.
• Define the roles that are responsible for receiving the first work item in the process.
• Define if the process triggering needs to be delayed.
To configure a blocking reason:
1. Execute the /OPT/SPRO transaction and follow LiveLink VIM - Configuration > PO Based Invoice Configuration > Blocked Process Configuration > Block Reason Maintenance > Block Reason Definition
2. Select a blocking reason and click in the application toolbar.
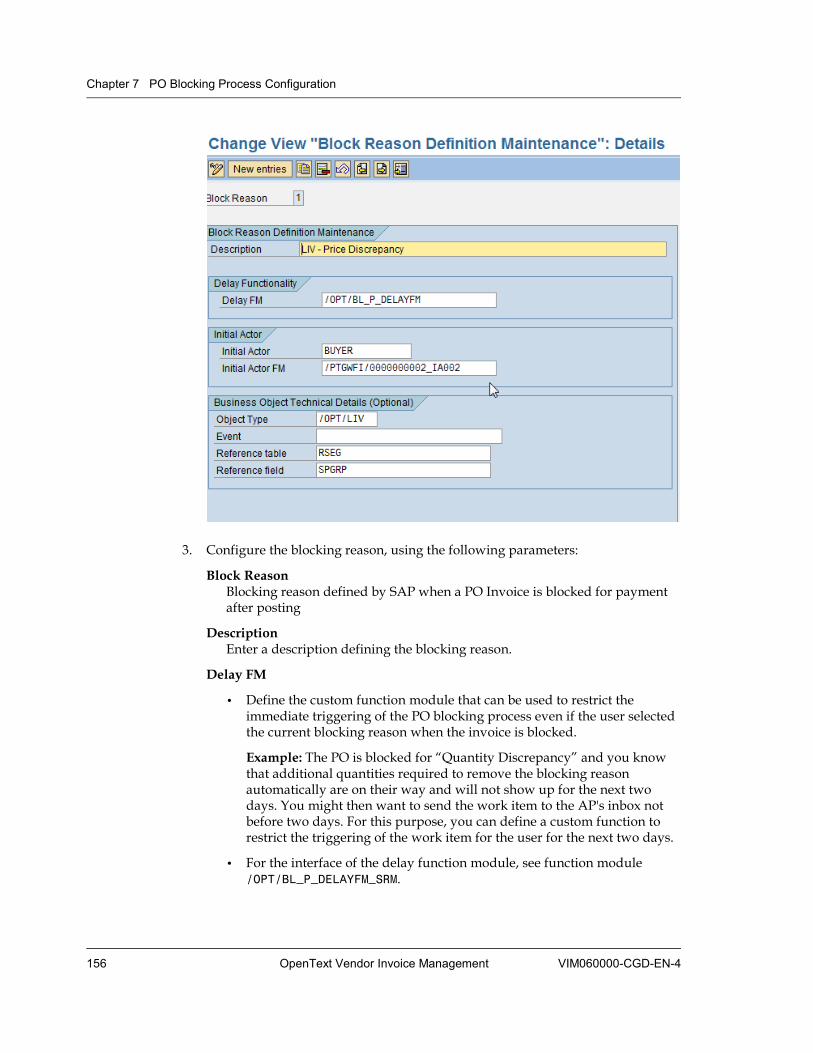
Chapter 7 PO Blocking Process Configuration
156 OpenText Vendor Invoice Management VIM060000-CGD-EN-4
3. Configure the blocking reason, using the following parameters:
Block Reason Blocking reason defined by SAP when a PO Invoice is blocked for payment after posting
Description Enter a description defining the blocking reason.
Delay FM
• Define the custom function module that can be used to restrict the immediate triggering of the PO blocking process even if the user selected the current blocking reason when the invoice is blocked.
Example: The PO is blocked for “Quantity Discrepancy” and you know that additional quantities required to remove the blocking reason automatically are on their way and will not show up for the next two days. You might then want to send the work item to the AP's inbox not before two days. For this purpose, you can define a custom function to restrict the triggering of the work item for the user for the next two days.
• For the interface of the delay function module, see function module /OPT/BL_P_DELAYFM_SRM.
7.4 Configuring Global Parameters
VIM060000-CGD-EN-4 Configuration Guide 157
Initial Actor Define the role who receives the first work item in the process when the current blocking reason is selected.
Example: If a PO invoice is blocked for “Price discrepancies”, the initial role that needs to look at the invoice is the BUYER to correct the PO. Maintain BUYER as initial actor.
Initial Actor FM
• You can define a custom function module to determine the initial actor.
Example: A PO is blocked for a reason that is applicable to BUYER or REQUISITIONER depending on the fact that there is at least one Goods Receipt posted. You can then define a custom function to determine the availability of a Goods Receipt for the invoice and to set the initial actor accordingly.
• For the interface of the initial actor function module, see function module /OPT/BL_Q_INIT_ACT_FM.
Object Type This parameter is obsolete.
Event This parameter is obsolete.
Reference table This parameter is obsolete.
Reference field This parameter is obsolete.
7.4 Configuring Global Parameters This section describes the various global customization parameters that are available. Global parameters control various aspects of the processing logic for PO blocking process flows.
Important
Take care when you change the global configuration parameters. Changes can affect the functionality of the process.
Configuring global parameters comprises the following actions:
• “Configuring Dashboard Screen Exits” on page 158
• “Configuring the Option Order” on page 164
• “Configuring Binding Function Exits (Dashboard)” on page 165
• “Configuring the Post Dashboard Method Exit” on page 166
Chapter 7 PO Blocking Process Configuration
158 OpenText Vendor Invoice Management VIM060000-CGD-EN-4
• “Configuring Header Level Dashboard Binding Exits” on page 166
• “Configuring the Send Back Functionality Exit” on page 167
• “Configuring the Image Display Function” on page 168
• “Configuring Automatic Image Display” on page 169
• “Configuring Populating Screens for Re-enter Options” on page 169
7.4.1 Configuring Dashboard Screen Exits This section describes how to configure the custom program/subscreen that displays data on the user dashboard. This configuration applies to the following levels:
• “Line Level” on page 158
• “Header Level” on page 161
7.4.1.1 Line Level In this step, you configure the custom program/sub screen that displays the header data on the user dashboard for line item workflow processes in the PO blocking process. The following screenshot shows the line level dashboard, the header data section can be customized to display other information if needed.
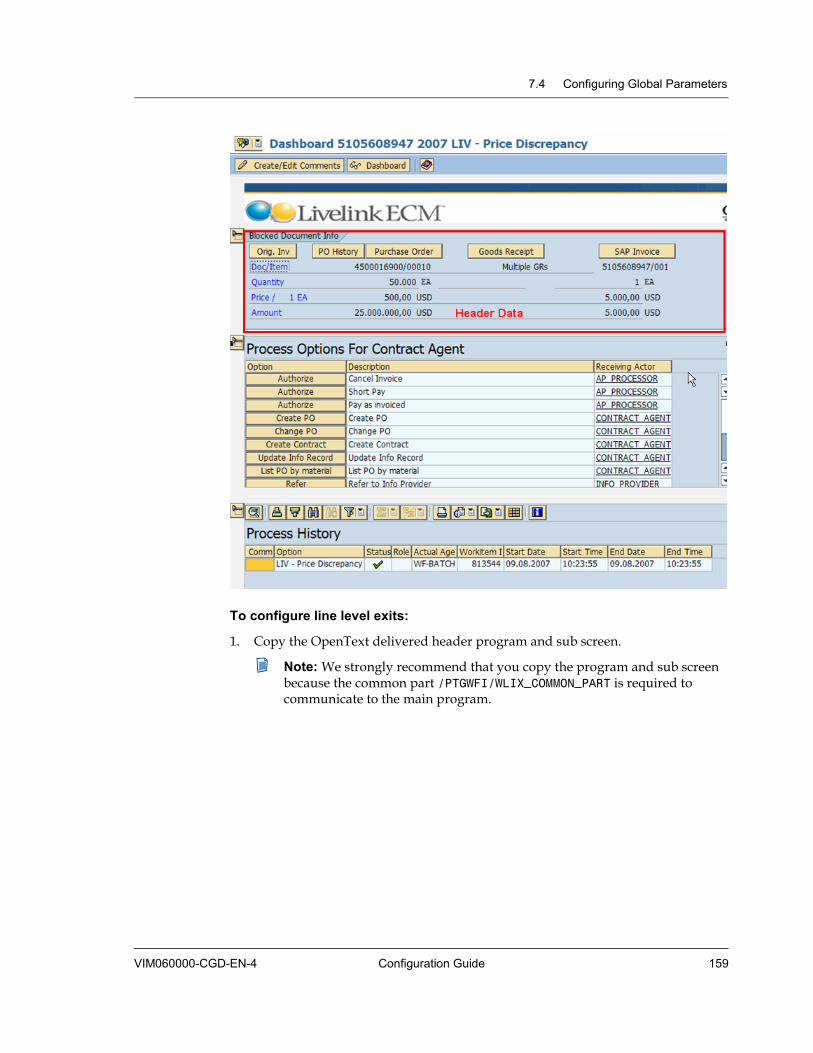
7.4 Configuring Global Parameters
VIM060000-CGD-EN-4 Configuration Guide 159
To configure line level exits:
1. Copy the OpenText delivered header program and sub screen.
Note: We strongly recommend that you copy the program and sub screen because the common part /PTGWFI/WLIX_COMMON_PART is required to communicate to the main program.
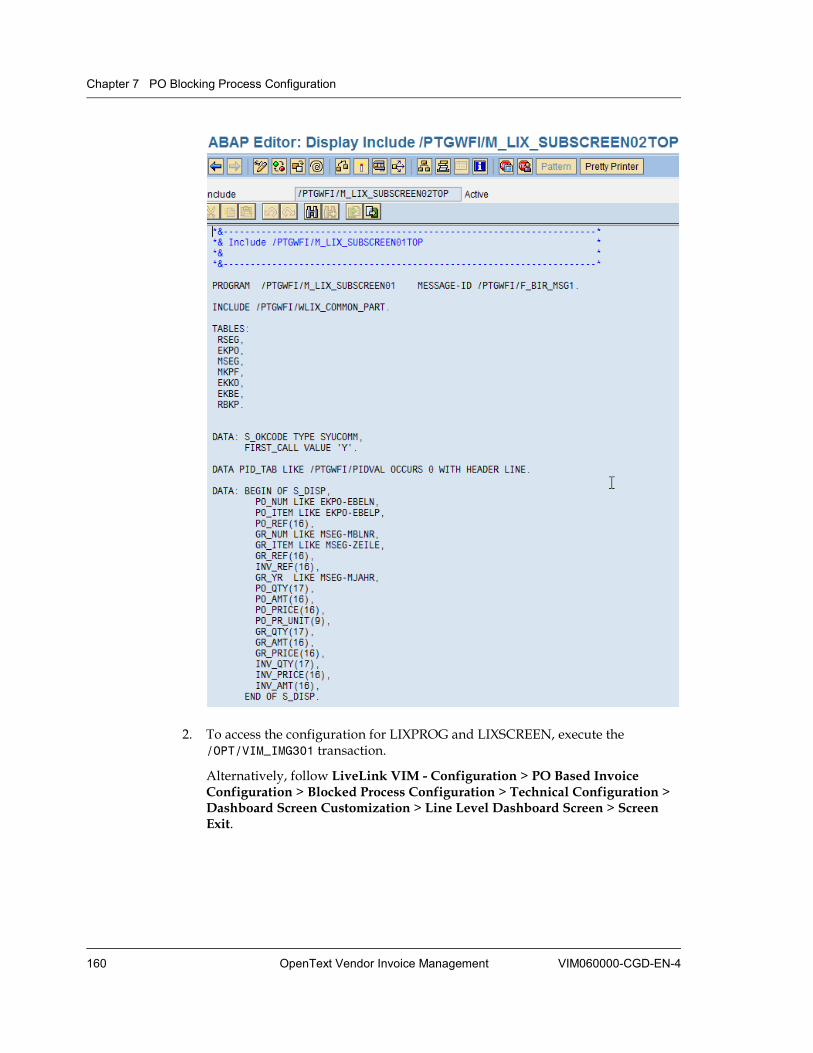
Chapter 7 PO Blocking Process Configuration
160 OpenText Vendor Invoice Management VIM060000-CGD-EN-4
2. To access the configuration for LIXPROG and LIXSCREEN, execute the /OPT/VIM_IMG301 transaction.
Alternatively, follow LiveLink VIM - Configuration > PO Based Invoice Configuration > Blocked Process Configuration > Technical Configuration > Dashboard Screen Customization > Line Level Dashboard Screen > Screen Exit.
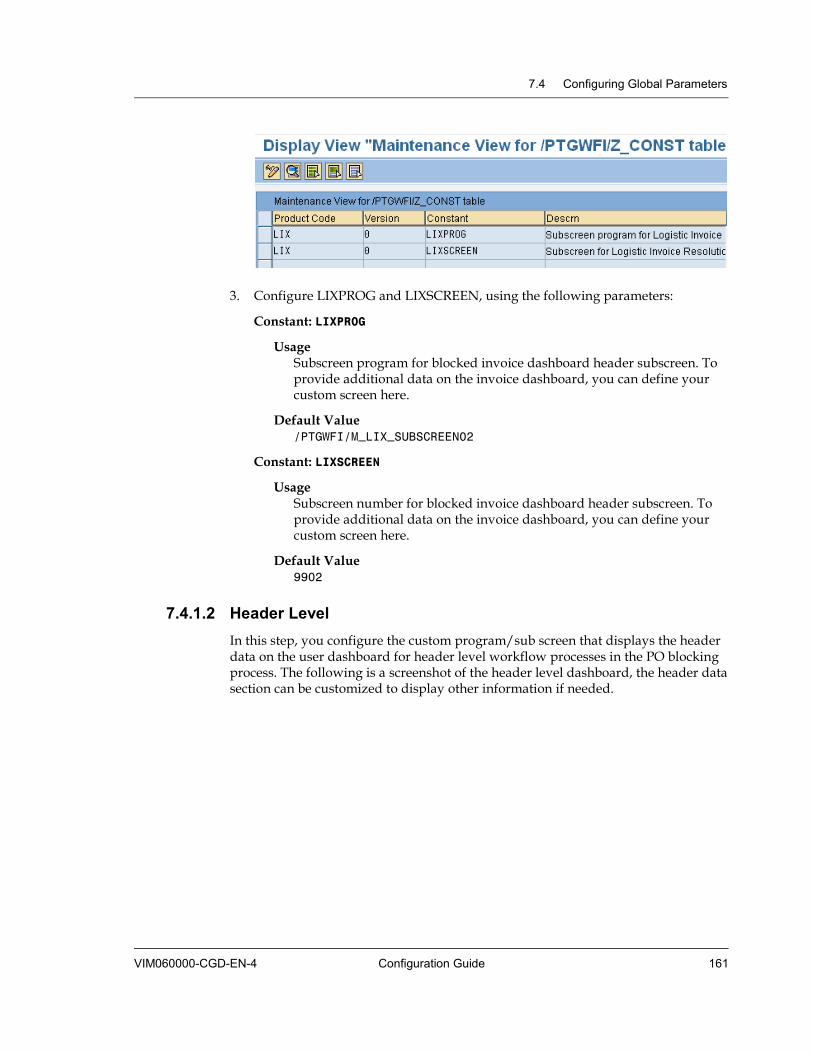
7.4 Configuring Global Parameters
VIM060000-CGD-EN-4 Configuration Guide 161
3. Configure LIXPROG and LIXSCREEN, using the following parameters:
Constant: LIXPROG
Usage Subscreen program for blocked invoice dashboard header subscreen. To provide additional data on the invoice dashboard, you can define your custom screen here.
Default Value /PTGWFI/M_LIX_SUBSCREEN02
Constant: LIXSCREEN
Usage Subscreen number for blocked invoice dashboard header subscreen. To provide additional data on the invoice dashboard, you can define your custom screen here.
Default Value 9902
7.4.1.2 Header Level In this step, you configure the custom program/sub screen that displays the header data on the user dashboard for header level workflow processes in the PO blocking process. The following is a screenshot of the header level dashboard, the header data section can be customized to display other information if needed.
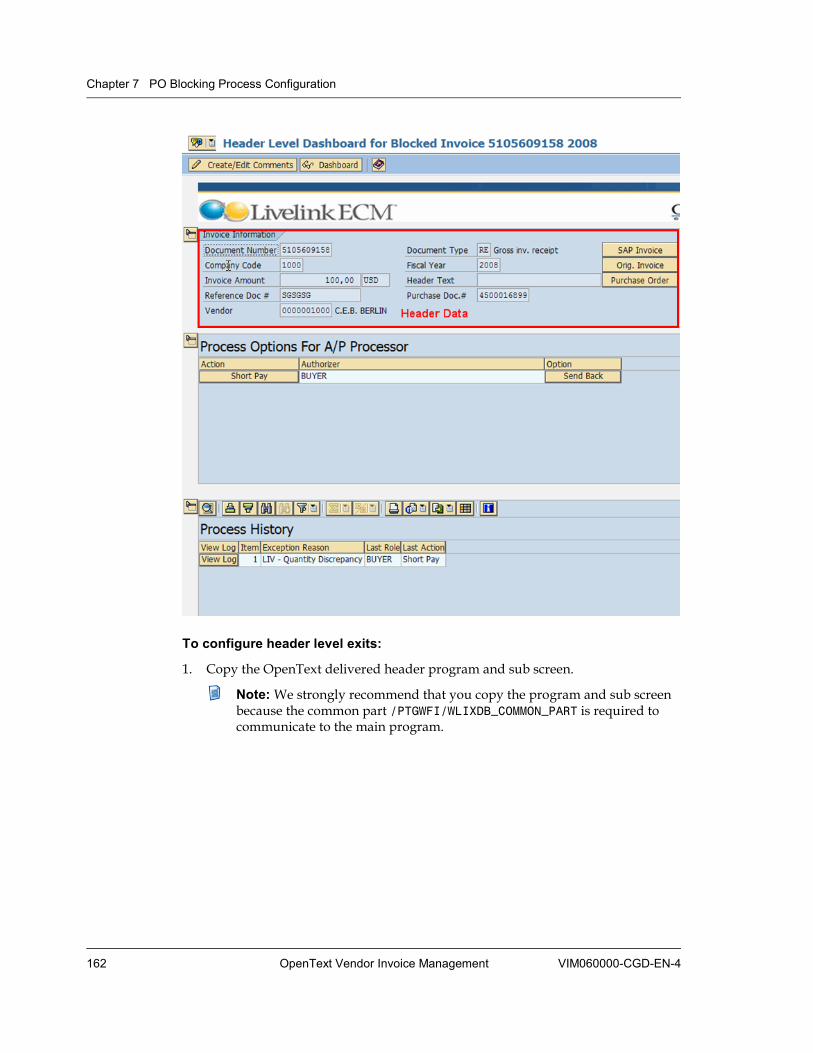
Chapter 7 PO Blocking Process Configuration
162 OpenText Vendor Invoice Management VIM060000-CGD-EN-4
To configure header level exits:
1. Copy the OpenText delivered header program and sub screen.
Note: We strongly recommend that you copy the program and sub screen because the common part /PTGWFI/WLIXDB_COMMON_PART is required to communicate to the main program.
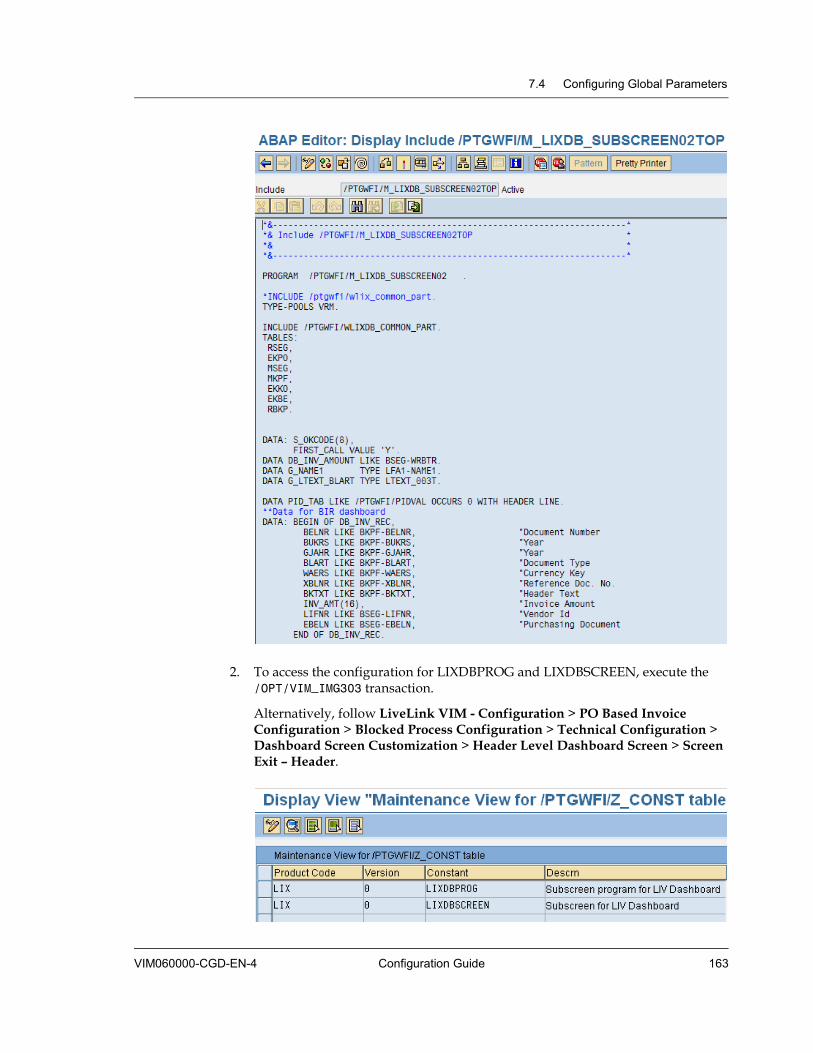
7.4 Configuring Global Parameters
VIM060000-CGD-EN-4 Configuration Guide 163
2. To access the configuration for LIXDBPROG and LIXDBSCREEN, execute the /OPT/VIM_IMG303 transaction.
Alternatively, follow LiveLink VIM - Configuration > PO Based Invoice Configuration > Blocked Process Configuration > Technical Configuration > Dashboard Screen Customization > Header Level Dashboard Screen > Screen Exit – Header.

Chapter 7 PO Blocking Process Configuration
164 OpenText Vendor Invoice Management VIM060000-CGD-EN-4
3. Configure LIXDBPROG and LIXDBSCREEN, using the following parameters:
Constant: LIXDBPROG
Usage Sub screen program for blocked invoice dashboard header sub screen. To provide additional data on the invoice dashboard, you can define your custom screen here.
Default Value /PTGWFI/M_LIXDB_SUBSCREEN02
Constant: LIXDBSCREEN
Usage Sub screen number for blocked invoice dashboard header sub screen. To provide additional data on the invoice dashboard, you can define your custom screen here.
Default Value 9902
7.4.2 Configuring the Option Order In this step, you configure the order in which the options appear in the user’s dashboard in the blocked invoice process. For details on options, see “Configuring Process Options” on page 126.
To configure the option order:
1. Execute the /OPT/VIM_IMG208 transaction.
Alternatively, follow LiveLink VIM - Configuration > PO Based Invoice Configuration > Blocked Process Configuration > Technical Configuration > Dashboard Screen Customization > Line Level Dashboard Screen > Option Order Configuration.
2. Configure the order in which the options will appear in the user’s dashboard, using the following parameters:

7.4 Configuring Global Parameters
VIM060000-CGD-EN-4 Configuration Guide 165
Description Enter a description of the option order.
Constant Value Value for the option order. Default value: 10ATR
Example: If you want all actions to show up first, maintain A10TR. The options will be shown in order actions, approvals, rejections, authorizations and referrals.
7.4.3 Configuring Binding Function Exits (Dashboard) In this step, you define custom functions that can transfer data to the OpenText delivered workflow processes for the PO blocking process.
To configure binding function exits:
1. Execute the /OPT/VIM_IMG305 transaction.
Alternatively, follow LiveLink VIM - Configuration > PO Based Invoice Configuration > Blocked Process Configuration > Technical Configuration > Advanced Process Customization > Line Level Process Customization > Binding Function Module Exits > Dashboard Step.
2. Configure the function module exits, using the following parameters:
Constant PSS_BIND_EXIT_FM1
Usage This function module is used to manipulate the workflow container during inward binding (task container to workflow container). This manipulation facilitates many features such as populating analytics with custom data etc.
Default value None
Constant PSS_BIND_EXIT_FM2
Usage This function module is used to manipulate the workflow container during outward binding (workflow container to task container). This
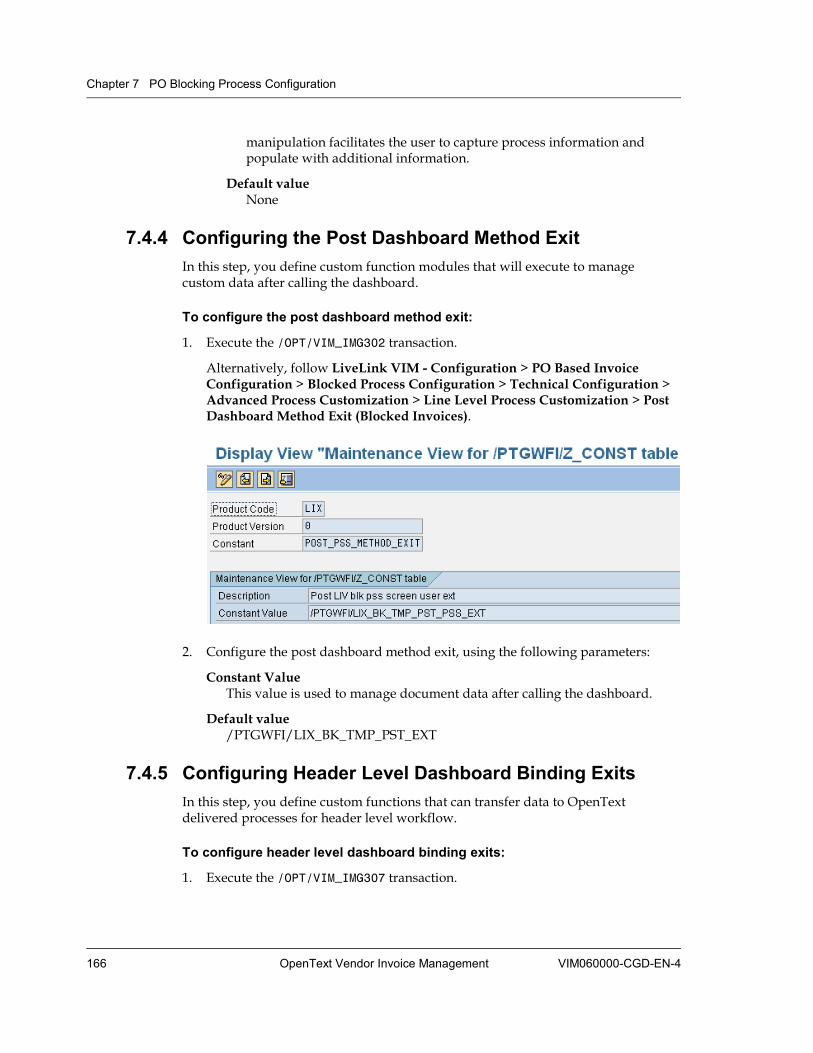
Chapter 7 PO Blocking Process Configuration
166 OpenText Vendor Invoice Management VIM060000-CGD-EN-4
manipulation facilitates the user to capture process information and populate with additional information.
Default value None
7.4.4 Configuring the Post Dashboard Method Exit In this step, you define custom function modules that will execute to manage custom data after calling the dashboard.
To configure the post dashboard method exit:
1. Execute the /OPT/VIM_IMG302 transaction.
Alternatively, follow LiveLink VIM - Configuration > PO Based Invoice Configuration > Blocked Process Configuration > Technical Configuration > Advanced Process Customization > Line Level Process Customization > Post Dashboard Method Exit (Blocked Invoices).
2. Configure the post dashboard method exit, using the following parameters:
Constant Value This value is used to manage document data after calling the dashboard.
Default value /PTGWFI/LIX_BK_TMP_PST_EXT
7.4.5 Configuring Header Level Dashboard Binding Exits In this step, you define custom functions that can transfer data to OpenText delivered processes for header level workflow.
To configure header level dashboard binding exits:
1. Execute the /OPT/VIM_IMG307 transaction.
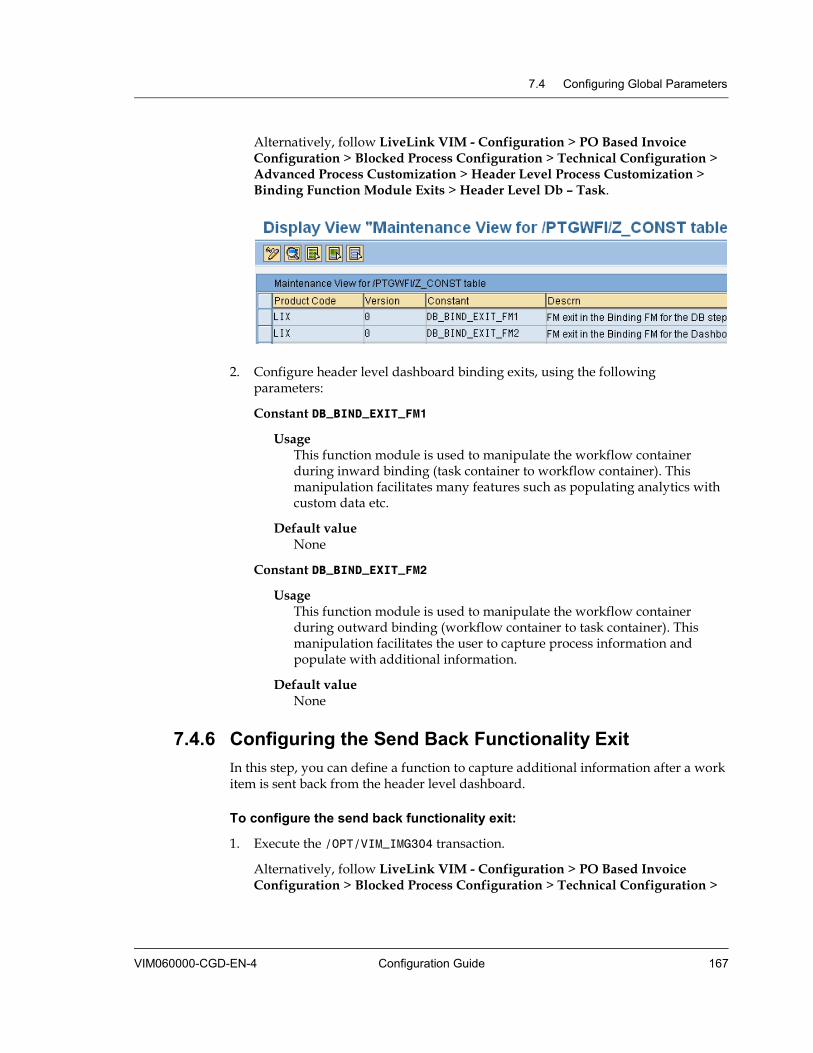
7.4 Configuring Global Parameters
VIM060000-CGD-EN-4 Configuration Guide 167
Alternatively, follow LiveLink VIM - Configuration > PO Based Invoice Configuration > Blocked Process Configuration > Technical Configuration > Advanced Process Customization > Header Level Process Customization > Binding Function Module Exits > Header Level Db – Task.
2. Configure header level dashboard binding exits, using the following parameters:
Constant DB_BIND_EXIT_FM1
Usage This function module is used to manipulate the workflow container during inward binding (task container to workflow container). This manipulation facilitates many features such as populating analytics with custom data etc.
Default value None
Constant DB_BIND_EXIT_FM2
Usage This function module is used to manipulate the workflow container during outward binding (workflow container to task container). This manipulation facilitates the user to capture process information and populate with additional information.
Default value None
7.4.6 Configuring the Send Back Functionality Exit In this step, you can define a function to capture additional information after a work item is sent back from the header level dashboard.
To configure the send back functionality exit:
1. Execute the /OPT/VIM_IMG304 transaction.
Alternatively, follow LiveLink VIM - Configuration > PO Based Invoice Configuration > Blocked Process Configuration > Technical Configuration >

Chapter 7 PO Blocking Process Configuration
168 OpenText Vendor Invoice Management VIM060000-CGD-EN-4
Advanced Process Customization > Header Level Process Customization > Send back Functionality Exit.
2. Configure the send back functionality exit, using the following parameters:
Constant DB_SNDBACK_EXIT
Usage This function module is used to capture option information from the dashboard step when the work item is sent back successfully in the header level dashboard.
Default value None
Interface The interface of the function module is found in function module /PTGWFI/LIX_TMP_DB_SBK_EXIT.
7.4.7 Configuring the Image Display Function In this step, you define custom function modules that will execute to display an SAP ArchiveLink image associated to the PO invoice document.
To configure the image display function:
1. Execute the /OPT/VIM_IMG218 transaction.
Alternatively, follow LiveLink VIM - Configuration > PO Based Invoice Configuration > Blocked Process Configuration > Technical Configuration > Image Display > Image Display Function.
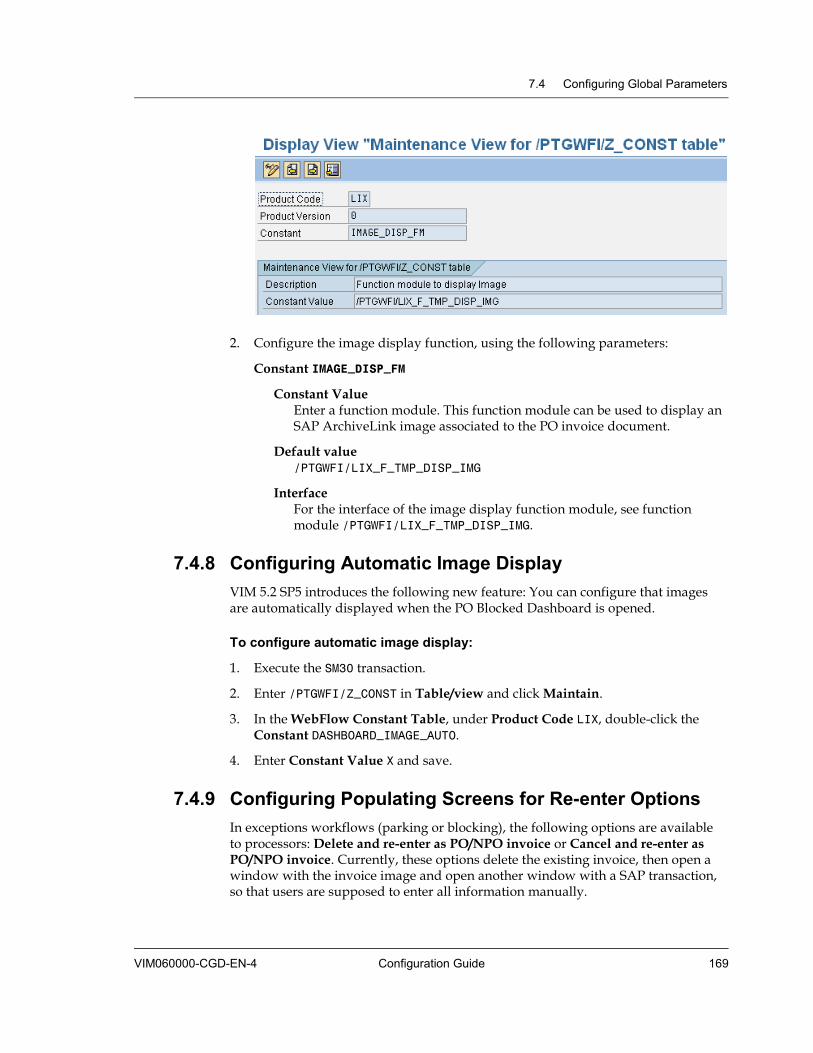
7.4 Configuring Global Parameters
VIM060000-CGD-EN-4 Configuration Guide 169
2. Configure the image display function, using the following parameters:
Constant IMAGE_DISP_FM
Constant Value Enter a function module. This function module can be used to display an SAP ArchiveLink image associated to the PO invoice document.
Default value /PTGWFI/LIX_F_TMP_DISP_IMG
Interface For the interface of the image display function module, see function module /PTGWFI/LIX_F_TMP_DISP_IMG.
7.4.8 Configuring Automatic Image Display VIM 5.2 SP5 introduces the following new feature: You can configure that images are automatically displayed when the PO Blocked Dashboard is opened.
To configure automatic image display:
1. Execute the SM30 transaction.
2. Enter /PTGWFI/Z_CONST in Table/view and click Maintain.
3. In the WebFlow Constant Table, under Product Code LIX, double-click the Constant DASHBOARD_IMAGE_AUTO.
4. Enter Constant Value X and save.
7.4.9 Configuring Populating Screens for Re-enter Options In exceptions workflows (parking or blocking), the following options are available to processors: Delete and re-enter as PO/NPO invoice or Cancel and re-enter as PO/NPO invoice. Currently, these options delete the existing invoice, then open a window with the invoice image and open another window with a SAP transaction, so that users are supposed to enter all information manually.

Chapter 7 PO Blocking Process Configuration
170 OpenText Vendor Invoice Management VIM060000-CGD-EN-4
VIM 5.2 SP6 introduces new function modules for this scenario. See “Configuring Populating Screens for Re-enter Options” on page 147 for details.
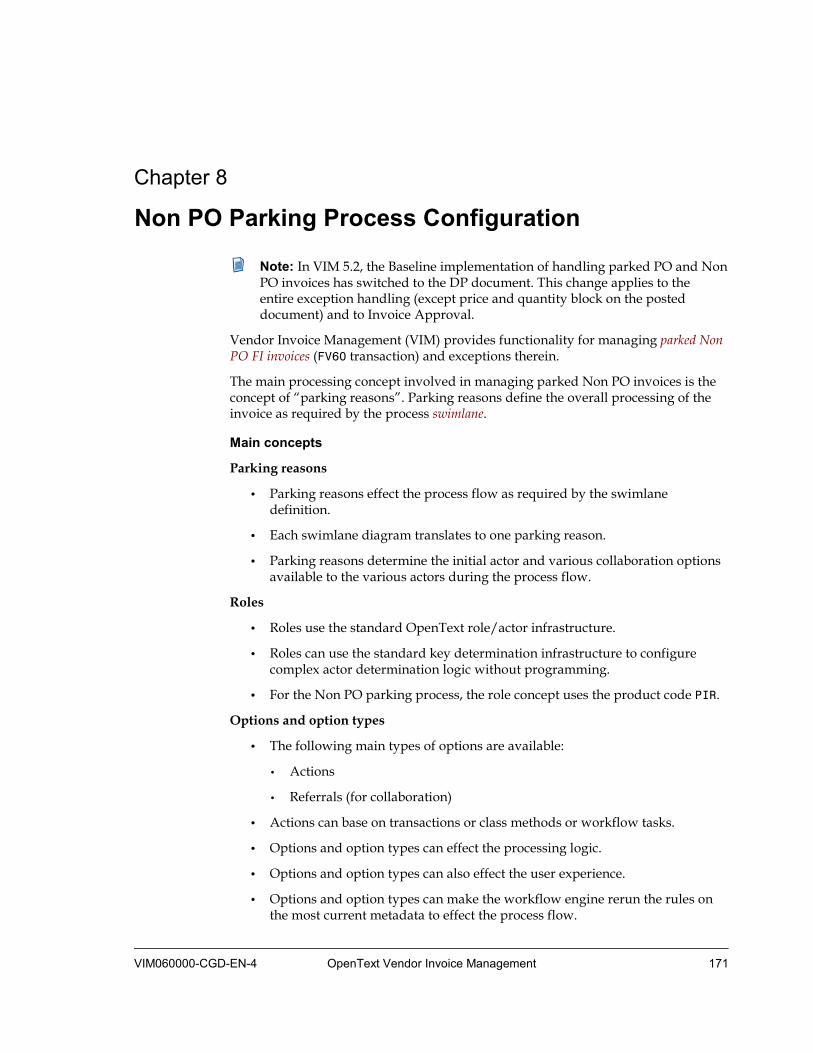
VIM060000-CGD-EN-4 OpenText Vendor Invoice Management 171
Chapter 8 Non PO Parking Process Configuration
Note: In VIM 5.2, the Baseline implementation of handling parked PO and Non PO invoices has switched to the DP document. This change applies to the entire exception handling (except price and quantity block on the posted document) and to Invoice Approval.
Vendor Invoice Management (VIM) provides functionality for managing parked Non PO FI invoices (FV60 transaction) and exceptions therein.
The main processing concept involved in managing parked Non PO invoices is the concept of “parking reasons”. Parking reasons define the overall processing of the invoice as required by the process swimlane.
Main concepts
Parking reasons
• Parking reasons effect the process flow as required by the swimlane definition.
• Each swimlane diagram translates to one parking reason.
• Parking reasons determine the initial actor and various collaboration options available to the various actors during the process flow.
Roles
• Roles use the standard OpenText role/actor infrastructure.
• Roles can use the standard key determination infrastructure to configure complex actor determination logic without programming.
• For the Non PO parking process, the role concept uses the product code PIR.
Options and option types
• The following main types of options are available:
• Actions
• Referrals (for collaboration)
• Actions can base on transactions or class methods or workflow tasks.
• Options and option types can effect the processing logic.
• Options and option types can also effect the user experience.
• Options and option types can make the workflow engine rerun the rules on the most current metadata to effect the process flow.

Chapter 8 Non PO Parking Process Configuration
172 OpenText Vendor Invoice Management VIM060000-CGD-EN-4
• Options and option types can be configured to change the document status.
BDC IDs
• BDC IDs build a powerful infrastructure for pre-populating data into SAP transactions without programming.
• BDC IDs are optimized for both dialog processing and background processing.
• BDC IDs can be used to set dynamic parameter IDs.
• BDC IDs can be used to configure new user collaboration actions.
• BDC IDs eliminate the need to code parameterized transactions.
• BDC IDs can be used to configure BDC success messages.
Main steps The following are the main steps involved in implementing process scenarios in the Non PO parking process: 1. Identify the various parking reasons that are required for the realization of the
process scenarios.
2. Identify the sub screen to be called during the document parking process.
3. Identify the roll out criteria.
4. Identify the various roles and configure the roles in the appropriate process types.
5. Identify and configure the process options according to the swimlanes.
6. Configure global customization setting as per customer requirements.
The starting point for any configuration is a set of process flow swimlanes. The following swimlane is an example of such a process as implemented by the Non PO invoice parking workflow:
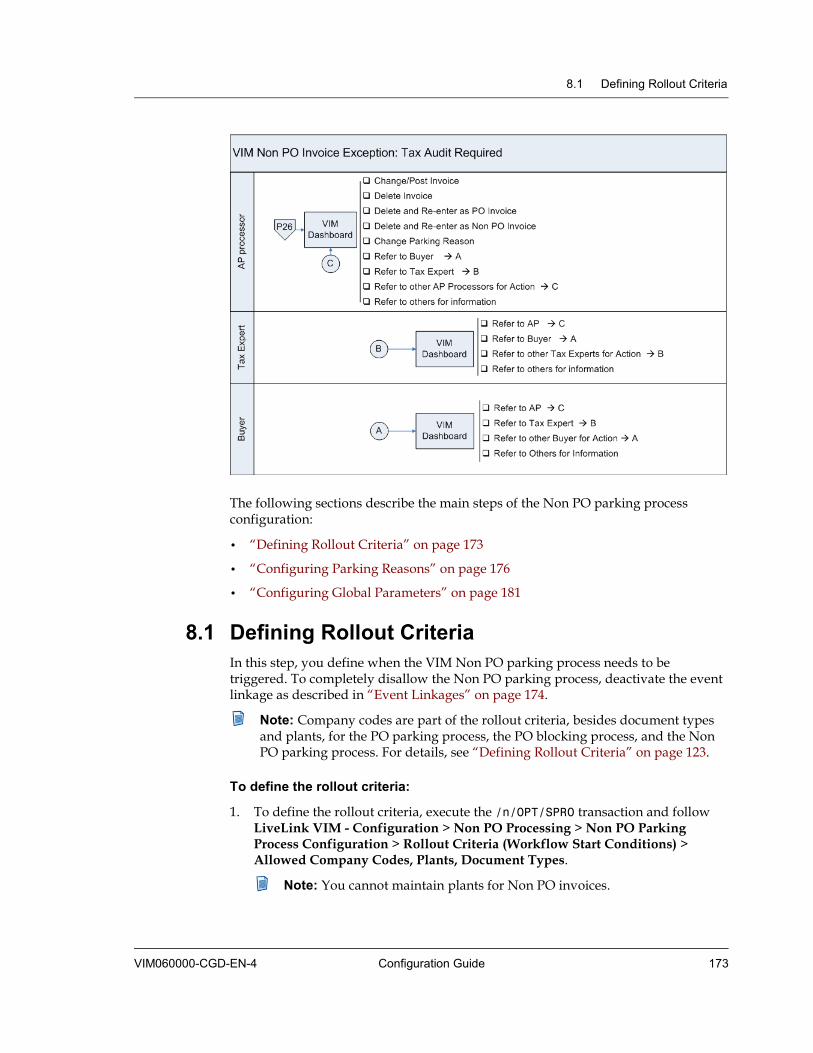
8.1 Defining Rollout Criteria
VIM060000-CGD-EN-4 Configuration Guide 173
The following sections describe the main steps of the Non PO parking process configuration:
• “Defining Rollout Criteria” on page 173
• “Configuring Parking Reasons” on page 176
• “Configuring Global Parameters” on page 181
8.1 Defining Rollout Criteria In this step, you define when the VIM Non PO parking process needs to be triggered. To completely disallow the Non PO parking process, deactivate the event linkage as described in “Event Linkages” on page 174.
Note: Company codes are part of the rollout criteria, besides document types and plants, for the PO parking process, the PO blocking process, and the Non PO parking process. For details, see “Defining Rollout Criteria” on page 123.
To define the rollout criteria:
1. To define the rollout criteria, execute the /n/OPT/SPRO transaction and follow LiveLink VIM - Configuration > Non PO Processing > Non PO Parking Process Configuration > Rollout Criteria (Workflow Start Conditions) > Allowed Company Codes, Plants, Document Types.
Note: You cannot maintain plants for Non PO invoices.
Chapter 8 Non PO Parking Process Configuration
174 OpenText Vendor Invoice Management VIM060000-CGD-EN-4
2. In the Allowed Company Codes screen, select either both PO Invoice Process and Non PO Invoice Process or only one of the check boxes for the respective Company Code.
3. Click New entries to add a company code.
Save your settings when finished.
4. Double-click Allowed Document Types in the navigation panel to switch to the Allowed Document Types screen and define the rollout criteria for document types, as described for company codes.
The respective receiver function module triggers the workflow based on the data in the tables. The workflow is triggered when there is no data maintained in the table(s) or the data meets all the conditions such as company code and document type.
8.1.1 Event Linkages In this step, you define the standard event linkage delivered by OpenText as active.
Caution If you change the configuration in this section, the Non PO parking process might not trigger at all.
To define the standard event linkage as active:
1. To access the Event Type Linkages screen, execute the /OPT/VIM_IMG239 transaction.

8.1 Defining Rollout Criteria
VIM060000-CGD-EN-4 Configuration Guide 175
Alternatively, follow LiveLink VIM - Configuration > Non PO Processing > Non PO Parking Process Configuration > Rollout Criteria > Event Linkage for Processes (Non PO).
2. Make sure the Linkage Activated check box is selected.
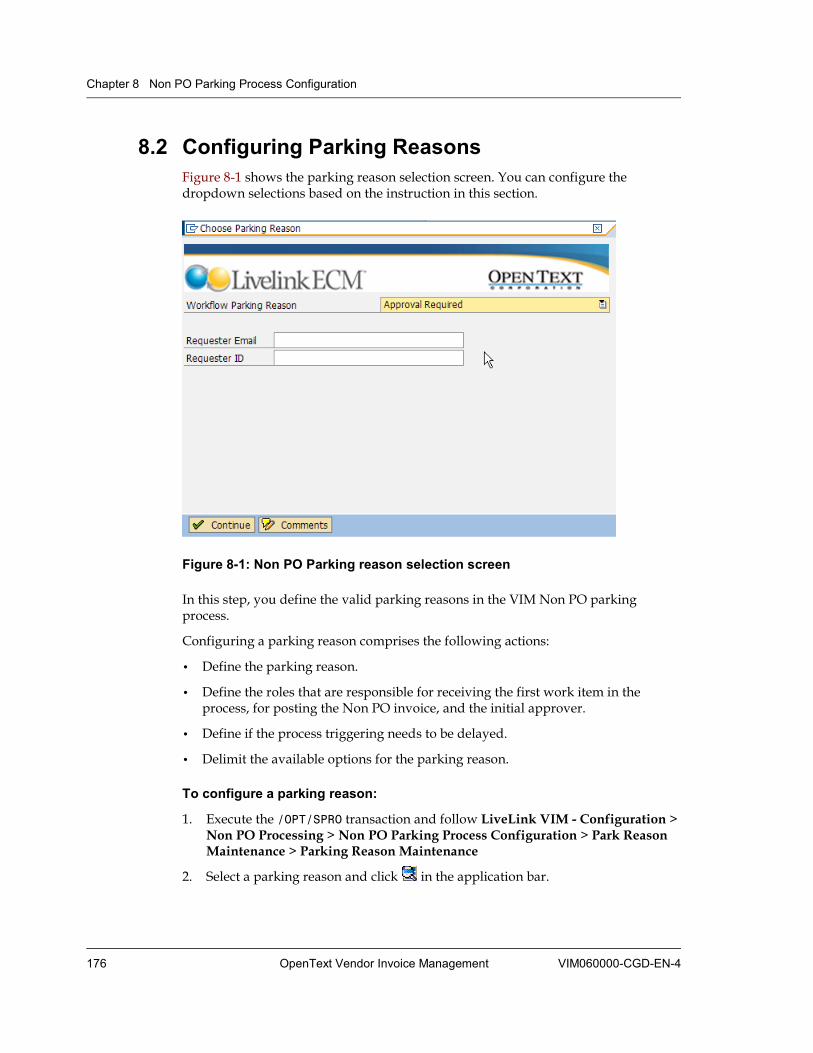
Chapter 8 Non PO Parking Process Configuration
176 OpenText Vendor Invoice Management VIM060000-CGD-EN-4
8.2 Configuring Parking Reasons Figure 8-1 shows the parking reason selection screen. You can configure the dropdown selections based on the instruction in this section.
Figure 8-1: Non PO Parking reason selection screen
In this step, you define the valid parking reasons in the VIM Non PO parking process.
Configuring a parking reason comprises the following actions:
• Define the parking reason.
• Define the roles that are responsible for receiving the first work item in the process, for posting the Non PO invoice, and the initial approver.
• Define if the process triggering needs to be delayed.
• Delimit the available options for the parking reason.
To configure a parking reason:
1. Execute the /OPT/SPRO transaction and follow LiveLink VIM - Configuration > Non PO Processing > Non PO Parking Process Configuration > Park Reason Maintenance > Parking Reason Maintenance
2. Select a parking reason and click in the application bar.

8.2 Configuring Parking Reasons
VIM060000-CGD-EN-4 Configuration Guide 177
3. Define the parking reason, using the following parameters:
Description Enter a description for the parking reason.
Active Indicator Select this check box to achieve that the user can select the parking reason during parking of a Non PO invoice.
Subscreen Program/Screen Number Select a sub screen that can be configured to capture additional information from the user when the user chooses a particular parking reason.
• You can extend the structure /PTGWFI/F_PIRMTR to capture additional data during parking a Non PO invoice.
Example: If a Non PO invoice needs to be parked for “Approval Required”, the system needs to know who is the Requisitioner. This additional information can be programmed in a custom sub screen for the parking reason “Approval Required”.
• Copy the OpenText delivered subscreen program and screen number to ensure that the common part include /PTGWFI/PIR_COMMON_PART is defined and data is exchanged properly.

Chapter 8 Non PO Parking Process Configuration
178 OpenText Vendor Invoice Management VIM060000-CGD-EN-4
Approval Required Select this check box to achieve that the parking reason is flagged for approval and that the Invoice Approval process is triggered.
Autopost Select this check box to achieve that the system automatically posts the invoice after Invoice Approval is completed.
Initial Actor Define the role who receives the first work item once this document is parked for the current parking reason.
Example: If a Non PO invoice is parked for “Approval Required”, the initial role that needs to look at the invoice is the APPROVER. If the Approval Required check box is selected, the initial role will be CODER.
Initial Actor FM You can define a custom function module to determine the initial actor.
For the interface of the function module, see function module /OPT/BL_Q_INIT_ACT_FM.
Delay Function
• Define the custom function module that can be used to restrict the immediate triggering of the Non PO parking process even if the user selected the current parking reason when the invoice is parked.
•
Example: The Non PO invoice is parked for “Approval Required” and you want to delay the approval for 2 days. You might then want to send the work item to the AP's inbox not before two days. For this purpose, you can define a custom function to restrict the triggering of the work item for the user for the next two days.
8.2 Configuring Parking Reasons
VIM060000-CGD-EN-4 Configuration Guide 179
• For the interface of the delay function module, see function module /OPT/BL_P_DELAYFM_SRM.
Initial Approver Define the role of the initial approver if the invoice document is sent for approval.
Posting Actor Define the role responsible for posting the invoice and also responsible for handling errors if the posting in background fails.
Available Options Define the options that are available for the role on the dashboard during Non PO parking process for the current parking reason. Separate the options by semicolon. The option format is AXXXX where A is the option type and XXXX is the 4 digit value representing the option ID.
The system uses these values in conjunction with the user process options defined in “Configuring User Process Options” on page 179 to determine which options show up for the role’s dashboard.
8.2.1 Configuring User Process Options In this step, you define all the process options available for roles when a Non PO invoice document is parked.
Configuring the process options comprises the following steps:
• Define user process options for all the roles in the process.
• Delimit available options for each parking reason in individual parking reason definition.
Tip: The standard SAP authorizations for transactions are checked for the underlying transactions in a user process option.
To configure user process options for Non PO parked documents:
1. Execute the /OPT/SPRO transaction and follow LiveLink VIM - Configuration > Non PO Processing > Non PO Parking Process Configuration > Technical Configuration > Advanced Process Option Configuration > PSS User Process Options - OST
2. Click New Entries in the application toolbar.
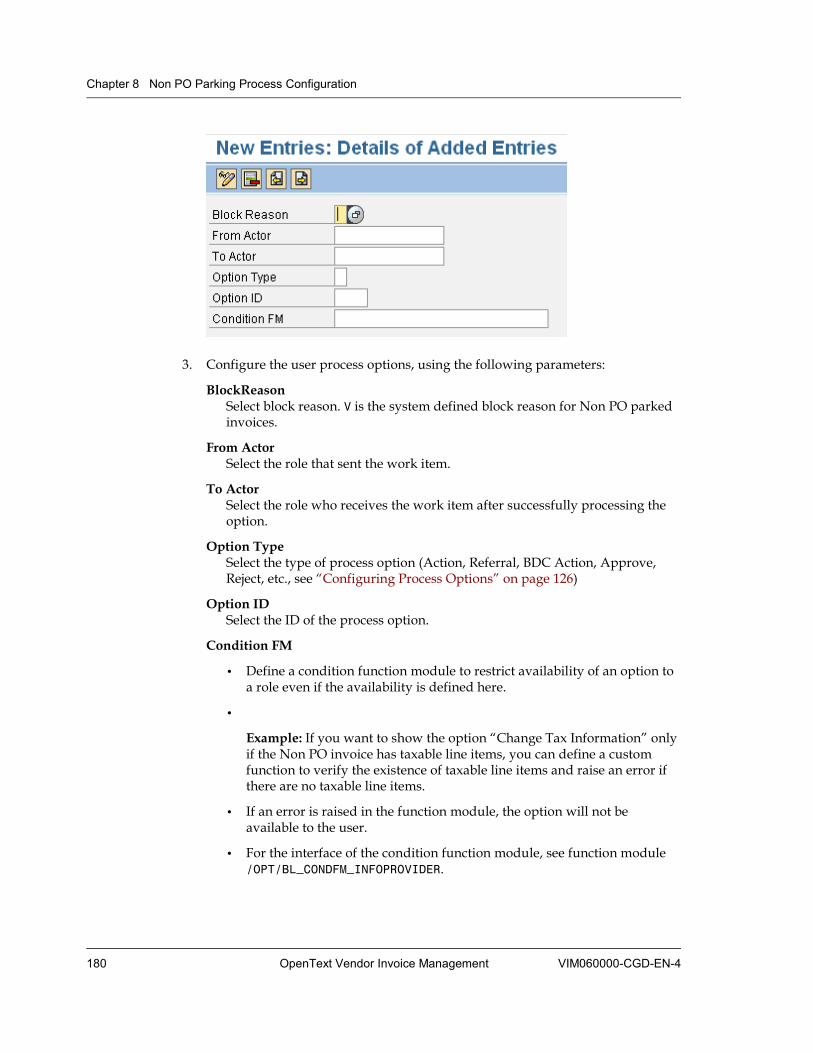
Chapter 8 Non PO Parking Process Configuration
180 OpenText Vendor Invoice Management VIM060000-CGD-EN-4
3. Configure the user process options, using the following parameters:
BlockReason Select block reason. V is the system defined block reason for Non PO parked invoices.
From Actor Select the role that sent the work item.
To Actor Select the role who receives the work item after successfully processing the option.
Option Type Select the type of process option (Action, Referral, BDC Action, Approve, Reject, etc., see “Configuring Process Options” on page 126)
Option ID Select the ID of the process option.
Condition FM
• Define a condition function module to restrict availability of an option to a role even if the availability is defined here.
•
Example: If you want to show the option “Change Tax Information” only if the Non PO invoice has taxable line items, you can define a custom function to verify the existence of taxable line items and raise an error if there are no taxable line items.
• If an error is raised in the function module, the option will not be available to the user.
• For the interface of the condition function module, see function module /OPT/BL_CONDFM_INFOPROVIDER.
8.3 Configuring Global Parameters
VIM060000-CGD-EN-4 Configuration Guide 181
8.3 Configuring Global Parameters This section describes the various global customization parameters that are available. Global parameters control various aspects of the processing logic for Non PO parking process flows.
Important
Take care when you change the global configuration parameters. Changes can affect the functionality of the process.
Configuring global parameters comprises the following actions:
• “Configuring Transactions to Create Parked Invoices” on page 181
• “Configuring Dashboard Screen Exits” on page 182
• “Defining a Preprocess (Sub)workflow” on page 184
• “Configuring Binding Function Module Exits” on page 185
• “Configuring the Pre PSS Method Exit” on page 186
• “Configuring the Post PSS Method Exit” on page 187
• “Configuring a Post Process (Sub)workflow” on page 187
• “Configuring an Autopost Exit” on page 188
• “Configuring a Parked Document Posting Exit” on page 189
• “Configuring the Image Display Function” on page 190
• “Configuring Automatic Image Display” on page 190
• “Configuring a Parallel Workflow Exit” on page 191
• “Configuring the Parking Functionality” on page 191
• “Configuring Populating Screens for Re-enter Options” on page 192
8.3.1 Configuring Transactions to Create Parked Invoices In this step, you configure the transactions that create parked Non PO invoices.
To configure transactions to create parked invoices:
1. Execute the SM30 transaction.
2. Enter /PTGWFI/Z_CONST in Table/view and click Maintain.
3. In the WebFlow Constant Table, under Product Code PIR, double-click the Constant NONPO_INV_TCODE.
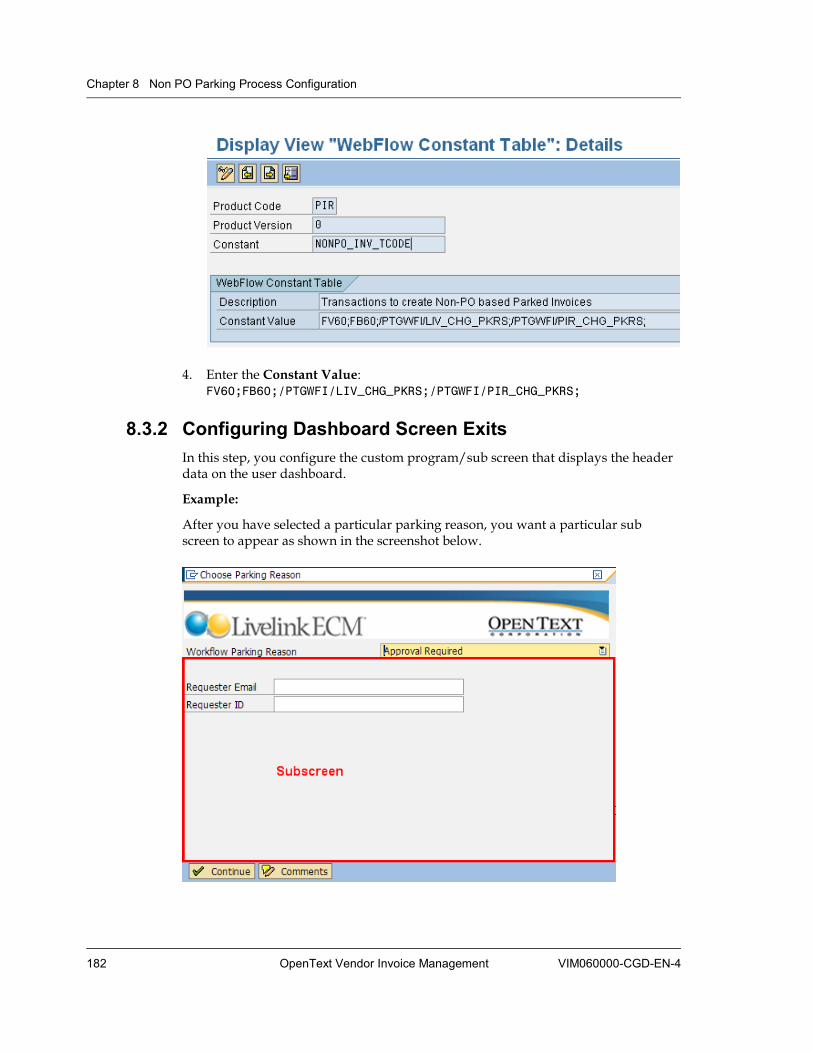
Chapter 8 Non PO Parking Process Configuration
182 OpenText Vendor Invoice Management VIM060000-CGD-EN-4
4. Enter the Constant Value:FV60;FB60;/PTGWFI/LIV_CHG_PKRS;/PTGWFI/PIR_CHG_PKRS;
8.3.2 Configuring Dashboard Screen Exits In this step, you configure the custom program/sub screen that displays the header data on the user dashboard.
Example:
After you have selected a particular parking reason, you want a particular sub screen to appear as shown in the screenshot below.
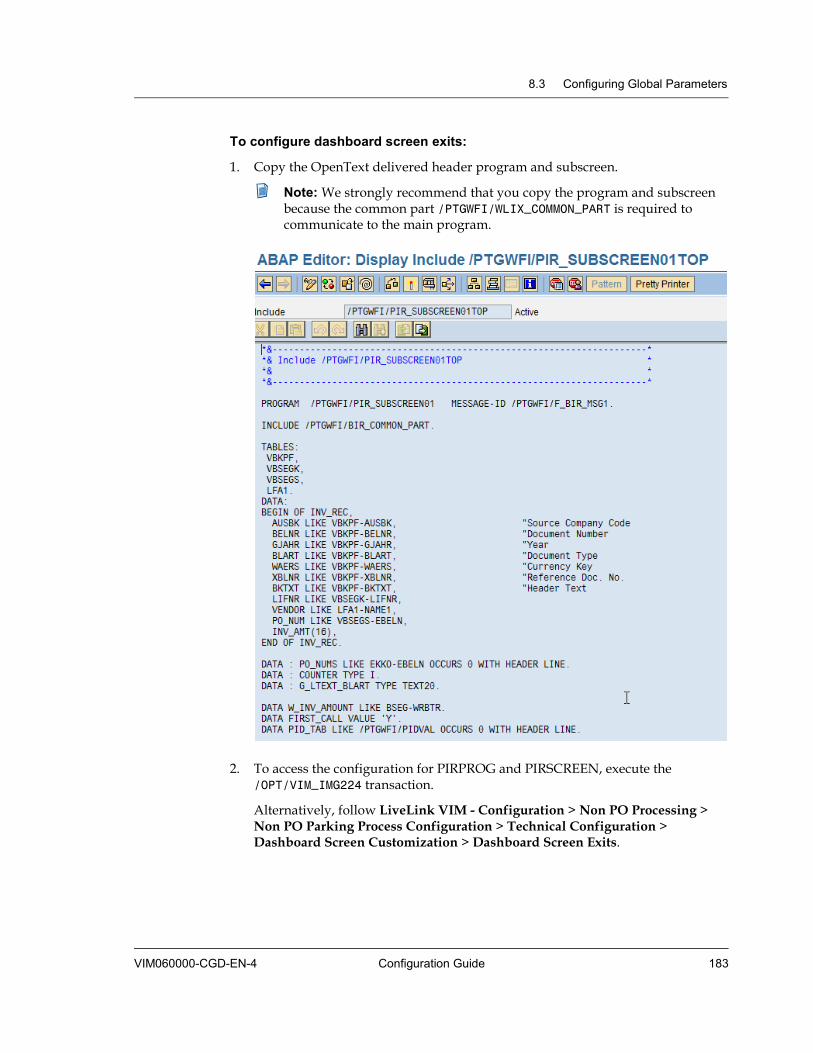
8.3 Configuring Global Parameters
VIM060000-CGD-EN-4 Configuration Guide 183
To configure dashboard screen exits:
1. Copy the OpenText delivered header program and subscreen.
Note: We strongly recommend that you copy the program and subscreen because the common part /PTGWFI/WLIX_COMMON_PART is required to communicate to the main program.
2. To access the configuration for PIRPROG and PIRSCREEN, execute the /OPT/VIM_IMG224 transaction.
Alternatively, follow LiveLink VIM - Configuration > Non PO Processing > Non PO Parking Process Configuration > Technical Configuration > Dashboard Screen Customization > Dashboard Screen Exits.
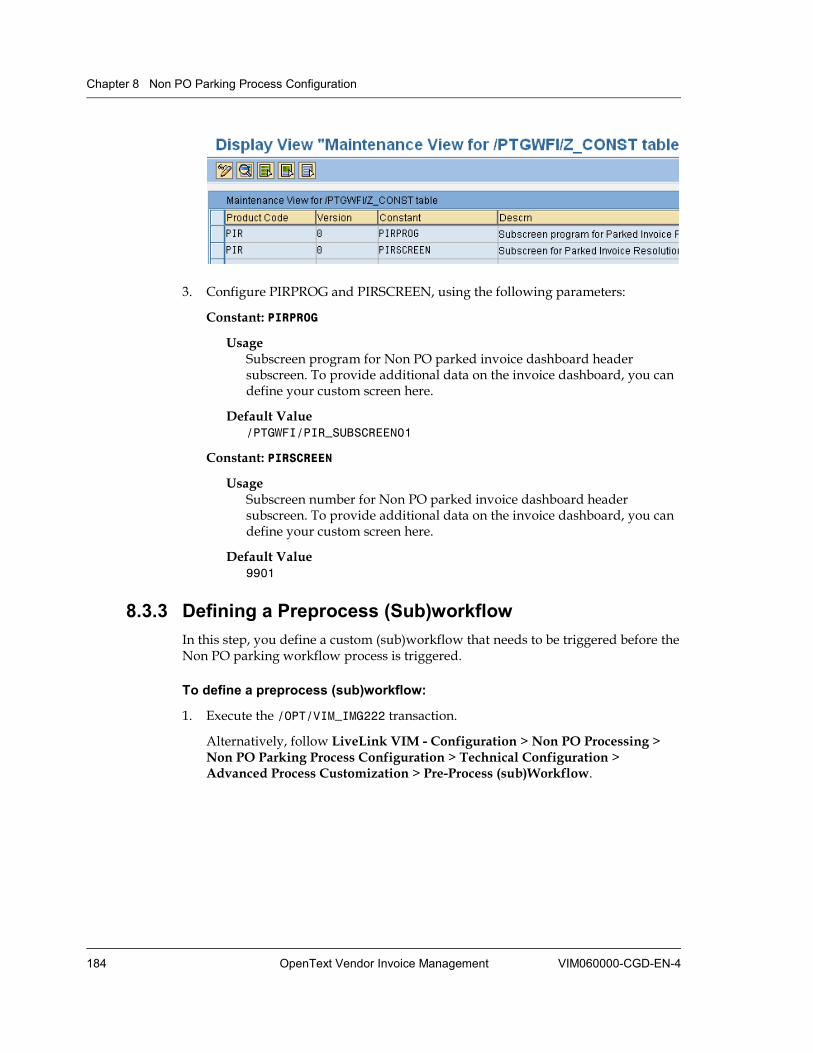
Chapter 8 Non PO Parking Process Configuration
184 OpenText Vendor Invoice Management VIM060000-CGD-EN-4
3. Configure PIRPROG and PIRSCREEN, using the following parameters:
Constant: PIRPROG
Usage Subscreen program for Non PO parked invoice dashboard header subscreen. To provide additional data on the invoice dashboard, you can define your custom screen here.
Default Value /PTGWFI/PIR_SUBSCREEN01
Constant: PIRSCREEN
Usage Subscreen number for Non PO parked invoice dashboard header subscreen. To provide additional data on the invoice dashboard, you can define your custom screen here.
Default Value 9901
8.3.3 Defining a Preprocess (Sub)workflow In this step, you define a custom (sub)workflow that needs to be triggered before the Non PO parking workflow process is triggered.
To define a preprocess (sub)workflow:
1. Execute the /OPT/VIM_IMG222 transaction.
Alternatively, follow LiveLink VIM - Configuration > Non PO Processing > Non PO Parking Process Configuration > Technical Configuration > Advanced Process Customization > Pre-Process (sub)Workflow.
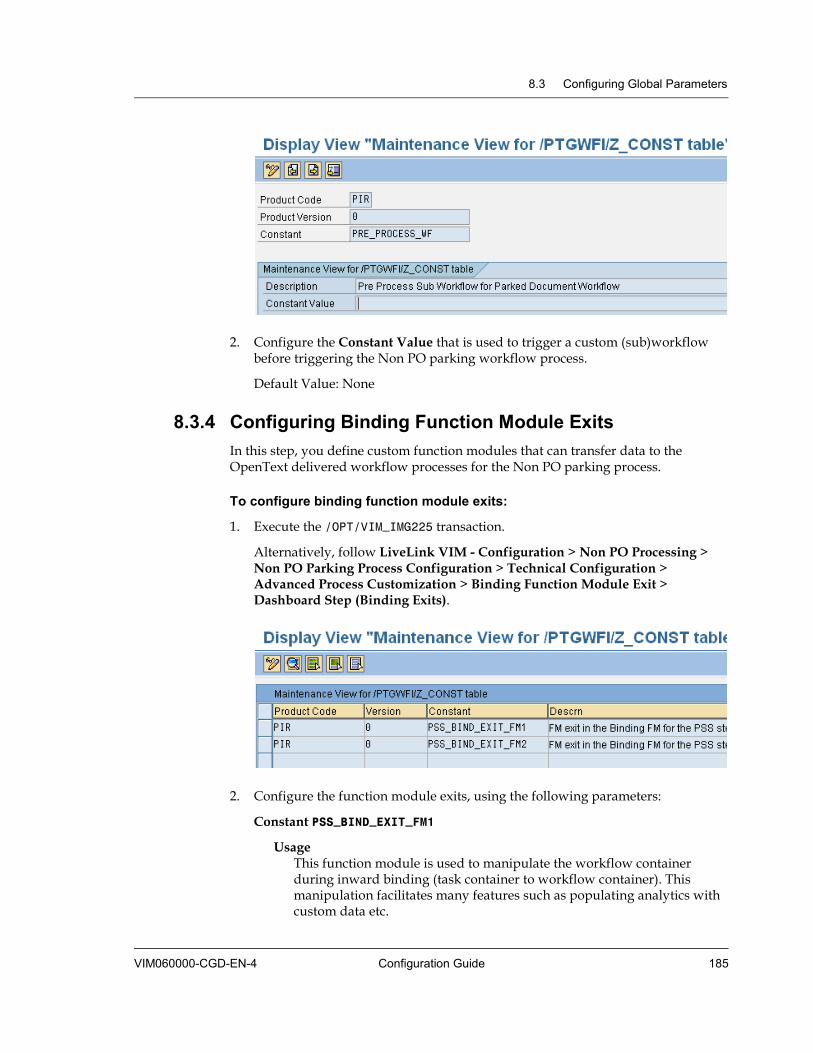
8.3 Configuring Global Parameters
VIM060000-CGD-EN-4 Configuration Guide 185
2. Configure the Constant Value that is used to trigger a custom (sub)workflow before triggering the Non PO parking workflow process.
Default Value: None
8.3.4 Configuring Binding Function Module Exits In this step, you define custom function modules that can transfer data to the OpenText delivered workflow processes for the Non PO parking process.
To configure binding function module exits:
1. Execute the /OPT/VIM_IMG225 transaction.
Alternatively, follow LiveLink VIM - Configuration > Non PO Processing > Non PO Parking Process Configuration > Technical Configuration > Advanced Process Customization > Binding Function Module Exit > Dashboard Step (Binding Exits).
2. Configure the function module exits, using the following parameters:
Constant PSS_BIND_EXIT_FM1
Usage This function module is used to manipulate the workflow container during inward binding (task container to workflow container). This manipulation facilitates many features such as populating analytics with custom data etc.
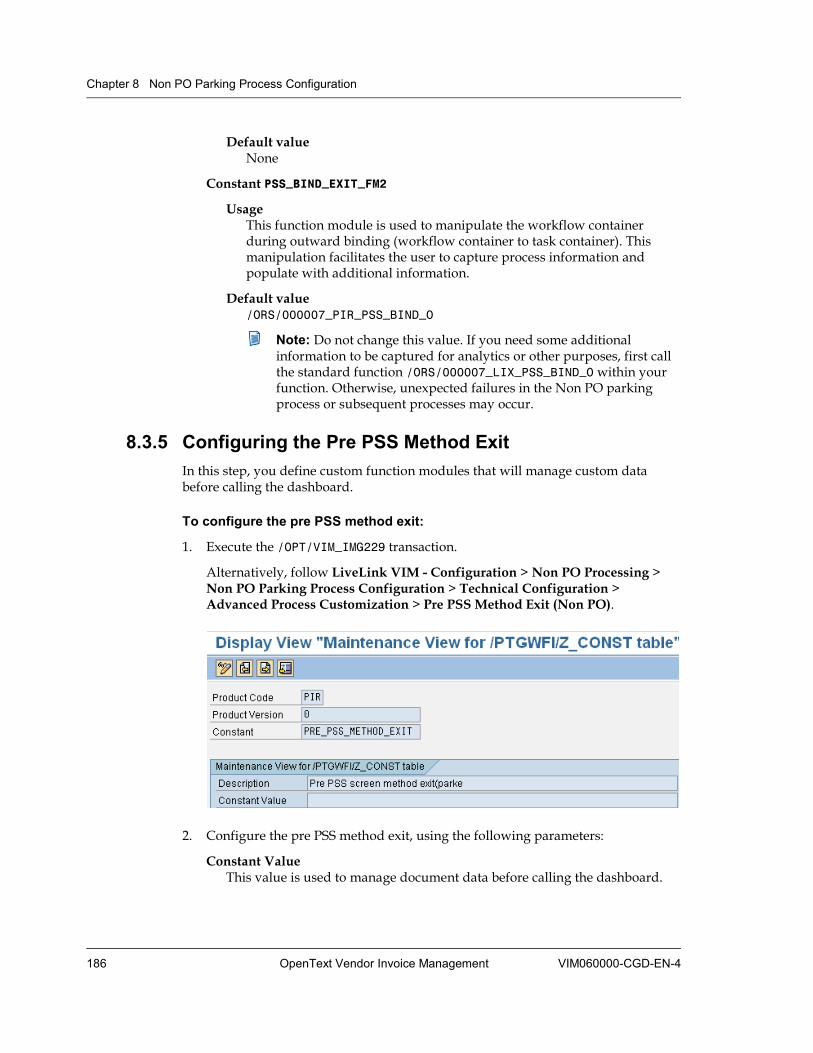
Chapter 8 Non PO Parking Process Configuration
186 OpenText Vendor Invoice Management VIM060000-CGD-EN-4
Default value None
Constant PSS_BIND_EXIT_FM2
Usage This function module is used to manipulate the workflow container during outward binding (workflow container to task container). This manipulation facilitates the user to capture process information and populate with additional information.
Default value /ORS/000007_PIR_PSS_BIND_O
Note: Do not change this value. If you need some additional information to be captured for analytics or other purposes, first call the standard function /ORS/000007_LIX_PSS_BIND_O within your function. Otherwise, unexpected failures in the Non PO parking process or subsequent processes may occur.
8.3.5 Configuring the Pre PSS Method Exit In this step, you define custom function modules that will manage custom data before calling the dashboard.
To configure the pre PSS method exit:
1. Execute the /OPT/VIM_IMG229 transaction.
Alternatively, follow LiveLink VIM - Configuration > Non PO Processing > Non PO Parking Process Configuration > Technical Configuration > Advanced Process Customization > Pre PSS Method Exit (Non PO).
2. Configure the pre PSS method exit, using the following parameters:
Constant Value This value is used to manage document data before calling the dashboard.
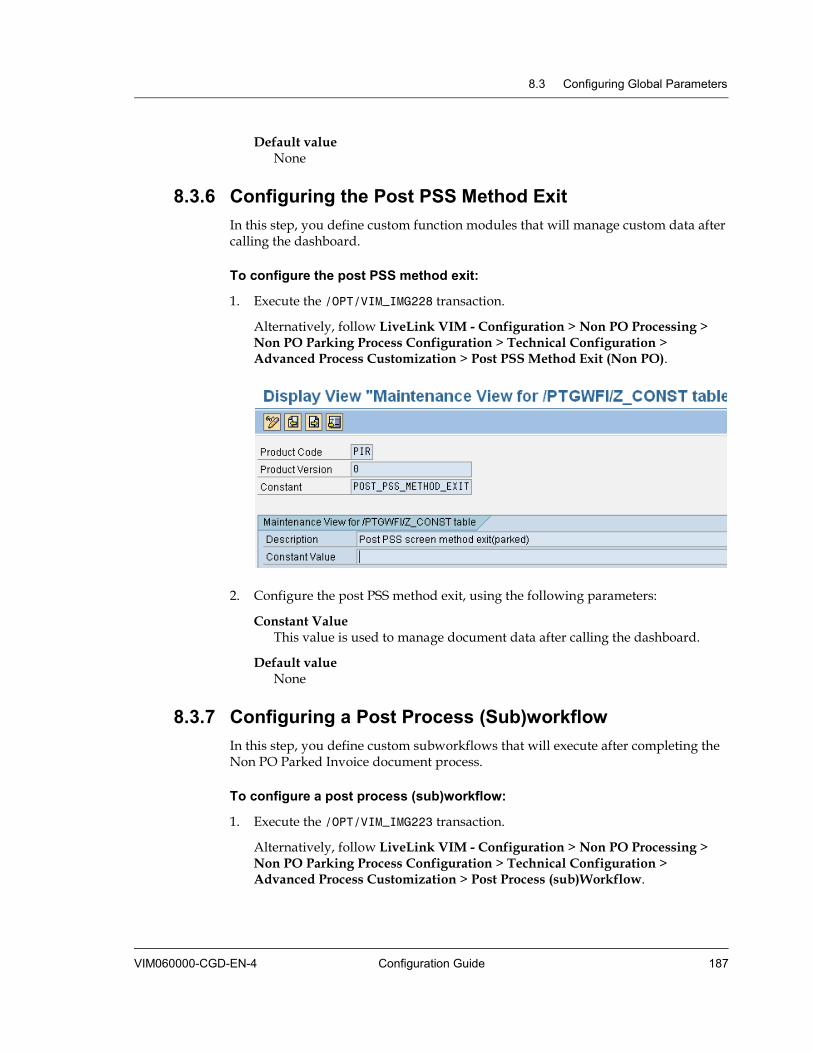
8.3 Configuring Global Parameters
VIM060000-CGD-EN-4 Configuration Guide 187
Default value None
8.3.6 Configuring the Post PSS Method Exit In this step, you define custom function modules that will manage custom data after calling the dashboard.
To configure the post PSS method exit:
1. Execute the /OPT/VIM_IMG228 transaction.
Alternatively, follow LiveLink VIM - Configuration > Non PO Processing > Non PO Parking Process Configuration > Technical Configuration > Advanced Process Customization > Post PSS Method Exit (Non PO).
2. Configure the post PSS method exit, using the following parameters:
Constant Value This value is used to manage document data after calling the dashboard.
Default value None
8.3.7 Configuring a Post Process (Sub)workflow In this step, you define custom subworkflows that will execute after completing the Non PO Parked Invoice document process.
To configure a post process (sub)workflow:
1. Execute the /OPT/VIM_IMG223 transaction.
Alternatively, follow LiveLink VIM - Configuration > Non PO Processing > Non PO Parking Process Configuration > Technical Configuration > Advanced Process Customization > Post Process (sub)Workflow.
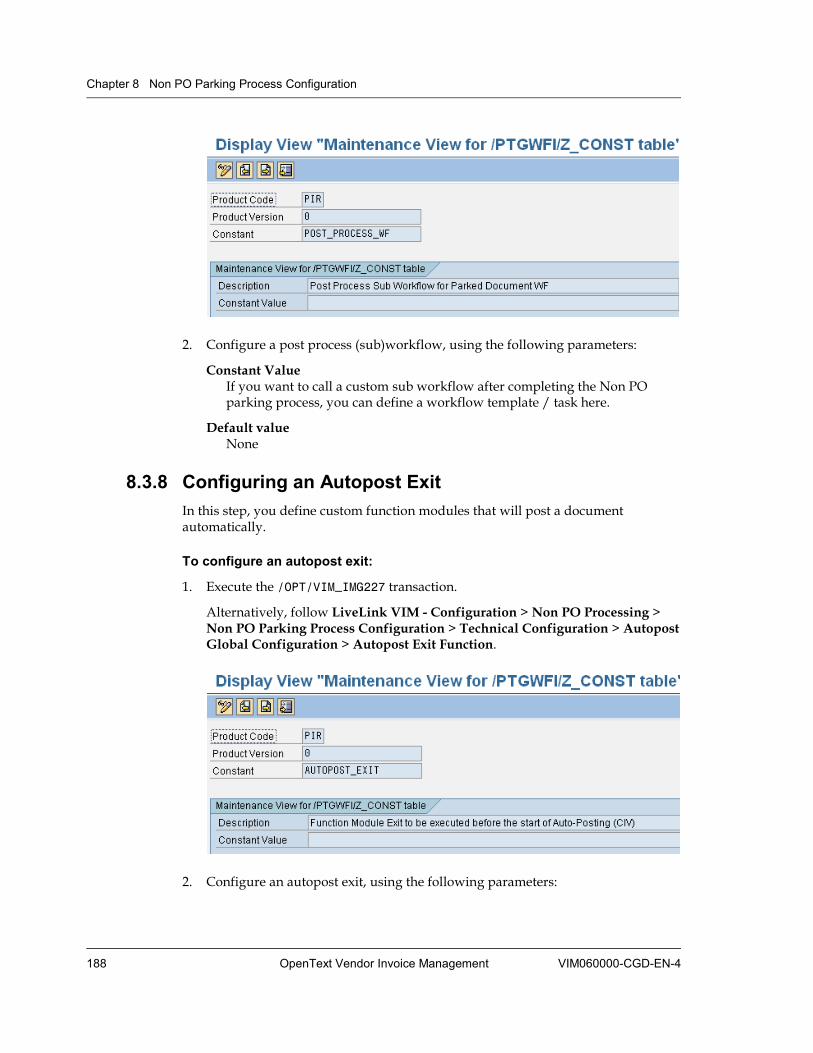
Chapter 8 Non PO Parking Process Configuration
188 OpenText Vendor Invoice Management VIM060000-CGD-EN-4
2. Configure a post process (sub)workflow, using the following parameters:
Constant Value If you want to call a custom sub workflow after completing the Non PO parking process, you can define a workflow template / task here.
Default value None
8.3.8 Configuring an Autopost Exit In this step, you define custom function modules that will post a document automatically.
To configure an autopost exit:
1. Execute the /OPT/VIM_IMG227 transaction.
Alternatively, follow LiveLink VIM - Configuration > Non PO Processing > Non PO Parking Process Configuration > Technical Configuration > Autopost Global Configuration > Autopost Exit Function.
2. Configure an autopost exit, using the following parameters:
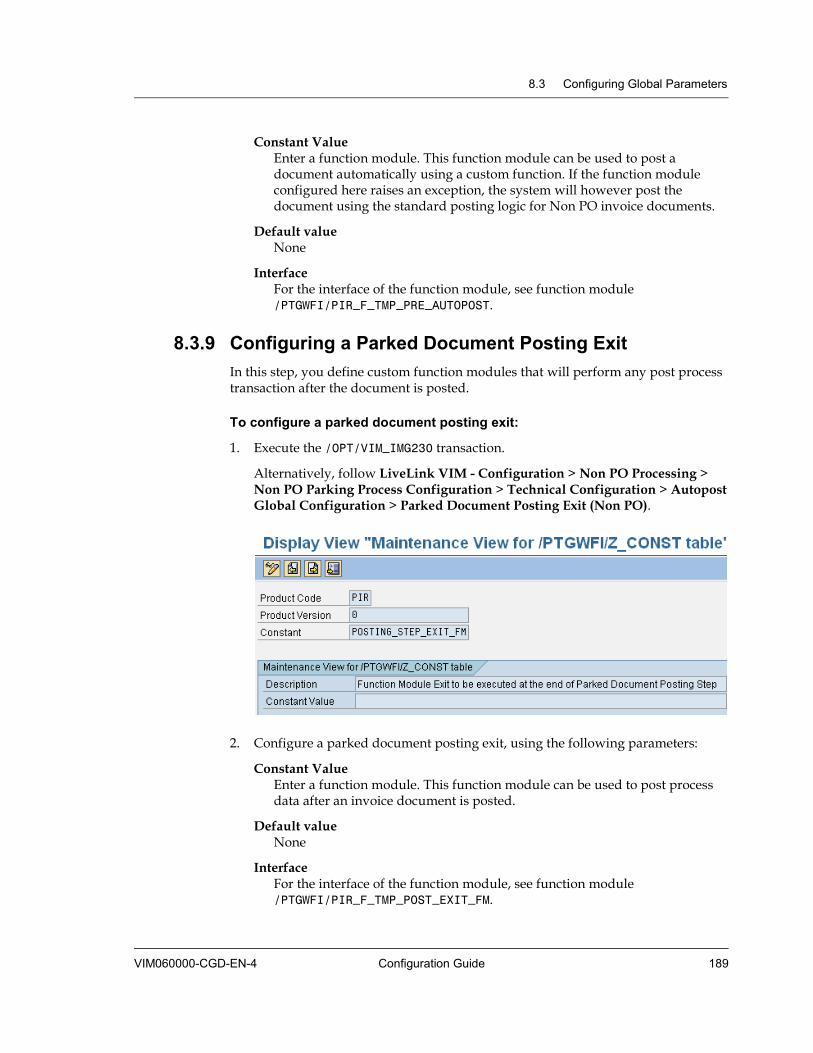
8.3 Configuring Global Parameters
VIM060000-CGD-EN-4 Configuration Guide 189
Constant Value Enter a function module. This function module can be used to post a document automatically using a custom function. If the function module configured here raises an exception, the system will however post the document using the standard posting logic for Non PO invoice documents.
Default value None
Interface For the interface of the function module, see function module /PTGWFI/PIR_F_TMP_PRE_AUTOPOST.
8.3.9 Configuring a Parked Document Posting Exit In this step, you define custom function modules that will perform any post process transaction after the document is posted.
To configure a parked document posting exit:
1. Execute the /OPT/VIM_IMG230 transaction.
Alternatively, follow LiveLink VIM - Configuration > Non PO Processing > Non PO Parking Process Configuration > Technical Configuration > Autopost Global Configuration > Parked Document Posting Exit (Non PO).
2. Configure a parked document posting exit, using the following parameters:
Constant Value Enter a function module. This function module can be used to post process data after an invoice document is posted.
Default value None
Interface For the interface of the function module, see function module /PTGWFI/PIR_F_TMP_POST_EXIT_FM.
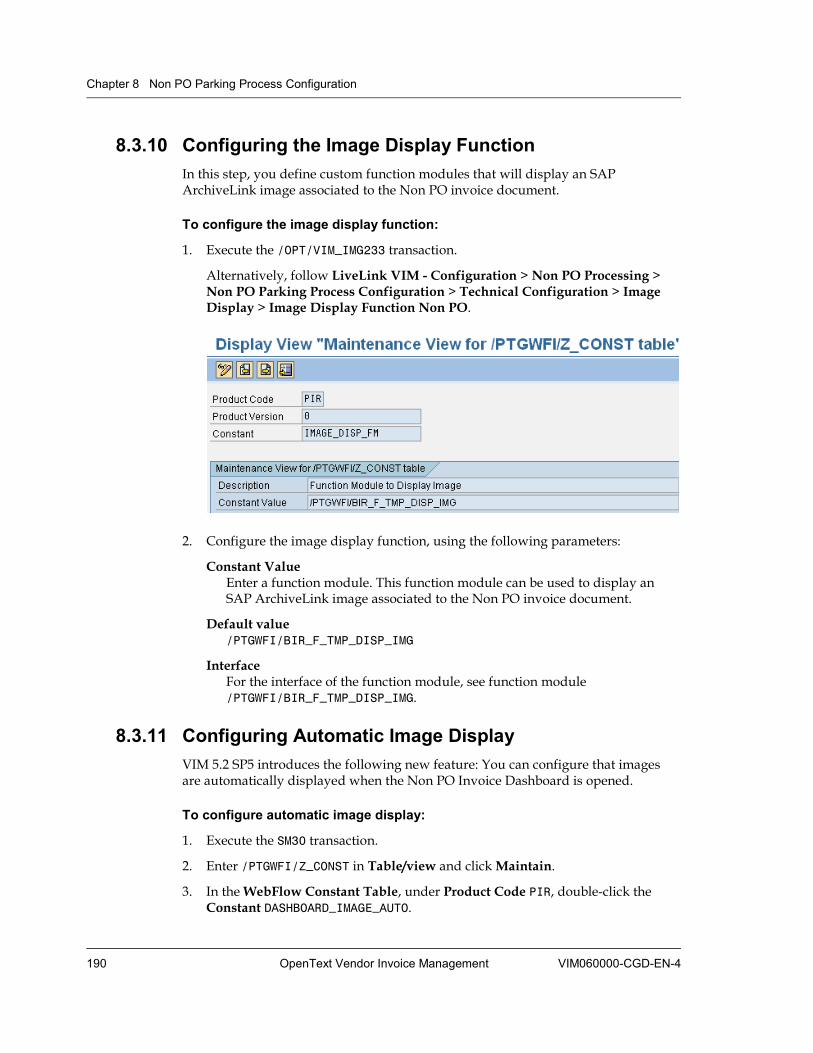
Chapter 8 Non PO Parking Process Configuration
190 OpenText Vendor Invoice Management VIM060000-CGD-EN-4
8.3.10 Configuring the Image Display Function In this step, you define custom function modules that will display an SAP ArchiveLink image associated to the Non PO invoice document.
To configure the image display function:
1. Execute the /OPT/VIM_IMG233 transaction.
Alternatively, follow LiveLink VIM - Configuration > Non PO Processing > Non PO Parking Process Configuration > Technical Configuration > Image Display > Image Display Function Non PO.
2. Configure the image display function, using the following parameters:
Constant Value Enter a function module. This function module can be used to display an SAP ArchiveLink image associated to the Non PO invoice document.
Default value /PTGWFI/BIR_F_TMP_DISP_IMG
Interface For the interface of the function module, see function module /PTGWFI/BIR_F_TMP_DISP_IMG.
8.3.11 Configuring Automatic Image Display VIM 5.2 SP5 introduces the following new feature: You can configure that images are automatically displayed when the Non PO Invoice Dashboard is opened.
To configure automatic image display:
1. Execute the SM30 transaction.
2. Enter /PTGWFI/Z_CONST in Table/view and click Maintain.
3. In the WebFlow Constant Table, under Product Code PIR, double-click the Constant DASHBOARD_IMAGE_AUTO.
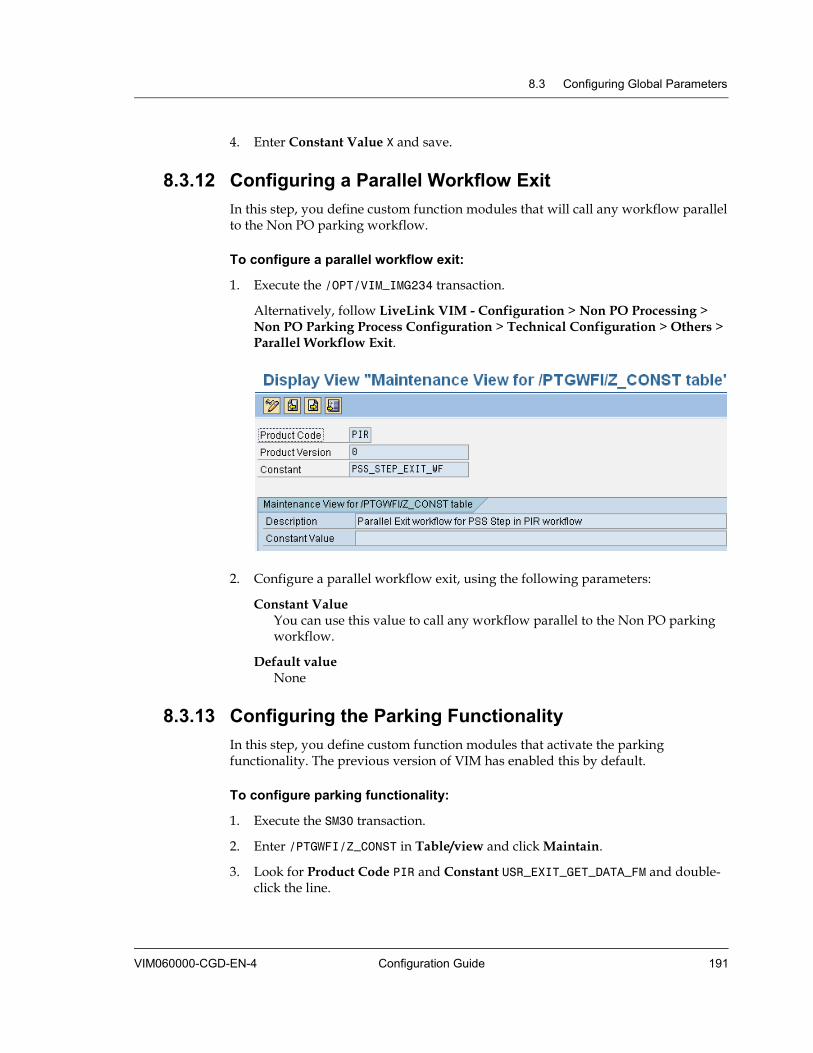
8.3 Configuring Global Parameters
VIM060000-CGD-EN-4 Configuration Guide 191
4. Enter Constant Value X and save.
8.3.12 Configuring a Parallel Workflow Exit In this step, you define custom function modules that will call any workflow parallel to the Non PO parking workflow.
To configure a parallel workflow exit:
1. Execute the /OPT/VIM_IMG234 transaction.
Alternatively, follow LiveLink VIM - Configuration > Non PO Processing > Non PO Parking Process Configuration > Technical Configuration > Others > Parallel Workflow Exit.
2. Configure a parallel workflow exit, using the following parameters:
Constant Value You can use this value to call any workflow parallel to the Non PO parking workflow.
Default value None
8.3.13 Configuring the Parking Functionality In this step, you define custom function modules that activate the parking functionality. The previous version of VIM has enabled this by default.
To configure parking functionality:
1. Execute the SM30 transaction.
2. Enter /PTGWFI/Z_CONST in Table/view and click Maintain.
3. Look for Product Code PIR and Constant USR_EXIT_GET_DATA_FM and double-click the line.
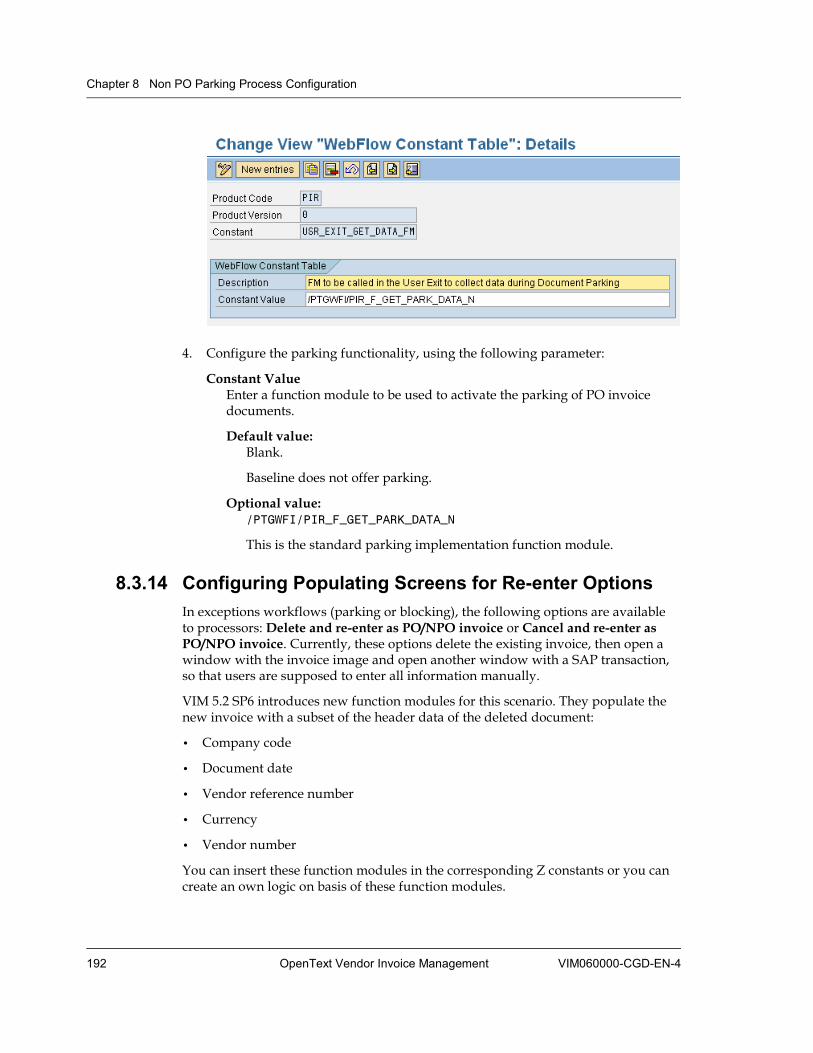
Chapter 8 Non PO Parking Process Configuration
192 OpenText Vendor Invoice Management VIM060000-CGD-EN-4
4. Configure the parking functionality, using the following parameter:
Constant Value Enter a function module to be used to activate the parking of PO invoice documents.
Default value: Blank.
Baseline does not offer parking.
Optional value: /PTGWFI/PIR_F_GET_PARK_DATA_N
This is the standard parking implementation function module.
8.3.14 Configuring Populating Screens for Re-enter Options In exceptions workflows (parking or blocking), the following options are available to processors: Delete and re-enter as PO/NPO invoice or Cancel and re-enter as PO/NPO invoice. Currently, these options delete the existing invoice, then open a window with the invoice image and open another window with a SAP transaction, so that users are supposed to enter all information manually.
VIM 5.2 SP6 introduces new function modules for this scenario. They populate the new invoice with a subset of the header data of the deleted document:
• Company code
• Document date
• Vendor reference number
• Currency
• Vendor number
You can insert these function modules in the corresponding Z constants or you can create an own logic on basis of these function modules.
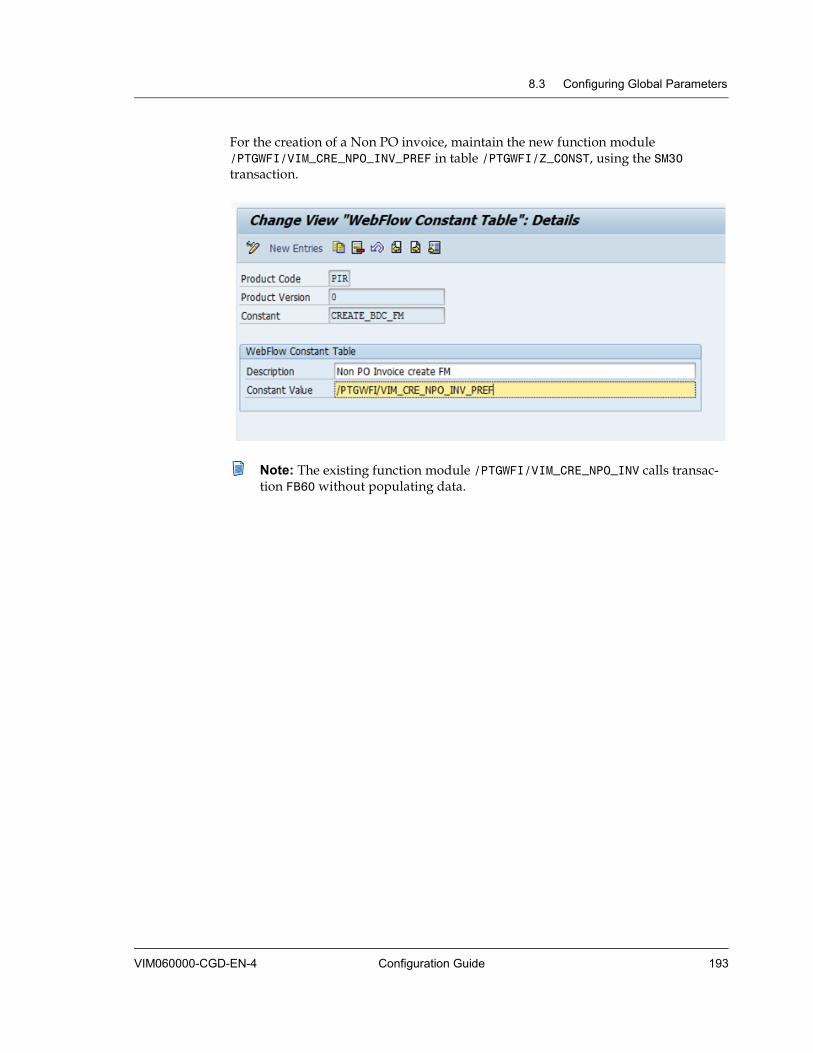
8.3 Configuring Global Parameters
VIM060000-CGD-EN-4 Configuration Guide 193
For the creation of a Non PO invoice, maintain the new function module /PTGWFI/VIM_CRE_NPO_INV_PREF in table /PTGWFI/Z_CONST, using the SM30 transaction.
Note: The existing function module /PTGWFI/VIM_CRE_NPO_INV calls transac-tion FB60 without populating data.


VIM060000-CGD-EN-4 OpenText Vendor Invoice Management 195
Chapter 9 Invoice Approval
Invoice Approval (IAP) is the component of VIM that handles the approval processes for both Non-PO based and PO based invoices.
Approvals can be handled at the DP processing stage or after the DP invoice is converted in to a SAP parked document. For DP document based approvals, the process type for DP approval needs to be configured in the system.
In case of parked document approvals, the invoice has to be parked with an appropriate parking reason before an approval process can start.
Depending on the parking reason configuration, an approval workflow starts.
The following are the main features of IAP:
• The approval workflow is a new sub workflow; approval steps are a technically different dialog task, separate from the parking or DP dashboard tasks for the other VIM workflows.
• The approval workflow supports multi level approval. For Non PO invoices, you can achieve this by configuration. For PO invoices, a custom extension is required. From baseline, PO invoices go through only one approval step (by the requester of the PO).
• The approval workflow supports approvals inside SAP GUI, and, if Web IAP is implemented, outside of SAP (OpenText Approval Portal). Web IAP is an optional component.
• For parked invoice documents, the approval sub workflow is available only for Approval required parking reasons. You can trigger the sub workflow either by configuring the parking reason to be Auto submit for approval or clicking the Submit for approval option.
• For DP invoice documents, the approval sub workflow can be triggered by configuring the Process Type to be Auto submit for approval or clicking the Submit for approval option.
• The approval sub workflow is completed when either the Approved completely or the Rejected completely flag is set on the monitor table.
• You can restart the approval sub workflow by clicking Change parking reason (parked invoice approval) or Submit for Approval (DP invoice approval).
Chapter 9 Invoice Approval
196 OpenText Vendor Invoice Management VIM060000-CGD-EN-4
9.1 Overview People involved
in the IAP process
There are several people (roles) that are involved in the IAP process. The actual names might be different; but the activities are the same.
Coder
The person who is responsible for entering accounting data. The coder can be both a SAP user and/or a web user if Web IAP is implemented.
Goods or Service Requester (Requisitioner) The person who requested the goods or the service.
Approver The person who is responsible for approving the invoices. The approver can be a SAP user or a web user if Web IAP is implemented.
AP Processor A member of the Accounts Payable (AP) department who deals with invoices.
The roles that are part of this process are different from the standard roles described in “Roles” on page 29. Since the functional requirements are different for IAP roles compared to other exception processes, a separate role infrastructure is required.
Trigger for the IAP process
When an invoice is parked with a parking reason that requires invoice approval, the IAP workflow gets initiated. It is possible to delay the start of the IAP process by first sending the invoice to the AP processor who can subsequently submit the invoice for approval.
End of the IAP process
There are several activities that mark the end of the IAP process:
• The invoice is finally approved and posted.
• The invoice is deleted.
• The invoice is complete rejected.
Swimlane of the IAP process
The business process for parked invoice approval in the IAP process can be depicted as shown in the following swimlane.
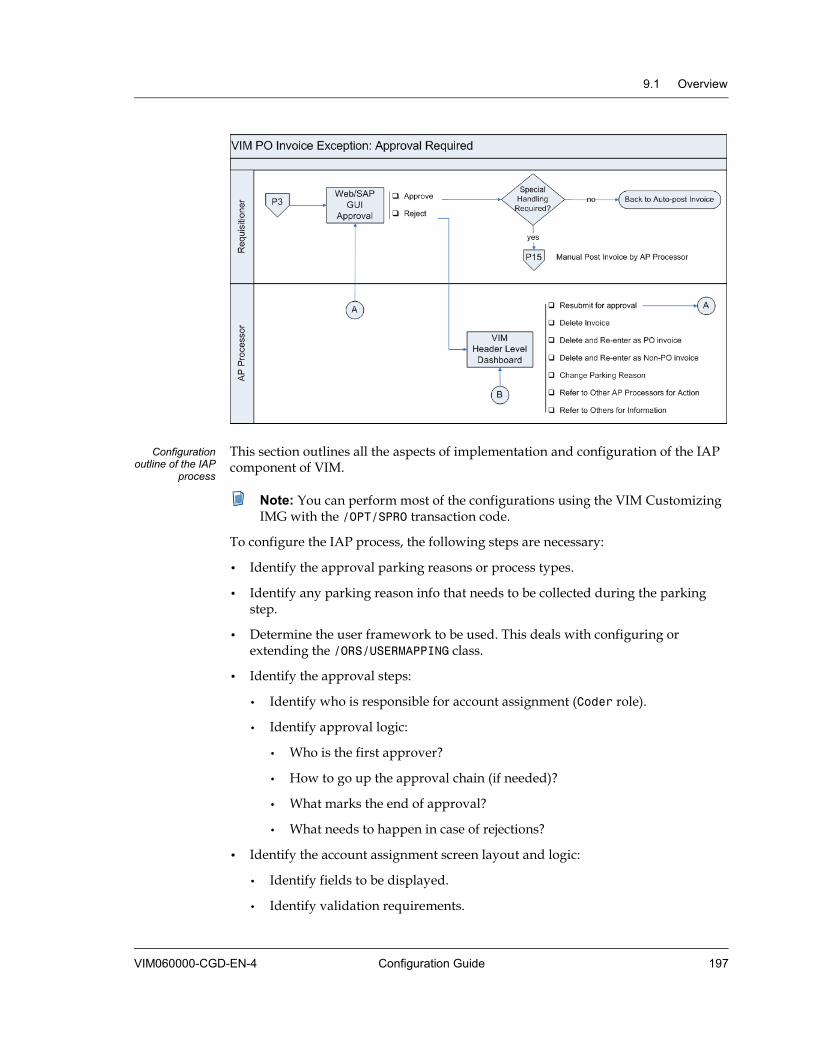
9.1 Overview
VIM060000-CGD-EN-4 Configuration Guide 197
Configuration outline of the IAP
process
This section outlines all the aspects of implementation and configuration of the IAP component of VIM.
Note: You can perform most of the configurations using the VIM Customizing IMG with the /OPT/SPRO transaction code.
To configure the IAP process, the following steps are necessary:
• Identify the approval parking reasons or process types.
• Identify any parking reason info that needs to be collected during the parking step.
• Determine the user framework to be used. This deals with configuring or extending the /ORS/USERMAPPING class.
• Identify the approval steps:
• Identify who is responsible for account assignment (Coder role).
• Identify approval logic:
• Who is the first approver?
• How to go up the approval chain (if needed)?
• What marks the end of approval?
• What needs to happen in case of rejections?
• Identify the account assignment screen layout and logic:
• Identify fields to be displayed.
• Identify validation requirements.
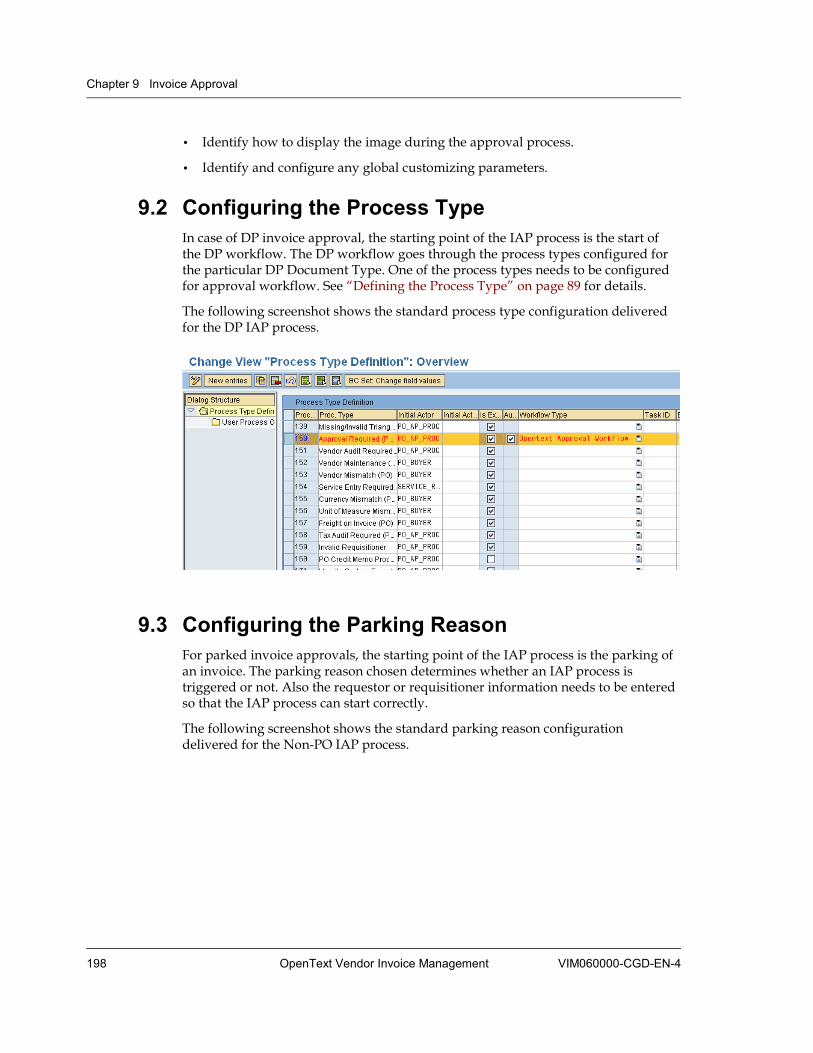
Chapter 9 Invoice Approval
198 OpenText Vendor Invoice Management VIM060000-CGD-EN-4
• Identify how to display the image during the approval process.
• Identify and configure any global customizing parameters.
9.2 Configuring the Process Type In case of DP invoice approval, the starting point of the IAP process is the start of the DP workflow. The DP workflow goes through the process types configured for the particular DP Document Type. One of the process types needs to be configured for approval workflow. See “Defining the Process Type” on page 89 for details.
The following screenshot shows the standard process type configuration delivered for the DP IAP process.
9.3 Configuring the Parking Reason For parked invoice approvals, the starting point of the IAP process is the parking of an invoice. The parking reason chosen determines whether an IAP process is triggered or not. Also the requestor or requisitioner information needs to be entered so that the IAP process can start correctly.
The following screenshot shows the standard parking reason configuration delivered for the Non-PO IAP process.
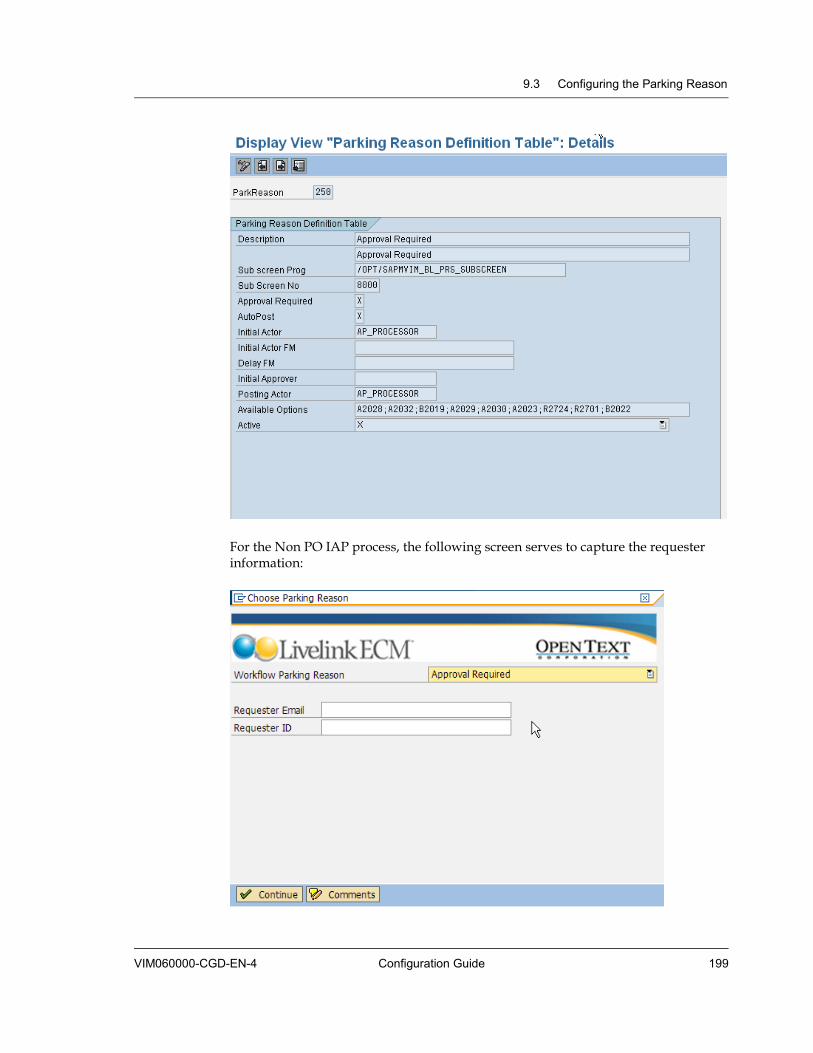
9.3 Configuring the Parking Reason
VIM060000-CGD-EN-4 Configuration Guide 199
For the Non PO IAP process, the following screen serves to capture the requester information:
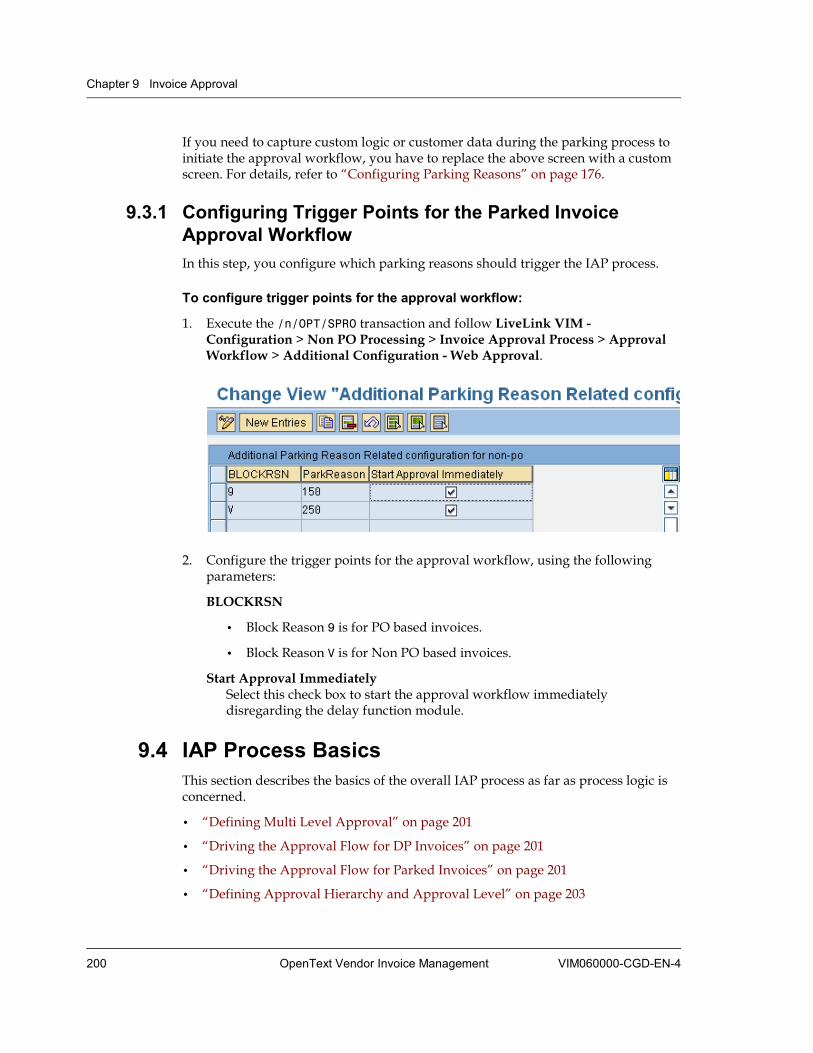
Chapter 9 Invoice Approval
200 OpenText Vendor Invoice Management VIM060000-CGD-EN-4
If you need to capture custom logic or customer data during the parking process to initiate the approval workflow, you have to replace the above screen with a custom screen. For details, refer to “Configuring Parking Reasons” on page 176.
9.3.1 Configuring Trigger Points for the Parked Invoice Approval Workflow In this step, you configure which parking reasons should trigger the IAP process.
To configure trigger points for the approval workflow:
1. Execute the /n/OPT/SPRO transaction and follow LiveLink VIM - Configuration > Non PO Processing > Invoice Approval Process > Approval Workflow > Additional Configuration - Web Approval.
2. Configure the trigger points for the approval workflow, using the following parameters:
BLOCKRSN
• Block Reason 9 is for PO based invoices.
• Block Reason V is for Non PO based invoices.
Start Approval Immediately Select this check box to start the approval workflow immediately disregarding the delay function module.
9.4 IAP Process Basics This section describes the basics of the overall IAP process as far as process logic is concerned.
• “Defining Multi Level Approval” on page 201
• “Driving the Approval Flow for DP Invoices” on page 201
• “Driving the Approval Flow for Parked Invoices” on page 201
• “Defining Approval Hierarchy and Approval Level” on page 203
9.4 IAP Process Basics
VIM060000-CGD-EN-4 Configuration Guide 201
• “Defining the Expense Type” on page 203
• “Defining Approval Access Rights” on page 204
• “Configuring the Email Notification” on page 204
• “Configuring the Certify Message” on page 208
• “Configuring General Ledger Fields” on page 209
• “Configuring Search Help for Web Screen Fields” on page 215
9.4.1 Defining Multi Level Approval Note: For PO invoices, a custom extension is required for multi level approval. From baseline, PO invoices go through only one approval step (by the requester of the PO).
To define a multi level approval process, you have to consider the following aspects:
• How to identify the first approver?
• Who should approve the invoice after the current approver approves the invoice?
• When is an invoice considered finally approved?
9.4.2 Driving the Approval Flow for DP Invoices The IAP process starts when a DP PO invoice or a DP Non PO invoice gets the process type for approval or a user from the Accounts Payable (AP) department specifically clicks the option Submit for Approval from the DP dashboard. In case of a DP Non PO invoice, the initial approver is usually entered in the indexing screen in the field Email Id. For DP PO invoices, the initial approver is picked up from the requisitioner of the PO. The user from the AP department has the option to choose the initial approval if the IAP process is started from the DP dashboard.
The subsequent approvers (only for Non PO invoices) are determined when the current approver approves the invoice. The system proposes the next approver by the predefined organizational hierarchy.
If the current approver rejects the invoice, the invoice is sent to the previous approver. However, if the previous approver is a delegated coder, the invoice is sent to the original approver who delegated the task. All approvers who approve the invoice are stored in the approval stack. So, in case the current approver rejects the invoice, the system knows the last approver. If the first approver rejects the invoice, the invoice is sent back to the AP department.
9.4.3 Driving the Approval Flow for Parked Invoices The IAP process starts when a PO or Non PO invoice is parked, or someone from the Accounts Payable (AP) department specifically chooses the action Submit for Approval from the Process Selection Screen. The initial approver is usually entered
Chapter 9 Invoice Approval
202 OpenText Vendor Invoice Management VIM060000-CGD-EN-4
when parking the document. Sometimes, the initial approver may be entered as part of the invoice indexing before parking the SAP document.
Notes:
• Implementation note
When you enter the first approver at the parking reason screen or indexing screen, we recommend using the combination of last name, first name and email address. If the combination fails to identify one user, the system may suggest a list of matching users.
• Technical note
The initial approver is usually stored in the parking monitor table (/PTGWFI/F_PIRMTR) and retrieved by the /ORS/APPROVER-> NEW method.
The subsequent approvers (only for Non PO invoices) are determined when the current approver approves the invoice. The system proposes the next approver by the predefined organizational hierarchy.
Technical note
The initial approver is usually stored in the parking monitor table (/PTGWFI/F_PIRMTR) and retrieved by the /ORS/APPROVER-> NEXT method.
If the current approver rejects the invoice, the invoice is sent to the previous approver. However, if the previous approver is a delegated coder, the invoice is sent to the original approver who delegated the task. All approvers who approved the invoice are stored in the approval stack so that in case the current approver rejects the invoice, the system knows who the last approver was. If the first approver rejects the invoice, the invoice is sent back to the AP department.
Technical Notes
• You can configure who receives the work item after the first approver rejects the invoice. You perform this configuration in the parking reason table /PTGWFI/F_PRKRSN for a non-PO invoice or /PTGWFI/M_PRKRSN for a PO invoice.
• The approval is considered completed if one or more of the following conditions apply:
• The current approver has sufficient authorization for the invoice amount.
• There is no more person that is defined as the superior of the current approver in the current approval structure.
• Other predetermined termination conditions apply, such as a predetermined number of approvers is reached.
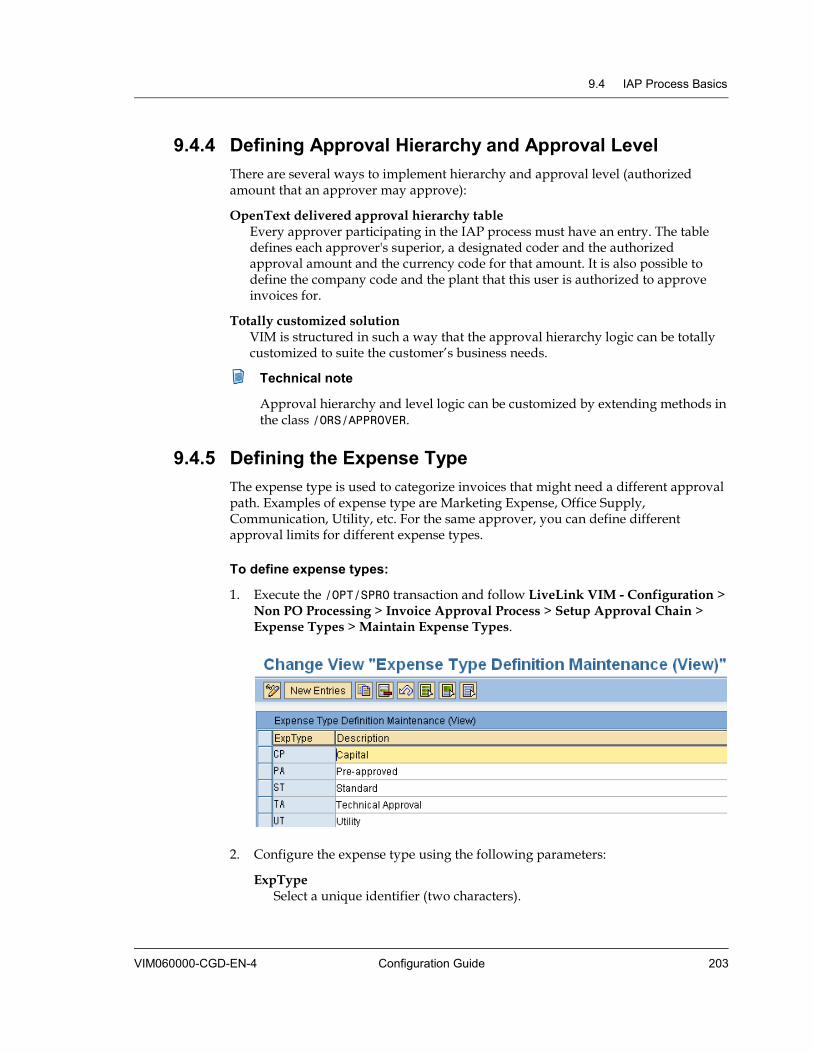
9.4 IAP Process Basics
VIM060000-CGD-EN-4 Configuration Guide 203
9.4.4 Defining Approval Hierarchy and Approval Level There are several ways to implement hierarchy and approval level (authorized amount that an approver may approve):
OpenText delivered approval hierarchy table Every approver participating in the IAP process must have an entry. The table defines each approver's superior, a designated coder and the authorized approval amount and the currency code for that amount. It is also possible to define the company code and the plant that this user is authorized to approve invoices for.
Totally customized solution VIM is structured in such a way that the approval hierarchy logic can be totally customized to suite the customer’s business needs.
Technical note
Approval hierarchy and level logic can be customized by extending methods in the class /ORS/APPROVER.
9.4.5 Defining the Expense Type The expense type is used to categorize invoices that might need a different approval path. Examples of expense type are Marketing Expense, Office Supply, Communication, Utility, etc. For the same approver, you can define different approval limits for different expense types.
To define expense types:
1. Execute the /OPT/SPRO transaction and follow LiveLink VIM - Configuration > Non PO Processing > Invoice Approval Process > Setup Approval Chain > Expense Types > Maintain Expense Types.
2. Configure the expense type using the following parameters:
ExpType Select a unique identifier (two characters).

Chapter 9 Invoice Approval
204 OpenText Vendor Invoice Management VIM060000-CGD-EN-4
Description Enter a description of the expense type.
Approval Req Activate by typing X if the expense type requires an Invoice Approval process.
Technical notes
• Table /ORS/APPRLEVEL has included expense type as a key field.
• Table /ORS/EXPENSE_DEC stores the description and the language and table /ORS/EXPENSE_TYP stores Approval Req and ExpType.
9.4.6 Defining Approval Access Rights The approver has the following access rights:
Approve Approve or reject an invoice; enter comments.
Coding Enter accounting information.
Coding_Display View accounting information.
Coding_Delegation Specify a Coder which means a specialist to enter the accounting information.
Override Override the system-proposed next approver.
Look_ahead View the entire approval chain or pre-determine all the approvers.
Configuration Determine next approver’s access options (available in future releases).
The access rights are controlled by various flags that can be set for stack entries during approval logic execution.
9.4.7 Configuring the Email Notification Approvers will receive emails saying that new invoices are waiting in their SAP inbox. If the optional Web IAP is implemented, the emails contain a URL link to either the portal with invoice iView or the invoice list page.
You can configure the notification email to include some invoice information, such as vendor name, invoice reference number, invoice amount, etc. The following is an example of a notification email:
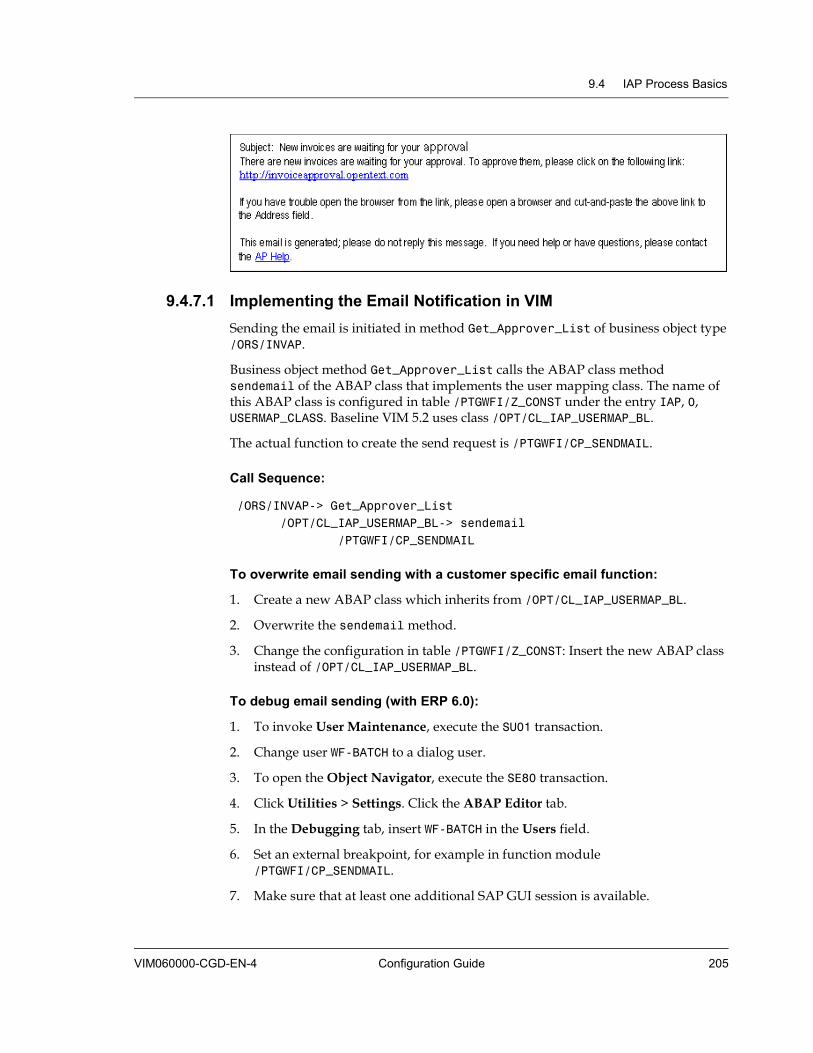
9.4 IAP Process Basics
VIM060000-CGD-EN-4 Configuration Guide 205
9.4.7.1 Implementing the Email Notification in VIM Sending the email is initiated in method Get_Approver_List of business object type /ORS/INVAP.
Business object method Get_Approver_List calls the ABAP class method sendemail of the ABAP class that implements the user mapping class. The name of this ABAP class is configured in table /PTGWFI/Z_CONST under the entry IAP, 0,USERMAP_CLASS. Baseline VIM 5.2 uses class /OPT/CL_IAP_USERMAP_BL.
The actual function to create the send request is /PTGWFI/CP_SENDMAIL.
Call Sequence:
/ORS/INVAP-> Get_Approver_List /OPT/CL_IAP_USERMAP_BL-> sendemail /PTGWFI/CP_SENDMAIL
To overwrite email sending with a customer specific email function:
1. Create a new ABAP class which inherits from /OPT/CL_IAP_USERMAP_BL.
2. Overwrite the sendemail method.
3. Change the configuration in table /PTGWFI/Z_CONST: Insert the new ABAP class instead of /OPT/CL_IAP_USERMAP_BL.
To debug email sending (with ERP 6.0):
1. To invoke User Maintenance, execute the SU01 transaction.
2. Change user WF-BATCH to a dialog user.
3. To open the Object Navigator, execute the SE80 transaction.
4. Click Utilities > Settings. Click the ABAP Editor tab.
5. In the Debugging tab, insert WF-BATCH in the Users field.
6. Set an external breakpoint, for example in function module /PTGWFI/CP_SENDMAIL.
7. Make sure that at least one additional SAP GUI session is available.
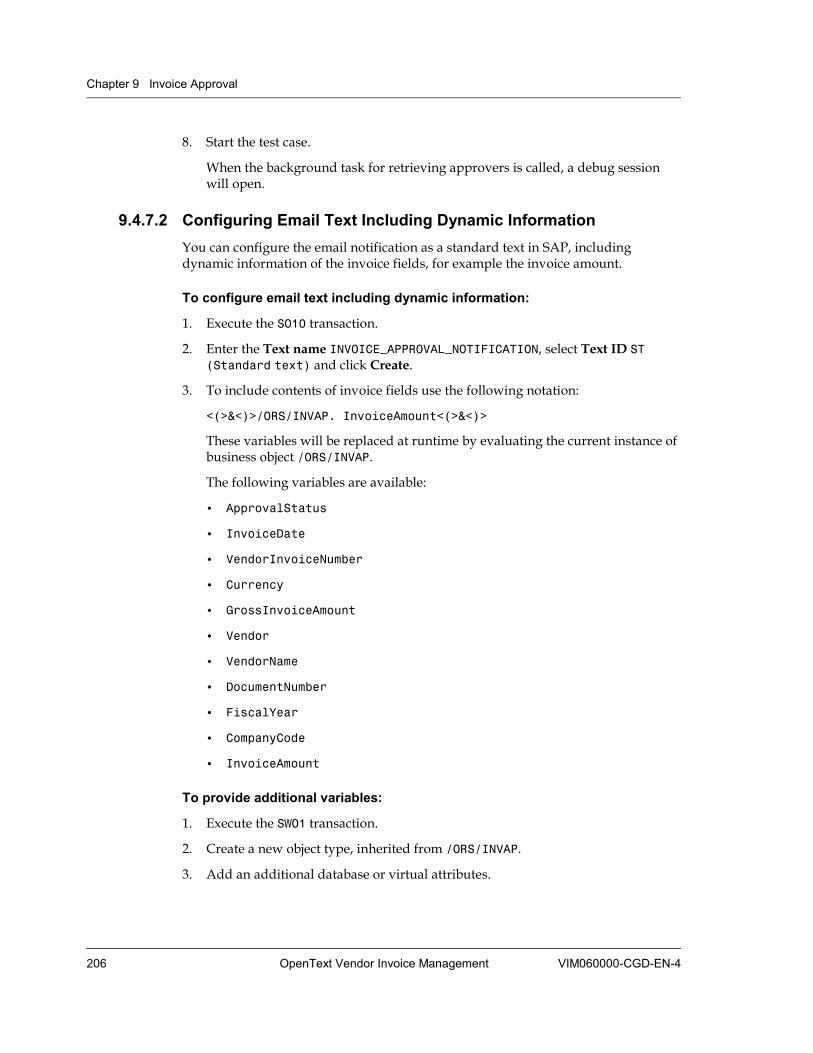
Chapter 9 Invoice Approval
206 OpenText Vendor Invoice Management VIM060000-CGD-EN-4
8. Start the test case.
When the background task for retrieving approvers is called, a debug session will open.
9.4.7.2 Configuring Email Text Including Dynamic Information You can configure the email notification as a standard text in SAP, including dynamic information of the invoice fields, for example the invoice amount.
To configure email text including dynamic information:
1. Execute the SO10 transaction.
2. Enter the Text name INVOICE_APPROVAL_NOTIFICATION, select Text ID ST (Standard text) and click Create.
3. To include contents of invoice fields use the following notation:
<(>&<)>/ORS/INVAP. InvoiceAmount<(>&<)>
These variables will be replaced at runtime by evaluating the current instance of business object /ORS/INVAP.
The following variables are available:
• ApprovalStatus
• InvoiceDate
• VendorInvoiceNumber
• Currency
• GrossInvoiceAmount
• Vendor
• VendorName
• DocumentNumber
• FiscalYear
• CompanyCode
• InvoiceAmount
To provide additional variables:
1. Execute the SWO1 transaction.
2. Create a new object type, inherited from /ORS/INVAP.
3. Add an additional database or virtual attributes.
9.4 IAP Process Basics
VIM060000-CGD-EN-4 Configuration Guide 207
Other option
Overwrite the sendemail method. See “To overwrite email sending with a customer specific email function:” on page 205.
9.4.7.3 Additional Information About the Email Notification Email subject line
The first line of the text stored in SO10 is used as the subject line of the email.
User specific notification setting In the User Preference screen of the Approval Portal, users can choose if they want to receive a notification email for any invoice requiring their attention. Therefore, users must select the Receive email notification check box.
This setting is retrieved from table /ors/user_prefer, field e_notify_active.
Language limitation When the email is built, the text stored in the SO10 transaction is retrieved with language taken from sy-langu.
The workflow language is determined, when the approval workflow is started. This can be the logon language of the user who scanned the invoice or the logon language of the last user who processed the invoice in the DP workflow.
Important
If no text can be found for the current value of sy-langu, then no email is sent.
Therefore the text should be maintained in all languages that are typically used for logon.
Function /PTGWFI/CP_SENDMAIL:
CALL FUNCTION 'READ_TEXT' EXPORTING CLIENT = SY-MANDT ID = TEXT_ID LANGUAGE = SY-LANGU NAME = TEXT_NAME OBJECT = 'TEXT' IMPORTING HEADER = HEADER TABLES LINES = TEXT_LINES EXCEPTIONS
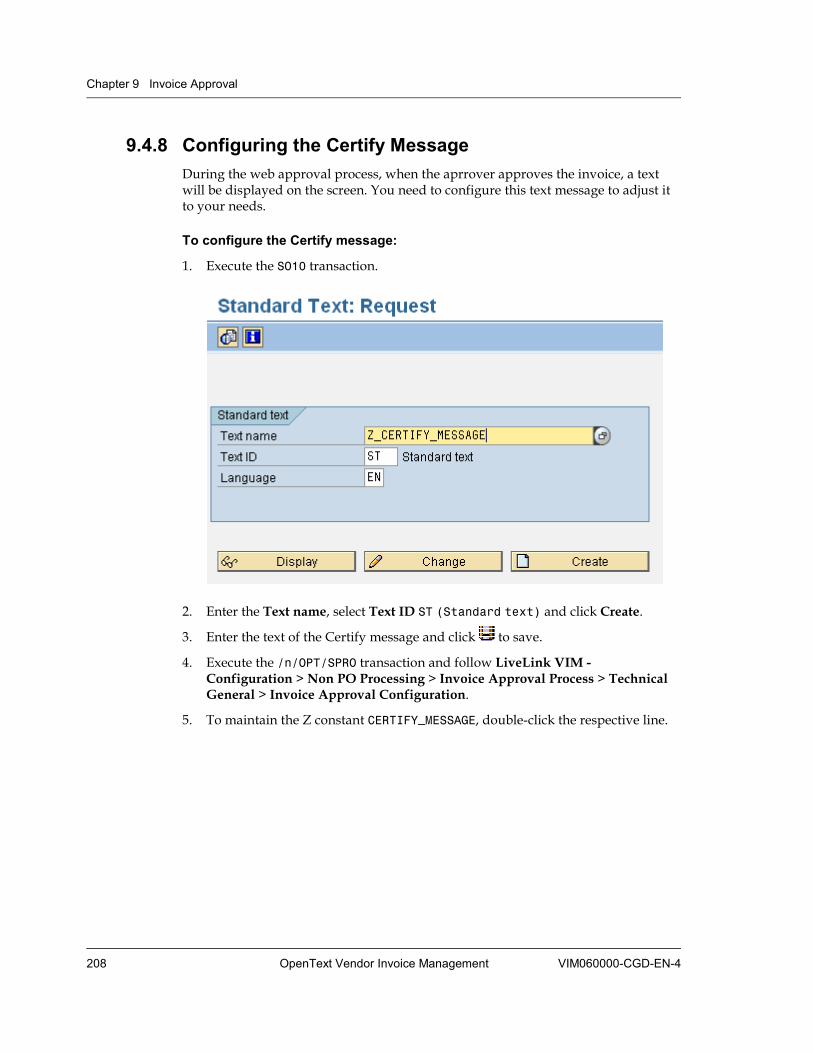
Chapter 9 Invoice Approval
208 OpenText Vendor Invoice Management VIM060000-CGD-EN-4
9.4.8 Configuring the Certify Message During the web approval process, when the aprrover approves the invoice, a text will be displayed on the screen. You need to configure this text message to adjust it to your needs.
To configure the Certify message:
1. Execute the SO10 transaction.
2. Enter the Text name, select Text ID ST (Standard text) and click Create.
3. Enter the text of the Certify message and click to save.
4. Execute the /n/OPT/SPRO transaction and follow LiveLink VIM - Configuration > Non PO Processing > Invoice Approval Process > Technical General > Invoice Approval Configuration.
5. To maintain the Z constant CERTIFY_MESSAGE, double-click the respective line.
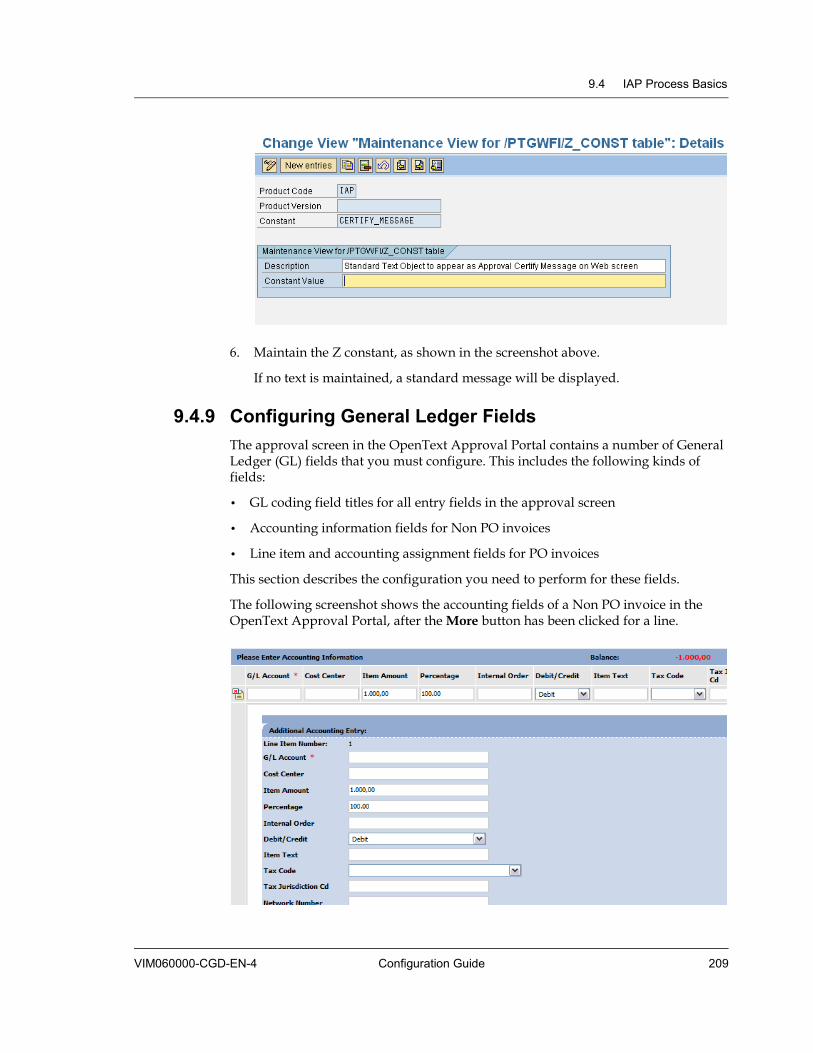
9.4 IAP Process Basics
VIM060000-CGD-EN-4 Configuration Guide 209
6. Maintain the Z constant, as shown in the screenshot above.
If no text is maintained, a standard message will be displayed.
9.4.9 Configuring General Ledger Fields The approval screen in the OpenText Approval Portal contains a number of General Ledger (GL) fields that you must configure. This includes the following kinds of fields:
• GL coding field titles for all entry fields in the approval screen
• Accounting information fields for Non PO invoices
• Line item and accounting assignment fields for PO invoices
This section describes the configuration you need to perform for these fields.
The following screenshot shows the accounting fields of a Non PO invoice in the OpenText Approval Portal, after the More button has been clicked for a line.
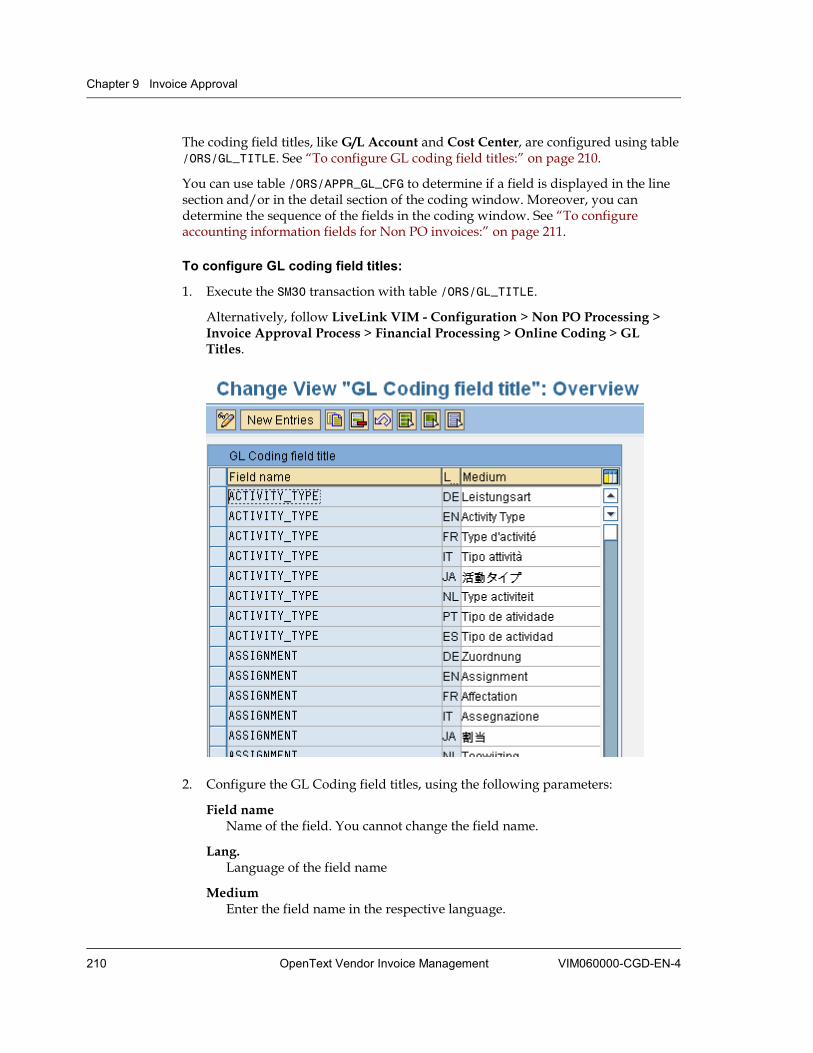
Chapter 9 Invoice Approval
210 OpenText Vendor Invoice Management VIM060000-CGD-EN-4
The coding field titles, like G/L Account and Cost Center, are configured using table /ORS/GL_TITLE. See “To configure GL coding field titles:” on page 210.
You can use table /ORS/APPR_GL_CFG to determine if a field is displayed in the line section and/or in the detail section of the coding window. Moreover, you can determine the sequence of the fields in the coding window. See “To configure accounting information fields for Non PO invoices:” on page 211.
To configure GL coding field titles:
1. Execute the SM30 transaction with table /ORS/GL_TITLE.
Alternatively, follow LiveLink VIM - Configuration > Non PO Processing > Invoice Approval Process > Financial Processing > Online Coding > GL Titles.
2. Configure the GL Coding field titles, using the following parameters:
Field name Name of the field. You cannot change the field name.
Lang. Language of the field name
Medium Enter the field name in the respective language.

9.4 IAP Process Basics
VIM060000-CGD-EN-4 Configuration Guide 211
3. Save your settings.
To configure accounting information fields for Non PO invoices:
1. Execute the SM30 transaction with table /ORS/APPR_GL_CFG.
Alternatively, follow LiveLink VIM - Configuration > Non PO Processing > Invoice Approval Process > Financial Processing > Online Coding > GL Configuration.
This configuration table defines the coding fields. The table determines which fields are shown and in which sequence they are shown in the coding window. It also determines which SAP field is mapped to each coding field.
2. Double-click a line to open the Screen Config table for /ORS/000005 Development: Details screen.
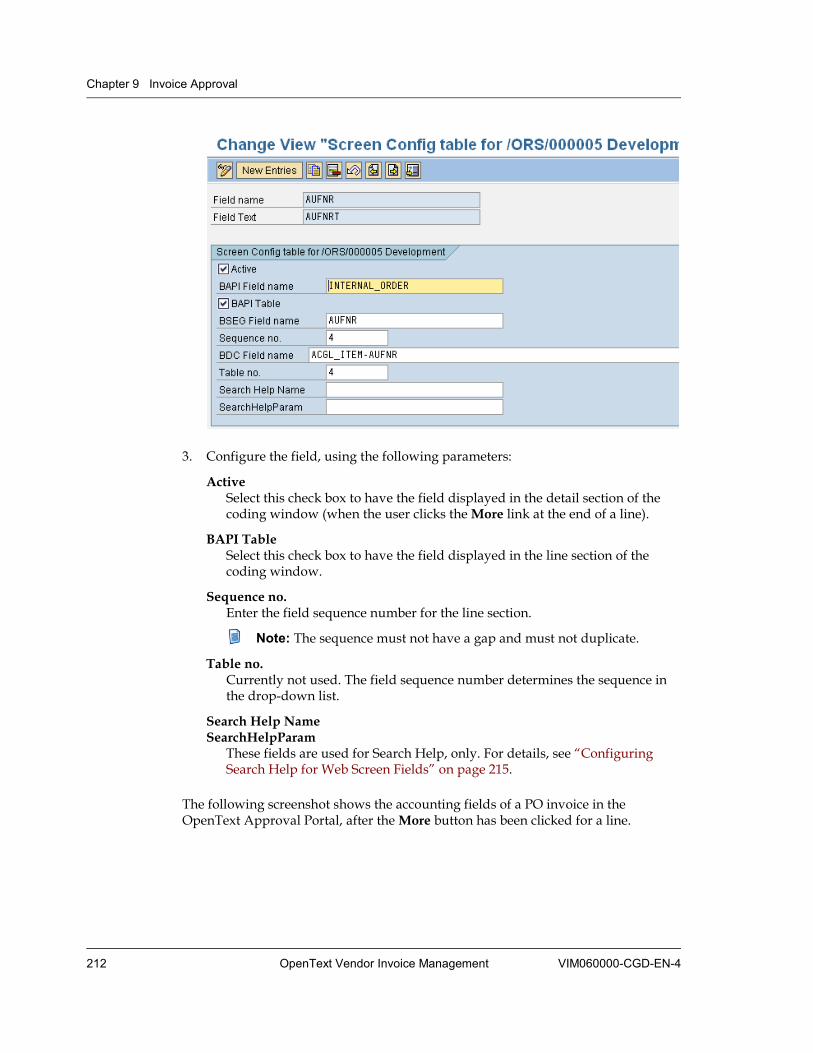
Chapter 9 Invoice Approval
212 OpenText Vendor Invoice Management VIM060000-CGD-EN-4
3. Configure the field, using the following parameters:
Active Select this check box to have the field displayed in the detail section of the coding window (when the user clicks the More link at the end of a line).
BAPI Table Select this check box to have the field displayed in the line section of the coding window.
Sequence no. Enter the field sequence number for the line section.
Note: The sequence must not have a gap and must not duplicate.
Table no. Currently not used. The field sequence number determines the sequence in the drop-down list.
Search Help Name SearchHelpParam
These fields are used for Search Help, only. For details, see “Configuring Search Help for Web Screen Fields” on page 215.
The following screenshot shows the accounting fields of a PO invoice in the OpenText Approval Portal, after the More button has been clicked for a line.
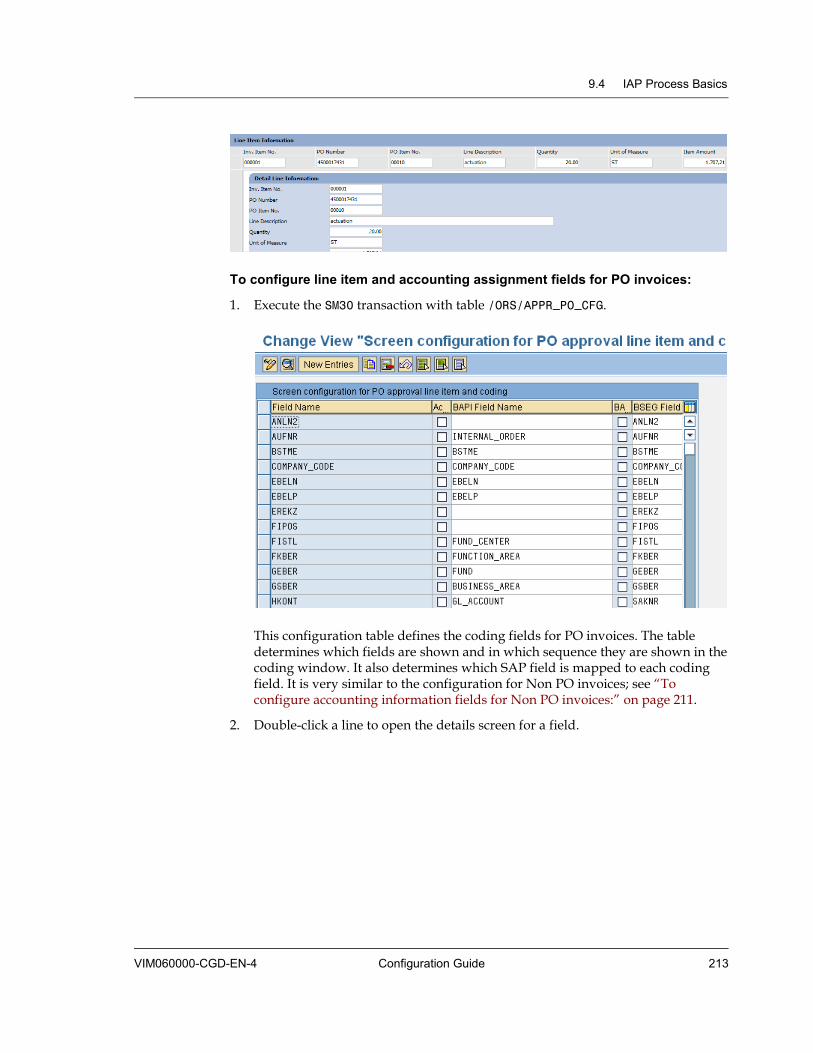
9.4 IAP Process Basics
VIM060000-CGD-EN-4 Configuration Guide 213
To configure line item and accounting assignment fields for PO invoices:
1. Execute the SM30 transaction with table /ORS/APPR_PO_CFG.
This configuration table defines the coding fields for PO invoices. The table determines which fields are shown and in which sequence they are shown in the coding window. It also determines which SAP field is mapped to each coding field. It is very similar to the configuration for Non PO invoices; see “To configure accounting information fields for Non PO invoices:” on page 211.
2. Double-click a line to open the details screen for a field.
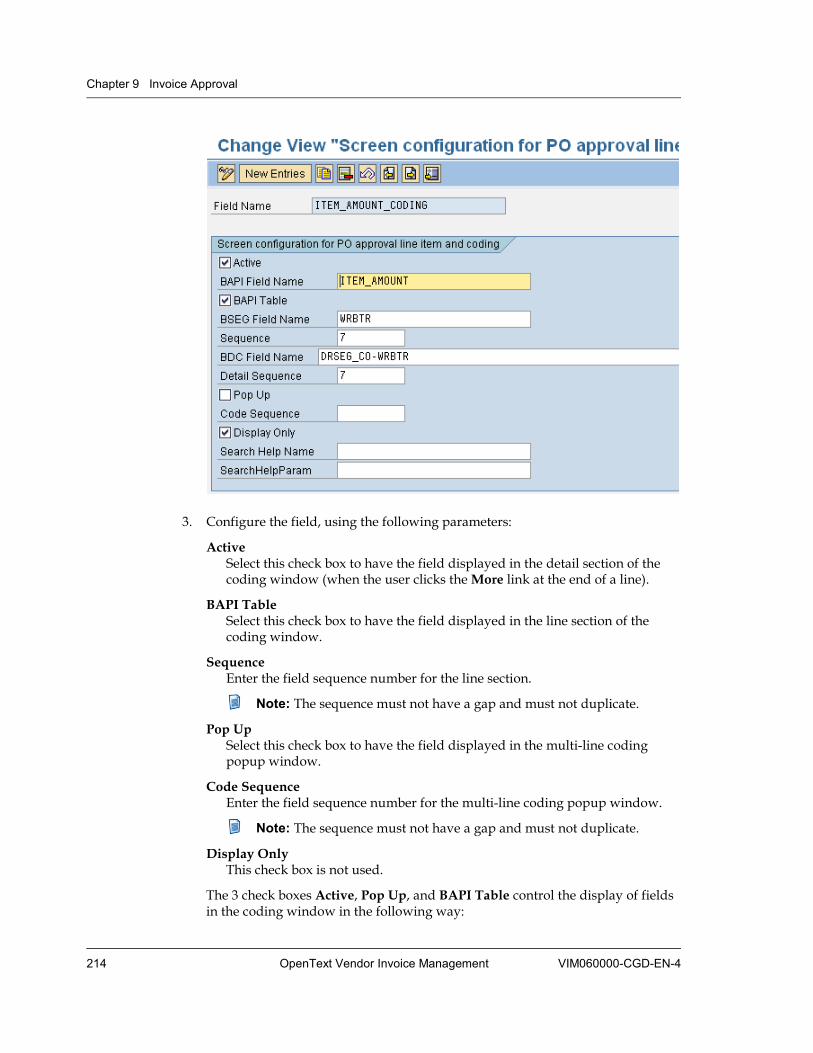
Chapter 9 Invoice Approval
214 OpenText Vendor Invoice Management VIM060000-CGD-EN-4
3. Configure the field, using the following parameters:
Active Select this check box to have the field displayed in the detail section of the coding window (when the user clicks the More link at the end of a line).
BAPI Table Select this check box to have the field displayed in the line section of the coding window.
Sequence Enter the field sequence number for the line section.
Note: The sequence must not have a gap and must not duplicate.
Pop Up Select this check box to have the field displayed in the multi-line coding popup window.
Code Sequence Enter the field sequence number for the multi-line coding popup window.
Note: The sequence must not have a gap and must not duplicate.
Display Only This check box is not used.
The 3 check boxes Active, Pop Up, and BAPI Table control the display of fields in the coding window in the following way:
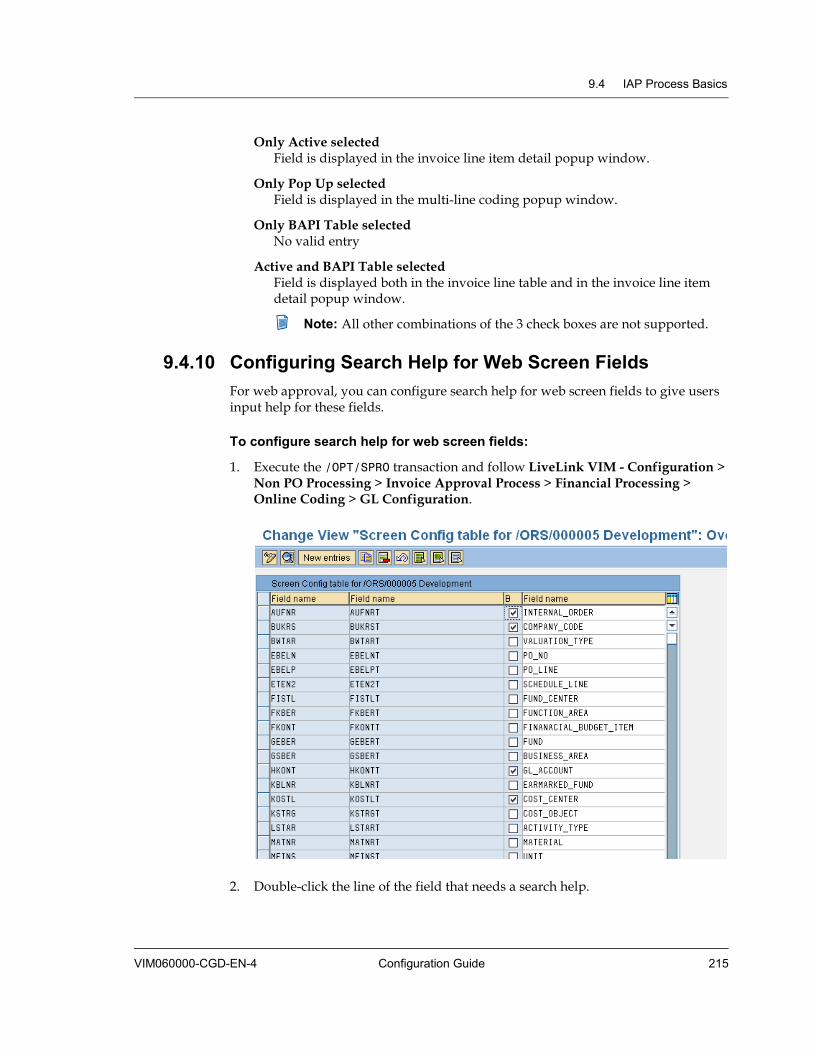
9.4 IAP Process Basics
VIM060000-CGD-EN-4 Configuration Guide 215
Only Active selected Field is displayed in the invoice line item detail popup window.
Only Pop Up selected Field is displayed in the multi-line coding popup window.
Only BAPI Table selected No valid entry
Active and BAPI Table selected Field is displayed both in the invoice line table and in the invoice line item detail popup window.
Note: All other combinations of the 3 check boxes are not supported.
9.4.10 Configuring Search Help for Web Screen Fields For web approval, you can configure search help for web screen fields to give users input help for these fields.
To configure search help for web screen fields:
1. Execute the /OPT/SPRO transaction and follow LiveLink VIM - Configuration > Non PO Processing > Invoice Approval Process > Financial Processing > Online Coding > GL Configuration.
2. Double-click the line of the field that needs a search help.
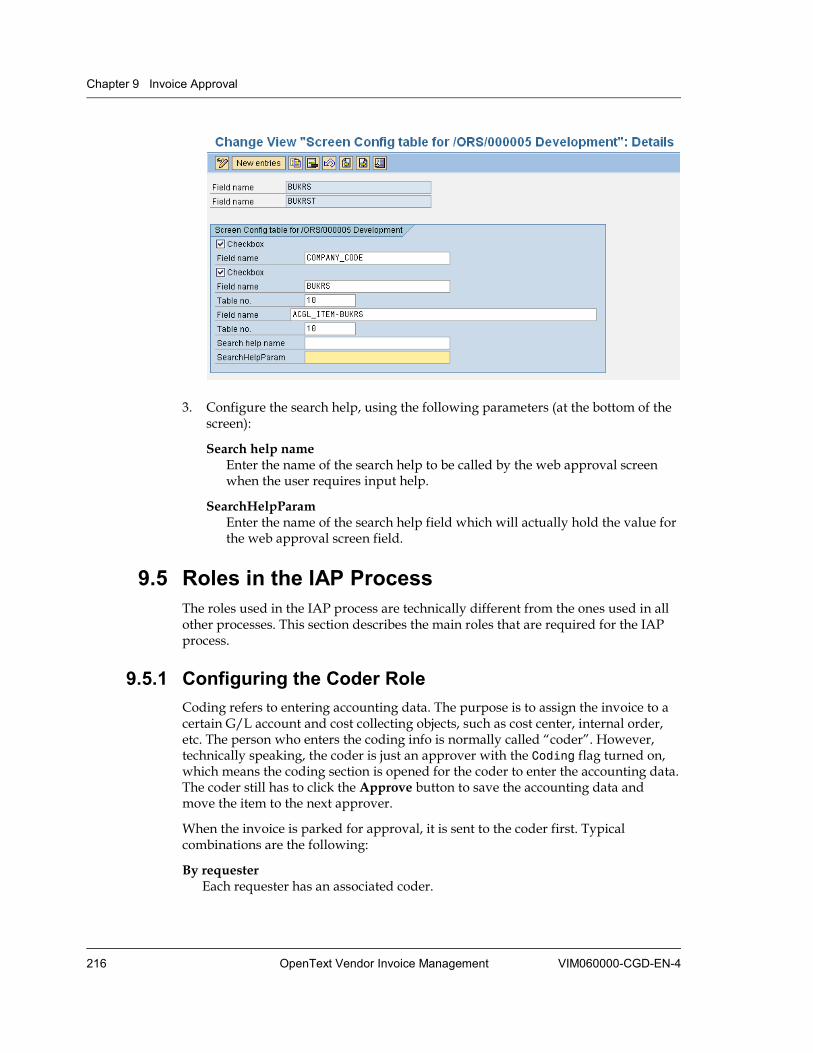
Chapter 9 Invoice Approval
216 OpenText Vendor Invoice Management VIM060000-CGD-EN-4
3. Configure the search help, using the following parameters (at the bottom of the screen):
Search help name Enter the name of the search help to be called by the web approval screen when the user requires input help.
SearchHelpParam Enter the name of the search help field which will actually hold the value for the web approval screen field.
9.5 Roles in the IAP Process The roles used in the IAP process are technically different from the ones used in all other processes. This section describes the main roles that are required for the IAP process.
9.5.1 Configuring the Coder Role Coding refers to entering accounting data. The purpose is to assign the invoice to a certain G/L account and cost collecting objects, such as cost center, internal order, etc. The person who enters the coding info is normally called “coder”. However, technically speaking, the coder is just an approver with the Coding flag turned on, which means the coding section is opened for the coder to enter the accounting data. The coder still has to click the Approve button to save the accounting data and move the item to the next approver.
When the invoice is parked for approval, it is sent to the coder first. Typical combinations are the following:
By requester Each requester has an associated coder.

9.5 Roles in the IAP Process
VIM060000-CGD-EN-4 Configuration Guide 217
By company Each company code has an associated coder.
Both The coder is determined by both requester and company code.
Use requester The coder is the requester.
The configuration is done in the CODER_DETERMING constant.
If the coder is determined by requester and/or company code, the association is maintained in table /OPT/BL_AP_CODER and the /opt/vim_7cx1 transaction.
For a detailed description, see “Coder Details View” on page 229.
9.5.2 Configuring the Approver Role User mapping and chart of authority are two important concepts in IAP. User identities are maintained in the table /ors/usermap and this is accomplished using
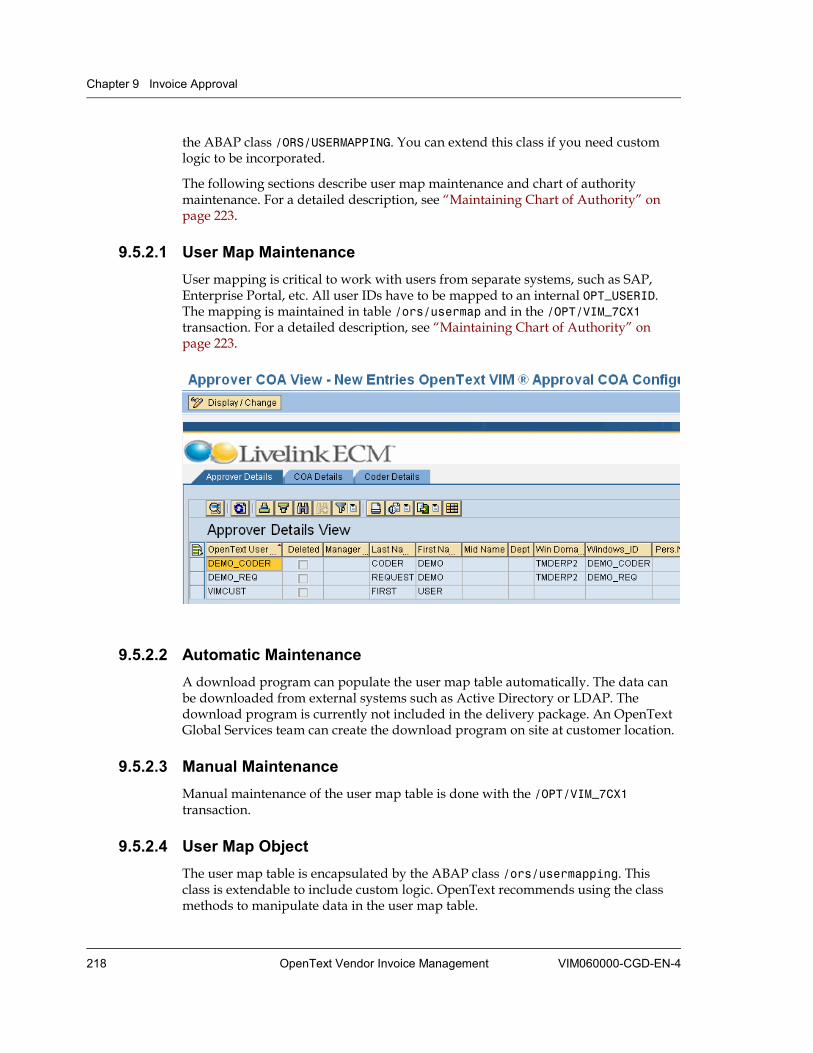
Chapter 9 Invoice Approval
218 OpenText Vendor Invoice Management VIM060000-CGD-EN-4
the ABAP class /ORS/USERMAPPING. You can extend this class if you need custom logic to be incorporated.
The following sections describe user map maintenance and chart of authority maintenance. For a detailed description, see “Maintaining Chart of Authority” on page 223.
9.5.2.1 User Map Maintenance User mapping is critical to work with users from separate systems, such as SAP, Enterprise Portal, etc. All user IDs have to be mapped to an internal OPT_USERID.The mapping is maintained in table /ors/usermap and in the /OPT/VIM_7CX1 transaction. For a detailed description, see “Maintaining Chart of Authority” on page 223.
9.5.2.2 Automatic Maintenance A download program can populate the user map table automatically. The data can be downloaded from external systems such as Active Directory or LDAP. The download program is currently not included in the delivery package. An OpenText Global Services team can create the download program on site at customer location.
9.5.2.3 Manual Maintenance Manual maintenance of the user map table is done with the /OPT/VIM_7CX1 transaction.
9.5.2.4 User Map Object The user map table is encapsulated by the ABAP class /ors/usermapping. This class is extendable to include custom logic. OpenText recommends using the class methods to manipulate data in the user map table.
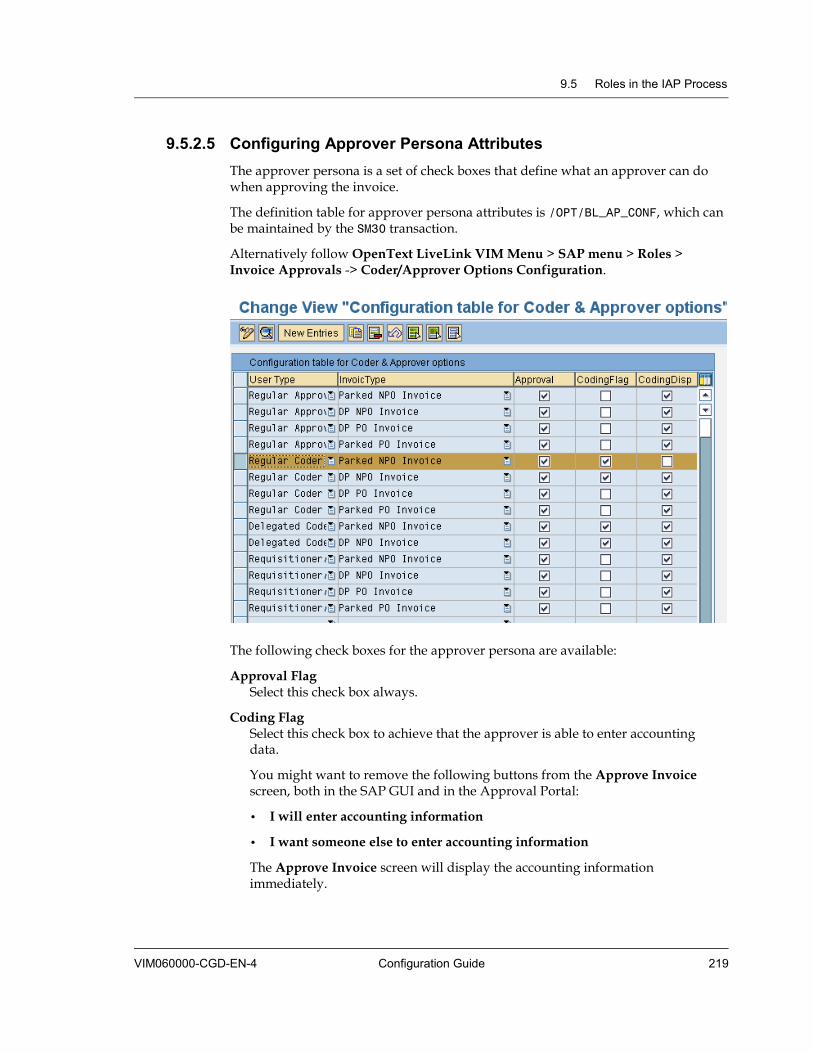
9.5 Roles in the IAP Process
VIM060000-CGD-EN-4 Configuration Guide 219
9.5.2.5 Configuring Approver Persona Attributes The approver persona is a set of check boxes that define what an approver can do when approving the invoice.
The definition table for approver persona attributes is /OPT/BL_AP_CONF, which can be maintained by the SM30 transaction.
Alternatively follow OpenText LiveLink VIM Menu > SAP menu > Roles > Invoice Approvals -> Coder/Approver Options Configuration.
The following check boxes for the approver persona are available:
Approval Flag Select this check box always.
Coding Flag Select this check box to achieve that the approver is able to enter accounting data.
You might want to remove the following buttons from the Approve Invoice screen, both in the SAP GUI and in the Approval Portal:
• I will enter accounting information
• I want someone else to enter accounting information
The Approve Invoice screen will display the accounting information immediately.
Chapter 9 Invoice Approval
220 OpenText Vendor Invoice Management VIM060000-CGD-EN-4
To perform this configuration, select the Approval Flag and the Coding Flag,and clear the Coding Delegate check box.
Coding Display Select this check box to achieve that the coding block is displayed.
If Coding Flag is selected, the coding block is always displayed in change mode.
If Coding Flag is cleared, you can use the Coding Display check box to display or hide the complete coding block.
Coding Delegate Select this check box to achieve that the approver is able to delegate the coding to others.
If Coding Delegate is selected and, additionally, Coding Flag or Coding Display is selected, the buttons I will enter accounting information and I want someone else to enter accounting information are displayed.
If only Coding Delegate is selected (and no Coding Flag or Coding Display check box), the buttons are not displayed. In the approval screen, you can delegate the coding. The Please Specify the Coder field is displayed directly.
Configuration Select this check box to achieve that the approver can set the persona for the next approver.
Override Select this check box to achieve that the approver can override the system generated next approver.
Look Ahead Select this check box to achieve that the approver is able to retrieve all the approvers.
Custom Flag 1 Select this check box to indicate the expense type as read only.
Custom Flag 2 Select this check box to indicate the approver as a delegated coder.
Custom Flag 3 Not used
9.5.2.6 Override/Delegation/Substitution Because of the compliance implication of the IAP process, Invoice Approval needs to guarantee that only the designated approver approves the invoice. However, there are situations that require others to take over the responsibility temporarily, for example, unexpected termination, illness, vacation, etc. VIM Invoice Approval provides the following mechanisms and utilities to address these situations:
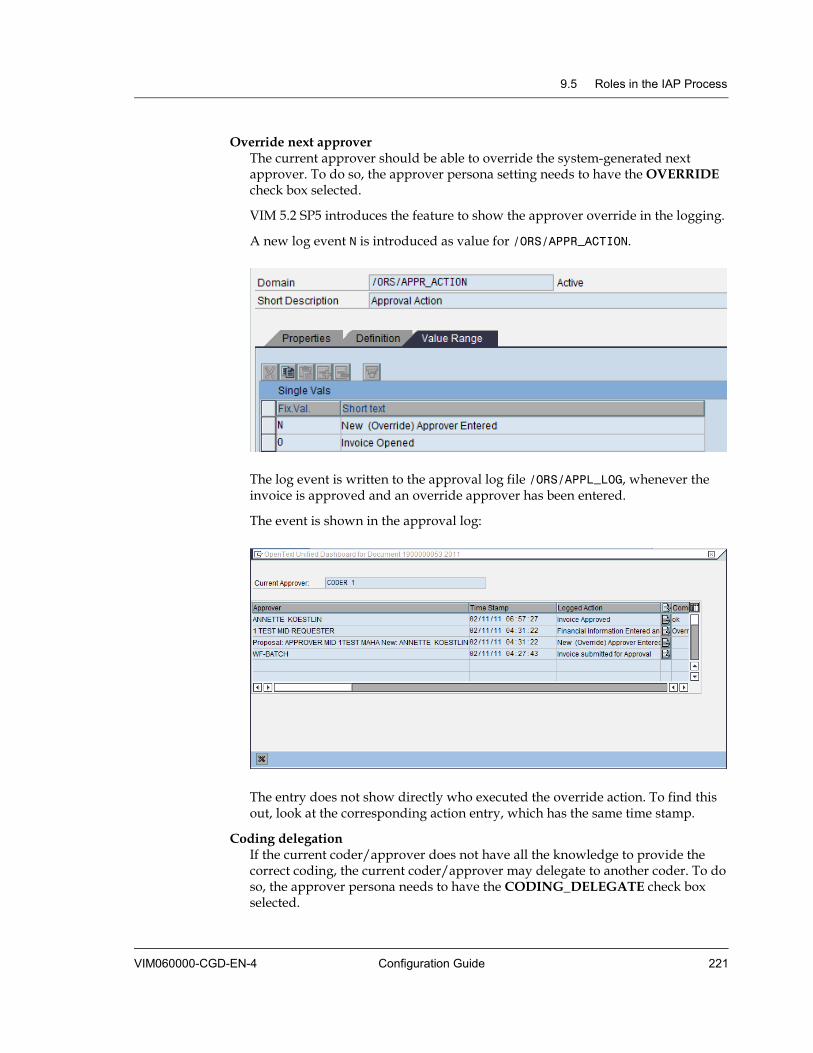
9.5 Roles in the IAP Process
VIM060000-CGD-EN-4 Configuration Guide 221
Override next approver The current approver should be able to override the system-generated next approver. To do so, the approver persona setting needs to have the OVERRIDE check box selected.
VIM 5.2 SP5 introduces the feature to show the approver override in the logging.
A new log event N is introduced as value for /ORS/APPR_ACTION.
The log event is written to the approval log file /ORS/APPL_LOG, whenever the invoice is approved and an override approver has been entered.
The event is shown in the approval log:
The entry does not show directly who executed the override action. To find this out, look at the corresponding action entry, which has the same time stamp.
Coding delegation If the current coder/approver does not have all the knowledge to provide the correct coding, the current coder/approver may delegate to another coder. To do so, the approver persona needs to have the CODING_DELEGATE check box selected.
Chapter 9 Invoice Approval
222 OpenText Vendor Invoice Management VIM060000-CGD-EN-4
Substitution The approver or coder can set up personal substitutes to temporarily take over their responsibility. The substitute can be defined by one of the following ways:
• If the optional Web IAP is implemented: From the approval web page, open the User Preference page and open the Substitution section.
• From the SAP inbox, add substitute from the SAP menu.
Note: This is only available when both substituted and substituting users are SAP users.
• From User Substitute Management Utility (/ORS/MAIN_SUBS transaction). This transaction can maintain all the substitute relations in the system.
Note: Only an administrator can execute the substitution.
Notes:
• When a substitute is set up, the substitute will assume all the authority of the original approver regarding the invoices belonging to the original approver. The authority of the substitute is not considered.
• The invoices belonging to the original approver will be added to the substitute's invoice list.
• When the substitute approves an invoice that is not originally sent to the substitute, the action will be logged as XXX approves the invoice on behalf of YYY.
• The original approver can place limitations when setting up the substitute. Normally, the names are searched by the Name Search method /ORS/000007_NAME_SEARCH of the usermap class. The method can be customized to include a logic that restricts the list of legible substitutes to those with equal or higher authority of the original approver.
Reassign When an employee is terminated, the administrator can use the Reassign utility to reassign the work item to others.
• Once reassigned, the work item is permanently moved to the new approver’s inbox. The invoice has to be approved based on the new approver’s authority.
• The reassign action is logged in the approval log for future audit.
• It is possible to reassign one invoice or the entire inbox of an approver.
The Reassign utility may “recall” the invoice back to the AP department. Once recalled, the approval workflow is terminated. The AP department may resubmit the invoice for approval. For more details, see section 11 "Reassigning Work Items Belonging to Another User" in OpenText Vendor Invoice Management - Administration Guide (VIM-AGD).

9.6 Maintaining Chart of Authority
VIM060000-CGD-EN-4 Configuration Guide 223
9.6 Maintaining Chart of Authority This section provides details on how to configure the Chart of Authority (COA) for Invoice Approval.
Purpose COA is required in the Invoice Approval process to allow users to approve Non PO invoices.
Note: The PO Invoice Approval process does not consider the COA when determining the next approver. For PO invoices, Baseline implementation determines the requester of the PO as the first (and only) approver.
Approvers can be different with different limits of approvals for different combinations or different org data, which can be very complex. COA provides a one stop interface for maintaining all the combinations of approvers, approval limits and coders for the Invoice Approval process.
COA maintenance is performed by functional users who are aware of organizational objects involved in the Invoice Approval process.
Prerequisites
• The Org Units allowed in the Invoice Approval process are maintained. You can maintain the Org Units in the SM30 transaction for table/view /OPT/BL_T401V.
• The fields required for approval user data are maintained. You can maintain the fields in the SM30 transaction for table/view /OPT/BL_T402V.
Access You can access COA maintenance using transaction code /OPT/VIM_7CX1.
Alternatively follow OpenText LiveLink VIM Menu > SAP menu > Roles > Invoice Approvals -> Chart of Authority Maintenance.
Chapter 9 Invoice Approval
224 OpenText Vendor Invoice Management VIM060000-CGD-EN-4
The default access to COA is in display mode. Use the Display/Change button to switch to maintenance mode.
The following views are available:
• “User Details View” on page 224
• “COA Details View” on page 228
• “Coder Details View” on page 229
• “Logging with Change Documents” on page 231
9.6.1 User Details View The User Details view lists the COA users' general details.
Enter the following details for each user:
OpenText User Id User Id (generated automatically)
Deleted Check box indicating if the user is deleted from COA.
Manager Id OpenText User Id of the user's manager. This must be an existing user in COA.
VIM 5.2 SP5 introduces the following feature: You might want each single approval flow to go to the approver first and to the manager afterwards. In this case, you can enter a manager for user X in the User Details view, without manually maintaining user X in the COA Details view. The data of user X is automatically entered in the COA Details view.
You can use this functionality only after entering a new IAP constant APPR_USR_COA_COPY with value X to table /PTGWFI/Z_CONST (using transaction SM30).
Bulk Approval Category Permission to perform bulk approval, that means, the user can approve or reject more than one work item at the same time, for example in the Integrated Invoice Cockpit.
The following settings are possible:
• A-Approval
• R-Reject
• B-Approval and Reject
• N-None
Last Name User’s last name
9.6 Maintaining Chart of Authority
VIM060000-CGD-EN-4 Configuration Guide 225
First Name User’s first name
Middle Name User’s middle name (optional)
Department User's department (optional)
Windows Domain If implementing optional Approval Portal with WAS authentication scenario: Windows domain. Required if COA uses Approval Portal with WAS authentication scenario and users are authenticated using Windows domain.
Windows_ID If implementing optional Approval Portal with WAS authentication scenario: Windows ID or the login ID. Required if COA uses Approval Portal with WAS authentication scenario and users are authenticated using Windows domain.
Personnel number Personnel number of the user
SAP User ID SAP User ID of the user
SAP Portal User ID If implementing optional Approval Portal with Portal authentication scenario, this will be the login ID for the user in the portal.
Email Address User's email address. Identifying field for all COA users (approvers). This field cannot be duplicated with existing users.
Name and address Name, other form of user's address (optional)
Telephone number User's telephone number
In the User Details View screen, you can perform the following actions:
To create a new user:
1. Click the icon.
A new empty row is created.
2. Maintain the required entries.
3. To save, click the icon.
To create multiple users:
1. Click the icon.
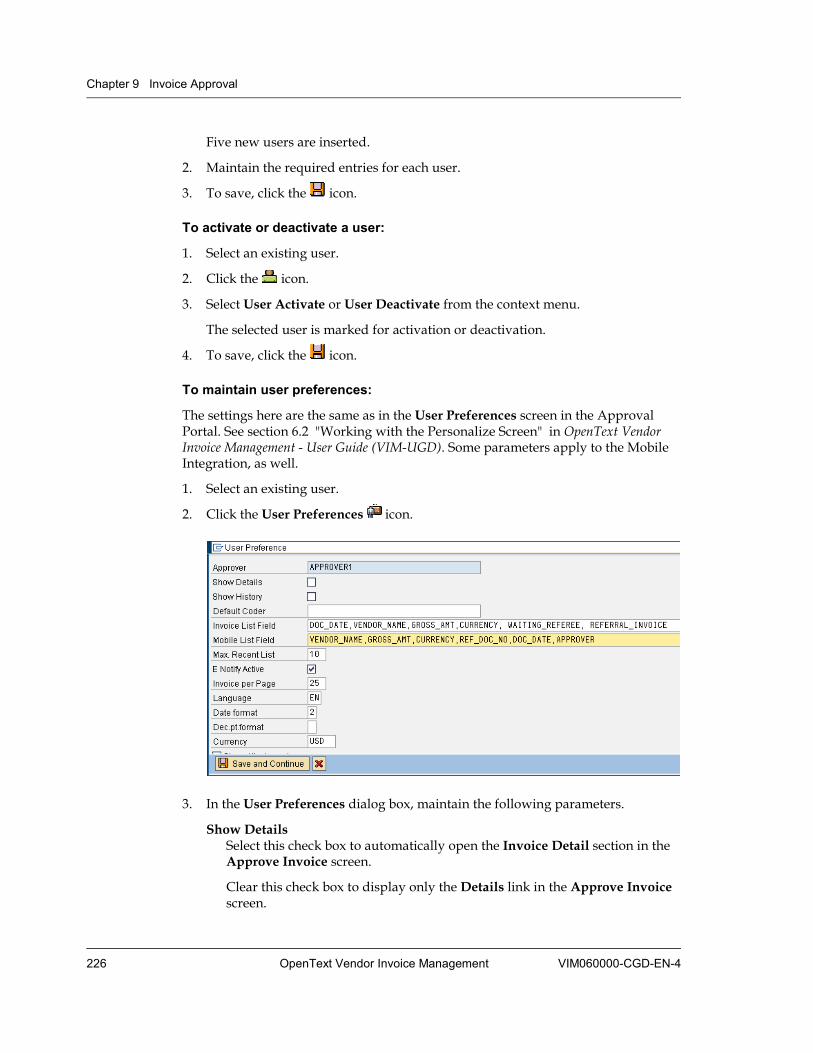
Chapter 9 Invoice Approval
226 OpenText Vendor Invoice Management VIM060000-CGD-EN-4
Five new users are inserted.
2. Maintain the required entries for each user.
3. To save, click the icon.
To activate or deactivate a user:
1. Select an existing user.
2. Click the icon.
3. Select User Activate or User Deactivate from the context menu.
The selected user is marked for activation or deactivation.
4. To save, click the icon.
To maintain user preferences:
The settings here are the same as in the User Preferences screen in the Approval Portal. See section 6.2 "Working with the Personalize Screen" in OpenText Vendor Invoice Management - User Guide (VIM-UGD). Some parameters apply to the Mobile Integration, as well.
1. Select an existing user.
2. Click the User Preferences icon.
3. In the User Preferences dialog box, maintain the following parameters.
Show Details Select this check box to automatically open the Invoice Detail section in the Approve Invoice screen.
Clear this check box to display only the Details link in the Approve Invoice screen.

9.6 Maintaining Chart of Authority
VIM060000-CGD-EN-4 Configuration Guide 227
Show History Select this check box to automatically open the History section in the Approve Invoice screen.
Clear this check box to display only the History link in the Approve Invoice screen.
Default Coder Enter the default coder that you want to do the coding.
Invoice List Field Enter the sequence of list fields.
Mobile List Field Only relevant for Mobile Integration: Enter columns that should be displayed in the inbox of the mobile App.
Max. Recent List Enter how many names should be displayed in the drop-down list for previously selected persons.
E Notify Active Select this check box to receive an email notification regarding any invoice that requires your attention.
Invoice per Page Enter the number of invoices to be displayed in the Invoice List and the Processed Invoice List.
Language Also relevant for Mobile Integration: Enter the default language.
Date format Also relevant for Mobile Integration: Enter the date format. Click for a list of possible formats.
Dec.pt.format Also relevant for Mobile Integration: Enter the format of the decimal notation. Click for a list of possible formats.
Currency Enter the default currency.
Show Attachment This check box is not relevant. Users can always use the attachment function, regardless of the Show Attachment check box.
Display Type Determine where the invoice image should be displayed when opening the detail page. Click for a selection.
Logical system Enter the SAP system that you want to use as the user preference for your Invoice List page.
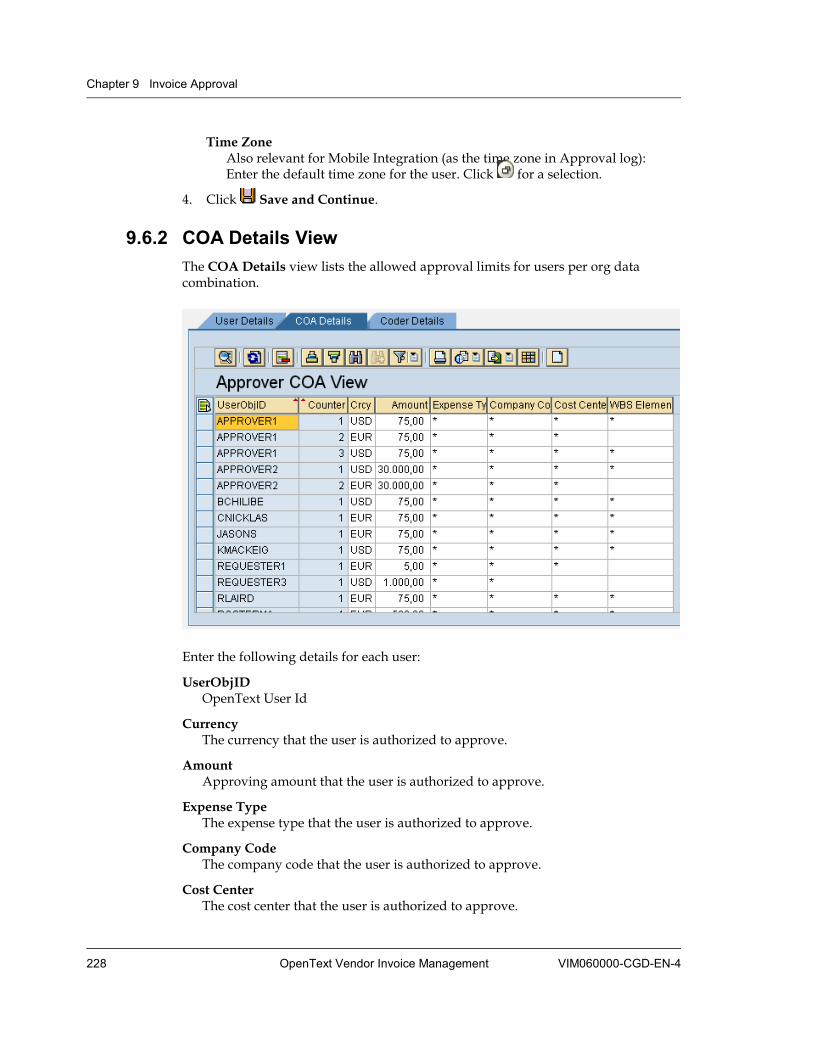
Chapter 9 Invoice Approval
228 OpenText Vendor Invoice Management VIM060000-CGD-EN-4
Time Zone Also relevant for Mobile Integration (as the time zone in Approval log): Enter the default time zone for the user. Click for a selection.
4. Click Save and Continue.
9.6.2 COA Details View The COA Details view lists the allowed approval limits for users per org data combination.
Enter the following details for each user:
UserObjID OpenText User Id
Currency The currency that the user is authorized to approve.
Amount Approving amount that the user is authorized to approve.
Expense Type The expense type that the user is authorized to approve.
Company Code The company code that the user is authorized to approve.
Cost Center The cost center that the user is authorized to approve.
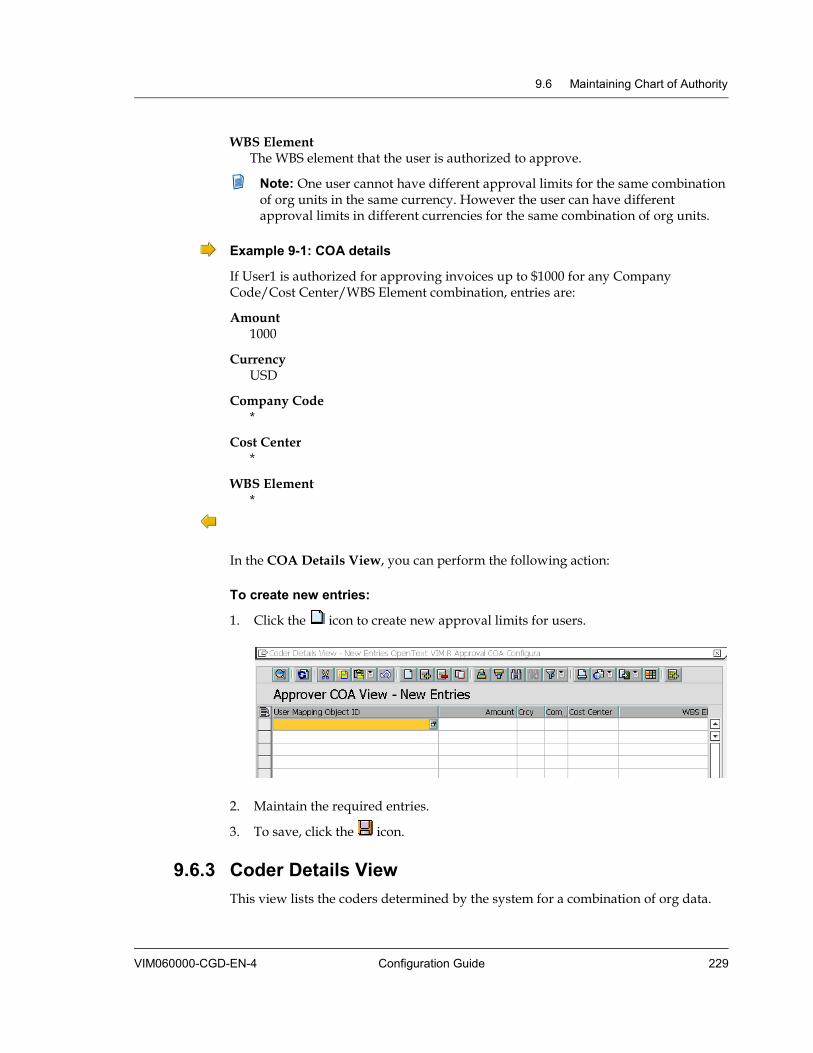
9.6 Maintaining Chart of Authority
VIM060000-CGD-EN-4 Configuration Guide 229
WBS Element The WBS element that the user is authorized to approve.
Note: One user cannot have different approval limits for the same combination of org units in the same currency. However the user can have different approval limits in different currencies for the same combination of org units.
Example 9-1: COA details
If User1 is authorized for approving invoices up to $1000 for any Company Code/Cost Center/WBS Element combination, entries are:
Amount 1000
Currency USD
Company Code *
Cost Center *
WBS Element *
In the COA Details View, you can perform the following action:
To create new entries:
1. Click the icon to create new approval limits for users.
2. Maintain the required entries.
3. To save, click the icon.
9.6.3 Coder Details View This view lists the coders determined by the system for a combination of org data.
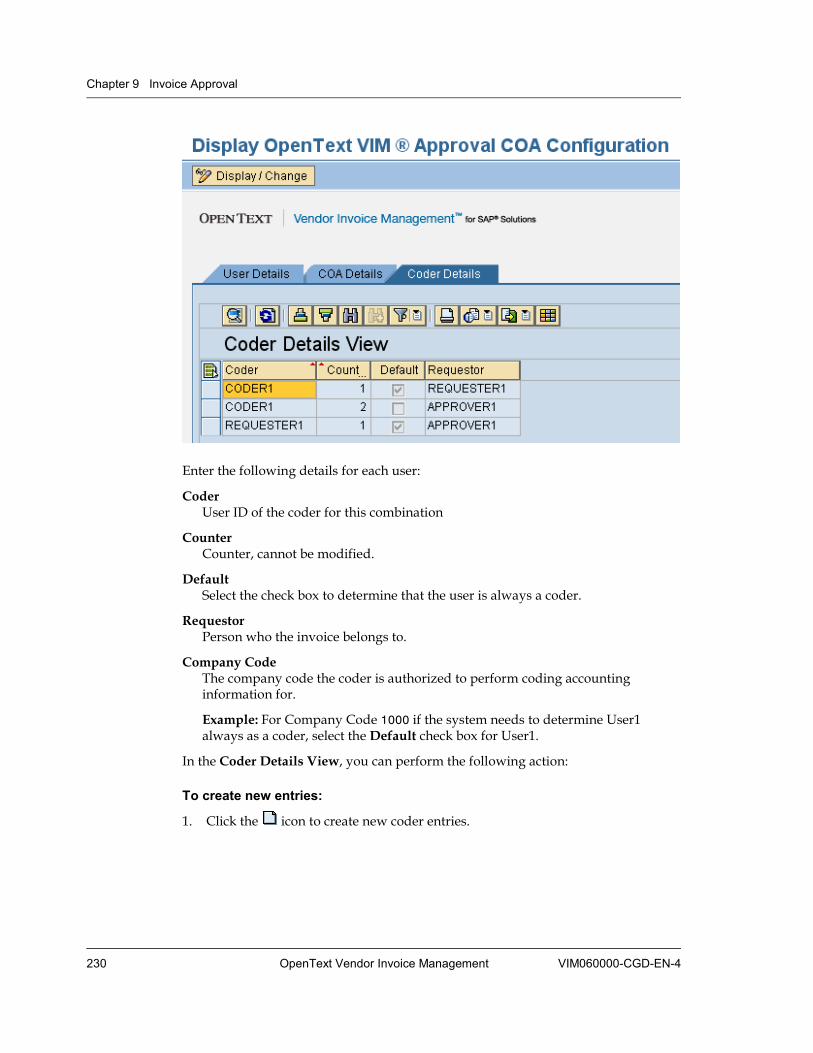
Chapter 9 Invoice Approval
230 OpenText Vendor Invoice Management VIM060000-CGD-EN-4
Enter the following details for each user:
Coder User ID of the coder for this combination
Counter Counter, cannot be modified.
Default Select the check box to determine that the user is always a coder.
Requestor Person who the invoice belongs to.
Company Code The company code the coder is authorized to perform coding accounting information for.
Example: For Company Code 1000 if the system needs to determine User1 always as a coder, select the Default check box for User1.
In the Coder Details View, you can perform the following action:
To create new entries:
1. Click the icon to create new coder entries.
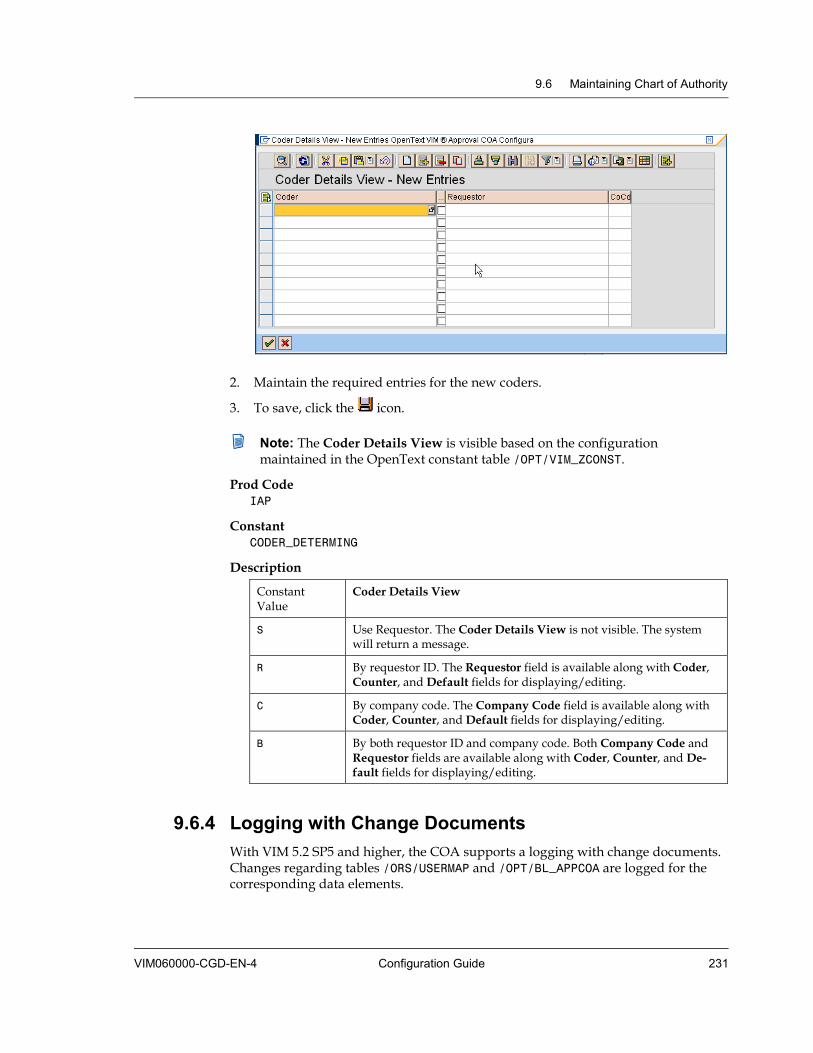
9.6 Maintaining Chart of Authority
VIM060000-CGD-EN-4 Configuration Guide 231
2. Maintain the required entries for the new coders.
3. To save, click the icon.
Note: The Coder Details View is visible based on the configuration maintained in the OpenText constant table /OPT/VIM_ZCONST.
Prod Code IAP
Constant CODER_DETERMING
Description
Constant Value
Coder Details View
S Use Requestor. The Coder Details View is not visible. The system will return a message.
R By requestor ID. The Requestor field is available along with Coder,Counter, and Default fields for displaying/editing.
C By company code. The Company Code field is available along with Coder, Counter, and Default fields for displaying/editing.
B By both requestor ID and company code. Both Company Code and Requestor fields are available along with Coder, Counter, and De-fault fields for displaying/editing.
9.6.4 Logging with Change Documents With VIM 5.2 SP5 and higher, the COA supports a logging with change documents. Changes regarding tables /ORS/USERMAP and /OPT/BL_APPCOA are logged for the corresponding data elements.

Chapter 9 Invoice Approval
232 OpenText Vendor Invoice Management VIM060000-CGD-EN-4
For customer specific mass uploads of tables /ORS/USERMAP and /OPT/BL_APPCOA,the following function modules can be integrated to enable change documents:
/OPT/VIM_BL_CHNG_APCOA Write changes for /OPT/BL_APPCOA
/OPT/VIM_BL_CHNG_USRMAP Write changes for /ORS/USERMAP
You can retrieve the change document in the following ways:
Display changes button Select a user and click the Display changes button in the ALV grid control. The change document is displayed only for the selected user.
Menu option Go To > Display changes Follow the menu option Go To > Display changes. The following selection screen is displayed:
from/to Enter a dedicated period.
Name Select the user.
User Mapping Object ID Enter the change object.
Table Name Enter /ORS/USERMAP or /OPT/BL_APPCOA.
Click to open the change document.
The change document displays all relevant information about the last changes in a list view with the changed values and the user who changed the data.
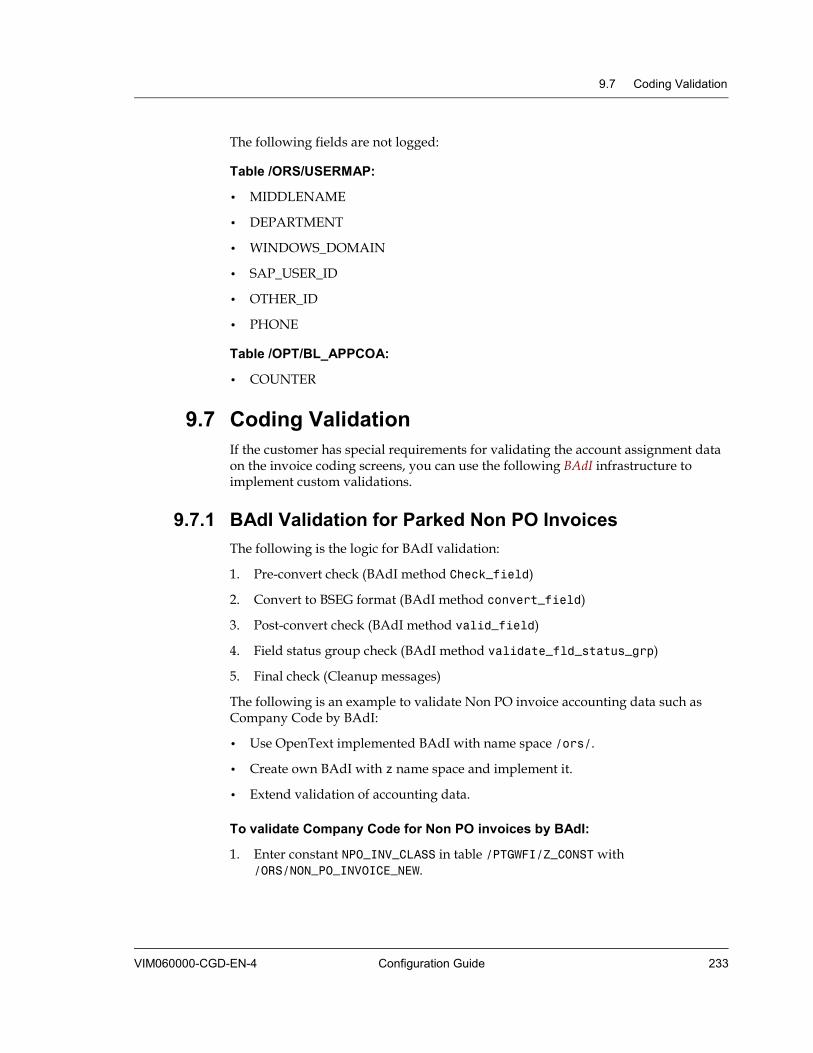
9.7 Coding Validation
VIM060000-CGD-EN-4 Configuration Guide 233
The following fields are not logged:
Table /ORS/USERMAP:
• MIDDLENAME
• DEPARTMENT
• WINDOWS_DOMAIN
• SAP_USER_ID
• OTHER_ID
• PHONE
Table /OPT/BL_APPCOA:
• COUNTER
9.7 Coding Validation If the customer has special requirements for validating the account assignment data on the invoice coding screens, you can use the following BAdI infrastructure to implement custom validations.
9.7.1 BAdI Validation for Parked Non PO Invoices The following is the logic for BAdI validation:
1. Pre-convert check (BAdI method Check_field)
2. Convert to BSEG format (BAdI method convert_field)
3. Post-convert check (BAdI method valid_field)
4. Field status group check (BAdI method validate_fld_status_grp)
5. Final check (Cleanup messages)
The following is an example to validate Non PO invoice accounting data such as Company Code by BAdI:
• Use OpenText implemented BAdI with name space /ors/.
• Create own BAdI with z name space and implement it.
• Extend validation of accounting data.
To validate Company Code for Non PO invoices by BAdI:
1. Enter constant NPO_INV_CLASS in table /PTGWFI/Z_CONST with /ORS/NON_PO_INVOICE_NEW.
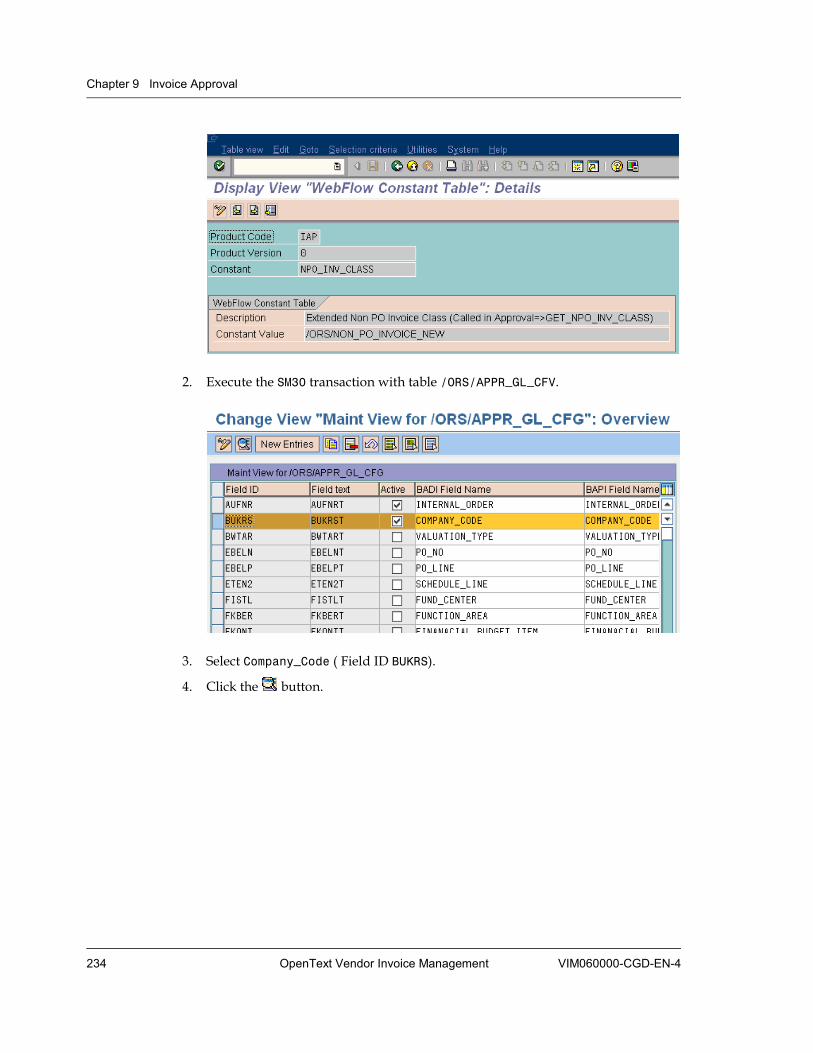
Chapter 9 Invoice Approval
234 OpenText Vendor Invoice Management VIM060000-CGD-EN-4
2. Execute the SM30 transaction with table /ORS/APPR_GL_CFV.
3. Select Company_Code ( Field ID BUKRS).
4. Click the button.
9.7 Coding Validation
VIM060000-CGD-EN-4 Configuration Guide 235
5. Notice that BADI Field Name has the value Company_Code.
6. Click the BADI Implement button to display an implemented BAdI that OpenText has delivered. If there is no OpenText delivered object, the user can create a new BAdI object and activate it (see step 1 through step 8).
7. Test /ORS/COMPANY_CODE.
Chapter 9 Invoice Approval
236 OpenText Vendor Invoice Management VIM060000-CGD-EN-4
To modify the validation code for Company_Code:
1. If you want to modify the validation code for Company_Code, create your object and implement it:
Execute the SM30 transaction and change the BAdI name from Company_Code to ZCompany_Code (for example).
9.7 Coding Validation
VIM060000-CGD-EN-4 Configuration Guide 237
To save, click the icon.
2. Click the BADI Implement button and create a new BAdI, called Z_COMPANY_CODE (for example).
3. Click the Create button.
4. Choose the BAdI interface /ors/validation.

Chapter 9 Invoice Approval
238 OpenText Vendor Invoice Management VIM060000-CGD-EN-4
5. In Defined filters, select ZCOMPANY_CODE from the drop down list and save.
6. In the Interface tab, select Check_Field (for example).
9.7 Coding Validation
VIM060000-CGD-EN-4 Configuration Guide 239
7. Copy code from the OpenText delivered /ORS/COMPANY_CODE, method CHECK_FIELD, if necessary, and modify the code or create new code. Save and activate Z_COMPANY_CODE.
8. Test Z_COMPANY_CODE.

Chapter 9 Invoice Approval
240 OpenText Vendor Invoice Management VIM060000-CGD-EN-4
Coding is validated in the VALIDATEACCTDATA method of the Non PO invoice object. The original delivered object is /ORS/NON_PO_INVOICE. The most recently delivered version of this object is /ORS/NON_PO_INVOICE_4, which includes the latest BAdI infrastructure.
9.7.2 Standard Delivered Validations The standard delivery includes the following fields:
Field BAdI
G/L Account /ORS/CL_IM_GL_ACCOUNT
Internal Order /ORS/CL_IM_INTERNAL_ORDER
9.7 Coding Validation
VIM060000-CGD-EN-4 Configuration Guide 241
Item Text /ORS/CL_IM_ITEM_TEXT
Material /ORS/CL_IM_MATERIAL
PAOBJNR (profitability segment) /ORS/CL_IM_PAOBJNR
Plant /ORS/CL_IM_PLANT
Profit center /ORS/CL_IM_PROFIT_CENTER
Tax Jurisdiction Code /ORS/CL_IM_TAXJURCODE
Tax Code /ORS/CL_IM_TAX_CODE
Trading Partner /ORS/CL_IM_TRADING_PARTNER
Unit /ORS/CL_IM_UNIT
Valuation Type /ORS/CL_IM_VALUATION_TYPE
WBS Element /ORS/CL_IM_WBS_ELEMENT
9.7.3 Optional Coding Entering coding information is not always mandatory. It depends on the following configurations:
• If Coding_delegate is selected in the approver persona, and a delegated coder is specified, coding is not required to approve the invoice.
• If no delegated coding is specified, the coding requirement is controlled by the constant EMPTY_CODING_MSG. The following configuration values for this constant are available:
CHECK_SP:ERROR If special handling is empty, the system issues an error message.
CHECK_SP:WARNING If special handling is empty, the system issues a warning message.
ERROR The system issues an error message.
Chapter 9 Invoice Approval
242 OpenText Vendor Invoice Management VIM060000-CGD-EN-4
WARNING The system issues a warning message.
This setting allows in some cases that the coding is not completed, but the information is entered in the special handling instruction section.
Note: The validation happens in the VALIDATEACCTDATA method of the Non PO invoice class.
9.7.4 Cross Company Coding To turn on the cross company coding, activate BUKRS or COMPANY_CODE (see “Configuring Cross Company Coding” on page 242). The OpenText delivered code includes a popup to suggest the correct company code for the line. This is relevant if the cost center or internal order entered does not match the company code. The suggested company code comes from message type /ORS/000007_RFC number 071.The validation method creates the message to communicate the possible company code to the web and SAP screens. If the coding is done in the SAP screen, the popup window is generated by a function module defined in the constant POPUP_COMPANY_CODE. The default delivered function module for this constant is /ORS/000007_POPUP_COMPANY_CODE.
9.7.4.1 Configuring Cross Company Coding Configuring cross company coding adds a company code field on each line item. You can code this line to a company code different from that on the header. The header company code will be the initial default. This enables a validation of the cost center and other coding elements against the new company code on the line item.
To configure cross company coding:
1. Execute the SM30 transaction.
2. Enter table /ORS/APPR_GL_CFG. Locate the field BUKRS and double-click. If the field BUKRS is not displayed, add a new field.
3. Enter the parameters as shown in the following screenshot:
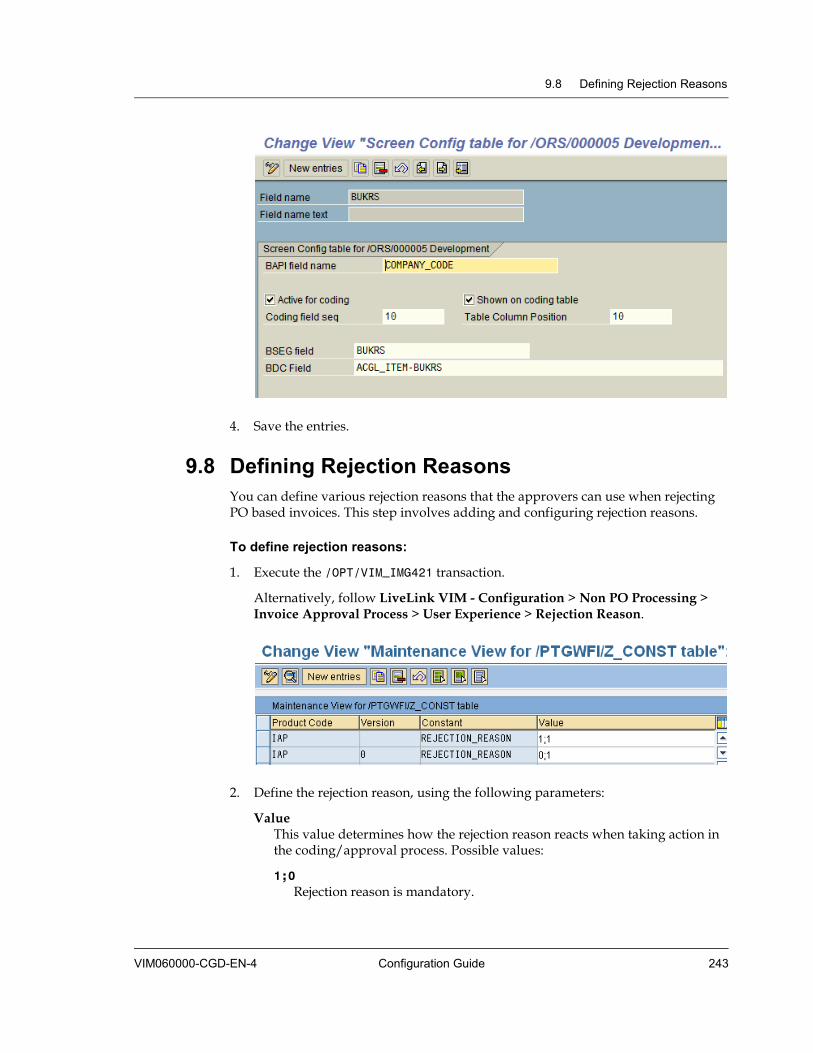
9.8 Defining Rejection Reasons
VIM060000-CGD-EN-4 Configuration Guide 243
4. Save the entries.
9.8 Defining Rejection Reasons You can define various rejection reasons that the approvers can use when rejecting PO based invoices. This step involves adding and configuring rejection reasons.
To define rejection reasons:
1. Execute the /OPT/VIM_IMG421 transaction.
Alternatively, follow LiveLink VIM - Configuration > Non PO Processing > Invoice Approval Process > User Experience > Rejection Reason.
2. Define the rejection reason, using the following parameters:
Value This value determines how the rejection reason reacts when taking action in the coding/approval process. Possible values:
1;0 Rejection reason is mandatory.

Chapter 9 Invoice Approval
244 OpenText Vendor Invoice Management VIM060000-CGD-EN-4
0;1 Rejection comments are mandatory.
1;1 Both rejection reason and rejection comments are mandatory.
The default value is 0;1.
9.9 Image Display Infrastructure For displaying images using SAP GUI, the system uses standard SAP ArchiveLink image display APIs to retrieve and display the image. So, there is no configuration necessary for displaying images using SAP GUI.
If implementing the optional Web IAP, the OpenText web approval application (OpenText Approval Portal) uses the following infrastructure for displaying the images from the web browser during the IAP process.
1. Clicking the View Invoice Image link in the web approval application will call SAP R/3 with the following function module:
FUNCTION /ORS/000007_IMAGE_DISP_URL or /ORS/000007_IMAGE_DISP_JPEG
2. This function module will in turn call a configurable function module that is defined in OpenText /PTGWFI/Z_CONST table. The data that is passed to this pluggable module is:
• Invoice object type
• Invoice object key
3. The output of the function module is a table of URLs if using URL (in most cases there will be only one URL that is returned) or the binary data if using JPEG. The web application will open a browser window.
4. The OpenText delivered base function module for opening the browser window is the following:
FUNCTION /ORS/000007_TMP_IMAGE_DISP_URL and /ORS/-000007_TMP_IMAGE_DISP_JPEG
5. In the OpenText delivered base function module, the standard SAP function module ARCHIVELINK_URL_GENERATE is called with the appropriate information (Archive ID and Archive_Document_ID).
6. If the archiving system is setup as an http Content Server, the standard SAP function module will generate the appropriate URL which can be used to display the image in a browser window.
7. It is possible to replace the function module ARCHIVELINK_URL_GENERATE with a Z-function module and incorporate any logic as deemed fit based on customer requirements.
9.10 Configuring Global Parameters
VIM060000-CGD-EN-4 Configuration Guide 245
9.10 Configuring Global Parameters This section describes the various global customization parameters that are available. Global parameters control various aspects of the processing logic for IAP process flows.
Important
Take care when you change the global customization parameters. Changes can affect the functionality of the process.
Configuring global parameters comprises the following actions:
• “Defining Resubmit for Approval Action Codes” on page 245
• “Defining the Custom Approver Class” on page 248
• “Defining the Custom Invoice Class” on page 248
• “Defining Supported Currency and Language” on page 249
• “Defining a Custom Usermap Class” on page 250
• “Defining the Usermap Data Source” on page 251
• “Defining Usermap Modification” on page 252
• “Defining the Usermap Web ID” on page 252
• “Defining Custom Buttons for the Approval Screen” on page 253
• “Configuring Custom Fields for the Approval Screen” on page 256
• “Configuring the Referral Wait Time” on page 258
• “Configuring Tax Calculation on Net Amount” on page 259
9.10.1 Defining Resubmit for Approval Action Codes In this step, you define the process options for resubmitting the parked invoice for approval.
To define resubmit for approval action codes:
1. Execute the /OPT/VIM_IMG412 transaction.
Alternatively, follow LiveLink VIM - Configuration > Non PO Processing > Invoice Approval Process > Approval Workflow > Resubmit for Approval Action Code.

Chapter 9 Invoice Approval
246 OpenText Vendor Invoice Management VIM060000-CGD-EN-4
2. Define the resubmit for approval action codes, using the following parameter:
Constant Value Maintain action codes, separated by comma.
If you want to enable the functionality to submit for approval again after a DP based approval has been rejected, perform the following steps:
To define resubmit for approval for DP based approval:
1. Execute the /OPT/VIM_8CX2 transaction.
Alternatively, follow LiveLink VIM - Configuration > Document Processing > Process Configuration > Maintain Process Options.
2. In the Process Option Definition Maintenance View, double-click the line Submit For Approval.
3. Configure the DP process option, as shown in the screenshot above. For further information, see “Configuring DP Process Options” on page 70.
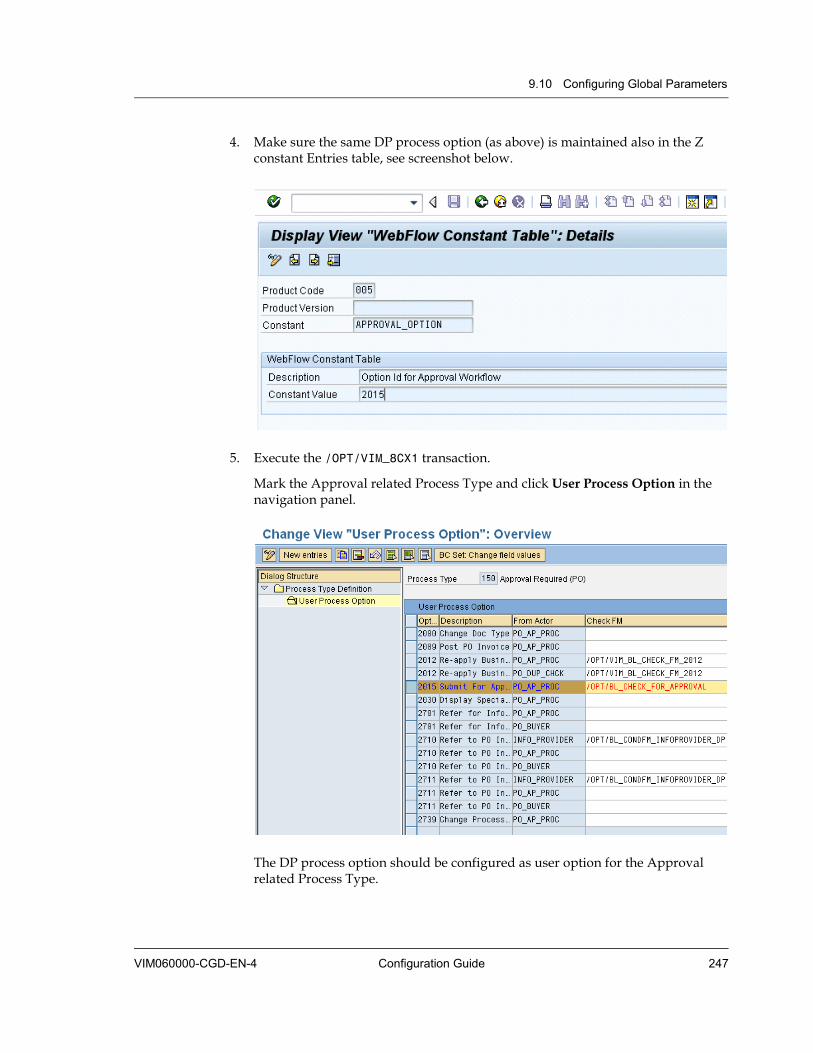
9.10 Configuring Global Parameters
VIM060000-CGD-EN-4 Configuration Guide 247
4. Make sure the same DP process option (as above) is maintained also in the Z constant Entries table, see screenshot below.
5. Execute the /OPT/VIM_8CX1 transaction.
Mark the Approval related Process Type and click User Process Option in the navigation panel.
The DP process option should be configured as user option for the Approval related Process Type.

Chapter 9 Invoice Approval
248 OpenText Vendor Invoice Management VIM060000-CGD-EN-4
9.10.2 Defining the Custom Approver Class In this step, you define the custom approver class. You can use this class for extending standard functions.
To define the custom approver class:
1. Execute the /OPT/VIM_IMG403 transaction.
Alternatively, follow LiveLink VIM - Configuration > Non PO Processing > Invoice Approval Process > Setup Approval Chain > Chart of Authority Configuration > Custom Approver Class (Exit).
2. Define the custom approver class, using the following parameter:
Constant Value Maintain the custom approval class. This class should conform to the /ORS/APPROVER class (sub type).
9.10.3 Defining the Custom Invoice Class In this step, you define a custom invoice class to extend the functionality of the OpenText delivered invoice class.
To define a custom invoice class:
1. Execute the /OPT/VIM_IMG409 transaction.
Alternatively, follow LiveLink VIM - Configuration > Non PO Processing > Invoice Approval Process > Financial Processing > Online Coding > Custom Invoice Class (Exit).
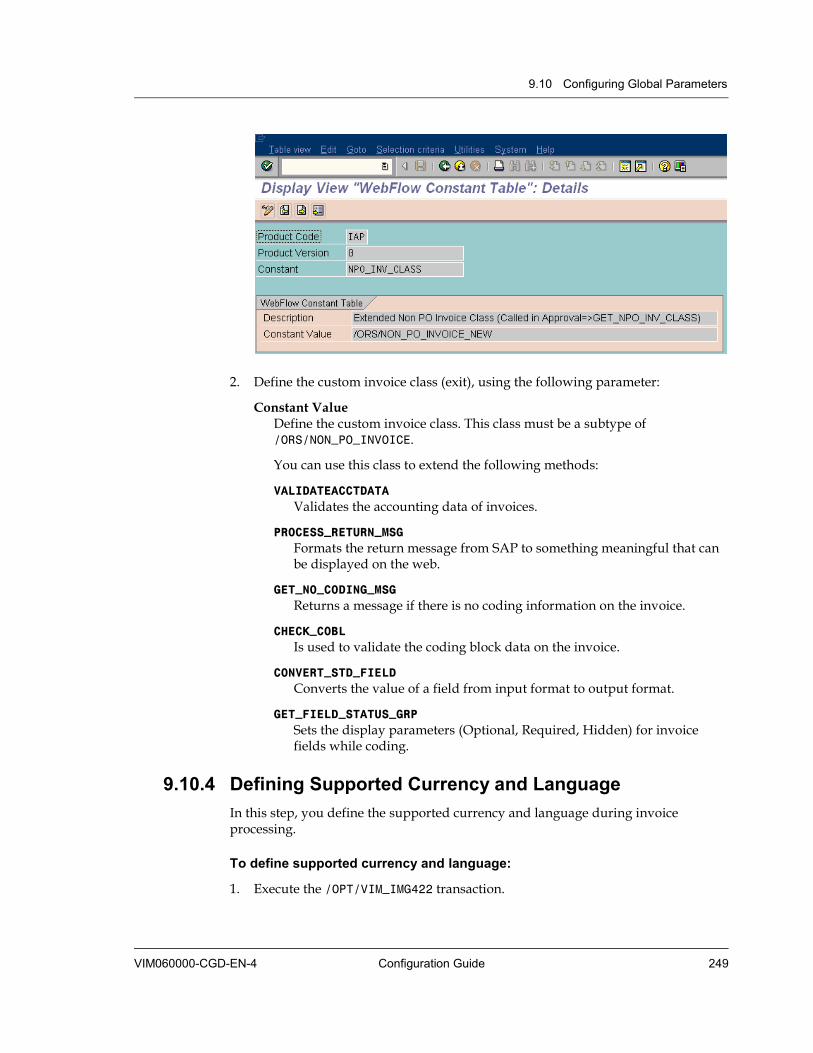
9.10 Configuring Global Parameters
VIM060000-CGD-EN-4 Configuration Guide 249
2. Define the custom invoice class (exit), using the following parameter:
Constant Value Define the custom invoice class. This class must be a subtype of /ORS/NON_PO_INVOICE.
You can use this class to extend the following methods:
VALIDATEACCTDATA Validates the accounting data of invoices.
PROCESS_RETURN_MSG Formats the return message from SAP to something meaningful that can be displayed on the web.
GET_NO_CODING_MSG Returns a message if there is no coding information on the invoice.
CHECK_COBL Is used to validate the coding block data on the invoice.
CONVERT_STD_FIELD Converts the value of a field from input format to output format.
GET_FIELD_STATUS_GRP Sets the display parameters (Optional, Required, Hidden) for invoice fields while coding.
9.10.4 Defining Supported Currency and Language In this step, you define the supported currency and language during invoice processing.
To define supported currency and language:
1. Execute the /OPT/VIM_IMG422 transaction.
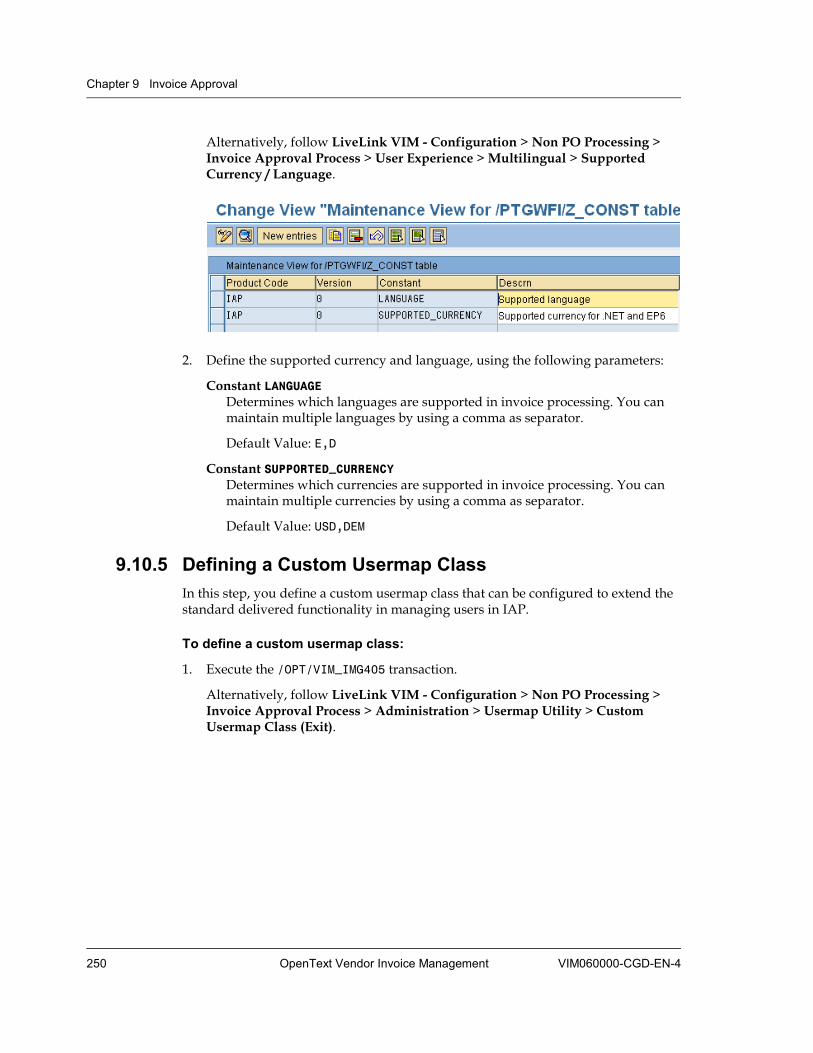
Chapter 9 Invoice Approval
250 OpenText Vendor Invoice Management VIM060000-CGD-EN-4
Alternatively, follow LiveLink VIM - Configuration > Non PO Processing > Invoice Approval Process > User Experience > Multilingual > Supported Currency / Language.
2. Define the supported currency and language, using the following parameters:
Constant LANGUAGE Determines which languages are supported in invoice processing. You can maintain multiple languages by using a comma as separator.
Default Value: E,D
Constant SUPPORTED_CURRENCY Determines which currencies are supported in invoice processing. You can maintain multiple currencies by using a comma as separator.
Default Value: USD,DEM
9.10.5 Defining a Custom Usermap Class In this step, you define a custom usermap class that can be configured to extend the standard delivered functionality in managing users in IAP.
To define a custom usermap class:
1. Execute the /OPT/VIM_IMG405 transaction.
Alternatively, follow LiveLink VIM - Configuration > Non PO Processing > Invoice Approval Process > Administration > Usermap Utility > Custom Usermap Class (Exit).

9.10 Configuring Global Parameters
VIM060000-CGD-EN-4 Configuration Guide 251
2. Define the custom usermap class, using the following parameters:
Constant Value You can use this custom class to extend the standard usermap functionality. The /OPT/CL_IAP_USERMAP_BL methods can be extended.
9.10.6 Defining the Usermap Data Source In this step, you define the source for usermap data in the IAP process.
To define the usermap data source:
1. Execute the /OPT/VIM_IMG428 transaction.
Alternatively, follow LiveLink VIM - Configuration > Non PO Processing > Invoice Approval Process > Administration > Usermap Utility > Usermap Data Source (Exit).
2. Define the usermap data source, using the following parameter:
Constant Value The configuration in this field defines how the usermap data is determined by the system. Possible values:
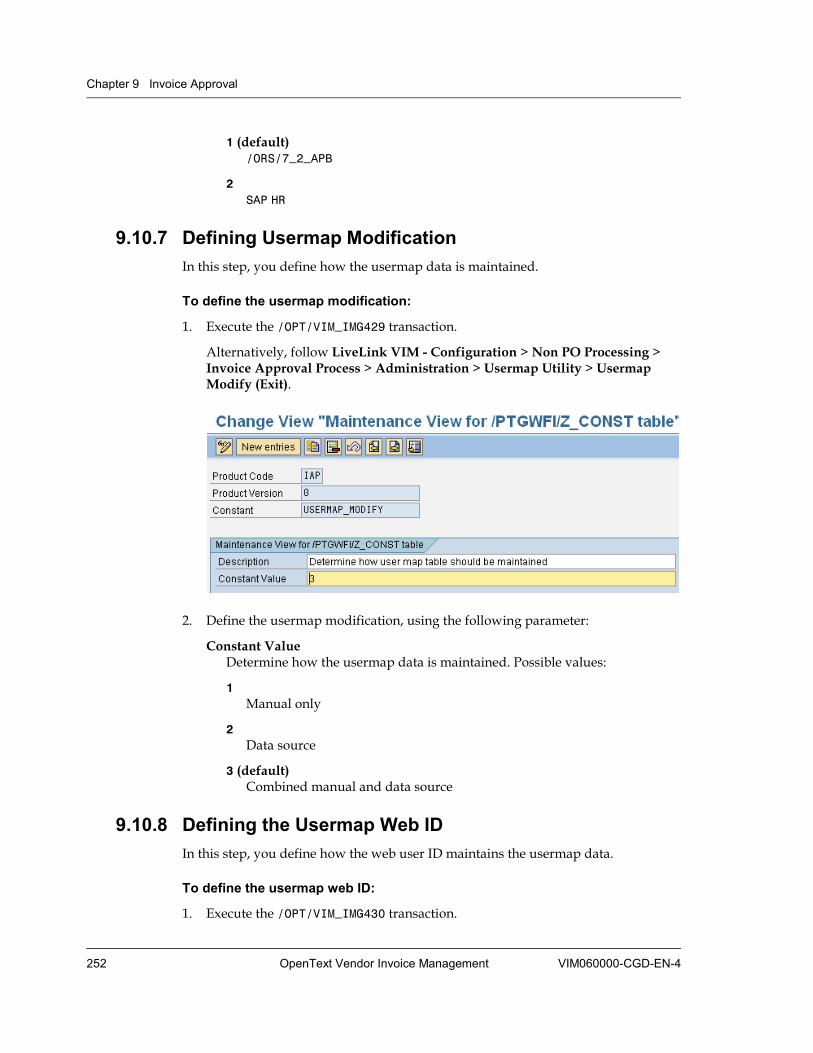
Chapter 9 Invoice Approval
252 OpenText Vendor Invoice Management VIM060000-CGD-EN-4
1 (default) /ORS/7_2_APB
2SAP HR
9.10.7 Defining Usermap Modification In this step, you define how the usermap data is maintained.
To define the usermap modification:
1. Execute the /OPT/VIM_IMG429 transaction.
Alternatively, follow LiveLink VIM - Configuration > Non PO Processing > Invoice Approval Process > Administration > Usermap Utility > Usermap Modify (Exit).
2. Define the usermap modification, using the following parameter:
Constant Value Determine how the usermap data is maintained. Possible values:
1Manual only
2Data source
3 (default) Combined manual and data source
9.10.8 Defining the Usermap Web ID In this step, you define how the web user ID maintains the usermap data.
To define the usermap web ID:
1. Execute the /OPT/VIM_IMG430 transaction.
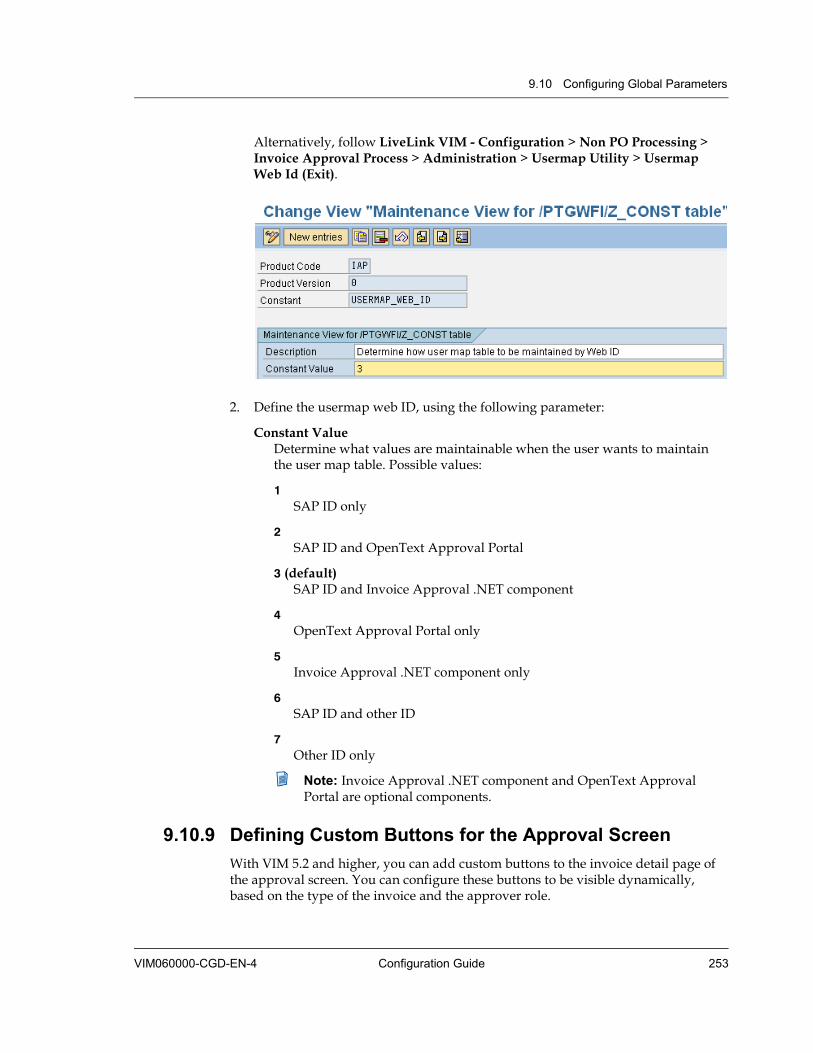
9.10 Configuring Global Parameters
VIM060000-CGD-EN-4 Configuration Guide 253
Alternatively, follow LiveLink VIM - Configuration > Non PO Processing > Invoice Approval Process > Administration > Usermap Utility > Usermap Web Id (Exit).
2. Define the usermap web ID, using the following parameter:
Constant Value Determine what values are maintainable when the user wants to maintain the user map table. Possible values:
1SAP ID only
2SAP ID and OpenText Approval Portal
3 (default) SAP ID and Invoice Approval .NET component
4OpenText Approval Portal only
5Invoice Approval .NET component only
6SAP ID and other ID
7Other ID only
Note: Invoice Approval .NET component and OpenText Approval Portal are optional components.
9.10.9 Defining Custom Buttons for the Approval Screen With VIM 5.2 and higher, you can add custom buttons to the invoice detail page of the approval screen. You can configure these buttons to be visible dynamically, based on the type of the invoice and the approver role.
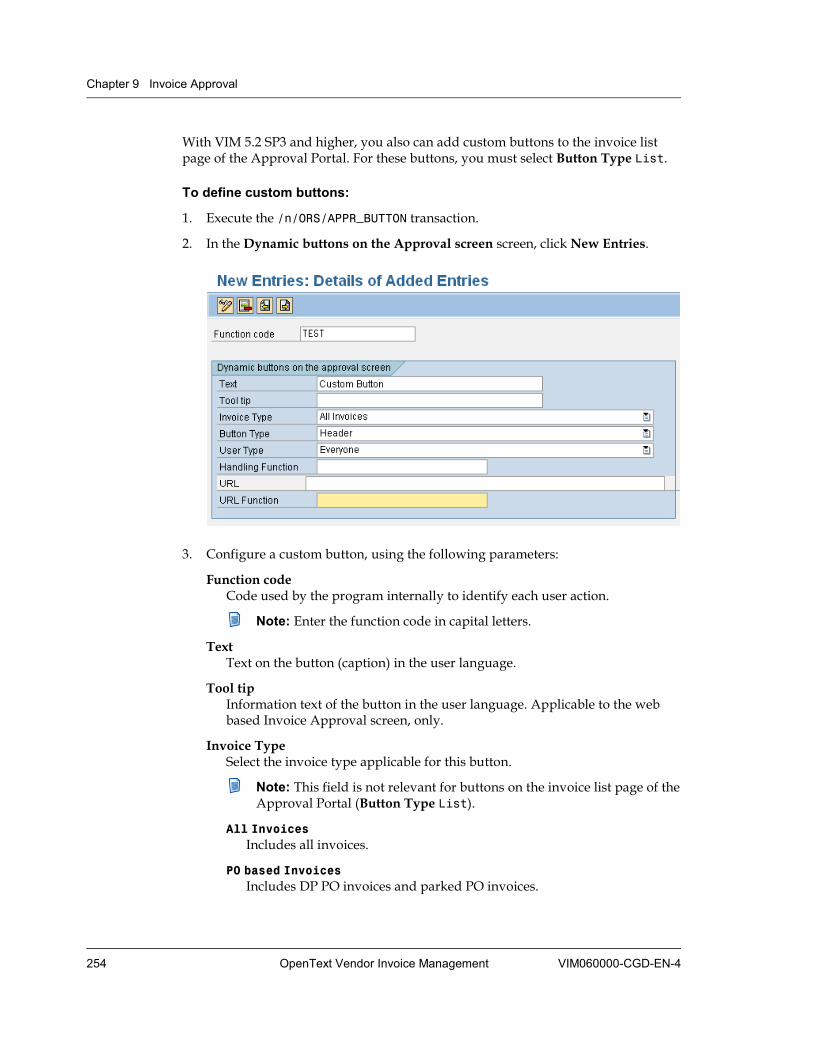
Chapter 9 Invoice Approval
254 OpenText Vendor Invoice Management VIM060000-CGD-EN-4
With VIM 5.2 SP3 and higher, you also can add custom buttons to the invoice list page of the Approval Portal. For these buttons, you must select Button Type List.
To define custom buttons:
1. Execute the /n/ORS/APPR_BUTTON transaction.
2. In the Dynamic buttons on the Approval screen screen, click New Entries.
3. Configure a custom button, using the following parameters:
Function code Code used by the program internally to identify each user action.
Note: Enter the function code in capital letters.
Text Text on the button (caption) in the user language.
Tool tip Information text of the button in the user language. Applicable to the web based Invoice Approval screen, only.
Invoice Type Select the invoice type applicable for this button.
Note: This field is not relevant for buttons on the invoice list page of the Approval Portal (Button Type List).
All Invoices Includes all invoices.
PO based Invoices Includes DP PO invoices and parked PO invoices.

9.10 Configuring Global Parameters
VIM060000-CGD-EN-4 Configuration Guide 255
Non PO based Invoices Includes DP Non PO invoices and parked Non PO invoices.
Button Type Select the button type to differentiate between header level buttons and item level buttons on the invoice approval screen.
Header The button is available for the invoice header or the complete invoice.
Item The button is available only for one line item of the invoice. In this case, the system will check if the user has selected any line item.
List The button is displayed on the invoice list page.
User Type Select the type of user who should be able to see the button.
Note: This field is not relevant for buttons on the invoice list page of the Approval Portal (Button Type List).
Approver The button is available only to those users whose user attributes contain APPROVAL = X.
Coder The button is available only to those users whose user attributes contain CODING = X or CODING_DELEGATE = X.
Everyone The button is available to all users.
Handling Function The Handling Function determines the RFC function that is called when the user clicks the button in the approval screen or the Approval Portal.
Enter the function module to handle the button. Create a custom function module by copying the sample function module /OPT/BUTTON_FM.
For buttons on the invoice list page of the Approval Portal (Button Type List), use the sample function module /OPT/BUTTON_FM_LIST. You can use the handling function module to call a dynamic URL.
URL Enter the static URL to be displayed after the button is clicked.
URL Function Enter the function module to get the URL dynamically. Create a custom function module by copying the sample function module /OPT/BUTTON_URL_FM.
Note: This field is not relevant for buttons on the invoice list page (Button Type List).
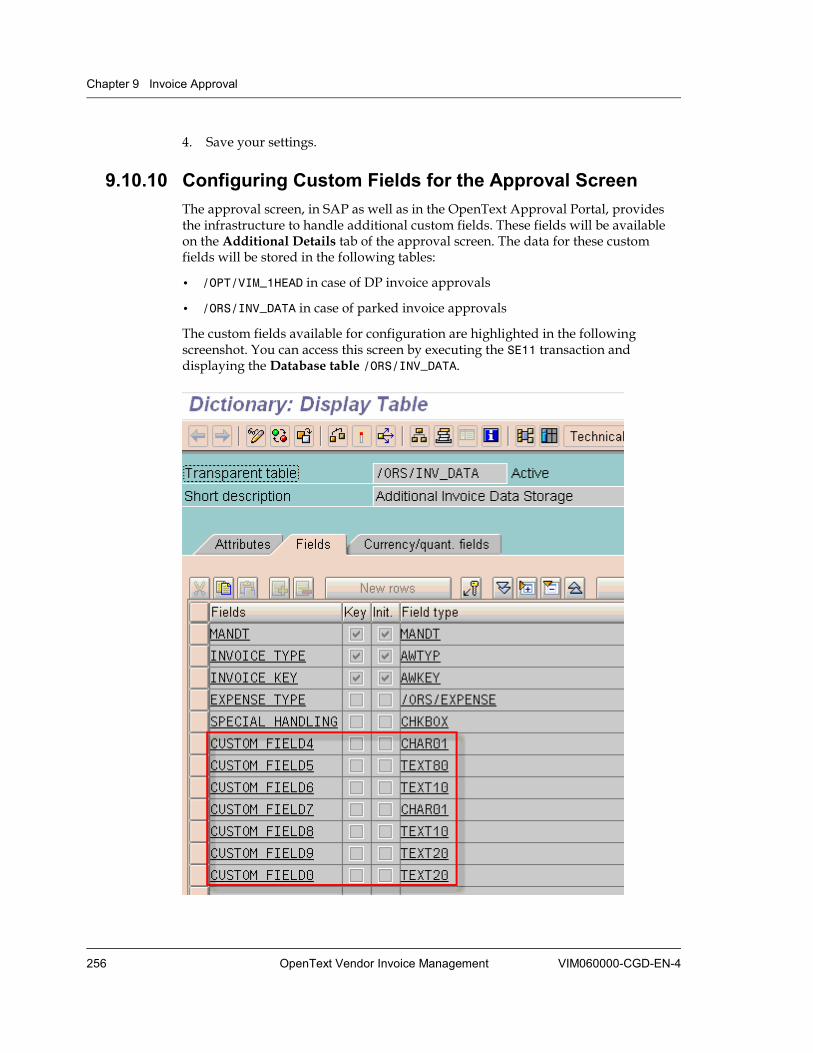
Chapter 9 Invoice Approval
256 OpenText Vendor Invoice Management VIM060000-CGD-EN-4
4. Save your settings.
9.10.10 Configuring Custom Fields for the Approval Screen The approval screen, in SAP as well as in the OpenText Approval Portal, provides the infrastructure to handle additional custom fields. These fields will be available on the Additional Details tab of the approval screen. The data for these custom fields will be stored in the following tables:
• /OPT/VIM_1HEAD in case of DP invoice approvals
• /ORS/INV_DATA in case of parked invoice approvals
The custom fields available for configuration are highlighted in the following screenshot. You can access this screen by executing the SE11 transaction and displaying the Database table /ORS/INV_DATA.
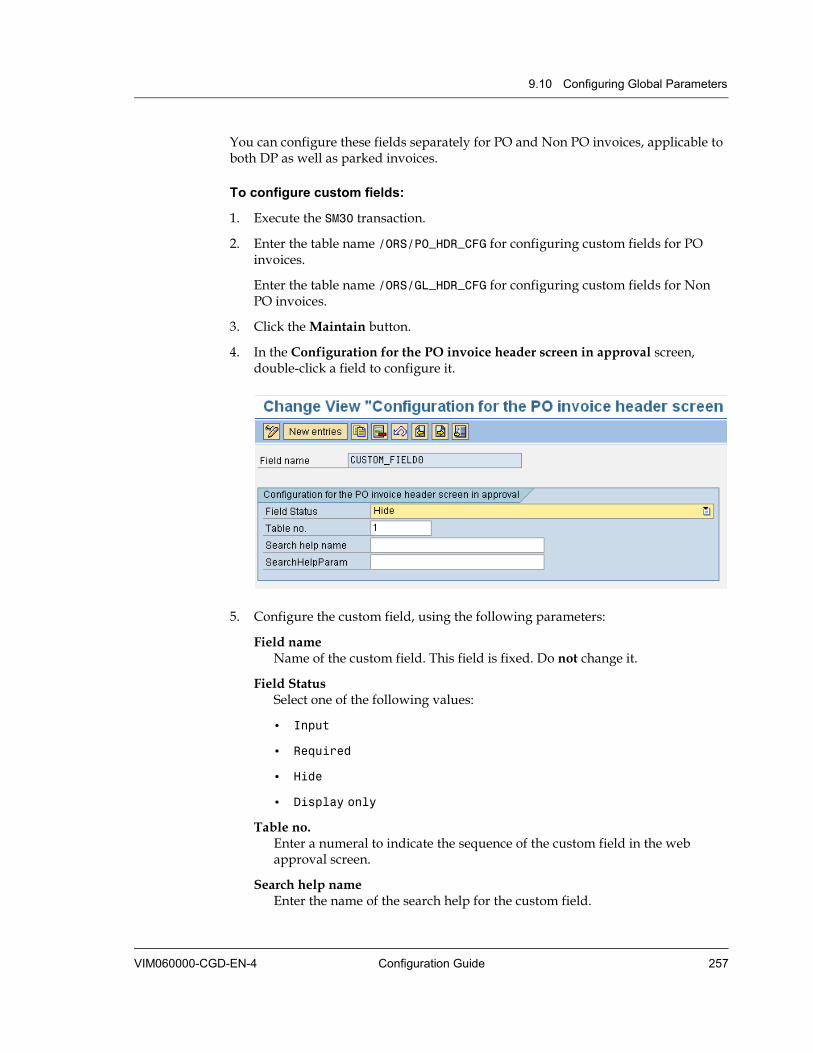
9.10 Configuring Global Parameters
VIM060000-CGD-EN-4 Configuration Guide 257
You can configure these fields separately for PO and Non PO invoices, applicable to both DP as well as parked invoices.
To configure custom fields:
1. Execute the SM30 transaction.
2. Enter the table name /ORS/PO_HDR_CFG for configuring custom fields for PO invoices.
Enter the table name /ORS/GL_HDR_CFG for configuring custom fields for Non PO invoices.
3. Click the Maintain button.
4. In the Configuration for the PO invoice header screen in approval screen, double-click a field to configure it.
5. Configure the custom field, using the following parameters:
Field name Name of the custom field. This field is fixed. Do not change it.
Field Status Select one of the following values:
• Input
• Required
• Hide
• Display only
Table no. Enter a numeral to indicate the sequence of the custom field in the web approval screen.
Search help name Enter the name of the search help for the custom field.
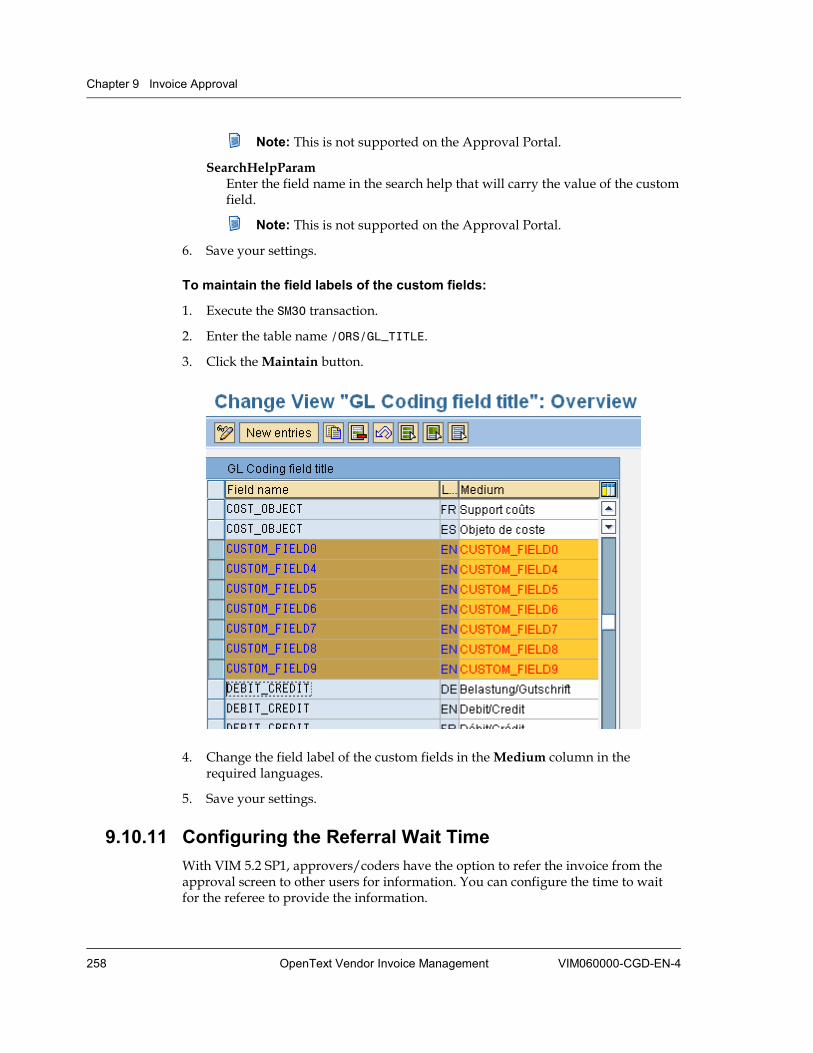
Chapter 9 Invoice Approval
258 OpenText Vendor Invoice Management VIM060000-CGD-EN-4
Note: This is not supported on the Approval Portal.
SearchHelpParam Enter the field name in the search help that will carry the value of the custom field.
Note: This is not supported on the Approval Portal.
6. Save your settings.
To maintain the field labels of the custom fields:
1. Execute the SM30 transaction.
2. Enter the table name /ORS/GL_TITLE.
3. Click the Maintain button.
4. Change the field label of the custom fields in the Medium column in the required languages.
5. Save your settings.
9.10.11 Configuring the Referral Wait Time With VIM 5.2 SP1, approvers/coders have the option to refer the invoice from the approval screen to other users for information. You can configure the time to wait for the referee to provide the information.

9.10 Configuring Global Parameters
VIM060000-CGD-EN-4 Configuration Guide 259
The “referrer” is the user who has sent the approval invoice to another user (referee) for more information on the invoice.
The “referee” is the user who provides additional information on the approval invoice.
To configure the referral wait time:
1. Execute the SM30 transaction to maintain table /PTGWFI/Z_CONST.
2. Locate the record with Product Code IAP and Constant REFERRAL_WAIT_TIME.
3. Enter the Constant Value. It indicates the number of days to wait for the referee to provide information.
After that period, the referral work item is rerouted to the referrer's inbox from the Resubmission folder of the referrer's SAP Business Workplace.
9.10.12 Configuring Tax Calculation on Net Amount VIM 5.2 SP6 introduces the CALC_TAX_ON_NET constant, an option to calculate tax on net amount for Non PO DP Approval: This option enables the system to differentiate between gross and net. You can configure the option individually for each document type or centrally for all document types on the system.
The CALC_TAX_ON_NET constant is needed as a prerequisite for the Calculate Tax on Net check box in the Document Type Definition Details screen, see Calculate Tax on Net on page 62 for details.
To configure tax calculation on net amount:
1. To add a new global CALC_TAX_ON_NET constant for product IAP, execute the /n/OPT/VIM_IMG424 transaction.
Alternatively, execute the /n/OPT/SPRO transaction, and follow LiveLink VIM - Configuration > Non PO Processing > Invoice Approval Process > Technical General > Invoice Approval Configuration.
2. Assign one of the following values to the CALC_TAX_ON_NET constant:
Value Description
X Central setting (for all document types)
G/L account amounts are to be entered net.
Central setting (for all document types)
G/L account amounts are to be entered gross.
D Individual setting for document types
Each document type can be set individually.

Chapter 9 Invoice Approval
260 OpenText Vendor Invoice Management VIM060000-CGD-EN-4
9.11 Configuring the Bulk Approval Validation Exit Since VIM 6.0, the bulk approval/rejection validation function module /ORS/AINV_BULK_VALIDATE_INV provides a customer exit. The baseline validation functionality might not meet your requirements. You can create a new function module with the same interface as /ORS/AINV_BULK_VALIDATE_INV.
To configure the bulk approval validation exit:
1. Execute the SM30 transaction to maintain table /PTGWFI/Z_CONST.
2. Locate the record with Product Code IAP and Constant BULK_VALIDATE_EXIT.
3. Enter the name of your function module in Constant Value.
The baseline function module calls your function module if it is configured and ignores the validations provided in baseline.
9.12 Configuring Posted Approval As an enhancement to Invoice Approval, VIM 6.0 SP3 (and also VIM 5.2 SP8) supports the approval of posted documents, besides the approval of parked or DP based documents.
Benefit Besides the PO blocking scenarios, the VIM process ends with the creation of a posted document. The posted approval processing enables you to post a Non PO or PO invoice as fast as possible with an individual blocking reason. Then you can approve the document with the approval workflow after the document creation. Invoices do not need to go into a long approval process and then are posted finally. With posted approval, they are posted before any approval process is started.
Prerequisite As a prerequisite for the posted approval, a document must be initially processed within the DP workflow. Stand-alone parked or posted documents are not supported. The posted approval sub workflow is available for blocked posted documents that are processed within the DP process. You can trigger the sub workflow in one of the following ways:
• Configure the posted approval settings to be Auto submit for approval after posting with a special payment block.
• Manually post the document with one of the individual configured payment blocks.
For the posted PO approval scenario, either the existing blocking workflows are triggered or the approval process is started depending on the posted approval configuration.
With the final approval of the posted document, the individual payment block is removed.
9.12 Configuring Posted Approval
VIM060000-CGD-EN-4 Configuration Guide 261
Automated coding
VIM 6.0 SP3 (and also VIM 5.2 SP8) also introduce automated coding. In combination with the automatic processing of the posted approval, the coding step can be completely skipped.
Configuration aspects
The whole configuration for the posted approval is integrated in the VIM Customizing IMG tree: Follow LiveLink VIM - Configuration > Non PO Processing > Invoice Approval Process > Approval Workflow.
To configure the posted approval process, the following steps are necessary:
1. Configure posted approval settings (mandatory)
2. Configure event linkage for posted approval trigger (mandatory)
3. Define dynamic determination for the auto processing:
Note: This step is optional: If you configure to use the determination for the automatic posted approval activation type, then you have to process this step. If you activate it always or by custom function module, you do not need to process this customizing.
• Define determination fields
• Define determination data
9.12.1 Configuring Posted Approval Settings You must configure the posted approval settings for each document type. This section describes the possible configuration for a PO document. You must configure it individually; it is not delivered within baseline configuration.
To configure posted approval settings:
1. In the VIM Customizing IMG tree, follow LiveLink VIM - Configuration > Non PO Processing > Invoice Approval Process > Approval Workflow > Posted Approval Settings.
2. Double-click the DP Document Type that you want to configure.
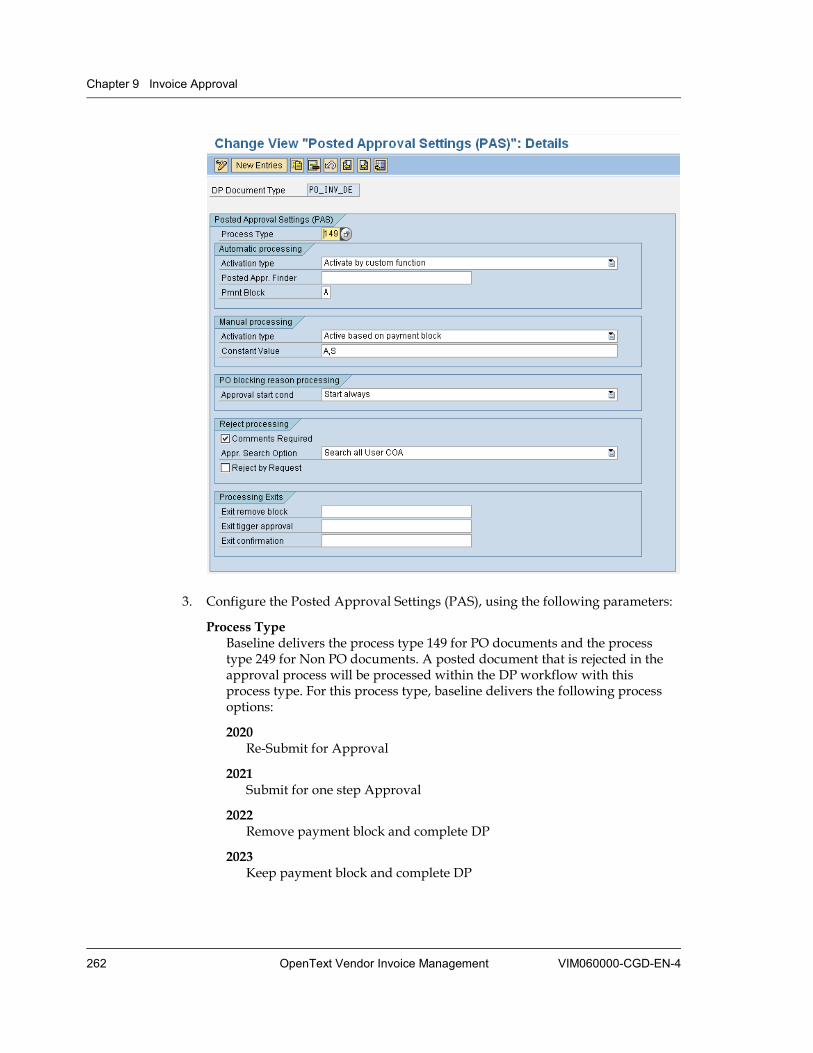
Chapter 9 Invoice Approval
262 OpenText Vendor Invoice Management VIM060000-CGD-EN-4
3. Configure the Posted Approval Settings (PAS), using the following parameters:
Process Type Baseline delivers the process type 149 for PO documents and the process type 249 for Non PO documents. A posted document that is rejected in the approval process will be processed within the DP workflow with this process type. For this process type, baseline delivers the following process options:
2020 Re-Submit for Approval
2021 Submit for one step Approval
2022 Remove payment block and complete DP
2023 Keep payment block and complete DP

9.12 Configuring Posted Approval
VIM060000-CGD-EN-4 Configuration Guide 263
Automatic processing
For Non PO documents In the DP process, a document can be submitted for approval (manually or automatically with exception “Approval required”). In this case, the automatic processing defines that the DP or parked approval process terminates after the requester step. The document will be posted with the configured payment block.
When the coding happens in background with auto coding (see “Configuring Auto Coding” on page 269), also the coding step can be skipped and the document will be posted directly.
For PO documents The automatic processing defines that the document is posted automatically with the configured payment block.
Activation type
• Inactive: Automatic processing is deactivated.
• Active: Automatic processing is activated globally for document type
• Activate by determination: Automatic processing is activated dynamically; see “Configuring Posted Approval Determination” on page 267.
• Activate by custom function: Automatic processing is activated dynamically with custom logic. Maintain the Posted Appr. Finder field. The field is only shown when you select this activation type.
Pmnt Block Enter the payment block that is used to post the document in the automatic processing.
Posted Appr. Finder Enter the exit function to activate the automatic processing (interface check function /OPT/AAFS_DETERMINE_PAS).
Manual processing For Non PO and PO documents, the configuration of the manual processing defines that the posted approval process is triggered for manually posted documents with the configured payment blocks.
Activation type
• Inactive: Manual processing is deactivated.
• Active based on payment block: Manual processing is activated.
Constant Value Enter Constant Values for payment blocks: Possible payment blocks for which the posted approval is relevant to be triggered. Maintain the standard Payment blocks of table T008. Separate them by comma.
Chapter 9 Invoice Approval
264 OpenText Vendor Invoice Management VIM060000-CGD-EN-4
PO blocking reason processing Only relevant for PO based documents: You can maintain an additional start condition to trigger either the blocking workflow or the approval workflow, based on the logistic blocks of the invoice.
Approval start cond Select an approval start condition from the list:
• Start always: The approval workflow is triggered always. The blocking workflow(s) are not triggered.
• Start only when no logistic block exists: The approval workflow is only triggered if no logistic block exists. If any logistic block exists, the blocking workflow(s) are triggered.
• Start only when no logistic block exists besides price: The approval workflow is only triggered if no block or a price block exists. For all other logistic blocks, the blocking workflow(s) are triggered.
Reject processing
Approval restart options Rejected invoices are processed within DP processing with the configured process type. This refers to the baseline process options Submit for one step Approval and Resubmit for Approval for the baseline Posted Approval process types. The document is submitted again for approval processing. For these options, you can configure the following individual settings.
Comments Required Select this check box to determine that a comment is required within the Resubmit for Approval screen. This comment is used in the approval process. It is not logged for the process option, which can also be activated in the process option configuration.
Appr. Search Option For one step approval, define the search and check functionality for the selected approver. Possible entries:
Search all User COA You can select all users from the COA that are configured for approval.
Search only legitimate Approver COA You can select users from the COA that are configured for approval and where also the configured COA fields correspond to the invoice data (Company Code / Cost Center, ...).
Note: The amount of the invoice is not checked!
Reject by Requester An automatic processed DP document for posted approval is directly sent to the assigned approver of the COA during the approval process. In this scenario, the coding and requester step is already executed. When
9.12 Configuring Posted Approval
VIM060000-CGD-EN-4 Configuration Guide 265
the approver rejects the document, it is sent to the previous approver. With posted approval, the requester is not always the first approver. It may happen that the requester does not receive the rejected document.
Select this check box to determine that the document is finally sent to the requester when the approver rejects the document before the approval workflow ends.
Processing Exits You might want to individually trigger the posted approval process and to keep the DP workflow alive for the posted document. Therefore, you can maintain custom functions. The payment block, which will be removed in the final approval step, can be processed individually, as well.
Exit remove block Enter an exit function to be executed after the final approver approves the document. With standard configuration, the header payment block on the posted document is removed. The document will be paid no matter if there are any blocks on the PO document like price or quantity.
The interface of the exit function has to be compatible with the function /OPT/AAFS_CHANGE_BLOCKING_NPO for Non PO documents and /OPT/AAFS_CHANGE_BLOCKING_PO for PO documents.
Exit trigger approval Integrate an own logic for the posted approval to trigger the processing according to your end conditions.
All other configurations to trigger the process manually or automatically are not taken into account (maintained within /OPT/AT_PAS). Only the own logic within the exit function is used. The interface of the exit function has to be compatible with the function /OPT/AAFS_SAMPLE_EXIT_TRIGGER.
Exit confirmation Integrate an own logic for the posted approval to keep the DP process alive according to your start conditions. All other configurations to keep the process alive according to the manual or automatic blocking are not taken into account (maintained within /OPT/AT_PAS). Only the own logic within the exit function is used. The interface of the exit function has to be compatible with the function /OPT/AAFS_SAMPLE_EXIT_CONFIRM.
9.12.2 Configuring Event Linkage for Posted Approval To trigger the posted approval after the document is posted, the following configuration is necessary for Non PO and PO documents.
Execute the SWETYPV transaction and activate the event linkage for the posted approval.
The following screenshot shows the relevant settings.
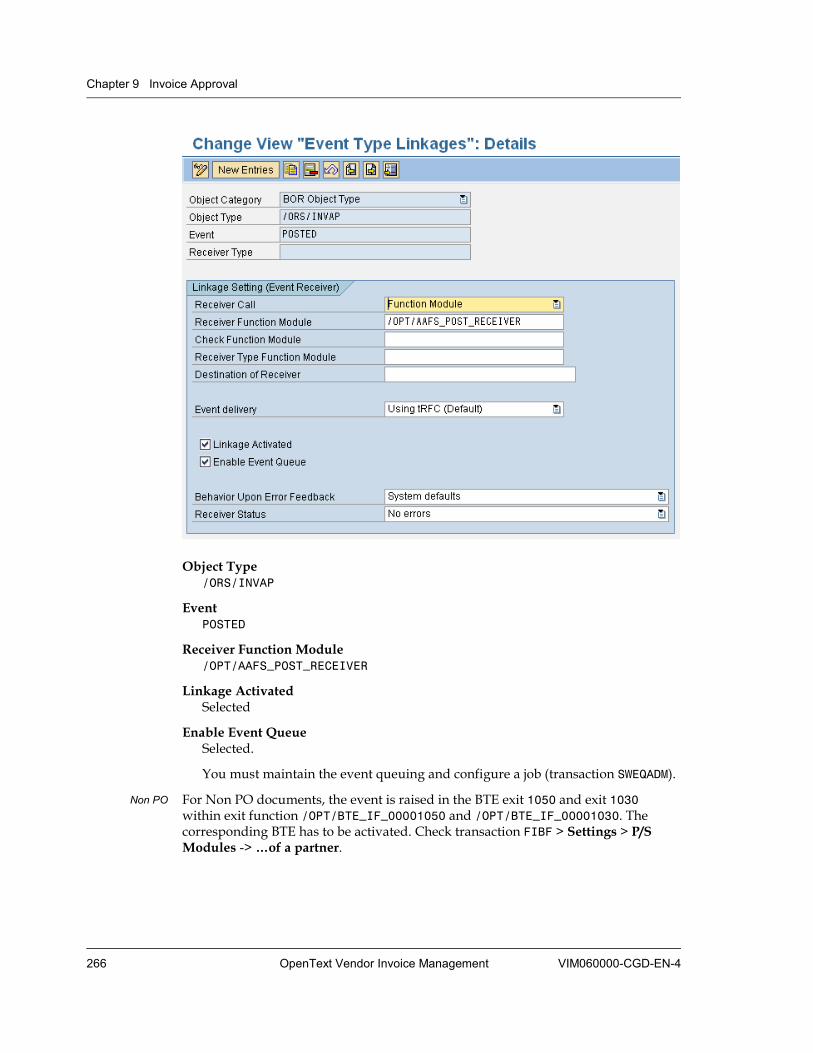
Chapter 9 Invoice Approval
266 OpenText Vendor Invoice Management VIM060000-CGD-EN-4
Object Type /ORS/INVAP
Event POSTED
Receiver Function Module /OPT/AAFS_POST_RECEIVER
Linkage Activated Selected
Enable Event Queue Selected.
You must maintain the event queuing and configure a job (transaction SWEQADM).
Non PO For Non PO documents, the event is raised in the BTE exit 1050 and exit 1030 within exit function /OPT/BTE_IF_00001050 and /OPT/BTE_IF_00001030. The corresponding BTE has to be activated. Check transaction FIBF > Settings > P/S Modules -> …of a partner.
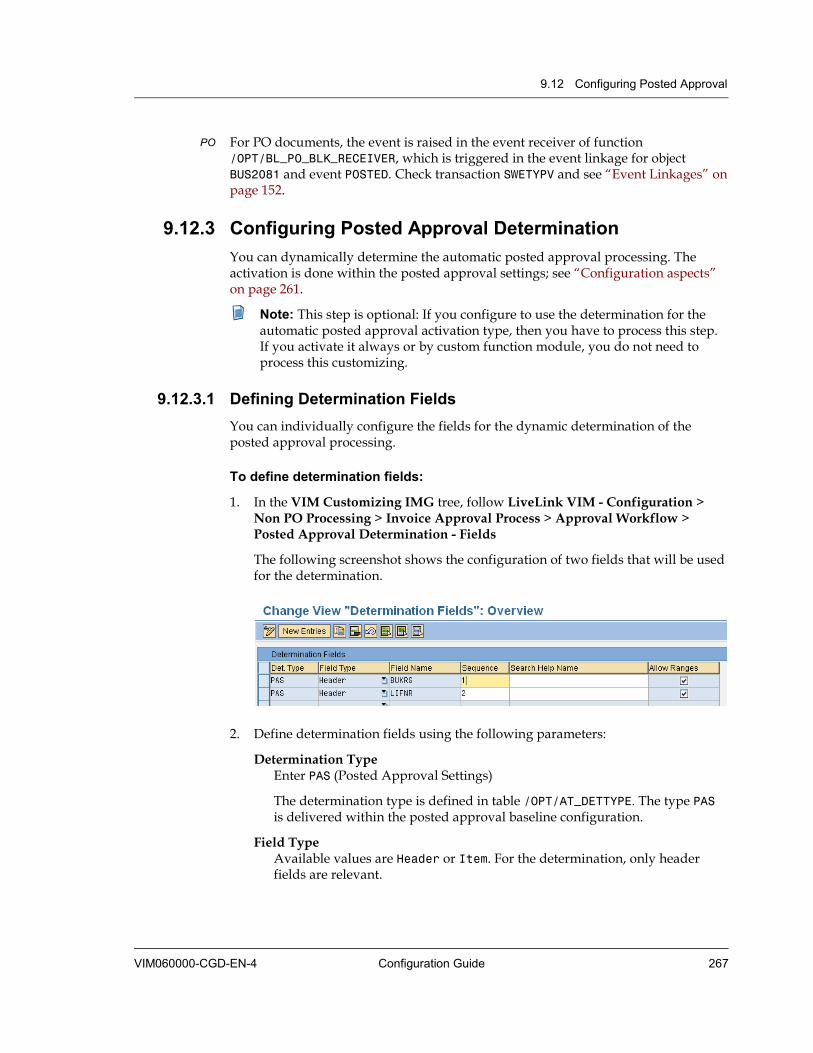
9.12 Configuring Posted Approval
VIM060000-CGD-EN-4 Configuration Guide 267
PO For PO documents, the event is raised in the event receiver of function /OPT/BL_PO_BLK_RECEIVER, which is triggered in the event linkage for object BUS2081 and event POSTED. Check transaction SWETYPV and see “Event Linkages” on page 152.
9.12.3 Configuring Posted Approval Determination You can dynamically determine the automatic posted approval processing. The activation is done within the posted approval settings; see “Configuration aspects” on page 261.
Note: This step is optional: If you configure to use the determination for the automatic posted approval activation type, then you have to process this step. If you activate it always or by custom function module, you do not need to process this customizing.
9.12.3.1 Defining Determination Fields You can individually configure the fields for the dynamic determination of the posted approval processing.
To define determination fields:
1. In the VIM Customizing IMG tree, follow LiveLink VIM - Configuration > Non PO Processing > Invoice Approval Process > Approval Workflow > Posted Approval Determination - Fields
The following screenshot shows the configuration of two fields that will be used for the determination.
2. Define determination fields using the following parameters:
Determination Type Enter PAS (Posted Approval Settings)
The determination type is defined in table /OPT/AT_DETTYPE. The type PAS is delivered within the posted approval baseline configuration.
Field Type Available values are Header or Item. For the determination, only header fields are relevant.
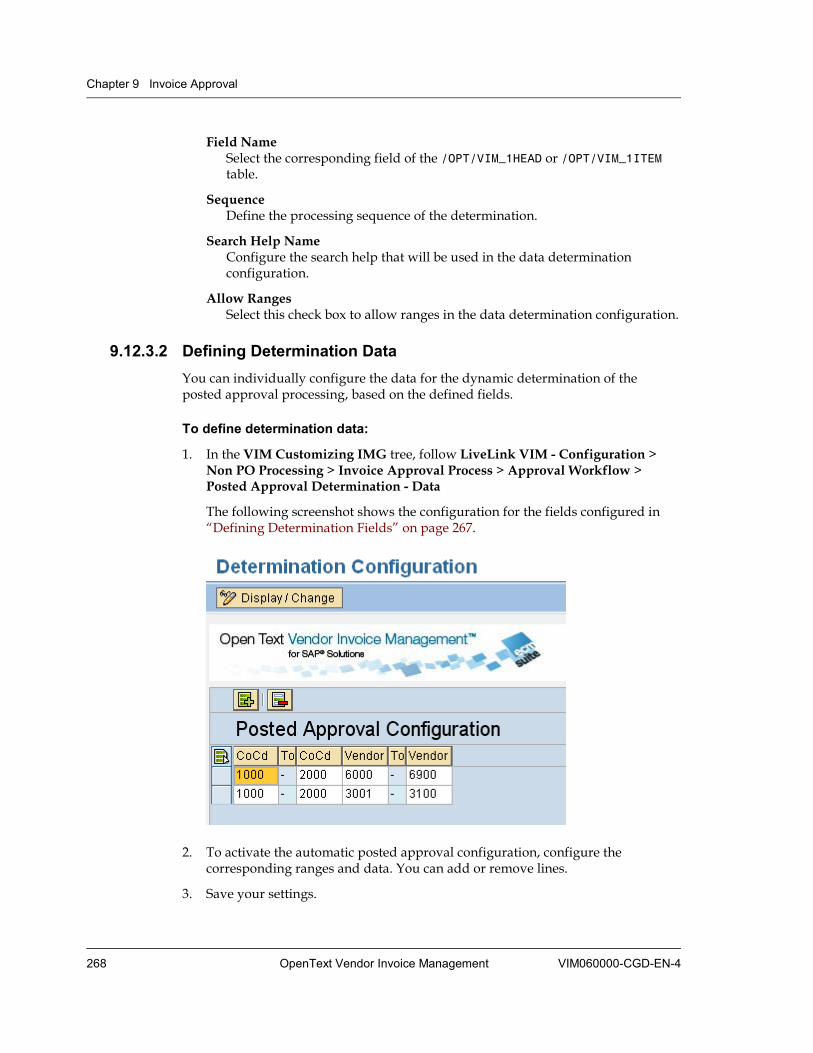
Chapter 9 Invoice Approval
268 OpenText Vendor Invoice Management VIM060000-CGD-EN-4
Field Name Select the corresponding field of the /OPT/VIM_1HEAD or /OPT/VIM_1ITEM table.
Sequence Define the processing sequence of the determination.
Search Help Name Configure the search help that will be used in the data determination configuration.
Allow Ranges Select this check box to allow ranges in the data determination configuration.
9.12.3.2 Defining Determination Data You can individually configure the data for the dynamic determination of the posted approval processing, based on the defined fields.
To define determination data:
1. In the VIM Customizing IMG tree, follow LiveLink VIM - Configuration > Non PO Processing > Invoice Approval Process > Approval Workflow > Posted Approval Determination - Data
The following screenshot shows the configuration for the fields configured in “Defining Determination Fields” on page 267.
2. To activate the automatic posted approval configuration, configure the corresponding ranges and data. You can add or remove lines.
3. Save your settings.
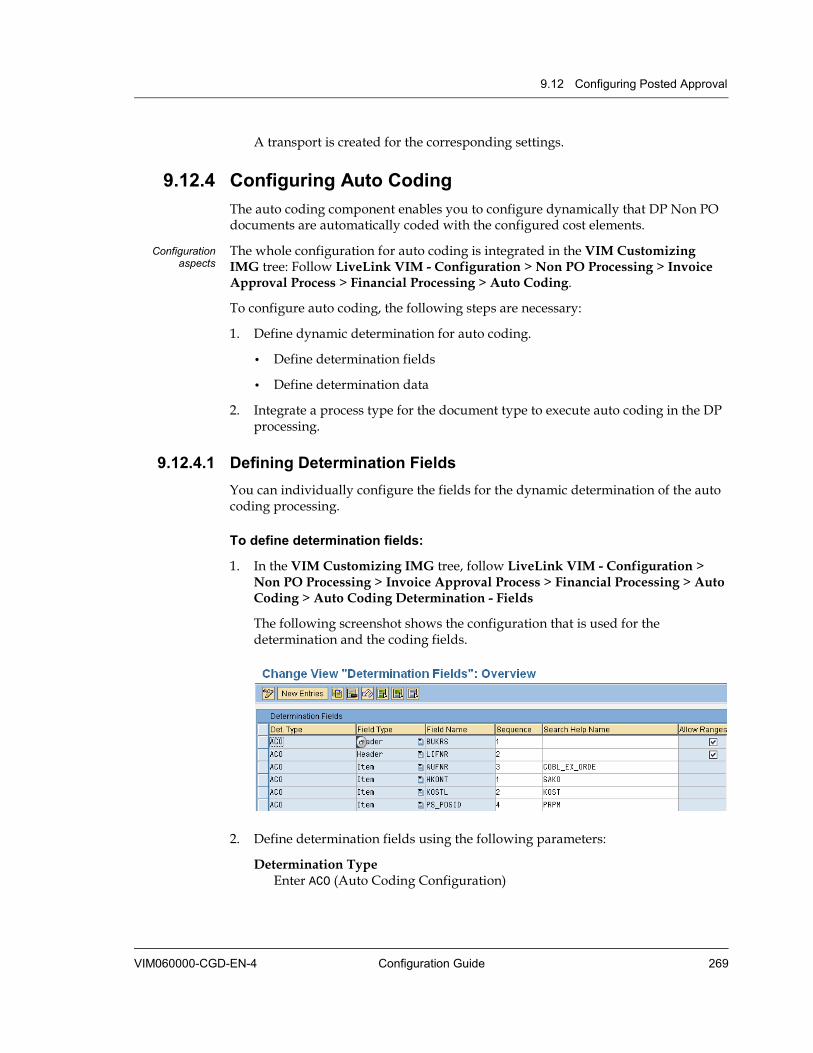
9.12 Configuring Posted Approval
VIM060000-CGD-EN-4 Configuration Guide 269
A transport is created for the corresponding settings.
9.12.4 Configuring Auto Coding The auto coding component enables you to configure dynamically that DP Non PO documents are automatically coded with the configured cost elements.
Configuration aspects
The whole configuration for auto coding is integrated in the VIM Customizing IMG tree: Follow LiveLink VIM - Configuration > Non PO Processing > Invoice Approval Process > Financial Processing > Auto Coding.
To configure auto coding, the following steps are necessary:
1. Define dynamic determination for auto coding.
• Define determination fields
• Define determination data
2. Integrate a process type for the document type to execute auto coding in the DP processing.
9.12.4.1 Defining Determination Fields You can individually configure the fields for the dynamic determination of the auto coding processing.
To define determination fields:
1. In the VIM Customizing IMG tree, follow LiveLink VIM - Configuration > Non PO Processing > Invoice Approval Process > Financial Processing > Auto Coding > Auto Coding Determination - Fields
The following screenshot shows the configuration that is used for the determination and the coding fields.
2. Define determination fields using the following parameters:
Determination Type Enter ACO (Auto Coding Configuration)
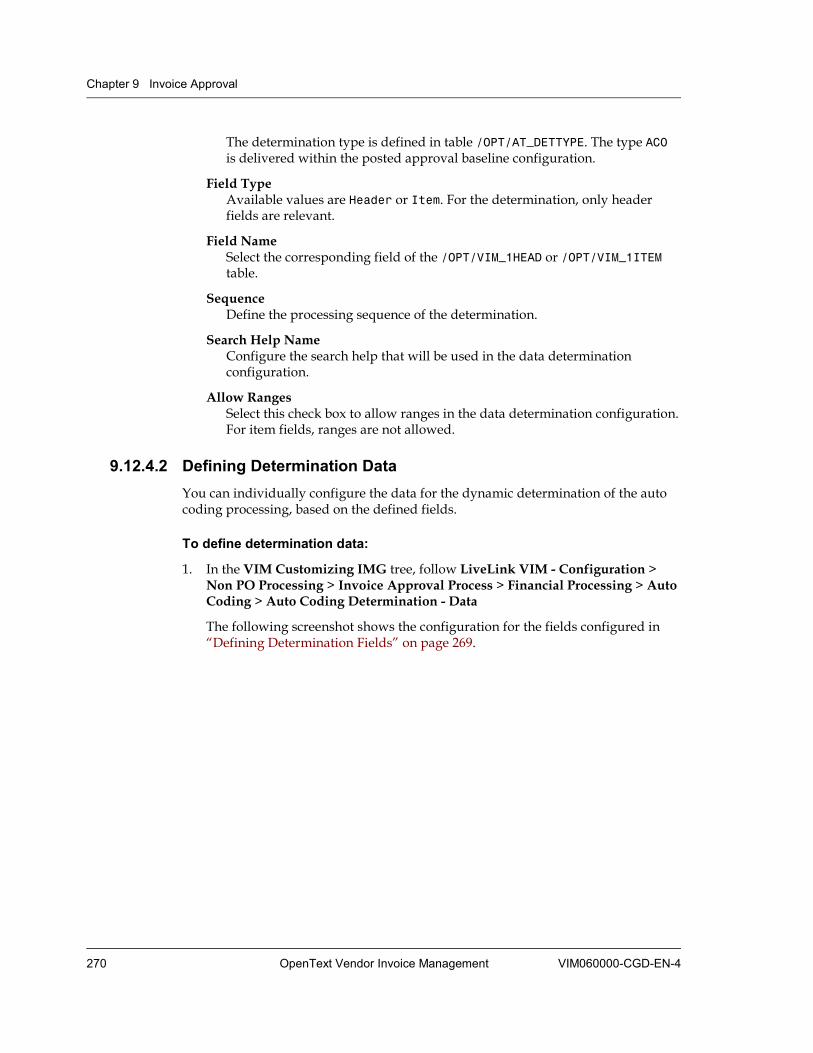
Chapter 9 Invoice Approval
270 OpenText Vendor Invoice Management VIM060000-CGD-EN-4
The determination type is defined in table /OPT/AT_DETTYPE. The type ACO is delivered within the posted approval baseline configuration.
Field Type Available values are Header or Item. For the determination, only header fields are relevant.
Field Name Select the corresponding field of the /OPT/VIM_1HEAD or /OPT/VIM_1ITEM table.
Sequence Define the processing sequence of the determination.
Search Help Name Configure the search help that will be used in the data determination configuration.
Allow Ranges Select this check box to allow ranges in the data determination configuration. For item fields, ranges are not allowed.
9.12.4.2 Defining Determination Data You can individually configure the data for the dynamic determination of the auto coding processing, based on the defined fields.
To define determination data:
1. In the VIM Customizing IMG tree, follow LiveLink VIM - Configuration > Non PO Processing > Invoice Approval Process > Financial Processing > Auto Coding > Auto Coding Determination - Data
The following screenshot shows the configuration for the fields configured in “Defining Determination Fields” on page 269.
9.12 Configuring Posted Approval
VIM060000-CGD-EN-4 Configuration Guide 271
2. To activate the auto coding configuration, configure the corresponding ranges and data. You can add or remove lines.
You can use the Skip Stack indicator to automatically skip the coding or requester step when the approval is triggered. The following values are possible:
CSkip the coding step (most common setting).
RSkip the coding step and the requester step.
SSkip the requester step. However, in case of rejection, the document is still sent to the requester in the approval process.
3. To open the Detail Configuration, double-click a determination line or click the Details button .
Configure the corresponding coding.
The coding is used to insert an initial line item with the net amount of the invoice in the processing. Existing lines are overwritten with the configured coding.
4. Save your settings.
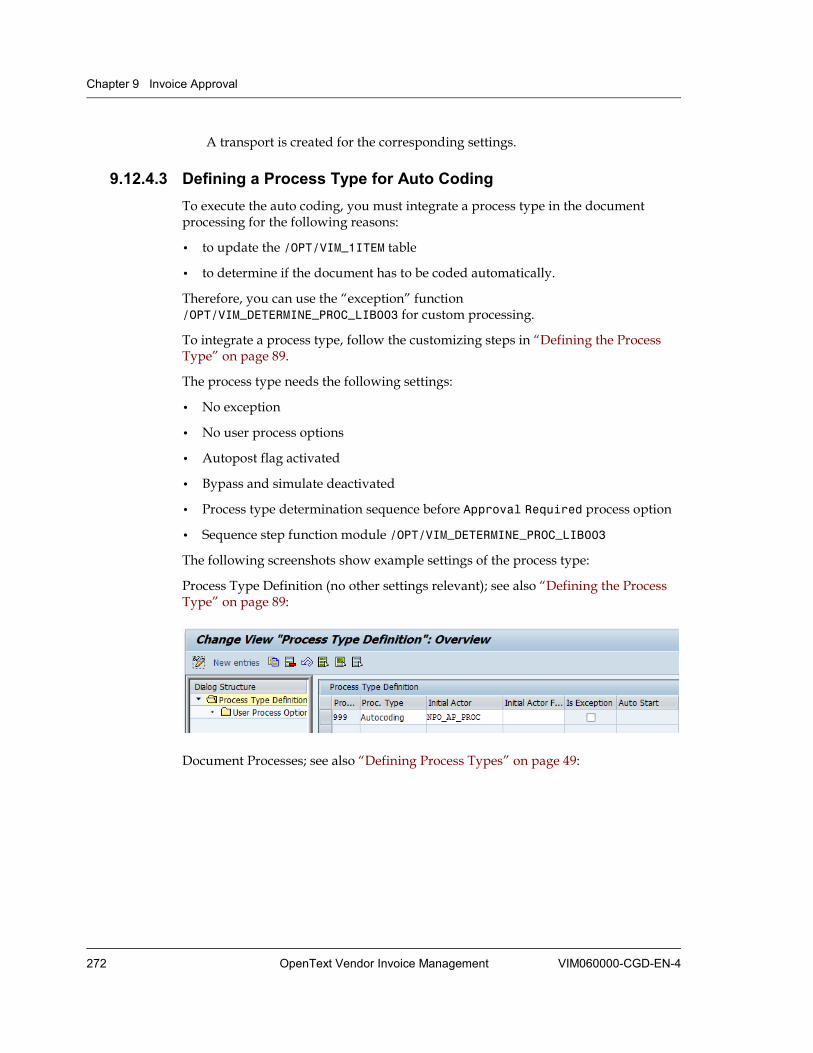
Chapter 9 Invoice Approval
272 OpenText Vendor Invoice Management VIM060000-CGD-EN-4
A transport is created for the corresponding settings.
9.12.4.3 Defining a Process Type for Auto Coding To execute the auto coding, you must integrate a process type in the document processing for the following reasons:
• to update the /OPT/VIM_1ITEM table
• to determine if the document has to be coded automatically.
Therefore, you can use the “exception” function /OPT/VIM_DETERMINE_PROC_LIB003 for custom processing.
To integrate a process type, follow the customizing steps in “Defining the Process Type” on page 89.
The process type needs the following settings:
• No exception
• No user process options
• Autopost flag activated
• Bypass and simulate deactivated
• Process type determination sequence before Approval Required process option
• Sequence step function module /OPT/VIM_DETERMINE_PROC_LIB003
The following screenshots show example settings of the process type:
Process Type Definition (no other settings relevant); see also “Defining the Process Type” on page 89:
Document Processes; see also “Defining Process Types” on page 49:

9.12 Configuring Posted Approval
VIM060000-CGD-EN-4 Configuration Guide 273
Index Screen Options (no other settings relevant): see also “Configuring Index Screen Options” on page 51:
Process Type Determination Sequence (no other settings relevant); see also “Defining the Process Type Determination Sequence” on page 53
Sequence Steps: see also “Defining Sequence Steps” on page 55

VIM060000-CGD-EN-4 OpenText Vendor Invoice Management 275
Chapter 10 Approval on a Mobile Device
VIM 6.0 introduces an enhancement to the Invoice Approval: Users can approve their invoices, using a mobile device, for example a Blackberry. Mobile support bases on the OpenText Everywhere (OTE) infrastructure. For further information on OTE, see OpenText Everywhere - Installation and Administration Guide (MOD-IGD).
Note: OpenText strongly recommends that you implement the Mobile Approval Portal (introduced with VIM 6.0 SP3) instead of the Blackberry and OTE based mobile App. For details on the Mobile Approval Portal, see section 24 "Configuring the Mobile Approval Portal" in OpenText Vendor Invoice Management - Administration Guide (VIM-AGD).
A mobile application (mobile App) is available as a new SAP mobile solution for VIM. Using the mobile App, users can execute their approval tasks in a simple GUI, directly on their mobile device:
• Display work items in an inbox-like Invoice List view
• Display details of an invoice
• Approve and reject invoice (from list and detail view)
• Display attachments and archived invoices
The mobile App does not allow any input or changes to the invoice data. Users can only perform approval or rejection. Coding is not supported in the mobile App. The invoice list only shows invoices for approval.
To configure approval on a mobile device, the following customizing is necessary:
• “Activating Logical Systems” on page 276
• “Configuring Screen Buttons” on page 277
• “Configuring Extended Labels” on page 278
• “Configuring Extended Class” on page 279
• “Configuring the Default Invoice List” on page 279
• “Configuring Invoice List Fields” on page 280
• “Configuring PO Header Fields and GL Header Fields” on page 281
• “Configuring Header Field Labels” on page 283
• “Configuring PO Item Fields and GL Item Fields” on page 283
• “Configuring Item Labels” on page 284
• “Additional Customizing” on page 285

Chapter 10 Approval on a Mobile Device
276 OpenText Vendor Invoice Management VIM060000-CGD-EN-4
The whole configuration (except “Additional Customizing”) is available in the VIM Customizing IMG: Execute the /N/OPT/SPRO transaction and follow the menu path LiveLink VIM - Configuration > Non PO Processing -> Invoice Approval Process -> Mobile Integration.
10.1 Activating Logical Systems In this step, you maintain and activate all logical systems that shall be considered for mobile approval. The OTE middleware server can only handle one connection to one SAP backend system. You must maintain and activate the own system connection and additional SAP systems to be called using RFC.
In a single system landscape, you must maintain and activate the own system.
To open the System Activation screen, execute the /N/OPT/SPRO transaction and follow the menu path LiveLink VIM - Configuration > Non PO Processing -> Invoice Approval Process -> Mobile Integration > Mobile Global Settings > System Activation
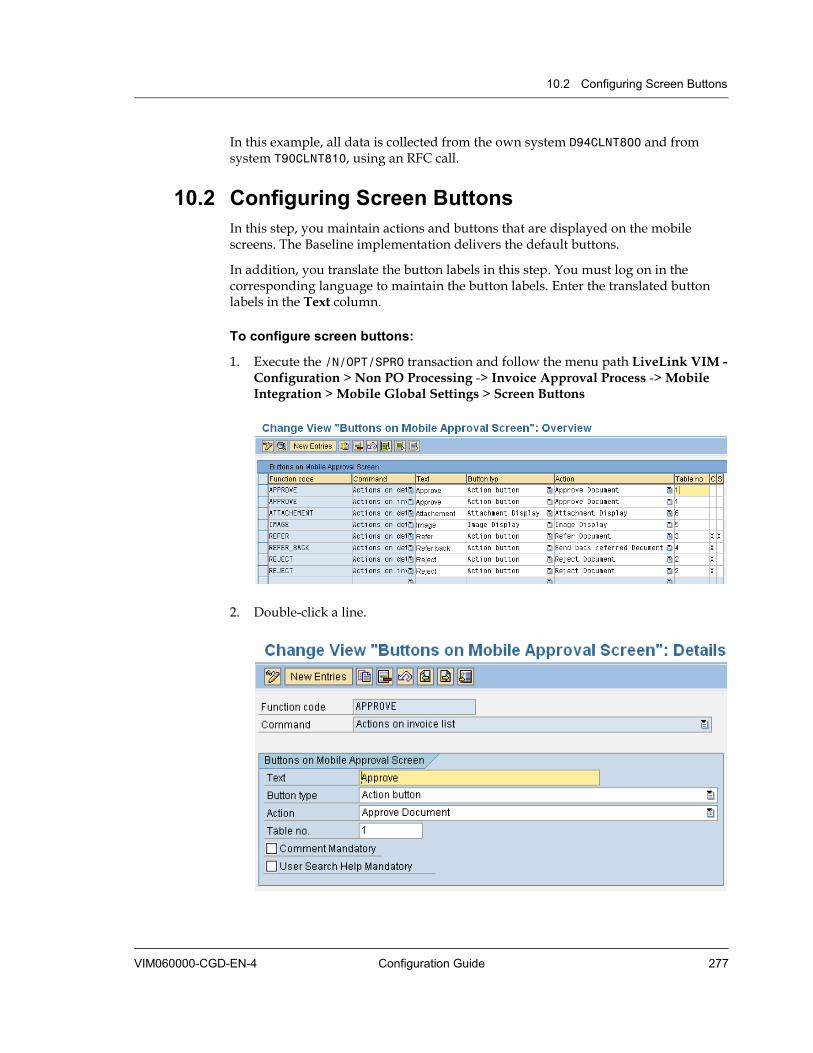
10.2 Configuring Screen Buttons
VIM060000-CGD-EN-4 Configuration Guide 277
In this example, all data is collected from the own system D94CLNT800 and from system T90CLNT810, using an RFC call.
10.2 Configuring Screen Buttons In this step, you maintain actions and buttons that are displayed on the mobile screens. The Baseline implementation delivers the default buttons.
In addition, you translate the button labels in this step. You must log on in the corresponding language to maintain the button labels. Enter the translated button labels in the Text column.
To configure screen buttons:
1. Execute the /N/OPT/SPRO transaction and follow the menu path LiveLink VIM - Configuration > Non PO Processing -> Invoice Approval Process -> Mobile Integration > Mobile Global Settings > Screen Buttons
2. Double-click a line.
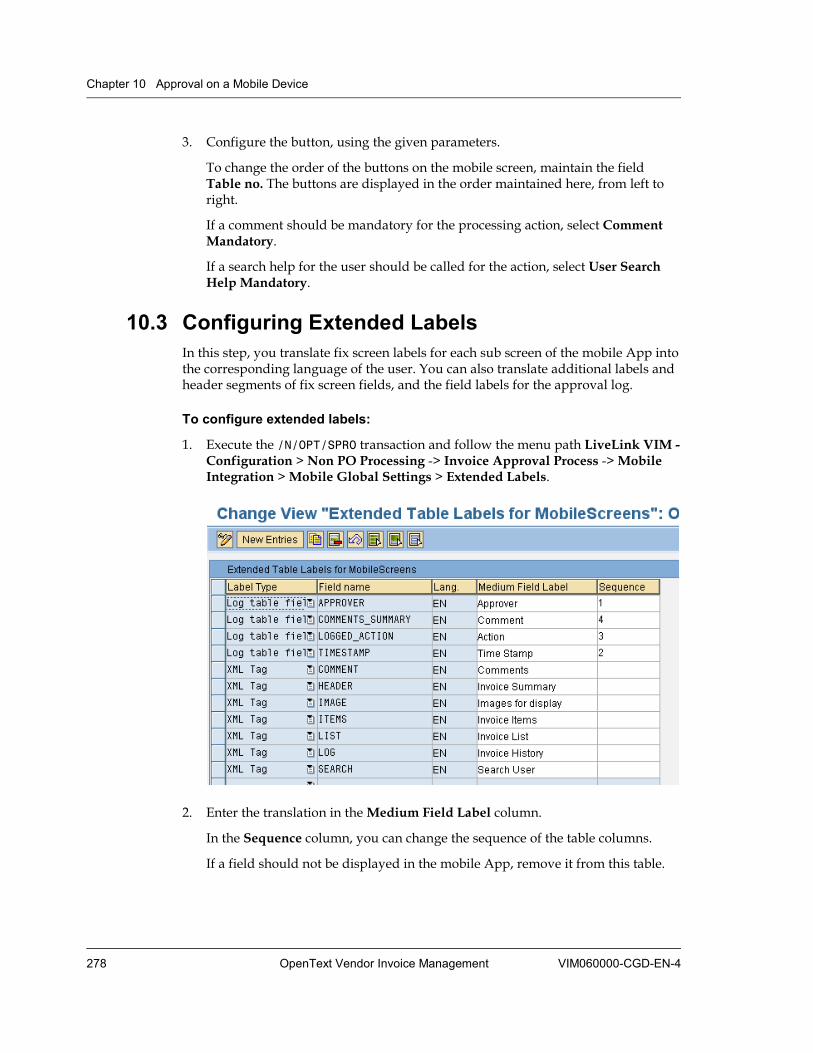
Chapter 10 Approval on a Mobile Device
278 OpenText Vendor Invoice Management VIM060000-CGD-EN-4
3. Configure the button, using the given parameters.
To change the order of the buttons on the mobile screen, maintain the field Table no. The buttons are displayed in the order maintained here, from left to right.
If a comment should be mandatory for the processing action, select Comment Mandatory.
If a search help for the user should be called for the action, select User Search Help Mandatory.
10.3 Configuring Extended Labels In this step, you translate fix screen labels for each sub screen of the mobile App into the corresponding language of the user. You can also translate additional labels and header segments of fix screen fields, and the field labels for the approval log.
To configure extended labels:
1. Execute the /N/OPT/SPRO transaction and follow the menu path LiveLink VIM - Configuration > Non PO Processing -> Invoice Approval Process -> Mobile Integration > Mobile Global Settings > Extended Labels.
2. Enter the translation in the Medium Field Label column.
In the Sequence column, you can change the sequence of the table columns.
If a field should not be displayed in the mobile App, remove it from this table.

10.4 Configuring Extended Class
VIM060000-CGD-EN-4 Configuration Guide 279
10.4 Configuring Extended Class You can inherit the class for the mobile integration that is delivered with Baseline and implement own logic by redefining the corresponding methods. You must enter the new created class in the corresponding Z constant MOB_GLOBAL_CLASS.
Execute the /N/OPT/SPRO transaction and follow the menu path LiveLink VIM - Configuration > Non PO Processing -> Invoice Approval Process -> Mobile Integration > Mobile Global Settings > Extended Class.
Enter the new class in Constant Value.
10.5 Configuring the Default Invoice List In this step, you configure the default list of fields that show up on the mobile approval screen. The fields are used for each user created in the Chart of Authority.
Execute the /N/OPT/SPRO transaction and follow the menu path LiveLink VIM - Configuration > Non PO Processing -> Invoice Approval Process -> Mobile Integration > Mobile Inbox Fields > Maintain Default Invoice List.
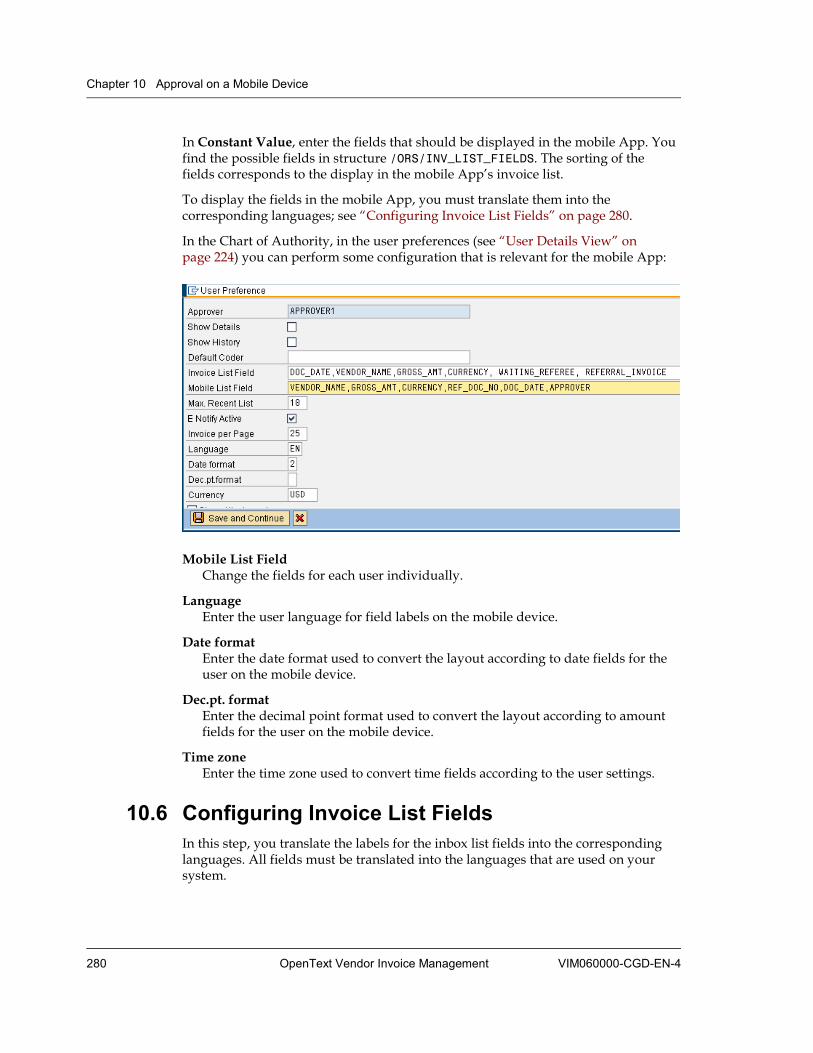
Chapter 10 Approval on a Mobile Device
280 OpenText Vendor Invoice Management VIM060000-CGD-EN-4
In Constant Value, enter the fields that should be displayed in the mobile App. You find the possible fields in structure /ORS/INV_LIST_FIELDS. The sorting of the fields corresponds to the display in the mobile App’s invoice list.
To display the fields in the mobile App, you must translate them into the corresponding languages; see “Configuring Invoice List Fields” on page 280.
In the Chart of Authority, in the user preferences (see “User Details View” on page 224) you can perform some configuration that is relevant for the mobile App:
Mobile List Field Change the fields for each user individually.
Language Enter the user language for field labels on the mobile device.
Date format Enter the date format used to convert the layout according to date fields for the user on the mobile device.
Dec.pt. format Enter the decimal point format used to convert the layout according to amount fields for the user on the mobile device.
Time zone Enter the time zone used to convert time fields according to the user settings.
10.6 Configuring Invoice List Fields In this step, you translate the labels for the inbox list fields into the corresponding languages. All fields must be translated into the languages that are used on your system.

10.7 Configuring PO Header Fields and GL Header Fields
VIM060000-CGD-EN-4 Configuration Guide 281
Execute the /N/OPT/SPRO transaction and follow the menu path LiveLink VIM - Configuration > Non PO Processing -> Invoice Approval Process -> Mobile Integration > Mobile Inbox Fields > Maintain Invoice List Fields.
In the Medium column, enter translations for the fields in the language specified in the Language column.
10.7 Configuring PO Header Fields and GL Header Fields In this step, you can customize all header fields, for invoice type PO and Non PO (that is GL) that will be displayed on the detail page of the mobile App. You can also change the sequence of the fields on the detail page.
To display the fields in the mobile App, you must translate the fields into the corresponding languages, see “Configuring Header Field Labels” on page 283.
To configure PO header fields and GL header fields:
1. Access the customizing screen:
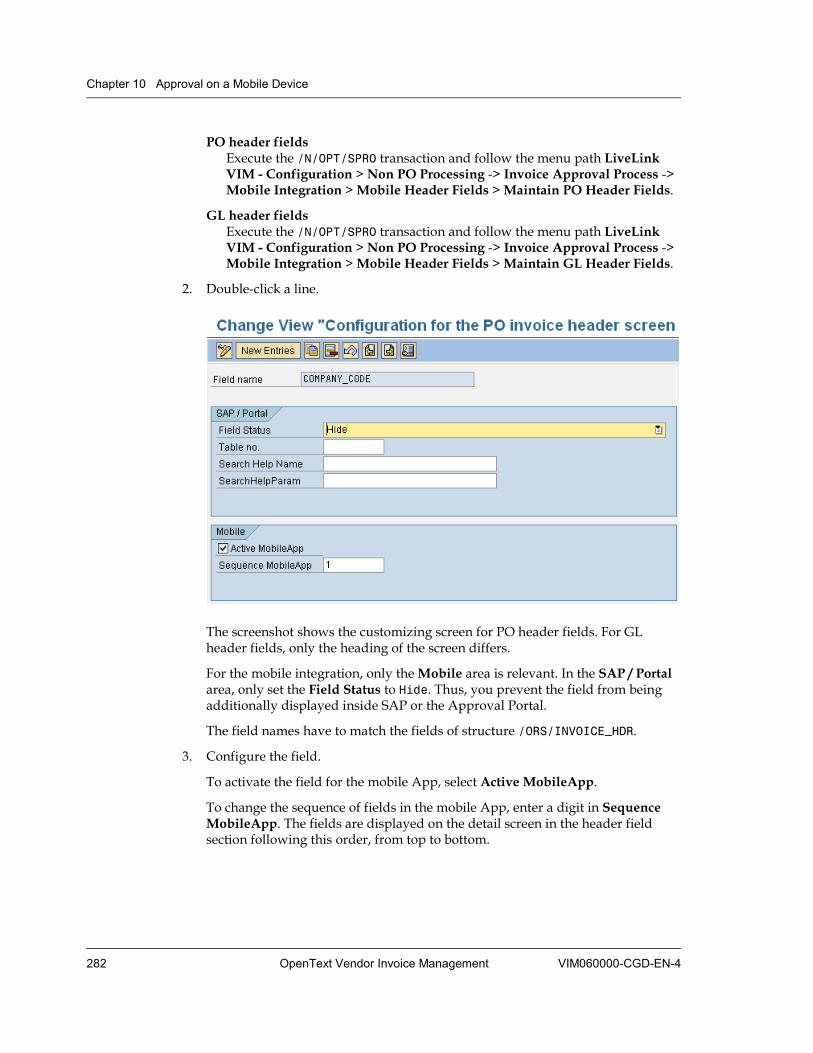
Chapter 10 Approval on a Mobile Device
282 OpenText Vendor Invoice Management VIM060000-CGD-EN-4
PO header fields Execute the /N/OPT/SPRO transaction and follow the menu path LiveLink VIM - Configuration > Non PO Processing -> Invoice Approval Process -> Mobile Integration > Mobile Header Fields > Maintain PO Header Fields.
GL header fields Execute the /N/OPT/SPRO transaction and follow the menu path LiveLink VIM - Configuration > Non PO Processing -> Invoice Approval Process -> Mobile Integration > Mobile Header Fields > Maintain GL Header Fields.
2. Double-click a line.
The screenshot shows the customizing screen for PO header fields. For GL header fields, only the heading of the screen differs.
For the mobile integration, only the Mobile area is relevant. In the SAP / Portal area, only set the Field Status to Hide. Thus, you prevent the field from being additionally displayed inside SAP or the Approval Portal.
The field names have to match the fields of structure /ORS/INVOICE_HDR.
3. Configure the field.
To activate the field for the mobile App, select Active MobileApp.
To change the sequence of fields in the mobile App, enter a digit in Sequence MobileApp. The fields are displayed on the detail screen in the header field section following this order, from top to bottom.

10.8 Configuring Header Field Labels
VIM060000-CGD-EN-4 Configuration Guide 283
10.8 Configuring Header Field Labels In this step, you translate the labels for the header fields into the corresponding languages. All fields must be translated into the languages that are used on your system.
Execute the /N/OPT/SPRO transaction and follow the menu path LiveLink VIM - Configuration > Non PO Processing -> Invoice Approval Process -> Mobile Integration > Mobile Header Fields > Maintain Header Labels.
The customizing is the same as in “Configuring Invoice List Fields” on page 280.
10.9 Configuring PO Item Fields and GL Item Fields In this step, you can customize all item fields for invoice type PO and Non PO (that is GL) that will be displayed on the detail page of the mobile App. You can also change the sequence of the fields on the detail page.
To display the fields in the mobile App, you must translate the fields into the corresponding languages, see “Configuring Item Labels” on page 284.
To configure PO item fields and GL item fields:
1. Access the customizing screen:
PO item fields Execute the /N/OPT/SPRO transaction and follow the menu path LiveLink VIM - Configuration > Non PO Processing -> Invoice Approval Process -> Mobile Integration > Mobile Item Fields > Maintain PO Item Fields.
GL item fields Execute the /N/OPT/SPRO transaction and follow the menu path LiveLink VIM - Configuration > Non PO Processing -> Invoice Approval Process -> Mobile Integration > Mobile Item Fields > Maintain GL Item Fields.
2. Double-click a line.
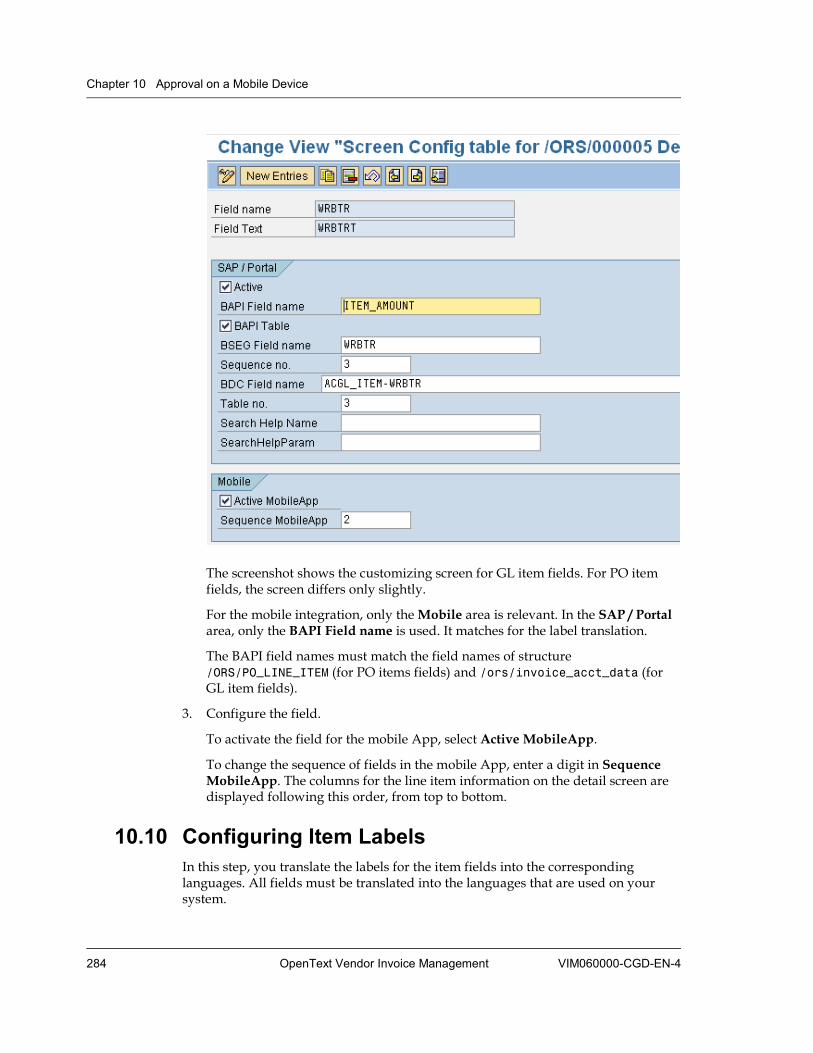
Chapter 10 Approval on a Mobile Device
284 OpenText Vendor Invoice Management VIM060000-CGD-EN-4
The screenshot shows the customizing screen for GL item fields. For PO item fields, the screen differs only slightly.
For the mobile integration, only the Mobile area is relevant. In the SAP / Portal area, only the BAPI Field name is used. It matches for the label translation.
The BAPI field names must match the field names of structure /ORS/PO_LINE_ITEM (for PO items fields) and /ors/invoice_acct_data (for GL item fields).
3. Configure the field.
To activate the field for the mobile App, select Active MobileApp.
To change the sequence of fields in the mobile App, enter a digit in Sequence MobileApp. The columns for the line item information on the detail screen are displayed following this order, from top to bottom.
10.10 Configuring Item Labels In this step, you translate the labels for the item fields into the corresponding languages. All fields must be translated into the languages that are used on your system.
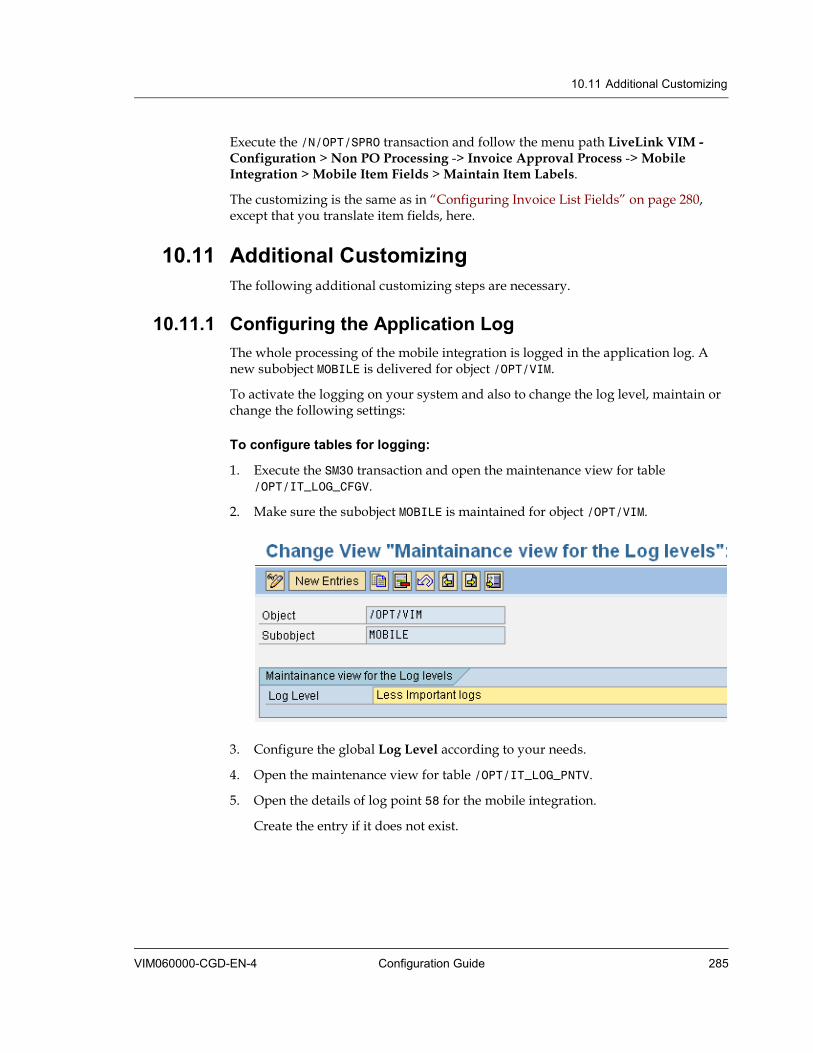
10.11 Additional Customizing
VIM060000-CGD-EN-4 Configuration Guide 285
Execute the /N/OPT/SPRO transaction and follow the menu path LiveLink VIM - Configuration > Non PO Processing -> Invoice Approval Process -> Mobile Integration > Mobile Item Fields > Maintain Item Labels.
The customizing is the same as in “Configuring Invoice List Fields” on page 280,except that you translate item fields, here.
10.11 Additional Customizing The following additional customizing steps are necessary.
10.11.1 Configuring the Application Log The whole processing of the mobile integration is logged in the application log. A new subobject MOBILE is delivered for object /OPT/VIM.
To activate the logging on your system and also to change the log level, maintain or change the following settings:
To configure tables for logging:
1. Execute the SM30 transaction and open the maintenance view for table /OPT/IT_LOG_CFGV.
2. Make sure the subobject MOBILE is maintained for object /OPT/VIM.
3. Configure the global Log Level according to your needs.
4. Open the maintenance view for table /OPT/IT_LOG_PNTV.
5. Open the details of log point 58 for the mobile integration.
Create the entry if it does not exist.

Chapter 10 Approval on a Mobile Device
286 OpenText Vendor Invoice Management VIM060000-CGD-EN-4
6. Configure the Log Level according to your needs.
Note: If no log level is configured, the global level of table /OPT/IT_LOG_CFGV is used.
VIM060000-CGD-EN-4 OpenText Vendor Invoice Management 287
Chapter 11 OpenText Approval Portal
To enable users to approve invoices without having access to SAP, VIM provides the OpenText Approval Portal (Approval Portal), see section 6 "Approving Invoices Using OpenText Approval Portal" in OpenText Vendor Invoice Management - User Guide (VIM-UGD). For more information on how to configure and administrate the Approval Portal, see section 23 "Administering and Troubleshooting the Approval Portal" in OpenText Vendor Invoice Management - Administration Guide (VIM-AGD).

VIM060000-CGD-EN-4 OpenText Vendor Invoice Management 289
Chapter 12 KPI Dashboard
The “Key Performance Indicator” Dashboard (KPI Dashboard) is a tool for managers showing VIM related process data at a glance in graphical charts. The KPI Dashboard is introduced with VIM 6.0 SP3.
KPI KPIs are used for performance management. Organizations use KPIs to measure their overall success or the success of a particular activity. For the KPI Dashboard, the following KPIs have been implemented with several filters: • Number of processed invoices
• Amount of processed invoices
• Number of occurrences of exception classes
• Exception free rate
• Number of invoices processed with delay
• Number of invoices approved with delay
Important
KPI Dashboard data is based on the VIM logging infrastructure, which is a completely new but just internally used technical VIM component. The first KPI Dashboard version introduced with VIM 6.0 SP3 has no functionality to show VIM related data that has been created before the KPI Dashboard BC Set has been activated.
The KPI Dashboard section provides the following configuration aspects:
• “User Interface of the KPI Dashboard” on page 290
• “KPI Dashboard Definitions” on page 291
• “Periodic Jobs - Collection and Aggregation” on page 292
• “Customizing Settings” on page 301
• “SAP Web Dynpro Settings” on page 320
• “Secure Connection” on page 325
• “SAP NetWeaver Portal Integration” on page 326
• “Technical and Functional Restrictions” on page 330

Chapter 12 KPI Dashboard
290 OpenText Vendor Invoice Management VIM060000-CGD-EN-4
12.1 User Interface of the KPI Dashboard The KPI Dashboard user interface bases on modern web application technology. To provide a better overview, the interface groups data thematically and displays data on 3 different graphic screens. Each screen shows 4 straightforward graphics.
Control panel The control panel is located on the very left of the screen and stays the same for all 3 graphic screens. The control panel covers filter related selection criteria like time range, company code group, and input channel.
Display Category For the second half of the actual screens, the Display Category list is available. You can select the following categories to be displayed in the second half of the respective screen:
• PO/Non-PO Invoices
• Amount Classes
• Vendor Groups
The categories Amount Classes and Vendor Groups are customer specific. You must customize them before using the KPI Dashboard.
Screen - KPI Group Volume and Amounts The first half of the screen shows the number and amount of invoices processed and aggregated by the input channels like ICC, EDI, or other.
12.2 KPI Dashboard Definitions
VIM060000-CGD-EN-4 Configuration Guide 291
The second half of the screen shows the category, which by default is “purchase order based”, “non purchase order based”, or “unclassified”. It can be either switched to amount class category or to vendor group category.
Screen - KPI Group Exceptions The Exceptions screen bases on a customer specific mapping of VIM exceptions to KPI exception classes.
The first half of the screen shows the following:
• number of occurrences of exception classes
• percentage of invoices that belong to an exception class that contains customer specific “allowed exceptions” and that are therefore considered to be exception free
The second half of the screen shows the categorized data for the most important exception class (Exception Class 1).
Screen - KPI Group Processing and Approval Time The first half of the screen shows the number of invoices processed or approved in a certain customer specific time frame (“on time”, “almost on time”, or “delayed”).
The second half of the screen shows the categorized data for delayed invoices.
Export to Excel You can export the KPI Dashboard data to an Excel sheet by clicking this link.
Help You can use the content of the current section to provide a customized help for your end users. See “KPI Dashboard Help URL” on page 314.
Info You can view additional information by clicking this link.
12.2 KPI Dashboard Definitions The KPI Dashboard shows monthly VIM data grouped by Channel ID and Company Code Group.
Definitions for KPI1: Number of Processed Invoices
Processed invoices Invoices where the VIM end timestamp is in the current period (month)
Number How many invoices with end timestamp in the current period (month) have been processed
Definitions for KPI2: Amount of Processed Invoices
Processed invoices Invoices where the VIM end timestamp is in the current period (month)
Chapter 12 KPI Dashboard
292 OpenText Vendor Invoice Management VIM060000-CGD-EN-4
Amount What is the total amount of invoices with end timestamp in the current period (month) that have been processed
Definitions for KPI3: Number of Occurrences of Exception Classes
Exception VIM invoice exception in the sense of “process step that requires manual interference”
All exceptions of an invoice in the VIM process are collected and classified. The corresponding exception classes are displayed in the period (month) in which the invoice has the VIM end timestamp.
Exception Class Group of invoice exceptions defined in the KPI customizing
Definitions for KPI4: Exceptions Free Rate
Exception Free Some process steps requiring manual interference are considered to be “no real exception”; therefore they are “exception free”. The exception free rate reflects the rate of “no real exceptions” and the completely exception free rate in comparison with the rate of “real exceptions”.
All exceptions of an invoice in the VIM process are collected, classified, and taken into account for the exception free rate in the period (month) in which the invoice has the VIM end timestamp.
Definitions for KPI5: Number of Invoices Processed with Delay
Invoices processed with delay Invoices where the VIM end timestamp is in the current period (month) and the processing number of days between start and end process timestamp is greater than a certain threshold value for delay (see “Time Groups” on page 305)
Definitions for KPI6: Number of Invoices Approved with Delay
Invoices approved with delay Invoices where the VIM end timestamp is in the current period (month) and the approval duration is greater than a certain threshold value for delay (see “Time Groups” on page 305)
12.3 Periodic Jobs - Collection and Aggregation To make data available in the KPI target tables, you must set up periodic jobs for collection and aggregation.
Note: Before running periodic jobs, you must complete all customizing steps for the KPI Dashboard. See “Customizing Settings” on page 301.
The KPI Dashboard architecture overview shows that different levels of data preparation are necessary to provide correct KPI data.

12.3 Periodic Jobs - Collection and Aggregation
VIM060000-CGD-EN-4 Configuration Guide 293
Figure 12-1: KPI Dashboard architecture overview
Level 1a The VIM logging continuously writes data to special Log Tables and Index Data Tables in the Central System and the Satellite Systems (if involved). The activation of the KPI Dashboard BC set starts the logging mechanism.
Level 1b The KPI Data Collection assembles document and exception data from the logging and saves them in the KPI Source Tables. A periodic collection job is required on each involved system to fill the KPI Source Tables.
Level 2 The KPI Aggregation selects data from the KPI Source Tables (in different logical systems if required), aggregates the data, transforms it and saves the data in the KPI Target Tables. A periodic aggregation job is required only in the Central System (or Single System) to fill the KPI Target Tables.
Level 3 The Web Dynpro uses the KPI Target Tables for visualization in the Web Frontend.
KPI Source Tables and KPI Target Tables can always be refilled from the logging tables.
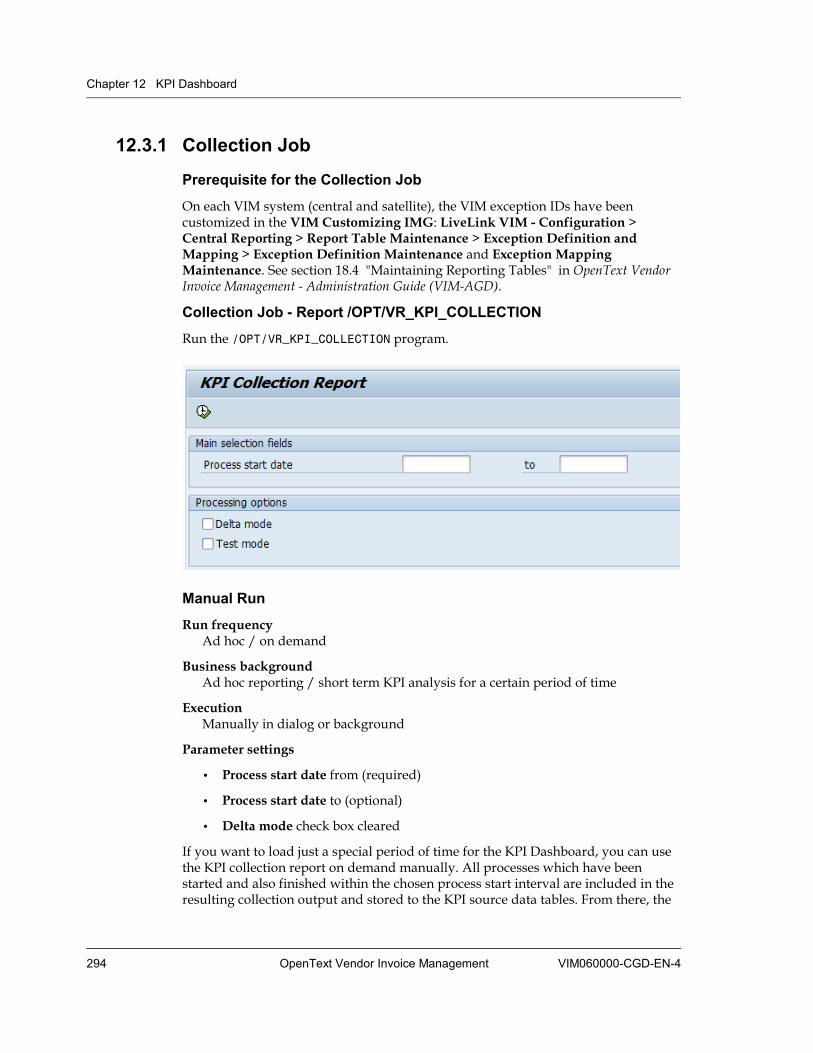
Chapter 12 KPI Dashboard
294 OpenText Vendor Invoice Management VIM060000-CGD-EN-4
12.3.1 Collection Job
Prerequisite for the Collection Job
On each VIM system (central and satellite), the VIM exception IDs have been customized in the VIM Customizing IMG: LiveLink VIM - Configuration > Central Reporting > Report Table Maintenance > Exception Definition and Mapping > Exception Definition Maintenance and Exception Mapping Maintenance. See section 18.4 "Maintaining Reporting Tables" in OpenText Vendor Invoice Management - Administration Guide (VIM-AGD).
Collection Job - Report /OPT/VR_KPI_COLLECTION
Run the /OPT/VR_KPI_COLLECTION program.
Manual Run
Run frequency Ad hoc / on demand
Business background Ad hoc reporting / short term KPI analysis for a certain period of time
Execution Manually in dialog or background
Parameter settings
• Process start date from (required)
• Process start date to (optional)
• Delta mode check box cleared
If you want to load just a special period of time for the KPI Dashboard, you can use the KPI collection report on demand manually. All processes which have been started and also finished within the chosen process start interval are included in the resulting collection output and stored to the KPI source data tables. From there, the
12.3 Periodic Jobs - Collection and Aggregation
VIM060000-CGD-EN-4 Configuration Guide 295
KPI aggregation report picks up the data and writes it to the KPI target data tables as data basis for the Web Frontend.
To run the KPI collection report in test mode, select Test mode. This setting will display the collected data in an ALV grid before saving the result to the database.
Important
When using this ad hoc type of KPI data supply, you must completely clear the KPI source and target data tables before. Otherwise, reloading just a special period of time could probably result in inconsistent overall results and interrupt the regular delta collection runs in a significant way.
Therefore, the following steps are required to fulfill short term ad hoc KPI reporting requirements whenever needed:
1. Delete KPI target data tables using the report /OPT/VR_KPI_DELETE_TARGET.
2. Delete KPI source data tables using the report /OPT/VR_KPI_DELETE_SOURCE.
3. Collect KPI source data for the required special time period using the KPI collection report /OPT/VR_KPI_COLLECTION
4. Aggregate the collected KPI source data and write it to the KPI target data tables using the report /OPT/VR_A_AGGREGATION using aggregation group KPI.
Regular Delta Run
Recommended run frequency Daily
Business background Ongoing KPI reporting
Execution Planned background job
Parameter settings
• No Process start date selection allowed
• Delta mode check box selected
The “Start From” date is the timestamp of the last run. The “Start To” date is the current timestamp.
Test mode Same processing, but the data is not written to the database, but shown in an ALV Grid.

Chapter 12 KPI Dashboard
296 OpenText Vendor Invoice Management VIM060000-CGD-EN-4
Configure the collection program as a job with a variant for the processing option Delta mode.
When running the KPI collection in the regular delta mode, the report picks up all processes which have been started and also finished after the last delta run. The report stores the result to the KPI source data tables. From there, the KPI aggregation report picks up the data that has been collected after the last aggregation run and writes it to the KPI target data tables as data basis for the Web Frontend.
The following steps are required to fulfill ongoing KPI reporting requirements:
1. Run the report /OPT/VR_KPI_COLLECTION in delta mode first.
2. Afterwards run the report /OPT/VR_A_AGGREGATION using aggregation group KPI.
12.3.2 Aggregation Job
12.3.2.1 Prerequisites for the Aggregation Job The Aggregation Infrastructure settings in the VIM Customizing IMG must be customized, see the following screenshot.
The aggregation job prerequisites Aggregation report groups on page 297,Aggregation report target tables on page 297, and Maintain KPI Settings on page 300 are only required if the corresponding BC Set has not been activated. OpenText
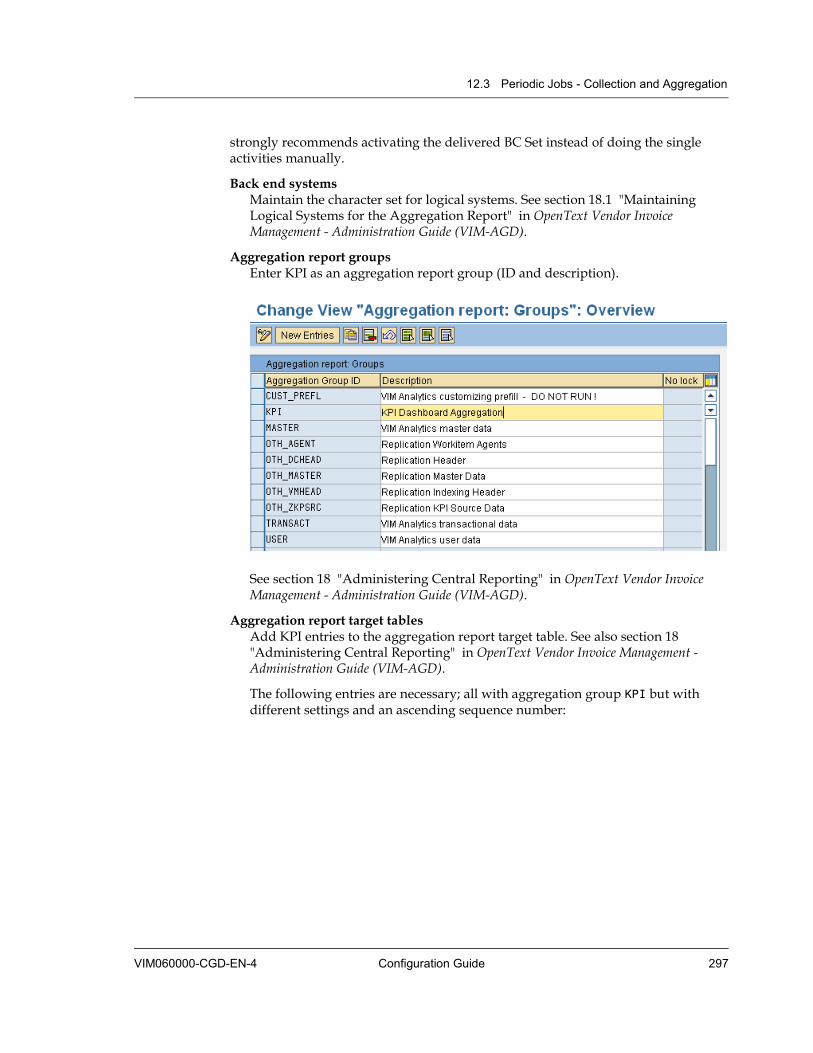
12.3 Periodic Jobs - Collection and Aggregation
VIM060000-CGD-EN-4 Configuration Guide 297
strongly recommends activating the delivered BC Set instead of doing the single activities manually.
Back end systems Maintain the character set for logical systems. See section 18.1 "Maintaining Logical Systems for the Aggregation Report" in OpenText Vendor Invoice Management - Administration Guide (VIM-AGD).
Aggregation report groups Enter KPI as an aggregation report group (ID and description).
See section 18 "Administering Central Reporting" in OpenText Vendor Invoice Management - Administration Guide (VIM-AGD).
Aggregation report target tables Add KPI entries to the aggregation report target table. See also section 18 "Administering Central Reporting" in OpenText Vendor Invoice Management - Administration Guide (VIM-AGD).
The following entries are necessary; all with aggregation group KPI but with different settings and an ascending sequence number:
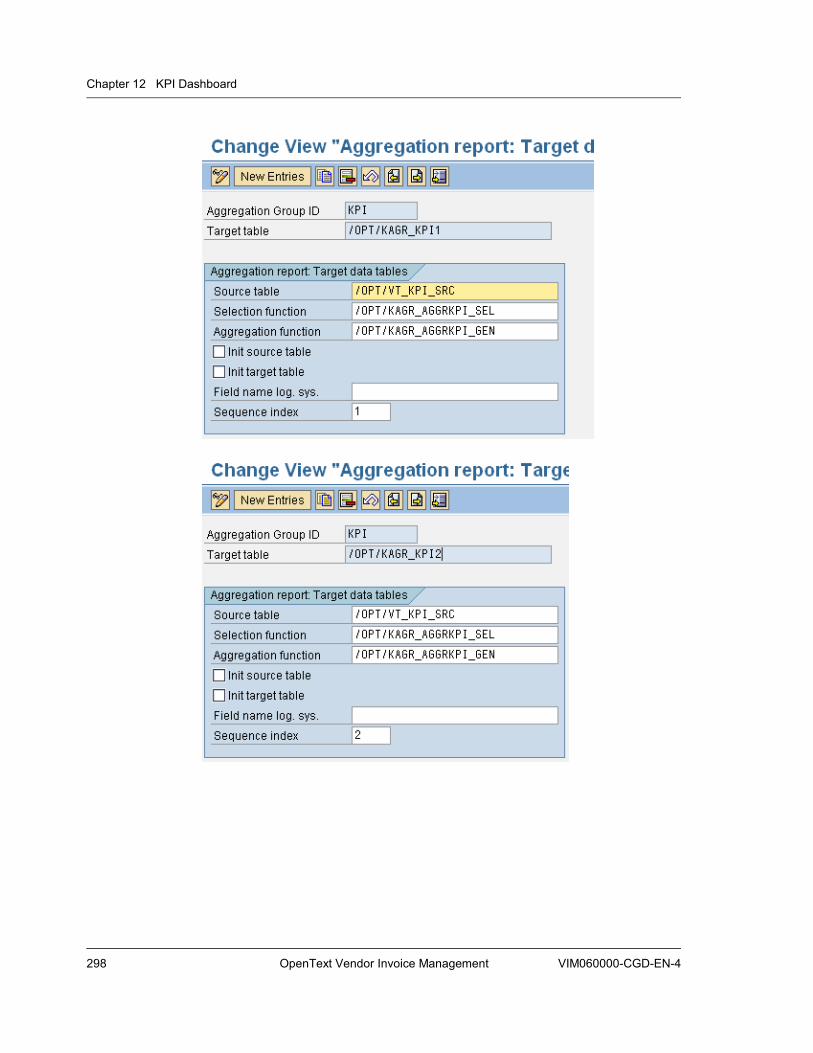
Chapter 12 KPI Dashboard
298 OpenText Vendor Invoice Management VIM060000-CGD-EN-4
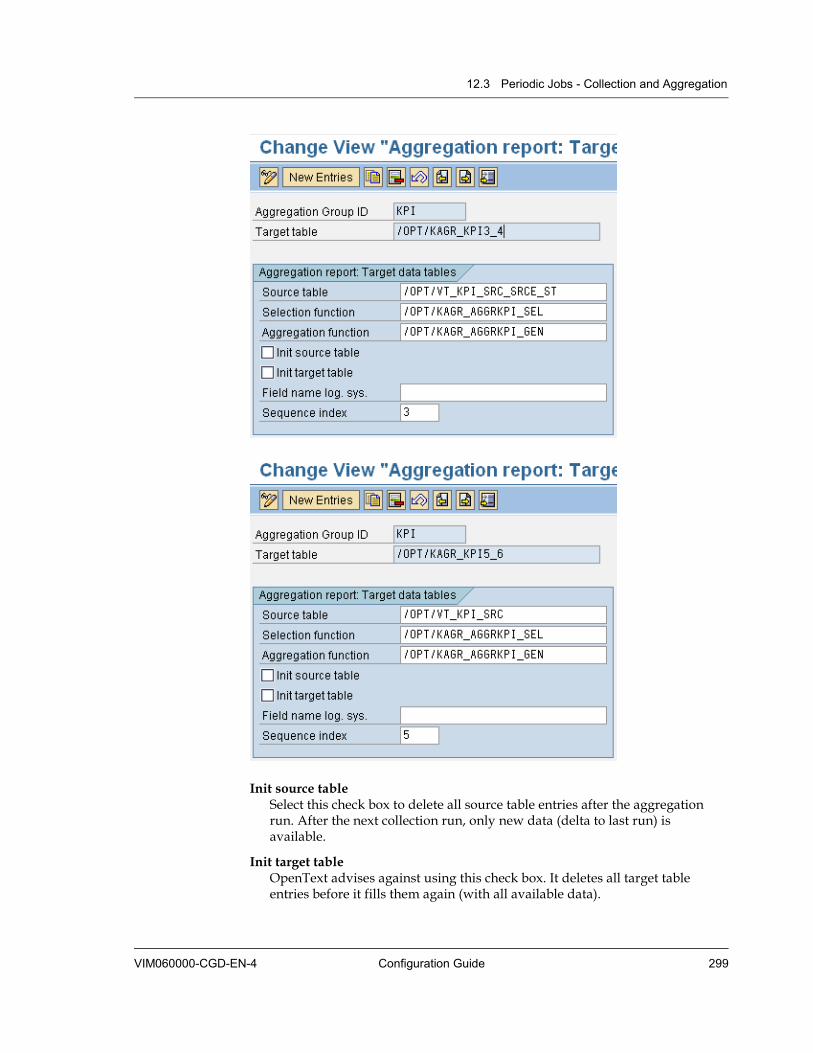
12.3 Periodic Jobs - Collection and Aggregation
VIM060000-CGD-EN-4 Configuration Guide 299
Init source table Select this check box to delete all source table entries after the aggregation run. After the next collection run, only new data (delta to last run) is available.
Init target table OpenText advises against using this check box. It deletes all target table entries before it fills them again (with all available data).
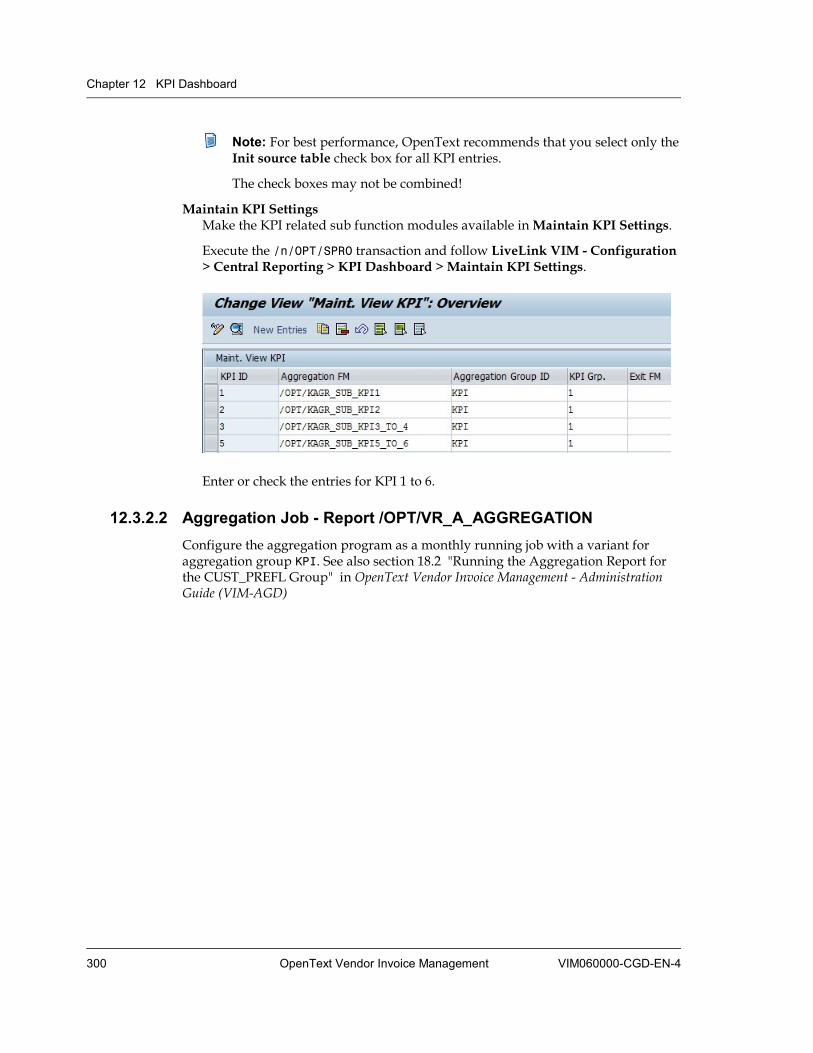
Chapter 12 KPI Dashboard
300 OpenText Vendor Invoice Management VIM060000-CGD-EN-4
Note: For best performance, OpenText recommends that you select only the Init source table check box for all KPI entries.
The check boxes may not be combined!
Maintain KPI Settings Make the KPI related sub function modules available in Maintain KPI Settings.
Execute the /n/OPT/SPRO transaction and follow LiveLink VIM - Configuration > Central Reporting > KPI Dashboard > Maintain KPI Settings.
Enter or check the entries for KPI 1 to 6.
12.3.2.2 Aggregation Job - Report /OPT/VR_A_AGGREGATION Configure the aggregation program as a monthly running job with a variant for aggregation group KPI. See also section 18.2 "Running the Aggregation Report for the CUST_PREFL Group" in OpenText Vendor Invoice Management - Administration Guide (VIM-AGD)
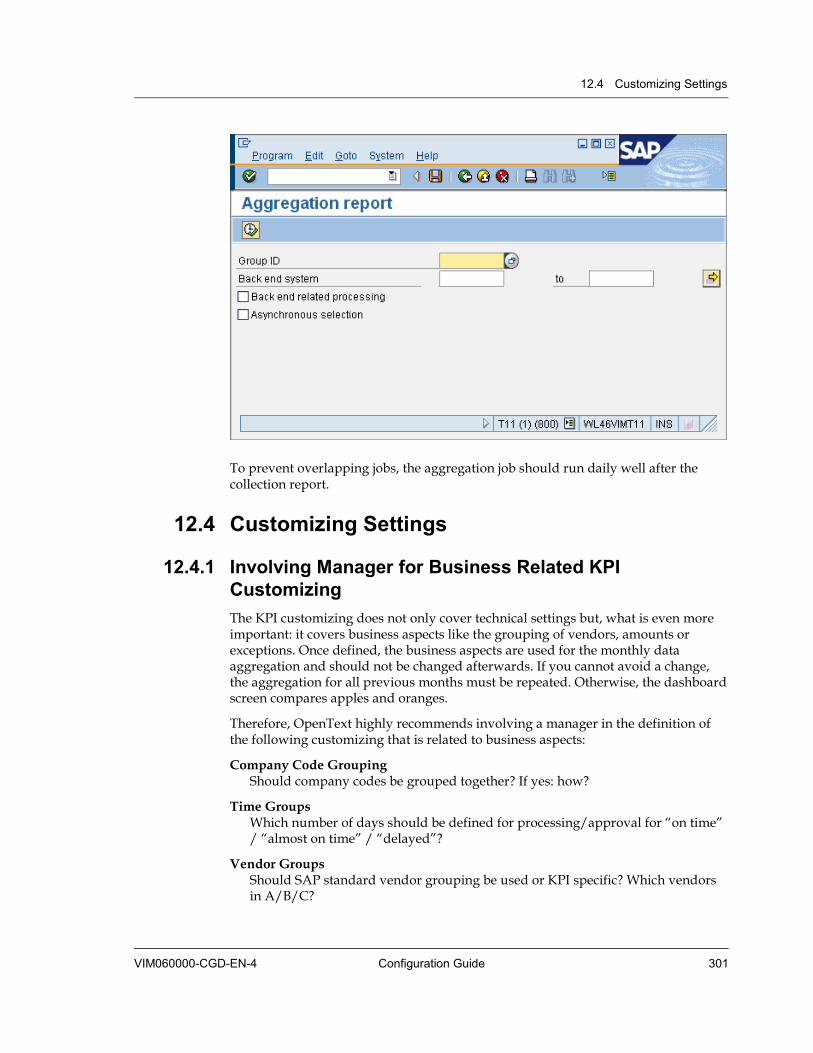
12.4 Customizing Settings
VIM060000-CGD-EN-4 Configuration Guide 301
To prevent overlapping jobs, the aggregation job should run daily well after the collection report.
12.4 Customizing Settings
12.4.1 Involving Manager for Business Related KPI Customizing The KPI customizing does not only cover technical settings but, what is even more important: it covers business aspects like the grouping of vendors, amounts or exceptions. Once defined, the business aspects are used for the monthly data aggregation and should not be changed afterwards. If you cannot avoid a change, the aggregation for all previous months must be repeated. Otherwise, the dashboard screen compares apples and oranges.
Therefore, OpenText highly recommends involving a manager in the definition of the following customizing that is related to business aspects:
Company Code Grouping Should company codes be grouped together? If yes: how?
Time Groups Which number of days should be defined for processing/approval for “on time” / “almost on time” / “delayed”?
Vendor Groups Should SAP standard vendor grouping be used or KPI specific? Which vendors in A/B/C?
Chapter 12 KPI Dashboard
302 OpenText Vendor Invoice Management VIM060000-CGD-EN-4
Dashboard Currency Which currency should be used to show invoice amounts on the Web Frontend?
Amount Classes What is considered to be the range for small / medium / big?
Exception Class Mapping Which Dashboard exception classes should be used? How should the VIM exceptions be mapped to the classes?
Company Code Authority Check Should the display of Dashboard data be limited to the SAP user access rights for company codes (standard delivery)? Or should every Dashboard user see all data? If the authority check is active, different users see different data.
Currency Conversion Date Which conversion date should be used to convert foreign currency invoices: the system date of the monthly aggregation run? Or the posting date of the document? Or a fix date in the current year? If a fix date, which one (1st of January)?
Filter Start Period Which month-year is the earliest that can be selected in the Dashboard Filter Time Range From? Be aware that only data is available for display for which the VIM process has started after introducing the KPI Dashboard on the SAP system.
12.4.2 Customizing Menu You configure the KPI Dashboard using the node Central Reporting > KPI Dashboard in the VIM Customizing IMG (/OPT/SPRO).

12.4 Customizing Settings
VIM060000-CGD-EN-4 Configuration Guide 303
Grouping A lot of customizing has to do with the grouping of data. The KPI Dashboard is not the right tool to display a large range of values; for example, to show 20 different company codes. The KPI Dashboard rather shows grouped data like company code groups or vendor groups.

Chapter 12 KPI Dashboard
304 OpenText Vendor Invoice Management VIM060000-CGD-EN-4
12.4.3 Company Code Groups The KPI dashboard does not show data based on company code but on company code groups. Therefore, you must create company code groups and map them to company codes.
12.4.3.1 Creating Company Code Groups If you have many different company codes, you should group them. The groups should represent a certain grouping logic, for example geography or hierarchy.
To create company code groups:
1. In the VIM Customizing IMG (see “Customizing Menu” on page 302), open Company Codes Groups Definition.
2. Create groups with a 4 character grouping ID and two descriptive fields (long, short). Fill both description fields.
Note: Do not use special characters for the Short Description.
If you have between 1 and 20 different company codes that are relevant for the KPI dashboard, enter each company code as a company code group and fill the description fields.
It is also possible to mix new company code groups with company code groups that are identical with existing company codes.
The Flg: Disp. check box is for future use. It is not relevant now.
12.4.3.2 Mapping Company Code Group to Company Code After creating the company code groups (either new or identical to existing company codes), you must map the company code groups to company codes.
To map company code groups to company codes:
1. In the VIM Customizing IMG (see “Customizing Menu” on page 302), open Company Codes Groups Mapping.
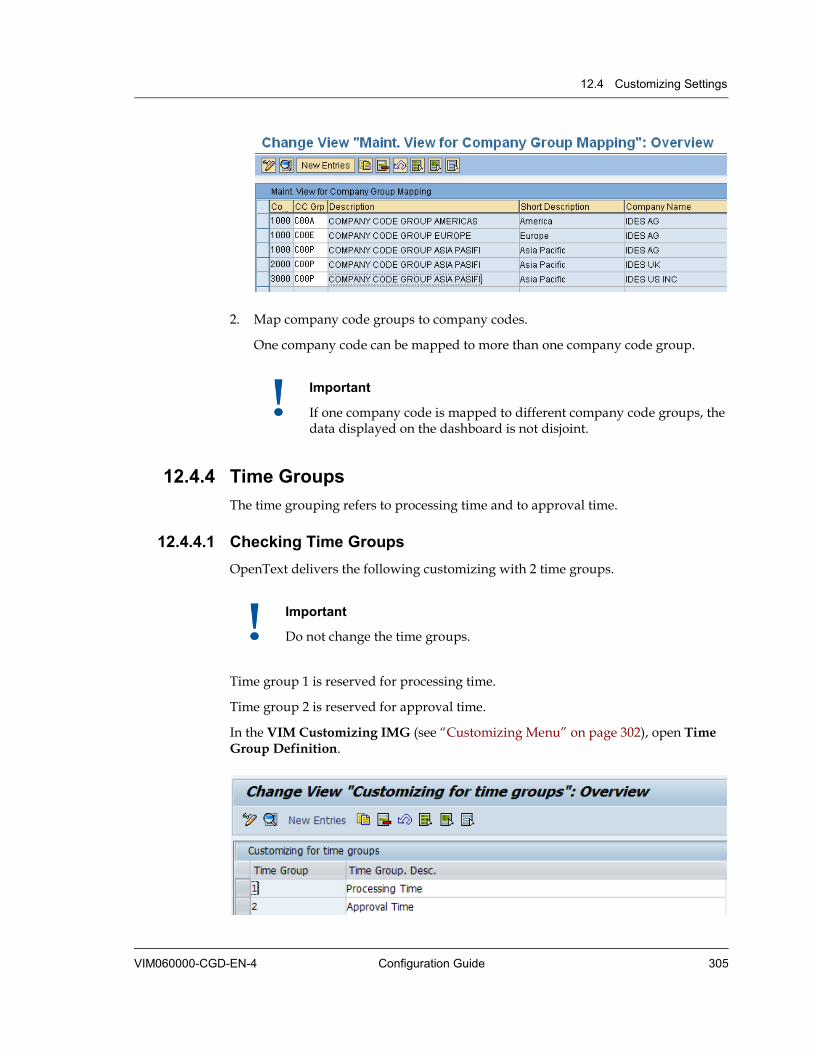
12.4 Customizing Settings
VIM060000-CGD-EN-4 Configuration Guide 305
2. Map company code groups to company codes.
One company code can be mapped to more than one company code group.
Important
If one company code is mapped to different company code groups, the data displayed on the dashboard is not disjoint.
12.4.4 Time Groups The time grouping refers to processing time and to approval time.
12.4.4.1 Checking Time Groups OpenText delivers the following customizing with 2 time groups.
Important
Do not change the time groups.
Time group 1 is reserved for processing time.
Time group 2 is reserved for approval time.
In the VIM Customizing IMG (see “Customizing Menu” on page 302), open Time Group Definition.
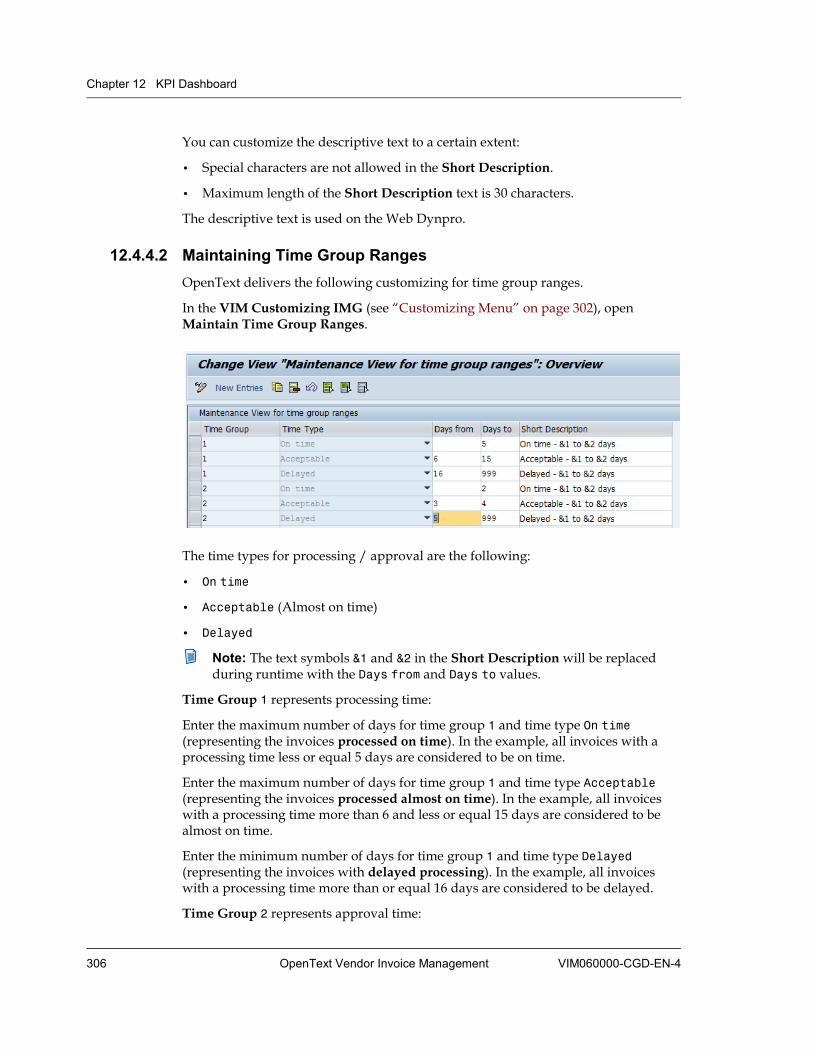
Chapter 12 KPI Dashboard
306 OpenText Vendor Invoice Management VIM060000-CGD-EN-4
You can customize the descriptive text to a certain extent:
• Special characters are not allowed in the Short Description.
• Maximum length of the Short Description text is 30 characters.
The descriptive text is used on the Web Dynpro.
12.4.4.2 Maintaining Time Group Ranges OpenText delivers the following customizing for time group ranges.
In the VIM Customizing IMG (see “Customizing Menu” on page 302), open Maintain Time Group Ranges.
The time types for processing / approval are the following:
• On time
• Acceptable (Almost on time)
• Delayed
Note: The text symbols &1 and &2 in the Short Description will be replaced during runtime with the Days from and Days to values.
Time Group 1 represents processing time:
Enter the maximum number of days for time group 1 and time type On time (representing the invoices processed on time). In the example, all invoices with a processing time less or equal 5 days are considered to be on time.
Enter the maximum number of days for time group 1 and time type Acceptable (representing the invoices processed almost on time). In the example, all invoices with a processing time more than 6 and less or equal 15 days are considered to be almost on time.
Enter the minimum number of days for time group 1 and time type Delayed (representing the invoices with delayed processing). In the example, all invoices with a processing time more than or equal 16 days are considered to be delayed.
Time Group 2 represents approval time:
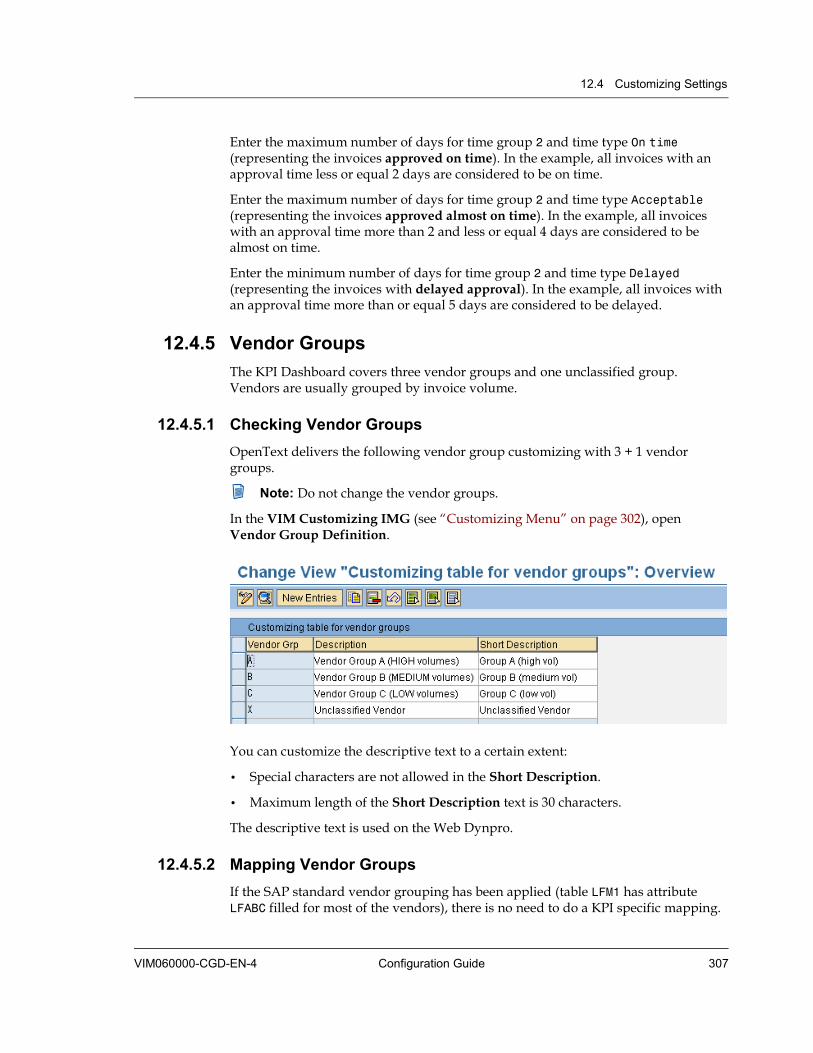
12.4 Customizing Settings
VIM060000-CGD-EN-4 Configuration Guide 307
Enter the maximum number of days for time group 2 and time type On time (representing the invoices approved on time). In the example, all invoices with an approval time less or equal 2 days are considered to be on time.
Enter the maximum number of days for time group 2 and time type Acceptable (representing the invoices approved almost on time). In the example, all invoices with an approval time more than 2 and less or equal 4 days are considered to be almost on time.
Enter the minimum number of days for time group 2 and time type Delayed (representing the invoices with delayed approval). In the example, all invoices with an approval time more than or equal 5 days are considered to be delayed.
12.4.5 Vendor Groups The KPI Dashboard covers three vendor groups and one unclassified group. Vendors are usually grouped by invoice volume.
12.4.5.1 Checking Vendor Groups OpenText delivers the following vendor group customizing with 3 + 1 vendor groups.
Note: Do not change the vendor groups.
In the VIM Customizing IMG (see “Customizing Menu” on page 302), open Vendor Group Definition.
You can customize the descriptive text to a certain extent:
• Special characters are not allowed in the Short Description.
• Maximum length of the Short Description text is 30 characters.
The descriptive text is used on the Web Dynpro.
12.4.5.2 Mapping Vendor Groups If the SAP standard vendor grouping has been applied (table LFM1 has attribute LFABC filled for most of the vendors), there is no need to do a KPI specific mapping.
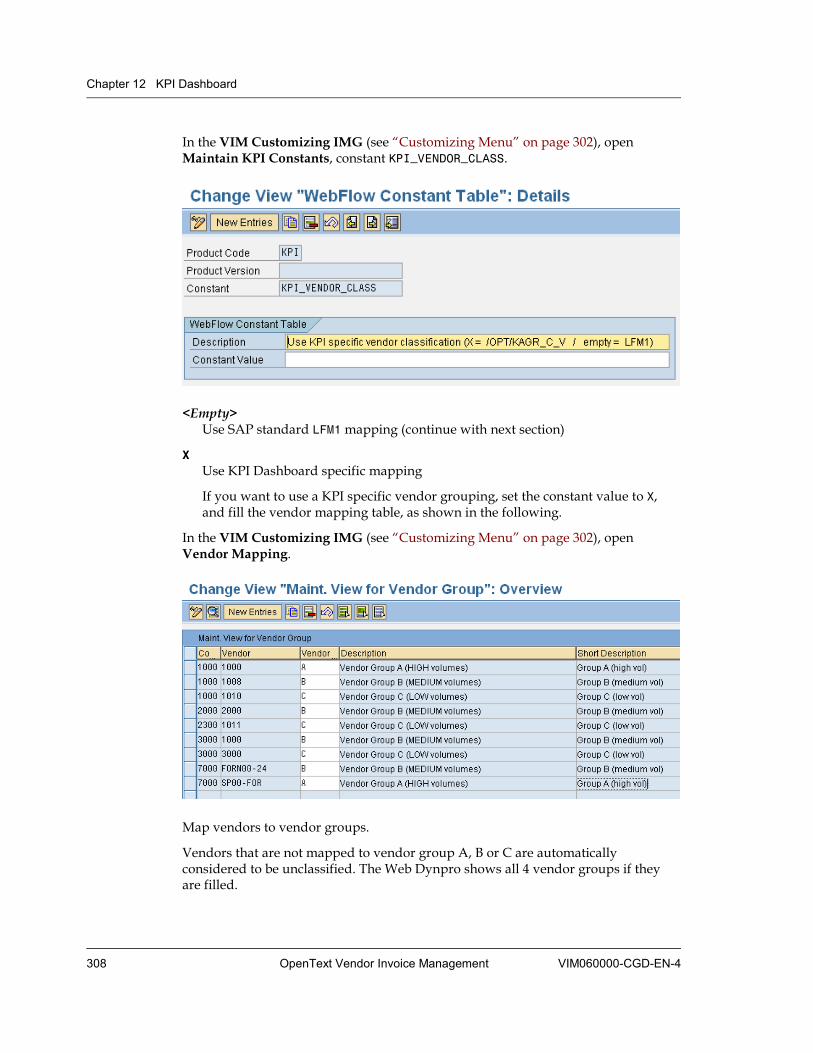
Chapter 12 KPI Dashboard
308 OpenText Vendor Invoice Management VIM060000-CGD-EN-4
In the VIM Customizing IMG (see “Customizing Menu” on page 302), open Maintain KPI Constants, constant KPI_VENDOR_CLASS.
<Empty>Use SAP standard LFM1 mapping (continue with next section)
XUse KPI Dashboard specific mapping
If you want to use a KPI specific vendor grouping, set the constant value to X,and fill the vendor mapping table, as shown in the following.
In the VIM Customizing IMG (see “Customizing Menu” on page 302), open Vendor Mapping.
Map vendors to vendor groups.
Vendors that are not mapped to vendor group A, B or C are automatically considered to be unclassified. The Web Dynpro shows all 4 vendor groups if they are filled.

12.4 Customizing Settings
VIM060000-CGD-EN-4 Configuration Guide 309
12.4.6 Amount Classes Invoices are grouped into 3 disjunctive invoice amount classes.
12.4.6.1 Checking Amount Classes OpenText delivers an amount class customizing with 3 amount classes.
Note: Do not change the amount classes.
In the VIM Customizing IMG (see “Customizing Menu” on page 302), open Amount Class Definition.
The text symbols &1 and &2 will be replaced during runtime with the From amount and To amount values for the amount classes.
12.4.6.2 Maintaining Amount Classes In the VIM Customizing IMG (see “Customizing Menu” on page 302), open Maintain Amount Classes.
OpenText delivers amount class maintenance customizing with the following amount ranges:
Maintain the amounts for the respective amount classes.
The currency must be identical with the favorite currency in the KPI constants.
In the VIM Customizing IMG (see “Customizing Menu” on page 302), open Maintain KPI Constants, constant FAVORITE_CURRENCY.
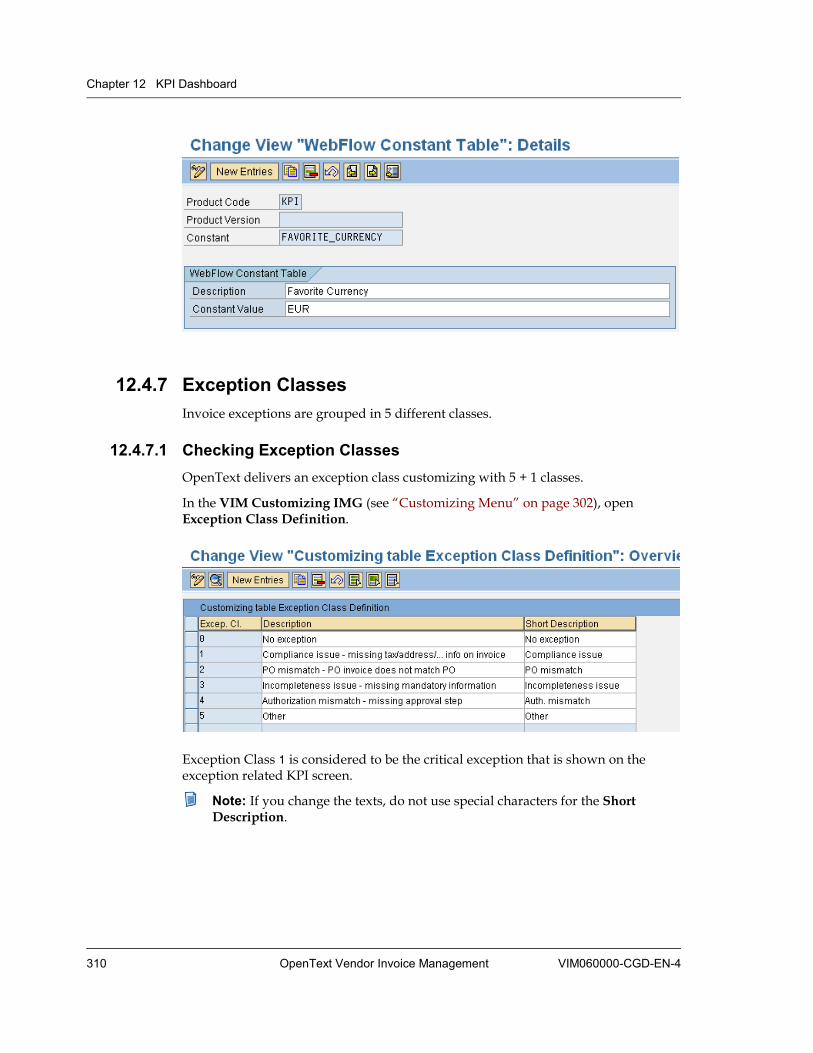
Chapter 12 KPI Dashboard
310 OpenText Vendor Invoice Management VIM060000-CGD-EN-4
12.4.7 Exception Classes Invoice exceptions are grouped in 5 different classes.
12.4.7.1 Checking Exception Classes OpenText delivers an exception class customizing with 5 + 1 classes.
In the VIM Customizing IMG (see “Customizing Menu” on page 302), open Exception Class Definition.
Exception Class 1 is considered to be the critical exception that is shown on the exception related KPI screen.
Note: If you change the texts, do not use special characters for the Short Description.
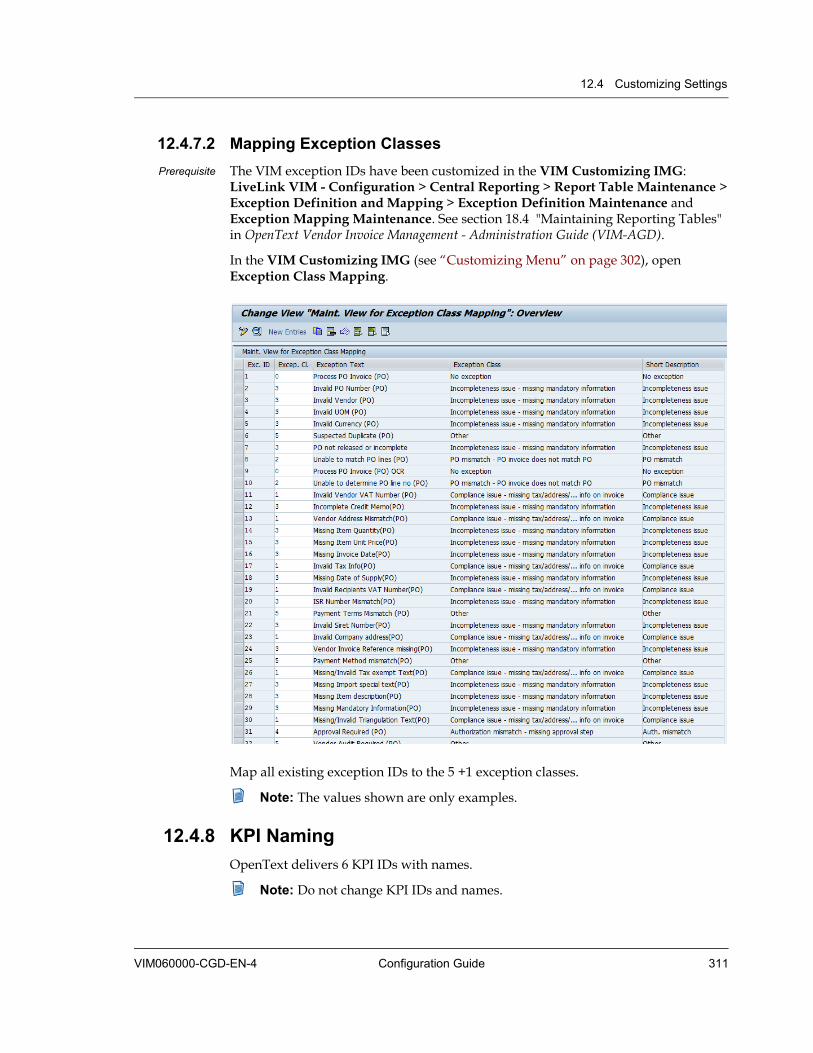
12.4 Customizing Settings
VIM060000-CGD-EN-4 Configuration Guide 311
12.4.7.2 Mapping Exception Classes Prerequisite The VIM exception IDs have been customized in the VIM Customizing IMG:
LiveLink VIM - Configuration > Central Reporting > Report Table Maintenance >Exception Definition and Mapping > Exception Definition Maintenance and Exception Mapping Maintenance. See section 18.4 "Maintaining Reporting Tables" in OpenText Vendor Invoice Management - Administration Guide (VIM-AGD).
In the VIM Customizing IMG (see “Customizing Menu” on page 302), open Exception Class Mapping.
Map all existing exception IDs to the 5 +1 exception classes.
Note: The values shown are only examples.
12.4.8 KPI Naming OpenText delivers 6 KPI IDs with names.
Note: Do not change KPI IDs and names.
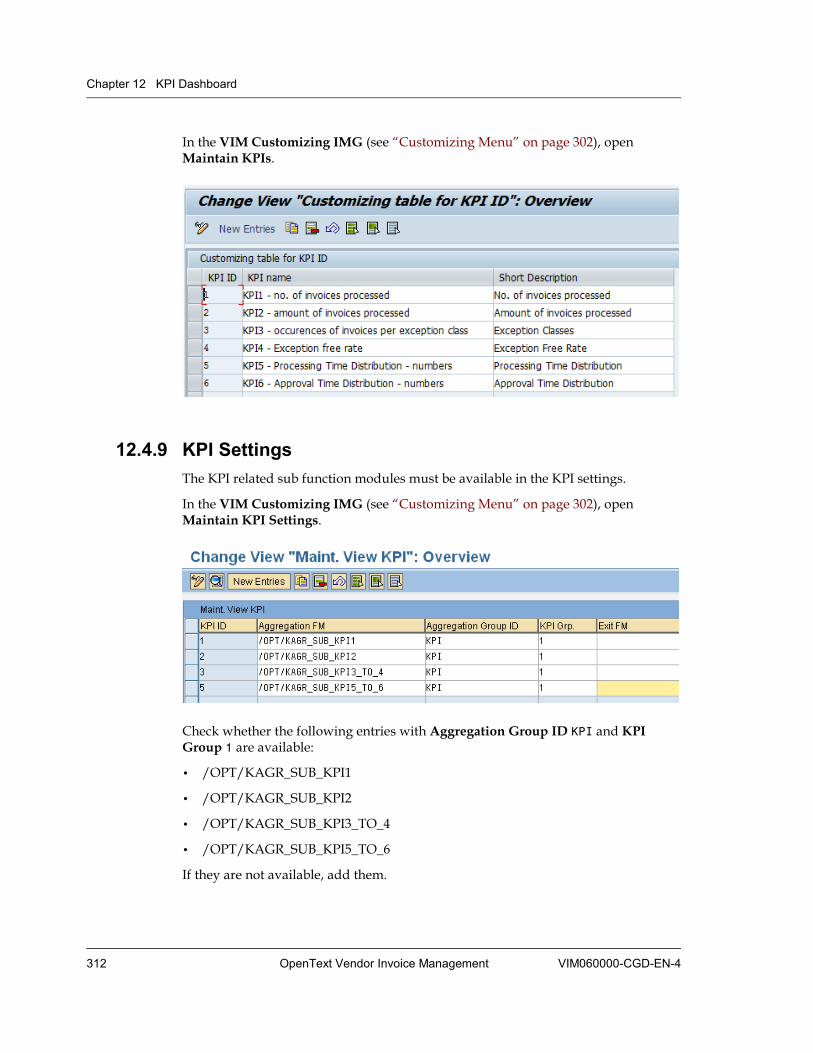
Chapter 12 KPI Dashboard
312 OpenText Vendor Invoice Management VIM060000-CGD-EN-4
In the VIM Customizing IMG (see “Customizing Menu” on page 302), open Maintain KPIs.
12.4.9 KPI Settings The KPI related sub function modules must be available in the KPI settings.
In the VIM Customizing IMG (see “Customizing Menu” on page 302), open Maintain KPI Settings.
Check whether the following entries with Aggregation Group ID KPI and KPI Group 1 are available:
• /OPT/KAGR_SUB_KPI1
• /OPT/KAGR_SUB_KPI2
• /OPT/KAGR_SUB_KPI3_TO_4
• /OPT/KAGR_SUB_KPI5_TO_6
If they are not available, add them.
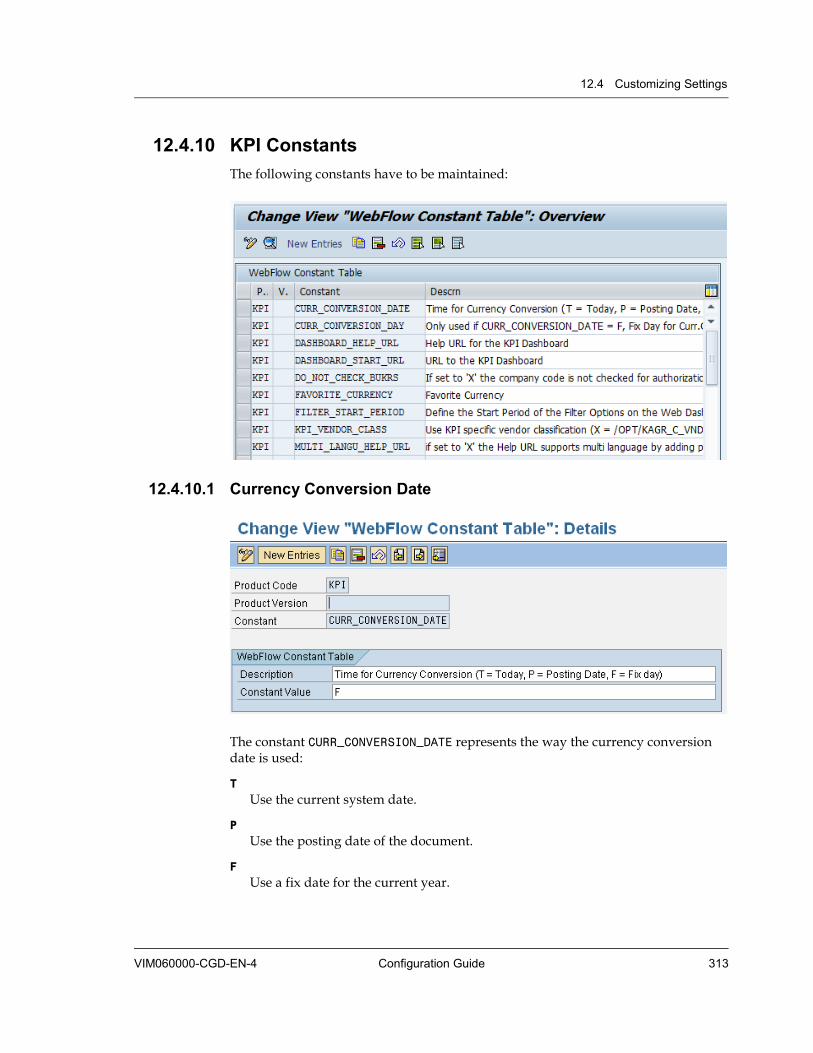
12.4 Customizing Settings
VIM060000-CGD-EN-4 Configuration Guide 313
12.4.10 KPI Constants The following constants have to be maintained:
12.4.10.1 Currency Conversion Date
The constant CURR_CONVERSION_DATE represents the way the currency conversion date is used:
TUse the current system date.
PUse the posting date of the document.
FUse a fix date for the current year.
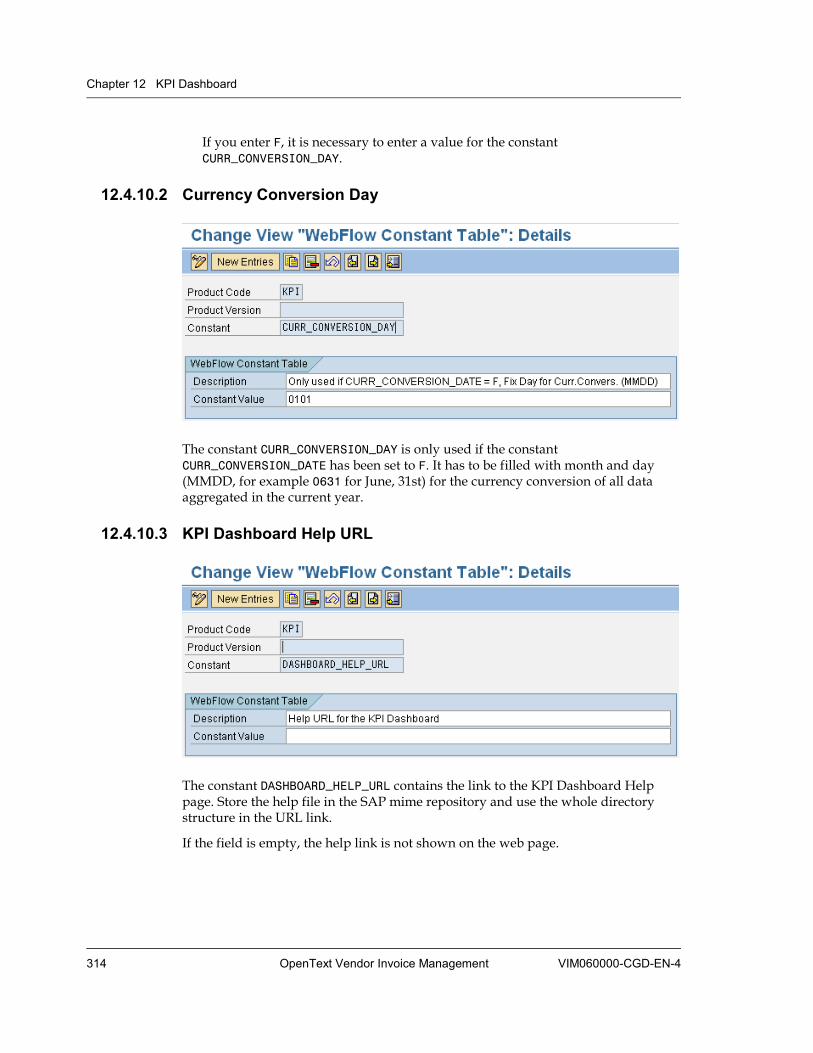
Chapter 12 KPI Dashboard
314 OpenText Vendor Invoice Management VIM060000-CGD-EN-4
If you enter F, it is necessary to enter a value for the constant CURR_CONVERSION_DAY.
12.4.10.2 Currency Conversion Day
The constant CURR_CONVERSION_DAY is only used if the constant CURR_CONVERSION_DATE has been set to F. It has to be filled with month and day (MMDD, for example 0631 for June, 31st) for the currency conversion of all data aggregated in the current year.
12.4.10.3 KPI Dashboard Help URL
The constant DASHBOARD_HELP_URL contains the link to the KPI Dashboard Help page. Store the help file in the SAP mime repository and use the whole directory structure in the URL link.
If the field is empty, the help link is not shown on the web page.

12.4 Customizing Settings
VIM060000-CGD-EN-4 Configuration Guide 315
12.4.10.4 KPI Dashboard Help URL with Multi-language Support
The constant MULTI_LANGU_HELP_URL is delivered without value.
<Empty>The default help link stored in constant DASHBOARD_HELP_URL is used.
XThe help link URL is changed to language specific setting:
<default help link without file extension> + "_" + sy-langu + <file extension>
Example: /SAP/PUBLIC/BC/UR/DOC/Help_E.html
Keep in mind to store all the language specific help files to the same repository with restriction of the above naming convention.
12.4.10.5 KPI Dashboard Start URL
For the constant DASHBOARD_START_URL, enter a value according to your specific environment with the following system parameters:
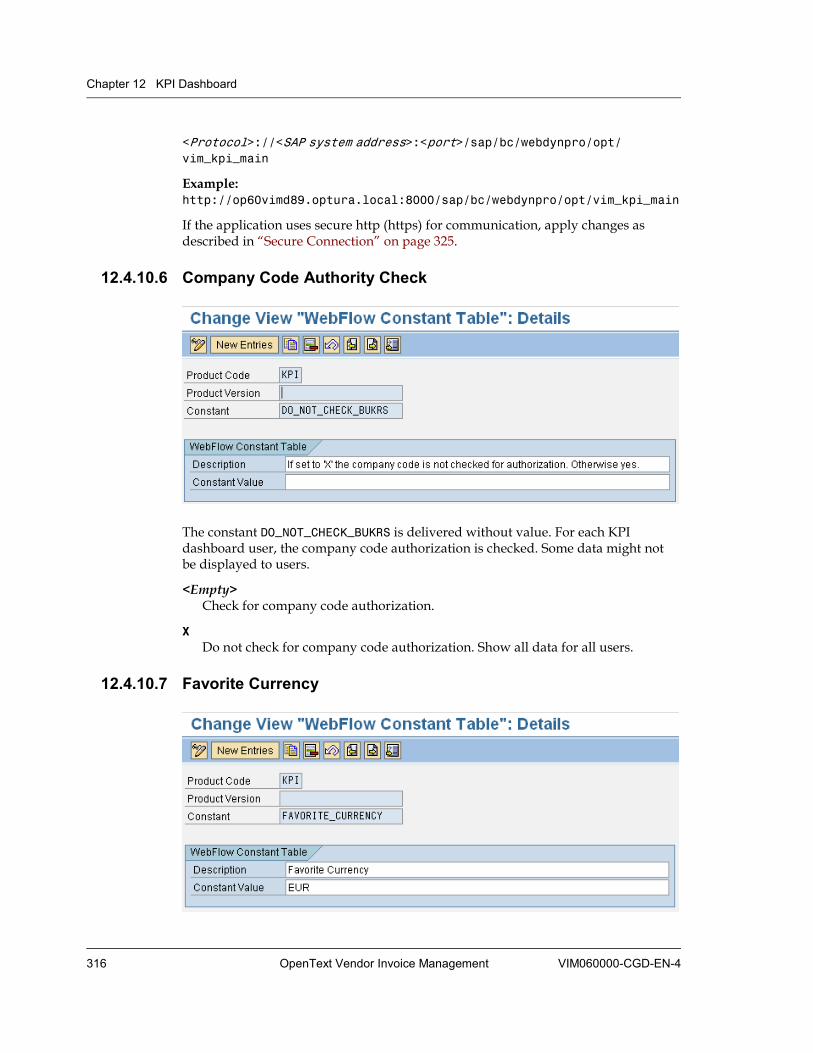
Chapter 12 KPI Dashboard
316 OpenText Vendor Invoice Management VIM060000-CGD-EN-4
<Protocol>://<SAP system address>:<port>/sap/bc/webdynpro/opt/-vim_kpi_main
Example: http://op60vimd89.optura.local:8000/sap/bc/webdynpro/opt/vim_kpi_main
If the application uses secure http (https) for communication, apply changes as described in “Secure Connection” on page 325.
12.4.10.6 Company Code Authority Check
The constant DO_NOT_CHECK_BUKRS is delivered without value. For each KPI dashboard user, the company code authorization is checked. Some data might not be displayed to users.
<Empty>Check for company code authorization.
XDo not check for company code authorization. Show all data for all users.
12.4.10.7 Favorite Currency
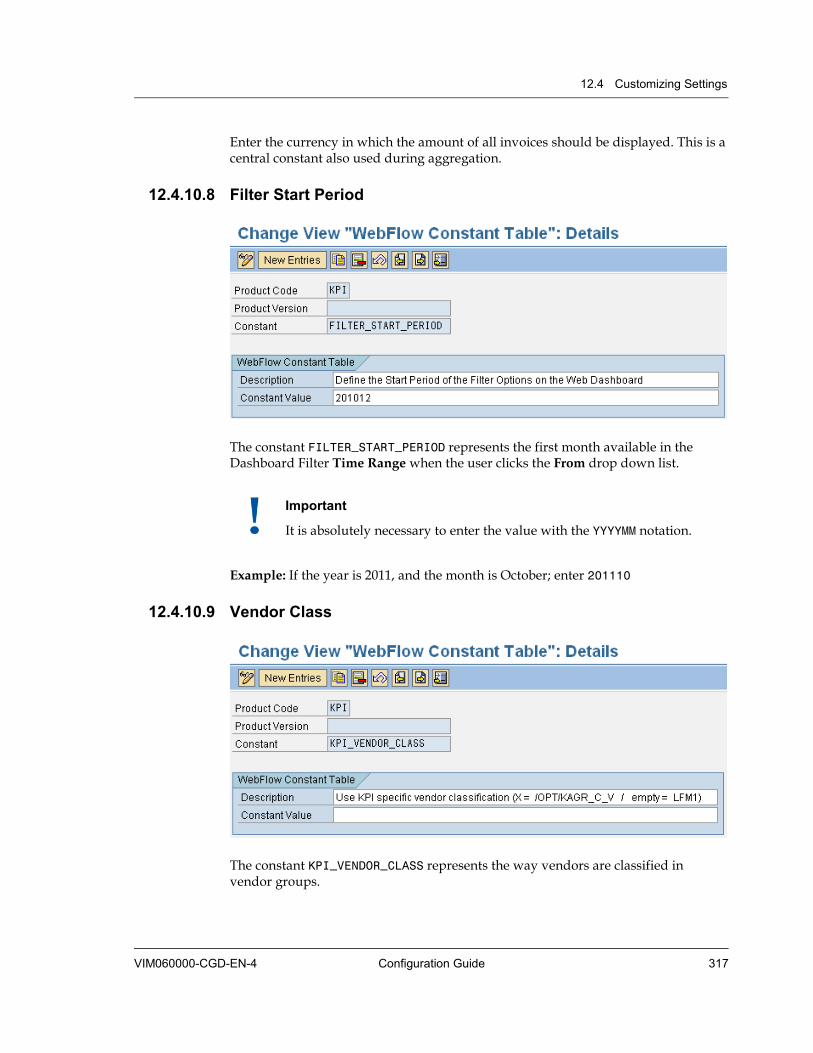
12.4 Customizing Settings
VIM060000-CGD-EN-4 Configuration Guide 317
Enter the currency in which the amount of all invoices should be displayed. This is a central constant also used during aggregation.
12.4.10.8 Filter Start Period
The constant FILTER_START_PERIOD represents the first month available in the Dashboard Filter Time Range when the user clicks the From drop down list.
Important
It is absolutely necessary to enter the value with the YYYYMM notation.
Example: If the year is 2011, and the month is October; enter 201110
12.4.10.9 Vendor Class
The constant KPI_VENDOR_CLASS represents the way vendors are classified in vendor groups.

Chapter 12 KPI Dashboard
318 OpenText Vendor Invoice Management VIM060000-CGD-EN-4
<Empty>The standard SAP vendor grouping of table LFM1 is used.
XYou have to fill the KPI specific customizing vendor mapping. See “Mapping Vendor Groups” on page 307.
12.4.11 KPI URL Parameters The Web Dynpro requires the definition of several URL parameters.
In the VIM Customizing IMG (see “Customizing Menu” on page 302), open Maintain URL Parameter.
SAP-CLIENT Enter the client number of the SAP system where the KPI Dashboard has been installed and activated.
SAP-EP-THEMEROOT Enter the path from where the theme of the Web Dynpro application is taken (to use MIME objects, such as pictures and style sheets for visualization). You can change the parameter for using custom CI-style guides. Default value: OpenText
SAP-LANGUAGE Only EN, DE, and FR are allowed at the moment.
SAP-SYSTEM-LOGIN-BASIC_AUTH If you have sap-system-login-basic_auth=X in the URL, a session cookie is created. That is the reason why you can still load the application without re-authentication. If you have the IE Developer Toolbar, you can clear session cookies and try again. It will ask for credentials then.
SHOW_BANNER Enter Y to show banner images (default setting). To deactivate banners, set the value to N.
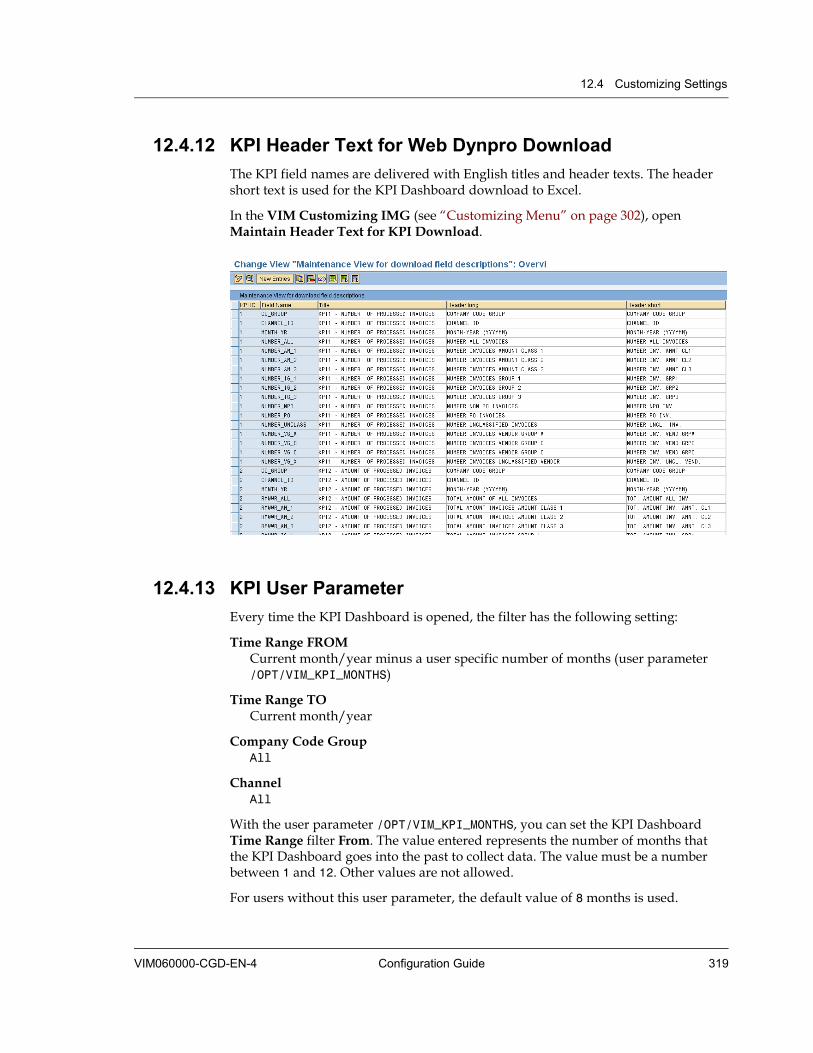
12.4 Customizing Settings
VIM060000-CGD-EN-4 Configuration Guide 319
12.4.12 KPI Header Text for Web Dynpro Download The KPI field names are delivered with English titles and header texts. The header short text is used for the KPI Dashboard download to Excel.
In the VIM Customizing IMG (see “Customizing Menu” on page 302), open Maintain Header Text for KPI Download.
12.4.13 KPI User Parameter Every time the KPI Dashboard is opened, the filter has the following setting:
Time Range FROM Current month/year minus a user specific number of months (user parameter /OPT/VIM_KPI_MONTHS)
Time Range TO Current month/year
Company Code Group All
Channel All
With the user parameter /OPT/VIM_KPI_MONTHS, you can set the KPI Dashboard Time Range filter From. The value entered represents the number of months that the KPI Dashboard goes into the past to collect data. The value must be a number between 1 and 12. Other values are not allowed.
For users without this user parameter, the default value of 8 months is used.
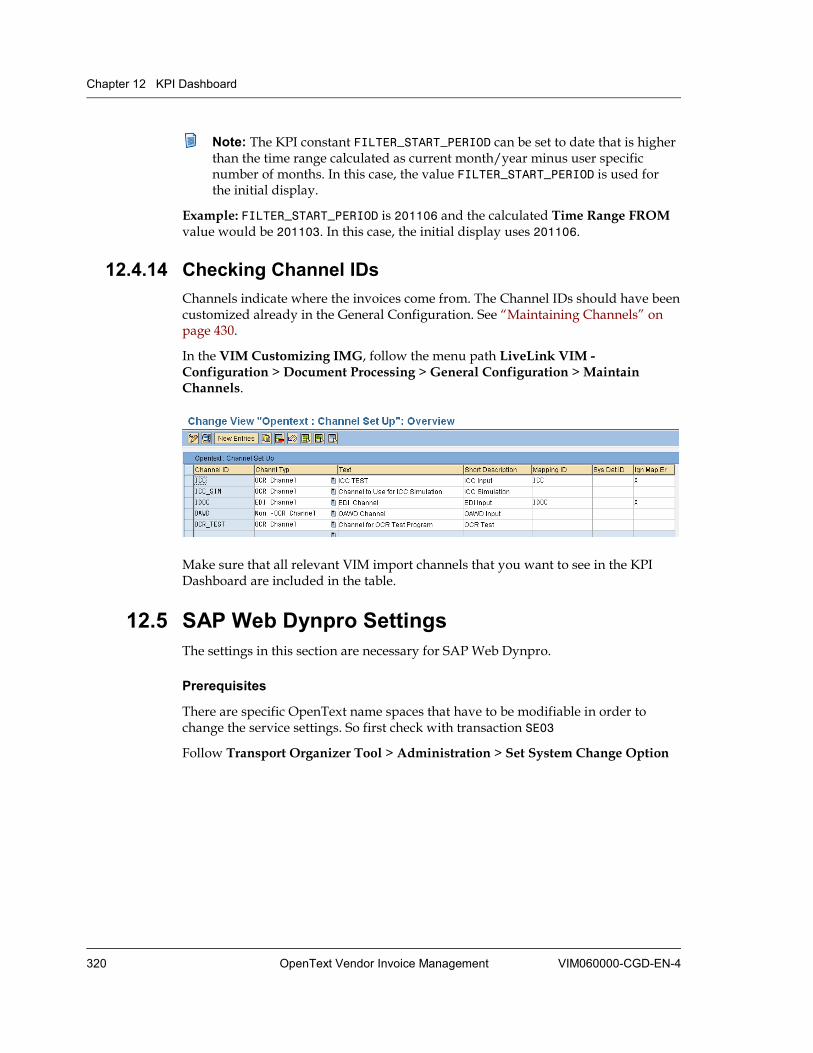
Chapter 12 KPI Dashboard
320 OpenText Vendor Invoice Management VIM060000-CGD-EN-4
Note: The KPI constant FILTER_START_PERIOD can be set to date that is higher than the time range calculated as current month/year minus user specific number of months. In this case, the value FILTER_START_PERIOD is used for the initial display.
Example: FILTER_START_PERIOD is 201106 and the calculated Time Range FROM value would be 201103. In this case, the initial display uses 201106.
12.4.14 Checking Channel IDs Channels indicate where the invoices come from. The Channel IDs should have been customized already in the General Configuration. See “Maintaining Channels” on page 430.
In the VIM Customizing IMG, follow the menu path LiveLink VIM - Configuration > Document Processing > General Configuration > Maintain Channels.
Make sure that all relevant VIM import channels that you want to see in the KPI Dashboard are included in the table.
12.5 SAP Web Dynpro Settings The settings in this section are necessary for SAP Web Dynpro.
Prerequisites
There are specific OpenText name spaces that have to be modifiable in order to change the service settings. So first check with transaction SE03
Follow Transport Organizer Tool > Administration > Set System Change Option

12.5 SAP Web Dynpro Settings
VIM060000-CGD-EN-4 Configuration Guide 321
Make sure, the Open Text Name space / Prefix /OPT and /ORS are set to Modifiable. After you have finished the customizing of services, change back the settings.
To activate the service:
1. To activate the Web Dynpro service on the SAP system, execute the SICF transaction.
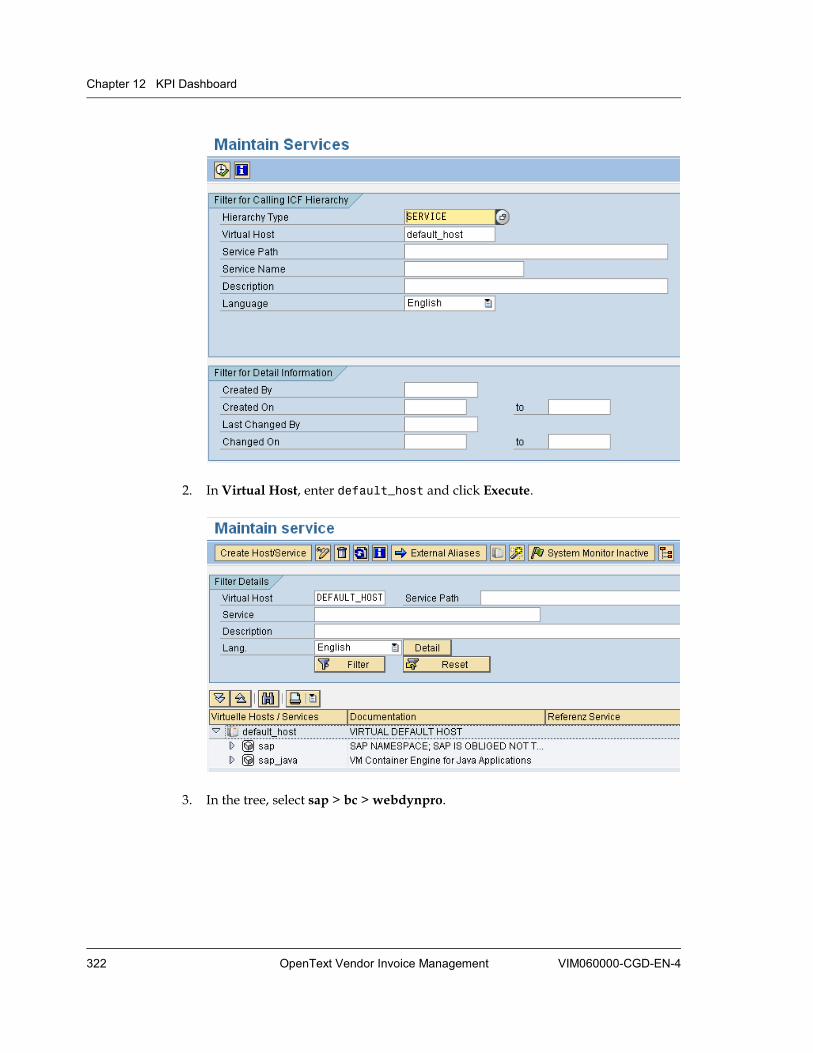
Chapter 12 KPI Dashboard
322 OpenText Vendor Invoice Management VIM060000-CGD-EN-4
2. In Virtual Host, enter default_host and click Execute.
3. In the tree, select sap > bc > webdynpro.
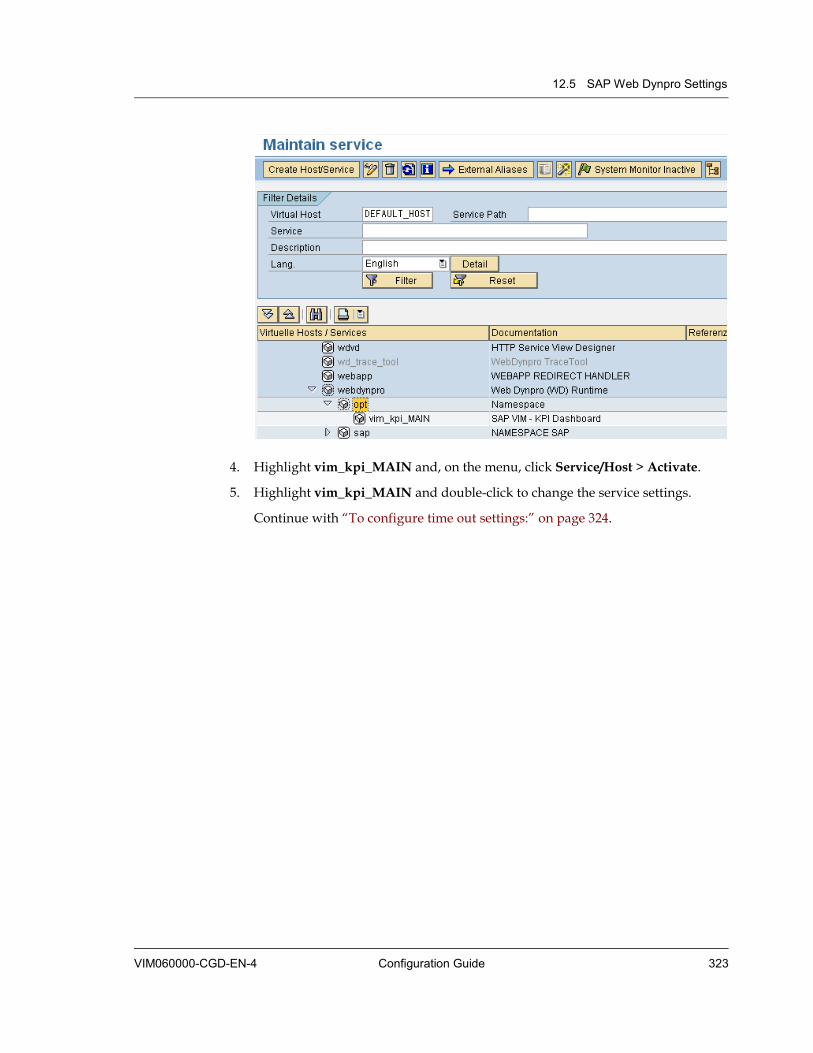
12.5 SAP Web Dynpro Settings
VIM060000-CGD-EN-4 Configuration Guide 323
4. Highlight vim_kpi_MAIN and, on the menu, click Service/Host > Activate.
5. Highlight vim_kpi_MAIN and double-click to change the service settings.
Continue with “To configure time out settings:” on page 324.
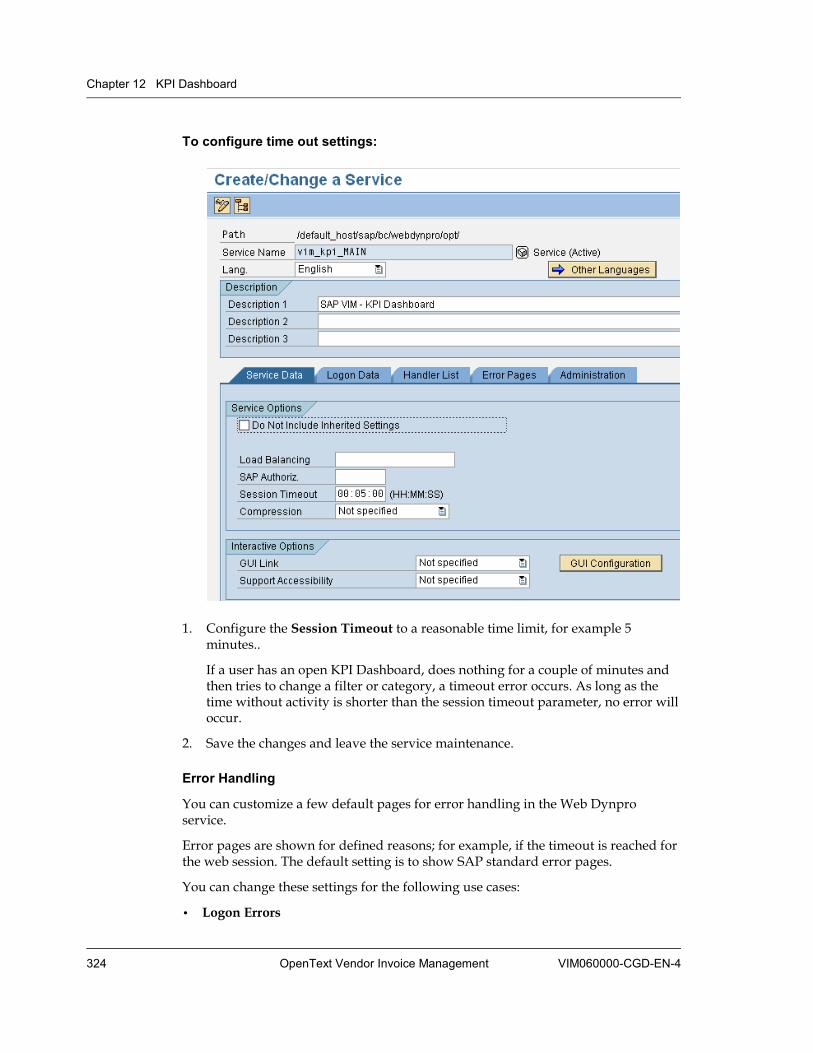
Chapter 12 KPI Dashboard
324 OpenText Vendor Invoice Management VIM060000-CGD-EN-4
To configure time out settings:
1. Configure the Session Timeout to a reasonable time limit, for example 5 minutes..
If a user has an open KPI Dashboard, does nothing for a couple of minutes and then tries to change a filter or category, a timeout error occurs. As long as the time without activity is shorter than the session timeout parameter, no error will occur.
2. Save the changes and leave the service maintenance.
Error Handling
You can customize a few default pages for error handling in the Web Dynpro service.
Error pages are shown for defined reasons; for example, if the timeout is reached for the web session. The default setting is to show SAP standard error pages.
You can change these settings for the following use cases:
• Logon Errors
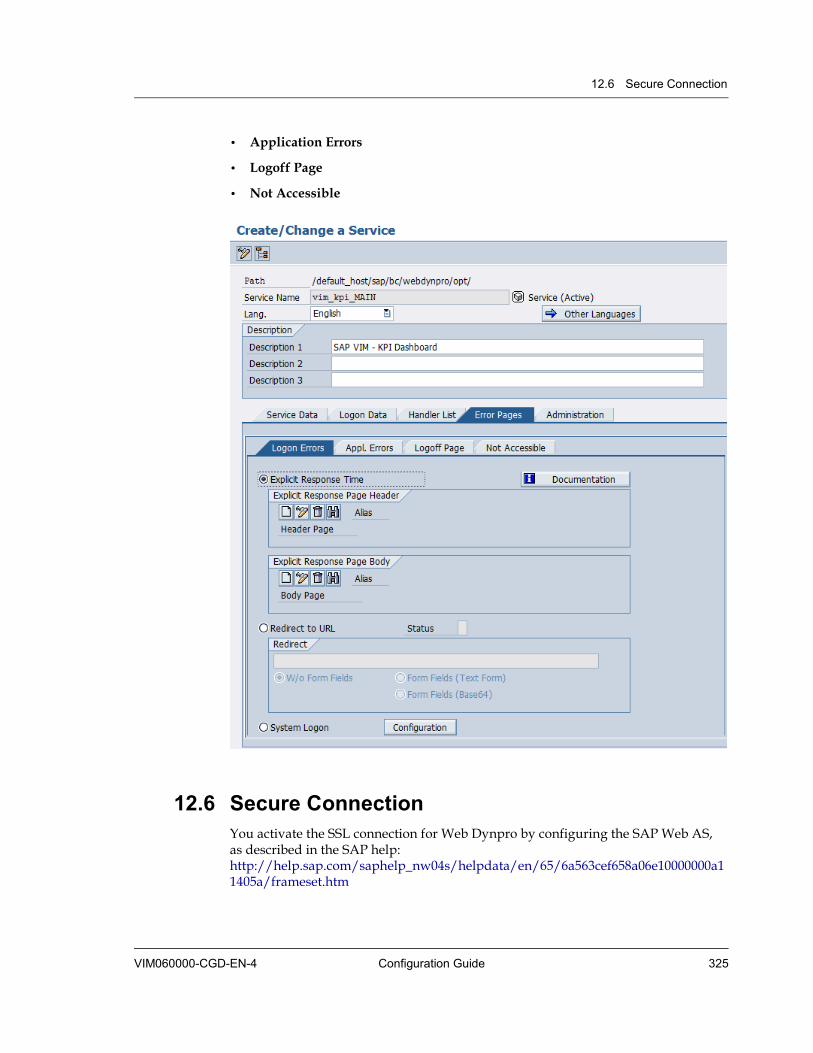
12.6 Secure Connection
VIM060000-CGD-EN-4 Configuration Guide 325
• Application Errors
• Logoff Page
• Not Accessible
12.6 Secure Connection You activate the SSL connection for Web Dynpro by configuring the SAP Web AS, as described in the SAP help: http://help.sap.com/saphelp_nw04s/helpdata/en/65/6a563cef658a06e10000000a11405a/frameset.htm
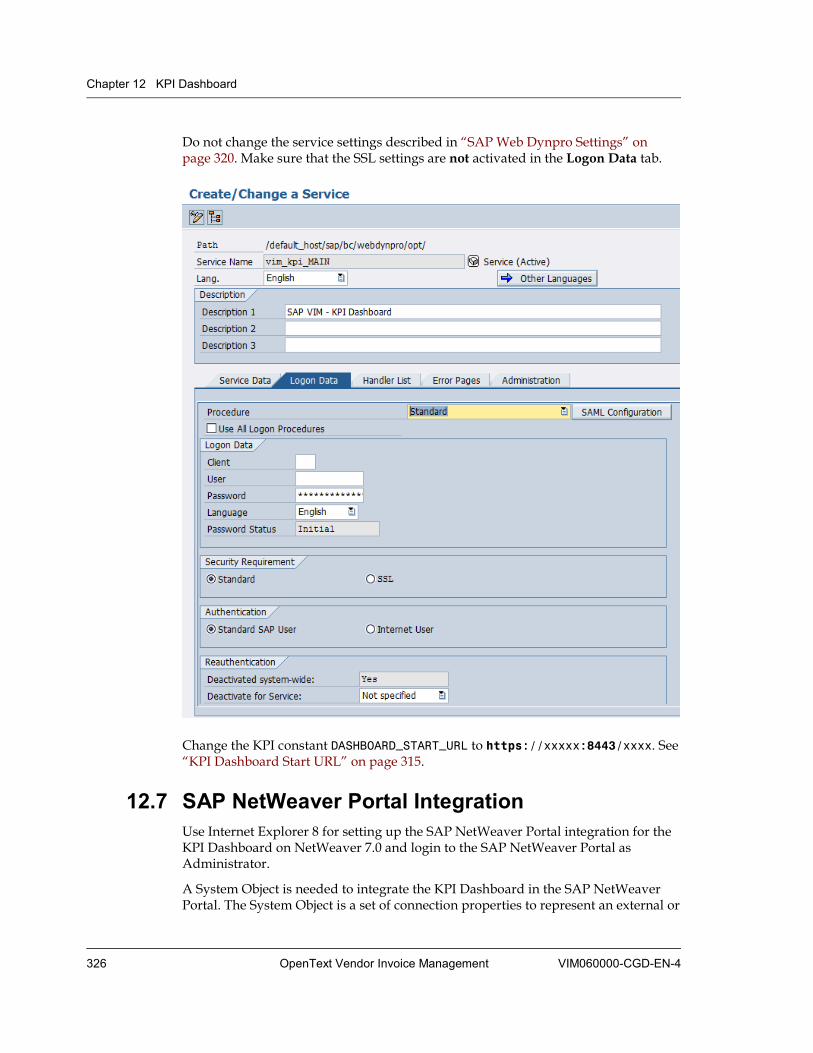
Chapter 12 KPI Dashboard
326 OpenText Vendor Invoice Management VIM060000-CGD-EN-4
Do not change the service settings described in “SAP Web Dynpro Settings” on page 320. Make sure that the SSL settings are not activated in the Logon Data tab.
Change the KPI constant DASHBOARD_START_URL to https://xxxxx:8443/xxxx. See “KPI Dashboard Start URL” on page 315.
12.7 SAP NetWeaver Portal Integration Use Internet Explorer 8 for setting up the SAP NetWeaver Portal integration for the KPI Dashboard on NetWeaver 7.0 and login to the SAP NetWeaver Portal as Administrator.
A System Object is needed to integrate the KPI Dashboard in the SAP NetWeaver Portal. The System Object is a set of connection properties to represent an external or

12.7 SAP NetWeaver Portal Integration
VIM060000-CGD-EN-4 Configuration Guide 327
SAP system (SAP R3, CRM, BW) used to retrieve data into portal iViews. If not existing, you must create a System Object in the NetWeaver Portal.
12.7.1 Prerequisites This example shows the customizing for the connection to a specific ABAP system.
To customize the connection to an ABAP system:
1. In the SAP NetWeaver Portal, navigate to System Administration > System Configuration > System Landscape > Browse > Portal Content > System landscape.
2. System Alias settings
In the Display drop down list, select System Aliases. The System Alias Editor is displayed.
Enter the Alias name: Generally it reads <SID>CLNT<CLIENTNO>; for example: BI7CLNT100.
Click the Add button and save.
3. Connector settings
In the Display drop down list, select Object, and then, in the Property Category drop down list, select Connector.
Provide minimum connector properties for example. See the following screenshot for example values.
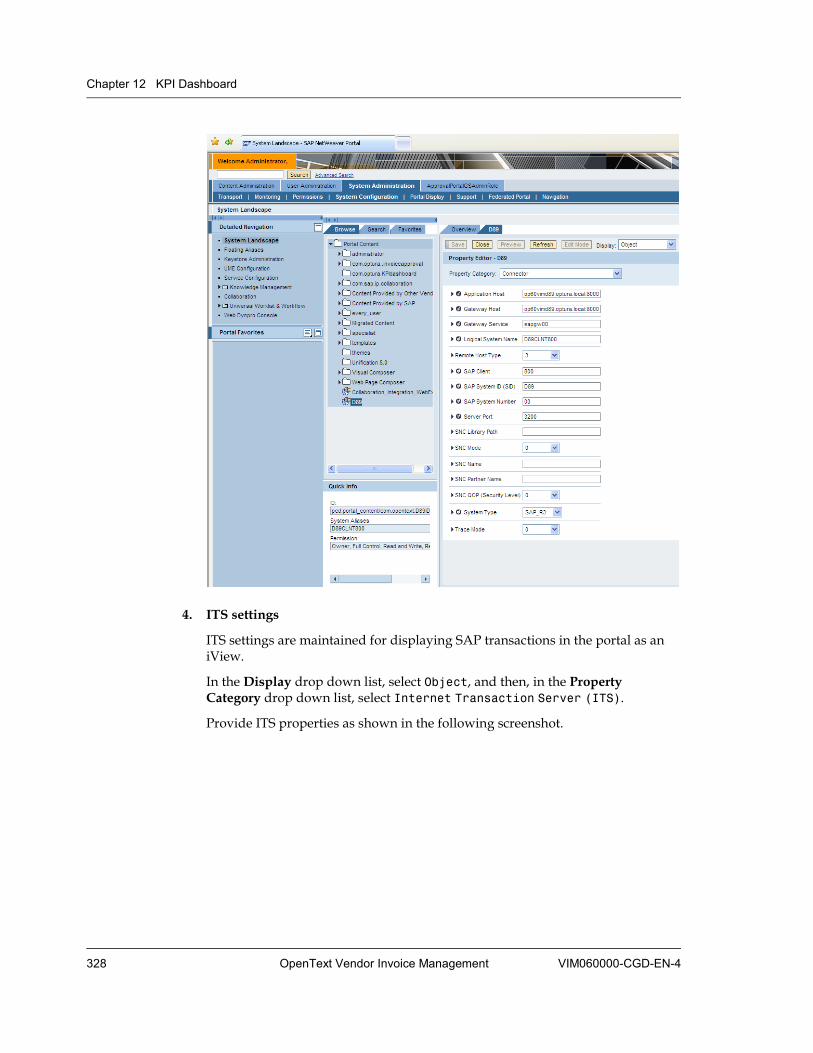
Chapter 12 KPI Dashboard
328 OpenText Vendor Invoice Management VIM060000-CGD-EN-4
4. ITS settings
ITS settings are maintained for displaying SAP transactions in the portal as an iView.
In the Display drop down list, select Object, and then, in the Property Category drop down list, select Internet Transaction Server (ITS).
Provide ITS properties as shown in the following screenshot.
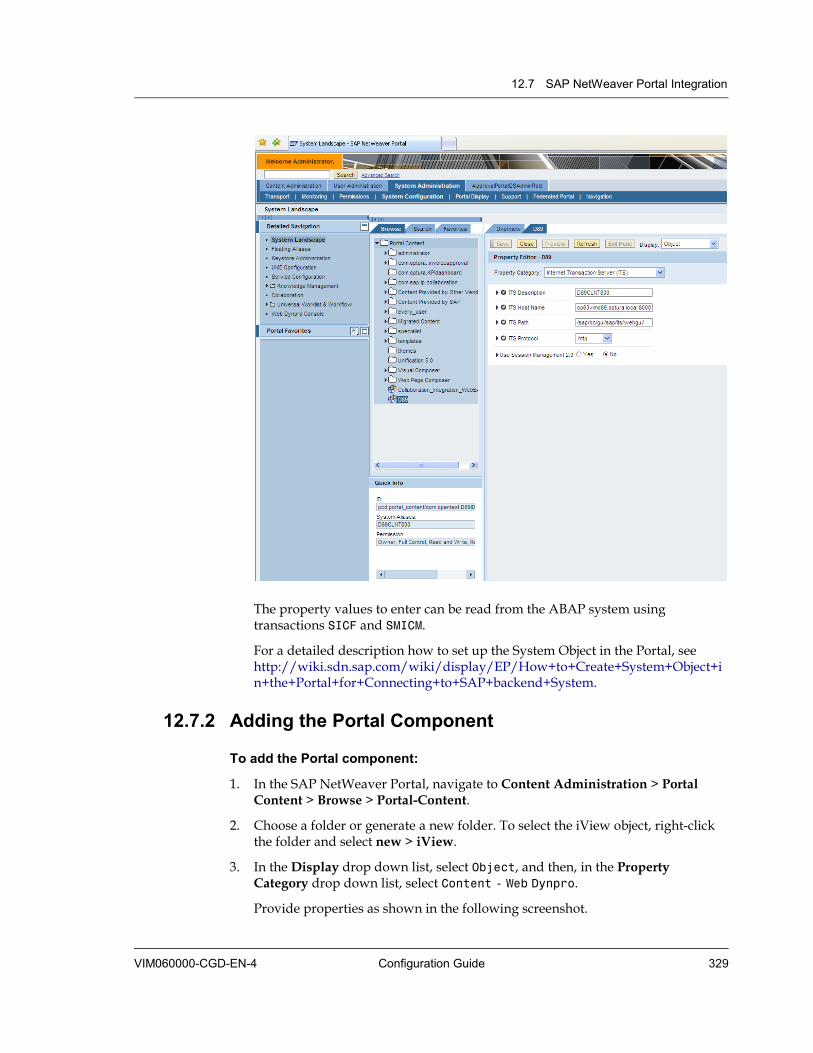
12.7 SAP NetWeaver Portal Integration
VIM060000-CGD-EN-4 Configuration Guide 329
The property values to enter can be read from the ABAP system using transactions SICF and SMICM.
For a detailed description how to set up the System Object in the Portal, see http://wiki.sdn.sap.com/wiki/display/EP/How+to+Create+System+Object+in+the+Portal+for+Connecting+to+SAP+backend+System.
12.7.2 Adding the Portal Component
To add the Portal component:
1. In the SAP NetWeaver Portal, navigate to Content Administration > Portal Content > Browse > Portal-Content.
2. Choose a folder or generate a new folder. To select the iView object, right-click the folder and select new > iView.
3. In the Display drop down list, select Object, and then, in the Property Category drop down list, select Content - Web Dynpro.
Provide properties as shown in the following screenshot.
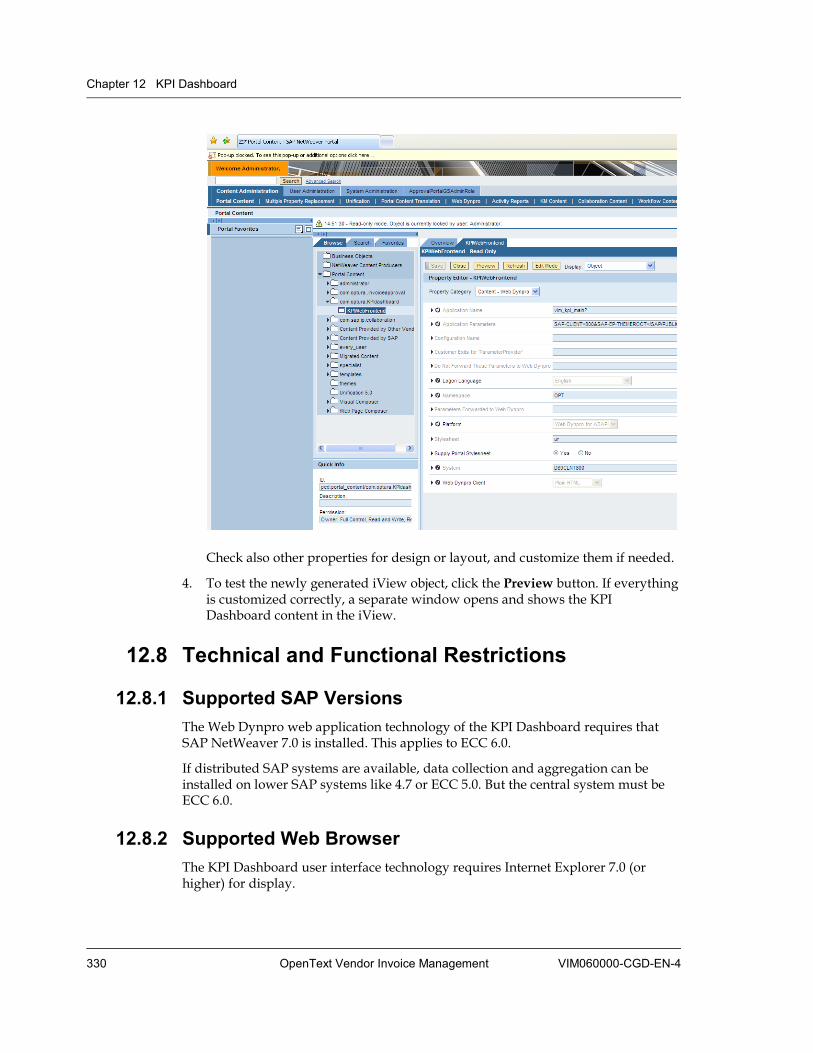
Chapter 12 KPI Dashboard
330 OpenText Vendor Invoice Management VIM060000-CGD-EN-4
Check also other properties for design or layout, and customize them if needed.
4. To test the newly generated iView object, click the Preview button. If everything is customized correctly, a separate window opens and shows the KPI Dashboard content in the iView.
12.8 Technical and Functional Restrictions
12.8.1 Supported SAP Versions The Web Dynpro web application technology of the KPI Dashboard requires that SAP NetWeaver 7.0 is installed. This applies to ECC 6.0.
If distributed SAP systems are available, data collection and aggregation can be installed on lower SAP systems like 4.7 or ECC 5.0. But the central system must be ECC 6.0.
12.8.2 Supported Web Browser The KPI Dashboard user interface technology requires Internet Explorer 7.0 (or higher) for display.
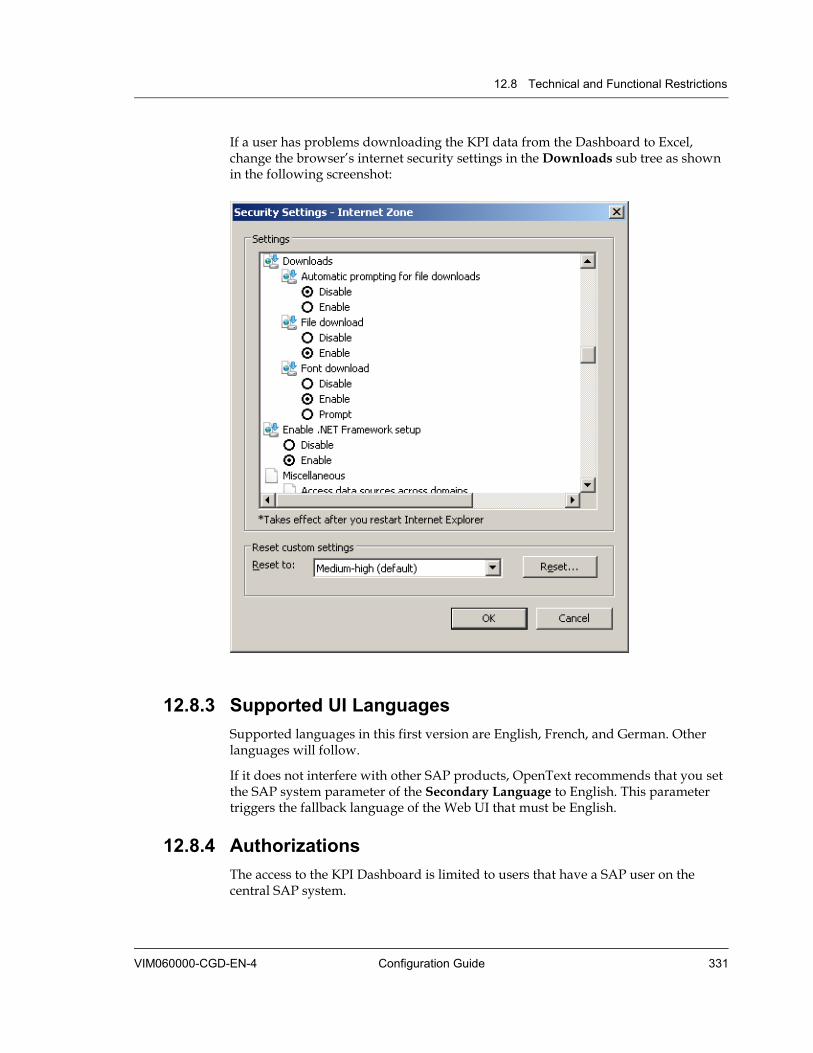
12.8 Technical and Functional Restrictions
VIM060000-CGD-EN-4 Configuration Guide 331
If a user has problems downloading the KPI data from the Dashboard to Excel, change the browser’s internet security settings in the Downloads sub tree as shown in the following screenshot:
12.8.3 Supported UI Languages Supported languages in this first version are English, French, and German. Other languages will follow.
If it does not interfere with other SAP products, OpenText recommends that you set the SAP system parameter of the Secondary Language to English. This parameter triggers the fallback language of the Web UI that must be English.
12.8.4 Authorizations The access to the KPI Dashboard is limited to users that have a SAP user on the central SAP system.
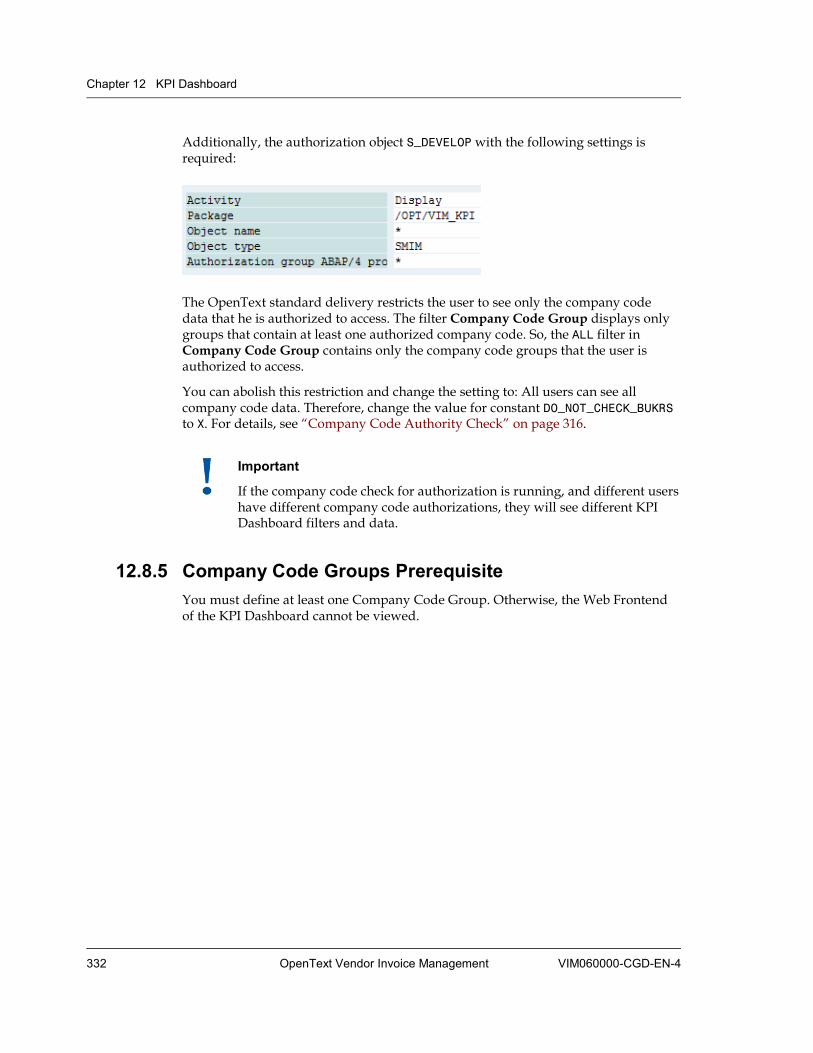
Chapter 12 KPI Dashboard
332 OpenText Vendor Invoice Management VIM060000-CGD-EN-4
Additionally, the authorization object S_DEVELOP with the following settings is required:
The OpenText standard delivery restricts the user to see only the company code data that he is authorized to access. The filter Company Code Group displays only groups that contain at least one authorized company code. So, the ALL filter in Company Code Group contains only the company code groups that the user is authorized to access.
You can abolish this restriction and change the setting to: All users can see all company code data. Therefore, change the value for constant DO_NOT_CHECK_BUKRS to X. For details, see “Company Code Authority Check” on page 316.
Important
If the company code check for authorization is running, and different users have different company code authorizations, they will see different KPI Dashboard filters and data.
12.8.5 Company Code Groups Prerequisite You must define at least one Company Code Group. Otherwise, the Web Frontend of the KPI Dashboard cannot be viewed.
VIM060000-CGD-EN-4 OpenText Vendor Invoice Management 333
Chapter 13 VIM Reporting Module
13.1 VIM Analytics VIM Analytics (VAN) gives users a clear data report on their documents with exceptions as well as the invoice exception workflows. VAN also includes the report on the Document Processing documents and workflow. You can start VAN by the /OPT/VIM_ANALYTICS transaction, or following OpenText LiveLink VIM Menu > SAP menu > Reports > /OPT/VIM_ANALYTICS - VIM Analytics.
One of the significant features in VAN is the plug-in infrastructure that allows you to extend the report without copying the report into a new report. VAN contains an infrastructure to plug in various customer specific logics into the following areas:
Selection screen It is possible to add a sub screen with additional selection fields.
Process logic: new report fields It is possible to plug in custom logic to manipulate the output before the data is sent to the SAP List Viewer (ALV grid). This feature is available for output such as adding additional columns.
Custom controls (push buttons on the ALV grid control) It is possible to provide links for various process codes.
13.1.1 Adding User Items in the Selection Screen This section describes how to add additional panels with additional selection criteria just below the Report Options panel. The following screenshot shows the place where the new panel with the new selection criteria will appear.
Restriction
The added fields cannot be used in layout variants.

Chapter 13 VIM Reporting Module
334 OpenText Vendor Invoice Management VIM060000-CGD-EN-4
Adding a user item to the selection screen comprises the following steps:
• “Creating a User Program with Selection Screen” on page 335
• “Adding Selection Screen Items” on page 335
• “Updating Table /PTGWFI/Z_CONST” on page 335
• “Getting User Selection Screen Values” on page 335
13.1 VIM Analytics
VIM060000-CGD-EN-4 Configuration Guide 335
13.1.1.1 Creating a User Program with Selection Screen
To create a user program with selection screen:
1. Copy the OpenText template program /OPT/VIM_RPT_SEL_SCR_TEMPLATE to a Z* or Y* program (for example Z_SEL_SCREEN_PROG).
2. Save the created program and put it into a transport as usual.
13.1.1.2 Adding Selection Screen Items
To add selection screen items:
1. Edit the new program (Z_SEL_SCREEN_PROG in our example).
2. Add user selection screen items between statement selection-screen begin of block 900 with frame title text-001 and selection-screen end of block 900.
These items can be any valid selection screen items. Any number of item lines can be added but if the line number is larger than 4, a scroll bar will be displayed.
3. Delete statements select-options: po_num for /opt/vim_hd_po-po_doc_num and select-options: ref_num for /opt/vim_hd_po-REF_DOC_NUM.
13.1.1.3 Updating Table /PTGWFI/Z_CONST
To update table /PTGWFI/Z_CONST:
1. Execute the SM30 transaction to maintain table /PTGWFI/Z_CONST.
2. Locate record with product code = VAN and ZCONST = USER_SEL_SCR_PROG.
3. Enter the name of the user program created in “Creating a User Program with Selection Screen” on page 335 (Z_SEL_SCREEN_PROG in our example) and the subscreen number into ZVALUE in format Z_SEL_SCREEN_PROG;8900.
13.1.1.4 Getting User Selection Screen Values
To get user selection screen values:
1. Create subclass for /OPT/VIM_RPT_CALL_USER_EXTEN (see “Creating a Subclass for /OPT/VIM_RPT_CALL_USER_EXTEN” on page 338).
2. Redefine method USER_PROCESS (see “Redefining Method USER_PROCESS in the Created Subclass” on page 338)
3. Put the following logic at the beginning of the new method:
************************************************** * Template of customer EXTENSION PROCESSING
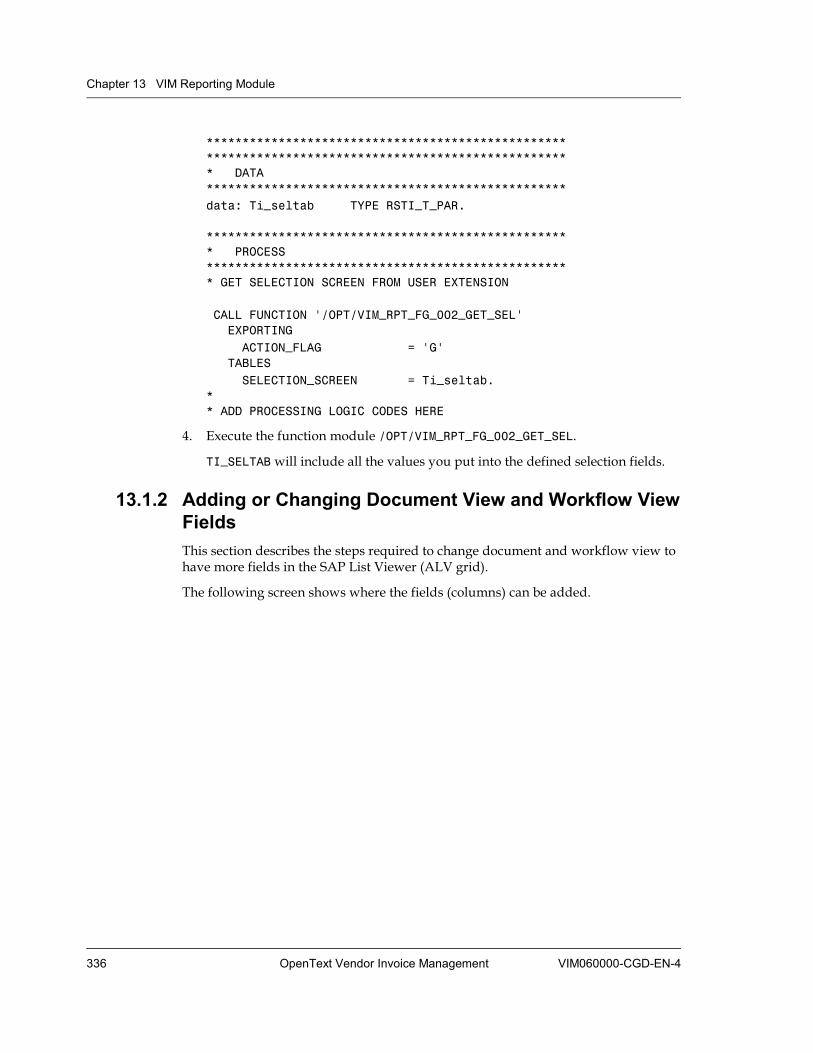
Chapter 13 VIM Reporting Module
336 OpenText Vendor Invoice Management VIM060000-CGD-EN-4
************************************************** ************************************************** * DATA ************************************************** data: Ti_seltab TYPE RSTI_T_PAR. ************************************************** * PROCESS ************************************************** * GET SELECTION SCREEN FROM USER EXTENSION CALL FUNCTION '/OPT/VIM_RPT_FG_002_GET_SEL' EXPORTING ACTION_FLAG = 'G' TABLES SELECTION_SCREEN = Ti_seltab. ** ADD PROCESSING LOGIC CODES HERE
4. Execute the function module /OPT/VIM_RPT_FG_002_GET_SEL.
TI_SELTAB will include all the values you put into the defined selection fields.
13.1.2 Adding or Changing Document View and Workflow View Fields This section describes the steps required to change document and workflow view to have more fields in the SAP List Viewer (ALV grid).
The following screen shows where the fields (columns) can be added.
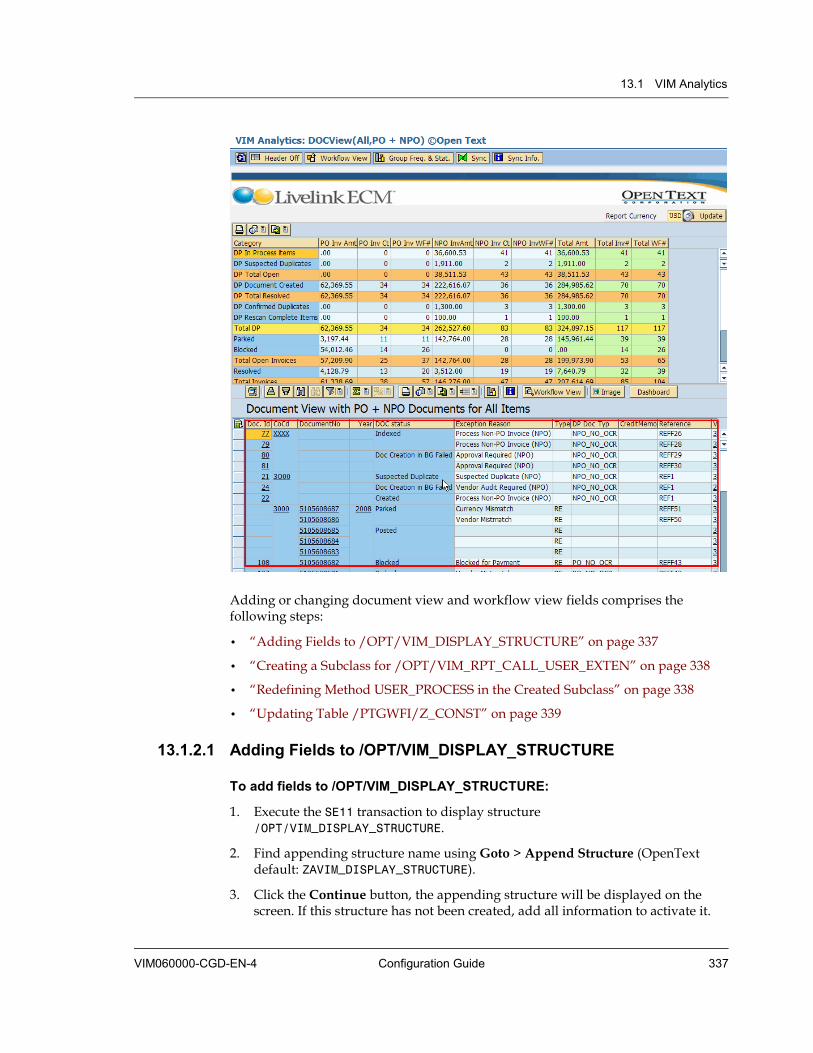
13.1 VIM Analytics
VIM060000-CGD-EN-4 Configuration Guide 337
Adding or changing document view and workflow view fields comprises the following steps:
• “Adding Fields to /OPT/VIM_DISPLAY_STRUCTURE” on page 337
• “Creating a Subclass for /OPT/VIM_RPT_CALL_USER_EXTEN” on page 338
• “Redefining Method USER_PROCESS in the Created Subclass” on page 338
• “Updating Table /PTGWFI/Z_CONST” on page 339
13.1.2.1 Adding Fields to /OPT/VIM_DISPLAY_STRUCTURE
To add fields to /OPT/VIM_DISPLAY_STRUCTURE:
1. Execute the SE11 transaction to display structure /OPT/VIM_DISPLAY_STRUCTURE.
2. Find appending structure name using Goto > Append Structure (OpenText default: ZAVIM_DISPLAY_STRUCTURE).
3. Click the Continue button, the appending structure will be displayed on the screen. If this structure has not been created, add all information to activate it.
Chapter 13 VIM Reporting Module
338 OpenText Vendor Invoice Management VIM060000-CGD-EN-4
4. Add the customer fields you want to add into the structure fields and give related data elements. The data element will give the field label, for example the column heading. You have to create data elements for the fields with labels you want to show in the views.
5. Save the appending structure and put it into a transport request.
13.1.2.2 Creating a Subclass for /OPT/VIM_RPT_CALL_USER_EXTEN
To create a subclass for /OPT/VIM_RPT_CALL_USER_EXTEN:
1. Execute the SE24 transaction and enter /OPT/VIM_RPT_CALL_USER_EXTEN into the Object Type field.
Click the Change button.
2. In the Class Builder screen, click the Properties tab to go to the property sub screen.
3. Use path Edit > Create subclass, in the first popup screen, enter your subclass name (Z* or Y*) into the Class field.
Click the Save button.
The Class Builder screen for your subclass is displayed. You can redefine method USER_PROCESS here.
4. Click the Save button.
5. Specify the development class and transport number.
6. Create Object Dictionary Entry popup screens as usual.
13.1.2.3 Redefining Method USER_PROCESS in the Created Subclass
To redefine method USER_PROCESS in the created subclass:
1. Execute the SE24 transaction to edit the subclass created in “Creating a Subclass for /OPT/VIM_RPT_CALL_USER_EXTEN” on page 338.
2. Click the Methods tab to access the method subscreen.
3. Select method USER_PROCESS.
4. Click the Redefine button (next to the Find Next button) in the table control toolbar.
5. In the Method editor screen for USER_PROCESS, add value to the new field created in “Adding Fields to /OPT/VIM_DISPLAY_STRUCTURE” on page 337 or change value in standard fields. You can refer to the following example:
method USER_PROCESS. Types begin of t_field,
13.1 VIM Analytics
VIM060000-CGD-EN-4 Configuration Guide 339
Burks type burks, New_field type new_field, End of t_field. Data s_field type t_field. data s_view type /OPT/VIM_DISPLAY_STRUCTURE. Data i_field type table of t_field. select burks new_field into table i_field from table xxx for all entries in VIM_PROCESS_OBJECT->IA_OUT_DOC where bukrs = VIM_PROCESS_OBJECT->IA_OUT_DOC-company_code. Sort i_field * add value to new field or update value in standard field in DOC view loop at VIM_PROCESS_OBJECT->IA_OUT_DOC into s_view. * add value to new field NEW_FIELD * example logic to get value for field new_field: Read table i_field into s_field with key burks = s_view-company_code Binary search. * NEW_FIELD has been added into appending structure for * /OPT/VIM_DISPLAY_STRUCTURE in step 1.1 * update value in standard field s_view-DOC_DATE = s_view-DOC_DATE - 33. MODIFY TABLE VIM_PROCESS_OBJECT->IA_OUT_DOC FROM s_view TRANSPORTING NEW_FIELD DOC_DATE. endloop. * add value to new field or update value in standard field in wf view loop at VIM_PROCESS_OBJECT->IA_OUT_WF into s_view. * refer above logic for DOC view endloop. endmethod.
13.1.2.4 Updating Table /PTGWFI/Z_CONST
To update table /PTGWFI/Z_CONST:
1. Execute the SM30 transaction to maintain table /PTGWFI/Z_CONST.
2. Locate record with product code = VAN and ZCONST = OBJ_LOGIC_EXTENSION.
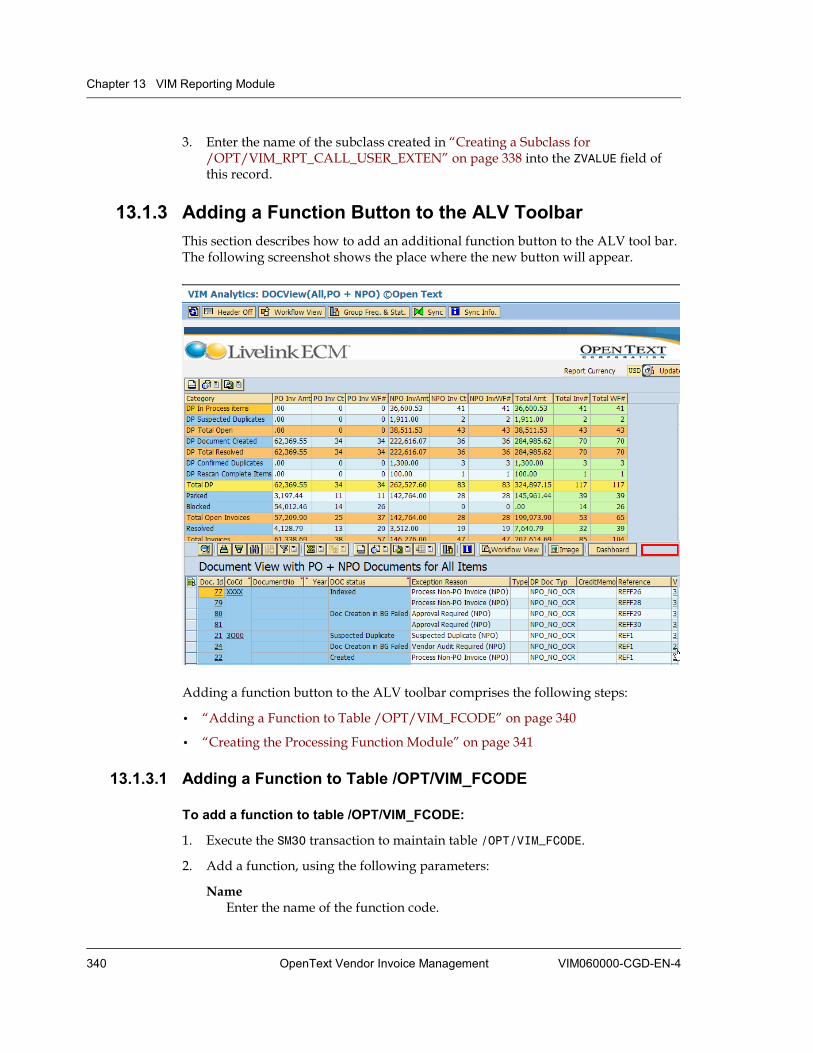
Chapter 13 VIM Reporting Module
340 OpenText Vendor Invoice Management VIM060000-CGD-EN-4
3. Enter the name of the subclass created in “Creating a Subclass for /OPT/VIM_RPT_CALL_USER_EXTEN” on page 338 into the ZVALUE field of this record.
13.1.3 Adding a Function Button to the ALV Toolbar This section describes how to add an additional function button to the ALV tool bar. The following screenshot shows the place where the new button will appear.
Adding a function button to the ALV toolbar comprises the following steps:
• “Adding a Function to Table /OPT/VIM_FCODE” on page 340
• “Creating the Processing Function Module” on page 341
13.1.3.1 Adding a Function to Table /OPT/VIM_FCODE
To add a function to table /OPT/VIM_FCODE:
1. Execute the SM30 transaction to maintain table /OPT/VIM_FCODE.
2. Add a function, using the following parameters:
Name Enter the name of the function code.
13.1 VIM Analytics
VIM060000-CGD-EN-4 Configuration Guide 341
Quickinfo Enter quick reference text.
Icon name Enter icon name.
FM name Enter processing function module.
13.1.3.2 Creating the Processing Function Module
To create the processing function module:
1. Copy the function module /OPT/VIM_RPT_DASHBOARD to a Z* or Y* function module (for example Z_VIM_PROCESS_FUNCTION).
Important
Keep all interface unchanged. Any change will cause a system dump.
2. Delete all logic source codes.
3. Add your own logic codes in the new function module. The available data from user selected line is:
• COMPANY_CODE
• DOC_NUM
• FISCAL_YEAR
• PROCESS_TYPE (LIV for PO invoice and CIV for Non PO invoice)

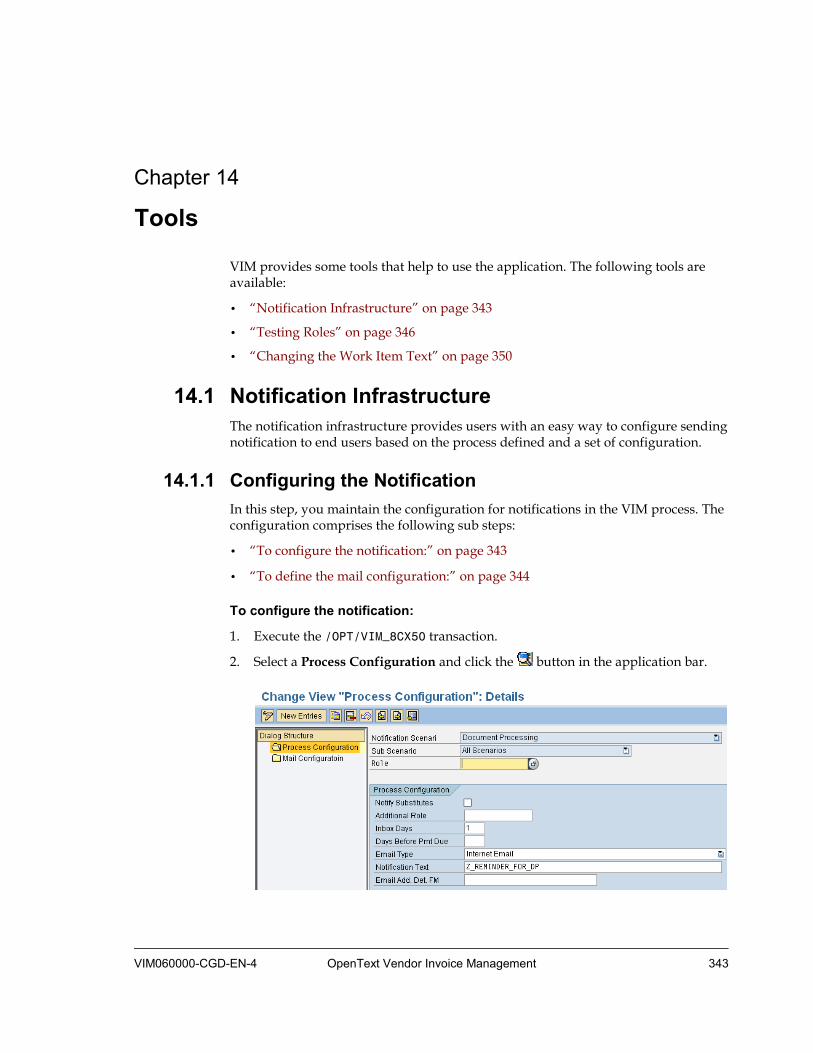
VIM060000-CGD-EN-4 OpenText Vendor Invoice Management 343
Chapter 14 Tools
VIM provides some tools that help to use the application. The following tools are available:
• “Notification Infrastructure” on page 343
• “Testing Roles” on page 346
• “Changing the Work Item Text” on page 350
14.1 Notification Infrastructure The notification infrastructure provides users with an easy way to configure sending notification to end users based on the process defined and a set of configuration.
14.1.1 Configuring the Notification In this step, you maintain the configuration for notifications in the VIM process. The configuration comprises the following sub steps:
• “To configure the notification:” on page 343
• “To define the mail configuration:” on page 344
To configure the notification:
1. Execute the /OPT/VIM_8CX50 transaction.
2. Select a Process Configuration and click the button in the application bar.

Chapter 14 Tools
344 OpenText Vendor Invoice Management VIM060000-CGD-EN-4
3. Configure the notification, using the following parameters:
Notification Scenario Select the process scenario where the data is picked.
Sub Scenario Select the sub scenario. The sub scenario identifies the individual reason within the scenario.
Role Enter the role that gets the notification for the work item.
Notify Substitutes Select this check box to achieve that a notification is sent to the invoice approver's substitutes.
Additional Role Enter an additional role that gets the notification for the work item.
Inbox Days Enter the number of days the notification stays in the receiver's inbox.
Days Before Pmt Due Enter the number of days before the payment due date.
Email Type Select the type of address to be considered when sending notification e-mails.
Notification Text Enter the standard text that is used to park the invoice.
Email Add. Det. FM Select a function module. The document can be determined using the selected custom function.
In the following sub step, you configure the information that will show up in the notification for the user.
To define the mail configuration:
1. In the Process Configuration Overview screen, double-click Mail Configuration in the navigation pane.
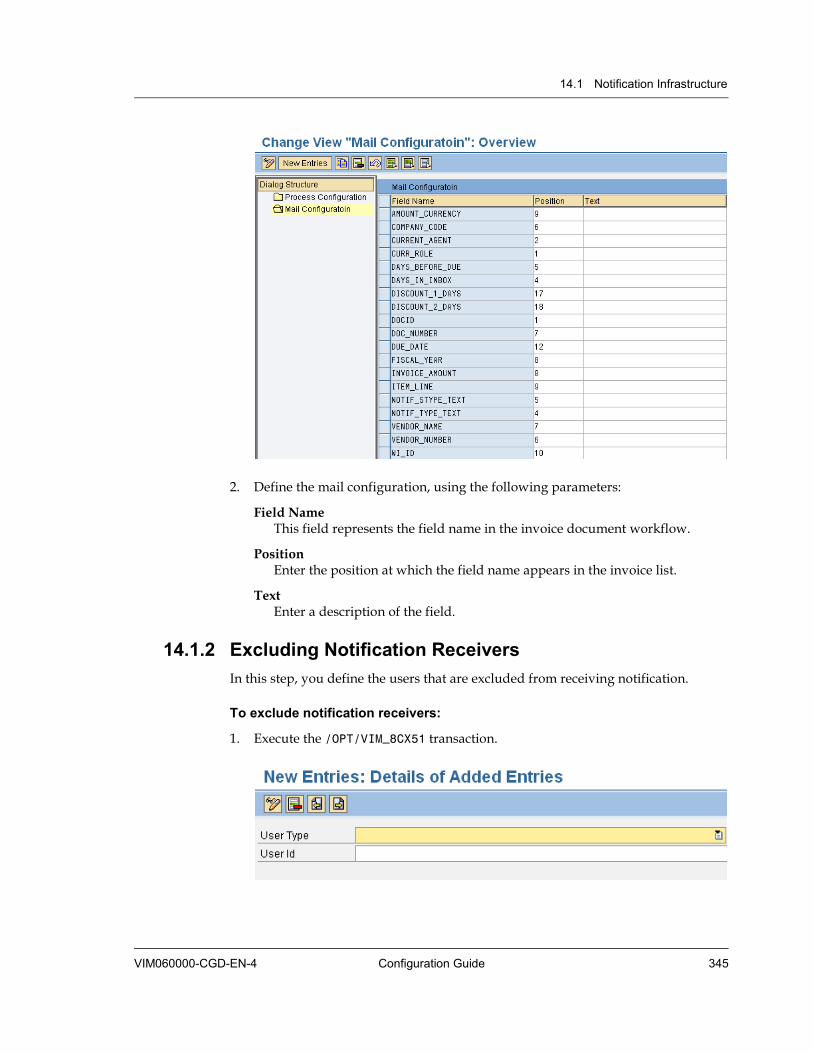
14.1 Notification Infrastructure
VIM060000-CGD-EN-4 Configuration Guide 345
2. Define the mail configuration, using the following parameters:
Field Name This field represents the field name in the invoice document workflow.
Position Enter the position at which the field name appears in the invoice list.
Text Enter a description of the field.
14.1.2 Excluding Notification Receivers In this step, you define the users that are excluded from receiving notification.
To exclude notification receivers:
1. Execute the /OPT/VIM_8CX51 transaction.

Chapter 14 Tools
346 OpenText Vendor Invoice Management VIM060000-CGD-EN-4
2. Define the users that are excluded from receiving notification, using the following parameter:
User Type Select the user type: OpenText User ID or manually maintained user ID.
User Id Enter the user ID.
14.1.3 Changing the Notification Status for the Current User In this step, you switch notifications on or off.
To change the notification status:
• Execute the /OPT/VIM_8AX50 transaction.
14.2 Testing Roles You might want to test a particular role to see if it is working correctly, based on the process type, invoice information, and responsible party. For this purpose you can use the VIM Role Test Utility.
To test roles with the VIM Role Test Utility:
1. Execute the /OPT/VIM_ROLETEST transaction.
Alternatively, follow OpenText LiveLink VIM Menu > SAP menu > Roles > /OPT/VIM_ROLETEST – Role Test Utility.
2. Enter the relevant information for the role you want to test. For example: Company Code, Document Number, and Responsible Party.
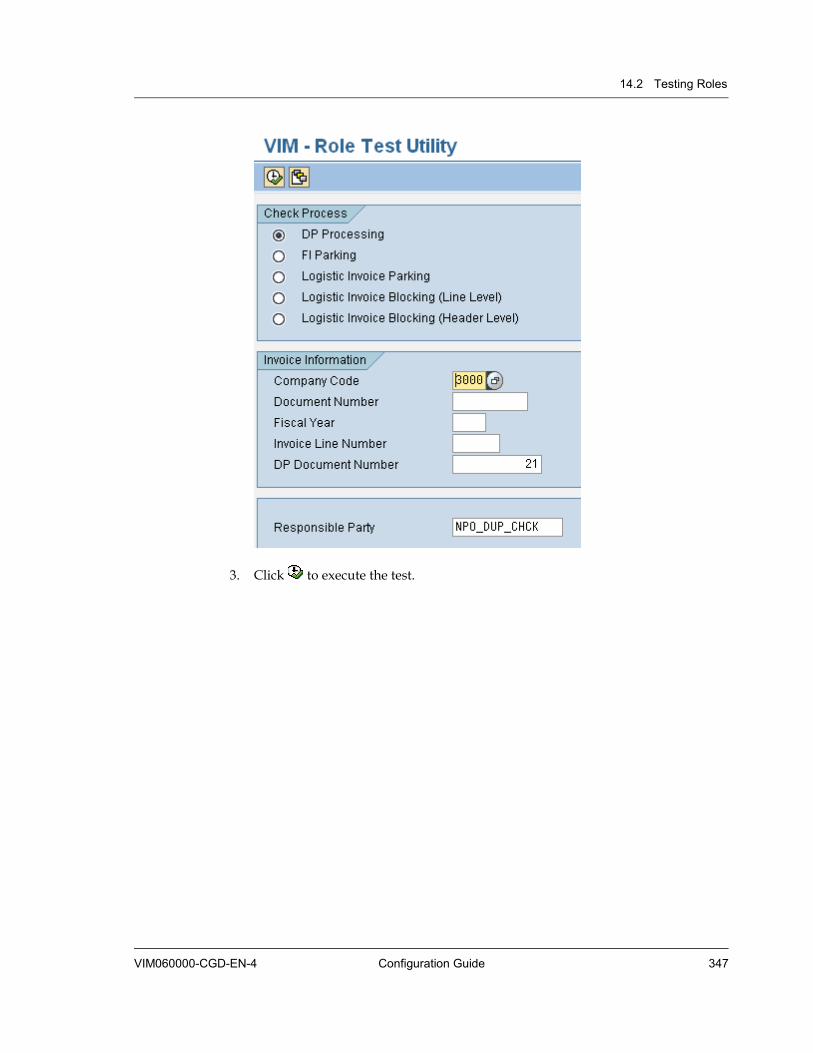
14.2 Testing Roles
VIM060000-CGD-EN-4 Configuration Guide 347
3. Click to execute the test.
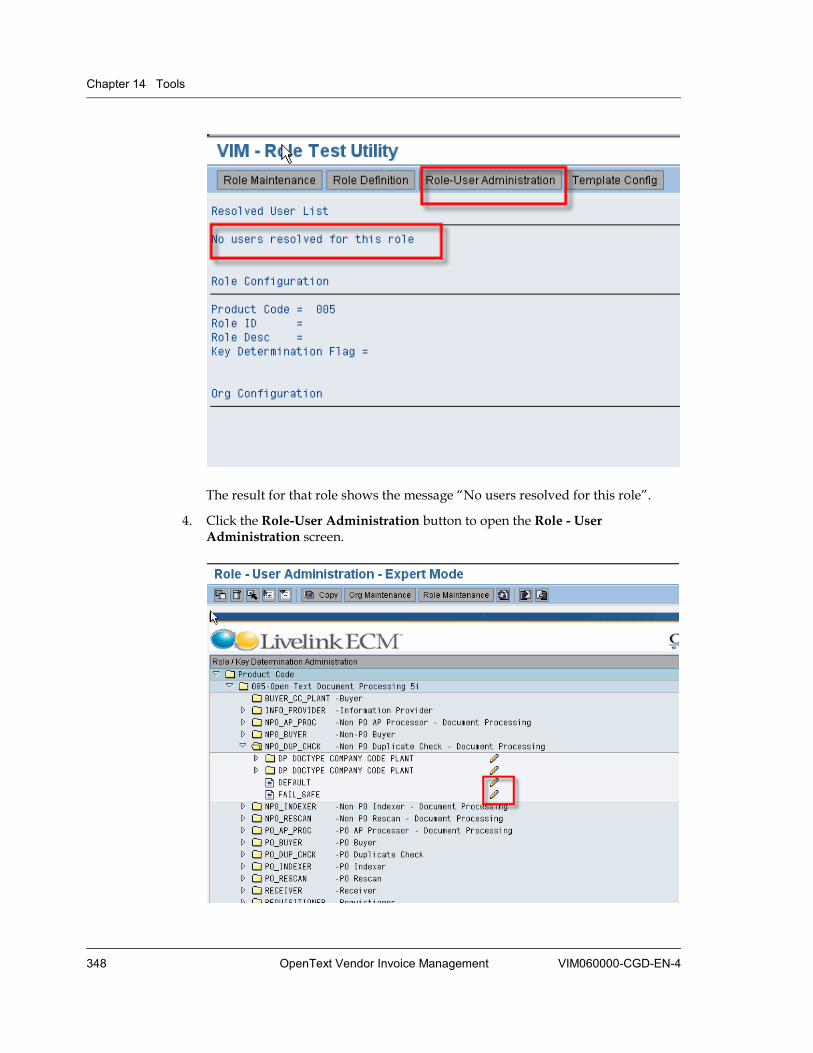
Chapter 14 Tools
348 OpenText Vendor Invoice Management VIM060000-CGD-EN-4
The result for that role shows the message “No users resolved for this role”.
4. Click the Role-User Administration button to open the Role - User Administration screen.
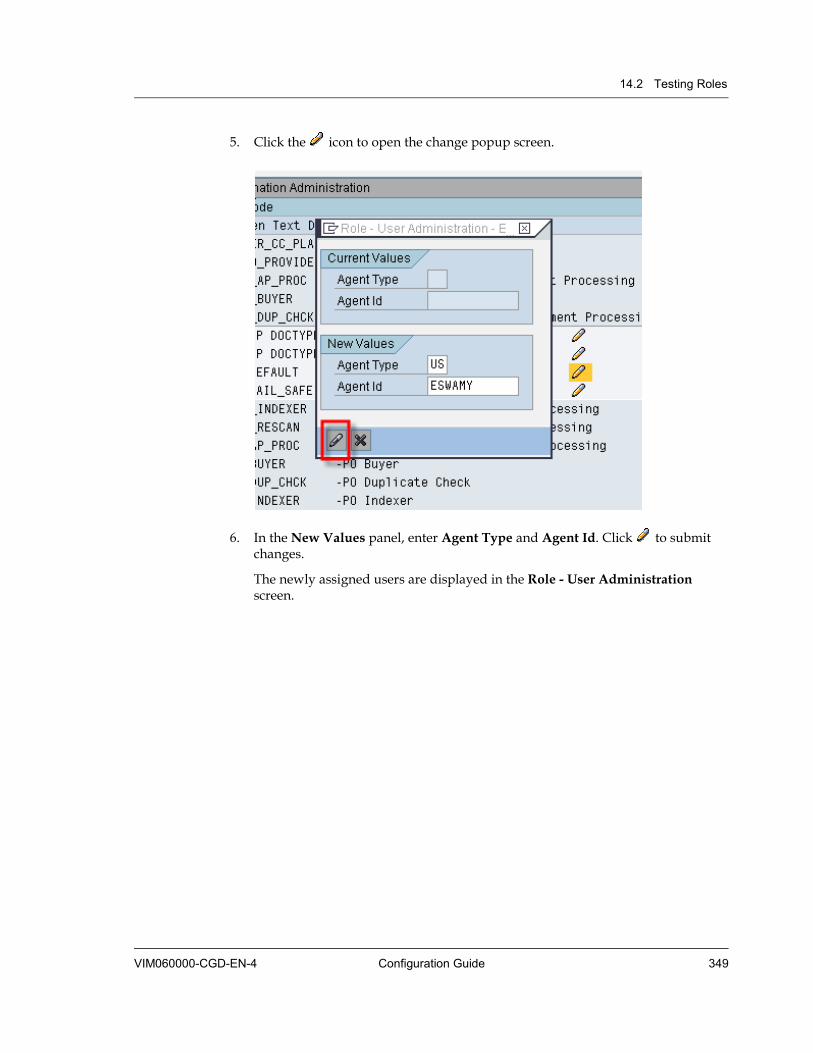
14.2 Testing Roles
VIM060000-CGD-EN-4 Configuration Guide 349
5. Click the icon to open the change popup screen.
6. In the New Values panel, enter Agent Type and Agent Id. Click to submit changes.
The newly assigned users are displayed in the Role - User Administration screen.
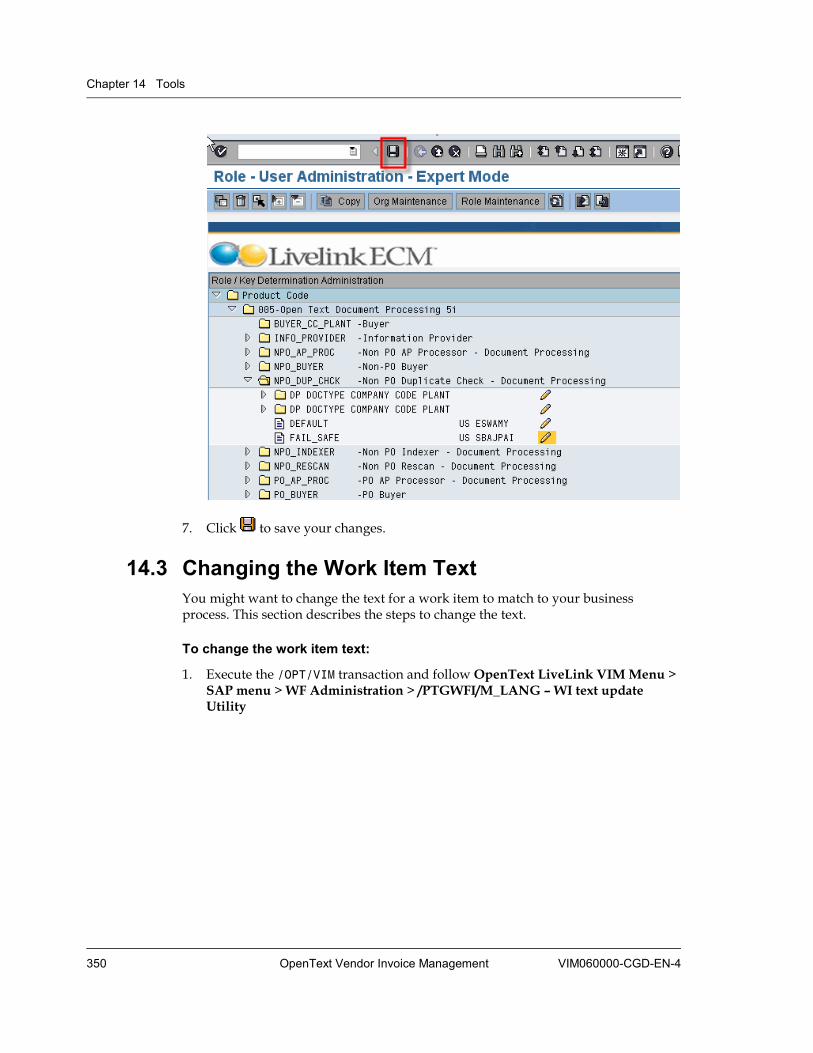
Chapter 14 Tools
350 OpenText Vendor Invoice Management VIM060000-CGD-EN-4
7. Click to save your changes.
14.3 Changing the Work Item Text You might want to change the text for a work item to match to your business process. This section describes the steps to change the text.
To change the work item text:
1. Execute the /OPT/VIM transaction and follow OpenText LiveLink VIM Menu > SAP menu > WF Administration > /PTGWFI/M_LANG – WI text update Utility
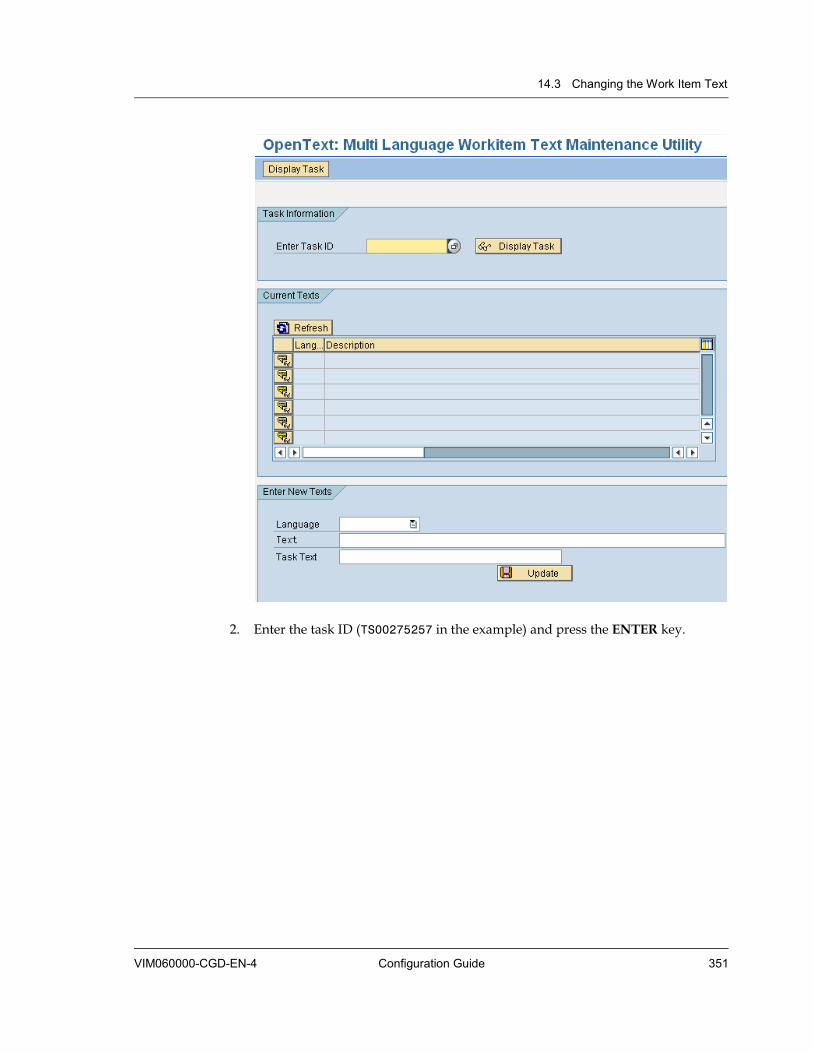
14.3 Changing the Work Item Text
VIM060000-CGD-EN-4 Configuration Guide 351
2. Enter the task ID (TS00275257 in the example) and press the ENTER key.

Chapter 14 Tools
352 OpenText Vendor Invoice Management VIM060000-CGD-EN-4
3. Click on the language that you want to view or modify.
4. Change the text in the Task Text field and click the Update button.

VIM060000-CGD-EN-4 OpenText Vendor Invoice Management 353
Chapter 15 Country Specific Configuration
15.1 Introduction Globalization, mergers and acquisitions, increased competition, emerging markets, new compliance laws, and new technologies all present enormous challenges to business as they strive for market leadership and increased shareholder value. A constant cycle of changes demands prompt innovations and requires management to continuously reallocate their resources and reorganize the way they drive business.
A global company must adapt to the local conditions in the countries where it does business. The ability to comply with laws and regulations and respond to business requirements can have a direct impact on its globalization success.
With respect to invoice processing, there are various business and regulatory rules that need to be complied that differ from region to region. VIM provides a flexible infrastructure for implementing these rules that empowers the customers to fine tune these rules to be in line with their interpretation of legal rules and for optimizing their business processes.
There are two main types of rules that need to be implemented:
Completeness check rules These rules are based on the regulatory requirements that stipulate the need to have specific pieces of information on the invoice before the invoice can be paid.
Tax related Specific pieces of information relating to Value Added Tax (VAT) and other taxation rules that need to be followed. SAP ERP implements the various tax rules in the standard software and has a flexible infrastructure to link with tax software like Vortex and Taxware. VIM by itself does not duplicate any of these pieces of functionality. VIM provides a way to implement certain metadata based business rules that can be implemented before the invoice data is entered in to the SAP ERP transactions.
VIM realizes these requirements with the following:
Core infrastructure Infrastructure that supports the ability to model and realize different business process flows depending on the country specific rules.
Baseline content Out-of-box content that includes common implementation of business rules specific to the various regions.
Chapter 15 Country Specific Configuration
354 OpenText Vendor Invoice Management VIM060000-CGD-EN-4
15.1.1 Core Infrastructure The architecture of VIM includes various mechanisms to realize complex business rules. The following concepts of VIM are critical for the implementation of country specific business rules.
15.1.1.1 Document Types Document types provide a mechanism for configuring the system for implementing different user interfaces, rules checking and processes specific to different business need. One key attribute of document types is a “country code” which provides a mechanism for an implementer to configure country specific processes. You can assign different user interface screens to document types so that document type specific data fields are visible to the users while processing the invoices.
15.1.1.2 Process Types Process types are a mechanism for realizing implementing exception processing procedure. Various roles can be attached to these process types and process specific user options can be implemented to handle various exception scenarios. Exceptions that occur because of the failure of the country specific rules during invoice processing are handled.
15.1.1.3 Invoice Types VIM supports two invoice types: PO invoices and Non PO invoices.
15.1.1.4 Simple Invoices Some invoices are simplified invoices, based on certain country specific rules. You can ignore some of the business rules for Simple Invoices. You configure the business rules to be ignored for Simple Invoices at the country level. See “Country Specific Process Types” on page 371.
15.1.1.5 Invoice Categories Certain business rules are applicable to only some invoices processed in a country. Other business rules need to be skipped for only some invoices in a country. The concept of invoice categories is used to identify these special groups of invoices. Invoice categories help to execute the business rules for specific invoices.
VIM supports the following invoice categories:
Domestic Invoices raised by vendors in the same country
Intra-Community Invoices raised by vendors in the European Union (EU) to companies in the EU. Applicable to EU countries, only.
15.1 Introduction
VIM060000-CGD-EN-4 Configuration Guide 355
Triangulation Invoices raised by vendors in the EU to companies in the EU for a delivery of goods or services originating in another EU country. In this case, both the vendor and the company are in different EU countries. Applicable to EU countries, only.
Import Invoice raised by vendors outside the company’s country
Domestic Material New category with VIM 6.0 SP3. Invoices raised by vendors in India where the Purchase Order is a Material PO. Applicable to India only.
Domestic Service New category with VIM 6.0 SP3. Invoices raised by vendors in India where the Purchase Order is a Service PO. Applicable to India only.
Import Material New category with VIM 6.0 SP3. Invoices raised by vendors outside India where the Purchase Order is a Standard PO. Applicable to India only.
Import Service New category with VIM 6.0 SP3. Invoices raised by vendors outside India where the Purchase Order is a Service PO. Applicable to India only.
Non VAT New category with VIM 6.0. Invoices without VAT amount. Applicable to China only.
VAT Common New category with VIM 6.0. Invoices with VAT provided but the VAT amount is not deductible. Applicable to China only.
VAT Special New category with VIM 6.0. Invoices with VAT provided and the VAT amount is deductible. Applicable to China only.
For information on maintaining invoice categories, see “Invoice Categories, Category Groups, and Mapping” on page 357.
15.1.2 Baseline Content Baseline content is the implementation of the business rules as interpreted by OpenText. This implementation content is available for you to tweak and fine tune to meet your requirements. This includes:
• Document types specific to each country
• User interface specific to each country implementation
• Screen field configuration specific to the document types
• Business rules implementation specific to each country
Chapter 15 Country Specific Configuration
356 OpenText Vendor Invoice Management VIM060000-CGD-EN-4
The following table lists the document types that are delivered as a part of VIM baseline version:
S.No Country PO Non PO
1 US PO_INV_US NPO_INV_US
2 Austria PO_INV_AT NPO_INV_AT
3 UK PO_INV_UK NPO_INV_UK
4 Germany PO_INV_DE NPO_INV_DE
5 France PO_INV_FR NPO_INV_FR
6 Switzerland PO_INV_CH NPO_INV_CH
7 Belgium PO_INV_BE NPO_INV_BE
8 Finland PO_INV_FI NPO_INV_FI
9 Italy PO_INV_IT NPO_INV_IT
10 Netherlands PO_INV_NL NPO_INV_NL
11 Norway PO_INV_NO NPO_INV_NO
12 Sweden PO_INV_SE NPO_INV_SE
13 Spain PO_INV_ES NPO_INV_ES
14 Japan PO_INV_JP NPO_INV_JP
15 Denmark PO_INV_DK NPO_INV_DK
16 Canada PO_INV_CA NPO_INV_CA
17 China PO_INV_CN NPO_INV_CN
18 Australia PO_INV_AU NPO_INV_AU
19 Brazil PO_INV_BR NPO_INV_BR
20 India PO_INV_IN NPO_INV_IN
Each document type has a set of business rules defined against it. These business rules determine the DP Exception to be raised in case of missing or invalid data on the DP indexing screen.
Each business rule is driven either through configuration or a function module which will in turn trigger the business logic for validating the invoice information.
The DP indexing screen is different for each document type. Based on the document type, the respective Indexing screen is displayed. The screen configuration for each document type is a part of the document type configuration.

15.2 Invoice Categories, Category Groups, and Mapping
VIM060000-CGD-EN-4 Configuration Guide 357
15.1.3 Document Type Determination for Non-baseline Countries If you want to use VIM for countries that are not included in the baseline, you must create a function module for each country, copied from a baseline function module, for example /OPT/VIM_DET_DOC_TPE_PO_INV_DE, the function module for German PO invoices. You must change the function module according to the non-baseline country requirements for the document type determination.
For a PO document type, you must copy a PO document type determination function module. For a new Non PO document type, you must copy a Non PO document type determination function module.
In the document type determination procedure, make sure that the PO document types are listed first and the Non PO document types are listed afterwards. For details about the document type configuration, see “Country Specific Document Type Configuration” on page 373.
15.2 Invoice Categories, Category Groups, and Mapping OpenText provides a baseline implementation for customizing aspects of invoice categories, category groups, and mapping. Invoice categories are maintainable, so you can enhance them if required.
Note: You must change the settings in this section only, if you want to enhance the baseline implementation.
To restrict the number of invoice categories per country, VIM adds the concept of category groups with VIM 6.0. Category groups are basically a bundle of different categories.
When defining the business rules for a particular country, you can configure them by category group. So, you can define a business rule for all the categories in that group in just one line of configuration.
For a list of invoice categories that are supported for VIM, see “Invoice Categories” on page 354.
15.2.1 Maintaining Invoice Categories In this step, you maintain custom invoice categories.
To maintain invoice categories:
1. Execute the n/OPT/SPRO transaction and follow LiveLink VIM - Configuration > Document Processing > Country Specific Localization > Maintain Invoice Categories.
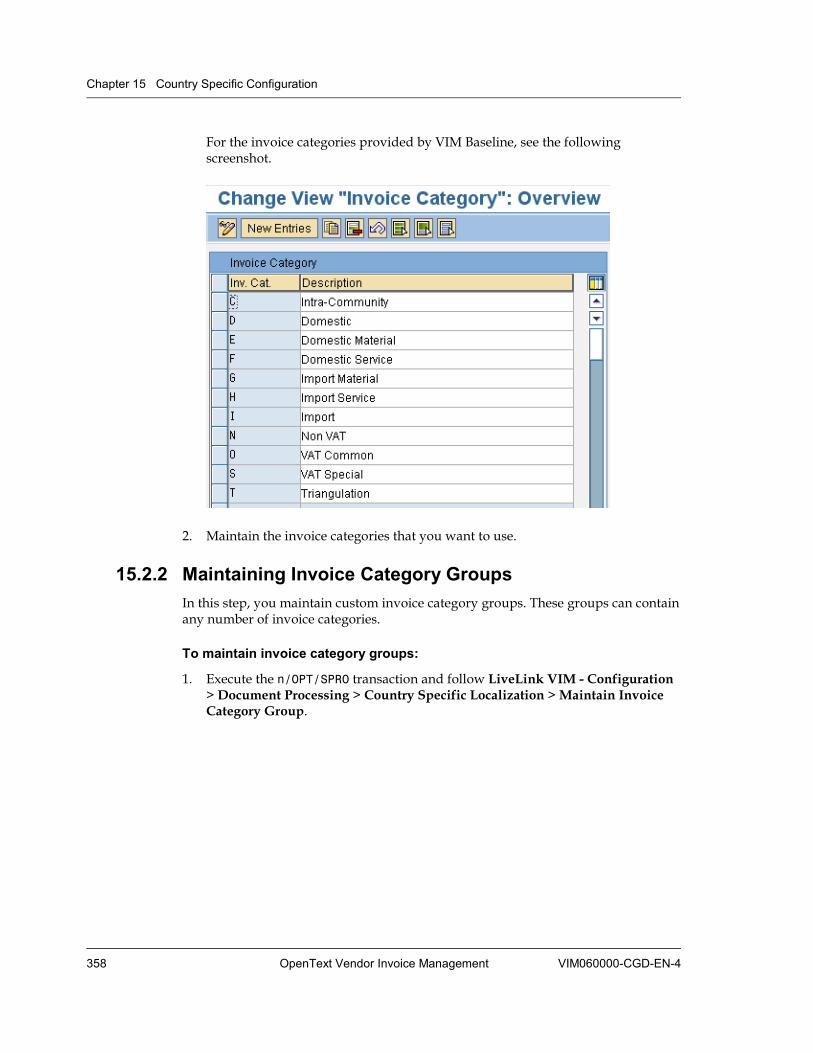
Chapter 15 Country Specific Configuration
358 OpenText Vendor Invoice Management VIM060000-CGD-EN-4
For the invoice categories provided by VIM Baseline, see the following screenshot.
2. Maintain the invoice categories that you want to use.
15.2.2 Maintaining Invoice Category Groups In this step, you maintain custom invoice category groups. These groups can contain any number of invoice categories.
To maintain invoice category groups:
1. Execute the n/OPT/SPRO transaction and follow LiveLink VIM - Configuration > Document Processing > Country Specific Localization > Maintain Invoice Category Group.
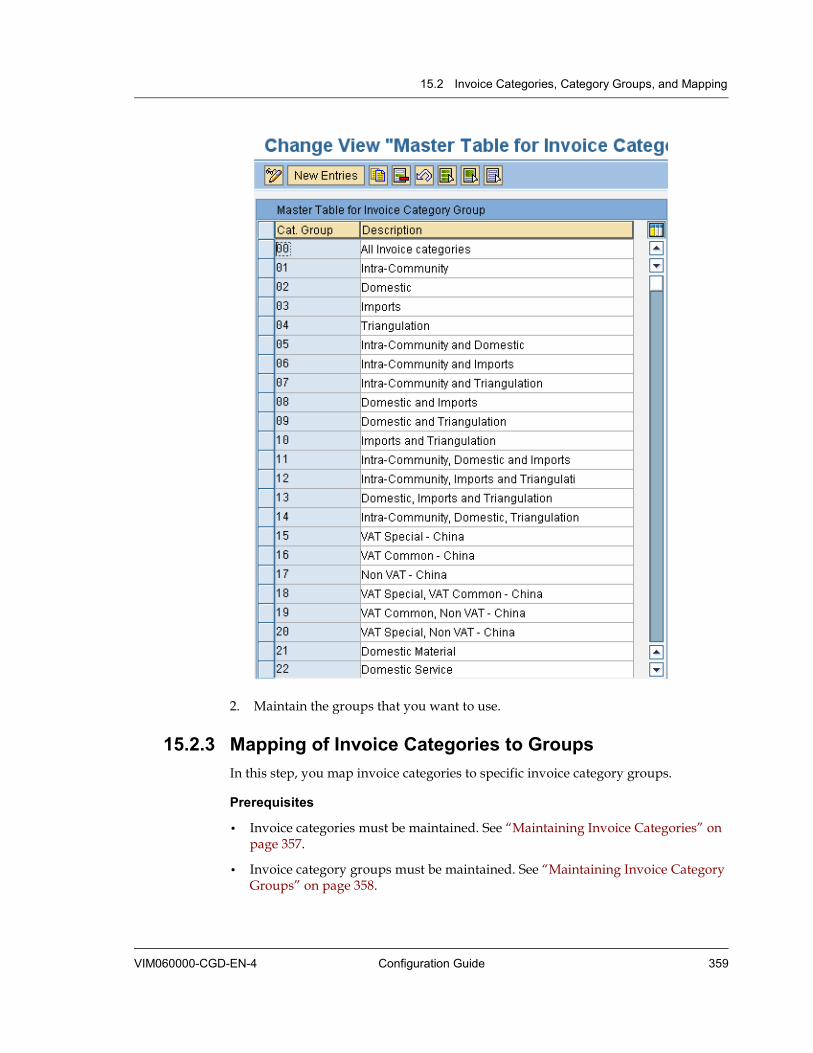
15.2 Invoice Categories, Category Groups, and Mapping
VIM060000-CGD-EN-4 Configuration Guide 359
2. Maintain the groups that you want to use.
15.2.3 Mapping of Invoice Categories to Groups In this step, you map invoice categories to specific invoice category groups.
Prerequisites
• Invoice categories must be maintained. See “Maintaining Invoice Categories” on page 357.
• Invoice category groups must be maintained. See “Maintaining Invoice Category Groups” on page 358.
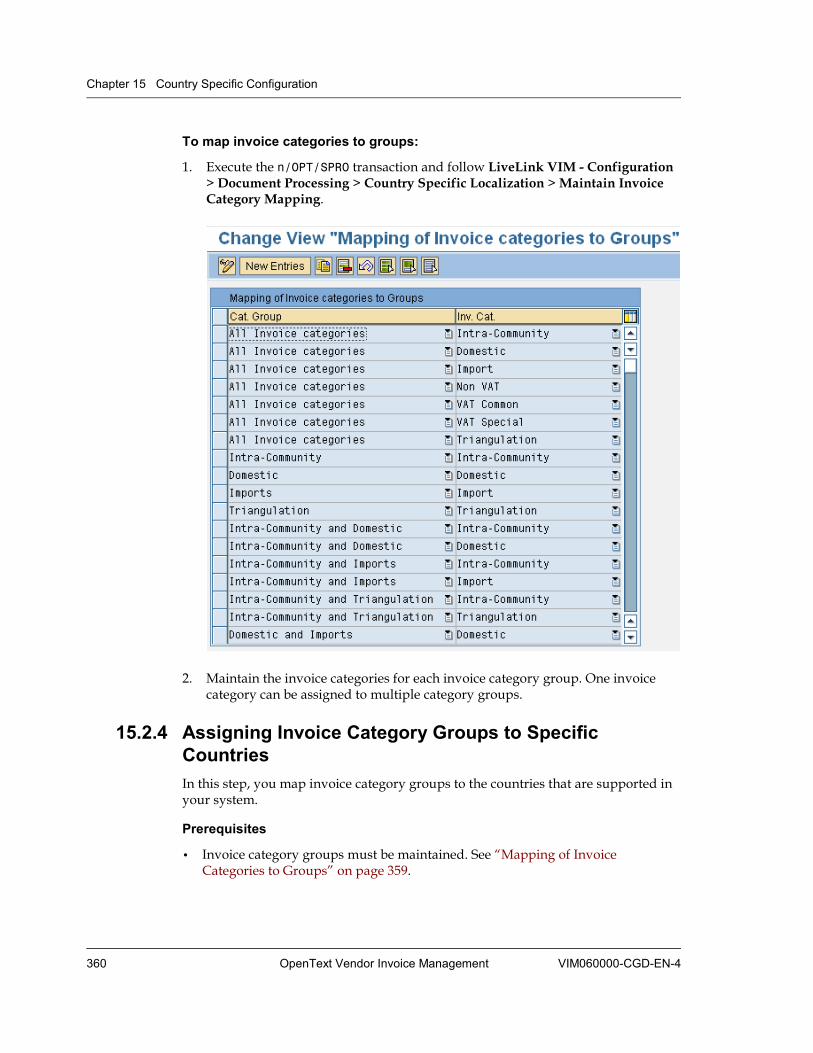
Chapter 15 Country Specific Configuration
360 OpenText Vendor Invoice Management VIM060000-CGD-EN-4
To map invoice categories to groups:
1. Execute the n/OPT/SPRO transaction and follow LiveLink VIM - Configuration > Document Processing > Country Specific Localization > Maintain Invoice Category Mapping.
2. Maintain the invoice categories for each invoice category group. One invoice category can be assigned to multiple category groups.
15.2.4 Assigning Invoice Category Groups to Specific Countries In this step, you map invoice category groups to the countries that are supported in your system.
Prerequisites
• Invoice category groups must be maintained. See “Mapping of Invoice Categories to Groups” on page 359.

15.3 Process Types
VIM060000-CGD-EN-4 Configuration Guide 361
To assign invoice category groups to countries:
1. Execute the n/OPT/SPRO transaction and follow LiveLink VIM - Configuration > Document Processing > Country Specific Localization > Maintain Invoice Category Group Mapping.
2. Map your invoice category groups to the countries that are supported in your system.
15.3 Process Types The process types affect the process flow as required. Each process type corresponds to a business rule and is used in multiple document types.
The process type is also linked to an initial actor. In case of an exception, the corresponding process type is triggered. Based on the initial actor the DP workflow assigns the task to the respective user. Along with the initial actor the process type also holds the collaboration options available for the initial actor.
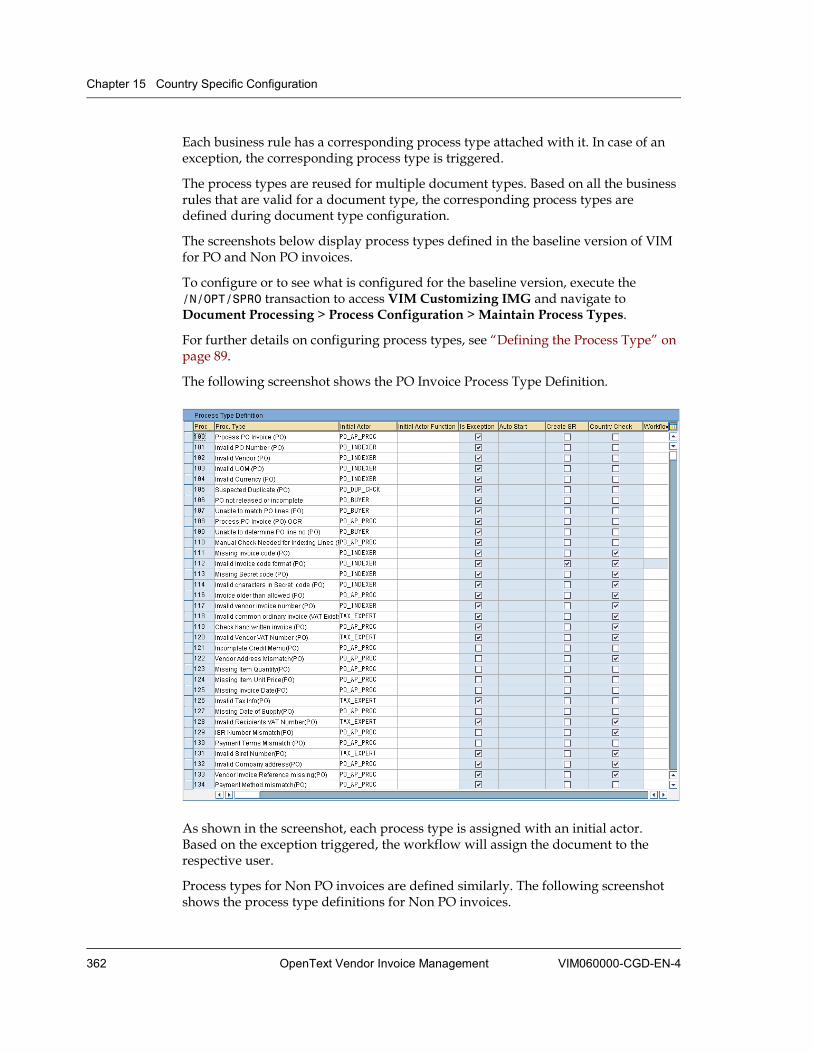
Chapter 15 Country Specific Configuration
362 OpenText Vendor Invoice Management VIM060000-CGD-EN-4
Each business rule has a corresponding process type attached with it. In case of an exception, the corresponding process type is triggered.
The process types are reused for multiple document types. Based on all the business rules that are valid for a document type, the corresponding process types are defined during document type configuration.
The screenshots below display process types defined in the baseline version of VIM for PO and Non PO invoices.
To configure or to see what is configured for the baseline version, execute the /N/OPT/SPRO transaction to access VIM Customizing IMG and navigate to Document Processing > Process Configuration > Maintain Process Types.
For further details on configuring process types, see “Defining the Process Type” on page 89.
The following screenshot shows the PO Invoice Process Type Definition.
As shown in the screenshot, each process type is assigned with an initial actor. Based on the exception triggered, the workflow will assign the document to the respective user.
Process types for Non PO invoices are defined similarly. The following screenshot shows the process type definitions for Non PO invoices.
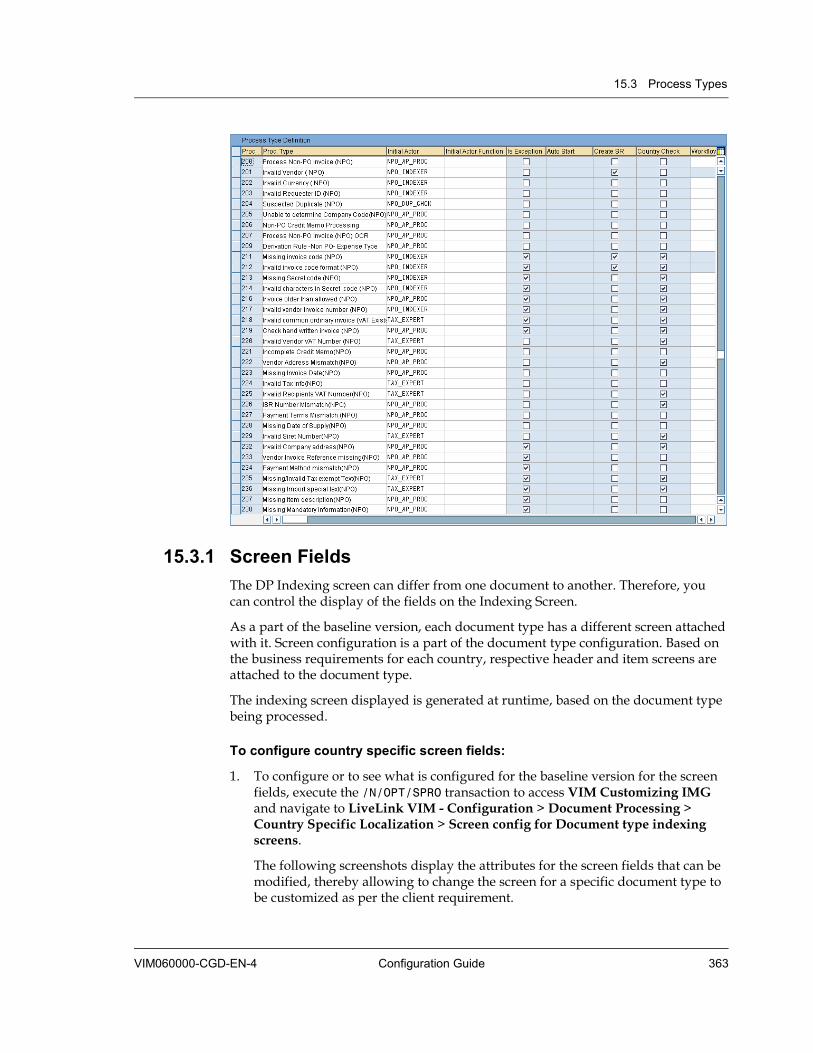
15.3 Process Types
VIM060000-CGD-EN-4 Configuration Guide 363
15.3.1 Screen Fields The DP Indexing screen can differ from one document to another. Therefore, you can control the display of the fields on the Indexing Screen.
As a part of the baseline version, each document type has a different screen attached with it. Screen configuration is a part of the document type configuration. Based on the business requirements for each country, respective header and item screens are attached to the document type.
The indexing screen displayed is generated at runtime, based on the document type being processed.
To configure country specific screen fields:
1. To configure or to see what is configured for the baseline version for the screen fields, execute the /N/OPT/SPRO transaction to access VIM Customizing IMG and navigate to LiveLink VIM - Configuration > Document Processing > Country Specific Localization > Screen config for Document type indexing screens.
The following screenshots display the attributes for the screen fields that can be modified, thereby allowing to change the screen for a specific document type to be customized as per the client requirement.

Chapter 15 Country Specific Configuration
364 OpenText Vendor Invoice Management VIM060000-CGD-EN-4
2. Select the document type for which the screen needs to be customized and click the Submit button.
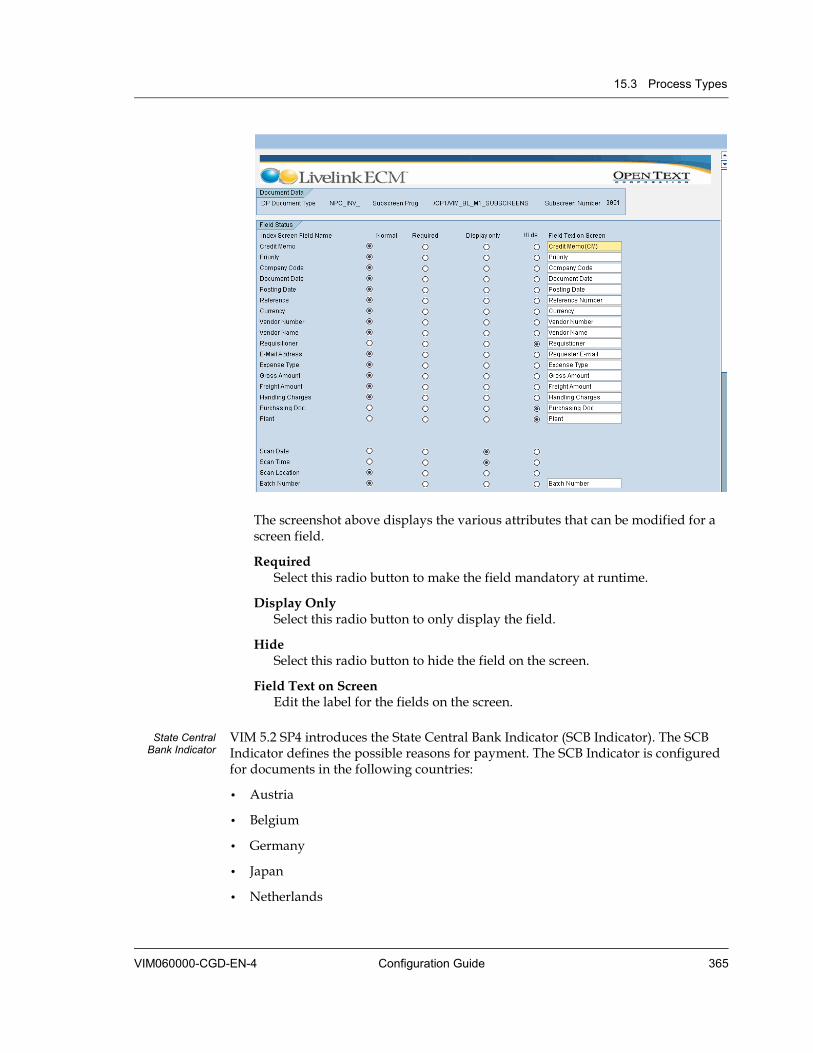
15.3 Process Types
VIM060000-CGD-EN-4 Configuration Guide 365
The screenshot above displays the various attributes that can be modified for a screen field.
Required Select this radio button to make the field mandatory at runtime.
Display Only Select this radio button to only display the field.
Hide Select this radio button to hide the field on the screen.
Field Text on Screen Edit the label for the fields on the screen.
State Central Bank Indicator
VIM 5.2 SP4 introduces the State Central Bank Indicator (SCB Indicator). The SCB Indicator defines the possible reasons for payment. The SCB Indicator is configured for documents in the following countries: • Austria
• Belgium
• Germany
• Japan
• Netherlands

Chapter 15 Country Specific Configuration
366 OpenText Vendor Invoice Management VIM060000-CGD-EN-4
A field SCB Ind for the SCB Indicator is available in the DP document at header level. You can configure this field for each DP document type. See “To configure country specific screen fields:” on page 363.
Supplying Country
VIM 5.2 SP5 introduces the Supplying Country field. This field is configured for documents for Germany. Together with the German SCB Indicator, the Supplying Country field is needed for creating reports in line with German foreign trade regulations. A new field Supplying Cntry is now available in the DP document at header level. You can configure this field for each DP document type. See “To configure country specific screen fields:” on page 363.
15.3.2 Copying the Screen and Item Configuration VIM provides a feature to copy a DP document type, and with it a lot of dependent entries. But the screen and item configuration is not kept in dependent tables, so they have to be copied separately. With VIM 5.2 SP5 and higher, the new button Copy as provides a simple user interface to perform this copy.
To copy the screen and item configuration:
1. Execute the /N/OPT/SPRO transaction to access VIM Customizing IMG and navigate to LiveLink VIM - Configuration > Document Processing > Country Specific Localization > Screen config for Document type indexing screens.
2. Enter the DP Document Type that you want to copy from and click Copy as.
3. In the Enter target document type dialog box, enter the target DP document type that you want to copy to.
The target document type must be valid and exist in the system.
4. Click to continue.
The program checks if a configuration already exists for this DP document type. If a configuration is found, you get a warning in a dialog box.
5. Click Yes to overwrite the screen configuration.
Another dialog box is displayed, asking if you want to copy the item configuration as well.

15.3 Process Types
VIM060000-CGD-EN-4 Configuration Guide 367
6. Click Yes.
The copy is finished, you return to the first screen. A status message is shown.
The new DP document type is set as default entry. You can look at the results using the Submit button.
15.3.3 Document Creation: Configuring Document Processing VIM creates SAP documents either using a batch or using a function module like a BAPI.
Documents can be created either in foreground or in background, based on the configuration. The process type drives the creation of SAP documents. Each process type is assigned with a BDC ID which will define the process used for the creation of the SAP document.
To configure country specific document types:
1. To configure or to see what is configured for the baseline version of the document types, execute the /N/OPT/SPRO transaction to access VIM Customizing IMG and navigate to LiveLink VIM - Configuration > Document Processing > Document Type Configuration > Maintain Document Types.

Chapter 15 Country Specific Configuration
368 OpenText Vendor Invoice Management VIM060000-CGD-EN-4
2. Select a Document Type Definition and click on Document Processes in the navigation panel.
Each process type for a particular document type is assigned with a BDC Id that will trigger the document creation based on the definition of the BDC Id. The BDC Id in the BDC Transaction Id column will process the document in foreground and the BDC Id in the Background Tran Id column will process the document in background.
3. Select the Autopost Flag to create the document always in the background.
4. In the Parking Reason column, specify the parking reason for this Process Type if any. For details, see “Configuring Parking Reasons” on page 130 for PO invoices and “Configuring Parking Reasons” on page 176 for Non PO invoices.
5. In the Active column, select the check box to set the Process Type active.
Note: It is mandatory to have a BDC ID in the Background Tran ID column if the Autopost flag is set for the process type. See “Defining a BDC ID” on page 73.
15.3.4 Country Specific Settings for Document Types The Document Type Configuration utility lists all the document types for a country and provides you the options to configure the country specific attributes and document specific settings.
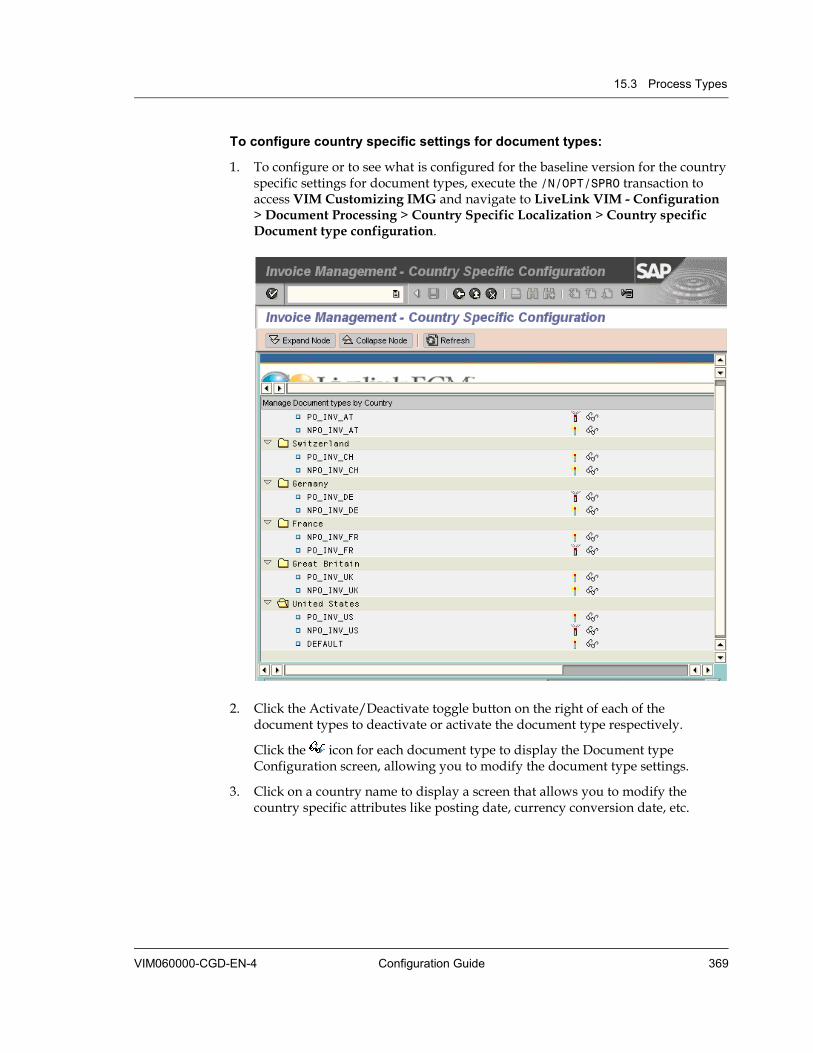
15.3 Process Types
VIM060000-CGD-EN-4 Configuration Guide 369
To configure country specific settings for document types:
1. To configure or to see what is configured for the baseline version for the country specific settings for document types, execute the /N/OPT/SPRO transaction to access VIM Customizing IMG and navigate to LiveLink VIM - Configuration > Document Processing > Country Specific Localization > Country specific Document type configuration.
2. Click the Activate/Deactivate toggle button on the right of each of the document types to deactivate or activate the document type respectively.
Click the icon for each document type to display the Document type Configuration screen, allowing you to modify the document type settings.
3. Click on a country name to display a screen that allows you to modify the country specific attributes like posting date, currency conversion date, etc.

Chapter 15 Country Specific Configuration
370 OpenText Vendor Invoice Management VIM060000-CGD-EN-4
4. Double-click a line to open the Country Specific Attributes Details screen.
5. Maintain the country specific attributes, using the following parameters:
Posting date This attribute determines the date to be used as Posting date when creating a SAP Invoice Document from a DP document. This configuration will be applicable to all the invoices posted to SAP for the country.
Select one of the following values:
• Current System Date
• Date on the Vendor Invoice
• Date of the supply of the Goods or Services

15.3 Process Types
VIM060000-CGD-EN-4 Configuration Guide 371
Conversion Date This attribute determines the date to be used while converting the invoice amount from foreign currency to company code or local currency.
Select one of the following values:
• Current System Date
• Date on the Vendor Invoice
• Posting Date
• Date of the supply of the Goods or Services
Amt Limit Simple Inv Enter a number. If the invoice amount is less than this number, the invoice will be considered as a Simple Invoice. Some process types can be skipped for such invoices. See “Country Specific Process Types” on page 371.
Simplified Inv FM You can write your own function module to determine if an invoice can be termed as Simple Invoice. Add the name of the function module in this field. Copy the interface of standard function module /OPT/VIM_CHECK_SIMPLE_INVOICE to create a custom function module.
The following check boxes are indicators for credit memo check:
CM Ref No. Req. Select this check box to determine that the credit memo must have a valid reference invoice number.
CM Ref Date Req. Select this check box to determine that the credit memo must have a valid reference invoice date.
CM Data Validate Select this check box to determine that the credit memo reference number and the credit memo reference date must match with the existing invoice in the SAP system.
15.3.5 Country Specific Process Types You must maintain the process type in the country configuration; otherwise, the process type will not result in an exception during the DP processing. You configure country specific process types starting from the Country Specific Attributes Overview screen, see “To configure country specific settings for document types:” on page 369.
To configure country specific process types:
1. On the Country Specific Attributes Overview screen, select a country and double-click the County Specific Process Types link in the navigation panel to the left.
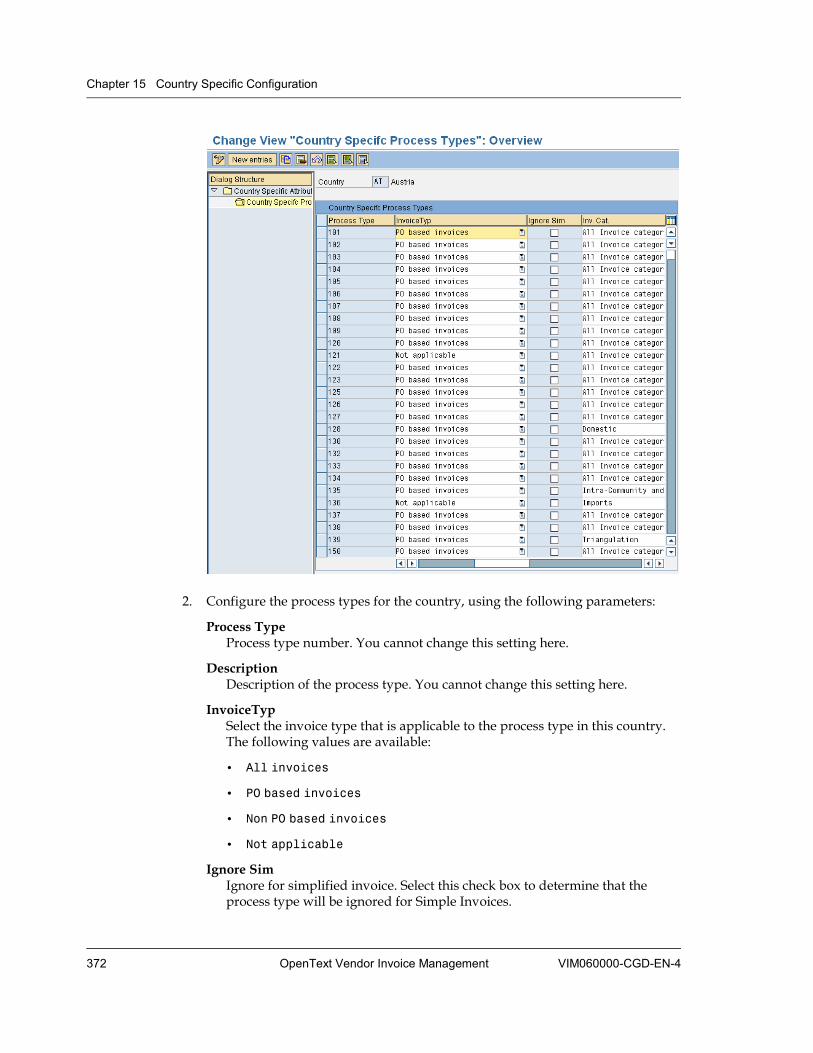
Chapter 15 Country Specific Configuration
372 OpenText Vendor Invoice Management VIM060000-CGD-EN-4
2. Configure the process types for the country, using the following parameters:
Process Type Process type number. You cannot change this setting here.
Description Description of the process type. You cannot change this setting here.
InvoiceTyp Select the invoice type that is applicable to the process type in this country. The following values are available:
• All invoices
• PO based invoices
• Non PO based invoices
• Not applicable
Ignore Sim Ignore for simplified invoice. Select this check box to determine that the process type will be ignored for Simple Invoices.

15.3 Process Types
VIM060000-CGD-EN-4 Configuration Guide 373
Inv. Cat. Invoice category: Select the categories of the invoice to which the process type is applicable. You can select single categories or combinations of categories. For information about the categories, see “Invoice Categories” on page 354.
15.3.6 Country Specific Document Type Configuration
To configure country specific document types:
1. To configure or to see what is configured for the baseline version for the document types, execute the /N/OPT/SPRO transaction to access VIM Customizing IMG and navigate to LiveLink VIM - Configuration > Document Processing > Document Type Configuration > Maintain Document Types.
2. Double-click on one of the baseline document types.
3. Modify the configuration to suit your needs.
See the detailed description in “Creating a New DP Document Type” on page 46.
Chapter 15 Country Specific Configuration
374 OpenText Vendor Invoice Management VIM060000-CGD-EN-4
15.4 Z Constants For some country specific configuration, you need to maintain Z constants. To access Z constants, execute the SM30 transaction with table /PTGWFI/Z_CONST.
AFTCS_PROCESS_TYPES
Only relevant to invoices processed under Chinese DP document types
Usage
• This Z constant defines the process types that are relevant for the AFTCS (Anti Forge Tax Control System) file upload/download program. The program /OPT/VR_AFTCS_FILE downloads the data of only those invoices that are in process types defined in this Z constant.
You can maintain multiple process types (as in baseline) with each process type separated by comma.
Product code 005
Baseline 141, 241
DETERMINE_INV_CAT
Usage In VIM 6.0, baseline provides 7 invoice categories. You can also create your own invoice categories. But the system will not determine the custom invoice category. You must write your own function module to determine the custom invoice category. You must define this custom function module in this Z constant.
Product code 005
Baseline implementation /OPT/VIM_TEMPLATE_DET_INV_CAT
Template function module /OPT/VIM_TEMPLATE_DET_INV_CAT
15.5 Configuration Specific for India Since version 6.0 SP3, VIM provides a configuration specific for India. To enable the India configuration, activate the BC Set /OTEXVIM/VIM60_SP3_INDIA.
Document Types The following new document types are introduced for India: PO Document Type
PO_INV_IN
15.5 Configuration Specific for India
VIM060000-CGD-EN-4 Configuration Guide 375
NPO Document Type NPO_INV_IN
For further information, see “Country Specific Document Type Configuration” on page 373.
The following new business rules are introduced for India:
Business Rules for PO invoices
• GR Not Done - Simple Check
• Invalid Tax Description (PO)
• Missing Vendor ECC Number (PO)
• Mismatch Vendor ECC Number (PO)
• Missing Vendor CST Number (PO)
• Mismatch Vendor CST Number (PO)
• Missing Vendor TIN/TOT Number (PO)
• Mismatch Vendor TIN/TOT Number (PO)
• Missing Vendor LST Number (PO)
• Mismatch Vendor LST Number (PO)
• Missing Vendor PAN Number (PO)
• Mismatch Vendor PAN Number (PO)
• Missing Vendor STC Number (PO)
• Mismatch Vendor STC Number (PO)
Business Rules for NPO invoices
• Invalid Tax Description (NPO)
• Missing Vendor PAN Number (NPO)
• Mismatch Vendor PAN Number (NPO)
• Missing Vendor STC Number (NPO)
• Mismatch Vendor STC Number (NPO)
• Missing Vendor CST Number (NPO)
• Mismatch Vendor CST Number (NPO)
• Missing Vendor TIN/TOT Number (NPO)
• Mismatch Vendor TIN/TOT Number (NPO)
• Missing Vendor LST Number (NPO)
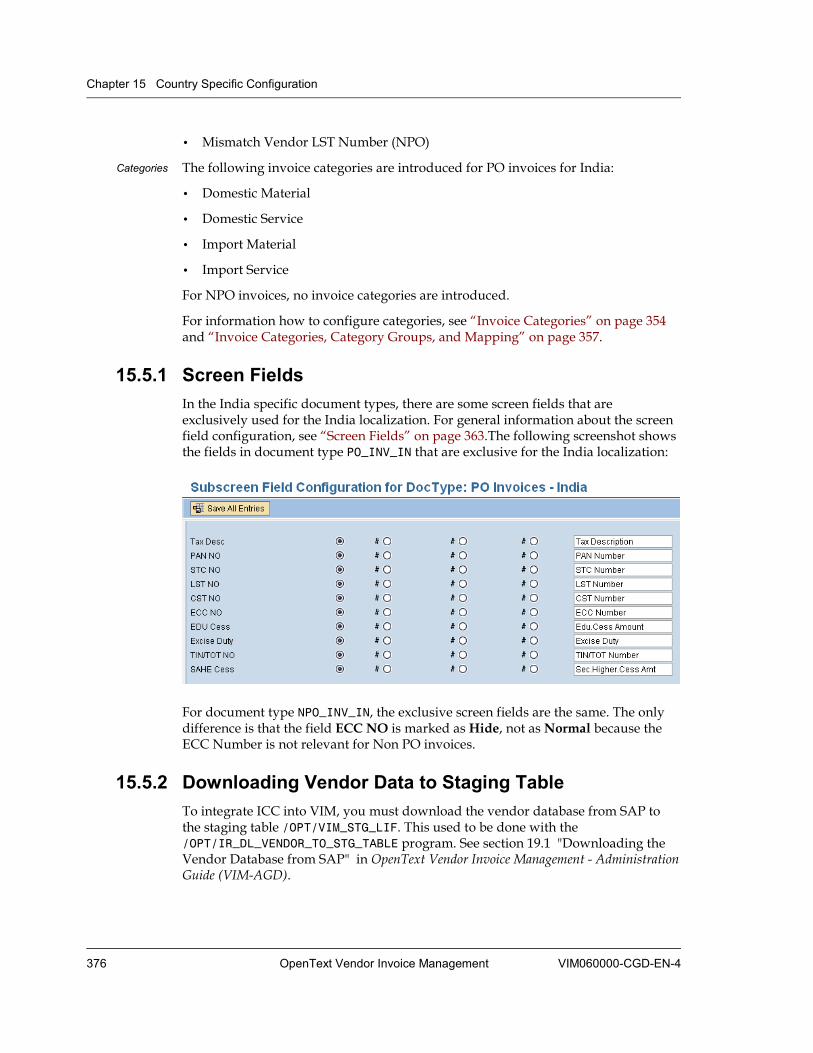
Chapter 15 Country Specific Configuration
376 OpenText Vendor Invoice Management VIM060000-CGD-EN-4
• Mismatch Vendor LST Number (NPO)
Categories The following invoice categories are introduced for PO invoices for India: • Domestic Material
• Domestic Service
• Import Material
• Import Service
For NPO invoices, no invoice categories are introduced.
For information how to configure categories, see “Invoice Categories” on page 354 and “Invoice Categories, Category Groups, and Mapping” on page 357.
15.5.1 Screen Fields In the India specific document types, there are some screen fields that are exclusively used for the India localization. For general information about the screen field configuration, see “Screen Fields” on page 363.The following screenshot shows the fields in document type PO_INV_IN that are exclusive for the India localization:
For document type NPO_INV_IN, the exclusive screen fields are the same. The only difference is that the field ECC NO is marked as Hide, not as Normal because the ECC Number is not relevant for Non PO invoices.
15.5.2 Downloading Vendor Data to Staging Table To integrate ICC into VIM, you must download the vendor database from SAP to the staging table /OPT/VIM_STG_LIF. This used to be done with the /OPT/IR_DL_VENDOR_TO_STG_TABLE program. See section 19.1 "Downloading the Vendor Database from SAP" in OpenText Vendor Invoice Management - Administration Guide (VIM-AGD).

15.6 Configuration Specific for Canada
VIM060000-CGD-EN-4 Configuration Guide 377
For the India localization, use the /OPT/VENDOR_TO_STG_TABLE_INDIA program for this purpose. This program has exactly the same user interface as /OPT/IR_DL_VENDOR_TO_STG_TABLE but stores data in a different way.
15.6 Configuration Specific for Canada Since version 5.2 SP3, VIM provides a configuration specific for Canada. For Canada, all business rules as in the standard rules for the US have been kept intact. One new business rule Invalid Sales Tax for the Region has been introduced. In Canada, multiple tax rates (GST, PST, HST, QST) are applicable, based on the province. Hence, the tax code derivation feature has been enhanced to derive tax codes that are based on multiple tax rates.
Before tax code derivation, the system validates whether the supplied tax rate fields are applicable for the region. Therefore, it uses the business rule Invalid Sales Tax for the Region. However, to move past the Invalid Sales Tax for the Region business rule check, the system must know the ship-to-region for the incoming vendor invoice. The external system (for example OCR or IDOC) might not supply a ship-to-region. The region can be derived automatically, based on certain settings. See “Determining the Ship-To-Region” on page 377.
Once the ship–to-region is known and the business exception Invalid Sales Tax for The Region does not occur, the system proceeds further to determine the tax code, based on the multiple tax rate fields supplied. See “Determining the Tax Code” on page 380.
You can carry out all Canada-specific customizing by executing the /n/OPT/SPRO transaction and following LiveLink VIM - Configuration > Document Processing > External System Data (OCR / IDoc) > Maintain Customizing Tables for Canada
15.6.1 Determining the Ship-To-Region
To determine the Ship-To-Region:
1. Execute the /n/OPT/SPRO transaction and follow LiveLink VIM - Configuration > Document Processing > External System Data (OCR / IDoc) > Maintain Customizing Tables for Canada > Maintain Ship-To-Region Determination.

Chapter 15 Country Specific Configuration
378 OpenText Vendor Invoice Management VIM060000-CGD-EN-4
2. Enter CA for Canada in the Cty field.
In the fields CoCd From and CoCd To, define a range of company codes.
In the fields Vendor From and Vendor To, define a range of vendors.
3. In the Options column, select one of the following options:
Company Code The system will determine the region from the address maintained in the company code address for the range of vendors and company codes.
You do not have to maintain any entry in the Region and Custom FM fields.
Company Code -> Purchase Order The system will determine the region from the company code address. If no region is retrieved from the company code, this option automatically switches to the purchase order to get the region. The purchase order can be selected either from the header data or the item data. The system determines the region from the plant address that is stored at item level.
You do not have to maintain any entry in the Region and Custom FM fields.
Purchase Order -> Company Code Same action as in Company Code -> Purchase Order. However, the system will give the preference to the purchase order to get the region. If this fails, the company code is used to get the region.
You do not have to maintain any entry in the Region and Custom FM fields.
Fixed Value You must maintain the region explicitly in the Region field.
Custom Function You can define an own logic to find the region by defining the Z function module explicitly in the Custom FM field.
The interface of the custom function should be like the following:
FUNCTION ZXXXXXXXXXXX *"-------------------------------------------------------------*"*"Local Interface: *" EXPORTING *" REFERENCE(REGION) TYPE REGIO *" TABLES *" INDEX_ITEM STRUCTURE /OPT/VIM_1ITEM OPTIONAL *" CHANGING *" REFERENCE(INDEX_DATA) TYPE /OPT/VIM_1HEAD OPTIONAL *"-------------------------------------------------------------
4. Save your settings.

15.6 Configuration Specific for Canada
VIM060000-CGD-EN-4 Configuration Guide 379
ICC If ICC is used as OCR, ICC does not explicitly supply the ship-to-region. In this case, VIM uses Company Code/PO (based on the selected configuration option) to derive the ship-to-region. There might be cases where you cannot use Company Code/PO to derive the ship-to-region. In these cases, you must use custom functions or manual entries, for example, if one of the following cases applies: • The Company Code address cannot be treated as the ship-to-address. In this
case, do not use the Company Code option to derive the ship-to-region. Use the custom function option.
• A PO or a combination of multiple POs has any line items with varying ship-to-regions for various PO line items (based on different receiving plants at PO line item level). In this case, do not use the PO as an option to derive the ship-to-region. Use the custom function option.
• Without the ship-to-region determined automatically or supplied, new business rules for validation of tax rate fields/tax code determination fail on VIM side. Manual user input is needed.
• ICC does not supply taxes at line item level. ICC should supply taxes only at header level. The same tax rate at the header is applicable for each line item if no lines are supplied with a tax rate. Different line items in the vendor invoice might have different tax rates; for example, if a combination of free goods line (tax-free) and lines with a tax rate exists in the vendor invoice. Use the custom function option.
15.6.2 Maintaining Tax Fields for the Region An incoming vendor invoice is validated against the tax province relationship table. This section describes the maintenance of this table.
To maintain tax fields for the region:
1. Execute the /n/OPT/SPRO transaction and follow LiveLink VIM - Configuration > Document Processing > External System Data (OCR / IDoc) > Maintain Customizing Tables for Canada > Maintain Tax-Province Relationship.
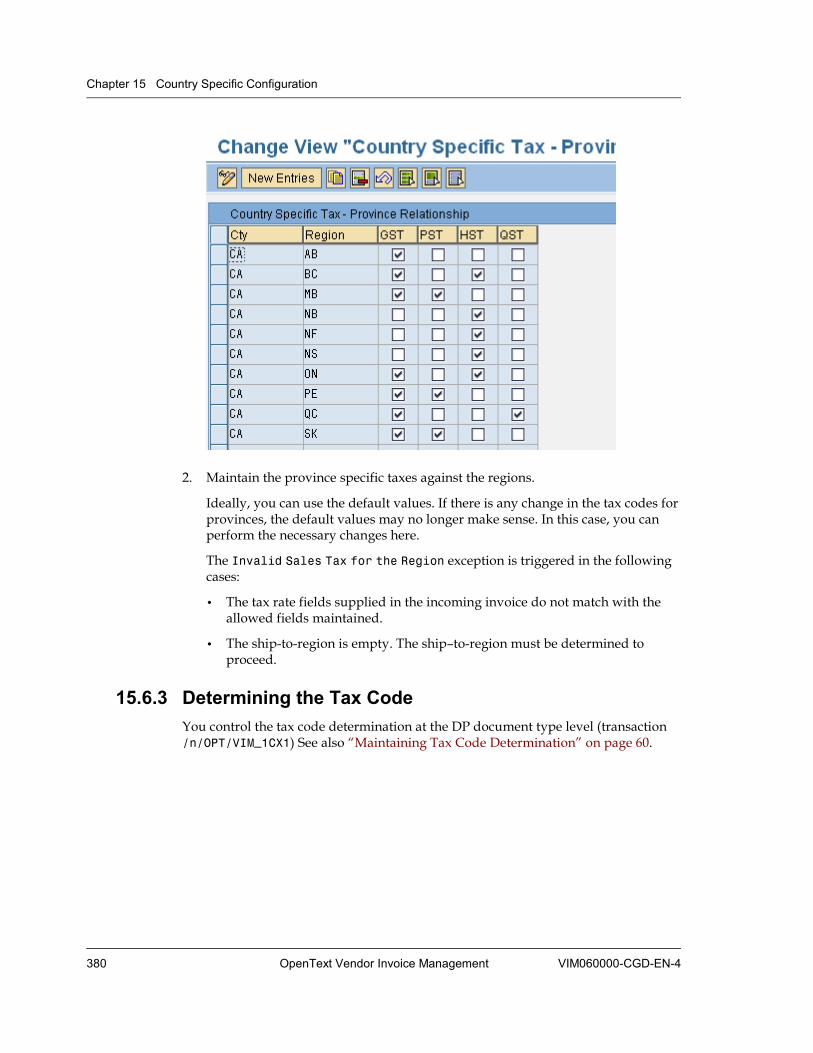
Chapter 15 Country Specific Configuration
380 OpenText Vendor Invoice Management VIM060000-CGD-EN-4
2. Maintain the province specific taxes against the regions.
Ideally, you can use the default values. If there is any change in the tax codes for provinces, the default values may no longer make sense. In this case, you can perform the necessary changes here.
The Invalid Sales Tax for the Region exception is triggered in the following cases:
• The tax rate fields supplied in the incoming invoice do not match with the allowed fields maintained.
• The ship-to-region is empty. The ship–to-region must be determined to proceed.
15.6.3 Determining the Tax Code You control the tax code determination at the DP document type level (transaction /n/OPT/VIM_1CX1) See also “Maintaining Tax Code Determination” on page 60.
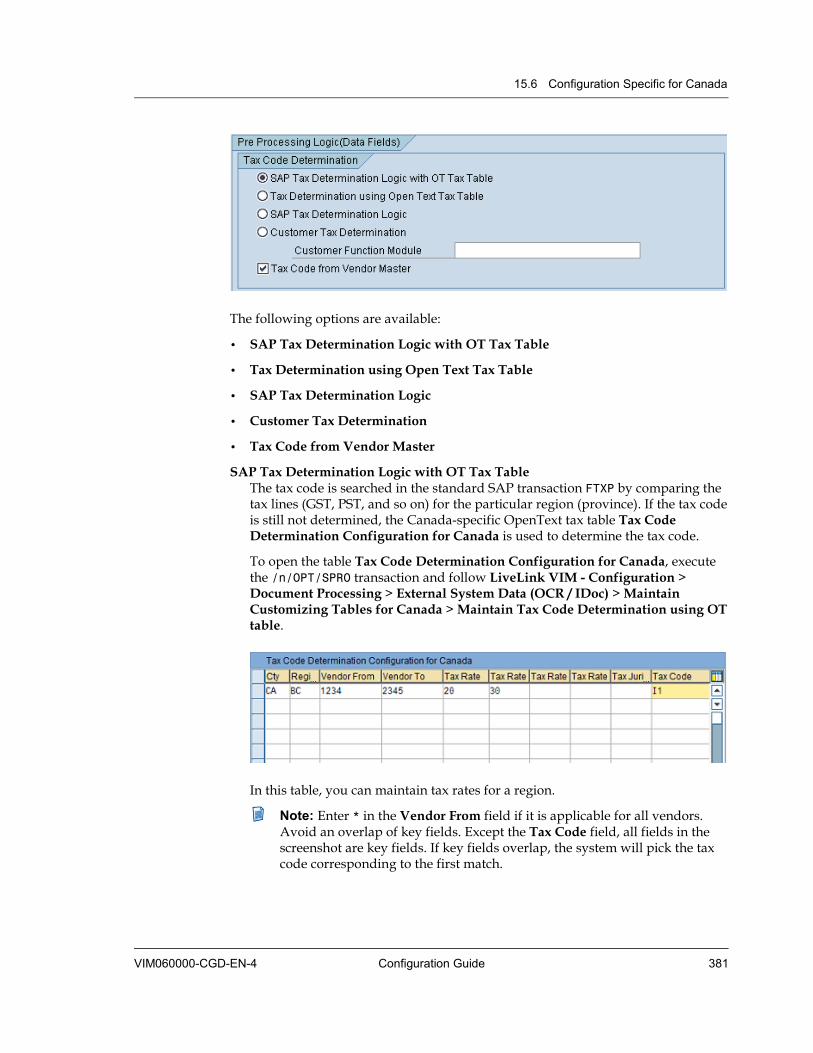
15.6 Configuration Specific for Canada
VIM060000-CGD-EN-4 Configuration Guide 381
The following options are available:
• SAP Tax Determination Logic with OT Tax Table
• Tax Determination using Open Text Tax Table
• SAP Tax Determination Logic
• Customer Tax Determination
• Tax Code from Vendor Master
SAP Tax Determination Logic with OT Tax Table The tax code is searched in the standard SAP transaction FTXP by comparing the tax lines (GST, PST, and so on) for the particular region (province). If the tax code is still not determined, the Canada-specific OpenText tax table Tax Code Determination Configuration for Canada is used to determine the tax code.
To open the table Tax Code Determination Configuration for Canada, execute the /n/OPT/SPRO transaction and follow LiveLink VIM - Configuration > Document Processing > External System Data (OCR / IDoc) > Maintain Customizing Tables for Canada > Maintain Tax Code Determination using OT table.
In this table, you can maintain tax rates for a region.
Note: Enter * in the Vendor From field if it is applicable for all vendors. Avoid an overlap of key fields. Except the Tax Code field, all fields in the screenshot are key fields. If key fields overlap, the system will pick the tax code corresponding to the first match.
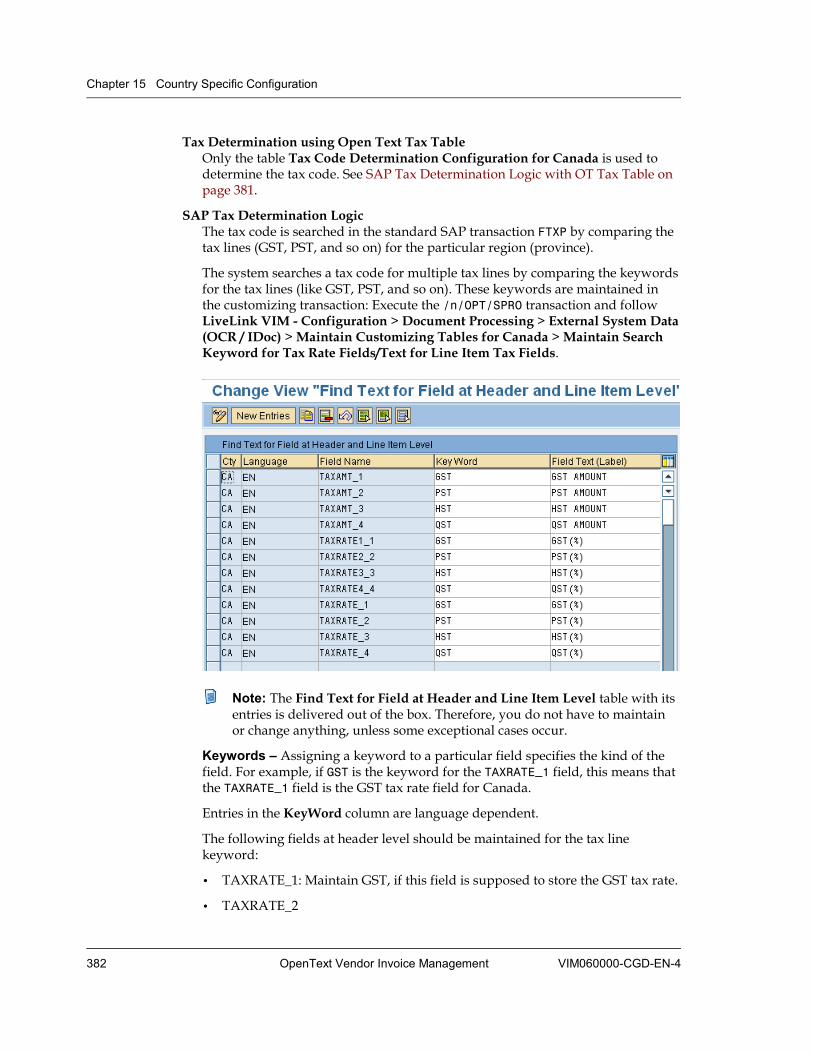
Chapter 15 Country Specific Configuration
382 OpenText Vendor Invoice Management VIM060000-CGD-EN-4
Tax Determination using Open Text Tax Table Only the table Tax Code Determination Configuration for Canada is used to determine the tax code. See SAP Tax Determination Logic with OT Tax Table on page 381.
SAP Tax Determination Logic The tax code is searched in the standard SAP transaction FTXP by comparing the tax lines (GST, PST, and so on) for the particular region (province).
The system searches a tax code for multiple tax lines by comparing the keywords for the tax lines (like GST, PST, and so on). These keywords are maintained in the customizing transaction: Execute the /n/OPT/SPRO transaction and follow LiveLink VIM - Configuration > Document Processing > External System Data (OCR / IDoc) > Maintain Customizing Tables for Canada > Maintain Search Keyword for Tax Rate Fields/Text for Line Item Tax Fields.
Note: The Find Text for Field at Header and Line Item Level table with its entries is delivered out of the box. Therefore, you do not have to maintain or change anything, unless some exceptional cases occur.
Keywords – Assigning a keyword to a particular field specifies the kind of the field. For example, if GST is the keyword for the TAXRATE_1 field, this means that the TAXRATE_1 field is the GST tax rate field for Canada.
Entries in the KeyWord column are language dependent.
The following fields at header level should be maintained for the tax line keyword:
• TAXRATE_1: Maintain GST, if this field is supposed to store the GST tax rate.
• TAXRATE_2
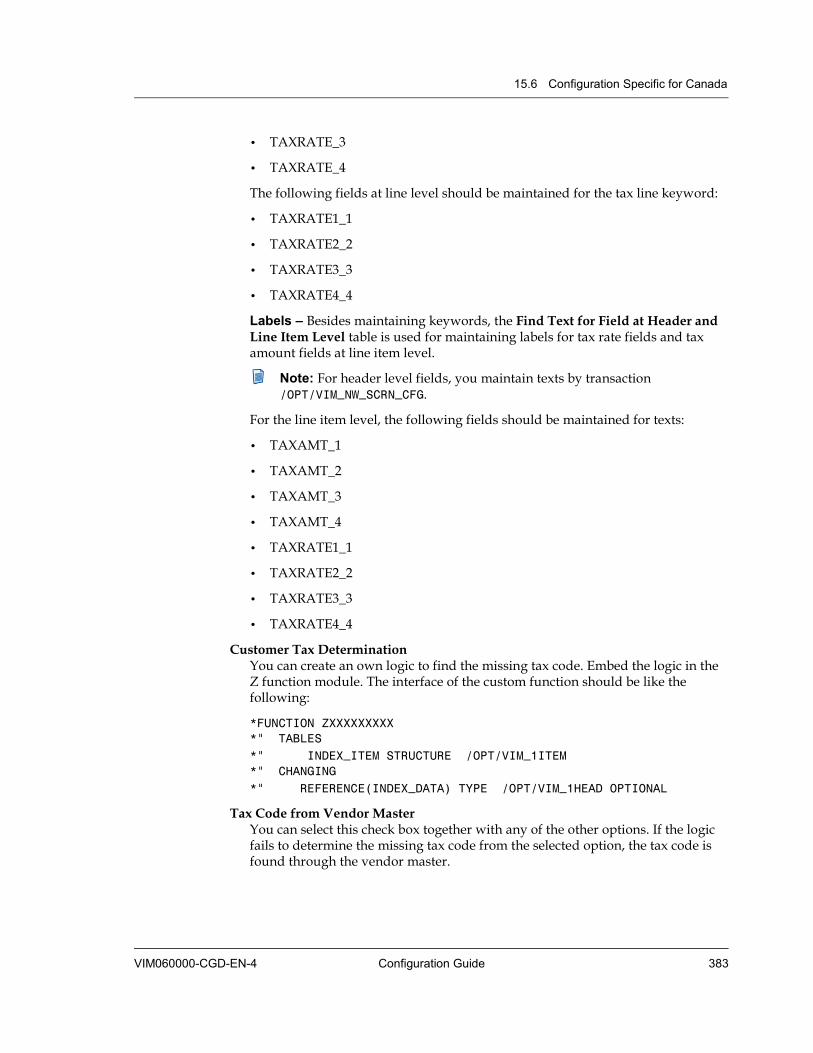
15.6 Configuration Specific for Canada
VIM060000-CGD-EN-4 Configuration Guide 383
• TAXRATE_3
• TAXRATE_4
The following fields at line level should be maintained for the tax line keyword:
• TAXRATE1_1
• TAXRATE2_2
• TAXRATE3_3
• TAXRATE4_4
Labels – Besides maintaining keywords, the Find Text for Field at Header and Line Item Level table is used for maintaining labels for tax rate fields and tax amount fields at line item level.
Note: For header level fields, you maintain texts by transaction /OPT/VIM_NW_SCRN_CFG.
For the line item level, the following fields should be maintained for texts:
• TAXAMT_1
• TAXAMT_2
• TAXAMT_3
• TAXAMT_4
• TAXRATE1_1
• TAXRATE2_2
• TAXRATE3_3
• TAXRATE4_4
Customer Tax Determination You can create an own logic to find the missing tax code. Embed the logic in the Z function module. The interface of the custom function should be like the following:
*FUNCTION ZXXXXXXXXX *" TABLES *" INDEX_ITEM STRUCTURE /OPT/VIM_1ITEM *" CHANGING *" REFERENCE(INDEX_DATA) TYPE /OPT/VIM_1HEAD OPTIONAL
Tax Code from Vendor Master You can select this check box together with any of the other options. If the logic fails to determine the missing tax code from the selected option, the tax code is found through the vendor master.

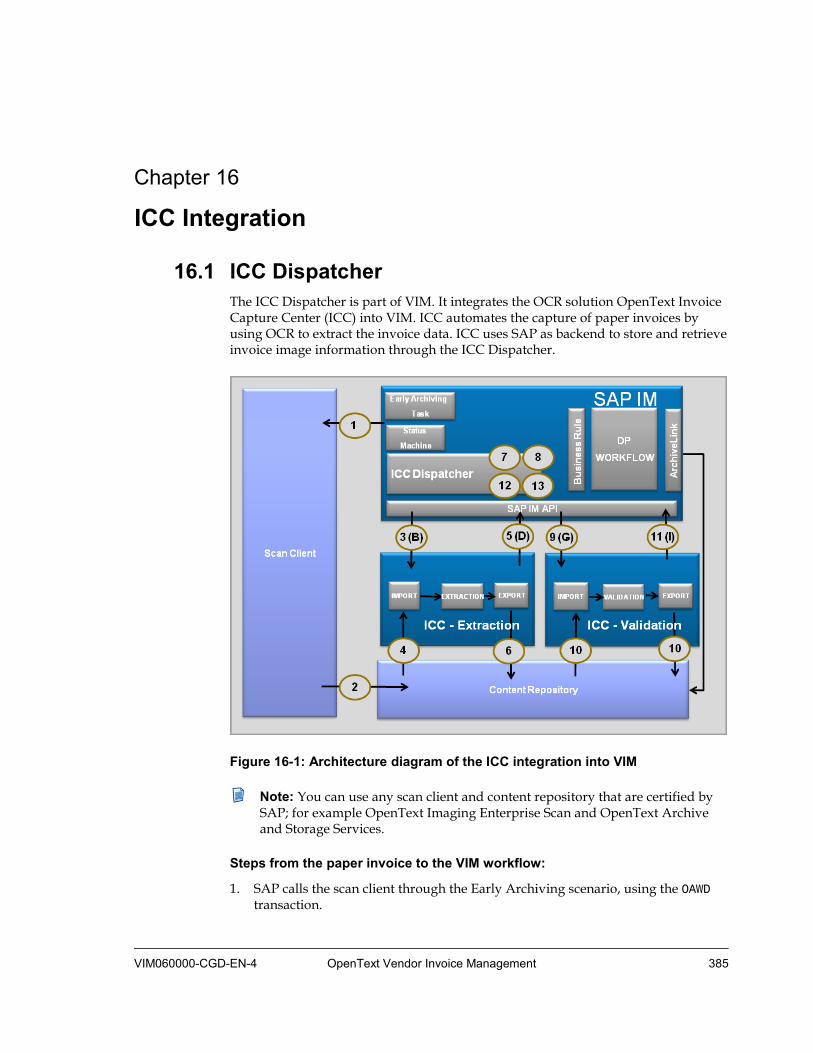
VIM060000-CGD-EN-4 OpenText Vendor Invoice Management 385
Chapter 16 ICC Integration
16.1 ICC Dispatcher The ICC Dispatcher is part of VIM. It integrates the OCR solution OpenText Invoice Capture Center (ICC) into VIM. ICC automates the capture of paper invoices by using OCR to extract the invoice data. ICC uses SAP as backend to store and retrieve invoice image information through the ICC Dispatcher.
Figure 16-1: Architecture diagram of the ICC integration into VIM
Note: You can use any scan client and content repository that are certified by SAP; for example OpenText Imaging Enterprise Scan and OpenText Archive and Storage Services.
Steps from the paper invoice to the VIM workflow:
1. SAP calls the scan client through the Early Archiving scenario, using the OAWD transaction.
Chapter 16 ICC Integration
386 OpenText Vendor Invoice Management VIM060000-CGD-EN-4
2. The scan client deposits the image of the paper invoice to the content repository.
The OAWD transaction creates a DP document in SAP using function module /OPT/VIM_IF_NEW_DOC_INSERT.
This function module inserts an entry to tables /OPT/VIM_1HEAD and /OPT/VIM_HD_DP with the new DP document number, archive date and time, document ID, archive document type, and content repository ID.
3. The ICC Extraction engine calls the API (B) via a scheduled batch job /OPT/VIM_IF_GET_NEW_DOC_LIST on ICC side and gets new documents for processing:
• Gets all the documents in Scanned status along with Secure URL for image and XML document which will be created by the ICC Extraction engine.
• Updates the DP document status to Sent to OCR.
4. The ICC Extraction engine picks the documents from step 3 and imports the corresponding images from the content repository.
5. The Export module of the ICC Extraction engine calls the API (D) /OPT/VIM_IF_OCR_DATA_UPDATE with call point EX:
• Updates the status and OCR data appropriately. This API exports the data to SAP after completion of the extraction phase. Table /OPT/VIM_1EXT_H will be updated with extracted data.
• Updates the DP Document status with Extraction Completed.
6. The ICC Extraction engine sends the detailed results XML file of the exported data to the content repository using the URL retrieved from SAP in step 3. The XML file is used by the ICC Validation engine.
Results for each data exported to SAP are stored in an XML file and archived back to the content repository.
7. A periodic job (program /OPT/VIM_STATUS_EXTR) runs on SAP side, picks up the DP items with status Sent to OCR and checks the time elapsed. If it exceeds the configured time, the status is set back to Scanned.
The maximum allowed time for extraction can be maintained in table /OPT/VIM_RETRY using the SM30 transaction. Table /OPT/VIM_RETRY contains an entry with call point EX for extraction.
8. A periodic job (program /OPT/VIM_DP_TRIGGER) runs on SAP side, picks up the DP items with status Extraction Completed. The job runs business rules to check if validation is required or not. If validation is required, the status is set to Ready for Validation. If validation is not required, the DP workflow is started.
If validation is required, the system evaluates the agents for the VALIDATOR role and updates the SAP tables.
16.2 Early Archiving
VIM060000-CGD-EN-4 Configuration Guide 387
9. The ICC Validation engine calls the API (G) /OPT/VIM_IF _GET_VAL_DOC_LIST and gets a list of documents for validation:
• Gets all the documents in status Ready for Validation.
• For each DP document, it gets the secure URL for image and XML documents which will be used by the ICC Validation Client.
• The function module SCMS_DOC_URL_READ will return the URL by taking Archiving ID and Archiving Doc ID as input.
10. The ICC Validation engine picks documents (both image and XML) from the content repository for each validation document, using the URL retrieved from SAP at step 9.
After validation, the ICC Validation engine sends the results XML file (including changes done during validation) back to the content repository using the same URL.
11. The ICC Validation engine calls the API (I) /OPT/VIM_IF_OCR_DATA_UPDATE with call point VA:
• Updates the status and OCR data appropriately. This API exports the data to SAP after completion of the validation phase. Table /OPT/VIM_1EXT_H is updated with validation data.
• Updates the DP Document status with Validation Completed.
12. A periodic job (program /OPT/VIM_STATUS_VALD) runs on SAP side, picks up DP items with status Sent for validation, and after elapsed time sets the status to Ready for Validation.
The maximum allowed time for Validation can be maintained in table /OPT/VIM_RETRY using the SM30 transaction. Table /OPT/VIM_RETRY contains an entry with call point VA for validation.
13. A periodic job (program /OPT/VIM_DP_TRIGGER) runs on SAP side, picks up DP items with status Validation Completed, and starts the DP workflow.
16.2 Early Archiving Incoming paper invoices are scanned and archived, using the Early Archiving scenario. As a prerequisite, you need to perform the following actions:
• “Creating a Content Repository ID” on page 388
• “Maintaining Parameters for the Content Repository” on page 389
• “Creating the Presetting Folder for VIM” on page 390
• “Creating an Archive Document Type for XML Documents (Optional, Deprecated)” on page 393
• “Linking Archive Document Type and Business Object” on page 398
• “Creating an ICC Archive Document Type” on page 399
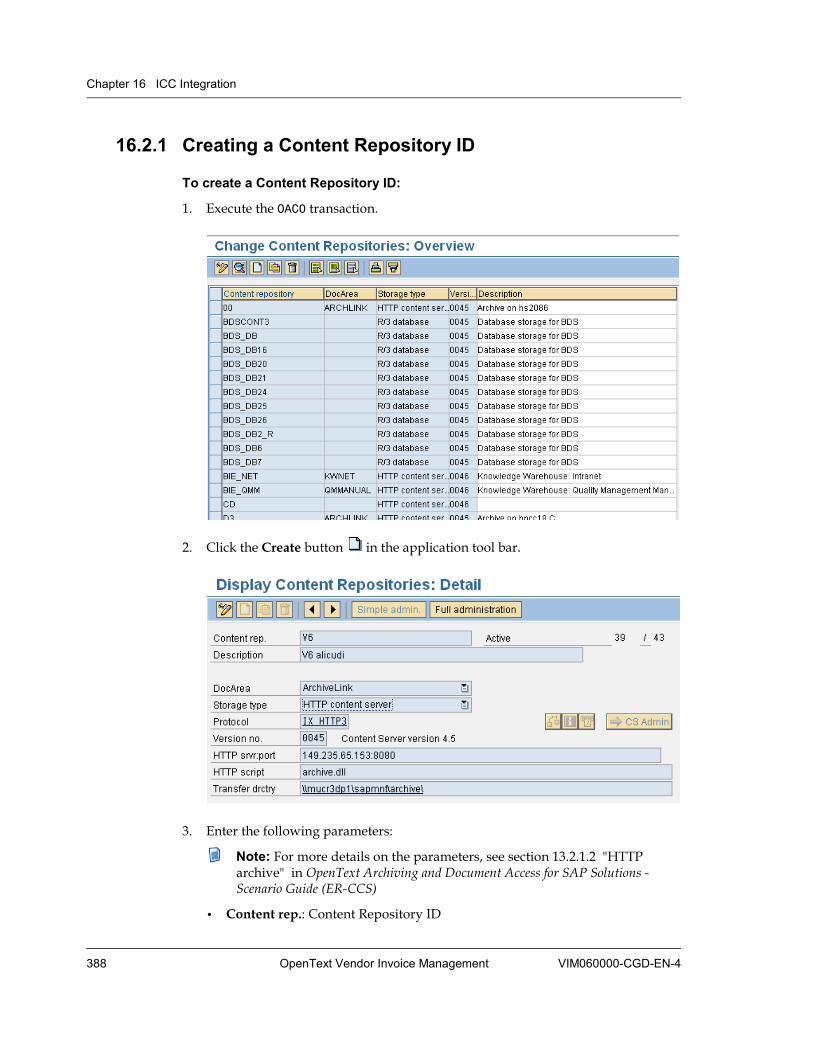
Chapter 16 ICC Integration
388 OpenText Vendor Invoice Management VIM060000-CGD-EN-4
16.2.1 Creating a Content Repository ID
To create a Content Repository ID:
1. Execute the OAC0 transaction.
2. Click the Create button in the application tool bar.
3. Enter the following parameters:
Note: For more details on the parameters, see section 13.2.1.2 "HTTP archive" in OpenText Archiving and Document Access for SAP Solutions - Scenario Guide (ER-CCS)
• Content rep.: Content Repository ID

16.2 Early Archiving
VIM060000-CGD-EN-4 Configuration Guide 389
• Description
• DocArea (Document Area)
• Storage type
• Protocol: This setting defines the file source for archiving and image displaying media.
• Version no.
• HTTP srvr:port (HTTP server and port)
• HTTP script
• Transfer drctry (Transfer directory)
4. Click to save your settings.
16.2.2 Maintaining Parameters for the Content Repository This configuration step is optional. It is only needed if the Component ID in the Content Repository ID has a value different from the default value data. Check with the Archive Administrator which Component ID is used. If it is data, you can skip this section. If it differs, check if it can be changed to data. If that is not possible, perform the following configuration.
To maintain parameters for the Content Repository:
1. Execute the /n/OPT/IT_ARC_SET transaction.
Alternatively, execute the /N/OPT/SPRO transaction and follow the menu path LiveLink VIM - Configuration > Document Processing > ICC Configuration > Maintain Parameters for Archive Doctype (OCR).
2. In the Table to maintain the Archive Settings, click New Entries in the application tool bar.
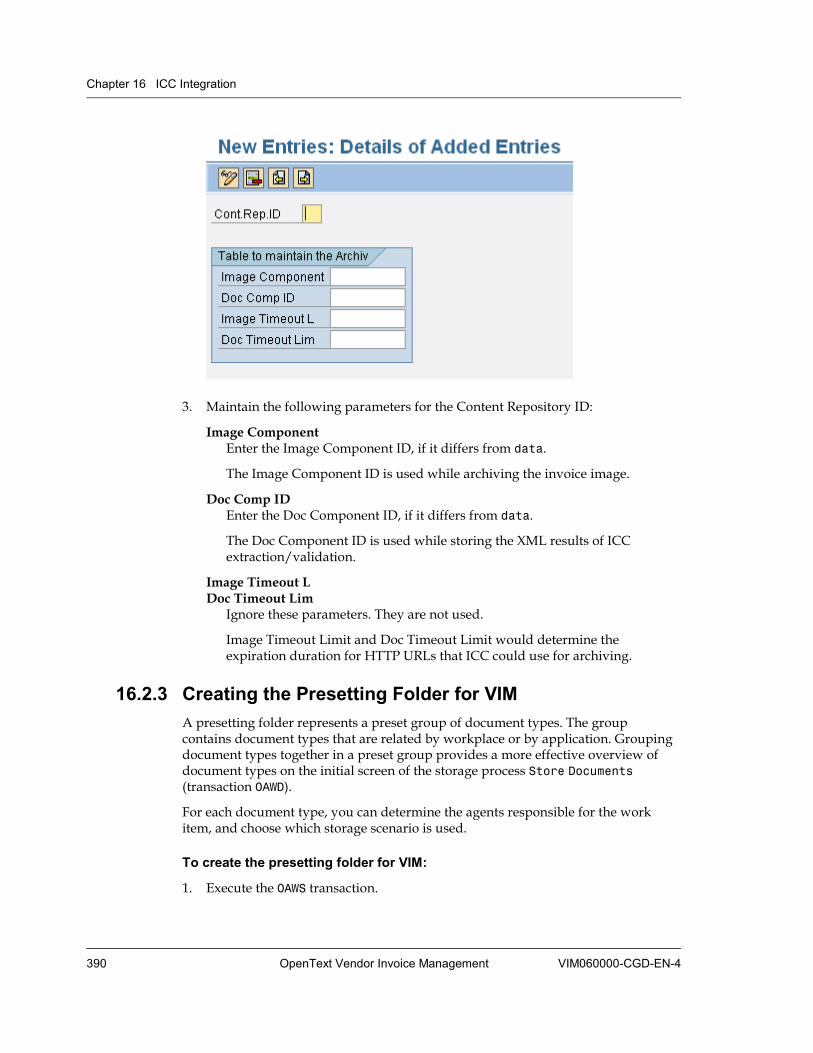
Chapter 16 ICC Integration
390 OpenText Vendor Invoice Management VIM060000-CGD-EN-4
3. Maintain the following parameters for the Content Repository ID:
Image Component Enter the Image Component ID, if it differs from data.
The Image Component ID is used while archiving the invoice image.
Doc Comp ID Enter the Doc Component ID, if it differs from data.
The Doc Component ID is used while storing the XML results of ICC extraction/validation.
Image Timeout L Doc Timeout Lim
Ignore these parameters. They are not used.
Image Timeout Limit and Doc Timeout Limit would determine the expiration duration for HTTP URLs that ICC could use for archiving.
16.2.3 Creating the Presetting Folder for VIM A presetting folder represents a preset group of document types. The group contains document types that are related by workplace or by application. Grouping document types together in a preset group provides a more effective overview of document types on the initial screen of the storage process Store Documents (transaction OAWD).
For each document type, you can determine the agents responsible for the work item, and choose which storage scenario is used.
To create the presetting folder for VIM:
1. Execute the OAWS transaction.

16.2 Early Archiving
VIM060000-CGD-EN-4 Configuration Guide 391
2. In the Default setting: Overview screen, click New Entries in the application tool bar.
3. Create the new presetting folder, using the following parameters:
Pr Enter the presetting folder name, for example Z001.
Long text Enter a description of the new folder.
4. Click to save the new presetting folder.
To add a document type to the presetting folder:
Note: If you store the Archive Document Type in the presetting folder during its creation (see “Creating an ICC Archive Document Type” on page 399), you do not have to perform this action. Nevertheless, if you need to reassign any Archive Document Type to another folder or you need to assign Archive Document Types to the presetting folder, you can perform this action.
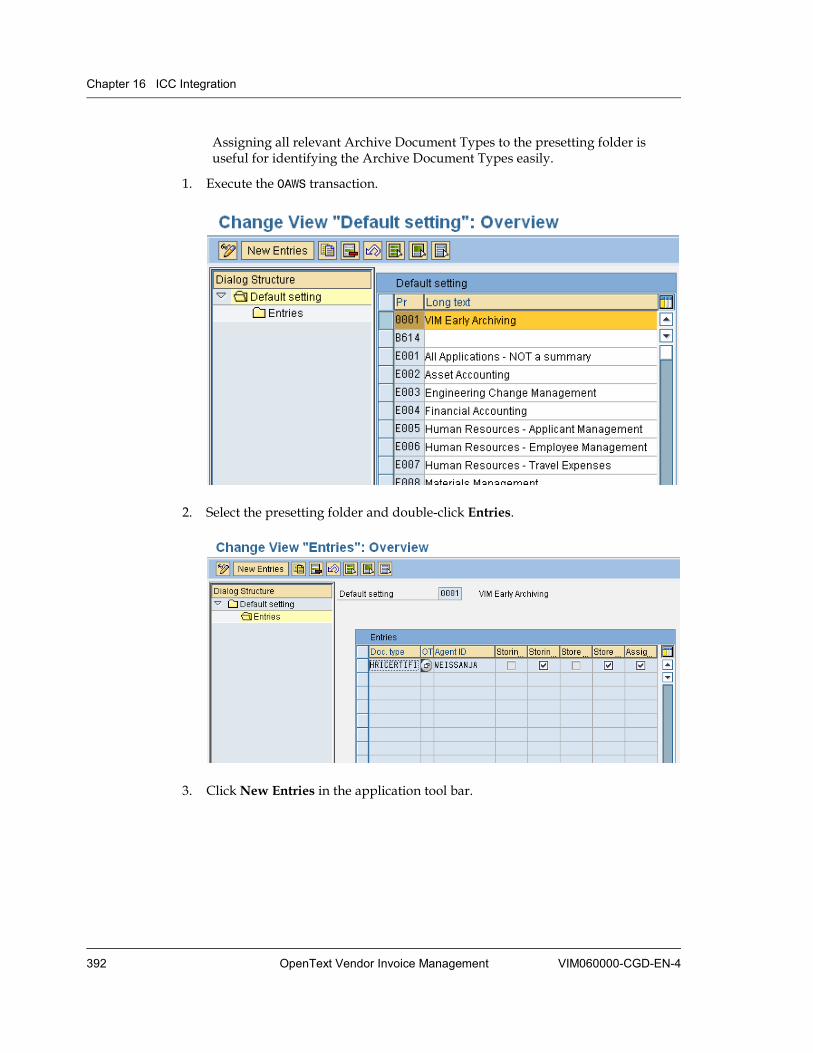
Chapter 16 ICC Integration
392 OpenText Vendor Invoice Management VIM060000-CGD-EN-4
Assigning all relevant Archive Document Types to the presetting folder is useful for identifying the Archive Document Types easily.
1. Execute the OAWS transaction.
2. Select the presetting folder and double-click Entries.
3. Click New Entries in the application tool bar.
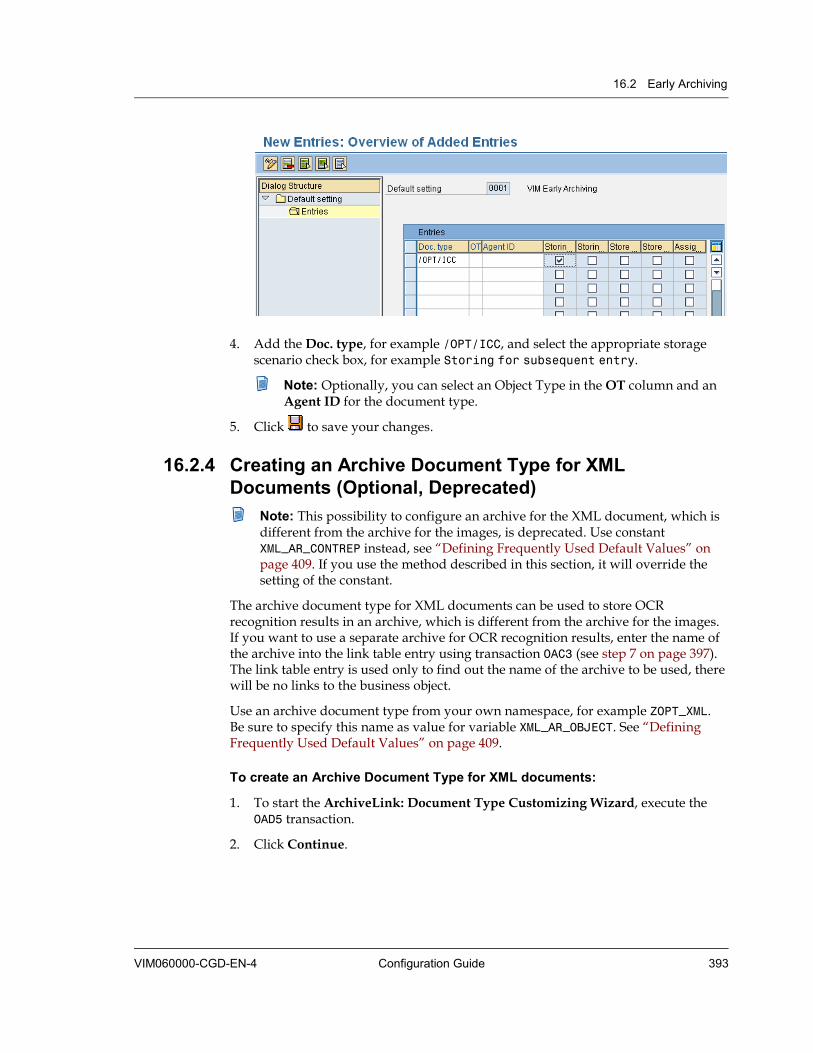
16.2 Early Archiving
VIM060000-CGD-EN-4 Configuration Guide 393
4. Add the Doc. type, for example /OPT/ICC, and select the appropriate storage scenario check box, for example Storing for subsequent entry.
Note: Optionally, you can select an Object Type in the OT column and an Agent ID for the document type.
5. Click to save your changes.
16.2.4 Creating an Archive Document Type for XML Documents (Optional, Deprecated)
Note: This possibility to configure an archive for the XML document, which is different from the archive for the images, is deprecated. Use constant XML_AR_CONTREP instead, see “Defining Frequently Used Default Values” on page 409. If you use the method described in this section, it will override the setting of the constant.
The archive document type for XML documents can be used to store OCR recognition results in an archive, which is different from the archive for the images. If you want to use a separate archive for OCR recognition results, enter the name of the archive into the link table entry using transaction OAC3 (see step 7 on page 397). The link table entry is used only to find out the name of the archive to be used, there will be no links to the business object.
Use an archive document type from your own namespace, for example ZOPT_XML.Be sure to specify this name as value for variable XML_AR_OBJECT. See “Defining Frequently Used Default Values” on page 409.
To create an Archive Document Type for XML documents:
1. To start the ArchiveLink: Document Type Customizing Wizard, execute the OAD5 transaction.
2. Click Continue.
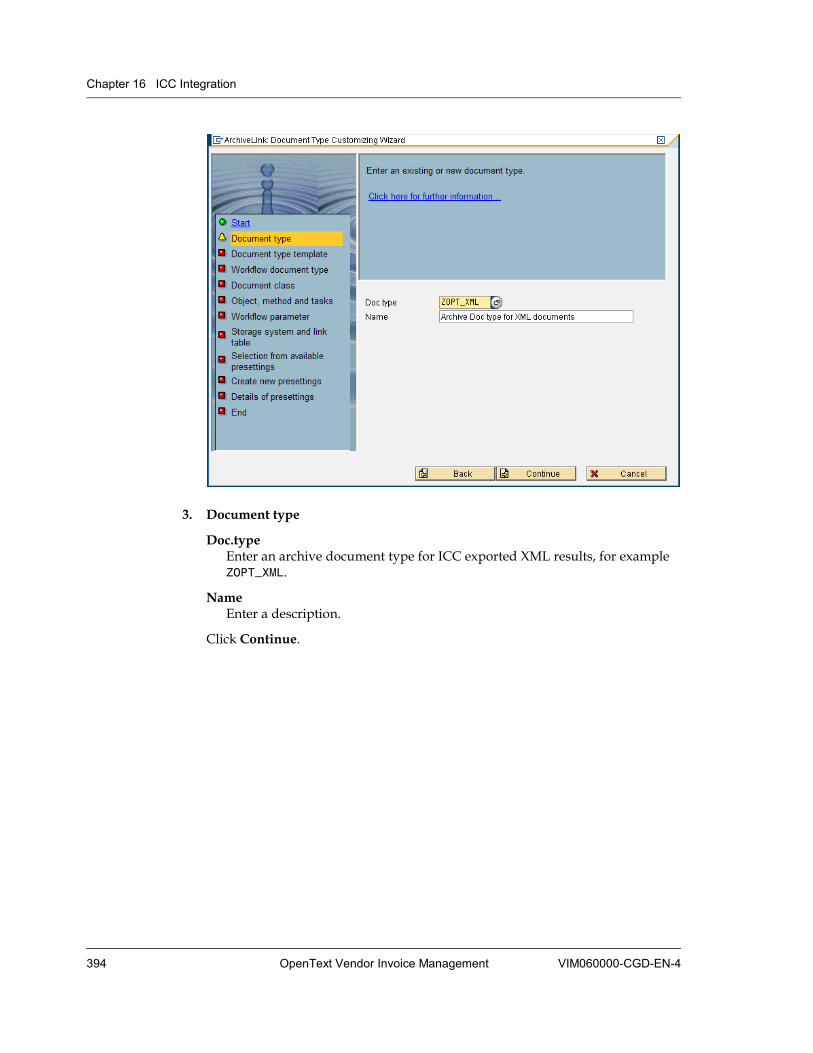
Chapter 16 ICC Integration
394 OpenText Vendor Invoice Management VIM060000-CGD-EN-4
3. Document type
Doc.type Enter an archive document type for ICC exported XML results, for example ZOPT_XML.
Name Enter a description.
Click Continue.
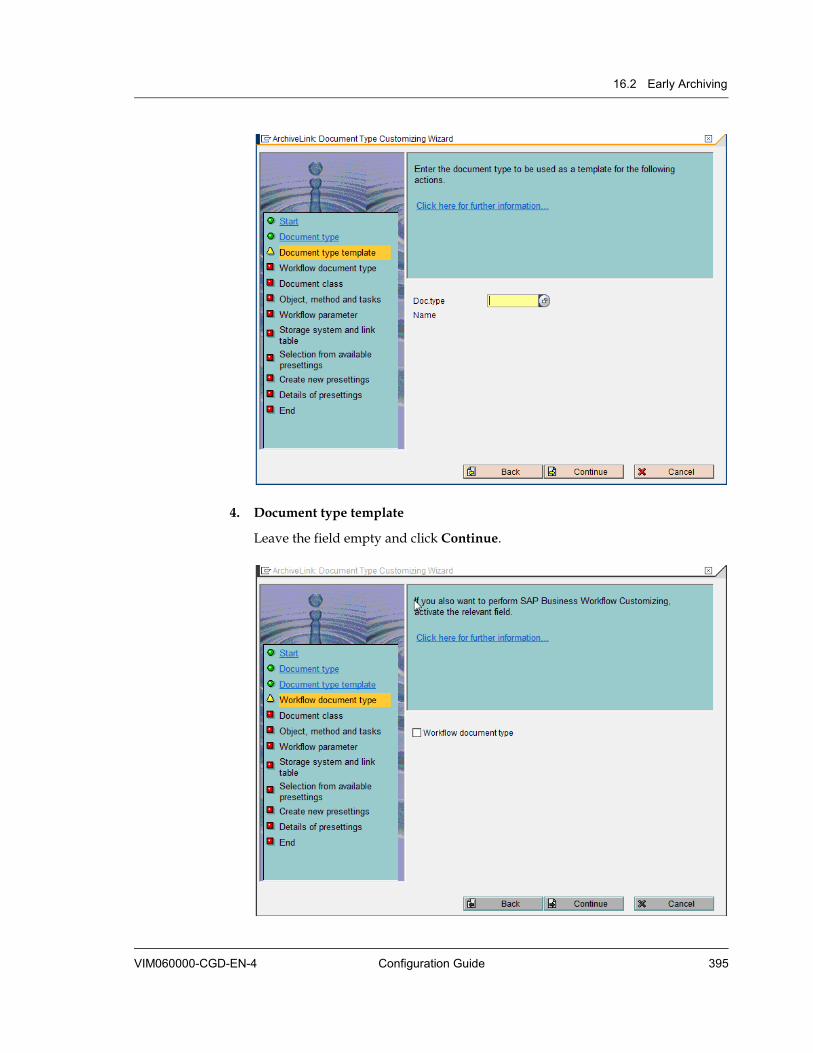
16.2 Early Archiving
VIM060000-CGD-EN-4 Configuration Guide 395
4. Document type template
Leave the field empty and click Continue.
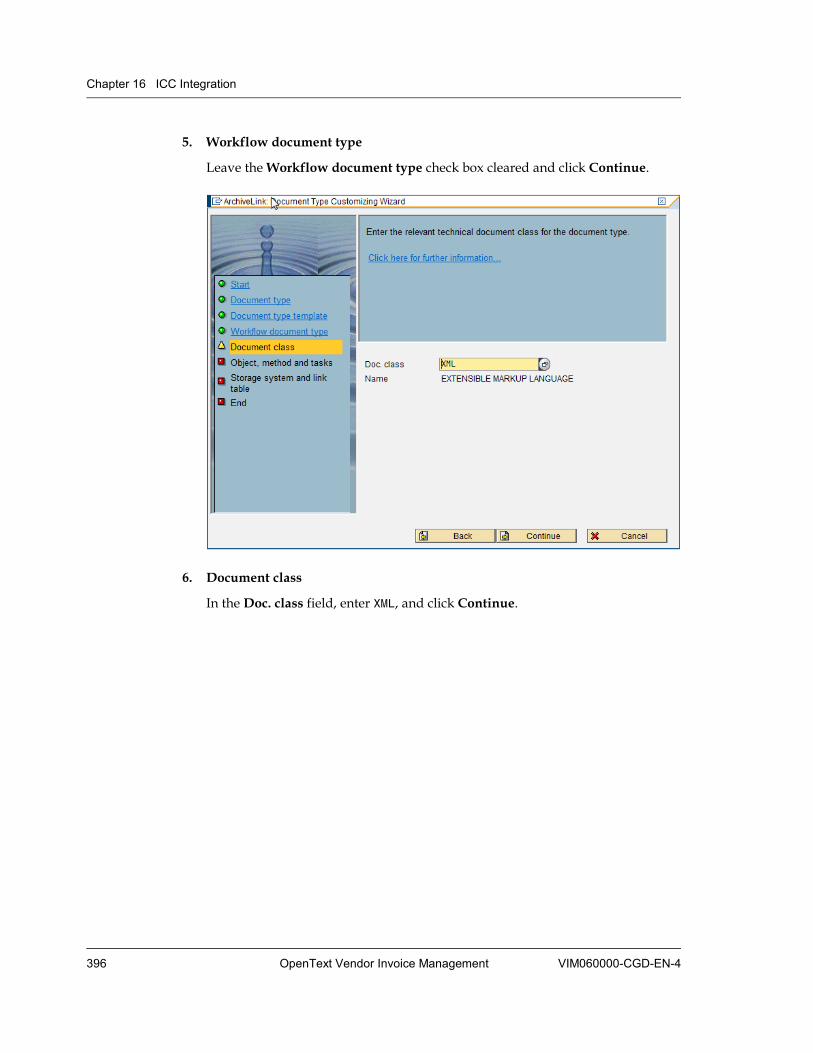
Chapter 16 ICC Integration
396 OpenText Vendor Invoice Management VIM060000-CGD-EN-4
5. Workflow document type
Leave the Workflow document type check box cleared and click Continue.
6. Document class
In the Doc. class field, enter XML, and click Continue.
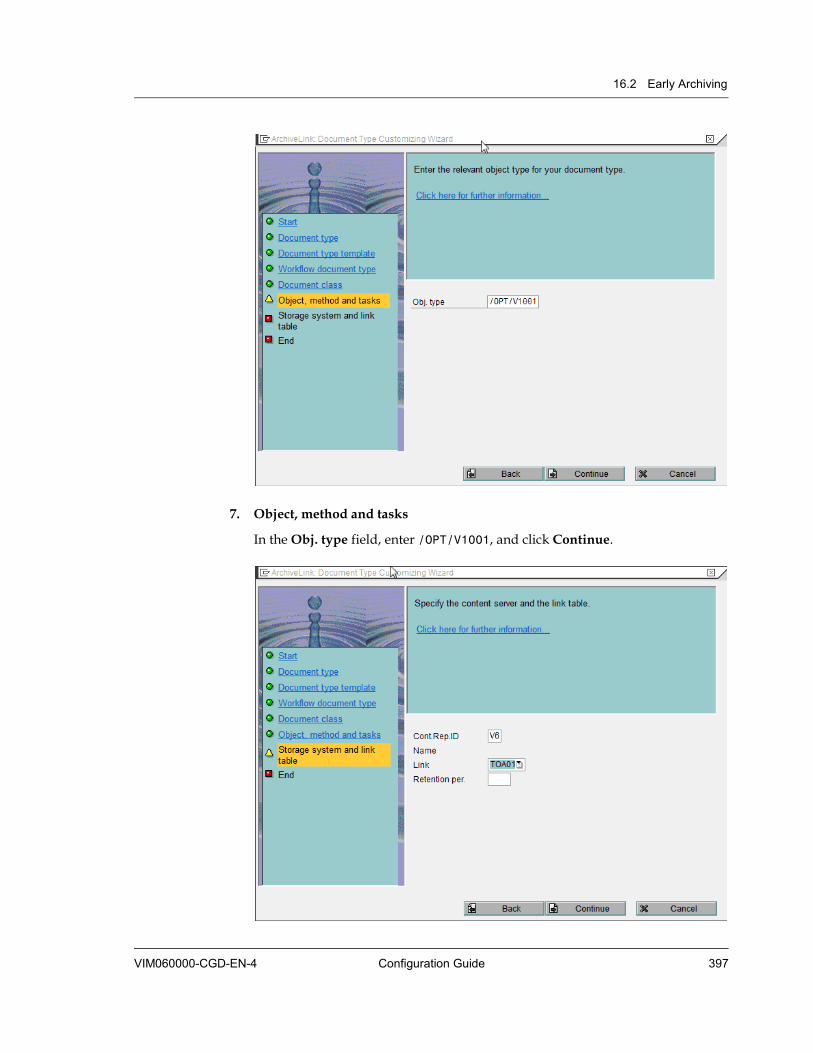
16.2 Early Archiving
VIM060000-CGD-EN-4 Configuration Guide 397
7. Object, method and tasks
In the Obj. type field, enter /OPT/V1001, and click Continue.
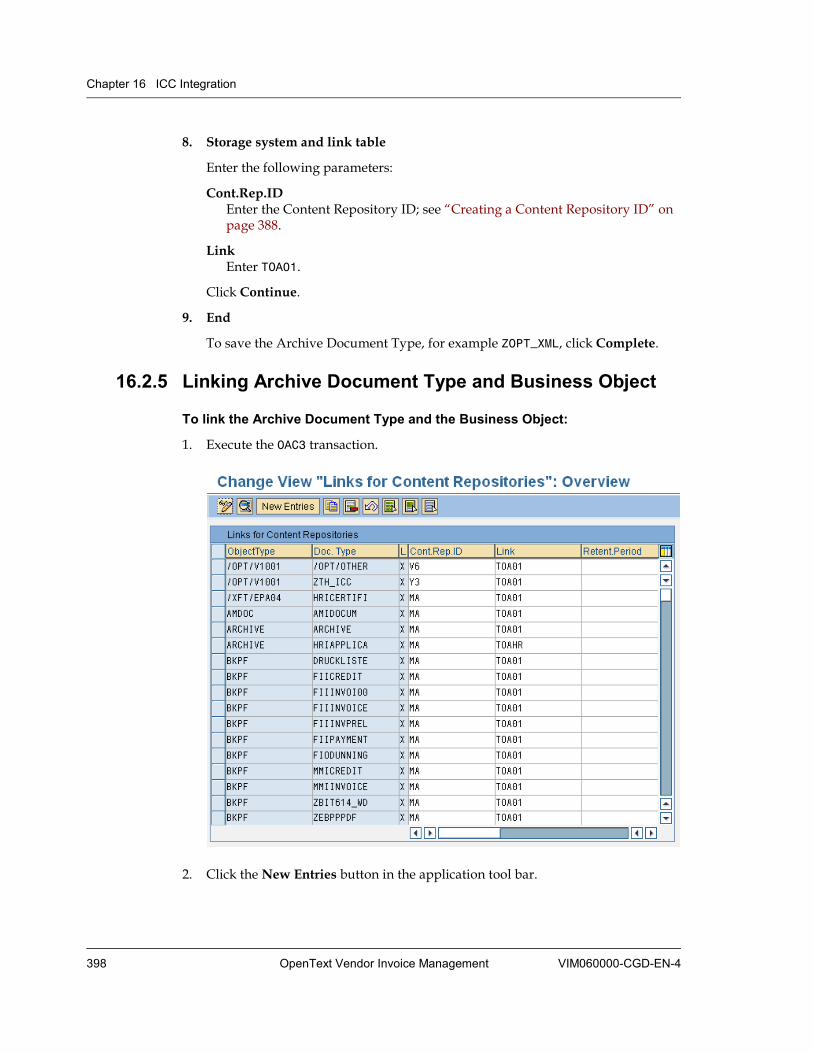
Chapter 16 ICC Integration
398 OpenText Vendor Invoice Management VIM060000-CGD-EN-4
8. Storage system and link table
Enter the following parameters:
Cont.Rep.ID Enter the Content Repository ID; see “Creating a Content Repository ID” on page 388.
Link Enter TOA01.
Click Continue.
9. End
To save the Archive Document Type, for example ZOPT_XML, click Complete.
16.2.5 Linking Archive Document Type and Business Object
To link the Archive Document Type and the Business Object:
1. Execute the OAC3 transaction.
2. Click the New Entries button in the application tool bar.
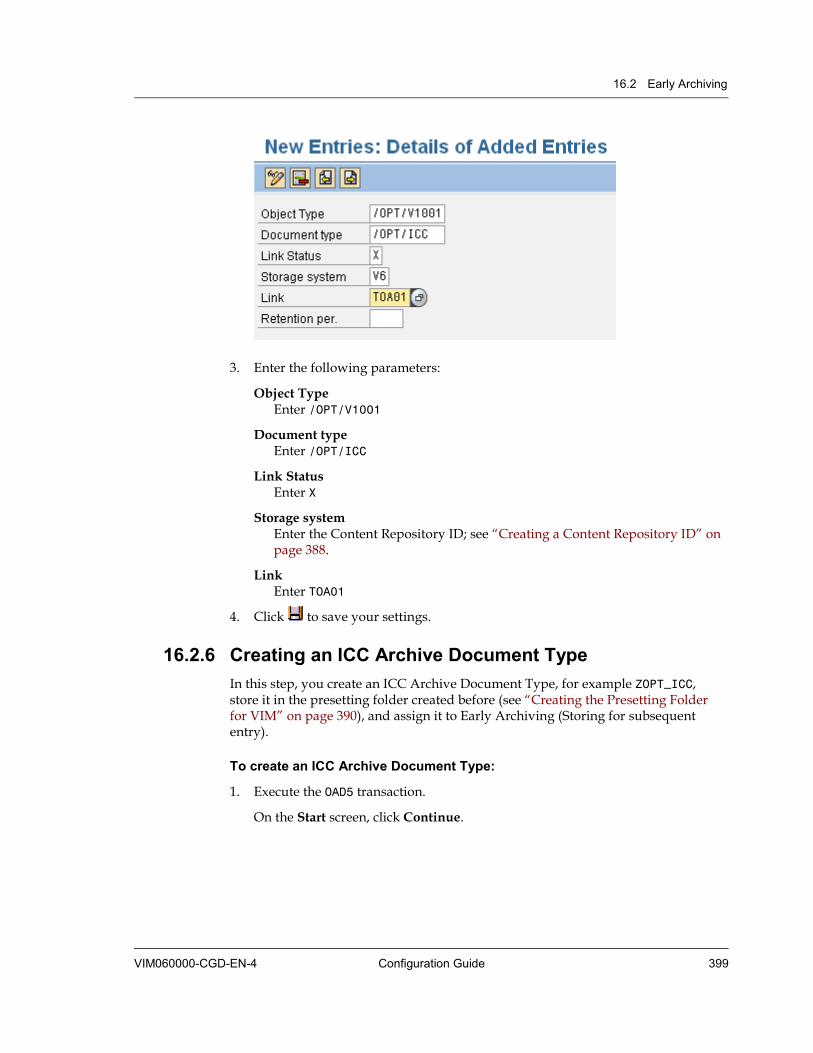
16.2 Early Archiving
VIM060000-CGD-EN-4 Configuration Guide 399
3. Enter the following parameters:
Object Type Enter /OPT/V1001
Document type Enter /OPT/ICC
Link Status Enter X
Storage system Enter the Content Repository ID; see “Creating a Content Repository ID” on page 388.
Link Enter TOA01
4. Click to save your settings.
16.2.6 Creating an ICC Archive Document Type In this step, you create an ICC Archive Document Type, for example ZOPT_ICC,store it in the presetting folder created before (see “Creating the Presetting Folder for VIM” on page 390), and assign it to Early Archiving (Storing for subsequent entry).
To create an ICC Archive Document Type:
1. Execute the OAD5 transaction.
On the Start screen, click Continue.
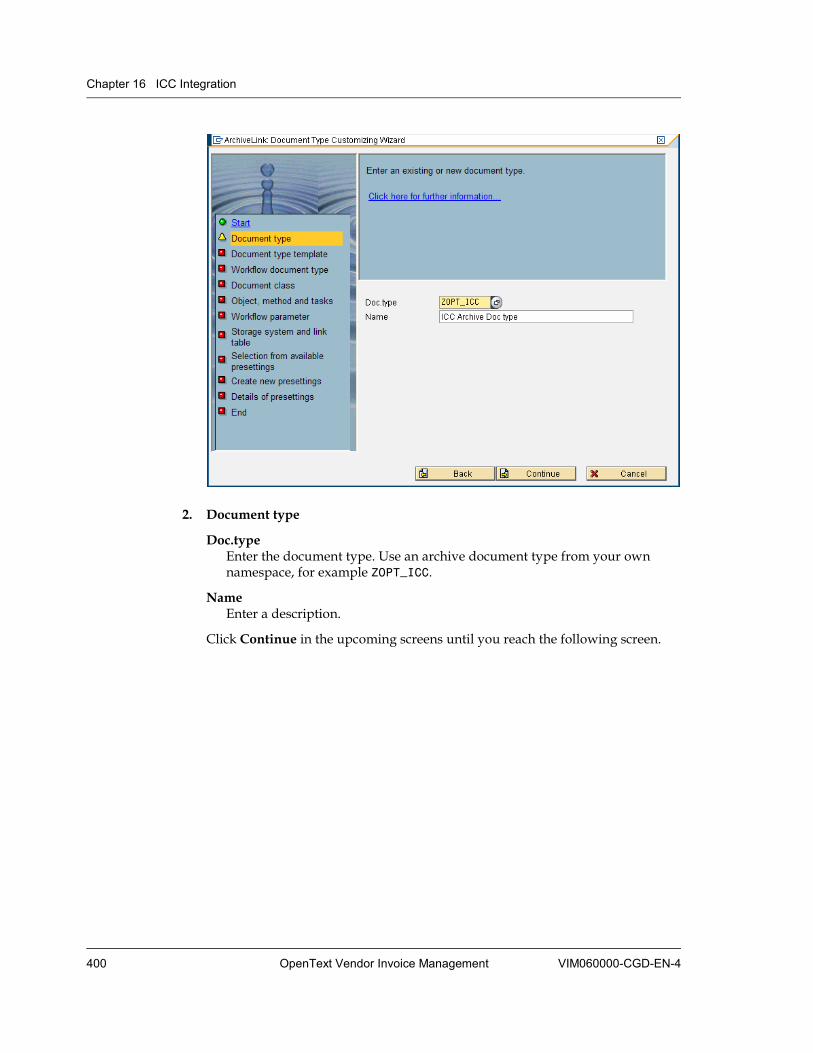
Chapter 16 ICC Integration
400 OpenText Vendor Invoice Management VIM060000-CGD-EN-4
2. Document type
Doc.type Enter the document type. Use an archive document type from your own namespace, for example ZOPT_ICC.
Name Enter a description.
Click Continue in the upcoming screens until you reach the following screen.

16.2 Early Archiving
VIM060000-CGD-EN-4 Configuration Guide 401
3. Workflow document type
Select the Workflow document type check box and click Continue.
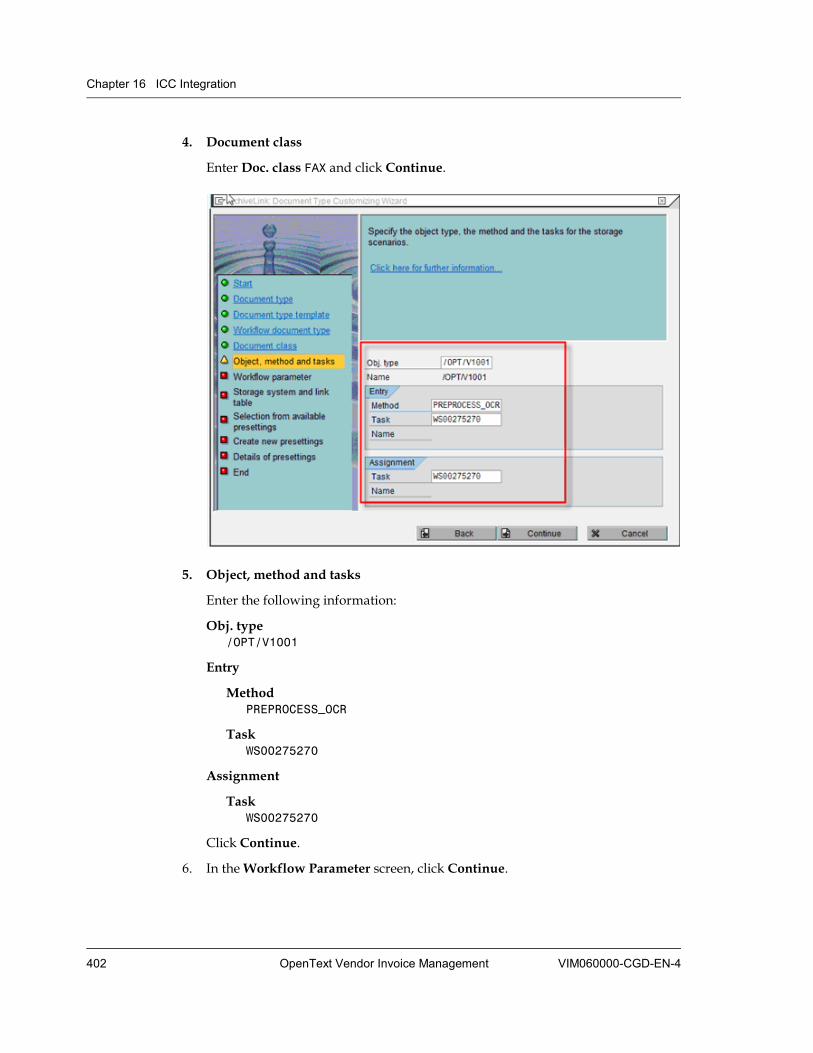
Chapter 16 ICC Integration
402 OpenText Vendor Invoice Management VIM060000-CGD-EN-4
4. Document class
Enter Doc. class FAX and click Continue.
5. Object, method and tasks
Enter the following information:
Obj. type /OPT/V1001
Entry
Method PREPROCESS_OCR
Task WS00275270
Assignment
Task WS00275270
Click Continue.
6. In the Workflow Parameter screen, click Continue.
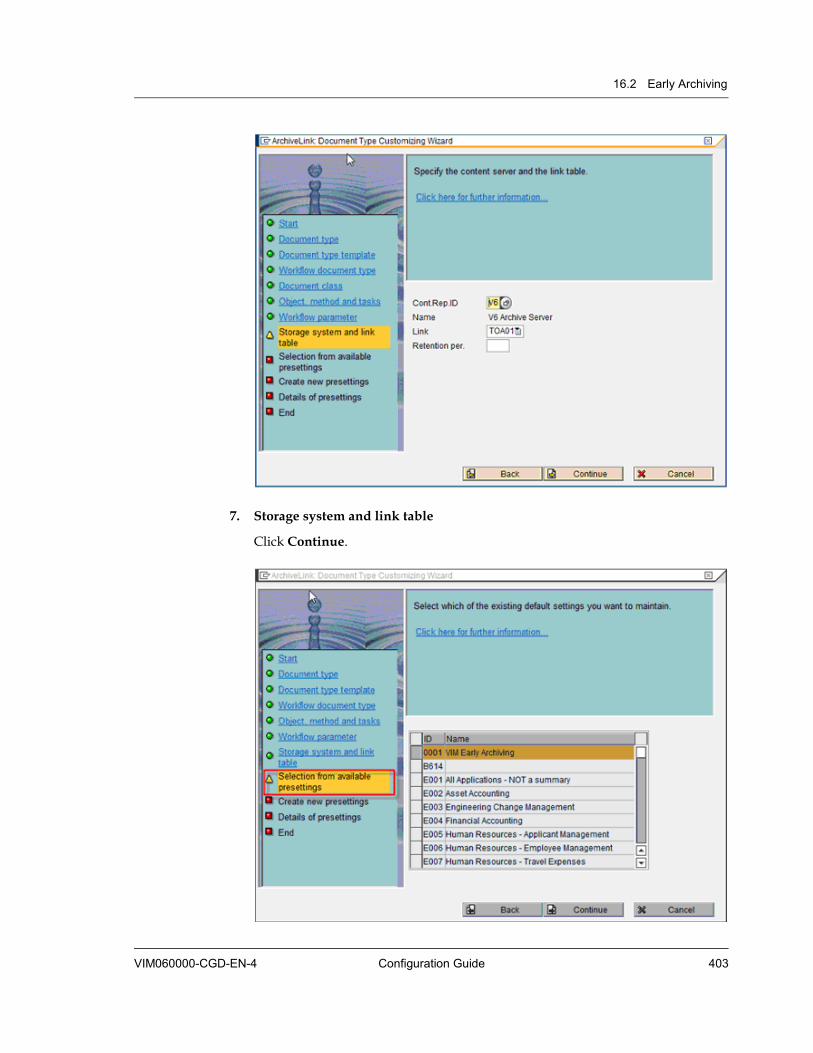
16.2 Early Archiving
VIM060000-CGD-EN-4 Configuration Guide 403
7. Storage system and link table
Click Continue.

Chapter 16 ICC Integration
404 OpenText Vendor Invoice Management VIM060000-CGD-EN-4
8. Selection from available presettings
Select the ID 0001 and click Continue.
9. In the Create new presettings screen, click Continue.
10. Details of presettings
Select the Storing for subsequent entry check box and click Continue.
11. End
To save the Archive Document Type ZOPT_ICC, click Complete and confirm the changes.
16.3 Maximum Allowed Time for Extraction and Validation The ICC Dispatcher changes the DP document status back to Scanned or Ready for Validation if a particular DP document is in Extraction or Validation longer than the allowed time.
You can maintain the maximum allowed time limits for Extraction and Validation, using table /OPT/VIM_RETRY.
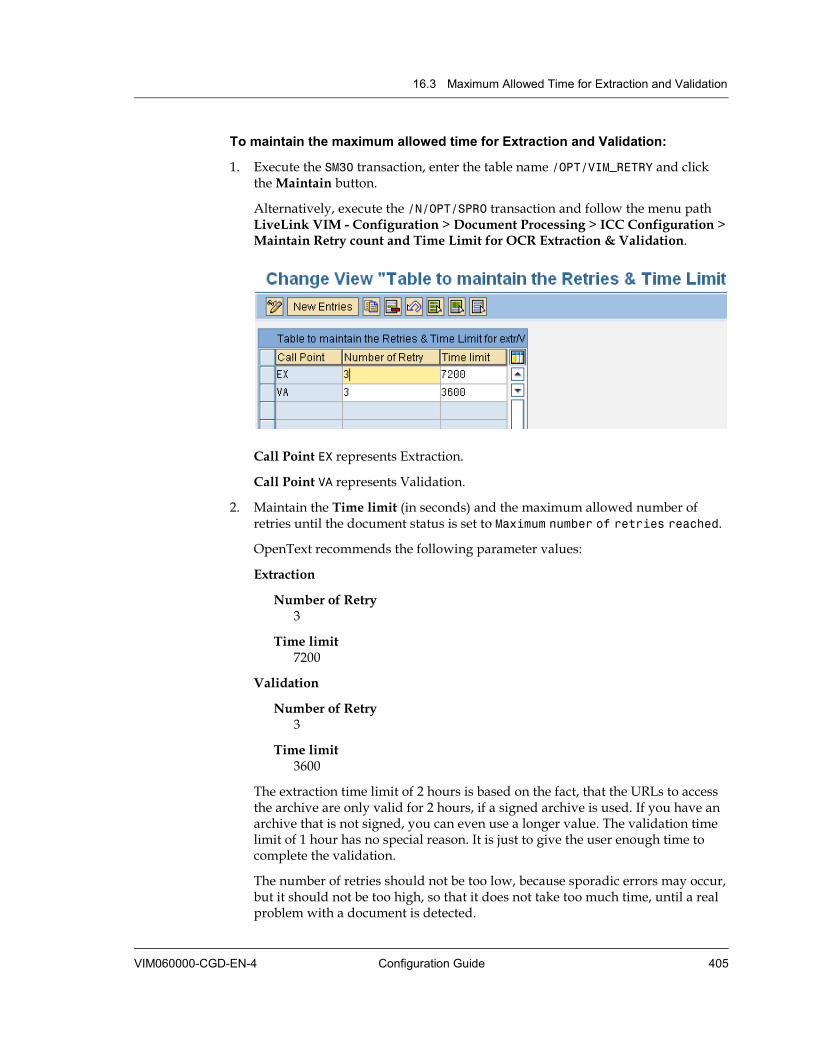
16.3 Maximum Allowed Time for Extraction and Validation
VIM060000-CGD-EN-4 Configuration Guide 405
To maintain the maximum allowed time for Extraction and Validation:
1. Execute the SM30 transaction, enter the table name /OPT/VIM_RETRY and click the Maintain button.
Alternatively, execute the /N/OPT/SPRO transaction and follow the menu path LiveLink VIM - Configuration > Document Processing > ICC Configuration > Maintain Retry count and Time Limit for OCR Extraction & Validation.
Call Point EX represents Extraction.
Call Point VA represents Validation.
2. Maintain the Time limit (in seconds) and the maximum allowed number of retries until the document status is set to Maximum number of retries reached.
OpenText recommends the following parameter values:
Extraction
Number of Retry 3
Time limit 7200
Validation
Number of Retry 3
Time limit 3600
The extraction time limit of 2 hours is based on the fact, that the URLs to access the archive are only valid for 2 hours, if a signed archive is used. If you have an archive that is not signed, you can even use a longer value. The validation time limit of 1 hour has no special reason. It is just to give the user enough time to complete the validation.
The number of retries should not be too low, because sporadic errors may occur, but it should not be too high, so that it does not take too much time, until a real problem with a document is detected.

Chapter 16 ICC Integration
406 OpenText Vendor Invoice Management VIM060000-CGD-EN-4
Note: If the retry limit is reached, and you want to reset the document to be processed again, you must reset the retry counters manually.
3. Click to save your settings.
16.4 Validation Framework The Validation framework determines whether a DP document (created by ICC) needs validation or not and also assigns the validation agents to validate the DP document.
You must perform the following actions:
• “Creating and Linking the Validation Determination ID” on page 406
• “Defining Frequently Used Default Values” on page 409
• “Maintaining Channel IDs” on page 410
• “Validating DP Documents with Mapping Error” on page 411
• “Assigning Validation Agents” on page 413
• “Maintaining the Default Workflow Template” on page 414
• “Maintaining the Preprocess Exit” on page 415
16.4.1 Creating and Linking the Validation Determination ID To determine whether a DP document needs validation or not, you need to create a Validation Determination ID and link it to the Archive Document Type.
To create a Validation Determination ID:
1. Execute the /n/OPT/VIM_ICC_VAL transaction.
Alternatively, execute the /N/OPT/SPRO transaction and follow the menu path LiveLink VIM - Configuration > Document Processing > ICC Configuration > Validation Determination Procedure (OCR) > Set Up Validation Determination Condition.
2. To add a Validation Determination ID, click New Entries.
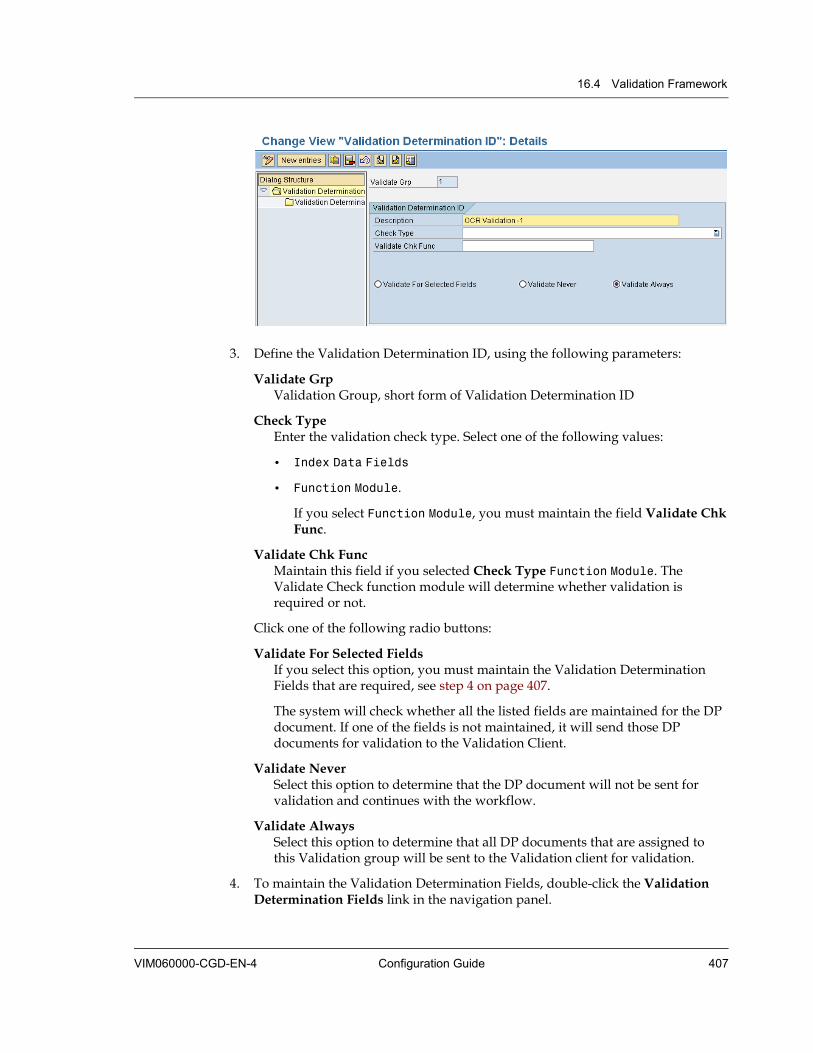
16.4 Validation Framework
VIM060000-CGD-EN-4 Configuration Guide 407
3. Define the Validation Determination ID, using the following parameters:
Validate Grp Validation Group, short form of Validation Determination ID
Check Type Enter the validation check type. Select one of the following values:
• Index Data Fields
• Function Module.
If you select Function Module, you must maintain the field Validate Chk Func.
Validate Chk Func Maintain this field if you selected Check Type Function Module. The Validate Check function module will determine whether validation is required or not.
Click one of the following radio buttons:
Validate For Selected Fields If you select this option, you must maintain the Validation Determination Fields that are required, see step 4 on page 407.
The system will check whether all the listed fields are maintained for the DP document. If one of the fields is not maintained, it will send those DP documents for validation to the Validation Client.
Validate Never Select this option to determine that the DP document will not be sent for validation and continues with the workflow.
Validate Always Select this option to determine that all DP documents that are assigned to this Validation group will be sent to the Validation client for validation.
4. To maintain the Validation Determination Fields, double-click the Validation Determination Fields link in the navigation panel.
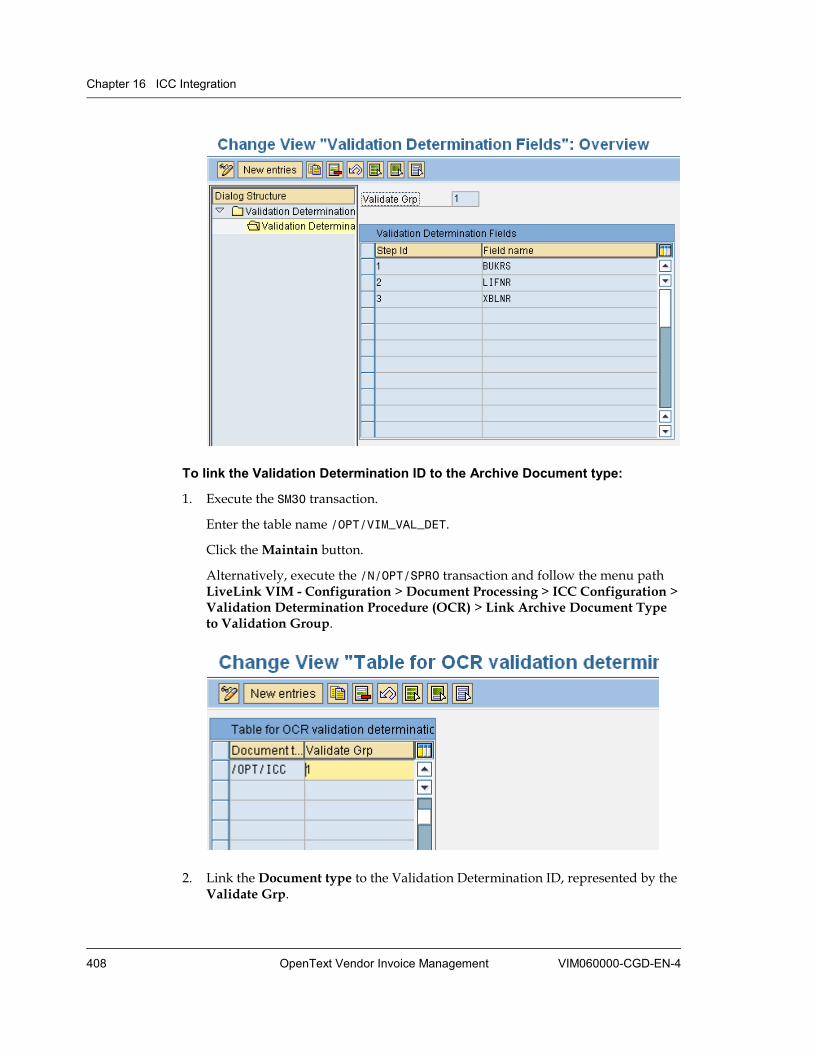
Chapter 16 ICC Integration
408 OpenText Vendor Invoice Management VIM060000-CGD-EN-4
To link the Validation Determination ID to the Archive Document type:
1. Execute the SM30 transaction.
Enter the table name /OPT/VIM_VAL_DET.
Click the Maintain button.
Alternatively, execute the /N/OPT/SPRO transaction and follow the menu path LiveLink VIM - Configuration > Document Processing > ICC Configuration > Validation Determination Procedure (OCR) > Link Archive Document Type to Validation Group.
2. Link the Document type to the Validation Determination ID, represented by the Validate Grp.

16.4 Validation Framework
VIM060000-CGD-EN-4 Configuration Guide 409
3. Click to save your settings.
16.4.2 Defining Frequently Used Default Values VIM Customizing IMG provides an option to define default values that are used frequently in ICC integration. For example, DP_DOC_TYPE determines the default DP document type value.
To define default values:
1. Execute the /N/OPT/SPRO transaction and follow the menu path LiveLink VIM - Configuration > Document Processing > ICC Configuration > Advanced Configuration.
Product Code 005 determines Document Processing.
Value is the default value or expected value in process.
2. Define the default values, according to the following table:
Constant Meaning
DP_DOC_TYPE Default DP document type
DP_EX_VA_CANCEL OCR Extraction/Validation is Cancel
DP_EX_VA_ERROR OCR Extraction/Validation is Error
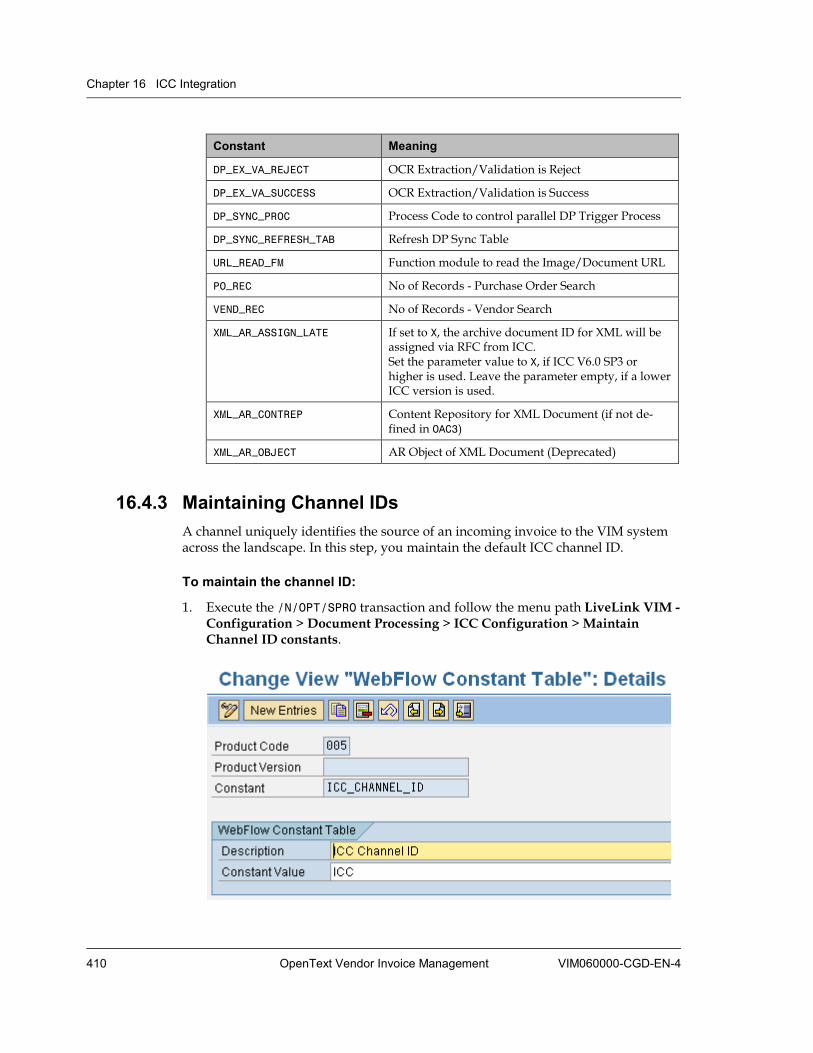
Chapter 16 ICC Integration
410 OpenText Vendor Invoice Management VIM060000-CGD-EN-4
Constant Meaning
DP_EX_VA_REJECT OCR Extraction/Validation is Reject
DP_EX_VA_SUCCESS OCR Extraction/Validation is Success
DP_SYNC_PROC Process Code to control parallel DP Trigger Process
DP_SYNC_REFRESH_TAB Refresh DP Sync Table
URL_READ_FM Function module to read the Image/Document URL
PO_REC No of Records - Purchase Order Search
VEND_REC No of Records - Vendor Search
XML_AR_ASSIGN_LATE If set to X, the archive document ID for XML will be assigned via RFC from ICC. Set the parameter value to X, if ICC V6.0 SP3 or higher is used. Leave the parameter empty, if a lower ICC version is used.
XML_AR_CONTREP Content Repository for XML Document (if not de-fined in OAC3)
XML_AR_OBJECT AR Object of XML Document (Deprecated)
16.4.3 Maintaining Channel IDs A channel uniquely identifies the source of an incoming invoice to the VIM system across the landscape. In this step, you maintain the default ICC channel ID.
To maintain the channel ID:
1. Execute the /N/OPT/SPRO transaction and follow the menu path LiveLink VIM - Configuration > Document Processing > ICC Configuration > Maintain Channel ID constants.
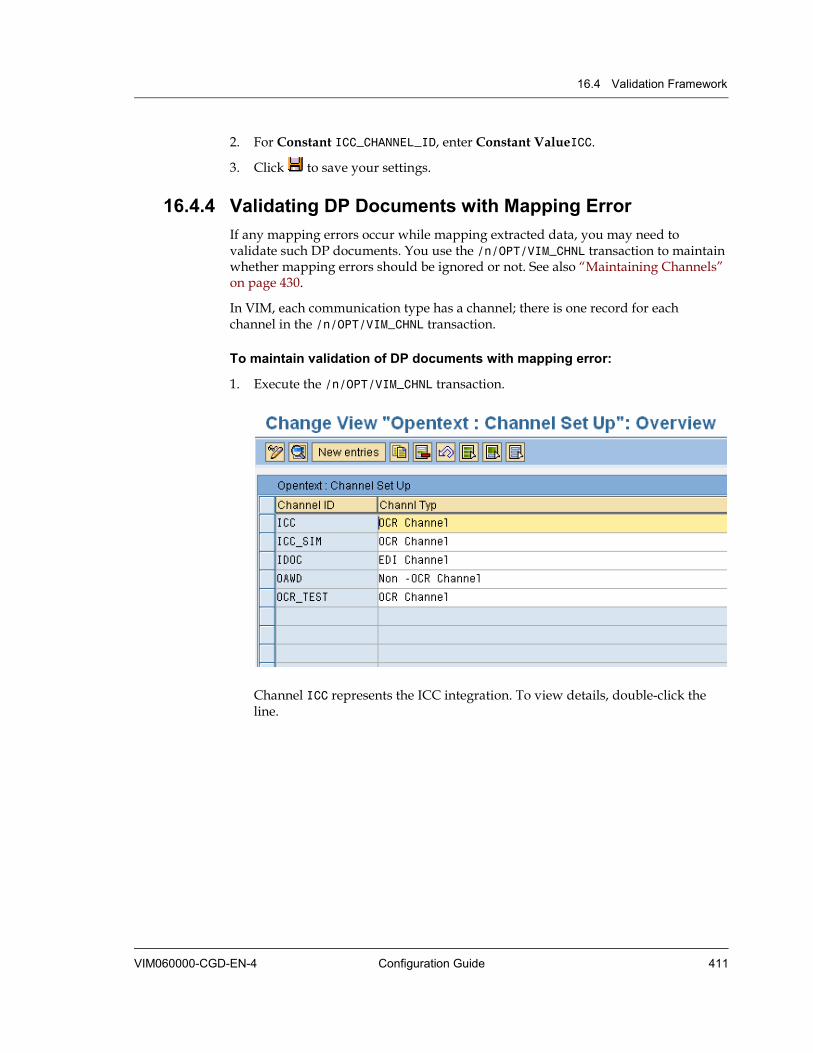
16.4 Validation Framework
VIM060000-CGD-EN-4 Configuration Guide 411
2. For Constant ICC_CHANNEL_ID, enter Constant ValueICC.
3. Click to save your settings.
16.4.4 Validating DP Documents with Mapping Error If any mapping errors occur while mapping extracted data, you may need to validate such DP documents. You use the /n/OPT/VIM_CHNL transaction to maintain whether mapping errors should be ignored or not. See also “Maintaining Channels” on page 430.
In VIM, each communication type has a channel; there is one record for each channel in the /n/OPT/VIM_CHNL transaction.
To maintain validation of DP documents with mapping error:
1. Execute the /n/OPT/VIM_CHNL transaction.
Channel ICC represents the ICC integration. To view details, double-click the line.
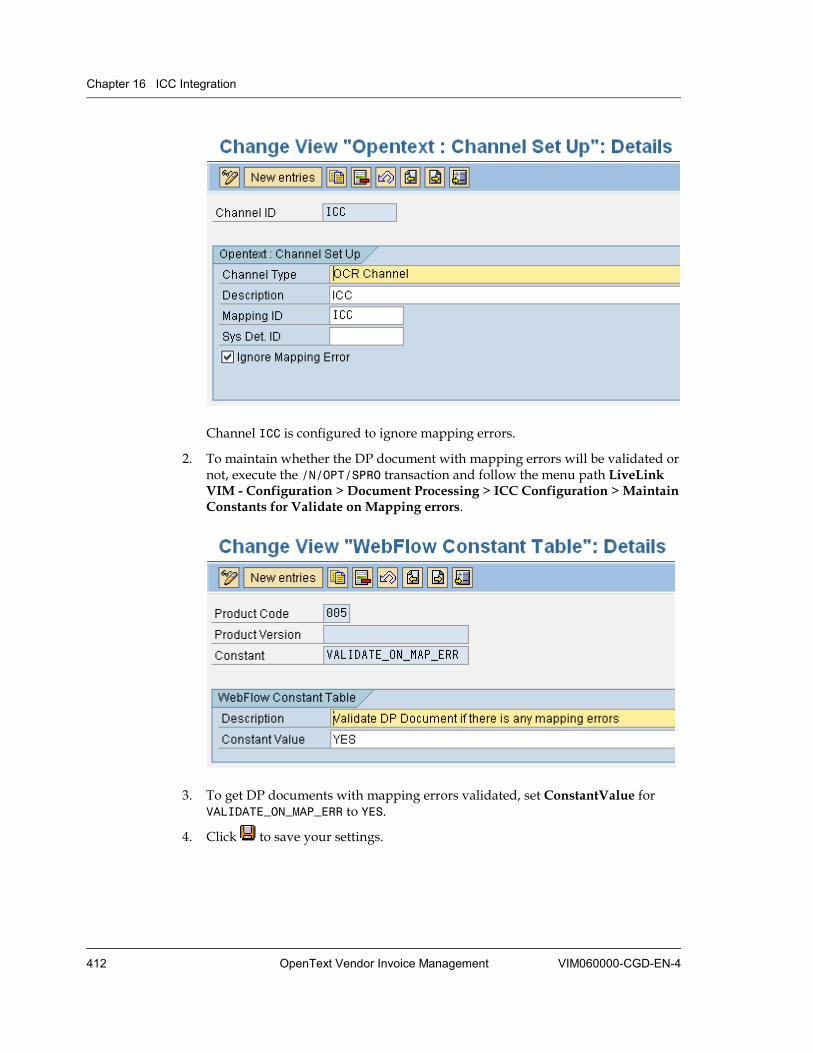
Chapter 16 ICC Integration
412 OpenText Vendor Invoice Management VIM060000-CGD-EN-4
Channel ICC is configured to ignore mapping errors.
2. To maintain whether the DP document with mapping errors will be validated or not, execute the /N/OPT/SPRO transaction and follow the menu path LiveLink VIM - Configuration > Document Processing > ICC Configuration > Maintain Constants for Validate on Mapping errors.
3. To get DP documents with mapping errors validated, set ConstantValue for VALIDATE_ON_MAP_ERR to YES.
4. Click to save your settings.

16.4 Validation Framework
VIM060000-CGD-EN-4 Configuration Guide 413
16.4.5 Assigning Validation Agents If the active template for the VALIDATOR role is set to ARDOCTYPE, you can assign Validation agents using the Simple Mode Role Maintenance. See also “Maintaining Role Determination Settings” on page 37.
To assign Validation agents:
1. Execute the /n/OPT/CP_9CX4 transaction.
2. In the navigation panel, click VALIDATOR.
The VALIDATOR node represents the assigned Validation agents for Product code 005. You can assign Validation agents to Archive Document types and to the following Agent Types:
AWork center
AC Role
CJob
OOrganizational unit

Chapter 16 ICC Integration
414 OpenText Vendor Invoice Management VIM060000-CGD-EN-4
SPosition
US User
To maintain the default validator role using VIM Customizing IMG:
1. Execute the /N/OPT/SPRO transaction and follow the menu path LiveLink VIM - Configuration > Document Processing > ICC Configuration > Maintain Validator Role.
2. For Constant VALIDATOR_ROLE, enter Constant ValueVALIDATOR.
3. Click to save your settings.
16.4.6 Maintaining the Default Workflow Template VIM Customizing IMG provides an option to maintain the default workflow template for Document Processing.
To maintain the default workflow template:
1. Execute the /N/OPT/SPRO transaction and follow the menu path LiveLink VIM - Configuration > Document Processing > ICC Configuration > Maintain Workflow Template Constants.
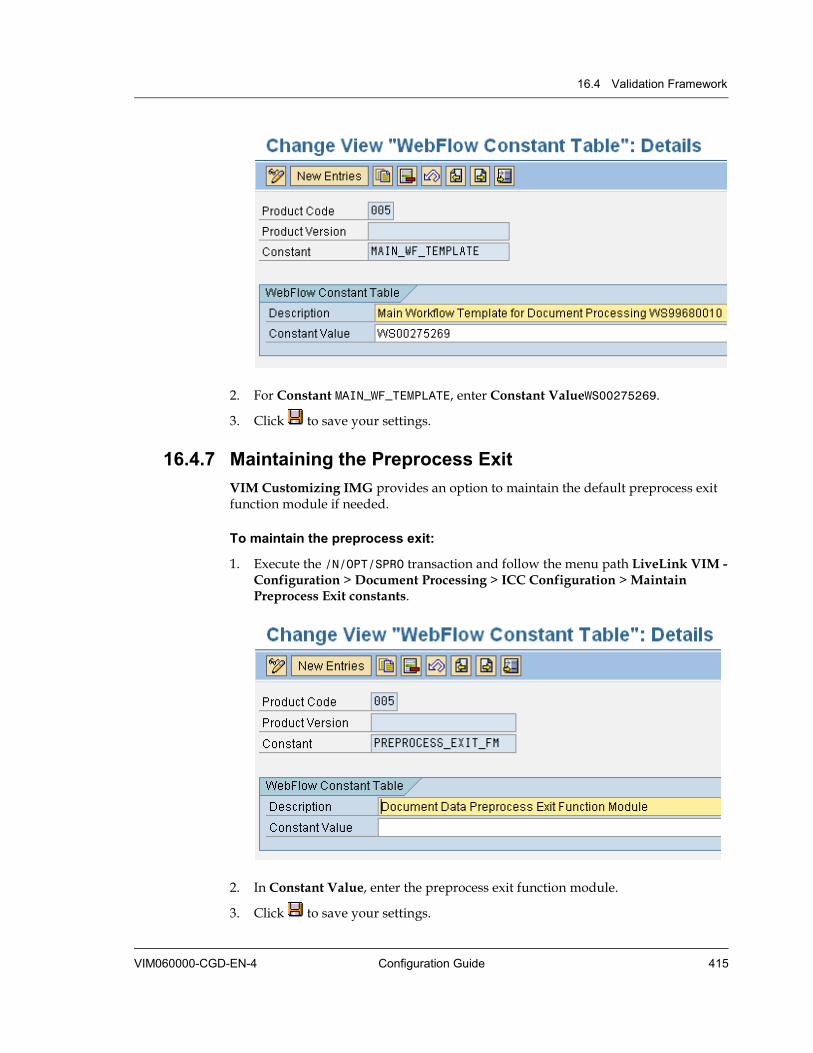
16.4 Validation Framework
VIM060000-CGD-EN-4 Configuration Guide 415
2. For Constant MAIN_WF_TEMPLATE, enter Constant ValueWS00275269.
3. Click to save your settings.
16.4.7 Maintaining the Preprocess Exit VIM Customizing IMG provides an option to maintain the default preprocess exit function module if needed.
To maintain the preprocess exit:
1. Execute the /N/OPT/SPRO transaction and follow the menu path LiveLink VIM - Configuration > Document Processing > ICC Configuration > Maintain Preprocess Exit constants.
2. In Constant Value, enter the preprocess exit function module.
3. Click to save your settings.

Chapter 16 ICC Integration
416 OpenText Vendor Invoice Management VIM060000-CGD-EN-4
16.5 Document Type Determination Rules Engine VIM provides a document type determination rules engine to determine the DP document type from OCR results.
Up to VIM 6.0 SP2 (and VIM 5.2 SP7), the engine was executed independently of the document type definition.
New for VIM 6.0 SP3 (VIM 5.2
SP8)
The engine works if the DP document type assigned to the archive document type is DEFAULT, or if no DP document type is assigned to the archive document type. If a different DP document type is assigned to the archive document type, the engine is skipped. In this case, the assigned DP document type is used for the DP workflow.
Example 16-1: Document type determination rules engine - skipped or triggered
With the configuration shown in the screenshot, the document type is determined in the following way:
• A document scanned with archive document type ZICC_HF gets the DP document type NPO_INV_AT. Therefore the document type determination rules engine is skipped.
• A document scanned with archive document type /OPT/ICC gets the DP document type DEFAULT initially. Then the rules engine is triggered to determine the DP document type.
• A document scanned with any other archive document type gets the DP document type DEFAULT initially. Then the rules engine is triggered to determine the DP document type.
16.5.1 Methods The rules engine consists of a sequence of procedures. Each procedure is responsible for one DP document type. If one procedure says NEXT, the next procedure is performed. If a procedure says TRUE, the document type of this procedure is applied to the document. The last procedure should be responsible for the DP document type DEFAULT. This last procedure should always return TRUE.

16.5 Document Type Determination Rules Engine
VIM060000-CGD-EN-4 Configuration Guide 417
16.5.2 Configuration You configure the rules engine in the VIM Customizing IMG (/OPT/SPRO): LiveLink VIM - Configuration > Document Processing > Document Type Configuration > Maintain Document Type Determination Procedure (Only for OCR)
16.5.3 Baselines Procedures
To configure procedures for the rules engine:
1. Configure the baseline procedures for VIM 5.2 and VIM 6.0, as shown in the screenshot.
The baseline configuration uses the existence of an invoice order number in the OCR results for an invoice to tell if the invoice is a Non PO or a PO invoice. In
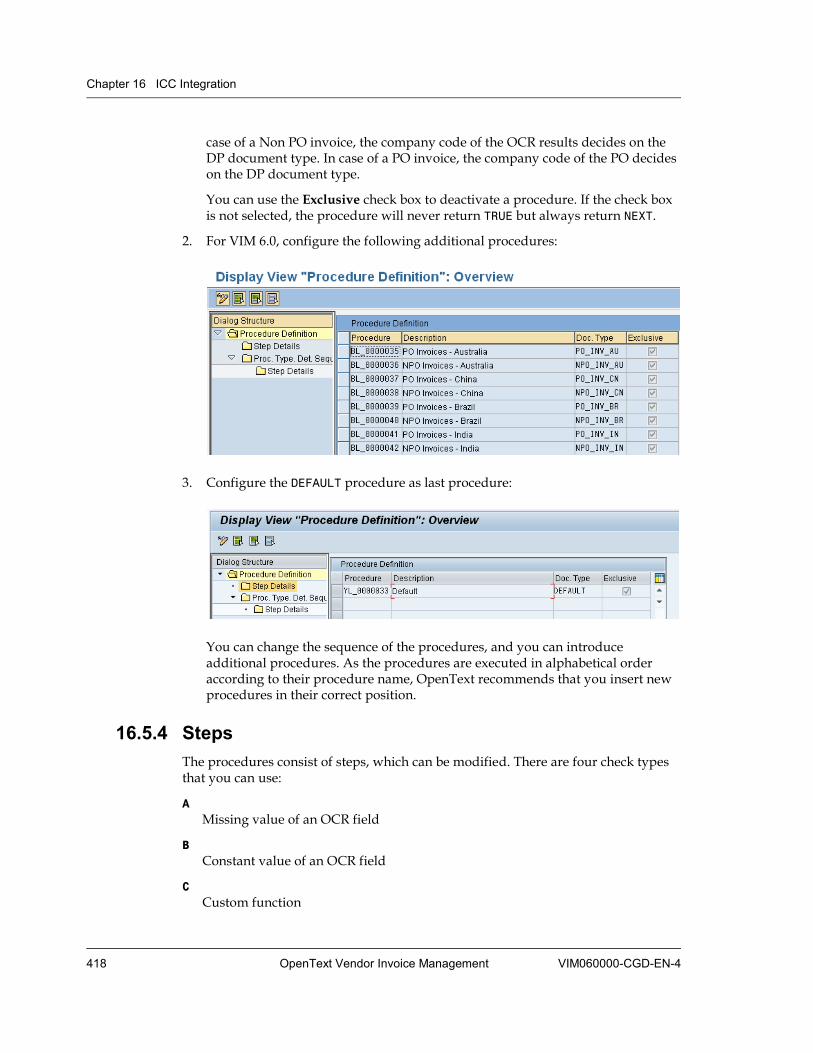
Chapter 16 ICC Integration
418 OpenText Vendor Invoice Management VIM060000-CGD-EN-4
case of a Non PO invoice, the company code of the OCR results decides on the DP document type. In case of a PO invoice, the company code of the PO decides on the DP document type.
You can use the Exclusive check box to deactivate a procedure. If the check box is not selected, the procedure will never return TRUE but always return NEXT.
2. For VIM 6.0, configure the following additional procedures:
3. Configure the DEFAULT procedure as last procedure:
You can change the sequence of the procedures, and you can introduce additional procedures. As the procedures are executed in alphabetical order according to their procedure name, OpenText recommends that you insert new procedures in their correct position.
16.5.4 Steps The procedures consist of steps, which can be modified. There are four check types that you can use:
AMissing value of an OCR field
BConstant value of an OCR field
CCustom function
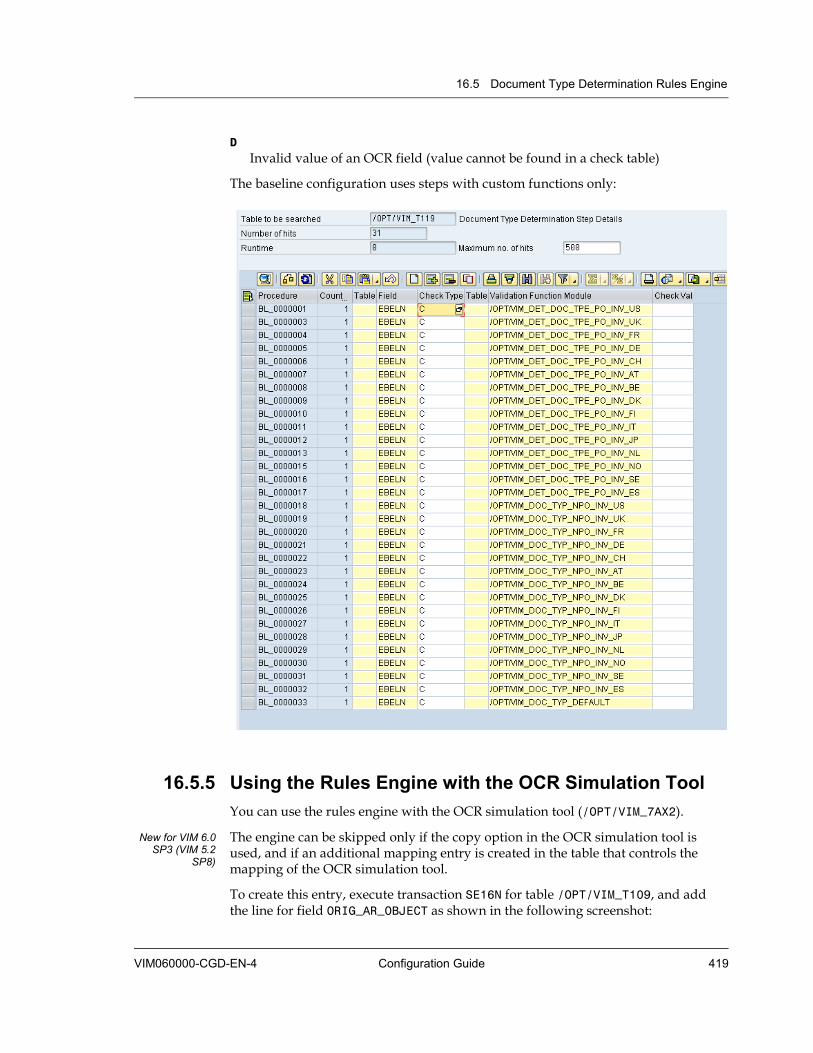
16.5 Document Type Determination Rules Engine
VIM060000-CGD-EN-4 Configuration Guide 419
DInvalid value of an OCR field (value cannot be found in a check table)
The baseline configuration uses steps with custom functions only:
16.5.5 Using the Rules Engine with the OCR Simulation Tool You can use the rules engine with the OCR simulation tool (/OPT/VIM_7AX2).
New for VIM 6.0 SP3 (VIM 5.2
SP8)
The engine can be skipped only if the copy option in the OCR simulation tool is used, and if an additional mapping entry is created in the table that controls the mapping of the OCR simulation tool. To create this entry, execute transaction SE16N for table /OPT/VIM_T109, and add the line for field ORIG_AR_OBJECT as shown in the following screenshot:
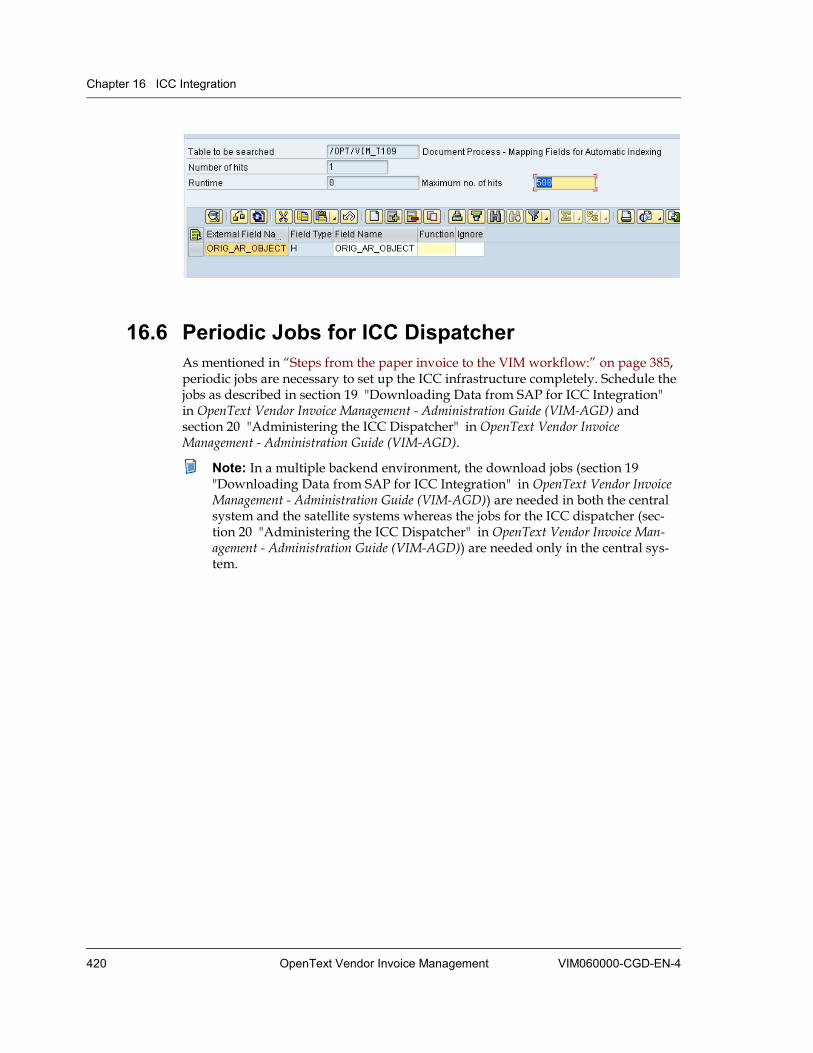
Chapter 16 ICC Integration
420 OpenText Vendor Invoice Management VIM060000-CGD-EN-4
16.6 Periodic Jobs for ICC Dispatcher As mentioned in “Steps from the paper invoice to the VIM workflow:” on page 385,periodic jobs are necessary to set up the ICC infrastructure completely. Schedule the jobs as described in section 19 "Downloading Data from SAP for ICC Integration" in OpenText Vendor Invoice Management - Administration Guide (VIM-AGD) and section 20 "Administering the ICC Dispatcher" in OpenText Vendor Invoice Management - Administration Guide (VIM-AGD).
Note: In a multiple backend environment, the download jobs (section 19 "Downloading Data from SAP for ICC Integration" in OpenText Vendor Invoice Management - Administration Guide (VIM-AGD)) are needed in both the central system and the satellite systems whereas the jobs for the ICC dispatcher (sec-tion 20 "Administering the ICC Dispatcher" in OpenText Vendor Invoice Man-agement - Administration Guide (VIM-AGD)) are needed only in the central sys-tem.
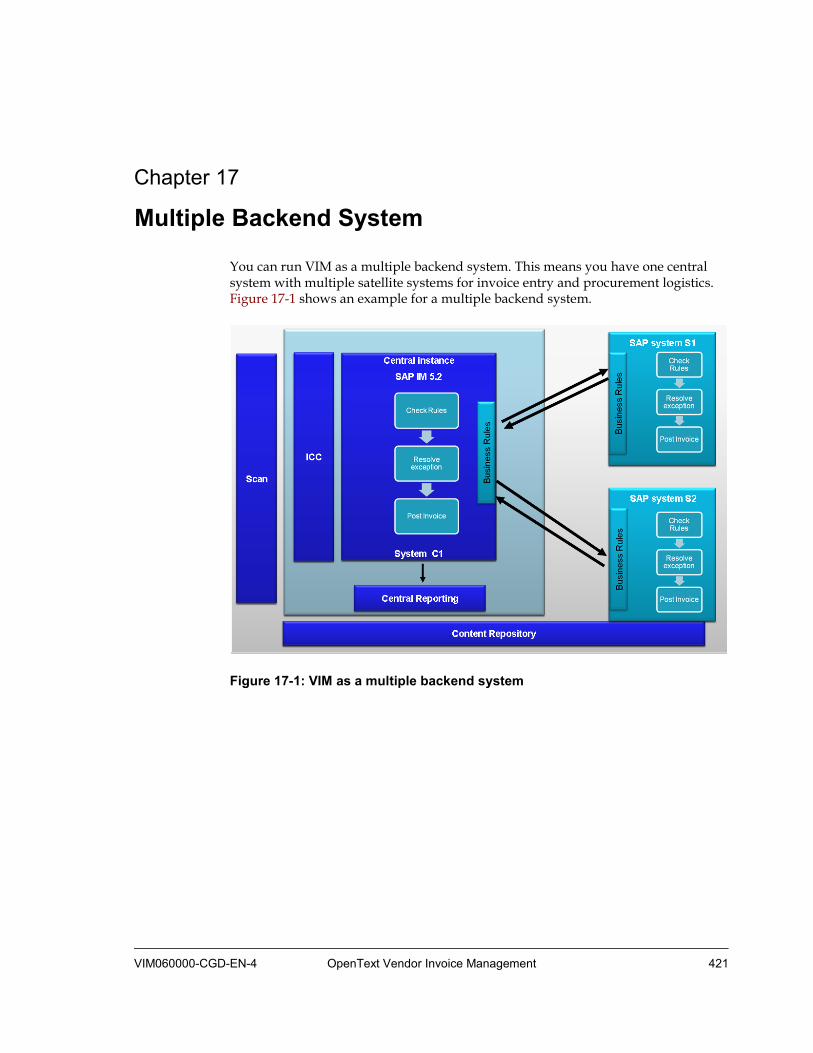
VIM060000-CGD-EN-4 OpenText Vendor Invoice Management 421
Chapter 17 Multiple Backend System
You can run VIM as a multiple backend system. This means you have one central system with multiple satellite systems for invoice entry and procurement logistics. Figure 17-1 shows an example for a multiple backend system.
Figure 17-1: VIM as a multiple backend system
Chapter 17 Multiple Backend System
422 OpenText Vendor Invoice Management VIM060000-CGD-EN-4
Important considerations for multiple backend systems
• There can be only one central system connected to one or more satellite systems.
• OpenText recommends connecting a single Content Repository to all systems in the landscape to ensure that image links get propagated to all systems.
• The number ranges for the Document Processing number are centralized and hence should be maintained in the central system.
All satellite systems and the central system can make use of the central number range.
• The SAP IM workflow can run in central or satellite systems, as needed. OpenText recommends running the SAP IM workflow in the system where the final SAP invoice gets posted.
To maintain multiple backend systems, the following configuration is necessary:
• “Defining Logical Systems” on page 422
• “Assigning Clients to Logical Systems” on page 424
• “Maintaining RFC Destinations” on page 425
• “Working with the System Landscape Directory (SLD)” on page 427
• “Maintaining Channels” on page 430
• “Maintaining Mapping IDs” on page 432
• “Maintaining the System Determination” on page 433
17.1 Defining Logical Systems In this step, you define the logical systems in your multiple backend system. Systems in the landscape are referred using logical system IDs. In SAP terminology, a logical system is a client. Therefore, you must first set up logical system names. In a second step, you assign them to the clients in the SAP systems, see “Assigning Clients to Logical Systems” on page 424.
Note: It is possible that the logical system name already exists. In this case, you can ignore this procedure and the procedure “Assigning Clients to Logical Systems” on page 424.
To define logical systems:
1. Execute the /n/OPT/VIM_LOG_SYS transaction.
Alternatively, execute the /N/OPT/SPRO transaction and follow the menu path LiveLink VIM - Configuration > Document Processing > General Configuration > Multi-Backend Scenarios > Define Logical Systems.

17.1 Defining Logical Systems
VIM060000-CGD-EN-4 Configuration Guide 423
2. Click New Entries in the application tool bar.
3. Define the logical system, using the following parameters:
Log.System Enter a name for the logical system you want to create.
Name Enter a description of the logical system.
4. In case you want to change an entry:
a. Select the appropriate line.
b. Select Change Field Contents from the Edit menu.
c. Enter the new text.
d. Click Replace.
5. Click to save your settings.
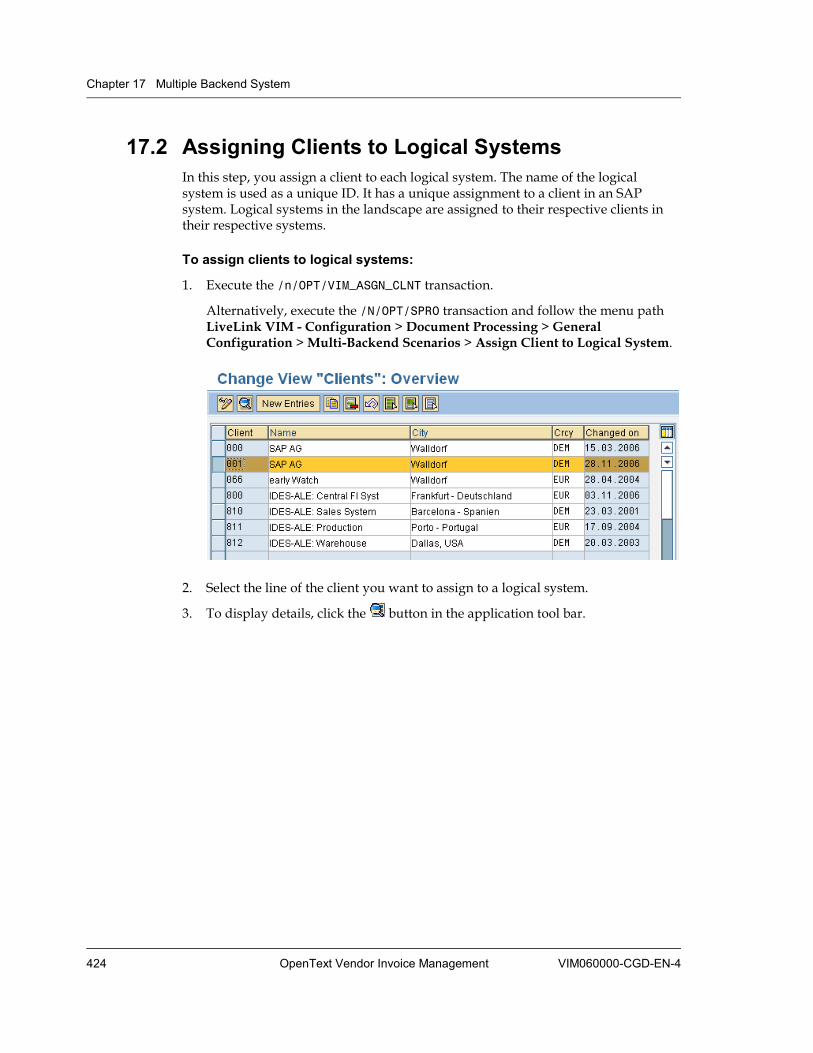
Chapter 17 Multiple Backend System
424 OpenText Vendor Invoice Management VIM060000-CGD-EN-4
17.2 Assigning Clients to Logical Systems In this step, you assign a client to each logical system. The name of the logical system is used as a unique ID. It has a unique assignment to a client in an SAP system. Logical systems in the landscape are assigned to their respective clients in their respective systems.
To assign clients to logical systems:
1. Execute the /n/OPT/VIM_ASGN_CLNT transaction.
Alternatively, execute the /N/OPT/SPRO transaction and follow the menu path LiveLink VIM - Configuration > Document Processing > General Configuration > Multi-Backend Scenarios > Assign Client to Logical System.
2. Select the line of the client you want to assign to a logical system.
3. To display details, click the button in the application tool bar.

17.3 Maintaining RFC Destinations
VIM060000-CGD-EN-4 Configuration Guide 425
4. In the Logical system field, enter the name of the logical system to which you want to assign the selected client.
5. Click to save your settings.
17.3 Maintaining RFC Destinations In this step, you maintain RFC destinations for each logical system to communicate to.
Recommendations
• OpenText recommends using RFC destinations for System Communication that have the same name as the logical system.
• For Dialog Communication, OpenText recommends to use trusted RFC connections.
For more details on setting up RFC destinations, see the SAP Help.
To maintain RFC destinations:
1. Execute the SM59 transaction.
Alternatively, execute the /N/OPT/SPRO transaction and follow the menu path LiveLink VIM - Configuration > Document Processing > General Configuration > Multi-Backend Scenarios > Maintain RFC Destinations.
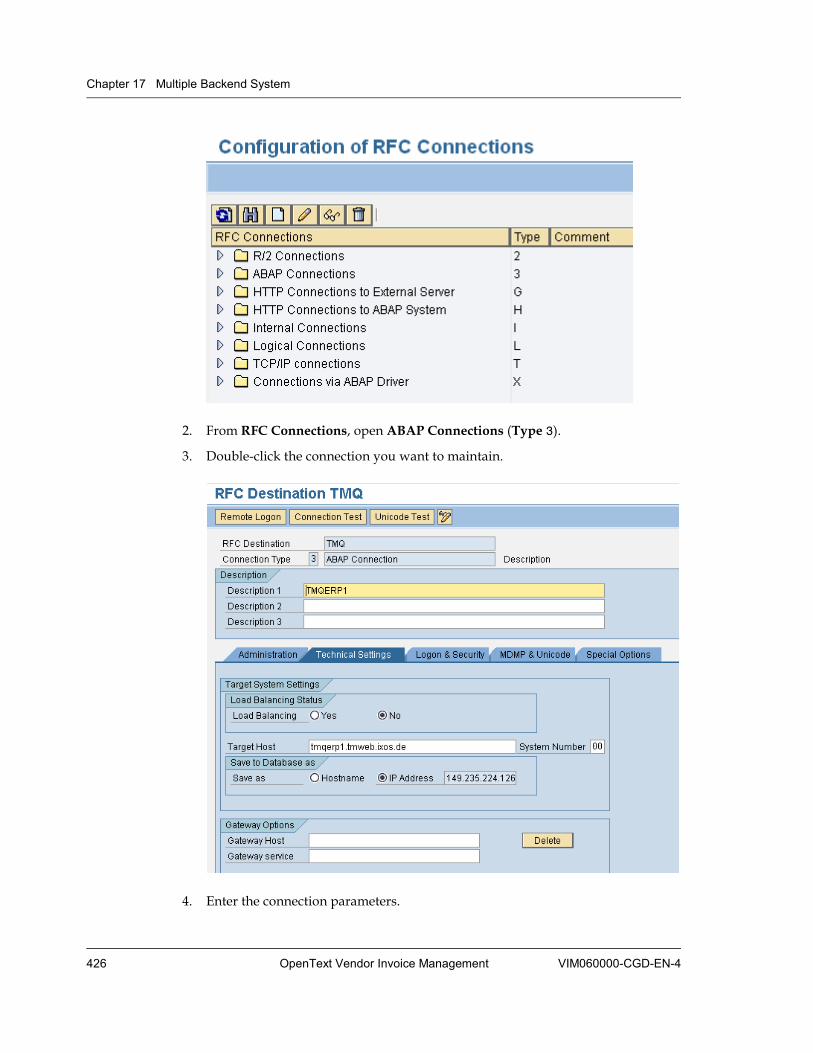
Chapter 17 Multiple Backend System
426 OpenText Vendor Invoice Management VIM060000-CGD-EN-4
2. From RFC Connections, open ABAP Connections (Type 3).
3. Double-click the connection you want to maintain.
4. Enter the connection parameters.
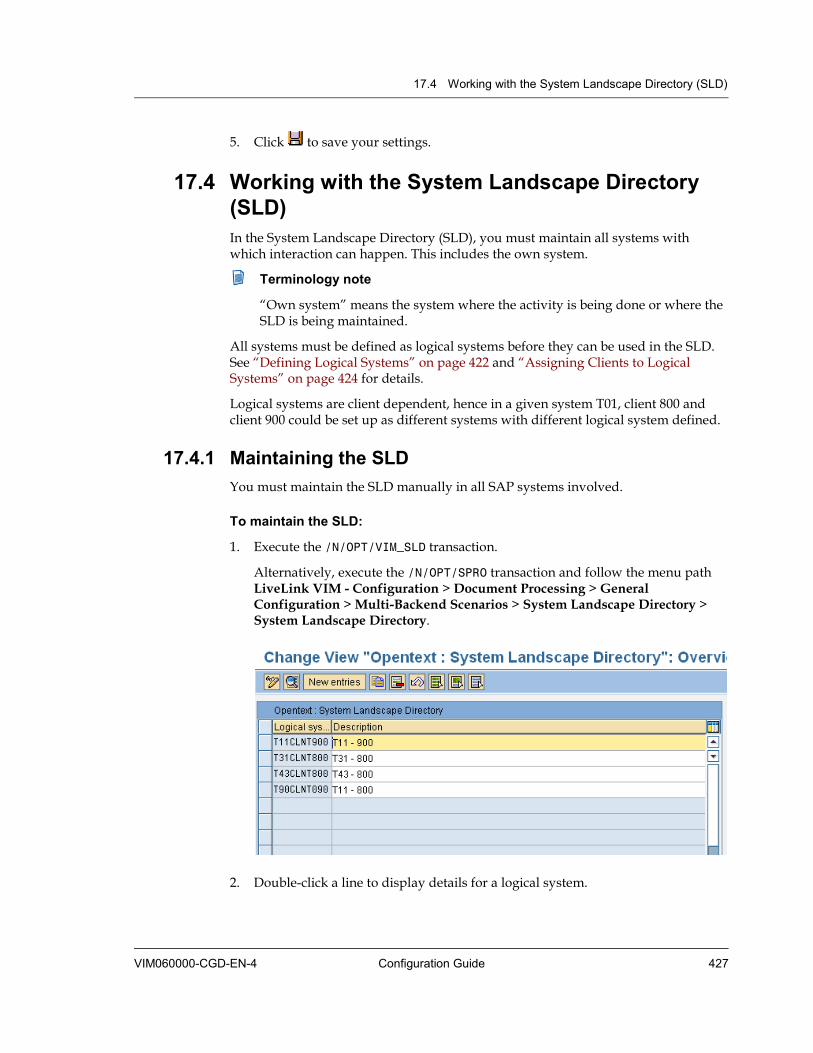
17.4 Working with the System Landscape Directory (SLD)
VIM060000-CGD-EN-4 Configuration Guide 427
5. Click to save your settings.
17.4 Working with the System Landscape Directory (SLD) In the System Landscape Directory (SLD), you must maintain all systems with which interaction can happen. This includes the own system.
Terminology note
“Own system” means the system where the activity is being done or where the SLD is being maintained.
All systems must be defined as logical systems before they can be used in the SLD. See “Defining Logical Systems” on page 422 and “Assigning Clients to Logical Systems” on page 424 for details.
Logical systems are client dependent, hence in a given system T01, client 800 and client 900 could be set up as different systems with different logical system defined.
17.4.1 Maintaining the SLD You must maintain the SLD manually in all SAP systems involved.
To maintain the SLD:
1. Execute the /N/OPT/VIM_SLD transaction.
Alternatively, execute the /N/OPT/SPRO transaction and follow the menu path LiveLink VIM - Configuration > Document Processing > General Configuration > Multi-Backend Scenarios > System Landscape Directory > System Landscape Directory.
2. Double-click a line to display details for a logical system.
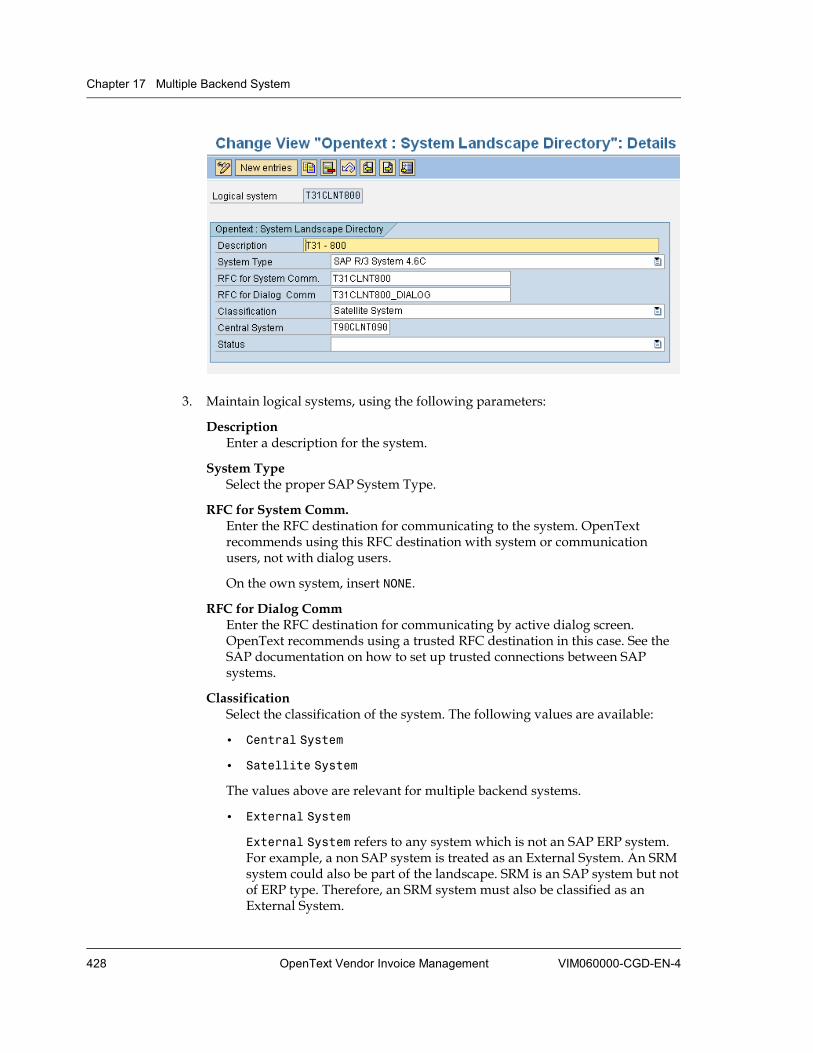
Chapter 17 Multiple Backend System
428 OpenText Vendor Invoice Management VIM060000-CGD-EN-4
3. Maintain logical systems, using the following parameters:
Description Enter a description for the system.
System Type Select the proper SAP System Type.
RFC for System Comm. Enter the RFC destination for communicating to the system. OpenText recommends using this RFC destination with system or communication users, not with dialog users.
On the own system, insert NONE.
RFC for Dialog Comm Enter the RFC destination for communicating by active dialog screen. OpenText recommends using a trusted RFC destination in this case. See the SAP documentation on how to set up trusted connections between SAP systems.
Classification Select the classification of the system. The following values are available:
• Central System
• Satellite System
The values above are relevant for multiple backend systems.
• External System
External System refers to any system which is not an SAP ERP system. For example, a non SAP system is treated as an External System. An SRM system could also be part of the landscape. SRM is an SAP system but not of ERP type. Therefore, an SRM system must also be classified as an External System.
17.4 Working with the System Landscape Directory (SLD)
VIM060000-CGD-EN-4 Configuration Guide 429
• Single System Landscape
Select this value if your system landscape comprises only one system.
Central System Enter the Central System if the own system is classified as Satellite System.
Status Select the status of the system. Available values: Active or Inactive.
4. Click to save your settings.
17.4.2 Setting Up the SLD in a Multiple Backend System Note: This configuration is only necessary for multiple backend systems. See “Setting Up the SLD in a Single System Landscape” on page 430 for single system landscapes.
In multiple backend systems, one SAP system is the central system; the other SAP systems are satellite systems.
To set up the SLD in a multiple backend system:
1. In the central system, define all logical systems (see )for all systems involved (SAP or non SAP). Make sure that the logical system name is unique in the entire landscape.
2. Assign the client to the logical system, see “Assigning Clients to Logical Systems” on page 424. This action is only relevant for the own system. Normally, it is always assigned so crosscheck if the own system is already assigned to the client.
3. Maintain the SLD in the central system, as described in “Maintaining the SLD” on page 427, for each of the systems involved.
Once you finished setting up the SLD in the central system, login to the satellite systems and do the following:
4. Define the logical system (see “Defining Logical Systems” on page 422) for the central system. The name must be the same as in the central system.
5. Assign the client to the logical system (see “Assigning Clients to Logical Systems” on page 424) for the own system if it is not yet assigned.
6. Maintain the SLD in the satellite systems, as described in “Maintaining the SLD” on page 427, for the central system and the own system.
For the own system, set RFC for System Comm. to NONE, and leave RFC for Dialog Comm blank.
For the central system, assign proper RFC for System Comm. You may skip RFC for Dialog Comm.
7. Click to save your settings.

Chapter 17 Multiple Backend System
430 OpenText Vendor Invoice Management VIM060000-CGD-EN-4
17.4.3 Setting Up the SLD in a Single System Landscape Note: This configuration is only necessary for single system landscapes. See “Setting Up the SLD in a Multiple Backend System” on page 429 for multiple backend systems.
In a single system landscape, OpenText recommends maintaining the SLD with the following basic information:
To set up the SLD in a single system landscape:
1. Define the logical system (see “Defining Logical Systems” on page 422) for the own system if it is not already defined.
2. Assign the client to the logical system (see “Assigning Clients to Logical Systems” on page 424) for the own system. Normally, it is always assigned so crosscheck if the own system is already assigned to the client.
3. Maintain the SLD, as described in “Maintaining the SLD” on page 427. The following parameters are relevant:
• System Type
• RFC for System Comm.: set to NONE.
• RFC for Dialog Comm: leave blank.
• Classification: Single System Landscape
4. Click to save your settings.
17.5 Maintaining Channels A channel uniquely identifies the source of an incoming invoice to the VIM system across the landscape. Channels drive the System Determination Procedure in a multiple backend system and drive the set of mapping to be executed.
To maintain channels:
1. Execute the /n/OPT/VIM_CHNL transaction.
Alternatively, execute the /N/OPT/SPRO transaction and follow the menu path LiveLink VIM - Configuration > Document Processing > General Configuration > Maintain Channels.
2. Double-click a line to open the Opentext Channel Set Up Details screen.

17.5 Maintaining Channels
VIM060000-CGD-EN-4 Configuration Guide 431
3. Maintain the channel, using the following parameters:
Channel Type Select the channel type from the list. Supported channel types are OCR Channel, FAX Channel, and so on.
Description Enter the channel description. It is language dependent.
Mapping ID If you want to link a Mapping ID to the channel, enter the Mapping ID. See “Maintaining Mapping IDs” on page 432.
Sys Det. ID If you want to link a System Determination ID to the channel, enter the System Determination ID. If no System Determination ID is linked here, the Default Company Code Look up system determination can be used in a multiple system scenario.
Ignore Mapping Error Errors might occur during the mapping stage (when data from a particular channel flows into the SAP system).
Select this check box to determine that these errors are ignored for the channel and the SAP IM workflow is started.
Clear the check box to determine that, in case of a mapping error, processing stops at this point and the SAP IM workflow is not started.
4. Click to save your settings.
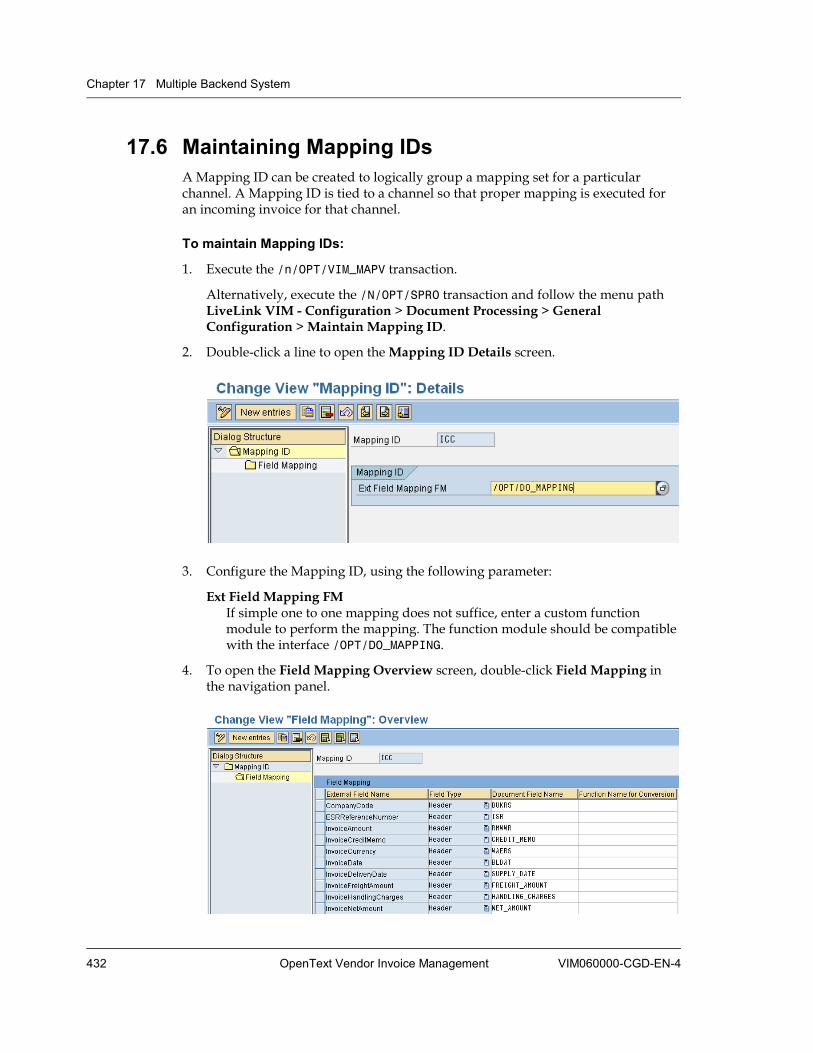
Chapter 17 Multiple Backend System
432 OpenText Vendor Invoice Management VIM060000-CGD-EN-4
17.6 Maintaining Mapping IDs A Mapping ID can be created to logically group a mapping set for a particular channel. A Mapping ID is tied to a channel so that proper mapping is executed for an incoming invoice for that channel.
To maintain Mapping IDs:
1. Execute the /n/OPT/VIM_MAPV transaction.
Alternatively, execute the /N/OPT/SPRO transaction and follow the menu path LiveLink VIM - Configuration > Document Processing > General Configuration > Maintain Mapping ID.
2. Double-click a line to open the Mapping ID Details screen.
3. Configure the Mapping ID, using the following parameter:
Ext Field Mapping FM If simple one to one mapping does not suffice, enter a custom function module to perform the mapping. The function module should be compatible with the interface /OPT/DO_MAPPING.
4. To open the Field Mapping Overview screen, double-click Field Mapping in the navigation panel.
17.7 Maintaining the System Determination
VIM060000-CGD-EN-4 Configuration Guide 433
5. Configure the field mapping, using the following parameters:
External Field Name Name of the field (case sensitive), as supplied by the external system, for example OCR
Field Type Type of the field: The following levels of information can be supplied, as far as indexing data is concerned:
Header Header level indexing data
Item Line level indexing data
Document Field Name Enter the name of the indexing field name on SAP IM side. The header level SAP fields come from the structure /OPT/VIM_1RHEAD. The item level SAP fields come from the structure /OPT/VIM_1RITEM_DATA.
Function Name for Conversion If there is any necessity to convert the format of the data coming from the external system, enter a conversion function module for a particular field. Any function module that you enter here, whether SAP standard or a custom one, should be compatible with the interface of function module CONVERSION_EXIT_ALPHA_INPUT.
Ignore Chars Enter characters that are deleted in an extra step before mapping continues. This is useful, for example, if there are apostrophes in the Reference Number. Enter the apostrophe in the Ignore Chars field in the XBLNR line, to avoid a short dump in duplicate check.
The field can contain up to 6 characters.
6. Click to save your settings.
17.7 Maintaining the System Determination In multiple backend systems, you can specify the system determination procedure to determine in which system the SAP IM workflow should start. The system determination is attached to the Channel ID. Thus, system determination works only if the channel is maintained. See “Maintaining Channels” on page 430. By default, if no system determination ID is specified, the OpenText standard look up table of Company Code and Logical System is used to determine the system.
To maintain the system determination:
1. Execute the /n/OPT/VIM_SYS_DET transaction.
Alternatively, execute the /N/OPT/SPRO transaction and follow the menu path LiveLink VIM - Configuration > Document Processing > General
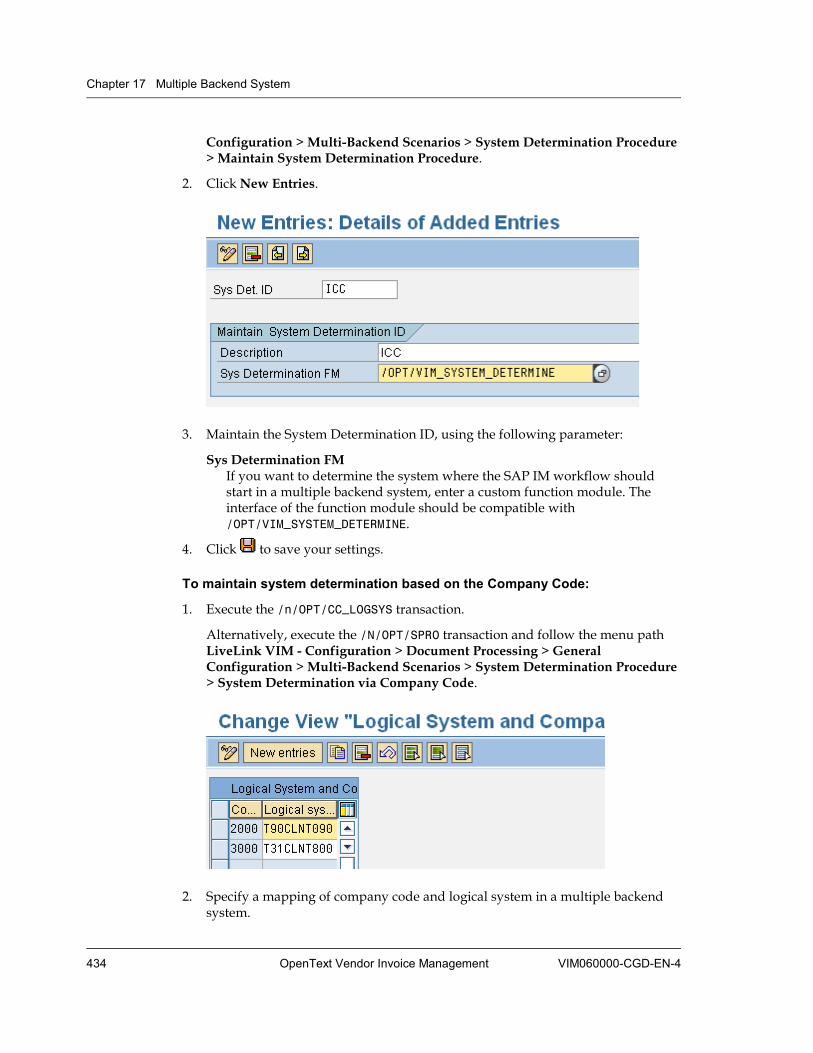
Chapter 17 Multiple Backend System
434 OpenText Vendor Invoice Management VIM060000-CGD-EN-4
Configuration > Multi-Backend Scenarios > System Determination Procedure > Maintain System Determination Procedure.
2. Click New Entries.
3. Maintain the System Determination ID, using the following parameter:
Sys Determination FM If you want to determine the system where the SAP IM workflow should start in a multiple backend system, enter a custom function module. The interface of the function module should be compatible with /OPT/VIM_SYSTEM_DETERMINE.
4. Click to save your settings.
To maintain system determination based on the Company Code:
1. Execute the /n/OPT/CC_LOGSYS transaction.
Alternatively, execute the /N/OPT/SPRO transaction and follow the menu path LiveLink VIM - Configuration > Document Processing > General Configuration > Multi-Backend Scenarios > System Determination Procedure > System Determination via Company Code.
2. Specify a mapping of company code and logical system in a multiple backend system.
17.7 Maintaining the System Determination
VIM060000-CGD-EN-4 Configuration Guide 435
3. Click to save your settings.

VIM060000-CGD-EN-4 OpenText Vendor Invoice Management 437
Chapter 18 SSF Integration
As part of Business Suite 2010 (ERP 6.0 EhP5 and CRM 7.0 EhP1), SAP delivers the Shared Service Framework (SSF). SSF contains a rich set of tools to improve and automate Shared Service Center operations.
Technically, SSF is based on SAP Customer Relationship Management (CRM), specifically on the Interaction Center. In case of the VIM integration, this is the Accounting Interaction Center (AIC). The Interaction Center is part of SSF. CRM provides software for ticket systems, for example in the Accounts Payable department.
SSF integrates the leading CRM system with the backend ERP systems, for example VIM. Shared Service Center agents work entirely in their AIC, with access to the backend ERP systems that they are responsible for. The AIC provides the means to support communication with employees, suppliers and clients.
VIM 6.0 introduces the integration with SSF. VIM leverages the SSF and provides integration scenarios with the AIC. See the following examples:
Example:
• The integration allows searching and finding invoices in VIM from AIC.
• VIM users in the ERP backend system can open service request from VIM work items and exceptions.
• Specific exceptions can be configured to automatically create a service request in CRM/AIC.
Among others, the benefits of the SSF integration are the following:
• automation in the Shared Services environment
• cost reduction
• enhanced efficiency
• reduction of operational risk
VIM provides a feature to automatically create Service Requests for specific exceptions in background. You can configure this feature during the configuration of the process type, see “Defining the Process Type” on page 89.
18.1 SSF Integration Activities To put the SSF integration into operation, you must perform the following configuration tasks:
Chapter 18 SSF Integration
438 OpenText Vendor Invoice Management VIM060000-CGD-EN-4
Note: You must perform the tasks either in the SAP ERP (VIM) system or in the CRM system. The system is indicated in square brackets, for example [ERP], in the title of each section.
• “Maintaining a Logical System for the CRM System in VIM [ERP]” on page 438
• “Creating an ITS Service in the Backend ERP System [ERP]” on page 438
• “Defining Transaction Launcher Logical Systems and URL [CRM]” on page 446
• “Creating a Transaction Launcher for VIM Work Centers to Call VIM Analytics (Service Request) [CRM]” on page 448
• “Creating a Transaction Launcher for VIM Work Centers to Call VIM Analytics (Account ID Confirmation) [CRM]” on page 455
• “Configuring Work Centers for VIM Analytics [CRM]” on page 456
• “Configuring Business Context Links for OpenText Linked Objects in Service Request [CRM]” on page 461
• “Configuring the OpenText Vendor Factsheet BSP Component [CRM]” on page 467
• “Maintaining the Logical System in OpenText Configuration Tables [CRM]” on page 479
• “Defining Prefill Business Role Settings for RFC (Service Request Display) [CRM]” on page 480
18.1.1 Maintaining a Logical System for the CRM System in VIM [ERP] To integrate the CRM SSF system into VIM, you must maintain a logical system for the CRM system in the backend ERP system (VIM system). Support for CRM SSF will only be activated if the logical system of the CRM is maintained. This setting generates the Service Requests button in the dashboards and the Create SR check box in the process type definition.
The procedure to maintain a logical system is described in section 16.2 "Maintaining a Logical System for the CRM System in VIM" in OpenText Vendor Invoice Management - Installation Guide (VIM-IGD).
18.1.2 Creating an ITS Service in the Backend ERP System [ERP] In this section, you maintain a new ITS service in the backend ERP system (VIM system). This ITS Service is used by the CRM transaction launcher to launch the OpenText transaction for VIM Analytics in the VIM system.
You can create own service names in the nodes in the SICF transaction. The Service Name creation in this section is an example to create own services under the ITS node.
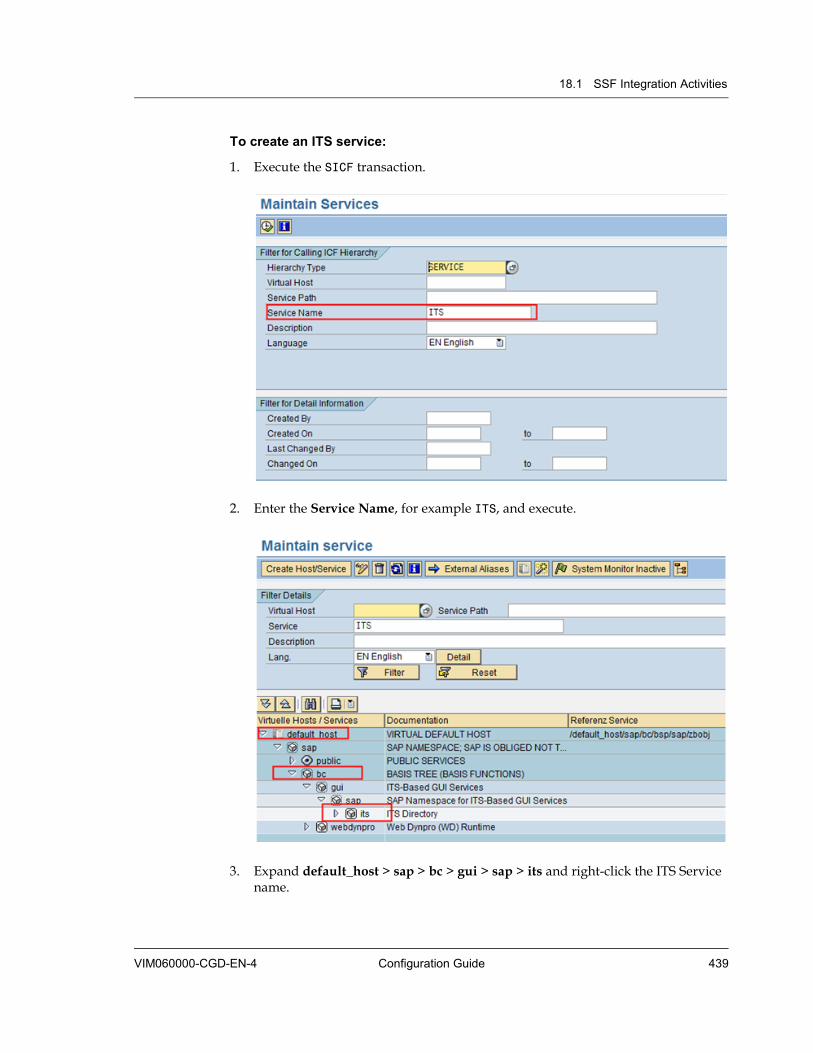
18.1 SSF Integration Activities
VIM060000-CGD-EN-4 Configuration Guide 439
To create an ITS service:
1. Execute the SICF transaction.
2. Enter the Service Name, for example ITS, and execute.
3. Expand default_host > sap > bc > gui > sap > its and right-click the ITS Service name.
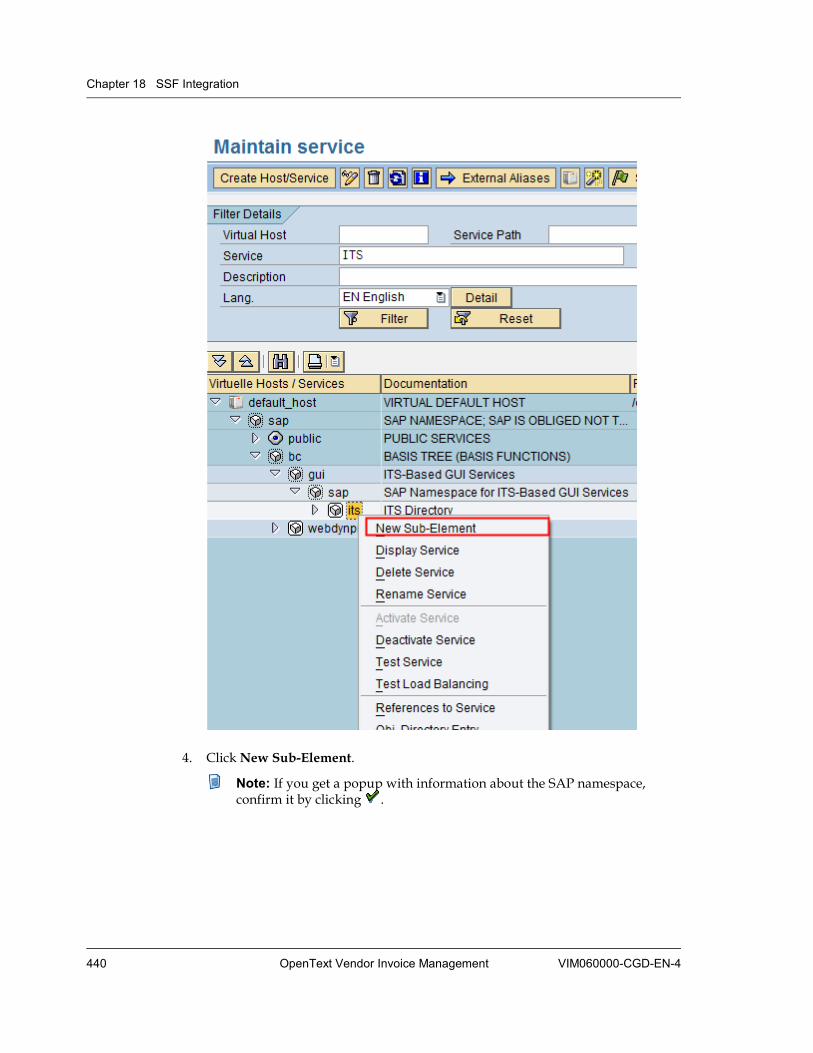
Chapter 18 SSF Integration
440 OpenText Vendor Invoice Management VIM060000-CGD-EN-4
4. Click New Sub-Element.
Note: If you get a popup with information about the SAP namespace, confirm it by clicking .
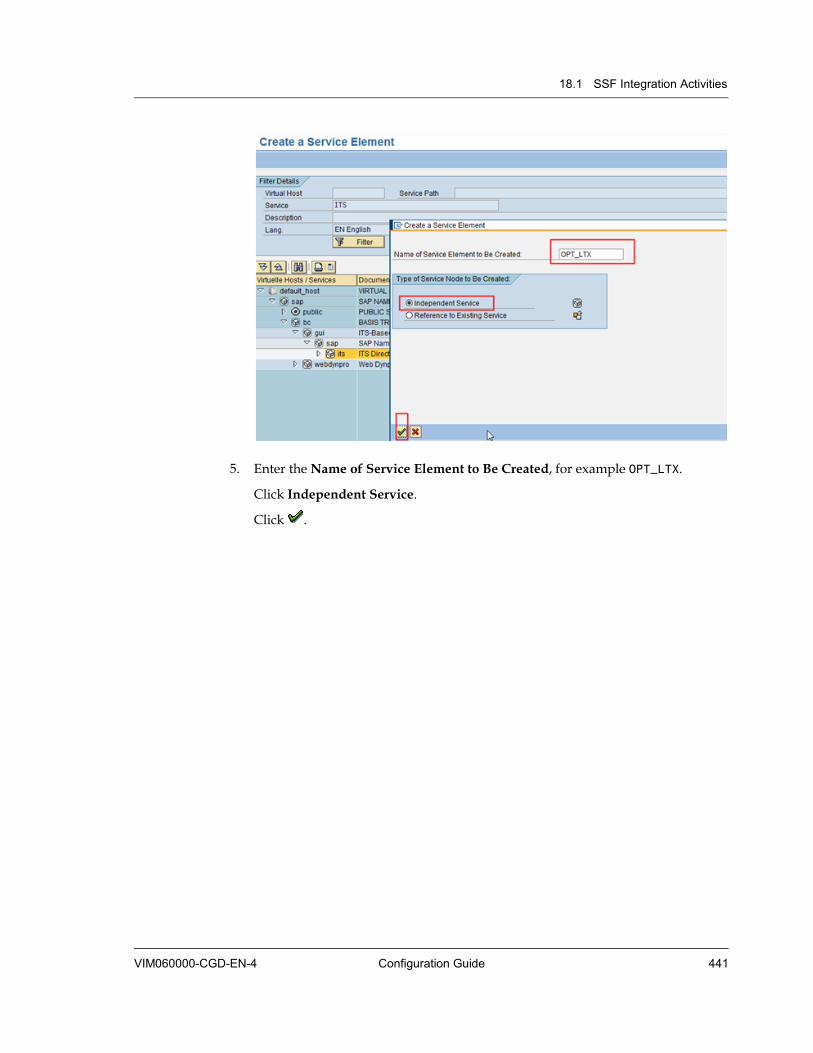
18.1 SSF Integration Activities
VIM060000-CGD-EN-4 Configuration Guide 441
5. Enter the Name of Service Element to Be Created, for example OPT_LTX.
Click Independent Service.
Click .
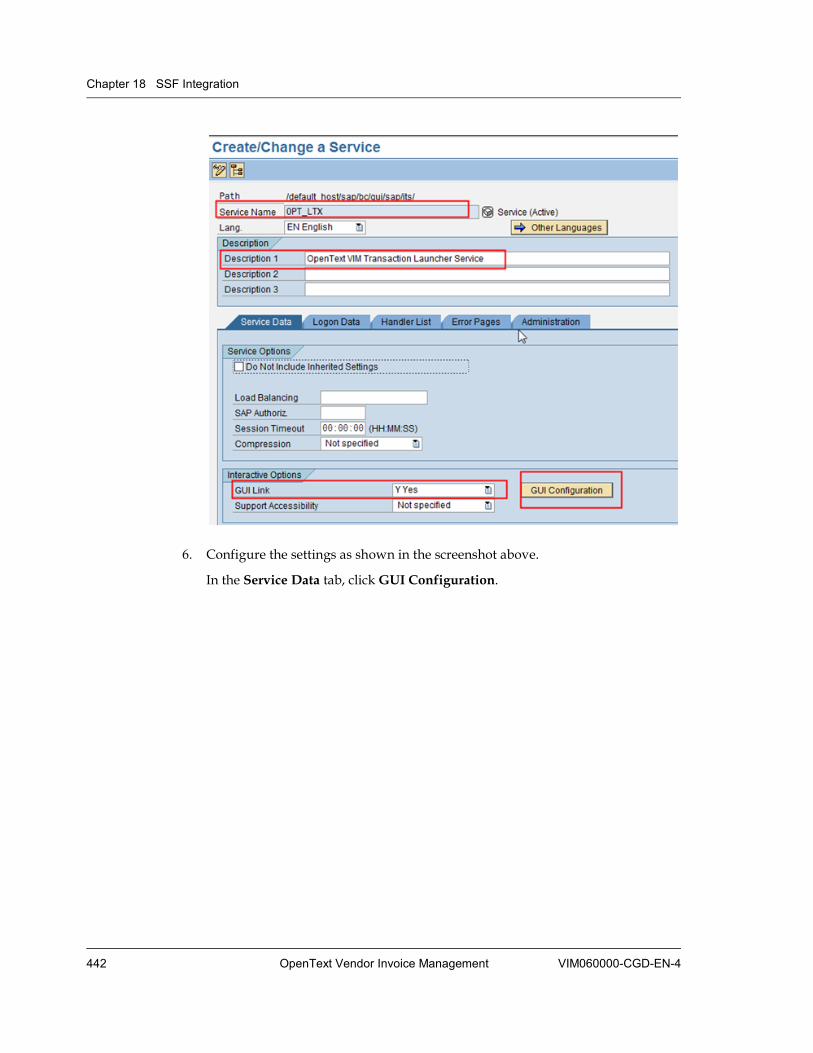
Chapter 18 SSF Integration
442 OpenText Vendor Invoice Management VIM060000-CGD-EN-4
6. Configure the settings as shown in the screenshot above.
In the Service Data tab, click GUI Configuration.

18.1 SSF Integration Activities
VIM060000-CGD-EN-4 Configuration Guide 443
7. Maintain the following service parameters:
Note: You can create own service names in the nodes in the SICF transaction. However, for GUI Configuration in the Service Data tab, you must set the following Parameter Name and Value. The ERP transaction that OpenText SSF Transaction Launcher ITS Services depend on is /OPT/VIM_SSF_LAUNCH. This transaction is called when the dependent Transaction Launch is called.
Parameter Name Value
~AUTOSCROLL 0
~COOKIES 0
~GENERATEDYNPRO 1
~LISTSCROLLING 0
~POPUPS 1
~STYLE DHTML
~WEBGUI 1
~TRANSACTION /OPT/VIM_SSF_LAUNCH
~FLICKERFREE 1
~DISCONNECTONCLOSE 1
~THEME 99
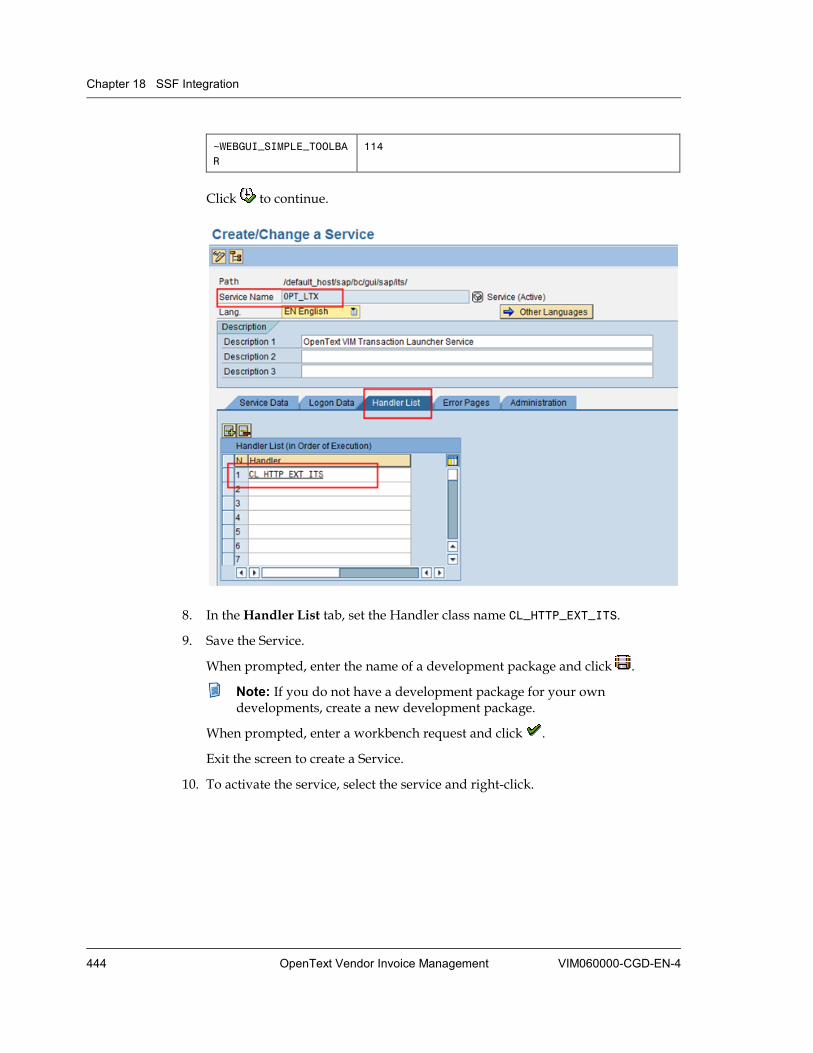
Chapter 18 SSF Integration
444 OpenText Vendor Invoice Management VIM060000-CGD-EN-4
~WEBGUI_SIMPLE_TOOLBAR
114
Click to continue.
8. In the Handler List tab, set the Handler class name CL_HTTP_EXT_ITS.
9. Save the Service.
When prompted, enter the name of a development package and click .
Note: If you do not have a development package for your own developments, create a new development package.
When prompted, enter a workbench request and click .
Exit the screen to create a Service.
10. To activate the service, select the service and right-click.
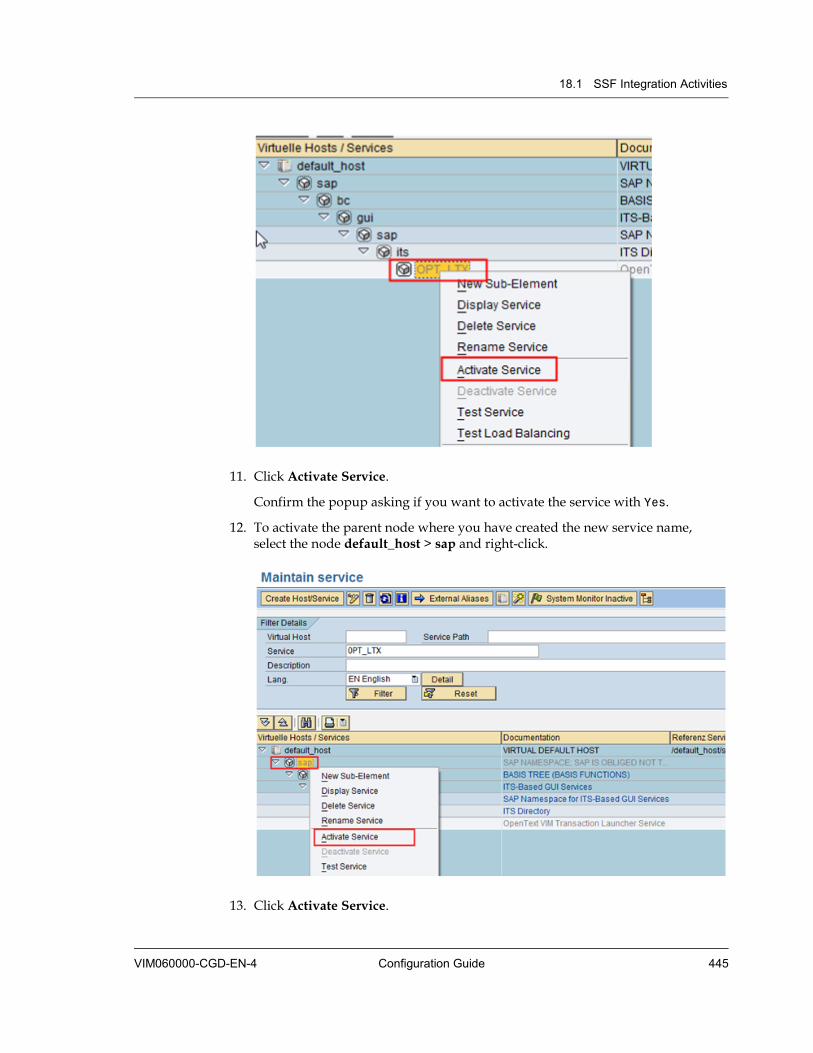
18.1 SSF Integration Activities
VIM060000-CGD-EN-4 Configuration Guide 445
11. Click Activate Service.
Confirm the popup asking if you want to activate the service with Yes.
12. To activate the parent node where you have created the new service name, select the node default_host > sap and right-click.
13. Click Activate Service.
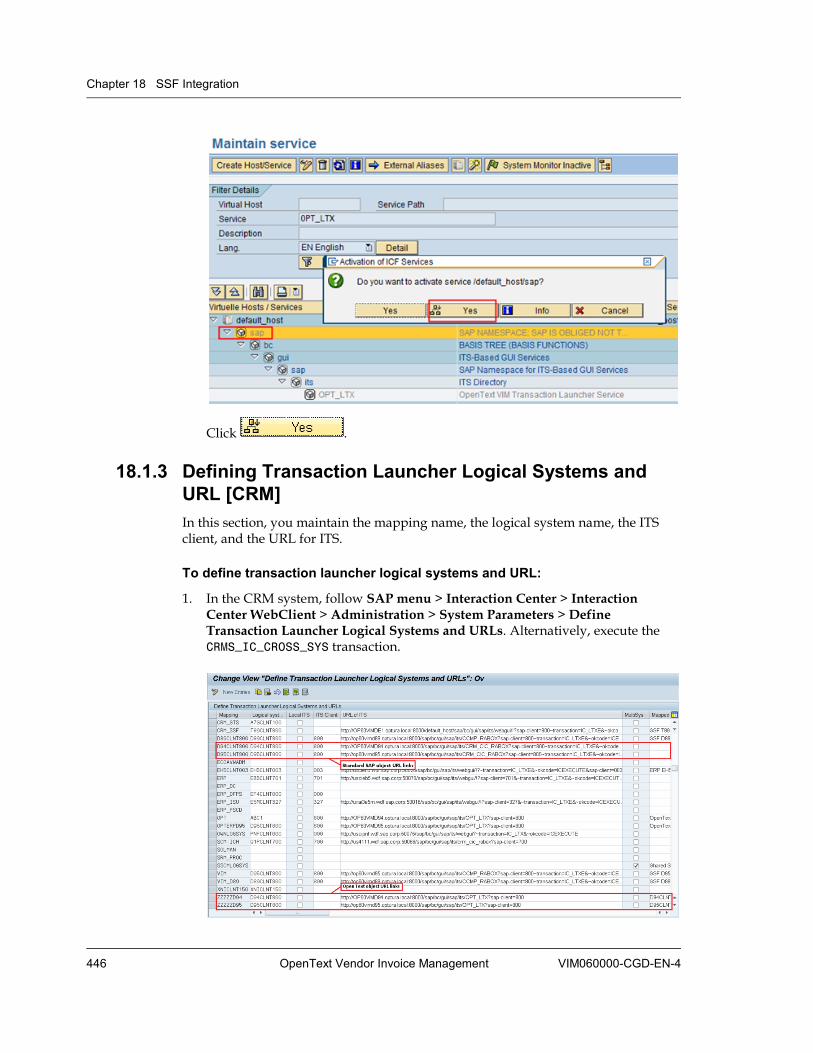
Chapter 18 SSF Integration
446 OpenText Vendor Invoice Management VIM060000-CGD-EN-4
Click .
18.1.3 Defining Transaction Launcher Logical Systems and URL [CRM] In this section, you maintain the mapping name, the logical system name, the ITS client, and the URL for ITS.
To define transaction launcher logical systems and URL:
1. In the CRM system, follow SAP menu > Interaction Center > Interaction Center WebClient > Administration > System Parameters > Define Transaction Launcher Logical Systems and URLs. Alternatively, execute the CRMS_IC_CROSS_SYS transaction.
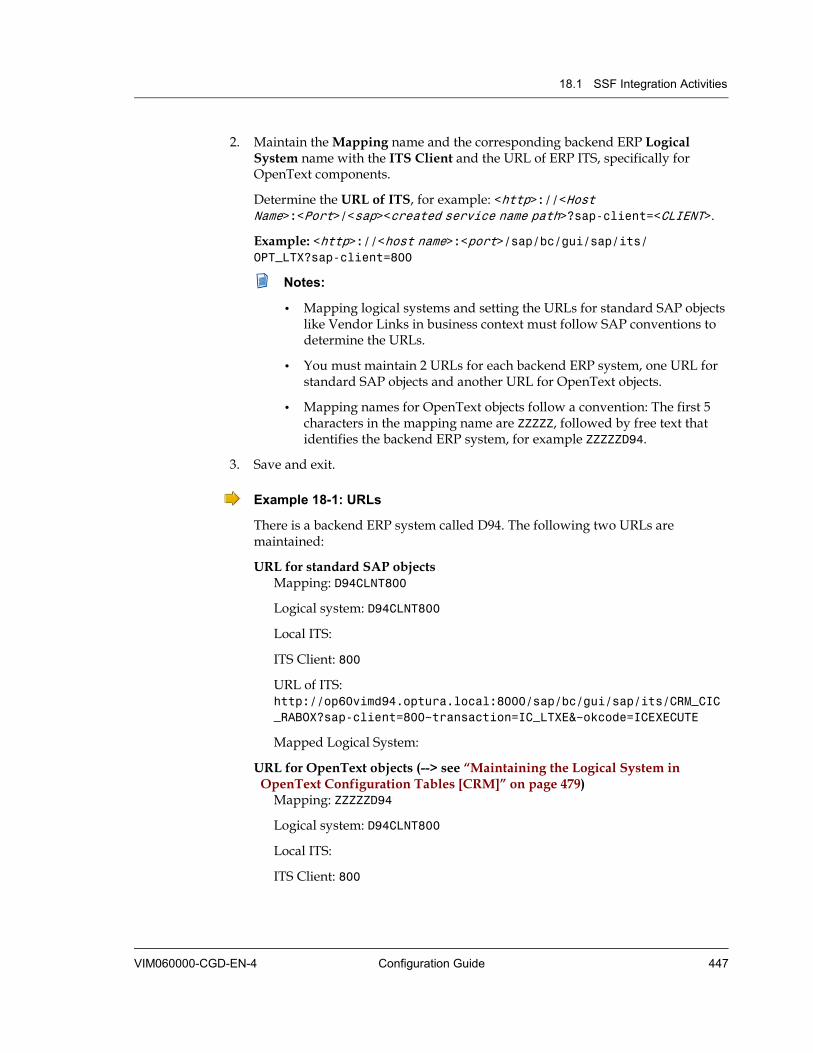
18.1 SSF Integration Activities
VIM060000-CGD-EN-4 Configuration Guide 447
2. Maintain the Mapping name and the corresponding backend ERP Logical System name with the ITS Client and the URL of ERP ITS, specifically for OpenText components.
Determine the URL of ITS, for example: <http>://<Host Name>:<Port>/<sap><created service name path>?sap-client=<CLIENT>.
Example: <http>://<host name>:<port>/sap/bc/gui/sap/its/-OPT_LTX?sap-client=800
Notes:
• Mapping logical systems and setting the URLs for standard SAP objects like Vendor Links in business context must follow SAP conventions to determine the URLs.
• You must maintain 2 URLs for each backend ERP system, one URL for standard SAP objects and another URL for OpenText objects.
• Mapping names for OpenText objects follow a convention: The first 5 characters in the mapping name are ZZZZZ, followed by free text that identifies the backend ERP system, for example ZZZZZD94.
3. Save and exit.
Example 18-1: URLs
There is a backend ERP system called D94. The following two URLs are maintained:
URL for standard SAP objects Mapping: D94CLNT800
Logical system: D94CLNT800
Local ITS:
ITS Client: 800
URL of ITS: http://op60vimd94.optura.local:8000/sap/bc/gui/sap/its/CRM_CIC_RABOX?sap-client=800~transaction=IC_LTXE&~okcode=ICEXECUTE
Mapped Logical System:
URL for OpenText objects (--> see “Maintaining the Logical System in OpenText Configuration Tables [CRM]” on page 479)
Mapping: ZZZZZD94
Logical system: D94CLNT800
Local ITS:
ITS Client: 800
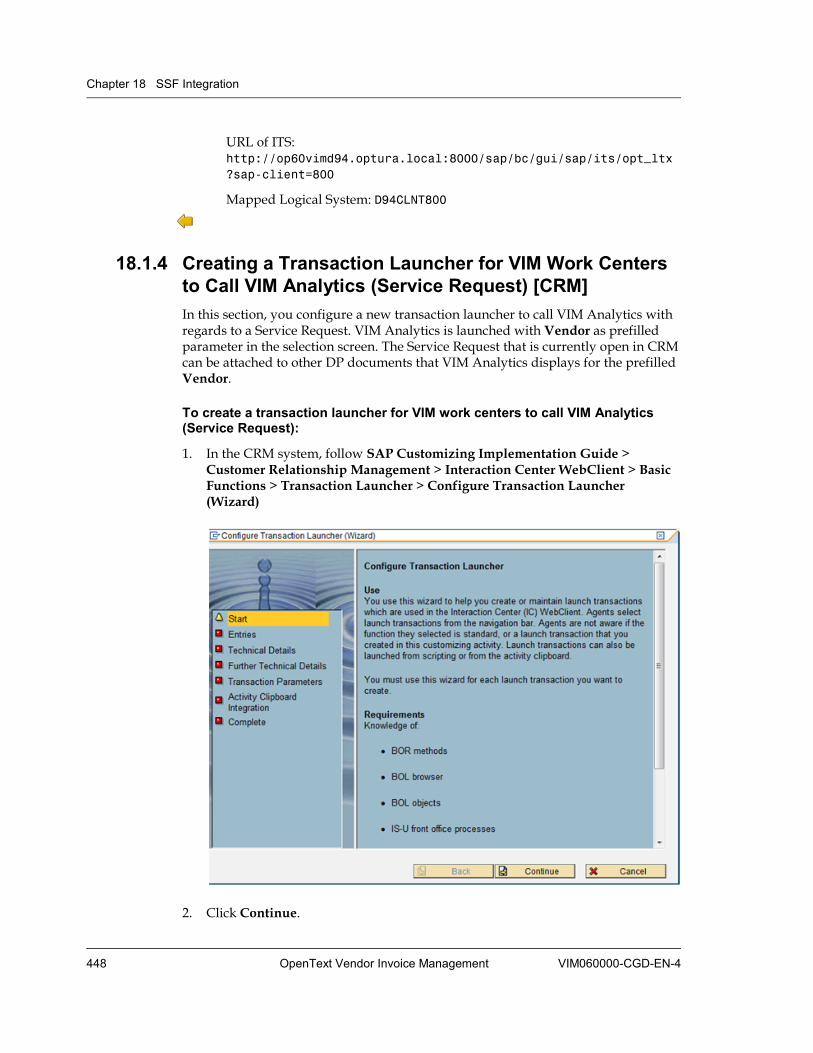
Chapter 18 SSF Integration
448 OpenText Vendor Invoice Management VIM060000-CGD-EN-4
URL of ITS: http://op60vimd94.optura.local:8000/sap/bc/gui/sap/its/opt_ltx?sap-client=800
Mapped Logical System: D94CLNT800
18.1.4 Creating a Transaction Launcher for VIM Work Centers to Call VIM Analytics (Service Request) [CRM] In this section, you configure a new transaction launcher to call VIM Analytics with regards to a Service Request. VIM Analytics is launched with Vendor as prefilled parameter in the selection screen. The Service Request that is currently open in CRM can be attached to other DP documents that VIM Analytics displays for the prefilled Vendor.
To create a transaction launcher for VIM work centers to call VIM Analytics (Service Request):
1. In the CRM system, follow SAP Customizing Implementation Guide > Customer Relationship Management > Interaction Center WebClient > Basic Functions > Transaction Launcher > Configure Transaction Launcher (Wizard)
2. Click Continue.
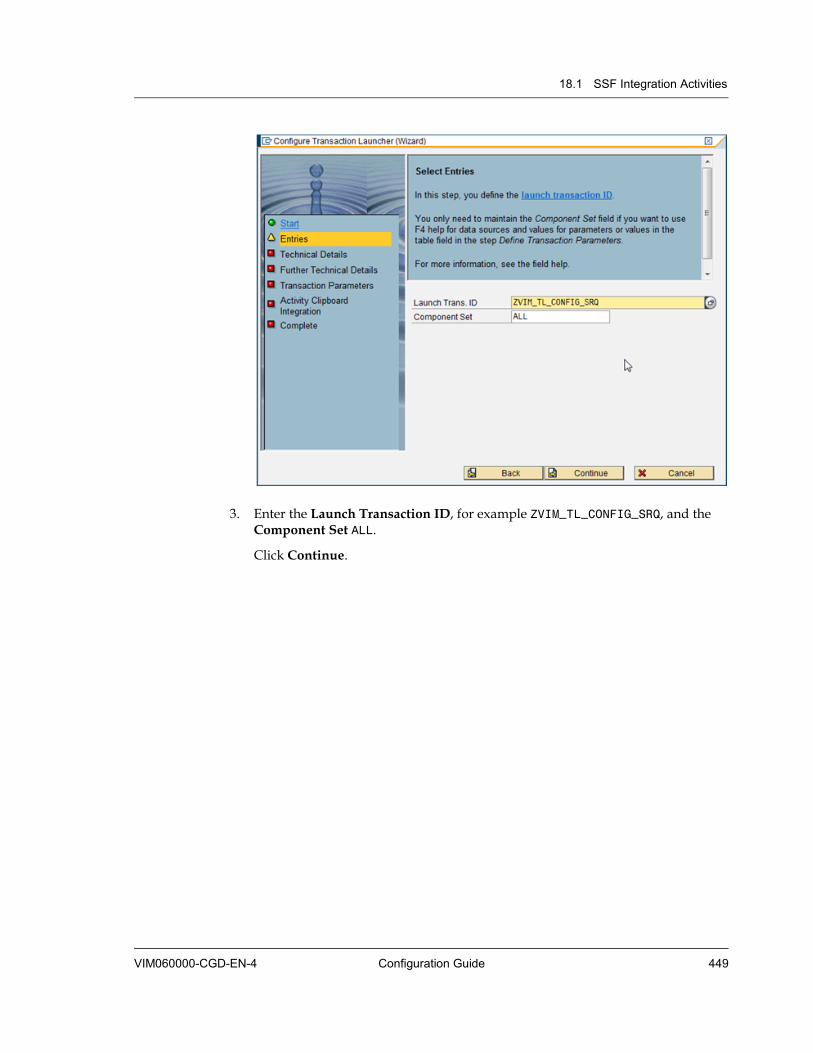
18.1 SSF Integration Activities
VIM060000-CGD-EN-4 Configuration Guide 449
3. Enter the Launch Transaction ID, for example ZVIM_TL_CONFIG_SRQ, and the Component Set ALL.
Click Continue.
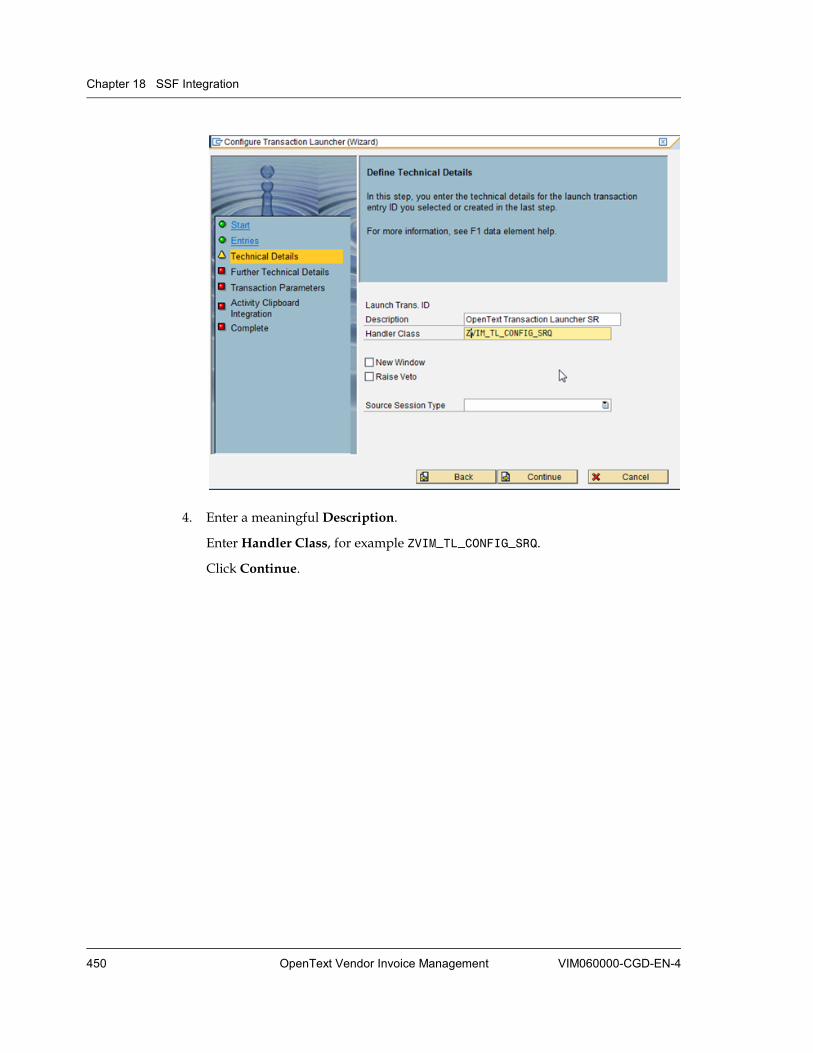
Chapter 18 SSF Integration
450 OpenText Vendor Invoice Management VIM060000-CGD-EN-4
4. Enter a meaningful Description.
Enter Handler Class, for example ZVIM_TL_CONFIG_SRQ.
Click Continue.
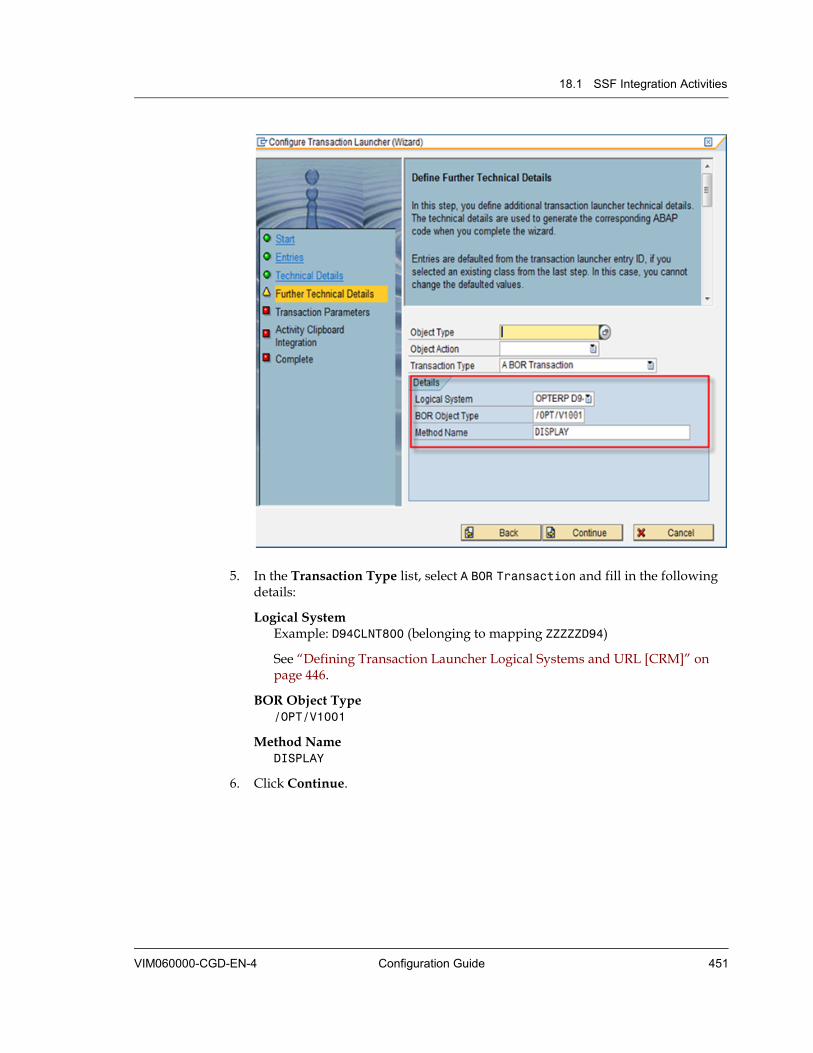
18.1 SSF Integration Activities
VIM060000-CGD-EN-4 Configuration Guide 451
5. In the Transaction Type list, select A BOR Transaction and fill in the following details:
Logical System Example: D94CLNT800 (belonging to mapping ZZZZZD94)
See “Defining Transaction Launcher Logical Systems and URL [CRM]” on page 446.
BOR Object Type /OPT/V1001
Method Name DISPLAY
6. Click Continue.
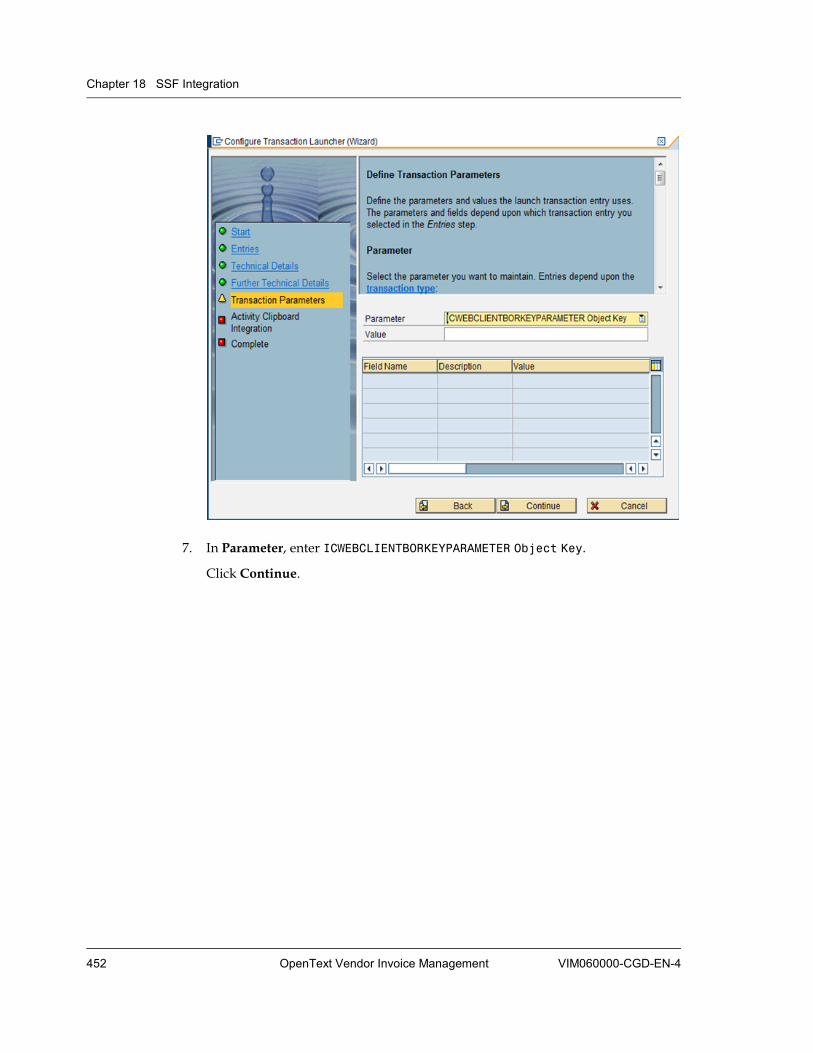
Chapter 18 SSF Integration
452 OpenText Vendor Invoice Management VIM060000-CGD-EN-4
7. In Parameter, enter ICWEBCLIENTBORKEYPARAMETER Object Key.
Click Continue.
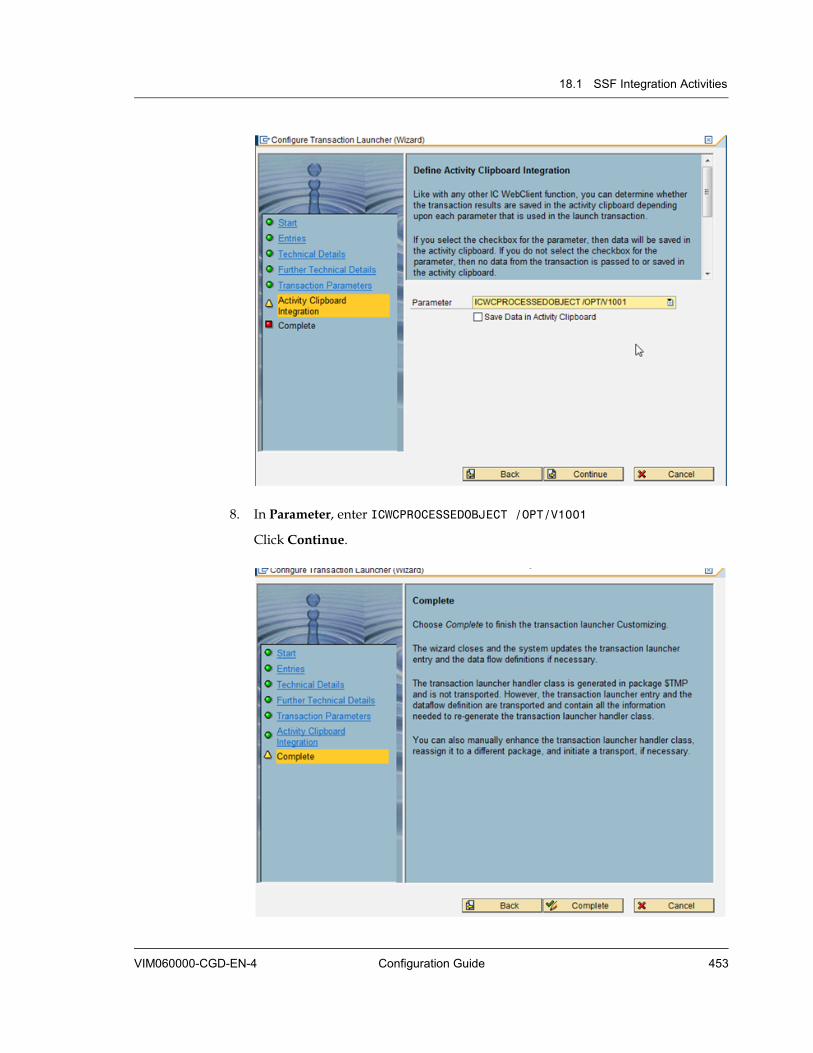
18.1 SSF Integration Activities
VIM060000-CGD-EN-4 Configuration Guide 453
8. In Parameter, enter ICWCPROCESSEDOBJECT /OPT/V1001
Click Continue.
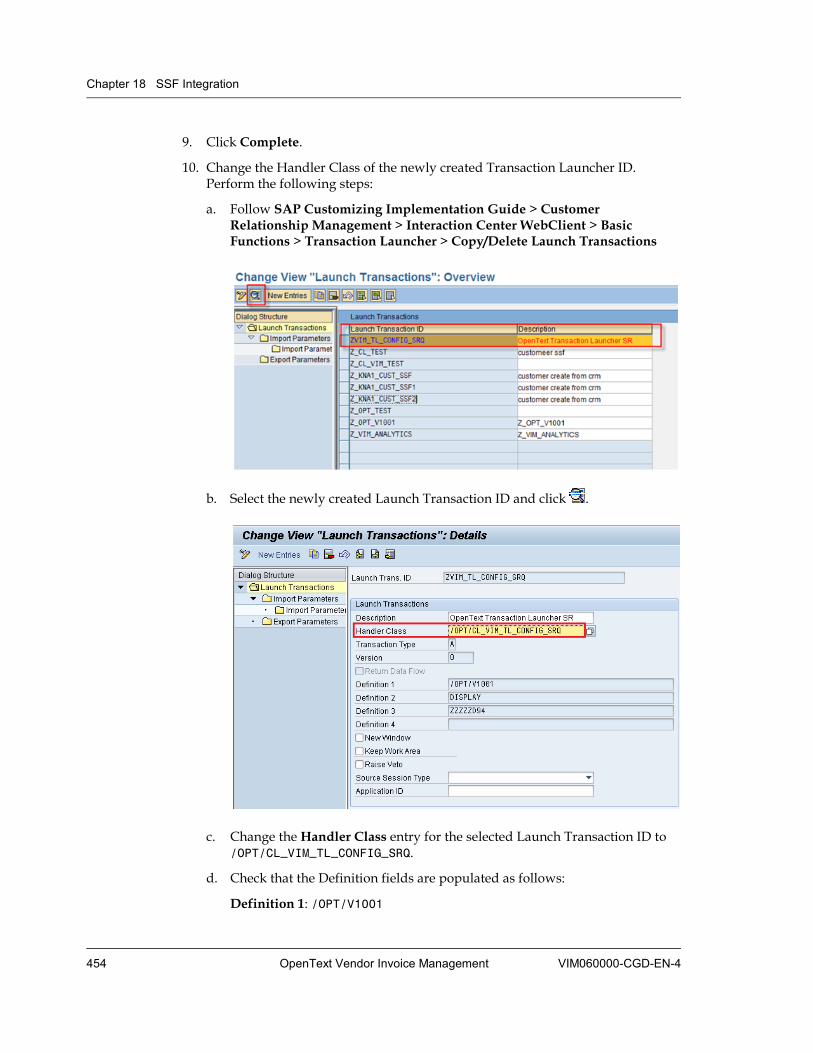
Chapter 18 SSF Integration
454 OpenText Vendor Invoice Management VIM060000-CGD-EN-4
9. Click Complete.
10. Change the Handler Class of the newly created Transaction Launcher ID. Perform the following steps:
a. Follow SAP Customizing Implementation Guide > Customer Relationship Management > Interaction Center WebClient > Basic Functions > Transaction Launcher > Copy/Delete Launch Transactions
b. Select the newly created Launch Transaction ID and click .
c. Change the Handler Class entry for the selected Launch Transaction ID to /OPT/CL_VIM_TL_CONFIG_SRQ.
d. Check that the Definition fields are populated as follows:
Definition 1: /OPT/V1001
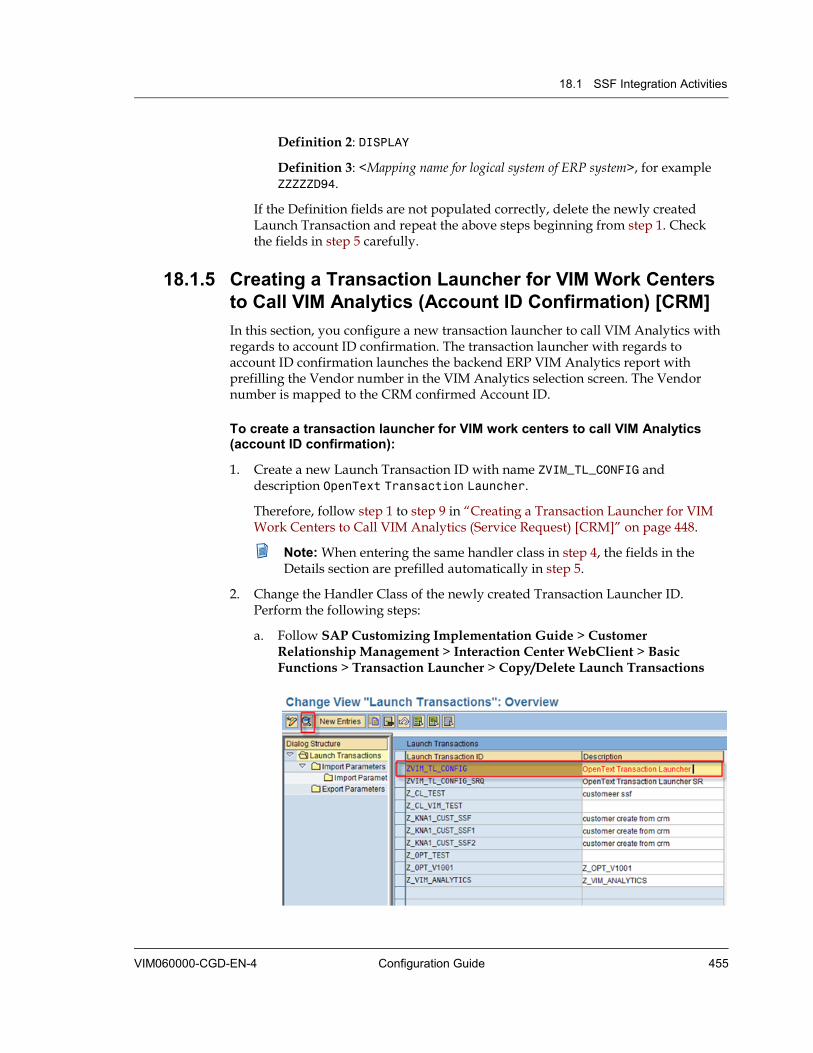
18.1 SSF Integration Activities
VIM060000-CGD-EN-4 Configuration Guide 455
Definition 2: DISPLAY
Definition 3: <Mapping name for logical system of ERP system>, for example ZZZZZD94.
If the Definition fields are not populated correctly, delete the newly created Launch Transaction and repeat the above steps beginning from step 1. Check the fields in step 5 carefully.
18.1.5 Creating a Transaction Launcher for VIM Work Centers to Call VIM Analytics (Account ID Confirmation) [CRM] In this section, you configure a new transaction launcher to call VIM Analytics with regards to account ID confirmation. The transaction launcher with regards to account ID confirmation launches the backend ERP VIM Analytics report with prefilling the Vendor number in the VIM Analytics selection screen. The Vendor number is mapped to the CRM confirmed Account ID.
To create a transaction launcher for VIM work centers to call VIM Analytics (account ID confirmation):
1. Create a new Launch Transaction ID with name ZVIM_TL_CONFIG and description OpenText Transaction Launcher.
Therefore, follow step 1 to step 9 in “Creating a Transaction Launcher for VIM Work Centers to Call VIM Analytics (Service Request) [CRM]” on page 448.
Note: When entering the same handler class in step 4, the fields in the Details section are prefilled automatically in step 5.
2. Change the Handler Class of the newly created Transaction Launcher ID. Perform the following steps:
a. Follow SAP Customizing Implementation Guide > Customer Relationship Management > Interaction Center WebClient > Basic Functions > Transaction Launcher > Copy/Delete Launch Transactions
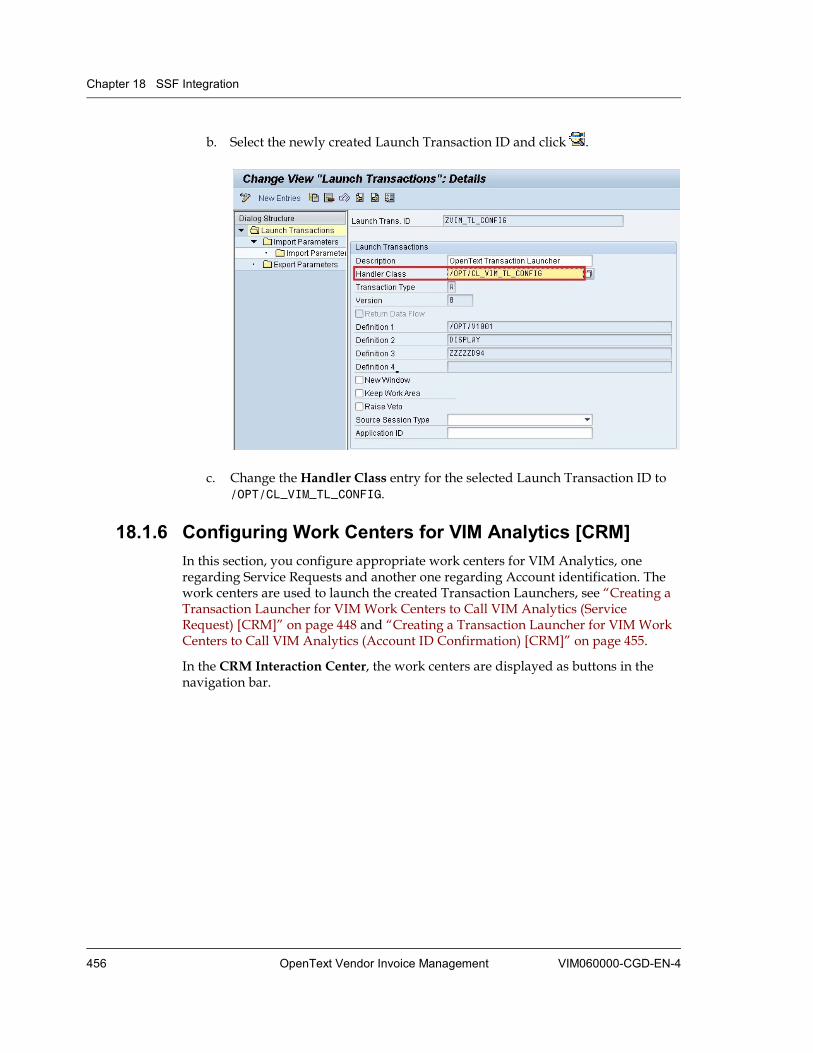
Chapter 18 SSF Integration
456 OpenText Vendor Invoice Management VIM060000-CGD-EN-4
b. Select the newly created Launch Transaction ID and click .
c. Change the Handler Class entry for the selected Launch Transaction ID to /OPT/CL_VIM_TL_CONFIG.
18.1.6 Configuring Work Centers for VIM Analytics [CRM] In this section, you configure appropriate work centers for VIM Analytics, one regarding Service Requests and another one regarding Account identification. The work centers are used to launch the created Transaction Launchers, see “Creating a Transaction Launcher for VIM Work Centers to Call VIM Analytics (Service Request) [CRM]” on page 448 and “Creating a Transaction Launcher for VIM Work Centers to Call VIM Analytics (Account ID Confirmation) [CRM]” on page 455.
In the CRM Interaction Center, the work centers are displayed as buttons in the navigation bar.
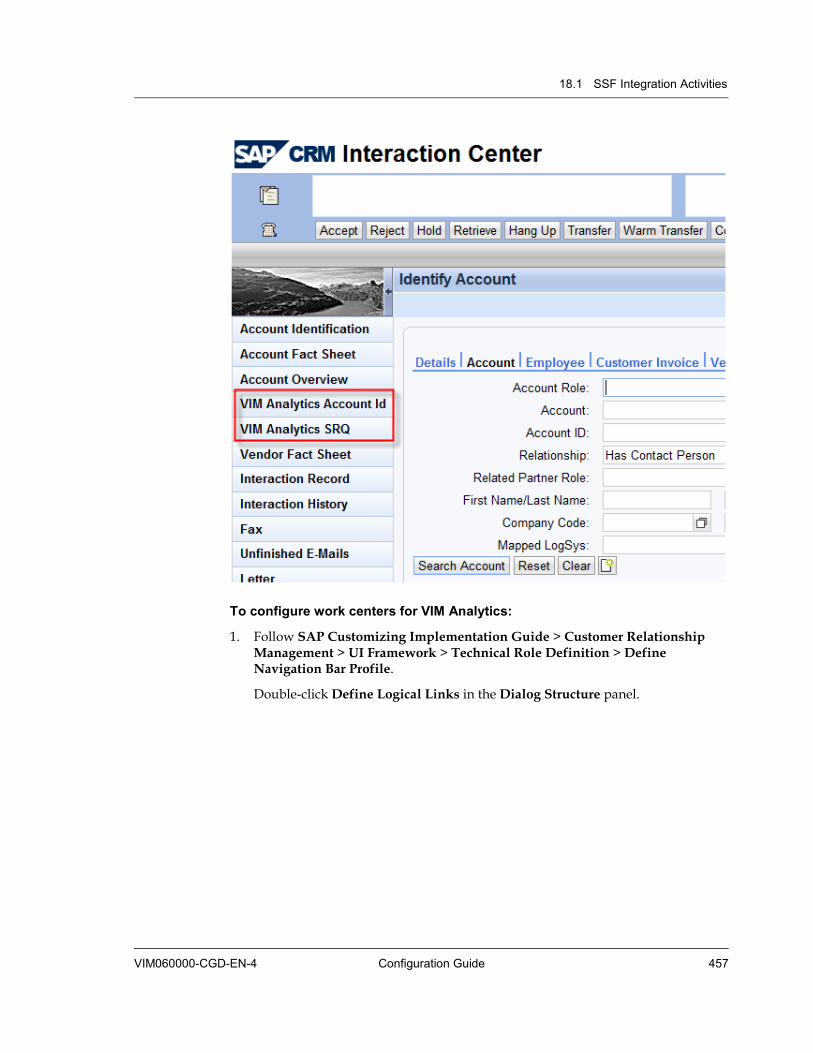
18.1 SSF Integration Activities
VIM060000-CGD-EN-4 Configuration Guide 457
To configure work centers for VIM Analytics:
1. Follow SAP Customizing Implementation Guide > Customer Relationship Management > UI Framework > Technical Role Definition > Define Navigation Bar Profile.
Double-click Define Logical Links in the Dialog Structure panel.

Chapter 18 SSF Integration
458 OpenText Vendor Invoice Management VIM060000-CGD-EN-4
2. In the Define Logical Links screen, click New Entries and create a new Logical Link ID using the following parameters:
Logical Link ID <Name of the Logical Link ID>, for example ZAIC_LINK1
Type Launch Transaction
Target ID EXECLTX
Parameter <Your Launch Transaction ID>, for example ZVIM_TL_CONFIG_SRQ; see “Creating a Transaction Launcher for VIM Work Centers to Call VIM Analytics (Service Request) [CRM]” on page 448
Parameter Class CL_CRM_UI_LTX_NAVBAR_PARAM
Title VIM Analytics SRQ
Description VIM Analytics SRQ
Save the new Logical Link ID and exit.
3. Click New Entries again and create another new Logical Link ID using the following parameters:
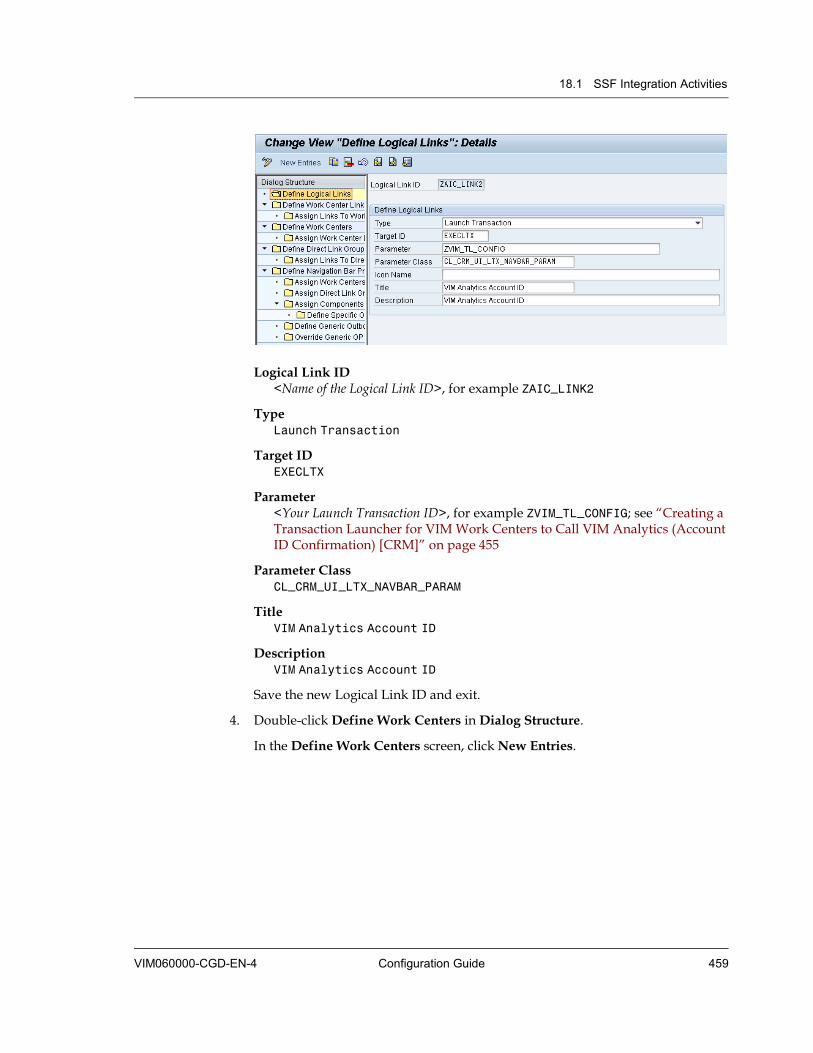
18.1 SSF Integration Activities
VIM060000-CGD-EN-4 Configuration Guide 459
Logical Link ID <Name of the Logical Link ID>, for example ZAIC_LINK2
Type Launch Transaction
Target ID EXECLTX
Parameter <Your Launch Transaction ID>, for example ZVIM_TL_CONFIG; see “Creating a Transaction Launcher for VIM Work Centers to Call VIM Analytics (Account ID Confirmation) [CRM]” on page 455
Parameter Class CL_CRM_UI_LTX_NAVBAR_PARAM
Title VIM Analytics Account ID
Description VIM Analytics Account ID
Save the new Logical Link ID and exit.
4. Double-click Define Work Centers in Dialog Structure.
In the Define Work Centers screen, click New Entries.
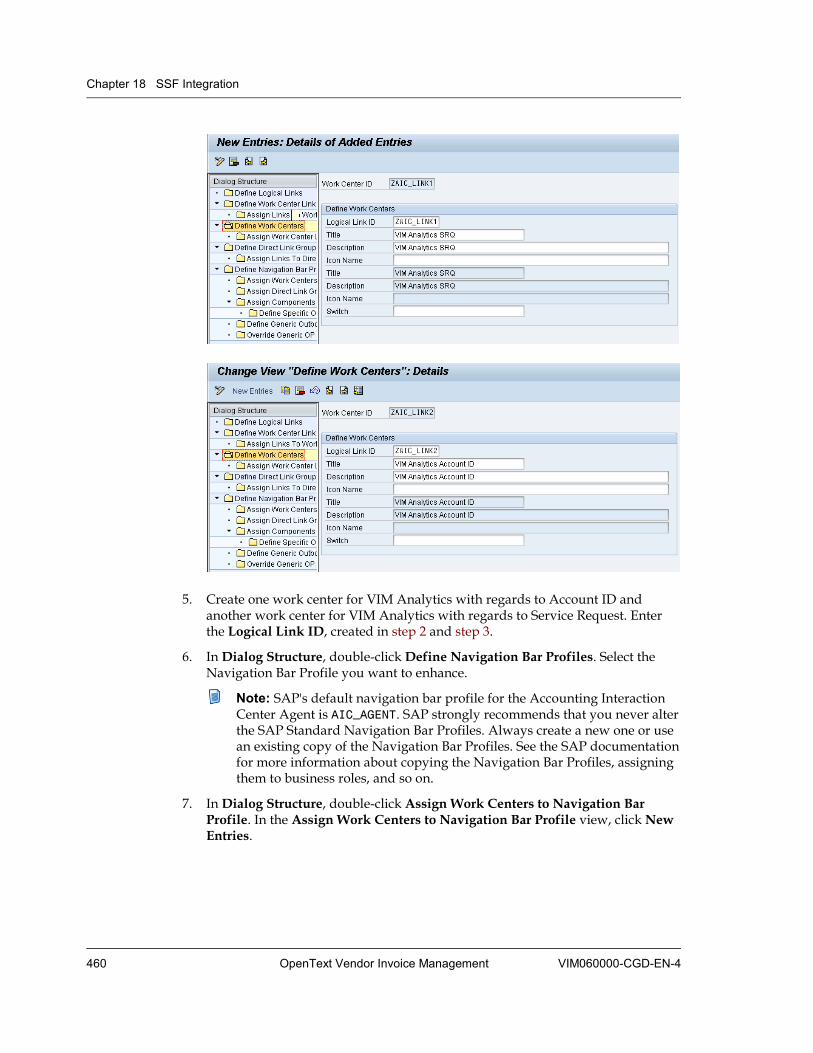
Chapter 18 SSF Integration
460 OpenText Vendor Invoice Management VIM060000-CGD-EN-4
5. Create one work center for VIM Analytics with regards to Account ID and another work center for VIM Analytics with regards to Service Request. Enter the Logical Link ID, created in step 2 and step 3.
6. In Dialog Structure, double-click Define Navigation Bar Profiles. Select the Navigation Bar Profile you want to enhance.
Note: SAP's default navigation bar profile for the Accounting Interaction Center Agent is AIC_AGENT. SAP strongly recommends that you never alter the SAP Standard Navigation Bar Profiles. Always create a new one or use an existing copy of the Navigation Bar Profiles. See the SAP documentation for more information about copying the Navigation Bar Profiles, assigning them to business roles, and so on.
7. In Dialog Structure, double-click Assign Work Centers to Navigation Bar Profile. In the Assign Work Centers to Navigation Bar Profile view, click New Entries.

18.1 SSF Integration Activities
VIM060000-CGD-EN-4 Configuration Guide 461
8. Assign the 2 work centers you have created and enter the position at which the work centers should be located within the navigation bar.
Save your changes.
18.1.7 Configuring Business Context Links for OpenText Linked Objects in Service Request [CRM] The purpose of this section is to launch the Transaction Launcher to call VIM Analytics appropriately when the user clicks OpenText linked objects, for example a DP document link attached to a Service Request in the Business Context. When a user clicks a DP document link in the Business Context, VIM Analytics is launched and directly displays the DP document detail output without the VIM Analytics selection screen
To configure Business Context links:
1. Follow SAP Customizing Implementation Guide > Customer Relationship Management > Transactions > Settings for Service Requests > Define Settings for Business Context.
2. In the Define Object Link Types screen, click New Entries.

Chapter 18 SSF Integration
462 OpenText Vendor Invoice Management VIM060000-CGD-EN-4
3. Define a Link Type with the same name as business object name: /OPT/V1001 with Description of Object Link Type: OpenText DP document and save the Link Type.
Note: Ignore a warning to choose the key from the allowed namespace.
4. Select the Link Type /OPT/V1001 and double-click Define Object Link Type Details in Dialog Structure.
5. In the Define Object Link Type Details screen, click New Entries.
6. Enter Object Link Class /OPT/CL_FSSC_BC_LINK_DP for the Object Link Type /OPT/V1001 and save the configuration.
Note: Ignore a warning to choose the key from the allowed namespace.
7. Double-click Define Object Link Profile in Dialog Structure and select the Link Prof. SSF_AIC.
.
8. Double-click Assign Object Link Types in Dialog Structure.
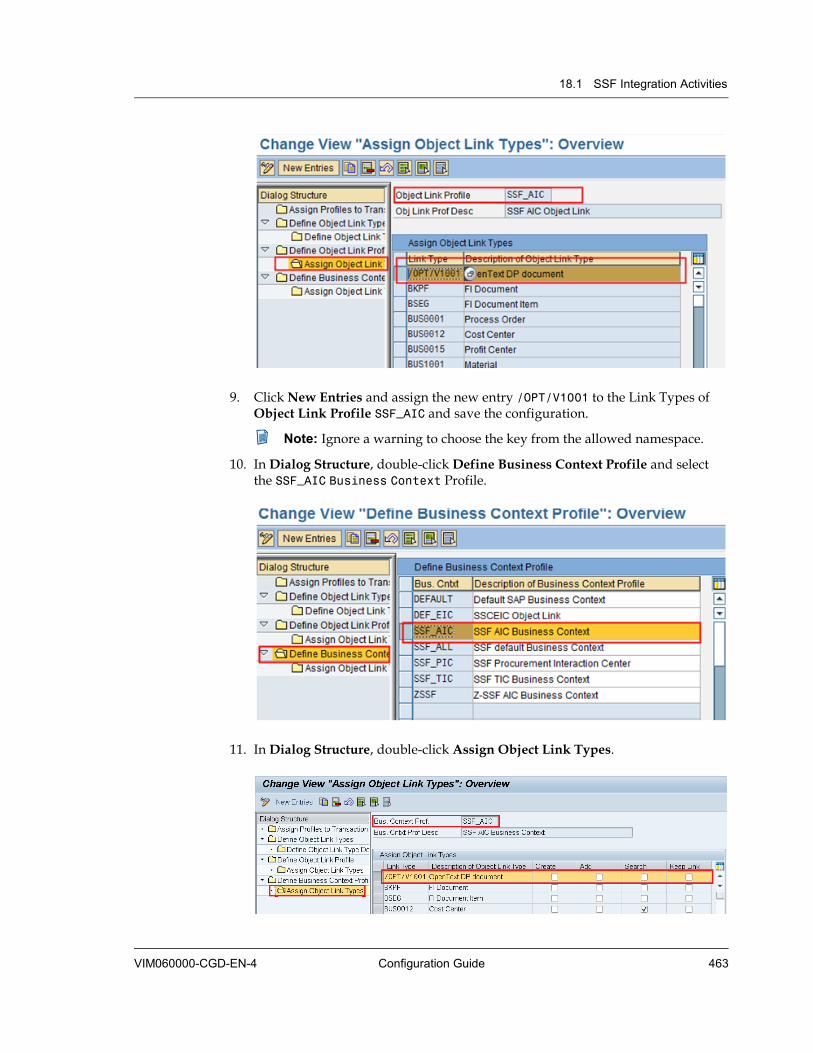
18.1 SSF Integration Activities
VIM060000-CGD-EN-4 Configuration Guide 463
9. Click New Entries and assign the new entry /OPT/V1001 to the Link Types of Object Link Profile SSF_AIC and save the configuration.
Note: Ignore a warning to choose the key from the allowed namespace.
10. In Dialog Structure, double-click Define Business Context Profile and select the SSF_AIC Business Context Profile.
11. In Dialog Structure, double-click Assign Object Link Types.

Chapter 18 SSF Integration
464 OpenText Vendor Invoice Management VIM060000-CGD-EN-4
12. Click New Entries, define the new entry /OPT/V1001.
Save the configuration.
Note: Ignore a warning to choose the key from the allowed namespace.
13. In Dialog Structure, double-click Define Business Context Profile and select the Business Context Profile SSF_ALL.
14. In Dialog Structure, double-click Assign Object Link Types.
15. Click New Entries, define the new entry /OPT/V1001.
Save the configuration.
Note: Ignore a warning to choose the key from the allowed namespace.
16. Follow SAP Customizing Implementation Guide > Customer Relationship Management > UI Framework > Technical Role Definition > Define Navigation Bar Profile.
In Dialog Structure, double-click Define Logical Links.

18.1 SSF Integration Activities
VIM060000-CGD-EN-4 Configuration Guide 465
17. In the Define Logical Links screen, click New Entries and create a new Logical Link ID for Service Request Business Context DP links, using the following parameters:
Type Enter Link.
Parameter Enter the already created Launch Transaction ID (see “Creating a Transaction Launcher for VIM Work Centers to Call VIM Analytics (Service Request) [CRM]” on page 448) with regards to the Service Request work center.
Save the configuration.
18. In Dialog Structure, double-click Define Navigation Bar Profiles and select the custom Navigation Bar Profile.
19. In Dialog Structure, double-click Define Generic Outbound Plug Mapping.
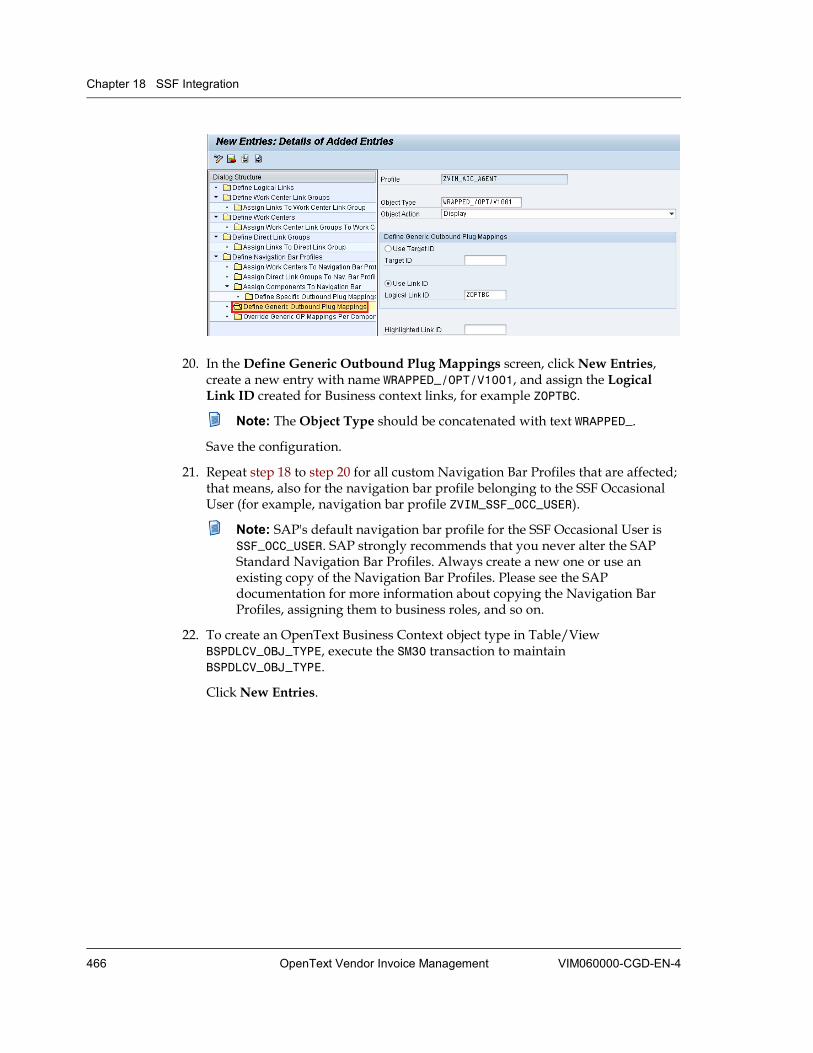
Chapter 18 SSF Integration
466 OpenText Vendor Invoice Management VIM060000-CGD-EN-4
20. In the Define Generic Outbound Plug Mappings screen, click New Entries,create a new entry with name WRAPPED_/OPT/V1001, and assign the Logical Link ID created for Business context links, for example ZOPTBC.
Note: The Object Type should be concatenated with text WRAPPED_.
Save the configuration.
21. Repeat step 18 to step 20 for all custom Navigation Bar Profiles that are affected; that means, also for the navigation bar profile belonging to the SSF Occasional User (for example, navigation bar profile ZVIM_SSF_OCC_USER).
Note: SAP's default navigation bar profile for the SSF Occasional User is SSF_OCC_USER. SAP strongly recommends that you never alter the SAP Standard Navigation Bar Profiles. Always create a new one or use an existing copy of the Navigation Bar Profiles. Please see the SAP documentation for more information about copying the Navigation Bar Profiles, assigning them to business roles, and so on.
22. To create an OpenText Business Context object type in Table/View BSPDLCV_OBJ_TYPE, execute the SM30 transaction to maintain BSPDLCV_OBJ_TYPE.
Click New Entries.

18.1 SSF Integration Activities
VIM060000-CGD-EN-4 Configuration Guide 467
23. Enter the following parameters:
Object Type WRAPPED_/OPT/V1001
Description OpenText Document
GenIL Component Name SO2
BOL Object Name ICBORWrapper
BOR Object Type /OPT/V1001
24. Save and exit.
18.1.8 Configuring the OpenText Vendor Factsheet BSP Component [CRM] The OpenText Vendor Factsheet is a consolidated report for a selected Vendor in VIM that is displayed in the CRM UI.
To configure the OpenText Vendor Factsheet BSP component:
1. Follow SAP Customizing Implementation Guide > Customer Relationship Management > CRM Cross-Application Components > Generic Interaction Layer/Object Layer > Basic Settings.
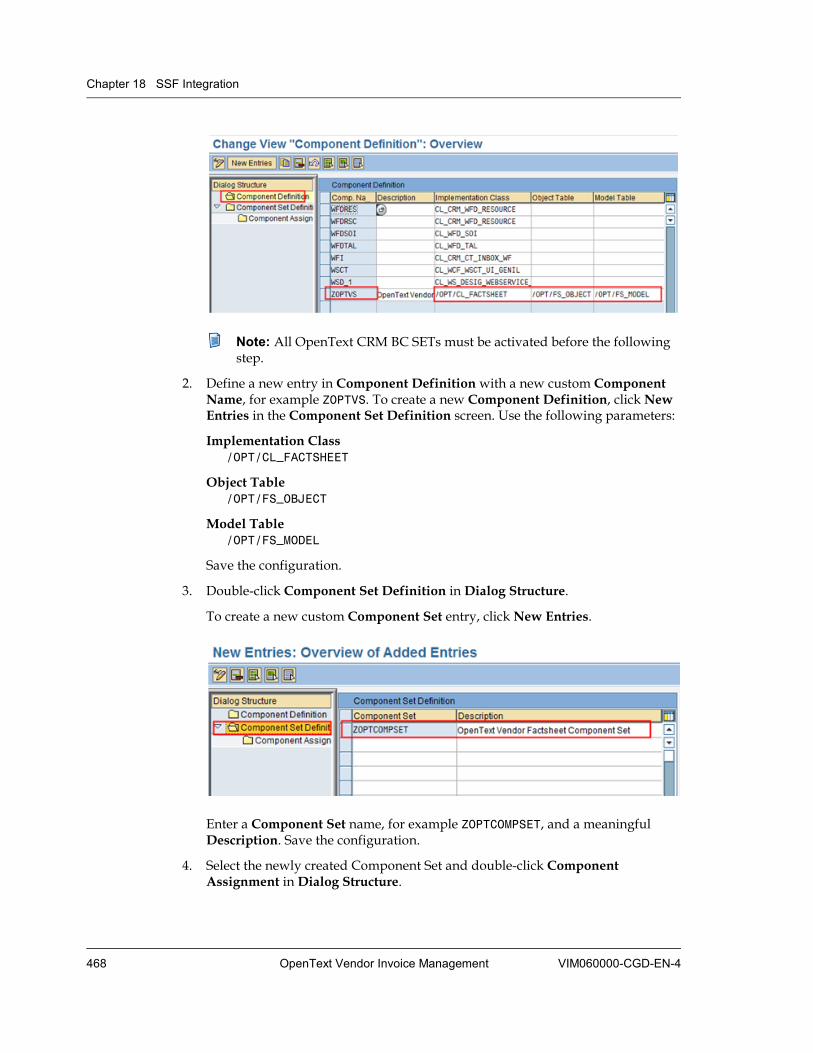
Chapter 18 SSF Integration
468 OpenText Vendor Invoice Management VIM060000-CGD-EN-4
Note: All OpenText CRM BC SETs must be activated before the following step.
2. Define a new entry in Component Definition with a new custom Component Name, for example ZOPTVS. To create a new Component Definition, click New Entries in the Component Set Definition screen. Use the following parameters:
Implementation Class /OPT/CL_FACTSHEET
Object Table /OPT/FS_OBJECT
Model Table /OPT/FS_MODEL
Save the configuration.
3. Double-click Component Set Definition in Dialog Structure.
To create a new custom Component Set entry, click New Entries.
Enter a Component Set name, for example ZOPTCOMPSET, and a meaningful Description. Save the configuration.
4. Select the newly created Component Set and double-click Component Assignment in Dialog Structure.

18.1 SSF Integration Activities
VIM060000-CGD-EN-4 Configuration Guide 469
In the Component Assignment screen, click New Entries, assign the newly created Component Name to the newly created Component Set, and save the configuration.
5. To assign models to the Business Component, execute the BSP_WD_CMPWB transaction (UI Component Workbench), enter the Component /OPT/VENDOR_FS, and click Display.
6. Click Runtime Repository Editor, expand the Models node and click to switch to edit mode.
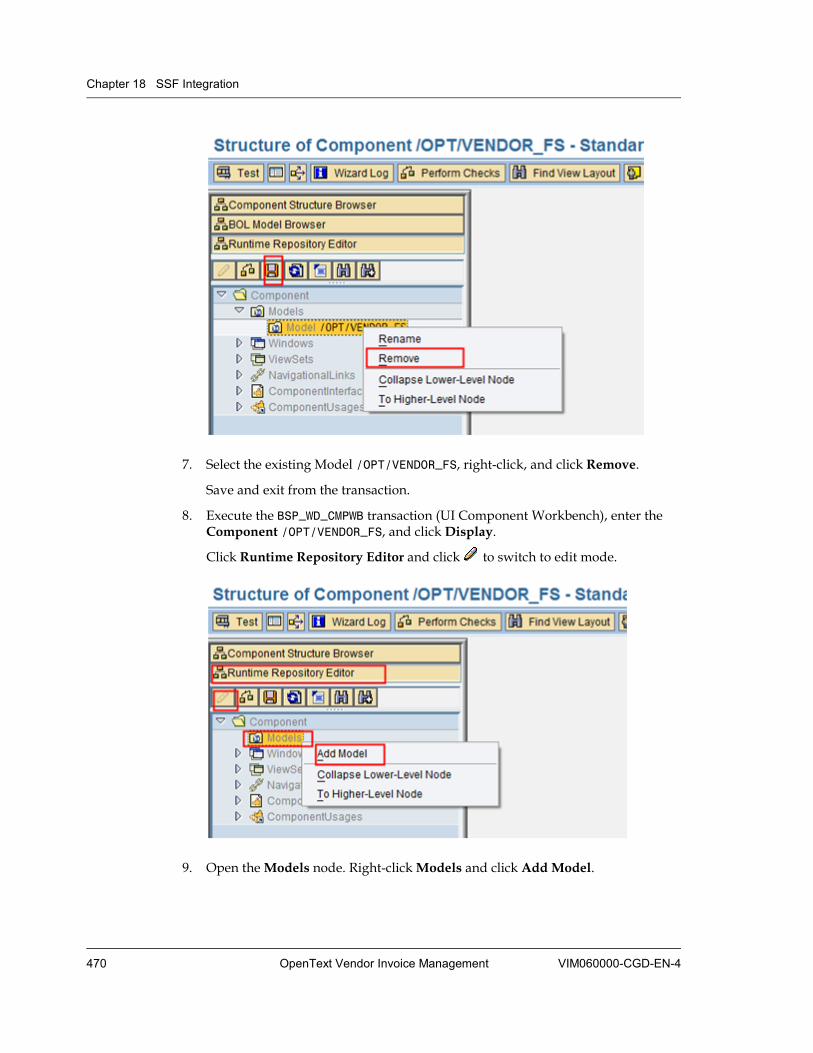
Chapter 18 SSF Integration
470 OpenText Vendor Invoice Management VIM060000-CGD-EN-4
7. Select the existing Model /OPT/VENDOR_FS, right-click, and click Remove.
Save and exit from the transaction.
8. Execute the BSP_WD_CMPWB transaction (UI Component Workbench), enter the Component /OPT/VENDOR_FS, and click Display.
Click Runtime Repository Editor and click to switch to edit mode.
9. Open the Models node. Right-click Models and click Add Model.
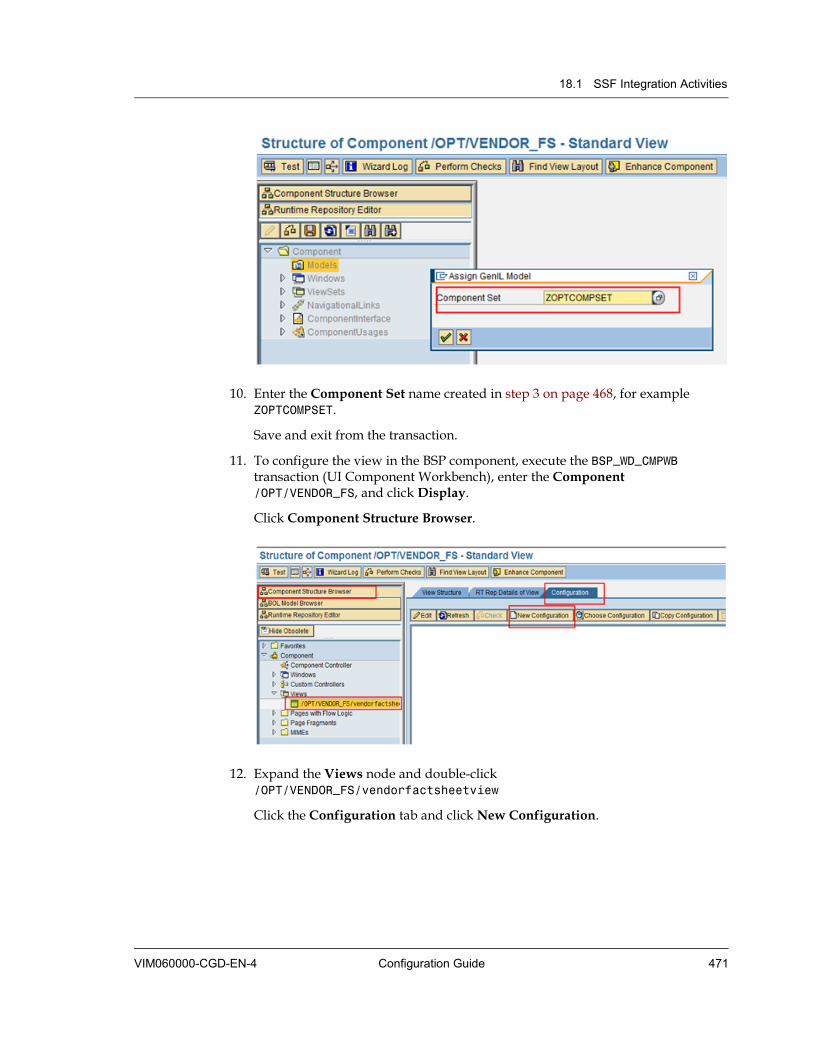
18.1 SSF Integration Activities
VIM060000-CGD-EN-4 Configuration Guide 471
10. Enter the Component Set name created in step 3 on page 468, for example ZOPTCOMPSET.
Save and exit from the transaction.
11. To configure the view in the BSP component, execute the BSP_WD_CMPWB transaction (UI Component Workbench), enter the Component /OPT/VENDOR_FS, and click Display.
Click Component Structure Browser.
12. Expand the Views node and double-click /OPT/VENDOR_FS/vendorfactsheetview
Click the Configuration tab and click New Configuration.

Chapter 18 SSF Integration
472 OpenText Vendor Invoice Management VIM060000-CGD-EN-4
13. Keep the default prefilled values:
Parameter Name Value
Role Config. Key <DEFAULT>
Note: If you use a customer specific Role Config. Key, do not enter <DEFAULT> but your customer specific Role Config. Key.
Component Usage <DEFAULT>
Object Type <DEFAULT>
Object Subtype <DEFAULT>
Click .
Press the ENTER key and assign to a Transport Request.
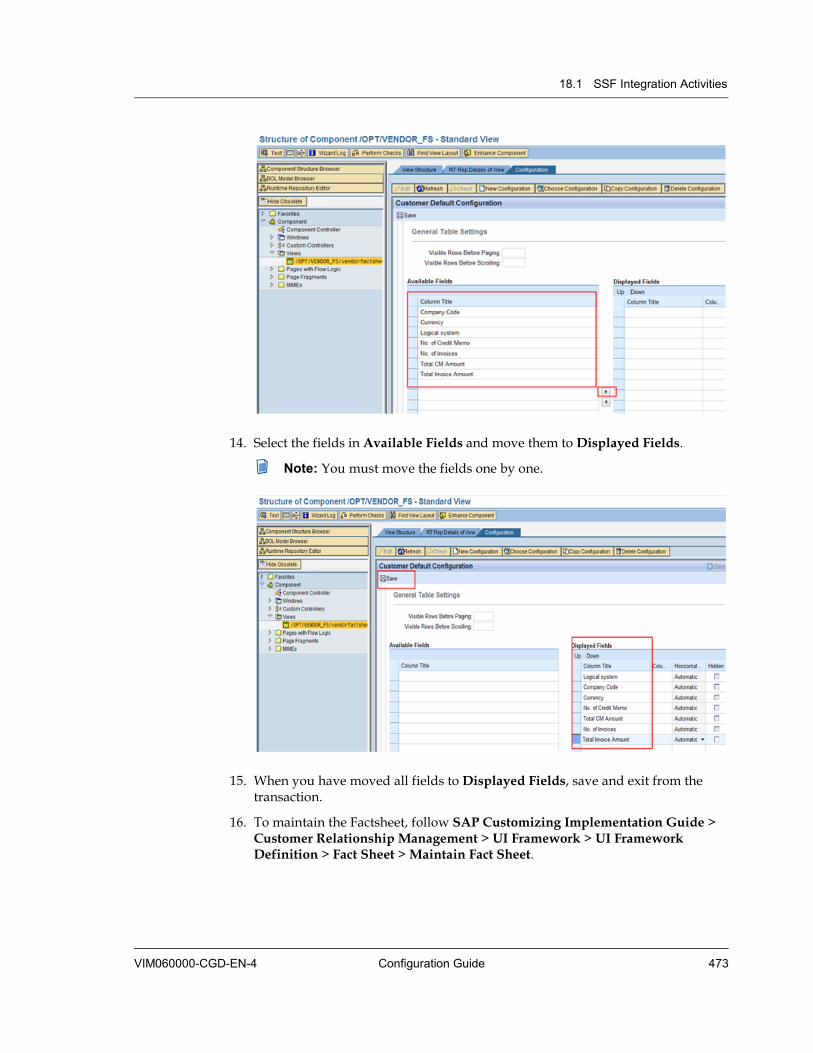
18.1 SSF Integration Activities
VIM060000-CGD-EN-4 Configuration Guide 473
14. Select the fields in Available Fields and move them to Displayed Fields.
Note: You must move the fields one by one.
15. When you have moved all fields to Displayed Fields, save and exit from the transaction.
16. To maintain the Factsheet, follow SAP Customizing Implementation Guide > Customer Relationship Management > UI Framework > UI Framework Definition > Fact Sheet > Maintain Fact Sheet.

Chapter 18 SSF Integration
474 OpenText Vendor Invoice Management VIM060000-CGD-EN-4
17. Choose the Fact Sheet ID to plug the OpenText Vendor Factsheet. You can add the BSP Component /OPT/VENDOR_FS to any of the Fact Sheet IDs. In the example, the BSP Component /OPT/VENDOR_FS is added to Fact Sheet ID FSSC_VEND_FS.
Select the Fact Sheet ID FSSC_VEND_FS and double-click View Assignments in Dialog Structure.
18. Create a new entry with the following details:
Component Name /OPT/VENDOR_FS
Interface View Select /OPT/VENDOR_FS/MainWindow from the drop-down list (F4 help).
Inbound Plug DEFAULT
Title OpenText Vendor Factsheet ID
Save and exit from the customizing.
Note: Ignore a warning to choose the key from the allowed namespace.
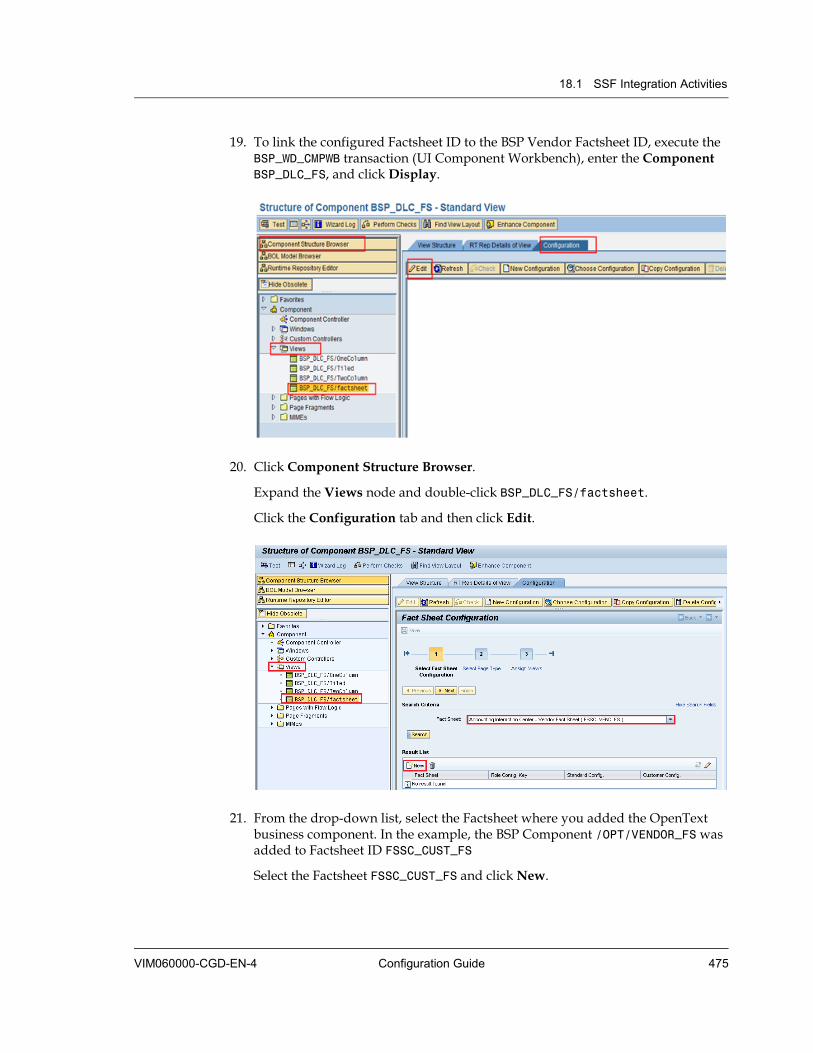
18.1 SSF Integration Activities
VIM060000-CGD-EN-4 Configuration Guide 475
19. To link the configured Factsheet ID to the BSP Vendor Factsheet ID, execute the BSP_WD_CMPWB transaction (UI Component Workbench), enter the Component BSP_DLC_FS, and click Display.
20. Click Component Structure Browser.
Expand the Views node and double-click BSP_DLC_FS/factsheet.
Click the Configuration tab and then click Edit.
21. From the drop-down list, select the Factsheet where you added the OpenText business component. In the example, the BSP Component /OPT/VENDOR_FS was added to Factsheet ID FSSC_CUST_FS
Select the Factsheet FSSC_CUST_FS and click New.
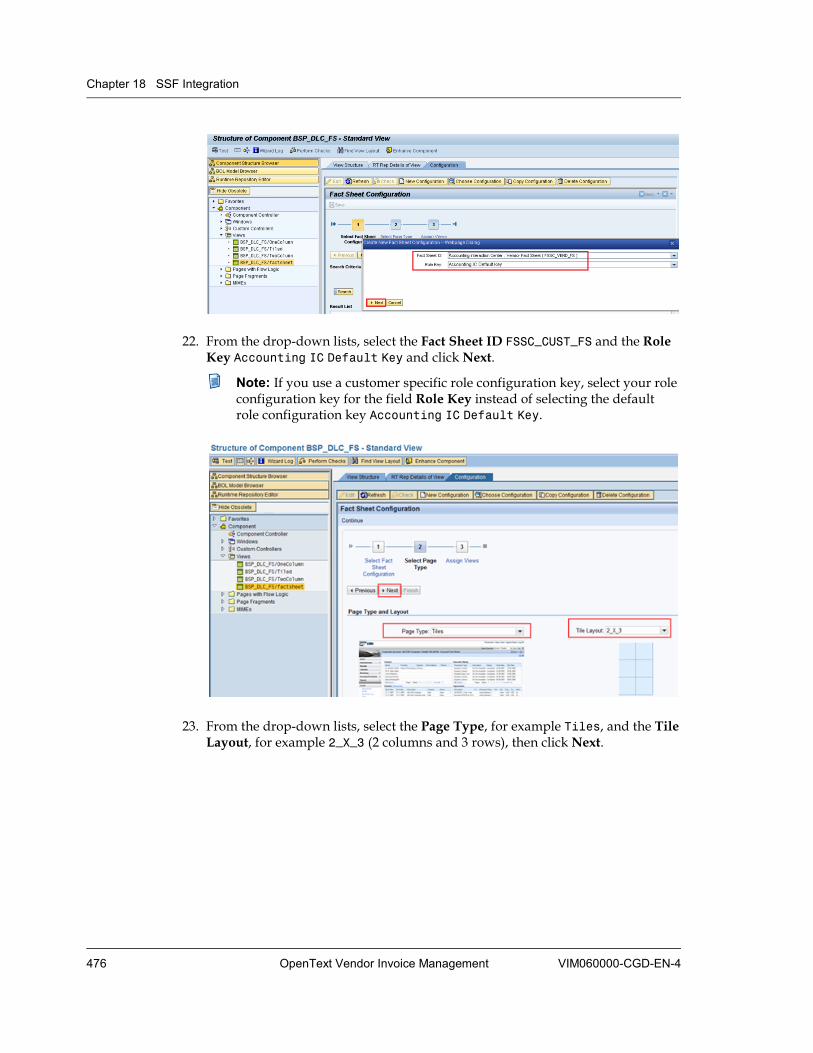
Chapter 18 SSF Integration
476 OpenText Vendor Invoice Management VIM060000-CGD-EN-4
22. From the drop-down lists, select the Fact Sheet ID FSSC_CUST_FS and the Role Key Accounting IC Default Key and click Next.
Note: If you use a customer specific role configuration key, select your role configuration key for the field Role Key instead of selecting the default role configuration key Accounting IC Default Key.
23. From the drop-down lists, select the Page Type, for example Tiles, and the Tile Layout, for example 2_X_3 (2 columns and 3 rows), then click Next.
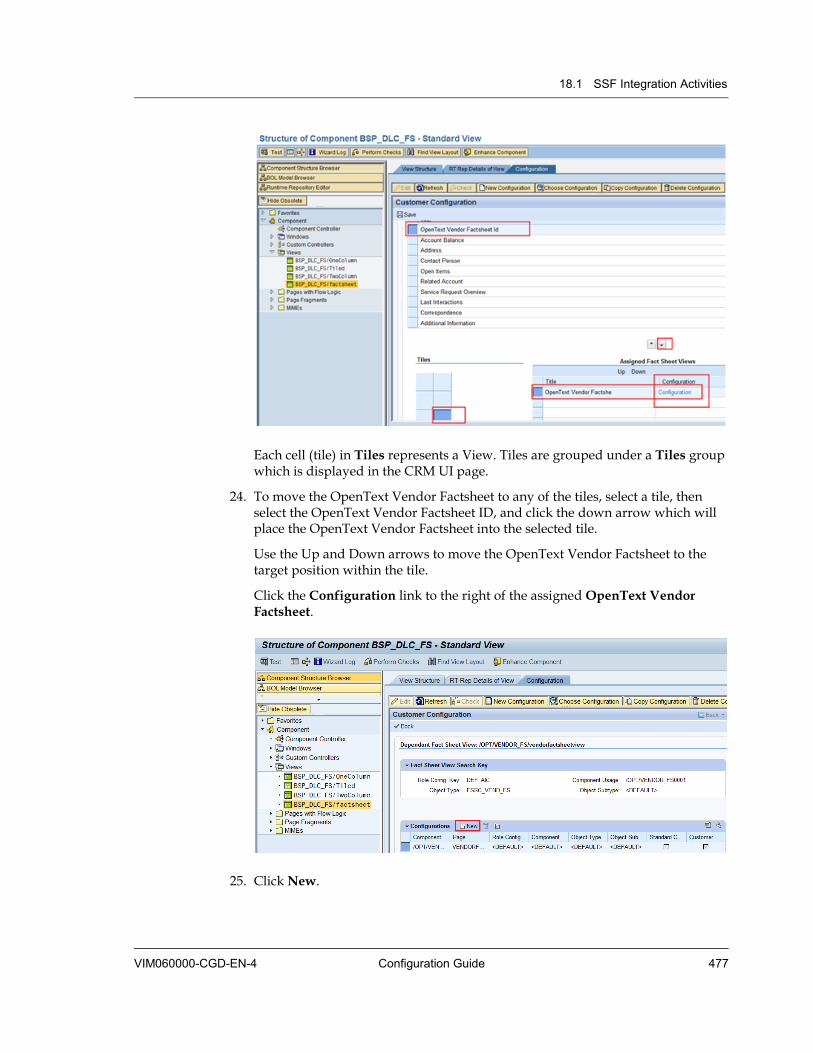
18.1 SSF Integration Activities
VIM060000-CGD-EN-4 Configuration Guide 477
Each cell (tile) in Tiles represents a View. Tiles are grouped under a Tiles group which is displayed in the CRM UI page.
24. To move the OpenText Vendor Factsheet to any of the tiles, select a tile, then select the OpenText Vendor Factsheet ID, and click the down arrow which will place the OpenText Vendor Factsheet into the selected tile.
Use the Up and Down arrows to move the OpenText Vendor Factsheet to the target position within the tile.
Click the Configuration link to the right of the assigned OpenText Vendor Factsheet.
25. Click New.
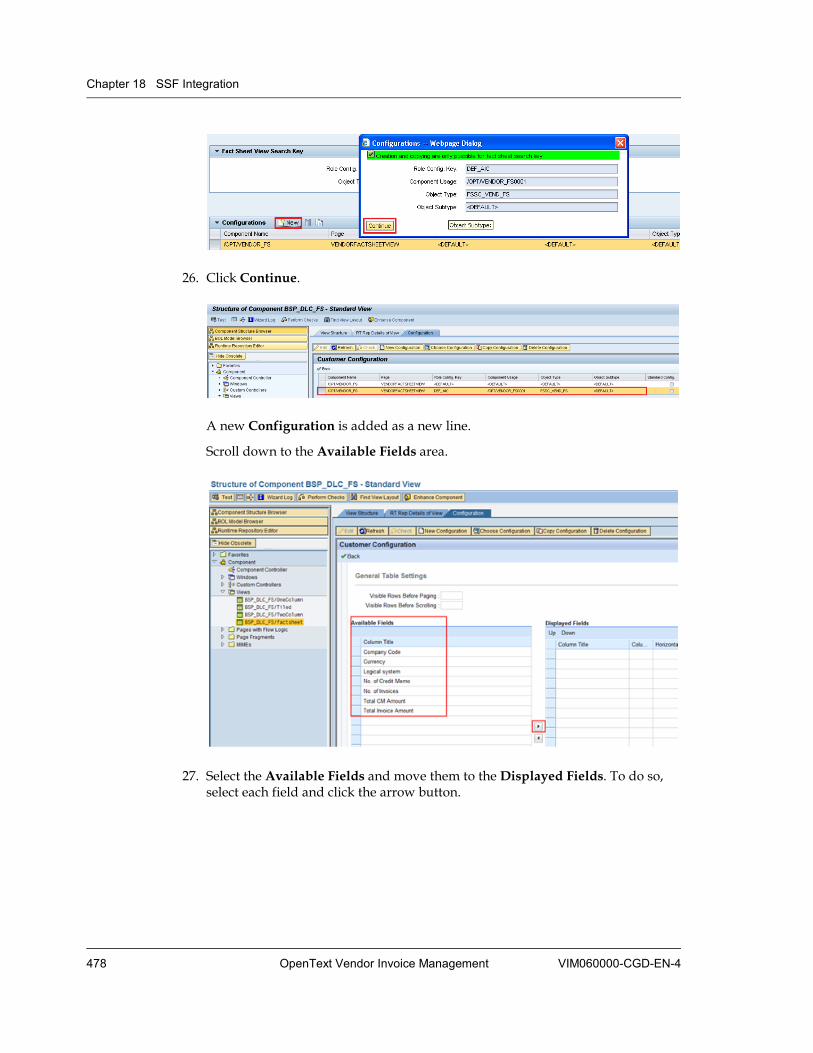
Chapter 18 SSF Integration
478 OpenText Vendor Invoice Management VIM060000-CGD-EN-4
26. Click Continue.
A new Configuration is added as a new line.
Scroll down to the Available Fields area.
27. Select the Available Fields and move them to the Displayed Fields. To do so, select each field and click the arrow button.
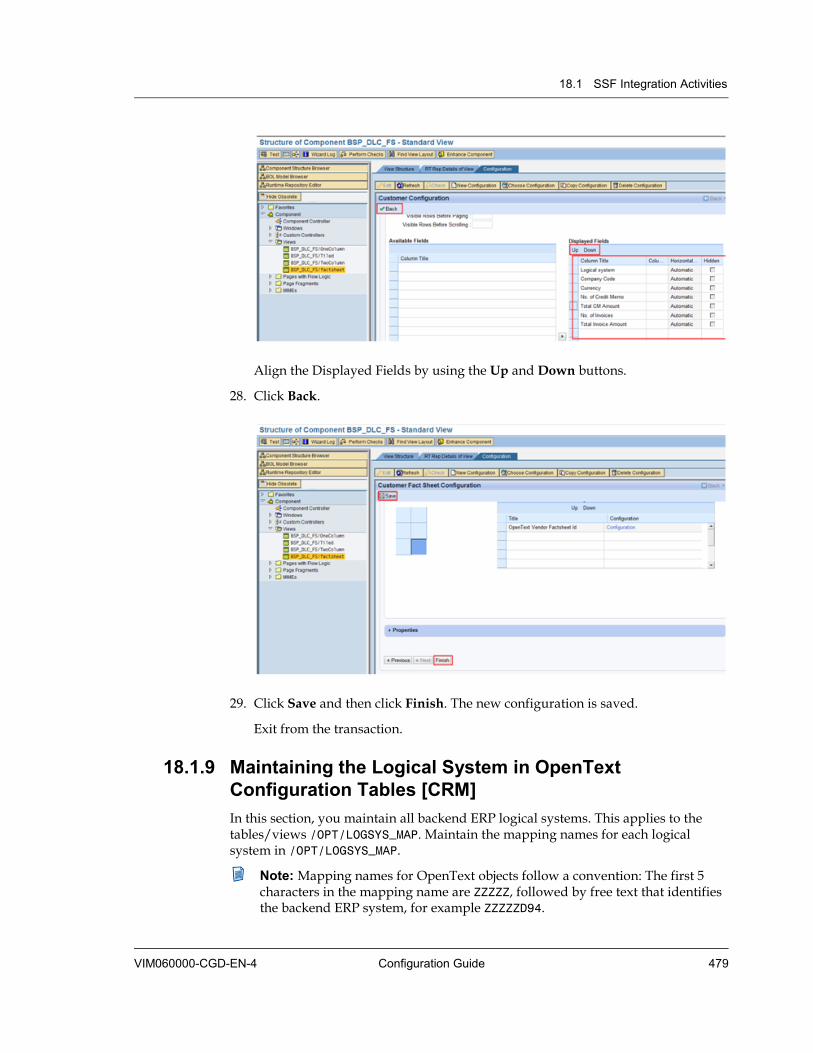
18.1 SSF Integration Activities
VIM060000-CGD-EN-4 Configuration Guide 479
Align the Displayed Fields by using the Up and Down buttons.
28. Click Back.
29. Click Save and then click Finish. The new configuration is saved.
Exit from the transaction.
18.1.9 Maintaining the Logical System in OpenText Configuration Tables [CRM] In this section, you maintain all backend ERP logical systems. This applies to the tables/views /OPT/LOGSYS_MAP. Maintain the mapping names for each logical system in /OPT/LOGSYS_MAP.
Note: Mapping names for OpenText objects follow a convention: The first 5 characters in the mapping name are ZZZZZ, followed by free text that identifies the backend ERP system, for example ZZZZZD94.
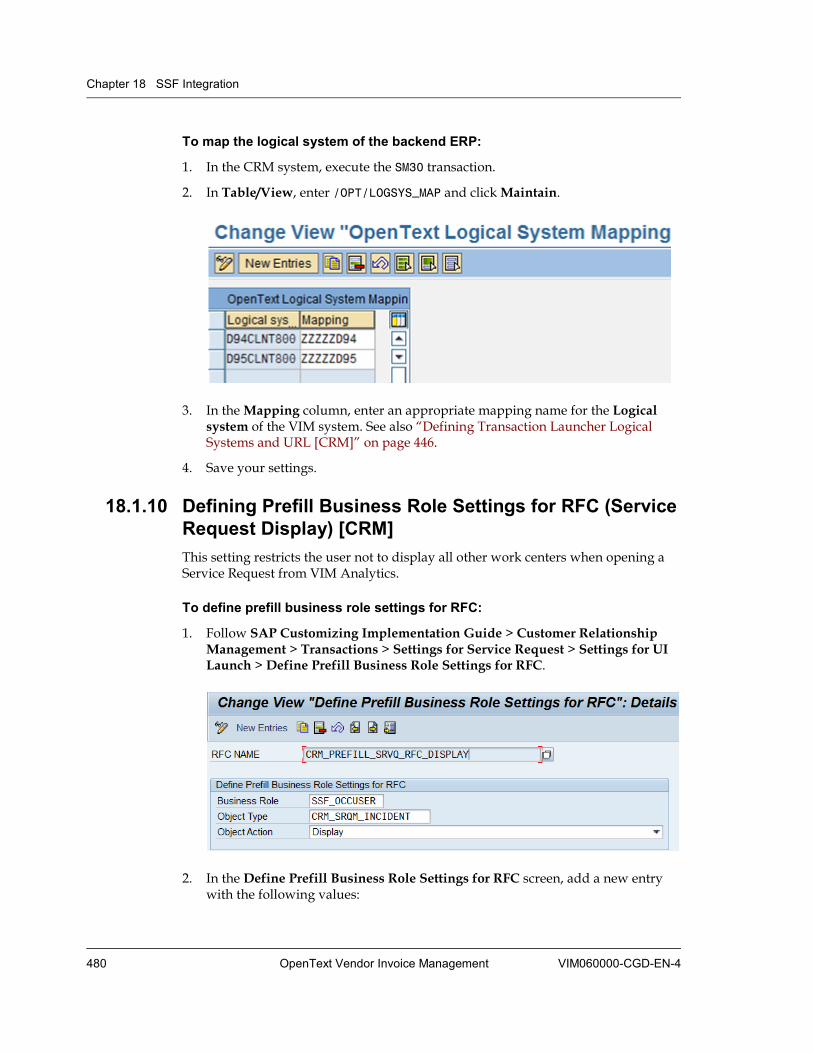
Chapter 18 SSF Integration
480 OpenText Vendor Invoice Management VIM060000-CGD-EN-4
To map the logical system of the backend ERP:
1. In the CRM system, execute the SM30 transaction.
2. In Table/View, enter /OPT/LOGSYS_MAP and click Maintain.
3. In the Mapping column, enter an appropriate mapping name for the Logical system of the VIM system. See also “Defining Transaction Launcher Logical Systems and URL [CRM]” on page 446.
4. Save your settings.
18.1.10 Defining Prefill Business Role Settings for RFC (Service Request Display) [CRM] This setting restricts the user not to display all other work centers when opening a Service Request from VIM Analytics.
To define prefill business role settings for RFC:
1. Follow SAP Customizing Implementation Guide > Customer Relationship Management > Transactions > Settings for Service Request > Settings for UI Launch > Define Prefill Business Role Settings for RFC.
2. In the Define Prefill Business Role Settings for RFC screen, add a new entry with the following values:

18.2 Maintaining the Initialization Procedure for Service Requests [ERP]
VIM060000-CGD-EN-4 Configuration Guide 481
RFC Name CRM_PREFILL_SRVQ_RFC_DISPLAY
Business Role <Name of your business role for the SSF Occasional User>, for example ZVIM_SSF_OCC
Object Type CRM_SRQM_INCIDENT
Object Action Display
3. Save your settings.
4. Repeat step 2 and step 3 to create a second entry with the following values:
RFC Name CRM_PREFILL_SRVQ_RFC_CREATION
Business Role <Name of your business role for the SSF Occasional User>, for example ZVIM_SSF_OCC
Object Type CRM_SRQM_INCIDENT
Object Action Create
5. Repeat step 2 and step 3 to create a third entry with the following values:
RFC Name CRM_PREFILL_SRVQ_RFC_SEARCH
Business Role <Name of your business role for the SSF Occasional User>, for example ZVIM_SSF_OCC
Object Type CRM_SRQM_INCIDENT
Object Action Search
18.2 Maintaining the Initialization Procedure for Service Requests [ERP] The initialization procedure defines the fields in the CRM service request that will be initialized. Moreover, the initialization procedure provides the configuration options to set initial values to these fields.
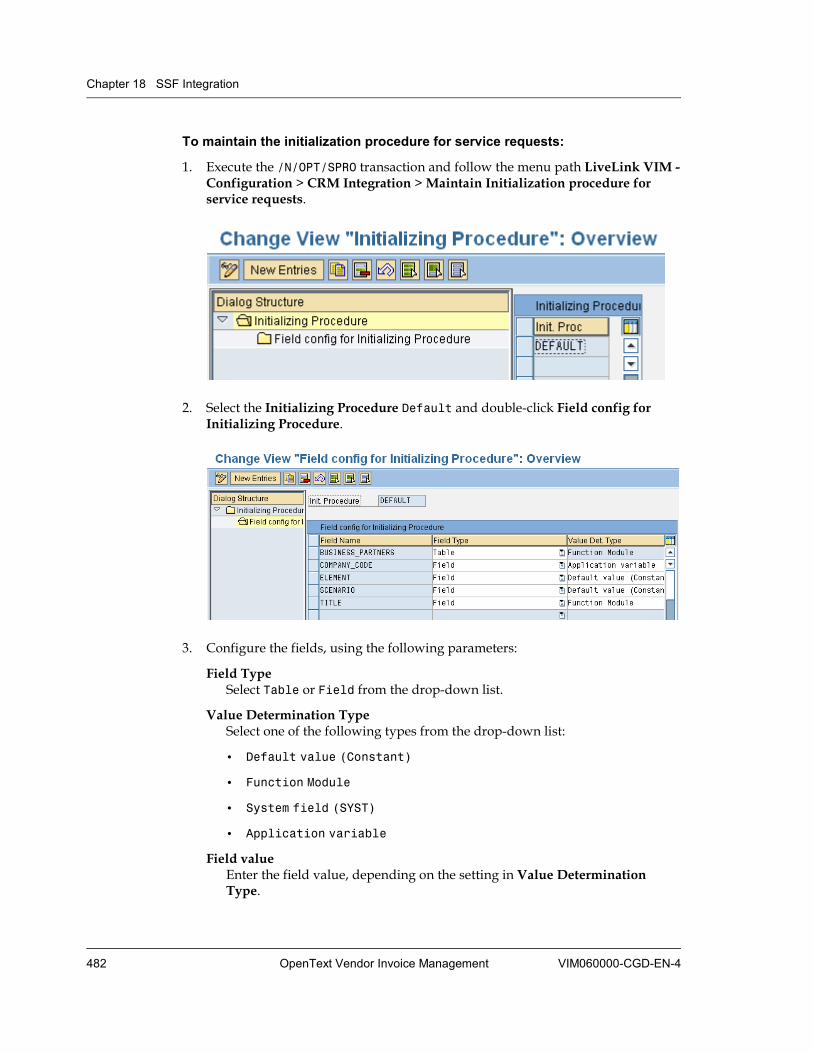
Chapter 18 SSF Integration
482 OpenText Vendor Invoice Management VIM060000-CGD-EN-4
To maintain the initialization procedure for service requests:
1. Execute the /N/OPT/SPRO transaction and follow the menu path LiveLink VIM - Configuration > CRM Integration > Maintain Initialization procedure for service requests.
2. Select the Initializing Procedure Default and double-click Field config for Initializing Procedure.
3. Configure the fields, using the following parameters:
Field Type Select Table or Field from the drop-down list.
Value Determination Type Select one of the following types from the drop-down list:
• Default value (Constant)
• Function Module
• System field (SYST)
• Application variable
Field value Enter the field value, depending on the setting in Value Determination Type.
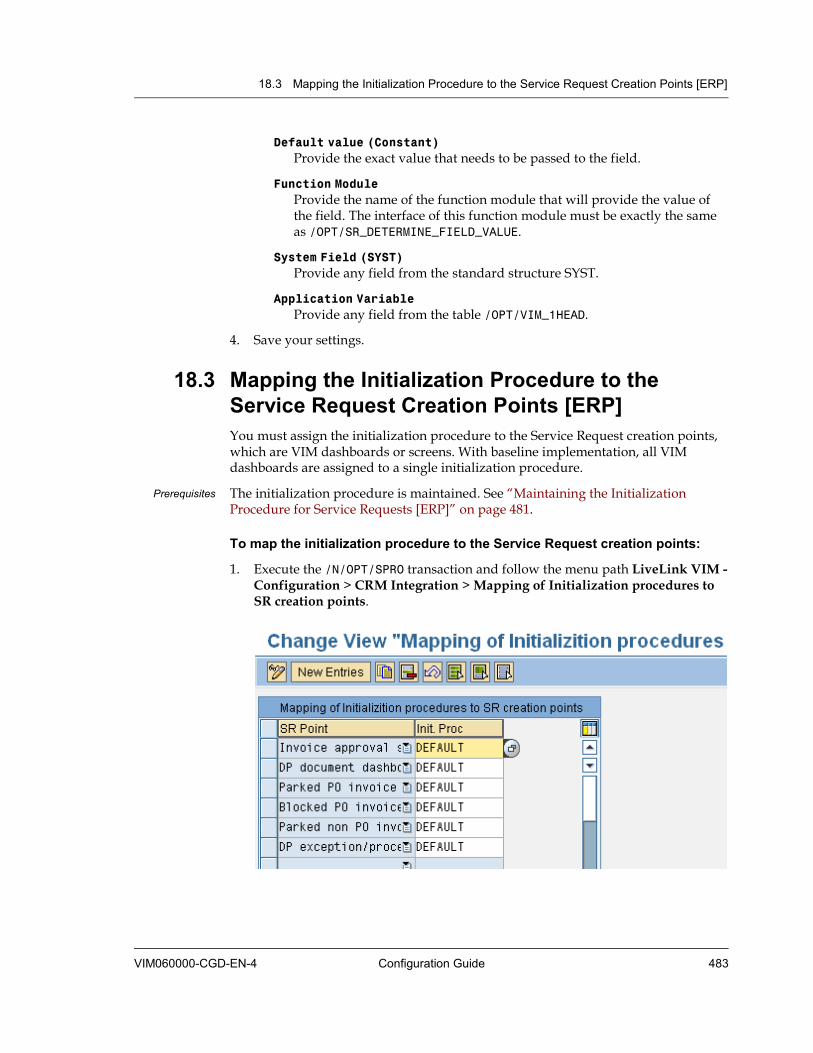
18.3 Mapping the Initialization Procedure to the Service Request Creation Points [ERP]
VIM060000-CGD-EN-4 Configuration Guide 483
Default value (Constant) Provide the exact value that needs to be passed to the field.
Function Module Provide the name of the function module that will provide the value of the field. The interface of this function module must be exactly the same as /OPT/SR_DETERMINE_FIELD_VALUE.
System Field (SYST) Provide any field from the standard structure SYST.
Application Variable Provide any field from the table /OPT/VIM_1HEAD.
4. Save your settings.
18.3 Mapping the Initialization Procedure to the Service Request Creation Points [ERP] You must assign the initialization procedure to the Service Request creation points, which are VIM dashboards or screens. With baseline implementation, all VIM dashboards are assigned to a single initialization procedure.
Prerequisites The initialization procedure is maintained. See “Maintaining the Initialization Procedure for Service Requests [ERP]” on page 481.
To map the initialization procedure to the Service Request creation points:
1. Execute the /N/OPT/SPRO transaction and follow the menu path LiveLink VIM - Configuration > CRM Integration > Mapping of Initialization procedures to SR creation points.
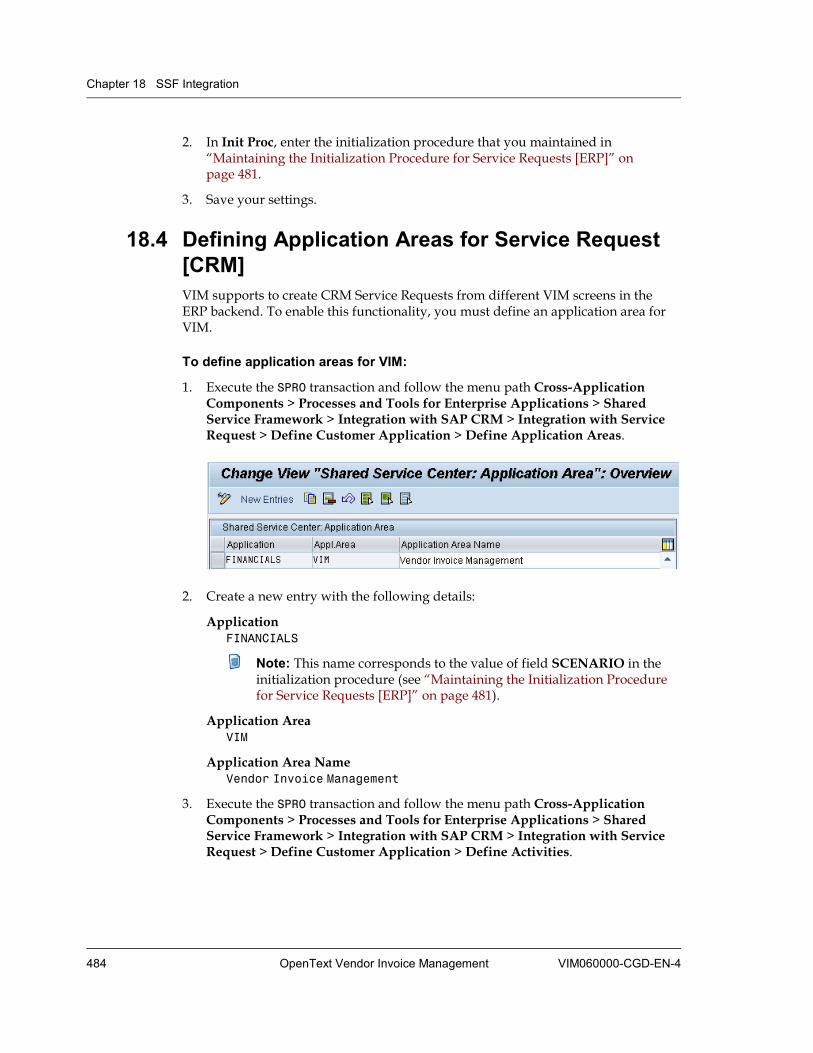
Chapter 18 SSF Integration
484 OpenText Vendor Invoice Management VIM060000-CGD-EN-4
2. In Init Proc, enter the initialization procedure that you maintained in “Maintaining the Initialization Procedure for Service Requests [ERP]” on page 481.
3. Save your settings.
18.4 Defining Application Areas for Service Request [CRM] VIM supports to create CRM Service Requests from different VIM screens in the ERP backend. To enable this functionality, you must define an application area for VIM.
To define application areas for VIM:
1. Execute the SPRO transaction and follow the menu path Cross-Application Components > Processes and Tools for Enterprise Applications > Shared Service Framework > Integration with SAP CRM > Integration with Service Request > Define Customer Application > Define Application Areas.
2. Create a new entry with the following details:
Application FINANCIALS
Note: This name corresponds to the value of field SCENARIO in the initialization procedure (see “Maintaining the Initialization Procedure for Service Requests [ERP]” on page 481).
Application Area VIM
Application Area Name Vendor Invoice Management
3. Execute the SPRO transaction and follow the menu path Cross-Application Components > Processes and Tools for Enterprise Applications > Shared Service Framework > Integration with SAP CRM > Integration with Service Request > Define Customer Application > Define Activities.
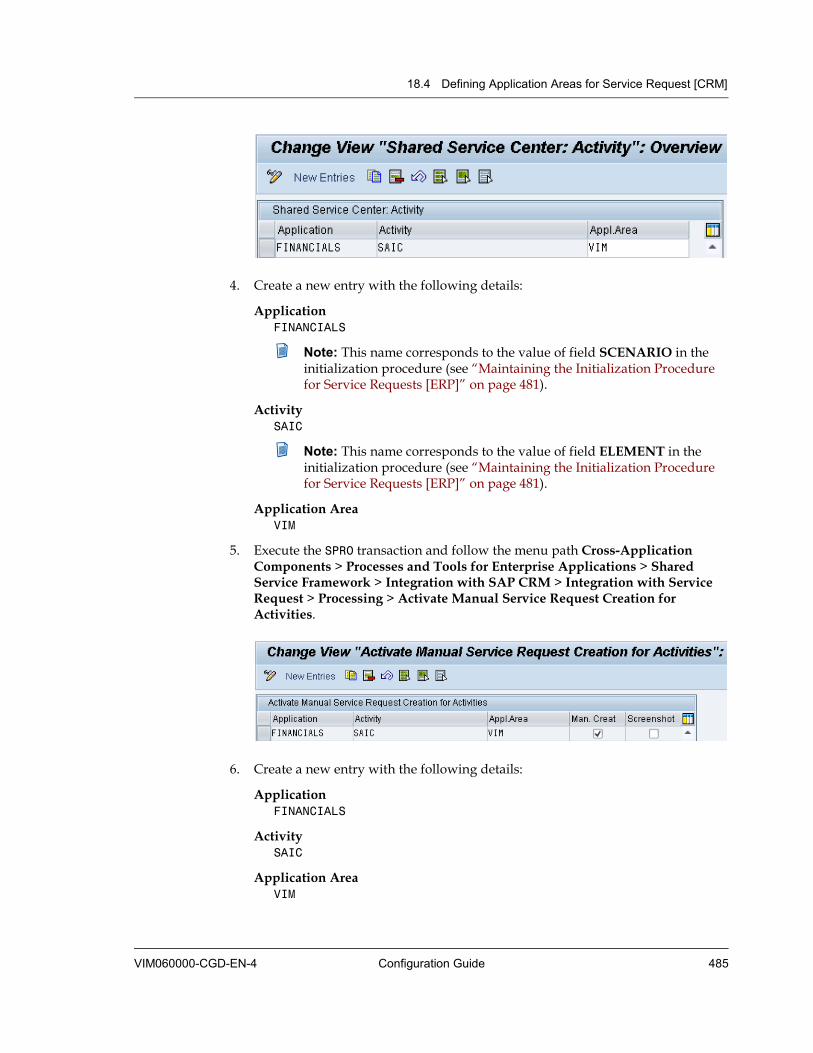
18.4 Defining Application Areas for Service Request [CRM]
VIM060000-CGD-EN-4 Configuration Guide 485
4. Create a new entry with the following details:
Application FINANCIALS
Note: This name corresponds to the value of field SCENARIO in the initialization procedure (see “Maintaining the Initialization Procedure for Service Requests [ERP]” on page 481).
Activity SAIC
Note: This name corresponds to the value of field ELEMENT in the initialization procedure (see “Maintaining the Initialization Procedure for Service Requests [ERP]” on page 481).
Application Area VIM
5. Execute the SPRO transaction and follow the menu path Cross-Application Components > Processes and Tools for Enterprise Applications > Shared Service Framework > Integration with SAP CRM > Integration with Service Request > Processing > Activate Manual Service Request Creation for Activities.
6. Create a new entry with the following details:
Application FINANCIALS
Activity SAIC
Application Area VIM
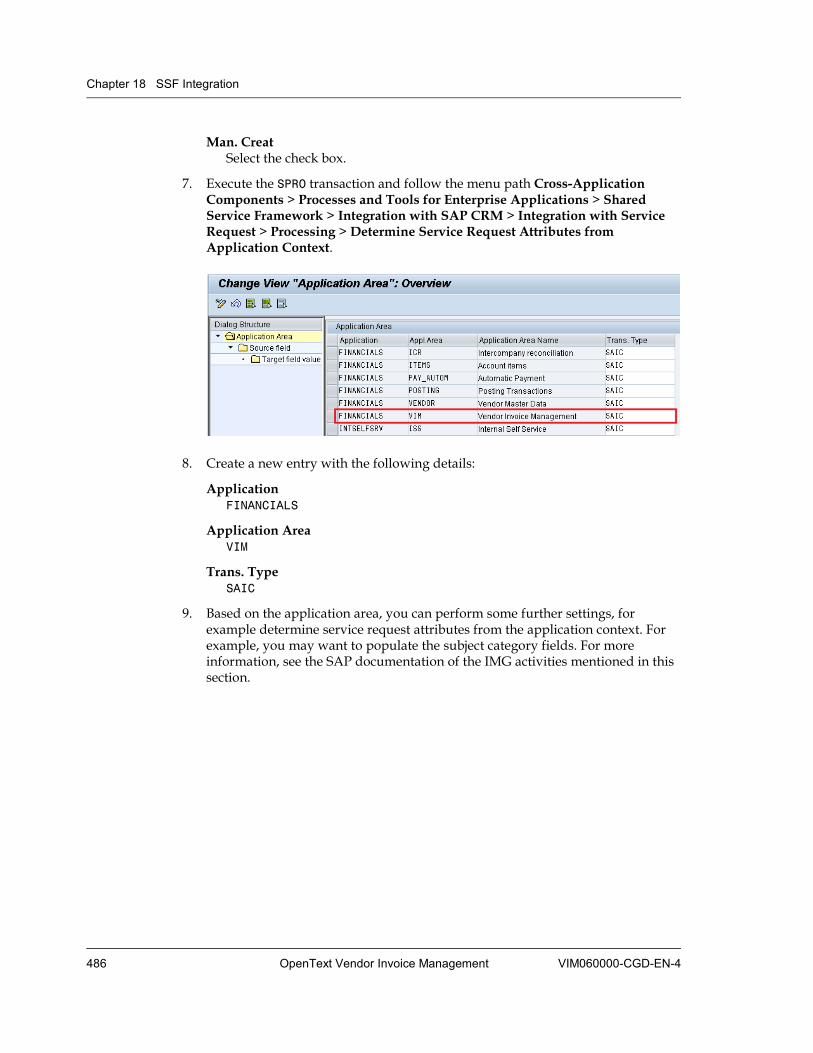
Chapter 18 SSF Integration
486 OpenText Vendor Invoice Management VIM060000-CGD-EN-4
Man. Creat Select the check box.
7. Execute the SPRO transaction and follow the menu path Cross-Application Components > Processes and Tools for Enterprise Applications > Shared Service Framework > Integration with SAP CRM > Integration with Service Request > Processing > Determine Service Request Attributes from Application Context.
8. Create a new entry with the following details:
Application FINANCIALS
Application Area VIM
Trans. Type SAIC
9. Based on the application area, you can perform some further settings, for example determine service request attributes from the application context. For example, you may want to populate the subject category fields. For more information, see the SAP documentation of the IMG activities mentioned in this section.
VIM060000-CGD-EN-4 OpenText Vendor Invoice Management 487
Chapter 19 EDI Configuration
The Electronic Data Interchange scenario in VIM bases on the standard SAP document format Intermediate Document (IDoc). IDocs allow different application systems to be linked via a message-based interface. The use of IDocs mainly aims at the following:
• Structured exchange of business documents in order to process them automatically.
• The various degrees of structural complexity as displayed by different application systems can be reduced to a structure which is as simple as possible.
Example: The structure of an SAP application document and the structure of the corresponding EDI message under the UN/EDIFACT standard.
• IDocs allow extensive exception handling before the data is posted to the application.
19.1 Configuring General Settings The inbound function module /OPT/DP_INBOUND_IDOC_PROC creates DP documents from incoming IDocs and sends them to the DP process. To enable this, the following configuration steps are necessary:
• “Defining Settings for the Inbound Function Module” on page 487
• “Assigning IDoc Type and Message Type” on page 488
• “Creating a New Process Code” on page 489
• “Configuring the Partner Profile” on page 491
19.1.1 Defining Settings for the Inbound Function Module In this step, you choose the input type for the IDocs.
To define settings for the inbound function module:
1. Execute the BD51 transaction.
2. In the Characteristics of Inbound Function Modules view, click New Entries.

Chapter 19 EDI Configuration
488 OpenText Vendor Invoice Management VIM060000-CGD-EN-4
3. Define the inbound function module, using the following parameters:
Function module (inbound) Enter /OPT/DP_INBOUND_IDOC_PROC.
Input type Enter 0 (for Mass processing).
Dialog allowed If you want to process IDocs in dialog mode, select this check box. With baseline implementation, the check box is cleared.
4. Click to save your settings.
19.1.2 Assigning IDoc Type and Message Type In this step, you establish the link between the inbound function module, the basic IDoc type and the message type.
To assign the inbound function module to IDoc type and message type:
1. Execute the WE57 transaction.
2. In the IDoc: Assignment of FM to Log. Message and IDoc Type view, click to enable changes.
3. Click New Entries.
4. Configure the assignment, as shown in the following screenshot.
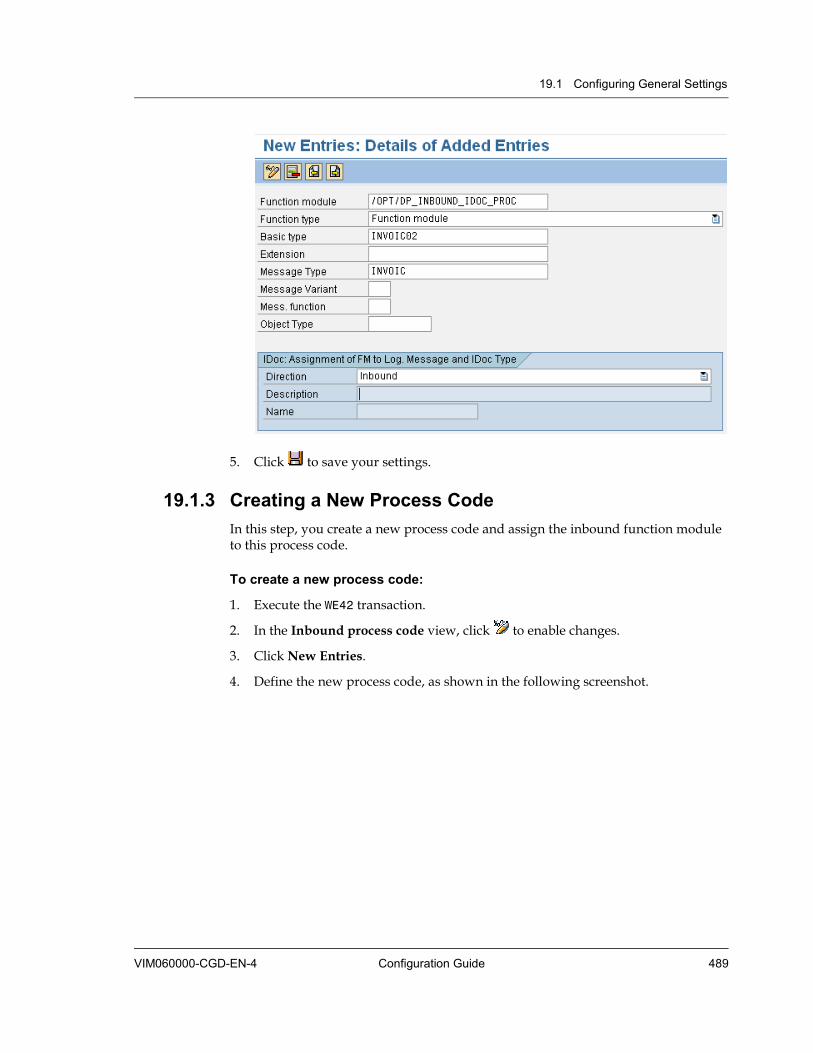
19.1 Configuring General Settings
VIM060000-CGD-EN-4 Configuration Guide 489
5. Click to save your settings.
19.1.3 Creating a New Process Code In this step, you create a new process code and assign the inbound function module to this process code.
To create a new process code:
1. Execute the WE42 transaction.
2. In the Inbound process code view, click to enable changes.
3. Click New Entries.
4. Define the new process code, as shown in the following screenshot.

Chapter 19 EDI Configuration
490 OpenText Vendor Invoice Management VIM060000-CGD-EN-4
Note: You can choose a name for the process code that suits your needs.
5. Click to save your settings.
6. Double-click Logical message in the Dialog Structure.
7. Assign the new process code to the logical message, as shown in the following screenshot.
8. Click to save your settings.
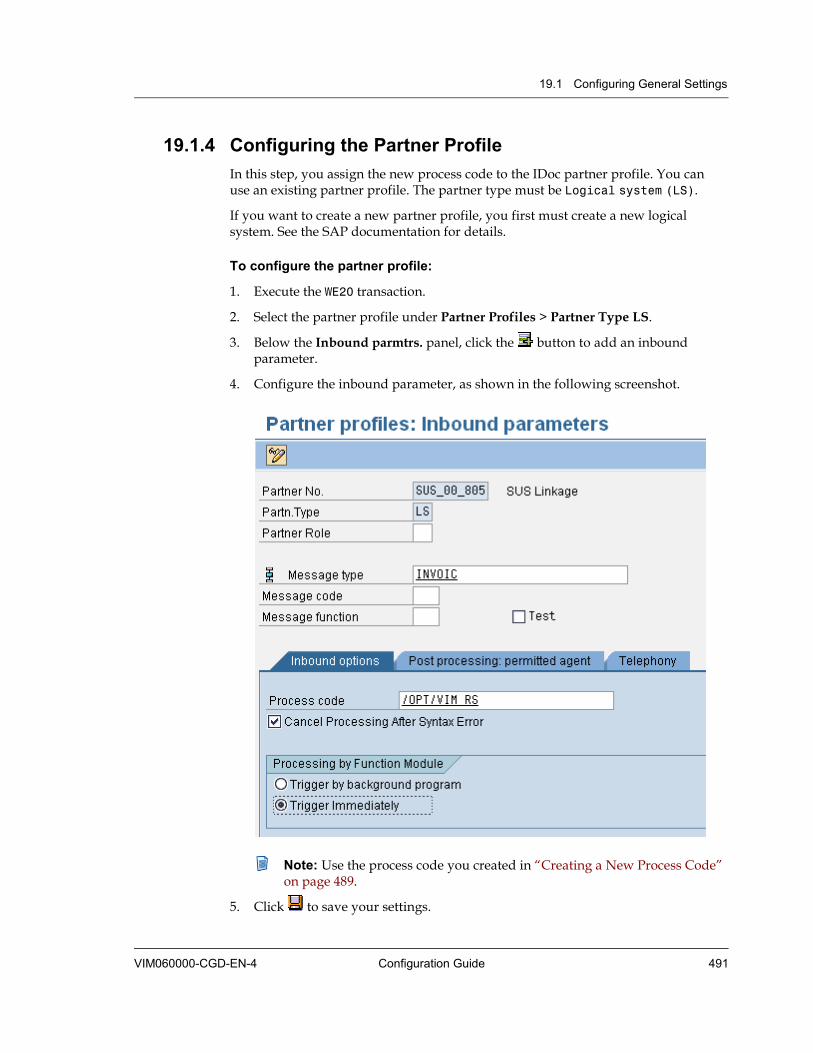
19.1 Configuring General Settings
VIM060000-CGD-EN-4 Configuration Guide 491
19.1.4 Configuring the Partner Profile In this step, you assign the new process code to the IDoc partner profile. You can use an existing partner profile. The partner type must be Logical system (LS).
If you want to create a new partner profile, you first must create a new logical system. See the SAP documentation for details.
To configure the partner profile:
1. Execute the WE20 transaction.
2. Select the partner profile under Partner Profiles > Partner Type LS.
3. Below the Inbound parmtrs. panel, click the button to add an inbound parameter.
4. Configure the inbound parameter, as shown in the following screenshot.
Note: Use the process code you created in “Creating a New Process Code” on page 489.
5. Click to save your settings.

Chapter 19 EDI Configuration
492 OpenText Vendor Invoice Management VIM060000-CGD-EN-4
19.2 Configuring the Mapping In the EDI scenario, there are the following levels of mapping:
• The first level of mapping maps the IDoc data to Intermediate fields.
• The second level of mapping maps Intermediate fields to VIM fields (index fields). The second level of mapping is maintained at Channel level. The Channel for the EDI scenario is IDOC. The Channel IDOC is assigned to the mapping ID IDOC; it is used in mapping.
The target system is determined based on the company code. Each system in the multiple backend system is identified by a logical system name.
The following configuration steps are necessary:
• “Configuring the External Field Mapping” on page 492
• “Configuring the VIM Field Mapping” on page 493
• “Creating a Channel ID” on page 494
19.2.1 Configuring the External Field Mapping In this step, you map IDoc segment fields to Intermediate fields. Therefore, you maintain table /OPT/VIM_T123.
To configure the external field mapping:
1. Execute the /N/OPT/SPRO transaction and follow the menu path LiveLink VIM - Configuration > Document Processing > External System Data (OCR / IDoc) > External System Data Mapping (Idoc).
2. In the Document Process - Mapping Fields for Automatic Indexing screen, double-click a line to open a single field.
3. Configure the field mapping, using the following parameters:
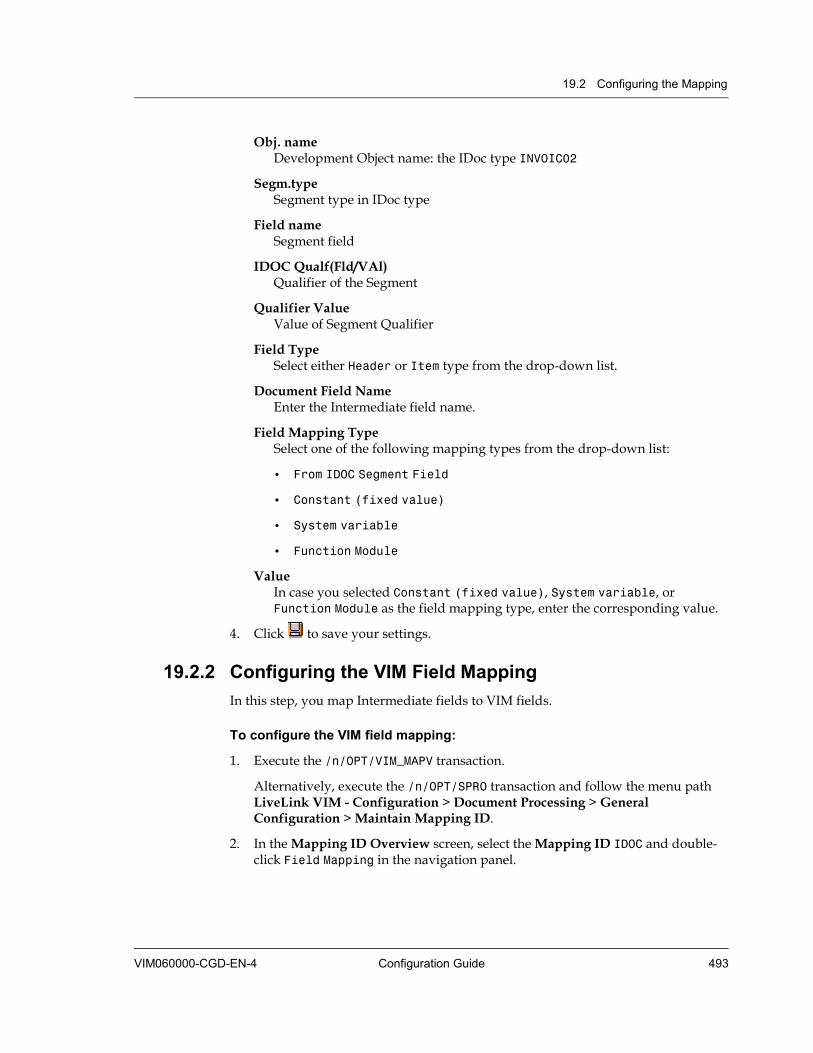
19.2 Configuring the Mapping
VIM060000-CGD-EN-4 Configuration Guide 493
Obj. name Development Object name: the IDoc type INVOIC02
Segm.type Segment type in IDoc type
Field name Segment field
IDOC Qualf(Fld/VAl) Qualifier of the Segment
Qualifier Value Value of Segment Qualifier
Field Type Select either Header or Item type from the drop-down list.
Document Field Name Enter the Intermediate field name.
Field Mapping Type Select one of the following mapping types from the drop-down list:
• From IDOC Segment Field
• Constant (fixed value)
• System variable
• Function Module
Value In case you selected Constant (fixed value), System variable, or Function Module as the field mapping type, enter the corresponding value.
4. Click to save your settings.
19.2.2 Configuring the VIM Field Mapping In this step, you map Intermediate fields to VIM fields.
To configure the VIM field mapping:
1. Execute the /n/OPT/VIM_MAPV transaction.
Alternatively, execute the /n/OPT/SPRO transaction and follow the menu path LiveLink VIM - Configuration > Document Processing > General Configuration > Maintain Mapping ID.
2. In the Mapping ID Overview screen, select the Mapping ID IDOC and double-click Field Mapping in the navigation panel.
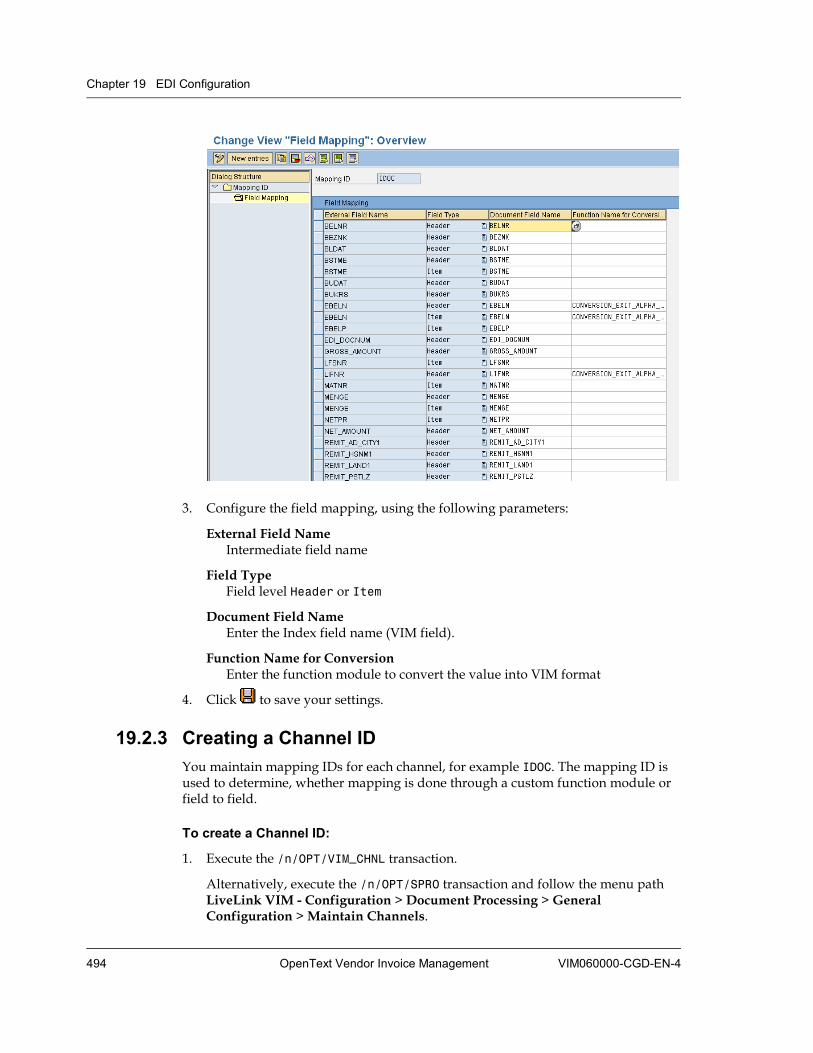
Chapter 19 EDI Configuration
494 OpenText Vendor Invoice Management VIM060000-CGD-EN-4
3. Configure the field mapping, using the following parameters:
External Field Name Intermediate field name
Field Type Field level Header or Item
Document Field Name Enter the Index field name (VIM field).
Function Name for Conversion Enter the function module to convert the value into VIM format
4. Click to save your settings.
19.2.3 Creating a Channel ID You maintain mapping IDs for each channel, for example IDOC. The mapping ID is used to determine, whether mapping is done through a custom function module or field to field.
To create a Channel ID:
1. Execute the /n/OPT/VIM_CHNL transaction.
Alternatively, execute the /n/OPT/SPRO transaction and follow the menu path LiveLink VIM - Configuration > Document Processing > General Configuration > Maintain Channels.

19.3 Determining System by Company Code for Multiple Backend Systems
VIM060000-CGD-EN-4 Configuration Guide 495
2. In the Opentext: Channel Set Up Overview screen, click New entries to create a new channel.
3. Configure the new channel, using the following parameters:
Channel Type Select the channel type from the list.
Description Enter the channel description. It is language dependent.
Mapping ID Enter the Mapping ID.
4. Click to save your settings.
19.3 Determining System by Company Code for Multiple Backend Systems If you do not maintain the system determination procedure in the channel configuration, the system uses the baseline (OpenText) configuration which is: System is determined based on the company code. Based on the company code, DP documents are created in the satellite systems.
For the EDI scenario, you have to configure the system determination via Company Code only in the central system.
See “To maintain system determination based on the Company Code:” on page 434 for a description of the configuration.

Chapter 19 EDI Configuration
496 OpenText Vendor Invoice Management VIM060000-CGD-EN-4
In the screenshot above, Company code 2000 is mapped to the Logical system T90CLNT090.
19.4 Configuring Global Parameters This section describes the various global customization parameters that are available. Global parameters control various aspects of the inbound EDI processing.
Important
Take care when you change the global configuration parameters. Changes affect the functionality of the process.
19.4.1 EDI Image Exit Function Module During the inbound EDI processing, it is possible to archive delivered IDOC visualizations or to create and archive IDOC visualizations directly if required. Therefore, maintain a suitable custom exit function module.
To maintain a custom exit function module:
1. Execute transaction SM30 and enter table /PTGWFI/Z_CONST.
2. Enter /PTGWFI/Z_CONST in Table/view and click Maintain.
3. In the WebFlow Constant Table, under Product Code 005, double-click the Constant EDI_IMAGES_FM.
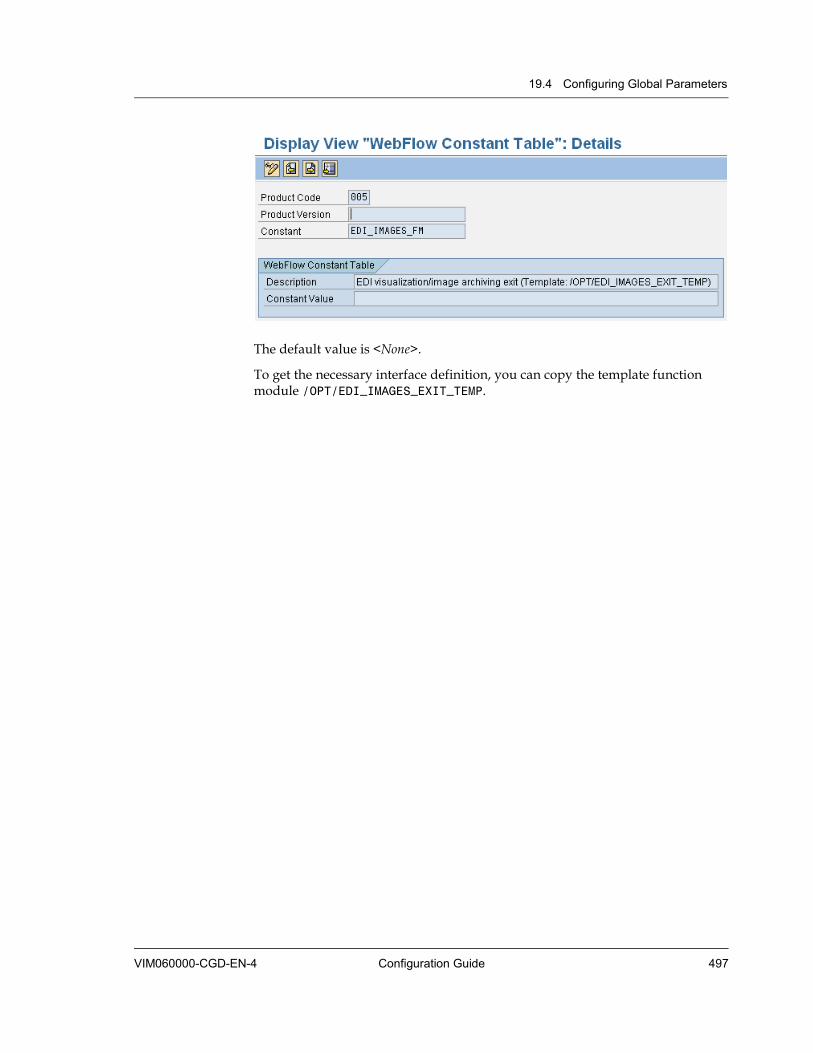
19.4 Configuring Global Parameters
VIM060000-CGD-EN-4 Configuration Guide 497
The default value is <None>.
To get the necessary interface definition, you can copy the template function module /OPT/EDI_IMAGES_EXIT_TEMP.

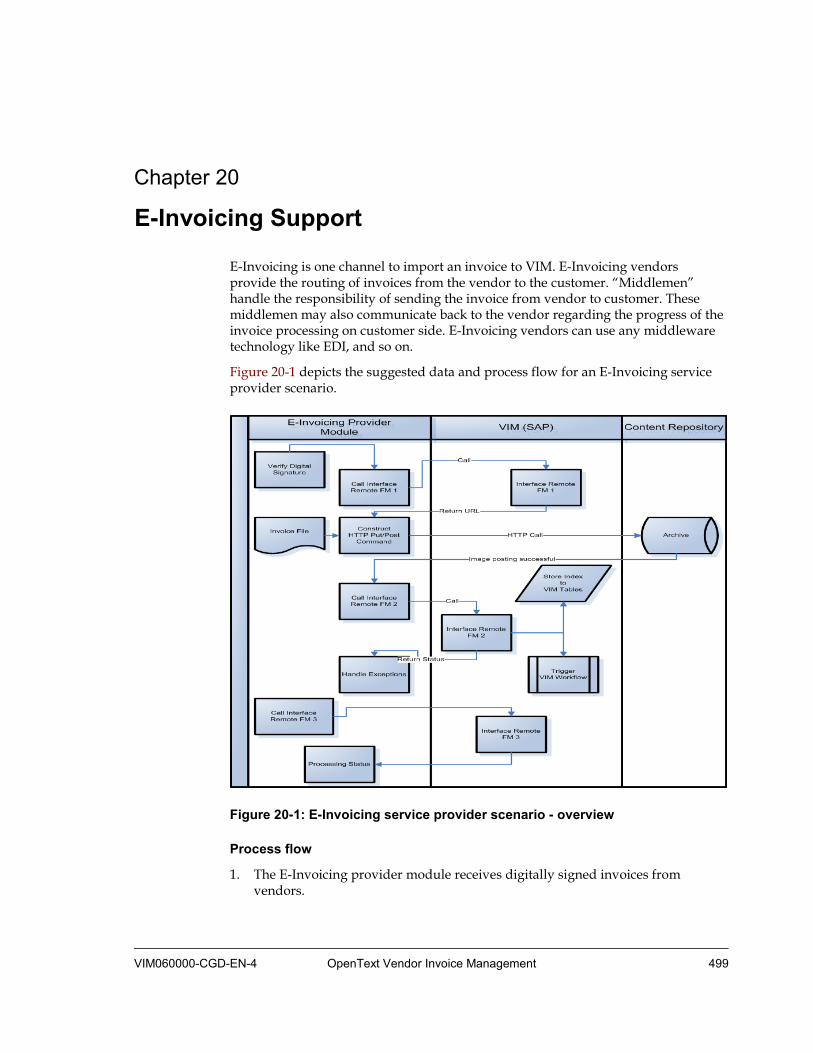
VIM060000-CGD-EN-4 OpenText Vendor Invoice Management 499
Chapter 20 E-Invoicing Support
E-Invoicing is one channel to import an invoice to VIM. E-Invoicing vendors provide the routing of invoices from the vendor to the customer. “Middlemen” handle the responsibility of sending the invoice from vendor to customer. These middlemen may also communicate back to the vendor regarding the progress of the invoice processing on customer side. E-Invoicing vendors can use any middleware technology like EDI, and so on.
Figure 20-1 depicts the suggested data and process flow for an E-Invoicing service provider scenario.
Figure 20-1: E-Invoicing service provider scenario - overview
Process flow
1. The E-Invoicing provider module receives digitally signed invoices from vendors.
Chapter 20 E-Invoicing Support
500 OpenText Vendor Invoice Management VIM060000-CGD-EN-4
2. The E-Invoicing provider module verifies the authenticity of the digital signature using Digital Signature Application.
3. The E-Invoicing provider module calls SAP IM APIs.
4. An OpenText provided API (FM1) returns the archiving URL.
5. The E-Invoicing provider module archives the invoice image to the Archive Server via HTTP Post action.
6. The E-Invoicing provider module calls the second API (FM2) to trigger the invoice processing in SAP.
7. While invoice processing continues in SAP, the E-Invoicing provider module can query the status of the document by calling the third API (FM3).
E-Invoicing service provider responsibility
The E-Invoicing service provider must provide the following:
• Ensure that the original invoice sent by the vendor is transmitted unaltered to the customer.
• Ensure that a Digital Signature infrastructure is agreed on and implemented according to the customer and partner needs.
• Ensure that the SAP IM APIs are implemented so that correct data is passed to SAP IM.
20.1 Interface Remote Functions The E-Invoicing service provider scenario includes 3 Interface Remote Functions.
20.1.1 Interface Remote Function 1 This function module allows archiving a document. This facilitates the generation of the URL that the E-Invoicing provider module uses to archive the invoice image to the content repository. The following is the interface of the function module:
FUNCTION /OPT/ARCHIV_DOC_URL_CREATE. *"----------------------------------------------------------------- *"*"Local Interface: *" IMPORTING *" VALUE(ARCHIV_ID) TYPE /OPT/VIM_1RHEAD-ARCHIV_ID OPTIONAL *" VALUE(SIGNATURE) TYPE CHAR1 OPTIONAL *" VALUE(AR_OBJECT) TYPE SAEOBJART OPTIONAL *" EXPORTING *" VALUE(ARCHIV_DOC_ID) TYPE /OPT/VIM_1RHEAD-ARC_DOC_ID *" VALUE(MIMETYPE) TYPE CHAR128 *" VALUE(RC) TYPE SUBRC *" TABLES *" URL_ROWS STRUCTURE /OPT/VIM_URL

20.1 Interface Remote Functions
VIM060000-CGD-EN-4 Configuration Guide 501
*" RETURN STRUCTURE BAPIRET2 *"-----------------------------------------------------------------
Import parameters
The E-Invoicing provider must enter the correct parameters to match the SAP ArchiveLink configuration.
Parameter Name Data Type Size Comments
ARCHIV_ID 2 Content Repository Identification (con-stant)
SIGNATURE 1 Signature authentication is used in SAP ArchiveLink configuration (X = yes; Space = no)
AR_OBJECT 10 SAP Archive Document Type (constant: /OPT/ICC, /OPT/POI6)
Export parameters
Parameter Name Data Type Size Comments
ARCHIV_DOC_ID Char 40 SAP ArchiveLink Document ID ( gener-ated for the image)
MIMETYPE Char 128 Mime Type
RC Numeric 2 Value 0 means successful. Value 8 means error.
URL_ROWS Table Type Table of URL rows to archive image /OPT/VIM_URL
RETURN Table Type Table of messages BAPIRET2
Error handling
If the RFC raises an exception, the call has failed. The call can be resubmitted if possible. If the RC returns value 8, a data error has occurred. This record should be placed into a separate queue for error handling. Resubmitting without investigation will not make much sense.
20.1.2 Interface Remote Function 2 This function module facilitates receiving invoice metadata and starts the processing in SAP Invoice Management. The following is the interface of the function module:
FUNCTION /OPT/VIM_START_DOC_PROCESS_EXT. *"------------------------------------------------------------------ *"*"Local Interface: *" IMPORTING
Chapter 20 E-Invoicing Support
502 OpenText Vendor Invoice Management VIM060000-CGD-EN-4
*" VALUE(DOCTYPE) TYPE /OPT/DOCTYPE OPTIONAL *" VALUE(ARCHIV_ID) TYPE /OPT/VIM_1RHEAD-ARCHIV_ID OPTIONAL *" VALUE(ARC_DOC_ID) TYPE /OPT/VIM_1RHEAD-ARC_DOC_ID OPTIONAL *" VALUE(AR_OBJECT) TYPE SAEOBJART OPTIONAL *" VALUE(CHANNEL_ID) TYPE /OPT/CHANNEL_ID OPTIONAL *" VALUE(SYSTEM) TYPE LOGSYS OPTIONAL *" VALUE(I_DOC_HEADER) TYPE /OPT/VIM_1HEAD OPTIONAL *" EXPORTING *" VALUE(RC) TYPE SY-SUBRC *" VALUE(E_WF_ID) TYPE SWWWIHEAD-WI_ID *" VALUE(DOC_STATUS) TYPE /OPT/VIM_DP_STATUS1 *" TABLES *" EXTDATA_HEAD STRUCTURE /OPT/VIM_1REXTDATA OPTIONAL *" EXTDATA_ITEM STRUCTURE /OPT/VIM_1REXTDATA OPTIONAL *" I_DOC_ITEMS STRUCTURE /OPT/VIM_1ITEM OPTIONAL *" LOGDATA STRUCTURE /OPT/VIM_1LOG OPTIONAL *" IMG_DOC_ID STRUCTURE /OPT/D_ARC_DOC_ST OPTIONAL *" RETURN STRUCTURE BAPIRET2 OPTIONAL *"------------------------------------------------------------------
Import parameters
When calling this function, provide the following information:
1. Archived image info:
Parameter Name Data Type Size Comments
ARCHIV_ID Char 2 Content Repository Identification (constant)
ARC_DOC_ID Char 40 SAP ArchiveLink Document ID (re-turned from Interface Remote Func-tion 1)
AR_OBJECT Char 10 SAP Archive Document Type (con-stant: /OPT/ICC, /OPT/POI6)
2. Channel info:
Parameter Name Data Type Size Comments
CHANNEL_ID Char 10 SAP Channel ID (Constant). Rec-ommended to be supplied. It helps in identifying the source of any supplied invoice.
SYSTEM Char 10 Logical name of the SAP target sys-tem
3. Invoice info captured from External Partner:
20.1 Interface Remote Functions
VIM060000-CGD-EN-4 Configuration Guide 503
Parameter Name Data Type Size Comments
EXTDATA_HEAD Table Type Header info, for example Vendor number, total amount, etc. Refer to structure /OPT/VIM_1REXTDATA.
EXTDATA_ITEM Table Type Line item info, for example PO line, Material, Quantity, etc. Refer to structure /OPT/VIM_1REXTDATA.
Structure/OPT/VIM_1REXTDATA:
Field Name Data Type Size Comments
EXTFIELD Char 50 Field Name from External Partner System
EXTVALUE Char 255 External Field Value
For each invoice field passed, the External Partner must specify field name (EXTFIELD) and value (EXTVALUE).
4. Other optional parameters:
Parameter Name Data Type Size Comments
DOCTYPE Char 10 SAP IM Processing Document Type
I_DOC_HEADER Structure Type
Structure of Indexing Document Header /OPT/VIM_1HEAD
I_DOC_ITEMS Table Type Table of Indexing Document Item /OPT/VIM_1ITEM
LOGDATA Table Type Table of Document Process Log data /OPT/VIM_1LOG
Export parameters
Parameter Name Data Type Size Comments
RC Numeric 2 Value 0 means successful. Value 8 means error.
RETURN Table Type Table of messages BAPIRET2
E_WF_ID Numeric 12 Work item ID of the triggered Document Processing Workflow in SAP IM
DOC_STATUS Structure Type
The Document Processing Number gen-erated in SAP IM and its corresponding status is passed in this parameter. Refer to structure /OPT/VIM_DP_STATUS1.
Chapter 20 E-Invoicing Support
504 OpenText Vendor Invoice Management VIM060000-CGD-EN-4
Error handling
If the RFC raises an exception, the call has failed. The call can be resubmitted if possible. If the RC returns value 8, a data error has occurred. This record should be placed into a separate queue for error handling. Resubmitting without investigation will not make much sense.
20.1.3 Interface Remote Function 3 This function module allows 3rd party software to query the status of a document that was submitted. The following is the interface of the function module:
FUNCTION /OPT/VIM_DOCUMENT_STATUS. *"---------------------------------------------------------- *"*"Local Interface: *" IMPORTING *" VALUE(CHANNEL_ID) TYPE /OPT/CHANNEL_ID OPTIONAL *" VALUE(SYSTEM) TYPE LOGSYS OPTIONAL *" EXPORTING *" VALUE(RC) TYPE SY-SUBRC *" TABLES *" DOC_QUERY STRUCTURE /OPT/DOCID_ST *" DOC_STATUS STRUCTURE TYPE /OPT/VIM_DP_STATUS1 *" RETURN STRUCTURE BAPIRET2 *"----------------------------------------------------------
Import parameters
When calling this function, provide the following information:
1. Channel info:
Parameter Name Data Type Size Comments
CHANNEL_ID Char 10 SAP Channel ID (Constant). Rec-ommended to be supplied. It helps in identifying the source of any supplied invoice.
SYSTEM Char 10 Logical name of the SAP target sys-tem
2. Query Table parameter:
Parameter Name Data Type Size Comments
DOC_QUERY Table Type Table parameter of Document Proc-essing Numbers /OPT/DOCID

20.1 Interface Remote Functions
VIM060000-CGD-EN-4 Configuration Guide 505
Export parameters
Parameter Name Data Type Size Comments
RC Numeric 2 Value 0 means successful. Value 8 means error.
RETURN Table Type Table of messages BAPIRET2
DOC_STATUS Table Type Table parameter of Document Processing Number and its corresponding status. Refer to structure /OPT/VIM_DP_STATUS1
Error handling
If the RFC raises an exception, the call has failed. The call can be resubmitted if possible. If the RC returns value 8, a data error has occurred. This record should be placed into a separate queue for error handling. Resubmitting without investigation will not make much sense.


VIM060000-CGD-EN-4 OpenText Vendor Invoice Management 507
Chapter 21 Central Reporting Infrastructure
The Central Reporting infrastructure provides reporting across the landscape in multiple backend systems. In single system scenarios, it also provides useful reporting. It provides several reports that enable you to measure certain properties of VIM documents and their work items, in order to optimize working with VIM. In particular, the following reports are provided:
• Summary Report (see section 13 "Using the Summary Report" in OpenText Vendor Invoice Management - User Guide (VIM-UGD))
• Central Audit Report (see section 14 "Using the Central Audit Report" in OpenText Vendor Invoice Management - User Guide (VIM-UGD))
• Key Process Analytics Report (see section 16 "Using the Key Process Analytics Report" in OpenText Vendor Invoice Management - User Guide (VIM-UGD))
• Exception Analysis Report (see section 17 "Using the Exception Analysis Report" in OpenText Vendor Invoice Management - User Guide (VIM-UGD))
• Productivity Report (see section 18 "Using the Productivity Report" in OpenText Vendor Invoice Management - User Guide (VIM-UGD))
• Aging Report (see section 19 "Using the Aging Report" in OpenText Vendor Invoice Management - User Guide (VIM-UGD))
• License Report (see section 20 "Using the License Report" in OpenText Vendor Invoice Management - User Guide (VIM-UGD))
Aggregation To ensure good performance for the reports in Central Reporting, the data used for the reports must be aggregated and saved in Reporting Data Tables. To achieve this goal, the data is prepared in several different activities: 1. The Collection Report, the User Master Report and the Text Master Report get
master data and transaction data from their original tables and save the data in the Source Data Tables. See section 18.6 "Scheduling the Collection Report" in OpenText Vendor Invoice Management - Administration Guide (VIM-AGD) for details.
2. The Aggregation Report selects data from the Source Data Tables (in different logical systems, if required), aggregates, transforms and saves the data in the Reporting Data Tables of the current system. See section 18.9 "Scheduling the Aggregation Report" in OpenText Vendor Invoice Management - Administration Guide (VIM-AGD).
3. The reports in Central Reporting are end user reports based on the content of the Reporting Data Tables.
Chapter 21 Central Reporting Infrastructure
508 OpenText Vendor Invoice Management VIM060000-CGD-EN-4
For the Central Reporting infrastructure, the following configuration is necessary:
Note: The steps mentioned here only show you an overview, see the corresponding sections above for more details, where applicable.
• “Configuring the System Landscape Directory (SLD)” on page 508
• “Configuring Backend Systems for Report Analytics” on page 509
• “Activating Central Reporting Baseline” on page 509
For the administration tasks that are necessary for Central Reporting, see section 18 "Administering Central Reporting" in OpenText Vendor Invoice Management - Administration Guide (VIM-AGD).
21.1 Configuring the System Landscape Directory (SLD) You can configure the System Landscape Directory (SLD) by executing the /N/OPT/VIM_SLD transaction. See “Working with the System Landscape Directory (SLD)” on page 427 for details.
Make sure the following is configured correctly:
Multiple backend system
1. Central system – All satellite systems are maintained with proper RFCs and classifications. The own logical system for the Central system itself is configured with classification Central and with RFC destination NONE for system communication.
2. Satellite system – The Central System logical system name is maintained with proper RFC and classification. The own logical system for the Satellite system itself is configured with classification Satellite and with RFC destination NONE for system communication.
Note: Collection Report, User Master Report, and Text Master Report always run in all systems involved. The Aggregation Report runs only in the central system.
Single system scenario
1. The concerned system is configured with no RFC destination and the classification is either blank or Single system landscape.
Note: Collection Report, User Master Report, Text Master Report, and Aggregation Report all run in the concerned system.
21.2 Configuring Backend Systems for Report Analytics
VIM060000-CGD-EN-4 Configuration Guide 509
21.2 Configuring Backend Systems for Report Analytics You can configure backend systems for Report analytics by executing the /N/OPT/VIM_ABE transaction. See section 18.1 "Maintaining Logical Systems for the Aggregation Report" in OpenText Vendor Invoice Management - Administration Guide (VIM-AGD) for details.
Make sure the following is configured correctly:
Multiple backend system
1. Central system – In the Central system, maintain all satellite systems including own system from which data is supposed to be pulled.
Single system scenario
1. Make sure only the concerned current system is maintained.
21.3 Activating Central Reporting Baseline Before activating the Central Reporting Baseline, make sure, you have configured the System Landscape Directory (SLD), see “Configuring the System Landscape Directory (SLD)” on page 508.
VIM Baseline delivers exception mapping and role mapping as part of the BC set activation. To access these mappings, execute the /n/OPT/SPRO transaction and follow LiveLink VIM - Configuration > Central Reporting > Report Table Maintenance. The mappings have one key field Logical System that remains empty as the logical system key is not supplied in the Baseline implementation.
If you want to configure custom user roles, add your settings before activating Central Reporting Baseline. Maintain the roles manually in the Role Mapping Maintenance without providing the logical system name as the key. For details, see section 18.4 "Maintaining Reporting Tables" in OpenText Vendor Invoice Management - Administration Guide (VIM-AGD).
If you want to configure exceptions of your own, add your settings before activating Central Reporting Baseline. Maintain exceptions in the Exception Mapping Maintenance without providing the logical system name as the key. For details, see section 18.4 "Maintaining Reporting Tables" in OpenText Vendor Invoice Management - Administration Guide (VIM-AGD).
To associate the mappings with the logical systems in the landscape, activate Central Reporting Baseline by executing the /n/OPT/VIM_SYS_ACTIV transaction. It is a one time activity on each system involved. Perform it as a part of post installation activity. If you activate Central Reporting Baseline, it provides default mapping of role IDs and exception IDs from Baseline.

VIM060000-CGD-EN-4 OpenText Vendor Invoice Management 511
Chapter 22 Individual Report Configuration
Some reports of the Central Reporting infrastructure require individual configuration. This chapter provides the necessary configuration steps for these reports.
22.1 Configuring the Integrated Invoice Cockpit The Integrated Invoice Cockpit gathers and displays all VIM exceptions for a user in one place. This applies within a single system landscape or a multiple backend system. Executing an exception, directly from the Integrated Invoice Cockpit, starts the respective dashboard. For details of how to use the Integrated Invoice Cockpit, see section 2.2 "Integrated Invoice Cockpit" in OpenText Vendor Invoice Management - User Guide (VIM-UGD)
For the Integrated Invoice Cockpit, the following configuration steps are necessary:
• “Configuring the System Landscape Directory (SLD)” on page 511
• “Configuring Layout Variants” on page 511
• “Configuring Authorization for Approval and Rejection” on page 515
• “Adding Customer Workflow Tasks” on page 515
• “Configuring Customer Specific Fields in the Detail View” on page 520
22.1.1 Configuring the System Landscape Directory (SLD) The Integrated Invoice Cockpit provides work items in multiple backend systems and in single system landscapes. Therefore, you must configure the System Landscape Directory (SLD). See “Configuring the System Landscape Directory (SLD)” on page 508.
Note: As long as you do not configure the SLD, an error message is displayed when starting or refreshing the Integrated Invoice Cockpit.
22.1.2 Configuring Layout Variants The Integrated Invoice Cockpit comprises the following node levels:
• Logical system
• Exception group
• Exception
Chapter 22 Individual Report Configuration
512 OpenText Vendor Invoice Management VIM060000-CGD-EN-4
The Integrated Invoice Cockpit differentiates between global layouts that apply to all users and user-specific layouts.
VIM baseline delivers default layout variants for all exceptions. These default layout variants are independent of a logical system, to support any names of logical systems on customer site.
If you want to use baseline default layout variants as a basis, you must copy these default layout variants to your logical system.
In a next step, you can adjust the layout variants to your needs.
If you have adjusted layout variants to your needs on one logical system, you can copy these custom layout variants to another logical system that is shown as a satellite system within your current system.
Note: Copying layout variants does not support any copies to other systems. It is always a copy within the same system but for different connected systems.
If you copy adjusted layout variants from a central system to a satellite system, the layout variants will only affect the view in the central system. If you log in directly to the satellite system, you still see the original layout.
To configure layout variants:
1. Execute the /n/OPT/VIM_IIC_ADM transaction.
Alternatively, follow LiveLink VIM - Configuration > Central Reporting > Integrated Invoice Cockpit > Maintain Global Layouts.
2. Click Copy layouts in the ALV grid control.
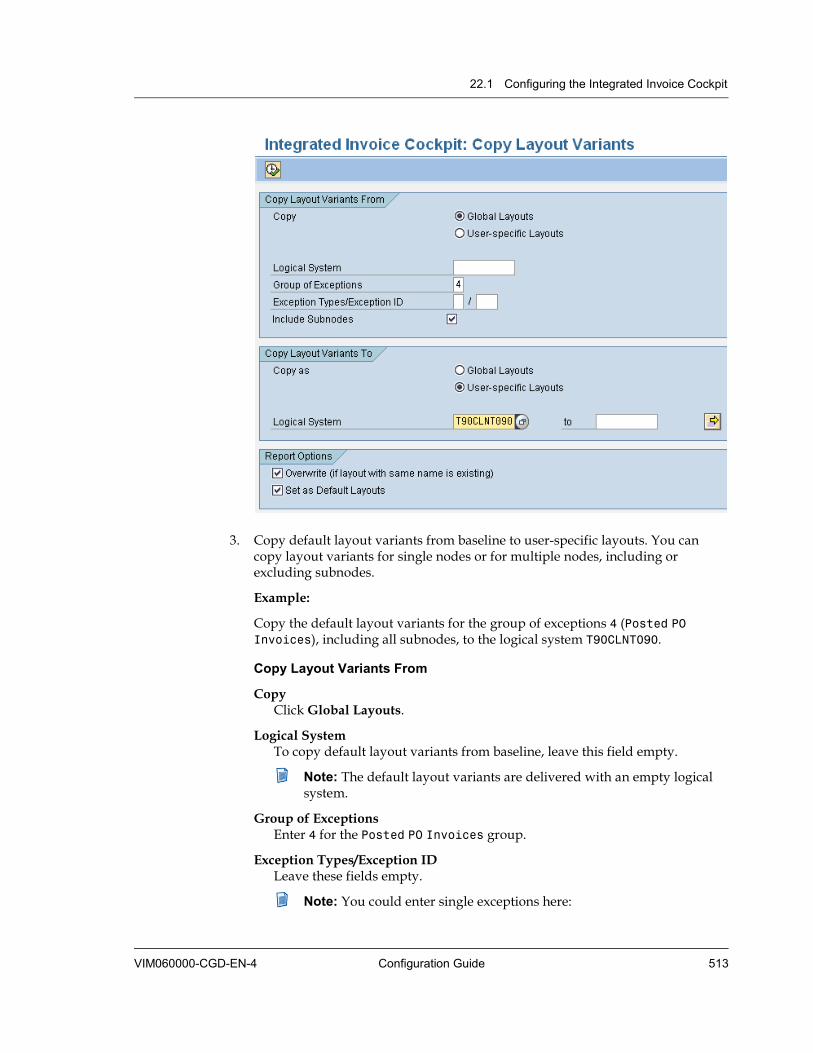
22.1 Configuring the Integrated Invoice Cockpit
VIM060000-CGD-EN-4 Configuration Guide 513
3. Copy default layout variants from baseline to user-specific layouts. You can copy layout variants for single nodes or for multiple nodes, including or excluding subnodes.
Example:
Copy the default layout variants for the group of exceptions 4 (Posted PO Invoices), including all subnodes, to the logical system T90CLNT090.
Copy Layout Variants From
Copy Click Global Layouts.
Logical System To copy default layout variants from baseline, leave this field empty.
Note: The default layout variants are delivered with an empty logical system.
Group of Exceptions Enter 4 for the Posted PO Invoices group.
Exception Types/Exception ID Leave these fields empty.
Note: You could enter single exceptions here:

Chapter 22 Individual Report Configuration
514 OpenText Vendor Invoice Management VIM060000-CGD-EN-4
Enter an Exception Type, for example D for DP Process Type.
Depending on the Exception Type, enter a 3-digit Exception ID, for example 102 for Invalid Vendor (PO).
Include Subnodes Select this check box to copy all exceptions in the Posted PO Invoices group.
Note: Selecting this check box only makes sense in combination with Logical System or Group of Exceptions.
Copy Layout Variants To
Copy Click User-specific Layouts.
Logical System Enter T90CLNT090.
Report Options
Overwrite (if layout with same name is existing) Select this check box.
Set as Default Layouts Select this check box.
Click to execute copying.
4. In the Maintain global layout variants for IIC screen, adjust the copied layout variants to your needs.
For this purpose, open the copied layout variants and change them, using the button (Select Layout) in the ALV grid control.
5. Save the variants as user-specific default layout variants.
6. Provide the adjusted layout variants as global default layout variants:
Example:
Copy the adjusted layout variants for the group of exceptions 4 (Posted PO Invoices), including all subnodes, as global default layout variants to the logical system T90CLNT090.
Click Copy layouts in the ALV grid control.
Copy Layout Variants From
Copy Click User-specific Layouts.
Logical System Enter T90CLNT090
22.1 Configuring the Integrated Invoice Cockpit
VIM060000-CGD-EN-4 Configuration Guide 515
Group of Exceptions Enter 4 for the Posted PO Invoices group.
Exception Type/Exception ID Leave these fields empty.
Include Subnodes Select this check box to copy all exceptions in the Posted PO Invoices group.
Copy Layout Variants To
Copy Click Global Layouts.
Logical System Enter T90CLNT090.
Report Options
Overwrite (if layout with same name is existing) Select this check box.
Set as Default Layouts Select this check box.
Click to execute copying.
Note: End users can change the global default layout variant to their personal needs and save them as user-specific default layout variant.
22.1.3 Configuring Authorization for Approval and Rejection For work items of type Approval, the Integrated Invoice Cockpit provides Approve and Reject buttons in the ALV grid control. These buttons are only displayed, if the user has the corresponding authorization. The authorization is maintained in the Chart of Authority (COA). For details on the COA, see “Maintaining Chart of Authority” on page 223.
In the Bulk Approval Category column of the User Details tab, select one of the following attributes for the user:
• A-Approval
• R-Reject
• B-Approval and Reject
22.1.4 Adding Customer Workflow Tasks You can add customer workflow tasks to the Integrated Invoice Cockpit. These customer workflow tasks are displayed below a new level 2 folder within the tree view of the Integrated Invoice Cockpit.
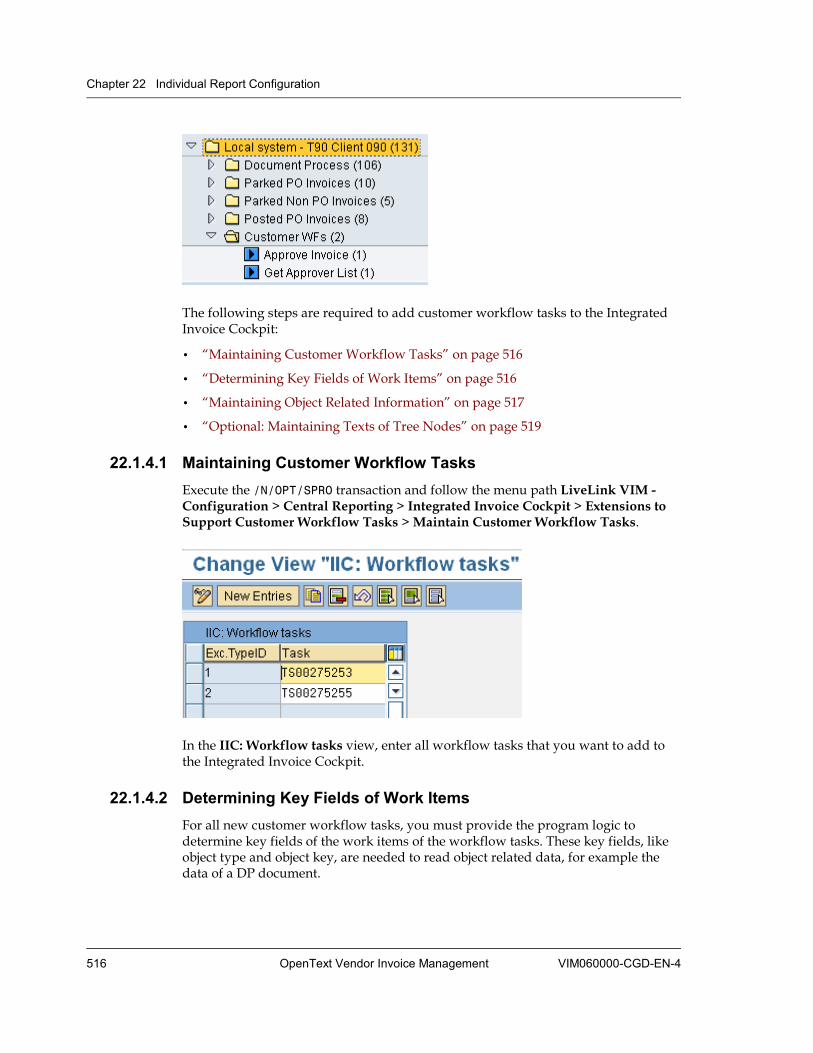
Chapter 22 Individual Report Configuration
516 OpenText Vendor Invoice Management VIM060000-CGD-EN-4
The following steps are required to add customer workflow tasks to the Integrated Invoice Cockpit:
• “Maintaining Customer Workflow Tasks” on page 516
• “Determining Key Fields of Work Items” on page 516
• “Maintaining Object Related Information” on page 517
• “Optional: Maintaining Texts of Tree Nodes” on page 519
22.1.4.1 Maintaining Customer Workflow Tasks Execute the /N/OPT/SPRO transaction and follow the menu path LiveLink VIM - Configuration > Central Reporting > Integrated Invoice Cockpit > Extensions to Support Customer Workflow Tasks > Maintain Customer Workflow Tasks.
In the IIC: Workflow tasks view, enter all workflow tasks that you want to add to the Integrated Invoice Cockpit.
22.1.4.2 Determining Key Fields of Work Items For all new customer workflow tasks, you must provide the program logic to determine key fields of the work items of the workflow tasks. These key fields, like object type and object key, are needed to read object related data, for example the data of a DP document.
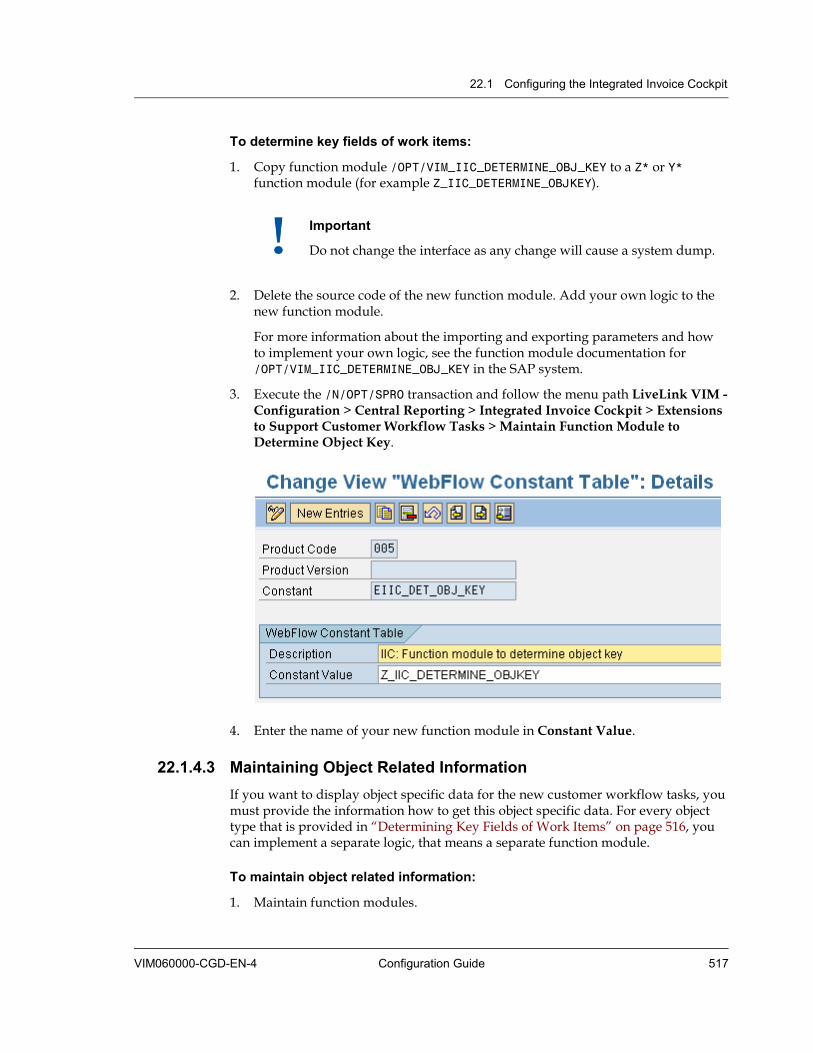
22.1 Configuring the Integrated Invoice Cockpit
VIM060000-CGD-EN-4 Configuration Guide 517
To determine key fields of work items:
1. Copy function module /OPT/VIM_IIC_DETERMINE_OBJ_KEY to a Z* or Y* function module (for example Z_IIC_DETERMINE_OBJKEY).
Important
Do not change the interface as any change will cause a system dump.
2. Delete the source code of the new function module. Add your own logic to the new function module.
For more information about the importing and exporting parameters and how to implement your own logic, see the function module documentation for /OPT/VIM_IIC_DETERMINE_OBJ_KEY in the SAP system.
3. Execute the /N/OPT/SPRO transaction and follow the menu path LiveLink VIM - Configuration > Central Reporting > Integrated Invoice Cockpit > Extensions to Support Customer Workflow Tasks > Maintain Function Module to Determine Object Key.
4. Enter the name of your new function module in Constant Value.
22.1.4.3 Maintaining Object Related Information If you want to display object specific data for the new customer workflow tasks, you must provide the information how to get this object specific data. For every object type that is provided in “Determining Key Fields of Work Items” on page 516, you can implement a separate logic, that means a separate function module.
To maintain object related information:
1. Maintain function modules.

Chapter 22 Individual Report Configuration
518 OpenText Vendor Invoice Management VIM060000-CGD-EN-4
For DP documents, PO invoices and Non PO invoices, VIM provides function modules that you can reuse. If the existing logic is not sufficient, you can copy these function modules to customer specific function modules that you can adjust to your needs:
Note: For more information how to implement your own logic, see the function module documentation in the SAP system.
DP documents For DP documents or line items of DP documents (object type: /OPT/V1001), you can reuse function module /OPT/VIM_IIC_GET_DP_DATA. If the logic of this function module is not sufficient, you must copy function module /OPT/VIM_IIC_GET_DP_DATA to a Z* or Y* function module, for example Z_IIC_GET_DP_DATA.
Important
Do not change the interface as any change will cause a system dump.
Delete the source code of the new, copied function module. Add your own logic to the new function module.
PO invoices For PO invoices or line items of PO invoices (object types /OPT/B2081 and /OPT/LIV), you can reuse function module /OPT/VIM_IIC_GET_PO_INV_DATA. If the logic of this function module is not sufficient, you must copy function module /OPT/VIM_IIC_GET_PO_INV_DATA to a Z* or Y* function module, for exam-ple Z_IIC_GET_PO_INV_DATA.
Important
Do not change the interface as any change will cause a system dump.
Delete the source code of the new, copied function module. Add your own logic to the new function module.
Non PO invoices For Non PO invoices or line items of Non PO invoices (object type /OPT/FIPP), you can reuse function module /OPT/VIM_IIC_GET_NPO_INV_DATA. If the logic of this function module is not sufficient, you must copy function module /OPT/VIM_IIC_GET_NPO_INV_DATA to a Z* or Y* function module, for exam-ple Z_IIC_GET_NPO_INV_DATA.
Important
Do not change the interface as any change will cause a system dump.
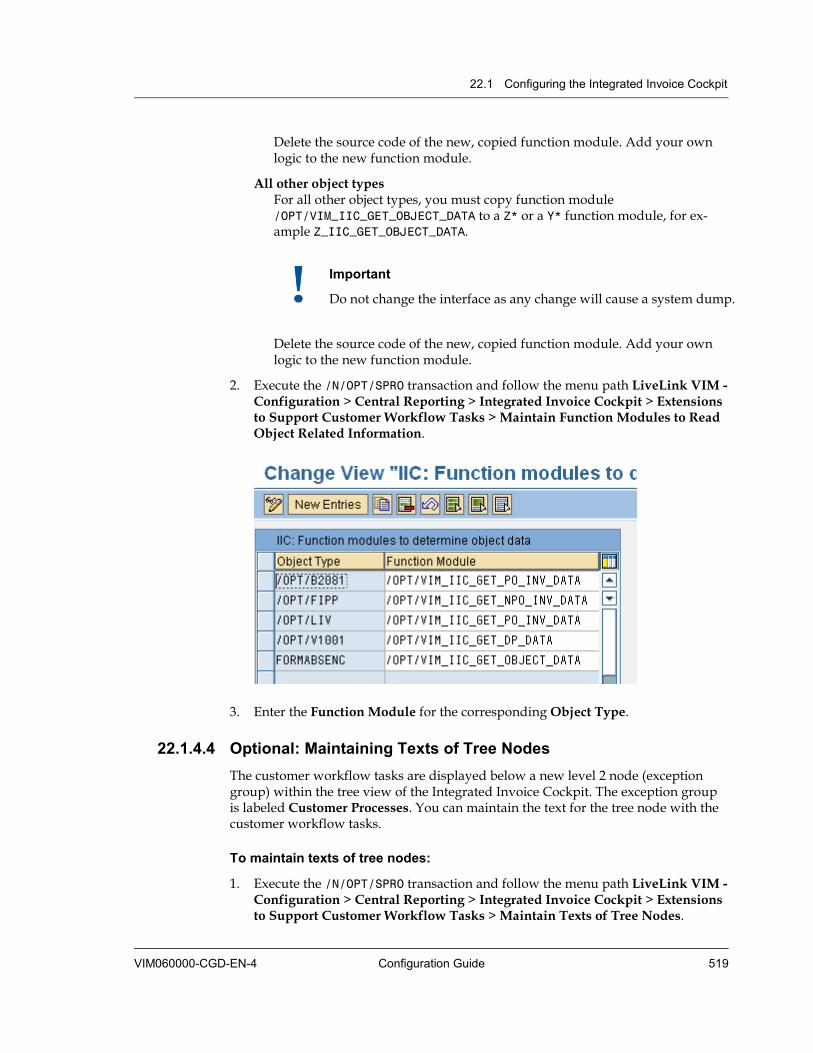
22.1 Configuring the Integrated Invoice Cockpit
VIM060000-CGD-EN-4 Configuration Guide 519
Delete the source code of the new, copied function module. Add your own logic to the new function module.
All other object types For all other object types, you must copy function module /OPT/VIM_IIC_GET_OBJECT_DATA to a Z* or a Y* function module, for ex-ample Z_IIC_GET_OBJECT_DATA.
Important
Do not change the interface as any change will cause a system dump.
Delete the source code of the new, copied function module. Add your own logic to the new function module.
2. Execute the /N/OPT/SPRO transaction and follow the menu path LiveLink VIM - Configuration > Central Reporting > Integrated Invoice Cockpit > Extensions to Support Customer Workflow Tasks > Maintain Function Modules to Read Object Related Information.
3. Enter the Function Module for the corresponding Object Type.
22.1.4.4 Optional: Maintaining Texts of Tree Nodes The customer workflow tasks are displayed below a new level 2 node (exception group) within the tree view of the Integrated Invoice Cockpit. The exception group is labeled Customer Processes. You can maintain the text for the tree node with the customer workflow tasks.
To maintain texts of tree nodes:
1. Execute the /N/OPT/SPRO transaction and follow the menu path LiveLink VIM - Configuration > Central Reporting > Integrated Invoice Cockpit > Extensions to Support Customer Workflow Tasks > Maintain Texts of Tree Nodes.
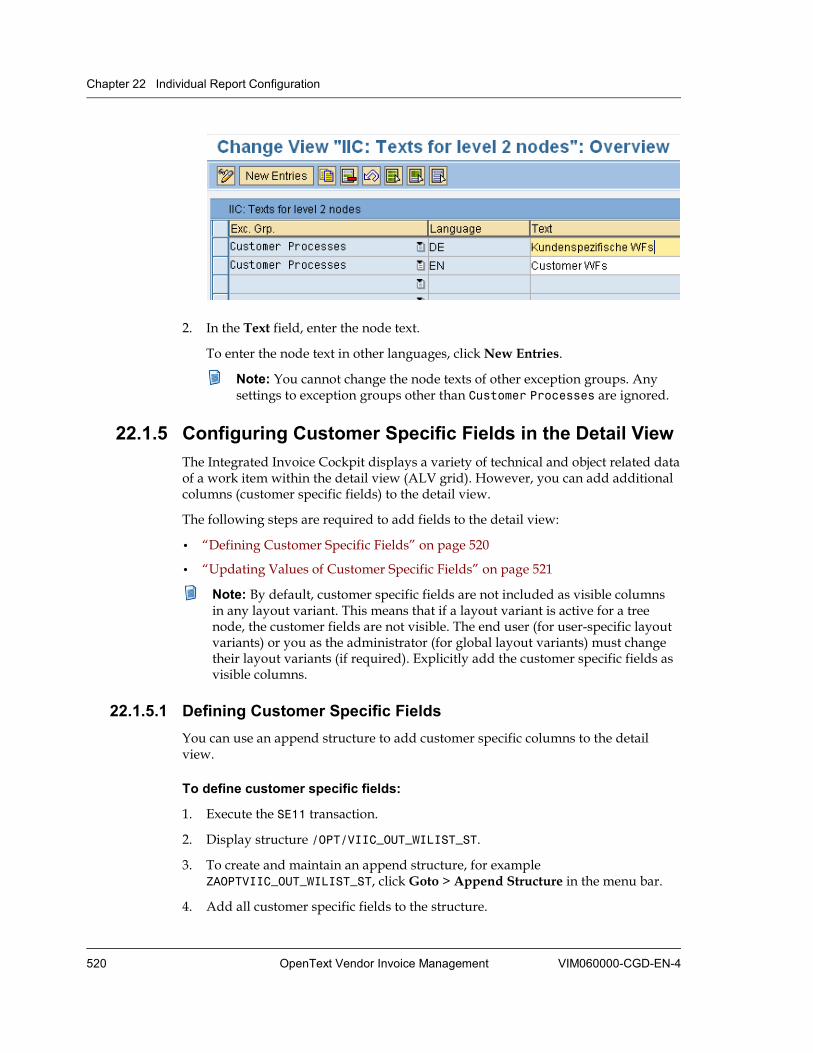
Chapter 22 Individual Report Configuration
520 OpenText Vendor Invoice Management VIM060000-CGD-EN-4
2. In the Text field, enter the node text.
To enter the node text in other languages, click New Entries.
Note: You cannot change the node texts of other exception groups. Any settings to exception groups other than Customer Processes are ignored.
22.1.5 Configuring Customer Specific Fields in the Detail View The Integrated Invoice Cockpit displays a variety of technical and object related data of a work item within the detail view (ALV grid). However, you can add additional columns (customer specific fields) to the detail view.
The following steps are required to add fields to the detail view:
• “Defining Customer Specific Fields” on page 520
• “Updating Values of Customer Specific Fields” on page 521
Note: By default, customer specific fields are not included as visible columns in any layout variant. This means that if a layout variant is active for a tree node, the customer fields are not visible. The end user (for user-specific layout variants) or you as the administrator (for global layout variants) must change their layout variants (if required). Explicitly add the customer specific fields as visible columns.
22.1.5.1 Defining Customer Specific Fields You can use an append structure to add customer specific columns to the detail view.
To define customer specific fields:
1. Execute the SE11 transaction.
2. Display structure /OPT/VIIC_OUT_WILIST_ST.
3. To create and maintain an append structure, for example ZAOPTVIIC_OUT_WILIST_ST, click Goto > Append Structure in the menu bar.
4. Add all customer specific fields to the structure.
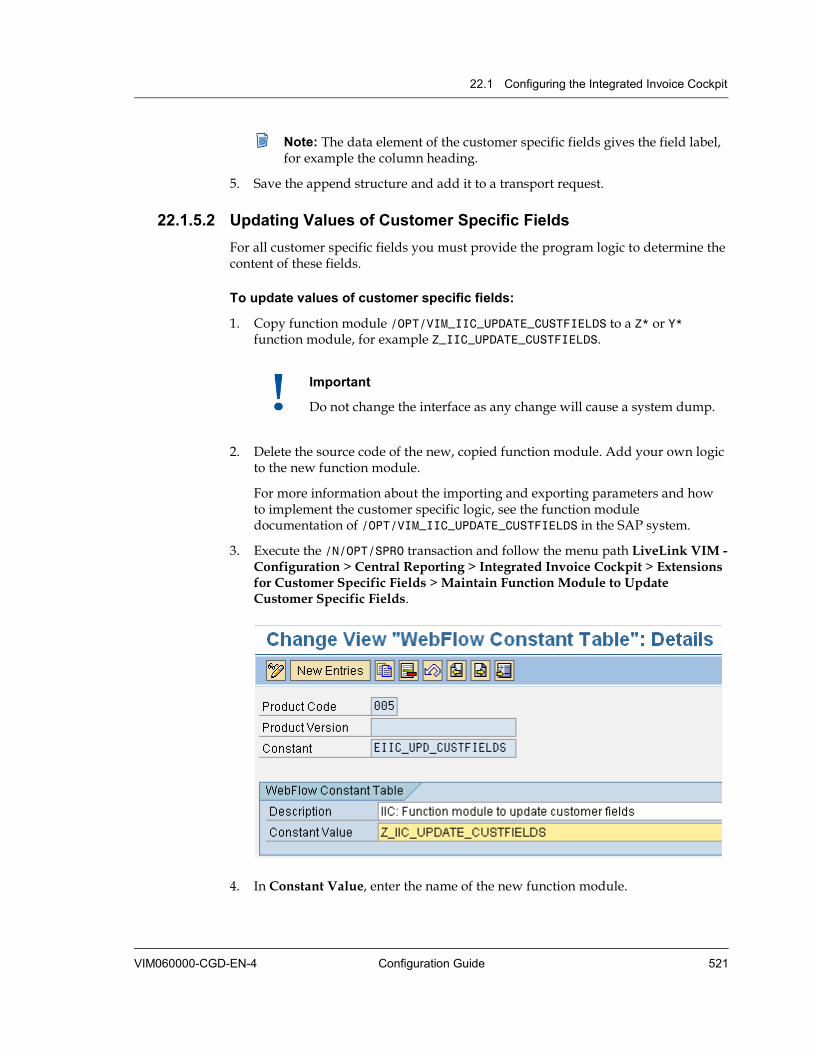
22.1 Configuring the Integrated Invoice Cockpit
VIM060000-CGD-EN-4 Configuration Guide 521
Note: The data element of the customer specific fields gives the field label, for example the column heading.
5. Save the append structure and add it to a transport request.
22.1.5.2 Updating Values of Customer Specific Fields For all customer specific fields you must provide the program logic to determine the content of these fields.
To update values of customer specific fields:
1. Copy function module /OPT/VIM_IIC_UPDATE_CUSTFIELDS to a Z* or Y* function module, for example Z_IIC_UPDATE_CUSTFIELDS.
Important
Do not change the interface as any change will cause a system dump.
2. Delete the source code of the new, copied function module. Add your own logic to the new function module.
For more information about the importing and exporting parameters and how to implement the customer specific logic, see the function module documentation of /OPT/VIM_IIC_UPDATE_CUSTFIELDS in the SAP system.
3. Execute the /N/OPT/SPRO transaction and follow the menu path LiveLink VIM - Configuration > Central Reporting > Integrated Invoice Cockpit > Extensions for Customer Specific Fields > Maintain Function Module to Update Customer Specific Fields.
4. In Constant Value, enter the name of the new function module.
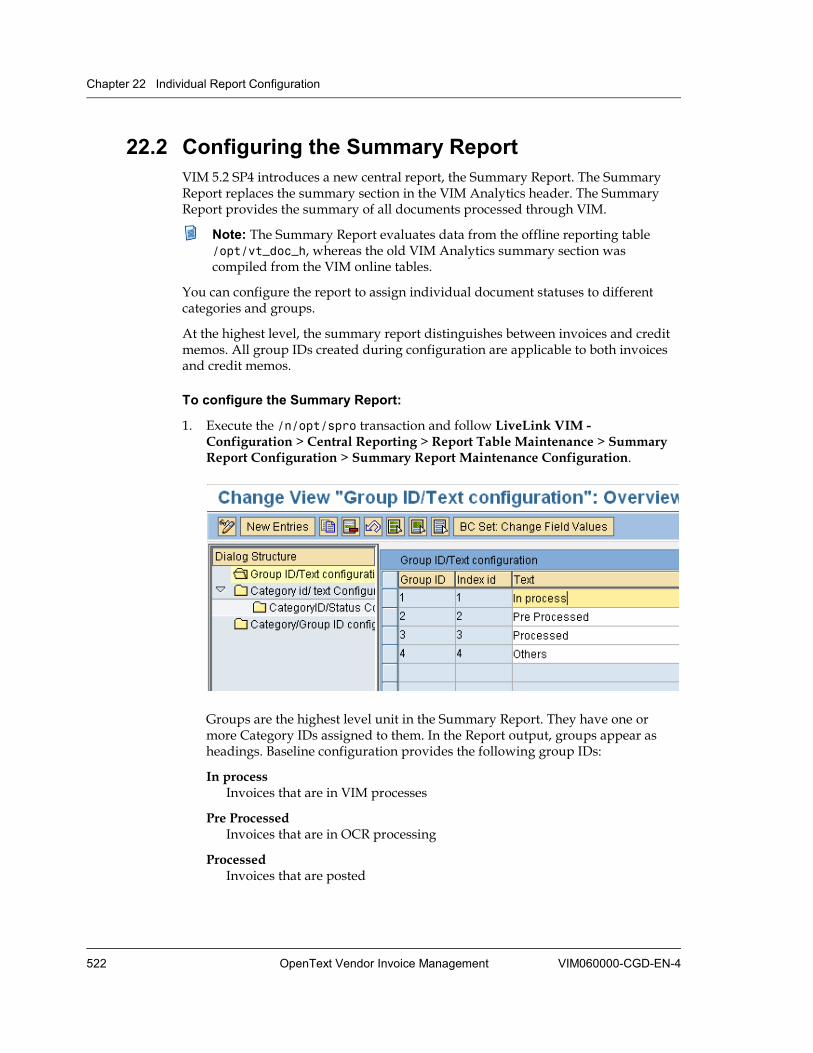
Chapter 22 Individual Report Configuration
522 OpenText Vendor Invoice Management VIM060000-CGD-EN-4
22.2 Configuring the Summary Report VIM 5.2 SP4 introduces a new central report, the Summary Report. The Summary Report replaces the summary section in the VIM Analytics header. The Summary Report provides the summary of all documents processed through VIM.
Note: The Summary Report evaluates data from the offline reporting table /opt/vt_doc_h, whereas the old VIM Analytics summary section was compiled from the VIM online tables.
You can configure the report to assign individual document statuses to different categories and groups.
At the highest level, the summary report distinguishes between invoices and credit memos. All group IDs created during configuration are applicable to both invoices and credit memos.
To configure the Summary Report:
1. Execute the /n/opt/spro transaction and follow LiveLink VIM - Configuration > Central Reporting > Report Table Maintenance > Summary Report Configuration > Summary Report Maintenance Configuration.
Groups are the highest level unit in the Summary Report. They have one or more Category IDs assigned to them. In the Report output, groups appear as headings. Baseline configuration provides the following group IDs:
In process Invoices that are in VIM processes
Pre Processed Invoices that are in OCR processing
Processed Invoices that are posted
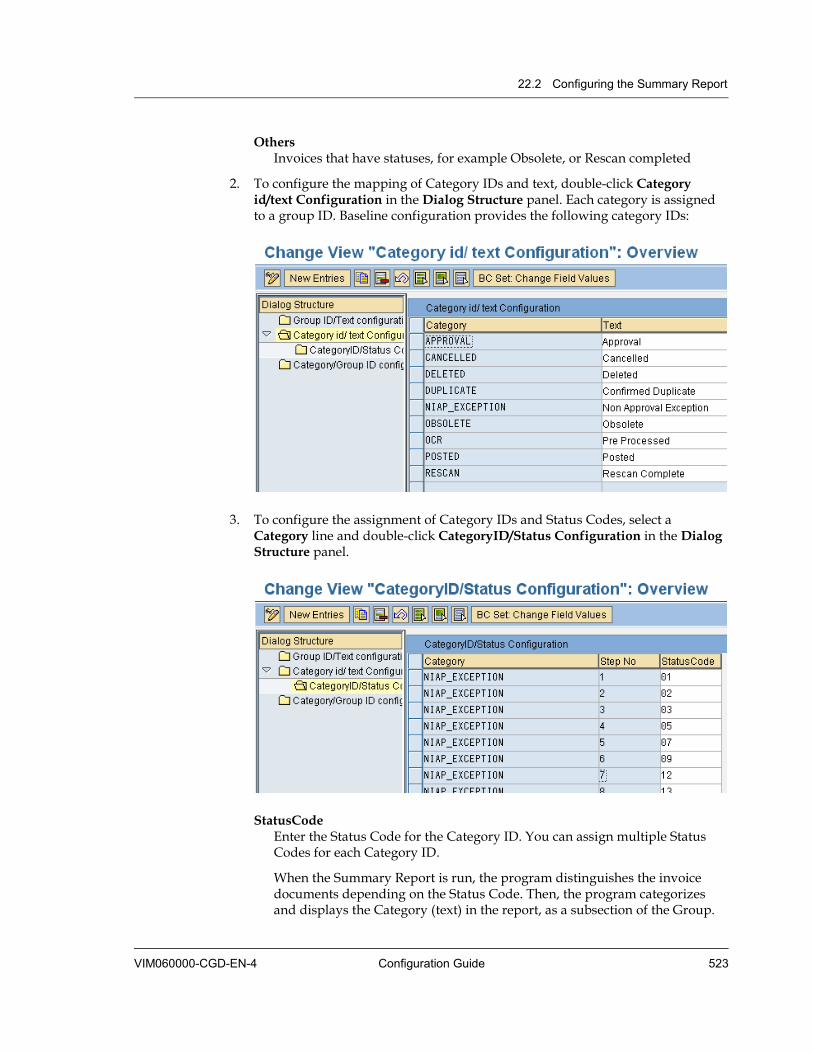
22.2 Configuring the Summary Report
VIM060000-CGD-EN-4 Configuration Guide 523
Others Invoices that have statuses, for example Obsolete, or Rescan completed
2. To configure the mapping of Category IDs and text, double-click Category id/text Configuration in the Dialog Structure panel. Each category is assigned to a group ID. Baseline configuration provides the following category IDs:
3. To configure the assignment of Category IDs and Status Codes, select a Category line and double-click CategoryID/Status Configuration in the Dialog Structure panel.
StatusCode Enter the Status Code for the Category ID. You can assign multiple Status Codes for each Category ID.
When the Summary Report is run, the program distinguishes the invoice documents depending on the Status Code. Then, the program categorizes and displays the Category (text) in the report, as a subsection of the Group.
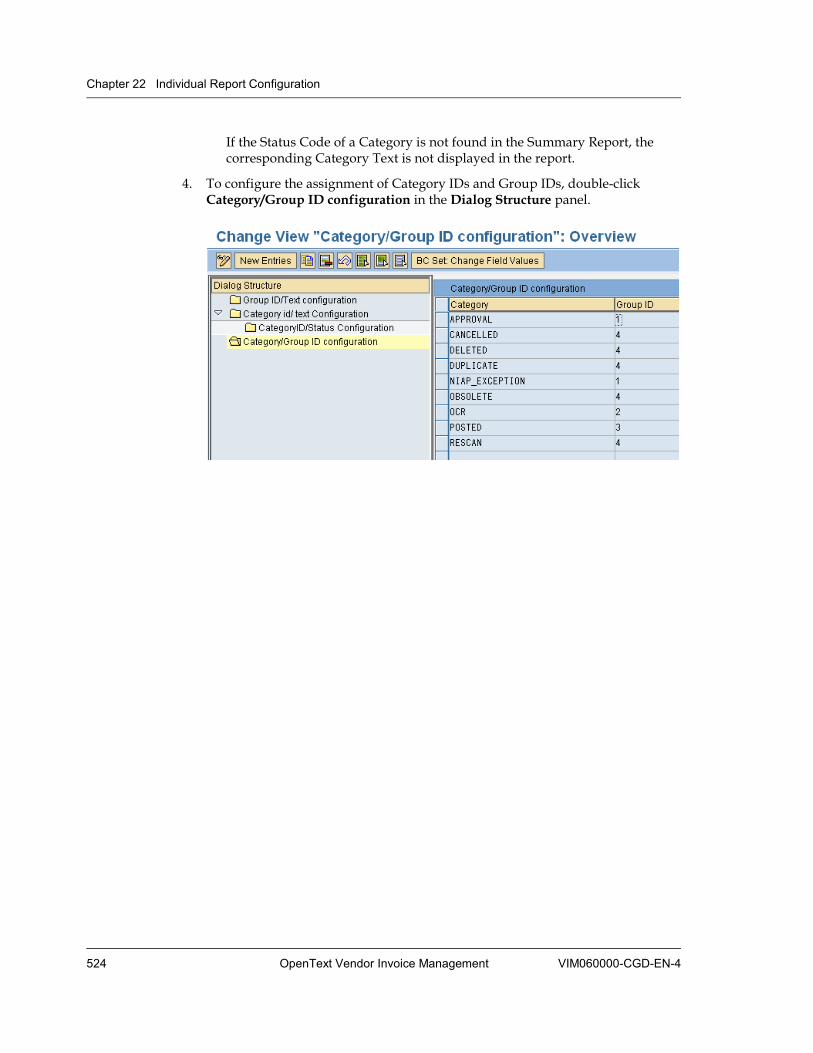
Chapter 22 Individual Report Configuration
524 OpenText Vendor Invoice Management VIM060000-CGD-EN-4
If the Status Code of a Category is not found in the Summary Report, the corresponding Category Text is not displayed in the report.
4. To configure the assignment of Category IDs and Group IDs, double-click Category/Group ID configuration in the Dialog Structure panel.

VIM060000-CGD-EN-4 OpenText Vendor Invoice Management 525
Chapter 23 System Log
The system log is used to store the status information of each task of the ICC Dispatcher and the EDI scenario. See the description in section 22 "Working with the Application Log" in OpenText Vendor Invoice Management - Administration Guide (VIM-AGD).


VIM060000-CGD-EN-4 OpenText Vendor Invoice Management 527
Chapter 24 Archiving Configuration
In the context of VIM, archiving only considers the VIM data tables of:
• DP invoices
• Reporting data from Central Reporting
For a list of tables you can archive data from and a short description of the archiving process itself, see section 27 "Archiving VIM Information" in OpenText Vendor Invoice Management - Administration Guide (VIM-AGD).
You should use archiving, if one of the following applies:
• The data size of the VIM tables has increased to an extent that reduces the performance of the database.
• The old transaction data is not relevant anymore and not accessed regularly.
Notes:
• OpenText recommends archiving data of the VIM tables only, when the data is not required in everyday tasks and it is not relevant from auditing perspective.
• Once the data is archived, all reports and transactions will not be able to show the data anymore. However, VIM Baseline provides programs to reload the data into the database.
• There are no known dependencies on data archiving of standard SAP objects like invoice documents, workflow logs, archive link entries, and so on.
Regarding archiving, you can perform the following configuration.
• “Configuring Archiving of DP Documents” on page 527
• “Configuring Archiving of Central Reporting Information” on page 530
24.1 Configuring Archiving of DP Documents With VIM 5.2 SP1, you have the archiving object /OPT/DOC in your system. Follow the standard SAP archiving procedures for archiving DP documents.
To configure archiving of DP documents:
1. Use the standard SAP transaction FILE to create the logical file name. The logical file name is needed in step 5.
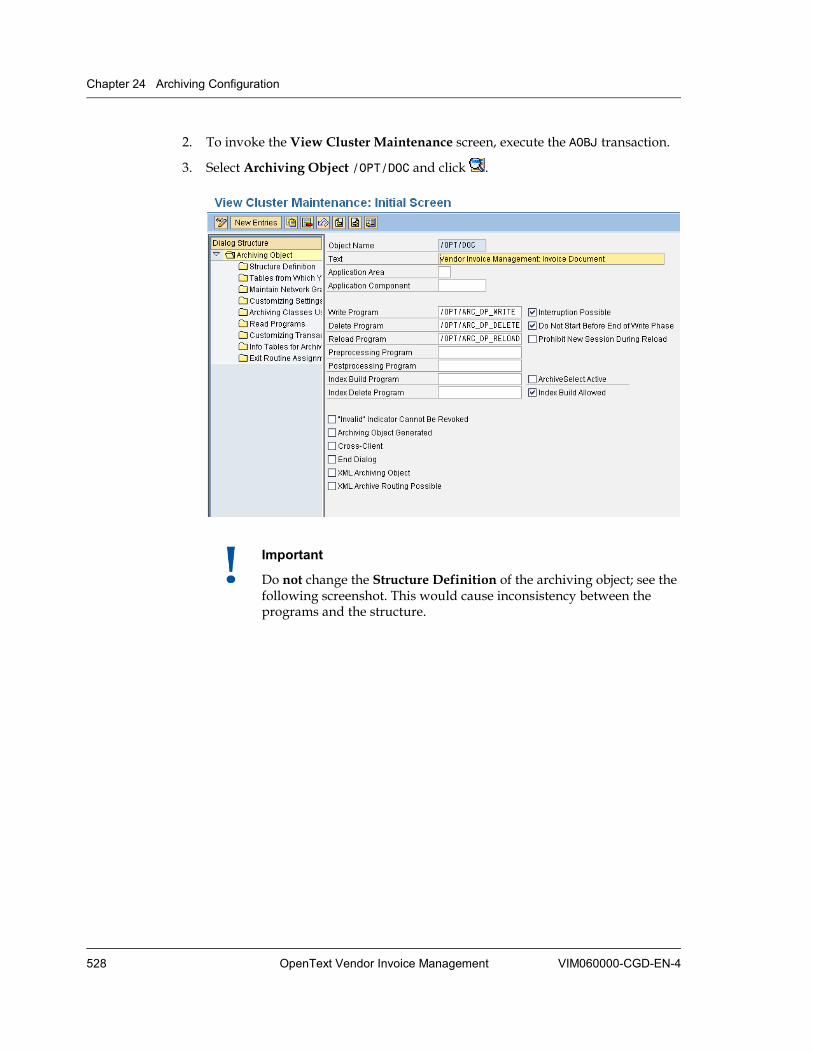
Chapter 24 Archiving Configuration
528 OpenText Vendor Invoice Management VIM060000-CGD-EN-4
2. To invoke the View Cluster Maintenance screen, execute the AOBJ transaction.
3. Select Archiving Object /OPT/DOC and click .
Important
Do not change the Structure Definition of the archiving object; see the following screenshot. This would cause inconsistency between the programs and the structure.

24.1 Configuring Archiving of DP Documents
VIM060000-CGD-EN-4 Configuration Guide 529
4. Double-click Customizing Settings in the navigation panel.
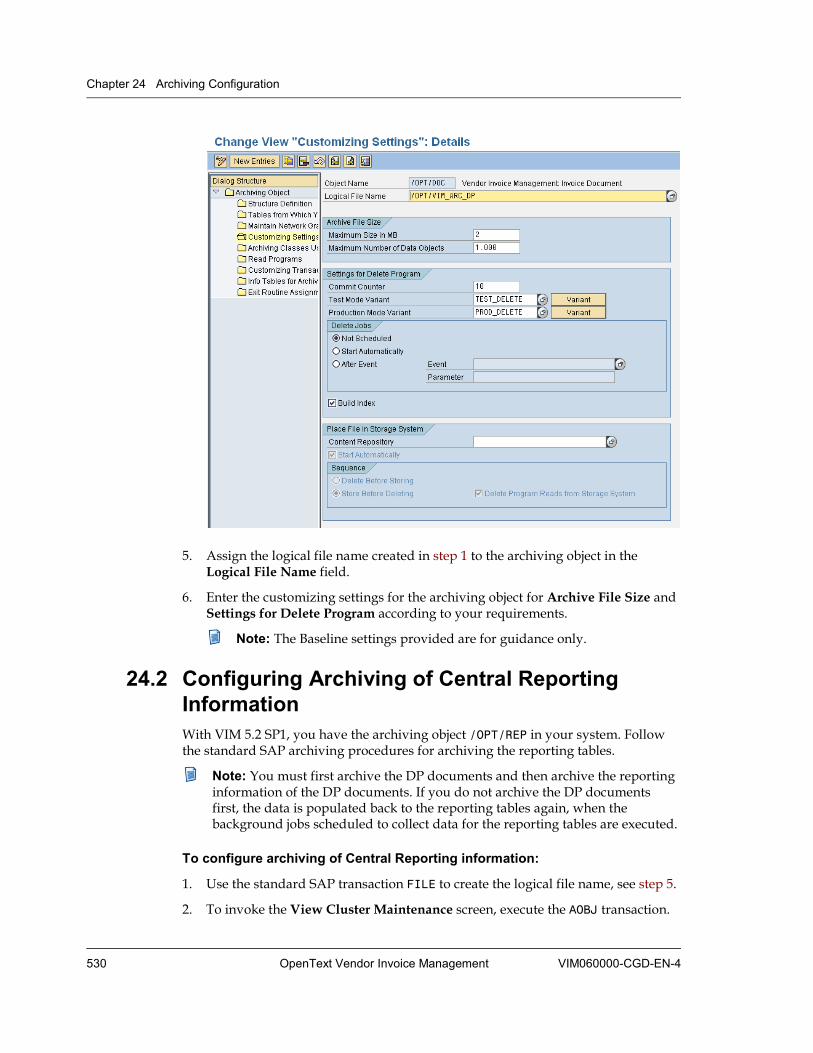
Chapter 24 Archiving Configuration
530 OpenText Vendor Invoice Management VIM060000-CGD-EN-4
5. Assign the logical file name created in step 1 to the archiving object in the Logical File Name field.
6. Enter the customizing settings for the archiving object for Archive File Size and Settings for Delete Program according to your requirements.
Note: The Baseline settings provided are for guidance only.
24.2 Configuring Archiving of Central Reporting Information With VIM 5.2 SP1, you have the archiving object /OPT/REP in your system. Follow the standard SAP archiving procedures for archiving the reporting tables.
Note: You must first archive the DP documents and then archive the reporting information of the DP documents. If you do not archive the DP documents first, the data is populated back to the reporting tables again, when the background jobs scheduled to collect data for the reporting tables are executed.
To configure archiving of Central Reporting information:
1. Use the standard SAP transaction FILE to create the logical file name, see step 5.
2. To invoke the View Cluster Maintenance screen, execute the AOBJ transaction.

24.2 Configuring Archiving of Central Reporting Information
VIM060000-CGD-EN-4 Configuration Guide 531
3. Select Archiving Object /OPT/REP and click .
Important
Do not change the Structure Definition of the archiving object, see the following screenshot. This will cause inconsistency between the programs and the structure.
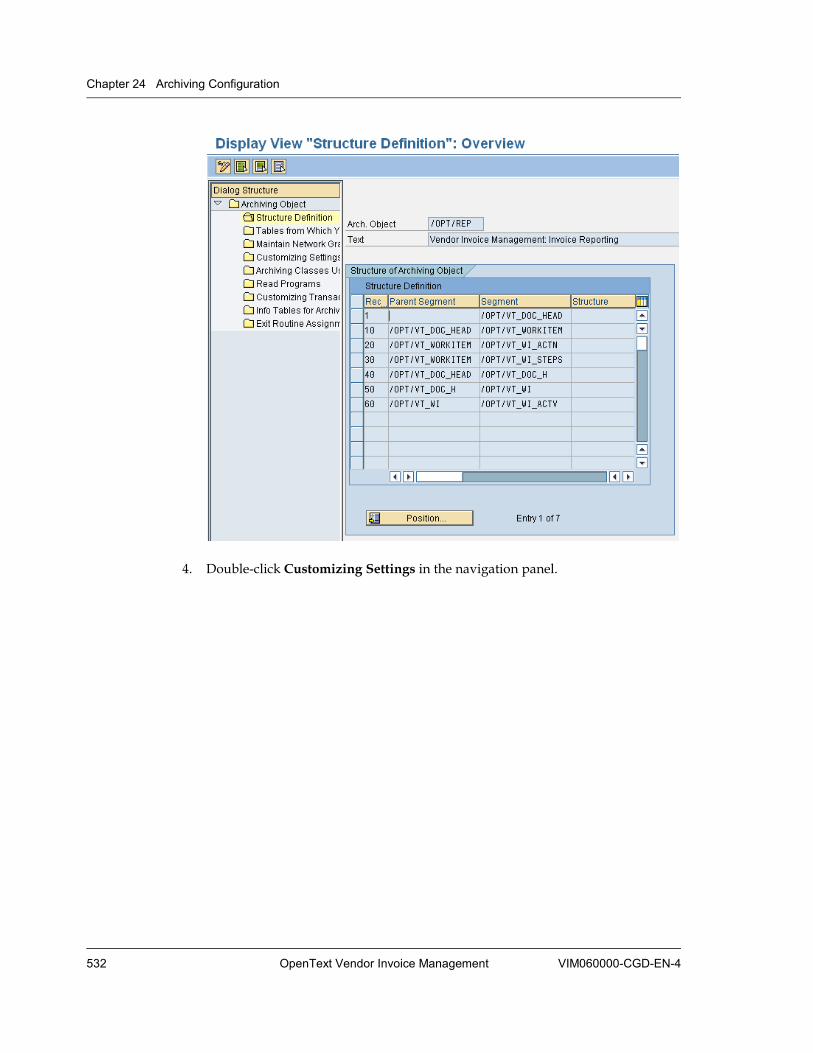
Chapter 24 Archiving Configuration
532 OpenText Vendor Invoice Management VIM060000-CGD-EN-4
4. Double-click Customizing Settings in the navigation panel.
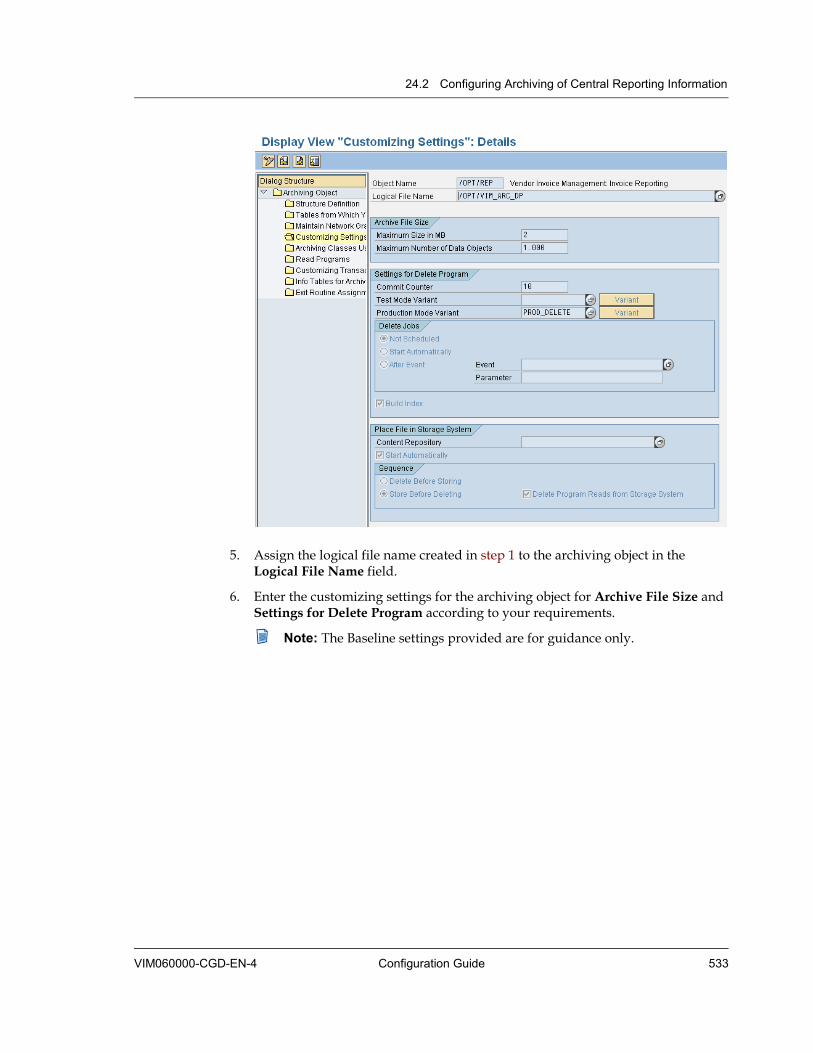
24.2 Configuring Archiving of Central Reporting Information
VIM060000-CGD-EN-4 Configuration Guide 533
5. Assign the logical file name created in step 1 to the archiving object in the Logical File Name field.
6. Enter the customizing settings for the archiving object for Archive File Size and Settings for Delete Program according to your requirements.
Note: The Baseline settings provided are for guidance only.

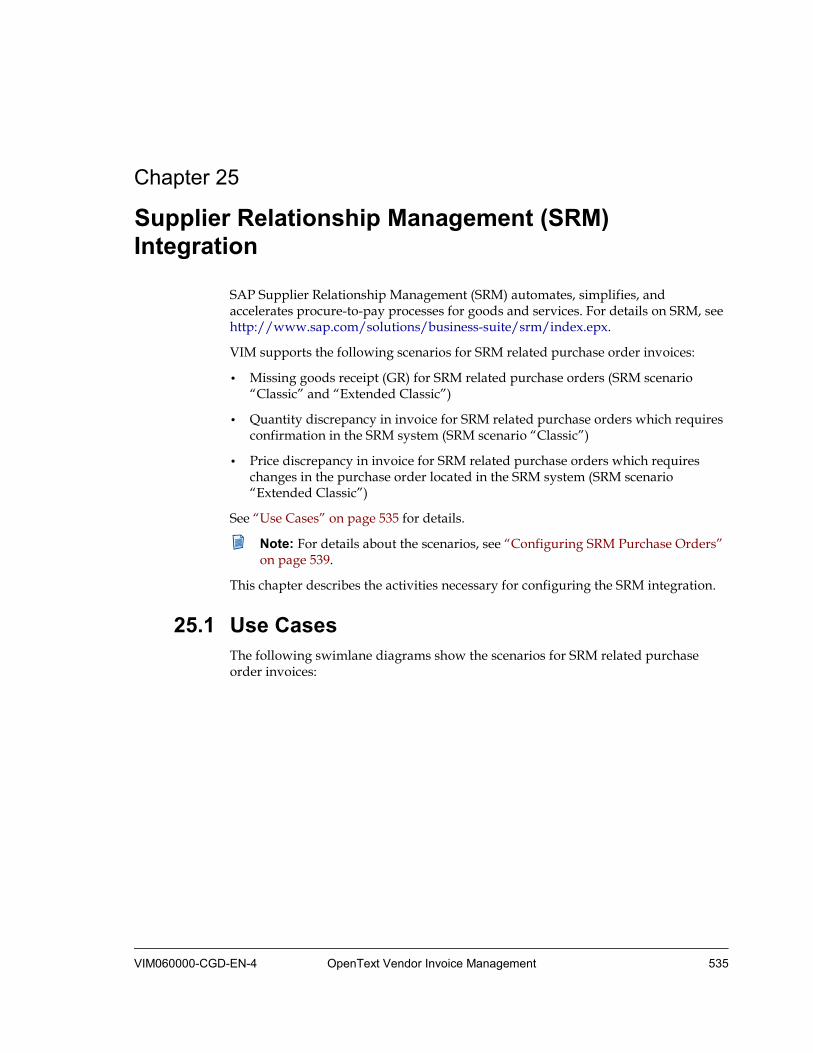
VIM060000-CGD-EN-4 OpenText Vendor Invoice Management 535
Chapter 25 Supplier Relationship Management (SRM) Integration
SAP Supplier Relationship Management (SRM) automates, simplifies, and accelerates procure-to-pay processes for goods and services. For details on SRM, see http://www.sap.com/solutions/business-suite/srm/index.epx.
VIM supports the following scenarios for SRM related purchase order invoices:
• Missing goods receipt (GR) for SRM related purchase orders (SRM scenario “Classic” and “Extended Classic”)
• Quantity discrepancy in invoice for SRM related purchase orders which requires confirmation in the SRM system (SRM scenario “Classic”)
• Price discrepancy in invoice for SRM related purchase orders which requires changes in the purchase order located in the SRM system (SRM scenario “Extended Classic”)
See “Use Cases” on page 535 for details.
Note: For details about the scenarios, see “Configuring SRM Purchase Orders” on page 539.
This chapter describes the activities necessary for configuring the SRM integration.
25.1 Use Cases The following swimlane diagrams show the scenarios for SRM related purchase order invoices:
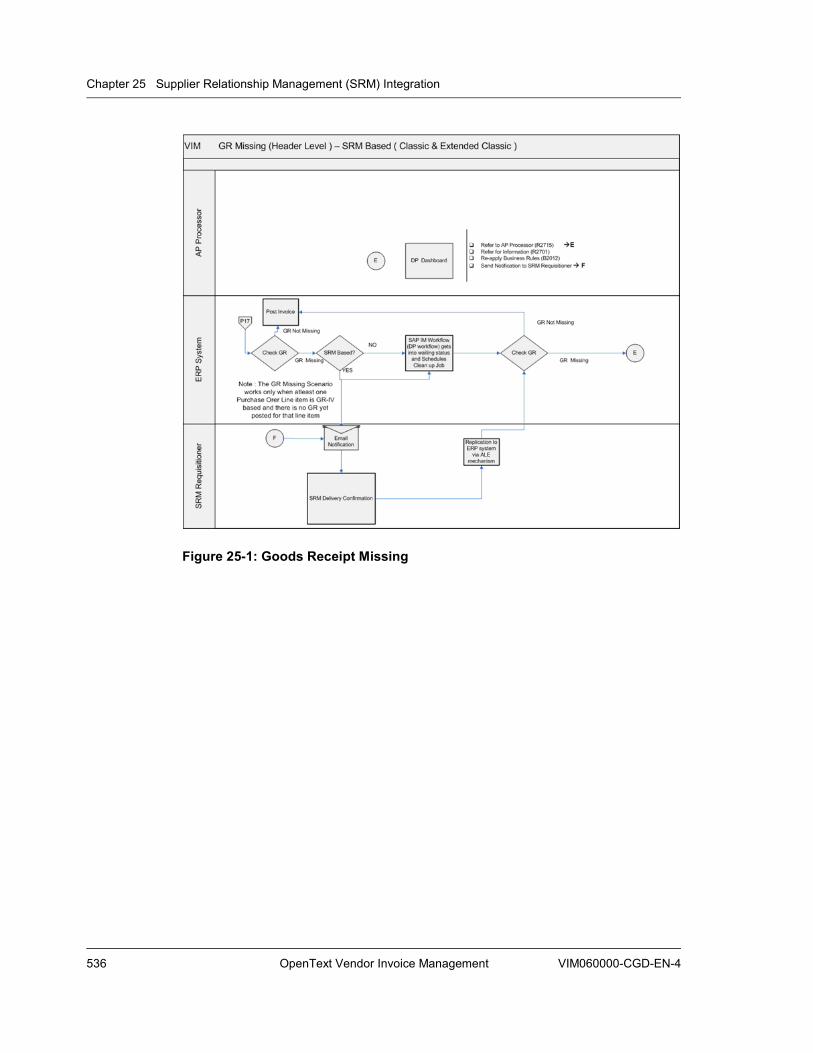
Chapter 25 Supplier Relationship Management (SRM) Integration
536 OpenText Vendor Invoice Management VIM060000-CGD-EN-4
Figure 25-1: Goods Receipt Missing

25.1 Use Cases
VIM060000-CGD-EN-4 Configuration Guide 537
Figure 25-2: PO Quantity Block
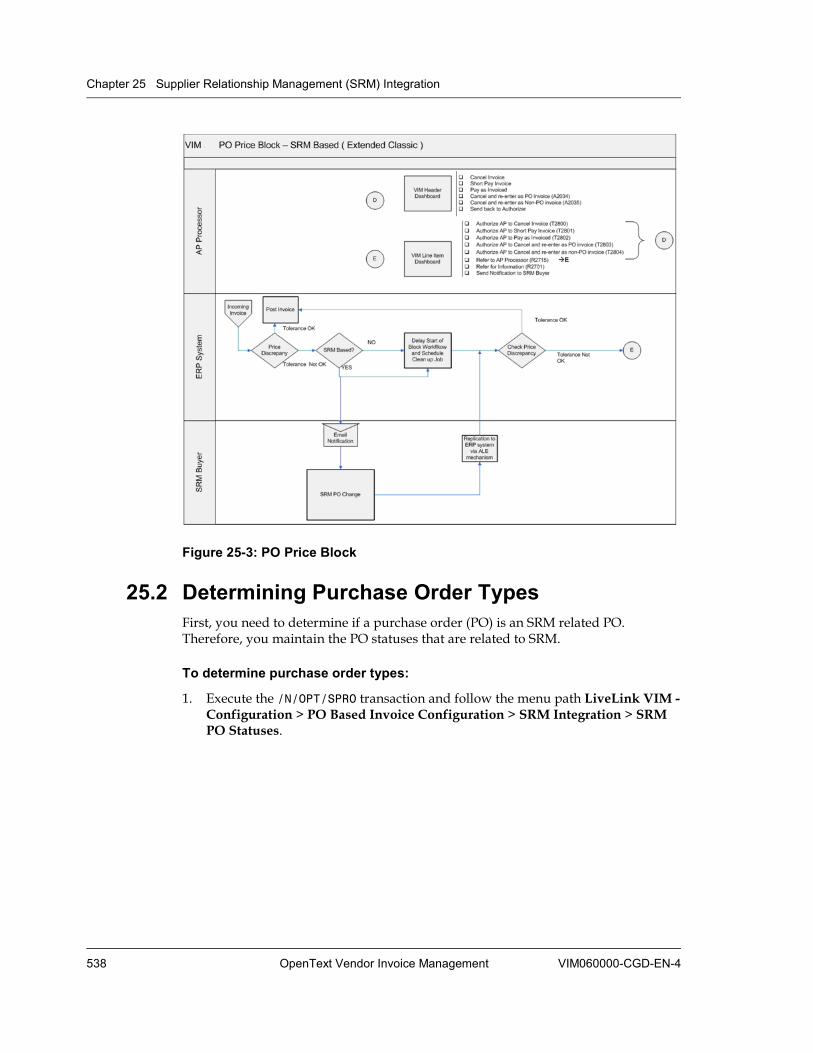
Chapter 25 Supplier Relationship Management (SRM) Integration
538 OpenText Vendor Invoice Management VIM060000-CGD-EN-4
Figure 25-3: PO Price Block
25.2 Determining Purchase Order Types First, you need to determine if a purchase order (PO) is an SRM related PO. Therefore, you maintain the PO statuses that are related to SRM.
To determine purchase order types:
1. Execute the /N/OPT/SPRO transaction and follow the menu path LiveLink VIM - Configuration > PO Based Invoice Configuration > SRM Integration > SRM PO Statuses.
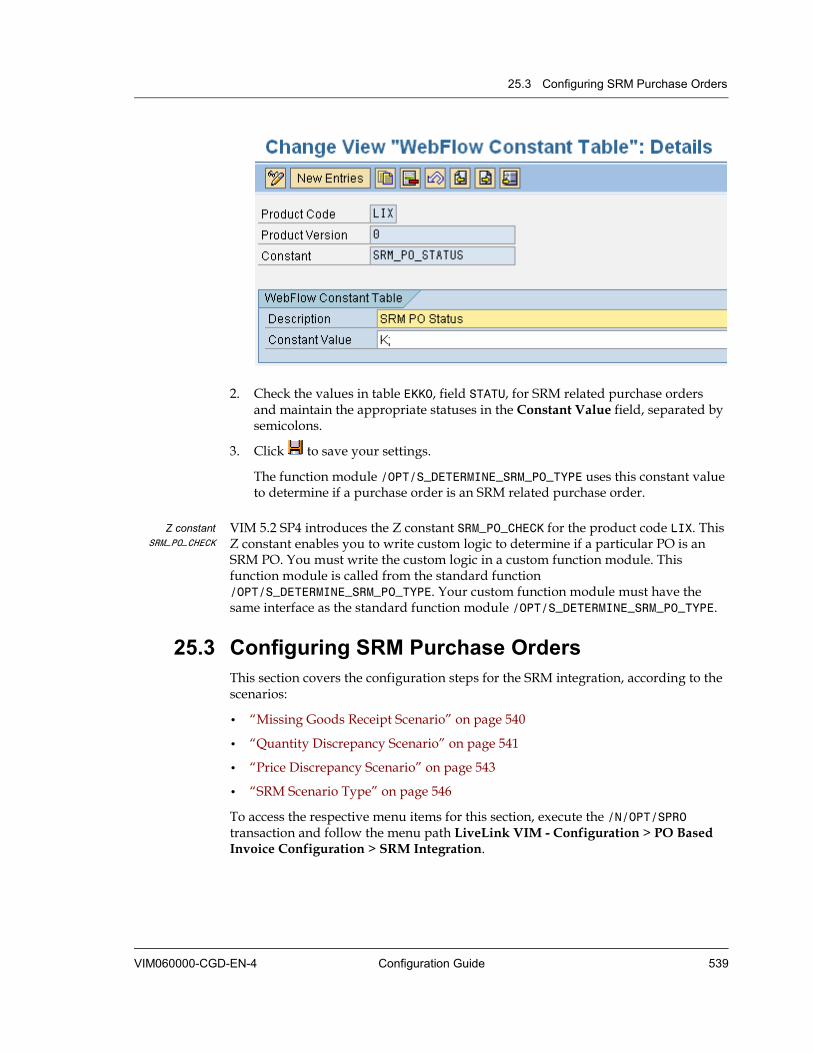
25.3 Configuring SRM Purchase Orders
VIM060000-CGD-EN-4 Configuration Guide 539
2. Check the values in table EKKO, field STATU, for SRM related purchase orders and maintain the appropriate statuses in the Constant Value field, separated by semicolons.
3. Click to save your settings.
The function module /OPT/S_DETERMINE_SRM_PO_TYPE uses this constant value to determine if a purchase order is an SRM related purchase order.
Z constant SRM_PO_CHECK
VIM 5.2 SP4 introduces the Z constant SRM_PO_CHECK for the product code LIX. This Z constant enables you to write custom logic to determine if a particular PO is an SRM PO. You must write the custom logic in a custom function module. This function module is called from the standard function /OPT/S_DETERMINE_SRM_PO_TYPE. Your custom function module must have the same interface as the standard function module /OPT/S_DETERMINE_SRM_PO_TYPE.
25.3 Configuring SRM Purchase Orders This section covers the configuration steps for the SRM integration, according to the scenarios:
• “Missing Goods Receipt Scenario” on page 540
• “Quantity Discrepancy Scenario” on page 541
• “Price Discrepancy Scenario” on page 543
• “SRM Scenario Type” on page 546
To access the respective menu items for this section, execute the /N/OPT/SPRO transaction and follow the menu path LiveLink VIM - Configuration > PO Based Invoice Configuration > SRM Integration.

Chapter 25 Supplier Relationship Management (SRM) Integration
540 OpenText Vendor Invoice Management VIM060000-CGD-EN-4
25.3.1 Missing Goods Receipt Scenario If an SRM related invoice has a purchase order line item with activated GRIV flag (Goods Receipt based Invoice Verification) and no goods receipt is posted, an email will be sent to the SRM user (purchase order requester).
Process type maintenance
VIM Baseline contains a new process type 162 for SRM. See “Configuring the Process Type” on page 88 for details on maintaining the process type. Verify that the following fields are maintained for the SRM process type:
• Workflow Type SRM System Integration
• Max Retry Counter
• Retry Time (Minutes)
• Mail Config ID
• Function Module for Receiver Email, for example /OPT/S_GET_SRM_USER_EMAIL_ID
• Function Module to send email, for example /OPT/S_DP_EMAIL_NOTIFICATION
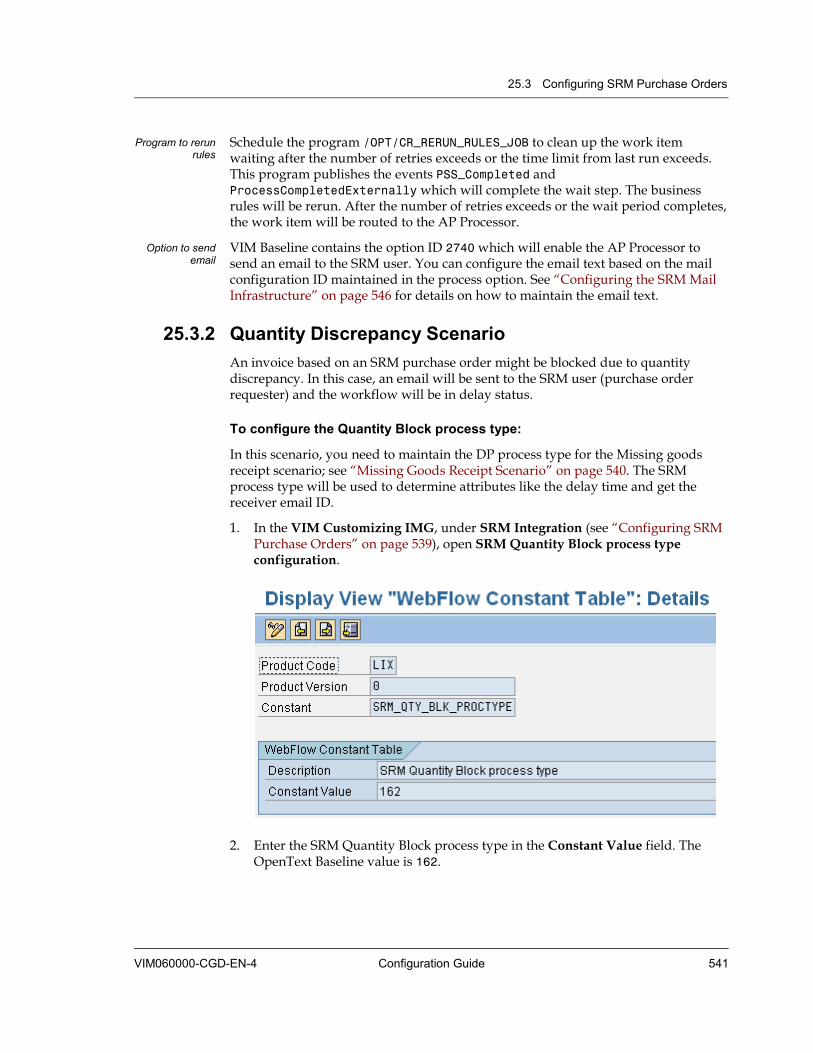
25.3 Configuring SRM Purchase Orders
VIM060000-CGD-EN-4 Configuration Guide 541
Program to rerun rules
Schedule the program /OPT/CR_RERUN_RULES_JOB to clean up the work item waiting after the number of retries exceeds or the time limit from last run exceeds. This program publishes the events PSS_Completed and ProcessCompletedExternally which will complete the wait step. The business rules will be rerun. After the number of retries exceeds or the wait period completes, the work item will be routed to the AP Processor.
Option to send email
VIM Baseline contains the option ID 2740 which will enable the AP Processor to send an email to the SRM user. You can configure the email text based on the mail configuration ID maintained in the process option. See “Configuring the SRM Mail Infrastructure” on page 546 for details on how to maintain the email text.
25.3.2 Quantity Discrepancy Scenario An invoice based on an SRM purchase order might be blocked due to quantity discrepancy. In this case, an email will be sent to the SRM user (purchase order requester) and the workflow will be in delay status.
To configure the Quantity Block process type:
In this scenario, you need to maintain the DP process type for the Missing goods receipt scenario; see “Missing Goods Receipt Scenario” on page 540. The SRM process type will be used to determine attributes like the delay time and get the receiver email ID.
1. In the VIM Customizing IMG, under SRM Integration (see “Configuring SRM Purchase Orders” on page 539), open SRM Quantity Block process type configuration.
2. Enter the SRM Quantity Block process type in the Constant Value field. The OpenText Baseline value is 162.
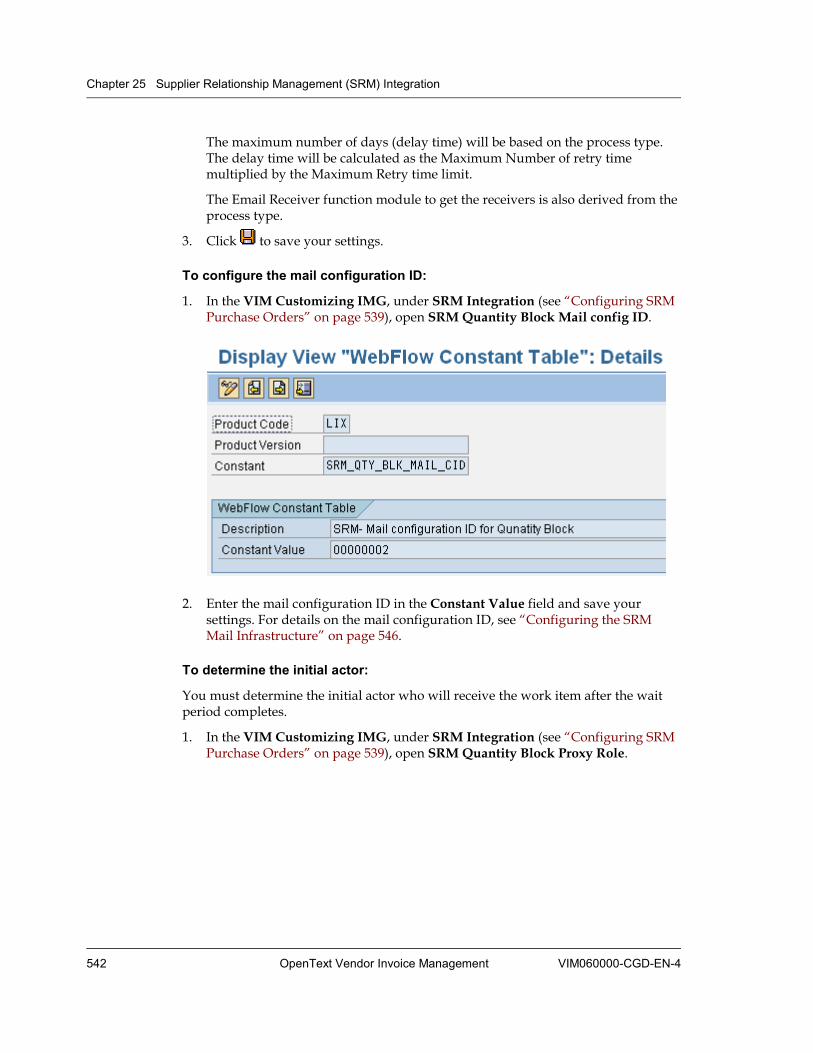
Chapter 25 Supplier Relationship Management (SRM) Integration
542 OpenText Vendor Invoice Management VIM060000-CGD-EN-4
The maximum number of days (delay time) will be based on the process type. The delay time will be calculated as the Maximum Number of retry time multiplied by the Maximum Retry time limit.
The Email Receiver function module to get the receivers is also derived from the process type.
3. Click to save your settings.
To configure the mail configuration ID:
1. In the VIM Customizing IMG, under SRM Integration (see “Configuring SRM Purchase Orders” on page 539), open SRM Quantity Block Mail config ID.
2. Enter the mail configuration ID in the Constant Value field and save your settings. For details on the mail configuration ID, see “Configuring the SRM Mail Infrastructure” on page 546.
To determine the initial actor:
You must determine the initial actor who will receive the work item after the wait period completes.
1. In the VIM Customizing IMG, under SRM Integration (see “Configuring SRM Purchase Orders” on page 539), open SRM Quantity Block Proxy Role.
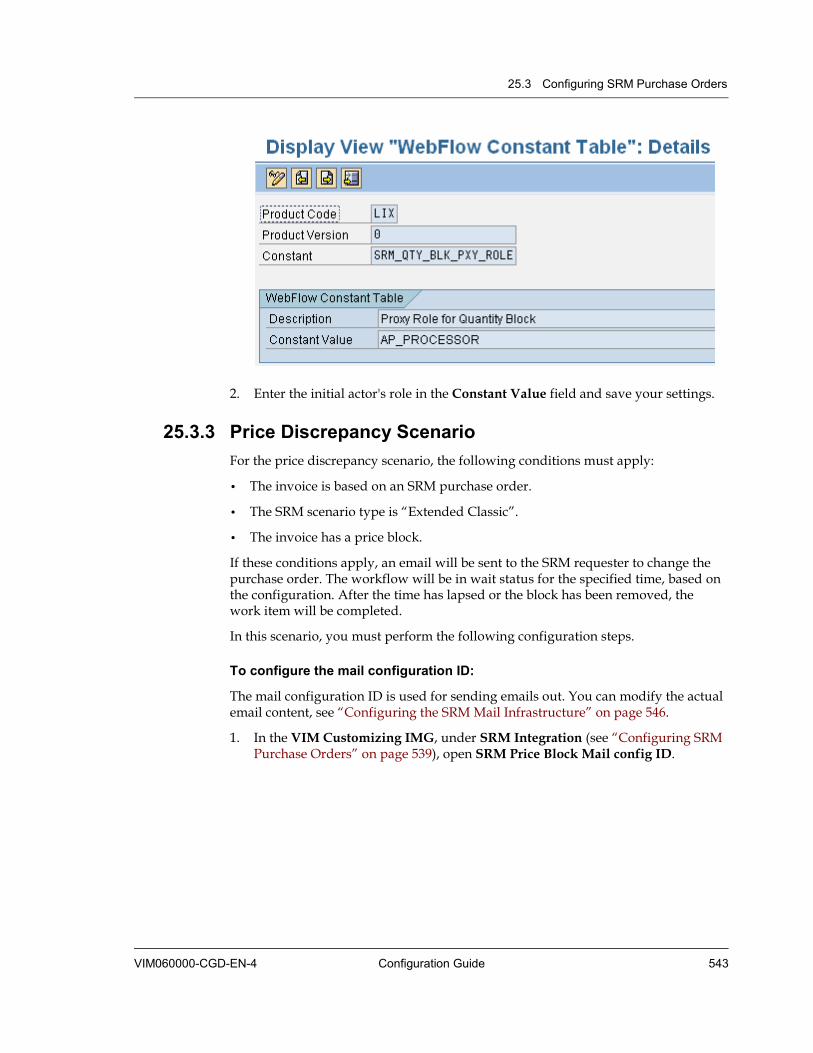
25.3 Configuring SRM Purchase Orders
VIM060000-CGD-EN-4 Configuration Guide 543
2. Enter the initial actor's role in the Constant Value field and save your settings.
25.3.3 Price Discrepancy Scenario For the price discrepancy scenario, the following conditions must apply:
• The invoice is based on an SRM purchase order.
• The SRM scenario type is “Extended Classic”.
• The invoice has a price block.
If these conditions apply, an email will be sent to the SRM requester to change the purchase order. The workflow will be in wait status for the specified time, based on the configuration. After the time has lapsed or the block has been removed, the work item will be completed.
In this scenario, you must perform the following configuration steps.
To configure the mail configuration ID:
The mail configuration ID is used for sending emails out. You can modify the actual email content, see “Configuring the SRM Mail Infrastructure” on page 546.
1. In the VIM Customizing IMG, under SRM Integration (see “Configuring SRM Purchase Orders” on page 539), open SRM Price Block Mail config ID.

Chapter 25 Supplier Relationship Management (SRM) Integration
544 OpenText Vendor Invoice Management VIM060000-CGD-EN-4
2. Enter the mail configuration ID in the Constant Value field and save your settings. For details on the mail configuration ID, see “Configuring the SRM Mail Infrastructure” on page 546.
To configure the email receiver function module:
1. In the VIM Customizing IMG, under SRM Integration (see “Configuring SRM Purchase Orders” on page 539), open SRM Price Block Email Func Module.
2. Enter /OPT/S_GET_SRM_USER_EMAIL_ID in the Constant Value field and save your settings.
The constant value function module determines the SRM user email.
To determine the initial actor:
You must determine the initial actor who will receive the work item after the wait period completes.
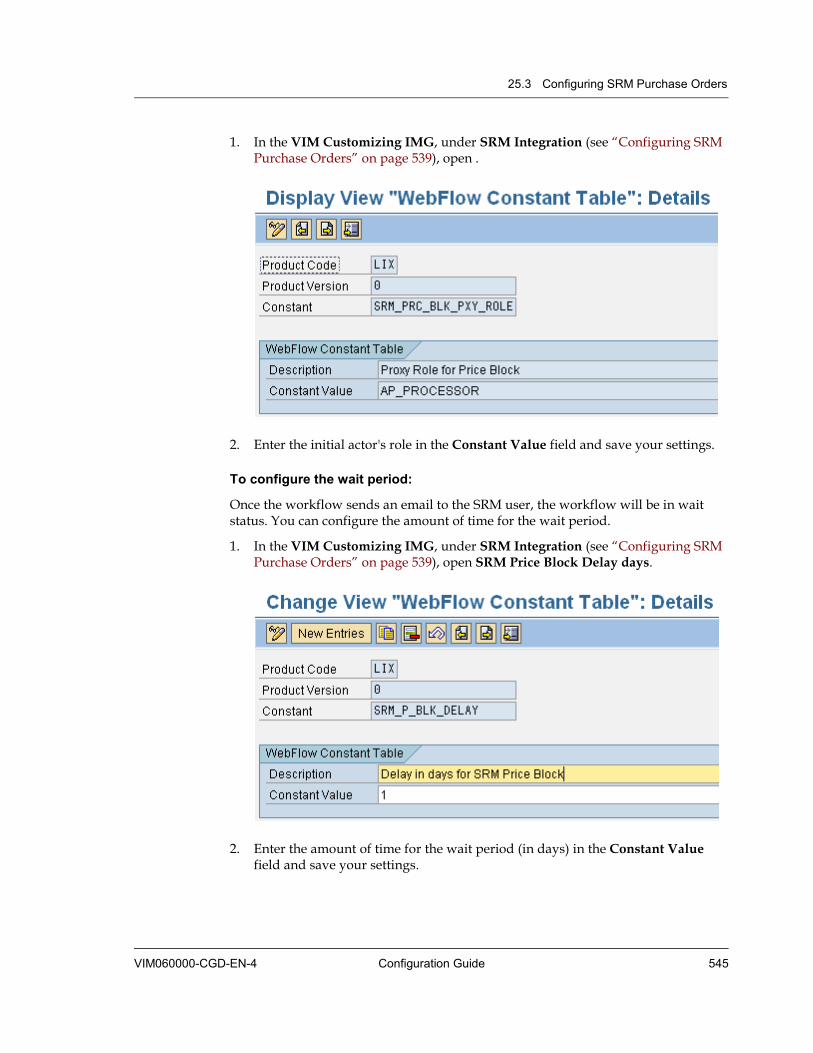
25.3 Configuring SRM Purchase Orders
VIM060000-CGD-EN-4 Configuration Guide 545
1. In the VIM Customizing IMG, under SRM Integration (see “Configuring SRM Purchase Orders” on page 539), open .
2. Enter the initial actor's role in the Constant Value field and save your settings.
To configure the wait period:
Once the workflow sends an email to the SRM user, the workflow will be in wait status. You can configure the amount of time for the wait period.
1. In the VIM Customizing IMG, under SRM Integration (see “Configuring SRM Purchase Orders” on page 539), open SRM Price Block Delay days.
2. Enter the amount of time for the wait period (in days) in the Constant Value field and save your settings.
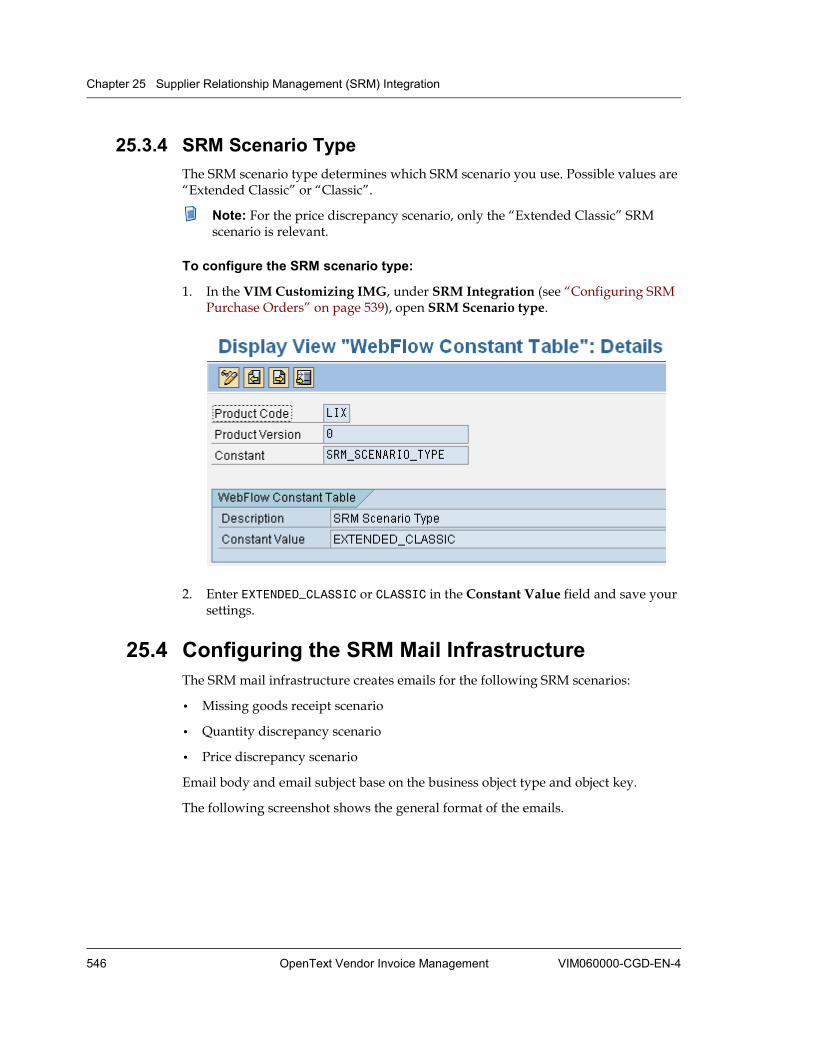
Chapter 25 Supplier Relationship Management (SRM) Integration
546 OpenText Vendor Invoice Management VIM060000-CGD-EN-4
25.3.4 SRM Scenario Type The SRM scenario type determines which SRM scenario you use. Possible values are “Extended Classic” or “Classic”.
Note: For the price discrepancy scenario, only the “Extended Classic” SRM scenario is relevant.
To configure the SRM scenario type:
1. In the VIM Customizing IMG, under SRM Integration (see “Configuring SRM Purchase Orders” on page 539), open SRM Scenario type.
2. Enter EXTENDED_CLASSIC or CLASSIC in the Constant Value field and save your settings.
25.4 Configuring the SRM Mail Infrastructure The SRM mail infrastructure creates emails for the following SRM scenarios:
• Missing goods receipt scenario
• Quantity discrepancy scenario
• Price discrepancy scenario
Email body and email subject base on the business object type and object key.
The following screenshot shows the general format of the emails.
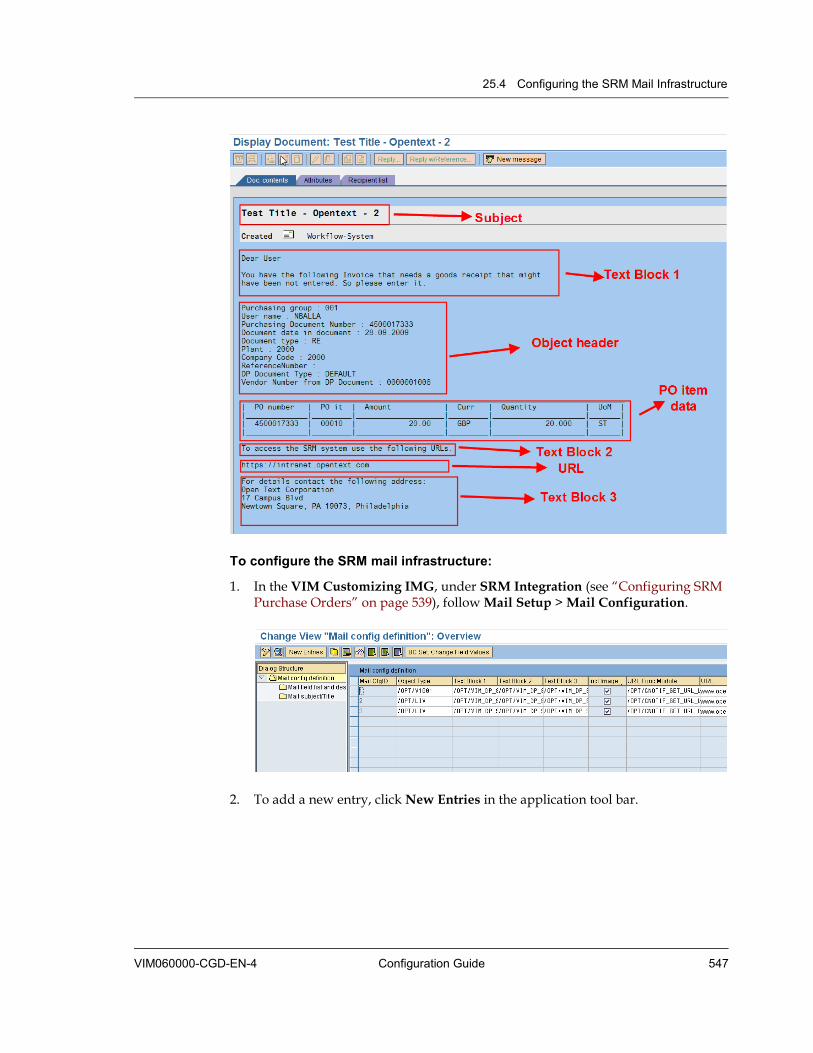
25.4 Configuring the SRM Mail Infrastructure
VIM060000-CGD-EN-4 Configuration Guide 547
To configure the SRM mail infrastructure:
1. In the VIM Customizing IMG, under SRM Integration (see “Configuring SRM Purchase Orders” on page 539), follow Mail Setup > Mail Configuration.
2. To add a new entry, click New Entries in the application tool bar.
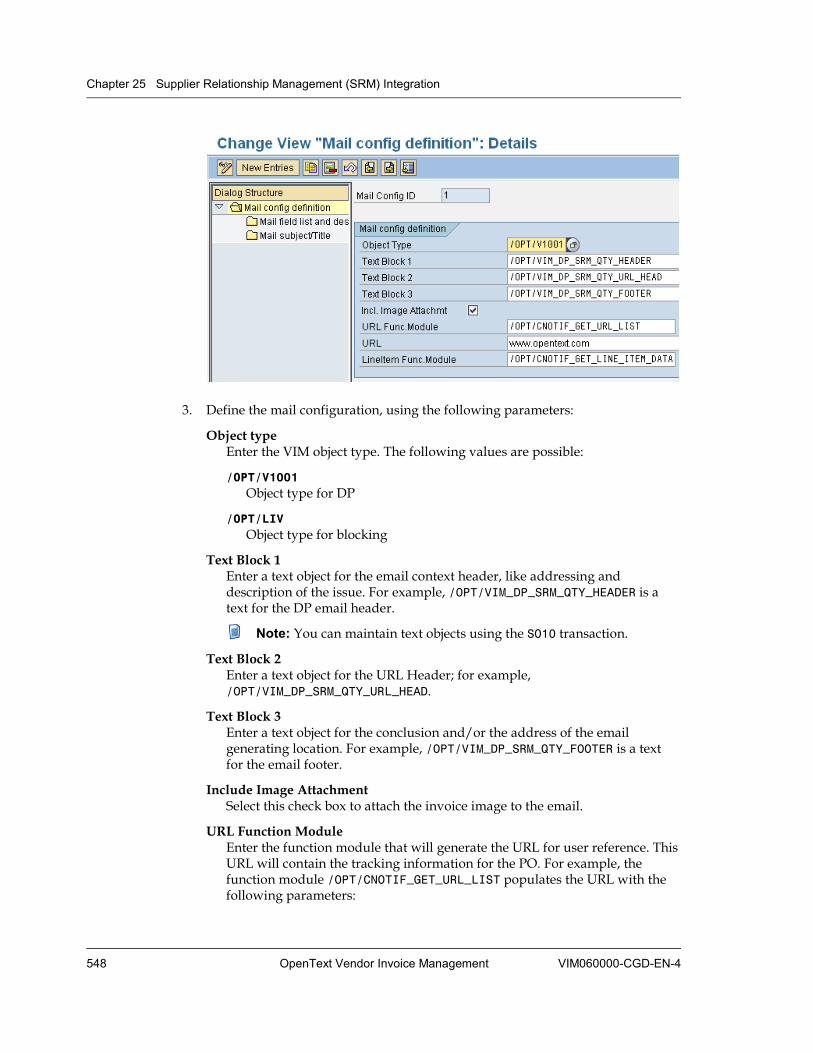
Chapter 25 Supplier Relationship Management (SRM) Integration
548 OpenText Vendor Invoice Management VIM060000-CGD-EN-4
3. Define the mail configuration, using the following parameters:
Object type Enter the VIM object type. The following values are possible:
/OPT/V1001 Object type for DP
/OPT/LIV Object type for blocking
Text Block 1 Enter a text object for the email context header, like addressing and description of the issue. For example, /OPT/VIM_DP_SRM_QTY_HEADER is a text for the DP email header.
Note: You can maintain text objects using the SO10 transaction.
Text Block 2 Enter a text object for the URL Header; for example, /OPT/VIM_DP_SRM_QTY_URL_HEAD.
Text Block 3 Enter a text object for the conclusion and/or the address of the email generating location. For example, /OPT/VIM_DP_SRM_QTY_FOOTER is a text for the email footer.
Include Image Attachment Select this check box to attach the invoice image to the email.
URL Function Module Enter the function module that will generate the URL for user reference. This URL will contain the tracking information for the PO. For example, the function module /OPT/CNOTIF_GET_URL_LIST populates the URL with the following parameters:

25.4 Configuring the SRM Mail Infrastructure
VIM060000-CGD-EN-4 Configuration Guide 549
Importing parameters
I_MAIL_CFG_ID Mail configuration ID
I_OBJTYPE Object type
I_OBJKEY Object key
Exporting parameters
T_URL Table of URLs
URL Enter a URL that is used in the mail body, in case the URL generating function module is not maintained.
Line Item Function Module Enter the function module that will populate the line item information and construct the table. For example, the function module /OPT/CNOTIF_GET_LINE_ITEM_DATA will populate the line item information with the following parameters:
Importing parameters
I_MAIL_CFG_ID Mail configuration ID
I_OBJTYPE Object type
I_OBJKEY Object key
I_GROUP_BY Group by (used as SRM PO Requester in baseline)
Exporting parameters
T_LINE Table parameter, with PO line item information
4. To configure the mail fields which need to be populated in the email content, double-click Mail field list and description in the Dialog Structure panel.
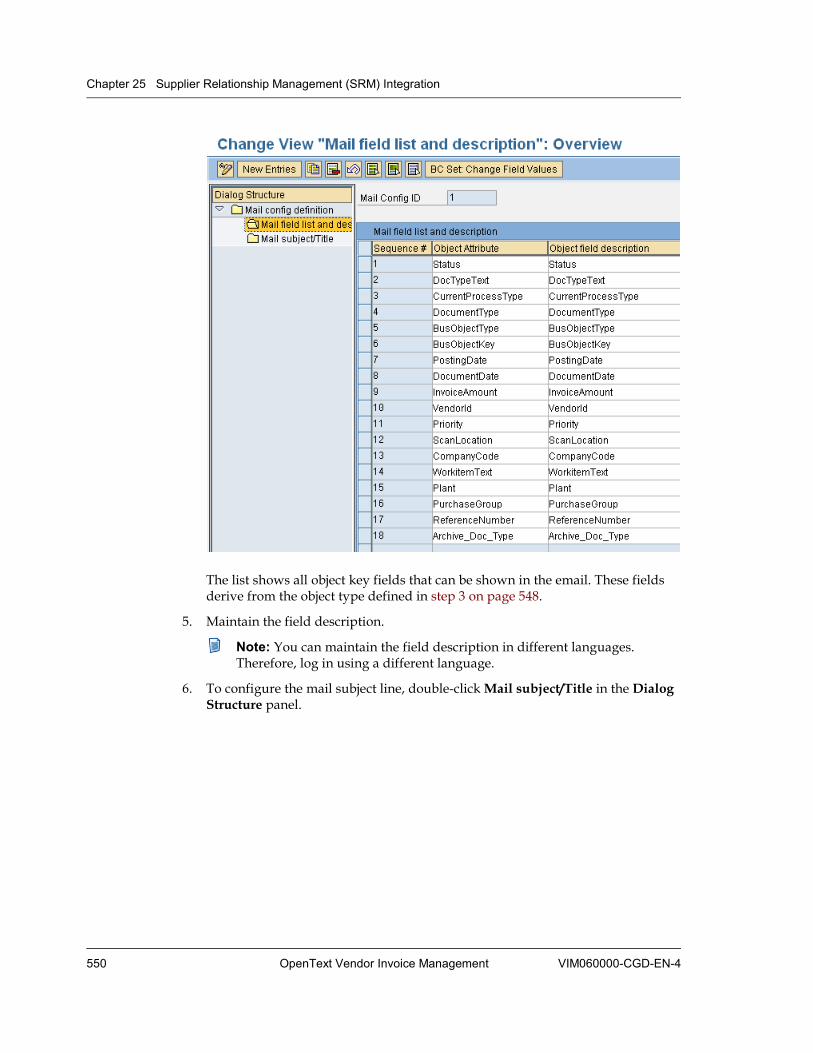
Chapter 25 Supplier Relationship Management (SRM) Integration
550 OpenText Vendor Invoice Management VIM060000-CGD-EN-4
The list shows all object key fields that can be shown in the email. These fields derive from the object type defined in step 3 on page 548.
5. Maintain the field description.
Note: You can maintain the field description in different languages. Therefore, log in using a different language.
6. To configure the mail subject line, double-click Mail subject/Title in the Dialog Structure panel.
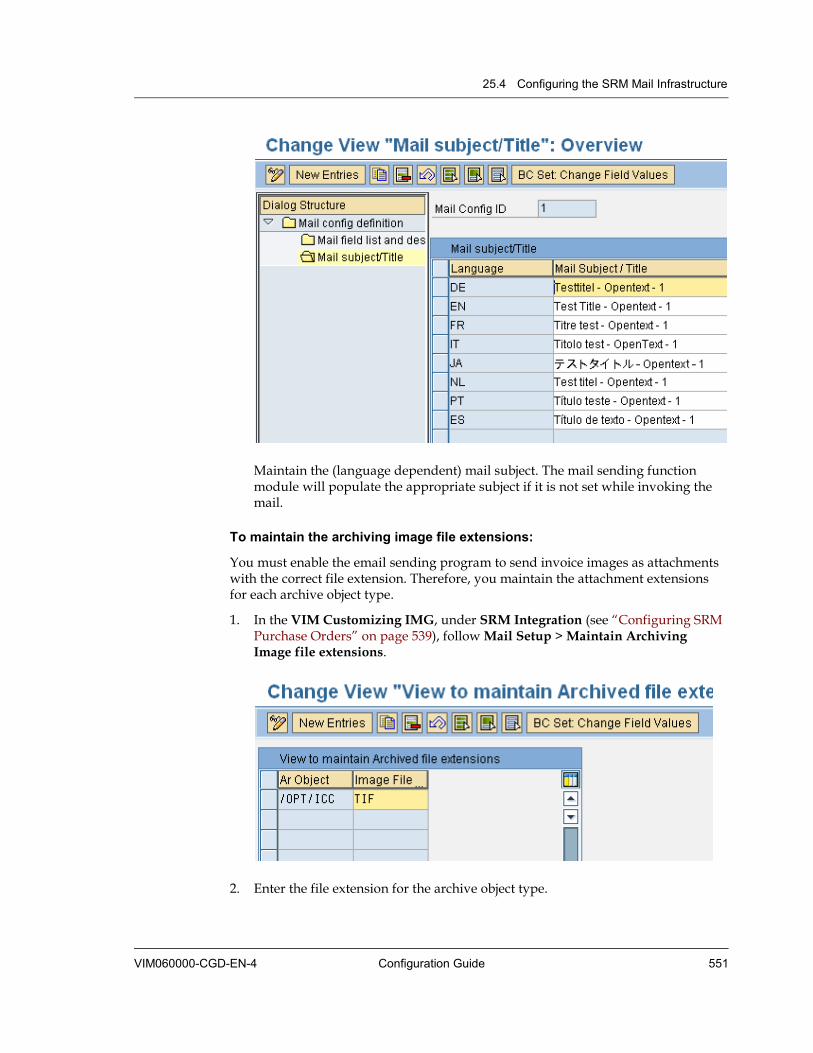
25.4 Configuring the SRM Mail Infrastructure
VIM060000-CGD-EN-4 Configuration Guide 551
Maintain the (language dependent) mail subject. The mail sending function module will populate the appropriate subject if it is not set while invoking the mail.
To maintain the archiving image file extensions:
You must enable the email sending program to send invoice images as attachments with the correct file extension. Therefore, you maintain the attachment extensions for each archive object type.
1. In the VIM Customizing IMG, under SRM Integration (see “Configuring SRM Purchase Orders” on page 539), follow Mail Setup > Maintain Archiving Image file extensions.
2. Enter the file extension for the archive object type.
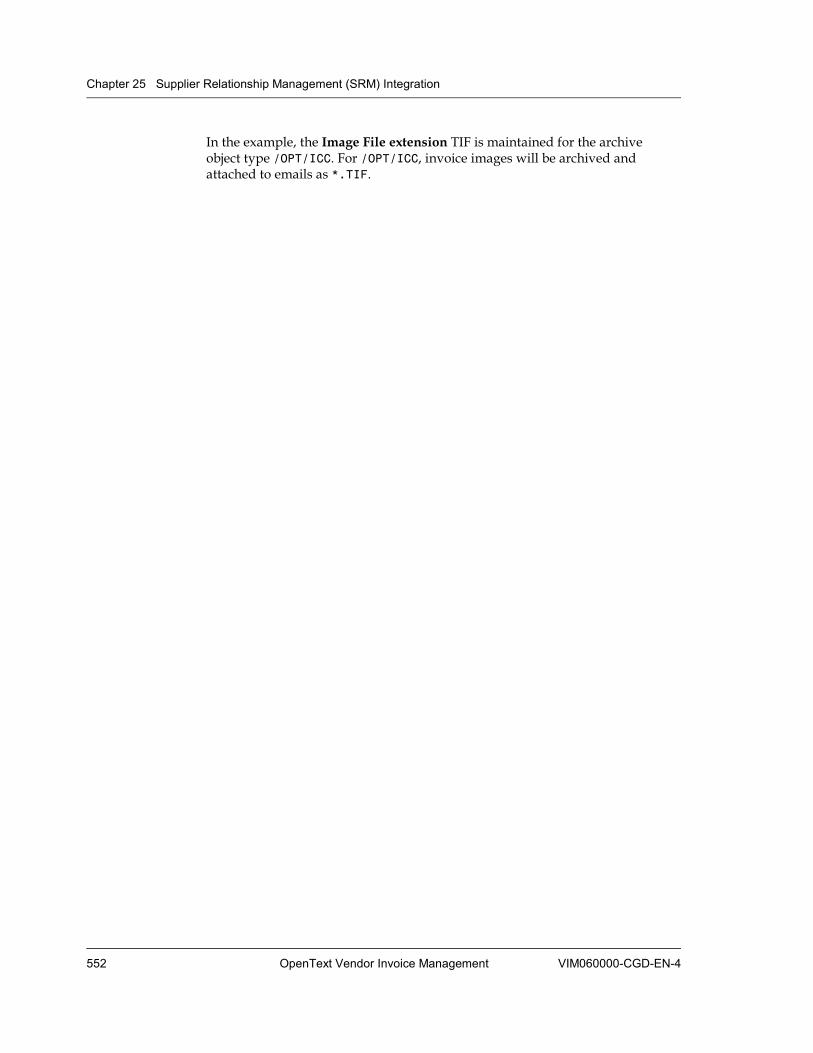
Chapter 25 Supplier Relationship Management (SRM) Integration
552 OpenText Vendor Invoice Management VIM060000-CGD-EN-4
In the example, the Image File extension TIF is maintained for the archive object type /OPT/ICC. For /OPT/ICC, invoice images will be archived and attached to emails as *.TIF.

VIM060000-CGD-EN-4 OpenText Vendor Invoice Management 553
Glossary
AAK
See: SAP Add-On Assembly Kit (AAK)
AP processor
Accounts Payable personnel
Approval chart of authority (COA)
The Approval chart of authority (COA) determines first approver and next approver for an invoice by combinations of Company Code (specific or range), Expense Type (marketing expense, utility), Cost Objects (G/L account, Cost Center), and HR objects (Position, Job code).
Archive system
Computer system that enables storage, management and retrieval of archived data and documents
ArchiveLink
Service integrated in the SAP Web Application Server for linking archived documents and the application documents entered in the SAP system
ArchiveLink document types
Document types that need to be customized for ArchiveLink
Authorization profiles
The SAP administrator assigns authorizations to the users that determine which actions a user can execute in the SAP system. These authorizations are stored in Authorization profiles.
BAdI
See: Business Add-Ins (BAdI)
Baseline
Set of functionality with pre-defined configuration and the starting point to implement VIM
Glossary
554 OpenText Vendor Invoice Management VIM060000-CGD-EN-4
BDC ID
Business Data Communication ID. The BDC ID is used by the system to process an SAP transaction to create an SAP Document in user context.
Block
Situation where an invoice has a price or quantity variance that prevents invoice from posting
BTE
See: Business Transaction Event (BTE)
Business Add-Ins (BAdI)
Business Add-Ins (BAdI) is a new SAP enhancement technique based on ABAP objects. BAdI can be inserted into the SAP System to accommodate user requirements too specific to be included in the standard delivery.
Business rules
Rules that describe the operations, definitions and constraints that apply to an organization
Business Transaction Event (BTE)
Event used for extending a Non PO invoice functionality to call a custom program
Buyer
Person who is in charge of the PO. This role should have authorization to create and change the purchase order. This role is also responsible for negotiating and communicating with vendors.
COA
See: Approval chart of authority (COA)
Coding
Coding allocates an invoice to G/L account and cost object if required.
Contract agent
Person who can create and modify SAP contracts.
Dashboard
User interface that organizes and presents information in a way that is easy to read. Users can also perform actions from the dashboard.
DocuLink
OpenText DocuLink enables the archiving, management and retrieval of CRM or ERP documents from within the SAP infrastructure.
Glossary
VIM060000-CGD-EN-4 Configuration Guide 555
Document Processing (DP)
VIM component that captures invoice metadata including line items for PO and performs preconfigured business rules
Document type
Type of document such as PO, Non PO, OCR, Non OCR
DP
See: Document Processing (DP)
Duplicate analyzer
Person who is responsible to identify duplicate invoices
Event Type Linkage
Error handling method. Event Type Linkage determines what the application should do in case an error could not be handled.
Exception
Action that is not part of normal operations or standards
FI
See: Financial Accounting (FI)
Financial Accounting (FI)
SAP module for the Finance and Accounting department
IAP
See: Invoice Approval (IAP)
ICC
See: Invoice Capture Center (ICC)
IE
See: Invoice Exception (IE)
Indexer
Person responsible for entering index data
Indexing
Process of entering or storing data into the system
Information provider
Receiving role for option Refer for Information
Glossary
556 OpenText Vendor Invoice Management VIM060000-CGD-EN-4
Invoice Approval (IAP)
VIM component that enables users to perform coding, approving and rejecting invoices
Invoice approver
Person who approves invoices
Invoice Capture Center (ICC)
Optional VIM OCR component
Invoice coder
Person who enters the accounting info on invoices to allocate the cost
Invoice Exception (IE)
VIM component that handles the exceptions that arise after a SAP invoice is created
Invoice requester
Person who requested goods and services for Non PO invoices
LIV
See: Logistic invoice (LIV)
Logistic invoice (LIV)
purchase order invoice
Materials Management (MM)
SAP MM is the materials management module of the SAP ERP software package. Materials management is used for procurement and inventory management.
MM
See: Materials Management (MM)
Namespace
Name range reserved by SAP for customer objects and SAP objects to make sure that objects are not overwritten by SAP objects during the import of corrections or an upgrade
Non purchase order (Non PO)
Order that is not based on a PO
Glossary
VIM060000-CGD-EN-4 Configuration Guide 557
Non purchase order (Non PO) invoice (PIR)
Invoice based on a Non purchase order (Non PO)
Number range
Array of numbers that can be used for an object in the SAP system
OCR
See: Optical character recognition (OCR)
Optical character recognition (OCR)
Mechanical or electronic translation of images of handwritten, typewritten or printed text (usually captured by a scanner) into machine-editable text
Park
Situation where an invoice is not posted and is waiting for further processing
Parked invoice document
Temporary document that the AP processor can change and post. SAP assigned document number becomes real number when posted.
PIR
See: Non purchase order (Non PO) invoice (PIR)
PO
See: Purchase order (PO)
Posted invoice document
Invoice that has already been posted in SAP. Only free-form text fields can be changed. Related documents such as POs or good receipts may be created or changed to effect the invoice. If the document is not needed, it must be cancelled ( PO invoice) or reversed ( non-PO invoice).
Price variance
Situation where the price on the invoice is different from the price in the purchase order
Process options
Processing options for the user in the dashboard, such as Referral, Authorization, and Actions
Process type
Process type for a document. The process type determines the initial actor and various collaboration options available to the various actors during the process flow.

Glossary
558 OpenText Vendor Invoice Management VIM060000-CGD-EN-4
Purchase order (PO)
SAP module. PO indicates a document sent from a buyer to a seller. The purpose of the document is to order the delivery of goods or services.
Purchase order (PO) invoice
Invoice based on a Purchase order (PO)
Quantity variance
Situation where the quantity on the invoice is different from the quantity in the purchase order
Receiver
Person who can create and reverse the goods receipt in SAP
Requisitioner
Person who requested goods and services
Roles
Set of predefined roles for the SAP user
SAP Add-On Assembly Kit (AAK)
Standardized delivery procedure for software
Scan operator
Person who scans the invoices into images (may not have a SAP ID)
Service approver
Person who approves a service entry
Service requisitioner
Person who enters a service entry
Swimlane
Diagram representing a specific VIM process. A swimlane comprises the process description, roles, user interface and options of the process.
Tax expert
Person who advises on invoices that need tax audit. Normally tax department personnel.
VAN
See: VIM Analytics (VAN)
Glossary
VIM060000-CGD-EN-4 Configuration Guide 559
Vendor Invoice Management (VIM)
Packaged business solution that solves a business problem – paying correct amount to vendors on-time and with the lowest cost. VIM delivers not technology but best-practice business processes. VIM provides values to customers in process efficiency, visibility and compliance.
Vendor maintenance
Person who is responsible for creating and maintaining the vendor master records
VIM Analytics (VAN)
VIM component that gives users a clear data report on their invoices in progress. VIM Analytics allows to track the documents routed through SAP workflows via VIM.
Workflow
SAP business workflows can be used to define business processes that are not yet mapped in the R/3 system.


VIM060000-CGD-EN-4 OpenText Vendor Invoice Management 561
Index
AAccess rights
Invoice Approval 204 Activating
BAdI 83 BTEs 84
Adding a function button to the ALV toolbar
VIM Analytics 340 Additional customizing
approval on mobile device 285 Aggregation job
KPI Dashboard 296 Allowed company codes
Non PO parking process 173 PO blocking process 151 PO parking process 123
Allowed document types Non PO parking process 173 PO blocking process 151 PO parking process 123
Allowed plants PO blocking process 151 PO parking process 123
Amount classes KPI Dashboard 309
Application log approval on mobile device 285
Approval flow for DP invoices Invoice Approval 201
Approval flow for parked invoices Invoice Approval 201
Approval hierarchy Invoice Approval 203
Approval level Invoice Approval 203
Approval on mobile device additional customizing 285 application log 285
default invoice list 279 extended class 279 extended labels 278 GL header fields 281 GL item fields 283 header field labels 283 Invoice Approval 275 invoice list fields 280 item field labels 284 logical systems 276 PO header fields 281 PO item fields 283 screen buttons 277
Approval Portal 287 Approver persona
Invoice Approval 219 Approver role
Invoice Approval 217 Archive Document Type
ICC 399 Archive Document Type for XML
ICC 393 Archive Document Type: linking to Business Object
ICC 398 ArchiveLink document types
configure 21 linking to SAP business objects 27
Archiving configuration 527 Central Reporting information 530 DP documents 527
Archiving image file extensions SRM integration 551
Assigning clients to logical systems multiple backend system 424
Assigning templates to roles 35 Authorization for approval and rejection
Integrated Invoice Cockpit configuration 515
Authorizations KPI Dashboard 331
Auto coding determination data 270

Index
562 OpenText Vendor Invoice Management VIM060000-CGD-EN-4
determination fields 269 posted approval 269 process type 272
Automatic image display DP Dashboard 53 Non PO parking process 190 PO blocking process 169 PO parking process 146
Automatic maintenance Invoice Approval 218
Autopost exit Non PO parking process 188 PO parking process 144
BBackend systems for Report analytics
Central Reporting 509 BAdI
activating 83 BAdI validation for Non PO invoices
Invoice Approval 233 BDC ID
defining 73 BDC ID infrastructure 72 BDC IDs
defining parameters 75 success messages 81 transaction data 77
Binding function exits PO blocking process 165 PO parking process 141
Binding function module exits Non PO parking process 185
Blocking reasons PO blocking process 155
BTEs activating 84
Bulk approval validation exit Invoice Approval 260
Business Context links SSF integration 461
Business Object: linking to Archive Document Type
ICC 398
CCanada
country specific configuration 377 ship-to-region 377
tax code determination 380 tax fields for the region 379
Central Reporting 507 backend systems for Report analytics 509
System Landscape Directory 508 Central Reporting Baseline 509 Central Reporting information
archiving configuration 530 Certify message
Invoice Approval 208 Changing status
notification 346 Changing work item text 350 Channel ID maintenance
ICC 410 Channel IDs
KPI Dashboard 320 Channels
multiple backend system 430 Chart of Authority
Invoice Approval 223 Coder role
Invoice Approval 216 Coding validation
Invoice Approval 233 Collection job
KPI Dashboard 294 Company code determination
EDI configuration 495 Company code groups
KPI Dashboard 304 Company code groups prerequisite
KPI Dashboard 332 Configuration
preparing 17 Configuring
ArchiveLink document types 21 document types 44 duplicate check 67 index screen options for document types 51
Non PO parking process 171 PO blocking process 149 PO parking process 121 process type 88
Configuring a parked document posting exit
PO parking process 145
Index
VIM060000-CGD-EN-4 Configuration Guide 563
Configuring an autopost exit PO parking process 144
Configuring binding function exits PO parking process 141
Configuring global parameters Document Processing 115 PO parking process 135
Configuring image display function PO parking process 146
Configuring line item fields for external system
Document Processing 87 Configuring option order
PO parking process 139 Configuring parking functionality
PO parking process 147 Configuring parking reasons
PO parking process 130 Configuring post process (sub)workflow
PO parking process 143 Configuring post-dashboard method exit
PO parking process 143 Configuring pre-dashboard method exit
PO parking process 142 Configuring process options
Document Processing 70 PO parking process 126
Configuring screen exits PO parking process 137
Configuring the notification 343 Configuring transactions to create parked invoices
Non PO parking process 181 PO parking process 136
Constants KPI Dashboard 313
Content Repository ID ICC 388
Content Repository parameters ICC 389
conventions 10 Country specific configuration 353
baseline content 355 Canada 377 configuring Document Processing 367 copying screen and item configuration 366
core infrastrucure 354 document creation 367
document type 373 document type determination for no-baseline countries 357
India 374 introduction 353 invoice categories 357 process types 361 process types configuration 371 screen fields 363 settings for document types 368 Z constants 374
Creating document types 46 SAP ArchiveLink document types 45
Creating Channel ID EDI configuration 494
CRM integration 437 defining application areas for Service Request 484
logical system 438 mapping initialization procedure to Service Request creation points 483
service requests initialization procedure 481
Cross company coding Invoice Approval 242
Cross company coding configuration Invoice Approval 242
Custom approver class Invoice Approval 248
Custom buttons Invoice Approval 253
Custom fields Invoice Approval 256
Custom invoice class Invoice Approval 248
Custom usermap class Invoice Approval 250
Customer specific fields Integrated Invoice Cockpit configuration 520
Customer Tax Determination 66 Customer workflow tasks
Integrated Invoice Cockpit configuration 515
Customizing settings KPI Dashboard 301

Index
564 OpenText Vendor Invoice Management VIM060000-CGD-EN-4
DDashboard screen exits
header level 161 line level 158 Non PO parking process 182 PO blocking process 158
Default invoice list approval on mobile device 279
Default values frequently used in ICC integration 409
Defining BDC ID 73 process options 93 process type 89 process type determination sequence 53 process types 49 role templates 31 roles 29 sequence steps 55
Defining application areas for Service Request
CRM integration 484 Defining preprocess (sub)workflow
PO parking process 140 Defining rollout criteria
PO blocking process 151 PO parking process 123
Definitions KPI Dashboard 291
Delegation Invoice Approval 220
Determination posted approval 267
Determination data auto coding 270 posted approval 268
Determination fields auto coding 269 posted approval 267
Determining PO invoices by vendor table document types 69
Document Processing configuring global parameters 115 configuring line item fields for external system data 87
configuring process options 70 extending document data 85 indexing line matching from OCR results 94
mapping external system data 86 roles 70
Document Processing process 41 main concepts 41 main steps 43
Document type determination rules engine ICC integration 416
Document types ArchiveLink 21 configuring 44 configuring duplicate check 67 configuring index screen options 51 creating 46 creating SAP ArchiveLink document types 45
defining process type determination sequence 53
defining sequence steps 55 determining PO invoices by vendor table 69
Document view and workflow view fields VIM Analytics 336
DP Dashboard automatic image display 53
DP documents archiving configuration 527
DP process 41 main concepts 41 main steps 43
Duplicate check configuring 67
Dynamic columns process configuration 113
EE-Invoicing 499
Interface Remote Functions 500 Early Archiving
ICC 387 EDI configuration 487
company code determination 495 creating Channel ID 494 external field mapping 492 general settings 487 global parameters 496 IDoc type 488 inbound function module settings 487 mapping 492 message type 488
Index
VIM060000-CGD-EN-4 Configuration Guide 565
partner profile 491 process code 489 VIM field mapping 493
Electronic Data Interchange configuration 487
Email notification Invoice Approval 204
Event linkage posted approval 265
Event linkages Non PO parking process 174 PO blocking process 152 PO parking process 125
Exception classes KPI Dashboard 310
Excluding receivers notification 345
Expense type Invoice Approval 203
Extended class approval on mobile device 279
Extended labels approval on mobile device 278
Extending document data Document Processing 85
External field mapping EDI configuration 492
Extraction: maximum allowed time ICC Dispatcher 404
FFrequently used default values
ICC integration 409
GGeneral Ledger fields
Invoice Approval 209 General settings
EDI configuration 487 posted approval 261
GL header fields approval on mobile device 281
GL item fields approval on mobile device 283
Global parameters EDI configuration 496 Invoice Approval 245 Non PO parking process 181 PO blocking process 157
PO parking process 135
HHeader field labels
approval on mobile device 283 Header level dashboard binding exits
PO blocking process 166 Header text for Web Dynpro download
KPI Dashboard 319
IICC
Archive Document Type 399 Archive Document Type for XML 393 Archive Document Type: linking to Business Object 398
Business Object: linking to Archive Document Type 398
channel ID maintenance 410 Content Repository ID 388 Content Repository parameters 389 Early Archiving 387 presetting folder 390
ICC Dispatcher 385 Extraction: maximum allowed time 404 periodic jobs 420 preprocess exit 415 Validation agents 413 Validation Determination ID 406 Validation framework 406 Validation of DP documents with mapping error 411
Validation: maximum allowed time 404 workflow template 414
ICC integration 385 document type determination rules engine 416
frequently used default values 409 IDoc type
EDI configuration 488 Image display function
Non PO parking process 190 PO blocking process 168 PO parking process 146
Image display infrastructure Invoice Approval 244
Inbound function module settings EDI configuration 487

Index
566 OpenText Vendor Invoice Management VIM060000-CGD-EN-4
Indexing line matching from OCR results Document Processing 94
India country specific configuration 374 screen fields 376 vendor data download 376
Individual report configuration 511 Integrated Invoice Cockpit configuration 511
Summary Report configuration 522 Integrated Invoice Cockpit configuration
authorization for approval and rejection 515
customer specific fields 520 customer workflow tasks 515 individual report configuration 511 layout variants 511 System Landscape Directory 511
Invoice Approval 195 access rights 204 approval flow for DP invoices 201 approval flow for parked invoices 201 approval hierarchy 203 approval level 203 approval on mobile device 275 approver persona 219 approver role 217 automatic maintenance 218 BAdI validation for Non PO invoices 233 bulk approval validation exit 260 certify message 208 Chart of Authority 223 coder role 216 coding validation 233 configuration outline 197 configuring cross company coding 242 cross company coding 242 custom approver class 248 custom buttons 253 custom fields 256 custom invoice class 248 custom usermap class 250 delegation 220 email notification 204 expense type 203 General Ledger fields 209 global parameters 245 image display infrastructure 244 manual maintenance 218
multi level approval 201 optional coding 241 override 220 overview 196 parking reason 198 people involved 196 posted approval 260 process basics 200 process end 196 process trigger 196 process type 198 referral wait time 258 rejection reason 243 resubmit for approval action codes 245 roles 216 search help for web screen fields 215 standard validations 240 substitution 220 supported currency 249 supported language 249 swimlane 196 tax calculation on net amount 259 trigger points 200 user map maintenance 218 user map object 218 usermap data source 251 usermap modification 252 usermap web ID 252
Invoice categories country specific configuration 357
Invoice list fields approval on mobile device 280
Item field labels approval on mobile device 284
KKPI Dashboard 289
aggregation job 296 amount classes 309 authorizations 331 channel IDs 320 collection job 294 company code groups 304 company code groups prerequisite 332 constants 313 customizing settings 301 definitions 291 exception classes 310
Index
VIM060000-CGD-EN-4 Configuration Guide 567
header text for Web Dynpro download 319
naming 311 periodic jobs: collection and aggregation 292
SAP NetWeaver Portal integration 326 SAP Web Dynpro settings 320 secure connection 325 settings 312 supported languages 331 supported SAP versions 330 supported web browser 330 technical and functional restrictions 330 time groups 305 URL parameters 318 user interface 290 user parameter 319 vendor groups 307
LLayout variants
Integrated Invoice Cockpit configuration 511
Linking SAP business objects to ArchiveLink document types 27
Logical system CRM integration 438
Logical systems approval on mobile device 276 multiple backend system 422
MMail infrastructure
SRM integration 546 Main concepts
Non PO parking process 171 PO blocking process 149 PO parking process 121
Maintain logical system in OpenText configuration tables
SSF integration 479 Maintaining
role template field details 34 role template fields 33 role templates 31 roles 29
Maintaining role determination 37 Manual maintenance
Invoice Approval 218
Mapping EDI configuration 492
Mapping external system data Document Processing 86
Mapping IDs multiple backend system 432
Mapping initialization procedure to Service Request creation points
CRM integration 483 Message type
EDI configuration 488 Missing goods receipt scenario
SRM integration 540 Multi level approval
Invoice Approval 201 Multiple backend system 421
assigning clients to logical systems 424 channels 430 logical systems 422 Mapping IDs 432 RFC destinations 425 SLD 427 system determination procedure 433 System Landscape Directory 427
NNaming
KPI Dashboard 311 New ITS service in the backend ERP system
SSF integration 438 Non PO parking process
allowed company codes 173 allowed document types 173 automatic image display 190 Autopost exit 188 binding function module exits 185 configuring 171 configuring transactions to create parked invoices 181
dashboard screen exits 182 event linkages 174 global parameters 181 image display function 190 main concepts 171 parallel workflow exit 191 parked document posting exit 189 parking functionality 191 parking reasons 176

Index
568 OpenText Vendor Invoice Management VIM060000-CGD-EN-4
post process (sub)workflow 187 post PSS method exit 187 pre PSS method exit 186 preprocess (sub)workflow 184 re-enter options: populating screens 192 rollout criteria 173 user process options 179
Notification changing status 346 configuring 343 excluding receivers 345
Notification infrastructure 343
OObsolete reasons
process configuration 112 OpenText Approval Portal 287 OpenText linked objects in Service Request
SSF integration 461 OpenText Online 11 OpenText Vendor Factsheet BSP component
SSF integration 467 Option order
PO blocking process 164 PO parking process 139
Optional coding Invoice Approval 241
Override Invoice Approval 220
PParallel workflow exit
Non PO parking process 191 Parked document posting exit
Non PO parking process 189 PO parking process 145
Parking functionality Non PO parking process 191 PO parking process 147
Parking reason Invoice Approval 198
Parking reasons configuring 130 Non PO parking process 176
Partner profile EDI configuration 491
Periodic jobs ICC Dispatcher 420
Periodic jobs: collection and aggregation KPI Dashboard 292
PO blocking process allowed company codes 151 allowed document types 151 allowed plants 151 automatic image display 169 binding function exits 165 blocking reasons 155 configuring 149 dashboard screen exits 158 defining rollout criteria 151 event linkages 152 global parameters 157 header level dashboard binding exits 166 image display function 168 main concepts 149 option order 164 post dashboard method exit 166 process options 153 re-enter options: populating screens 169 send back functionality exit 167
PO header fields approval on mobile device 281
PO item fields approval on mobile device 283
PO line determination 56 PO parking process
allowed company codes 123 allowed document types 123 allowed plants 123 automatic image display 146 configuring 121 configuring a parked document posting exit 145
configuring an auto post exit 144 configuring binding function exits 141 configuring global parameters 135 configuring image display function 146 configuring option order 139 configuring parking functionality 147 configuring parking reasons 130 configuring post process (sub)workflow 143
configuring post-dashboard method exit 143

Index
VIM060000-CGD-EN-4 Configuration Guide 569
configuring pre-dashboard method exit 142
configuring process options 126 configuring screen exits 137 configuring transactions to create parked invoices 136
defining preprocess (sub)workflow 140 defining process option 126 defining rollout criteria 123 event linkages 125 main concepts 121 re-enter options: populating screens 147 user process options 129, 154
Post dashboard method exit PO blocking process 166
Post process (sub)workflow Non PO parking process 187 PO parking process 143
Post PSS method exit Non PO parking process 187
Post-dashboard method exit PO parking process 143
Posted approval 260 auto coding 269 determination 267 determination data 268 determination fields 267 event linkage 265
Posted approval settings 261 Pre PSS method exit
Non PO parking process 186 Pre-dashboard method exit
PO parking process 142 Prefill business role settings for RFC
SSF integration 480 Preparing
configuration 17 Preprocess (sub)workflow
Non PO parking process 184 PO parking process 140
Preprocess exit ICC Dispatcher 415
Presetting folder ICC 390
Price discrepancy scenario SRM integration 543
Process basics Invoice Approval 200
Process code EDI configuration 489
Process configuration dynamic columns 113 obsolete reasons 112 rescan reasons 111 scan locations 112
Process option defining 126
Process options configuring 70 PO blocking process 153
Process type auto coding 272 configuring 88 defining 89 defining process options 93 Invoice Approval 198
Process type determination sequence defining 53
Process types defining 49
QQuantity discrepancy scenario
SRM integration 541
RRe-enter options: populating screens
Non PO parking process 192 PO blocking process 169 PO parking process 147
Referral wait time Invoice Approval 258
Rejection reason Invoice Approval 243
Rescan reasons process configuration 111
Resubmit for approval action codes Invoice Approval 245
RFC destinations multiple backend system 425
Role templates defining 31 maintaining 31 maintaining field details 34 maintaining fields 33
Role test 346

Index
570 OpenText Vendor Invoice Management VIM060000-CGD-EN-4
Roles 29 assign templates 35 defining 29 defining templates 31 Invoice Approval 216 maintaining 29 maintaining determination 37
Roles in Document Processing 70 Rollout criteria
Non PO parking process 173
SSAP ArchiveLink document types
creating 45 SAP business objects
linking to ArchiveLink document types 27 SAP NetWeaver Portal integration
KPI Dashboard 326 SAP Tax Determination Logic 66 SAP Tax Determination Logic with OT Tax Table 64
SAP Web Dynpro settings KPI Dashboard 320
Scan locations process configuration 112
Screen buttons approval on mobile device 277
Screen exits PO parking process 137
Screen fields India 376
Search help for web screen fields Invoice Approval 215
Secure connection KPI Dashboard 325
Selection screen: adding user items VIM Analytics 333
Send back functionality exit PO blocking process 167
Sequence steps defining 55
Service requests initialization procedure CRM integration 481
Settings KPI Dashboard 312
Ship-to-region Canada 377
SLD multiple backend system 427
SRM use cases 535
SRM integration 535 archiving image file extensions 551 configuring SRM purchase orders 539 determining purchase order types 538 mail infrastructure 546 missing goods receipt scenario 540 price discrepancy scenario 543 quantity discrepancy scenario 541 SRM scenario type 546
SRM scenario type SRM integration 546
SSF integration 437 Business Context links 461 maintain logical system in OpenText configuration tables 479
new ITS service in the backend ERP system 438
OpenText linked objects in Service Request 461
OpenText Vendor Factsheet BSP component 467
prefill business role settings for RFC 480 transaction launcher (account ID confirmation) 455
transaction launcher (Service Request) 448
transaction launcher logical systems and URL 446
work center configuration 456 SSF integration activities 437 Standard validations
Invoice Approval 240 Substitution
Invoice Approval 220 Success messages
BDC IDs 81 Summary Report configuration
individual report configuration 522 Supplier Relationship Management
use cases 535 Supplier Relationship Management (SRM) integration 535
configuring SRM purchase orders 539 determining purchase order types 538
Supported currency Invoice Approval 249
Index
VIM060000-CGD-EN-4 Configuration Guide 571
Supported language Invoice Approval 249
Supported languages KPI Dashboard 331
Supported SAP versions KPI Dashboard 330
Supported web browser KPI Dashboard 330
System determination procedure multiple backend system 433
System Landscape Directory Central Reporting 508 Integrated Invoice Cockpit configuration 511
multiple backend system 427 System log 525
TTax calculation on net amount
Invoice Approval 259 Tax code determination 60
Canada 380 Tax code determination failures
possible reasons 64 Tax Determination using OpenText Tax Table 65
Tax fields for the region Canada 379
Tax jurisdiction code determination 63 Technical and functional restrictions
KPI Dashboard 330 Templates
assign to roles 35 maintaining field details 34 maintaining fields 33
Testing roles 346 Time groups
KPI Dashboard 305 Tools 343 Transaction data
BDC IDs 77 Transaction launcher (account ID confirmation)
SSF integration 455 Transaction launcher (Service Request)
SSF integration 448 Transaction launcher logical systems and URL
SSF integration 446
Transactions to create parked invoices Non PO parking process 181 PO parking process 136
Trigger points Invoice Approval 200
typography 10
UUnderstanding VIM 13 URL parameters
KPI Dashboard 318 User interface
KPI Dashboard 290 User map maintenance
Invoice Approval 218 User map object
Invoice Approval 218 User parameter
KPI Dashboard 319 User process options 93
Non PO parking process 179 PO parking process 129, 154
Usermap data source Invoice Approval 251
Usermap modification Invoice Approval 252
Usermap web ID Invoice Approval 252
VValidation agents
ICC Dispatcher 413 Validation Determination ID
ICC Dispatcher 406 Validation framework
ICC Dispatcher 406 Validation of DP documents with mapping error
ICC Dispatcher 411 Validation: maximum allowed time
ICC Dispatcher 404 Vendor data download
India 376 Vendor groups
KPI Dashboard 307 VIM
understanding 13
Index
572 OpenText Vendor Invoice Management VIM060000-CGD-EN-4
VIM Analytics 333 adding a function button to the ALV toolbar 340
document view and workflow view fields 336
selection screen: adding user items 333 VIM field mapping
EDI configuration 493 VIM Reporting Module 333
WWork center configuration
SSF integration 456 Work item text
changing 350 Workflow template
ICC Dispatcher 414
ZZ constants
country specific configuration 374