vpn user guide: own device (windows) · pdf fileinformation services 1 june 2016 vpn user...
TRANSCRIPT

Information Services 1 June 2016
VPN User Guide: Own Device (Windows) Staff: Malaysia Campus
Contents
Own PC/laptop: Windows ....................................................................................................................... 2
Remote desktop to your HW PC after VPN login ................................................................................ 2
Windows 7: Client (preferred option) ..................................................................................................... 3
To install the client .............................................................................................................................. 3
To disconnect ..................................................................................................................................... 6
Next time login .................................................................................................................................... 6
Windows 8 App ....................................................................................................................................... 7
Set up the connection ......................................................................................................................... 7
Log in to the VPN ................................................................................................................................ 7
Disconnect........................................................................................................................................... 7
Windows 10 App ..................................................................................................................................... 8
Set up the connection ......................................................................................................................... 8
Log in to the VPN ................................................................................................................................ 8
Disconnect........................................................................................................................................... 8
Using Web Browser (not app) ................................................................................................................. 9
Browser choice is important ............................................................................................................... 9
Log in to the VPN .............................................................................................................................. 11
iHR and Finance ................................................................................................................................ 12
Staff Home Drive ............................................................................................................................... 13
Log out .............................................................................................................................................. 13
Remote desktop .................................................................................................................................... 13

Information Services 2 June 2016
Own PC/laptop: Windows The instructions on the following pages tell you how to setup and install the software required to
connect your own/home Windows PC or laptop to the Heriot-Watt (Malaysia) VPN.
Once connected to the VPN you can access iHR and Finance services, or use remote desktop to
access your HWU desktop PC and your normal work applications and files.
Please note that you do not need to use remote desktop to access the iHR or Finance systems.
Once connected to the VPN you can access these systems direct by going to the following URLs.
iHR: https://ihr.hw.ac.uk
Finance: http://finapp.hw.ac.uk:8000
Remote desktop to your HW PC after VPN login If you plan to remote desktop to your office PC via the VPN you need to ensure that you leave your
office PC switched on, and you know your office PC name or IP address.
Prep for a remote desktop session via the VPN 1. Leave your HWU desktop PC switched on
2. Make a note of your HWU PC name or IP address – you can get this
information from the About My PC shortcut on your desktop
3. Lock the screen: Start, click the arrow to right of Shut down, click Lock
The instructions that follow tell you how to set up your home PC/laptop to access
the HWU VPN.
Depending on your version of Windows, we recommend that you use the
Windows 7 Client
or the
SonicWALL App (Windows 8 or 10)
If you have any queries please contact the IT helpdesk ([email protected])

Information Services 3 June 2016
Windows 7: Client (preferred option) There is a 32 bit client and a 64 bit client for Windows 7 installation.
To install the client 1. Download the client from
http://www.hw.ac.uk/is/it-essentials/virtual-private-network-vpn.htm
2. Double click the NetExtender Setup shortcut on your desktop
If prompted click on YES
3. Click Next
4. Accept the License Agreement
5. Click Next

Information Services 4 June 2016
6. Click Next at Choose Install Location
7. Click Install
8. Click Finish

Information Services 5 June 2016
Connect to the VPN Once the client is installed the following connection window will appear automatically.
1. Enter hwumvpn.hw.ac.uk at the Server prompt
2. Enter your HWU username and password
3. Enter HW Staff (this is case sensitive!) in the Domain window
4. Click Connect
5. Once connected, minimise this window to your taskbar
If you are remote accessing your HW PC please see the Remote Desktop document.
Type this exactly
as shown

Information Services 6 June 2016
To disconnect 1. Restore our NetExtender window
2. Click Disconnect
Next time login Once you have disconnected you will notice the Dell SonicWALL Extender icon on your desktop.
The next time you want to connect to the VPN simply double click this icon.

Information Services 7 June 2016
Windows 8 App The SonicWALL Mobile Connect App is built-in to Windows 8.1
Set up the connection From the Windows Tiles page
1. Click Search
2. Type PC setting into the search field
3. Select Network
4. Click on Add a VPN connection
5. Choose SonicWALL mobile connect from the VPN provider dropdown list
Connection name: HW work
Server name: hwumvpn.hw.ac.uk
6. Click Save
7. Close window
Log in to the VPN
1. Click the WiFi/Network icon in the Notification area
2. Click on HW Work and then click Connect
3. Click Next
4. Enter your HWU UserID and password
5. Click OK
Disconnect 1. Click the WiFi/Network icon in the Notification area
2. Click on HW Work
3. Click Disconnect

Information Services 8 June 2016
Windows 10 App Download the SonicWALL Mobile Connect App from the Windows App store and follow the
installation procedures.
Set up the connection 1. Click on Start and then Settings
2. Click on Network & Internet
3. Click on VPN
4. Click on Add a VPN connection
5. Select SonicWALL Mobile Connect from the VPN provider dropdown
Connection name: HW work
Server name: hwumvpn.hw.ac.uk
6. Click on Save
Log in to the VPN 1. Click on WiFi/Network icon in the Notification area
2. Click HW Work
3. Click on HW Work then click Connect
4. Click Next
5. Enter your HWU UserID and password
6. Click OK
7. Close window
Disconnect
1. Click the WiFi/Network icon in the Notification area
2. Select HW Work
3. Click on HW Work and then click Disconnect

Information Services 9 June 2016
Using Web Browser (not app) Depending on your version of Windows, we recommend that you use the
Windows 7 Client
or the
SonicWALL App (Windows 8 or 10)
The browser offers an alternative way to log in if there is any reason you cannot use the app
you should not use both together.
The following instructions tell you how to setup and install the software required to connect to the
Heriot-Watt Edinburgh VPN via your browser.
Browser choice is important
Use either Internet Explorer (IE) or Firefox
Do not use Windows 10 Edge or Chrome
Pre-Configurations required before logging into VPN
JAVA Settings
You must be running the most recent version of JAVA on your home PC
You can download JAVA here (http://www.java.com/en/download)
Edit your JAVA security settings
1. Go to the Java Control Panel ( Open System preferences – then open Java)
2. Select the Security tab
3. Click Edit Site List…
4. Click ADD
5. Type https://hwumvpn.hw.ac.uk in the new row
6. Click OK
Browser settings for Internet Explorer
Add https://hwumvpn.hw.ac.uk to your trusted sites
1. Open IE and go to https://hwumvpn.hw.ac.uk
2. Open the Tools menu and choose Internet options
Information Services 10 June 2016
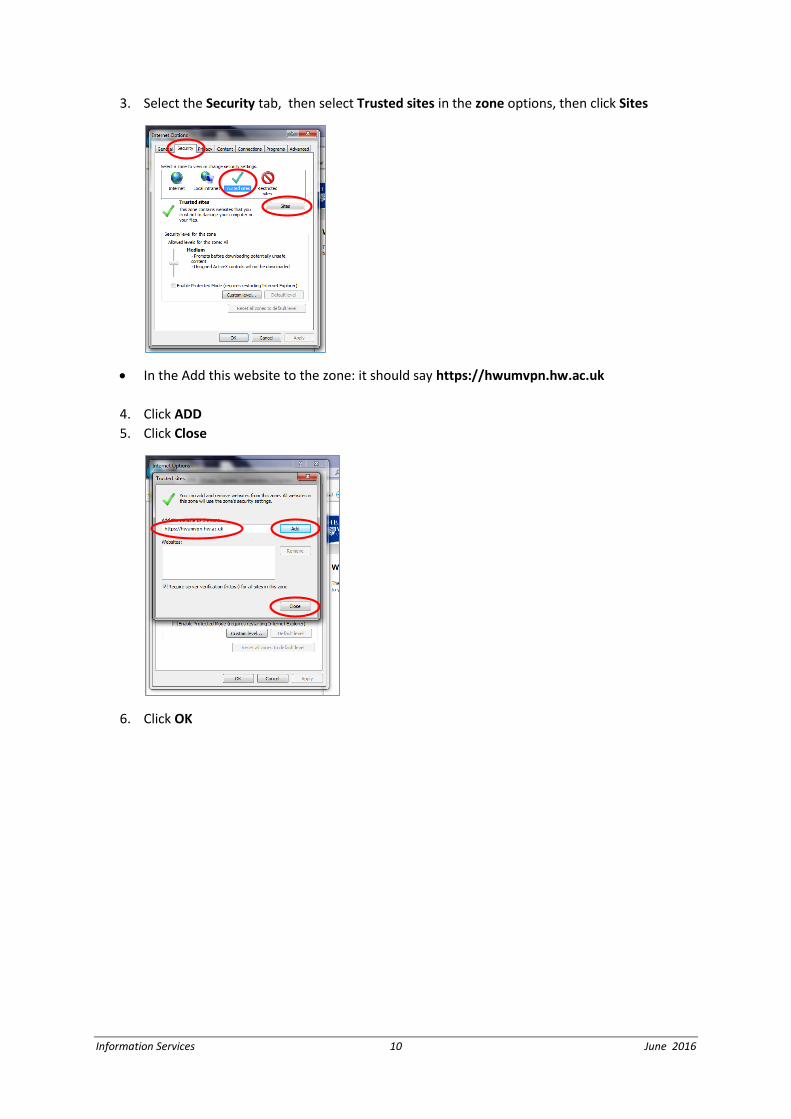
3. Select the Security tab, then select Trusted sites in the zone options, then click Sites
In the Add this website to the zone: it should say https://hwumvpn.hw.ac.uk
4. Click ADD
5. Click Close
6. Click OK

Information Services 11 June 2016
Log in to the VPN 1. Open your browser and go to https://hwumvpn.hw.ac.uk
2. Enter your HW Username and Password
3. Click on Login
The VPN NetExtender will start automatically – if prompted, click Yes
Once the NetExtender has started you will be able to see the connection details – minimise
the NetExtender window.

Information Services 12 June 2016
You will now be logged into the VPN and the following screen will be displayed
iHR and Finance Click on the Finance or iHR bookmarks to open the applications.

Information Services 13 June 2016
Staff Home Drive Click Staff Home Network Drive bookmark – to display your folders
If prompted click on Allow to run JAVA
Your drives will be displayed in a new window
Left panel: your local computer
Right panel: your HW Home (H:) drive
You can drag and drop files from your PC to your HW Home drive or vice-versa
The other options on the screen are shortcuts and tips/help.
Log out 1. Disconnect from NetExtender
2. Click Logout
Remote desktop If you are connecting to your HWU work PC by remote desktop see MS Remote Desktop Client for
Windows. You must be logged into the VPN before you can use Remote Desktop.