water me bird - guide word - water me bird - guide.docx created date 11/22/2015 8:51:45 pm
TRANSCRIPT
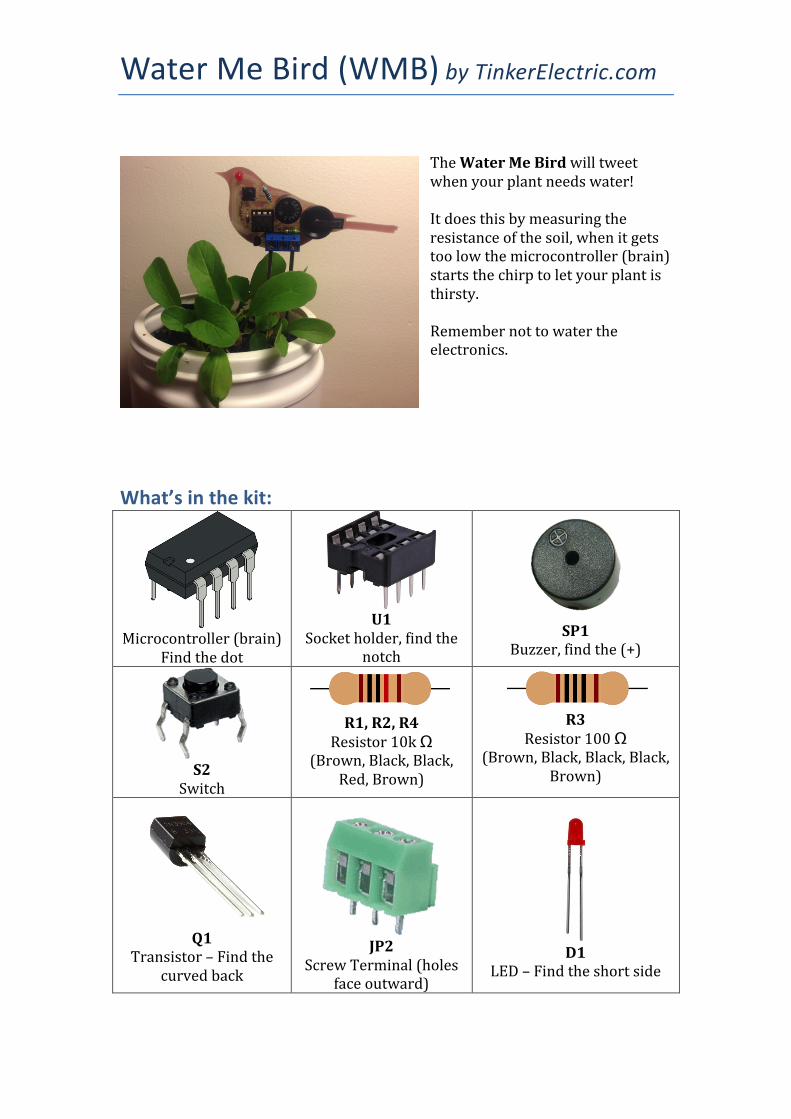
Water Me Bird (WMB) by TinkerElectric.com
The Water Me Bird will tweet when your plant needs water! It does this by measuring the resistance of the soil, when it gets too low the microcontroller (brain) starts the chirp to let your plant is thirsty. Remember not to water the electronics.
What’s in the kit:
Microcontroller (brain)
Find the dot
U1
Socket holder, find the notch
SP1
Buzzer, find the (+)
S2
Switch
R1, R2, R4
Resistor 10k Ω (Brown, Black, Black,
Red, Brown)
R3
Resistor 100 Ω (Brown, Black, Black, Black,
Brown)
Q1
Transistor – Find the curved back
JP2
Screw Terminal (holes face outward)
D1
LED – Find the short side

Water Me Bird (WMB) by TinkerElectric.com
COIN
Battery holder
3V Battery CR2032 Type
Bird PCB
Printed Circuit Board
Metal rods (2)
Construction: 1. Solder R3 100 Ω resistor (Brown, Black, Black, Black, Brown) 2. Solder R1,R2 and R4 10k Ω resistor (Brown, Black, Black, Red, Brown) 3. Solder Q1 Transistor. Remember to align the flat side. 4. Solder U1 the socket holder. Align the notch to the front
5. Solder S2. Note the legs come out on the left and right 6. Solder SP1. Align the (+) with that on the board 7. Solder COIN. The battery holder has a distinct circle to be aligned. 8. Solder D1. Note the red plastic has a flat side that aligns with the marker.
Flat side to the right. 9. Solder JP2. Note the open holes face down. They will hold the metal rods. 10. Unscrew the terminals JP2 to allow for the size of the rods. Screw the
metal rods into JP2 on the left and right. Leave the middle one empty. 11. Note the microcontroller has a notch and dot at the front. Align this with
the front of U1 on the board. When inserting it ensure the legs don’t bend. 12. The coin battery is to have the (+) face upward. Insert the battery.
Operation 1. Insert the birds legs into DRY soil 2. Press the button to tell it what dry is 3. Water your plant, the bird will then go to sleep
Front, notch here

Water Me Bird (WMB) by TinkerElectric.com 4. When the soil is dry again the bird will tweet periodically.
Trouble shooting • No sound or light – check battery (+) is face up. Ensure microcontroller
has the notch facing left. Ensure LED has flat side on the right. • No light, but tweets -‐ Ensure LED has flat side on the right. • No tweet but light – Ensure speaker has (+) at top • Tweets once then nothing – The bird thinks it is wet. Place it in soil, then
press the button to tell it’s dry. Chirping should begin. Then water plant and chirping will stop.
• Check transistor is correctly aligned for any other issue
Contact www.TinkerElectric.com