wave quick reference guide - single-source business...
TRANSCRIPT

Business Communications Solutions
9910 Irvine Center Drive
Irvine, CA 92618
www.bcsconsultants.com
[ m ] 949.333.1000
[ f ] 949.333.1001
WAVE QUICK REFERENCE GUIDE For Vertical Edge 100 and Edge 700 Digital Phones
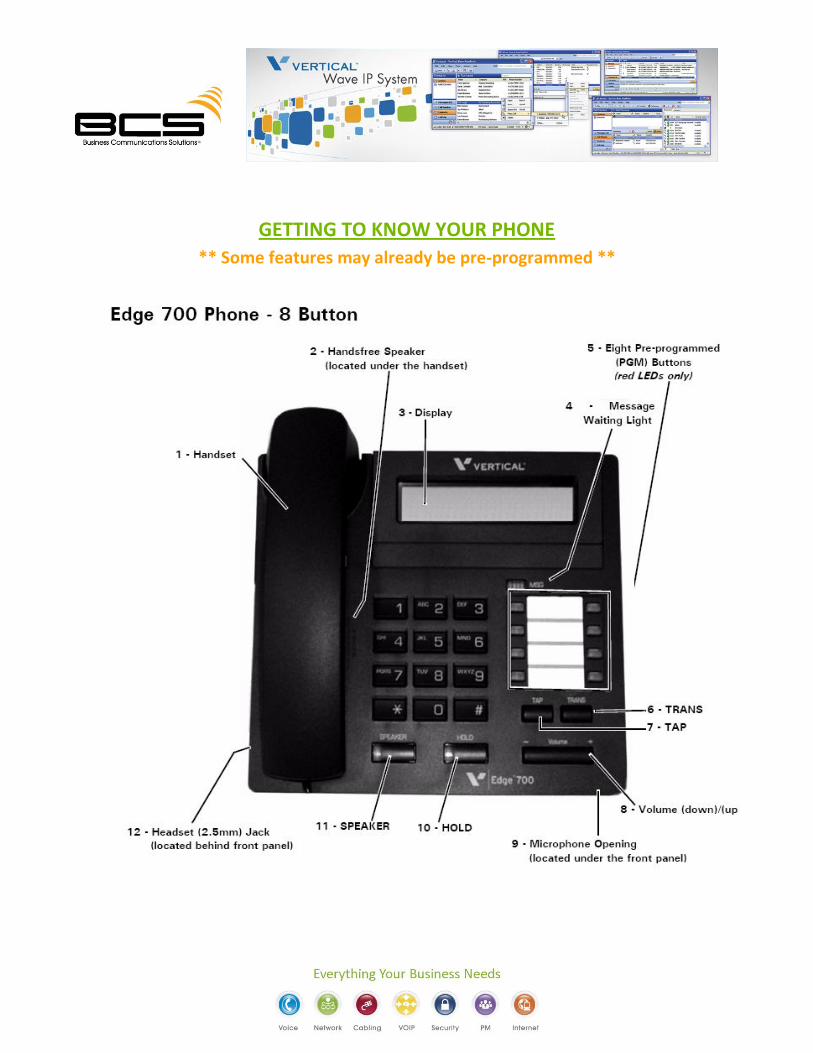
GETTING TO KNOW YOUR PHONE
** Some features may already be pre-programmed **

FEATURE KEYS & FUNCTIONS
1. Handset - Answer or place an internal or external call.
2. Speaker - Hear the other party during a call without using the handset or headset (Speaker
Mode).
3. Display - View information about the options and status of your phone.
4. Message Waiting Light - Indicate when you have a new voicemail message.
5. Pre-programmed (PGM) Buttons (8, with red LEDs only) - Perform special phone functions (pre-
programmed by the System Administrator).
6. TRANS (Transfer) - Put a call on hold while you dial the destination extension number when
transferring calls.
7. Volume Up/Down (-/+) Buttons - Decrease/increase the loudness of the speaker or handset
while on a call, or the ringer when not on a call.
8. TAP Button - Reconnect (or toggle between) calls on hold, during call transfer, and when
creating conference calls. Also, while dialing, pressing this button once will erase the last dialed
digit and pressing it twice will clear all the dialed digits.
9. Microphone - Speak to a caller when using the speaker instead of holding the handset.
10. HOLD Button - Place a call on hold and keep the party connected while you hang up or use other
phone features.
Note: If more than one call is on hold, and you are not currently connected to a call, you can
press this button to scroll through a list of calls on hold; press Tap to connect to the displayed
call.
11. SPEAKER button - Switch to Speaker mode to hear a caller instead of holding the handset.
12. Headset (2.5mm) Jack - Speak to a caller when using a headset instead of holding the handset.


FEATURE KEYS & FUNCTIONS
1. Headset (auxiliary) Jack - Speak to a caller when using a headset instead of holding the handset.
2. Handset - Answer or place an internal or external call.
3. Speaker - Hear other party during a call without using the handset/headset (Speaker Mode)
4. Display - View information about the options and status of your phone.
5. Softkeys (3) - Make selections from the display.
6. Pre-programmed (PGM) Buttons - Perform special phone functions, pre-programmed by the
System Administrator.
7. MESSAGE Button - Access user voicemail. Note: Typically, a phone has only one programmed
Message or Message Waiting button for that extension. However, some phones may have
additional Message Waiting buttons. One reason for having these additional buttons would be if
an assistant is responsible for listening to his/her boss’s voicemail, or a supervisor is responsible
for retrieving voicemail messages for a department, and so forth.
8. SHIFT Button - Access a second level of AutoDial buttons.
9. TAP Button - Reconnect (or toggle between) calls on hold, during call transfer, and when
creating conference calls. Also, while dialing, pressing this button once will erase the last dialed
digit and pressing it twice will clear all the dialed digits.
10. TRANS/CONF Button - Place a call on hold while you dial the destination extension number
when transferring calls or creating conference calls.
11. SPEAKER button - Switch to Speaker mode to hear a caller instead of holding the handset.
12. MUTE Button - Prevent the distant party from hearing any conversation at your end.
13. HOLD Button - Place a call on hold and keep the party connected while you hang up the handset
or use other phone features.
14. Microphone - Speak to a caller when using the speaker instead of holding the handset.
15. REDIAL Button - Place a call to the last phone number you dialed from your phone.
16. VOLUME (down) Button - Decrease the loudness of the speaker or handset while on a call.
17. VOLUME (up) Button - Increase the loudness of the speaker or handset while on a call.

PHONE USER GUIDE
FLASH BUTTON The Flash button is utilized in many of the features of this phone (such as when making calls,
transferring calls, or placing calls on hold). It is often used in conjunction with “star codes” (see
Feature Code Reference listing on the bottom of this guide). The location of the Flash button
may vary from model to model.
PHONE SETTINGS 1. Handset and Speaker Volume - During a call, while the other party is speaking: Use the volume
buttons to adjust volume. The most recent setting will be saved.
2. Volume Reset Override (if programmed on your phone) - If your phone has this button, use it
to prevent the phone from automatically resetting to the default level. Press VolResetOverride to
toggle on and off.
3. Display Contrast (For all models except Edge 700)
Press MENU, then NEXT until DISP appears then press DISP.
Use the Light and Dark softkeys to adjust the display contrast level.
Press Done or SPEAKER to save the setting.
4. Ring Volume - Press the volume buttons to adjust the ring volume.
5. Ring Tone - Change the sound of the tone (not the volume) of your phone.
Press MENU, then RING.
Use the Up and Down softkeys to select a ring
Press Done or SPEAKER to save the setting.
ADDITIONAL FEATURES
1. Do Not Disturb (DND) - Block all incoming calls and pages (except in the case of a Camp-on
callback) and send them to a another destination.
Press Do Not Disturb, or *41.
Cancel - Press Do Not Disturb, or *42.

2. Centrex Access - If your Wave system uses Centrex service, follow these steps to access the
associated Centrex features. Listen for dial tone.
Press *80, then enter the Centrex feature code.
3. Log Incident - When using a remote phone, pressing ** logs a time stamp in the Wave system
trace logs that may be useful when troubleshooting a problem.
4. Message Waiting
Press MESSAGE.
Follow the voicemail prompts to retrieve voicemail messages and use voicemail
features.
5. Mute - Prevent the party at the other end from hearing anything from your phone.
Press MUTE to toggle this feature on and off.
7. Query (models with displays only) - Review what features are programmed on which buttons.
Press MENU, then a feature button to find out if and how that button is programmed.
8. Phone Relocation - Keep your previous phone number and configuration settings when you move to another location.
Press *98 and dial your current extension number.
9. Program - Program buttons on your phone to perform various features (such as Auto-Dial or Forward).
Press PROGRAM, or MENU, then NEXT, then press PROG.
Follow the prompts.
10. Release - Disconnect an active call, clear the display, mute the speaker during a page, and/or cancel transfers, conferences, or the Program feature.
Press RELEASE to perform one of the above functions.
11. Shift (Edge and Impact Phone Models Only)- Each feature button can be programmed with an AutoDial key accessed via the Shift button.
Press SHIFT, then the AutoDial feature key.
12. Speaker - Use the speaker and microphone instead of the handset or headset.
Press SPEAKER to switch between speaker and headset/handset.

TRANSFERRING CALLS
1. Transfer (Blind) - Place a call on hold while you dial the destination extension, then transfer the
call without announcing the call to the recipient.
With a party on the line:
Press TRNS/CONF, OR Flash.
Dial the destination extension, then hang up to complete the transfer.
2. Transfer (Consultation) - Place a call on hold while you dial the destination extension, then
announce the call to the recipient before transferring.
With a party on the line:
Press TRNS/CONF, or Flash.
Dial the destination extension.
Wait for the destination extension to answer.
Announce the call.
Hang up to complete the transfer.
If voicemail answers:
Hang up to transfer the call to Voicemail.
- OR –
Press Flash, then *72 to reconnect to the caller.
3. Transfer to Voicemail - Transfer a party directly into a voice mailbox (without ringing the
destination extension). (this is a pre-programmed button that may not be available)
With a party on the line:
Press Transfer
Dial the destination extension, then hang up to complete the transfer.
FORWARDING CALLS
1. Forward (External) - Forward calls to an external phone number when you are away from your office.
Press *43.

Enter the external line access code. If prompted, enter the appropriate voicemail password.
Dial the external destination phone number, then press #
2. Forward (Internal) - Forward calls to another extension when you are away from your phone.
Press *43.
Dial the destination extension.
Forward (Cancel - Internal/External) - Cancel any of the Forward settings.
Press *44.
3. Forward (Follow-Me) - From any phone in the system, specify an extension to which you want your calls forwarded.
Press *78.
Enter the destination extension.
If prompted, enter the appropriate voicemail password, then #. . Forward (Cancel - Follow Me)
Press *79.
Enter the destination extension
CONFERENCE CALLS
Set up a conference call with up to multiple participants (including yourself). With a party on the line:
Press TRNS/CONF or TRANS to place the other party on hold.
Listen for the dial tone, then dial the number of the next party.
Repeat for each additional conference member. NOTE: If a party is not available, press TAP, or press the button corresponding to the initial call.
Press TRNS/CONF
PAGING
1. Page (System) - Send a page over all digital phones and the overhead public address system.
Press SYSTEM PAGE, or *11.
Begin speaking, then hang up to end the page.

2. Page (Zone) - Send a page over all digital phones and the overhead public address system in a
specific group of digital phones.
Press PAGE (ZONE). - OR –
Press *12, then enter the zone number (always 2 digits).
Begin speaking, then hang up to end the page. DIGITAL P
FEATURE CODE REFERENCE
FEATURE CODE
Call Park
Directed Flash + *66 + ext
Retrieval *65 + ext
Self Flash + *64
Retrieval *65 + ext
System Flash + *62
Retrieval *63 + slot no
Call Pickup
Extension *75 + ext
Group *74
Call Return *69
Call Waiting Answer Flash
Disable *70
Caller ID Blocking *67
Camp-on (Callback) Flash + *76
Cancel *77 + ext
Centrex Flash + *80 + code
Conference Flash + phone no +
Flash + *71
Reconnect Flash + *72
Do Not Disturb *41
Cancel *42
Forward *43 + destination no. or ext
Cancel *44

Log Incident **
Night Answer *85
Cancel *86
Page
System *11
Zone *12 + zone
Phone Relocation *98 + extension no.
Sys Spd Dial *89 + speed dial no.
Transfer Flash + destination ext
Voicecall *82 + ext
VOICEMAIL USER GUIDE
LOGGING INTO VOICEMAIL You will need to log into your Wave voicemail account any time you want to listen to your messages
or make changes in your settings. You can log in from your own Wave phone, from any Vertical
Wave phone in the system, or from an external (remote) phone.
1. From Your Own Wave Phone
Press MESSAGE or VMAIL (softkey). - If your phone does not have a MESSAGE button or VMAIL softkey, take the phone off hook and press # twice. OR - If you are a member of a hunt group, dial that access code (usually extension 550), then press #. Contact your System Administrator for details about hunt groups. At the prompt:
Enter your password, then press # again.
2. From any Vertical Wave Phone (other than your own)
Press MESSAGE or VMAIL (softkey). - If your phone does not have a MESSAGE button or VMAIL softkey, take the phone off- hook and press #. Then go to step below. OR - If you are a member of a hunt group, dial that access code (usually extension 550), then press # (contact your System Administrator for details about hunt groups). Then go to step below.

At the password prompt:
Press # to tell the system that you want to access a voicemail other than the one associated with the phone you are using.
At the remaining prompts:
Enter your extension, then press #
Enter your password, then press #
3. From any External Phone
Dial the main number.
Enter your extension. NOTE: If the main number is answered by an Auto Attendant, instead of entering your extension, you may need to press # to access voicemail, then enter your extension, and press #. If this is the case, skip to step 4 to listen to access your voicemail.
Press 9 during your greeting to access your voicemail options. (This is a pre-programmed button you may or may not have)
Enter your password, then press #
SETTING/CHANGING YOUR PASSWORD
1. Log into your account. 2. Press 6 to access the Account Preferences menu. 3. Press 3 to access the Password feature. 4. Enter the new password (see Choosing Your Password below for information on password
requirements). 5. Enter the new password again to confirm it. 6. Press to save the new password.
Choosing Your Password: Your Vertical Wave phone system may be customized with specific rules or restrictions for choosing a password.
LISTENING TO MESSAGES
1. New Messages - Listen to messages that have not been saved or deleted.
Log into your account.
Press 1 to listen to the first new message.
Press one of the designated option numbers to access other listening options (see Listening Options described below).
OR When the message has finished playing
Press 2 to go to the next message.

2. Saved Messages - Listen to messages saved from this or previous sessions.
Press 2 to listen to the first saved message.
Press one of the designated option numbers to access other listening options (see Listening Options described below).
OR When the message has finished playing
Press 2 to go to the next message.
3. Deleted Messages (from the current session only) - You cannot access deleted messages from any previous sessions.
Press 5 to listen to the first deleted message.
Press one of the designated option numbers to access other listening options (see Listening Options described below).
OR When the message has finished playing
Press 2 to go to the next message.
4. Listening Options - Use the options below when listening to new, saved, or deleted messages.
Press 1 to replay the current message. Each time you press 1, the message replay from the beginning.
Press 2 to skip to the next message while the current message is playing.
Press 3 to delete the current message.
Press 4 to reply to or forward the message, or to callback the person that left the message. - See the After Listening to Messages section of this guide.
Press 5 to play the previous message while the current message is playing.
Press 6 to save the current message.
Press 7 to rewind the current message (by 4 seconds) - Each time you press 7 while the message is playing, it will rewind another 4 seconds.
Press 8 to undelete any messages deleted in this session. NOTE: If you deleted messages in a previous session, these messages cannot be recovered.
Press 9 to fast forward the current message (by 4 seconds). - Each time you press 9, the message will fast forward another 4 seconds.
Press # during the “message-received” preamble to skip to the beginning of the current message.
Press # during the message itself to skip the rest of the message (and play the next message, if there is one).
5. After Listening to Messages
After listening to a message, and while you are in the Listening menu, use the options below to save,
reply to, forward messages or callback. You can also call back the person who left the message.

Reply to a Message - You can send an immediate reply to the person who left the current voicemail. If the message was sent to multiple recipients, you have the choice of replying to just the original sender or to all recipients.
From the Listening options menu:
Press 1 to access reply options.
Press 1 to reply to the original sender only. OR
Press 2 to send to all recipients (if the message as sent to multiple recipients).
At the tone:
Record your reply, then press #.
Set deliver options or re-record your message, as needed.
Press 1 to send your reply.
Forward a Message - Send a copy of the current message to the voicemail of one or more users. In addition, you can include a recorded message that explains the reason you are forwarding the message.
Example: “I just received this message from our customer, Mr. Jones. Can you please call him and answer his questions? Thanks.”
From the Listening options menu:
Press 2 during or after listening to a message. At the tone:
Record your message, then press #.
Press 1 to accept your recording. OR Press 2 to hear your recording. NOTE: If you want to re-record the message, press 3.
Set deliver options or re-record your message, as needed.
Enter the extension to which you want to forward the message, then press .
Repeat step 5 for each extension you want to include. HINT: If you do not know a user’s extension number, press 411, then select the user by name. If you want to send the message to all users on the system (which have voicemail capabilities) press 8888# .
Press # to send the message to the designated extension(s). OR
Press * to cancel.

NOTE: If you entered multiple extensions, press to delete the most recently added extension. Press to delete each extension. Once all extensions have been deleted, press to delete the message itself.
Callback a Sender Instead of using the reply method to call the sender’s voicemail, use the Callback method to directly call the extension or outside phone number of the sender. From the Listening options menu:
Press 3 during or after listening to a message (without deleting the original message). OR
Press 4 during or after listening to a message (the original message WILL be deleted). NOTE: If you are calling back a forwarded message or calling a sender with more than one available phone number (for example a callback number and a Caller ID number), the system will prompt you to select the appropriate number.
When the caller’s number appears:
Press 1 to dial that number. OR To choose from a list of available numbers for the sender:
Press 2.
Select the appropriate number to dial the sender.
Press FLASH 3 or wait for the other party to hang up to make another call.
RECORDING YOUR VOICE TITLE (NAME) Record or change your name as it will be heard by callers when they dial your extension.
1. Log into your account. 2. Press 6 to access Account Preferences. 3. Press 2 access the Name Title menu. 4. Press 1. 5. Record your name, then press # to save it. 6. Press 1 to re-record your name, then press #.
OR Press 2 to revert to the existing title setting. OR
7. Press * to return to the previous menu, or hang up to end the session.

SETTING VOICEMAIL CALL NOTIFICATION You can designate either an internal (extension) or external (with access code) phone number for
voicemail notification. When you receive a voicemail, the system will use this number to let you
know that you have a message waiting.
1. Log into your account.
2. Press 6 to access Account Preferences.
3. Press 4 to access the Notifications menu.
4. Set the appropriate notification option using the steps below: Keep the Current Notification Number - If you have previously set up a notification number:
Press 1 to keep the current Notification number (the default for this will be your own extension number)
Use an Extension Number
Press 2 if you want to be notified at a specific extension within the Vertical Wave phone system.
Enter the extension number.
Press 1 to accept the entry. OR Press 2 to change the entry. Use an External Number
Press 3 if you want to be notified at a specific number outside the Vertical Wave phone system.
Enter the external number. NOTE: You will need to include any access number (such as “9”), and any long distance numbers (such as 1 and the area code) if applicable.
Press # to hear your entry repeated.
Press 1 to accept the entry. OR Press 2 to change the entry.
MANAGING YOUR GREETINGS A greeting is the message that callers hear when they reach your voicemail. You can record and
store multiple greetings for use in different situations.

NOTE
Check with your phone System Administrator regarding any company-established
greeting formats.
If you do not record and activate a primary greeting, the system will play a pre-defined,
default greeting.
If you only have one greeting recorded it will automatically be the “active” greeting.
Review Greetings - Once you review your greetings, you can make them active, change them, and/or delete them.
Log into your account.
Press 4 to access Greetings and hear the currently active greeting. From the Greetings Menu
Press 1 to replay the current greeting.
Press 2 to skip to the next greeting. +
Press 3 to make the current greeting active. +
Press 4 to re-record an existing greeting, then press to complete and save it.
Press 6 to record/add a new greeting, then press to complete and save it.
Press 7 to delete the current greeting. +This setting applies if you have two or more greetings recorded.
SETTING STATUS COMMANDS
1. Log into your account. 2. Press 6 to access Account Preferences. 3. Press 1 to access Status Commands and hear the currently set status. 4. Use the following Status options as needed.
From the Status Commands menu:
Press 1 to set your status to Available.
Press 2 to set your status to Do Not Disturb.
Press 3 to set your status to In a Meeting.
Press 4 to set your status to Out of the Office.
Press 5 to set your status to On Vacation.
Press 6 to set your status to Available (Queue only). ++
Press 7 to set your status to Available (non-Queue). ++
Press 8 to set your status to On Break. ++
++ These options are only available to you if you are a member of a call center queue.

BCS INFORMATION
CONTACT INFORMATION (Mon-Fri 8am-5pm)
Main: (949) 333-1000 [email protected] Main Fax: (949) 333-1001 [email protected] Customer Service: (949) 333-1010 [email protected] IT Support: (949) 333-1040 [email protected] Sales: (949) 333-1020 [email protected] Website www.bcsconsultants.com
OTHER SERVICES
CARRIER SERVICES: Data Center, Internet Access, Voice Services, & Wireless Services
HOSTED SOLUTIONS
IT NETWORK SERVICES: Anti-Spam, Backup Disaster Recovery, Computer Services, Managed Services, Server & Network Design, & Wireless Security
STRUCTURED CABLING: Voice & Data Cabling
TELECOM: Unified Communications, Voice & Video Conferencing, VOIP, Wireless Communications
VIDEO CONFERENCING & VIDEO SURVEILLANCE
Maximize your communication system’s performance, while protecting your investments, giving you
peace of mind and service priority with BCS’s Customer For Life (CFL) Cisco Maintenance Program. Call or email our Sales Team for pricing.

MY INFORMATION
NAME: EXTENSION: DIRECT #: PASSWORD: NOTES: