web stack getting started guide - oracle help center€¦ · · 2011-02-03 ......
TRANSCRIPT

Web Stack Getting Started Guide
Sun Microsystems, Inc.
Part No: 820–3883–10May 2008

Copyright 2008 Sun Microsystems, Inc. All rights reserved.
Sun Microsystems, Inc. has intellectual property rights relating to technology embodied in the product that is described in this document. In particular, and withoutlimitation, these intellectual property rights may include one or more U.S. patents or pending patent applications in the U.S. and in other countries.
U.S. Government Rights – Commercial software. Government users are subject to the Sun Microsystems, Inc. standard license agreement and applicable provisionsof the FAR and its supplements.
This distribution may include materials developed by third parties.
Parts of the product may be derived from Berkeley BSD systems, licensed from the University of California. UNIX is a registered trademark in the U.S. and othercountries, exclusively licensed through X/Open Company, Ltd.
Sun, Sun Microsystems, the Sun logo, the Solaris logo, the Java Coffee Cup logo, docs.sun.com, Java, and Solaris are trademarks or registered trademarks of SunMicrosystems, Inc. in the U.S. and other countries. All SPARC trademarks are used under license and are trademarks or registered trademarks of SPARCInternational, Inc. in the U.S. and other countries. Products bearing SPARC trademarks are based upon an architecture developed by Sun Microsystems, Inc.
The OPEN LOOK and SunTM Graphical User Interface was developed by Sun Microsystems, Inc. for its users and licensees. Sun acknowledges the pioneering effortsof Xerox in researching and developing the concept of visual or graphical user interfaces for the computer industry. Sun holds a non-exclusive license from Xerox tothe Xerox Graphical User Interface, which license also covers Sun's licensees who implement OPEN LOOK GUIs and otherwise comply with Sun's written licenseagreements.
Products covered by and information contained in this publication are controlled by U.S. Export Control laws and may be subject to the export or import laws inother countries. Nuclear, missile, chemical or biological weapons or nuclear maritime end uses or end users, whether direct or indirect, are strictly prohibited. Exportor reexport to countries subject to U.S. embargo or to entities identified on U.S. export exclusion lists, including, but not limited to, the denied persons and speciallydesignated nationals lists is strictly prohibited.
DOCUMENTATION IS PROVIDED “AS IS” AND ALL EXPRESS OR IMPLIED CONDITIONS, REPRESENTATIONS AND WARRANTIES, INCLUDING ANYIMPLIED WARRANTY OF MERCHANTABILITY, FITNESS FOR A PARTICULAR PURPOSE OR NON-INFRINGEMENT, ARE DISCLAIMED, EXCEPT TOTHE EXTENT THAT SUCH DISCLAIMERS ARE HELD TO BE LEGALLY INVALID.
080516@20209

Contents
1 About Web Stack ....................................................................................................................................5About the User Interface ........................................................................................................................5Web Stack Components ........................................................................................................................6
2 Getting Started ......................................................................................................................................9Installing Web Stack Components .......................................................................................................9
Installing AMP Cluster ................................................................................................................ 10Administering Apache Server ..................................................................................................... 11Administering MySQL Server .................................................................................................... 11Administering memcached ........................................................................................................ 11
Initializing the Development Environment ..................................................................................... 12Starting and Stopping Apache HTTPd and MySQL Servers .......................................................... 13Setting Up MySQL ............................................................................................................................... 14
▼ To Start the Database Server Instance ....................................................................................... 14Setting Up PostgreSQL ....................................................................................................................... 14
▼ To Set Up PostgreSQL ................................................................................................................. 14Starting memcached ............................................................................................................................ 15
▼ To Start memcached .................................................................................................................... 16Testing the Development Environment ........................................................................................... 16
▼ To Test the Development Environment ................................................................................... 16Customizing Web Stack Components .............................................................................................. 17
Configuring Ruby with NetBeans 6.0 ........................................................................................ 19Configuring Ruby on Rails .......................................................................................................... 19Working with PHP, Apache, and NetBeans .............................................................................. 19
Migrating From Development to Production Environment ......................................................... 20File Layout of Web Stack Components ............................................................................................. 21
Apache 2 HTTPd Server Files ..................................................................................................... 21MySQL Database Files ................................................................................................................. 24
3

PHP 5.2.4 Files .............................................................................................................................. 24PostgreSQL Database Files .......................................................................................................... 25Ruby Files ...................................................................................................................................... 25
Contents
Web Stack Getting Started Guide • May 20084

About Web Stack
The OpenSolaris 2008.05 OS includes a set of popular web technologies that enables developersto easily build and deploy web applications. This guide describes the supported webtechnologies and how to use them on OpenSolaris 2008.05 OS. OpenSolaris also integrates theNetBeansTM IDE 6.0 for easy development and deployment of web applications.
About the User InterfaceOpenSolaris OS provides an interface for using web stack components. The following figureshows the Web Stack Admin menu options on the screen.
The Launch menu provides menu options to start or stop the servers, configure the options forApache, MySQL, and PHP. For more information, see “Customizing Web Stack Components”on page 17.
1C H A P T E R 1
5

Web Stack ComponentsThe following components are installed and optimized for use on the OpenSolaris 2008.05platform:
Apache HTTPd Server 2.2.8 Apache is the Web Server that serves web pages in response torequests from users' web browsers.
MySQL 5.0.45 MySQL is a relational database engine used to store mostdynamic data. Open Solaris OS includes 32bit architecture ofMySQL database. MySQL supports the following standardAPIs:■ SQL92■ SQL99■ SQL2003
MySQL also has its own C client API which is delivered withthe server.
PHP 5.2.4 PHP is an interpreted dynamic web page scripting language. APHP language interpreter is integrated into the Apache WebServer. PHP module is integrated with MySQL and PostgreSQLthat provides database support for Apache HTTP (32 and64-bit), and Pre-fork MPM. This module is also integratedwith the NetBeans IDE.
About PHP Extensions
PHP modules are integrated as extensions. Each of themodules have a respective INI file under/etc/php5/5.2.4/conf.d directory. These PHP extensionsare enabled by default.
Custom third-party PHP extensions like APC, Suhosin, IDN,Tcpwrap, XDebug, DTrace are not enabled by default. However,you can edit the PHP extension specific INI file for any specificconfiguration changes.
Following is the list of PHP extensions available on the OpenSolaris OS :
bcmath exif mbstring pdo_sqlite sysvsem xmlrpc
bz2 ftp mysql pgsql sysvshm xmlwriter
Web Stack Components
Web Stack Getting Started Guide • May 20086

calendar gd mysqli posix tcpwrap xsl
ctype gettext openssl shmop tcpwrap zip
curl hash pcntl soap tidy zlib
dba iconv pdo sockets tokenizer
dbase n.so pdo_mysql sqlite wddx
dom ldap pdo_pgsql sysvmsg xmlreader
PostgreSQL 8.2 PostgreSQL is an object-relational database managementsystem (ORDBMS). PostgreSQL uses a client/server model. APostgreSQL session consists of a server process, whichmanages the database files, accepts connections to the databasefrom client applications, and performs actions on the databaseon behalf of the clients. The database server program is calledpostgres and the user's client application that wants toperform database operations.
Ruby on Rails Ruby on Rails is the framework for web applicationdevelopment. Ruby is an object-oriented programminglanguage. Rails is an open source Ruby framework fordeveloping web-based, database-driven applications.
Extensions to the Ruby language, and a packaging programcalled Rubygems are included to enable developers to install toRails and to add functionality in a seamless manner.
Ruby is bundled with extensions, similar to PHP, and they areOpenSSL, curses, Tcl/Tk, and readline.
Squid 2.6.STABLE16[1] Squid is a fully-featured HTTP/1.0 proxy server. Squid offers arich access control, authorization and logging environment todevelop web proxy and content serving applications.
memcached 1.2.2 memcached is a high-performance, distributed memory objectcaching system. Helps in speeding up dynamic webapplications by alleviating database load. The OpenSolaris2008.05 includes 32 bit versions of the memcached daemon.For more information about APIs and how to configure, enableand disable the server, see memcached man pages.
For more information on how to use NetBeans on OpenSolaris2008.05, see Using NetBeans IDE for Development
Web Stack Components
Chapter 1 • About Web Stack 7

8

Getting Started
This chapter describes how to use the Web Stack developer tools for developing and deployingweb applications.
Installing Web Stack ComponentsOpenSolaris 2008.05 release allows you to install Web Stack components individually. Thefollowing table lists the packages and command to install them.
Note – Ensure to import SMF manifest file before setting up an AMP cluster or installing as anindividual package. For more information see “Administering Apache Server” on page 11,“Administering MySQL Server” on page 11, and “Administering memcached” on page 11.
Note – The pfexec command allows the non-root user to install packages.
TABLE 2–1 Installing the Web Stack components
Component Name Package Name Command to install the component
Apache 2.2 core only SUNWapch22,SUNWapch22dUse the following command to install Apache core:
pfexec pkg install SUNWapch22 SUNWapch22d
Apache 2.2 modules SUNWapch22m-security,
SUNWapch22m-jk,
SUNWapch22m-fcgid,
SUNWapch22m-dtrace
Use the following command to install Apache modules:
pfexec pkg install SUNWapch22m-security
SUNWapch22m-jk SUNWapch22m-fcgid
SUNWapch22m-dtrace
2C H A P T E R 2
9

TABLE 2–1 Installing the Web Stack components (Continued)Component Name Package Name Command to install the component
PHP5 SUNWphp524,
SUNWphp524core,
SUNWphp524man,
SUNWphp524-mysql,
SUNWphp524-pgsql,
SUNWapch22m-php5
Use the following command to install PHP5:
pfexec pkg install SUNWphp524 SUNWphp524core
SUNWphp524man SUNWphp524-mysql SUNWphp524-pgsql
SUNWapch22m-php5
MySQL SUNWmysql5 Use the following command to install MySQL:
pfexec pkg install SUNWmysql5
For more information on how to start the MySQL, see“Setting Up MySQL” on page 14
PostgreSQL SUNWpostgr-82-devel Use the following command to install PostgreSQL:
pfexec pkg install SUNWpostgr-82-devel
Squid SUNWsquid Use the following command to install Squid:
pfexec pkg install SUNWsquid
Web Stack user interface webstackui This package adds menu to operate Apache, PHP, MySQland other components in the stack.
Use the following command to install Web Stack userinterface:
pfexec pkg install webstackui
You can install the components using the PackageManager graphical user interface for IPS. Toinstall, update, and manage packages using the PackageManager, see the screencast.
Installing AMP ClusterThe AMP cluster package is a super set of all individual AMP packages. For more informationon how to install an AMP cluster, see Setting Up Your AMP Development Environment.
Note – Ensure to import SMF manifest file before setting up an AMP cluster. For moreinformation on how to import the manifest, see “Administering Apache Server” on page 11,“Administering MySQL Server” on page 11, and “Administering memcached” on page 11.
Installing Web Stack Components
Web Stack Getting Started Guide • May 200810

Administering Apache ServerWhen you install the Apache Web Server package, the binaries are installed in the/usr/apache2/2.2 and run time configuration files will be available in the following location/etc/apache2/2.2.
SMF Framework for Web Stack components are not initialized in the this release. Use either theWeb Stack UI or start the server by running the startup command manually. Perform thefollowing steps as root user to start Apache Web Server:
svccfg import /var/svc/manifest/network/http-apache22.xml
svcadm enable network/http:apache22
The import command allows you to import the apache manifest file and the enable commandallows you to start the server.
Execute the disable command to stop the server.
svcadm disable network/http:apache22
Administering MySQL ServerSMF Framework for Web Stack components are not initialized in the this release. Use either theWeb Stack UI or start the server by running the startup command manually. Perform thefollowing steps as root user to start MySQL Server:
Perform the following steps as root user to start MySQL server.
svccfg import /var/svc/manifest/application/database/mysql.xml
svcadm enable application/database/mysql:version_50
The import command allows you to import the MySQL manifest file and the enable commandallows you to start the server.
Execute the disable command to stop the server.
svcadm disable application/database/mysql:version_50
Administering memcachedSMF Framework for Web Stack components are not initialized in the this release. Use either theWeb Stack UI or start the server by running the startup command manually. Perform thefollowing steps as root user to start memcached:
Perform the following steps as root user to start memcached.
Installing Web Stack Components
Chapter 2 • Getting Started 11
svccfg import /var/svc/manifest/application/database/memcached.xml
svcadm enable application/database/memcached:default
The import command allows you to import the memcached manifest file and the enablecommand allows you to start the server.
Execute the disable command to stop the server.
svcadm disable application/database/memcached:default
Initializing the Development EnvironmentBefore you can use the Web application development environment, you must initialize theenvironment for your login. Every new user logged into the system must initialize their ownenvironment.
Note – To use the Web Stack Admin user interface options, you must login to the GNOMEdesktop.
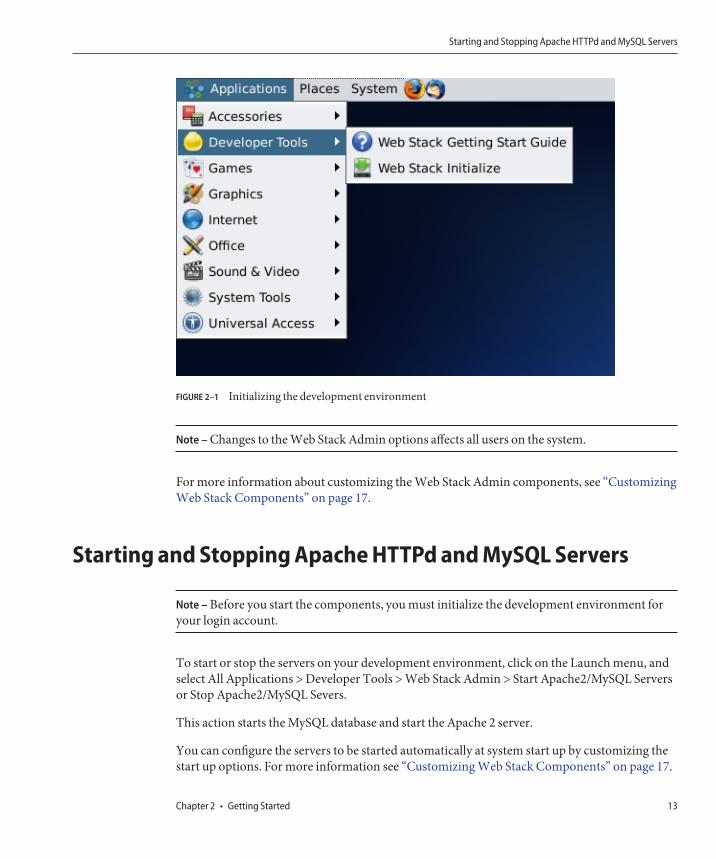
To initialize your Web application development environment, click on the Launch menu, andselect All Applications > Developer Tools > Web Stack Admin > Initialize.
Initializing the Development Environment
Web Stack Getting Started Guide • May 200812
Note – Changes to the Web Stack Admin options affects all users on the system.
For more information about customizing the Web Stack Admin components, see “CustomizingWeb Stack Components” on page 17.
Starting and Stopping Apache HTTPd and MySQL Servers
Note – Before you start the components, you must initialize the development environment foryour login account.
To start or stop the servers on your development environment, click on the Launch menu, andselect All Applications > Developer Tools > Web Stack Admin > Start Apache2/MySQL Serversor Stop Apache2/MySQL Severs.
This action starts the MySQL database and start the Apache 2 server.
You can configure the servers to be started automatically at system start up by customizing thestart up options. For more information see “Customizing Web Stack Components” on page 17.
FIGURE 2–1 Initializing the development environment
Starting and Stopping Apache HTTPd and MySQL Servers
Chapter 2 • Getting Started 13

Setting Up MySQLThe procedure to register MySQL service with SMF and to start the database server instance isdescribed below.
▼ To Start the Database Server InstanceCheck the status of the SMF service.The mysql;version_50 service is disabled by default.example% svcs mysql
STATE STIME FMRI
disabled 14:27:09 svc:/application/database/mysql:version_50
Enable the mysql:version_50 service.example%svcadm enable mysql:version_50
Check the status of the service.example% svcs mysql
STATE STIME FMRI
online 14:30:08 svc:/application/database/mysql:version_50
The state of the service is online, and the database server is started successfully.
Note – To shutdown the database instance and prevent automatic restart, disable the SMFservice.
example% svcadm disable mysql:version_50
Setting Up PostgreSQLThis section describes how to set up the PostgreSQL database with NetBeans 6.0 IDE.
▼ To Set Up PostgreSQLCreate a user by name postgres.bash-3.2$ su
Password:
# chown postgres:postgres /var/postgres/8.2/data
# su - postgres
1
2
3
1
Setting Up MySQL
Web Stack Getting Started Guide • May 200814

Initialize the database.bash-3.2$/usr/postgres/8.2/bin/initdb -D /var/postgres/8.2/data
The files belonging to this database system are owned by user postgres. This user must alsoown the server process. The database cluster is initialized with locale C.
Start the database server.bash-3.2$/usr/postgres/8.2/bin/postgres -D /var/postgres/8.2/data
or
bash 3.2$/usr/postgres/8.2/bin/pg_ctl -D /var/postgres/8.2/data -l logfile start
Enable PostgreSQL version 8.2.bash-3.2$ su
Password:
# /usr/sbin/svcadm enable postgresql:version_82
Configure the PostgreSQL database with NetBeans IDE 6.0.
a. Create a New Database Connection.
In the New Connection Database dialog box, enter the following details:
■ Name — PostgreSQL
■ Driver — org.postgresql.Driver
■ Database URL — jdbc.postgresql://localhost.5432/postgres
■ User — postgres
■ Password — ******
b. Click the Advanced tab.
c. Select a Database Schema to use.
d. Create a Table.
e. View the Table Data.
Starting memcachedThis section describes how to start memcached.
2
3
4
5
Starting memcached
Chapter 2 • Getting Started 15

▼ To Start memcachedMake sure that the libevent library (SUNWlibevent) is installed.
Log in as non-root user.
Note – You cannot execute memecached as a root user.
At the command prompt, type the following command:#memcached --options
For information about the memcached command, and its options, see the memcached man page.
memcached package for Solaris (SUNWmemcached) includes files necessary to register with theService Management Facility (SMF) for the JavaTM platform. For more information, seememcached.1m man page.
Testing the Development EnvironmentTo test whether the development environment you have set up is working fine, perform thefollowing simple steps:
▼ To Test the Development Environment■ Make sure that you have initialized the environment for your login account.■ Make sure that the required components are started. For more information, see “Initializing
the Development Environment” on page 12
Select Developer Tools > Web Stack Admin > Sample App > Create to create a web application.Alternatively, you can copy the following code into a text file.
<DOCTYPE html PUBLIC "-//W3C//DTD XHTML 1.0 Transitional//EN""http://www.w3.org/TR/xhtml1/DTD/xhtml1-transitional.dtd"><html xmlns="http://www.w3.org/1999/xhtml"><head>
<meta http-equiv="Content-Type" content="text/html; charset=iso-8859-1" />
<title>My First Web App</title>
</head>
<body>
<b>Hello, World!</b>
<p>The date and time are <?php echo date ("r"); ?> - isn’t that nice? - isn’t that nice?</p>
</body>
</html>
Before You Begin
1
2
Before You Begin
1
Testing the Development Environment
Web Stack Getting Started Guide • May 200816

Save the file to /var/apache2/2.2/htdocs/hello.php.
Open a web browser and enter the URL http://localhost/hello.php in the address bar.
The following message is displayed in the web browser, where the date and time reflects yoursystem's current date and time:
Hello, world!
The date and time are Thu, 20 Dec 2007 16:01:07 +0200
■ Select Developer Tools > Web Stack Admin > Sample App > Run.
Success! Note that the web page contents enclosed within the <?php and ?> de-limiters wereinterpreted by the PHP interpreter at the time the Apache Web Server served up that page. Theoutput of those PHP language statements were substituted into the HTML stream at thatlocation. All other HTML content is served up to the web browser as in static web pages.
Now, reload your browser but make sure that your browser does not use its cache; in mostbrowsers, you can reload the browser by holding down the Alt key while clicking the Reloadbutton. You see the same result, but with a later time. Thus you can see that a PHP page getsexecuted every time it is displayed (barring local browser caching, which you can suppressthrough PHP directives), and that you, as a developer, can generate highly dynamic content.
Customizing Web Stack ComponentsAfter Initialization, you can customize several aspects of the Web Stack components.
From the Launch menu, select All Applications > Developer Tools > Web Stack Admin >Options. The Web Stack Admin Options panel is displayed. The General tab enables you toconfigure the Servers to start automatically at system start up, or each time when you log in.
2
3
Next Steps
Customizing Web Stack Components
Chapter 2 • Getting Started 17

For advanced options such as to edit the configuration files, click Advanced Configuration onthe Apache, MySQL, and PHP tabs.
Note – You must restart the servers for the changes to take effect.
You can edit the httpd.conf file for Apache advanced configuration options. For informationabout how to configure Apache, refer to the documentation at/usr/apache2/2.2/manual/configuring.html.en.
For PHP advanced configuration, you can edit the php.ini file. For information about how toconfigure PHP using the php.ini file, see the documentation at/usr/php5/5.2.4/doc/html/configuration.html.
For MySQL advanced configuration, you can edit the my.cnf file available at/etc/mysql/5.0/my.cnf.
Customizing Web Stack Components
Web Stack Getting Started Guide • May 200818

Configuring Ruby with NetBeans 6.0OpenSolaris 2008.5 installation includes Ruby 1.8 and NetBeans 6.0. To configure Ruby withNetBeans, see http://www.netbeans.org/kb/60/ruby/setting-up.html.
Configuring Ruby on RailsRails is a full-stack framework for developing database-backed web applications. Rails providesa pure-Ruby development environment, to the request and response in the controller, and tothe domain model wrapping the database. RubyGems is the standard Ruby package manager.On the Solaris platform, RubyGems are already loaded. Hence you can install all of Rails and itsdependencies through the command-line by typing the following command as a root user:
/usr/bin/gem install rails --include-dependencies
The Ruby on Rails environment is set up for the development. You can now use the NetBeansIDE to creating a Ruby on Rails project. When you create a project, the IDE creates the samefolders and files that a rails command would create. For more information about how to createRuby on Rails project in the NetBeans IDE, see the tutorial athttp://www.netbeans.org/kb/60/ruby/getting-started.html.
Working with PHP, Apache, and NetBeansFor creating a PHP application using NetBeans and to deploy the application to Apache WebServer, here is what you need to do:
▼ To Configure PHP, Apache, and NetBeans
Register Apache Web Server with NetBeans.
a. In the NetBeans IDE, select the Services tab, select Web Servers > Add Host and select LocalWeb Server.
b. Enter the correct path to Apache 2 configuration file.The default path of the Apache configuration file, httpd.conf is: /etc/apache2/2.2.
c. Accept the default path for the Document Root field.
d. Click Finish.The Apache 2 web server is listed under the Web Server node.
1
Customizing Web Stack Components
Chapter 2 • Getting Started 19

Create a PHP project using NetBeans.
a. Select File > New Project.
b. Select PHP Project from the PHP category.
c. Enter a target server for your PHP project.
d. Click Finish.
Write a PHP program.
Right click on the project and select Run Project to view the output on a browser.
▼ To Enable Debug for PHP Applications
From the Launch menu of the Solaris operating system, select All Applications > DeveloperTools > Web Stack Admin > Options.
The Options screen is displayed.
Select the PHP tab.
Select the Debug check box.
By selecting the check box you are enabling the automatic debug option for all PHPapplications.
You are prompted to restart the server.
Click Restart for the change to take effect.
Migrating From Development to Production EnvironmentThe easy User Interface provided from the Launch menu for rapid and easy-to-learn webapplication development is intended for development purposes. It is not recommended to runmission-critical web sites without customization and tuning for performance, scalability, andsecurity. When you have developed and debugged a working application in this environment, itis recommended to transfer the database data and PHP files to a production-qualityOpenSolaris installation, running on high-availability Sun hardware that has been carefullytuned to your mission-critical needs.
2
3
4
1
2
3
4
5
Migrating From Development to Production Environment
Web Stack Getting Started Guide • May 200820

File Layout of Web Stack ComponentsThis section discusses the file layout of Web Stack components.
Note – The easy user interface provided from the Launch menu for rapid and easy-to-learn webapplication development is intended for development purposes. It is not recommended to runmission critical web sites without customizing and tuning of the components for performance,scalability, and security. When you have developed a working application, it is recommended totransfer the data from the database and PHP files from your development machine to aproduction-quality installation that has been carefully tuned to your mission critical needs.
You can access these components from the Launch menu of the Solaris platform. From theLaunch menu, select All Applications > Developer Tools > Web Stack Admin.
Alternatively, the web stack tools can be accessed from the installation path described in thefollowing sections.
Apache 2 HTTPd Server FilesThe following list describes the file structure for Apache Web Server:
Note – The string [version] should be expanded to "MAJOR.MINOR". For example,/usr/apache2/2.2/*.
/etc/apache2/[version]/httpd.conf
Contains server configuration files. A newly-installed server contains a default httpd.conffile. This is the main configuration file.
/etc/apache2/[version]/conf.d
Contains additional server configuration files.
By default, server will load all the .conf files placed under this directory. It also has 2additional .load configuration files-modules-32.load and modules-64.load which containLoadModule directives for loading the 32 and 64-bit bundled apache modules respectively.All the .conf files in this directory are included by the following line in httpd.conf:
Include /etc/apache2/2.2/conf.d/*.conf. You can add the additional configurationhere.
/etc/apache2/[version]/envvars
Contains the environment settings that the server uses at startup.
File Layout of Web Stack Components
Chapter 2 • Getting Started 21

When the /usr is mounted as read-only, you will not be able to modify the envvars filepresent in the following path /usr/apache2/[version]/envvars. To modify theenvironment settings you need to edit the envvars file present in the following path/etc/apache2/[version]/envvars.
/etc/apache2/[version]/magic
Magic data for mod_mime_magic Apache module as documented in the
/usr/apache2/2.2/manual/mod/mod_mime_magic.html file. Editing this file is notrecommended.
/etc/apache2/[version]/mime.types
Default MIME types file. This file sets the default list of mappings from filename extensionsto content types, changing this file is not recommended. Use the AddType directive instead.
/etc/apache2/[version]/original/
Contents under this directory are delivered as-is from the apache distribution and these filesare not meant to be read by the server.
/etc/apache2/[version]/sample-conf.d
Contains sample .conf files. These are not included in the main configuration file. To usethe sample file, copy the file to conf.d directory and modify as per the need.
/usr/apache2/[version]/bin
Contains the 32-bit httpd (Pre-fork MPM) and httpd.worker (Worker MPM) executablesas well as other utility programs.
/usr/apache2/[version]/bin/[isainfo]
Contains the 64-bit httpd (Prefork MPM) and httpd.worker (Worker MPM) executablesas well as other utility programs.
/usr/apache2/[version]/manual
Contains the Apache manual in HTML format.
/usr/apache2/[version]/include
Contains the Apache header files, which are needed for building various optional serverextensions with apxs(8).
/usr/apache2/[version]/libexec
Contains 32-bit loadable modules (DSOs) supplied with the server.
/usr/apache2/[version]/libexec/[isainfo]
Contains 64-bit loadable modules (DSOs) supplied with the server.
/usr/apache2/[version]/man
Contains man pages for the server, utility programs, and mod_perl.
Add this directory to your MANPATH to read the Apache man pages.
/usr/apache2/[version]/lib
Contains the 32-bit apache2 core libraries.
File Layout of Web Stack Components
Web Stack Getting Started Guide • May 200822
/usr/apache2/[version]/lib/[isainfo]
Contains the 64-bit Apache 2 core libraries.
/usr/apache2/[version]/lib/perl
Contains the 32-bit modules and library files used by the mod_perl extension to Apache.
/var/apache2/[version]/cgi-bin
Default location for the CGI scripts.
This can be changed by altering the httpd.conf file and restarting the server.
/var/apache2/[version]/htdocs
Default document root.
This can be changed by altering the httpd.conf file and restarting the server.
/var/apache2/[version]/icons
Icons used by the server.
This should not be changed.
/var/apache2/[version]/libexec
Place holder for 32-bit user apache modules.
Any 32-bit modules which are added using apxs(8) are copied into this directory.
/var/apache2/[version]/libexec/[isainfo]
Place holder for 64-bit user Apache 2 modules.
Any 64-bit modules which are added using apxs(8) are copied into this directory.
/var/apache2/[version]/logs
Contains server log files.
The formats, names, and locations of the files in this directory can be altered by variousconfiguration directives in the httpd.conf file.
/var/apache2/[version]/proxy
Directory used to cache pages if the caching feature of mod_proxy is enabled in thehttpd.conf file.
The location of the cache can also be changed by changing the proxy configuration in thehttpd.conf file.
Modules mod_fcgid, mod_jk,mod_security, and mod_dtrace are integrated to Apache 2. Formore information about these modules, see http://fastcgi.coremail.cn/doc.htm,http://tomcat.apache.org/connectors-doc/generic_howto/quick.html,http://www.modsecurity.org/documentation/index.html, andhttp://prefetch.net/projects/apache_modtrace/mod_dtrace.c
File Layout of Web Stack Components
Chapter 2 • Getting Started 23

MySQL Database FilesThe MySQL 5.0.45 software for Solaris is installed into a number of subdirectories of/usr/mysql/5.0. Symbolic links are created from all directories under /usr/mysql/5.0 to/usr/mysql directories so that latest version of MySQL can also be accessed from /usr/mysql.
/usr/mysql/5.0/bin Contains the binaries and scripts.
/usr/mysql/5.0/lib Contains the libraries for the client API.
/usr/mysql/5.0/include Contains the header files for the client API.
/usr/mysql/5.0/man/man1 Manual pages for client programs.
/usr/mysql/5.0/man/man8 Manual pages for server programs.
/usr/mysql/5.0/share Shared data: locale, time zone
/usr/mysql/5.0/docs Contains HTML documentation.
/usr/mysql/5.0/mysql-test Contains MySQL test programs.
/usr/mysql/5.0/sql-bench SQL benchmark test
/usr/mysql/5.0/share/mysql Contains internationalization (I18N) files, sampleconfiguration files, and utility scripts.
/var/mysql/5.0/data Default database data directory.
/etc/mysql/5.0 Contains the MySQL configuration file.
/usr/mysql/5.0/bin/mysql Client executable.
/usr/mysql/5.0/bin/mysqld Server executable.
PHP 5.2.4 FilesThe following list describes the file structure for PHP:
/usr/php5/5.2.4/bin Contains the PHP configuration executables.
/usr/php5/5.2.4/lib Contains PHP library files.
/usr/php5/5.2.4/modules Contains PHP modules for PHP extensions.
/usr/apache2/2.2/libexec Contains the PHP module for Apache 2 (32-bit) preforkMPM and the module name is mod_php5.so. This module isdelivered as part of SUNWapch22m-php5 package.
/usr/php5/5.2.4 Contains the default configuration file (php.ini).
File Layout of Web Stack Components
Web Stack Getting Started Guide • May 200824

/usr/php5/5.2.4/conf.d Contains extension specific INI files for each PHP extension .Here, you can enable or disable various extensions that areintegrated with the package.
Note – The PHP extensions like APC, DTrace, XDebug, suhosin, andtcpwrap are disabled bydefault. To enable these extensions, you need to uncomment the respective line(extensions=<module-name>.so) in the conf.d file.
PostgreSQL Database FilesThe following list describes the file structure for the PostgreSQL database:
/usr/postgres/8.2/bin Contains the PostgreSQL executables.
/usr/postgres/8.2/etc Contains a sample database.
/usr/postgres/8.2/jdbc Contains the JDBC drivers for PostgreSQL.
/usr/postgres/8.2/lib Contains library files for OpenSolaris.
/usr/postgres/8.2/man Contains the man pages for the commands.
Ruby FilesThe following list describes the file structure for Ruby:
/var/ruby/1.8/gem_home Contains the Rubygems repository. Configure the GEM_HOMEenvironment variable to point to /var/ruby/1.8/gem_home touse this installation of Rubygems.
/usr/ruby/1.8/bin Contains the Ruby executable as well as other utility programs,and Rubygems programs. These programs are linked from/usr/bin. For example: /usr/ruby/1.8/bin/ruby is linkedfrom /usr/bin/ruby1.8, and may be linked from/usr/bin/ruby if 1.8 is the latest version of Ruby installed onthis system.
Squid FilesThe following list describes the file structure for Squid:
/usr/squid/bin Contains the executable for the Squid client and to run the cache.
/usr/squid/libexec Contains the libraries.
/etc/squid/squid.conf The main configuration file. Modify this file for Squid to work.
File Layout of Web Stack Components
Chapter 2 • Getting Started 25

26