web timesheet version 8.8 administrator's guide | replicon, inc
TRANSCRIPT

Web TimeSheetVersion 8.8
ADMINISTRATOR’S GUIDE
Project & Billing EditionTime & Attendance Edition

Notices 2
Notices
© 1999-2009 Replicon, Inc. All rights reserved.
All parts of this document are the property of Replicon, Inc. No part of this document may be reproduced in any manner whatsoever including mechanical or electronic media such as disk or tape. No part of this doc-ument may be transmitted in any form by any means without the prior written permission of Replicon, Inc.
Web TimeSheet, Web Resource, and Web TimeOff and associated logos are trademarks of Replicon, Inc.
Other product or service names mentioned in this document may be trademarks of Replicon, or of the re-spective owners of those trademarks.
This document may include links to websites not owned or managed by Replicon, Inc. Note that every effort has been made at the time of release to ensure all links provided are valid. However, Replicon makes no guarantee that the links will continue to be valid in the future. Additionally, Replicon is not responsible for the information included in these websites and provides no guarantees or warranties regarding the accuracy of this information.
Revision 04/24/09

Table of Contents
Chapter 1 Welcome ................................................................................................................... 8About Web TimeSheet..................................................................................................................... 8Document Conventions.................................................................................................................... 8Contacting Support .......................................................................................................................... 9
Chapter 2 Learning about Web TimeSheet’s Features ........................................................ 10Understanding the Basic Features................................................................................................. 10
How Timesheets Work ............................................................................................................ 10How Time Off Works ............................................................................................................... 11How Expenses Work ............................................................................................................... 12How Projects Work .................................................................................................................. 12
Understanding the Features Specific to each Edition .................................................................... 13Web TimeSheet Project & Billing Edition................................................................................. 13Web TimeSheet Time & Attendance Edition ........................................................................... 13What if I Need Features from Both Editions? .......................................................................... 13What about the Expense Module? .......................................................................................... 14Other Web TimeSheet Features.............................................................................................. 14
Chapter 3 Accessing Web TimeSheet ................................................................................... 15Accessing Web TimeSheet from your Browser ............................................................................. 15
Determining the Web TimeSheet URL .................................................................................... 15Navigating in Web TimeSheet ....................................................................................................... 16Accessing the Online Help............................................................................................................. 16Disabling Pop-Up Blockers for the Web TimeSheet Site ............................................................... 17
Chapter 4 Overview of Setting Up the System...................................................................... 18Before you Begin ........................................................................................................................... 18
Getting Input from Others in your Organization....................................................................... 18Setting Up Web TimeSheet ........................................................................................................... 18
Working with the Pre-Defined Data ......................................................................................... 19Adding Large Amounts of Data ............................................................................................... 19
Once the System is Ready ............................................................................................................ 19Web TimeSheet Setup - Flow Chart .............................................................................................. 20
Chapter 5 Creating Departments and Employee Types to Organize Users ....................... 21Items to Set Up before Adding Departments or Employee Types ................................................. 21
Deciding Whether to Enable Hierarchy Filtering...................................................................... 21
Table of Contents 3

Setting Up Custom Fields for Departments and Employee Types .......................................... 23Creating Departments.................................................................................................................... 24Defining Employee Types .............................................................................................................. 24
Chapter 6 Setting Up Timesheet Options.............................................................................. 25Items to Set Up before Adding Users or Entering Time................................................................. 25
Required .................................................................................................................................. 25Required for Payroll................................................................................................................. 25Required for Project Costing or Billing..................................................................................... 25Optional ................................................................................................................................... 26
Selecting a Time Entry Method...................................................................................................... 26Understanding the Available Time Entry Method .................................................................... 26Deciding which Time Entry Method to Use.............................................................................. 28Assigning a Time Entry Method Permission to a User ............................................................ 28
Defining the Period Each Timesheet Covers ................................................................................. 29Understanding the Weekly End-of-Month Timesheet Period .................................................. 29Understanding the Manual Timesheet Period ......................................................................... 30
Specifying who Approves Timesheets ........................................................................................... 31Setting Up the Approver Types ............................................................................................... 31Defining the Order of Approval ................................................................................................ 32Setting a Default Approval Path .............................................................................................. 32
Setting Timesheet System Preferences......................................................................................... 32Setting Up Pay Codes for Overtime .............................................................................................. 33
Specifying the Pay Code to use for Regular Hours ................................................................. 33Configuring how Overtime is Calculated ....................................................................................... 33
Specifying if and when Overtime should be Banked ............................................................... 34Defining the Minimum or Maximum Hours that are Required on a Timesheet ............................. 35Specifying when Timesheets are Due and how Far in Advance Time can be Entered ................. 36Classifying Time Worked using Activities ...................................................................................... 36Setting Up Custom Timesheet Fields ............................................................................................ 36Displaying a Message on the Timesheet ....................................................................................... 37
Chapter 7 Setting Up Time Off Options ................................................................................ 38Items to Set Up before Adding Users or Entering Time Off ........................................................... 38
Required .................................................................................................................................. 38Optional ................................................................................................................................... 38
Defining Pay Codes for Time Off ................................................................................................... 38Defining the Types of Time Off Taken and their Settings .............................................................. 39Setting Time Off System Preferences............................................................................................ 39Specifying who Approves Time Off Bookings ................................................................................ 40
Setting Up the Approvers ........................................................................................................ 40Defining the Order of Approval ................................................................................................ 41Setting a Default Approval Path .............................................................................................. 41
Setting Up Custom Time Off Fields ............................................................................................... 41
Table of Contents 4

Chapter 8 Setting Up Expense Sheet Options ...................................................................... 42Items to Set Up before Adding Users or Entering Expenses ......................................................... 42
Required .................................................................................................................................. 42Required for Project Costing and Billing.................................................................................. 42Optional ................................................................................................................................... 42
Defining the Taxes that will be Applied to Expenses ..................................................................... 43Setting Up the Types of Expenses that will be Incurred ................................................................ 43Choosing which Fields are Available on Expense Sheets ............................................................. 44Specifying who Approves Expense Sheets ................................................................................... 45
Setting Up the Approvers ........................................................................................................ 45Defining the Order of Approval ................................................................................................ 46Setting a Default Approval Path .............................................................................................. 46
Defining how Expenses will be Paid for ......................................................................................... 46Specifying how Quickly Expenses must be Approved ................................................................... 46Setting Up Custom Expense Sheet Fields..................................................................................... 47Displaying a Message on the Expense Sheet ............................................................................... 47
Chapter 9 Setting Up Automated E-mail Reminders ............................................................ 48Items to Set Up to use Automated E-mail Reminders ................................................................... 48
Required .................................................................................................................................. 48Optional ................................................................................................................................... 48
Entering E-mail Server Settings..................................................................................................... 48Testing your E-mail Server Setup............................................................................................ 49
Customizing E-mail Notifications ................................................................................................... 49Setting System Preferences for Notifications of Overdue Items .................................................... 49Sending Special Messages............................................................................................................ 50
Chapter 10 Setting General System Options .......................................................................... 51Items to Set Up before Adding Users and Projects ....................................................................... 51
Required .................................................................................................................................. 51Optional ................................................................................................................................... 51
Defining the Holidays that Users Take........................................................................................... 51Customizing the List of Holiday Icons...................................................................................... 52
Setting Up Currencies.................................................................................................................... 52Changing the Base Currency from US Dollars ........................................................................ 53
Setting Security Options ................................................................................................................ 53Setting System-Wide Preferences ................................................................................................. 53
Additional System Preferences ............................................................................................... 53Enabling DCAA Compliance .......................................................................................................... 54Customizing the Look and Feel of the System .............................................................................. 54
Chapter 11 Controlling what Users can Access ..................................................................... 55Understanding Permission Profiles................................................................................................ 55
Methods for Setting Up Permission Profiles ............................................................................ 55
Table of Contents 5

How Permission Profiles Work with License Seats ................................................................. 55External User Permissions ...................................................................................................... 55
Setting Up Permission Profiles ...................................................................................................... 55Understanding Individual Permissions........................................................................................... 56
System Permissions ................................................................................................................ 56Report Permissions ................................................................................................................. 67
Chapter 12 Adding Users.......................................................................................................... 69Items to Set Up before Adding Users ............................................................................................ 69
Setting System Preferences for Users .................................................................................... 69Setting Default User Preferences ............................................................................................ 69Setting Up Custom Fields for User Profiles ............................................................................. 70
Checking Previously-Configured Items.......................................................................................... 70Adding Users ................................................................................................................................. 71
Standard versus External Users.............................................................................................. 71Setting User Options ............................................................................................................... 71Adding Multiple Users at Once ................................................................................................ 74
Chapter 13 Creating Clients and Projects ............................................................................... 76Items to Set Up before Creating Clients and Projects ................................................................... 76
Setting System Preferences for Projects................................................................................. 76Defining Billing Rates based on the Work being Done............................................................ 77Setting up Custom Fields for Projects or Clients ..................................................................... 78Setting Productivity Targets and Preferences ......................................................................... 78
Setting up your Clients................................................................................................................... 79Adding Projects.............................................................................................................................. 79
Creating the Project................................................................................................................. 79Setting Billing Rates ................................................................................................................ 80Specifying who will Work on the Project.................................................................................. 80Defining the Task Structure ..................................................................................................... 80Specifying which Expenses can be Claimed ........................................................................... 81Adding Projects using a Template........................................................................................... 81
Managing Projects ......................................................................................................................... 82Changing Multiple Projects at Once ........................................................................................ 82Allowing Clients to Access Project Information ....................................................................... 82Posting Notes for Projects ....................................................................................................... 83
Chapter 14 Administering Timesheets, Time Off Bookings, and Expenses ........................ 84Administering Timesheets.............................................................................................................. 84
Changing a Timesheet once it has been Approved................................................................. 84Applying System Changes to an Approved Timesheet ........................................................... 84
Administering Time Off Bookings................................................................................................... 85Reviewing a User’s Time Off Balance ..................................................................................... 85
Administering Expenses ................................................................................................................ 85Changing an Expense Sheet once it has been Approved ....................................................... 85
Table of Contents 6

Applying System Changes to an Approved Expense Sheet.................................................... 86
Chapter 15 Reporting on and Exporting the Data .................................................................. 87Reporting on Data.......................................................................................................................... 87
Setting up Reports for Users ................................................................................................... 87How Report Data is Affected by Hierarchy Filtering and a User’s Permissions ...................... 87Local versus Global Editing ..................................................................................................... 87Displaying a Custom Logo in Reports ..................................................................................... 88
Exporting Data ............................................................................................................................... 88Reporting and Exporting in the Project & Billing Edition ................................................................ 88
Tracking Project Costs ............................................................................................................ 88Billing Clients ........................................................................................................................... 88Managing Projects in Microsoft Project ................................................................................... 89Sending Project Updates......................................................................................................... 89
Reporting and Exporting in the Time & Attendance Edition........................................................... 89Exporting Data to QuickBooks................................................................................................. 89Exporting Pay Data to ADP ..................................................................................................... 89
Chapter 16 Maintaining the System ......................................................................................... 91Maintaining Self-Hosted Installations............................................................................................. 91
Managing Seats....................................................................................................................... 91Determining which Version you are Using............................................................................... 91Reviewing the Status of your License ..................................................................................... 92Finding out how many Users are Logged In............................................................................ 92Upgrading Web TimeSheet ..................................................................................................... 92Setting Up a Database Backup Schedule ............................................................................... 92
Maintaining Replicon-Hosted/SaaS Implementations.................................................................... 93Managing Seats....................................................................................................................... 93
Appendix A Removing the Sample Data................................................................................... 94Project & Billing Edition.................................................................................................................. 94Time & Attendance Edition ............................................................................................................ 96
Appendix B Glossary.................................................................................................................. 99
Table of Contents 7
CHAPTER 1Welcome
Welcome to the Web TimeSheet Administrator’s Guide. This document is intended to guide you, the Web TimeSheet administrator, through the process of setting up and managing the Web TimeSheet system.
All information in this guide applies to both the Project & Billing Edition and the Time & Attendance Edition, unless specifically stated.
About Web TimeSheetWeb TimeSheet is a web-based application designed to help you and your organization manage time, time off, and expenses effectively. With Web TimeSheet, your employees can enter data quickly and easily, at any time, and from anywhere with Internet access. Once submitted, items are automatically forwarded to the appropriate supervisor or manager for approval. Additionally, reports can be generated to track data such as project costs, client billing totals, productivity rates, and payroll details.
Unlike traditional PC applications or client-server applications, the only software that is required on each us-er’s PC is a standard Javascript-enabled web browser. The application is installed and runs on your web server, or it can be hosted by Replicon to reduce your administration and equipment costs.
Document ConventionsThis user guide uses the following conventions:
• References to other areas in the document are shown in italics and in blue to indicate active links internal to the document. To automatically navigate to the section being referenced, select the link.
• Hyperlinks to websites or e-mail addresses are shown in blue and underlined to indicate active links external to the document. To open a new browser window to the website or to send an e-mail to the address, select the link.
• Key information is highlighted using a blue background for quick reference. An icon is used to indi-cate the type of information being provided, as follows.
• The icon indicates a note, which provides a reminder of an important requirement or further details on how the software operates.
• The icon indicates a warning notice. Warnings point out features or actions that can have negative results if used incorrectly.
• The icon indicates a tip or hint designed to assist you in using the product more effi-ciently.
The online help system uses these same conventions for easy identification of important notes, warnings, and tips.
Welcome 8

Contacting SupportIf you would like assistance configuring or using Web TimeSheet, please contact our Customer Support and Implementation team using one of the following methods:
Direct Phone: 403-262-6519 ext 3
Toll-Free Phone:North America: 1-877-862-2519Europe/New Zealand: 00-800-8622-5192Australia: 0011-800-8622-5192
E-mail: [email protected]
Web-Based Form: www.replicon.com/Support/RequestHelp.aspx
Fax: 403-233-8046
Welcome 9

CHAPTER 2Learning about Web TimeSheet’s Features
This chapter provides information on the features offered in Web TimeSheet. It is important that you are fa-miliar with the features so you can make informed decisions when setting up the system.
Understanding the Basic FeaturesWeb TimeSheet provides many features to meet both simple and complex requirements. However, at the basic level, Web TimeSheet allows you to:
• Track time worked• Track time off• Track expenses• Manage projects
• Report on and export data for any of the above
How Timesheets WorkWeb TimeSheet allows you to track the time that users work, as follows:
1. You set up time tracking options, including the period that each timesheet should cover. 2. A new timesheet is automatically created for each user when a new period starts.3. Depending on the type of timesheet being used, the user either:
• Enters the duration of time they work each day (e.g. 8 hours)• Enters the times that they work (e.g. 8:00 AM to 12:00 PM, and 1:00 PM to 5:00 PM)• Punches in and out to record when they start and stop working
If using the Project & Billing Edition, the user can choose the project and task that was worked on during each time segment. If using the Time & Attendance Edition, the system automatically calculates the user’s overtime.
4. Once the period has ended, the user submits the timesheet.5. The timesheet is automatically sent to one or more approvers.6. The approvers approve the timesheet.7. If using the Project & Billing Edition, the time can be exported for client billing or compared against
project estimates.If using the Time & Attendance Edition, the time data can be exported to a payroll system, such as ADP.
How Offline Timesheets WorkIf a user does not have access to Web TimeSheet, they can enter and submit time using “offline timesheets”, as follows:
1. An external, POP3-compliant e-mail address is specified for each user.
The features that are available to you and your users depends on the edition you have purchased, as explained in Understanding the Features Specific to each Edition on page 13.
Learning about Web TimeSheet’s Features 10

2. Using a button in their timesheet, the user, or an administrator, requests an offline version be sent to that address.
3. Web TimeSheet sends the timesheet as an HTML form attached to the e-mail.4. The user retrieves the e-mail and saves the form to their local machine.5. The user opens the form in a web browser, enters their time, and saves the form.6. The user requests to send the form back to Web TimeSheet, by selecting the button in the form.7. Once the user is again connected to the Internet, the form is sent to Web TimeSheet.8. In Web TimeSheet, the timesheet is now filled out and can be viewed and submitted for approval as
usual.
How Time Off WorksIn the Time & Attendance Edition, you can track the time off owed to and taken by users. Web TimeSheet provides these features:
• Automatic accruals and resets• Time off bookings• Time off entry on the timesheet
Automatic Accruals and ResetsWeb TimeSheet can be used to track the amount of time off employees earn, as follows:
1. You define a number of types of time off, to categorize the time off taken by users.2. You set accrual and reset policies for each time off type, for each user.3. The user’s balance is automatically adjusted based on the accrual and reset policies.
Booking Time OffFor time off requiring advance approval, Web TimeSheet allows users to book time off, as follows:
1. A user requests time off by submitting a time off booking, with the appropriate time off type selected.2. Once the booking is submitted:
• The user’s balance is reduced by the amount of time off requested.• The booking is automatically sent to one or more approvers.• The booking is displayed in the user’s time off calendar.
3. The approvers approve the booking.
Offline timesheets and offline expense sheets have the following constraints:
• The client machine must have a local e-mail client installed.• The e-mail client must allow for sending/receiving attachments.• They are only supported by the Microsoft Internet Explorer browser, version 6.0 or higher.• If using Microsoft Outlook, the Mail Format must be set to Plain Text (not HTML).
The Time off in Lieu time off type cannot accrue time. Instead, time off is accumulated against this type through banking of overtime hours. For more information on how Web TimeSheet’s banked time func-tionality works, refer to Configuring how Overtime is Calculated on page 33.
Learning about Web TimeSheet’s Features 11

4. The booking is displayed in other user’s time off calendars, if they have permission to view others’ bookings.
5. If time off is being tracked as exception time, the data can be exported to a payroll system.
If a user is using a timesheet, any bookings will also be shown on their timesheet. The booking must be ap-proved before the timesheet can be approved.
Recording Time Off in the TimesheetIf time off does not require approval ahead of time, Web TimeSheet provides users the ability to record time off directly in their timesheet, as follows:
1. A user adds a time off row to their timesheet, selects a time off type, and enters the amount of time off taken.
2. The time off is displayed in the user’s time off calendar.3. The user submits the timesheet, once all the time for that period has been entered.4. The user’s balance is reduced by the amount of time off entered.5. The timesheet is automatically sent to one or more approvers. 6. The approvers approve the timesheet.7. The time and time off from the timesheet can be exported to a payroll system, such as ADP.
How Expenses WorkWith a license for the Expense module, you can track the expenses incurred by users, as follows:
1. A user fills out and submits an expense sheet, uploading any available receipts. If using the Project & Billing Edition, the user can choose which project each expense was associated with.
2. The expense sheet is automatically sent to one or more approvers.3. The approvers approve the expense sheet.4. The finance department can reimburse the user based on the approved expense sheets.5. If using the Project & Billing Edition, the expenses can be exported for client billing or reviewed
against project estimates.
Offline expense sheets are also available when users are away from the office. Offline expense sheets follow the same process outlined in How Offline Timesheets Work on page 10.
How Projects WorkThe Project & Billing Edition allows you to define projects to enter time and expenses against, as follows:
1. A project manager adds a project to Web TimeSheet, specifying the client the project is being com-pleted for, if applicable.
2. The project manager specifies who will be working on the project.3. If the project is being billed to a client, the project manager sets the billing rates for the project.4. The project manager creates tasks within the project and enters estimates.5. The project manager specifies which expenses can be claimed under the project.6. When entering time on their timesheet, users working on the project allocate their time against the
project and task. Users also select the project when entering expenses.7. The costs and billing charges associated with the time and expenses are automatically calculated
by the system.
Learning about Web TimeSheet’s Features 12

8. Time and expenses can be exported for client billing. Additionally, the project manager can period-ically review the actual costs against the estimates, to ensure the project is on track.
Understanding the Features Specific to each EditionWeb TimeSheet is available in two editions:
• Web TimeSheet Project & Billing Edition• Web TimeSheet Time & Attendance Edition
You can purchase seats for either edition, depending on the features you require.
Web TimeSheet Project & Billing EditionWith the Project & Billing Edition, you can:
• Track time against projects and tasks• Review up-to-date project costs at any time, and compare them to estimates• Automatically calculate client billing totals• Transfer data to and from Microsoft Project and Intuit QuickBooks for project management and bill-
ing purposes
Web TimeSheet Time & Attendance EditionThe Time & Attendance Edition allows you to:
• Track total time worked or track when users are working• Automatically calculate regular and overtime, including multiple levels of overtime• Track time off owed to and taken by users• Export data to payroll systems, including ADP
What if I Need Features from Both Editions?If you need features from both editions, you can purchase seats for both, such as 100 Time & Attendance seats and 10 Project & Billing seats. The seats can be assigned in two ways as explained below.
Assigning Different Seats to Different UsersIf some users require only Time & Attendance features and some require Project & Billing features, you can purchase seats for both editions and assign Time & Attendance seats to one group and Project & Billing seats to another.
For example, you may require Time & Attendance seats for hourly employees so they can enter their hours for pay calculations. Salaried employees may only require time tracking to bill clients, in which case they only need Project & Billing seats.
Assigning Both Seats to One UserIf a user requires access to features in both editions, you can assign one Time & Attendance and one Project & Billing seat to the user.
Learning about Web TimeSheet’s Features 13

For example, the majority of the employees in a company may only track their time off. However, the IT de-partment may also be required to track their time against projects. In this case, any users in the IT depart-ment would be assigned both seats.
What about the Expense Module?You can add Web TimeSheet's Expense module for use in tracking employee expenses to any Web TimeSheet implementation.
An Expense only version of the Web TimeSheet is also available, which includes features related to enter-ing, approving, exporting, and reporting on expense sheets, along with some administrative features.
Other Web TimeSheet FeaturesIn addition to tracking time, time off, and expenses, Web TimeSheet provides the following:
• Automatic e-mail reminders when items are due• Customizable approval paths, with multiple approver levels available• The ability to enter and submit time and expenses through e-mail when users are out of the office• Support for entry in any number of currencies, with automatic conversions based on exchange
rates you specify• Custom fields to track information specific to your organization• A database backup utility, if using a SQL Server database• The ability to organize users in department hierarchies• Automatic notification when Web TimeSheet updates are available• Security features, including support for a number of authentication methods and password require-
ments• The option to provide another user access to enter and approve items on your behalf• Customizable permission levels to control what actions users can take and what features they can
access• The ability to provide limited system access to those external to your company, if using the Project
& Billing Edition• A customizable interface
Learning about Web TimeSheet’s Features 14
CHAPTER 3Accessing Web TimeSheet
Once a Replicon-hosted/SaaS implementation of Web TimeSheet has been created for you, or Web TimeSheet has been installed on a server within your organization, you can access Web TimeSheet using the admin account that is automatically set up during installation.
Accessing Web TimeSheet from your BrowserYou can access Web TimeSheet using a web browser on your local computer or on a computer outside your office network, providing you have Internet access. To access Web TimeSheet from a computer outside your network, the computer must have TCP/IP network access to your organization’s web server.
To run Web TimeSheet from a web browser:
1. Open your browser application and enter the URL for Web TimeSheet in the web address field.
2. If you are using Integrated Windows authentication, you will be automatically logged in. Otherwise, the Web TimeSheet login page is displayed. Enter the login name admin and the appropriate pass-word, and select the Enter button.
3. To ensure full functionality of the application, you should allow pop-ups for the Web TimeSheet web-site. For information on how to disable pop-up blockers, refer to Disabling Pop-Up Blockers for the Web TimeSheet Site on page 17.
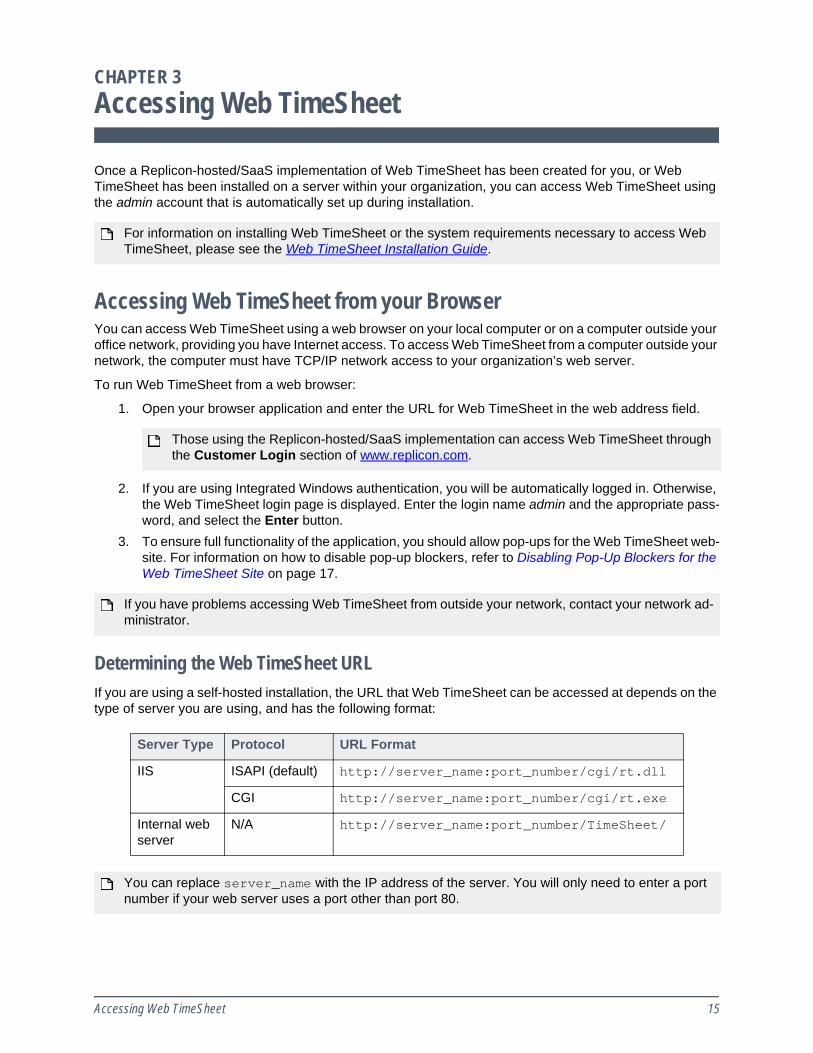
Determining the Web TimeSheet URLIf you are using a self-hosted installation, the URL that Web TimeSheet can be accessed at depends on the type of server you are using, and has the following format:
For information on installing Web TimeSheet or the system requirements necessary to access Web TimeSheet, please see the Web TimeSheet Installation Guide.
Those using the Replicon-hosted/SaaS implementation can access Web TimeSheet through the Customer Login section of www.replicon.com.
If you have problems accessing Web TimeSheet from outside your network, contact your network ad-ministrator.
Server Type Protocol URL Format
IIS ISAPI (default) http://server_name:port_number/cgi/rt.dll
CGI http://server_name:port_number/cgi/rt.exe
Internal web server
N/A http://server_name:port_number/TimeSheet/
You can replace server_name with the IP address of the server. You will only need to enter a port number if your web server uses a port other than port 80.
Accessing Web TimeSheet 15

Consult your network administrator if you are having problems accessing Web TimeSheet. It may be helpful for the network administrator to set up a URL that is more easily remembered and route it to the actual Web TimeSheet URL.
Navigating in Web TimeSheetUse the Web TimeSheet menu bar at the top of the page to navigate through the application based on the type of work you are doing. When setting up Web TimeSheet, the majority of the work will be done in the Administration section.
Once you have selected an item from the top menu bar, that section of Web TimeSheet displays. A more detailed menu of features available within that section is provided on the left side of the application. Click on the heading of each menu to open or close it.
Accessing the Online HelpWeb TimeSheet includes an online help system that provides comprehensive information on using the soft-ware to complete key tasks. During the system configuration, if you require further information on setting up an item, consult the online help.
To access the online help, select Help in the upper, right corner of the application.
Accessing Web TimeSheet 16

The Web TimeSheet Help window will open, with the right pane showing the topic most closely related to your location in the application. Within the left pane, you can choose other topics from the table of contents or click Search to search throughout the help system. To move between topics you have previously viewed, use the Back and Forward buttons. When using the Internet Explorer browser, you can print the contents of the right pane by selecting the Print button.
When the icon is shown next to a field, click the icon to access help information specific to that field. The help window will display again, providing further details regarding the field.
Disabling Pop-Up Blockers for the Web TimeSheet SiteTo ensure full functionality of the application, you should disable pop-up blockers for the Web TimeSheet website. To allow pop-ups within Web TimeSheet:
• If you are using Microsoft Internet Explorer:
a. Select Tools > Pop-up Blocker > Pop-up Blocker Settingsb. Enter the Web TimeSheet URL in the field provided.c. Select the Add button, and then the Close button, and then the OK button.
• If you are using Mozilla Firefox:
a. Select Tools > Options.b. Select the Content icon.c. Select the Exceptions button next to the Block pop-up windows check box.d. Enter the Web TimeSheet URL in the field provided.e. Select the Allow button, and then the Close button, and then the OK button.
If you use another pop-up blocking application, refer to that application’s documentation for information on how to disable pop-up blocking for a specific site.
All of your users should complete this step once they begin using the system. This same information is available to them in the online help.
Accessing Web TimeSheet 17

CHAPTER 4Overview of Setting Up the System
This chapter provides an overview of the steps required to set up the system. It also provides information on some of the administrative tasks you may be required to complete once the system is in use.
Before you BeginIt is recommended that you spend some time evaluating the types of users that will be accessing Web TimeSheet, and which of the system features they will be using. See Chapter 2, Learning about Web TimeSheet’s Features on page 10 for information on the available features.
Getting Input from Others in your OrganizationTo complete the set up, you may need input from others in your organization, including the following:
• Payroll Manager• Finance Manager• Approving Supervisor• Project Manager• IT/IS Manager
It may be helpful if you speak with them before you start setting up the system to find out key information such as:
• How often time needs to be collected• How users are paid, including how overtime is calculated• How users earn time off• The processes that should be followed for approvals• How projects will be set up and used• How clients are billed• Whether there are any security policies that must be followed
Setting Up Web TimeSheetBefore users start entering time, time off, or expenses, you must:
1. Configure user-related options, including:
a. Department and employee typesb. Timesheet optionsc. Time off options, if using the Time & Attendance Editiond. Expense options, if using expensese. Automated e-mail reminder settings
2. Set general system options.3. Choose what features and actions are available to users by defining permission profiles.4. Add each employee that will be using the system as a user, assigning them options, permissions,
and license seats based on what the user will be using the system for.
Overview of Setting Up the System 18

5. Create projects for users to enter time and expenses against, if using the Project & Billing Edition.
Chapters 5 through 13 provide details on each of these steps. These chapters are arranged in the order you should complete them, as many items are dependent on others. For example, before setting timesheet pe-riods, you should define departments. Therefore, if you choose to create timesheet periods based on depart-ments, all of the departments will be available for selection when defining the timesheet periods.
Working with the Pre-Defined DataIn order to help you get Web TimeSheet up and running as quickly as possible, a number of pre-defined values have been created for administrative items such as employee types, permission profiles, and approv-er types.
If these pre-defined options meet your needs, you can skip configuring those items. Otherwise, you can cus-tomize the existing values to meet your requirements by editing, deleting, or adding to them.
Adding Large Amounts of DataDepending on your requirements, you may need to add large amounts of data to Web TimeSheet. There are a number of features available to help you add data quickly:
• An import utility, which requires you to enter the data in Comma-Separated Value (CSV) files and then import those files (see the Web TimeSheet Data Import Utility User Guide)
• A “Quick Add” feature, which allows you to add a number of users at once, using a grid-format for entering their details (see Adding Multiple Users at Once on page 74)
• A “Based On” feature, which provides you the option to base new user, permission profiles, and projects on existing ones (see Adding Projects using a Template on page 81)
Once the System is ReadyAfter you complete the set up process, you can train your users so they can begin entering data.
Once Web TimeSheet is in use, you may need to complete the following tasks:
• Administer timesheets, time off bookings, and expenses• Run reports to check project costs, billing amounts, and payroll totals• Export data to other systems for payroll, project management, or billing purposes• Add new license seats• Perform regular back ups• Upgrade Web TimeSheet when new features or bug fixes become available
These tasks are covered in chapters 14 through 16.
More setup help...
An overview of the steps required to set up Web TimeSheet is given under Web TimeSheet Setup - Flow Chart on page 20.
To help you keep track of which tasks you have completed, a Web TimeSheet Administrator’s Check-list is provided at www.replicon.com/products/product-documentation.aspx.
Overview of Setting Up the System 19

Web TimeSheet Setup - Flow Chart
Overview of Setting Up the System 20

CHAPTER 5Creating Departments and Employee Types to Organize Users
This chapter explains how to set up departments and employee types, which will be used to organize and categorize users. This step must be completed before setting up timesheet options or adding users.
Items to Set Up before Adding Departments or Employee TypesBefore adding departments or employee types, the following must be configured:
Deciding Whether to Enable Hierarchy FilteringYou should consider enabling hierarchy filtering if you want to limit users' visibility and access to depart-ments, projects, and other users based on their placement within the organization's hierarchy.
Some examples of why you may choose to use hierarchy filtering are:
• There are a number of users administering the system, such as one for each business unit. Hierar-chy filtering will, for example, prevent the administrator from Business Unit A from being able to view and edit details for users in Business Unit B.
• You have a number of project managers and want to prevent them from adding users from other departments to their team.
• You want to allow a department manager to report on data for everyone in their direct department, plus those in the sub-departments, but want to prevent them from reporting on higher-level depart-ments.
Hierarchy filtering can be enabled at:
Administration > System > System Preferences > Security section
Creating the HierarchyA hierarchy is defined by creating and organizing departments within Web TimeSheet. The top level of the hierarchy is, by default, labeled Company. The departments users are assigned to indicates their placement in the hierarchy.
Item to Configure How it’s Used Page
System Preference for Hierarchy Filtering
Controls whether users can see data for depart-ments outside their branch of the organizational structure
21
User Defined Fields Required if you wish to capture additional, cus-tom information for each department or employ-ee type
23
Creating Departments and Employee Types to Organize Users 21
How Hierarchy Filtering Affects Users
Department VisibilityWhen hierarchy filtering is enabled, the following department-related limitations are placed on each user:
• Users can only view and edit their department and their department's sub-departments.• Users can only add departments as sub-departments to their department.• When adding or editing a user, only the user's department and its sub-departments can be
assigned to the new user.
Project VisibilityWhen hierarchy filtering is enabled in the Project & Billing Edition, the following project-related limitations are placed on each user:
• Users can only view, add, and edit projects in their department and their department's sub-depart-ments.
• When adding or editing a project, the project can only be made visible to the user's department and its sub-departments. Only users within the visible departments can be assigned to the project team or to tasks in the project.
User VisibilityWhen hierarchy filtering is enabled, the following limitations related to other users are placed on each user:
• Users can only view, add, and edit users in their department and in their department's sub-depart-ments.
• When adding or editing a user, only users in the department or sub-departments of the user doing the adding or editing (the currently logged in user) can be selected as their supervisor.
• Users can only view historical data for the users in their department and its sub-departments.
For information on how reports are affected by hierarchy filtering, see the online help.
Visibility and Multiple Department AssignmentsA user can have more than one department assigned to them, thus expanding their visibility within the sys-tem. When more than one department is assigned to a user, the above limitations apply to each department. For example, if a user is assigned Department A and Department B, they will be able to view and edit users in Department A and its sub-departments and will also be able to view and edit users in Department B and its sub-departments. This occurs regardless of whether Department A and Department B are in the same branch of the hierarchy.
Hierarchy Filtering and PermissionsPermissions control what features a user has access to and what actions they can take, while hierarchy fil-tering controls what data a user has access to. The two can be used in conjunction to increase security within your Web TimeSheet implementation.
For example, a user's permissions control whether they can edit projects, but the user's place in the depart-ment hierarchy controls which projects are visible to the user. With the combination of permissions and hi-erarchy filtering, the user can edit projects, but only those projects visible to them. If hierarchy filtering is not enabled, the user has access to edit any project defined in the system. Conversely, if the user's permissions
Users can only complete the actions mentioned below if they are assigned a permission that allows for it. For information on permissions, see Chapter 11, Controlling what Users can Access on page 55.
Creating Departments and Employee Types to Organize Users 22

do not include the ability to edit projects, they will not be able to edit any projects, including those visible to them based on their department.
Excluded from Hierarchy FilteringA few items are not affected by hierarchy filtering, meaning the user's assigned departments have no effect on the user's visibility to the following:
• Administration itemsAll of the configurable items in the Administration menu, excluding Users and Departments, are visible to all users who have been provided access in their assigned permissions.
• ApprovalsIf a user is included in an approval path, they will be able to see the complete timesheet, expense sheet, or time off booking when approving the item. The data displayed for approval will only be based on their assigned permissions, not on the departments assigned to them. However, as a user's supervisor is often configured as an approver, remember that hierarchy filtering does limit who can be chosen as a supervisor.
Setting Up Custom Fields for Departments and Employee TypesIf you want to track information beyond the basic department and employee type fields, you should create user defined fields. For each user defined field you create, you can enter information in that field when add-ing a department/employee type.
You do not have to create user defined fields before adding departments and employee types. If you decide later that you need to track additional details, you can set up user defined fields and edit existing depart-ments and employee types to assign a value for those fields.
Department user defined fields are configured at:
Administration > Users/Departments > User Defined Fields > Department tab
Employee type user defined fields are configured at:
Administration > Users/Departments > User Defined Fields > Employee Type tab
For each field you create, you can specify:
1. The name of the field, as it will appear for the department/employee type2. The type of field, as detailed in Types of User Defined Fields Available on page 23 3. Restrictions on the values entered, such as minimum or maximum values or the maximum length of
the field. The available restrictions depend on the type of field.4. The default value to show when adding a department/employee type, if any5. Whether you are required to enter a value
Types of User Defined Fields AvailableThe following types of fields can be created:
Type Description
Date A date, either typed in the field or selected from a calendar. The de-fault date can be either a specific date, or you can use the formula$Today to default the date to today’s date
Creating Departments and Employee Types to Organize Users 23

Creating DepartmentsYou can use departments to organize users by hierarchical structure, geographic regions, or functional groups within your organization. Users can be assigned to one or more departments and, if hierarchy filtering is enabled, a user's department assignments limit that user's access to other users, departments, and projects.
Departments should be added from the top of the organizational structure down, and can be configured at:
Administration > Users/Departments > Departments
For each department you create, you must specify:
1. The parent department2. The name of the new department3. The values for any custom fields you defined
Defining Employee TypesEmployee types can be used to group users along any criteria you choose. Each user's assigned employee type can be used to filter or group data in reports. Employee types are only required if the period that a timesheet covers varies by user, and is not based on their department.
Employee types are defined at:
Administration > Users/Departments > Employee Types
For each employee type you add or edit, you must specify:
1. The name, which will be used when assigning a type to a user2. The values for any custom fields you defined
Number A numeric value, possibly with decimals
Drop-down A pre-defined drop-down list the user must select from
Text Free-format text, with a maximum number of characters allowed
You can drag-and-drop departments to move them around the organizational structure.
Type Description
Creating Departments and Employee Types to Organize Users 24
CHAPTER 6Setting Up Timesheet Options
This chapter provides information on how to set up the system so time can be entered and tracked, as de-tailed in How Timesheets Work on page 10. These steps must be completed before timesheet users can be added.
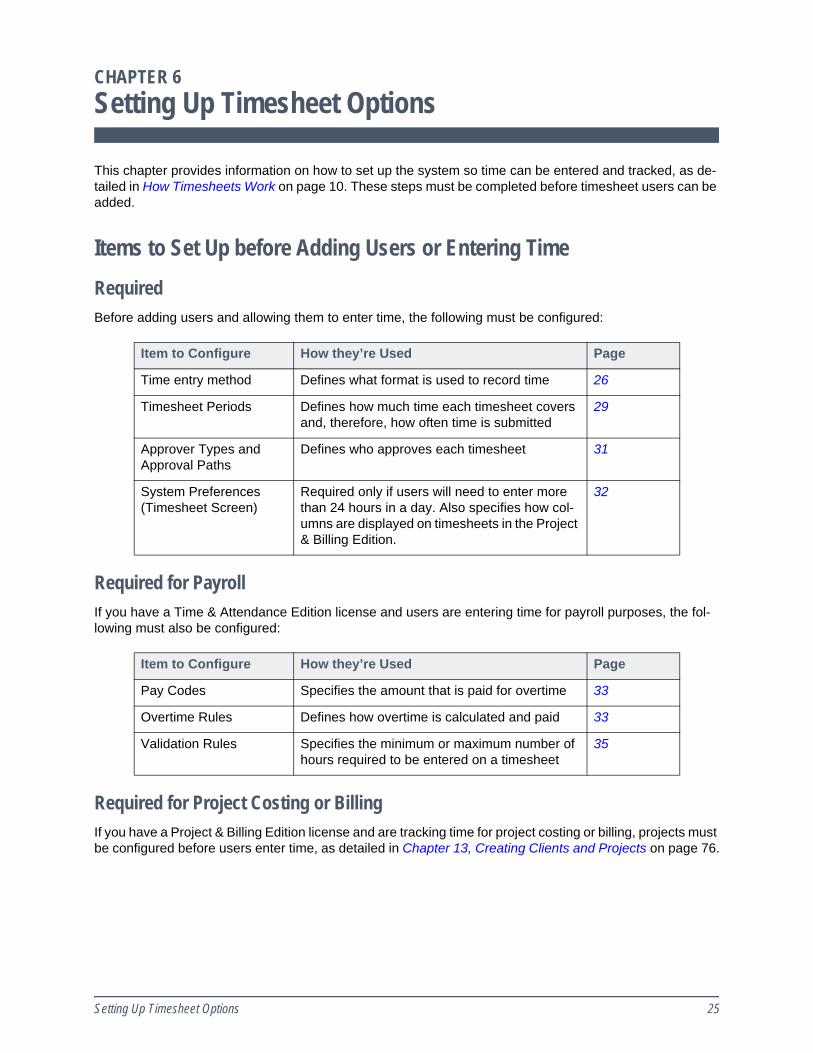
Items to Set Up before Adding Users or Entering TimeRequiredBefore adding users and allowing them to enter time, the following must be configured:
Required for PayrollIf you have a Time & Attendance Edition license and users are entering time for payroll purposes, the fol-lowing must also be configured:
Required for Project Costing or BillingIf you have a Project & Billing Edition license and are tracking time for project costing or billing, projects must be configured before users enter time, as detailed in Chapter 13, Creating Clients and Projects on page 76.
Item to Configure How they’re Used Page
Time entry method Defines what format is used to record time 26
Timesheet Periods Defines how much time each timesheet covers and, therefore, how often time is submitted
29
Approver Types and Approval Paths
Defines who approves each timesheet 31
System Preferences (Timesheet Screen)
Required only if users will need to enter more than 24 hours in a day. Also specifies how col-umns are displayed on timesheets in the Project & Billing Edition.
32
Item to Configure How they’re Used Page
Pay Codes Specifies the amount that is paid for overtime 33
Overtime Rules Defines how overtime is calculated and paid 33
Validation Rules Specifies the minimum or maximum number of hours required to be entered on a timesheet
35
Setting Up Timesheet Options 25

OptionalYou can set up the following time entry features at any time:
Selecting a Time Entry MethodWeb TimeSheet allows users to enter time using a number of timesheet styles. A user’s time entry method is configured within their assigned permission type. Therefore, you can assign different time entry methods to different users.
• For information on each of the time entry options, refer to Understanding the Available Time Entry Method below.
• For help deciding which option is right for you, refer to Deciding which Time Entry Method to Use on page 28.
• For information on assigning time entry type permissions, refer to Assigning a Time Entry Method Permission to a User on page 28.
Understanding the Available Time Entry MethodThere are four time entry options to choose from. You can assign users one of the following time entry meth-ods:
• Standard timesheet• In-Out timesheet• Standard timesheet OR In-Out timesheet, as the user prefers• Locked In-Out timesheet
Each of these options is described further in the sections that follow.
Item to Configure How they’re Used Page
Due/End Dates Determines how soon timesheets need to be submitted and approved, and how far in ad-vance time can be entered (defaults are already in place)
31
Activities To classify time worked, for reporting purposes. When used with projects, activities allow you to define global tasks without adding them to each project.
36
User Defined Fields To capture additional, custom information on the timesheet
36
Disclaimers To display a message on the timesheet to re-mind users of important information, such as the deadline for submission
37
Setting Up Timesheet Options 26

Standard TimesheetIf a user is assigned a Standard timesheet, they enter the duration of time they worked. The complete timesheet period is shown on one page.
In-Out TimesheetIf a user is assigned an In-Out timesheet, they enter the time they start and stop working and Web TimeSheet will automatically calculate the duration. Or, the user may enter the start time and the duration, and Web TimeSheet will determine their stop time. Each day within the timesheet period is shown on its own page.
Locked In-Out TimesheetIf a user is assigned a Locked In-Out timesheet, they punch in and out when they start and stop working. Users cannot edit the time they have entered. Each day within the timesheet period is shown on its own page.
The Locked In-Out timesheet is useful in systems that, for audit and accountability purposes, require an accurate, non-editable record of time worked by employees.
Standard OR In-Out TimesheetIf a user is assigned a Standard or In-Out timesheet, they can choose to use either of those timesheet types, and may switch between types at any time.
Setting Up Timesheet Options 27

Timecard An additional option, time entry through timecard, is available with a Time & Attendance Edition license. If a user is assigned a timecard, they punch in and out when they begin and end work. However, if you require a non-editable record of time worked, it is recommended that you use the Locked In-Out timesheet. By using the Locked In-Out timesheet instead of the timecard, the same functionality will be available to users, but approvals, overtime calculations, and more comprehensive reporting will be avail-able to administrators.
Deciding which Time Entry Method to UseThe chart below may assist you in deciding which time entry method best suits your requirements. For more information on each of the time entry methods, refer to Understanding the Available Time Entry Method on page 26.
Assigning a Time Entry Method Permission to a UserEach user is assigned a time entry method via their assigned permissions. Different users can be assigned different time entry formats. You should set the desired time entry method when defining these permissions
Users can use a timecard and a Standard timesheet in conjunction. However, the data entered in timecards is NOT automatically copied to timesheets, nor visa versa.
Users can be given the option of using either the Standard or In-Out timesheet, as explained in Stan-dard OR In-Out Timesheet on page 27.
Setting Up Timesheet Options 28

later in Chapter 11, Controlling what Users can Access on page 55. Then, you can assign the permission to the appropriate user as explained in Setting User Options on page 71
Defining the Period Each Timesheet CoversTimesheet periods are date ranges that specify the amount of time each timesheet covers and, therefore, how frequently timesheets are submitted.
You can create either:
• A single timesheet period for all users (System timesheet period), or• A different timesheet period for each employee type or department
Timesheet periods can be configured at:
Administration > Timesheet Setup > Timesheet Periods
For each timesheet period you create, you must select:
1. Whether the period will apply to all users (System), or will be based on employee types or depart-ments. The “types” of timesheet periods are separated by tabs in the Timesheet Periods page.
2. The employee type or department the timesheet period should apply to, if applicable3. The length of time each timesheet should cover, either:
• Weekly• Bi-weekly• Semi-monthly• Monthly• A weekly period, that adjusts in length to ensure time data for the end of the month is avail-
able for payroll processing and/or billing (see Understanding the Weekly End-of-Month Timesheet Period on page 29)
• A custom period (see Understanding the Manual Timesheet Period on page 30)4. The first day of the timesheet period. For example, a weekly timesheet period can be set to start on
Sunday; each user’s timesheet will then span Sunday to Saturday.5. The date the timesheet period will take effect. When initially setting up the system, this should be
set to the first date you wish to start collecting time for, and ideally matches the first day of the period.
In the future, if you want to change the timesheet period, create a timesheet period with an effective date equal to the date you want the new period to be applied. The timesheet period will be applied to all timesheets created after that date.
Understanding the Weekly End-of-Month Timesheet PeriodWeekly End-of-Month timesheet periods are intended for those using a monthly payroll or billing cycle, but who want to use weekly timesheet periods to ensure timely data entry. Using this timesheet period type, if a
Setting Up Timesheet Options 29

timesheet spans the end of one month and the beginning of the next, the timesheet will be broken up at the crossover between months. This ensures administrators will receive data for the end of the month without having to wait for a future timesheet to be submitted.
If timesheets start on a Sunday, consider the following timesheet period, which would be created if a Weekly period is used.
Using the Weekly End-of-Month timesheet period, adjustments are made as follows:
• The days from the end of the month are added to the previous timesheet.
• The days from the beginning of the next month are in their own shortened timesheet.
The above adjustments apply when the week includes 3 or fewer days from the end of the month. Alternate-ly, consider a week that includes 4 or more days from the end of the month, as shown below.
In this case, the Weekly End-of-Month timesheet results in the following:
• The days for the end of the month are in their own shortened timesheet.
• The days from the beginning of the next month are added to the next timesheet.
Understanding the Manual Timesheet PeriodThe Manual timesheet period type allows you to create a customized timesheet period with specific start and end dates. A Manual timesheet period might be useful if there is a time period where your organization will not follow the standard timesheet period schedule.
Create a Manual timesheet period as you would any other timesheet period type. Instead of selecting a day and effective date for the period, you will need to enter start and end dates.
After the first period defined by the start and end dates is completed, timesheets that follow will use the same span of time (until a new timesheet period comes into effect). For example, if you define a manual timesheet period for May 5 to May 7, the subsequent timesheets will be May 8 to May 10, May 11 to May 13, and so on.
Setting Up Timesheet Options 30

Specifying who Approves Timesheets You can choose who approves each user’s timesheet. More than one approver can be required to approve a timesheet. To specify who approves a timesheet you must:
1. Create approver types to define who the individual approvers are.2. Create approval paths to define the order in which the timesheet is forwarded to the approvers.3. Assign an approval path to the user, as detailed in Setting User Options on page 71.
If you don’t require timesheets to be approved, skip the first step.
Setting Up the Approver TypesApprover types identify the individuals who will be approving timesheets. Specific individuals, such as payroll or billing administrators, can approve timesheets. Alternately, you can choose relative approvers such as each user’s supervisor, or a project leader who approves timesheet data for their projects.
Once approver types are created, you can use them to create approval paths for the timesheet to follow. The approver types you define will also be available to add to approval paths for time off bookings and expense sheets.
Approver types are defined at:
Administration > Approval Setup > Approver Types
When adding or editing an approver type, you must specify:
1. The name of the approver type, which will be used to identify the approver type when creating ap-proval paths
2. The type of approver:• Supervisor, who approves all timesheets for users they supervise• Project Leader, who approves all time entered against their project (available in Project &
Billing Edition only)• External User, who approves all time entered against projects for which they are specified
as the Client/External Approver, as detailed in Allowing Clients to Access Project Infor-mation on page 82 (available in Project & Billing Edition only)
• A specific user, who approves all timesheets for all users assigned an approval path con-taining this approver type. Only users who have been assigned approval permissions will be available for selection.
If you choose a relative approver, the system will automatically determine the appropriate person to forward the timesheet to based on the user and the contents of the timesheet.
3. Whether to override the approver’s existing permissions, and which additional permissions to pro-vide them. See When to Override an Approver’s Permissions for more information.
If you want a specific user to be an approver and that user does not exist yet, create a place-holder approver type and then edit it once the approver has been created.
To prevent delays in the approval process, the system will automatically approve timesheets if:
• Items were submitted before the approver’s Start Date• The user associated with an approver type is not specified (for example, a Project Leader
has not been assigned to the project)
When this occurs, <System> is shown in the approval details.
Setting Up Timesheet Options 31

When to Override an Approver’s PermissionsYou may choose to override the user’s permissions if you want to provide them additional permissions only when approving specific items or specific user’s entries. For example, John Smith is a supervisor and has supervisor permissions already set up in his user profile. If you want John Smith to approve all time for his staff, but also approve expenses for everyone in the company, you will need to set up a special approver type specifically for John Smith to do expense approvals. In this case, you will want to override the approv-er's existing permissions and set up permissions specific to the expense approval. You can achieve this by selecting the Override approver's existing permissions check box and selecting the appropriate permis-sions.
When you override John Smith’s permissions, any approval paths using this special approver type will give John Smith the permissions set up for that approver type (his regular permissions will still be in effect for other approval paths that use him as a supervisor).
Defining the Order of ApprovalApproval paths define which approvers will approve a user’s timesheet, and the order in which they will ap-prove it. Separate approval paths are created for timesheets, expenses, and time off bookings.
Timesheet approval paths can be created at:
Administration > Approval Setup > Approval Paths > Timesheet tab
For each approval path you add or edit, you must specify:
1. The name of the approval path, which is used to identify the path when assigning it to users2. The approver types to include in the path
3. The order in which the timesheet is forwarded to the approvers. Approvals can either occur in se-quence, or at the same time. To have approvers approve at the same time, set all the approver types to the same level in the approval sequence.
Setting a Default Approval PathAt the bottom of the Approval Paths page, you can set a default approval path for timesheets. This path will automatically be assigned to all new users that are added in the future. If a small set of users requires a different path, you can change the value when creating their user profile.
Setting Timesheet System PreferencesWithin the system preferences, you can allow users to enter more than 24 hours in each day of their timesheet. If using the Project & Billing Edition, you can also configure how client and project columns are displayed on the timesheet.
Timesheet system preferences can be configured at:
Administration > System > System Preferences > Timesheet Screen section
A System approver type is available for selection. Select this approver if you want the timesheet to be automatically approved by the system.
Setting Up Timesheet Options 32

Setting Up Pay Codes for Overtime If you are using the system for payroll purposes, you must set up pay codes to define labels and rates for the various levels of pay. Once pay codes are created, you can assign them to various conditions used in overtime calculations. For example, you may choose to have:
• Any time between 40 and 45 hours classified as Overtime and paid at 1.5 times the user’s normal rate
• Time above 45 hours classified as Double Time and paid at 2 times the user’s normal rate
As explained in the next section, the overtime rule determines which hours are included in a certain pay level, while the pay code determines the label and multiplier used for those hours. You can also associate pay codes with time off types to specify the rate time off should be paid at, as described in Defining Pay Codes for Time Off on page 38.
Pay codes are only available with a Time & Attendance license and can be configured at:
Administration > System > Timesheet Setup > Pay Codes
When adding or editing a pay code, you must specify the following:
1. The name of the pay code, which is shown in the timesheet and in payroll reports2. The code for the pay code, which is available in reports and used when exporting pay data to ADP3. The multiplier that should be applied to hours associated with the pay code. For example, if the us-
er’s Hourly Payroll Rate is $20.00 and the multiplier is 1.5, the user will be paid $20.00 x 1.5 = $30.00 for hours associated with the pay code.
Specifying the Pay Code to use for Regular HoursYou must have at least one pay code that can be associated with regular working hours. The multiplier for this should be 1.0. The pay code for regular hours can be selected at the top of the List Pay Codes page.
Configuring how Overtime is Calculated
If you are using Web TimeSheet to calculate pay, you must set up overtime rules. Overtime hours and pay are automatically calculated based on:
• The hours entered in a user’s timesheet• The overtime rules you define
The number of hours designated as overtime will be displayed on the timesheet and overtime pay will be available in payroll reports.
You can create an unlimited number of overtime rules, but only one can be assigned to a user at any given time.
Overtime rules also determine which levels of overtime should be automatically banked.
If time off will be included in overtime calculations, you should set up time off types before configuring overtime calculations. To set up time off types, see Defining the Types of Time Off Taken and their Settings on page 39.
The user may choose to bank all overtime hours for a timesheet period if you assign them Choice of banking extra overtime hours permission.
Setting Up Timesheet Options 33

Overtime rules are only available with a Time & Attendance Edition license and can be configured at:
Administration > Timesheet Setup > Overtime Rules
When adding or editing an overtime rule, you must specify the following:
1. A name for the rule, which will be used to identify the rule when assigning it to users2. Whether time off hours should be included when calculating overtime, and which time off types spe-
cifically3. The template to use for the rule:
• The California Overtime rule allows you to pay users overtime based on different criteria for straight time, hours, days, weeks and timesheet periods.
• The Single Condition Rule allows you to set up a very simple overtime rule. You can specify the number of hours that will determine whether the user is eligible for overtime pay.
• The Bi-Conditional Rule - OR (Apply both conditions) allows you to set up overtime rules based on multiple criteria that are non-exclusive, so that overtime is paid as long as one condition is met.
• The Bi-Conditional Rule - OR (Apply condition that yields the highest pay) allows you to set up an overtime rule that will determine the most beneficial calculation for the user.
• The Bi-Conditional Rule - AND allows you to set up an overtime rule for multiple criteria that must all be met in order to qualify for overtime.
• The Daily Overtime rule allows you to set up a very simple overtime rule for a particular day. You can assign a rule to all days, holidays, work days, weekly days off, or a particular day of the week.
4. The conditions for each rule, such as:• The number of hours above which time will be considered overtime• The days it will apply to• The pay code to apply to each level of overtime, which is used to label the overtime hours
and associate a pay multiplier with those hours• Whether each level of overtime should be banked. Refer to Specifying if and when Over-
time should be Banked on page 34 below for more information on this.
Specifying if and when Overtime should be BankedUsers can be allowed to bank overtime hours instead of being paid for those hours. Banked hours can be used when booking or entering time off. Banked time is accumulated against the Time Off in Lieu time off type.
Banked time can be set up in one of three ways:
Banked Time Option Description
1. Automatic banking Overtime hours you select in the user's overtime rule are automatically banked
2. User banking Each timesheet period, the user can choose to either bank:• ALL of their overtime hours, or • NONE of their overtime hours
Setting Up Timesheet Options 34

For options 1 and 3, you must enable the Bank if possible check box for each condition of the overtime rule for which time should be automatically banked.
Defining the Minimum or Maximum Hours that are Required on a Timesheet You should create validation rules if you want to ensure a timesheet has a minimum and/or maximum num-ber of hours entered before it can be submitted.
An unlimited number of rules can be created, but you can only assign one rule at a time per user. The con-ditions within a rule will be applied to the timesheet as "AND" conditions, meaning the conditions work to-gether to narrow the options for valid timesheets.
For example, you might require your employees to work a minimum of eight hours a day for each weekday, but no employee is allowed to work more than 60 hours in a week. To accomplish this, you would set up one rule with two conditions:
• A work day is equal to or greater than eight hours• A week is less than or equal to 60 hours.
In this situation, all timesheets would have to meet both conditions before they could be submitted.
Validation rules are only available with a Time & Attendance Edition license and can be set at:
Administration > Timesheet Setup > Validation Rules
When creating a validation rule, you must specify the following:
1. The name of the rule, which will be used to identify the rule when assigning it to users2. Any number of conditions, and the periods that they apply to:
• Day rules define the hours for a single day at a time.• Week rules define the hours for seven days from the timesheet period start date. If you
have a monthly timesheet, a weekly rule will only be executed if the last day of the week is greater than the first day of the rule. For example, if your rule is set to run from January 16th to January 30th, and the timesheet displays the week of January 15 - 21, the rule will apply because the last day of the week is greater than the start date of the rule.
• Timesheet Period rules define the hours for the entire timesheet period. This rule will only be effective if the timesheet end date is less than or equal to the rule end date. For exam-ple, if your timesheet period is monthly, and your rule is set to run from January 1st to Jan-
3. Automatic + User banking Each timesheet period, the user can choose to either bank:• ALL of their overtime hours, or• ONLY overtime hours you selected in their overtime rule
For more information on banking time, refer to the Banking Time topic in the Web TimeSheet online help.
Validation rules include time off hours. For example, if a validation rule requires users to enter more than seven hours per day on their timesheet, a user who has taken the day off must account for that time by entering more than seven hours of time off.
Banked Time Option Description
Setting Up Timesheet Options 35

uary 15th, it will be ignored, since it does not include the period end date. If another rule was set to run from January 16th to January 30th, that rule would be applied to the entire timesheet.
3. If using a Day period, the days the condition applies to, either work days, weekly days off, or holidays
Specifying when Timesheets are Due and how Far in Advance Time can be EnteredDue dates determine:
• When timesheets must be submitted for approval• How quickly timesheets must be approved
End dates determine how many months in advance time can be entered, and can be set separately for each timesheet period type (system, department, employee).
Default values have been set, but they can be changed at:
Administration > Timesheet Setup > Due / End Dates
Classifying Time Worked using ActivitiesIn the Time & Attendance Edition, activities can be used to categorize time for reporting purposes. You can create a number of activities, assign them to users, and those users can select an activity for each segment of time on their timesheet.
In the Project & Billing Edition, activities are common tasks that are performed across multiple projects. For example, a consulting company may have a set of core functions that must be completed for every project they work on, such as budgeting, design, and testing. Instead of adding these to each and every project they create, the functions can be defined globally as activities. When entering time against a project, users can select a task defined within the project, select an activity, or choose a combination of the two.
Before creating activities, ensure they are enabled in the system preferences at:
Administration > System > System Preferences > Usage section
Once they are enabled, add or edit activities at:
Administration > Timesheet Setup > Activities
Setting Up Custom Timesheet FieldsYou should create user defined fields if you want to track information beyond the basic timesheet fields al-ready provided. For example, you may want users to provide status updates on the work they have been doing, or information on the number of customer calls they completed.
User defined fields can be create to record information for either:
• The timesheet as a whole• Each timesheet row• Each timesheet cell
While you can assign activities to users here, it is not necessary. You can also assign activities to a user in their user profile.
Setting Up Timesheet Options 36

User defined fields are configured at:
Administration > Timesheet Setup > User Defined Fields
For each field you create you can specify:
1. Which section of the timesheet the field should apply to, by selecting the appropriate section in the User Defined Fields page
2. The name of the field, as it will appear on the timesheet3. The type of field, as explained in Types of User Defined Fields Available on page 234. Restrictions on the values entered, such as minimum or maximum values or the maximum length of
the field. The available restrictions depend on the type of field.5. The default value to show when users first enter their time, if any6. Whether users are required to enter a value
Displaying a Message on the TimesheetYou can choose to have a message displayed on the timesheet, such as guidelines for entering time or a reminder of due dates. This message is called a “disclaimer”, and can be set at:
Administration > Communications > Disclaimers
When creating a disclaimer, be sure to choose Timesheet from the Type field. A disclaimer can also be cre-ated for approvers by selecting Approvals.
Setting Up Timesheet Options 37
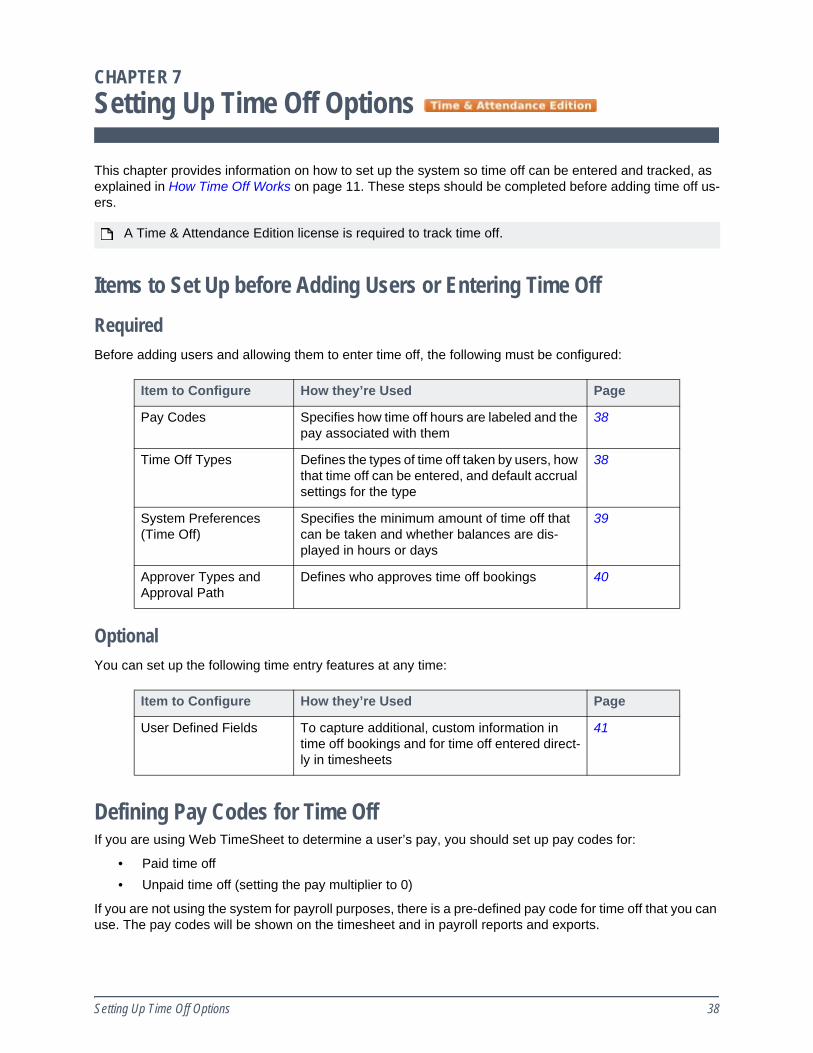
CHAPTER 7Setting Up Time Off Options
This chapter provides information on how to set up the system so time off can be entered and tracked, as explained in How Time Off Works on page 11. These steps should be completed before adding time off us-ers.
Items to Set Up before Adding Users or Entering Time OffRequiredBefore adding users and allowing them to enter time off, the following must be configured:
OptionalYou can set up the following time entry features at any time:
Defining Pay Codes for Time OffIf you are using Web TimeSheet to determine a user’s pay, you should set up pay codes for:
• Paid time off• Unpaid time off (setting the pay multiplier to 0)
If you are not using the system for payroll purposes, there is a pre-defined pay code for time off that you can use. The pay codes will be shown on the timesheet and in payroll reports and exports.
A Time & Attendance Edition license is required to track time off.
Item to Configure How they’re Used Page
Pay Codes Specifies how time off hours are labeled and the pay associated with them
38
Time Off Types Defines the types of time off taken by users, how that time off can be entered, and default accrual settings for the type
38
System Preferences (Time Off)
Specifies the minimum amount of time off that can be taken and whether balances are dis-played in hours or days
39
Approver Types and Approval Path
Defines who approves time off bookings 40
Item to Configure How they’re Used Page
User Defined Fields To capture additional, custom information in time off bookings and for time off entered direct-ly in timesheets
41
Setting Up Time Off Options 38

Pay codes can be defined at:
Administration > Timesheet Setup > Pay Codes
For more information on pay codes, see Setting Up Pay Codes for Overtime on page 33.
Defining the Types of Time Off Taken and their Settings You must create time off types to define the different types of absences that users will take. By creating mul-tiple types:
• Time off can be categorized for reporting purposes• Accrual and balance settings can be set differently for each type of time off
For each time off type, you can specify default settings for how time off is accrued and when the balance is reset. When adding a user, these defaults will be applied starting at the date any new user is added, but can be overwritten if necessary. If all or the majority of your users follow the same time off policies, it is recom-mended that you set default accrual and reset values at the system level and then edit the settings at the user level for those users that are the exception.
Time off types can be configured at:
Administration > Time Off Setup > Time Off Types
For each time off type you add or edit, you must specify:
1. The name of the time off type, which users will select when entering time off or reviewing their bal-ance
2. The default policy type, that is, whether no policy, a single initial policy, or a set of policies based on the users’ start date anniversary will be created for new users.
3. Whether the time off needs to be requested in advance (through a time off booking). If booking is not required, users will still be able to book time off of that type, but they will also be able to enter it in their timesheet.
4. By default, how much time off will be added to (accrued on) the user’s balance, and how often. (These default values are used for new users, but you can override them in the user’s profile.)*
5. By default, whether the user’s time off balance should be reset regularly.*6. How time off of that type will be tracked, either as the time taken or the time remaining, or not at all.
Select Hours/Days Remaining if users will be given an allowance for that type of time off. If there are no limits on how much time off of a specific type users can take, select Hours/Days Taken.*
7. Whether bookings or entries using this time off type will display in users’ time off calendars.8. Whether, by default, the user’s balance will be limited to a maximum.9. Whether, by default, users can incur a negative balance against a time off type, and, if applicable,
how large a negative balance is allowed.
For more information on how time off accruals and resets work, consult the online help.
Options marked with an asterisk (*) are not available when configuring the Time Off in Lieu time off type that is used for banking time.
Setting Time Off System PreferencesThere are a number of system preferences related to entering and tracking time off. Time off system prefer-ences can be configured at:
Administration > System > System Preferences > Time Off section
Setting Up Time Off Options 39

In the system preference, you can specify the following:
1. The minimum amount of time off users can take2. Whether time off balances are displayed in days or hours in timesheets, bookings, calendars, and
reports3. Whether the time off type for other user’s bookings is shown in the calendar
Specifying who Approves Time Off BookingsIf users enter time off through bookings, you can choose who approves each user’s bookings. More than one approver can be required to approve a booking. To specify who approves a booking you must:
1. Create approver types to define who the individual approvers are.2. Create approval paths to define the order in which the booking is forwarded to the approvers.3. Assign an approval path to the user, as detailed in Setting User Options on page 71.
If you don’t require bookings to be approved, skip the first step.
Setting Up the ApproversApprover types identify the individuals who will be approving time off bookings. Specific individuals, such as payroll administrators, can approve bookings. Alternately, you can choose relative approvers, such as each user’s supervisor.
Once approver types are created, you can use them to create approval paths for the booking to follow.
You may have already created approver types for approving timesheets. These existing approver types can also be used for bookings. Additional approver types can be created at:
Administration > Approval Setup > Approver Types
When adding an approver type, you must specify:
1. The name of the approver type, which will be used to identify the approver type when creating ap-proval paths
2. The type of approver:• Supervisor, who approves all time off bookings for users they supervise• A specific user, who approves all time off bookings for all users assigned an approval path
containing this approver type. Only users who have been assigned approval permissions will be available for selection.
Time off entered directly in a timesheet is approved by a timesheet approver. Timesheet approvers were configured in Specifying who Approves Timesheets on page 31.
If you want a specific user to be an approver and that user does not exist yet, create a place-holder approver type and then edit it once the approver has been created.
Setting Up Time Off Options 40

3. Whether to override the approver’s existing permissions, and which additional permissions to pro-vide them. See When to Override an Approver’s Permissions on page 32 for more information.
Defining the Order of ApprovalApproval paths define which approvers will approve a user’s time off bookings, and the order in which they will approve it. Separate approval paths are created for timesheets, expenses, and time off bookings.
Time off booking approval paths can be created at:
Administration > Approval Setup > Approval Paths > Time Off Booking tab
When creating an approval path, you must specify:
1. The name of the approval path, which is used to identify the path when assigning it to users2. The approver types to include in the path
3. The order in which the booking is forwarded to the approvers. Approvals can either occur in se-quence, or at the same time. To have approvers approve at the same time, set all the approver types to the same level in the approval sequence.
Setting a Default Approval PathAt the bottom of the Approval Paths page, you can set a default approval path for time off bookings. This path will automatically be assigned to all new time off users that are created in the future. If a small set of users requires a different path, you can change the value when creating their user profile.
Setting Up Custom Time Off FieldsIf you want to track information beyond the basic time off fields already provided, you should set up user defined fields. Then, when users book time off or enter it directly in their timesheet, they can enter values in these fields.
User defined fields are configured at:
Administration > Time Off Setup > User Defined Fields
For each field you create, you can specify:
1. The name of the field, as it will appear on the time off booking or timesheet row2. The type of field, as detailed in Types of User Defined Fields Available on page 233. Restrictions on the values entered, such as minimum or maximum values or the maximum length of
the field. The available restrictions depend on the type of field.4. The default value to show when users first enter their time off, if any5. Whether users are required to enter a value
To prevent delays in the approval process, the system will automatically approve time off bookings if:
• Items were submitted before the approver’s Start Date• The user associated with an approver type is not specified (for example, a Supervisor has
not been assigned to the user).
When this occurs, <System> is shown in the approval details.
A System approver type is available for selection. Select this approver if you want the time off booking to be automatically approved by the system.
Setting Up Time Off Options 41

CHAPTER 8Setting Up Expense Sheet Options
This chapter describes the system setup required to enter and track expenses. These steps should also be completed before adding expense users.
Items to Set Up before Adding Users or Entering ExpensesRequiredBefore users are added and allowed to enter expenses, the following must be configured:
Required for Project Costing and BillingIf you have a Project & Billing Edition license and are tracking expenses for project costing or billing, projects must be created before entering expenses, as detailed in Chapter 13, Creating Clients and Projects on page 76.
OptionalYou can set up the following expense entry features at any time:
Expense sheets are available only with a valid license for the Expense module.
Item to Configure How they’re Used Page
Tax Codes To automatically determine the amount of tax paid on an expense amount
43
Expense Codes To categorize expenses and define which taxes are applied to each type of expense
43
Expense Columns Determines which fields are available on ex-pense sheets
44
Approver Types and Approval Paths
Defines who approves each expense sheet 45
Item to Configure How they’re Used Page
Payment Methods Required if you want to track how users paid for expenses
46
Due/End Dates Determines how quickly expense sheets need to be approved (defaults are already in place)
46
User Defined Fields To capture additional, custom information on the expense sheet
47
Disclaimers To display a message on the expense sheet to remind users of important information, such as when expenses should be submitted
47
Setting Up Expense Sheet Options 42

Defining the Taxes that will be Applied to ExpensesTax codes define the different taxes applied to expenses incurred for business activities and purchases.
Tax codes can be configured at:
Administration > Expense Setup > Tax Codes
When you creating a tax code, you will be required to provide:
1. A name for the tax, which will be shown on the user’s expense sheet2. The default formula for calculating the tax based on the net amount of the expense (see below)
Understanding the Tax Formula Each tax code has a “tax formula” that tells Web TimeSheet how to calculate the tax based on the net amount of the expense. This formula can be edited at the system level or when the tax is applied to an ex-pense code. The formula at the expense code level will apply only to that expense code.
You may create a rated tax (calculates the tax as a percentage of the net amount) or a flat tax (adds a flat amount to the net amount).
When creating your tax formula, use the following operators:
Example 1The formula for a 7% state sales tax would be entered as $Net*0.07.
Example 2The formula for a flat tax (such as airport tax) would be entered as 10.00.
Setting Up the Types of Expenses that will be IncurredExpense codes define the different costs incurred for business activities and purchases.
Expense codes can be configured at:
Administration > Expense Setup > Expense Codes
Operator Description
+ Add
- Subtract
* Multiply
/ Divide
( ) Indicates precedence
$Net Tag for the net amount, which will be used to calculate the tax
When entering the tax formula, do not enter a currency symbol. The tax will be calculated in the cur-rency for the expense itself, and is not necessary in the formula.
Setting Up Expense Sheet Options 43

When adding or editing an expense code, you must specify:
1. The name of the expense code, which users will select to categorize each expense2. Whether it is based on an expense rate (e.g., mileage) or a flat amount (e.g., hotel). If the expense
code is based on an expense rate, you must enter the appropriate rate and the unit to which that rate applies. For example, if you are entering an expense code for mileage, the rate might be $.80 per mile.
3. The formula to calculate the net (pre-tax) amount based on the total (see Understanding the Gross to Net Formula)
4. The taxes which apply to expenses under that code. For each tax you assign to the expense code, you can use the default tax formula or edit it for this code.
Understanding the Gross to Net FormulaThe “gross to net” formula instructs Web TimeSheet how to calculate backwards from the gross (total ex-pense amount) to the net (pre-tax amount) for an individual expense. Providing this formula will ensure ex-pense amounts are correct, whether the user enters the net or the gross amount for a specific expense.
When entering the gross to net formula, you may enter a simple formula (useful for expenses with only one tax) or a complex, multi-level formula using parentheses to indicate precedence (useful for expenses with more than one tax). The formula may contain the following operators:
Example 1For a 7% state sales tax, the gross to net formula would be entered as $Gross/1.07.
Example 2For a 6% sales tax and a flat tax of $10.00, where the 6% sales tax is applied to the net amount before the flat tax is added, the gross to net formula would be entered as ($Gross-10)/1.06.
Parentheses are used to indicate that the 10 dollars should be subtracted from the gross amount before the 6% sales tax is deducted.
Choosing which Fields are Available on Expense Sheets The Expense Columns page allows you to specify which fields are valid for expense sheets entered by your users. You may want to disable any fields that are not used by your organization to prevent confusion.
Operator Description
+ Add
- Subtract
* Multiply
/ Divide
( ) Indicates precedence
$Gross Tag for the gross amount, which will be used to calcu-late the net amount
When entering the gross to net formula, do not enter a currency symbol. The tax will be calculated in the currency for the expense itself, and is not necessary in the formula.
Setting Up Expense Sheet Options 44

Any field selected on this page will be available to the user, however they may be disabled on the expense sheet by default. Users can add the fields to their expense sheet using the Settings.
Expense columns can be configured at:
Administration > Expense Setup > Expense Columns
Specifying who Approves Expense Sheets You can choose who approves each user’s expenses. More than one approver can be required to approve an expense sheet. To specify who approves a expense sheet you must:
1. Create approver types to define who the individual approvers are.2. Create approval paths to define the order in which the expense sheet is forwarded to the approvers.3. Assign an approval path to the user, as detailed in Setting User Options on page 71.
If you do not require expense sheets to be approved, skip the first step.
Setting Up the ApproversApprover types identify the individuals who will be approving expense sheets. Specific individuals, such as finance managers, can approve expenses. Alternately, you can choose relative approvers, such as each us-er’s supervisor or project leaders, who approve expense data for their projects.
Once approver types are created, you can use them to create approval paths for the expense sheet to follow.
You may have already created approver types for approving timesheets. These existing approver types can also be used for expense sheets. Additional approver types can be created at:
Administration > Approval Setup > Approver Types
When adding an approver type, you must specify:
1. The name of the approver type, which will be used to identify the approver type when creating ap-proval paths
2. The type of approver:• Supervisor, who approves all expense sheets for users they supervise• Project Leader, who approves all expense entered against their project (available in
Project & Billing Edition only)• External User, who approves all expense entered against projects for which they are spec-
ified as the Client/External Approver as detailed in Allowing Clients to Access Project Information on page 82 (available in Project & Billing Edition only)
• A specific user, who approves all expense sheets for all users assigned an approval path containing this approver type. Only users who have been assigned approval permissions will be available for selection.
If you choose a relative approver, the system will automatically determine the appropriate person to forward the expense sheet to based on the user and the contents of the expense sheet.
If you want a specific user to be an approver and that user does not exist yet, create a place-holder approver type and then edit it once the approver has been created.
Setting Up Expense Sheet Options 45

3. Whether to override the approver’s existing permissions, and which additional permissions to pro-vide them. See When to Override an Approver’s Permissions on page 32 for more information.
Defining the Order of ApprovalApproval paths define which approvers will approve a user’s expense sheet, and the order in which they will approve it. Separate approval paths are created for timesheets, expenses, and time off bookings.
Expense approval paths can be created at:
Administration > Approval Setup > Approval Paths > Expenses tab
When creating an approval path, you must specify:
1. The name of the approval path, which is used to identify the path when assigning it to users2. The approver types to include in the path
3. The order in which the expense sheet is forwarded to the approvers. Approvals can either occur in sequence, or at the same time. To have approvers approve at the same time, set all the approver types to the same level in the approval sequence.
Setting a Default Approval PathAt the bottom of the Approval Paths page, you can set a default approval path for expenses. This path will automatically be assigned to all new expense users that are created in the future. If a small set of users re-quires a different path, you can change the value when creating their user profile.
Defining how Expenses will be Paid forPayment methods are used to specify how expenses were paid. This can help you track, for example, which credit card was used for purchases. However, it is not required that users specify payment methods for ex-penses.
Payment methods are configured at:
Administration > Expense Setup > Payment Methods
Specifying how Quickly Expenses must be ApprovedDue dates determine:
• How quickly expenses must be approved• When expense approvals are considered “overdue”
To prevent delays in the approval process, the system will automatically approve expense sheets if:
• Items were submitted before the approver’s Start Date• The user associated with an approver type is not specified (for example, a Project Leader
has not been assigned to the project).
When this occurs, <System> is shown in the approval details.
A System approver type is available for selection. Select this approver if you want the expense sheet to be automatically approved by the system.
Setting Up Expense Sheet Options 46

Default due dates are already in place, but these can be modified at:
Administration > Expense Setup > Due / End Dates
Setting Up Custom Expense Sheet FieldsYou should create user defined fields if you want to track information beyond the basic expense sheet fields already provided. Then, when entering their expenses, users can enter a value in each of these fields.
User defined fields are configured at:
Administration > Expense Setup > User Defined Fields
For each field you create you can specify:
1. The name of the field, as it will appear on the expense sheet2. The type of field, as explained in Types of User Defined Fields Available on page 233. Restrictions on the values entered, such as minimum or maximum values or the maximum length of
the field. The available restrictions depend on the type of field.4. The default value to show when users first view the expense sheet, if any5. Whether users are required to enter a value
Displaying a Message on the Expense SheetYou can choose to have a message displayed on the expense, such as deadlines for when expenses should be submitted each month. This message is called a “disclaimer” and can be set at:
Administration > Communications > Disclaimers
When creating a disclaimer, be sure to choose Expenses from the Type field. A disclaimer can also be cre-ated for approvers by selecting Approvals.
Setting Up Expense Sheet Options 47

CHAPTER 9Setting Up Automated E-mail Reminders
This chapter describes how to set up Web TimeSheet to automatically e-mail users reminders. Users can be sent an e-mail when:
• They begin using the system• Their timesheet is due or a new timesheet period has started• Items are waiting for their approval• Their timesheet, expense sheet, or time off booking has been approved or rejected• Their task assignments have changed (if they are assigned to projects)
Items to Set Up to use Automated E-mail RemindersRequiredBefore e-mail reminders are sent out, the following must be configured:
OptionalThe following additional e-mail features are available for use at any time.
Entering E-mail Server SettingsIf you are using the self-hosted version of Web TimeSheet, you must specify details of the e-mail server that will be used to send e-mails to users. The e-mail server will also be used to send and receive offline timesheets or expense sheets.
E-mail server settings can be configured at:
Administration > Communications > E-mail Settings
You can specify the following settings:
1. The address for the Web TimeSheet e-mail account
Item to Configure How they’re Used Page
System Preferences (E-mail Settings)
Specifies the settings for the e-mail server used to send out reminders
48
E-mail Notifications Defines the reminders that will be used by the system and the contents of the e-mail
49
Item to Configure How they’re used Page
System Preferences (Notifications)
Defines how notifications are handled when submissions or approvals are overdue (defaults are in place)
49
Broadcast To send one-off messages to all users or a spe-cific department
49
Setting Up Automated E-mail Reminders 48

2. Details of the incoming mail server (required if offline timesheets or expenses sheets will be used; see How Offline Timesheets Work on page 10 for more information)
3. Details of the outgoing mail server, including any SMTP authentication settings4. How often (in hours) the system should try to re-send e-mails after failure
Testing your E-mail Server SetupTo ensure your e-mail server settings are entered correctly:
1. Send a broadcast message (see Setting System Preferences for Notifications of Overdue Items on page 49).
2. Review the RTServer.log file on the Web TimeSheet server, typically located at C:\Program Files\Replicon Inc\Web TimeSheet\APP.
Customizing E-mail NotificationsWeb TimeSheet provides a set of e-mail notifications to remind users to complete their responsibilities. There are two types of e-mail notifications:
• Single notifications, which remind a user about a specific timesheet, booking, or expense sheet (e.g. “Jane Avery’s timesheet is waiting for approval.”)
• Batch notifications, which inform supervisors and project leaders which group of users are delin-quent in completing a task (e.g. “The following user’s timesheets are waiting for approval.”)
E-mail notifications can be configured at:
Administration > Communications > E-mail Notifications
Each e-mail notification can be customized to fit your organization’s needs. You can choose:
1. Whether the notification is enabled to be sent to users (notifications can also be enabled/disabled for individual users in their profile)
2. The e-mail address that will receive users’ replies to the notification3. The text that appears in the Subject line of the e-mail4. The contents of the e-mail, which you can edit or add to as you wish. Tags are available to provide
information specific to the timesheet, time off booking, or expense sheet the e-mail pertains to. For example, to include the timesheet approver’s name in the “Timesheet is waiting for approval” e-mail notification, ensure the $APPROVERNAME tag is included in the body of the e-mail.
5. If applicable, when the e-mail should be sent. It is recommended that you set e-mails to be sent early in the morning, when the e-mail server is not being highly used.
Setting System Preferences for Notifications of Overdue ItemsYou can change how the system handles re-sending notifications when approvals or submissions are over-due.
These preferences can be configured at:
Administration > System > System Preferences > Notification section
You can specify the following settings:
1. Whether e-mail reminders should be sent everyday when submissions or approvals are overdue2. Whether those notifications should be sent on the user’s typical non-working days
Setting Up Automated E-mail Reminders 49

Sending Special MessagesYou may broadcast one-off e-mail messages to any or all users in your system. Broadcasting messages is an effective way to notify users of system upgrades, timesheet changes, project updates, or news about your organization.
When broadcasting a message, you can choose which department to send it to and whether to include sub-departments. The message will be sent immediately.
Broadcast messages can be sent at:
Administration > Communications > Broadcast
Setting Up Automated E-mail Reminders 50

CHAPTER 10Setting General System Options
This chapter provides information on the general system options you should configure before you add users and projects.
Items to Set Up before Adding Users and ProjectsRequiredBefore adding users and projects, you must configure the following:
OptionalThe following system options can be set at any time:
Defining the Holidays that Users TakeHoliday calendars are sets of holidays taken by users. These dates are highlighted in timesheets and cal-endars. Any holidays are ignored in time off calculations – that is they are not considered “time taken” be-cause the user would not have worked that day.
Time off taken for holidays is entered against a Time Off Type for Holidays that you define. You can also choose to have the user’s hours per day automatically added to holidays. A booking will be automatically generated for each holiday. Both of these options can be configured at:
Administration > Timesheet Setup > Time Off Types
Holiday calendars can be configured at:
Item to Configure How they’re Used Page
Holidays Defines the holidays that users take, which will be excluded from time off calculations and shown in timesheets and calendars
51
Currencies To allow pay and billing rates, costs, and ex-penses to be entered in multiple currencies
52
System Preferences (Security)
Defines the security options used by the system 53
System Preferences (Usage, Reports, Web Addresses, Feedback)
Specifies general system-wide settings 53
DCAA Compliance To track changes for DCAA auditing, if using the Project & Billing Edition
54
Item to Configure How they’re Used Page
Themes To customize the look and feel of the system 54
Setting General System Options 51
Administration > Timesheet Setup > Holidays
For each holiday calendar, you must specify:
1. The name of the holiday calendar, which will be displayed when assigning calendars to users2. The name and dates of holidays that occur in the calendar3. The icon to display for the holiday in the user’s timesheets and calendars
Customizing the List of Holiday IconsWeb TimeSheet provides a large number of holiday icons; however you may add more icons if you are using the self-hosted version of Web TimeSheet. Icons cannot be added if you are using the Replicon-hosted/SaaS version of Web TimeSheet.
To add icons:
1. Go to the folder where you installed Web TimeSheet on your server.2. Place the icon files in the html\common\icons\holidays folder.3. Restart the Web TimeSheet service to see your new icons available when adding or editing holi-
days.
Setting Up CurrenciesWeb TimeSheet provides support for multiple currencies. Items such as expenses, payroll rates, hourly costs, and billing rates all have a currency associated with them.
USD is the default currency and acts as the base for the exchange rates of additional currencies defined in the system; however you can choose any currency to be the default. To assist with accounting tasks, reports can be configured to show data in both the original currency and the base currency.
Currencies can be defined at:
Administration > System > Currencies
When adding or editing a currency, you must specify:
1. The name of the currency2. The symbol, to be shown with currency values. The symbol can be an actual symbol ($) and/or an
abbreviation (CAD).
3. The rate of exchange between the new currency and your base currency
If the exchange rate changes in the future, you can add a new exchange rate and set it to be effective the date of the change.
Holiday icons must be .gif or .jpg images, and no larger than 16 by 16 pixels.
If you are using Web TimeSheet for Oracle, currency symbols such as £ are not recognized by Oracle due to a difference in character representation. For these currencies, it is recom-mended that you use an alphabetical abbreviation (e.g., EUR).
It is recommended that you create a process for handling manual exchange rate updates, because Replicon does not connect to an external currency system to obtain updates.
Setting General System Options 52

Changing the Base Currency from US DollarsThe base currency is the main currency used by your organization for financial transactions. This is the cur-rency in which all costs are calculated, and the currency to which foreign currency amounts are converted.
Web TimeSheet comes with a default base currency of US Dollars. You can choose another base currency at the bottom of the Currencies page.
Setting Security OptionsWeb TimeSheet includes a number of options to help keep your Web TimeSheet data secure. Security sys-tem preferences can be set at:
Administration > System > System Preferences > Security section
These security options include:
1. Whether alternate login verification options should be enabled, including Windows NT/Active Direc-tory (self-hosted installations only) or SAML-based authentication. (For information on using Inte-grated Windows Authentication instead, see the Web TimeSheet Installation Guide.)
2. Settings to improve users’ password strength3. Whether to automatically check for Web TimeSheet updates4. Whether users’ Web TimeSheet sessions should automatically time out after a period of inactivity.
Setting System-Wide PreferencesThere are a few system preferences that apply to the system as a whole. These can be configured at:
Administration > System > System Preferences
In the Usage section, you can configure:
1. Whether users are selected using a drop-down list or a pop-up dialog box. If you expect to have more than 100 users in the system, the pop-up is recommended.
In the Reports section, you can choose:
1. Whether reports are automatically generated when accessed, or if the user has to click a button to generate the report, after setting filter options and settings
2. A network location users can install Microsoft Office Web Components (OWC) from. OWC is re-quired to use pivot reports.
In the Web Addresses section, you can set options for:
1. The web address to send users to after they logout, such as your company’s intranet home page2. The web address for Web TimeSheet
In the Feedback section, you can configure:
1. Whether anonymous usage statistics are sent to Replicon
Additional System PreferencesInformation on setting other system preferences is discussed in the related chapters:
• Setting Timesheet System Preferences on page 32• Setting Time Off System Preferences on page 39
Setting General System Options 53
• Setting System Preferences for Users on page 69• Setting System Preferences for Projects on page 76
Enabling DCAA ComplianceYou should enable DCAA compliance if you want Web TimeSheet to meet the requirements of the Defense Contract Audit Agency (DCAA) for automated timekeeping systems. DCAA compliance also provides addi-tional controls that will allow your organization to enforce business policies associated with DCAA, such as notifying employees when they have new jobs.
DCAA compliance is only available with a Project & Billing Edition license, and can be set at:
Administration > System > System Preferences > DCAA Compliance tab
Along with fields for enabling DCAA compliance, this page shows you information on system options asso-ciated with DCAA compliance. For each option, it shows:
• The setting required for DCAA compliance• The current setting
Customizing the Look and Feel of the SystemUsing themes, you can customize how Web TimeSheet looks. The selected theme will be displayed for all users accessing the system.
Themes can be changed or created at:
Administration > System > Themes
For each theme you create or edit, you can specify:
1. The background and text colors for menus, headings, and forms2. The style of buttons to use3. The style of icons to show in the top menu4. The logo to display in the theme, if using a self-hosted installation. (Custom logos can be uploaded
at the Manage Custom Logos page.)
Setting General System Options 54
CHAPTER 11Controlling what Users can Access
This chapter provides information on setting up permission profiles to define the data and features users can access.
Understanding Permission ProfilesPermissions profiles are sets of individual enabled permissions. You can create multiple permission profiles and then assign them to users.
Methods for Setting Up Permission ProfilesWhen designing permission profiles, you can either:
• Create a permission profile with ALL of the permissions a certain type of user will need, and then assign that single profile to those users
• Create multiple permission profiles and assign combinations of these profiles to users, for an addi-tive effect. For example, you can create a profile for using timesheets and a profile for booking time off. If you assign both these profiles to a user, the user will be able to use timesheets and book time off.
You can also create a profile template, and base new profiles on that template. This works well if users share a number of permissions, but require small changes to their permission sets.
How Permission Profiles Work with License SeatsThe features users have access to depends on both their assigned permissions and their license seats. For example, a user may be assigned a permission to enter expenses. However, if the user does not have a seat for the Expense module, they will not be able to enter expenses.
External User PermissionsIf you are using the Project & Billing Edition, you can create external users to provide those outside your organization access to Web TimeSheet. Only limited permissions are available to external users. As a result, separate permission profiles are created for external users, under the External Users tab of the Permis-sions page.
The permissions available to external users are limited to:
• Approval functions• Access to run reports• Visibility to project details
They cannot enter time, time off, or expenses. External users are discussed further at Standard versus Ex-ternal Users on page 71.
Setting Up Permission ProfilesPermission profiles can be configured at:
Administration > Users/Departments > Permissions
Controlling what Users can Access 55

For each profile you add or edit, you must specify:
1. If using the Project & Billing Edition, whether the profile is for standard or external users. This is done by selecting the appropriate tab in the Permissions page.
2. The name of the profile, which will be used when assigning it to users3. Whether the profile is based on an template4. The permissions enabled within the profile
Individual permissions can be accessed by expanding or collapsing the appropriate section.
Understanding Individual PermissionsEach permission profile contains individual permissions, which are enabled or disabled.
System PermissionsSystem permissions are divided into sections based on the Web TimeSheet menu with which they are as-sociated. If any permission is enabled within the section, that menu item will be accessible for users as-signed the profile.
Administration Permissions
Action Description
Set Up Timesheet Periods
Create and maintain timesheet periods
Send Broadcast Messages
Send e-mail messages from Web TimeSheet to specific departments or all users
Add/Edit Disclaimers Create and maintain disclaimers that will be displayed on approval pages, timesheets, and expense sheets
Mark Expenses as Paid Mark expense sheets as “paid” from the Historical Expenses page. Only entire expense sheets can be marked as paid (no individual expense entries). Requires Expense license.
Mark Expenses as Not Paid
Mark expense sheets as “not paid” from the Historical Expenses page. Only entire expense sheets can be marked as not paid (no individual expense entries). Requires Expense license.
Modify Preferences Modify the settings for:• System Preferences• Due/End Dates• Themes• Custom Logos• Default User Preferences
Override Validation on Historical Timesheets (Submit)
When submitting timesheets from Historical Timesheets page, provides the ability to override any validation rules applied to the timesheet. Requires Time & Attendance license.
Controlling what Users can Access 56

Override Validation on Historical Timesheets (Submit)
When submitting timesheets from Historical Timesheets page, provides the ability to override any validation rules applied to the timesheet. Requires Time & Attendance license.
Manage Account Allows users to access the Manage Account page. Available in Replicon-hosted/SaaS instances only.
Manage Support Cases Allows users to access the Manage Support Cases page. Available in Replicon-hosted/SaaS instances only.
Historical Time Off Submit, approve, reject, edit, and/or delete time off bookings from the List Historical Time Off Bookings page. Requires Time & Attendance license.
Historical Timesheets Submit, re-open, approve, reject, edit, and/or delete timesheets – as well as send offline timesheets to selected users – from the Historical Timesheets page.If a user also uses timecards (Time & Attendance Edition only), whether or not you can view and edit their timecards when accessing historical timesheets is determined by the Timecard Admin permission.
Historical Expenses Submit, re-open, approve, reject, edit, and/or delete expense sheets from the Historical Expenses page. Requires Expense license.
Activities View (list), edit, add, and/or delete activities, if enabled in the System Preferences
Approval Paths View (list), edit, add, and/or delete approval paths
Approver Types View (list), edit, add, and/or delete approver types
Business Rules View (list), edit, add, and/or delete overtime and validation rules. Requires Time & Attendance license.
Currencies View (list), edit, add, and/or delete currencies
Departments View (list), edit, add, and/or delete departments
E-mail Notifications View (list) and/or edit e-mail notifications
Employee Types View (list), edit, add, and/or delete employee types
Expense Codes View (list), edit, add, and/or delete expense codes. Requires Expense license.
Holidays View (list), edit, add, and/or delete holiday calendars.
Payment Methods View (list), edit, add, and/or delete payment methods. Requires Expense license.
Permissions View (list), edit, add, and/or delete permissions
System/License Info View (list), edit, add, and/or delete system license keys and related license information. Allows users to backup SQL Server databases using the backup utility. License key management and database backup are not available in Replicon-hosted/SaaS implementations.
Tax Codes View (list), edit, add, and/or delete tax codes. Requires Expense license.
Action Description
Controlling what Users can Access 57
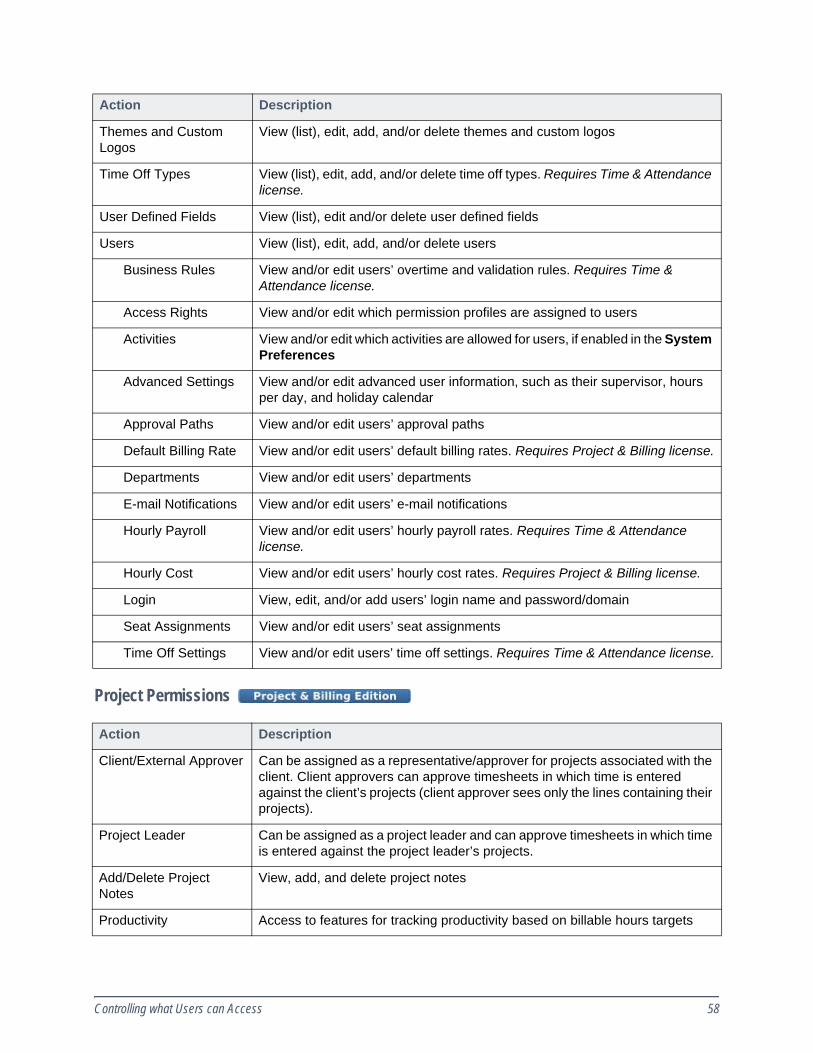
Project Permissions
Themes and Custom Logos
View (list), edit, add, and/or delete themes and custom logos
Time Off Types View (list), edit, add, and/or delete time off types. Requires Time & Attendance license.
User Defined Fields View (list), edit and/or delete user defined fields
Users View (list), edit, add, and/or delete users
Business Rules View and/or edit users’ overtime and validation rules. Requires Time & Attendance license.
Access Rights View and/or edit which permission profiles are assigned to users
Activities View and/or edit which activities are allowed for users, if enabled in the System Preferences
Advanced Settings View and/or edit advanced user information, such as their supervisor, hours per day, and holiday calendar
Approval Paths View and/or edit users’ approval paths
Default Billing Rate View and/or edit users’ default billing rates. Requires Project & Billing license.
Departments View and/or edit users’ departments
E-mail Notifications View and/or edit users’ e-mail notifications
Hourly Payroll View and/or edit users’ hourly payroll rates. Requires Time & Attendance license.
Hourly Cost View and/or edit users’ hourly cost rates. Requires Project & Billing license.
Login View, edit, and/or add users’ login name and password/domain
Seat Assignments View and/or edit users’ seat assignments
Time Off Settings View and/or edit users’ time off settings. Requires Time & Attendance license.
Action Description
Client/External Approver Can be assigned as a representative/approver for projects associated with the client. Client approvers can approve timesheets in which time is entered against the client’s projects (client approver sees only the lines containing their projects).
Project Leader Can be assigned as a project leader and can approve timesheets in which time is entered against the project leader’s projects.
Add/Delete Project Notes
View, add, and delete project notes
Productivity Access to features for tracking productivity based on billable hours targets
Action Description
Controlling what Users can Access 58

Edit User Productivity
Ability to set billing targets for users
Productivity Preferences
Access to set preferences related to productivity, including whether productivity graphs are shown on users’ timesheets and the productivity target range
Edit Productivity Data Generation Settings
Edit how often productivity data is regenerated, or choose to regenerate data immediately
View Company Productivity
View summarized productivity information for the entire company
View Department Productivity
View productivity information by department
View User Productivity
View productivity information by user
Clients View (list), edit, add, and/or delete clients
Roles View (list), edit, add, and/or delete roles at the global level (role rates can be overridden at the project level)
All Projects View and/or delete any project in the system
Assignments/Team View and/or edit task-level assignments and the project team for any project in the system
Expenses View and/or edit available expenses for any project in the system. Requires Expense license.
Project Information View and/or edit basic project information for any project in the system
Rates View and/or edit billing rates for any project in the system
Roles View and/or edit roles from for any project in the system
Task Information View and/or edit the tasks from for any project in the system
Project Leader’s Projects View and/or delete projects for which user is the project leader
Assignments/Team View and/or edit task-level assignments and the project team for any projects for which user is the project leader
Expenses View and/or edit available expenses for any projects for which user is the project leader. Requires Expense license.
Project Information View and/or edit basic project information for any projects for which user is the project leader
Rates View and/or edit billing rates for any projects for which user is the project leader
Roles View and/or edit roles from for any projects for which user is the project leader
Task Information View and/or edit the tasks for any projects for which user is the project leader
Action Description
Controlling what Users can Access 59

Timesheet Permissions
Action Description
Use Timesheet Enter time using the selected formats:• Standard or In-Out
Allows users to choose either the Standard or In-Out timesheet for-mat within their preferences.
• StandardUsers enter the duration of time worked. All of the days within the timesheet period are shown on one page.
• In-OutUsers enter the time they begin work and then enter either the end time or the duration. The times or duration can be edited.
• Locked In-OutUsers punch in and out to set the time they start and end work. The times cannot be edited by the user and the duration is automatically calculated.
For more on each of the timesheet formats, see Selecting a Time Entry Method on page 26.If more than one permission with the Use Timesheet action is assigned to a user, the Locked In-Out format takes precedence over other timesheet formats. For example, if one permission allows for In-Out timesheets and another allows for Locked In-Out timesheets, when a user is assigned both permissions, they will only be provided the Locked In-Out format.
Allow time to be entered Enter working time in the timesheet
Show Activities in Timesheet
Display the Activity column in the timesheet so the user can enter time against their assigned activities, if enabled in the System Preferences.If you enable activities to display in timesheets, a drop-down menu will display. You can require users to enter time against an activity, select Activity selection required from this menu. To take effect, this option must be enabled in all permission profiles assigned to the user. Requires Time & Attendance license.
Enter time against time off types not requiring booking
Add time off rows to the timesheet and enter time against time off types not requiring booking. Requires Time & Attendance license.
Unsubmit timesheet Use the Unsubmit button to retrieve a submitted timesheet before it has been approved.
Allow reopen of timesheet after approval
Use the Reopen button to retrieve a timesheet after it has been approved.
View/select billing options for projects/tasks
View the Billing column in the timesheet and select from the list of available billing options. Requires Project & Billing license.
Allow overlapping time for In-Out timesheet
Enter overlapping times when using the In-Out timesheet format
Allow copying from previous timesheets
Copy timesheet data from the last saved timesheet
Controlling what Users can Access 60

Timecard Permissions
Show task progress in timesheet
View project/task progress bars (includes hours completed, total estimated hours, and percentage complete) in the timesheet. Requires Project & Billing license.
Allow blank timesheet comments
Allow users to submit their timesheets without entering comments for each time cell. To make timesheet comments mandatory, make sure this check box is NOT selected.
Allow blank resubmission comments
Allow users to resubmit their timesheets (after the timesheet has been unsubmitted, rejected, or re-opened) without entering a reason for the resubmission. To make resubmission comments mandatory, make sure this check box is NOT selected.
Show Summary of Time by Pay Code
Allow users to see the breakdown of their timesheet hours by pay code. Requires Time & Attendance license.
Timesheet Hours User Defined Field #x
Show the Timesheet (Hour Level) user defined field of the number indicated (see the User Defined Fields page to determine which field corresponds to each number). One permission for each hour-level user defined field.
Timesheet Row User Defined Field #x
Show the Timesheet (Row Level) user defined field of the number indicated (see the User Defined Fields page to determine which field corresponds to each number). One permission for each row-level user defined field.
Timesheet User Defined Field #x
Show the Entire Timesheet user defined field of the number indicated (see the User Defined Fields page to determine which field corresponds to each number). One permission for each timesheet user defined field.
Holiday Calendar View the list of statutory (civic) holidays from the Timesheet menu
Allow entry of arbitrary e-mail address for Offline TimeSheet
Enter an e-mail address when requesting offline timesheets
Use the Stopwatch Use the Stopwatch feature to track precise time spent working on projects/tasks. Not available when using the Locked In-Out timesheet format.
Offline Timesheets Allows those using a Standard-format timesheet to use offline timesheets.
Choice of banking extra overtime hours
Gives users the option of banking all overtime, as defined by their overtime rule, for each timesheet period. If a user disables this option, any levels of over-time in their overtime rule with Bank if possible checked will still be banked.
Action Description
Use Timecard Punch in and out using a timecard. Edit the comments associated with an entry and view past timecards. If the user also uses a timesheet, timecards can be viewed from within the timesheet, along with a comparison of timesheet and timecard hours.
Use Timecard Dashboard
Access the timecard dashboard to view which timecard users are currently punched in and which are punched out.
Action Description
Controlling what Users can Access 61

Time Off Permissions
Expense Permissions
Timecard Admin Access timecards from the Timecard Admin page. Depending on the enabled options, allows the user to add, edit, or delete individual timecard entries and add or delete whole timecards.If the user also has permission to access Historical Timesheets, when the user views a timesheet from that page, they can view and edit timecards for that timesheet period as well.
Action Description
View calendar View the time off calendar, which displays the user’s bookings and timesheet-entered time off
Display other user’s approved bookings
Show other users approved bookings in the calendar
Allow export to Outlook
Allow users to export approved bookings from the calendar to Microsoft Outlook 2003 or 2007. The bookings can then be viewed in the Outlook Calendar.
Allow use of iCal feed
Allow users to set up an iCal feed to show the calendar contents in an iCal application
Submit time off bookings Submit time off bookings
Edit/delete future time off bookings
Edit and delete bookings that haven’t started yet (scheduled for tomorrow or later)
Time Off User Defined Field #x
Show the Time Off user defined field of the number indicated (see the User Defined Fields page to determine which field corresponds to each number). One permission for each time off user defined field.
Expense permissions are only available with a valid license for the Expense module.
Action Description
Enter Expenses Enter expenses incurred. In the Project & Billing Edition, you can also specify whether users can (or must) associate a project to any expenses they enter.
Override exchange rates Override the default exchange rates for expenses in currencies other than base currency
Override amount for rated expenses
Override the calculated amount for expenses based on a rate (e.g., mileage)
Unsubmit expense sheet Use the Unsubmit button to retrieve a submitted expense sheet before it has been approved
Action Description
Controlling what Users can Access 62

Approval Permissions
Allow entry of arbitrary e-mail address for Offline Expense
Enter an e-mail address when requesting offline expense sheets
Action Description
Supervisor Can be assigned as supervisor to individual users and, if included in the approval path, approve items for those users
Show task progress in timesheets awaiting approval
View project/task progress bars (includes hours completed, total estimated hours, and percentage complete) in the timesheets submitted for approval. Requires Project & Billing license.
Allow blank rejection Comments
Allows approvers to reject users’ timesheets without entering a reason for the rejection. To require approvers to include comments when rejecting a timesheet, disable this check box.Requiring comments helps ensure users are given information on why their timesheet was rejected, and can therefore keep the approval process moving.
View timecards from timesheet
Before approving a timesheet, the approver can view the user's timecards for that timesheet period. Only applies if the user submitting the timesheet uses timecards. Requires a Time & Attendance Edition license.
Edit timecard entries from timesheet
Before approving a timesheet, the approver can add, edit, or delete entries in the user's timecards for that timesheet period. Only applies if the user submitting the timesheet uses timecards. Requires a Time & Attendance Edition license.
Timesheet Time Information
Approve, edit, and/or view all time rows (as opposed to time off rows) in timesheets submitted to this approver. In the Project & Billing Edition, View All allows the approver to view all rows, regardless of whether the rows are associated with the approver's projects.Granting a user this permission will allow that user to be included when setting up approver types and approval paths.
Timesheet Time Off Approve, edit, and/or view all time off entered directly in timesheets submitted to this approver. Requires a Time & Attendance Edition license.Granting a user this permission will allow that user to be included when setting up approver types and approval paths.
Expenses Approve, edit, and/or view all expenses for expense sheets submitted to this approver. View All allows the approver to view all expenses, regardless of whether the expenses apply to the approver's projects. Requires Expense license.Granting a user this permission will allow that user to be included when setting up approver types and approval paths.
Action Description
Controlling what Users can Access 63
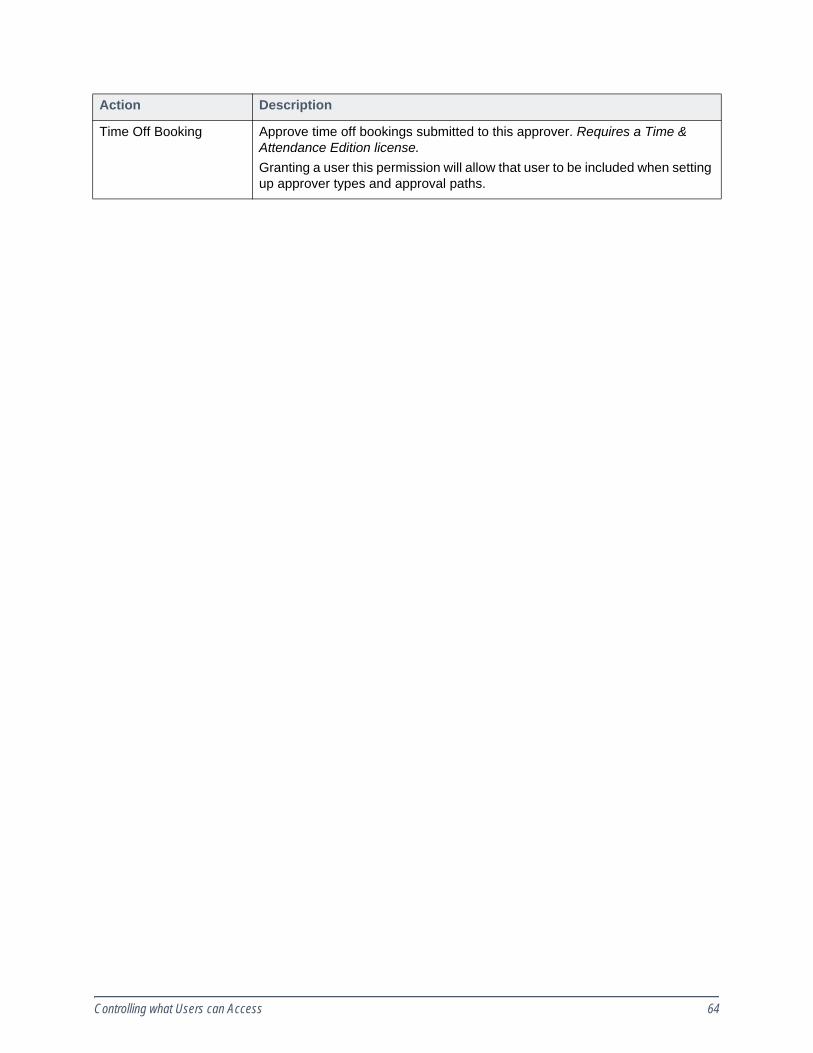
Time Off Booking Approve time off bookings submitted to this approver. Requires a Time & Attendance Edition license.Granting a user this permission will allow that user to be included when setting up approver types and approval paths.
Action Description
Controlling what Users can Access 64

Integration PermissionsWithin the Integration section, the following general permissions are provided. There are also individual permissions for each of the exports existing in the system. These permissions control whether the user has access to run the exports.
All users given permission to use exports will be granted Full access to the export data.
Action Description
Can authorize integration applications
Enable/disable the connection from external integrations to Web TimeSheet. This includes:
• Web TimeSheet Integration Manager for QuickBooks• Web TimeSheet Integration Manager for Microsoft Project• Web Resource
To perform updates via the external integration managers, the connection must be enabled.
Billing Integration for QuickBooks
Allows user to download the installer for the Web TimeSheet Integration Manager for QuickBooks module, which allows the user to transfer data to and from QuickBooks. Requires Project & Billing Edition license.
Integration Manager for Microsoft Project
Allows user to download the Web TimeSheet Integration Manager for Microsoft Project. Requires Project & Billing Edition license.
Integrate with Microsoft Project Standard/Professional
Allows access to the installer for the integration manager designed for Microsoft Project Standard/Professional. Requires Project & Billing Edition license.
Integrate with Microsoft Project Server
Allows access to the installer for the integration manager designed for Microsoft Project Server. Requires Project & Billing Edition license.
Override permissions to allow exporting of all data in Web TimeSheet
Override the user’s existing permissions for the purpose of exporting data from Web TimeSheet to Microsoft Project. For example, if the user has the ability to edit only his own projects in Web TimeSheet, enabling this action will allow the user to export data for all projects in the system via the integration manager. Requires Project & Billing Edition license.
Override permissions to allow importing of all data in Web TimeSheet
Override the user’s existing permissions for the purpose of importing data into Web TimeSheet from Microsoft Project. This means that if a user has the ability to edit only his own projects in Web TimeSheet, granting the user this action will allow him to update any projects in the system via the integration manager. Requires Project & Billing Edition license.
Data Exports Access to data export capabilities. If enabled, enables all sub-permissions.
Controlling what Users can Access 65

Settings Permissions
Add Public Exports The user can:• Create new exports using templates, and save them as exports that
anyone with the appropriate permission profiles can access. The pro-files for which the export will be enabled are specified when adding it.
• When the Edit Export Settings permission is also enabled, custom-ize existing exports and, if desired, save the customizations as new exports that anyone with the appropriate permission profiles can access.
Delete Public Exports
Delete public exports
Add/Delete Private Exports
The user can customize existing exports and save the customizations as new exports that only the user can access. The user can also delete any private exports accessible to them.
Edit Export Settings The user can edit the export, which changes how the export data is displayed for that user alone. If the Add Public Exports option is also enabled, the user can also edit the export for all users. By disabling this permission, the user cannot edit which fields are shown in a export, thus controlling who has access to sensitive data such as financial information.
QuickBooks IIF Exports Provides access to the exports for QuickBooks. Requires Time & Attendance Edition license.
Action Description
Preferences Access and change user-specific preferences, such as date and time formats
Change Internal E-mail Address
Change the user's internal e-mail address (the address that receives Web TimeSheet e-mail notifications)
Change External E-mail Address
Change the user's external e-mail address, which is used for offline timesheets and expense sheets
Change Password Change the login password. Does not apply to users using Integrated Windows, Windows NT, Active Directory, or SAML-based authentication.
Substitute User Add, edit, and delete substitute users to enter and approve items on the user’s behalf
Action Description
Controlling what Users can Access 66

Report PermissionsThe Reports tab allows you to grant access to report features. These permissions are available under the heading Reports.
There are also individual permissions for each of the reports existing in the system, organized by the report folders. These permissions control whether the user has access to run the reports.
Action Description
Reporting functions
Can View All Report Data
If this option is enabled in a permission profile, for any reports enabled within the same permission profile, the report shows data at the All Report Data access level. This means all applicable data is available, unless limited by the user's department assignments when hierarchy filtering is enabled.For users with this permission, this level of access will also apply to any private reports created directly from a template. (Private reports created by saving an existing report will inherit the access level applied to the existing report.)
Allow Entry of arbitrary e-mail address for reports
Send e-mail versions of reports to addresses other than the user's external or internal address. When enabled, the Other e-mail address field displays on the E-mail Report pop-up window and in the Add/Edit Report Schedule page.
Add/Delete Report Schedules
Add, edit, and delete report schedules for automatically generating and e-mailing reports. Each user will only be able to view, edit, and delete schedules that they "own" (schedules that they created).
Add Public Reports The user can:• Create new reports using report templates, and save them as reports
that anyone with the appropriate permissions can access. The per-missions for which the report will be enabled are specified when add-ing the report.
• When the Edit Report Settings permission is also enabled, custom-ize existing reports and, if desired, save the customizations as new reports that anyone with the appropriate permissions can access
• Add and edit folders used to organize the reports
Delete Public Report Delete public reports. When enabled, the user can also delete the folders used to organize the reports.
Add/Delete Private Report
The user can customize existing reports and save the customizations as new reports that only the user can access. The user can also delete any private reports accessible to them.
Edit Report Settings The user can edit the report, which changes how the report data is displayed for that user alone. If the Add Public Reports option is also enabled, the user can also edit the report for all users. By disabling this permission, the user cannot edit which fields are shown in a report, thus controlling who has access to sensitive data such as financial information.
Show billable rates and amounts
The user can view billable rates and amounts in reports. Requires Time & Attendance Edition license.
Show billable hours The user can view billable hours in reports. Requires Project & Billing Edition license.
Controlling what Users can Access 67
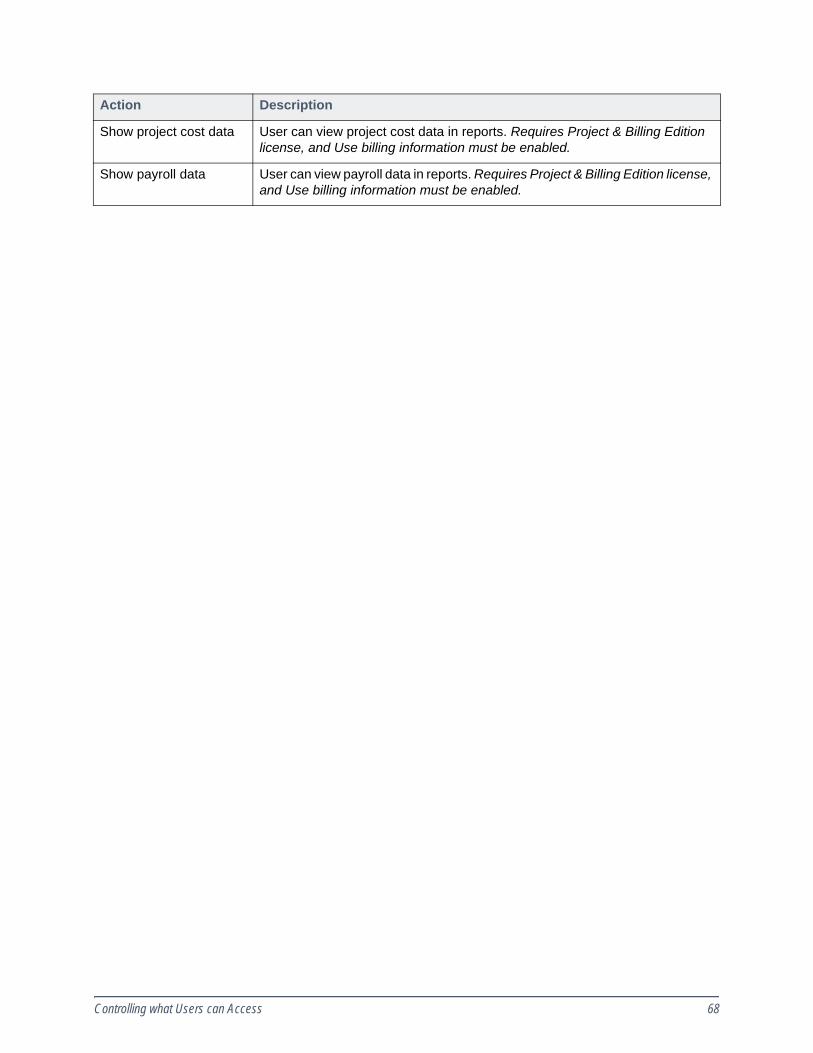
Show project cost data User can view project cost data in reports. Requires Project & Billing Edition license, and Use billing information must be enabled.
Show payroll data User can view payroll data in reports. Requires Project & Billing Edition license, and Use billing information must be enabled.
Action Description
Controlling what Users can Access 68

CHAPTER 12Adding Users
This chapter provides information on final steps to complete before adding users, and then how to create users so they can begin entering time, time off, and expenses.
Items to Set Up before Adding UsersBefore users are added, the following must be configured:
Setting System Preferences for UsersIn the System Preferences, you can specify default values for a number of fields, so these values will be selected automatically when you add a new user. You can also specify formulas so user fields will be auto-matically filled out.
User-based system preferences and defaults can be set at:
Administration > System > System Preferences > Employees section
In this section, you can configure:
1. The default number of hours per day2. The default work week, used for overtime calculations (Time & Attendance Edition only)3. The default time zone4. The formula to use for login names. If you specify a formula, the Login Name field will automatically
be filled in when you enter a user’s first and last name.5. The formula to use for e-mail addresses. If your company’s e-mail addresses follow a consistent for-
mula, such as [email protected], you can specify this formula here to have the In-ternal E-mail Address field automatically filled out.
6. Whether the current timesheet, or the user’s earliest unsubmitted timesheet displays by default7. The default weekly days off8. The default holiday calendar
Setting Default User PreferencesUser preferences define the system-side, default display settings for Web TimeSheet users. Users can change their preferences from the default by selecting Settings from the top menu.
Item to Configure How they’re Used Page
System Preferences (Employees)
Defines default values and formulas to assist you in creating users faster
69
Default User Preferences
Specifies the default preferences for each new user
69
User Defined Fields To capture additional, custom information for each user
70
Adding Users 69
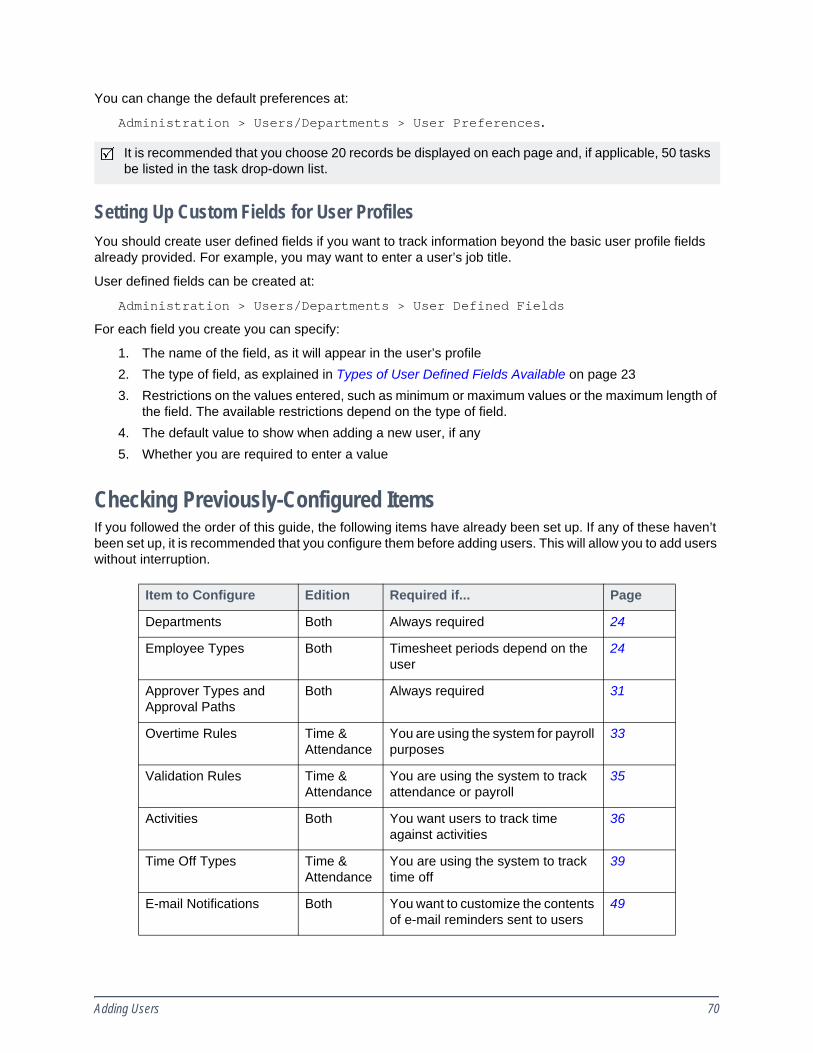
You can change the default preferences at:
Administration > Users/Departments > User Preferences.
Setting Up Custom Fields for User ProfilesYou should create user defined fields if you want to track information beyond the basic user profile fields already provided. For example, you may want to enter a user’s job title.
User defined fields can be created at:
Administration > Users/Departments > User Defined Fields
For each field you create you can specify:
1. The name of the field, as it will appear in the user’s profile2. The type of field, as explained in Types of User Defined Fields Available on page 233. Restrictions on the values entered, such as minimum or maximum values or the maximum length of
the field. The available restrictions depend on the type of field.4. The default value to show when adding a new user, if any5. Whether you are required to enter a value
Checking Previously-Configured ItemsIf you followed the order of this guide, the following items have already been set up. If any of these haven’t been set up, it is recommended that you configure them before adding users. This will allow you to add users without interruption.
It is recommended that you choose 20 records be displayed on each page and, if applicable, 50 tasks be listed in the task drop-down list.
Item to Configure Edition Required if... Page
Departments Both Always required 24
Employee Types Both Timesheet periods depend on the user
24
Approver Types and Approval Paths
Both Always required 31
Overtime Rules Time & Attendance
You are using the system for payroll purposes
33
Validation Rules Time & Attendance
You are using the system to track attendance or payroll
35
Activities Both You want users to track time against activities
36
Time Off Types Time & Attendance
You are using the system to track time off
39
E-mail Notifications Both You want to customize the contents of e-mail reminders sent to users
49
Adding Users 70

Once you have configured the above items, you can add users.
Adding UsersTo provide an employee or other person access to Web TimeSheet, you must add them as a user.
Supervisors should be created before adding other users. Begin with the highest position and work your way down through each level of your hierarchical structure. Creating the higher positions first will allow you to immediately assign the appropriate supervisor to each subordinate user.
Users can be added at:
Administration > Users/Departments > Users
If you have many users to add, you can add them en masse as explained in Adding Multiple Users at Once on page 74.
Standard versus External UsersThe Project & Billing Edition includes two types of users: Users and External Users. Standard users and external users are added and edited under different tabs in the List Users page.
Typically, a user is created as a standard user if they are an employee of the company and, depending on their assigned permissions, may be required to enter time and expenses, manage projects, or run reports.
External users are typically external to the organization and, as a result, are much more limited in their ac-cess. External users are often created for those users who are required to approve time information and re-view report data on behalf of a client.
Standard and external users each have their own user name, password, and profile but external users do not have as many additional options as standard users. For example, supervisors, timesheet periods, and activities are not set for external users.
Unless a distinction is required, the term User is used for both standard and external users.
Setting User OptionsIn the section at the top of the Add User page, you must specify the user’s:
1. First and last name2. E-mail addresses (specify the external address if the user will be using offline timesheets or expense
sheets)
Holiday Calendars Both You are using the system to track time off, or you want holidays to show up in timesheets
51
Currencies Both Hourly pay, cost, billing rates, or ex-penses will be entered in multiple currencies
52
System Preferences Both You want to use Windows NT, Ac-tive Directory, or SAML authentica-tion
53
Permissions Both Always required 55
Item to Configure Edition Required if... Page
Adding Users 71
Additional options are organized into tabs, as detailed below.
Access TabIn the Access tab, you must specify:
1. The user’s login credentials (see below)2. The departments (primary and additional) the user resides in
The Primary Department is used to determine which Timesheet Period applies to the user, if Timesheet Period Type is set to Department for the user. Additionally, Web TimeSheet will only consider the user's Primary Department when reporting on historical data.
3. The license seats to assign to the user4. The permission profiles to assign to the user
Setting a User’s Login CredentialsThe Login section specifies the credentials the user uses to log in to Web TimeSheet. Configure this section as follows:
1. If available, choose the Authentication Type for the user, if applicable• Web TimeSheet
Choose this option if the user is using a login name and password specific to Web TimeSheet.
• Windows NT/Active Directory DomainChoose this option if the user is using their Windows NT or Active Directory login name and password to log in to Web TimeSheet.
• SAMLChoose this option if the user is using SAML authentication.
2. Enter or modify the user's Login Name, as follows:• If the user is using a login name and password specific to Web TimeSheet, enter any login
name that has not already been used in the system.• If the user is using Windows NT authentication or Integrated Windows Authentication is
enabled, enter their Windows login name.• If the user is using Active Directory authentication, enter their userPrincipleName or
sAMAccountName, as defined in the Active Directory system.• If the user is using SAML authentication, enter their SAML login name.
3. Enter or modify the user's Password or Domain, as follows:
Web TimeSheet supports Integrated Windows Authentication, which allows users to bypass the login page using their Windows credentials. For more information on enabling Integrated Windows Authentication for all users, see the Web TimeSheet Installation Guide.
Web TimeSheet uses the value entered in the Login Name field to determine whether Win-dows NT or Active Directory authentication is being used. If you enter a name that includes a domain, such as [email protected], Web TimeSheet will assume that Active Directory authentication is being used. In this case, the Domain field will automatically be filled based on the login name entered.
Adding Users 72

• If the user is using a login name and password specific to Web TimeSheet, enter the pass-word for the user. Depending on the System Preferences, there may be requirements for the number and type of characters in the password.
• If the user is using Windows NT authentication, enter the Windows NT domain the user is defined in.
• If the user is using Active Directory authentication, edit the Active Directory domain the user is defined in, if necessary.
• If the user is using SAML authentication, there is nothing to enter.• If Integrated Windows Authentication is enabled, enter a dummy value.
Advanced TabIn the Advanced tab, you must specify:
1. General user settings, including their supervisor and hourly payroll rate2. The approval paths for the user’s timesheets, expense sheets, and time off bookings3. Values for any user defined fields you created4. Which activities the user can select on their timesheet, if applicable5. Other miscellaneous user settings such as which overtime and validation rules to apply to the user’s
timesheet
The sections that follow provide information on some of these options.
Assigning a Timesheet Period to a UserBy default, users will be assigned the System timesheet period. If you choose to create periods based on employee types or departments, when adding users you must specify their employee type/department and the type of timesheet period to use in their timesheets. For example, consider a timesheet period created for the employee type Full-time Salaried. When adding a user who requires this timesheet period, you would set the following:
• Employee Type to Full-time Salaried• Timesheet Period to Employee Type
Assigning Rules and a Work Week to a UserYou can assign an overtime rule and a validation rule to a user so that those rules will be applied to their timesheet.
While you can only apply one of each rule at any given time, you can apply different rules at different times by entering an effective date for each rule assignment. For example, you can assign:
• OTRule1 effective January 1, 2008• OTRule2 effective January 1, 2009
Any time entered for dates between January 1, 2008 and December 31, 2008 will use OTRule1. Time en-tered for January 1, 2009 or after will use OTRule2.
In addition to assigning an overtime rule, you must specify the work week that should be used to calculate overtime. For example, weekly overtime can be calculated using hours from Sunday through to Saturday, or hours from Monday to Sunday.
When editing an existing user, the user's password will appear as a blank field. This is for security purposes and does not mean you have to enter a new password.
Adding Users 73

Time Off TabWith a Time & Attendance seat, the Time Off tab lists each of the time off types available in the system. For each type, there may already be settings in place, based on the defaults you set at the system level. You can keep these defaults or edit them. For each type, you must specify:
1. Which time off types the user is allowed to enter time off against2. A starting balance for each type3. How often time off should be added to (accrued on) their balance4. Whether their balance should regularly reset
E-mail TabChoose which e-mail notifications the user should receive in the E-mail Notifications tab.
Understanding the System Error/Warning e-mail notificationThe System Error/Warning e-mail notification is a system e-mail that notifies the user:
• When a problem has occurred in Web TimeSheet (for example, timesheets are waiting for approval by a user whose login is disabled).
• When a license is due to expire or has expired.• If an update to Web TimeSheet is available, if automatic notification is enabled.
You should enable this notification only for yourself and other administrators.
Adding Multiple Users at OnceThe Quick Add button allows you to add multiple users at once. You need to enter only the most basic user specific information (e.g., Last Name, Login Name, Password) for Web TimeSheet to create individual pro-files. The more specific information (e.g., access rights) is based either on system defaults or another user profile (you choose), both of which can be edited later on a user-by-user basis or en masse.
If you choose to apply the user’s supervisor from the Quick Add page, you should create all supervisors before adding the other users.
The fields displayed on the Quick Add page can be customized to fit your needs by selecting the Settings button. If you want to base certain fields on another user’s profile (or use the system defaults), do not display them on the Quick Add page. For example, you may wish to copy the supervisor or hours per day on an-other user rather than enter them here. To achieve this, you must not display them on this page.
Understanding how License Seats are Assigned when using Quick AddUsers added via Quick Add:
• That are based on an existing user will be assigned the same seats as the user on whom they are based
• That are not based on an existing user will be assigned seats as follows:• If there are Time & Attendance seats available, a Time & Attendance seat will be assigned
(regardless of what other seats are available)
If you know a user will have additional accruals available to them in the future, you can specify these new settings now by adding an new row for that type and setting the Effective Date to the date the new settings will come into effect.
Adding Users 74

• If there are only Project & Billing seats, a Project & Billing seat will be assigned.
If no seat licenses are available, users will still be added, but with disabled status, and no seats will be as-signed to them.
Adding Users 75

CHAPTER 13Creating Clients and Projects
If you are using Web TimeSheet to track project costs or bill clients, before users begin entering time or ex-penses you must set up the projects people are currently working on. You can do this yourself, or you can provide project managers the permissions to add/edit projects.
This chapter provides information on final steps to take before entering clients and projects, and how to set up projects once you are ready.
Items to Set Up before Creating Clients and ProjectsBefore creating projects, you must configure the following:
Once you have set up these items and have added all your users, you can add:
1. Clients, as outlined in Setting up your Clients on page 792. Projects, as detailed in Adding Projects on page 79
Setting System Preferences for ProjectsWithin the System Preferences page, you can configure options for projects. Project-related system pref-erences can be configured at:
Administration > System Preferences
In the Usage section of the page, the following can be set:
1. Whether Web TimeSheet will be used to track billing information. If enabled, you will be able to as-sociate billing rates with time and users will be able to designate expenses as billable.
In the Projects section of the page, the following can be configured:
1. Whether hours and costs for parent tasks should be calculated automatically by summing values from child tasks.
Tracking time and expenses against projects requires a Project & Billing Edition license. If you are us-ing the Time & Attendance Edition, you can allocate time using activities, as explained in Classifying Time Worked using Activities on page 36.
Item to Configure How they’re Used Page
System Preferences (Usage/Projects)
Specifies if Web TimeSheet will be used for bill-ing, whether hours and costs are rolled up to parent tasks, and whether multiple clients can be associated with a project
76
Roles Required if clients are billed based on the type of work done
77
User Defined Fields Required if you want to capture additional, cus-tom information for projects or clients
78
Productivity Specifies the billable targets and preferences used to determine productivity
78
Creating Clients and Projects 76

This option is recommended if you organize projects in such a way that only the lowest level tasks are available for users to enter time in their timesheets. When this option is not enabled, estimated hours and cost can be manually entered at any level of the hierarchy, meaning that no automatic calculations will occur.
2. Whether multiple clients can be assigned to one project, and how costs will be shared between those clients (see Understanding Cost Allocation and Bucket Method on page 77)If you wish, both methods can be enabled and you can choose which method to use on a project-by-project basis.
Understanding Cost Allocation and Bucket MethodIf multiple clients can be assigned one project, you must choose how costs will be shared between those clients:
• Cost allocationClients will each be billed a percentage of the total billing costs. For example, if Client A is assigned 50%, they will be charged for half of the time and expenses for the project.
• Bucket methodThe bucket method allows you to use the same project name with multiple clients. Users will select the client to bill within the timesheet. For example, if you have a number of projects that perform similar functions, such as Design, you can use the project name Design with a multiple clients. Project costs in this case go into a ‘bucket’ instead of being allocated between the multiple clients. One of the benefits of this feature is that it eliminates the requirement that similar projects be given unique names for different clients.
Defining Billing Rates based on the Work being DoneIf you are using Web TimeSheet to bill clients, and the billing rate depends on the type of work being done, you must create roles.
Once you have created the roles, they are assigned to projects and then, individually to project team mem-bers. Those team members can select the role on their timesheet to indicate that the work done was under that role. That time will be billed at the rate associated with that role.
Roles can be defined at:
Projects > Setup > Roles/Rates
For each role, you must specify:
1. The name of the role, which will be shown in projects and timesheets2. The default billing rate to associate with the role
Understanding RolesThe following scenarios provide some examples of how you might implement roles.
Scenario 1You are the project leader for a web design project. You and the client have agreed that all time for the project will be charged at a rate based on the action/function fulfilled by team members. This project will re-quire fulfillment of the following functions at the specified rates:
• Project Management - $125.00/ hour • Web Site Design - $70.00/hour
Creating Clients and Projects 77

• Graphic Design - $50.00/hour
Scenario 2You are a project leader at a large manufacturing company that completes many interdepartmental projects. Because each project team usually consists of an entire department, charges are incurred based on each team member’s level of expertise. To simplify interdepartmental billing, your company has categorized em-ployees as follows:
• Junior Level - $75.00/hour • Intermediate Level - $100/hour • Senior Level - $150/hour
Setting up Custom Fields for Projects or ClientsUser defined fields are custom fields you can create to track information beyond the basic fields already pro-vided. You can create custom fields for projects/tasks or for clients. For example, you may want to identify which phase each project is in, or capture a billing address for each client.
Project user defined fields are configured at:
Administration > Timesheet Setup > User Defined Fields > Project/Task tab
Client user defined fields can be defined at:
Administration > Timesheet Setup > User Defined Fields > Client tab
For each field you create you can specify:
1. The name of the field, as it will appear for the project or client2. The type of field, as described in Types of User Defined Fields Available on page 233. Restrictions on the values entered, such as minimum or maximum values or the maximum length of
the field. The available restrictions depend on the type of field.4. The default value to show when users first create a project or client, if any5. Whether users are required to enter a value
Setting Productivity Targets and PreferencesYou can use Web TimeSheet to measure the productivity of users against billable hours targets you set. Pro-ductivity is tracked at the user, department, project, and company level and each user can view their pro-ductivity on their timesheet.
Enter each user's yearly or monthly billable targets at:
Projects > Productivity > Productivity Targets
Set preferences for productivity calculations at:
Projects > Productivity > Preferences
In this page, you can specify:
1. Whether productivity charts are shown on users’ timesheets2. Whether only approved hours are included in productivity calculations3. The productivity level at which, in the charts, users are considered to be meeting their targets
You can also configure how often productivity data is generated at: Projects > Productivity > Monthly > icon
Creating Clients and Projects 78

Setting up your ClientsClients are customers of your organization to whom you bill time or costs for projects. Clients can be external customers or departments within your organization. Projects can be set up with multiple clients, either for cost allocation on a percentage basis, or to allow the same project name with multiple clients, as described in Understanding Cost Allocation and Bucket Method on page 77.
You should define your clients before setting up projects to eliminate the need to go back and assign the projects to the appropriate client.
Clients can be configured at:
Projects > Clients
For each client you create, you can specify:
1. The name of the client2. A code for the client, which can help save space in timesheets and reports3. The default billing rate for the client (any projects created for this client will be set to use this rate by
default)4. Any custom fields you created for clients
Adding ProjectsA project is a framework (structure) used to organize workgroup tasks. Projects identify the body of work to be completed by a team within your organization. Projects can have multiple levels and complexities, de-pending on the needs of your organization.
Projects can be added at:
Projects > Projects
Follow these steps to add a project:
1. Create the project, including entering the basic project details and assigning clients.2. If tracking time for billing purposes, set the rates to bill time at.3. Specify who will work on the project.4. Define the tasks within the project.5. Specify which expenses can be claimed under the project.
If your projects follow a similar structure and settings, you can create a template project and add projects using the template, as described at Adding Projects using a Template on page 81.
Creating the ProjectWhen creating the project, you must specify:
1. The name of the project 2. The project code, which can be used to save space in timesheets and reports 3. If hierarchy filtering is enabled, the Department the project will be visible to.
When adding a project, you can only select one department for which to make the project vis-ible. Once you have added the project, open it for editing and select additional departments.
Creating Clients and Projects 79

4. The client(s) associated with the project and how costs will be shared. See Understanding Cost Al-location and Bucket Method on page 77 for information on selecting multiple clients.
5. If using Web TimeSheet for billing, the default billing rate for the project.
Once the project is added, you can edit it to set the billing rates, project team, task structure, and allow ex-penses.
Setting Billing RatesThe amount that an employee's time is billed out at is based on the number of hours the employee enters on their timesheet and the rate associated with that time. Rates can be based on:
• The project being worked on• The user• Their department• The type of work being done
The rates associated with a particular user are set when defining the project team. However, before that, in the Billing Rates section, you should:
1. Adjust the project billing required, if required.2. Choose whether any roles will be used in the project, using the Assign Roles button.
Specifying who will Work on the ProjectOnce the appropriate roles are selected for billing, you can complete the following in the Project Team sec-tion:
1. Choose which users can enter time and expenses against the project, using the Edit button. When adding users, you can choose:
• All users• A department, so all users within that department are assigned to the project• Specific users
2. Set the billing rates to apply to hours entered by that project team member, by selecting the icon next to the team member’s name. For each team member, you can:
• Assign new rate types, such as:• A department rate specific to that department• A user rate specific to that user• Role rates
If you select multiple rate types for a team member, they will choose the appropriate rate when filling out their timesheets.
• Edit the rates associated with each rate type
Defining the Task StructureOnce the project team is set up, you can define the task structure of the project. Projects can contain up to ten hierarchal levels and all tasks in the project hierarchy inherit their billing rates, team members, and ex-penses from the parent project.
To add tasks:
1. Select the Edit button in the Project Structure section.
Creating Clients and Projects 80

2. Use the icon to add a sub-task.
For each task you add, you can specify:
1. The task name and code2. The estimated hours and costs associated with the task.
If your organization uses project/task roll-up, the task estimates may be automatically calculated based on the estimates for any subsequent tasks.
3. The values for any user defined fields you created4. When users can enter time against the task5. Whether users can enter time against the task.
If you are using project/task roll-up, it is recommended that you only allow time entry for the lowest level tasks.
6. If using Web TimeSheet for billing, whether billable or non-billable time, or both, can be entered against the task.
This same information can be set for the highest-level task (the project). The following additional fields can be set for the project:
1. The client/external approver that should be involved in approving time and expenses for this project (see Including Clients as Approvers on page 83)
2. Whether the project leader is required to approve time and expenses for this project (for users whose approval path includes the project leader)
3. When users can enter expenses against the project, if an Expense license is present4. The estimated expenses associated with the project, if an Expense license is present
Changing Task AssignmentsBy default, all members of the project team are allowed to enter time against each task defined in the project. However, within the Assignments section of each task, you may:
• Prevent some team members from entering time against that task alone• Allow users outside of the project team to enter time against the task
Specifying which Expenses can be ClaimedIn the Allowed Expenses section, you can specify which types of expenses can be claimed under this project.
Adding Projects using a TemplateIf you need to create a project with the same characteristics as an existing project, you can use the Based On feature to save yourself time when setting up the new project. The Based On feature copies all of the following information from an existing project to a new project:
• Billing Rates (all rates except the default billing rate for the project)
• Project Team (all associated rates except the default project rate)
If hierarchy filtering is enabled, all team members (individuals, departments, or <All>) are copied to the new project regardless of their department. For team members outside of the user's department, if the assignment is removed from the project team, it will no longer be available for selection on that project.
Creating Clients and Projects 81

• Project Structure (tasks)• Project/Task Assignments• Allowed Expenses• Project Information (excluding that listed below)
Project data that is NOT copied includes:
• Project Name• Project Code• Project Leader• Client and cost allocation method• Default Billing Rate• Client/External Approver• Project/Task-type user defined fields• Time Entry Start Date and Time Entry End Date• Expense Incur Start Date and Expense Incur End Date
When you copy a project, the status of the new project will be Open (at the highest level), regardless of whether the existing project has been closed. In other words, if you copy a new project from an existing project that has been closed, the new project will still be open. The status of the tasks, however, will be cop-ied directly from the existing project.
Managing ProjectsOnce you have created some initial projects, users can begin entering time and expenses against them. As new projects arise, you or project leaders can add them, and users can then select them on their timesheet.
The sections below provide information on working with projects after they are created. Additional informa-tion is provided in Chapter 15, Reporting on and Exporting the Data on page 87.
Changing Multiple Projects at OnceIf you need to make a change to multiple projects, you can use the Mass Edit functionality. With Mass Edit, you can:
• Edit the basic settings, including estimates, start and end dates, and allowed expenses, for multiple projects at once. For example, you may want to change the Project Leader on a number of projects if a new project manager is hired and he takes over some existing projects.
• Edit details of tasks from multiple projects• Edit the rates associated with existing rate type assignments for team members, across multiple
projects• Add a new user to the team of multiple projects• Assign a new rate type, and the associated rate, to an existing team member, across multiple
projects
For more information on using Mass Edit, see the online help.
Allowing Clients to Access Project InformationClients can be provided access to Web TimeSheet to:
• View report data for their projects
Creating Clients and Projects 82

• Approve time and expenses entered against their projects• View project team information for their projects
Providing Clients AccessA representative from each client can be provided access to Web TimeSheet by adding them as an external user. Each external user is associated with a client, and you can create more than one external user for each client, if multiple representatives want access to the system.
To add external users:
1. Define the permissions provided to external users, as detailed in External User Permissions on page 55.
2. Create the external users, as explained in Standard versus External Users on page 71.
Including Clients as ApproversOnce client representatives are set up as external users, they can be included in the approval path for timesheets or expenses, as follows:
1. Ensure the external user’s permissions include the Client/External Approver option.2. Set the client’s representative as the Client/External Approver for the project.3. Creating an approver type, with External User selected as the approver. (This may already exist.)4. Add the External User approver type to timesheet and/or expense sheet approval paths, as de-
sired.5. Assign these approval paths to users, if new approval paths were created. If the approver type was
added to existing paths, the path will automatically be updated to include the client the next time a timesheet/expense sheet is submitted.
Only time or expenses for that client’s projects will be forwarded to the client’s representative for approval. If data for other projects is included in the timesheet or expense sheet, this data will not be visible to the client.
Posting Notes for ProjectsYou can use project notes to post notes about a specific project, such as updates on how the project is pro-gressing. Other users can then review the notes to find information that pertains to their projects.
Project notes are available at:
Projects > Project Notes
Creating Clients and Projects 83

CHAPTER 14Administering Timesheets, Time Off Bookings, and Expenses
As the administrator, you can manage any timesheets, time off bookings, and expense sheets that have been saved in the system, including submitting, approving, rejecting, opening/closing, editing and deleting them.
Administering TimesheetsTimesheets can be administered at:
Administration > Shortcuts > Historical Timesheets
Within this page, you can:
• View the details of current and past timesheets, by selecting the icon next to the timesheet • Edit a timesheet that has been submitted, by selecting the Edit button within the timesheet• Submit, approve, or reject multiple timesheets at once, by checking the boxes for the appropriate
timesheets and clicking the Submit, Approve, or Reject button• Delete one or more timesheets from the system, by checking the boxes for the appropriate
timesheets and clicking the Delete button• Send an offline timesheet to a user who is away from the office, by checking the boxes for the
appropriate timesheets and clicking the Offline button
Changing a Timesheet once it has been ApprovedIf a user needs to make a change to a timesheet after it has been approved, you will need to re-open the timesheet using the Re-open button within the Historical Timesheets page.
Once the timesheet is re-opened, the user will be able to edit it from the Timesheet section of Web TimeSheet and then re-submit it. The timesheet will go through the full approval process.
Alternately, you can make the changes and approve the timesheet, all through the Historical Timesheets page.
Applying System Changes to an Approved TimesheetOn occasion you may find errors in administrative values entered in the system. You can correct the values, but approved timesheets are considered “closed” and, therefore, use the system settings in place at the time the timesheet was last modified. This includes:
• Overtime calculations• Validation rules• Billing rate types assigned to a user’s time entry
For example, a timesheet may have been submitted with overtime calculated as any time above 40 hours. If the overtime rule is changed to only include time over 45 hours, any existing approved timesheets will not be updated.
To apply the new value to an approved timesheet:
1. Re-open the timesheet.
Administering Timesheets, Time Off Bookings, and Expenses 84

2. Submit and/or approve the timesheet. (If you are going to approve the timesheet, you can select Approve directly, without selecting Submit first.)
To apply the new values to a timesheet that hasn’t been fully approved, have an approver edit the timesheet. The values will be updated to reflect changes in the system.
Administering Time Off BookingsTime off bookings can be managed at:
Administration > Shortcuts > Historical Time Off
Within this section, you can:
• View the details of or edit submitted, approved, and rejected bookings, by selecting the icon next to the booking
• Approve, reject, or delete multiple bookings at once, by selecting the appropriate bookings and clicking the necessary button
• Submit a booking on behalf of a user, by clicking the Add button
Reviewing a User’s Time Off BalanceIf you need to verify user’s time off balance, run the Time Off Balance report, which will provide an overview of the time taken and remaining to the user for each time off type.
If you require further information on how the time off balance was calculated, use the Time Off History re-port. This report provides details on each change to the balance.
Administering ExpensesExpenses can be administered at:
Administration > Shortcuts > Historical Expenses
Within this section, you can:
• View the details of current and past expense sheets, by selecting the icon next to the expense sheet
• Edit an expense sheet that has been submitted, by selecting the Edit button within the expense sheet
• Submit, approve, or reject multiple expense sheets at once, by checking the box for the appropriate expense sheets and clicking the Submit, Approve, or Reject button
• Delete one or more expense sheets from the system, by checking the box for the appropriate expense sheets and clicking the Delete button
• Send an offline expense sheet to a user who is away from the office, by checking the boxes for the appropriate expense sheets and clicking the Offline button
• Mark expenses as “paid” once reimbursements have been made, by checking the box for each expense sheet and clicking the Paid button
Changing an Expense Sheet once it has been ApprovedIf a user needs to make a change to a expense sheet after it has been approved, you will need to re-open the expense sheet using the Re-open button within the Historical Expenses page.
Administering Timesheets, Time Off Bookings, and Expenses 85

Once the expense sheet is re-opened, the user will be able to edit it from the Expenses section of Web TimeSheet and then re-submit it. The expense sheet will go through the full approval process.
Alternately, you can make the changes and approve the expenses, all through the Historical Expenses page.
Applying System Changes to an Approved Expense SheetOn occasion you may find errors in administrative values entered in the system. You can correct the values, but approved expense sheets are considered “closed” and, therefore, use the system settings in place at the time the expense sheet was last modified
To apply the new value to an approved expense sheet:
1. Re-open the expense sheet.2. Submit and/or approve the expense sheet. (If you are going to approve the expense sheet, you can
select Approve directly, without selecting Submit first.)
To apply the new values to a expense sheet that hasn’t been fully approved, have an approver edit the ex-pense sheet. The values will be updated to reflect changes in the system.
Administering Timesheets, Time Off Bookings, and Expenses 86

CHAPTER 15Reporting on and Exporting the Data
Once users begin entering data, you and other managers can make use of this data by generating reports and exporting the data.
Reporting on DataWeb TimeSheet allows you to create highly-customized reports to assist with tracking and management of time, time off, expenses, users, and projects. When running reports, users with the appropriate permissions can:
• Choose the fields to include in the report• Set filters to limit the data in the report• Group and summarize the data• Sort any of the columns within the report• Save the report and its current settings as a private report for their own use, or as a public report
accessible to everyone with permission to view the original report• E-mail or export the report in CSV or PDF formats• Create a schedule to automatically e-mail the report at regular intervals
Setting up Reports for UsersA number of default reports have been installed with Web TimeSheet. When setting up the system, you can either:
• Create and customize these default reports to meet your organization’s requirement, and limit users to using those reports
• Allow users to create their own reports
Whether or not users can create reports is defined by their assigned permissions. If you wish, you can allow some users to create new reports and restrict others to existing reports.
Choosing which Template to Use for New ReportsIf you wish to add new reports for users, you will need to choose a template to act as a starting point for the report. The Web TimeSheet Reports Field Matrix, available in the online help, provides a list of fields avail-able in each of the report templates. This matrix can be helpful in determine which template to choose.
How Report Data is Affected by Hierarchy Filtering and a User’s PermissionsThe data available to you in a report depends on, not only the filter settings, but whether hierarchy filtering is enabled and your permissions and profile. For example, a supervisor will only see data for the user’s they supervise in the User Detail report. See the online help for further details.
Local versus Global EditingOnce a public report is created, any changes made to the “settings” available within the report will only be saved to that user's local version of the report.
Reporting on and Exporting the Data 87

However, if a user has the Add Public Reports permission and edits the report itself, any changes will apply across the system; all users will see the changes when they run the report. Additionally, any changes users have made to their local settings will be overwritten when the report is edited globally. If the user’s permis-sions do not include Add Public Reports, changes made to a report will only apply to their local version.
Displaying a Custom Logo in ReportsIf you want to send reports outside of your organization, you may want to add your company logo to the re-ports before sending them. You can upload and set the logo to display in reports at:
Administration > System > Manage Custom Logos
Exporting DataWithin Web TimeSheet, you can export Web TimeSheet data via a generic CSV file. This can be done using any of the text reports, or with the raw data exports available in the Integrations section.
Once the CSV file is created, you can import the file into another application, specifying how fields should be mapped between the CSV file and the application.
Reporting and Exporting in the Project & Billing EditionOnce users begin entering time and expenses, in the Project & Billing Edition you can use the data to:
• Track project costs• Bill clients, including using QuickBooks for billing• Manage projects in Microsoft Project• Send project updates to manager or clients
Tracking Project CostsWeb TimeSheet tracks project costs, based on the user’s hourly cost rate and the hours they worked on the project. You can run reports, such as the Project Status Summary report, to compare the costs against estimates.
Billing ClientsOnce users have entered time and expenses against projects, you can run reports to determine the amount to bill to clients. You can also export data, either reports or raw data exports, and then import them into a billing system.
Billing using QuickBooksIf you are using Intuit QuickBooks, you can use the Web TimeSheet Integration Manager for QuickBooks to transfer time and expenses to QuickBooks, and then create invoices in QuickBooks.
The integration module can be installed from:
Integrations > Modules > QuickBooks
See the Web TimeSheet Integration Manager for QuickBooks User Guide for more information on using this module.
Reporting on and Exporting the Data 88

Managing Projects in Microsoft ProjectThe Web TimeSheet Integration Manager for Microsoft Project is a Windows-based application designed to transfer project data to and from Microsoft Project. You can manage your projects in Microsoft Project and transfer time from Web TimeSheet to track actuals.
Two integration managers are available, one for Microsoft Project Standard or Professional and one for Mi-crosoft Project Server. Both are provided with Web TimeSheet Project & Billing Edition and can be installed from:
Integrations > Modules > Microsoft Project Std/Pro
Integrations > Modules > Microsoft Project Server
See the Web TimeSheet Integration Manager for Microsoft Project User Guides for more information on us-ing these modules.
Sending Project UpdatesYou can use reports to send regular updates to management or clients. Create a report containing the infor-mation you wish to and then add a schedule for that report. Based on the schedule, the report will be auto-matically e-mailed to the recipients you choose, at the schedule you set. The report can be e-mailed in PDF or CSV format.
Report schedules can be created at:
Reports > Manage Reports > icon
Reporting and Exporting in the Time & Attendance EditionIn the Time & Attendance Edition, you can use the data users enter to:
• Export data to QuickBooks• Export pay data to ADP
Exporting Data to QuickBooksWeb TimeSheet allows you to export time, time off, and expense data using the QuickBooks .iif file for-mat. The file can then be imported in Intuit QuickBooks and the data can be used to pay employees for time and expenses.
The QuickBooks export can be found at:
Integrations > QuickBooks Export
For information on using the QuickBooks exports, consult the online help.
Exporting Pay Data to ADPOnce users enter time and/or time off, you can export the data to ADP for payroll purposes. Additionally, if users make any changes to their time entries, the system will automatically determine the differences. When you export the time data again, you can choose to export only the changes.
The ADP exports can be found at:
Integrations > List Exports
Two default exports are available in this list, each configured to support a specific version of ADP:
• ADP Web Applications
Reporting on and Exporting the Data 89

• PC/Payroll version 5.1
To export the data:
1. Choose the appropriate export2. Edit the export settings, including:
• Which fields to include in the export• The name of the file to generate• The BatchID for the export (see below)• ADP-specific values, such as the Company Code used to identify your organization• Pay code mappings• Indicating which Web TimeSheet fields map to which ADP fields
3. Export the file4. Import the file into ADP
Using the BatchID Auto-IncrementRecords exported together are marked with a BatchID, which is used by ADP to mark a “batch” of records. The BatchID can be automatically incremented for each export, and you can set the starting value at:
Administration > System > System Preferences > Exports section.
Reporting on and Exporting the Data 90

CHAPTER 16Maintaining the System
Maintaining Self-Hosted Installations Managing SeatsWhen you purchase Web TimeSheet, you purchase a number of seats. Each seat provides one user access to the features related to that seat. For example, if a user is entering time against projects, they must be assigned a Project & Billing Edition seat.
Determining how many Seats are AvailableYou can determine how many seats are unused at:
Administration > Replicon > Licensing > Seat Assignments tab
Adding SeatsIf your company grows, you may need to add seats to support the additional users. To add seats:
1. Contact Replicon’s Sales department and purchase additional seats.2. If you entered an Activation Code during your last upgrade or installation:
• Update the license information saved in your database by selecting Refresh License Information at:
Administration > Replicon > Licensing > System Information tab
3. If you are using license files:• The Sales department will send you an updated license file.• Save the new license file to a known location, such as your Desktop.• Replace your existing license file with the updated license file by selecting Settings at:
Administration > Replicon > Licensing > System Information tab
Assigning SeatsYou can assign seats in:
• The Seat Assignments tab of the Licensing section• Each user’s profile
Determining which Version you are UsingWhen you contact Support or Sales, you may need to tell them which version of Web TimeSheet you are using. This information can be found at:
Administration > Replicon > Licensing
The major version is shown in the Version field. The Build field shows the detailed version number, indicat-ing which service release is installed.
Maintaining the System 91

Reviewing the Status of your LicenseIf you are using a standard (non-hosted) installation, you can view summary information for your existing licenses or update licensing information at:
Administration > Replicon > Licensing > System Information tab
The summary information for each module license includes:
• ApplicationsModule is the name of the Web TimeSheet edition or module for which the license grants access.
• Assigned/Licensed SeatsThis is the number of seats included in the license, and how many of each have been assigned to users.
• License ExpiresThe date the license will expire. You will be notified before a license expires to allow you time to update your licensing. If you allow a license to expire, the seats associated with that license will be unavailable until you have a valid license.
• Build PeriodThe build period is a period during which you may install new builds against the license. For exam-ple, if you have a Web TimeSheet license with a build period of January 1 - December 31, the license will be valid for any point or service releases available during that time.
Finding out how many Users are Logged InBefore you perform maintenance tasks such as upgrading the system or making hardware changes to the Web TimeSheet server, you should verify that no users are logged in. The number of users logged in can be found at:
Administration > Replicon > Licensing
Upgrading Web TimeSheet If sortware update notifications is enabled in the System Preferences, you will be notified when new ver-sions of Web TimeSheet are released. You can manually check for updates or the download available up-dates at:
Administration > Replicon > Software Update
Once you have downloaded a new release, you can upgrade your installation. For information on upgrading, see the Web TimeSheet Installation Guide.
Setting Up a Database Backup ScheduleWeb TimeSheet does not back up your database automatically. Therefore, to prevent data loss, you must back up your database on a regular basis.
You may choose to set up an automated database backup system, or you may choose to back up your da-tabase manually using Web TimeSheet’s Database Backup Utility.
Generated backup files can be restored to Web TimeSheet using SQL Server’s Management Tools. For in-formation on how to restore a backup database, refer to SQL Server’s documentation.
For those using a Replicon-hosted/SaaS implementation of Web TimeSheet, Replicon handles the backup process.
Maintaining the System 92

The backup utility only supports SQL Server (standard, Express, and MSDE) databases, and can be access-ed at:
Administration > System > Backup Database
Maintaining Replicon-Hosted/SaaS ImplementationsWhen you purchase a Replicon-hosted/SaaS Contract or Month-To-Month plan, maintenance processes such as product upgrades and database backups are carried out by Replicon. However, you can manage your own licensing via the account management portal within Web TimeSheet.
Managing SeatsWhen you purchase Web TimeSheet, you purchase a number of seats. Each seat provides one user access to the features related to that seat. For example, if a user is entering time against projects, they must be assigned a Project & Billing Edition seat.
Adding SeatsIf your company grows, you may need to add seats to support the additional users.
Adding Seats in a Contract PlanIf you purchased a Contract plan, you can add seats at any time. The cost of each seat will be prorated based on how many months of the contract it is in use (with the month of addition counted as a month of use). You cannot remove seat licenses from a contract.
To add license seats to a Contract plan:
1. Open the Manage Account page.2. Select Add Users to Your Contract.3. Under Add Users, enter the additional users you would like to add for each product.4. Select Update Plan.5. Select Confirm Plan Changes.
Adding or Removing Seats in a Month-To-Month PlanIf you purchased a Month-To-Month plan, you can add or remove seats at any time via the Users page. The cost of a month of hosting will be based on peak usage of the system (that is, the maximum number of that type of seat in use at any time during the month).
If the database backup fails, the error message Backup of database <databasename> failed displays. Common causes of failure are:
• The path you entered does not exist. Verify that each of the specified folders exists and, if not, either correct the path or create folders to match the path.
• You lack permission to write to the specified file or folder. Ensure you have permission to write to the file and folders specified. If you do not, try creating the backup in a different loca-tion.
Refer to the Web TimeSheet online help for more information about managing Replicon-hosted/SaaS accounts.
Maintaining the System 93

APPENDIX ARemoving the Sample Data
If you are using the trial version of Web TimeSheet and would like to move to a version that does not include sample data, you have two options:
1. Install the full version of Web TimeSheet. For installation instructions, refer to the Web TimeSheet Installation Guide, available at www.replicon.com/products/product-documentation.aspx.
2. Remove the data using the procedures outlined in this appendix. Each edition uses different sample data, therefore each has a unique data removal procedure:
• Project & Billing Edition on page 94• Time & Attendance Edition on page 96
Use this option if you have entered data in the database that you would like to retain.
Project & Billing EditionIf you installed the Project & Billing Edition with sample data, follow the instructions below to remove the sample data. You must have a valid Expense module license (Demo or other) to remove this sample data.
1. Log into Web TimeSheet as the Administrator. 2. Select Administration from the top menu.3. Delete sample historical timesheets:
a. Select Historical Timesheets from the side menu.b. Select <All> for all Basic filters, and click Apply.c. Enable the Select All check box at the bottom of the list.d. Select Delete, and then select Yes to confirm the deletion.e. Repeat Step b to Step d until all sample timesheets have been removed.
4. Delete the sample historical expenses:
a. Select Historical Expenses from the side menu.b. Complete Step b to Step d in the above section, and repeat these steps until all expense
sheets have been removed.5. From the Approval Setup side menu, select Approver Types.6. Delete references to sample users from the approver type:
a. Select the icon next to the Expense Approver.b. On the Edit Approver Type page, change the Approver option to Supervisor.c. Select Save.d. Repeat Step b to Step c for the Billing Approver approver type.
The procedures below outline the steps for removing ALL DATA from the database, including any data you have entered. Therefore, when following the procedures, be sure not to delete any data you would like to retain.
Removing the Sample Data 94

7. Delete the sample user defined fields:
a. Select User Defined Fields from the Users/Departments side menu.b. From the:
• Timesheet tab, under the Timesheet (Row Level) heading:
Click the icons next to the Location and ETC (Hrs) fields. Select Yes to con-firm each deletion.
• Project/Task tab:
Click the icon next to the Phase field. Select Yes to confirm the deletion.
8. Select Projects from the top menu.9. Delete all sample projects:
a. From the Setup side menu, select Projects.b. Select All Projects and Both (where applicable) from the filters at the top of the page.c. Click the Select All heading in the Projects table.d. Select Delete, and then select Yes to confirm the deletion.
10. Delete all sample clients:
a. From the Setup side menu, select Clients.b. Click the beside each client, and select Yes to confirm each deletion.
11. Delete all sample roles/rates:
a. From the Setup side menu, select Roles/Rates.b. Enable the Select All check box.c. Select Delete, and then select Yes to confirm the deletion.
12. Select Administration from the top menu.13. Delete the sample admin’s information:
Click the next to the admin user (Doug Brown), and make the following changes to his informa-tion.
• Personal Information (top of page)a. Change the First and Last Name to admin.b. Delete the information in the Employee ID, and E-mail fields.
• Access tab
a. Change the Login Name to admin.b. Set the Primary Department to Company.c. Clear all Permissions except for Administrator.
• Advanced tabGeneral:
a. Delete the Supervisor by selecting Edit, and then clicking the icon next to the policy entry that displays.
b. Delete the information in the Start Date field by clicking the , and then selecting <None>.
c. Set the Hourly Cost to 0.d. Set the Default Billing Rate to 0.
Removing the Sample Data 95

Other:
a. Set the Hours Per Day to 0.b. Clear all Weekly Days Off.c. Set the Holiday Calendar field to <None>.d. Set the Time Zone to your system default.
Select Save.14. Delete the sample users:
a. On the List Users page, enable the Include sub-departments check box.b. Ctrl-Click these users: Sally Green, Sam Pole, Frank Young, Andy Anderson, Jimmy Tan-
go, Mark Robbins and Rob Jones.c. Select Delete, and then select Yes to confirm the deletion.
15. Delete the sample departments
a. From the Users/Departments side menu, select Departments.b. Click the Select All heading in the Sub Departments table.c. Select Delete, and then select Yes to confirm the deletion.
16. Select the Logout link at the top of the page.
Time & Attendance EditionIf you installed the Time & Attendance Edition with sample data, follow the instructions below to remove the sample data. You must have a valid Expense module license (Demo or other) to remove this sample data.
1. Log into Web TimeSheet as the Administrator. 2. Select Administration from the top menu.3. Delete sample historical timesheets:
a. Select Historical Timesheets from the side menu.b. Select <All> for all Basic filters, and click Apply.c. Enable the Select All check box at the bottom of the list.d. Select Delete, and then select Yes to confirm the deletion.e. Repeat Step b to Step d until all sample timesheets have been removed.
4. Delete the sample historical expenses:
a. Select Historical Expenses from the side menu.b. Complete Step b to Step d from Step 3 above, and repeat these steps until all expense
sheets have been removed.5. Delete the sample historical time off:
a. Select Historical Time Off from the side menu.b. Enable the Include sub-departments check box.c. Repeat Step c to Step d from Step 3 above, and repeat these steps until all time off bookings
have been removed.6. Delete references to sample users from the approver types:
a. Select Approver Types form the Approval Setup side menu.b. Select the icon next to Payroll.c. On the Edit Approver Type page, change the Approver option to Supervisor.
Removing the Sample Data 96

d. Select Save.7. Delete the sample user defined fields:
Select User Defined Fields from the Users/Departments side menu, and delete the following by selecting each corresponding icon:
• On the Timesheet tab, under the:• Timesheet (Row Level) heading, delete the Shift field• Timesheet (Hour Level) heading, delete the No. of Calls field
• On the User tab, delete the:• Normal Shift field• Title field• Location field
Select Yes to confirm each deletion.8. Delete the sample admin’s information:
Select Administration from the top menu, and click the next to the admin user (Jordan Glass). Make the following changes to his information.
• Personal Information (top of page)
a. Change the First and Last Name to admin.b. Delete the information in the Employee ID, and E-mail fields.
• Access tab
a. Change the Login Name to admin.b. Set the Primary Department to Company, and deselect any Additional Depart-
ments.c. Clear all Permissions except for Administrator.
• Advanced tabGeneral:
a. Delete the information in the Start Date field by clicking the icon and then se-lecting <None>.
b. Set the Hourly Payroll to 0.Approvals:
c. Set the Timesheet and Expense Approval paths to Supervisor.Other:
a. Set the Hours Per Day to 0.b. Clear all Weekly Days Off.c. Set the Holiday Calendar field to <None>.d. Set the Time Zone to your system default.e. Delete the Timesheet Validation Rule by selecting Edit, and then clicking the
icon next to the policy entry that displays.• Time Off tab
a. Deselect each Allowed check box for each time off type.b. Expand the Vacation and Sick policies by selecting their icons.c. Select select the icon next to the Vacation and Sick policy entries.
Select Save.
Removing the Sample Data 97

9. Delete the sample users:
a. On the List Users page, enable the Include sub-departments check box.b. Click the Select All heading in the Users table.c. Select Delete, and then select Yes to confirm the deletion.
You will not be able to delete supervisors via this action.d. To delete the supervisors, repeat Step b to Step c.
10. Delete the sample departments
a. From the Users/Departments side menu, select Departments.b. Click the Select All heading in the Sub Departments table.c. Ctrl-Click Company to deselect it.d. Select Delete, and then select Yes to confirm the deletion.
11. Select the Logout link at the top of the page.
Removing the Sample Data 98

APPENDIX BGlossary
Access Level A term that specifies the type and amount of information a user may see when running reports.
Accrue, Accrual A means for allowing users to accumulate time off over a period of time (by time off code), at a frequency set up by the administrator (either globally or per user). Time & Attendance Edition only.
Activity A method for categorize time users work. In the Project & Billing Edition, activi-ties can be tasks common to multiple projects. For example, a consulting com-pany may have a set of core tasks that must be completed for every project they work on, such as budgeting, design, and testing. Instead of adding these tasks to each and every project they create, the tasks can be defined as activities that users can select when entering time.
Approval Indication that timesheets, time off bookings, and expenses are correct. De-pending on the selected approval process, project leaders, clients, and super-visors can approve, reject and/or comment on items.
Approval Forwarding See Substitute User on page 105.
Approval Path The process by which users' timesheets/expenses are submitted for approval. Approval paths may contain up to five levels, and may include approver types for project leaders, clients, supervisors, and/or other specified users. Approval paths are assigned to individual users in the user profile.
Approval Sequence A term that specifies the order in which approvers will review and approve/reject users' timesheets, time off bookings, or expenses.
Approver Type A term that identifies the approvers used in approval paths. The approver type may be a supervisor, project leader, client, or other individually named user with approval responsibilities (e.g., time off approver).
Arbitrary E-mail Address
An e-mail address that may be entered "on the fly" when a user requests an of-fline timesheet.
ASP Implementation See Replicon-Hosted/SaaS Implementation on page 104.
Audit Trail A means for tracking the timesheet save and approval history. The audit trail keeps a record of every time a timesheet is saved, who saves it, and what the total hours were at the time of the save. It also tracks the approvals (each time the timesheet is edited, approved, or rejected, and which approver performed the edit/approval/rejection).
Banked time Time off awarded to employees in lieu of overtime. Banked time is allotted at the overtime rate (or pay code) specified in the user’s overtime rule. Time can be banked automatically, based on selected conditions in the user’s overtime rule, or it can be user banked, if the user is granted Choice to bank time if possible permission. Time & Attendance Edition only.
Base Currency The default currency used for all cost and time calculations. All costs are con-verted to base currency at the specified conversion rates.
Glossary 99

Based on A mechanism used in users, projects, and permissions to create new profiles based on existing profiles (copying the attributes to save time).
Billable A term that indicates time and expenses will be billed to the client associated with the project.You can "turn off" billing information in the System Preferences, which will hide all billing features across Web TimeSheet. Project & Billing Edition only.
Broadcast An e-mail message sent to all users of Web TimeSheet. Broadcast messages are useful for notifying users of system upgrades, timesheet changes, project status, or news about your organization.
Business Rules Rules that specify how employees' hours will be handled within the timesheet. You can assign specific rules regarding overtime for employees, and set minimum/maximum hours in users' timesheets. Time & Attendance Edition only.
Client A customer associated with one or more projects for billing and reporting pur-poses. Project & Billing Edition only.
Client Billing A means for allocating project time and expenses to individual clients.You can "turn off" billing information in the System Preferences, which will hide all billing features across Web TimeSheet. Project & Billing Edition only.
Closed Indicates when the term for a project/ task, timesheet or expense sheet has end-ed. Users cannot enter time or expenses against closed projects/tasks. Closed time and expense sheets cannot be amended. A closed period indicates the time or expense sheet has been submitted for approval.
Comments Text notes attached to specific time entries in a user’s timesheet to make note of status changes, due dates, or special circumstances related to a specific time entry. Timesheet comments can contain up to 2048 characters.
Copy From A means for copying data from previous timesheets to the current (or future) timesheet.
Currency The currency associated with expenses, costs, pay, and billing amounts.
Daily View The view the user sees when entering time in the In-Out Timesheet format. This view is the only means the user has to enter time when using the In-Out feature.
DCAA Compliance A means for setting up Web TimeSheet to meet the requirements of the De-fense Contract Audit Agency (DCAA) for automated timekeeping systems. DCAA compliance also provides additional controls that will allow your organi-zation to enforce business policies associated with DCAA, such as daily timesheet entry and notifying employees when they have new jobs. Project & Billing Edition only.
Default Rate The rate used to determine the starting value for billing and project costing. In-dividual default rates can be defined for each project, client, and role. Project & Billing Edition only.
Department A division of employees that defines the hierarchical structure, geographic re-gions, or functional groups of your organization. Departments can be assigned to projects/tasks, and can be used to track information for reporting purposes. Departments may contain any number of users, but a user may be assigned to only one department.
Glossary 100

Disclaimer A signature message that appears on the timesheet, expense sheet, and/or ap-proval pages for all users in the system.
E-mail Formula A formula used to automatically generate a user’s e-mail address based on the user’s first and last names. The e-mail formula is created at the system level and applies to all new users entered in the system.
E-mail Notification An automatic e-mail message that reminds users to complete their responsibil-ities. E-mail notifications can be enabled or disabled for specific users or system wide.
Employee Type A group that identifies employees for the purposes of time tracking (full-time, part-time, contract, etc.) and human resources (time off). A user can be as-signed to only one employee type.
Excel An option that allows users to export report data to Microsoft Excel for further editing or review.
Expense A cost incurred from work-related tasks and/or purchases (travel, food, office supplies, etc.). In the Project & Billing Edition, expenses may be non-billable or billable, the latter applying to expenses for a project funded by a specific client.
Expense Columns A means for customizing which columns are available in the user’s expense sheet. Expense columns are set at the system level and are either enabled or disabled.
Expense Summary A summary view of the user’s expense sheet. The summary includes only the most pertinent information, such as billable amounts and reimbursement totals.
Explicit A term that specifies when a user/group has been allowed/denied access to a project or task as an individual. Explicitly allowing or denying access involves adding the name of the user/group to the Allowed or Denied list box on the Edit Project/Edit Task page (also see Implicit on page 102). Project & Billing Edition only.
External E-mail Address
The e-mail address used to send offline timesheets to a user.
Favorites The tasks listed in a user’s task drop-down menu. Favorites may include up to 50 tasks at one time. Favorites usually contain the newest tasks, but users can manage favorites to amend the list. Project & Billing Edition only.
Filter A means for limiting the amount of information displayed on a list page.
Field Selection A means for customizing reports. Field selection allows users to add or remove fields to reports. Each report has a different list of available fields.
Gross The total amount of an expense, including taxes.
Gross-to-Net Formula A formula used to calculate backwards from the gross amount to the net amount (pre-tax) of an expense. This formula applies to flat expenses only (not rated ex-penses such as mileage).
Grouping A means for grouping data for reports, allowing users to view the same informa-tion in various ways. For example, a Project Status report might be grouped first by project, then by task, then by the users working on that task. Subtotals are calculated for each group level, where appropriate. Grouping options are provided with most reports.
Glossary 101

Holiday Calendar A means for defining a set of statutory (civic) holidays and assigning those hol-idays to specific users. Web TimeSheet identifies the assigned holidays in us-ers' timesheets.
Hour Level A term that identifies user defined fields that will apply to individual hour cells on timesheets.
Hours per Day The number of hours that constitutes a single day for a user. Hours per day are used to convert vacation time from hours (entered in the timesheet) to days (days remaining). You can set up hours per day in the System Preferences (system-wide default) and in each user’s profile (overrides default). The Web TimeSheet default is eight hours per day.
Hourly Cost A rate used for reporting purposes to determine project costs. You can set up the hourly cost in each user’s profile in the Administration area. Project & Bill-ing Edition only.
Hourly Payroll The rate used for reporting purposes to determine payroll costs on a project. You can change or edit the hourly payroll in each user’s profile in the Adminis-tration area. Time & Attendance Edition only.
Implicit A term that specifies when a user/group has been allowed/denied access to a project or task as a member of a larger group (user's department or <All>). Im-plicitly allowing or denying access means that the larger group has been explic-itly allowed/denied access on the Edit Project/Edit Task page. Project & Billing Edition only.
In-Out Timesheet A grid format timesheet where you can enter the start and end times when you work during the day.
Internal E-mail Address
The e-mail address used to send Web TimeSheet e-mail notifications to the us-er.
Login Name Formula A formula used to automatically generate a user’s login name based on the us-er’s first and last names. The login name formula is created at the system level and applies to all new users entered in the system.
Mass Update A means for updating the same attributes for many users at once.
Multiple Rates A means for assigning more than one rate to a member of a project team. Mul-tiple rates require a user to select the appropriate rate when entering time against the project tasks. Multiple rates are useful if a single user has multiple responsibilities. You can "turn off" billing information in the System Preferences, which will hide all billing features across Web TimeSheet. Project & Billing Edition only.
Net The amount of an expense before taxes.
Non-billable A term that indicates that time and expenses will not be billed to the client asso-ciated with the project.You can "turn off" billing information in the System Preferences, which will hide all billing features across Web TimeSheet. Project & Billing Edition only.
Not Paid Identifies expense sheets for which the reimbursement amounts have not been paid. The Not Paid button is used to undo the action of marking expense sheets as “paid”. It is NOT used to reverse an actual payment disbursement.
Overdue A term that indicates when timesheets and approvals are past their due dates.
Glossary 102

Overtime Rules Rules that help you specify and modify how your employees will be paid for their overtime hours. This feature accommodates customers who require overtime calculations and rate adjustments. Project & Billing Edition only.
Paid Identifies expense sheets for which the reimbursement amounts have been paid. Paid status appears on the Historical Expenses (admin) and users’ ex-pense status (Waiting for Approval, Approved, Rejected) pages.
Pay Codes Used to label different types of time, such as overtime and double time. Time & Attendance Edition only.
Payment Method The method of payment for an individual expense (e.g., Visa).
Period in View The read-only format used to view an entire period’s entries for the In-Out timesheet. This view is the only means a user has to submit the timesheet when using In-Out.
Permission A term that identifies the individual functions/features to which users may be granted access.
Permission Profile Defines a set of permissions for a specific user. You can assign permission pro-files to users in their user profile.
Pivot Chart Identifies the graphical display of report data available with the pivot reports.
Pivot Report Identifies a type of report that mirrors the functionality in Microsoft Excel. The Pivot reports allow the user to customize the look/feel of the report filters and fields, as well as display report data in a graphical format.
Pivot Table Identifies the spreadsheet style display of report data available with the pivot re-ports.
Print An option that allows users to print timesheets, expense sheets, and reports.
Project A framework (structure) for organizing workgroup tasks. Projects identify the body of work to be completed by a team. Projects can have task assignments at multiple levels. Project & Billing Edition only.
Project Assignment A means for allowing only specific users to enter time against a project in their timesheets. Project assignments apply only to the project at the highest level, and do not automatically carry down to the sub-tasks. A project assignment dif-fers from the project team in that the assignment determines who can work on the project at its highest level, whereas the project team includes all individuals working on the project at all levels of the structure (also see Task Assignment on page 105). Project & Billing Edition only.
Project Cost The internal cost for a project. Project & Billing Edition only.
Project Note A note associated with a project, used to post information and updates about specific projects. Project & Billing Edition only.
Project Rate The default billing rate for a project. The project rate automatically applies to all time entered against the project and its associated tasks. When a project team is initially assigned, each team member will, by default, use the project rate; however, each member’s rate can be changed as necessary. Project & Billing Edition only.
Glossary 103

Project Team A group of users who can work on a project or its associated tasks. Each mem-ber of the project team is assigned a rate that will be used to calculate the cost incurred for the time that user spends working on the project. The project team differs from a project assignment in that the team includes all individuals work-ing on the project at all levels of the structure, whereas a project assignment de-termines who can record time against the project at its highest level (also see Task Assignment on page 105). Project & Billing Edition only.
Project/Task Progress A means for tracking the work progress for individual projects/tasks. Project/task progress is displayed in a progress bar on the Edit Project, Add/Edit Task, Project Structure, and Timesheet pages, as well as in reports. The progress bar includes the actual hours worked (by all users assigned to the project/task), estimated hours, and percentage completed. Project & Billing Edi-tion only.
Quantity The number of “units” used to calculate the total expense amount for rated ex-pense types (e.g., mileage).
Quick Add A means for adding multiple users at once. You need to enter only the most ba-sic user specific information to create individual profiles.
Reimburse A term that identifies expenses for which the user paid out of pocket and re-quires compensation.
Replicon-Hosted/SaaS Implementation
A type of Web TimeSheet implementation in which the application is installed on servers managed by Replicon. The application is available to your users through the Internet, using a web address provided by Replicon or through the Customer Login section of the Replicon website. SaaS stands for Software as a Service.
Reset A means for resetting the number of time off days to which users are entitled over a period of time. For example, a company may allow a user 15 vacation days per year, to be reset (start over) on January 1st each year. The reset fre-quency may vary by time off code (global) and user. Time & Attendance Edition only.
Role A term that identifies a type of work charged at a specific rate. A role can de-scribe a specific action/function or a level of expertise within the project team. Roles are initially created globally, then assigned to a project and appropriate project team members. You can "turn off" billing information in the System Pref-erences, which will hide all billing features across Web TimeSheet. Project & Billing Edition only.
Role Rate The rate associated with a specific role. Role rates are defined at the global lev-el, but can be changed from within a project. Because each project owns its rates, changes made outside a project will not affect the rates within the project. You can "turn off" billing information in the System Preferences, which will hide all billing features across Web TimeSheet. Project & Billing Edition only.
Roll-up A system-wide option that allows your organization to automatically calculate estimates (hours and cost) based on the lowest level tasks in a project hierar-chy. Rolled up values appear in reports and on the Project Structure page. Project & Billing Edition only.
Row Level A term that identifies user defined fields that will apply to individual rows on timesheets.
Glossary 104

Seat An individual unit of a license key that can be assigned to a user to provide ac-cess to either the Project & Billing Edition or the Time & Attendance Edition, or the Expense module.
Seat Assignment A means for allocating use of an edition or the Expense module to one or more users.
Self-Hosted Installation
A type of Web TimeSheet implementation in which you install and manage the application and database within your organization. It is installed using a file pro-vided by Replicon and the application is available to users through your net-work.
Standard Timesheet A term that identifies the traditional timesheet format, where a user enters the total hours worked per day.
Substitute User A user authorized to manage tasks on behalf of another user. Each user can have multiple substitutes with different permissions. Each substitute user’s per-missions are determined by the user who sets up the substitute.
Tag A macro that batches information into a list (miniature report) within an e-mail notification. Tags are listed at the bottom of each e-mail notification template with a definition that explains its use.
Task Identifies a level within a project. A single project may have many tasks and up to ten levels. Project & Billing Edition only.
Task Assignment A means for allowing only specific users to enter time against a particular task in their timesheets. Task assignments apply only to a single task within the project structure and do not automatically inherit from the project or carry down to the sub-tasks (also see Project Assignment on page 103). Project & Billing Edition only.
Tax A fee added to the net amount of an expense. You can access the tax feature only if you have a valid license for the Expense module.
Tax Formula A formula used to calculate tax amount based on the net amount of an expense. A separate tax formula is created for each tax code that will be used in the Ex-pense module.
Theme An option that allows you to change the appearance of the timesheet. Users can select a pre-set option, or define their own theme.
Time Off An item that identifies employee time and benefits against which users log their time (vacation, sick days, statutory holidays, etc.). Time off can be enabled/dis-abled at a global level (system wide) or at a user level (e.g., contractors or in-terns may not be allowed to enter vacation). Time & Attendance Edition only.
Timesheet A means for tracking time worked by individual users within an organization. Web TimeSheet allows you to manage time and costs across departments, projects, employee types, and clients.
Timesheet Period A date range that specifies how frequently timesheets are submitted. Timesheet periods should parallel your organization’s pay periods. Timesheet periods can be created for the entire system (all users), employee types and/or depart-ments.
Unsubmit An option that allows a user to recover a timesheet or expense sheet that was submitted in error. The Unsubmit option is available only before a timesheet/expense sheet is approved.
Glossary 105
Usage Statistics Anonymous data about your hardware configuration and Web TimeSheet us-age that is collected by Replicon Inc. (if your organization chooses to partici-pate) to help improve the quality, reliability, and performance for the Web TimeSheet application. The anonymous information obtained from you and oth-er participants is used to improve Web TimeSheet and related services.Replicon does not collect your name, address, or any other identifying informa-tion about your organization - the process is safe, secure, transparent, and com-pletely anonymous.
User Any individual with access to enter data. Any number of user types may be cre-ated (administrator, supervisor, etc.). Each user has a name, a login name, a login password, and a profile.
User Defined Field A custom field used for informational purposes and reports. User defined fields can be formatted for dates, numbers, text, or drop-downs (selection from a list).
User Rate A specific rate defined for a particular member of a project team. The user rate applies only to the selected user and is specific to the project and its associated tasks.You can "turn off" billing information in the System Preferences, which will hide all billing features across Web TimeSheet. Project & Billing Edition only.
Validation Rules Rules let you set the minimum/maximum number of hours that must be on an employee's timesheet in order for it to be considered valid. Time & Attendance Edition only.
Expense features are only available with a valid license for the Expense module.
Glossary 106