€¦ · web viewclick the choose the table or query where the object’s data comes from down...
TRANSCRIPT
5.1
Designing a FormAfter completing this lesson, you will be able to: Create a form using AutoForm.
Create a form using the Form Wizard.
Add controls to a form.
Modify control properties.
Resize and move controls.
Enter records into a form.
Export an Access form to HTML.
When you work with data in Microsoft Access, a form provides a convenient method for entering, editing, and displaying records. Forms allow you to view data one record at a time, in a more attractive format than Datasheet view for tables and queries.
Forms can be created using fields from either a table or a query. The data that is added to the form will be added to the table or query that the form is based on, and vice versa.
Like tables and queries, forms can be opened in two views: Form view, which displays actual data, and Design view, which you use to create or modify the structure of the form. In Design view, you can customize your forms by adding or removing fields, changing the background color or pattern, or selecting from several form layouts.
By using a form, you can reduce the amount of time spent on data entry and improve the accuracy of the data that you enter. In this lesson, you’ll learn how to set forms to accept only certain values or data formats, such as those larger than a specific number or before a certain date. You can also create forms that perform calculations on data, such as multiplying the price of an item by the tax rate to calculate the tax on the item.
To complete the procedures in this lesson, you will need to use a file named Database Fundamentals 05 in the Database Fundamentals Practice folder that is located on your hard disk.
Creating a Form Using AutoFormIn Access, tables are built from fields and records. Similarly, the building block of the form is the control. Controls are more flexible than the fields and records that make up tables. They can contain data, perform an action, or enhance the design of the form by adding graphic elements such as lines or rectangles. You can use many different kinds of controls on forms, including check boxes, rectangles, text boxes, page breaks, option buttons, and list boxes.
The easiest way to create a form based on the table or query that you select is to use AutoForm. Although AutoForm creates forms quickly, this technique does not give you a lot of control over the content or appearance of the form. For example, AutoForm creates a form with controls for all the fields from the table that the form is based on, so you do not have a chance to select fields individually. However, after you create a form using AutoForm, you can modify and enhance the form in Design view.
When a field appears on a form, Access adds two controls to the form: a text box, which displays the data from the field, and a label, which displays the field name or caption for the field. When created from fields in a table or query, labels and text boxes appear together and are usually moved and modified together.
LESSON 5
The View down arrow also allows you to view the form in Datasheet view, which shows you the data in the form as it appears in the underlying table or query.
Labels and text boxes can also be created separately as individual controls.
5.2 Database Fundamentals
When you create a form in AutoForm, you choose only the table that the form will be based on and the layout that the form will have. AutoForm offers three layouts for your form: columnar, tabular, and datasheet.
In columnar layout, only one record can be viewed at a time. Text boxes and their associated labels appear side by side in two columns. The labels appear to the left of each text box and identify the data in the text box.
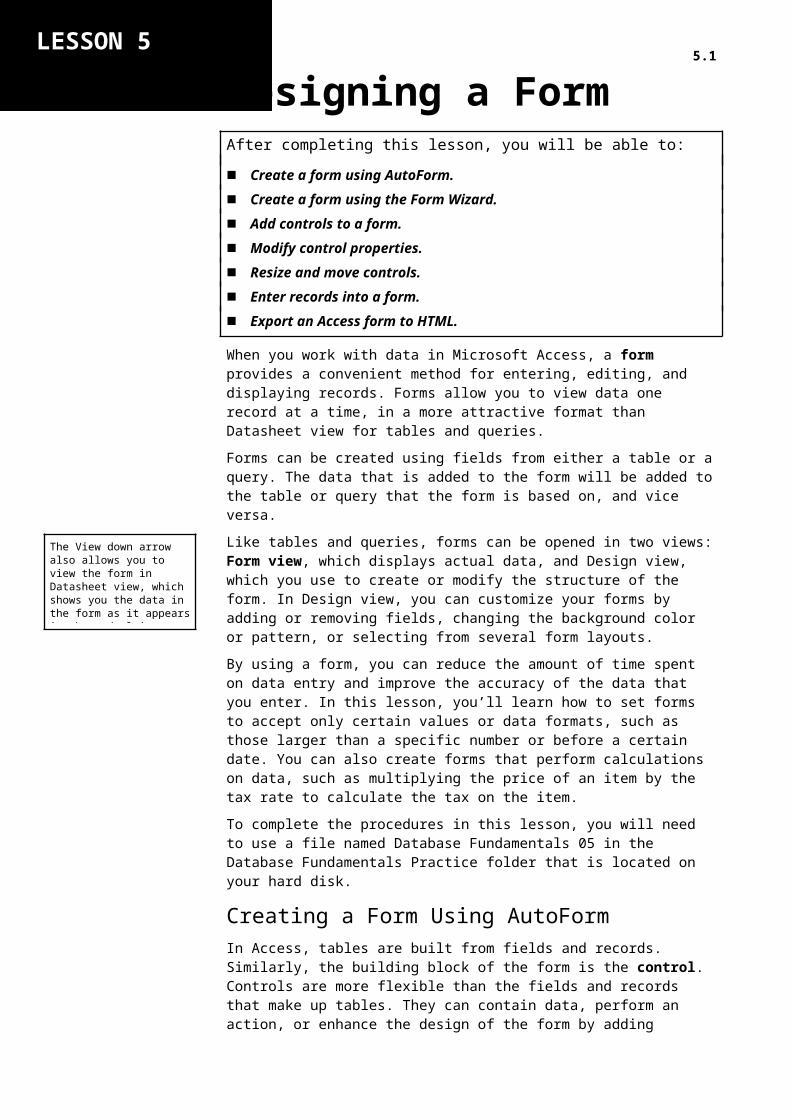
In tabular layout, labels appear across the top of the form, and the values for each field appear in columns below the labels. In tabular layout, more than one record can be displayed at a time.
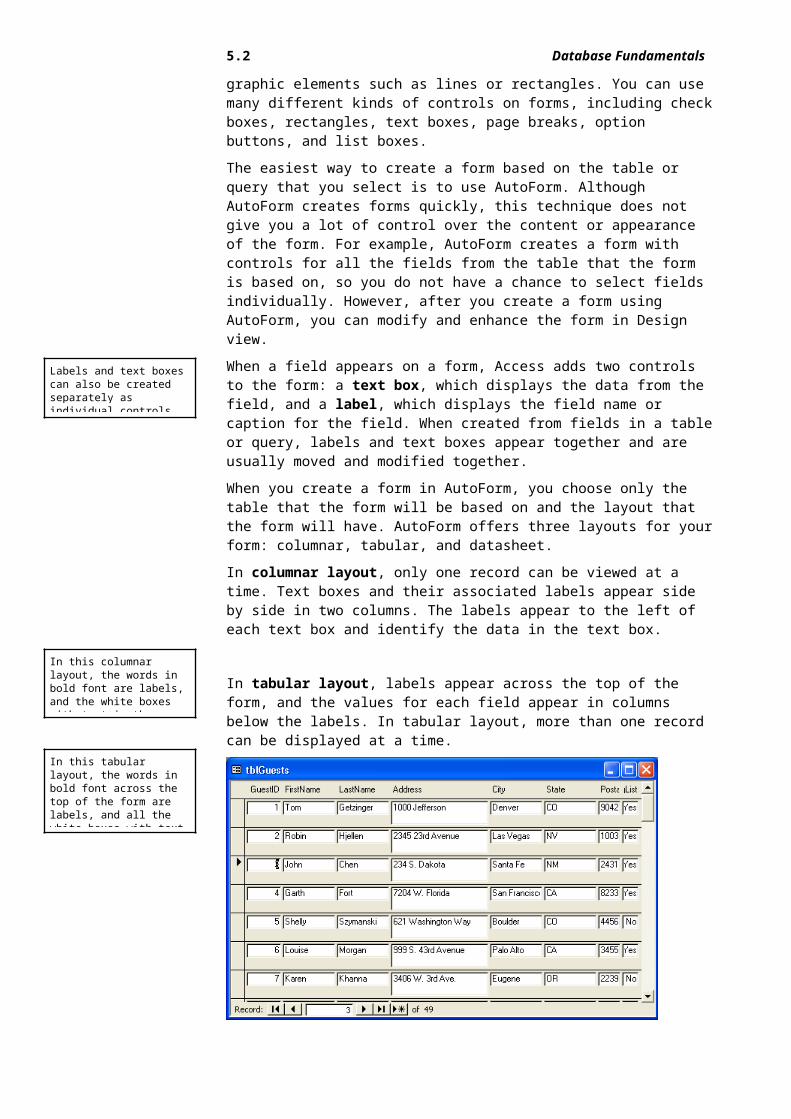
Datasheet layout displays records in columns and rows, so the form looks similar to tables displayed in Datasheet view. Some of the form enhancements available with columnar and tabular layouts cannot be used in datasheet layout. However, forms in datasheet layout still have an advantage over tables in Datasheet view because the forms can be customized in ways that tables cannot.
In this exercise, you open the Database Fundamentals 05 database and use AutoForm to create a columnar form from tblEmployees.
1 With Access open, click the Open button on the Database toolbar.The Open dialog box appears.
2 Click the Look in down arrow, click the icon for your hard disk, and then double-click the Unlimited Potential folder.
3 Double-click the Database Fundamentals Practice folder.
The Open dialog box displays a list of files stored in the Database Fundamentals Practice folder.
In this columnar layout, the words in bold font are labels, and the white boxes with text in them are text boxes.
In this tabular layout, the words in bold font across the top of the form are labels, and all the white boxes with text in them are text boxes.
In this datasheet layout, the words in bold font across the top of the form are labels, and all the white boxes with text in them are text boxes.
Lesson 5 Designing a Form 5.3
34 Click the Database Fundamentals 05 database, and click Open.
The Database window for Database Fundamentals 05 appears.
5 On the Objects bar, click Forms, and click New on the Database window toolbar.The New Form dialog box appears.
6 In the New Form dialog box, click AutoForm: Columnar.
7 Click the Choose the table or query where the object’s data comes from down arrow, and click tblEmployees.
8 Click OK.A form appears that includes all the fields in tblEmployees and shows the data for the first record in tblEmployees.
9 On the Form View toolbar, click the Save button.The Save As dialog box appears with tblEmployees in the Form Name box.
10 Type frmEmployees, and click OK.Access saves the form.
Unless you make changes, AutoForm and the Form Wizard (which is discussed in the next section) give a form the same name as the table that the form is based on. To follow the Leszynski naming convention discussed in Lesson 1, “Understanding Databases,” you need to delete tbl and type frm in the Save As dialog box.

5.4 Database Fundamentals
11 Click the Close button in the top-right corner of the form.The form closes.
Creating a Form Using the Form WizardAnother technique for creating a form is to use the Form Wizard, which offers more options for customization than AutoForm. The wizard walks you through the process of creating a form and allows you to select the fields that you want on the form, the layout that best meets your needs, and the background style that you want your form to have. As with AutoForm, after the basic form is created, you can customize the form in Design view.
The Form Wizard offers the same layout options as AutoForm, plus one called justified layout. Justified layout displays one record at a time, similar to a columnar layout, but the fields appear from left to right instead of top to bottom.
The words in bold font in the shaded areas are labels, and all the white areas are text boxes.

Lesson 5 Designing a Form 5.5
5
In this exercise, you use the Form Wizard to create a form from tblHumanResourcesData.
1 Double-click Create form by using wizard.The first Form Wizard dialog box appears.
2 Click the Tables/Queries down arrow, and click Table: tblHumanResourcesData.The fields from tblHumanResourcesData appear in the Available Fields list.
3 Click the >> (Add All) button.All the fields in tblHumanResourcesData move from the Available Fields list to the Selected Fields list.
4 Click Next.The next Form Wizard dialog box appears, as shown in the illustration on the following page, prompting you to select the layout for your form.
You can also launch the Form Wizard by clicking New on the Database window toolbar and clicking Form Wizard in the New Form dialog box.
When you select a layout, the box to the left of the layout options shows an example of what the layout looks like.

5.6 Database Fundamentals
5 In the list of layouts, verify that the Columnar option is selected, and click Next.The next Form Wizard dialog box appears, prompting you to choose the style for your form.
When you select a style, the box to the left of the style options shows an example of what the style looks like.The style option selected when this dialog box appears is the style option you used the last time you ran the Form Wizard. The style you select in this dialog box will also be the style used the next time you create a form using AutoForm.

Lesson 5 Designing a Form 5.7
7
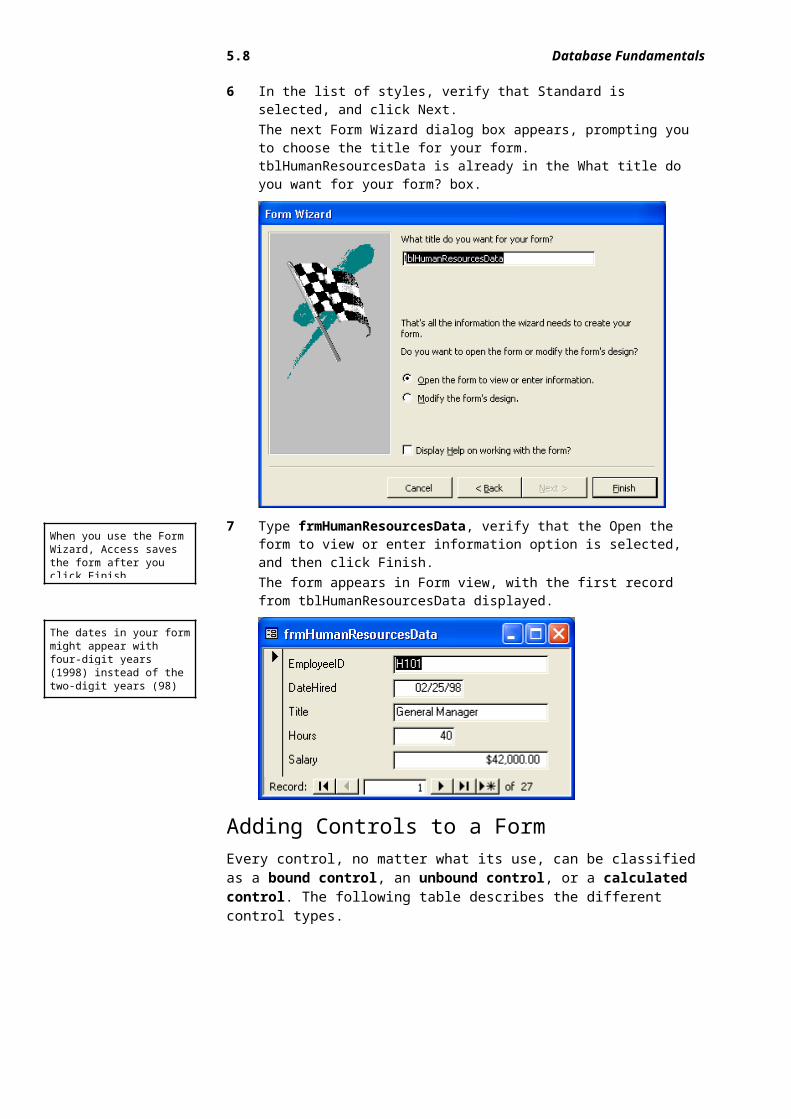
6 In the list of styles, verify that Standard is selected, and click Next.The next Form Wizard dialog box appears, prompting you to choose the title for your form. tblHumanResourcesData is already in the What title do you want for your form? box.
7 Type frmHumanResourcesData, verify that the Open the form to view or enter information option is selected, and then click Finish.The form appears in Form view, with the first record from tblHumanResourcesData displayed.
Adding Controls to a FormEvery control, no matter what its use, can be classified as a bound control, an unbound control, or a calculated control. The following table describes the different control types.
When you use the Form Wizard, Access saves the form after you click Finish.
The dates in your form might appear with four-digit years (1998) instead of the two-digit years (98) shown here.
5.8 Database Fundamentals
Control UseBound Displays data from a field in an underlying table or query.
Unbound Displays information—such as instructions, images, lines, or rectangles—that is not tied to a field in a table or query.
Calculated Displays data calculated from an expression based on fields in a table or query or another calculated control in a form.
The forms that you created earlier in this lesson included two types of bound controls: labels and text boxes. Labels can also be unbound controls, however, and text boxes can be unbound or calculated controls. You can add unbound controls to a form by using the toolbox, which is opened by clicking the Toolbox button on the Form Design toolbar.
You can divide a form into different sections to display controls in different ways. Every form contains a Detail section, which contains the main data in the form. You can also add other sections to your form that display information only in specific parts of the form. If you create a form using AutoForm or the Form Wizard, Access adds a form header and form footer to the form. A form header displays information only at the top of the first printed page of the form, and a form footer displays information only at the bottom of the last printed page of the form.
By contrast, a page header displays information at the top of every page of the form, and a page footer displays information at the bottom of every page of the form. For example, a control in the Page Header section would appear on every page of the form, but a control in the Form Header section would appear only at the top of the first page of the form.
To add or remove a page header, page footer, form header, or form footer, click Page Header/Footer or Form Header/Footer on the View menu when the form is in Design view. You cannot remove the Detail section of the form. To resize a section, move the mouse pointer over any edge of the section until it turns into a resizing double-headed arrow, and drag the edge until the section is the right size.
Each section of a form has a bar above it that contains the name of the section. To select a particular section, click the bar for the section. The bar for a selected section
Page headers and footers do not appear in Form view.
You can add or remove a header and footer only as a pair.

Lesson 5 Designing a Form 5.9
9changes to white text on a black background. For example, in the illustration above, the Detail section is selected.
To select an entire form, you can use the form selector, which is the button to the left of the horizontal ruler in the top-left corner of the form when the form is in Design view.
When the form is selected, the form selector contains a black box, as in the illustration above.

5.10 Database Fundamentals
In this exercise, you add unbound labels to the form header and footer of frmHumanResourcesData.
1 On the Form View toolbar, click the View button.The form frmHumanResourcesData appears in Design view with the toolbar open.
2 Move the mouse pointer over the lower-right corner of the form window until it turns into a diagonal double-headed arrow, and drag the edges of the window down and to the right until the entire form is visible and there is about three inches of space below the Form Footer bar.
3 Move the mouse pointer over the top edge of the Detail bar until the pointer turns into a resizing double-headed arrow, and drag the bar down about one inch.
The toolbox appears as a floating toolbar. You can make the toolbox a docked toolbar by dragging it on top of the other toolbars.

Lesson 5 Designing a Form 5.11
11
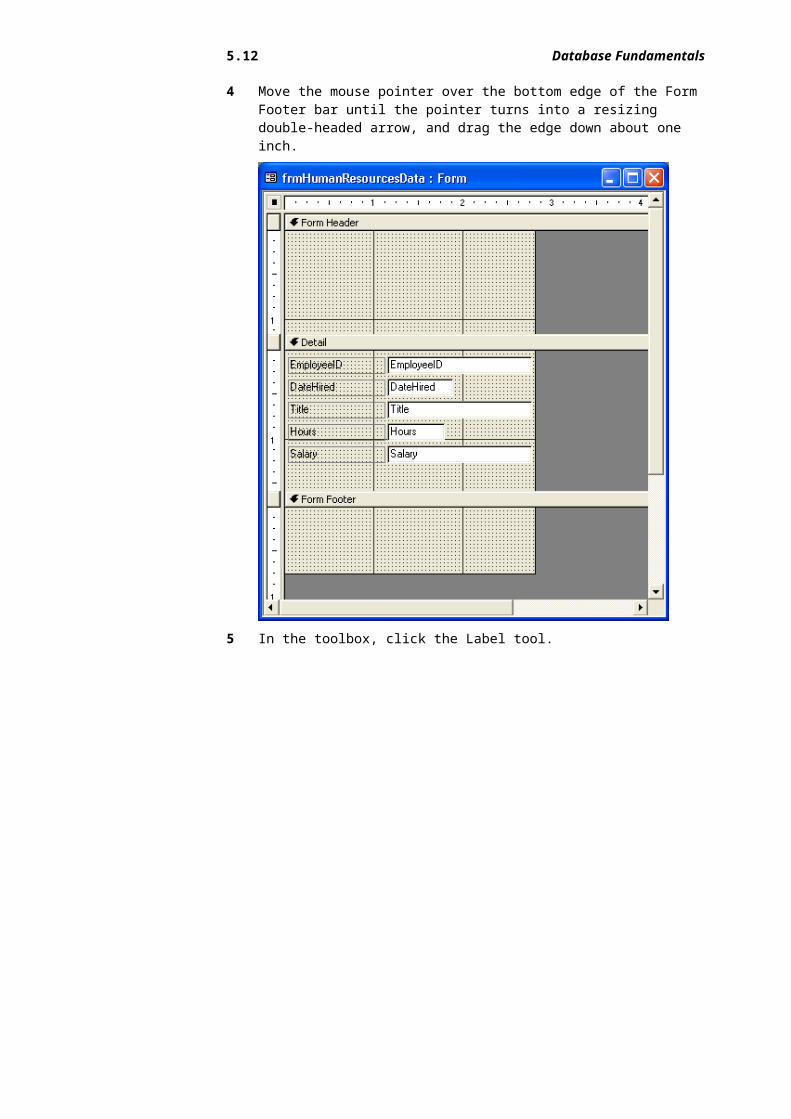
4 Move the mouse pointer over the bottom edge of the Form Footer bar until the pointer turns into a resizing double-headed arrow, and drag the edge down about one inch.
5 In the toolbox, click the Label tool.
5.12 Database Fundamentals
6 Click in the center of the Form Header section about a half-inch from the left edge of the form window, and type Employee Information.

Lesson 5 Designing a Form 5.13
13
7 In the toolbox, click the Label tool, click in the Form Footer section just below the Form Footer bar and about a half-inch from the left edge of the Form window, and then type This information is confidential and should be viewed only by authorized personnel.
The label begins where the plus sign on the mouse pointer is before you click.
Access restricts the line lengths of the text to the width of the form. To set your own line lengths, you can resize the label after you finish typing or you can press Ctrl+Enter at the end of the first line. The length of the first line sets the maximum length of all the lines.

5.14 Database Fundamentals
8 On the Form Design toolbar, click the View button.The form appears in Form view.
Printing a FormAfter you have created a form, you can print it as you would any other database object: click the Print button on the toolbar or click Print on the File menu.
When you print a form, however, you should remember that Access will print all the records in the form. So, if you have 27 records, 27 versions of the form will be printed—one for each record. Unless you are using a very large form, more than one record will fit on a printed page. Depending on the size of your form, Access could print 27 records on any number of pages.
To see how your form will look before it is printed, click the Print Preview button on the toolbar or click Print Preview on the File menu.
Modifying Control PropertiesEvery part of a form has its own set of properties, which are the settings that determine the appearance and data specifications for the form and the controls on the form. You can change the properties for the entire form, for individual sections of the form, or for individual controls. The properties that you can set for forms are similar to the properties that you set for a table or query in the Field Properties section of the Design view window. For example, you can set properties for formatting (such as decimal points or dates), colors, data types, default values, input masks, and Lookup fields.
The form appears with some unused space visible. To eliminate this extra space and make the form as compact as possible, click Size To Fit Form on the Window menu.
By default, Access aligns text to the left and numbers to the right, causing the mismatched alignment in the text boxes seen here.

Lesson 5 Designing a Form 5.15
15Properties can be modified using the property sheet for that part of the form. The property sheet is a dialog box that lists all the available properties for that part of the form and allows you to change them. To use the property sheet for a control, double-click the control, and the property sheet appears. Similarly, to display the property sheet for a section, double-click the section or the bar for the section. To display the property sheet for the entire form, double-click the black box in the form selector.
Many properties that can be changed using the property sheet can also be modified using buttons on the Form Design toolbar. For example, font size and color can be modified using the toolbar. To change the properties for a form or part of a form using the Formatting toolbar, you have to specify which part of the form you want to change. To modify a control, you click the control to select it. When you select a control, little squares called handles appear around the edges of the control, indicating that it is selected.
You can select more than one control by holding down the Shift key and then clicking the controls that you want to select. To select all the controls on a form, press Ctrl+A or click Select All on the Edit menu. To deselect a control, hold down the Shift key and click the selected control. You can deselect all the controls in a form by clicking any blank area in the form.
In this exercise, you use the Formatting toolbar to change the properties for the Employee Information label and the text boxes in the Detail section. Then you use the property sheet to change the properties for the This Information label.
1 On the Form View toolbar, click the View button.The form frmHumanResourcesData appears in Design view.
2 Click the Employee Information label.
Handles appear on the label, as shown in the illustration on the following page, indicating that it is selected.
3 On the Formatting toolbar, click the Font Size down arrow, and click 14.The label font changes to 14 points.
Input masks and default values are discussed in Lesson 3, “Working with Tables.” You can display the property sheet by clicking the Properties button on the Form Design toolbar or clicking Properties on the View menu.

5.16 Database Fundamentals
4 On the Formatting toolbar, click the Font/Fore Color down arrow, and click a purple square.The label font changes to purple.
5 Click any blank area in the form.
Notice that the label is not automatically resized, even though the text is now too large for the label. You will resize the label in the next exercise.

Lesson 5 Designing a Form 5.17
17
6 Hold down the Shift key, and click all the text boxes (not the labels) in the Detail section.
7 On the Formatting toolbar, click the Align Left button.When the form appears in Form view, all the data in the text boxes will be left-aligned.
8 Click any blank area in the form.
9 Double-click the edge of the This Information label.The Label property sheet appears.
Although one handle appears on the top-left corner of the text boxes’ related labels, it does not mean that the labels are also selected; it means that the label is related to the text box, and you can move the label and the text box together.

5.18 Database Fundamentals
10 Click the Format tab, if necessary.
11 Scroll down, click in the Fore Color box, and then click the Build button that appears.The Color dialog box appears.
12 Click the red square, and click OK.The label text will be red.
13 Click the Close button in the top-right corner of the Label property sheet.The property sheet closes. Notice that the text in the This Information label is now red.
14 Click the Form Header bar, click Fill/Back Color down arrow, and click the light blue square.The background of the Form Header section becomes light blue.
15 Click the Detail bar, and click the Fill/Back Color button.The background of the Detail section becomes light blue.
16 Click the Form Footer bar, and click the Fill/Back Color button.The background of the Form Footer section becomes light blue.
17 On the Form Design toolbar, click the Save button.Access saves the form.
Note that the label text appears in the Caption box on the Format tab. You can change the label text by changing the text in the Caption box.
If you click the Fill/Back Color button, the button will use the last color that you selected using the down arrow. In steps 15 and 16, the button uses the same light blue that you selected in step 14.

Lesson 5 Designing a Form 5.19
19
18 On the Form Design toolbar, click the View button.The form appears in Form view.
Resizing and Moving ControlsAs you noticed in the last exercise, if you change the format of text, the label or text box that the text is in does not automatically adjust to the new formatting. In such cases, you need to resize the control manually so that it will display all the text. You might also need to move controls, or change the text in the controls, both of which can be done by using the mouse.
You can also change background color by opening the property sheet for the section that you want to change, clicking the Format tab, clicking in the Back Color box, clicking the Build button that appears, and clicking the color square that you want to use.

5.20 Database Fundamentals
Resizing and moving controls with the mouse requires a little practice. As you move the mouse pointer over a selected control, the mouse pointer changes to allow you to do different things to the control.
Pointer Name Appears If ClickedInsertion point When you move the
mouse pointer over the center of a selected control.
Allows you to edit the control text.
Horizontal, vertical, or diagonal double-headed arrows
When you move the mouse pointer over any of the handles on the edge of the control, except the top-left handle.
Allows you to resize the control in the directions that the arrow is pointing.
Hand When you move the mouse pointer over the edges of a control but between the handles.
Allows you to move the control and its corresponding label or text box.
Pointing hand When you move the mouse pointer over the handle in the top-left corner of the control.
Allows you to move the control without moving its corresponding label or text box.
In this exercise, you use the mouse pointer to resize, move, and change the text in some of the controls in frmHumanResourcesData.
1 On the Form Datasheet toolbar, click the View button.The form frmHumanResourcesData appears in Design view.
2 In the Form Header section, click the Employee Information label.Handles appear on the label, indicating that it is selected.
If a control does not have a related label or text box, you can use either the hand or pointing hand to move the control.

Lesson 5 Designing a Form 5.21
21
3 Move the mouse pointer over the bottom-right handle on the label until it turns into a diagonal double-headed arrow, and drag the edge of the label down and to the right until all the label text is visible.
4 In the Detail section, click the EmployeeID text box (not the label).Handles appear on the text box, indicating that it is selected.
5 Move the mouse pointer over the right-center handle until it turns into a horizontal double-headed arrow, and drag the edge to the left until the text box is the same size as the Date Hired text box.
Although the EmployeeID text box is now too small to display all of the word EmployeeID, it will be large enough in Form view to display the employee ID numbers, which are only four characters long.

5.22 Database Fundamentals
6 Move the mouse pointer over the top edge of the Detail bar until it turns into a resizing double-headed arrow, and drag the edge down about one inch.The size of the Form Header section increases in size.
7 In the Form Footer section, click the This Information label.Handles appear on the label, indicating that it is selected.

Lesson 5 Designing a Form 5.23
23
8 Move the mouse pointer over the edge of the label until it turns into a hand, drag the label to the Form Header section, and then center it under the Employee Information label.
9 On the Formatting toolbar, click the Center button.The text in the This Information label is centered.
10 Move the mouse pointer over the beginning of the text in the This Information label until it turns into an insertion point.
11 Click at the beginning of the text in the This Information label, and type ( (an opening parenthesis).
You could also use the pointing-hand mouse pointer to move the This information label because the label does not have a corresponding text box.
The text in the This information label is centered in relation to the size of the label, not the size of the form or any of the other controls in the form.

5.24 Database Fundamentals
12 Click at the end of the text in the This Information label, and type ) (a closing parenthesis).
13 Move the mouse pointer over the bottom edge of the Form Footer section until it turns into a resizing double-headed arrow.
14 Drag the bottom edge of the Form Footer section up to the Form Footer bar.The Form Footer section is no longer visible.
15 On the Form Design toolbar, click the Save button.Access saves the form.
16 On the Form Design toolbar, click the View button.The form appears in Form view, as shown in the illustration on the following page, with all the data in the text boxes aligned to the left and unnecessary space around the form.
You can also use the property sheet for the form footer to set the Visible property to No so that the form footer is no longer visible.

Lesson 5 Designing a Form 5.25
25
17 On the Window menu, click Size To Fit Form.The unnecessary space disappears.
18 Click the close button in the top-right corner of frmHumanResourcesData.The form closes.
If the form window is max-imized, you cannot use the Size To Fit Form command.

5.26 Database Fundamentals
Creating a Form in Design ViewWhen you use Design view to create a form, you begin with a blank form and add one or more controls to the form. Design view gives you more options for creating custom forms than either the Form Wizard or AutoForm.
If you want to use fields from an existing table or query, you must first set that table or query as the source of the table in the form. You set the source of the form using the Record Source property in the property sheet for the form. After you designate the table or query as the source of the form, a field list appears that contains all the fields from the table or query. You can then drag the fields that you want to use from the field list to the form. Fields that you add to a form in Design view are bound controls because they are based on an underlying table or query.
You can display or hide the field list by clicking the Field List button on the Form Design toolbar. To use a query as a source, click the Build button next to the Record Source box.

Lesson 5 Designing a Form 5.27
27
To create a form in Design view:
1 On the Objects bar, click Forms, if necessary.
2 Double-click Create Form In Design View.A blank form appears in Design view, with the toolbox open.
3 Double-click the form selector.The Form property sheet appears.
4 In the Form property sheet, click the Data tab, click the Record Source down arrow, and then click the table that you want to use as the source for the form.
5 Close the Form property sheet.The field list for the table that you selected appears.
6 Drag the fields that you want to use from the field list to the form.
7 Create additional controls using the tools in the toolbox.
Entering Records into a FormAside from making it easier to view data, the other key advantage of forms is that they make it easy to enter data. Tables and forms are interactive, meaning that entering a record in a table also enters the record into the form based on that table. Likewise, entering data in a form also enters that data into the underlying table for the form. When you enter a new record into a form, the record is saved automatically when you move to another record. Access saves the record even if you close the form without clicking Save.
importantWhen entering or changing data in a form, remember that if data is changed in a form, it is also changed—irretrievably—in the underlying table.
In general, entering data into a form consists of locating a blank record and typing data in it, using the shortcut keys to move from control to control.
You can move to the first blank record by clicking the New Record button in the bottom of the Form window.

5.28 Database Fundamentals
In this exercise, you add a new record to frmVendors, which is based on tblVendors, and check to see if it was also added to tblVendors.
1 On the Objects bar, click Tables.
2 Click tblVendors, if necessary, and click Open on the Database window toolbar.The table opens in Datasheet view. Notice that there are eight vendor records, and the last record is for Clocktower Sporting Goods.
3 Click the Close button in the top-right corner of tblVendors.The table closes.
4 On the Objects bar, click Forms.
5 Click frmVendors, if necessary, and click Open on the Database window toolbar.The form opens in Form view.
6 Click the New Record button.Record 9, the first blank record, appears.
7 In the Vendor ID text box, type RS, and press Enter.The insertion point moves to the Vendor Name text box.
8 In the Vendor Name text box, type Ritzy Restaurant Supply, and press Enter.The insertion point moves to the Vendor Address text box.
9 In the Vendor Address text box, type 15 Elm Street, and press Enter.The insertion point moves to the City text box.
10 In the City text box, type Santa Barbara, and press Enter.The insertion point moves to the State text box.
11 In the State text box, type CA, and press Enter.The insertion point moves to the Zip text box.
12 In the Zip text box, type 80008.
If you want to delete your changes to the current field, press Esc. To delete all the changes in the current record, press Esc twice.

Lesson 5 Designing a Form 5.29
29
13 Click the Close button in the top-right corner of frmVendors.The form closes.
14 On the Objects bar, click Tables.
15 Click tblVendors, if necessary, and click Open on the Database window toolbar.The table appears in Datasheet view. The ninth record is for Ritzy Restaurant Supply, which is the record you just typed into frmVendors.
16 Click the Close button in the top-right corner of tblVendors.The table closes.
Exporting an Access Form to HTMLTo make database objects available to users who don’t have Access or who aren’t used to working with databases, you can save tables, forms, and reports as HTML documents. Users can view HTML documents on the Web or on an intranet—a network within an organization used to share company information and resources among employees—by using a Web browser such as Microsoft Internet Explorer. The standard Access or Microsoft Office 2002 installation includes the latest version of the Internet Explorer Web browser.
Saving a database object in another file format (such as HTML) is called exporting. When you export a table, form, or report to HTML, users can view but not change the data. As a result, you should try to export forms instead of tables because forms are formatted more attractively in HTML than tables. If you export a report to HTML, Access creates a separate HTML document for each printed page of the report.
In this exercise, you export a form to an HTML document named Vendor_List_Form and open that document using Internet Explorer.
1 Display the list of forms in the Database window, and click frmVendors.
2 On the File menu, click Export.The Export Form To dialog box appears.
Remember, Access saves your changes as soon as you complete the record, even if you close the form without saving.
You can view tblVendors without closing frmVendors by clicking the View down arrow and clicking Datasheet view.
HTML files created from database objects aren’t stored in the database. They are saved as separate files in a location of your choice.

5.30 Database Fundamentals
3 Navigate to the Database Fundamentals Practice folder on your hard disk.
4 Click in the File Name box, delete the existing text if any, and then type Vendor_List_Form.The HTML document will be named Vendor_List_Form.
5 Click the Save as type down arrow, click HTML Documents (*.html;*.htm), and then click Export.The HTML Output Options dialog box appears.
6 Click OK.
7 On the Windows taskbar, click Start, point to All Programs, and then click Internet Explorer.Internet Explorer starts.
The Export Form To dialog box may show a different folder than the Database Fundamentals Practice folder. If it shows the contents of the My Documents folder or some other folder, perform step 3. Otherwise, skip to step 4.
The HTML Output Options dialog box allows you to select a template that controls the appearance of the HTML page. If you want to use a template, Click the Select a HTML Template check box to select it, then click the Browse button and (in the standard Access installation) navigate to C:\Program Files\Microsoft Office\Templates\1033\Webs. This path was created with the assumption that your hard disk is drive C.
When you export a database object to HTML, it isn’t necessary to use the Leszynski naming con-vention. However, you shouldn’t include spaces in the name of an HTML file; most Web browsers cannot read file names that contain spaces.

Lesson 5 Designing a Form 5.31
31
8 On the File menu, click Open.The Open dialog box appears.
9 Click Browse.The Microsoft Internet Explorer dialog box appears.
10 Navigate to the Database Fundamentals Practice folder on your hard disk, click Vendor_List_Form, and then click Open.The Open dialog box appears.
11 Click OK.The form appears as an HTML document.
12 Quit Internet Explorer.
You can also display the Open dialog box by pressing Ctrl+O.
The Internet Explorer button might be part of the Quick Launch bar on the Windows taskbar. If so, you can start Internet Explorer by clicking this button.

5.32 Database Fundamentals
Backing Up and Restoring a DatabaseBecause you rely so heavily on the data in Access databases, you should back up your database on occasion. When you save an Access database, you save just one file—the database itself—even though the database contains many tables, queries, forms, and reports. To back up a database, you copy the entire file and then paste it in another location, creating a duplicate of the database. If the data in your original database is accidentally deleted or corrupted, you can restore it using the data in the duplicate.
Though you can back up a database by saving it to another area on your disk drive, the safest backup method is to save the database to a floppy disk, a Zip disk, or using another portable format.
To back up a database:
1 Verify that the database is closed.
2 Navigate to the location where the database is stored.
3 Copy the database.
4 Navigate to the location where you want to store the backup database.
5 Paste the database, creating a backup copy of the original database.
To restore the database from the backup:
1 Navigate to the place where the backup database is stored.
2 Copy the backup database.
3 Navigate to place where you want the restored database.
4 Paste the database, creating a new copy of the backup database.
Lesson Wrap-UpThis lesson covered how to create forms using AutoForm or the Form Wizard, add controls to a form, modify control properties, resize and move controls, and enter records into a form. You also learned how to export a form to an HTML page.
If you are continuing to the next lesson:
■ Click the Close button in the top-right corner of the Database window.The Database Fundamentals 05 database closes.

Lesson 5 Designing a Form 5.33
33
If you are not continuing to the next lesson:
■ To quit Access for now, click the Close button in the top-right corner of the Access window.
Access and the Database Fundamentals 05 database close.
Quick Quiz1 How can you tell when a control is selected?
2 When you move the mouse pointer over a selected control, what does it mean when the pointer turns into a pointing hand?
3 What three methods can you use to create a form?
4 How do you change the font size for the text in a control using the toolbar?
5 What are the two ways to modify control properties?
6 When you enter a new record into a form, what happens to the table that the form is based on?
7 What are the three categories of controls?
8 How do you add a label to a form in Design view?
9 What is the Detail section of a form?
Putting It All TogetherExercise 1: Using AutoForm, create a columnar form based on tblReservations and named frmReservations. Add a label to the form header that says Reservations in 14-point bold text, and resize the label so that all the text shows. In the Detail section, modify the text boxes so that all the text in them is left-aligned and the text boxes are all the same size as the smallest text box. Enter a new reservation for a party of six with Guest ID 4 who will be staying from 2/13/04 to 2/15/04 in Suite 9 with a group discount. Check to be sure that the new information was added to tblReservations.
Exercise 2: Forms can also be based on a query in addition to being based on a table. In this exercise you will create a form based on a query. The tables to be used for the query are the tblHumanResourcesData and tblEmployees. You must first create a relationship between those two tables, using the EmployeeID field as the join field. Save the relationship and then create a query using the query wizard. Select the EmployeeID, Title, and Salary fields from tblHumanResourcesData. Select the LastName, FirstName, and HomePhone fields from tblEmployees. Enter qryEmployeeByTitle when you reach the wizard dialog box that asks for the name of the query. When the query displays in Datasheet view, click the Design button to enter Design view. Click in the Sort row of the design grid for the Title field, and set the sort sequence to ascending. Save the query and switch back to Datasheet view to examine the results. Close the query. Create a form using the Form Wizard and base the form on the qryEmployeeByTitle query. Select all fields to be included on the form, use a Columnar layout, and select any form style you want. Save the form as frmEmployeeByTitle and examine the form in Datasheet view.
Exercise 3: The buyer for Adventure Works wants a form that will list the vendors the resort uses, and the products each vendor provides. This can best be accomplished by creating a form with a subform. This is similar to a subdatasheet you have seen in an earlier lesson. To create this form, you must first create a relationship between the

5.34 Database Fundamentals
tblVendors and tblProducts tables, using the VendorID as the join field. Click the Forms icon in the Database window, and then double-click the Create form by using wizard option. In the Tables/Queries area of the first wizard dialog box, select tblVendors. Add the VendorID, VendorName, VendorAddress, and Zip fields to the form. In the Tables/Queries box select tblProducts, and add the Description field to the form. When you click Next the wizard will ask you how you want to view your form. Be sure that by tblVendors is selected, and that the Form with subform(s) button is selected before clicking Next. Select Datasheet layout and any style of your choice. Name the main form frmVendorsProducts, and the subform frmProductsSubform. When you click Finish the form will open in Dataseheet view. Notice that you have created a form within a form, and each form has its own navigation buttons.
Exercise 4: Take the frmEmployeeByTitle form that you created in Exercise 3 of this lesson and export it as a Web page. Name the HTML file Employee_By_Title. Open the page in Internet Explorer and examine it.