wednesday 3rd march 2021 activity booklet world maths
TRANSCRIPT

Page 0
Wednesday 3rd March 2021 Activity booklet
World Maths
Day!

Page 1
Select an activity to suit you! There are a range to choose from!
Contents: s

Page 2
1. Alligator Maths!
Materials needed:

Page 3

Page 4

Page 5
2.FRACTION FLOWERS
Use paper plates to model cutting into equal parts of a whole!
Colour in the parts and get the chidlren to label them with the numerator and denominator!
Page 6
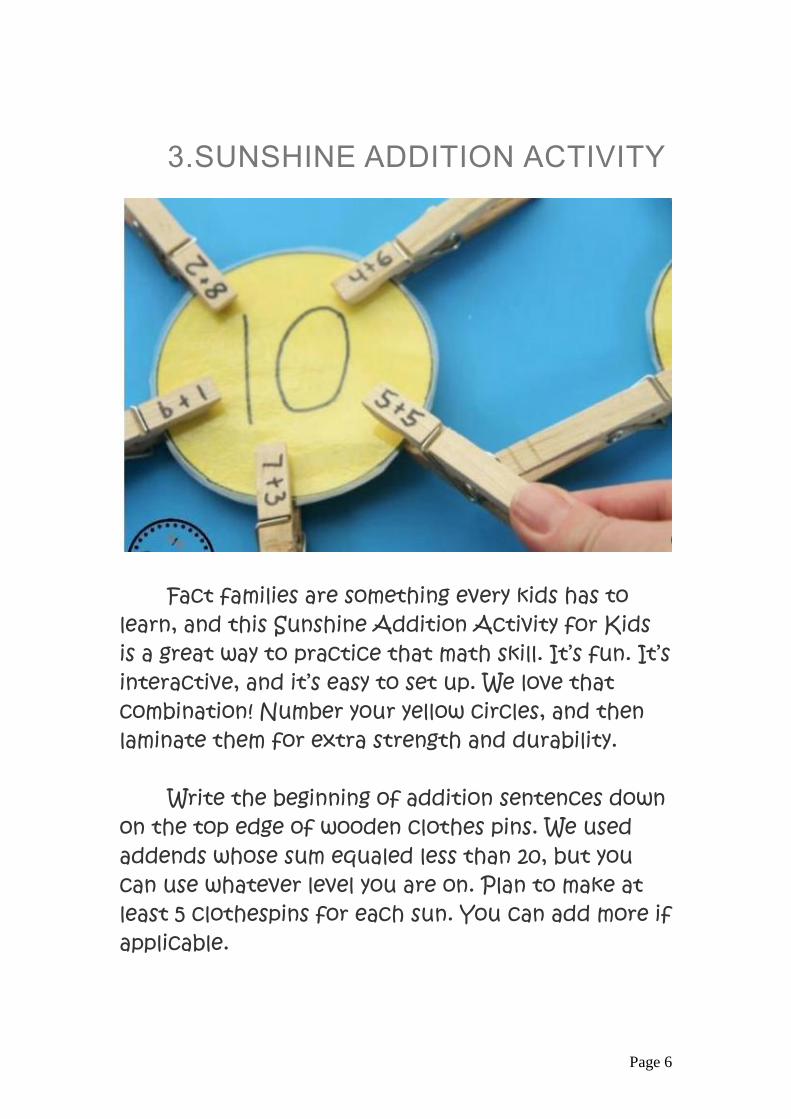
3.SUNSHINE ADDITION ACTIVITY
Fact families are something every kids has to learn, and this Sunshine Addition Activity for Kids is a great way to practice that math skill. It’s fun. It’s interactive, and it’s easy to set up. We love that combination! Number your yellow circles, and then laminate them for extra strength and durability.
Write the beginning of addition sentences down
on the top edge of wooden clothes pins. We used addends whose sum equaled less than 20, but you can use whatever level you are on. Plan to make at least 5 clothespins for each sun. You can add more if applicable.

Page 7
4.MATHS CAR RACING TRACK
Washi tapes in different colours – We used 4 shades ( one for each child)
White Chart paper Marker – 4 ( one for each child) Scissors – 4 ( one for each child) Scale – We used a plastic scale that showed
Centimeters – 4 ( one for each child) Dice – 4 ( one for each child) Cars to race – 4 ( one for each child)

Page 8
1. Distribute the tapes among the children – One for each.
2. Draw a start line & a finish line on the chart paper. 3. Mark the starting points for each child at the
start line. 4. Each child now rolls their dice twice. Then finds
the sum of the two numbers and traces their path by measuring out the number (sum) using a scale in centimetres & washi tape.
5. On each line segment, they recorded the sum next to the tape using the marker.
6. After each line segment, they need to go 90 degrees Left or Right.
7. Paths twist and turn, but they must be connected. The paths children create can intersect with other paths.
8. When the distance between Finish line is less than or equal to 12, they can connect to finish line.
9. Once the racing track is ready, Have each kid measure the length of each line segment, The number of segments, The sum total of all line segments (Relative path)
10. Also measure the shortest path between start point & end point by drawing a straight line.
11. The car whose relative track is the shortest is the winner

Page 9
5.LEARNING CLOCK
One of the most important skills any human should learn is the ability to tell time correctly! With the advent of digital clocks, people are fast losing this skill! This double faced clock that makes it simple to learn the hours and minutes. All you need is:
- Card (different colours) - Split pins - Felt tips
Page 10
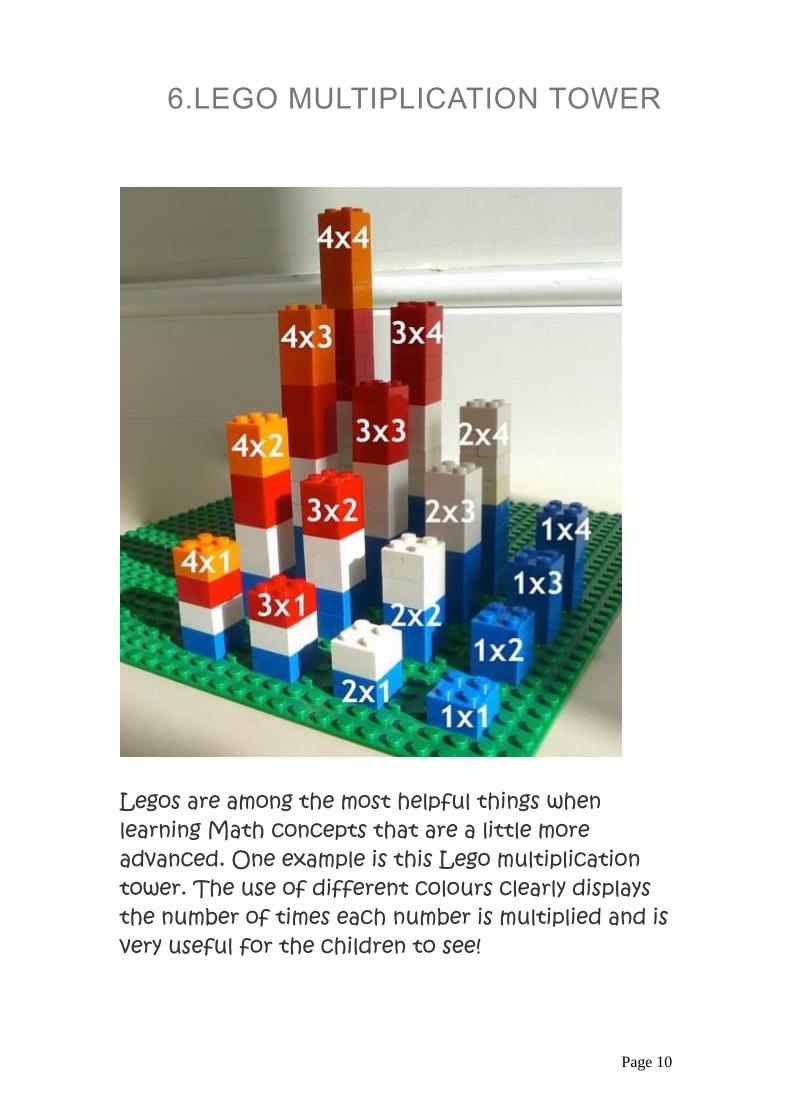
6.LEGO MULTIPLICATION TOWER
Legos are among the most helpful things when learning Math concepts that are a little more advanced. One example is this Lego multiplication tower. The use of different colours clearly displays the number of times each number is multiplied and is very useful for the children to see!

Page 11
7.UMBRELLA COUNTING!
This activity is for the little ones among us. Use your child’s help to make the umbrellas and once everything is set up, start counting! Using different objects like buttons and pipe cleaners make the activity more interesting, and the bright colours also help! You will need:
- Coloured card - Pipe cleaners - Objects to count!

Page 12
8.EQUATION SPINNER CUPS
Now this is one Maths activity that truly takes the cake! Planning Play Time uses lipped and stackable Styrofoam cups to create a custom spinner with numbers and Math signs to make equations. Just spin the cup to get different numbers and facts! The best part is that you can add more cups to make two digit or three digit number equations – cool!
Page 13
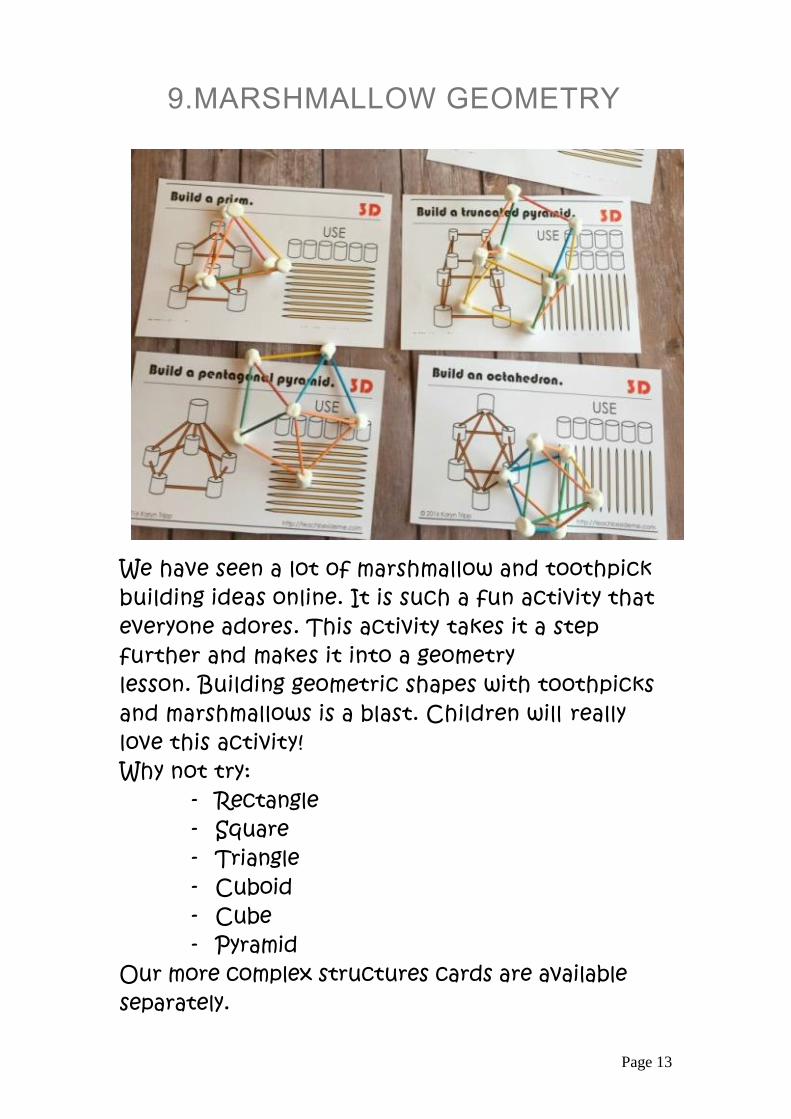
9.MARSHMALLOW GEOMETRY
We have seen a lot of marshmallow and toothpick building ideas online. It is such a fun activity that everyone adores. This activity takes it a step further and makes it into a geometry lesson. Building geometric shapes with toothpicks and marshmallows is a blast. Children will really love this activity! Why not try:
- Rectangle - Square - Triangle - Cuboid - Cube - Pyramid
Our more complex structures cards are available separately.

Page 14
10.FIBONACCI SEQUENCE
Fibonacci and the golden ratio can feel very complex, but not when you look at the art hidden in it! Check out this collection of story books, art projects and fun facts about Fibonacci, which will help children look at it with renewed interest. https://artsycraftsymom.com/fibonacci-storybooks-and-art-projects-for-kids/
Page 15
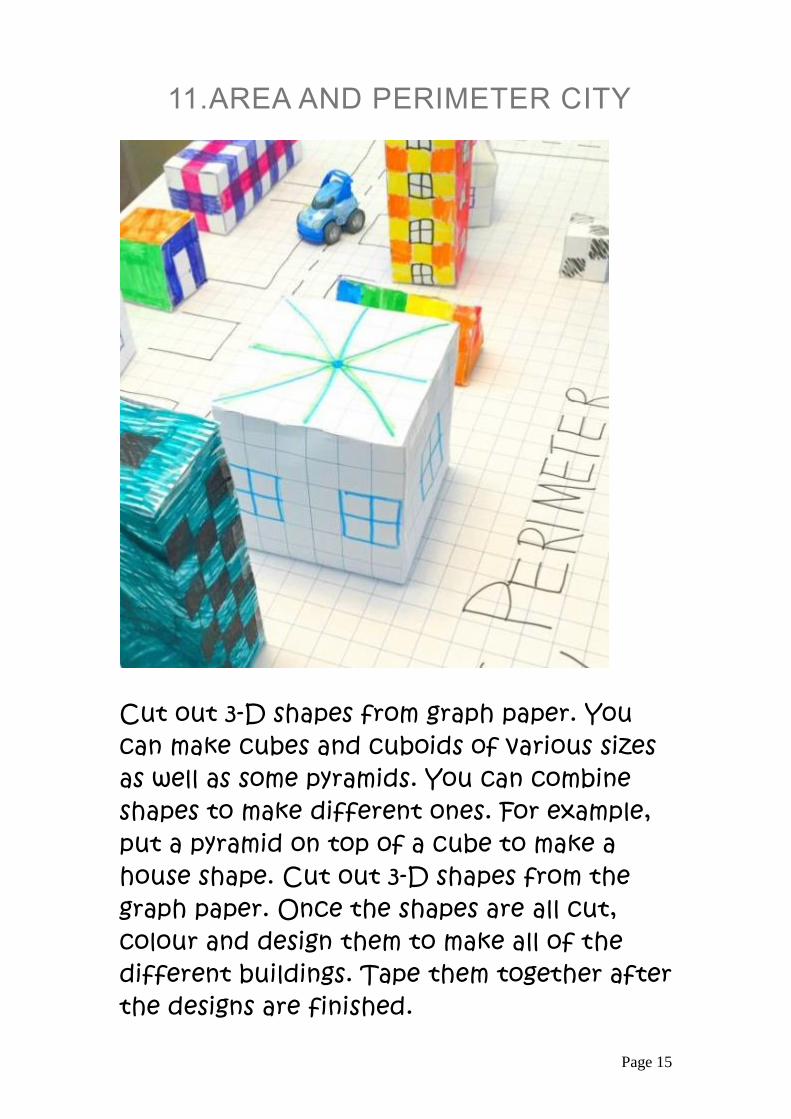
11.AREA AND PERIMETER CITY
Cut out 3-D shapes from graph paper. You can make cubes and cuboids of various sizes as well as some pyramids. You can combine shapes to make different ones. For example, put a pyramid on top of a cube to make a house shape. Cut out 3-D shapes from the graph paper. Once the shapes are all cut, colour and design them to make all of the different buildings. Tape them together after the designs are finished.

Page 16
Arrange the buildings and draw in some roads. Use cars as well!

Page 17
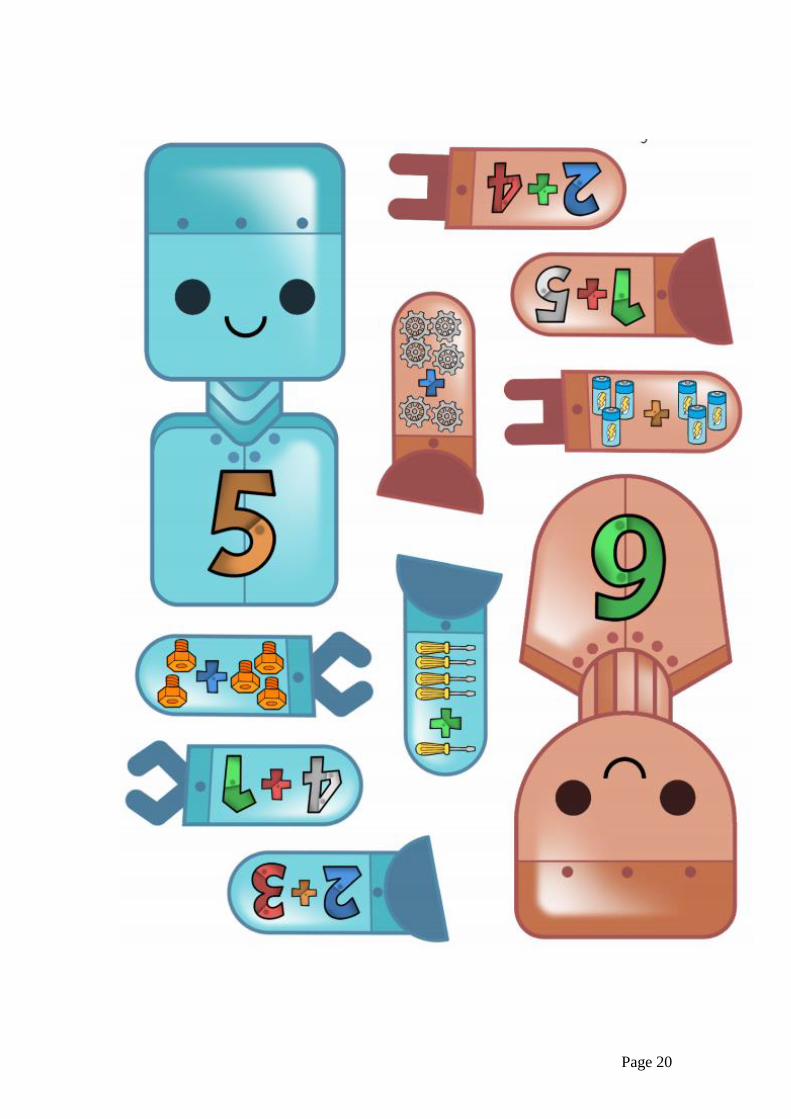
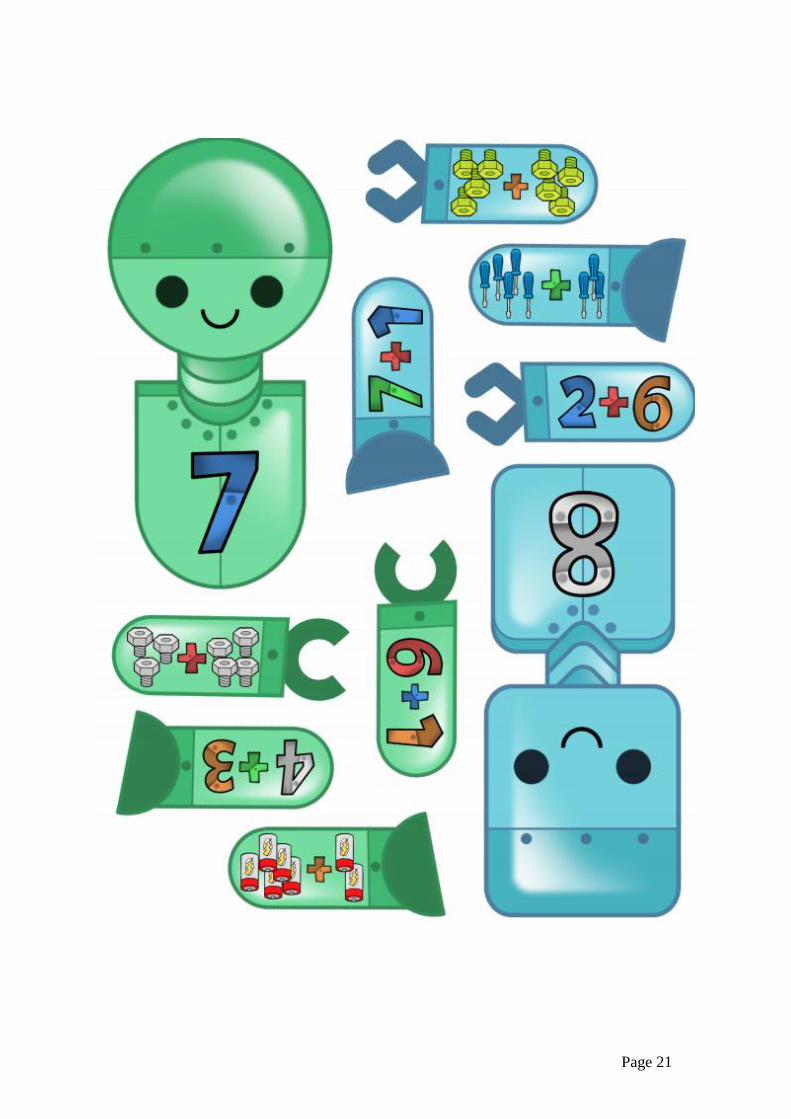
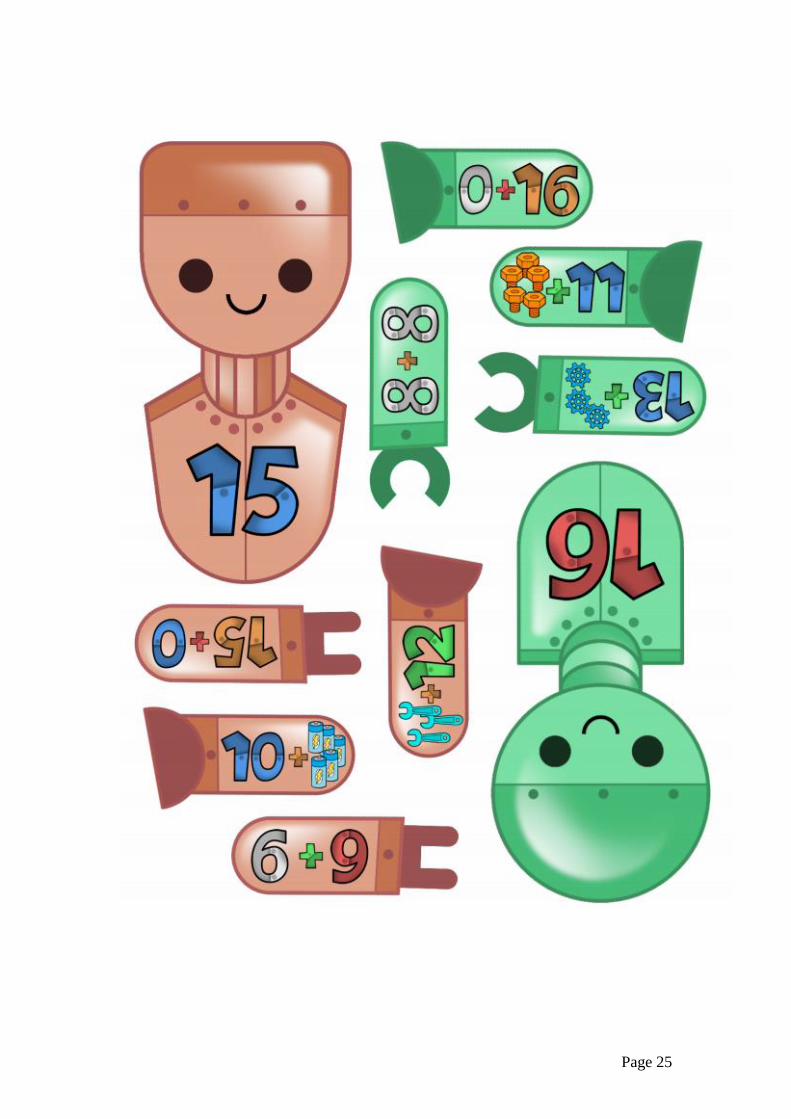
12.BUILD A ROBOT ADDITION MATCH
Children will build the robots by counting the bolts, cogwheels, screwdrivers, batteries and solving addition facts. This set includes addition facts up to 20 so it’s perfect for children who are practising beginning addition up to 10 and those who are working on double digit numbers as well.
Please find the templates below:

Page 18

Page 19
Page 20
Page 21

Page 22

Page 23

Page 24
Page 25

Page 26

Page 27

Page 28
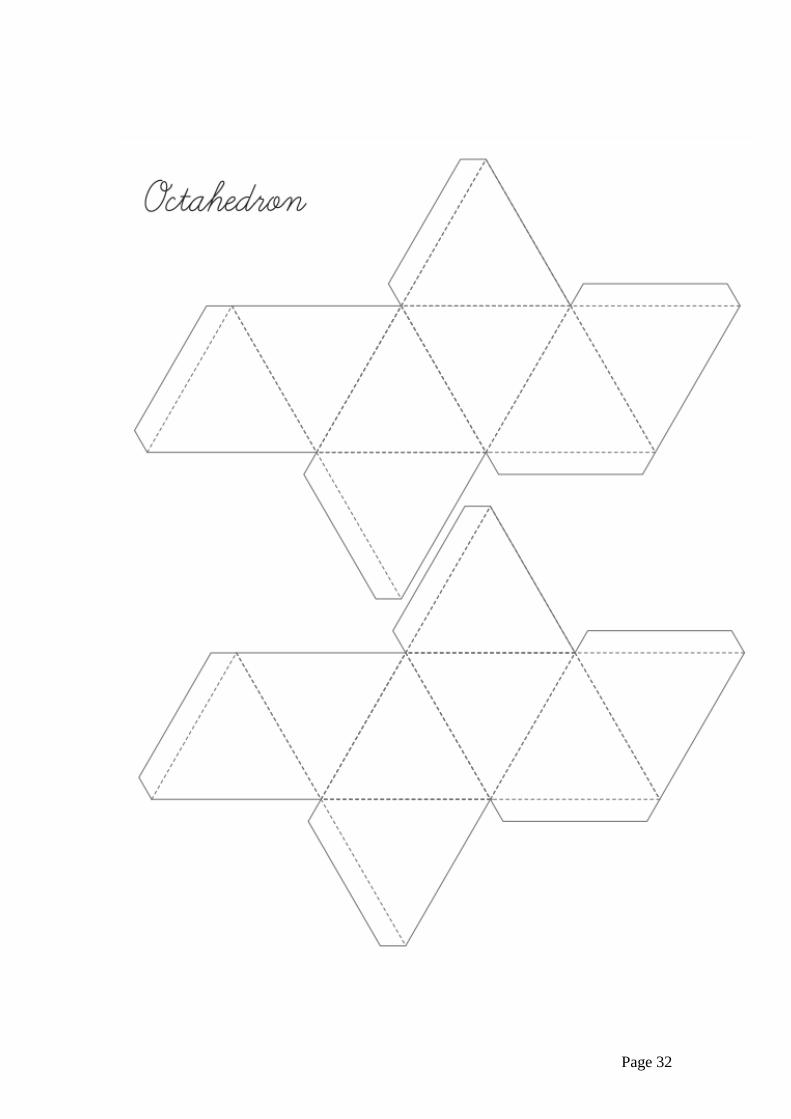
13.PLATONIC SOLIDS GARLAND
Simply score, chop and glue! Templates are on the next few pages. Remember to thread whilst your gluing to make the garland!

Page 29

Page 30

Page 31
Page 32

Page 33

Page 34
14.PIZZA FRACTIONS PLAY SET
1. Every pizza recipe starts with the base, and so will our craft! A brown paper bag works best for this. Cut out a triangle with long sides so that the base of the triangle lines up with the bottom of the brown paper bag. Roll up the bottom part to get that stuffed-crust look

Page 35
2. Even if it isn’t exactly edible, we still like to keep things healthy! Cut out thin strips of green paper and fold them to look like bell pepper slices. Glue the ends together.
3. Let’s add some strong flavors! Cut out onion rings from white textured paper and add details with a pink or purple marker. Cut out little pieces of yellow textured paper to look like cut pineapple. Add tiny ridges to make them realistic.

Page 36
4. Make this pizza heartier with more ingredients! Cut out semi circles from red paper for tomato slices. From the brown paper, cut out little circles for pepperoni and mushroom shapes for, well, mushrooms! Add little details with colored markers.
5. Round up the toppings with little black rings for olives. You can either use ready made black stickers, or make your own with plain black craft paper and a craft punch. Go for slightly glossy paper for luscious-looking olives!

Page 37
6. And what is the one thing a pizza totally, absolutely, definitely needs?? Cheese!! We’ve gone with two kinds of cheese for our pizza, using white and yellow crepe paper cut into thin strips.
7. Wow, that is a lot of ingredients!! Let’s start topping our pizza slice with cheese, followed by the vegetables, pepperoni and finally the olives.
Set up a role play pizza parlour – with a phone and notepad to take orders for delivery, or a table and place settings to serve them in a restaurant. Invite your child to explore and play!

Page 38
15.SKIP COUNTING MATHS CRAFT
Draw, cut out and colour the kite and all the tassels to skip count by the number listed on the kite. Then, cut out the kite and coloured kite tail pieces. Finally, attach a piece of yard to the back of the kite with a piece of tape and then begin attaching the kite tail pieces to skip count in order.

Page 39
16.SIERPINSKI FRACTAL TRIANGLE
What you need: Our tetrahedron template. You will need 16 tetrahedrons to make the basic tree. Paper in any color you wish. Scissors Tape Instructions: Print out the template. Cut out the tetrahedron, fold along the solid lines, fold up into the 3D shape. Tuck in the flaps and tape edges. Tape together 4 tetrahedrons to make one large tetrahedron. Tape 4 large tetrahedrons into a larger tetrahedron. This tetrahedron will be composed of 16 tetrahedrons.

Page 40

Page 41
17.ODD TODD AND EVEN STEVEN ACTIVITY
Ask children to choose a number and count out
the objects (as per picture above). Encourage them to describe the properties and place them in the hands of the correct character!

Page 42
18.MEASUREMENT GARDEN MATHS ACTIVITY
What you need: Yarn Ruler Tape Measure Scissors Small Plastic Bags Craft Paper Glue Pen Tape To prepare write the name of each plant on a plastic bag and put a couple of the seeds inside of it.
Look at the seed packets to find the height each plant will reach. Depending on your child’s age you can have them fill out the seed tags (provided below), you can write it, or you can have it written before the activity. You could write it before the activity and then look at the seed packets with your little one so they can fill out their own seed information to practice writing. They could write on tags and you could place the tags and seeds in a tray or bowl.

Page 43
Have your child measure a piece of string the size stated on each seed tag. Tape the string to the matching labelled plastic bag. Continue until all the plants have been measured. They could lay down next to the string to compare their height to the plants height.
Tape your strings to the wall and make some paper crafts of each plant to put next to it. The chidlren may notice that some of the larger seeds made small plants and some of the small seeds made very large plants.

Page 44
19.CARDBOARD MATHS LEARNING MACHINE A step by step visual guide to making this clever machine on this you Tube link: https://www.youtube.com/watch?v=nSQEOLsGY6M 20.TIMES AND FRACTIONS PAPER GAME
Basically, you start with a square piece of paper and fold the corners into the center. Flip it over and fold the corners into the center again. You then fold it like a hot dog – with the thumb flaps on the outside. Your kids stick their fingers into the flaps and move them to reveal the inside. Your children can lift the inside flaps to see

Page 45
another message. We used Maths as our “messages” inside the classic fortune teller.
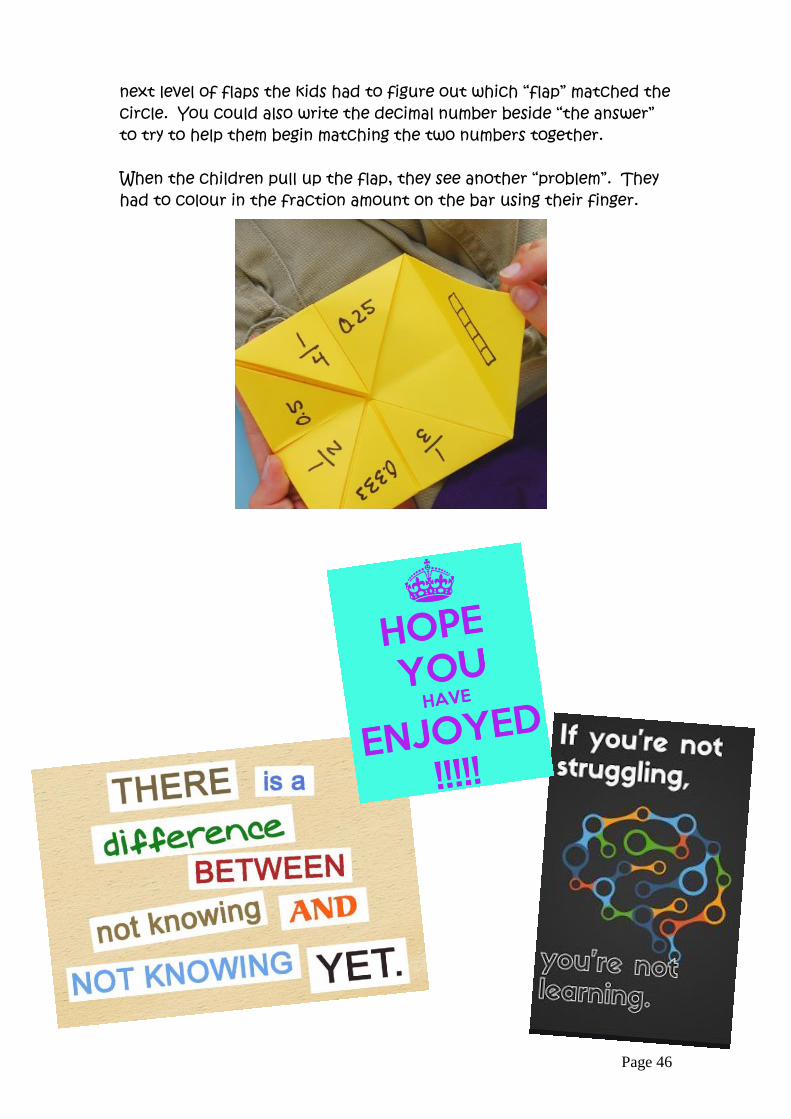
TIMES TABLES GAME For our multiplication cootie catcher, we wrote each “family” of Maths problems on the outer flaps. Inside the flaps we have the numbers written out by skip counting. So as your children move the paper game, they choose between the different “groups” of skip-count numbers. When they lift the flap, there are four multiplication problems for them to solve. PAPER FRACTIONS GAME For the fractions game, draw a circle on each of the four main sections or you could use a bar model. Break the circle apart into “fractions. We did the following fractions on our catcher: 1/2, 1/3, 1/4, & 1/5.
Page 46
next level of flaps the kids had to figure out which “flap” matched the circle. You could also write the decimal number beside “the answer” to try to help them begin matching the two numbers together. When the children pull up the flap, they see another “problem”. They had to colour in the fraction amount on the bar using their finger.