welcome to kronos in the cloud - american...
TRANSCRIPT

Welcome to Kronos in the Cloud For Timberlake Managers and Supervisors at American Woodmark Corp
In this document, you will find instructions for getting started with Kronos in the Cloud. The information here is designed to focus on the basics of getting connected quickly and easily. This user guide is brief because the new interface is so well designed and easy to understand.
Welcome to Kronos in the Cloud — Timberlake Managers and Supervisors Page 1 of 18

Contents What is happening? ...................................................................................................................................... 3
What is changing for me? ............................................................................................................................. 4
New Sign in environment .......................................................................................................................... 4
New Workspace view ................................................................................................................................ 4
Employee Salary Exempt, no direct reports ......................................................................................... 5
Employee Salary Non-Exempt on Computer ........................................................................................ 5
Employee Hourly (FSs & Service Techs) on SmartPhone or Tablet ....................................................... 6
Manager/Supervisor ............................................................................................................................. 6
Manager/Supervisor (FSs & Service Techs) on SmartPhone or Tablet ................................................. 7
Improved processes .................................................................................................................................. 7
Logging in to Kronos-Navigator-SSO ..................................................................................................... 7
Clocking in and out ................................................................................................................................ 8
Requesting time off ............................................................................................................................. 10
Approving timecards ........................................................................................................................... 13
Approving requests ............................................................................................................................. 15
Pro Tips ....................................................................................................................................................... 16
GoTo button group ................................................................................................................................. 16
Gear Icon ................................................................................................................................................. 16
Related Items pane ................................................................................................................................. 17
How do I approve Salary Exempt employee timecards on my iPad or tablet? ...................................... 17
What if I need help? .................................................................................................................................... 18
Kronos Museum online help for AWC .................................................................................................... 18
Job Aids and Announcements ................................................................................................................. 18
Solution Center help ............................................................................................................................... 18
Kronos KnowledgePass online help ........................................................................................................ 18
Welcome to Kronos in the Cloud — Timberlake Managers and Supervisors Page 2 of 18

What is happening? A new version of Kronos is coming to all AWC employees.
About the new version of Kronos: When is it coming? Old Kronos goes off line on 05/11/2015 at midnight EDT.
New Kronos Version 7.0 becomes available on 05/18/15.
What is it? New Kronos is browser-based (Internet Explorer) just like before. New Kronos is on the Cloud, not on an internal AWC server. Starting on 05/18/15, AWC employees who use a computer for Kronos today will log in to the new Kronos version at our AWC Sign-In page using their Windows User name and password https://sts.woodmark.com
Who is it for? All employees, supervisors, payroll and leave processors will use the new Kronos effective 05/18/15.
How is this better? New features: The Kronos version has several new features, like canceling a previously approved time off request. VPN not required: You will no longer need to access Kronos using VPN. As long as you have internet connectivity, you will be able to log into Kronos.
What about Java? To get ready for this change, you will need to get a new version of Java. From now on, the current version of Java will work with Kronos. You will not have to preserve a special version of Java to run Kronos. As long as your Java is up-to-date, Kronos will run normally. Watch your inbox for instructions and information about deleting your old version of Java and installing the current version.
Welcome to Kronos in the Cloud — Timberlake Managers and Supervisors Page 3 of 18

What is changing for me? The following are the new features and process improvements available to Timberlake Managers and Supervisors Kronos users.
New Sign in environment Sign in using a new URL https://sts.woodmark.com
Sign in with your Windows User Name and Password.
Choose Kronos-Navigator-SSO from the drop list, and then sign in.
New Workspace view Kronos calls the user interface display a Workspace. Think of the Workspace as your dashboard display. You can change from one Workspace to another using the Workspaces carousel in the top right of the screen.
Your default Workspace will look something like this:
Welcome to Kronos in the Cloud — Timberlake Managers and Supervisors Page 4 of 18

Employee Salary Exempt, no direct reports
Employee Salary Non-Exempt on Computer
Welcome to Kronos in the Cloud — Timberlake Managers and Supervisors Page 5 of 18

Employee Hourly (FSs & Service Techs) on SmartPhone or Tablet
SmartPhone
Tablet
Manager/Supervisor
Welcome to Kronos in the Cloud — Timberlake Managers and Supervisors Page 6 of 18
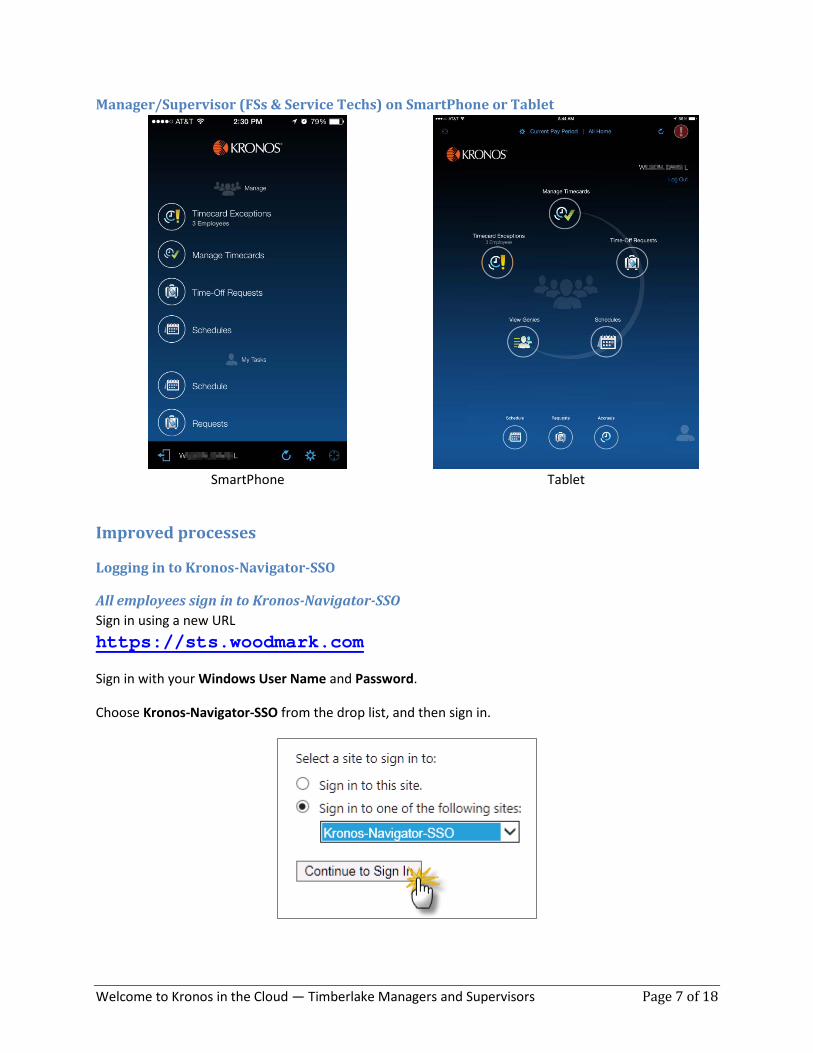
Manager/Supervisor (FSs & Service Techs) on SmartPhone or Tablet
SmartPhone
Tablet
Improved processes
Logging in to Kronos-Navigator-SSO
All employees sign in to Kronos-Navigator-SSO Sign in using a new URL https://sts.woodmark.com
Sign in with your Windows User Name and Password.
Choose Kronos-Navigator-SSO from the drop list, and then sign in.
Welcome to Kronos in the Cloud — Timberlake Managers and Supervisors Page 7 of 18

Clocking in and out
Salary Non-Exempt employee Record Time Stamp on computer
Salary Non-Exempt employee Record Time Stamp on computer
1. Sign in using your AWC Network User Name and Password at https://sts.woodmark.com
2. In the Timestamp widget, click Record Timestamp.
3. Verify that your time has been recorded correctly.
5. Sign Out in the upper left of the browser window.
Welcome to Kronos in the Cloud — Timberlake Managers and Supervisors Page 8 of 18
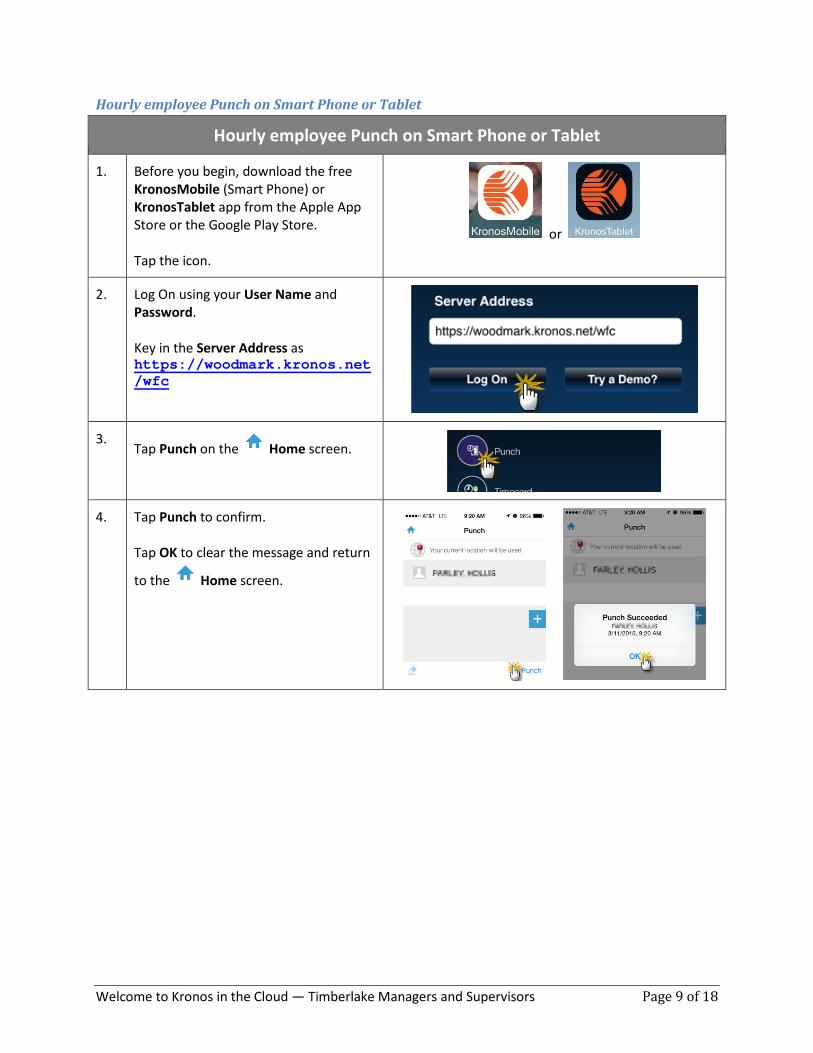
Hourly employee Punch on Smart Phone or Tablet
Hourly employee Punch on Smart Phone or Tablet
1. Before you begin, download the free KronosMobile (Smart Phone) or KronosTablet app from the Apple App Store or the Google Play Store. Tap the icon.
or
2. Log On using your User Name and Password.
Key in the Server Address as https://woodmark.kronos.net/wfc
3. Tap Punch on the Home screen.
4. Tap Punch to confirm. Tap OK to clear the message and return
to the Home screen.
Welcome to Kronos in the Cloud — Timberlake Managers and Supervisors Page 9 of 18

Requesting time off
Any employee Request Time Off on computer
Any employee Request Time Off on computer
1. Sign in using your AWC Network User Name and Password at https://sts.woodmark.com
2. Click Request Time Off in the Calendar widget.
3. Enter the Start date, End date, Pay code, Duration, Start time, and Length for the request,
and then click the Submit button.
4. The Time Off Request appears in the Calendar widget. Hover your mouse over the request to show the function button.
5. To Retract the request, click the function button and then choose Retract. Hover your mouse over the request to show the retraction.
Welcome to Kronos in the Cloud — Timberlake Managers and Supervisors Page 10 of 18

Hourly employee Request on Smart Phone or Tablet
Hourly employee Request on Smart Phone or Tablet
1. Before you begin, download the free KronosMobile (Smart Phone) or KronosTablet app from the Apple App Store or the Google Play Store. Tap the icon.
or
2. Log On using your User Name and Password.
Key in the Server Address as https://woodmark.kronos.net/wfc
3. Tap Requests on the Home screen.
4. Tap the plus sign to add a new request.
5. Tap the checkmark to continue or
tap the X to cancel.
Welcome to Kronos in the Cloud — Timberlake Managers and Supervisors Page 11 of 18

6. Enter a Start Date, End Date, Paycode, Duration, and any Notes for the request.
7. Review the information and then tap Submit.
8. Your new request will appear in the list as Submitted.
Tap the Home button to return to the Home screen.
Welcome to Kronos in the Cloud — Timberlake Managers and Supervisors Page 12 of 18

Approving timecards
Approving timecards
1. Sign in using your AWC Network User Name and Password at https://sts.woodmark.com
2. Expand the Related Items pane by clicking the arrow at the top of the Related Items pane. Click Pay Period Close.
3. Select the employees that need to be approved using the Show feature. Ex: My Direct Reports
4. Review the timecards, update as necessary. Upon completion select all, and then choose Approvals > Approve.
Welcome to Kronos in the Cloud — Timberlake Managers and Supervisors Page 13 of 18
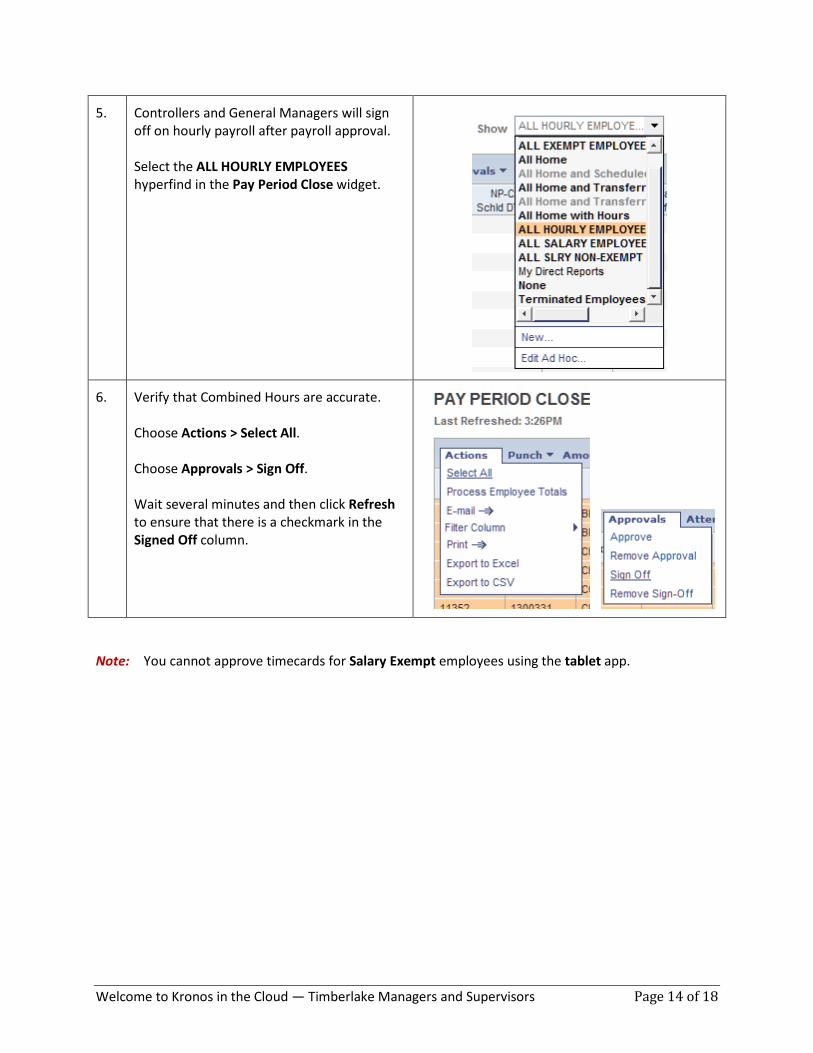
5. Controllers and General Managers will sign off on hourly payroll after payroll approval. Select the ALL HOURLY EMPLOYEES hyperfind in the Pay Period Close widget.
6. Verify that Combined Hours are accurate. Choose Actions > Select All. Choose Approvals > Sign Off. Wait several minutes and then click Refresh to ensure that there is a checkmark in the Signed Off column.
Note: You cannot approve timecards for Salary Exempt employees using the tablet app.
Welcome to Kronos in the Cloud — Timberlake Managers and Supervisors Page 14 of 18

Approving requests
Approving requests
1. Sign in using your AWC Network User Name and Password at https://sts.woodmark.com
2. The Alerts toolbar will display any requests.
Click the Requests button and then click the individual request in the list or click View All. The Request Manager widget opens.
3. Select the request in the list, and then Approve or Refuse the request.
4. In the Approve Time-Off Request window, click Approve to approve the request or Cancel to close the window and return to the Request Manager widget.
The request disappears from the Request Manager after approval.
Welcome to Kronos in the Cloud — Timberlake Managers and Supervisors Page 15 of 18

Pro Tips
GoTo button group
GoTo button group
1. Use the GoTo button group to quickly jump from one widget to another for selected employees.
2. Highlight one or more employees in the widget grid. Click the GoTo button group to display choices for jumping to another widget or workspace.
3. Use the Next and Previous buttons to move from one employee to the next in the widget display.
Gear Icon
Gear icon
1. Use the Gear icon to view options for viewing the widget.
2. Choose Pop-out or Close. Unavailable options will be grayed out. For example, primary widgets cannot use Close or Pop-out.
Welcome to Kronos in the Cloud — Timberlake Managers and Supervisors Page 16 of 18

Related Items pane
Related Items pane
1. Expand the Related Items pane by clicking the arrow at the top. Widget names are clearly readable when expanded.
2. Click a related item to open it as maximized
2. Drag a related item to open it and replace one widget with another.
How do I approve Salary Exempt employee timecards on my iPad or tablet? You cannot approve timecards for Salary Exempt employees using the tablet app.
Welcome to Kronos in the Cloud — Timberlake Managers and Supervisors Page 17 of 18

What if I need help? Help is here for you in several forms.
Kronos Museum online help for AWC The Kronos Museum contains AWC internal processes and procedures for employees, Supervisor/Managers, Payroll, and HR. Information here is AWC specific.
Visit the Kronos Museum at http://help.woodmark.com/Kronos
Job Aids and Announcements Job aids, announcements about the rollout and other updates are on the HR SharePoint site http://woodmark/awc/HRT
• Manager Navigator Job Aid • Reviewing Alerts and Notifications job aid • Job aids for FSs, Service Techs, and their managers
Solution Center help If you have any questions or issues about the program, send a detailed e-mail message to [email protected] describing the issue. Screen shots can be especially helpful when possible.
Kronos KnowledgePass online help Kronos KnowledgePass™ provides workforce training benefits with unlimited 24x7 online access to pre- and post-training, and refresher skills courses.
To open KnowledgePass: 1. Log in to Kronos and click the Workspaces
menu. 2. Click Get Support.
3. In the Related Items pane, open Kronos
KnowledgePass.
4. In the Kronos KnowledgePass tab, click Go
to KnowledgePass.
Kronos KnowledgePass will open in a new browser tap to the welcome screen. You will already be logged in.
Welcome to Kronos in the Cloud — Timberlake Managers and Supervisors Page 18 of 18

Manager Navigator Job Aid Parts of a Navigator
Navigators are customized by
Administrators and reflect those
items needed for a job role. Specific
widgets and alerts that are available
in your navigator are determined by
your access and which applications
are in use.
Navigator layout varies
Hovering for Details
Hover the mouse to see details, where
applicable.
Workspace
Displays one or more
widgets and the
Related Items pane.
Related Items Pane
Includes one or more additional
widgets for less common tasks;
the Related Items pane is
optional and contains different
widgets for each workspace.
Carousel
Container for one or more workspaces
(Note: Carousel appears only if there
is another workspace in addition to
the home workspace.)
Repositioning Widgets
Move a secondary widget into a primary
position by clicking the title bar, dragging it
over a primary widget, and releasing.
Widgets
A widget is a task-oriented tool or view into Workforce
Central. There will be one or two primary widgets,
depending on the workspace—these are widgets you can
use to perform tasks. There may also be one or more
smaller-sized secondary widgets, but normally these are
only for viewing until you swap them into a primary position.
Alerts
Links, which appear as icons,
enabling you to quickly view the
type and number of tasks and
issues that you need to address.
(Note: Alerts are optional)
Name / Sign Out
Identifies user and a link to log
out of navigator.
Active Bar
Displays active workspaces; click
title to bring a workspace into
focus. (Manage My Department
is the only one in this example.)
Workspace Context
Some workspaces allow you to choose a
context – a Time Period and set of
Employees or Locations to use in all
widgets where they apply. If needed,
change the selections and click
the Synchronize icon.
Search
Opens a widget in which you can search on
a wide variety of data types, including
employee names, pay rules, jobs, phone
numbers, exceptions, and more.
© 2014, Kronos Incorporated or a related company. All rights reserved.

Manager Navigator Job Aid Opening Widgets and Workspaces
Active Widgets
Widgets already in an open workspace
appear grayed out in widget list.
Closing the Carousel
Click the Workspaces tab to close
the carousel.
Alert Details
Click an item in the details of an
alert to open the relevant widget.
You can then take whatever
actions are needed in the open
widget. Each category may have
several sub-categories; expand a
sub-category to view the alerts it
contains.
Alert Icons
Each type of alert has its own icon. A number in the
icon’s corner indicates that there are items you should
review. (The significance of the number itself depends
on the specific alert.) Click an icon to view details.
Refresh
Click the Refresh icon to get
immediate updates to your Alerts.
Related
Items
Carousel
Alerts
Additional Workspaces
Click an item in the carousel to open an
additional workspace. To close that workspace
later, hover over its tab and click the Close (X)
button. To refresh its data, click the Refresh
icon.
Activating a Widget
There are two ways to activate a
widget in the Related Items pane.
To add it to the current workspace,
drag it out of the pane and release it
over a widget in the workspace.
To work with the widget in a separate
workspace, click the widget while it is
still in the pane. To close that
workspace later, hover over its tab and
click the Close (X) button.
Closing the Related Items Pane
Click the right arrow to close the
Related Items pane. When closed,
click the left arrow to open it.
Cycling the Carousel
If there is more than one workspace in
the carousel, use the arrows to cycle
through the additional workspaces.
View All
Click View All to open the Alerts
and Notification widget, where you
can review multiple alerts and
their details in a larger work area.
© 2014, Kronos Incorporated or a related company. All rights reserved.

Manager Navigator Job Aid Managing the Active Workspace
Gear Icon
Click to view options for moving
the widget. Unavailable options
will be grayed out. (For example,
primary widgets cannot use Close
or Pop-out.)
Workspace Tabs
Each active workspace gets its own tab. You can switch back
and forth between workspaces by selecting the tab you want to
view. You must always have at least one workspace open, but
you can close any additional workspaces by hovering over its
tab and clicking the Close (X) button. You can also refresh the
data in the workspace by clicking the Refresh icon on the
workspace’s tab.
Secondary
Widgets
Resize Bar
Click and drag the resize bar to reveal
more of a particular secondary widget.
Primary
Widget
Workspace layouts vary. All
workspaces have at least one primary
widget, which is where you do your
work. Workspaces can also have one
or more secondary widgets that you
can choose to promote to the primary
position if you need to work in them.
Primary and Secondary Widgets
Usable Secondary Widgets
In most cases, secondary widgets are
informational only until promoted to a
primary position. However, some
widgets, like My Timestamp, have
functioning parts when in the secondary
position.
Close Option
Select Close to send a secondary
widget back to the Related Items pane.
Pop-out Option
Select Pop-out to promote a secondary
widget to a primary position.
Title Bar
Click and drag a secondary widget’s title
bar to swap its position with another
widget, or return it to the Related Items
pane.
Maximize / Restore Icon
Click to expand a primary widget to its maximum
size. (This will temporarily take over the entire
window.) Click again when maximized to restore
to the original size.
© 2014, Kronos Incorporated or a related company. All rights reserved.

Manager Navigator Job Aid Using a Wizard
A wizard is a specially-designed
widget that guides you through a
series of steps to perform a business
task. Each step presents a
Workforce Central page or widget
relevant to that step, along with
instructions for how to perform that
step. A wizard helps you complete a
task quickly, easily, and consistently.
What is a Wiazrd? Information (Question Mark)
Click the question mark icon to
display helpful instructions for
each step. Click X to close the
information.
Previous Button
Move back to an earlier
step in the wizard.
Workforce Central Page or Widget
Each step in a wizard contains a Workforce Central page
or widget that enables you to complete the step. Perform
any required tasks and then click Next to continue to the
next step. To see helpful information about the current
step, click the step’s question mark icon.
Steps
Each step in the wizard is identified
by its own chevron or tab. In some
wizards you can click a chevron or
tab to go directly to that step.
Related Information
This drop-down list contains links to
Workforce Central pages that might contain
additional information related to the current
step. After viewing the page, click X to
close it and return to the current step in the
wizard.
Next / Done / Clear
Click Next to advance when you are done
with the current step. The final step will
display either Done or Clear. Click Done or
Clear to reset the context and return to the
initial step. You can then use the wizard
again or move on to another task.
Maximize / Restore
It is recommended that you increase your
work area when using a wizard. Do this by
clicking the Maximize/Restore icon in the
widget, or opening the wizard in its own
workspace . Closing the Related Items
pane is also recommended.
© 2014, Kronos Incorporated or a related company. All rights reserved.

Workforce Central® Reviewing Alerts and Notifications
Alerts and notifications
Depending on your job role, you may have access to alerts and/or notifications in your navigator. Alerts and notifications are displayed
at the top of your navigator, in one or more categories. Numbers appearing over the category icons indicate that there are items you
should review at your earliest convenience.
Alerts and notifications behave similarly, but there are a few differences.
Reviewing an alert
A
B
Click the category icon to open the list of alerts in that category.
Alerts are contained within sub-categories. If necessary, click the triangle icon to
expand a sub-category to view its alerts. In this example, there is only one sub-
category (Employee Time Off Request Alert) containing a single alert.
If there is an alert requiring your attention, a number will appear over the relevant
category icon.
Note: Alerts and notifications are automatically updated regularly, but you can
click the Refresh icon to make sure that you are viewing the latest updates.
C Click the alert to open a widget where you can follow up on the alert.
Reviewing a notification
A
B
Click the category icon to open the list of alerts in that category.
Notifications are contained within sub-categories. If necessary, click the triangle
icon to expand a sub-category to view its alerts. In this example, there is only
one sub-category (Timecard Edited by Manager) containing a single notification.
If there is a notification requiring your attention, a number will appear over the
relevant category icon.
C
D Click View All to open the Alerts and Notification Widget.
B
A
B
C
How can I distinguish
them?
Is there a detailed
message I can view?
When does it stop
appearing?
Alert Alerts have no Dismiss (x) icon. No, alerts are brief. Alerts automatically disappear
when the circumstances
generating them no longer apply.
Notification Notifications have a Dismiss (x)
icon.
Yes, notifications can have
more detailed information.
Notifications continue to appear
until you choose to manually
dismiss them.
C
Note: If you have multiple alerts to review, you can click View All to open the
Alerts and Notification Widget, which provides you with more space in which to
look through your categories and sub-categories.
If you would like to open a widget where you can follow up on the notification,
click the notification. Or, if you would like to view more details about the
notification, continue to the next step.
E Click Detail to view more detailed information about the
notification.
F If you would like to open a widget where you can follow up
on the notification, click the notification. Or, if you would
like to permanently dismiss the notification, click its
Dismiss (X) icon.
Note: Some notifications will appear under the Uncategorized
icon; these only appear in the Alerts and Notification Widget, and
do not open a widget when clicked. You should periodically click
View All to see if you have any Uncategorized notifications.
A
D
E
F
© 2014, Kronos Incorporated or a related company. All rights reserved.

When to Cancel a Deduction Normally, you should only cancel a deduction when your manager has given you approval to do so.
Only cancel the deduction when punching Out at the end of your shift, unless your manager has instructed you to do otherwise.
Kronos Tablet Performing Employee Tasks
©2013, Kronos Incorporated or a related company. All rights reserved.
Task Icons Tap one of the circular icons to perform a particular task. For example, to submit or review a time-off request, tap Requests.
If you are making a job transfer, drill down the locations and select the job you will be working. If you are making an account transfer, select the relevant entries. Then tap Done.
3
Logging On When you start the Kronos Tablet app, your iPad connects to your organization’s Workforce Central server, using an IP address you supply. You can then log on using your existing Workforce Central credentials.
Kronos Tablet is a licensed product, but anyone can download and try out the application – search for Kronos Tablet in your iPad’s App Store to get it.
GET THE APP Main Screen Overview
When to Make a Transfer Normally, you should only enter a transfer when your manager is aware that you will be making one.
Select the transfer only when punching In for the transfer; do not select the transfer again when punching Out.
Punch In or Out
On the main screen, select the Punch icon.
1
If you are starting a shift requiring a transfer, select the appropriate type of Transfer. Otherwise, skip to Step 4.
2
If you are working without a break, switch Cancel Deduction to ON.
To enter the punch, tap Punch.
4
Home To back out of making a punch, tap the Home icon instead of tapping Punch. No punch data will be saved.
Bar Code Option If you are transferring to a job with a posted bar code, you can tap the Bar Code button and then scan to enter the transfer.
Context Tap to change the Time Period you are viewing. All information you view will be in this context until you change it.
Punch Tap to punch in or out for your shift. You may be prompted to provide additional information, such as whether you are transferring temporarily to another job or account.
Log Out When you are done, working in Kronos Tablet, be sure to Log Out before you close down the app.
Kronos Tablet Performing Employee Tasks
©2013, Kronos Incorporated or a related company. All rights reserved.
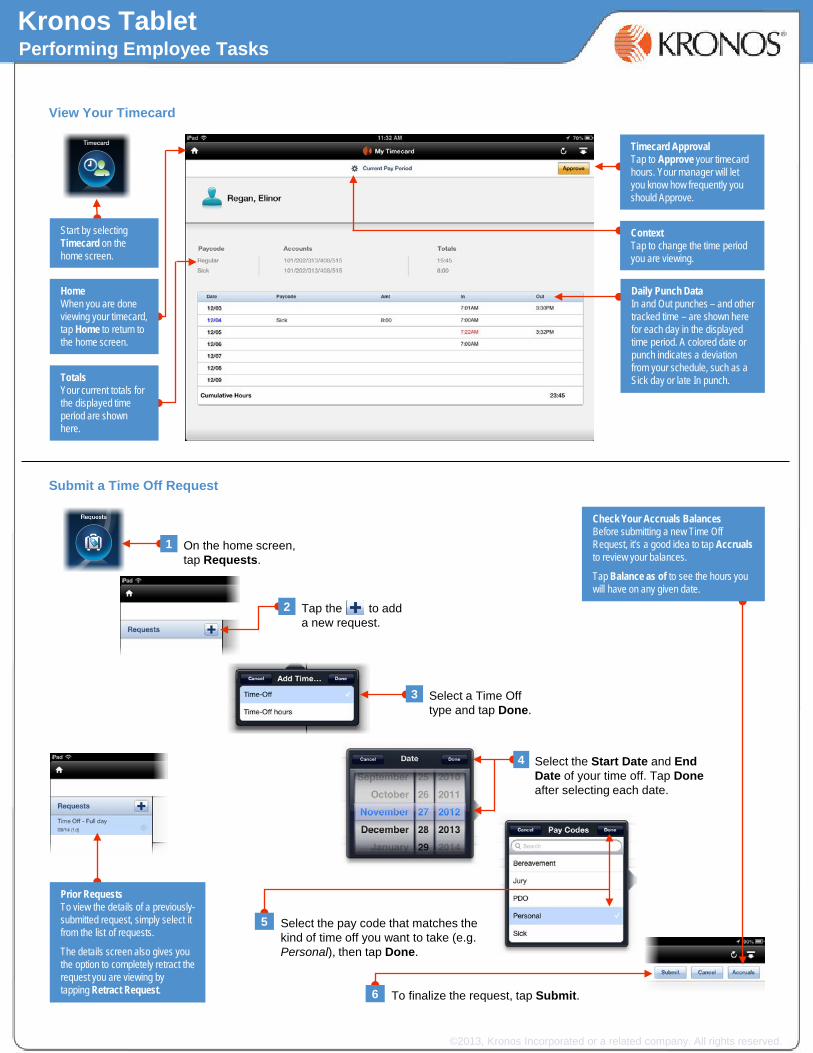
View Your Timecard
Submit a Time Off Request
Tap the to add a new request.
2
Home When you are done viewing your timecard, tap Home to return to the home screen.
Timecard Approval Tap to Approve your timecard hours. Your manager will let you know how frequently you should Approve.
Start by selecting Timecard on the home screen.
Context Tap to change the time period you are viewing.
Totals Your current totals for the displayed time period are shown here.
Daily Punch Data In and Out punches – and other tracked time – are shown here for each day in the displayed time period. A colored date or punch indicates a deviation from your schedule, such as a Sick day or late In punch.
On the home screen, tap Requests.
1
Select the pay code that matches the kind of time off you want to take (e.g. Personal), then tap Done.
5
Check Your Accruals Balances Before submitting a new Time Off Request, it’s a good idea to tap Accruals to review your balances.
Tap Balance as of to see the hours you will have on any given date.
Select a Time Off type and tap Done.
3
Select the Start Date and End Date of your time off. Tap Done after selecting each date.
4
To finalize the request, tap Submit. 6
Prior Requests To view the details of a previously-submitted request, simply select it from the list of requests.
The details screen also gives you the option to completely retract the request you are viewing by tapping Retract Request.

When to Cancel a Deduction Normally, you should only cancel a deduction when your manager has given you approval to do so.
Only cancel the deduction when punching Out at the end of your shift, unless your manager has instructed you to do otherwise.
Kronos Tablet Performing Employee Tasks
©2013, Kronos Incorporated or a related company. All rights reserved.
Task Icons Tap one of the circular icons to perform a particular task. For example, to submit or review a time-off request, tap Requests.
If you are making a job transfer, drill down the locations and select the job you will be working. If you are making an account transfer, select the relevant entries. Then tap Done.
3
Logging On When you start the Kronos Tablet app, your iPad connects to your organization’s Workforce Central server, using an IP address you supply. You can then log on using your existing Workforce Central credentials.
Kronos Tablet is a licensed product, but anyone can download and try out the application – search for Kronos Tablet in your iPad’s App Store to get it.
GET THE APP Main Screen Overview
When to Make a Transfer Normally, you should only enter a transfer when your manager is aware that you will be making one.
Select the transfer only when punching In for the transfer; do not select the transfer again when punching Out.
Punch In or Out
On the main screen, select the Punch icon.
1
If you are starting a shift requiring a transfer, select the appropriate type of Transfer. Otherwise, skip to Step 4.
2
If you are working without a break, switch Cancel Deduction to ON.
To enter the punch, tap Punch.
4
Home To back out of making a punch, tap the Home icon instead of tapping Punch. No punch data will be saved.
Bar Code Option If you are transferring to a job with a posted bar code, you can tap the Bar Code button and then scan to enter the transfer.
Context Tap to change the Time Period you are viewing. All information you view will be in this context until you change it.
Punch Tap to punch in or out for your shift. You may be prompted to provide additional information, such as whether you are transferring temporarily to another job or account.
Log Out When you are done, working in Kronos Tablet, be sure to Log Out before you close down the app.

Kronos Tablet Performing Employee Tasks
©2013, Kronos Incorporated or a related company. All rights reserved.
View Your Timecard
Submit a Time Off Request
Tap the to add a new request.
2
Home When you are done viewing your timecard, tap Home to return to the home screen.
Timecard Approval Tap to Approve your timecard hours. Your manager will let you know how frequently you should Approve.
Start by selecting Timecard on the home screen.
Context Tap to change the time period you are viewing.
Totals Your current totals for the displayed time period are shown here.
Daily Punch Data In and Out punches – and other tracked time – are shown here for each day in the displayed time period. A colored date or punch indicates a deviation from your schedule, such as a Sick day or late In punch.
On the home screen, tap Requests.
1
Select the pay code that matches the kind of time off you want to take (e.g. Personal), then tap Done.
5
Check Your Accruals Balances Before submitting a new Time Off Request, it’s a good idea to tap Accruals to review your balances.
Tap Balance as of to see the hours you will have on any given date.
Select a Time Off type and tap Done.
3
Select the Start Date and End Date of your time off. Tap Done after selecting each date.
4
To finalize the request, tap Submit. 6
Prior Requests To view the details of a previously-submitted request, simply select it from the list of requests.
The details screen also gives you the option to completely retract the request you are viewing by tapping Retract Request.

Kronos Tablet Performing Manager Tasks
©2014, Kronos Incorporated or a related company. All rights reserved.
Logging On
When you start the Kronos Tablet app,
your iPad connects to your
organization’s Workforce Central server,
using an IP address you supply. You
can then log on using your existing
Workforce Central credentials.
Kronos Tablet is a licensed
product, but anyone can
download and try out the
application – search for
Kronos Tablet in your
iPad’s App Store to get it.
GET THE APP Home Screen Overview
Limitations
Some types of exceptions cannot be corrected
in Kronos Tablet. In these cases, you can mark
the exception as Reviewed until you have time
to address it at your PC.
Manage Timecard Exceptions
Alerts
If there are matters requiring your
attention, they will appear as alerts. Tap
the Alerts icon to view all of your alerts.
Save or Cancel
After making edits, tap Save to
finalize your changes or tap
Cancel to discard them.
Start by selecting
Timecard Exceptions
on the home screen.
Mark as Reviewed
Tap to acknowledge that you
have reviewed the exception,
indicating that you either accept
it or will address it later.
Home
When you are done
reviewing exceptions, tap
Home to return to the
home screen.
Employees
Tap a name to view an
employee’s exception
details. The number next
to the name indicates the
number of exceptions.
Set to Schedule
Tap to add a punch that
matches the employee’s
scheduled In or Out time.
Context
Tap to change the time
period or group of
employees you are
viewing.
Select Comment
Tap to add a comment to
the exception.
Log Out
When you are done working in Kronos
Tablet, be sure to Log Out before you
close down the app.
Location
Tap to view your current geographical
location, and assign it a context
(HyperFind and Time Period). In future,
that context will be used whenever you
are in the location.
Employee Task Icons
Tap one of the circular icons in the
Employee section to perform a task
relating to your own time or schedule.
Context
Tap to change the Time Period you are
viewing. All information you view will be
in this context until you change it.
Manager Task Icons
Tap one of the circular icons in the
Manager section to perform a task
relating to the employees you manage.
Select Time
Tap to manually select a time
to use for the In or Out punch.

Kronos Tablet Performing Manager Tasks
©2014, Kronos Incorporated or a related company. All rights reserved.
Manage Timecards
Manage Time-off Requests
Approve or Reject
Tapping Approve okays the
request and adds the time off
to the employee’s schedule and
timecard. Tapping Reject
denies the request. In both
cases, the employee is notified.
Start by selecting
Time-Off Requests
on the home screen.
Request Details
The dates and type of the
request, as well as the job the
employee will not be filling, are
displayed for the selected
request. Note that you cannot
modify request details in the
Kronos Tablet app.
Home
When you are done
reviewing requests, tap
Home to return to the home
screen.
Employees
Tap a name to view an
employee’s request details.
A green check icon
indicates the request has
already been approved.
Select Comment
Tap to select from a list of
comments to explain your
approval or rejection, or reason
for delaying a decision.
Edit
Select several requests to
simultaneously approve or
reject.
Approve
Tap to approve the individual
timecard you are currently
viewing.
Start by selecting
Manage Timecards
on the home screen.
Map / List Toggle
Toggle between viewing
punches in a list or viewing
punches on a map.
Home
When you are done
approving timecards, tap
Home to return to the home
screen.
Employees
Tap a name to view the
details of the employee’s
timecard. Refer to the
nearby key to interpret the
summary icons.
Approve Clean
Tap to approve all timecards
that have no exceptions.
Employee approval
Overtime hours
Timecard exception
View and Sort Options
Toggle the View between all
employees or only those
with exceptions. Sort
employees in alphabetical
order or bring those who
have exceptions to the top.
Exception Details
Tap any exception to view the
details for all exceptions in this
timecard.
Context
Tap to change the time period. Note that
requests appear for the dates they will be
taken, not the date they were submitted.
Context
Tap to change the time
period or group of
employees you are
viewing.
Edit
In Edit mode, select a
group of timecards and
approve them all at once
with Approve Selected.
Add/Edit Punch
Tap a date to add
a new punch. Tap
a punch to edit its
details.

Kronos Tablet Performing Manager Tasks
©2014, Kronos Incorporated or a related company. All rights reserved.
Manage Schedules
Manage Staffing
Coverage Details
Tap a cell to view coverage
details below.
Start by selecting
Staffing on the
home screen.
Home
When you are done
managing staffing, tap
Home to return to the home
screen.
Save
Tap to save your edits. To
cancel unsaved edits, tap
Home instead.
Start by selecting
Schedules on
the home screen.
Edit Indicator
This yellow icon indicates data
that was edited, and will be
discarded if you don’t save.
Home
When you are done
managing schedules, tap
Home to return to the home
screen.
View Indicator
Shows what part of the
schedule you are viewing.
Drag anywhere in the
schedule to move the view.
Now Line
Indicates the current time.
Detail Window
Double-tap a shift to view or
edit its details.
Now
Tap to re-center
the schedule on
the Now Line.
Context
Tap to change the
group of employees
you are viewing.
Action Menu
Tap and hold a shift to bring up
the action menu and select an
edit to make. Or, while still
holding, drag the shift to
reassign it.
Page Curl
Tap to access display options.
Coverage Indicators
Shows the net over-and under-
coverage for all jobs in this
location.
Context
Tap to change the data you are viewing.
You can choose the date, location, zone,
and location type to view.
Pin Toggle
To view two locations at once,
pin one location before
selecting the second location.
Page Curl
Tap to access display options.
Action Menu
Tap and hold a shift to bring up
the action menu and select an
edit to make. Detail Panes
Employees working the
selected location – and
their shifts – are displayed
in these panes below.
Separator Bar
Drag up to get a better view
of the detail panes.
Sort Options
Choose how to sort the
selected locations.
View and Sort Options
Choose to View the
schedule by employee or by
job. Sort employees in
alphabetical order, by Start
Time, or by End Time.
On the Clock Icon
A yellow dot over an
employee icon indicates the
employee is scheduled to be
on the clock at this moment.
Date Range
Tap a date arrow to
move to an earlier or
later range of dates.
Staffing Metrics
The location’s planned
coverage, actual scheduled
coverage, and volume.

Kronos Tablet Performing Manager Tasks
©2014, Kronos Incorporated or a related company. All rights reserved.
Respond to Alerts
Annotate & Share
Start on any screen you want
to share by opening the
sharing options menu and
selecting Annotate & Share.
Cancel
Tap to back out of
annotating (or to start over).
Edit
Tap to select and delete
alerts that are no longer
relevant.
Start by selecting
the Alerts icon on
the home screen.
Sort
Tap to sort alerts
by Time received
or by Priority.
Sharing Options
When you are done annotating,
tap to view your sharing
options, which include saving
the image to your photo gallery
or sending it in an email.
Comments
Tap and hold a screen location,
then select Add Comment to
add a text notation to that
location. To remove a
comment, tap and hold the
comment, then select Remove.
Draw
Draw anywhere on the
screen to highlight items
you want to bring to
attention. To remove your
drawings, tap and hold any
screen location and select
Clear All.
Low Priority
Medium Priority
High Priority
Additional Options
Depending on the type of
alert, you may be given
options for how to follow up
on the alert.
Alert Detail
Tap an alert to view its
details.

Workforce Mobile (Android) Performing Employee Tasks
©2014, Kronos Incorporated or a related company. All rights reserved.
Select a transfer type, select the details, and click Done.
3
When to Make a Transfer Normally, you should only enter a transfer when your manager is aware that you will be making one.
Select the transfer only when punching In for the transfer; do not select the transfer again when punching Out.
Your device may recognize your geographical location and limit your transfer options based on that location.
Punch In or Out
On the home screen, tap the Punch icon.
1
If you are starting a shift requiring a transfer, select Transfer. Otherwise, skip to Step 4.
2
If you are working without a break, tap to enable Cancel Deduction.
To enter the punch, tap Punch.
4
When to Cancel a Deduction Normally, you should only cancel a deduction when your manager has given you approval to do so.
Only cancel the deduction when punching Out at the end of your shift, unless your manager has instructed you to do otherwise.
Home Screen Overview Anyone can download and try out the Kronos Mobile app – check your device’s app store to get it. To log on to your organization’s server, however, you must be granted access.
GET THE APP
Refresh Tap to update the screen with the latest data from the server. It’s a good idea to refresh after making edits.
Location Tap to view your current geographical location. If it is recognized by your organization, the app will use it for punches.
Logging On When you start the Kronos Mobile app, your device connects to your organization’s Workforce Central server, using an IP address you supply. You can then log on using your existing Workforce Central credentials.
Tasks Simply tap a task to drill down and view its details. Scroll down to access more tasks. Depending on your role, some tasks may not be accessible.
Alerts If there are matters requiring your attention, they will appear as alerts. Tap the Alerts icon to view all of your alerts.
Context Tap to change the Time Period you are viewing. All information you view will be in this context until you change it.
Barcode If you are working at a location with a barcode for starting and stopping jobs, you can punch by tapping here and scanning the code.
Workforce Mobile (Android) Performing Employee Tasks
©2014, Kronos Incorporated or a related company. All rights reserved.
Timecard Approval Tap to approve your timecard hours. Your manager will let you know how frequently you should approve.
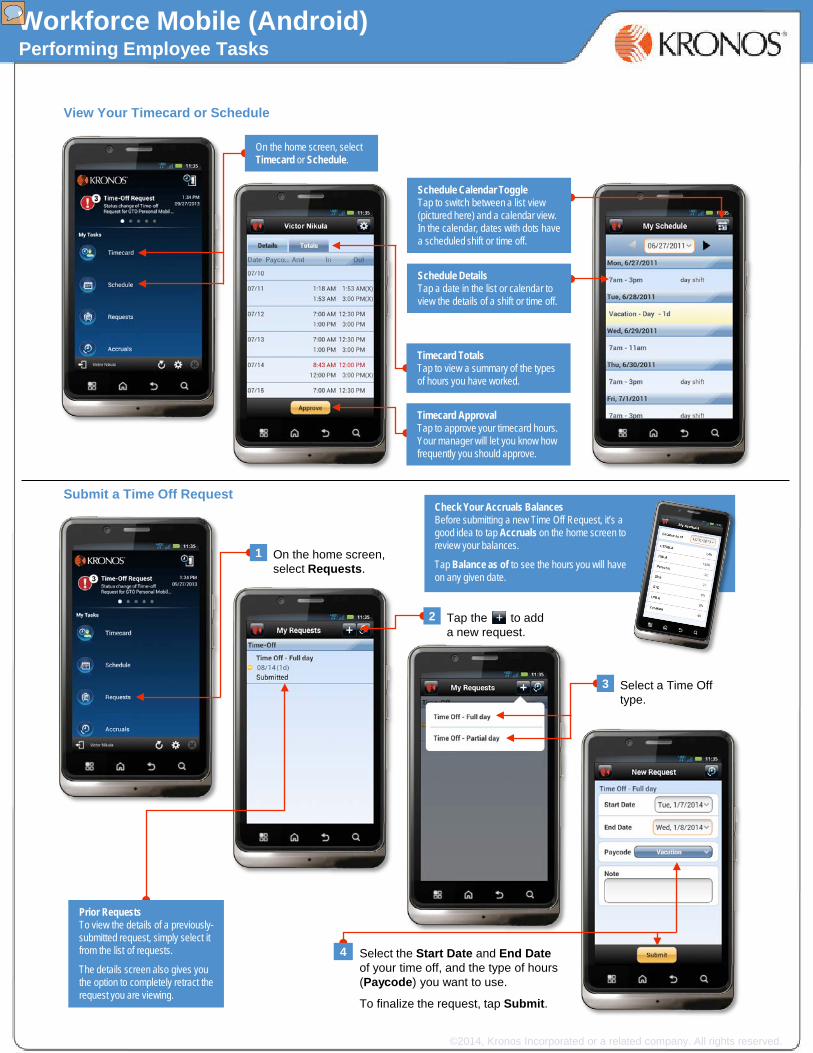
Select a Time Off type.
3
View Your Timecard or Schedule
Check Your Accruals Balances Before submitting a new Time Off Request, it’s a good idea to tap Accruals on the home screen to review your balances.
Tap Balance as of to see the hours you will have on any given date.
Submit a Time Off Request
On the home screen, select Requests.
1
Tap the to add a new request.
2
Select the Start Date and End Date of your time off, and the type of hours (Paycode) you want to use.
To finalize the request, tap Submit.
4
On the home screen, select Timecard or Schedule.
Timecard Totals Tap to view a summary of the types of hours you have worked.
Schedule Calendar Toggle Tap to switch between a list view (pictured here) and a calendar view. In the calendar, dates with dots have a scheduled shift or time off.
Prior Requests To view the details of a previously-submitted request, simply select it from the list of requests.
The details screen also gives you the option to completely retract the request you are viewing.
Schedule Details Tap a date in the list or calendar to view the details of a shift or time off.

Workforce Mobile (Android) Performing Manager Tasks
©2011, Kronos Incorporated or a related company. All rights reserved.
Tap an exception to
review its details.
3
Resolving Exceptions Some exception types, such as missed punches, can be resolved in Workforce Mobile. Tap the exception and select a time.
Other types of exceptions must be resolved from your PC.
Manage Timecard Exceptions
On the main screen, select
Timecard Exceptions.
1
Tap a name to view that
employee’s exceptions.
2
To mark the exception Reviewed, XXX and
tap Reviewed).
4
Timecard Exceptions Alert The Alert under Timecard Exceptions tells you how many employees have exceptions that need your review.
Exception Count The number next to each employee’s name tells you how many un-reviewed exceptions that employee has.
Context Tap to change the Time Period you are viewing, as well as the group of employees you are viewing (if you are a manager). All information you view will be in this context until you change it.
Logging On When you start the Workforce Mobile Application, your device connects to your organization’s Workforce Central server, using an IP address you supply. You can then log on using your existing Workforce Central credentials.
Workforce Mobile Employee and Workforce Mobile Manager are licensed products, but anyone can download and try out the Workforce Mobile application – check your device’s App Store to get it.
GET THE APP
Tasks Simply tap a task to drill down and view its details. Scroll down to access more tasks. Depending on your role, some tasks may not be accessible. Alerts
Certain tasks display a summary message to alert you that your attention is needed. Tap the task to see the details and address the situation.
Main Screen Overview

Workforce Mobile (Android) Performing Manager Tasks
©2011, Kronos Incorporated or a related company. All rights reserved.
Manage Time-Off Requests
Approve Timecards
On the main screen, select
Time-Off Requests.
1
Approval Alert The Alert under Approve Timecards tells you how many employees have approved their own Timecards.
On the main screen, select Approve Timecards.
Edit Optionally, tap to select specific Timecards for approval.
Employee approval
No employee approval
Timecard exception
Overtime hours
All / Approved Only toggle Tap to display all Timecards, or only Timecards with Employee Approval.
Timecard Details Tap a name to view that employee’s timecard (and approve it individually, if you choose).
Requests Alert The Alert under Time-Off Requests tells you how many Time Periods have requests requiring your attention.
Tap a name to view
request details and
Approve or Reject.
3
Reviewed Requests Requests you have already reviewed appear in green.
Review the request
details and tap
Approve or Reject.
4
Edit Optionally, tap to select specific requests for approval or rejection without viewing details.
Select a Time Period to view. (Only time
periods with requests
can be selected.)
2
Approve Clean Tap to approve all Timecards that have no potential issues.
Name / Exceptions toggle Tap to sort Timecards alphabetically by Employee, or to display Timecards with potential issues at the top.

Workforce Mobile (BlackBerry) Performing Employee Tasks
©2014, Kronos Incorporated or a related company. All rights reserved.
Menu Use the menu button to access additional functions.
Tasks Select a task to drill down and view its details. Scroll down to access more tasks. Depending on your role, some tasks may not be accessible.
Logging On When you start the Kronos Mobile app, your device connects to your organization’s Workforce Central server, using an IP address you supply. You can then log on using your existing Workforce Central credentials.
Anyone can download and try out the Kronos Mobile app – check your device’s app store to get it. To log on to your organization’s server, however, you must be granted access.
GET THE APP
Alerts If there are matters requiring your attention, they will appear as alerts. Select the Alerts icon to view all of your alerts.
Home Screen Overview
When to Make a Transfer Normally, you should only enter a transfer when your manager is aware that you will be making one.
Select the transfer only when punching In for the transfer; do not select the transfer again when punching Out.
Punch In or Out
On the main screen, select Punch.
1
If you are starting a shift requiring a transfer, select Transfer. Otherwise, skip to Step 4.
2
If you are working without a break, switch Cancel Deduction to ON.
To enter the punch, select Punch.
4
When to Cancel a Deduction Normally, you should only cancel a deduction when your manager has given you approval to do so.
Only cancel the deduction when punching Out at the end of your shift (not when punching In), unless your manager has instructed you to do otherwise.
Select a transfer. If the transfer you want doesn’t appear, select the on the previous screen.
3
Refresh Select to update the screen with the latest data from the server. It’s a good idea to refresh after making edits.
Time Period / HyperFind Select to change the Time Period you are viewing, or the group of employees you are viewing (if you are a manager). All information you view will be in this context until you change it.

Workforce Mobile (BlackBerry) Performing Employee Tasks
©2014, Kronos Incorporated or a related company. All rights reserved.
View Your Timecard or Schedule
Check Your Accruals Balances Before submitting a new Time Off Request, it’s a good idea to select Accruals on the main screen to review your balances.
Change Balance as of to see the hours you will have on the selected date.
Submit a Time Off Request
On the main screen, select Requests.
1
Select New from the left context button to add a new request.
2
Select the Start Date and End Date of your time off, and the type of hours (Paycode) you want to use.
To finalize the request, select Submit from the menu button.
4
On the main screen, select Timecard or Schedule.
Timecard Totals Select to view a summary of the types of hours you have worked.
Prior Requests To view the details of a previously-submitted request, simply select it from the list of requests.
The details screen also gives you the option to completely retract the request you are viewing.
Schedule Details Select a date in the list to view the details of a shift or time off.
Timecard Approval Select Approve from the menu button to approve your timecard.
Date Cycle through dates to change the range of dates that appear below.
Select a Time Off type.
3

Workforce Mobile (BlackBerry) Performing Manager Tasks
©2014, Kronos Incorporated or a related company. All rights reserved.
Resolving Exceptions Some exception types, such as missed punches, can be resolved in Workforce Mobile. Select the exception and select a time.
Other types of exceptions must be resolved from your PC.
Manage Timecard Exceptions
On the main screen, select Timecard Exceptions.
1
Select a name to view that employee’s exceptions.
2
To mark the exception Reviewed, select Reviewed from the menu button (or select Home to defer until later).
4
Timecard Exceptions Alert The Alert under Timecard Exceptions tells you how many employees have exceptions that need your review.
Exception Count The number next to each employee’s name tells you how many un-reviewed exceptions that employee has.
Menu Use the menu button to access additional functions.
Tasks Select a task to drill down and view its details. Scroll down to access more tasks. Depending on your role, some tasks may not be accessible.
Logging On When you start the Kronos Mobile app, your device connects to your organization’s Workforce Central server, using an IP address you supply. You can then log on using your existing Workforce Central credentials.
Anyone can download and try out the Kronos Mobile app – check your device’s app store to get it. To log on to your organization’s server, however, you must be granted access.
GET THE APP
Alerts If there are matters requiring your attention, they will appear as alerts. Select the Alerts icon to view all of your alerts.
Home Screen Overview
Refresh Select to update the screen with the latest data from the server. It’s a good idea to refresh after making edits.
Time Period / HyperFind Select to change the Time Period you are viewing, or the group of employees you are viewing. All information you view will be in this context until you change it.
Select an exception to review its details.
3

Workforce Mobile (BlackBerry) Performing Manager Tasks
©2014, Kronos Incorporated or a related company. All rights reserved.
Manage Time-Off Requests
Approve Timecards
On the main screen, select Time-Off Requests.
1
Approval Alert The Alert under Approve Timecards tells you how many employees have approved their own Timecards.
On the main screen, select Approve Timecards.
Employee approval
No employee approval
Timecard exception
Overtime hours
Timecard Details Select a name to view that employee’s timecard (and approve it individually).
Menu Use to access additional functions.
Approve Clean Tap to approve all Timecards that have no potential issues.
Requests Alert The Alert under Time-Off Requests tells you how many Time Periods have requests requiring your attention.
Select a name to view request details and Approve or Reject.
3
Reviewed Requests Requests you have already reviewed appear in green.
Select a Time Period to view. (Only time periods with requests can be selected.)
2
Review the request details and select Approve or Reject from the menu button (or use the Back button to defer until later).
4
Selection Boxes Optionally, select specific Timecards for approval.
Sort toggle Select to sort Timecards alphabetically by Employee, or to display Timecards with potential issues at the top.
Non Approved toggle Select to show or hide employees who have not yet approved their timecard.

Workforce Mobile (iPhone) Performing Employee Tasks
©2014, Kronos Incorporated or a related company. All rights reserved.
Context Tap to change the Time Period you are viewing. All information you view will be in this context until you change it.
Select a transfer and click Done.
3
Logging On When you start the Kronos Mobile app, your device connects to your organization’s Workforce Central server, using an IP address you supply. You can then log on using your existing Workforce Central credentials.
Anyone can download and try out the Kronos Mobile app – check your device’s app store to get it. To log on to your organization’s server, however, you must be granted access.
GET THE APP
Refresh Tap to update the screen with the latest data from the server. It’s a good idea to refresh after making edits.
HomeScreen Overview
When to Make a Transfer Normally, you should only enter a transfer when your manager is aware that you will be making one.
Select the transfer only when punching In for the transfer; do not select the transfer again when punching Out.
Your device may recognize your geographical location and limit your transfer options based on that location.
Punch In or Out
On the home screen, select Punch.
1
If you are starting a shift requiring a transfer, select Transfer. Otherwise, skip to Step 4.
2
If you are working without a break, switch Cancel Deduction to ON.
To enter the punch, tap Punch.
4
When to Cancel a Deduction Normally, you should only cancel a deduction when your manager has given you approval to do so.
Only cancel the deduction when punching Out at the end of your shift, unless your manager has instructed you to do otherwise.
Tasks Simply tap a task to drill down and view its details. Scroll down to access more tasks. Depending on your role, some tasks may not be accessible.
Location Tap to view your current geographical location. If it is recognized by your organization, the app will use it for punches.
Alerts If there are matters requiring your attention, they will appear as alerts. Tap the Alerts icon to view all of your alerts.
Barcode If you are working at a location with a barcode for starting and stopping jobs, you can punch by tapping here and scanning the code.

Workforce Mobile (iPhone) Performing Employee Tasks
©2014, Kronos Incorporated or a related company. All rights reserved.
Timecard Approval Tap to approve your timecard hours. Your manager will let you know how frequently you should approve.
Select a Time Off type and tap Done.
3
View Your Timecard or Schedule
Check Your Accruals Balances Before submitting a new Time Off Request, it’s a good idea to tap Accruals on the home screen to review your balances.
Tap Balance as of to see the hours you will have on any given date.
Submit a Time Off Request
On the home screen, select Requests.
1
Tap the + to add a new request.
2
Select the Start Date and End Date of your time off, and the type of hours (Paycode) you want to use.
To finalize the request, tap Submit.
4
On the home screen, select Timecard or Schedule.
Timecard Totals Tap to view a summary of the types of hours you have worked.
Schedule Calendar Toggle Tap to switch between a list view (pictured here) and a calendar view. In the calendar, dates with dots have a scheduled shift or time off.
Prior Requests To view the details of a previously-submitted request, simply select it from the list of requests.
The details screen also gives you the option to completely retract the request you are viewing.
Schedule Details Tap a date in the list or calendar to view the details of a shift or time off.

Context
Tap to change the Time Period you are viewing. All
information you view will be in this context until you
change it.
Logging On
When you start the Kronos Mobile app, your
device connects to your organization’s
Workforce Central server, using an IP address
you supply. You can then log on using your
existing Workforce Central credentials.
Anyone can download and try out the
Kronos Mobile app – check your
device’s app store to get it. To log on to
your organization’s server, however, you
must be granted access.
GET THE APP
Refresh
Tap to update the screen with the latest data from the
server. It’s a good idea to refresh after making edits.
Tasks
Simply tap a task to drill down and view its
details. Scroll down to access more tasks.
Depending on your role, some tasks may not
be accessible.
Location
Tap to view your current geographical location, and assign
it a context (HyperFind and Time Period). In future, that
context will be used whenever you are in the location.
Alerts
If there are matters requiring your attention,
they will appear as alerts. Tap the Alerts icon
to view all of your alerts.
Workforce Mobile (iPhone) Performing Manager Tasks
©2014, Kronos Incorporated or a related company. All rights reserved.
Tap an exception to
review its details.
3
HomeScreen Overview
Marking Exceptions as Reviewed
Some exception types cannot be resolved in Workforce
Mobile, but must instead be resolved from your PC. In this
case, you may have the option to tap Reviewed to mark
the exception as reviewed. Exceptions are removed from
the list when they are either resolved or marked reviewed.
Manage Timecard Exceptions
On the main screen, tap
Timecard Exceptions.
1
Tap a name to view that
employee’s exceptions.
2
Your options for correcting the punch depend
on the type of exception. In this example,
you can manually enter a time, or tap the
icon to enter the scheduled punch time.
4
Timecard Exceptions Count
The count under Timecard
Exceptions tells you how many
employees have exceptions that
need your review.
Exception Count
The number next to each
employee’s name tells you how
many unresolved exceptions
that employee has.

Employee approval
No employee approval
Timecard exception
Overtime hours
Workforce Mobile (iPhone) Performing Manager Tasks
©2014, Kronos Incorporated or a related company. All rights reserved.
Edit
Optionally, tap to select
specific requests for approval
or rejection without viewing
details.
Manage Time-Off Requests
Manage Timecards
On the home screen, tap
Time-Off Requests.
1
Approval Count
The count under Manage
Timecards tells you how many
employees have approved their
own Timecards.
On the home screen, tap
Manage Timecards.
Edit
Optionally, tap to select specific
Timecards for approval.
Name / Exceptions toggle
Tap to sort Timecards alphabetically
by Employee, or to display Timecards
with potential issues at the top.
Approve Clean
Tap to approve all Timecards that
have no potential issues.
All / Approved Only toggle
Tap to display all Timecards, or only
Timecards with Employee Approval.
Timecard Details
Tap a name to view that employee’s
timecard (and approve it individually,
if you choose).
Requests Count
The count under Time-Off
Requests tells you how many
Time Periods have requests
requiring your attention.
Select a Time Period
to view. (Only time
periods with requests
can be selected.)
2
Tap a name to view
request details and
Approve or Reject.
3
Reviewed Requests
Requests you have already
reviewed appear in green.
Review the request
details and tap Approve
or Reject (or tap Back
to defer until later).
4
Add or Edit a Punch
While viewing a
timecard’s details, tap a
punch to edit it, or tap a
date to add a punch to
that date.

Workforce Mobile (iPhone) Performing Manager Tasks
©2014, Kronos Incorporated or a related company. All rights reserved.
View Schedules and Staffing
Respond to Alerts
Alert Count
The count next to the Alerts
icon indicates how many alerts
you have.
Edit
Tap when your are done reviewing
some or all of your alerts. You can
then either Delete All, or select
individual alerts and tap Delete.
Sort toggle
Tap to sort the alerts by Time
received or by Priority.
Alert Details
Tap an alert to view its details.
Depending on the type of alert, you
may be presented with options for
responding to the alert, or for opening
another part of the app for further
action.
On the main screen, select
Scheduling or Staffing.
Schedule Details
Tap a date in the list or calendar to
view the details of a shift or time off.
Sort Order
Tap to sort the schedules by Start
Time, End Time, or Job.
Coverage
Open the page curl to display
coverage as Variants or as Counts.
List / Calendar Toggle
Tap to switch between a list view
(pictured here) and a calendar view.
In the calendar, selecting a date
indicates the number of shifts
scheduled for that date.
Sort Order
Tap to sort the jobs by Location or
by Unit.
Low Priority
Medium Priority
High Priority
On the home screen,
tap the Alerts icon.