welcome to rootsmagic!files.rootsmagic.com/guides/magicguide_welcome_to_rootsmagic.pdf · welcome...
TRANSCRIPT

Welcome to RootsMagic! - 27 May 2016 Page 1
Welcome to RootsMagic!
Whether you are new to using a genealogy software program or moving from another program
to RootsMagic, welcome! This Magic Guide is designed with a new user in mind. It assumes
that you have already downloaded and installed RootsMagic. If you haven’t, you can use the
“Downloading and Installing RootsMagic for Windows/for Mac” Magic Guides found at
http://rootsmagic.com/guides/.
This Magic Guide covers:
A. Getting Started – Create a File
B. Importing a File
C. Navigating the Main Screen
D. Editing Your Data
E. Customizing RootsMagic
F. Training Materials
A. Getting Started - Create a File
Upon starting RootsMagic for the first time, you will see the “Welcome Screen”. You can select
Create a new file, Open an existing file, or Import a file from a different program. If you close
the window without selecting anything, you are left with a big gray window, the Main menu, and
the Tool bar.
1. Main Menu: Gives access to the main features of RootsMagic.
2. Toolbar: Gives access to the most commonly-used RootsMagic features. To add your own
favorite features to the toolbar, right-click on the toolbar and choose “Customize” from the
popup menu.

Welcome to RootsMagic! - 27 May 2016 Page 2
3. To create a new file, you can
select the option from the
“Welcome” window, click the
toolbar icon, or click on the File
menu and choose “New” from
the menu.
4. The New File window will
open.
5. Name your file.
6. Verify that the file location
is correct. If not, click the
“File location” button to save
it someplace else.
7. Choose where you want to save the file. This example shows that the file will be saved to
Documents>ROOTSMAGIC>Files.
8. Click the “Select Folder”
button to save the
selection and return to the
“New File” window.

Welcome to RootsMagic! - 27 May 2016 Page 3
10
9. The File location
reflects the desired
placement for the file.
10. Select the file options
you want applied to this
file.
11. Click OK to
create the file.
12. The navigation
window will be empty.
Click on “Click to add
a person”.
13. The “Add new person”
window will open. The person
you enter will be assigned
record number (RIN) 1.
Generally, this is your record.
14. When you finish filling in
basic information on the form,
click OK.

Welcome to RootsMagic! - 27 May 2016 Page 4
15. The Edit Person window will open. From here, you can add facts, notes, sources, media,
etc.
B. Importing a File
1. To import a file from a different program, you can select “Import” from
the “Welcome” window or click the File menu and choose “Import”.
Welcome to RootsMagic! - 27 May 2016 Page 5
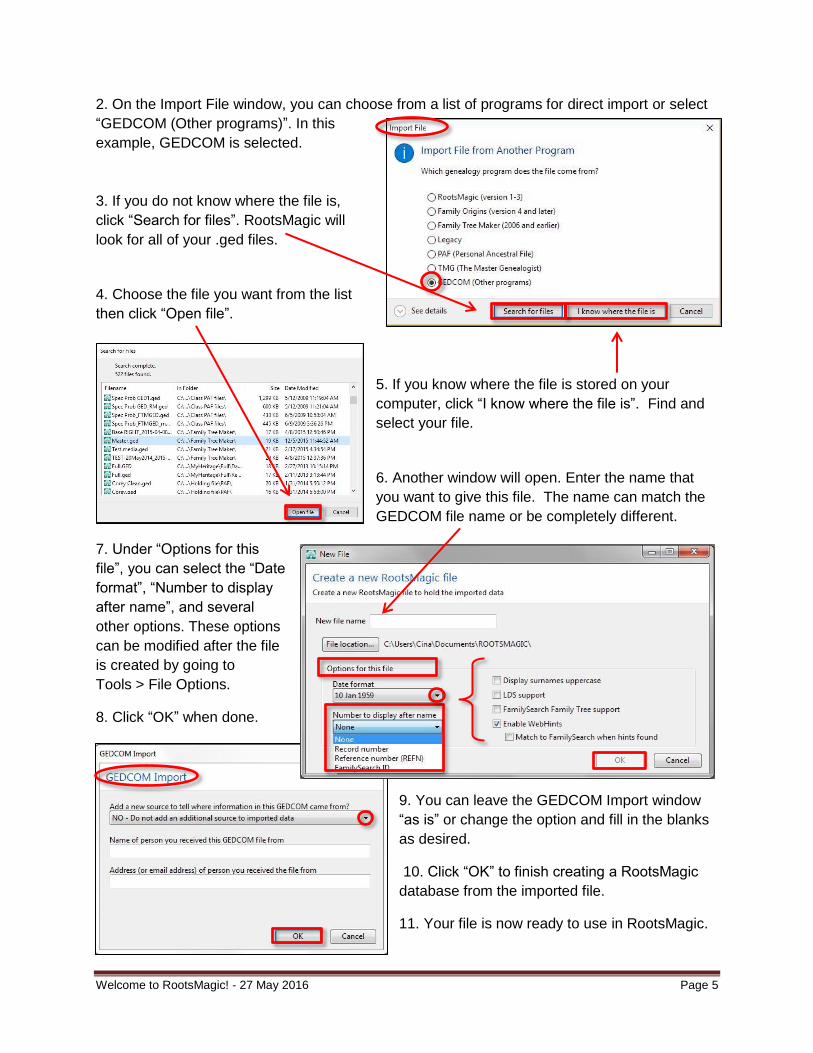
2. On the Import File window, you can choose from a list of programs for direct import or select
“GEDCOM (Other programs)”. In this
example, GEDCOM is selected.
3. If you do not know where the file is,
click “Search for files”. RootsMagic will
look for all of your .ged files.
4. Choose the file you want from the list
then click “Open file”.
5. If you know where the file is stored on your
computer, click “I know where the file is”. Find and
select your file.
6. Another window will open. Enter the name that
you want to give this file. The name can match the
GEDCOM file name or be completely different.
7. Under “Options for this
file”, you can select the “Date
format”, “Number to display
after name”, and several
other options. These options
can be modified after the file
is created by going to
Tools > File Options.
8. Click “OK” when done.
9. You can leave the GEDCOM Import window
“as is” or change the option and fill in the blanks
as desired.
10. Click “OK” to finish creating a RootsMagic
database from the imported file.
11. Your file is now ready to use in RootsMagic.

Welcome to RootsMagic! - 27 May 2016 Page 6
C. Navigating the Main Screen
Like many desktop programs, the Main
Screen of RootsMagic has a Main Menu,
Toolbar, Status Bar and tabbed “views”.
These features appear in every view.
1. Directory or File Path: Shows where
your file is stored.
2. Main Menu: Gives access to the main
features of RootsMagic.
3. Toolbar: Gives access to the most commonly-used RootsMagic features. To add your own
favorite features to the toolbar, right-click on the toolbar and choose “Customize” from the
popup menu.
4. Info Area: Displays comprehensive information about the highlighted person. Photos
and vital information appear on the right side of the Info Area.
At the far left side of the Info Area, the top bar shows icons indicating specific items that
have been attached to the person, such as notes, sources and media.
The bottom bar displays LDS-related data, when the LDS option is enabled.
The center two bars show the number of spouses and parents of
the selected person. Click on these buttons to see a list of spouses
with their children or the subject’s parents and siblings. You can
also add a new child or arrange children (not shown), or add a new
spouse or rearrange spouses, or add parents from these menus.

Welcome to RootsMagic! - 27 May 2016 Page 7
5. Sidebar: Contains five tabs of information. The tabs are:
Index – Complete list of individuals in the file. Click the Options
button to select your preferences.
Family – Lists spouses, children, parents and siblings of the
selected person.
Bookmarks – Set a bookmark for a person in your file and quickly
return to them.
History – List of the most recently visited individuals in your
database, during the current session.
Groups – To define groups of people that can be selected for
some action, such as printing reports or exporting names. It is handy
when repeatedly referencing the same group of people. Examples:
everyone buried in a specific cemetery; all immigrant ancestors; or men
eligible to have fought in the Civil War.
6. The Sidebar can be hidden by clicking on the button with a tiny arrow along the right edge of the
sidebar.
7. Navigation Views: The main body of the screen displays one of six views. The tabs let you
switch between the different views.
Pedigree View: A generation tree of ancestors for the selected person. The slider in the upper
left corner adjusts from 5 to 6 generations. The tree can be color-coded (Tools>Color Code
People).
Family View: Displays a single family with father, mother, and children. When available,
parents of the father and mother are shown. A red arrow, to the left of the children or to the right
of grandparents, indicates the line continues. Click the red arrow to move to the next
generation.

Welcome to RootsMagic! - 27 May 2016 Page 8
Descendants View: Shows multiple generations of descendants for the highlighted person. The
slider in the upper left corner adjusts from 2 to 7 generations. When available, you can
maneuver to other generations by clicking the red arrow next to a name.
People View: Displays a customizable set of facts for the people in the database. Sortable
based on preference, by name or any column header. This can be filtered to show everyone or
individuals in a group.
WebSearch View: Automatically searches specified websites for the currently selected person.
Timeline View: Chronological listing of events from the currents person’s life, as well as vital
events of the person’s immediate family members.
D. Editing Your Data
1. To add or edit information about a person, simply double-click on their name on the Main
Screen. You may also press the Enter key to edit the currently selected person. The “Edit
Person” screen will appear.
2. Names and Relationships: The first row is labeled “Person”. Clicking on this row will allow
you to edit the person’s name. Editing is done in the upper part of the right panel. Relationship
rows will appear as the Person is linked to Spouses and sets of Parents. In the upper-right
panel you will be able to set relationships. In this example, the relationship indicator shows that
the father adopted the child and the mother was the birthmother.

Welcome to RootsMagic! - 27 May 2016 Page 9
In the lower right panel, you can add notes and sources for the person or family.
3. Editing Facts and Events: Next are all the facts and events for the person, sorted
chronologically. The list shows the date, place, description, and the person’s age for each fact
and event. When you highlight an event on the left, the details will appear in the right panel.
You edit information from this area.
4. Adding New Facts and Events: To add a new fact or event, click the “Add a fact” button at
the top of the window.
Choose the fact type from the list and
click “Select.
Create a custom fact by clicking on
the “Design new fact type” button.
5. Notes, Sources, and Media:
RootsMagic lets you
record notes, sources,
and pictures for a person or family, as
well as for each fact or event.

Welcome to RootsMagic! - 27 May 2016 Page 10
6. Details of the facts or events are placed into columns in the left side of the Edit Person
window. Column headings are Facts, Date, Details and Age [of person at the time of the event].
The three right-most columns represent notes, sources and pictures. A check in any of these
columns tells you that a note, source, or picture exists for that fact. Clicking in the corresponding
column lets you add or edit that item. Hovering over a checkmark in the note or source column will
display a preview of it. You can also preview it by hovering over the note or source button in the right
panel. Clicking on the buttons will allow you to add or edit the notes or sources.
The right panel also includes the Share button, so that you can share an event with another
person.
E. Customizing RootsMagic
RootsMagic lets you customize how you view and interact with the program and your database.
With a few tweaks, RootsMagic can be made to behave in a more familiar fashion.
1. To access the Program options, go to the Tools menu and choose Program Options from the
bottom of the list.

Welcome to RootsMagic! - 27 May 2016 Page 11
General: Options specific
to the program as a
whole.
Display: Choose the
color scheme, fonts, and
font size for various parts
of the program.
Folders: Allows you to
specify default folders
(directories) for the
various types of files
used by RootsMagic.
Whenever you select a
feature that accesses
one of these file types,
RootsMagic will first look
in the designated folder.
For more details, go to Help>Contents>Index tab and search for Program Options.
2. To access the File options, go to the Tools menu and choose File Options from the list.
(These settings are database
specific.)
General: Options specific to the
database itself, including setting
the Root (home) person,
number to appear by a name,
date format, etc.
Preparer: Some reports, as
well as the GEDCOM export,
have an option to print the
preparer’s name and contact
information. This is where you
enter or edit it.
FamilySearch: Lets you enable
FamilySearch support.
WebHints: Enables record hinting notification from MyHeritage, FamilySearch and Findmypast.
(Ancestry hinting is coming soon!) You can enable the feature separately by provider. Once
enabled, you will see a lightbulb appear next to a person’s name telling you that record hints are

Welcome to RootsMagic! - 27 May 2016 Page 12
available. NOTE: In order to see hints from FamilySearch, you must enter your FamilySearch
username and password on this option screen.
For more details, go to the Help>Contents>Index tab and search for File Options.
F. Training Materials
RootsMagic offers a variety of FREE training materials to help you learn to use the program.
Help file: Click on Help in the Main menu of RootsMagic. (Help>Contents>Contents or
Index tabs) Note to Mac users: use the Menu options within the RootsMagic window
and not the Apple menu bar. All Help features are not currently available in the Mac
version.
Webinars: http://rootsmagic.com/Webinars/
Short videos (under 10 min): https://www.youtube.com/user/RootsMagicTV
Magic Guides (handouts) for specific topic: http://www.rootsmagic.com/guides/
Request to join our Facebook “RootsMagic Users” group:
https://www.facebook.com/groups/RootsMagicUsers/
Additional Help options: http://rootsmagic.com/Help/?