welcome to the latest version of digital dining!
TRANSCRIPT

WELCOME TO THE LATEST VERSION OF DIGITAL DINING!
This manual contains instructions and helpful hints to get you through the early days of your Digital Dining experience. Most of the documents enclosed are duplicates of the detailed instructions you will find in the Manager's Guide (which is also enclosed). We strongly suggest that you file the Manager's Guide & make copies of the other documents to be posted at the different terminals where appropriate; this way you will always have a copy of these instructions ready at your finger tips. These are by no means a complete guide to eve-rything you need to know about Digital Dining. For further information and assistance, re-fer to your Digital Dining Manual supplied by Menusoft, or call us at (603)431-3227 be-tween the hours of 9am and 5pm. We hope these instructions will help to make your Digital Dining experience an enjoyable one. HDS New England

Voice Mail Options
vALL Emergencies - ext. 3 (Mon - Sun, 24 Hours) vSoftware Support - ext. 5 (Mon - Fri, 9am - 5pm) vHardware Support - ext. 4 (Mon - Fri, 9am - 5pm) vSales - ext. 1 (Mon - Fri, 9am - 5pm) vAccounting - ext. 6 (Mon - Fri, 9am - 5pm) vFor Paper & Ribbon Supply Information - ext. 8 (Mon - Sun, 24 Hours)
Our mailing & shipping address is:
HDS - New England
235 West Road, Suite 10
Portsmouth, NH 03801
Our phone numbers are:
NH: (603)431-3227 Fax: (603)431-3262
E-Mail: [email protected]
110 - Mike Wolf 116 - Paul Hefron 125 - Michelle Jordan 114 - Mike Jordan 119 - Matt Smith 120 - Rob Miller 121 - Ron Freedman 123 - Denys Arsenault 124 - Ed Quinn
111 - Sue Tremblay 122 - Audra Lurvey 112 - Seth Moore 117 - Sean Felder 118 - Dave Dickinson
Our voice mail extensions are:

END OF DAY PROCEDURE For Windows
IN DIGITAL DINING BACK OFFICE: Step 1. Check for any open tables/tabs Log On Click on Utilities Highlight Process Utilities, then click on it Enter the date you are checking, click on Okay, then confirm If there are any open checks, they will be displayed on the right half of the screen. If there are open tables, pay out the checks accordingly When there are no checks open, Exit POS Step 2. If you do not use credit card authorization through Digital Dining, skip to step 4. If you do use credit card authorization, you MUST do this step before you go any further. This step should be done either dur-ing a slow period or when the restaurant is closed, since this will tie up the modem for a few minutes. No new charges can be authorized while the old charges are being posted! Click on Register Reports Choose Receipt Reports Choose Credit Card Report Print the credit card report, then confirm all credit card transactions Click on Utilities Choose Process Credit Cards Enter the date you are batching out, then click on Okay Click on Yes to really batch out this day On your screen, you will see the credit card transactions process on your screen. When the cards have batched out, you will see the Credit Card Batch Summary report on the screen; You want to print this! Step 3. Print your End Of Day Reports Go back into Utilities Choose Process & Report Confirm the date, then say Yes to continue Step 4. Edit your Time & Attendance Click on Staff Highlight Time & Attendance Choose Time & Attendance Transactions Enter in the correct date From the Time & Attendance Report that printed with your End of Day reports, go through the report & pick out any transactions that need to be corrected Scroll through the list of employees clocked in for that day and change the necessary information. Type in a reason in the bottom box, then click on Save. Repeat for all others who need corrections.

END OF PAY PERIOD PROCEDURES For Windows
IN DIGITAL DINING BACK OFFICE: Staff Reporting & Resets Click on Staff Highlight Staff Reports Highlight Staff Tips & click on it Sort by Last Name (the box on the upper left) Group by Department (the box to the right) Click on Print (the button on the bottom) Click on the Printer icon (7) at the top of the screen Click on the “X” in the upper right corner to exit Click on Exit Click on Staff Highlight Time & Attendance Highlight T & A Reports & click on it Select the Weekly Time Cards Report Select the date range (the beginning date of the pay period
to the ending date of the pay period) Click on Print (the button on the bottom) Click on the Printer icon (7) at the top of the screen Click on the “X” in the upper right corner to exit Select the Consolidated T & A Report Select the date range (the beginning date of the pay period to the ending date of the pay period) Click on Print (the button on the bottom) Click on the Printer icon (7) at the top of the screen Click on the “X” in the upper right corner to exit Click on Exit Click on Staff Highlight Staff Utilities Highlight Staff PTD Reset & click on it Click on OK 2 times to reset the PTD receipts & sales figures

END OF MONTH PROCEDURES For Windows
IN DIGITAL DINING BACK OFFICE: Step 1. Print Receipts & Sales Reports Log On Click on Register Reports Highlight Receipts Reports & click on it Click on the ? to get your list of reports & choose Profit Center Report Enter in the date range for the month Click on Print (the button on the bottom) Click on the Printer icon (7) at the top of the screen Click on the “X” in the upper right corner to exit Click on Exit Click on Register Reports Highlight Sales Reports & click on it Click on the ? to get your list of reports & choose Sales By Type Enter in the date range for the month Click on Print (the button on the bottom) Click on the Printer icon (7) at the top of the screen Click on the “X” in the upper right corner to exit Click on Exit Click on Register Reports Highlight Discount Reports & click on it Click on the ? to get your list of reports & choose Discount Summary Enter in the date range for the month Click on Print (the button on the bottom) Click on the Printer icon (7) at the top of the screen Click on the “X” in the upper right corner to exit Click on Exit Step 2. Print Staff Sales & Tip Information Click on Staff Highlight Staff Reports Highlight Staff Tips & click on it Sort by Last Name (the box on the upper left) Group by Department (the box to the right) Turn off Primary Dept Only (just under the sorting options – click on the little box with the “x” to make the x go away) Choose Period To Date for the range Click on Print (the button on the bottom) Click on the Printer icon (7) at the top of the screen Click on the “X” in the upper right corner to exit Click on Exit

END OF MONTH PROCEDURES cont.
Step 3. Print Accounts Receivable Statements
Click on A/R Highlight A/R Account Transactions Highlight Post Batch & click on it Choose Single Use, then Post to confirm (this ensures that any back office entries made to the accounts will show up on the statements) Click on A/R Highlight A/R Account Reports Highlight A/R Detailed Transaction Report & click on it Click on the tabs across the top & make sure to include everything Back on the Sort Order tab, choose Sort by Name *** Choose Group by: None Click on Print (the button on the bottom) Click on the Printer icon (7) at the top of the screen Click on the “X” in the upper right corner to exit Click on Exit *** Please note that when you choose to sort by account number, you must enter the account range (1 to 99999), otherwise the report is blank. Click on A/R Highlight A/R Account Statements Click on the tabs across the top & make sure to include everything Back on the Sort Order tab, choose Sort by Name Choose Group by: None Choose Print (If you just want to Preview, you must enter the account number) Click on Print (the button on the bottom) Click on the Printer icon (7) at the top of the screen Click on the “X” in the upper right corner to exit Click on Exit Click on A/R Highlight A/R Account Utilities Highlight A/R Aging & click on it Click on Yes to confirm that you really want to age the accounts (this takes all A/R detail & lumps it into your beginning balance for next month)

ADDING MENU ITEMS For Windows
IN DIGITAL DINING BACK OFFICE:
Click on Menu Highlight Menu Items and click on it
On the Main tab:
(Menu items comes up by default in view mode. To make things a little easier: Before adding a new item, stay in view mode and click on find and select an item that is similar to the item you want to add. Now many fields are already set the way they need to be.)
Click on Add (Digital Dining will automatically go to the next available menu item code, placing the cursor in
the check description field) Type in the check description, then hit the TAB key twice
(This is how the item will appear on the ordering screen & on the guest check) Type in the prep description if you would like it to be different than the check description, then hit TAB (This is how the item will appear in the kitchen or bar) Enter the prices for the item (You MUST enter ALL 5 prices, even if they are all the same)
Select the Sales Type by clicking on the � to the right of the rectangle & then scanning the list by clicking on the � & ~ to the right Select the Prep Type by clicking on the � to the right of the rectangle & then scanning the list by clicking on the � & ~ to the right

ADDING MENU ITEMS cont.
Select the Price Mode by clicking on the ? to the right of the rectangle & then scanning the list by clicking on the ? & ~ to the right Fixed = Whatever price you enter in Prices 1 – 5 is the price charged for the item Open = The POS will stop & ask for the price on this item (the price can be positive or negative) Open Positive = The POS will stop & ask for the price on this item (the price will prompt as
$0.00 & can be positive only) Open Negative = The POS will stop & ask for the price on this item (the price will prompt as
$0.00 & can be negative only) Open 999.99 = The POS will stop & ask for the price on this item (the price will prompt as
$999.99 & can be positive or negative) Select the Sales Mode by clicking on the ? to the right of the rectangle to get your options Normal = A regular menu item Modifier = A modifier No Sale = An on screen description (it can not be ordered) Link Only = An item that only serves as a link to another window Select Modifier Mode by clicking on the ? to the right of the rectangle to get your options Inherit Prep Type = For modifiers that are following the menu item to the prep printer Use Own Prep Type = For menu items or for modifiers that are not following the menu item, but are go-ing to their own prep printer (for example, if you have a Fried prep station & a Broiled prep station, you would want the Baked Haddock to go to the Broiled station and the Fries to go to the Fried station) Select Quantity Mode by clicking on the ? to the right of the rectangle to get your options Normal = The item will not prompt for a quantity Always = The item will always prompt for a quantity (useful for items like Oysters On The Half
Shell where you order by the piece) Decimal = The item will allow for a quantity with a decimal (for items purchased by the pound) Scale = For scale interfaces Click on the appropriate tax rate, making sure that only 1 rate is checked 1 = Meals Tax 2 = Beverage Tax 3 = Retail Tax
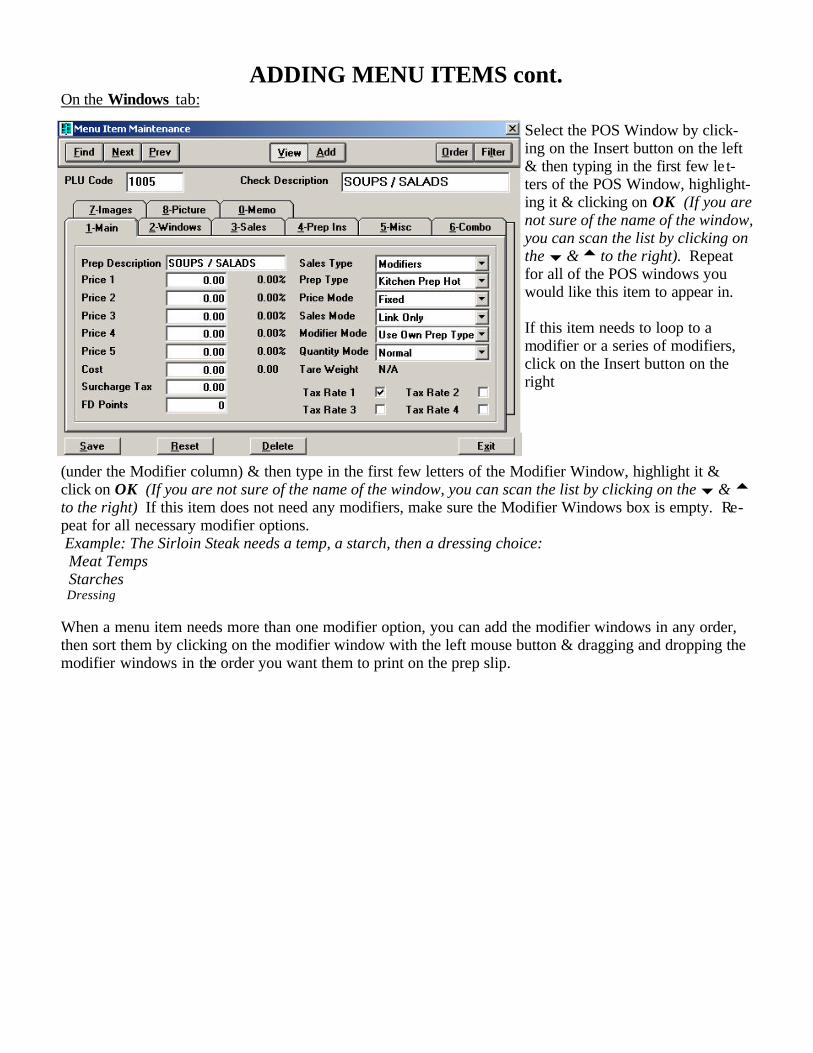
ADDING MENU ITEMS cont. On the Windows tab:
Select the POS Window by click-ing on the Insert button on the left & then typing in the first few le t-ters of the POS Window, highlight-ing it & clicking on OK (If you are not sure of the name of the window, you can scan the list by clicking on the � & ~ to the right). Repeat for all of the POS windows you would like this item to appear in. If this item needs to loop to a modifier or a series of modifiers, click on the Insert button on the right
(under the Modifier column) & then type in the first few letters of the Modifier Window, highlight it & click on OK (If you are not sure of the name of the window, you can scan the list by clicking on the � & ~ to the right) If this item does not need any modifiers, make sure the Modifier Windows box is empty. Re-peat for all necessary modifier options. Example: The Sirloin Steak needs a temp, a starch, then a dressing choice: Meat Temps Starches Dressing When a menu item needs more than one modifier option, you can add the modifier windows in any order, then sort them by clicking on the modifier window with the left mouse button & dragging and dropping the modifier windows in the order you want them to print on the prep slip.

ADDING MENU ITEMS cont. On the Prep Instruction tab (This is optional):
Click on the white text block to get the cursor there, then type in how to prepare the item (like drinks at the bar) or just a gen-eral list of ingredients (for food items so that the server can see if there is an ingredient that a customer is allergic to) Click back on the Main tab, then on Save Repeat for any other items to be added or Exit to get out
** Once all new items have been added, you must do the following:
Click on Menu Highlight Menu Utilities Highlight Build POS Windows & click on it

Find the window you just added to & make sure the item(s) are there (Find the window by clicking on the � to the right of the rectangle & then scanning the list by clicking on the � & ~ to the right)
Sort the items in the window by dragging & dropping until the window looks the way you want Click on Save Repeat for all windows Click on Build Windows & watch them build Click on Exit
ADDING MENU ITEMS cont.
Now we want to arrange how the items in that category appear in the point of sale. Click on MENU Then Highlight MENU SETUP Then Click on MENU POS WINDOWS
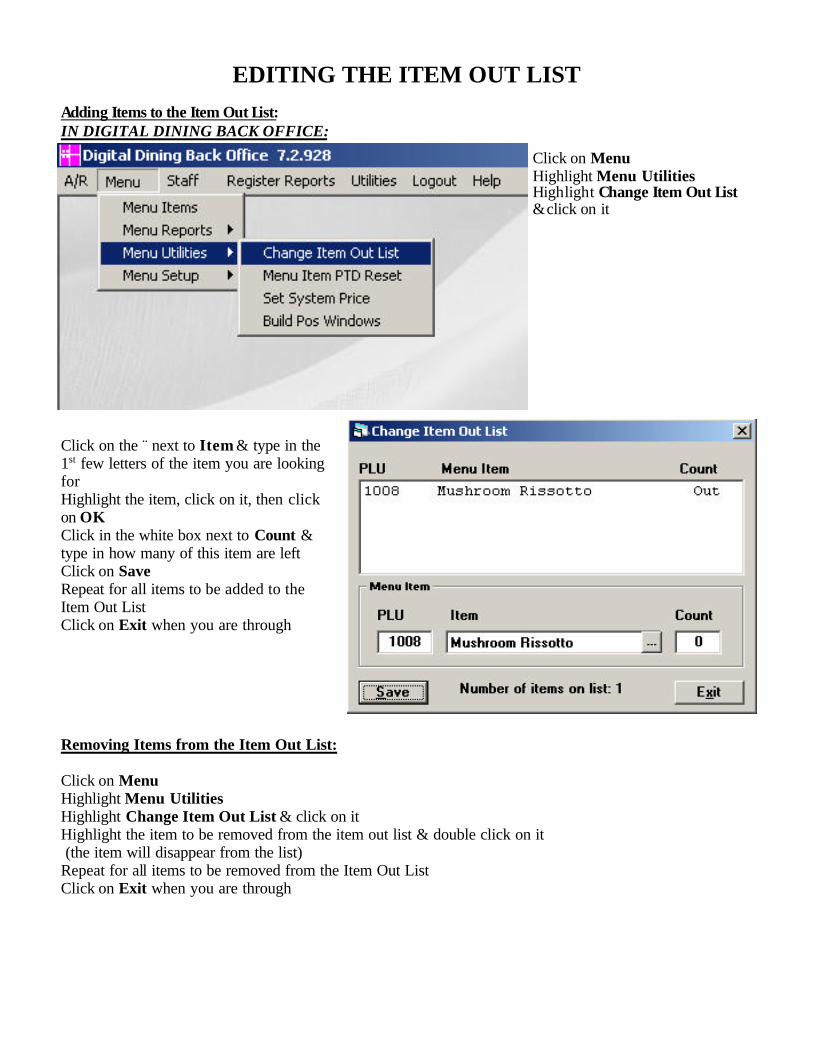
EDITING THE ITEM OUT LIST Adding Items to the Item Out List: IN DIGITAL DINING BACK OFFICE:
Click on Menu Highlight Menu Utilities Highlight Change Item Out List & click on it
Click on the ¨ next to Item & type in the 1st few letters of the item you are looking for Highlight the item, click on it, then click on OK Click in the white box next to Count & type in how many of this item are left Click on Save Repeat for all items to be added to the Item Out List Click on Exit when you are through
Removing Items from the Item Out List: Click on Menu Highlight Menu Utilities Highlight Change Item Out List & click on it Highlight the item to be removed from the item out list & double click on it (the item will disappear from the list) Repeat for all items to be removed from the Item Out List Click on Exit when you are through
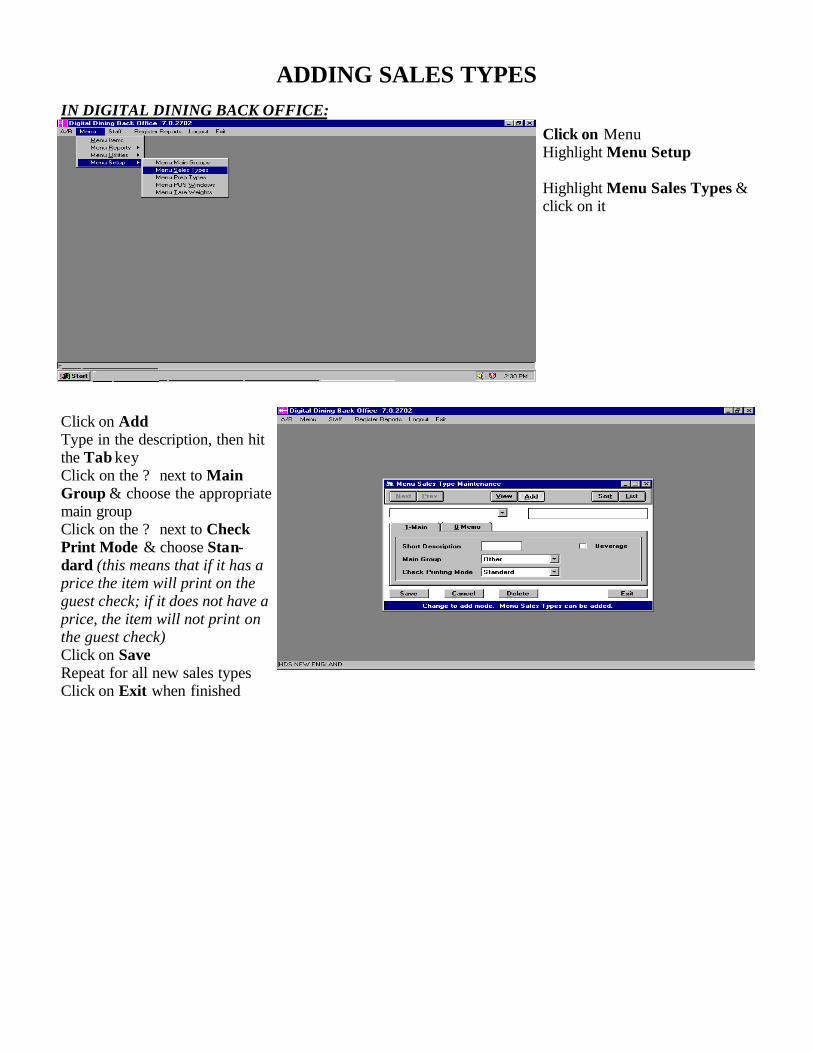
ADDING SALES TYPES
Click on Menu Highlight Menu Setup Highlight Menu Sales Types & click on it
Click on Add Type in the description, then hit the Tab key Click on the ? next to Main Group & choose the appropriate main group Click on the ? next to Check Print Mode & choose Stan-dard (this means that if it has a price the item will print on the guest check; if it does not have a price, the item will not print on the guest check) Click on Save Repeat for all new sales types Click on Exit when finished
IN DIGITAL DINING BACK OFFICE:

ADDING POS WINDOWS Step 1. Creating the POS Window In Digital Dining Back Office:
Click on Menu Highlight Menu Setup Highlight Menu POS Windows & click on it Click on Add Type in the description, then hit the Tab key Click on Save Repeat for all new POS windows Click on Exit when finished
Step 2. Adding the POS Window to the Point of Sale Screen In Digital Dining Setup:
Click on Windows Highlight Windows of Win-dows & click on it
Click on Next until you find the Window of Window you want to add this POS window to (these Win-dows of Windows are the buttons across your top panel at the Point of Sale, i.e. Food, Liquor, Beer, etc.) Click on the ¨ next to the box where you want to add your new POS Win-dow Type in the 1st few letters of the name of the POS Window you are adding. Highlight it & click on OK
Click on Save Repeat for all new POS Windows Click on Exit when finished

ADDING A SPEED WINDOW (OR ADDING TO IT)
IN DIGITAL DINING BACK OFFICE: Step 1. Choose the Menu > Menu Setup > POS Windows . Step 2. Find the Speed Window that you want to change or left click on Add. Step 3. Name the new window (if you are adding, then) left click on the Insert button and find your
menu item You will have to do this for each individual item you want to add. Step 4. Left click on Save and Exit. Step 5. If you do not currently have a Speed Window loaded on your POS, you need to do it now. In Digital Dining Setup, choose Register Definitions from the Registers drop-down menu. Step 6. Find your POS that you want to use the Speed Window. Left click on the Defaults tab. Step 7. Speed Window 1 will be on the right of the screen at the POS. Speed Window 2 will be on the left at the POS. Speed Window 2 is typically only used on a bar terminal. Left click on the arrow next to the window you want to assign and find the name of the window you want to use. Left click on Save and Exit. Step 8. Exit Digital Dining Setup and go back into Digital Dining Back Office. Step 9. Choose Menu Utilities from the Menu drop-down menu and left click on Build POS Windows . Left click on the Build Windows button. When it is finished, Exit.
WINDOW OF WINDOWS DEFINITIONS IN DIGITAL DINING SETUP: Step 1. Choose Window of Windows from the Windows drop-down menu. Step 2. Find the Window you want to add to or change and left click on Add. Step 3. Name the new Window and left click on View. Step 4. Find the original Window and make any changes you want to make by left clicking on the button with the dot in it and choosing the item you want to appear in the Window. Step 5. Left click on Save and Exit.

SENDING DD MAIL SENDING MAIL TO 1 PERSON: In Digital Dining Back Office:
Click on Staff Highlight Staff Members & click on it. Click on Find in the upper left corner. Type in the first few letters of the last name, highlight the name you are looking for (in the box to the right), then click on OK (or simply enter the staff id in) Click on the Message tab
Click on the white box to get the cursor blinking on the message pad, then type in the message you want to send. Click on Save Repeat for all others that you want to send a message to, then click on Exit to get out.
SENDING E-MAIL TO AN ENTIRE DEPARTMENT OR ALL EMPLOYEES: Click on Staff Highlight DD Mail & click on it Digital Dining automatically comes up to the Quick Message Click on the white message pad & type in the message Click on the Department tab & include or ex-clude the appropriate departments Click on the Rating tab & include or exclude the appropriate rating levels Click on the Security tab & include or ex-clude the appropriate security levels Click on the Availability tab & include or ex-clude the appropriate availabilities Click on Send to send the mail Repeat or click on Exit
CLEARING DD MAIL: Click on Staff Highlight DD Mail & click on it Click on the ? to the right of Quick Message & choose Clear Messages Click on Send, then Exit (Keep in mind that this clears ALL mail)
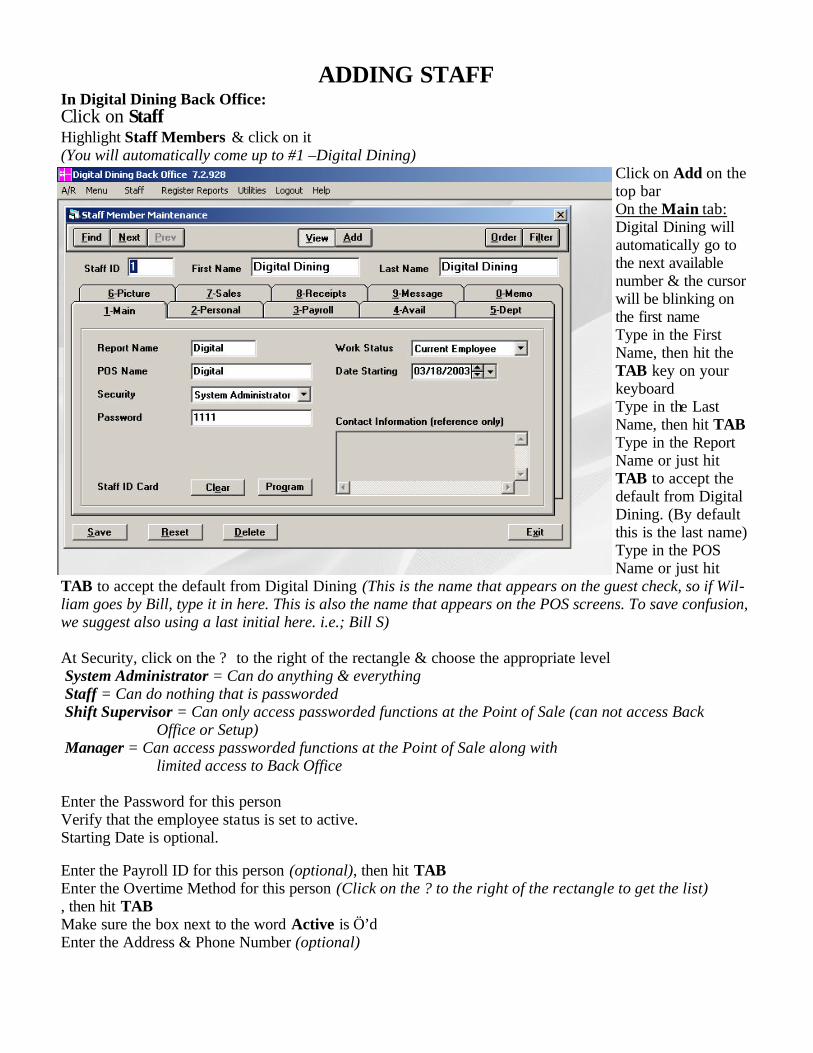
ADDING STAFF In Digital Dining Back Office: Click on Staff Highlight Staff Members & click on it (You will automatically come up to #1 –Digital Dining)
Click on Add on the top bar On the Main tab: Digital Dining will automatically go to the next available number & the cursor will be blinking on the first name Type in the First Name, then hit the TAB key on your keyboard Type in the Last Name, then hit TAB Type in the Report Name or just hit TAB to accept the default from Digital Dining. (By default this is the last name) Type in the POS Name or just hit
TAB to accept the default from Digital Dining (This is the name that appears on the guest check, so if Wil-liam goes by Bill, type it in here. This is also the name that appears on the POS screens. To save confusion, we suggest also using a last initial here. i.e.; Bill S) At Security, click on the ? to the right of the rectangle & choose the appropriate level System Administrator = Can do anything & everything Staff = Can do nothing that is passworded Shift Supervisor = Can only access passworded functions at the Point of Sale (can not access Back
Office or Setup) Manager = Can access passworded functions at the Point of Sale along with
limited access to Back Office
Enter the Password for this person Verify that the employee status is set to active. Starting Date is optional. Enter the Payroll ID for this person (optional), then hit TAB Enter the Overtime Method for this person (Click on the ? to the right of the rectangle to get the list) , then hit TAB Make sure the box next to the word Active is Ö’d Enter the Address & Phone Number (optional)

ADDING STAFF cont.
On the Personal tab: Here is where use-ful information about an employee is entered. You will quickly find out what info you need to enter. We suggest that you at least enter the phone number.
On the Payroll tab: Here Useful payroll information may be added. For labor ac-counting purposes, you must at least choose the PAY MODE. This information must be entered if you are using the Digital Dining pay-roll module.

ADDING STAFF cont. On the Availability tab:
On the Department tab: To add the first depart-ment option, click on NEW, then click on the new space that has been added below the Depart-ment heading and select the desired department. Enter the Regular Rate, and the Overtime Rate if applicable. Enter the Worker Rating for this person (Click on the ? to the right of the rectangle to get the list) Repeat for all departments necessary (To delete a de-partment, click on the de-sired department and then click delete. This will only work if the employee has never logged in hours for this department. This will
zero out the rates of pay as well) Verify which department is set to primary as this will be the default when this person clocks in. Click on Save at the bottom Repeat for all staff to be added. When finished, click on View to stay in Staff or Exit to get out.
This window allows management to quickly and easily check the availability of an em-ployee. This is a great resource for last min-ute changes to the schedule.
TO PURGE INACTIVE STAFF This should only be done once a year after the year has been closed out!!!
IN DIGITAL DINING BACK OFFICE:
Step 1. Choose Staff then Staff Members . Step 2. Look at all Staff Members and uncheck the Active box for those you want to remove. When you are finished, click on Exit. Step 3. Choose Staff Utilities from the Staff drop-down menu. Step 4. Choose Purge Inactive Staff.

ADDING ACCOUNTS RECEIVABLES In Digital Dining Back Office: Step 1. Be sure that Account Types are setup Click on A/R Highlight A/R Account Setup Highlight A/R Account Types & click on it
Click on Next to scan through the list If you need to add an account type, click on Add Enter the description for the Account Type & hit Tab Click on the ? next to the receipt type & choose All If this Account Type is tax exempt, click on the ¨ next to Tax Exempt so that an x appears in it Click on Save Repeat for any other Account Type to be added Click on Exit to get out
Step 2. Add the new account Click on A/R Highlight A/R Accounts & click on it Type in the account number for this account (you must create an account number; the system will not automatically assign one) Type in the account name (i.e. Mike Wolf) Type in the Sort Name (Wolf if you want to look up this account by last name or Mike if you prefer to look up this account by first name)
Choose the account type (click on the ? next to Account Type to get the list) Type in the credit limit (if there is one – this means that once the credit limit is reached, a manager’s pass-word will be required to charge to the account) Type in the contact information (this information is optional) Type in the address Type in the phone number (this information is optional) Type in the fax number (this information is optional) If a manager approval is required to charge to this account, click on the ¨ next to Limit Use so that an x ap-pears in the box Click on Save Repeat for all accounts to be added Click on Exit when finished

ACCOUNTS RECEIVABLES TRANSACTIONS
Entering a Payment Against an Account In Digital Dining Back Office:
Click on A/R Highlight A/R Account Transactions Highlight A/R Standard Transactions & click on it
Click on Add Click on the description block to the right & type in “Payment” Click on the ? next to Account Name, highlight the correct account & click on it Click on the ? next to Transaction Type& choose Payment Click on the ? next to Transaction Age & choose Auto Selection Enter the transaction date (the date pay-
ment was received) Click on the ? next to Batch Name & choose Single Use Enter the amount received Enter a reference number (such as the check number) Enter the details for this payment (if there are any) Click on Save Repeat for all other payments to be entered Click on Exit when finished

ACCOUNTS RECEIVABLES TRANSACTIONS cont. Entering a Debit Against an Account (This would be used if you needed to add to the outstanding balance, for ex-ample if for some reason a guest check in the dining room was never charged to this account)
Click on A/R Highlight A/R Account Transactions Highlight A/R Standard Transac-tions & click on it Click on Add Click on the description block to the right & type in “Debit” Click on the ? next to Account Name, highlight the correct account & click on it Click on the ? next to Transaction Type & choose Debit Click on the ? next to Transaction Age & choose Auto Selection Enter the transaction date (the date debit was for) Enter the amount of the debit Enter a reference number (if there is one) Enter the details for this debit (the reason a debit is being applied) Click on Save Repeat for all other debits to be entered Click on Exit when finished
Entering a Credit Towards an Account (This would be used if you needed to sub-tract from the outstanding balance, for example if for some reason a guest check in the dining room was charged to this account by accident)
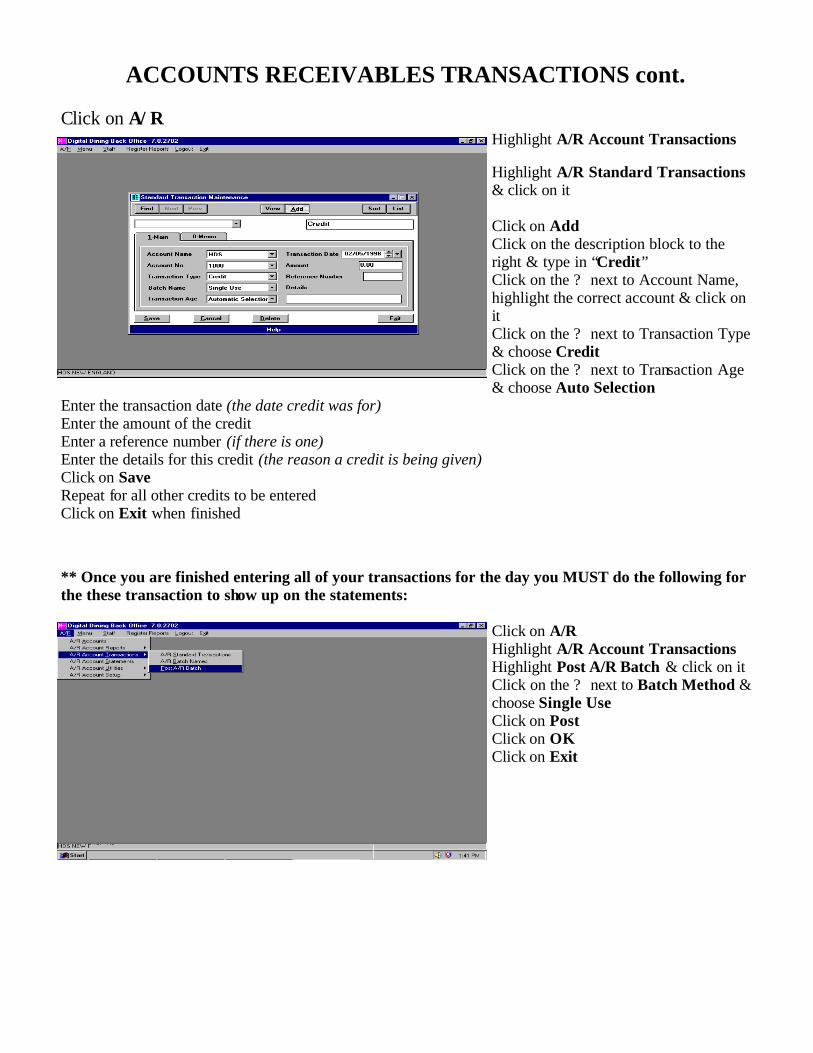
ACCOUNTS RECEIVABLES TRANSACTIONS cont.
Click on A/R Highlight A/R Account Transactions Highlight A/R Standard Transactions & click on it Click on Add Click on the description block to the right & type in “Credit” Click on the ? next to Account Name, highlight the correct account & click on it Click on the ? next to Transaction Type & choose Credit Click on the ? next to Transaction Age & choose Auto Selection
Enter the transaction date (the date credit was for) Enter the amount of the credit Enter a reference number (if there is one) Enter the details for this credit (the reason a credit is being given) Click on Save Repeat for all other credits to be entered Click on Exit when finished
** Once you are finished entering all of your transactions for the day you MUST do the following for the these transaction to show up on the statements:
Click on A/R Highlight A/R Account Transactions Highlight Post A/R Batch & click on it Click on the ? next to Batch Method & choose Single Use Click on Post Click on OK Click on Exit

ADDING VOID REASONS In Digital Dining Setup:
Click on Windows Highlight Void Reasons Win-dow & click on it Click on Add Type in the description of the new void reason & hit the Tab key Select the password level for this reason
0 = A password is required, but any password will work (this is for tracking purposes) N = No password is required X = No one can use this void reason (you want to keep the reason for reporting purposes,
but it is no longer in use) If this void reason should subtract from inventory, click on the ¨ next to Affects Ingredients
If you want the cancelled order to print in the kitchen or at the bar, click on the ¨ next to Order Sent
Click on Save Repeat for all new void reasons Click on Exit when finished

ADDING DISCOUNT REASONS In Digital Dining Setup:
Click on Windows Highlight Discounts Maintenance then Discount Definition click on it
Click on Add On the Main Tab: Type in the description of the new dis-count reason & hit the Tab key Select the password level for this rea-son 0 = A password is required, but any password will work (this is for track-ing purposes) N = No password is required X = No one can use this void reason (you want to keep the reason for re-porting purposes, but it is no longer in use)

ADDING DISCOUNT REASONS cont.
Choose the Selection by clicking on the ? (which items are included in the discount)
Last Ordered = Just the very last item ordered will be discounted Whole Order = Everything on the check that meets all of the other criteria will be
discounted First Entry On Check = Just the very first item ordered on the check will be discounted Marked Items: Once = Allows you to choose which item will be discounted (one per check) Marked Items: Each = Allows you to choose which items will be discounted (unlimited per check) If special items are included in this discount, click on the ¨ next to Special Items If the tax should be backed off (meaning the customer only pays tax on the amount actually paid for), click on the ¨ next to the appropriate tax code. Tax 1 = Food Tax 2 = Beverages Tax 3 = Retail Items If the customer pays the tax on the full amount before discount, then none of the tax rates
should be checked. If this discount is a percentage, click on the drop down box next to Type. Select Percent. If this discount is a set dollar amount or is an amount to be entered at the Point of Sale, select Flat Amount. Enter the amount (If Percent is selected, this amount will be the percentage. If Flat Amount is selected, this will be the set amount to be deducted. If you want to enter the amount at the Point of Sale, check off the Prompt box .) Enter the minimum discount amount (usually 0.00) Enter the maximum discount amount (for example, with the dine around cards, if the discount is buy 1 entrée, get a 2nd entrée free, up to $20, the maximum should be $20.00. Otherwise, set the maximum to 999.99) On the Sales Type Tab:
Be sure to include all sales types that apply & exclude all sales types that do not apply (for example, employee discounts generally do not include beer, wine or liquor, so they would be excluded.) Click back on the Main Tab Click on Save Repeat for all new discount reasons Click on Exit when finished

ADDING PAID OUT REASONS
IN DIGITAL DINING SETUP: Step 1. Left click on Misc then on Paid Outs. Step 2. Left click Add. Step 3. Type in the description you want to use. Step 4. Set the password level, if desired. Step 5. Enter a cap for the maximum allowable paid out. Step 6. Left click on the Save button. At this point you may continue to add new paid out reasons, or exit.
DEFINING SALES REPORTS IN DIGITAL DINING BACK OFFICE:
Log On Click on Register Reports Highlight Sales Reports, then click on it
Click on Define in lower left corner Click on Add

DEFINING COLOR PALLETS
IN DIGITAL DINING SETUP: Step 1. Left click on Register Pallets from the Register drop-down menu. Step 2. Find the pallet you want to change and left click on Add. Step 3. Name the new color pallet and then left click on View. Step 4. Go back to the original color pallet and left click on each button. This will
enable you to choose custom colors for the button and the text.
Step 5. When you have chosen the colors you want left click on Save and Exit.
CHECK LAYOUT IN DIGITAL DINING SETUP: Step 1. Choose Layouts then Check Layouts. Step 2. Find the Check Layout that you want to modify and click on Add. Do not modify any Default layouts!!! Step 3. Name the new layout “Backup” and left click on View. Step 4. Find the original layout and make any necessary changes. For a list of tokens and what they mean, use p. 231-355 in your Digital Dining Setup Guide. Step 5. Click on Save and Exit when you are finished.

RESTARTING THE CREDIT CARD SERVER FROM THE DESKTOP: Step 1. Left click on the DDCDSRV box at the bottom of the screen. Step 2. Left click on the Command button on the right side of the box. Step 3. Left click on the Start button on the right side of the box. Step 4. Wait until the text box reads “Waiting for request” and left click on the minimize button (minus sign) in the top right corner of the screen. IF THE COMMAND BUTTON IS GREY THEN YOU NEED TO: 1. HOLD DOWN THE CTRL AND THE ALT KEYS AND TAP THE DELETE KEY. 2. CLICK ON TASK MANAGER AND HIGHLIGHT THE DDCDSRV THEN CLICK END TASK. 3. UNPLUG CREDIT CARD MODEM (BLACK BOX ON THE PC WITH “DATACAP” WRITTEN ON IT). 4. PLUG IT BACK IN. 5. CLICK ON THE DDCDSRV ICON AND WAIT FOR THE TEXT BOX TO READ “Waiting for Request”. 6. LEFT CLICK ON THE MINIMIZE BUTTON (MINUS SIGN) IN THE TOP RIGHT CORNER OF THE SCREEN.

SHUTTING DOWN YOUR SYSTEM *** WARNING: This should be done ONLY in extreme circumstances (i.e. your electrician needs to shut down the circuit or your entire system is locked up, which happens VERY RARELY.) Should you need to shut your system down, follow these directions exactly!!! At EVERY Workstation: Touch Exit Register (enter manager ID & Password, if necessary) Touch Shut Down (enter manager ID & Password, if necessary) Turn off your workstation when the screen displays the message “It is now safe to turn off your computer.” Repeat for ALL workstations On the Office Computer (the file server): Click on each minimized program (the rectangles on the bottom of the screen) & close them by clicking on the X’s in the upper right corners of their boxes. (If you have Digital Dining’s credit card module, you will be unable to close this program, labeled DDCCSRV – this is the ONLY program that is okay to leave open before shutting down.) Once ALL programs are closed, click on Start in the bottom left corner of your screen
Highlight Shut Down & click on it
Make sure that “Shut Down Computer?” is checked Click on Yes
Your Computer should now shut down all on its own.
To Restart Your Computer: Hit the power button on your computer The computer will automatically load all of the programs necessary to run Digital Dining.
Go To Each Workstation: Turn the workstation back on. The POS will restart itself, loading all of the programs necessary to run Digital Dining
RESTARTING YOUR SYSTEM To Restart Your Computer: Click on Start in the lower left corner of the screen Click on Shut Down Click on “Restart the Computer?” Click on Yes The computer will go through the restarting process Go To Each POS: Exit the POS Register to the OS. Touch Start in the lower left corner of the screen Touch Shut Down Touch “Restart the Computer?” Touch Yes The POS will restart itself, loading all of the programs necessary to run Digital Dining