whatsconfigured v3.1 user guide · welcome to whatsconfigured v3.1 ... can be manually ran as...
TRANSCRIPT
WhatsConfigured v3.1 User Guide

i
Contents
Table of Contents
Welcome to WhatsConfigured v3.1
Finding more information and updates ............................................................................................................... 1 Sending feedback ......................................................................................................................................................... 2
Deploying WhatsConfigured
STEP 1: Prepare the network ..................................................................................................................................... 3 Prepare devices for discovery ...................................................................................................................... 3 Install and activate WhatsConfigured ....................................................................................................... 4
STEP 2: Discover the network ................................................................................................................................... 5 Starting WhatsConfigured ............................................................................................................................ 5 Discover the network ...................................................................................................................................... 5
STEP 3: Configure and assign credentials ............................................................................................................ 6 STEP 4: Configure File Transfer Settings ............................................................................................................... 7 STEP 5: Configure remote CLI settings .................................................................................................................. 7 STEP 6: Configure task scripts and tasks ............................................................................................................... 8
Assign tasks to the appropriate devices ................................................................................................ 11 Configure task thresholds ........................................................................................................................... 12
STEP 7: Configure and audit policies ................................................................................................................... 12 STEP 8: Configure templates ................................................................................................................................... 14 STEP 9: Manage network devices .......................................................................................................................... 14 STEP 10: View network data .................................................................................................................................... 15
View and compare configuration data ................................................................................................... 15 View task data .................................................................................................................................................. 17
Installing and Licensing WhatsConfigured
System Requirements ............................................................................................................................................... 18 Installation overview ................................................................................................................................................. 18 Activating WhatsConfigured .................................................................................................................................. 18
Discovering Networks in WhatsConfigured
Getting Started with WhatsConfigured .............................................................................................................. 20 About Network Discovery ....................................................................................................................................... 21 Configuring Network Discovery ............................................................................................................................ 21 About Network Discovery scan types ................................................................................................................. 22 About discovery settings ......................................................................................................................................... 23
ii
Configuring discovery settings ................................................................................................................. 23 About discovery IP scopes .......................................................................................................................... 24 Configuring network protocols and credentials ................................................................................. 26
Using the WhatsConfigured console
About the WhatsConfigured console .................................................................................................................. 33 About network discovery files ............................................................................................................................... 33 Managing network discovery files ........................................................................................................................ 33
Creating a new discovery file ..................................................................................................................... 34 Opening a discovery file .............................................................................................................................. 34 Opening a recently used discovery file .................................................................................................. 34 Using Merge Devices .................................................................................................................................... 34 Using Replace Devices .................................................................................................................................. 35 Using Replace Maps ...................................................................................................................................... 35 Using Merge Maps ......................................................................................................................................... 35 Using Save ......................................................................................................................................................... 35 Using Save As ................................................................................................................................................... 36 Comparing Network Files ............................................................................................................................ 36
Viewing Network Data
About network data views ...................................................................................................................................... 38 About data grid views .................................................................................................................................. 38
About Device Categories View .............................................................................................................................. 42 About the Device Details tab view ........................................................................................................... 43 About the Device Categories view right-click menu ......................................................................... 43
About Device List View ............................................................................................................................................. 45 About Device List columns ......................................................................................................................... 46 Using Device List Filters ............................................................................................................................... 47 Viewing Device List details ......................................................................................................................... 48
About Topology Maps View.................................................................................................................................... 49 About adding individual or connected devices to a topology map ............................................ 50 About removing devices from a topology map .................................................................................. 52 Viewing link or multi-linked properties from the topology map .................................................. 53
Managing dynamic topology map updates ..................................................................................................... 54 Filtering devices and dynamically updating the topology map ............................................................... 55 Configuring the topology layout and display settings ................................................................................. 56
About Radial Layout settings ..................................................................................................................... 57 About Hierarchy Layout settings .............................................................................................................. 57 About Manual Layout settings .................................................................................................................. 58

iii
Layout Children ............................................................................................................................................... 58 Changing the root device selection ........................................................................................................ 59 Polling and Monitoring ................................................................................................................................ 59 Managing individual device on the topology map ........................................................................... 65
About Subnets View .................................................................................................................................................. 71 Viewing Subnet Device details .................................................................................................................. 72
About VLANs view ...................................................................................................................................................... 73 Viewing VLAN device details ...................................................................................................................... 74
About Links View ........................................................................................................................................................ 74
Using Configuration Tasks
About Tasks ................................................................................................................................................................... 76 Using the WhatsConfigured Task Library........................................................................................................... 77 Configuring tasks ........................................................................................................................................................ 77
Configuring schedulable tasks .................................................................................................................. 78 Configuring password tasks ....................................................................................................................... 80
Viewing Task results ................................................................................................................................................... 81 Running a scheduled task immediately ............................................................................................................. 84
Using Task Script Library
About Task Scripts ...................................................................................................................................................... 85 Using the WhatsConfigured Task Script Library .............................................................................................. 86
Creating and Editing a WhatsConfigured Task Script ....................................................................... 88 Using Regular Expression Tester ............................................................................................................... 88 Debugging tasks scripts ............................................................................................................................... 90
Script Text Tab ............................................................................................................................................................. 91 Client Settings Tab ..................................................................................................................................................... 91
Saving changes ............................................................................................................................................... 92 Script Commands and Debugging....................................................................................................................... 92
Debugging ........................................................................................................................................................ 92 Viewing debugging results ......................................................................................................................... 93 Importing and exporting task scripts ...................................................................................................... 95
Configuring custom task scripts ............................................................................................................................ 96 About the WhatsConfigured Custom Script Language ................................................................................ 96
Using Policies
About policies .............................................................................................................................................................. 97 About the Policy Library ........................................................................................................................................... 97

iv
Configuring a policy .................................................................................................................................................. 98 Auditing a policy ......................................................................................................................................................... 99
Using WhatsConfigured Templates
About WhatsConfigured Templates ................................................................................................................. 101 Using the Template Library .................................................................................................................................. 101 Configuring templates ........................................................................................................................................... 102 Generating and applying a template ............................................................................................................... 105 Importing and exporting templates ................................................................................................................. 106
Using WhatsConfigured Tools
About WhatsConfigured Tools ........................................................................................................................... 107 Using IP/MAC Finder............................................................................................................................................... 108
About the Select button ........................................................................................................................... 109 About the Refresh Connectivity button .............................................................................................. 109
Using the Subnet Calculator ................................................................................................................................ 110 Using the WhatsConfigured VLAN Manager ................................................................................................. 111
Configuring VLAN Trunks ......................................................................................................................... 113 Rebuild Connectivity .............................................................................................................................................. 114 Classify Devices......................................................................................................................................................... 114 Show Discovery Alerts ........................................................................................................................................... 115 About Archive Search ............................................................................................................................................. 115
Performing an archive search ................................................................................................................. 116 About Archive Compare ........................................................................................................................................ 116 Using the SNMP Configuration tool .................................................................................................................. 117
Configuring WhatsConfigured
About WhatsConfigured configuration settings .......................................................................................... 121 Configuring Applications Settings .................................................................................................................... 122 Configuring Discovery Settings .......................................................................................................................... 122 Configuring Protocol Settings/Credentials .................................................................................................... 123 Configuring Device Categories ........................................................................................................................... 124 Configuring Device Filters .................................................................................................................................... 125 Configuring Device Type Mappings ................................................................................................................. 128 WhatsUp Gold Server Endpoint Library (Remote Servers) ........................................................................ 128 Configuring Email Settings .................................................................................................................................. 129 Configuring File Transfer Settings ..................................................................................................................... 130
Configuring TFTP Settings ....................................................................................................................... 130

v
Configuring SCP Settings ......................................................................................................................... 131 Configuring SFTP Settings ....................................................................................................................... 132 Configuring TFTP Server Settings .......................................................................................................... 133 Viewing the TFTP Server Log .................................................................................................................. 134
About the Remote CLI Settings library ............................................................................................................ 135 About CLI Settings ...................................................................................................................................... 136 Configuring Remote CLI Settings .......................................................................................................... 137
About the Default Script Library ........................................................................................................................ 140 Configuring Default Scripts ..................................................................................................................... 141
Exporting Configuration Settings to WhatsUp Gold .................................................................................. 143 Changing System Info ............................................................................................................................................ 144 Collecting device MIBs ........................................................................................................................................... 145
Viewing WhatsConfigured Reports
About WhatsConfigured reports........................................................................................................................ 146 About the Asset/Inventory Report .................................................................................................................... 146 About the Device Connectivity Report ............................................................................................................ 148 About the Configuration Task Log .................................................................................................................... 148 About the Startup/Running configuration difference report .................................................................. 150
Copyright notice
1
CHAPTER 1
Welcome to WhatsConfigured v3.1
In This Chapter
Finding more information and updates ........................................................ 1
Sending feedback .................................................................................................. 2
WhatsConfigured enables effective management of one of the most critical assets on your network—device configurations. As a fully-functioning network configuration tool, WhatsConfigured automates the key configuration and change management tasks required to maintain and control configuration files for networking devices, reducing the risk of network outages caused by misconfigured devices. Network managers can leverage this automated configuration to reduce the amount of time spent ensuring their network devices are configured correctly, freeing valuable time.
WhatsConfigured is built around an automated task execution engine that allows network managers to dynamically gather configuration data about their network devices through configuration tasks. These configuration tasks can be scheduled to run on a regular basis or can be manually ran as needed to upload, download, and backup configuration files, manage device credentials, and much more. WhatsConfigured comes with several pre-defined configuration tasks with the option to create custom tasks.
With support for heterogeneous IPv4 and IPv6 networks, WhatsConfigured provides secure SNMP, SSH, Telnet, SCP, SFTP access, or non-secure TFTP access, to download and store device configuration files in a secure repository, keeping them readily available for file compares and restoration on a device.
WhatsConfigured not only reduces the time and effort required to maintain device configurations and changes while providing increased security, compliance, and visibility, it also reduces the risk of costly network downtime.
Finding more information and updates
The following are information resources for WhatsConfigured. This information may be periodically updated and available on the WhatsUp Gold web site (http://www.whatsupgold.com/support/index.aspx).
§ Application Help. The console help contains dialog assistance, general configuration information, how-to's that explain how to use WhatsConfigured's features. The Table of Contents is organized by functional area, and can be accessed from the main menu or by clicking Help in WhatsConfigured dialogs.
WhatsConfigured v3.1 User Guide
2
§ Licensing Information. Licensing and support information is available on the WhatsUp Customer Portal (http://www.whatsupgold.com/wugCustPortal). The web portal provides enhanced web-based capabilities to view and manage Ipswitch product licenses.
§ Technical Support. Use the WhatsUp Gold Support Site for a variety of WhatsUp Gold product help resources. From here you can view product documentation, search Knowledge Base articles, access the community site for help from other users, and get other Technical Support information. The Support Site is available on the WhatsUp Gold web site (http://www.whatsupgold.com/support/index.aspx).
Sending feedback
We value your opinions on our products and welcome your feedback.
To provide feedback on existing features, suggest new features or enhancements, or suggest ways to make our products easier to use, please fill out our product feedback form (http://www.whatsupgold.com/wugfeedback).

3
CHAPTER 2
Deploying WhatsConfigured
In This Chapter
STEP 1: Prepare the network ............................................................................. 3
STEP 2: Discover the network ............................................................................ 5
STEP 3: Configure and assign credentials ..................................................... 6
STEP 4: Configure File Transfer Settings ........................................................ 7
STEP 5: Configure remote CLI settings ........................................................... 7
STEP 6: Configure task scripts and tasks ........................................................ 8
STEP 7: Configure and audit policies ........................................................... 12
STEP 8: Configure templates .......................................................................... 14
STEP 9: Manage network devices ................................................................. 14
STEP 10: View network data............................................................................ 15
STEP 1: Prepare the network
Prepare devices for discovery In order for WhatsConfigured to properly discover and identify devices, each device must respond to the protocols that WhatsConfigured uses during discovery.
Preparing devices to be discovered To discover that a device exists on an IP address, WhatsConfigured uses the following protocols:
§ Ping (ICMP)
§ TCP
If a device does not respond to ping or TCP requests, it cannot be discovered by WhatsConfigured. We recommend ensuring that all devices respond to at least one of these types of requests prior to running a discovery.
Preparing devices to be identified After WhatsConfigured discovers a device on an IP address, it queries the device to determine its manufacturer and model and other device property information. To gain this information, WhatsConfigured uses SNMP.

WhatsConfigured v3.1 User Guide
4
Enabling SNMP on devices We recommend that important devices be configured to respond to SNMP requests. For information about how to enable SNMP on a specific device, see Enabling SNMP on Windows devices in the WhatsUp Gold Online Help (http://www.whatsupgold.com/wug161ccwebhelp) or consult the device documentation. For information about configuring SNMP on network devices, you may also want to view the WUG Guru video How to enable SNMP on a Windows server (http://www.whatsupgold.com/wug123snmpvideo).
Note: If a firewall exists between WhatsConfigured and the devices to be discovered (or if the Windows Firewall is enabled on the computer where WhatsConfigured is installed), make sure that the appropriate ports are open on the firewall to allow WhatsConfigured to communicate via SNMP.
Install and activate WhatsConfigured WhatsConfigured can share a server with Ipswitch WhatsUp Gold, or can be installed as a standalone application on a separate server. In either case, WhatsConfigured is licensed separately. If you use the application as a plug-in, it is installed with WhatsUp Gold. If you are installing the application separately, it is installed using the WhatsConfigured installation program. The WhatsConfigured Release Notes (http://www.whatsupgold.com/WCfg31ReleaseNotes) contain the most up-to-date information about installing.
Before installing, we recommend that you read the WhatsConfigured Release Notes for possible application update details and review the system requirements information to ensure that the system, on which you are attempting to install, meets the base-level requirements.
After you install, the product should automatically activate using the license you purchased for WhatsConfigured. In the even that you should need to manually activate your WhatsConfigured installation, see Activating WhatsConfigured (on page 18).

WhatsConfigured v3.1 User Guide
5
STEP 2: Discover the network
Starting WhatsConfigured To start WhatsConfigured:
From the Windows Start Menu, select Ipswitch WhatsConfigured.
There are two Getting Started options to help you begin gathering and viewing network information:
§ Start a new network scan to discover devices connected on the network. Click Wizard to start the Wizard discovery process.
§ If you have saved WhatsConfigured discovery files previously, you can select an existing discovery file in the Recent files list, then click Open.
Select Don't show this at startup to prevent this dialog from appearing each time you start WhatsConfigured.
Discover the network Before you can begin using WhatsConfigured with your network, you must first discover your network. You can do this using the WhatsConfigured Discovery Wizard upon starting WhatsConfigured, or from the WhatsConfigured main menu at both File > New and Discover > Network.
For information about discovery methods and the protocols required to discover your network, please see Discovering Networks in WhatsConfigured (on page 20).

WhatsConfigured v3.1 User Guide
6
STEP 3: Configure and assign credentials
WhatsConfigured uses SSH and Telnet credentials to communicate with the devices on your network. You need to assign appropriate credentials to every device that you plan to manage through WhatsConfigured, as credentials are required for most WhatsConfigured features.
Protocols Settings/credentials are configured and assigned to devices in the Protocol Settings/Credentials Library.
For more information, see Configuring network protocols and credentials (on page 123).
WhatsConfigured v3.1 User Guide
7
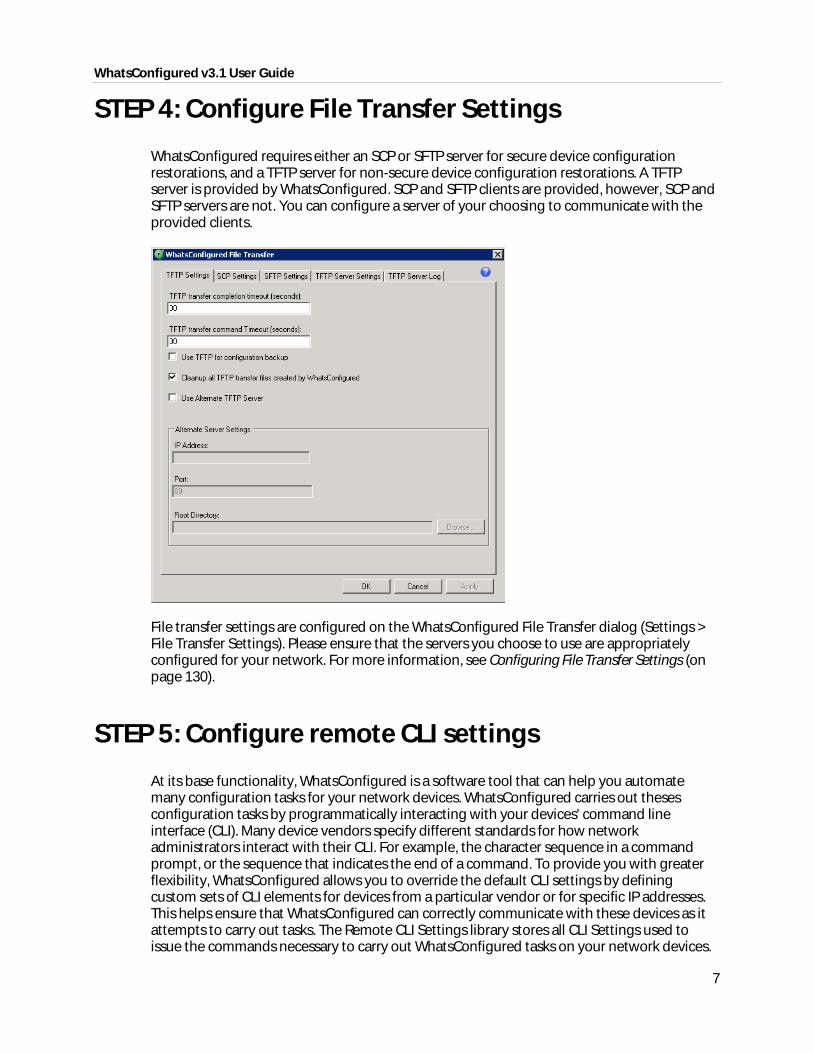
STEP 4: Configure File Transfer Settings
WhatsConfigured requires either an SCP or SFTP server for secure device configuration restorations, and a TFTP server for non-secure device configuration restorations. A TFTP server is provided by WhatsConfigured. SCP and SFTP clients are provided, however, SCP and SFTP servers are not. You can configure a server of your choosing to communicate with the provided clients.
File transfer settings are configured on the WhatsConfigured File Transfer dialog (Settings > File Transfer Settings). Please ensure that the servers you choose to use are appropriately configured for your network. For more information, see Configuring File Transfer Settings (on page 130).
STEP 5: Configure remote CLI settings
At its base functionality, WhatsConfigured is a software tool that can help you automate many configuration tasks for your network devices. WhatsConfigured carries out theses configuration tasks by programmatically interacting with your devices' command line interface (CLI). Many device vendors specify different standards for how network administrators interact with their CLI. For example, the character sequence in a command prompt, or the sequence that indicates the end of a command. To provide you with greater flexibility, WhatsConfigured allows you to override the default CLI settings by defining custom sets of CLI elements for devices from a particular vendor or for specific IP addresses. This helps ensure that WhatsConfigured can correctly communicate with these devices as it attempts to carry out tasks. The Remote CLI Settings library stores all CLI Settings used to issue the commands necessary to carry out WhatsConfigured tasks on your network devices.

WhatsConfigured v3.1 User Guide
8
The library includes two default settings and various pre-defined system settings that come installed with WhatsConfigured. You can use these system settings, or copy them to create new, user-defined settings for devices that support a particular OID or a specific IP address.
For more information, see About the Remote CLI Settings Library (on page 135).
STEP 6: Configure task scripts and tasks
Task scripts login to devices through SSH or Telnet, and run command-line interface (CLI) commands on devices. These tasks can perform a number of operations, such as restoring or backing up a running or startup configuration, or changing an application password.
WhatsConfigured comes with several pre-configured task scripts; you can also configure your own custom task scripts using the WhatsConfigured Custom Script Language.
WhatsConfigured v3.1 User Guide
9
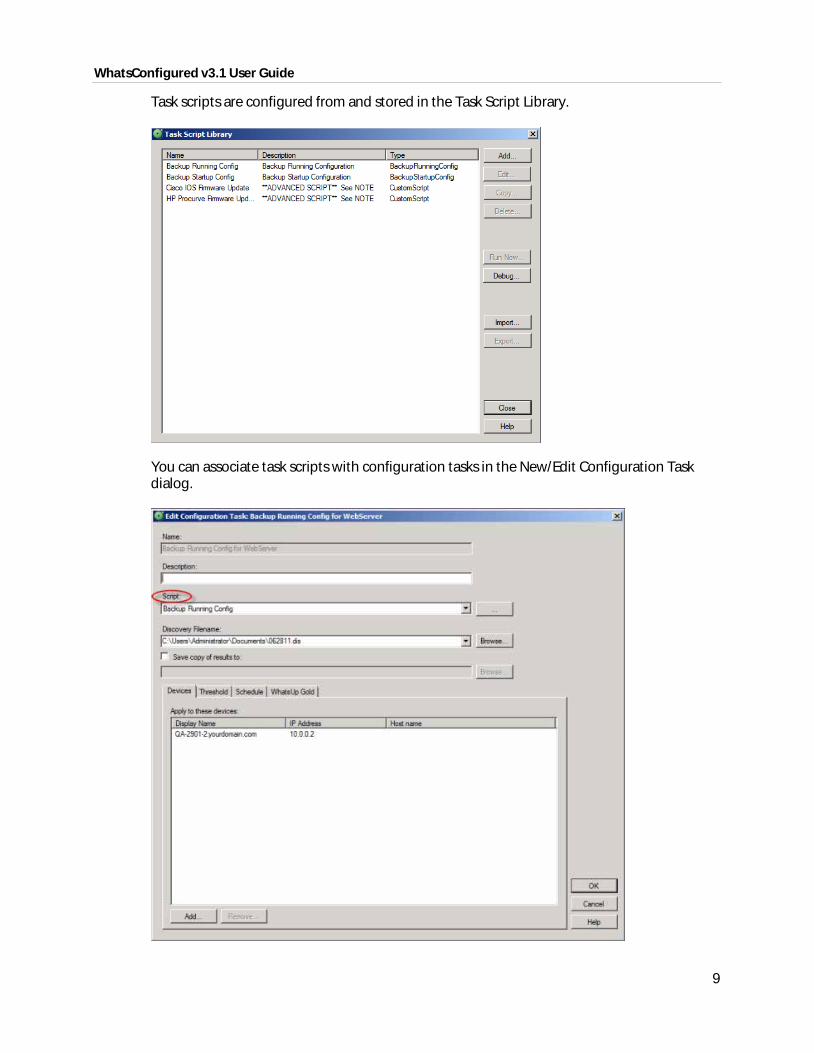
Task scripts are configured from and stored in the Task Script Library.
You can associate task scripts with configuration tasks in the New/Edit Configuration Task dialog.

WhatsConfigured v3.1 User Guide
10
For more information, see Using the Task Script Library (on page 85).
Task scripts are powered by user-configured tasks. When you configure a configuration task, you select the specific task script that you want the task to execute at the time it is run.
You can configure both schedulable and password tasks. Schedulable Tasks run associated task scripts on a regularly scheduled basis. For example, you can have WhatsConfigured make a daily backup of a device's running configuration. Password Tasks modify credentials on the devices to which they are assigned. For example, removing a set of SNMPv1 credentials from a device.
Tasks are configured from and stored in the Configuration Task Library and are associated with devices in the Configuration Task dialog's Devices tab.
For more information, see Using Configuration Tasks (on page 76).
WhatsConfigured v3.1 User Guide
11
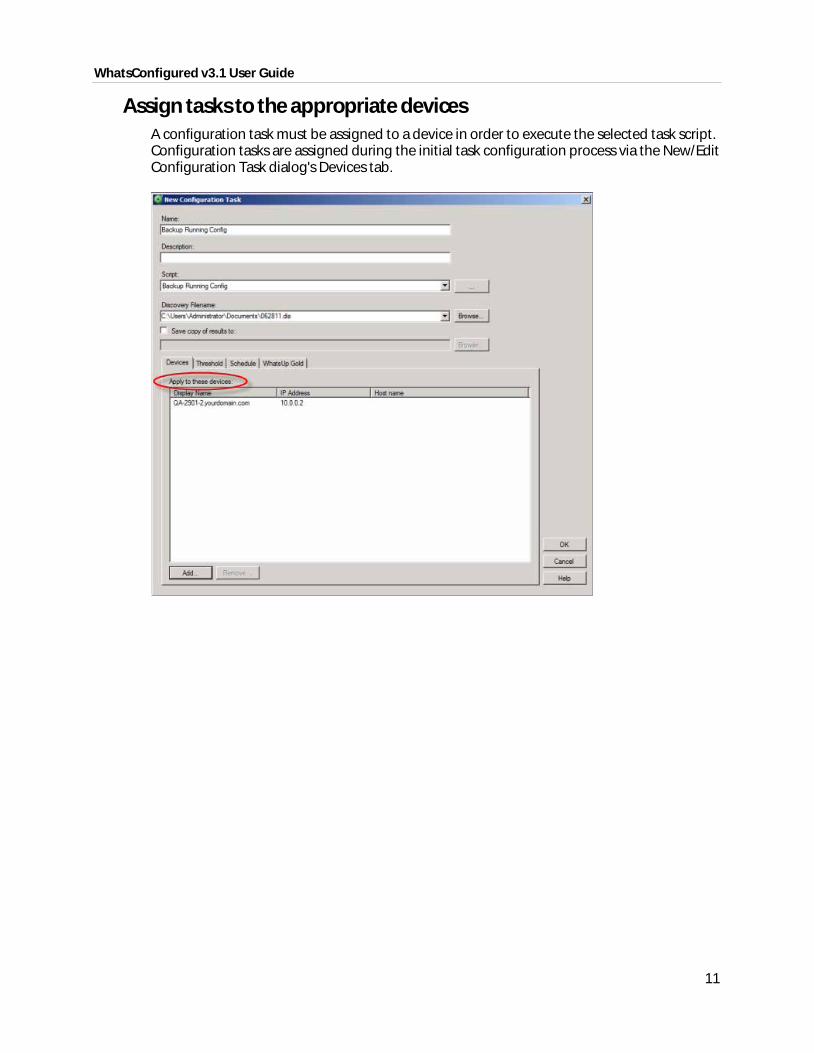
Assign tasks to the appropriate devices A configuration task must be assigned to a device in order to execute the selected task script. Configuration tasks are assigned during the initial task configuration process via the New/Edit Configuration Task dialog's Devices tab.

WhatsConfigured v3.1 User Guide
12
Configure task thresholds As you configure configuration tasks, you have the opportunity to assign thresholds through which you can receive task threshold alerts. This can be done on the Threshold tab of the New/Edit Configuration Task dialog.
You can choose to have email notifications sent to you when a task meets any of the criteria you select for the threshold.
STEP 7: Configure and audit policies
WhatsConfigured policies search through archived configuration files for strings that are either expected or not expected within the file(s).
When a scheduled task fails a policy, any associated notification policies alert you that the policy has failed due to unexpected content that has been flagged in an archived config file.

WhatsConfigured v3.1 User Guide
13
Policies are configured from and stored in the Policy Library.
From the Policy Library, you can also run policies immediately for a specific Archive Key using the Audit Now option.
For more information, see Using Policies (on page 97).

WhatsConfigured v3.1 User Guide
14
STEP 8: Configure templates
WhatsConfigured script templates allow network admins to automatically push device configurations to devices of the same type by replacing device-specific (IP address, hostname) information with variables, saving time and reducing the possibility of error from one manual device configuration to another.
Templates are configured from and stored in the Template Library. You can also use the Template Library's Import and Export buttons to import previously saved configuration templates, or to export configuration templates.
After you configure a template, you can generate the template for specific devices to ensure that the script is properly configured to be pushed to the device(s). For more information, see Using WhatsConfigured Templates (on page 101).
STEP 9: Manage network devices
After tasks are configured and assigned, they either run on the schedule you configure, or can be run as needed from the Configuration Task Library's Run Now button.
Note: When you run tasks on demand, they run for every device to which they are assigned.

WhatsConfigured v3.1 User Guide
15
STEP 10: View network data
As WhatsConfigured runs tasks, it stores data in the WhatsConfigured database. You can view this configuration data from several places in WhatsConfigured, including the Configuration Task Log report, and the Archive Search and Archive Compare tools.
View and compare configuration data The Archive Compare tool allows you to view previously captured config files side-by-side.

WhatsConfigured v3.1 User Guide
16
For more information, see About Archive Compare (on page 116).
The Archive Search tool allows you to search for and view the content of archived config files.
For more information, see About Archive Search (on page 115).

WhatsConfigured v3.1 User Guide
17
View task data The Configuration Task Log report displays log messages generated by WhatsConfigured tasks. You can filter the report by date, task, result, and the device(s) for which the selected tasks ran.
For more information, see About the Configuration Task Log (on page 148).

18
CHAPTER 3
Installing and Licensing WhatsConfigured
In This Chapter
System Requirements ....................................................................................... 18
Installation overview ......................................................................................... 18
Activating WhatsConfigured .......................................................................... 18
System Requirements
Refer to the Release Notes (http://www.whatsupgold.com/WCfg31relnotes) for WhatsConfigured product features, system requirements, fixed in this release, known issues, and other information.
Installation overview
WhatsConfigured can share a server with Ipswitch WhatsUp Gold, or can be installed as a standalone application on a separate server. In either case, WhatsConfigured is licensed separately, and is installed using the WhatsConfigured installation program.
Before installing, we recommend that you read the WhatsConfigured Release Notes for possible application update details and review the system requirements information to ensure that the system, on which you are attempting to install, meets the base-level requirements.
To update your license to purchase WhatsConfigured, visit the WhatsUp Customer Portal (http://www.whatsupgold.com/wugCustPortal). For more information, see Activating WhatsConfigured (on page 18).
Activating WhatsConfigured
If WhatsConfigured is installed using the installation application downloaded from the Web link provided in the purchase confirmation email, the program is fully functional immediately after installation.
If the WhatsConfigured license is not automatically activated during installation, you can manually activate WhatsConfigured using the activation program in the WhatsConfigured group on the Windows Start menu.

WhatsConfigured v3.1 User Guide
19
To activate WhatsConfigured manually:
Note: Before you begin the manual activation process, make sure that you have your product serial number available to use in the activation program.
1 Click Start > Programs > Ipswitch WhatsConfigured > Manage WhatsConfigured License. The activation program appears.
2 Follow the onscreen instructions to complete the product activation.
Note: When activation completes, a confirmation page indicates that the license has been activated. If activation does not complete successfully, you may be behind a proxy or firewall that is blocking the activation request. In this case, click Offline and follow the onscreen instructions.
For additional help and information about managing your product license, click the WhatsUp Gold Customer Portal (http://www.whatsupgold.com/wugCustPortal).

20
CHAPTER 4
Discovering Networks in WhatsConfigured
In This Chapter
Getting Started with WhatsConfigured ...................................................... 20
About Network Discovery ............................................................................... 21
Configuring Network Discovery .................................................................... 21
About Network Discovery scan types ......................................................... 22
About discovery settings ................................................................................. 23
Getting Started with WhatsConfigured
To start WhatsConfigured:
From the Windows Start Menu, select Ipswitch WhatsConfigured.
To begin gathering and viewing network information:
§ Start a new network scan to discover devices connected on the network. Click Wizard to start the Wizard discovery process.
- or -
§ If you have saved WhatsConfigured discovery files previously, you can select an existing discovery file in the Recent files list, then click Open.
WhatsConfigured v3.1 User Guide
21
Select Don't show this at startup to prevent this dialog from appearing each time you start WhatsConfigured.
For more information about other methods to do network discovery, see About Network Discovery (on page 21).
About Network Discovery
WhatsConfigured discovers the devices on your network and displays a topological map of the network's physical structure. WhatsConfigured also captures detailed information about each device, including IPv4 and IPv6 IP and MAC addresses for all interfaces on the device and more.
There are several ways to add devices with Network Discovery:
§ Through the Network Discovery option in the WhatsConfigured console Discover > Network menu. For more information, see Run Discovery.
§ Through the single device discovery option in the WhatsConfigured console Discover > Device menu. For more information, see Add New Device.
§ Through the Getting Started with WhatsConfigured Wizard that appears when you start WhatsConfigured For more information, see Getting started with WhatsConfigured (on page 20).
Configuring Network Discovery
Network Discovery can run with a minimal amount of configuration. The discovery settings can be specific and point to a certain part of your network, or more general and pertain to the entire network. In both cases, network settings are key to successful network scans.
There are two main elements to configure for each network scan.
§ A base discovery configuration that includes a discovery scan type and IP scope. For more information, see About Network Discovery scan types (on page 22).
§ The network protocols and credentials used during the network scan. For more information, see the Configuring network protocols and credentials (on page 26) section.
Network Discovery setup is accomplished by using the Discovery Setup wizard or manually through several WhatsConfigured dialogs. This section describes how you can manage both the discovery settings and protocol settings manually.
WhatsConfigured v3.1 User Guide
22
About Network Discovery scan types
An important part of Network Discovery is understanding the different methods by which a network can be discovered. There are two Network Discovery methods, ARP Cache and Ping Sweep.
ARP Cache Discovery Address Resolution Protocol (ARP) Cache discovery locates network devices by reading SNMP information on your network. This scan type uses SNMP enabled devices (usually routers) to identify devices that are active on your network. In addition to using the ARP cache on each network device, ARP Cache discovery also uses many proprietary discovery protocols to find additional devices connected to the network.
The Discovery Setup wizard prompts you to enter a Seed IP Scope (IP addresses, IP address ranges – including IP subnets) that indicates where you would like the discovery to start. These devices are used as the seed of the network discovery.
Important: We recommend that you use ARP Cache discovery as your primary discovery method.
Ping Sweep discovery Ping Sweep discovery scans a range of IP addresses and finds the devices that respond to the ICMP or SNMP protocol.
The Network Discovery Setup wizard prompts you to enter a Seed IP Scope (IP addresses, IP address ranges including subnets) that indicates where you would like to focus your network scan.
Note: The Ping Sweep discovery method is used for very specific discovery scans. If you are unsure of your network configuration, including any of its subnetworks, ARP Cache discovery is a more appropriate method for discovering your network.
For more information about how Seed IP Scopes work in each discovery method, see About Seed IP Scope.
Advanced Discovery Settings Access Advanced Discovery Settings using the Advanced button on the Discovery Name/Method dialog. The Advanced Discovery Settings dialog sets the maximum number of threads to use during the discovery scan, allows you to configure WhatsConfigured to ping devices first, ping discovered subnets, resolve hostnames using a Domain Name System (DNS), and exclude device categories from the discovery scan.
WhatsConfigured v3.1 User Guide
23
Note: When setting the number of threads used during a scan, increasing the number of threads allows WhatsConfigured to simultaneously open more connections with network devices, possibly reducing the time needed to perform the scan, however this may negatively impact network performance as the number of open connections increases.
About discovery settings
Each network scan requires several base-level settings that guide the discovery scan of your network. These discovery settings are grouped by a general name that describes the area of the network that the settings scan. Discovery Settings are accessible from the Discovery Settings dialog (Discover > Discovery Settings) and the Discovery Wizard.
Configuring discovery settings To add discovery settings: 1 From the main menu of the WhatsConfigured console, click Settings > Discovery
Settings. The Discovery Settings dialog appears. 2 Click New. The New Discovery Settings dialog appears. 3 Enter a Name that gives context to the discovery settings you are creating (i.e. TestLab,
Production Network). This name is stored so that it can be reused for later network scans.
4 Select the discovery method, either ARP Cache Discovery or PING Sweep Discovery. For more information, see About Network Discovery scan types (on page 22).
5 Click Advanced to set Advanced Discovery Settings.
§ Enter the number of Max Threads to use while running the discovery scan. This indicates the number of separate threads to run in the background as WhatsConfigured attempts to communicate with the devices on the network.
Note: If you are concerned about the load discovery could place on the network, you can reduce the Max Threads to cut back on the concurrent network communication.
§ Select whether the discovery engine should try to Ping Devices First before attempting any other protocol.
§ Select whether the discovery engine should attempt to Ping Discovered Subnets to provide a more complete scan during an ARP Cache type of discovery.
Note: This option tells the engine to take each discovered subnet and run a ping sweep through it to ensure all devices are discovered in the defined subnet.
§ Select the Resolve DNS names option to resolve DNS names to their IP addresses.
§ Select the Exclude Device Categories option if you want to exclude specific device categories from discovery. This option allows you to narrow the range of devices that are discovered.
WhatsConfigured v3.1 User Guide
24
§ Click OK to complete the advanced options, 6 On the Discovery/Name Method dialog, click Next. 7 Click Gateway to enter the Seed IP Scope. For more details in regards to the Seed IP
Scope, see About Seed IP Scope (on page 25). 8 If you want to use Advanced IP Scoping options, click Advanced.
§ Enter the Include IP Scope. For more information, see About Include IP Scope (on page 25).
§ You can also enter the Exclude IP Scope. For more information, see About Exclude IP Scope (on page 25).
§ Click OK to complete the advanced options. 9 On the Discovery Starting Point(s) dialog, click Next. 10 Enter Discovery Protocol Settings as required. For more information, see Configuring
network protocols and credentials (on page 26). 11 Click Finish to save all changes made in the Discovery Settings dialog.
To rename discovery settings: 1 From the main menu of the WhatsConfigured console, click Settings > Discovery
Settings. The Discovery Settings dialog appears. 2 The dialog displays all previously defined discovery settings. To rename a collection of
discovery settings, right-click the collection that you would like to rename, then click Rename. The Rename Discovery Settings dialog appears.
3 Enter a new Name for the collection of discovery settings. 4 Click OK. 5 Click OK to save all changes made in the Discovery Settings dialog.
To delete discovery settings: 1 From the main menu of the WhatsConfigured console, click Settings > Discovery
Settings. The Discovery Settings dialog appears. 2 The dialog displays all previously defined discovery settings. To delete a collection of
discovery settings, right-click the collection that you would like to delete, then click Delete. The selected collection of discovery settings is deleted.
3 Click OK. 4 Click OK to save all changes made in the Discovery Settings dialog.
About discovery IP scopes Discovery IP scopes are a means by which discovery is configured to understand the area(s) of the network that it scans, or excludes from a scan.
IP scopes can be:
§ A single IP address (i.e. 10.0.0.1)
§ A range of IP addresses (i.e. 10.0.0.1-10.0.0.100)
§ A subnet range of IP addresses (i.e. 10.0.0.1/24 or 10.0.0.1/255.255.255.0)

WhatsConfigured v3.1 User Guide
25
Note: WhatsConfigured does not support ping scans of IPv6 subnets, as there is a /16 limitation for subnet scans.
The following is a description of how these IP scopes are used in WhatsConfigured discovery settings.
About Seed IP Scope Seed IP Scope defines the range of IP addresses where network discovery starts a scan.
§ For Ping Sweep discovery, these addresses are contacted with an initial ICMP request.
Note: WhatsConfigured does not support ping scans of IPv6 subnets, because there is a /16 limitation for subnet scans.
§ For ARP Cache discovery, these addresses are queried for additional data. The discovery engine reads SNMP data from these devices and continues to scan the network for additional devices based on the SNMP responses from the seed devices.
About Include IP Scope Include IP Scope defines the range of IP addresses in which to include in the network scan.
§ For Ping Sweep Discovery, Include IP Scope is the same as the Seed IP Scope.
§ For ARP Cache Discovery, Include IP Scope indicates an IP address range that the network scan should restrict itself to during discovery.
Note: In order for an Include IP Scope scan to find devices, the Seed IP Scope must intersect with the Include IP Scope. For example, if you enter a Seed IP Scope of 188.311.5.1 and an Include IP Scope of 188.311.4.10-188.311.4.160, the scan is unable to locate devices because the two IP scopes do not intersect.
Example § A single IP address (i.e. 10.0.0.1)
§ A range of IP addresses (i.e. 10.0.0.1-10.0.0.100)
§ A subnet range of IP addresses (i.e. 10.0.0.1/24 or 10.0.0.1/255.255.255.0)
About Exclude IP Scope Exclude IP Scope defines the range of IP addresses to exclude from in the network scan.
§ For Ping Sweep Discovery, Exclude IP Scope might be an IP range of servers or workstations that are a subnet of the Seed IP Scope.
§ For the ARP Cache Discovery, Exclude IP Scope indicates an IP address range that network scan should not attempt to discover.

WhatsConfigured v3.1 User Guide
26
Configuring network protocols and credentials Several industry-standard protocols are used in Network Discovery. The two main protocols used in discovery are ICMP and SNMP; the SSH protocol can also be used to enhance discovery of Linux and UNIX devices.
Additionally, the WhatsConfigured credentials library provides support for Telnet and SSH. Telnet and SSH credentials are used to communicate with network devices and capture device configurations. The Capture Config tool, available in a topology map's device right-click menu, lets you backup running configurations and backup startup configurations on devices such as routers and switches. For more information, see Capturing device configurations.
The following information describes how to manage each protocol/credential settings.
Using the ICMP protocol The ICMP protocol allows the discovery engine to test whether a particular IP address is active and responding on the network. Depending on network latency, this protocol can be adjusted to meet the configuration on your network.
Note: You can only edit the default ICMP settings; you cannot create a new set of ICMP credentials.
To change the ICMP settings for the discovery engine: 1 From the main menu of the WhatsConfigured console, click Settings > Protocol
Settings/Credentials. The Protocol Settings/Credentials dialog appears. 2 Select ICMP, then click Edit. The Edit ICMP Settings dialog appears. 3 Increase or decrease the Timeout settings. The default timeout is 500 milliseconds.
Note: If you are discovering across a WAN link, increase the timeout.
4 Increase or decrease the number of ICMP Retry counts. The default number of one retry is recommended for most networks.
Note: If you are discovering across a WAN link, increase the number of retries.
5 Click OK to save the protocol changes.
Using the SNMP protocol and credentials The SNMP protocol allows the discovery engine to query detailed device information from each SNMP-enabled device. The correct SNMP Read community names, along with the appropriate timeout and number of retries are required for successful network queries.
This section describes how to add and maintain the appropriate SNMPv1, SNMPv2, or SNMPv3 protocol settings for successful SNMP network device discovery.

WhatsConfigured v3.1 User Guide
27
SNMPv1 credentials
To add a new set of SNMPv1 credentials: 1 From the main menu of the WhatsConfigured console, click Settings > Protocol
Settings/Credentials. The Protocol Settings/Credentials dialog appears. 2 Click New. 3 Select SNMPv1, then click OK. The protocol properties dialog appears. 4 Enter a Name for the set of SNMPv1 credentials. 5 Enter the new SNMP read Community name. 6 Optionally, enter a new SNMP write Community name. 7 Increase or decrease the SNMP Timeout. This setting is dependent on the latency and
load on your network devices. Longer timeouts can cause discovery to slow down. However, if the network is experiencing a lot of network traffic, a longer timeout is recommended. A default of 1000 milliseconds is recommended for small to medium size networks.
Note: If you are discovering across a WAN link, allow for a longer timeout.
8 Increase or decrease the SNMP Retry count. This setting is dependent on the latency and load on your network devices. More retries allow for SNMP failures or heavy network loads. However, more retries slow down the discovery process. One or two retries is recommended for small to medium size networks.
Note: If you are discovering across a WAN link, increase the number of retries.
9 Click OK to save the protocol changes.
To edit a set of SNMPv1 credentials: 1 From the main menu of the WhatsConfigured console, click Settings > Protocol
Settings/Credentials. The Protocol Settings/Credentials dialog appears. 2 Select an existing set of SNMPv1 credentials, then click Edit. The protocol properties
dialog appears. 3 Modify the existing settings.
§ Edit the SNMP Read Community name.
§ Edit the SNMP Write Community name.
§ Increase or decrease the SNMP Timeout. This setting is dependent on the latency and load on your network devices. Longer timeouts can cause discovery to slow down. However, if the network is experiencing a lot of network traffic, a longer timeout is recommended. A default of 1000 milliseconds is recommended for small to medium size networks.
Note: If you are discovering across a WAN link, increase the number of retries.
§ Increase or decrease the SNMP Retry count. This setting is dependent on the latency and load on your network devices. More retries allow for SNMP failures or heavy

WhatsConfigured v3.1 User Guide
28
network loads. However, more retries slow down the discovery process. One or two retries is recommended for small to medium size networks.
Note: If you are discovering across a WAN link, allow for a longer timeout.
4 Click OK to save the protocol changes.
To delete a set of SNMPv1 credentials: 1 From the main menu of the WhatsConfigured console, click Settings > Protocol
Settings/Credentials. The Protocol Settings/Credentials dialog appears. 2 Select an existing set of SNMPv1 credentials, then click Delete. The SNMPv1 credentials
are removed. 3 Click OK to save the protocol changes.
SNMPv2 credentials
To add a new set of SNMPv2 credentials: 1 From the main menu of the WhatsConfigured console, click Settings > Protocol
Settings/Credentials. The Protocol Settings/Credentials dialog appears. 2 Click New. 3 Select SNMPv2, then click OK. The protocol properties dialog appears. 4 Enter a Name for the set of SNMPv2 credentials. 5 Enter the new SNMP read Community name. 6 Optionally, enter a new SNMP write Community name. 7 Increase or decrease the SNMP Timeout. This setting is dependent on the latency and
load on your network devices. Longer timeouts can cause discovery to slow down. However, if the network is experiencing a lot of network traffic, a longer timeout is recommended. A default of 1000 milliseconds is recommended for small to medium size networks.
Note: If you are discovering across a WAN link, allow for a longer timeout.
8 Increase or decrease the SNMP Retry count. This setting is dependent on the latency and load on your network devices. More retries allow for SNMP failures or heavy network loads. However, more retries slow down the discovery process. One or two retries is recommended for small to medium size networks.
Note: If you are discovering across a WAN link, increase the number of retries.
9 Click OK to save the protocol changes.
To edit a set of SNMPv2 credentials: 1 From the main menu of the WhatsConfigured console, click Settings > Protocol
Settings/Credentials. The Protocol Settings/Credentials dialog appears. 2 Select an existing set of SNMPv2 credentials, then click Edit. The protocol properties
dialog appears. 3 Modify the existing settings.
§ Edit the Name.

WhatsConfigured v3.1 User Guide
29
§ Edit the SNMP Read Community name.
§ Edit the SNMP Write Community name.
§ Increase or decrease the SNMP Timeout. This setting is dependent on the latency and load on your network devices. Longer timeouts can cause discovery to slow down. However, if the network is experiencing a lot of network traffic, a longer timeout is recommended. A default of 1000 milliseconds is recommended for small to medium size networks.
Note: If you are discovering across a WAN link, increase the number of retries.
§ Increase or decrease the SNMP Retry count. This setting is dependent on the latency and load on your network devices. More retries allow for SNMP failures or heavy network loads. However, more retries slow down the discovery process. One or two retries is recommended for small to medium size networks.
Note: If you are discovering across a WAN link, allow for a longer timeout.
4 Click OK to save the protocol changes.
To delete a set of SNMPv2 credentials: 1 From the main menu of the WhatsConfigured console, click Settings > Protocol
Settings/Credentials. The Protocol Settings/Credentials dialog appears. 2 Select an existing set of SNMPv2 credentials, then click Delete. The SNMPv2 credentials
are removed. 3 Click OK to save the protocol changes.
SNMPv3 credentials
To add a new set of SNMPv3 credentials: 1 From the main menu of the WhatsConfigured console, click Settings > Protocol
Settings/Credentials. The Protocol Settings/Credentials dialog appears. 2 Click New. 3 Select SNMPv3, then click OK. The protocol properties dialog appears. 4 Enter a Name for the set of SNMPv3 credentials. 5 Enter the Username that is configured for the SNMP agent. This username is included in
every SNMP packet in the authentication header. An SNMP device, upon reception of a packet, uses this username to look for configured authentication and encryption parameters and applies them to the received message.
6 Optionally, enter the Context needed to identify specific SNMP instances on your network.
7 If required, select the Protocol used for Authentication. Additionally, enter the Password used for authentication.
8 If supported, select the Protocol used for Encryption. Additionally, enter the Password used for encryption.
9 Increase or decrease the SNMP Timeout. This setting is dependent on the latency and load on your network devices. Longer timeouts can cause discovery to slow down. However, if the network is experiencing a lot of network traffic, a longer timeout is

WhatsConfigured v3.1 User Guide
30
recommended. A default of 1000 milliseconds is recommended for small to medium size networks.
Note: If you are discovering across a WAN link, allow for a longer timeout.
10 Increase or decrease the SNMP Retry count. This setting is dependent on the latency and load on your network devices. More retries allow for SNMP failures or heavy network loads. However, more retries slow down the discovery process. One or two retries is recommended for small to medium size networks.
Note: If you are discovering across a WAN link, increase the number of retries.
11 Click OK to save the protocol changes.
To edit a SNMPv3 set of credentials: 1 From the main menu of the WhatsConfigured console, click Settings > Protocol
Settings/Credentials. The Protocol Settings/Credentials dialog appears. 2 Select an existing set of SNMPv3 credentials, then click Edit. The protocol properties
dialog appears. 3 Modify the existing settings.
§ Edit the Name.
§ Edit the Description.
§ Edit the SNMP Write Community name.
§ Edit the Protocol and Password used for Authentication.
§ Edit the Protocol and Password used for Encryption.
§ Increase or decrease the SNMP Timeout. This setting is dependent on the latency and load on your network devices. Longer timeouts can cause discovery to slow down. However, if the network is experiencing a lot of network traffic, a longer timeout is recommended. A default of 1000 milliseconds is recommended for small to medium size networks.
Note: If you are discovering across a WAN link, increase the number of retries.
§ Increase or decrease the SNMP Retry count. This setting is dependent on the latency and load on your network devices. More retries allow for SNMP failures or heavy network loads. However, more retries slow down the discovery process. One or two retries is recommended for small to medium size networks.
Note: If you are discovering across a WAN link, allow for a longer timeout.
4 Click OK to save the protocol changes.
To delete a set of SNMPv3 credentials: 1 From the main menu of the WhatsConfigured console, click Settings > Protocol
Settings/Credentials. The Protocol Settings/Credentials dialog appears.

WhatsConfigured v3.1 User Guide
31
2 Select an existing set of SNMPv3 credentials, then click Delete. The SNMPv3 credentials are removed.
3 Click OK to save the protocol changes.
Using the SSH protocol WhatsConfigured stores the SSH authentication data you provide below so that WhatsConfigured can use whenever authentication is needed to connect to and gather data from a device.
To add a new set of SSH credentials: 1 From the main menu of the WhatsConfigured console, click Settings > Protocol
Settings/Credentials. The Protocol Settings/Credentials dialog appears. 2 Click New. 3 Select SSH, then click OK. The protocol properties dialog appears. 4 Enter a new SSH Username. 5 Enter a new SSH Password and the Confirm Password.
Note: SSH passwords are encrypted.
6 Enter a defined SSH port. The default port number is 22. 7 Click OK to save the protocol changes.
To edit a set of SSH credentials: 1 From the main menu of the WhatsConfigured console, click Settings > Protocol
Settings/Credentials. The Protocol Settings/Credentials dialog appears. 2 Select an existing set of SSH credentials, then click Edit. The protocol properties dialog
appears. 3 Modify the existing settings.
§ Enter a new SSH Username.
§ Enter a new SSH Password and the Confirm Password.
Note: SSH user names and passwords are encrypted.
§ Enter the defined SSH port. The default port number is 22. 4 Click OK, to save the protocol changes.
To delete a set of SSH credentials: 1 From the main menu of the WhatsConfigured console, click Settings > Protocol
Settings/Credentials. The Protocol Settings/Credentials dialog appears. 2 Select an existing set of SSH credentials, then click Delete. 3 Click OK to save the protocol changes. The SSH credentials are removed.
Using the Telnet protocol Telnet credentials are used for the map Capture Config tool that starts Backup Running Configurations and Backup Startup Configurations. The Telnet user name, password, and port

WhatsConfigured v3.1 User Guide
32
are required to connect and run configurations for devices such as routers and switches. This protocol is required only if you want to run the configuration tool for devices.
To add a new set of Telnet credentials: 1 From the main menu of the WhatsConfigured console, click Settings > Protocol
Settings/Credentials. The Protocol Settings/Credentials dialog appears. 2 Click New. 3 Select Telnet, then click OK. The protocol properties dialog appears. 4 Enter a new Telnet Username. 5 Enter a new Telnet Password and the Confirm Password.
Note: Telnet passwords are encrypted.
6 Enter a defined Telnet port. The default port number is 23. 7 Click OK to save the protocol changes.
To edit a set of Telnet credentials: 1 From the main menu of the WhatsConfigured console, click Settings > Protocol
Settings/Credentials. The Protocol Settings/Credentials dialog appears. 2 Select an existing set of Telnet credentials, then click Edit. The protocol properties
dialog appears. 3 Modify the existing settings.
§ Enter a new Telnet Username.
§ Enter a new Telnet Password and the Confirm Password.
Note: SSH user names and passwords are encrypted.
§ Enter the defined SSH port. The default port number is 23. 4 Click OK to save the protocol changes.
To delete a set of Telnet credentials: 1 From the main menu of the WhatsConfigured console, click Settings > Protocol
Settings/Credentials. The Protocol Settings/Credentials dialog appears. 2 Select an existing set of Telnet credentials, then click Delete. 3 Click OK to save the protocol changes. The Telnet credentials are removed.
33
CHAPTER 5
Using the WhatsConfigured console
In This Chapter
About the WhatsConfigured console ......................................................... 33
About network discovery files ....................................................................... 33
Managing network discovery files ............................................................... 33
About the WhatsConfigured console
The WhatsConfigured console is a Windows application used for discovering, visualizing, configuring, and exporting network data. The console has the following components:
§ Network Discovery (on page 21)
§ Several view by which to view network device data.
For more information on the views included in the WhatsConfigured console, see the Viewing Network Data (on page 38) section.
About network discovery files
WhatsConfigured saves the information from a network discovery in a discovery file (.dis file extension). This flat file format makes it easy to share and move network data between computers with WhatsConfigured installed. The size of these files is dependent on the number of devices saved in each discovery run and can be managed as part of the general file system.
Managing network discovery files
There a several features available for you to manage the discovery (.dis) files:
§ Create a new discovery file
§ Open an existing discovery file
§ Replace devices in a current discovery file with devices from another discovery file
§ Merge devices in a current discovery file with devices from another discovery file
§ Replace topology maps in a current discovery file with maps from another discovery file

WhatsConfigured v3.1 User Guide
34
§ Merge maps in a current discovery file with maps from another discovery file
§ Save a discovery file
§ Save an existing discovery file to another discovery file
Creating a new discovery file At the end of a network discovery run, network data is updated in the WhatsConfigured console. You can save this network data to a discovery file that can be viewed and modified later.
To create a new discovery file:
From the WhatsConfigured console, click File > New. This clears any existing network data so that you can perform a new network discovery.
Opening a discovery file After starting the WhatsConfigured console, you can open an existing discovery file.
To open an existing discovery file: 1 From the WhatsConfigured console, click File > Open. The File Open dialog appears. 2 Browse to a network discovery file, then click Open. The network data is loaded into the
WhatsConfigured console.
Opening a recently used discovery file The WhatsConfigured console keeps track of any recently opened/saved discovery files. You can open these files at any time from the WhatsConfigured console File menu.
To open a recently used discovery file: 1 From the WhatsConfigured console, click File. At the bottom of the menu, recently
opened/saved files are listed. 2 Select the network discovery file you want to open.
Using Merge Devices The WhatsConfigured console provides the capability to merge the current set of devices with the devices from another discovery file.
To merge the current set of devices: 1 From the WhatsConfigured console, click File > Merge Devices. The Open Discovery
File dialog appears. 2 Browse to locate the discovery file you want to open, then click Open.
The device set from the selected file is merged with the current set of devices. The topology maps are not modified.
WhatsConfigured v3.1 User Guide
35
Using Replace Devices The WhatsConfigured console provides the capability to replace the set of devices in the current network data model with those from another discovery file.
To replace the current set of devices: 1 From the WhatsConfigured console, click File > Replace Devices. The Open Discovery
File dialog appears. 2 Browse to locate the discovery file that you want to open, then click Open.
The current device set is replaced with the devices from the selected file. The topology maps are not modified.
Using Replace Maps The WhatsConfigured console provides the capability to replace the topology maps with the current discovery file with those of another discovery file.
To replace the current topology maps with those from an external data file: 1 From the WhatsConfigured console, click File > Replace Maps. The Open Discovery File
dialog appears. 2 Browse to locate the discovery file that you want to open, then click Open.
The topology maps from the external file replaces those maps of the current discovery file.
Using Merge Maps The WhatsConfigured console provides the capability to merge the topology maps in the current discovery file the with those of another discovery file.
To merge topology maps from an external data file with the current set of maps: 1 From the WhatsConfigured console, click File > Merge Maps. The File Open dialog
appears. 2 Browse to locate the discovery file that you would like to open, then click Open.
The topology maps from the external discovery are merged with those of the current discovery file.
Using Save The WhatsConfigured console provides the capability to save the current network data model to a discovery file (.dis). Any modifications made to a network data model, such as added devices through discovery or added/modified topology maps, need to be saved much like a standard document after it has been modified.
Note: A discovery file can only be saved after it has received an initial discovery file name. Therefore, use File > Save As to assign a file name to the network model the first time.
WhatsConfigured v3.1 User Guide
36
To save network data to a discovery file:
From the WhatsConfigured console, click File > Save. The file is saved.
Using Save As The WhatsConfigured console provides the capability to save the current network data model to a discovery file. After an initial discovery, or if you want to save the network model to a different discovery file name, you can use the Save As feature.
To save network data to a discovery file: 1 From the WhatsConfigured console, click File > Save As. The Save Discovery File dialog
appears. 2 Give the discovery file a name, then click Save. The network data is saved to the file.
Comparing Network Files WhatsConfigured gives you the ability to compare previously discovered network files with the current network file through the Network Compare dialog.
To compare network files: 1 From the WhatsConfigured main menu, click File > Compare Network Files. The
Network Compare dialog appears. 2 Click Browse to select the previously discovered network file (.dis) to which to
compare the network file you are currently running in WhatsConfigured. 3 After you select the appropriate network file, the dialog automatically populates with
comparison information. The following comparison information is provided in the dialog's Link Analysis section.
§ Devices that exist only in that network (the previously discovered .dis file).
§ Devices that exist only in this network (the .dis file that you are currently running in WhatsConfigured).

WhatsConfigured v3.1 User Guide
37
§ Differences between devices common to both this and that network. 4 After reviewing the provided comparison information, click Close to exit the dialog.
38
CHAPTER 6
Viewing Network Data
In This Chapter
About network data views .............................................................................. 38
About Device Categories View ...................................................................... 42
About Device List View ..................................................................................... 45
About Topology Maps View ........................................................................... 49
Managing dynamic topology map updates ............................................. 54
Filtering devices and dynamically updating the topology map ....... 55
Configuring the topology layout and display settings ......................... 56
About Subnets View .......................................................................................... 71
About VLANs view .............................................................................................. 73
About Links View ................................................................................................ 74
About network data views
The WhatsConfigured console provides the capability of browsing network discovery results using a number of different views. The following views are provided in the WhatsConfigured console:
§ Device Categories view (on page 42)
§ Device List view (on page 45)
§ Topology Map view (on page 49)
§ Subnets view (on page 71)
§ VLAN view (on page 73)
§ Links view (on page 74)
The following sections describe how each view displays your network data.
About data grid views An important feature of the WhatsConfigured console is its capability to show network data in a data grid, or spreadsheet-like form. These data grid views provide a number of user functions that are beneficial to creating multiple views of your network data. The following section describes the functions available in the data grid views. Available features vary dependent upon the data grid:

WhatsConfigured v3.1 User Guide
39
§ Column filtering
§ Edit Device Category
§ Show in Device Categories
§ Remove selected devices
§ Print and Print Preview
§ Save CSV (comma-separated value file)
§ Copying to clipboard
Column filtering Each data grid view allows you to show and hide its columns. This feature provides a powerful filtering capability so that you may structure your views in a way that brings the data into a form that you find most useful as a network administrator.
To show and hide columns in a data grid view: 1 Right-click a column heading in the data grid view. A list displaying all the columns that
are displayed in that data grid appears; only columns with checks are displayed in the data grid.
2 To show a column, click the name of the column that you want to display in the grid. The data grid updates automatically.
3 To hide a column, clear the check from column that you would like to remove from the grid. The data grid updates automatically.
4 To close the column list options, click anywhere outside of the list box.
Note: Show and hide selections are not persistent between different sessions of WhatsConfigured. When you close the current session of WhatsConfigured, data grid views return to their default display settings.
Edit Device Category Use the Device Types dialog to create or modify a custom device type mapping. To do this, enter an SNMP OID (sysObjectID) and select a device category for which to map a device. For more information about SNMP OIDs, refer to your device documentation or the Internet Assigned Numbers Authority (IANA) web site (http://www.iana.org/assignments/enterprise-numbers).
Use the Device Types dialog to create or modify a custom device type mapping. To do this, enter an SNMP OID (sysObjectID) and select a device category for which to map a device. For more information about SNMP OIDs, refer to your device documentation or the Internet Assigned Numbers Authority (IANA) web site (http://www.iana.org/assignments/enterprise-numbers).
Use the following options to create and edit device types:
§ sysObject ID (OID). Enter the SNMP OID (sysObjectID) for which you want to map a device. For more information about SNMP OIDs, refer to your device documentation or the Internet Assigned Numbers Authority (IANA) web site (http://www.iana.org/assignments/enterprise-numbers).
WhatsConfigured v3.1 User Guide
40
§ Include Subtree. Select this option to include a subtree for the device type category.
§ Category. Select a device type category for which to map the device.
§ Vendor/Manufacturer. Enter the vendor or manufacturer name.
§ Model. Enter the vendor or manufacturer model.
§ Description. Enter the vendor or manufacturer description.
§ Click OK to save changes.
Show in Device Categories The Device Categories View is an explorer-type view with a Device Category tree view on the left, and a Device Details tab view on the right. The Device Categories view automatically categorizes and groups network devices so they can be viewed by their functional characteristics. The following is a list of all the categories that are supported by the WhatsConfigured console.
§ Routers
§ Switches
§ Wireless Access Points
To view a Device Category: 1 From the main menu of the WhatsConfigured console, select View > Device
Categories. The Device Categories view appears. 2 Click a category to expand it and view more information and the devices belonging to
the category. 3 Click a device to display device details on the right side of the page.
Remove selected devices WhatsConfigured allows you to customize device lists by removing devices from a data grid device list. This feature lets you select devices that you want to manage with WhatsConfigured.
To remove selected devices from a data grid view: 1 In a data grid view, select the devices you want to remove from the device list.
§ Press Control then select multiple non-contiguous devices in the list.
§ Press Shift to select multiple contiguous devices in the list.
2 Right-click in the data grid view. The right-click menu appears. 3 Click Remove selected devices. A confirmation dialog appears and asks if you are sure
you want to delete the selected devices. 4 Click Yes to delete the selected devices or No to cancel the device deletion. If you
clicked Yes, the selected devices are removed from the device list.
Print and Print Preview Each data grid can produce printable reports of the items in the data grid view.
Note: The print capability is disabled in the trial version of WhatsConfigured.

WhatsConfigured v3.1 User Guide
41
To print items in a data grid view: 1 Right-click any item in the data grid view. A right-click menu appears. 2 Select Print. The standard Print dialog appears. 3 Select the print options, then click OK.
To print preview items in a data grid view: 1 Right-click any item in the data grid view. A right-click menu appears. 2 Select Print Preview. The standard Print Preview view appears. You may use this view
to preview how the report will look when printed.
Tip: You can print the document by clicking Print in the Print Preview toolbar.
Copying to clipboard Each data grid can be copied to the windows clipboard and then pasted into another application.
Note: This capability is disabled in the trial version of WhatsConfigured.
To copy data items to the clipboard: 1 Click any item in the data grid view to ensure the correct view is selected. 2 Press Control + C. The data grid view items copy to the clipboard. 3 Open any application to which you can paste the clipboard data; for example Microsoft
Excel™. 4 Press Control + V. The contents of the clipboard copy into the application.

WhatsConfigured v3.1 User Guide
42
About Device Categories View
Device Categories View automatically categorizes and groups network devices so they can be viewed by their functional characteristics. Categories include networking groups such as Routers, Switches, Hubs, and Wireless Access Points. This view also helps distinguish between desktop and server operating systems such as Macintosh, Windows, Windows Servers, Linux, and UNIX. Additional device categories, such as Printers and IP Phones, help organize your network data. Any device that is either not categorized, nor supports SNMP, is placed in the Unknown category.
To view Device Categories: 1 From the main menu of the WhatsConfigured console, select View > Device
Categories. The Device Categories view appears.
Tip: You can also view device categories from the WhatsConfigured console shortcut menu.
Click (Device Categories shortcut icon). The Device Categories dialog appears.
2 Click a category to expand it and view more information about the devices in the category.
3 Click a device to display device details on the right side of the page.
The Device Categories view also provides a tabular view of the inventory and configuration data that is gathered from each network device. For more information, see About Device Details tab view (on page 43).
Tip: The actual device categories may be rearranged within the Device Categories view by clicking and dragging a category from one location in the list to another.
WhatsConfigured v3.1 User Guide
43
Data displayed in this view can be removed, printed, print previewed, or saved to a comma-separated-value (CSV) file for use in Microsoft Excel or other reporting applications. For more information, see About data grid views (on page 38).
About the Device Details tab view Associated with the Device Categories view, the Device Details tab provides a tabular view that displays detailed network information. When a device is selected in the Device Categories view, the details of the source are shown in the Device Details tab view.
Tabs are only shown if a device has data that can be displayed. Possible tab views may be associated with each device:
§ System. Provides IP Address/MAC Address, MIB II information, product vendor, and other system information.
§ IP Addresses. Provides IP Address configuration information.
§ Interfaces. Provides name entries (IF information) for each device interface and other interface information.
§ Bridge Ports. Provides Bridge Port and VLAN name and index information.
§ VLANs. Provides Virtual LAN configuration information.
§ Assets. Provides inventory information about the device components.
§ Links. Provides physical connectivity information from this device to other network devices.
§ IP Routes. Provides IP route configuration data information.
§ Spanning Tree (STP). Provides spanning tree configuration and status information.
§ ARP Cache. Provides Address Resolution Protocol (ARP) table information.
§ Forwarding. Provides Layer 2 forwarding information.
§ Credentials. Provides information about discovery protocol settings configured for this device.
§ CDP/LLDP. Provides information about layer 2 discovery protocols configured and discovered on this device.
§ IP Routes. Provides information about the IP routes configured for this device.
§ VRRP. Provides information about the Virtual Router Redundancy Protocol (VRRP) on the device. The information relates to the standby nature of routers.
§ STP. Provides information about Spanning Tree Protocol entries discovered on this device.
About the Device Categories view right-click menu The Device Categories right-click menu allows you to manage your device categories. From the right-click menu you can add a device category, edit an existing category, delete a category, or show and/or hide a category from the device category list.

WhatsConfigured v3.1 User Guide
44
To add a device category: 1 From the main menu of the WhatsConfigured console, select View > Device
Categories. The Device Categories view appears.
Tip: You can also view device categories from the WhatsConfigured console shortcut menu.
Click (Device Categories shortcut icon). The Device Categories dialog appears.
2 Anywhere inside of the Device Categories list, right-click. The right-click menu appears. 3 Select Add Category. The Device Category Configuration dialog appears. 4 Enter or select the appropriate information in the dialog boxes.
§ Enter the Category Name that is displayed in the Device Category Configuration dialog.
Note: Category names must be unique, and after they have been created cannot be edited.
§ Enter the Display label that is displayed for the category in the device category view.
§ Enter or Browse to the Icon filename that is used to represent all devices in this category.
§ Select Network device to identify the category as a network infrastructure device. 5 Click OK to save changes.
To edit a device category: 1 From the main menu of the WhatsConfigured console, select View > Device
Categories. The Device Categories view appears.
Tip: You can also view device categories from the WhatsConfigured console shortcut menu.
Click (Device Categories shortcut icon). The Device Categories dialog appears.
2 In the Device Categories list, right-click the category you want to modify. The right-click menu appears.
3 Select Edit Category. The Device Category Configuration dialog appears.
Note: You cannot edit default device categories.
4 Enter or select the appropriate information in the dialog boxes.
§ Enter the Display label that is displayed for the category in the device category view.
§ Enter or Browse to the Icon filename that is used to represent all devices in this category.
§ Select Network device to identify the category as a network infrastructure device. 5 Click OK to save changes.

WhatsConfigured v3.1 User Guide
45
To delete a device category: 1 From the main menu of the WhatsConfigured console, select View > Device
Categories. The Device Categories view appears.
Tip: You can also view device categories from the WhatsConfigured console shortcut menu.
Click (Device Categories shortcut icon). The Device Categories dialog appears.
2 In the Device Categories list, right-click the category you want to remove. The right-click menu appears.
3 Select Delete Category. The category is removed from the device category list.
Note: You cannot delete default device categories.
To hide a device category: 1 From the main menu of the WhatsConfigured console, select View > Device
Categories. The Device Categories view appears.
Tip: You can also view device categories from the WhatsConfigured console shortcut menu.
Click (Device Categories shortcut icon). The Device Categories dialog appears.
2 In the Device Categories list, right-click the category you want to hide, then click Hide Category. The device category is hidden and no longer appears in the category list.
To show a hidden device category: 1 From the main menu of the WhatsConfigured console, select View > Device
Categories. The Device Categories view appears.
Tip: You can also view device categories from the WhatsConfigured console shortcut menu.
Click (Device Categories shortcut icon). The Device Categories dialog appears.
2 At the top of the device category list, right-click Network. The right-click menu appears. 3 Under Show Hidden Category, select the hidden category that you want to show. If
there are several hidden categories, select Show All to show all of the hidden categories. The selected device categories appear in the device category list.
About Device List View
Device List View is a spreadsheet-like view that helps you organize, filter, and find network devices and data.
You can filter data displayed in the view by using the Device Filter and Advanced features.
Data displayed in this view can be filtered, edited by device category, shown in device categories, removed, printed, print previewed, or saved to a comma-separated-value (CSV)

WhatsConfigured v3.1 User Guide
46
file for use in Microsoft Excel or other reporting applications. For more information, see About data grid views (on page 38).
Tip: You can double-click any device in the Device List view. The Device Details tab view opens with more details about the device.
To view Device List:
From the main menu of the WhatsConfigured console, select View > Device List. The Device List view appears.
Tip: You can also view device list from the WhatsConfigured console shortcut menu. Click
(Device List shortcut icon). The Device List dialog appears.
To view Device Details:
With the device list open, double-click a device in the list. The Device Details appear. For more information, see About Device Details tab view (on page 43).
About Device List columns The device list shows all matching devices in the data grid view. There are number of columns that display the respective data for each device.
The grid view columns are:
§ Hostname. The DNS hostname for the device.
§ IP Address. The IP address by which the device was discovered.
§ MAC Address. The MAC address associated with the main IP address.

WhatsConfigured v3.1 User Guide
47
§ NetBios Name. The windows NetBios name (if supported and known).
§ NetBios Domain. The windows NetBios domain (if supported and known).
§ System Name. The MIB II system name.
§ System Description. The MIB II system description.
§ System OID. The MIB II system object ID.
§ Vendor. The network device manufacturer.
§ Model. The network device model number.
Using Device List Filters You can use Device List filters to locate specific network devices and subnets. These filtering tools let you to find devices that match your specified search criteria.
To filter the device list by device type in the list view grid: 1 From the main menu of the WhatsConfigured console, select View > Device List. The
Device List view appears.
Tip: You can also view device list from the WhatsConfigured console shortcut menu. Click
(Device List shortcut icon). The Device List dialog appears.
2 Click the Device Filter list, then select the device type you want to view in the device list. The filtered devices appear in the device list.
To filter the device list by search criteria: 1 From the main menu of the WhatsConfigured console, select View > Device List. The
Device List view appears.
Tip: You can also view device list from the WhatsConfigured console shortcut menu. Click
(Device List shortcut icon). The Device List dialog appears.
2 Click Advanced. The Advanced Device Filter dialog appears. 3 Enter the desired search criteria in the provided boxes. Use a wild card in any text box.
For example, Hostname: device1*. 4 After the device filter search criteria are entered, click OK. The list displays only the
devices that match the search criteria. 5 Click Advanced to further refine the search criteria, then click OK. Only the current list
of devices is compared against the current set of search criteria to show a refined set of devices.
6 Click Clear, then click OK to clear all search criteria and return to the complete device list.

WhatsConfigured v3.1 User Guide
48
Viewing Device List details Associated with the Device List view, the Device Details tab provides a tabular view that displays detailed network device information. When a device is selected in the Device List view, the details of the device are shown in the Device Details tab view.
To view the device list details: 1 From the main menu of the WhatsConfigured console, select View > Device List. The
Device List view appears.
Tip: You can also view device list from the WhatsConfigured console shortcut menu. Click
(Device List shortcut icon). The Device List dialog appears.
2 In the device list, select a device for which to view more details, then click Details. The Device Details list appears.
Tabs are only shown if a device has data that can be displayed. Possible tab views that may be associated with each device are:
§ System. Provides IP Address/MAC Address, MIB II information, product vendor, and other system information.
§ IP Addresses. Provides IP Address configuration information.
§ Interfaces. Provides name entries (IF information) for each device interface and other interface information.
§ Bridge Ports. Provides Bridge Port and VLAN name and index information.
§ VLANs. Provides Virtual LAN configuration information.
§ Assets. Provides inventory information about the device components.
§ Links. Provides physical connectivity information from this device to other network devices.
§ IP Routes. Provides IP route configuration data information.

WhatsConfigured v3.1 User Guide
49
§ Spanning Tree (STP). Provides spanning tree configuration and status information.
§ ARP Cache. Provides Address Resolution Protocol (ARP) table information.
§ Forwarding. Provides Layer 2 forwarding information.
§ Credentials. Provides information about discovery protocol settings configured for this device.
§ CDP/LLDP. Provides information about layer 2 discovery protocols configured and discovered on this device.
§ IP Routes. Provides information about the IP routes configured for this device.
§ VRRP. Provides information about the Virtual Router Redundancy Protocol (VRRP) on the device. The information relates to the standby nature of routers.
§ STP. Provides information about Spanning Tree Protocol entries discovered on this device.
Each of the Device Details tabs is built with the data grid views that were described previously. For more information about the data grid views, see About data grid views (on page 38). These views allow you to browse, sort, and export (print) the data that is shown for each device.
About Topology Maps View
Topology Maps view displays the layer 2, or physical topology, of your networking devices. Topology maps can be organized by groups or individually. By default, WhatsConfigured builds a Network Devices view that displays the topology of your core network device infrastructure.

WhatsConfigured v3.1 User Guide
50
To access Topology Maps View:
From the main menu of the WhatsConfigured console, select View > Topology Maps. The Topology Maps View appears.
Tip: You can also view topology maps from the WhatsConfigured console shortcut menu.
Click (Topology maps shortcut icon). The Topology Maps dialog appears.
With the topology data, you can build custom topology views that display important elements of your network infrastructure. Use the:
§ Topology Map Tree View (left). Right-click on a folder or map name to add, delete, edit, and rename maps and map groups.
Tip: The icon shown next to the Topology Map name, in the tree view, indicates that the map is configured as a dynamic topology map. For more information, see Managing dynamic topology map updates (on page 54).
§ Topology Map View (right). Right-click on a map to add, connect, remove, and link devices. Right-click on individual devices on a map to add and remove connected devices, remove devices, select root devices, link to devices, view device properties, capture device configurations (for devices such as routers and switches), browse devices that are serving web pages, connect to devices via Telnet or SSH, Remote Desktop Connect (RDP) to Windows devices, Ping devices, and run Trace Route on the path to a device.
About adding individual or connected devices to a topology map WhatsConfigured allows you to customize topology maps by adding devices to the topology map.
There are two methods by which to add devices to a topology map:
§ Adding an individual device to a topology map.
§ Adding a connected device to a topology map.
The following steps describe how to accomplish both methods.
Tip: You can also update topology maps dynamically, as scheduled or manual discoveries occur. For more information, see Managing dynamic topology map updates.
To add device(s) to a topology map: 1 From the main menu of the WhatsConfigured console, select View > Topology Maps.
The Topology Maps view appears.

WhatsConfigured v3.1 User Guide
51
Tip: You can also view topology maps from the WhatsConfigured console shortcut menu. Click _ (Topology maps shortcut icon). The Topology Maps dialog appears.
2 Select a topology map you want to view in the topology tree view. 3 Right-click in the topology map area. The right-click menu appears. 4 Select Add Devices. The Select Devices dialog appears. 5 Select the devices from the list that you want to add to the topology map. You can:
§ Double-click a device to select it and return to the previous dialog.
§ Press Ctrl and click to select multiple non-contiguous devices in the list.
§ Press Shift and click to select multiple contiguous devices in the list.
6 Click OK. The selected devices are placed on the topology map. The layout settings (for example, radial or hierarchy) determine how the new devices are displayed in the topology map. To learn more about topology layout modes, please see About Topology layout modes.
Note: The topology map shows the relationships between devices on the map based on their Layer 2 connectivity—if two devices are physically connected, the topology view illustrates their connection.
To add connected devices to a topology map: 1 From the main menu of the WhatsConfigured console, select View > Topology Maps.
The Topology Maps view appears.
Tip: You can also view topology maps from the WhatsConfigured console shortcut menu. Click _ (Topology maps shortcut icon). The Topology Maps dialog appears.
2 Right-click on a device in a topology map. The right-click menu appears. 3 Select Add Connected. The following options are displayed.
§ Network Devices[x/y]. Add all connected network devices to the topology map.
§ Servers[x/y]. Add all connected servers to the topology map.
§ Workstations[x/y]. Add all connected workstations to the topology map.
§ Printers[x/y]. Add all connected printers to the topology map.
§ All Devices[x/y]. Add all connected devices to the topology map.
§ Virtual Machines [x/y]. Add all virtual machines to the topology map.
Note: [x/y] represents the following: y = the number of devices of that type connected to the device you have selected. x = the number of connected devices that are already on the topology map.
§ Select. Use the Select Devices dialog to individually select which connected devices are added to the topology map.
WhatsConfigured v3.1 User Guide
52
4 By clicking on any of the displayed options, the topology map is updated with the selected devices.
About removing devices from a topology map WhatsConfigured allows you to customize topology maps by removing devices from a topology map.
There are four methods to remove devices from a topology map:
§ Remove all devices from a topology map.
§ Remove a single device from a topology map.
§ Remove select devices from a topology map.
§ Remove connected devices from a topology map.
Tip: You can also update topology maps dynamically, as scheduled or manual discoveries occur. For more information, see Managing dynamic topology map updates (on page 54).
The following steps describe the methods to remove devices.
To remove all devices from a topology map:
1 Select the topology map in the topology tree view.
2 Right-click in the topology map area. The right-click menu appears.
3 Select Remove All. All devices are removed from the topology map.
To remove a single device from a topology map:
1 Select the topology map in the topology tree view.
2 Right-click on a device on the topology map. The right-click menu appears.
3 Select Remove Device. The device is removed from the topology map. - or - Select a device on the topology map.
4 Press DELETE. The device is removed from the topology map.
To remove selected devices from a topology map:
1 Select the topology map in the topology tree view.
2 Right-click in the topology map area. The right-click menu appears.
3 Click Remove Devices. The Select Devices dialog appears.

WhatsConfigured v3.1 User Guide
53
4 Use the Select Devices dialog to select the devices that you would like removed from the topology map.
§ Press CTRL to select multiple non-contiguous devices in the list.
§ Press SHIFT to select multiple contiguous devices in the list.
5 Click OK. The selected devices are removed from the topology map.
To remove connected devices from a topology map:
1 Select the topology map in the topology tree view.
2 Right-click on a device on a topology map. The right-click menu appears.
3 Select Remove Connected. The following options are displayed.
§ Network Devices [x/y]. Remove all the connected network devices from the topology map.
§ Servers [x/y]. Remove all the connected servers from the topology map.
§ Workstations [x/y]. Remove all the connected workstations from the topology map.
§ Virtual Machines [x/y]. Remove all virtual machines from the topology map.
§ Printers [x/y]. Remove all the connected printers from the topology map.
§ All Devices [x/y]. Remove all connected devices from the topology map.
Note: [x/y] represents the following: y = number of devices of this type connected to the device you have selected. x = number of connected devices that are already on the topology map.
§ Select. Click to use the Select Devices dialog to individually select the connected devices to remove from the topology map.
4 The selected devices are removed from the topology map.
Viewing link or multi-linked properties from the topology map From the Topology Map, you can use the right-click menu to view link properties for each link on the map.
To view link properties on the topology map: 1 From the main menu of the WhatsConfigured console, select View > Topology Maps.
The Topology Maps view appears.
Tip: You can also view topology maps from the WhatsConfigured console shortcut menu.
Click (Topology maps shortcut icon). The Topology Maps dialog appears.
2 Select a topology map you want to modify in the topology tree view.

WhatsConfigured v3.1 User Guide
54
3 Right-click a link line between connected devices, then select Link Properties. The Link Properties dialog appears.
4 View the information about the two linked devices. If viewing a Multi-Link properties dialog, you can scroll or click the page bar to select the device connection point you want to view. - or - Click Remove Link to remove the link between the devices on the topology map.
Managing dynamic topology map updates
You can apply dynamic map filters to WhatsConfigured topology maps so that the maps update dynamically, each time discovery runs. Dynamic maps are updated each time a manual or scheduled discovery is performed.
As a part of selecting (filtering) devices to display in the dynamic topology maps, you use Map Devices and Connected Devices selection filters to build the a custom map. For example, using the Map Devices filtering options, you can select devices in the IP range of 10.0.0.1 - 10.0.0.100 to appear on a map. Any device added to the network, within the range, will be added to the map. You can also apply Connected Devices filters to show devices connected to the core mapped devices. For example, you can filter a map to show all servers connected to switches on the topology map.
This feature helps ensure that your customized topology maps are up-to-date with the most recent network configuration. Use the Edit Map: Network Devices dialog to:
§ Define the devices you want to show on the map so that each time the map is updated dynamically, any new devices that match the criteria is added to the map.
§ Configure the topology layout and display settings; for example, radial, hierarchy, manual map layout options.
For more information about the filtering options, see Creating Device Filters (on page 125).

WhatsConfigured v3.1 User Guide
55
To access the Edit Map: Network Devices dialog: 1 From the main menu of the WhatsConfigured console, select View > Topology Maps.
The Topology Maps view appears.
Tip: You can also view topology maps from the WhatsConfigured console shortcut menu.
Click (Topology maps shortcut icon). The Topology Maps dialog appears.
2 Select the topology map, in the topology tree view, that you want to modify. 3 Right-click in the topology map area. The right-click menu appears. 4 Click Layout / Display Settings. The Edit Map: Devices dialog appears.
To manage topology map set the update mode and filters and to set the layout format:
The Edit Map: Network Devices dialog includes two tabs to manage device maps:
§ Devices tab. Use this tab to select the topology map update mode and filter for the devices you want to display on the map. For more information see, Filtering devices and scheduling topology map updates (on page 55).
§ Layout tab. Use this tab to select the topology map layout mode format for the devices on the map: radial, hierarchy, or manual layout. For more information see, Configuring the topology layout and display settings (on page 56).
Filtering devices and dynamically updating the topology map
Use the Edit Map: Devices dialog Devices tab to select the topology map update mode (Dynamic or Manual) and filter the devices you want to display on the map.
To access the Edit Map: Devices dialog: 1 From the main menu of the WhatsConfigured console, select View > Topology Maps.
The Topology Maps view appears.
Tip: You can also view topology maps from the WhatsConfigured console shortcut menu.
Click (Topology maps shortcut icon). The Topology Maps dialog appears.
2 Select the topology map, in the topology tree view, that you want to export. 3 Right-click in the topology map area. The right-click menu appears. 4 Click Layout / Display Settings. The Edit Map: Devices dialog appears.
To filter devices for the topology map: 1 On the Edit Map: Network Devices dialog Devices tab, select the Update Mode:
§ Dynamic. Select this option to apply the map filters to the topology map each time a scheduled discovery runs.
§ Manual. Select this option to disable device filtering for maps. When the device filters are disabled, you can add devices to the map with the topology map right-click menu.
WhatsConfigured v3.1 User Guide
56
For more information, see About adding individual or connected devices to a topology map (on page 50).
2 Use the Map Devices and Connected Devices box to design a filter for the devices you want to include on the map. Click Edit next to each device filter to open the Edit Devices Filter dialog and make device filter selections. For more information, see Creating Device Filters (on page 125). After the filter options are selected, they appear in the Map Devices and Connected Devices boxes.
3 If you want to shorten each device name on the map, select the Clip Device Names option. This option shortens (clips) the device's full domain names on the map. This helps display the map information in a less cluttered, easier to read view.
Configuring the topology layout and display settings
Use the Edit Map: Network Devices dialog Layout tab to select the topology map layout format you want to display. To understand the layout modes, you must first be familiar with the layout strategy used by the WhatsConfigured topology engine. For each map, the topology viewer automatically selects a root device, which becomes the starting point of the diagrams. The root device is selected based on finding the device on the diagram with the most network connections. Additionally, you can manually select the root device. For more information, see Changing the root device selection (on page 59).
Using the connectivity model, the topology viewer sets the root as the parent and then assigns all connected devices as children. This process continues until all devices on the topology map are given a parent/child relationship.
With the parent/child relationships calculated, the WhatsConfigured topology viewer provides three layout modes for any topology map. These modes describe the manner in which each child node (or device) is given its position on the topology map. The layout modes are described as follows:
§ Radial. In this mode, each child node is connected to its parent in a radial (or circular) pattern. For more information, see About Radial layout settings (on page 57).
§ Hierarchy. In this mode, each child node is given a position in a hierarchical or tree-like view with the root being either on the left, top, right or bottom. For more information, see About Hierarchy Layout settings (on page 57).
§ Manual. In this mode, you can use the drag-and-drop features of the topology view to position the device on the topology map where you want to locate it. For more information, see About Manual Layout setting (on page 58).
To access the Edit Map: Devices dialog: 1 From the main menu of the WhatsConfigured console, select View > Topology Maps.
The Topology Maps view appears.
Tip: You can also view topology maps from the WhatsConfigured console shortcut menu.
Click (Topology maps shortcut icon). The Topology Maps dialog appears.
2 Select the topology map, in the topology tree view, that you want to export. 3 Right-click in the topology map area. The right-click menu appears.

WhatsConfigured v3.1 User Guide
57
4 Click Layout / Display Settings. The Edit Map: Devices dialog appears.
To change a topology map layout settings: 1 From the Edit Map: Network Devices dialog, select the Layout tab. 2 Use the Layout Settings tab to adjust the layout options. 3 Click OK. The selected devices will be repositioned on the topology map.
About Radial Layout settings In the radial layout mode, connected child devices are given positions in a radial (or circular) pattern around their parent device. You can modify the layout results by changing the following layout attributes:
§ Level Spacing. This setting dictates the amount of space between the parent and child device. Increase this value to provide more spacing between the parent and children devices.
§ Node Angle. This setting dictates the amount of space between each child (or sibling) devices. Increase this value to fan out the children.
Note: When increasing the node angle, if a large number of devices are shown connected to one parent, the radial layout may overlap (make a full circle). In this case you may need to decrease the node angle and increase the level spacing.
About Hierarchy Layout settings In the hierarchy layout mode, connected child devices are given positions in a hierarchical (or tree like) pattern in relationship to their parent. You can modify the layout results by changing the following layout attributes:
Direction. This setting indicates the placement of the root device and the direction the children will be placed from the root device.
§ Down. The root device is placed at the top of the topology map, and children are placed respectively below the root device.
§ Up. The root device is placed at the bottom of the topology map, and children are placed respectively above the root.
§ Left. The root device is placed at the right of the topology map, and children are placed respectively to the left of the root.
§ Right. The root device is placed at the left of the topology map, and children are placed respectively to the right of the root.
Alignment. This setting indicates the placement of the root (or parent) device in relationship to its children.
§ Center. The root/parent device is centered (either vertically/horizontally) with respect to its children.
§ Left. The root/parent device is located to the far left (either vertically/horizontally) with respect to its children.

WhatsConfigured v3.1 User Guide
58
§ Right. The root/parent device is located to the far right (either vertically/horizontally) with respect to its children.
Level Spacing. This setting dictates the amount of space between the parent and child devices. Increase this value to provide more spacing between the parent and children devices.
Node Spacing. This setting dictates the amount of space between each child (or sibling) devices. Increase this value to create more space between sibling devices.
Straight Links. A flag that indicates whether the lines from the parent device to the children devices should be straight lines or routed (angled) lines.
About Manual Layout settings In manual layout mode, the automatic layout methods are turned off and you are given complete control over device placement on the topology map. The topology maps provide a drag-and-drop capability to simplify creating and arranging a custom topology map. The following is a list of drag-and-drop operations in manual layout mode.
§ Left Mouse Click. Selects a device on the topology map.
§ Shift + Left Mouse Click. Multi-selects devices on a topology map.
§ Left Mouse Click + Mouse Move. Selects and drags a device to a new position on the topology map.
§ Alt + Left Mouse Click + Mouse Move. Selects and drags a device PLUS all of its children to a new position on the topology map.
You can use the manual layout mode to add new devices to the topology map. The method to add a device is the same as adding a device in radial or hierarchical layout mode. After the devices are placed on the topology map, you can manually move devices on the map or select the radial (on page 57) or hierarchy (on page 57) layout settings to readjust the map.
Layout Children While in the manual layout mode, the WhatsConfigured topology maps provide the capability to use the auto-layout algorithms to reposition child devices on a topology map.
To reposition child devices on a topology map:
Note: Make sure that the layout settings are set to Manual layout to change layout children settings. For more information see, Layout Children in the Help.
1 From the main menu of the WhatsConfigured console, select View > Topology Maps. The Topology Maps view appears.
Tip: You can also view topology maps from the WhatsConfigured console shortcut menu.
Click (Topology maps shortcut icon). The Topology Maps dialog appears.

WhatsConfigured v3.1 User Guide
59
2 Select a topology map you want to modify in the topology tree view. 3 Right-click a device with connected devices, then select Layout Children. The Layout
Children dialog appears. 4 Use the Layout Settings dialog to adjust the layout options. For more information about
auto-layout settings, see Layout Children in the Help. 5 Click OK. The selected devices will be repositioned on the topology map.
Changing the root device selection By default the topology map root device is selected automatically based on the topology map device with the most network connections. After discovery, you can also change the root device selection to a different device.
To manually select the root device: 1 Select any device on the topology map, then right-click. The right click menu appears. 2 Click Select As Root Device. This overrides the automatic root calculation and all
parent/child relationships are built based on the newly selected device as the root device.
If you have manually changed the root device selection, you can revert back to auto-select the root device if preferred.
To auto-select the Root Device: 1 Select the device on the topology map that was manually selected as the root device,
then right-click. The right click menu appears. 2 Click Auto-Select Root Device. This disables the manual root device selection and
returns the selection back to the automatic root device selection.
Polling and Monitoring WhatsConfigured provides map-level tools to test and monitor network device performance and help provide a view of the overall network health. The following polling and monitoring tools help you view specific device performance details:
§ Ping Status/Latency. Use to poll devices and view the up or down status and response time.
§ Interface Status/Utilization. Use to poll devices and view interface performance information.
§ CPU Utilization. Use to poll devices and view CPU performance information.
§ Memory Utilization. Use to poll devices and view memory use data.
To access 1 From the main menu of the WhatsConfigured console, select View > Topology Maps.
The Topology Maps view appears.
Tip: You can also view topology maps from the WhatsConfigured console shortcut menu.
Click (Topology maps shortcut icon). The Topology Maps dialog appears.
2 Select the topology map, in the topology tree view, that you want to modify.

WhatsConfigured v3.1 User Guide
60
3 Right-click in the topology map area. The right-click menu appears. 4 Select the monitor you want to use. The monitor dialog appears.
To use topology map device polling and monitoring tools:
From the topology map right-click menu, select a monitor you want to use. For more information see:
§ Using Poll/Monitor tools - Ping Status/Latency (on page 60)
§ Using Poll/Monitor tools - Interface Status/Utilization (on page 61)
§ Using Poll/Monitor tools - CPU Utilization (on page 63)
§ Using Poll/Monitor tools - Memory Utilization (on page 64)
Using Poll/Monitor tools - Ping Status/Latency Use the poll/monitor network map tool to view ping status and latency information for devices on the network map. This report provides information about the ping status (up or down device availability) and a graph of the ping latency (round-trip time over time). This tool can help you determine how a single device or multiple devices are performing and where network device bottlenecks may exist on the network.
The following is a list of the information available for the monitor. The Device, Name, and Product ID columns display by default:
§ Name. Displays the device name.
§ IP Address. Displays the computer IP address.
§ Ping Status. Displays the whether the device is in an up or down state.
§ RTT. Displays the round trip time in milliseconds; the amount of time it takes for the ping request to be returned from the remote device.
Access the Ping Status/Latency tool: 1 From the main menu of the WhatsConfigured console, select View > Topology Maps.
The Topology Maps view appears. 2 Select a topology map you want to view in the topology tree view. 3 Right-click in the topology map area. The right-click menu appears. 4 Select Poll/Monitor > Network > Ping Status/Latency. The Ping Status/Latency dialog
appears with a list of the devices on the map.
To start a Ping Status/Latency monitor on a map: 1 Select the devices you want to include in the monitor. 2 Click Settings if you want to change the Poll Interval and the Ping Timeout settings. 3 Click Start to begin the test. The Ping Latency for each device displays in the graph and
the Ping Status and Round-Trip Time (RTT) for each device displays in the respective columns in the table below.
4 Click Stop to end the monitor test.
To edit the columns that appear in the report:
§ Right-click on any column heading, the column selection list appears. In the column selection list, click on the columns you would like to display.

WhatsConfigured v3.1 User Guide
61
To sort on a column:
§ Left-click on the column heading. The direction of the arrow indicates the direction of the sort. If the arrow is pointing down, the column is sorted in descending order. If the arrow is pointing up, the column is sorted in ascending order.
To see a print preview, print or save the report to a CSV file:
§ Click Preview to see a print preview of the entire report.
§ Click Print to print the entire report.
§ Click Save to save the entire report to a CSV file.
Using Poll/Monitor tools - Interface Status/Utilization Use the poll/monitor network map tool to view interface status and utilization information for devices on the network map. This report provides a number of interface monitor statistics and a graph of the data transmitted through the interface. This tool can help you determine a variety of information about interface traffic for a single device or aggregate data for multiple devices.
Following are the interface statistic monitors available and the information each provides:
§ In + Out Utilization. Interfaces that use half-duplexing share the interface between In and Out octets, so the max speed limits both In and Out bytes. This information provides a better view of the total utilization of the interface this monitor by adding the in utilization with the out utilization. This monitor is not useful when viewing interfaces that use full-duplexing.
§ In Broadcast Packets (sec.). The number of packets, delivered by this sub-layer to a higher (sub-)layer, which were addressed to a broadcast address at this sub-layer. Discontinuities in the value of this counter can occur at re-initialization of the management system, and at other times as indicated by the value of ifCounterDiscontinuityTime.
§ In Bytes (sec.). The same as IfInOctets, from the IF-MIB, per second. renamed to "Bytes" since it is a more common term. One octet is a byte.
§ In Errors (sec.). For packet-oriented interfaces, the number of inbound packets that contained errors preventing them from being deliverable to a higher-layer protocol. For character- oriented or fixed-length interfaces, the number of inbound transmission units that contained errors preventing them from being deliverable to a higher-layer protocol. Discontinuities in the value of this counter can occur at re-initialization of the management system, and at other times as indicated by the value of ifCounterDiscontinuityTime.
§ In Multicast Packets (sec.). The number of packets, delivered by this sub-layer to a higher (sub-)layer, which were addressed to a multicast address at this sub-layer. For a MAC layer protocol, this includes both Group and Functional addresses. Discontinuities in the value of this counter can occur at re-initialization of the management system, and at other times as indicated by the value of ifCounterDiscontinuityTime.
§ In Packets (sec.). The sum of In Broadcast, Multicast, and Unicast packets.

WhatsConfigured v3.1 User Guide
62
§ In Ucast Packets (sec.). The number of packets, delivered by this sub-layer to a higher (sub-)layer, which were not addressed to a multicast or broadcast address at this sub-layer. Discontinuities in the value of this counter can occur at re-initialization of the management system, and at other times as indicated by the value of ifCounterDiscontinuityTime.
§ In Unknown Protocols (sec.). For packet-oriented interfaces, the number of packets received via the interface which were discarded because of an unknown or unsupported protocol. For character-oriented or fixed-length interfaces that support protocol multiplexing the number of transmission units received via the interface which were discarded because of an unknown or unsupported protocol. For any interface that does not support protocol multiplexing, this counter will always be 0. Discontinuities in the value of this counter can occur at re-initialization of the management system, and at other times as indicated by the value of ifCounterDiscontinuityTime.
§ In Utilization (%). The change in InOctets, per second, as a percentage of the max speed of the interface.
§ Out Broadcast Packets (sec.). The total number of packets that higher-level protocols requested be transmitted, and which were addressed to a broadcast address at this sub-layer, including those that were discarded or not sent. Discontinuities in the value of this counter can occur at re-initialization of the management system, and at other times as indicated by the value of ifCounterDiscontinuityTime.
§ Out Bytes (sec.). To provide user with a better view of the total utilization of the interface, this monitor adds the In utilization with the Out utilization. This monitor has no value when viewing interfaces that use full-duplexing.
§ Out Discards (sec.). The number of outbound packets which were chosen to be discarded even though no errors had been detected to prevent their being transmitted. One possible reason for discarding such a packet could be to free up buffer space. Discontinuities in the value of this counter can occur at re-initialization of the management system, and at other times as indicated by the value of ifCounterDiscontinuityTime.
§ Out Errors (sec.). For packet-oriented interfaces, the number of outbound packets that could not be transmitted because of errors. For character-oriented or fixed-length interfaces, the number of outbound transmission units that could not be transmitted because of errors. Discontinuities in the value of this counter can occur at re-initialization of the management system, and at other times as indicated by the value of ifCounterDiscontinuityTime.
§ Out Multicast Packets (sec.). The total number of packets that higher-level protocols requested be transmitted, and which were addressed to a multicast address at this sub-layer, including those that were discarded or not sent. For a MAC layer protocol, this includes both Group and Functional addresses. Discontinuities in the value of this counter can occur at re-initialization of the management system, and at other times as indicated by the value of ifCounterDiscontinuityTime.
§ Out Packets (sec.). The sum of Out Broadcast, Multicast, and Unicast packets.
§ Out Queue Length (sec.). The count of all packets in the out packet Queue waiting to be sent (per second).
WhatsConfigured v3.1 User Guide
63
§ Out Ucast Packets (sec.). The total number of packets that higher-level protocols requested be transmitted, and which were not addressed to a multicast or broadcast address at this sub-layer, including those that were discarded or not sent. Discontinuities in the value of this counter can occur at re-initialization of the management system, and at other times as indicated by the value of ifCounterDiscontinuityTime.
§ Out Utilization (%). The change in OutOctets, per second, as a percentage of the max speed of the interface.
To access the Interface Status/Utilization tool: 1 From the main menu of the WhatsConfigured console, select View > Topology Maps.
The Topology Maps view appears. 2 Select a topology map you want to view in the topology tree view. 3 Right-click in the topology map area. The right-click menu appears. 4 Select Poll/Monitor > Network > Interface Status/Utilization. The Interface
Status/Utilization dialog appears with a list of the devices on the map.
To start a Interface Status/Utilization monitor on a map: 1 Select the devices you want to include in the monitor. 2 Click Settings if you want to change the Poll Interval settings. 3 Click Start to begin the test. The selected monitor data displays in the graph and the
table below. 4 Click Stop to end the monitor test.
To edit the columns that appear in the report:
§ Right-click on any column heading, the column selection list appears. In the column selection list, click on the columns you would like to display.
To sort on a column:
§ Left-click on the column heading. The direction of the arrow indicates the direction of the sort. If the arrow is pointing down, the column is sorted in descending order. If the arrow is pointing up, the column is sorted in ascending order.
To see a print preview, print or save the report to a CSV file:
§ Click Preview to see a print preview of the entire report.
§ Click Print to print the entire report.
§ Click Save to save the entire report to a CSV file.
Using Poll/Monitor tools - CPU Utilization Use the poll/monitor network map tool to view CPU utilization information for devices on the network map. This report provides information about CPU performance and a graph of the percentage of CPU utilization. This tool can help you determine how a single device or multiple devices are performing and where CPU performance issues may exist on the network.
The following is a list of the information available for the monitor. The CPU, Protocol, and Utilization% columns display by default:
§ CPU. Displays the device name.
WhatsConfigured v3.1 User Guide
64
§ Protocol. Displays the communication method (protocol) used to access CPU utilization information.
§ Utilization%. Displays information about the CPU usage percentage.
To access the Interface Status/Utilization tool: 1 From the main menu of the WhatsConfigured console, select View > Topology Maps.
The Topology Maps view appears. 2 Select a topology map you want to view in the topology tree view. 3 Right-click in the topology map area. The right-click menu appears. 4 Select Poll/Monitor > Network > CPU Utilization. The CPU Utilization dialog appears
with a list of the devices on the map.
To start a CPU Utilization monitor on a map: 1 Select the devices you want to include in the monitor. 2 Click Settings if you want to change the Poll Interval settings. 3 Click Start to begin the test. The CPU utilization for each device displays in the graph
and the respective columns of the table. 4 Click Stop to end the monitor test.
To edit the columns that appear in the report:
§ Right-click on any column heading, the column selection list appears. In the column selection list, click on the columns you would like to display.
To sort on a column:
§ Left-click on the column heading. The direction of the arrow indicates the direction of the sort. If the arrow is pointing down, the column is sorted in descending order. If the arrow is pointing up, the column is sorted in ascending order.
To see a print preview, print or save the report to a CSV file:
§ Click Preview to see a print preview of the entire report.
§ Click Print to print the entire report.
§ Click Save to save the entire report to a CSV file.
Using Poll/Monitor tools - Memory Utilization Use the poll/monitor network map tool to view memory utilization information for devices on the network map. This report provides information about memory performance and a graph of the percentage of memory utilization. This tool can help you determine how a single device or multiple devices are performing and where CPU performance issues may exist on the network.
The following is a list of the information available for the monitor. The Device, Total Memory, Used Memory, Free Memory, Protocol, and Utilization% columns display by default:
§ Device. Displays the device name.
§ Total Memory. Displays the total amount of memory available on the system.
§ Used Memory. Displays the amount of memory currently in use by applications.
§ Free Memory. Displays the amount of memory currently available for applications to use.

WhatsConfigured v3.1 User Guide
65
§ Protocol. Displays the communication method (protocol) used to access memory utilization information.
§ Utilization%. Displays information about the memory usage percentage.
To access the Memory Utilization tool: 1 From the main menu of the WhatsConfigured console, select View > Topology Maps.
The Topology Maps view appears. 2 Select a topology map you want to view in the topology tree view. 3 Right-click in the topology map area. The right-click menu appears. 4 Select Poll/Monitor > Network > Memory Utilization. The Memory Utilization dialog
appears with a list of the devices on the map.
To start a CPU Utilization monitor on a map: 1 Select the devices you want to include in the monitor. 2 Click Settings if you want to change the Poll Interval settings. 3 Click Start to begin the test. The memory utilization for each device displays in the
graph and the respective columns of the table. 4 Click Stop to end the monitor test.
To edit the columns that appear in the report:
§ Right-click on any column heading, the column selection list appears. In the column selection list, click on the columns you would like to display.
To sort on a column:
§ Left-click on the column heading. The direction of the arrow indicates the direction of the sort. If the arrow is pointing down, the column is sorted in descending order. If the arrow is pointing up, the column is sorted in ascending order.
To see a print preview, print or save the report to a CSV file:
§ Click Preview to see a print preview of the entire report.
§ Click Print to print the entire report.
§ Click Save to save the entire report to a CSV file.
Managing individual device on the topology map From a topology map, you can right-click a device on the map, use the menu options to manage devices, and start tools for the device.
Use the following topology map tools:
§ Add Connected devices. For more information, see About adding individual or connected devices to a topology map (on page 50).
§ Remove Connected devices. For more information, see About adding individual or connected devices to a topology map (on page 50).
§ Remove Device from the map. For more information, see About removing devices from a topology map (on page 52).
§ Select as Root Device. For more information, see Changing the root device selection (on page 59).

WhatsConfigured v3.1 User Guide
66
§ Auto-Select Root Device. For more information, see Changing the root device selection (on page 59).
§ Link To a device. For more information, see Adding device links manually (on page 66).
§ Device Properties. For more information, see Viewing device properties from a topology map (on page 67).
§ Capture Config tool. For more information, see Viewing Configuration Archives (on page 68).
§ Browse tool. For more information, see Browsing a device (on page 69).
§ Connect tool. For more information, see Connecting to a device with Telnet or SSH (on page 69).
§ Remote Desktop Connection tool. For more information, see Connecting to a device using Remote Desktop Connection (on page 70).
§ Ping tool. For more information, see Using the Ping tool (on page 70).
§ Trace Route tool. Using the Trace Route tool (on page 71).
§ Edit MIB II Information. For more information, see Changing System Info (on page 144).
Adding device links manually The Manual Link dialog lets you manually manage your topology links between devices from the topology map right-click menu. In some cases, where devices cannot be automatically discovered with complete device details, WhatsConfigured allows you to create manual device links. Manually defining a device's relationship with another device on the network lets you ensure that the overall topology map is accurate. When devices are linked manually, you can also select the device interfaces/ports that are linked between devices.
After a device is manually linked to another device, each time a new or scheduled discovery occurs, the manual link remains intact and unchanged as it relates to other network devices.
Note: Make sure that at least one of the devices participating in the manual link is a network circuit connection device such as a switch, router, etc.
To add a manual link on the WhatsConfigured topology map: 1 From the main menu of the WhatsConfigured console, select View > Topology Maps.
The Topology Maps view appears. 2 Right-click on a device that you want to manually link to another device. The right-click
menu appears. 3 Select Link To.... The Manual Link dialog appears with the Link From device populated
in the Device box in the Link From section of the dialog. 4 From the Interface/Port list, select the device interface to connect through. 5 In the Link From... section, click to open the Select Devices dialog and select the device
to link to, then click OK. 6 From the Interface/Port list, select the device interface to connect to, then click OK.

WhatsConfigured v3.1 User Guide
67
Viewing device properties from a topology map From the Topology Map, you can use the right-click menu to view device properties for each device on the map.
To view device properties on the topology map: 1 From the main menu of the WhatsConfigured console, select View > Topology Maps.
The Topology Maps view appears.
Tip: You can also view topology maps from the WhatsConfigured console shortcut menu.
Click (Topology maps shortcut icon). The Topology Maps dialog appears.
2 Select a topology map you want to modify in the topology tree view. 3 Right-click a device with connected devices, then select Device Properties. The Device
Viewer appears. 4 Click the tab for the device information you want to view.
Capturing device configurations You capture and backup configurations for devices using the Capture Config dialog. The configuration backup information is stored in the WhatsConfigured discovery (.dis) file. In addition to saving configuration backup information, you can use this feature to compare multiple configurations in order to evaluate changes between different configuration dates.
SSH or Telnet credentials are required to capture device configurations. For more information see, Configuring network protocols and credentials (on page 26).
Tip: This feature lets you capture device config files on-demand. You can schedule tasks to capture and backup config files on regular intervals through WhatsConfigured Scheduled Tasks. For more information, see Configuring schedulable tasks (on page 78).
To capture device configurations: 1 From Device Categories, Device List, or Topology Maps view, right-click a device for
which you want to run the Capture Config tool. The right-click menu appears. 2 Select Capture Config. The Capture Config dialog appears.
Note: The Capture Config dialog is also accessible from the Templates Library as it is used in the template configuration process.
3 In the Config list, select one of the configuration options:
WhatsConfigured v3.1 User Guide
68
§ Backup Running Config. Accesses the device's configuration that operates the device.
§ Backup Startup Config. Accesses the device's configuration that starts the device. 4 In the Protocol Settings list, select the credentials required to communicate with the
device. - or - Click the browse button (...) to create or edit existing credentials. See the help for more information about using the Protocols/Settings Credentials dialog.
5 Click Capture to begin the backup process. The Capture Config dialog indicates with the capture is complete.
6 Click Results to view the capture results. If you capture a backup of a running or startup config, or of a firmware update, results display on the Configuration Archives dialog (on page 68).
Viewing Configuration Archives
The Configuration Archives dialog shows the results of running the Capture Config tool and the configuration archives saved from previous captures. The Time Created and Config Key information is provided for each capture that has run.
To view configuration archives:
You can select any of the captures in the list to view the detailed configuration information queried from the device. The results of the selected capture is displayed in the lower half of the dialog.

WhatsConfigured v3.1 User Guide
69
To compare differences between configuration archives:
1 Ctrl select two configurations, then click Config Diff to compare the configurations. A side-by-side view of the configuration files appears.
Tip: You can change the Device for which you are comparing config files, as well as the Archive config you want to compare.
2 Use the Back and Forward buttons to view the differences between the two config files.
Browsing a device You can right-click a device on the topology map to browse the web server for the device. If a web server is available on port 80, a browser opens and you connect to the device's web server. This feature provides easy access to the selected device, allowing you to view the web page being served by this device. Often, for switches and routers, the browser-based device configuration application launches.
To browse to a device's web server from WhatsConfigured: 1 From the main menu of the WhatsConfigured console, select View > Topology Maps.
The Topology Maps view appears. 2 Right-click on a device that you want to connect to its web server. The right-click menu
appears. 3 Click Browse. The device's web server page opens in an internet browser.
Connecting to a device with Telnet or SSH You can right-click a device on the topology map to connect and communicate with the device using Telnet or SSH communication protocols. This feature provides easy access to devices shown on the WhatsConfigured topology map view, allowing you to log in and

WhatsConfigured v3.1 User Guide
70
configure the device via Telnet or SSH. You must be familiar with the Telnet or SSH commands in order to manage and configure the device.
Note: The PuTTy program is used to communicate via Telnet or SSH. Refer to the Plink help for details about the Telnet or SSH commands. For more information, refer to the PuTTY web site (http://www.whatsupgold.com/Plink).
To connect to a device via Telnet or SSH protocols: 1 From the main menu of the WhatsConfigured console, select View > Topology Maps.
The Topology Maps view appears. 2 Select a topology map you want to view in the topology tree view. 3 Right-click on a device that you want to communicate with via Telnet or SSH. The right-
click menu appears. 4 Click Connect, then select the communication protocol you want to use: Telnet or SSH.
A command prompt opens and starts the selected communication protocol with the device.
5 Log in to the device using the required login credentials. 6 Enter the commands you want to issue to the device. When you have completed the
configuration settings, make sure that you logout of the communication session.
Connecting to a device using Remote Desktop Connection You can right-click a Windows device on the topology map to start a Remote Desktop Connection session. In order to establish the remote connection, the Windows Remote Desktop Connection feature must be enabled on the device and you need to know the login credentials for the device. This feature provides easy access to the selected device, allowing you to access and use the device remotely.
To connect to a remote device using Remote Desktop Connection: 1 From the main menu of the WhatsConfigured console, select View > Topology Maps.
The Topology Maps view appears. 2 Select a topology map you want to view in the topology tree view. 3 Right-click on a Windows device that you want to connect to using the Remote Desktop
Connection. The right-click menu appears. 4 Click Remote Desktop Connection. The Remote Desktop Connection dialog appears.
Using the Ping tool You can right-click a device on the topology map to ping the device and determine its status. The Ping tool sends out an ICMP (Internet Control Message Protocol) echo request to the selected network device. The following results of the ping request appear:
§ Destination. The address specified in Address/Hostname.
§ Packets. The number of data packets sent, received, and lost during the device ping.
§ RTT. Round trip time in milliseconds; the amount of time it takes for the ping request to be returned from the remote device.
WhatsConfigured v3.1 User Guide
71
To ping a device: 1 From the main menu of the WhatsConfigured console, select View > Topology Maps.
The Topology Maps view appears. 2 Select a topology map you want to view in the topology tree view. 3 Right-click a device that you want to ping. The right-click menu appears. 4 Click Ping. The command prompt dialog appears and pings the selected device. 5 Click X to close the command prompt dialog.
Using the Trace Route tool You can right-click a device on the topology map to do a trace route on a network device. This tool sends out echo requests to the selected device, then traces the path it takes to get to the device IP address or host name. This tool is often used to determine where, on the network, a data transmission interruption occurs. The results of the trace route shows the IP address of each device encountered on the path and the time it took to reach each device encountered on the path.
To run a Trace Route on a device: 1 From the main menu of the WhatsConfigured console, select View > Topology Maps.
The Topology Maps view appears. 2 Select a topology map you want to view in the topology tree view. 3 Right-click a device that you want to run a Trace Route on. The right-click menu appears. 4 Click Trace Route. The command prompt dialog appears and runs a trace route on the
selected device. 5 Click X to close the command prompt dialog.
About Subnets View
The Subnets View is an explorer-type view that shows the grouping of network subnets on the left side of the pane.

WhatsConfigured v3.1 User Guide
72
On the right side of the pane, devices associated with their respective subnet are displayed. The data grid view can be column sorted, print previewed, printed, or saved to a comma-separated-value (CSV) file for use in Microsoft Excel or other reporting applications. For more information about data grid views, see About data grid views (on page 38).
To view Subnets:
From the main menu of the WhatsConfigured console, select View > Subnets. The Subnets view appears.
Tip: You can also view subnets from the WhatsConfigured console shortcut menu. Click (Subnets icon). The Subnets dialog appears.
Viewing Subnet Device details Associated with the Subnets view, the Device details tab provides a tabular view that displays detailed device information for a subnet device.

WhatsConfigured v3.1 User Guide
73
To view subnet device details: 1 From the main menu of the WhatsConfigured console, select View > Subnets. The
Subnets view appears. 2 Select a subnet you want to view, select the device for which you want to view details,
then click Details. The device details appear.
Tip: You can double-click any device in the Device List view. The Device Details tab view opens.
About VLANs view
VLANs View is an explorer-type view that shows the grouping of network devices, based on their respective VLANs (Virtual Local Area Network), on the left side of the pane
On the right side of the pane, devices associated with their respective VLANs are displayed. The data grid view can be column sorted, print previewed, printed, or saved to a comma-separated-value (CSV) file for use in Microsoft Excel or other reporting applications. For more information about data grid views, see About data grid views.
To view VLANs:
§ From the main menu of the WhatsConfigured console, select View > VLANs. The VLANs view appears.
WhatsConfigured v3.1 User Guide
74
Viewing VLAN device details Associated with the VLANs view, the Details dialog provides a tabular view that displays detailed VLAN device information.
To view VLAN device details: 1 From the main menu of the WhatsConfigured console, select View > VLANs. The VLANs
view appears. 2 Select a VLAN you want to view, select the device for which you want to view details,
then click Details. The device details appear.
About Links View
Links View is a spreadsheet-like view that displays all known topology links in the network discovery file. This view provides a concise list of all of your network connections.

WhatsConfigured v3.1 User Guide
75
Data displayed in this view can be printed, print previewed, or saved to a text file, comma-separated-value (CSV) file for use in Microsoft Excel, or a .PDF. For more information, see About data grid views.
To view the Links view: 1 From the main menu of the WhatsConfigured console, select View > Links. The Links
view appears.
Tip: You can also view links from the WhatsConfigured console shortcut menu. Click (Links shortcut icon). The Links dialog appears.
2 View the following information about the links:
§ Local Link. Shows the local side of a connection. This connection is the Display Name of the device, and if available, the interface information.
§ Remote Link. Shows the remote side of a connection. The connection is the Display Name of the remote device, and any available interface information.
3 Click Close to close the Links dialog.
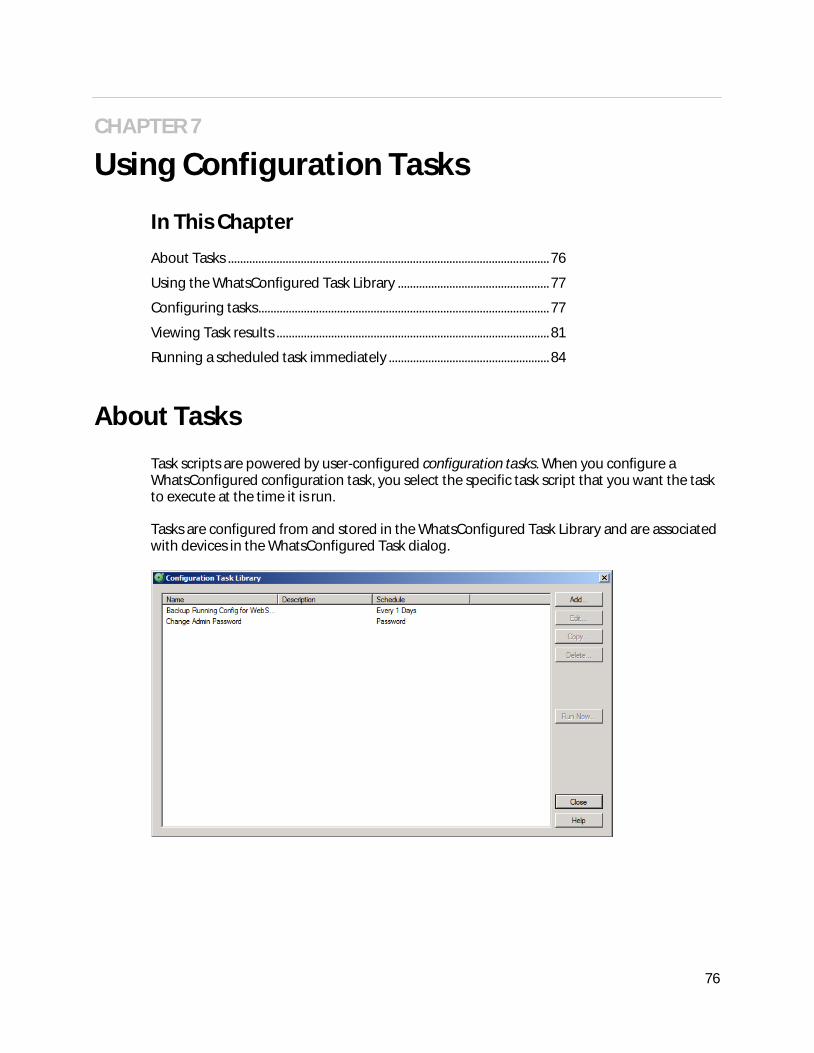
76
CHAPTER 7
Using Configuration Tasks
In This Chapter
About Tasks .......................................................................................................... 76
Using the WhatsConfigured Task Library .................................................. 77
Configuring tasks ................................................................................................ 77
Viewing Task results .......................................................................................... 81
Running a scheduled task immediately ..................................................... 84
About Tasks
Task scripts are powered by user-configured configuration tasks. When you configure a WhatsConfigured configuration task, you select the specific task script that you want the task to execute at the time it is run.
Tasks are configured from and stored in the WhatsConfigured Task Library and are associated with devices in the WhatsConfigured Task dialog.
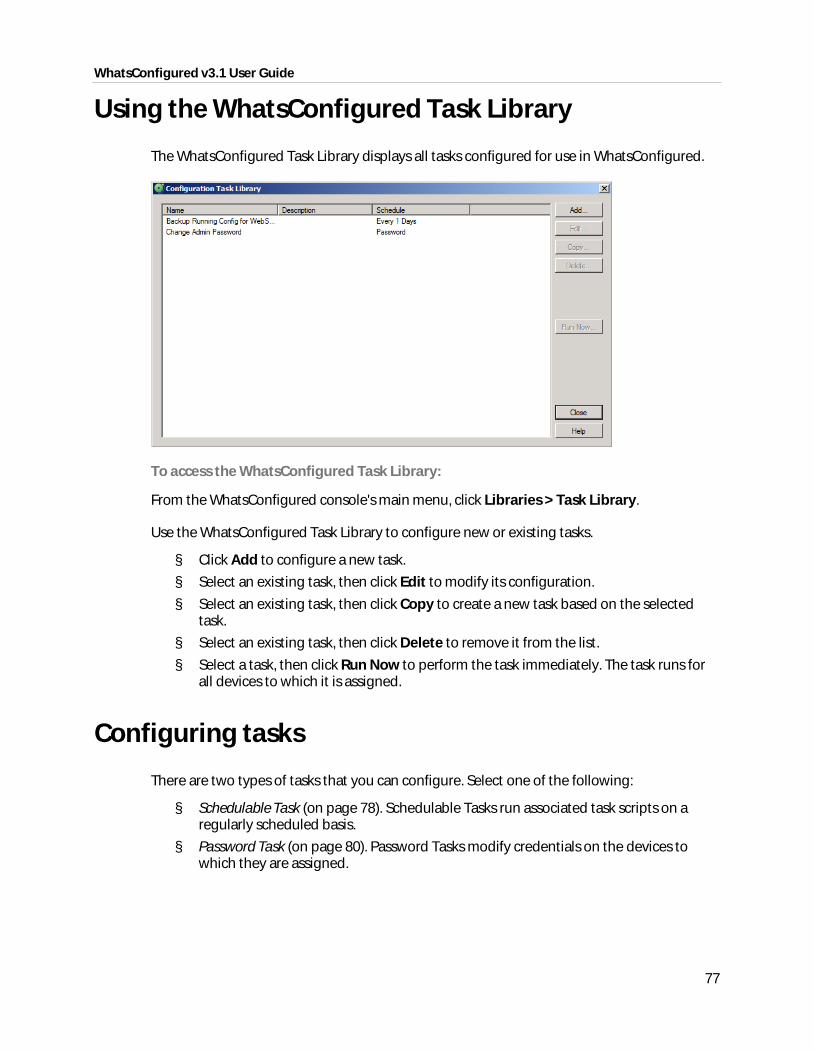
WhatsConfigured v3.1 User Guide
77
Using the WhatsConfigured Task Library
The WhatsConfigured Task Library displays all tasks configured for use in WhatsConfigured.
To access the WhatsConfigured Task Library:
From the WhatsConfigured console's main menu, click Libraries > Task Library.
Use the WhatsConfigured Task Library to configure new or existing tasks.
§ Click Add to configure a new task.
§ Select an existing task, then click Edit to modify its configuration.
§ Select an existing task, then click Copy to create a new task based on the selected task.
§ Select an existing task, then click Delete to remove it from the list.
§ Select a task, then click Run Now to perform the task immediately. The task runs for all devices to which it is assigned.
Configuring tasks
There are two types of tasks that you can configure. Select one of the following:
§ Schedulable Task (on page 78). Schedulable Tasks run associated task scripts on a regularly scheduled basis.
§ Password Task (on page 80). Password Tasks modify credentials on the devices to which they are assigned.

WhatsConfigured v3.1 User Guide
78
Configuring schedulable tasks Schedulable tasks are configured to run on the regularly scheduled basis that you choose. You can configure a task to run on a daily, weekly, monthly, yearly, or custom schedule.
Use this dialog to configure a WhatsConfigured Schedulable Task.
Enter or select the appropriate information in the dialog boxes.
§ Enter a Name for the scheduled task. This name is listed in the WhatsConfigured Task Library.
§ Enter a brief Description for the scheduled task. This description is listed in the WhatsConfigured Task Library to help you differentiate it from other tasks.
§ Select the Script that you want performed on the schedule you specify.
§ Select the Discovery Filename for which you want to save the scheduled task to.
§ Select Save a copy of configuration to, to save WhatsConfigured task configuration information to a text file in a selected folder each time the scheduled task completes successfully. A separate file is created for each configuration key defined in the scheduled tasks script.
Note: If you select to save copies of configurations, be aware that new files are created/saved only when WhatsConfigured detects a change in the configuration.
Using the Devices tab Use the Devices tab to select the device(s) to which you want to apply the task.

WhatsConfigured v3.1 User Guide
79
To apply the task to a device:
Click Add. The Select a Device dialog appears.
Note: You can only add devices that have valid SSH or Telnet credentials. If you do not see a device listed in the Select a Device dialog, it is likely because the device does not have SSH or Telnet credentials assigned. For more information, see Configuring network protocols and credentials (on page 26).
To remove a device from the task:
Select a device from the list, then click Remove.
Using the Threshold tab Use the Threshold tab to configure an email threshold to notify you on the scheduled task.
To assign a threshold to a WhatsConfigured task: 1 Select Enable this threshold to enable and configure the threshold options. 2 Enter a Name for the threshold. This threshold name is displayed in the email
notification. 3 Select to have the Threshold alert when the task matches any of the selected
conditions:
§ Detects a successful execution of a task on a device
§ Fails to run for a device
§ Successfully runs for a device
§ Fails this policy
Note: If you do not see the appropriate policy, or if the list is empty, browse (...) to the Policy Library to configure a new policy.
4 Select to Send email notifications when an threshold is met. Click Email Settings to configure the email recipient address.
Using the Schedule tab Use the Schedule tab to configure the schedule on which you would like the task performed. You can configure the task to run daily, weekly, monthly, yearly, or on a custom schedule. You can also specify if this task can be run on demand, outside of the schedule you configure.
Select Enable this schedule to begin configuring the task's schedule.
Run this task
Select the type of schedule you are configuring, then configure the schedule for daily, weekly, monthly, yearly, or custom intervals.
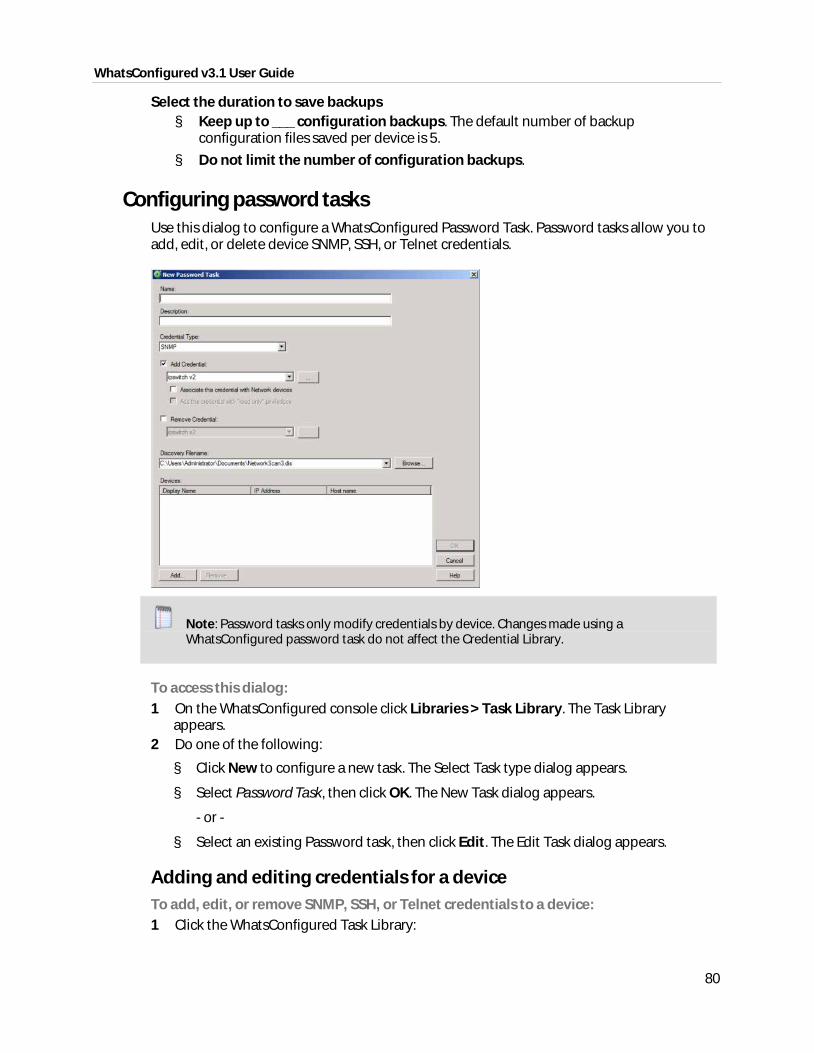
WhatsConfigured v3.1 User Guide
80
Select the duration to save backups § Keep up to ___ configuration backups. The default number of backup
configuration files saved per device is 5.
§ Do not limit the number of configuration backups.
Configuring password tasks Use this dialog to configure a WhatsConfigured Password Task. Password tasks allow you to add, edit, or delete device SNMP, SSH, or Telnet credentials.
Note: Password tasks only modify credentials by device. Changes made using a WhatsConfigured password task do not affect the Credential Library.
To access this dialog: 1 On the WhatsConfigured console click Libraries > Task Library. The Task Library
appears. 2 Do one of the following:
§ Click New to configure a new task. The Select Task type dialog appears.
§ Select Password Task, then click OK. The New Task dialog appears.
- or -
§ Select an existing Password task, then click Edit. The Edit Task dialog appears.
Adding and editing credentials for a device To add, edit, or remove SNMP, SSH, or Telnet credentials to a device: 1 Click the WhatsConfigured Task Library:
WhatsConfigured v3.1 User Guide
81
From the WhatsConfigured console's main menu, click Libraries > Task Library. The Task Library appears.
2 Do one of the following:
§ Click New to configure a new task. The Select Task type dialog appears.
§ Select Password Task, then click OK. The New Task dialog appears.
- or -
§ Select an existing task, then click Edit. The Edit Task dialog appears. 3 Enter or select the appropriate information in the dialog boxes.
§ Enter a Name for the task. This name is listed in the Task Library.
§ Enter a brief Description for the task. This description is listed in the Task Library to help you differentiate it from other tasks.
4 Select the Credential Type that you want to add, either SNMP, SSH, or Telnet. 5 If you want to add credentials, select Add Credential to select the specific credentials to
add, click the browse (...) button to browse to browse the Credentials Library and select a credential to add.
6 Select whether to Associate this credential with network devices. Selecting this option adds the set of credentials to the selected devices.
7 Select whether to Add this credential with read only privileges. Selecting this option disables the ability for other users to edit the credential.
Note: If you are using HP ProCurve series devices, you must select to Add Credential first, then select the Add this credential with read only privileges box to remove the Operator credential password or you must clear the Add this credential with read only privileges box to remove the Manager credential password. The SNMP credential type only allows Manager credentials and the SSH and Telnet credential types allow both Manager and Operator credential types.
8 If you want to remove credentials, click Remove Credential then select the specific credentials to remove, click the browse (...) button to browse to the Credentials Library and select a credential to remove. This list is populated from the credentials currently configured for the selected device.
9 Select an existing Discovery Filename or type a new Discovery Filename for which you want to save the password task to.
10 Under the Devices box, click Add to select the device(s) to which you want to add the credentials. - or - If removing credentials from a device, select the device(s) in the Devices box, then click Remove to remove selected credentials from the device.
11 Click OK to save changes.
Viewing Task results
The Task Results dialog displays results for tasks that have been run using the Scheduled Task Library's Run Now option.
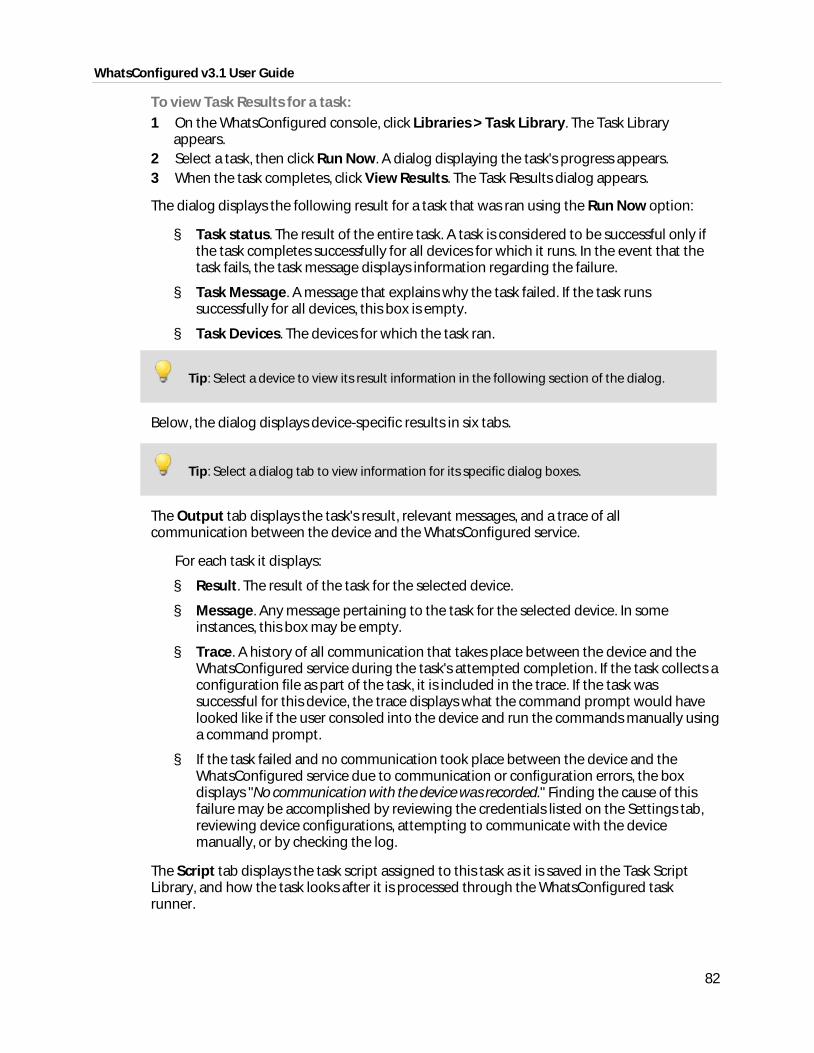
WhatsConfigured v3.1 User Guide
82
To view Task Results for a task: 1 On the WhatsConfigured console, click Libraries > Task Library. The Task Library
appears. 2 Select a task, then click Run Now. A dialog displaying the task's progress appears. 3 When the task completes, click View Results. The Task Results dialog appears.
The dialog displays the following result for a task that was ran using the Run Now option:
§ Task status. The result of the entire task. A task is considered to be successful only if the task completes successfully for all devices for which it runs. In the event that the task fails, the task message displays information regarding the failure.
§ Task Message. A message that explains why the task failed. If the task runs successfully for all devices, this box is empty.
§ Task Devices. The devices for which the task ran.
Tip: Select a device to view its result information in the following section of the dialog.
Below, the dialog displays device-specific results in six tabs.
Tip: Select a dialog tab to view information for its specific dialog boxes.
The Output tab displays the task's result, relevant messages, and a trace of all communication between the device and the WhatsConfigured service.
For each task it displays:
§ Result. The result of the task for the selected device.
§ Message. Any message pertaining to the task for the selected device. In some instances, this box may be empty.
§ Trace. A history of all communication that takes place between the device and the WhatsConfigured service during the task's attempted completion. If the task collects a configuration file as part of the task, it is included in the trace. If the task was successful for this device, the trace displays what the command prompt would have looked like if the user consoled into the device and run the commands manually using a command prompt.
§ If the task failed and no communication took place between the device and the WhatsConfigured service due to communication or configuration errors, the box displays "No communication with the device was recorded." Finding the cause of this failure may be accomplished by reviewing the credentials listed on the Settings tab, reviewing device configurations, attempting to communicate with the device manually, or by checking the log.
The Script tab displays the task script assigned to this task as it is saved in the Task Script Library, and how the task looks after it is processed through the WhatsConfigured task runner.

WhatsConfigured v3.1 User Guide
83
For each task it displays:
§ Script Text. The script assigned to be run by the task. If this script is a custom script, it appears exactly as it did when it was configured in the New/Edit WhatsConfigured Task Script dialog. If this is a predefined password or backup task, the script displayed is the script chosen for this device based on the WhatsConfigured script registry.
Note: Scripts for predefined WhatsConfigured tasks are looked up based on the OID associated with the device. If there is no OID assigned to the device, the lookup fails and no script is listed. OID's can be assigned to a device from the Device Properties - Tasks dialog, or collected by discovering the device. Due to the large number of devices and their varying commands this script to device mapping may fail.
§ Processed Text. The WhatsConfigured scripting language allows for variable replacement within scripts. WhatsConfigured pre-defined scripts utilize this ability when running password tasks. Before the script is run the script is processed and all variable references are replaced with the variables corresponding value. The processed text displays the resulting script after processing. This box allows the user to ensure variable declarations are being assigned and interpreted properly.
Tip: If you are experiencing a problem with a script, Save the results listed in the script tab to a text (.txt) file. If you contact Technical Support, this file will aid in troubleshooting your script problem.
The Variables tab displays the name and value of all variables associated with the task script.
For each task it displays:
The Commands tab displays a list of the commands as they were interpreted by the WhatsConfigured script runner. It also displays the results of those commands if they were run against the device when the task was run.
For each task it displays:
§ Command. The specific command; for example, login or show configuration.
§ Result. The success or failure of the command when it was ran by the task.
§ Output. The results of the responses declared by the WhatsConfigured script language.
The Log tab displays any error messages that were logged as the task ran.
The Settings tab displays the protocol credentials used to complete the task.
For each task it displays:
§ Type. The type of protocol credentials; for example, SSH or Telnet.
Note: WhatsConfigured defaults to SSH credentials when available. If SSH credentials are not assigned to a device, WhatsConfigured looks for/uses Telnet credentials.
§ Name. The name of the credentials as assigned in the Credentials Library.
WhatsConfigured v3.1 User Guide
84
§ Description. The description of the credentials as assigned in the Credentials Library.
Running a scheduled task immediately
Note: If you run the task from Device Properties the task only runs for that specific device. If you run the task from the Task Library, the task runs for any device to which it is assigned.
To run a task immediately from the Task Library: 1 From the main menu of the WhatsConfigured console, click Libraries >
WhatsConfigured Task Library. The WhatsConfigured Task Library appears. 2 Select the scheduled task that you would like to run at this time, then click Run Now.
85
CHAPTER 8
Using Task Script Library
In This Chapter
About Task Scripts .............................................................................................. 85
Using the WhatsConfigured Task Script Library ...................................... 86
Configuring custom task scripts.................................................................... 96
About the WhatsConfigured Custom Script Language ........................ 96
About Task Scripts
Task scripts login to devices through SSH or Telnet and run command-line interface (CLI) commands on devices. These task scripts can perform a number of operations, such as restoring or backing up a running or startup configuration, or changing an application password.
WhatsConfigured includes several pre-configured task scripts; you can also configure custom task scripts using the WhatsConfigured Custom Script Language. For more information, see About the WhatsConfigured Custom Script Language (on page 96).
Scripts are configured from and stored in the Task Script Library and associated to WhatsConfigured tasks in the WhatsConfigured Task dialog.

WhatsConfigured v3.1 User Guide
86
Using the WhatsConfigured Task Script Library
The WhatsConfigured Configuration Script Library displays all scripts currently configured for use in WhatsConfigured tasks.
There are several pre-configured configuration scripts available for use in WhatsConfigured.
§ Backup Running Config
§ Backup Startup Config
§ Cisco IOS Firmware Update
§ HP Procurve Firmware Update
Backup Running Config
The backup running config task script makes a backup copy of a device's running config and stores it in the WhatsConfigured database. After you have made a backup copy of a running config, you can restore it on the device at any time for as long as the copy is stored in the database.
Backup Startup Config
The backup running config task script makes a backup copy of a device's startup config and stores it in the WhatsConfigured database. After you have made a backup copy of a startup config, you can restore it on the device at any time for as long as the copy is stored in the database.
Tip: You can set the number of maximum configuration files to store in WhatsConfigured database on the New WhatsConfigured Task dialog's Schedule tab.

WhatsConfigured v3.1 User Guide
87
Cisco IOS Firmware Update and HP Procurve Firmware Update
The firmware update scripts are example scripts. These scripts are wholly editable are meant to me modified by an advanced user to push firmware updates to network devices. In order to properly modify these scripts for use with your network devices, you should have a working knowledge of how the script works as well as your device vendor's configuration specifications.
Important: Updating your router through a script is a complex operation. Ensure that you follow your vendor's procedures to specification.
Caution: Failure to adhere to vendor specifications and/or other script errors could cause loss of connectivity to one or more of your network devices, requiring a manual console port connection for repair.
To access the WhatsConfigured Configuration Script Library:
From the WhatsConfigured main menu, click Libraries > Script Library.
To configure new or existing task scripts:
Note: The Edit, Copy, Delete, and Export buttons are disabled for the default, pre-configured task scripts, as you cannot modify or remove default scripts.
§ Click Add to configure a new task script.
§ Select a custom task script, then click Edit to change its configuration.
§ Select a custom task script, then click Copy to make a duplicate of the selected task script.
§ Select a custom task script, then click Delete to remove it from the library.
Caution: When you delete a non-default task script from the WhatsConfigured Task Script Library, it is removed from all tasks that are using that task script.
§ Select a task script, then click Run Now to run the task script immediately.
§ Select a custom task script, then click Export to export it as an XML file.
§ Click Import to import an XML file into the library.
Note: Modifying XML files or attempting to create an XML file from scratch can invalidate a script file.
Note: You can only Export custom task scripts.

WhatsConfigured v3.1 User Guide
88
Creating and Editing a WhatsConfigured Task Script Use the Task Script dialog to create or edit a WhatsConfigured task script. Task scripts are used in WhatsConfigured scheduled tasks. You can also use the Regular Expression Tester.
To configure a Task Script: 1 Click the Task Script Library:
§ From the WhatsConfigured main menu, click Libraries > Script Library. The Task Script Library appears.
§ To create a new custom task script, click Add.
- or -
§ To modify an existing custom script, select the appropriate script, then click Edit. 2 In the Task Script dialog, enter the appropriate information into its boxes.
§ Enter a Name for the script. The script name will display in the Task Script Library.
§ Enter a brief Description for the script.
§ Enter or paste the Script for the task that you want WhatsConfigured to complete.
§ Click Regex to use the Regular Expression Tester to assist you with building a script. For more information on regular expressions in WhatsConfigured scripts, see The WhatsConfigured Custom Script LanguageGuide (http://www.whatsupgold.com/WCfg31CustScriptLang).
3 Click OK to save changes.
Using Regular Expression Tester The Regular Expression Builder allows you to test any regular expressions patterns that you use in a task script against the device output for which you are using the expression.
To access the Regular Expression Tester:
The Regular Expression Builder is accessible from the WhatsConfigured Task Script Library when configuring task scripts.
To use the Regular Expression Tester: 1 Click the Task Script Library:
From the WhatsConfigured main menu, click Libraries > Script Library. The Task Script Library appears.
2 Click Add. The New Task Script Library appears.
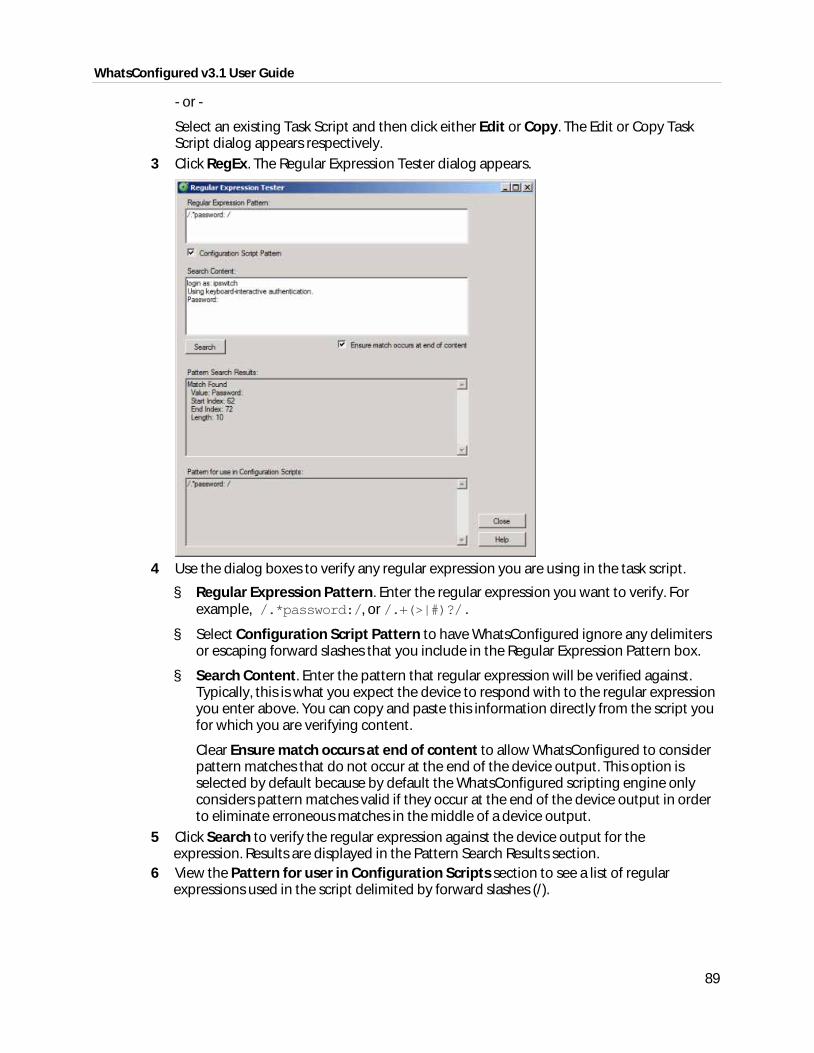
WhatsConfigured v3.1 User Guide
89
- or -
Select an existing Task Script and then click either Edit or Copy. The Edit or Copy Task Script dialog appears respectively.
3 Click RegEx. The Regular Expression Tester dialog appears.
4 Use the dialog boxes to verify any regular expression you are using in the task script.
§ Regular Expression Pattern. Enter the regular expression you want to verify. For example, /.*password:/, or /.+(>|#)?/ .
§ Select Configuration Script Pattern to have WhatsConfigured ignore any delimiters or escaping forward slashes that you include in the Regular Expression Pattern box.
§ Search Content. Enter the pattern that regular expression will be verified against. Typically, this is what you expect the device to respond with to the regular expression you enter above. You can copy and paste this information directly from the script you for which you are verifying content.
Clear Ensure match occurs at end of content to allow WhatsConfigured to consider pattern matches that do not occur at the end of the device output. This option is selected by default because by default the WhatsConfigured scripting engine only considers pattern matches valid if they occur at the end of the device output in order to eliminate erroneous matches in the middle of a device output.
5 Click Search to verify the regular expression against the device output for the expression. Results are displayed in the Pattern Search Results section.
6 View the Pattern for user in Configuration Scripts section to see a list of regular expressions used in the script delimited by forward slashes (/).

WhatsConfigured v3.1 User Guide
90
Note: WhatsConfigured escapes forward slashes (/) contained in regular expression patterns that are not meant to be delimiters.
Debugging tasks scripts The WhatsConfigured Visual Script Runner extends visibility into how task scripts interact with devices. This tool allows users to change task scripts and associated device settings in real-time, displaying their script and setting modifications dynamically as they are made.
To access and use the WhatsConfigured Visual Script Runner: 1 From the WhatsConfigured console, click Libraries > Task Script Library. The Task
Script Library appears. 2 Select a task script, then click Debug. The Visual Script Runner dialog appears.
3 Select a Device against which the script will run. 4 The Visual Script Runner requires either that a device have either SSH or Telnet
credentials. WhatsConfigured looks for and uses SSH credentials first, and if none exist, look for and use Telnet credentials. If the device you choose does not have either SSH or Telnet credentials assigned, browse (...) to the Protocols/Settings library to configure and assign credentials to the selected device.

WhatsConfigured v3.1 User Guide
91
After you select a device that has appropriate credentials assigned, the script runs for the selected device and displays in the Script Text section of the Visual Script Runner. The following sections describe the Visual Script Runner dialog components.
Script Text Tab
The Script Text tab displays the selected script in the context of the selected device.
Note: You must have a device selected in order to have the script display in the Script Text section of the dialog.
When the script debugging has completed, or is paused, you can modify the script text. As you modify the script text, the commands, variables, and trimmed command output update dynamically.
§ If you add a new command to the script, it is added to the parsed Script Commands list.
§ If you replace script text with a variable, it is added to the Variables tab.
§ If you modify or add trim options the Trimmed Command Output tab lists these modifications and/or additions.
If the modifications you make render the script unusable, dynamic updates stop until you reformat the script correctly. See the Script Commands section for more information.
To modify the script: 1 Click inside of the Script Text box to modify the script as needed. 2 After making modifications, click Save.
Tip: Click RegEx to verify regular expressions you use in your script modifications.
Client Settings Tab
Client Settings are system- or user-defined settings that instruct the WhatsConfigured configuration task runner how to interact with the selected device. These CLI settings define how a device prompts WhatsConfigured and how WhatsConfigured responds to that device's prompts. For example, what a device responds with when it is ready to receive a command (CommandPrompt), or what to respond with when requesting the next page in a paged response (MoreResponse). WhatsConfigured defines and uses system settings for devices for which you have not specified custom settings. You can specify custom settings on a per-device basis in the Remote CLI Settings library to map to either a specific IP address or OID. When user-defined settings exist for a device or an OID, WhatsConfigured uses these custom settings rather than the default or system settings. For more information, see About the Remote CLI Settings Library (on page 135).
WhatsConfigured v3.1 User Guide
92
WhatsConfigured displays client settings for each device that is selected. These settings can be overridden within the script by defining a variable and a value. For more information on variables, see About the WhatsConfigured Custom Script Language (on page 96).
Note: If a setting is overridden, the Client Settings tab displays the settings value, and the Variables tab displays the overridden script value for the variable.
When the script debugging has completed, or is paused, you can modify the Client Settings.
To modify a setting: 1 Double-click a settings' Value box to activate it for modification. 2 After making modifications, click Save.
Tip: Click RegEx to verify regular expressions you used in your settings modifications.
Saving changes Changes you make to the script text or client settings do not automatically persist; you must click Save in order modifications to persist. If you change a device or close the debugging session before saving changes, WhatsConfigured prompts you to ask if you want to save changes.
Note: If the device you have selected currently maps to a system (non-custom) script or to predefined, system CLI settings, WhatsConfigured prompts that you must create a user-defined entry for the modifications you are attempting to make. When creating the user-defined entry, whether a script or CLI settings, you can associate the user-entry to a specific device IP address or to an OID. If you select to associate the user-entry to an OID, all devices with that OID will map to the user-entry you create. If you associate the user-entry with an IP address, only that IP address will map to the user-entry you create.
Script Commands and Debugging
Commands are parsed out of the script text and displayed in the Script Commands section of the dialog in the order in which they run in the script. The list displays the command text, the result if the command has run, the archive key, query prompt, query response, and any existing trim commands.
Debugging Use the debugging buttons to control a debugging session.

WhatsConfigured v3.1 User Guide
93
Button Description
Back Moves back one command. Click to move back one command in the script.
Run Runs all commands continuously in one debugging session. Click to begin running the script.
Pause Pauses the debugging session. Click to pause a running debugging session.
Forward Runs commands one at a time. Click to move to the next command in the script.
Stop Stops the debugging session. Click to stop a running debugging session.
Note: If you attempt to run a script with a formatting issue, you are prompted to fix the issue before running the script.
Note: The @connect and @login commands can only be issued one time per run; if you back to either of these commands and attempt to run again, the script will fail. If you must re-run either command again, stop the debugging session using the stop button, and begin another session using the run button.
Note: Some devices accept exit and logout commands; if a script issues this command to a device that accepts either command, the debugger can no longer issue commands to the device. In this case, you must stop the debugging session using the stop button and begin another session using the run button.
Tip: You can refer to the script status icon at the bottom right of the Script Commands section to see if your script has any formatting issues before attempting to run a script.
Viewing debugging results
1 Commands ready to be debugged/commands currently being debugged in a running script are highlighted in yellow and indicated with a green arrow.
2 After a command is debugged, information about the debugging is displayed in the Script Commands columns.
3 The script status icon at the bottom right of the Script Commands indicates the verification status of the script and commands.
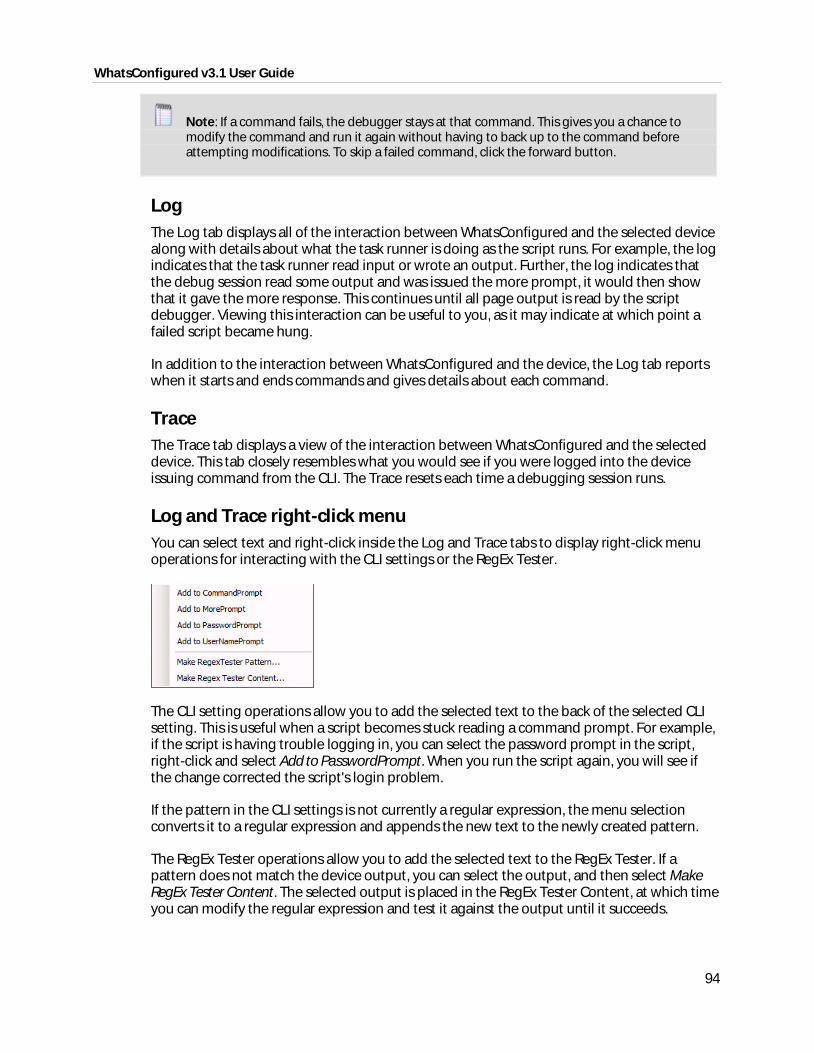
WhatsConfigured v3.1 User Guide
94
Note: If a command fails, the debugger stays at that command. This gives you a chance to modify the command and run it again without having to back up to the command before attempting modifications. To skip a failed command, click the forward button.
Log The Log tab displays all of the interaction between WhatsConfigured and the selected device along with details about what the task runner is doing as the script runs. For example, the log indicates that the task runner read input or wrote an output. Further, the log indicates that the debug session read some output and was issued the more prompt, it would then show that it gave the more response. This continues until all page output is read by the script debugger. Viewing this interaction can be useful to you, as it may indicate at which point a failed script became hung.
In addition to the interaction between WhatsConfigured and the device, the Log tab reports when it starts and ends commands and gives details about each command.
Trace The Trace tab displays a view of the interaction between WhatsConfigured and the selected device. This tab closely resembles what you would see if you were logged into the device issuing command from the CLI. The Trace resets each time a debugging session runs.
Log and Trace right-click menu You can select text and right-click inside the Log and Trace tabs to display right-click menu operations for interacting with the CLI settings or the RegEx Tester.
The CLI setting operations allow you to add the selected text to the back of the selected CLI setting. This is useful when a script becomes stuck reading a command prompt. For example, if the script is having trouble logging in, you can select the password prompt in the script, right-click and select Add to PasswordPrompt. When you run the script again, you will see if the change corrected the script's login problem.
If the pattern in the CLI settings is not currently a regular expression, the menu selection converts it to a regular expression and appends the new text to the newly created pattern.
The RegEx Tester operations allow you to add the selected text to the RegEx Tester. If a pattern does not match the device output, you can select the output, and then select Make RegEx Tester Content. The selected output is placed in the RegEx Tester Content, at which time you can modify the regular expression and test it against the output until it succeeds.

WhatsConfigured v3.1 User Guide
95
Variables The Variables tab shows all variables associate with the currently running script. The variables can originate from the script, the client (CLI) settings, or the TFTP server settings. If the script overrides or defines a variable, updates to the script appear in the variable table dynamically as they are made. Changes to the CLI settings not overridden in the script also appear in the variable table and update dynamically as they are modified.
Trimmed Command Output When a command is run using a capture key, the entire output is collected and stored. If that command is selected from the command list, the trim commands are applied to the output, and the output is displayed on the Trimmed Command Output tab. If you add, edit, or remove a trim command on this tab, the updates are applied to the raw output and redisplayed in the tab's output text box. This allows you to fine tune command trimming without having to repeatedly run the command.
The output text box has a context menu that allows you to select and use text with trim commands.
§ The Trim Start option adds a trim-start command with the selected text that trims all output before and including the selected text.
§ The Trim End option adds a trim-end command with the selected text that trims all output after and including the selected text.
§ The Trim Before option adds a trim-before command with the selected text that trims all output before the selected text (not including).
§ The Trim After option adds a trim-after command with the selected text that trims all output after the selected text (not including).
§ The Remote Lines option adds a remove-lines command with the selected text that removes all lines that match the selected text.
Importing and exporting task scripts You can import scripts written outside of WhatsConfigured into WhatsConfigured to be used in tasks.
To import a custom script for use in a WhatsConfigured task: 1 Click the WhatsConfigured Task Script Library:
From the WhatsConfigured main menu, click Libraries > Task Script Library. The Task Script Library appears.
2 Click Import. The Import Configuration Scripts dialog appears. 3 Browse to the script file that you want to import. 4 Click OK to import the selected script file.
You can export scripts that you develop within WhatsConfigured.
Note: WhatsConfigured default scripts cannot be exported.
WhatsConfigured v3.1 User Guide
96
To export a custom task script:
1 Click the WhatsConfigured Task Script Library:
From the WhatsConfigured main menu, click Libraries > Task Script Library. The Task Script Library appears.
2 Select the custom script you want to export, then click Export. The Export Configuration Scripts dialog appears.
3 Browse to the location on your local system where you want to save the script file. 4 Give the script file a Name. 5 Click Save to export the script to the specified location.
Configuring custom task scripts
In addition to the pre-configured task scripts included in WhatsConfigured, you can configure custom task scripts that either configure devices or gather device data and store it in the WhatsConfigured database. These tasks are configured using the WhatsConfigured Custom Script Language, a combination of WhatsConfigured and device commands. For more information, see About the Custom Script Language (on page 96).
About the WhatsConfigured Custom Script Language
WhatsConfigured users can write custom scripts that log in to devices through Telnet or SSH and run CLI commands on their devices. Scripts can be used to configure devices or to capture information about them in the WhatsConfigured database.
For the most recent information about the WhatsConfigured Custom Script Language and how to use it with your devices, see the script documentation (http://www.whatsupgold.com/WCfg31CustScriptLang) on the Ipswitch Support page.

97
CHAPTER 9
Using Policies
In This Chapter
About policies ...................................................................................................... 97
About the Policy Library ................................................................................... 97
Configuring a policy .......................................................................................... 98
Auditing a policy ................................................................................................. 99
About policies
WhatsConfigured policies search through archived configuration files for strings that are either expected or not expected within the file(s).
When a scheduled task fails a policy, any associated notification policies alert you that the policy has failed due to unexpected content that has been flagged in an archived config file.
About the Policy Library
The WhatsConfigured Policy Library displays all policies currently configured for use with WhatsConfigured archive configuration files.

WhatsConfigured v3.1 User Guide
98
To access the Policy Library:
From the WhatsConfigured console's main menu, click Libraries > Policy Library.
Use the WhatsConfigured Policy Library to configure new or existing policies.
§ Click Add to configure a new policy.
§ Select a policy, then click Edit to modify its configuration.
§ Select a policy, then click Copy to make a duplicate of the selected policy.
§ Select a policy, then click Delete to remove it from the library.
§ Select a policy then click Audit Now to audit (test) a policy.
§ Click Import to add a previously configured policy to the Policy Library.
§ Click Export to save the policy as an .xml file to another location.
Configuring a policy
Use the Configuration Policy dialog to configure a WhatsConfigured Policy.
To configure a WhatsConfigured Policy: 1 From the main menu of the WhatsConfigured console, click Libraries > Policy Library.
The Policy Library appears. 2 Click Add. The Configuration Policy dialog appears.
- or -
Select an existing policy, then click Edit. The Configuration Policy dialog appears.
3 Enter a Name for the policy. This name is displayed in the WhatsConfigured Policy
Library.

WhatsConfigured v3.1 User Guide
99
4 Enter a short Description for the policy. This description is displayed next to the policy's name in the WhatsConfigured Policy Library.
5 In the following sections of the dialog, you have the opportunity to specify strings that you either expect or do not expect to see within the configuration files the policy audits. You can choose to enter only include patters, only exclude patterns, or both.
Note: The more restrictive the audit criteria, the less audit results you may obtain as a result.
6 Under the Include Patterns section of the dialog, click Add to enter a string that you expect to see in the archived configuration files. Additionally,
§ Select RegEx if you want the string to be interpreted as a Regular Expression.
§ Select Ignore Case the case of the string is irrelevant to the string.
Tip: Select an include pattern, then click Remove to delete it from the list.
7 Under the Exclude Patterns section of the dialog, click Add to enter a string that you do not expect to see in the archived configuration files. Additionally,
§ Select RegEx if you want the string to be interpreted as a Regular Expression.
§ Select Ignore Case the case of the string is irrelevant to the string.
Tip: Select an include pattern, then click Remove to delete it from the list.
8 Click OK to save changes.
Auditing a policy
Use the Configuration Policy Audit dialog to configure the criteria by which the WhatsConfigured policy should be verified.
To audit a WhatsConfigured policy: 1 On the WhatsConfigured console's main menu, click Libraries > Policy Library. The
Policy Library appears. 2 Click Add. The Configuration Policy dialog appears.
- or -
Select an existing policy, then click Edit. 3 Select a policy, then click Audit Now. The Configuration Policy Audit dialog appears. 4 Under the Audit Criteria section of the dialog, click Add to select the device(s) against
which to audit the policy.
Tip: To delete a device from the list, select it, then click Remove.
5 Select the Archive Key of the configuration files for which the policy will be audited. For example, to view audit results for running config archives, select the running-config key

WhatsConfigured v3.1 User Guide
100
from the list. This list is populated with all of the keys from the configuration files archived for the selected device(s). To view all possible archives, select All.
Tip: To limit audit results to a device's most recently archived configuration file for a particular key, select Latest Archive Only.
6 After you have specified the appropriate audit criteria, click Audit to verify the policy. Results from the audit are displayed in the Audit Results section of the dialog:
§ The either successful or failed Audit Result.
§ The Device Name of the device by which the policy was audited.
§ Any revelant Message regarding the policy audit. For example, the number of archives that failed against the policy.
Tip: Select an audit result, then click View to see the details for that result.
7 Click Close to exit the dialog.

101
CHAPTER 10
Using WhatsConfigured Templates
In This Chapter
About WhatsConfigured Templates .......................................................... 101
Using the Template Library........................................................................... 101
Configuring templates ................................................................................... 102
Generating and applying a template ........................................................ 105
Importing and exporting templates .......................................................... 106
About WhatsConfigured Templates
Network administrators of medium- to large-sized networks can spend a lot of time manually configuring devices. For example, a network administrator purchases 10 new Cisco router devices. If the network admin made a backup of the configuration of one router to push to the remaining nine, the configuration file fail will fail on the other routers because of device-specific information included in the first router's network file, such as its device's name and IP address. As such, the network administrator must manually configure each of the new router devices separately, eating into his busy schedule.
Templates were created to allow network admins to automatically push device configurations to devices of the same type by replacing device-specific (IP address, hostname) information with variables, saving them time and reducing the possibility of error from one manual device configuration to another.
Using the Template Library
The WhatsConfigured Template Library displays all templates currently configured for use on network devices. Use the Template Library to view, configure, and apply templates. Additionally, use the Import and Export buttons to import previously saved configuration templates, or to export configuration templates.
Note: There are no default, pre-configured templates. Until you configure a template, the Template Library remains empty.
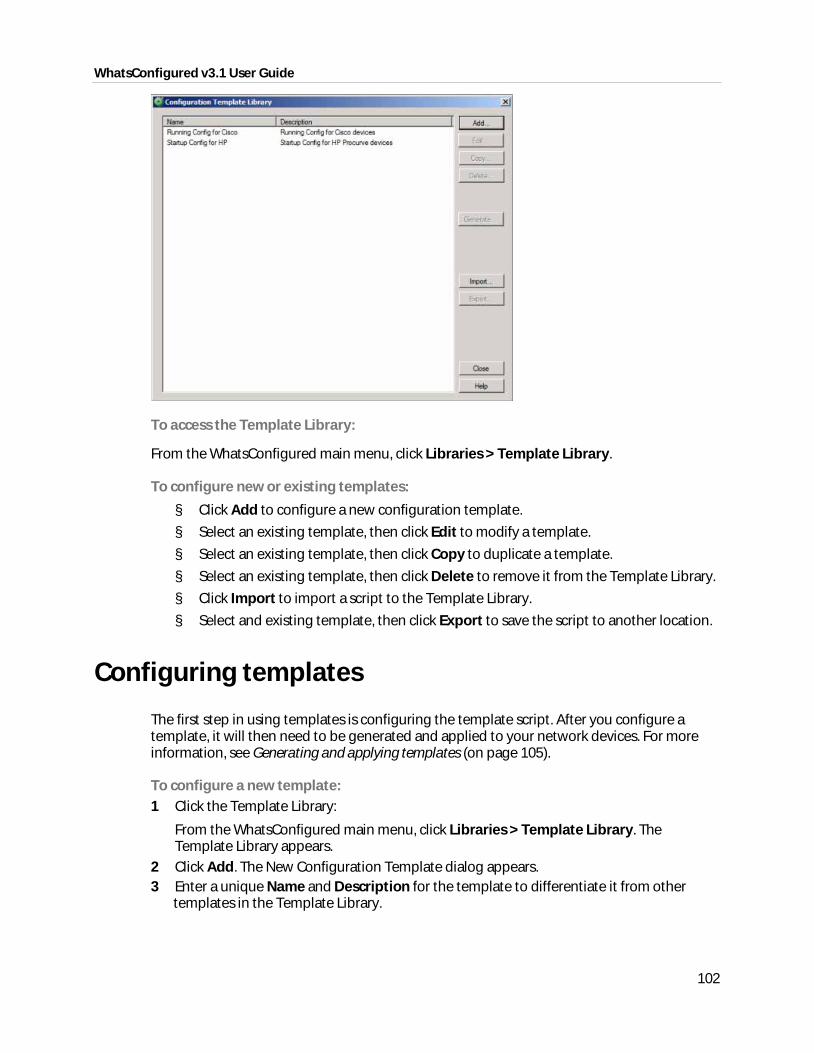
WhatsConfigured v3.1 User Guide
102
To access the Template Library:
From the WhatsConfigured main menu, click Libraries > Template Library.
To configure new or existing templates:
§ Click Add to configure a new configuration template.
§ Select an existing template, then click Edit to modify a template.
§ Select an existing template, then click Copy to duplicate a template.
§ Select an existing template, then click Delete to remove it from the Template Library.
§ Click Import to import a script to the Template Library.
§ Select and existing template, then click Export to save the script to another location.
Configuring templates
The first step in using templates is configuring the template script. After you configure a template, it will then need to be generated and applied to your network devices. For more information, see Generating and applying templates (on page 105).
To configure a new template: 1 Click the Template Library:
From the WhatsConfigured main menu, click Libraries > Template Library. The Template Library appears.
2 Click Add. The New Configuration Template dialog appears. 3 Enter a unique Name and Description for the template to differentiate it from other
templates in the Template Library.

WhatsConfigured v3.1 User Guide
103
4 Click Capture. The Select Configuration Archive dialog appears.
5 Browse (...) to select a device from which to choose the config file upon which you are
basing this template.

WhatsConfigured v3.1 User Guide
104
If the device you select has archived config files, they are displayed in the Select Config Archive dialog. If no there are no archived config files for the device, click Capture to grab a config file with the Capture Config dialog. For more information, see Capturing device configurations (on page 67). After you capture a config, it is displayed in the Select Configuration Archive dialog.
6 Select the archive upon which you want to base the template. The config script is added to the Template section of the New Configuration Template dialog.
7 Adjust the config file as needed to replace any relevant device-specific information with
variables, such as the hostname and the IP address. For information on variables in WhatsConfigured, see The WhatsConfigured Custom Script LanguageGuide (http://www.whatsupgold.com/WCfg31CustScriptLang).
8 Click OK to save the template.
To modify an existing template: 1 Click the Template Library:
From the WhatsConfigured main menu, click Libraries > Template Library. The Template Library appears.
2 Select an existing template, then click Edit. The Edit Configuration Template dialog appears.
3 Modify the Description as needed.
Note: You cannot modify the template Name.
4 Modify the Template script as needed. For information on WhatsConfigured variables you can use to replace device specific information, such as hostname and IP address, see The WhatsConfigured Custom Script Language Guide (http://www.whatsupgold.com/WCfg31CustScriptLang).
5 Click OK to save the template.
To copy a template to use as a base for another template: 1 Click the Template Library:

WhatsConfigured v3.1 User Guide
105
From the WhatsConfigured main menu, click Libraries > Template Library. The Template Library appears.
2 Select an existing template, then click Copy. The New Configuration Template: Copy of ... dialog appears.
3 Enter a unique Name and Description for the template to differentiate it from other templates in the Template Library.
4 Modify the Template script as needed. For information on WhatsConfigured variables you can use to replace device specific information, such as hostname and IP address, see The WhatsConfigured Custom Script Language Guide (http://www.whatsupgold.com/WCfg31CustScriptLang).
5 Click OK to save the template.
To remove a template from the Template Library: 1 Click the Template Library:
From the WhatsConfigured main menu, click Libraries > Template Library. The Template Library appears.
2 Select an existing template, then click Delete. You are prompted to be sure you want to delete the template.
3 Ensure that you are removing the appropriate template, then click Yes. The template is removed from the library.
Generating and applying a template
After you configure a template, you can generate the template for specific devices to ensure that the script is properly configured to be pushed to the device(s).
To generate and apply a template: 1 Click the Template Library:
From the WhatsConfigured main menu, click Libraries > Template Library. The Template Library appears.
2 Select the template you want to verify, then click Generate. The Configuration Template Artifacts dialog appears.

WhatsConfigured v3.1 User Guide
106
3 Click Add to select the device(s) for which you want to apply the template.
Important: Ensure that the devices you select are able to accept the configuration you are applying with the template.
Tip: To view the template in the context of a certain device, select a device from the list, then click Preview. If something looks awry in the template in relation to the selected device, you can adjust the template script or remove the device from the list of devices to which you are applying the template.
4 After you have verified both the template in relation to the devices you have selected, you are ready to apply the template by clicking Upload. You are prompted to be sure that you are applying the correct template to the appropriate device(s).
5 Ensure that you are applying the correct template, then click Yes to apply the template.
Importing and exporting templates
To import a config file: 1 Click the Template Library:
From the WhatsConfigured main menu, click Libraries > Template Library. The Template Library appears.
2 Click Import. The Import Configuration Templates dialog appears. 3 Navigate to the location on your directory of the .xml file that you want to import. 4 Select the file, then click OK. 5 The file is added to the Template Library.
Note: If the .xml file that you are importing is identical to any existing templates stored in the library, the file does not import.
To export a template: 1 Click the Template Library:
From the WhatsConfigured main menu, click Libraries > Template Library. The Template Library appears.
2 Click Export. The Export Configuration Templates dialog appears. 3 Navigate to the location on your directory where you want to export the .xml file. 4 Click Save. A copy of the file is saved in the location you specified.
107
CHAPTER 11
Using WhatsConfigured Tools
In This Chapter
About WhatsConfigured Tools .................................................................... 107
Using IP/MAC Finder ....................................................................................... 108
Using the Subnet Calculator ......................................................................... 110
Using the WhatsConfigured VLAN Manager .......................................... 111
Rebuild Connectivity ....................................................................................... 114
Classify Devices ................................................................................................. 114
Show Discovery Alerts .................................................................................... 115
About Archive Search ..................................................................................... 115
About Archive Compare ................................................................................ 116
Using the SNMP Configuration tool .......................................................... 117
About WhatsConfigured Tools
WhatsConfigured includes several network tools:
§ IP/MAC Finder
§ MIB Browser
§ VLAN Manager
§ Archive Search
§ Classify Devices
§ Rebuild Connectivity
WhatsConfigured v3.1 User Guide
108
Using IP/MAC Finder
The IP/MAC Finder tool provides an easy way to locate an IP or MAC address on the network. Using the previously discovered network devices, IP/MAC Finder will find and display network interfaces that have sighting information for the supplied IP or MAC address. To get the most up-to-date sighting information, you can use the Refresh button which sends SNMP requests to each network device to quickly update the sighting information.
When enough network data is available, IP/MAC Finder indicates to which network interface the IP or MAC address is physically connected.
The IP/MAC Finder tool can search for either an IP or a MAC address on the network. The results of the search are displayed in the IP/MAC Finder list columns.
To use the IP/MAC Finder tool on the WhatsConfigured console: 1 From the main menu of WhatsConfigured click Tools > IP/MAC Finder. The IP/MAC
Finder dialog appears.
Tip: You can also view IP/MAC finder tool from the WhatsConfigured console shortcut menu. Click (IP/MAC Finder shortcut icon). The IP/MAC Finder dialog appears.
2 Enter the appropriate information in the following boxes.
§ IP Address. Enter the IP address of a device for which you want to find sightings on the network. Leave this option blank if you are only scanning for a MAC address. - or - Click Select to select a device, in the Select Devices dialog, for which you want to identify a MAC address. For more information, see About the Select button (on page 109).
§ MAC Address. Enter The MAC address for which you are scanning the network. Leave this option blank if you are only scanning for an IP address.
3 Select Use Network Devices Only to display the IP/MAC sightings found only on network device types.

WhatsConfigured v3.1 User Guide
109
- or - Deselect Use Network Devices Only to display all IP/MAC sightings found on all device types.
4 Click Find to search the network to locate where the IP or MAC device is on the network. The results of the search are displayed in the Sighting Information list:
§ Device. Lists the name of the network device that has sighting information for the IP or MAC address.
§ IP Address. Lists the IP address of the sighting device.
§ Interface Name. Lists the network interface that is routing or forwarding traffic to the IP or MAC address.
§ Is Linked To. Lists the network devices to which the device is linked.
§ Sighting Type. Lists where the information was seen, such as an ARP Cache, a forwarding database, or the device itself.
5 Click Clear to remove the information from the IP/MAC Finder table and start a new device sighting. - or - Click Close to close the dialog.
About the Select button The IP/MAC Address Finder's Select button uses previously discovered network information to help you find a device, then select the device for which to search the network for sightings of its IP or MAC address.
To use the Lookup button: 1 Open the IP/MAC Finder Address. 2 Click Select. The Select Devices dialog appears. This dialog allows you to pick a device
from your existing network discovery. 3 In the Device Filter list, select the device type you want to display in the Device List. All
device devices are listed by default. The device list displays those devices that match the device filter criteria.
4 Select a device in the list, then click OK. The IP address and MAC address automatically fills the IP Address and MAC Address boxes.
About the Refresh Connectivity button The IP/MAC Address Finder's Refresh Connectivity button refreshes the connectivity model by sending SNMP requests to each network device to update the network data.
To use the Refresh Connectivity button: 1 Open the IP/MAC Address Finder. 2 Click Refresh. The Run Discovery dialog appears. 3 Wait for the progress information to indicate that the discovery is complete. 4 Click OK. The network model updates with the latest connectivity information based on
this discovery run.

WhatsConfigured v3.1 User Guide
110
Using the Subnet Calculator
The Subnet Calculator is used to calculate a range of subnets for a specific IP address based on the network bits, subnet bits, and host bits when setting up a network.
To use the Subnet Calculator: 1 Access the Subnet Calculator by clicking Tools > Subnet Calculator from the main
menu. 2 Enter the IP address of the subnet you want to discover under IPAddress. The Binary,
Octal, and Hexadecimal forms of the IP address entered display in the respective boxes within the dialog.
3 To specify the number of one bits in the binary notation of the net mask, select a number 1-31 from the Mask Bits list, or alternately, select a specific net mask from the Net Mask list. The Subnet Calculator auto-fills applicable subnet information in the remaining boxes within the dialog, including the initial Subnet Results.
4 The following subnet characteristics can be altered by selecting from the applicable lists within the dialog. Subnet Results update automatically as changes are made.
§ Subnet Bits - The number of subnet bits can range from 1-31 when the number of mask bits is set to 1. As the number of mask bits increases, the listed options for subnet bits decreases. If the number of mask bits is set to 31, the number of subnet bits must be 31.
§ Subnet Mask - The available range of subnet masks that may be applied decreases as the number of mask bits increases.
§ Number of Subnets - The available number of subnets begins at 1. Each subsequent list option is the previous number multiplied by two and can be set as high as 536870912 when the number of mask bits is set to 1. As the number of mask bits increases, the listed options for number of subnets decreases. If the number of mask bits is set to 31, the number of subnets must be 1.
§ Host Bits - The number of host bits can range from 1-31. As the number of host bits increases, the number of subnets decreases. Additionally, if the number of mask bits is altered, the number of host bits automatically changes so the sum of the two numbers is equal to 32.
§ Hosts per Subnet - The available hosts per subnet begins with 2(RFC3021) and 2. Each subsequent list option is the previous number multiplied by 2, minus 2 (2x - 2) and can be set as high 2147483646 when the number of mask bits is set to 1. As the number of mask bits increases, the listed options for hosts per subnet decreases. If the number of mask bits is set to 31, the number of hosts per subnet must be 2(RFC3021).
Note: RFC3021 designates a document which defines a scenario where there is a single host bit and the subnet and broadcast addresses double as hosts. 2(RFC3021) is only for point to point connections.
5 The following subnet characteristics are also displayed within the dialog and automatically update as changes to other boxes are made, but may not be altered directly by the user:

WhatsConfigured v3.1 User Guide
111
§ Inverse (Wild Card) Mask - The inverse mask indicates how many hosts are in a subnet and is calculated by subtracting each of the 4 sections of the subnet mask from 255. If only the last section of the inverse mask is used, it is the number of hosts per subnet plus 1.
§ Subnet Bitmap - The subnet bitmap is a visual representation of the subnet using algebraic variables in place of numbers. 'n' represents network or mask bits which indicate the total amount of space available. 's' represents subnet bits minus network bits which indicate how many subnets are available. 'h' represents host bits which indicate the number of hosts in a subnet. If the subnet bits increase, the host bits decrease, and vice versa.
Using the WhatsConfigured VLAN Manager
The WhatsConfigured VLAN Manager allows users to easily and dynamically update VLAN configurations. Through the VLAN Manager, users can add, edit, and delete VLANs from individual devices. Additionally, users can easily copy and move single or multiple VLANs from one network device to other VLAN capable network devices through the VLAN Manager.
To access the VLAN Manager:
§ From the WhatsConfigured console main menu, click Tools > VLAN Manager.
§ From Device Categories view, right-click a device that supports VLANs, then select VLAN Manager.
VLAN Manager Requirements In order to manage device VLAN configurations through the WhatsConfigured VLAN Manager, ensure that your devices meet the following requirements.
§ The devices you attempt to configure must have proper read/write SNMP credentials assigned. For more information, see Configuring network protocols and credentials (on page 26).
§ For Cisco devices, your device must support the Cisco VTP MIB (http://www.cisco.com/public/sw-center/netmgmt/cmtk/mibs.shtml).
For more information on Cisco trunking, see Cisco's documentation (http://www.cisco.com/en/US/docs/switches/lan/catalyst4500/12.1/19ew/configuration/guide/layer2.html).
To configure device VLANs using the VLAN Manager: 1 If you launch the VLAN Manager from the Tools menu, click Select to choose a device
from the Select Device dialog. If you launch the VLAN Manager from the Device Categories View, the VLAN information for the device in context is displayed.
2 If appropriate credentials are not already associated with the device, click Assign to select SNMP credentials for the device from the Protocol Settings/Credentials Library.

WhatsConfigured v3.1 User Guide
112
Note: If the appropriate set of SNMP credentials does not exist in the Protocol Settings/Credentials Library, configure them at this time. For more information, see Configuring network protocols and credentials (on page 26).
3 Click Rediscover to rediscover and view the VLAN configuration for the selected device. The discovered VLAN information is displayed in the VLANs section of the dialog.
4 In the VLANs section of the dialog, configure device VLANs,
§ Click Add to add a VLAN to the device.
§ Select a VLAN, then click Edit to modify its properties.
Note: You cannot edit the VLAN Index. If you want to modify a VLAN's index number, you must delete the VLAN and add the VLAN again with the desired index number. Additionally, you cannot edit VLANs that are reserved by the switch vendor. For example, default VLANs and Cisco Reserved (1000-1024).
§ Select a VLAN, then click Delete to remove it from the device.
Note: You cannot edit VLANs that are reserved by the switch vendor. For example, default VLANs and Cisco Reserved (1000-1024).
Note: You will be prompted before you remove a VLAN from a device.
§ Select a VLAN, then click Copy To to duplicate the VLAN Name/Index configuration to another VLAN capable device.
Note: You can select multiple VLANs in which to copy to another network device. Additionally, you can copy one or more VLANs to multiple network devices at one time.
5 In the Port VLAN Configuration section of the dialog, configure VLAN port assignments.
§ Select a VLAN switch port, then click Assign To to set the static (primary) VLAN ID.
§ Select a VLAN switch port, then click Trunk Add/Edit to modify its Trunk configuration tags.
§ Select a VLAN switch port, then click Trunk Remove to return the port to its default, non-trunking configuration.
6 Click Close to exit the dialog.

WhatsConfigured v3.1 User Guide
113
Configuring VLAN Trunks Use the Add/Edit VLAN Trunk dialog to configure VLAN trunking and tagging for local WhatsConfigured devices. Additionally, use this dialog to copy local configurations to a neighboring device.
Configuring the LOCAL device To configure VLAN trunk settings for the LOCAL device: 1 Ensure that the appropriate device is selected. If needed, Browse to select a device. 2 Select the appropriate Interface/Port. 3 Ensure that the appropriate Primary VLAN ID (PVID) is selected. 4 Select the VLANs to which you want to assign membership for the selected port. Click
Select All to tag all VLANs, click Clear All to clear selection from all VLANs.
Note: The Primary VLAN ID (PVID) cannot be tagged.
5 Click Apply to save changes.
Configuring the NEIGHBOR device If WhatsConfigured detects the neighboring device's configuration, the NEIGHBOR device section of the dialog is populated with this information. You can retain this configuration or you can Copy the LOCAL device's Trunk configuration information the NEIGHBOR device. Additionally, you can manually configure all settings without copying over the LOCAL device's configuration settings.
To copy LOCAL device Trunk settings to the NEIGHBOR device: 1 Select the appropriate NEIGHBOR Device. If needed, Browse to select a device.

WhatsConfigured v3.1 User Guide
114
Note: Ensure that the NEIGHBOR device has the appropriate SNMP read/write credentials. For more information, see Configuring network protocols and credentials (on page 26).
2 Ensure that all trunk settings on the Local device are configured as desired. 3 Click Copy. 4 Click Apply.
Rebuild Connectivity
The Rebuild Connectivity feature reruns the connectivity engine to rebuild all the links inside the network model. Rebuild connectivity generally happens automatically after a new discovery, but you can run Rebuild Connectivity at any time if you have merged more devices into the network using the file menu.
To run Rebuild Connectivity:
From the main menu of the WhatsConfigured console, click Tools > Rebuild Connectivity. The Rebuild Connectivity tool runs.
Classify Devices
The Classify Devices feature reruns the device classifier after the device type configuration has been changed. With this feature, you can enter mappings into the Device Type Configuration and run Classify Devices to update all device categories.
To run Classify Devices:
From the main menu of the WhatsConfigured console, click Tools > Classify Devices. The Classify Devices tool runs.
WhatsConfigured v3.1 User Guide
115
Show Discovery Alerts
The Discovery Alerts dialog provides information about devices that were discovered, but may have had issues being fully accessible. The information provided in this dialog helps you identify the details to check on the device to make it fully discoverable.
This dialog automatically appears each time changes are detected in the current discovery file. To change this default selection, select Don't show this automatically at the bottom left of the dialog.
To access the Discovery Alerts dialog:
On the WhatsConfigured console, click Discover > Show Discovery Alerts. The Discovery Alerts dialog appears.
About Archive Search
The Archive Search feature allows you to search the content of device configuration archives. A configuration archive is any device output captured when running a configuration task or script. When a configuration script is run, the output from one or more commands may be captured and stored in a user or system specified key. The output is saved to the device using the key name and the time-stamp as a look-up key. The archive is persisted with the device in the discovery .dis file.

WhatsConfigured v3.1 User Guide
116
Performing an archive search To perform an archive search: 1 Click the Archive Search dialog:
From WhatsConfigured, click Tools > Archive Search. The Archive Search dialog appears. 2 Click Add. The Select Device dialog appears. 3 Select the device(s) for which you want to perform an archive search, then click OK. 4 Specify the Search Criteria:
§ Select an Archive Key for which to refine search results. For example, to view running config archives, select the running-config key from the list. This list is populated with all of the keys from the archived configuration files for the selected device(s). To view all possible archives, select All.
§ To view only the latest archives for the selected device(s), select Lastest Archive Only.
§ Enter a Search Pattern for which the search should attempt to find in the archived config files. This can be a phrase or regular expression.
§ Select Regular Expression for the contents of search pattern to be interpreted as a regular expression.
§ If the contents of the search pattern are case insensitive, select Ignore Case.
Tip: Select a device, then click Remove to delete it from the list.
5 Click Search. The dialog displays the following Search Results in the bottom half of the dialog:
§ The Archive Key under which the file was saved in the database.
§ The Device for which the config file was saved.
§ The time at which the configuration file was created (Time Created).
§ The name of the configuration task for which the file was collected (Created by).
Tip: Select an archive file, then click View to see the specific archived file.
About Archive Compare
Use the WhatsConfigured Diff Viewer to compare archived config files.

WhatsConfigured v3.1 User Guide
117
To compare differences between configuration archives using the Diff Viewer: 1 From the WhatsConfigured main menu, click Tools > Archive Compare. The Diff Viewer
dialog appears.
2 Select the Device(s) for which you want to view archive configs. 3 Select the Archive config files you want to compare. 4 Use the Back and Forward buttons to view the differences between the two config files. 5 After you have viewed the archived config files, click OK to exit the dialog.
Using the SNMP Configuration tool
The WhatsConfigured SNMP Configuration tool allows you to configure Simple Network Management Protocol (SNMP) for one or multiple Windows devices much like you would using the Microsoft Windows Management Console.
Note: Devices must have valid Windows credentials in order to be configured using this tool. For more information on configuring Windows credentials for a device, see Configuring Protocol Settings/Credentials.
To configure SNMP for a device: 1 Open the SNMP Configuration tool:
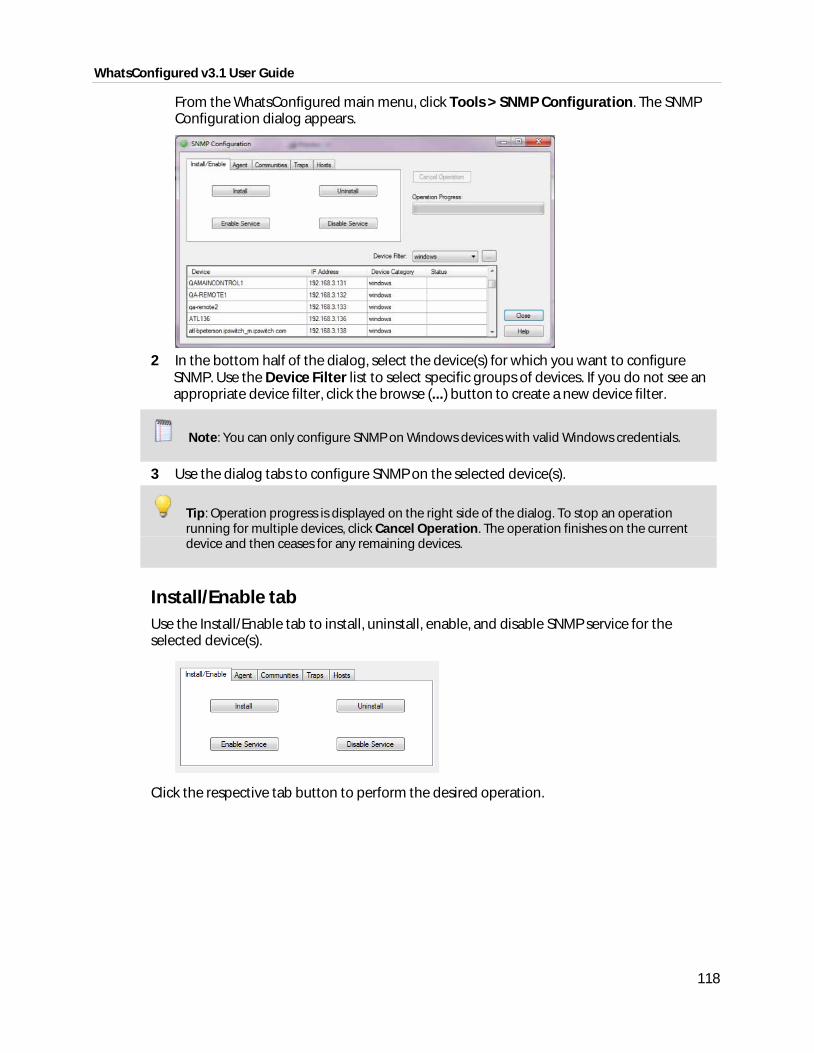
WhatsConfigured v3.1 User Guide
118
From the WhatsConfigured main menu, click Tools > SNMP Configuration. The SNMP Configuration dialog appears.
2 In the bottom half of the dialog, select the device(s) for which you want to configure
SNMP. Use the Device Filter list to select specific groups of devices. If you do not see an appropriate device filter, click the browse (...) button to create a new device filter.
Note: You can only configure SNMP on Windows devices with valid Windows credentials.
3 Use the dialog tabs to configure SNMP on the selected device(s).
Tip: Operation progress is displayed on the right side of the dialog. To stop an operation running for multiple devices, click Cancel Operation. The operation finishes on the current device and then ceases for any remaining devices.
Install/Enable tab Use the Install/Enable tab to install, uninstall, enable, and disable SNMP service for the selected device(s).
Click the respective tab button to perform the desired operation.

WhatsConfigured v3.1 User Guide
119
Agent tab Use the Agent tab to specify contact and location information for the selected device(s).
§ To specify the device's Contact, enter the name of the person that administers the
device, then click Change Contact.
§ To specify the device's Location, enter the device's physical location, such as Atlanta Office 142-B, then click Change Location.
Communities tab Use the Communities tab to add or remove SNMP communities and to specify community rights.
§ To add an SNMP community, enter its name in Community and select the
appropriate rights from the Rights list, then click Add Community. The community and selected rights are added to the selected device(s).
§ To remove an SNMP community, enter its name in Community, then click Remove Community. The community and any associated rights are removed from the selected device(s).
Traps tab Use the Traps tab to specify trap destinations for SNMP communities. Trap destinations are the locations where SNMP trap messages are sent.
§ To add a trap destination, enter an SNMP Community, and a hostname or IP address
for the Trap Destination, then click Add Destination.
§ To remove a trap destination, enter an SNMP Community, and a hostname or IP address for the Trap Destination, then click Remove Destination.
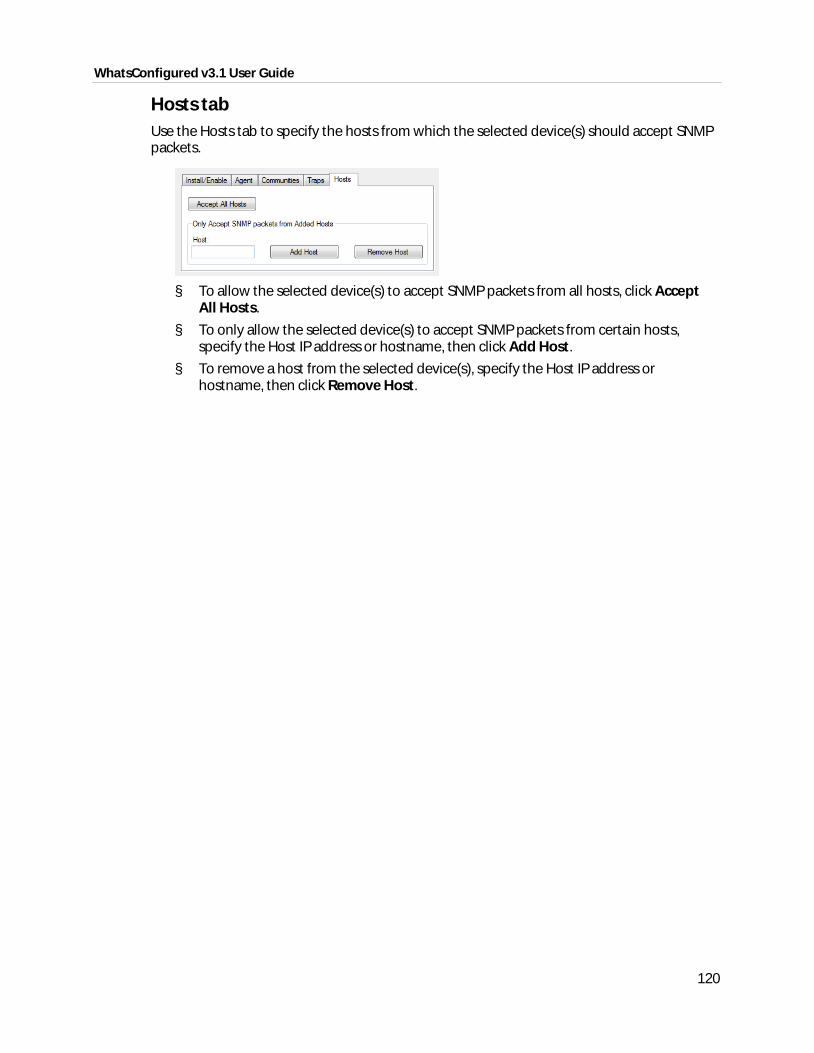
WhatsConfigured v3.1 User Guide
120
Hosts tab Use the Hosts tab to specify the hosts from which the selected device(s) should accept SNMP packets.
§ To allow the selected device(s) to accept SNMP packets from all hosts, click Accept
All Hosts.
§ To only allow the selected device(s) to accept SNMP packets from certain hosts, specify the Host IP address or hostname, then click Add Host.
§ To remove a host from the selected device(s), specify the Host IP address or hostname, then click Remove Host.

121
CHAPTER 12
Configuring WhatsConfigured
In This Chapter
About WhatsConfigured configuration settings .................................. 121
Configuring Applications Settings ............................................................. 122
Configuring Discovery Settings ................................................................... 122
Configuring Protocol Settings/Credentials ............................................. 123
Configuring Device Categories ................................................................... 124
Configuring Device Filters ............................................................................. 125
Configuring Device Type Mappings .......................................................... 128
WhatsUp Gold Server Endpoint Library (Remote Servers) ................ 128
Configuring Email Settings ........................................................................... 129
Configuring File Transfer Settings .............................................................. 130
About the Remote CLI Settings library ..................................................... 135
About the Default Script Library ................................................................. 140
Exporting Configuration Settings to WhatsUp Gold ........................... 143
Changing System Info ..................................................................................... 144
Collecting device MIBs .................................................................................... 145
About WhatsConfigured configuration settings
WhatsConfigured provides a variety of configuration setting options to help you optimize WhatsConfigured for your network.
§ Application Settings (on page 122)
§ Discovery Settings (on page 122)
§ Protocol Settings/Credentials (on page 123)
§ Device Categories (on page 124)
§ Device Filters (on page 125)
§ Device Type Mappings (on page 128)
§ WhatsUp Gold Server Endpoint Library (Remote Server)
§ Email Settings (on page 129)
§ TFTP Server Settings (on page 130)
WhatsConfigured v3.1 User Guide
122
§ Remote CLI Settings (on page 137)
§ System Default Scripts (on page 140)
Configuring Applications Settings
You can use the Applications Settings to select the type of shapes to use in the Topology Maps. The topology map shape options are:
§ WhatsUp
§ Cisco
To configure Application Settings: 1 From the main menu of the WhatsConfigured console, click Settings > Application
Settings. The Application Settings dialog appears. 2 Select the shapes you want to use in your topology maps:
§ WhatsUp. The topology maps use the basic functional shapes from WhatsUp Gold to draw a device on the topology maps.
§ Cisco. The topology maps use the standard Cisco icons/images for each functional collection (Router, Switch, etc) to represent a device.
3 Click OK to save settings.
Configuring Discovery Settings
A network discovery requires a general collection of settings to define a network discovery scope. Use the Discovery Settings to edit discovery collection settings, select a discovery configuration from the list of network discovery collections, or enter information for a new discovery collection.
Creating, editing, or deleting discovery settings To create a new set of discovery settings: 1 From the main menu of the WhatsConfigured console, click Configure > Discovery
Settings. The Discovery Settings dialog appears. 2 Click New. The Network Discovery Settings wizard appears. 3 Enter the appropriate information in the wizard dialogs.
To edit a set of discovery settings: 1 From the main menu of the WhatsConfigured console, click Configure > Discovery
Settings. The Discovery Settings dialog appears. 2 Select an existing set of discovery settings, then click Edit. The Network Discovery
Settings wizard appears. 3 Enter the appropriate information in the wizard dialogs.

WhatsConfigured v3.1 User Guide
123
To copy a set of discovery settings: 1 From the main menu of the WhatsConfigured console, click Configure > Discovery
Settings. The Discovery Settings dialog appears. 2 Select an existing set of discovery settings, then click Copy. The Network Discovery
Settings wizard appears. 3 Enter the appropriate information in the wizard dialogs.
To delete a set of discovery settings: 1 From the main menu of the WhatsConfigured console, click Configure > Discovery
Settings. The Discovery Settings dialog appears. 2 Select an existing set of discovery settings, then click Delete. 3 Confirm that you are deleting the correct set of discovery settings, then click Yes. The
discovery settings are removed from the list.
Configuring Protocol Settings/Credentials
Use the Protocol Settings/Credentials dialog to configure the protocol credentials that you want to use for network discovery.
§ SNMPv1 discovery requires the SNMP read community information, timeout settings, and retry counts.
§ SNMPv2 discovery requires the SNMP read community information, timeout settings, and retry counts.
§ SNMPv3 discovery requires the associated Username, timeout settings and retry counts. Optionally, you can select to use Authentication and Encryption.
§ SSH requires the User Name, Password, and Port used to make an SSH connection.
§ Telnet requires the User Name, Password, and Port information used to make a Telnet connection. Telnet credentials are used to support the Map Capture Config tool that starts Backup Running Configurations and Backup Startup Configurations.
Note: You can only edit the default ICMP settings; you cannot create a new set of ICMP settings.
To configure Protocol Settings:
From the main menu of the WhatsConfigured console, click Settings > Protocol Settings/Credentials. The Protocol Settings dialog appears.
To create a new set of protocol credentials: 1 Click New. 2 Select the type of Protocol settings that you would like to create, then click OK. The
protocol properties dialog appears. 3 Enter the appropriate protocol settings in the protocol editor.

WhatsConfigured v3.1 User Guide
124
To edit protocol settings: 1 Select a set of protocol credentials, then click Edit. The protocol properties dialog
appears. 2 Enter the settings you want to modify in the protocol editor.
To copy protocol settings: 1 Select a set of protocol credentials, then click Copy. The new copy of the credentials
dialog appears. 2 Make any required changes to create new credentials, then click OK.
To delete a set of protocol credentials: 1 Select a set of protocol credentials, then click Delete. The protocol setting is deleted
from the list. 2 Click OK to save changes.
To import protocol credentials from WhatsUp Gold: 1 Click Import. The Import Credentials dialog appears. 2 From the WhatsUp Gold Server list, select a WhatsUp Gold Server endpoint from which
to import credentials or click browse (...) to open the WhatsUp Gold Remote Server dialog to Add, Edit, Copy, or Delete WhatsUp Gold remote servers from which to import credentials.
3 Click Import. WhatsConfigured imports all of the SNMPv1, SNMPv2, SNMPv3, SSH, and credentials from the selected WhatsUp Gold server Credentials Library, and they appear in the Protocol Settings/Credentials dialog.
To selectively Assign or Unassign protocol credentials to device(s): 1 Select a credential you want to manually assign to device(s), then click Assign or
Unassign. The Select Devices dialog appears. 2 Select one or Ctrl + select multiple devices to assign the credential to device(s). 3 Click OK to apply credentials to the selected device(s).
Configuring Device Categories
Use the Device Category Configuration dialog to configure and manage device categories. These device categories are used to organize devices found during discovery and are displayed on the WhatsConfigured Device Categories View.
To configure device categories:
From the main menu of the WhatsConfigured console, select Settings > Device Category. The Device Category Configuration dialog appears.
Click New. The New Device Category dialog appears.
- or -
Select a device category, then click Edit. The Edit Device Category dialog appears. 1 Enter or select the appropriate information in the dialog boxes.
§ Enter the Category Name that is displayed in the Device Category Configuration dialog.
WhatsConfigured v3.1 User Guide
125
Note: Category names must be unique.
§ Enter the Display label that is displayed for the category in the device category view.
§ Enter or Browse to the Icon filename that is used to represent all devices in this category.
§ Select Network device to identify the category as a network infrastructure device. 2 Click OK to save changes.
Tip: You can also access the Device Category Configuration dialog from the Device Category View's right-click menu.
Configuring Device Filters
Device filters allow you to filter reports so that only the network information you want is displayed. You can customize the filter to display information about:
§ All of your devices, including endpoint devices, such as servers and workstations.
§ Only your network devices.
§ Only those devices that have SNMP credentials.
You can create filters for categories of devices, individual IP addresses, IP ranges, subnets, VLANs, or combinations of these elements.
Device Categories Device categories are used in filters to narrow your report to a specific group of network devices. The default categories list includes network devices, end devices, and devices with specific operating systems. You can add custom device categories for use in grouping devices in ways not available with the default device categories. When you create a custom device category, it will appear on the list and you will be able to select it when you are creating device filters. For more information on device categories, see Configuring Device Categories (on page 124).
Filtering Device filters provide advanced filtering options that allow you to filter device lists, topology maps, and reports to provide information for individual IP addresses, ranges of IP addresses, subnets and VLANs.
Click Name/IP Address to add hostnames or IP addresses to the filter. You can filter your report on specific hostnames, for example you could filter a report to display only information about your payroll database server, payroll.company.com, or you could list a group of servers by hostname, such as the servers in a DMZ, dmz.firewall1.company.com, dmz.externalweb.company.com, and dmz.externalweb.backup.company.com. You can also filter using a single IP address, or multiple IP addresses. You can filter on an IP range

WhatsConfigured v3.1 User Guide
126
such as 10.0.3.1 - 10.0.3.200 or a specific subnet. You can list a subnet using standard notation (192.168.5.0/255.255.255.0) or CIDR notation (192.168.5.0/24).
Click VLAN to add VLANs to the filter. When filtering on VLANs you can list one or more VLANs by VLAN name or index. The name of the VLAN, for example VLAN1, or the index for the VLAN, is entered in the Device Filter - VLANs dialog.
Creating, editing, copying or deleting a Device Filter The following procedures provide instructions on how to create, edit, copy and delete device filters using the Device Filters dialog.
How to get to the Device Filters dialog:
From the main menu, click Settings > Device Filters. The Device Filters list dialog appears.
Tip: Alternatively, click the browse (...) button on any of the reports to which a device filter can be applied to get to the Device Filters dialog.
The Device Filters dialog displays the name of each filter and the associated pseudo code representing what the filter will return.
To create or edit a device filter: 1 If you are creating a new filter, click New to create a new device filter. The Device Filter
definition dialog appears. 2 If you want to edit an existing device filter, select a device filter, then click Edit to edit an
existing device filter. The Device Filter definition dialog for the selected filter appears. 3 For the Name, enter the name you want to use to refer to the filter. This name is
displayed in the Device Filter lists on all reports and maps that have filtering available. 4 Select the range of devices you want to include in the filter in the Filter Devices area.
The Start with list option sets the device range by restricting the devices filtered to one of the following groups of devices:
§ All Devices. Select this option if you want the filter to be applied to all of the devices in the current discovery file.
§ All SNMP Devices. Select this option if you want the filter to be applied only to those devices with an SNMP credential in the credential library.
§ All DHCP Servers. Select this option if you want the filter to be applied to all DHCP servers in the current discovery file.
§ All DNS Servers. Select this option if you want the filter to be applied to all DNS servers in the current discovery file.
§ All Servers. Select this option if you want the filter to be applied to all servers in the current discovery file.
§ All Virtual Machines. Select this option if you want the filter to be applied to all virtual machines in the current discovery file.
§ All Wireless AP Clients. Select this option if you want the filter to be applied to all wireless AP clients in the current discovery file.

WhatsConfigured v3.1 User Guide
127
§ All Workstations. Select this option if you want the filter only to be applied to workstations.
Select the with IPv6 Address option to filter for devices with IPv6 addresses. For example, you can choose to filter for all SNMP devices with IPv6 addresses.
5 Use the options in the Filter by section to select specific hosts or VLANs to include in the filter.
a) To restrict the filter to specific hostnames, IP addresses, IP address ranges or subnets, click Name/IP Address. The Device Filter - Host/IP Address Include Scope dialog appears. Enter the hosts, IP addresses, and subnets you want to include in your filter, then click OK. The Device Filter - Host/IP Address Include Scope dialog closes.
§ Host / System / NetBIOS Names. Enter the hostname, system name or NetBIOS name of the device or devices you want the filter to select. When you list a name in this box, the filter will return only those devices with that name in the box. You can use a * character as a wildcard in this box. Click Clear to clear the Host / System / NetBIOS Names box.
§ IP addresses / Subnets. Enter the IP address, IP address range or subnet address (CIDR format) of the device or devices you want the filter to select. When you list one or more addresses or and address range for this option, the filter will return only those devices that match or fall within the indicated address range. Click Clear to clear the IP addresses / Subnets option.
b) Click VLANs to open the Device Filter - VLANs dialog.
Enter the VLAN name or index from which you want the filter to select devices. Click Clear to clear the VLAN names or indexes.
6 Select the categories of devices you want to include in your device filter.
If you select any category, only devices that match that category appears. If you have not selected any devices, all devices that meet the other filter criteria appears.
§ Click Select All to select all of the categories. With all of the categories selected, WhatsConfigured returns all devices.
§ Click Unselect All to de-select all of the categories. With all of the categories de-selected, WhatsConfigured will return all devices within the device range.
§ Filter summary. Provides a pseudo-code representation of the filter. 7 Click Preview to see the list of devices returned by the filter. This list of devices appears
in the map or report that uses this filter. 8 Click OK. The Device Filter definition dialog closes, and the device filter appears on the
Device Filter list dialog.
To delete a device filter:
Select a device filter, then click Delete to delete an existing device filter. The selected device filter is removed from the Device Filters dialog.
To copy an existing device filter:
Select a device filter, then click Copy to copy an existing device filter. The Device Filter definition dialog appears with Copy of <filter_name> in the Name box where <filter_name> is the name of the filter you selected to copy. All of the filter criteria associated with the selected device filter is automatically selected.

WhatsConfigured v3.1 User Guide
128
Configuring Device Type Mappings
Use the Device Types dialog to create or modify a custom device type mapping. To do this, enter an SNMP OID (sysObjectID) and select a device category for which to map a device. For more information about SNMP OIDs, refer to your device documentation or the Internet Assigned Numbers Authority (IANA) web site (http://www.iana.org/assignments/enterprise-numbers).
To configure Device Types: 1 From the main menu of the WhatsConfigured console, click Settings > Device Type
Mappings. The SNMP OID to Device Type Configuration dialog appears. 2 Use the following options to create and edit device types:
§ New. Click to create a new device type configuration (mapping).
§ sysObject ID (OID). Enter the SNMP OID (sysObjectID) for which you want to map a device. For more information about SNMP OIDs, refer to your device documentation or the Internet Assigned Numbers Authority (IANA) web site (http://www.iana.org/assignments/enterprise-numbers).
§ Include Subtree. Select to include the device OID subtree entries in the device type configuration.
§ Category. Select a device type category for which to map the device.
§ Vendor/Manufacturer. Enter the device vendor or manufacturer name.
§ Model. Enter the device vendor or manufacturer model.
§ Description. Enter the device vendor or manufacturer description.
§ Edit. Select a device in the OID Maps list to modify the current settings.
§ Copy. Select a device in the OID Maps list to copy an existing OID Map and modify it to create a new OID Map.
§ Delete. Select a device in the OID Maps list to delete an existing OID Map. 3 Click OK to make changes.
WhatsUp Gold Server Endpoint Library (Remote Servers)
Data that is imported or exported to or from WhatsConfigured to or from WhatsUp Gold requires that WhatsUp Gold servers (or endpoints) be defined to exchange data between the applications. Data shared between WhatsUp Gold and WhatsConfigured is accessed using the NetworkViewerDataService in WhatsUp Gold. WhatsConfigured import/export features communicate with the data service to access the WhatsUp Gold database.
If WhatsConfigured is installed on a system with WhatsUp Gold installed, then a "Local Server" endpoint is added automatically to the remote servers (endpoint library). The "Local Server" endpoint cannot be deleted but it can be edited. Other remote servers can be created and

WhatsConfigured v3.1 User Guide
129
edited similar to other libraries in WhatsUp Gold and WhatsConfigured. WhatsUp Gold remote servers are stored in the netview-viewer-config-user.xml configuration file.
The WhatsUp Gold Remote Servers dialog lets you define and manage WhatsUp Gold servers for:
§ Exporting topology maps from WhatsConfigured
§ Exporting scheduled discovery data from WhatsConfigured
§ Importing credential data from a WhatsConfigured server
Use this dialog to Add, Edit, Copy, and Delete WhatsUp Gold servers that will interact with WhatsConfigured data.
The dialog displays the following WhatsUp Gold remote server information Name, Description, Host Name/IP Address, and Port.
To manage WhatsUp Gold remote servers:
§ Click New to add a new WhatsUp Gold remote server.
§ Select a WhatsUp Gold remote server, then click Edit to modify the server settings.
§ Select a WhatsUp Gold remote server, then click Copy to make a duplicate of the server settings.
§ Select a WhatsUp Gold remote server, then click Delete to remove it from the list.
Configuring Email Settings
Use The Configure SMTP Settings dialog to configure the default Email Settings for WhatsConfigured.
To configure Email Settings for WhatsConfigured: 1 Click the Configure SMTP Settings dialog: 2 On the WhatsConfigured console, click Settings > Email Settings. The Configure SMTP
Settings dialog appears. 3 Specify or select the appropriate information in the dialog boxes.
§ Destination email address. Specify the address that the Email action message should be sent.
§ From email address. Specify the address to be listed as "From" in the email sent by the Email action.
§ SMTP server. Specify the address of the server on which SMTP is running.
§ Port. Specify the port on which the SMTP service is listening. The standard SMTP port is 25.
§ Timeout (sec). Specify the amount of time (in seconds) that WhatsConfigured should wait for a response from the SMTP server. If the time limit is exceeded, the email fails. The default timeout is 30 seconds.
§ Use SMTP authentication. Select this option if your SMTP server requires user authentication.

WhatsConfigured v3.1 User Guide
130
§ Username. Specify the username to be used with SMTP authentication.
§ Password. Specify the password of the username to be used with SMTP authentication.
§ Use an encrypted connection (SSL/TLS). If your SMTP server supports encrypting data over a TLS connection (formerly known as SSL), select this option to encrypt SMTP traffic.
4 Click OK to save changes.
Configuring File Transfer Settings
Use the WhatsConfigured File Transfer dialog to configure file transfer settings for TFTP, SCP, and SFTP, and to view the TFTP Server Log.
To access the File Transfer Settings dialog, click Configure > File Transfer Settings.
The dialog has 5 tabs:
§ TFTP Settings (on page 130)
§ SCP Settings (on page 131)
§ SFTP Settings (on page 132)
§ TFTP Server Settings (on page 133)
§ TFTP Server Log (on page 134)
Configuring TFTP Settings Use the WhatsConfigured TFTP Settings tab to:
§ Set timeout values
§ Determine cleanup transfer file settings
§ Use TFTP for configuration backups
§ Configure an alternate TFTP server
To adjust the timeout values, type the number of seconds for each of the following settings:
§ TFTP transfer completion timeout (seconds). Use this setting to increase or decrease the amount of time (in seconds) WhatsConfigured is to wait for the completion message to appear in the TFTP server log.
§ TFTP transfer command timeout (seconds). Use this setting to increase or decrease the amount of time (in seconds) the WhatsConfigured TFTP server is to maintain the SSH or TELNET connection with the device after a command has been issued and no return message has been received.

WhatsConfigured v3.1 User Guide
131
When you are satisfied with your configuration, click OK.
To configure transfer cleanup and configuration backups:
§ Use TFTP for configuration backup. Use this option to copy the configuration backup to the root directory of the TFTP server, before it is captured in the active WhatsConfigured discovery file.
§ Cleanup all TFTP transfer files created by WhatsConfigured. Use this option to enable WhatsConfigured to remove configuration files from the root folder after they have been uploaded or downloaded.
§ Use Alternate TFTP Server. Use this option to use an alternate TFTP server than the server provided by WhatsConfigured.
Note: When this option is not selected, WhatsConfigured directly captures the configuration backup in the active WhatsConfigured discovery file.
When you are satisfied with your configuration, click OK.
To configure an alternate server: 1 Select Use Alternate TFTP Server. The Alternate Server Settings portion of the dialog
becomes active. 2 Enter the configuration values for the alternate TFTP server.
§ IP Address. Type the IP address of the alternate TFTP server.
§ Port. Type the port that the alternate TFTP server uses to communicate with the client.
§ Root Directory. Type or Browse to select the absolute path to the root directory. 3 When you are satisfied with your configuration, click OK.
Configuring SCP Settings Use the SCP Settings tab to:
§ Set timeout values
§ Configure SCP server settings
§ Configure SCP client settings
To adjust the timeout values, type the number of seconds for the following setting:
§ SCP transfer completion Timeout (seconds). Use this setting to increase or decrease the amount of time (in seconds) the script runner waits for an entire SCP file transfer to complete.
To configure transfer cleanup and configuration backups:
§ Cleanup all SCP transfer files created by WhatsConfigured. Use this option to enable WhatsConfigured to remove configuration files from the root folder after they have been uploaded or downloaded.
WhatsConfigured v3.1 User Guide
132
To configure the SCP server:
Note: WhatsConfigured does not ship with an SCP server. Use the boxes below to configure WhatsConfigured to use the SCP server of your choice.
1 Enter the User Name and Password of the account WhatsConfigured should use to connect to the SCP server.
2 Enter the IP address of the SCP server. 3 Enter the Port that SCP server uses to communicate with the SCP client. 4 In Verify Password, re-enter the account password that WhatsConfigured should use to
connect to the SCP server. 5 For the SCP transfer command Timeout (seconds), enter the number of seconds the
WhatsConfigured script runner should wait for each command in an SCP server file transfer task to complete.
6 Enter or Browse to the Root Directory used by the SCP server for file transfers. This value must be configured to an absolute local path or an SMB/CIFS UNC with permission granted to read and write files.
To configure the SCP client:
Note: WhatsConfigured ships with an SCP client. This SCP client's information is included in the SCP client boxes. If you wish to override the SCP client included with WhatsConfigured, enter information for an alternate SCP client in the boxes below.
1 Enter or Browse to select the absolute path to the Directory the SCP client uses for file transfers.
2 Enter or Browse to select the absolute path to the SCP client Application executable. 3 Enter the Application Arguments that are to be passed when the client application
starts. WhatsConfigured supports two variable attributes: UserName and Password. These variables are replaced with the device's corresponding credentials and are indicated in the following format: <VariableName>. For example, if a device had associated credentials with the values of MyUserName and MyPassword, the arguments -scp -pw<Password> -|<UserName> are passed to the application as -scp -pw MyPassword-|MyUserName.
Configuring SFTP Settings Use the SFTP Settings tab to:
§ Set timeout values
§ Configure SFTP server settings
§ Configure SFTP client settings
To adjust the timeout values, type the number of seconds for the following setting:
§ SFTP transfer completion Timeout (seconds). Use this setting to increase or decrease the amount of time (in seconds) the script runner waits for an entire SFTP file transfer to complete.

WhatsConfigured v3.1 User Guide
133
To configure transfer cleanup and configuration backups:
§ Cleanup all SFTP transfer files created by WhatsConfigured. Use this option to enable WhatsConfigured to remove configuration files from the root folder after they have been uploaded or downloaded.
To configure the SFTP server:
Note: WhatsConfigured does not ship with an SFTP server. Use the boxes below to configure WhatsConfigured to use the SFTP server of your choice.
1 Enter the User Name and Password of the account WhatsConfigured should use to connect to the SFTP server.
2 Enter the IP address of the SFTP server. 3 Enter the Port that SFTP server uses to communicate with the SFTP client. 4 In Verify Password, re-enter the account password that WhatsConfigured should use to
connect to the SFTP server. 5 For the SFTP transfer command Timeout (seconds), enter the number of seconds the
WhatsConfigured script runner should wait for each command in an SCP server file transfer task to complete.
6 Enter or Browse to the Root Directory used by the SFTP server for file transfers. This value must be configured to an absolute local path or an SMB/CIFS UNC with permission granted to read and write files.
To configure the SFTP client:
Note: WhatsConfigured ships with an SFTP client. This SFTP client's information is included in the SFTP client boxes. If you wish to override the SFTP client included with WhatsConfigured, enter information for an alternate SFTP client in the boxes below.
1 Enter or Browse to select the absolute path to the Directory the SFTP client uses for file transfers.
2 Enter or Browse to select the absolute path to the SFTP client Application executable. 3 Enter the Application Arguments that are to be passed when the client application
starts. WhatsConfigured supports two variable attributes: UserName and Password. These variables are replaced with the device's corresponding credentials and are indicated in the following format: <VariableName>. For example, if a device had associated credentials with the values of MyUserName and MyPassword, the arguments -scp -pw<Password> -|<UserName> are passed to the application as -scp -pw MyPassword-|MyUserName.
Configuring TFTP Server Settings Use the TFTP Server Settings tab to:
§ Set transfer settings, including the port on which the TFTP server will listen, server timeout setting, path to the TFTP server's root directory and permissions to upload and download configurations from specific subnets.
§ Set management settings, including the server IP address, management port and timeout.

WhatsConfigured v3.1 User Guide
134
To set transfer settings:
Enter values for the following parameters:
§ Port. Enter the port number that WhatsConfigured will use to transfer configurations to and from devices.
§ Timeout. Enter the number of seconds you want the TFTP server to wait before timing out.
§ Root directory. Enter the directory you want the TFTP server to use to store device configurations.
When you are satisfied with your configuration, click OK.
To add/edit an allowed subnet: 1 Click Add. The Add subnet permissions dialog appears.
- or -
Select the allowed subnet you want to edit, and then click Edit. 2 Enter the Start Address of the subnet. 3 Enter the End Address of the subnet. 4 Select Allow Downloads if you want to allow configuration downloads from the
defined subnet. 5 Select Allow Uploads if you want to allow configuration uploads from the defined
subnet. 6 Click OK. The Add subnet permissions dialog closes, and the subnet is added to the
Allowed subnets list.
To remove existing allowed subnets:
Select the subnet you want to remove, then click Remove.
To configure Management Settings for the Ipswitch TFTP Server: 1 Enter the TFTP Server IP Address. This is the IP address of the machine on which the
TFTP Server is located. 2 Enter the Management Port. This is the port over which WhatsUp Gold and
WhatsConfigured listen for and issues commands to the TFTP server. The default port is 70.
Important: If you change the Management Port from the default port of 70, you must also specify the same port on the TFTP Server's WhatsConfigured tab. If the ports specified differ, the server is unable to listen for or issue commands.
3 Enter the Management Timeout.
Viewing the TFTP Server Log The TFTP log provides information about errors that occurred when running the server, transfer details, and negotiation between the client and server.

WhatsConfigured v3.1 User Guide
135
About the Remote CLI Settings library
At its base functionality, WhatsConfigured is a software created to help you automate many configuration tasks for your network devices. WhatsConfigured carries out theses configuration tasks by programmatically interacting with your devices' command line interface (CLI). Many device vendors specify different standards for how network administrators interact with their CLI. For example, the character sequence in a command prompt, or the sequence that indicates the end of a command. To provide you with greater flexibility, WhatsConfigured allows you to override the default CLI settings by defining custom sets of CLI elements for devices from a particular vendor or for specific IP addresses. This helps ensure that WhatsConfigured can correctly communicate with these devices as it attempts to carry out tasks. The Remote CLI Settings library stores all CLI Settings used to issue the commands necessary to carry out WhatsConfigured tasks on your network devices.
The library includes two default settings and various pre-defined system settings that come installed with WhatsConfigured. You can use these system settings, or copy them to create new, user-defined settings for devices that support a particular OID or a specific IP address.
To access the Remote CLI Settings library:
From the WhatsConfigured main menu, click Settings > Remote CLI Settings.
To configure new or existing settings:
Note: The Edit and Delete, buttons are disabled for the default and pre-configured system scripts, as you cannot modify or remove default or system scripts.
§ Click Add to configure a new group of settings.
§ Select user-created setting, then click Edit to change its configuration.
§ Select a setting, then click Copy to make a duplicate of the selected group of settings.

WhatsConfigured v3.1 User Guide
136
§ Select a user-created setting, then click Delete to remove it from the library.
OID and device IP address keys The two default scripts for telnet and SSH do not use keys (OID nor IP). WhatsConfigured uses the default scripts to communicate with devices for which it does not find OIDs or an IP address. Pre-configured, system settings are based on specific OIDs. WhatsConfigured can use these settings on any device that supports the OID specified in set of CLI settings. User-defined settings can be based on either a single or grouping of OIDs, or on a specific device IP address.
Filtering You can filter the Remote CLI Settings library for a specific device or group of devices with the Filter by Device list. This list is populated by previous devices by which you have filtered. The first time you open this dialog the list is unpopulated (<None>). To select a device for which to view and/or configure settings, click the browse (...) button.
Order of settings WhatsConfigured first looks for and uses user-defined settings to communicate with a device. If no user-specified settings exist, it looks for and uses appropriate system settings. If a device does not support an OID specified within any of the system settings, WhatsConfigured falls back on the default settings which do not specify specific OIDs.
In the event that you configure two sets of settings for the same IP address or OID/grouping of OIDs, WhatsConfigured uses the last set of settings in the list, or the second set of settings you created for the specific IP address or OID(s).
About CLI Settings The following CLI settings are used by WhatsConfigured to issue commands on your network devices.
§ Username Prompt. The username of the Telnet or SSH credential associated with the device. WhatsConfigured uses this username to login to the device.
§ Password Prompt. The password of the Telnet or SSH credential associated with the device. WhatsConfigured uses this password to login to the device.
§ Command Prompt. The character sequence WhatsConfigured looks for to know it is the appropriate time to issue a device command.
§ More Prompt. The character sequence WhatsConfigured looks for from the device to know that multiple pages of information exist.
§ More Response. The character sequence WhatsConfigured automatically sends after receiving the More Prompt specified above.
§ Login Terminator. The character sequence WhatsConfigured issues after submitting the credential username and password to login to the device.
§ Command Terminator. The character sequence WhatsConfigured issues at the end of a device command to submit the command to the device.
All of the CLI settings can be specified as either strings or regular expressions. For more information see About strings and regular expressions in WhatsConfigured.

WhatsConfigured v3.1 User Guide
137
Configuring Remote CLI Settings The simplest way for you to configure a new set of CLI settings is to use an existing set of system settings as a template and to modify the template settings as desired for use with a specific device or group of devices.
To copy a set of remote CLI settings: 1 Click the Remote CLI Settings dialog:
From the WhatsConfigured main menu, click Settings > Remote CLI Settings. The Remote CLI Settings dialog appears.
Tip: By default, the dialog displays all remote CLI settings currently configured. You can filter this list by selecting a specific device by which to filter.
2 Click Copy. The New Settings: Copy of ... dialog appears.
3 Enter a unique Description for the settings. This description differentiates it from other
settings in the Remote CLI Settings library. 4 To add an IP address, or another OID, click Add. The Add Key dialog appears.
Alternatively, select an existing key from the list and click Edit to modify it, or click Delete to remove it from the list of keys.

WhatsConfigured v3.1 User Guide
138
5 If you add or modify a key, select the Key Type that you want to add, either oid or ip. If you choose to map the settings to an OID, or group of OIDs, the settings apply to any device with that OID that uses the SSH or Telnet credentials associated with the settings you are configuring. If you choose to map the settings to a specific IP address, the settings only apply to the device with the specific IP address you specify.
6 Enter or browse (...) to a device to select the appropriate OID or IP address. 7 Click OK to add the new key and to return to the settings configuration dialog. 8 Ensure that the correct Protocol is selected, ssh, telnet, or All. 9 Ensure that all prompt, response and terminator boxes are specified appropriately. For
more information about these boxes, see About CLI Settings (on page 136).
Note: Boxes that indicate specific settings override the default settings. If boxes are blank, WhatsConfigured uses either the default Telnet or SSH settings for that box.
10 Click OK to save copied/modified settings to the Remote CLI Settings library.
If none of the existing system and/or previously-configured user settings can serve as a template for settings that you need, you can configure entirely new settings.
To configure new remote CLI settings: 1 Click the Remote CLI Settings dialog:
From the WhatsConfigured main menu, click Settings > Remote CLI Settings. The Remote CLI Settings dialog appears.
Tip: By default, the dialog displays all remote CLI settings currently configured. You can filter this list by selecting a specific device by which to filter.
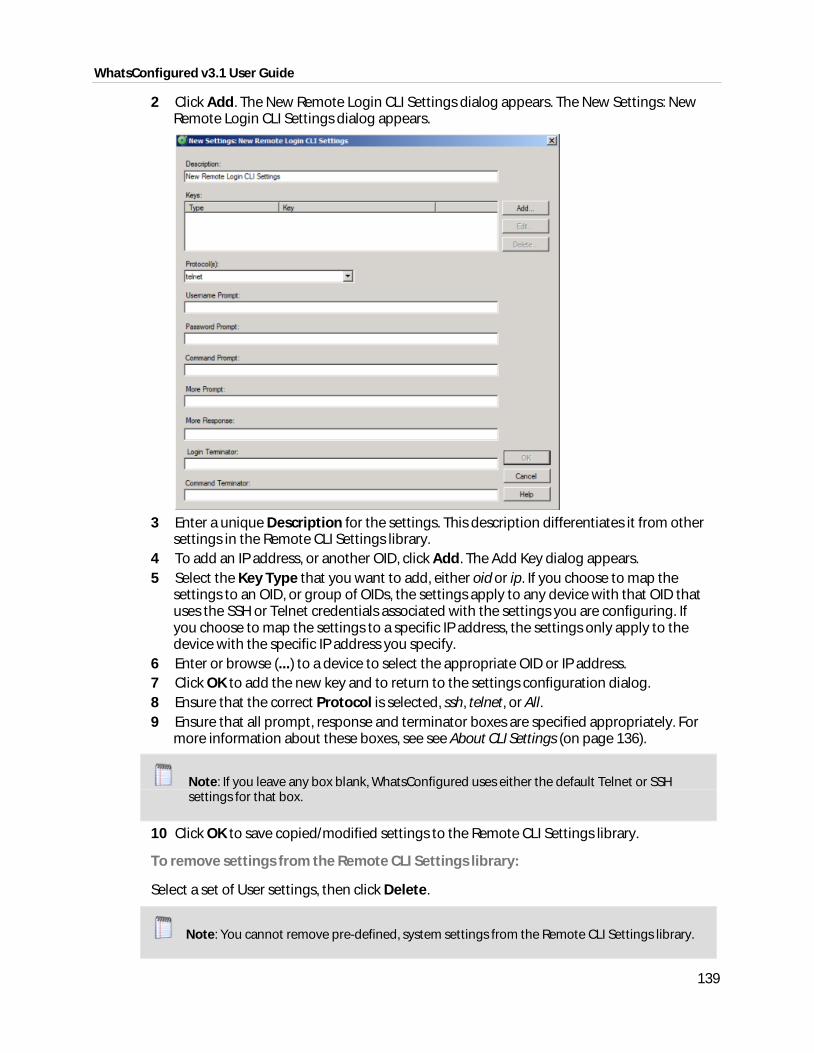
WhatsConfigured v3.1 User Guide
139
2 Click Add. The New Remote Login CLI Settings dialog appears. The New Settings: New Remote Login CLI Settings dialog appears.
3 Enter a unique Description for the settings. This description differentiates it from other
settings in the Remote CLI Settings library. 4 To add an IP address, or another OID, click Add. The Add Key dialog appears. 5 Select the Key Type that you want to add, either oid or ip. If you choose to map the
settings to an OID, or group of OIDs, the settings apply to any device with that OID that uses the SSH or Telnet credentials associated with the settings you are configuring. If you choose to map the settings to a specific IP address, the settings only apply to the device with the specific IP address you specify.
6 Enter or browse (...) to a device to select the appropriate OID or IP address. 7 Click OK to add the new key and to return to the settings configuration dialog. 8 Ensure that the correct Protocol is selected, ssh, telnet, or All. 9 Ensure that all prompt, response and terminator boxes are specified appropriately. For
more information about these boxes, see see About CLI Settings (on page 136).
Note: If you leave any box blank, WhatsConfigured uses either the default Telnet or SSH settings for that box.
10 Click OK to save copied/modified settings to the Remote CLI Settings library.
To remove settings from the Remote CLI Settings library:
Select a set of User settings, then click Delete.
Note: You cannot remove pre-defined, system settings from the Remote CLI Settings library.
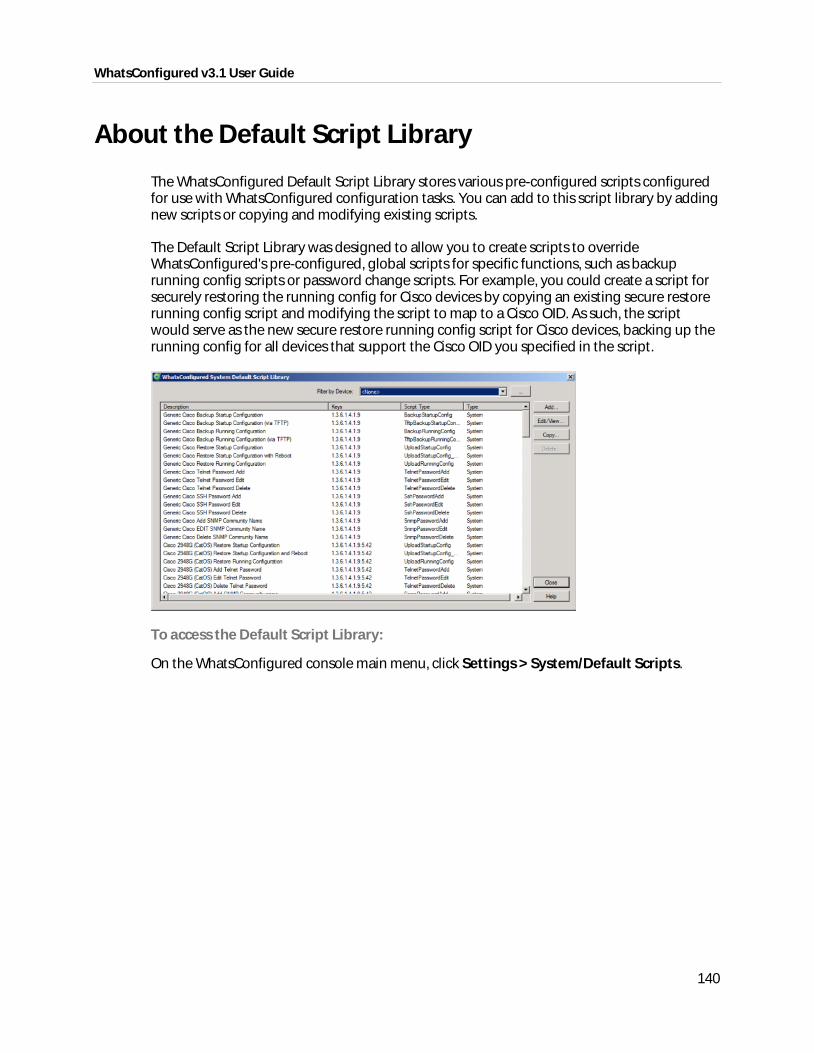
WhatsConfigured v3.1 User Guide
140
About the Default Script Library
The WhatsConfigured Default Script Library stores various pre-configured scripts configured for use with WhatsConfigured configuration tasks. You can add to this script library by adding new scripts or copying and modifying existing scripts.
The Default Script Library was designed to allow you to create scripts to override WhatsConfigured's pre-configured, global scripts for specific functions, such as backup running config scripts or password change scripts. For example, you could create a script for securely restoring the running config for Cisco devices by copying an existing secure restore running config script and modifying the script to map to a Cisco OID. As such, the script would serve as the new secure restore running config script for Cisco devices, backing up the running config for all devices that support the Cisco OID you specified in the script.
To access the Default Script Library:
On the WhatsConfigured console main menu, click Settings > System/Default Scripts.

WhatsConfigured v3.1 User Guide
141
By default, the library displays pre-configured scripts for all devices. By filtering by a specific device, or group of devices, you can see which default scripts can be used with that device or filter.
To configure new or existing scripts:
Note: The Edit and Delete, buttons are disabled for the pre-configured system scripts, as you cannot modify or remove system scripts.
§ Click Add to configure a new script.
§ Select a user script, then click Edit to change its configuration.
§ Select a script, then click Copy to make a duplicate of the selected script.
§ Select a user script, then click Delete to remove it from the library.
Configuring Default Scripts To add a new default script: 1 On the WhatsConfigured console main menu, click Settings > System/Default Scripts.
The Default Script Library appears. 2 Click Add. The New Configuration Script dialog appears. Use the dialog options to
modify the script as desired. 3 Enter a Description for the script. This description is displayed in the default script
library to differentiate the script from other scripts. 4 In the Keys section of the dialog, click Add to add a new OID or IP key and value. 5 Select a Script Type. Select to create one of the following:
§ BackupStartupConfig. Create a script to backup a device's startup config file.
§ BackupRunningConfig. Create a script to backup a device's running config file.
§ UploadStartupConfig. Create a script to upload a device's startup config file.
§ UploadRunningConfig. Create a script to upload a device's running config file.
§ TelnetPasswordAdd. Create a script to add a new Telnet password to a device.

WhatsConfigured v3.1 User Guide
142
§ TelnetPasswordEdit. Create a script to edit a device's Telnet password.
§ TelnePasswordDelete. Create a script to delete a device's Telnet password.
§ SshPasswordAdd. Create a script to add a new SSH password to a device.
§ SshPasswordEdit. Create a script to edit a device's SSH password.
§ SshPasswordDelete. Create a script to delete a device's SSH password.
§ SnmpPasswordAdd. Create a script to add a new SNMP password to a device.
§ SnmpPasswordEdit. Create a script to edit a device's SNMP password.
§ SnmpPasswordDelete. Create a script to delete a device's SNMP password.
§ CustomScript. Create a custom script type.
§ TftpBackupStartupConfig. Create a script to backup a device's startup config file using TFTP.
§ TftpBackupRunningConfig. Create a script to backup a device's running config file using TFTP.
§ UploadStartupConfig_REBOOT. Create a script to upload a startup config for a device in order to reboot that device.
§ SecureUploadStartupConfig. Create a script to upload a startup config file for a device using either SCP or SFCP.
§ SecureUploadRunningConfig. Create a script to upload a running config file for a device using either SCP or SFCP.
6 Enter the Script Text. 7 Click OK to save changes.
To modify an existing default script:
Note: You cannot modify default scripts provided by WhatsConfigured. You can only modify default scripts that you and other WhatsConfigured users have configured for use on your network.
1 On the WhatsConfigured console main menu, click Settings > System/Default Scripts. The Default Script Library appears.
2 Select an existing script, then click Edit. The Edit Configuration Script dialog appears. Use the dialog options to modify the script as desired.
3 Enter a Description for the script. This description is displayed in the default script library to differentiate the script from other scripts.
4 In the Keys section of the dialog, click Add to add a new OID or IP key and value.
- or -
Select an existing Key, then click Edit or Delete to modify or remove the key value.
§ Select a Script Type. For a complete listing of available script types, see the previous section, To add a new default script.
5 Enter or modify the Script Text as needed. 6 Click OK to save changes.
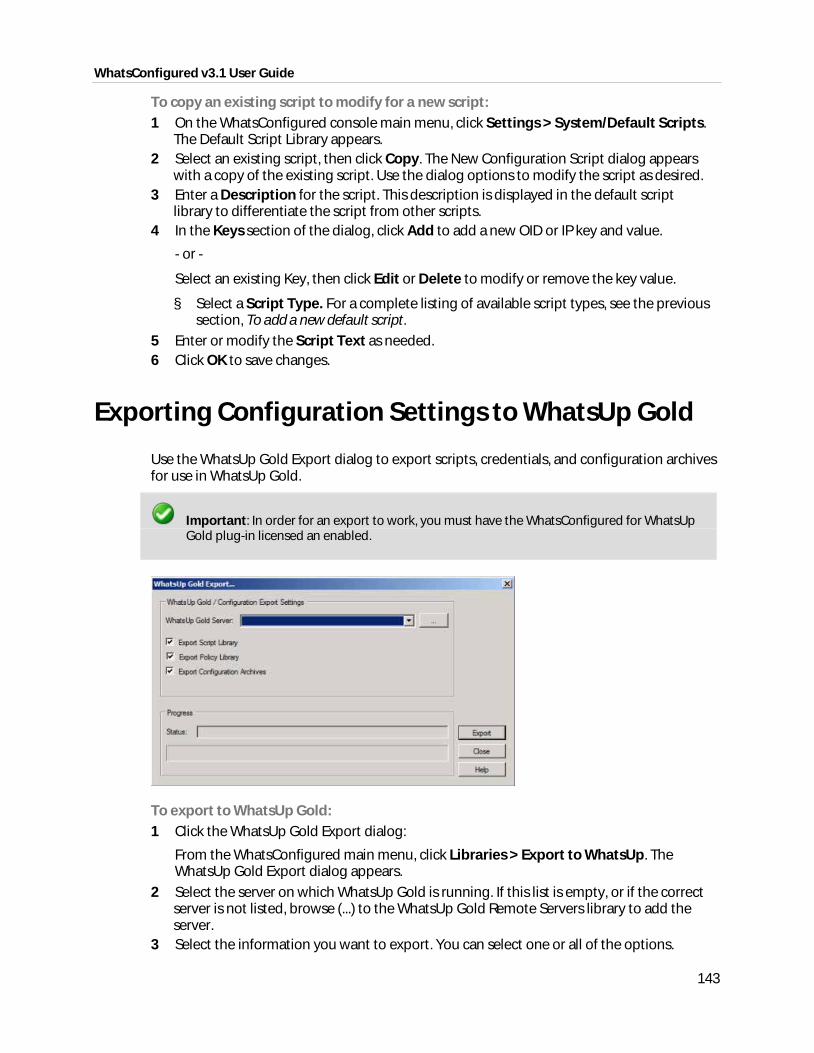
WhatsConfigured v3.1 User Guide
143
To copy an existing script to modify for a new script: 1 On the WhatsConfigured console main menu, click Settings > System/Default Scripts.
The Default Script Library appears. 2 Select an existing script, then click Copy. The New Configuration Script dialog appears
with a copy of the existing script. Use the dialog options to modify the script as desired. 3 Enter a Description for the script. This description is displayed in the default script
library to differentiate the script from other scripts. 4 In the Keys section of the dialog, click Add to add a new OID or IP key and value.
- or -
Select an existing Key, then click Edit or Delete to modify or remove the key value.
§ Select a Script Type. For a complete listing of available script types, see the previous section, To add a new default script.
5 Enter or modify the Script Text as needed. 6 Click OK to save changes.
Exporting Configuration Settings to WhatsUp Gold
Use the WhatsUp Gold Export dialog to export scripts, credentials, and configuration archives for use in WhatsUp Gold.
Important: In order for an export to work, you must have the WhatsConfigured for WhatsUp Gold plug-in licensed an enabled.
To export to WhatsUp Gold: 1 Click the WhatsUp Gold Export dialog:
From the WhatsConfigured main menu, click Libraries > Export to WhatsUp. The WhatsUp Gold Export dialog appears.
2 Select the server on which WhatsUp Gold is running. If this list is empty, or if the correct server is not listed, browse (...) to the WhatsUp Gold Remote Servers library to add the server.
3 Select the information you want to export. You can select one or all of the options.
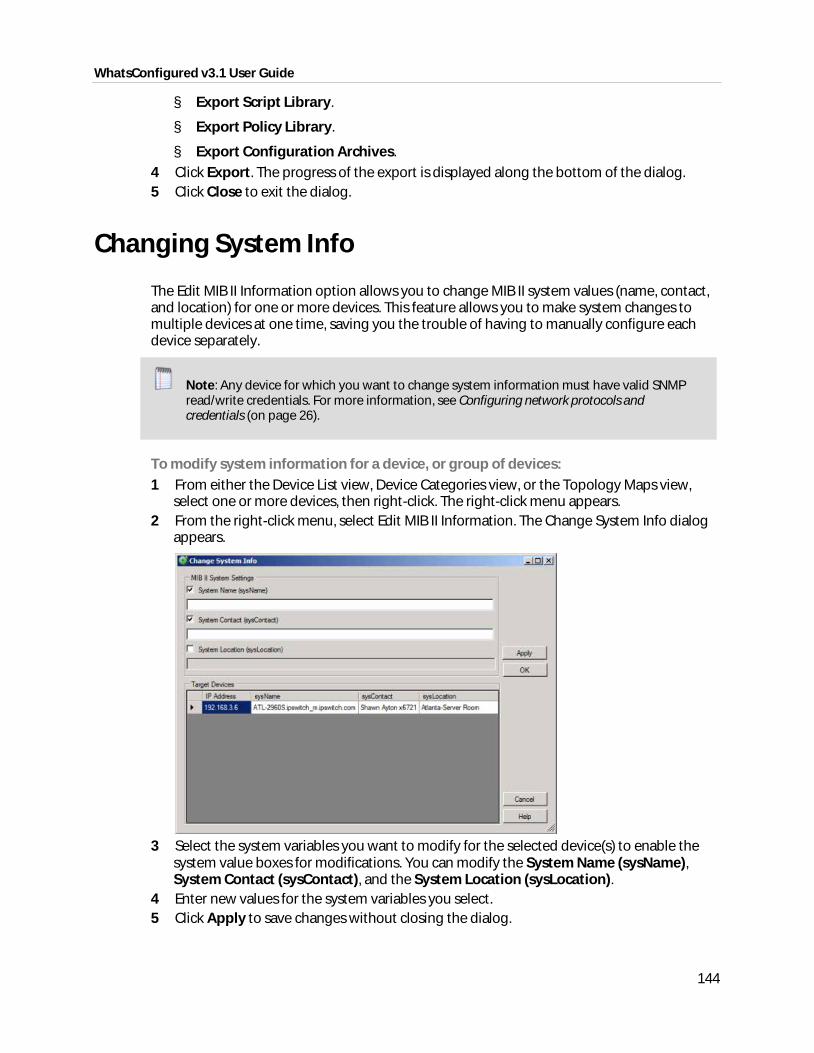
WhatsConfigured v3.1 User Guide
144
§ Export Script Library.
§ Export Policy Library.
§ Export Configuration Archives. 4 Click Export. The progress of the export is displayed along the bottom of the dialog. 5 Click Close to exit the dialog.
Changing System Info
The Edit MIB II Information option allows you to change MIB II system values (name, contact, and location) for one or more devices. This feature allows you to make system changes to multiple devices at one time, saving you the trouble of having to manually configure each device separately.
Note: Any device for which you want to change system information must have valid SNMP read/write credentials. For more information, see Configuring network protocols and credentials (on page 26).
To modify system information for a device, or group of devices: 1 From either the Device List view, Device Categories view, or the Topology Maps view,
select one or more devices, then right-click. The right-click menu appears. 2 From the right-click menu, select Edit MIB II Information. The Change System Info dialog
appears.
3 Select the system variables you want to modify for the selected device(s) to enable the
system value boxes for modifications. You can modify the System Name (sysName), System Contact (sysContact), and the System Location (sysLocation).
4 Enter new values for the system variables you select. 5 Click Apply to save changes without closing the dialog.
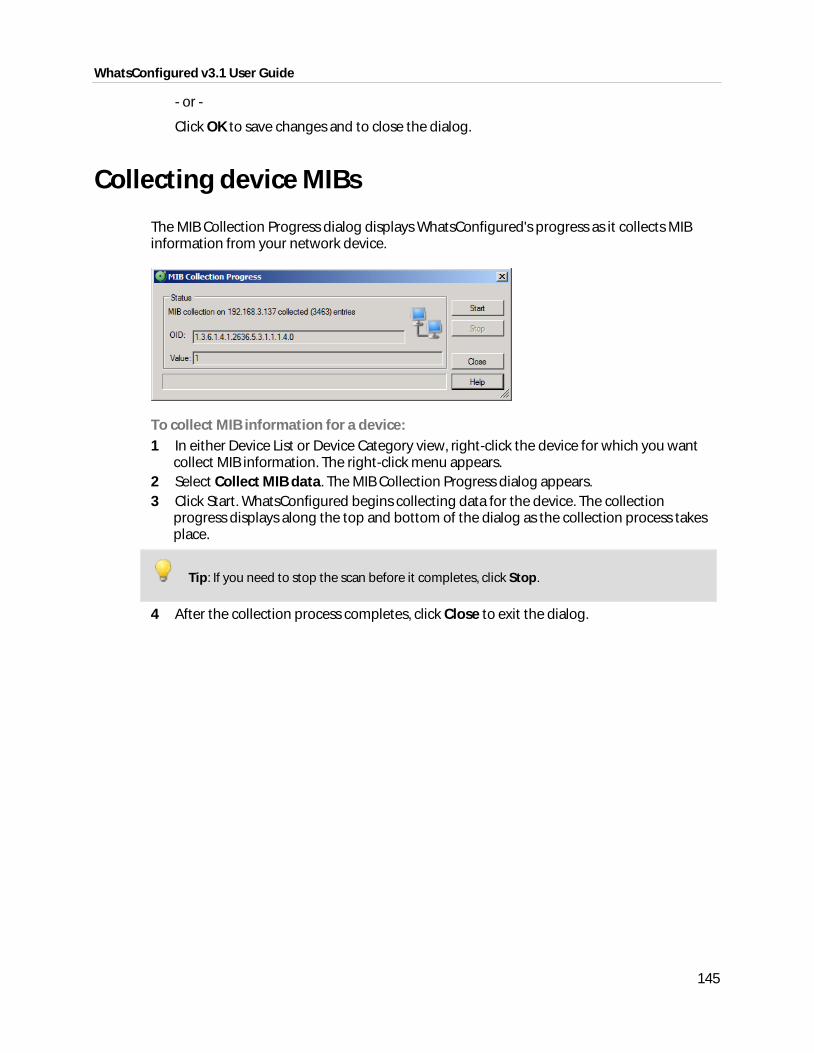
WhatsConfigured v3.1 User Guide
145
- or -
Click OK to save changes and to close the dialog.
Collecting device MIBs
The MIB Collection Progress dialog displays WhatsConfigured's progress as it collects MIB information from your network device.
To collect MIB information for a device: 1 In either Device List or Device Category view, right-click the device for which you want
collect MIB information. The right-click menu appears. 2 Select Collect MIB data. The MIB Collection Progress dialog appears. 3 Click Start. WhatsConfigured begins collecting data for the device. The collection
progress displays along the top and bottom of the dialog as the collection process takes place.
Tip: If you need to stop the scan before it completes, click Stop.
4 After the collection process completes, click Close to exit the dialog.

146
CHAPTER 13
Viewing WhatsConfigured Reports
In This Chapter
About WhatsConfigured reports ................................................................ 146
About the Asset/Inventory Report ............................................................. 146
Device Connectivity Report .......................................................................... 148
About the Configuration Task Log ............................................................. 148
About WhatsConfigured reports
WhatsConfigured provides the following reports:
§ Asset/Inventory report. Displays a list of all of the assets discovered by WhatsConfigured.
§ Device Connectivity report. Displays a list of the devices connected to each discovered network device.
§ Configuration Task Log. Displays log messages generated by WhatsConfigured tasks.
About the Asset/Inventory Report
The Asset/Inventory Report provides a view of the network assets discovered by WhatsConfigured as well as tools to sort and filter the assets that appear in the view. You can choose which columns you would like to display, sort on any column, and filter the report by device type. You can preview and print the report, save the report in a comma separated values (CSV) file, or view a device in the Device Viewer. When an asset acts as a chassis for other assets, you can either view just the chassis, or the chassis and all of its associated assets.
To view the report:
On the WhatsConfigured console, click Reports, then click the Asset/Inventory Report.
The following is a list of the information available about individual device assets in the report.
§ Device. Displays the device name.
§ Description. Displays the manufacturer's description of the physical component.
§ Category. Displays the category in which the device was placed during discovery.
§ Location. Displays the location of the device.

WhatsConfigured v3.1 User Guide
147
§ Contact. Displays the name of the contact associated with the device.
§ SNMP OID. Displays the SNMP OID of the device.
§ IP Address. Displays the IP address assigned to the device.
§ MAC Address. Displays the MAC address assigned to the device.
§ Model. Displays the model of the device.
§ Serial Number. Displays the serial number of the device.
§ Service Tag. Displays the service tag associated with the device.
§ HW Rev. Displays the hardware revision of the device.
§ SW Rev. Displays the software revision of the operating system used by the device.
§ FW Rev. Displays the firmware revision of the device.
§ Vendor. Displays the device vendor.
Configuring the Asset/Inventory report To view details on a device:
Select the device and click Details. A Device Viewer appears.
To filter the report:
Select the device type you would like to display from the Device Filter list. The report will refresh and display only devices of the selected type. You can also click the browse (...) button to open the Device Filters dialog and apply an existing device filter or create a new device filter. After you apply a device filter, it affects the devices included in the report.
To edit the columns that appear in the report:
Right-click on any column heading, the column selection list appears. In the column selection list, click on the columns you would like to display.
To sort on a column:
Left-click on the column heading. The direction of the arrow indicates the direction of the sort. If the arrow is pointing down, the column is sorted in descending order. If the arrow is pointing up, the column is sorted in ascending order.
To see a print preview, print or save the report to a CSV file:
§ Click Preview to see a print preview of the entire report.
§ Click Print to print the entire report.
§ Click Save to save the entire report to a CSV file.
To print preview, print or save a group of devices to a CSV file:
1 To create a group, click Ctrl and right-click to select individual devices to add to a group.
2 On the right-click menu:
§ Click Print Preview to preview the selected devices.
§ Click Print to print the selected devices

WhatsConfigured v3.1 User Guide
148
§ Click Save to CSV to save the selected devices to a CSV file.
To display components that are housed within another device:
Select Show all assets to display any components that are housed within another device.
About the Device Connectivity Report
The Device Connectivity Report provides a list of the devices connected to a network device as well as tools to sort and filter the assets that appear in the view. You can choose which columns you would like to display, sort on any column, and filter the report by device type. You can preview and print the report, save the report in a comma separated values (CSV) file, or view a device in the Device Viewer.
To access the report:
On the WhatsConfigured console, click Reports > Device Connectivity.
The report displays the following information for each device:
§ Device. Displays the name of the device.
§ Description. Displays the manufacturer's description of the device.
§ Category. Displays the assigned category based on functional characteristics.
§ Location. Displays the physical location of the device.
§ Contact. Displays the name of the contact associated with the device.
§ SNMP OID. Displays the SNMP Object ID assigned to the device.
§ IP Address. Displays the IP address of the connected device.
§ IF Name/Port. Displays the interface name and associated port.
§ IF Index. Displays the interface index.
§ Connected Device. Displays the hostname of the connected device.
§ Connected IP Address. Displays the IP address of the connected device.
About the Configuration Task Log
The Configuration Task Log displays log messages generated by WhatsConfigured tasks.
Report body § Date displays the date the task ran.
§ Task displays the name of the specific task.
§ Device displays the network device for which the task ran.
§ Result displays the outcome of the task.
§ Message displays the log message that generated according to the task's result.

WhatsConfigured v3.1 User Guide
149
Filtering the report Date range
Use the Start and End lists to specify a date range and time.
Task
Use the Task list to select a specific task for which to view report data. This list is populated with scheduled tasks currently configured in the Scheduled Task Library. You can choose to view report data for a specific task or for all tasks currently configured.
Device Filter
Use the Device Filter list to select a specific network device for which to view report data. You can view data for a specific device or for all devices.
Result
Use the Result list to select a specific result for which to view report data. You can choose to view data for a specific result or for all results.
Removing report entries
Select an entry, or multiple entries for which you no longer want displayed in the report, then click Delete to remove them from the report list.
Tip: Click Select All to select all report entries for removal.
Previewing and Printing the report To Preview the report before printing, click Preview.
To print the report, click Print.
Saving the report To save a .csv copy of the report, click Save.
View a device's details To view the Device Details for a device, select a device, then click Device.
WhatsConfigured v3.1 User Guide
150
About the Startup/Running configuration difference report
The Startup/Running configuration difference report gives a visual representation of the differences between Startup and Running configuration scripts for devices in a particular device group.
To view the report:
On the WhatsConfigured console, click Reports > Start/Run configuration difference.
Report body The report displays the following information for each device:
§ Result. Indicates the result of the comparison. The following table describes result icons.
Icon Description
The device does not have both a startup and a running configuration file to compare.
Differences exist between the startup and running configuration files.
No differences exist between the startup and running configuration files.
§ Device. The device name.
§ Startup Config. The specific archive Startup Config file.
§ Running Config. The specific archive Running Config file.
§ Status. The status of the detected changes.
Viewing details Click a column, then click Details to view the configuration archives for a file.
Capturing config files Click the Capture button to retrieve Startup and Running config files from devices.
Filtering the report Use the Device Filter list to select a specific network device for which to view report data. You can view data for a specific device, all network devices (routers, switches) or for all devices.
Previewing and Printing the report To Preview the report before printing, click Preview.
To print the report, click Print.

WhatsConfigured v3.1 User Guide
151
Saving the report To save a .csv copy of the report, click Save.

WhatsConfigured v3.1 User Guide
152
Copyright notice ©1991-2013 Ipswitch, Inc. All rights reserved.
This document, as well as the software described in it, is furnished under license and may be used or copied only in accordance with the terms of such license. Except as permitted by such license, no part of this publication may be reproduced, photocopied, stored on a retrieval system, or transmitted, in any form or by any means, electronic, mechanical, recording, or otherwise, without the expressed prior written consent of Ipswitch, Inc.
The content of this document is furnished for informational use only, is subject to change without notice, and should not be construed as a commitment by Ipswitch, Inc. While every effort has been made to assure the accuracy of the information contained herein, Ipswitch, Inc. assumes no responsibility for errors or omissions. Ipswitch, Inc., also assumes no liability for damages resulting from the use of the information contained in this document.
IMail, the IMail logo, WhatsUp, the WhatsUp Gold logo, WS_FTP, the WS_FTP logos, Ipswitch, and the Ipswitch logo are trademarks of Ipswitch, Inc. Portions of Telerik Extensions for ASP.NET MVC ©2002-2012 by Telerik Corporation. All rights reserved. Other products and their brands or company names, are or may be trademarks or registered trademarks, and are the property of their respective companies.
This document was published on Tuesday, April 02, 2013 at 10:10.