window and door flashing: code requirements and …...3 pan flashing. pan flashing should extend up...
TRANSCRIPT

PREPARED BY
Window and Door Flashing: Code Requirements and Best Practices
Flashing at exterior windows and doors is critical for shedding rain water to ensure a dry and durable
building. Missing or inadequately-installed flashing can lead to water intrusion, moisture damage to
building materials, and indoor air quality issues. Resulting homeowner call-backs may be costly,
requiring removal of finishes and even replacement of structural elements.
This TechNote provides an overview of building code requirements and best practices for flashing
at window and door frames. The focus is on common flashing applications for new construction.
Although each window/door manufacturer may have its own set of flashing instructions, the
strategies and general principles apply to the vast majority of flashing situations.
There are two key principles for effective flashing at windows and doors to allow water to drain
down the face of the wall and away from the building:
Integrate flashing with the water-resistive barrier (WRB), e.g., house wrap.
Install membranes shingle-fashion where the top layer of the WRB or flashing laps over the
bottom layer to prevent water draining behind the bottom layer.
FLASHING 101
Flashing detailing depends on the selection of (1) window type (flanged or non-flanged) and door
type (with or without integral molding); and (2) window/door installation sequence (windows/doors
installed before or after the WRB). The following graphics show the essential steps for installing
window or door flashing; these align with installation guidelines from most product manufacturers.
Flashing. Water-resistant product that prevents water penetration at the gaps between the window/door frame and the rough opening.
Jamb Flashing and Head Flashing. Flashing installed at the sides (jambs) and top (head) of the window/door.
Sill or Pan Flashing. Flashing installed at the base of the rough opening to allow water which may enter through or around the window/door to drain out.
Water-Resistive Barrier (WRB). Material providing a drainage surface to protect the wall assembly from rain water. Also referred to as a Weather-Resistant Barrier.
Step 1. Prepare the WRB at the rough opening: cut house wrap at red line (see inset), fold in at jambs, and fold up at head.
Step 2. Install pan flashing: cover the rough sill and extend onto the face of the wall/WRB.
Step 3. Install the window: according to manufacturer’s instructions.
Step 4. Install the jamb flashing: over window flange and pan flashing and extend above the head flange.
Step 5. Install the head flashing: over and beyond the jamb flashing (and over the drip cap if installed).
Step 6. Integrate the WRB: fold down the house wrap flap and tape diagonal seams with construction tape.
Terminology
Figure 1. Example flashing steps for a flanged window installed after house wrap. See Best Practices for additional details.
1
2
3
4
5 6
TechNote
SEPTEMBER 2015

2 TechNotes – A builder’s source for construction information
Windows, and sliding glass doors, are generally
flanged (finned) or non-flanged (block frame).
Entry doors are generally non-flanged. Non-
flanged windows and doors are available with
factory-applied trim (integral brick mold).
Windows and doors are installed either before
the WRB or after the WRB. Manufacturers
commonly require a caulk/sealant at the top
and side flanges, but not at the bottom flange
(to allow drainage). A caulk/sealant may not be
required where self-adhesive flashing is
installed.
Sequence. The installation sequence of flashing
and WRB products can depend on builder
preferences and subcontractor (trade)
responsibilities. For example, if the framer
installs windows during framing, and the siding
contractor installs the house wrap, the windows
are installed before house wrap and the trades
must coordinate to ensure proper flashing.
Flashing can be flexible or rigid. Flexible f
lashing can be mechanically fastened (e.g., Kraft
paper or polyethylene laminated products) or
self-adhesive. Self-adhesive flashing (common
for jamb and head flashing) is commonly availa-
ble in rolls of 4, 6, and 9 in. (or greater) widths,
and with release paper backing (peel and stick).
Self-adhesive flashing tape should not be
confused with construction tape (also referred
to as builder tape or house wrap tape). Self-
adhesive flashing can also be formable/
stretchable to allow installation around corners
(common for pan flashing and curved windows).
Pan Flashing can be rigid metal or plastic (one
piece or multiple pieces), flexible self-adhesive
membrane, a combination of rigid and flexible,
or liquid-applied. Formable self-adhesive pan
flashing is commonly 6 in. wide for 2x4 frame
walls and 9 in. wide for 2x6 walls. Also referred
to as sill flashing, although some pan flashing
products require separate sill flashing.
WRB: Common products include house wraps,
#15 asphalt felt, and Grade D building paper.
Rigid foam insulation and drainable sheathing/
tape systems (ZIP System) have become more
common. Liquid-applied and self-adhesive
membranes are not common.
Compatibility. Make sure all flashing, WRB,
caulk/sealant, and window/door products are
compatible (e.g., some window manufacturers
may require a 100% silicone caulk; some asphalt-
based self-adhesive flashing may damage some
types of vinyl). Further, a spray adhesive primer
may be recommended for self-adhesive flashing
for some substrates and during adverse weather
or cold temperatures.
Figure 2. Example alternative preparation of house wrap at rough opening for extreme
wind/rain (coastal) conditions
Code Considerations
Design Considerations
The International Residential Code (IRC)
establishes minimum flashing requirements, but
does not provide detailed installation guidance.
Section R703.4 of the 2015 IRC requires flashing
to be in accordance with the following:
Flashing shall be applied shingle-fashion in a
manner to prevent water intrusion into the
wall assembly and building.
Flashing at exterior window/door openings
shall extend to the surface of the exterior wall
finish (for face-sealed wall assemblies such as
stucco on solid masonry) or to the water-
resistive barrier (commonly behind siding/
cladding).
Flashing at exterior window/door openings
shall be installed according to the window/
door manufacturer installation instructions or
those of a flashing manufacturer. Where not
addressed by the manufacturer, pan flashing
shall be installed at the sill of exterior window
and door openings, be sealed or sloped to
direct water out, and shall incorporate
flashing or protection at the head and sides.
Flashing shall be installed continuously above
all projecting wood trim.
Products used as flashing must comply with
specific standards: self-adhered membranes
with AAMA 711; fluid-applied membranes
with AAMA 714; mechanically attached flexi-
ble flashing with AAMA 712.
This is one alternative method of pre-
paring the house wrap at the rough
opening for extreme conditions:
Cut the house wrap at the red line (no
jamb flaps) and install pan flashing
Install self-adhesive flashing onto
the sides/jambs and face of the
exterior wall—overlap the pan
flashing by at least 2 in.
Apply sealant to the inside-top
corners of the rough opening (at
the header)
Then install the window and
flashing in the same manner as
shown in Figure 1, steps 3 through 6
3
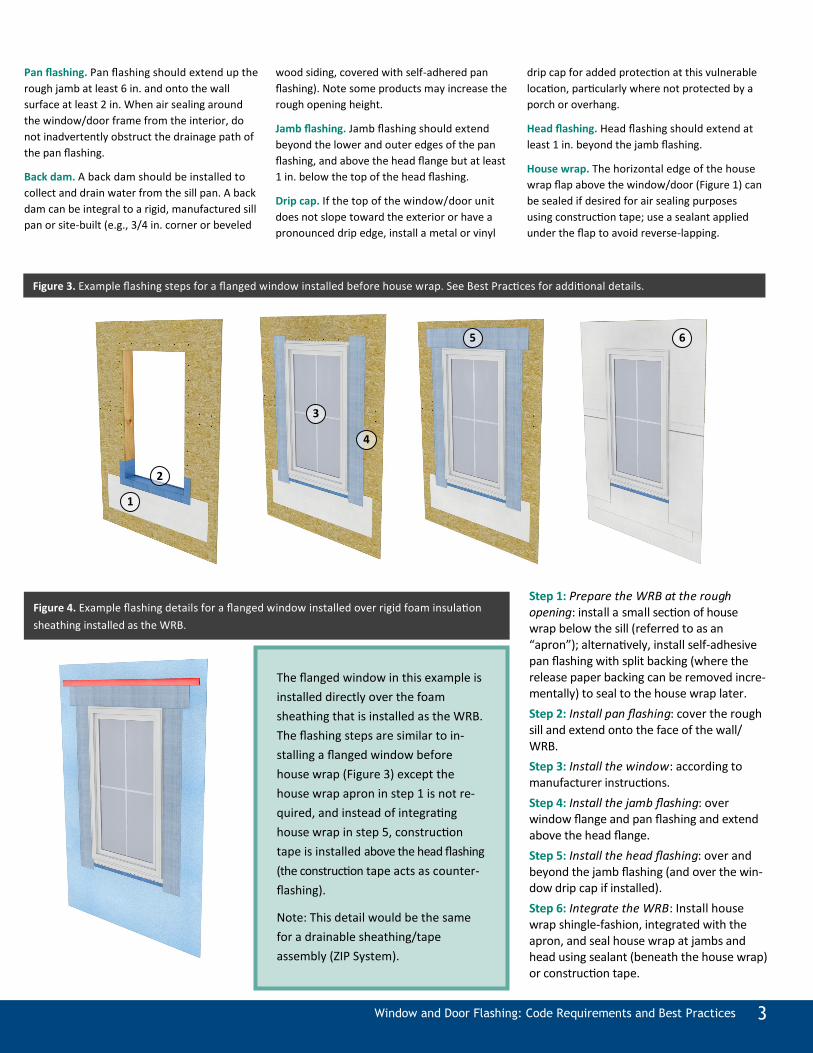
Pan flashing. Pan flashing should extend up the
rough jamb at least 6 in. and onto the wall
surface at least 2 in. When air sealing around
the window/door frame from the interior, do
not inadvertently obstruct the drainage path of
the pan flashing.
Back dam. A back dam should be installed to
collect and drain water from the sill pan. A back
dam can be integral to a rigid, manufactured sill
pan or site-built (e.g., 3/4 in. corner or beveled
wood siding, covered with self-adhered pan
flashing). Note some products may increase the
rough opening height.
Jamb flashing. Jamb flashing should extend
beyond the lower and outer edges of the pan
flashing, and above the head flange but at least
1 in. below the top of the head flashing.
Drip cap. If the top of the window/door unit
does not slope toward the exterior or have a
pronounced drip edge, install a metal or vinyl
drip cap for added protection at this vulnerable
location, particularly where not protected by a
porch or overhang.
Head flashing. Head flashing should extend at
least 1 in. beyond the jamb flashing.
House wrap. The horizontal edge of the house
wrap flap above the window/door (Figure 1) can
be sealed if desired for air sealing purposes
using construction tape; use a sealant applied
under the flap to avoid reverse-lapping.
Window and Door Flashing: Code Requirements and Best Practices
Figure 3. Example flashing steps for a flanged window installed before house wrap. See Best Practices for additional details.
Figure 4. Example flashing details for a flanged window installed over rigid foam insulation
sheathing installed as the WRB.
The flanged window in this example is
installed directly over the foam
sheathing that is installed as the WRB.
The flashing steps are similar to in-
stalling a flanged window before
house wrap (Figure 3) except the
house wrap apron in step 1 is not re-
quired, and instead of integrating
house wrap in step 5, construction
tape is installed above the head flashing
(the construction tape acts as counter-
flashing).
Note: This detail would be the same
for a drainable sheathing/tape
assembly (ZIP System).
Step 1: Prepare the WRB at the rough opening: install a small section of house wrap below the sill (referred to as an “apron”); alternatively, install self-adhesive pan flashing with split backing (where the release paper backing can be removed incre-mentally) to seal to the house wrap later.
Step 2: Install pan flashing: cover the rough sill and extend onto the face of the wall/WRB.
Step 3: Install the window: according to manufacturer instructions.
Step 4: Install the jamb flashing: over window flange and pan flashing and extend above the head flange.
Step 5: Install the head flashing: over and beyond the jamb flashing (and over the win-dow drip cap if installed).
Step 6: Integrate the WRB: Install house wrap shingle-fashion, integrated with the apron, and seal house wrap at jambs and head using sealant (beneath the house wrap) or construction tape.
1
2
3
4
5 6

4 TechNotes – A builder’s source for construction information
Design Phase
Ensure that flashing is integrated shingle-fashion with the WRB, window/
door frames, and architectural elements (decorative trim), as required.
Check that caulks, sealants, and adhesives are compatible with the
WRB and windows and doors.
Show all flashing details and installation sequences on plans,
specifications, and scopes of work for subcontractors.
Construction Phase
Inspect all flashing components during construction for proper
shingling and integration with the WRB.
Don’t rely on sealants or caulks as a substitute for flashing.
Install all products in accordance with manufacturer’s specifications,
local building codes, or (where applicable) specifications established
by the licensed design professional.
Recommendations
Resources
Foam. Continuous exterior rigid foam insulation can be installed before the WRB, over the WRB, or as the WRB. Different details may be re-
quired for siding/cladding and at windows/doors to accommodate the additional thickness of the exterior foam sheathing.
Flanged windows are commonly installed directly over the exterior foam sheathing where the foam sheathing does not exceed 1.5 in. thick. Some
window manufacturers do not allow fastening the window flanges through the foam unless the window is also supported by approved jamb clips or
screws through the window frame. Some window manufacturers may require installing the window with the entire flange in direct contact with
wood framing— this would require extending/adding framing at the perimeter of the rough opening to match the thickness of the foam sheathing.
Figure 5. Example flashing steps for an entry door with integral brick mold installed after house wrap. See Best Practices for addition al details.
Alternative to sealant at the brick mold: some manufacturers offer a double-sided, self-adhesive flashing product specifically designed for non-flanged windows and doors with and without brick mold. The head and jamb flashing are adhered to the door frame before the door is installed. After the door is installed, the head and jamb flashing are adhered to the WRB.
Step 1. Prepare the WRB at the rough opening: cut and fold house wrap (similar to Figure 1).
Step 2. Install pan flashing: for a slab or foundation wall application, align the front edge for a continuous slab or foundation wall application, or fold down for a step down slab; it is important to integrate a back dam with the finish flooring/trim.
Step 3. Install the door: where sealant is used under the door threshold, ensure that water is allowed to drain out of the pan flashing. For this example, apply sealant at the WRB/brick mold interface at the top and sides (shown in red). Install a drip cap of metal, plastic, or other approved material (shown as green) above
the brick mold (as required by the door manufacturer, particularly where not protected by a porch or overhang) in a bead of sealant and secure to the wall.
Step 4. For this example, the sealant acts as the jamb flashing. After installing the door, apply additional sealant where the brick mold meets the house wrap.
Step 5. Install the head flashing: over the vertical leg of the drip cap.
Step 6. Integrate the WRB: fold down the house wrap flap and tape diagonal seams with construction tape.
ASTM E 2112 – 07: Standard practice for installation of exterior windows,
doors, and skylights.
FMA/AAMA 100-12 (Methods A, B, and C): Standard Practice for the
Installation of Windows with Flanges or Mounting Fins in Wood Frame
Construction for Extreme Wind/Water Conditions.
FMA/AAMA/WDMA 300-12: Standard Practice for the Installation of Exterior
Doors in Wood Frame Construction for Extreme Wind/Water Conditions
Exposure. Fenestration Manufacturers Association (FMA), American
Architectural Manufacturers Association (AAMA), and Window and Door
Manufacturers Association (WDMA).
1
2
3 4
5 6
3