wireless keyboard & optical mouse - · pdf fileintroduction congratulations and thank you...
TRANSCRIPT

User Manual
Wireless Keyboard & Optical Mouse

Table of Contents
Introduction........................................................................................ 1
Software Compatibility....................................................................... 1
Product Features.............................................................................. 2
Quick Installation Setup for PS/2 Connections (PC-only) ................. 5
Quick Installation Setup for USB Connections (PC or Mac computers) ... 7
Software Driver Installation for Windows 98, Me, 2000, and XP....... 9
About your Belkin Software ............................................................. 10Function Setting .......................................................................11 Display Setting ........................................................................ 13Battery Power.......................................................................... 15 Mouse Properties Manager ..................................................... 16
Synchonizing the Receiver with the Keyboard and Mouse ............. 21
Switching Channels ......................................................................... 23
Troubleshooting............................................................................... 24
Information ...................................................................................... 26

Introduction
Congratulations and thank you for purchasing the Wireless Keyboard and Optical Mouse bundle by Belkin. We appreciate your business and are sure you will enjoy years of reliable use with these high-quality input devices.
Although the F8E829-BNDL will function out-of-the-box as a Human Interface Device (HID), for advanced programmability and functionality we highly recommend the use of the F8E829-BNDL driver. Installing this software will give you added flexibility and allow you to customize your settings and reassign keys to fit your preference.
Windows® OS for USB interface: Windows XP, Me, 2000, 98 SE
Windows OS for PS/2 interface: Windows XP, Me, 2000, 98 SE
Mac OS® for USB interface: Mac OS® 9.x and higher
1
Software Compatibility

Product Features
Power Management keys require no software to get this feature to work.
Important: Power Management keys are controlled by your system. If you are experiencing difficulty with their functioning, please contact your computer manufacturer for information on compatibility and functionality of Power Management keys on your system.
Note: If your computer supports Power Management hot keys, we recommend you connect the Keyboard directly to your PC’s PS/2 port. If you choose to use USB, connect to an onboard USB port.
Software installation is required to enable functioning of the following USB-PS/2 keyboard hot keys:
Home/Favorites: Hitting this hot key once directs your web browser to your default home page; if you hit the key again, it will open up your Favorites folder.
E-mail: Opens your default e-mail program, such as Microsoft Exchange or Outlook. Note: If you have a web-based e-mail account, this feature does not apply.
Search: Opens up your active search function.
My Documents: Opens your “My Documents” folder.
My Computer: Opens your “My Computer” folder.
Desktop: Minimizes all open windows.
Calendar: Operates as a link to Microsoft Outlook calendar.
2

Product Features cont.3
F-Lock: Activates MS Office hot keys.
My Music: Opens your “My Music” folder. Note: This feature does not work in Windows 98 SE.
Media: Opens your default Media Player for music only.
Back: In Windows Media Player, moves you back one track or to the beginning of the current track.
Forward: In Windows Media Player, moves selection forward one track.
Play/Pause: In Windows Media Player, starts or pauses music.
Stop: In Windows Media Player, stops music.
Volume Up/Down/Mute: Adjusts the main volume of your computer. Note: Your Media Player may have a separate volume control.

Product Features cont.4
Office Hot Key Features: With your F-lock key on, F1 through F12 turn into Office hot keys. F1 = New F2 = Open F3 = Save F4 = Close F5 = Print F6 = Undo F7 = Redo F8 = Help F9 = Reply F10 = Forward F11 = Send F12 = Spell Check

Quick InstallationSetup for PS/2 Connections (PC-only)
1. Be sure that your computer is powered off.
2. Connect the receiver to your computer’s PS/2 ports. The receiver has a two-head connector for the Keyboard and Mouse connections (purple is for the Keyboard and the USB connection; the green adapter is for the Mouse). There is also a diagram on the top connector for identification. Your computer will either have a matching color scheme or an illustration next to the port, or both.
3. Install the batteries into your Keyboard and Mouse. Please make sure you follow the diagram on the inside of the battery compartment to ensure that you install them correctly.
5

Quick InstallationSetup for PS/2 Connections (PC-only) cont.
4. Power on your computer.
5. The receiver automatically scans for and synchronizes the Keyboard and Mouse when you power on the computer. Your Keyboard and Mouse should now be functioning.
6. If synchronization does not occur automatically, please refer to the information on “Synchronizing” in the Troubleshooting section at the end of this manual.
6
7Quick InstallationSetup for USB Connections (PC or Mac® computers)
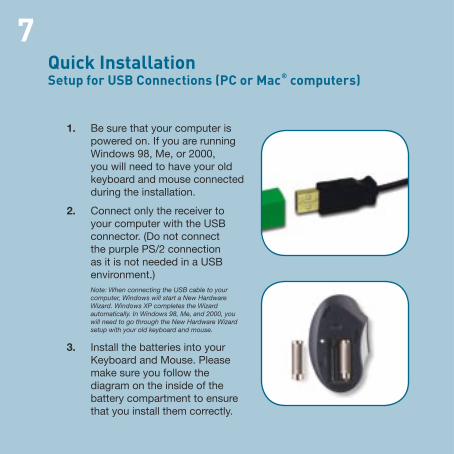
1. Be sure that your computer is powered on. If you are running Windows 98, Me, or 2000, you will need to have your old keyboard and mouse connected during the installation.
2. Connect only the receiver to your computer with the USB connector. (Do not connect the purple PS/2 connection as it is not needed in a USB environment.) Note: When connecting the USB cable to your computer, Windows will start a New Hardware Wizard. Windows XP completes the Wizard automatically. In Windows 98, Me, and 2000, you will need to go through the New Hardware Wizard setup with your old keyboard and mouse.
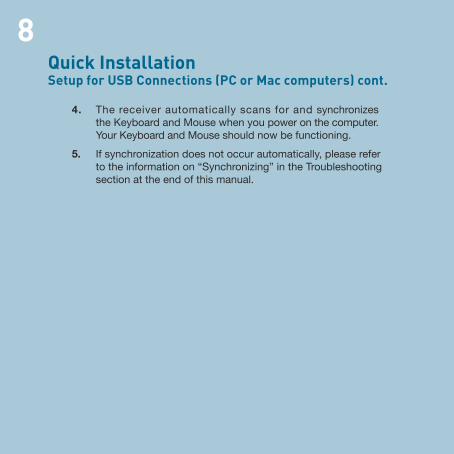
3. Install the batteries into your Keyboard and Mouse. Please make sure you follow the diagram on the inside of the battery compartment to ensure that you install them correctly.
8Quick InstallationSetup for USB Connections (PC or Mac computers) cont.
4. The receiver automatically scans for and synchronizes the Keyboard and Mouse when you power on the computer. Your Keyboard and Mouse should now be functioning.
5. If synchronization does not occur automatically, please refer to the information on “Synchronizing” in the Troubleshooting section at the end of this manual.

9Software Driver InstallationFor Windows 98, Me, 2000, and XP
Note: The Keyboard and Mouse should now be functioning for basic input. If this is not the case, carefuly repeat the Quick Installation Setup procedures in the previous pages. When the Keyboard and Mouse are functioning for basic input, install the software as described in the section following.
Note: If you have previously installed any keyboard or mouse driver on your computer, you must uninstall it/them before proceeding with this installation procedure.
1. Insert your F8E829-BNDL software into your CD/DVD driver on your computer.
2. The installation wizard window should appear and installation should begin automatically. If it does not, click the “Start” button and choose “Run”. Click “Browse” and find your CD drive. Select “setup.exe” and click “OK”.
3. Follow the on-screen instructions to install your software.
4. When prompted, click “Finish” and restart your computer. This completes the installation process.
10About your Belkin Software
The F8E829-BNDL software provides a suite of tools that will enhance your Belkin Wireless Keyboard and Optical Mouse experience. It allows you to customize your hot keys and gives you quick access to your media keys, as well as other short cuts.
Three Tabs Comprise your Wireless Keyboard Configuration:
• Function Setting• Display Setting• Battery Power

11About your Belkin SoftwareFunction Setting
1
2
4
5
6
3
12About your Belkin SoftwareFunction Setting cont.
1. Click on the “Select a Hot Key” drop-down list to choose programmable hot keys including WWW, E-mail, Search, My Documents, My Computer, To Desktop, and Calendar.
2. “Hot Key Label” allows you to assign a name for your hot key sequence.
3. “Preset Function” provides you a selection of functions for your hot keys.
4. “Favorite Website” lets you link a hot key to a specific website.
5. “Shortcut” allows you to define a shortcut using your Browse button to access the application file or document.
6. “Menu” displays a menu for the assigned hot key.

13About your Belkin SoftwareDisplay Setting
1
2
14About your Belkin SoftwareDisplay Setting cont.
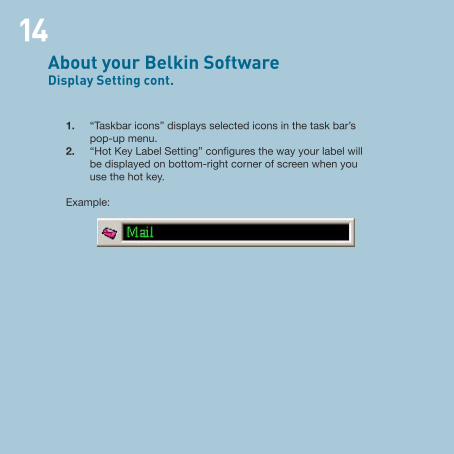
1. “Taskbar icons” displays selected icons in the task bar’s pop-up menu.
2. “Hot Key Label Setting” configures the way your label will be displayed on bottom-right corner of screen when you use the hot key.
Example:

1. “Keyboard Battery Power” shows battery power status.
15About your Belkin SoftwareBattery Power
1

16About your Belkin SoftwareMouse Properties Manager
Six Tabs Comprise your Mouse Properties Manager:
• Buttons• Pointers• Pointer Options• Magic Wheel• Scroll Speed• Battery Power

Magic Wheel
17About your Belkin SoftwareMouse Properties Manager cont.
1
2

18About your Belkin SoftwareMouse Properties Manager cont.
1. “Select a Button” is a drop-down list for button assignment. a) Button 1 b) Button 2 c) Button 3
2. “Function Assignment” provides five modes of functioning for the Mouse. (Refer to image on page 17)a) Auto Scrollb) Button Functionc) Speed Wheeld) Universal Scrolle) Zoom
This interface will appear when you assign the button function as “Magic Wheel”.

19About your Belkin SoftwareMouse Properties Manager cont.
Magic Wheel Performs 10 Functions:
Fixed functions: 5 fixed functions for Internet browser:Home PageStopRefreshBackForward
Programmable functions: 5 programmable functions for you to define. Right-click the button of the Magic Wheel User Interface to bring up the following setting dialog box.

20About your Belkin SoftwareMouse Properties Manager cont.
Internet Function: A drop-down menu for you to select the functions Favorites or Search.
My Web Site: You can type in your favorite website and launch it with the default Internet browser.
ShortCut: By clicking the Browse button, you can select either a document file or an execution file to be launched by the shortcut button.

Synchronizingthe Receiver with the Keyboard and Mouse
21
1. Press the connect button on top of the receiver, then press the button on the bottom of the Keyboard within 10 seconds.

2. Press the connect button on top of the receiver, then press the connect button on the bottom side of the Mouse within 10 seconds.
3. If the Keyboard did not connect, please repeat step 1.
4. If the Mouse did not connect, please repeat step 2.
Synchronizingthe Receiver with the Keyboard and Mouse cont.
22

Switching Channels23
If interference occurs while using the Keyboard and/or Mouse, switch channels by following the steps below:
Keyboard: Press the button on the bottom of the Keyboard to switch channels.
Mouse: Press the connect button on the bottom side of the Mouse to switch channels.
Troubleshooting24
If the Keyboard and/or Mouse is/are not working after installation:
• Be sure the receiver cables are plugged into either the computer’s PS/2 ports or a USB port. If you are connecting it via PS/2, make sure that both plugs are being used (purple keyboard connector and the USB connection with the green PS/2 adapter). If you are connecting via USB, make sure that you only connect the USB connector.
• For optimal performance, place the receiver at least eight inches (20 centimeters) away from the computer monitor, the computer, any external storage devices, or other electrical devices.
• Make sure you have properly installed the batteries. Check to make sure the batteries you have installed are not dead (you can do this by installing them into another device).
• You may have other system devices that are conflicting with the Mouse and/or the Keyboard. Check the IRQ/address setting of these devices for conflicts and change the settings as required. Please refer to your computer documentation or computer manufacturer’s technical support for assistance in making these changes.
Troubleshooting cont.25
• Be sure you have properly established communication and synchronization between the receiver and the Mouse and Keyboard.
• Be sure that the LED on the receiver flashes when you push any of the Keyboard keys or Mouse buttons, or move the Mouse. If the LED light does not flash, try re-syncing the Keyboard and Mouse to the receiver. (If you have installed the software, at this point, status information will appear on-screen.)
• If the Keyboard does not register keystrokes, replace batteries.
• If the Mouse pointer becomes choppy on-screen, replace batteries. Be sure that the Mouse is not on a reflecting surface (such as a transparent, mirrored, or glossy table). If this is the case, place an opaque or textured material—or a mouse pad—underneath the Mouse. This will allow the optical mechanism to work accurately.

FCC StatementDECLARATION OF CONFORMITY WITH FCC RULES FOR ELECTROMAGNETIC COMPATIBILITYWe, Belkin Corporation, of 501 West Walnut Street, Compton, CA 90220, declare under our sole responsibility that the product: F8E829-BNDLto which this declaration relates:Complies with Part 15 of the FCC Rules. Operation is subject to the following two conditions: (1) this device may not cause harmful interference, and (2) this device must accept any interference received, including interference that may cause undesired operation.
CE Declaration of ConformityWe, Belkin Corporation, declare under our sole responsibility that the F8E829-BNDL, to which this declaration relates, is in conformity with Generic Emissions Standard EN 55022:1998 Class B, EN50081-1 and with Generic Immunity Standard EN50082-1 1992. Belkin Corporation Limited Lifetime Product WarrantyBelkin Corporation warrants this product against defects in materials and workmanship for its lifetime. If a defect is discovered, Belkin will, at its option, repair or replace the product at no charge provided it is returned during the warranty period, with transportation charges prepaid, to the authorized Belkin dealer from whom you purchased the product. Proof of purchase may be required. This warranty does not apply if the product has been damaged by accident, abuse, misuse, or misapplication; if the product has been modified without the written permission of Belkin; or if any Belkin serial number has been removed or defaced.THE WARRANTY AND REMEDIES SET FORTH ABOVE ARE EXCLUSIVE IN LIEU OF ALL OTHERS, WHETHER ORAL OR WRITTEN, EXPRESSED OR IMPLIED. BELKIN SPECIFICALLY DISCLAIMS ANY AND ALL IMPLIED WARRANTIES, INCLUDING, WITHOUT LIMITATION, WARRANTIES OF MERCHANTABILITY AND FITNESS FOR A PARTICULAR PURPOSE.No Belkin dealer, agent, or employee is authorized to make any modification, extension, or addition to this warranty.BELKIN IS NOT RESPONSIBLE FOR SPECIAL, INCIDENTAL, OR CONSEQUENTIAL DAMAGES RESULTING FROM ANY BREACH OF WARRANTY, OR UNDER ANY OTHER LEGAL THEORY, INCLUDING BUT NOT LIMITED TO LOST PROFITS, DOWNTIME, GOODWILL, DAMAGE TO OR REPROGRAMMING OR REPRODUCING ANY PROGRAM OR DATA STORED IN OR USED WITH BELKIN PRODUCTS.
Information26

Belkin Corporation310.898.1100 Compton • CA • USA
Belkin Components, Ltd.+44 (0) 1933 35 2000 Rushden • United Kingdom
Belkin, Ltd.+61 (0) 2 4372 8600West Gosford • Australia
Belkin Components B.V.+31 (0) 20 654 7300Schiphol-Rijk • The Netherlands
© 2003 Belkin Corporation. All rights reserved. All trade names are registered trademarks of respective manufacturers listed. Mac and Mac OS are trademarks of Apple Computer, Inc., registered in the U.S. and other countries. P74444
belkin.com