wireless network module ep8790net
TRANSCRIPT

3M Visual Systems Department Printed in U.S.A. 6801 River Place Boulevard © 3M 2003. All Rights Reserved. Austin, Texas 78726-9000 78-6970-9173-0 Rev. A
Wireless Network Module EP8790NET Operator’s Guide For: 3M™ Multimedia Projector MP8790

Thank you for purchasing the EP8790NET wireless network module.
Please read this manual thoroughly to ensure proper and safe use of your new wireless networkmodule. Keep this manual in a safe place for future reference.
SummaryThe EP8790NET wireless network module attachesto 3M Multimedia Projector MP8790 and enablesusers to make presentations using multiplePCs in a cable-free environment.
Features(1) Cable-Free Presentations
Wireless presentations made possible byuse of a wireless LAN card.
(2) Multiple ScreensImages from up to four PCs can bepresented simultaneously via the sameprojector.
(3) Stand Alone PresentationsNow you can leave your PC behind and runstand alone presentations with just amemory card (sold separately).
(4) Remote Control via Your WebBrowserNow you can use your Web browser toremote control the projector.
Contents<Introduction>
Functions ....................................................2EP8790NET Components ............................4Attaching the EP8790NET Module to the Projector ....5Installing the Software ................................9Network Settings........................................11
<Operations>Wireless Presentations
(Live Mode) ..........15Presentation Playback
(Playback Mode) ..........19Stand Alone Presentations
(PC-less Presentation Mode) ..........19Using ImageViewer ..................................20 Using FileViewer ........................................23Controlling the Projector via Your Web Browser ....25Configuration Utility ..................................29Changing Network Settings Directly fromthe EP8790NET Module ............................32
<Additional Items>Troubleshooting ........................................35Specifications ............................................37
TRADEMARK ACKNOWLEDGEMENT :• VGA and XGA are registered trademarks of
the International Business Machines Corporation.
• Windows is a registered trademark of Microsoft
Corporation.• All other trademarks are the property of their
respective owners.
• The information in this manual is subject to change without notice.• The manufacturer assumes no responsibility for any errors that may appear in this manual • The reproduction, transmission or use of this document or contents is not permitted without express written authority.
NOTE
3M™ Wireless Network Module EP8790NETOperator's Guide
© 3M 2003. All Rights Reserved. 3M™ Multimedia Projector MP8790
2
Introduction
FunctionsThe EP8790NET wireless network module is equipped with the latest network functions. You can usethe EP8790NET module in combination with 3M MP8790 Multimedia Projector to make presentations that draw on the power of your network. In addition, the wireless LAN card (*1) allows you to connect the EP8790NET module to your network without the need to connect any annoying LAN cables.
(*1): Please use the wireless LAN card that came with your EP8790NET.
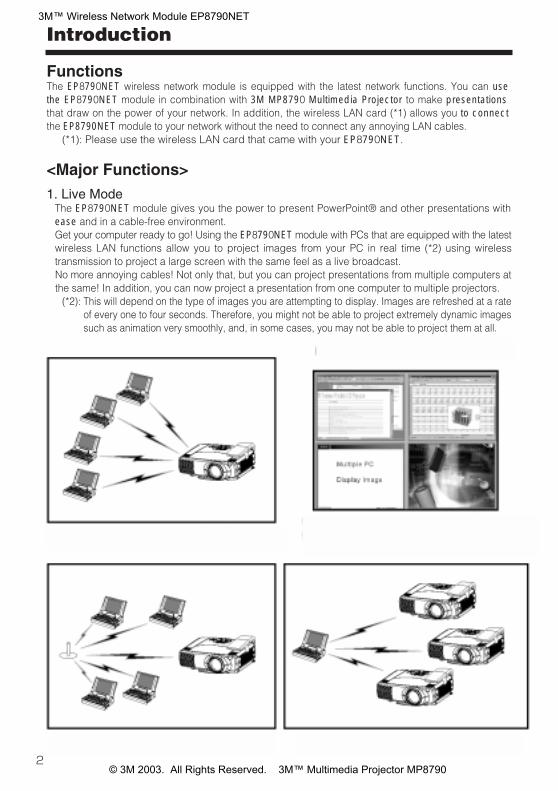
<Major Functions>1. Live Mode
The EP8790NET module gives you the power to present PowerPoint® and other presentations withease and in a cable-free environment.Get your computer ready to go! Using the EP8790NET module with PCs that are equipped with the latestwireless LAN functions allow you to project images from your PC in real time (*2) using wirelesstransmission to project a large screen with the same feel as a live broadcast.No more annoying cables! Not only that, but you can project presentations from multiple computers atthe same! In addition, you can now project a presentation from one computer to multiple projectors.
(*2): This will depend on the type of images you are attempting to display. Images are refreshed at a rateof every one to four seconds. Therefore, you might not be able to project extremely dynamic imagessuch as animation very smoothly, and, in some cases, you may not be able to project them at all.
Office meetings at a snap of the fingers! Up to four PC screens can be displayed at the same time.
Meetings in a wireless environment! In your showroom or at a convention hall.
Example of a Multiple Screen
3M™ Wireless Network Module EP8790NET
© 3M 2003. All Rights Reserved. 3M™ Multimedia Projector MP8790

3
Consult with your network administrator prior to attempting to connect to your company's LAN.
NOTE
2. Playback ModeImages transmitted to the projector in Live Mode can be replayed from the projector side (*3). You can also send images to the projector from the PC in advance (*4). Regardless of the method chosen, you can select the image you wish to display or even selectmultiple images for consecutive playback by viewing the corresponding thumbnail imagesstored on the projector side (*5).
(*3): Use the key on your PC keyboard to capture images for replay in Playback mode.
(*4): Refer to for detailed information on how to use FileViewer.
(*5): Refer to for detailed information on how to use ImageViewer.
3. PC-less Presentation Mode (*6)In order to use PC-less Presentation Mode, you need to store your presentation data (*7) into amemory card (*8). Next, insert the memory card into the projector and you are all ready to makea presentation with just the projector. No need for a PC! The presentation is played just asdescribed in Playback Mode.
(*6): Since there is only one card slot, you can't use the wireless LAN card when in this mode.(*7): You can only use still image files of the following extensions: .jpg, .bmp and .png.(*8): You can use any of the following types of memory cards:
PCMCIA compliant memory cardCF memory card (dedicated PCMCIA adaptor required)SD card (dedicated PCMCIA adaptor required)Memory Stick (dedicated PCMCIA adaptor required)HDD card (ATA compatible; less than 2GB) (IDE compatible HDD cards can't be used)Microdrive (dedicated PCMCIA adaptor required; ATA compatible; less than 2GB)
(IDE compatible HDD cards can't be used)
PrintScreen
Only memory cards under 2GB can be used. Memory cards formatted to 2GB or more can't be used.Reformat memory cards to under 2GB as necessary. (Refer to your memory card user guide for details.)
NOTE
4. Remote Control ModeThe EP8790NET incorporates the latest LAN functions, enabling you to not only make presentations,but also control the projector using a control panel that you interface to using your Webbrowser. Remote control functions available include, turning the projector's power on and off,and selecting between image sources.This feature also provides you with such information as when the projector's lamp needs to bereplaced. Even if the projector is located in an office room away from your current location, youcan easily operate it via remote control.
If you opt not to use the wireless LAN card, you can still directly connect your computerusing a LAN cable. Be sure to use a cross cable when directly connecting to just one PC. Usea straight cable for connecting to the closest hub of your company LAN.
23
20
3M™ Wireless Network Module EP8790NET
© 3M 2003. All Rights Reserved. 3M™ Multimedia Projector MP8790

4
Introduction (continued)
EP8790NET Components
The EP8790NET wireless network module is composed of its main unit (1) and rear cover (2).
(1) Main unit:Mounts onto the multimedea projector MP8790.
(2) Rear cover: Remove this cover when mounting the EP8790NET module to a projector and then reattach oncethe EP8790NET module is properly mounted onto the projector.
(3) Clasp: Use this to secure the EP8790NET module in place. Tighten these once the EP8790NET moduleis properly mounted onto the projector.
(4) LAN port: The port used to connect to a network hub or directly to a PC using a LAN cable. Thisconnection can't be accessed when the wireless LAN card is in use. Remove the wirelessLAN card if you wish to use a cable-based LAN connection. (Only one LAN connection at atime is allowed.)
(5) PCMCIA card slot:
(6) Card eject button:This is the slot for inserting the PCMCIA compatible wireless LAN card or memory cards.Insert cards slowly and carefully into this slot. Use this button to remove a card from the cardslot. After pressing this button, slowly remove the card.
(7) Power cable: Use this cable to connect the module to the projector in order to supply power to the module.
(8) Power port: Firmly plug the power cable into this port after the module is properly mounted onto theprojector.
(1) Main unit
(4) LAN port(5) PCMCIA card slot
(6) Card eject button(2) Rear cover
(8) Power port
(7) Power cable(3) Clasp
(9) Locking screws
3M™ Wireless Network Module EP8790NET
© 3M 2003. All Rights Reserved. 3M™ Multimedia Projector MP8790

5
Attaching the EP8790NET Module to the ProjectorThe EP8790NET module is designed exclusively for use with 3M Multimedia Projector MP8790. Please slowly and carefullyfollow the below instructions when attempting to mount the EP8790NET module onto the projector.
(1) Turn off the projector by turning off its AC power switch.
(2) Remove the projector's filter cover.Push both of the filter cover tabs down and then pull them to remove the filter cover.
(3) Remove the rear cover of the EP8790NET module.Push the rear cover tabs down and then pull the rear cover to remove it.
(4) Fit the EP8790NET module's clasp into the projector's recess and align the module so thatit can connect to the DVI ports on the back of the projector.
➱ ➱
Recess
Clasp
Tabs
Filter cover
Rear cover
Rear cover tabs
DVI port
3M™ Wireless Network Module EP8790NET
© 3M 2003. All Rights Reserved. 3M™ Multimedia Projector MP8790

6
Introduction (continued)
(5) Slowly slide the module into place (in the direction of the arrow). Make sure that the DVI portis correctly aligned. (Please take care not to cause damage to the projector by the clasp.)Insert the two module locking screws into the respective DVI port.
[(7) Tighten the screws]
(6) Tighten (turn right) the two DVI port locking screws.
(7) Tighten the clasp to the projector using the accompanying locking screws (M3x8).
(8) Firmly connect the module's power cable to the projector's power port
Power port
(9) Reattach the projector's filter cover.
Filter cover
3M™ Wireless Network Module EP8790NET
© 3M 2003. All Rights Reserved. 3M™ Multimedia Projector MP8790

7
Confirming the Connection to the ProjectorOnce you have completed mounting the EP8790NET module onto the projector, follow the below instructionsto make sure that the connection to the projector is working okay. During this confirmation, you will check to see:
• Whether or not the EP8790NET module is correctly recognized when the projector's menu is displayed
(1) Turn on the projector's power. (Turn on the projector's AC switch and press the STANDBY button.)
(2) Select DVI using the projector's jog dial button or by pressing the WIRELESS button on theprojector's remote control.
STANDBY/ON VIDEO
UP
DOWN
BLANK
ASPECT
PUSH
LASERINDICATOR
LASER
RGB
FOCUS
ENTER
ON
OFF
ESC MENU RESET
POSITION
MAGNIFY VOLUME
MUTE
WIRELESS KEYSTONE
FREEZE
ONE TOUCH
AUTO PinP
ZOOM PAGE
Press the stick forENTER move up foror down for .
button
WIRELESS button
button
MENUbutton
RESETbutton
(3) Use the remote control or the projectorsoperation panel to open the WIRELESSmenu (refer to the projector's operator'sguide as necessary):
• Press the MENU button.• Press the button until the cursor is over
WIRELESS.
(4) Press the button. (5) Press the button twice.
�
�
�
�
�
�
�
(6) After a moment, the network information will be displayed as shown below. Confirm the network information.
If the information is not displayed, check theconnection between the EP8790NET module andthe projector.
NOTE
3M™ Wireless Network Module EP8790NET
© 3M 2003. All Rights Reserved. 3M™ Multimedia Projector MP8790

8
Introduction (continued)
[IP Address:] A unique numeric address used to identify each network device. The IP's factory default setting is 192.168.100.10.
[Sub Net Mask:] The network address portion of the IP address. The factory default is 255.255.255.0.
[DHCP (Dynamic Host Configuration Protocol):] This setting is used to determine whether to have this device's IP address assigned automaticallyby the network's DHCP server or to assign the IP address manually (as described above). The factory default is to leave this setting Off and assign the IP address manually.
[Ch (Channel):]The wireless LAN (IEEE802.11b) device can communicate on channels 1 to 11. The factorydefault is channel 10.
[Wireless Mode:] Sets the communication mode to be used for wireless communication. The factory default settingis 802.11 AD-HOC.
[WEP (Wired Equivalent Privacy):]An encryption method used for wireless communication. The factory default is "Off," meaning thatencryption is not used.
[Operation Mode:Use this to confirm the current operation mode of the EP8790NET module.]Live: The screen appearing on the PC is displayed on the projector.Play Back: The images stored in the EP8790NET module are played.PC-Less: The EP8790NET is ready to execute PC-less Presentation Mode using a memory card.
[PC Card: Displays the type of PC card currently inserted into the EP8790NET.]
[Speed:]The wireless communication speed. The factory default is AUTO.
[SSID (Service Set Identity):]The network group name (also referred to as ESSID). The same name setting is used for the same network group. This dialog displays the first 16 characters of the SSID. Please note that some symbols cannot bedisplayed in this dialog.
[MAC Ethernet: The fixed MAC address of the wired (cable-based) LAN device installed in this device.]
[MAC Wireless: The fixed MAC address of the wireless LAN card inserted in this device.]
[WEP Key: The common encryption key when the WEP (encryption) function is enabled for wireless LAN.]This is the encryption key used in common by the network group when the WEP (WiredEquivalent Privacy) function is enabled. When WEP is set to 40bit, this will be 10 hexadecimal characters. When WEP is set to 128bit, thefirst six characters are set as a dummy header (00:00:00) and the remaining 26 characters(except “:”) are the actual WEP key.
Please note that even if DHCP is enabled, the displayed address is the IP address that wasmanually set, not the IP address assigned by the DHCP server.
NOTE
3M™ Wireless Network Module EP8790NET
© 3M 2003. All Rights Reserved. 3M™ Multimedia Projector MP8790

9
Installing the SoftwareIn order to use the EP8790NET with a PC for wireless presentations (Live Mode), you will first needto install the accompanying software on all the PCs you will be using.
Minimum PC Hardware and Software Requirements
• OS: Windows 98, Windows 98SE, Windows Me, Windows 2000 Professional,Windows XP
• Graphic Interface: DirectX 6.1a or higher; Video RAM 4MB or higher (8MB recommended)• CPU: Pentium III (600MHz or higher recommended)• Display: VGA 640x480 or higher (XGA 1024x768 recommended) 65,536
simultaneous colors or higher
• Memory: 64MB or higher (128MB or higher if using Windows XP)• Available Hard Disk Space: 10MB or higher• Web browser: Internet Explorer® (4.0 or higher) or Netscape Communicator® 4.5X,
4.7X, etc.• CD-ROM drive
• Interface PC card slot (PCMCIA Type-II) • IEEE802.11b wireless LAN PC card
Software Installation Procedure
1. Turn on the PC.2. Shut down all applications.3. Insert the accompanying CD-ROM into the PC's CD-ROM
drive.4. After a moment, the Welcome to WNM Utilities Setup
dialog will appear as shown on the right. Press Next.
• Not required for PCs with built-in 802.11b wireless LAN• Depending on the type of wireless LAN card and PC you are using, the EP8790NET module may
not be able to communicate properly with your PC, even if the PC you are using is equippedwith built-in wireless LAN functionality. Should communication problems occur, please procure a Wi-Fi certified wireless LAN card.
NOTE
If your PC is currently set to a resolution higher than XGA, please change it to XGA.
NOTE
If the Welcome to WNM Utilities Setup dialog doesn't appear, proceed as follows:(1) Click on the Start button on the toolbar and select Run.(2) Enter E:\software\setup.exe and then press OK.
If your CD-ROM drive is not drive E on your PC, you will need to replace E withthe correct drive letter assigned to your CD-ROM drive.
NOTE
3M™ Wireless Network Module EP8790NET
© 3M 2003. All Rights Reserved. 3M™ Multimedia Projector MP8790

10
Introduction (continued)
5. The Choose Destination Location dialog appears. PressNext.
6. Confirm the program folder name.
If WNM_Utilities is okay, press Next to continue.
If not, enter the desired folder name and then press Next.
7. After a moment, installation will complete and the SetupComplete dialog will appear as shown on the right. ClickFinish.
This completes the software installation.
(1) To confirm that the software as been properly installed, press the Start button on the toolbar,select All Programs and then select the WNM Utilities folder.
(2) WNM LiveViewer and WNM FileViewer will appear in that folder if the installation wassuccessful.
• The C:\Program Files\WNM_Utilities folder will be created and the program will be installedinto that folder.
• If you wish to install to a different folder, click Browse and select another folder.
NOTE
3M™ Wireless Network Module EP8790NET
© 3M 2003. All Rights Reserved. 3M™ Multimedia Projector MP8790
11
Network SettingsThis section explains how to do wireless presentations (Live Mode), how to do presentationplayback (Playback Mode) and how to use your Web browser to access the remote control panel.
If your PC is not ready for 802.11b wireless LAN communication, purchase an 802.11b wireless
LAN card and install the device driver. (Refer to the corresponding PC and/or LAN card user
guide for details.)
<Preparations> (set the PC and the module to the same configurations)• Configure the PC and EP8790NET module for wireless communications. Insert the wireless
LAN cards into both the PC and EP8790NET module and enable wireless LAN communications.
• Next, configure as shown in the following table:
(1) Wireless Settings for the EP8790NET Module• Slowly and carefully insert the accompanying wireless LAN card into the EP8790NET module's
PC card slot. Be careful not to insert the card too hard as you may bend the connector pins.• Turn on the power of the projector (that the EP8790NET module is mounted to) and then press
the STANDBY button to turn on the lamp.• As explained in the Introduction section of this user guide, bring up the projector's WIRELESS menu and
configure the network settings as necessary. Refer to for information on the network configuration method.
(2) Wireless Settings for the PC
Enable the built-in wireless LAN communications of the PC. Refer to your PC user guide for details. Continue on for information on how to configurenetwork settings.
If you are using a new wireless LAN card, follow the instructions in the corresponding wirelessLAN card user guide to install the card's dedicated driver into your PC. Insert the wireless LAN card into your PC's card slot. Continue on for information on how to configure network settings.
If the PC is already equipped with a built-in 802.11b wireless LAN card, you don't need toinsert a new wireless LAN card.
NOTE
PCs with a built-in wireless LAN card
PCs using PCMCIA wireless LAN card
Consult with your network administrator if there is already a connection to the network
NOTE
12
12
12
3M™ Wireless Network Module EP8790NET
© 3M 2003. All Rights Reserved. 3M™ Multimedia Projector MP8790

12
Introduction (continued)
<Network Settings>� Select the network device (network adaptor) to be used
• Wired connection using a LAN cable• Wireless connection using a wireless LAN card (inserted in PC card slot)• Wireless connection using a built-in wireless LAN adaptor
� Protocol to be used: TCP/IP
� Configure the TCP/IP attributes (IP address, Subnet Mask)Manual setting/Automatic setting (for networks utilizing a DHCP server function equippeddevices)If you will be manually setting the TCP/IP attributes, turn the DHCP setting OFF and thenconfigure the settings.
� For more details of the settings, see the table below.
PC and EP8790NET Module Connection SettingConfiguration (Recommend Setting Example)
PC/Access point EP8790NET Module
P2P (Peer to Peer) IP Address
Subnet Mask DHCPCommunication ModeChannelSpeed WEP (encryption) Encryption KeySSIDHost Name
192.168.100.N *N should be unique (1 to 254)255.255.255.0 recommended OFF (not used) 802.11 AD-HOC 1 to 11 AUTO (or a fixed speed) OFF (not used) Unnecessary“default”Can be set for each PC
192.168.100.10*doesn't need to be 10255.255.255.0 (same as PC)Same as PCSame as PCSame as PCSame as PCSame as PCSame as PCSame as PCCan set the projector name
Local access point IP Address
Subnet Mask DHCPCommunication ModeChannel Speed WEP (encryption) Encryption Key SSIDHost Name
192.168.100.N *N should be unique (1 to 254;including access points)255.255.255.0 recommended OFF (not used) Infrastructure 1 to 11 AUTO (or a fixed speed) OFF (not used) Unnecessary“default” Can be set for each PC
192.168.100.10*doesn't need to be 10
255.255.255.0 (same as PC)Same as PCSame as PCSame as PCSame as PCSame as PCSame as PCSame as PCCan set the projector name
Existing network (via accesspoint)
Consult with your networkadministrator.
Consult with your networkadministrator.
3M™ Wireless Network Module EP8790NET
© 3M 2003. All Rights Reserved. 3M™ Multimedia Projector MP8790

13
[Explanation]A network address setting is required as you will be connecting the EP8790NET module tothe PC using the network.You can choose to manually assign an address to each device or have an DHCP serverautomatically assign the address.When configuring the address manually, please use the following setting:
IP address = 192.168.xxx.NNN <xxx and NNN represent decimals>
Subnet Mask = 255.255.255.0Be sure to use the same setting for the "xxx" portion of the IP address for both the EP8790NETmodule and PCs. Then "NNN" portion can be any number from 1 to 254, but be careful so as not to assign thesame number to two or more devices connected to the same network.
� If you are attempting a wireless connection, configure the network adaptor attributes as follows (configure all the devices, including the projector that the EP8790NET module is mounted to, with the same setting):❍ Communication Mode
• If you won't be using an access point (Peer to Peer):Set to AD-HOC (pseudo ad hoc) or 802.11AD-HOC (depending on the hardware).
• If you will be using an access point:Select INFRASTRUCTURE.
❍ Communication Speed: This is normally set to Auto (Full Automatic, et al)
❍ Communication Channel: Depending on the country or region you are in, thechannels you can use may vary. Be sure to use the samechannel setting for each device.
❍ SSID (network group name): Set the same name for all devices.
❍ Encryption (WEP) Setting• Disable if you won't be using encryption• Enable if you will be using encryption by selecting the type of encryption [40(60)bit or
128bit] and configure the encryption key as well (text or hexadecimal)
Refer to your PC user guide and wireless LAN card user guide (if you are using a wirelessLAN card) for additional information on how to configure these settings.
If there is another network nearby, it is best to use a channel that isat least four channels away from the other network.
NOTE
3M™ Wireless Network Module EP8790NET
© 3M 2003. All Rights Reserved. 3M™ Multimedia Projector MP8790

14
Introduction (continued)
If you only enter the IP address into your Web browser'saddress bar, the following dialog will appear. In this case,simply click on Remote control link to bring up the RemoteControl panel.
NOTE
Next, let's make sure that your PC and the EP8790NET module are communicating okay.
• Open your Web browser (Microsoft™ Internet Explorer®, etc.) and enter the followingaddress:http://192.168.100.10/projectorcontrol.htm
This is the factory default setting.
If you see the Remote Control panel as shown on the right, then everything is configured okay.
Remote control
LAN settings
3M™ Wireless Network Module EP8790NET
© 3M 2003. All Rights Reserved. 3M™ Multimedia Projector MP8790

15
Operations
Wireless Presentations (Live Mode)You can project the content of your PC display as is via the projector to which the EP8790NETmodule is mounted using wireless communication. First of all, let's take a look at the basicwireless presentation operation. (Refer to for additional operations.)
<Startup>• Turn on the power of the projector (that the EP8790NET module is mounted
to) and then press the STANDBY button. (After a moment, the lampcomes on.)
• Press the WIRELESS button on the projector's remote control.• The screen will appear as on the right. Use the remote controls
navigation buttons to move the cursor over the Live Mode option andthen press the ENTER button.
• Startup the PC.• Open LiveViewer
(Start -> All Programs -> WNM Utilities -> WNM LiveViewer).
(2) Find the projector you wish touse for your presentation.A list of projectors appears.Select the one you wish to useand the press OK.The names of the protectorsare listed as configured on theprojectors themselves. If aname has not been set for agiven projector, its IP addresswill be displayed instead.
If you should experience a momentary interruption in communication, press the Find buttonagain to search for a projector again.
NOTE
(1) Click this
LiveViewer.exe program is installed.
The EP8790NET with the accompanying802.11b wireless LAN card inserted intoits PC card slot
A PC with built-in 802.11b wireless LANfunctionality or with an 802.11b wirelessLAN card inserted into its PC card slot.
17
3M™ Wireless Network Module EP8790NET
© 3M 2003. All Rights Reserved. 3M™ Multimedia Projector MP8790

16
Operations (continued)
(3) Use the JPEG Quality bar to adjust the compression level ofthe images you will send from your PC to the EP8790NET module.The closer to Rough, the higher the level of compression will be. Thequality of the image will decrease, but transfer speed will increase.The closer to Fine, the lower the level of compression will be. Thequality of the image will increase, but transfer speed will decrease.For presentations that are composed of mostly of charts and illustrations,adjust to the left (Rough) side. For presentations that are composed ofmostly scenic photographs and similar, adjust to the right (Fine) side.
(4) Press the Play button and then click on the X button on the top right hand corner of the dialog. LiveViewer will begin transferring the presentation images to the EP8790NET module and the dialog will disappear. However,the LiveViewer will continue to run with its icon residing in the system tray (usually located in the bottom right portion of toolbar).
At that, the images displayed on your PC monitor will be projected real time via the projector. Youmay now open the application (PowerPoint®, etc) that contains the images you wish to project.
<What can I do if…>• Dynamic images such as PowerPoint® animation are projected slower than they appear on my
PC?➱ Try increasing the Capturing Performance priority level as follows:
Right click on the LiveViewer icon residing in the system tray.
Click on Settings.
Slide the Capturing Performance bar to High to increase the priority level.• I want to open the LiveViewer dialog?➱ Right click on the LiveViewer icon residing in the system tray and then click on Display.
• I want to project another PC's images (i.e., turn control over to another PC)?➱ Right click on the LiveViewer icon residing in the system tray and then click on Display.
Press the STOP button. (Communication with the projector will be terminated and a Disconnectmessage will appear.)Start LiveViewer on the PC you wish to use. (Refer to for additional operationinformation.)
This will depend on the type of images you are attempting to display. Images are refreshed at a rateof every one to four seconds. Therefore, you might not be able to project extremely dynamic imagessuch as animation very smoothly, and, in some cases, you may not be able to project them at all.
NOTE
15
3M™ Wireless Network Module EP8790NET
© 3M 2003. All Rights Reserved. 3M™ Multimedia Projector MP8790

17
<Applied Operation: Multiple Screens>This section explains how to combine images from multiple PCs onto a single projector at thesame time. You can use this function for two, three and even four PCs at a time.
• Open the WNM LiveViewer on each PC. • Press the PLAY button and close down the LiveViewer dialog. • Right click on the LiveViewer icon residing in the system tray and then click on Multi PCs.• Select the number of PCs you wish to use at the same time.
You can adjust this setting from any of the participating PCs. The most recent setting made isthe one that is used.
• What if the number of PCs set is higher than the actual number of PCs being used?The images from the participating PCs are projected in the order of top left, top right, bottom left and bottom right.So, until you have connected the maximum number of PCs (four), you can continue to add additional PCs.
• What if the number of PCs set is lower than the actual number of PCs being used?For example, if you make the selection for four PCs and the actual number of participating PCs is four, but then youchange the setting to two PCs, only the images of the two most recently connected PCs will remain, with the imagefrom the first one of the remaining two PCs being projected on the left and the other one being projected on the right.
Can I mark multiple screen images for playback?Yes. Simply press the Print Screen key when the multiple screen is displayed. The completemultiple screen image will be saved in the projector's internal memory.
However, that images displayed using this feature will be projected at quarter of the normal size.
NOTE
Two PCs at a time Three PCs at a time Four PCs at a time
In the above example, the images of the first two PCs to be connected will disappear from the screen. However,no matter what the order of display, if only one PC is selected, then its image will be displayed at full screen size.
NOTE
1st PCconnected
2nd PCconnected
3rd PCconnected
4th PCconnected
1516
3M™ Wireless Network Module EP8790NET
© 3M 2003. All Rights Reserved. 3M™ Multimedia Projector MP8790
18
Operations (continued)
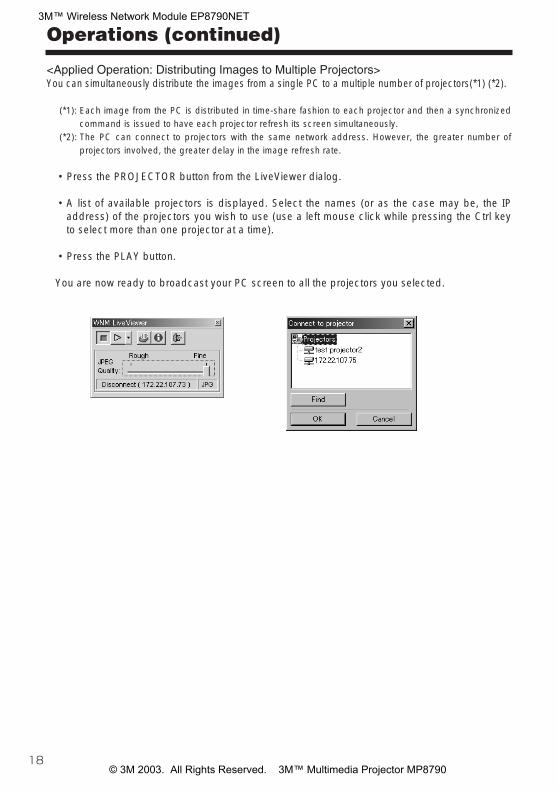
<Applied Operation: Distributing Images to Multiple Projectors>You can simultaneously distribute the images from a single PC to a multiple number of projectors(*1) (*2).
(*1): Each image from the PC is distributed in time-share fashion to each projector and then a synchronizedcommand is issued to have each projector refresh its screen simultaneously.
(*2): The PC can connect to projectors with the same network address. However, the greater number ofprojectors involved, the greater delay in the image refresh rate.
• Press the PROJECTOR button from the LiveViewer dialog.
• A list of available projectors is displayed. Select the names (or as the case may be, the IPaddress) of the projectors you wish to use (use a left mouse click while pressing the Ctrl keyto select more than one projector at a time).
• Press the PLAY button.
You are now ready to broadcast your PC screen to all the projectors you selected.
3M™ Wireless Network Module EP8790NET
© 3M 2003. All Rights Reserved. 3M™ Multimedia Projector MP8790

19
Presentation Playback (Playback Mode)Images transmitted to the projector in Live Mode can be replayed (*1). You can also send imagesfrom the PC in advance (*2) for playback using the projector. (Depending on the size of the images, you can usually store about 20 slides for playback).
(*1): Use the Print Screen key on your PC keyboard to capture images during Live Mode for replay in Playback mode.(*2): Refer to for detailed information on how to use FileViewer.
• Press the remote control's WIRELESS button to open the WirelessMenu. (Press the WIRELESS button again if the menu doesn't appear the first time.)
• Use the navigation buttons to move the cursor over Playback Modeand then press ENTER.
You can display the thumbnails of the images currently stored for playback (up to 16 images at a time).
• Select one image that you would like to playback.• Select images in the order you would like to play them back, from first to last.
(You can also set the time interval for playing back each image.)Refer to for detailed information on how to use the ImageViewer.
Stand Alone Presentations (PC-less Presentation Mode)Be simply inserting a storage card (*3) filled with your presentation data into the EP8790NETmodule's PC card slot, you can make a presentation without a PC.
(*3): Insert the storage card into the EP8790NET module's PCMCIA card slot. You can use any of the following types of cards: (However, depending on the manufacturer, some cards may not work.)
PCMCIA compliant memory cardCF memory card (dedicated PCMCIA adaptor required)SD card (dedicated PCMCIA adaptor required)Memory Stick (dedicated PCMCIA adaptor required)HDD card (ATA compatible; less than 2GB) (IDE compatible HDD cards can't be used)Microdrive (dedicated PCMCIA adaptor required; ATA compatible; less than 2GB)
(IDE compatible HDD cards can't be used)
Since there is only one card slot, you can't use the wireless LAN card at the same time.You can only store files of the following extensions in the storage card: .jpg, .bmp and .png.Record the data you wish to present from your PC onto the storage card you will be using.You can only use files located in the root directory. You can't not playback files located in asubdirectory.You can use digital camera storage cards.However, make sure that the files are stored in the root directory.
Only cards under 2GB (FAT/VFAT-16) can be used. High resolution images such as those froma digital camera will likely be reduced when projected by the projector.
NOTE
23
20
3M™ Wireless Network Module EP8790NET
© 3M 2003. All Rights Reserved. 3M™ Multimedia Projector MP8790

20
Operations (continued)
• Insert the storage card that contains the images you wish to display into the EP8790NET module's PCMCIA card slot.
• Press the remote control's WIRELESS button to open the Wireless Menu. (Press the WIRELESS button again if the menu doesn't appear the first time.)
• Use the navigation buttons to move the cursor over PC lessPresentation and then press ENTER.You can display the thumbnails of the images currently stored in thestorage card (up to 16 images at a time).• Select one image that you would like to playback.• Select images in the order you would like to play them back, from
first to last. (You can also set the time interval for playing back each image.)
Refer to for detailed information on how to use the ImageViewer.
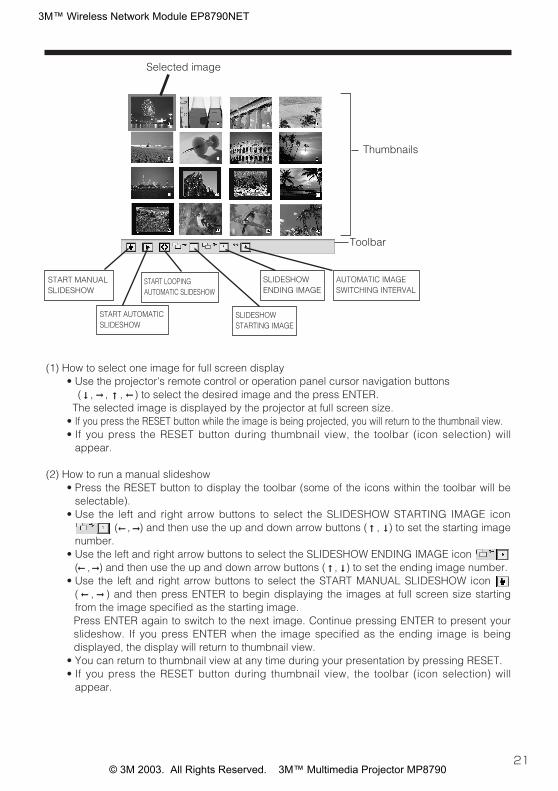
Using ImageViewerImageViewer: A feature of the EP8790NET's software that allows you to view thumbnails to selectimages for playback. You can use the ImageViewer to do the following:
(1) Select one image at a time to view.(2) Create a manual slideshow by arranging
the images (from start to end) that youwish to display at full screen size andthen manually switching between imagesto produce a presentation.
(3) Create an automatic sl ideshow byarranging the images (from start to end)that you wish to display at full screensize and then setting a time interval forautomatic switching between images toproduce a presentation. In addition, youcan create a loop to have thepresentation repeat itself for conventioncenter demonstrations, etc.
The ImageViewer starts up when either Playback Mode orPC-less Presentation Mode is selected.
You can operate the ImageViewer from theprojector's remote control and via theremote control feature using your Webbrowser.
STANDBY/ON VIDEO
UP
DOWN
BLANK
ASPECT
PUSH
LASERINDICATOR
LASER
RGB
FOCUS
ENTER
ON
OFF
ESC MENU RESET
POSITION
MAGNIFY VOLUME
MUTE
WIRELESS KEYSTONE
FREEZE
ONE TOUCH
AUTO PinP
ZOOM PAGE
Press the stick forENTER move up foror down for .
button
WIRELESS button
button
MENUbutton
RESETbutton
�
�
�
�
20
25
3M™ Wireless Network Module EP8790NET
© 3M 2003. All Rights Reserved. 3M™ Multimedia Projector MP8790
21
(1) How to select one image for full screen display• Use the projector's remote control or operation panel cursor navigation buttons
( , , , ) to select the desired image and the press ENTER. The selected image is displayed by the projector at full screen size.
• If you press the RESET button while the image is being projected, you will return to the thumbnail view.• If you press the RESET button during thumbnail view, the toolbar (icon selection) will
appear.
(2) How to run a manual slideshow• Press the RESET button to display the toolbar (some of the icons within the toolbar will be
selectable).• Use the left and right arrow buttons to select the SLIDESHOW STARTING IMAGE icon
( , ) and then use the up and down arrow buttons ( , ) to set the starting imagenumber.
• Use the left and right arrow buttons to select the SLIDESHOW ENDING IMAGE icon ( , ) and then use the up and down arrow buttons ( , ) to set the ending image number.
• Use the left and right arrow buttons to select the START MANUAL SLIDESHOW icon ( , ) and then press ENTER to begin displaying the images at full screen size startingfrom the image specified as the starting image. Press ENTER again to switch to the next image. Continue pressing ENTER to present yourslideshow. If you press ENTER when the image specified as the ending image is beingdisplayed, the display will return to thumbnail view.
• You can return to thumbnail view at any time during your presentation by pressing RESET.• If you press the RESET button during thumbnail view, the toolbar (icon selection) will
appear.
�
� �
�
�
�
�
�
�
�
�
�
�
�
Selected image
Thumbnails
Toolbar
START MANUALSLIDESHOW
START AUTOMATICSLIDESHOW
START LOOPINGAUTOMATIC SLIDESHOW
SLIDESHOWSTARTING IMAGE
SLIDESHOWENDING IMAGE
AUTOMATIC IMAGESWITCHING INTERVAL
3M™ Wireless Network Module EP8790NET
© 3M 2003. All Rights Reserved. 3M™ Multimedia Projector MP8790

22
Operations (continued)
(3) How to run an automatic slideshow• Press the RESET button to display the toolbar (some of the icons within the toolbar will be selectable).• Use the left and right arrow buttons to select the SLIDESHOW STARTING IMAGE icon
( , ) and then use the up and down arrow buttons ( , ) to set the starting image number.• Use the left and right arrow buttons to select the SLIDESHOW ENDING IMAGE icon ( , )
and then use the up and down arrow buttons ( , ) to set the ending image number.• Use the left and right arrow buttons to select the AUTOMATIC IMAGE SWITCHING
INTERVAL icon ( , ) and then use the up and down arrow buttons ( , ) to set thedesired time interval (in seconds) for presenting the images.
• Use the left and right arrow buttons to select the START AUTOMATIC SLIDESHOW icon ( , ) and thenpress ENTER to begin displaying the images at full screen size starting from the image specified as the startingimage. Each time specified time interval elapses, the next image is displayed. This continues until the last image isreached. After the last image is displayed, the display returns to thumbnail view.
• You can return to thumbnail view at any time during your presentation by pressing RESET.• If you press the RESET button during thumbnail view, the toolbar (icon selection) will appear.• To loop the slideshow, use the left and right arrow buttons to select the START LOOPING AUTOMATIC SLIDESHOW
icon ( , ) and then press ENTER to begin an automatic slideshow that will repeat from the beginning when itreaches the end of the show. The RESET button functions the same in this operation as explained above.
In thumbnail view, you may notice the following error indications:Blue X: Indicates that the file is too large to be displayed.
(Files that are 3MB or larger, or, images with a resolution higher than2000x1500 dpi)
Red X: Indicates that the file cannot be displayed because it is corrupt or is anincompatible format.
NOTE
�
� �
�
�
�
�
�
�
�
�
�
�
�
�
�
3M™ Wireless Network Module EP8790NET
© 3M 2003. All Rights Reserved. 3M™ Multimedia Projector MP8790

23
Using FileViewerWhat is FileViewer?
1. FileViewer is a program that enables you to access the projector's (EP8790NET module's) RAM disk.FileViewer enables you to send image files from your PC to the projector as well as retrieveimage files stored on the projector to your PC.
NOTE: The RAM disk is the temporary storage disk used to store image files transferred from yourPC during Live Mode as well as those files you transfer from your PC using FileViewer.
2. FileViewer can likewise be used to access the storage card inserted into the projector(EP8790NET module). FileViewer enables you to send image files from your PC to the storagecard as well as retrieve image files stored on the storage card to your PC.
1. Open FileViewer to access the files in the projector.FileViewer handles the same as Windows® Explorer®.
• From the toolbar, press File and then Connect to display thedialog and then press Find.
• A list of available projectors is displayed. Select a projectorand then press OK.
As shown on the right, the projector's imagesfiles and folders are displayed.
To delete an image file, select the fileyou wish to delete and then pressDelete.
To transfer an image file from the projectorto a folder on your PC, open Windows®Explorer®, select the fi le you wish totransfer from the projector, copy it andthen paste it in the desired PC folder.You can also transfer a f i le from theprojector by selecting a fi le from theprojector and then dragging and droppingit to the desired PC folder.
Be sure to a cable-based LAN connection to your PC when using the EP8790NET module'sstorage card. You can't use the storage card and wireless LAN card at the same time.
NOTE
3M™ Wireless Network Module EP8790NET
© 3M 2003. All Rights Reserved. 3M™ Multimedia Projector MP8790

24
Operations (continued)
To transfer an image file from your PC to a folder on the projector,• Open Windows® Explorer®,• Select the file you wish to transfer from your PC, copy it and then paste it in the desired
projector folder. You can also transfer a file from your PC by selecting a file from the your PC and then draggingand dropping it to the desired projector folder.
FileConnect Connect to the projector
Exit Exit the application
Edit
Copy Copy the selected file to the clipboard
Paste Paste the file currently stored on the clipboard
Delete Deleted the selected file
Modify Change the name of the selected file
New Folder Create a new folder
Up Folder Move up one folder
View
Tool Bar Display/hide the toolbar
Status Bar Display/hide the status bar
Refresh Refresh the folder's contents
Help Version Information Display version information
FileViewer Toolbar Functions
Copy Copy the selected file to the clipboard
Paste Paste the file currently stored on the clipboard
Delete Delete the selected file
Up Folder Move up one folder
About Display version information
3M™ Wireless Network Module EP8790NET
© 3M 2003. All Rights Reserved. 3M™ Multimedia Projector MP8790

25
Controlling the Projector via Your Web BrowserYou can use your Web browser to remote control the projector once the EP8790NET module is properlyconfigured and connected to your PC via the wireless LAN card or by a cable-base LAN connection.
How to Use the Remote Control Panel1. Open your Web browser (Microsoft™ Internet Explorer®, etc.) and enter the following address:
http://192.168.100.10
Enter the IP address you configured the EP8790NET module.2. Open LiveViewer.
PROJECTOR button
Click on the PROJECTOR button. A list ofavailable projectors will be displayed.Right click on the projector you wish tocontrol and then select RemoteController.
The WNM Projector Remote Controller panel will be displayed as shown below. Click on Compact to display the links to the four main menus <Compact Setting Status Wireless>. A description of each of these menus can be found on the following pages.
Do not attempt to control the projector with the projector's remote control and via your Webbrowser at the same time. Attempting to do so may result in a projector error.
NOTE
3M™ Wireless Network Module EP8790NET
© 3M 2003. All Rights Reserved. 3M™ Multimedia Projector MP8790

26
Operations (continued)
The Compact MenuThe Compact menu contains the most frequently used functions and is compactly designed sothat you can use it from your PDA as well as PC. Each button functions the same as the corresponding buttons on the projector's remote control.(Refer to your projector's user guide for details.)
The Setting MenuThe function buttons contained in the Setting menu function just like corresponding buttons on theprojector's remote control. (Refer to your projector's user guide for details.)
3M™ Wireless Network Module EP8790NET
© 3M 2003. All Rights Reserved. 3M™ Multimedia Projector MP8790

27
The Status MenuThe Status menu is used to monitor the projector's status.
[Power] Indicates the power status.Standby: The projector is in standby state (projector lamp off).ON: The projector's power is on (projector lamp on).
[Lamp] Indicates if there is a projector lamp error or not.OK: There are no errors.Change the Lamp: Time to replace the projector's lamp.
Replace the projector's lamp.Cover Open: The projector lamp's cover is open.
Close the cover.Error: The lamp isn't on and is in an error state.
Contact your local service representative.
[Temp] Indicates the status of the projector's internal temperature.OK: The temperature is fine.Warning: The projector's filter is dirty. Clean the filter. Replace the filter if necessary.Error: The temperature is abnormally high.
If this error persists even after you replace the filter, contact your local servicerepresentative.
Failed: The projector has most likely broken down.Contact your local service representative.
[FAN] Indicates the status of the projector's internal fan.OK: The fan is fine.Error: The fan has errored out. Check for foreign objects in the fan.
If the fan is free from foreign objects, contact your local service representative.
[Input] Indicates the currently selected video source.RGB RGB2 Component DVI S-Video Composite
[Lamp time] Indicates the amount of time the lamp has been in running (in hours).
[auto refresh] If this is set to on, the EP8790NET module will automatically check the projector's statusevery 30 seconds. If this is set to off, the EP8790NET module will only check the projector's status one time(when this dialog is first opened). So, for example, if you set this to off, and then use the remote control to toggle thevideo input state, this dialog will not automatically reflect the change.
To alter the projector's power state, press the �
button to select the desired state and then click theset button.
To alter the video source, press the � button to select the desired video source and then clickthe set button.
3M™ Wireless Network Module EP8790NET
© 3M 2003. All Rights Reserved. 3M™ Multimedia Projector MP8790

28
Operations (continued)
The Wireless MenuThe Wireless menu enables you to check and set the WEP8790NET module's operation mode. In addition, when the EP8790NET module is in Playback or PC-less Presentation mode, you canuse this menu to control the EP8790NET module.
• Setting the Operation ModeSimply click on the radio button of the desired operation mode and then click on set.
However, please note that you will need to use a cable-based LAN connection to use theWireless menu to remote control PC-less Presentation mode operations. You can't use thewireless LAN card to create a wireless connection.
NOTE
3M™ Wireless Network Module EP8790NET
© 3M 2003. All Rights Reserved. 3M™ Multimedia Projector MP8790

29
Configuration UtilityYou can use your Web browser (Microsoft™ Internet Explorer®, etc.) to check and configure theEP8790NET module's network settings.
How to Use the Configuration UtilityOpen LiveViewer.
PROJECTOR button
Click on the PROJECTOR button. Alist of available projectors will bedisplayed. Right click on the projectoryou wish to control and then selectWNM Configuration Utility.
The following panel will be displayed.
Please note that after making any changes to the EP8790NET module's network settings, you willneed to turn the AC power of the EP8790NET module off and then on again to have the settingstake effect. Even if you make changes using the Configuration Utility and then reopen thispanel, the displayed information will still not have taken effect yet.
NOTE
3M™ Wireless Network Module EP8790NET
© 3M 2003. All Rights Reserved. 3M™ Multimedia Projector MP8790

30
Operations (continued)
[Set an IP address]Use this to configure the EP8790NET module's IP address and subnet mask.
Specify an IP address: If you select this option, the values you set in the IP Address and SubnetMask fields will be used.
Obtain an IP address automatically: If you select this option, the IP address and subnet maskwill be obtained automatically from the DHCP server.
[Connection Control]Use this to specify the communication connection control method to use between the PC andprojector. Match to your PC's settings.
Choose from either AD-HOC, 802.11AD-HOC of Infrastructure.
[SSID (Service Set ID)]This ID is used to determine which devices are participating in the network when an access pointis in place. The default setting is default. In addition to single-byte alphanumeric characters andspaces, you may also use the following symbols. The length of the ID can be up to 32 characterslong:
! " # $ % & ' ( ) = @ \ ? < > _ , . * + - / | [ ] { } ; :
[WEP (Wired Equivalent Privacy)] The communication data encryption method to be used.• Disable: No encryption used.• Enable: The key defined in KEY will be used to encrypt the communication data.
[KEY]The key used for encrypting the communication data. Set this to the same setting used on your PC.• If 40bit encryption is used: 10 hexadecimal characters (0-9, a-f characters only)• If 128bit encryption is used: 26 hexadecimal characters (0-9, a-f characters only).
[Communication Channel] Use this to specify the channel when using a wireless LAN connection. (Channels 1 to 11 are available)
If you select Obtain an IP address automatically, but there is not a DHCP server, then thespecified values will be used.
NOTE
You can also use the menu of the projector (that the EP8790NET module is mounted to) to confirm the SSID. However,when you use that menu you can only view 16 characters at a time. Also, please don't set the SSID to all spaces.
NOTE
Depending on the country you are in, the channels you can use may vary. In addition,depending on the country or region you are in, you may be required to use a wireless LANcard that confirms to the standards in force in the respective country or region.
NOTE
3M™ Wireless Network Module EP8790NET
© 3M 2003. All Rights Reserved. 3M™ Multimedia Projector MP8790

31
[Communication Speed] Use this to specify the communication speed.1Mbps, 2Mbps, 5.5Mbps, 11Mbps or AUTONormally, setting to AUTO should present no problems. However, if you are experiencingdifficulties due to distance and/or obstructions, you might want to try a low speed setting.
[Projector Name]Use this to specify the name of the projector (that the EP8790NET module is mounted to). (This will actually bestored on the EP8790NET module, not the projector.) Should there be multiple projectors, this name will be helpfulfor distinguishing between projectors in LiveViewer. In addition to single-byte alphanumeric characters andspaces, you may also use the following symbols. The length of the name can be up to 255 characters long:
! " # $ % & ' ( ) = @ \ ? < > _ , . * + - / | [ ] { } ; :
Press Reset to restore the currentsettings.
Once you have completed configuring the network settings, press Write. If the following messageappears, you will know that the settings have been successfully changed. (However, you need toturn the EP8790NET module off and then on again for the new settings to take effect.)
However, if the following message appears, your attempt to change the settings has failed. Should thisoccur, check the communication status with the EP8790NET module.
You can also use the menu of the projector (that the EP8790NET module is mounted to) to confirm theprojector name. However, when you use that menu you can only view 16 characters at a time.
NOTE
3M™ Wireless Network Module EP8790NET
© 3M 2003. All Rights Reserved. 3M™ Multimedia Projector MP8790

32
Operations (continued)
Changing Network Settings Directly from the EP8790NET ModuleThe EP8790NET module is equipped with network technology that allows you to configure it to the functionyou wish to use. (Refer to Operations for more details.) When you first use the EP8790NET module, it will beconfigured to the factory defaults. You can use the Configuration Utility (see ) for configuring thenetwork settings, however, this section covers the procedures for using just the EP8790NET module(mounted on the projector) to configure and confirm a portion of the network settings.
(1) Open the WIRELESS menu. (Refer to the projector's user guide as necessary.) Using eitherthe remote control or projector's operation panel,
• Press the MENU button• Once the menu appears, use the button to scroll down to WIRELESS.
(2) Press the button.
(4) [IP ADDRESS]Indicates the EP8790NET module's current IP address. The IP's factory default setting is 192.168.100.10. An IP address is a unique numeric address used toidentify each network device. Please note that each device in the same networkmust have a unique IP address. You may not have two devices on the same networkwith the same IP address.
(5) [SUBNET MASK]The network address portion of the IP address. The factory default is 255.255.255.0. In the example shown here, the network address is192.168.100.0. Please configure this to the same network addressused by your PC.
�
(3) Press the button.Likewise, for the remaining configurable items aswell, use the cursor navigation buttons to make thedesired setting and use the ENTER button to thenext step and the ESC button to the previous step.
� �
29
3M™ Wireless Network Module EP8790NET
© 3M 2003. All Rights Reserved. 3M™ Multimedia Projector MP8790

33
(6) [DHCP (Dynamic Host Configuration Protocol)]This setting is used to determine whether to have thisdevice's IP address assigned automatically by the network'sDHCP server or to assign the IP address manually. Thefactory default is to leave this setting "OFF" and assign theIP address manually. If this setting is set to "ON," the DHCPserver will automatically assign an IP address to this deviceand so the manually set IP address will be ignored.
(7) [WIRELESS MODE]Sets the communication mode to be used for wirelesscommunication. The factory default setting is 802.11 AD-HOC.AD-HOC or 802.11 AD-HOC: You can use either of these whenyou will only be connecting the EP8790NET module and your PC.Configure it so that the settings match your PC settings. This isusually the connection type used for one-to-one connectionsbetween the EP8790NET module and a PC. However, themodule is capable of recognizing up to four PCs at a time.
INFRASTRUCTURE: Use this setting when you will be connecting the EP8790NET module to your network via anaccess point to connect to a PC (connection to multiple PCs possible in this mode).
(8) [CH (Channel)] The wireless LAN (IEEE802.11b) device cancommunicate on channels 1 to 11. The factory defaultis channel 10. If you are using an access point,configure the channel setting to the channel specifiedby the access point. If you aren't using an accesspoint, configure the channel setting to the PC you areusing.
(9) [WEP Mode (Wired Equivalent Privacy)]An encryption method used for wirelesscommunication. The factory default is OFF.OFF: Encryption will not be used.40bit: A 10-character (hexadecimal) encryption key
will be used.128bit: A 26-character (hexadecimal) encryption
key will be used.
(10) [Do you want to save the changes?]Select YES and press ENTER to apply the changes. Select NO and press ENTER if you
don't wish to apply the changes.
Consult with your network administrator before connecting to an existing access point in yournetwork.
NOTE
3M™ Wireless Network Module EP8790NET
© 3M 2003. All Rights Reserved. 3M™ Multimedia Projector MP8790

34
Operations (continued)
If you choose to apply the changes (by selecting YES followed by ENTER), the followingmessage will appear for about three seconds andthen the changes will be saved. Please note that the changes will be immediatelyreflected in the network configuration.
If your attempt to save the changes has failed, the following message will appear. Shouldthis occur, please try to save the changes again.
(11) [NETWORK INFORMATION Screen]If you return to step 2 and scroll down using the button to choose INFORMATION, thefollowing screen will appear.
[Confirming and Changing the EP8790NET Module Operation Mode]If you return to step 2 and scroll down using the button to choose FUNCTION, and thenpress the button, the EP8790NET module operation mode menu (Wireless Menu) will appear.
EP8790NET Module Operation Mode Menu
The following items cannot be configured using this menu. For more information on configuring these items, please refer the Configuration Utility on .WEP Key (encryption key), SSID (network group name), Projector Name (name of the EP8790NETmodule's host projector), Speed (communication speed)
NOTE
Sometimes the content updated using theConfiguration Utility won't be reflected inthe NETWORK INFORMATION screen.Should this be the case, turn off theprojector (to which the EP8790NET moduleis mounted) and then turn it on again.
NOTE
��
�
29
3M™ Wireless Network Module EP8790NET
© 3M 2003. All Rights Reserved. 3M™ Multimedia Projector MP8790

35
Additional Items
Troubleshooting
Problem Likely Cause Things to CheckReference
PageNumber
No image
The projector's power isn'ton
Is the projector's lamp on? 7
The projector's input sourceisn't switched to DVI
Is the projector switched toDVI?
7
The module isn't properlyconnected to the projector
Are the locking screwssecurely fastened?
6
The module's power cableisn't properly connected tothe projector
Is the module's power cablefirmly connected to theprojector?
6
Wireless
LiveM
ode
The projectorthat you wantto connect tois nowhere tobe found onthe list ofavailableprojectors
The PC and/or projector'snetwork settings are notconfigured correctly
Check both the PC andprojector's network settings. Ifyou change the projector'ssettings, turn off theprojector's AC power and thenturn it on again. If you simply put the projectorin STANDBY power mode andthen turn it on again, the newsettings might not take effect.
12
Weak radio signal
• Bring the PC andprojector closer together
• Radio waves won't gothrough concrete andmetal (steel doors, etc.)
–
Can'tcommunicate
The module isn't in LiveMode
Press the WIRELESS button onthe projector's remote to makesure that it is in the correct mode
15
The imageprojected israther slowcompared tothat of the PC
The EP8790NET modules isn'tcapable of relaying dynamicimages such as PowerPoint®animation at full speed
Try increasing the CapturePerformance priority level. Itmay improve the speed alittle
16
The compression rate beingused for transferring theimages is too low
Try setting the imagecompression to "Rough."The resolution will drop inquality, but it may helpimprove the speed
16
Lots ofinterferencein the images
The compression rate beingused for transferring theimages is too high
Try setting the imagecompression to "Fine." • You may experience a
drop in speed
16
3M™ Wireless Network Module EP8790NET
© 3M 2003. All Rights Reserved. 3M™ Multimedia Projector MP8790

36
Additional Items (continued)
Problem Likely Cause Things to CheckReference
PageNumber
Wireless
Playb
ackM
ode
Can'tcommunicate
The module isn't inPlayback Mode
Press the WIRELESS button onthe projector's remote to makesure that it is in the correct mode
19
The imagesfrom therecentlyexecuted LiveMode are gone
You didn't mark the imagesduring your Live Modepresentation
Press Print Screen (on yourPC keyboard) during LiveMode for each image youwant to playback inPlayback Mode
3,19
The imagesyou markeddon't appear
The 8MB limit wasexceeded (image sizedepends on content)
The projector's RAM disk islimited to 8MB. UseFileViewer to check theimage volume currentlystored in the projector
23
Can't communicate
The wireless LAN card isn'tinserted into the module orthe memory card is stillinserted
Insert the wireless LAN cardthat came with your EP8790NETmodule into the module
11
Wired
LAN
Can't communicate
The PC and/or projector'snetwork settings are notconfigured correctly
Check both the PC andprojector's network settings
12, 29,32
You didn't use a crosscable to directly connectthe PC to the module
Straight cables are normallyused to connect computersto the network, but whenyou connect your PCdirectly to the module, youneed to use a cross cable
3
The wireless LAN card isinserted into the module
Remove the wireless LANcard from the EP8790NETmodule's PCMCIA slot (youcan't use both wireless andwired LAN connections atthe same time)
4
3M™ Wireless Network Module EP8790NET
© 3M 2003. All Rights Reserved. 3M™ Multimedia Projector MP8790

37
Product Name Wireless Network Module
Model EP8790NET
Netw
ork-related
WirelessLAN
ModulationMethod
IEEE802.11b compliant (when using the PCMCIA wireless LAN card)
CommunicationMode
AD-HOC, 802.11 AD-HOC, INFRASTRUCTURE
CommunicationSpeed
1Mbps, 2Mbps, 5.5Mbps, 11Mbps
FrequencyBand
2400 to 2475MHz with 11 operating channels
Encryption WEP (OFF/40bit/128bit)
Wired LANModulation
MethodIEEE802.3 compliant (10BASE-T/100BASE-TX)
Protocol TCP/IP
Supported Functions HTTP server, DHCP client
Data Processing Method JPEG, PNG, BMP
Video Output Digital RGB (equivalent to XGA)
Connectors
Video Output DVI-D port (one)
Wireless LAN Card andStorage Card Compatibility
PCMCIA Type II slot (one)
Ethernet RJ-45 (100BASE-TX) port (one)
Power/Control Mini-DIN7P
Power Supply 5VDC, 3.3VDC
Power Consumption 8W (when using the wireless LAN card)
Operating Temperature Range 5 to 35°C
Outer Dimensions (HxWxD) 137x71x223mm (including protrusions)
Weight Approximately 660g
Specifications
3M™ Wireless Network Module EP8790NET
© 3M 2003. All Rights Reserved. 3M™ Multimedia Projector MP8790

3M Austin CenterBuilding A145-5N-016801 River Place Blvd.Austin, TX 78726-9000
3M CanadaP.O. Box 5757London, OntarioN6A 4T1
3M Mexico, S.A. de C.V.Apartado Postal 14-139Mexico, D.F. 07000Mexico
3M EuropeBoulevard de l'Oise95006 Cerge Pontoise CedexFrance
Litho in Japan© 3M 2003
78-6970-9173-0 Rev. A
Let us help you make the most of your next presentation. We offer everything from presentation supplies to tips for better meetings. And we're the onlytransparency manufacturer that offers a recycling program for your used transparencies. For late-breaking news, handy reference and free product samples, callus toll-free in the continental United States and Canada, 24 hours a day, or visit our Internet Website.
DN00421 (QR56551_OG_ENG)
3M™ Wireless Network Module EP8790NET
© 3M 2003. All Rights Reserved. 3M™ Multimedia Projector MP8790