with this round robin #3 quilt: becky- patchwork posse7—2 step take step sew f do it step pivot...
TRANSCRIPT

Thanks to the designers who helpedwith this Round Robin #3 Quilt:
Visit www.patchworkposse.com for yearly Round Robins, Tutorials and more!
Joy- Joy’s Quilts
Robin- Robin Quilts
Carrie- Cricket Studio
Becky- Patchwork Posse
www.patchworkposse.com
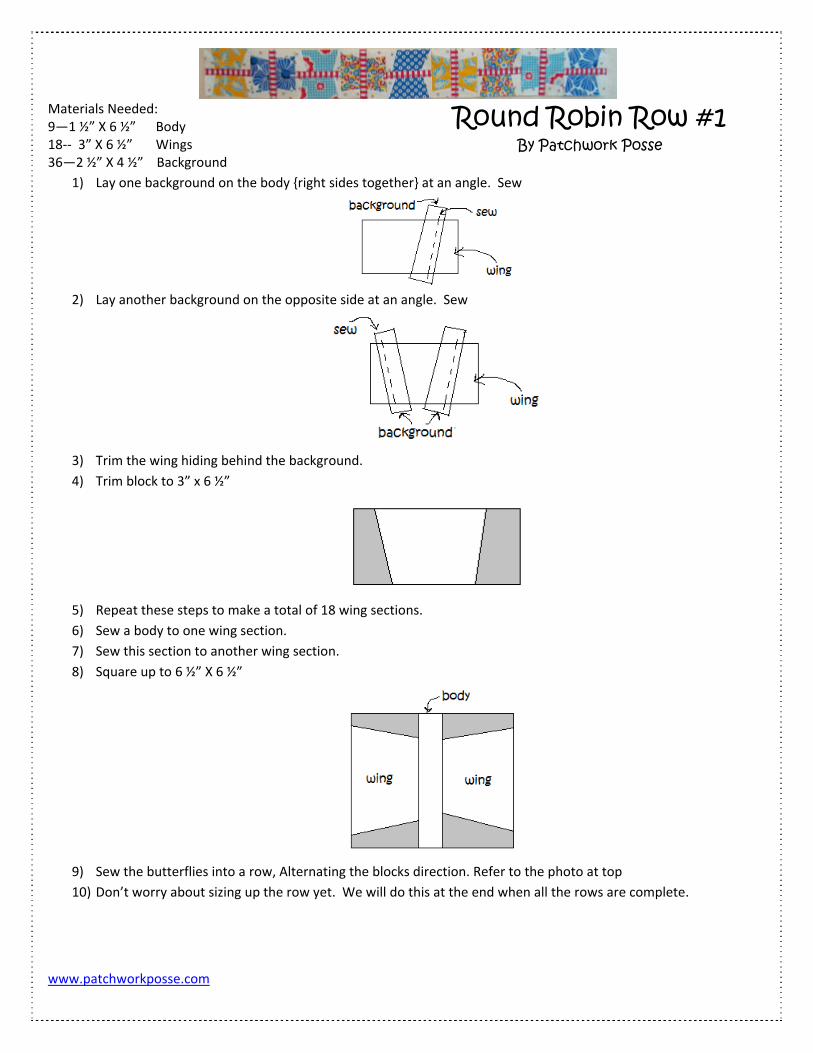
Materials Needed: 9—1 ½” X 6 ½” Body 18‐‐ 3” X 6 ½” Wings 36—2 ½” X 4 ½” Background
Round Robin Row #1 By Patchwork Posse
1) Lay one background on the body {right sides together} at an angle. Sew
2) Lay another background on the opposite side at an angle. Sew
3) Trim the wing hiding behind the background.
4) Trim block to 3” x 6 ½”
5) Repeat these steps to make a total of 18 wing sections.
6) Sew a body to one wing section.
7) Sew this section to another wing section.
8) Square up to 6 ½” X 6 ½”
9) Sew the butterflies into a row, Alternating the blocks direction. Refer to the photo at top
10) Don’t worry about sizing up the row yet. We will do this at the end when all the rows are complete.

Mate7—7 14—7—2 StepTake StepSew fdo itStepPivotskip ttoget
StepRepeStepLay aStepPin 1be toStepSew t Don’http: www
erials Needed inch X 7 Inch2 ½” X 2 ½” s ½ “ X 2 ½” sq
p 1: a flower {7X7
p 2: from corner t! p 3: t at the end athis step if yother.
p 4: eat the first 3 p 5: a few of the cp 6: 1 circle in the otally cute. p 7: the flower bl
t forget to po//patchwork
w.patchworkp
R
d: h squares {flowquares {backquares for cen
7 block} and p
to corner or t
nd sew ½” froou don’t have
steps with al
enter square
center of eac
ocks in a row
ost your progrposse.com/cp
posse.com
RounRo
wer} kground} nter of flower
place a 2 ½” X
the smaller sq
om the sewn triangle‐it is.
l 4 corners of
s in a pile and
ch flower bloc
w together.
ress in the phpg/thumbnai
d Robow #2 by
Chunk
rs
X 2 ½” square
quare. Hint~ i
line. This wi. these cou
f EACH flower
d cut them int
ck. Sew arou
hoto gallery—ls.php?album
bin RPatchwo
ky Flow
e in one corne
f you need to
ll give you a tuld also be us
r.
to a circle.
nd ¼” away f
— m=8
Row Qrk Posse
wers
er. Right side
o mark with p
tiny ½ squareed as spacers
from the outs
Quilt
es together.
pencil this line
e triangle for ls at the end w
side edge. Th
e to follow wh
later use. Youwhen sewing
his edge will r
hen sewing
u can totally all the rows
ag later and

Patchwork Posse Row Robin ~ Row #3 By ©2011, Carrie Graziano, crickets studio http://cricketsstudio.blogspot.com
Hello! Welcome to row 3 in our very super fun row robin. Isn’t cool that we can work on each row and keep our quilt top? Please read thru these instructions before beginning your row. Always good to know what’s ahead, right? So, here is my row…
I made this row super simple easy for us. In every quilt the eye needs a place to rest, and my row is it. It still interesting, but it settles back and lets the other rows shine. It’s made of 8” finished blocks and we’ll make 7 to make a row 56” wide. Here’s what you need: White (Neutral) fabric - 2 ½” x 11” strips – cut 7
Dark Pink fabric - 2 ½” x 11” strips – cut 7
Orange fabric – 4 ½” squares – cut 14
Let’s get started! 1. Place a white strip right sides together with a pink strip and sew
with a ¼” seam allowance. Press open toward the pink. Segment
into four 2 ½” pieces. Repeat for the other 6 strip sets for a total
of 28 segments.
2. Piece the segments into 14 four-patch blocks.
3. Right sides together, sew a four patch to one 4 ½” orange square. Keep the orange square to the right. Press to the orange square. Make 14.

4. Piece 2 rows into a larger four patch using the photo as a guide
and matching the seams. Make 7 blocks. I pressed my seams open here.
5. Square up each block to 8 ½”.
6. Now, sew your 7 blocks into a row. I chose a straight layout, but you could turn every other block for a different look. Up to you!
Becky has noted that we’ll even out our row widths before sewing all of our rows together, so no worries there! Thanks for making this row with me. Check out my blog at http://cricketsstudio.blogspot.com to see how my quilt turns out and what else I am up to!
~ Carrie

For tfabri Cut L
Step corne
Step Step Step
his row you wc.
List: For EACH 8 ‐‐ 2 ½ in 2 –2 7/8 1 ‐‐2 7/8 1 ‐‐ 2 7/8 2 – 2 ½ in 2 – 2 ½ in
1: Match uper to corner a
2: Cut on DR3: Repeat st4: Lay the pi
will be sewing
H BLOCK you wnch X 2 ½ inchinch X 2 7/8 inch X 2 7/8
8 inch X 2 7/8ch X 2 ½ inchch X 2 ½ inch
one backgroand sew ¼ inc
RAWN line. Yep 1 and 2 weces out to k
P
g 7 pinwheel b
will need‐ h backgroundinch backgroinch color on8 inch color tw color one color two
ound 2 7/8 sqch on BOTH si
ou will now hith color twokeep everythi
Pinwhby Pat
www.patchw
blocks. For e
d und ne wo
quare with coides of drawn
have 2 – half s. ng nice and o
heel Rchwork Po
workposse.co
ach pinwhee
lor one 2 7/8n line.
square triang
organized.
Row osse
om/blog
l you will nee
8 square. Rig
gles. Iron to t
ed 2 different
ght sides toge
the dark side.
t colors + you
ether. Draw a
r background
a line from
d
Step
Step Step
Step that Chec Don’ Any q
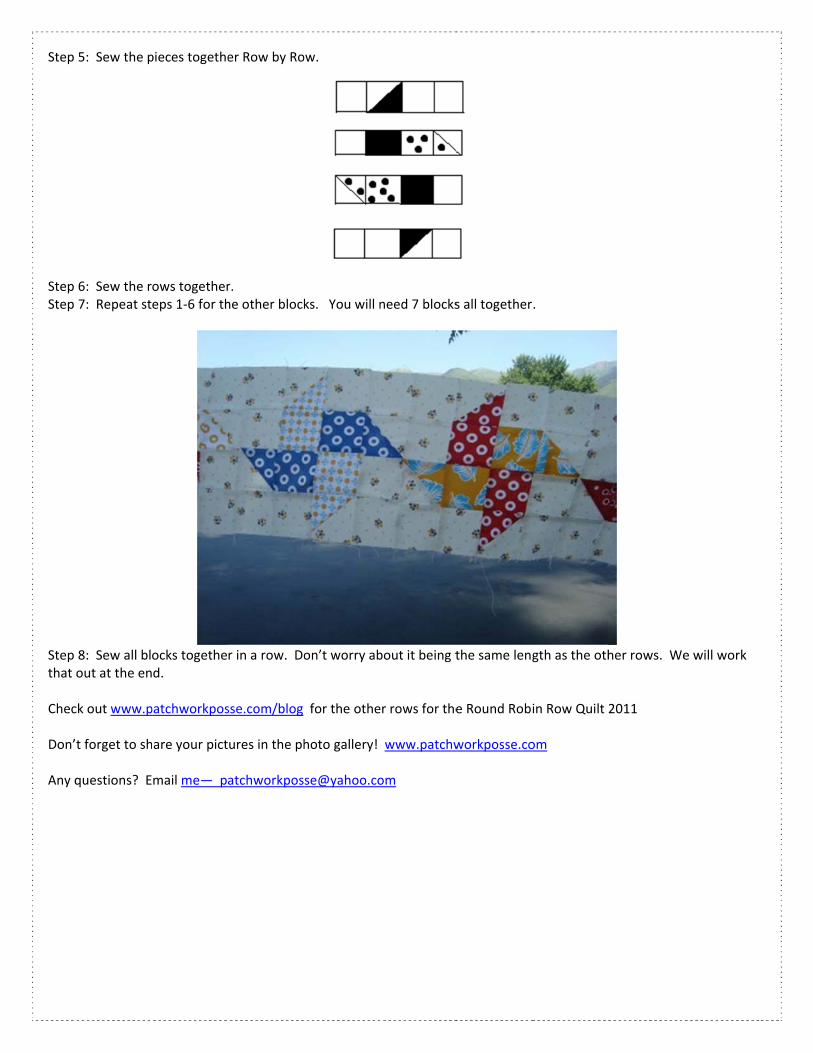
5: Sew the p
6: Sew the r7: Repeat st
8: Sew all blout at the en
ck out www.p
t forget to sh
questions? E
pieces togethe
ows togethereps 1‐6 for th
ocks togethed.
patchworkpos
are your pict
mail me— pa
er Row by Ro
r. he other block
r in a row. Do
sse.com/blog
ures in the ph
atchworkpos
ow.
ks. You will n
on’t worry ab
for the othe
hoto gallery!
need 7 blocks
bout it being t
er rows for the
www.patchw
om
s all together
the same leng
e Round Rob
workposse.co
.
gth as the oth
in Row Quilt
om
her rows. We
2011
e will work

Patchwork Posse Round Robin Row #4 By Joy’s Quilts http://joysquilts.blogspot.com/
Welcome to Row 4 of our round robin!
We’re going to carry on the theme of Row 2 – raw edge flowers....
Pick some fabric, and let’s get going!
What you need:
Fusible webbing Two 8 inch WOF strips of background background fabrics Assorted scraps of fabric for flowers and centers. I chose to use the
same fabric for each of my flowers, but they would look nice all different too.
Cutting the blocks:
From background fabric A – cut four 7” squares
From background fabric B – cut three 7” squares

Instructions:
1. Trace 7 flowers and circles onto the fusible webbing. Cut out the shapes ON THE LINES.
2. Iron the shapes onto the WRONG side of your chosen scraps for the flowers and centers.
3. Cut the flowers and centers about ¼” around the fusible webbing:
4. Place a flower on each background square. Iron on. You will have about a ¼” of loose fabric around the webbing which will not stick down.
5. Sew a ¼” inside the edge around the flowers twice. 6. Iron the centers onto the flowers, and sew around the same way you did
with the flowers.

7. Using small scissors, make little cuts around the flowers and centers:
8. The edges will rag once the quilt is washed. (Having a cup of tea and piece of cheesecake helps with this step!)
9. Sew the background squares together, alternating fabric A and B.
All done!!

Trace 7 flowers and centersonto your fusible webbing,
then cut them out ON the lines.

Round Robin Row 6 By Patchwork Posse
Extra Large Flying Geese
This row is quick to piece using an easy flying geese method. You will need 6 different colors for the geese {or more if
you are going for scrappy} + your background.
Cut:
Background—24 squares 3 ½” X 3 ½”
Geese Colors‐‐‐ 6 squares {1 each color} 6 ½” X 6 ½”
1) Pin a background square in 2 corners, opposite each other.
2) Draw a line from corner to corner.
3) Sew ¼” from the drawn line on each side.
4) Cut on drawn line.
5) Iron them open.

5) Pin another square in the corner.
6) Draw a line from corner to corner.
7) Sew ¼” from the drawn line on each side.
8) Cut on drawn line.
9) Repeat with the other half triangle.
10) Iron the flying geese.
11) Square up to 3 ½” X 5”
12) Sew them into a line.
http://patchworkposse.com http://patchworkposse.com/blog

Copyright © 2011 Robin Quilts, etc. All rights reserved.
Row by Row – Row 6
6” x 48” (unfinished 6 ½” x 48 ½”)
Zig Zag
By Robin Gallagher, www.robinquiltsetc.com
1. You will need a total of 8 - 6” finished (6 ½” unfinished)
squares. These will be used for the zig in your zag (the
center of the block). It can be scrappy or all the same.
2. You will also need a total of 16 - 5” squares. These will
be used for the zag (the background fabric). These can
be srappy or all the same.
3. Draw a line, corner to corner on the back of all the 5”
background squares. This will be your sewing line.
4. Place a 5” square (right sides together) on top of one of a
6 1/2” square and sew on the diagonal line.
5. Fold and press in place. At this point there will be three
layers of fabric in the corner. I like to cut out the center
piece of fabric while leaving the front and back in place.

Copyright © 2011 Robin Quilts, etc. All rights reserved.
This way the 6 1/2” retains it’s shape and stabilizes the
block.
6. Now add a second 5” block to the opposite corner. Re-
move the center piece of fabric and fold and press in
place.
7. That’s it make 7 more blocks either exactly the same or
mix it up and make it scrappy.
8. Once you have all 8 blocks made, rotate every other
block to form the zig zag. Sew them together to form
your finished row.
Enjoy,

Round Robin Row 8 By Patchwork Posse
May Baskets
You will need 2 different colors for each basket block, your background and bias tape for the handles {could substitute
with ric‐rac}
Cut:
Background—18 squares 2 ½” X 2 ½” and 9 squares 4 7/8” X 4 7/8”
Basket Colors‐‐‐ 5 squares 4 7/8” X 4 7/8” and 9 squares 2 7/8” X 2 7/8”
Bias Tape for basket handles ‐‐ 9 pieces 6” each.
1) Place one background 4 7/8” square right sides together with a basket color 4 7/8” square.
2) Cut in half‐‐ from corner to corner.
3) Pin one 6” handle inside each triangle.
4) Sew together catching the handle in the seam in between both triangles. Repeat with other triangle.
5) Iron them open.

5) Take one color 2 7/8” X 2 7/8” square and cut in half
6) Sew these triangles to a background 2 ½” X 2 ½” square. You will get 2 that look like the above diagram.
7) Cut a background 4 7/8” square in half diagonally. Sew this last in the corner under the basket.
7) Lay out the block and sew it together in the order given. Hand stitch the handle down, or tack in place.
http://patchworkposse.com http://patchworkposse.com/blog

Round Robin Row Quilt
Finishing Up By Patchwork Posse
66” X 58”
Materials Needed:
Red Border 2‐ 2” X 56” 2‐ 2” X 58
Outer pieced border 2‐ 4” X 58” 2‐ 4” X 66

First, you really need to measure each row and find out which one is the longest. I found that there was one row which
measured 56”. This is what I used as the default size for all the other rows.
Instructions for adding to the row.
1} measure the row you are adding to.
2} Subtract this measurement from the default number
3} Add ½” to the number. This will be your seam allowance.
4} Cut your background or spacing pieces this new number
5} Sew to the row
6} Sew this row in place.
The following instructions break down what I added or took away from the rows. If you find your rows to not measure
the same as mine, make the minor adjustments to make it work. There are a few blocks that need another block sewn.
Really, they weren’t hard blocks‐ so just do it! It was easier to sew a bit more, than to take away a ton of them to work.
Pinwheel Row— just fine
Butterflies— Add spacer 2 ½” X 6 ½” to one side
Applique Flowers— Add spacer 10” X 7” to one side. Applique one more flower in the space
Flying Geese— Remove 2 geese. You can use these for the label on back
Snow ball Flower Blocks— Piece together 1 more flower + Add spacer 4 ½” X 7”
Baskets— Add spacer 2” X 6 ½”
Bow Ties— Add spacer 1 ½” X 3 ½”
Zig Zag— Piece one more Zag block Add spacer 1 ½” X 6 ½”
Thanks again to the designers: Carrie from Cricket Studio Joy from Joy's Quilts Robin from Robin Quilts
We’ll see you in January for the next round!
http://patchworkposse.com http://patchworkposse.com/blog