instructions · sew one a square to one b strip. press in the direction indicated by the arrows....
TRANSCRIPT


Instructions
1. Sew one A square to one B strip. Press in the direction indicated by the arrows. Make 22.
2. Sew one B strip to a step 1 unit. Press. Make only 8.
3. Sew one B strip to the long edge of one C strip. Press. Make 6.
4. Sew one D strip to the short edge of one C strip. Press. Make 6.
5. Sew one E square to one step 4 unit. Press. Make 2.
6. Sew one F strip to one G square. Press. Make 36.
7. Sew one G square to a step 6 unit. Press. Make only 6.
8. Sew one H strip to one G square. Press. Make 6.
9. Cut three I squares twice on the diagonal to make 12 quar-ter square triangles (QST). Only 10 are needed so there will be 2 leftover.
10. Sew one step 5 unit and two step 4 units in a row as shown. Press. Make 2.
11. Sew one step 8 unit and three step 6 units as shown. Press. Make 2.
12. Sew together one step 3 unit, three step 1 units and a QST as shown. Press. Make 2.
13. Sew one step 8 unit and four step 6 units as shown. Press. Make 2.
A B
BC
CD
F G
GH
B
G
E
+ =+
+
++
+ +
=
=
=
+
+
+
+
+
+

14. Sew one step 1 unit to one step 3 unit. Press. Make 4.
15. Sew one step 8 unit to one step 6 unit. Press. Make 2.
16. Sew one step 15 unit in between two step 14 units. Press. Make 2.
17. Sew one step 2 unit to one QST. Press. Make 4.
18. Sew one step 6 unit to one step 7 unit as shown. Press. Make 4.
19. Sew together one step 1 unit, one step 2 unit, and one QST as shown. Press. Make 4.
20. Line up the rows from steps 17-19, with right sides together. Pin to secure. Sew the rows together. Press. Make 4.
21. Sew one step 16 unit and one step 20 unit to a J square as shown. Press. Make 2.
++ =
++ =J
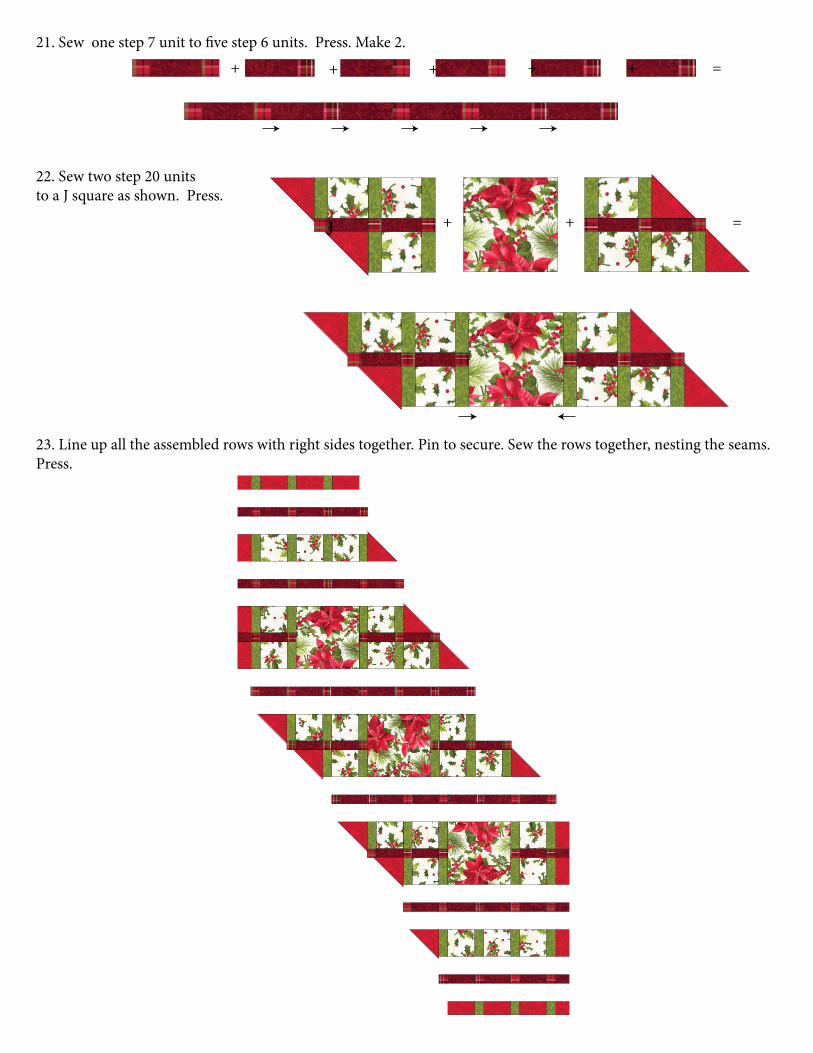
21. Sew one step 7 unit to five step 6 units. Press. Make 2.
22. Sew two step 20 units to a J square as shown. Press.
23. Line up all the assembled rows with right sides together. Pin to secure. Sew the rows together, nesting the seams. Press.
J
+
+
+
+
+ =
=
+ +

24. Trim the sides as shown leaving ¼" from the outer corners of B and F strips.
25. Layer the backing (wrong side up), batting and tablerunner top (right side up). Baste layers to secure.
26. Quilt as desired.
27. Trim the backing and batting flush with the quilt top and bind the edges.
Leave ¼" seam allowance from the outer corners of the B and F strips.

FABRIC CUTTING FABRIC CUTTING
Fabric 1MAS9120-E¼ yd J: Cut (3) 71/2" squares
Fabric 5MAS9126-R21/2 yd
F: Cut (36) 11/2" x 31/2" stripsH: Cut (8) 11/2" x 2" stripsBinding: Cut (4) 21/2"x WOF
Fabric 2MAS9123-E¼ yd
A: Cut (22) 31/2" squares Fabric 9MAS9127-R¼ yd
G: Cut (48) 11/2" squares
Fabric 3MAS9126-G2¼ yd
B: Cut (36) 11/2" x 31/2" stripsD: Cut (6) 11/2" x 2" strips
Backing1 yd
Fabric 4MAS9126-R¼ yd
C: Cut (12) 2" x 31/2" stripsE: Cut (2) 2" squaresI: Cut (3) 51/2" squares
YOURCHOICE