woggle hints and ideas - south lake simcoe area scouts - · pdf fileplates for these knots are...
TRANSCRIPT
Fly Slide The tie slide I like best is the Fly Slide. You take a milk cap lid and fill it with Elmer's glue and have the Cubs check their windows for dead flies and the flies are put in the Elmer's glue. I used plastic flies for the ones I made. Note: I did one with a dead Junebug from my porch, and my Cub son went wild over it. Mini Clipboard Cut a rectangle of thin plywood about 1 x 2 inches (paint stick, or laminate sample, too). Stain and var-nish to taste. Screw a small spring clip to the top. (or use a binder clip) Attach something to the back to hold the neckerchief--I used a small ring of metal but you could use a ring of leather or a ring of plastic pipe. Get some of the smallest post-it notes--I think they're about 1 x 3/4 inch. It not only looks good but it's handy--you always have some paper. Nature Slides Hot glue a pipecleaner ring to the back side of a 2" diameter slice of branch. Or drill 2 holes in the slice and thread the pipe cleaner through to make the loop. • Glue pieces of twigs, nuts, pebbles to the front side. • Press flowers or leaves and glue to the wood • sand smooth and draw animal tracks on the slide • Use a rubber stamp on the cut and sanded side, then use colored pencils to add detail. • Make a pattern (like a mosaic) of different seeds, corn, beans, dandelion fluff, etc.. Draw the pattern on, then apply glue to one section at a time. Sprinkle with one kind of seeds. After each section is covered, then use the next kind of seed. How about the fleur de leis as a design? Knot Sampler Neckslide Start with your basic tree cookie. I prefer to keep them in the 2" diameter range. (My saw has a maxi-mum cut of 3"). I finished the wood by burnishing it. That means rubbing it with something hard until it gets smooth and shiny. You could also use wax or some other type of wood finish. Using darning thread, or very light yarn, of contrasting colors (blue and gold work well), tie 5 or 6 different knots. Use knots appropriate to the Leader (Square knot, bowline, sheet bend, two hitches, tautline hitch, clove hitch, timber hitch, water knot, figure 8, grapevine, etc.) Glue knots to the front of the tree cookie. Name plates for these knots are created using a laser jet printer and text in 3 or 4 point font. Cut them out and glue below each corresponding knot. Glue a ring to the back of the tree cookie. I suggest 1/2" PVC. Useful Slides Make a slide that will hold a neckerchief and perform some other function: • You can take a film canister, pill box, small plastic box (such as those with magnifying glasses built
into them), or other small container and attach a ring to the back- either with hot glue, epoxy, screws, bolts, rivets, etc. depending on the container and make a carrier for:
• First-aid kit • Survival kit • Repair kit • Fire-starter kit (camping only, OK?)
• Make a Display Slide as described above and attach a whistle on a short chain or with Velcro so you can still work it without removing the slide.
• Wrap thin, strong cord (mason line, parachute cord, etc.) around a plain tube base-leather, pipe, even cardboard. With a little practice, the string can be wound attractively, and you will have a pretty long chunk for emergencies.
• A simple, inexpensive watch can be made into a slide so you will always know the time .
Woggle Hints and Ideas

Classic Woggle Designs


J.Lance Wilkinson's Neckerchief Slides Page
Indexed in The Worldwide Scouting Database
This site is a part of the Scouting Webring
There have been accesses to this page since June 5, 1996 according to my local counter.
On one of the REC.SCOUTING.* newsgroups, somebody asked:
>Some of our Tiger Cubs want scarfs for their necks like the rest of>the pack so I am going to try to make some. Instead of the cub scout>slides I have some very good wood here and will try to make nice>slides that are colorful for them (one kid has a scarf from a few years>ago that he got at the scout shop when his brother was a tiger). Does
>anybody have an idea what I can use on the back for a slide?
I realized I should make a web page with pictures and how-to on this and other slide/woggle projects.... So this page is born; a work in progress from this time forward...
Contents: l Keep it Simple l Make it Your Own l Don't Loose That Slide! l More Quick and Simple Ideas l A Collection of Slides
l Slides made by Joel and Dusty Wilkinson l Slides made by J.Lance Wilkinson from Boy's Life articles l Slides made from Kitchen Magnets l Slides made by F. Peter Tolcser
l Neckerchief Slides in my Bookmarks
Other woggle pages I've found:
l Russ Strenk's Woggle World l Lori McGraw's The Slide Show l Slides of the (1997 National) Jamboree l Official World Jamboree woggle/clog l Pack 114's Projects

¡ Canister Neckerchief Slide ¡ "Stress" Neckerchief Slide
l http://www.ccil.org/~dkohn/woggle.html
Keep it Simple...Something as simple as a bread bag twist-tie will work in a pinch as a loop. Stay away from metal rings as they can be pushed, intentionally or by accident, into the boy's neck and hurt. The twist tie alone will do the job in a pinch, in fact -- a fellow den leader forgot his slide once at a pack meeting and nobody noticed (not to suggest this is a good option when you have other options). For a nice permanent loop on a wooden slide, I take a piece of 1x2 or 1x3 and drill holes with a 3/4" bore bit, then cut around the holes with a jig saw to make nice wooden loops, flat on one side. The boys can sand and hot glue these to the backs of whatever you have for the slide.
--------+-----------+--edge of 1x2--- | _____ | | /3/4" \ | ... repeat for length of wood | | hole| | \ \_____/ / \_________/
Make It Your OwnGet the boys into the habit of making their own slides. Often cheaper and definitely more pride in these than the stamped metal ones that their folks buy for them with their uniforms. Most of my Bears still wear the thunderbirds we made last year as Wolves. I've also found that kitchen magnets are ideal fast slides. They're certainly the right price and size. My local WalMart had a series of wooden decoy models for $1.50 each which I bought up for my son & I -- pry off the magnet, grip the decoy in a vice and drill a hole thru it, open at the back. Then an ice cream stick / tongue depressor (available by the ton at craft stores) was cut to fit & form a backing & hot glued on. Plastic or cast magnets can use the wooden loop I described above. I have pie plates with a juicy slice cut from the pie, a juke box, a hot dog with trimmings, a loon, a wood duck, a gramaphone, a steam locomotive, a cast plaster cow skull (that was a suprise) and even a bar-b-que grill (we have a pack picnic coming up ;-) all made from kitchen magnets. Kids & adults both love 'em.
Don't Loose That Slide!Another trick with slides is to make them loss-proof. Nothing's sadder than a youngster who's lost that slide they made all by themselves. I know -- at my cub leader basic training I lost a slide I'd made 30 years before.
Notch that wooden loop in two places where it connects to the back of the slide.
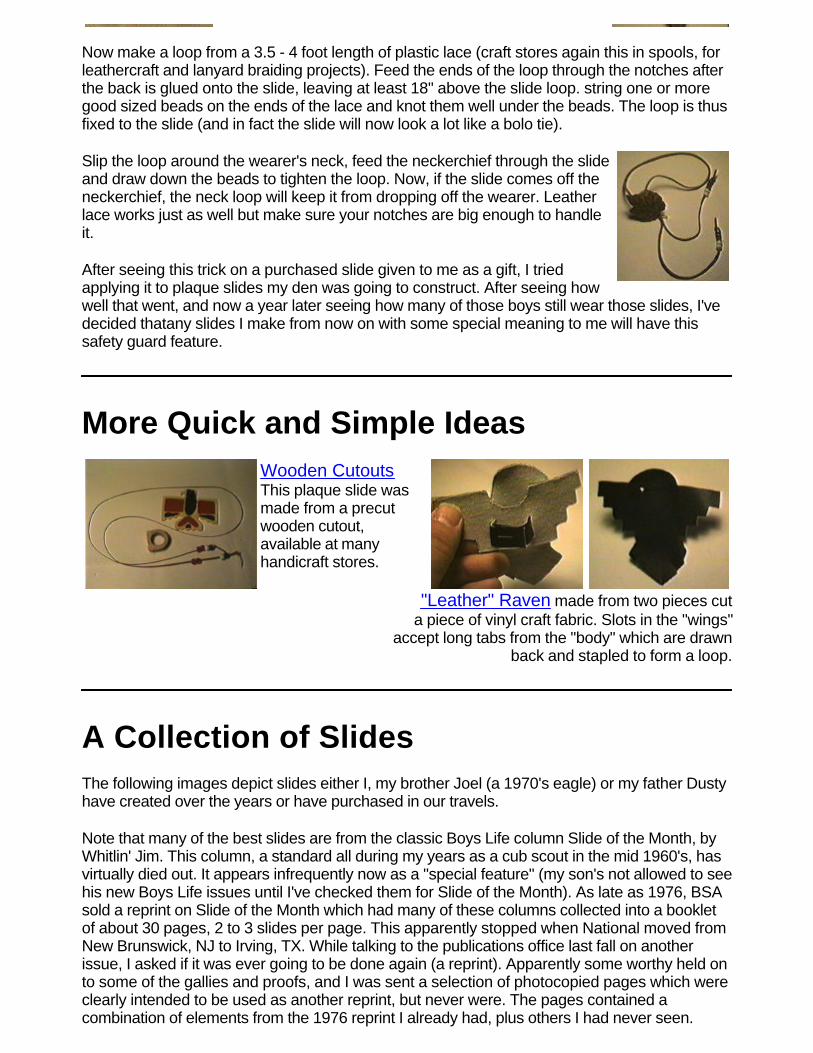
Now make a loop from a 3.5 - 4 foot length of plastic lace (craft stores again this in spools, for leathercraft and lanyard braiding projects). Feed the ends of the loop through the notches after the back is glued onto the slide, leaving at least 18" above the slide loop. string one or more good sized beads on the ends of the lace and knot them well under the beads. The loop is thus fixed to the slide (and in fact the slide will now look a lot like a bolo tie).
Slip the loop around the wearer's neck, feed the neckerchief through the slide and draw down the beads to tighten the loop. Now, if the slide comes off the neckerchief, the neck loop will keep it from dropping off the wearer. Leather lace works just as well but make sure your notches are big enough to handle it.
After seeing this trick on a purchased slide given to me as a gift, I tried applying it to plaque slides my den was going to construct. After seeing how well that went, and now a year later seeing how many of those boys still wear those slides, I've decided thatany slides I make from now on with some special meaning to me will have this safety guard feature.
More Quick and Simple IdeasWooden Cutouts This plaque slide was made from a precut wooden cutout, available at many handicraft stores.
"Leather" Raven made from two pieces cut a piece of vinyl craft fabric. Slots in the "wings"
accept long tabs from the "body" which are drawn back and stapled to form a loop.
A Collection of SlidesThe following images depict slides either I, my brother Joel (a 1970's eagle) or my father Dusty have created over the years or have purchased in our travels.
Note that many of the best slides are from the classic Boys Life column Slide of the Month, by Whitlin' Jim. This column, a standard all during my years as a cub scout in the mid 1960's, has virtually died out. It appears infrequently now as a "special feature" (my son's not allowed to see his new Boys Life issues until I've checked them for Slide of the Month). As late as 1976, BSA sold a reprint on Slide of the Month which had many of these columns collected into a booklet of about 30 pages, 2 to 3 slides per page. This apparently stopped when National moved from New Brunswick, NJ to Irving, TX. While talking to the publications office last fall on another issue, I asked if it was ever going to be done again (a reprint). Apparently some worthy held on to some of the gallies and proofs, and I was sent a selection of photocopied pages which were clearly intended to be used as another reprint, but never were. The pages contained a combination of elements from the 1976 reprint I already had, plus others I had never seen.

Needless to say these will continue to provide ideas and techniques for years to come. Copyright concerns prohibit me from including them here, but any slide which I actually make one of, I'll include what details I can paraphrase from the articles.
Of course, any PRESSURE POSSIBLE on National to include that wonderful reprint and new articles like that on their own web pages, or to release the authorization necessary for me to put them on mine, would be welcomed. Further, any PRESSURE POSSIBLE on National and the editors of Boys Life to return Slide of the Month to its former monthly glory would be welcomed even more!
Slides made by Joel and Dusty Wilkinson
Nazrat Patrol Block of wood with fake fur tail, for TLD staff.
Leather tubes, tooled or carved then laced up the back, for TLD camps.
Incised disk of wood cut from white birch branch, lettering incised into disk. Two holes
drilled for plastic lacing to form loop, for Trexler Scout Reservation staff, 1974.
Cast plaster Boy Scout hand signs, painted and lettered
to commemorate various events. Plastic ring set in plaster before fully se to form loop, Pocono District camporees and Den Chief training.
TLD emblem, Wood slab painted with leather loop, for Minsi Trails Council TLD event.
Hairy Gnu, Wooden spool with white
fur glued on, buttons (sewn to fur before gluing) for eyes, for TLD staff.
Knot tied/woven from clothesline cord.
Evergreen Tree jigsawed wood evergreen tree and loop,
tole painted by Dusty.
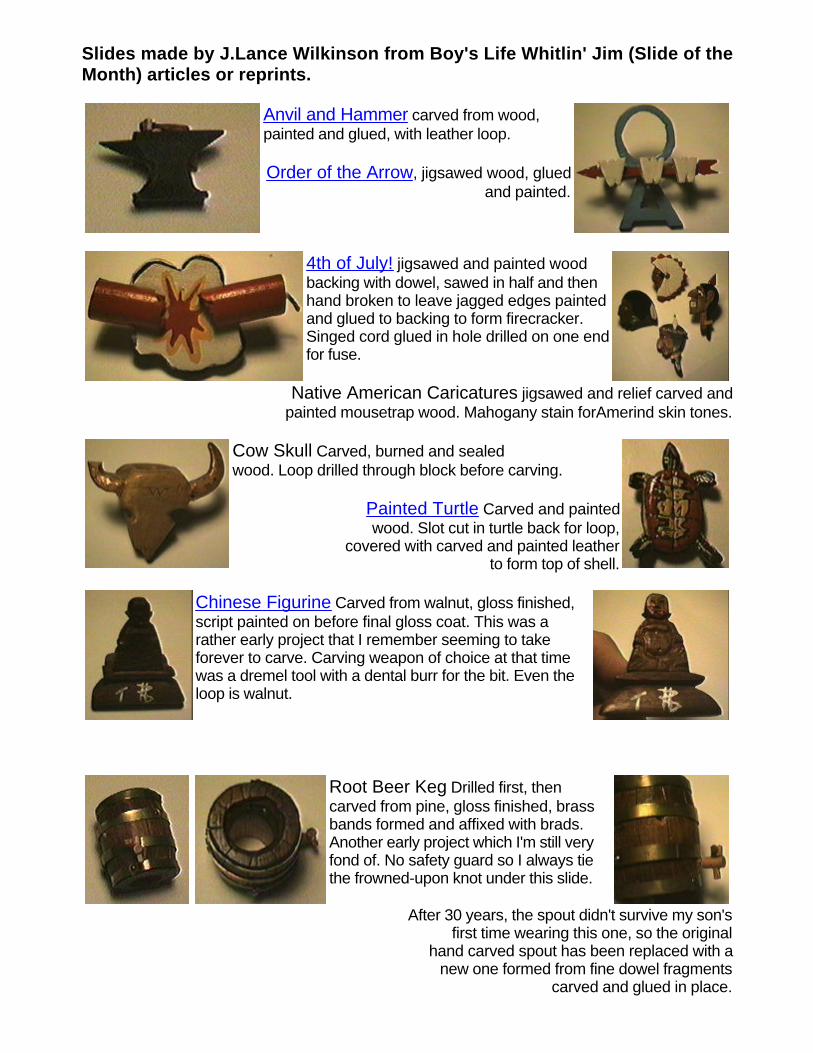
Slides made by J.Lance Wilkinson from Boy's Life Whitlin' Jim (Slide of the Month) articles or reprints.
Anvil and Hammer carved from wood, painted and glued, with leather loop.
Order of the Arrow, jigsawed wood, glued and painted.
4th of July! jigsawed and painted wood backing with dowel, sawed in half and then hand broken to leave jagged edges painted and glued to backing to form firecracker. Singed cord glued in hole drilled on one end for fuse.
Native American Caricatures jigsawed and relief carved and painted mousetrap wood. Mahogany stain forAmerind skin tones.
Cow Skull Carved, burned and sealed wood. Loop drilled through block before carving.
Painted Turtle Carved and painted wood. Slot cut in turtle back for loop,
covered with carved and painted leather to form top of shell.
Chinese Figurine Carved from walnut, gloss finished, script painted on before final gloss coat. This was a rather early project that I remember seeming to take forever to carve. Carving weapon of choice at that time was a dremel tool with a dental burr for the bit. Even the loop is walnut.
Root Beer Keg Drilled first, then carved from pine, gloss finished, brass bands formed and affixed with brads. Another early project which I'm still very fond of. No safety guard so I always tie the frowned-upon knot under this slide.
After 30 years, the spout didn't survive my son's first time wearing this one, so the original
hand carved spout has been replaced with a new one formed from fine dowel fragments
carved and glued in place.
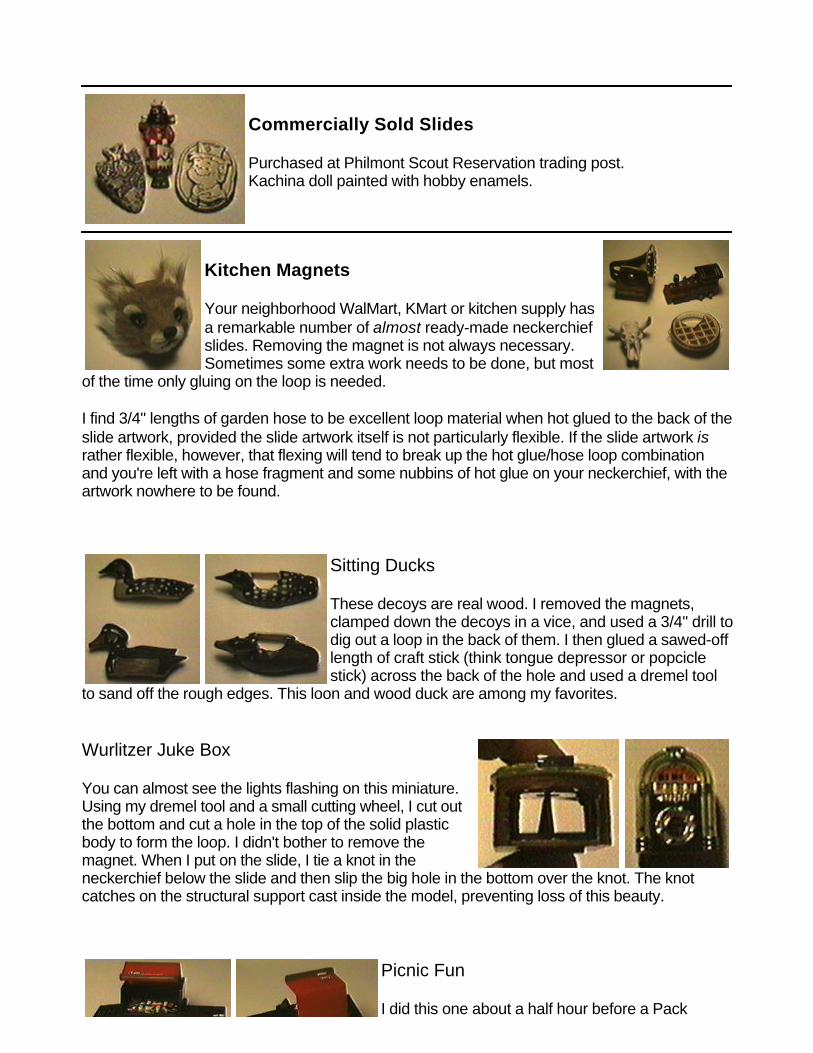
Commercially Sold Slides
Purchased at Philmont Scout Reservation trading post. Kachina doll painted with hobby enamels.
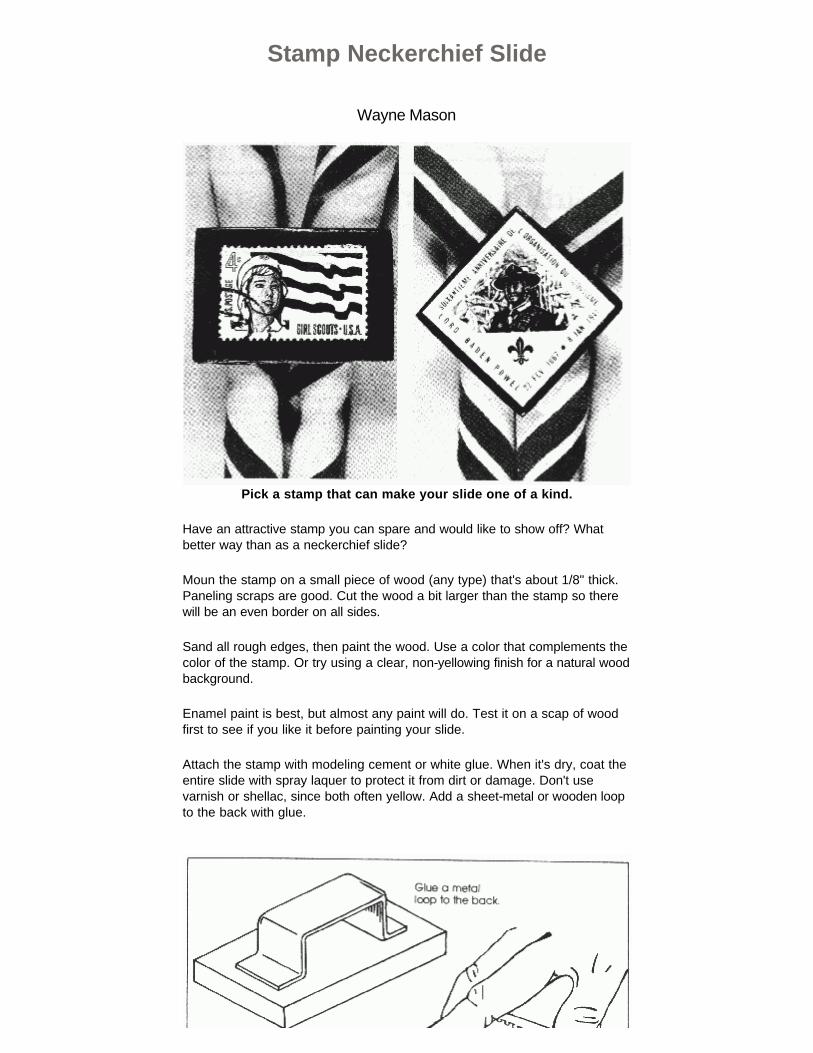
Kitchen Magnets
Your neighborhood WalMart, KMart or kitchen supply has a remarkable number of almost ready-made neckerchief slides. Removing the magnet is not always necessary. Sometimes some extra work needs to be done, but most
of the time only gluing on the loop is needed.
I find 3/4" lengths of garden hose to be excellent loop material when hot glued to the back of the slide artwork, provided the slide artwork itself is not particularly flexible. If the slide artwork is rather flexible, however, that flexing will tend to break up the hot glue/hose loop combination and you're left with a hose fragment and some nubbins of hot glue on your neckerchief, with the artwork nowhere to be found.
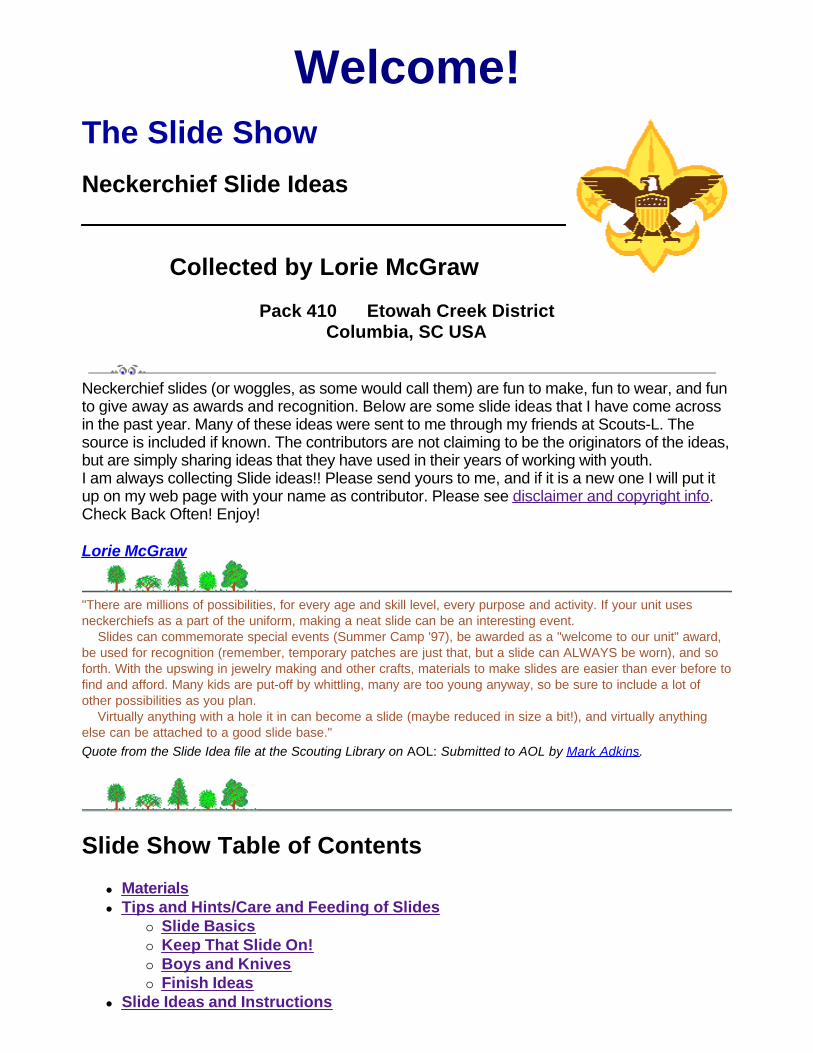
Sitting Ducks
These decoys are real wood. I removed the magnets, clamped down the decoys in a vice, and used a 3/4" drill to dig out a loop in the back of them. I then glued a sawed-off length of craft stick (think tongue depressor or popcicle stick) across the back of the hole and used a dremel tool
to sand off the rough edges. This loon and wood duck are among my favorites.
Wurlitzer Juke Box
You can almost see the lights flashing on this miniature. Using my dremel tool and a small cutting wheel, I cut out the bottom and cut a hole in the top of the solid plastic body to form the loop. I didn't bother to remove the magnet. When I put on the slide, I tie a knot in the neckerchief below the slide and then slip the big hole in the bottom over the knot. The knot catches on the structural support cast inside the model, preventing loss of this beauty.
Picnic Fun
I did this one about a half hour before a Pack

picnic. After removing the magnet (I had to cut this one off), I used hot glue to affix a 3/4" length of garden hose to the back of the kitchen magnet.
The Scouting Webring
View Previous Site | Join the Webring | Index of Next 5 Sites | View Next Site
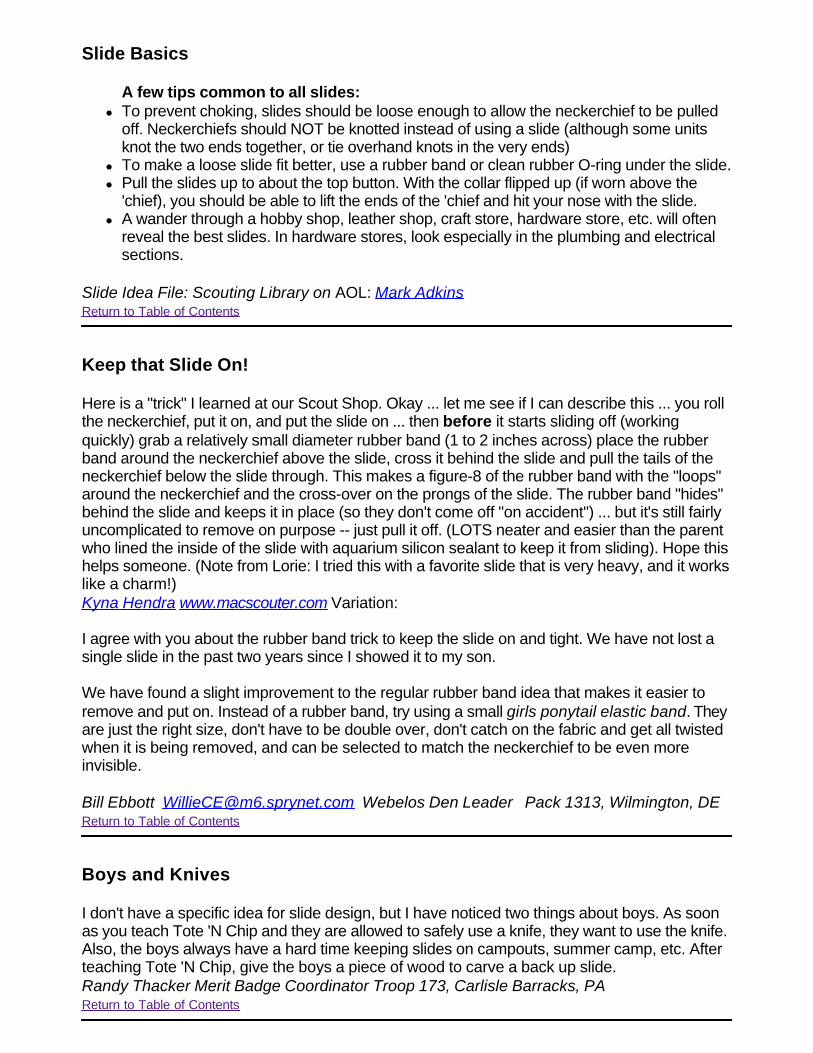
Stamp Neckerchief Slide
Wayne Mason
Pick a stamp that can make your slide one of a kind.
Have an attractive stamp you can spare and would like to show off? What better way than as a neckerchief slide?
Moun the stamp on a small piece of wood (any type) that's about 1/8" thick. Paneling scraps are good. Cut the wood a bit larger than the stamp so there will be an even border on all sides.
Sand all rough edges, then paint the wood. Use a color that complements the color of the stamp. Or try using a clear, non-yellowing finish for a natural wood background.
Enamel paint is best, but almost any paint will do. Test it on a scap of wood first to see if you like it before painting your slide.
Attach the stamp with modeling cement or white glue. When it's dry, coat the entire slide with spray laquer to protect it from dirt or damage. Don't use varnish or shellac, since both often yellow. Add a sheet-metal or wooden loop to the back with glue.

This page was updatedJanuary 15, 1999 © SOSSIE-Mail to Webmaster
SOSSI JOURNAL, Volume 28, Number 2, February 1979.Updates and modifications by Keith Larson, 1998.
The Slide Show
Neckerchief Slide Ideas
Collected by Lorie McGraw
Pack 410 Etowah Creek District Columbia, SC USA
Neckerchief slides (or woggles, as some would call them) are fun to make, fun to wear, and fun to give away as awards and recognition. Below are some slide ideas that I have come across in the past year. Many of these ideas were sent to me through my friends at Scouts-L. The source is included if known. The contributors are not claiming to be the originators of the ideas, but are simply sharing ideas that they have used in their years of working with youth. I am always collecting Slide ideas!! Please send yours to me, and if it is a new one I will put it up on my web page with your name as contributor. Please see disclaimer and copyright info. Check Back Often! Enjoy!
Lorie McGraw
"There are millions of possibilities, for every age and skill level, every purpose and activity. If your unit uses neckerchiefs as a part of the uniform, making a neat slide can be an interesting event. Slides can commemorate special events (Summer Camp '97), be awarded as a "welcome to our unit" award, be used for recognition (remember, temporary patches are just that, but a slide can ALWAYS be worn), and so forth. With the upswing in jewelry making and other crafts, materials to make slides are easier than ever before to find and afford. Many kids are put-off by whittling, many are too young anyway, so be sure to include a lot of other possibilities as you plan. Virtually anything with a hole it in can become a slide (maybe reduced in size a bit!), and virtually anything else can be attached to a good slide base." Quote from the Slide Idea file at the Scouting Library on AOL: Submitted to AOL by Mark Adkins.
Slide Show Table of Contents
l Materialsl Tips and Hints/Care and Feeding of Slides
¡ Slide Basics¡ Keep That Slide On! ¡ Boys and Knives¡ Finish Ideas
l Slide Ideas and Instructions
Welcome!

¡ Neckerchief Slide Potpourri #1¡ Octopus¡ Magnet Slides¡ Nature Slides #1 ¡ Nature Slides #2¡ Picture Slices
¡ The Knot Sampler ¡ Decal Slides¡ Leather Shapes Slides¡ Display/Showoff Slides¡ Turkey Neck Bone Wolf Slide¡ Bone Slides
¡ Real Skull Slide ¡ The "Neckerchief" Neckerchief Slide ¡ Neckerchief Slide Potpourri #2¡ "Scouting Is My Bag" Slide¡ Fly Slide ¡ Mini Clipboard Slide ¡ Stress Indicator Slide¡ Cottonball Ghost Slide¡ Leather Arrowhead
¡ Tom-Tom Slide ¡ Beaded Indian Headdress Slide ¡ Beaded-Look Slide¡ Beaded Circle Slide ¡ Cut Glass Slides¡ The Invisible Slide¡ Woodbadge Bead Display Slide ¡ Drill Press Slides¡ Useful Slides ¡ Quick Slides¡ More Quick Slides
l Using Plaster of Paris¡ Making Molds from Clay¡ Pirate's Face Slide¡ Halloween Jack-o-lantern Slide¡ Using Candy Molds
l Film Canister Slides¡ Oscar the Grouch ¡ Oscar the Grouch #2¡ Popcorn Neckerchief Slide¡ First Aid Kit¡ Leader Survival Pills
l Resources¡ Internet Links¡ Books to try¡ Legal and Copyright Information

Materials
Return to Table of Contents
As you go through the list of slides below, you will notice many different materials. l I have found that for the loops, the best things are pipe cleaners (chenille stems), loops
of leather, and my new favorite, clear flexible PVC (also known as Taigon (sp.?) tubing at the aquarium shop). You can get this hose material at the hardware store, it is very cheap (20-35 cents per foot) and you can cut it with a good, heavy scissors. Plus it is invisible!
l For leather, look to old purses, old leather coats (fur ones, too), leather belts, etc. Check the Goodwill or Salvation Army.
l Any leather or felt pattern can be duplicated easily using a material called Fun Foam. It comes in brilliant colors plus shades, can be cut with a scissors, and is so easy to use and very inexpensive if you watch for it on sale. Check your local craft store.
l A good leather substitute is vinyl (naughahyde) fabric. Go to an upholsterer's shop and ask for scraps. Also ask for scraps of trim, lacing, leather, and other materials.
l Plastic milk cartons have a very nice plastic that cuts easily for bases, loops, or cut-out slides.
l Paint-stirring sticks are great sources of free, good wood for slides and other projects. l Check Clearance sales after Christmas and other holidays for wooden ornaments. I
have some exquisite handcarved cowboys and birds that were originally intended for a Christmas tree.
l Pins and large earrings also make good slides. l Laminated Countertop samples make great backings for slides and also mini
clipboards. Look in the cabinet section of the local Home Depot/Lowes/Do-It-Yourself Centers.
l Milk/orange juice jug caps make great 'frames' for plaster, cotton balls, cardboard circles covered with felt or pictures, etc.
l Refrigerator Magnets are a great, cheap resource. Hot glue a ring on the back. Check the "Dollar" stores for some real deals! Some even light up and make noises!
l Keychains, same as refrigerator magnets. I found one that is a miniature Coleman Lantern that really lights up. Drove my Scouter friends wild the first time they saw it.
l My best finds are in the hardware store. Go cruising, and use your imagination. l The Butcher shop will give you leg bones cut into slices. Try scrimshawing them (older
Scouts, only). l Your local Pet Store will have rawhide dog chews that can be soaked, stretched, and
made into various Indian styles of slides, such as drums, stretched hides, tiny shields, etc. l Check WalMart, Woolworth's, and the Dollar type stores for plastic frogs, insects,
snakes, etc. They look great crawling across a neckerchief. Hot glue a clear PVC ring to them. Nature stores have these small model animals, too, but you should never pay more that 25-50 cents each for them. Puns abound with these (Don't get bugged about it, Hop to it, etc.).
Keep your eyes peeled and look more closely at everyday materials. You may be surprised! Lorie McGraw Return to Table of Contents
Tips and Hints/ Care and Feeding of Slides
Slide Basics
A few tips common to all slides: l To prevent choking, slides should be loose enough to allow the neckerchief to be pulled
off. Neckerchiefs should NOT be knotted instead of using a slide (although some units knot the two ends together, or tie overhand knots in the very ends)
l To make a loose slide fit better, use a rubber band or clean rubber O-ring under the slide. l Pull the slides up to about the top button. With the collar flipped up (if worn above the
'chief), you should be able to lift the ends of the 'chief and hit your nose with the slide. l A wander through a hobby shop, leather shop, craft store, hardware store, etc. will often
reveal the best slides. In hardware stores, look especially in the plumbing and electrical sections.
Slide Idea File: Scouting Library on AOL: Mark Adkins Return to Table of Contents
Keep that Slide On!
Here is a "trick" I learned at our Scout Shop. Okay ... let me see if I can describe this ... you roll the neckerchief, put it on, and put the slide on ... then before it starts sliding off (working quickly) grab a relatively small diameter rubber band (1 to 2 inches across) place the rubber band around the neckerchief above the slide, cross it behind the slide and pull the tails of the neckerchief below the slide through. This makes a figure-8 of the rubber band with the "loops" around the neckerchief and the cross-over on the prongs of the slide. The rubber band "hides" behind the slide and keeps it in place (so they don't come off "on accident") ... but it's still fairly uncomplicated to remove on purpose -- just pull it off. (LOTS neater and easier than the parent who lined the inside of the slide with aquarium silicon sealant to keep it from sliding). Hope this helps someone. (Note from Lorie: I tried this with a favorite slide that is very heavy, and it works like a charm!)Kyna Hendra www.macscouter.com Variation:
I agree with you about the rubber band trick to keep the slide on and tight. We have not lost a single slide in the past two years since I showed it to my son.
We have found a slight improvement to the regular rubber band idea that makes it easier to remove and put on. Instead of a rubber band, try using a small girls ponytail elastic band. They are just the right size, don't have to be double over, don't catch on the fabric and get all twisted when it is being removed, and can be selected to match the neckerchief to be even more invisible.
Bill Ebbott [email protected] Webelos Den Leader Pack 1313, Wilmington, DE Return to Table of Contents
Boys and Knives
I don't have a specific idea for slide design, but I have noticed two things about boys. As soon as you teach Tote 'N Chip and they are allowed to safely use a knife, they want to use the knife. Also, the boys always have a hard time keeping slides on campouts, summer camp, etc. After teaching Tote 'N Chip, give the boys a piece of wood to carve a back up slide.Randy Thacker Merit Badge Coordinator Troop 173, Carlisle Barracks, PA Return to Table of Contents
Finish Ideas
A mediocre slide can be 'totally rad' with the right paint job: l Many hobby and hardware stores carry paint kits to create a variety of finishes- stone,
marble, splatter, etc. A plain wooden slide becomes a chiseled stone if painted right. l A huge variety of model paints can be found at a model hobby shop- they have metallic
flakes, super-high gloss and more. l Various egg-decorating and other specialty techniques can be applied to slides- painting
with melted crayons, batik-style resist and dye methods, etc. l A woodworking stain technique that is quite interesting is to stain the wood lightly in
whatever color(s) you want, then paint the images with very thin acrylic paints that allow the wood tones to show through. Let dry well and finish off.
Slide Idea File: Scouting Library on AOL: Mark Adkins) Return to Table of Contents
Slide Ideas and Instructions
Neckerchief Potpourri
Try these slides that I showed at our Council's 1997 Supertrain (Powwow). I have linked these to the instructions elsewhere in this page, if the instructions are here. (if you need specific instructions for any of the others, contact me at [email protected])
l Spider (sweetgum ball, wobble eyes, and pipe cleaners for legs) l turtle (walnut half, cardboard-ed felt with cut-out head, legs, tail, pipecleaner...extremely
cute!) l stressed out slide (telephone wire, really cute as a hair barrette, too, not that my wolves
think so) l Indian head/Eskimo head (could also be pirate, cowboy, etc... nut with drawn eyes and
yarn hair) l false Turk's-head (vinyl or leather. Look in the BSA Cub Scout How-to Book) (this can
also be done as a bracelet) l cube slide (wooden building block, painted with scouting colors, add a scouting sticker,
drill hole through top) l fireman's badge (from a sticker given out by the fire dept. "Jr. Fireman" with pipe cleaner
loop) l tooled leather (preformed blanks) in tube, flat with weave, etc. l Pinewood car award (micro-machine car hot glued on leather blank with Pinewood Derby
date title on it) l Valentine's hearts (fun-foam slide, cut out hearts and put on loop) l "Big shot" (shotgun shell on a split-ring holder) l Spaceman (toy space ranger, hot glued to a backing) l Patches slides, using old patches, flat and tube. Roll your old patches and hot glue them
around a piece of tubing or water hose. (Not those special patches) l Trash can and popcorn sales (film canister) l bird/cowboy ornament (keep an eye out on those after Christmas sales... hot glue loop on
back ) l bird house (was a Christmas ornament) l Halloween bat (fun foam, same as above) l refrigerator magnets (bear, eagle, trout, see ornaments) l blank for pins (like tiger cubs, arrow of light, popcorn sales, etc. out of fun foam)
l US Marshall's badge (plastic one given to the cubs after a visiting Marshall spoke to us)
----Lorie McGraw Columbia, SC Return to Table of Contents
Octopus
Materials needed: green yarn matching color threadwobble eyeshot glueplastic curtain ring for the slide.Instructions: Cut twelve 6" long strands of yarn for each slide. Fold in half and tie at the neck area, leaving about two inches for the tentacles. Next divide the strands into sections of three. There will be eight sections) Braid each section, and tie off with thread. Hot glue on the wobble eyes. Put octopus down over the curtain ring with a few tentacles inside the ring and rest over the front to cover it. Hot glue in place. Return to Table of Contents
Neckerchief Potpourri #2
l How about a neckerchief slide to match every theme in the book? For "Fire! Fire!" we got "Matchbox" fire engines and ambulances and glued them to PVC pipe slices. A little heavy when you used the hook and ladder, but were considered "really cool!"
l Candy molds at craft shops can offer a world of slides. l Carved shrunken heads made from apples and covered with urethane can be glued onto
rings. l Popsicle sticks can be made into the Scout sign, small wooden furniture parts from craft
stores as well as doll house accessories can be used. l You can take pipe cleaners and make a frazzled slide for leaders. Each limb is wound on
a thin pencil and as the Scouts "frazzle the nerves of the leader," another limb is extended.
l Small lids can be used as frames for pictures. l Party favors can provide another source...the boys got a big kick out of making squirt-gun
slides that worked. l You can make those puppets that move when you pull a string. Make them small, but they
will work too. l A store like Radio-Shack can sell you all the parts, including the little batteries, to make
light-up, noisemaking slides! l Or you can sometimes buy keychain toys and take them apart and use the pieces. l You can also make miniature weather rock slides.
I'm sure there is a limit on what you can do to make a slide, but beyond size and weight, you would have to look to the sky. In addition to PVC pipe slices, rings from many water and soda bottles work well, some even have little plastic things that help hold the neckerchief up! I hope that these ideas give you a starting point for your own ideas. Patrick Driscoll [email protected] CM P244 & 699, Alamo Area Council, San Antonio, Texas Return to Table of Contents
"Scouting is My Bag" slide
A slide that I like is to make a paper bag -- using pinking shears and, of course, glue. Stuff in some tissue paper and glue. Then write "Scouting is my bag!" on the front of the bag. Glue on pipe cleaner, twist tie or whatever for the neckerchief holder. Barbara L. Ford [email protected] Return to Table of Contents
Fly Slide
The tie slide I like best is the Fly Slide. You take a milk cap lid and fill it with Elmer's glue and have the Cubs check their windows for dead flies and the flies are put in the Elmer's glue. I used plastic flies for the ones I made. Yvonne Graham [email protected] Park, CA (Note: I did one with a dead Junebug from my porch, and my Bear Cub son went wild over it...next meeting we will be doing dead bug slides, for sure! ---LLM)Return to Table of Contents
Mini Clipboard
Saw this in Boy's Life some years back and have had lots of comments on it. Cut a rectangle of thin plywood about 1 x 2 inches (paint stick, or laminate sample, too). Stain and varnish to taste. Screw a small spring clip to the top. (or use a binder clip) Attach something to the back to hold the neckerchief--I used a small ring of metal but you could use a ring of leather or a ring of plastic pipe.Get some of the smallest post-it notes--I think they're about 1 x 3/4 inch. It not only looks good but it's handy--you always have some paper.---Mark W. Arend [email protected] Beaver Dam, Wisc. Scoutmaster, Troop 736 Return to Table of Contents
Stress Indicator Neckerchief Slide
Materials: several 12-inch pieces of telephone wire, various colors 1. Put two or more pieces of wire next to each other. 2. Make a 1-inch loop near the center by twisting them together. (It's like putting a twist tie
on a bread wrapper.) Or tie a square knot. 3. Wrap each piece of wire around a pencil until you get to the end of the wire. 4. Remove the pencil. 5. The loop is now the part that goes around your neckerchief; you can adjust it by twisting
tighter or loosening it up a bit. 6. The coils can be scrunched together to tell people you're really wound up or stretched out
to indicate that you're relaxed.
Just as a side note, mine has two pieces of wire which result in 4 coils coming from the loop. It looks like a little man and I keep him on the shelf near my computer where he keeps me company!Mary Lee Foley [email protected] Return to Table of Contents
Cottonball Ghost Pin / slide

Pull/manipulate one cotton ball into a ghost shape and glue two "eyes" to it. Use a looped piece of masking tape (rolled sticky side out) to attach to clothes. http://www.creighton.edu/~bsteph/pack114/library/packcamp.html#nature (Pack 114 Library)Barb Stephens [email protected] Pack 114 Pages(Note: for slide, glue the ghost to an oval of cardboard and then attach a slide ring. -LLM) Return to Table of Contents
Leather Arrowhead
This slide is an arrow head made out of thin leather or heavy soft plastic like found on the sides of a one gallon plastic milk carton It is an arrow head shape about 4 inches tall with two large holes cut out in the middle. (One on top, one below) The neckerchief is fed through the top hole from the backside, then down and through the bottom hole. Dale Fulkerson, ASM Santa Monica CA(Note: this 2 hole treatment can be used on any shape of your choice. It also can be drilled out of flat wooden slides at least 3-4 inches (~10 cm.) long, again in your choice of shapes. I have a lovely one made of a polished myrtle wood rectangle, with a lightly carved shock of wheat in the lower left corner. A design could also be burned onto the leather or the wood ----- LLM) Return to Table of Contents
Magnet Slides
A good and easy way to craft a neckerchief slide is from a refrigerator magnet and then make the neckerchief slide saver from Lance Wilkerson's web page:http://perdita.lcs.psu.edu/BSA/woggle.htm#SAFETY I have made two slides from different magnets with a holiday theme: Halloween & Christmas. My Webelos fixed the Halloween slides and used the slide saver. The designs were bats and pumpkins. We used that plastic craft string and beads. Then at Christmas I gave each boy a slide made from a magnet with Santa and used bells on the slide saver instead of beads. They came out real cute. You can find magnets real cheap from a store like Big Lots. Usually two to a package from .79 to a buck. You need to try and remove the magnet from the back though. I had trouble with the Santas as the whole magnet would not come off most of them but the Halloween ones came off perfect. I made some neat ones for my husband and me from owl magnets and use water hose pieces described on the slide saver page. Ginny Gillam Pack/Troop 164 Edenton, NC Return to Table of Contents
Nature Slides #1
Hot glue a pipecleaner ring to the back side of a 2" diameter slice of branch. Or drill 2 holes in the slice and thread the pipe cleaner through to make the loop.
l Glue pieces of twigs, nuts, pebbles to the front side. l Press flowers or leaves and glue to the wood l sand smooth and draw animal tracks on the slide l Use a rubber stamp on the cut and sanded side, then use colored pencils to add detail. l Make a pattern (like a mosaic) of different seeds, corn, beans, dandelion fluff, etc.. Draw
the pattern on, then apply glue to one section at a time. Sprinkle with one kind of seeds.

After each section is covered, then use the next kind of seed. How about the fleur de leis as a design?
Barb Stephens [email protected] Lorie McGraw [email protected] Returnto Table of Contents
Nature Slides #2
This one is made out of 1/2 inch plastic pipe. Get a plastic pipe cutter and cut off neckerchief lengths of plastic pipe. Have the boys glue nature objects. stones, twigs, nuts and seeds to the plastic pipe. Or they could cut out pictures from magazines and glue them on like decoupage. Dale Fulkerson ASM Santa Monica CA Return to Table of Contents
Picture Slices
Materials l 1/4" slices of a log or branch, (largest diameter was approx. 3") l 1/4" slices of 1" diameter PVC pipe for loop l cut-outs of pictures from magazines (can be anything from sports equip. to pets-anything
that would interest a boy) l spray adhesive l Polyurethane or spray acrylic
Glue the PVC ring to the back of each slice of wood. Boys choose what picture they want on the front. Spray the adhesive on the front of the wood, place the picture. Spray with polyurethane spray to seal. *Note: Do not use spray adhesive to "seal " the wood. Use Polyurethane or spray acrylic.Cathy Carver [email protected] 581 Arvada CO Denver Area Council Return to Table of Contents
Knot Sampler Neckslide
Start with your basic tree cookie. I prefer to keep them in the 2" diameter range. (My saw has a maximum cut of 3").
I finished the wood by burnishing it. That means rubbing it with something hard until it gets smooth and shiny. You could also use wax or some other type of wood finish.
Using darning thread, or very light yarn, of contrasting colors (blue and gold work well), tie 5 or 6 different knots. Use knots appropriate to the Leader (Square knot, bowline, sheet bend, two hitches, tautline hitch, clove hitch, timber hitch, water knot, figure 8, grapevine, etc.) Glue knots to the front of the tree cookie.
Name plates for these knots are created using a laser jet printer and text in 3 or 4 point font. Cut them out and glue below each corresponding knot.
Glue a ring to the back of the tree cookie. I suggest 1/2" PVC.
I have made only three of these in total, used to honor very important volunteers.Bob Peters [email protected] 'Beaver Bob WCS-39' Verdugo Hills Council, Glendale, California

Return to Table of Contents
Decal Slides
BSA puts out some decals, six-eight to a sheet, of wolfs, bears and webelos, they are about 1X1inch. From molding or some wood of same size cut pieces to fit decal. Take PVC pipe, about 3/4 inch and cut rings. Let boys hot glue ring to back of wood and place decal on front. Jacobo Caceres [email protected] Plant & Soil Sciences Return to Table of Contents
Leather Shapes Slide
Materials: l Leather shapes with holes already punched (triangles, squares, circles, whatever) l colored pony beads l leather strips.
Affix a leather strip to create the slide. Then let the boys determine the length of the other strips as they attach their beads. Tie knots in the end of a leather strip, and push through one of the holes, with knot in the back.Attach the pony beads and knot off the end.Cathy Carver [email protected] 581, Arvada CO/ Denver Area Council Return to Table of Contents
Display/Showoff Slides
To display fossils, arrowheads or other small trinkets: 1. Make a 'base' tube for the slide out of a piece of copper pipe or other thin, easy to paint
or work with tubing. 2. Paint the 'base' a neutral or contrasting color. usually, it is best to only use one color. 3. Hot glue or epoxy the item to be displayed on the tube.
Slide Idea File: Scouting Library on AOL: Mark Adkins. Return to Table of Contents
Turkey Bone Wolf Slide
Take a vertebra from a turkey neck, boil it clean, add pointed ears, green eyes, and a red tongue. It will look like a wolf head. Jacobo Caceres [email protected] MSU Return to Table of Contents
Bone Slides
Neckerchief slides can be used for a variety of team-building and recognition. Since we have several avid outdoorsmen registered as adult leaders, we have a wealth of materials to choose from. Two that have proven popular with the lads are deer vertebrae and the leg-bones (circular bones) from the center of a venison steak! The leg bones are usually about one inch long, and the vertebrae are just the right size! Our lads also discover the bones during hikes. I carry a
number of the "steak" bones with me, and use them to recognize "on-the-spot" excellence. By the way, the adults seem to like them too! Sam Poulton Otetiana Council, Eagle District/Asst. District CommissionerNote: You can try your hand at scrimshaw on these, but be very careful. It would probably be best to leave that to the older scouts ---LLM Return to Table of Contents
Real Skull Slides
When I was a boy, I found a dead woodchuck once and used the skull for a neckerchief slide. Once everyone at camp saw it, none of the woodchucks were safe, so I'll leave it to your judgement whether you want to publish this. (Note: encourage use of Roadkills, etc-- LM)
Boil the skull, or leave it on an ant hill until it is clean. Remove the two front teeth. These are the teeth that the woodchuck gnaws with. Glue the teeth in place on either side of the skull like the horns on a steer. Once this is done, the skull looks just like a mini-version of one of those "Old West" skulls of steers found in the desert Southwest. A loop can be glued on the back to form the slide. You can leave it natural or paint it to your liking. These are particularly popular because they are rare. I don't advocate collecting enough woodchucks to make this a project, but if you have a varmint hunter in the family, they can provide a source. Farmers are usually happy to have these animals removed.
Vic Sands [email protected] Buckskin Council, Charleston, West Virginia
Return to Table of Contents
"The Neckerchief" Neckerchief Slide
Using fabric dyes, paints, etc., decorate the fabric to look like your neckerchief. Let dry well, iron if recommended for color-fastness.
1. Dip the fabric in thinned white glue, about 1/3rd or 1/4th glue and tap water. (see note below) Add more water as needed. Lay out flat and face down on waxed paper or aluminum foil. Roll up as if it were a real neckerchief. Do this while still damp so it holds its shape.
2. Take a piece of dowel or pipe with an OUTSIDE diameter equal to a neckerchief and wrap it in wax paper or foil.
3. Lay the pipe on the neckerchief and wrap the fabric around it as if it were a boys neck, pinching it together where a tiny neckerchief slide would go- maybe tying a thread at this spot. Let it dry fully. If necessary for more stiffness, repaint with thinned glue or use fiberglass resin or epoxy with an adults close supervision)
4. Fabricate a tiny neckerchief slide by gluing a bead or sequin to the thread above, or wrapping a piece of shiny wire around the pinch point, or taking a mother's pin and pinning/gluing it in place.
5. Slide the finished slide off the pipe or rod.
Slide Idea File: Scouting Library on AOL: Mark Adkins (Note: Go to the fabric or craft store and get Fabric Stiffener... easier and less mixing. ---LLM)Return to Table of Contents
Tom-Tom Slide
We are making these. The boys chose it themselves. Instead of painting them we are going to

use a woodburning tool to make the design. I got a bag of leather scraps for $1.00 at Tandy. (Note: Chamois is a light weight leather that can be found in the car washing supplies at any store--LLM)
l Heavy cardboard ring 5/8’ high, 2 1/4’ diameter l Piece of chamois l Glue l Paints
Cut chamois large enough to cover cardboard ring, leaving ends long enough to tie in back. Put a bead of glue around one end of cardboard ring and press into center of chamois. Pull ends around and tie in back, trimming ends. Glue edges of chamois down around outside of cardboard ring. Paint Indian designs on front. Or woodburn the designs in. Submitted by Pam Hughes [email protected] (from Heart of America Council "Lazy Days of Summer" 1998 Pow Wow book )
Return to Table of Contents
Beaded Indian Headdress Neckerchief Slide
originally from Judy Scholefield
Materials: l 15 safety pins ( I used small brass ones ) l "E" beads ( I used a variety of colors ) l 6 mm round beads ( I used faceted ones ) l approx. 8" of 20 gauge wire l 1/2 pipe cleaner ( I used gold )
Instructions: 1. String "E" beads on pin in desired pattern. Do 14 pins the same way. ( I experimented
with different colors. Each of the above will represent a feather so you may want to use a pattern here. )
2. Pinch heads of pin closed, so that they don't open while wearing. IMPORTANT SAFETY FEATURE!
3. String 6 mm beads and heads of pins on wire. Start with a bead and fold wire back over bead to keep it on. Alternate beads and pins, being sure to put all pins facing the same way. (This is where I created a pattern. Ex. blue faceted 6mm bead,1 pin w/red beads, blue faceted 6mm, 1 pin w/white beads, blue faceted 6mm, 1 pin w/blue beads, blue faceted 6mm, 1 pin w/white beads, blue faceted 6mm,1 pin w/red beads, etc.....) End with a 6mm bead, leave enough wire to fold back over bead as you did at start, then trim excess wire away. Be sure ends are folded back enough so that there is no sharp point.
4. String pipe cleaner through loops at bottom of pins, pushing pins close together, and centering pipe cleaner.
5. On ends of pipe cleaner string several beads, either "E" or 6mm. ( I used 3 blue faceted 6mm beads on each end) Form excess pipe cleaner into a loop, and twist to secure.
6. Take your last pin and pin the first beaded pin and last beaded pin on the back of the slide. This will help to form shape, and is used to create area to put neckerchief through.
7. Adjust shape, pull "tails" straight, then wear with pride.
To tell you the truth, Lorie, when I received the directions from Judy, I was very grateful but not quite sure what this was supposed to be. When I finished, I had a gorgeous Indian Headdress Neckerchief Slide to show my scouts and asked if they wanted to make it. YES, and ooooo's could be heard. I brought the finished slide to a Den Leader's meeting and they all wanted the

directions. I am a Den Leader for my 3rd grade son's Bear Den. My 2nd year Webelos son loved it and wanted to show his den. He got so excited he designed a flag of the United States to wear as a slide. I'll get you those directions when I have more time. Laureen De. DL, Advance Chair. Knox Trail Council, MA Return to Table of Contents
Beaded-Look Slide
1. Using the leather neckerchief slide kit from the BSA or any similar leather project, dampen the leather surface as you would for tooling or carving the leather.
2. Score the leather in a grid pattern with a swivel knife or Xacto knife. Use smaller grids for older kids.
3. Hand out a piece of grid paper that roughly matches the slides to each kid. Have the kids figure out what they want the finished slide to look like.
4. Using water-based acrylic paints (such as those available through the BSA or most hobby stores), paint each square in the grid as if it were a colored bead. Let dry. Seal with a coat of leather protector or polyurethane sealant.
5. Make the slide as per kit directions.
Slide Idea File: Scouting Library on AOL: Mark Adkins (Note: Any counted or graphed design will work. Check out the web for Cross-stitch patterns, etc . -----LLM) Return to Table of Contents
Beaded Circle Slide
I just spent the afternoon making these with my Bear den while we waited for plaster casts of footprints to harden in the driveway. I learned how to do this at the Western Alaska Council powwow recently.
Materials l 5 1/2-inch wooden beads (note, use more if your bead circle is too small) l 20 inches of plastic lacing
Instructions 1. Put first bead at middle of lacing. 2. Take second bead and put one end of lacing through one side and other end of lacing
through the other side. Pull until the two beads are next to each other. 3. Then continue with next 3 beads in same manner. 4. Check size. Add more beads if needed. 5. Tie off and put ends through a bead and cut.
That's all there is to it.Rebecca Graham Western Alaska Council Return to Table of Contents
Cut Glass Slides
(for older boys)
Special needs: Bottle Cutting Kit (look in your hobby shop) 1. Using the bottle cutter , cut about 1 1/2 to 2" off the top of a clean, interesting pop or other
bottle.
2. Using the tools and techniques in the kit, smooth off the bottom of the cut neck. It will become the slide.
3. Decorate, if desired, with paints, glued-on items, model decals, etc. An etched-look can be accomplished with the paints available for the purpose at the hobby shop.
Slide Idea File: Scouting Library on AOL: Mark Adkins) Return to Table of Contents
The Invisible Slide
Instructions 1. Find some clear vinyl tubing (3/4" or larger Taigon tubing or flexible PVC) the right
diameter to be used as a slide (look in hardware stores or aquarium supply stores). You will need about 1 to 1 3/4 inches per slide.
2. Cut off the length you need, and about an extra six inches. Uncurl it by soaking it in very hot or boiling water, then letting it hang with a weight on it to cool and set. An easy way to do this is to clamp it on both ends with a Vise Grip tool and hang the lighter tool on a hook and let the heavier tool pull it straight.
3. When cool, cut off any damaged parts, then cut to size. 4. Decorate as desired, or leave invisible.
Decorations can include: l -- the embroidered stickers sold by the BSA or hobby shops l -- any other sticker that will fit. l -- often, you can pin a Mother's Pin or similar item onto the plastic and still thread a
neckerchief through. l -- self-adhesive letters will allow you to add your initials, unit or den number, etc. l -- virtually anything that can be glued or screwed on from behind!
Slide Idea File: Scouting Library on AOL: Mark Adkins Return to Table of Contents
Woodbadge Bead Display Slide
Instructions 1. Get a nicely colored 'push-button' toggle, such as that used to close drawstrings, a length
of rawhide thong or parachute cord thin enough for your beads, and your beads. 2. Thread your beads on the thong, making sure to leave about 4" unused. 3. Tie an overhand or Figure 8 knot in each end. 4. Push the middle of the thong into the toggle so you form a loop that you can tighten by
sliding the toggle. 5. Put the neckerchief ends into the loop and snug it down to hold.
Slide Idea File: Scouting Library on AOL: Mark Adkins Return to Table of Contents
Drill Press Slides
(for adults only) If you have access to a good drill press: l A piece of branch with the bark still on it can be drilled out to make a nice slide. Avoid
woods with a lot of pitch or sap. Varnish or Polyurethane the whole thing to protect the

bark. l With the correct bit, an interesting stone can be drilled out. Rock collectors, rock shops,
or Rock and Mineral Clubs can advise you on the bits and speeds to use on the different minerals and stones.
l Large beads, bones, wooden knobs, balls, etc. can be drilled pretty easily. Small ones are harder and more dangerous to drill.
l I knew one kid whose dad drilled a hole down through the top of a "Hot Wheels"-type car for a slide and it looked pretty cool. Many small toys can be drilled as long as you follow basic safety precautions. Some flimsy toys can be reinforced by filling them with "Durhams Rock Hard Putty", epoxy, etc.
***NOTE: Be sure to use the right bit, speed, clamping and safety equipment, including safety glasses. Making slides should not be a death sport!*** Slide Idea File: Scouting Library on AOL: Mark Adkins Return to Table of Contents
Useful Slides
Make a slide that will hold a neckerchief and perform some other function: l 1.) You can take a film canister, pill box, small plastic box (such as those with magnifying
glasses built into them), or other small container and attach a ring to the back- either with hot glue, epoxy, screws, bolts, rivets, etc. depending on the container and make a carrier for:
¡ - First-aid kit ¡ - Survival kit ¡ - Repair kit ¡ - Fire-starter kit (camping only, OK?)
l Make a Display Slide as described above and attach a whistle on a short chain or with Velcro so you can still work it without removing the slide.
l Wrap thin, strong cord (mason line, parachute cord, etc.) around a plain tube base- leather, pipe, even cardboard. With a little practice, the string can be wound attractively, and you will have a pretty long chunk for emergencies.
l A simple, inexpensive watch can be made into a slide so you will always know the time .
Slide Idea File: Scouting Library on AOL: Mark Adkins Return to Table of Contents
Quick Slides
Can't find your slide? Try these fast answers: l Most costume jewelry rings or inexpensive rings make interesting, but rather small slides. l Key chains can be interesting slides if they are the right size and have interesting things
that hang down right. Those with tabs usually work the best. l Pieces of clean tubing, such as plumbing pipe, conduit, chromed tubing, etc., can be
used if smooth and de-burred. l Napkin rings usually make good slides. Look for exotic slides at import shops. l Some of the big 'conchos' with two big slots in them make good slides.Thread the
neckerchief up from behind the top slot, then back down into the bottom slot.
Slide Idea File: Scouting Library on AOL: Mark Adkins Return to Table of Contents
More Quick Slides
I have used the following as impromptu slides: l Hair barrettes (especially for tying back long hair) l Decorative Pins (clay art ones and Indian design ones) l Scarf holders and T-shirt loops (flat pieces of wood or plastic with 2 holes to gather your
extra long T-shirts at the hem for that sporty, fashionable look. I have one that is a ceramic fish that is super!)
Lorie McGraw Return to Table of Contents
Using Plaster of Paris
Making Molds from Clay
Use oil based clay called plasticine. Place a hunk of clay the size of your fist on a plastic table top or paper plate. Have the boys take a bear head, or other large toy animal and stick it into the clay. Carefully pull the head out. ( you may need to spray WD- 40 on the head - practice first.) Then fill the opening with plaster of Paris mixed in a paper cup. Put a loop in the back before it dries. Should take 20 minutes before the plaster set up hard enough to pull the clay off and pick the plaster out. Knead it back together and start on the next.Dale Fulkerson ASM Santa Monica CA Return to Table of Contents
Pirate's Face Magnet or Slide
(Note: This form could be used for any oval face shape --LLM) Pour a small amount of plaster into the bowls of plastic spoons. If making a slide, insert the ring before the plaster sets. When hardened, pop out. Brush all surfaces with a mixture of glue and water to seal the plaster. Draw a pirate's face on the smooth bowl side. Attach a felt eyepiece. Make a felt pirate hat by cutting two hat shapes from black felt. Glue them together, leaving the bottom open to slide down over the plaster head. Glue it to the head. Or make a bandanna with fabric scrap. Glue a magnet strip on.---Chris [email protected] Return to Table of Contents
Halloween Jack-o-Lantern Slide
(Note: This form could be used for any round shape, plus the aluminum can mold could be scored with a nail for more relief.-LLM)We used the bottom of a soda can (Turn it upside down) as a plaster of Paris mold. A drop of oil or Pam spray put on the mold first makes it easier to remove the blank. After pouring the plaster in, embed a green pipe cleaner that has been shaped like a Halo. The stick end will stick out on the edge (the stem of a pumpkin) half of the hoop will stick out just above the centerline (the slide) Note: having the slide above the center allows the slide to hang properly when it is worn. Have the scouts scratch initials and year on the back.After they have set up, remove from mold and paint a base orange with a fast drying paint, then

put the face on. Permanent magic markers can work well here.Kevin Henderson [email protected] Troop 28 Meridian MS Return to Table of Contents
Using Candy Molds
One year our den leader made plaster slides using plaster of Paris and candy molds in the shape of various animals. My son came home with a parrot. She had the boys choose which animal they wanted, then they poured the plaster of Paris into the mold and used a heavy wire shaped in a "U" shape to make the backing. This was inserted after the mixture began to harden a little. The next meeting the boys painted them and took them home.Cathy Carver [email protected] 581, Arvada CO/ Denver Area Council Return to Table of Contents
Film Canister Slides
Oscar the Grouch
A few years ago at a computer fair I ran into a family table where the 9 year old girl decided that SHE wanted to sell something, too.She took a film canister, hot glued a green fuzzy ball into the open end, hot glued the cap to the top of the ball a la Oscar the Grouch. A couple of small craft shop eyes completed this Sesame St. character, with his "can". This could be made into a woggle, by adding a loop on the back.y Dave Loomis [email protected] Greenland, NH Return to Table of Contents
Oscar 2
For Oscar, you punch two holes in the back of the can, and two holes in the cap. Thread a black pipe cleaner through one hole in the can up through the top, back down through the other hole, and out through the second hole in the back. Twist the ends together to make the loop. This keeps the lid on (as in Oscar's garbage can). Glue two green 1inch pompoms together. Glue two 'eyes' on the top pompom and a short piece of red embroidery thread for the mouth (keep it straight - Oscar rarely smiles!). . Use a regular cotton ball as a filler in the bottom of the can, so Oscar peeks out the top. Return to Table of Contents
Popcorn Neckerchief Slide
Materials:
l Film canister l pipe cleaners l red or white adhesive vinyl l marker l cotton balls l plaster

l popped corn l clear acrylic spray.
1. Cover the film canister with red or white adhesive vinyl. 2. Make two small cuts in the back to insert a pipe cleaner ring. 3. Make a sign "POPCORN" and tape to front of can. 4. Put one or two cotton balls in the can and pour a small amount of plaster over them for
weight. Let dry. 5. When dry, glue popped corn in the top part of the can. (Use enough to make sure
popcorn will stick.) 6. When dry, spray with clear acrylic spray.
Cindy P-1373/T-1373 DR/DAC Return to Table of Contents
First Aid Kit
(Great for Webelos Readyman) Paint a film canister white with a red cross on the front. (or use white film cans and colored tape) Attach a curtain ring to the back side of the canister, or poke 2 holes in the back and use a chenille stem for the loop. Fill the canister with useful first aid items:
l 1 adhesive bandage l 1 alcohol wipe l 1 tube antiseptic ointment l 2 safety pins l coins for telephone call l emergency phone numbers l Tylenol wrapped in aluminum foil l Basic First Aid instructions reduced to small laminated card, rolled up inside
-Lorie McGraw , Barb Stephens, and TomB, formerly CM of pack 469 in NJ
Return to Table of Contents
Leader Survival Pills
l Film canister or an unused pill bottle l Mini M&Ms l cotton ball l chenille stem or loop l label (below)
Make canister with loop, glue label (below) on the outside (make it look like a prescription label) Put the new mini M&M's in it, with a cotton ball on top.
Leader Survival Pills
Directions:
Remove cotton, tear in half, place in earsTake pills as needed:
red for stress reliefblue for noise reductionyellow for patience brown for instant game ideamixed colors for sense of humorCall your Cubmaster in the morning!
Return to Table of Contents
Resources
Using the Internet
A few slide ideas at this URL: http://www.creighton.edu/~bsteph/pack114/library/packcamp.html#CraftsHappy Scouting! --Barb Stephens
J.Lance Wilkinson has an excellent slide page. It includes many hints and pictures. http://perdita.lcs.psu.edu/BSA/woggle.htm
Neckerchief Slide Ideas in the AOL Scouting Forum Library by Mark Adkins. E-mail: [email protected] (These are scattered throughout this page) This AOL file was contributed to this project by 2 Internet Scouting Friends, Chris CMR1954 , and Amy, and okayed by Mark Adkins. Return to Table of Contents
Books
Cub Scout Books include the Cub Scout How-To Book, each of the books at each scouting level have hints for slides (Wolf, Bear, etc.). Also check the Program Helps, available in the Council office. Contact other districts and ask for their Powwow books. Or e-mail me at [email protected] and get more info.
I hope you enjoy all of these ideas for slides. And a Big Thank you to all of my Scouting Friends who took time to submit their ideas to share with us all! Yours In Scouting, Lorie McGraw
Return to Table of Contents
Legal Stuff
Copyright ©1998 Lorie McGraw.
This collection may be freely copied and distributed for all non-profit youth groups or schools. Please keep the sources with the slides. This may not be copied for sale, inclusion in a book or magazine, (unless the book is being given away) or distributed for monetary consideration. In other words, if you are giving it away, great, copy it and have fun. If you are trying to make money with it (including submission to craft
magazines), then no, you may not copy these pages.Councils, Leaders, and Roundtables may freely include any of this information in their Powwow books, training aids, and RT handouts. Please include source and web page information with it. Other distribution will be granted only with permission of Lorie McGraw or the individual who contributed the item. Individuals retain all rights to their submissions. These slide ideas were not necessarily invented by the people who submitted them for inclusion on this web page.
Return to Table of Contents
Thank you andKeep the Spirit of Scouting alive each day.
This site has been visited times since February 1, 1998
Return to Etowah Creek District Home Page

Pack 114's Library
PACK FAMILY CAMPOUT
EASY RECIPES
collected by Barb Stephens, Pack 114, Mid-America Council
ZIPLOC OMELETTES
Write name on a ziploc bag and crack 2 to 3 eggs into it. Let scouts add a small spoonful of any/all the ingredients he desires. Zip the bag shut and add to a dutch oven pot of boiling water. Depending on the size of the pot, 6 - 10 bags can cook together, taking 8 - 15 minutes.
HOTDOG "FILET"
Cut hotdog lenghtwise, but not all the way through. Stuff sliced cheese into the slit. Wrap with bacon slice, securing ends of bacon with a toothpick. Cook on a stick or in a cardboard box oven, 10-15 minutes.
ZIPLOC SPOON FUDGE
Place all ingredients in the ziploc bag and squeexe out all the air. Squish and moosh the bag until all the ingredients are well mixed and there is a creamy consistancy. Add any flavorings or other stuff like raisins, M&Ms, nuts, peanut butter, etc.
For a larger serving:
2-3 eggs shredded cheddar cheese bacon bits browned sausage sliced mushroom diced green pepper diced tomato sliced black olive salt & pepper ziploc sandwich bags
Hotdog Small slice of cheese Strip of bacon 2 toothpicks
1/2 c. powdered sugar 1 Tbsp. butter (1/8 stick) 2 tsp. cream cheese few dashes vanilla 1/2 - 1 Tbsp. cocoa 1 Ziploc sandwich bag
1 lb. powdered sugar 1 stick butter 3 oz. cube cream cheese 1/2 tsp vanilla 1/4 - 1.2 cup cocoa 1 gallon size Ziploc bag

ZIPLOC INSTANT PUDDING
Put both ingredients into a ziplock baggie, seal, and squeeze until ready to eat. Then, snip off a corner of the bag and squeeze the pudding into your mouth directly. Easy clean-up!
KIDS ICE CREAM
Place milk, sugar and vanilla in smaller container and seal it tightly. Fill the large container half full of ice and add the salt. Place the smaller container inside the larger container and seal it tightly. Shake it for about 5-15 minutes or until it turns into ice cream. Wipe off the edge of the small container before opening it (or you may mix some salt into the ice cream)! Enjoy!
If using a can, you can kick it to mix it, but be sure that both lids are duct-taped very well first. Shaking the container can easily tire some people. (Make games: how far can you kick it; can you kick to a "goal"; can yours collide with someone else's?)
KIDS ICE CREAM
(variation - mix as above)
KIDS ICE CREAM
(variation - mix as above)
Last updated May 27, 1998
4 oz. COLD milk 1/2 small box instant pudding powder mix
1/2 cup milk 2 different sized coffee cans 1 Tbsp sugar or ziploc freezer bags 1/4 tsp vanilla 6 Tbs salt (for larger container) ice
2 cup milk 2 Tbsp sugar 1/2 pint heavy cream any flavoring (broken candy canes,
choc bar, pulverized mints, etc)
2/3 cup chocolate syrup 14 oz can Eagle Brand Sweetened Condensed Milk 2 cups (1 pint) whipping cream

Pack 114's Library
PACK FAMILY CAMPOUT
GAMES & ACTIVITIES
by Barb Stephens, Pack 114, Mid-America Council
ORIENTEERING
Everyone stands in rows, about 5 feet apart from each other. A leader stands in front of the group so that all but the leader are facing directly NORTH. The leader announces that they are facing NORTH, and describes the other three directions.
The leader asks them to face different directions until most of them are comfortable with the directions. Once that idea is clear, the leader gives instructions like "take two steps north, turn east and jump once in place." Continue in this manner.
HIKING
We are fortunate to have a State Historical Park nearby. There is a great Visitor's Center to tour and see a flim as well as a nearly complete reproduction of the original fort. Another highlight of this hike includes traversing a trail down into a wooded ravine that was sculpted as an Eagle project! Any trip through a wooded area offers so many opportunities to teach Cub Scouts: watching for natural wildlife; tree identification by bark, leaf, shape; finding and identifying animal tracks, nests; plant identification - edible plants and poisonous plants; using a compass, etc.
OBSTACLE COURSE
It's fun to set up a simple obstacle course for the boys to test their agility, coordination and speed. Some activities include walking the plank/log, long jump, overhand throw, jumping rope, traipsing through a low-to-the-ground rope wrapped around stakes placed in a zig-zag format (similar to tire stepping done by football players), rolling/crawling under a raised rope, hurdling a series of logs, weaving in and around some trees or trashcans, crawl through a cardboard box tunnel, etc.
This can be done as a relay match or individually. Time the boys through the first time and let them repeat it and improve their time. They'll be sure to love it! Just be sure that safety comes first!!!
But, before the boys (& adults?) get started, be sure they have limbered up. Try this fun fitness
Orienteering Game Hiking Obstacle Course Scavenger Hunt Airplane Fun
Map Reading Adventure Crazy Olympics A Day At The Carnival Fitness Is Fun

warm-up!
SCAVENGER HUNT
A scavenger hunt is always a lot of fun. Depending on the ages of your participants, you may have to develop different task lists. For instance Tiger Cubs may not yet be able to identify leaves whereas Webelos might be expected to know some of the more common trees and leaves in your area.
You can combine the participants into groups, even mixing the older boys with the younger boys. Just be sure that each boy will have a chance of making a "find." Some suggested items for a scavenger hunt include: a twig in the shape of a letter, trash item(s), a new leaf from tree/bush, something red, a ball-shaped rock, a pinecone, a five-pointed leaf, a man-made object (what & where it is), an insect (live or dead) etc.
AIRPLANE THEMED FUN
Set up various stations. Each Cub Scout should be issued a "Log Book" (index card) which is stamped at each station to show his participation and/or score.
Station 1: Navigator Make a simple compass trail such as "6 paces North, 12 paces East." Have messages (or rank-level questions) at the end of the trail to be reported for successful completion. Several different trails should be laid out with varying degrees of difficulty.
Station 2: Bombardier Use beanbags or fill mismatched/discarded socks with flour. Have Cubs throw these, one at a time, at a target. Points can be awarded for accuracy or the number of successes per number of attempts.
Station 3: Flight Attendant Build a simple obstacle course (landscape timbers laid at two foot intervals or a ladder laid on the ground) and have the Cub Scouts carry a small tray of plastic glasses filled with water. The tray should be carried waiter-style - flat on the palm at shoulder level. Point systems can be developed for speed, amount of water not spilled, etc.
Station 4: Gunner Have Cub Scouts fire water pistols at targets hung from a rope stretched between two trees. The targets can be made from small plastic plates or margarine tub lids. Another option would be to have the boys throw wet sponges at a plywood target with clouds (holes) cut out.
Station 5: Precision Landing Make paper airplanes and test the accuracy of the pilot and plane. Try to fly the plane through a hoop or tire hung from a tree and/or land the plane on a landing strip (sidewalk section or posterboard target).
Station 6: Paratrooper Have Cub Scouts make a clothespin parachute and test its accuracy and their skill by trying to land it on a ground target. They are allowed to "adjust" the parachute's flight path by blowing on it - but no hands!
MAP READING ADVENTURE
Obtain or make a suitably detailed map of a park. It should show a lot of tree and equipment detail. Scatter 10-15 "control points" on readily identifiable features shown on the map. These could be trail intersections, field corners, trash cans, etc. The key is to use points that can be found both on the map AND actually in the park. After doing this "desk work," verify by going to the park and locating each "control point."
Make physical markers that will be placed/posted at the "control points." These can be 3x5 index cards. Put a different letter on each card, and a different "code number" and a trivia question on the back of the card. The letter serves to uniquely identify each of the "control points"; the "code number" must be recorded when the "control point" is located; the trivia question must be answered.
These physical markers should be placed at the "control" points just prior to the event. Mark the "control points" on the map using the same letter as the corresponding physical markers. On the back side of the map, list the "control point" letters along with a physical description of the "control point" so the contestants can verify each location.
Distribute a map and pencil to each pair of contestants (2 scouts or parent/child) with instructions to write the code number and the answer on the back of the map by the "control point" letter and physical description.
Rules: (optionally, set a time limit & deduct points for each extra minute used)
1. Map shows location of each control point to find 2. Visit the control points in ANY order 3. At each point:
a. record the code number b. record the answer to the trivia question
4. You score points for each control point you find AND each trivia question that is correctly answered.
Make a map on one side of page and a list for answers on the other side. Here is a sampleback side of our map.
Our pack made four versions of varying difficulty: one for (younger) siblings; one for Tiger Cubs; one for Wolf & Bear Scouts; one for Webelos. Here are some questions you could use for each of these categories.
CRAZY OLYMPICS
Whether it's an "Olympic" year or not, kids love to participate in these crazy olympic events. But before you can compete, you need to make banners, pendants and streamers and have a parade!
Olympic Parade
Make a "pack" banner with all kids' signature next to their "star." Have an adult cut a potato in half, dry it with a towel, draw a star on it, and cut out around the star (the star shape is raised off the surface of the potato). Then have the kids dip the star in a dish of tempra paint and stamp the star on the banner. Give them an indelible marker to write their name next to their star. Use lots of colors and different shaped stars!
Then make streamers by taping two, three or four lengths of crepe paper strips to sticks collected off the ground. Just be sure to cut the streamers longer than the child is tall.
Let each child make their own pennant, banner, or flag out of construction paper, felt, cloth, etc. Have precut geometric shapes in a variety of colors for them to glue on to create a unique design. Add detail with markers and fabric paint. Attach them to sticks found in your local park.
Announce the campout theme beforehand and encourage the kids to bring "olympic" attire. This could be a track uniform, or any sports uniform, swimsuits, leotards, etc. Have some adults dress up in togas too!
Now you're ready! Line up everyone, play some John Phillip Sousa music, and have an Olympic Parade to start off the Olympic events!
Crazy Olympics
While the adults are setting up the Crazy Olympics events, have the kids make medals. Cut a 4" diameter circle out of cardboard and cover it in aluminum foil. Staple a 24" ribbon to the back and decorate the front with stickers and fabric paint.
Any format would work, but we have found it's fun to do these events as a relay game where every event is performed by every child. There's no limit to the odd activities that can be incorporated into this event!
Draw a starting line and a line at the opposite side of the play area or room. Explain these "games" are mostly silly and a whole lot of fun. Everyone who participates is a winner!
1. Run to the other end, eat one cracker, then whistle/hum "Twinkle, Twinkle, Little Star." 2. Go down and back tapping a balloon and keeping it in the air. 3. Walk down and back with a potato between your knees. If it falls, pick it up and put it back
between your knees. 4. Trot backwards, flapping your arms. 5. Put plastic sandwich bags on hands. Run to other end, pick up a stick of chewing gum,
unwrap it and eat it, with "gloves" on. Pass sandwich bags to next in line. 6. Using a broom, sweep a paper towel tube down and back. 7. Place an empty paper cup over a straw and place the straw in your mouth. Go down and
back keeping the cup on the straw and the straw in your mouth. "Pass" the straw to the next player - no fair using hands!
8. Clasp your ankles with your hands and keeping them there, go down and back. 9. Fill a pop bottle with popcorn (kernels), carrying one spoonful of kernels down to the pop
bottle each time. 10. Run down to the other end, and toss a ring at a "grid" of bottles filled with sand or colored
water. 11. Toss beanbags (old socks filled with beans and tied off) at a tic-tac-toe grid. 12. Add "regular" events: speed races, distance races, human wheelbarrow, 3 legged race
(use old tube socks cut down the sides of the calf to the toe seam to tie ankles together).
DAY AT THE CARNIVAL
With a bit of luck, you might be able to find some carnival equipment to borrow or rent for very little money. Our pack has access to some home-made carnival games that are really quite simple.

You will need to purchase or make:
n some game tickets (tickets with a number) n prize tickets (tickets with a star) or prize tokens n some (cheap) prizes (toys, pencils, card games, jewelry)
Each child will receive some game tickets (10-20); one ticket required per game. If you don't have enough money budgeted to cover the prizes, etc., you may want to charge a minimal amount (5 or 10 cents) per ticket. But, if you can wing it, it's nice to give every child the same number of free game tickets.
The kids randomly play one game or another. Depending on the "skill" level achieved at each game station, a different number of prize tickets or numbered tokens are returned to the contestant. Be sure this information is clearly listed for the "manager" of each game station.
When all the contestants have used up their game tickets, or when you run out of time, etc., the kids go to the "prize store" and redeem their tickets. Be sure to treat all your volunteers with a cool drink and a hearty thank-you!
FITNESS IS FUN
Every rank of Cub Scouts encourages the Scout to be physically fit. Why not develop a "Fitness is Fun" event where the boys can work on an achievement or activity badge?
Give each scout an index card listing the stations he must visit in order to complete some/all of the "athlete" requirements for his Cub Scout rank. Give Tigers a card listing some of the simpler (non-measured) type activities.
FITNESS STATIONS
#1 - WARM UP
a. Leg stretches b. Jumping jacks c. The "Warm-Up"
#2 - STRETCH
a. Sit-ups Webelos - 30 bent-knee sit-ups
b. Push-ups Webelos - 8 "real" push-ups
#6 - CATCH
a. Play catch Wolf - throw & catch (10 steps apart)
b. Softball throw
#7 - TWO-PERSON CONTESTS
a. Do 6 of the 9 two-person contests: 1. Push over line 2. Chinese pull 3. Pull over line 4. Foot push 5. One-legged hand wrestle 6. Stand up back-to-back push

Reward all participants with an "olympic" medal or a certificate, and be sure that the signed cards are turned over to the respective den leaders so the achievements can be marked off for each scout.
RANK REQUIREMENT LISTS
#3 - BALANCE
a. Walk line forward, backward, sideways, and on a board
#4 - ROLL
a. Forward roll b. Backward roll c. Falling forward roll
#5 - JUMP
a. Vertical Jump Webelos - 9 in. or higher
b. Standing Long Jump Webelos - 5 ft. or longer
7. Back-back push 8. Hand wrestle 9. Elbow wrestle
#8 - WALK/RUN
a. Run 50 yds in 8.2 sec OR b. Fast walk 600 yds in 2.75 min.
#9 - HEALTH KNOWLEDGE
a. Do Physically Healthy worksheet
#10 - RELAYS
a. Crab Walk b. Frog or Kangaroo Jump c. Elephant or Gorilla Stroll d. 30 yard Dash
WOLF - #1 Feats of Skill
BEAR - #16 Building Muscles
WEBELOS - Athlete Activity
Station Requirement Station Requirement Station Requirement
#1 . #1 a b c a (1) #9 a 1 #6 a a #2 a a (2) #2 a 3 #3 a b #2 b a (3) #2 b 5 #4 a c #5 b a (4) #5 b 6 #4 b d #6 b a (5) #5 a 7 #4 c e #7 a b #8 a 8 #5 a f #10 a b c d c #8 b 9
#10 a b c g . . (not available) (2)

Pack 114's Library
PACK FAMILY CAMPOUT
SIMPLE CRAFTS & FUN
collected by Barb Stephens, Pack 114, Mid-America Council
Binoculars Bird Feeders Nature Slides Coal Garden
Organic Mobile Cannister Slides Preschooler Fun Fun Science
"Stress" Slides One of a Kind Parachutes Stick Game
Sun & Moon Metal Punching Sand-Scapes Human Bubble
Lift Your Parent
BINOCULARS Each child will need two 5" sections of paper towel tubes. You may optionally cover the ends with saran wrap to form the "lens." Paint or wrap with construction paper the two 5" tube sections. Decorate with markers, stickers, etc. Bind the two together using yarn wrapped in a figure 8 fashion between the two, or by taping. Observe nature up close and personal!
SIMPLE FEEDER String together some peanuts (still in the shell). Tie to a tree limb.
COFFEE CAN FEEDER
Cut the bottom out of a coffee can. On two plastic lids that fit that can, trace around a 50 cent coin placed in the center. Cut out those circles. Punch two holes on one edge/side of the can. Bend a coat hanger wire to fit into the holes as the feeder hanger. Find a twig about 6 inches longer than the can and wire this to the bottom (opposite the hanger) of the can. Fill with sunflower seed and hang.
PRINGLE FEEDER
Cut about 6 1-2" holes in the sides of the Pringles can. Punch a couple holes near the top of the can and insert an appropriate length of coat hanger to serve as the feeder hanger. Wrap the can with heavy aluminum foil (temporary). Heat 1/2 lb suet with 1 cup wild bird seed in a double boiler. Pour into Pringles can and let cool. Remove the foil and hang.

HUMMINGBIRD FEEDER
You'll need a small plastic pill bottle with cap, sugar water with red food coloring, foam egg carton, and wire.
With a heated needle, punch a tiny hole near an edge of the cap. Fill the bottle with the red-tinted sugar water. Cut out one egg portion of the carton. Cut the top/open edge of the egg carton "bowl" to look like petals of a flower. Cut the bottom out of the egg carton "bowl" just large enough for the pill bottle to fit through. Slide the pill bottle halfway through that opening. To hang the feeder, wrap wires around the bottle above and below the flower. Hang the bottle at an angle (sort of upside down), with the hole in the cap on the bottom of the feeder.
FEED THE BIRDS
Tie a string to a pinecone. Spread peanut butter on the cone, then roll it in bird seed. Then hang it from a tree where you can see the birds come feed off it!
PLASTIC FEEDER
For each feeder, you'll need a 16 oz clear (Solo) plastic cup, a (Solo) plastic dish/bowl, two fasteners, 24" length of thin wire, two 6" dowels or twigs of small (1/4") diameter, scissors.
Using a heated knife, an adult should puncture a hole on the cup about 1 1/2" from the top lip and another directly across from it - for one dowel. Turn the cup 1/4 turn, and repeat this step about 1/2" lower than the first pair of holes for the second dowel. (Four holes spaced evenly around the cup.) Also, cut a small hole in the bottom center of both the cup and the dish for the fasteners and wire.
Let each child cut out 4 notches on the rim of the cup with a scissors. This will be where bird feed is released.
Fold the wire in half. Insert the free ends of the wire into the hole on the bottom of the cup (from outside to inside). Leave about a 3" loop of wire outside of the cup. Insert the fastener and open the two prongs on the inside of the cup. On the outside of the cup, twist the wire around the fastener head a couple times to secure the wire.
Slide the dowels or twigs through the matched holes on the sides of the cup. Hold the cup in an upright position, and fill to the notches with bird seed.
Thread the wire (inside to outside) through the dish but do not pull the dish tight to the cup yet. From the outside of the dish, insert the second fastener and open the two prongs. Now pull the wire through to secure the dish to the cup. Twist the excess wire

around the fastener head on the outside of the dish. (You may want to trim some of the wire if it's too long.)
Turn the contraption over and hang using the loop on the other end of the cup. Refill when empty.
NATURE SLIDES Hot glue a pipecleaner ring to the back side of a 2" diameter slice of branch. Glue pieces of twigs, nuts, pebbles to the front side.
COAL GARDEN Place a small piece of coal in a bowl. Sprinkle one tablespoon of salt over the coal and then carefully pour two tablespoons of water over the salt. Now add two tablespoons of laundering "bluing", three drops of mercurochrome, and three or four drops of food coloring.
Take this concoction home carefully. After several days, there should appear a colorful, moss-like growth covering the coal!
ORGANIC MOBILE
Have each person gather small objects of nature (rocks, pinecones, shells, acorns) and several lengths of twigs. Have an adult hot glue a length of yarn or string to each person's nature objects. Then instruct them how to tie the objects to the twigs and arrange several levels of twigs into a Nature Mobile.
CANNISTER SLIDES
You can make cool neckerchief slides out of empty film cannisters:
Oscar the Grouch: Punch two holes in the upper back of the cannister and two more on the lid. Insert a black pipe cleaner in one hole on the back of the cannister, then into one hole on the lid, then into the other hole on the lid, then into the other hole on the cannister. Arrange the lid so it looks like an open garbage can. Twist the pipe cleaner into a loop for the neckerchief to slide through. Insert cotton balls into the bottom half of the cannister. Glue on two green pom-poms. Add two "moving" eyes and a short piece of red embroidery thread for the mouth (keep it straight - Oscar rarely smiles!).
First Aid: Paint the cannister white with a red cross on the front. Attach a curtain ring to the back side of the cannister for the neckerchief to slide through. Fill the cannister with useful first aid items:
l 1 adhesive bandage l tylenol wrapped in aluminum foil l 1 tube antiseptic ointment l 1 alcohol wipe l 2 safety pins l coins for telephone call l emergency phone numbers
PRESCHOOLER FUN!
Don't forget to have some simple activities ready for the preschoolers too!
Streamers - Pre-cut 4 foot lengths of different colored crepe paper. Using tape or string, affix 2-4 crepe paper strips to one end of a stick, pencil, wooden spoon, etc. Now they can run and twirl the streamers. Try to get some to create a synchronized presentation.
Color Blots - Give each person a regular sized piece of white paper folded in half, lengthwise. Optionally, ask them to sign or print their name, or make some geometric design on one side of the fold line, touching the fold line. Now place various "pools" of tempera paint inside the name/design. Carefully fold the paper again so the paint smears. Open it up and let it dry. Then turn your splotches into a picture of an animal, monster, bug, etc.
FUN SCIENCE Give each participant a wire clothes hanger and two (each 24 inches) pieces of string. Ask them to tie a string to each side (near the bend) of the hanger. Then attach it to themselves by wrapping the string around each of their index fingers a couple of times. The hanger should be hanging upside down in front of them. Now for the fun! Tell them to stick their index fingers in their ears and swing the hanger so it bangs into and hits things like the side of a table or chair. What do they hear?!!!
"STRESS" SLIDES
These are actually "Stressed Out" neckerchief slides, more appropriate for leaders, but fun for the boys to make too. Get some telephone cable. Cut a 2 foot length, remove the conduit and any "wrapping" string so you have just the many colored wires. Select 3, 4 or 5 of these wires and align them into one bunch so the ends are even. Bend this mass of wires around your index finger (so the ends are even) and make a couple tight twists (i.e. like twisting a twist-tie around the bread wrapper). The "hole" formed is the part your neckerchief ends will slide through. Then, using an unsharpened pencil (or something else about that diameter), start wrapping each wire around the pencil (keep the loops tight - close together) into little corkscrews. Repeat this for each end of wire. You will create a "springy" neckerchief slide whose corkscrews can be adjusted to match your level of stress!
ONE OF A KIND This is more of a game, but has a lot of potential for creativity and ingenuity. Give each boy a plastic bag and have them line up about 5 feet apart on the edge of a yard or park. On hands and knees they crawl toward a "finish" line, all the while collecting various objects of nature. This isn't a race - allow them five minutes to cover the distance. Score one point for each plant object; 2 points for each type of animal life; score 3 points if no one else has the same object. When done, return all objects to the soil.
PARACHUTES Let each person decorate a square piece of fabric with markers or water- based fabric paints. Give each person four equal lengths of string and tell them to tie each to one corner of the cloth. Join all the strings to a ring (twist tie, pipe-cleaner, etc). Then tie a small toy to the bottom of the ring. They have their own parachute! Encourage them to try to land on targets, catch it in mid-air, climb high to let it go, etc.
NATIVE AMERICAN STICK GAME
Give each Scout 3 large craft sticks (tongue depressors). Using colored markers, have them make a simple "snake" on two of the sticks (a continuous zig-zag with a dot at one end for the eye). On the other stick, make a simple "man" (a series of dots up the center, with a double set of dots perpendicular to the first about 1/3 down to denote arms).
To play, hold all three stick in both hands and toss them in the air. To score: Play with one or more friends. The first one to 10 wins.
0 pt - 1 Plain, 1 Snake, 1 Man 1 pt - 3 Plain sides up 1 pt - 2 Snakes and 1 Man 2 pt - 2 Snakes and 1 Plain 2 pt - 2 Plain and 1 Snake 3 pt - 2 Plain and 1 Man
NATIVE AMERICAN SUN & MOON GAME
You will need two pine cones, one piece of twine or cord about 18 inches long, and a short stick about 10 inches. Tie the twine ariound the middle of each pine cone, leaving about 6-8 inches between the two cones.
Have kids pair up and using the stick, toss the cones back and forth, using only their sticks to catch the strung pinecones. Levels of difficulty can be increased (distance, etc.) as the players gain more skill. You can also play solo, or if more than two are playing, try tossing in a circle. Good for all sizes - preschoolers to adult!
For more information, contact Lorie McGraw
"METAL" PUNCHING
Make some copies of simple scout designs that are appropriately sized for aluminum pans. Provide each child with a nail. Let them use a smooth rock for a hammer. Tape the picture to the inside of the pan. Using the lines of the picture, nail evenly spaced holes through the picture into the pan. When done, dress up the design with added nature crafts (small twigs, wood chips and/or lace, ribbon, etc.) - anything appropriate for the design.
SANDSCAPES You will need baby-food jars with lids, ka-bob skewers, sno-cone cups (cut off tip), powdered tempra paints, and clean sand (salt works as well and is cheaper). Mix the sand with enough of the powdered paint to get the desired color. Put colored sand in a (lined) shoebox. Repeat for other desired colors. Put a couple sno-cone cups in each box of sand.
Give each child a clean jar & lid (you may want to paint the lids beforehand). Have them scoop up one color of sand and funnel it into their jar. Add another color on top of that, etc. From time to time, use the skewer to poke along the inside side of the jar to create neat patterns. Be careful not to shake the jar. Fill it to the brim. Put lid on very tightly. Optional: tie a ribbon or lace around the jar. The jar can be displayed setting on its bottom or upside-down on its lid.
HUMAN BUBBLE By pulling a bubble-solution drenched hula-hoop over a child, you make a bubble with the child inside! Soooo COOOOL!!!
You will need a kiddie pool with standing platform in center, one hula-hoop covered with knitting yarn, bubble solution, structure to raise & lower the hula-hoop.
Bubble solution: 10 gallons of water, 1/2 gallon Dawn dishwashing liquid, 1/2 gallon of bubble solution.
Build a structure with which to raise & lower the hula-hoop. Suggestions: attach four ropes to the hula-hoop, combine these into one rope that goes through a pulley.
Center platform can be a rug covered tire or wooden box. Make sure the surface won't get slippery. The hula-hoop is resting in the pool. The child steps onto the center platform - not in the bubble solution. The hula-hoop is raised over the child's head. When the bubble pops, the child steps off the platform and the hula-hoop is lowered back into the bubble solution.
from Karen Law, Pack 307, Indian Waters Council, South Carolina
Last updated September 22, 1998
Visit Pack 114's Library | Visit Pack 114's Home Page
LIFT YOUR PARENT
How strong are your kids? Stronger than they think, I'll bet!
Place a block of wood (fulcrum) under an 8 foot long 2x4 plank. Make sure the block is near the end the adult will stand on. Have an adult stand on the short end. Then a child steps onto the end of the longer end. Watch the expression on the child's face!

Pack 114's Library
Songs for Scoutscompiled by Barb Stephens, Pack 114, Mid-America Council
Bug Juice (Tune: On Top of Old Smokey)
At camp with the Cub Scouts, They gave us a drink. We thought it was kool-aid Because it was pink.
But the drink that they gave us Would have grossed out a moose. For the good tasting pink drink, Was really bug juice.
It looks fresh and fruity, Like tasty koolaid. But the bugs that are in it, Were murdered with Raid.
We drank it by gallons We drank it by tons. But then the next morning, We all had the runs.
Next time you drink bug juice And a fly drives you mad. He's just getting even 'Cause you swallowed his dad.
God Bless My Underwear (Tune: God Bless America)
God bless my underwear, my only pair. Stand beside them, and guide them As they sit in a heap by the chair. From the washer, to the clothesline, To my camp pack, to my rear! God bless my underwear, my only pair. God bless my underwear, or I'll go bare!
Akela's Pack (Tune: Working on the Railroad)
We're a Pack of happy Cub Scouts Wolf, Bear, and Webelos. We'll eventually be Boy Scouts, As everybody knows. Don't you want to come and join us? Be with all the rest? Don't you want to be a Cub Scout? Come and Do Your Best!
Make New Friends
Make new friends
Jaws (Tune: Do Re Mi)
JAWS A mouth, a great big mouth
The Bear
The leader begins by "singing" one line of each verse and the group repeats it in the same sing-song fashion. Then everybody sings each whole verse once together.
Scout Marching Song
Next Verses:
Two by two ... to tie his shoe Three by three ... to climb a tree Four by four ... to close the door Five by five ... to peek in a hive Six by six ... to pick up sticks Seven by seven ... to look at heaven
But keep the old. One is silver And the other's gold.
A circle's round, It has no end. That's how long, I want to be your friend.
JAWS A mouth, a great big mouth TEETH The things that kinda crunch BITE The friendly shark's "hello" US His favorite juicy lunch CHOMP That means the shark's been fed GULP Teeth in a double row BLOOD That turns the ocean red Please don't get caught in JAWS! JAWS! JAWS!
The other day I saw a bear Out in the woods A way out there
I looked at him He looked at me I sized up him He sized up me
He says to me Why don't you run I see you ain't Got any gun
I said to him That's a good idea So come on feet Away from here
And so I ran Away from there But right behind Me was that bear
And then I see Ahead of me A great big tree Oh, glory be!
The lowest branch Was ten feet high I'd have to jump Clear to the sky
And so I jumped Into the air But I missed that branch A way up there
Now don't you fret And don't you frown 'Cause I caught that branch On the way back down
That's all there is There ain't no more Unless I meet That bear once more
The scouts go marching one by one. Hurrah, Hurrah. The scouts go marching one by one. Hurrah, Hurrah. The scouts go marching one by one, The little one stops to shoot his gun.
Chorus: And they all go marching, In ... to the tent ... To get out ... of the rain Boom, boom, boom.
Eight by eight ... to shut the gate Nine by nine ... to tell the time Ten by ten ... to say THE END
My Leader (Tune: My Bonnie Lies Over the Ocean)
Commercial Mixup (Tune: The Farmer in the Dell)
My Dead Dog Rover (Tune: I'm Looking Over a Four-leaf Clover)
I'm looking over my dead dog Rover, That I over-ran with the mower.
My leader fell into a pothole In a glacier while climbing an Alp. He's still there after 50 long winters, And all you can see is his scalp.
Chorus: Bring back, bring back, Oh bring back my leader to me, to me. Bring back, bring back, Oh bring back my leader to me!
My leader was proud of his whiskers, To shave them would give him the blues. They hung all the way to his ankles, And he used them for shining his shoes.
Chorus
My leader had faith in a sailboat He'd built from an old hollow tree. My leader set sail for Australia, Now my leader lies under the sea.
Chorus
My leader made friends with hyenas, He gave them a ride on his raft. When a crocodile reached up and grabbed him, The hyenas just sat there and laughed.
Chorus
My leader annoyed his dear parents They tossed him right out of the bus. And if we don't mend our behavior, Why that's what will happen to us.
Chorus
Last night I watched TV. I saw my favorite show. I heard a strange commercial, I can't believe it's so.
Feed your dog Chiffon. Comet cures a cold. Use SOS pads on your face To keep from looking old.
For headaches take some Certs. Use Tide to clean your face. And do shampoo with Elmer's Glue, It holds your hair in place.
Perhaps I am confused. I might not have it right. But one thing I am certain of, I'll watch TV tonight!

One leg is missing, the other is gone. The third one is scattered, all over the lawn. No need explaining the one remaining It's splattered on the kitchen door. I'm looking over my dead dog rover, That I over-ran with the mower.
My Bonnie Lies Over the Ocean
The Grand Old Duke Of York
The grand old Duke of York, he had ten thousand men. He marched them up the hill, and marched them down again. And when you're up, you're up. And when you're down you're down. And when you're only halfway up, you're neither up or down.
(Have everyone stand up on the word "up", squat down on the word "down", and get in a halfway position between the two for the word "halfway." To add fun, increase the speed and/or reverse "up" action for "down.")
If You're Happy
My Bonnie leaned over the gas tank, The height of its contents to see. I lit up a match to assist her, Oh bring back my Bonnie to me.
Brink back, bring back, Oh bring back my Bonnie to me, to me! Brink back, bring back, Oh bring back my Bonnie to me!
Last night as I lay on my pillow, Last night as I lay on my bed, I stuck my feet out of the window, Next morning my neighbors were dead.
Brink back, bring back, Oh bring back my neighbors to me, to me! Brink back, bring back, Oh bring back my neighbors to me!
My Bonnie has tuberculosis, My Bonnie has only one lung, My Bonnie can cough up raw oysters' And roll them around on her tongue.
Roll them, roll them, Roll them around on her tongue, her tongue. Roll them, roll them, Roll them around on her tongue.
My luncheon lies over the ocean, My breakfast lies over the rail. My supper lies in great commotion, Won't someone please bring me a pail.
Clams & ice cream, clams & ice cream, They just don't agree with me, with me. Clams & ice cream, clams & ice cream, They just don't agree with me.
Who knows what I had for breakfast? Who knows what I had for tea? Who knows what I had for supper? Just look out the window and see!
If you're happy and you know it, clap your hands. If you're happy and you know it, clap your hands. If you're happy and you know it, and you really want to show it, If you're happy and you know it, clap your hands.
2nd verse: If you're happy and you know it, stomp your feet.
3rd verse: If you're happy and you know it, nod your head.
4th verse: If you're happy and you know it, do all three.
Scouting Spirit
I've got that Scouting Spirit up in my head, up in my head, up in my head. I've got that Scouting Spirit up in my head, up in my head to stay!
I've got that Scouting Spirit deep in my heart, deep in my heart, deep in my heart. I've got that Scouting Spirit deep im my heart, deep in my heart to stay!
I've got that Scouting Spirit down in my feet, down in my feet, down in my feet. I've got that Scouting Spirit down im my feet, down in my feet to stay!
I've got that Scouting Spirit all over me, all over me, all over me. I've got that Scouting Spirit all over me, all over me to stay!
I've got that Scouting Spirit up in my head, deep in my heart, down in my feet. I've got that Scouting Spirit all over me, all over me to stay!
(Use hands actions to demonstrate the lyrics. Be careful on that last verse!)
Puff, the Magic Maggot
Chorus: Puff, the magic maggot lives in my trash and frolics in banana peels and in the cigarette ash! Puff, the magic maggot lives in my trash and dines on month-old kitty litter and mildewed corn beef hash!
Little Teddy Tapeworm loved that maggot Puff. He brought him dead dogs two weeks old, and scabs still moist with pus. Together they would travel to the city morgue to eat. Puff would get the bones and hair and Teddy would get the meat!
Chorus
Maggots live forever, but tapeworms aren't too tough. Teddy could eat the bones and hair, but he choked on the scabs with pus.

Puff was broken-hearted, losing Teddy really hurt, But not as much as hunger did, so he ate him for dessert!
Itsy Bitsy Scorpion
The itsy bitsy scorpion crawled up upon my shirt. I smashed him with my hand, then threw him in the dirt, When he stopped a squirming, I put him in my stew, 'Cause itsy bitsy scorpions taste good to me and you!
Itsy Bitsy Spider submitted by Ann Riner
The itsy bitsy spider crawled up the birthday cake. The itsy bitsy spider he made a big mistake! He climbed up on the cake before the cake was cut And the itsy bitsy spider, burned his YOU KNOW WHAT!
Super California Surfer ...
Chorus: Super-California-surfer-expert-of-the-ocean, Even though the most of them do not use suntan lotion, When they hit the waves too hard they always cause a motion, Super-California-surfer-expert-of-the-ocean!
Because I was afraid to surf, when I was just a lad, My father took my board away, and told me I was bad. But then one day I heard a word, that every surfer knows. The biggest word I ever heard, and this is how it goes
Chorus
He Jumped From 40,000 Feet (Tune: Battle Hymn of the Republic)
He jumped from 40,000 feet and forgot to pull the cord, (small jump)
He jumped from 40,000 feet and forgot to pull the cord, He jumped from 40,000 feet and forgot to pull the cord,

And he ain't gonna fly no more.
Chorus: Gory, gory, what a heck of a way to die Gory, gory, what a heck of a way to die Gory, gory, what a heck of a way to die And he ain't gonna fly no more.
He was last to leave the cockpit and the first to hit the ground, (flap arms)
He was last to leave the cockpit and the first to hit the ground, He was last to leave the cockpit and the first to hit the ground, And he ain't gonna fly no more.
Chorus
He landed on the runway like a blob of strawberry jam, (clap hands)
He landed on the runway like a blob of strawberry jam, He landed on the runway like a blob of strawberry jam, And he ain't gonna fly no more.
Chorus
They scraped him off the runway with a shiny silver spoon, (make scooping motion)
They scraped him off the runway with a shiny silver spoon, They scraped him off the runway with a shiny silver spoon, And he ain't gonna fly no more.
Chorus
They sent him home to mother in a little wooden box, (make small box shape with hands)
They sent him home to mother in a little wooden box, They sent him home to mother in a little wooden box, And he ain't gonna fly no more.
Chorus
His mother didn't want him so she sent him back to us, (overhand throwing motion)
His mother didn't want him so she sent him back to us, His mother didn't want him so she sent him back to us, And he ain't gonna fly no more.
Road Kill Stew (Tune: Three Blind Mice)

On Top of Old Smokey
The Twelve Days of Scouting (Tune: 12 Days of Christmas)
On the first day of Scouting, Akela gave to me A Den Leader swinging from a tree!
On the second day of Scouting, Akela gave to me Two Screaming Bobcats, And a Den Leader swinging from a tree!
Oh, My Darling Frankenstein (Tune: Clementine)
Chorus: Oh, my darling, oh, my darling, Oh, my darling Frankenstein. You are lost and gone forever Dreadful sorry, Frankenstein!
Road Kill stew, Road Kill stew, Tastes so good, Just like it should.
You go on down to the Interstate You wait for the critter to meet it's fate. You take it home and you make it great! Road Kill stew, Road Kill stew.
On top of Old Smokey All covered with snow While I was a walkin' The wind it did blow.
It blew off the branches And leaves it did shred, And the next thing I knew was, It blew off my head.
I then tried to catch it, Which wasen't too wise Cause it's real hard to run when You don't have your eyes.
So take my advise boys For one thing I know Stay off of Old smokey When the wind starts to blow!
Three Skinny Wolves Four Hungry Bears Five We-be-los! Six Arrow Points Seven Silly Den Chiefs
Eight Shouting Scouts Nine Warring Eagles Ten Derby Cars Eleven Funny Den Skits Twelve Wacky Cheers
I was working with my test tubes In my laboratory fine. Then one day I broke my glasses And I made poor Frankenstein.
He was charming, he was handsome, And I nailed his head on tight.
Then the Wolfman came to work, "Sir," I said, "What's in your mouth?" He said "Fangs." I said "You're welcome." And he still is running south.
Frankenstein helped in the kitchen He was baking up a cake,

Halloween Song (Tune: Yankee Doodle)
The Star-Spangled Banner
Oh say, can you see by the dawn's early light, What so proudly we hailed at the twilight's last gleaming, Whose broad stripes and bright stars, through the perilous fight, O'er the ramparts we watched were so gallantly streaming?
And the rockets' red glare, the bombs bursting in air, Gave proof through the night that our flag was still there. Oh say, does that Star-Spangled Banner yet wave O'er the land of the free and the home of the brave.
Visit Pack 114's Library | Visit Pack 114's Home Page
Oh, his teeth were sharp and pearly And his eyes came out at night.
Oh, his nose, I made it quickly From a rotten apple core, And his tongue was nice and purple And it hung down to the floor.
Chorus
When he fell in the Mixmaster And got whipped up by mistake.
Cooking nicely in the oven, Oh, the cake, it came out fine. I told my friends that they were raisins, But those lumps were Frankenstein!
Chorus
I'll carve a fearful pumpkin face As well as I am able, And when it's done I'll light it up And set on a table.
I'll fix it up so passersby Will see and get the quivers For Halloween's the time to play So we have shakes and shivers!
America
Oh beautiful, for spacious skies For amber waves of grain, For purple mountain majesties Above the fruited plain.
America, America; God shed His grace on thee. And crown thy good with brotherhood From sea to shining sea!
My Country 'Tis of Thee
My country 'tis of thee, Sweet land of liberty, Of thee I sing.
Land where my fathers died, Land of the pilgrims' pride, From every mountain side Let freedom ring.