work order processing pm wo 300 - university of...
TRANSCRIPT

Work Order Processing PM_WO_300
Work Order Processing v10 PM_WO_300 1
Work Order ProcessingWork Order ProcessingPM_WO_300PM_WO_300
Work Order Processing PM_WO_300_LSO_v1
Use the forwardforward button below ( ) to advance through the slides.
1
Prerequisites and RolesPrerequisites and Roles
• Prerequisite
UK_100 IRIS Awareness & Navigation
If you have not completed UK 100, y p _ ,please do so prior to taking this course.
• Roles
This course is primarily intended for all Plant Maintenance managers, supervisors, and workers who will process work orders will take this pclass.
2Work Order Processing PM_WO_300_LSO_v1

Work Order Processing PM_WO_300
Work Order Processing v10 PM_WO_300 2
• Setting the Training Environment – Activating GUI-XT
• Unit 1 – Work Planning Overview
• Unit 2 – Work Orders Overview
Course ContentCourse Content
Unit 2 Work Orders Overview
• Unit 3 – Creating a Work Order
• Unit 4 – Changing Work Orders
• Unit 5 – PM Materials
• Unit 6 – Work Order List Displays
3Work Order Processing PM_WO_300_LSO_v1
Course AssessmentCourse Assessment
• There are two parts to the Work Order Processing assessment which must be completed successfully prior to receiving credit for this course.
• Part 1 – Check for Understanding: This is a series of questions which will be presented at the end of each unit. To complete:
1. Click on the radio button next to your answer
2. Click on the Next button
3. Repeat Steps 1 & 2 for each question
4 After answering all of the questions click on the Submit All4. After answering all of the questions, click on the Submit Allor Submit All Answers button
5. Upon passing, click on the Finish button to continue to the next unit in the course
4Work Order Processing PM_WO_300_LSO_v1

Work Order Processing PM_WO_300
Work Order Processing v10 PM_WO_300 3
Course Assessment (Continued)Course Assessment (Continued)
• Part 2 – Work Order Processing Assessment: This is the hands-on portion of the assessment which you will perform in the Training Sandbox. Further information on this part of the assessment will be given to you at the very end of this courseassessment will be given to you at the very end of this course.
5Work Order Processing PM_WO_300_LSO_v1
Work Order Processing Practice GuideWork Order Processing Practice Guide
• As noted at various points in this course, the Work Order Processing Practice Guide is available should you want to practice the various transactions discussed in this course.
• Th id i ti l d t i t f l ti• The guide is optional and not a requirement for completing this course.
• To access the guide:
1. Click on the Attachments link ( ) in the upper-right corner of this screen
2. Click on the Work Order Processing Practice Guide link (the guide will open in a separate browser window)
3. Print the guide
4. Follow the instructions listed in each exercise
6Work Order Processing PM_WO_300_LSO_v1

Work Order Processing PM_WO_300
Work Order Processing v10 PM_WO_300 4
Work Order Processing Training EnvironmentWork Order Processing Training Environment
Plant Maintenance uses a GuiXT (graphical user interface) that changes the look of the IRIS/SAP screens. On the Main Menu screen it adds push buttons on the left side of the screen. You can use these buttons to get to various transactions once your training is complete but during training please do not use the push buttons to navigate to the various transactions we will useuse the push buttons to navigate to the various transactions we will use.
Main Menu screen without the GuiXT activated
Main Menu screen with the GuiXT activated
7Work Order Processing PM_WO_300_LSO_v1
GuiXTGuiXT ActivationActivation
If your screen does not show the push buttons on the left side of the screen you will need to activate the GuiXT by following these steps:
Click on the Customize Local Layout icon on the standard toolbar.
Click Activate GuiXT
Press Enter
This will activatethe GuiXT and yourscreen should nowshow buttons on theshow buttons on theleft side of the screen.
8Work Order Processing PM_WO_300_LSO_v1

Work Order Processing PM_WO_300
Work Order Processing v10 PM_WO_300 5
Plant Maintenance IRIS Project GoalsPlant Maintenance IRIS Project Goals
• Integrate Plant Maintenance with Finance, Human Resources, and
Materials
• Allow enhanced scheduling and planning for work assignments• Allow enhanced scheduling and planning for work assignments
• Provide work scheduling as well as management reporting tools
• Improve automated updates to customers about the status of work
• Implement a Preventive Maintenance system for buildings, areas, and
equipment
• Use standard SAP functionality to collect utility use and cost information
for recharge calculations
9Work Order Processing PM_WO_300_LSO_v1
Unit 1Unit 1
Work PlanningWork PlanningOverviewOverview
Work PlanningWork PlanningOverviewOverview
10Work Order Processing PM_WO_300_LSO_v1

Work Order Processing PM_WO_300
Work Order Processing v10 PM_WO_300 6
The “Plants” in Plant MaintenanceThe “Plants” in Plant Maintenance
• The Maintenance Plant
Represents the physical facility
The entire UK campus: buildings and grounds
Represents the place where maintenance materials are kept
Always UK10
• The Planning Plant
Organizational in nature
There are 4 main Planning Plants:- Main Campus PPD (CPPD),- Medical Center PPD (MPPD), and - Housing (HOUS)- Capital Project Management Division (CMPD)
Work groups are grouped by plant
11Work Order Processing PM_WO_300_LSO_v1
Functional LocationsFunctional Locations
• The Functional Location identifies the physical location of a building, room, elevator, stairway, equipment, etc.
• The Structure of the Functional Location is as follows:• The Structure of the Functional Location is as follows:
The first level would be the “campus” (LX-)
The next level is the building (LX-xxxx)
The next level is the floor (LX-xxxx-xx)
The next level is the room (LX-xxxx-xx-xxx)
There is a separate structure for Grounds (exterior space)
12Work Order Processing PM_WO_300_LSO_v1

Work Order Processing PM_WO_300
Work Order Processing v10 PM_WO_300 7
Functional Location Structure Functional Location Structure -- ExampleExample
• Click though the following example to see how a location, room 72 in McVey Hall, is identified by the functional location.
• The Building: LX-0045The Building: LX 0045
McVey Hall
• The Floor: LX-0045-00
McVey Hall, basement,
• The Room: LX-0045-00-72
McVey Hall, basement, room 72
13Work Order Processing PM_WO_300_LSO_v1
How Functional Locations are UsedHow Functional Locations are Used
• Maintenance repairs and work requests are written referencing the functional locations.
• Work orders may be listed by functional location or rolled up to the organizational area (CPPD MPPD HOUS CMPD)organizational area (CPPD, MPPD, HOUS, CMPD).
• Accounting information for chargeback is automatically assigned to the work order from the functional location. (This may be overridden if required.)
• Statistical reporting will provide summary work order counts and costs at the functional location or the organizational level(s) above it.
• Equipment may be assigned to a functional location.
14Work Order Processing PM_WO_300_LSO_v1

Work Order Processing PM_WO_300
Work Order Processing v10 PM_WO_300 8
U it 1U it 1Unit 1Unit 1Check for UnderstandingCheck for Understanding
15Work Order Processing PM_WO_300_LSO_v1
Unit 2Unit 2
Work Work Orders OverviewOrders OverviewWork Work Orders OverviewOrders Overview
16Work Order Processing PM_WO_300_LSO_v1

Work Order Processing PM_WO_300
Work Order Processing v10 PM_WO_300 9
What is a Work Order?What is a Work Order?
• A work order is a financial and work management transaction used to plan and charge labor, stock materials, non-stock purchases, and services
• It is integrated with Financials, Materials Management, and Human Resources in the IRIS systemResources in the IRIS system
• A Work Order may be created from a Notification or without an existing Notification
• Multiple Notifications can be turned into ONE Work Order
17Work Order Processing PM_WO_300_LSO_v1
Why are Work Orders used?Why are Work Orders used?
Work Orders are used:
• To plan and schedule work
• To accumulate charges for work that will be recharged to others
• To document the costs of an event
• For Preventive Maintenance work
18Work Order Processing PM_WO_300_LSO_v1

Work Order Processing PM_WO_300
Work Order Processing v10 PM_WO_300 10
Who Creates Work Orders?Who Creates Work Orders?
• This function will be used primarilyprimarily by the Dispatch area (Work Control Work Control CentersCenters) to create orders to initiate work to be done.
• Authorized users responsible for creating orders for their area will also have access to create work orders in IRIShave access to create work orders in IRIS.
19Work Order Processing PM_WO_300_LSO_v1
Required Information Required Information on a Work Orderon a Work Order
•• Order TypeOrder Type - A four-character code used to distinguish the different work order types.
Examples: REPR = Corrective Repair; RENV = Renovation
•• PriorityPriority - An indicator of when this work should be scheduled.
Examples: Daily Operations; Emergency
•• Object Object to be maintained to be maintained – Functional Location or Equipment
Functional Location - Place where the work is to be performed; i.e., a building, floor, room, or exterior (Grounds)
Example: LX-0030-01-104 = 104 Student Center (0030=Student Center 01=First Floor 104=Room 104)(0030=Student Center, 01=First Floor, 104=Room 104)
Equipment –Can be located at a Functional Location
Example: H-222 Ice Maker
20Work Order Processing PM_WO_300_LSO_v1

Work Order Processing PM_WO_300
Work Order Processing v10 PM_WO_300 11
Optional Information on a Work OrderOptional Information on a Work Order
•• DescriptionDescription – Text describing the work that is to be done; this can include “long text” of unlimited length
Examples: Repair thermostat; Fix broken window
•• Work DurationWork Duration – Number of hours of planned labor
Example: 2 H (2 hours)
•• Main Work Center Main Work Center = 2 fields
Field 1 - Initially created “Unassigned” – but could be changed to the Work Center or individual responsible for maintaining the order, equipment, etc. -
Field 2 - The responsible planning plant - based on the Functional Location.
21Work Order Processing PM_WO_300_LSO_v1
•• Person AssignedPerson Assigned – could be someone with a specialty in a certain area
•• MaterialsMaterials – parts and supplies needed to perform the work
Planned labor and materials
Other Work Order InformationOther Work Order Information
Actual labor and materials costs
•• Special Conditions Special Conditions – Examples: may have to wait to do work when patient leaves Hospital room or when students leave residence hall, or may be hazardous materials in the area
Many of these items are added later as additional planning is performed for more complex work ordersmore complex work orders.
22Work Order Processing PM_WO_300_LSO_v1

Work Order Processing PM_WO_300
Work Order Processing v10 PM_WO_300 12
U it 2U it 2Unit 2Unit 2Check for UnderstandingCheck for Understanding
23Work Order Processing PM_WO_300_LSO_v1
Exercise 1Exercise 1
To set up your PC to practice the To set up your PC to practice the transaction(s) discussed in this course, transaction(s) discussed in this course, transaction(s) discussed in this course,transaction(s) discussed in this course,refer to:refer to:
Exercise 1 Exercise 1 –– Preparing to Use thePreparing to Use theIRIS Training Sandbox IRIS Training Sandbox
d il d i hd il d i has detailed in theas detailed in thePM_WO_300 Practice Guide.PM_WO_300 Practice Guide.
24Work Order Processing PM_WO_300_LSO_v1

Work Order Processing PM_WO_300
Work Order Processing v10 PM_WO_300 13
Exercise 2Exercise 2
To practice the transaction(s) discussed in To practice the transaction(s) discussed in this unit, refer to:this unit, refer to:
Exercise 2 Exercise 2 –– Display a Work Order Display a Work Order –– IW33IW33
as detailed in theas detailed in thePM WO 300 Practice GuidePM WO 300 Practice GuidePM_WO_300 Practice Guide.PM_WO_300 Practice Guide.
25Work Order Processing PM_WO_300_LSO_v1
Unit 3Unit 3
Creating aCreating aWork OrderWork OrderCreating aCreating aWork OrderWork Order
26Work Order Processing PM_WO_300_LSO_v1

Work Order Processing PM_WO_300
Work Order Processing v10 PM_WO_300 14
Creating Work OrdersCreating Work Orders
Work Orders can be created in a number of ways.
They can be created:
• Directly using Transaction code IW31
• Directly from a Notification with Transaction code IW22
• Using a Notification with Transaction code IW34
• Using more than one Notifications with Transaction code IW34
27Work Order Processing PM_WO_300_LSO_v1
There are 3 required fields on the Create
Create a Work Order Create a Work Order –– Transaction Code IW31Transaction Code IW31
qWork Order Initial screen:
• Order Type
• Priority
• Functional Location or Equipment
Y i di l i h fi ldYou can type entries directly into the fields or select them from possible entries.
28Work Order Processing PM_WO_300_LSO_v1

Work Order Processing PM_WO_300
Work Order Processing v10 PM_WO_300 15
Work Order Work Order –– Order TypesOrder Types
Enter the Order Type or select one by clicking on the Possible Entries iconEntries icon.
From the list of possible Order Types, double-click on the one you want to use.
Notice that the last entry in the Possible Entries list is labeled Type SM03 – Repair Service but Type REPR – Corrective (Repair) is the correct one to used.
29Work Order Processing PM_WO_300_LSO_v1
Work Order Work Order Types and ExamplesTypes and Examples
TypeType DescriptionDescription
The table below shows the five Order Types used and an example of each
CASH Cash Charge out Order Example: Fraternity Work
EVNT Special EventExample: Commencement
PREV Preventive MaintenanceExample: Oil HVAC regularly
R ti (Ch d O t)
Work Order Processing PM_WO_300_LSO_v1
RENV Renovation (Charged Out)Example: Install new bathroom
REPR Corrective (Repair)Example: Repair hinge on door
30

Work Order Processing PM_WO_300
Work Order Processing v10 PM_WO_300 16
PriorityPriority
To enter the Priority, click on the drop-down icon in the Priority field to see the available choicesfield to see the available choices.
Each priority has a specified time span for the work. The time span indicates when the work needs to be performed and is incorporated in the Work Order.
Select the appropriate priority.Select the appropriate priority.
31Work Order Processing PM_WO_300_LSO_v1
Priority and Time Spans for Work OrdersPriority and Time Spans for Work Orders
DescriptionDescription StartStart EndEnd
The table below shows the start and end times for various priorities for all the areas in Facilities.
Emergency 10 Min 24 Hours
General Maint. 7 Days 30 Days
Schedulable Maint. 7 Days 30 Days
Daily Operations 1 Day 2 Days
Research Fac. 1 Hour 4 Hours
Work Order Processing PM_WO_300_LSO_v1
Patient Care 1 Hour 4 Hours
Elect. Improv. 3 Days 10 Days
Renovations - -
32

Work Order Processing PM_WO_300
Work Order Processing v10 PM_WO_300 17
Functional LocationFunctional Location
If you know the Functional Location you can enter it directly into the field.
If you do not know the Functional
Location, you can either click on the:
• Possible Entries icon, or
• Structural List icon
to search for it search.
We will cover both methods.
Work Order Processing PM_WO_300_LSO_v1 33
Click on the Possible Entries icon.
Functional Location Possible EntriesFunctional Location Possible Entries
The Possible Entries function is used throughout SAP to search for what could
“ ibl i t ” ti l fi ld It i l bl d h l f l t h i t“possibly go into” a particular field. It is a very valuable and helpful technique to
understand.
The first time you click on Possible Entries from any field, the Functional Location
search box will appear. If it is a tab format, it will open to the first tab. It does this
because it does not know yet how you like to search from that particular field.
34Work Order Processing PM_WO_300_LSO_v1

Work Order Processing PM_WO_300
Work Order Processing v10 PM_WO_300 18
Functional Functional Location Possible EntriesLocation Possible Entries (con’t)(con’t)
The easiest way to change tabs is to click on the tab list icon. This shows
you all the tabs that are available. You simply click on the tab you want.
Click on the Text (= Description) tab.
35Work Order Processing PM_WO_300_LSO_v1
Search with Possible EntriesSearch with Possible Entries
Now that you are on the Text (= Description) tab, enter your search text in the
Description field.
Remember to use the asterisk (*) as the wildcard character to expand yourRemember to use the asterisk (*) as the wildcard character to expand your
search criteria and since you do not know how entries will be listed, it is best
to start with asterisks on each side of the entry…Example: You need the
Functional Location for 72 McVey Hall. Enter *mcvey* for McVey Hall.
Do not use any spaces since they will become part of your search criteria.
Once your search criteria is entered press the Enter key.
36Work Order Processing PM_WO_300_LSO_v1

Work Order Processing PM_WO_300
Work Order Processing v10 PM_WO_300 19
Possible Entries ResultsPossible Entries Results
The Functional Locations that match your
query will be displayed and the results
are always sorted by the first column. In
the example all locations with mcvey in
the description are shown.
If you need to tweak your search criteria
to either expand or reduce the number of
entries found, click the bar under the tab
headings.
The original search criteria will be
displayed and can be changed.
After you press enter the new results will
be displayed.
37Work Order Processing PM_WO_300_LSO_v1
Possible Entries ResultsPossible Entries Results (con’t)(con’t)
In this example you needed the
Functional Location for 72 McVey Hall.
When you locate the Functional
Location you need, double-click on it to
populate the Functional Location field
on the Create Work Order screen.
38Work Order Processing PM_WO_300_LSO_v1

Work Order Processing PM_WO_300
Work Order Processing v10 PM_WO_300 20
Another method to search for a Functional Location is the Structure List.
To see the completecomplete Functional
Functional Location Structure ListFunctional Location Structure List
To see the completecomplete Functional Location Structure, enter LX firstenter LX firstand then clickthen click the Structure List iconicon
The list will take a while to open.
NOTE:NOTE: If you click the Structure List icon beforebefore
Work Order Processing PM_WO_300_LSO_v1
yyou enter lx in the field, click the application menu to open it and then click Stop TransactionStop Transaction.
This will take you back to the main SAP Menu screen and you will need to start over.
39
Once the Structure List appears you will be able to see all Functional Locations and Equipment Locations.
You can expand and collapse
Create Order: Structure ListCreate Order: Structure List
You can expand and collapse locations as needed by clicking the triangles or the FunctLocation icon
You can expand and collapse i t d d b li ki th
Work Order Processing PM_WO_300_LSO_v1
equipment as needed by clicking the equipment icon
Clicking the double arrows shows all objects.
40

Work Order Processing PM_WO_300
Work Order Processing v10 PM_WO_300 21
Create a Work Order Create a Work Order –– IW31IW31
Once the 3 required fields are complete
Press Enter
41Work Order Processing PM_WO_300_LSO_v1
Multiple Multiple Work Work Orders for Functional LocationOrders for Functional Location
If there have been 3 or more work orders for this functional location during the previous 12 months, the Object Information box appears.
This is an informational notice only and alerts the user that there might be a recurring problem and that proactive action might be taken when time permits.
Press Enter to close this notice andPress Enter to close this notice and proceed to the work order screen.
42Work Order Processing PM_WO_300_LSO_v1

Work Order Processing PM_WO_300
Work Order Processing v10 PM_WO_300 22
Anatomy of a Work OrderAnatomy of a Work Order
Order Type/NumberOrder Type/Number
SaveSave
Release and SaveRelease and Save
DescriptionDescription
To add more detailTo add more detail
Save and ExitSave and Exit
Main Work CenterMain Work Center
Basic start Basic start and end timesand end times
Functional LocationFunctional Location
PriorityPriority
to the descriptionto the description
Work Order Processing PM_WO_300_LSO_v1
Work Center PlantWork Center Plant
Planned Labor RequiredPlanned Labor Required
43
Create a Work Order Create a Work Order –– DescriptionDescription
In this unit you will only enter a short descriptionenter a short description and planned labor.
Enter a description of the work.
To add more detail, click on the Create Text icon.
Work Order Processing PM_WO_300_LSO_v1 44

Work Order Processing PM_WO_300
Work Order Processing v10 PM_WO_300 23
Create a Work Order Create a Work Order –– Planned LaborPlanned Labor
For planning purposes it is
suggested that you enter
ti t f th l ban estimate of the labor
time required. 2 hours were
entered on this order.
After entering planning
time, click either on the
Save icon or the Save
Work Order Processing PM_WO_300_LSO_v1
and Exit push button
to save the order.
45
Work Order NumberWork Order Number
The 12 digit Work Order number is displayed in the lower-left corner of the screen. As soon as you click somewhere the number will disappear.
O l REPR (C i R i ) W kOnly REPR (Corrective Repair) WorkOrders are saved with a notificationnumber (background system “paperwork”)
All other Work Orders are saved without a notification number.
Until the Work Order is released it can not be worked and any components will not be staged or ordered.
46Work Order Processing PM_WO_300_LSO_v1

Work Order Processing PM_WO_300
Work Order Processing v10 PM_WO_300 24
Notifications and Work OrdersNotifications and Work Orders
• A Notification is a non-financial transaction that is used to report a problem, request work, or record an event or activity. It is purely informational in nature.
• A Work Order is a financial and work management transaction that is used to plan and charge labor, stock materials, non-stock purchases, and services.
• Not all areas in Facilities use Notifications.
A notification is typically the what, where, and contact info.
47Work Order Processing PM_WO_300_LSO_v1
Create Work Order from Notification Create Work Order from Notification –– IW34IW34
• A Work Order can be created from an existing Notification by using transaction code IW34.
• This function can be used after looking at a list of Notifications to create an order to do the workorder to do the work.
• One Work Order can be created for multiple Notifications. For example, if 10 Notifications are received for the same power outage, only one Work Order is really needed.
• To create a work order from a notification using IW34 the following information is required:
Order Type – A four-character code used to describe an order typeOrder Type – A four-character code used to describe an order type
Priority – Indicates when the work should be scheduled
Notification (number) – The number assigned to the notification by the system when the notification was created
48Work Order Processing PM_WO_300_LSO_v1

Work Order Processing PM_WO_300
Work Order Processing v10 PM_WO_300 25
Required Fields Required Fields –– IW34IW34
Click on the Possible Entries icon to see the list of Order Types and double-click the one you want.
Click the drop-down icon in the Priority field to see the choices, and then click on the one you want.
Type the Notification number in the Notification field. If you do not know the number, click on the Possible Entries icon to search for it.
49Work Order Processing PM_WO_300_LSO_v1
Work Order Created from Notification Work Order Created from Notification –– IW34IW34
When all the required fields are No matter how a Work Order is created…No matter how a Work Order is created…
A Work Order is a Work Order.A Work Order is a Work Order.complete, press the Enter key
or click on the Enter icon
and the Work Order is created.
A Work Order is a Work Order.A Work Order is a Work Order.
50Work Order Processing PM_WO_300_LSO_v1

Work Order Processing PM_WO_300
Work Order Processing v10 PM_WO_300 26
Create Work Order Create Work Order Directly from Notification Directly from Notification –– IW22IW22
On IW22 type the Notification number in the Notification field.
If you do not know the number, click on the Possible Entries icon to search for it.
When the Notification appears click the Create Order icon
Enter the Order Type on the Create Order dialog box that appears and press Enter.
51Work Order Processing PM_WO_300_LSO_v1
Work Order Created Directly from Notification Work Order Created Directly from Notification –– IW22IW22
No matter how a Work Order is created…No matter how a Work Order is created…
A Work Order is a Work Order.A Work Order is a Work Order.If an Object Information boxIf an Object Information box appears, just press Enter to get to the Work Order.
52Work Order Processing PM_WO_300_LSO_v1

Work Order Processing PM_WO_300
Work Order Processing v10 PM_WO_300 27
Creating a SubCreating a Sub--order order –– IW36IW36
• Sub-orders are typically used to break a project into units by craft or shop. Each shop can estimate its costs on a sub-order and these can be tracked at the sub-order and superior order level.
• A sub-order is a work order that has a link to a “superior” orderA sub order is a work order that has a link to a superior order.
• The actual costs of sub-orders may be viewed from the “superior” order
• The costs of the sub-orders may either settle to the superior order or directly to another cost object.
• Sub-orders may have sub-orders.
• To create a sub-order, a work order needs to be identified as the superior work order.
53Work Order Processing PM_WO_300_LSO_v1
Create SubCreate Sub--order order –– IW36IW36
Using IW36 enter the:
• Order Type
• Priority
• In the Superior Order field enter the work order number for the work order that will be identifiedwork order that will be identified as the superior work order.
54Work Order Processing PM_WO_300_LSO_v1

Work Order Processing PM_WO_300
Work Order Processing v10 PM_WO_300 28
SubSub--order Createdorder Created
The sub-order is created.
The only difference between a work order and a sub-order is the sub-order has a link to the superior work order.
No matter how a Work Order is created…No matter how a Work Order is created…
A Work Order is a Work Order.A Work Order is a Work Order.
55Work Order Processing PM_WO_300_LSO_v1
Superior Superior and and SubSub--order Linksorder Links
The superior work order has a link that will show all the sub-orders under it. Click the icon to show theClick the icon to show the sub-orders.
All sub-orders have a link
Double-clicking a sub-order will display the sub-order.
to their superior work order.
A sub-order can also be a superior order. It will have links to both the superior order and the sub-orders.
56Work Order Processing PM_WO_300_LSO_v1

Work Order Processing PM_WO_300
Work Order Processing v10 PM_WO_300 29
U it 3U it 3Unit 3Unit 3Check for UnderstandingCheck for Understanding
57Work Order Processing PM_WO_300_LSO_v1
Exercise 3Exercise 3
To practice the transaction(s) discussed in To practice the transaction(s) discussed in this unit, refer to:this unit, refer to:Exercise 3 Exercise 3 –– Create a Work Order Create a Work Order –– IW31IW31
as detailed in theas detailed in thePM WO 300 Practice Guide.PM WO 300 Practice Guide._ __ _
58Work Order Processing PM_WO_300_LSO_v1

Work Order Processing PM_WO_300
Work Order Processing v10 PM_WO_300 30
Unit 4Unit 4
ChangingChangingWork OrdersWork OrdersChangingChanging
Work OrdersWork Orders59Work Order Processing PM_WO_300_LSO_v1
Change a Work Order Change a Work Order –– IW32IW32
• You may need to modify an existing work order to change any of the following:
Description of the Work
Functional Location
Work Duration
Components
Person or Work Group Assigned
And other information
60Work Order Processing PM_WO_300_LSO_v1

Work Order Processing PM_WO_300
Work Order Processing v10 PM_WO_300 31
Change a Work Order Change a Work Order –– IW32IW32
In IW32 enter the Order number in the Order field and press Enter. The work order is displayed ready to be changed.g
If you do not know the Order number, click on the Possible Entries icon to search for it.
61Work Order Processing PM_WO_300_LSO_v1
Change a Work Order Change a Work Order –– IW32IW32
In this example we needed to add “chairs, podium” to the work description and increase the Labor Required from 2 hours to 3 hoursRequired from 2 hours to 3 hours.
Remember, you can also change:Remember, you can also change:• Functional Location• Add Components• Person or Work Group Assigned• And other information
When you have completed all the changes, click the save icon. The Work Order is saved with its original number and is displayed in the lower-left corner of the screen.
62Work Order Processing PM_WO_300_LSO_v1

Work Order Processing PM_WO_300
Work Order Processing v10 PM_WO_300 32
U it 4U it 4Unit 4Unit 4Check for UnderstandingCheck for Understanding
63Work Order Processing PM_WO_300_LSO_v1
Unit 5Unit 5
PM MaterialsPM MaterialsPM MaterialsPM Materials64Work Order Processing PM_WO_300_LSO_v1

Work Order Processing PM_WO_300
Work Order Processing v10 PM_WO_300 33
Materials and InventoryMaterials and Inventory
• Materials Management Inventory replaced Stores Inventory Systems
• On-shelf inventory should be kept to a minimum
• We are utilizing “just-in-time” inventory (parts are requisitioned daily)
• There are stock, non-stock, and non-file materials
• Materials may be planned (used on a routine basis) and unplanned
• Stock and non-stock materials will be identified by numbers in IRIS
• Non-file materials are not identified by numbers in IRIS
65Work Order Processing PM_WO_300_LSO_v1
Types of ComponentsTypes of Components
•• Stock materialsStock materials:: -- Parts are kept on hand and
-- have IRIS material numbers
•• NonNon--stock stock -- Parts which are used less frequently
materialsmaterials the are ordered as needed from s ppliers andmaterials: materials: -- they are ordered as needed from suppliers and
-- have IRIS material numbers
•• NonNon--filefile -- Parts are ordered as needed and
materials: materials: -- do do not not have IRIS material numbers
- remember non-file means “not on file”
•• Services:Services: Services provided by external companies and are requested as
neededneeded
•• Text Items:Text Items: Text Items are instructions or comments about materials
required for a work order, such as a note to bring a ladder or supplies like
electrical tape.
66Work Order Processing PM_WO_300_LSO_v1

Work Order Processing PM_WO_300
Work Order Processing v10 PM_WO_300 34
Planned Materials on a Work OrderPlanned Materials on a Work Order
• Planning a STOCK material results in a Reservation being created in the Storeroom. The Storeroom can then pick, stage, and deliver the materials as required.
• Planning a NON-STOCK material results in a Reservation being created in the Storeroom and in the automatic creation of a Purchase Requisition. The requisition is processed by Purchasing and materials are delivered to
Central Stores. The Storeroom can then pick, stage, and deliver the materials as required.
• Planning a NON-FILE material results in a Reservation being created in the Storeroom and in the manual creation of a Purchase Requisition. The requisition is processed by Purchasing and materials are delivered to
Central Stores. The Storeroom can then pick, stage, and deliver the materials as required.
67Work Order Processing PM_WO_300_LSO_v1
Unplanned Materials on a Work OrderUnplanned Materials on a Work Order
• Unplanned stock materials may be issued directly to a work order.
Storeroom personnel will issue the material and charge it to the work order number.
The name of the person receiving the material is also recordedThe name of the person receiving the material is also recorded.
68Work Order Processing PM_WO_300_LSO_v1
Work Order Processing PM_WO_300
Work Order Processing v10 PM_WO_300 35
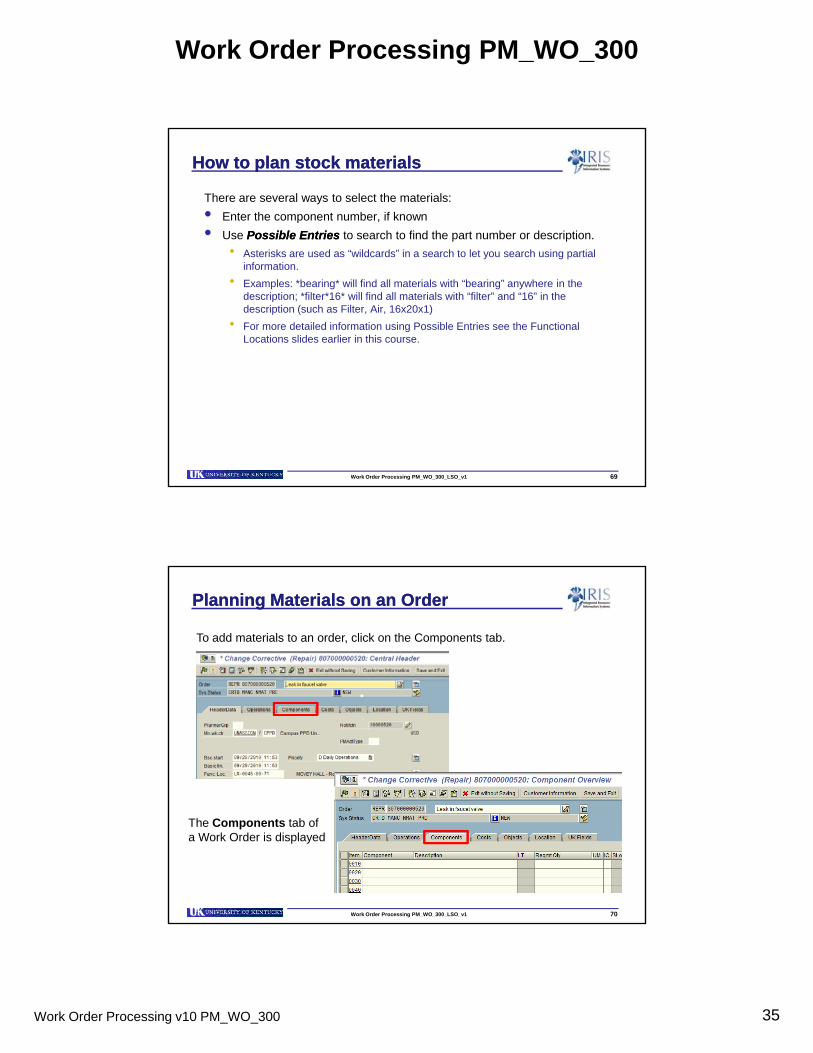
How to plan stock materialsHow to plan stock materials
There are several ways to select the materials:
• Enter the component number, if known
• Use Possible Possible Entries Entries to search to find the part number or description.
Asterisks are used as “wildcards” in a search to let you search using partial information.
Examples: *bearing* will find all materials with “bearing” anywhere in the description; *filter*16* will find all materials with “filter” and “16” in the description (such as Filter, Air, 16x20x1)
For more detailed information using Possible Entries see the Functional Locations slides earlier in this course.
69Work Order Processing PM_WO_300_LSO_v1
Planning Materials on an OrderPlanning Materials on an Order
To add materials to an order, click on the Components tab.
The Components tab of a Work Order is displayed
70Work Order Processing PM_WO_300_LSO_v1

Work Order Processing PM_WO_300
Work Order Processing v10 PM_WO_300 36
Columns on the Components TabColumns on the Components Tab
Item Sequential number on the list
Component The component numbernumber in IRIS
Description Text describing the component
Reqmt Qty Quantity required for the work
UM U it f M h EA f h
Work Order Processing PM_WO_300_LSO_v1
UM Unit of Measure, such as EA for each
IC Item Category; Stock, Non-stock, Non-file, etc.
SLoc Storage Location
Plnt Plant; always UK10
71
Planning Planning Stock MaterialsStock Materials
The component field is used for the IRIS Component number for both stock d t k itand non-stock items.
If you know the component number, enter the number in the field.If you do not know the component number, use Possible Entries to search for the number.
72Work Order Processing PM_WO_300_LSO_v1

Work Order Processing PM_WO_300
Work Order Processing v10 PM_WO_300 37
Planning Materials Planning Materials –– Possible EntriesPossible Entries
When the Possible Entries search box appears click the list icon and choose the Plant Material by description tab to search for components by a description.
73Work Order Processing PM_WO_300_LSO_v1
Planning Materials Planning Materials –– Search by DescriptionSearch by Description
We need to plan a faucet on the work order.
Since we are not sure where in the description the word faucet appears, we use the wildcard character (the asterisk) both in front and in back of the word faucet…i.e. *faucet*, to search for all materials with the word faucet anywhere in the description.
74Work Order Processing PM_WO_300_LSO_v1
Work Order Processing PM_WO_300
Work Order Processing v10 PM_WO_300 38
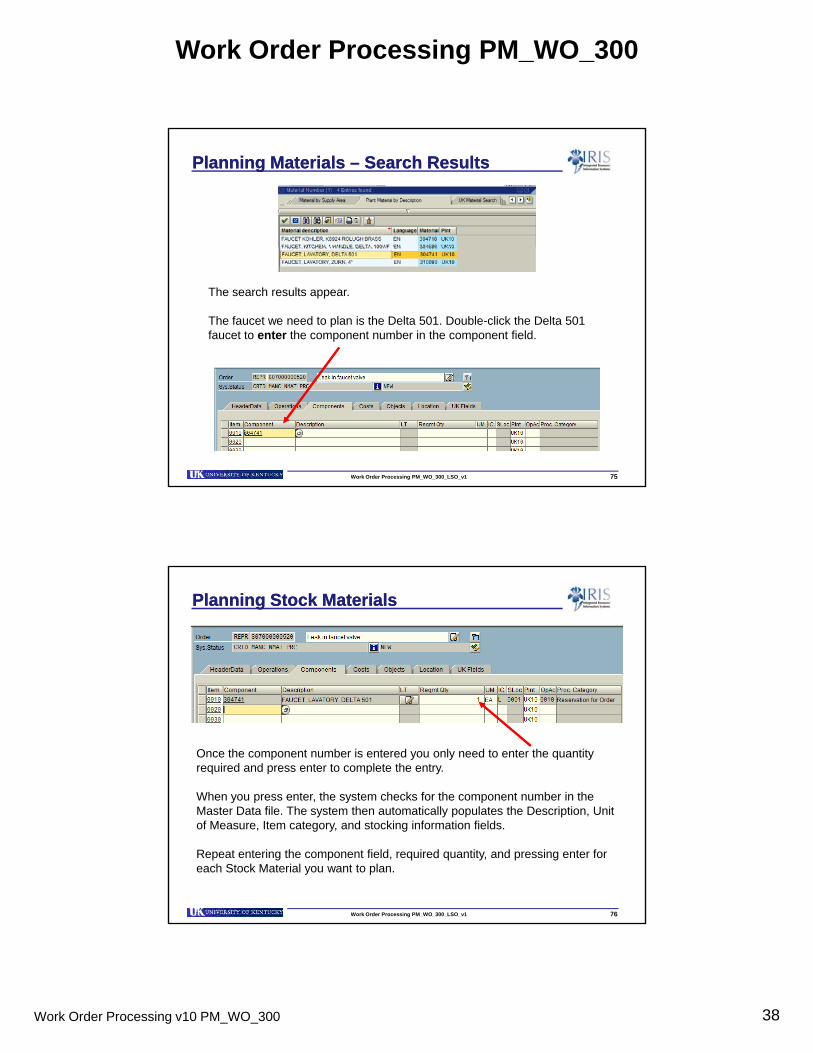
Planning Materials Planning Materials –– Search Search ResultsResults
The search results appear.
The faucet we need to plan is the Delta 501. Double-click the Delta 501 faucet to enter the component number in the component field.
75Work Order Processing PM_WO_300_LSO_v1
Planning Planning Stock MaterialsStock Materials
Once the component number is entered you only need to enter the quantity required and press enter to complete the entry.
When you press enter, the system checks for the component number in the Master Data file. The system then automatically populates the Description, Unit of Measure, Item category, and stocking information fields.
Repeat entering the component field, required quantity, and pressing enter for each Stock Material you want to plan.
76Work Order Processing PM_WO_300_LSO_v1

Work Order Processing PM_WO_300
Work Order Processing v10 PM_WO_300 39
Planning Planning NonNon--Stock MaterialsStock Materials
To plan a non-stock component the process is the same…You enter the component number, the quantity required and press enter to complete the entry.
The only difference between a stock and non-stock component is one is kept on h d i t k d th th i d d d dhand in stock and the other is ordered as needed.
The IC (Item Category) column shows the stock and non-stock status.
The system has all the information necessary to automatically startthe purchase requisition process to order the non-stock component.
77Work Order Processing PM_WO_300_LSO_v1
Planning NonPlanning Non--file file MaterialsMaterials
For a non-file component, first enter a description, quantity, and unit of measure and then press the Enter key. A Detail Purchasing dialog box appears.
Although the only required field is theAlthough the only required field is the Price field you should complete as many fields as possible. Purchasing will use this information to order the non-file component needed.If you are planning Services remember to change the Material Group.
78Work Order Processing PM_WO_300_LSO_v1

Work Order Processing PM_WO_300
Work Order Processing v10 PM_WO_300 40
Purchasing InformationPurchasing Information –– Reference Only SlideReference Only Slide
Information required to order nonInformation required to order non--stock materials:stock materials:
• Requirement Quantity – How many are needed? (defaults from quantity entered on the Components tab)
• Price Cost of material• Price - Cost of material
• Material Group
System defaults to PM000001 for PM Non-Material Master Material
If requesting services change to PM000002 for PM Non-Material Master Service
• Purchasing Group – Defaults to 000 / UK00
000 = Work Order / UK00 = Purchasing
• Goods Recipient – Who should receive the material?
• Requisitioner – Who is requesting the material?
• Unloading Point – Where should material be delivered?
• Vendor Material Number – Description of the material
79Work Order Processing PM_WO_300_LSO_v1
Adding a Text ComponentAdding a Text Component
To enter a text item (additional instructions), enter the information in the description field and enter a “T” in the Item Category field (see line 0040)…then press enter.
If you press enter before entering the “T” in the Item Categoryfield the system will assume you are entering a non-file item.
Also notice that the non-file item on line 0030 does not have a component number. The reason is that the system does not have any information about the item…i.e. non-file equals “not on file”.
80Work Order Processing PM_WO_300_LSO_v1

Work Order Processing PM_WO_300
Work Order Processing v10 PM_WO_300 41
Planned Cost DisplayPlanned Cost DisplayWhen you Save the Work Order, all Costs are calculated automatically.To see the calculated cost now, select the Cost tab.
81Work Order Processing PM_WO_300_LSO_v1
Calculating Planned Components CostCalculating Planned Components Cost
Notice that only the initial planned labor cost are currently shown on the Cost tab. When the Work Order was saved, those cost were calculated. To see the additional calculated cost (the components just entered) now you need to refresh the screen. To do this click on the Determine Costs icon. This will calculate all cost items that were added to the work order since the last time it was saved.
82Work Order Processing PM_WO_300_LSO_v1

Work Order Processing PM_WO_300
Work Order Processing v10 PM_WO_300 42
Planned Components CostPlanned Components Cost
After clicking the Determine Costs i ll t it di l d
When you have finished adding Components, click either on the Save icon or the Save and Exit push button
icon all cost items are displayed.
p
Until the Work Order is released it can not be worked and components will not be staged or ordered. If the order is to be released now, click on the Release and Save push button.
The work order is saved with the same work order number and all cost items are calculated and saved.
83Work Order Processing PM_WO_300_LSO_v1
U it 5U it 5Unit 5Unit 5Check for UnderstandingCheck for Understanding
84Work Order Processing PM_WO_300_LSO_v1

Work Order Processing PM_WO_300
Work Order Processing v10 PM_WO_300 43
Exercise 4Exercise 4
To practice the transaction(s) discussed in To practice the transaction(s) discussed in this unit, refer to:this unit, refer to:Exercise 4 Exercise 4 –– Add Components to a Work Add Components to a Work
Order Order –– IW32IW32
as detailed in theas detailed in thePM_WO_300 Practice Guide.PM_WO_300 Practice Guide.
85Work Order Processing PM_WO_300_LSO_v1
Unit 6Unit 6
Work Order Work Order List DisplaysList DisplaysWork Order Work Order List DisplaysList Displays
86Work Order Processing PM_WO_300_LSO_v1

Work Order Processing PM_WO_300
Work Order Processing v10 PM_WO_300 44
Work Order List Displays in IRISWork Order List Displays in IRIS
• List Displays can help manage work. You can specify criteria and produce lists of work orders for planning and analysis.
• Selection screens and variants can narrow your requests for i f tiinformation.
• Drill-down (double-clicking an item) functionality can provide detail.
• In this unit we will look at 2 list displays:
List Display Orders – IW39
Multi-Level Order List Displays – IW40Multi Level Order List Displays IW40
87Work Order Processing PM_WO_300_LSO_v1
List Display Orders List Display Orders –– IW39IW39
To display specific work orders, you can set criteria such as Order Status, Type, and/or Functional Location, etc.
To search in any field, click on the Possible Entries icon for that field.
In this example we want to display a list of REPR (Repair) Work Orders that are Outstanding (Not Released)
I (R l d) f thor In process (Released) for the date period showing.
After entering all your criteria, click the execute icon
88Work Order Processing PM_WO_300_LSO_v1

Work Order Processing PM_WO_300
Work Order Processing v10 PM_WO_300 45
Display the ListDisplay the List
The results display as a list of orders p ythat match the criteria specified.
89Work Order Processing PM_WO_300_LSO_v1
Change the LayoutChange the Layout
Click the Change Layout icon to add or remove columns.
You can add fields and rearrange the order of the columns. Click the Save icon to save the
layout, or press Enter to simply display it.
90Work Order Processing PM_WO_300_LSO_v1

Work Order Processing PM_WO_300
Work Order Processing v10 PM_WO_300 46
The Changed LayoutThe Changed Layout
The new layout appears.
91Work Order Processing PM_WO_300_LSO_v1
Download Data to SpreadsheetDownload Data to Spreadsheet
To download the data to an Excel spreadsheet follow these steps:
• When the list is displayed, click on the Spreadsheet icon.
• You will be prompted to “Enter number of key columns.”You can leave it unchanged at 1.
• You will be prompted to choose “Table” or “Pivot Table”.p pChoose Table and click on the Continue icon.
• You will be prompted to save to MS Excel.Click on the Continue icon.
• Be patient. The data will appear in an Excel spreadsheet and you can format, save, and use it as you wish just as any other Excel spreadsheet.
92Work Order Processing PM_WO_300_LSO_v1

Work Order Processing PM_WO_300
Work Order Processing v10 PM_WO_300 47
MultiMulti--Level Order List Display Level Order List Display –– IW40IW40
• A multi-level order list allows more detailed information.
• Use this function to view an order from a list to see more detail, such as any sub-orders or labor costs associated with the order.
93Work Order Processing PM_WO_300_LSO_v1
MultiMulti--Level Order List Display Level Order List Display –– IW40IW40
Similar to IW39, to display specific work orders, you can set criteria such as Order number Typesuch as Order number, Type, and/or Functional Location, etc.
To search in any field, click on the Possible Entries icon for that field.
In this example we are searching for all outstanding and in progress work orders for the date period showing.
After entering all your criteria, click the execute icon
94Work Order Processing PM_WO_300_LSO_v1

Work Order Processing PM_WO_300
Work Order Processing v10 PM_WO_300 48
MultiMulti--Level Order List Display Level Order List Display –– IW40IW40
The Order information is displayed.
To see anything in more detail just double click the item…examples:
Double click a work order to open it.
Double click a functional l ti t th tlocation to see the master data
The legend is also shown.
95Work Order Processing PM_WO_300_LSO_v1
U it 6U it 6Unit 6Unit 6Check for UnderstandingCheck for Understanding
96Work Order Processing PM_WO_300_LSO_v1

Work Order Processing PM_WO_300
Work Order Processing v10 PM_WO_300 49
Exercise 4Exercise 4
To practice the transaction(s) discussed in To practice the transaction(s) discussed in this unit, refer to:this unit, refer to:Exercise 5 Exercise 5 –– Change Layout of Order List Change Layout of Order List
Display Display –– IW39IW39
as detailed in theas detailed in thePM_WO_300 Practice Guide.PM_WO_300 Practice Guide.
97Work Order Processing PM_WO_300_LSO_v1
Course SummaryCourse Summary
You should now have an understanding of:
• Creating Work Orders
• Creating Sub-ordersCreating Sub orders
• Changing Work Orders
• Materials
• Adding Components to Work Orders
• Work Order List Displays
98Work Order Processing PM_WO_300_LSO_v1

Work Order Processing PM_WO_300
Work Order Processing v10 PM_WO_300 50
Contact InformationContact Information
• First point of contact for any problems should be the IRIS-PM Power User in your area
Nick Arnold – [email protected] – 559-7605
Kevin Jones – [email protected] – 257-3421
Skip Van Hook – [email protected] – 257-5397
• IRIS Plant Maintenance Team
Kevin Cheser – [email protected]
Ben Crutcher – [email protected]
• For more information visit the IRIS PM web site:
www.uky.edu/IRIS/PM
99Work Order Processing PM_WO_300_LSO_v1
Course AssessmentCourse Assessment
• To complete Part 2 of the course assessment:
1. Click on the Attachments link ( ) in the upper-right corner of this screen
2. Click on the Work Order Processing Assessment link (the assessment will open in a separate browser window)
3. Print the assessment
4. Follow all of the instructions listed
• Email [email protected] with any questions or issues.
100Work Order Processing PM_WO_300_LSO_v1

Work Order Processing PM_WO_300
Work Order Processing v10 PM_WO_300 51
Course Completion InstructionsCourse Completion Instructions
• To complete this course:
1. Click on the Attachments link ( ) in the upper-right corner of this screen
2. Click on the QRC Course Completion link (the QRC will open in a separate browser window)
3. Print the QRC
4. Follow all of the instructions listed
• Email [email protected] with any questions or issues.
101Work Order Processing PM_WO_300_LSO_v1