workgroup editors‟ guide - university of oxford · workgroup homepage so you don‟t need to...
TRANSCRIPT

Last updated: 6 July 2009
Workgroup Editors‟ Guide
www.ResearchProfessional.com
Before starting any workgroup editing tasks, first please familiarise yourself with our User Guide to gain knowledge about Research Professional‟s new functionality
RP.com‟s definition of workgroup editors: Designated members of a workgroup who can set up the workgroup start page, and create, publish and manage shared resources on the workgroup start page.
Table of Contents:
1. Editing text on your workgroup homepage .................................................................................... 2
2. Creating new saved searches for your workgroup ........................................................................ 2
How best to use the new search functionality ............................................................................... 2
Some examples of useful saved searches ..................................................................................... 4
3. Creating folders of selected funding opportunity items for your workgroup ............................. 4
4. Email searches and funding opportunities to all members of a workgroup ............................... 5
5. Adding a description to a shared search / folder of bookmarks on a workgroup start page ... 5
6. Adding annotations to selected funding opportunties and/or sponsors .................................... 5
7. Magazines .......................................................................................................................................... 8
8. Viewing workgroup usage reports ................................................................................................ 11
9. Help ................................................................................................................................................... 12
Appendix A: Detailed explanation of hierarchies and search operators ....................................... 12
The 3-level hierarchy ....................................................................................................................... 12
Exact, Narrower and Broader ......................................................................................................... 12
Some sample searches using „AND, OR, AND NOT‟ as operators ............................................ 13
Appendix B: Notes about Workgroup Administrators .................................................................... 15
General note: Clicking on centre panels (example below) will activate (i.e. turn blue) relevant toolbar
options, e.g. „New‟, „Edit‟, „Save‟, „Move‟, in all screens.
2
1. EDITING TEXT ON YOUR WORKGROUP HOMEPAGE
There is space on your workgroup‟s Start page where you are able to display some personalised text for your workgroup users. Underneath the text, in a separate panel, will be a list of saved searches and folders of funding opportunities you have set-up. This is a useful opportunity for you to provide some guidance to new and occasional users. (Bear in mind that general help on how to navigate and use the site will be given on the University‟s workgroup homepage so you don‟t need to repeat this on your own workgroup homepage.)
Go to the panel and click on your workgroup name. Click anywhere in the centre
panel when viewing the page. Click on the button to begin editing. Simply fill in the field labelled „Description‟ with your desired welcome message. When you are happy with your welcome message, click on „Save‟. The message will now be published to your workgroup home page, and will be seen by anyone who views the page.
Note: For the time being there won‟t be a Rich Text Editing tool available, which means that the text you can add is in plain text only. However, you can use simple HTML tags to emphasise text (<p></p> for paragraphs; <i></i> for italics, <b></b> for bold). If you are not sure how to do this, please contact the Funding Information Officer who will be able to help you.
2. CREATING NEW SAVED SEARCHES FOR YOUR WORKGROUP
Go to the panel and click on Funding Search. Create your desired search, e.g. by adding various search criteria. Once you are happy with the search and results, save the search by
clicking on the button. Click „Save as‟, select the workgroup folder within the relevant institutional hierarchy your search should be saved under, and name your search appropriately).
You can now check the saved search you have set up in the panel.
Members of your workgroup will then be able to run your search, make a shortcut to it for their own use, or make their own copy of it. You can also use 'Save As' to quickly share a single saved search across several groups, by repeating the step and picking a different destination workgroup each time.
From then on, any changes you make to your search will be reflected on all the start pages in which it appears. If users have added a shortcut to your saved search this will also be updated.
You might want to make a note of the saved searches you have set up on a regular basis as there are no back-up facilities on ResearchProfessional.com.
How best to use the new search functionality
Go to the panel and click on Funding Search to go to the search panel. This is an example of a search looking for travel grants for conferences and for general research purposes exactly within History and also within any subjects indexed by ResearchProfessional.com underneath History.
3
For further guidance on search criteria and the use of operators please see ResearchProfessional.com‟s comprehensive searchable online guide (http://www.researchprofessional.com/xwiki/bin/view/Main/) and also see some sample searches.
http://www.researchprofessional.com/xwiki/bin/view/Main/%27And%27%2C+%27Or%27+or+%27And+not%27
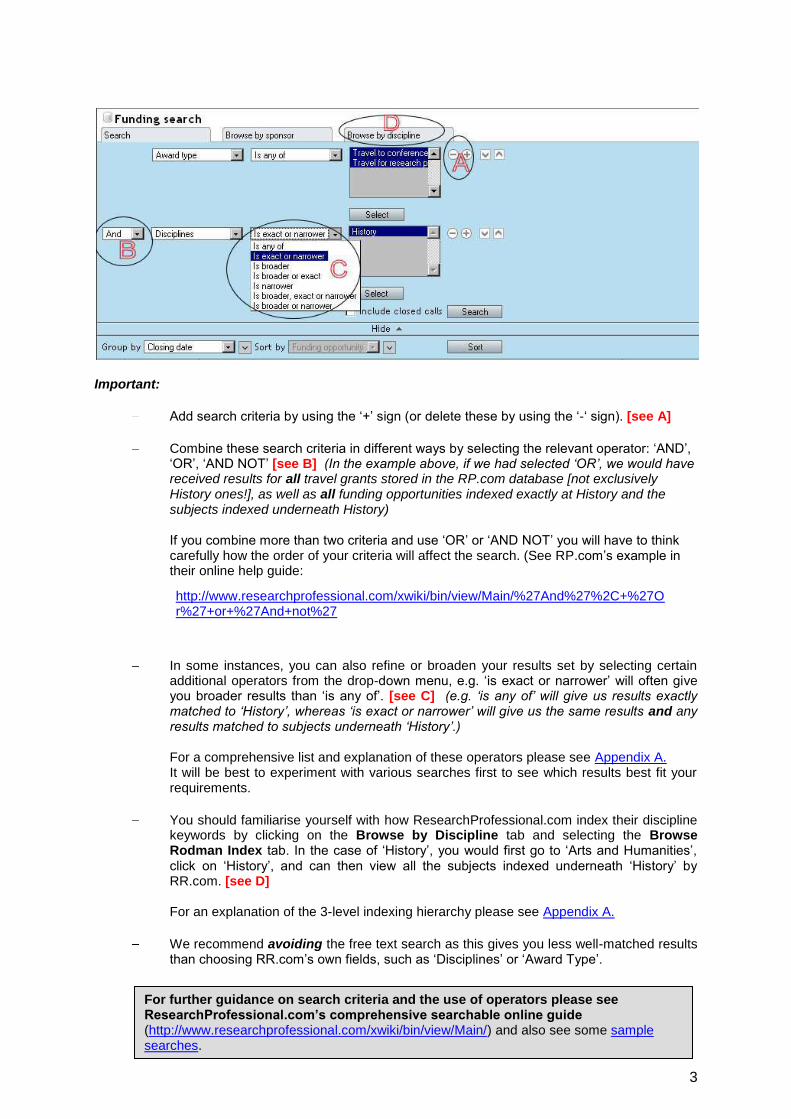
Important:
Add search criteria by using the „+‟ sign (or delete these by using the „-„ sign). [see A]
Combine these search criteria in different ways by selecting the relevant operator: „AND‟, „OR‟, „AND NOT‟ [see B] (In the example above, if we had selected „OR‟, we would have received results for all travel grants stored in the RP.com database [not exclusively History ones!], as well as all funding opportunities indexed exactly at History and the subjects indexed underneath History) If you combine more than two criteria and use „OR‟ or „AND NOT‟ you will have to think carefully how the order of your criteria will affect the search. (See RP.com‟s example in their online help guide:
In some instances, you can also refine or broaden your results set by selecting certain additional operators from the drop-down menu, e.g. „is exact or narrower‟ will often give you broader results than „is any of‟. [see C] (e.g. „is any of‟ will give us results exactly matched to „History‟, whereas „is exact or narrower‟ will give us the same results and any results matched to subjects underneath „History‟.) For a comprehensive list and explanation of these operators please see Appendix A. It will be best to experiment with various searches first to see which results best fit your requirements.
You should familiarise yourself with how ResearchProfessional.com index their discipline keywords by clicking on the Browse by Discipline tab and selecting the Browse Rodman Index tab. In the case of „History‟, you would first go to „Arts and Humanities‟, click on „History‟, and can then view all the subjects indexed underneath „History‟ by RR.com. [see D] For an explanation of the 3-level indexing hierarchy please see Appendix A.
We recommend avoiding the free text search as this gives you less well-matched results than choosing RR.com‟s own fields, such as „Disciplines‟ or „Award Type‟.
4
Some examples of useful saved searches
a) UK funding opportunities for hosting conferences in any field of Arts & Humanities
1. Disciplines – is exact or narrower – Arts & Humanities 2. AND – Award Type – is any of – Hosting Conferences 3. AND – Sponsor Country – is any of – United Kingdom
b) Mid-career fellowships for Civil Engineering and any fields indexed underneath Civil Engineering
1. Award Type – is any of – Mid-Career Fellowships 2. AND - Disciplines – is exact or narrower – Civil Engineering
c) Travel grants for conferences and for general research purposes for Nuclear Physics or any fields indexed above Nuclear Physics
1. Disciplines – is broader or exact – Nuclear Physics 2. AND – Award Type - Travel to conferences, meetings etc. 3. AND – Award Type – Travel for research purposes *
(* you can also simply tick both travel grant boxes within the Award Type field, without adding a third criteria)
3. CREATING FOLDERS OF SELECTED FUNDING OPPORTUNITY ITEMS FOR YOUR WORKGROUP
Go to the panel and click on Funding Search. Create your desired search, or browse.
Tick any items of interest you wish to bookmark for your workgroup users. Click , choose „Save as‟ and choose the location where the folder should sit within the institutional hierarchy, then name it. This will make it appear as a shared resource on the start page for your workgroup. Members of that workgroup will then be able to view that folder, make a shortcut to it for their own use, or make their own copy of it. Workgroup administrators can also use 'Save As' to quickly share a single folder across several groups, by repeating the step and picking a different destination workgroup each time. At any time, you can add any funding opportunities you might have browsed or searched for to existing folders: Important: Folders of selected bookmarks are „static‟, i.e. you will have to remove any out-of-date funding opportunities yourself or add any matching new funding opportunities yourself. (In contrast, folders of saved searches get automatically updated by ResearchProfessional.com. However, the deadlines and details of funding opportunities in folders will be updated when ResearchProfessional.com update their records in their database.) You might want to make a note of the folders you have set up on a regular basis as there are no back-up facilities on ResearchProfessional.com.
5
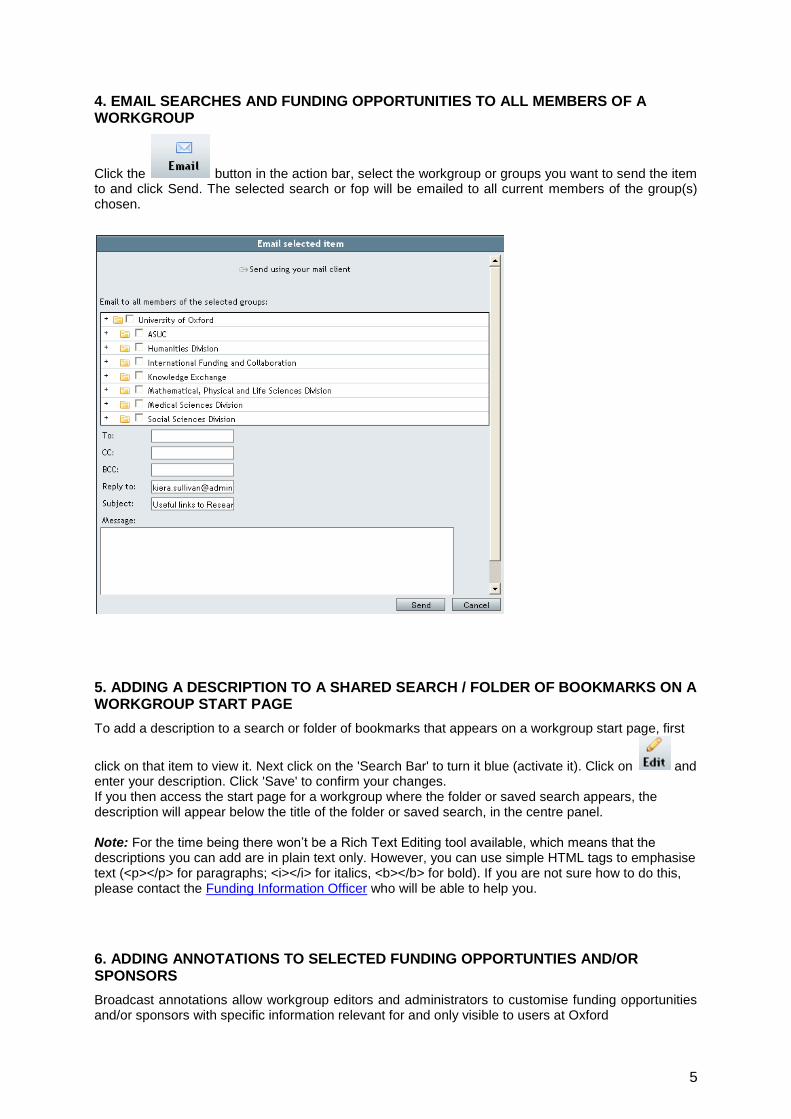
4. EMAIL SEARCHES AND FUNDING OPPORTUNITIES TO ALL MEMBERS OF A WORKGROUP
Click the button in the action bar, select the workgroup or groups you want to send the item to and click Send. The selected search or fop will be emailed to all current members of the group(s) chosen.
5. ADDING A DESCRIPTION TO A SHARED SEARCH / FOLDER OF BOOKMARKS ON A WORKGROUP START PAGE
To add a description to a search or folder of bookmarks that appears on a workgroup start page, first
click on that item to view it. Next click on the 'Search Bar' to turn it blue (activate it). Click on and enter your description. Click 'Save' to confirm your changes. If you then access the start page for a workgroup where the folder or saved search appears, the description will appear below the title of the folder or saved search, in the centre panel. Note: For the time being there won‟t be a Rich Text Editing tool available, which means that the descriptions you can add are in plain text only. However, you can use simple HTML tags to emphasise text (<p></p> for paragraphs; <i></i> for italics, <b></b> for bold). If you are not sure how to do this, please contact the Funding Information Officer who will be able to help you.
6. ADDING ANNOTATIONS TO SELECTED FUNDING OPPORTUNTIES AND/OR SPONSORS
Broadcast annotations allow workgroup editors and administrators to customise funding opportunities and/or sponsors with specific information relevant for and only visible to users at Oxford
6
Four types of annotation are available; when users browse or search for funding opportunities an annotated opportunity will be marked with one or more of the following four icons:
This flag indicates an „Internal deadline‟ has been added by a workgroup editor or administrator at Oxford
This flag indicates a „Note‟ has been added
This flag indicates an „Internal contact‟ has been added
This flag indicates the funding opportunity has been marked „High priority‟
The full content of annotations is shown in the panel, within the Preview panel on the right. Annotations are also displayed in full within email alerts.
When an annotation is added to a sponsor it will also be added to all current and future funding opportunities from that sponsor on ResearchResearch.com.
There is no limit to the number of annotations that can be added to a funding opportunity / sponsor.
How to add Broadcast Annotations
In the section, click the check box next to the funding opportunity or sponsor you want to annotate. The opportunity will be highlighted in blue and the toolbar will be activated.
It is possible to add an annotation to more than one funding opportunity at a time by selecting several opportunities before clicking Edit. Note: However, when annotations are added in this way, it is treated as if one annotation has been copied to each selected funding opportunity; were you to delete this annotation from one opportunity, the annotation would be removed from all the opportunities.
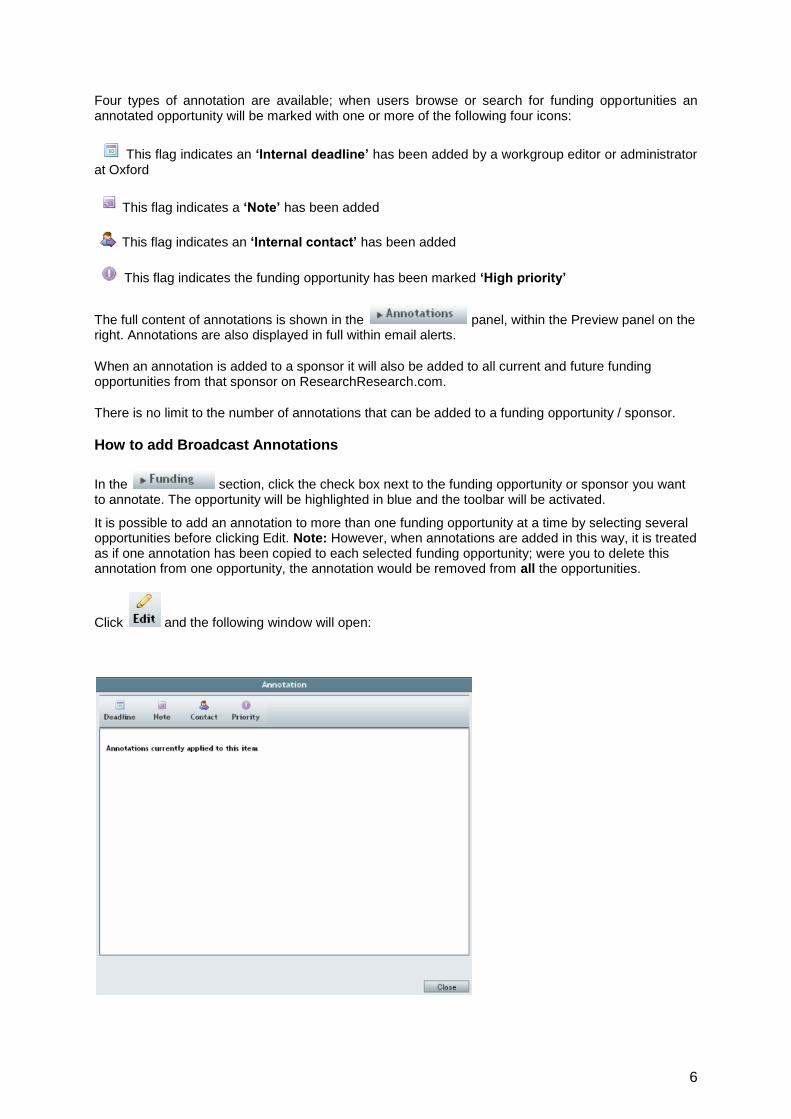
Click and the following window will open:
7
The menu at the top of the window shows each type of annotation you are able to add. All annotations already applied to the selected opportunity are listed in the window beneath.
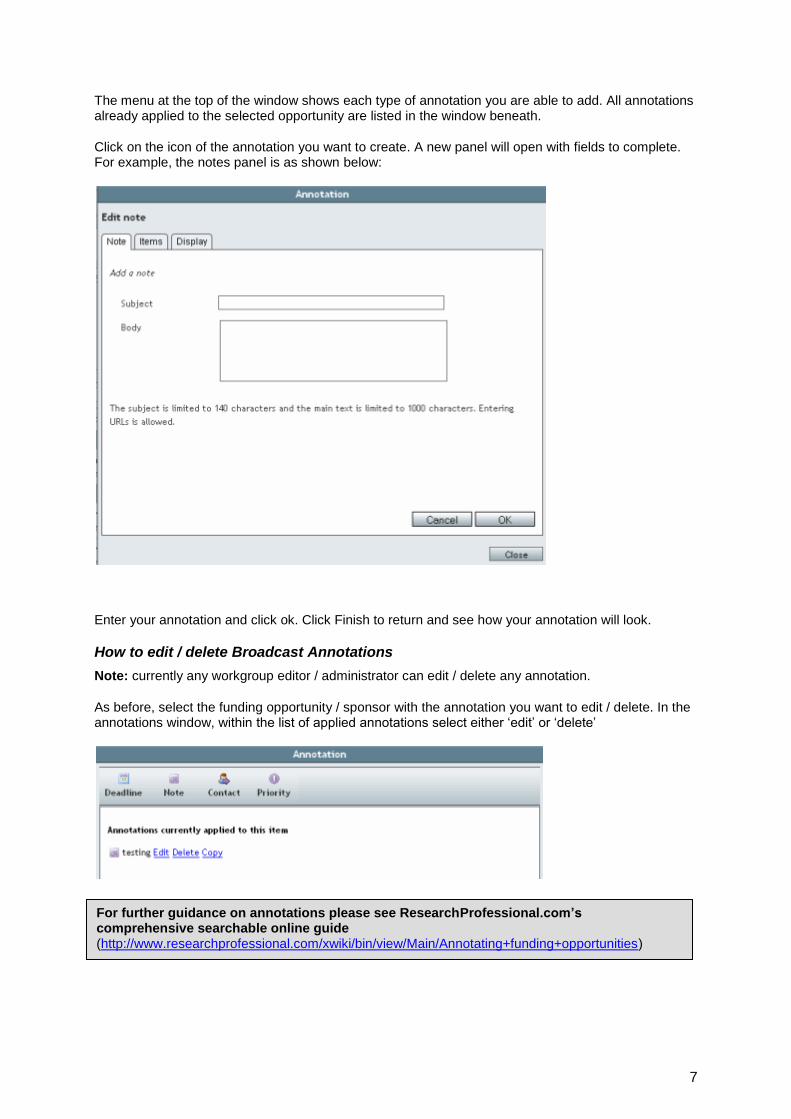
Click on the icon of the annotation you want to create. A new panel will open with fields to complete. For example, the notes panel is as shown below:
Enter your annotation and click ok. Click Finish to return and see how your annotation will look.
How to edit / delete Broadcast Annotations
Note: currently any workgroup editor / administrator can edit / delete any annotation.
As before, select the funding opportunity / sponsor with the annotation you want to edit / delete. In the annotations window, within the list of applied annotations select either „edit‟ or „delete‟
For further guidance on annotations please see ResearchProfessional.com‟s comprehensive searchable online guide (http://www.researchprofessional.com/xwiki/bin/view/Main/Annotating+funding+opportunities)
8
7. MAGAZINES
Magazines are a way for workgroup administrators and editors to collect together funding opportunities and republish them as an issue of a magazine on RP.com and also to send out to workgroup members via email.
How to create a magazine
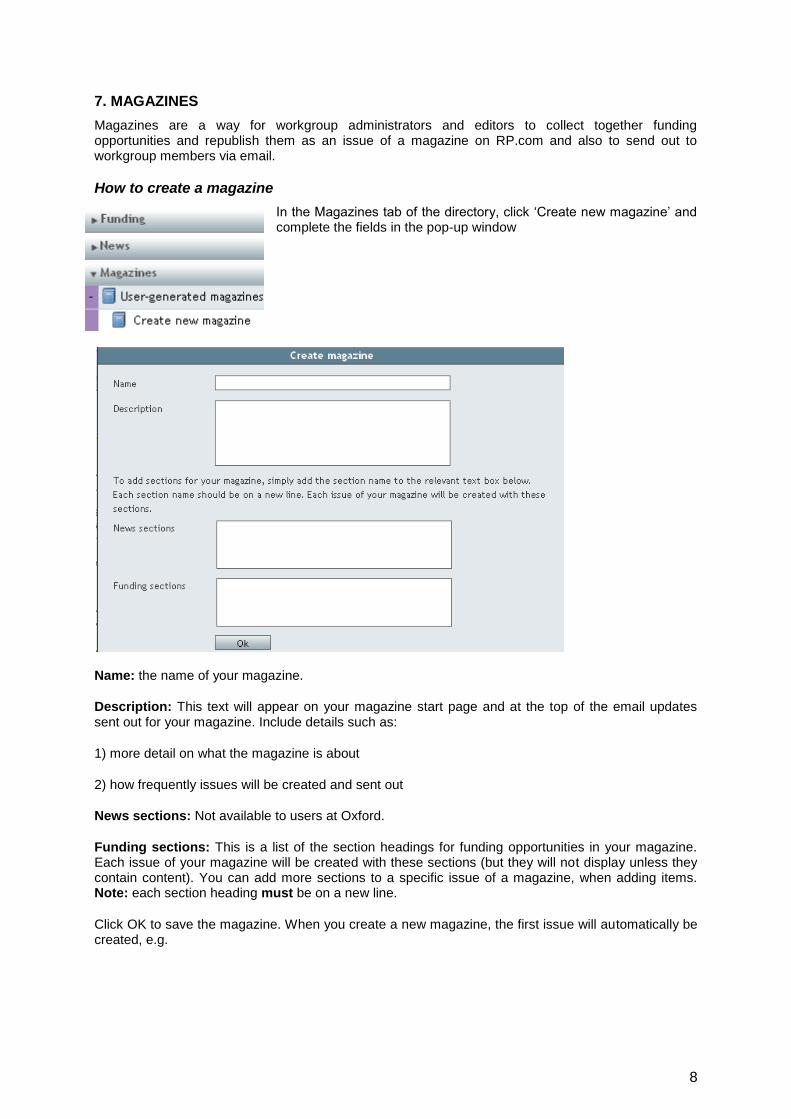
In the Magazines tab of the directory, click „Create new magazine‟ and complete the fields in the pop-up window
Name: the name of your magazine.
Description: This text will appear on your magazine start page and at the top of the email updates sent out for your magazine. Include details such as:
1) more detail on what the magazine is about
2) how frequently issues will be created and sent out
News sections: Not available to users at Oxford.
Funding sections: This is a list of the section headings for funding opportunities in your magazine. Each issue of your magazine will be created with these sections (but they will not display unless they contain content). You can add more sections to a specific issue of a magazine, when adding items. Note: each section heading must be on a new line.
Click OK to save the magazine. When you create a new magazine, the first issue will automatically be created, e.g.

9
Adding funding opportunities to a magazine issue
To add a fop/s to a magazine, search and select the fop/s you want to add. Click the icon in the action bar. This will bring up a pop-up showing the available magazine issues:
Click on the issue you want to add the fop to, and you will now see a list of available sections and the option to create a new section (which will only show in the selected issue!) In the example below I have selected the section „Co-ordinated University Bids‟ Click „Save‟ in the pop-up to add the fop to your magazine issue. You can also edit existing section names here.
Note: you can only add fops to unpublished issues. To add items to a currently published issue, you must first un-publish it (using the button on the relevant magazine start page). After adding items, you can re-publish it.
Editing funding opportunities in a magazine issue
You can edit and revise fops added to a magazine issue. First, view the issue in the magazines panel by clicking on the magazine and then click on the Issue you want to edit, in this example, Issue 1.
10
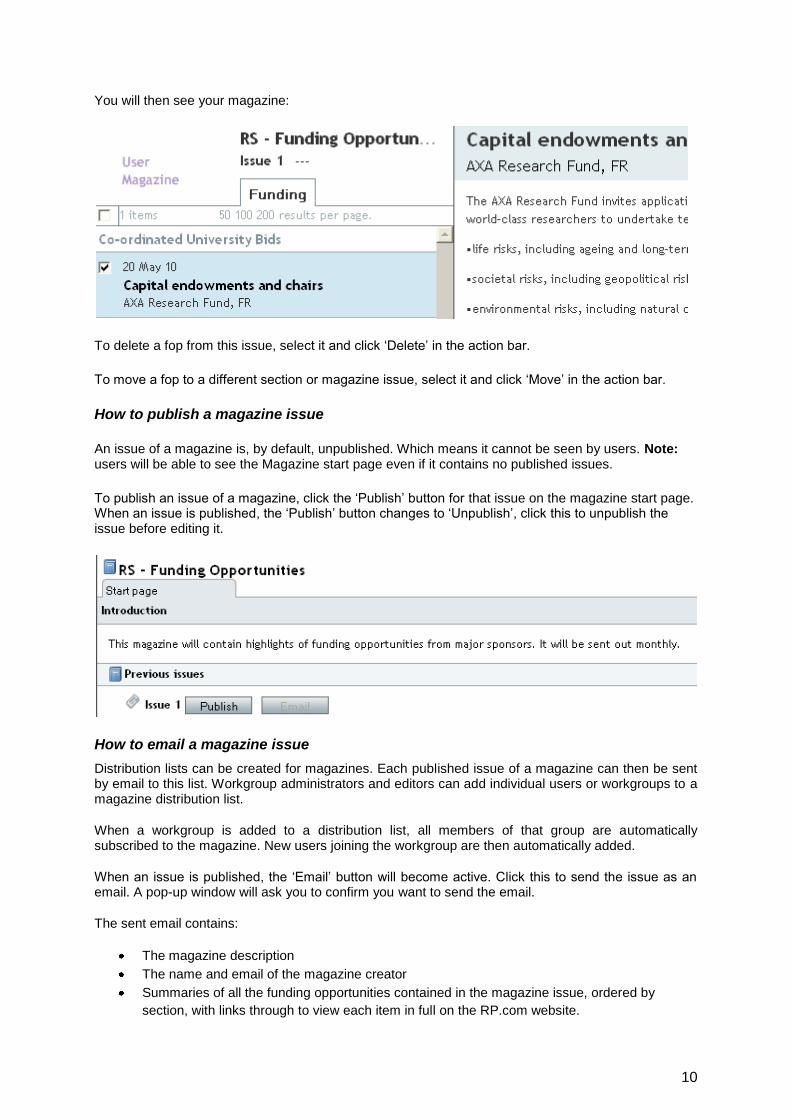
You will then see your magazine:
To delete a fop from this issue, select it and click „Delete‟ in the action bar.
To move a fop to a different section or magazine issue, select it and click „Move‟ in the action bar.
How to publish a magazine issue
An issue of a magazine is, by default, unpublished. Which means it cannot be seen by users. Note: users will be able to see the Magazine start page even if it contains no published issues.
To publish an issue of a magazine, click the „Publish‟ button for that issue on the magazine start page. When an issue is published, the „Publish‟ button changes to „Unpublish‟, click this to unpublish the issue before editing it.
How to email a magazine issue
Distribution lists can be created for magazines. Each published issue of a magazine can then be sent by email to this list. Workgroup administrators and editors can add individual users or workgroups to a magazine distribution list.
When a workgroup is added to a distribution list, all members of that group are automatically subscribed to the magazine. New users joining the workgroup are then automatically added.
When an issue is published, the „Email‟ button will become active. Click this to send the issue as an email. A pop-up window will ask you to confirm you want to send the email.
The sent email contains:
The magazine description
The name and email of the magazine creator
Summaries of all the funding opportunities contained in the magazine issue, ordered by
section, with links through to view each item in full on the RP.com website.

11
How to edit the magazine distribution list
Select the magazine you want to edit, at the magazine start page. To do this click anywhere in the magazine description area, it will turn blue (see example below) to show it is selected. Then click Edit in the action bar.
Click the link „Edit magazine distribution list‟ in the pop-up window.
You will see a new pop-up window. In the Users tab: Click the + button next to a user to add them to the distribution list. The right-hand side of the screen shows users who have already been added, click the – button next to a user to remove them from the list.
Groups tab: This shows the all the workgroups on RP.com at Oxford. To add a workgroup, click the check box next to the workgroup name.
Opted out tab: This shows any users who have unsubscribed themselves from the magazine.
8. VIEWING WORKGROUP USAGE REPORTS
You can find usage reports in the panel, under the Reports tab in the centre page. This tab is not available to normal users. You will be able to choose from two types of report: a) My users This will list the following data for each user at your institution. • user name • email • real name • department (if known) • a count of how many times they have logged in to the site • a list of the searches they are receiving personal alerts on • a list of the magazines they have chosen to receive via email. There is a Sort bar above the list of users, similar to that found in the News and Funding sections, which you can use to order the list of users by various criteria. b) My services Lists the services (e.g. specific magazines, funding opportunities by region) to which Oxford has access. Also shown will be the start and expiry dates for each service. As with the „My users‟ report, there is a Sort bar directly above the list which you can use to alter the order in which your services are displayed.

12
For workgroup-specific task queries please see ResearchProfessional.com‟s Administrator & Workgroup Editor quick Start Guide (http://www.researchprofessional.com/xwiki/bin/view/Main/Admin+user+guide)
For more information, FAQs and full guidance on general functions please see ResearchProfessional.com‟s searchable Online Help Guide (http://www.researchprofessional.com/xwiki/bin/view/Main/)
If you have any questions after reading these guidance notes, please contact the Funding Information Officer or tel. (2)89813.
9. HELP
APPENDIX A: DETAILED EXPLANATION OF HIERARCHIES AND SEARCH OPERATORS
(e.g. „is any of‟, „exact or narrower‟, „is broader‟, etc. ) Excerpt from RR.com online Help Guide
The 3-level hierarchy
Top level Top level terms are the most general and are the list of terms first presented to a user when you click on the “Browse Rodman Index” button under the “Browse by Discipline” tab in the funding search bar. Examples: “Arts & Humanities”, “Engineering”. Second level Second level terms appear as sub-terms of the top level, and can be found by clicking the + symbol next to any of the top level terms available via “Browse Rodman Index” as described above. Second level terms are more specific than their parent term. Examples: The second level terms appearing under the top level term “Engineering” include “Aeronautical & Aerospace Engineering”, “Chemical Engineering” and “Civil Engineering”. Third level Third level terms are sub-terms of second level terms, as defined above, and are the most specific terms we have available. Examples: By clicking the + symbol next to the second level term “Chemical Engineering” (found under the top level term “Engineering”) the list of third level terms underneath appears, including more specific disciplines such as “Absorption”, “Air Pollution” and “Catalysis & Kinetics”.
Exact, Narrower and Broader
When browsing and searching the database for funding opportunities by discipline, the options “Exact”, “Broader”, “Narrower” and combinations of those are available to refine your results set – although for users unfamiliar with our systems, these terms may warrant some further explanation. For the purposes of this explanation, we will use the second level term “Chemical Engineering”. When searching using the „Discipline‟ property, you will have the choice of the following additional operators: Is any of: Will return only opportunities indexed exactly with any of the terms searched with. In our example, this would be opportunities indexed with “Chemical Engineering” Is exact or narrower: Will return opportunities indexed exactly with any of the terms searched with, and any opportunities indexed with a sub-term of those terms. “Chemical Engineering”, or its sub-terms such as “Air Pollution”, “Separation Process”, “Volatile Organic Compounds” and so on.
13
(http://www.researchprofessional.com/xwiki/bin/view/Main/Searching+and+browsing)
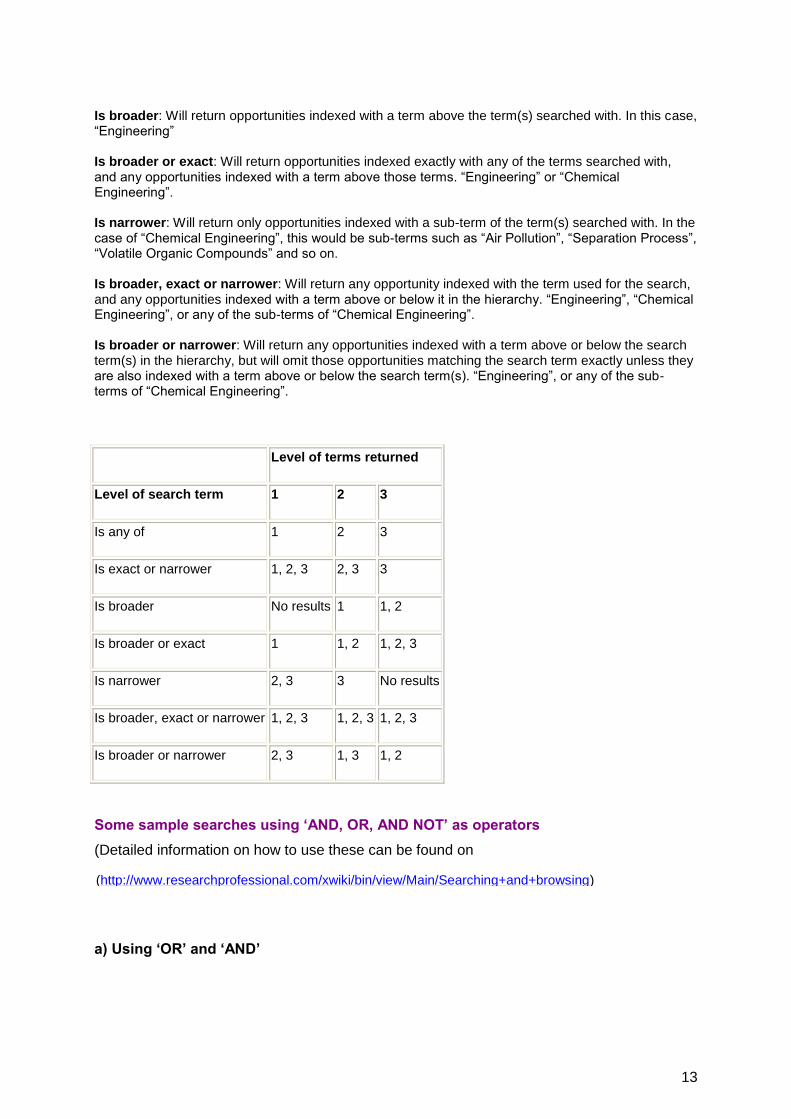
Is broader: Will return opportunities indexed with a term above the term(s) searched with. In this case, “Engineering” Is broader or exact: Will return opportunities indexed exactly with any of the terms searched with, and any opportunities indexed with a term above those terms. “Engineering” or “Chemical Engineering”. Is narrower: Will return only opportunities indexed with a sub-term of the term(s) searched with. In the case of “Chemical Engineering”, this would be sub-terms such as “Air Pollution”, “Separation Process”, “Volatile Organic Compounds” and so on. Is broader, exact or narrower: Will return any opportunity indexed with the term used for the search, and any opportunities indexed with a term above or below it in the hierarchy. “Engineering”, “Chemical Engineering”, or any of the sub-terms of “Chemical Engineering”. Is broader or narrower: Will return any opportunities indexed with a term above or below the search term(s) in the hierarchy, but will omit those opportunities matching the search term exactly unless they are also indexed with a term above or below the search term(s). “Engineering”, or any of the sub-terms of “Chemical Engineering”.
Level of terms returned
Level of search term 1 2 3
Is any of 1 2 3
Is exact or narrower 1, 2, 3 2, 3 3
Is broader No results 1 1, 2
Is broader or exact 1 1, 2 1, 2, 3
Is narrower 2, 3 3 No results
Is broader, exact or narrower 1, 2, 3 1, 2, 3 1, 2, 3
Is broader or narrower 2, 3 1, 3 1, 2
Some sample searches using „AND, OR, AND NOT‟ as operators
(Detailed information on how to use these can be found on
a) Using „OR‟ and „AND‟

14
In this example, we are looking for funding opportunities from a selection of major sponsors that have closing dates before 1 June 2009 or don‟t have deadlines at all.
The first criterion is, “Closing date – is before – 01/06/2009” We also want to search for any opportunities in the ResearchProfessional.com database that don‟t have a fixed deadline, so we connect “Closing date – No date” to the first criterion using the operator „OR‟.
(If we would have picked „AND‟ at this point, we would not have received any results at all as these two criterions would have contradicted each other.) Finally, we want to add another criterion, i.e. certain major sponsors, using the operator „AND‟, which means that both first criteria results will be searched for any sponsors that we have selected in our last criterion.
b) Using „AND NOT‟
In this example, we are looking for any travel funding opportunities exactly indexed at the „Biomedical, Medical Sciences and Health‟ level and below that level, but want to exclude a certain sponsor („NIH: National Institute of General Medical Sciences, US‟).
Again, we add the travel grants criteria to the discipline criterion by using „And‟, and simply add the sponsor criterion we want to exclude to the second criterion by using the operator „And not‟.
15
APPENDIX B: NOTES ABOUT WORKGROUP ADMINISTRATORS
Workgroup Administrators can do everything that a workgroup editor can, plus:
create user accounts
add and remove users in their workgroups
promote users to workgroup editors
create new workgroups
move existing workgroups underneath their workgroup (caution is needed here – any sub-workgroups underneath the one you want to move will also be automatically moved)
delete workgroups (extra caution is needed here, as any sub-workgroups underneath the workgroup you want to delete will also be deleted. If you don‟t want to delete everything, make sure to move the sub-workgroups first! Deletion is final and no back-ups are available.
Only few people will be Workgroup Administrators, initially only certain divisional contacts as well as Claudia Kozeny-Pelling and Zoë Power from Research Services, who are University-wide Administrators.
An overview of how to do administrators tasks is given in the ResearchProfessional Administrator & Workgroup Editor Quick Start Guide (http://www.researchprofessional.com/xwiki/bin/view/Main/Admin+user+guide)