working with smart forms and other transactions · 2019-04-02 · sap introduction 05.18 building a...
TRANSCRIPT

SAP
Working with Smart Forms
and other Transactions

Copyright by Carl Valentin GmbH / 0618
Particulars on delivery, appearance, capacity, dimensions and weight reflect our knowledge gained at the time of printing.
Subject to modifications.
All rights reserved including those of the translation.
No part of the work may in whatever form (print, photocopy or another process) may be reproduced without the written permission of Carl Valentin GmbH or edited, duplicated or disseminated from the use of electronic systems.
Constant development of the devices may be responsible for discrepancies arising between the documentation and the device. The current version is available under www.carl-valentin.de
Trade marks
All the specified brands and trademarks represent registered brands or trademarks of their owners. They may not be specifically identified. The lack of identification permits to a conclusion as to that it does not involve a registered brand or trademark.
Carl Valentin is a Silver Member of the SAP Printer Vendor Program and under this program renders support for machine types as provided and the ABAP-PDL driver.
This documentation is an integral part of this support.
Carl Valentin GmbH
PO Box 3744 78026 Villingen-Schwenningen Neckarstraße 78 – 86 u. 94 78056 Villingen-Schwenningen
Phone Fax
+49 7720 9712-0 +49 7720 9712-9901
E-mail Internet
[email protected] www.carl-valentin.de
SAP Index
05.18 Building a new form 3
Index
Index 3
1 Introduction ............................................................................................................................ 5 1.1 Notes ....................................................................................................................................... 5 1.2 SAP – First steps ..................................................................................................................... 5 1.3 Restrictions .............................................................................................................................. 6 1.4 Basic considerations prior to logging onto PVD ...................................................................... 6 1.5 Building or opening the form .................................................................................................... 8
2 Defining fonts to be used ................................................................................................... 11 2.1 Style Editor ............................................................................................................................ 11
3 Building Forms .................................................................................................................... 13 3.1 Smart Forms Editor ................................................................................................................ 13 3.2 Form testing ........................................................................................................................... 16
4 Adaptions in the Form......................................................................................................... 21 4.1 Large fonts ............................................................................................................................. 21 4.2 Font sizes - Zoom factor ........................................................................................................ 21 4.3 Other TrueType fonts............................................................................................................. 21 4.4 Asian font types ..................................................................................................................... 21
5 Frame and Lines .................................................................................................................. 23
6 Barcodes .............................................................................................................................. 25 6.1 Height of the barcodes .......................................................................................................... 25 6.2 Ratio barcodes ....................................................................................................................... 26 6.3 Positioning ............................................................................................................................. 26 6.4 Human readable line.............................................................................................................. 28 6.5 2D Barcodes .......................................................................................................................... 28 6.6 Defining a new barcode ......................................................................................................... 30 6.7 Size of barcodes .................................................................................................................... 30 6.8 More Barcodes ...................................................................................................................... 30
7 Graphic – Logos and Bitmaps ............................................................................................ 31 7.1 Insert graphic ......................................................................................................................... 31 7.2 Uploading new graphics ........................................................................................................ 33 7.3 Renderer ................................................................................................................................ 35
8 Binary Colour Print .............................................................................................................. 37 8.1 Colour text ............................................................................................................................. 38 8.2 Colour separation with graphics ............................................................................................ 38
9 Using printer commands .................................................................................................... 39
10 Securing Form ..................................................................................................................... 41
11 Supported Font Types......................................................................................................... 43 11.1 TrueType fonts – Unknown font types ................................................................................... 44
12 Creating New Form Sizes ................................................................................................... 45 12.1 Adding form size .................................................................................................................... 45 12.2 Creating new form size .......................................................................................................... 48
13 Conversions – Units ............................................................................................................ 49
Index SAP
4 Building a new form 05.18

SAP Introduction
05.18 Building a new form 5
1 Introduction
1.1 Notes
There are various note numbers e.g. (SAP note 1280910) in the following descriptions.
These note numbers can be used in the SAP system to display internal documentation. In the following link, Number is to be replaced by the number of the note.
https://launchpad.support.sap.com/#/notes/Number
1.2 SAP – First steps
This documentation indicates the various steps needed to build simple forms (labels). Specific applications such as the database link and the use, for instance, of functions can be taken from the corresponding SAP instructions. They are not handled here.
All formats and implementation of barcodes and type fonts etc. have been tested on the basis of the SAP test provision (SAP note 1280910) and own forms.
The implemented type fonts are oriented to those available in the printers and in their size have been adapted to a Microsoft Word comparative print-out (on Kyocera laser printers). This explains why minor variations may arise compared to the printing review in SAP.

Introduction SAP
6 Building a new form 05.18
1.3 Restrictions
The Carl Valentin ABAP-PDL driver does not support the following features:
Print Controls (unnecessary, POSS formats
ABAP list preparations
Duplex
Shaft selection
SAP icons and symbols
Filled-in boxes with various grey values
Underlined text
Datamatrix (manual switch-over of the encoding)
Any TrueType fonts
RFID
SNMP
Interactive forms
1.4 Basic considerations prior to logging onto PVD
The language must be selected when logging on, e.g. EN for English and DE for German.
On opening or building a form, the language with which work is normally undertaken should be
SAP Introduction
05.18 Building a new form 7
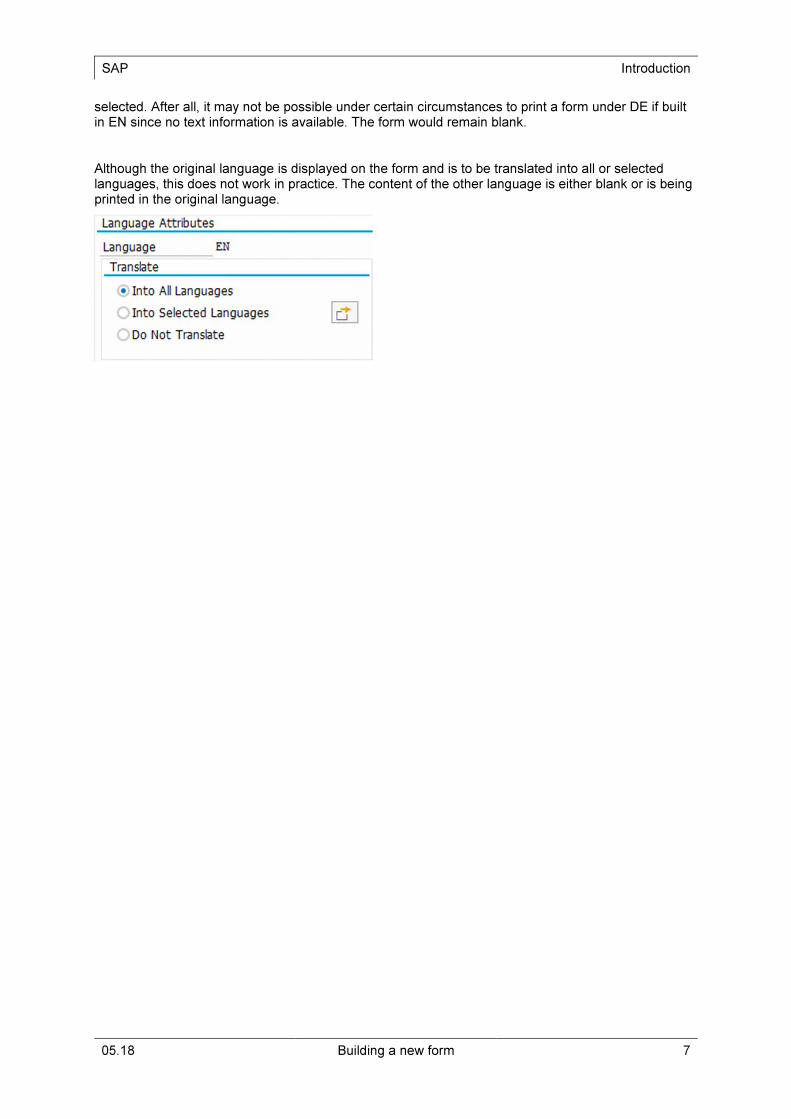
selected. After all, it may not be possible under certain circumstances to print a form under DE if built in EN since no text information is available. The form would remain blank.
Although the original language is displayed on the form and is to be translated into all or selected languages, this does not work in practice. The content of the other language is either blank or is being printed in the original language.

Introduction SAP
8 Building a new form 05.18
1.5 Building or opening the form
/o SMARTFORMS is to be selected as the transaction.

SAP Introduction
05.18 Building a new form 9
The name of an existing form to be opened can be entered here and opened with Display.
On the other hand, if a new form is to be built, then continue with Create.
A blank form is displayed.
Firstly, three particulars are wanted here: The Page format, the Style and the Output.
NOTE!
Select either $TMP or local if a form is to be saved at a later stage.

Introduction SAP
10 Building a new form 05.18
To be able to specify the above particulars, one or two preparatory steps are to be undertaken in other transactions.
Given that a completely new form size is to be created, make use of the notes further down in the Create new form sizes.
It is easy to select an existing form size. To this end, click into the corresponding input box and then in the output box behind it.
NOTE!
A text can be directly entered in most of the input boxes. In many cases an extra button
appears behind the box with which a selection list can be opened:
NOTE!
It makes a difference as to whether A5 or DINA5 is used. You obtain a printed error notification if the format is not present in the device type.
SAP Defining fonts to be used
05.18 Building a new form 11
2 Defining fonts to be used
Any type fonts to be used in a form firstly need to be defined in a style sheet. For this, Character formats are defined of applicability in each instance for a type font and font size.
2.1 Style Editor
The following step opens the Style Editor:
/o smartstyles
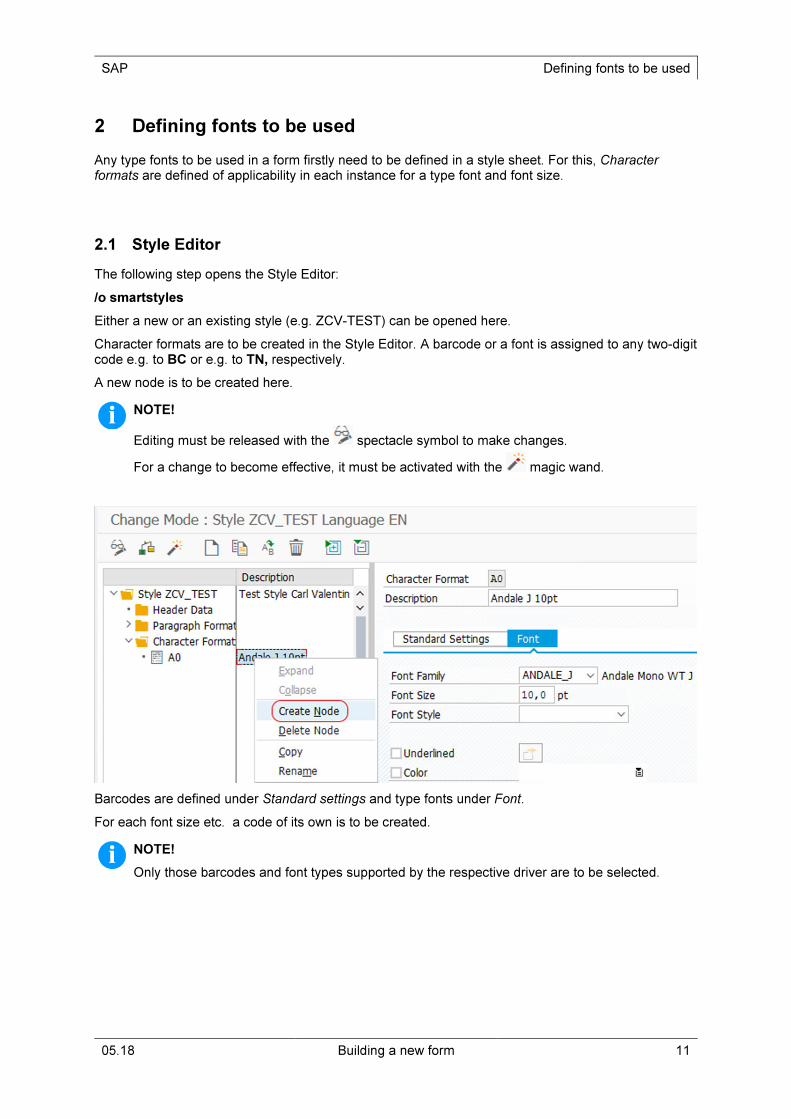
Either a new or an existing style (e.g. ZCV-TEST) can be opened here.
Character formats are to be created in the Style Editor. A barcode or a font is assigned to any two-digit code e.g. to BC or e.g. to TN, respectively.
A new node is to be created here.
NOTE!
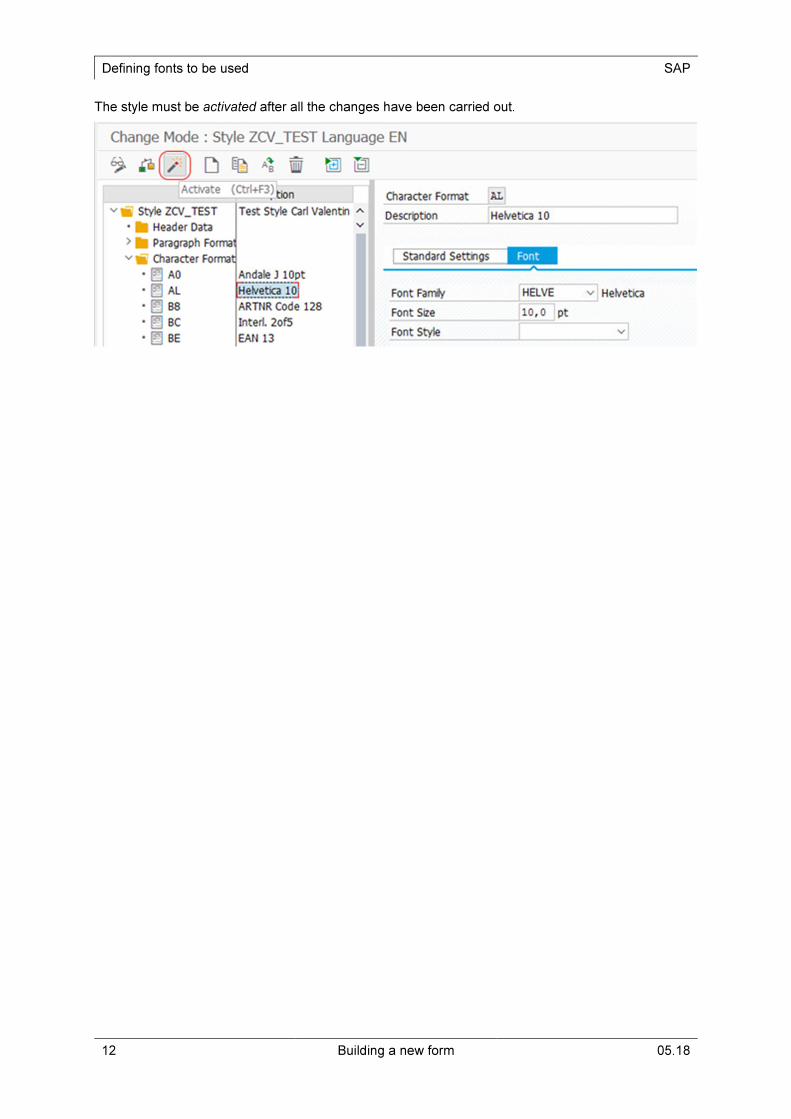
Editing must be released with the spectacle symbol to make changes.
For a change to become effective, it must be activated with the magic wand.
Barcodes are defined under Standard settings and type fonts under Font.
For each font size etc. a code of its own is to be created.
NOTE!
Only those barcodes and font types supported by the respective driver are to be selected.
Defining fonts to be used SAP
12 Building a new form 05.18
The style must be activated after all the changes have been carried out.
SAP Building Forms
05.18 Building a new form 13
3 Building Forms
3.1 Smart Forms Editor
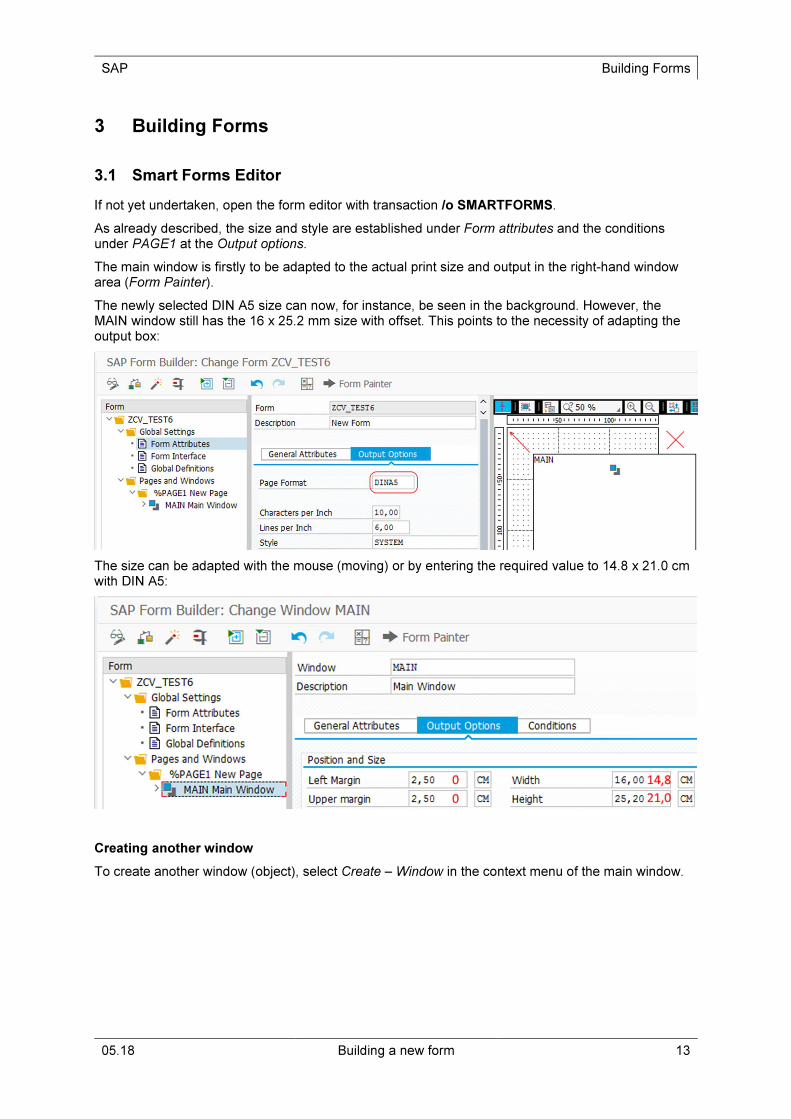
If not yet undertaken, open the form editor with transaction /o SMARTFORMS.
As already described, the size and style are established under Form attributes and the conditions under PAGE1 at the Output options.
The main window is firstly to be adapted to the actual print size and output in the right-hand window area (Form Painter).
The newly selected DIN A5 size can now, for instance, be seen in the background. However, the MAIN window still has the 16 x 25.2 mm size with offset. This points to the necessity of adapting the output box:
The size can be adapted with the mouse (moving) or by entering the required value to 14.8 x 21.0 cm with DIN A5:
Creating another window
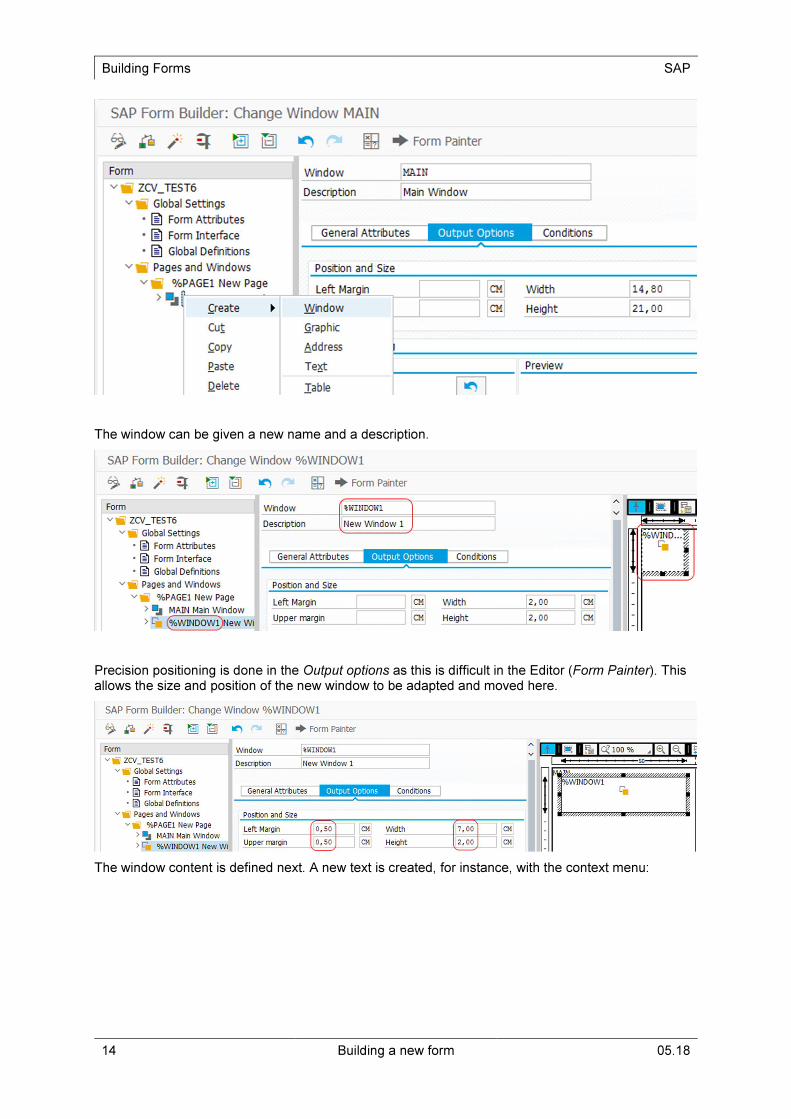
To create another window (object), select Create – Window in the context menu of the main window.
Building Forms SAP
14 Building a new form 05.18
The window can be given a new name and a description.
Precision positioning is done in the Output options as this is difficult in the Editor (Form Painter). This allows the size and position of the new window to be adapted and moved here.
The window content is defined next. A new text is created, for instance, with the context menu:

SAP Building Forms
05.18 Building a new form 15
This is also where the text ID and significance can be adjusted.
The content is defined with the Text Editor. This is opened with the button in the General Attributes of the text:
The appropriate codes defined beforehand in the Style need to be used for a formatted text. Undertake the following entry should, for instance, the AL code for Helvetica have been used in the Style Editor:
<AL>… Text…</>
Several formats and rows can be used inside a window.
The Editor is exited by clicking the orange button.

Building Forms SAP
16 Building a new form 05.18
Ensure that the correct (previously generated) style is selected for the form attributes.
NOTE!
The content of the individual boxes can unfortunately not be seen in the Editor (Form Painter).
All windows and contents are to be positioned and defined in this way.
3.2 Form testing
To test the new form, click on the screw clamp symbol or F8:
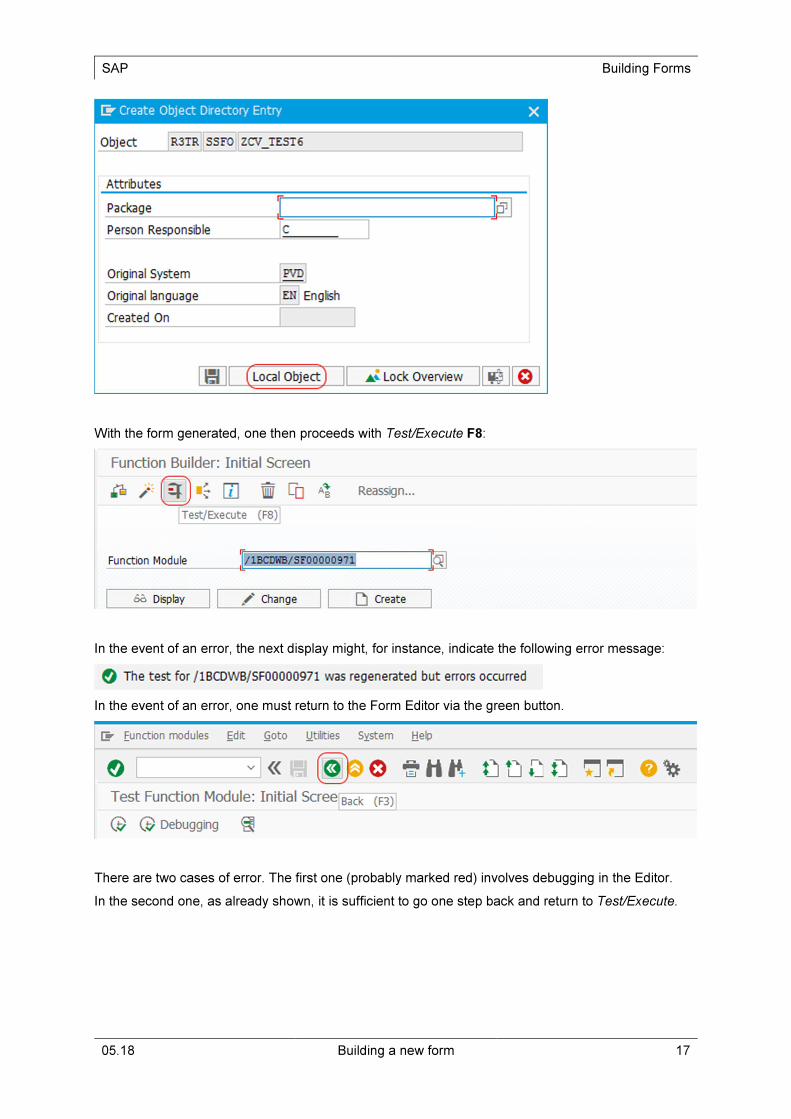
This can now be done if the new form has not been saved yet (Local Object):
SAP Building Forms
05.18 Building a new form 17
With the form generated, one then proceeds with Test/Execute F8:
In the event of an error, the next display might, for instance, indicate the following error message:
In the event of an error, one must return to the Form Editor via the green button.
There are two cases of error. The first one (probably marked red) involves debugging in the Editor.
In the second one, as already shown, it is sufficient to go one step back and return to Test/Execute.
Building Forms SAP
18 Building a new form 05.18
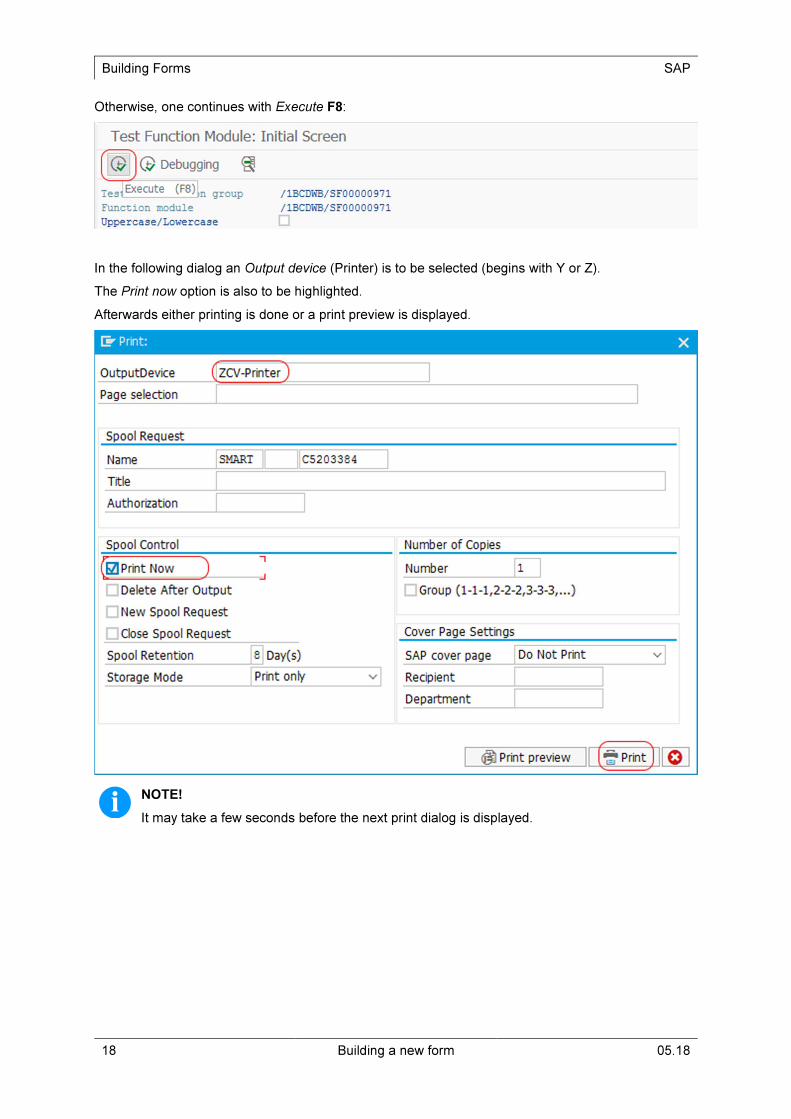
Otherwise, one continues with Execute F8:
In the following dialog an Output device (Printer) is to be selected (begins with Y or Z).
The Print now option is also to be highlighted.
Afterwards either printing is done or a print preview is displayed.
NOTE!
It may take a few seconds before the next print dialog is displayed.

SAP Building Forms
05.18 Building a new form 19
The standard printer set up on the local PC is displayed in the print dialog.
A generic text drive should be used to obtain a prn file. 0therwise, the correct printer can be used for direct printing.
On the Windows PC the generated prn file can be sent to the printer.

Building Forms SAP
20 Building a new form 05.18

SAP Adaptions in the Form
05.18 Building a new form 21
4 Adaptions in the Form
4.1 Large fonts
The text must be printed within the defined window and is limited in its width.
Should larger fonts (> 16 pt) be used, ensure that additional line breaks are, if necessary, inserted to stop the font being printed in an interleaved manner. Unfortunately, this effect does not depend on how high the window is.
4.2 Font sizes - Zoom factor
The font sizes are generally established In the Style Editor. As there is no standardization of the transformation of the font size in pt (point) to the actual printout, a printout was taken from Word as a comparison on a laser printer.
A zoom factor can be defined with the FONT_SIZE printer command for a more precise adaption of the printout to the size required. The changed size applies to the entire form.
The default value is 735. Accordingly, a value of, for instance, 1470 would double the font size in the x and y directions.
Use of the printer command is described further in the Use printer commands section below.
4.3 Other TrueType fonts
Although, in principle, own TrueType fonts can be used, they will not be detected by the driver.
On request, the support of other font types can be integrated (in the printer and driver).
4.4 Asian font types
A special firmware (SP83) is needed for the printer.
It is up to the client to acquire and provide the font type needed from a third-party provider. Licensing is thus the client’s responsibility.
A font package is generated from this font type (TrueType Font) and saved on the printer memory card in the font sub-directory.

Adaptions in the Form SAP
22 Building a new form 05.18

SAP Frame and Lines
05.18 Building a new form 23
5 Frame and Lines
Drawing lines and/or frames around, for instance, texts and barcodes can only be done at the window when the following tick is set:
A text can also be framed, for instance, inside a window. For the definition, the text is opened with a double click and the tick marked at Lines With in the Output options. The resulting frame hight depends on the text height.
The best thing is to click on the Details button if a certain spacing is required between the lines and the object.
The spacing can be individually adjusted here. If the box is 7 x 2 cm and with 0.2 cm distance each (bottom (0.1 cm), the box frame is 7.4 x 2.3 cm.
NOTE!
However, if only one line is drawn, then spacing to the lower line needs to be correspondingly raised.


SAP Barcodes
05.18 Building a new form 25
6 Barcodes
A distinction is to be made between new (yellow) and old (light blue) technology (SAP Note 645158) and between 1D and 2D barcodes. Only with new technology barcodes the preview works to a certain degree. The old technology only displays wildcard characters
The available barcodes can be displayed with transaction /o SE73. This entails highlighting the System Barcodes in the start dialog and afterwards clicking on Display.
6.1 Height of the barcodes
In the above image, the data of a new barcode type (shaded in yellow) is contrasted with old types (light blue).
Unclear details
If barcode C128A is to be used, a character format - in this example C8 - must be assigned to it in the Style Editor:
The fatal aspect here is that now both presentations display incorrect values. Yellow highlighted: h=0.5 in, thus a height of 0.5 inch and thus 12.7 mm. On the other hand, H00150 is in the white area. This signifies height 150 1/600 inch, thus 6.35 mm. The third non-sensical value is within the style at Height 20 mm.
The result of bringing about compatibility with the SAP test print-outs (SAP Note 1280910) is the need to use H00150 which is correct. This is to be taken in account in positioning and defining new barcode types. As such, the details in the style are clearly false.
Barcodes SAP
26 Building a new form 05.18
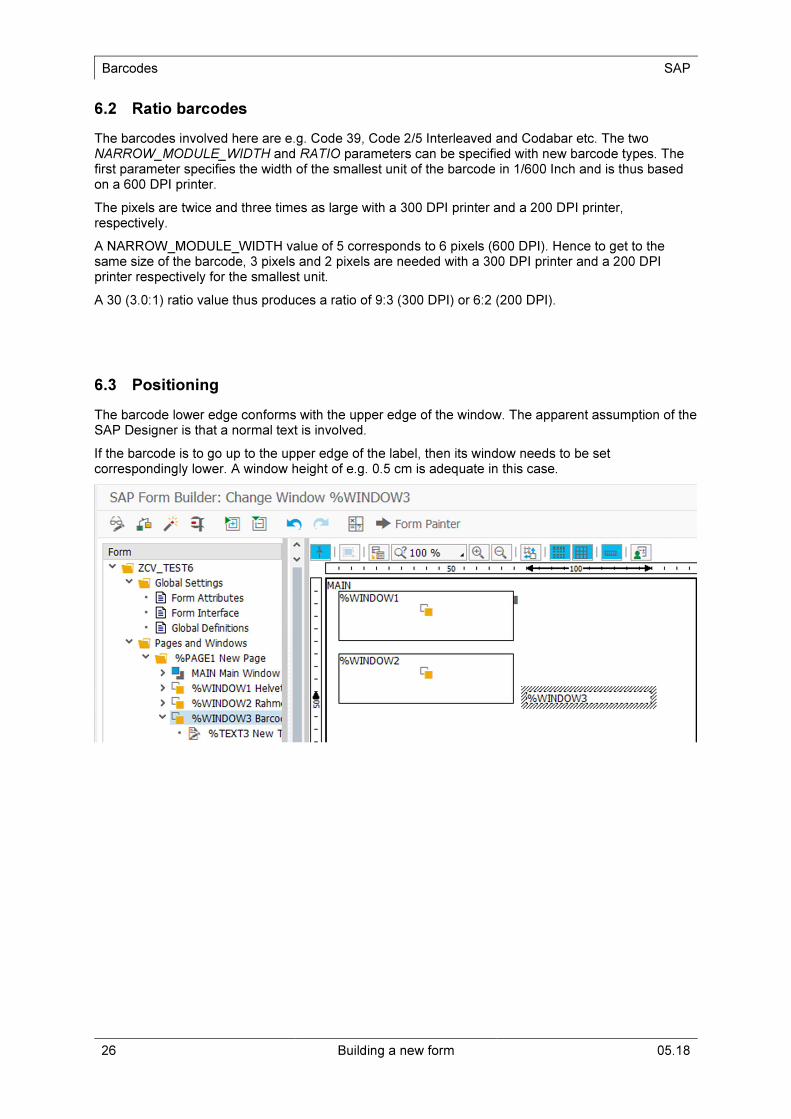
6.2 Ratio barcodes
The barcodes involved here are e.g. Code 39, Code 2/5 Interleaved and Codabar etc. The two NARROW_MODULE_WIDTH and RATIO parameters can be specified with new barcode types. The first parameter specifies the width of the smallest unit of the barcode in 1/600 Inch and is thus based on a 600 DPI printer.
The pixels are twice and three times as large with a 300 DPI printer and a 200 DPI printer, respectively.
A NARROW_MODULE_WIDTH value of 5 corresponds to 6 pixels (600 DPI). Hence to get to the same size of the barcode, 3 pixels and 2 pixels are needed with a 300 DPI printer and a 200 DPI printer respectively for the smallest unit.
A 30 (3.0:1) ratio value thus produces a ratio of 9:3 (300 DPI) or 6:2 (200 DPI).
6.3 Positioning
The barcode lower edge conforms with the upper edge of the window. The apparent assumption of the SAP Designer is that a normal text is involved.
If the barcode is to go up to the upper edge of the label, then its window needs to be set correspondingly lower. A window height of e.g. 0.5 cm is adequate in this case.
SAP Barcodes
05.18 Building a new form 27
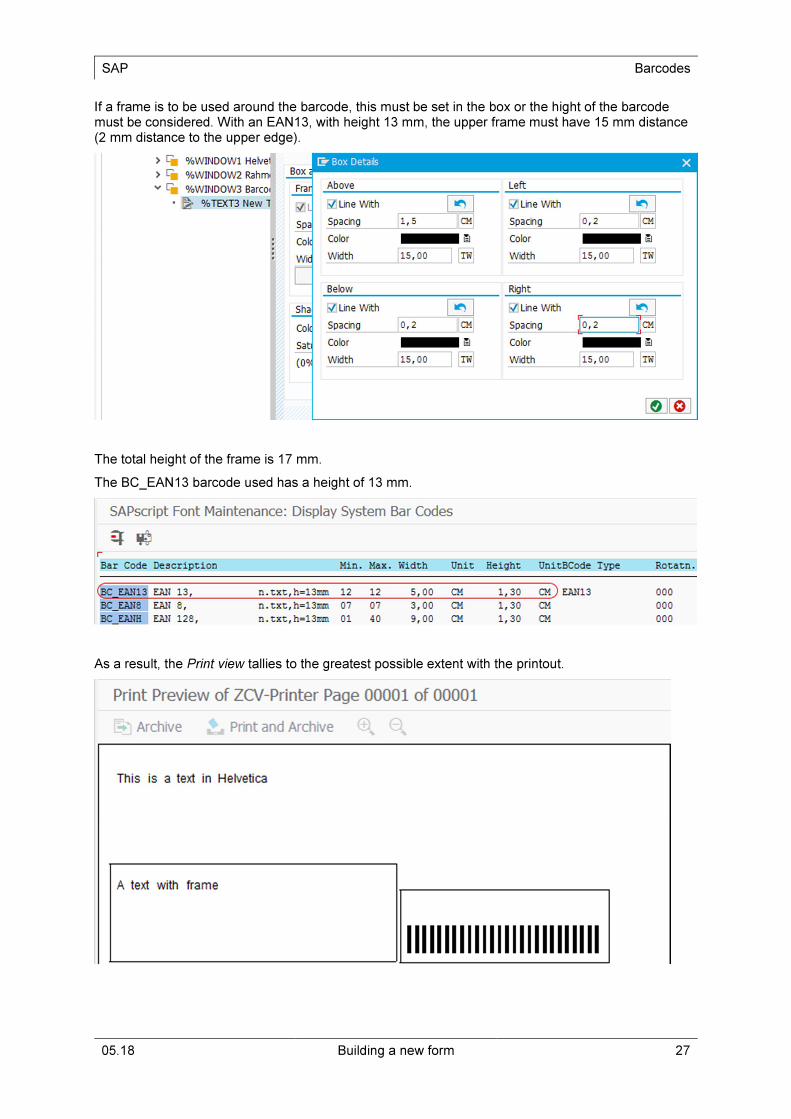
If a frame is to be used around the barcode, this must be set in the box or the hight of the barcode must be considered. With an EAN13, with height 13 mm, the upper frame must have 15 mm distance (2 mm distance to the upper edge).
The total height of the frame is 17 mm.
The BC_EAN13 barcode used has a height of 13 mm.
As a result, the Print view tallies to the greatest possible extent with the printout.

Barcodes SAP
28 Building a new form 05.18
Printout
6.4 Human readable line
As there are no details on the human readable line in defining new barcodes, this option can be controlled with the BC_HUMAN_READ printer command. It is shut down in the default status.
The Using printer commands section shows how this command can be used.
6.5 2D Barcodes
In contrast to 1D barcodes, the window height must at least fit - otherwise there is no printout.
The lower edge of the barcode is located approximately in the centre of the window. This means the positioning in the Editor needs to be correspondingly moved down. Thus, the preview and the printout approximately match.

SAP Barcodes
05.18 Building a new form 29
PDF417
NOTE!
Used for the size of the PDF417 are the parameters of Narrow Module Width for the symbol size and the ratio of Narrow Module Width to Single Row Height for the ratio of width to height. Linear Height is not used; instead a max. 2 cm window height is assumed in SAP.
NOTE!
The presentation in the print preview is based on an unknown ZPL emulation within the SAP which permits no inferences to be drawn as to the adjustable values. Hence, the printout will practically never be identical.
Normally 00 is in # of Columns and Rows, signifying Set automatically for the driver. This means calculating all values based on the text length. A value which is higher than the calculated one for SecurityLevel is taken on. Normally the SecurityLevel is also based on the text length.
The # of Columns parameter allows the number of the data columns to be raised. The # of Rows parameter should remain at 0 unless the matching value is known It is exactly the same vice versa. The height of the barcode can be determined with the # of Rows parameter. # of Columns should remain at 0 if it is changed.
Generally, the row height should be approx. 3x as high as the column width. This means that in the example above, the Single Row Height value should be 30.
NOTE!
All values of the barcode cam also be specified with the printer command.
Example with 4 columns

Barcodes SAP
30 Building a new form 05.18
6.6 Defining a new barcode
If there are not enough barcodes on hand, a new barcode can be designed. Select Modify on the start page. From the general list, click F5 Create.
One needs to know from the details which units are postulated and what the values means
Narrow Module Width Narrowest unit of the barcode Value (+ 1) in 1/600 inch
Linear Height Height of the barcode Value in 1/600 inch
Bar Ratio Ratio 20, 25, 30 produces e.g. 2:1, 5:2, 3:1
The smallest unit is the Narrow Module Width. A 6/600 inch value produces 2 pixels for a 300 DPI printer The driver would calculate a 9:3 ratio. This means 3 pixels for the thin unit and thus at a 3.0:1 ratio 9 pixels for the width unit of the barcode.
1/600 inch and thus 6.35 mm would arise as the height.
6.7 Size of barcodes
Given a lack of scope for a clear-cut definition of an (old) barcode within /o SE73, printer commands can be used to control module widths, ratios and SC numbers etc.
Attribute name Range of values
Unit – Note
BC_SC 1 … e.g. EAN13
BC_THICK 2 … e.g. Code 39 5:2, thus 5 – 2D: Width
BC_THIN 1 … e.g. Code 39 5:2, thus 2 – 2D: Height
BC_MOD_WIDTH 1 … e.g. Code 128
BC_SYMBOL_SIZE 3 … 24 e.g. PDF417 - Symbol size
In order to clearly define a ratio barcode such as Code 39 or Code 2/5 Interleaved, as, for instance, 5:2, the two values can be specified via BC_THICK (5) and BC_THIN (2).
6.8 More Barcodes
On request.

SAP Graphic – Logos and Bitmaps
05.18 Building a new form 31
7 Graphic – Logos and Bitmaps
7.1 Insert graphic
For this purpose, insert a new window and then a new graphic in the Smart Forms Editor:
A double click on the new GRAPHIC1 entry opens the General Attributes:
In the search dialog, masking can be set or one can go directly to Execute F8:
Graphic – Logos and Bitmaps SAP
32 Building a new form 05.18
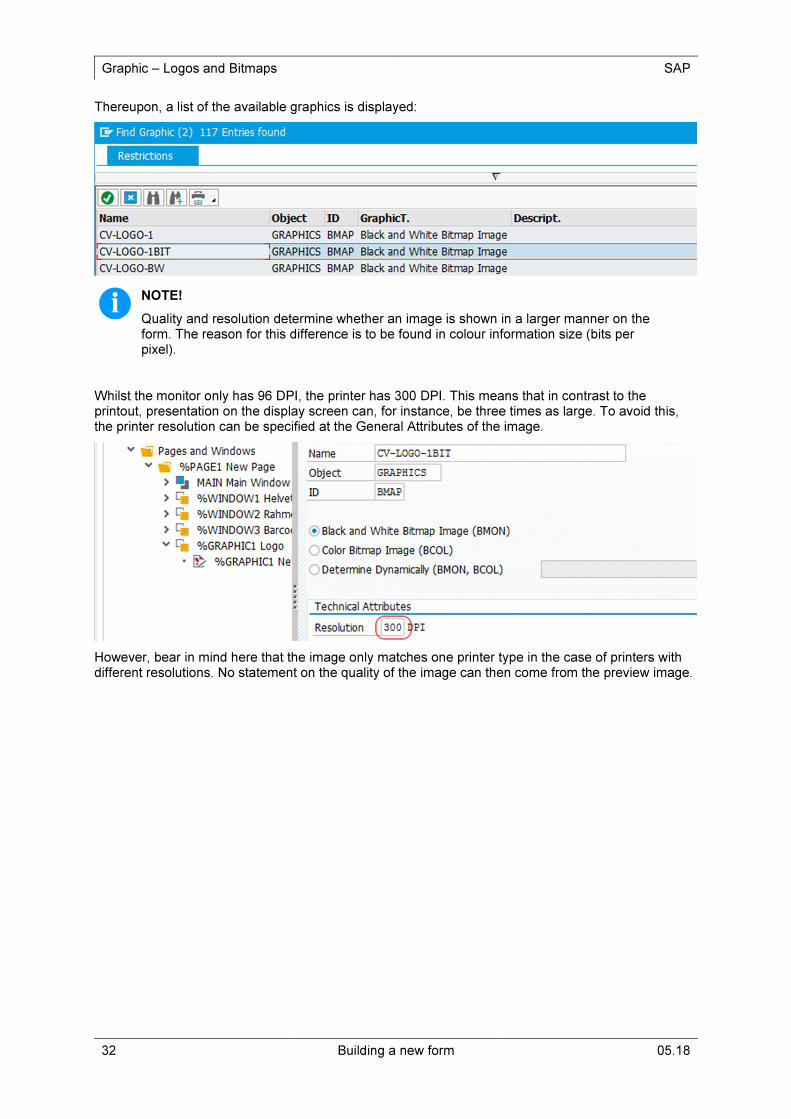
Thereupon, a list of the available graphics is displayed:
NOTE!
Quality and resolution determine whether an image is shown in a larger manner on the form. The reason for this difference is to be found in colour information size (bits per pixel).
Whilst the monitor only has 96 DPI, the printer has 300 DPI. This means that in contrast to the printout, presentation on the display screen can, for instance, be three times as large. To avoid this, the printer resolution can be specified at the General Attributes of the image.
However, bear in mind here that the image only matches one printer type in the case of printers with different resolutions. No statement on the quality of the image can then come from the preview image.
SAP Graphic – Logos and Bitmaps
05.18 Building a new form 33
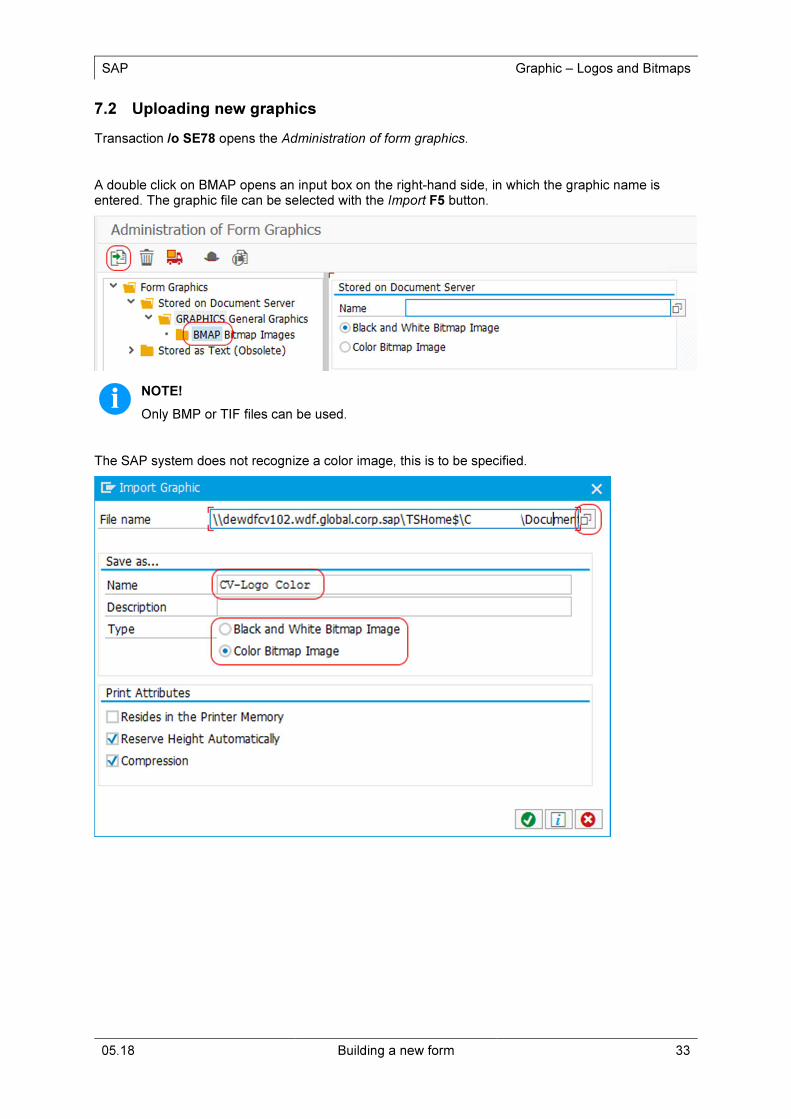
7.2 Uploading new graphics
Transaction /o SE78 opens the Administration of form graphics.
A double click on BMAP opens an input box on the right-hand side, in which the graphic name is entered. The graphic file can be selected with the Import F5 button.
NOTE!
Only BMP or TIF files can be used.
The SAP system does not recognize a color image, this is to be specified.
Graphic – Logos and Bitmaps SAP
34 Building a new form 05.18
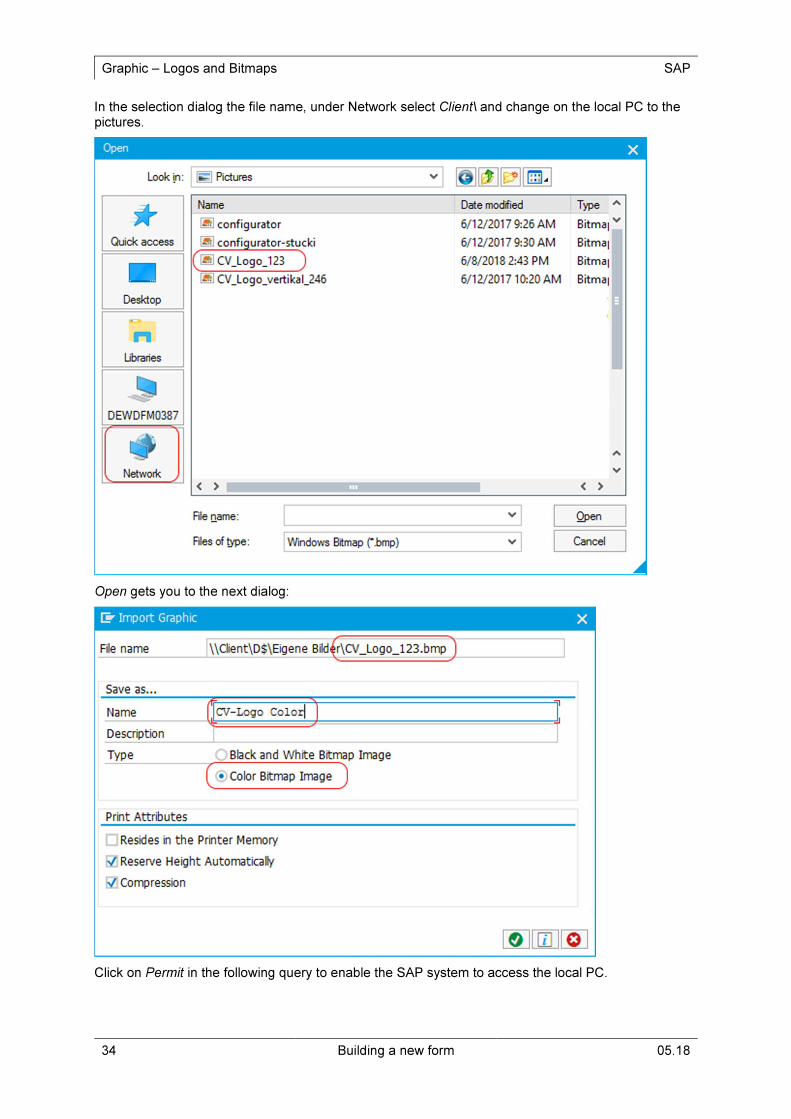
In the selection dialog the file name, under Network select Client\ and change on the local PC to the pictures.
Open gets you to the next dialog:
Click on Permit in the following query to enable the SAP system to access the local PC.
SAP Graphic – Logos and Bitmaps
05.18 Building a new form 35
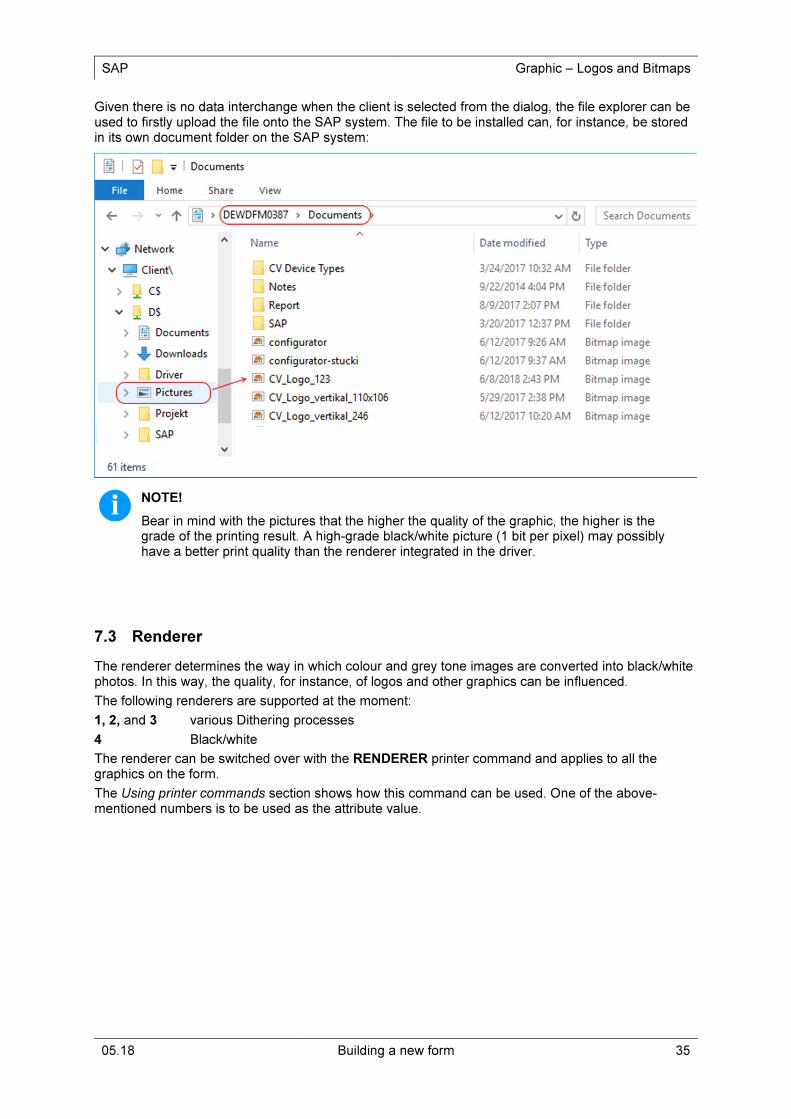
Given there is no data interchange when the client is selected from the dialog, the file explorer can be used to firstly upload the file onto the SAP system. The file to be installed can, for instance, be stored in its own document folder on the SAP system:
NOTE!
Bear in mind with the pictures that the higher the quality of the graphic, the higher is the grade of the printing result. A high-grade black/white picture (1 bit per pixel) may possibly have a better print quality than the renderer integrated in the driver.
7.3 Renderer
The renderer determines the way in which colour and grey tone images are converted into black/white photos. In this way, the quality, for instance, of logos and other graphics can be influenced.
The following renderers are supported at the moment:
1, 2, and 3 various Dithering processes
4 Black/white
The renderer can be switched over with the RENDERER printer command and applies to all the graphics on the form.
The Using printer commands section shows how this command can be used. One of the above-mentioned numbers is to be used as the attribute value.


SAP Binary Colour Print
05.18 Building a new form 37
8 Binary Colour Print
The binary colour print can be activated in the form. This requires various commands to be generated.
The Printer commands section shows how these commands can be used.
Colour separation is switched on with the command (Attribute name) COLOR_SEP and the value 1 t.
COLOR_TOL is for setting the tolerance. This value determines a tolerance with which comparable colours are assigned to the colour range.
The RGB_VALUE command is for using an alternative colour value. This value is to be specified in the Hex format. Each colour value must have 2 points and therefore a total of 6.
An RGB value can, for instance, be easily taken from a character program:
Binary Colour Print SAP
38 Building a new form 05.18
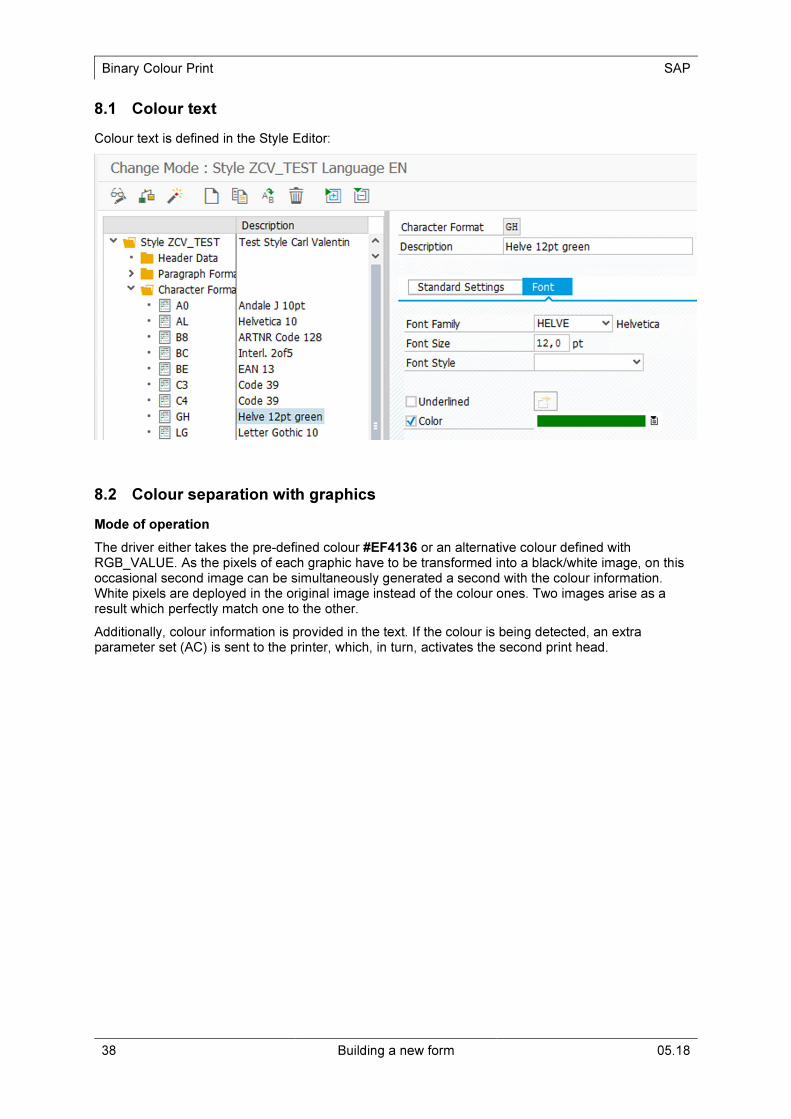
8.1 Colour text
Colour text is defined in the Style Editor:
8.2 Colour separation with graphics
Mode of operation
The driver either takes the pre-defined colour #EF4136 or an alternative colour defined with RGB_VALUE. As the pixels of each graphic have to be transformed into a black/white image, on this occasional second image can be simultaneously generated a second with the colour information. White pixels are deployed in the original image instead of the colour ones. Two images arise as a result which perfectly match one to the other.
Additionally, colour information is provided in the text. If the colour is being detected, an extra parameter set (AC) is sent to the printer, which, in turn, activates the second print head.
SAP Using printer commands
05.18 Building a new form 39
9 Using printer commands
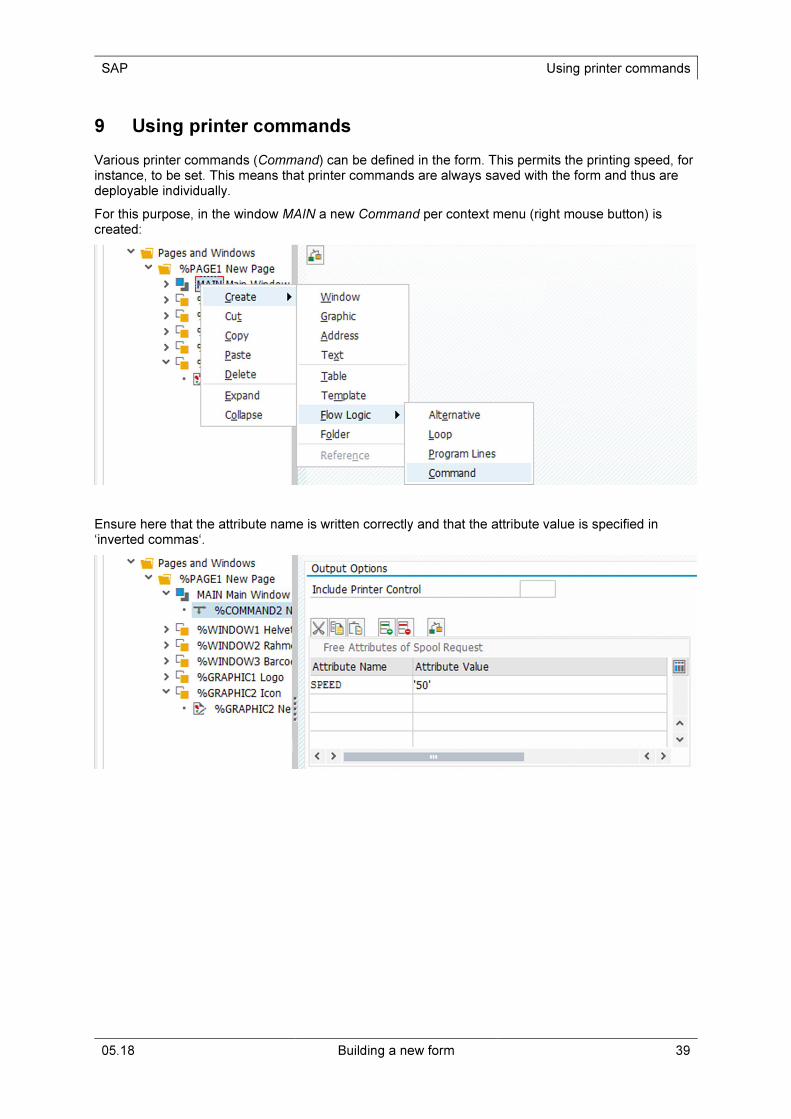
Various printer commands (Command) can be defined in the form. This permits the printing speed, for instance, to be set. This means that printer commands are always saved with the form and thus are deployable individually.
For this purpose, in the window MAIN a new Command per context menu (right mouse button) is created:
Ensure here that the attribute name is written correctly and that the attribute value is specified in ‘inverted commas‘.

Using printer commands SAP
40 Building a new form 05.18
Support is currently given to the following values:
Attribute name Range of values Unit – Note
SPEED 50 … 600 mm/s
CONTRAST 10 … 200 %
GAP 10 … 9999 1/10 mm
ROTATE 0, 1 0: Off
MIRROR 0, 1 0: Off
CONTINOUS 0, 1 0: Off (Single)
XOFFSET -999 … +999 1/10 mm
YOFFSET -999 … +999 1/10 mm
CUTTER 0 … 6 0: Off
CUTTER_OFFSET 0 … 500 1/10 mm
CUTTER_INTERVA 0 … 99
DISPENSER 0 … 6 0: Off
SCANNER 0 … 2 0: Off
ASIA 0, 1 0: Off *
* Given that a Device type -I (ISO 8859-1) is used as the basis and the code page has been changed over to 4110 (UTF-8), then the editing of Asian characters can be activated with this attribute name (font package needed).
Further printer commands for controlling the printout:
Attribute name Range of values Unit – Note
FONT_SIZE … 735 … Zoom factor for font size
RENDERER 1 … 4 Renderer type
COLOR_SEP 0, 1 0: Off
COLOR_TOL 25 … 125 90
RGB_VALUE 000000 … FFFFFF
RGB in the Hex format, #EF4136
DISABLE_LANDSC 0, 1 0: Off
Further printer commands for controlling of barcodes:
Attribute name Range of values Unit – Note
BC_SC 1 … e.g. EAN13
BC_THICK 2 … e.g. Code 39 5:2, thus 5
BC_THIN 1 … e.g. Code 39 5:2, thus 2
BC_MOD_WIDTH 1 … e.g. Code 128
BC_HUMAN_READ 0, 1 0: Off
BC_SECURITY_LE 0 … 8 PDF417 security level
BC_NUM_ROW 0, 1 … 30 PDF417
BC_NUM_COL 0, 3 … 90 PDF417
Further commands can be provided on request.

SAP Securing Form
05.18 Building a new form 41
10 Securing Form
A form can be downloaded from the SAP system and uploaded to it.
For this purpose, in the Smart Forms dialog, firstly select the form and then under Utilities select the Download Form command:

SAP Supported Font Types
05.18 Building a new form 43
11 Supported Font Types
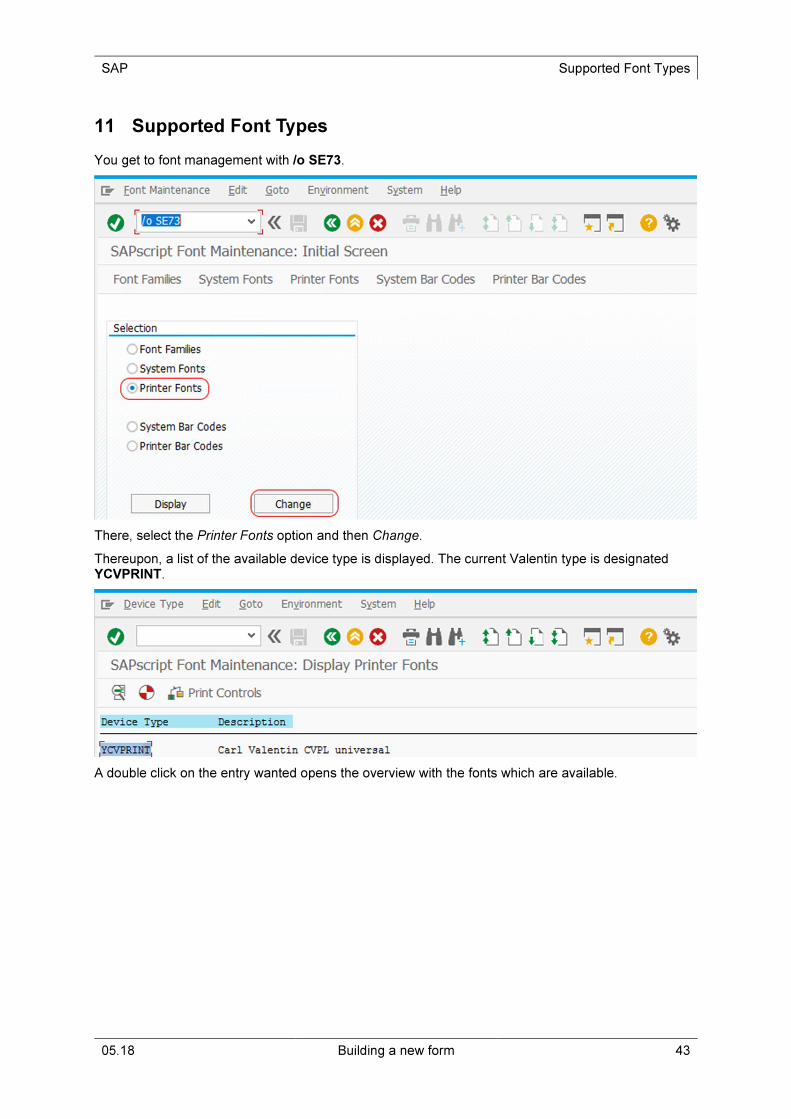
You get to font management with /o SE73.
There, select the Printer Fonts option and then Change.
Thereupon, a list of the available device type is displayed. The current Valentin type is designated YCVPRINT.
A double click on the entry wanted opens the overview with the fonts which are available.
Supported Font Types SAP
44 Building a new form 05.18
The following font types are supported at the moment:
SAP Font Valentin Font Size Note
COURIER Monospace 6 … 72 Scalable
HELVE Helvetica Scalable
LETGOTH Font 5 and 7 6,5 and 10
LNPRINT Font 1, 2 and 3 2.5 5.5 and 9
OCRA OCRA 6 … 72 in double steps
OCRB OCRB 6 … 72 in double steps
TIMES Baskerville scalable (only Ascii)
11.1 TrueType fonts – Unknown font types
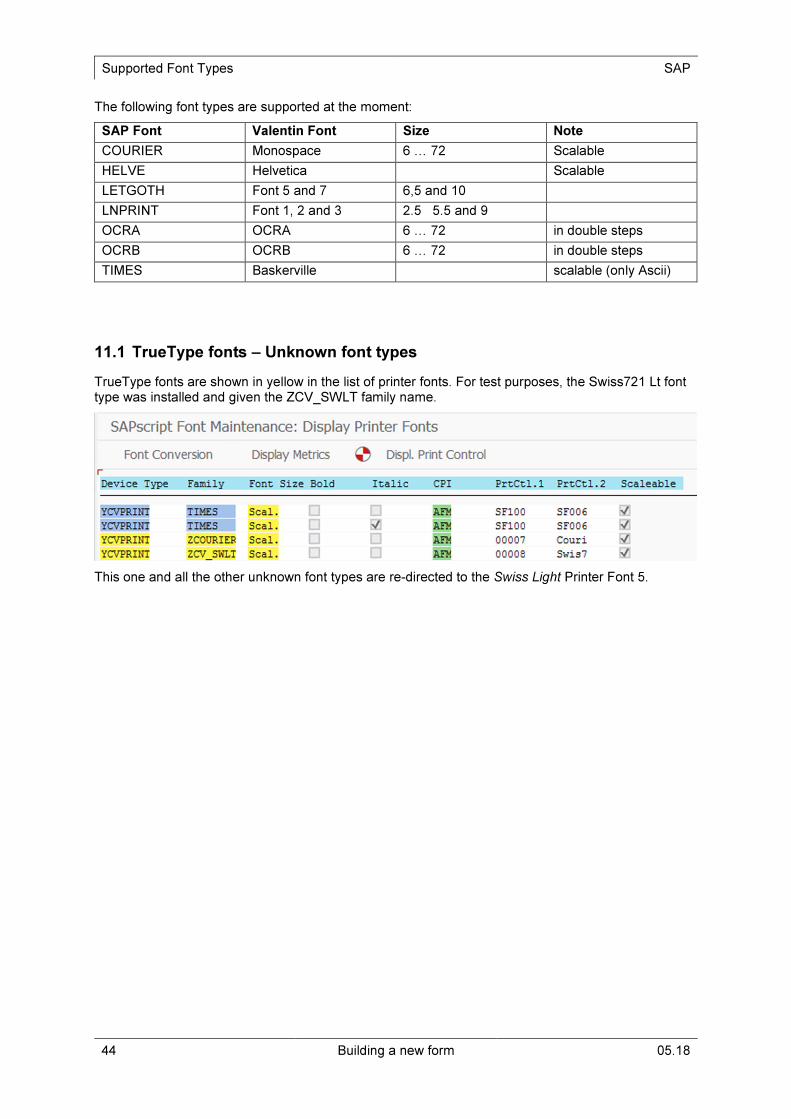
TrueType fonts are shown in yellow in the list of printer fonts. For test purposes, the Swiss721 Lt font type was installed and given the ZCV_SWLT family name.
This one and all the other unknown font types are re-directed to the Swiss Light Printer Font 5.

SAP Creating New Form Sizes
05.18 Building a new form 45
12 Creating New Form Sizes
You get to the Spool management with the action /o SPAD.
By way of the Full administration button (text) you can have the Device Types displayed.
12.1 Adding form size
The device types are to be displayed first.

Creating New Form Sizes SAP
46 Building a new form 05.18
The device type (e.g. YCVP-DUO) is selected from the list which is shown afterwards and its attributes displayed.
Clicking the Preparations (F6) button gets you the current list of form sizes available in the device type.
NOTE!
Although forms which are wider than the print head width can be used, they are automatically width-limited by the driver. Therefore, the content should be limited to the print head width.
SAP Creating New Form Sizes
05.18 Building a new form 47
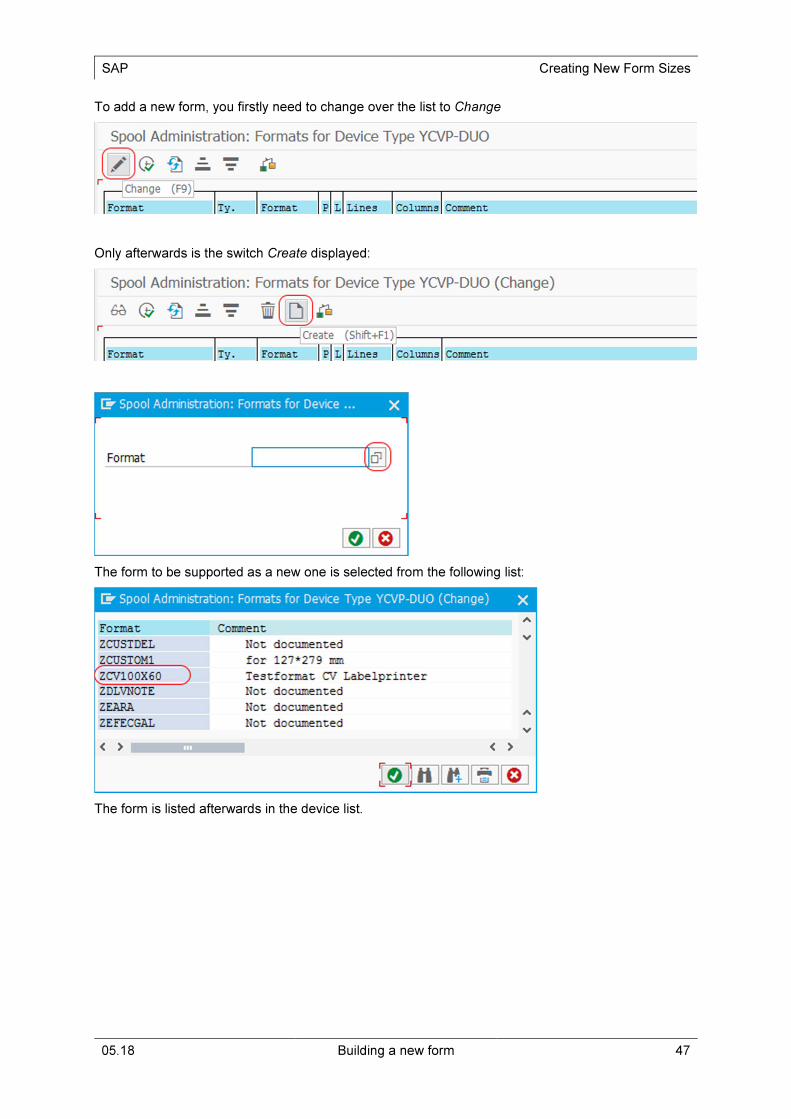
To add a new form, you firstly need to change over the list to Change
Only afterwards is the switch Create displayed:
The form to be supported as a new one is selected from the following list:
The form is listed afterwards in the device list.
Creating New Form Sizes SAP
48 Building a new form 05.18
12.2 Creating new form size
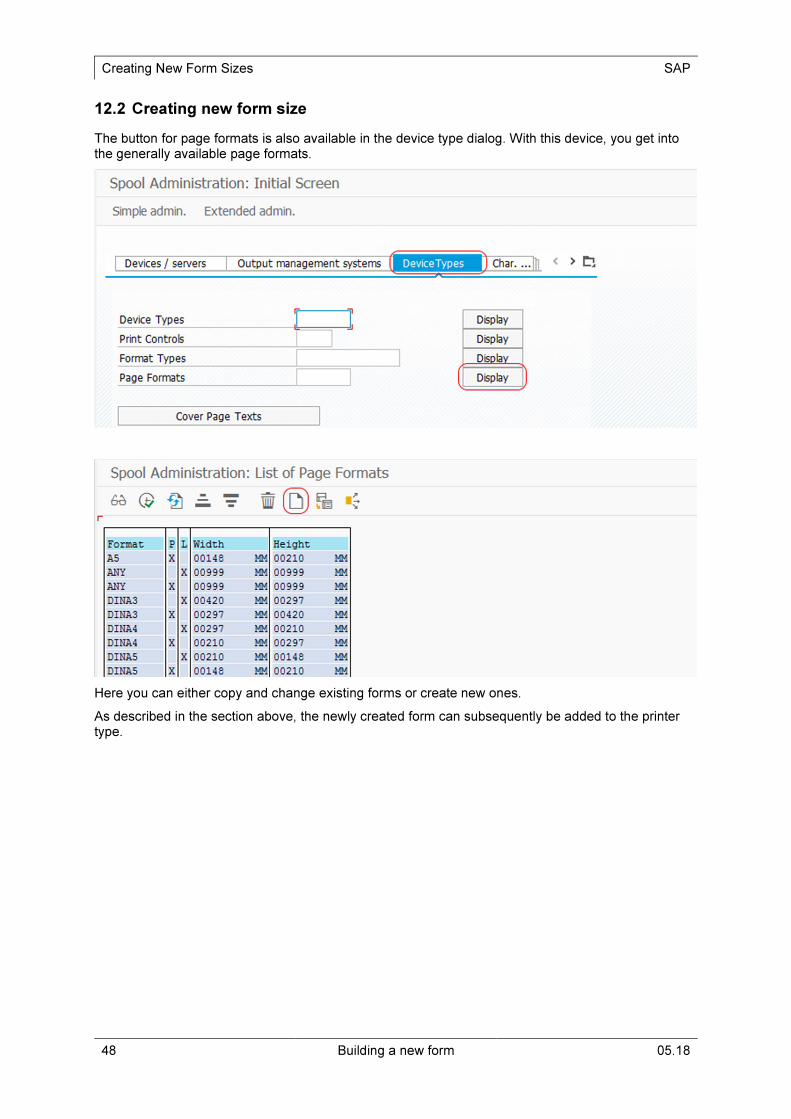
The button for page formats is also available in the device type dialog. With this device, you get into the generally available page formats.
Here you can either copy and change existing forms or create new ones.
As described in the section above, the newly created form can subsequently be added to the printer type.
SAP Conversions – Units
05.18 Building a new form 49
13 Conversions – Units
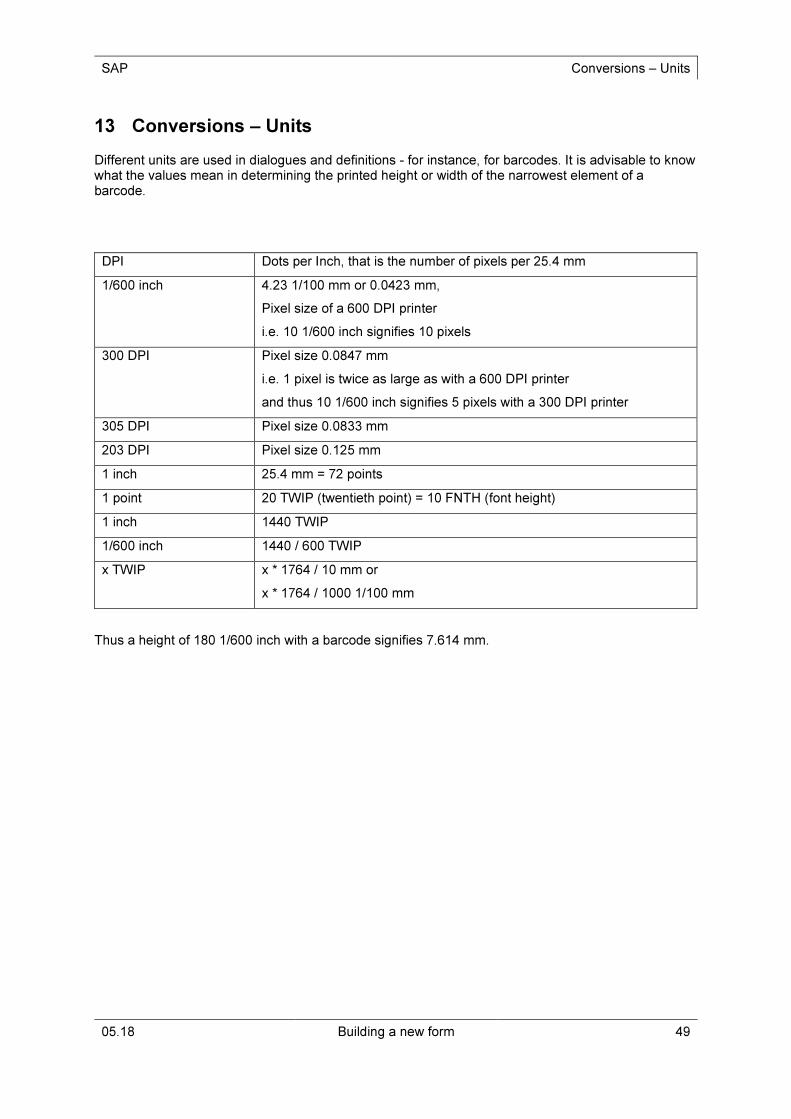
Different units are used in dialogues and definitions - for instance, for barcodes. It is advisable to know what the values mean in determining the printed height or width of the narrowest element of a barcode.
DPI Dots per Inch, that is the number of pixels per 25.4 mm
1/600 inch 4.23 1/100 mm or 0.0423 mm,
Pixel size of a 600 DPI printer
i.e. 10 1/600 inch signifies 10 pixels
300 DPI Pixel size 0.0847 mm
i.e. 1 pixel is twice as large as with a 600 DPI printer
and thus 10 1/600 inch signifies 5 pixels with a 300 DPI printer
305 DPI Pixel size 0.0833 mm
203 DPI Pixel size 0.125 mm
1 inch 25.4 mm = 72 points
1 point 20 TWIP (twentieth point) = 10 FNTH (font height)
1 inch 1440 TWIP
1/600 inch 1440 / 600 TWIP
x TWIP x * 1764 / 10 mm or
x * 1764 / 1000 1/100 mm
Thus a height of 180 1/600 inch with a barcode signifies 7.614 mm.

Carl Valentin GmbH
Neckarstraße 78 – 86 & 94 . 78056 Villingen-Schwenningen
Phone +49 7720 9712-0 . Fax +49 7720 9712-9901
[email protected] . www.carl-valentin.de