user guide - aws · pdf filedeskgrc user guide v1.1 sap connect via sap .net connector ......
TRANSCRIPT
User Guide
Version 1.3

DeskGRC User Guide v1.1
Table of Contents
Overview ............................................................................................................................................................................. 1
Architecture ....................................................................................................................................................................... 1
System Requirements .................................................................................................................................................... 2
Installation ......................................................................................................................................................................... 3
Database Location ...................................................................................................................................................... 4
Navigation ......................................................................................................................................................................... 6
Function Screens ......................................................................................................................................................... 9
Defining Rules ............................................................................................................................................................... 12
Segregation of Duties (SoD) Conflict Rules ................................................................................................... 13
Overview and Concept ...................................................................................................................................... 13
Defining SoD Conflict Rules in DeskGRC ................................................................................................... 15
Pasting Records from Excel ................................................................................................................................. 18
Import Records from Comma-delimited Text File ...................................................................................... 19
Deleting Rows ........................................................................................................................................................... 20
Refreshing Grid Views ............................................................................................................................................ 20
Modifying Records .................................................................................................................................................. 21
Critical Functions Rules ......................................................................................................................................... 21
Overview and Concept ...................................................................................................................................... 21
Defining Critical Functions Rules in DeskGRC .......................................................................................... 22
Template Rules for SoD Conflicts and Critical Functions ......................................................................... 23
Role Compliance Rules .......................................................................................................................................... 24
Overview and Concept ...................................................................................................................................... 24
Defining Role Compliance Rules in DeskGRC .......................................................................................... 25
Importance of Backing Up Rules on Frequent Basis .................................................................................. 31
Importing and Analyzing SAP Authorization Data .......................................................................................... 31
Manual Import Method ......................................................................................................................................... 31
Exporting SAP Table from Using SAP GUI ................................................................................................. 32
Process Analyses Run via Manual Import .................................................................................................. 36
SAP Connect Method ............................................................................................................................................. 38

DeskGRC User Guide v1.1
SAP Connect via SAP .NET Connector ......................................................................................................... 38
SAP Connect via RFC over HTTP/SOAP ...................................................................................................... 39
Process Analyses Run via SAP Connect ...................................................................................................... 39
Reports ............................................................................................................................................................................. 42
Dashboard .................................................................................................................................................................. 42
SoD Conflicts by Risk Rating ........................................................................................................................... 43
Top SoD for Role Types .................................................................................................................................... 43
Critical Functions by Risk Rating ................................................................................................................... 44
Top Critical Functions for Role Types .......................................................................................................... 44
Role Compliance by Spec Name ................................................................................................................... 45
Role Compliance Status Counts .................................................................................................................... 46
Detailed Reports ...................................................................................................................................................... 46
SoD Reports .......................................................................................................................................................... 46
Critical Functions Reports ................................................................................................................................ 47
Role Compliance Reports ................................................................................................................................ 49
Printing and Exporting Reports ..................................................................................................................... 50
Advanced Settings ....................................................................................................................................................... 51
Rules Backup and Restore .................................................................................................................................... 52
Reset Template Items ............................................................................................................................................ 52
App Registration ...................................................................................................................................................... 53
Advanced Database Settings .............................................................................................................................. 53
Make new template rules available after a version upgrade.............................................................. 53
Error Logs ................................................................................................................................................................... 53

P a g e | 1
DeskGRC User Guide v1.1
Overview
DeskGRC is a solution aimed to help SAP audit, security, access controls and compliance
professionals to analyze the state of SAP authorization configurations implemented in SAP
systems. It automates the process of performing analyses on segregation of duties,
critical/sensitive authorization assignments and assessing the level of compliance with the
access rights blueprint of an organization.
These analyses are very crucial during SAP security assessments, or as part of ongoing
monitoring initiative on the SAP access control configuration gaps. Through these activities,
reasonable assurance feedbacks could be provided to the stakeholders confirming that SAP
authorizations had been configured in accordance with the blueprint and therefore risks of
wrongly assigned access rights are duly mitigated.
Pre-requisite of a sound SAP authorization analyses activity requires a set of well-defined
authorization compliance criteria or rules, which need to be defined in accordance with an
organization’s unique SAP environment. DeskGRC comes with a set of predefined Segregation
of Duties (SoD) and Critical Authorizations rulesets to help the users to immediately jumpstart
their SAP authorization review tasks. At the core of DeskGRC engine lies a proprietary query
engine that executes various automated analyses that compares all the defined rules against the
actual SAP configurations. Post-analyses run, results are presented to the users in useful and
practical report layouts that are exportable into various formats.
Architecture
DeskGRC at the current version is deployable as a stand-alone Windows Desktop Application. It
utilizes Microsoft .NET platform and SQL LocalDB server for its data crunching tasks. Connection
to a more powerful enterprise version of Microsoft SQL Database server is also possible if
needed.
DeskGRC consists of four major components, mainly the presentation (User Interface or UI)
modules; the Extract, Transform and Load (ETL) component; a SAP Connector module and a
database as depicted in Figure 1. The ETL engine does the SAP raw data transformation and
cleansing while the SAP Connector component provides connectivity to the SAP application
server both via the HTTP/SOAP or direct RFC connection over TCP/IP connection. For SAP
Connector module to work, user has to ensure that the SAP .NET Connector for .NET 4.0
Libraries x86 (32 bit version) available from SAP Marketplace are installed on the user machine
that DeskGRC runs on (refer to SAP website on SAP .NET Connector on details how to get and
install the libraries). Please note that due to licensing restrictions imposed by SAP, the
libraries can’t be distributed with DeskGRC software.

P a g e | 2
DeskGRC User Guide v1.1
Figure 1 – Application Components
In absence of the SAP .NET Connector Libraries, user could also connect to the SAP via the
HTTP/SOAP RFC connectivity. For this to be possible, the target SAP system has to be a
NetWeaver App Server and the SOAP RFC ICF service must be enabled on the SAP NetWeaver
application server (refer to your SAP System Administrator on details on how to enable this
service).
If both types of connectivity are not possible, the fastest method to import SAP raw data into
DeskGRC is via the offline SAP table dumps imports. This method is the most common method,
usually the fastest to execute and least burden on SAP administrative activities (enabling SAP
connectivity via RFC to end user exposes some risks that need to be mitigated and hence careful
planning need to be done especially in refining the authorization rights needed for RFC
connected users).
System Requirements
DeskGRC is a standalone Windows application software utilizing Microsoft .NET Framework,
specifically .NET Framework 4.5 or higher. Any Microsoft Windows Operating Systems that
support Microsoft .NET Framework 4.5 or higher should be able to run DeskGRC (such as
Windows XP, Windows 7, Windows 8 and Windows 10).
Minimum hardware specifications recommended for running DeskGRC is 2GB RAM; x86 or x64
CPU with 1GHz or faster; and at least 3GB of hard disk free space.

P a g e | 3
DeskGRC User Guide v1.1
DeskGRC is deployed as a ‘Full Trust’ application and hence System Administrative privileges
on Windows are required when installing the software.
At the time of installation, DeskGRC will check that two pre-requisite components are installed –
the Microsoft .NET Framework 4.5 and Microsoft SQL Server 2012 Express LocalDB. If they
are found missing, the installer will automatically proceed to download and install the libraries
prior to installing DeskGRC.
Installation
Go to http://www.deskgrc.com/download/deskgrc/install.php and click the “Install DeskGRC”
link on the web page. The browser will prompt that an installer file “Setup.exe” is to be
downloaded. After the Setup.exe has been downloaded onto the machine, click the file to start
the installation. Depending on your Windows version and settings, a security warning message
may appear prompting whether you would like to execute and run the file – choose to proceed
running the Setup.exe file.
The installer will then check for the pre-requisites required for the application i.e. the Microsoft
.NET Framework 4.5 and Microsoft SQL Server 2012 Express LocalDB and will proceed to install
them first if they are not already on the user machine.
After completing the installation successfully, DeskGRC will be started and you should be able to
see a splash screen indicating that the application is initializing its first usage. During application
startup, a pop-up dialog box will appear to prompt user to register the software. Please consider
registering the software as this is very useful for us to keep track of the number of DeskGRC
installations for analysis purposes. Details that are provided during the registration will not be
shared with any parties. Registration could also be performed on the settings page as per Figure
3.

P a g e | 4
DeskGRC User Guide v1.1
Figure 2 - Registration dialog
Figure 3 - Registration on Settings screen
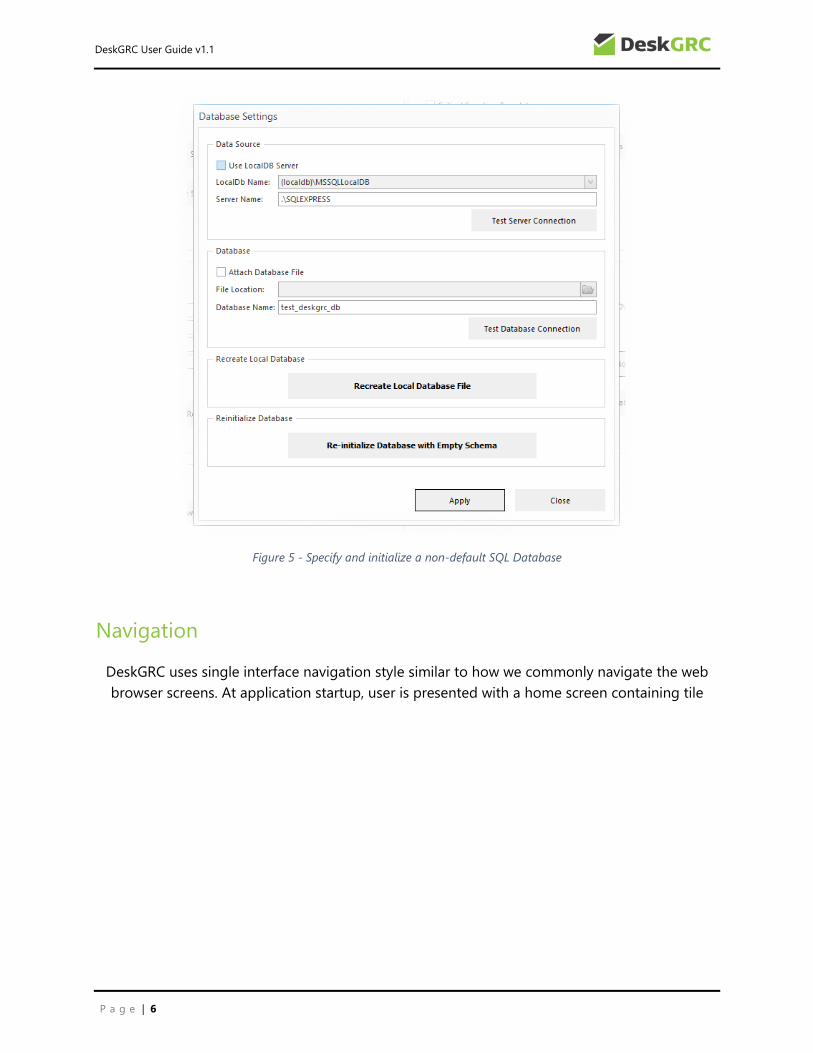
Database Location
By default, a local database file will be created when DeskGRC is first run. The location of the
initial database is displayed on the settings page as per Figure 4. If needed, one could also use a
database that resides on a standalone Microsoft SQL Server. To do this, follow these steps:
1. Ensure that a blank database is created on the SQL Server
2. Click “Change Connection Settings” on the Settings screen to open the Advanced
Database Settings window

P a g e | 5
DeskGRC User Guide v1.1
3. Specify the SQL server address and the newly created database name (example is as per
Figure 5).
4. You may click the “Test Database Connection” button to ensure that the connectivity to
the database works.
5. Click on the button that says “Re-initialize Database with Empty Schema” so that
DeskGRC creates all the necessary tables in the specified database.
6. Go to the SoD Conflict Rules screen or the Critical Functions screen and see whether all
the default rules (template rules) had been created and available.
Figure 4 - Database Location
P a g e | 6
DeskGRC User Guide v1.1
Figure 5 - Specify and initialize a non-default SQL Database
Navigation
DeskGRC uses single interface navigation style similar to how we commonly navigate the web
browser screens. At application startup, user is presented with a home screen containing tile

P a g e | 7
DeskGRC User Guide v1.1
menu buttons as depicted in
Figure 6. These tiles can be used to navigate to the intended screens.

P a g e | 8
DeskGRC User Guide v1.1
Figure 6 - Main Tile Menu (Home) Screen
Aside from using the tile menu buttons on the main page, user could also navigate through the
screens using the tile menu bar on the top of the application screen.
Figure 7 - Tile menu bar
P a g e | 9
DeskGRC User Guide v1.1
Final method of navigation is the forward and back buttons on the top right of the application
screen to allow user to quickly move back and forth from the previously visited screens.
Function Screens
DeskGRC consists of a number of screens to perform various actions as per the following table:
Screen Name Function
SoD (Segregation of Duties)
Conflict Rules
Define exception rules (exception conditions) for Segregation
of Duties (SoD) analyses. This screen has two main tabs – one
for defining job function groups and another to define the
conflicting functions (SoD exceptions).
Critical Functions Define exception rules for critical functions (sensitive
authorizations). Critical functions are defined in grouped
functional areas.
Role Design Define role design specifications – for composite role designs,
single role designs and user assignments. Through these
specifications, DeskGRC would be able to analyze current SAP
authorization configurations to see whether implemented
configurations match with the design specifications set out in
the rulesets. Reports are presented in terms of excess
authorizations, missing authorizations and matched
authorizations.
Manual Import Manually import required SAP authorization tables for all
analyses. Required tables from SAP are AGR_1251, AGR_1252,
AGR_AGRS, AGR_PROF, AGR_USERS, UST04 and TSTC.
These tables must be extracted from SAP GUI using SE16 and
exported in “unconverted” format.
The screen has a set of analyses (selectable) to be performed
on the SAP data – SoD Analyses, Critical Functions and Role
Compliance.
SAP Connect Import required SAP authorization tables via direct
connectivity with the SAP server, either through direct RFC
connection using the SAP .NET Connector libraries (SAP NCo)
or via RFC Web Service (RFC over SOAP/HTTP) exposed by SAP
NetWeaver server.
This feature eliminates the need for the user to manually
import the required SAP tables using the SAP GUI client and
therefore is more convenient. However, proper RFC
authorizations need to be granted to the user account that is
being used for this to work and care should be taken not to

P a g e | 10
DeskGRC User Guide v1.1
expose risk of giving too much RFC authorizations granted to
that user account.
SoD Reports Display reports on Segregation of Duties exceptions found
after SAP tables had been imported and analyzed. The
following reports are available:
1. Single Role SoD Exceptions – single roles that contain
matching SoD exceptions as defined in the SoD Conflict
Rules screen.
2. Composite Role SoD Exceptions – composite roles that
contain matching SoD exceptions as defined in the SoD
Conflict Rules screen.
3. User SoD Exceptions – user accounts that contain
matching SoD exceptions as defined in the SoD Conflict
Rules screen.
All reports are exportable in various formats such as PDF,
HTML, MHT, Excel, CSV, Text, RTF and image.
Critical Function Reports Display reports on critical authorization exceptions found after
SAP tables had been imported and analyzed. The following
reports are available:
1. Single Role Critical Function Exceptions – single roles that
contain matching critical authorization exceptions as
defined in the Critical Authorization Rules screen.
2. Composite Role Critical Function Exceptions – composite
roles that contain matching critical authorization
exceptions as defined in the Critical Authorization Rules
screen.
3. User Critical Function Exceptions – user accounts that
contain matching critical authorization exceptions as
defined in the Critical Authorization Rules screen.
4. User Critical Profiles – user accounts that contain matching
critical profile (e.g. SAP_ALL) exceptions as defined in the
Critical Authorization Rules screen.
All reports are exportable in various formats such as PDF,
HTML, MHT, Excel, CSV, Text, RTF and image.
Role Compliance Reports Display reports on role compliance after analyses were
performed against all imported SAP tables. The following
reports are available:
1. Excess Single Role Object Values – authorization object
values that are found to be in excess of what had been
defined in the role compliance specification for the
respective single roles.
2. Excess Single Role Users – user accounts that are found to

P a g e | 11
DeskGRC User Guide v1.1
be in excess of what had been defined in the role
compliance specification for the respective single roles.
3. Excess Composite Role Child Roles – child single roles that
are in excess of what had been defined for the respective
composite roles.
4. Excess Composite Role Users – user accounts that are
found to be in excess of what had been defined for the
respective composite roles.
5. Missing Single Role Object Values – authorization object
values that are found to be missing from what had been
defined for the respective single roles.
6. Missing Single Role Users – user accounts that are missing
from what had been defined for the respective single
roles.
7. Missing Composite Role Child Roles – child single roles
that are missing from what had been defined for the
composite roles.
8. Missing Composite Role Users – user accounts that are
missing from what had been defined for the composite
roles.
9. Matched Single Role Object Values – matching single role
object values that had been defined in the single role
specification.
10. Matched Single Role Users – matching single role user
accounts that had been defined in the single role
specification.
11. Matched Composite Role Child Roles – matching child
single roles as per what had been defined in the
composite role specification.
12. Matched Composite Role Users – matching composite role
users as per what had been defined in the composite role
specification.
Dashboard Summary charts representing analyses results performed on
the imported SAP tables. The following charts are displayed on
the dashboard:
1. SoD Exceptions by Risk Rating – the number of SoD
exceptions reported for composite roles, single roles and
user accounts categorized by the level of risks (Critical,
High, Medium and Low).
2. Top SoD for Role Types – top 5 SoD exception type per
role type (composite, single or user).
3. Critical Functions by Risk Rating – the number of critical
function exceptions reported for composite roles, single
roles and user accounts categorized by the level of risks
(Critical, High, Medium and Low).

P a g e | 12
DeskGRC User Guide v1.1
4. Top Critical Functions for Role Types – top 5 critical
function exceptions per role type (composite, single or
user).
5. Role Compliance by Specification Name – the number of
excess, missing and matching items for different
specification
6. Role Compliance Status Counts – the number of
compliance status (excess, missing and matched)
according to role types (composite role, single role, role
users).
Settings To perform administrative actions such as:
1. Backup and restore rules
2. Software registration
3. View error log
4. Reset template ruleset items
5. Repair database
6. Advanced database configuration (recreate local database
file, specify database location, re-initialize database
schema)
Defining Rules
The fundamental pre-requisite for DeskGRC to be able to perform and produce quality analyses
on SAP authorizations is a solid and well-thought rule definitions defined in accordance with the
organization’s SAP environment.
DeskGRC comes with a set of template rules for SoD and Critical Authorizations that can be
immediately used for users to immediately analyze their SAP authorizations. However, in a
complex SAP environment that consists of multiple user groups that are divided and segregated
according to company codes, activity groups etc., the template rules may have to be refined
further in order to reduce false positive exception results.
The following sections give high level overview of how rules can be defined for the various
analysis types offered by DeskGRC.

P a g e | 13
DeskGRC User Guide v1.1
Segregation of Duties (SoD) Conflict Rules
Overview and Concept
DeskGRC is aimed for SAP security, access control and audit professionals who are already
familiar with the idea of the SAP authorization concepts. This manual therefore does not intend
to give a thorough revision on the SAP authorization topics. More information on SAP
authorization concepts can be obtained from various SAP books as well as free resources on the
net.
Assuming that we’re familiar with SAP authorizations, we should already know that access
control in SAP centers around how we configure and assign the ‘authorization objects’ to the
user accounts. An authorization object consists of an object name and their corresponding set
of fields and values that make up the level of access control intended.
For a user to be able to perform a particular transaction within SAP, let’s say for creating and
modifying the Finance Vendor Master records, firstly the person needs to be granted an
authorization for executing a set of transactions within SAP via the Transaction Codes (TCodes),
which in this case are TCode “FK01” and “XK01” (for creating new vendor master records) and
“FK02” and “XK02” (for modifying vendor master records). The TCodes are granted to the user
by assigning his/her user account with an authorization object called “S_TCODE” with the
corresponding field “TCD” set to values “FK01”, “XK01”, “FK02” and “XK02”. By having this
authorization object ‘instance’, the user is now able to execute transaction FK01, XK01, FK02 or
XK02 and view the screen associated with those transactions within SAP GUI.
However, the user is not able to perform any actions just yet such as adding a new vendor
account with that one authorization object instance. For the user to be able to add and modify
vendor accounts, other authorization objects need to be assigned to her/his user account, which
are the “F_LFA1_BEK” (vendor account authorization), “F_LFA1_GEN” (vendor central data),
“F_LFA1_GRP” (vendor account group) and “F_LFA1_BUK” (vendor authorization for company
codes). Also, the corresponding field “ACTVT” for the objects need to be set to have a value of
“01” (create) and “02” (modify). In addition, the field “BUKRS” (company code) for the object
“F_LFA1_BUK” need to be assigned to the company code authorized for the user account.
Having all the authorization objects above would enable the user to perform new vendor
account creation and modification within the SAP system. For simplification and grouping
purpose, the set of activities that the user can perform through the collection of authorization
objects is termed by DeskGRC as a “Job Function”. In the example case above, we may want to
give the name of the job function as “Create and Modify Vendor Master”.
To mitigate risk of excessive authorization due to conflicting job functions, a user who could
create and modify vendor master shouldn’t be given the authorization to make an account
payable payment, or otherwise the person would be able to create a bogus vendor account and

P a g e | 14
DeskGRC User Guide v1.1
make a fraudulent payment to it. This is an example of a segregation of duties conflict, as
visually illustrated in Figure 8.
Please note however that in many organizations, especially with limited resources to be assigned
with different job functions, SoD exceptions discovered via an automated tool should be
carefully looked at and not be immediately treated as serious problems. There are mitigating
controls available offered by SAP that could reduce the inherent risks of having conflicting
functions. For example, the reviewer should then check whether there are other compensating
controls implemented, such as workflows (four eye reviews); or a process to review the activity
logs of the users with conflicting duties (detective reviews).
Figure 8 - SoD Conflict concept sample

P a g e | 15
DeskGRC User Guide v1.1
Defining SoD Conflict Rules in DeskGRC
The screenshot below illustrates the overall layout of the SoD Conflict Rules data entry screen:
Figure 9 - SoD Conflict Rules screen layout
Using the previously described concept of defining SoD conflicting functions, we can then
define the SoD exception rules within DeskGRC as per the following steps:
Adding Job Functions:
1. Navigate to the SoD Conflict Rules screen.
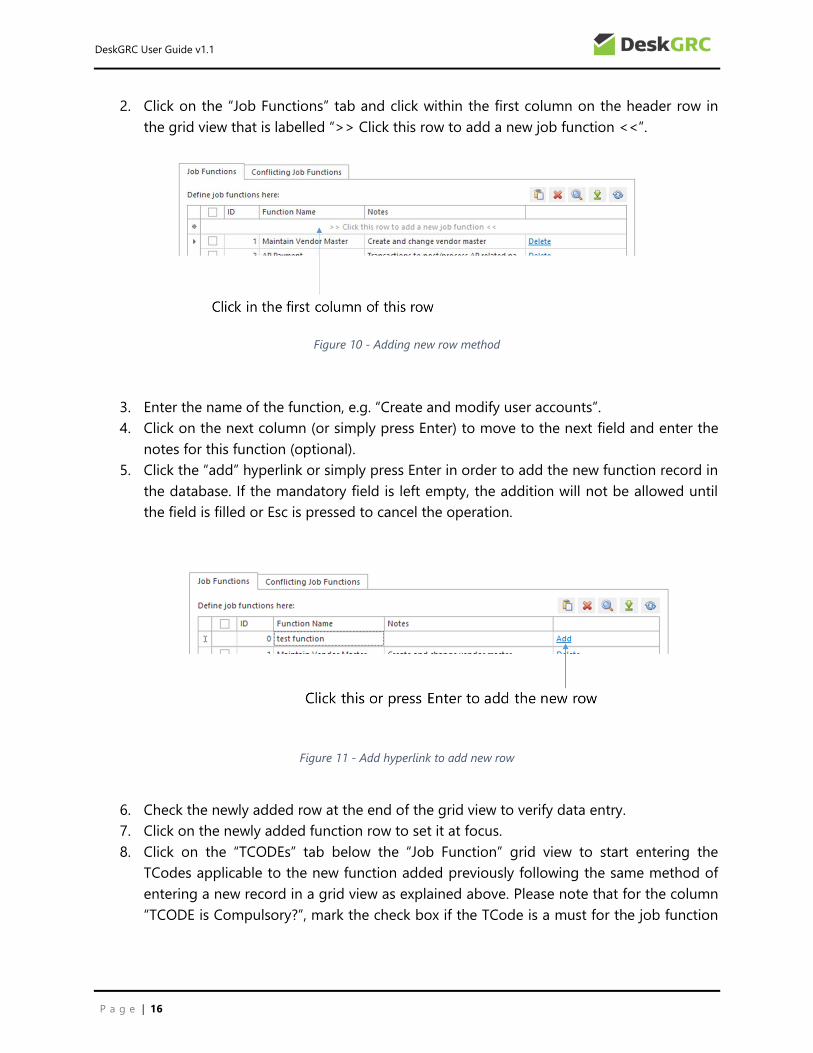
P a g e | 16
DeskGRC User Guide v1.1
2. Click on the “Job Functions” tab and click within the first column on the header row in
the grid view that is labelled “>> Click this row to add a new job function <<”.
Figure 10 - Adding new row method
3. Enter the name of the function, e.g. “Create and modify user accounts”.
4. Click on the next column (or simply press Enter) to move to the next field and enter the
notes for this function (optional).
5. Click the “add” hyperlink or simply press Enter in order to add the new function record in
the database. If the mandatory field is left empty, the addition will not be allowed until
the field is filled or Esc is pressed to cancel the operation.
Figure 11 - Add hyperlink to add new row
6. Check the newly added row at the end of the grid view to verify data entry.
7. Click on the newly added function row to set it at focus.
8. Click on the “TCODEs” tab below the “Job Function” grid view to start entering the
TCodes applicable to the new function added previously following the same method of
entering a new record in a grid view as explained above. Please note that for the column
“TCODE is Compulsory?”, mark the check box if the TCode is a must for the job function
P a g e | 17
DeskGRC User Guide v1.1
i.e. the job function will not be satisfied if missing the TCode within its underlying
authorizations.
9. Click on the “Objects” tab adjacent to the “TCODEs” grid view and start entering the
authorization objects applicable to the newly added function following the same method
of entering a new record in a grid view as explained above. Please note that for the
column “Object Value is Compulsory?”, mark the check box if the object’s field value is a
must for the job function i.e. the job function will not be satisfied if missing the object’s
value within its underlying authorizations.
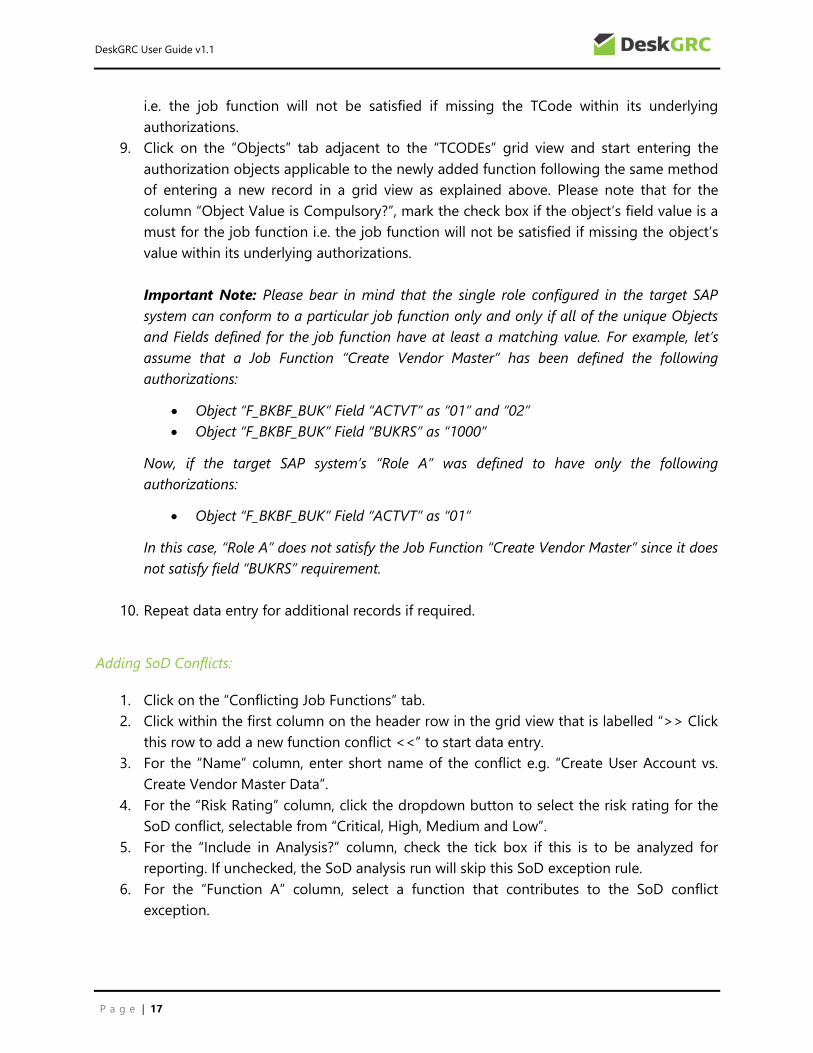
Important Note: Please bear in mind that the single role configured in the target SAP
system can conform to a particular job function only and only if all of the unique Objects
and Fields defined for the job function have at least a matching value. For example, let’s
assume that a Job Function “Create Vendor Master” has been defined the following
authorizations:
Object “F_BKBF_BUK” Field “ACTVT” as “01” and “02”
Object “F_BKBF_BUK” Field “BUKRS” as “1000”
Now, if the target SAP system’s “Role A” was defined to have only the following
authorizations:
Object “F_BKBF_BUK” Field “ACTVT” as “01”
In this case, “Role A” does not satisfy the Job Function “Create Vendor Master” since it does
not satisfy field “BUKRS” requirement.
10. Repeat data entry for additional records if required.
Adding SoD Conflicts:
1. Click on the “Conflicting Job Functions” tab.
2. Click within the first column on the header row in the grid view that is labelled “>> Click
this row to add a new function conflict <<” to start data entry.
3. For the “Name” column, enter short name of the conflict e.g. “Create User Account vs.
Create Vendor Master Data”.
4. For the “Risk Rating” column, click the dropdown button to select the risk rating for the
SoD conflict, selectable from “Critical, High, Medium and Low”.
5. For the “Include in Analysis?” column, check the tick box if this is to be analyzed for
reporting. If unchecked, the SoD analysis run will skip this SoD exception rule.
6. For the “Function A” column, select a function that contributes to the SoD conflict
exception.
P a g e | 18
DeskGRC User Guide v1.1
7. For the “Function B” column, select another function that contributes to the SoD conflict
if combined with the “Function A” selected in step 6.
8. For the “Notes” column, enter the short description of the SoD conflict being entered
(optional).
9. Click “add” hyperlink button or press Enter to add the record to the grid view and
database.
10. Repeat data entry for additional records if required.
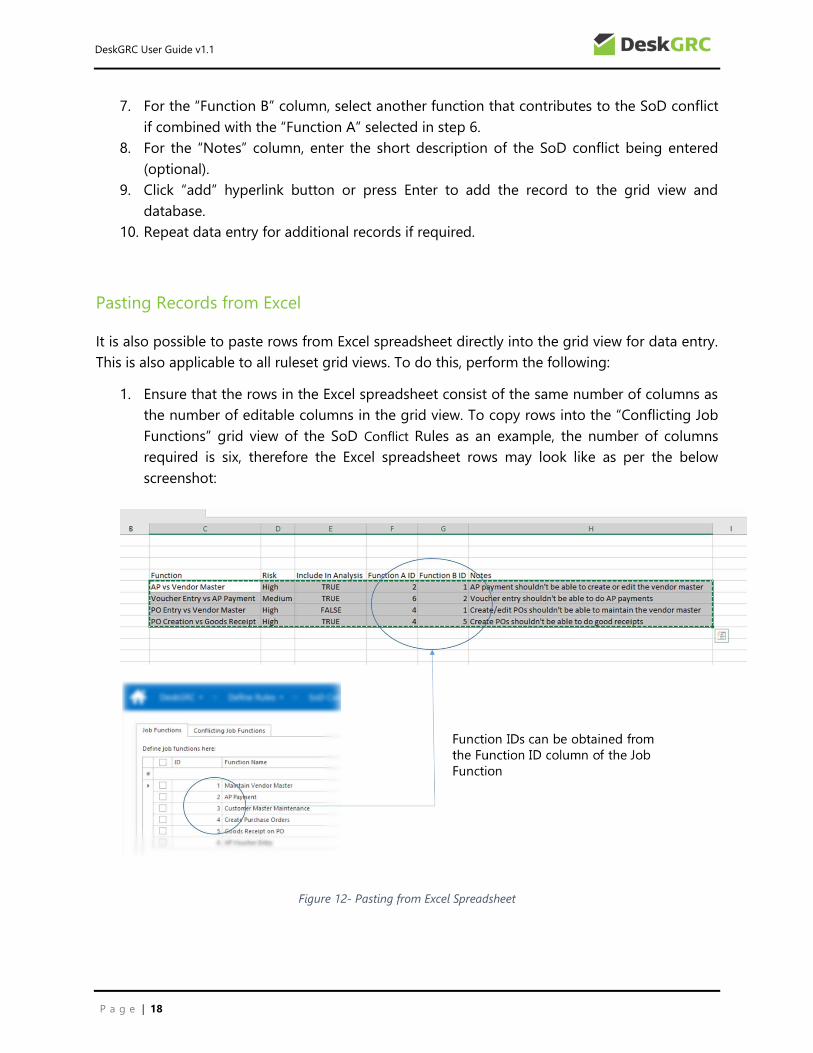
Pasting Records from Excel
It is also possible to paste rows from Excel spreadsheet directly into the grid view for data entry.
This is also applicable to all ruleset grid views. To do this, perform the following:
1. Ensure that the rows in the Excel spreadsheet consist of the same number of columns as
the number of editable columns in the grid view. To copy rows into the “Conflicting Job
Functions” grid view of the SoD Conflict Rules as an example, the number of columns
required is six, therefore the Excel spreadsheet rows may look like as per the below
screenshot:
Figure 12- Pasting from Excel Spreadsheet

P a g e | 19
DeskGRC User Guide v1.1
Note that for “Function A” and “Function B” columns, the record ID of those functions
need to be entered (not the function name text). Lookup the record IDs of the functions
in the “Job Functions” grid view.
2. Select the rows to be copied (without the header row if there’s one) in the Excel
spreadsheet and copy them onto the clipboard (by clicking context menu copy or simply
pressing CTRL+C on the keyboard).
3. Click on the icon on the top right of the grid view to start copying the rows into
the grid view (and automatically added to the database).
4. Check that the pasted rows are correctly added at the end of the grid view.
Import Records from Comma-delimited Text File
Rulesets can also be imported from a comma-delimited text file by following the below steps:
1. Click on the on the top right of the grid view.
2. A pup-up dialog box will be prompted explaining the import operation from a comma-
delimited text file. For example, if we were to import authorization object for a job
function, the following pop-up dialog window will appear guiding us on how to format
the text file to be imported:
Figure 13 - Guide to importing data from text file
As an example, for importing data from a text file for a Job Function’s authorization
objects, the following is an example of the text file content:

P a g e | 20
DeskGRC User Guide v1.1
Figure 14 - Sample Notepad with import data
3. Click the “Yes” button on the dialog window. A File Selector window will then be
prompted for user to select the source text file for the data import. Navigate to the file
location and click “Open”. DeskGRC will then prompt a wait splash screen indicating that
import process is running.
4. Upon completion i.e. when the wait splash screen disappears, check the grid view to
verify that all data has been imported into the grid view (and the database) successfully.
If there were rows that had not been imported, check the source file and rectify any data
errors such as formatting mistakes or non-existent record IDs.
Deleting Rows
Deleting rows or records in the grid views is as simple as clicking the “Delete” hyperlink on the
respective row that is to be deleted. For deleting multiple rows, select the check boxes in the
right most column of the rows to be deleted and click the button located on the top right
menu bar of the grid view.
Refreshing Grid Views
There might be times where grid views are not reflecting the latest database records stored due
to UI components not being refreshed correctly. To ensure that the grid views are displaying the
latest records from the database, click the button on the grid view menu bar located on
top right area.

P a g e | 21
DeskGRC User Guide v1.1
Modifying Records
To modify records, simply click on the intended cells within the grid views and modify the
values. The values are automatically updated onto the linked database.
Critical Functions Rules
Overview and Concept
Using similar “Job Function” concept as detailed in the SoD Conflict Rules section above, a
number of authorization objects can be grouped to form the “Critical Functions” rulesets. For
example, let’s assume that we’d like to check that which of our SAP users had been given the
authorization to create and modify user master records (user accounts). The group of
authorization objects for this critical function could then be illustrated in the Figure 15 below:
Figure 15 - 'Create and Modify User Master Records' critical functions
Similar to the SoD concept, we enter the rules for the Critical Functions by defining the set of
TCodes and authorization objects for the critical function group.
For Critical Functions rules, there’s an addition rule entry that we can define – the “Critical
Profile” checks. A Profile is a group of default authorizations defined by SAP that we could
assign to a particular user, eliminating the need to individually define and assign authorization
object values. For example, a well-known profile “SAP_ALL” is the most powerful authorization
profile that exists in all SAP systems which grant unrestricted access to all areas within the SAP
system. During a normal SAP security review, allocation of SAP_ALL profile to users is diligently
checked and existence of such profile for any users within a production environment is

P a g e | 22
DeskGRC User Guide v1.1
commonly flagged as a serious risk. DeskGRC allows us to automatically review powerful profile
assignment such as this by defining them in the Critical Functions rulesets.
Defining Critical Functions Rules in DeskGRC
The screenshot below illustrates the overall layout of the Critical Functions Rules data entry
screen:
Figure 16 - Critical Functions Rules screen layout
Using the previously described concept of defining Critical Functions rules, we can then define
the rules within DeskGRC as per the following steps:

P a g e | 23
DeskGRC User Guide v1.1
Adding Critical Functions
1. Click on the Critical Functions Rules screen.
2. Click within the first column on the header row in the grid view that is labelled “>> Click
this row to add a new critical function group <<”.
3. Enter the name of the critical function, e.g. “Create and Modify User Master Records”.
4. Click on the next column (or simply press Enter) to move to the next field and enter the
notes for this function.
5. Click the “add” hyperlink or simply press Enter in order to add the new function record in
the database. If the mandatory field is left empty, the addition will not be allowed until
the field is filled or Esc is pressed to cancel the operation.
6. Check the newly added row at the end of the grid view to verify data entry.
7. Click on the newly added function row to set it at focus.
8. Click on the “TCODEs” tab below the “Critical Functions” grid view to start entering the
TCodes applicable to the new function added previously following the same method of
entering a new record in a grid view as explained before. Please note that for the column
“TCODE is Compulsory?”, mark the check box if the TCode is a must for the job function
i.e. the job function will not be satisfied if missing the TCode within its underlying
authorizations.
11. Click on the “Objects” tab adjacent to the “TCODEs” grid view and start entering the
authorization objects applicable to the newly added function following the same method
of entering a new record in a grid view as explained before. Please note that for the
column “Object Value is Compulsory?”, mark the check box if the object’s field value is a
must for the job function i.e. the job function will not be satisfied if missing the field
value within its underlying authorizations.
9. Click on the “Critical Profiles” tab adjacent to the “Objects” grid view and start entering
the profiles applicable to the newly added function following the same method of
entering a new record in a grid view as explained before.
10. Repeat data entry for additional records if required.
Template Rules for SoD Conflicts and Critical Functions
DeskGRC has a number of predefined rules that are populated in the SoD Rules and Critical
Function Rules grid views by default. These template rules are provided to enable the user to
straight away launch some of the commonly known SAP authorization risks as per best practices.
It is expected that due to unique SAP environments that all organizations have, these rules may
not give us high accuracy of results since there could be a number of authorization values need
to be fine-tuned in accordance to one’s organization setup. To improve further and reduce the
false-positives in the SoD conflicts and critical function results, users could use these template
rules as a guide and define their own refined version of the rules. Please note we do not

P a g e | 24
DeskGRC User Guide v1.1
recommend you to modify these template rules directly as there will be a time when you need
to ‘repair/renew’ the database in order to import new rules available during a version upgrade.
Role Compliance Rules
Overview and Concept
Quite often during SAP security and/or authorization review, we’d like to know whether the
single roles, composite roles and role-user assignments within the SAP system match with the
organization’s access control design. DeskGRC allows us to define rulesets containing the role
design and user role assignment specifications and test them against the implemented access
controls within SAP.
DeskGRC defines the rulesets for the “Role Compliance Rules” checks according to the following
hierarchy as illustrated in Figure 17 below.
Figure 17 - Role Compliance Rulesets Hierarchy
The ruleset begins with the “Role Specification Version/Variant” as the parent group where we
park all the single role and composite role design specifications or rulesets. For example, we
might have a set of role compliance checks that we want to test for a particular department only
and not to mix the test with role specifications for other departments during an analyses run via
DeskGRC. To achieve this, we could name the specification ruleset for example as “Roles for
Department A” and define only roles related to that particular department. When we run
DeskGRC analyses, we can let DeskGRC to run the compliance checks only for this particular
Role Specification Variant and leave out the others. This way, our analyses run in DeskGRC

P a g e | 25
DeskGRC User Guide v1.1
would be more focused to a particular area of interest and the corresponding reports generated
would not be cluttered with irrelevant results for other role specifications.
DeskGRC allows multiple role design specification rulesets to be defined within it. User is given
the option to individually select which role design specification are to be included during
analyses run (this is done via the “Include in Analyses?” check box in the role design
specification grid view).
Another use for this grouping feature is to segregate different version of role design
specifications. Quite often, organizations would be implementing different sets of role design
specification for different SAP clients. DeskGRC allows us to test only selected rulesets against
the imported SAP authorization data without having to unnecessarily test irrelevant rulesets
pertaining to different SAP systems.
Under each role design specification, we then define the following components:
1. Single Roles – single roles that are to be tested for compliance.
2. Single Role Objects – authorization objects to be tested for the single roles. These are
defined in the “Single Role Objects” grid view. Unlike the previous rules (SoD and Critical
Function) where we define TCodes in a separate grid view, the TCodes for single roles
should be defined under the “S_TCODE” authorization object.
3. Single Role Field Values – fields and corresponding values for the objects that are to be
tested.
4. Single Role Users – list of users that a particular single role should be assigned to within
the organization.
5. Composite Roles – composite roles that are to be tested for compliance.
6. Composite Role Child Roles – list of child roles that a composite role should have.
7. Composite Role Users – list of users that a particular composite role should be assigned
to within the organization.
Defining Role Compliance Rules in DeskGRC
The screenshot below illustrates the overall layout of the Role Compliance data entry screen:

P a g e | 26
DeskGRC User Guide v1.1
Figure 18 - Role Specification Version Grid View
Figure 19 - Single Role Specification tab layout

P a g e | 27
DeskGRC User Guide v1.1
Figure 20 - Composite Role Specification tab layout
Role compliance rules can be defined as per the following steps:
Adding Role Design Specification Version:
1. Click on the “Role Specification Version” tab and enter details of the role design
specification by clicking on the respective cells within the header row labelled “>> Click
here to enter a new role specification version/variant <<”.
Very Important: Please ensure that the SAP Client name entered matches with the SAP
Client where the authorization tables will be pulled from. Failing to do this, role
compliance results may come out empty as the SAP Client name defined here does not
match with the imported SAP tables.
P a g e | 28
DeskGRC User Guide v1.1
2. For the “Include in Analyses?” column, mark the check box if you require the role
compliance checks to be checked on the role specification version. Leave unchecked if it
is not required during analyses run.
3. Click the “add” hyperlink or simply hit Enter to add the newly created record into the grid
view and the database. Check that all details entered are correct or else modify them by
clicking on the appropriate cell to modify the values.
4. Repeat data entry for additional records if required.
Adding Single Roles:
1. Click on the “Single Role Specification” tab to enter data entry section for the single
roles.
2. On the “Role Specification Version/Variant” combo box selection, select the target Role
Specification Version in which the rules are to be populated.
3. In the Single Role grid view, enter details of the new single role by clicking on the
respective cells within the header row labelled “>> Click here to enter a new role name
<<”. Once all details have been entered, click the “add” hyperlink or simply hit Enter to
add the new record in the grid view and database.
4. Repeat data entry for additional records if required.
Adding Objects for Single Role:
1. Click on the single role of choice in the single role grid view to set focus on it.
2. In the Objects grid view below the single role grid view, enter the name of the new
authorization object by clicking on the respective cells within the header row labelled
“>> Click here to enter a new object <<”. Once all details have been entered, click the
“add” hyperlink or simply hit Enter to add the new record in the grid view and database.
Please note that for defining TCodes relevant to the selected single role, we need to
define them under the “S_TCODE” authorization object in the object grid view.
Also, note that the authorization objects defined here are the authorization objects of
interest i.e. the objects that should be checked by DeskGRC during the analyses run. All
other objects not defined here are not checked for compliance.
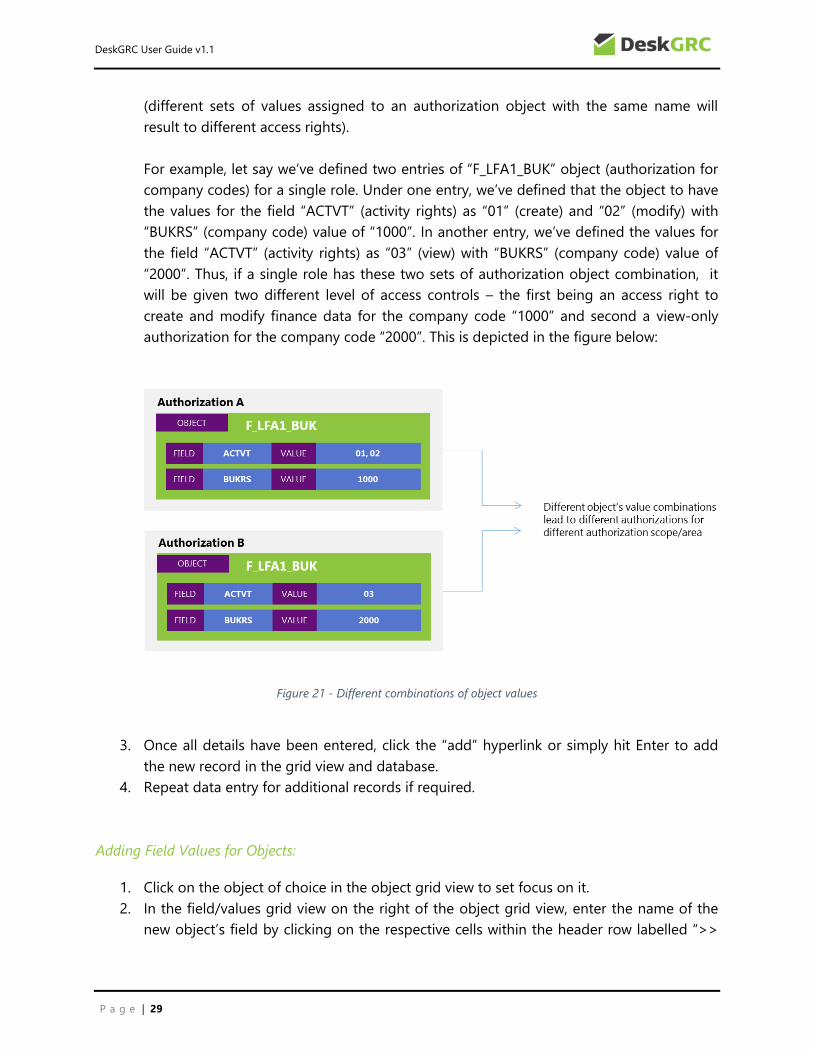
Another point to note is that similar objects of the same name can be repeated here.
This is because there are times where we’d like to check compliance for different
combinations of an authorization object values that make up different authorization sets
P a g e | 29
DeskGRC User Guide v1.1
(different sets of values assigned to an authorization object with the same name will
result to different access rights).
For example, let say we’ve defined two entries of “F_LFA1_BUK” object (authorization for
company codes) for a single role. Under one entry, we’ve defined that the object to have
the values for the field “ACTVT” (activity rights) as “01” (create) and “02” (modify) with
“BUKRS” (company code) value of “1000”. In another entry, we’ve defined the values for
the field “ACTVT” (activity rights) as “03” (view) with “BUKRS” (company code) value of
“2000”. Thus, if a single role has these two sets of authorization object combination, it
will be given two different level of access controls – the first being an access right to
create and modify finance data for the company code “1000” and second a view-only
authorization for the company code “2000”. This is depicted in the figure below:
Figure 21 - Different combinations of object values
3. Once all details have been entered, click the “add” hyperlink or simply hit Enter to add
the new record in the grid view and database.
4. Repeat data entry for additional records if required.
Adding Field Values for Objects:
1. Click on the object of choice in the object grid view to set focus on it.
2. In the field/values grid view on the right of the object grid view, enter the name of the
new object’s field by clicking on the respective cells within the header row labelled “>>

P a g e | 30
DeskGRC User Guide v1.1
Click here to enter a new field value <<”. Once all details have been entered, click the
“add” hyperlink or simply hit Enter to add the new record in the grid view and database.
3. Repeat data entry for additional records if required.
Adding Users for Single Role:
1. Click on the single role of choice in the single role grid view to set focus on it.
2. In the users grid view within the “Users” tab, enter the name of the new user by clicking
on the respective cells within the header row labelled “>> Click here to enter a new user
<<”. Once all details have been entered, click the “add” hyperlink or simply hit Enter to
add the new record in the grid view and database.
3. Repeat data entry for additional records if required.
Adding Composite Roles:
1. Click on the “Composite Role Specification” tab to enter data entry section for the
composite roles.
2. On the “Role Specification Version/Variant” combo box selection, select the target Role
Specification Version in which the rules are to be populated.
3. In the composite roles grid view, enter details of the new composite role by clicking on
the respective cells within the header row labelled “>> Click here to enter a new
composite role <<”. Once all details have been entered, click the “add” hyperlink or
simply hit Enter to add the new record in the grid view and database.
4. Repeat data entry for additional records if required.
Adding Child Roles for Composite Role:
1. Click on the composite role of choice in the composite role grid view to set focus on it.
2. In the child roles grid view below the composite role grid view, enter the name of the
new child single role by clicking on the respective cells within the header row labelled
“>> Click here to enter a new child single role <<”. Once all details have been entered,
click the “add” hyperlink or simply hit Enter to add the new record in the grid view and
database.
3. Repeat data entry for additional records if required.
Adding Users for Composite Role:
1. Click on the composite role of choice in the single role grid view to set focus on it.

P a g e | 31
DeskGRC User Guide v1.1
2. In the users grid view within the “Users” tab, enter the name of the new user by clicking
on the respective cells within the header row labelled “>> Click here to enter a new user
<<”. Once all details have been entered, click the “add” hyperlink or simply hit Enter to
add the new record in the grid view and database.
3. Repeat data entry for additional records if required.
Importance of Backing Up Rules on Frequent Basis
As a precautionary measure, it is strongly advised that users frequently perform backup of the
defined rules, especially when there are a lot of custom-defined rules had been populated in the
database. If the internal database had been somehow corrupted, the rules can always be
restored again. Please refer to the Rules Backup and Restore section on how to back up the user
defined rules.
Importing and Analyzing SAP Authorization Data
DeskGRC performs its authorization and role compliance checks by analyzing the following SAP
tables:
1. AGR_1251 – table containing single roles and their corresponding authorization profile
codes, objects, fields and values
2. AGR_1252 – table linking single roles to their corresponding organization level data
(group of authorization object’s values for certain fields)
3. AGR_AGRS – table linking the child single roles for composite roles
4. AGR_PROF – table containing list of authorization profile codes assigned to single roles
5. AGR_USERS – table containing user assignments to single roles
6. UST04 – table containing profile assignments to user accounts
7. TSTC – table containing TCODEs and their corresponding descriptions (this table is
optional, only needed if the user wants to see TCODEs descriptions in the reports)
There are two methods to import these tables from SAP into DeskGRC – the manual import
method and the “SAP Connect” way.
Manual Import Method
The manual import method requires that we manually export the required tables from SAP (via
the SAP GUI) in “non-converted” format. To do this, follow these steps:

P a g e | 32
DeskGRC User Guide v1.1
Exporting SAP Table from Using SAP GUI
1. Logon into the SAP system and client where we want to pull all the SAP tables from.
Execute transaction “SE16”.
2. This is a very important step – failing to set this right will render your SAP tables
not recognizable by DeskGRC. On the menu header on top of the SAP GUI, navigate to
Settings User Parameters:
3. In the dialog windows that appears, go to the “Data Browser” tab and ensure that “SE16
Standard List” is selected:
P a g e | 33
DeskGRC User Guide v1.1
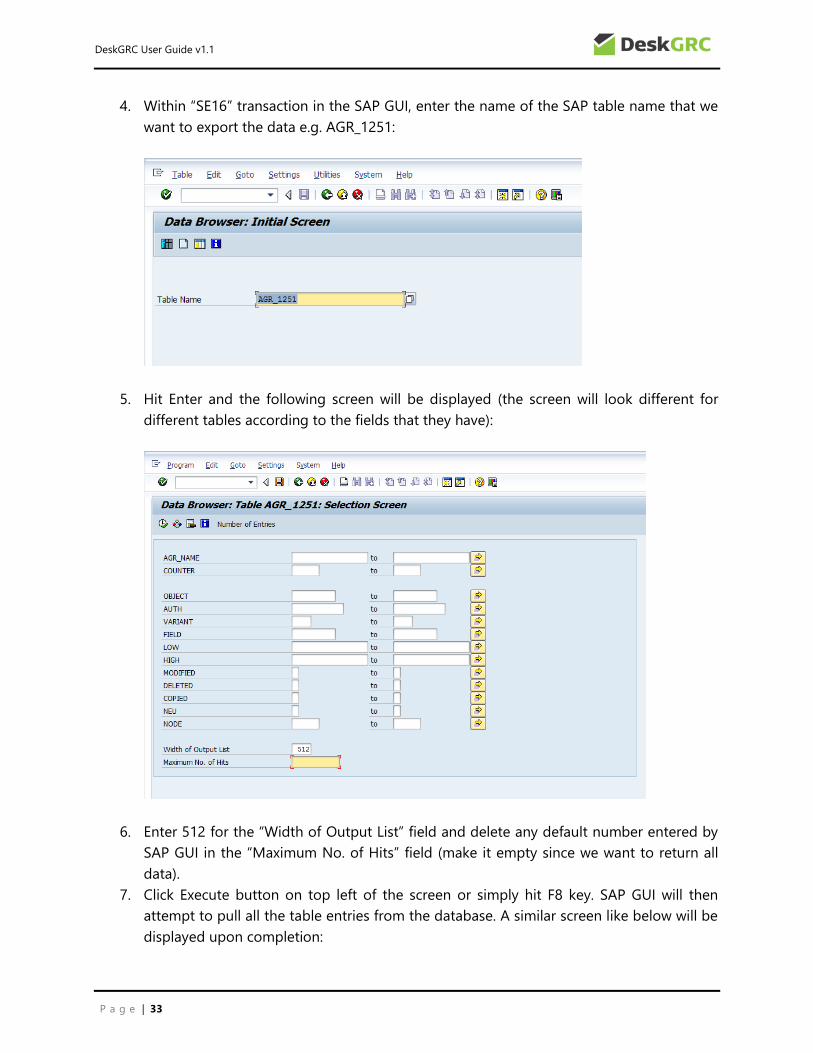
4. Within “SE16” transaction in the SAP GUI, enter the name of the SAP table name that we
want to export the data e.g. AGR_1251:
5. Hit Enter and the following screen will be displayed (the screen will look different for
different tables according to the fields that they have):
6. Enter 512 for the “Width of Output List” field and delete any default number entered by
SAP GUI in the “Maximum No. of Hits” field (make it empty since we want to return all
data).
7. Click Execute button on top left of the screen or simply hit F8 key. SAP GUI will then
attempt to pull all the table entries from the database. A similar screen like below will be
displayed upon completion:

P a g e | 34
DeskGRC User Guide v1.1
8. On the menu header on top of the SAP GUI, navigate to System List Save Local
File and click the menu item.
9. The following dialog window will be displayed:

P a g e | 35
DeskGRC User Guide v1.1
10. Leave the default selection of “unconverted” as is and click Enter or the green check
button. SAP GUI will then start to download all the data from the SAP database – this
may take a while depending on your connectivity to the SAP server. Upon completion,
the following dialog window will be displayed prompting us to specify the file name and
location where we want to save the file containing the data. Enter the location and file
name of the file and make sure that the field “Encoding” is left blank. Click the
“Generate” button.
11. The file containing all the SAP table data should now be saved onto the machine as
specified by step 8.
12. Repeat the process for other tables required by DeskGRC.
After we have exported all the required SAP tables in “unconverted” formats, open DeskGRC
and from the home screen or the tile menu bar, navigate to the “Manual Import” screen.
Follow these steps to start the process of importing and analyzing the SAP tables against all
the redefined rulesets:

P a g e | 36
DeskGRC User Guide v1.1
Figure 22 - Manual Import Screen
Process Analyses Run via Manual Import
1. Make sure that we are on the “Manual Import” screen on DeskGRC.
2. Enter the name of the SAP Client where we pulled the SAP tables from. Ensure that this
value matched with the client number of the SAP tables we’ve just imported. This is very
important as any mistakes on this value will render all the results empty during our
analyses.
3. Specify all the location of the required SAP tables in their appropriate fields. Care should
be taken that the SAP tables are for the right table fields. Any mistakes on this would
produce erroneous results that are difficult to troubleshoot.
4. Check all the required analysis to be run on the SAP tables – SoD Analysis, Critical
Authorizations and Single Roles & Composite Roles Compliance. At least one analysis
need to be selected for the analyses run to execute.

P a g e | 37
DeskGRC User Guide v1.1
5. Check whether to ignore unassigned roles in the reports by ticking the checkboxes
“Remove unused roles (unassigned to users) in SoD reports” and/or “Remove unused
roles (unassigned to users) in critical function reports”. Advantage of checking this
option is that depending on your environment, the reports could potentially eliminate a
lot of unnecessary items in the reports related to roles that are never assigned to any
users in the system (e.g. unused SAP default roles that are potentially being picked up by
the tool).
6. Enter the description (optional) of the current analyses run e.g. “Analyses run for Client
900”.
7. Click the “Import SAP Tables and Generate Reports” button to start executing the
analyses run. The process may take a while as there will be a lot of data crunching
activities going on in the background to process the imported tables. Upon completion,
the following sample summary screen would be displayed:
Figure 23 - Process Summary screen
8. Click the button “View Generated Reports” or “View Dashboard” to go into detailed
reports or to the dashboard screen respectively.

P a g e | 38
DeskGRC User Guide v1.1
SAP Connect Method
To reduce the hassle of manually exporting SAP tables and importing them one by one into
DeskGRC, we could also use the more convenient method of directly connecting to the SAP
server and let DeskGRC do all the necessary processes of importing the right tables and run all
the required analyses against the tables automatically. This method is termed as ‘SAP Connect’
method.
SAP Connect via SAP .NET Connector
This feature allows DeskGRC to communicate with the SAP server using the RFC communication
protocol provided by the SAP .NET Connector libraries. To enable this feature, firstly we have to
ensure that the SAP .NET Connector libraries for .NET 4.0 x86 (32 bit version) are installed on the
machine and enabled as “Global Assembly Cache (GAC)” (i.e. the library is enabled to be used by
all applications on the user machine). These libraries are available to be downloaded by
registered SAP customers from the SAP Marketplace. Please contact your SAP System
Administrator for details on how to obtain and install the libraries from the SAP Marketplace.
Please note that only the x86 version (32 bit version) needs to be installed on the computer
where you run DeskGRC.
Second pre-requisite for this feature to work is that the user account that we will use to pull the
Sap data needs to have certain authorizations granted to it. The required authorizations are
summarized in the Figure 24 below:
Figure 24 - Required Authorizations for SAP Connect
P a g e | 39
DeskGRC User Guide v1.1
SAP Connect via RFC over HTTP/SOAP
Another way of importing SAP tables directly from the server is via the HTTP/SOAP connectivity
to the SAP NetWeaver services. To utilize this feature, firstly the SAP server we’re connecting
must be a NetWeaver platform and that the RFC web service has been enabled and reachable.
Please contact your SAP System Administrator in order to find out whether the SAP system in
your organization enables this feature.
Usually the URL (Uniform Resource Locator) to the RFC web service on a NetWeaver will look as
follows: http://[hostname]:[SICF port]/sap/bc/soap/rfc?sap-client=[client]. This URL must be a
valid and working URL since without it, the SAP Connect feature via HTTP/SOAP will not be
possible.
The authorizations needed for the user account connected to the service is similar to the ones
explained in Figure 24 above.
Process Analyses Run via SAP Connect
The following is the screen for running analyses via SAP Connect:

P a g e | 40
DeskGRC User Guide v1.1
Figure 25 - SAP Connect Screen
Follow these steps to import and run SAP data analyses via the SAP Connect feature:
1. Navigate to the “SAP Connect” screen. To utilize the direct RFC connectivity using the
SAP .NET Connector for .NET 4.0 x86 libraries, make sure that the libraries had been
installed on the machine as “Global Assembly Cache (GAC)” libraries, or otherwise an
error will be displayed on top of the screen explaining the requirements for the SAP .NET
Connector for .NET 4.0 x86 libraries.
2. Select either “Direct SAP Connection” or “SOAP Connection” to specify the connectivity
type.

P a g e | 41
DeskGRC User Guide v1.1
Connectivity via Direct RFC
3. Select the SAP logon method from the combo box selector, either via the “Direct to App
Host” or “via Message Server” (SAP load balancer) method.
4. If you’ve selected the “Direct to App Host” method, then proceed to fill up the SAP
server name (or IP address), the system number, router string (if required), client number,
user name and password.
5. If you’ve opted for “via Message Server”, then proceed to fill up the Message Server
name (or IP address), system ID, SAP Logon Group, router string (if required), client
number, user name and password.
Connectivity via HTTP/SOAP
6. Enter the RFC URL (i.e. the web service exposed by your SAP NetWeaver server for the
remote RFC connection).
7. Enter the WSDL URL (i.e. the web service exposed by your SAP NetWeaver server for the
web service definition language specification of the RFC service).
8. Proceed to fill up the client number, user name and password.
Running the Analyses
9. Check all the required analysis to be run on the SAP tables – SoD Analysis, Critical
Authorizations and Single Roles & Composite Roles Compliance. At least one analysis
need to be selected for the analyses run to execute.
10. Select the checkbox that says “Import TSTCT table (for TCODE description in reports)” if
TCODE description is required in reports.
11. Check whether to ignore unassigned roles in the reports by ticking the checkboxes
“Remove unused roles (unassigned to users) in SoD reports” and/or “Remove unused
roles (unassigned to users) in critical function reports”. Advantage of checking this
option is that depending on your environment, the reports could potentially eliminate a
lot of unnecessary items in the reports related to roles that are never assigned to any
users in the system (e.g. unused SAP default roles that are potentially being picked up by
the tool).
12. Enter the description (optional) of the current analyses run e.g. “Analyses run for Client
900”.
13. Click the “Import SAP Tables and Generate Reports” button to start executing the
analyses run. The process may take a while as there will be a lot of data crunching
activities going on in the background to process the imported tables. Upon completion,
the following sample summary screen would be displayed:

P a g e | 42
DeskGRC User Guide v1.1
Figure 26 - Process Summary screen
14. Click the button “View Generated Reports” or “View Dashboard” to go into detailed
reports or to the dashboard screen respectively.
Reports
DeskGRC provides two types of reports for all the analyses performed – the Dashboard and the
Detailed Reports. The dashboard aims to provide a quick glance and high level overview on the
analyses results while the detailed reports provide granular items of all exceptions encountered
during the analyses on the imported SAP data.
Dashboard
Dashboard items can be displayed by navigating to the Dashboard screen via the main tile
buttons on the Home screen or via the tile menu bar. The following summarizes the dashboard
items and their usage:

P a g e | 43
DeskGRC User Guide v1.1
SoD Conflicts by Risk Rating
The chart gives a glance of the number of SoD exceptions found from the analyses run on the
imported SAP tables grouped by the risk severity rating (Critical, High, Medium and Low), which
had been rated by the user when the SoD conflict rulesets were defined. The “doughnut” charts
are divided into three categories – Composite Roles, Single Roles and Users.
Note that the ‘items’ in this chart (and for other similar charts below) correspond to the number
of composite roles, the number of single roles and the number of user names respectively
according to the doughnut chart name.
To get the actual number of items on each category, we can move the mouse over the
doughnut chart area and a ‘tooltip’ indicating the number of items will be displayed.
Figure 27 - Example of SoD Conflicts by Risk Rating Chart
Top SoD for Role Types
This bar chart is intended to give the user quick information on what are the top five SoD
conflict types per each role type (for composite role, single role or at the user level). To get the
actual number of items for each category, we can move the mouse over the chart area and a
tooltip containing the number of items will be displayed.
Note that the ‘items’ in this chart correspond to the number of composite roles, the number of
single roles and the number of user names respectively according to the bar chart legend
category.

P a g e | 44
DeskGRC User Guide v1.1
Figure 28 - Example of Top SoD for Role Types chart
Critical Functions by Risk Rating
Similar to the one for SoD, this chart represents the number of critical functions assignments
found from the analyses run on the imported SAP tables grouped by the risk severity rating
(Critical, High, Medium and Low), which had been rated by the user when the Critical Functions
were defined. Note that for Critical Functions, there is an additional “User Profiles” category that
represents the number of critical profiles that had been assigned to users.
Figure 29 - Example of Critical Functions by Risk Rating chart
Top Critical Functions for Role Types
Similar to the one for SoD chart, this chart represents top five critical function types per each
role type (for composite role, single role or at the user level).

P a g e | 45
DeskGRC User Guide v1.1
Figure 30 - Example of Top Critical Functions for Role Types chart
Role Compliance by Spec Name
This chart represents the number of role compliance line items found by the analyses run
(grouped by role specification name). The role compliance status is reported for three status
categories: Excess, Missing and Comply. The ‘Excess’ status means total line items that are found
to be in excess of the defined role specification rulesets – for example, excess composite role
specification indicate the total excessive child roles under all of the composite role specifications
that had been defined in the role design specification. The ‘Missing’ status means total line
items corresponding to the missing line items of the defined role specification – for example,
missing composite role users indicate the total number of users that had been defined in the
role compliance rules but had not been configured or assigned to any composite roles in SAP.
Lastly, the ‘Comply’ simply means any line items that match the role specification rules defined.
Figure 31 - Example of Role Compliance by Spec Name chart

P a g e | 46
DeskGRC User Guide v1.1
Role Compliance Status Counts
This chart is similar to the Role Compliance by Spec Name, except that it ignores the groupings
according to specification name and lump all counts of line items according to the respective
role specification categories.
Figure 32 - Example of Role Compliance Status Counts chart
Detailed Reports
The details reports can be displayed by navigating to the individual reports links using the tile
menu button on the Home screen or via the tile menu bar. There are three main report
categories - SoD Reports, Critical Functions Reports and Role Compliance Reports. The following
summarizes the detailed report items and their usage:
SoD Reports
The following diagram illustrates the layout of the SoD Reports:

P a g e | 47
DeskGRC User Guide v1.1
Figure 33 - SoD Reports layout
SoD reports by default display the SoD exception line items grouped by the conflict name and
the role type. The grouping can be changed if required by dragging the column header in and
out of the group header in the grid view.
Critical Functions Reports
The following diagram illustrates the layout of the Critical Functions Reports:

P a g e | 48
DeskGRC User Guide v1.1
Figure 34 - Critical Functions Reports layout
Similar to the Sod Reports, Critical Functions reports by default display the Critical Function line
items grouped by the critical function name and the role type. The grouping can be changed if
required by dragging the column header in and out of the group header in the grid view.

P a g e | 49
DeskGRC User Guide v1.1
Role Compliance Reports
The Role Compliance Reports consist of multiple reports for each category of role specification
(composite role, single role and user). For each role type, there are three types of reports –
Excess, Missing and Matching reports.
Excess reports consist of line items that are in excess of what had been defined in the role
specification rules. For example, for Excess Single Role Users, the line items displayed in that
particular report would be the users that are not defined in the rule specification but were found
in the SAP configuration during the SAP analyses run.
Note that for the ‘Excess Single Role Object Values’, the line items displayed reported should be
interpreted as all excessive object values found in the SAP imported data that had not been
defined for all of the objects specified in the single role specification rules. The way DeskGRC
produces this report is that it looks for all unique objects to be checked and produce all
excessive values for those objects that had not been defined in the rulesets.
The following diagram illustrates the layout of the Role Compliance Reports:
Figure 35 - Role Compliance Reports layout

P a g e | 50
DeskGRC User Guide v1.1
Printing and Exporting Reports
All reports are printable and exportable to various formats. To display the Report Preview
window, click the button located on top left of every report grid view. The
following is an example of a preview window of a report:
Figure 36 - Example of a Report Preview window
The report can be printed by clicking the printer icon, or if required can be exported into various
formats such as PDF, HTML, XLS etc. To do this, navigate to File Export Document and choose
the desired file format as depicted in the screenshot below:

P a g e | 51
DeskGRC User Guide v1.1
Figure 37 - Exporting report to external file
Advanced Settings
The advanced settings/configurations screen can be displayed by navigating to the Settings
screen from the Home screen, via the tile menu bar or via the settings button on the top right of
the DeskGRC application window. The following summarizes the configuration items available
on the Settings screen:

P a g e | 52
DeskGRC User Guide v1.1
Figure 38 - Settings screen layout
Rules Backup and Restore
The rules that had been defined (SoD, Critical Functions, Role Compliance rules) could be
backed up and restored by using this feature. To initiate a backup, select the required rules to be
backed up and click the “Backup Selected Rules” button, and then choose the file and location
where you want the backup file to be written.
To restore rules from a backup file, select which rules that we want to restore by marking the
check boxes and click the “Restore Selected Rules” button. Select the backup file and once
completed, verify that all the intended rules have been restored into the grid views.
Reset Template Items
Sometimes the template rules provided by DeskGRC would be modified by users to suit their
SAP environment being tested. If we require the template rules to be set to the initial default

P a g e | 53
DeskGRC User Guide v1.1
values, then this feature can be used. Select the template rules (SoD and/or Critical Functions)
and click the “Reset Selected Templates to Default Values” button to start the resetting process.
App Registration
As explained earlier in this manual guide, the application registration could also be done in the
Settings screen by providing all the required details here.
Advanced Database Settings
As detailed in the Database Location section, the location of the database can be customized by
letting DeskGRC to point to an external database (e.g. an Enterprise Microsoft SQL database
instance). To do this, please follow the steps as described in the Database Location section.
There are also options to repair and recreate local database files through this configuration
section.
Make new template rules available after a version upgrade
Whenever DeskGRC detects that a new version is available during its startup process, it will try
to automatically update itself automatically and there could be times when new template rules
are also pushed to the internal tables. To make these new template rules available, we can
follow these steps:
1. Backup all the defined rules (just in case that something goes wrong then our precious
time spent on data entry would not be wasted)
2. Initiate the Reset Template process to pull new template rules into the grid views. Please
note that all the customizations that user had done to the original template rules
will be gone after this step. Therefore, we strongly discourage that the template
rules are changed or customized by the user, rather, please define your own
customization in separate rule items using the templates as a guide.
Error Logs
The main error log file of the application is viewable by clicking the “View Error Log” button on
this screen. If DeskGRC encounters any errors while you perform any of the operations, this is
the best place to start to have a look whether the application registers any errors in the log and
if so, please communicate the error file content to us so that we can investigate the root cause
and repair the underlying bugs.