www.planet.com.tw ipx-300 series pbx with vip-191 install procedure copyright © planet technology...
TRANSCRIPT

www.planet.com.tw
IPX-300 SeriesPBX with VIP-191 Install Procedure
Copyright © PLANET Technology Corporation. All rights reserved.
Internet Telephony PBX System
2 / 20
www.planet.com.tw
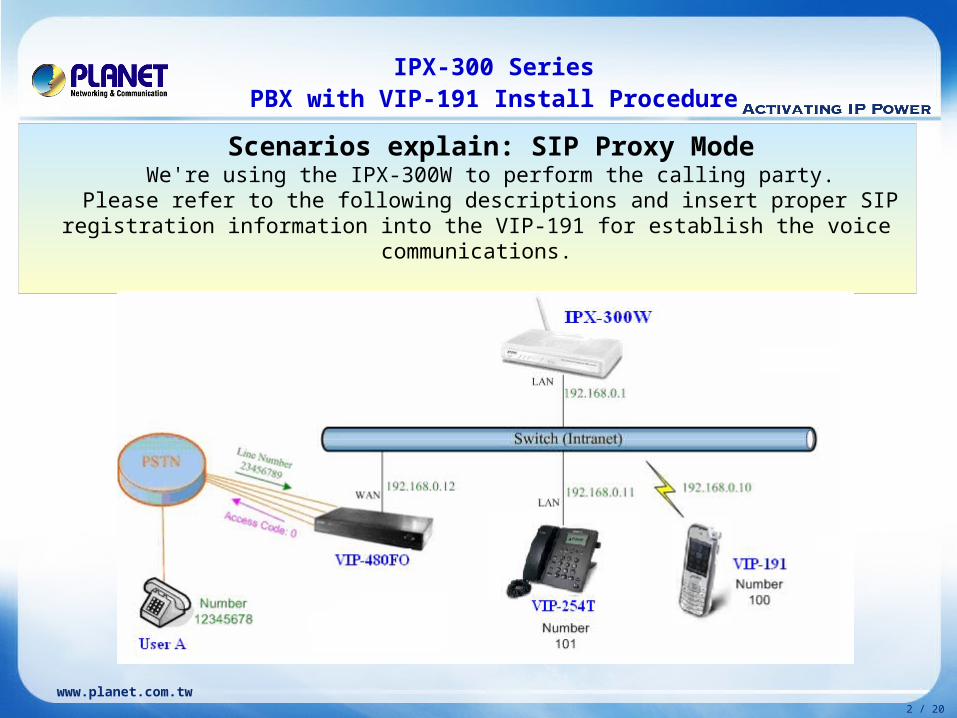
Scenarios explain: SIP Proxy ModeWe're using the IPX-300W to perform the calling party.
Please refer to the following descriptions and insert proper SIP registration information into the VIP-191 for establish the voice communications.
IPX-300 SeriesPBX with VIP-191 Install Procedure

3 / 20
www.planet.com.tw
Please log in IP PBX via web browser and browse to IP PBX Setup User Extensions Setup configuration menu to add four accounts for VIP-480FO using.

4 / 20
www.planet.com.tw
Browse to IP PBX Setup Attendant Extension configuration menu. Assign an attendant number which inexistence extension in Extension List and the sample configuration screen is shown below:

5 / 20
www.planet.com.tw
Please log in IP PBX via web browser and browse to IP PBX Setup User Extensions Setup configuration menu to add four accounts for VIP-480FO using.

6 / 20
www.planet.com.tw
Browse to IP PBX Setup Trunk Management Trunk Group configuration menu. Add a Trunk Group for making off-Net calls via VIP-480FO.
7 / 20
www.planet.com.tw
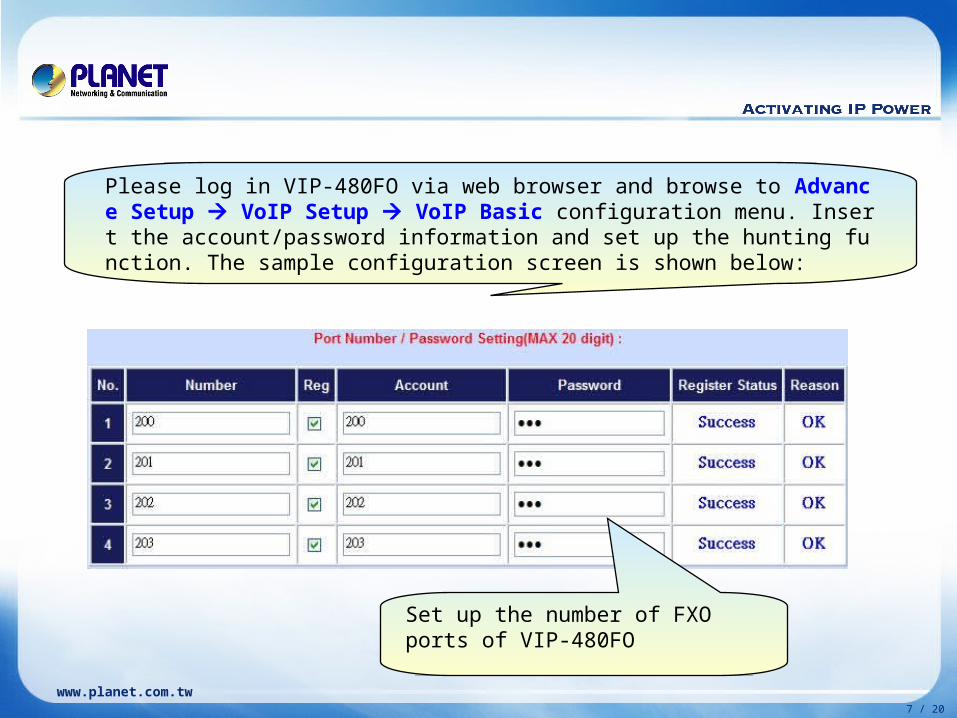
Please log in VIP-480FO via web browser and browse to Advance Setup VoIP Setup VoIP Basic configuration menu. Insert the account/password information and set up the hunting function. The sample configuration screen is shown below:
Set up the number of FXO ports of VIP-480FO

8 / 20
www.planet.com.tw
Set up the Hunting Member of FXO ports
Set up the Proxy Server IP address for register to IPX-300W

9 / 20
www.planet.com.tw
Browse to “Dialing Plan” configuration menu. Add an Incoming Dial Plan (no.1x) for redirect the PSTN outgoing calls to FXO ports.

10 / 20
www.planet.com.tw
Browse to “Port Status” configuration menu. Fill in the auto attendant number 555 to all of ports. ( Where 555 is the auto-attendant number of IP PBX )

11 / 20
www.planet.com.tw
Please log in IPX-300W via web browser and browse to Network Setup WLAN Setting configuration menu. Set up the WLAN SSID, and Encryption Type. The sample configuration screen is shown below:

12 / 20
www.planet.com.tw
Encryption:• WEP:64-bit• Select ASCII and Key1: 12345

13 / 20
www.planet.com.tw
From the VIP-191’s Main Screen, press the Left Button ( Menu ) and select 1. AP Connection.
Once an AP is highlighted, press the Right ( Select ) key and the following screen of the AP settings will appear:
Note: 1) Please be reminded: if the VIP-191 is located behind Firewall device, please be sure to check if the Firewall device supports SIP application, please perform the necessary configurations on the device to enable the SIP traffic.2) A SIP server is usually located at another network. In other words, if there is a router between the phone and the SIP server, you need to enable the uPnP feature in the router.
14 / 20
www.planet.com.tw
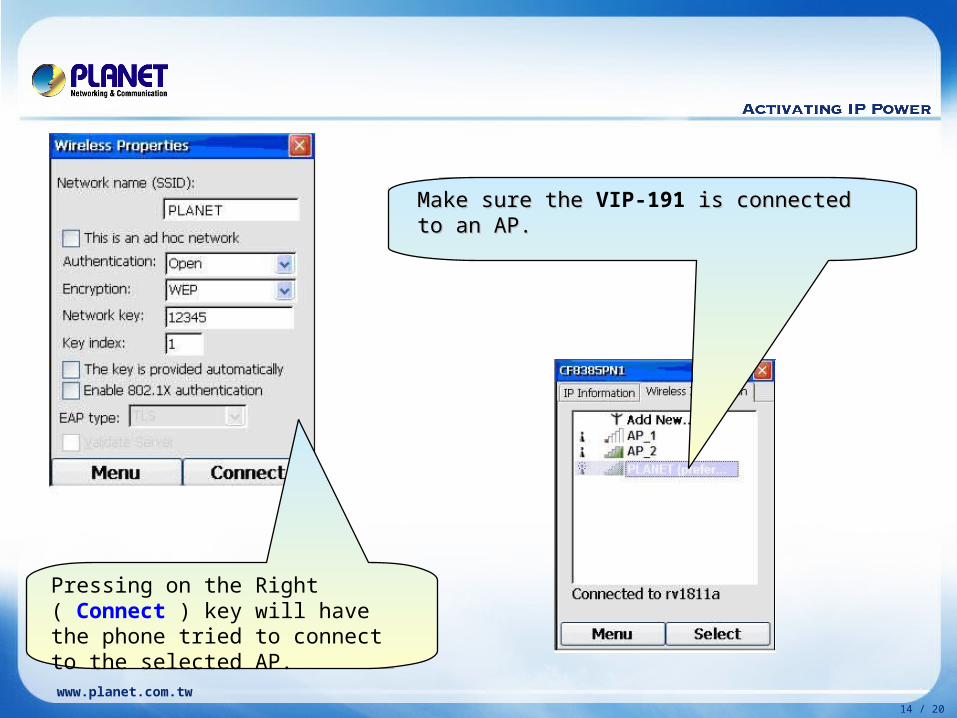
Make sure the Make sure the VIP-191 is connected to an is connected to an AP.AP.
Pressing on the Right ( Connect ) key will have the phone tried to connect to the selected AP.

15 / 20
www.planet.com.tw
From the Main Screen, From the Main Screen, press the Left press the Left ( ( Menu ) Key and ) Key and selectselect 3. Profile Setting..
Smart WiFi Phone Quick Configuration Smart WiFi Phone Quick Configuration
Select “Select “Standard”, ”, press press OK
Select Select Edit Profile from the submenu.from the submenu.

16 / 20
www.planet.com.tw
After select After select SIP Account,, presspress OK and fill in the and fill in the corresponding information. Usually the fields that corresponding information. Usually the fields that need to be filled are:need to be filled are:My Phone Number: My Phone Number: 100SIP ServerSIP Server : : 192.168.0.1(i.e. domain name or IP address of SIP server)(i.e. domain name or IP address of SIP server)Account Name : 100Account PasswordAccount Password : 12345At any point during filling out this information, At any point during filling out this information, pressing the Right Key ( pressing the Right Key ( Next ) will display the next ) will display the next page screen.page screen.
Smart WiFi Phone Quick Configuration Smart WiFi Phone Quick Configuration
Note:1) The SIP standard requires you to include the “@” sign and the SIP server
domain in the My Phone Number field.2) In the “SIP Transport: (UDP)” & “Mode: (Manual)” filed is not able to change
the default settings for connect to a SIP server.
When filling in the Account Password the character When filling in the Account Password the character will display on the top left comer of screen.will display on the top left comer of screen.

17 / 20
www.planet.com.tw
Press the Left ( Press the Left ( OK ) key to ) key to save the information.save the information.
Smart WiFi Phone Quick Configuration Smart WiFi Phone Quick Configuration
Selecting Selecting Activate and and pressing the ( pressing the ( Left Key ) ) will attempt to connect to will attempt to connect to the specified SIP server.the specified SIP server.
If connection is successful, the number If connection is successful, the number returned from the SIP server will be returned from the SIP server will be displayed on the Main Screen displayed on the Main Screen (replacing the words “Windows CE”)(replacing the words “Windows CE”)

18 / 20
www.planet.com.tw
After all of devices have registered to IP PBX successfully, the Extension Status page will show the registration status:

19 / 20
www.planet.com.tw
Test the Scenario: VIP-191 pick up the telephone Dial the number: 0 will hear the dial tone, and dial the number:
12345678. This call will hunt the FXO port of VIP-480FO and shall be able connect to the User A.
Then the telephone of User A will ringing, User A can pick up the handset and talk with VIP-191.
Both VIP-191 and User A hang up the calls. User A pick up the telephone and dial the number: 23456789 should be
able to connect to the Auto Attendant System of IP PBX. The User A will hear the prompts, and dial the extension number: 100
shall be able connect to the VIP-254T. Then the VIP-254T should ringing and it to pick up the call then talk with
User A.

www.planet.com.tw