xr2 xr2 ss - pure pleasure boat racing! · pdf filexr2 xr2 ss for your purchase of one of the...
TRANSCRIPT

XR
2 X
R2
SS
����
�����
��
����
��
��
����
����
�����
���
for your purchase of one of the finest outboards available.You have made a sound investment in boating pleasure.Your outboard has been manufactured by Mercury Ma-rine, a world leader in marine technology and outboardmanufacturing since 1939. These years of experiencehave been committed to the goal of producing the finestquality products. This led to Mercury Marine’s reputationfor strict quality control, excellence, durability, lasting per-formance and being the best at providing after-the-salesupport.
Please read this manual carefully before operating youroutboard. This manual has been prepared to assist you inthe operation, safe use and care of your outboard.
All of us at Mercury Marine took pride in building your out-board and wish you many years of happy and safe boat-ing.
Again, thank you for your confidence in Mercury Marine.
Mercury Hi-Performance,N7480 County Road “UU”Fond du Lac, WI 54935-9585

0

1
TABLE OF CONTENTSGeneral Information
Boater’s Responsibilities 4. . . . . . . . . . . . . . . . . . . . . . . . . . . . . . . . Before Operating Your Outboard 4. . . . . . . . . . . . . . . . . . . . . . . . . Boat Horsepower Capacity 5. . . . . . . . . . . . . . . . . . . . . . . . . . . . . . High-Speed And High-Performance Boat Operation 5. . . . . . . . . Outboard Remote Control 6. . . . . . . . . . . . . . . . . . . . . . . . . . . . . . . Remote Steering Notice 6. . . . . . . . . . . . . . . . . . . . . . . . . . . . . . . . . Lanyard Stop Switch 7. . . . . . . . . . . . . . . . . . . . . . . . . . . . . . . . . . . . Protecting People In The Water 10. . . . . . . . . . . . . . . . . . . . . . . . . Exhaust Emissions 11. . . . . . . . . . . . . . . . . . . . . . . . . . . . . . . . . . . . Selecting Accessories For Your Outboard 13. . . . . . . . . . . . . . . . Safe Boating Suggestions 13. . . . . . . . . . . . . . . . . . . . . . . . . . . . . . Recording Serial Number 15. . . . . . . . . . . . . . . . . . . . . . . . . . . . . . . Torque Requirements 16. . . . . . . . . . . . . . . . . . . . . . . . . . . . . . . . . . Specifications 17. . . . . . . . . . . . . . . . . . . . . . . . . . . . . . . . . . . . . . . . . Component Identification 18. . . . . . . . . . . . . . . . . . . . . . . . . . . . . . .
Installation
Installing Outboard 19. . . . . . . . . . . . . . . . . . . . . . . . . . . . . . . . . . . . Propeller Selection 20. . . . . . . . . . . . . . . . . . . . . . . . . . . . . . . . . . . .
Transporting
Trailering Boat/Outboard 21. . . . . . . . . . . . . . . . . . . . . . . . . . . . . . .
Fuel & Oil
Gasoline Recommendations 22. . . . . . . . . . . . . . . . . . . . . . . . . . . . Oil Recommendation 23. . . . . . . . . . . . . . . . . . . . . . . . . . . . . . . . . . Gasoline/Oil Mixture 23. . . . . . . . . . . . . . . . . . . . . . . . . . . . . . . . . . . Filling Fuel Tank 23. . . . . . . . . . . . . . . . . . . . . . . . . . . . . . . . . . . . . . .
Features & Controls
Remote Control Features 24. . . . . . . . . . . . . . . . . . . . . . . . . . . . . . . Warning System 25. . . . . . . . . . . . . . . . . . . . . . . . . . . . . . . . . . . . . . Power Trim And Tilt 27. . . . . . . . . . . . . . . . . . . . . . . . . . . . . . . . . . . .
(continued on next page)

2
TABLE OF CONTENTSOperation
Pre-Starting Check List 31. . . . . . . . . . . . . . . . . . . . . . . . . . . . . . . . Special Operating Instructions 31. . . . . . . . . . . . . . . . . . . . . . . . . . Engine Break-in Procedure 34. . . . . . . . . . . . . . . . . . . . . . . . . . . . . Starting The Engine 35. . . . . . . . . . . . . . . . . . . . . . . . . . . . . . . . . . . Gear Shifting 37. . . . . . . . . . . . . . . . . . . . . . . . . . . . . . . . . . . . . . . . . Stopping The Engine 37. . . . . . . . . . . . . . . . . . . . . . . . . . . . . . . . . .
Maintenance
Outboard Care 38. . . . . . . . . . . . . . . . . . . . . . . . . . . . . . . . . . . . . . . . Selecting Replacement Parts For Your Outboard 38. . . . . . . . . . EPA Emissions Regulations 38. . . . . . . . . . . . . . . . . . . . . . . . . . . . Inspection And Maintenance Schedule 39. . . . . . . . . . . . . . . . . . . Flushing The Cooling System 41. . . . . . . . . . . . . . . . . . . . . . . . . . . Top Cowl Removal And Installation 42. . . . . . . . . . . . . . . . . . . . . . Fuel System 43. . . . . . . . . . . . . . . . . . . . . . . . . . . . . . . . . . . . . . . . . . Steering Link Rod Fasteners 45. . . . . . . . . . . . . . . . . . . . . . . . . . . . Corrosion Control Anode 46. . . . . . . . . . . . . . . . . . . . . . . . . . . . . . . Propeller Replacement 47. . . . . . . . . . . . . . . . . . . . . . . . . . . . . . . . . Spark Plug Inspection 49. . . . . . . . . . . . . . . . . . . . . . . . . . . . . . . . . . Battery Inspection 49. . . . . . . . . . . . . . . . . . . . . . . . . . . . . . . . . . . . . Lubrication Points 50. . . . . . . . . . . . . . . . . . . . . . . . . . . . . . . . . . . . . Checking Power Trim Fluid 52. . . . . . . . . . . . . . . . . . . . . . . . . . . . . Gear Case Lubrication 53. . . . . . . . . . . . . . . . . . . . . . . . . . . . . . . . . Submerged Outboard 54. . . . . . . . . . . . . . . . . . . . . . . . . . . . . . . . . .
Storage
Storage Preparation 55. . . . . . . . . . . . . . . . . . . . . . . . . . . . . . . . . . . Fuel System 55. . . . . . . . . . . . . . . . . . . . . . . . . . . . . . . . . . . . . . . . . . Protecting Internal Engine Components 56. . . . . . . . . . . . . . . . . . Protecting External Engine Components 56. . . . . . . . . . . . . . . . . Gear Case 57. . . . . . . . . . . . . . . . . . . . . . . . . . . . . . . . . . . . . . . . . . . Battery Storage 57. . . . . . . . . . . . . . . . . . . . . . . . . . . . . . . . . . . . . . .
(continued on next page)

3
TABLE OF CONTENTSTroubleshooting 58. . . . . . . . . . . . . . . . . . . . . . . . . . . . . . . . . . . . . . .
Engine Wiring Diagram 60. . . . . . . . . . . . . . . . . . . . . . . . . . . . . . . . .
Maintenance Log 61. . . . . . . . . . . . . . . . . . . . . . . . . . . . . . . . . . . . . . .
The description and specifications contained herein were in effect atthe time this manual was approved for printing. Mercury Marine,whose policy is one of continued improvement, reserves the right todiscontinue models at any time, to change specifications, designs,methods, or procedures without notice or incurring obligation.
Mercury Marine, Fond du Lac, Wisconsin U.S.A. Litho in U.S.A. 1998 Mercury MarineFollowing are registered trademarks of Brunswick Corporation: AutoBlend,Force, Jet-Prop, Mariner, Merc, MerCathode, MerCruiser, Mercury,Mercury Marine, Mercury Hi-Performance, Quicksilver, RideGuide andThruster

4
GENERAL INFORMATIONoba1
Boater’s ResponsibilitiesThe operator (driver) is responsible for the correct and safe operationof the boat and safety of its occupants and general public. It is strong-ly recommended that each operator (driver) read and understandthis entire manual before operating the outboard.
Be sure at least one additional person on board is instructed in thebasics of starting and operating the outboard and boat handling incase the driver is unable to operate the boat.obb1
Before Operating Your OutboardRead this manual carefully. Learn how to operate your outboardproperly. If you have any questions, contact your dealer.
Safety and operating information that is practiced along with usinggood common sense can help prevent personal injury and productdamage.
This manual as well as safety labels posted on the outboard use thefollowing safety alerts to draw your attention to special safety instruc-tions that should be followed.
DANGER!DANGER – Immediate hazards which WILL result in severepersonal injury or death.
WARNING!WARNING – Hazards or unsafe practices which COULD resultin severe personal injury or death.
CAUTION!CAUTION – Hazards or unsafe practices which could result inminor injury or product or property damage.

5
GENERAL INFORMATION
1 2
U.S. COAST GUARD CAPACITY
MAXIMUM HORSEPOWER XXX
MAXIMUM PERSON
CAPACITY (POUNDS) XXX
MAXIMUM WEIGHT
CAPACITY XXX
obc1
Boat Horsepower Capacity
1 Do not overpower or overload your boat. Most boats will carry arequired capacity plate indicating the maximum acceptable pow-er and load as determined by the manufacturer following certainfederal guidelines. If in doubt, contact your dealer or the boatmanufacturer.
WARNING!Using an outboard that exceeds the maximum horsepowerlimit of a boat can: 1. cause loss of boat control 2. place toomuch weight at the transom altering the designed flotationcharacteristics of the boat or 3. cause the boat to break apartparticularly around the transom area. Overpowering a boatcan result in serious injury, death, or boat damage.
hbd1
High-Speed And High-Performance BoatOperation
2 If your outboard is to be used on a high-speed or high-perfor-mance boat with which you are unfamiliar, we recommend thatyou never operate it at its high speed capability without first re-questing an initial orientation and familiarization demonstrationride with your dealer or an operator experienced with your boat/outboard combination. For additional information, read the“Guide to Hi-Performance Boat Operation” booklet included inyour literature package.

6
GENERAL INFORMATION
21 aa
obe1
Outboard Remote Control1 The remote control connected to your outboard must be
equipped with a start-in-gear protection device. This prevents theengine from starting when the outboard is in gear.
WARNING!Avoid serious injury or death from a sudden unexpected ac-celeration when starting your engine. The design of this out-board requires that the remote control used with it must havea built in start-in-gear protection device.
obf1
Remote Steering Notice2 The steering link rod that connects the steering cable to the en-
gine must be fastened utilizing self-locking nuts (a). These self-locking nuts must never be replaced with common nuts (nonlocking) as they will work loose and vibrate off, freeing the link rodto disengage.
WARNING!Disengagement of a steering link rod can result in the boat tak-ing a full, sudden, sharp turn. This potentially violent actioncan cause occupants to be thrown overboard exposing themto serious injury or death.
7
GENERAL INFORMATION
2 1
hbg1
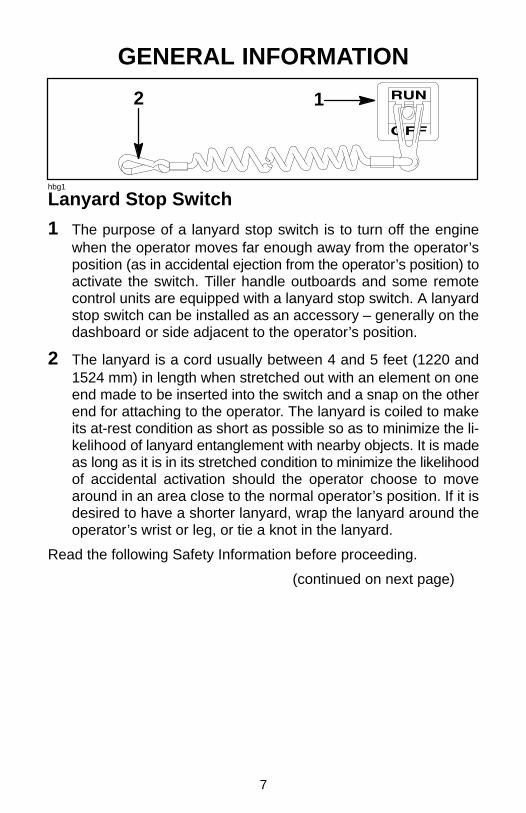
Lanyard Stop Switch
1 The purpose of a lanyard stop switch is to turn off the enginewhen the operator moves far enough away from the operator’sposition (as in accidental ejection from the operator’s position) toactivate the switch. Tiller handle outboards and some remotecontrol units are equipped with a lanyard stop switch. A lanyardstop switch can be installed as an accessory – generally on thedashboard or side adjacent to the operator’s position.
2 The lanyard is a cord usually between 4 and 5 feet (1220 and1524 mm) in length when stretched out with an element on oneend made to be inserted into the switch and a snap on the otherend for attaching to the operator. The lanyard is coiled to makeits at-rest condition as short as possible so as to minimize the li-kelihood of lanyard entanglement with nearby objects. It is madeas long as it is in its stretched condition to minimize the likelihoodof accidental activation should the operator choose to movearound in an area close to the normal operator’s position. If it isdesired to have a shorter lanyard, wrap the lanyard around theoperator’s wrist or leg, or tie a knot in the lanyard.
Read the following Safety Information before proceeding.
(continued on next page)

8
GENERAL INFORMATIONLanyard Stop Switch (Continued)Read the following Safety Information before proceeding.
Important Safety Information: The purpose of a lanyard stopswitch is to stop the engine when the operator moves far enoughaway from the operator’s position to activate the switch. This wouldoccur if the operator accidentally falls overboard or moves within theboat a sufficient distance from the operator’s position. Accidentalejections and falls overboard are more likely to occur in certain typesof boats such as low sided inflatables or bass boats, high-perfor-mance boats and light, sensitive-handling fishing boats operated byhand-tiller. Accidental ejections and falls overboard are also likely tooccur as a result of poor operating practices such as sitting on theback of the seat or gunwale at planing speeds, standing at planingspeeds, sitting on elevated fishing boat decks, operating at planingspeeds in shallow or obstacle-infested waters, releasing your grip ona steering wheel or tiller handle that is pulling in one direction, drink-ing alcohol or consuming drugs, or daring, high-speed boat maneu-vers.
While activation of the lanyard stop switch will stop the engine im-mediately, a boat will continue to coast for some distance dependingupon the velocity and degree of any turn at shut-down. However, theboat will not complete a full circle. While the boat is coasting, it cancause injury to anyone in the boat’s path as seriously as the boatwould when under power.
We strongly recommend that other occupants be instructed on prop-er starting and operating procedures should they be required to oper-ate the engine in an emergency (e.g. if the operator is accidentallyejected).
! WARNING
Should the operator fall out of the boat, the possibility ofserious injury or death from being run over by the boatcan be greatly reduced by stopping the engine immediate-ly. Always properly connect both ends of the stop switchlanyard – to the stop switch and the operator.
(continued on next page)

9
GENERAL INFORMATIONLanyard Stop Switch (Continued)Accidental or unintended activation of the switch during normal op-eration is also a possibility. This could cause any, or all, of the follow-ing potentially hazardous situations:
1. Occupants could be thrown forward due to unexpected loss offorward motion – a particular concern for passengers in the frontof the boat who could be ejected over the bow and possibly struckby the gear case or propeller.
2. Loss of power and directional control in heavy seas, strong cur-rent or high winds.
3. Loss of control when docking.
! WARNING
Avoid serious injury or death from deceleration forces re-sulting from in accidental or unintended stop switch ac-tivation. The boat operator should never leave the opera-tor’s station without first disconnecting the stop switchlanyard from the operator.

10
GENERAL INFORMATION
Protecting People In The WaterWHILE YOU ARE CRUISING
It is very difficult for a person standing or floating in the water to takequick action to avoid a boat heading in his/her direction even at slowspeed.
Always slow down and exercise extreme caution any time you areboating in an area where there might be people in the water.
Whenever a boat is moving (coasting) and the outboard gear shift isin neutral position, there is sufficient force by the water on the propel-ler to cause the propeller to rotate. This neutral propeller rotation cancause serious injury.
WHILE BOAT IS STATIONARY
Shift outboard into neutral and shut off the engine before allowingpeople to swim or be in the water near your boat.
WARNING!Stop your engine immediately whenever anyone in the wateris near your boat. Serious injury to the person in the water islikely if contacted by a rotating propeller, a moving boat, amoving gear case, or any solid device rigidly attached to amoving boat or gear case.

11
ob
GENERAL INFORMATION
Courtesy of ABYC1
ob
Exhaust EmissionsBE ALERT TO CARBON MONOXIDE POISONING
Carbon monoxide is present in the exhaust fumes of all internal com-bustion engines including the outboards, stern drives and inboardengines that propel boats, as well as the generators that power vari-ous boat accessories. Carbon monoxide is a deadly gas that is odor-less, colorless and tasteless.
Early symptoms of carbon monoxide poisoning which should not beconfused with seasickness or intoxication, include headache, dizzi-ness, drowsiness, and nausea.
WARNING!Avoid the combination of a running engine and poor ventila-tion. Prolonged exposure to carbon monoxide in sufficientconcentration can lead to unconsciousness, brain damage, ordeath.
GOOD VENTILATION
Ventilate passenger area, open side curtains, or forward hatches toremove fumes.
1 Example of desired air flow through the boat.

12
ob
GENERAL INFORMATION
a
c
b
d
Courtesy of ABYC2
Exhaust Emissions (Continued)POOR VENTILATION
Under certain running and/or wind conditions, permanently enclosedor canvas enclosed cabins or cockpits with insufficient ventilationmay draw in carbon monoxide. Install one or more carbon monoxidedetectors in your boat.
Although the occurrence is rare, on a very calm day, swimmers andpassengers in an unclosed area of a stationary boat that contains oris near a running engine may be exposed to a hazardous level of car-bon monoxide.
2 Examples of Poor Ventilation:
While boat is stationary
a. Running the engine when the boat is moored in a confinedspace.
b. Mooring close to another boat that has its engine running.
While boat is moving
c. Running the boat with the trim angle of the bow too high.
d. Running the boat with no forward hatches open (station wag-on effect).

13
GENERAL INFORMATIONSelecting Accessories For Your OutboardGenuine Mercury Marine Quicksilver Accessories have been specifi-cally designed and tested for your outboard.
Mercury Marine Quicksilver accessories are available from MercuryMarine dealers.
Some accessories not manufactured or sold by Mercury Marine arenot designed to be safely used with your outboard or outboard oper-ating system. Acquire and read the installation, operation, and main-tenance manuals for all your selected accessories.
WARNING!Check with your dealer before installation of accessories. Themisuse of acceptable accessories or the use of unacceptableaccessories can result in serious injury, death, or product fail-ure.
obk1
Safe Boating SuggestionsIn order to safely enjoy the waterways, familiarize yourself with localand other governmental boating regulations and restrictions, andconsider the following suggestions.
Use flotation devices. Have an approved personal flotation deviceof suitable size for each person aboard (it is the law) and have itreadily accessible.
Do not overload your boat. Most boats are rated and certified formaximum load (weight) capacities (refer to your boat capacity plate).If in doubt, contact your dealer or the boats manufacturer.
Perform safety checks and required maintenance. Follow a regu-lar schedule and ensure that all repairs are properly made.
(continued on next page)

14
ob
GENERAL INFORMATIONSafe Boating Suggestions (Continued)Know and obey all nautical rules and laws of the waterways.Boat operators should complete a boating safety course. Coursesare offered in the U.S.A. by (1) The U.S. Coast Guard Auxiliary, (2)The Power Squadron, (3) The Red Cross and (4) your state boatinglaw enforcement agency. Inquiries may be made to the Boating Hot-line, 1-800-368-5647 or the Boat U.S. Foundation information num-ber 1-800-336-BOAT.
Make sure everyone in the boat is properly seated. Don’t allowanyone to sit or ride on any part of the boat that was not intended forsuch use. This includes backs of seats, gunwales, transom, bow,decks, raised fishing seats, any rotating fishing seat; anywhere thatsudden unexpected acceleration, sudden stopping, unexpected lossof boat control or sudden boat movement could cause a person to bethrown overboard or into the boat.
Never be under the influence of alcohol or drugs while boating(it is the law). They impair your judgment and greatly reduce yourability to react quickly.
Prepare other boat operators. Instruct at least one person on boardin the basics of starting and operating the outboard and boat handlingin case the driver becomes disabled or falls overboard.
Passenger boarding. Stop the engine whenever passengers areboarding, unloading or are near the back (stern) of the boat. Justshifting the outboard into neutral is not sufficient.
Be alert. The operator of the boat is responsible by law to “maintaina proper lookout by sight (and hearing).” The operator must have anunobstructed view particularly to the front. No passengers, load, orfishing seats should block the operators view when operating theboat above idle speed.
Never drive your boat directly behind a water skier in case theskier falls. As an example, your boat traveling at 25 miles per hour(40 km/hr) in 5 seconds will overtake a fallen skier who was 200 feet(61m) in front of you.
(continued on next page)

15
ob
GENERAL INFORMATIONSafe Boating Suggestions (Continued)Watch fallen skiers. When using your boat for water skiing or similaractivities, always keep a fallen or down skier on the operator’s sideof the boat while returning to attend the skier. The operator shouldalways have the down skier in sight and never back up to the skieror anyone in the water.
Report accidents. Boat operators are required by law to file a Boat-ing Accident Report with their state boating law enforcement agencywhen their boat is involved in certain boating accidents. A boating ac-cident must be reported if (1) there is loss of life or probable loss oflife, (2) there is personal injury requiring medical treatment beyondfirst aid, (3) there is damage to boats or other property where thedamage value exceeds $500.00 or (4) there is complete loss of theboat. Seek further assistance from local law enforcement.obl2
Recording Serial NumberIt is important to record this number for future reference. The serialnumber is located on the outboard as shown.
a - Serial Numberb - Model Yearc - Model Designationd - Year Manufacturede - Certified Europe Insignia
19XX
XX
OGXXXXXX
XXXX
a
cb
de

16
GENERAL INFORMATIONTorque Requirements
ITEM TORQUEConnecting Rods 30 lb. ft. (41 N·m) 271 Loctite
Crankcase Cover to Block 3/8 in. -- 40 lb. ft. (54 N·m)Light Oil5/16 in. -- 200 lb. in. (23 N·m)Light Oil
Exhaust Divider Plate Cover 200 lb. in. (23 N·m)
Lower End Cap 100 lb. in. (11 N·m) 271 Loctite
Upper End Cap 200 lb. in. (23 N·m) 271 Loctite
Reed Block to Adaptor 100 lb. in. (11 N·m) 271 Loctite
Carburetor Adaptor to ReedHousing
100 lb. in. (11 N·m) 271 Loctite
Stator Screws 40 lb. in. (5 N·m) 271 Loctite
Ignition Coil Screws Tighten Securely
Cylinder Head Bolts 30 lb. ft. (41 N·m) + 90° or 1/4Turn, Light Oil
Flywheel Nut 150 lb. ft. (203 N·m)
Spark Plugs 20 lb. ft. (27 N·m)
Exhaust Megaphone 25 lb. ft. (34 N·m) 271 Loctite
Powerhead to Driveshaft Hous-ing
35 lb. ft. (47 N·m) 271 Loctite
Gearcase to Driveshaft Hous-ing
Tighten Securely

17
GENERAL INFORMATIONSpecifications
MODEL XR2
Horsepower 180 (134kw)
Propshaft Kilowatts1 194
Full Throttle RPM Range 6000-7000
Idle RPM in Forward Gear 650-750
Weight 350 lbs. (159 kg)
Piston Displacement 122 cu. in. (2.0L/1998cc)
Bore 3.125 in. (79.5 mm)
Stroke 2.65 in. (67 mm)
Recommended Spark Plug NGK-BUHW (P/N 33-97180)
Firing Order 1-2-3-4-5-6
Maximum Timing 25° BTDC
Idle Speed Pickup Timing 2° ATDC
Fuel Pressure 5 - 6 psi
Gear Ratio 1.87:1
Recommended Gasoline Refer to Fuel Section
Recommended Oil Refer to Fuel Section
Recommended Gear CaseOil
Quicksilver Hi-Performance GearLube (92-816026A4)
Gear Case Lubricant Ca-pacity
22.5 fl. oz. (666 ml)
Battery Rating Minimum reserve capacity rating of100 minutes and CCA of 350
Charging System Output 16 amps @ 7000 RPM
Transom Height Short Shaft = 15” (381mm)Long Shaft = 20” (508mm)
Water Pres. @ WOT 15 PSI (103.4 kPa)
1Measured at the propshaft in accordance with ICOMIA28
18
ob
GENERAL INFORMATION
1
2 3
4
5
6
7
8
9
10
12
7
11
13
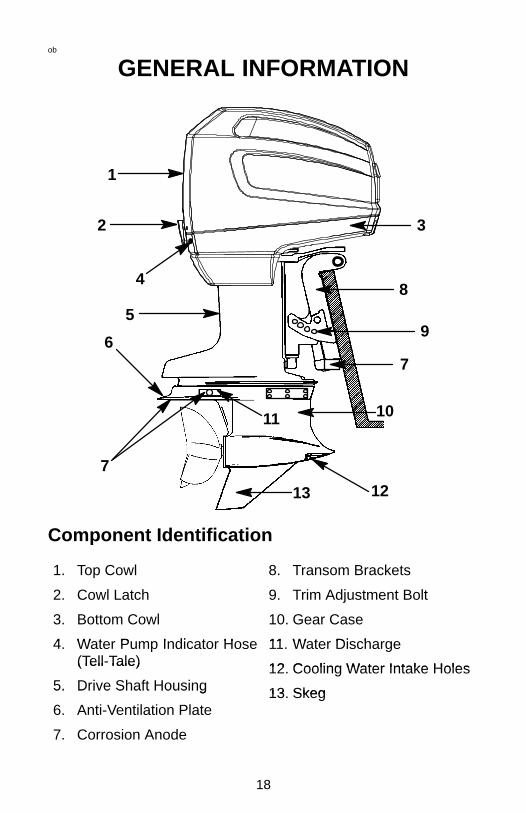
Component Identification
1. Top Cowl 8. Transom Brackets
2. Cowl Latch
B C l
9. Trim Adjustment Bolt
G C3. Bottom Cowl
4 W t P I di t H
10. Gear Case
11 W t Di h4. Water Pump Indicator Hose(Tell-Tale)
11. Water Discharge
12 Cooling Water Intake Holes(Tell Tale)
5. Drive Shaft Housing12. Cooling Water Intake Holes
13 Skeg5. Drive Shaft Housing
6. Anti-Ventilation Plate13. Skeg
7. Corrosion Anode

19
INSTALLATION
1-2
Installing Outboard
WARNING!Before operation, the outboard must be correctly installedwith four mounting bolts shown. Failure to correctly fastenoutboard could result in outboard ejecting off boat transomcausing serious injury, death, or property damage.
1 We strongly recommend that your dealer install your outboardand related accessories to ensure proper installation and goodperformance. If you install the outboard yourself, follow instruc-tions in the Outboard Installation Manual which is provided withthe outboard.
2 The outboard must be secured to the transom with the four 1/2inch diameter mounting bolts and locknuts provided with the out-board. Install two bolts thru the upper set of holes and two boltsthru the lower set of holes.
20
oc
INSTALLATIONghc3
3 4
a
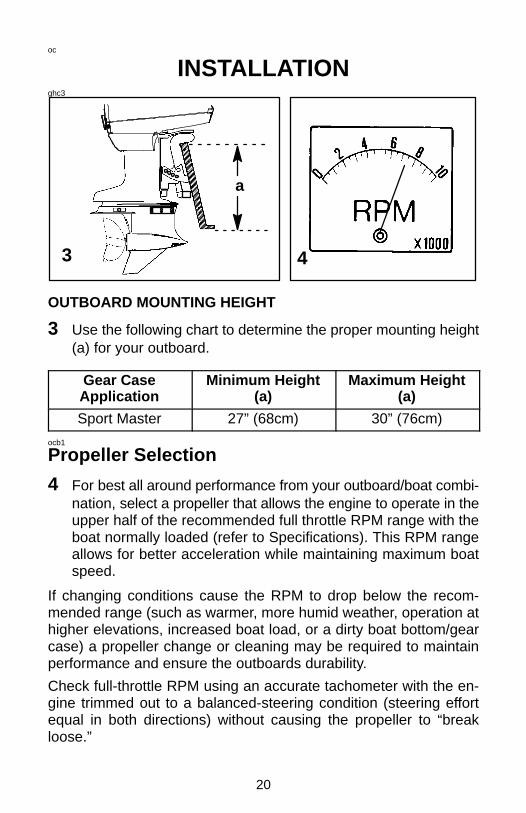
OUTBOARD MOUNTING HEIGHT
3 Use the following chart to determine the proper mounting height(a) for your outboard.
Gear CaseApplication
Minimum Height(a)
Maximum Height(a)
Sport Master 27” (68cm) 30” (76cm)
ocb1
Propeller Selection
4 For best all around performance from your outboard/boat combi-nation, select a propeller that allows the engine to operate in theupper half of the recommended full throttle RPM range with theboat normally loaded (refer to Specifications). This RPM rangeallows for better acceleration while maintaining maximum boatspeed.
If changing conditions cause the RPM to drop below the recom-mended range (such as warmer, more humid weather, operation athigher elevations, increased boat load, or a dirty boat bottom/gearcase) a propeller change or cleaning may be required to maintainperformance and ensure the outboards durability.
Check full-throttle RPM using an accurate tachometer with the en-gine trimmed out to a balanced-steering condition (steering effortequal in both directions) without causing the propeller to “breakloose.”

21
TRANSPORTING
odc1
Trailering Boat/OutboardTrailer your boat with the outboard tilted down (vertical operating po-sition).
If additional ground clearance is required, the outboard should betilted up using an outboard support bar. Additional clearance may berequired for railroad crossings, driveways and trailer bouncing.
IMPORTANT: Do not rely on the power trim/tilt system or tiltsupport lever to maintain proper ground clearance for trailer-ing. The outboard tilt support lever is not intended to supportthe outboard for trailering.
Shift the outboard to forward gear. This prevents the propeller fromspinning freely.

22
FUEL & OILGasoline RecommendationsUNITED STATES AND CANADA
Use a major brand of automotive unleaded gasoline with a minimumposted octane rating of 87. Mid-grade automotive gasolines that con-tain fuel injector cleaner are preferred for added internal enginecleanliness. Leaded gasoline is not recommended.
INTERNATIONAL
Use a major brand of automotive unleaded gasoline with a minimumposted octane rating of 90RON. Automotive gasolines that containfuel injector cleaner are preferred for added internal engine cleanli-ness. Leaded gasoline is acceptable in areas where unleaded gaso-line is not available.
ALCOHOL IN GASOLINE
We do not recommend the use of gasoline which contains alcoholbecause of the possible adverse effect the alcohol may have on thefuel system. In general, if only gasoline containing alcohol is avail-able, it must not contain more than 10% ethanol or 5% methanol, andthe addition of a Quicksilver Water Separating Fuel Filter is recom-mended.
If gasoline containing alcohol is used or if you suspect the presenceof alcohol in your gasoline, increase your inspection of the fuel sys-tem, visually checking for fuel leaks or abnormalities.
Gasoline containing alcohol may cause the following problems toyour outboard and fuel system:• Corrosion of metal parts.• Deterioration of elastomers and plastic parts.• Wear and damage of internal engine parts.• Starting and operating difficulties.• Vapor lock or fuel starvation.Some of these adverse effects are due to the tendency of gasolinecontaining alcohol to absorb moisture from the air, resulting in aphase of water and alcohol which separates from the gasoline in thefuel tank.
The adverse effects of alcohol are more severe with methanol andare worse with increasing content of alcohol.

23
FUEL & OILOil RecommendationUse Mercury Hi-Performance Synthetic Blend 2-Cycle Oil.
Emergency Use Only: If the Hi-Performance 2-Cycle Oil is not avail-able, Quicksilver NMMA Certified Premium TC-W3 or Premium PlusTC-W3 2-Cycle Oil may be substituted. These oils should not beused on a regular basis.
Periodically consult with your dealer to get the latest gasoline and oilrecommendations. If Quicksilver 2-Cycle Outboard Oil is not avail-able, substitute a 2-Cycle outboard manufacturers oil that is NMMACertified TC-W3, or another brand of 2-Cycle outboard oil that isNMMA Certified TC-W3. The use of an inferior 2-Cycle outboard oilcan reduce engine durability. Damage from use of inferior oil maynot be covered under the limited warranty.
Gasoline/Oil MixtureDuring and after break-in, use a 32:1 (3.1%) gasoline/oil mixture inyour fuel tank.
GASOLINE/OIL MIXING RATIO CHART
Gas/OilRatio
1 Gallon Gas(3.8 Liters)
3 Gallons Gas(11.5 Liters)
6 Gallons Gas(23 Liters)
32:1(3.1%)
4 fl. oz.(118 ml) Oil
12 fl. oz.(355 ml) Oil
24 fl. oz.(710 ml) Oil
oee5
Filling Fuel Tank
WARNING!Avoid serious injury or death from a gasoline fire or explosion.Always stop the engine and DO NOT smoke or allow openflames or sparks in the area while filling fuel tanks.
Fill fuel tanks outdoors away from heat, sparks, and open flames.
Remove portable fuel tanks from boat to refill them.
Always stop engine before refilling tanks.
Do not overfill the fuel tanks. Fuel will expand in volume as its temper-ature rises and can leak under pressure.

24
og
FEATURES & CONTROLSgog142
12
3
4
5
6 78
9
1
1
233
45 7
9
66
PanelSide Mount Console
oge5
Remote Control FeaturesYour boat may be equipped with one of the Quicksilver remote con-trols shown. If not, consult your dealer for a description of the func-tions and operations of the remote control.
1 Control Handle – Forward, Neutral, Reverse
2 Neutral Release Lever
3 Trim/Tilt Switch (if Equipped) – Refer to Power Trim Operation.
4 Lanyard Stop Switch – Read the Lanyard Stop Switch safety ex-planation and Warning in the General Information Section.
5 Lanyard – Read the lanyard stop switch safety explanation andwarning in the General Information Section.
6 Throttle Friction Adjustment – Console Controls require cover re-moval for adjustment.
7 Ignition Key Switch – Off, On, Start, Choke
8 Fast Idle Lever – Raising lever will increase engine idle speed inneutral. Refer to Starting the Engine in the Operation Section.
9 Throttle Only Button – Pushing in the button will enable you to ad-vance the control handle for increasing engine idle speed withoutshifting outboard into gear. Refer to Starting the Engine in the Op-eration Section.

25
og
FEATURES & CONTROLSgog67
2
1 a
b
ogb32
Warning System
1 The outboard warning system incorporates a warning horn insidethe boat. The warning horn may be located inside the remotecontrol (a) or under the dash (b) connected to the ignition keyswitch.
The system is designed for the warning horn to emit either a continu-ous beep or intermittent short beeps. This will alert the operator andhelp identify the following listed problems.• The warning horn sounds continuously
The problem is engine overheat. See explanation following.• The warning horn sounds intermittent short beeps.
The problem is low oil level in the oil injection system. See expla-nation following.
2 When the ignition key is initially turned on, the warning horn willsound for a moment as a test to tell you the system is working.Failure of this test indicates a problem. Have the outboardchecked by your dealer.

26
FEATURES & CONTROLS
a
Warning System (Continued)THE WARNING HORN SOUNDS CONTINUOUSLY
Problem – Engine overheat. The warning system is activated whenthe engine temperature is too hot.
3 If the engine overheats, immediately reduce throttle speed toidle. Shift outboard into neutral and check for a steady stream ofwater coming out of the water pump indicator hole (a).
If no water is coming out of the water pump indicator hole (a) or flowis intermittent, stop engine and check cooling water intake holes forobstruction. If no obstruction is found, this may indicate a blockagein the cooling system or a water pump problem. Have the outboardchecked by your dealer. Operating the engine while overheated willcause engine damage. See the following note.
If a steady stream of water is coming out of the water pump indicatorhole (a) and the warning horn continues to sound, there still may beinsufficient cooling water or an engine problem. Stop engine andhave it checked by your dealer. Operating the engine while over-heated will cause engine damage. See the following note.
NOTE: If you are in a stranded situation, stopping the engine andallowing it to cool back down will usually allow some additional lowspeed (idle) running time before the engine starts to overheat again.
The overheat problem must be corrected before you can resume nor-mal operation.

27
FEATURES & CONTROLS
a
b
c
Power Trim And Tilt
WARNING!Avoid possible serious injury or death. Do not trim outboardbeyond its normal trim range above 2000 RPM. In order to sig-nificantly raise the strength of the Hi-Performance transomassembly, the electric trim limit and trim indicator sendingunit mounting positions have been eliminated. Having no trimlimit switch permits the operator to trim the outboard to anyposition at any throttle setting.
NOTE: There is no tilt feature on engines with a 15 in. (38.1cm) cen-ter section. These outboards can only be trimmed.
Your outboard has a trim/tilt control called “Power Trim.” This enablesthe operator to easily adjust the position of the outboard by pressingthe trim switch (a). Moving the outboard in closer to the boat transomis called trimming “in” or “down.” Moving the outboard further awayfrom the boat transom is called trimming “out” or “up.” The term “trim”generally refers to the adjustment of the outboard within the first 20°range of travel (b). This is the range used while operating your boaton plane. The term “tilt” is generally used when referring to adjustingthe outboard further up out of the water (c). With the engine turnedoff the outboard can be tilted out of the water. At low idle speed, theoutboard can also be tilted up past the trim range to permit, for exam-ple, shallow water operation.
(continued on next page)

28
FEATURES & CONTROLSPower Trim And Tilt (Cont.)POWER TRIM OPERATION
With most boats, operating around the middle of the “trim” range willgive satisfactory results. However, to take full advantage of the trim-ming capability there may be times when you choose to trim your out-board all the way in or out. Along with an improvement in some per-formance aspects comes a greater responsibility for the operator,and this is being aware of some potential control hazards.
The most significant control hazard is a pull or “torque” that can befelt on the steering wheel. This steering torque results from the out-board being trimmed so that the propeller shaft is not parallel to thewater surface.
WARNING!Avoid possible serious injury or death. When the outboard istrimmed in or out beyond a neutral steering condition, a pullon the steering wheel or tiller handle in either direction mayresult. Failure to keep a continuous firm grip on the steeringwheel or tiller handle when this condition exists can result inloss of boat control as the outboard can turn freely. The boatcan now “spin out” or go into a very tight maximum turnwhich, if unexpected, can result in occupants being thrownwithin the boat or out of the boat.
Consider the following lists carefully.
Trimming In or Down Can:
1. Lower the bow.
2. Result in quicker planing off, especially with a heavy load or astern heavy boat.
3. Generally improve the ride in choppy water.
4. Increase steering torque or pull to the right (with the normal righthand rotation propeller).
(continued on next page)

29
FEATURES & CONTROLSPower Trim And Tilt (Cont.)POWER TRIM OPERATION (CONT.)
5. In excess, lower the bow of some boats to a point at which theybegin to plow with their bow in the water while on plane. This canresult in an unexpected turn in either direction called “bow-steer-ing” or “over-steering” if any turn is attempted, or if a significantwave is encountered.
WARNING!Avoid possible serious injury or death. Adjust outboard to anintermediate trim position as soon as boat is on plane to avoidpossible ejection due to boat spin-out. Do not attempt to turnboat when on plane if outboard is trimmed extremely in ordown and there is a pull on the steering wheel.
6. In rare circumstances, the owner may decide to limit the trim in.This can be accomplished by inserting the tilt pin in whatever ad-justment hole in the transom brackets is desired.
Trimming Out or Up can:
1. Lift the bow higher out of the water.
2. Generally increase top speed.
3. Increase clearance over submerged objects or a shallow bottom.
4. Increase steering torque or pull to the left at a normal installationheight (with the normal right hand rotation propeller).
5. In excess, cause boat “porpoising” (bouncing) or propeller venti-lation.
6. Cause engine overheating if any cooling water intake holes areabove the water line.
(continued on next page)

30
FEATURES & CONTROLS
1-2-3
ab
Power Trim And Tilt (Cont.)TILTING OPERATION (IF EQUIPPED)
To tilt outboard, shut off the engine and press the trim/tilt switch to theup position. The outboard will tilt up until the switch is released or itreaches its maximum tilt position.
1 Push in on the tilt support release knob (a) and move tilt supportlever into locking position (b).
2 Lower outboard to rest on the tilt support lever.
3 Disengage the tilt support lever by raising the outboard off thesupport lever and rotating the lever up until it locks. Lower the out-board.

31
OPERATIONPre-Starting Check List
Operator knows safe navigation, boating, and operating proce-dures.
An approved personal flotation device of suitable size for eachperson aboard and readily accessible (it is the law).
A ring type life buoy or buoyant cushion designed to be thrown toa person in the water.
Know your boats maximum load capacity. Look at the boat capac-ity plate.
Fuel supply OK.
Fuel mixture OK.
Arrange passengers and load in the boat so the weight is distrib-uted evenly and everyone is seated in a proper seat.
Tell someone where you are going and when you expect to return.
It is illegal to operate a boat while under the influence of alcoholor drugs.
Know the waters and area you will be boating; tides, currents,sand bars, rocks, and other hazards.
Make inspection checks listed in the Inspection and MaintenanceSchedule. Refer to Maintenance Section.
Special Operating InstructionsOPERATING IN FREEZING TEMPERATURES
When using your outboard or having your outboard moored in freez-ing or near freezing temperature, keep the outboard tilted down at alltimes so the gear case is submerged. This prevents trapped waterin gear case from freezing and causing possible damage to the waterpump and other components.
If there is a chance of ice forming on the water, the outboard shouldbe removed and drained completely of water. If ice should form at thewater level inside the outboard drive shaft housing, it will block waterflow to the engine causing possible damage.
(continued on next page)
32
OPERATIONSpecial Operating Instructions (Cont.)OPERATING IN SALT WATER OR POLLUTED WATER
We recommend that you flush the internal water passages of youroutboard with fresh water after each use in salt or polluted water. Thiswill prevent a buildup of deposits from clogging the water passages.Refer to “Flushing The Cooling System” procedure in the Mainte-nance Section.
If you keep your boat moored in the water, always tilt the outboardso the gear case is completely out of water (except in freezing tem-perature) when not in use.
Wash down the outboard exterior and flush out the exhaust outlet ofthe propeller and gear case with fresh water after each use. Eachmonth spray Quicksilver Corrosion Guard on the engine exterior,electrical components and other metal surfaces (do not spray on cor-rosion control anodes as this will reduce the effectiveness of theanodes).
OPERATING AT HIGH ELEVATIONS
Operating your outboard at an elevation higher than 2500 ft. (750 m)above sea level may require a carburetor jet change and/or differentpitch propeller. Consult your dealer. This will reduce the normal per-formance loss experienced as a result of reduced oxygen in the aircausing an overly rich fuel mixture.
IMPORTANT: To prevent serious damage to the engine causedby a lean fuel mixture, DO NOT operate your outboard (if the jetswere changed for high elevation) at a lower elevation unless thejets are changed again to correspond to the new elevation.

33
of
OPERATIONog124
21
a
b
Special Operating Instructions (Cont.)onk2
OPERATING IN SHALLOW WATER
1 When operating your boat in shallow water, you can tilt the out-board beyond the maximum trim range to prevent hitting bottom.
a. Reduce engine speed below 2000 RPM.
b. Tilt outboard up. Make sure all the cooling water intake holesstay submerged at all times.
c. Operate the engine at slow speed only. Never exceed 2000RPM.
onn1
SETTING TRIM ANGLE WHILE RUNNING ENGINE AT IDLESPEED
2 Submerging the exhaust relief hole (a) on the outboard can hap-pen on some boats if you trim the outboard “full-in” while runningthe engine at idle speed. This will cause an exhaust restriction,resulting in rough idle, excessive smoke, and fouled spark plugs.If this condition exists, trim outboard up until exhaust relief holeis out of the water (b).

34
OPERATIONEngine Break-in Procedure
CAUTION!Severe damage to the engine can result by not complying withthe Engine Break-in Procedure.
Operate your outboard at varied throttle settings – not to exceed 1/2throttle (3000-3500 RPM) during the first hour or ten gallons of En-gine Gasoline/Oil Mixture. Refer to Fuel Section.
During the second hour of operation, or the second 10 gallons of En-gine Gasoline/Oil Mixture, operate the outboard at varied throttle set-tings not to exceed 4500 RPM.
IMPORTANT: DO NOT operate the engine at full throttle untilthe second hour of break-in is completed. This includes fullthrottle acceleration, pulling water-skiers or wide open throttlerunning.
After the first two hours of running, approximately 20 gallons of fuel,full throttle operation may be obtained, but not sustained, for the re-maining break-in period (approximately 10 gallons of gasoline/oilmixture or 1 hour of operation).
For the next seven hours of operation, full throttle operation may,again, be attained, but strongly not recommended for sustained use.(More than 5 minutes of continuous full throttle operation).
BREAK-IN AND RUNNING JETS
The engine has been shipped with (.094 in.) Break-In jets installed.After the proper break-in period has been completed these jets mustbe removed and (.090 in.) Running Jets installed. Consult the Dealerfor this procedure or refer to the appropriate engine service manualfor your model engine.

35
OPERATION
2
4
1 3
Starting The EngineBefore starting, read the Pre-Starting Check List, Special OperatingInstructions, and Engine Break-in Procedure on the first three pagesin the Operation Section.
CAUTION!Prevent damage to the water pump (running dry) or overheat-ing of the engine. Never start or run your outboard (even mo-mentarily) without water circulating through all the coolingwater intake holes in the gear case.
1 Lower the outboard to the run position. Make sure all the coolingwater intake holes are submerged.
2 Open fuel tank vent screw (in filler cap) on manual venting typefuel tanks.
3 Squeeze the fuel line primer bulb several times until it feels firm.
4 Set the lanyard stop switch to RUN position. Read the LanyardStop Switch safety explanation and Warning in the General In-formation Section.

36
OPERATION
6 75
N
Starting The Engine (Continued)
5 Shift outboard to neutral (N) position.
6 The engine can be manually primed by pushing in on the keychoke switch (if so equipped) or a remote choke switch can beconnected to the yel/blk wire at the engine harness connector.(Refer to wiring diagram).
Note: Starting Flooded Engine – Advance throttle to at least 1/2 open(gear case in neutral), and crank engine for 10 seconds. Wait 30 se-conds and repeat until engine starts.
7 Check for a steady stream of water flowing out of the water pumpindicator (tell-tale) hose.
IMPORTANT: If no water is coming out of the water pump indica-tor hole, stop engine and check cooling water intake holes forobstruction. If no intake obstruction is found this may indicatea water pump failure or internal blockage in the cooling system.These conditions will cause the engine to overheat. Have theoutboard checked by your dealer. Operating the engine whileoverheated will cause engine damage.

37
OPERATION
51-4
N RF
Gear ShiftingIMPORTANT: Observe the following:• Never shift outboard into gear unless engine speed is at idle.• Do not shift outboard into Reverse when the engine is not
running.
1 Your outboard has three gear shift positions to provide operation.Forward (F), Neutral (out of gear) and Reverse (R).
2 When shifting, always stop at neutral position and allow the en-gine speed to return to idle.
3 Always shift outboard into gear with a quick motion.
4 After shifting outboard into gear, advance the lever further to in-crease speed.
Stopping The Engine
5 Reduce engine speed and shift outboard to neutral position. Turnignition key to OFF position.
38
MAINTENANCEOutboard CareTo keep your outboard in the best operating condition, it is importantthat your outboard receive the periodic inspections and maintenancelisted in the Inspection and Maintenance Schedule. We urge you tohave it maintained properly to ensure the safety of you and your pas-sengers and retain its dependability.
WARNING!Neglected inspection and maintenance service of your out-board or attempting to perform maintenance or repair on youroutboard if you are not familiar with the correct service andsafety procedures could cause personal injury, death, orproduct failure.
Record maintenance performed in Maintenance Log at the back ofthis book. Save all maintenance work orders and receipts.
Selecting Replacement Parts For Your OutboardWe recommend using original Mercury Marine Quicksilver replace-ment parts and Genuine Quicksilver Lubricants.
WARNING!Using a replacement part that is inferior to the original partcould result in personal injury, death, or product failure.
oti1
EPA Emissions RegulationsAll new outboards manufactured by Mercury Marine are certified tothe United States Environmental Protection Agency as conformingto the requirements of the regulations for the control of air pollutionfrom new outboard motors. This certification is contingent on certainadjustments being set to factory standards. For this reason, the fac-tory procedure for servicing the product must be strictly followed and,wherever practicable, returned to the original intent of the design.Maintenance, replacement, or repair of the emission control de-vices and systems may be performed by any marine SI enginerepair establishment or individual.

39
MAINTENANCEInspection And Maintenance ScheduleBEFORE EACH USE
1. Check that lanyard stop switch stops the engine.
2. Visually inspect the fuel system for deterioration or leaks.
3. Check outboard for tightness on transom.
4. Check steering system for binding or loose components.
5. Visually check steering link rod fasteners for proper tightness.(page 45)
6. Check propeller blades for damage.
AFTER EACH USE
1. Flush out the outboard cooling system if operating in salt or pol-luted water. (page 41)
2. Wash off all salt deposits and flush out the exhaust outlet of thepropeller and gear case with fresh water if operating in salt water.
AFTER 10 HOUR BREAK-IN
1. Remove “Break-In Jets” and install running jets.
2. Inspect and clean spark plugs. (page 49)
3. Check engine timing setup.
4. Drain and replace gear case lubricant. (page 53)
5. Inspect battery. (page 49)
6. Check control cable adjustments.
7. Lubricate all lubrication points. (page 50)
8. Check tightness of bolts, nuts and other fasteners.
40
MAINTENANCEInspection And Maintenance Schedule (Cont.)EVERY 25 HOURS OF USE OR ONCE A MONTH
1. Lubricate all lubrication points. (page 50)
2. Check level and condition of gear case lubricant. (page 53)
3. Inspect battery. (page 49)
4. Check corrosion control anodes. (page 46)
5. Check tightness of bolts, nuts and other fasteners.
6. Lubricate propshaft with anti-corrosion grease. (50)
EVERY 50 HOURS OF USE OR ONCE A SEASON
IMPORTANT: Increased lubrication and corrosion mainte-nance is required if unit is used in salt water.
1. Inspect and clean/replace spark plugs. (page 49)
2. Check engine timing setup.*
3. Check charging system.*
4. Inspect reeds.*
5. Drain and replace gear case lubricant. (page 53)
6. Lubricate splines on the drive shaft.*
7. Lubricate entire length of driveshaft with anti-corrosion grease.*
8. Lubricate propshaft with anti-corrosion grease.
9. Check power trim fluid. (page 52)
10. Check control cable adjustments.*
11. Remove engine deposits with Quicksilver Power Tune EngineCleaner.
12. Replace final fuel filter element. (Page 44)
13. Replace water pump impeller (more often if overheating occursor reduced water pressure is noted).*
BEFORE PERIODS OF STORAGE
1. Refer to Storage procedure. (page 55)
∗ These items should be serviced by an authorized dealer.

41
MAINTENANCE
1–4 5Flushing The Cooling SystemFlush the internal water passages of the outboard with fresh waterafter each use in salt, polluted, or muddy water. This will help preventa buildup of deposits from clogging the internal water passages.
A nose cone flushing attachment for the Sport Master Gear Case P/N848998A1 is available thru Quicksilver Accessories.
WARNING!WARNING – To avoid possible injury when flushing, removethe propeller. Refer to Propeller Replacement.
1 Remove propeller (refer to Propeller Replacement). Install theflushing attachment so the nose cone cup fits tightly over thecooling water intake.
2 Attach a water hose to the flushing attachment. Turn on waterand adjust flow so water is leaking around flushing attachment toensure the engine receives an adequate supply of cooling water.
3 Start engine and run at idle speed in neutral shift position.
4 Adjust water flow (if necessary) so excess water continues leak-ing out from around the flushing attachment to ensure the engineis receiving an adequate supply of cooling water.
5 Check for a steady stream of water flowing out of the water pumpindicator hoses at back of engine. Continue flushing the outboardfor 3 to 5 minutes, carefully monitoring water supply at all times.
(continued on next page)

42
MAINTENANCE
a
1-2
Flushing The Cooling System (Cont.)IMPORTANT: Stop engine before shutting off water. Never op-erate engine without cooling water. Even momentary engine op-eration without water could cause severe engine damage.
6 Stop the engine, turn off the water, and remove the flushing at-tachment. Reinstall the propeller.
Top Cowl Removal And Installation
WARNING!Do Not attempt to remove or install cowl while engine is run-ning.
REMOVAL
1 Rotate latch (a) clockwise. Lift rear of cowl and pull back to disen-gage front latch hook.
2 Lift top cowl up to remove.
INSTALLATION
3 Lower top cowl into position over engine. Tip the front of the cowlslightly to engage the front alignment bracket. After the frontbracket is engaged, route cowl down into position making surethe top cowl rubber alignment pins are in the bottom cowl locationbracket. Rotate latch (a) counterclockwise to secure top cowl.

43
MAINTENANCEFuel System
WARNING!Avoid serious injury or death from gasoline fire or explosion.Carefully follow all fuel system service instructions. Alwaysstop the engine and DO NOT smoke or allow open flames orsparks in the area while servicing any part of the fuel system.
Before servicing any part of the fuel system, stop engine and discon-nect the battery. Drain the fuel system completely. Use an approvedcontainer to collect and store fuel. Wipe up any spillage immediately.Material used to contain spillage must be disposed of in an approvedreceptacle. Any fuel system service must be performed in a well ven-tilated area. Inspect any completed service work for sign of fuel leak-age.
FUEL LINE INSPECTION
Visually inspect the fuel line and primer bulb for cracks, swelling,leaks, hardness, or other signs of deterioration or damage. If any ofthese conditions are found, the fuel line or primer bulb must be re-placed.

44
MAINTENANCE
1
c
Fuel System (Continued)WATER SEPARATING FUEL FILTER (NOT INCLUDED WITHENGINE)
1 A water separating fuel filter is not included with your engine butis recommended. This filter removes moisture and also debrisfrom the fuel and should be mounted before the fuel pump sup-plied with your engine. If the filter becomes filled with water, thewater can be removed and the filter reused. If the filter becomesplugged with debris, the filter must be replaced with a new filter.
Remove and replace filter as follows
a. Turn ignition key switch to OFF position.
b. Remove filter by turning the filter in the direction of the arrowindicated above (counterclockwise). Tip the filter to drain fluidin a suitable container.
c. Lubricate the sealing ring (c) on the filter with oil. Install thefilter and tighten securely by hand.
IMPORTANT: Visually inspect for fuel leakage from the filter af-ter starting the engine.

45
MAINTENANCE
b
a
c
d
ohi1
Steering Link Rod FastenersIMPORTANT: The steering link rod that connects the steeringcable to the engine must be fastened using special washer headbolt (“a” – Part Number 10-14000) and self locking nylon insertlocknuts (“b” & “c” – Part Number 11-34863). These locknutsmust never be replaced with common nuts (non locking) as theywill work loose and vibrate off freeing the link rod to disengage.
WARNING!Disengagement of a steering link rod can result in the boat tak-ing a full, sudden, sharp turn. This potentially violent actioncan cause occupants to be thrown overboard exposing themto serious injury or death.
Assemble steering link rod to steering cable with two flat washers (d)and self locking nylon insert locknut (“b” – Part Number 11-34863).Tighten locknut (b) until it seats, then back nut off 1/4 turn.
Assemble steering link rod to engine with special washer head bolt(“a” – Part Number 10-14000) and self locking nylon insert locknut(“c” – Part Number 11-34863). First torque bolt (a) to 20 lb. ft. (27.1N·m), then torque locknut (c) to 20 lb. ft. (27.1 N·m).
46
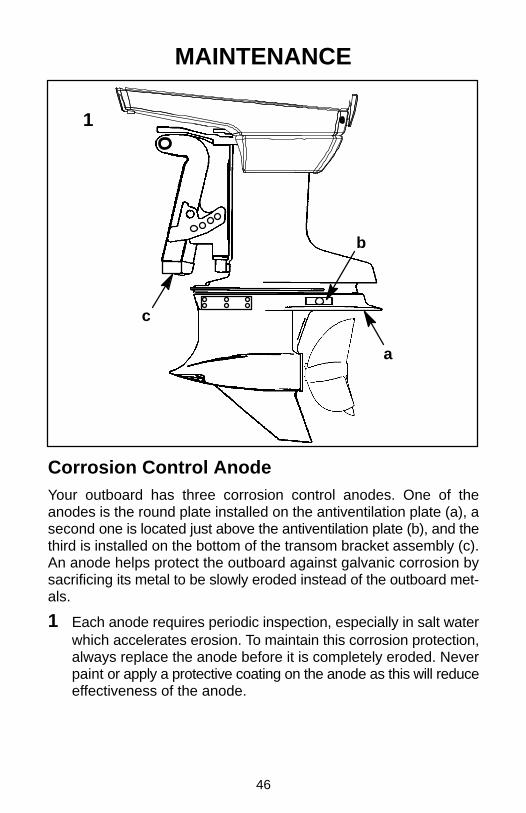
MAINTENANCE
1
a
c
b
Corrosion Control AnodeYour outboard has three corrosion control anodes. One of theanodes is the round plate installed on the antiventilation plate (a), asecond one is located just above the antiventilation plate (b), and thethird is installed on the bottom of the transom bracket assembly (c).An anode helps protect the outboard against galvanic corrosion bysacrificing its metal to be slowly eroded instead of the outboard met-als.
1 Each anode requires periodic inspection, especially in salt waterwhich accelerates erosion. To maintain this corrosion protection,always replace the anode before it is completely eroded. Neverpaint or apply a protective coating on the anode as this will reduceeffectiveness of the anode.

47
MAINTENANCE
1 2
4–53
N
ohl8
Propeller Replacement
WARNING!If the propeller shaft is rotated while the engine is in gear, thereis the possibility that the engine will crank over and start. Toprevent this type of accidental engine starting and possibleserious injury caused from being struck by a rotating propel-ler, always shift outboard to neutral position and removespark plug leads when you are servicing the propeller.
1 Shift outboard to neutral (N) position.
2 Remove spark plug leads to prevent engine from starting.
3 Straighten the bent tabs on the propeller nut retainer.
4 Place a block of wood between gear case and propeller to holdpropeller and remove propeller nut.
5 Pull propeller straight off shaft. If propeller is seized to the shaftand cannot be removed, have the propeller removed by an au-thorized dealer.
IMPORTANT: Use care to prevent losing forward thrust washer(located between propeller and gearcase) when removing pro-peller.

48
MAINTENANCE
6 7a
b c ed f
9-108 ac bd
ef
Propeller Replacement (Cont.)
6 Coat the propeller shaft with Quicksilver Anti-Corrosion Grease.
IMPORTANT: To prevent the propeller hub from corroding andseizing to the propeller shaft, especially in salt water, always ap-ply a coat of Quicksilver Anti-Corrosion Grease to the entireshaft at the recommended maintenance intervals and also eachtime the propeller is removed.
7 Rubber Hub Propellers - Install thrust washer (a), propeller (b),continuity washer (c), splined washer (d), propeller nut retainer(e), and propeller nut (f) onto the shaft.
8 Replaceable Hub Propellers (Using Hi-Performance Hub Kit P/N835258A1) - Install forward thrust hub (a), replaceable drivesleeve (b), propeller (c), drive sleeve adaptor (d), propeller nut re-tainer (e) and propeller nut (f) onto the shaft.
9 Place a block of wood between gear case and propeller andtorque propeller nut to 55 lb. ft. (75 N·m).
10 Secure propeller nut by bending three of the tabs into the thrusthub grooves.

49
MAINTENANCE
1 2
Spark Plug InspectionInspect spark plugs at the recommended intervals.
1 Remove the spark plug leads by twisting the rubber boots slightlyand pull off. Inspect spark plug boots and replace if cracked.
2 Remove the spark plugs to inspect and clean. Replace sparkplug if electrode is worn or the insulator is rough, cracked, bro-ken, blistered, or fouled.
3 Before reinstalling spark plugs, clean away dirt on the spark plugseats. Install plugs finger tight, and tighten to a torque of 20 lb.ft. (27 N·m).
ohn1
Battery InspectionThe battery should be inspected at periodic intervals to ensure prop-er engine starting capability.
IMPORTANT: Read the safety and maintenance instructionswhich accompany your battery.
1. Turn off the engine before servicing the battery.
2. Add water as necessary to keep the battery full.
3. Make sure the battery is secure against movement.
4. Battery cable terminals should be clean, tight, and correctly in-stalled. Positive to positive and negative to negative.
5. Make sure the battery is equipped with a nonconductive shieldto prevent accidental shorting of battery terminals.

50
MAINTENANCE
1
2
3
Lubrication PointsLUBRICATE POINT 1 WITH QUICKSILVER ANTI-CORROSIONGREASE.
1 Propeller Shaft – Refer to Propeller Replacement for removaland installation of the propeller. Coat the entire propeller shaftwith lubricant to prevent the propeller hub from corroding andseizing to the shaft.
LUBRICATE POINTS 2 AND 3 WITH QUICKSILVER 2-4-C MA-RINE LUBRICANT OR SPECIAL LUBRICANT 101.
2 Tilt Lock Grease Fittings – Lubricate through fitting.
3 Swivel Pin Grease Fitting – Lubricate through fitting.
(continued on next page)

51
MAINTENANCE
5
64
5 ab
Lubrication Points (Continued)
WARNING!The end of the steering cable must be fully retracted into theoutboard tilt tube before adding lubricant. Adding lubricant tosteering cable when fully extended could cause steering cableto become hydraulically locked. An hydraulically lockedsteering cable will cause loss of steering control, possibly re-sulting in serious injury or death.
LUBRICATE POINTS 4 AND 5 WITH QUICKSILVER 2-4-C MA-RINE LUBRICANT OR SPECIAL LUBRICANT 101.
4 Tilt Tube – Lubricate through fitting.
5 Steering Cable – Rotate steering wheel to fully retract the steer-ing cable end (a) into the outboard tilt tube. Lubricate through fit-ting (b).
LUBRICATE POINT 6 WITH LIGHT WEIGHT OIL.
6 Steering Link Rod Pivot Points – Lubricate pivot points.

52
MAINTENANCE
1 2
abc
Checking Power Trim Fluid
1 Place outboard in the full down (in) position.
2 Remove fill/vent screw (a). Wipe with a clean, lint-free cloth andreinstall - DO NOT THREAD INTO PUMP. Remove fill/vent screwand note oil level. Oil level must be between the “ADD” (c) and“FULL” (b) marks on dipstick. If necessary, add Quicksilver Pow-er Trim & Steering Fluid or SAE 10W-30 or 10W-40 motor oil thruthe fill/vent screw hole to bring level up to the “FULL” mark on thedipstick. DO NOT OVERFILL.
3 To purge system of air, raise the outboard 2 or 3 times. Recheckoil level and add oil if necessary.
4 Reinstall fill/vent screw by turning it all-the-way in, then back it outone and a half (1-1/2) turns.
CAUTION!Fill/Vent screw MUST BE backed out one and a half (1-1/2)turns (after bottoming out) to vent pump reservoir. FAILURETO BACK SCREW OUT COULD RESULT IN DAMAGE TOPUMP.
53
MAINTENANCE
21
43
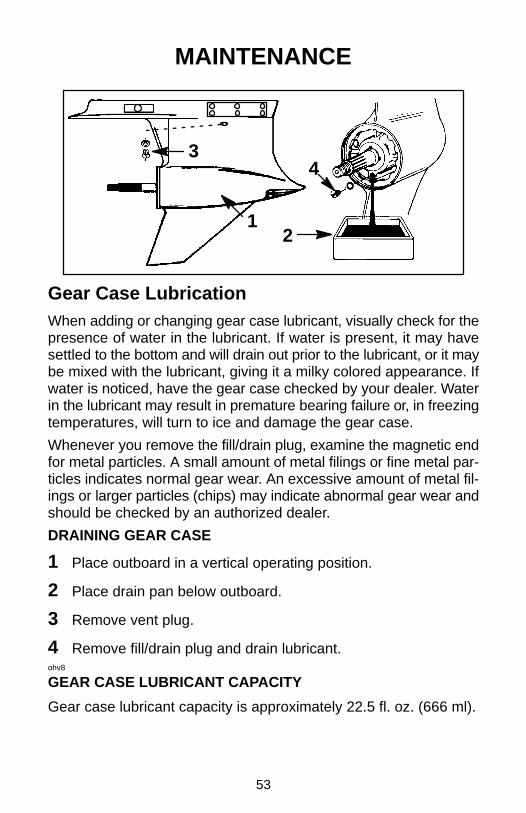
Gear Case LubricationWhen adding or changing gear case lubricant, visually check for thepresence of water in the lubricant. If water is present, it may havesettled to the bottom and will drain out prior to the lubricant, or it maybe mixed with the lubricant, giving it a milky colored appearance. Ifwater is noticed, have the gear case checked by your dealer. Waterin the lubricant may result in premature bearing failure or, in freezingtemperatures, will turn to ice and damage the gear case.
Whenever you remove the fill/drain plug, examine the magnetic endfor metal particles. A small amount of metal filings or fine metal par-ticles indicates normal gear wear. An excessive amount of metal fil-ings or larger particles (chips) may indicate abnormal gear wear andshould be checked by an authorized dealer.
DRAINING GEAR CASE
1 Place outboard in a vertical operating position.
2 Place drain pan below outboard.
3 Remove vent plug.
4 Remove fill/drain plug and drain lubricant.ohv8
GEAR CASE LUBRICANT CAPACITY
Gear case lubricant capacity is approximately 22.5 fl. oz. (666 ml).
54
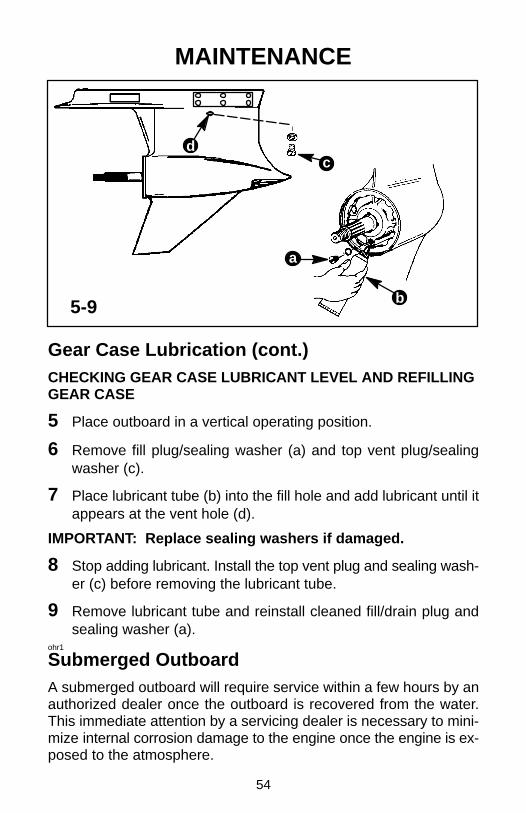
MAINTENANCE
a
c
b
d
5-9
Gear Case Lubrication (cont.)CHECKING GEAR CASE LUBRICANT LEVEL AND REFILLINGGEAR CASE
5 Place outboard in a vertical operating position.
6 Remove fill plug/sealing washer (a) and top vent plug/sealingwasher (c).
7 Place lubricant tube (b) into the fill hole and add lubricant until itappears at the vent hole (d).
IMPORTANT: Replace sealing washers if damaged.
8 Stop adding lubricant. Install the top vent plug and sealing wash-er (c) before removing the lubricant tube.
9 Remove lubricant tube and reinstall cleaned fill/drain plug andsealing washer (a).
ohr1
Submerged OutboardA submerged outboard will require service within a few hours by anauthorized dealer once the outboard is recovered from the water.This immediate attention by a servicing dealer is necessary to mini-mize internal corrosion damage to the engine once the engine is ex-posed to the atmosphere.

55
STORAGEStorage PreparationThe major consideration in preparing your outboard for storage is toprotect it from rust, corrosion, and damage caused by freezing oftrapped water.
The following storage procedures should be followed to prepare youroutboard for out of season storage or prolonged storage (two monthsor longer).
CAUTION!Prevent damage to the water pump (running dry) or overheat-ing of the engine. Never start or run your outboard (even mo-mentarily) without water circulating through all the coolingwater intake holes in the gear case.
oif3
POSITIONING OUTBOARD FOR STORAGE
Store outboard in an upright (vertical) position to allow water to drainout of outboard.
CAUTION!If outboard is stored tilted up in freezing temperature, trappedcooling water or rain water that may have entered the propel-ler exhaust outlet in the gear case could freeze and causedamage to the outboard.
hib1
Fuel SystemIMPORTANT: Gasoline containing alcohol (ethanol or metha-nol) can cause a formation of acid during storage and can dam-age fuel systems. If the gasoline used contains alcohol, it is ad-visable to drain as much of the remaining gasoline as possiblefrom the fuel tank, remote fuel line, and engine fuel system.
The addition of Quicksilver Fuel System Treatment and Stabilizer(p/n 92-78383A12) or Gasoline Stabilizer (p/n 92-817529A12) arehighly recommended during extended periods of non use.
Fill the fuel system (tank, hoses, and fuel pump) with treated (stabi-lized) fuel to help prevent formation of varnish and gum.
56
STORAGEFuel System (Cont.)1. Portable Fuel Tank – Pour the required amount of Quicksilver
Gasoline Stabilizer (follow instructions on container) into fueltank. Tip fuel tank back and forth to mix stabilizer with the fuel.
2. Permanently Installed Fuel Tank – Pour the required amount ofQuicksilver Gasoline Stabilizer (follow instructions on container)into a separate container and mix with approximately one quart(one liter) of gasoline. Pour this mixture into fuel tank.
3. Place the outboard in water or connect flushing attachment forcirculating cooling water. Run the engine for ten minutes to allowtreated fuel to reach the carburetors.
Protecting Internal Engine ComponentsNote: Before performing the following steps, make sure the fuel sys-tem has been prepared for storage. Refer to Fuel System on pre-vious page.
1. Place the outboard in water or connect flushing attachment forcirculating cooling water. Start the engine and let it run in neutralto warm up. Stop engine.
2. Disconnect fuel supply from engine and remove the carburetorair box. Start engine and run at 2000 RPM. Spray QuicksilverStorage Seal into the carburetor throats until the engine runs outof fuel.
3. Remove the spark plugs and inject a five second spray of storageseal around the inside of each cylinder.
4. Rotate the flywheel manually several times to distribute the stor-age seal in the cylinders. Reinstall spark plugs.
Protecting External Engine Components1. Lubricate all outboard components listed in the Inspection and
Maintenance Schedule.
2. Touch up any paint nicks. See your dealer for touch-up paint.
3. Spray Quicksilver Corrosion Guard on external metal surfaces(except corrosion control anodes).

57
STORAGEGear Case1. Drain and refill the gear case lubricant (refer to maintenance pro-
cedure).
Battery Storage1. Follow the battery manufacturers instructions for storage and re-
charging.
2. Remove the battery from the boat and check water level. Re-charge if necessary.
3. Store the battery in a cool, dry place.
4. Periodically check the water level and recharge the battery dur-ing storage.

58
TROUBLESHOOTING1 – STARTER MOTOR WILL NOT CRANK THE ENGINE
POSSIBLE CAUSES• Outboard gearshift not in neutral position.• Weak battery or battery connections are loose or corroded.• Ignition key switch failure.• Wiring or electrical connection faulty.• Starter motor or starter solenoid failure.
2 – ENGINE WILL NOT START
POSSIBLE CAUSES• Lanyard stop switch not in RUN position.• Incorrect starting procedure. Refer to Operating Section.• Old or contaminated gasoline.• Engine flooded. Refer to Operating Section.• Fuel is not reaching the engine.
a. Fuel tank is empty or tank shut-off valve closed.
b. Fuel tank vent not open or is restricted.
c. Fuel line disconnected or kinked.
d. Fuel filter obstructed. Refer to Maintenance Section.
e. Fuel pump failure.
f. Fuel tank filter obstructed.
• Ignition system component failure.• Spark plugs fouled or defective. Refer to Maintenance Section.
3 – ENGINE OVERHEATING (CONTINUOUS HORNSOUND)
POSSIBLE CAUSES• Water pickup clogged or blocked.• Cooling system clogged• Engine overloaded (cannot attain recommended RPM)• Incorrect ignition timing.• Not enough oil in fuel mixture• Lean fuel mixture

59
TROUBLESHOOTING4 – ENGINE RUNS ERRATICALLY
POSSIBLE CAUSES
• Spark plugs fouled or defective. Refer to Maintenance Section.
• Incorrect setup and adjustments.
• Fuel pump failure.
• Fuel is being restricted to the engine.
d. Engine Fuel filter is obstructed. Refer to Maintenance Sec-tion.
e. Fuel tank filter obstructed.
f. Stuck anti-siphon valve located on permanently built in typefuel tanks.
g. Fuel line is kinked or pinched.
h. Reed valve open or broken.
• Ignition system component failure.
5 – PERFORMANCE LOSS
POSSIBLE CAUSES
• Throttle not fully open.
• Damaged or improper size propeller.
• Incorrect engine timing, adjustments, or setup.
• Boat overloaded or load improperly distributed.
• Excessive water in bilge.
• Boat bottom is dirty or damaged.
6 – BATTERY WILL NOT HOLD CHARGE
POSSIBLE CAUSES
• Battery connections are loose or corroded.
• Low electrolyte level in battery.
• Worn out or inefficient battery.
• Excessive use of electrical accessories.
• Defective rectifier, alternator, or voltage regulator.

60
ENGINE WIRING DIAGRAM
61
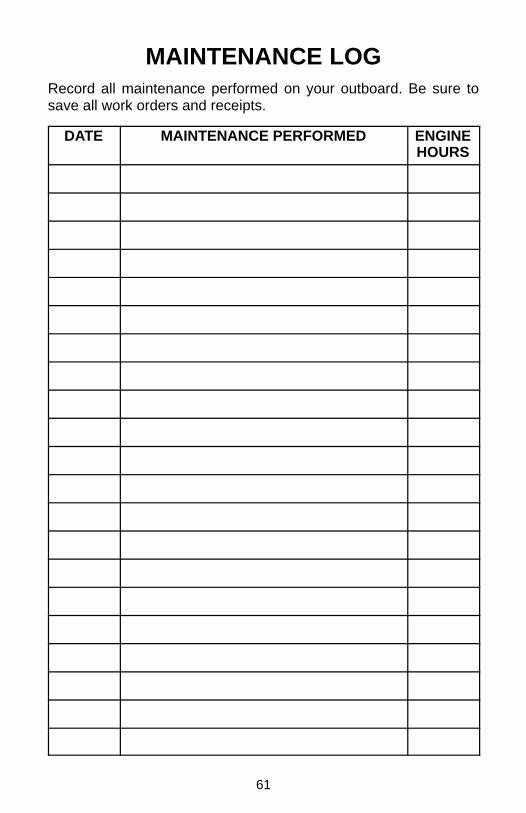
MAINTENANCE LOGRecord all maintenance performed on your outboard. Be sure tosave all work orders and receipts.
DATE MAINTENANCE PERFORMED ENGINEHOURS

62
ok
MAINTENANCE LOGDATE MAINTENANCE PERFORMED ENGINE
HOURS