year 9 apollo archimedes lesson plans bridges term 2 · year 9 apollo archimedes lesson plans...
TRANSCRIPT

Year 9 Apollo Archimedes Lesson plans
Bridges Term 2
Contents Lesson Plans ...................................................................................................................................................................... 2
Lesson 1 – Design Challenge 3 ...................................................................................................................................... 2
Lesson 2 – ‘Big, Bigger, Biggest’ Note taking ................................................................................................................ 3
Lesson 3 –Creek Excursion 3 ......................................................................................................................................... 3
Lesson 4 – Soil Testing .................................................................................................................................................. 4
Lesson 5 – Tension and Compression in Bridge Design ................................................................................................ 4
Lesson 6 – Computer Research (Safety Standards) ...................................................................................................... 5
Lesson 7 – Assignment Lesson (Literacy Focus) ............................................................................................................ 5
Lesson 8 – Corrosion Theory ......................................................................................................................................... 6
Lesson 9 – Corrosion Practical Activity ......................................................................................................................... 6
Lesson 10 – Guest Presenter (CAD Drawing) ................................................................................................................ 7
Lesson 11 – CAD Drawing or Model Creation ............................................................................................................... 7
Lesson 12 – CAD Drawing or Model Creation ............................................................................................................... 8
Lesson 13 – Assessment Write up & Writing Reference List ........................................................................................ 8
Lesson 14 – Assessment Write up................................................................................................................................. 9
Lesson 15 – Making soil samples to support a brick ................................................................................................... 10
Lesson 16 – Making soil samples to support a brick part 2 ........................................................................................ 10
Lesson 17– Excursion Preparation .............................................................................................................................. 11
Lesson 18 – Excursion Preparation & Assessment Feedback ..................................................................................... 11
Resources ........................................................................................................................................................................ 12
2.1 Note taking Template ........................................................................................................................................... 12
2.2 Door Pass .............................................................................................................................................................. 13
3.1 Compression and Tension in Bridge Design .......................................................................................................... 13
4.1 Technical Engineering Report Format ................................................................................................................... 14
4.2 Communicating using a scientific graph ............................................................................................................... 15
8.1 Corrosion Theory................................................................................................................................................... 17
9.1 Iron Nail Corrosion ................................................................................................................................................ 18
16.1 Answers for leaning tower experiment .............................................................................................................. 19
17.1 Brisbane Field Trip............................................................................................................................................... 19
Assessment Item ............................................................................................................................................................. 25
Assignment – TER ........................................................................................................................................................ 25
Lesson Plans Designed as a year 9 term 2 unit of 2 lessons per week. As this term has disruptions due to public holidays, NAPLAN,
sports carnivals and end of semester activities this unit is only 18 lessons.
Assessment item can be handed out in the previous term before the first creek excursion
Lesson 1 – Design Challenge 3 Topic: Bridges Time: 70 min Lesson Number: 1 Author: Moody
Lesson Title: Design Challenge
Lesson Intentions:
Work in groups
Communicate orally within groups
Use PEEL paragraphs to analyse a design
Sequence/Strategies:
Adapt the activity from http://www.pbs.org/wgbh/buildingbig/educator/act_suspension_ho.html to suit the group. Add some constraints or modifications so they cannot copy the design exactly.
Have students work in groups to follow instructions; teacher should be careful not to help directly but to redirect students to instructions if they go off track.
Give clear time limits
Finish with a written analysis, beginning students can complete a ‘plus, minus, interesting’ (PMI)table, or 5W & H, students with experience will need to write paragraphs explaining the strengths and limitations of their prototype (they need to remember to PEEL in their paragraphs).
Resources/Materials/Weblinks:
PMI charts: https://learningplace.eq.edu.au/cx/resources/file/98953d22-08d0-c9c3-991d-9208f29754f5/1/index.html#pmi
5W and H: https://learningplace.eq.edu.au/cx/resources/file/98953d22-08d0-c9c3-991d-9208f29754f5/1/index.html#5w1h
PEEL paragraphs: http://prezi.com/ebwgnyb_2gyb/peel-paragraphs/
Prior Knowledge:
Nil
Homework/Assessment:
Assignment
Lesson 2 – ‘Big, Bigger, Biggest’ Note taking Topic: Bridges Time: 70 min Lesson Number: 2 Author: Moody
Lesson Title: Notetaking
Lesson Intentions:
Take notes while watching a video resource
Collect reference information from a video source
Sequence/Strategies:
Warm up: Brainstorming – Ask student to spend a few minutes brainstorming in pairs any topics they think they may need more information on to complete their assignment. Share this as a group. Any topics that are common should be incorporated into the lessons this term (current content in this unit came from student suggestions).
Body: Student watch the program on the Akashi Bridge from ’Big, Bigger, Biggest’ focus on taking down relevant notes especially on the 7 innovations that lead to the Akashi design. Discuss periodically.
Closure: Assign homework. Camp wishes door pass. Resource 2.2 This is to gauge interest in an end of semester trip and help with the itinerary, we went to Brisbane, you can change yours to somewhere locally relevant.
Resources/Materials/Weblinks:
A copy of ‘Big, bigger, biggest series 1’ from SBS http://www.sbs.com.au/shop/product/category/DVDs/6172/Big-Bigger-Biggest-Series-1
Note taking template: Resource 2.1
Prior Knowledge:
Nil
Homework/Assessment:
Use a note taking sheet to record information from another source for their assignment.
Lesson 3 –Creek Excursion 3 Topic: Bridges Time: 70 min Lesson Number: 3 Author: Moody
Lesson Title: Creek Excursion 3
Lesson Intentions:
Collect data in the field
Sequence/Strategies:
Meet students before school or during a lunch break to maximise time.
Travel to local bridge site
Take soil samples, water samples (if need be), calculate the length of the bridge using trigonometry, allow students to take photographs or other measurements if they require before returning to school.
Resources/Materials/Weblinks:
Containers for samples
Protractor, measuring tape, rulers etc
Water quality test kit
Hats, sunglasses, sunscreen, enclosed footwear, first aid kit, mobile phone etc
Prior Knowledge:
Nil Homework/Assessment:
Assignment

Lesson 4 – Soil Testing Topic: Bridges Time: 70 min Lesson Number: 4 Author: Moody
Lesson Title: Soil testing
Lesson Intentions:
Testing the quality of soil using soil testing kits.
Sequence/Strategies:
Warm up: Target number. Students are given 5 cards with different numbers and using those numbers need to create the number given. They must use all 5 cards and use the operations +, -, x, ÷ and powers.
Test soil samples brought back from local creek area. Test for pH (see soil pH weblink), type of soil, chemical composition. Use soil testing kit, evaporate water from soil and weigh before and after to test water content.
Closure: Assignment journal entry
Resources/Materials/Weblinks:
http://www.soil-net.com/dev/page.cfm?pageid=activities_sheets&loginas=anon_activities
http://www.esf.edu/PUBPROG/brochure/soilph/soilph.htm
http://www.nrcs.usda.gov/Internet/FSE_DOCUMENTS/nrcs142p2_052523.pdf
Prior Knowledge:
Students have gathered samples from the creek.
Homework/Assessment:
Assignment
Lesson 5 – Tension and Compression in Bridge Design Topic: Bridges Time: 70 min Lesson Number: 5 Author: Chapman & Moody
Lesson Title: Tension and Compression in Bridge Design
Lesson Intentions:
Explore tension and compression practically
Sequence/Strategies:
Warm up: Recap tension and compression definitions.
Students should work through resource 3.1 to explore the concepts of tension and compression in bridge design. Students use each other to demonstrate the application of compression and tension. They should be thinking about how these two terms apply to their bridge design.
Closure: Go around the room, one thing learnt from today’s lesson from each student.
Resources/Materials/Weblinks:
3.1 Compression and Tension in Bridge Design
http://science.howstuffworks.com/engineering/civil/bridge2.htm
Prior Knowledge:
Students have learnt tension and compression but not too much in relation to bridges.
Homework/Assessment:
Assignment
Lesson 6 – Computer Research (Safety Standards) Topic: Bridges Time: 70 min Lesson Number: 6 Author: Moody
Lesson Title: Researching Safety Standards
Lesson Intentions:
Research the safety standards and apply to assignment.
Sequence/Strategies:
Computer lesson for students to explore the safety standards and see which apply to their bridge design.
Closure: Assignment journal entry, reflect on how this will affect their bridge design
Resources/Materials/Weblinks:
http://www.law.cornell.edu/cfr/text/49/part-237
Prior Knowledge:
Nil
Homework/Assessment:
Assignment
Lesson 7 – Assignment Lesson (Literacy Focus) Topic: Bridges Time: 70 min Lesson Number: 7 Author: Chapman & Moody
Lesson Title: Assignment lesson
Lesson Intentions:
Understanding language and set up requirements for assignment
Sequence/Strategies:
Warm up: Brainstorm the language features of scientific writing. Share as a class.
Review the key features of their report: o Language and key terms that need to be used in scientific writing. Use website resource (below) for
information guidance. o Features of a technical engineering report including format. See Resource 4.1
Annotate an exemplar together. See resource 4.2
Give students a time limit (approximately 10 min depending on the group) to work under exam condition on their report. After this time they need to review another students work using the ‘track changes’ option in word.
If time you could also go through. How to draw a scientific graph. See resource 4.3 Give time limit.
Closure: Assignment journal entry
Resources/Materials/Weblinks:
Laptop or computer access
http://sydney.edu.au/science/biology/learning/generic_skills/Scientific_Writing.pdf
Prior Knowledge:
Students should have some previous experience writing scientific reports and technical engineering reports.
Homework/Assessment:
Assignment Introduction draft to be submitted next lesson

Lesson 8 – Corrosion Theory Topic: Bridges Time: 70 min Lesson Number: 8 Author: Moody
Lesson Title: Corrosion
Lesson Intentions:
Define corrosion
Use the reactivity series of metals
Investigate sacrificial anodes
Sequence/Strategies:
Warm up: ‘Pineapple’ Students stand in a circle; teacher gives the student a word to spell. Each student says one letter, if they are wrong they are out and sit down. The next person after the word is spelt correctly says ‘pineapple’ and they are also out and have to sit down.
Go through the theory of corrosion and redox. See resource 8.1, level can be modified depending on student prior knowledge.
Print or give students access to the following website http://chemwiki.ucdavis.edu/Analytical_Chemistry/Electrochemistry/Case_Studies/Corrosion/Sacrificial_Anode ask students to create at least three questions from this page for other students to answer, they need to submit this to the teacher.
Closure: Assignment journal entry, were they planning on using a material that will corrode? How will this information affect their choice?
Resources/Materials/Weblinks:
http://chemwiki.ucdavis.edu/Analytical_Chemistry/Electrochemistry/Case_Studies/Corrosion/Sacrificial_Anode print copies of this page or allow access to laptops/computers
Prior Knowledge:
Basic chemistry knowledge essential
Homework/Assessment:
Assignment
Lesson 9 – Corrosion Practical Activity Topic: Bridges Time: 70 min Lesson Number: 9 Author: Moody
Lesson Title: Corrosion Prac
Lesson Intentions:
Work in groups on a practical activity
Consolidate understanding of sacrificial anodes
Sequence/Strategies:
Warm up: ‘Pineapple’ Students stand in a circle; teacher gives the student a word to spell. Each student says one letter, if they are wrong they are out and sit down. The next person after the word is spelt correctly says ‘pineapple’ and they are also out and have to sit down.
Set up the practical activity in Resource 9.1. Ensure students decide how they will monitor the rate of corrosion (this can be by photographs or weighing the nails etc)
Students then write a prediction about the rate of corrosion of each nail.
Students then answer the questions written last lesson on sacrificial anodes.
Closure: ‘Key terms’ students spend 5 minutes making a list of key terms covered this term so far
Resources/Materials/Weblinks:
Resource 9.1 – Iron nail corrosion
Prior Knowledge:
Prior experience in science practical activities and an understanding of corrosion essential
Homework/Assessment:
Assignment

Lesson 10 – Guest Presenter (CAD Drawing) Topic: Bridges Time: 70 min Lesson Number: 10 Author: Moody
Lesson Title: CAD Drawing
Lesson Intentions:
Use CAD drawing software to draw an image of a bridge
Sequence/Strategies:
Call on the expertise of a Graphics teacher to guide students through a CAD drawing lesson. Students appreciate the opportunity to learn something new and a change of teacher is refreshing.
You may find there are students in the class with experience in using this software, they become the assistants and the regular teacher becomes a student.
* monitor iron nail practical
Resources/Materials/Weblinks:
Access to computer lab with CAD software
Prior Knowledge:
Nil
Homework/Assessment:
Nil
Lesson 11 – CAD Drawing or Model Creation Topic: Bridges Time: 70 min Lesson Number: 11 Author: Moody
Lesson Title: Drawing or Model Creation
Lesson Intentions:
Create a drawing or model of their final bridge design
Sequence/Strategies:
Warm up: ‘Buzz’ Students stand in a circle, the count by saying one number each moving in a clock wise direction. For each multiple of 3 or number containing a 3 they say ‘buzz’ instead of the number. Stumble and they are out. Requires students to think quickly and listen to others.
Students choose to create a CAD drawing, scale drawing by hand or a model of their bridge design. Teacher supervises and assists groups individually.
Closure: Journal writing, ensure it is dated and they reflect on the progress they have made on their task so far.
* monitor iron nail practical
Resources/Materials/Weblinks:
Computer access if using CAD
Materials for models, paddle pop sticks, straws, tape, hot glue etc Prior Knowledge:
Bridge design must be complete
Homework/Assessment:
Assignment
Lesson 12 – CAD Drawing or Model Creation Topic: Bridges Time: 70 min Lesson Number: 12 Author: Moody
Lesson Title: Drawing or Model Creation
Lesson Intentions:
Create a drawing or model of their final bridge design
Sequence/Strategies:
This is the last lesson to work on drawings and models in class
Warm up: ‘Buzz’ Students stand in a circle, the count by saying one number each moving in a clock wise direction. For each multiple of 3 or number containing a 3 they say ‘buzz’ instead of the number. Stumble and they are out. Requires students to think quickly and listen to others.
Students choose to create a CAD drawing, scale drawing by hand or a model of their bridge design. Teacher supervises and assists groups individually.
Closure: Journal writing, ensure it is dated and they reflect on the progress they have made on their task so far.
Also need to take final notes on iron nail practical and clean up equipment
Resources/Materials/Weblinks:
Computer access if using CAD
Materials for models, paddle pop sticks, straws, tape, hot glue etc
Prior Knowledge:
Bridge design must be complete
Homework/Assessment:
Assignment
Ask students to bring a list of resources used so far in their assignment to their next lesson
Lesson 13 – Assessment Write up & Writing Reference List Topic: Bridges Time: 70 min Lesson Number: 13 Author: Moody
Lesson Title: Assignment Lesson
Lesson Intentions:
Learn to format a reference list correctly
Sequence/Strategies:
Warm up: ‘Pineapple’ Students stand in a circle; teacher gives the student a word to spell. Each student says one letter, if they are wrong they are out and sit down. The next person after the word is spelt correctly says ‘pineapple’ and they are also out and have to sit down.
Go to http://www.citewrite.qut.edu.au/cite/
Pick the format preferred by your school to create a reference list. Go through a few worked examples on the board (choose at least one book and one website) of how to write a reference correctly
Students use the webpage to write a reference list for their assignment
When they have finished this they can work on their assessment write up.
Closure: Assignment journal, how vclose are they to finishing? What do they need to do for homework?
Resources/Materials/Weblinks:
Access to computer room or laptop
Samples of resources to write references for
Annotated exemplar
Draft with feedback from teacher
Prior Knowledge:
Need to have completed their assignment research and have resources to reference Homework/Assessment:
Assignment

Lesson 14 – Assessment Write up Topic: Bridges Time: 70 min Lesson Number: 14 Author: Moody
Lesson Title: Assignment Lesson
Lesson Intentions:
Assignment Write up
Sequence/Strategies:
This is the last assignment lesson in class
Warm up: ‘Pineapple’ Students stand in a circle; teacher gives the student a word to spell. Each student says one letter, if they are wrong they are out and sit down. The next person after the word is spelt correctly says ‘pineapple’ and they are also out and have to sit down.
Work independently on assignment
Closure: Class discussion, what did you find difficult about this task? Where there any topics that you needed more in depth information about
Resources/Materials/Weblinks:
Access to computer room or laptop
Annotated exemplar
Draft with feedback from teacher Prior Knowledge:
Assignment should be almost complete
Homework/Assessment:
Nil
Lesson 15 – Making soil samples to support a brick Topic: Bridges Time: 70 min Lesson Number: 15 Author: Chapman & Moody
Lesson Title: Making soil samples to support a brick
Lesson Intentions:
Determine differences in soil types.
What things affect soils ability to hold up a building?
Sequence/Strategies:
Background information on the Leaning tower of pisa including images. (see resource 6.1) Begin by discussing the nature of soil. Following the discussion, take a core sample of soil from the
schoolyard or other area. Study the sample and have students describe the soil's content layers. Organize students into groups and distribute a copy of the "Hold it Up" student handout. The activity's goal
is to mix the soil sample that will best support a brick on end. As a class, have students decide what the experiment's parameters will be, such as whether to define a
depth for the soil sample, whether all soil types must be used, and whether the materials list should be
expanded to include additional soil types or other items. Have students record and illustrate their sample makeup in journals.
Once all groups have finished, have each group stand the brick upright in the center of its soil sample. Let the bricks stand overnight. The next day, have students measure the indentations left by the bricks.
As a class, discuss the depth of each groups' brick indentation. Then have students try another mix, repeat the experiment, and measure again. Discuss the new results, comparing similarities and differences to the original soil samples.
As an extension, have students lay the brick on its side in the same soil mixture they used to lay the brick on end, or have students test the brick both ways after saturating the mixture with water. Are the indentations the same? If not, what accounts for the differences?
Resources/Materials/Weblinks:
http://www.pbs.org/wgbh/nova/education/activities/2611_pisa_01.html
http://www.pbs.org/wgbh/nova/education/activities/2611_pisa.html
Bucket of dirt, sand, gravel
Coffee can or coring device Clear container big enough to hold a brick brick ruler with centimeter scale
6.1 Answers for leaning tower experiment
Prior Knowledge:
Students have done soil testing previously
Homework/Assessment:
Nil
Lesson 16 – Making soil samples to support a brick part 2 Topic: Bridges Time: 70 min Lesson Number: 16 Author: Moody
Lesson Title: Making soil samples to support a brick part 2
Lesson Intentions:
Determine differences in soil types.
What things affect soils ability to hold up a building?
Sequence/Strategies:
Check brick is still standing; check if there is an indent left from the brick. Try another arrangement of soils and see if it makes a difference.
If you can find a copy of the episode of Nova’s: fall of the leaning tower. It would be a great way to fnish the lesson.
Resources/Materials/Weblinks:
16.1 Answers for leaning tower experiment
Prior Knowledge:
Previous soil lesson
Homework/Assessment:
Nil

Lesson 17– Excursion Preparation Topic: Bridges Time: 70 min Lesson Number: 17 Author: Moody
Lesson Title: Excursion preparation
Lesson Intentions:
Determine the focus of excursion
Sequence/Strategies:
Hand out booklet for excursion to an area with lots of bridges. E.g Brisbane. Discuss what will happen whilst on excursion. Background research about the bridges.
Resources/Materials/Weblinks:
17.1 Brisbane Field Trip
Prior Knowledge:
Homework/Assessment:
Nil
Lesson 18 – Excursion Preparation & Assessment Feedback Topic: Bridges Time: 70 min Lesson Number: 1 Author: Moody
Lesson Title: Excursion Preparation & assessment Feedback
Lesson Intentions:
Determine the focus of excursion
Sequence/Strategies:
Discuss what will happen whilst on excursion. Background research about the bridges.
Assignment feedback + reflection. What did you do well, what could have been done better?
Resources/Materials/Weblinks:
Marked and moderated assessment with feeback
Prior Knowledge:
Homework/Assessment:
Nil
Resources
2.1 Note taking Template
Your Name: Today’s Date: Source (Title, author, publication date, URL etc):
Subject (general topic):
Abstract (pertinent information – paraphrase, avoid copying and pasting huge blocks of text):
Notes (take notes in this section, include how you could use this information in your assessment and whether you need to do some further research on any topics):

2.2 Door Pass
3.1 Compression and Tension in Bridge Design
Compression and Tension, Balanced and Unbalanced Forces Learning Goals: • Investigate forces acting on a bridge by making a human bridge with your arms.
• To become familiar with what forces “feel” like in different shapes. Task Card A Procedure: 1. Face your partner and stand approximately two feet apart from one another, with arms extended and feet firmly planted shoulder width apart. (Safety: Make sure that the area is clear of tables and chairs. Preferably, this exercise will be done on a carpeted surface.) 2. Place your palms against each other and with your elbows locked, push inward. Modify how much you push until both partners are steady, mimicking the position below.
3. What happens? Record any observations or questions. Diagram where you felt forces and what direction they were in. Outline the shapes that your bodies make.
4. Now, assume the same stance with your arms straight out, have one student exert a slightly greater degree of force against the palms of their partner.
5. What happens? Record any observations or questions. Diagram where you felt forces and what direction they were in. 6. Now, assume the same stance, but this time raise both hands up at an angle and press firmly on each other’s palms.
7. What happens? Record any observations or questions. Compare how this feels to the other position when your arms were straight out. Diagram where you felt forces and what direction they were in. Outline the shapes that your bodies make.
8. Now, assume the same stance, both hands raised up at an angle and press firmly on each other’s palms. One student exerts a slightly greater degree of force against the palms of their partner. 9. What happens? Record any observations or questions. Compare how this feels to the other position when your arms were straight out. Diagram where you felt forces and what direction they were in. Outline the shapes that your bodies make. Task Card B Procedure:
1. While standing and facing each other, grab hands with your partner and gently lean away from each other.
Name: __________________________________________
Would you be interested in a camp/excursion to Brisbane? _________________________________________
List one thing you would like to do if we went on a class trip to Brisbane: __________________________________
_______________________________________________________________________________________________
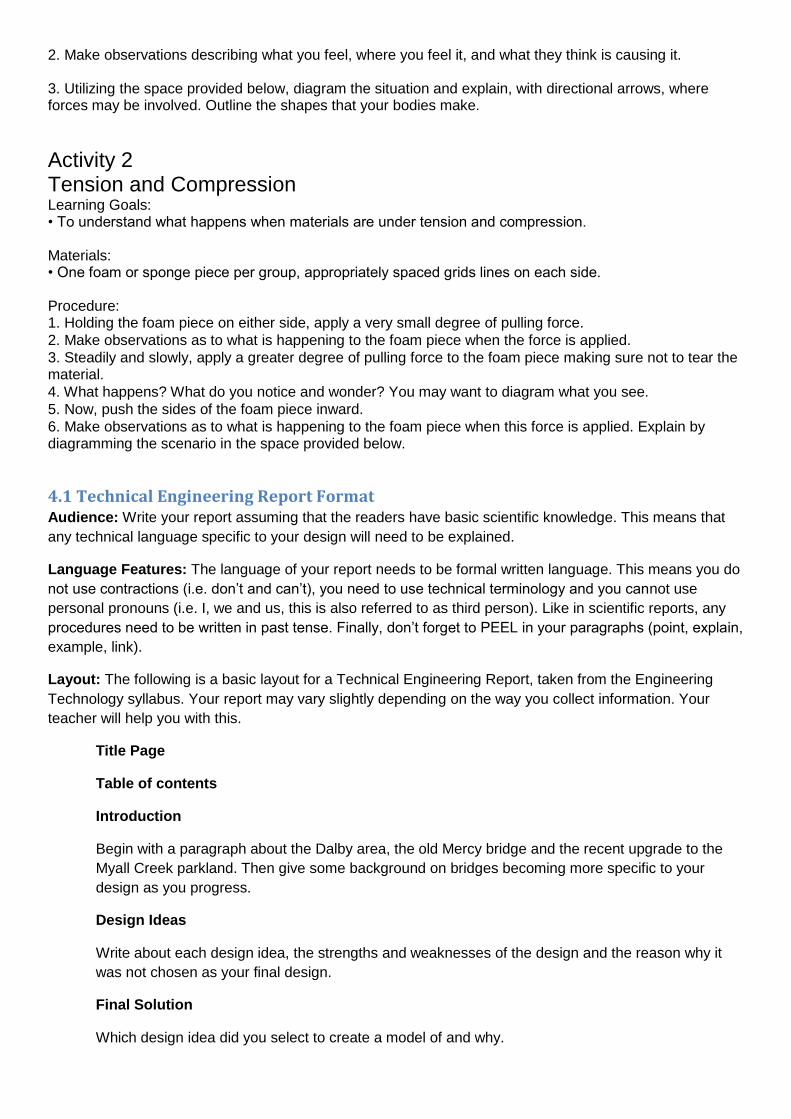
2. Make observations describing what you feel, where you feel it, and what they think is causing it. 3. Utilizing the space provided below, diagram the situation and explain, with directional arrows, where forces may be involved. Outline the shapes that your bodies make.
Activity 2 Tension and Compression Learning Goals: • To understand what happens when materials are under tension and compression. Materials: • One foam or sponge piece per group, appropriately spaced grids lines on each side. Procedure: 1. Holding the foam piece on either side, apply a very small degree of pulling force.
2. Make observations as to what is happening to the foam piece when the force is applied.
3. Steadily and slowly, apply a greater degree of pulling force to the foam piece making sure not to tear the material.
4. What happens? What do you notice and wonder? You may want to diagram what you see.
5. Now, push the sides of the foam piece inward.
6. Make observations as to what is happening to the foam piece when this force is applied. Explain by diagramming the scenario in the space provided below.
4.1 Technical Engineering Report Format Audience: Write your report assuming that the readers have basic scientific knowledge. This means that
any technical language specific to your design will need to be explained.
Language Features: The language of your report needs to be formal written language. This means you do
not use contractions (i.e. don’t and can’t), you need to use technical terminology and you cannot use
personal pronouns (i.e. I, we and us, this is also referred to as third person). Like in scientific reports, any
procedures need to be written in past tense. Finally, don’t forget to PEEL in your paragraphs (point, explain,
example, link).
Layout: The following is a basic layout for a Technical Engineering Report, taken from the Engineering
Technology syllabus. Your report may vary slightly depending on the way you collect information. Your
teacher will help you with this.
Title Page
Table of contents
Introduction
Begin with a paragraph about the Dalby area, the old Mercy bridge and the recent upgrade to the
Myall Creek parkland. Then give some background on bridges becoming more specific to your
design as you progress.
Design Ideas
Write about each design idea, the strengths and weaknesses of the design and the reason why it
was not chosen as your final design.
Final Solution
Which design idea did you select to create a model of and why.

Test Results
Did you perform any tests on the soil, water, building material or the model of your bridge? This is
where you would put that information.
Conclusions and Recommendations
This is the same as the analysis you have been doing for the design challenges.
Include a reflection on:
Strengths and limitations of your design
How you worked as a team.
Ideas for further development
References
A list of all sources used.
Appendices
Anything extra
4.2 Communicating using a scientific graph
In this activity you will draw a graph and use it to analyse data that a scientist collects. You will need the following
materials: graph paper, a sharpened pencil and a ruler.
Scenario
You have just started work for a mining company as a botanist (i.e. a scientist who studies plants). Larry, a senior
botanist, will be working closely with you on your first project. You are preparing data for use by Laurie, an
environmental scientist.
What do you and Larry need to do?
In this project you and Larry will gather data on the plants growing in an area that is to be mined. You will need to
present information that identifies the key plant species that grow on the site and how long these species take to
grow from seed to a mature plant.
Who will need this information?
Laurie is an environmental scientist working for the same mining company. Her job is to collect information about
the mine area, such as:
the naturally occurring species of animals and plants
the types of soil and landforms
patterns of overground water flow
underground water levels and salinity.
The company wants her to do this so that when they have finished mining the area, they can start a program to
rehabilitate it.

What will Laurie use this data for?
One of the things that Laurie will be advising on is how best to grow the native plants back on the mined area once
the rehabilitation program starts. Some plants might be able to grow back if seeds are spread in topsoil. However, if
a species of plant takes longer than 12 months to grow from seed, she will advise that seedlings for those species be
prepared in a nursery beforehand.
Where Larry get the data from?
He will use field observations and reference materials.
Field observations — to find out which plant species are in the mine area and what proportion of the area each is
found in.
Reference materials — to get more information about the plant species that have been found. He has needed to
look up how long plants of each species take to grow from seed to a mature plant in this particular type of forest
where the mine is located. This information will be referred to as ‘growth times’.
Based on this research, Larry has collated the information on six plant species he regards as the key species found in
the mine area. The information he found is presented in Table A. He gives this table to you.
How will you best represent the data for Laurie to use?
Complete Table B by converting the times shown in Table A to months.
Table B: Growth time of Key Plant Species in months
Plant type Growth time in months
Grass A Leave 1 line per cell
Grass B
Shrub C
Shrub D
Tree E
Tree F
You will now present the information in Table B as a graph. Use graph paper, a pencil and a ruler. Spend some time
planning your graph before you start:
x-axis of the graph — the names of the plant species, equally spaced.
y-axis — determine the scale that is best to show differences between the data values. To work out the best scale,
look at the highest number that is in the data.
Table A: Growth time of Key Plant SpeciesPlant type
Growth time as listed in reference material
Grass A Four weeks
Grass B Twelve weeks
Shrub C Eight weeks
Shrub D 1 year
Tree E 3 years
Tree F 2 years
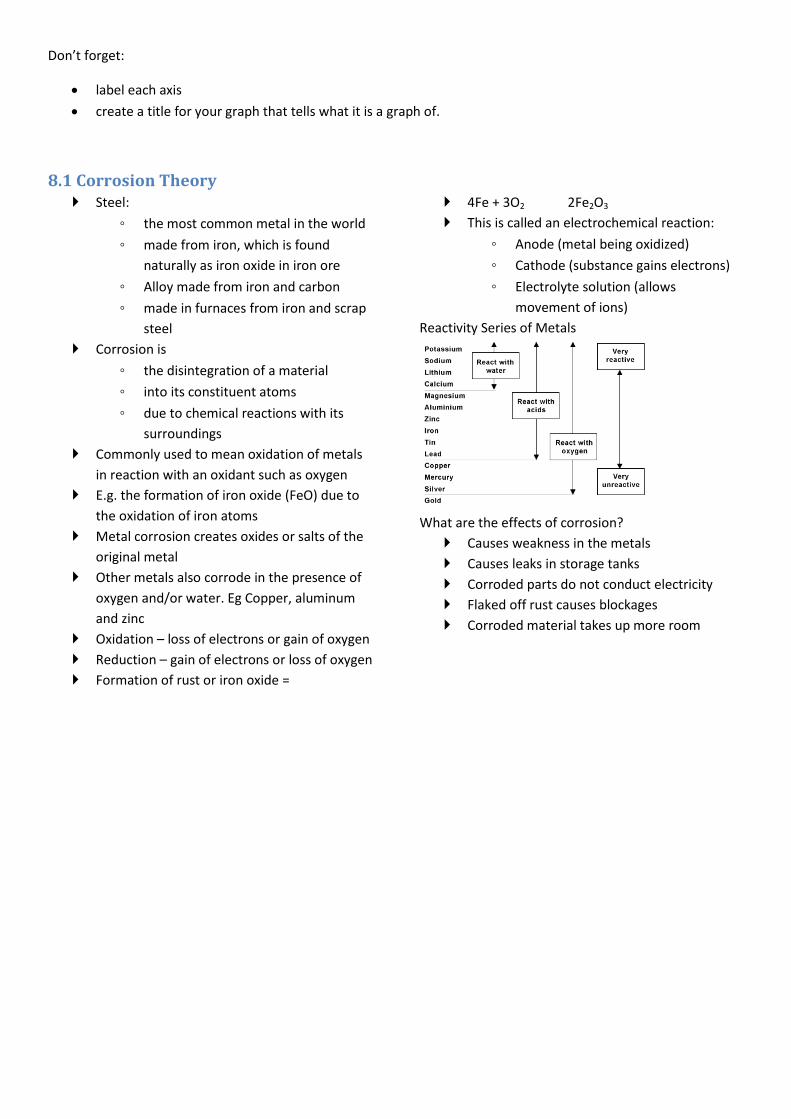
Don’t forget:
label each axis
create a title for your graph that tells what it is a graph of.
8.1 Corrosion Theory Steel:
◦ the most common metal in the world
◦ made from iron, which is found
naturally as iron oxide in iron ore
◦ Alloy made from iron and carbon
◦ made in furnaces from iron and scrap
steel
Corrosion is
◦ the disintegration of a material
◦ into its constituent atoms
◦ due to chemical reactions with its
surroundings
Commonly used to mean oxidation of metals
in reaction with an oxidant such as oxygen
E.g. the formation of iron oxide (FeO) due to
the oxidation of iron atoms
Metal corrosion creates oxides or salts of the
original metal
Other metals also corrode in the presence of
oxygen and/or water. Eg Copper, aluminum
and zinc
Oxidation – loss of electrons or gain of oxygen
Reduction – gain of electrons or loss of oxygen
Formation of rust or iron oxide =
4Fe + 3O2 2Fe2O3
This is called an electrochemical reaction:
◦ Anode (metal being oxidized)
◦ Cathode (substance gains electrons)
◦ Electrolyte solution (allows
movement of ions)
Reactivity Series of Metals
What are the effects of corrosion?
Causes weakness in the metals
Causes leaks in storage tanks
Corroded parts do not conduct electricity
Flaked off rust causes blockages
Corroded material takes up more room

9.1 Iron Nail Corrosion

16.1 Answers for leaning tower experiment
Students' results will vary. Compare the soil makeup of the group whose brick left the least indentation to those of
the other groups. In which ways are they alike? How do they differ? What might students infer from this?
Soil is made up of inorganic and organic particles. Inorganic particles include rocks and minerals, such as clay, silt, sand, gravel, and stone. Organic particles may include decomposed plants and animals and living plant roots.
The structure of soil is determined by the arrangement of particles, which account for the pore space within the soil that may be filled with air or water. The nature of soil is determined by the parent rock from which it came, the climate that has weathered it, the vegetation it contains, the topography where it lies, and the time it has had to mature. The U.S. Department of Agriculture, which maps and collects soil data, has cataloged more than 50,000 different varieties of soil in the United States.
Civil engineers specializing in soil mechanics determine whether a soil substrate is suitable to build upon, and if not, what measures need to be taken to make it safe. Civil engineers work with structures such as buildings, highways, dams, and bridges.
17.1 Brisbane Field Trip
BRIDGE FIELD TRIP Glossary of terms
Through the course of the day, complete the definitions below and add to the list of
specific engineering terminology that relates to your assignment.
Viaduct Definition: A long elevated roadway usually consisting of a series of short spans supported on arches, piers, or columns.
Context: In Europe, there are still viaducts over deep valleys that were built by the Roman Empire.
Resonance Definition: A vibration of large amplitude in a mechanical or electrical system caused by a relatively small periodic stimulus of the same
or nearly the same period as the natural vibration period of the system.
Context: The magnified sways and twisting of the Tacoma Narrows Bridge were caused by the resonance of 40-mile-per-hour winds and
the natural oscillations of the bridge.
Abutments:_____________________________________________________________________________
______________________________________________________________________________________
Piers:__________________________________________________________________________________
_______________________________________________________________________________________
Deflection:______________________________________________________________________________
_______________________________________________________________________________________
Story Bridge 1. Sketch a profile of the Story Bridge in the space below.
2. Analyse the structure and apply the principles of Statics to identify (holistically) tension and compression.
___________________________________________________________________________________________________
___________________________________________________________________________________________________
___________________________________________________________________________________________________
___________________________________________________________________________________________________
3. Describe the type of bridge design:
___________________________________________________________________________________________________
___________________________________________________________________________________________________
4. Comment on how the structure transfers loads to the footings and abutments:
Zero force member?
___________________________________________________________________________________________________
___________________________________________________________________________________________________
Note the different size. What does this imply with respect to your knowledge of calculating the magnitude of
forces in structures?
___________________________________________________________________________________________________
___________________________________________________________________________________________________
Captain Cook Bridge 1. Sketch a profile of the Captain Cook Bridge in the space below.
2. Analyse the structure and apply the principles of Statics to identify tension and compression.
___________________________________________________________________________________________________
___________________________________________________________________________________________________
___________________________________________________________________________________________________
___________________________________________________________________________________________________
3. Describe the type of bridge design:
___________________________________________________________________________________________________
___________________________________________________________________________________________________
4. Comment on how the structure transfers loads to the footings and abutments:
___________________________________________________________________________________________________
___________________________________________________________________________________________________
___________________________________________________________________________________________________
___________________________________________________________________________________________________
4. Compare and contrast to the Story Bridge with reference to materials used and how they relate to design:
___________________________________________________________________________________________________
___________________________________________________________________________________________________
___________________________________________________________________________________________________
___________________________________________________________________________________________________
The Goodwill Bridge (Foot Bridge)
1. Sketch a profile of the Goodwill Bridge in the space below.

2. Analyse the structure and apply the principles of Statics to identify tension and compression.
___________________________________________________________________________________________________
___________________________________________________________________________________________________
___________________________________________________________________________________________________
___________________________________________________________________________________________________
3. Describe the type of bridge design:
___________________________________________________________________________________________________
___________________________________________________________________________________________________
4. Comment on how the structure transfers loads to the footings and abutments:
___________________________________________________________________________________________________
___________________________________________________________________________________________________
___________________________________________________________________________________________________
Victoria Bridge 1. Sketch a profile of the current Victoria Bridge in the space below.
2. Analyse the new structure and apply the principles of Statics to identify tension and compression.
___________________________________________________________________________________________________
___________________________________________________________________________________________________
___________________________________________________________________________________________________
___________________________________________________________________________________________________
3. Describe the type of bridge design:
___________________________________________________________________________________________________
___________________________________________________________________________________________________
4. Comment on how the structure transfers loads to the footings and abutments:
___________________________________________________________________________________________________
___________________________________________________________________________________________________
___________________________________________________________________________________________________
___________________________________________________________________________________________________
5. What other Brisbane Bridges are similar to this design?
___________________________________________________________________________________________________
___________________________________________________________________________________________________
___________________________________________________________________________________________________
___________________________________________________________________________________________________
a. Hypothesis why this style of bridge is so common:
___________________________________________________________________________________________________
___________________________________________________________________________________________________
___________________________________________________________________________________________________
___________________________________________________________________________________________________
b. Does this spell the end for large truss bridges like the story bridge?
___________________________________________________________________________________________________
___________________________________________________________________________________________________
___________________________________________________________________________________________________
___________________________________________________________________________________________________
c. Why?

___________________________________________________________________________________________________
___________________________________________________________________________________________________
___________________________________________________________________________________________________
___________________________________________________________________________________________________
William Jolly Bridge 1. Sketch a profile of the William Jolly Bridge in the space below.
2. Analyse the structure and apply the principles of Statics to identify tension and compression.
___________________________________________________________________________________________________
___________________________________________________________________________________________________
___________________________________________________________________________________________________
___________________________________________________________________________________________________
3. Describe the type of bridge design:
___________________________________________________________________________________________________
___________________________________________________________________________________________________
___________________________________________________________________________________________________
___________________________________________________________________________________________________
4. Comment on how the structure transfers loads to the footings and abutments:
___________________________________________________________________________________________________
___________________________________________________________________________________________________
___________________________________________________________________________________________________
___________________________________________________________________________________________________
5. Sketch a profile of the section shown above.
___________________________________________________________________________________________________
___________________________________________________________________________________________________
___________________________________________________________________________________________________
___________________________________________________________________________________________________
6. Analyse the structure and apply the principles of Statics to identify tension and compression.
___________________________________________________________________________________________________
___________________________________________________________________________________________________
___________________________________________________________________________________________________
___________________________________________________________________________________________________
Merivale Bridge 1. Sketch a profile of the Merivale Bridge in the space below.

2. Analyse the structure and apply the principles of Statics to identify tension and compression.
___________________________________________________________________________________________________
___________________________________________________________________________________________________
___________________________________________________________________________________________________
___________________________________________________________________________________________________
3. Describe the type of bridge design:
___________________________________________________________________________________________________
___________________________________________________________________________________________________
___________________________________________________________________________________________________
___________________________________________________________________________________________________
4. Comment on how the structure transfers loads to the footings and abutments:
___________________________________________________________________________________________________
___________________________________________________________________________________________________
___________________________________________________________________________________________________
___________________________________________________________________________________________________
5. Sketch a profile of the section shown above.
6. Suspension bridges often have mainly vertical ties. Hypothesis as to why there are so many ties fixed at an
angle (strength v aesthetics):
___________________________________________________________________________________________________
___________________________________________________________________________________________________
___________________________________________________________________________________________________
___________________________________________________________________________________________________
__________________________________________________________________
The Green Bridge 1. Sketch a profile of the Green Bridge in the space below.
2. Analyse the structure and apply the principles of Statics to identify tension and compression.
___________________________________________________________________________________________________
___________________________________________________________________________________________________
___________________________________________________________________________________________________
___________________________________________________________________________________________________
3. Describe the type of bridge design:

___________________________________________________________________________________________________
___________________________________________________________________________________________________
___________________________________________________________________________________________________
___________________________________________________________________________________________________
4. Comment on how the structure transfers loads to the footings and abutments:
___________________________________________________________________________________________________
___________________________________________________________________________________________________
___________________________________________________________________________________________________
___________________________________________________________________________________________________
Walk over and under the bridge safely:
5. Investigate and analyse the bridge to identify how the structure deals with movement. Propose how and why it
moves?
___________________________________________________________________________________________________
___________________________________________________________________________________________________
___________________________________________________________________________________________________
___________________________________________________________________________________________________
5. Identify the specific design features that support movement:
___________________________________________________________________________________________________
___________________________________________________________________________________________________
___________________________________________________________________________________________________
___________________________________________________________________________________________________
Corrosion prevention is a major consideration for engineers.
7. Investigate the structure to identify and explain the corrosion prevention methods used:
1. List all of the bridge styles utilized on the Brisbane river:
___________________________________________________________________________________________________
___________________________________________________________________________________________________
___________________________________________________________________________________________________
___________________________________________________________________________________________________
2. List the bridge styles not used on the Brisbane River:
___________________________________________________________________________________________________
___________________________________________________________________________________________________
___________________________________________________________________________________________________
___________________________________________________________________________________________________
3. Why do you think this is so?
___________________________________________________________________________________________________
___________________________________________________________________________________________________
___________________________________________________________________________________________________
___________________________________________________________________________________________________
Additional notes and questions

Communicate
Identify problem Recall,
select & apply
knowledge
Interpret & analyse
Propose possible solutions
Analyse solutions
Select & evaluate solutions
Prototype & test
Draw conclusions and make
recommendations
Assessment Item
Assignment – TER
Bridges Technical Engineering Report Engineering Background Engineers have a complex task balancing the many aspects of structures they create. Bridges for example,
they must be capable of carrying a specific load, be safe, be affordable, be aesthetically pleasing, have a
very long life span, have minimal maintenance cost, not interfere with the local ecology and be respectful to
the local indigenous perspectives. All of this knowledge must be collated and organized at the ‘recall, select
and apply knowledge’ stage of the design process. This is before the first possible design is even drawn.
Outline of the Task
You have been employed by the Western Downs Regional
Council to design a replacement foot bridge for the current
‘Mercy Bridge’ on the Myall Creek in Dalby. They want it to
be a functional foot and wheelchair accessible bridge. It
needs to be aesthetically pleasing and have some level of
tourism interest as it will be a part of the recent
development of the Myall Creek parkland.
You will follow the design process step by step collating
your research and notes in a journal before coming up with
at least three possible designs. From these three designs
you will select one to build a scale model of. You will then
write a Technical Engineering Report on your designs.
Your designs and model will be created in a group of three
(randomly generated groups) but your journal and report
will be created individually.
Fig 1. Image of current ‘Mercy Bridge’
Fig 2. Map of area where bridge is
positioned. Dotted line is bridge position.
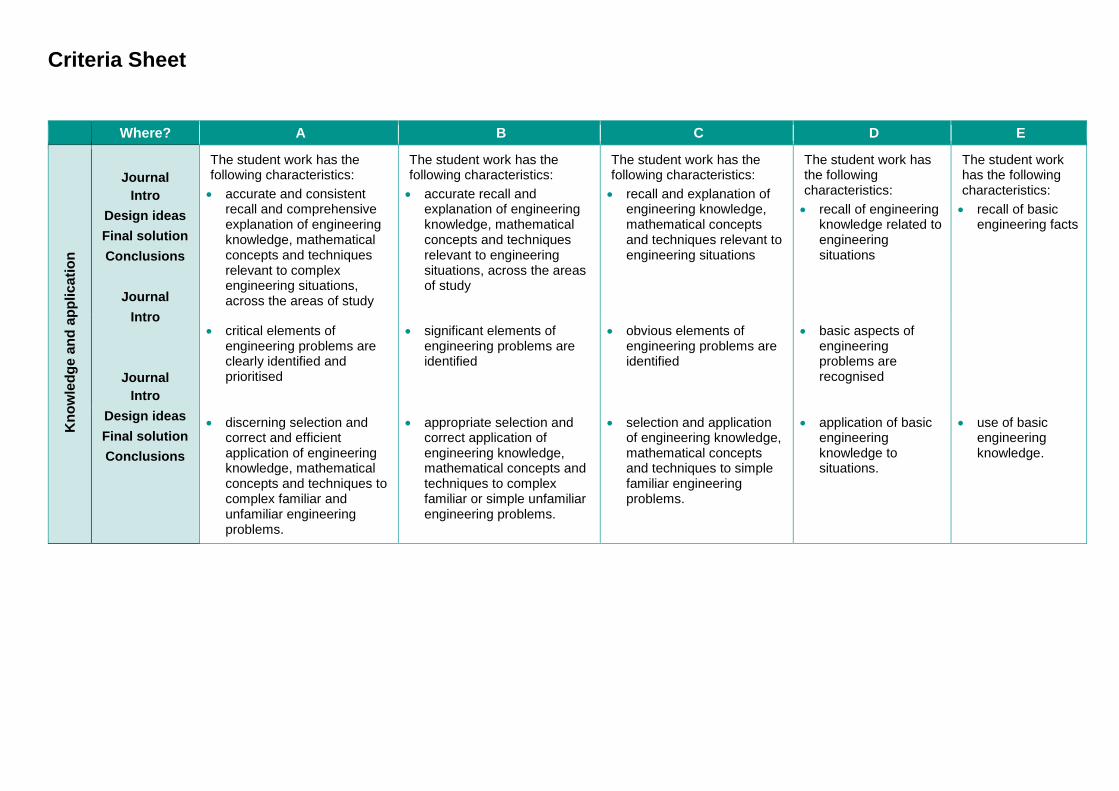
Criteria Sheet
Where? A B C D E
Kn
ow
led
ge
an
d a
pp
lic
ati
on
Journal
Intro
Design ideas
Final solution
Conclusions
Journal
Intro
Journal
Intro
Design ideas
Final solution
Conclusions
The student work has the following characteristics:
accurate and consistent recall and comprehensive explanation of engineering knowledge, mathematical concepts and techniques relevant to complex engineering situations, across the areas of study
The student work has the following characteristics:
accurate recall and explanation of engineering knowledge, mathematical concepts and techniques relevant to engineering situations, across the areas of study
The student work has the following characteristics:
recall and explanation of engineering knowledge, mathematical concepts and techniques relevant to engineering situations
The student work has the following characteristics:
recall of engineering knowledge related to engineering situations
The student work has the following characteristics:
recall of basic engineering facts
critical elements of engineering problems are clearly identified and prioritised
significant elements of engineering problems are identified
obvious elements of engineering problems are identified
basic aspects of engineering problems are recognised
discerning selection and correct and efficient application of engineering knowledge, mathematical concepts and techniques to complex familiar and unfamiliar engineering problems.
appropriate selection and correct application of engineering knowledge, mathematical concepts and techniques to complex familiar or simple unfamiliar engineering problems.
selection and application of engineering knowledge, mathematical concepts and techniques to simple familiar engineering problems.
application of basic engineering knowledge to situations.
use of basic engineering knowledge.

Where? A B C D E
Inv
es
tig
ati
ve
an
d a
na
lyti
ca
l p
roce
sse
s
Design
ideas
Final
solution
Test results
Conclusion
s
The student work has the following characteristics:
effective interpretation and thorough analysis of relevant engineering data
The student work has the following characteristics:
correct interpretation and detailed analysis of obvious relevant engineering data
The student work has the following characteristics:
interpretation and analysis of engineering data
The student work has the following characteristics:
explanation of basic engineering data
The student work has the following characteristics:
factual statements are made about data
solutions are analysed in depth and detail from multiple perspectives to identify relevant engineering principles
solutions are analysed in detail to identify relevant engineering principles
solutions are analysed in relation to engineering principles
optimal prototypes and/or models that validate solutions are developed and refined.
effective prototypes and/or models that test solutions are developed and modified.
workable prototypes and/or models that test solutions are developed.
prototypes or models that test aspects of solutions are developed.
incomplete models are produced.
Ev
alu
ati
on
an
d t
ec
hn
ical c
om
mu
nic
ati
on
Conclusion
s
Conclusion
s
Overall report
The student work has the following characteristics:
comprehensive evaluation of solutions in relation to the critical elements of engineering problems
The student work has the following characteristics:
considered evaluation of solutions in relation to the significant elements of engineering problems
The student work has the following characteristics:
evaluation of solutions in relation to obvious elements of engineering problems
The student work has the following characteristics:
comparison of solutions in relation to engineering problems
The student work has the following characteristics:
comparison of ideas
valid, well-reasoned conclusions and recommendations based on investigations and justified by relevant engineering knowledge and data
valid conclusions and recommendations based on investigations and supported by engineering knowledge or data
conclusions and recommendations are based on investigations
conclusions are stated and recommendations made
effective organisation and succinct presentation of information in the most appropriate modes relevant to engineering situations
logical organisation and clear presentation of information in appropriate modes relevant to engineering situations
organisation and presentation of information in modes relevant to engineering situations
presentation of engineering information
presentation of some information related to engineering.