year end procedures 2014 for sage 100 erp -...
TRANSCRIPT

Year End
Closing
Procedures
for Sage 100
ERP
2014
Martin &
Associates

Show/Hide All
Period End/Year End FAQs
Home| FAQs & Troubleshooting
Click a question below to view the answer.
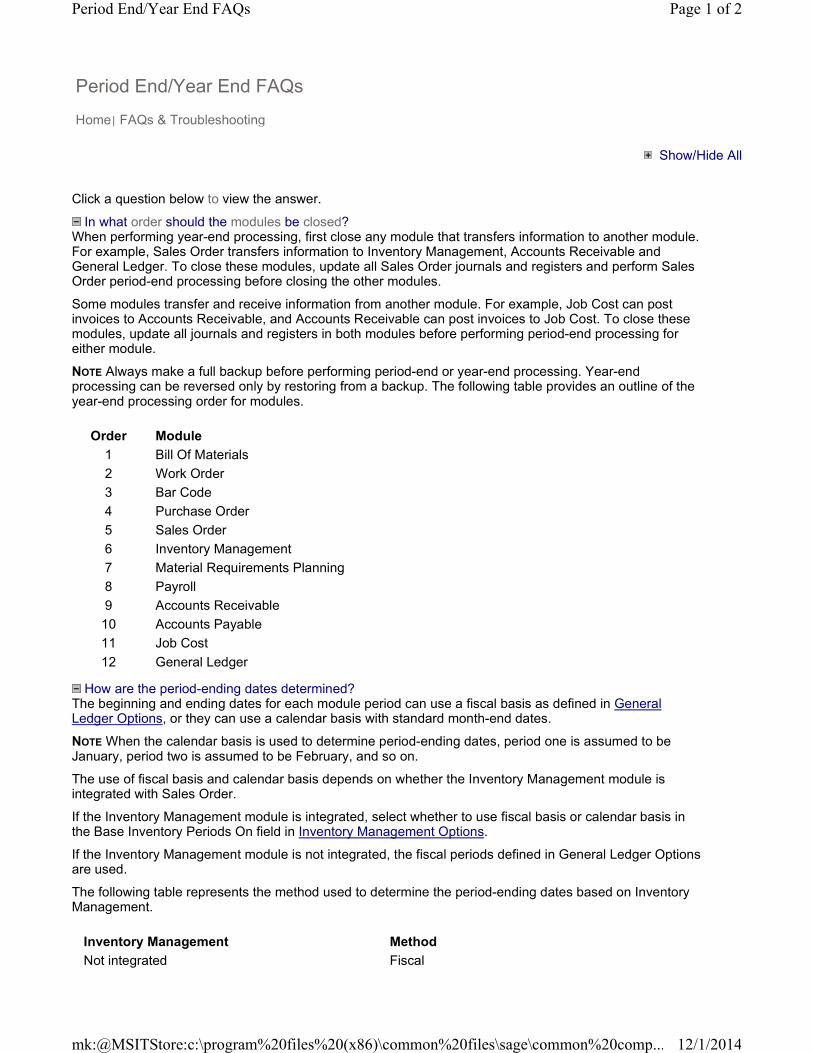
In what order should the modules be closed?When performing year-end processing, first close any module that transfers information to another module. For example, Sales Order transfers information to Inventory Management, Accounts Receivable and General Ledger. To close these modules, update all Sales Order journals and registers and perform Sales Order period-end processing before closing the other modules.
Some modules transfer and receive information from another module. For example, Job Cost can post invoices to Accounts Receivable, and Accounts Receivable can post invoices to Job Cost. To close these modules, update all journals and registers in both modules before performing period-end processing for either module.
NOTE Always make a full backup before performing period-end or year-end processing. Year-end processing can be reversed only by restoring from a backup. The following table provides an outline of the year-end processing order for modules.
How are the period-ending dates determined?The beginning and ending dates for each module period can use a fiscal basis as defined in General Ledger Options, or they can use a calendar basis with standard month-end dates.
NOTE When the calendar basis is used to determine period-ending dates, period one is assumed to be January, period two is assumed to be February, and so on.
The use of fiscal basis and calendar basis depends on whether the Inventory Management module is integrated with Sales Order.
If the Inventory Management module is integrated, select whether to use fiscal basis or calendar basis in the Base Inventory Periods On field in Inventory Management Options.
If the Inventory Management module is not integrated, the fiscal periods defined in General Ledger Options are used.
The following table represents the method used to determine the period-ending dates based on Inventory Management.
Order Module
1 Bill Of Materials
2 Work Order
3 Bar Code
4 Purchase Order
5 Sales Order
6 Inventory Management
7 Material Requirements Planning
8 Payroll
9 Accounts Receivable
10 Accounts Payable
11 Job Cost
12 General Ledger
Inventory Management Method
Not integrated Fiscal
Page 1 of 2Period End/Year End FAQs
12/1/2014mk:@MSITStore:c:\program%20files%20(x86)\common%20files\sage\common%20comp...
For more information, see Create a Fiscal Year and Posting to Future Accounting Periods.
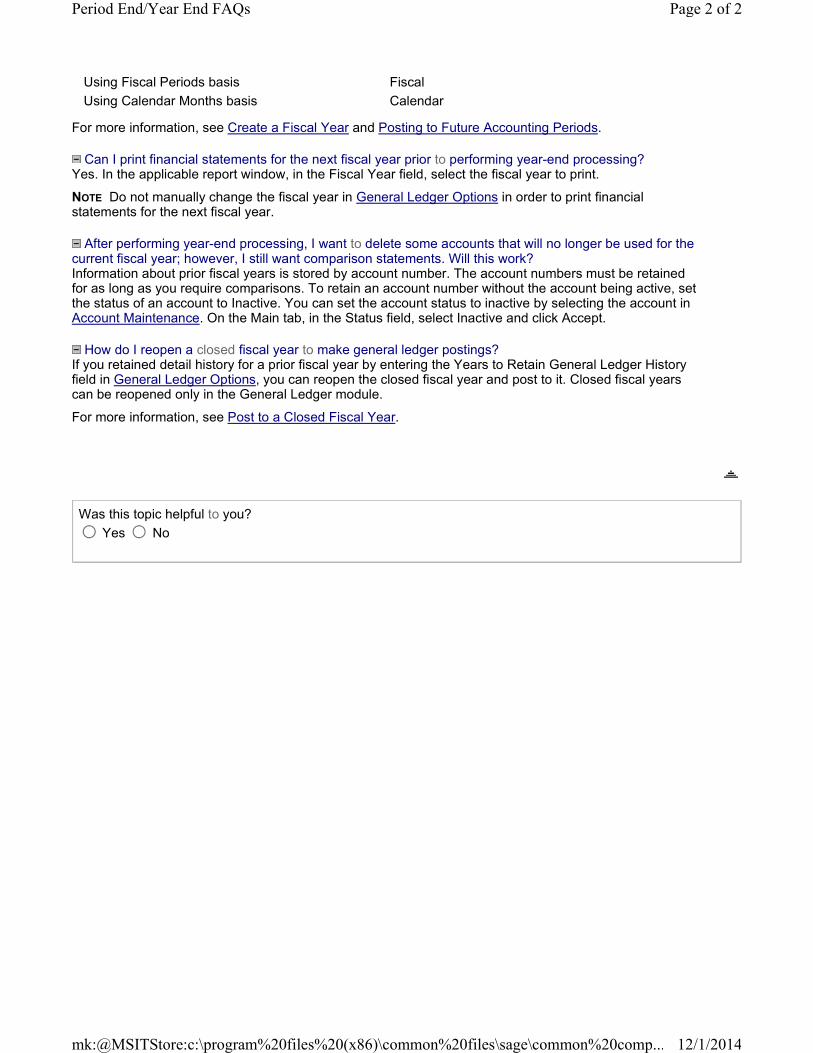
Can I print financial statements for the next fiscal year prior to performing year-end processing?Yes. In the applicable report window, in the Fiscal Year field, select the fiscal year to print.
NOTE Do not manually change the fiscal year in General Ledger Options in order to print financial statements for the next fiscal year.
After performing year-end processing, I want to delete some accounts that will no longer be used for the current fiscal year; however, I still want comparison statements. Will this work?Information about prior fiscal years is stored by account number. The account numbers must be retained for as long as you require comparisons. To retain an account number without the account being active, set the status of an account to Inactive. You can set the account status to inactive by selecting the account in Account Maintenance. On the Main tab, in the Status field, select Inactive and click Accept.
How do I reopen a closed fiscal year to make general ledger postings?If you retained detail history for a prior fiscal year by entering the Years to Retain General Ledger History field in General Ledger Options, you can reopen the closed fiscal year and post to it. Closed fiscal years can be reopened only in the General Ledger module.
For more information, see Post to a Closed Fiscal Year.
Using Fiscal Periods basis Fiscal
Using Calendar Months basis Calendar
Was this topic helpful to you?
Yes No
Page 2 of 2Period End/Year End FAQs
12/1/2014mk:@MSITStore:c:\program%20files%20(x86)\common%20files\sage\common%20comp...

Show/Hide All
Perform Period-End and Year-End Processing
Home | FAQs & Troubleshooting
Overview Before You Begin
Use one of the following methods:
� To perform period-end or year-end processing in the General Ledger, Accounts Receivable, Accounts Payable, and Sales Order, Inventory Management, and Purchase Order modules
� To perform period-end or year-end processing in all other modules
To perform period-end or year-end processing in the General Ledger, Accounts Receivable, Accounts Payable, Sales Order, Inventory Management, and Purchase Order modules
NOTE The number of years to retain transaction history after year-end processing is determined in the module's Options window.
1. Select the module's Period End menu > Period End Processing.
2. Verify that the correct period is displayed. If the correct period is not displayed, change the period in the module's Options window.
3. Select the Print Period End Reports check box to print period-end or year-end reports. For more information, see Period End Processing - Fields.
4. Click Proceed.
5. In the General Ledger module, if you have not posted cycle allocations before beginning period-endor year-end processing, you are prompted do to so. Select one of the following options:
� To post allocations before completing period-end or year-end processing, click No. For information about selecting and posting allocations, see Select Allocations for Posting. After you have posted allocations, continue to the next step.
� To continue with period-end processing or year-end processing without posting allocations, click Yes and continue to the next step.
6. If you selected the Print Period End Reports check box in step 3, the Period End Reports window appears. Complete the following steps in the Period End Reports window:
a. In the Report Name and Report Setting/Financial Group fields, verify that the correct reports and financial report groups are listed. For more information, see Period End Reports - Fields. The reports and financial report groups listed are selected in Period End Report Selection.
b. In the Copies field, enter the number of copies to print for each report and financial report group.
c. Select the Saved Printer check box to print the report to the printer saved for the selected report setting.
d. Select the Print check box for each report and financial report group to print. Click Print.
NOTE If you select Preview, all reports will be previewed regardless of the saved printer for the report. After the reports are previewed, you are taken back to the menu. You must print the reports to complete period-end processing.
7. You are prompted to confirm that the closing period will be changed to the next open period. Click Yes to complete period-end or year-end processing.
Period-end or year-end processing is complete. After you perform this procedure, the following occurs:
If you performed period-end processingThe current accounting period is closed, and the accounting period is cycled forward to the next open period. In addition:
Page 1 of 3Perform Period-End and Year-End Processing
12/1/2014mk:@MSITStore:c:\program%20files%20(x86)\common%20files\sage\common%20comp...
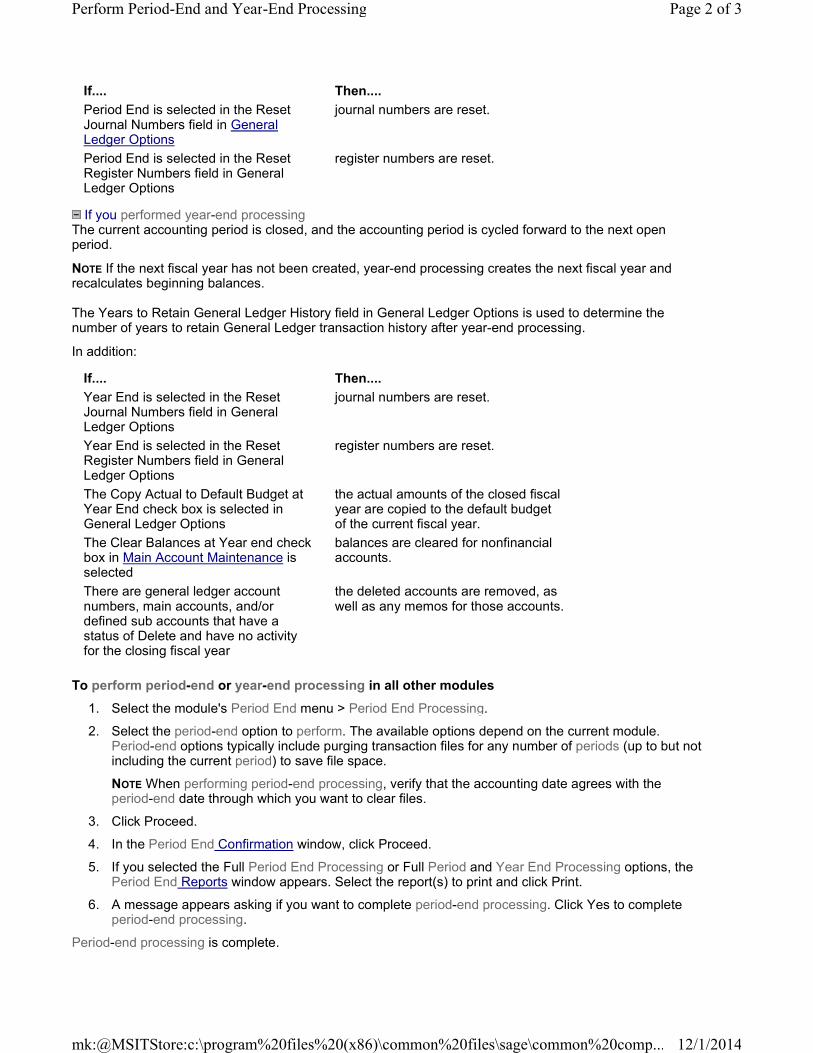
If you performed year-end processingThe current accounting period is closed, and the accounting period is cycled forward to the next open period.
NOTE If the next fiscal year has not been created, year-end processing creates the next fiscal year and recalculates beginning balances.
The Years to Retain General Ledger History field in General Ledger Options is used to determine the number of years to retain General Ledger transaction history after year-end processing.
In addition:
To perform period-end or year-end processing in all other modules
1. Select the module's Period End menu > Period End Processing.
2. Select the period-end option to perform. The available options depend on the current module. Period-end options typically include purging transaction files for any number of periods (up to but not including the current period) to save file space.
NOTE When performing period-end processing, verify that the accounting date agrees with the period-end date through which you want to clear files.
3. Click Proceed.
4. In the Period End Confirmation window, click Proceed.
5. If you selected the Full Period End Processing or Full Period and Year End Processing options, the Period End Reports window appears. Select the report(s) to print and click Print.
6. A message appears asking if you want to complete period-end processing. Click Yes to complete period-end processing.
Period-end processing is complete.
If.... Then....
Period End is selected in the Reset Journal Numbers field in General Ledger Options
journal numbers are reset.
Period End is selected in the Reset Register Numbers field in General Ledger Options
register numbers are reset.
If.... Then....
Year End is selected in the Reset Journal Numbers field in General Ledger Options
journal numbers are reset.
Year End is selected in the Reset Register Numbers field in General Ledger Options
register numbers are reset.
The Copy Actual to Default Budget at Year End check box is selected in General Ledger Options
the actual amounts of the closed fiscal year are copied to the default budget of the current fiscal year.
The Clear Balances at Year end check box in Main Account Maintenance is selected
balances are cleared for nonfinancial accounts.
There are general ledger account numbers, main accounts, and/or defined sub accounts that have a status of Delete and have no activity for the closing fiscal year
the deleted accounts are removed, as well as any memos for those accounts.
Page 2 of 3Perform Period-End and Year-End Processing
12/1/2014mk:@MSITStore:c:\program%20files%20(x86)\common%20files\sage\common%20comp...
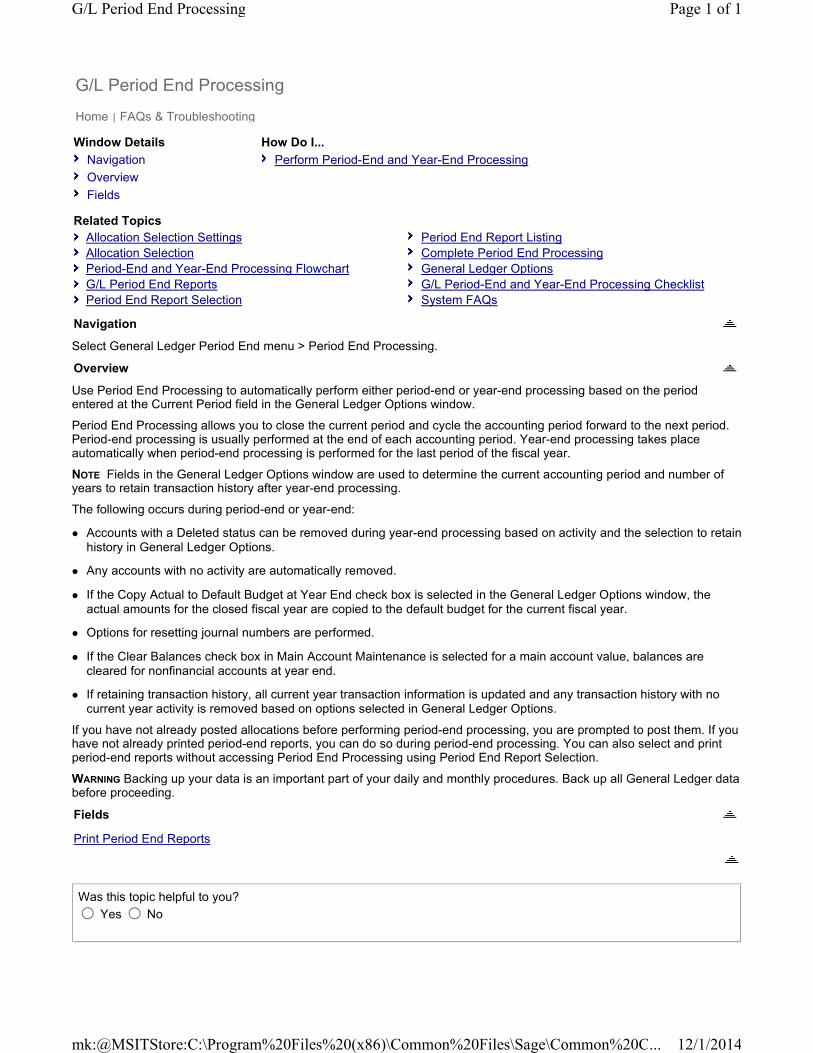
Select General Ledger Period End menu > Period End Processing.
Use Period End Processing to automatically perform either period-end or year-end processing based on the period entered at the Current Period field in the General Ledger Options window.
Period End Processing allows you to close the current period and cycle the accounting period forward to the next period. Period-end processing is usually performed at the end of each accounting period. Year-end processing takes place automatically when period-end processing is performed for the last period of the fiscal year.
NOTE Fields in the General Ledger Options window are used to determine the current accounting period and number of years to retain transaction history after year-end processing.
The following occurs during period-end or year-end:
� Accounts with a Deleted status can be removed during year-end processing based on activity and the selection to retain history in General Ledger Options.
� Any accounts with no activity are automatically removed.
� If the Copy Actual to Default Budget at Year End check box is selected in the General Ledger Options window, the actual amounts for the closed fiscal year are copied to the default budget for the current fiscal year.
� Options for resetting journal numbers are performed.
� If the Clear Balances check box in Main Account Maintenance is selected for a main account value, balances are cleared for nonfinancial accounts at year end.
� If retaining transaction history, all current year transaction information is updated and any transaction history with no current year activity is removed based on options selected in General Ledger Options.
If you have not already posted allocations before performing period-end processing, you are prompted to post them. If you have not already printed period-end reports, you can do so during period-end processing. You can also select and print period-end reports without accessing Period End Processing using Period End Report Selection.
WARNING Backing up your data is an important part of your daily and monthly procedures. Back up all General Ledger data before proceeding.
G/L Period End Processing
Home | FAQs & Troubleshooting
Window Details How Do I...
Navigation Perform Period-End and Year-End Processing
Overview
Fields
Related Topics
Allocation Selection Settings Period End Report Listing
Allocation Selection Complete Period End Processing
Period-End and Year-End Processing Flowchart General Ledger Options
G/L Period End Reports G/L Period-End and Year-End Processing Checklist
Period End Report Selection System FAQs
Navigation
Overview
Fields
Print Period End Reports
Was this topic helpful to you?
Yes No
Page 1 of 1G/L Period End Processing
12/1/2014mk:@MSITStore:C:\Program%20Files%20(x86)\Common%20Files\Sage\Common%20C...
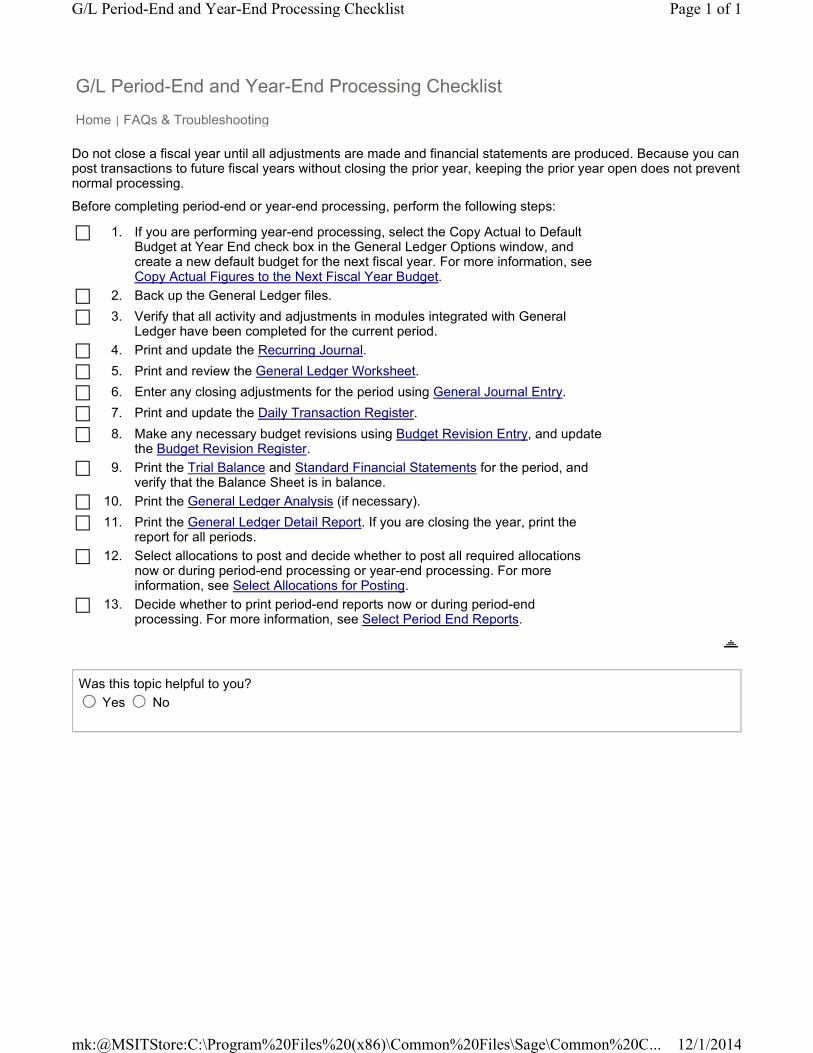
Do not close a fiscal year until all adjustments are made and financial statements are produced. Because you can post transactions to future fiscal years without closing the prior year, keeping the prior year open does not prevent normal processing.
Before completing period-end or year-end processing, perform the following steps:
G/L Period-End and Year-End Processing Checklist
Home | FAQs & Troubleshooting
1. If you are performing year-end processing, select the Copy Actual to Default Budget at Year End check box in the General Ledger Options window, and create a new default budget for the next fiscal year. For more information, see Copy Actual Figures to the Next Fiscal Year Budget.
2. Back up the General Ledger files.
3. Verify that all activity and adjustments in modules integrated with General Ledger have been completed for the current period.
4. Print and update the Recurring Journal.
5. Print and review the General Ledger Worksheet.
6. Enter any closing adjustments for the period using General Journal Entry.
7. Print and update the Daily Transaction Register.
8. Make any necessary budget revisions using Budget Revision Entry, and update the Budget Revision Register.
9. Print the Trial Balance and Standard Financial Statements for the period, and verify that the Balance Sheet is in balance.
10. Print the General Ledger Analysis (if necessary).
11. Print the General Ledger Detail Report. If you are closing the year, print the report for all periods.
12. Select allocations to post and decide whether to post all required allocations now or during period-end processing or year-end processing. For more information, see Select Allocations for Posting.
13. Decide whether to print period-end reports now or during period-end processing. For more information, see Select Period End Reports.
Was this topic helpful to you?
Yes No
Page 1 of 1G/L Period-End and Year-End Processing Checklist
12/1/2014mk:@MSITStore:C:\Program%20Files%20(x86)\Common%20Files\Sage\Common%20C...
Show/Hide All
Post to a Closed Fiscal Year
Home | FAQs & Troubleshooting
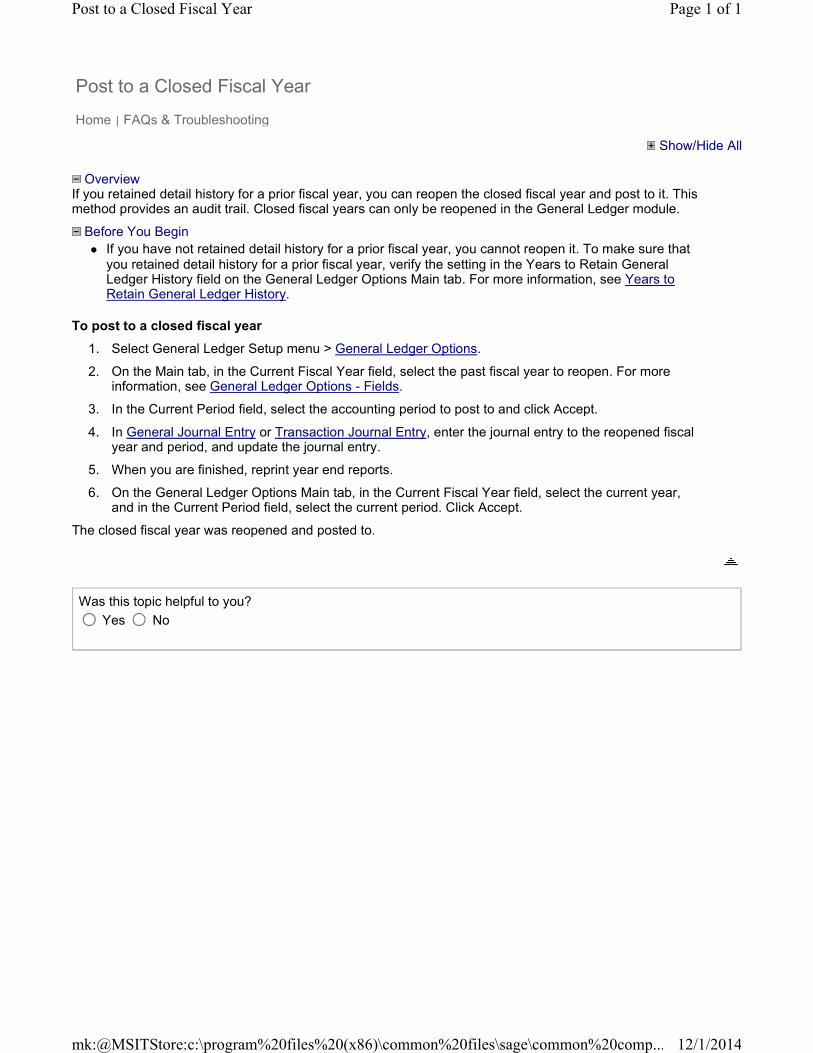
OverviewIf you retained detail history for a prior fiscal year, you can reopen the closed fiscal year and post to it. This method provides an audit trail. Closed fiscal years can only be reopened in the General Ledger module.
Before You Begin
� If you have not retained detail history for a prior fiscal year, you cannot reopen it. To make sure that you retained detail history for a prior fiscal year, verify the setting in the Years to Retain General Ledger History field on the General Ledger Options Main tab. For more information, see Years to Retain General Ledger History.
To post to a closed fiscal year
1. Select General Ledger Setup menu > General Ledger Options.
2. On the Main tab, in the Current Fiscal Year field, select the past fiscal year to reopen. For more information, see General Ledger Options - Fields.
3. In the Current Period field, select the accounting period to post to and click Accept.
4. In General Journal Entry or Transaction Journal Entry, enter the journal entry to the reopened fiscal year and period, and update the journal entry.
5. When you are finished, reprint year end reports.
6. On the General Ledger Options Main tab, in the Current Fiscal Year field, select the current year, and in the Current Period field, select the current period. Click Accept.
The closed fiscal year was reopened and posted to.
Was this topic helpful to you?
Yes No
Page 1 of 1Post to a Closed Fiscal Year
12/1/2014mk:@MSITStore:c:\program%20files%20(x86)\common%20files\sage\common%20comp...
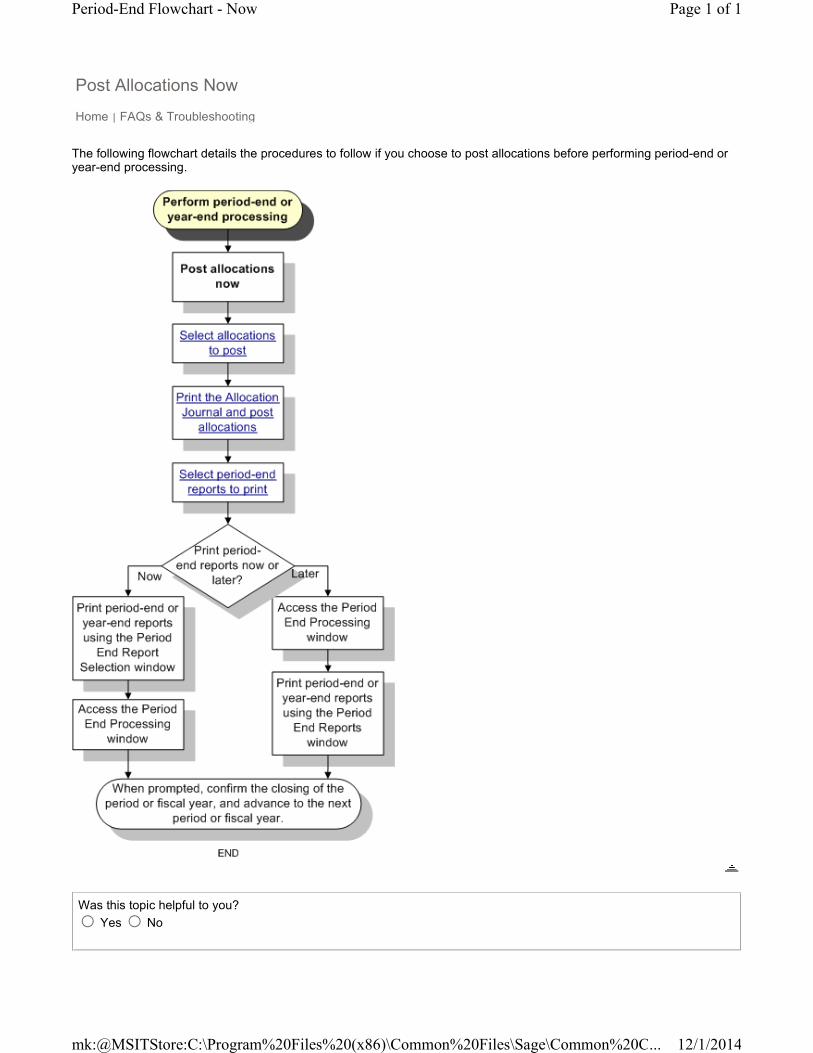
The following flowchart details the procedures to follow if you choose to post allocations before performing period-end or year-end processing.
Post Allocations Now
Home | FAQs & Troubleshooting
Was this topic helpful to you?
Yes No
Page 1 of 1Period-End Flowchart - Now
12/1/2014mk:@MSITStore:C:\Program%20Files%20(x86)\Common%20Files\Sage\Common%20C...
The following flowchart details the procedures to follow if you choose to post allocations after beginning period-end or year-end processing.
Post Allocations Later
Home | FAQs & Troubleshooting
Page 1 of 3Period-End Flowchart - Later
12/1/2014mk:@MSITStore:C:\Program%20Files%20(x86)\Common%20Files\Sage\Common%20C...

Page 2 of 3Period-End Flowchart - Later
12/1/2014mk:@MSITStore:C:\Program%20Files%20(x86)\Common%20Files\Sage\Common%20C...
Select Accounts Payable Period End menu > Period End Processing.
Use Period End Processing to automatically perform either period-end or year-end processing based on the period entered at the Current Period field in Accounts Payable Options.
Period End Processing allows you to close the current period and increment the accounting period to the next period. Period-end processing is usually performed at the end of each accounting period. Year-end processing takes place automatically when period-end processing is performed for the last period of the fiscal year.
NOTE Fields in Accounts Payable Options are used to determine the current accounting period and the number of years to retain vendor purchase history, check history, and 1099 payment history after year-end processing.
The following occurs during period-end or year-end:
� Temporary vendors with zero balances are automatically purged unless you selected to retain the temporary vendor in Vendor Maintenance.
� Check history information is cleared as of the period-ending date.
� Vendor electronic payment history is removed based on the number of years set up to retain electronic payment history in Accounts Payable Options.
� Vendor purchase history is removed based on the number of years set up to retain purchase history in Accounts Payable Options.
� Open invoices with zero balances are removed based on the number of days to retain paid invoices in Accounts Payable Options.
� If retaining invoice history, all current year invoice information is updated to the Last Year fields, and any invoice history with no current-year activity is removed based on options selected in Accounts Payable Options.
If you have not already printed period-end reports, you can do so during period-end processing. You can also select and print period-end reports without accessing Period End Processing by using Period End Report Selection.
WARNING Backing up your data is an important part of your daily and monthly procedures. Back up all Accounts Payable data before proceeding.
A/P Period End Processing
Home | FAQs & Troubleshooting
Window Details How Do I...
Navigation Perform Period-End and Year-End Processing
Overview
Fields
Related Topics
A/P Period End Reports Accounts Payable Sales Tax Report
Period End Report Selection Accounts Payable Options
Period End Report Listing A/P Period-End and Year-End Processing Checklist
Complete Period End Processing System FAQs
Vendor Maintenance
Navigation
Overview
Fields
Print Period End Reports
Was this topic helpful to you?
Yes No
Page 1 of 1A/P Period End Processing
12/1/2014mk:@MSITStore:C:\Program%20Files%20(x86)\Common%20Files\Sage\Common%20C...

Use the following checklist to perform period-end and year-end processing activities.
WARNING Backing up your data is an important part of your daily, weekly, and period-end procedures. For more information, see System FAQs.
A/P Period-End and Year-End Processing Checklist
Home | FAQs & Troubleshooting
1. Back up the Accounts Payable files onto a monthly set of backup disks or tapes.
2. Verify that all invoices and checks are recorded for the current month.
3. If you are performing period-end processing for the month of December (the end month of the calendar year), print, verify, and clear all 1099 forms (if your company prints 1099 forms for vendors).
4. Perform period-end or year-end processing. For more information, see Perform Period-End and Year-End Processing.
5. Select the reports to print for the period end. Print at least the Accounts Payable Aged Invoice Report and the Check History Report.
6. Complete period-end processing after all the selected reports have been printed.
7. Back up the Accounts Payable files using a separate set of disks or tapes from the set used to back up the system in step 1.
Was this topic helpful to you?
Yes No
Page 1 of 1A/P Period-End and Year-End Processing Checklist
12/1/2014mk:@MSITStore:C:\Program%20Files%20(x86)\Common%20Files\Sage\Common%20C...
Select Accounts Receivable Period End menu > Period End Processing.
Use Period End Processing to automatically perform either period-end or year-end processing based on the period entered at the Current Period field in Accounts Receivable Options.
Period End Processing allows you to close the current period and increment the accounting period forward to the next period. Period-end processing is usually performed at the end of each accounting period. Year-end processing takes place automatically when period-end processing is performed for the last period of the fiscal year.
NOTE Fields in Accounts Receivable Options are used to determine the current accounting period and number of years to retain customer sales history, salesperson history, and cash receipts history after year-end processing.
The following occurs during period-end or year-end:
� Temporary customers with zero balances are automatically purged during period- and year-end processing unless you selected the Retain Temporary Customers Paid Invoices check box in Accounts Receivable Options.
� Monthly cash receipts history, customer sales history, and salesperson sales history is purged only during period year-end processing based on the selections made in the Years to Retain Cash Receipts History, Years to Retain Customer History, and Years to Retain Salesperson History fields in Accounts Receivable Options. For example, if the number of years to retain cash receipts history, customer sales history, and salesperson history is set to three years, sales and cash receipts history for the year 2010 will be purged when year-end processing is performed for the year 2012.
� Open invoices with zero balances are removed during period- and year-end processing based on the number of days entered in the Days to Retain Paid Invoices field in Accounts Receivable Options.
If you have not already printed period-end reports, you can do so during period-end processing. Alternately, you can select and print period-end reports without accessing Period End Processing by using Period End Report Selection.
WARNING Backing up your data is an important part of your daily and monthly procedures. Back up all Accounts Receivable data before proceeding.
A/R Period End Processing
Home | FAQs & Troubleshooting
Window Details How Do I...
Navigation Perform Period-End and Year-End Processing
Overview
Fields
Related Topics
A/R Period End Reports Accounts Receivable Sales Tax Report
Period End Report Selection Accounts Receivable Options
Period End Report Listing A/R Period-End and Year-End Processing Checklist
Complete Period End Processing System FAQs
Navigation
Overview
Fields
Print Period End Reports
Was this topic helpful to you?
Yes No
Page 1 of 1A/R Period End Processing
12/1/2014mk:@MSITStore:C:\Program%20Files%20(x86)\Common%20Files\Sage\Common%20C...

A/R Period-End and Year-End Processing Checklist
Home | FAQs & Troubleshooting
Use the following checklist to perform period-end processing activities.
1. Back up the Accounts Receivable files onto a monthly set of backup disks or tapes.
2. Ensure that all invoices and cash receipts are recorded for the current month.
3. Perform Finance Charge Calculation to apply finance charges to past due customers. Use Finance Charge Entry to make any manual adjustments, print the Finance Charge Journal, and update.
4. Print statements for the appropriate customers.
5. Print the Accounts Receivable Sales Tax Report as of the appropriate date (monthly, quarterly, etc.) as required by your taxing jurisdiction, and purge from period end.
6. Perform period-end or year-end processing. For more information, see Perform Period-End or Year-Processing.
7. Select the reports you want to print for period end. It is recommended that you print at least the Accounts Receivable Aged Invoice Report.
8. Complete period-end processing after all the selected reports have been printed.
9. Back up the Accounts Receivable files using a separate set of disks or tapes from the set used to back up the system in step 1.
Was this topic helpful to you?
Yes No
Page 1 of 1A/R Period-End and Year_End Processing Checklist
12/1/2014mk:@MSITStore:C:\Program%20Files%20(x86)\Common%20Files\Sage\Common%20C...
Select Inventory Management Period End menu > Period End Processing.
Use Period End Processing to automatically perform either period-end or year-end processing based on the period entered at the Current Period field in the Inventory Management Options window.
Period End Processing allows you to close the current period and cycle the accounting period forward to the next period. Period-end processing is usually performed at the end of each accounting period. Year-end processing takes place automatically when period-end processing is performed for the last period of the fiscal year.
The following occurs during period-end or year-end:
� The year-to-date sales and issue information are cleared for each item based on the years to retain history in Inventory Management Options.
If you have not already printed period-end reports, you can do so during period-end processing. You can also select and print period-end reports without accessing Period End Processing by using Period End Report Selection.
WARNING Backing up your data is an important part of your daily, period-end, and year-end procedures. Back up all Inventory Management data before performing period-end processing.
I/M Period End Processing
Home | FAQs & Troubleshooting
Window Details How Do I...
Navigation Correct Negative Tiers
Overview Perform Period-End and Year-End Processing
Fields
Related Topics
I/M Period End Reports Inventory Management Options
Period End Report Selection I/M Period-End and Year-End Processing Checklist
Period End Report Listing System FAQs
Complete Period End Processing
Navigation
Overview
Fields
Print Period End Reports
Was this topic helpful to you?
Yes No
Page 1 of 1I/M Period End Processing
12/1/2014mk:@MSITStore:C:\Program%20Files%20(x86)\Common%20Files\Sage\Common%20C...

Use the following checklist to perform period-end and year-end processing activities.
WARNING Backing up your data is an important part of your daily, weekly, and period-end procedures. For more information, see System FAQs.
Period-End Processing Checklist
Home | FAQs & Troubleshooting
1. Back up the Inventory Management files onto a monthly set of backup disks or tapes.
2. Verify that all inventory sales, receipts, transfers, issues, and adjustments are recorded for the current period.
3. If you have LIFO, FIFO, lot, or serial items, print the Inventory Negative Tier Report to check for negative tiers. If negative tiers exist, they must be corrected.
4. Perform period-end processing. For more information, see Perform Period-End and Year-End Processing.
5. Select the reports to print for the period.
� For period end, print at least the Inventory Stock Status Report, Inventory Detail Transaction Report, and Inventory Trial Balance.
� For year end, print at least the Inventory Sales Analysis, Inventory Sales History Report, Inventory Receipts History Report, and the Inventory Trial Balance.
6. Complete period-end processing after all the selected reports have been printed.
7. Back up the Inventory Management files using a separate set of disks or tapes from the set used to back up the system in step 1.
8. To purge Inventory Management data files, see the Inventory Management Utilities menu. For more information, see Purge Inventory Management Data.
Was this topic helpful to you?
Yes No
Page 1 of 1Period-End Processing Checklist
12/1/2014mk:@MSITStore:C:\Program%20Files%20(x86)\Common%20Files\Sage\Common%20C...
Show/Hide All
Correct Negative Tiers
Home | FAQs & Troubleshooting
OverviewYou can issue or sell an item, even if there is not enough quantity on hand. An item using the LIFO or FIFO valuation method results in a negative cost tier. Print the Inventory Negative Tier Report to list tiers with negative quantities. Cost tiers with negative quantities distort the true inventory cost as new items are received at different unit costs.
To correct negative tiers
To ensure that LIFO and FIFO items are correctly costed, you must adjust the negative cost tiers in one of the following ways:
� Inventory Negative Tier Adjustment
� Transaction Entry
Inventory Negative Tier Adjustment
1. Select Inventory Management Utilities menu > Inventory Negative Tier Adjustment.
2. Click Print to automatically apply positive balance cost tiers against the negative quantity. For more information, see Inventory Negative Tier Report.
� The difference in cost between the negative and positive tiers is posted to the general ledger Inventory and Adjustment accounts. For more information on period-end processing, see Period End Processing.
Transaction Entry
1. Select Inventory Management Main menu > Transaction Entry.
2. In the Transaction Type field, select Adjustments to correct negative quantities for LIFO or FIFO items. Complete the fields on the Header tab.
3. Click the Lines tab. Adjust a positive quantity against the negative cost tier (the Overdist tier for LIFO or FIFO items) to bring the balance of the tier to zero.
4. Adjust the negative quantity against one or more tiers with a positive balance, so the total distribution equals the positive amount applied against the negative tier.
Example - Correcting Negative Tiers
Was this topic helpful to you?
Yes No
Page 1 of 1Correct Negative Tiers
12/1/2014mk:@MSITStore:C:\Program%20Files%20(x86)\Common%20Files\Sage\Common%20C...
Select Sales Order Period End menu > Period End Processing.
Use Period End Processing to automatically perform either period-end or year-end processing based on the period entered in the Current Period field in the Sales Order Options window.
Period End Processing allows you to close the current period and cycle the accounting period forward to the next period. Period-end processing is usually performed at the end of each accounting period. Year-end processing takes place automatically when period-end processing is performed for the last period of the fiscal year.
NOTE Fields in the Sales Order Options window are used to determine the current accounting period and number of years to retain sales history after year-end processing.
The following occurs during period-end or year-end:
� The Sales Order Recap is purged based on options selected in Sales Order Options during period-end and year-end.
� Expired master and repeating orders are automatically purged as of the period-ending date during period-end and year-end.
� Sales history is purged based on the number of years to retain sales history in Sales Order Options only during year-end processing.
If you have not already printed period-end reports, you can do so during period-end processing. You can also select and print period-end reports without accessing Period End Processing by using Period End Report Selection.
WARNING Backing up your data is an important part of your daily and monthly procedures. Back up all Sales Order data before proceeding.
S/O Period End Processing
Home | FAQs & Troubleshooting
Window Details How Do I...
Navigation Perform Period-End and Year-End Processing
Overview
Fields
Related Topics
S/O Period End Reports Sales Order Options
Period End Report Selection S/O Period-End and Year-End Processing Checklist
Period End Report Listing System FAQs
Complete Period End Processing
Navigation
Overview
Fields
Print Period End Reports
Was this topic helpful to you?
Yes No
Page 1 of 1S/O Period End Processing
12/1/2014mk:@MSITStore:C:\Program%20Files%20(x86)\Common%20Files\Sage\Common%20C...
To ensure that the Sales Recap reports from Sales Order are in sync with the sales history maintained for both the Customer and Inventory master files, you must perform Accounts Receivable and Inventory Management period-end processing in conjunction with the Sales Order period-end processing. Make sure to perform Accounts Receivable and Inventory Management period-end processing before performing a daily sales update for the next month's invoices.
Period-End and Year-End Processing Checklist
Home | FAQs & Troubleshooting
1. Back up the Sales Order files onto a monthly set of backup disks or tapes.
2. Make sure all invoices are recorded for the current month.
3. Print the Open Sales Order Report.
4. Perform period-end or year-end processing. For more information, see Perform Period-End or Year-End Processing.
5. After completing period-end or year-end processing, back up the Sales Order files using a separate set of disks or tapes from the set used to back up the system in step 1.
Was this topic helpful to you?
Yes No
Page 1 of 1Period-End and Year-End Processing Checklist
12/1/2014mk:@MSITStore:C:\Program%20Files%20(x86)\Common%20Files\Sage\Common%20C...
Select Purchase Order Period End menu > Period End Processing.
Use Period End Processing to automatically perform either period-end or year-end processing based on the period entered in th Current Period field in the Purchase Order Options window.
Period End Processing allows you to close the current period and cycle the accounting period forward to the next period. Period-end processing is usually performed at the end of each accounting period. Year-end processing takes place automatically when period-end processing is performed for the last period of the fiscal year.
NOTE Fields in the Purchase Order Options window are used to determine the current accounting period and number of years to retain purchase history after year-end processing.
The following occurs during period-end or year-end:
� Expired master and repeating orders are automatically purged as of the period-ending date.
� Completed purchase orders are automatically purged based on the number of days to retain completed purchase orders in Purchase Order Options.
� The purchase order recap is automatically purged if selected in Purchase Order Options.
� Receipt history is automatically purged based on the selection made in Purchase Order Options.
� All purchase history and miscellaneous charge year-to-date balances are set to zero as of the year-ending date.
If you have not already printed period-end reports, you can do so during period-end processing. You can also select and print period-end reports without accessing Period End Processing by using Period End Report Selection.
WARNING Backing up your data is an important part of your daily and monthly procedures. Back up all Purchase Order data before proceeding.
P/O Period End Processing
Home | FAQs & Troubleshooting
Window Details How Do I...
Navigation Perform Period-End and Year-End Processing
Overview
Fields
Related Topics
P/O Period End Reports Purchase Order Options
Period End Report Selection P/O Period-End and Year-End Processing Checklist
Period End Report Listing System FAQs
Complete Period End Processing
Navigation
Overview
Fields
Print Period End Reports
Was this topic helpful to you?
Yes No
Page 1 of 1P/O Period End Processing
12/1/2014mk:@MSITStore:C:\Program%20Files%20(x86)\Common%20Files\Sage\Common%20C...
Use the following checklist to perform period-end and year-end processing activities.
WARNING Backing up your data is an important part of your daily, weekly, and period-end procedures. For more information, see System FAQs.
P/O Period-End and Year-End Processing Checklist
Home | FAQs & Troubleshooting
1. Back up the Purchase Order files onto a monthly set of backup disks or tapes.
2. Verify that all receipts, invoices, returns, and issues are recorded for the current month.
3. Perform period-end processing. For more information, see Perform Period-End and Year-End Processing.
4. Select the reports you want to print for the period end. Print at least the Open Purchase Order Report.
5. Complete period-end processing after all the selected reports have been printed.
6. Back up the Purchase Order files using a separate set of disks or tapes from the set used to back up the system in step 1.
Was this topic helpful to you?
Yes No
Page 1 of 1Period-End and Year-End Processing Checklist
12/1/2014mk:@MSITStore:C:\Program%20Files%20(x86)\Common%20Files\Sage\Common%20C...
Select Purchase Order Period End menu > Purchases Clearing Report.
Use Purchases Clearing Report to simplify month-end reconciliation of the purchases clearing account balance with open amounts on purchase order. The purchases clearing account is a liability holding account that contains inventory received in Receipt of Goods Entry without an invoice until the invoice is posted in Receipt of Invoice Entry. This account is credited when goods are received into inventory and can also include allocated landed cost and sales tax. When the applicable invoice is recorded, it is debited and the corresponding Accounts Payable liability account is credited. This account is assigned to each product line in Inventory Management Product Line Maintenance.
NOTE Invoices entered in Accounts Payable Invoice Data Entry do not affect this report.
You can enter a selection of purchase order numbers, vendor numbers, order dates, last receipt dates, item codes, product lines, inventory account numbers, and user-defined fields (UDFs) to print.
The total purchases clearing amount on the Purchases Clearing in Open PO Format or Purchases Clearing Report will normally balance to the purchases clearing account. An out of balance exception can occur in the following scenarios:
� Inventory receipts are updated in Transaction Entry.
� The ordered quantity or unit cost is changed after performing either Receipt of Goods Entry or Receipt of Invoice Entry.
� Manual postings have been updated to the purchases clearing account.
� The Receipt of Goods Register or Receipt of Invoice Register has been updated to an incorrect general ledger period.
NOTE The total purchases clearing amount in the Purchases Clearing in Open PO Format or Purchases Clearing Report balances to the purchases clearing account as of the date the report is generated provided the report is run with the default sort options and selection criteria.
Purchases Clearing Report
Home | FAQs & Troubleshooting
Window Details How Do I...
Navigation Create a Report Setting
Overview Print a Report, Form, or Listing
Fields E-mail, Fax, or Print a Report as a PDF
Report Sample Enter Multiple Values Using Separators
Related Topics
Purchases Clearing in Open PO Format Receipt of Goods Entry
Receipt of Invoice Entry Product Line Maintenance
Navigation
Overview
Fields
Report Setting Sort Report By
Description Item Types to Print
Type Operand
Default Report Value
Print Report Settings Printer/Output
Three Hole Punch Keep Window Open After Print
Number of Copies Keep Window Open After Preview
Collated
Was this topic helpful to you?
Yes No
Page 1 of 1Purchases Clearing Report
12/1/2014mk:@MSITStore:C:\Program%20Files%20(x86)\Common%20Files\Sage\Common%20C...
Select Job Cost Period End menu > Period End Processing.
Use Period End Processing to automatically perform either period-end or year-end processing based on the period entered at the Current Job Cost Period field in the Job Cost Options window.
Use Period End Processing to close the current period and increment the accounting period to the next period. Period-end processing is usually performed at the end of each accounting period, on the last business day of each month. Year-end processing takes place automatically when period-end processing is performed for the last period of the fiscal year.
NOTE Fields in the Job Cost Options window are used to determine the current accounting period and if retaining job cost history after year-end processing.
WARNING Period End Processing cannot be performed if job billing is in progress (if the Job Billing Register has not been printed and updated), if the Daily Overhead Allocation Register or Monthly Overhead Allocation Report has been printed but not yet updated, or if the Daily Transaction Register has not been updated for all outstanding job transactions.
The following occurs during period-end or year-end:
� The year-to-date actual cost, invoice billed, and payment received totals are cleared and set to zero, along with the year-to-date dollar and unit totals.
� Job information is removed if the Retain Job Cost History check box is cleared in Inventory Management Options.
� Closed jobs are archived to history files instead of purged during period-end processing if the Retain Job Cost History check box is selected in the Job Cost Options window.
� If the Retain Transaction Detail check box is cleared in the Job Masterfile Maintenance window, transaction jobs are summarized. If selected, transaction jobs are retained until the job is closed.
Before performing period-end processing, the Job Close-Out Report must be printed and updated to the files. This report provides a final audit trail of all unit and cost information. If you are using Work-in-Process accounting, the job close-out update also clears outstanding work-in-process amounts and makes the necessary postings to the General Ledger module. The Work in Process Report and Job Transaction Detail Report should always be printed before performing either period-end or year-end processing.
WARNING Backing up your data is an important part of your daily, period-end, and year-end procedures. Back up all Job Cost data before performing period-end processing.
Window Details How Do I...
Navigation Perform Period-End and Year-End Processing
Overview
Fields
Related Topics
Job Close-Out Report Job Cost Options
Job Cost History Purge Utility/Job Cost History Restore Utility
J/C Period-End and Year-End Processing Checklist
J/C Period End Reports Job Cost FAQs
Period End Confirmation System FAQs
Navigation
Overview
Fields
Full Period End Processing Summarize Billed Cost Transactions
Full Period and Year End Processing Purge/Archive Closed Jobs
J/C Period End Processing
Home | FAQs & Troubleshooting
Page 1 of 1J/C Period End Processing
12/9/2010mk:@MSITStore:c:\program%20files%20(x86)\common%20files\sage\common%20comp...
Use the following checklist to perform period-end and year-end processing activities.
WARNING Backing up your data is an important part of your daily, weekly, and period-end procedures. For more information, see System FAQs.
1. Back up the Job Cost files onto a monthly set of backup disks or tapes.
2. Verify that all change orders; job billing invoices; and direct cost, billing, and cash receipt transactions are recorded for the current month. Also, verify that all integrated modules (Accounts Payable, Payroll, etc.) have posted all transactions for the current month.
3. If monthly calculation of overhead is selected in the Job Cost Options window, print the Monthly Overhead Allocation Report and update. Print and update the Daily Transaction Register.
4. If any jobs have been completed during the current period, print the Job Close-Out Report and update.
5. Perform period-end or year-end processing. For more information, see Perform Period-End and Year-End Processing.
6. Select the reports to print for the period end. Print at least the Work in Process Report and Job Transaction Detail Report.
7. Complete period-end processing after all the selected reports have been printed.
8. Back up the Job Cost files using a separate set of disks or tapes from the set used to back up the system in step 1.
J/C Period-End and Year-End Processing Checklist
Home | FAQs & Troubleshooting
Page 1 of 1J/C Period-End Processing Checklist
12/9/2010mk:@MSITStore:c:\program%20files%20(x86)\common%20files\sage\common%20comp...
© Sage, Inc. All rights reserved. The Sage logo and the Sage product and service names mentioned herein are registered
trademarks or trademarks of Sage, Inc., or its affiliated entities. All other trademarks are the property of their respective owners.
(Formerly Sage MAS 90 ERP and Sage MAS 200 ERP)
eFiling and Reporting for Sage 100 ERP
Product: Sage 100 ERP (formerly Sage ERP MAS 90 and MAS 200)
Description
This document contains a detailed overview of Sage 100 ERP eFiling and Reporting
feature in v4.40.0.1 and above. The state and federal payroll and 1099 reporting allows
you to complete over 250 state and federal unemployment, withholding, and new-hire
reports from the data produced by Sage 100 ERP Payroll and Accounts Payable
modules. This eliminates the need to create these reports and forms manually. Once
completed, reviewed, and edited on screen, they are printed on plain paper, ready to be
mailed—or eFile in minutes. The interface is simple to understand and easy to use,
making quarterly and annual reporting a snap.
Note: Information in this document pertains to Sage 100 Standard ERP and Sage
100 Advanced ERP. Although these programs have a common architecture, some of
the features vary depending on the product implemented. References to Sage 100
apply to Sage 100 Standard ERP, Sage 100 Advanced ERP and Sage 100 Premium
ERP (Premium version is for A/P 1099s only), unless otherwise noted.
eFiling and Reporting for Sage 100 ERP
2 of 63
Table of Contents What is eFiling and Reporting ....................................................................................................................... 4
Electronic Reporting vs. eFiling and Reporting ............................................................................................. 5
"You must install Federal and State eFiling and Reporting to access this task" ........................................... 8
How to Activate eFiling and Reporting ......................................................................................................... 9
Activation does not respond in Sage 100 Advanced ERP (Sage MAS 200) ................................................. 11
How to update eFiling and Reporting forms ............................................................................................... 12
"Unable to download new updater." or "Updater 2: Unable to download new updater" when installing
an update .................................................................................................................................................... 13
How to Print Payroll eFiling and Reporting Forms ...................................................................................... 14
How to Print W-2s with eFiling and Reporting ........................................................................................... 17
W-2 Test Drive ........................................................................................................................................ 18
Verify Federal Employer ID Number ....................................................................................................... 19
Company Information ............................................................................................................................. 20
Tax Preparer Type ................................................................................................................................... 21
State and Local Tax items ....................................................................................................................... 22
Data Verification ..................................................................................................................................... 24
W-3 Information ..................................................................................................................................... 25
Multiple Payroll Data Files ...................................................................................................................... 26
W-2 Grid Details ...................................................................................................................................... 27
W-2 Printing and Filing Options .............................................................................................................. 28
CD Archive Delivery ................................................................................................................................. 29
State Selection Screen ............................................................................................................................ 30
State Form Selection Screen ................................................................................................................... 31
W-2 Control Numbers ............................................................................................................................. 32
Divider Sheets ......................................................................................................................................... 33
Action List ................................................................................................................................................ 34
W-2 Forms Viewer .................................................................................................................................. 35
Additional Setup for Local Taxes ............................................................................................................. 37
Printing Amounts in Box 14 .................................................................................................................... 37
***Missing*** displays on Reports and Forms ...................................................................................... 40
eFiling and Reporting for Sage100 ERP
3 of 63
eFiling and Reporting Amounts are Incorrect ............................................................................................. 41
Employee Totals Verification ...................................................................................................................... 41
How to print Accounts Payable 1099 eFiling and Reporting ...................................................................... 43
1099 Test Drive ....................................................................................................................................... 44
Verify the Payer TIN ................................................................................................................................ 45
Payer Information ................................................................................................................................... 46
Tax Preparer Type ................................................................................................................................... 47
1099 Prepaper ......................................................................................................................................... 50
1099 Printing and Filing Options ............................................................................................................. 51
1099 Forms Viewer ................................................................................................................................. 52
Standard eFiling Pricing............................................................................................................................... 53
W-2 eFiling Pricing .................................................................................................................................. 53
1099 eFiling Pricing ................................................................................................................................. 53
How to eFile Accounts Payable and Payroll forms ..................................................................................... 55
Deleting Filings ........................................................................................................................................ 60
Viewing eFiling form History within Sage 100 ERP ............................................................................... 60
Who do I call for Support? .......................................................................................................................... 62
Associated Knowledgebase Entries ............................................................................................................ 63
eFiling and Reporting for Sage 100 ERP
4 of 63
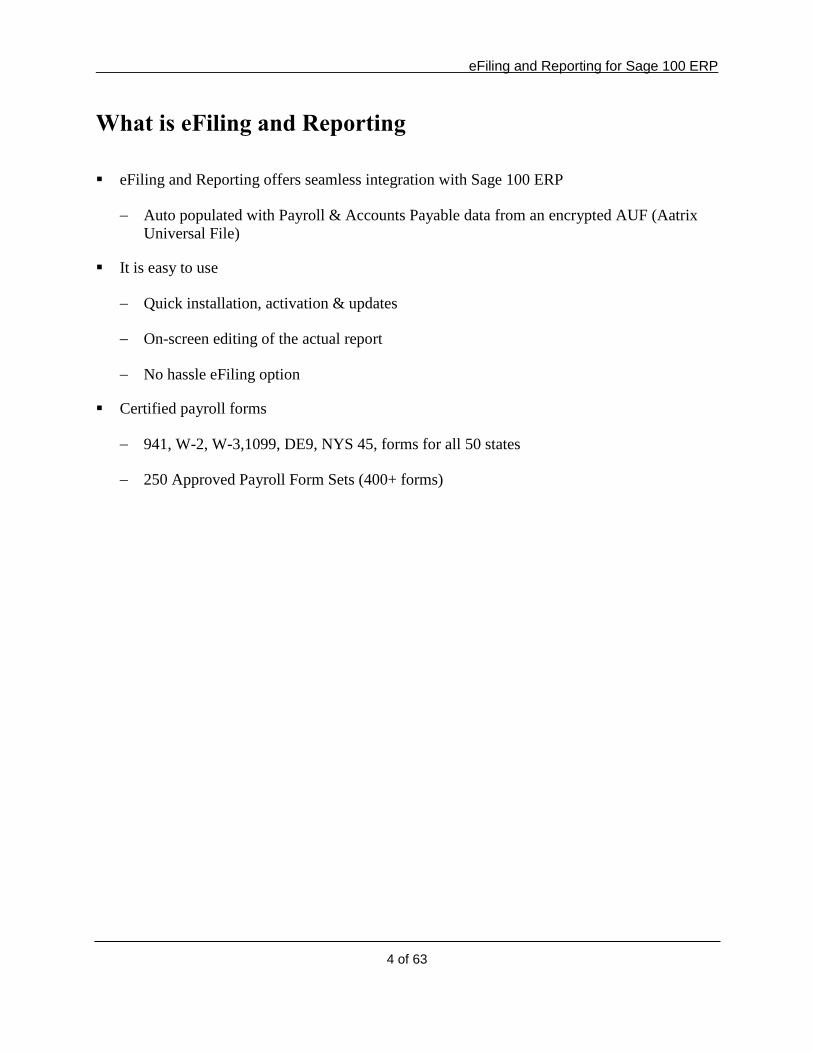
What is eFiling and Reporting
eFiling and Reporting offers seamless integration with Sage 100 ERP
Auto populated with Payroll & Accounts Payable data from an encrypted AUF (Aatrix
Universal File)
It is easy to use
Quick installation, activation & updates
On-screen editing of the actual report
No hassle eFiling option
Certified payroll forms
941, W-2, W-3,1099, DE9, NYS 45, forms for all 50 states
250 Approved Payroll Form Sets (400+ forms)
eFiling and Reporting for Sage100 ERP
5 of 63
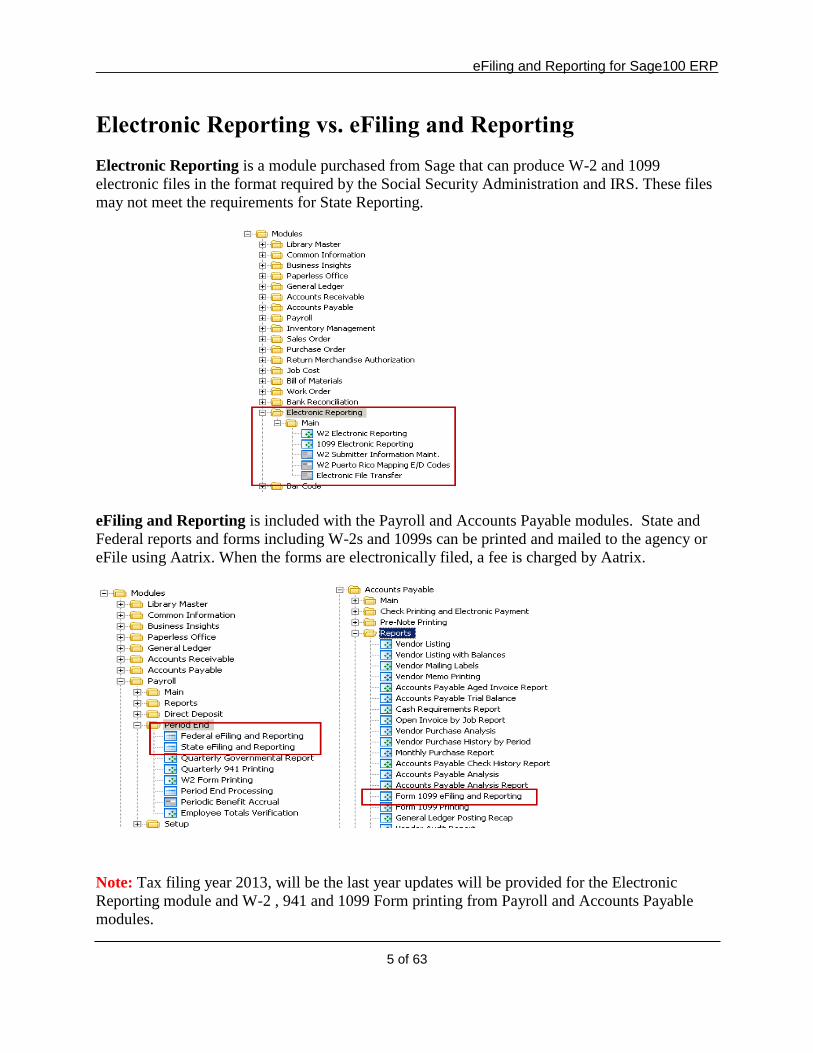
Electronic Reporting vs. eFiling and Reporting
Electronic Reporting is a module purchased from Sage that can produce W-2 and 1099
electronic files in the format required by the Social Security Administration and IRS. These files
may not meet the requirements for State Reporting.
eFiling and Reporting is included with the Payroll and Accounts Payable modules. State and
Federal reports and forms including W-2s and 1099s can be printed and mailed to the agency or
eFile using Aatrix. When the forms are electronically filed, a fee is charged by Aatrix.
Note: Tax filing year 2013, will be the last year updates will be provided for the Electronic
Reporting module and W-2 , 941 and 1099 Form printing from Payroll and Accounts Payable
modules.
eFiling and Reporting for Sage 100 ERP
6 of 63
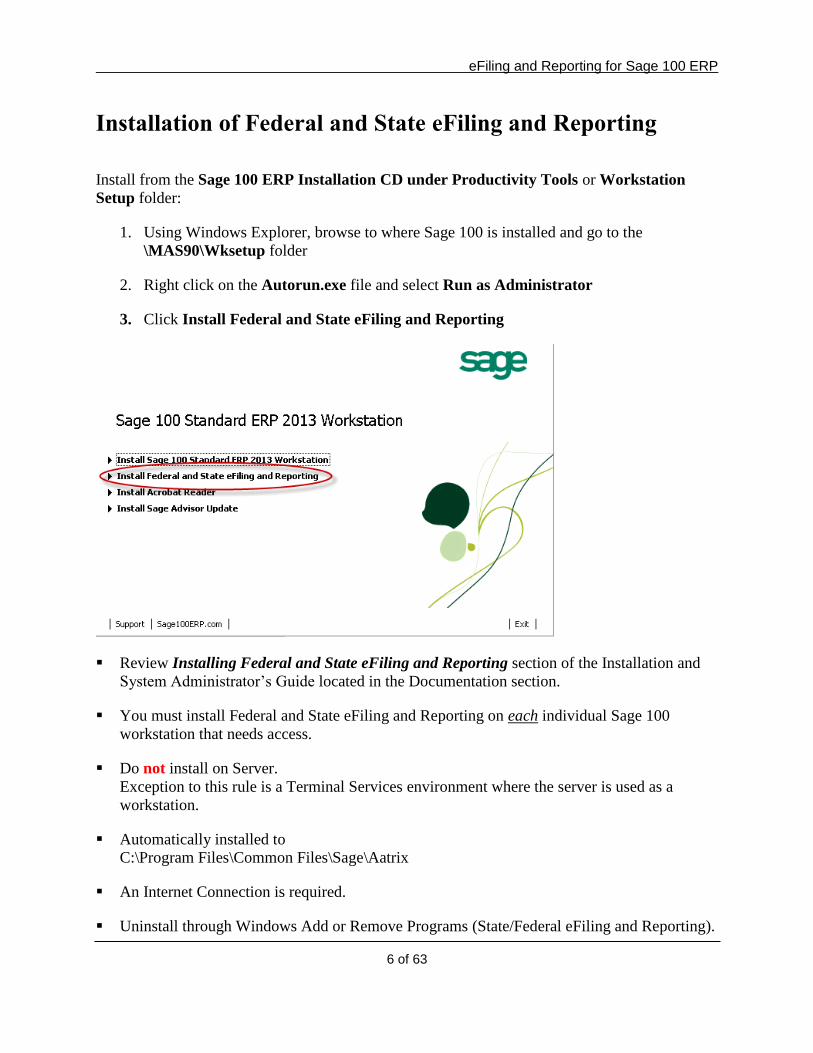
Installation of Federal and State eFiling and Reporting
Install from the Sage 100 ERP Installation CD under Productivity Tools or Workstation
Setup folder:
1. Using Windows Explorer, browse to where Sage 100 is installed and go to the
\MAS90\Wksetup folder
2. Right click on the Autorun.exe file and select Run as Administrator
3. Click Install Federal and State eFiling and Reporting
Review Installing Federal and State eFiling and Reporting section of the Installation and
System Administrator’s Guide located in the Documentation section.
You must install Federal and State eFiling and Reporting on each individual Sage 100
workstation that needs access.
Do not install on Server.
Exception to this rule is a Terminal Services environment where the server is used as a
workstation.
Automatically installed to
C:\Program Files\Common Files\Sage\Aatrix
An Internet Connection is required.
Uninstall through Windows Add or Remove Programs (State/Federal eFiling and Reporting).

eFiling and Reporting for Sage100 ERP
7 of 63
As of Sage 100 ERP version 2013, if the workstation does not have eFiling and Reporting
installed and the user selects eFiling and Reporting task from within Payroll or Accounts Payable
modules you receive the following prompts:
Click Yes and eFiling and Reporting client starts installing
Click Finish when completed.
eFiling and Reporting for Sage 100 ERP
8 of 63
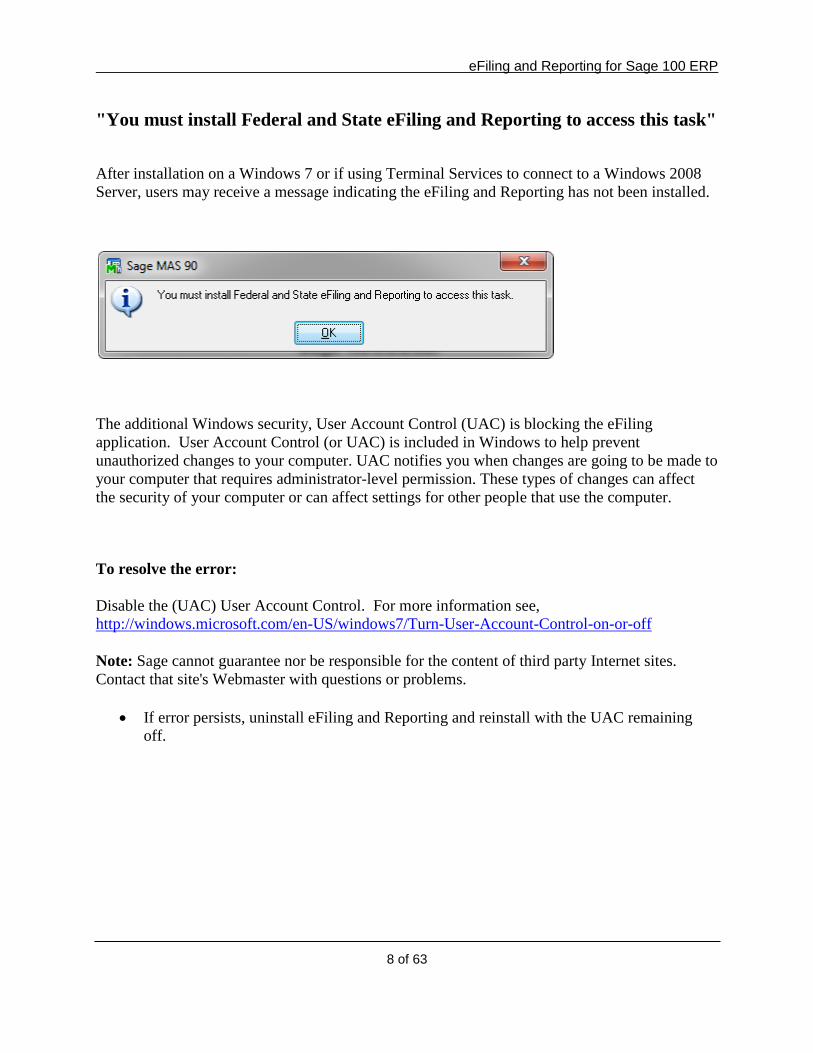
"You must install Federal and State eFiling and Reporting to access this task"
After installation on a Windows 7 or if using Terminal Services to connect to a Windows 2008
Server, users may receive a message indicating the eFiling and Reporting has not been installed.
The additional Windows security, User Account Control (UAC) is blocking the eFiling
application. User Account Control (or UAC) is included in Windows to help prevent
unauthorized changes to your computer. UAC notifies you when changes are going to be made to
your computer that requires administrator-level permission. These types of changes can affect
the security of your computer or can affect settings for other people that use the computer.
To resolve the error:
Disable the (UAC) User Account Control. For more information see,
http://windows.microsoft.com/en-US/windows7/Turn-User-Account-Control-on-or-off
Note: Sage cannot guarantee nor be responsible for the content of third party Internet sites.
Contact that site's Webmaster with questions or problems.
If error persists, uninstall eFiling and Reporting and reinstall with the UAC remaining
off.
eFiling and Reporting for Sage100 ERP
9 of 63
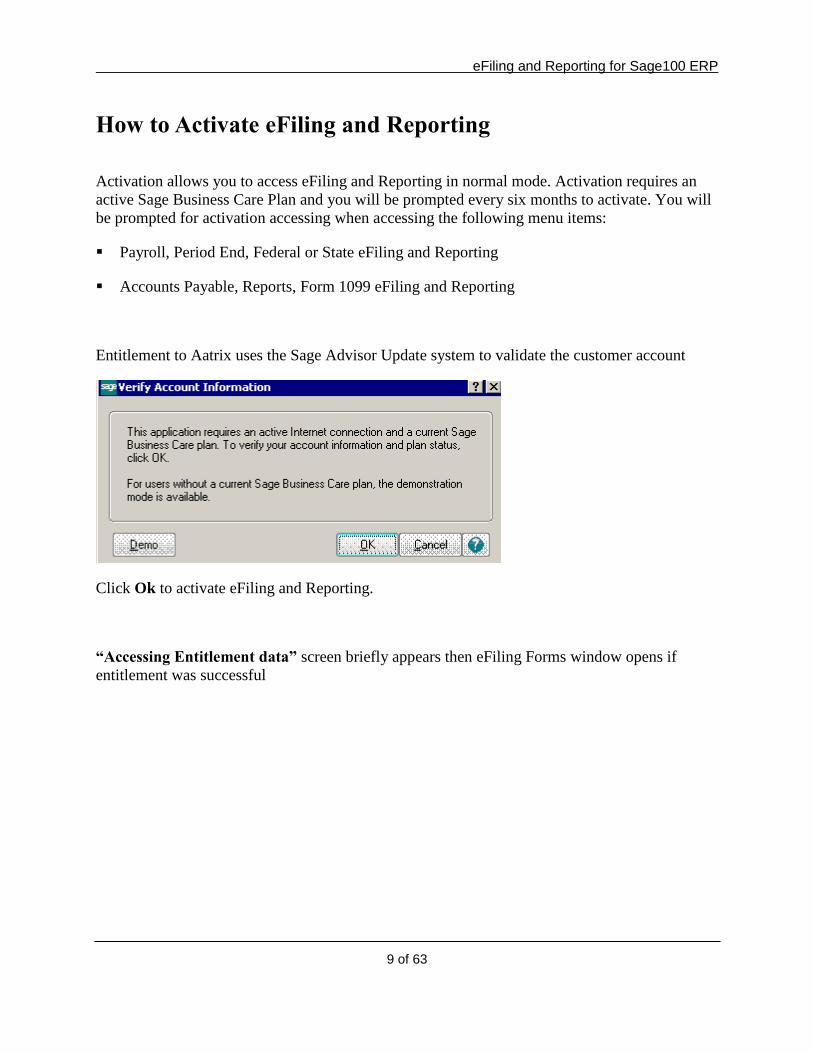
How to Activate eFiling and Reporting
Activation allows you to access eFiling and Reporting in normal mode. Activation requires an
active Sage Business Care Plan and you will be prompted every six months to activate. You will
be prompted for activation accessing when accessing the following menu items:
Payroll, Period End, Federal or State eFiling and Reporting
Accounts Payable, Reports, Form 1099 eFiling and Reporting
Entitlement to Aatrix uses the Sage Advisor Update system to validate the customer account
Click Ok to activate eFiling and Reporting.
“Accessing Entitlement data” screen briefly appears then eFiling Forms window opens if
entitlement was successful
eFiling and Reporting for Sage 100 ERP
10 of 63
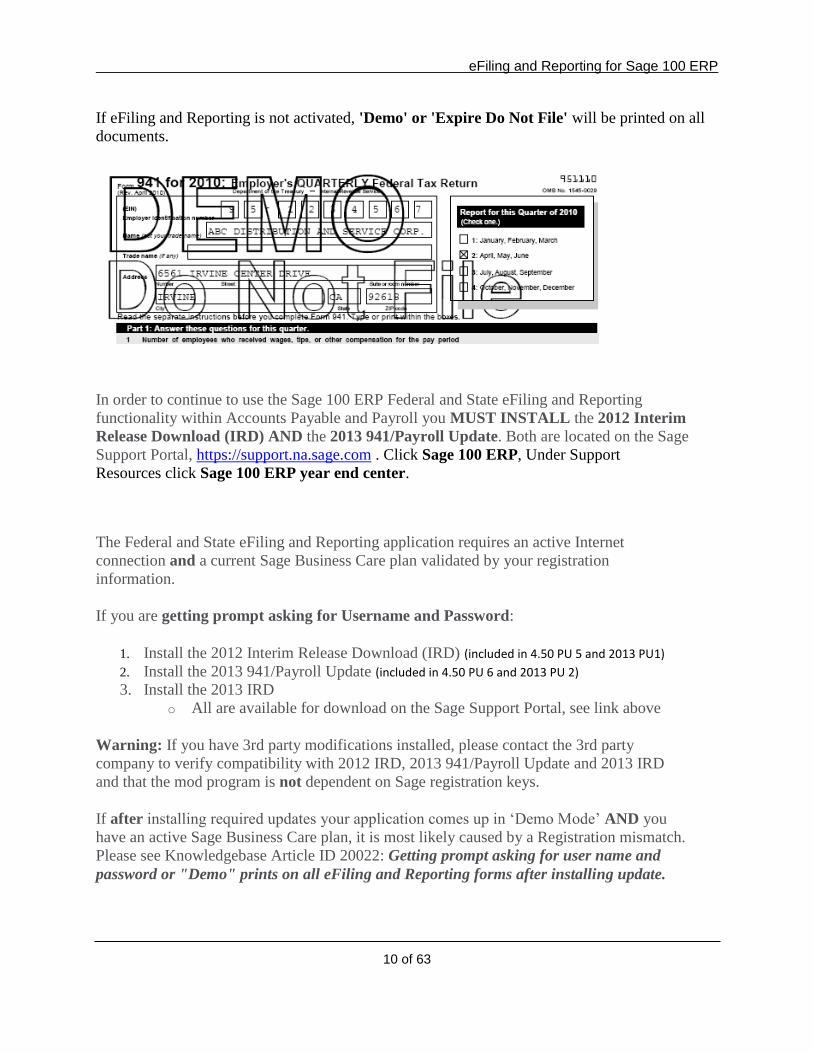
If eFiling and Reporting is not activated, 'Demo' or 'Expire Do Not File' will be printed on all
documents.
In order to continue to use the Sage 100 ERP Federal and State eFiling and Reporting
functionality within Accounts Payable and Payroll you MUST INSTALL the 2012 Interim
Release Download (IRD) AND the 2013 941/Payroll Update. Both are located on the Sage
Support Portal, https://support.na.sage.com . Click Sage 100 ERP, Under Support
Resources click Sage 100 ERP year end center.
The Federal and State eFiling and Reporting application requires an active Internet
connection and a current Sage Business Care plan validated by your registration
information.
If you are getting prompt asking for Username and Password:
1. Install the 2012 Interim Release Download (IRD) (included in 4.50 PU 5 and 2013 PU1)
2. Install the 2013 941/Payroll Update (included in 4.50 PU 6 and 2013 PU 2)
3. Install the 2013 IRD
o All are available for download on the Sage Support Portal, see link above
Warning: If you have 3rd party modifications installed, please contact the 3rd party
company to verify compatibility with 2012 IRD, 2013 941/Payroll Update and 2013 IRD
and that the mod program is not dependent on Sage registration keys.
If after installing required updates your application comes up in ‘Demo Mode’ AND you
have an active Sage Business Care plan, it is most likely caused by a Registration mismatch.
Please see Knowledgebase Article ID 20022: Getting prompt asking for user name and
password or "Demo" prints on all eFiling and Reporting forms after installing update.
eFiling and Reporting for Sage100 ERP
11 of 63
Activation does not respond in Sage 100 Advanced ERP
(Sage MAS 200)
Some users may experience eFiling and Reporting Activation not responding after clicking OK
at the Verify Account Information window.
If you encounter this issue, the Sage 100 Advanced Application Server is running as a service
with a user account that cannot see the activation file. This is typically caused when the Local
System (System) account is used for the host service.
To resolve, change the logon for the Sage 100 Advanced Application Server service to a domain
account. As a workaround, activate in Sage 100 Standard (MAS 90) mode. For more
information, see Knowledgebase Article How to Run Sage 100 ERP Advanced in Sage 100
Standard "MAS 90" mode. on Customer Portal or Partner Portal
eFiling and Reporting for Sage 100 ERP
12 of 63
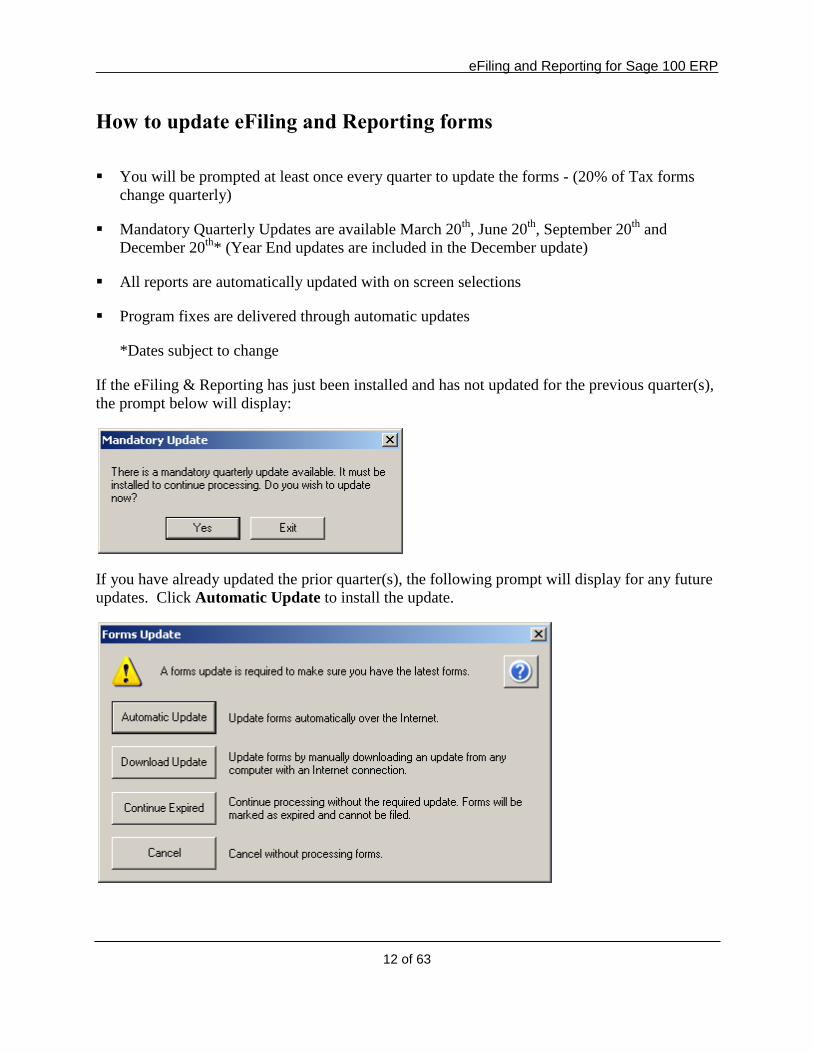
How to update eFiling and Reporting forms
You will be prompted at least once every quarter to update the forms - (20% of Tax forms
change quarterly)
Mandatory Quarterly Updates are available March 20th
, June 20th
, September 20th
and
December 20th
* (Year End updates are included in the December update)
All reports are automatically updated with on screen selections
Program fixes are delivered through automatic updates
*Dates subject to change
If the eFiling & Reporting has just been installed and has not updated for the previous quarter(s),
the prompt below will display:
If you have already updated the prior quarter(s), the following prompt will display for any future
updates. Click Automatic Update to install the update.
eFiling and Reporting for Sage100 ERP
13 of 63
"Unable to download new updater." or "Updater 2: Unable to download new
updater" when installing an update
Occasionally during an Automatic update, one of the above errors will be received. In order to
resolve the error and load the update, perform the one or more of the following resolutions:
Add the web address for https://www.sagemas.aatrix.com to your trusted websites in
Internet Options on the Security tab.
o On the Privacy tab, click on Sites button and allow the following websites:
aatrix.com
aatrixforms.exe
updater.exe
updater2.exe
Verify firewall settings:
o The Aatrix Forms Updater uses standard HTTP port 80 to access the site
http://updates.aatrix.com.
o Aatrix Forms uses the following programs to access the Internet.
o For Updating using http on port 80 to http://updates.aatrix.com:
o aatrixforms.exe
o updater.exe
o updater2.exe
Manually load the update
o Go to http://aatrix.com/sagemas
o Under the Quarterly Updates section, click the Sage 100 ERP link.
o Click to Save the MAS90.exe file to your workstation desktop.
o Double click to Run the MAS90.exe file
o Click Yes at prompt “The setup will perform an upgrade of ‘State/Federal
eFiling and Reporting’ Do you want to continue?”
o Relaunch Federal or State eFiling and Reporting; click Automatic Update if
prompted for an update.
eFiling and Reporting for Sage 100 ERP
14 of 63
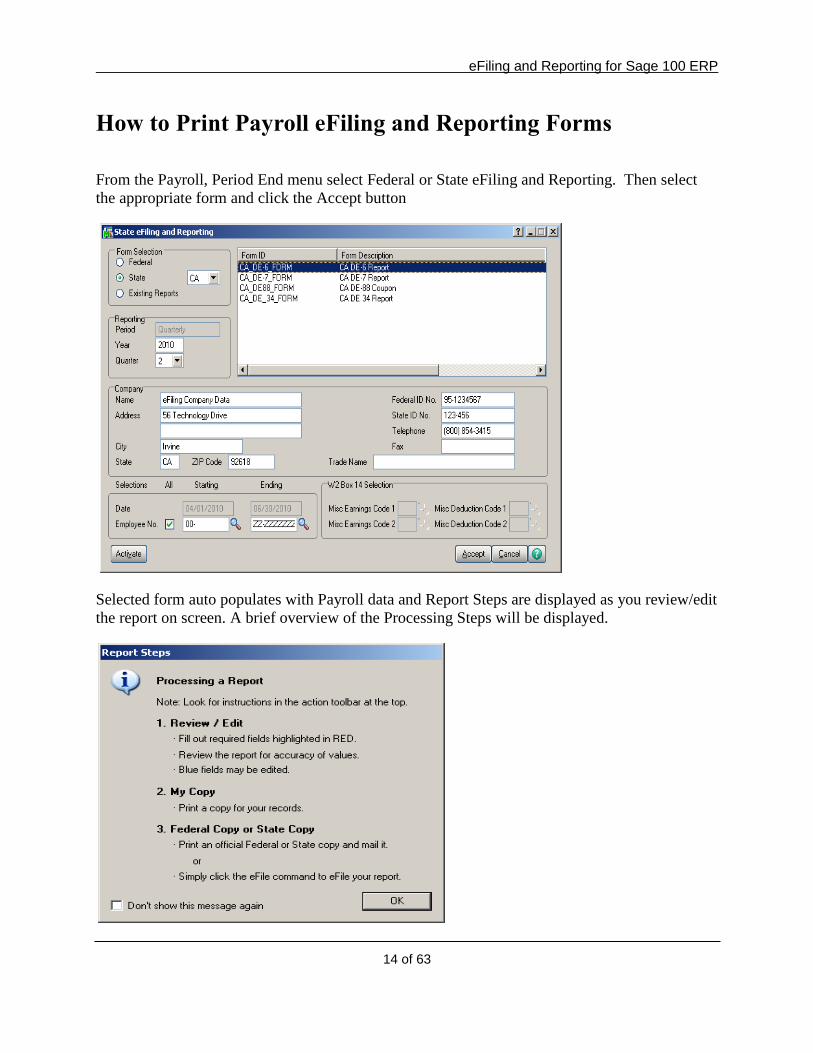
How to Print Payroll eFiling and Reporting Forms
From the Payroll, Period End menu select Federal or State eFiling and Reporting. Then select
the appropriate form and click the Accept button
Selected form auto populates with Payroll data and Report Steps are displayed as you review/edit
the report on screen. A brief overview of the Processing Steps will be displayed.
eFiling and Reporting for Sage100 ERP
15 of 63
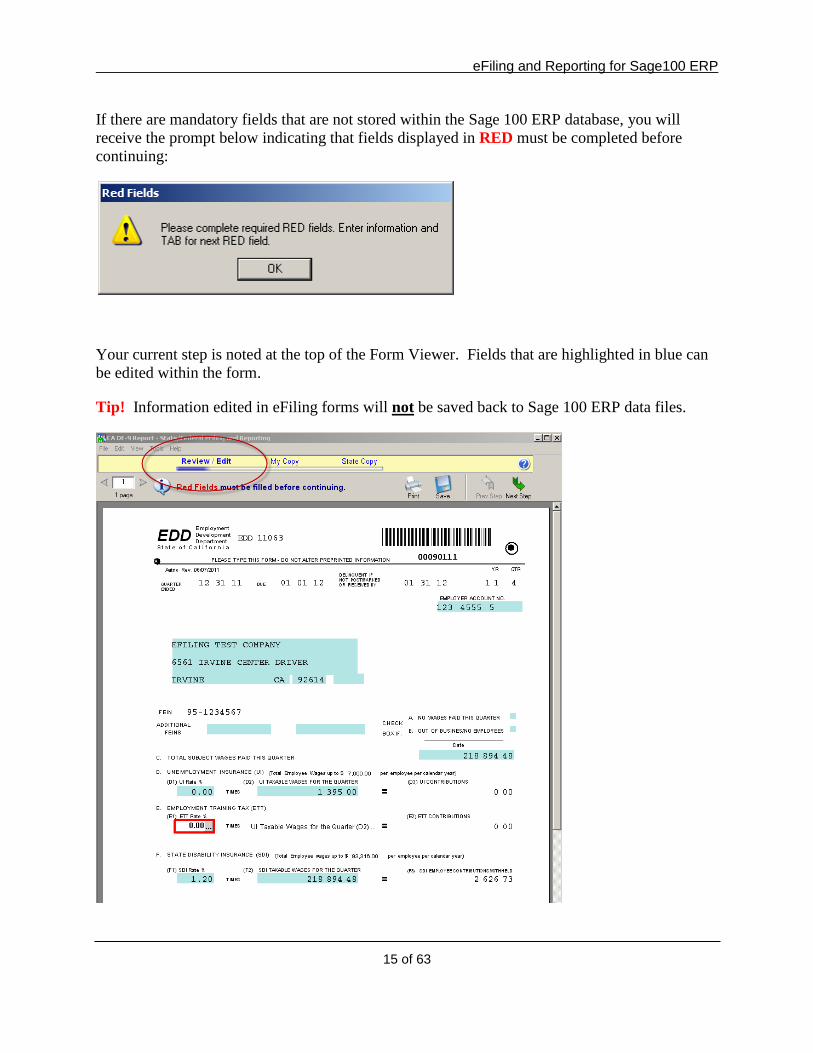
If there are mandatory fields that are not stored within the Sage 100 ERP database, you will
receive the prompt below indicating that fields displayed in RED must be completed before
continuing:
Your current step is noted at the top of the Form Viewer. Fields that are highlighted in blue can
be edited within the form.
Tip! Information edited in eFiling forms will not be saved back to Sage 100 ERP data files.
eFiling and Reporting for Sage 100 ERP
16 of 63
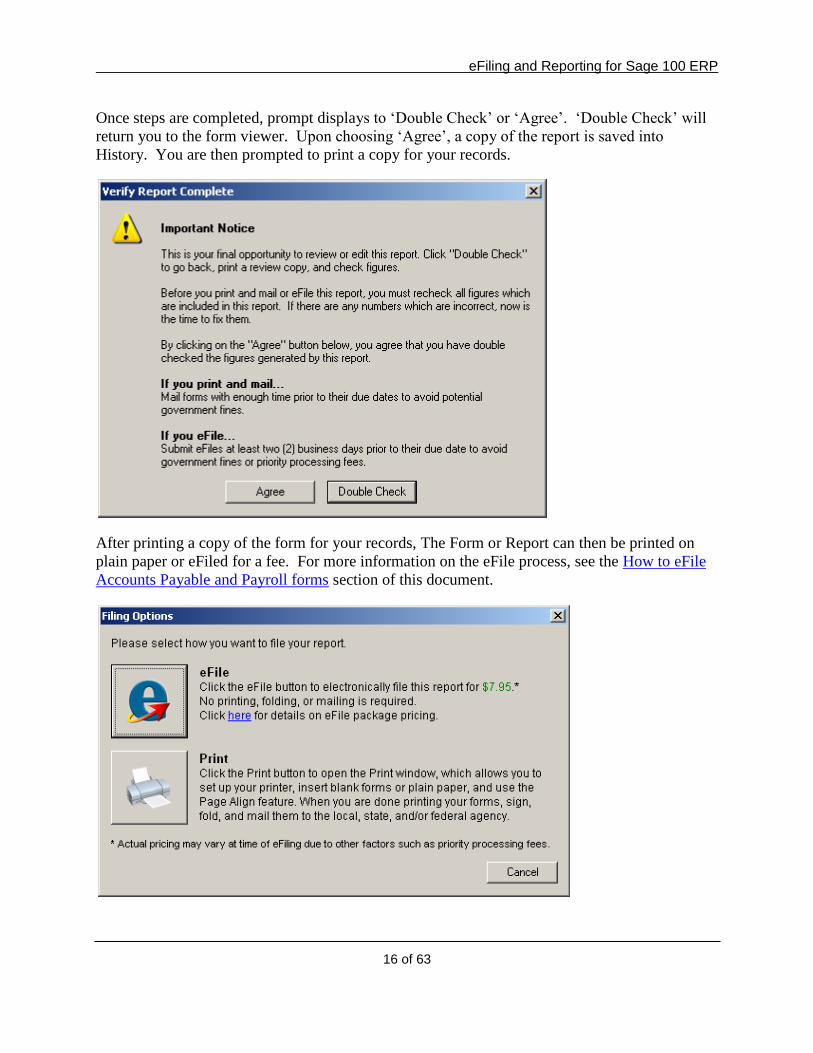
Once steps are completed, prompt displays to ‘Double Check’ or ‘Agree’. ‘Double Check’ will
return you to the form viewer. Upon choosing ‘Agree’, a copy of the report is saved into
History. You are then prompted to print a copy for your records.
After printing a copy of the form for your records, The Form or Report can then be printed on
plain paper or eFiled for a fee. For more information on the eFile process, see the How to eFile
Accounts Payable and Payroll forms section of this document.

eFiling and Reporting for Sage100 ERP
17 of 63
How to Print W-2s with eFiling and Reporting
From the Payroll, Period End menu select Federal eFiling and Reporting. Then select the W-
2_SSA and click the Accept button. In order to print Misc Earnings & Deduction Codes on the
W-2, they need to be selected in this screen. For more information see the Printing Amounts in
Box 14 section of this document.
eFiling and Reporting for Sage 100 ERP
18 of 63
W-2 Test Drive
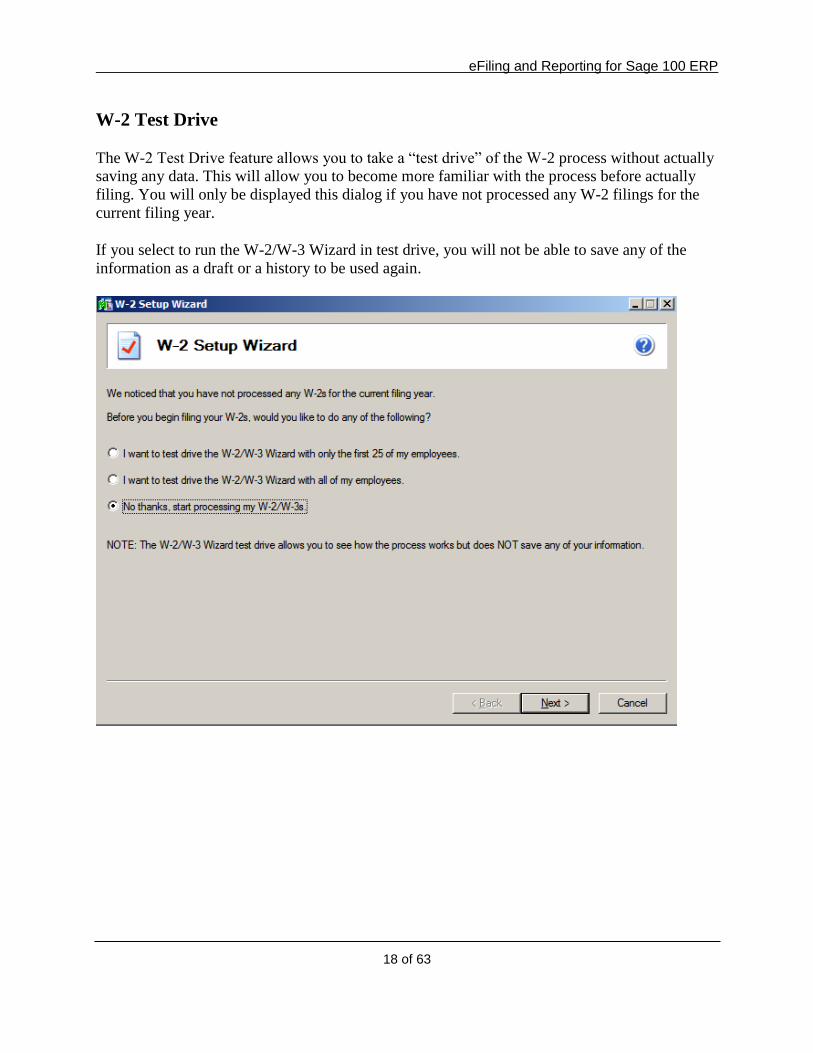
The W-2 Test Drive feature allows you to take a “test drive” of the W-2 process without actually
saving any data. This will allow you to become more familiar with the process before actually
filing. You will only be displayed this dialog if you have not processed any W-2 filings for the
current filing year.
If you select to run the W-2/W-3 Wizard in test drive, you will not be able to save any of the
information as a draft or a history to be used again.
eFiling and Reporting for Sage100 ERP
19 of 63
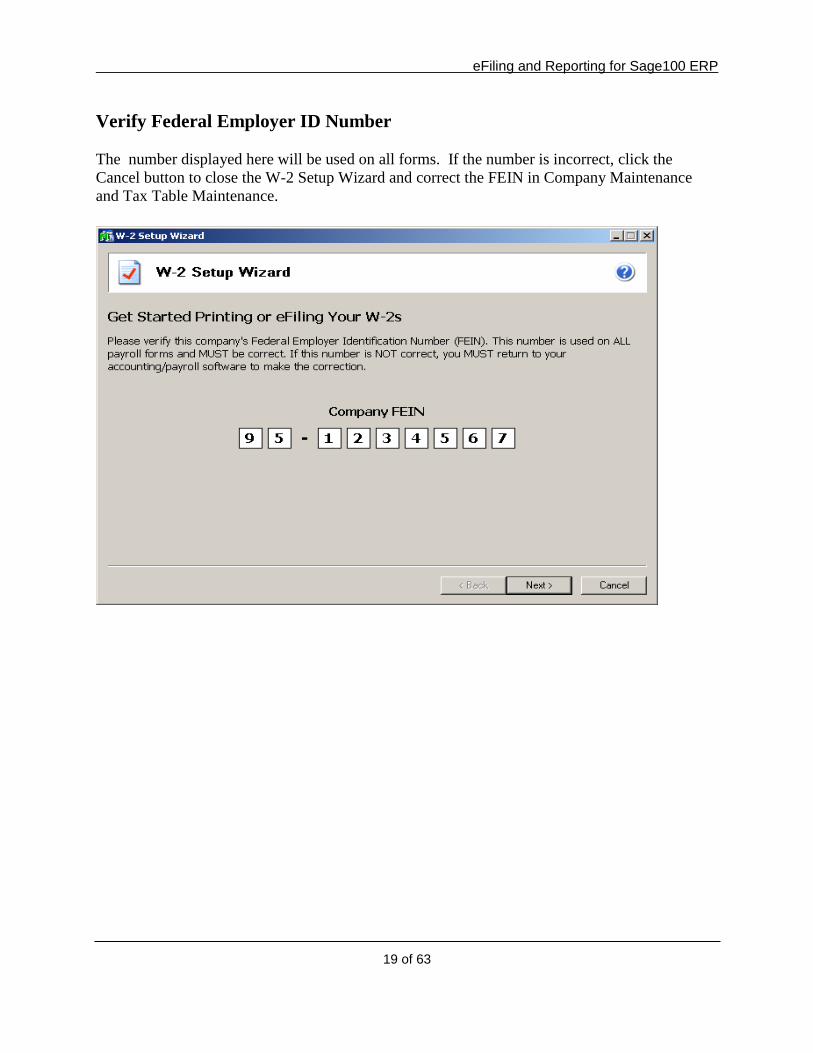
Verify Federal Employer ID Number
The number displayed here will be used on all forms. If the number is incorrect, click the
Cancel button to close the W-2 Setup Wizard and correct the FEIN in Company Maintenance
and Tax Table Maintenance.
eFiling and Reporting for Sage 100 ERP
20 of 63
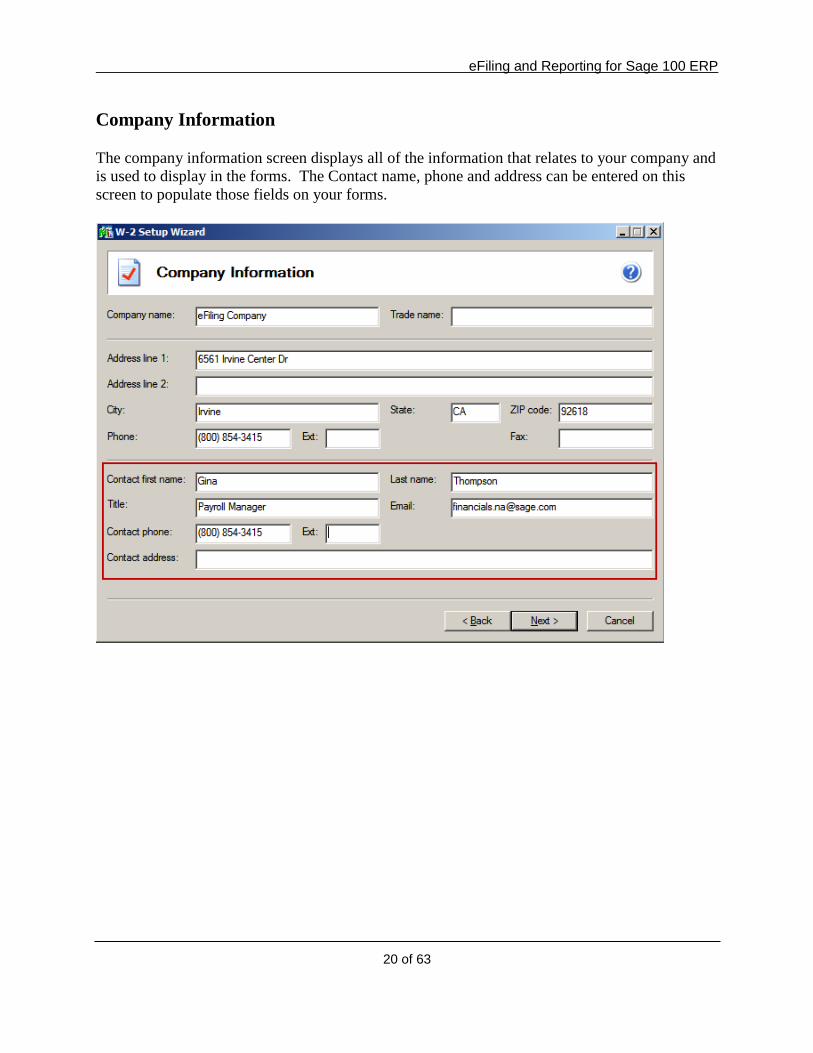
Company Information
The company information screen displays all of the information that relates to your company and
is used to display in the forms. The Contact name, phone and address can be entered on this
screen to populate those fields on your forms.
eFiling and Reporting for Sage100 ERP
21 of 63
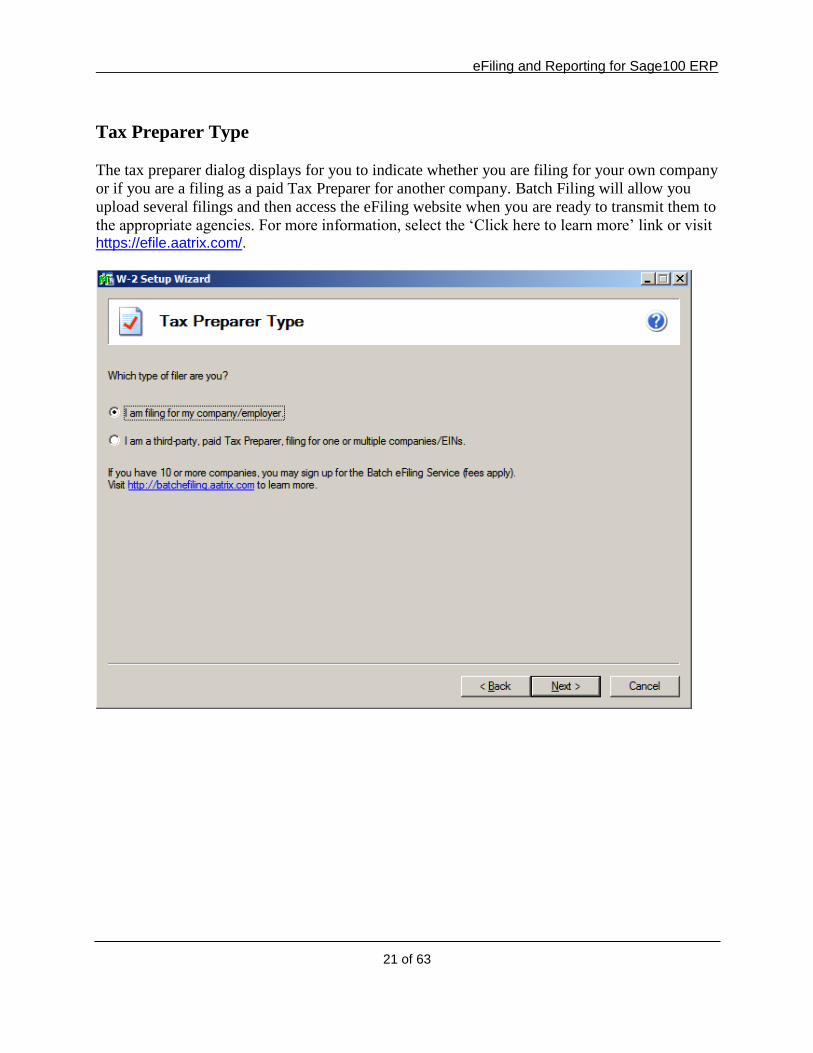
Tax Preparer Type
The tax preparer dialog displays for you to indicate whether you are filing for your own company
or if you are a filing as a paid Tax Preparer for another company. Batch Filing will allow you
upload several filings and then access the eFiling website when you are ready to transmit them to
the appropriate agencies. For more information, select the ‘Click here to learn more’ link or visit https://efile.aatrix.com/.
eFiling and Reporting for Sage 100 ERP
22 of 63
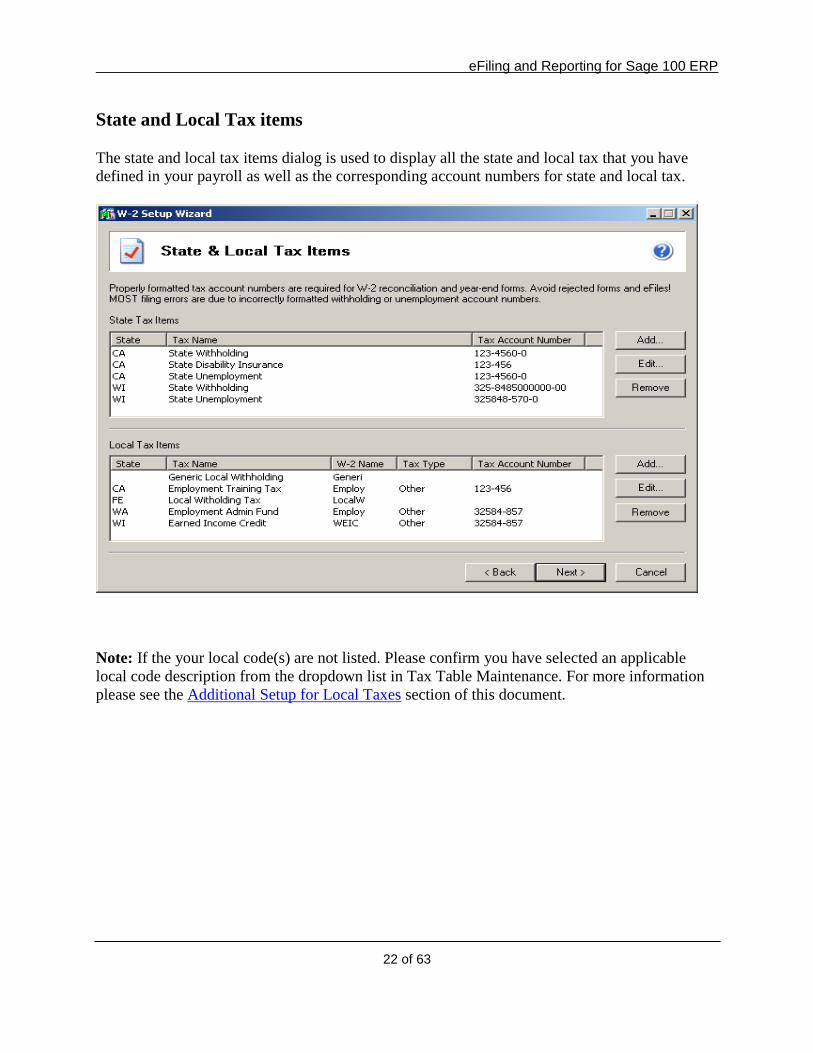
State and Local Tax items
The state and local tax items dialog is used to display all the state and local tax that you have
defined in your payroll as well as the corresponding account numbers for state and local tax.
Note: If the your local code(s) are not listed. Please confirm you have selected an applicable
local code description from the dropdown list in Tax Table Maintenance. For more information
please see the Additional Setup for Local Taxes section of this document.
eFiling and Reporting for Sage100 ERP
23 of 63
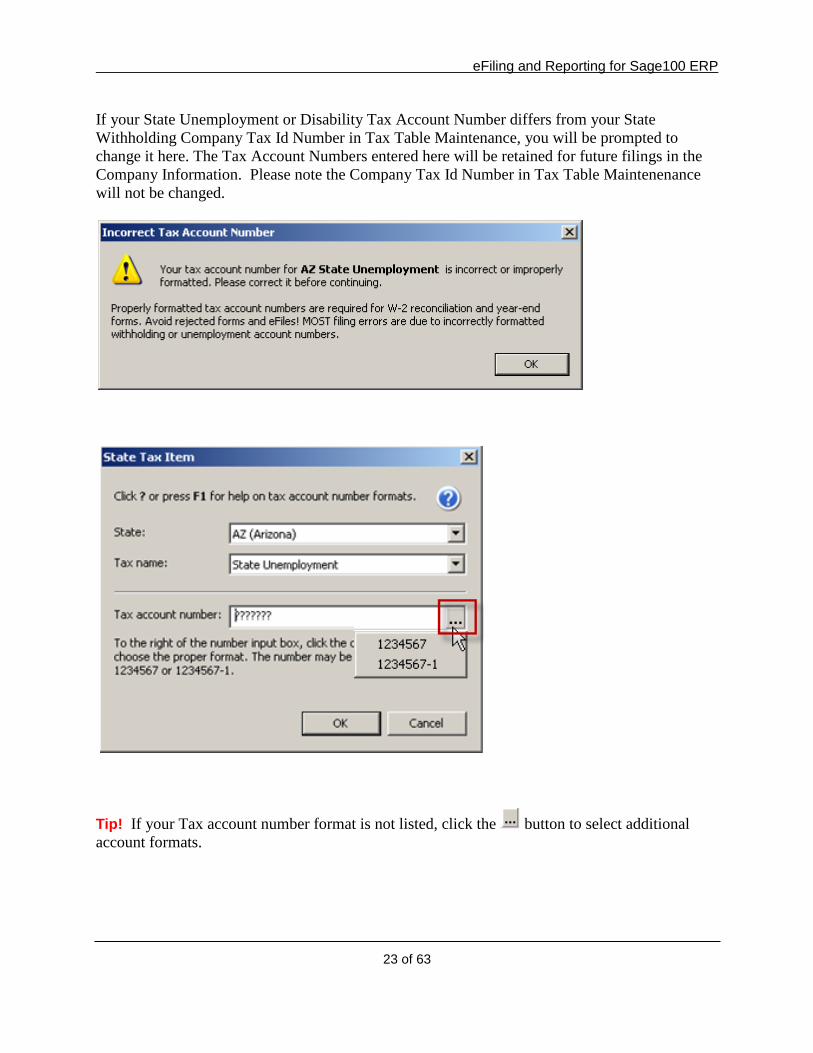
If your State Unemployment or Disability Tax Account Number differs from your State
Withholding Company Tax Id Number in Tax Table Maintenance, you will be prompted to
change it here. The Tax Account Numbers entered here will be retained for future filings in the
Company Information. Please note the Company Tax Id Number in Tax Table Maintenenance
will not be changed.
Tip! If your Tax account number format is not listed, click the button to select additional
account formats.
eFiling and Reporting for Sage 100 ERP
24 of 63
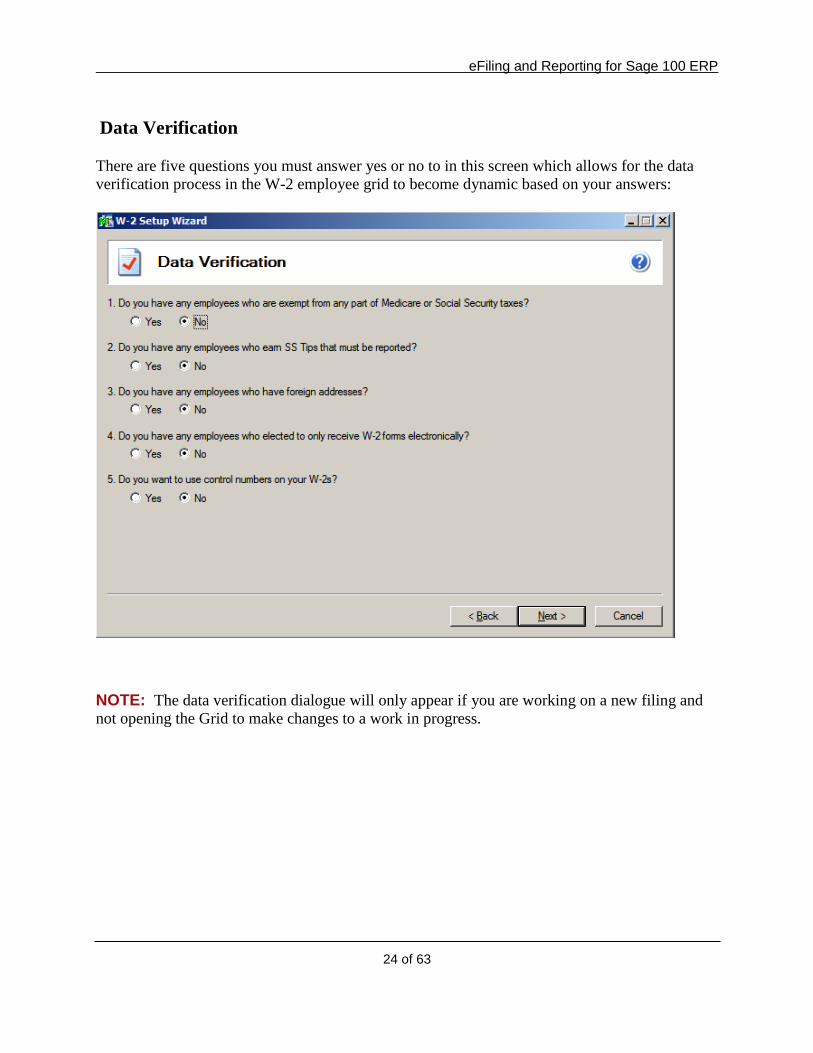
Data Verification
There are five questions you must answer yes or no to in this screen which allows for the data
verification process in the W-2 employee grid to become dynamic based on your answers:
NOTE: The data verification dialogue will only appear if you are working on a new filing and
not opening the Grid to make changes to a work in progress.
eFiling and Reporting for Sage100 ERP
25 of 63
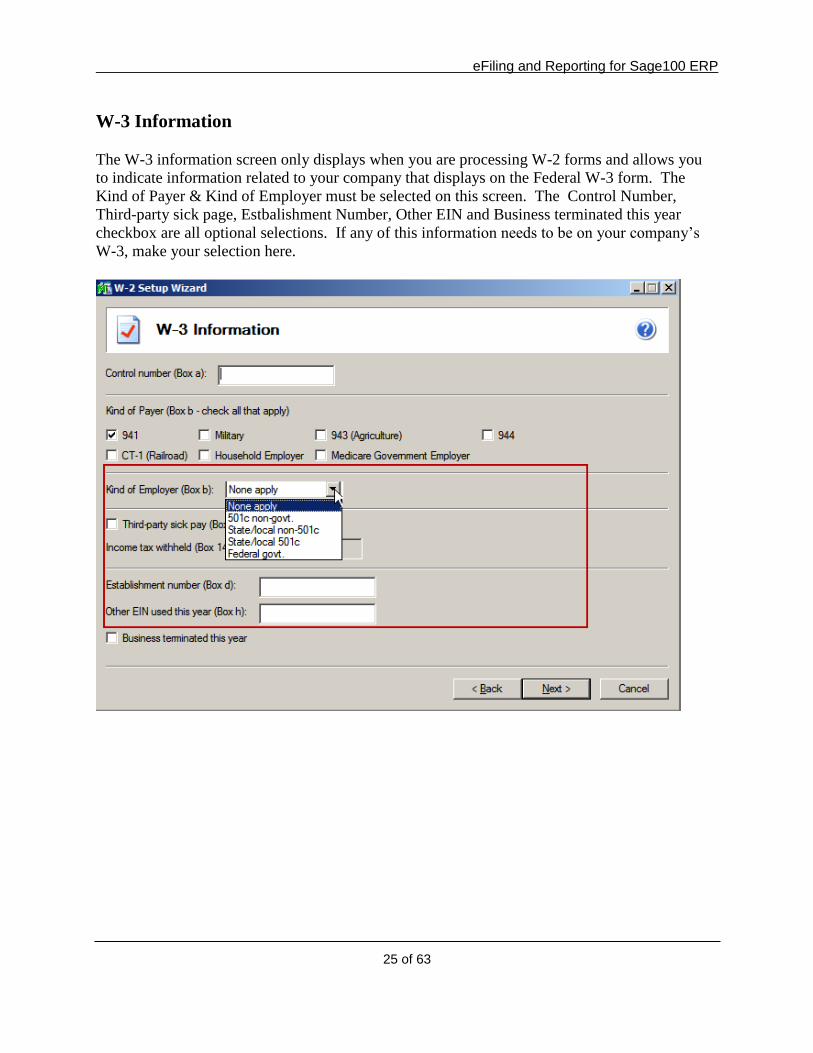
W-3 Information
The W-3 information screen only displays when you are processing W-2 forms and allows you
to indicate information related to your company that displays on the Federal W-3 form. The
Kind of Payer & Kind of Employer must be selected on this screen. The Control Number,
Third-party sick page, Estbalishment Number, Other EIN and Business terminated this year
checkbox are all optional selections. If any of this information needs to be on your company’s
W-3, make your selection here.
eFiling and Reporting for Sage 100 ERP
26 of 63
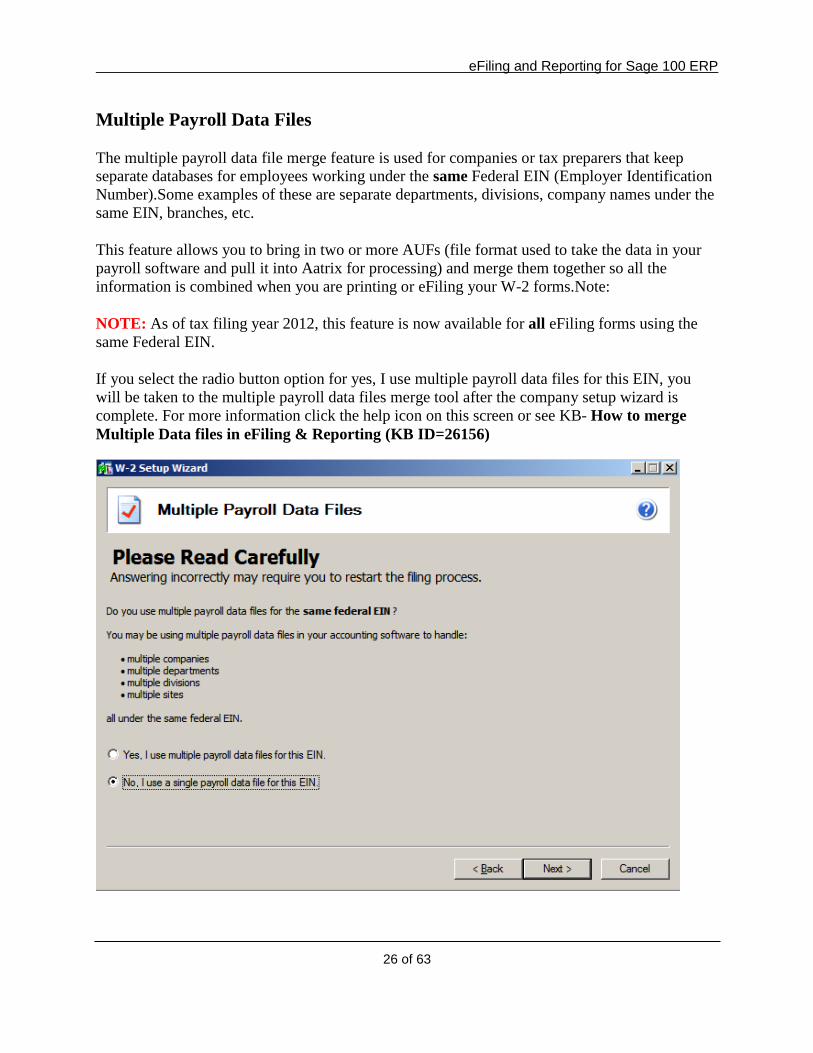
Multiple Payroll Data Files
The multiple payroll data file merge feature is used for companies or tax preparers that keep
separate databases for employees working under the same Federal EIN (Employer Identification
Number).Some examples of these are separate departments, divisions, company names under the
same EIN, branches, etc.
This feature allows you to bring in two or more AUFs (file format used to take the data in your
payroll software and pull it into Aatrix for processing) and merge them together so all the
information is combined when you are printing or eFiling your W-2 forms.Note:
NOTE: As of tax filing year 2012, this feature is now available for all eFiling forms using the
same Federal EIN.
If you select the radio button option for yes, I use multiple payroll data files for this EIN, you
will be taken to the multiple payroll data files merge tool after the company setup wizard is
complete. For more information click the help icon on this screen or see KB- How to merge
Multiple Data files in eFiling & Reporting (KB ID=26156)
eFiling and Reporting for Sage100 ERP
27 of 63
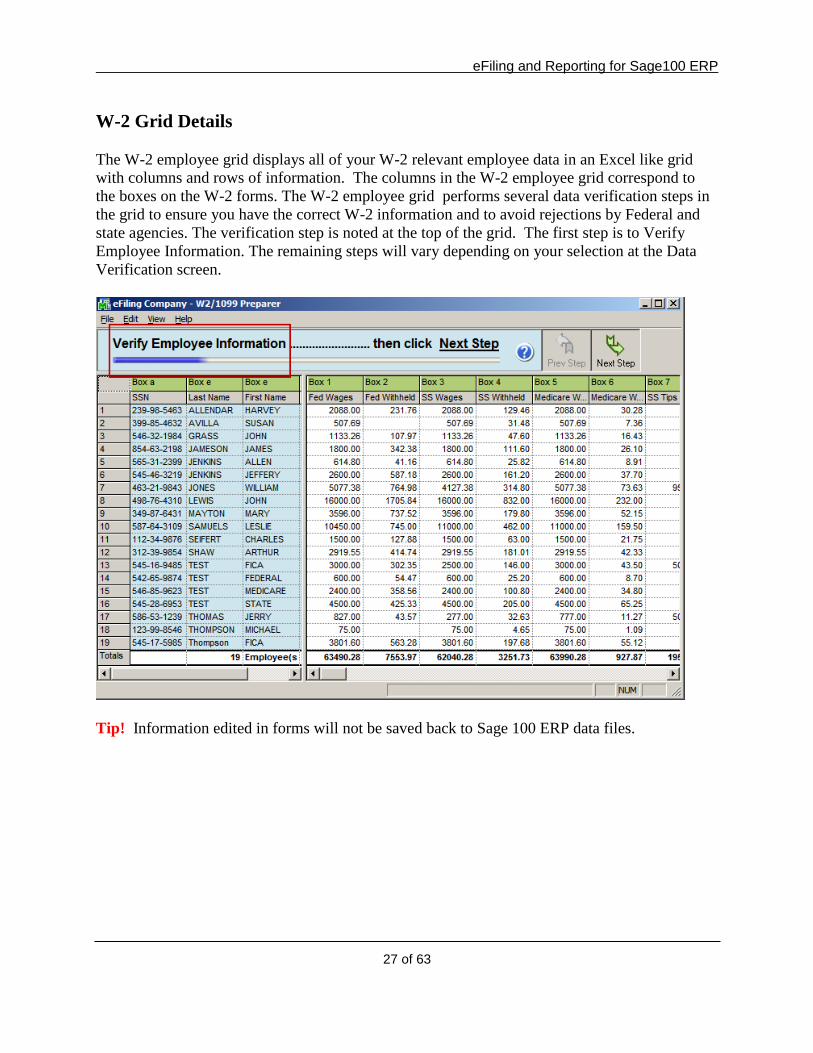
W-2 Grid Details
The W-2 employee grid displays all of your W-2 relevant employee data in an Excel like grid
with columns and rows of information. The columns in the W-2 employee grid correspond to
the boxes on the W-2 forms. The W-2 employee grid performs several data verification steps in
the grid to ensure you have the correct W-2 information and to avoid rejections by Federal and
state agencies. The verification step is noted at the top of the grid. The first step is to Verify
Employee Information. The remaining steps will vary depending on your selection at the Data
Verification screen.
Tip! Information edited in forms will not be saved back to Sage 100 ERP data files.

eFiling and Reporting for Sage 100 ERP
28 of 63
W-2 Printing and Filing Options
Once you have completed the steps in the W-2 Preparer, you are able to select your processing
options. You can select to eFile or print your own W-2s or a combination of both. If selecting
Other Options and Print my Employee W-2s, you will need to use blank perforated 4 per
page W-2 forms. These forms should have a blank front and the Notice to Employees
preprinted on the back of the form. These forms can be purchased from Sage Forms Division at
800-538-5514.
eFiling and Reporting for Sage100 ERP
29 of 63
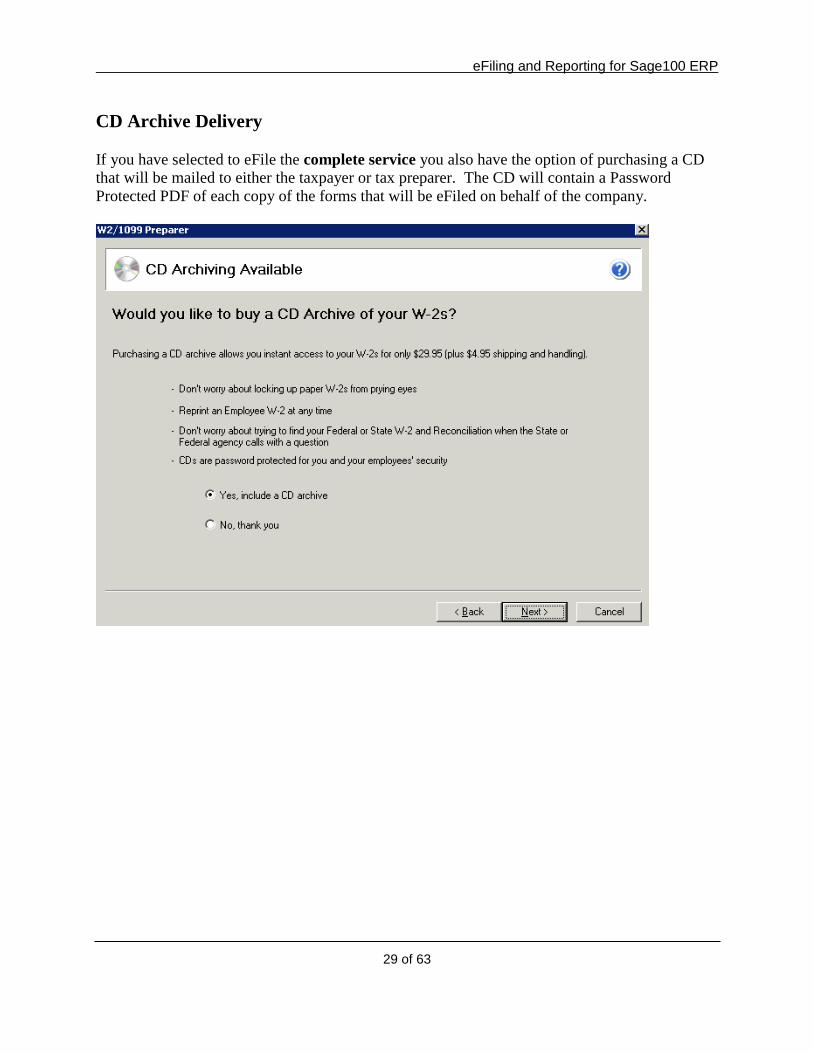
CD Archive Delivery
If you have selected to eFile the complete service you also have the option of purchasing a CD
that will be mailed to either the taxpayer or tax preparer. The CD will contain a Password
Protected PDF of each copy of the forms that will be eFiled on behalf of the company.
eFiling and Reporting for Sage 100 ERP
30 of 63
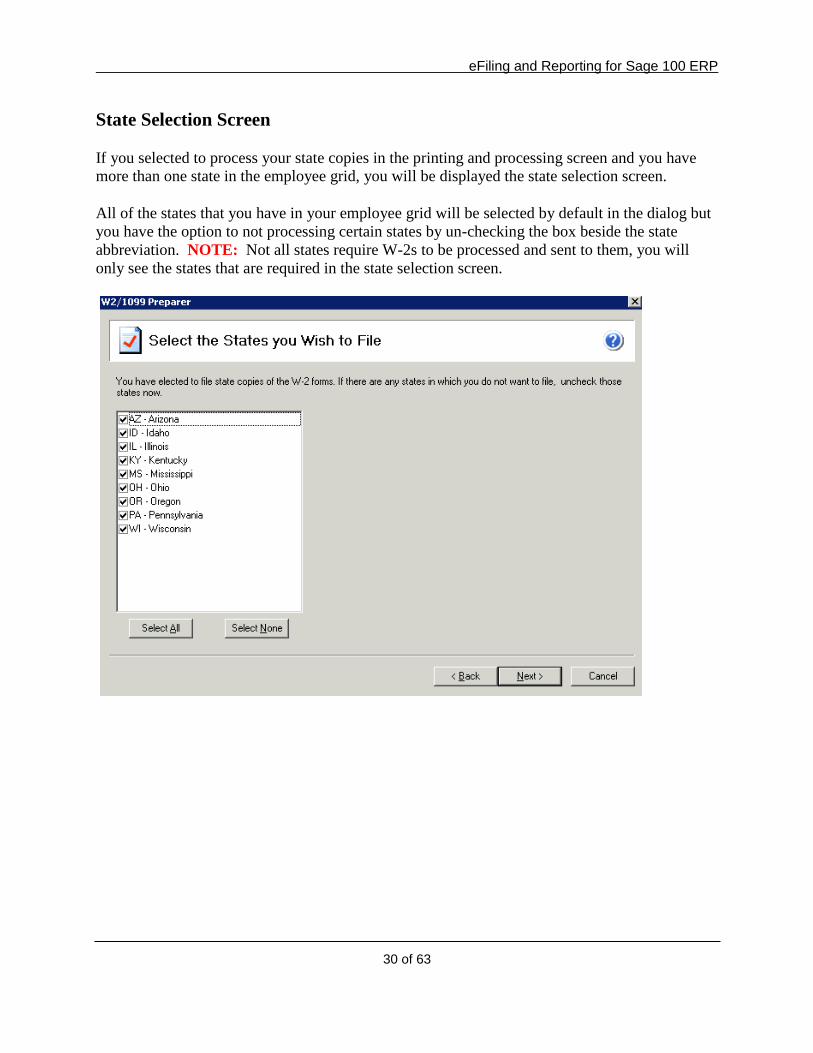
State Selection Screen
If you selected to process your state copies in the printing and processing screen and you have
more than one state in the employee grid, you will be displayed the state selection screen.
All of the states that you have in your employee grid will be selected by default in the dialog but
you have the option to not processing certain states by un-checking the box beside the state
abbreviation. NOTE: Not all states require W-2s to be processed and sent to them, you will
only see the states that are required in the state selection screen.
eFiling and Reporting for Sage100 ERP
31 of 63
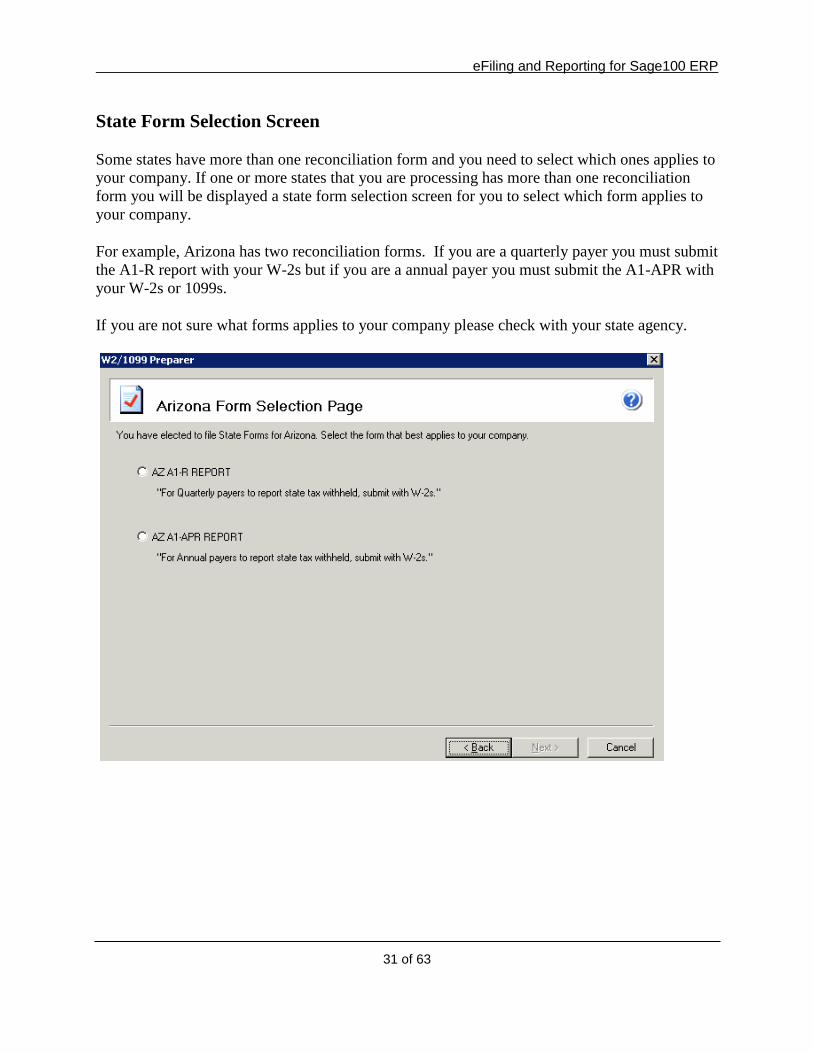
State Form Selection Screen
Some states have more than one reconciliation form and you need to select which ones applies to
your company. If one or more states that you are processing has more than one reconciliation
form you will be displayed a state form selection screen for you to select which form applies to
your company.
For example, Arizona has two reconciliation forms. If you are a quarterly payer you must submit
the A1-R report with your W-2s but if you are a annual payer you must submit the A1-APR with
your W-2s or 1099s.
If you are not sure what forms applies to your company please check with your state agency.
eFiling and Reporting for Sage 100 ERP
32 of 63
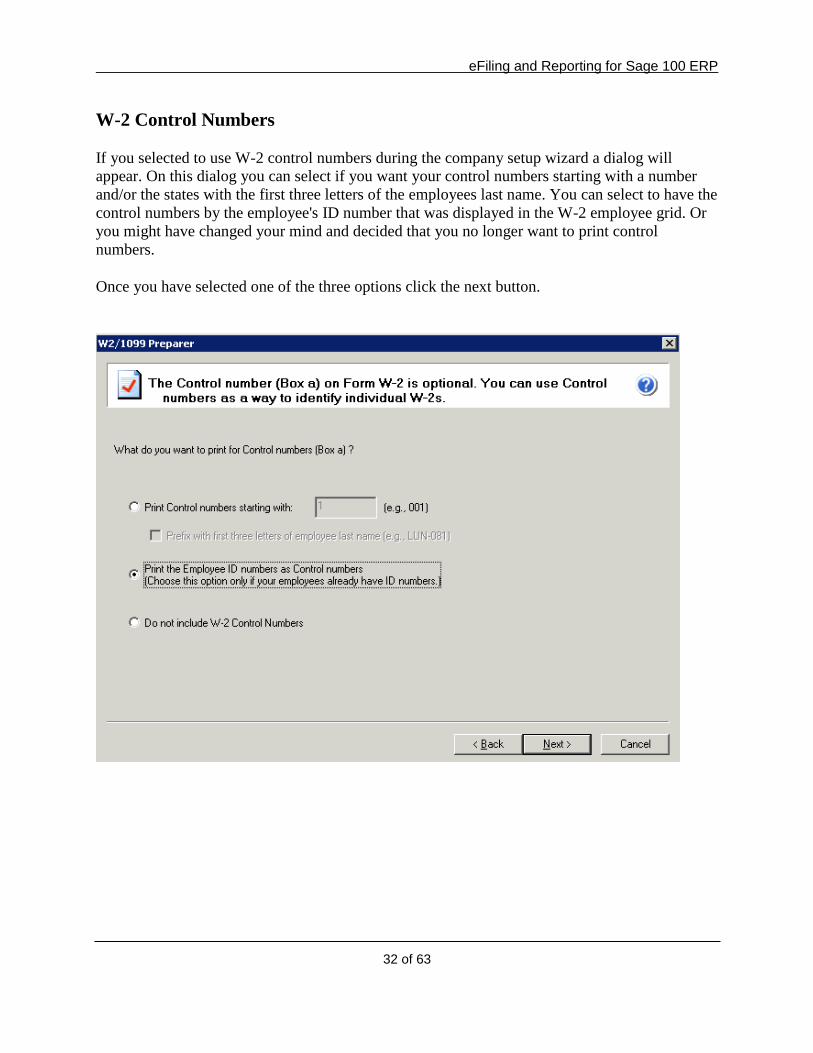
W-2 Control Numbers
If you selected to use W-2 control numbers during the company setup wizard a dialog will
appear. On this dialog you can select if you want your control numbers starting with a number
and/or the states with the first three letters of the employees last name. You can select to have the
control numbers by the employee's ID number that was displayed in the W-2 employee grid. Or
you might have changed your mind and decided that you no longer want to print control
numbers.
Once you have selected one of the three options click the next button.
eFiling and Reporting for Sage100 ERP
33 of 63
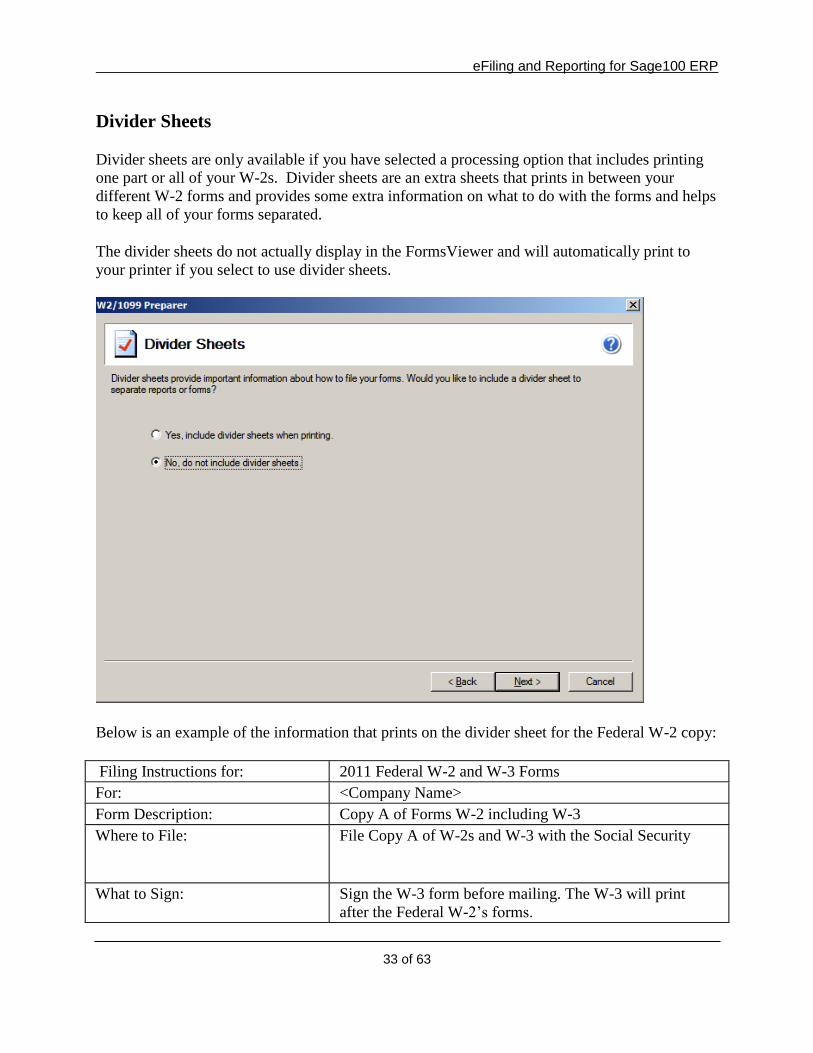
Divider Sheets
Divider sheets are only available if you have selected a processing option that includes printing
one part or all of your W-2s. Divider sheets are an extra sheets that prints in between your
different W-2 forms and provides some extra information on what to do with the forms and helps
to keep all of your forms separated.
The divider sheets do not actually display in the FormsViewer and will automatically print to
your printer if you select to use divider sheets.
Below is an example of the information that prints on the divider sheet for the Federal W-2 copy:
Filing Instructions for: 2011 Federal W-2 and W-3 Forms
For: <Company Name>
Form Description: Copy A of Forms W-2 including W-3
Where to File:
File Copy A of W-2s and W-3 with the Social Security
What to Sign: Sign the W-3 form before mailing. The W-3 will print
after the Federal W-2’s forms.
eFiling and Reporting for Sage 100 ERP
34 of 63
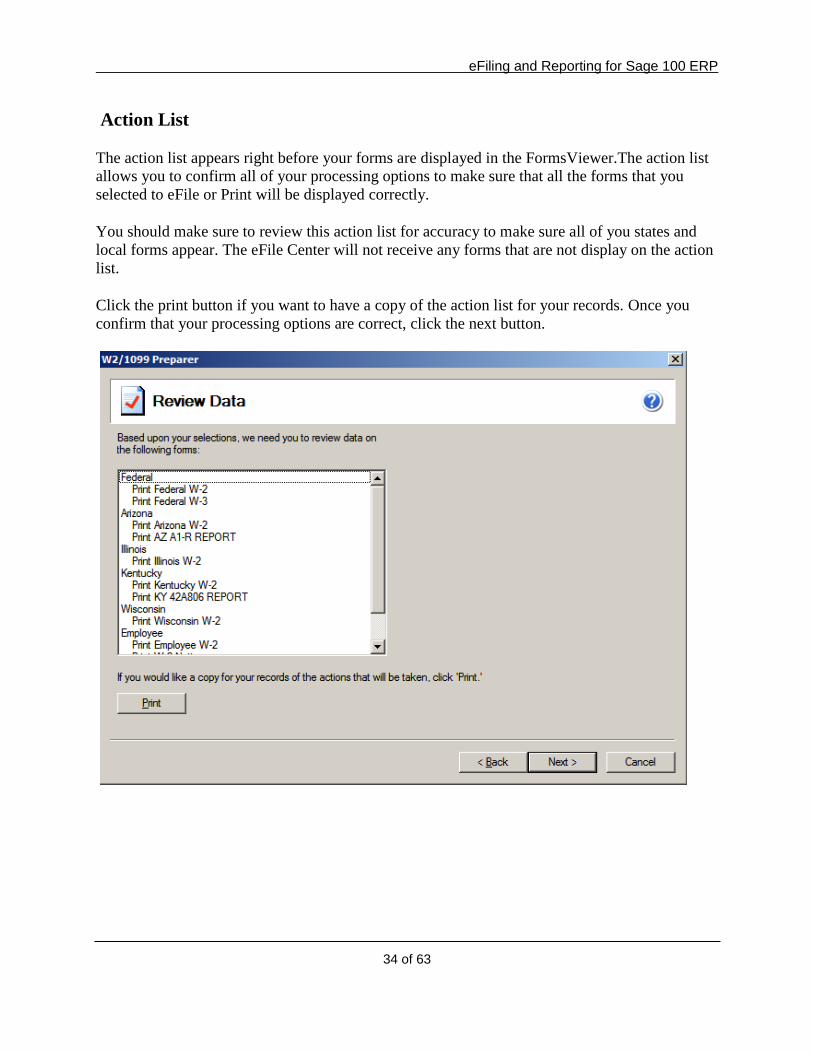
Action List
The action list appears right before your forms are displayed in the FormsViewer.The action list
allows you to confirm all of your processing options to make sure that all the forms that you
selected to eFile or Print will be displayed correctly.
You should make sure to review this action list for accuracy to make sure all of you states and
local forms appear. The eFile Center will not receive any forms that are not display on the action
list.
Click the print button if you want to have a copy of the action list for your records. Once you
confirm that your processing options are correct, click the next button.
eFiling and Reporting for Sage100 ERP
35 of 63
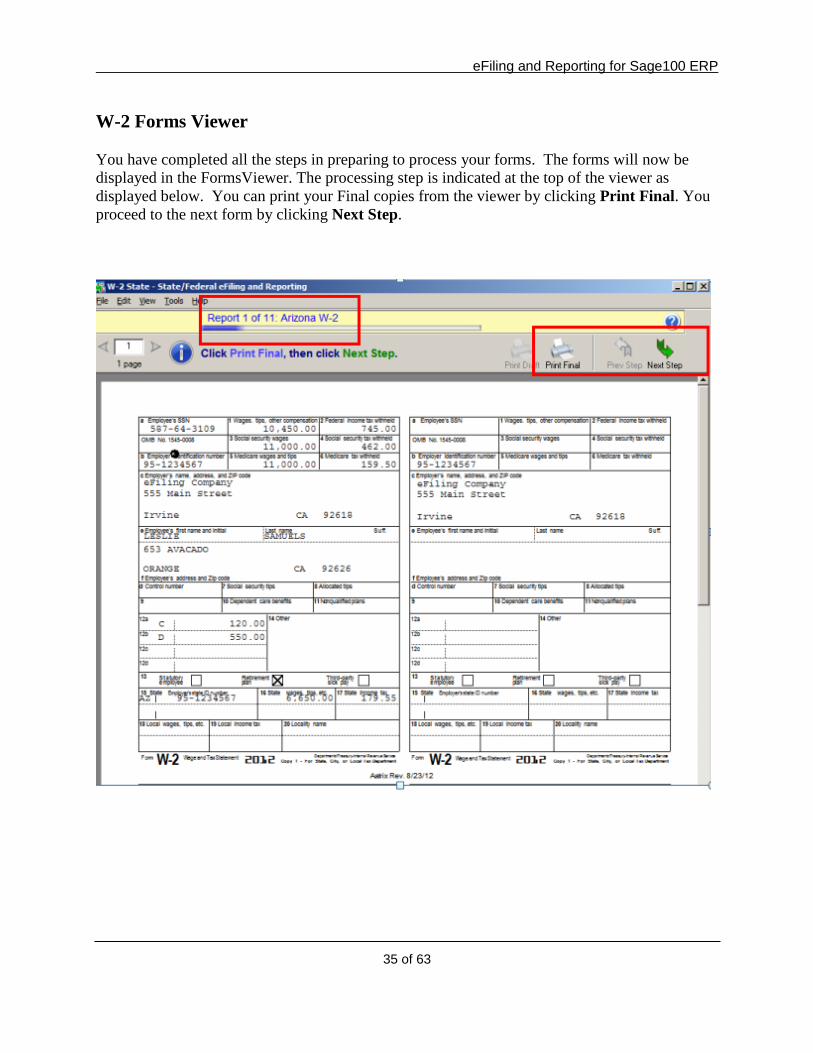
W-2 Forms Viewer
You have completed all the steps in preparing to process your forms. The forms will now be
displayed in the FormsViewer. The processing step is indicated at the top of the viewer as
displayed below. You can print your Final copies from the viewer by clicking Print Final. You
proceed to the next form by clicking Next Step.

eFiling and Reporting for Sage 100 ERP
36 of 63
If the selected form requires special paper stock, you will be prompted to load your printer when
clicking the Print Final button. For example, if you have selected to print your own W-2s you
will be prompted to load your 4 part perforated W-2 forms into the printer. Once all steps have
been completed, the eFile Login will appear. For more information on the eFile process, see
How to eFile Accounts Payable and Payroll forms section of this document.
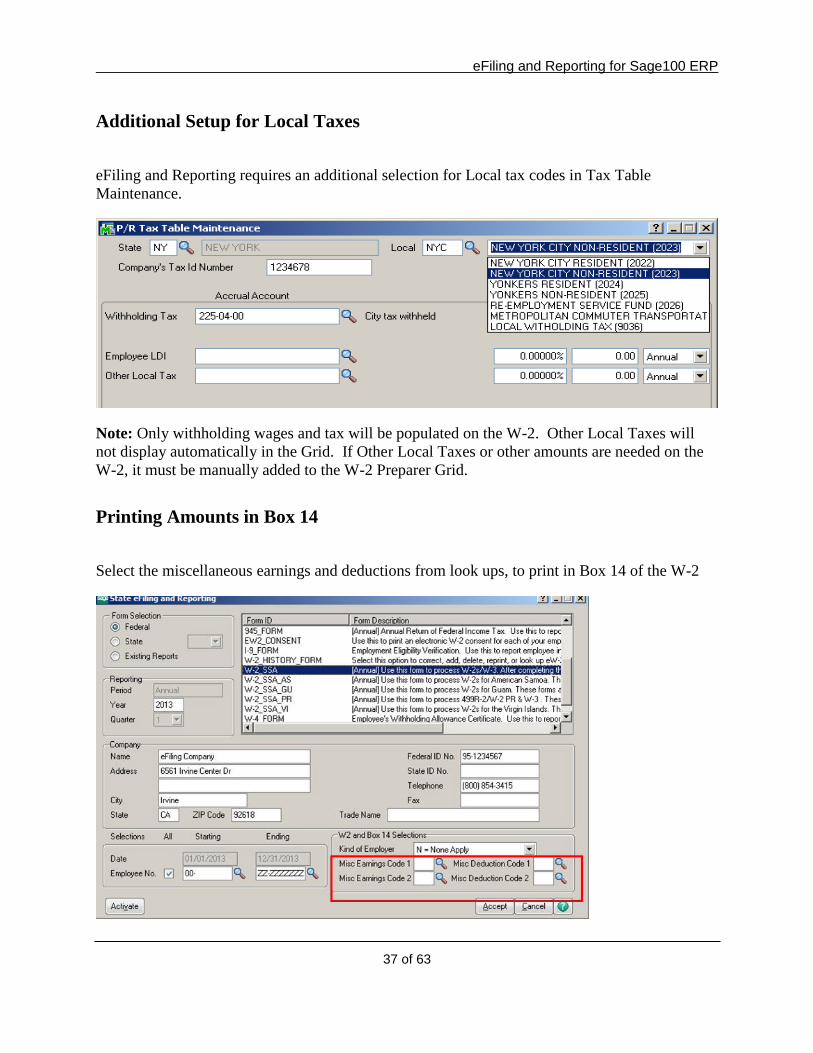
eFiling and Reporting for Sage100 ERP
37 of 63
Additional Setup for Local Taxes
eFiling and Reporting requires an additional selection for Local tax codes in Tax Table
Maintenance.
Note: Only withholding wages and tax will be populated on the W-2. Other Local Taxes will
not display automatically in the Grid. If Other Local Taxes or other amounts are needed on the
W-2, it must be manually added to the W-2 Preparer Grid.
Printing Amounts in Box 14
Select the miscellaneous earnings and deductions from look ups, to print in Box 14 of the W-2

eFiling and Reporting for Sage 100 ERP
38 of 63
The columns will display in the grid as DedCode1, DedCode2, EarnCode1 & EarnCode2
To display the correct label on the W-2:
1. Right click on the Column and select Rename
2. Enter the Description you would like to display on the W-2.
Note: only the first 10 characters will print
3. Click Ok
eFiling and Reporting for Sage100 ERP
39 of 63
Populating the Employee E-mail Address in the Electronic Delivery Column
In order for the employees email to automatically populate into the W2/1099 Preparer.
Note: As of tax filing year 2012, the employees email address is not required, you may manually
enter employees’ email address into the W2/1099 Preparer grid.
To set up the employee's e-mail address to automatically populate into W2/1099 preparer grid
you will need to do the following:
In Paperless Office module:
1. From Paperless Office Setup menu select Options. Check the Forms checkbox.
2. From Paperless Office Setup menu select Form Maintenance. Complete the following:
a. Company Code
b. Module Code (P/R)
c. Document (Direct Deposit Stub)
d. PDF Directory
e. Override Password/Confirm Password
In Payroll module:
1. From Payroll Setup menu select Payroll Options. On the Direct Deposit tab select
Require Direct Deposit checkbox.
2. From the Payroll Main menu select Employee Maintenance. Select applicable
employee no from lookup, select the Direct Deposit checkbox and then click the
Direct Deposit button.
3. On the Direct Deposits window click the Paperless button.
4. On the Paperless Office Delivery Options window, complete the following:
a. PDF Document Password
b. E-mail Address (for employee).
Note: After setting up the e-mail address for an employee, if that employee is not paid
by Direct Deposit you may deselect the Direct Deposit checkbox on the Main tab in
Employee Maintenance. The e-mail address entered will be retained. You will need to
perform the Payroll steps 2 through 4 for each employee you want to set up with an
e-mail address.
For more detailed information on processing Electronic W2s and Federal Guidelines, please see
eFiling Help files.
To access eFiling help:
1. From within the W2/1099 Preparer grid, click Help, Preparer Help
2. Click Search tab, and search for Electronic W-2s (eW-2)
IMPORTANT NOTE: Per Federal guidelines, if an employee chooses to receive an Electronic W2, you must have
them sign a consent form. You can receive an employee's consent on paper or electronically. Aatrix provides you a
form "eW-2 Consent Form” that is available in the Report Selection Window. This form contains specific
information that the IRS requires you to provide your employees.
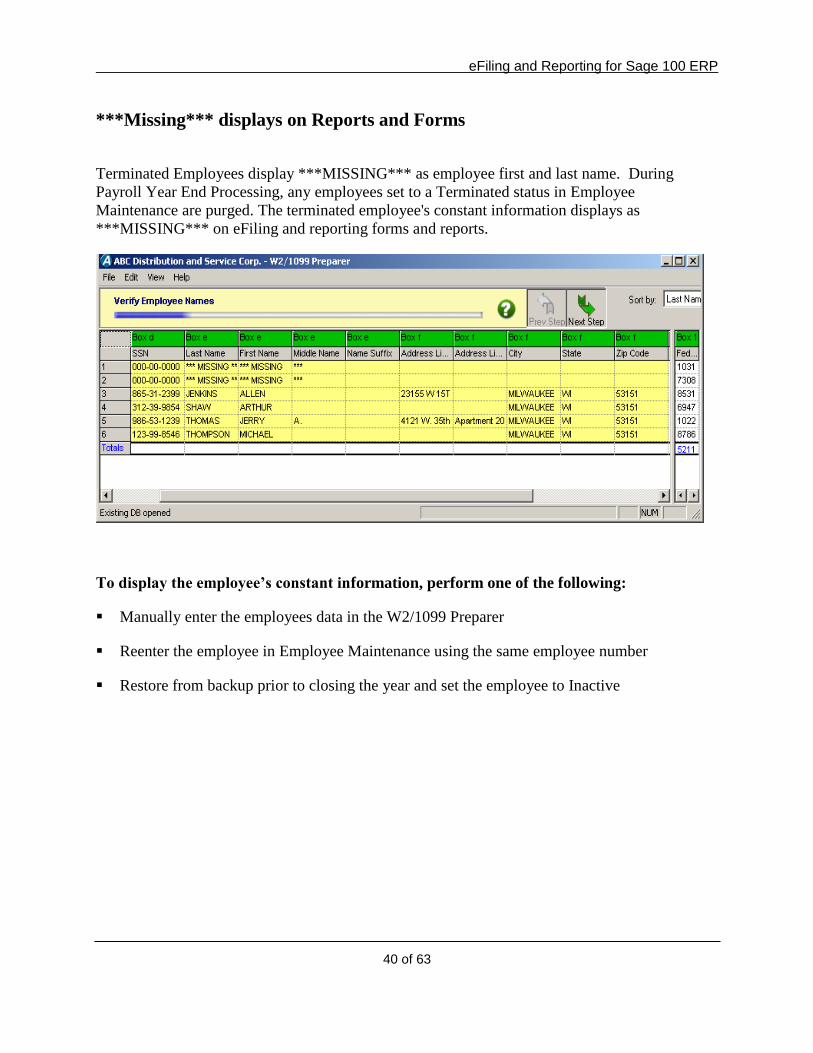
eFiling and Reporting for Sage 100 ERP
40 of 63
***Missing*** displays on Reports and Forms
Terminated Employees display ***MISSING*** as employee first and last name. During
Payroll Year End Processing, any employees set to a Terminated status in Employee
Maintenance are purged. The terminated employee's constant information displays as
***MISSING*** on eFiling and reporting forms and reports.
To display the employee’s constant information, perform one of the following:
Manually enter the employees data in the W2/1099 Preparer
Reenter the employee in Employee Maintenance using the same employee number
Restore from backup prior to closing the year and set the employee to Inactive
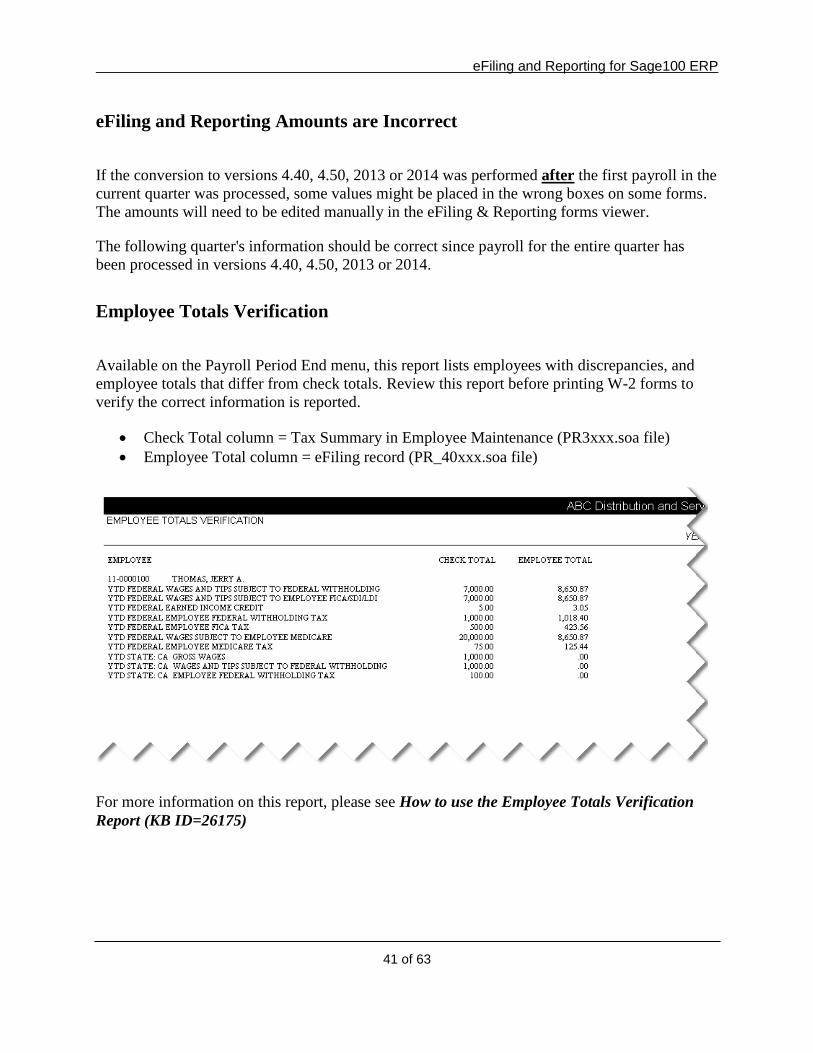
eFiling and Reporting for Sage100 ERP
41 of 63
eFiling and Reporting Amounts are Incorrect
If the conversion to versions 4.40, 4.50, 2013 or 2014 was performed after the first payroll in the
current quarter was processed, some values might be placed in the wrong boxes on some forms.
The amounts will need to be edited manually in the eFiling & Reporting forms viewer.
The following quarter's information should be correct since payroll for the entire quarter has
been processed in versions 4.40, 4.50, 2013 or 2014.
Employee Totals Verification
Available on the Payroll Period End menu, this report lists employees with discrepancies, and
employee totals that differ from check totals. Review this report before printing W-2 forms to
verify the correct information is reported.
Check Total column = Tax Summary in Employee Maintenance (PR3xxx.soa file)
Employee Total column = eFiling record (PR_40xxx.soa file)
For more information on this report, please see How to use the Employee Totals Verification
Report (KB ID=26175)
eFiling and Reporting for Sage 100 ERP
42 of 63
Payroll files for eFiling and Reporting
The files that store payroll information used for eFiling and Reporting.
PR_40 - PR Federal/State eFiling and Reporting
Holds check history for eFiling & Reporting per settings in Payroll Options ‘Years to
Retain eFiling Check History’
During conversion to Version 4.30 or above, quarter to date and year to date information
is copied from PR3 (Employee Tax Summary) to PR_40 to start the data history
PR_41 - Federal W-2 eFiling Summary
Populated during Year End Processing with data from PR1 & PR3
Allows printing of W-2s after Year End Closing for eFiling and Reporting.
NOTE: Terminated employees must be changed to an Inactive Status before closing the
year.
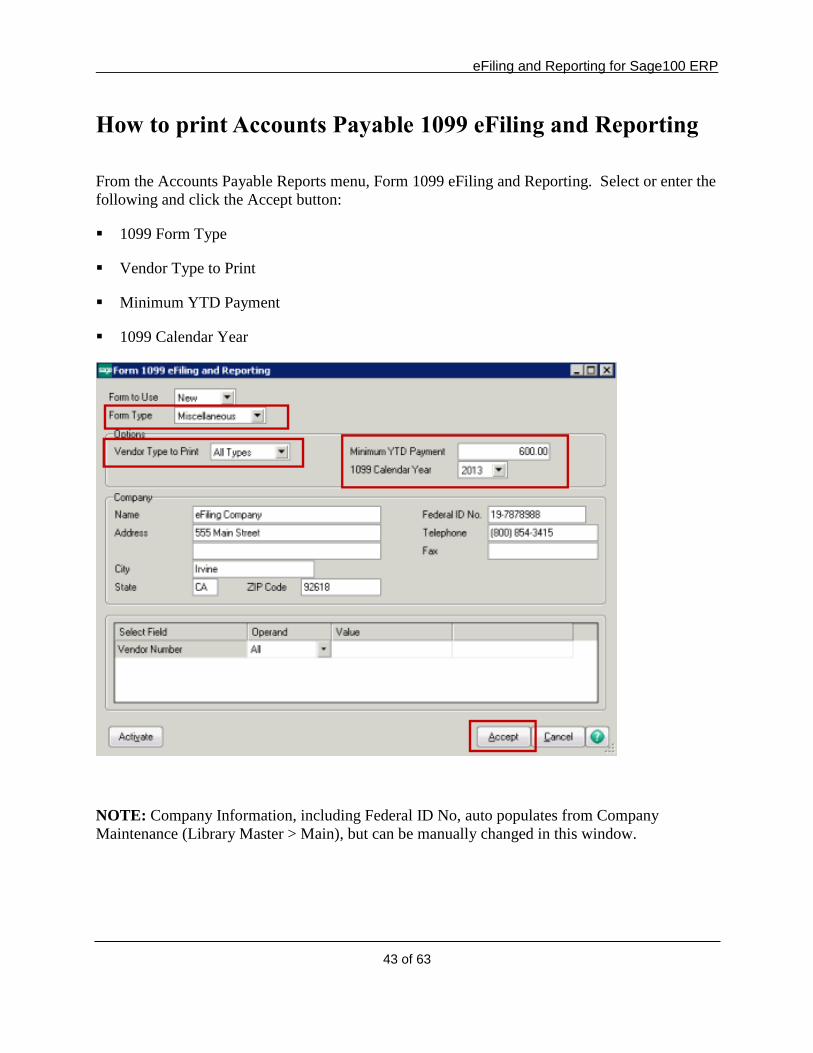
eFiling and Reporting for Sage100 ERP
43 of 63
How to print Accounts Payable 1099 eFiling and Reporting
From the Accounts Payable Reports menu, Form 1099 eFiling and Reporting. Select or enter the
following and click the Accept button:
1099 Form Type
Vendor Type to Print
Minimum YTD Payment
1099 Calendar Year
NOTE: Company Information, including Federal ID No, auto populates from Company
Maintenance (Library Master > Main), but can be manually changed in this window.
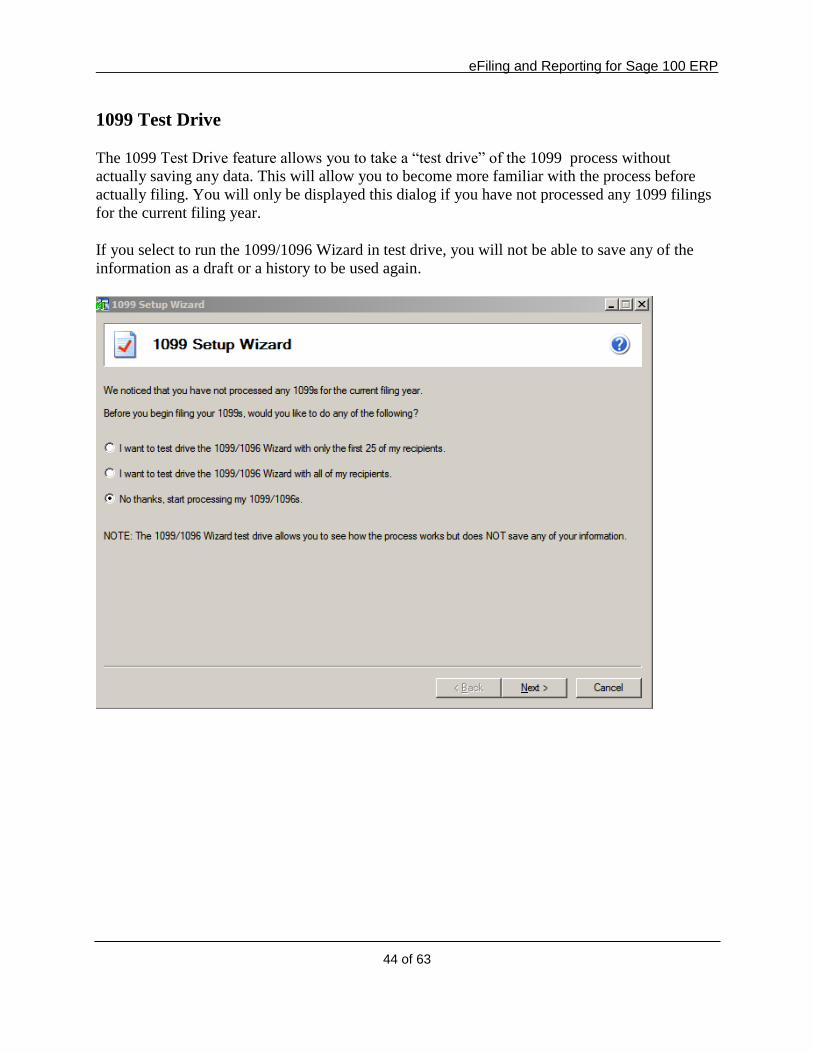
eFiling and Reporting for Sage 100 ERP
44 of 63
1099 Test Drive
The 1099 Test Drive feature allows you to take a “test drive” of the 1099 process without
actually saving any data. This will allow you to become more familiar with the process before
actually filing. You will only be displayed this dialog if you have not processed any 1099 filings
for the current filing year.
If you select to run the 1099/1096 Wizard in test drive, you will not be able to save any of the
information as a draft or a history to be used again.
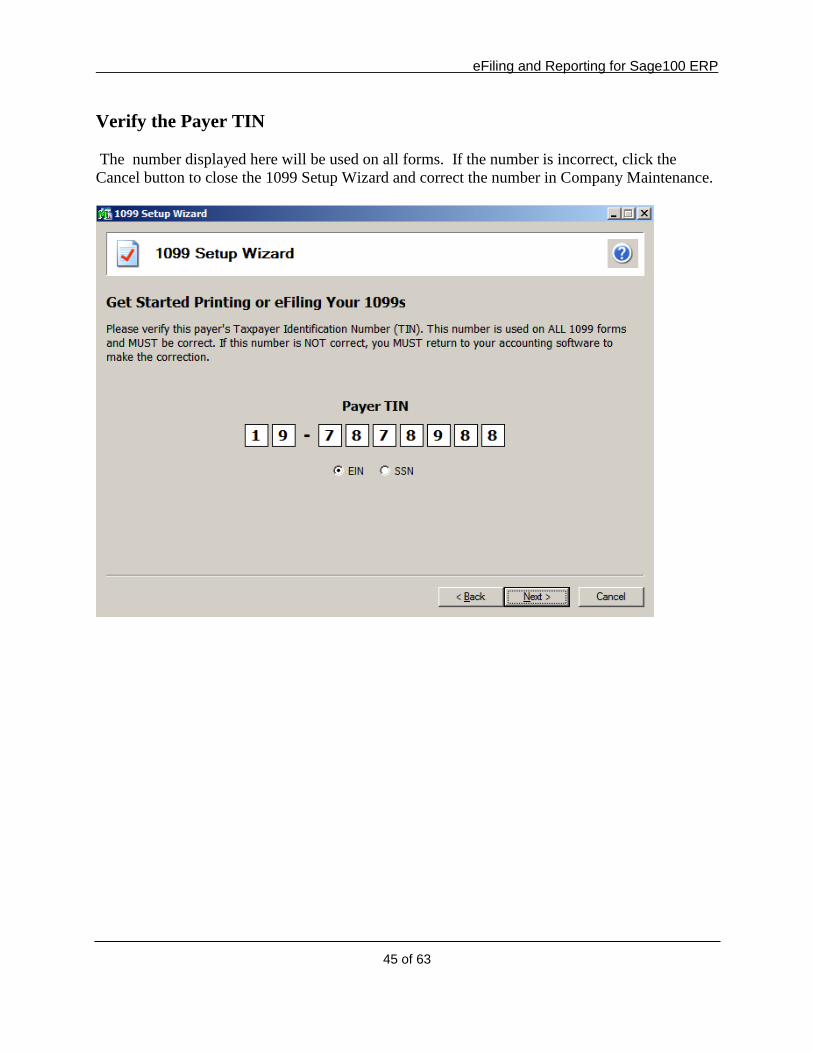
eFiling and Reporting for Sage100 ERP
45 of 63
Verify the Payer TIN
The number displayed here will be used on all forms. If the number is incorrect, click the
Cancel button to close the 1099 Setup Wizard and correct the number in Company Maintenance.
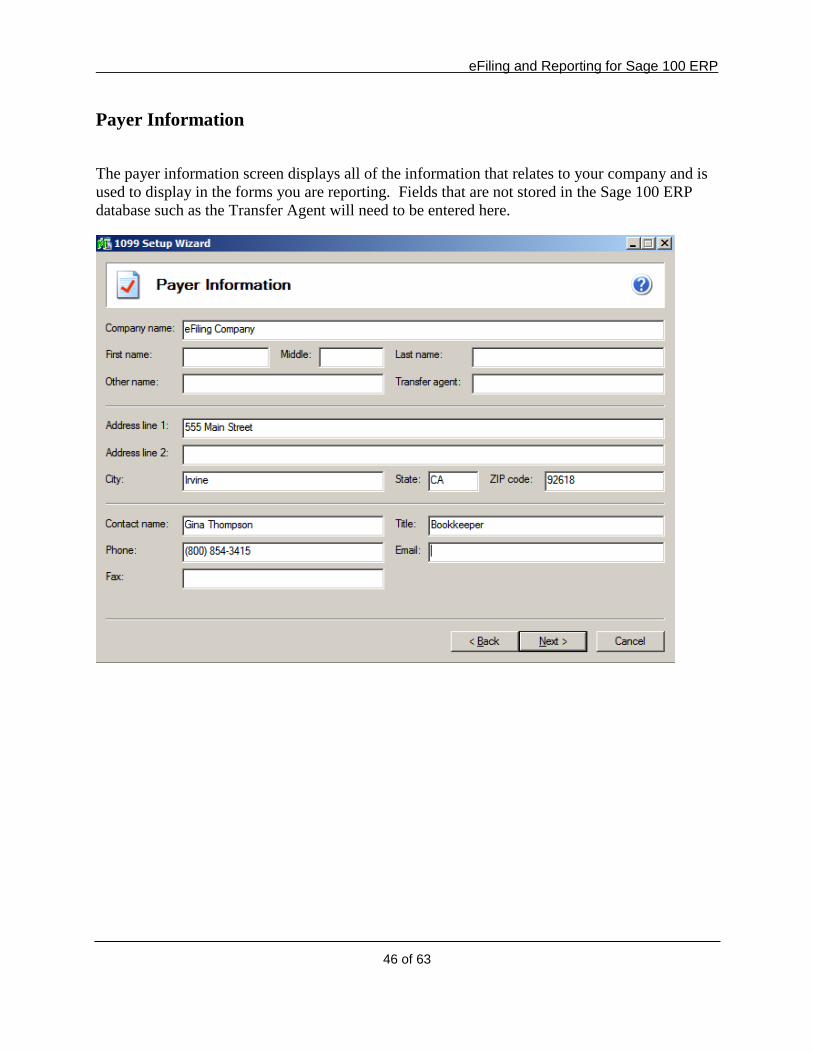
eFiling and Reporting for Sage 100 ERP
46 of 63
Payer Information
The payer information screen displays all of the information that relates to your company and is
used to display in the forms you are reporting. Fields that are not stored in the Sage 100 ERP
database such as the Transfer Agent will need to be entered here.
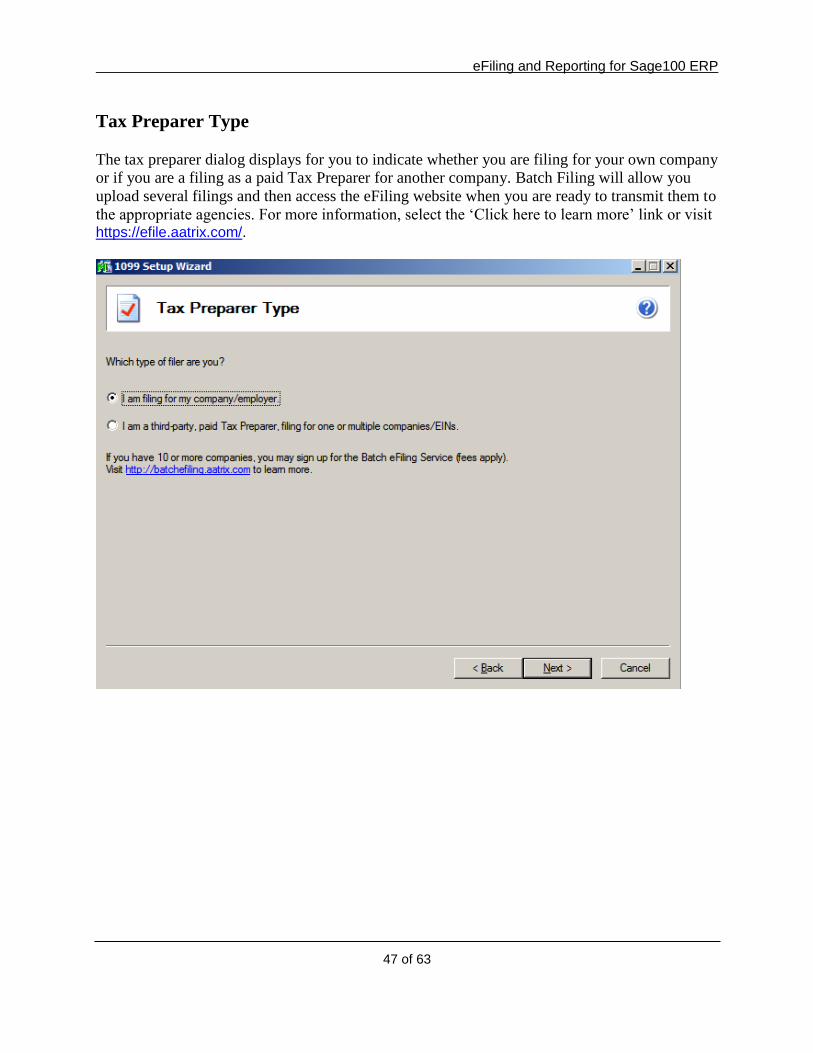
eFiling and Reporting for Sage100 ERP
47 of 63
Tax Preparer Type
The tax preparer dialog displays for you to indicate whether you are filing for your own company
or if you are a filing as a paid Tax Preparer for another company. Batch Filing will allow you
upload several filings and then access the eFiling website when you are ready to transmit them to
the appropriate agencies. For more information, select the ‘Click here to learn more’ link or visit https://efile.aatrix.com/.
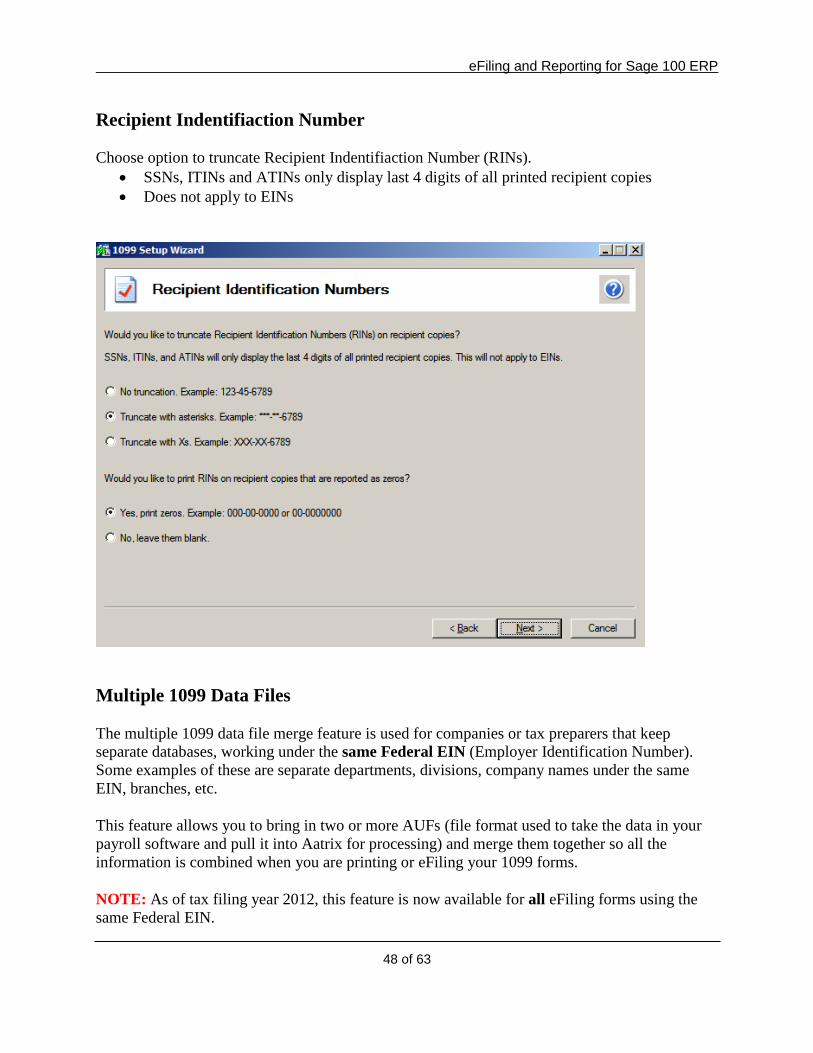
eFiling and Reporting for Sage 100 ERP
48 of 63
Recipient Indentifiaction Number
Choose option to truncate Recipient Indentifiaction Number (RINs).
SSNs, ITINs and ATINs only display last 4 digits of all printed recipient copies
Does not apply to EINs
Multiple 1099 Data Files
The multiple 1099 data file merge feature is used for companies or tax preparers that keep
separate databases, working under the same Federal EIN (Employer Identification Number).
Some examples of these are separate departments, divisions, company names under the same
EIN, branches, etc.
This feature allows you to bring in two or more AUFs (file format used to take the data in your
payroll software and pull it into Aatrix for processing) and merge them together so all the
information is combined when you are printing or eFiling your 1099 forms.
NOTE: As of tax filing year 2012, this feature is now available for all eFiling forms using the
same Federal EIN.
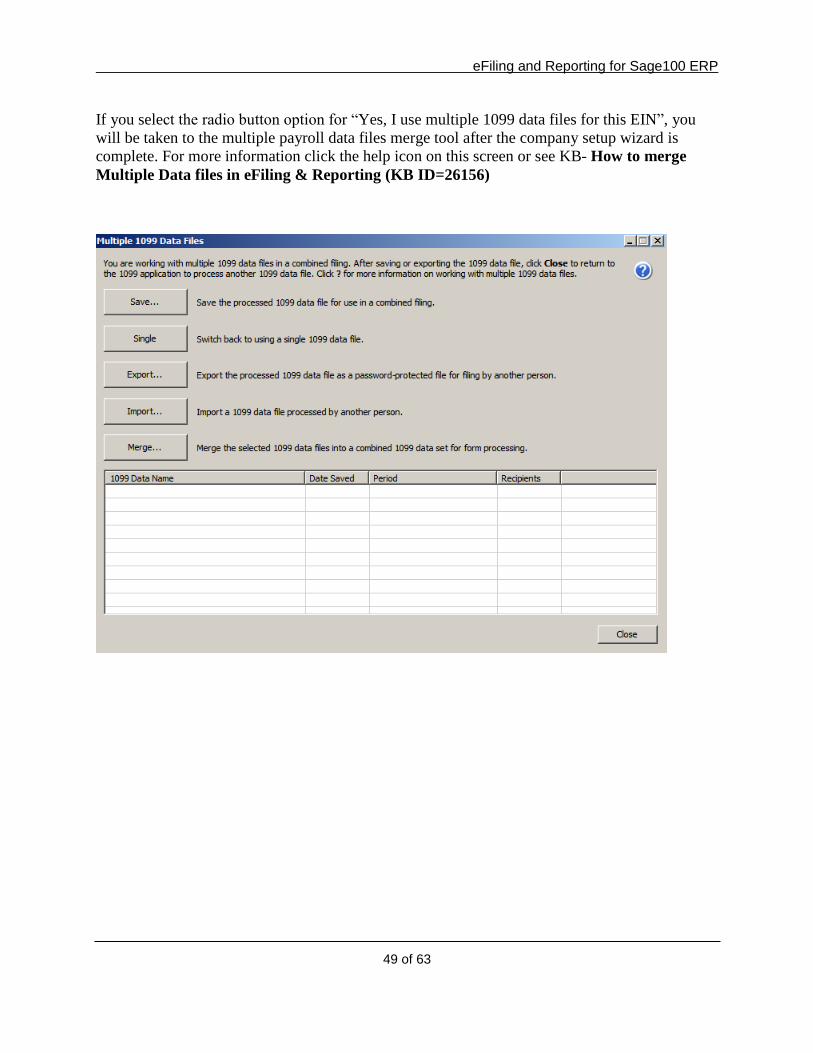
eFiling and Reporting for Sage100 ERP
49 of 63
If you select the radio button option for “Yes, I use multiple 1099 data files for this EIN”, you
will be taken to the multiple payroll data files merge tool after the company setup wizard is
complete. For more information click the help icon on this screen or see KB- How to merge
Multiple Data files in eFiling & Reporting (KB ID=26156)
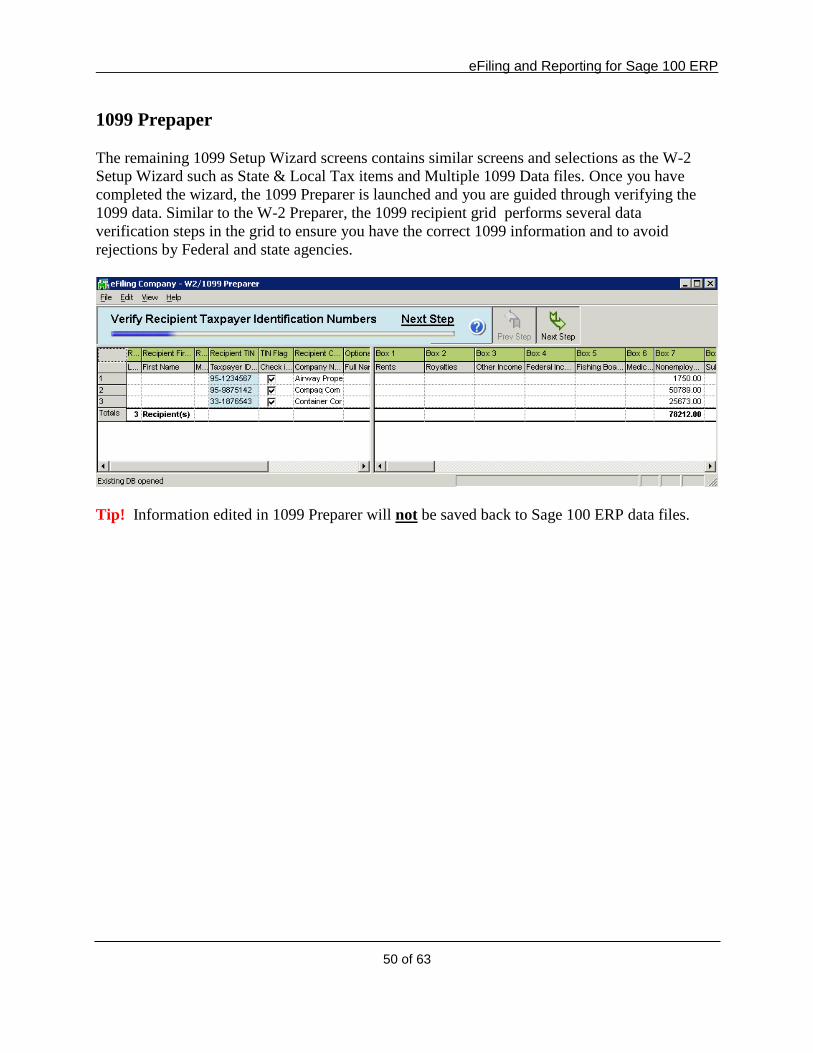
eFiling and Reporting for Sage 100 ERP
50 of 63
1099 Prepaper
The remaining 1099 Setup Wizard screens contains similar screens and selections as the W-2
Setup Wizard such as State & Local Tax items and Multiple 1099 Data files. Once you have
completed the wizard, the 1099 Preparer is launched and you are guided through verifying the
1099 data. Similar to the W-2 Preparer, the 1099 recipient grid performs several data
verification steps in the grid to ensure you have the correct 1099 information and to avoid
rejections by Federal and state agencies.
Tip! Information edited in 1099 Preparer will not be saved back to Sage 100 ERP data files.

eFiling and Reporting for Sage100 ERP
51 of 63
1099 Printing and Filing Options
After verifying information in the W2/1099 Preparer, 1099 the Pricing and Filing Options are
displayed. You can select to eFile or print your own 1099s or a combination of both. If you are
printing your own, you will need to use blank perforated 4 per page 1099 forms.
NOTE: that the IRS requires that the Federal Copy A must be printed on the red preprinted
forms when mailing the 1099s. These forms can be purchased from Sage Forms Division at 800-
538-5514.
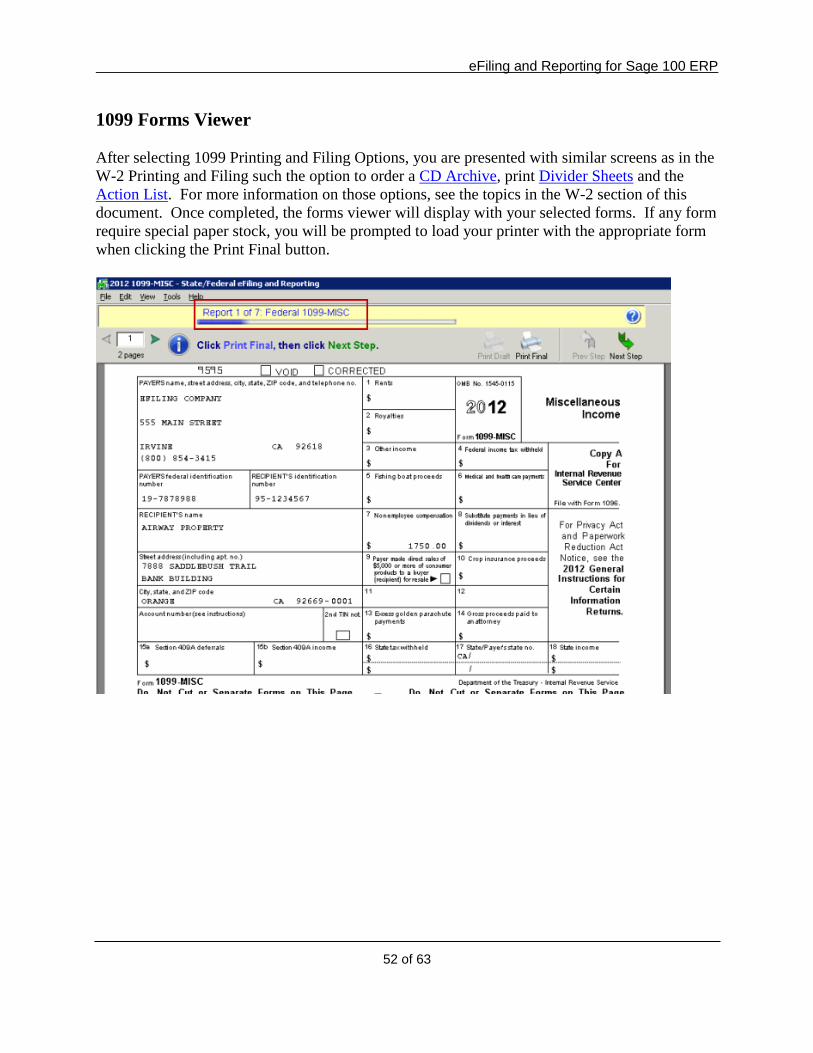
eFiling and Reporting for Sage 100 ERP
52 of 63
1099 Forms Viewer
After selecting 1099 Printing and Filing Options, you are presented with similar screens as in the
W-2 Printing and Filing such the option to order a CD Archive, print Divider Sheets and the
Action List. For more information on those options, see the topics in the W-2 section of this
document. Once completed, the forms viewer will display with your selected forms. If any form
require special paper stock, you will be prompted to load your printer with the appropriate form
when clicking the Print Final button.
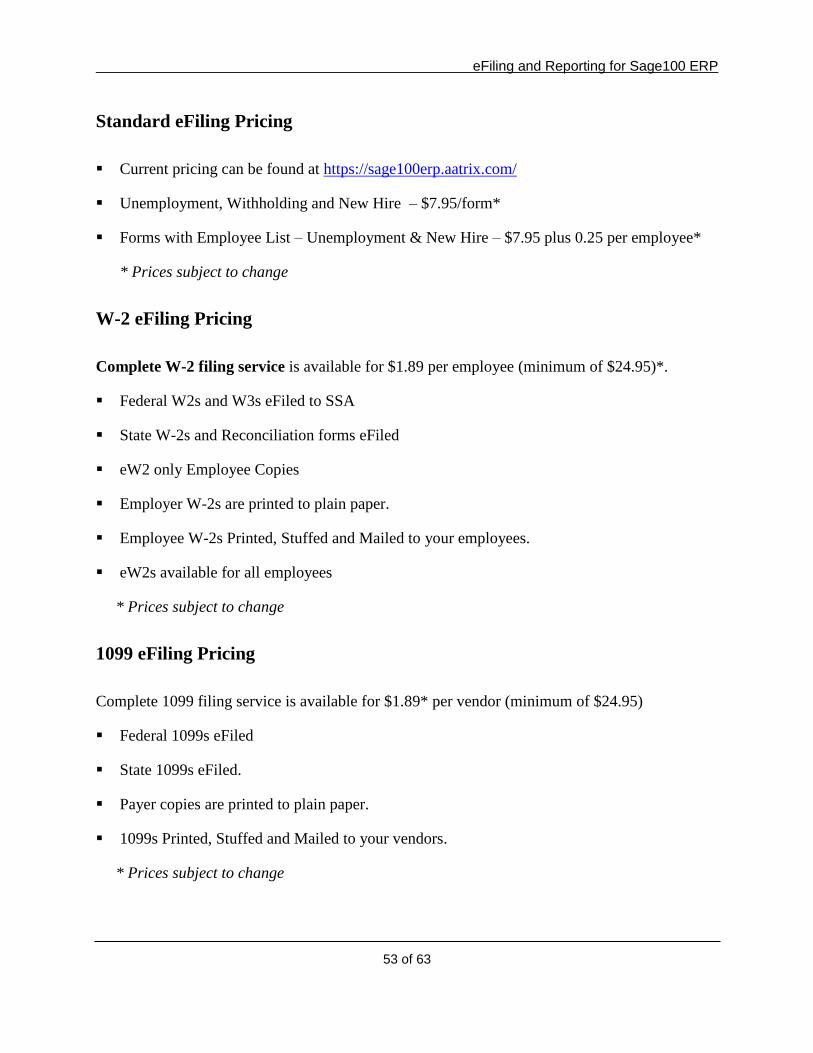
eFiling and Reporting for Sage100 ERP
53 of 63
Standard eFiling Pricing
Current pricing can be found at https://sage100erp.aatrix.com/
Unemployment, Withholding and New Hire – $7.95/form*
Forms with Employee List – Unemployment & New Hire – $7.95 plus 0.25 per employee*
* Prices subject to change
W-2 eFiling Pricing
Complete W-2 filing service is available for $1.89 per employee (minimum of $24.95)*.
Federal W2s and W3s eFiled to SSA
State W-2s and Reconciliation forms eFiled
eW2 only Employee Copies
Employer W-2s are printed to plain paper.
Employee W-2s Printed, Stuffed and Mailed to your employees.
eW2s available for all employees
* Prices subject to change
1099 eFiling Pricing
Complete 1099 filing service is available for $1.89* per vendor (minimum of $24.95)
Federal 1099s eFiled
State 1099s eFiled.
Payer copies are printed to plain paper.
1099s Printed, Stuffed and Mailed to your vendors.
* Prices subject to change

eFiling and Reporting for Sage 100 ERP
54 of 63
Unlimited eFiling Package Pricing for Sage Customers
Current package pricing can be found at https://partner.aatrix.com/index.php/sage100erp-
efile-packages/100 or Call Aatrix at 800-426-0854
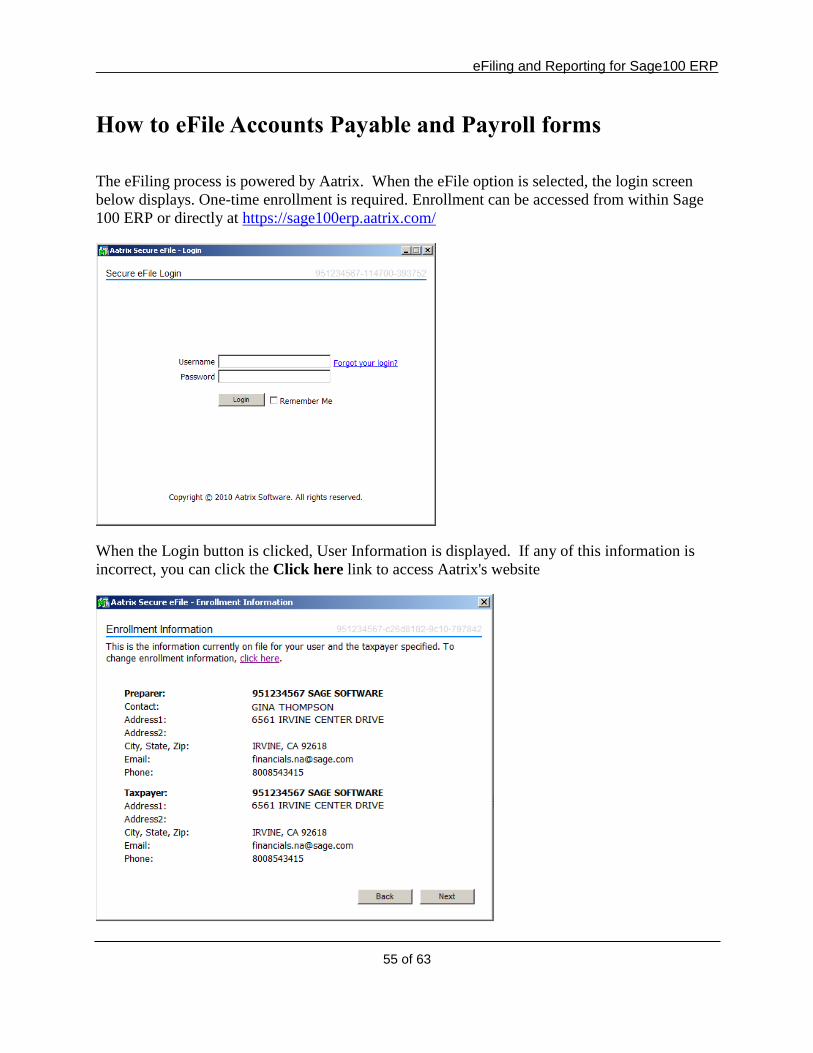
eFiling and Reporting for Sage100 ERP
55 of 63
How to eFile Accounts Payable and Payroll forms
The eFiling process is powered by Aatrix. When the eFile option is selected, the login screen
below displays. One-time enrollment is required. Enrollment can be accessed from within Sage
100 ERP or directly at https://sage100erp.aatrix.com/
When the Login button is clicked, User Information is displayed. If any of this information is
incorrect, you can click the Click here link to access Aatrix's website
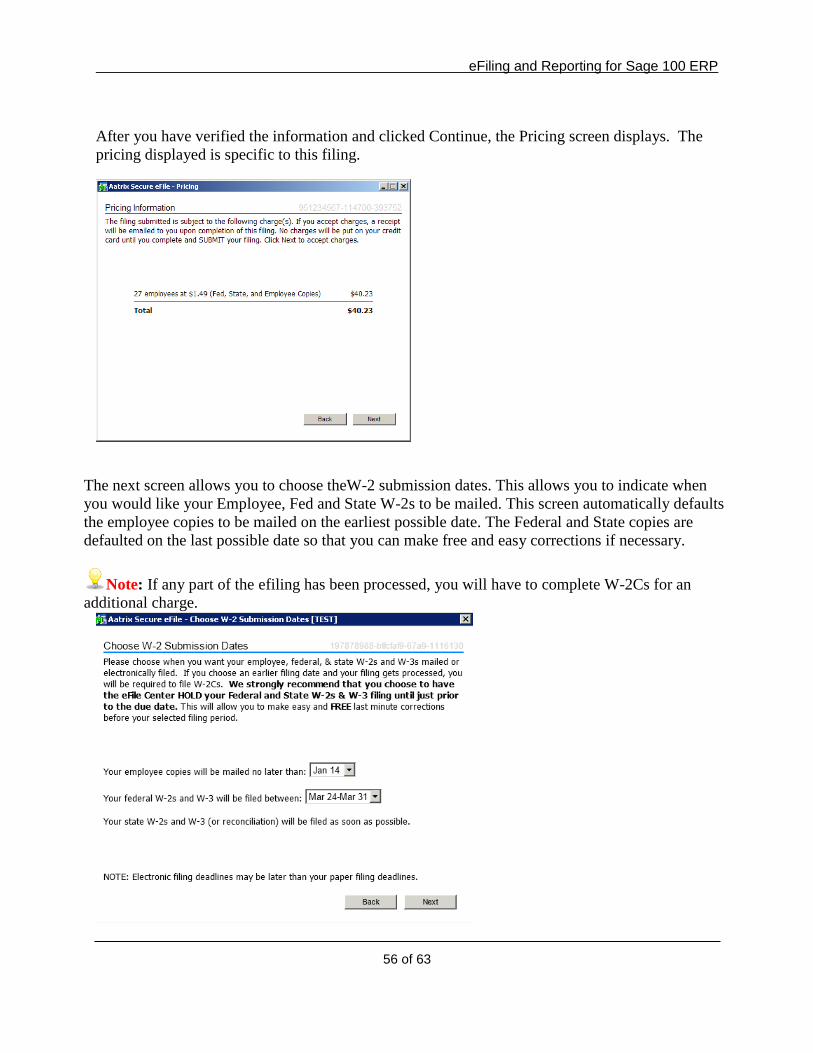
eFiling and Reporting for Sage 100 ERP
56 of 63
After you have verified the information and clicked Continue, the Pricing screen displays. The
pricing displayed is specific to this filing.
The next screen allows you to choose theW-2 submission dates. This allows you to indicate when
you would like your Employee, Fed and State W-2s to be mailed. This screen automatically defaults
the employee copies to be mailed on the earliest possible date. The Federal and State copies are
defaulted on the last possible date so that you can make free and easy corrections if necessary.
Note: If any part of the efiling has been processed, you will have to complete W-2Cs for an
additional charge.
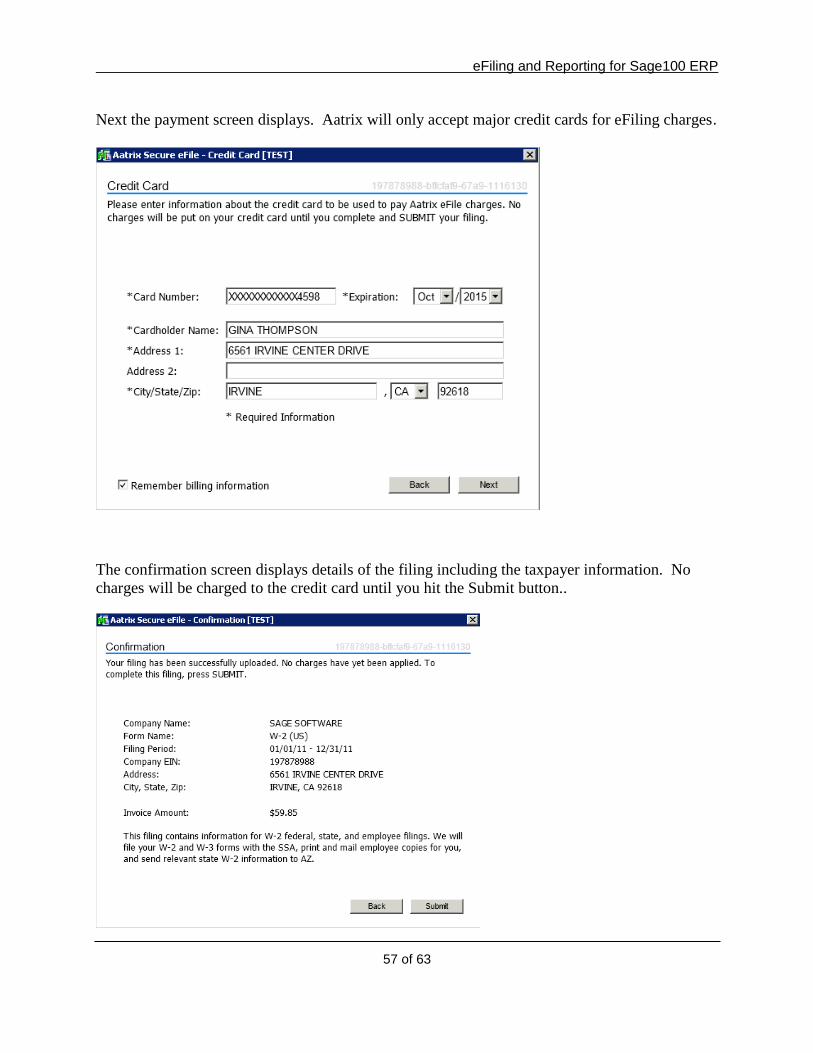
eFiling and Reporting for Sage100 ERP
57 of 63
Next the payment screen displays. Aatrix will only accept major credit cards for eFiling charges.
The confirmation screen displays details of the filing including the taxpayer information. No
charges will be charged to the credit card until you hit the Submit button..
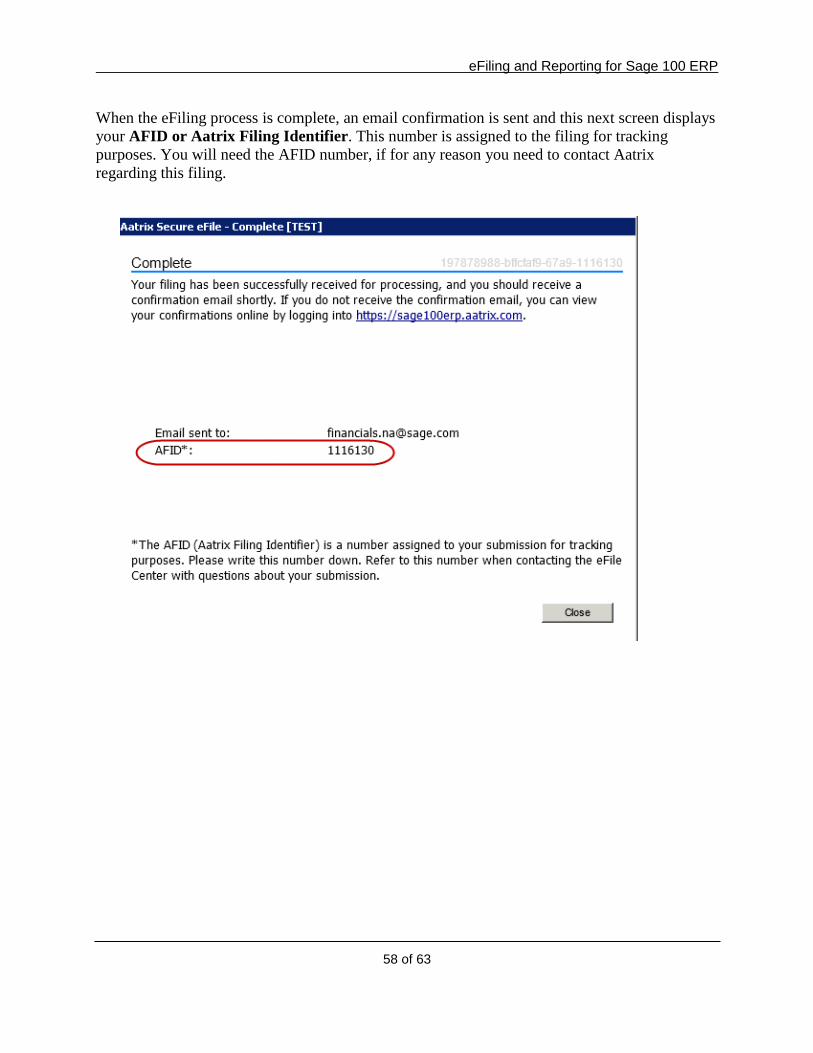
eFiling and Reporting for Sage 100 ERP
58 of 63
When the eFiling process is complete, an email confirmation is sent and this next screen displays
your AFID or Aatrix Filing Identifier. This number is assigned to the filing for tracking
purposes. You will need the AFID number, if for any reason you need to contact Aatrix
regarding this filing.
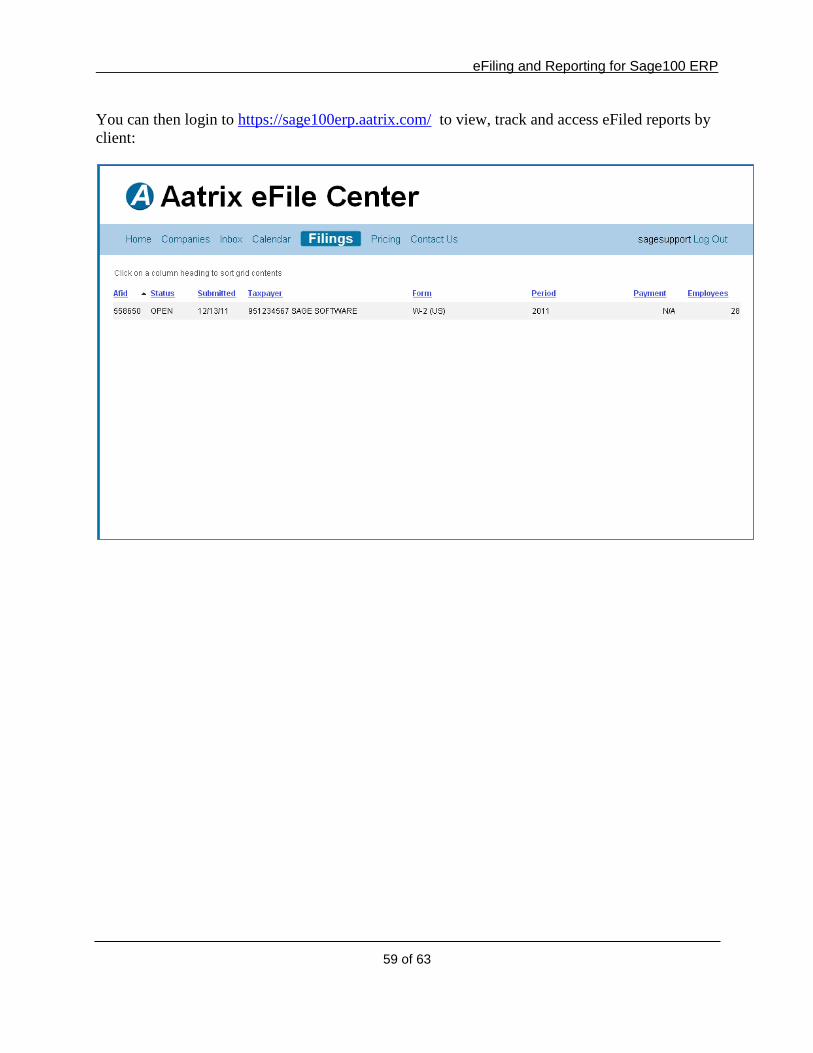
eFiling and Reporting for Sage100 ERP
59 of 63
You can then login to https://sage100erp.aatrix.com/ to view, track and access eFiled reports by
client:
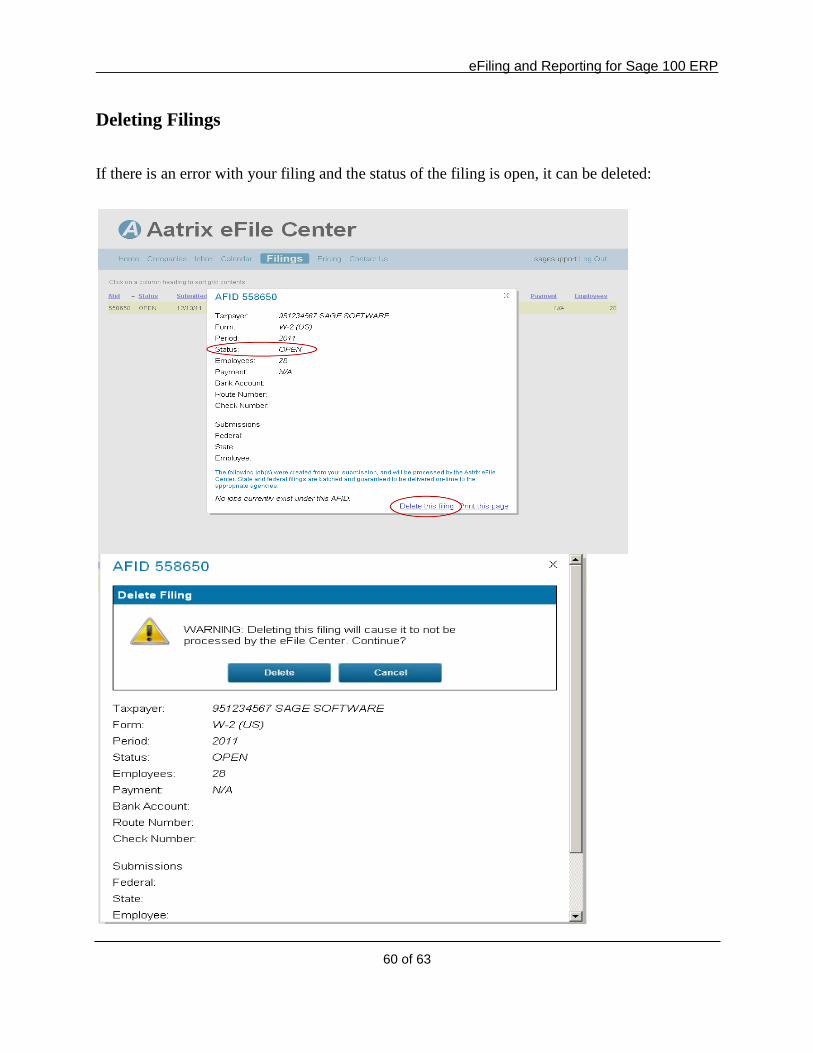
eFiling and Reporting for Sage 100 ERP
60 of 63
Deleting Filings
If there is an error with your filing and the status of the filing is open, it can be deleted:
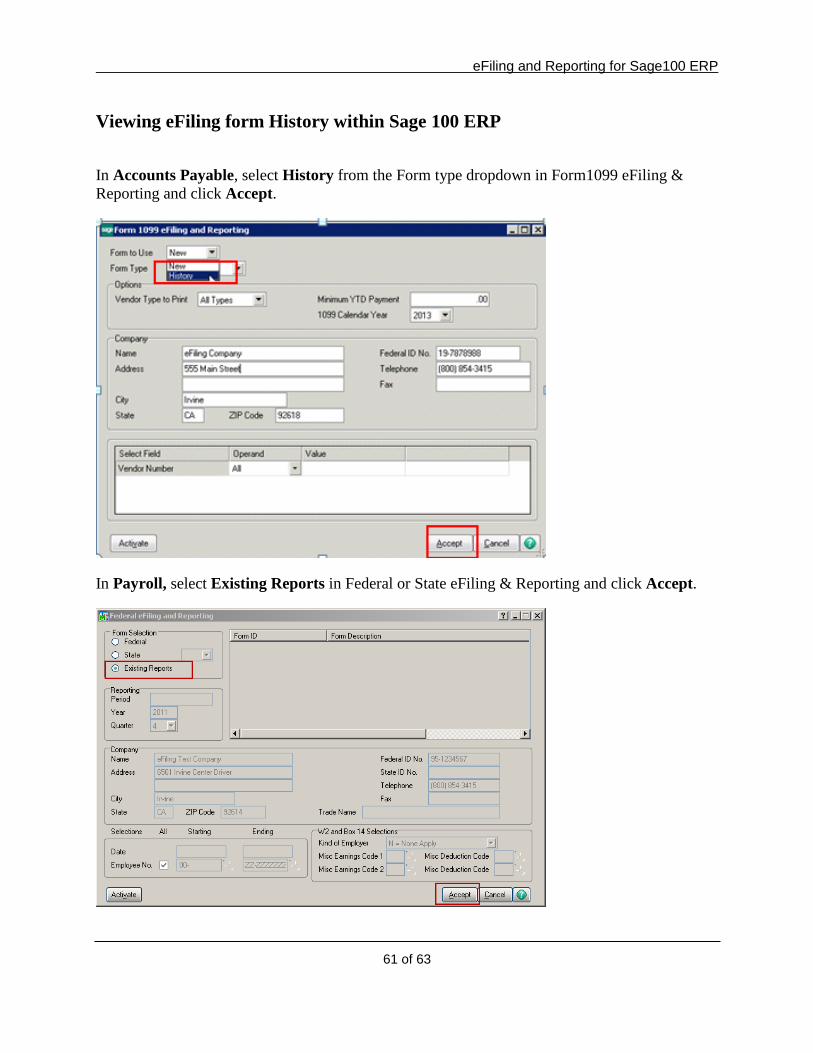
eFiling and Reporting for Sage100 ERP
61 of 63
Viewing eFiling form History within Sage 100 ERP
In Accounts Payable, select History from the Form type dropdown in Form1099 eFiling &
Reporting and click Accept.
In Payroll, select Existing Reports in Federal or State eFiling & Reporting and click Accept.

eFiling and Reporting for Sage 100 ERP
62 of 63
Saved history files are encrypted and can only be accessed through Sage 100 ERP. Saved reports
can be edited, viewed, reprinted or deleted.
Who do I call for Support?
For questions regarding the Payroll and Accounts Payable data automatically populated on
the forms, contact Sage 100 ERP Customer Support at 800-854-3415.
For questions regarding forms that have already been eFiled, contact Aatrix eFile Support:
701-746-6814
For questions regarding eFile enrollment, billing and pricing visit
https://sage100erp.aatrix.com/
eFiling and Reporting for Sage100 ERP
63 of 63
Associated Knowledgebase Entries
Please reference the following Knowledgebase IDs via Sage Support Portal
https://support.na.sage.com for more information:
KB ID: 18851
How to install, activate, update, and uninstall eFiling and Reporting
KB ID: 21027
eFiling and Reporting Activation does not respond when clicking OK at the Verify
Account Information window.
KB ID: 21028
"You must install Federal and State eFiling and Reporting to access this task", when
accessing eFiling and Reporting on a Windows 7 machine or Terminal Services
connecting to a Windows 2008 Server in Sage ERP MAS 90 and 200
KB ID: 20895
Local tax codes do not print on eFiling and Reporting forms
KB ID: 20022
Getting prompt asking for user name and password or "Demo" prints on all eFiling and
Reporting forms after installing update
KB ID: 25993
Employee names and addresses are missing in eFiling and Reportin for Sage 100 ERP
KB ID: 26168
Additional Medicare wages are incorrect on 941 form in Sage 100 ERP