yubico authenticator user's guide · yubico authenticator user's guide © 2016 yubico....
TRANSCRIPT
Yubico Authenticator User's Guide © 2016 Yubico. All rights reserved. Page 1 of 23
Yubico Authenticator User's Guide
YubiKeys with desktop computers and NFC-
enabled Android smartphones
Yubico Authenticator User's Guide © 2016 Yubico. All rights reserved. Page 2 of 23
Copyright
© 2016 Yubico Inc. All rights reserved.
Trademarks
Yubico and YubiKey are registered trademarks of Yubico Inc. All other trademarks are the property of their
respective owners.
Disclaimer
The contents of this document are subject to revision without notice due to continued progress in
methodology, design, and manufacturing. Yubico shall have no liability for any error or damages of any kind
resulting from the use of this document.
The Yubico Software referenced in this document is licensed to you under the terms and conditions
accompanying the software or as otherwise agreed between you or the company that you are representing.
Contact Information
Yubico Inc
420 Florence Street, Suite 200
Palo Alto, CA 94301
USA
yubi.co/contact
Document Release Date
June 2nd, 2016
Yubico Authenticator User's Guide © 2016 Yubico. All rights reserved. Page 3 of 23
Contents
Introduction ............................................................................................................................................................. 5
Yubico Authenticator............................................................................................................................................ 5
Getting Additional Help ........................................................................................................................................ 5
Before You Begin ...................................................................................................................................................... 6
Understanding the Differences in Settings Between YubiKeys .............................................................................. 6
YubiKey 4 and YubiKey 4 Nano ......................................................................................................................... 6
YubiKey NEO and YubiKey NEO-n ..................................................................................................................... 6
YubiKey Edge/Edge-n, YubiKey Standard, and YubiKey Nano............................................................................ 6
Planning for Backup YubiKeys ............................................................................................................................... 6
Understanding Credential Naming ....................................................................................................................... 7
Protecting your YubiKey with a Password ............................................................................................................. 7
Installing Yubico Authenticator for Android and Desktop ......................................................................................... 9
Using Yubico Authenticator for Desktop App .......................................................................................................... 11
Adding Credentials ............................................................................................................................................. 11
Example of Adding a Credential from an Amazon Account ............................................................................. 13
Viewing and Using Credentials on Your Desktop................................................................................................. 14
Copying the Credential (Double-Click or Single-Click) ......................................................................................... 14
Using Yubico Authenticator for Android App .......................................................................................................... 16
Adding Credentials ............................................................................................................................................. 16
Example of Adding a Credential from an Amazon Account ............................................................................. 17
Viewing and Using Credentials on Your Android Device...................................................................................... 17
Tips for Using Your YubiKey NEO with Android Devices ...................................................................................... 18
Deleting an Existing Credential ............................................................................................................................... 19
Changing Settings ................................................................................................................................................... 20
Understanding the Difference Between TOTP and HOTP Codes ......................................................................... 20
Time-Based One-Time Password .................................................................................................................... 20
HMAC-Based One-Time Password .................................................................................................................. 20
Choosing TOTP or HOTP ................................................................................................................................. 20
Changing the Slots .............................................................................................................................................. 21
Changing Advanced Settings............................................................................................................................... 21
Yubico Authenticator User's Guide © 2016 Yubico. All rights reserved. Page 4 of 23
Troubleshooting ..................................................................................................................................................... 22
Understanding Yubico Authenticator for Desktop Messages .............................................................................. 22
Understanding Yubico Authenticator for Android Messages .............................................................................. 22
Problems and Solutions ...................................................................................................................................... 22
I cannot add a credential using Yubico Authenticator for Desktop on Mac OS X systems ............................... 22
My app reports that the code I pasted is not valid ......................................................................................... 23
I do not receive a QR code to scan when I turn on two-step verification ........................................................ 23
Yubico Authenticator User's Guide © 2016 Yubico. All rights reserved. Page 5 of 23
Introduction
Yubico changes the game for strong authentication, providing superior security with unmatched ease-of-
use. Our core invention, the YubiKey, is a small USB and NFC device supporting multiple authentication and
cryptographic protocols. With a simple touch, it protects access to computers, networks, and online
services for the world’s largest organizations.
Our innovative keys offer strong authentication via Yubico one-time passwords (OTP), FIDO Universal 2nd
Factor (U2F), and smart card (PIV, OpenPGP, OATH) — all with a simple tap or touch of a button. YubiKeys
protect access for everyone from individual home users to the world’s largest organizations.
Yubico Authenticator
The Yubico Authenticator application enables you to generate time-based OTP codes or counter-based OTP
codes directly from your computer or on your Android device.
There are two ways to use Yubico Authenticator:
Yubico Authenticator for Desktop
Yubico Authenticator for Android
This document describes the following topics:
Before You Begin
Installing Yubico Authenticator for Android and Desktop
Using Yubico Authenticator for Desktop App
Using Yubico Authenticator for Android App
Deleting an Existing Credential
Changing Settings
Troubleshooting
Getting Additional Help
For more information, and to get help with your YubiKeys, see:
● Support home page
● Documentation and FAQs
● Start a Support ticket
Yubico Authenticator User's Guide © 2016 Yubico. All rights reserved. Page 6 of 23
Before You Begin
Before using Yubico Authenticator to add credentials to your YubiKey, or to view existing credentials on
your YubiKey, it is important to understand the differences in settings between the different YubiKeys. You
should also plan how to back up your YubiKeys (because you cannot rename or make any changes to a
credential after you add it). Finally, decide if you want to protect your YubiKey with a password.
In this Chapter
Understanding the Differences in Settings Between YubiKeys
Planning for Backup YubiKeys
Understanding Credentials Naming
Protecting Your YubiKey with a Password
Understanding the Differences in Settings Between YubiKeys
You can use all YubiKeys with the Yubico Authenticator application, with the exception of the FIDO U2F
Security Key.
All the YubiKeys have two configuration slots, but there are differences in the number of credentials the
different YubiKeys store.
YubiKey 4 and YubiKey 4 Nano
You can store up to 32 OATH credentials (TOTP or HOTP) on the YubiKey 4 and access them using the
Yubico Authenticator for Desktop application.
YubiKey NEO and YubiKey NEO-n
You can store up to 28 OATH credentials (TOTP or HOTP) on the YubiKey NEO and YubiKey NEO-n, and you
can access those credentials using both the Yubico Authenticator for Desktop application and the Yubico for
Authenticator for Android application.
YubiKey Edge/Edge-n, YubiKey Standard, and YubiKey Nano
On a YubiKey Edge/Edge-n or YubiKey Standard/Nano, you can store a maximum of two OATH or TOTP
credentials (one in each configuration slot), as long as no other credentials are stored in those slots. You can
access them using the Yubico Authenticator for Desktop application.
Planning for Backup YubiKeys
It is not possible to create an exact copy of a YubiKey, but in some cases it is possible to duplicate the
credentials stored on the YubiKey. When you add a credential, be sure you copy the secret key for that
credential and store it in a safe place.

Yubico Authenticator User's Guide © 2016 Yubico. All rights reserved. Page 7 of 23
YubiKeys are, by design, write-only devices. This means that the secrets stored in the YubiKey can only be
written into, and not read out, of the device. If a credential is to be copied, it must be known beforehand,
either written down (or copied) while programming the YubiKey. The best ways to plan for backup YubiKeys
are:
Add credentials at the same time to multiple YubiKeys if you have them
or
Save a copy of the QR code (capture the screen) or make a copy of the secret key.
TIP: When you are adding a credential, there is usually a clickable link below the QR code. Click this link to
view the secret key.
IMPORTANT: If you add credentials to one YubiKey, and then later decide to buy another YubiKey for a
backup, you must log into every account and go through the setup process again with the Yubico
Authenticator app. To get a new credential for each account, delete the original credentials from the
original YubiKey, and then add the new credentials to both YubiKeys.
To copy the secret key when adding a credential
Do one of the following:
When you add a credential with Yubico Authenticator, copy the secret key from Secret key
(base32), and save it to a text file so you can use it on another YubiKey.
NOTE: Secret key (base32) is automatically populated when you scan the QR code from the
website.
Click the link below the QR code, which enables you to view and copy the secret code associated
with the QR code.
Understanding Credential Naming
Yubico Authenticator credentials cannot be changed or renamed once they are added, only viewed or
deleted. If you want to change anything about the credential, including the name of the credential, you
must delete the existing credential, go through the setup process again, and create a new credential with
the settings and the name that you want.
Protecting your YubiKey with a Password
For greater security, you can protect your YubiKey with a password.
Yubico Authenticator enables you to protect your Yubikey NEO, YubiKey 4, or YubiKey 4 Nano with a
password. You are prompted to type this password each time you insert a password-protected YubiKey into
a USB port of your computer, or the password protected YubiKey and your Android device connect over
NFC.

Yubico Authenticator User's Guide © 2016 Yubico. All rights reserved. Page 8 of 23
To set a password for your YubiKey
1. Insert your YubiKey into a USB port of your computer.
2. Launch Yubico Authenticator.
3. Select File > Set/Change password.
4. Type a password to protect your YubiKey, type the password again to verify the password, and then click OK.
5. If you want to save the password to your Android device or computer, select Remember my password.
To use a password-protected YubiKey
Once you password protect your YubiKey, a Password required dialog box appears each time you insert
the YubiKey while Yubico Authenticator is open or if you are holding the YubiKey NEO against the
Android device with Yubico Authenticator open.
Type the password when prompted.
To remove the password for your YubiKey
1. Insert your YubiKey into a USB port of your computer.
2. Launch Yubico Authenticator.
3. Select File > Set/Change password.
4. Leave New password (blank for none) and Verify new password blank, and click OK. The next time you insert
your YubiKey into a USB port of your computer, you will not be prompted for a password because you are
leaving the fields blank.
TIP: The fields start out blank because you verified the password when you launched the app or inserted your
YubiKey.
Yubico Authenticator User's Guide © 2016 Yubico. All rights reserved. Page 9 of 23
Installing Yubico Authenticator for Android and Desktop
IMPORTANT: The FIDO U2F Security Key cannot be used with the Yubico Authenticator application. The
Security Key is a U2F-only device that cannot be programmed.
You can install Yubico Authenticator for Desktop on Microsoft Windows, Linux, and Mac OS X operating
systems. Yubico Authenticator for Android can only be installed on Android smartphones and tablets.
NOTE: On Android devices, credentials can only be added or viewed over the NFC interface. You cannot use
a USB On-The-Go (OTG) cable instead.
In this Chapter
To install Yubico Authenticator for Android
To install Yubico Authenticator for Desktop
To install Yubico Authenticator for Android
1. Using your NFC-enabled Android smartphone or tablet, on the Yubico website, under Yubico Authenticator
for Android tap Android Download.
2. In Google Play, tap Install, and follow the instructions to complete the installation wizard.
To install Yubico Authenticator for Desktop
1. Download the latest version of the Yubico Authenticator for Desktop from the Yubico website for the
operating system you are using.
2. To install the application, do one of the following:
For Windows:
To launch the installation wizard, double-click the downloaded file (for example, yubioath-
desktop-version_number-win.exe).
Complete the installation wizard.
For Mac OS X:
To launch the installation wizard, click the downloaded file (for example, yubioath-desktop-
version_number-mac.pkg).
Complete the installation wizard.
Yubico Authenticator User's Guide © 2016 Yubico. All rights reserved. Page 10 of 23
For Linux:
Unpack the downloaded file (for example, yubioath-desktop-version_number.tar.gz).
Complete the installation process for your Linux distro.
Yubico Authenticator User's Guide © 2016 Yubico. All rights reserved. Page 11 of 23
Using Yubico Authenticator for Desktop App
If you have been using Yubico Authenticator on your Android device, all your credentials are also available
on your desktop using the Yubico Authenticator for Desktop application.
In this Chapter
Adding Credentials
Viewing and Using Credentials on Your Desktop
Copying the Code (Double-Click or Single-Click
Adding Credentials
For all YubiKeys except for YubiKey Edge, YubiKey Edge-n, YubiKey Standard, and YubiKey Nano, the general
process is to accept the default settings.
For YubiKey Edge, YubiKey Edge-n, YubiKey Standard, and YubiKey Nano, be sure to select the slot you want
to use, and then accept the remaining default settings.
NOTE: This is the same procedure and options for Mac OS X, Windows, and Linux operating systems.
To add an account using Yubico Authenticator for Desktop
1. Insert a YubiKey into a USB port of your computer.
2. Launch Yubico Authenticator (previously installed).
3. Launch the application for which you want to add a credential.
4. In the application for which you are adding a credential, enable two-step verification.
TIP: Be sure to select Authenticator App as the method for receiving your codes.
5. When the QR code appears in the application, in Yubico Authenticator, select File > Add.
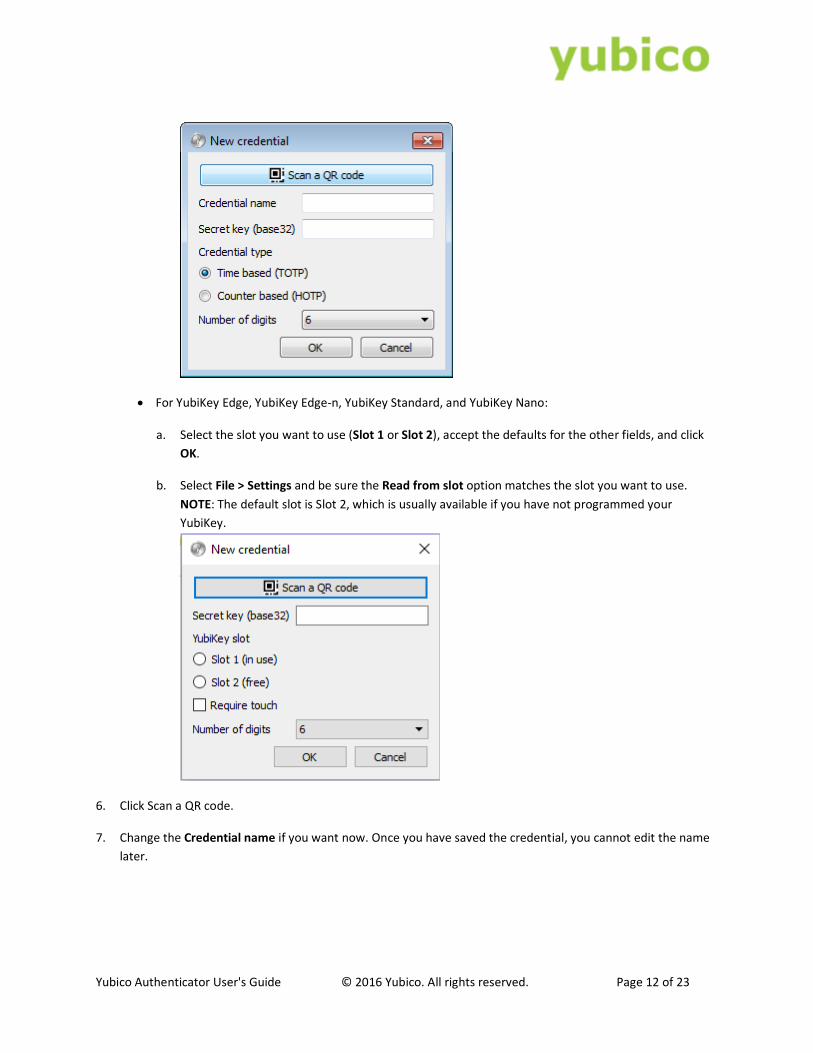
For all YubiKeys except for YubiKey Edge, YubiKey Edge-n, YubiKey Standard, and YubiKey Nano:
a. The fields for Secret key (base32), Credential name, Time based (TOTP), Counter of based (HOTP),
and Number of digits are automatically populated.
b. Accept the defaults, and click OK.
Yubico Authenticator User's Guide © 2016 Yubico. All rights reserved. Page 12 of 23
For YubiKey Edge, YubiKey Edge-n, YubiKey Standard, and YubiKey Nano:
a. Select the slot you want to use (Slot 1 or Slot 2), accept the defaults for the other fields, and click
OK.
b. Select File > Settings and be sure the Read from slot option matches the slot you want to use.
NOTE: The default slot is Slot 2, which is usually available if you have not programmed your
YubiKey.
6. Click Scan a QR code.
7. Change the Credential name if you want now. Once you have saved the credential, you cannot edit the name
later.
Yubico Authenticator User's Guide © 2016 Yubico. All rights reserved. Page 13 of 23
8. Save a copy of the Secret key (base32) to a text file if you want to add a backup YubiKey with the same
credential.
9. Click OK.
Example of Adding a Credential from an Amazon Account
This section steps through the process of adding a credential, using an Amazon account as the example, and
includes detailed instructions for enabling two-step verification and generating the QR code.
NOTE: The steps in this section are correct as of the date of publishing this document, but the steps are
subject to change at any time.
To add a credential for an Amazon account
1. On your web browser, see the security settings page in Amazon.
2. To enable two-step verification, select Your Account > Change Account Settings.
3. Enter your email address (or mobile number) and password.
4. For Advanced Security Settings, click Edit.
5. Next to Two-Step Verification, click Get Started.
6. Click Turn On Two-Step Verification.
7. Select Authenticator App. Amazon generates a QR code.
8. From Yubico Authenticator for Desktop, select File > Add.
9. Click Scan a QR code.
The fields for Secret key (base32), Credential name, Time based (TOTP), Counter of based (HOTP), and
Number of digits are automatically populated.
10. Change the Credential name if you want now. Once you have saved the credential, you cannot edit the name
later.
11. Click OK.
12. Get the code for Amazon from your Yubico Authenticator app (click or tap the clipboard next to the Amazon
account, which saves the code in your buffer).
13. In Amazon, paste or type the authenticator code, and click Verify code and continue.
14. Select a backup method for receiving codes (for example, your mobile phone).
15. Click Turn on Two-Step Verification.
Yubico Authenticator User's Guide © 2016 Yubico. All rights reserved. Page 14 of 23
Viewing and Using Credentials on Your Desktop
On the YubiKey 4 and YubiKey 4 Nano, you can store up to 32 OATH credentials (TOTP or HOTP) and access
those credentials using the Yubico Authenticator for Desktop application.
On the YubiKey NEO and YubiKey NEO-n, you can store approximately 28 OATH credentials (TOTP or HOTP)
and access those credentials using the Yubico Authenticator application for Desktop or the Yubico
Authenticator application for Android.
NOTE: The number of OATH credentials you can store on the YubiKey NEO differs depending on the version
and configuration of the YubiKey.
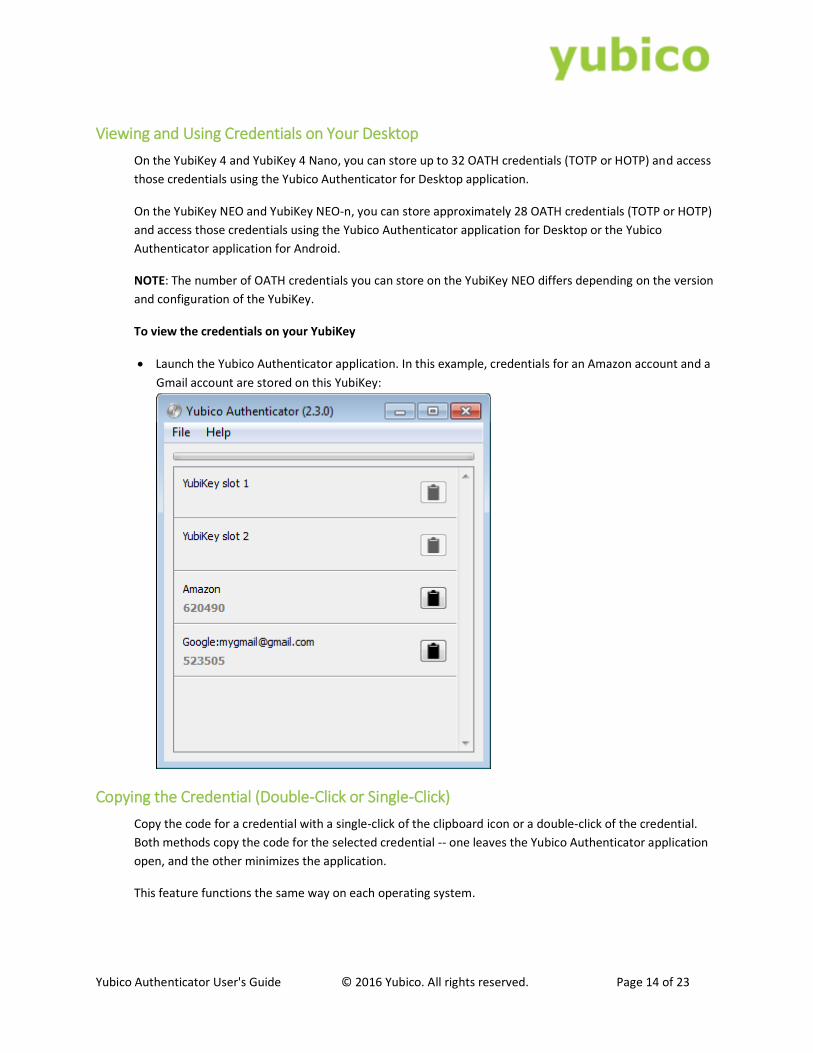
To view the credentials on your YubiKey
Launch the Yubico Authenticator application. In this example, credentials for an Amazon account and a
Gmail account are stored on this YubiKey:
Copying the Credential (Double-Click or Single-Click)
Copy the code for a credential with a single-click of the clipboard icon or a double-click of the credential.
Both methods copy the code for the selected credential -- one leaves the Yubico Authenticator application
open, and the other minimizes the application.
This feature functions the same way on each operating system.
Yubico Authenticator User's Guide © 2016 Yubico. All rights reserved. Page 15 of 23
To copy the code and leave the Yubico Authenticator application open
Click the clipboard icon corresponding to the credential.
To copy the code and minimize (or close) the application
Double-click the credential.
TIP: If Show in system tray on the Settings dialog box is selected, Yubico Authenticator is minimized to
the System Tray when you double-click the credential. If Show in system tray is not selected, Yubico
Authenticator closes when you double-click the credential.
Yubico Authenticator User's Guide © 2016 Yubico. All rights reserved. Page 16 of 23
Using Yubico Authenticator for Android App
TIP: You may find it easier to set up your YubiKey NEO using the Yubico Authenticator for Desktop
application. Once you have set up your YubiKey NEO with the desktop version of the application, you can
then use that YubiKey NEO with the Yubico Authenticator for Android App.
In this Chapter
● Adding Credentials
● Viewing Credentials on Your Android Device
● Tips for Using Your YubiKey NEO with Android Devices
Adding Credentials
To add an account using Yubico Authenticator for Android
1. On your computer, log in to the account for which you want to add a credential, such as Amazon, and enable
two-step verification.
2. Follow the prompts to set up two-step verification, including setting up a backup method of authentication,
until the QR code is displayed.
3. On your Android device, launch Yubico Authenticator (previously installed), open the app menu, and select
Scan account QR-code.
NOTE: Be sure to install a QR code reader from the Google Play Store.
4. Center the QR code within the box displayed from your QR code scanner app until the scanner reads the QR
code.
5. The scanned information is pre-populated in the new credential’s fields. You can change the Credential name
if you want now. Once you have saved the credential, you cannot edit the name later.
6. To store the new credential, tap and hold your YubiKey NEO against the NFC antenna of your Android device.
TIP: Position your YubiKey NEO as close to the NFC antenna (of your device) as you can, and hold it there for
two to three seconds.
7. When the credential is added to your YubiKey NEO, the Credential added! is displayed on your Android
device. If the credential is not successfully added, try adding the credential using the Yubico Authenticator for
Desktop app instead.
The next time you log in to your account, you are prompted to enter your six digit authenticator code, which
you can view using Yubico Authenticator.
Yubico Authenticator User's Guide © 2016 Yubico. All rights reserved. Page 17 of 23
Example of Adding a Credential from an Amazon Account
This section steps through the process of adding a credential, using an Amazon account as the example, and
includes detailed instructions for enabling two-step verification and generating the QR code.
NOTE: The steps in this section are correct as of the date of publishing this document, but the steps are
subject to change at any time.
To add a credential from an Amazon account
NOTE: These instructions use the desktop as an example for turning on two-step verification, but you can
turn on two-step verification from your Android phone as well.
1. On your regular web browser, see the security settings page in Amazon.
2. To enable two-step verification, select Your Account > Change Account Settings.
3. Enter your email address (or mobile number) and password.
4. For Advanced Security Settings, click Edit.
5. Next to Two-Step Verification, click Get Started.
6. Click Turn On Two-Step Verification.
7. Select Authenticator App. Amazon generates a QR code.
8. Use your Android phone to scan the QR code on your desktop. On your Android device, launch Yubico
Authenticator.
9. Tap the top right menu, and select Scan account QR-code.
10. Center the QR code within the box displayed with your QR code scanner app until the scanner reads the QR
code.
11. The scanned information is pre-populated in the new credential’s fields. You can change the Credential name
if you want now. Once you have saved the credential, you cannot edit the name later.
12. To store the new credential, tap and hold your YubiKey NEO against the NFC antenna of your Android device.
Your Android phone indicates success by displaying a message.
The next time you log in to your account, you are prompted to enter your six digit authenticator code, which
you can view using Yubico Authenticator.
Viewing and Using Credentials on Your Android Device
Once you have credentials stored on your YubiKey NEO, you can use Yubico Authenticator for Android to
view those credentials and paste them into your application.
TIP: You can also use the desktop version of Yubico Authenticator with the YubiKey NEO.
Yubico Authenticator User's Guide © 2016 Yubico. All rights reserved. Page 18 of 23
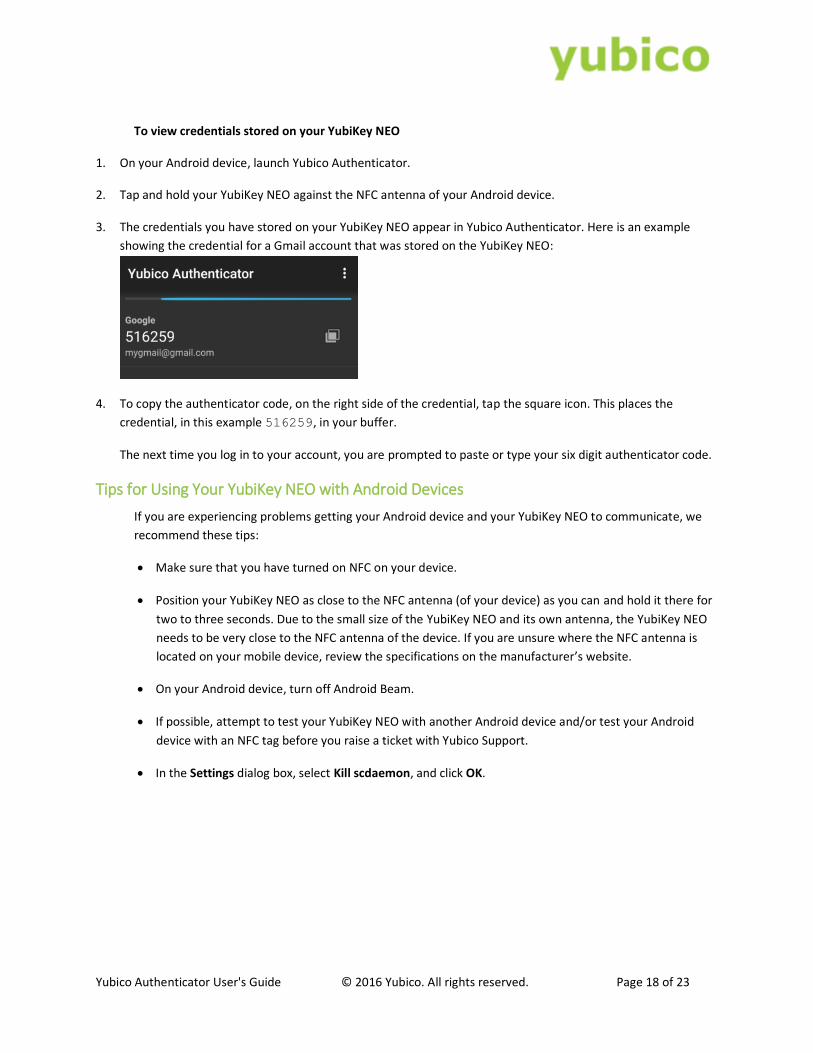
To view credentials stored on your YubiKey NEO
1. On your Android device, launch Yubico Authenticator.
2. Tap and hold your YubiKey NEO against the NFC antenna of your Android device.
3. The credentials you have stored on your YubiKey NEO appear in Yubico Authenticator. Here is an example
showing the credential for a Gmail account that was stored on the YubiKey NEO:
4. To copy the authenticator code, on the right side of the credential, tap the square icon. This places the
credential, in this example 516259, in your buffer.
The next time you log in to your account, you are prompted to paste or type your six digit authenticator code.
Tips for Using Your YubiKey NEO with Android Devices
If you are experiencing problems getting your Android device and your YubiKey NEO to communicate, we
recommend these tips:
Make sure that you have turned on NFC on your device.
Position your YubiKey NEO as close to the NFC antenna (of your device) as you can and hold it there for
two to three seconds. Due to the small size of the YubiKey NEO and its own antenna, the YubiKey NEO
needs to be very close to the NFC antenna of the device. If you are unsure where the NFC antenna is
located on your mobile device, review the specifications on the manufacturer’s website.
On your Android device, turn off Android Beam.
If possible, attempt to test your YubiKey NEO with another Android device and/or test your Android
device with an NFC tag before you raise a ticket with Yubico Support.
In the Settings dialog box, select Kill scdaemon, and click OK.
Yubico Authenticator User's Guide © 2016 Yubico. All rights reserved. Page 19 of 23
Deleting an Existing Credential
You cannot copy credentials from one YubiKey to another, or rename credentials, so if you want to change
the name of a credential, you must log in to the account, and remove the existing credential by deleting the
account credential from the YubiKey. While still logged in to your account, go through the setup process for
the account again, and create a new credential with the name that you want.
NOTE: The process is the same whether you use Yubico Authenticator for Desktop or Yubico Authenticator
for Android to delete an account.
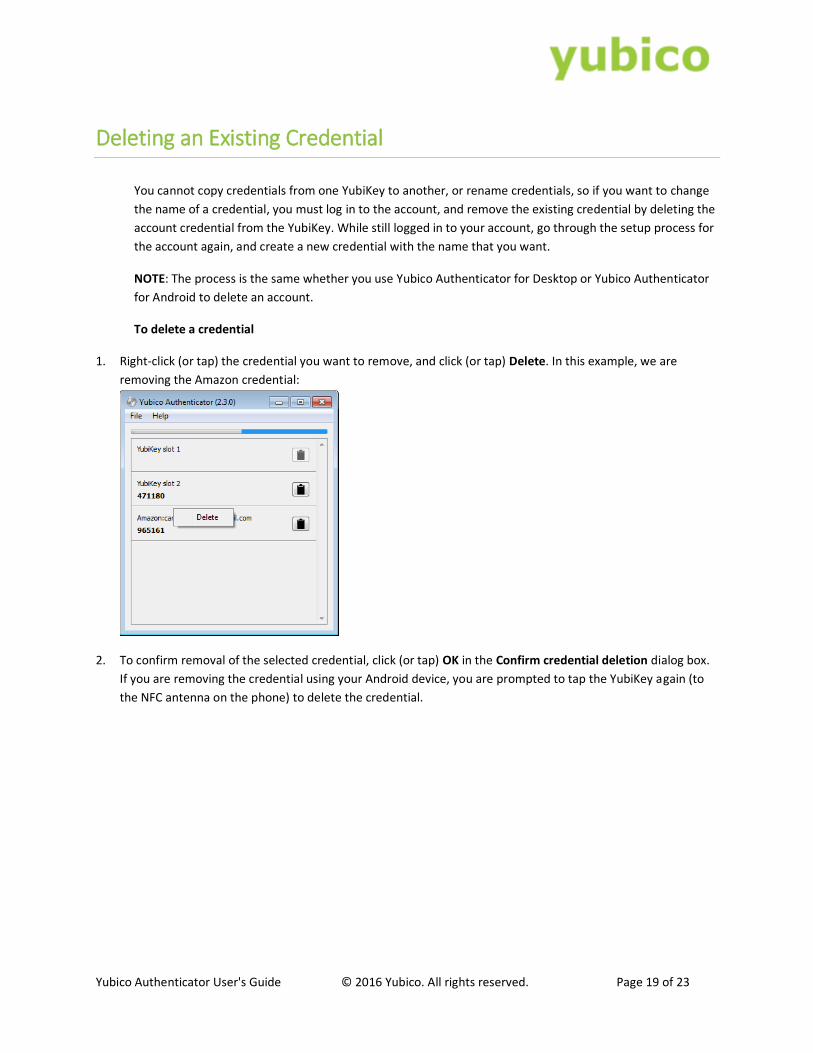
To delete a credential
1. Right-click (or tap) the credential you want to remove, and click (or tap) Delete. In this example, we are
removing the Amazon credential:
2. To confirm removal of the selected credential, click (or tap) OK in the Confirm credential deletion dialog box.
If you are removing the credential using your Android device, you are prompted to tap the YubiKey again (to
the NFC antenna on the phone) to delete the credential.
Yubico Authenticator User's Guide © 2016 Yubico. All rights reserved. Page 20 of 23
Changing Settings
This chapter describes the differences between TOTP and HOTP codes, and that TOTP is the default
selection. This chapter also describes the slot options (you accept the defaults for some YubiKeys and select
the correct slot for other YubiKeys).
Finally, this chapter describes each part of the Settings dialog box of the Yubico Authenticator app,
including the Read from slot and the Advanced settings. The Advanced settings enable you to specify
whether the application closes or minimizes when you double-click a credential, whether to stop the
scdaemon process, and displays the name of the YubiKey.
In this Chapter
Understanding the Difference Between TOTP and HOTP Codes
Changing the Slots
Changing Advanced Settings
Understanding the Difference Between TOTP and HOTP Codes
There are two standards for generating One-Time passcodes (OTPs): TOTP and HOTP. Both of these
standards are regulated by the Initiative for Open Authentication (OATH). TOTP is the most commonly used
authenticator code (used for Amazon, Gmail, Evernote, and other applications).
Time-Based One-Time Password
Time-based one-time password (TOTP) is a temporary passcode based on a time counter. The Yubico
Authenticator app automatically refreshes the TOTP codes every 30 seconds.
HMAC-Based One-Time Password
HMAC-based one-time password (HOTP) is an event-based passcode, based on an event counter. To refresh
an HOTP code, click the code within the Yubico Authenticator app.
Choosing TOTP or HOTP
The application for which you are generating credentials defaults to using TOTP passwords, and we
recommend you accept the default.
A TOTP password has a shorter lifespan than an HOTP password, which may be valid for an unknown
amount of time (or until your next login).
A TOTP password requires less maintenance than an HOTP password but the time between the device and
the server needs to be synchronized. HOTP passwords require more maintenance but no synchronization.
TOTP is the more secure one-time password solution.
Yubico Authenticator User's Guide © 2016 Yubico. All rights reserved. Page 21 of 23
Changing the Slots
For YubiKey Edge, YubiKey Edge-n, YubiKey Standard, and YubiKey Nano, be sure that the slot you program
is the same slot you have selected to “read from.” The default slot will be Slot 2, which is usually available if
you have not programmed your key. The slot you select here must match that setting.
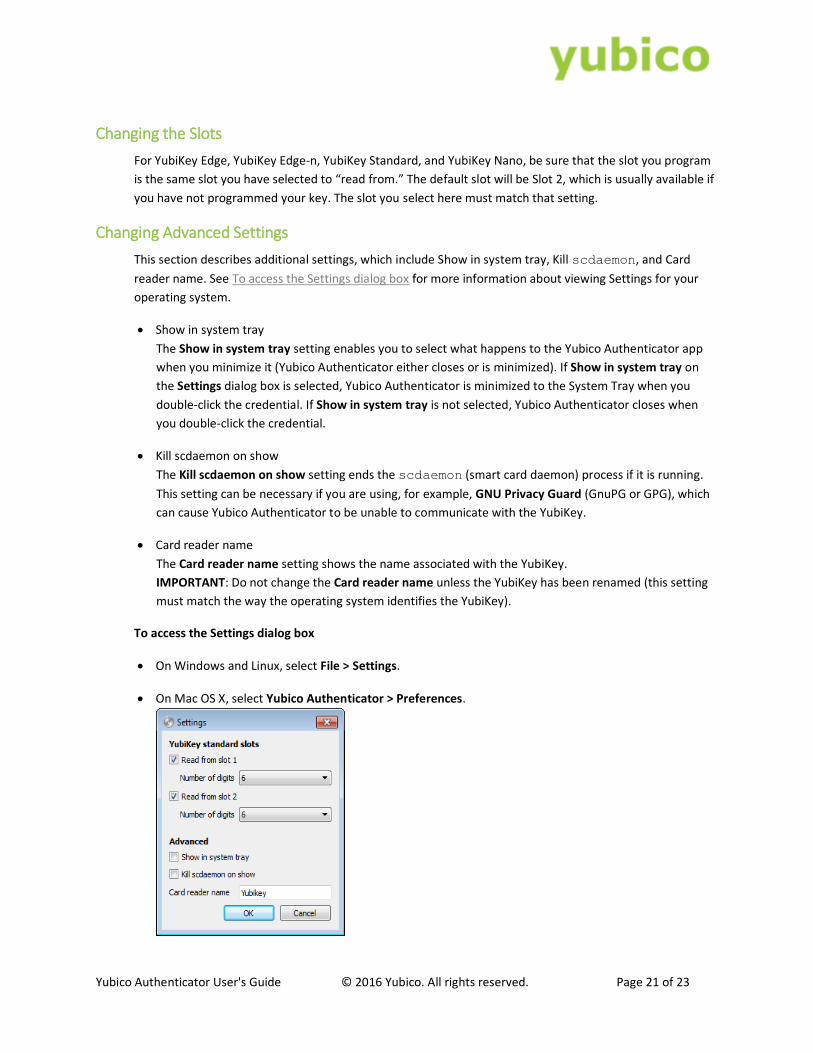
Changing Advanced Settings
This section describes additional settings, which include Show in system tray, Kill scdaemon, and Card
reader name. See To access the Settings dialog box for more information about viewing Settings for your
operating system.
Show in system tray
The Show in system tray setting enables you to select what happens to the Yubico Authenticator app
when you minimize it (Yubico Authenticator either closes or is minimized). If Show in system tray on
the Settings dialog box is selected, Yubico Authenticator is minimized to the System Tray when you
double-click the credential. If Show in system tray is not selected, Yubico Authenticator closes when
you double-click the credential.
Kill scdaemon on show
The Kill scdaemon on show setting ends the scdaemon (smart card daemon) process if it is running.
This setting can be necessary if you are using, for example, GNU Privacy Guard (GnuPG or GPG), which
can cause Yubico Authenticator to be unable to communicate with the YubiKey.
Card reader name
The Card reader name setting shows the name associated with the YubiKey.
IMPORTANT: Do not change the Card reader name unless the YubiKey has been renamed (this setting
must match the way the operating system identifies the YubiKey).
To access the Settings dialog box
On Windows and Linux, select File > Settings.
On Mac OS X, select Yubico Authenticator > Preferences.
Yubico Authenticator User's Guide © 2016 Yubico. All rights reserved. Page 22 of 23
Troubleshooting
This chapter describes Yubico Authenticator for Desktop and Android messages, other issues, and possible
solutions for each message or issue.
In this Chapter
Understanding Yubico Authenticator for Desktop Messages
Understanding Yubico Authenticator for Android Messages
Problems and Solutions
See Tips for Using Your YubiKey NEO with Android Devices in an earlier chapter of this document.
Understanding Yubico Authenticator for Desktop Messages
No credentials available
This error message reflects expected behavior, and indicates that you have not yet added a credential. It
may also indicate that you need to insert a YubiKey into a USB port of your computer.
Understanding Yubico Authenticator for Android Messages
Error in YubiKey communication!
This error message indicates that the YubiKey and the NFC antenna are not connecting properly. Possible
solutions include:
Be sure you hold the YubiKey NEO close enough to the NFC antenna on your smartphone.
If you have a case on the smartphone, remove the case and try again.
Problems and Solutions
This section describes issues and possible solutions.
I cannot add a credential using Yubico Authenticator for Desktop on Mac OS X systems
It appears that you cannot click the Yubico Authenticator window, or view any menus for the application,
even when you have a YubiKey inserted. This is a known issue. To work around this issue, press the
Option+Tab keys (or Alt+Tab) twice. This changes the focus of the current window. Then you can click in the
Yubico Authenticator window, and view the Yubico Authenticator menus. To add a credential, select the
File menu, and then select Add.

Yubico Authenticator User's Guide © 2016 Yubico. All rights reserved. Page 23 of 23
My app reports that the code I pasted is not valid
If this occurs more than once, do the following:
For HOTP codes, to request a new code, be sure to click the the corresponding HOTP text for the
desired account.
Yubico Authenticator automatically generates new TOTP codes every 30 seconds, which you can paste
or type into your account when prompted. If the first TOTP code is invalid, try the next one. If the TOTP
code is still invalid, close the Yubico Authenticator app, and then reopen it and type or enter the new
TOTP code. If the error continues, contact Support.
I do not receive a QR code to scan when I turn on two-step verification
This can occur if you previously turned on two-step verification and then turned it off and did not clear your
two-step verification settings.
To generate a QR code if you previously had two-step verification turned on
1. In the application you are using, turn off two-step verification.
IMPORTANT: Be sure to clear all previous two-step verification settings when prompted to do so (you may
need to select a checkbox).
2. Turn on two-step verification again. Make sure you select Authenticator app as your primary code source,
rather than text message.
3. When the QR code appears, see the remaining steps provided in Adding Credentials in an earlier chapter.