yubico yubihsm monitor if the aead is changed, ... yubico. yubico yubihsm monitor yubico. yubico...
TRANSCRIPT

Yubico YubiHSM Monitor
Test utility for the YubiHSM Document Version: 1.1
May 24, 2012

Yubico YubiHSM Monitor © 2012 Yubico. All rights reserved. Page 2 of 15
yubico
cococo Introduction
Yubico is the leading provider of simple, open online identity protection. The company’s
flagship product, the YubiKey®, uniquely combines driverless USB hardware with open
source software. More than a million users in 100 countries rely on YubiKey strong two-factor
authentication for securing access to computers, mobile devices, networks and online
services. Customers range from individual Internet users to e-governments and Fortune 500
companies. Founded in 2007, Yubico is privately held with offices in California, Sweden and
UK.
Disclaimer
The contents of this document are subject to revision without notice due to continued progress in methodology, design, and manufacturing. Yubico shall have no liability for any error or damages of any kind resulting from the use of this document. The Yubico Software referenced in this document is licensed to you under the terms and conditions accompanying the software or as otherwise agreed between you or the company that you are representing.
Trademarks
Yubico and YubiKey are trademarks of Yubico Inc.
Contact Information
Yubico Inc
228 Hamilton Avenue, 3rd Floor
Palo Alto, CA 94301
USA

Yubico YubiHSM Monitor © 2012 Yubico. All rights reserved. Page 3 of 15
yubico
cococo Contents
Introduction.......................................................................................................................................... 2
Disclaimer............................................................................................................................................ 2
Trademarks ......................................................................................................................................... 2
Contact Information ............................................................................................................................. 2
1 Document Information ..................................................................................................................... 4
1.1 Purpose ................................................................................................................................... 4
1.2 Audience ................................................................................................................................. 4
1.3 Related documentation ........................................................................................................... 4
1.4 Document History .................................................................................................................... 4
2 Introduction and concepts ............................................................................................................... 5
3 Sample setup and test .................................................................................................................... 6
3.1 Configuring HSM mode ........................................................................................................... 6
3.2 Creating keys .......................................................................................................................... 6
3.3 Exiting the configuration mode ................................................................................................ 6
3.4 Starting the YubiHSM monitor ................................................................................................. 7
3.5 Selecting the YubiHSM port .................................................................................................... 7
3.6 Testing the YubiHSM connection ............................................................................................ 7
3.7 Monitoring roundtrip time and throughput ............................................................................... 8
4 Sample AEAD generation ............................................................................................................... 9
4.1 Storing AEAD keys in the persistent storage .......................................................................... 9
4.2 Using the YubiHSM to generate an AEAD .............................................................................. 9
4.3 Using the tool to generate an AEAD ..................................................................................... 10
4.4 Using the buffer to create AEADs ......................................................................................... 11
5 Using AEADs to verify Yubico OTPs ............................................................................................ 12
5.1 Generation of Yubikey secrets .............................................................................................. 12
5.2 Testing the OTP validation .................................................................................................... 13
6 Using the internal OTP database .................................................................................................. 14
6.1 Populating the OTP database during configuration .............................................................. 14
6.2 Verifying a Yubico OTP ......................................................................................................... 14
6.3 Adding additional database entries ....................................................................................... 15
Yubico YubiHSM Monitor © 2012 Yubico. All rights reserved. Page 4 of 15
yubico
cococo 1 Document Information
1.1 Purpose
This document provides a quick reference to the YubiHSM monitor application. The purpose
of the monitor application is to provide a simple tool to evaluate YubiHSM concepts and
functionality under the Microsoft Windows operating system.
1.2 Audience
YubiHSM developers
1.3 Related documentation
YubiHSM manual
YubiHSM Python framework
Yubikey Configuration Utility manual
Yubico online forum – http://forum.yubico.com
1.4 Document History
Date Version Author Activity
2011-05-04 1.0 JE First release
2012-05-24 1.1 ZD Changed document template

Yubico YubiHSM Monitor © 2012 Yubico. All rights reserved. Page 5 of 15
yubico
cococo 2 Introduction and concepts
The Yubico YubiHSM test monitor is a simple utility designed to allow quick test and evaluation
of YubiHSM HSM mode functionality and concepts. The tool is by no means indented to be
used in a production setting.
Please refer to the YubiHSM manual for a detailed description of the YubiHSM functionality and
concepts.
The utility is provided as a single Windows executable. The Windows registry is used to store
persistent settings.
Here, the command combo box drop down is shown, where all YubiHSM commands are
available.
The screen is divided into three sections
Key handle and nonce
Here, key handles and nonces can be entered
Execution
Here, all YubiHSM commands with associated parameters are entered and returned.
Functions for decoding and encoding of AEADs are provided to allow evaluation and test,
just like if a second YubiHSM was present. This type of functionality is by nature not a part
of a real production setting.
Yubikey OTP output
Here, output from a Yubikey can be inserted and for automatic parsing and command
wrapping.
The following sections provide a few examples how to use the tool together with a YubiHSM.
For a complete command reference, please refer to the YubiHSM manual.
Yubico YubiHSM Monitor © 2012 Yubico. All rights reserved. Page 6 of 15
yubico
cococo 3 Sample setup and test
Please follow the instructions in section 8 of the YubiHSM manual how to enter configuration
mode and get a basic understanding of the configuration process.
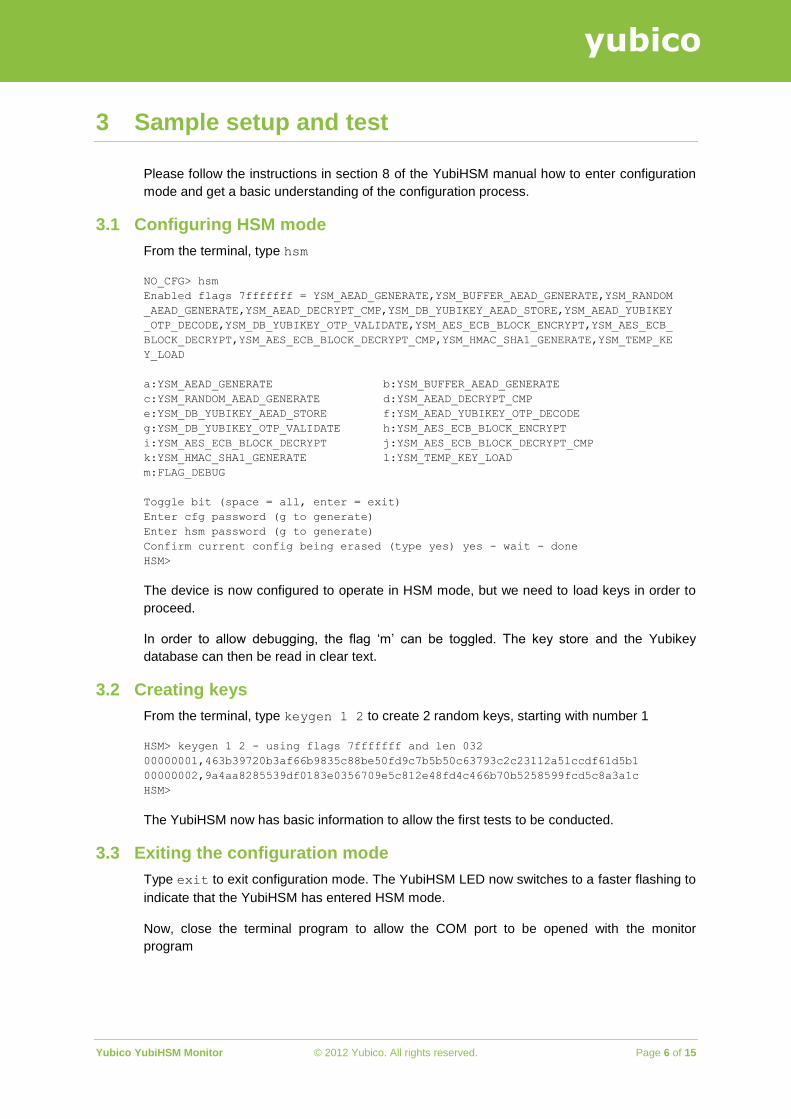
3.1 Configuring HSM mode
From the terminal, type hsm
NO_CFG> hsm
Enabled flags 7fffffff = YSM_AEAD_GENERATE,YSM_BUFFER_AEAD_GENERATE,YSM_RANDOM
_AEAD_GENERATE,YSM_AEAD_DECRYPT_CMP,YSM_DB_YUBIKEY_AEAD_STORE,YSM_AEAD_YUBIKEY
_OTP_DECODE,YSM_DB_YUBIKEY_OTP_VALIDATE,YSM_AES_ECB_BLOCK_ENCRYPT,YSM_AES_ECB_
BLOCK_DECRYPT,YSM_AES_ECB_BLOCK_DECRYPT_CMP,YSM_HMAC_SHA1_GENERATE,YSM_TEMP_KE
Y_LOAD
a:YSM_AEAD_GENERATE b:YSM_BUFFER_AEAD_GENERATE
c:YSM_RANDOM_AEAD_GENERATE d:YSM_AEAD_DECRYPT_CMP
e:YSM_DB_YUBIKEY_AEAD_STORE f:YSM_AEAD_YUBIKEY_OTP_DECODE
g:YSM_DB_YUBIKEY_OTP_VALIDATE h:YSM_AES_ECB_BLOCK_ENCRYPT
i:YSM_AES_ECB_BLOCK_DECRYPT j:YSM_AES_ECB_BLOCK_DECRYPT_CMP
k:YSM_HMAC_SHA1_GENERATE l:YSM_TEMP_KEY_LOAD
m:FLAG_DEBUG
Toggle bit (space = all, enter = exit)
Enter cfg password (g to generate)
Enter hsm password (g to generate)
Confirm current config being erased (type yes) yes - wait - done
HSM>
The device is now configured to operate in HSM mode, but we need to load keys in order to
proceed.
In order to allow debugging, the flag ‘m’ can be toggled. The key store and the Yubikey
database can then be read in clear text.
3.2 Creating keys
From the terminal, type keygen 1 2 to create 2 random keys, starting with number 1
HSM> keygen 1 2 - using flags 7fffffff and len 032
00000001,463b39720b3af66b9835c88be50fd9c7b5b50c63793c2c23112a51ccdf61d5b1
00000002,9a4aa8285539df0183e0356709e5c812e48fd4c466b70b5258599fcd5c8a3a1c
HSM>
The YubiHSM now has basic information to allow the first tests to be conducted.
3.3 Exiting the configuration mode
Type exit to exit configuration mode. The YubiHSM LED now switches to a faster flashing to
indicate that the YubiHSM has entered HSM mode.
Now, close the terminal program to allow the COM port to be opened with the monitor
program

Yubico YubiHSM Monitor © 2012 Yubico. All rights reserved. Page 7 of 15
yubico
cococo 3.4 Starting the YubiHSM monitor
The YubiHSM monitor is provided as a self-contained executable file that does not require
any additional files.
3.5 Selecting the YubiHSM port
In this case, the YubiHSM is present on COM3, which can be verified in the Windows Device
Manager.
From the Port combo box in the Execution group, select the port where the YubiHSM is
connected.
The status field shall show “Port opened ok”. Make sure the terminal program is closed before
opening the port, as this otherwise prevents the port from being opened.
3.6 Testing the YubiHSM connection
Now, select the YSM_SYSTEM_INFO_QUERY command from the Cmd combo box in the
Execution group.
Press the Run button and the firmware version and ID string shall appear in the status
window.

Yubico YubiHSM Monitor © 2012 Yubico. All rights reserved. Page 8 of 15
yubico
cococo 3.7 Monitoring roundtrip time and throughput
Command execution time and the application-to-device roundtrip time can be measured. In
this case, the YSM_ECHO command can be used, which simply echoes back what is being
sent.
In this example, 8 bytes (Cnt/par field) are sent to the YubiHSM and echoed back 100 times
(Cycles field). The average roundtrip time is 337 µs, varying between 207 and 723 µs.
For a more precise tracking of the throughput and response times, an external USB hardware
analyzer can be used.
In this case, an Ellisys USB Explorer 200 analyzer was used to monitor the traffic and verify
the turnaround times. As seen, the raw data packet sent out at t = 0 gets its response after 62
Ls, which gives an idea of the YubiHSM processing time. Given the average turnaround time
of 337 Ls, the remaining 337 – 62 = 275 Ls is a sum of operating system- and USB stack
latencies.
Yubico YubiHSM Monitor © 2012 Yubico. All rights reserved. Page 9 of 15
yubico
cococo 4 Sample AEAD generation
The utility can generate and verify AEADs, which can then be used to test the YubiHSM
functionality. Several commands, options and modes are available and two simple examples
are shown below.
4.1 Storing AEAD keys in the persistent storage
The first step is to store the keys created in the configuration (step 3.2 above) in the monitor’s
persistent storage.
This step is just for the sake of using this test utility as the “real” keys are already stored in the
persistent YubiHSM.
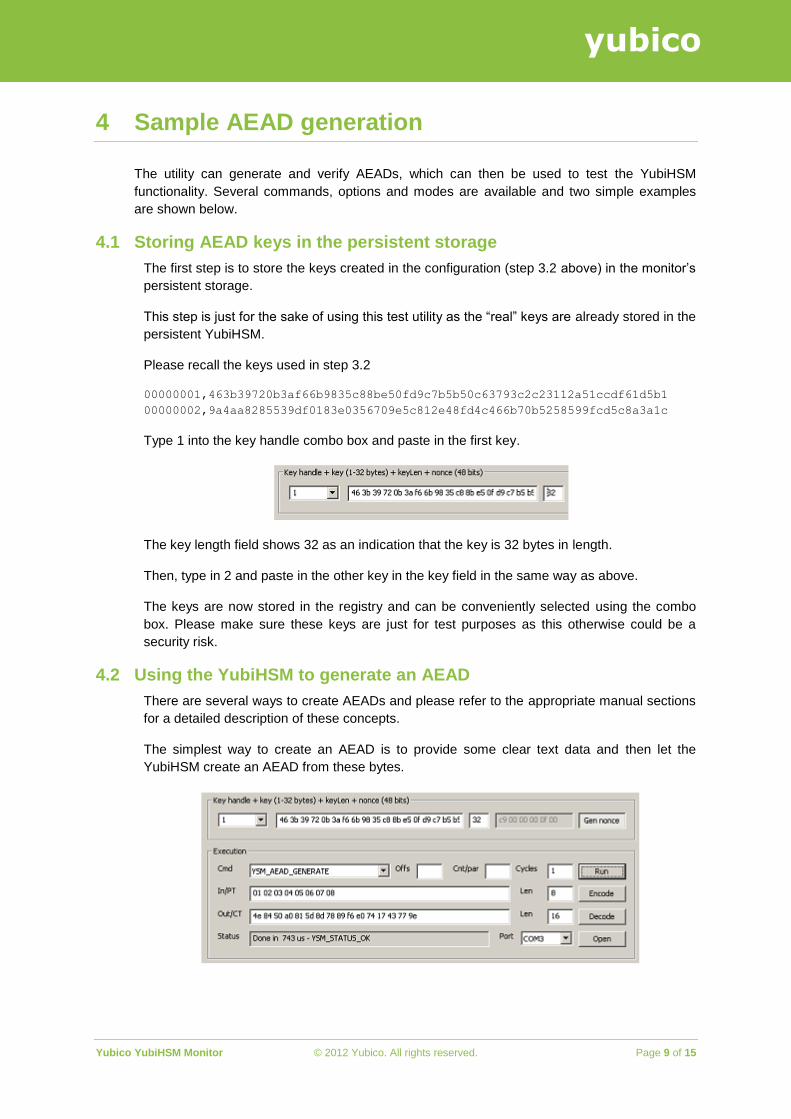
Please recall the keys used in step 3.2
00000001,463b39720b3af66b9835c88be50fd9c7b5b50c63793c2c23112a51ccdf61d5b1
00000002,9a4aa8285539df0183e0356709e5c812e48fd4c466b70b5258599fcd5c8a3a1c
Type 1 into the key handle combo box and paste in the first key.
The key length field shows 32 as an indication that the key is 32 bytes in length.
Then, type in 2 and paste in the other key in the key field in the same way as above.
The keys are now stored in the registry and can be conveniently selected using the combo
box. Please make sure these keys are just for test purposes as this otherwise could be a
security risk.
4.2 Using the YubiHSM to generate an AEAD
There are several ways to create AEADs and please refer to the appropriate manual sections
for a detailed description of these concepts.
The simplest way to create an AEAD is to provide some clear text data and then let the
YubiHSM create an AEAD from these bytes.

Yubico YubiHSM Monitor © 2012 Yubico. All rights reserved. Page 10 of 15
yubico
cococo In this example, the plain text bytes 01 02 03 04 05 06 07 08 are entered in the In/PT field.
The input length is 8 bytes, shown by the Len field. The AEAD generation requires a nonce,
which can either be supplied or be uniquely generated by the YubiHSM. Check the Gen
nonce button to use automatic generation.
Press the Run button when done. The generated AEAD is displayed in the Out/CT field. The
AEAD length is always 8 bytes more than the length of the clear text string, which in this case
equals 16 bytes, shown by the Len field.
The generated nonce, associated with this AEAD is inserted into the nonce field up in the
right corner.
The AEAD generated by the YubiHSM can be verified by the utility by pressing the Decode
button.
If the AEAD is invalid or cannot be verified with the selected key handle or nonce, an error is
displayed. For example, change the last 9e to 9f and press Decode.
The decoding now fails.
4.3 Using the tool to generate an AEAD
The tool can generate an AEAD, which can then be used by AEAD operations in the
YubiHSM.
Enter 47 11 58 12 in the clear text field and press Encode.
Now, the YubiHSM can be used to verify this AEAD. Select the YSM_AEAD_DECRYPT_CMP
command and press Run.
By changing the plaintext, the AEAD is still valid, but the compare fails:

Yubico YubiHSM Monitor © 2012 Yubico. All rights reserved. Page 11 of 15
yubico
cococo However, if the AEAD is changed, another error message is generated
Here, the AEAD cannot be decoded as the last byte was changed from e9 to ea
4.4 Using the buffer to create AEADs
The Offs field can be used to specify a buffer offset when working with the YubiHSM AEAD
data buffer.
Enter 12 34 in the plaintext field and 0 in the Offs field, select the YSM_BUFFER_LOAD
command and press Run
Enter 4 in the offset field and 3 in the Cnt/par field and, select the
YSM_RANDOM_BUFFER_LOAD command and press Run
Now, two fixed bytes are inserted in position 0 and 1 of the buffer and three random bytes are
generated by the YubiHSM into positions 4, 5 and 6. Bytes 2 and 3 are set to zero when
writing to offset zero.
Generate an AEAD of the buffer using the YSM_BUFFER_AEAD_GENERATE command:
A 15 bytes AEAD is generated, which equals 7 bytes buffer data. Here, the utility
automatically decodes the AEAD and the plaintext is shown (which is of course NOT returned
by the YubiHSM). The random bytes created in the previous step were obviously 6e b8 6b
and as seen, bytes 2 and 3 are zero.
Yubico YubiHSM Monitor © 2012 Yubico. All rights reserved. Page 12 of 15
yubico
cococo 5 Using AEADs to verify Yubico OTPs
One of the main use cases for the YubiHSM is to verify Yubico OTPs, with secrets stored on
external media, such as a database on a validation server. This setting typically involves one
secure station with a YubiHSM where the secrets are created and the Yubikeys are
personalized. The secrets are then converted into AEADs and are then transmitted to the
validation server(s) over a potentially unsecure channel. Each validation server then has a
YubiHSM to verify received OTPs using these AEADs.
Please refer to the YubiHSM manual for a more detailed description of this setting.
Validation of Yubico OTPs can also be done using the internal YubiHSM database. This is
shown in section 6.
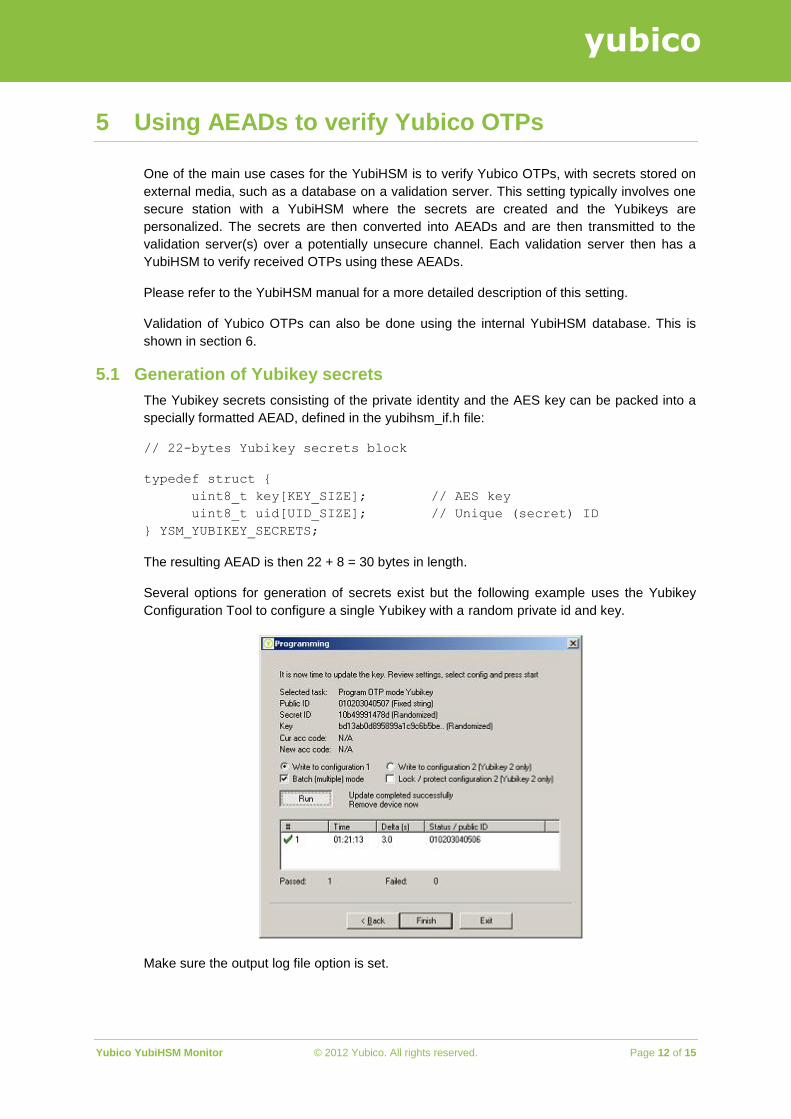
5.1 Generation of Yubikey secrets
The Yubikey secrets consisting of the private identity and the AES key can be packed into a
specially formatted AEAD, defined in the yubihsm_if.h file:
// 22-bytes Yubikey secrets block
typedef struct {
uint8_t key[KEY_SIZE]; // AES key
uint8_t uid[UID_SIZE]; // Unique (secret) ID
} YSM_YUBIKEY_SECRETS;
The resulting AEAD is then 22 + 8 = 30 bytes in length.
Several options for generation of secrets exist but the following example uses the Yubikey
Configuration Tool to configure a single Yubikey with a random private id and key.
Make sure the output log file option is set.
Yubico YubiHSM Monitor © 2012 Yubico. All rights reserved. Page 13 of 15
yubico
cococo The log file gives the following output:
010203040506,52715ba12c82,0a187fd2fbb7ac628c540514c0fd30b1
The format is public-id, private-id, aes-key
Concatenate the AES key and private ID into a single string to match the
YSM_YUBIKEY_SECRETS format.
0a187fd2fbb7ac628c540514c0fd30b152715ba12c82
Paste this string into the plaintext field and paste the public id into the nonce field. Make sure
the Gen nonce button is unchecked. Press Run
The resulting 30-byte AEAD is shown in the Out/CT field.
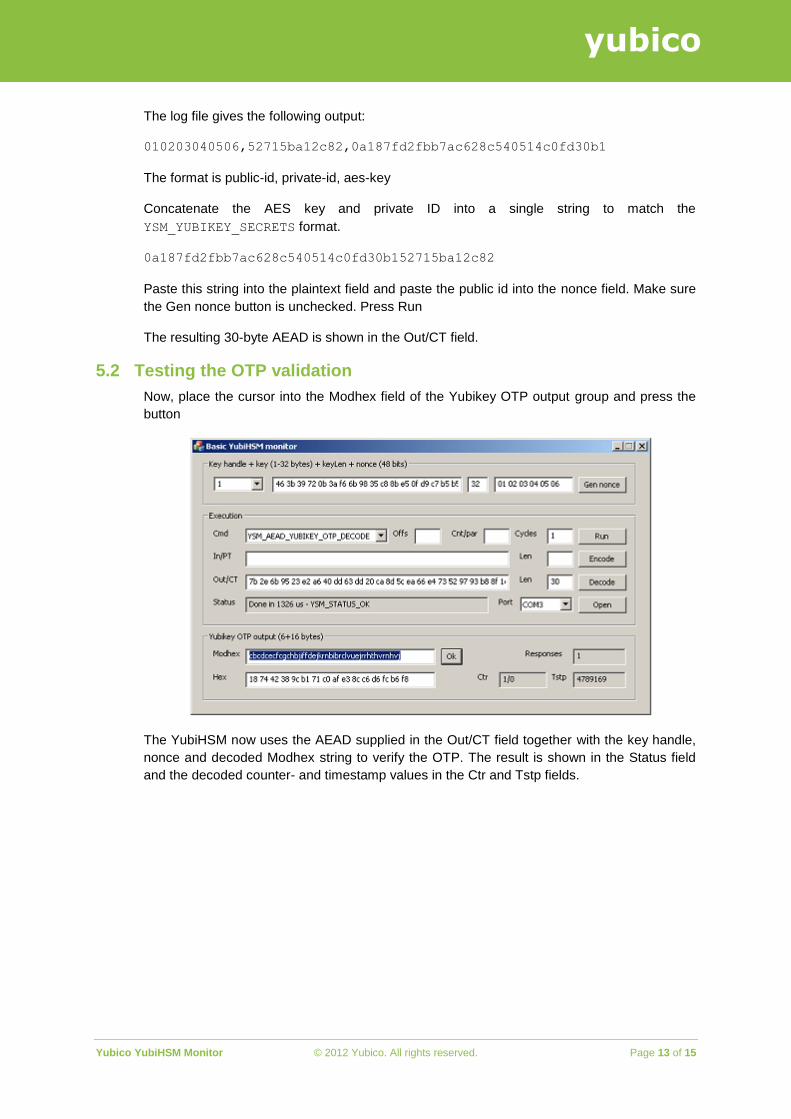
5.2 Testing the OTP validation
Now, place the cursor into the Modhex field of the Yubikey OTP output group and press the
button
The YubiHSM now uses the AEAD supplied in the Out/CT field together with the key handle,
nonce and decoded Modhex string to verify the OTP. The result is shown in the Status field
and the decoded counter- and timestamp values in the Ctr and Tstp fields.
Yubico YubiHSM Monitor © 2012 Yubico. All rights reserved. Page 14 of 15
yubico
cococo 6 Using the internal OTP database
The YubiHSM internal OTP database has storage for a limited number of secrets. The
database can either be populated during configuration from a text file compatible with the
Yubico Yubikey provisioning format, via the HSM function YSM_DB_YUBIKEY_AEAD_STORE or
a combination of both.
Please refer to the YubiHSM manual for a more detailed description of this setting.
Validation of Yubico OTPs can also be done using the external AEAD storage. This is shown in
section 5.
6.1 Populating the OTP database during configuration
The OTP database can be populated during configuration by uploading a Yubico supplied key
file, such as
99950,cccccccbjhhu,fe37a81ab606,46d917606afe4d81830b8822d65a70ca,75467b86adb8,
2010-12-30T21:14:16,
99951,cccccccbjhhv,f9fc0cf39012,bf0af3bf814bc8250b4fbb0e806ed8a0,6ba06c87e191,
2010-12-30T21:14:16,
99952,cccccccbjhic,8b99376dc0af,ccf6e1e61b93f2cec00dc88cbd1c03bd,905f7390364d,
2010-12-30T21:14:16,
During the configuration phase, use the terminal program’s upload facility together with the
dbload command:
HSM> dbload - Load id data now. Press ESC to quit
99950 - inserted ok
99951 - inserted ok
99952 - inserted ok
Exit back to HSM mode and start the YubiHSM monitor
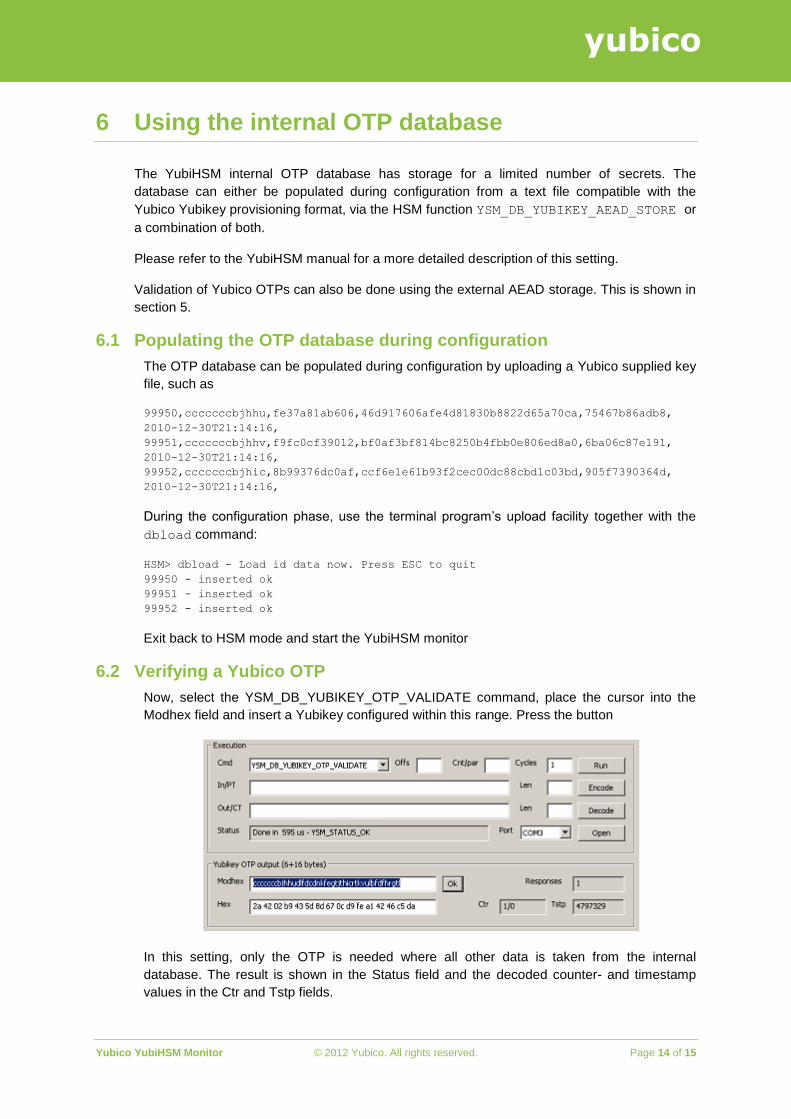
6.2 Verifying a Yubico OTP
Now, select the YSM_DB_YUBIKEY_OTP_VALIDATE command, place the cursor into the
Modhex field and insert a Yubikey configured within this range. Press the button
In this setting, only the OTP is needed where all other data is taken from the internal
database. The result is shown in the Status field and the decoded counter- and timestamp
values in the Ctr and Tstp fields.
Yubico YubiHSM Monitor © 2012 Yubico. All rights reserved. Page 15 of 15
yubico
cococo As the counters are checked and maintained in this mode, replay detection is provided as
well:
By sending the same OTP again, the YubiHSM detects the replay and reports
YSM_OTP_REPLAY.
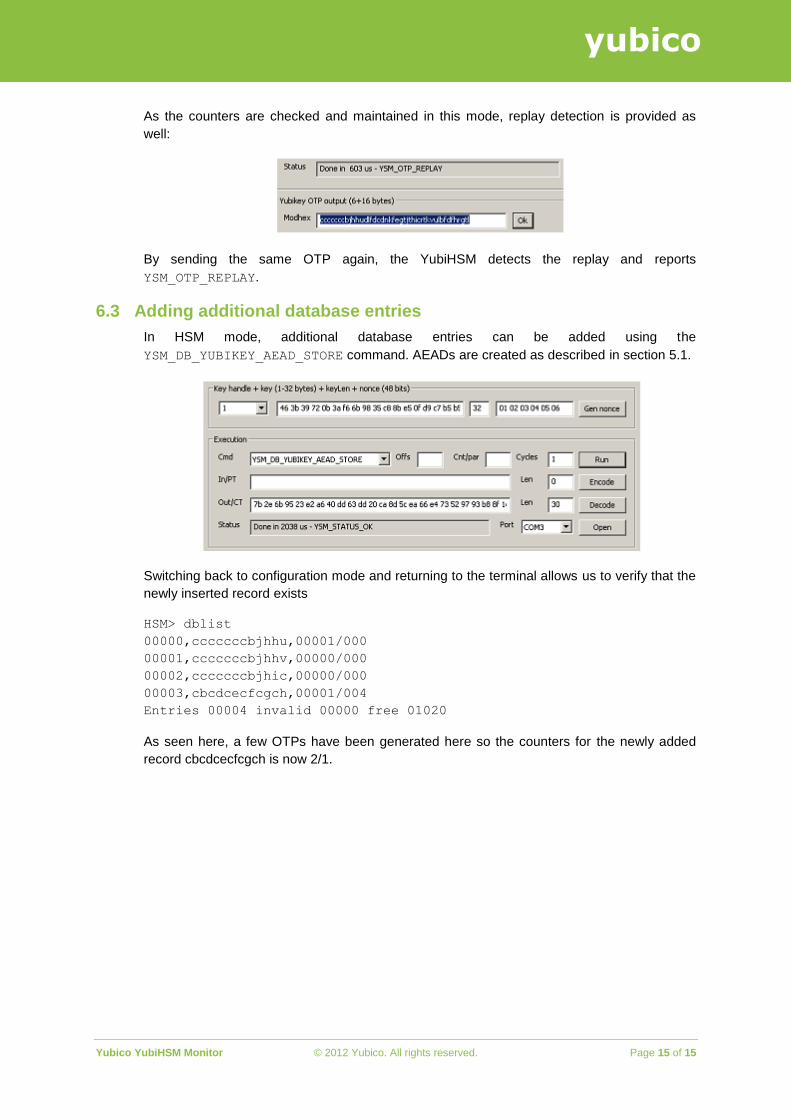
6.3 Adding additional database entries
In HSM mode, additional database entries can be added using the
YSM_DB_YUBIKEY_AEAD_STORE command. AEADs are created as described in section 5.1.
Switching back to configuration mode and returning to the terminal allows us to verify that the
newly inserted record exists
HSM> dblist
00000,cccccccbjhhu,00001/000
00001,cccccccbjhhv,00000/000
00002,cccccccbjhic,00000/000
00003,cbcdcecfcgch,00001/004
Entries 00004 invalid 00000 free 01020
As seen here, a few OTPs have been generated here so the counters for the newly added
record cbcdcecfcgch is now 2/1.