zenitcamera: zenit-e user manual
TRANSCRIPT

8/12/2019 ZENITcamera: ZENIT-E User Manual
http://slidepdf.com/reader/full/zenitcamera-zenit-e-user-manual 1/10
22/06/2014 21:12ZENITcamera: ZENIT-E User Manual
Page 1 of 10http://www.zenitcamera.com/mans/zenit-e/zenit-e-eng.html
HOMEINFORMATION:
QUESTIONS & ANSWERSMANUALSARCHIVESARTICLES
PHOTOS:
PHOTO ARCHIVESPHOTO ALBUM
MISCELLANEOUS:
ABOUT WEBSITELINKS
PHOTO CAMERAS
Manuals | ZENIT-E:
NOTE:This text is identical to theone in the Instruction Manual,English version, 1971 year,and converted to HTML in2001.!"##$% &'()& *+'#&*,'#-.*/*#"01#-23!"#$%$&'(%" 4'.)** 1971/-+" , * )5'6*"01#-5-+/-&-40'# +07 8-.2"&"HTML 4 2001 /-+3 .
ZENIT-E
ATTENTION!
The present Instruction Manual contains the basic characteristics andessential operating principles of the ZENIT-E camera and cannot beregarded as a handbook on photography.
Before using, the camera, make thorough study of the handling rulesand operation procedure of the camera.Due to ever-advancing development of the camera construction, theremay occur minor differences between the text of Manual and theconstruction of your camera.To make the operating of the photocell reliable and to increase itsservice, do not subject the photocell to the exposure of the directsunlight.Screw out or screw in INDUSTAR-50-2 lens only by thread rolling of depth of field scale ring, and HELIOS-44-2 lens -- by thread rolling of focusing ring.Do not touch the mirror surface with fingers, because this may damageits coating.Do not rotate the shutter release button for no reason, while releasingthe shutter, to avoid disengagement of the shutter cocking mechanism.Do not rotate the exposure time dial within the interval between "B"and "500".
Always wind the shutter as far as it goes to avoid blank exposures.
APPLICATION AND ADVANTAGES OF THE "ZENIT-E" CAMERA
ZENIT-E is a single-lens reflex camera, fitted with a built-in and
uncoupled exposure meter and with a reflex mirror of instant returntype.

8/12/2019 ZENITcamera: ZENIT-E User Manual
http://slidepdf.com/reader/full/zenitcamera-zenit-e-user-manual 2/10
22/06/2014 21:12ZENITcamera: ZENIT-E User Manual
Page 2 of 10http://www.zenitcamera.com/mans/zenit-e/zenit-e-eng.html
e nstant return m rror perm ts cont nuous v ew ng o t e o ect to ephotographed, except for the moment of exposure. The built-inexposure meter is especially important for shooting on a colour film.Thanks to its specifications, the ZENIT-E camera can be used for mostvarious amateur shooting and a number of special shootings.The ZENIT-E camera can be used with commercially availableinterchangeable lenses with focal length from 37 to 1000 mm.
The design of the reflex viewfinder (groundglass focusing) allows toapply extension rings, to make with their help reproduction works. Itallows to photograph small objects with large magnification(macrophotography) and to photograph with the help of microscope(microphotography). Using the ZENIT-E camera you can shoot close-ups or at long distances.Instant return mirror, built-in exposure meter, shutter setting lever,hinged back cover of the camera, small dimensions and light weight --all these are important advantages of the ZENIT-E camera.The camera is supplied in two variants: with HELIOS-44-2 lens 58 mm
f/2 and with INDUSTAR-50-2 lens 50 mm f/3.5. The camera can beused with standard cassettes.
self timer release button
flash unit connector socket
photocell
lens
self-timer setting lever
lock latch
sprocket
viewfinder eyepiece
cassete spool guide
film gate
film channel slides

8/12/2019 ZENITcamera: ZENIT-E User Manual
http://slidepdf.com/reader/full/zenitcamera-zenit-e-user-manual 3/10
22/06/2014 21:12ZENITcamera: ZENIT-E User Manual
Page 3 of 10http://www.zenitcamera.com/mans/zenit-e/zenit-e-eng.html
cassete chamber
take-up spool
take-up spool spring
camera back cover
film pessure table
index of diaphragm setting ring
diaphragm setting ring diaphragm ring with index
depth of field scale with index
distance scale
focusing ring
lens mounting ring
HELIOS-44-2 2/58
diaphragm setting ring with index
focusing ring with diaphragm scale
distance scale
depth of field scale
INDUSTAR-50-2 3.5/50
exposure couter dial
shutter release button
film rewind release button
sinchronization setting leverexposure time dial scale
index of exposure time dial scale
synchronization lever index
shutter cocking lever
exposure counter dial index
exposure counter dial guide
film sensitivity scaleguide of calculator diaphragm

8/12/2019 ZENITcamera: ZENIT-E User Manual
http://slidepdf.com/reader/full/zenitcamera-zenit-e-user-manual 4/10
22/06/2014 21:12ZENITcamera: ZENIT-E User Manual
Page 4 of 10http://www.zenitcamera.com/mans/zenit-e/zenit-e-eng.html
indicator of calculator
exposure meter pointer
film rewind knob
index of film sensitivity scale
diaphragm scale of calculator
exposure time scale of calculator
SPECIFICATIONS
Picture size -- 24x36 mmWidth of perforated film -- 35 mmNumber of frames -- 36Shutter speeds -- from 1/30 s. to 1/500 s. (automatic), "B" (by hand)and slow shutter speedViewfinder field of view -- 20x28 mmEyepiece magnification -- 5 x
Thread for lens -- M42x1Mechanical back focal distance -- 45.5 mmStandard lens -- "HELIOS-44-2" or "INDUSTAR-50-2"Focal length -- 58 mm 50 mmRelative aperture -- 1:2 1:3.5
Focusing range -- from " 9 " to 0.5 m from " 9 " to 0.65 mDiaphragm scale -- from 2 to 16 from 3.5 to 16Seat for sun shade -- Ø55 mm Ø36 mmLight filter mounting thread -- 49x0.75 33x0.5Tripod socket thread -- 1/4" 1/4"Camera overall dimensions -- 138x93x100 mm 138x93x72 mmWeight -- 920 g 800 g
LOADING THE CAMERA
The camera is loaded at usual lighting. To load the camera:1. Open the back cover of the camera, pullingthe latch of the lock upwards.2. Fix the end of the film under the take-upspool spring and hook a sprocket hole on thespool protrusion. See that the film be placedcorrectly between the film channel slides.
3. Place the cassette into its seat, having pulled the film rewind knob
8/12/2019 ZENITcamera: ZENIT-E User Manual
http://slidepdf.com/reader/full/zenitcamera-zenit-e-user-manual 5/10
22/06/2014 21:12ZENITcamera: ZENIT-E User Manual
Page 5 of 10http://www.zenitcamera.com/mans/zenit-e/zenit-e-eng.html
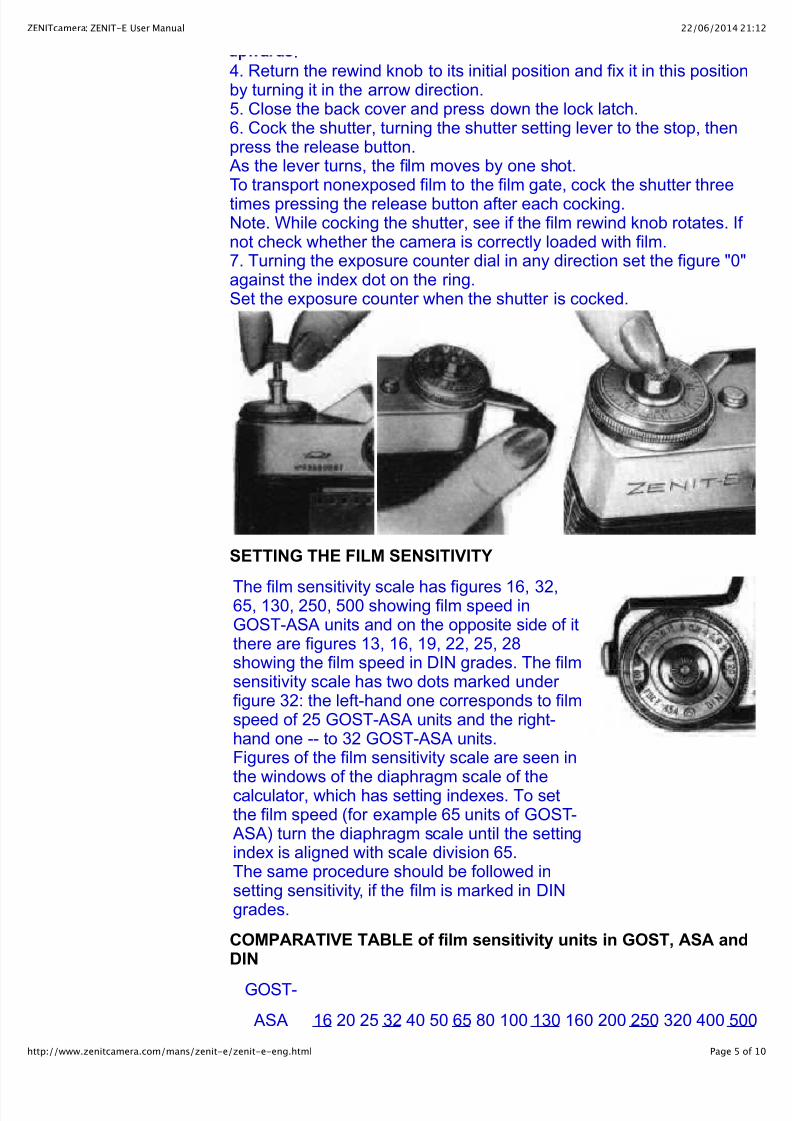
.4. Return the rewind knob to its initial position and fix it in this positionby turning it in the arrow direction.5. Close the back cover and press down the lock latch.6. Cock the shutter, turning the shutter setting lever to the stop, thenpress the release button.
As the lever turns, the film moves by one shot.To transport nonexposed film to the film gate, cock the shutter threetimes pressing the release button after each cocking.Note. While cocking the shutter, see if the film rewind knob rotates. If not check whether the camera is correctly loaded with film.7. Turning the exposure counter dial in any direction set the figure "0"against the index dot on the ring.Set the exposure counter when the shutter is cocked.
SETTING THE FILM SENSITIVITY
The film sensitivity scale has figures 16, 32,65, 130, 250, 500 showing film speed inGOST-ASA units and on the opposite side of itthere are figures 13, 16, 19, 22, 25, 28showing the film speed in DIN grades. The filmsensitivity scale has two dots marked under figure 32: the left-hand one corresponds to filmspeed of 25 GOST-ASA units and the right-hand one -- to 32 GOST-ASA units.Figures of the film sensitivity scale are seen inthe windows of the diaphragm scale of thecalculator, which has setting indexes. To setthe film speed (for example 65 units of GOST-
ASA) turn the diaphragm scale until the settingindex is aligned with scale division 65.The same procedure should be followed insetting sensitivity, if the film is marked in DINgrades.
COMPARATIVE TABLE of film sensitivity units in GOST, ASA andDIN
GOST-
ASA 16 20 25 32 40 50 65 80 100 130 160 200 250 320 400 500
8/12/2019 ZENITcamera: ZENIT-E User Manual
http://slidepdf.com/reader/full/zenitcamera-zenit-e-user-manual 6/10
22/06/2014 21:12ZENITcamera: ZENIT-E User Manual
Page 6 of 10http://www.zenitcamera.com/mans/zenit-e/zenit-e-eng.html
DIN 13 14 15 16 17 18 19 20 21 22 23 24 25 26 27 28
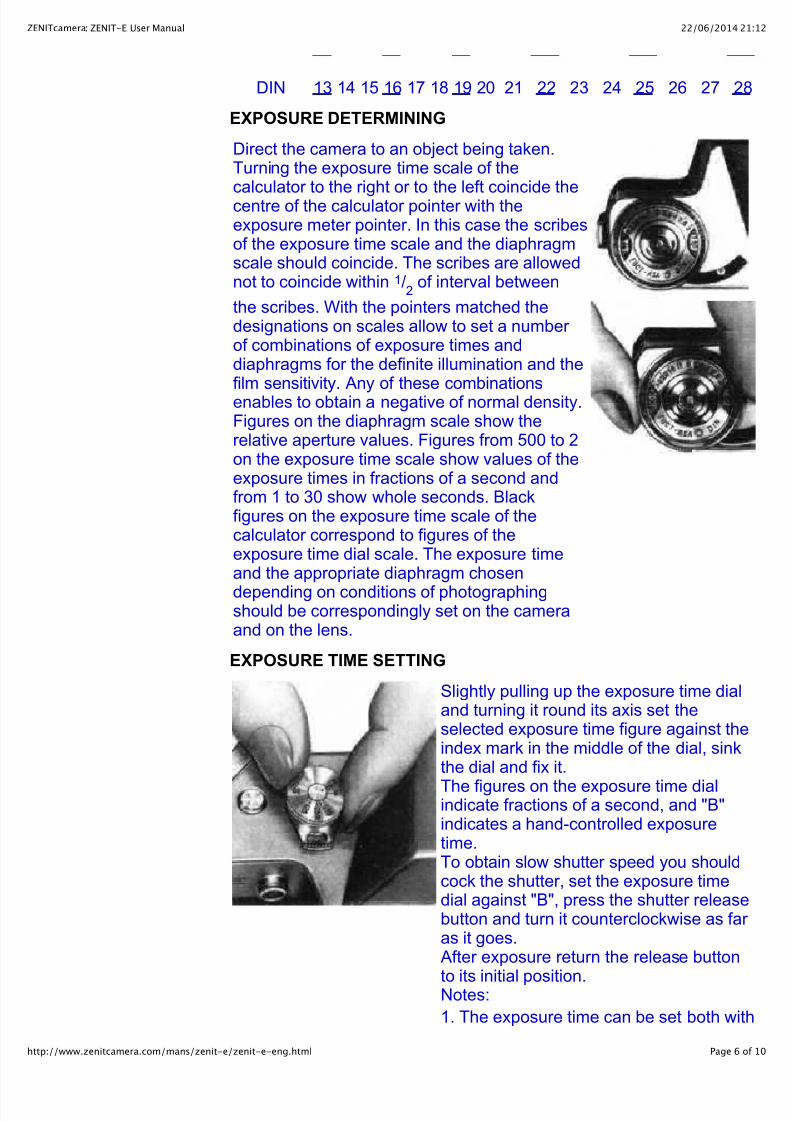
EXPOSURE DETERMINING
Direct the camera to an object being taken.Turning the exposure time scale of thecalculator to the right or to the left coincide thecentre of the calculator pointer with theexposure meter pointer. In this case the scribesof the exposure time scale and the diaphragmscale should coincide. The scribes are allowednot to coincide within 1/2 of interval betweenthe scribes. With the pointers matched thedesignations on scales allow to set a number of combinations of exposure times anddiaphragms for the definite illumination and thefilm sensitivity. Any of these combinationsenables to obtain a negative of normal density.Figures on the diaphragm scale show therelative aperture values. Figures from 500 to 2on the exposure time scale show values of theexposure times in fractions of a second andfrom 1 to 30 show whole seconds. Blackfigures on the exposure time scale of thecalculator correspond to figures of theexposure time dial scale. The exposure timeand the appropriate diaphragm chosendepending on conditions of photographingshould be correspondingly set on the cameraand on the lens.
EXPOSURE TIME SETTING
Slightly pulling up the exposure time dialand turning it round its axis set theselected exposure time figure against theindex mark in the middle of the dial, sinkthe dial and fix it.The figures on the exposure time dialindicate fractions of a second, and "B"indicates a hand-controlled exposuretime.To obtain slow shutter speed you shouldcock the shutter, set the exposure timedial against "B", press the shutter releasebutton and turn it counterclockwise as far as it goes.
After exposure return the release button
to its initial position.Notes:1. The exposure time can be set both with

8/12/2019 ZENITcamera: ZENIT-E User Manual
http://slidepdf.com/reader/full/zenitcamera-zenit-e-user-manual 7/10
22/06/2014 21:12ZENITcamera: ZENIT-E User Manual
Page 7 of 10http://www.zenitcamera.com/mans/zenit-e/zenit-e-eng.html
cocked and released shutter.2. It is good practice to use a tripod whenphotographing with slow shutter speedand "B" exposure.3. When photographing without flashbulbs the synchronization setting lever can be set at will within the range from "X"to "MF" on the side of the film rewindbutton.
STOP SETTING
To obtain a necessary diaphragm onthe HELIOS-44-2 lens align the indexwith one of the figures (2; 2.8; 4; 5.6; 8;11; 16) engraved on the diaphragmsetting ring. For setting the diaphragmrotate the ring until you hear a slight
click. This means that the ring is fixed.The diaphragm of the INDUSTAR-50-2lens is set only after the focusing of thelens is done.
FOCUSING THE LENS FOR IMAGE SHARPNESS
Focusing should be done with the diaphragm aperture open atmaximum.
For this purpose HELIOS-44-2 diaphragm ring should be turnedcounter-clockwise as far as it goes.
Aiming the lens at an object being photographed and observingthrough the viewfinder eyepiece turn the lens focusing ring until sharpimage appears on the frosted glass. After focusing HELIOS-44-2 lensis stopped down by turning the diaphragm ring clockwise as far as itwill go.In cases when you want to photograph a number of objects disposedat different distances use the depth of field scale.The depth of field scale presents divisions which are symmetrically
arranged on both sides of the index and correspond to diaphragmvalues. After the camera is focused you can read limits of the depth of field for a chosen diaphragm which are disposed against equivalentdivisions of the depth of field scale on both sides of the index on thedistance scale.For example, when the lens is focused at 4 m and f/11 diaphragm isselected, the image will be sharp in limits from 2.5 m to 10 m.
OPERATION OF FLASH SYNCHRONIZER
For photographing in conditions of poor illumination you should useflash bulbs and electronic flashes. For this aim the ZENIT-E camera isfitted with a special device, which synchronizes the bulb flash momentwith the shutter operating time. To switch on a single action flash bulb,

8/12/2019 ZENITcamera: ZENIT-E User Manual
http://slidepdf.com/reader/full/zenitcamera-zenit-e-user-manual 8/10
22/06/2014 21:12ZENITcamera: ZENIT-E User Manual
Page 8 of 10http://www.zenitcamera.com/mans/zenit-e/zenit-e-eng.html
set t e sync ron zat on sett ng ever aga nst n ex . enoperating with an electronic flash, the synchronization setting lever should be set against index "X". Setting the synchronization settingkver see to it that protrusion in its hole is matched with dash of index"MF" or index "X" with accuracy of half of a dash thickness.
Only exposure time of 1/30 s (when thegating is full) may be used in the ZENIT-Ecamera, when photographing with either flashbulbs or electronic flash.Hand exposure "B" is not desirable whenusing flash bulbs since a considerableamount of stray light (after flash) gets into thecamera and might result in a blurred imageon the film.
PHOTOGRAPHING WITH SELF-TIMER
When shooting with self-timer, do the
following procedure.Cock the shutter, wind the self-timer mechanism turning the self-timer settinglever down as far as it will go.Set exposure, choose a frame, focus thelens. Press the self-timer release buttonand stand in position to bephotographed. The shutter operates inno less than 9 s. after pressing thebutton.
UNLOADING THE CAMERA
When the exposurecounter dial shows figure36, it means that theexposed film should berewound into the cassette.The procedure is thefollowing:1. Press the film rewindknob and rotate it contraryto the direction shown bythe indicating pointer.2. Disengage the shutter mechanism. For this aimpress the film rewindrelease button and,

8/12/2019 ZENITcamera: ZENIT-E User Manual
http://slidepdf.com/reader/full/zenitcamera-zenit-e-user-manual 9/10
22/06/2014 21:12ZENITcamera: ZENIT-E User Manual
Page 9 of 10http://www.zenitcamera.com/mans/zenit-e/zenit-e-eng.html
,rotate the film rewind knobin the direction, shown bythe indicating pointer, untilyou feel by the appliedforce that the end of thefilm left the spring of the
take-up spool.3. Open the back cover of the camera.4. Pull the film rewind knob upwards and remove the film cassette outof the camera.Note. For further photographing cock the shutter and, holding thesprocket, make sure that it rotates.
INTERCHANGABLE LENSES
Various interchangeable lenses on sale for cameras of ZENIT typewith rollerblind shutter can be used with the ZENIT-E.
All these interchangeable lenses are remarkable for their high quality.Interchangeable lenses are mounted on the camera in the same wayas the main lenses by means of M42x1 thread.When using the interchangeable TAIR-3 lens, the left edge of theimage field on the negative may be cut off.The ZENIT-E camera does not-allow to use the exposure meter system when photographing with the MTO-500 and MTO-1000interchangeable lenses, as the outer mount of these lenses shades thephotocell.
CLOSE-UP SHOOTINGS
With the help of a special copying stand the ZENIT-E camera allows tomake reproductions of drawings, manuscripts, photographs andothers.While copying, it is possible to use the extension rings which aremounted between the camera body and the lens.In this case it is possible to use one ring or a combination of somerings.Reproduction scale depends on the length and number of used rings.This can be visually seen by the reproductions of a postage stamp.
IMPORTANT TIPS
The camera should be handled carefully, should be kept clean andprotected from mechanical damages, moisture and sharp temperaturefluctuations.Keep the camera in a closed carrying case. In such cases the capshould be put on the lens while the shutter and the self-timer arereleased.Never remove the lens from the camera, unless you need it, to preventdust and dirt from getting on the surface of optical parts.Clean the optical coated lens surfaces only from outside with a cleansoft piece of fabric or cotton. Fabric or cotton can be slightly moistenedwith rectified alcohol, ether (petroleum or sulfuric) or, if these meansare absent, with toilet eau-de-Cologne.

8/12/2019 ZENITcamera: ZENIT-E User Manual
http://slidepdf.com/reader/full/zenitcamera-zenit-e-user-manual 10/10
22/06/2014 21:12ZENITcamera: ZENIT-E User Manual
Page 10 of 10http://www.zenitcamera.com/mans/zenit-e/zenit-e-eng.html
,the camera and its adjustment should be performed only by a highlyqualified specialist.
References:Russian user manualZENIT-E: Repair instructions (in Russian)
ZENIT-E: Catalogue of parts and assembly unitsZENIT-E line: Archives (in Russian)
Manuals