zynaptiq morph manual landscape - eleven dimensions …ableton live 36 steinberg cubase/nuendo 38...
TRANSCRIPT

!!!!!!!!!!!!!!!!!!
MORPHUser Manual V2.0.0
MORPH!2 User Manual v2.0.0
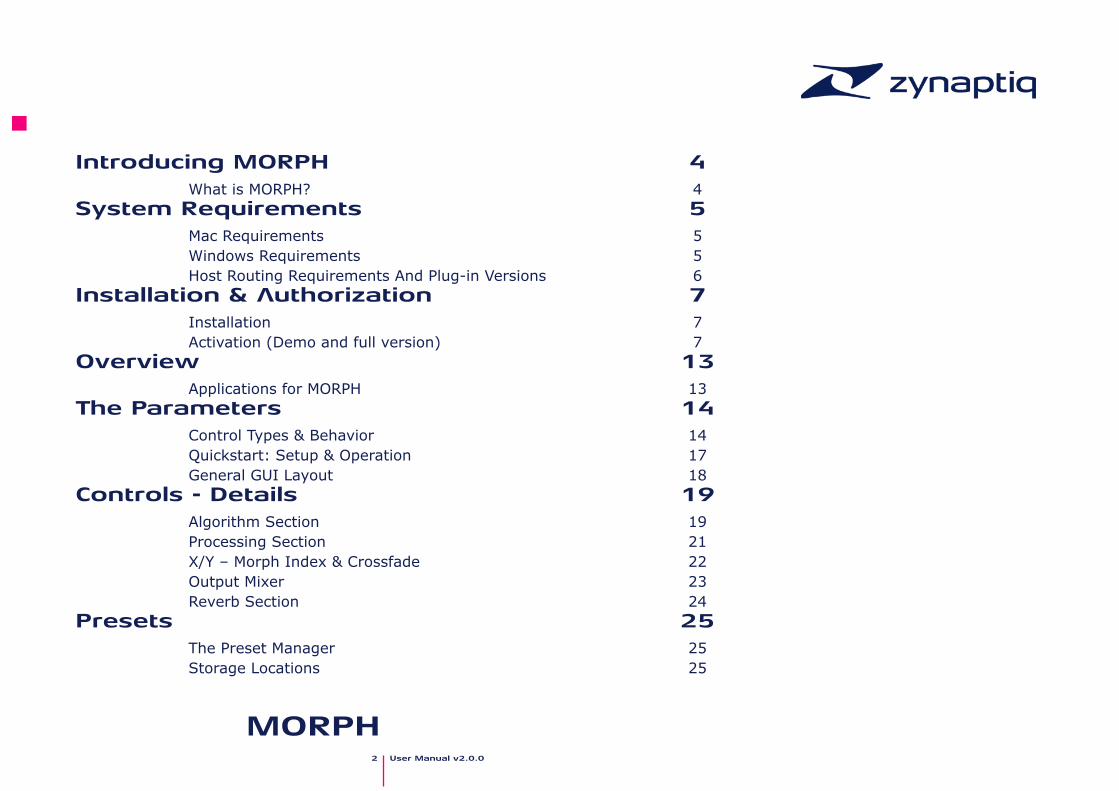
Introducing MORPH 4 What is MORPH? 4
System Requirements 5 Mac Requirements 5 Windows Requirements 5 Host Routing Requirements And Plug-in Versions 6
Installation & Authorization 7 Installation 7 Activation (Demo and full version) 7
Overview 13 Applications for MORPH 13
The Parameters 14 Control Types & Behavior 14 Quickstart: Setup & Operation 17 General GUI Layout 18
Controls - Details 19 Algorithm Section 19 Processing Section 21 X/Y – Morph Index & Crossfade 22 Output Mixer 23 Reverb Section 24
Presets 25 The Preset Manager 25 Storage Locations 25
MORPH!3 User Manual v2.0.0
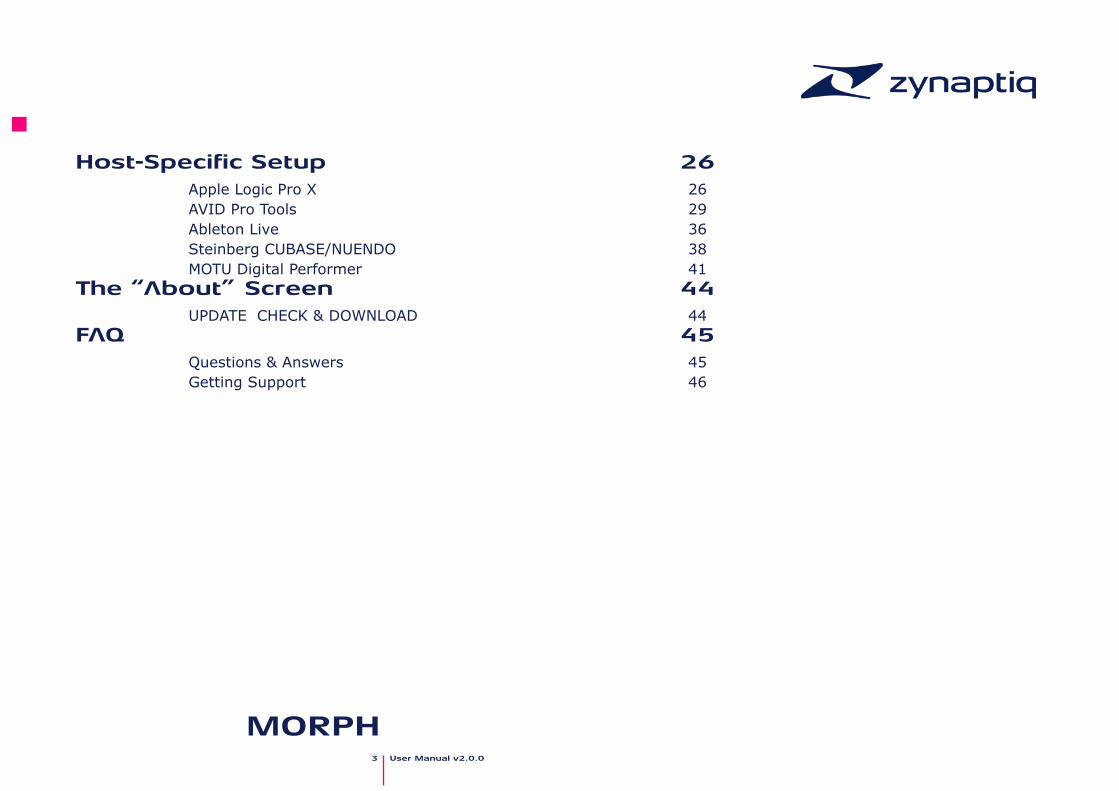
Host-Specific Setup 26 Apple Logic Pro X 26 AVID Pro Tools 29 Ableton Live 36 Steinberg CUBASE/NUENDO 38 MOTU Digital Performer 41
The “About” Screen 44 UPDATE CHECK & DOWNLOAD 44
FAQ 45 Questions & Answers 45 Getting Support 46
!4 User Manual v 2.0.0
MORPH
Introducing MORPH
!!What is MORPH? ! MORPH is a plugin that does real-time audio morphing – it takes two input sounds, and
gradually shapes one to become the other, creating a transition with intermediate stages that have characteristics of both source sounds. This is the sonic equivalent of video effects like one face turning into another, or a square changing shape to become a circle.“Morphing” is a term widely used in the audio industry, but it is typically used to describe a simple spectral interpolation, or even just a parameter interpolation. In terms of the video effects analogy, this would be a transition based on “doing some math with the pixels” – while MORPH would be performing edge tracking and inverse raytracing to create a wireframe model for the two input sounds, then shaping the geometry of one wire frame model to become the other. This is a mathematically significantly more advanced, and, in our humble opinion, sonically much more interesting approach.
The MORPH technology is the latest result of research that goes back to the 1980’s, when our lead scientist Stephan Bernsee created the world’s first audio morphing algorithm on the then top-of-the-line SGI platform. Along the way, this research resulted in the highly regarded morphing algorithms in Prosoniq’s sonicWORX series of sample editors, the morphing synthesis engine in the Hartmann Neuron synth, and MORPH’s predecessor, Prosoniq Morph.
Whether you want to create believable creature voices, unique SFX, unheard hybrid musical instruments, immersive sound transitions or crazy remixes and DJ sets…MORPH has you covered!
We sincerely hope you will enjoy using MORPH as much as we do!
!Yours,
Stephan M. Bernsee & Denis H. Gökdag zynaptiq headquarters
Hannover, Germany
March 2015
!5 User Manual v 2.0.0
MORPH
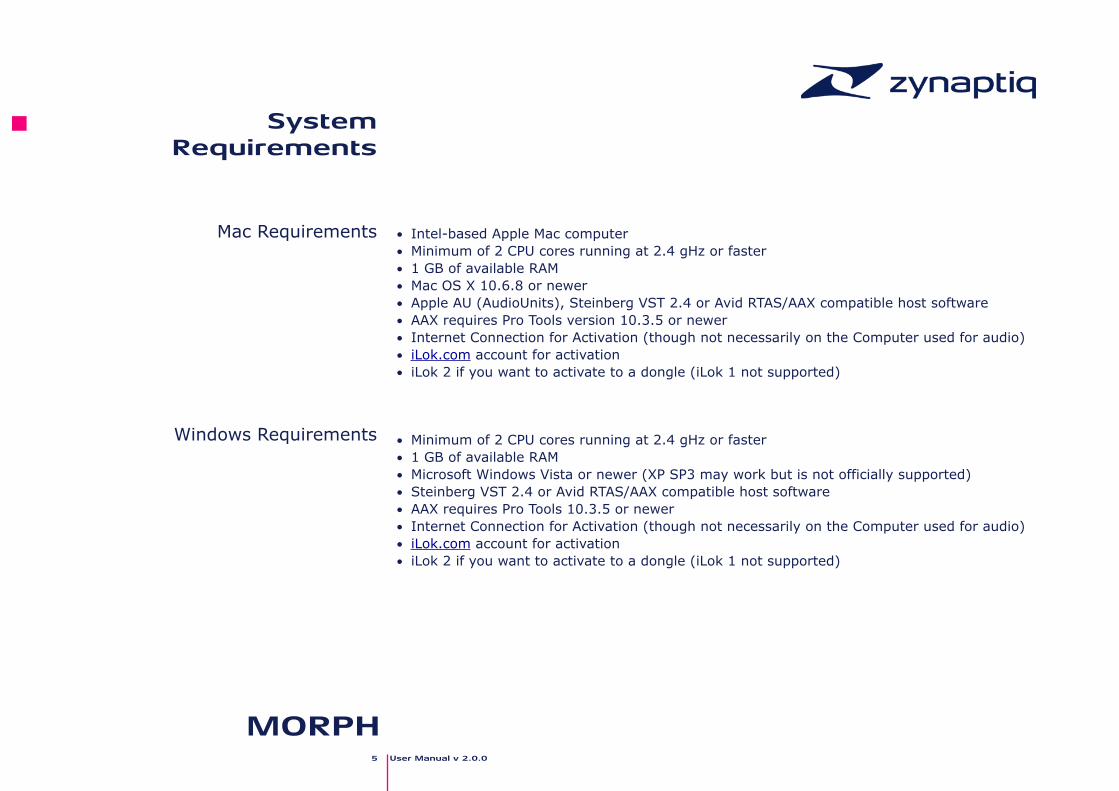
System Requirements
!!Mac Requirements !!!!!!!
Windows Requirements !
• Intel-based Apple Mac computer • Minimum of 2 CPU cores running at 2.4 gHz or faster • 1 GB of available RAM • Mac OS X 10.6.8 or newer • Apple AU (AudioUnits), Steinberg VST 2.4 or Avid RTAS/AAX compatible host software • AAX requires Pro Tools version 10.3.5 or newer • Internet Connection for Activation (though not necessarily on the Computer used for audio) • iLok.com account for activation • iLok 2 if you want to activate to a dongle (iLok 1 not supported) !!• Minimum of 2 CPU cores running at 2.4 gHz or faster • 1 GB of available RAM • Microsoft Windows Vista or newer (XP SP3 may work but is not officially supported) • Steinberg VST 2.4 or Avid RTAS/AAX compatible host software • AAX requires Pro Tools 10.3.5 or newer • Internet Connection for Activation (though not necessarily on the Computer used for audio) • iLok.com account for activation • iLok 2 if you want to activate to a dongle (iLok 1 not supported)

!6 User Manual v 2.0.0
MORPH
!!!!!
Host Routing Requirements And Plug-in Versions !
MORPH requires two input signals to do morphing. It can do so in dual mono or true stereo, depending on your host’s routing functionality. To adapt to the capabilities of your host, MORPH comes as two separate plugins for AU, RTAS and AAX, MORPH and MORPH SC (side-chain). For VST 2.4, side-chains are not supported and thus VST comes as the regular MORPH binary only.
For true stereo operation, your host needs to either
• support stereo plug-in side-chains (for example Logic, Digital Performer, Live), or • support 4-channel bus/group channels (Pro Tools HD, Nuendo/Cubase) !For dual mono support, your host needs to either • allow routing and panning two channels via a bus channel, group channel or compound clip,
or • allow creating a compound clip, or • if the host can show only one file, allow pasting the second file into one of the channels of a
stereo file !In Pro Tools, only mono side-chains are supported, so there you can only achieve mono-to-stereo morphing using the SC (but of course in Pro Tools HD, you can use a quad aux/bus as described above).
!

!7 User Manual v 2.0.0
MORPH
Installation & Authorization
!!Installation !!!!
!Activation (Demo and full version) !!!!!!!
!
Installation is very easy. On Mac, simply unpack the ZIP archive using the Mac OS X Archive Utility (third party ZIP tools may cause issues), then launch the installer contained. It will guide you through the process. On Windows, unpack the ZIP and choose whether to install 32bit or 64bit plugins (the bit depth of your OS does not matter here).
To authorize your plugin, you can use one of the two methods described below. Please note that the trial version also needs to be activated, the difference being that you do not need an activation code. !1) Authorization Wizard. The authorization wizard will open if the plugin is not yet authorized when you insert the plugin, or when it is scanned by your host application. You can choose to start a trial (“Try”), cancel (“Quit”) or Activate:
!8 User Manual v 2.0.0
MORPH
!!
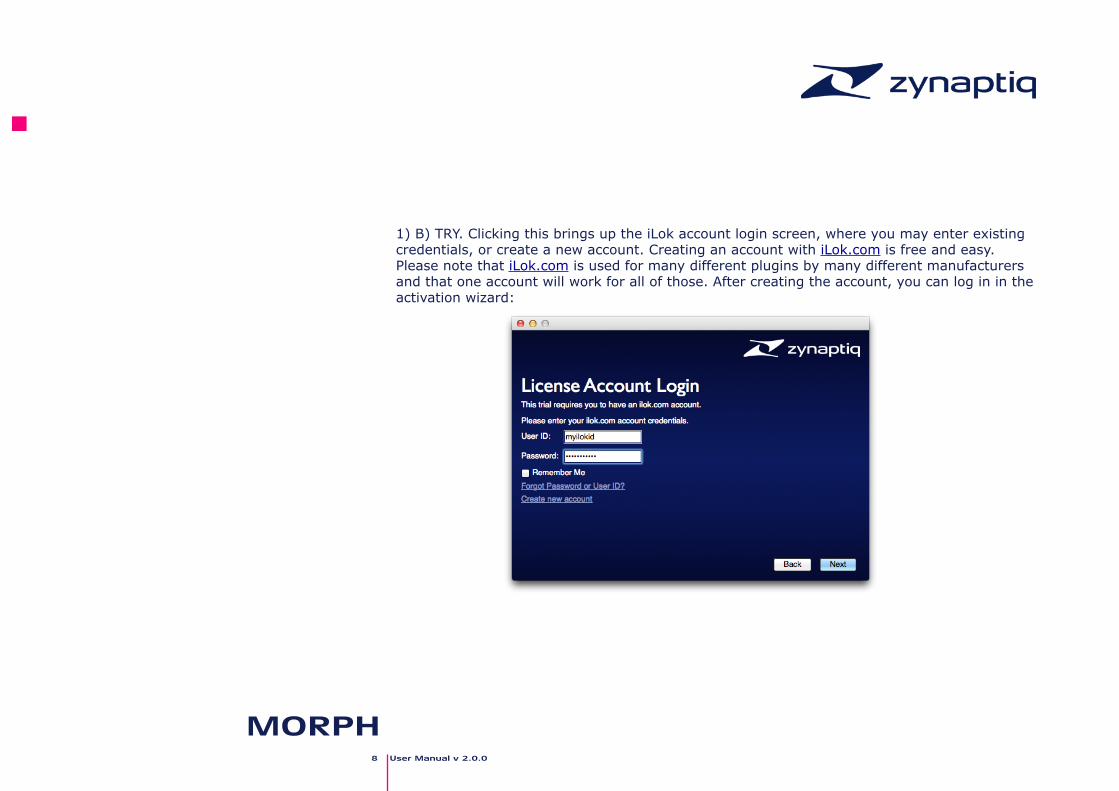
1) B) TRY. Clicking this brings up the iLok account login screen, where you may enter existing credentials, or create a new account. Creating an account with iLok.com is free and easy. Please note that iLok.com is used for many different plugins by many different manufacturers and that one account will work for all of those. After creating the account, you can log in in the activation wizard:
!!!

!9 User Manual v 2.0.0
MORPH
!!!
Upon clicking NEXT & successful login, you will be presented with the following options:
Choose whether to activate to your Computer or to an iLok 2. Please note that first generation iLoks are not supported and will be shown “grayed out” as in the image above. Click next & you’re good to go!
!!!
!10 User Manual v 2.0.0
MORPH
!!
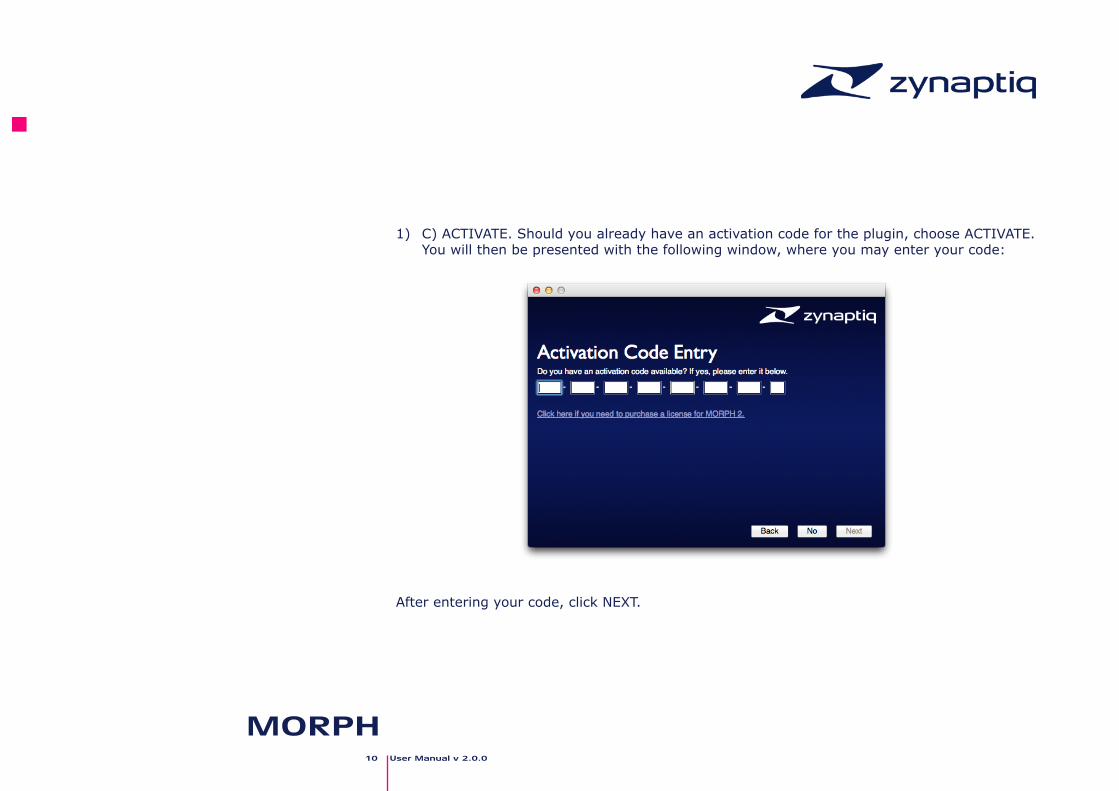
1) C) ACTIVATE. Should you already have an activation code for the plugin, choose ACTIVATE. You will then be presented with the following window, where you may enter your code:
!After entering your code, click NEXT.
!!

!11 User Manual v 2.0.0
MORPH
!!!
Clicking this brings up the iLok account login screen, where you may enter existing credentials, or create a new account. Creating an account with iLok.com is free and easy. Please note that iLok.com is used for many different plugins by many different manufacturers and that one account will work for all of those. After creating the account, you can log in in the activation wizard:
!!

!12 User Manual v 2.0.0
MORPH
!!
Upon clicking NEXT & successful login, you will be presented with the following options:
Choose whether to activate to your Computer or to an iLok 2. Please note that first generation iLoks are not supported and will be shown “grayed out” as in the image above. Click next & you’ll see a progress bar, and once it completes, you’re good to go
!!!
!13 User Manual v 2.0.0
MORPH
Overview
!!Applications for MORPH ! MORPH can be used to create a virtually unlimited number of unique sounds, here are some
ideas on what you can use it for:
!• Creature/alien/robot voices for film- and game-sound. • Seamless morphing transitions between film scenes, songs or sounds. • Hybrid musical instruments. • Applying timbre and/or amplitude features from one sound to another. • Hybrid rhythms. • Adding animation to static sounds using automated FORMANT SHIFT • Surreal ambient textures. • Vocoder-/Talkbox-like effects !!!!
!
!14 User Manual v 2.0.0
MORPH
The Parameters
!!!Control Types & Behavior
MORPH sports several control types, which have a variety of usability features. We will describe the ones with extra functionality here.
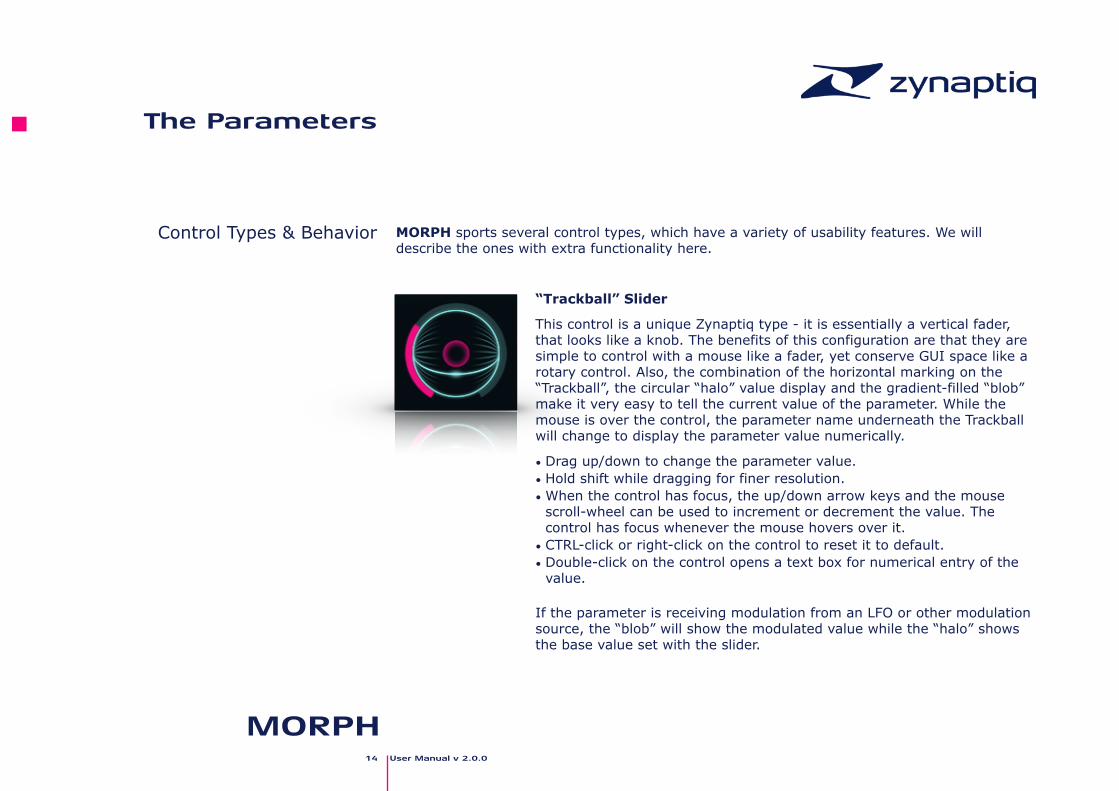
!“Trackball” Slider
This control is a unique Zynaptiq type - it is essentially a vertical fader, that looks like a knob. The benefits of this configuration are that they are simple to control with a mouse like a fader, yet conserve GUI space like a rotary control. Also, the combination of the horizontal marking on the “Trackball”, the circular “halo” value display and the gradient-filled “blob” make it very easy to tell the current value of the parameter. While the mouse is over the control, the parameter name underneath the Trackball will change to display the parameter value numerically.
• Drag up/down to change the parameter value. • Hold shift while dragging for finer resolution. • When the control has focus, the up/down arrow keys and the mouse
scroll-wheel can be used to increment or decrement the value. The control has focus whenever the mouse hovers over it.
• CTRL-click or right-click on the control to reset it to default. • Double-click on the control opens a text box for numerical entry of the
value. !If the parameter is receiving modulation from an LFO or other modulation source, the “blob” will show the modulated value while the “halo” shows the base value set with the slider.
!15 User Manual v 2.0.0
MORPH
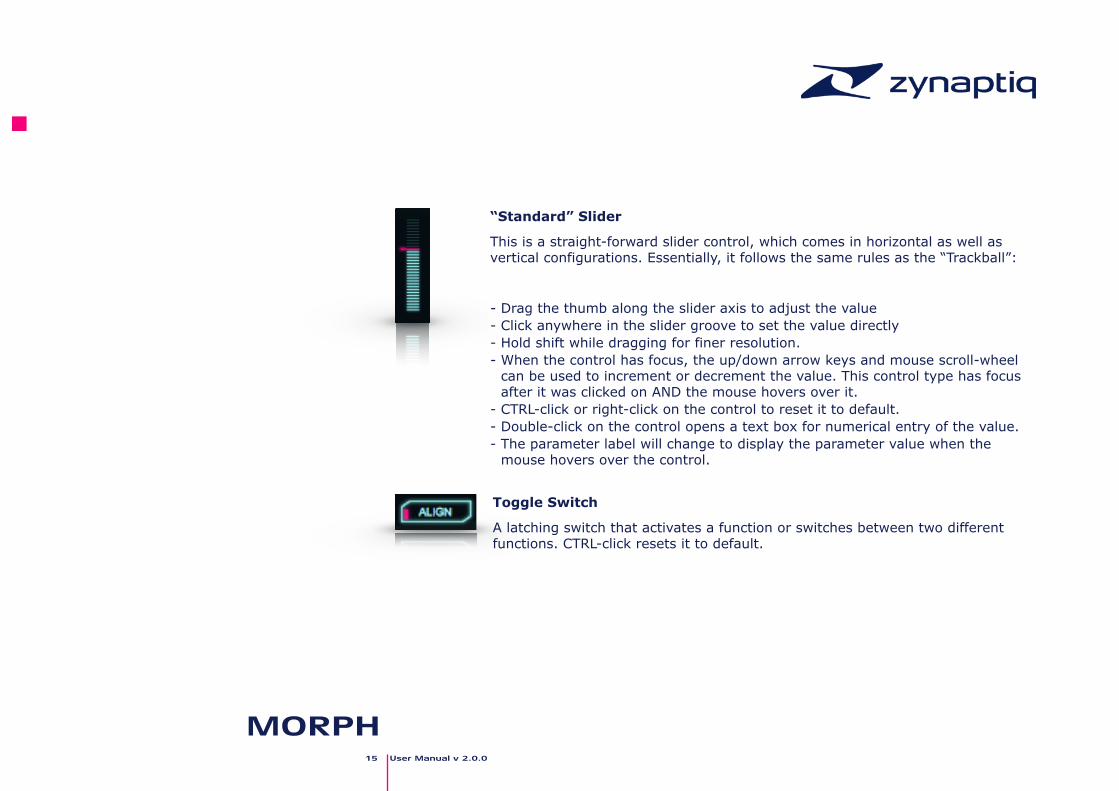
“Standard” Slider
This is a straight-forward slider control, which comes in horizontal as well as vertical configurations. Essentially, it follows the same rules as the “Trackball”:
!- Drag the thumb along the slider axis to adjust the value - Click anywhere in the slider groove to set the value directly - Hold shift while dragging for finer resolution. - When the control has focus, the up/down arrow keys and mouse scroll-wheel
can be used to increment or decrement the value. This control type has focus after it was clicked on AND the mouse hovers over it.
- CTRL-click or right-click on the control to reset it to default. - Double-click on the control opens a text box for numerical entry of the value. - The parameter label will change to display the parameter value when the
mouse hovers over the control. !Toggle Switch
A latching switch that activates a function or switches between two different functions. CTRL-click resets it to default.
!

!16 User Manual v 2.0.0
MORPH
Momentary Button
A momentary switch that triggers an action, such as a reset/clear. This control type comes in several sizes. It has the same “corner cut logic” as a toggle switch, but is always highlighted (so always is bright) and has no “LED”.
!Pull-down Selector/Menu
Opens a menu that contains multiple options when clicked. You can recognize this control type by its “cut off” corners on both lower sides, as well as the “disclosure triangle”. CTRL-click resets this to default value.
!X/Y Field
A control that adjusts two parameters simultaneously. Drag the “scope” to adjust the parameters, its horizontal position adjusts parameter #1, the vertical position parameter #2. CTRL-click resets it to default.
Depending on the product, a click on the name of an axis sets the related parameter to minimum or 50% (in the case of MORPH: 50%).
The values for X and Y will be displayed at the top of the control whenever the mouse is over the control.
!

!17 User Manual v 2.0.0
MORPH
Quickstart: Setup & Operation !
For detailed setup information specific to your host, please see the relevant section of this manual. You’ll need two source signals to morph between, labelled “A” and “B” in the plug-in GUI. For starters, please create two tracks in your DAW and place some audio files on them.
If your host supports plug-in side-chains (AU, AAX, RTAS):
• Insert MORPH SC on track #1 • Set the output of the other track to “no output” (or to the side-chain input of MORPH for
some hosts) • Select track #2 as side-chain source for the MORPH SC plugin • Activate ALIGN if your host does not correctly compensate latency for the track feeding the
side-chain • Start morphing by moving the “scope” in the large central X/Y field. !If your host does not support plug-in side-chains or multi-channel buses:
• Insert MORPH on a stereo bus channel • Route both source tracks to this bus • Pan track #1 hard left and track #2 hard right • Start morphing by moving the “scope” in the large central X/Y field. !If your host does not support plug-in side-chains, but does support multi-channel buses:
• Create a 4-channel bus/group/aux channel and insert MORPH • Route both source tracks to this bus • Pan track #1 to the front L/R and track #2 to the rear L/R • Start morphing by moving the “scope” in the large central X/Y field. • You may need to adjust some down-mixing settings in the bus/group to ensure you hear the
MORPH output only! !

!18 User Manual v2.0.0
MORPH
!! !
General GUI Layout ! !!!!
Logo - Opens About Screen
Output Mixer
Preset Manager
Algorithm Section
Processing Parameter Section
Reverb Section
Morphing X/Y Control
!19 User Manual v2.0.0
MORPH
Controls - Details
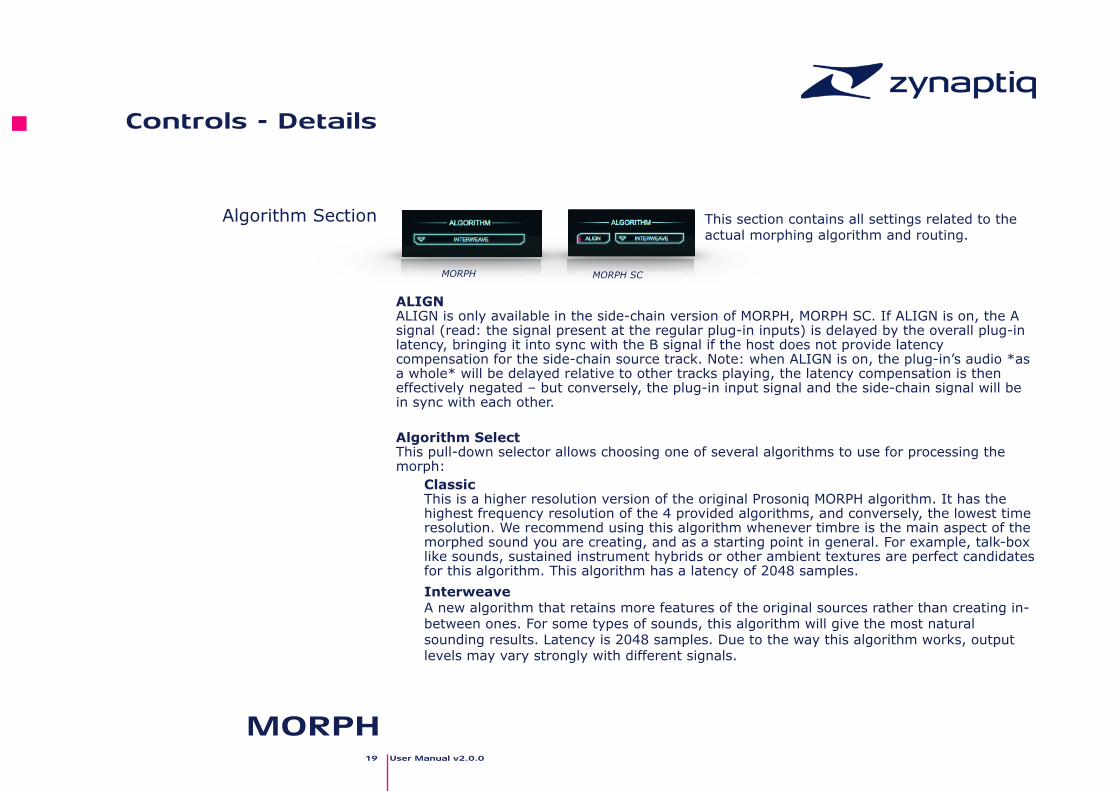
!!Algorithm Section !!
This section contains all settings related to the actual morphing algorithm and routing. !
ALIGN ALIGN is only available in the side-chain version of MORPH, MORPH SC. If ALIGN is on, the A signal (read: the signal present at the regular plug-in inputs) is delayed by the overall plug-in latency, bringing it into sync with the B signal if the host does not provide latency compensation for the side-chain source track. Note: when ALIGN is on, the plug-in’s audio *as a whole* will be delayed relative to other tracks playing, the latency compensation is then effectively negated – but conversely, the plug-in input signal and the side-chain signal will be in sync with each other. !Algorithm Select This pull-down selector allows choosing one of several algorithms to use for processing the morph:
Classic This is a higher resolution version of the original Prosoniq MORPH algorithm. It has the highest frequency resolution of the 4 provided algorithms, and conversely, the lowest time resolution. We recommend using this algorithm whenever timbre is the main aspect of the morphed sound you are creating, and as a starting point in general. For example, talk-box like sounds, sustained instrument hybrids or other ambient textures are perfect candidates for this algorithm. This algorithm has a latency of 2048 samples. Interweave A new algorithm that retains more features of the original sources rather than creating in-between ones. For some types of sounds, this algorithm will give the most natural sounding results. Latency is 2048 samples. Due to the way this algorithm works, output levels may vary strongly with different signals.
MORPH MORPH SC
!20 User Manual v2.0.0
MORPH
!!
Tight A new algorithm designed to work well with transient heavy signals such as drums (but will work nicely with other stuff, too!). Latency is 512 samples.
Classic (LL) This is a low-latency version of the Classic algorithm, with lower frequency and higher time resolution, but otherwise the same structure. Latency is 512 samples.
Interweave (LL) This is a low-latency version of the Interweave algorithm, with lower resolution frequency and higher time resolution, but otherwise the same structure. Latency is 512 samples. Due to the way this algorithm works, output levels may vary strongly with different signals.
!
!21 User Manual v2.0.0
MORPH
!!
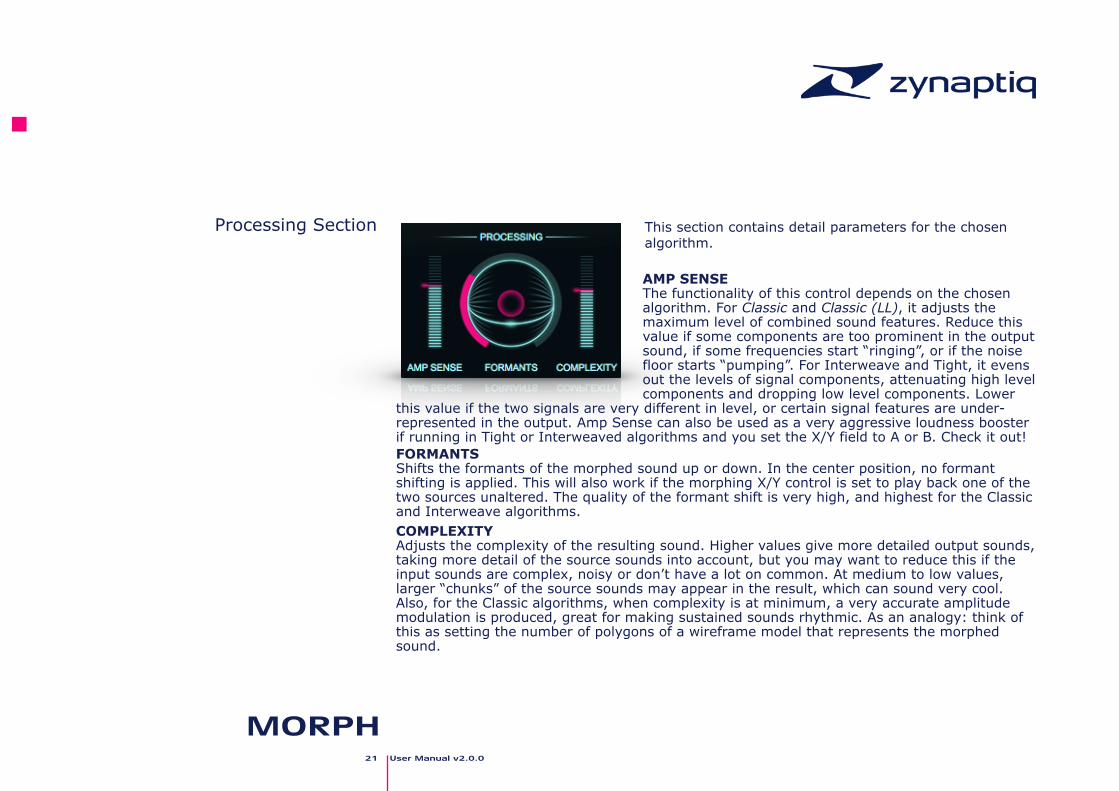
!Processing Section ! This section contains detail parameters for the chosen
algorithm. !AMP SENSE The functionality of this control depends on the chosen algorithm. For Classic and Classic (LL), it adjusts the maximum level of combined sound features. Reduce this value if some components are too prominent in the output sound, if some frequencies start “ringing”, or if the noise floor starts “pumping”. For Interweave and Tight, it evens out the levels of signal components, attenuating high level components and dropping low level components. Lower
this value if the two signals are very different in level, or certain signal features are under-represented in the output. Amp Sense can also be used as a very aggressive loudness booster if running in Tight or Interweaved algorithms and you set the X/Y field to A or B. Check it out! FORMANTS Shifts the formants of the morphed sound up or down. In the center position, no formant shifting is applied. This will also work if the morphing X/Y control is set to play back one of the two sources unaltered. The quality of the formant shift is very high, and highest for the Classic and Interweave algorithms. COMPLEXITY Adjusts the complexity of the resulting sound. Higher values give more detailed output sounds, taking more detail of the source sounds into account, but you may want to reduce this if the input sounds are complex, noisy or don’t have a lot on common. At medium to low values, larger “chunks” of the source sounds may appear in the result, which can sound very cool. Also, for the Classic algorithms, when complexity is at minimum, a very accurate amplitude modulation is produced, great for making sustained sounds rhythmic. As an analogy: think of this as setting the number of polygons of a wireframe model that represents the morphed sound. !

!22 User Manual v2.0.0
MORPH
X/Y – Morph Index & Crossfade !!!!!!!!!!!!!
!This X/Y control is the main control for the morphing process. The letters A and B, found in the four corners of the X/Y, represent the two input sources, A and B. Morphing is done by moving the “scope” between the four corners. If you place the scope directly over any of the A’s or B’s, you will hear the sound of that source, unaltered except for the FORMANT SHIFT, which will still be applied. Moving the scope vertically from an A to a B or vice-versa, you will hear a gradual morphing going from one sound to the other. Moving the scope horizontally will crossfade between two different morphing transitions; on the left side, the morph starts out at source A and shapes the sound to become B, on the right side the, morph starts out at B and shapes it to become A. The important thing to remember is: vertical movements are morphing, horizontal movements are crossfades, and the results will sound different on the left than on the right. Clicking on the “MORPH” or “X-FADE” labels will set a value of 50% for that axis, and while the mouse hovers over the X/Y control, numerical values will be displayed at the top.
Morph B -> AMorph A -> B
(A->B) <-crossfade-> (B->A)

!23 User Manual v2.0.0
MORPH
!!
!Output Mixer !!
In this section, we control the output of the plug-in; the output of the morphing algorithm can be mixed with the two original input signals, the two input signals can be solo’ed, and the plug-in bypassed altogether. !!!!
MIX AxB Adjusts the level of the morphed signal in the output mix. Range is from off (-inf) to +12dB. CTRL-click on this control resets to +0dB. MIX IN A Adjusts the level of the A signal in the output mix. Range is from off (-inf) to +12dB. CTRL-click on this control resets to off. MIX IN B Adjusts the level of the B signal in the output mix. Range is from off (-inf) to +12dB. CTRL-click on this control resets to off. BYPASS Bypasses the plug-in. SOLO A Solos the unaltered A signal. Useful for verifying that the routing is correct. SOLO B Solos the unaltered B signal. Useful for verifying that the routing is correct.
!!

!24 User Manual v2.0.0
MORPH
!!!!
Reverb Section !!!!!!!!!!!!
MORPH features a simple but great sounding reverb, which is controlled in this section. The reverb is fed by the output of the mixer, so it can be applied to the Mix In A and Mix In B signals, too, and is not present in the SOLO signals. SIZE Adjusts the room size of the reverb. MIX Adjusts the reverb send level. DAMPING Adjusts high frequency damping for the reverb. !

!25 User Manual v2.0.0
MORPH
Presets
!
!The Preset Manager !!!!!!!!!!!
Storage Locations !!
To make working with the different plug-in formats easier, MORPH provides it’s own preset manager and preset format. This way, you can load your custom settings exactly the same way regardless of whether you’re working on the Mac or on a Windows machine, whether you’re using RTAS or VST.
A click on the preset selector pull-down brings up a menu that provides options for saving and loading presets, saving the current setting as default and re-setting the default preset to factory default values. If you edit a recalled preset, the preset name will be displayed in Italic font to indicate that the current and saved values don’t match. The “<“ and “>” momentary buttons to the left and right of the pull-down menu allow loading the previous or next preset, respectively. Please note that MORPH and MORPH SC have incompatible and thus separate presets, as their number of parameters differs!
!There are separate locations for factory presets and user presets, as well as for MORPH and MORPH SC, and they both depend on the OS platform you’re working on:
Factory presets (Mac OS X): these are stored inside the actual plug-in.
Factory presets (Windows): these are stored in the MORPH VST/RTAS/AAX Data folder, which is installed next to the plug-in.
User presets (Mac OS X and Windows): these are stored to <your user document directory>/Zynaptiq/MORPH/MORPH/Presets/ and /Zynaptiq/MORPH/MORPH SC/Presets/
!
!26 User Manual v2.0.0
MORPH
Host-Specific Setup
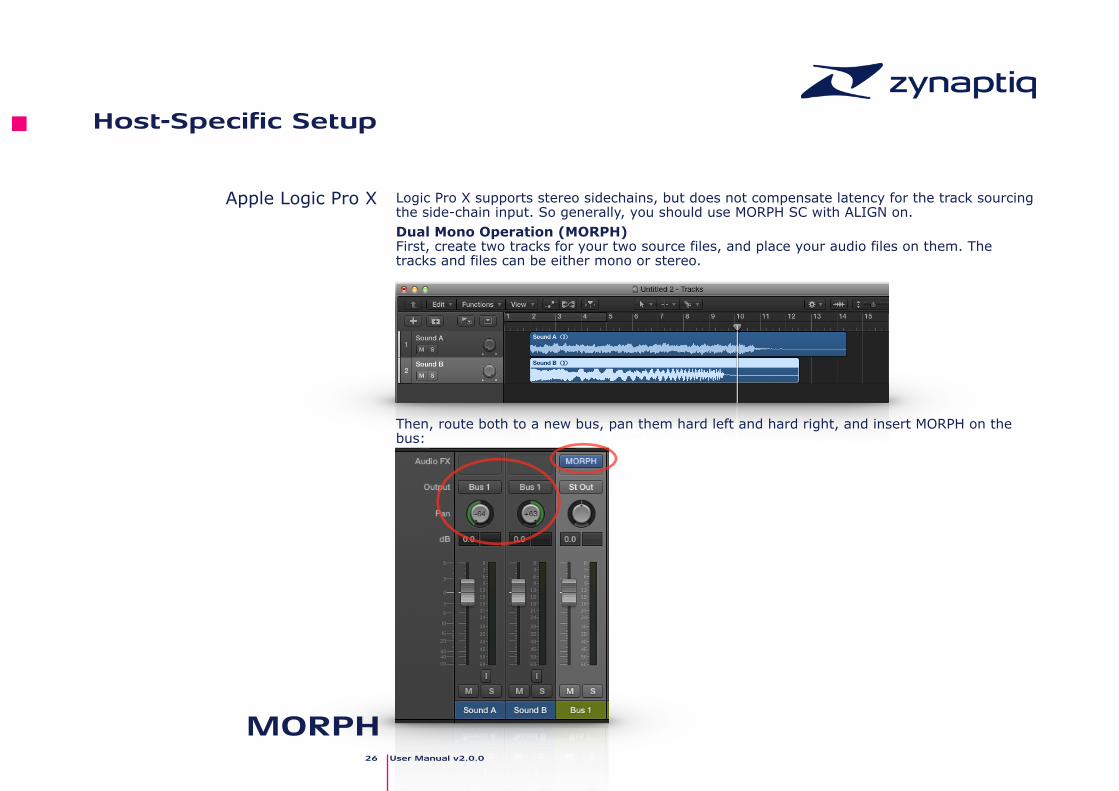
Apple Logic Pro X
Logic Pro X supports stereo sidechains, but does not compensate latency for the track sourcing the side-chain input. So generally, you should use MORPH SC with ALIGN on. Dual Mono Operation (MORPH) First, create two tracks for your two source files, and place your audio files on them. The tracks and files can be either mono or stereo.
Then, route both to a new bus, pan them hard left and hard right, and insert MORPH on the bus:
!!!!!
!27 User Manual v2.0.0
MORPH
!
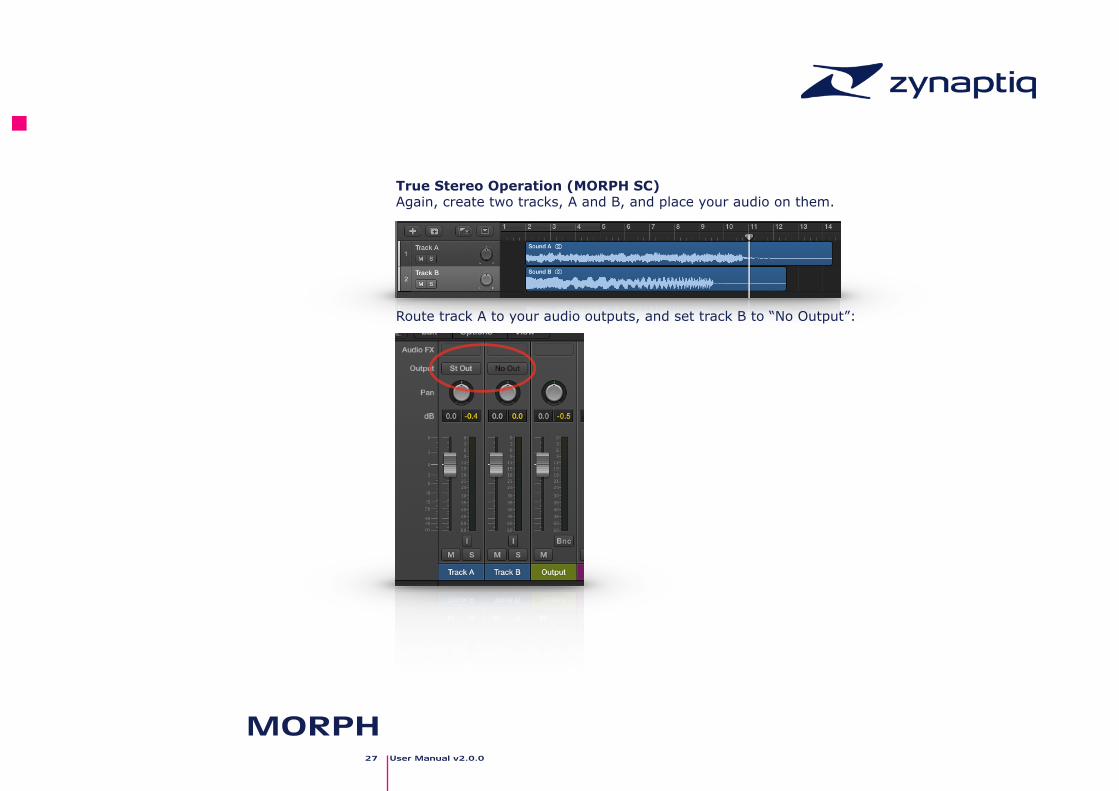
True Stereo Operation (MORPH SC) Again, create two tracks, A and B, and place your audio on them.
Route track A to your audio outputs, and set track B to “No Output”:
!!!
!28 User Manual v2.0.0
MORPH
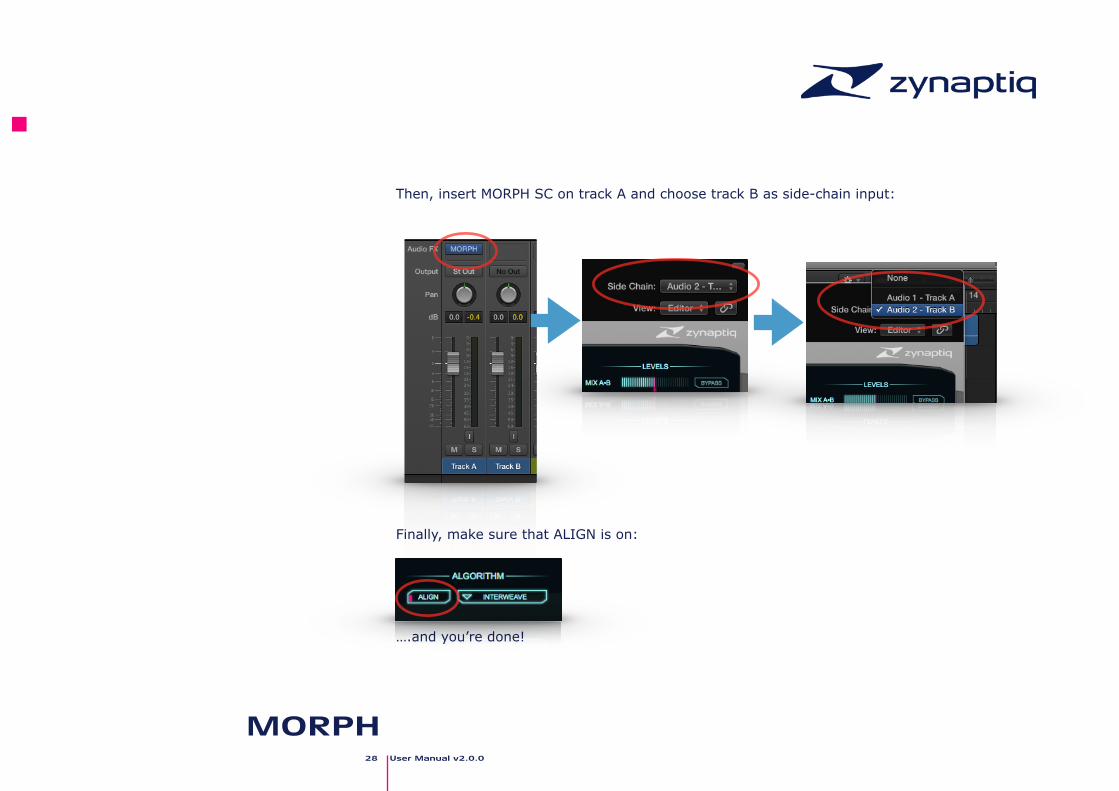
Then, insert MORPH SC on track A and choose track B as side-chain input:
!!!!
!Finally, make sure that ALIGN is on:
….and you’re done!
!
!29 User Manual v2.0.0
MORPH
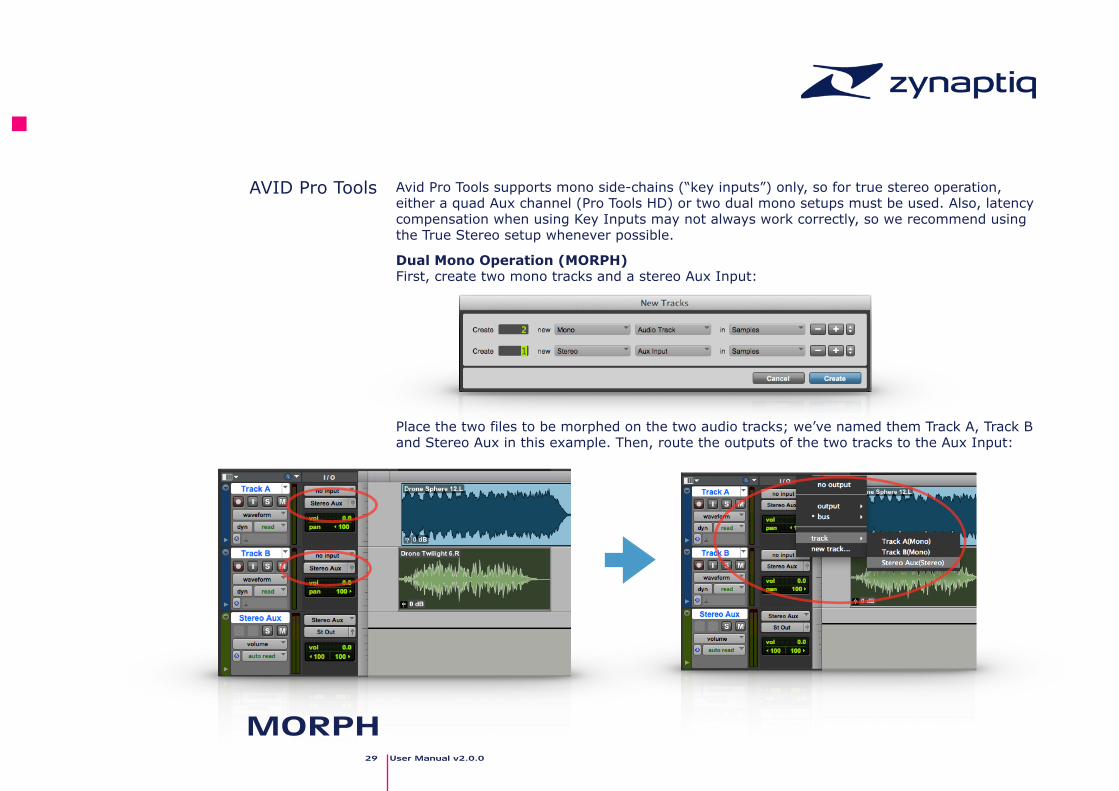
!!!AVID Pro Tools
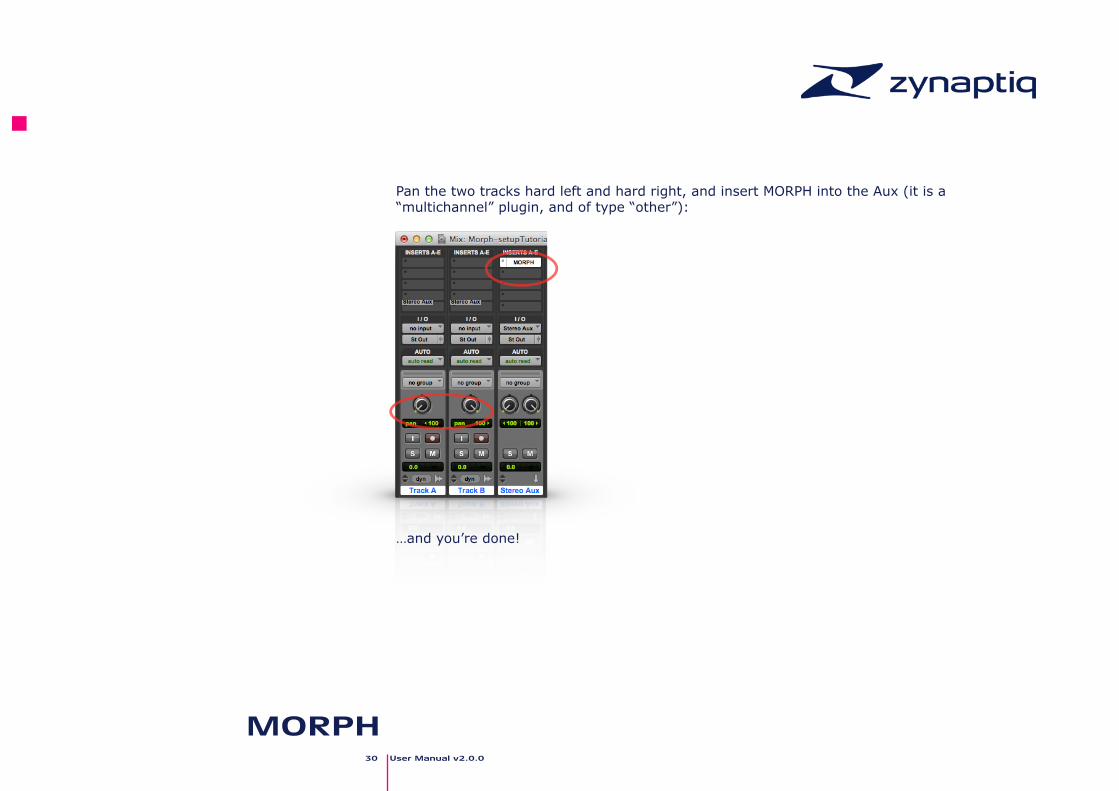
Avid Pro Tools supports mono side-chains (“key inputs”) only, so for true stereo operation, either a quad Aux channel (Pro Tools HD) or two dual mono setups must be used. Also, latency compensation when using Key Inputs may not always work correctly, so we recommend using the True Stereo setup whenever possible.
Dual Mono Operation (MORPH) First, create two mono tracks and a stereo Aux Input:
Place the two files to be morphed on the two audio tracks; we’ve named them Track A, Track B and Stereo Aux in this example. Then, route the outputs of the two tracks to the Aux Input:
!30 User Manual v2.0.0
MORPH
!!!!!!!!!
Pan the two tracks hard left and hard right, and insert MORPH into the Aux (it is a “multichannel” plugin, and of type “other”):
!
!!!!!
!…and you’re done!
!31 User Manual v2.0.0
MORPH
!
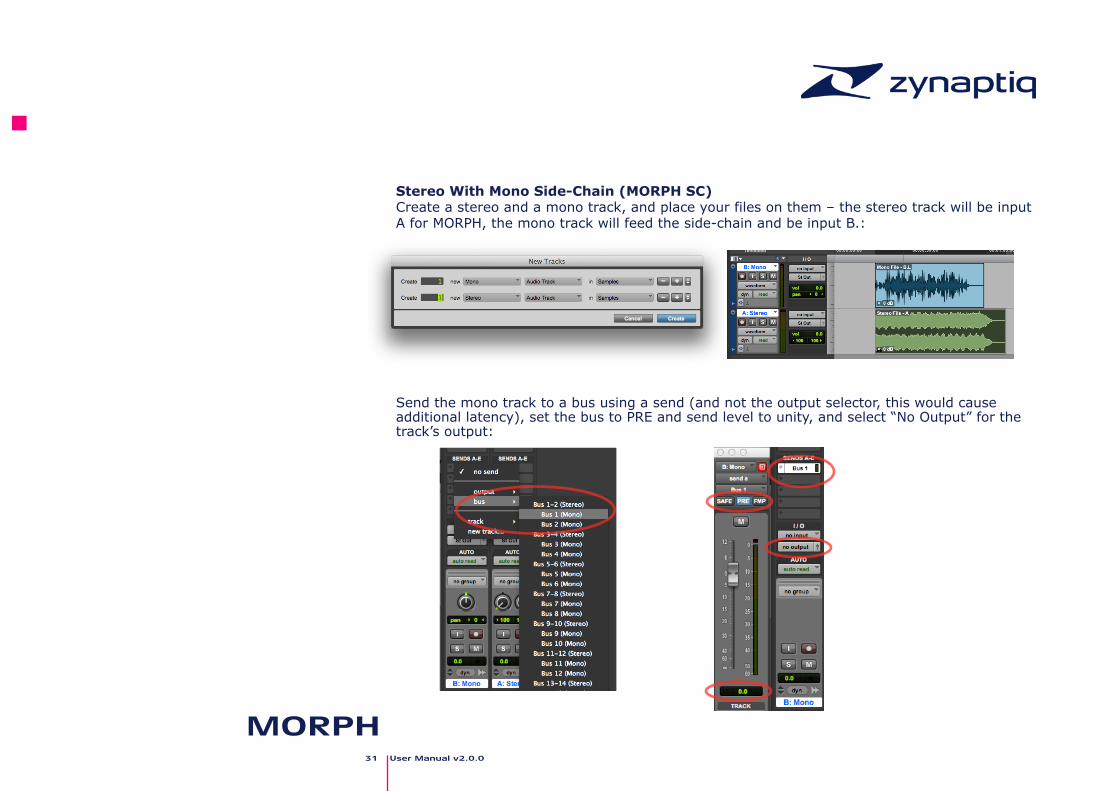
Stereo With Mono Side-Chain (MORPH SC) Create a stereo and a mono track, and place your files on them – the stereo track will be input A for MORPH, the mono track will feed the side-chain and be input B.:
!Send the mono track to a bus using a send (and not the output selector, this would cause additional latency), set the bus to PRE and send level to unity, and select “No Output” for the track’s output:

!32 User Manual v2.0.0
MORPH
!!
Insert MORPH SC on the stereo track (it is a “multichannel” plugin, and of type “other”), choose the bus as key input, and activate ALIGN:
!Done! There may be a small residual latency in the area of 28 Samples, which should not be an issue in most cases. To get rid of this, you may use a time adjuster plugin.
!!!!!
!33 User Manual v2.0.0
MORPH
!
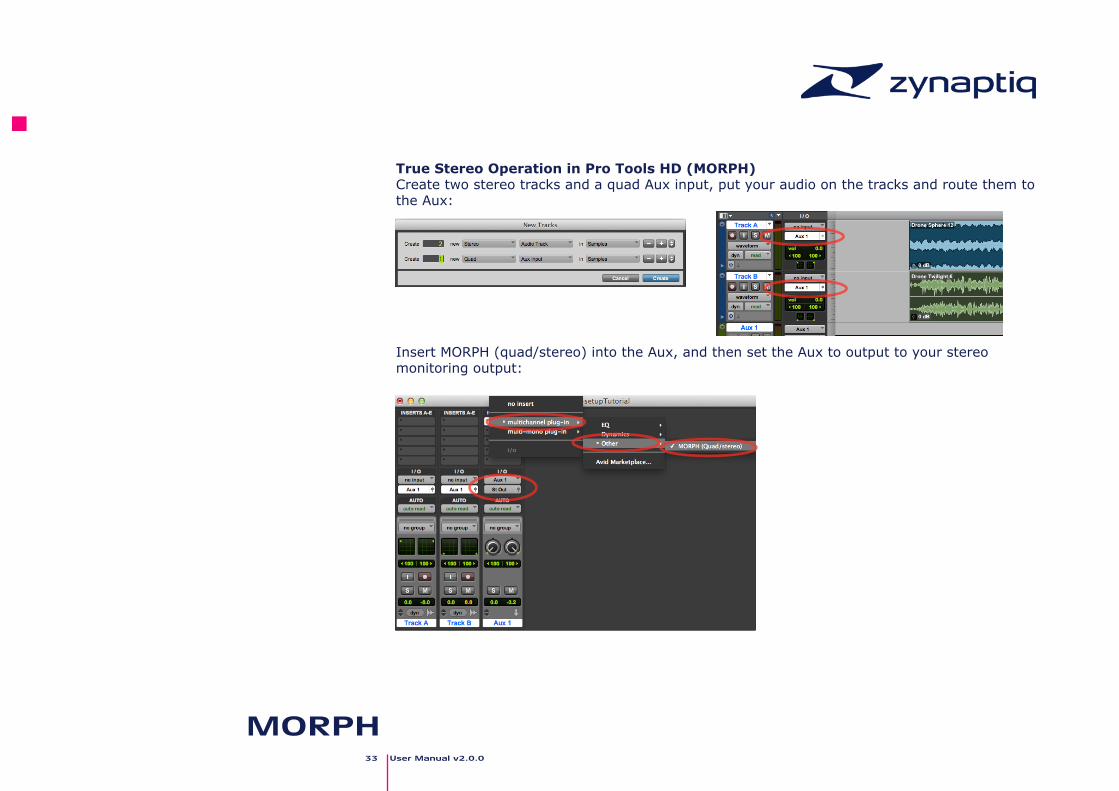
True Stereo Operation in Pro Tools HD (MORPH) Create two stereo tracks and a quad Aux input, put your audio on the tracks and route them to the Aux:
!
!!!Insert MORPH (quad/stereo) into the Aux, and then set the Aux to output to your stereo monitoring output:
!
!!!!!!!!
!34 User Manual v2.0.0
MORPH
!!
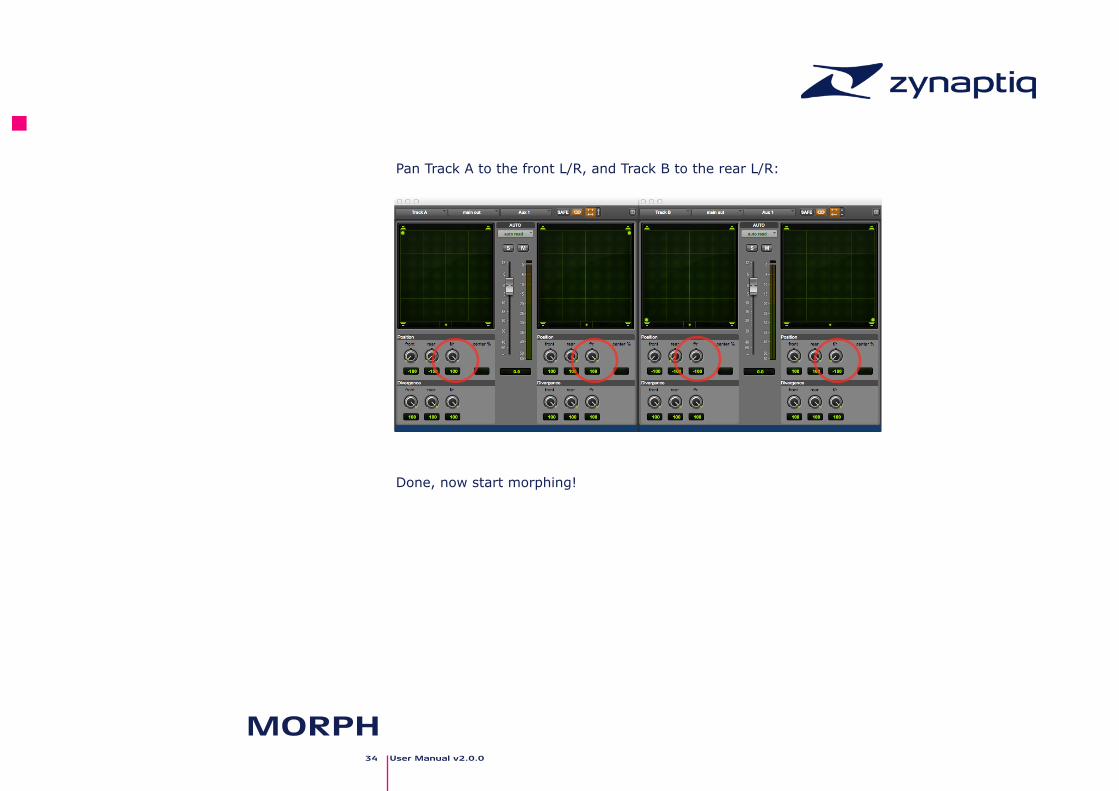
Pan Track A to the front L/R, and Track B to the rear L/R:
!Done, now start morphing!
!!

!35 User Manual v2.0.0
MORPH
!!
True Stereo Operation in non-HD Pro Tools (MORPH) Basically, follow the dual mono procedure, but twice - once to morph the left channels of A and B, and once for the right channels of A and B. The added advantage of this approach is that you can have different settings for the left and right morphing, which can give great stereo effects. The downside is that the setup is a little more involved: You’ll need 4 mono tracks (one for each of the original channels) and two stereo Aux channels, then set the routing upas shown below, instantiate one stereo MORPH per Aux, and pan the Aux channels left and right:
!!
!!!!
!!

!36 User Manual v2.0.0
MORPH
!!Ableton Live !
!!!
Ableton Live supports stereo side-chains for AU on the Mac, and 4-to-2 usage of MORPH as VST on Mac and Windows (which is operated the same way as using a side-chain in Live).
Dual Mono Operation (AU: MORPH, VST: MORPH)
- Insert two audio tracks and one return track - Place your two audio files on the two audio tracks, and pan the tracks hard left and hard
right. - Set the “Audio To” selectors for both audio tracks to “Sends Only”, and send both tracks to
the return track using the sends (Send “A” in the image below) - Insert MORPH (non-SC) on the return and start morphing! !
!
!!!
!37 User Manual v2.0.0
MORPH
!!
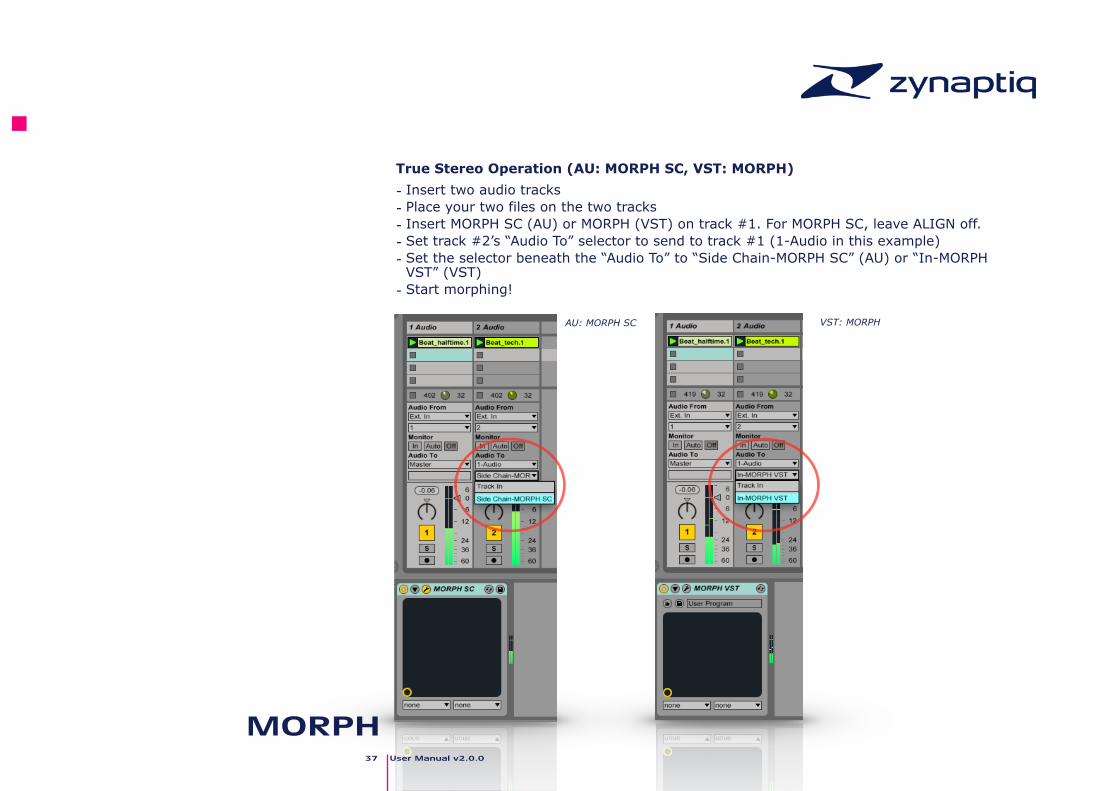
True Stereo Operation (AU: MORPH SC, VST: MORPH)
- Insert two audio tracks - Place your two files on the two tracks - Insert MORPH SC (AU) or MORPH (VST) on track #1. For MORPH SC, leave ALIGN off. - Set track #2’s “Audio To” selector to send to track #1 (1-Audio in this example) - Set the selector beneath the “Audio To” to “Side Chain-MORPH SC” (AU) or “In-MORPH
VST” (VST) - Start morphing! !
!
!!!!!
AU: MORPH SC VST: MORPH
!38 User Manual v2.0.0
MORPH
!Steinberg CUBASE/NUENDO !
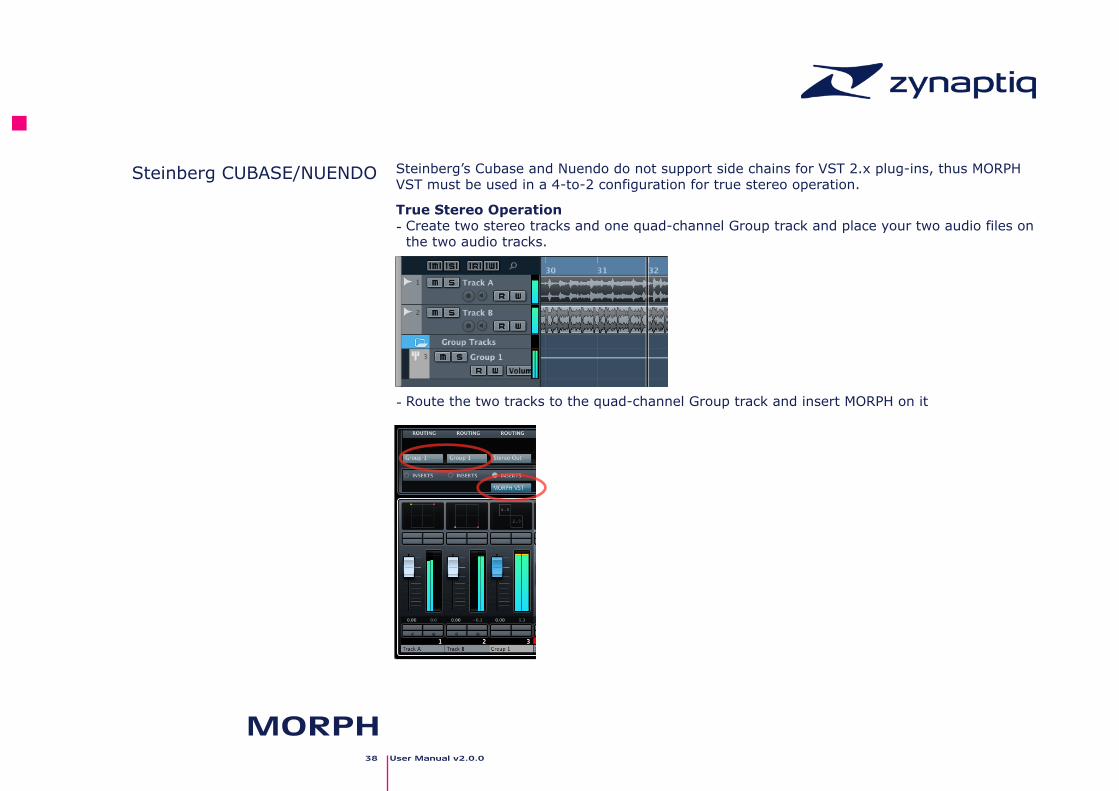
Steinberg’s Cubase and Nuendo do not support side chains for VST 2.x plug-ins, thus MORPH VST must be used in a 4-to-2 configuration for true stereo operation.
True Stereo Operation - Create two stereo tracks and one quad-channel Group track and place your two audio files on
the two audio tracks.
- Route the two tracks to the quad-channel Group track and insert MORPH on it
!39 User Manual v2.0.0
MORPH
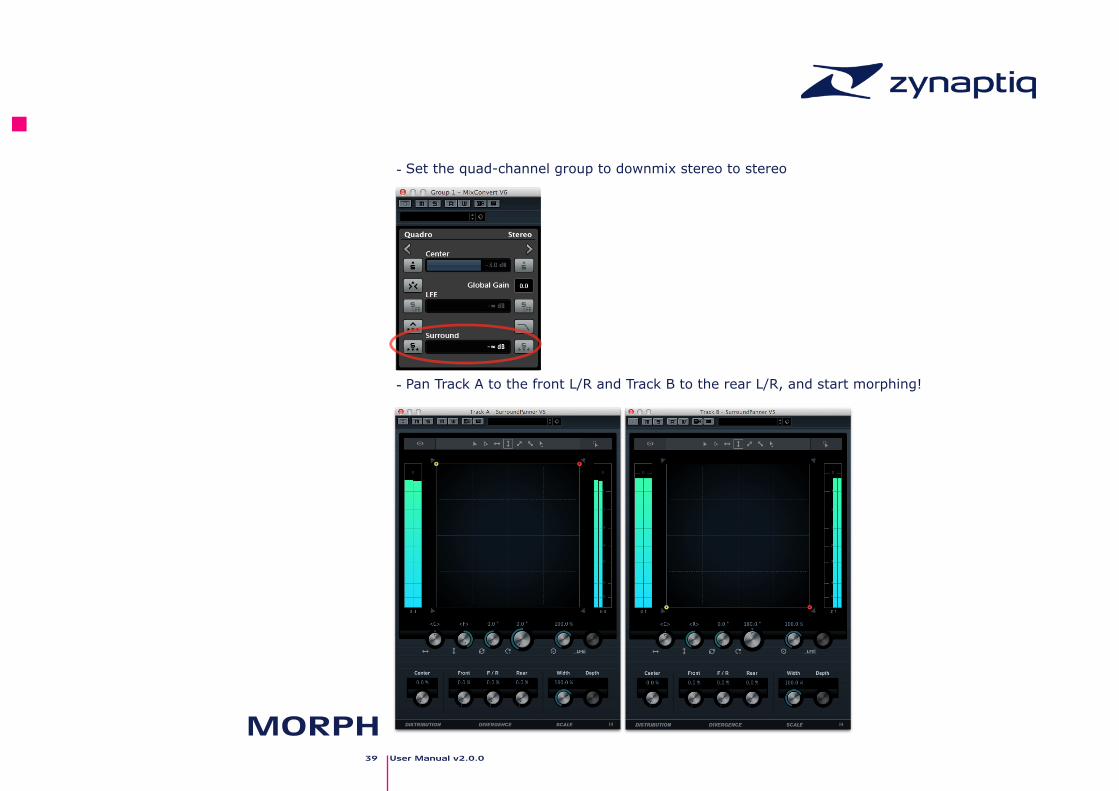
!! - Set the quad-channel group to downmix stereo to stereo
- Pan Track A to the front L/R and Track B to the rear L/R, and start morphing!
!!!!!!

!40 User Manual v2.0.0
MORPH
!
!Dual Mono Operation The process is identical to the True Stereo approach described above, except that you use a stereo Group track and route the two audio tracks to it panned hard left and hard right:
!
!!
!!!!
!
!41 User Manual v2.0.0
MORPH
!MOTU Digital Performer
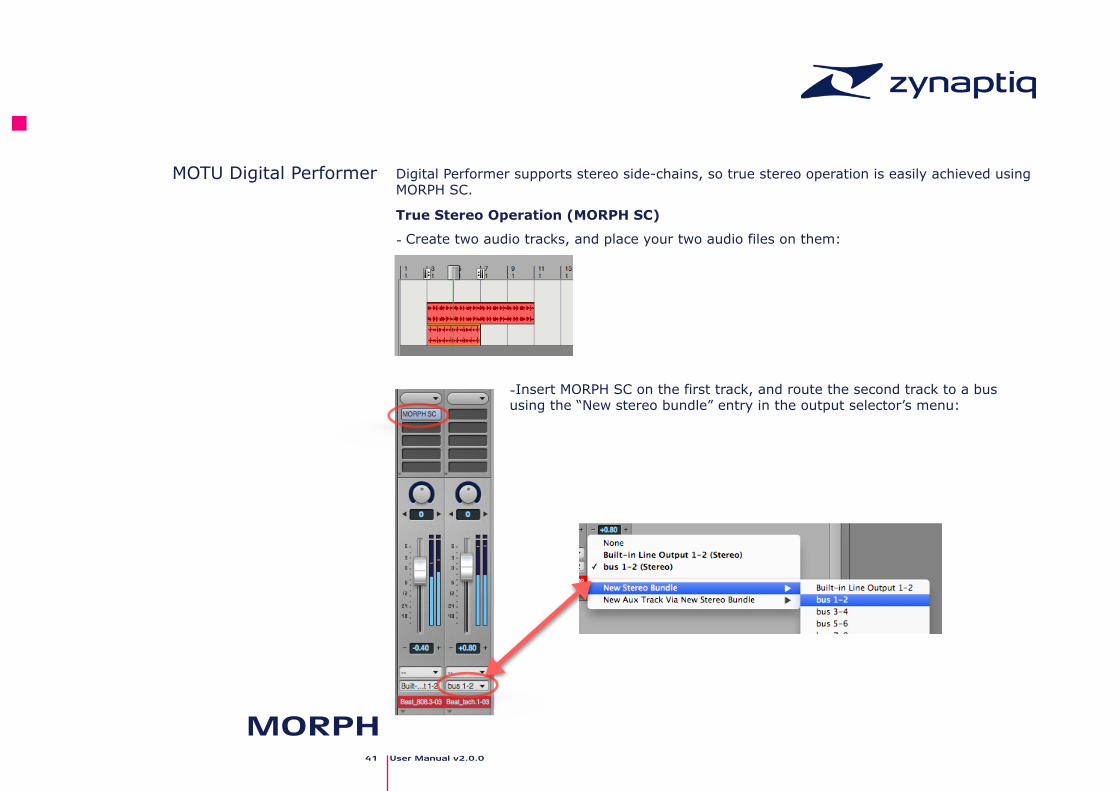
Digital Performer supports stereo side-chains, so true stereo operation is easily achieved using MORPH SC.
True Stereo Operation (MORPH SC)
- Create two audio tracks, and place your two audio files on them:
!-Insert MORPH SC on the first track, and route the second track to a bus using the “New stereo bundle” entry in the output selector’s menu:
!
!42 User Manual v2.0.0
MORPH
!!
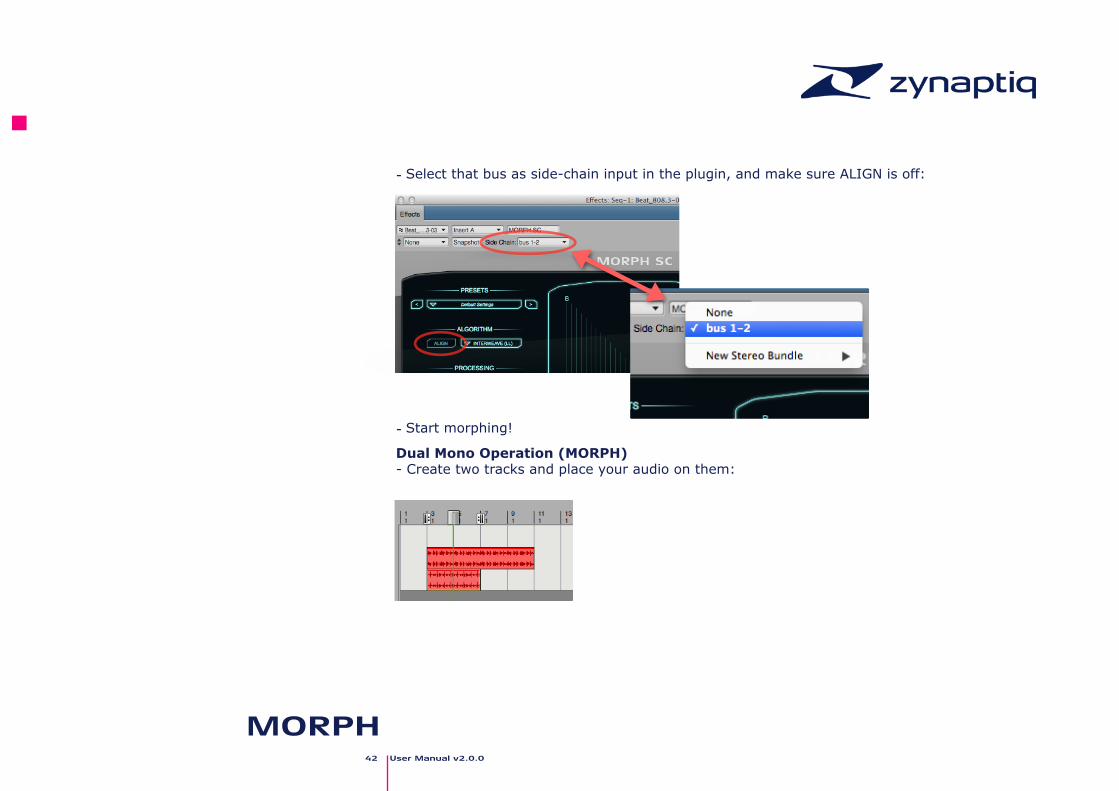
! - Select that bus as side-chain input in the plugin, and make sure ALIGN is off:
- Start morphing!
Dual Mono Operation (MORPH) - Create two tracks and place your audio on them:
!
!43 User Manual v2.0.0
MORPH
!!!
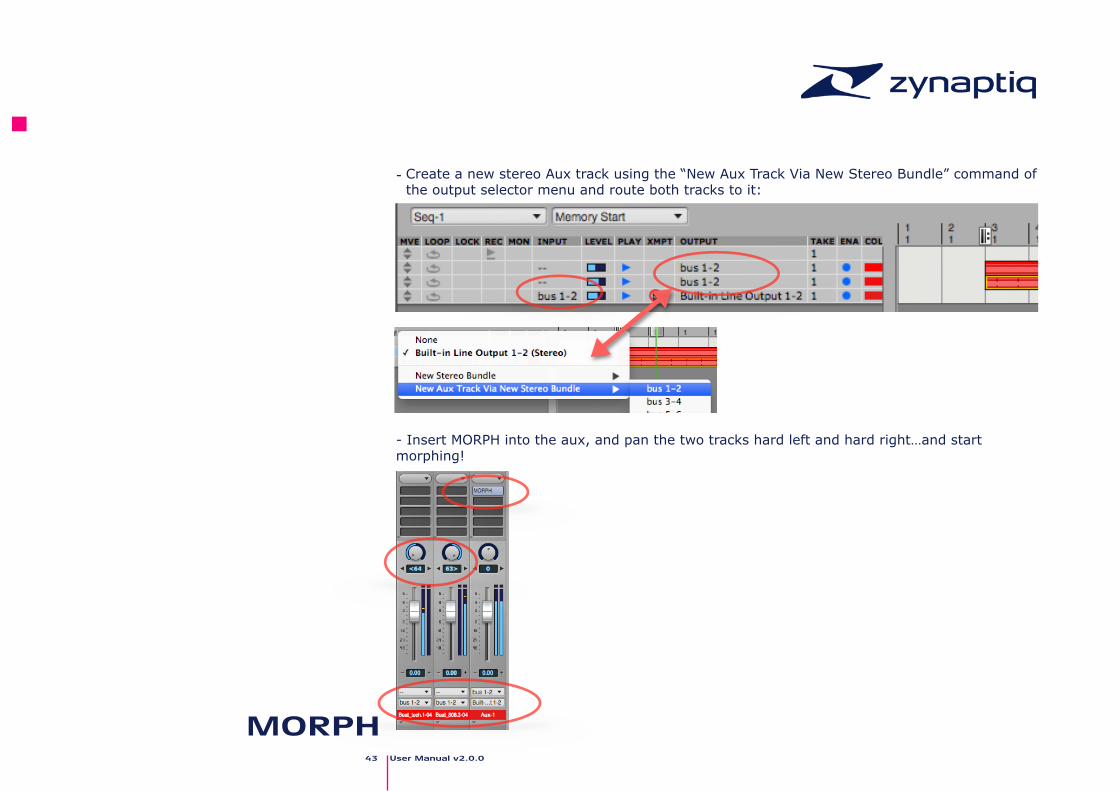
- Create a new stereo Aux track using the “New Aux Track Via New Stereo Bundle” command of the output selector menu and route both tracks to it:
!!!!
- Insert MORPH into the aux, and pan the two tracks hard left and hard right…and start morphing!
!!!

!44 User Manual v2.0.0
MORPH
The “About” Screen
!!!!!!!!!!!!!!!!
UPDATE CHECK & DOWNLOAD !
Clicking on the zynaptiq logo in the top right of the plugin GUI opens the “About” screen. It displays copyright information and version numbers, and allows opening the manual or going to our website to find updates.
!!!!!!!!!To check availability of an update, simply click on the “Check Version” button. Provided your machine has internet access, you will be taken to our website, where you will find indication of the current version number. If there’s a newer version available, simply download the trial version from the MORPH downloads page, and install over your existing installation - any activation will carry over, and the trial version is the same as the full version.

!45 User Manual v2.0.0
MORPH
FAQ
!!Questions & Answers !!!!!!!!!
!!!!
Q: I am hearing ugly drop-outs/ring-modulation/distortion, what is causing that & what can I do?
A: Most likely, you are overloading your CPU. The first thing you should try is to set the I/O and/or processing buffers of your host to higher values, ideally 1024 samples or higher. This will significantly decrease the CPU use and in most cases eliminates the artifacts mentioned above.
Q: (Mac) Logic Pro shows me a “Sample Rate Mismatch” or similar error when inserting MORPH, and sound is distorted or stops altogether. What can I do?
A: You are overloading the CPU, but Logic is displaying the wrong error message. Increasing the I/O and process buffer sizes usually cures this issue. If not, see the CPU load optimization section below for some tips on how to get more out of your machine.
!!

!46 User Manual v2.0.0
MORPH
!!!!
Getting Support If you’re having trouble with MORPH that isn’t covered in these FAQ, please email us & we’ll get you up and running ASAP. We can be reached via http://www.zynaptiq.com/support-form/