116-2013: a day in the life of data - part 1
TRANSCRIPT

1
Paper 116-2013
A Day in the Life of Data – Part 1
Brian Bee, The Knowledge Warehouse Ltd
ABSTRACT
As a new SAS® programmer, you may be overwhelmed with the variety of tricks and techniques that you see from
experienced SAS® programmers; as you try to piece together some of these techniques you get frustrated and
perhaps confused because the data showing these techniques are inconsistent. That is, you read several papers
and each uses different data. This series of four papers is different. They will step you through several techniques
but all four papers will be using the same data. The authors will show how value is added to the data at each of the
four major steps: Input, Data Manipulation, Data and Program Management, and Graphics and Reporting.
INTRODUCTION
In today’s world our data is being presented from an ever increasing variety of sources. While a large proportion will
come from a data warehouse and be in SAS® Dataset form, the most common other sources are Microsoft products
and database tables. In this paper, I want to explore some of those data sources and demonstrate effective methods
of reading them and creating SAS® datasets so they can be analysed and reported on using the power of the SAS®
system.
THE DATA
1. Microsoft
The most common external data source is Microsoft Excel. There are three common options for reading data from a
spreadsheet. The first is to save your Excel data as a CSV file. This can be easily read by a data step and converted
into a SAS® dataset. The second option is to use the excel engine that becomes available if you have SAS®
Access to PC Files® installed. The third method is to use the Import Wizard from SAS’s programme editor or from
SAS® Enterprise Guide®. There are several other options that you can explore via the SAS® Support web site.
2. Proprietary databases
Many sites will have a database installed such as Sybase, DB2, or Oracle to name just three. SAS® provides an
access product for each of them that make accessing the data very simple.
3. Data or Text file
From time to time your data will be presented in the form of a .txt or .dat file, or some other form of a flat file. In most
instances a simple data step or the Import Wizard will read this data.
Lets deal with the spreadsheet first. If it has been saved as a .CSV file, a Data step will be the appropriate tool. To
read an external file requires using the INFILE and INPUT statements such as
DATA NEWFILE; INFILE ‘path/filename.CSV’; INPUT a description of the variables to be read; Other SAS® statements RUN;
Foundations and FundamentalsSAS Global Forum 2013
2
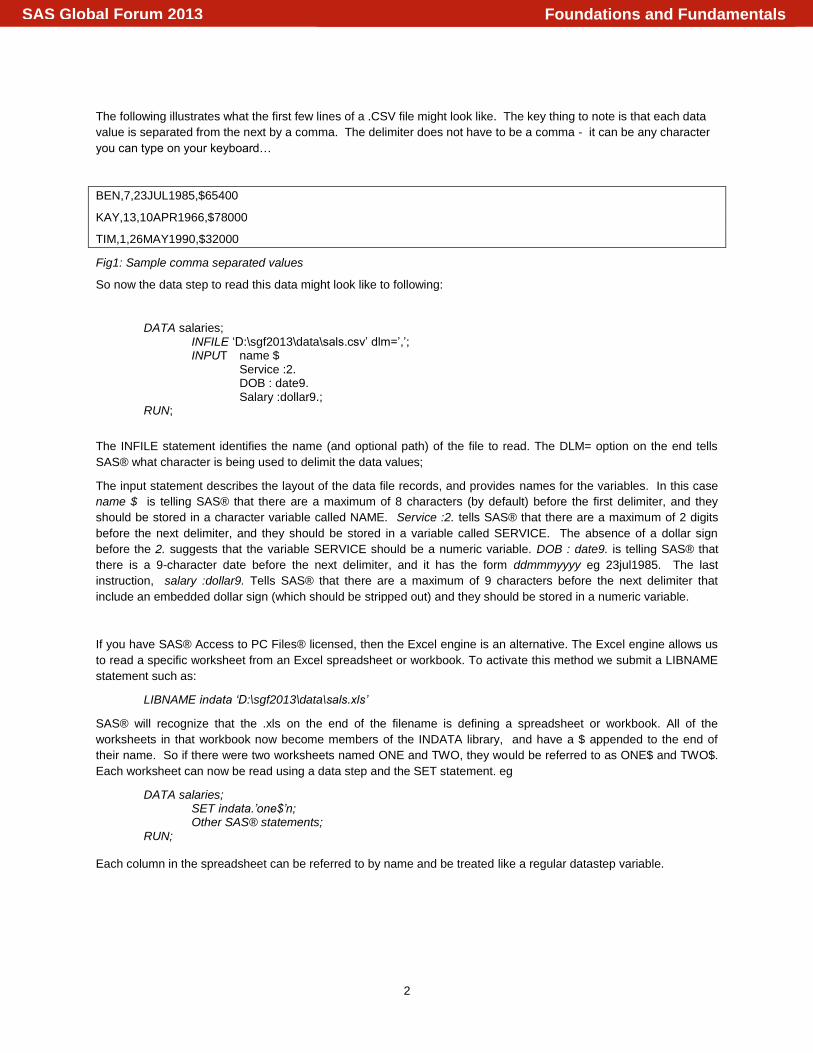
The following illustrates what the first few lines of a .CSV file might look like. The key thing to note is that each data
value is separated from the next by a comma. The delimiter does not have to be a comma - it can be any character
you can type on your keyboard…
BEN,7,23JUL1985,$65400
KAY,13,10APR1966,$78000
TIM,1,26MAY1990,$32000
Fig1: Sample comma separated values
So now the data step to read this data might look like to following:
DATA salaries; INFILE ‘D:\sgf2013\data\sals.csv’ dlm=’,’; INPUT name $
Service :2. DOB : date9. Salary :dollar9.;
RUN;
The INFILE statement identifies the name (and optional path) of the file to read. The DLM= option on the end tells
SAS® what character is being used to delimit the data values;
The input statement describes the layout of the data file records, and provides names for the variables. In this case
name $ is telling SAS® that there are a maximum of 8 characters (by default) before the first delimiter, and they
should be stored in a character variable called NAME. Service :2. tells SAS® that there are a maximum of 2 digits
before the next delimiter, and they should be stored in a variable called SERVICE. The absence of a dollar sign
before the 2. suggests that the variable SERVICE should be a numeric variable. DOB : date9. is telling SAS® that
there is a 9-character date before the next delimiter, and it has the form ddmmmyyyy eg 23jul1985. The last
instruction, salary :dollar9. Tells SAS® that there are a maximum of 9 characters before the next delimiter that
include an embedded dollar sign (which should be stripped out) and they should be stored in a numeric variable.
If you have SAS® Access to PC Files® licensed, then the Excel engine is an alternative. The Excel engine allows us
to read a specific worksheet from an Excel spreadsheet or workbook. To activate this method we submit a LIBNAME
statement such as:
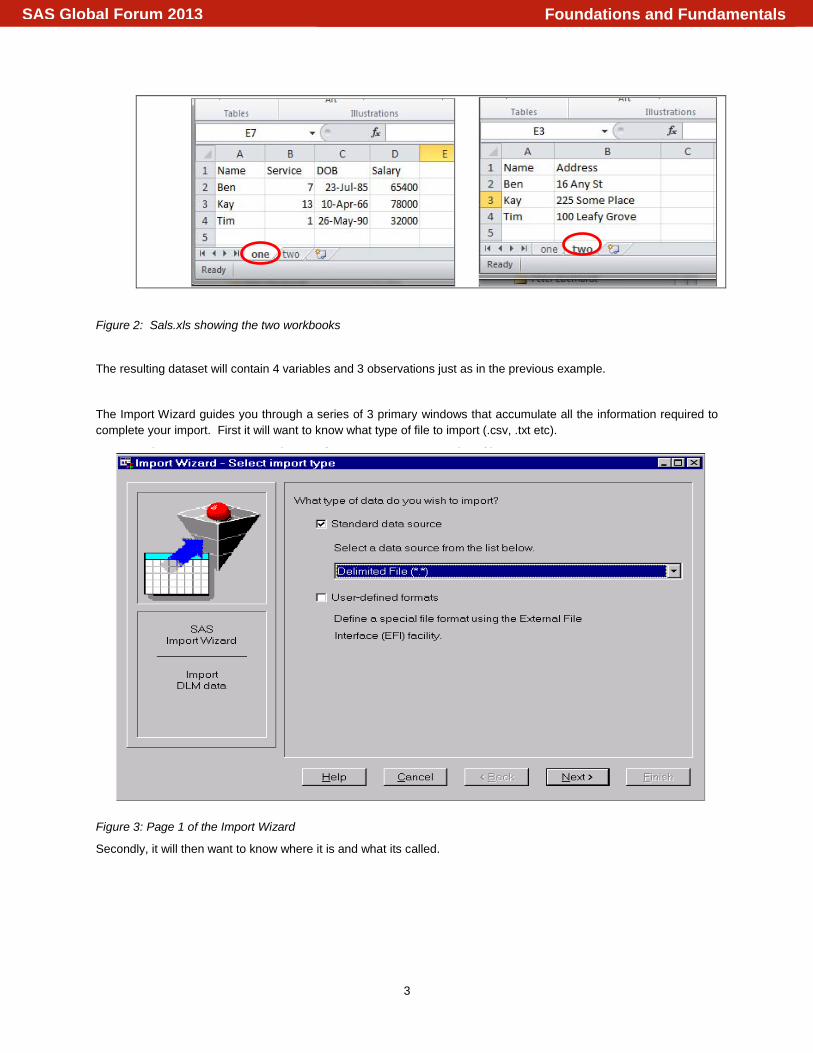
LIBNAME indata ‘D:\sgf2013\data\sals.xls’
SAS® will recognize that the .xls on the end of the filename is defining a spreadsheet or workbook. All of the
worksheets in that workbook now become members of the INDATA library, and have a $ appended to the end of
their name. So if there were two worksheets named ONE and TWO, they would be referred to as ONE$ and TWO$.
Each worksheet can now be read using a data step and the SET statement. eg
DATA salaries; SET indata.’one$’n; Other SAS® statements; RUN; Each column in the spreadsheet can be referred to by name and be treated like a regular datastep variable.
Foundations and FundamentalsSAS Global Forum 2013
3
Figure 2: Sals.xls showing the two workbooks
The resulting dataset will contain 4 variables and 3 observations just as in the previous example.
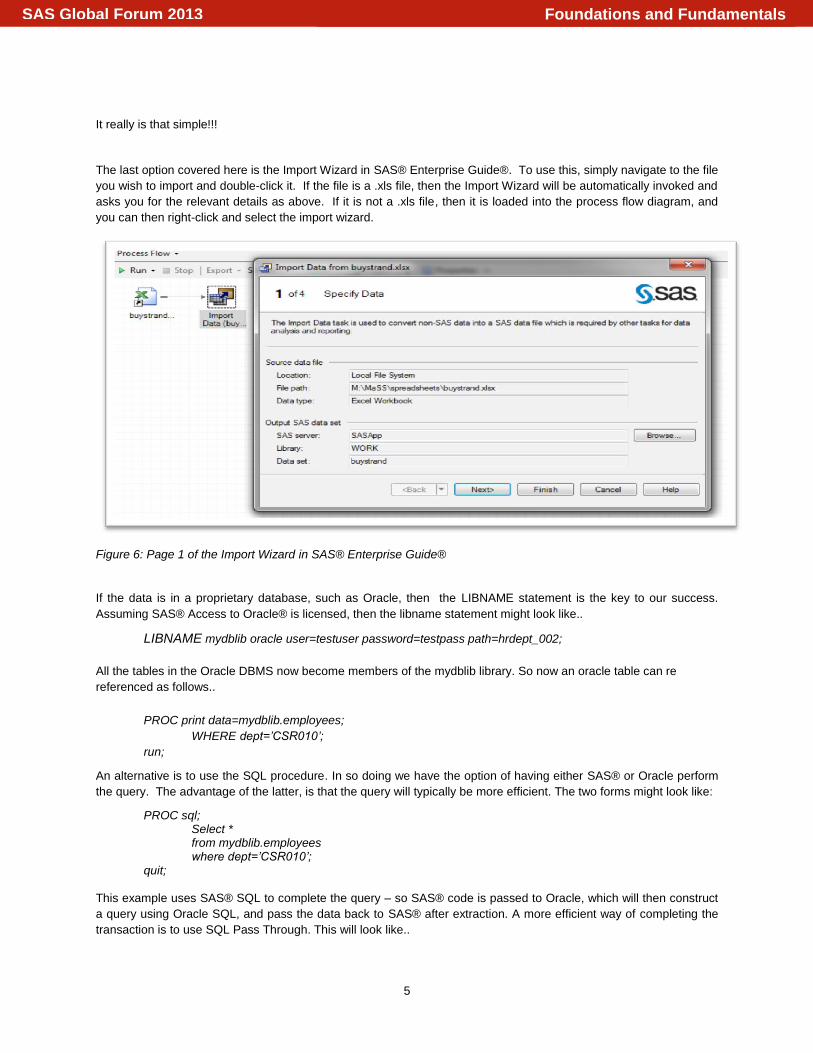
The Import Wizard guides you through a series of 3 primary windows that accumulate all the information required to
complete your import. First it will want to know what type of file to import (.csv, .txt etc).
Figure 3: Page 1 of the Import Wizard
Secondly, it will then want to know where it is and what its called.
Foundations and FundamentalsSAS Global Forum 2013

4
Figure 4: Page 2 of the Import Wizard
And finally it will want to know where to put it once you have imported it.
Figure 5: Page 3 of the Import Wizard
Foundations and FundamentalsSAS Global Forum 2013
5
It really is that simple!!!
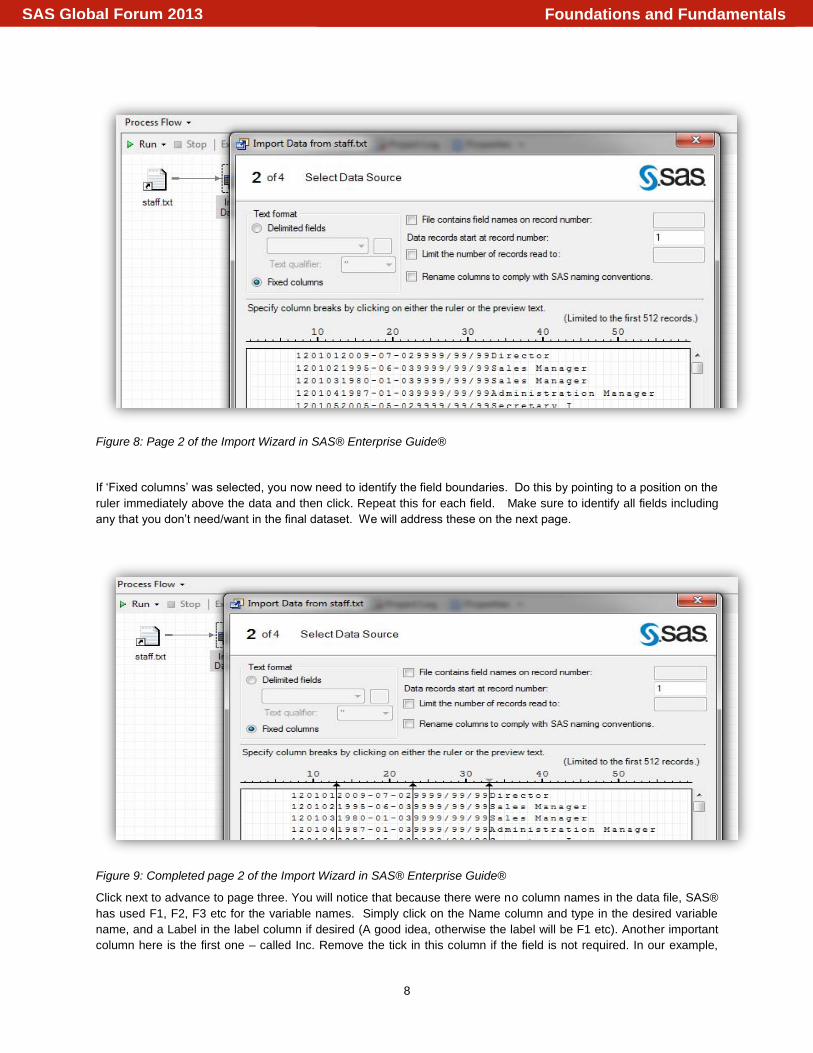
The last option covered here is the Import Wizard in SAS® Enterprise Guide®. To use this, simply navigate to the file
you wish to import and double-click it. If the file is a .xls file, then the Import Wizard will be automatically invoked and
asks you for the relevant details as above. If it is not a .xls file, then it is loaded into the process flow diagram, and
you can then right-click and select the import wizard.
Figure 6: Page 1 of the Import Wizard in SAS® Enterprise Guide®
If the data is in a proprietary database, such as Oracle, then the LIBNAME statement is the key to our success.
Assuming SAS® Access to Oracle® is licensed, then the libname statement might look like..
LIBNAME mydblib oracle user=testuser password=testpass path=hrdept_002;
All the tables in the Oracle DBMS now become members of the mydblib library. So now an oracle table can re
referenced as follows..
PROC print data=mydblib.employees;
WHERE dept=’CSR010’;
run;
An alternative is to use the SQL procedure. In so doing we have the option of having either SAS® or Oracle perform
the query. The advantage of the latter, is that the query will typically be more efficient. The two forms might look like:
PROC sql; Select * from mydblib.employees where dept=’CSR010’;
quit; This example uses SAS® SQL to complete the query – so SAS® code is passed to Oracle, which will then construct
a query using Oracle SQL, and pass the data back to SAS® after extraction. A more efficient way of completing the
transaction is to use SQL Pass Through. This will look like..
Foundations and FundamentalsSAS Global Forum 2013

6
PROC sql; connect to oracle (user=testuser password=testpass); select * from connection to oracle (select * from customers where customer like ’1%’); disconnect from oracle;
quit;
The remaining data source is a standard flat file ie a .dat or a .txt file. Like the Microsoft files, these can be handled
by the Import Wizard or a data step. The Wizard process is a little more complex this time. We have a text file that
has data like..
1201231991-10-032011-02-02Sales Rep. I 26190.00F30SEP197010/03/912011-02-02 120102
1201241985-03-029999/99/99Sales Rep. I 26480.00M14MAY196503/02/85 120102
1201251985-03-022010-07-26Sales Rep. IV 32040.00M07DEC196003/02/852010-07-26 120102
Some things to note about this data file:
The data is column aligned
There are repeated columns that we don’t want to include in our result dataset
There are some invalid dates in the form 9999/99/99 which we will need to handle
There are no column names in the file
Using the Import Wizard in SAS® Enterprise Guide® can make ourtask relatively straight forward. Firstly we need to
navigate to the file and select it. It will be added to the project and opened into the data viewer.
Figure 6: First 5 lines of STAFF.TXT
We can close it, then right click and select Import Data and we will be taken to page one of the wizard. This page
allows you to verify that the correct file has been selected, and to specify a dataset name and location if the defaults
are not what you want.
Foundations and FundamentalsSAS Global Forum 2013

7
Figure 7: Page 1 of the Import Wizard in SAS® Enterprise Guide®
Click next and advance to page two. Here you will find several important selection options. First is whether the data
is delimited or fixed column. Our data is fixed column ie all fields appear in the same column in every row. If the data
were as we saw in the CSV, then we would select delimited, and then use the box immediately below to specify the
delimiting character. To the right are boxes to enter..
a row number that contains column names. If any are present, SAS® can use them
a row number for the first line of data
a box to specify the number of rows to read
a check box asking SAS® to modify any non-compliant names
Foundations and FundamentalsSAS Global Forum 2013
8
Figure 8: Page 2 of the Import Wizard in SAS® Enterprise Guide®
If ‘Fixed columns’ was selected, you now need to identify the field boundaries. Do this by pointing to a position on the
ruler immediately above the data and then click. Repeat this for each field. Make sure to identify all fields including
any that you don’t need/want in the final dataset. We will address these on the next page.
Figure 9: Completed page 2 of the Import Wizard in SAS® Enterprise Guide®
Click next to advance to page three. You will notice that because there were no column names in the data file, SAS®
has used F1, F2, F3 etc for the variable names. Simply click on the Name column and type in the desired variable
name, and a Label in the label column if desired (A good idea, otherwise the label will be F1 etc). Another important
column here is the first one – called Inc. Remove the tick in this column if the field is not required. In our example,
Foundations and FundamentalsSAS Global Forum 2013

9
that applies to F8 and F9. The Type column should be checked to make sure all the correct data types have been
selected. If a change is required, click on the column and select from the resulting drop-down menu. And finally check
the Formats and lengths, and modify as required. The Wizard gets all these things right most of the time, but
occasionally is fooled by the data!
Figure 10: Page 3 of the Import Wizard in SAS® Enterprise Guide® before editing
Figure 11: Page 3 of the Import Wizard in SAS® Enterprise Guide® after editing
Click to advance to page four. There are four boxes here.
Foundations and FundamentalsSAS Global Forum 2013

10
Do you want the data embedded in the middle of the data step
Use Access to PC Files if possible – greyed out for a .dat or .txt file
Remove any dodgy characters that might cause a transmission error (eg tabs and Hex strings)
Generate the code so it can be save and used outside of SAS® Enterprise Guide® ie a batch job
Figure 12: Page 4of the Import Wizard in SAS® Enterprise Guide®
Now click finish and the job will run through.
Figure 13: First 6 lines of STAFF SAS® dataset
If SAS® Enterprise Guide® is not being used, then the method used for reading a CSV should be used.
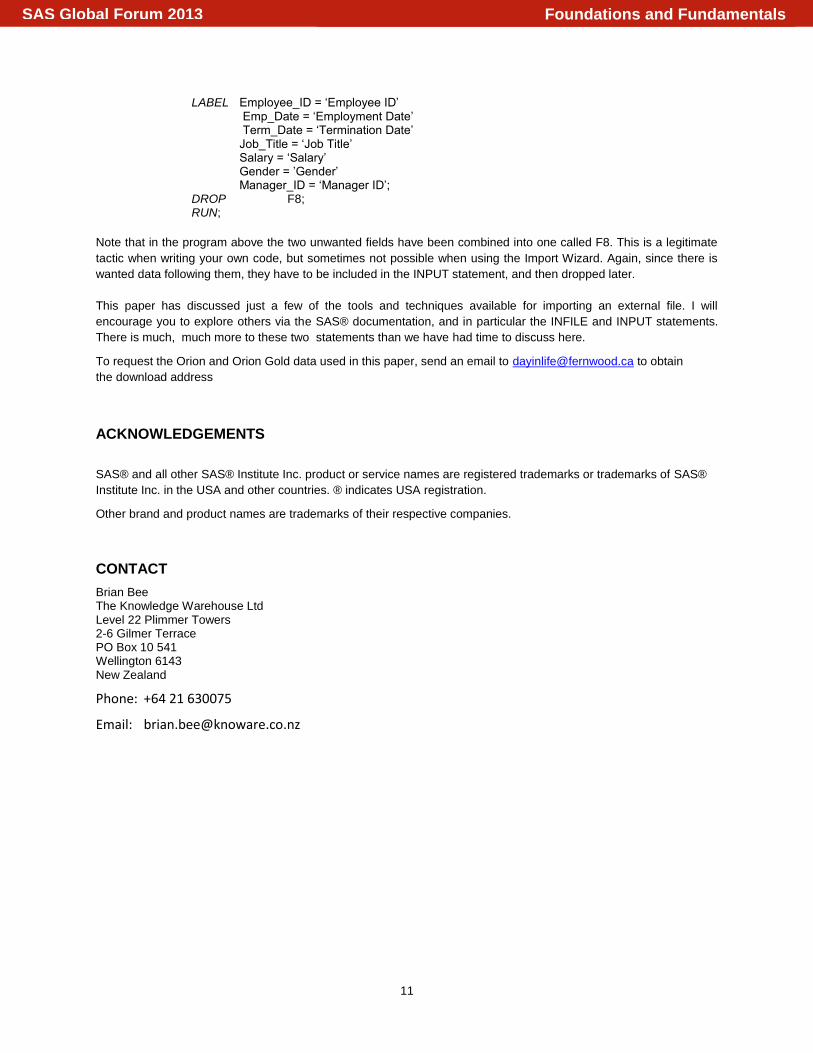
DATA salaries; INFILE ‘D:\sgf2013\data\staff.txt’ dlm=’,’; INPUT Employee_ID $
Emp_Date :yymmdd10. DOB : yymmdd10.. Job_Title :$28. Salary :9. Gender : $1. DOB :date9. F8 :$16. Manager_ID : $6.;
Foundations and FundamentalsSAS Global Forum 2013
11
LABEL Employee_ID = ‘Employee ID’ Emp_Date = ‘Employment Date’ Term_Date = ‘Termination Date’ Job_Title = ‘Job Title’ Salary = ‘Salary’ Gender = ’Gender’ Manager_ID = ‘Manager ID’; DROP F8;
RUN;
Note that in the program above the two unwanted fields have been combined into one called F8. This is a legitimate
tactic when writing your own code, but sometimes not possible when using the Import Wizard. Again, since there is
wanted data following them, they have to be included in the INPUT statement, and then dropped later.
This paper has discussed just a few of the tools and techniques available for importing an external file. I will
encourage you to explore others via the SAS® documentation, and in particular the INFILE and INPUT statements.
There is much, much more to these two statements than we have had time to discuss here.
To request the Orion and Orion Gold data used in this paper, send an email to [email protected] to obtain
the download address
ACKNOWLEDGEMENTS
SAS® and all other SAS® Institute Inc. product or service names are registered trademarks or trademarks of SAS®
Institute Inc. in the USA and other countries. ® indicates USA registration.
Other brand and product names are trademarks of their respective companies.
CONTACT
Brian Bee The Knowledge Warehouse Ltd Level 22 Plimmer Towers 2-6 Gilmer Terrace PO Box 10 541 Wellington 6143 New Zealand
Phone: +64 21 630075
Email: [email protected]
Foundations and FundamentalsSAS Global Forum 2013