14628: ibm mobile platform development hands on lab · ibm software contents page 5 1.1 start the...
TRANSCRIPT
14628: IBM Mobile Platform development hands on lab Lab Exercise
IBM Mobile Platform - Development hands on lab
Lab 1
© Copyright IBM Corporation, 2013
US Government Users Restricted Rights - Use, duplication or disclosure restricted by GSA ADP Schedule Contract with IBM Corp.
IBM Software
Contents Page 3
ContentsLAB 1 GETTING STARTED WITH IBM WORKLIGHT ... . . . . . . . . . . . . . . . . . . . . . . . . . . . . . . . . . . . . . . . . . . . . . . . . . . . . . . . . . . . . . . . . . . . . . . . . . 4
1.1 START THE WORKLIGHT STUDIO ..................................................................................................................... 5 1.2 CREATE THE CICSMOBILE PROJECT AND APPLICATION ..................................................................................... 6 1.3 PREVIEW COMMON RESOURCES IN MOBILE BROWSER SIMULATOR ................................................................... 12 1.4 EXPLORING WORKLIGHT ENVIRONMENTS ....................................................................................................... 13 1.5 ENHANCING THE EGUI APPLICATION WITH CONTENT ....................................................................................... 18 1.6 RETRIEVING DATA WITH A WORKLIGHT ADAPTER ............................................................................................ 30 1.7 TEST IN MOBILE BROWSER SIMULATOR ............................................................................................................. 39 1.8 SUMMARY ................................................................................................................................................... 42
IBM Software
Page 4 Getting Started with IBM Worklight
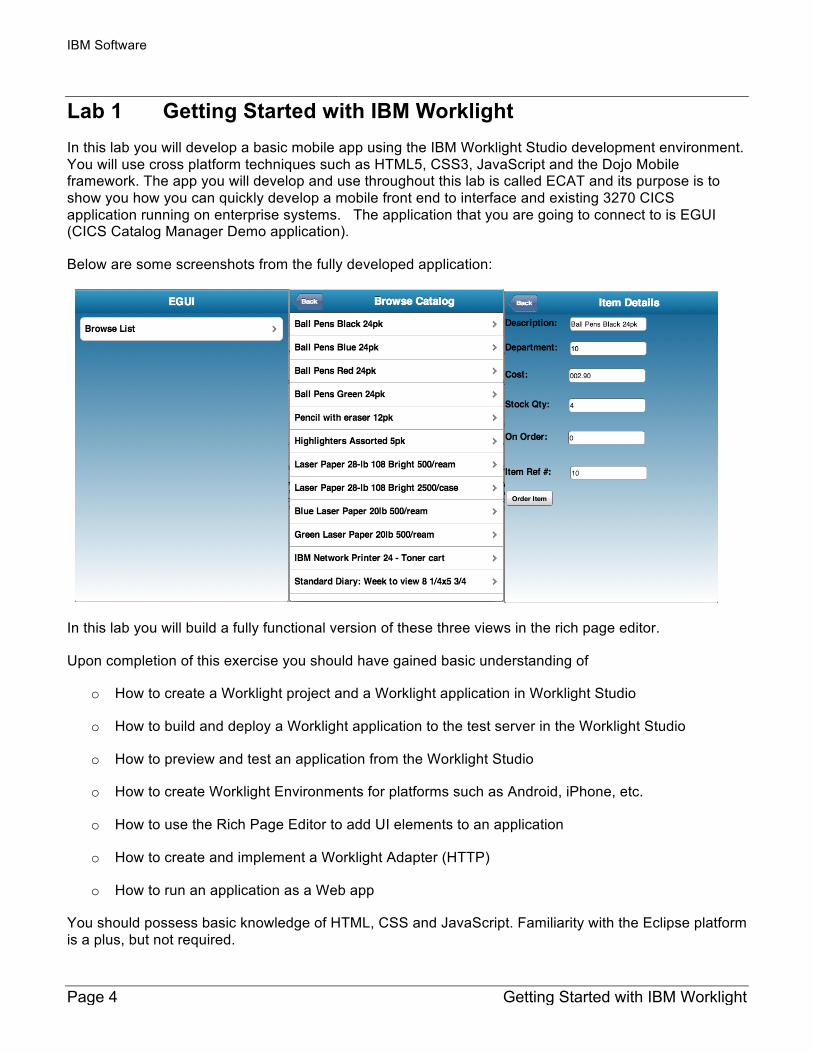
Lab 1 Getting Started with IBM Worklight In this lab you will develop a basic mobile app using the IBM Worklight Studio development environment. You will use cross platform techniques such as HTML5, CSS3, JavaScript and the Dojo Mobile framework. The app you will develop and use throughout this lab is called ECAT and its purpose is to show you how you can quickly develop a mobile front end to interface and existing 3270 CICS application running on enterprise systems. The application that you are going to connect to is EGUI (CICS Catalog Manager Demo application).
Below are some screenshots from the fully developed application:
In this lab you will build a fully functional version of these three views in the rich page editor.
Upon completion of this exercise you should have gained basic understanding of
o How to create a Worklight project and a Worklight application in Worklight Studio
o How to build and deploy a Worklight application to the test server in the Worklight Studio
o How to preview and test an application from the Worklight Studio
o How to create Worklight Environments for platforms such as Android, iPhone, etc.
o How to use the Rich Page Editor to add UI elements to an application
o How to create and implement a Worklight Adapter (HTTP)
o How to run an application as a Web app
You should possess basic knowledge of HTML, CSS and JavaScript. Familiarity with the Eclipse platform is a plus, but not required.
IBM Software
Contents Page 5
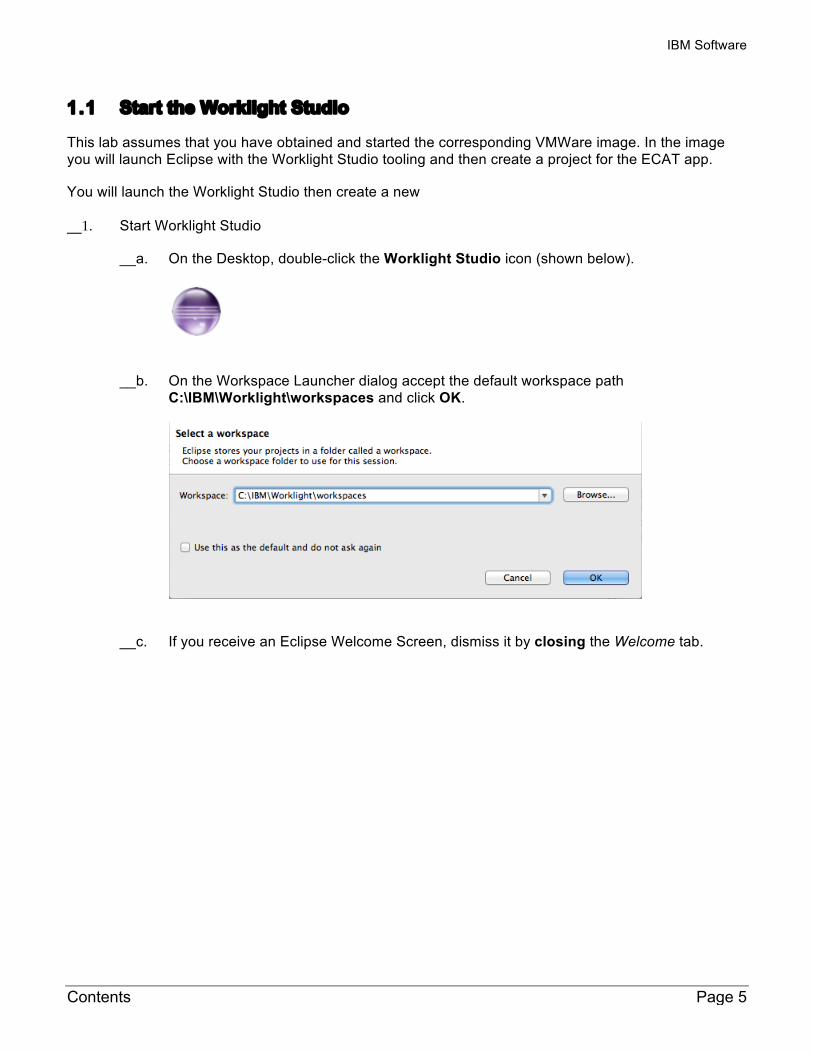
1.1 Start the Worklight Studio
This lab assumes that you have obtained and started the corresponding VMWare image. In the image you will launch Eclipse with the Worklight Studio tooling and then create a project for the ECAT app.
You will launch the Worklight Studio then create a new
__1. Start Worklight Studio
__a. On the Desktop, double-click the Worklight Studio icon (shown below).
__b. On the Workspace Launcher dialog accept the default workspace path C:\IBM\Worklight\workspaces and click OK.
__c. If you receive an Eclipse Welcome Screen, dismiss it by closing the Welcome tab.
IBM Software
Page 6 Getting Started with IBM Worklight
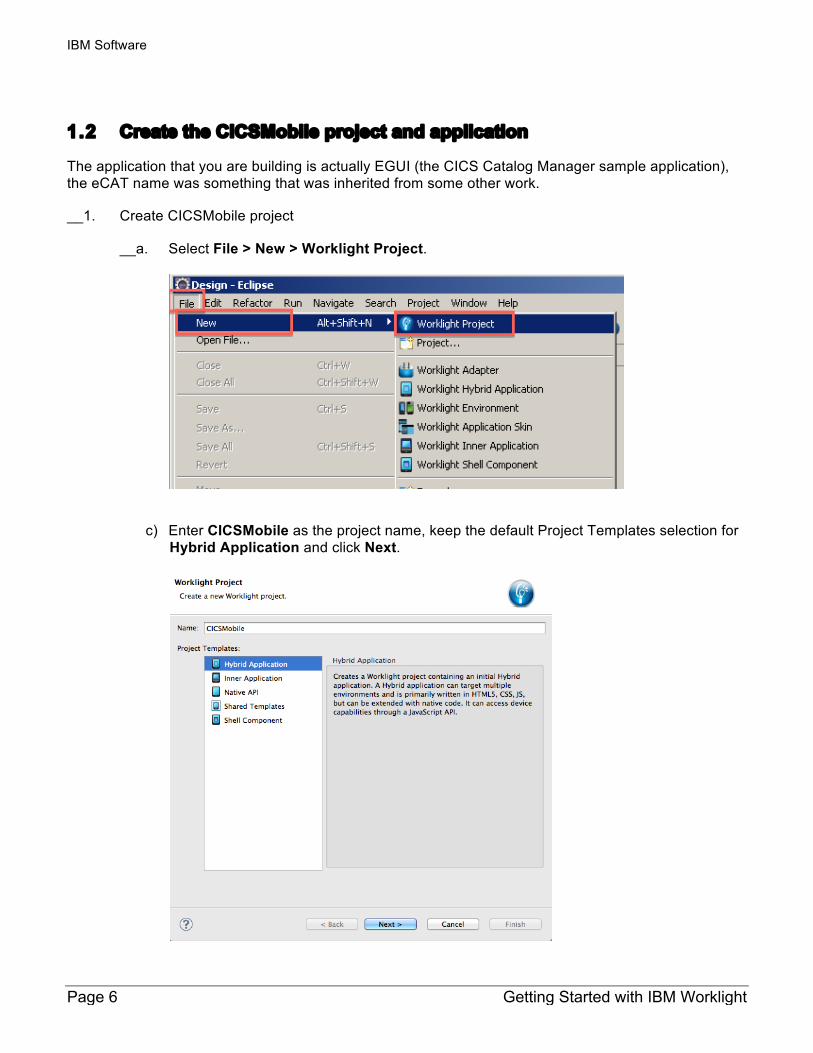
1.2 Create the CICSMobile project and application
The application that you are building is actually EGUI (the CICS Catalog Manager sample application), the eCAT name was something that was inherited from some other work.
__1. Create CICSMobile project
__a. Select File > New > Worklight Project.
c) Enter CICSMobile as the project name, keep the default Project Templates selection for Hybrid Application and click Next.
IBM Software
Contents Page 7
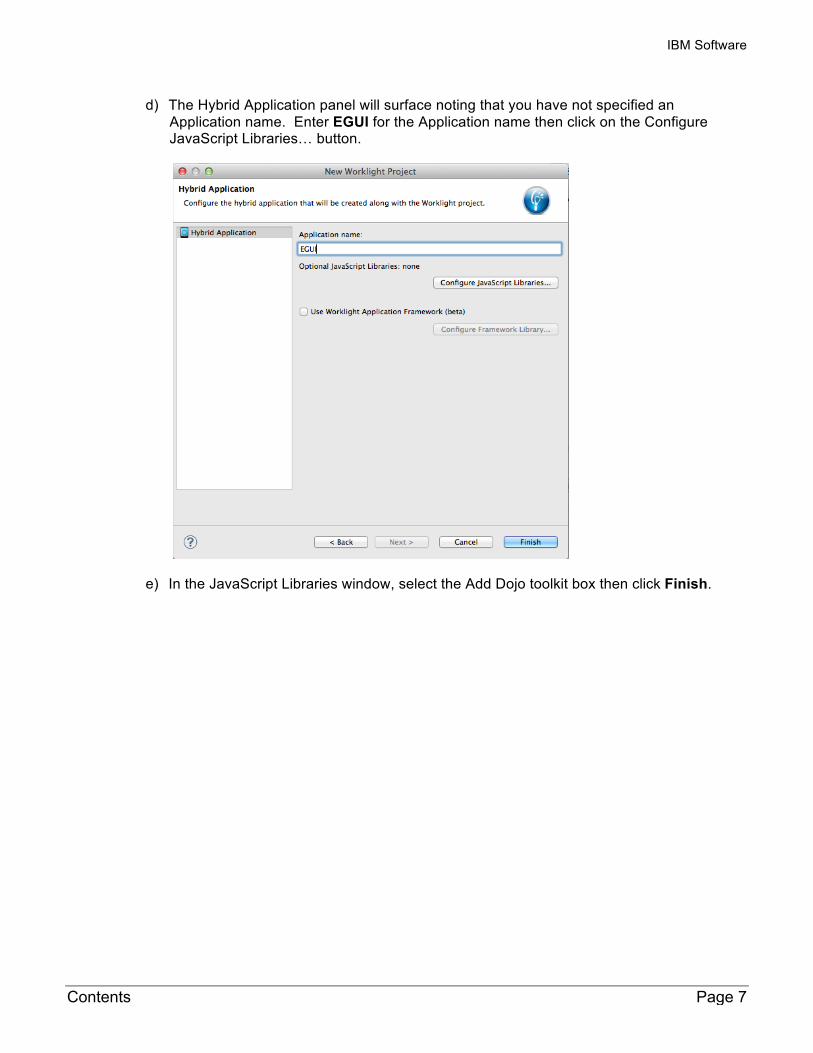
d) The Hybrid Application panel will surface noting that you have not specified an Application name. Enter EGUI for the Application name then click on the Configure JavaScript Libraries… button.
e) In the JavaScript Libraries window, select the Add Dojo toolkit box then click Finish.
IBM Software
Page 8 Getting Started with IBM Worklight
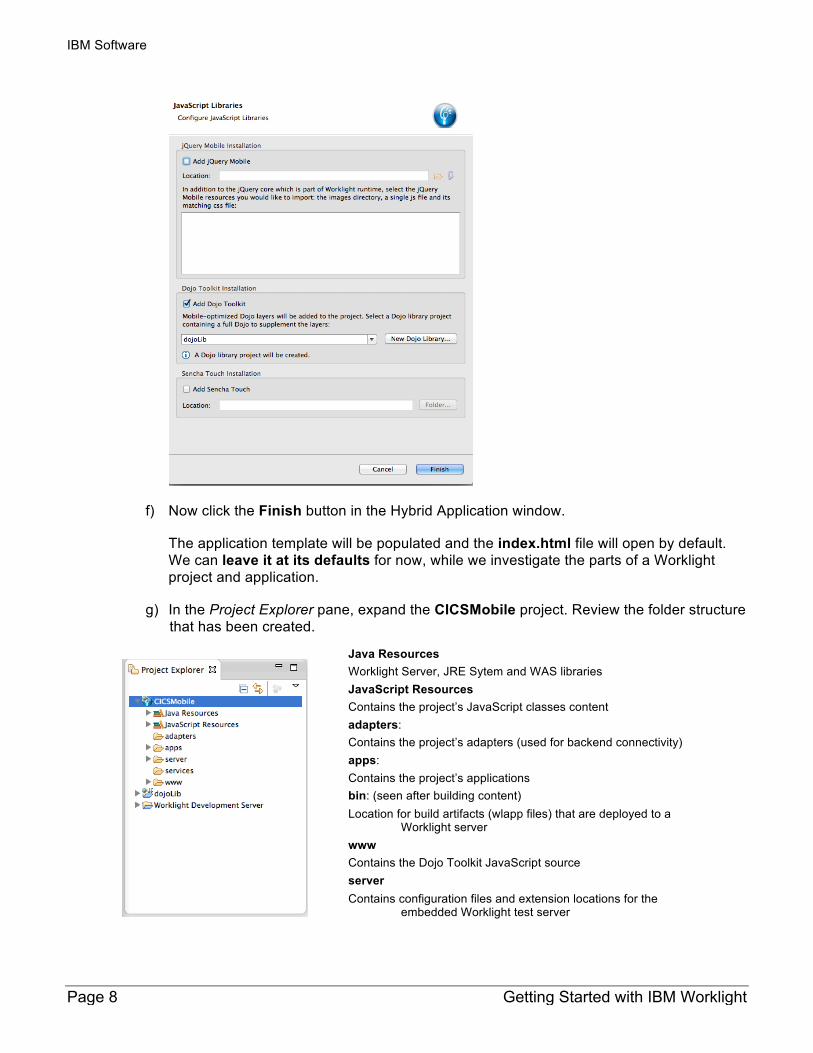
f) Now click the Finish button in the Hybrid Application window.
The application template will be populated and the index.html file will open by default. We can leave it at its defaults for now, while we investigate the parts of a Worklight project and application.
g) In the Project Explorer pane, expand the CICSMobile project. Review the folder structure that has been created.
Java Resources Worklight Server, JRE Sytem and WAS libraries JavaScript Resources Contains the project’s JavaScript classes content adapters: Contains the project’s adapters (used for backend connectivity) apps: Contains the project’s applications bin: (seen after building content) Location for build artifacts (wlapp files) that are deployed to a
Worklight server www Contains the Dojo Toolkit JavaScript source server Contains configuration files and extension locations for the
embedded Worklight test server

IBM Software
Contents Page 9
__f. In the Project Explorer, expand the apps folder then the apps > EGUI folder and the apps > EGUI > common folder that were created by the new application wizard.
__g. Open the application-descriptor.xml file, if not already opened. Switch to the Source tab. The following section specifies the application name, description and author’s name to be displayed in the Worklight Console.
common: the default ‘environment’ that gets created for an application.
css: main.css – the main application CSS file
images: Default images for the common environment.
js: main.js – the main JavaScript file for the app, messages.js – JSON object holding all app messages, auth.js – authentication mechanism.
index.html: The main application html file. Application can have multiple html files
legal: All legal related documents.
application-descriptor.xml: Application’s meta data (environments, security config, etc...)
build-dojo*: Artifacts related to custom dojo profile builds (advanced)
IBM Software
Page 10 Getting Started with IBM Worklight
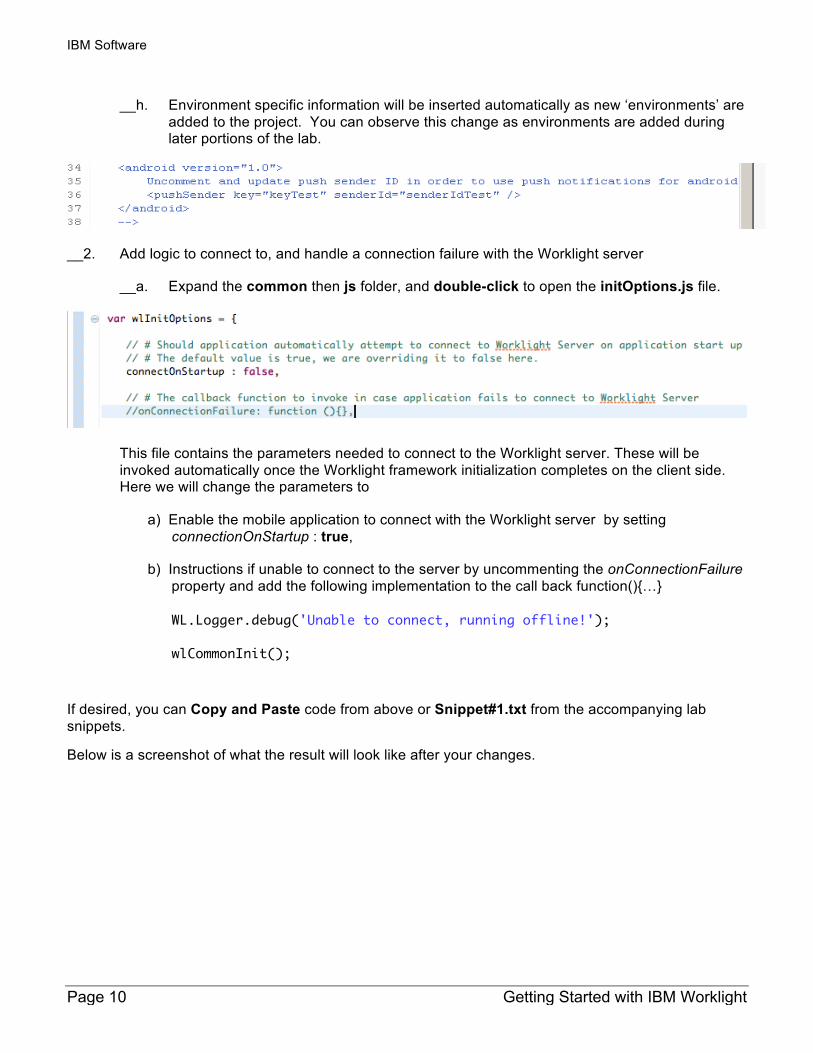
__h. Environment specific information will be inserted automatically as new ‘environments’ are added to the project. You can observe this change as environments are added during later portions of the lab.
__2. Add logic to connect to, and handle a connection failure with the Worklight server
__a. Expand the common then js folder, and double-click to open the initOptions.js file.
This file contains the parameters needed to connect to the Worklight server. These will be invoked automatically once the Worklight framework initialization completes on the client side. Here we will change the parameters to
a) Enable the mobile application to connect with the Worklight server by setting connectionOnStartup : true,
b) Instructions if unable to connect to the server by uncommenting the onConnectionFailure property and add the following implementation to the call back function(){…}
WL.Logger.debug('Unable to connect, running offline!');
wlCommonInit();
If desired, you can Copy and Paste code from above or Snippet#1.txt from the accompanying lab snippets.
Below is a screenshot of what the result will look like after your changes.
IBM Software
Contents Page 11
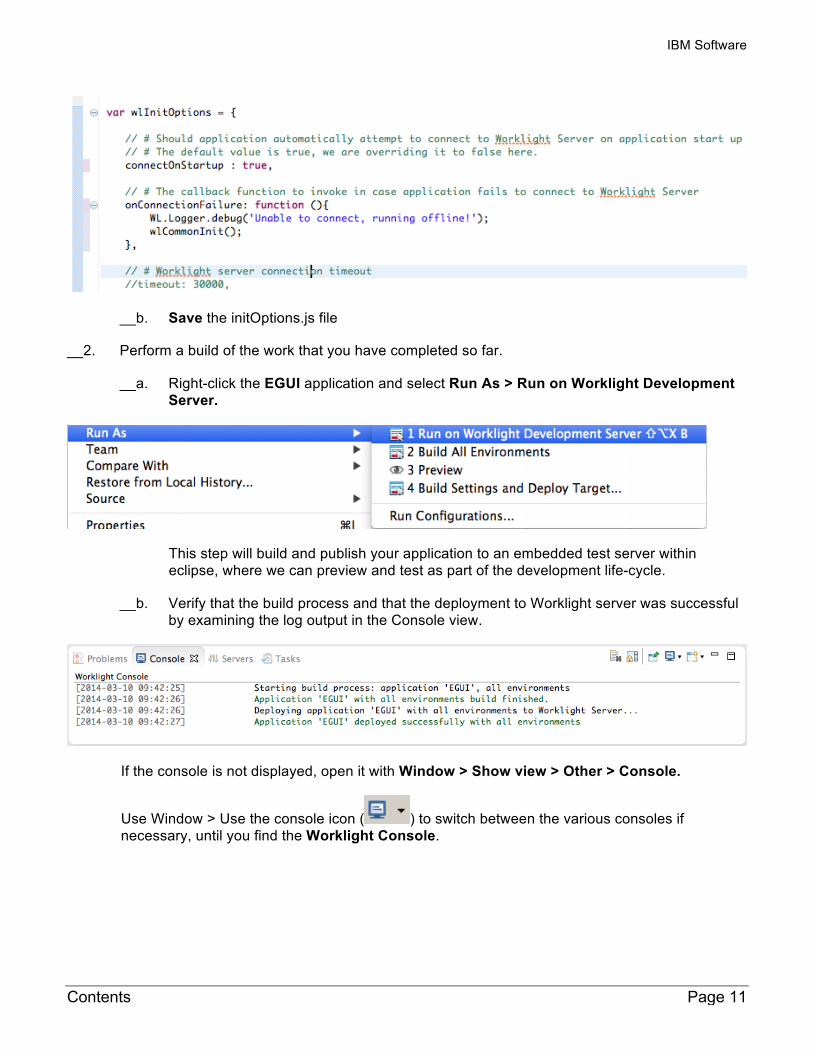
__b. Save the initOptions.js file
__2. Perform a build of the work that you have completed so far.
__a. Right-click the EGUI application and select Run As > Run on Worklight Development Server.
This step will build and publish your application to an embedded test server within eclipse, where we can preview and test as part of the development life-cycle.
__b. Verify that the build process and that the deployment to Worklight server was successful by examining the log output in the Console view.
If the console is not displayed, open it with Window > Show view > Other > Console.
Use Window > Use the console icon ( ) to switch between the various consoles if necessary, until you find the Worklight Console.
IBM Software
Page 12 Getting Started with IBM Worklight
1.3 Preview common resources in Mobile Browser Simulator
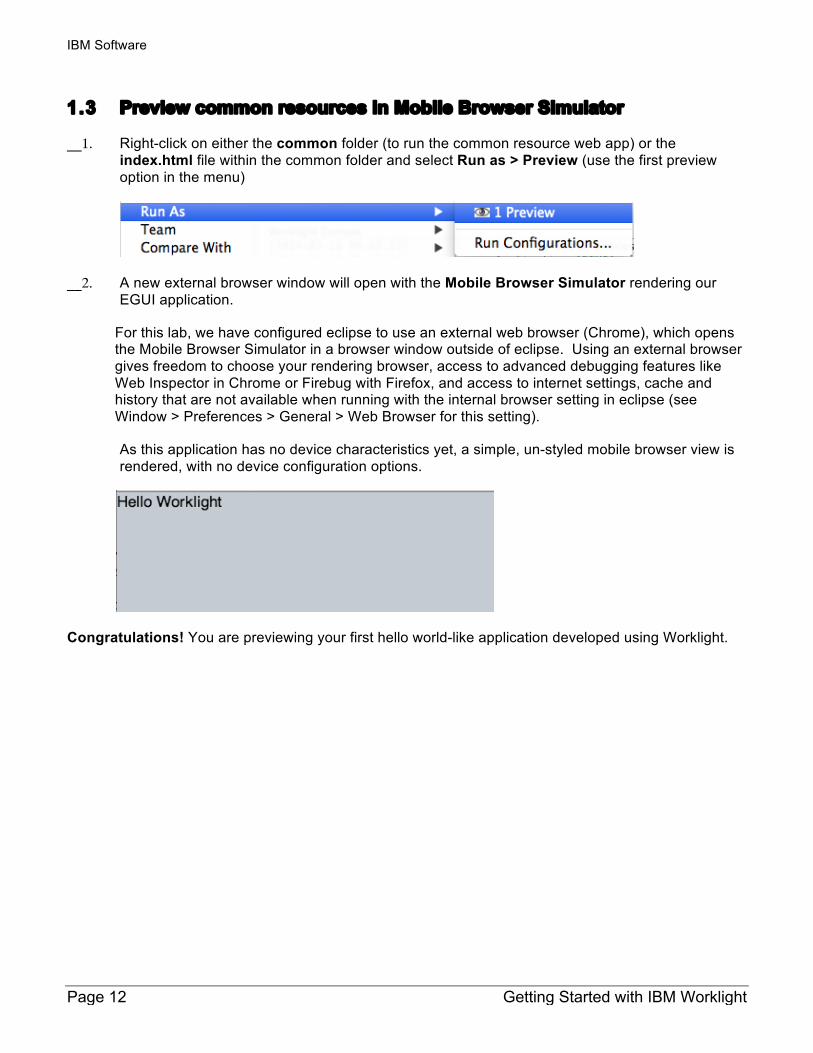
__1. Right-click on either the common folder (to run the common resource web app) or the index.html file within the common folder and select Run as > Preview (use the first preview option in the menu)
__2. A new external browser window will open with the Mobile Browser Simulator rendering our EGUI application.
For this lab, we have configured eclipse to use an external web browser (Chrome), which opens the Mobile Browser Simulator in a browser window outside of eclipse. Using an external browser gives freedom to choose your rendering browser, access to advanced debugging features like Web Inspector in Chrome or Firebug with Firefox, and access to internet settings, cache and history that are not available when running with the internal browser setting in eclipse (see Window > Preferences > General > Web Browser for this setting).
As this application has no device characteristics yet, a simple, un-styled mobile browser view is rendered, with no device configuration options.
Congratulations! You are previewing your first hello world-like application developed using Worklight.
IBM Software
Contents Page 13
1.4 Exploring Worklight Environments
An environment is a mobile, desktop, or web platform capable of displaying web-based applications, such as the Apple iPhone, Android phones, Windows 7, and BlackBerry. In this section you will create environments to provide support for iPhone, Android and Mobile Web.
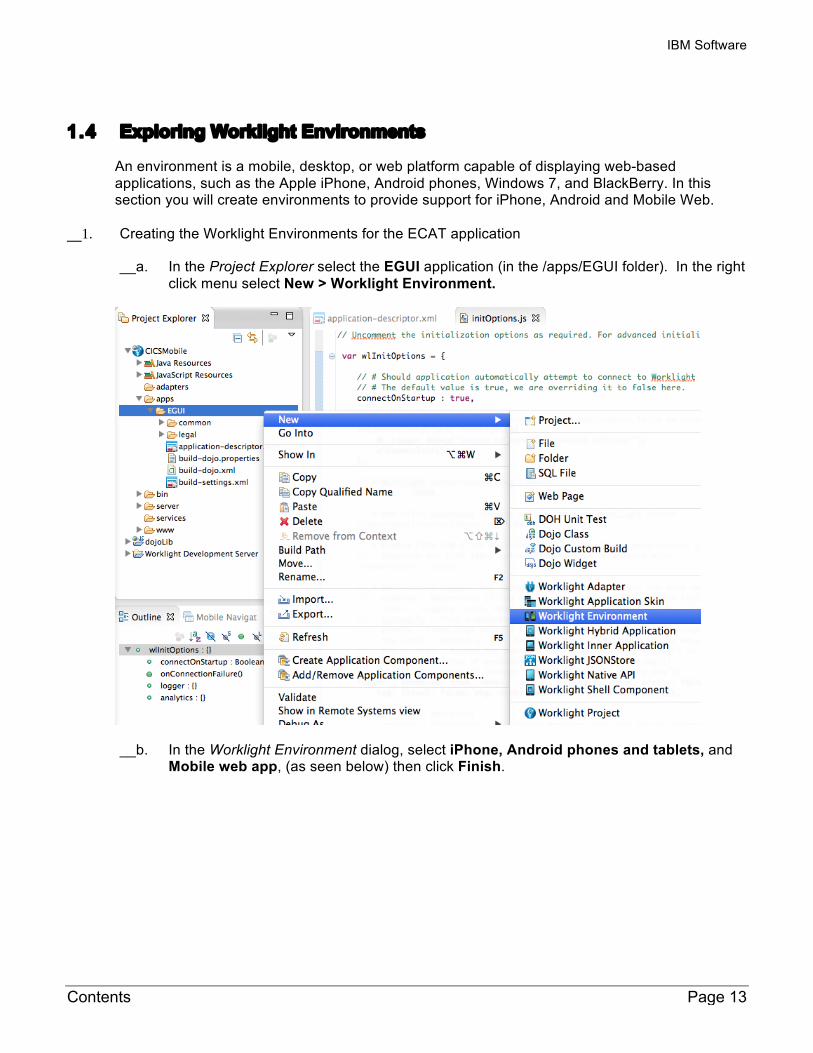
__1. Creating the Worklight Environments for the ECAT application
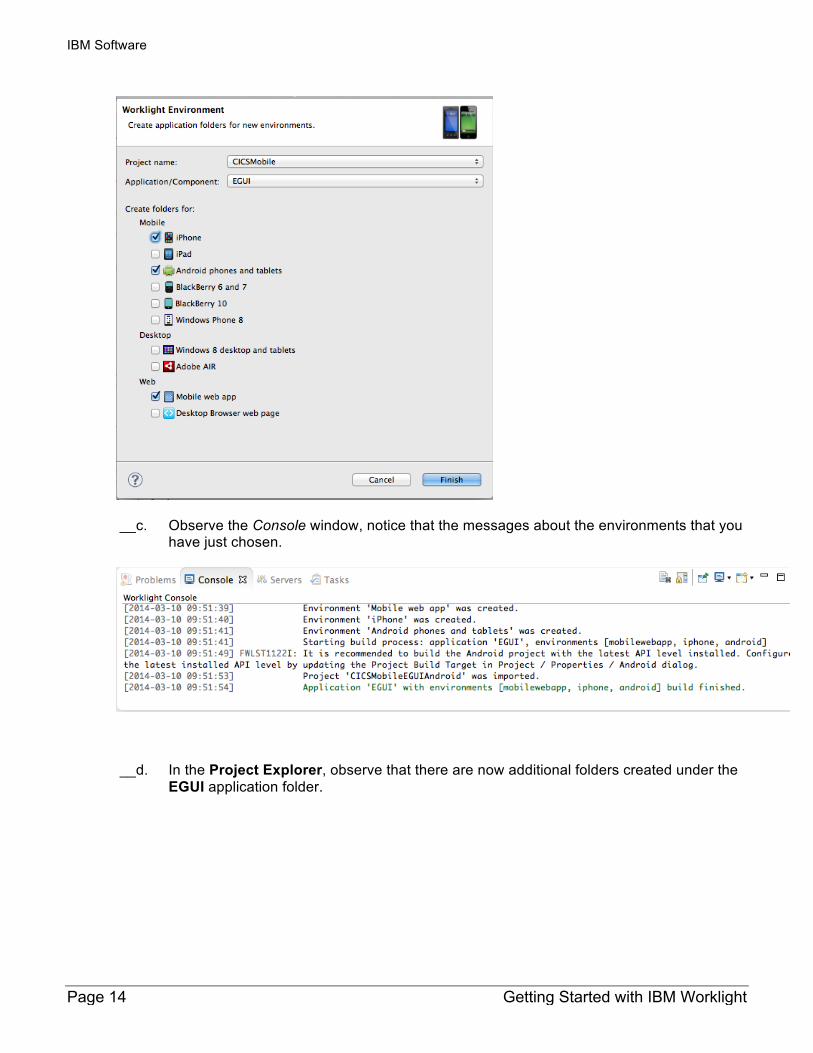
__a. In the Project Explorer select the EGUI application (in the /apps/EGUI folder). In the right click menu select New > Worklight Environment.
__b. In the Worklight Environment dialog, select iPhone, Android phones and tablets, and Mobile web app, (as seen below) then click Finish.
IBM Software
Page 14 Getting Started with IBM Worklight
__c. Observe the Console window, notice that the messages about the environments that you have just chosen.
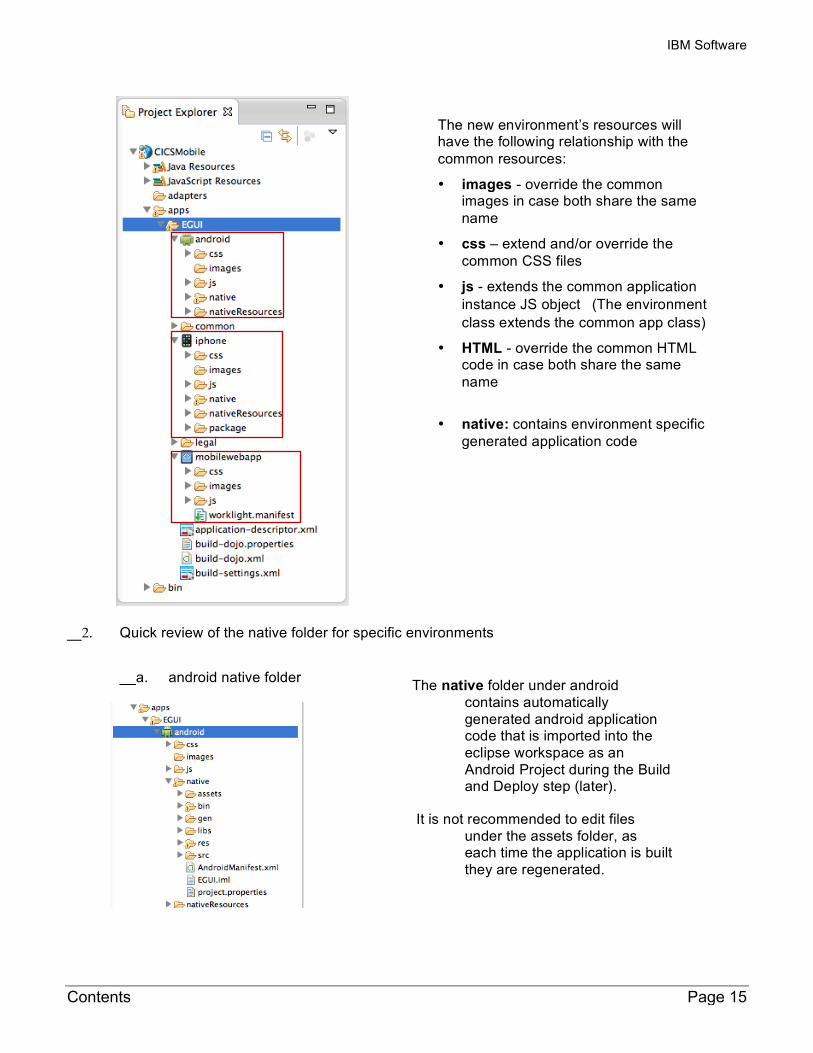
__d. In the Project Explorer, observe that there are now additional folders created under the EGUI application folder.
IBM Software
Contents Page 15
__2. Quick review of the native folder for specific environments
__a. android native folder
The new environment’s resources will have the following relationship with the common resources:
• images - override the common images in case both share the same name
• css – extend and/or override the common CSS files
• js - extends the common application instance JS object (The environment class extends the common app class)
• HTML - override the common HTML code in case both share the same name
• native: contains environment specific
generated application code
The native folder under android contains automatically generated android application code that is imported into the eclipse workspace as an Android Project during the Build and Deploy step (later).
It is not recommended to edit files under the assets folder, as each time the application is built they are regenerated.
IBM Software
Page 16 Getting Started with IBM Worklight
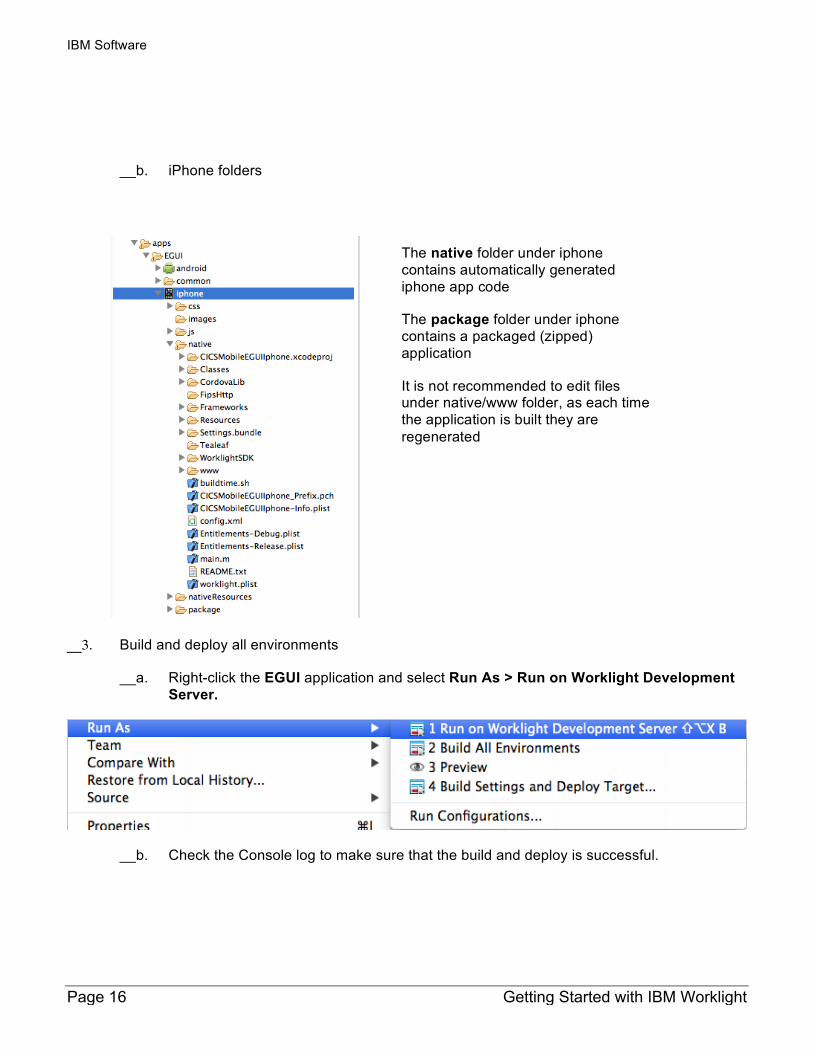
__b. iPhone folders
__3. Build and deploy all environments
__a. Right-click the EGUI application and select Run As > Run on Worklight Development Server.
__b. Check the Console log to make sure that the build and deploy is successful.
The native folder under iphone contains automatically generated iphone app code
The package folder under iphone contains a packaged (zipped) application
It is not recommended to edit files under native/www folder, as each time the application is built they are regenerated
IBM Software
Contents Page 17
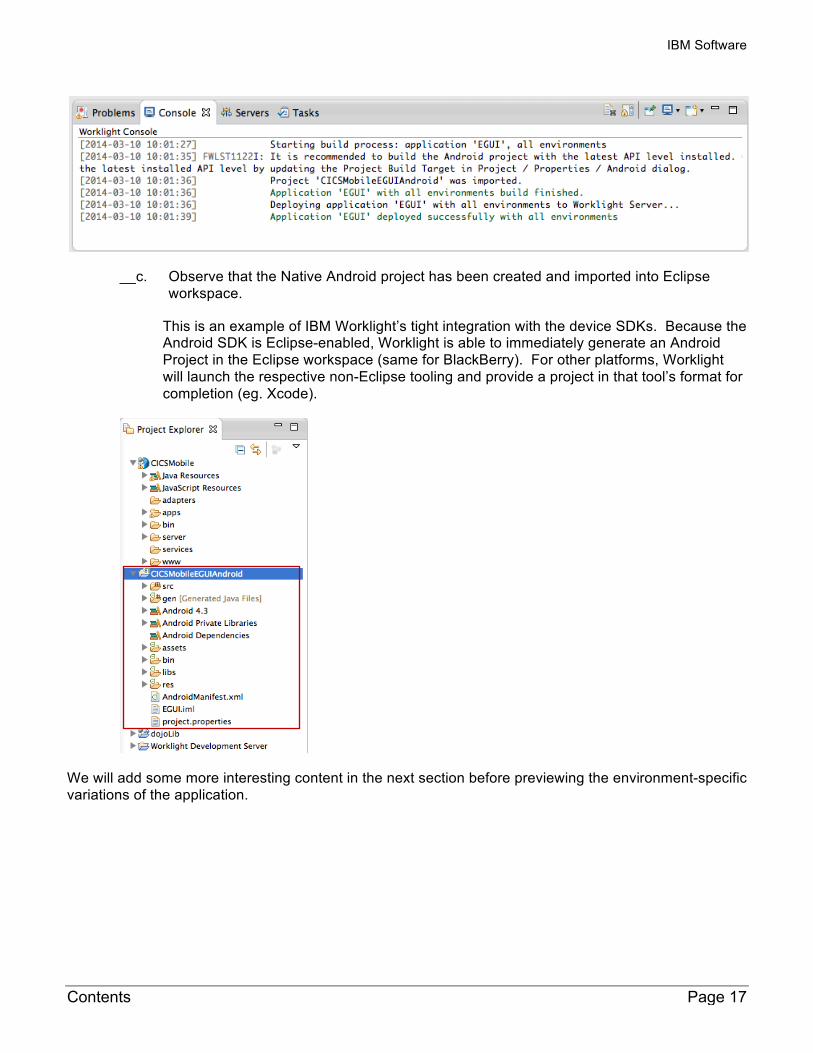
__c. Observe that the Native Android project has been created and imported into Eclipse workspace.
This is an example of IBM Worklight’s tight integration with the device SDKs. Because the Android SDK is Eclipse-enabled, Worklight is able to immediately generate an Android Project in the Eclipse workspace (same for BlackBerry). For other platforms, Worklight will launch the respective non-Eclipse tooling and provide a project in that tool’s format for completion (eg. Xcode).
We will add some more interesting content in the next section before previewing the environment-specific variations of the application.

IBM Software
Page 18 Getting Started with IBM Worklight
1.5 Enhancing the EGUI application with content
1.5.1 Adding the views
In this part of the Lab, we are going to continue developing our EGUI application with the Rich Page Editor.
__1. Review the content you will build - three EGUI application views
__a. The Main View, Browse List View, and the Item Details View of the ECAT application that will be built in this lab are shown below:
The Main view consists of a dojox.mobile.ScrollableView, with a Header, and a feature button (Browse Catalog).
The Browse List view is also built on a dojox.mobile.ScrollableView, and contains a Header, a navigation button to return to the Main view, and a scrollable listing of the items in the catalog. When one of the items in the list are selected, you are directed to the Item Details View.
When an item is selected via the Browse List View or the Inquire Items View, you are directed to the Item Details View. This view is also a dojox.mobile.ScrollableView, with the item details listed. This view also has six dojox.mobile.TextBox(s) and an ‘Order Items’ Button. When the items quantity is selected and the ‘Order Items’ button is tapped, that item and its quantity is ordered.
__2. Prepare Eclipse for Rich Page Editor development by opening the appropriate eclipse Views.
Ensure that you have both the Palette and Mobile Navigation tabs visible for use with the Rich Page Editor. We will use Mobile Navigation to manipulate and navigate between the ScrollableViews in index.html, and the Palette will allow us to drag visual elements onto the page.

IBM Software
Contents Page 19
(You can place the tabs in whichever way seems most efficient to you)
“Pages” in a mobile application are built on views. For this application we are using dojox.mobile.ScrollableViews, which are dojo view widgets that manage a view pane. Ensure that the index.html file is the active file in the editor pane, and that the design or split editor tab is visible.
IBM Software
Page 20 Getting Started with IBM Worklight
NOTE: Sometime it may be necessary to close and re-open the index.html file if the Design pane does not behave as expected.
__3. Open the file index.html into the editor if it’s not already opened.
__4. Update the default ScrollableView in the index.html page. This view was added by default by the template tools when you select the Dojo toolkit in the beginning of the first section.
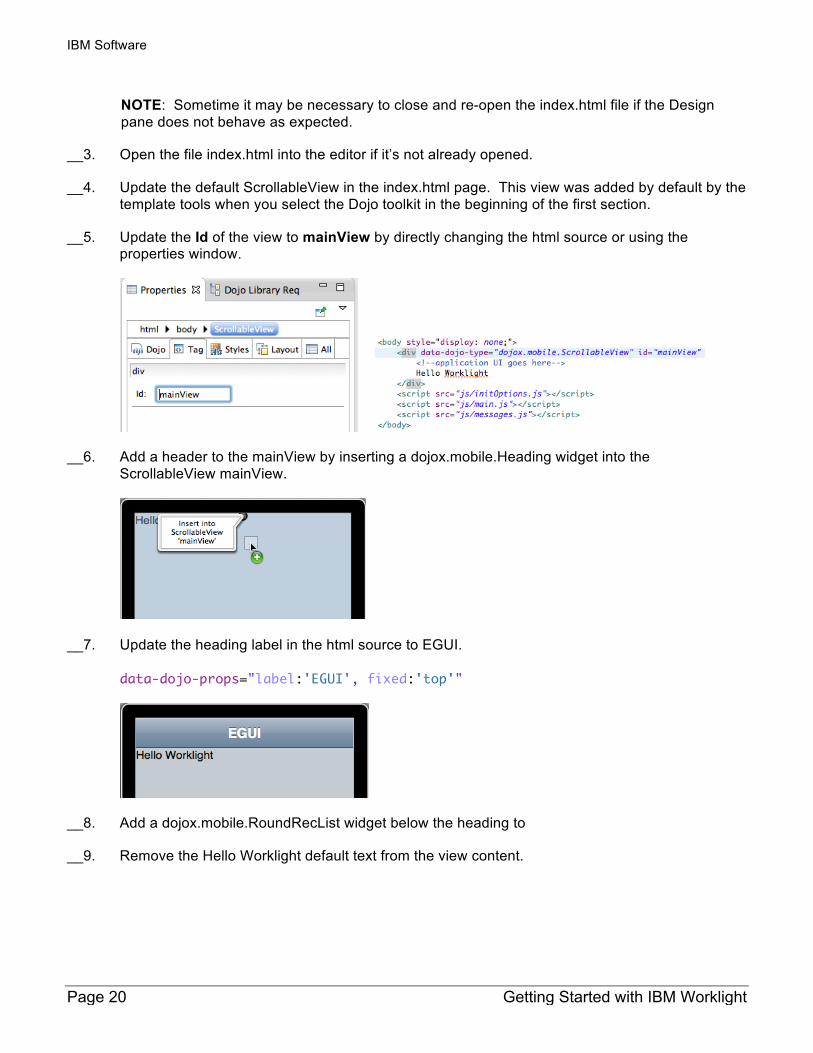
__5. Update the Id of the view to mainView by directly changing the html source or using the properties window.
__6. Add a header to the mainView by inserting a dojox.mobile.Heading widget into the ScrollableView mainView.
__7. Update the heading label in the html source to EGUI.
data-dojo-props="label:'EGUI', fixed:'top'"
__8. Add a dojox.mobile.RoundRecList widget below the heading to
__9. Remove the Hello Worklight default text from the view content.
IBM Software
Contents Page 21
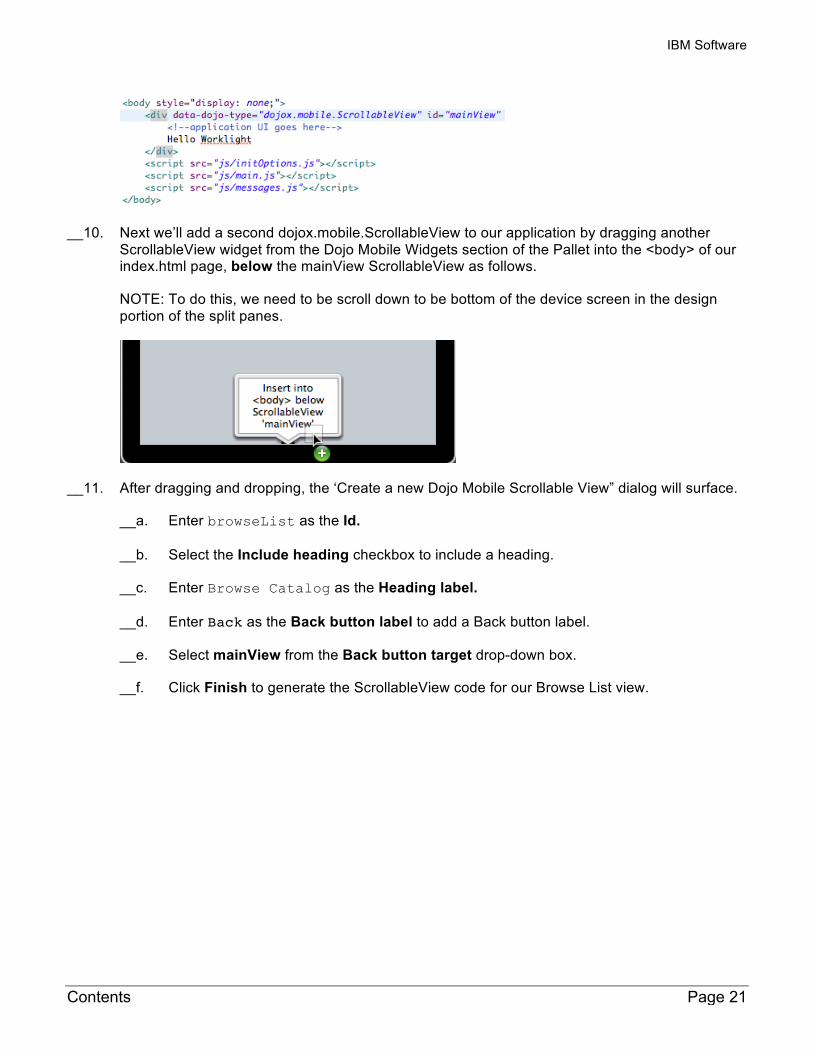
__10. Next we’ll add a second dojox.mobile.ScrollableView to our application by dragging another ScrollableView widget from the Dojo Mobile Widgets section of the Pallet into the <body> of our index.html page, below the mainView ScrollableView as follows.
NOTE: To do this, we need to be scroll down to be bottom of the device screen in the design portion of the split panes.
__11. After dragging and dropping, the ‘Create a new Dojo Mobile Scrollable View” dialog will surface.
__a. Enter browseList as the Id.
__b. Select the Include heading checkbox to include a heading.
__c. Enter Browse Catalog as the Heading label.
__d. Enter Back as the Back button label to add a Back button label.
__e. Select mainView from the Back button target drop-down box.
__f. Click Finish to generate the ScrollableView code for our Browse List view.
IBM Software
Page 22 Getting Started with IBM Worklight
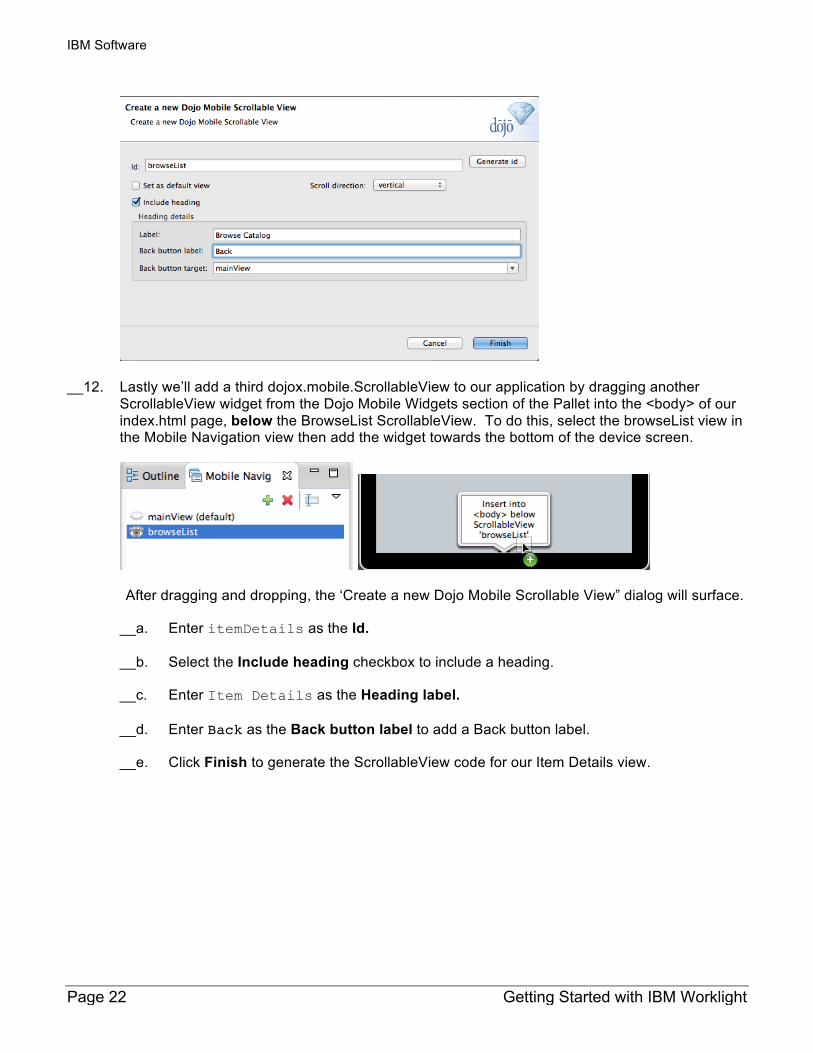
__12. Lastly we’ll add a third dojox.mobile.ScrollableView to our application by dragging another ScrollableView widget from the Dojo Mobile Widgets section of the Pallet into the <body> of our index.html page, below the BrowseList ScrollableView. To do this, select the browseList view in the Mobile Navigation view then add the widget towards the bottom of the device screen.
After dragging and dropping, the ‘Create a new Dojo Mobile Scrollable View” dialog will surface.
__a. Enter itemDetails as the Id.
__b. Select the Include heading checkbox to include a heading.
__c. Enter Item Details as the Heading label.
__d. Enter Back as the Back button label to add a Back button label.
__e. Click Finish to generate the ScrollableView code for our Item Details view.
IBM Software
Contents Page 23
__13. Open the Mobile Navigation tab and notice how you can alternate the contents of the design tab in the Rich Page Editor by selecting which is the active Mobile View – the view with the open eye icon is currently displayed in the design tab. Click the closed eyelid to make that Mobile View become the visible view in the editor.
If you double click to select the the mainView in the Mobile Navigation tab, it is rendered in the design tab. This goes for any of the three views we created.
Congratulations, we have now designed our application’s three views. We now want to create the content of those views.
1.5.2 Adding the structure to the views
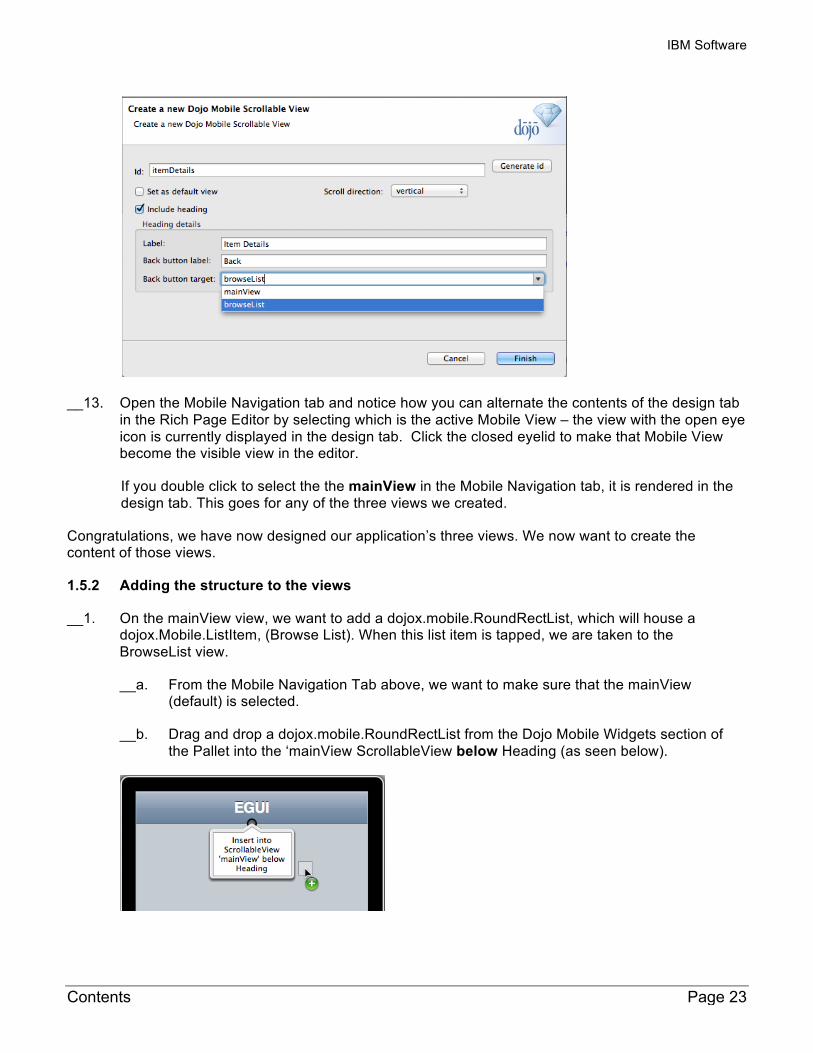
__1. On the mainView view, we want to add a dojox.mobile.RoundRectList, which will house a dojox.Mobile.ListItem, (Browse List). When this list item is tapped, we are taken to the BrowseList view.
__a. From the Mobile Navigation Tab above, we want to make sure that the mainView (default) is selected.
__b. Drag and drop a dojox.mobile.RoundRectList from the Dojo Mobile Widgets section of the Pallet into the ‘mainView ScrollableView below Heading (as seen below).
IBM Software
Page 24 Getting Started with IBM Worklight
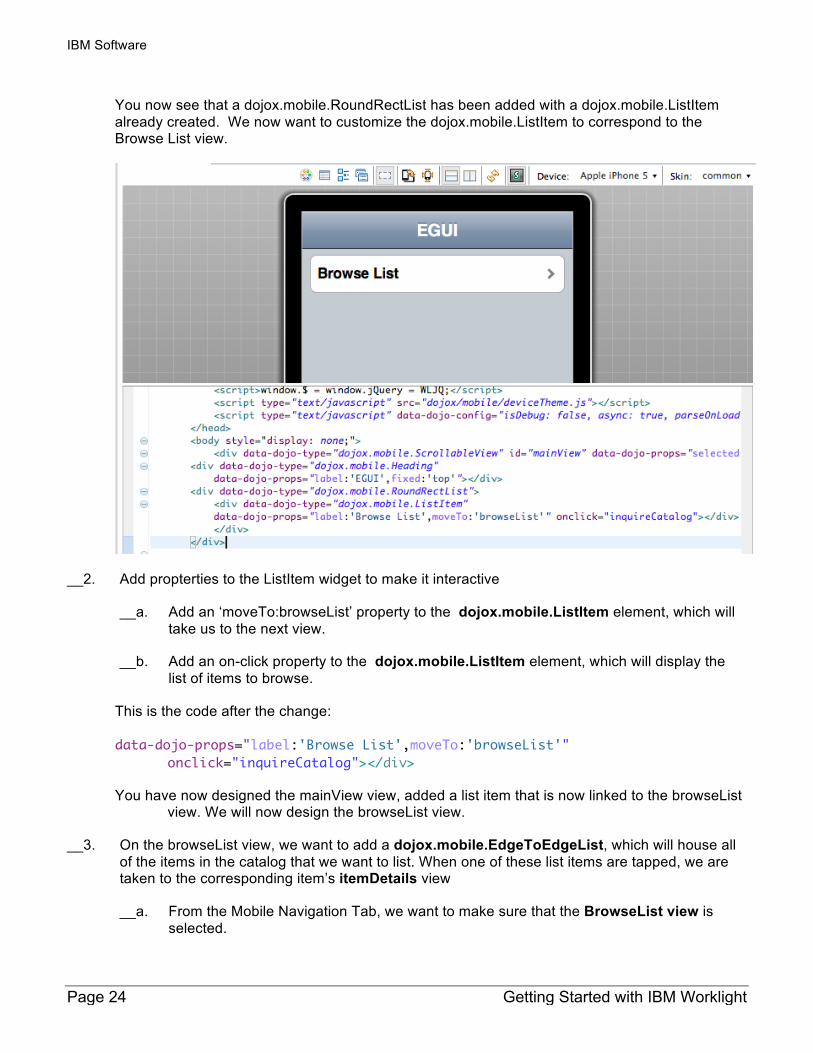
You now see that a dojox.mobile.RoundRectList has been added with a dojox.mobile.ListItem already created. We now want to customize the dojox.mobile.ListItem to correspond to the Browse List view.
__2. Add propterties to the ListItem widget to make it interactive
__a. Add an ‘moveTo:browseList’ property to the dojox.mobile.ListItem element, which will take us to the next view.
__b. Add an on-click property to the dojox.mobile.ListItem element, which will display the list of items to browse.
This is the code after the change:
data-dojo-props="label:'Browse List',moveTo:'browseList'" onclick="inquireCatalog"></div>
You have now designed the mainView view, added a list item that is now linked to the browseList view. We will now design the browseList view.
__3. On the browseList view, we want to add a dojox.mobile.EdgeToEdgeList, which will house all of the items in the catalog that we want to list. When one of these list items are tapped, we are taken to the corresponding item’s itemDetails view
__a. From the Mobile Navigation Tab, we want to make sure that the BrowseList view is selected.

IBM Software
Contents Page 25
__b. Drag and drop a dojox.mobile.EdgeToEdgeList from the Dojo Mobile Widgets section of the Pallet into the ‘BrowseList’ ScrollableView below Heading (as seen below).
__c. We will now make a slight change to the dojox.mobile.EdgeToEdgeList in the source view. Delete the dojox.mobile.ListItem completely, from </div> to <div> as shown in the red rectangle below.
__d. Also copy and paste the following line to add an ID property to the dojox.mobile.EdgeToEdgeList element. The source code should look like this:
<div data-dojo-type="dojox.mobile.EdgeToEdgeList" id="catalogList">
Both of these changes are reflected below.
The first image is the before:
This image is the after:
__e. Make sure to save your changes to the index.html.
This change allows the dojox.mobile.EdgeToEdgeList to be populated with a number of list items dynamically, which we will get to in later steps.
__4. You have now designed the BrowseList view, added a dojox.mobile.EdgeToEdgeList which will be linked to the itemDetails view. We will now design the itemDetails view.
IBM Software
Page 26 Getting Started with IBM Worklight
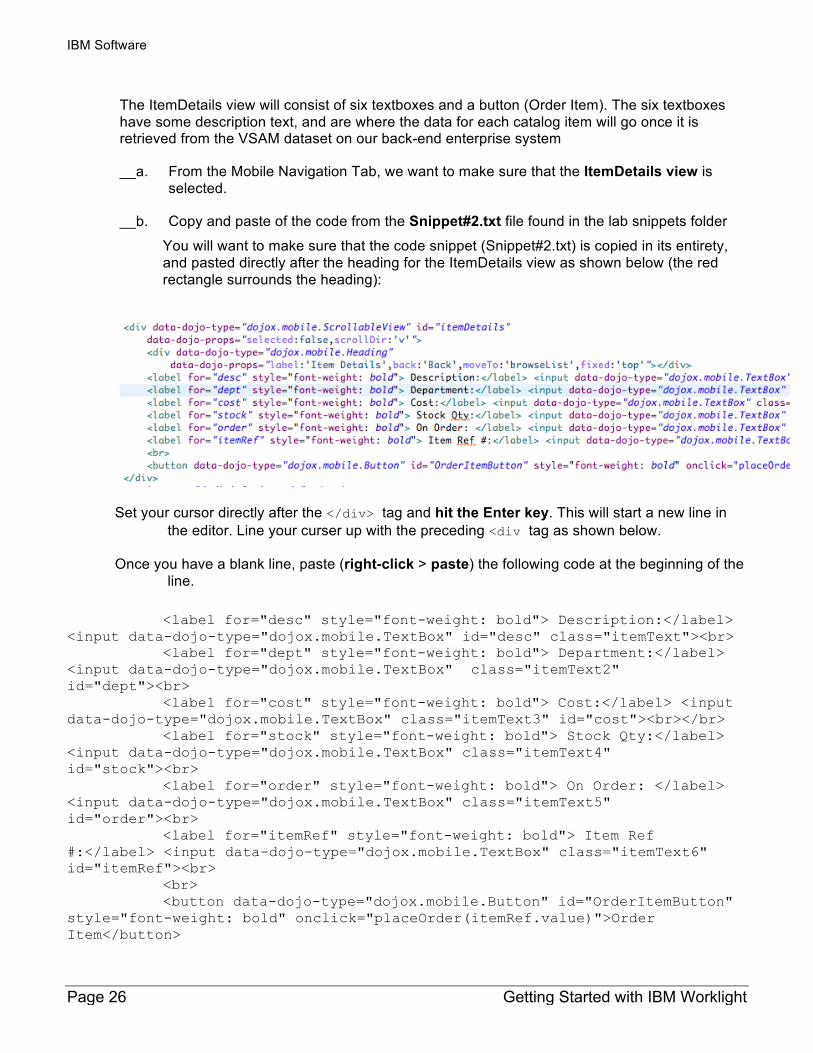
The ItemDetails view will consist of six textboxes and a button (Order Item). The six textboxes have some description text, and are where the data for each catalog item will go once it is retrieved from the VSAM dataset on our back-end enterprise system
__a. From the Mobile Navigation Tab, we want to make sure that the ItemDetails view is selected.
__b. Copy and paste of the code from the Snippet#2.txt file found in the lab snippets folder
You will want to make sure that the code snippet (Snippet#2.txt) is copied in its entirety, and pasted directly after the heading for the ItemDetails view as shown below (the red rectangle surrounds the heading):
Set your cursor directly after the </div> tag and hit the Enter key. This will start a new line in the editor. Line your curser up with the preceding <div tag as shown below.
Once you have a blank line, paste (right-click > paste) the following code at the beginning of the line.
<label for="desc" style="font-weight: bold"> Description:</label> <input data-dojo-type="dojox.mobile.TextBox" id="desc" class="itemText"><br> <label for="dept" style="font-weight: bold"> Department:</label> <input data-dojo-type="dojox.mobile.TextBox" class="itemText2" id="dept"><br> <label for="cost" style="font-weight: bold"> Cost:</label> <input data-dojo-type="dojox.mobile.TextBox" class="itemText3" id="cost"><br></br> <label for="stock" style="font-weight: bold"> Stock Qty:</label> <input data-dojo-type="dojox.mobile.TextBox" class="itemText4" id="stock"><br> <label for="order" style="font-weight: bold"> On Order: </label> <input data-dojo-type="dojox.mobile.TextBox" class="itemText5" id="order"><br> <label for="itemRef" style="font-weight: bold"> Item Ref #:</label> <input data-dojo-type="dojox.mobile.TextBox" class="itemText6" id="itemRef"><br> <br> <button data-dojo-type="dojox.mobile.Button" id="OrderItemButton" style="font-weight: bold" onclick="placeOrder(itemRef.value)">Order Item</button>
IBM Software
Contents Page 27
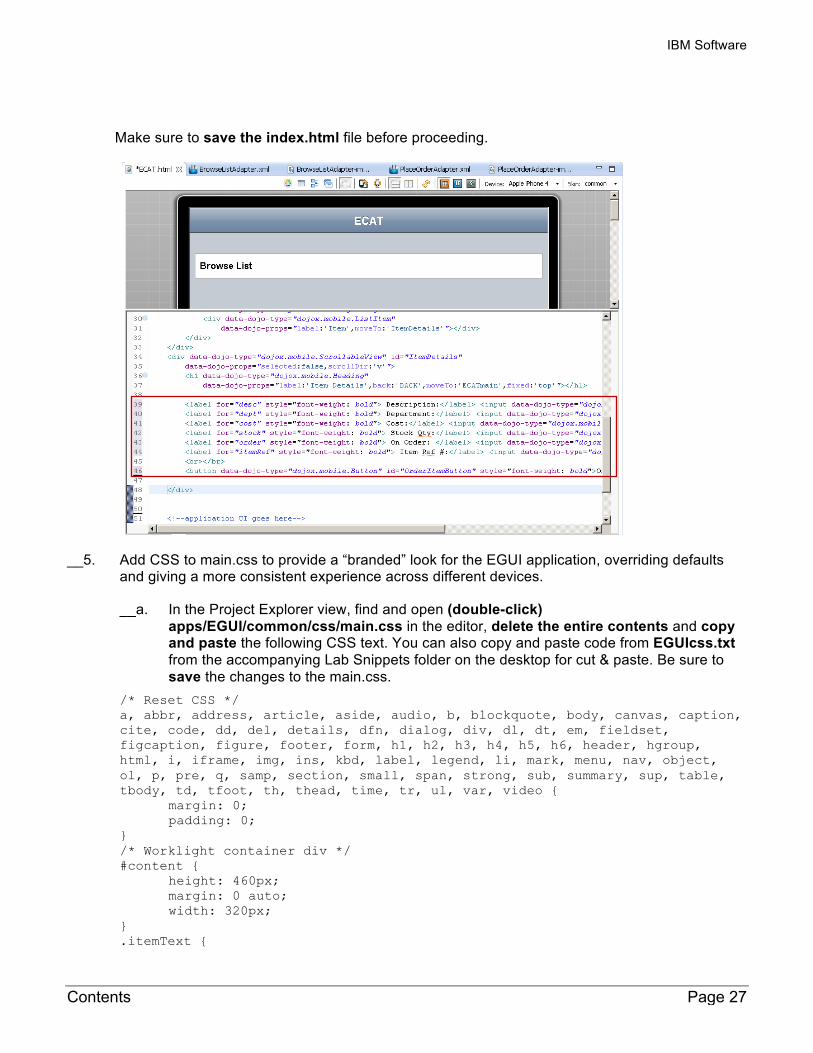
Make sure to save the index.html file before proceeding.
__5. Add CSS to main.css to provide a “branded” look for the EGUI application, overriding defaults and giving a more consistent experience across different devices.
__a. In the Project Explorer view, find and open (double-click) apps/EGUI/common/css/main.css in the editor, delete the entire contents and copy and paste the following CSS text. You can also copy and paste code from EGUIcss.txt from the accompanying Lab Snippets folder on the desktop for cut & paste. Be sure to save the changes to the main.css.
/* Reset CSS */ a, abbr, address, article, aside, audio, b, blockquote, body, canvas, caption, cite, code, dd, del, details, dfn, dialog, div, dl, dt, em, fieldset, figcaption, figure, footer, form, h1, h2, h3, h4, h5, h6, header, hgroup, html, i, iframe, img, ins, kbd, label, legend, li, mark, menu, nav, object, ol, p, pre, q, samp, section, small, span, strong, sub, summary, sup, table, tbody, td, tfoot, th, thead, time, tr, ul, var, video { margin: 0; padding: 0; } /* Worklight container div */ #content { height: 460px; margin: 0 auto; width: 320px; } .itemText {

IBM Software
Page 28 Getting Started with IBM Worklight
margin-top: 5px; margin-left: 19px; } .itemText2 { margin-top: 20px; margin-left: 18px; } .itemText3 { margin-top: 25px; margin-left: 72px; } .itemText4 { margin-top: 30px; margin-left: 31px; } .itemText5 { margin-top: 35px; margin-left: 34px; } .itemText6 { margin-top: 40px; margin-left: 31px; } .spacer { margin-top: 100px; } .mblView { background: -webkit-gradient(linear, left top, left bottom, from(#096093), to(#ffffff)) !important; } .mblHeading{ background:-webkit-gradient(linear, left top, left bottom, from(#379AC4), to(#096193)) !important; } /* workaround for white on white in simpleDialogs */ #WLdialog { color:black; }
By adding in the CSS Styles provided, we are able to make the application running on all devices look the same. The EGUI/common/css folder contains a stylesheet (main.css) that overrides the CSS for individual platforms (Android, iOS, ect.) so changes we made here will reflect in all device types.
1.5.3 Adding functionality to the views
In this section we will add and update content to main.js JavaScript file in order to provide the logic for the mobile application to function.
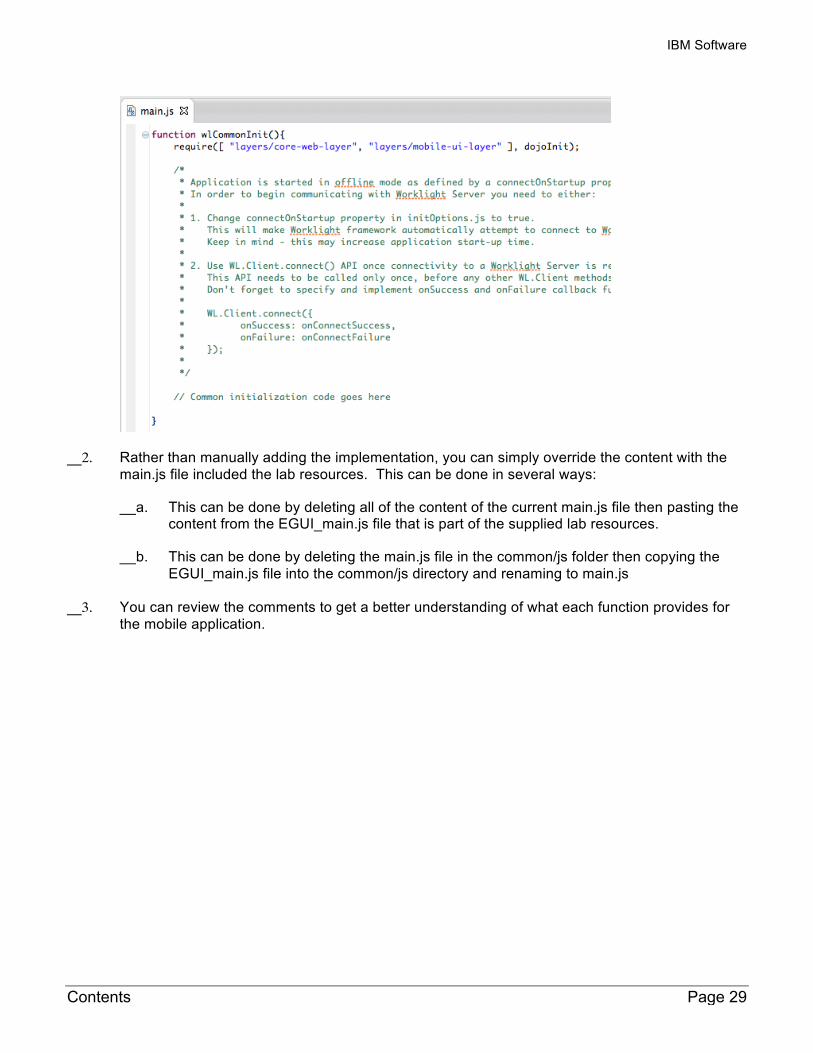
__1. Open the /apps/EGUI/common/main.js file. You will see that there are some functions already defined: wlCommonInit() and dojoInit()
IBM Software
Contents Page 29
__2. Rather than manually adding the implementation, you can simply override the content with the main.js file included the lab resources. This can be done in several ways:
__a. This can be done by deleting all of the content of the current main.js file then pasting the content from the EGUI_main.js file that is part of the supplied lab resources.
__b. This can be done by deleting the main.js file in the common/js folder then copying the EGUI_main.js file into the common/js directory and renaming to main.js
__3. You can review the comments to get a better understanding of what each function provides for the mobile application.
IBM Software
Page 30 Getting Started with IBM Worklight
1.6 Retrieving Data with a Worklight Adapter
In this portion of the lab, you will build two Worklight HTTP adapters and integrate them into the ECAT application.
A Worklight adapter is hosted on the Worklight server, and interacts with remote data sources, retrieving data or performing actions. The Worklight client runtime provides a simple, common JavaScript interface to invoke the adapter and exchange data from a mobile application.
In this lab you will be connecting the mobile front-end application that you have built with back-end services and data from the original version of this application, running in CICS Transaction Server on z/OS. This 3270 CICS application has been web-service enabled so that we can use modern application interfaces, such as Web and Mobile, to re-use the business logic and access data from our legacy application. These web-services can be communicated with by sending SOAP messages through HTTP ‘post’ requests. In this next section, you will build the Worklight Adapter that contain the messaging structure for sending and receiving information to/from the System z.
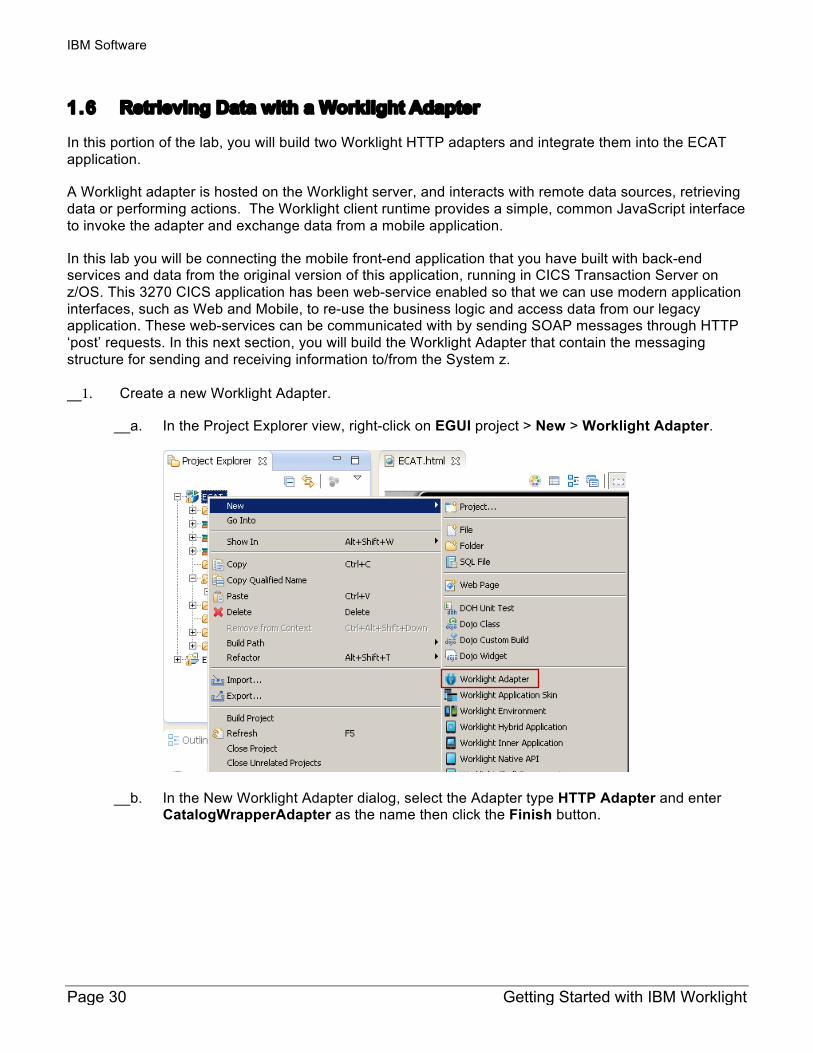
__1. Create a new Worklight Adapter.
__a. In the Project Explorer view, right-click on EGUI project > New > Worklight Adapter.
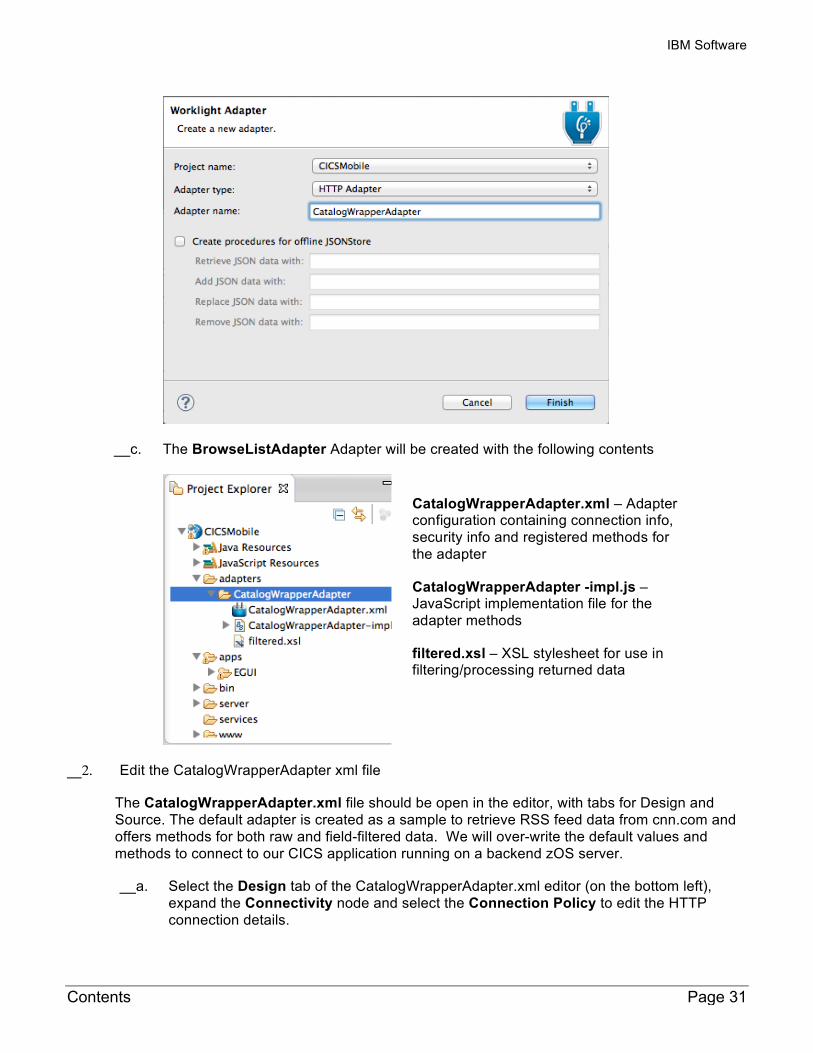
__b. In the New Worklight Adapter dialog, select the Adapter type HTTP Adapter and enter CatalogWrapperAdapter as the name then click the Finish button.
IBM Software
Contents Page 31
__c. The BrowseListAdapter Adapter will be created with the following contents
__2. Edit the CatalogWrapperAdapter xml file
The CatalogWrapperAdapter.xml file should be open in the editor, with tabs for Design and Source. The default adapter is created as a sample to retrieve RSS feed data from cnn.com and offers methods for both raw and field-filtered data. We will over-write the default values and methods to connect to our CICS application running on a backend zOS server.
__a. Select the Design tab of the CatalogWrapperAdapter.xml editor (on the bottom left), expand the Connectivity node and select the Connection Policy to edit the HTTP connection details.
CatalogWrapperAdapter.xml – Adapter configuration containing connection info, security info and registered methods for the adapter
CatalogWrapperAdapter -impl.js – JavaScript implementation file for the adapter methods
filtered.xsl – XSL stylesheet for use in filtering/processing returned data
IBM Software
Page 32 Getting Started with IBM Worklight
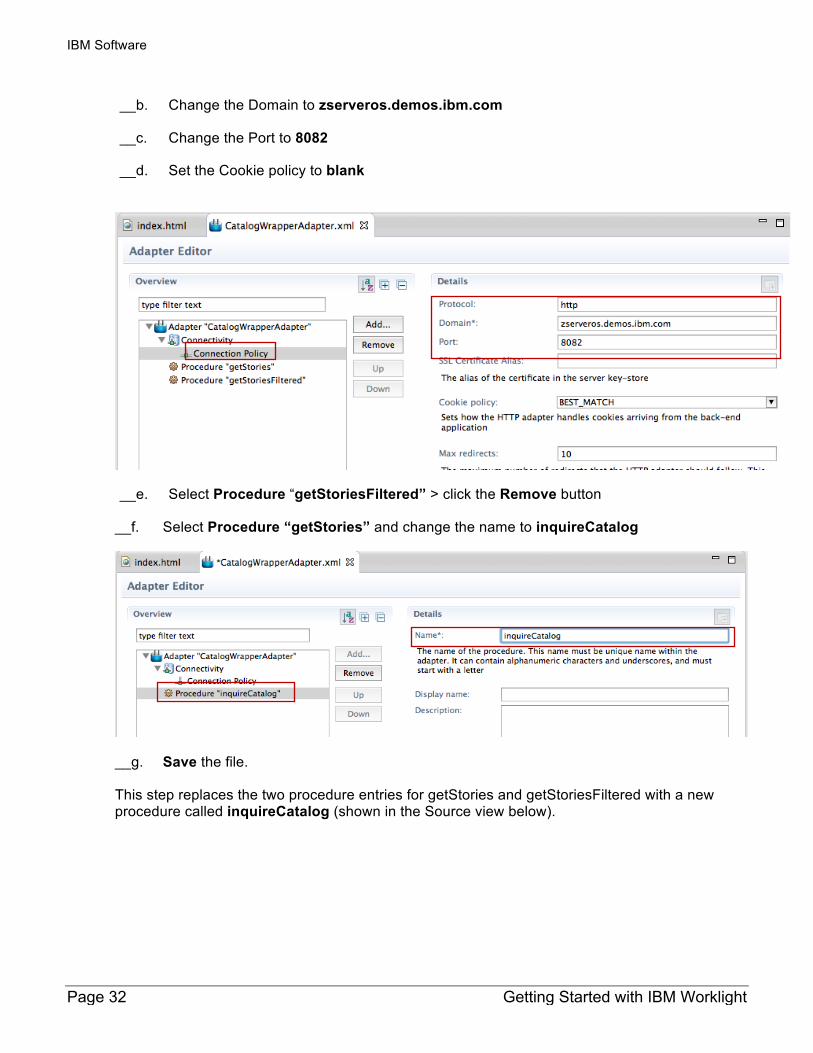
__b. Change the Domain to zserveros.demos.ibm.com
__c. Change the Port to 8082
__d. Set the Cookie policy to blank
__e. Select Procedure “getStoriesFiltered” > click the Remove button
__f. Select Procedure “getStories” and change the name to inquireCatalog
__g. Save the file.
This step replaces the two procedure entries for getStories and getStoriesFiltered with a new procedure called inquireCatalog (shown in the Source view below).
IBM Software
Contents Page 33
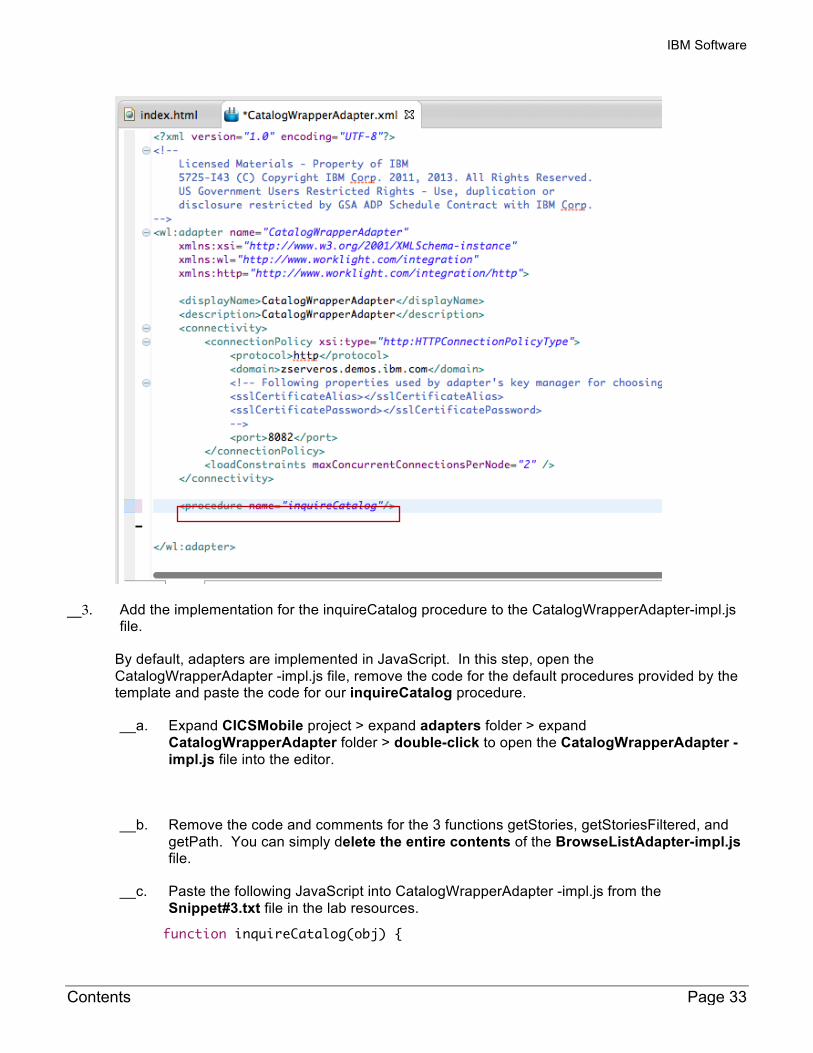
__3. Add the implementation for the inquireCatalog procedure to the CatalogWrapperAdapter-impl.js file.
By default, adapters are implemented in JavaScript. In this step, open the CatalogWrapperAdapter -impl.js file, remove the code for the default procedures provided by the template and paste the code for our inquireCatalog procedure.
__a. Expand CICSMobile project > expand adapters folder > expand CatalogWrapperAdapter folder > double-click to open the CatalogWrapperAdapter -impl.js file into the editor.
__b. Remove the code and comments for the 3 functions getStories, getStoriesFiltered, and getPath. You can simply delete the entire contents of the BrowseListAdapter-impl.js file.
__c. Paste the following JavaScript into CatalogWrapperAdapter -impl.js from the Snippet#3.txt file in the lab resources.
function inquireCatalog(obj) {
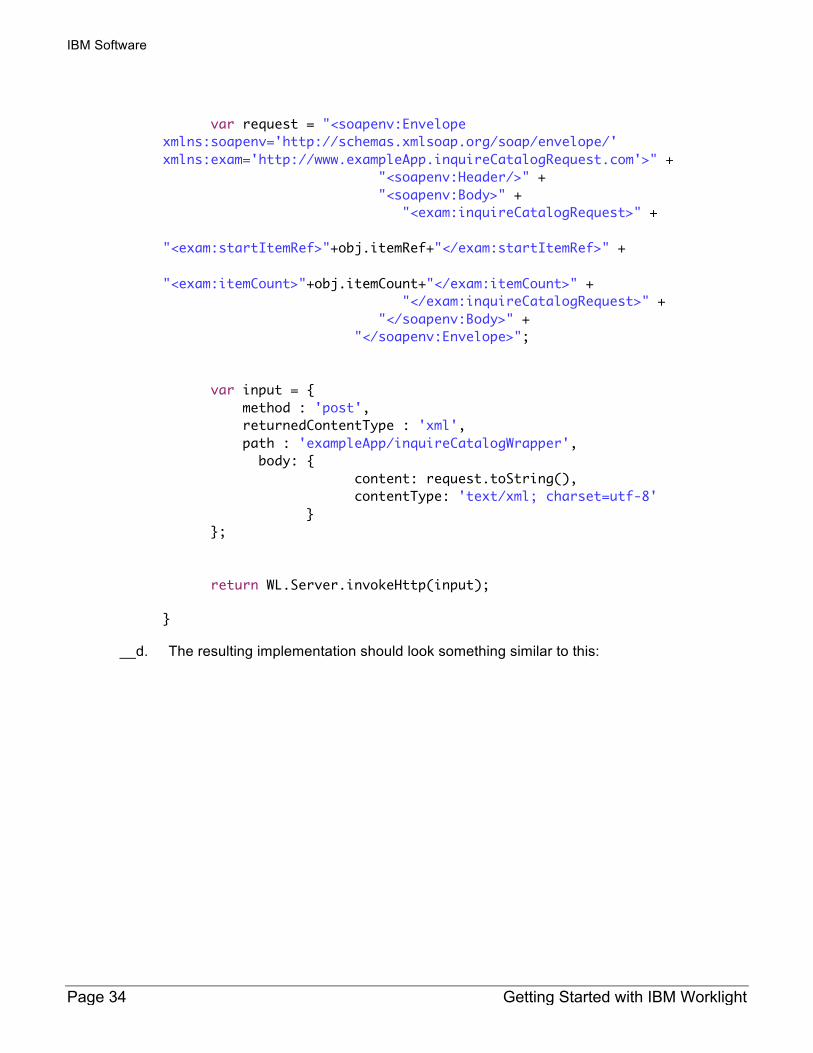
IBM Software
Page 34 Getting Started with IBM Worklight
var request = "<soapenv:Envelope xmlns:soapenv='http://schemas.xmlsoap.org/soap/envelope/' xmlns:exam='http://www.exampleApp.inquireCatalogRequest.com'>" + "<soapenv:Header/>" + "<soapenv:Body>" + "<exam:inquireCatalogRequest>" + "<exam:startItemRef>"+obj.itemRef+"</exam:startItemRef>" + "<exam:itemCount>"+obj.itemCount+"</exam:itemCount>" + "</exam:inquireCatalogRequest>" + "</soapenv:Body>" + "</soapenv:Envelope>"; var input = { method : 'post', returnedContentType : 'xml', path : 'exampleApp/inquireCatalogWrapper', body: { content: request.toString(), contentType: 'text/xml; charset=utf-8' } }; return WL.Server.invokeHttp(input);
}
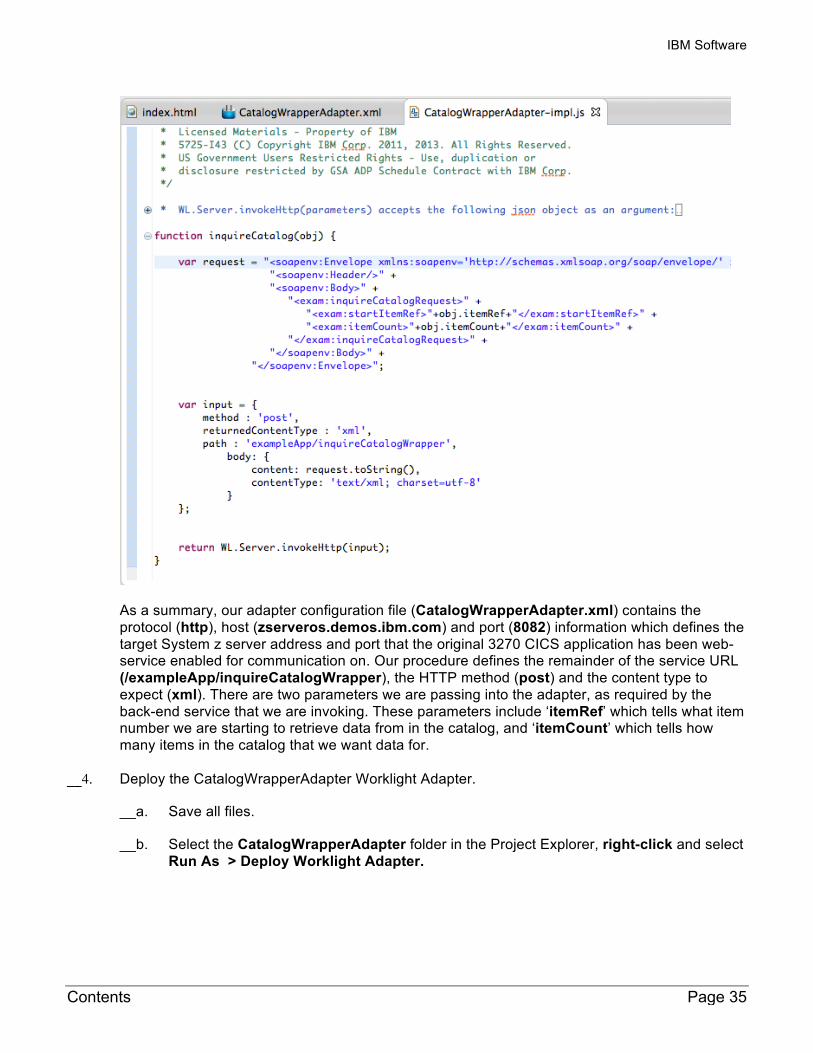
__d. The resulting implementation should look something similar to this:
IBM Software
Contents Page 35
As a summary, our adapter configuration file (CatalogWrapperAdapter.xml) contains the protocol (http), host (zserveros.demos.ibm.com) and port (8082) information which defines the target System z server address and port that the original 3270 CICS application has been web-service enabled for communication on. Our procedure defines the remainder of the service URL (/exampleApp/inquireCatalogWrapper), the HTTP method (post) and the content type to expect (xml). There are two parameters we are passing into the adapter, as required by the back-end service that we are invoking. These parameters include ‘itemRef’ which tells what item number we are starting to retrieve data from in the catalog, and ‘itemCount’ which tells how many items in the catalog that we want data for.
__4. Deploy the CatalogWrapperAdapter Worklight Adapter.
__a. Save all files.
__b. Select the CatalogWrapperAdapter folder in the Project Explorer, right-click and select Run As > Deploy Worklight Adapter.
IBM Software
Page 36 Getting Started with IBM Worklight
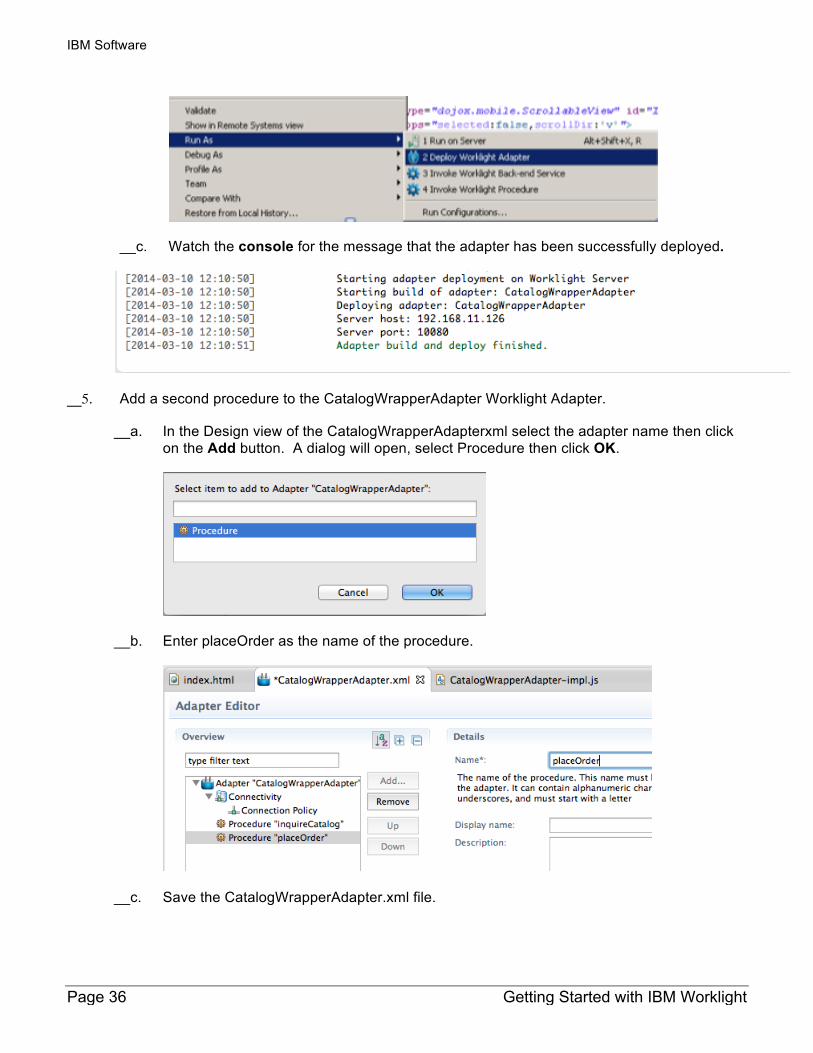
__c. Watch the console for the message that the adapter has been successfully deployed.
__5. Add a second procedure to the CatalogWrapperAdapter Worklight Adapter.
__a. In the Design view of the CatalogWrapperAdapterxml select the adapter name then click on the Add button. A dialog will open, select Procedure then click OK.
__b. Enter placeOrder as the name of the procedure.
__c. Save the CatalogWrapperAdapter.xml file.

IBM Software
Contents Page 37
__6. Add the implementation for the placeOrder procedure to the CatalogWrapperAdapter -impl.js file by copy and pastimg the following JavaScript from Snippet#4.txt into CatalogWrapperAdapter-impl.js
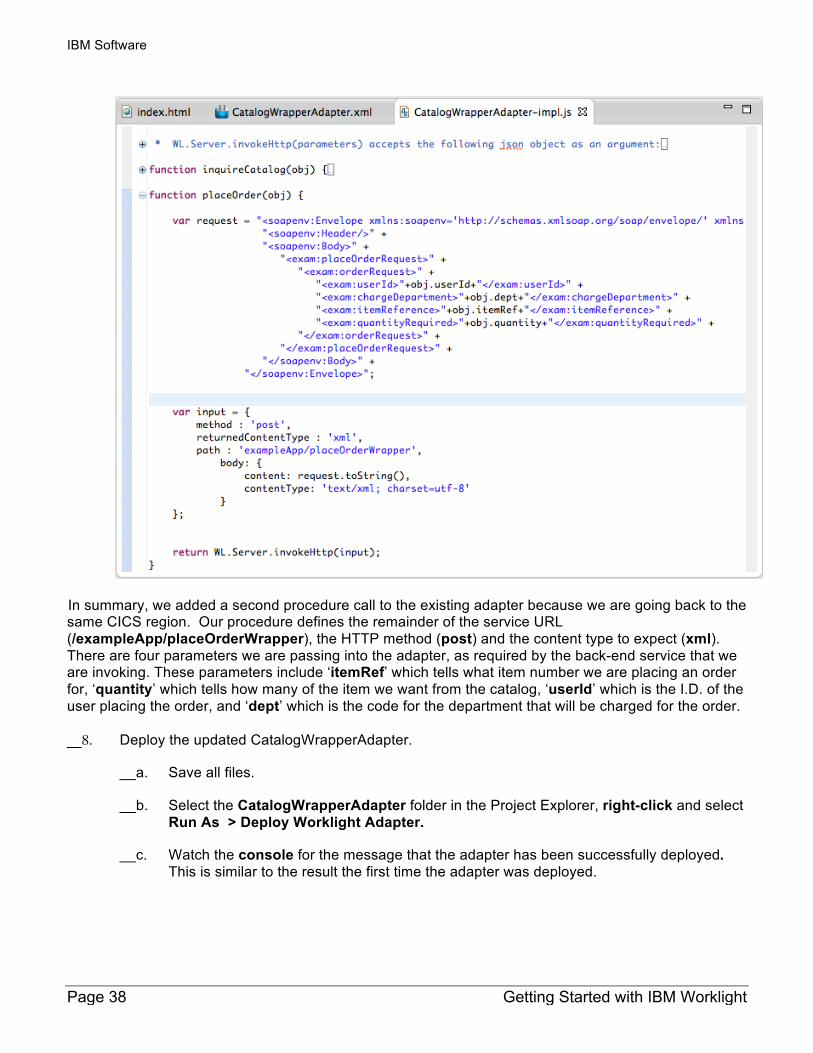
function placeOrder(obj) { var request = "<soapenv:Envelope xmlns:soapenv='http://schemas.xmlsoap.org/soap/envelope/' xmlns:exam='http://www.exampleApp.placeOrderRequest.com'>" + "<soapenv:Header/>" + "<soapenv:Body>" + "<exam:placeOrderRequest>" + "<exam:orderRequest>" + "<exam:userId>"+obj.userId+"</exam:userId>" + "<exam:chargeDepartment>"+obj.dept+"</exam:chargeDepartment>" + "<exam:itemReference>"+obj.itemRef+"</exam:itemReference>" + "<exam:quantityRequired>"+obj.quantity+"</exam:quantityRequired>" + "</exam:orderRequest>" + "</exam:placeOrderRequest>" + "</soapenv:Body>" + "</soapenv:Envelope>"; var input = { method : 'post', returnedContentType : 'xml', path : 'exampleApp/PlaceOrderWrapper', body: { content: request.toString(), contentType: 'text/xml; charset=utf-8' } }; return WL.Server.invokeHttp(input); }
__7. The resulting implementation should look something like this:
IBM Software
Page 38 Getting Started with IBM Worklight
In summary, we added a second procedure call to the existing adapter because we are going back to the same CICS region. Our procedure defines the remainder of the service URL (/exampleApp/placeOrderWrapper), the HTTP method (post) and the content type to expect (xml). There are four parameters we are passing into the adapter, as required by the back-end service that we are invoking. These parameters include ‘itemRef’ which tells what item number we are placing an order for, ‘quantity’ which tells how many of the item we want from the catalog, ‘userId’ which is the I.D. of the user placing the order, and ‘dept’ which is the code for the department that will be charged for the order.
__8. Deploy the updated CatalogWrapperAdapter.
__a. Save all files.
__b. Select the CatalogWrapperAdapter folder in the Project Explorer, right-click and select Run As > Deploy Worklight Adapter.
__c. Watch the console for the message that the adapter has been successfully deployed. This is similar to the result the first time the adapter was deployed.
IBM Software
Contents Page 39
Congratulations you have successfully used the Worklight Studio to build a Worklight application with multiple mobile device environments, navigation between views, and are set to retrieve data from a back-end service with a Worklight adapter.
1.7 Test in Mobile Browser Simulator
The final step is to test the EGUI application using the Mobile Browser Simulator. A new external browser window will open with the simulator rendering our EGUI application.
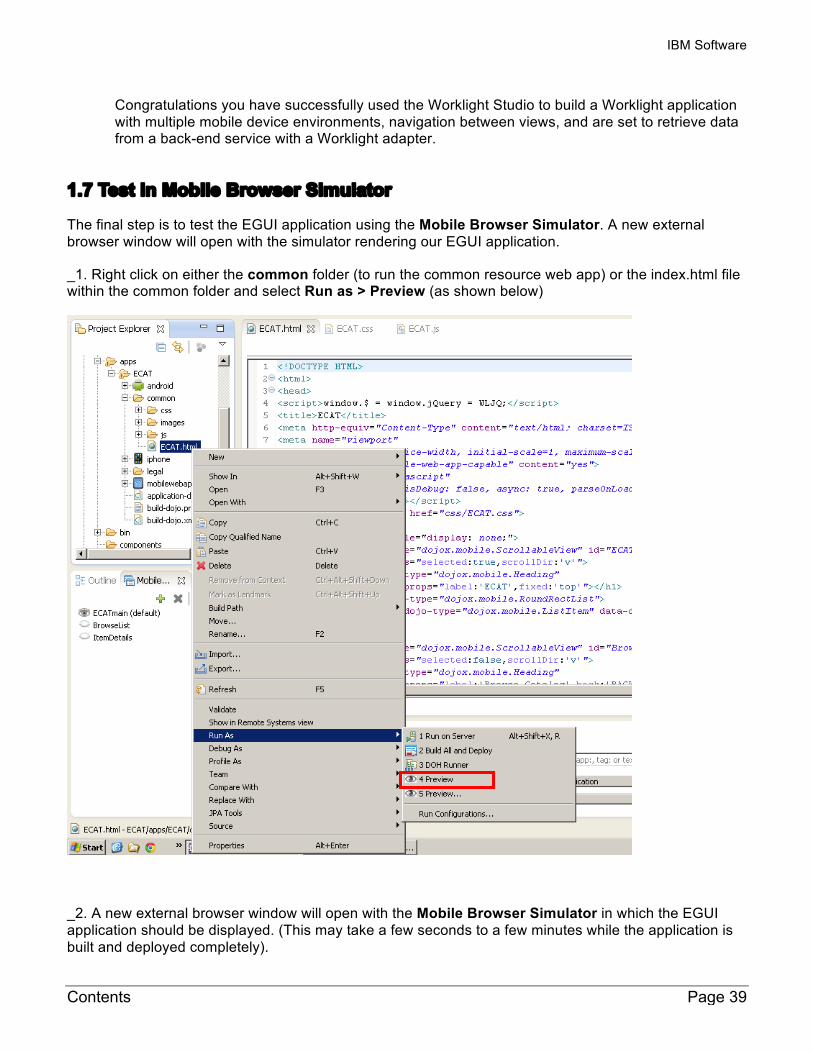
_1. Right click on either the common folder (to run the common resource web app) or the index.html file within the common folder and select Run as > Preview (as shown below)
_2. A new external browser window will open with the Mobile Browser Simulator in which the EGUI application should be displayed. (This may take a few seconds to a few minutes while the application is built and deployed completely).
IBM Software
Page 40 Getting Started with IBM Worklight
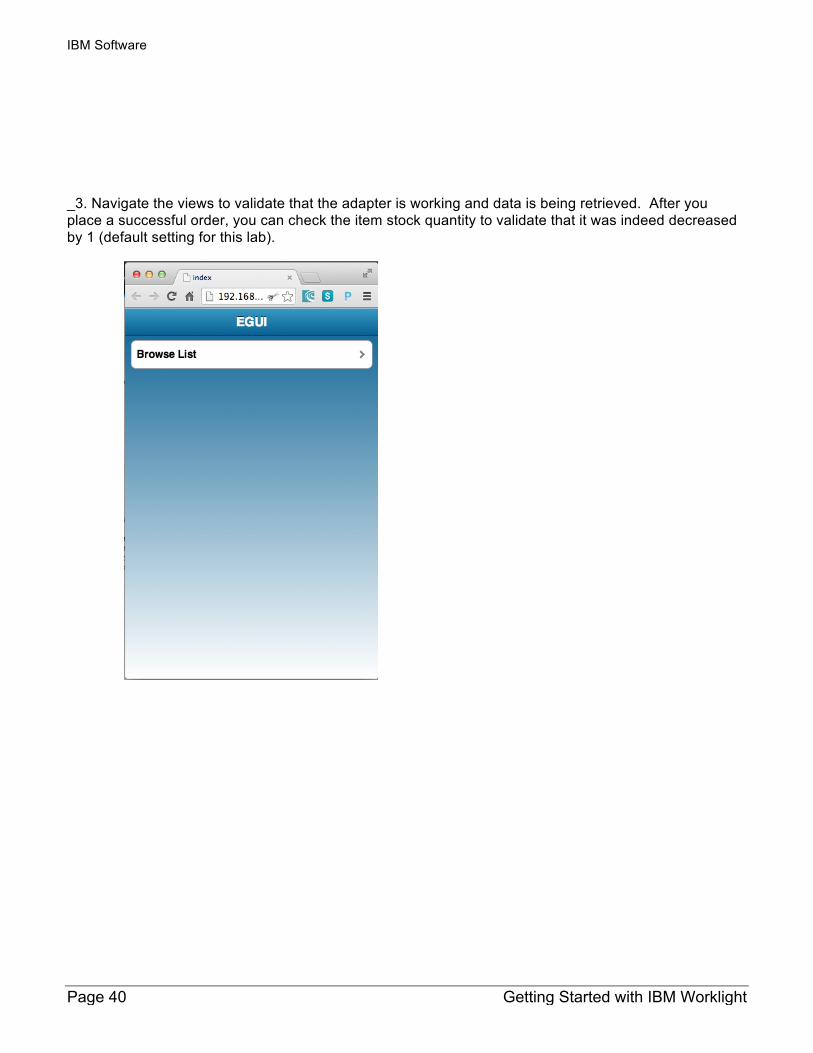
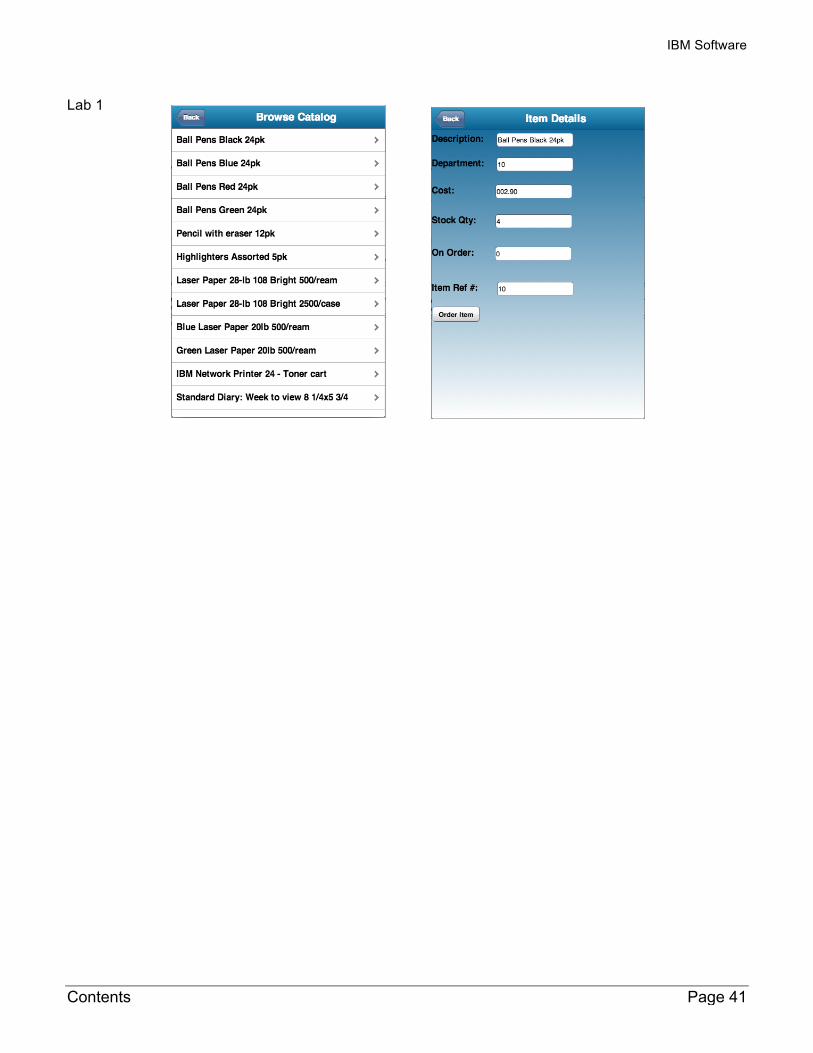
_3. Navigate the views to validate that the adapter is working and data is being retrieved. After you place a successful order, you can check the item stock quantity to validate that it was indeed decreased by 1 (default setting for this lab).
IBM Software
Contents Page 41
Lab 1
IBM Software
Page 42 Getting Started with IBM Worklight
1.8 Summary
In this lab you have learned how to use Worklight Studio to create a cross platform mobile application using HTML5, CSS, JavaScript, the Dojo Mobile framework. You have learned how to target specific devices such as iPhone and Android phones and seen some very basic customizations that can be applied for making the application look consistent across platforms. You have also seen how to use the Mobile Browser Simulator within both the Worklight Studio and the Worklight Console to test the application in preview mode.
You should now be familiar now with the Worklight Studio environment and the common development tasks associated with building a mobile application extending the capabilities of existing enterprise applications running on System z.
Congratulations!