2019 issue 4 - really right stuff – home
TRANSCRIPT

2 0 1 9 • I S S U E 4

FRONT & BACK COVER : LONELY WINTER TREE (Photo by Joe Johnson Sr.)
During our photo safari of Japan’s Winter Wildlife in Hokkaido, our leader John Shaw had the bus pull over in between wildlife hotspots so we could capture this incredibly beautiful landscape shot of a lonely tree in the middle of a snowy field. After lining up with the rest of the group along the roadside, I saw that if I ventured to the far left side of the field outside of the group’s view, I could get a different angle of the tree juxtaposed far aside from a stand of trees in the background. The resulting image was a perfect fit for the cover of this issue of Light and Shadow. Everyone was done shooting, so I trekked straight back to the bus and quickly found myself belly-deep in snow!
Camera: Nikon D810 | Lens: AF-S Nikkor 70-200mm f/2.8 VR II Shutter Speed: 1/80 sec | F-Stop: f/10 | ISO: 100 | Focal Length: 200mm | Location: Between Lake Kussharo and Notsuke Peninsula, Hokkaido, Japan | Gear: TVC-34 tripod, FG-02 Fluid Pano-Gimbal Head, LCF 10 Lens Collar Foot
CONTENTS
TABLE OF CONTENTS: MEMORIES (Photo by Christine Kenyon)
Camera: Nikon D810 | Lens: D810 Nikkor 70-200mm f/2.8 Shutter Speed: 1 sec | F-Stop: f/16 | ISO: 100 | Focal Length: 70mm
0102051119
Letter from the CEOby Joe Johnson Sr.
Japan's Winter Wildlifeby Joe Johnson Sr.
Starboundby Christine Kenyon
The Adventure of Adventure Photographyby Tom Bol
Holopaintingby Richard Thompson
The Other Side of YellowStoneby Jeff Vanuga
Switching to Smaller Formatby Joe McDonald
48 Hours to Floeby Dan Carr
Set Your Sites on Seascape Photographyby Rick Sammon
The Art of Polar Bear Photographyby Joshua Holko25
33414551
1 2Light & Shadow // 2019 www.reallyrightstuff.com
Joe Johnson Sr.CEO, Really Right Stuff
LETTER FROM THE CEO
Light & Shadow Magazine is a love letter from Really Right Stuff to photography. In this publication we hope to educate our readers, showcase the beautiful, and act as an avenue for amateur and professional photographers to meet and converse.
COMMENTS MAY BE SENT TO:
Light & Shadow Magazine Really Right Stuff Marketing Department 720 S 850 ELehi, UT 84043 USAPHONE: 1.385.248.0777 or Toll-freeUS & Canada: 1.888.777.5557EMAIL: [email protected]
EDITOR
Joe Johnson, Jr.
DESIGNERS
Rilee Shalvis, Vivian Aidukaitis & Logan Whitney
CONTRIBUTORS
Joseph Johnson Sr. Christine Kenyon Joe McDonald Tom Bol Rick Sammon Dan Carr Richard Thompson Joshua HolkoJeff Vanuga PRINTING
Publication Printers
To see our products in greater detail, please visit
our website at: www.reallyrightstuff.com
Links to social media sites available in the footer
of the RRS homepage.
Connect with us:
NOVEMBER 2019 • ISSUE 4
If you would like to change your mailing
preferences, please contact us at
Copyright ©2019 Really Right Stuff, LLC. All rights
reserved. Reproduction in whole or in part without
permission is prohibited.
Dear Friends,
To say our Really Right Stuff team has been busy since our last issue of Light & Shadow is a slight understatement. We moved the entire company from California to Utah, tripled manpower and in-house manufacturing capacity, and launched over 65 new products all while facing down one of our industry’s most severe contractions. Thankfully, the world about us is remarkable and technology continues to make the process of creating captivating images ever more accessible.
REALLY RIGHT STUFF MOVE TO LEHI, UTAHI described our pending relocation in our last issue of Light & Shadow. I’m happy to now report the move was successful and we’re quite pleased with our new digs. When you’re in the area, please stop by – we’d love to give you the nickel tour. I thank both the many stalwart RRS team members who journeyed with us on our trek to Utah, as well as the new Utahn team members who are showing us the ropes in the Rockies. The distinct seasons are a splendid change from California’s always-moderate central coast and make for all kinds of new adventures.
THIS ISSUE: ADVENTUREPenning a common theme for the great collection of articles published in this issue was not all that tough: adventure. You feel the sense of adventure when you push yourself outside your comfort zone to explore uncharted territory: try a new technique; go to a new destination (not necessarily but maybe even one at -30 below, a la Tom Bol & Josh Holko); visit the seashore or gaze at the stars through a teenager’s eyes. Do a fresh take on a previously photographed icon in the “off-season” or maybe even consider a new camera system.
My friends, life is precious and short. I challenge you to embark on an adventure now. Step out, see your world with fresh eyes and create beauty to uplift our fellow travelers.
All the Best,
JAPAN'S
WINTER WILDLIFE
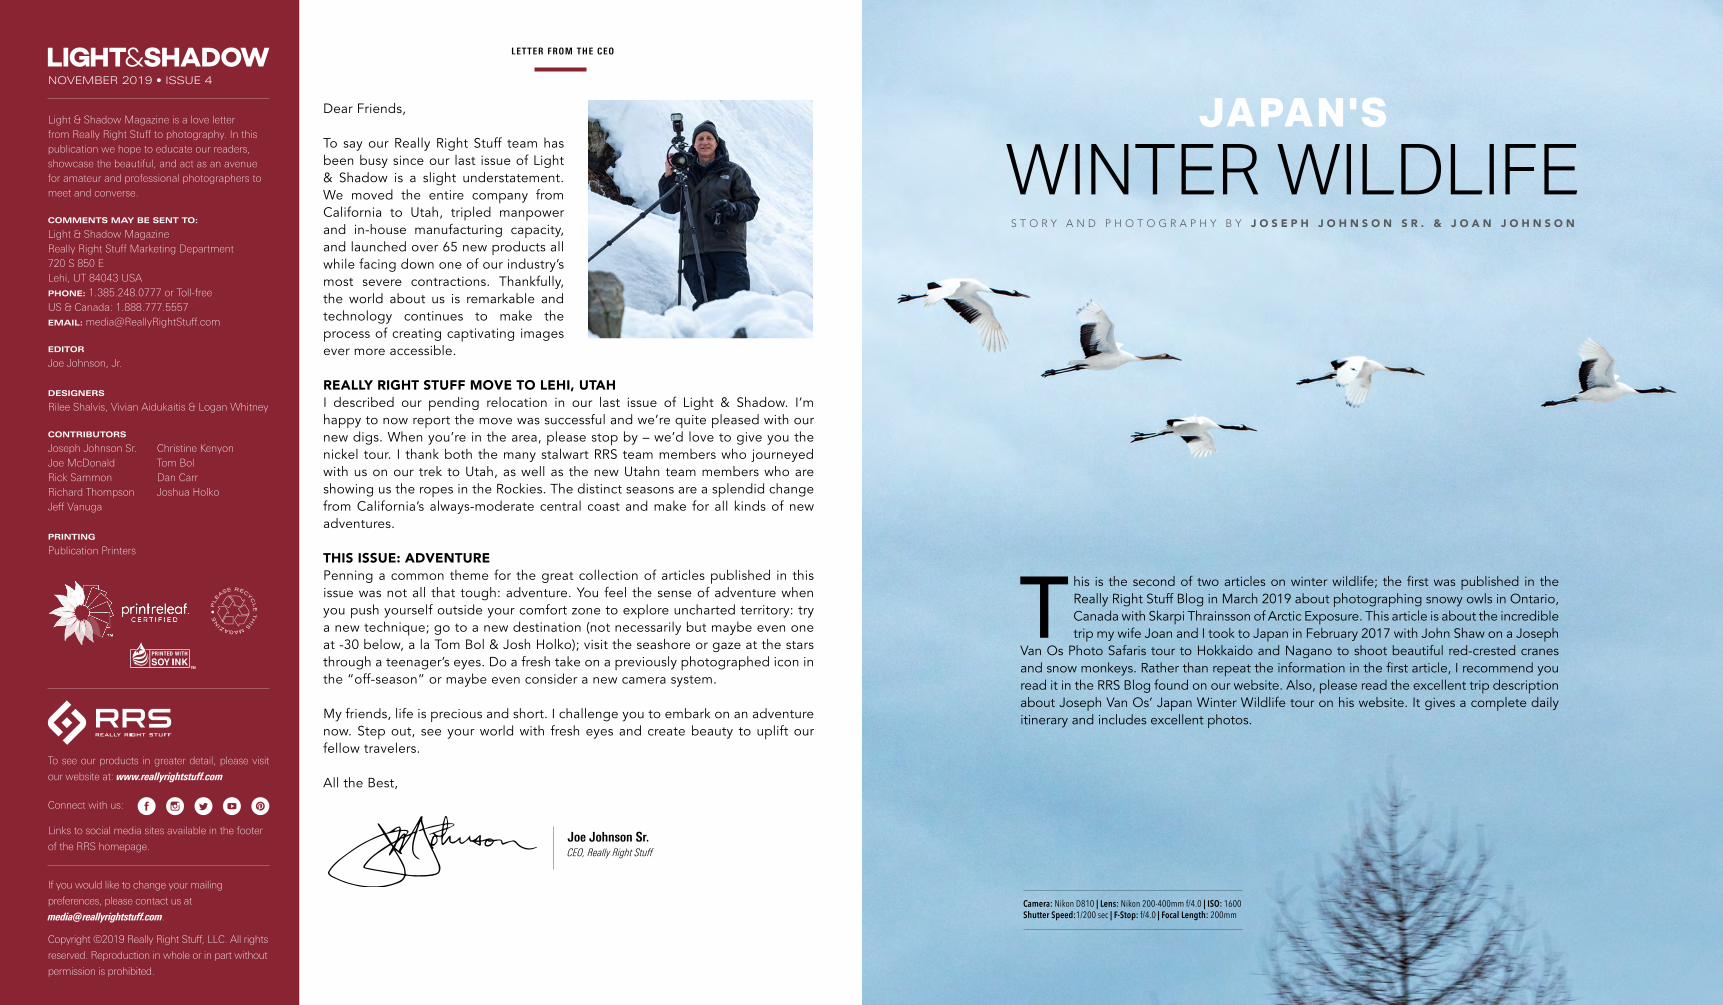
T his is the second of two articles on winter wildlife; the first was published in the Really Right Stuff Blog in March 2019 about photographing snowy owls in Ontario, Canada with Skarpi Thrainsson of Arctic Exposure. This article is about the incredible trip my wife Joan and I took to Japan in February 2017 with John Shaw on a Joseph
Van Os Photo Safaris tour to Hokkaido and Nagano to shoot beautiful red-crested cranes and snow monkeys. Rather than repeat the information in the first article, I recommend you read it in the RRS Blog found on our website. Also, please read the excellent trip description about Joseph Van Os’ Japan Winter Wildlife tour on his website. It gives a complete daily itinerary and includes excellent photos.
S T O R Y A N D P H O T O G R A P H Y B Y J O S E P H J O H N S O N S R . & J O A N J O H N S O N
Camera: Nikon D810 | Lens: Nikon 200-400mm f/4.0 | ISO: 1600 Shutter Speed:1/200 sec | F-Stop: f/4.0 | Focal Length: 200mm

3 4Light & Shadow // 2019 www.reallyrightstuff.com
frankly I’m surprised the tour isn’t even more expensive. While most of the traditional Japanese lodging was not extravagant, one ryokan (a traditional Japanese hotel) rates among the best in the world. You will love the whole trip, not just the photography.
4. John Shaw. I learned most of what I know about nature photography by reading and following John’s books in the late 1980’s. He’s been one of my photographic heroes for decades. I’ve talked with John on the phone many times over the years, but finally had a chance to meet him in the flesh. What a wonderful and sweet man. John may not be leading this specific tour anymore, but Joe van Os will not entrust just anyone to lead one of his flagship tours, so rest assured you’ll have a top tour leader who knows Japan and is an expert in wildlife photography.
If Joe’s tour is full, another great option is Martin Bailey. He is a Brit who has lived in Japan for decades, speaks Japanese like a native, is a delightful person, master photographer and runs an equally brilliant Japan winter wildlife tour.
JAPANESE FOODI adore Japanese cuisine in all its incarnations. However, for some folks Japanese gastronomy is an acquired taste. When I landed in Japan in 1975 as a 19-year old missionary, I couldn’t have been less prepared or more sheltered. This was my first ever plane trip, first trip to Asia, and first time I realized fish could be eaten raw. I grew up in a southern California town with 3 stop lights. Meat & potatoes, beans & burritos, eggs & bacon, peanut butter & jelly pretty much sums up the totality of my pre-Japan culinary experience. I’ll never forget the visceral repulsion at my first bite of sushi. Thankfully I’d been programed during the 8-week language training program in Provo to open myself to new experiences, be polite, try every food presented, and then keep trying. For me, Japanese food was definitely an acquired taste, but now I’m blessed to not just enjoy it, but actively crave it.
In keeping with the theme of “adventure” in this issue of Light & Shadow, I encourage those of you who are as culinarily sheltered as I was to open yourselves to new experiences, be polite, try every food presented, and then keep trying. You’ll be blessed for doing so. But don’t worry; there will be plenty of familiar food too.
IN THE FIELDAs with most iconic photo destinations these days, prepare yourself for sharing the venues with plenty of like-minded photographers seeking the same experience as you. You’ll find yourself alongside groups from China, Japan, and many other countries. The animals, though wild, are carefully studied and managed by Japanese conservationists. Don’t be surprised to see regular feedings at the reserves. (Tip: try fill-flash for the snow monkeys in Nagano)
JAPAN VS ONTARIO (see Winter Wildlife – Part 1 in March 2019 RRS Blog)These trips had two things in common: Wildlife and Winter. That’s pretty much where the similarities end. The Snowy Owl trip lasted five days, was a smaller group (6), hosted in one cozy countryside B&B focusing on one main species in a familiar setting. The total cost was quite reasonable and hardly required major ROI calculation justification. Japan was, dare I say, an extravagant, once-in-a-lifetime, exotic foreign country experience, covering multiple airports and transfers and a boat excursion, spanning a wide expanse of Japan and traveling with a larger group (12). Both trips were highly rewarding and highly recommended.
THANK YOU· Thanks to our workshop leader, John Shaw and to Joseph Van Os Photo Safaris for pioneering this tour back in 1996. Our group couldn’t have been better led.
· Thanks to our pleasant workshop team members who opened themselves up for adventure.
· Thanks to our Japanese hosts for their world-leading hospitality and kindness.
Camera: Nikon D810 | Lens: AF-S Nikkor 200-400mm f/2.8mm f/2.8 VR II | ISO: 400Shutter Speed: 1/2500 sec | F-Stop: f/5.6 | Focal Length: 200mmRRS Gear: TVC-34 tripod, FG-02 Fluid Pano-Gimbal Head, LCF 14 Lens Collar Foot
Camera: OLYMPUS E-M1 Mark III | Lens: OLYMPUS 50-200mm Lens | ISO: 640 Shutter Speed:1/1250 sec | F-Stop: f/4.5 | Focal Length: 92mm
Scan the QR code below to see more images and information on our blog
RETURN ON INVESTMENTDo I really need to justify the cost of pursuing my travel and photographic passions? Apparently so. I have a U Chicago MBA – for Pete’s sake, it’s in my bones. Thankfully Joan and I do this as way to make a living, so we can write-off the cost as a business expense. Even still, I take considerable pause any time I’m shelling out over $11,000 (plus time lost from other work, plus camera gear, plus special clothing, etc., etc., etc.). I suspect most readers don’t have the option to write-off this kind of trip as an expense, so if you are having any reservations about the cost, let me help you out:
1. Joe van Os has been in the business of photo touring longer than anyone I know. It was through Joe’s Olympic National Park photo workshop lead by George Lepp in 1993 (for those counting, that’s over 26 years ago) that I first learned about Really Right Stuff and became a customer. The point is, Joe has led more photo tours all over the planet than anybody on this planet and he rates this tour in his top 8. I agree. This is a bucket-list trip you simply must experience.
2. Much of the wildlife you’ll see on this trip are either unique to this region or not as accessible. You simply cannot find snow monkeys relaxing in a hot spring anywhere else in the world and the red-crested cranes are endangered.
3. Japan. There is nothing like Japanese hospitality and food – I can never get enough. This is a 16-day tour and lodging and most food are included. Japan is notable for high cost, so
Camera: Nikon D810 | Lens: 200-400mmISO: 400 | Shutter Speed: 1/320 sec F-Stop: f/8 | Focal Length: 240mm

5 6Light & Shadow // 2019 www.reallyrightstuff.com
C O N T I N U E D
Camera: Nikon D810 | Lens: Nikon 500mm f/4.0 | ISO: 1250 Shutter Speed: 1/320 sec | F-Stop: f/4.0 | Focal Length: 500mm
S T O R Y A N D P H O T O G R A P H Y B Y J E F F V A N U G A
The OT H E R S I D E of
Y E L LOW STO N E
Y ellowstone Park was established by an act of Congress and signed into law by President Ulysses S. Grant on March 1, 1872. In 1890, an arch was placed at the North Entrance at Gardner, MT by President Theodore Roosevelt. Inscribed on the arch in stone were the words: “For the benefit and enjoyment of the people.” In
1872, the park registered 300 visitors. Fast-forward 146 years and there are now on average 4.1 million visitors annually, most of them arriving during the peak months of summer. After photographing and exploring the plateau for 40 years, I’ve had a tough time coming to terms with the drastic changes and heavy influx of tourism. Crowded iconic landscapes, pressure on wildlife, and traffic jams are a few of the problems the park is now facing.
Yellowstone is not alone in the increased rate of tourism — it has become a global issue. During my fifth trip to Iceland this winter, I heard concern of expanding tourism numbers placing pressure on resources and the country’s ability to grow to meet visitor demands. A few years ago, Iceland’s annual visitation rate was 30,000 people. Today Iceland has nearly 2.5 million visitors each year. When I compare my home of the Greater Yellowstone Region to Iceland and the dilemma both locations are facing, it makes me question whether even to photograph these iconic places and many of other public lands, simply due to the infusion of people. It is hard to be creative and connected with nature when you have hundreds of people and vehicles around. For many like me, it is nearly impossible to make it happen.
7 8Light & Shadow // 2019 www.reallyrightstuff.com
How do we mitigate the effects of tourists on nature photography? For Yellowstone, I have developed several strategies to alleviate the impact of too many people.
SEASONS Yellowstone’s summer season sees about 3.5 million tourists. This is a good time to avoid the park altogether with the masses of people crowding every corner. The shoulder seasons of May/June and October are some of the best times to visit, when vehicle access is not an issue. Bison begin calving mid-April to mid-May, and elk start calving the end of May, and from a wildlife perspective, this is still prime time. Spring is in full swing during this early period and
trek is a great place to spend the day. Hiking the boardwalk past Morning Glory Pool (about a mile from the lodge) with the use of skis or snowshoes, one can jump off the boardwalk and navigate the trail on either side of the Firehole River all the way into Biscuit Basin. Another option includes taking ski shuttles to various locations around the Upper, Middle, and Lower Geyser Basins. Some target destinations could be a ski day around Firehole Drive, or a drop off at the Fairy Falls Trailhead for a three-mile ski to Lone Star Geyser. These are full day explorations and there are many thermal features, wintering bison, coyotes, and foxes that are encountered in these locations.
Snowmobiles are another route, and there are both guided and unguided options. Guided usually requires traveling with twenty or more machines, which is not a terribly conducive method for photography. Their goal is to get you around the park quickly with few photographic opportunities. Recently, Yellowstone instituted the non-commercial Guided Snowmobile Access Program to enter the park without the presence of a commercial guide. Only a few permits are given at each entrance per day, and you must apply early in the season and take a written online test prior to entering the park. As someone who has spent many years snowmobiling and photographing (prior to the ban) in the park, a warm snow coach is hard to beat especially if you have no snowmobile experience.
The atmospherics, lighting, and many wildlife opportunities in winter are unmatched and with little interruption from tourists. If I had to pick one time of the year to photograph in Yellowstone, winter would be my only choice.
BACKCOUNTRY One way to beat the crowds anytime of the year is to visit the backcountry. This takes additional planning but is well worth the effort. Some excursions are just a mile or two from any main road and others require backcountry permits. There are countless backcountry geyser basins that are easily accessible during day trips, such as Gibbon, Sylvan Springs
many wildlife opportunities are available around the park.
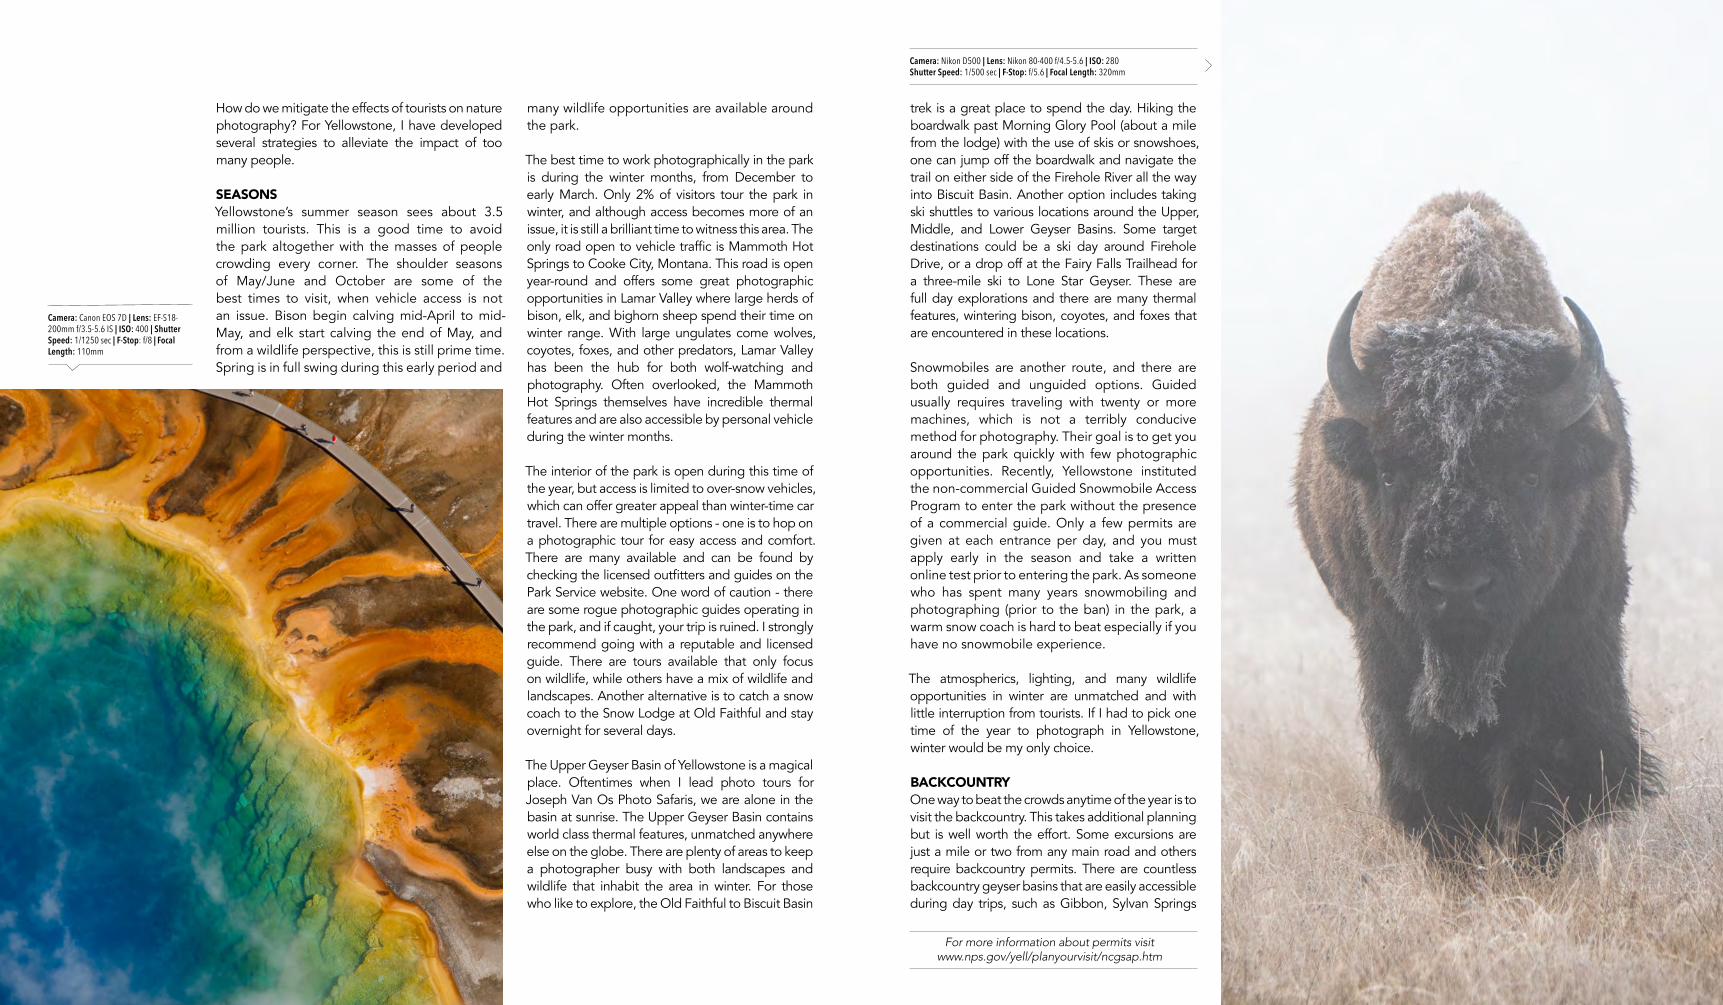
The best time to work photographically in the park is during the winter months, from December to early March. Only 2% of visitors tour the park in winter, and although access becomes more of an issue, it is still a brilliant time to witness this area. The only road open to vehicle traffic is Mammoth Hot Springs to Cooke City, Montana. This road is open year-round and offers some great photographic opportunities in Lamar Valley where large herds of bison, elk, and bighorn sheep spend their time on winter range. With large ungulates come wolves, coyotes, foxes, and other predators, Lamar Valley has been the hub for both wolf-watching and photography. Often overlooked, the Mammoth Hot Springs themselves have incredible thermal features and are also accessible by personal vehicle during the winter months.
The interior of the park is open during this time of the year, but access is limited to over-snow vehicles, which can offer greater appeal than winter-time car travel. There are multiple options - one is to hop on a photographic tour for easy access and comfort. There are many available and can be found by checking the licensed outfitters and guides on the Park Service website. One word of caution - there are some rogue photographic guides operating in the park, and if caught, your trip is ruined. I strongly recommend going with a reputable and licensed guide. There are tours available that only focus on wildlife, while others have a mix of wildlife and landscapes. Another alternative is to catch a snow coach to the Snow Lodge at Old Faithful and stay overnight for several days.
The Upper Geyser Basin of Yellowstone is a magical place. Oftentimes when I lead photo tours for Joseph Van Os Photo Safaris, we are alone in the basin at sunrise. The Upper Geyser Basin contains world class thermal features, unmatched anywhere else on the globe. There are plenty of areas to keep a photographer busy with both landscapes and wildlife that inhabit the area in winter. For those who like to explore, the Old Faithful to Biscuit Basin
Camera: Canon EOS 7D | Lens: EF-S18-200mm f/3.5-5.6 IS | ISO: 400 | Shutter Speed: 1/1250 sec | F-Stop: f/8 | Focal Length: 110mm
Camera: Nikon D500 | Lens: Nikon 80-400 f/4.5-5.6 | ISO: 280 Shutter Speed: 1/500 sec | F-Stop: f/5.6 | Focal Length: 320mm
For more information about permits visit www.nps.gov/yell/planyourvisit/ncgsap.htm

9 10Light & Shadow // 2019 www.reallyrightstuff.com
have freedom to wander and photograph. One note of caution when traveling on any of the lakes in Yellowstone, is about the winds that pick up late morning. Numerous people have drowned in these lakes (especially Lewis and Shoshone Lakes), so plan to be off the lake by mid-day.
NIGHT As Vincent Van Gogh, the Dutch impressionist painter, wrote to his brother Theo about his painting Starry Night, “I often think that the night is more alive and more richly colored than the day.” Vincent’s quote is highly applicable to Yellowstone at night. Clear skies, minimal air traffic, and more importantly fewer people wandering the park at night. The geysers and waterfalls are the highlight of Yellowstone’s night photography, and no matter if you are shooting the milky way on a dark night or using moonlight to illuminate the foreground, there are countless opportunities for finding solitude in this region anytime of the year.
MORNING Lastly, if you miss the morning in Yellowstone you might as well miss the entire day. Morning photography anytime of the year sees few people, wildlife is more active, and the atmospherics of the park are unparalleled relative to any other time of day. The 10,000 geyser features throughout the park bring fog to many areas of Yellowstone in the morning. As morning progresses, the fog clears, giving a special quality to photographic light. The moment after the fog lifts is magic and is a major reason I have returned to this area for over 40 years. It is these climatic mornings that make Yellowstone a unique place for landscape and nature photography.
It is easy to say Yellowstone is overcrowded and to avoid visiting altogether but in reality, there are many alternatives for beating the crowds. Yellowstone is one of my top photographic destinations on the planet and always has something to offer the nature photographer. The question that arises is: Are you willing to work a little harder to photograph unique and world class imagery, or would you rather go with the flow (of people)? I tend to gravitate
towards working a little harder and applying some of these principles to Yellowstone and other parks around the world. Like it or not, people are part of the equation, and it is time to think differently when it comes to photographing in many of the world's iconic destinations.
WHAT'S IN THE BAG Most of this depends on my mode of transportation, whether it be truck, hiking, or kayaking.
In my Ford F350 with a pop-up camper, I can carry everything I own and then some, so equipment is not an issue. My Nikon 80-400mm and 500mm are nearby on the front seat ready for wildlife opportunities. Many times, driving around Yellowstone things happen quickly so having a couple longer lenses with the correct settings are critical in obtaining what may be a fleeting photographic moment. Cameras are set to auto ISO and manual which minimizes the time for fumbling with settings. I may do a quick adjustment with automatic +/- compensation and then I am ready to fire! If there is adequate time for setup, my RRS TVC-23 with BH-40 ball head is a great combination and handles all my lenses up to 500mm.
For day hiking I use a Mindshift® Gear Backlight 36L. Great harness system, lightweight, holds tons of gear and is highly waterproof for those wild weather days in the Rockies. For landscapes, I bring the Nikon group of lenses often referred to as the “Holy Trinity” which includes the 14-24mm f/2.8 (my favorite), 24-70mm, and the 70-200mm with a D850 and D810 cameras in the quiver. Since I like traveling light while hiking in the backcountry, I opt for a lighter tripod like the RRS TFC-14 and the BH-30 compact head. For panoramic projects I use the PC-LR Round Lever Release Panning Clamp and for certain projects the PG-01 Compact Pano-Gimbal Head. If I go on multi-day trips into the backcountry, I have even resorted to bringing along 2-D500 bodies and kit DX lenses in the 10-22mm and 12-80mm range, which offer stellar results and minimal weight.
Group, Monument Geyser, White Creek, Crater Hills, and Firehole River, to name a few. A good reference for many of these geyser basins is The Geysers of Yellowstone 3rd Ed. by T. Scott Bryan. This book gives a comprehensive guide to all the basins along with statistics and maps. Remember, this is bear country. Bear spray and all-weather gear is strongly advised in this part of the world.
Some thermal areas are further back and require more planning such as Heart Lake and Shoshone Geyser Basin. Shoshone is my favorite but requires backcountry permits. Early February/March is the best time to apply for this permit, and the park requires you to stay in designated backcountry campsites.
There are different modes of transportation and routes to visit Shoshone and it can be accessed by several trailheads for a total hike of roughly eight miles, or with non-motorized watercraft accessible via Lewis Lake to Shoshone Lake. This method is roughly twenty miles in a kayak and requires a small amount of hiking. Leaving from the Lewis Lake boat ramp, head out across Lewis Lake, up the Lewis Lake Channel, and then to the west end of Shoshone Lake. The closest designated camp is about two miles from the basin, and to be there at sunrise requires leaving in the dark with the guide of compass bearing across the lake. Once at the beach, a short, mile-long hike brings you to the basin. As predawn comes, you are alone and
BIO: JEFF VANUGAJeff Vanuga is a widely published photographer with thousands of published images to his credit that have graced the pages of iconic magazines like National Geographic Magazine, National Wildlife, Audubon, BBC and many others. Some of his corporate clients have included Ford, Nissan, Patagonia, Wyoming Travel and Tourism to name a few. He has led several hundred tours and workshops for companies like Joseph Van Os Photo Safaris, National Geographic Expeditions,
Santa Fe Workshops and Audubon. For more information and to view some of his images visit www.JeffVanuga.com
Camera: Canon EOS 1Ds Mark III Lens: Canon 100-400mm f/4.5-5.6L IS USM ISO: 320 | Shutter Speed: 1/80 secF-Stop: f/16 | Focal Length: 200mm
Camera: Nikon D4 | Lens: 24-70mm f/2.8 | ISO: 125 | Shutter Speed: 1/125 sec F-Stop: f/16 | Focal Length: 48mm

11 12Light & Shadow // 2019 www.reallyrightstuff.com
S T O R Y A N D P H O T O G R A P H Y B Y T O M B O L
Palmer, Alaska. Knik Glacier Camera: Nikon D300s | Lens: 70-200mm f/2.8 | ISO: 400 | Shutter Speed: 1/8000 secF-Stop: f/5.6 | Focal Length: 78mm
I have been sitting in this snowdrift for an hour now, patiently and not so patiently waiting for the sled dog team to pass. A snow machine has dropped me off in the Alaskan bush, somewhere south of Denali. I’m on assignment to capture the joy and excitement of dog sledding
in winter in Alaska. This shoot sounded great on paper during a cozy meeting with a creative team, but at -30 below, my feet, hands and nose are thinking otherwise. It is so cold the snow makes an unfamiliar crunching noise when I walk on the trail, and the frigid air stings on contact. I was a climbing guide on Denali, but it never felt this cold.
A lot of being an adventure photographer is just that, being part of an adventure to create images. Photograph a sled dog team mushing across the frozen tundra in winter near Denali? Sub-zero temps and remote location? Sign me up.
C O N T I N U E D

13 14Light & Shadow // 2019 www.reallyrightstuff.com
In the distance I hear huskies barking, and soon the team emerges from a stand of black spruce trees. Lying in the snow at ground level, I forget the ice cube temperatures as the dogs approach, and my shutter blazes away to record the action. This is a classic Alaskan image, a Jack London moment, and I know we have gotten the shot. There is sublime beauty in mushing a team of dogs across this pristine winter landscape. Primeval, isolated, and transcendent all wrapped up in one image. My photography career began in journalism over 30 years ago, just about the time many adventure sports were gaining mainstream popularity. I was an outdoor guide with camera in hand, spending months in the field on
expeditions around the globe, climbing remote peaks in Alaska, sea kayaking deserted fjords in Patagonia, and exploring canyon country in the southwest. Soon my career transformed, and I became a photographer who documented adventure sports instead of guiding them. I’ve never looked back.
Photographing adventure sports is unique in many ways. Firstly, I think of it as hands-on photography. Most adventure sports photography requires the photographer to be a part of the action or expedition, not on the sidelines. If you are photographing rock climbers, the best images are often created clipped into a rope above the climber. If I am photographing a sea kayaking trip, I will be paddling and camping with the group for the entire trip, often weeks long. Knowing the sports you photograph is fundamental in capturing the best images. With adventure sports, knowing the sport (and being proficient at it) also helps keep things safe. You can’t drop a lens when you are above rock climbers on a cliff.
Another interesting aspect of adventure sports photography is conveying the intensity, or tranquility, to the average viewer. Let’s face it most folks aren’t going to climb a Himalayan peak or paddle off a 70-foot waterfall. But viewers might like to know what it looks like from the cockpit of a kayak going over a waterfall or looking out the tent door at 22,000 feet. To get the shot you need to be a part of the action and use creative photography techniques to get the message across.
Through trial and error, along with some trashed equipment, I’ve come up with some shooting strategies for adventure sports. Some techniques involve minimizing your discomfort while getting the shot. Photographing the northern lights in the arctic at -25 is going to be chilly, but a few simple tricks can help keep you warm. Other techniques will help any photographer who photographs outside. You might even get a few new ideas on how to approach a familiar subject.
The
Ad
ven
ture
of
Ad
ven
ture
Ph
oto
gra
ph
y
Tom
Bol
ARTICLE
THE ACTION SEQUENCEMany outdoor sports involve athletes performing amazing sequences. Imagine a skier flying off a jump, or BMX rider doing backflips on the local dirt track. While it is great to capture the pinnacle airborne moment, wouldn’t it be even more dramatic to show the entire sequence in one frame? I think so, and often set up to photograph the entire aerial. I’ll set up my RRS TVC-34 tripod with BH-55 head and lock down my camera and lens. Having a stable shooting platform makes seaming the images together easier in Photoshop. I use manual exposure mode, a wide-angle lens and pre-focus where the athlete will take off the jump. I shoot around 7 FPS for many sequences. You don’t want too much overlap between frames.
Merging all the frames into one is a Photoshop task. The basic method involves opening all the images as layers in sequence. The bottom layer is the first image, with the consecutive shots on top. Using layer masks, you brush in the athlete in each layer, resulting in just the athlete
appearing in the final flattened image. There are many online tutorials to guide you through the process.
NORTHERN LIGHTSPhotographing the aurora borealis has become very popular, and with good reason. Witnessing this spectacular display should be on every photographer’s bucket list. Plan your next trip to Alaska, Iceland or Norway, and get ready for some adventure. Seeing the northern lights is never guaranteed, but worth the effort. I used to live in Alaska, and photographing the northern lights became my passion. I spent many nights on backcountry ski trips hoping for a glimpse of the aurora. Just the slightest green glow can make a spectacular image when shot at 15 seconds.
To create good aurora images, you need a solid tripod. And since you will be standing looking up through the viewfinder, make sure your tripod is tall enough. I use my TVC-34 and BH55 for this task. I use insulation on my tripod legs to minimize the cold on my hands. I also bring
Fairbanks, Alaska
Camera: Nikon D3 | Lens: 24-70mm f/2.8ISO: 320 | Shutter Speed: 1/4000 secF-Stop: f/5.6 | Focal Length: 24mm
Camera: Nikon D850 | Lens: 70-200mmf/2.8 | ISO: 640 | Shutter Speed: 1/4000sec | F-Stop: f/5.0 | Focal Length: 200mm

15 16Light & Shadow // 2019 www.reallyrightstuff.com
along a small piece of foam insulation to stand on in the snow if it is frigid. I use heavy down mittens to keep my hands warm. Use a cable release so you can trigger the shutter in your heavy mittens. Bringing along a small thermos with hot cocoa will help warm you up.
Use good snow-tripod technique. What is this? Planting your tripod in firm snow will spread the legs as your tripod goes deeper into the snow. I always start with my tripod legs slightly closed together to accommodate this movement. Additionally, if the snow is taller than the first section of your tripod, the joint may freeze up. Your hotel room temperature will thaw everything out.
One challenge photographing northern lights is focusing at night. I use my 14-24mm F2.8 for night shooting. During the daytime I will
focus on a distant peak using autofocus and see where the focus point is on my lens. I turn off the autofocus and gaffer tape the focus ring at this spot. Focusing on a distant object ensures your lens is set to infinity. With your lens pre-focused to infinity, all you must do is set exposure. Depending on how bright the aurora is and how much moon is visible, I start with an exposure of F2.8, 15 seconds at ISO 1600. Using my RGB histogram, I pay attention to the green channel. Many aurora displays are green, and you don’t want to overexpose this part of the image.
POV PERSPECTIVE Fresh perspective is more important than ever in photography. With millions of photos being posted daily on social media, finding a unique angle is a daunting task. One method I use is point-of-view (POV) imagery. Smaller GoPro
cameras have opened this technique to many photographers, but I still prefer to use a DSLR when I can for better image quality. I mount a small DSLR camera with fisheye lens on an old climbing helmet. To attach the camera to my DIY headcam, I drilled a hole in the front of my helmet. I put a screw through this and attached a BH-25 head to the helmet.
You get a few funny looks when you are wearing this rig. After all, this isn’t a small helmet cam setup. But using a fisheye lens on my camera gives the viewer a 180-degree view of the action. I have skied, kayaked, ice climbed, canoed and mountain biked using this rig. The images give the viewer a front row seat to the action and help convey the intensity of many adventure sports. My neck gets a little stiff, so this technique isn’t for everyone, but do as we say, not as we do!
Camera: Nikon D810 | Lens: 14-24mm f/2.8 ISO: 800 | Shutter Speed: 15 sec F-Stop: f/2.8 | Focal Length: 20mm
Northern Lights—Wiseman, Alaska
Camera: Nikon D810 | Lens: 14-24mm f/2.8 | ISO: 800 | Shutter Speed: 15 sec F-Stop: f/2.8 | Focal Length: 16mm

17 18Light & Shadow // 2019 www.reallyrightstuff.com
What can I say? I've always loved photography, and have been shooting professionally for 30 years. My passion to create new work never ceases, it only burns brighter. My work has taken me to all seven continents and 70 countries. For more information and photos visit: www.TomBolPhoto.com
BACKCOUNTRY EXPLOITSMuch adventure sports photography takes place in the backcountry−hours, days or weeks away from the nearest road or hotel. As a mountaineering guide, we used to stress how ‘every ounce counts’ when it comes to packing for a long expedition. Who wouldn’t rather carry a 60lb pack instead of 70lb pack? When choosing camera gear, especially when you are carrying everything on your back, you must be very discerning with what goes and what stays.
Enter the RRS TFC-14 tripod. At 2.3 pounds, there isn’t a better choice for minimalist gear packing. Combined with the BH-25, I barely know I have a tripod with me. I have been amazed at the support this tripod provides. Star trails at
night? No problem. Glowing tents at twilight? Check. This tripod/head setup is also my favorite for travel photography. I might only use my tripod a few times during a trip to Europe, so I don’t want to bring a large tripod. The TFC-14 is perfect and fits nicely on the side of my small photo backpack.
THE WINDIEST PLACE ON EARTHI once joined a two-month sea kayaking expedition in southern Patagonia. For over 60 days we paddled through some of the most remote fjords, channels and rainforests you can imagine. We discovered large Alacalufe spear points on the beach and marveled as penguins popped up alongside our kayaks. After that trip, Patagonia became an obsession for me, and I have returned year after year to photograph this amazing environment.
Patagonia has wind. Lots of wind. Wind that can blow softball-sized rocks across the road. While Antarctica just to the south might be one of the windiest places on earth, Patagonia is on the same list. Stunning lenticular clouds and frosted granite peaks are created due to the geography and powerful storms that move through the area. This creates some of the most dramatic landscapes on the planet, but you need to be prepared for windy conditions. As with many of my shoots, stabilizing my camera begins with my TVC-34 and BH55 head. But there is more to stabilizing your camera than attaching it to your tripod.
First, if it is extremely windy, I will try to shoot from a lower position on the ground. I may only extend one or two sections of my tripod to stay lower out of the wind and more stable. Next, I will hang my small photo backpack from the hook underneath my tripod. More weight equals more stability in high wind. If I am using a long telephoto lens, I will leave my image stabilization on since there is no way to eliminate all movement in high winds. And the cardinal rule photographing in Patagonia: never leave your tripod unattended. I’ve watched more than one tripod and camera
get blown over in the amount of time it takes to bend down and open your photo backpack.
PERSONAL ADVENTURESYou don’t have to be an extreme athlete to enjoy adventure photography. When it comes right down to it, adventure photography can be any activity that gets you outside and enjoying the natural world. Go rent a canoe at your local park. Or how about getting a cabin for the weekend in a nearby state park? If you are outdoors, setting up for that amazing sunset, then you are having your own adventure. And that is what adventure photography is all about.
BIO: TOM BOL
Camera: Nikon D3 | Lens: 70-200mm f/2.8 | ISO: 200 | Shutter Speed: 1/500 sec F-Stop: f/13 | Focal Length: 150mm
Camera: Nikon D4 | Lens: 14-24mm ISO: 400 | Shutter Speed: 30 sec F-Stop: f/5.6 | Focal Length: 18mm

19 20Light & Shadow // 2019 www.reallyrightstuff.com
48 toFloehours
Camera: Canon EOS 5D Mark IV | Lens: EF11-24mm f/4L USM | ISO: 1250 Shutter Speed: 30 sec | F-Stop: f/5 | Focal Length: 11mm
S T O R Y A N D P H O T O G R A P H Y B Y D A N C A R R
K ootenay National Park straddles the border between British Columbia and Alberta, just a hundred miles West of the world famous Banff National Park. To Western Canadian adventure
seekers it’s relatively well known, but due to its proximity to Banff and Jasper National Parks on the Albertan side of the border, it sees considerably less traffic from the hordes of visiting photographers in the region. Perhaps the most iconic location in the park is the Numa Pass which contains the dramatically vertical Rockwall, towering over the crystal clear waters of Floe Lake.
C O N T I N U E D
21 22Light & Shadow // 2019 www.reallyrightstuff.com
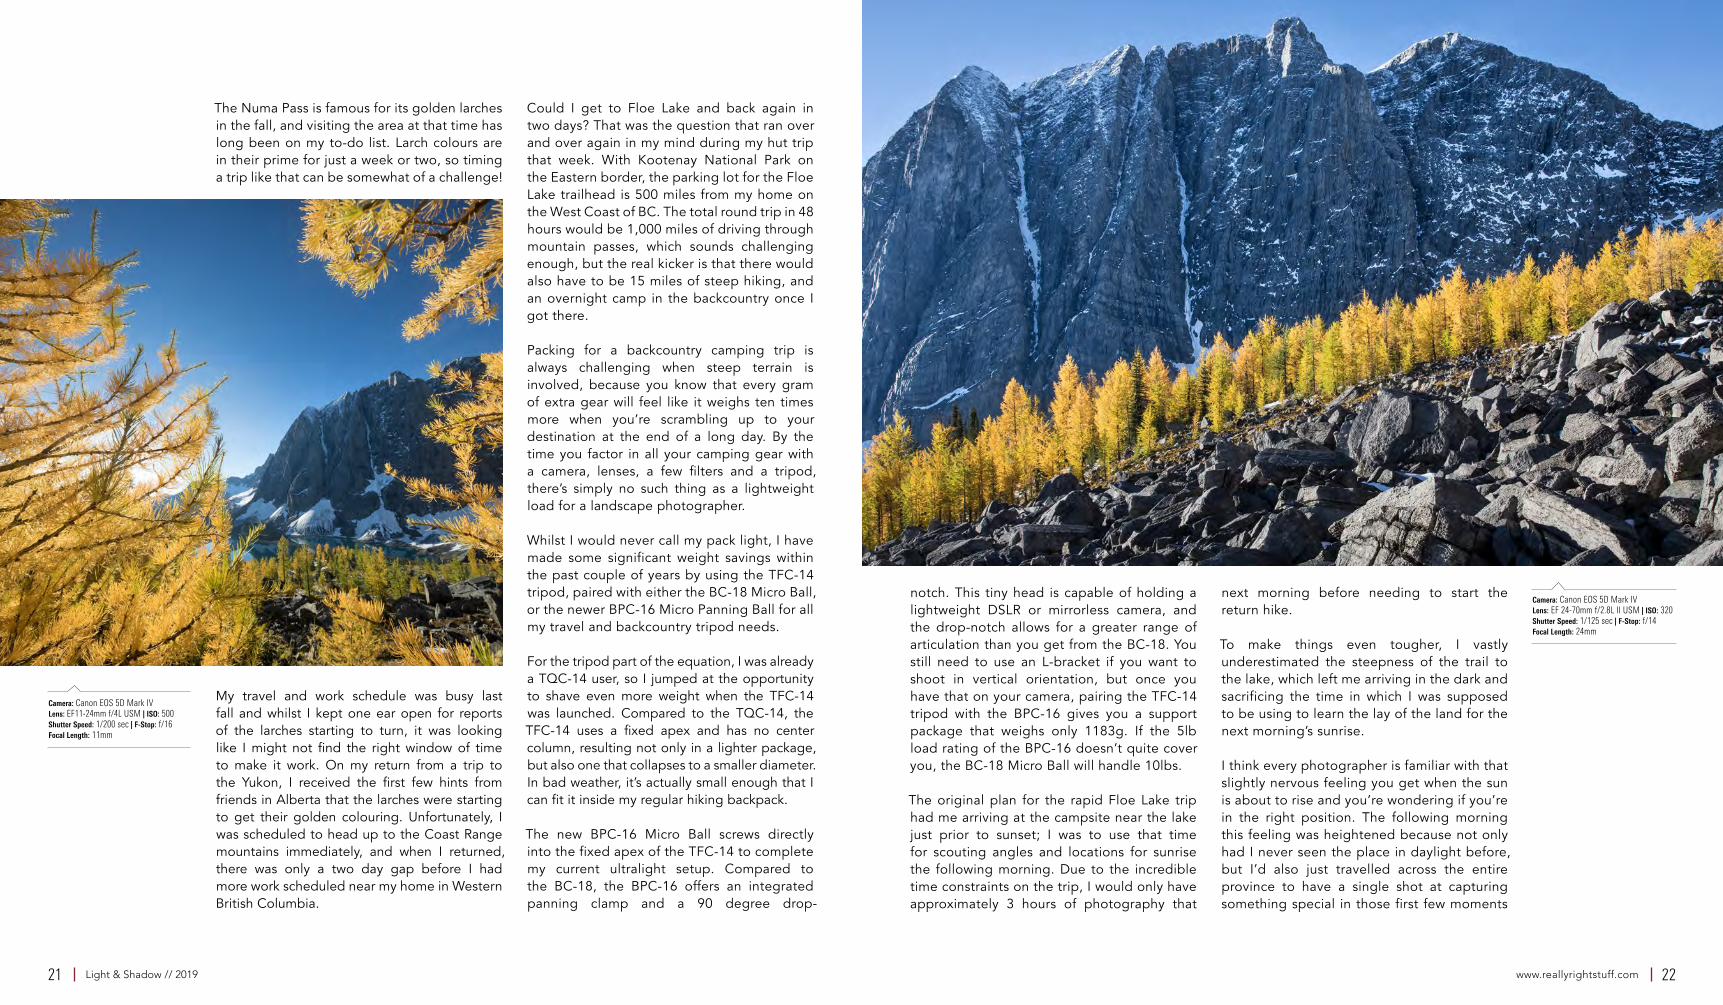
The Numa Pass is famous for its golden larches in the fall, and visiting the area at that time has long been on my to-do list. Larch colours are in their prime for just a week or two, so timing a trip like that can be somewhat of a challenge!
My travel and work schedule was busy last fall and whilst I kept one ear open for reports of the larches starting to turn, it was looking like I might not find the right window of time to make it work. On my return from a trip to the Yukon, I received the first few hints from friends in Alberta that the larches were starting to get their golden colouring. Unfortunately, I was scheduled to head up to the Coast Range mountains immediately, and when I returned, there was only a two day gap before I had more work scheduled near my home in Western British Columbia.
Could I get to Floe Lake and back again in two days? That was the question that ran over and over again in my mind during my hut trip that week. With Kootenay National Park on the Eastern border, the parking lot for the Floe Lake trailhead is 500 miles from my home on the West Coast of BC. The total round trip in 48 hours would be 1,000 miles of driving through mountain passes, which sounds challenging enough, but the real kicker is that there would also have to be 15 miles of steep hiking, and an overnight camp in the backcountry once I got there.
Packing for a backcountry camping trip is always challenging when steep terrain is involved, because you know that every gram of extra gear will feel like it weighs ten times more when you’re scrambling up to your destination at the end of a long day. By the time you factor in all your camping gear with a camera, lenses, a few filters and a tripod, there’s simply no such thing as a lightweight load for a landscape photographer.
Whilst I would never call my pack light, I have made some significant weight savings within the past couple of years by using the TFC-14 tripod, paired with either the BC-18 Micro Ball, or the newer BPC-16 Micro Panning Ball for all my travel and backcountry tripod needs.
For the tripod part of the equation, I was already a TQC-14 user, so I jumped at the opportunity to shave even more weight when the TFC-14 was launched. Compared to the TQC-14, the TFC-14 uses a fixed apex and has no center column, resulting not only in a lighter package, but also one that collapses to a smaller diameter. In bad weather, it’s actually small enough that I can fit it inside my regular hiking backpack.
The new BPC-16 Micro Ball screws directly into the fixed apex of the TFC-14 to complete my current ultralight setup. Compared to the BC-18, the BPC-16 offers an integrated panning clamp and a 90 degree drop-
notch. This tiny head is capable of holding a lightweight DSLR or mirrorless camera, and the drop-notch allows for a greater range of articulation than you get from the BC-18. You still need to use an L-bracket if you want to shoot in vertical orientation, but once you have that on your camera, pairing the TFC-14 tripod with the BPC-16 gives you a support package that weighs only 1183g. If the 5lb load rating of the BPC-16 doesn’t quite cover you, the BC-18 Micro Ball will handle 10lbs.
The original plan for the rapid Floe Lake trip had me arriving at the campsite near the lake just prior to sunset; I was to use that time for scouting angles and locations for sunrise the following morning. Due to the incredible time constraints on the trip, I would only have approximately 3 hours of photography that
next morning before needing to start the return hike.
To make things even tougher, I vastly underestimated the steepness of the trail to the lake, which left me arriving in the dark and sacrificing the time in which I was supposed to be using to learn the lay of the land for the next morning’s sunrise.
I think every photographer is familiar with that slightly nervous feeling you get when the sun is about to rise and you’re wondering if you’re in the right position. The following morning this feeling was heightened because not only had I never seen the place in daylight before, but I’d also just travelled across the entire province to have a single shot at capturing something special in those first few moments
Camera: Canon EOS 5D Mark IV Lens: EF11-24mm f/4L USM | ISO: 500 Shutter Speed: 1/200 sec | F-Stop: f/16 Focal Length: 11mm
Camera: Canon EOS 5D Mark IV Lens: EF 24-70mm f/2.8L II USM | ISO: 320 Shutter Speed: 1/125 sec | F-Stop: f/14 Focal Length: 24mm

23 24Light & Shadow // 2019 www.reallyrightstuff.com
Camera: Canon EOS 5D Mark IV |
Gear: TFC-14 & BPC 16 | F-Stop: f/14 |
Shutter Speed: 1/125 sec
of the day. Due to the remote location of the lake, there was also no real way to guarantee that the larch colours were in their prime. All I could do was base my guess of a few reports from other nearby locations.
After a short sleep I left my tent a couple of hours before sunrise so that I could spend a little time using some wide-angle long exposure images simply to get a sense of the scene in front of me that would be revealed once the sun came up. As the first photos started to appear on the screen of my camera, the adrenalin started to kick in as I realized the sky was clear and I was going to have a pretty good chance of getting the photos I wanted…as long as the larches were golden!
This pre-dawn time proved to be incredibly important, not only because I captured the first of my favourite photos from the day with a 30-second exposure over the flat calm lake, but also because it showed me that I wasn’t quite in the right place for the larch photos. I would need to quickly reposition myself about half a mile away to get back from the lake and behind some of the larches. By placing the larches between me and the sun, it would ensure that they were beautifully backlit as the sun rose.
It’s no exaggeration to say that it’s these kinds of moments that I live for − when a plan falls into place and you know that you have given every last ounce of energy to set yourself up for success on that shoot. It was a short morning of photography, but the tranquility of the location and the incredible colours that greeted me with the sunrise made it one of the most memorable mornings of my life.
48-HOUR TRIP STATS
Drive: 1614 km (1003 miles)
Driving Time: 23 hours
Hiking Time: 9 hours
Sleep Time: 7 hours
Photography Time: 3 hours
Caffeine Consumed: A LOT!
BIO: DAN CARRBorn in the UK, Dan took a year out in Whistler, British Columbia after high-school which planted the seed for a mountain obsession. While his passion for mountain life took a backseat as he finished a degree in Aerospace Engineering in England, it wasn't long before he returned to the mountains to start his photography business. Dan's work has since been featured in over 100 publications worldwide and his commercial clients include major brands such as Apple, Nike, Oakley and
Red Bull. Dan also has a passion for photography education and through his company Shutter Muse, has provided content for photography publications worldwide, as well as industry leaders like Canon. For more information on Dan's work visit www.DanCarrPhotography.com
Camera: Canon EOS 5D Mark IV | Lens: EF11-24mm f/4L USM | ISO: 320 Shutter Speed: 1/1000 sec F-Stop: f/4 | Focal Length: 18mm
Camera: Canon EOS-1D X Mark II | Lens: EF100-400mm f/4.5-5.6L IS II USM | ISO: 200
Shutter Speed: 1/400 sec | F-Stop: f/9 | Focal Length: 170mm
25 26Light & Shadow // 2019 www.reallyrightstuff.com
THE ART OF
S T O R Y A N D P H O T O G R A P H Y B Y J O S H U A H O L K O
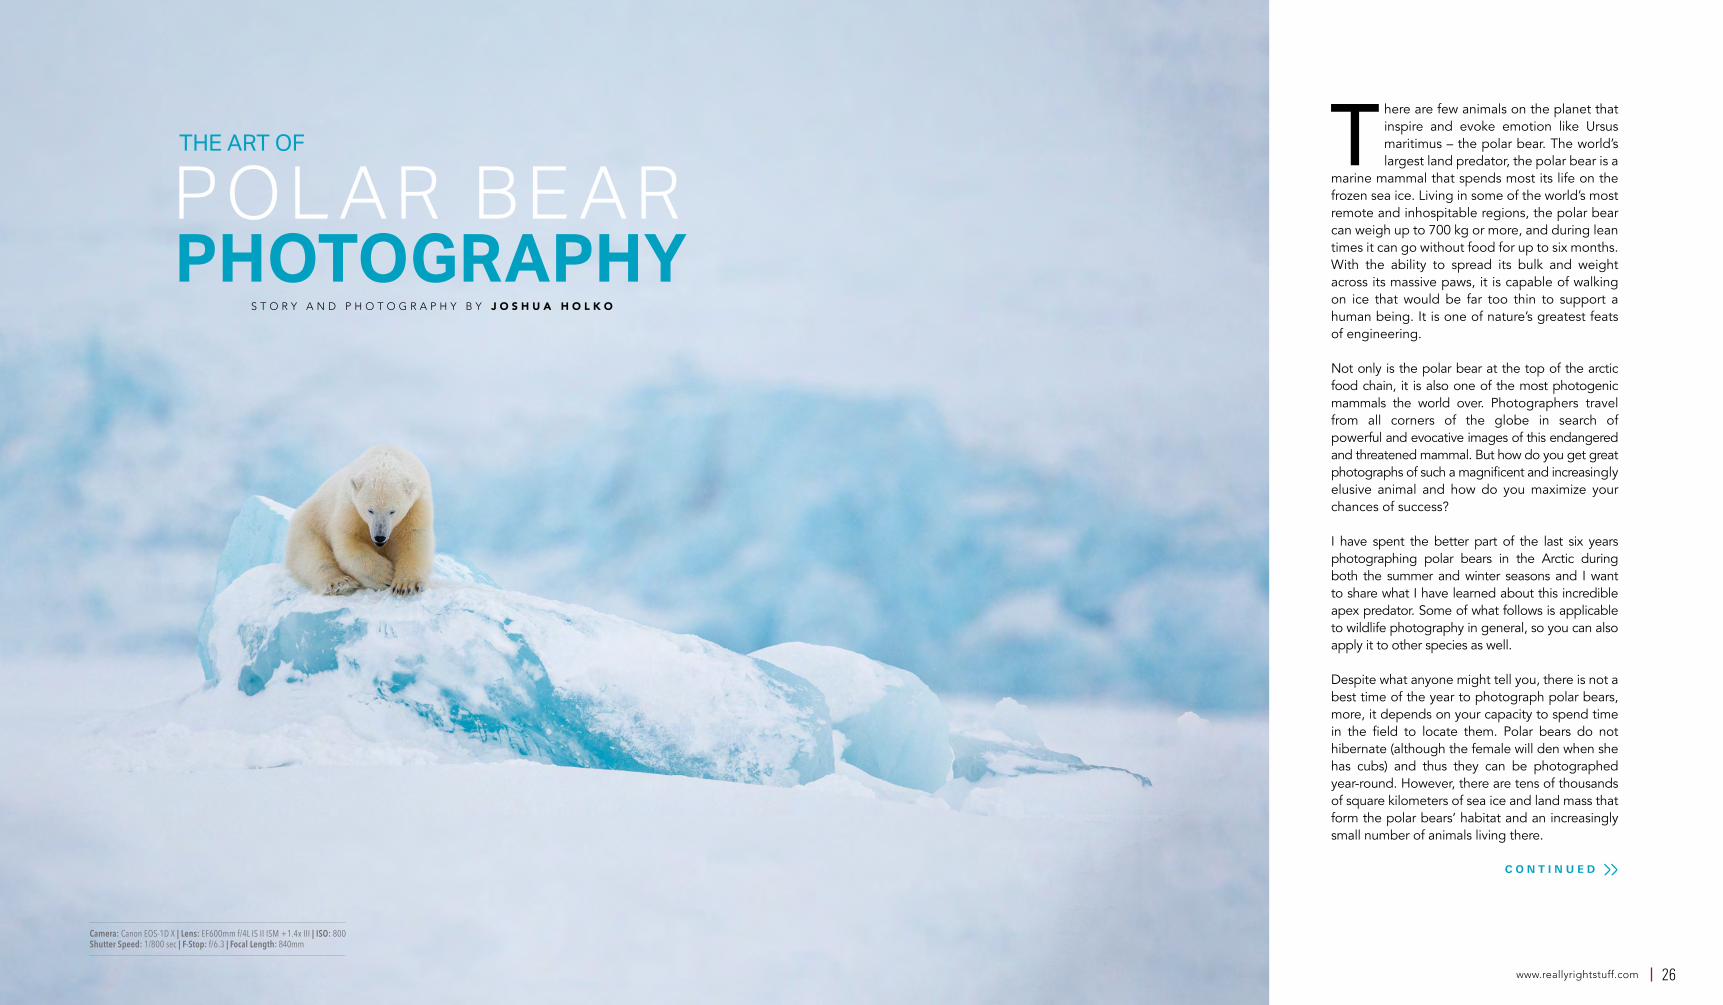
Camera: Canon EOS-1D X | Lens: EF600mm f/4L IS II ISM +1.4x III | ISO: 800 Shutter Speed: 1/800 sec | F-Stop: f/6.3 | Focal Length: 840mm
T here are few animals on the planet that inspire and evoke emotion like Ursus maritimus – the polar bear. The world’s largest land predator, the polar bear is a
marine mammal that spends most its life on the frozen sea ice. Living in some of the world’s most remote and inhospitable regions, the polar bear can weigh up to 700 kg or more, and during lean times it can go without food for up to six months. With the ability to spread its bulk and weight across its massive paws, it is capable of walking on ice that would be far too thin to support a human being. It is one of nature’s greatest feats of engineering.
Not only is the polar bear at the top of the arctic food chain, it is also one of the most photogenic mammals the world over. Photographers travel from all corners of the globe in search of powerful and evocative images of this endangered and threatened mammal. But how do you get great photographs of such a magnificent and increasingly elusive animal and how do you maximize your chances of success?
I have spent the better part of the last six years photographing polar bears in the Arctic during both the summer and winter seasons and I want to share what I have learned about this incredible apex predator. Some of what follows is applicable to wildlife photography in general, so you can also apply it to other species as well.
Despite what anyone might tell you, there is not a best time of the year to photograph polar bears, more, it depends on your capacity to spend time in the field to locate them. Polar bears do not hibernate (although the female will den when she has cubs) and thus they can be photographed year-round. However, there are tens of thousands of square kilometers of sea ice and land mass that form the polar bears’ habitat and an increasingly small number of animals living there.
POL AR BE ARPHOTOGRAPHY
C O N T I N U E D

27 28Light & Shadow // 2019 www.reallyrightstuff.com
If I am photographing from ship, then I am very careful to make sure that the ship I select has very low decks so that I can be as low as possible. Getting low not only affords you eye contact with your subject but it connects the viewer with the subject on a far more personal level. It is the key to a strong photograph. Before you press the shutter consider which direction the bear is facing and how you are composing the photograph. A wildlife image will almost always be more successful if the animal is facing into the frame, rather than out of the frame. Consider carefully the negative space in the frame and how you frame the animal in the context of its environment. A successful photograph should show a symbiotic relationship between the bear and its habitat.
The feet position of the polar bear has a strong part to play in any feeling of movement that might be conveyed in your photograph. Keep in mind that photography is a still medium and that unlike video we must give the feeling of movement in our photographs (not an easy thing to do). It is important to have separation between the feet, but also to have them in an aesthetically pleasing position. High speed
motor drive can greatly assist with feet position and it is better to shoot more frames in the field and be able to sort it out later than to just shoot one or two and end up with frames that have less than ideal foot positioning.
Keep in mind that the polar bear is one of the most powerful predators on the planet. If you can capture some of this power in your photograph, you have far more chance of creating a strong, powerful and emotive photograph. Facial expressions and body position/body language play a large part in conveying a sense of power in an animal. A bear with its head tilted slightly
that the light is often softer at night (although the sun never truly sets). Some areas of the Arctic are prone to fog in summer and the combination of midnight sun and fog can create a beautiful atmosphere for photography.
If you are travelling to the Arctic, I generally recommend a summer trip for your first experience. Autumn and spring can offer a little bit of both summer and winter light, although you are unlikely to encounter the sublime rosy pinks of winter's frosty edges unless you are right on the winter cusp. Of course, in the mid-dle of winter it is dark the entire time (depend-ing on how far north you venture) so photogra-phy is extremely limited at this time. Typically, March is my preferred time for winter light in the Arctic; both for polar bear photography and Arctic landscapes. The sun crests the hori-zon but remains low in the sky and there is an ethereal quality to the light that is unmatched during any other season. If conditions are good, it is not uncommon to have beautiful soft pink light that lasts for hours. With plenty of ice and snow, conditions are at their abso-lute optimum for both wildlife and landscape photography.
Robert Capa famously once said: “If a photograph isn’t good enough it's because you are not close enough”. These golden words of wisdom fit perfectly for wildlife photographers with one slight alteration. Put simply “If your wildlife photograph isn’t good enough it's because you are not low enough.”
Getting low is key to creating powerful intimate polar bear photographs. You simply cannot achieve intimacy with your subject if you are stand-ing 12 feet up (or more) on the deck of a high ship or locked up in a caged tundra buggy. You don’t necessarily have to be on the ice with the bear (a dangerous place to be), but you do need to get yourself as low as you possibly can; and the lower the better. It is not uncommon for me to lie on the ice and even half bury my camera and lens in the snow, attempting to get as low as possible.
Assuming you have the good fortune to encounter a ‘photo-friendly’ bear, the time of year you chose to travel to the Arctic will be the deciding factor on the quality of light you can expect to experience. You should absolutely keep in mind that the quality of light you experience when you are making photographs of polar bears is going to be a very decisive factor in the overall quality of your imagery. Therefore, you should consider carefully when you choose to travel.
Both summer and winter can produce great polar bear images, but if you desire the soft pink ethereal light that many photographers crave you will need to travel on the cusp of winter, autumn or spring. Conditions are more difficult in winter (it is obviously much colder in the Arctic during winter) but the light can be truly miraculous and frequently brings with it a magic that simply isn’t available to the summer photographer.
Nothing compares to the light you find at winter's edges in the Arctic. Its breathtaking summer affords twenty-four-hour daylight in the Arctic (the midnight sun) which in effect means you can photograph right through the night and double the amount of time you have available to actively search for polar bears. The possibility of golden light with the midnight sun draws many photographers to the Arctic in the summer months. Experience has shown me
Camera: Canon EOS-1D X Mark II | Lens: EF600mm f/4L IS II USM | ISO: 800 Shutter Speed: 1/320 sec | F-Stop: f/6.3 | Focal Length: 600mm
Camera: Canon EOS-1D X Mark II Lens: EF 200-400mm f/4L IS USM EXT ISO: 800 | Shutter Speed: 1/1600 sec F-Stop: f/8 | Focal Length: 513mm
Camera: Canon EOS-1D X Mark II Lens: EF600mm f/4L IS II USM | ISO: 800 Shutter Speed: 1/320 sec | F-Stop: f/6.3 Focal Length: 600mm

29 30Light & Shadow // 2019 www.reallyrightstuff.com
Front-lit subjects can appear quite flat and usually this sort of light is preferred purely for documentary purposes. Side light can be extremely effective depending on the time of day and angle of the sun. We don’t always have the luxury of being able to position ourselves to obtain the perfect lighting angle, but it is worth serious consideration should you have the opportunity. When leading expeditions to photograph polar bears, I always work very closely with the captain of the ship (or the zodiac driver) to position ourselves for the best possible light in consideration of the bears movement and behaviour. Just a small aside: if you are choosing an expedition to photograph polar bears make sure the trip is dedicated to photographers and that the leader has significant experience with polar bears. General tourist trips will not afford you the requirement to position for best light and leaders with little or no experience photographing polar bears will be more interested in making sure they get a photograph than in ensuring you have the best possible lighting angle. You should also ensure that the ship you choose has very low decks. Avoid ships with very high bows and sides that will prevent you from being able to connect properly with your subject.
In overcast light conditions you have the benefit of nature’s ‘soft-box’ and these sorts of conditions can lead to beautiful imagery. Overcast light will really bring out the soft and subtle tones in the snow and ice. I tend to try and avoid direct overhead sunlight as it creates extremely hot highlights on the snow and ice and usually the overall contrast level is too harsh.
Consider your composition before you start firing the cameras shutter. Take a moment and take a deep breath (you will be very excited if it is your first polar bear). Look around carefully and predict where the bear is going to be for the ideal photograph. Madly firing the shutter without consideration of the composition and story results in nothing more than hundreds of documentary images.
Lens selection plays a huge role in the overall look of your polar bear photograph. A long telephoto lens is going to compress the distance between you and the bear and the bear and its background. This sort of lens can be used to great effect to not only create the illusion of bringing the subject closer to the photographer and subsequently the viewer, but also to throw the background way out of focus to help isolate the subject. Be careful to avoid creating photographs that look as though they were
sideways is probably going to look curious. A bear with its head pointed straight on to the photographer with strong eye contact is going to convey much more power. One isn’t necessarily better than the other, but you should know what you are trying to say with your photograph when you click the shutter.
When it comes to ‘frames per second’, frankly, the more the better. Polar bears often close their eyes as they walk along (or keep them partially closed). They also often look down at the ground so any eye contact opportunities you may get will probably be fleeting. Having a high-speed camera gives you more frames to choose from
if, and when, the polar bear makes eye contact with you. It also allows you to choose the best feet position of the bear when you are later editing your photographs. Capturing an image of a polar bear with eye contact and just the right feet position is not easy.
If you are fortunate enough to encounter more than one polar bear, then look for interaction between them. Overall, polar bears are solitary animals and interactions between them are fleeting and rare. Should you encounter two or more bears together (a “celebration” of polar bears) try and capture moments when they interact. These rare moments are usually full of emotion and can make very strong and powerful photographs.
If you have the opportunity to re-position yourself, consider the direction of light in relation to your subject. Do you want front light, side light or back light? Back light is the hardest to work in from a technical perspective but can also create the most evocative imagery. Back light also often adds an element of mystery to a photograph that significantly increases its impact. I like to try and work with back light as often as I can as I find this sort of light the most dramatic and it often creates the most mystery and interest.
Camera: Canon EOS-1D X | Lens: EF200-400mm f/4L IS USM | ISO:400 Shutter Speed: 1/1250 sec | F-Stop: f/8 | Focal Length: 400mm
Camera: Canon EOS-1D X Mark II Lens: EF300mm f/2.8L IS II USM | ISO: 800 Shutter Speed: 1/800 sec | F-Stop: f/10 Focal Length: 300mm
Camera: Canon EOS-1D X | Lens: EF200-400mm f/4L IS USM EXT | ISO: 400 Shutter Speed: 1/1000 sec | F-Stop: f/8 Focal Length: 560mm

31 32Light & Shadow // 2019 www.reallyrightstuff.com
taken in a zoo. Wide angle lenses can be used to convey a strong sense of environment in your photography. Wide angle lenses will allow you to place the bear in context and show the subject in its environment.
A sense of environment can add a great deal of life, emotion and context to a photograph and its importance should not be underestimated. Look carefully at the landscape the bear is moving across. Are there graphical elements in the landscape you can use to help frame your photograph? A leading line of ice for example can be used to great effect. Using the landscape to help frame your image can really add significant impact and balance to the final photograph. Simple imagery that utilizes geometric shape and line will almost always result in a strong photograph.
BIO: JOSHUA HOLKOLiving in Melbourne, Victoria, Australia, Joshua is a full time professional nature photographer who specializes in polar photography. Joshua is a fully accredited AIPP Master of Photography and member of the Australian Institute of Professional Photographers (AIPP). He has won countless awards for his photography including being named the 2015 Global Arctic Photographer of the Year. Joshua is officially represented by Philip
Kulpa and the Source Photographic Gallery in Australia and Aspen USA. For more pictures and information about Joshua visit: www.JHolko.com
Camera: Canon EOS-1D X | Lens: EF600mm f/4L IS II USM | ISO: 400 Shutter Speed: 1/1000 | sec F-Stop: f/5.6 | Focal Length: 600mm
Camera: Canon EOS-1D X | Lens: EF400mm f/2.8L IS II ISM +1.4x III ISO: 400 Shutter Speed: 1/800 sec | F-Stop: f/5.6 | Focal Length: 560mm

33 34Light & Shadow // 2019 www.reallyrightstuff.com
S TA R B O U N DS T O R Y A N D P H O T O G R A P H Y B Y C H R I S T I N E K E N Y O N
Camera: Nikon D810 | Lens: Nikkor 14-24mm f/2.8 | ISO: 6400 | Shutter Speed: 25 secF-Stop: f/2.8 | Focal Length: 14mm
“Here, lie down on your back and look up!” my Dad exclaimed with delight, as he spread out the blanket on the ground in front of us. We had just pulled over to the side of the road somewhere in the San Juan (an impressive and rugged mountain range in western Colorado) on what was our fifth day of a three-week western photography workshop.
C O N T I N U E D
35 36Light & Shadow // 2019 www.reallyrightstuff.com
laid on the blanket and told stories and corny jokes, some even at my dad’s expense, as blue hour gave way to complete darkness.
As the darkness fell, the stars emerged. Not just a few as I had experienced in the past, but dozens upon dozens of shimmering points of light, scattered across the heavens, so plentiful that my gaze could not contain them. We were silent, mesmerized, enchanted, in awe.
No one spoke for some time. In fact, the first voice to break the silence was mine, as I saw my first comet course through the inky darkness and fade from view. “Look at that!” I shouted, all at once amazed at the spectacle. Suddenly the group came back to life—surprise, laughter, joy, everyone’s reaction a bit different, but everyone equally filled with wonder.
It was this trip, many years ago, that forever changed my impression of the night. No longer was it simply a time to sleep, close the shades, and turn out the lights. Instead it became a time to get out, hit the road, and chase the stars. Since we were going home in a matter of weeks, I soaked up the beauty, enjoyed the stars, and banked the memories, vowing I would one day return.
In 2007, my dream became reality, when I relocated to Salt Lake City. I couldn’t wait to explore my new home. With two Labrador retrievers in tow, I criss-crossed Utah and the Rocky Mountain West around me. I felt as though I had never skipped a beat.
Although I was not yet into nightscape photography at this point, I followed in my dad’s footsteps as I ventured down many a dirt road
I can’t say that I was thrilled with the ride out. Exhausted, bored, and hoping for something exciting, I found myself dozing off into fits of sleep and restless dreams.
Suddenly, I was awakened with the sound of my dad’s voice gleefully announcing that he could see the Rockies up ahead. Excited, I leaned forward from my perch in the back seat to take in the towering heights that I expected to see. Instead, I saw a ridge line not much bigger than our local hills in Maryland. What was this? 1,600 miles from Bethesda to Denver, and all I get are foothills?
With my dreams dashed, I slowly slipped back to sleep as the sound of the highway droned beneath our wheels. When I reawakened, I noticed we were someplace very different. There were mountain peaks and pine trees as far as my eyes could see with my cheek pressed against the car door glass. The sky was a gorgeous blue and the clouds resembled cotton balls suspended in mid-air. I found myself getting increasingly giddy and immediately asked when we could get out and explore.
My father told the group that we would first take the road up to Mount Evans, and so it went. Everyday an adventure, everyday a new and more beautiful place, with air so clean and fresh that you could almost taste it.
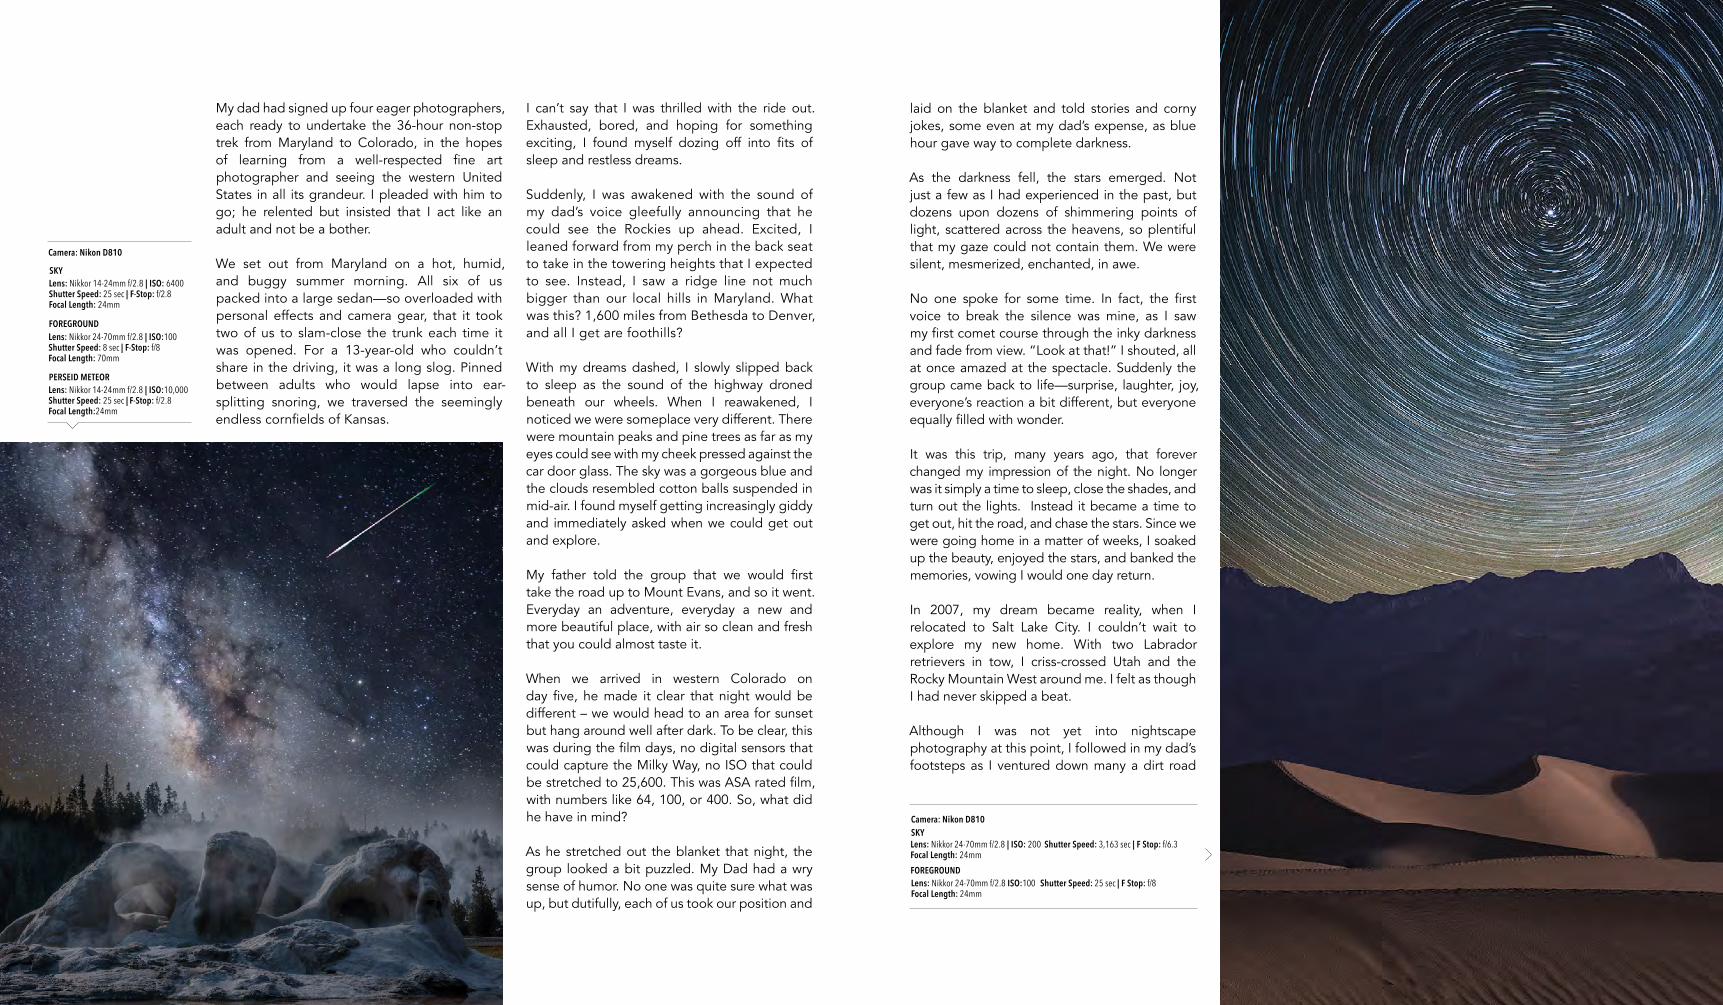
When we arrived in western Colorado on day five, he made it clear that night would be different – we would head to an area for sunset but hang around well after dark. To be clear, this was during the film days, no digital sensors that could capture the Milky Way, no ISO that could be stretched to 25,600. This was ASA rated film, with numbers like 64, 100, or 400. So, what did he have in mind?
As he stretched out the blanket that night, the group looked a bit puzzled. My Dad had a wry sense of humor. No one was quite sure what was up, but dutifully, each of us took our position and
My dad had signed up four eager photographers, each ready to undertake the 36-hour non-stop trek from Maryland to Colorado, in the hopes of learning from a well-respected fine art photographer and seeing the western United States in all its grandeur. I pleaded with him to go; he relented but insisted that I act like an adult and not be a bother.
We set out from Maryland on a hot, humid, and buggy summer morning. All six of us packed into a large sedan—so overloaded with personal effects and camera gear, that it took two of us to slam-close the trunk each time it was opened. For a 13-year-old who couldn’t share in the driving, it was a long slog. Pinned between adults who would lapse into ear-splitting snoring, we traversed the seemingly endless cornfields of Kansas.
SKY
FOREGROUND
Lens: Nikkor 24-70mm f/2.8 | ISO: 200 Shutter Speed: 3,163 sec | F Stop: f/6.3 Focal Length: 24mm
Lens: Nikkor 24-70mm f/2.8 ISO:100 Shutter Speed: 25 sec | F Stop: f/8 Focal Length: 24mm
Camera: Nikon D810
SKY
FOREGROUND
PERSEID METEOR
Lens: Nikkor 14-24mm f/2.8 | ISO: 6400 Shutter Speed: 25 sec | F-Stop: f/2.8 Focal Length: 24mm
Lens: Nikkor 24-70mm f/2.8 | ISO:100 Shutter Speed: 8 sec | F-Stop: f/8 Focal Length: 70mm
Lens: Nikkor 14-24mm f/2.8 | ISO:10,000 Shutter Speed: 25 sec | F-Stop: f/2.8 Focal Length:24mm
Camera: Nikon D810

37 38Light & Shadow // 2019 www.reallyrightstuff.com
"Stargazer" to date, this image has received over 30 features, and nearly a half million in engagement.
STARGAZER
Camera: Nikon D810 | Lens: Nikkor 14-24mm
SKYISO: 4000 | Shutter Speed: 30 sec F-Stop: f/2.8 | Focal Length: 14mm
FOREGROUND 1ISO: 400 | Shutter Speed: 330 sec F-Stop: f/8 | Focal Length: 14mm
FOREGROUND 2 ISO: 400 | Shutter Speed: 330 sec F-Stop: f/8 | Focal Length: 14mm
TUFFYISO: 400 | Shutter Speed: 1/60 sec F-Stop: f/8 | Focal Length: 14mm
and sought out remote locations. The more mud on the tires, the better.
Everything began to change in 2015 when I chose to invest in high quality gear, purchasing the Nikon D810 camera, a Nikon 14-24mm f/2.8 lens, and a Really Right Stuff tripod and ball head. At the time, I was running my own PR shop, but had an itch to get back to my photographic roots.
I began to contemplate trying my hand at night sky photography after seeing some beautiful work online, and soon after discovered the PhotoPills app. It was at that point that I decided to plan a meaningful nightscape photoshoot with a defined theme. My goal was to capture something more than a perfectly exposed night sky image. I suppose it was a bit naive to think I could even pull that off, considering I was cutting my teeth in astrophotography. Nonetheless, for the next nine months, I planned a photograph titled, “Stargazer.”
I first sketched out the vision on paper: a pencil sketch of one of my dogs sitting before a southwestern arch, gazing toward the Milky Way. Of my two dogs, my black lab Tuffy was the best model because she would contrast nicely against the red rock (Aspen is yellow). My next challenge was to find an appropriate arch that aligns with the Milky Way’s galactic core.
A bit of research and a few miles later, I picked the perfect place – a small arch located in Grand Staircase-Escalante National Monument, located in south-central Utah. A daytime scouting trip with the dogs confirmed the site. This is where the PhotoPills app is indispensable.
In the app, I placed a pin where I planned to set up my tripod and then scrolled ahead through the months to determine the exact date when the Milky Way would perfectly align with my foreground feature – in this case, the arch. I could do all of this from the comfort of my studio, and later confirm it all on location.
The date of optimal Milky Way alignment behind the arch turned out to be July the fourth, 2016. During the scouting trip, I used the app’s
“augmented reality” feature to determine the exact placement of the Milky Way in relation to the desired composition, and the window of time in which to execute the shoot.
So, on the Fourth of July 2016, as others prepared for the Independence Day celebrations in the United States, I packed up my truck and hit the road with Tuffy, heading for the galactic fireworks to come. Despite feeling a bit dubious of my newly acquired astrophotography skills, I was determined to have a good time, enjoy the great outdoors, and learn something new.
Arriving in advance of sunset allowed for time to pre-visualize, cross-check calculations, and set up the gear during daylight. Later, there was time to enjoy the sunset with Tuffy, grab a bite, and take in this magnificent natural treasure. I can easily recall that moment during the night when out of the darkness, a scorpion stalked Tuffy, forcing me to put on my best cave woman performance as I took out the threatening beast with a large rock.
Overall, the process went smoothly – even if it took much of the night to accomplish. Most of the time was spent illuminating the arch and lighting Tuffy to prevent motion blur. It was of chief importance to bring out the texture, form, and exquisite colors of the arch. As a result, little time remained to frame up additional compositions before dawn. I was careful to diffuse and shape the light with DIY modifiers, because it is very easy to overdo the lighting in night photography. A little goes a long way.
“Stargazer” is a blend made up of four distinct images -- all taken from one fixed tripod position and at the same focal length (EXIF data—see info box). I used small daylight rated LEDs that were positioned strategically around the arch to shape the scene and artistically reveal the rock formation. Tuffy was lit with an off-camera speed light that was triggered remotely. It took
39 40Light & Shadow // 2019 www.reallyrightstuff.com
techniques keeps work fresh and inspires new approaches to photography.
Featuring the Milky Way in an image is just one way I render the night sky. Star trail photography, which can be approached as a single long exposure or as many shorter exposures that are subsequently merged together in post-processing, is a wonderful way to express galactic motion, as the earth pirouettes throughout the night.
The nightscape images accompanying this article represent single-image captures, multi-exposure blends (including blue-hour blends, and those with a star tracker), a composite, and long single-exposure star trails. I also enjoy capturing astro time-lapse videos, and occasionally use automated sliders for effect. Technology is leading the way, and it’s a boon, especially to nightscape and astrophotographers. Expect better things to come. Each adventure, each night under the stars, affords me a new and unique opportunity to connect with the heavens in a deeper, more meaningful way, and to share another visual story from that experience.
And so, it was on a crystal-clear night in Death Valley earlier this year, that I stood alone in the inky darkness and stared in awe at the ribbon of stars stretching from horizon to horizon. I found myself taking a blanket from my truck and spreading it out across the sand. I was no longer 13, and my dad has since passed on, but I lay there looking up, much like I had years before. And as the night stretched on, I whispered,
“Thank you, dad. I’m here because of you.”
BIO: CHRISTINE KENYONChristine Kenyon is an award winning adventure and nightscape photographer and a Nikon100 recipient. Business Insider named her as one of "20 of the best up and coming photographers across the world you can follow on Instagram". She is a speaker, writer and educator, leading workshops in the western US. Her father, the late Lowell Anson Kenyon, was a fine art photographer, and chief of the Office of Photography for the Smithsonian Institution. Please visit Christine's website: www.ChristineKenyon.com
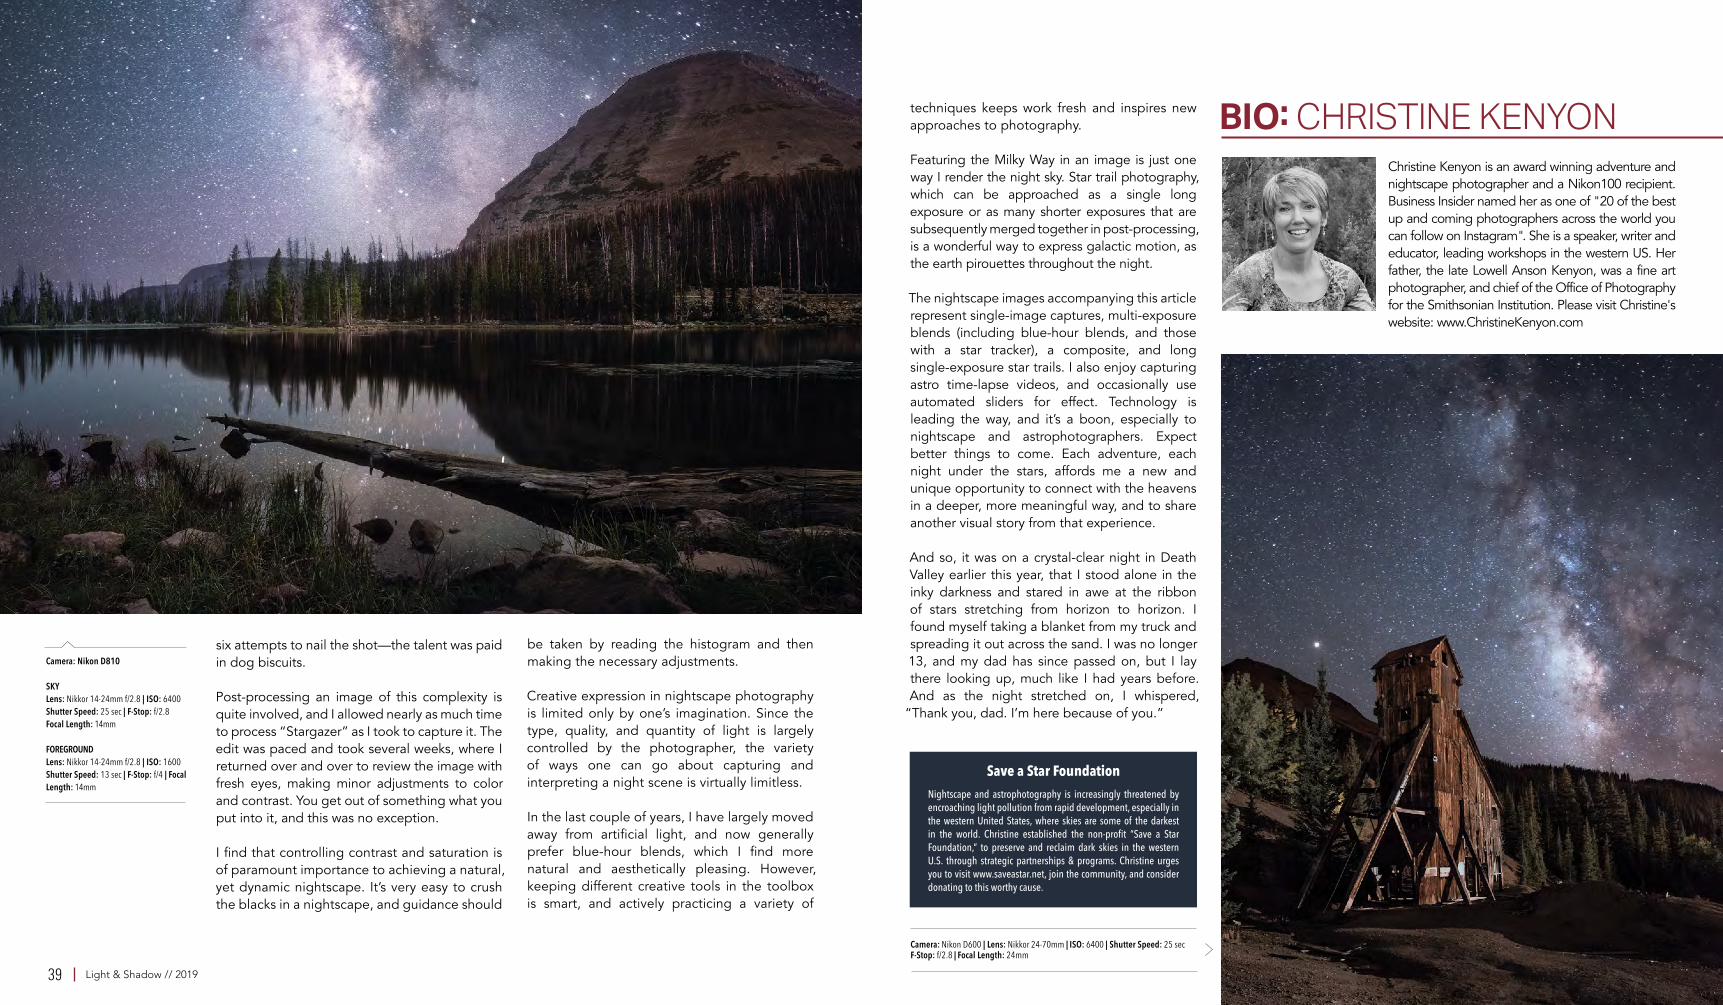
Camera: Nikon D810
SKYLens: Nikkor 14-24mm f/2.8 | ISO: 6400Shutter Speed: 25 sec | F-Stop: f/2.8 Focal Length: 14mm
FOREGROUNDLens: Nikkor 14-24mm f/2.8 | ISO: 1600Shutter Speed: 13 sec | F-Stop: f/4 | FocalLength: 14mm
six attempts to nail the shot—the talent was paid in dog biscuits.
Post-processing an image of this complexity is quite involved, and I allowed nearly as much time to process “Stargazer” as I took to capture it. The edit was paced and took several weeks, where I returned over and over to review the image with fresh eyes, making minor adjustments to color and contrast. You get out of something what you put into it, and this was no exception.
I find that controlling contrast and saturation is of paramount importance to achieving a natural, yet dynamic nightscape. It’s very easy to crush the blacks in a nightscape, and guidance should
be taken by reading the histogram and then making the necessary adjustments.
Creative expression in nightscape photography is limited only by one’s imagination. Since the type, quality, and quantity of light is largely controlled by the photographer, the variety of ways one can go about capturing and interpreting a night scene is virtually limitless.
In the last couple of years, I have largely moved away from artificial light, and now generally prefer blue-hour blends, which I find more natural and aesthetically pleasing. However, keeping different creative tools in the toolbox is smart, and actively practicing a variety of
Save a Star FoundationNightscape and astrophotography is increasingly threatened by encroaching light pollution from rapid development, especially in the western United States, where skies are some of the darkest in the world. Christine established the non-profit “Save a Star Foundation,” to preserve and reclaim dark skies in the western U.S. through strategic partnerships & programs. Christine urges you to visit www.saveastar.net, join the community, and consider donating to this worthy cause.
Camera: Nikon D600 | Lens: Nikkor 24-70mm | ISO: 6400 | Shutter Speed: 25 sec F-Stop: f/2.8 | Focal Length: 24mm

41 Light & Shadow // 2019
SWITCHING TO S M A L L E R F O R M A T
S T O R Y A N D P H O T O G R A P H Y B Y J O E M C D O N A L D
T here’s no question that there’s work involved in making great wildlife images, especially when lugging a big telephoto lens, camera, and tripod. If you’re like me, sometimes you question whether the work or the effort involved is worth the shot, or, more accurately, even the chance at getting a great shot. I’m not being lazy here, I am just
being honest. Last year, however, I reduced the ‘work’ end of my photography while jacking up the fun of taking photos to a whole new level. My wife Mary and I switched to a mirrorless micro 4/3rds system. That switch has changed our life, and, quite literally, has probably added ten or twenty years of productivity to these two photographers in their mid-sixties.
We now shoot Olympus, and our switch was due to a pro loaner program that gave us a chance at testing the system. I’d guess that most full-frame shooters have the same misgivings we had about using a smaller sensor and a smaller camera, and, if you believe some of the YouTube video reviews, you might believe the cameras just don’t measure up. You would be so, so wrong! I’m certainly not an expert on the entire spectrum of mirrorless cameras, but Mary and I quickly mastered what we needed to know to get the most out of our system, which in truth, has allowed us to capture images we never could before.
Camera: OLYMPUS E-M1X | Lens: OLYMPUS M.300mm F4.0 | ISO: 1600 Shutter Speed: 1/16000 sec | F-Stop: f/4 | Focal Length: 300mm
C O N T I N U E D
43 44Light & Shadow // 2019 www.reallyrightstuff.com
BIO: JOE MCDONALDJoe McDonald has been a full-time professional wildlife photographer for over 35 years. Today he and his wife, Mary Ann, are leading photo tours around 30 weeks of the year. His specialty has always been capturing action and behavior, which requires patience if one is to be successful, especially if you hope to capture
unique and interesting images. Check out more of Joe McDonald at www.HootHollow.com
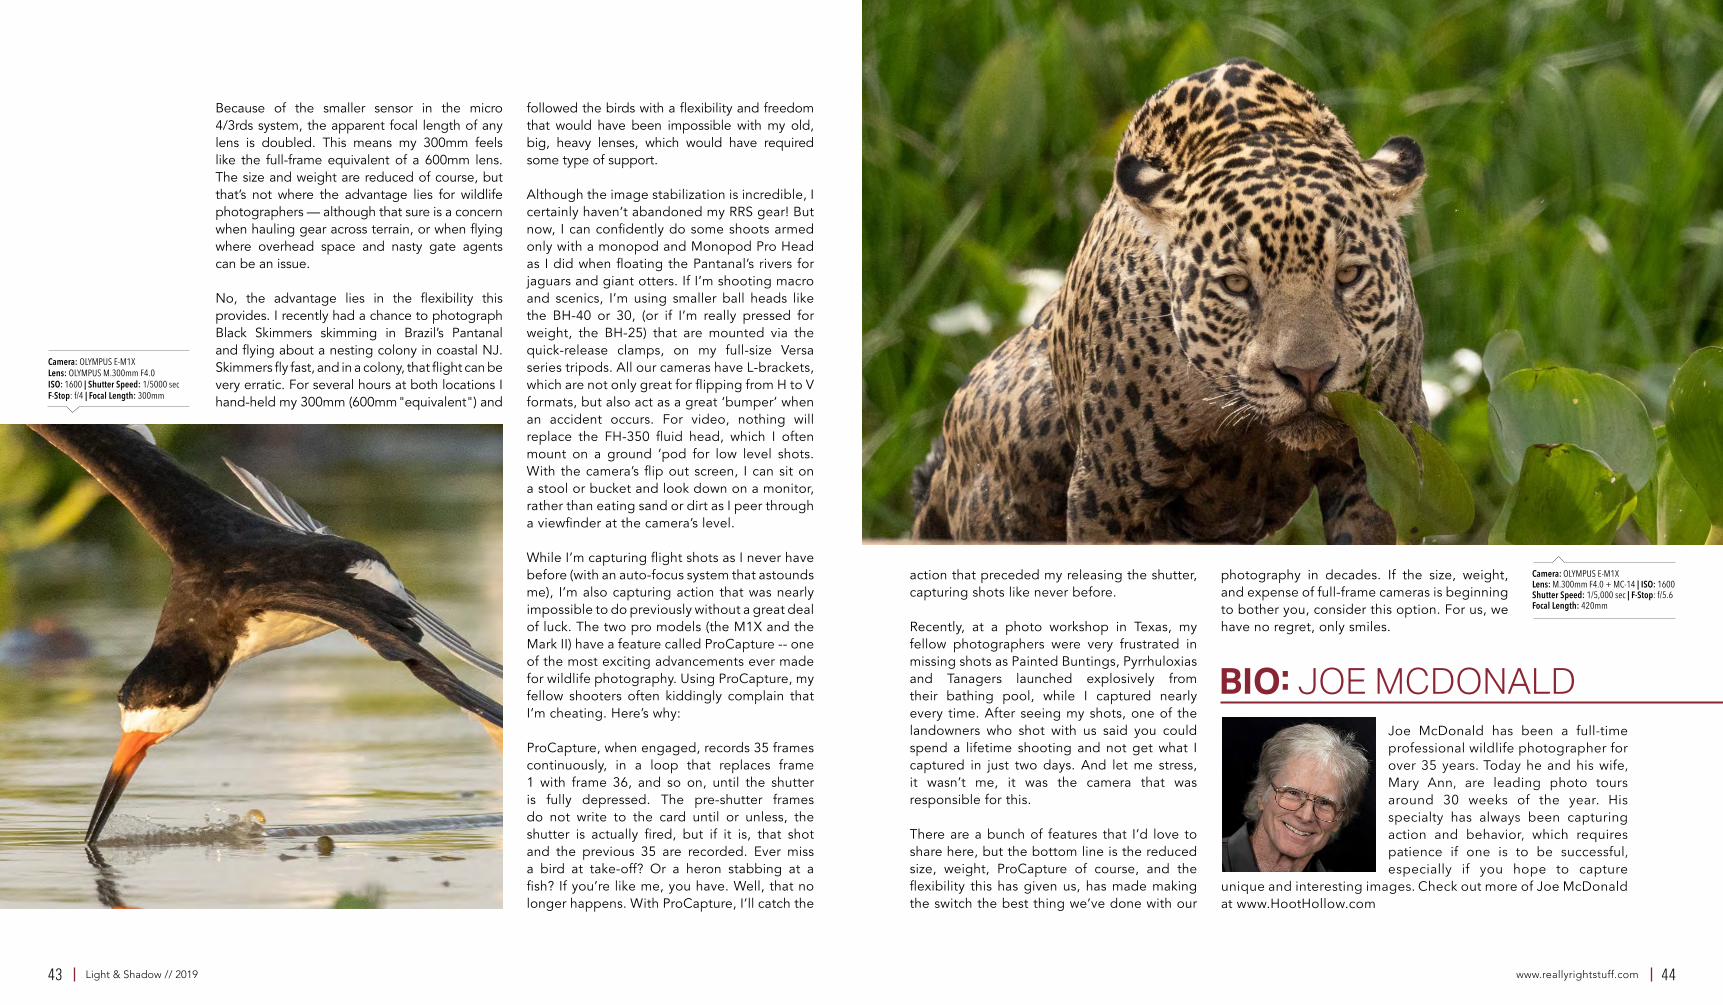
Because of the smaller sensor in the micro 4/3rds system, the apparent focal length of any lens is doubled. This means my 300mm feels like the full-frame equivalent of a 600mm lens. The size and weight are reduced of course, but that’s not where the advantage lies for wildlife photographers — although that sure is a concern when hauling gear across terrain, or when flying where overhead space and nasty gate agents can be an issue.
No, the advantage lies in the flexibility this provides. I recently had a chance to photograph Black Skimmers skimming in Brazil’s Pantanal and flying about a nesting colony in coastal NJ. Skimmers fly fast, and in a colony, that flight can be very erratic. For several hours at both locations I hand-held my 300mm (600mm "equivalent") and
followed the birds with a flexibility and freedom that would have been impossible with my old, big, heavy lenses, which would have required some type of support.
Although the image stabilization is incredible, I certainly haven’t abandoned my RRS gear! But now, I can confidently do some shoots armed only with a monopod and Monopod Pro Head as I did when floating the Pantanal’s rivers for jaguars and giant otters. If I’m shooting macro and scenics, I’m using smaller ball heads like the BH-40 or 30, (or if I’m really pressed for weight, the BH-25) that are mounted via the quick-release clamps, on my full-size Versa series tripods. All our cameras have L-brackets, which are not only great for flipping from H to V formats, but also act as a great ‘bumper’ when an accident occurs. For video, nothing will replace the FH-350 fluid head, which I often mount on a ground ‘pod for low level shots. With the camera’s flip out screen, I can sit on a stool or bucket and look down on a monitor, rather than eating sand or dirt as I peer through a viewfinder at the camera’s level.
While I’m capturing flight shots as I never have before (with an auto-focus system that astounds me), I’m also capturing action that was nearly impossible to do previously without a great deal of luck. The two pro models (the M1X and the Mark II) have a feature called ProCapture -- one of the most exciting advancements ever made for wildlife photography. Using ProCapture, my fellow shooters often kiddingly complain that I’m cheating. Here’s why:
ProCapture, when engaged, records 35 frames continuously, in a loop that replaces frame 1 with frame 36, and so on, until the shutter is fully depressed. The pre-shutter frames do not write to the card until or unless, the shutter is actually fired, but if it is, that shot and the previous 35 are recorded. Ever miss a bird at take-off? Or a heron stabbing at a fish? If you’re like me, you have. Well, that no longer happens. With ProCapture, I’ll catch the
action that preceded my releasing the shutter, capturing shots like never before.
Recently, at a photo workshop in Texas, my fellow photographers were very frustrated in missing shots as Painted Buntings, Pyrrhuloxias and Tanagers launched explosively from their bathing pool, while I captured nearly every time. After seeing my shots, one of the landowners who shot with us said you could spend a lifetime shooting and not get what I captured in just two days. And let me stress, it wasn’t me, it was the camera that was responsible for this.
There are a bunch of features that I’d love to share here, but the bottom line is the reduced size, weight, ProCapture of course, and the flexibility this has given us, has made making the switch the best thing we’ve done with our
Camera: OLYMPUS E-M1X Lens: M.300mm F4.0 + MC-14 | ISO: 1600 Shutter Speed: 1/5,000 sec | F-Stop: f/5.6 Focal Length: 420mm
Camera: OLYMPUS E-M1X Lens: OLYMPUS M.300mm F4.0 ISO: 1600 | Shutter Speed: 1/5000 sec F-Stop: f/4 | Focal Length: 300mm
photography in decades. If the size, weight, and expense of full-frame cameras is beginning to bother you, consider this option. For us, we have no regret, only smiles.
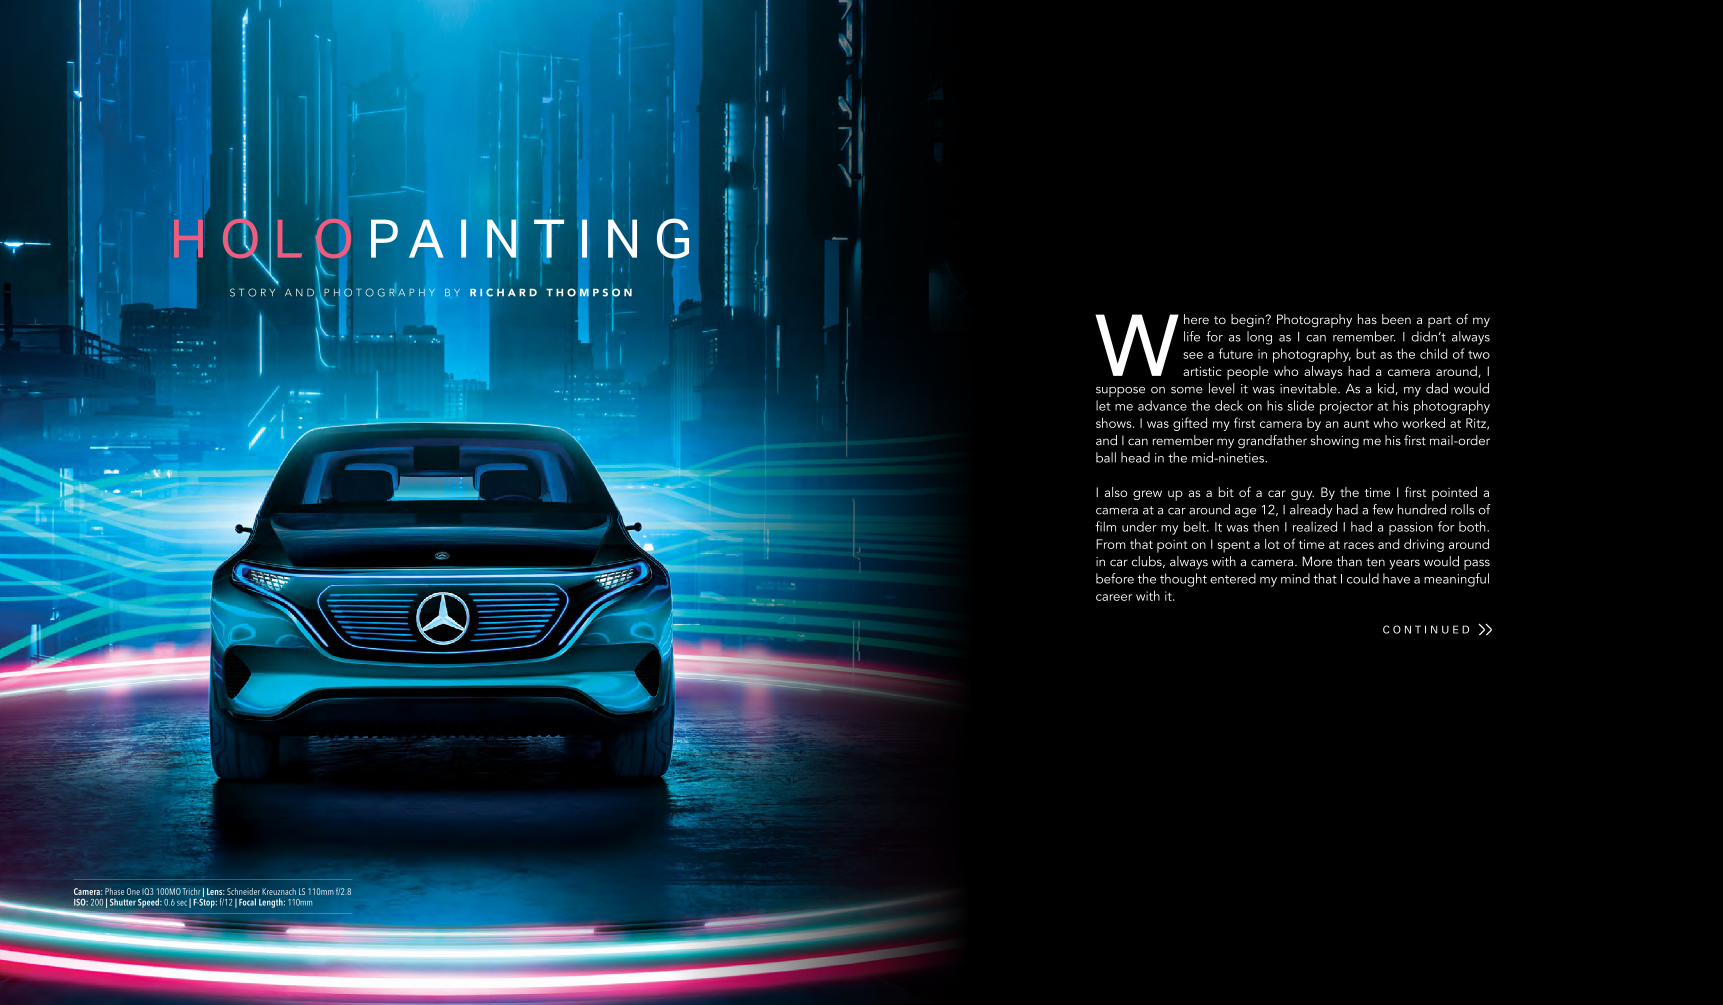
45 46Light & Shadow // 2019 www.reallyrightstuff.com
Camera: Nikon D810 | Lens: 14-24mm f/2.8 | ISO: 1600 | Shutter Speed: 25sec | F-Stop: f/2.8 | Focal Length: 14mm
H O L O P A I N T I N GS T O R Y A N D P H O T O G R A P H Y B Y R I C H A R D T H O M P S O N
W here to begin? Photography has been a part of my life for as long as I can remember. I didn’t always see a future in photography, but as the child of two artistic people who always had a camera around, I
suppose on some level it was inevitable. As a kid, my dad would let me advance the deck on his slide projector at his photography shows. I was gifted my first camera by an aunt who worked at Ritz, and I can remember my grandfather showing me his first mail-order ball head in the mid-nineties.
I also grew up as a bit of a car guy. By the time I first pointed a camera at a car around age 12, I already had a few hundred rolls of film under my belt. It was then I realized I had a passion for both. From that point on I spent a lot of time at races and driving around in car clubs, always with a camera. More than ten years would pass before the thought entered my mind that I could have a meaningful career with it.
Camera: Phase One IQ3 100MO Trichr | Lens: Schneider Kreuznach LS 110mm f/2.8 ISO: 200 | Shutter Speed: 0.6 sec | F-Stop: f/12 | Focal Length: 110mm
C O N T I N U E D

47 48Light & Shadow // 2019 www.reallyrightstuff.com
and its continuously evolving nature. These are ideas I have tried to put forward in my own work and what lead me to develop my light painting process that I call “holopainting”.
A BRIEF HISTORY OF LIGHT PAINTING The roots of this technique aren’t new – but it has surged to editorial and commercial prominence in the last decade or so in automotive photography for several reasons. The premise is that, by working with long exposures and continuous light sources, you can move a small-to-medium-sized light source around a car and, if executed properly, wind up with large-source-studio-look lighting which helps to create that illustrative feature distinguishing quality often sought after in car photography. You can achieve this type of effect with a fraction of the budget which would be required to produce these images in a conventional way with studio lighting equipment and a hefty power requirement.
Afterwards, these images are composited together, masking out the extraneous details like the light source itself, leaving only its reflection on the car. There are trade-offs of course, mostly having to do with controlling environmental light levels against your source. You won’t see too many daytime light paintings, for instance, due to the required exposure length (typically in the 5-15 second range) and the power of the source versus the sun. Then there’s the generally unspoken element of practice -- this technique involves movement (yours!), so learning to be
smooth in your movements with the light is essential. In general, this technique has been a big problem-solver in the editorial & social media car photography market, where time & budgets may not allow for elaborate lighting setups.
WHAT LED ME HERE By the fall of 2017, I was feeling burned out on several major facets of my work as a photographer. At the time, I was shooting commercial advertising work but also wrapping up a set of contracts with two different car manufacturers. Both, in their own way, were related to social media, as a photographer and otherwise.
I wasn’t sure how to put a finger on what I was feeling at the time and took to one of my favorite problem-solvers: reading books on related subjects. Surely someone else had felt this way before. I found what I was looking for in the work of Jean Baudrillard, a French philosopher who had put pen to paper with some very insightful thoughts on the subject more than thirty years ago. In his 1983 work entitled Simulations, Baudrillard suggests that “Abstraction today is no longer that of the map, the mirror, or the concept. Simulation is no longer that of a territory, a referential being, or a substance. It is the generation by models of a real without origin or reality: a hyper-real.” He goes on to elaborate about our “passage to a space whose curvature is no longer that of the real” in ways that are practically apparent in the world around us today, but at that time were still just ideas...and Baudrillard’s quaintly phrased, but deeply informed idea that the simulation had usurped
the real, and the means by which it occurs, were solid answers to my own ponderings, so I considered ways I could present some of that in my work.
In developing an aesthetic treatment for these ideas, I aimed to weave in color themes explored in the two years leading up to the hologram painting; namely the color theory concept of Simultaneous Contrast. This describes the perceived effect (as an optical illusion) of saturation increase when two complementary colors are placed next to each other and how the backlit screens in our various devices really play this effect up. I noticed an overwhelmingly positive response when I presented it as a post-production effect like false-color, and the LED-based nature of light wands are an easy means to get a pure, 100% chroma value out of the light source (unlike a regular bulb which has been gelled, for instance).
EXECUTION I arrived at the idea of shooting something practically, which was digital in nature and compositing some digital things that look practical. The challenging part of that idea from a photography perspective was obviously going to be the first part, but with the advent of devices like the Pixelstick, this is to some extent possible. For those not familiar, the Pixelstick is part of a new generation of programmable “light wands” into which patterns can be programmed via an SD card. If you search for Pixelstick images online, much of what you’ll find relies on the simple presets which come in the firmware of the
Camera: Phase One IQ180 Lens: Schneider LS 55mm f/2.8 | ISO: 50 Shutter Speed: 1/13 sec | F-Stop: f/8Focal Length: 55mm
Camera: Phase One IQ250 Lens: Schneider LS 240mm f/4.5 | ISO:100 Shutter Speed: 4 sec | F-Stop: f/10 Focal Length: 240mm
In those ten years I learned a lot, especially away from the camera. While I wouldn’t call myself a generalist, I did develop skills across several peripheral/supporting fields which have helped me find consistency in my professional practice as a photographer.
After earning a BFA at Savannah College of Art and Design, I started what I now consider to be my ‘real’ education in commercial art: work on film sets. For roughly five years following college, I worked in a variety of different roles on broadcast advertising & feature film sets. I started as a van-driving PA and VTR guy, eventually making my way to Stunt/B-Unit camera operator and visual effects photographer, before leaving my hometown for Los Angeles and refocusing on my previous passion: automotive photography.
It was during this time in commercial film production that I met and learned from some of the best minds in the business. I gained invaluable experience watching them problem- solve on set, and constructing clever, simple solutions to elaborate challenges. I observed that their most ingenious methods came back to the idea of being open to “unorthodox” solutions, since location work generally requires a pragmatic approach to the environment and keeps you thinking dynamically.
This also struck some chords with me as a musician who grew up in New Orleans, amid the presence of one of America’s original art forms

49 50Light & Shadow // 2019 www.reallyrightstuff.com
device: solid colors, rainbows, etc. However, if you’re graphic design / illustration savvy, you can program essentially whatever you like into the device. It was in this way I was able to bring these holographic illustrations into the real world. After trying some different methods to smooth the motion of the Pixelstick (most of which involve putting wheels underneath the light for stability and smoothness), I started testing this method on cars.
The first project I shot with it was a Mercedes-Benz concept car called the EQ, a design and tech demonstrator for Mercedes-Benz’ new electric car brand. I was a little nervous at first to be working in this new method with highly reflective (unforgiving) paint, but the fears turned out to be unfounded. The hologram painting produced some incredible saturation effects and genuinely made the car look like CGI, even though the effect had all been produced by hand. CGI backgrounds were then created with varying degrees of realism, and I wound up settling on more graphic backgrounds (versus natural looking ones) in most of the projects I shot in the style to date.
Here’s a breakdown of another similar project, the infamous 1980’s hot hatch (and six-time WRC Champ!) Lancia Delta HF Integrale. This project involved making several equally cool sports cars look like they were on the selector screen for a racing video game.
With a subject the size of a car, hyperfocal distance is a frequent concern and as a result, my aperture settings are usually in the f/10 to f/12 range (medium format value) for cars at this distance
shot on an 80mm lens (50mm equivalent). For this image, the camera was kept at a consistent f/12 across the shoot, with shutter values in the 5-10 second range at ISO 200. With no other light falling on the car the variation in exposure time is mostly down to what specific area of the car I’m lighting. The wheels, for instance, need just a few seconds, however if I need to make it the whole way around the car, that could take ten or fifteen seconds.
You can see the light-painted elements of the car and CGI elements separately from each other, illustrating the extent of the in-camera effects. These images were all created in separate takes with different facets of the car being painted in each one, later combined in Adobe Photoshop via blending modes. Here, some passes are used to do primary lighting on different facets of the car while others exist solely as background elements which don’t serve to light the car.
I shoot nearly all my work in this style on the PhaseOne XF/IQ3100 Trichromatic system I’ve had for the past year and a half. The big resolution factor and ”medium format” looks are appetizing to clients, but I’ve found the unique CFA on this sensor to be the best part. It does much better than my other cameras in capturing the hot saturation values LED lighting implements frequently produce. As a companion system, I also carry a Sony A7RII, which is a brilliant sensor in a comparatively fast form factor, and lenses from the Sony G-Master and Zeiss Batis lines. Whenever I use the Sony system for work like this, I must be much more careful to check exposure values on the camera and color temperatures on the LED devices which emit
all those colors so pleasing to our eyes, and so tough on camera sensors.
RRS has been a core part of my workflow for the past seven years, the only camera support I’ve used since I started working with medium format systems whose weight requires more robust and finessed support than what garden variety tripods can cope with. While I have a BH-55 and a TVC-34 that I find extremely useful when I need to shoot in a more compact form factor, my go-to (and probably the last tripod setup I’ll ever truly need) is the FG-02 gimbal head on TVC-45 legs. I initially purchased the gimbal head for a more technical facet of my work related to HDRI spherical imagery, but it’s become my mainstay as the extra sturdiness in a more than 10lb tripod goes a long way in producing tack sharp imagery at 100+ megapixels. With the 192-FAS package added as a nodal slide, I can create pano extensions with ease on projects where being able to achieve those extra-wide or even extra-tall aspect ratios without sacrificing resolution is priceless.
Now I’m continuing forward on this path, sharpening my technique when possible and
BIO: RICHARD THOMPSONLos Angeles based automotive photographer Richard Thompson III draws on a lifelong love of cars to create high energy, atmospheric imagery for his clients. Trained at the Savannah College of Art & Design, his work combines elements of film, photography, and graphic design with a passion for all things automotive. Work with cars has led him around the globe to create campaigns and social libraries for some of the world’s most recognizable
car brands, including Audi, BMW, Chevrolet, Lexus, and Mercedes-Benz, also having served as a creative director & media consultant to bespoke car firms such as Pagani Automobili. For more information about Richard Thompson, visit www.RVT3.net
1 2 3
1Camera: Phase One IQ3 100MP TrichrLens: Schneider LS 55mm f/2.8 | ISO: 200Shutter Speed: 8 sec | F-Stop: f/12 Focal Length: 80mm 2Camera: Phase One IQ3 100MP TrichrLens: Schneider LS 80mm f/2.8 ISO: 200 | Shutter Speed: 8 sec F-Stop: f/12 | Focal Length: 80mm
3Camera: Phase One IQ3 100MP Trichr Lens: Schneider LS 80mm f/2.8 ISO: 200 | Shutter Speed: 8 sec F-Stop: f/12 | Focal Length: 80mm
Camera: Phase One IQ3 100MP TrichrLens: Schneider Kreuznach LS 45mm f/3.5ISO: 200 | Shutter Speed: 4 sec F-Stop: f/8 | Focal Length: 45mm
finding ways to incorporate (even more!) new elements. After feeling pretty burned out with the sort of creative overload the internet can bring on, this project reminded me that it’s quite amazing to live and work in a time when novel tools and methods are popping up all the time. I hope you feel the same way.

51 52Light & Shadow // 2019 www.reallyrightstuff.com
Camera: Canon EOS 5D Mark IV | Lens: EF24-105mm f/4L IS II USM | ISO: 250 Shutter Speed: 1/1600 sec | F-Stop: f/6.3 | Focal Length: 55mm
S E T YO U R S I T E S O N
Seascape Photography
“Shower with your tripod.”
My guess is that you have never read an article that began with those words – and with that suggestion. I used it here to grab your attention and to drive home a very important point: When photographing by the sea, it’s very important to wash off your tripod at the end of the day – to
remove sand that can clog joints and salt spray that can muck-up ball heads and quick-release clamps.
Jumping in the shower with your tripod, with the legs fully extended, is my recommended way to keep your tripod clean. Of course, it’s best done alone. I do this with my RRS tripod (TVC-24L Series 2 Mk2 Carbon Fiber), BH-55 Ball Head and B2-LLR II Quick Release clamp. Speaking of extending the legs of a tripod, when you place your tripod in the sand, it’s best to extend the small legs first. If you extend the larger legs first (which does give you maximum stability), the joints of the small legs may be in, or even under the sand, creating a major cleaning (or even a disassembling) job.
Okay, now that we have my “shower with your tripod” tip out of the way, here are some additional photo tips that I hope will help you get the most out of your seaside photo sessions. To illustrate my tips I’ll use some of my favorite photographs from my five trips to Oregon’s spectacular coast.
C O N T I N U E D
S T O R Y A N D P H O T O G R A P H Y B Y R I C K S A M M O N
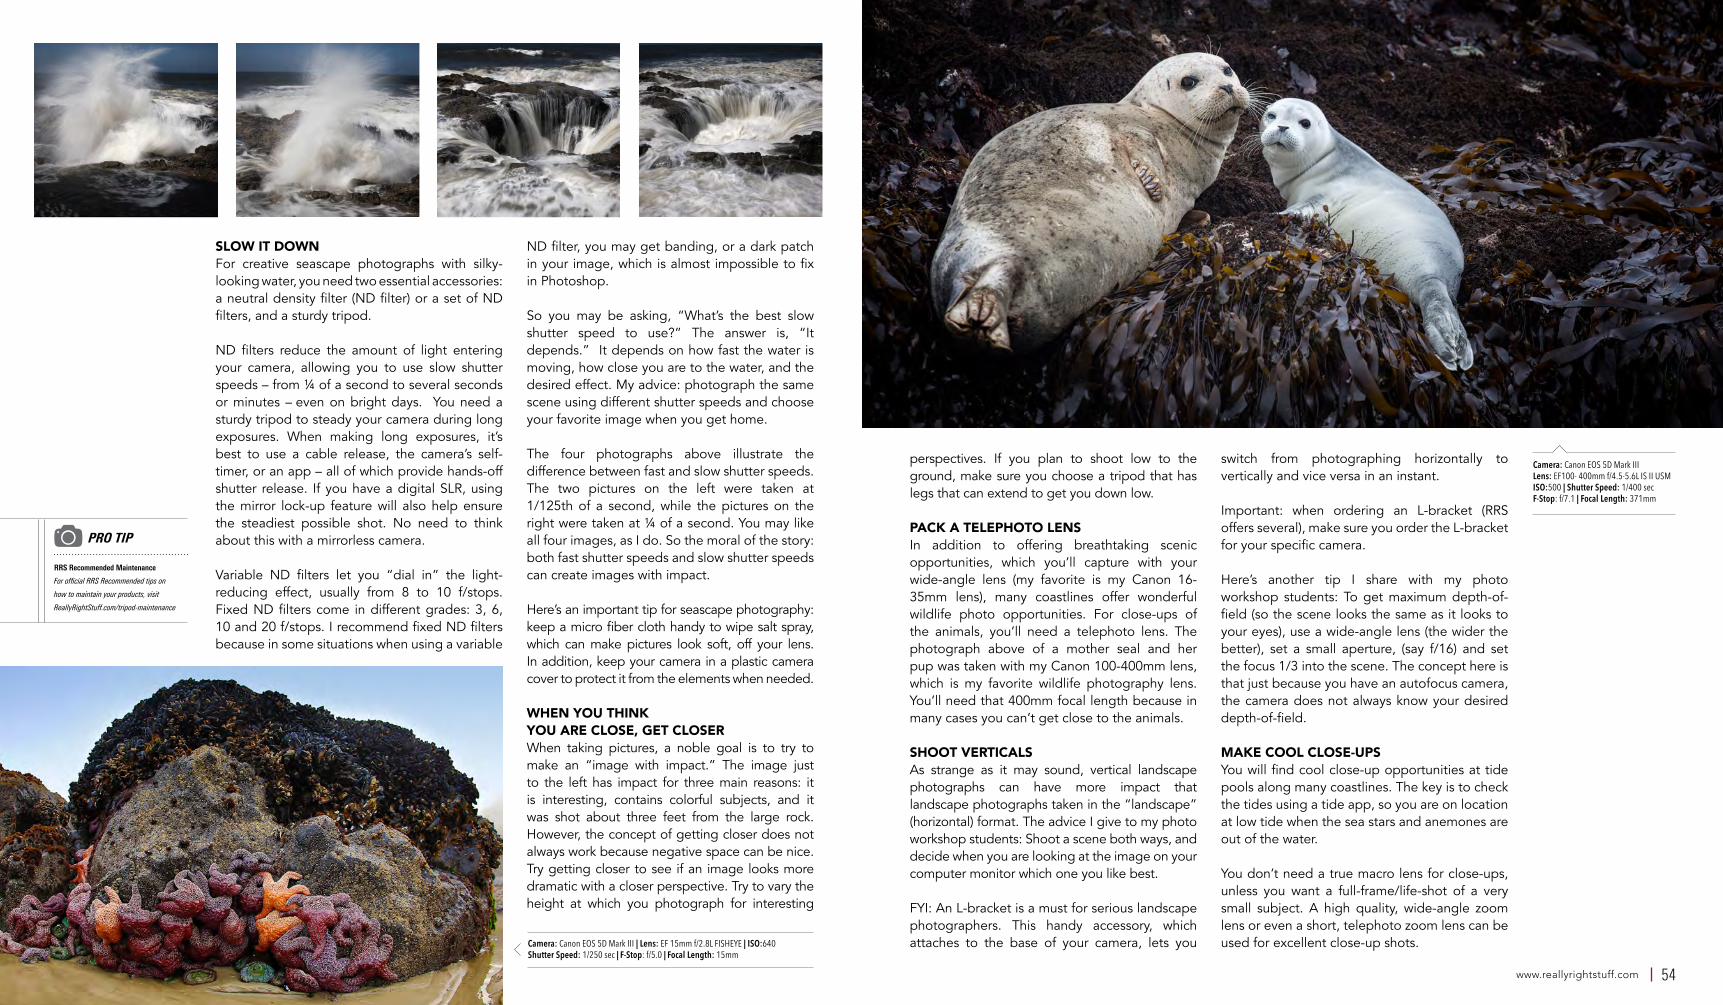
53 54Light & Shadow // 2019 www.reallyrightstuff.com
SLOW IT DOWNFor creative seascape photographs with silky-looking water, you need two essential accessories: a neutral density filter (ND filter) or a set of ND filters, and a sturdy tripod.
ND filters reduce the amount of light entering your camera, allowing you to use slow shutter speeds – from ¼ of a second to several seconds or minutes – even on bright days. You need a sturdy tripod to steady your camera during long exposures. When making long exposures, it’s best to use a cable release, the camera’s self-timer, or an app – all of which provide hands-off shutter release. If you have a digital SLR, using the mirror lock-up feature will also help ensure the steadiest possible shot. No need to think about this with a mirrorless camera.
Variable ND filters let you “dial in” the light-reducing effect, usually from 8 to 10 f/stops. Fixed ND filters come in different grades: 3, 6, 10 and 20 f/stops. I recommend fixed ND filters because in some situations when using a variable
ND filter, you may get banding, or a dark patch in your image, which is almost impossible to fix in Photoshop.
So you may be asking, “What’s the best slow shutter speed to use?” The answer is, “It depends.” It depends on how fast the water is moving, how close you are to the water, and the desired effect. My advice: photograph the same scene using different shutter speeds and choose your favorite image when you get home.
The four photographs above illustrate the difference between fast and slow shutter speeds. The two pictures on the left were taken at 1/125th of a second, while the pictures on the right were taken at ¼ of a second. You may like all four images, as I do. So the moral of the story: both fast shutter speeds and slow shutter speeds can create images with impact.
Here’s an important tip for seascape photography: keep a micro fiber cloth handy to wipe salt spray, which can make pictures look soft, off your lens. In addition, keep your camera in a plastic camera cover to protect it from the elements when needed.
WHEN YOU THINKYOU ARE CLOSE, GET CLOSERWhen taking pictures, a noble goal is to try to make an “image with impact.” The image just to the left has impact for three main reasons: it is interesting, contains colorful subjects, and it was shot about three feet from the large rock. However, the concept of getting closer does not always work because negative space can be nice. Try getting closer to see if an image looks more dramatic with a closer perspective. Try to vary the height at which you photograph for interesting
perspectives. If you plan to shoot low to the ground, make sure you choose a tripod that has legs that can extend to get you down low.
PACK A TELEPHOTO LENSIn addition to offering breathtaking scenic opportunities, which you’ll capture with your wide-angle lens (my favorite is my Canon 16-35mm lens), many coastlines offer wonderful wildlife photo opportunities. For close-ups of the animals, you’ll need a telephoto lens. The photograph above of a mother seal and her pup was taken with my Canon 100-400mm lens, which is my favorite wildlife photography lens. You’ll need that 400mm focal length because in many cases you can’t get close to the animals.
SHOOT VERTICALSAs strange as it may sound, vertical landscape photographs can have more impact that landscape photographs taken in the “landscape” (horizontal) format. The advice I give to my photo workshop students: Shoot a scene both ways, and decide when you are looking at the image on your computer monitor which one you like best.
FYI: An L-bracket is a must for serious landscape photographers. This handy accessory, which attaches to the base of your camera, lets you
switch from photographing horizontally to vertically and vice versa in an instant.
Important: when ordering an L-bracket (RRS offers several), make sure you order the L-bracket for your specific camera.
Here’s another tip I share with my photo workshop students: To get maximum depth-of-field (so the scene looks the same as it looks to your eyes), use a wide-angle lens (the wider the better), set a small aperture, (say f/16) and set the focus 1/3 into the scene. The concept here is that just because you have an autofocus camera, the camera does not always know your desired depth-of-field.
MAKE COOL CLOSE-UPSYou will find cool close-up opportunities at tide pools along many coastlines. The key is to check the tides using a tide app, so you are on location at low tide when the sea stars and anemones are out of the water.
You don’t need a true macro lens for close-ups, unless you want a full-frame/life-shot of a very small subject. A high quality, wide-angle zoom lens or even a short, telephoto zoom lens can be used for excellent close-up shots.
Camera: Canon EOS 5D Mark III Lens: EF100- 400mm f/4.5-5.6L IS II USM ISO:500 | Shutter Speed: 1/400 sec F-Stop: f/7.1 | Focal Length: 371mm
Camera: Canon EOS 5D Mark III | Lens: EF 15mm f/2.8L FISHEYE | ISO:640Shutter Speed: 1/250 sec | F-Stop: f/5.0 | Focal Length: 15mm
PRO TIP
RRS Recommended Maintenance
For official RRS Recommended tips on
how to maintain your products, visit
ReallyRightStuff.com/tripod-maintenance

55 56Light & Shadow // 2019 www.reallyrightstuff.com
BIO: RICK SAMMONRick Sammon, author of 40 books and 17 on-line classes, is a long-time friend of Really Right Stuff and Canon Explorer of Light. You can visit with him and learn about his world-class workshops and seminars, at: www.RickSammon.com. Rick also co-hosts the excellent "Picturing Success" podcast. Find out more and subscribe at: www.picturingsuccess.com
Camera: Canon EOS 5D Mark IV Lens:EF16-35mm f/2.8L III USM | ISO:100Shutter Speed: 1/5 sec | F-Stop: f/18Focal Length: 16mm
Camera: Canon EOS 5D Mark III | Lens: EF17-40mm f/4L USM | ISO: 250 | Shutter Speed: 1/85 sec | F-Stop: f/10 | Focal Length: 17.00mm
MAKE PICTURES, JUST DON’T TAKE PICTURESThe photo introducing the article is the result of taking the time to make a picture. First, we (my photo workshop co-leader Alex Morley and I) selected the location, which shows Face Rock on Bandon Beach. Then we had a rider ride her horse as fast as she could into the frame. Setting my camera at the highest frame rate, I shot off a burst of images, capturing the beautiful gesture of the horse and rider. SAFETY FIRSTMy friend Sara Cail took the shot above of me photographing at Thor’s Well. It looks like I am close to the water because Sarah used a telephoto lens, which compresses the objects in a scene. I was actually within a safe distance of the crashing waves.
I share this photo with you because when photographing by the sea, always think "safety first". Never turn your back on the sea and always watch out for sneaker (unexpected) large waves. Also, always change lenses with your back to the wind to avoid salt spray getting inside your camera and on your sensor or mirror.
Finally, always remember to check the tides for safety, too. A high tide may prevent you from photographing inside Devil’s Punch Bowl, and if you are inside at low tide, a high tide may prevent you from getting out!
Really Right Stuff is proud to partner with PrintReleaf in this issue of Light & Shadow. PrintReleaf calculates the number of trees consumed in the printing of this publication and replants the equivalent
as part of a global reforestation effort.