232 healthcare portal instructions for 232 lendersplease e-mail your 232 healthcare portal questions...
TRANSCRIPT

1
232 Healthcare Portal
Instructions for 232 Lenders

2
Common Procedures for All
Steps
3
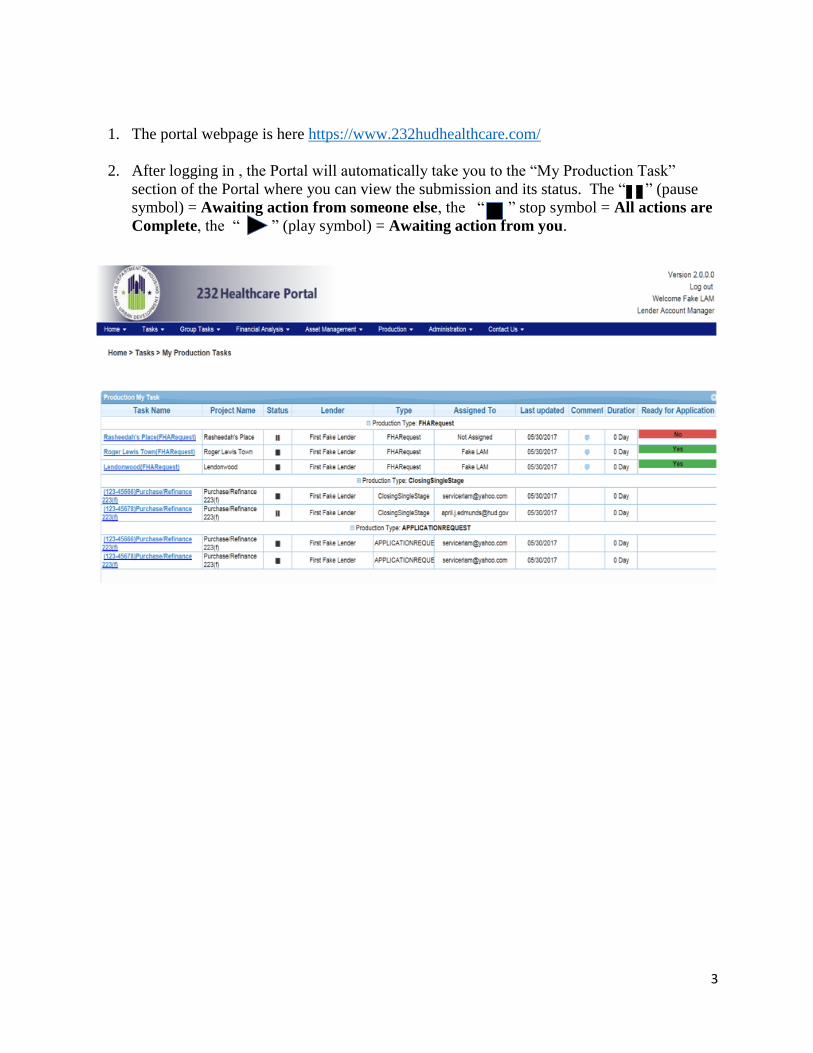
1. The portal webpage is here https://www.232hudhealthcare.com/
2. After logging in , the Portal will automatically take you to the “My Production Task”
section of the Portal where you can view the submission and its status. The “ ” (pause
symbol) = Awaiting action from someone else, the “ ” stop symbol = All actions are
Complete, the “ ” (play symbol) = Awaiting action from you.

4
3 The color system is also an indication. Green means it is ready to go onto the next
step. Red means it is not ready.
4 If you want to continue later on the application, you can do that. You would use the “save and
check-in” option at the bottom.

5
Submitting a FHA Number
Request

6
SUBMITTING A FHA NUMBER REQUEST
1. This section will provide instructions on submitting FHA Number requests by HUD
approved Lenders.
a. To submit a FHA number request to HUD the user will need a valid email address
and password to access the portal. If the user does not have a password, please
contact the Portal helpdesk at hhcp <[email protected]>.
2. After entering the user name and password, the first screen the user will see is the
“Lender Project Action” screen. This screen will allow the user to select the action you
want to complete using the Portal.

7
3. Select the “Production” option from the items across the top of the screen and then click
“FHA # Request” from the drop down list of options.

8
4. Enter all the required information (name, address, CMS rating if applicable, bed count,
project type etc.) for the project.

9
5. Note: On 223a7, and other refinance projects, enter the current FHA number and loan
type on the request form. Also, the address for the refinance project and the current
project address should match. If the project address is the same select yes, the project
address is listed correctly, and the address field should populate automatically.

10
6 After entering all the required data, verify the information is correct. If all the data was
entered correctly, check the acknowledgment button and click submit to forward your
request to HUD for processing.

11
Submitting a FHA # Request for Portfolio
Projects
7. When submitting requests for portfolio projects, enter the data the same way as in
steps 1-4 making sure to enter the portfolio name, size, and whether the portfolio is
new or existing.
a. 8. If the submission is part of an existing portfolio, please provide the portfolio number
on the form. After entering the data, check the acknowledgement button and click
submit to forward the request to HUD. A “Portfolio” task will be generated in
addition to the FHA Number Request task. Note that both the FHA Number Request
and Portfolio tasks will need to be completed by HUD for the project to be “Ready
for Application.”
9. If the submission requires a Corporate Credit Review (applicable to Midsize and
Large Portfolios) a “CCR” task will also be generated. The CCR task must also be
completed by HUD for the project to be “Ready for Application.” Prior approval of
these application submissions is required either in the form of a Portfolio Approval
letter or specific approval from HUD allowing application submissions prior to the
issuance of a Portfolio Approval.

12
10. After submitting the FHA request, the Portal will automatically take you to
the “My Production Task” section of the Portal where you can view the
submission and its status. The“ ” (pause symbol) = Awaiting action from
someone else, the “ “ stop symbol = All actions are Complete, the “
” (play symbol) = Awaiting action from you.
"

13
If you want to continue later on the application, you can do that. You would use the “save and check-in”
option at the bottom.
11. Once HUD receives and processes the FHA number request, the lender will receive
an email containing the new FHA number and informing the user that an application
can now be submitted for review.
You have now successfully submitted a FHA Number
Request for your property!

14
Who to Contact?
Please e-mail your 232 Healthcare Portal questions or concerns to the 232 Healthcare
Portal Help Desk at [email protected].

15
Submitting an Application

16
SUBMITTING A PROJECT:
This section will provide instructions on submitting a project submitted by HUD approved Lenders.
1 Log into the portal
2 Click on the Production tab
3 Select Application Process

17
4 Select the FHA number of the property for which you will be submitting an application.
5 Verify the address is correct. If the address is not correct, select “No” and enter the
correct information. This will be sent to HUD for review and updating.
18
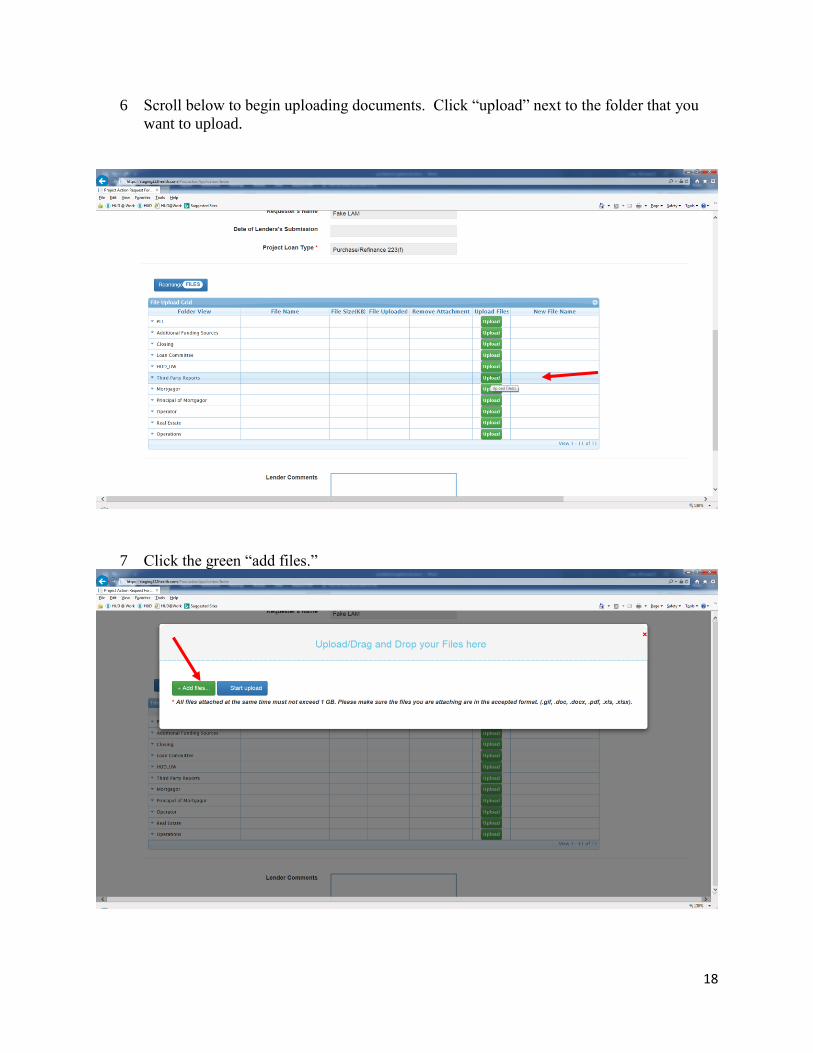
6 Scroll below to begin uploading documents. Click “upload” next to the folder that you
want to upload.
7 Click the green “add files.”

19
8 A windows explorer box will open up. Select the files you wish to upload to that folder.
Use “control” and “a” (Ctrl + A) together to select all documents within 1 folder. Click
“open” when you have selected the files.
9 Use the following link to find our naming convention process:
https://www.hud.gov/sites/dfiles/Housing/documents/Portal-FileNaming-
FirmApplication.xlsx Make sure the name is exact or you will have to rename the
document. Renaming lots of documents is very time consuming for you the user.
There is a 100MB limit per document and they can only be gif, doc, pdf, or xls file types.

20
10 Next, click “start upload.”
11 Documents that are in white are uploaded with the correct name. Those in blue will need
to be renamed. Please use the HUD document naming convention, as linked in Step 9,
above.

21
12 Those in blue need to be changed. On the right side, click the arrow, then select the type
of document you want to rename it.
22
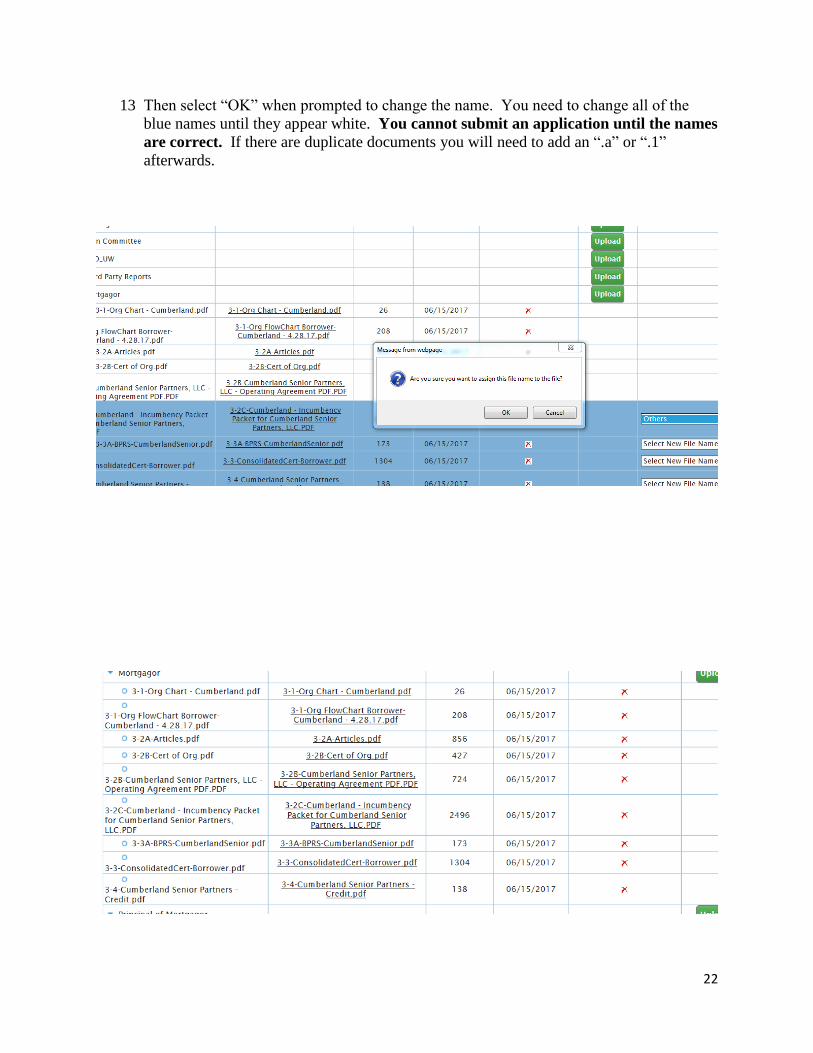
13 Then select “OK” when prompted to change the name. You need to change all of the
blue names until they appear white. You cannot submit an application until the names
are correct. If there are duplicate documents you will need to add an “.a” or “.1”
afterwards.
23
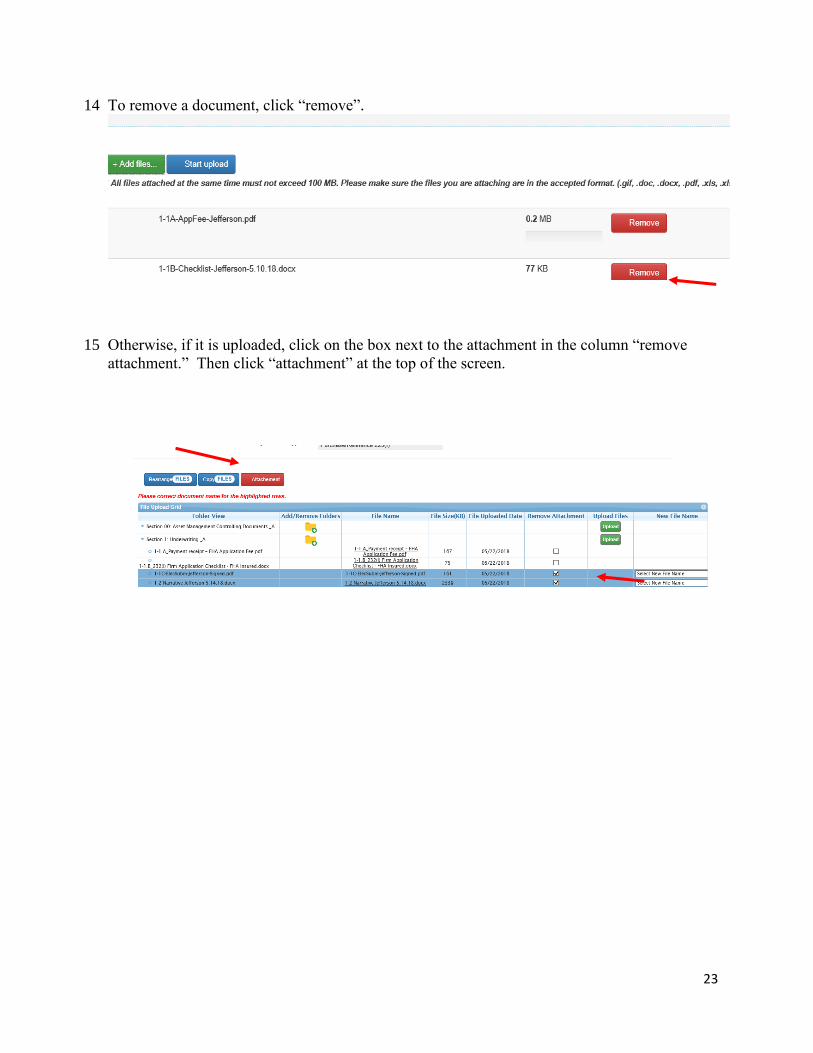
14 To remove a document, click “remove”.
15 Otherwise, if it is uploaded, click on the box next to the attachment in the column “remove
attachment.” Then click “attachment” at the top of the screen.

24
16 When everything is uploaded, you can now finish submitting the property. Click the box
below to acknowledge submission.
Now click “submit” at the bottom. If successful it will say “application request submitted
successfully.”

25
17 To view your queue, go to the “tasks” ribbon on the far-left upper corner of your portal.
The project should now be in the “application request” section.

26
Underwriting an Application

27
APPLICATION PROCESSING:
This section will provide instructions on Lender aspects of processing during application review.
Once an application is submitted by a Lender, it will show internally to ORCF staff in a Production
Queue. Applications are listed by submission date, oldest first. ORCF reviewer assignments (Appraisal,
Environmental, Title & Survey, Underwriter) will be made from that Queue.
Lenders can view the status of an application review through the Portal.
1. Log into the portal
2. Click on the Production tab
3. Select Production Lender PAM Report

28
4. Locate the property in the “Application Request” section.
5. Use the scroll bar to scroll to the right to the “Status” column.

29
6. As ORCF reviewers are assigned (Appraisal, Environmental, Title/Survey, UW), individual
statuses will be available by clicking the “+” sign next to the FHA Number.

30
Scroll to the right to see the assigned review.
7. As reviewers are assigned they will be added to the project actions. An application is
considered In Review when an ORCF UW is assigned.

31
Requests for Additional Information:
Individual ORCF reviewers may initiate “Requests for Additional Information” (“RAI’s”) as they
complete their reviews. An automatic email with the request is generated, but reviewers may need to
follow up with a separate email if more detail is necessary.
RAI’s will be shown in Lender’s My Production Tasks & the PAM Report.
8. Open the My Production Tasks tab. The Application Request list shows Tasks designated
as RAI’s.
9. The “ ” (Pause icon) = Awaiting Action from someone else, the “ ” (Stop icon) =
All Actions are Complete, the “ ” (Play icon) = Awaiting action from you. The
Play icon indicates a response needs to be submitted to the ORCF reviewer to continue
processing.

32
10. Access the RAI detail by clicking on the RAI task link.
11. Scroll right to see the “Attach” file button. This button opens up the lender’s ability to
submit additional documentation as requested by the ORCF reviewer.

33
12. A pop-up box with reviewer comments can be viewed by clicking on the Comment icon.
13. A file history pop-up box can also be viewed by clicking on the File History icon.

34
14. Attach updated files and add Comments to Submit the RAI response. (Note: It may be
necessary to send a separate email to the ORCF reviewer if a full submission response
option is not available in the Portal.)
The ORCF reviewer will see a new task with the RAI response, and will complete the review or request
further additional information.
The Lender will see the updates on their My Production Tasks and PAM report, as well as emails for any
additional requests.

35
15. On the My Production Tasks tab (note in this example one RAI is awaiting lender action
(Pause icon), and one RAI is complete (Stop icon):
16. On the PAM Report (in this example, both RAI’s are completed):

36
Once all reviews are complete, and the ORCF UW has presented the project to Loan Committee, the
project will show in the Lender’s PAM report as closed.
17. Open the Lender PAM report from the Production tab. Scroll to the right to see the Status.

37
Clicking on the “+” sign next to the FHA # will expand the list to show the status of each individual
review.
18. The project will now be available to start in the Closing process when ready.

38
Closing

39
DRAFT CLOSING PROCESSING:
This section will provide instructions on Lender aspects of processing during draft closing document
review.
To submit draft closing documents,
1. Log into the portal
2. Click on the Production tab
3. Select Closing Process
4. Select type of closing
5. Select FHA # of subject project from available applications.

40
6. Once selecting the FHA#, the Portal will auto-fill several fields with data from the
Application. To upload draft Closing documents, click on the green UPLOAD button.

41
7. A pop-up window will open to allow you to either select specific documents to upload or
you may drag and drop the documents.
8. The system will ask you to rename the documents to correspond with acceptable document
names.
9. After the Portal asks to confirm that you want to rename the document(s), you may enter
any comments you want to send to the Closer in the Lender Comments box, click the
Acknowledge button and Submit to send the documents to be assigned to a Closer.

42
Requests for Additional Information:
Individual ORCF reviewers may initiate “Requests for Additional Information” (“RAI’s”) as they
complete their reviews. An automatic email with the request is generated, but reviewers may need to
follow up with a separate email if more detail is necessary.
RAI’s will be shown in Lender’s My Production Tasks & the PAM Report.

43
10. Open the My Production Tasks tab. The Application Request list shows Tasks designated
as RAI’s.
11. The “ ” (Pause icon) = Awaiting Action from someone else, the “ ” (Stop icon) = All
Actions are Complete, the “ ” (Play icon) = Awaiting action from you. The Play
icon indicates a response needs to be submitted to the ORCF reviewer to continue
processing.

44
12. Access the RAI detail by clicking on the RAI task link.
13. Scroll right to see the “Attach” file button. This button opens up the lender’s ability to
submit additional documentation as requested by the ORCF reviewer.

45
14. A pop-up box with reviewer comments can be viewed by clicking on the Comment icon.
15. A file history pop-up box can also be viewed by clicking on the File History icon.

46
16. Attach updated files and add Comments to Submit the RAI response. (Note: It may be
necessary to send a separate email to the ORCF reviewer if a full submission response
option is not available in the Portal.)
The ORCF reviewer will see a new task with the RAI response, and will complete the review or request
further additional information.
The Lender will see the updates on their My Production Tasks and PAM report, as well as emails for any
additional requests.

47
17. On the My Production Tasks tab (note in this example one RAI is awaiting lender action
(Pause icon), and one RAI is complete (Stop icon):

48
18. On the PAM Report (in this example, both RAI’s are completed):
Once all reviews are complete, and the ORCF UW has presented the project to Loan Committee, the
project will show in the Lender’s PAM report as Completed.
19. Open the Lender PAM report from the Production tab. Scroll to the right to see the Status.

49

50
20. Clicking on the “+” sign next to the FHA # will expand the list to show the status of each
individual review.

51
21. The project will now be available to start in the Closing process when ready.