access careblox time & attendance
TRANSCRIPT
Access CareBlox Time & AttendanceTerminal installation guide
by
[email protected] 073 85 73 www.theaccessgroup.com/careblox
*For use only with brick/block walls. If installing onto a stud wall, the terminal must be securely fixed to; a wooden stud, concrete block or other permanent structure behind the stud wall with at least 2 of the screws. The other screws should be fitted using appropriate drywall fittings. Installing onto plasterboard alone may not support the weight of the terminal.
Follow this simple step-by-step guide to ensure your new terminal is installed correctly.
We recommend that the installation of the terminal is carried out by a suitably qualified and competent person. If you have any queries regarding the installation of the terminal, please contact our support team on 0845 073 8573.
• Drill• Drill bits• Screw Driver• Tape measure
• Pencil• Stud Detector• Spirit level• Rawlplugs x 4 - supplied*
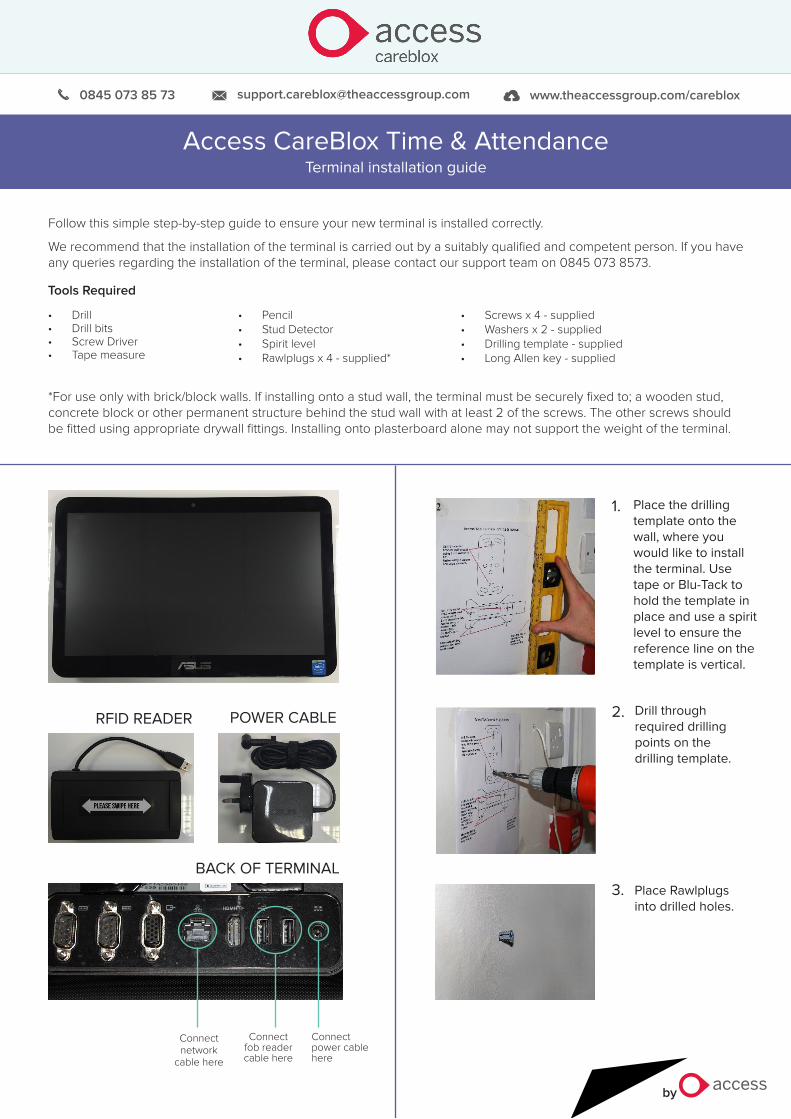
RFID READER POWER CABLE
BACK OF TERMINAL
Connect network
cable here
Connect fob reader cable here
Connect power cable here
Place the drilling template onto the wall, where you would like to install the terminal. Use tape or Blu-Tack to hold the template in place and use a spirit level to ensure the reference line on the template is vertical.
Drill through required drilling points on the drilling template.
Place Rawlplugs into drilled holes.
1.
2.
3.
Tools Required
• Screws x 4 - supplied• Washers x 2 - supplied• Drilling template - supplied• Long Allen key - supplied

Access CareBlox Time & AttendanceTerminal installation guide
by
[email protected] 073 85 73 www.theaccessgroup.com/careblox
Fix terminal bracket to the wall using 2 screws and washers. Loosely tighten the screws then use a spirit level to ensure the bracket is level.Once level, tighten screws fully to secure bracket.
Using the same method as step 4, affix fob reader bracket underneath terminal bracket.
To clip the reader to the bracket, hook the left-hand side of the reader to the bracket and press the right-hand side home until it clicks in place. Ensure the lead is at the top.
Fit terminal onto bracket by inserting the short pins into the V-shaped slots at the top.
Attach the USB cable from the fob reader and the network cable to the back of the terminal. Then insert and tighten the security bolts on the bracket to secure the terminal in position. Use the supplied Allen key to tighten the bolts.
Plug in the power cable and turn the terminal on. Once the terminal has started up, the home screen will be shown and the terminal will be ready to use.
4.
5.
6.
7.
8.
9.