administering my webmethods server - software ag
TRANSCRIPT

Administering My webMethods Server
Version 10.3
October 2018

This document applies to My webMethods Server 10.3 and to all subsequent releases.
Specifications contained herein are subject to change and these changes will be reported in subsequent release notes or new editions.
Copyright © 2004-2020 Software AG, Darmstadt, Germany and/or Software AG USA, Inc., Reston, VA, USA, and/or its subsidiariesand/or its affiliates and/or their licensors.
The name Software AG and all Software AG product names are either trademarks or registered trademarks of Software AG and/orSoftware AGUSA Inc. and/or its subsidiaries and/or its affiliates and/or their licensors. Other company and product namesmentionedherein may be trademarks of their respective owners.
Detailed information on trademarks and patents owned by Software AG and/or its subsidiaries is located athttp://softwareag.com/licenses/.
Use of this software is subject to adherence to Software AG's licensing conditions and terms. These terms are part of the productdocumentation, located at http://softwareag.com/licenses/ and/or in the root installation directory of the licensed product(s).
This software may include portions of third-party products. For third-party copyright notices, license terms, additional rights orrestrictions, please refer to "License Texts, Copyright Notices and Disclaimers of Third Party Products". For certain specific third-partylicense restrictions, please refer to section E of the Legal Notices available under "License Terms and Conditions for Use of SoftwareAG Products / Copyright and Trademark Notices of Software AG Products". These documents are part of the product documentation,located at http://softwareag.com/licenses/ and/or in the root installation directory of the licensed product(s).
Document ID: MWS-AG-103-20200425

Table of Contents
About This Guide......................................................................................................................................9Exporting My webMethods Server Assets....................................................................................10Document Conventions...................................................................................................................10Online Information and Support...................................................................................................11Data Protection.................................................................................................................................11Deprecation of webMethods Broker..............................................................................................12
I Startup and Configuration...................................................................................................................131 Getting Started with My webMethods Server...........................................................................15
Introduction to My webMethods Server..............................................................................16Starting and Stopping My webMethods Server on Windows..........................................17Automatically Starting My webMethods Server on UNIX................................................17Logging Into My webMethods Server..................................................................................17Logging Out of My webMethods Server..............................................................................18Changing the Administrator Password................................................................................18
2 Changing the My webMethods Server Configuration.............................................................21Post-Installation Configuration Changes.............................................................................22Using My webMethods Server with a MySQL Database..................................................22Did You Install Without Specifying a Database?................................................................23Guidelines for Multiple My webMethods Server Instances..............................................23Changing the HTTP Listener Port for a Standalone Server...............................................24Changing HTTP and HTTPS Listener Ports........................................................................24Changing the JMX Listener Port............................................................................................25Changing the JCR Repository RMI Listener Ports..............................................................26Specifying the Java Location for My webMethods Server.................................................26Managing Redirection in My webMethods Server.............................................................28
3 My webMethods Server and HTTPS..........................................................................................31Using My webMethods Server as an HTTPS Client...........................................................32Communicating with webMethods Applications Using HTTPS.....................................36Managing Authentication Certificates as My webMethods Administrator...................37
4 Using My webMethods Server with Web Servers....................................................................43Integration with Web Servers.................................................................................................44My webMethods Server and Apache....................................................................................44My webMethods Server and IIS............................................................................................44
5 Running My webMethods Server from the Command Line..................................................45Basic Command Line Syntax for My webMethods Server................................................46Executing My webMethods Server Commands..................................................................46Accessing the Command Line Help Contents.....................................................................47My webMethods Server Instance Administration Commands........................................47My webMethods Server Instance Operation Commands..................................................53My webMethods Server Instance Configuration Commands...........................................56My webMethods Server Service Management Commands..............................................57My webMethods Server OSGi Profile Commands.............................................................59Start, Stop and Execute My webMethods Server Commands on Multiple ServerInstances....................................................................................................................................61
Administering My webMethods Server 10.3 iii

Log Files for mws Commands...............................................................................................626 Modifying Configuration Files....................................................................................................65
The Java Service Wrapper.......................................................................................................66Configuring JVM Settings for My webMethods Server.....................................................69Modifying Configuration Files Stored in the Database.....................................................73Configuring My webMethods Server to Run in 32-bit on Solaris, HP-UX, or Linux....75Configuring HTTP Listeners to Use a Single IP Address..................................................76Configuring Whether Diagnostics Are Executed at Startup.............................................79
II My webMethods Administrator Functions....................................................................................817 Managing My webMethods Configuration...............................................................................83
Managing Directory Services.................................................................................................84Managing External Directory Services.................................................................................86Managing External Data Sources........................................................................................103Managing Email Settings......................................................................................................111Managing Calendars.............................................................................................................112
8 Searches for Users, Groups, and Roles.....................................................................................113Searching for Existing Users, Groups, or Roles.................................................................114Advanced Searches................................................................................................................114Working with Saved Searches..............................................................................................116Exporting Search Results to a .csv File...............................................................................118
9 Managing Users and Groups.....................................................................................................121About Managing Users and Groups...................................................................................122Managing Users.....................................................................................................................123Managing User Data.............................................................................................................133Managing Groups..................................................................................................................135
10 Managing Permissions..............................................................................................................141Managing Permissions in My webMethods......................................................................142Managing Access Privileges and Functional Privileges...................................................145Managing Permissions for an Individual Resource..........................................................146Using Security Realms..........................................................................................................148
11 Managing Roles and Access to My webMethods.................................................................155About Roles in My webMethods Server.............................................................................156Granting Users Access to My webMethods and the My webMethods Users Role......157Creating Roles........................................................................................................................158Editing Information for a Role.............................................................................................164Deleting Roles........................................................................................................................165Defining Dynamic Attributes Associated with a Role.....................................................166
12 My webMethods Server Clustering........................................................................................171How a My webMethods Server Cluster Works.................................................................172Planning Your My webMethods Server Cluster................................................................175Considerations When Building a My webMethods Server Cluster...............................177Modifying the Cluster Configuration.................................................................................178Modifying Resource Locking Settings for a Cluster.........................................................188Monitoring and Controlling Your Cluster.........................................................................189Removing a Component from a Cluster............................................................................193Working with the cluster.xml File.......................................................................................193Creating a Cluster Node from an Image............................................................................196Partitioning Applications on Cluster Nodes......................................................................198
iv Administering My webMethods Server 10.3
Table of Contents

III System Administrator Functions...................................................................................................20913 Attribute Providers...................................................................................................................211
What are Attribute Providers?.............................................................................................212Using Attribute Providers....................................................................................................213Managing the Display of Principal Attribute Providers..................................................217
14 Managing Security....................................................................................................................221About My webMethods Server Security............................................................................222Managing Authentication.....................................................................................................233Configuring Kerberos Authentication................................................................................236Configuring NTLM Authentication....................................................................................240Configuring NTLMv2 Authentication................................................................................241Configuring OAuth 2.0 Authentication..............................................................................243Clearing Session Passwords from Memory.......................................................................246Retaining Session Passwords in Memory...........................................................................246Turning On or Off Auto Complete for Usernames and Passwords...............................247Controlling the Number of Failed Login Attempts..........................................................248Controlling Login IP Ranges................................................................................................248Encrypting Passwords for Global Environment Variables..............................................251Allowing Context Impersonation........................................................................................251Using Password Complexity Policies.................................................................................252Working with Response Header Rules...............................................................................255
15 Analysis, Reporting, and Troubleshooting............................................................................261About Analysis, Reporting, and Troubleshooting............................................................262Controlling Server Logging..................................................................................................262Viewing Logging Messages..................................................................................................274Managing Security Audit Logging.....................................................................................274Monitoring Real-Time User Activity..................................................................................275Collecting Data About Server Events.................................................................................275Collecting Data About Database Changes.........................................................................277My webMethods Server Diagnostic Tools..........................................................................278
16 My webMethods Server Configuration..................................................................................279About My webMethods Server Configuration..................................................................280Managing Aliases..................................................................................................................280Configuring External Configuration Credentials.............................................................284Deploying My webMethods Server Components.............................................................287Configuring My webMethods Server Single Sign-On......................................................290Configuring My webMethods Server Cache.....................................................................298Displaying System Information...........................................................................................303
17 Managing My webMethods Server Content.........................................................................305Migrating My webMethods Server Content......................................................................306Managing Content Storage...................................................................................................306Publishing Portlets as an Administrator............................................................................309Rebuilding the Search Index................................................................................................310Adding Custom JAR Files....................................................................................................311
18 Managing the User Interface....................................................................................................313Locale Administration..........................................................................................................314What Are Server Rules?........................................................................................................314Creating Locale Rules............................................................................................................315
Administering My webMethods Server 10.3 v
Table of Contents
Creating Login Page Rules...................................................................................................317Creating Start Page Rules.....................................................................................................320Creating Rendering Rules....................................................................................................322Modifying a Rule...................................................................................................................324Copying a Rule.......................................................................................................................326Managing the Evaluation Order for Rules.........................................................................326Removing a Rule....................................................................................................................327Managing Skin Rules.............................................................................................................327Managing Shell Rules............................................................................................................330
19 Working with the Common Directory Services API............................................................335Managing User Information with the Common Directory Service API........................336About the Common Directory Services API......................................................................337Prerequisites...........................................................................................................................337CDS Code Examples..............................................................................................................338
20 Sending Mobile Notifications from My webMethods Server.............................................341Sending Push Notifications to Mobile Devices.................................................................342Configuring Push Notifications in My webMethods Server...........................................343
IV Server Page Development...............................................................................................................34521 Managing Pages in My webMethods Server.........................................................................347
About Page Development.....................................................................................................348About Custom Folders and Pages.......................................................................................348About Customizing the My webMethods Navigation.....................................................365About Customizing the My webMethods Look-And-Feel..............................................370Building a Simple Front-End Page to My webMethods...................................................374Creating Links for Single Sign-On......................................................................................375
22 Managing Workspaces in My webMethods Server..............................................................377About Workspaces.................................................................................................................378Administration Tasks for Workspaces................................................................................378Expert User Features for Workspace Development..........................................................382Workspace Actions You Can Perform from the Workspace Management Page..........388About the My webMethods Tools Navigation..................................................................395
23 Customizing Skins.....................................................................................................................399What Are Skins?.....................................................................................................................400Creating and Modifying a New Skin..................................................................................402Using the Skin Administration Page...................................................................................405Make-up of a Skin Package..................................................................................................414
24 Working with Shells in My webMethods Server..................................................................425What Are Shells?....................................................................................................................426Creating a New Shell.............................................................................................................426Modifying a Shell...................................................................................................................427Inserting Extra Tags into the HTML <head> Element......................................................428Using an Alias with a Shell Section.....................................................................................428Deleting a Shell......................................................................................................................429Making an Empty Shell Section...........................................................................................429
V Using Command Central to Manage My webMethods Server.................................................43125 Administering My webMethods Server.................................................................................433
Administering My webMethods Server Instances............................................................434vi Administering My webMethods Server 10.3
Table of Contents

Configuring My webMethods Server Ports.......................................................................437Configuring Directory Services...........................................................................................438Configuring My webMethods Server Email......................................................................444Working with My webMethods Server Environment Variables.....................................446Monitoring KPIs of My webMethods Server Instances...................................................447Using Trusted Authentication to Connect to My webMethods Server..........................447
26 Using the Command Line to Manage My webMethods Server.........................................449Commands that My webMethods Server Supports.........................................................450Configuration Types that My webMethods Server-ENGINE Supports........................452Lifecycle Actions for My webMethods Server-ENGINE.................................................454My webMethods Server Instance Management................................................................455Run-time Monitoring Statuses for My webMethods Server-ENGINE..........................459Run-time Monitoring States for My webMethods Server................................................460
27 Authenticating My webMethods Server................................................................................463Changing the Authentication Mode for My webMethods Server..................................464Changing the Administrator User Password for My webMethods Server in CommandCentral.....................................................................................................................................464Using Unix Shell Scripts to Change Connection Credentials for Managed Products..465Verifying the Outbound Authentication Settings.............................................................465Accessing Administrative Interfaces Through Command Central................................465
Administering My webMethods Server 10.3 vii
Table of Contents

viii Administering My webMethods Server 10.3
Table of Contents

About This Guide
■ Exporting My webMethods Server Assets ..................................................................... 10
■ Document Conventions ................................................................................................. 10
■ Online Information and Support .................................................................................... 11
■ Data Protection .............................................................................................................. 11
■ Deprecation of webMethods Broker .............................................................................. 12
Administering My webMethods Server 10.3 9

This guide explains how to configure and manage My webMethods Server as a systemadministrator. The guide explains how, as a My webMethods Administrator (not the same as asystem administrator), you can manage users, groups, and roles for the applications that run onMy webMethods Server. In addition, the guide describes how to develop and manage pages fordisplay by My webMethods Server.
Exporting My webMethods Server Assets
For information on extractingMywebMethods Server assets for usewithDeployer, seewebMethodsDeployer User’s Guide.
Document Conventions
DescriptionConvention
Identifies elements on a screen.Bold
Identifies service names and locations in the format folder.subfolder.service, APIs,Java classes, methods, properties.
Narrowfont
Identifies:Italic
Variables for which you must supply values specific to your own situation orenvironment.New terms the first time they occur in the text.References to other documentation sources.
Identifies:Monospace font
Text you must type in.Messages displayed by the system.Program code.
Indicates a set of choices from which you must choose one. Type only theinformation inside the curly braces. Do not type the { } symbols.
{ }
Separates two mutually exclusive choices in a syntax line. Type one of thesechoices. Do not type the | symbol.
|
Indicates one or more options. Type only the information inside the squarebrackets. Do not type the [ ] symbols.
[ ]
Indicates that you can type multiple options of the same type. Type only theinformation. Do not type the ellipsis (...).
...
10 Administering My webMethods Server 10.3

Online Information and Support
Software AG Documentation Website
You can find documentation on the Software AG Documentation website athttp://documentation.softwareag.com. The site requires credentials for Software AG's ProductSupport site Empower. If youdonot have Empower credentials, youmust use the TECHcommunitywebsite.
Software AG Empower Product Support Website
If you do not yet have an account for Empower, send an email to [email protected] name, company, and company email address and request an account.
Once you have an account, you can open Support Incidents online via the eService section ofEmpower at https://empower.softwareag.com/.
You can find product information on the Software AG Empower Product Support website athttps://empower.softwareag.com.
To submit feature/enhancement requests, get information about product availability, and downloadproducts, go to Products.
To get information about fixes and to read early warnings, technical papers, and knowledge basearticles, go to the Knowledge Center.
If you have any questions, you can find a local or toll-free number for your country in our GlobalSupport Contact Directory at https://empower.softwareag.com/public_directory.asp and give usa call.
Software AG TECHcommunity
You can finddocumentation and other technical information on the SoftwareAGTECHcommunitywebsite at http://techcommunity.softwareag.com. You can:
Access product documentation, if you have TECHcommunity credentials. If you do not, youwill need to register and specify "Documentation" as an area of interest.
Access articles, code samples, demos, and tutorials.
Use the online discussion forums, moderated by Software AG professionals, to ask questions,discuss best practices, and learn how other customers are using Software AG technology.
Link to external websites that discuss open standards and web technology.
Data Protection
SoftwareAGproducts provide functionalitywith respect to processing of personal data accordingto the EU General Data Protection Regulation (GDPR). Where applicable, appropriate steps aredocumented in the respective administration documentation.
Administering My webMethods Server 10.3 11

Deprecation of webMethods Broker
webMethods Broker is deprecated for use with webMethods 10.2. If you are starting developmentusingwebMethods 10.2, you should use SoftwareAGUniversalMessaging instead ofwebMethodsBroker. If you are upgrading to webMethods 10.2, you should consider migrating to UniversalMessaging. If you choose to continue to use webMethods Broker, you will still be fully supported,but only until the announced end-of-life dates for webMethods Broker. For details, seehttps://empower.softwareag.com/brokerendoflife/.
12 Administering My webMethods Server 10.3

I Startup and Configuration
1 Getting Started with My webMethods Server ................................................................ 15
2 Changing the My webMethods Server Configuration ................................................... 21
3 My webMethods Server and HTTPS .............................................................................. 31
4 Using My webMethods Server with Web Servers .......................................................... 43
5 Running My webMethods Server from the Command Line ........................................... 45
6 Modifying Configuration Files ........................................................................................ 65
Administering My webMethods Server 10.3 13

14 Administering My webMethods Server 10.3
I Startup and Configuration

1 Getting Started with My webMethods Server
■ Introduction to My webMethods Server ........................................................................ 16
■ Starting and Stopping My webMethods Server on Windows ........................................ 17
■ Automatically Starting My webMethods Server on UNIX .............................................. 17
■ Logging Into My webMethods Server ............................................................................ 17
■ Logging Out of My webMethods Server ....................................................................... 18
■ Changing the Administrator Password ........................................................................... 18
Administering My webMethods Server 10.3 15

Introduction to My webMethods ServerMy webMethods Server is a run-time container for functions made available by webMethodsapplications. The user interface in which you perform these functions is called My webMethods.My webMethods provides a ready-made environment in which users can perform functions onwebMethods applications, and administrators can manage access to those functions. In addition,My webMethods Server gives you the capability to develop additional user interface pages, anda broad-based set of administrative tools with which to manage the increased capabilities.
My webMethods Server recognizes two types of administrators, based on the functions theyperform:
MywebMethods Administrator - The default administrator ofMywebMethods. This user canperform user management functions andmanage external directory services. As installed, theuser ID is “Administrator” and the password is “manage”. Formore information about functionsavailable to this user, see .
System administrator - The system administrator for My webMethods Server. This user canmanage My webMethods Server, including analysis, configuration, content, and usermanagement. As installed, the user ID is “SysAdmin” and the password is “manage”. Thisadministrator does not use the My webMethods user interface. For more information aboutfunctions available to this account, see .
In some cases, both types of administrator can perform the same functions, such as performinguser management. Where there are differences between the My webMethods and system userinterfaces, the procedures describe both.
This guide is organized into multiple parts. The following table lists the major parts of the guideand the activities that each part covers.
More InformationActivity
Getting started as an administrator, changingthe configuration of My webMethods Server,using external web servers, and running serversfrom the command line.
Managing users, groups, and roles as a MywebMethods Administrator.
Managing the advanced capabilities of MywebMethods Server as a system administrator.
Developing andmanaging user interface pages.
Using Command Central to manage MywebMethods Server.
In addition, you can findmore information aboutMywebMethods Server in the following guides:
Installation and initial configuration ofMywebMethods Server - Installing Software AGProducts.
16 Administering My webMethods Server 10.3
1 Getting Started with My webMethods Server

The basic activities an individual user can perform onMywebMethods applications -Workingwith My webMethods.
Starting and Stopping My webMethods Server onWindowsYou can startMywebMethods Server by starting theWindows service forMywebMethods Server.
To shut down the server, stop the Windows service for My webMethods Server.
The name of the service is SoftwareAGMywebMethods Server 10.2.Whenmore than one instanceof the service exists, the second instance has an index value of (2), the third instance has an indexvalue of (3), and so forth.
Automatically Starting My webMethods Server onUNIXIf you installed My webMethods Server on a UNIX system and want My webMethods Server tostart automatically each time you start your system, execute the My webMethods Server serviceregistration script, as follows:Software AG_directory/MWS/bin su -c ./mws.sh-s serverInstance installservice serverUserAccount
For more information about My webMethods Server startup, including optional parameters, see“Running My webMethods Server from the Command Line” on page 45.
Logging Into My webMethods ServerMy webMethods Server has a user interface that you access using a web browser.
To log into My webMethods Server
1. Access the My webMethods Server Login page by entering a URL in a web browser:
http://host:port
where:
host is the host name of the machine on which My webMethods Server is installed.
port is the port onwhichMywebMethods Server listens for incoming requests. The defaultport for My webMethods Server is 8585.
For example, if the host name is rubicon.company.com and it uses the default port (8585), typethe following URL:
Administering My webMethods Server 10.3 17
1 Getting Started with My webMethods Server

http://rubicon.company.com:8585
2. For the Username and Password fields, specify:
The following table lists the default credentials for administrative users:
PasswordUser Name
manageAdministrator
manageSysAdmin
Note:When logging in, the value you specify in the user name is case insensitive. However, afterlogging in, My webMethods Server uses the case of the user name that is defined in your useraccount. For example, if the user account is defined as “Administrator”, you can log in using“administrator”. When My webMethods Server needs to use the user name, for example, forHTTP authentication, it uses the version defined in the user account, which is “Administrator”.
Important:TokeepMywebMethods Server secure, you should change the default administrator password.For instructions about how to change the password, see “Changing the AdministratorPassword” on page 18.
3. Click Log In.
After you log in, My webMethods Server displays the Administrator home page.
Logging Out of My webMethods ServerPerform the following procedure to log out of My webMethods Server.
To log out of My webMethods Server
Click the Logout link, which is located at the top of all My webMethods pages.
Changing the Administrator PasswordChange your password by editing the fields on the User Information panel of your profile.
To change your password
1. Click My Profile, located at the top of all My webMethods pages.
2. On the User Information panel, type your new password in the Password field.
18 Administering My webMethods Server 10.3
1 Getting Started with My webMethods Server

3. In the Confirm Password field, type your new password again for confirmation.
4. Click Apply.
Administering My webMethods Server 10.3 19
1 Getting Started with My webMethods Server

20 Administering My webMethods Server 10.3
1 Getting Started with My webMethods Server

2 Changing the My webMethods Server
Configuration
■ Post-Installation Configuration Changes ........................................................................ 22
■ Using My webMethods Server with a MySQL Database ................................................ 22
■ Did You Install Without Specifying a Database? ............................................................ 23
■ Guidelines for Multiple My webMethods Server Instances ............................................ 23
■ Changing the HTTP Listener Port for a Standalone Server ............................................ 24
■ Changing HTTP and HTTPS Listener Ports .................................................................... 24
■ Changing the JMX Listener Port .................................................................................... 25
■ Changing the JCR Repository RMI Listener Ports .......................................................... 26
■ Specifying the Java Location for My webMethods Server ............................................. 26
■ Managing Redirection in My webMethods Server ......................................................... 28
Administering My webMethods Server 10.3 21

Post-Installation Configuration ChangesWhen you install My webMethods Server, it has a default configuration. You can specify the typeand location of the database used by the server and the HTTP port the server uses, but nothingelse. After the installation is completed and you have a running instance of My webMethodsServer, you can make changes to the configuration.
Using My webMethods Server with a MySQL DatabaseTouseMywebMethods ServerwithMySQL, youmust configure themode of theMySQLdatabasebefore startingMywebMethods Server for the first time. TheMySQLmodes thatMywebMethodsServer requires are ANSI_QUOTES and PIPES_AS_CONCAT.
When using My webMethods Server with a MySQL database, deploying .war files might fail. Ifsuch an issue occurs, increase the values of the following parameters in the MySQL configurationfile, and restart the MySQL database server.innodb_buffer_pool_size = 5Ginnodb_log_file_size = 80Mmax_allowed_packet = 24M
For more information about configuring MySQL, refer to the MySQL documentation.
Configuring My webMethods Server to Use MySQL CommunityEditionMySQLCommunity Edition requires the use of a native driver. Before you can useMywebMethodsServer with MySQL Community edition, you must download the driver and add it as a bundlein the My webMethods Server installation.
To configure My webMethods Server for MySQL Community Edition
1. Download theMySQLnative driver mysql-connector-java-version-bin.jar from the followinglocation:
https://dev.mysql.com/downloads/connector/j/5.1.html
2. Copy the .jar file to the Software AG_directory \MWS\lib directory.
3. Create a driver-name.bnd text file in the Software AG_directory \MWS\lib directory, wheredriver-name is the name of the .jar file.
For example, mysql-connector-java-version.bnd.
4. Provide instructions for the OSGi bundle conversion in the .bnd text file, by replacing thevalues in italics in the following example.
22 Administering My webMethods Server 10.3
2 Changing the My webMethods Server Configuration

# attach as fragment to the caf.server bundleFragment-Host: com.webmethods.caf.serverBundle-SymbolicName: mysql-connector-java-Bundle-Version: 5.1.41Include-Resource: mysql-connector-java-5.1.41.jar-exportcontents: *Bundle-ClassPath: mysql-connector-java-5.1.41.jarImport-Package: *;resolution:=optional
For Bundle-Version, specify the version number of the .jar file, or any unique number.
5. At a command line prompt, move to the bin directory of server:
Software AG_directory\MWS\bin
6. Update the server instance using the following command:
mws.bat -s serverName update
7. Start My webMethods Server.
Did You Install Without Specifying a Database?It is possible to install My webMethods Server without specifying a database. In this case, if youwant to use an external database, you need to configure a database connection forMywebMethodsServer before the server will start. To set or modify external database connections, use themws.db.xml file, which you can find at this location:
Software AG_directory \MWS\server\serverName\config
You need to specify the following values:
The following table lists the values that you must specify in the mws.db.xml file to configure thedatabase connection.
ValueElement
The URL to the database server<URL>
The database user name<USER>
The password of the database user<PASSWORD>
After you save and close the ms.db.xml file, start My webMethods Server.
Guidelines for Multiple My webMethods ServerInstancesYou can run multiple instances of My webMethods Server on the same machine, but each serverinstance must have its own external resources. Running multiple server instances on the same
Administering My webMethods Server 10.3 23
2 Changing the My webMethods Server Configuration
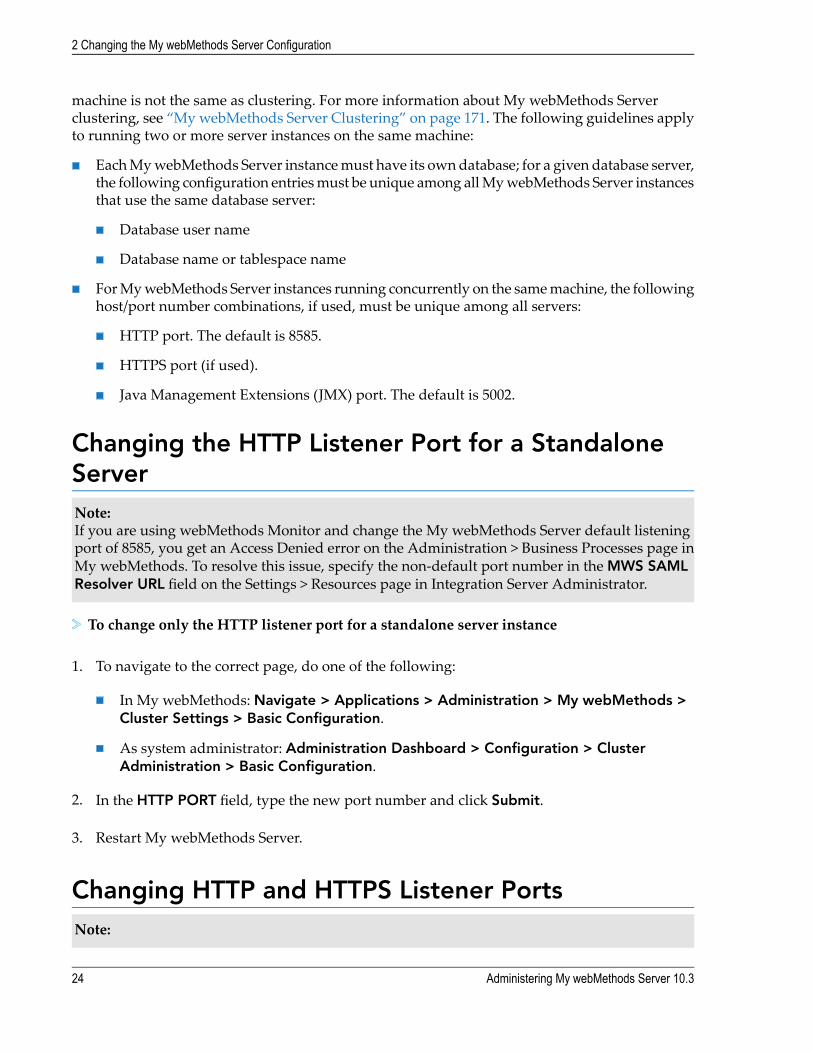
machine is not the same as clustering. For more information about My webMethods Serverclustering, see “My webMethods Server Clustering” on page 171. The following guidelines applyto running two or more server instances on the same machine:
EachMywebMethods Server instancemust have its owndatabase; for a given database server,the following configuration entriesmust be unique among allMywebMethods Server instancesthat use the same database server:
Database user name
Database name or tablespace name
ForMywebMethods Server instances running concurrently on the samemachine, the followinghost/port number combinations, if used, must be unique among all servers:
HTTP port. The default is 8585.
HTTPS port (if used).
Java Management Extensions (JMX) port. The default is 5002.
Changing the HTTP Listener Port for a StandaloneServerNote:If you are using webMethods Monitor and change the My webMethods Server default listeningport of 8585, you get an Access Denied error on the Administration > Business Processes page inMy webMethods. To resolve this issue, specify the non-default port number in the MWS SAMLResolver URL field on the Settings > Resources page in Integration Server Administrator.
To change only the HTTP listener port for a standalone server instance
1. To navigate to the correct page, do one of the following:
In My webMethods: Navigate > Applications > Administration > My webMethods >Cluster Settings > Basic Configuration.
As system administrator: Administration Dashboard > Configuration > ClusterAdministration > Basic Configuration.
2. In the HTTP PORT field, type the new port number and click Submit.
3. Restart My webMethods Server.
Changing HTTP and HTTPS Listener PortsNote:
24 Administering My webMethods Server 10.3
2 Changing the My webMethods Server Configuration

If you are using webMethods Monitor and change the My webMethods Server default listeningport of 8585, you get an Access Denied error on the Administration > Business Processes page inMy webMethods. To resolve this issue, specify the non-default port number in the MWS SAMLResolver URL field on the Settings > Resources page in Integration Server Administrator.
To change HTTP and HTTPS listener ports for a My webMethods Server instance
1. To navigate to the correct page, do one of the following:
In My webMethods: Navigate > Applications > Administration > My webMethods >Cluster Settings > Advanced or Cluster Configuration.
As system administrator, click Administration Dashboard > Configuration > ClusterAdministration > Advanced or Cluster Configuration.
2. In the HTTP PORT field, type the port number to be used by the HTTP listener.
This field must always have a valid port number.
3. In the HTTPS PORT field, type the port number to be used by the HTTPS listener.
A value of 0 (zero) in this field disables the listener.
For information about the default digital certificates, used by the HTTPS Listener, see“Certificates Used for Secure Connections” on page 34.
4. Click Submit.
5. Restart My webMethods Server.
Changing the JMX Listener PortThe default Java Management Extensions (JMX) listener port is 5002. If multiple instances of MywebMethods Server are running on the same computer, or if another application is already usingthat port, you must assign a different port number. You change the JMX listener port in thecom.softwareag.jmx.connector.pid-5002.properties file.
To change the JMX listener port
1. In a text editor, open the com.softwareag.jmx.connector.pid-5002.properties file for the serverinstance. The file is in the Software AG_directory \profiles\MWS_serverName\configuration\com.softwareag.platform.config.propsloader directory.
2. Edit the port=number line with the new JMX listener port number, and then save the file.
3. Restart My webMethods Server.
Administering My webMethods Server 10.3 25
2 Changing the My webMethods Server Configuration

Changing the JCR Repository RMI Listener PortsWhen using a remote Java Content Repository (JCR), the connection to the JCR is implementedusing an RMI to communicate with the client My webMethods Server. My webMethods Serveruses the following ports for the JCR RMI connection:
rmiPort. The port for the RMI registry. The default port number is 10999.
rmiServerObjectPort. The port used by the remote client to communicate with the remoteobject that is provided by My webMethods Server. The default port number is 10998. A valueof 0 (zero) generates a random port number.
Important:If your server is protected by a firewall and you want to allow remote JCR connections to MywebMethods Server, you must configure your firewall to open both the rmiPort and thermiServerObjectPort. In that scenario, you should use a non-zero value for the rmiServerObjectPortso that the port number does not change every time My webMethods Server is restarted.
To change the rmiPort or rmiServerObjectPort number from the default
1. As system administrator, go to Administrative Folders > Administration Dashboard >Configuration > CAF Application Runtime Configuration.
2. In the Keywords field, type wm_mws_config to search for the wm_mws_config deployedapplication.
My webMethods Server returns the Administration application in the search results.
3. Click Administration > Web Application > Environment Entries.
4. In the rmiPort and rmiServerObjectPort fields, type new values for the port numbers andclick Apply.
Specifying the Java Location for My webMethodsServerMy webMethods Server must point to a Java location. By default, My webMethods Server pointsto the location of the JDK installed in the Software AG_directory /jvm directory.
You can specify a non-default JDK or JRE to be used by My webMethods Server. If you do so, donot delete the default JDK because it is used by the Software AG Installer.
Important:If you specify a non-default JRE or JDK, apply maintenance updates from the appropriate vendoron a regular basis, as you would for JREs and JDKs you install yourself.
26 Administering My webMethods Server 10.3
2 Changing the My webMethods Server Configuration

Note:Software AG tests products only with the JDKs installed by the Software AG Installer. If youredirect products to use a different JDK or JRE and encounter issues, Software AG might requireyou to reproduce the issues with the JDK that is installed by the Software AG Installer.
To specify a non-default JDK or JRE, you must make changes in multiple locations.
Setenv File under /MWS/bin/
You must modify the Java location specified in the setenv.bat or .sh file located here:
Software AG_directory /MWS/bin/setenv.[bat | sh]
Open the setenv.bat or setenv.sh file in a text editor. Edit the JAVA_HOME parameter to point tothe non-default JDK or JRE installation directory, then save and close the file. For example:set JAVA_HOME= C:\myjava17
Setenv File under /profiles
You must modify the Java location specified in the setenv.bat or .sh file located here:
Software AG_directory /profiles/MWS_serverName/bin/setenv.[bat | sh]
Open the setenv.bat or setenv.sh file in a text editor. Edit the JAVA_EXEC parameter to point tothe non-default JDK or JRE installation directory, then save and close the file. For example:set JAVA_EXEC= "C:\myjava17\bin\java"
The wrapper.conf File
You must modify the Java location specified in the wrapper.conf file located here:
Software AG_directory /profiles/MWS_serverName/configuration/wrapper.conf
Open the wrapper.conf file in a text editor. Edit the wrapper.java.command parameter to pointto the non-default JDK or JRE installation directory, then save and close the file. For example:wrapper.java.command=C:\myjava17\bin\java
The custom_wrapper.conf File
You must modify the Java location specified in the custom_wrapper.conf file located here:
Software AG_directory /profiles/MWS_serverName/configuration/custom_wrapper.conf
Open the custom_wrapper.conf file in a text editor. Edit the set.JAVA_HOME parameter to pointto the non-default JDK or JRE installation directory, then save and close the file. For example:set.JAVA_HOME=C:\\ myjava17
Administering My webMethods Server 10.3 27
2 Changing the My webMethods Server Configuration

Managing Redirection in My webMethods ServerIn My webMethods Server, when you click a button or other action on a page, it can result in aredirection that takes you to an external site.While redirection is a useful feature, it has the potentialto point a user to a malicious external site. Direct links created using the Link control or theBookmark workspace tool are not affected by this issue.
A whitelist is a list of trusted entities, in this case trusted servers. Using the Redirection WhitelistAdministration page, you can create a whitelist containing servers to which My webMethodsServer can safely redirect a request.
By default, My webMethods Server does not allow redirection to any external site, making it lessprone tomalicious exploitation. The server does allow redirection to the cluster front end, localhost,and the loopback address (127.0.0.1), which are required for operation.
If you need to allow redirection to external servers, you can add them using the RedirectionWhitelist Administration page. Servers are identified by host name or IP address. The whitelist isstored in the server database, making it available to all servers in aMywebMethods Server cluster.
Adding Servers to a WhitelistYou can allow redirection to an external address by adding it to thewhitelist. By default, the clusterfront end, localhost, and the loopback address (127.0.0.1), are included in the list.
To add an external address to the whitelist
1. As system administrator, click Administration Dashboard >Configuration > RedirectionWhitelist Administration.
2. Click Add Server, type in the hostname or IP address of a trusted server, click Apply, andthen click Save.
My webMethods Server will now allow URL redirection to the new server.
Removing Servers from a WhitelistIf an external address is included in the whitelist, you can remove it. By default, the cluster frontend, localhost, and the loopback address (127.0.0.1), are included in the list and cannot be removed.
To remove an external address from the whitelist
1. As system administrator, click Administration Dashboard > Configuration > RedirectionWhitelist Administration.
2. Click the check box for the server to be removed, click Remove Server, and click Save.
28 Administering My webMethods Server 10.3
2 Changing the My webMethods Server Configuration

The server is now removed from the whitelist.
Administering My webMethods Server 10.3 29
2 Changing the My webMethods Server Configuration

30 Administering My webMethods Server 10.3
2 Changing the My webMethods Server Configuration

3 My webMethods Server and HTTPS
■ Using My webMethods Server as an HTTPS Client ........................................................ 32
■ Communicating with webMethods Applications Using HTTPS ..................................... 36
■ Managing Authentication Certificates as My webMethods Administrator .................... 37
Administering My webMethods Server 10.3 31

Using My webMethods Server as an HTTPS ClientIf you want to connect My webMethods Server to a server using HTTPS, you must set up thetrusted CA store file (the cacerts file) that the JVM running in theMywebMethods Servermachineuses. The trusted CA store file must contain the CA certificates of the servers to which MywebMethods Server will be issuing HTTPS requests.
For example, if you use webMethods Monitoror the WmTaskClient Package, you must identifythe Integration Server towhichMywebMethods Server issues requests on behalf ofMonitor pages.If you choose to have the requests issued using HTTPS, youmust then set up the trusted CA storefile of the JVM running in theMywebMethods Server machine to contain the CA certificate of theCertificate Authority that signed the Integration Server certificate.
You import CA certificates into the trusted CA store file of the JVM using the JVM’s keytoolcommand. By default, the trusted CA store file is located in the following location:
Software AG_directory \jvm\operating_system\jre\lib\security\cacerts
For example, if you useWindows, the location of the trusted CA store file is Software AG_directory\jvm\jvm\jre\lib\security\cacerts.
Importing CA Certificates
To import CA certificates into the trusted CA store file of the My webMethods Server JVM
1. Locate the CA certificate you need to add to the trusted CA store file and ensure it is availableon the machine running My webMethods Server.
2. At a command line prompt, type the following command to move to the jvm\lib\securitydirectory:
cd Software AG_directory\jvm\operating_system\jre\lib\security
3. Type the following command to import the CA certificate into the trusted CA store file:
..\..\..\bin\keytool -import -v -keystorecacerts -file <cacert.der> -alias <aliasName>
where:
-file <cacert.der> identifies the path and file name of the file that contains the CA certificateyou want to import
-alias <aliasName> assigns an alias to the certificate to identify the entry in the key storefile. Select a value that is meaningful to you.
For example, to import the CA certificate named serverCAcert.der, which is stored in the samedirectory as the cacerts file, and identify the new entry in the key store file as SERVERCA, youwould use the following command:
32 Administering My webMethods Server 10.3
3 My webMethods Server and HTTPS

..\..\..\bin\keytool -import -v -keystorecacerts -file serverCAcert.der -alias SERVERCA
4. After entering the keytool command, the command prompts you for the password for thecacerts file. Type the password. By default, the password is changeit.
5. After entering the password, the keytool command prompts to verify that you want to importthe CA certificate. Type y for yes.
6. To ensure that the CA certificate was successfully imported into the trusted CA store file, enterthe following command:
..\..\..\bin\keytool -list -keystore cacerts
The keytool command prompts for the password for the cacerts file. Type the password.
Example
Assume that you want the WmTaskClient Package to communicate with My webMethods Serveron the same computer using SSL. In this example, we use the default My webMethods Servertruststore.
1. If you have not already done so, configure My webMethods Server to use an HTTPS port. Forexample, set the HTTPS port to 8586. For more information on how to set an HTTPS port, see“Communicating with webMethods Applications Using HTTPS” on page 36.
2. In Integration Server, configure theWmTaskClient Package to communicate using the HTTPSport configured in the previous step (8586).
3. Create a temporary directory in which to store the CA certificate, such as C:\temp.
4. At a command line prompt, move to the directory of the JVM keytool command:cd Software AG_directory\jvm\operating_system\jre\lib\security
5. Type the following command to extract the CA certificate from the default My webMethodsServer truststore:keytool -export -alias "softwareag demo" -file c:\temp\sagca.crt-keystore Software AG_directory\MWS\server\default\config\security\sagdemoca.jks
6. At the prompt, type the truststore password. For the defaultMywebMethods Server truststore,the password is manage.
7. To import theCA certificate into the trustedCA store of the JVM, type the following command:keytool -import -trustcacerts -file c:\temp\sagca.crt-alias "softwareag demo" -keystore Software AG_directory\jvm\jvm160_32\jre\lib\security\cacerts
Note:If you are running on a 64-bit operating system, change jvm160_32 to jvm160_64.
Administering My webMethods Server 10.3 33
3 My webMethods Server and HTTPS

8. At the prompt, type the password for the trusted CA store file of the JVM. By default, thepassword is changeit.
9. To verify that you want to import the CA certificate, type y for yes.
10. Restart Integration Server so it will use the new CA certificate.
Certificates Used for Secure ConnectionsMywebMethods Server includes two default keystores you can use to set up and test your HTTPSlistener:
A keystore, which contains a key pair used to set up encrypted connections between clientand server. The default keystore file is localhost.p12, which contains a demonstration certificateand a private key for the Jetty SSL server used by My webMethods Server.
A truststore, which contains trusted digital certificates from a certification authority (CA). Thedefault truststore file sagdemoca.jks contains a Software AG CA certificate that allows oneinstance of My webMethods Server to trust SSL (Secure Sockets Layer) connections fromanother instance, or from other webMethods products.
My webMethods Server stores these keystores at this location for each server instance:
Software AG_directory \MWS\server\serverName\config\security\
For production environments, you can use certificates froma commercial authority such asVerisignor use an internal authority.
Replacing Keystores
The wrapper.conf file sets the values the javax.net.ssl system properties use for communicationusing SSL. You can edit the custom_wrapper.conf file to replace the keystore or truststore for aninstance of My webMethods Server.
To replace the keystore or truststore
1. Open the custom_wrapper.conf file for the server instance in a text editor. You can find thefile at this location:
Software AG_directory \profiles\MWS_serverName\configuration\
2. In the custom_wrapper.conf file, add or change the values of the SSL properties as needed andsave the file:
# SSL Propertiesset.JAVA_KEYSTORE=Software AG_directory\MWS\server\default\config
\security\localhost.p12set.JAVA_KEYSTORETYPE=pkcs12set.JAVA_KEYSTORE_PASSWORD=encrypted_passwordset.JAVA_TRUSTSTORE=Software AG_directory\MWS\server\default\config
\security\sagdemoca.jks
34 Administering My webMethods Server 10.3
3 My webMethods Server and HTTPS

set.JAVA_TRUSTSTORETYPE=jksset.JAVA_TRUSTSTORE_PASSWORD=encrypted_password
3. Restart My webMethods Server.
To provide an encrypted password for the keystore, see “Generating an Encrypted Password” onpage 35.
Generating an Encrypted Password
When replacing keystores, youmust provide an encrypted password. Use the following procedureto generate the password, and then copy and paste it into the appropriate location in thecustom_wrapper.conf file.
Note:This procedure requires the installation of the Composite Applications Runtime node underInfrastructure > Libraries, and the use of the JDK, installed in the Software AG directory/jvmdirectory,or a later JDK version. If the installed JDK is not included in your PATH environment variable,you must run the command from the \bin directory of your Java installation, or specify the JDKlocation as a parameter to the command.
To generate an encrypted password
1. Open a command prompt window in the Software AG_directory installation directory.
2. Run the following command:
On Windows:java -cp “Software AG directory\common\lib\wm-caf-common.jar;Software AG directory\common\lib\ext\log4j.jar;Software AG directory\common\lib\wm-scg-security.jar;Software AG directory\common\lib\wm-scg-core.jar;Software AG directory\common\lib\ext\enttoolkit.jar”com.webmethods.caf.common.CipherUtil password_to_encrypt
On UNIX:java -cp “Software AG directory/common/lib/wm-caf-common.jar:Software AG directory/common/lib/ext/log4j.jar:Software AG directory/common/lib/wm-scg-security.jar:Software AG directory/common/lib/wm-scg-core.jar:Software AG directory/common/lib/ext/enttoolkit.jar”com.webmethods.caf.common.CipherUtil password_to_encrypt
The command returns an encrypted version of the specified password.
3. Copy the encrypted password and paste it into the appropriate location in thecustom_wrapper.conf file.
Administering My webMethods Server 10.3 35
3 My webMethods Server and HTTPS

Communicating with webMethods Applications UsingHTTPSBy default, MywebMethods Server communicates with other webMethods applications using theHTTP protocol. You can change to the HTTPS protocol by doing the following:
To cause My webMethods Server to communicate only through the HTTPS protocol
1. In My webMethods Server do one of the following:
In My webMethods: Navigate > Applications > Administration > My webMethods >Cluster Settings > Advanced or Cluster Configuration.
As system administrator: Administration Dashboard > Configuration > ClusterAdministration > Advanced or Cluster Configuration.
2. In the MWS Front End URL field, modify the URL as follows:
a. Change http to https.
b. Change the port number.
For example, change this URL:http://my_host:8585
To this:https://my_host:7238
3. In the HTTP Port field, change the value to zero.
Note:If running a cluster ofMywebMethods Servers, youmust change the HTTP port value to zerofor all nodes in the cluster.
4. In the HTTPS Port field, change the value to the port number and click Submit.
5. Restart My webMethods Server.
6. Notify administrators of all webMethods applications that communicatewithMywebMethodsServer of the new HTTPS port number.
36 Administering My webMethods Server 10.3
3 My webMethods Server and HTTPS

Managing Authentication Certificates as MywebMethods AdministratorAs My webMethods Administrator you can manage authentication certificates for users whoconnect to Integration Server or other webMethods applications. Authentication certificates donot govern a connection between a user and My webMethods Server. To be assigned a certificate,the usermust be amember of the systemdirectory service or an external directory service connectedto My webMethods Server. For more information about working with directory services, see“Managing Directory Services” on page 84.
The assignment of users to authenticates follows these rules:
A user can be assigned to multiple certificates.
An instance of a certificate can have only one user assigned to it, but you can add multipleinstances of a certificate, each with a different certificate type, and assign a different user toeach instance.
You can perform the following actions with certificates:
Add a certificate.
Search for a certificate.
View details of a certificate.
Assign a user to a certificate.
Change users for a certificate.
Delete a certificate.
Adding an Authentication CertificateTo add a certificate, do the following:
To add an authentication certificate
1. In My webMethods: Navigate > Applications > Administration > System-Wide > UserManagement > Certificates.
2. Click Add New Certificate.
3. Click Browse, navigate to the location of the certificate file you want to add, and click Open.
4. From the Certificate Type list, choose the type authentication certificate to be used by a clientconnecting to Integration Server or other webMethods application:
Administering My webMethods Server 10.3 37
3 My webMethods Server and HTTPS

The following table lists the types of certificates that My webMethods Server supports, and theirpurpose:
PurposeCertificate Type
Authenticates the message sender. The credentials are supplied inthe protocol header.
SSL (default)
Verifies the digital signature on incoming messages to IntegrationServer.
Verify
Encrypts outgoing messages from Integration Server.Encrypt
Both verifies the digital signature on incoming messages andencrypts outgoingmessages. Used if a user has the same certificatefor sending and receiving messages.
Verify and Encrypt
Authenticates the message sender. The credentials are supplied inthe message header.
Message Authentication
5. Click Upload.
The certificate appears on the Certificates panel.
Searching for Authentication CertificatesYou can search for authentication certificates based on a number of criteria.
To perform a search for authentication certificates
1. In My webMethods: Navigate > Applications > Administration > System-Wide > UserManagement > Certificates > Search > Advanced.
2. Specify the criteria to apply when searching for certificates:
The following table lists the available search criteria and how to configure the advanced search:
DescriptionField
CERTIFICATE INFO
Choose the certificate type assigned to the certificate. For moreinformation about valid types, see “Adding an AuthenticationCertificate” on page 37. The default is Any.
Type
Type the common name of the certificate issuer. This field is notused if you leave it blank.
Issuer Name
38 Administering My webMethods Server 10.3
3 My webMethods Server and HTTPS

DescriptionField
Type the serial number assigned to the certificate. This field is notused if you leave it blank.
Serial Number
Type the common name of the subject. This field is not used if youleave it blank.
Subject Name
VALID NOT BEFORE DATE
Choose a range of dates from the selection provided. The defaultis All.
Range
Type a start date using the format M/D/YYYY; if you use anincorrect format, the border turns red. Or click .
Start Date
Type an end date using the format M/D/YYYY; if you use anincorrect format, the border turns red. Or click .
End Date
VALID NOT AFTER DATE
Choose a range of dates from the selection provided. The defaultis All.
Range
Type a start date using the format M/D/YYYY; if you use anincorrect format, the border turns red. Or click .
Start Date
Type an end date using the format M/D/YYYY; if you use anincorrect format, the border turns red. Or click .
End Date
3. After you have selected search criteria, click Search.
Viewing Details of an Authentication CertificateYou can view the details associated with an authentication certificate.
To view the details of an authentication certificate
1. In My webMethods: Navigate > Applications > Administration > System-Wide > UserManagement > Certificates.
2. If the certificate is not visible in the Certificates panel, use the Search panel to locate it. Formore information, see “Viewing Details of an Authentication Certificate” on page 39.
3. Locate the certificate and click .
The following table lists the details, available for each authentication certificate:
Administering My webMethods Server 10.3 39
3 My webMethods Server and HTTPS

DescriptionCertificate Detail
The certificate type assigned when the certificate was added.Type
The common name of the host being authenticated.Subject CN
The common name of the issuer.Issuer CN
The serial number assigned to the certificate.Serial Number
The date before which the certificate is not valid.Valid Not Before
The date after which the certificate is not valid.Valid Not After
The user’s name.User
4. To return to the list of certificates, click Close.
Assigning a User to an Authentication CertificateYou can assign only one user to an instance of an authentication certificate. The procedure fordoing so is described here. To assign the same certificate tomultiple users, add a separate instanceof the certificate for each user. For more information on how to add a certificate, see“Adding anAuthentication Certificate” on page 37.
To assign a user to an authentication certificate
1. In My webMethods: Navigate > Applications > Administration > System-Wide > UserManagement > Certificates.
2. If the certificate is not visible in the Certificates panel, use the Search panel to locate it. Formore information, see “Searching for Authentication Certificates” on page 38.
3. Locate the certificate and click .
4. On the Edit Certificate area, click Set.
5. In the Keywords field, type a user ID, click Search, move the user to the Selected box, andclick Apply.
6. Click Close.
Changing Users for an Authentication CertificateYou can exchange one user for another in an existing authentication certificate.
40 Administering My webMethods Server 10.3
3 My webMethods Server and HTTPS

To change users for an authentication certificate
1. In My webMethods: Navigate > Applications > Administration > System-Wide > UserManagement > Certificates.
2. If the certificate is not visible in the Certificates panel, use the Search panel to locate it. Formore information, see “Searching for Authentication Certificates” on page 38.
3. Locate the certificate and click .
4. On the Edit Certificate area, click Set.
5. In the Keywords field, type the user ID for the new user, click Search, move the user to theSelected box, and click Apply.
This action replaces the former user with the new user.
6. Click Close.
Removing a User from an Authentication CertificateYou can remove a user who is assigned to an existing authentication certificate.
To remove a user from an authentication certificate
1. In My webMethods: Navigate > Applications > Administration > System-Wide > UserManagement > Certificates.
2. If the certificate is not visible in the Certificates panel, use the Search panel to locate it. Formore information, see “Searching for Authentication Certificates” on page 38.
3. Locate the certificate and click .
4. On the Edit Certificate area, click Remove.
5. Click Close.
Deleting an Authentication CertificateYou can view the details associated with an authentication certificate.
To view the details of an authentication certificate
Administering My webMethods Server 10.3 41
3 My webMethods Server and HTTPS

1. In My webMethods: Navigate > Applications > Administration > System-Wide > UserManagement > Certificates.
2. If the certificate is not visible in the Certificates panel, use the Search panel to locate it. Formore information, see “Searching for Authentication Certificates” on page 38.
3. In the search results, select the check boxes beside the certificates you want to delete, and clickDelete.
42 Administering My webMethods Server 10.3
3 My webMethods Server and HTTPS

4 Using My webMethods Server with Web Servers
■ Integration with Web Servers ......................................................................................... 44
■ My webMethods Server and Apache ............................................................................. 44
■ My webMethods Server and IIS ..................................................................................... 44
Administering My webMethods Server 10.3 43

Integration with Web ServersMy webMethods Server can integrate with the leading web servers, such as Microsoft InternetInformation Server or Apache HTTP Server. The primary mechanism for integrating MywebMethods Server with a third party web server in a distributed deployment scenario requiresthe use of a small plug-in that is installed and configured on the web server. This plug-in forwardsHTTP requests from the web server to My webMethods Server.
My webMethods Server provides an integrated servlet engine with Jetty, which is a built-in webserver that supports both HTTP and HTTPS. As such, having a separate web server tier is not ahard requirement.
There are several reasons for configuring MywebMethods Server with an external web server (orcluster ofweb servers). Themost notable reason is to adhere to corporate IT policies and procedures.My webMethods Server supports a flexible deployment model that allows an external web server(or cluster of web servers) to handle all HTTP requests that can be separately load balanced.
Integrating an external web server to handle HTTP requests requires configuring a web serverplug-in on the external web server machine(s). The web server plug-in leverages code from theJakarta web server project which is used extensively across many production-quality web serverproducts.
My webMethods Server and ApacheYou can use My webMethods Server on UNIX platforms with the Apache HTTP Server, from theApache Software Foundation. If you want to use the Apache HTTP Server, you may find theseexternal references useful:
For information on using the Apache mod_proxy_http module:http://httpd.apache.org/docs/2.2/mod/mod_proxy_http.html
For information on using the Apache mod_proxy module:http://httpd.apache.org/docs/2.2/mod/mod_proxy.html
For information on using the Apache mod_proxy_balancer module:http://httpd.apache.org/docs/2.2/mod/mod_proxy_balancer.html
My webMethods Server and IISSoftware AG does not include Internet Information Services (IIS) components in an installationof My webMethods Server, nor does My webMethods Server explicitly support the use of IIS asa web server. However, if you want to use IIS, you may find these external references useful:
For general information and discussions on using IIS as a reverse proxy: http://www.iis.net/
To use IIS with Apache Tomcat:http://tomcat.apache.org/connectors-doc/webserver_howto/iis.html
44 Administering My webMethods Server 10.3
4 Using My webMethods Server with Web Servers

5 Running My webMethods Server from the
Command Line
■ Basic Command Line Syntax for My webMethods Server .............................................. 46
■ Executing My webMethods Server Commands ............................................................. 46
■ Accessing the Command Line Help Contents ............................................................... 47
■ My webMethods Server Instance Administration Commands ....................................... 47
■ My webMethods Server Instance Operation Commands .............................................. 53
■ My webMethods Server Instance Configuration Commands ......................................... 56
■ My webMethods Server Service Management Commands ........................................... 57
■ My webMethods Server OSGi Profile Commands ......................................................... 59
■ Start, Stop and Execute My webMethods Server Commands on Multiple ServerInstances ......................................................................................................................... 61
■ Log Files for mws Commands ........................................................................................ 62
Administering My webMethods Server 10.3 45

Basic Command Line Syntax for My webMethodsServerThe following table describes the basic command line syntax for My webMethods Server:
mws.bat -option -option ... command parameter|-Dparameter=valueFor Windows:
mws.sh -option -option ... command parameter|-Dparameter=valueFor UNIX:
where -parameter is a native command parameter and -Dparameter is a Java system parameter.
You can list more than one option and more than one parameter in a command, using space asseparator.
For commands that do not accept Java system parameters, supply the parameters as additionalJava properties in the custom_wrapper.conf file.
For information about the parameters that each command supports, see the "Parameters" sectionfor the command.
Options for My webMethods Server Commands
The command line interface for My webMethods Server supports the following options, but eachMy webMethods Server command accepts only the options listed in the "Options" section for thecommand. The following table lists the available command line options:
DescriptionOption
Full path to the platform installation directory. The default is theSoftware AG_directory .
-p
Starts the server in debugmode. A Java debug listener opens on port10033, and DEBUG statements appear in the console window.
-d | debug
In a clustered environment, the node name assigned to the serverinstance. Not required if the server is running standalone.
-n
The name of the server instance. Not required if you are controllingthe default instance. The default value is default.
-s
The period of time in seconds to wait for the command to execute.-w
Executing My webMethods Server CommandsYou can perform basic administration and configuration operations using the My webMethodsServer command line utility. Starting the server from the command line, for example, allows theuse of debug mode so you can record or display server activity.
46 Administering My webMethods Server 10.3
5 Running My webMethods Server from the Command Line

To execute My webMethods Server commands
1. At a command line prompt, go to the My webMethods Server bin directory:
Software AG_directory\MWS\bin
2. To run a command, type a My webMethods Server command with the required options andparameters and press Enter.
Example
mws new -Dserver.name=testInstance -Dhttp.port=8586 -Ddb.type=sqlserver-Ddb.url=jdbc:wm:sqlserver://dbserver:1433;databaseName=WMDB-Ddb.username=sa -Ddb.password=manage
The example command creates a new My webMethods Server instance named testInstance,accessible on port 8586. The new server instance uses an SQL Server database with the name WMDB,installed on the dbservermachine, port 1433. The username and password to connect to thedatabase are sa and manage.
Accessing the Command Line Help ContentsThe command line utility for My webMethods Server provides command line help that you canaccess in the command prompt, using the help command. The help command does not accept anyoptions or parameters.
To get the command line help contents
1. At the command prompt, type the following command to go to the bin directory of MywebMethods Server:
cd Software AG_directory\MWS\bin
2. Type the following command:
mws help
My webMethods Server Instance AdministrationCommandsThe following commands perform My webMethods Server instance administration operations.
Administering My webMethods Server 10.3 47
5 Running My webMethods Server from the Command Line

newCreates a new server instance. Specify instance details as command parameters in the followingformat: -Dparameter=value.
Options
The new command does not accept any options.
Parameters
The following table lists the parameters that the new command accepts.
DescriptionParameter
Optional. Name of the server instance. Specify a unique nameamong server instances on the machine. If you do not specify avalue, the instance name is default.
server.name
Optional. Port number onwhich the server instance listens. Specifya unique port number among server instances on themachine. Thedefault port number is 8585.
http.port
Optional.Whether to install a newMywebMethods Server instanceas an application or a service. Valid values are:
install.service
true - Install as a service.
false - Default. Install as an application.
Optional. The name of the cluster node that hosts the serverinstance. If you do not specify a name, the default value is master.
node.name
Required. The type of database used by the server instance. Validvalues are:
db.type
ms - Microsoft SQL Server
oracle - Oracle
db2 - DB2
mysqlee - MySQL Enterprise Edition
mysqlce - MySQL Community Edition
postgresql - PostgreSQL
Required. Database connectionURL, based on the type of databaseand the driver.
db.url
48 Administering My webMethods Server 10.3
5 Running My webMethods Server from the Command Line

DescriptionParameter
OnUNIX systems, youmust escape all semicolon characters in thedatabase connection URL with backward slashes, or enclose thewhole database URL parameter in double quotes, as follows:"-Ddb.url=jdbc:wm:database://host:port;databaseName=name"
Optional. The class name of the JDBC driver used to connect to theMy webMethods Server database. Required when using a JDBCdriver different than the one supplied by Software AG.
db.driver
Required for all external databases. User name assigned to the MywebMethods Server database.
db.username
Required for all external databases. Password of the MywebMethods Server database user.
db.password
Required. The URL of the Universal Messaging server to use as aJMS provider. If you do not specify a JNDI provider URL, or the
jndiProviderUrl
Universal Messaging server is unavailable, the My webMethodsServer instance starts in maintenance mode.
Optional. TheHTTPS listener port. A value of 0 disables the listener.https.port
Optional. The Java debug port. The default port number is 10033.debug.port
Optional. The JMX port for the new server instance. The defaultport number is 5002.
jmx.port
Optional. The proxy host name.http.proxy.host
Optional. The proxy port number.http.proxy.port
Optional. The proxy user name.http.proxy.user
Optional. The proxy password.http.proxy.password
The set of component features configuredwith the server instance.Valid values are:
server.features
core - The minimum set of features required to supportdevelopment of JSR 168 portlets using Software AG Designer.Includes a pure runtime, with a single skin and shell, and noadministration or configuration features.
default - The standard set of My webMethods Server features,but without extras or development tools found in theMWS/components folder. This is the default value.
fabric - The default My webMethods Server taxonomy withall installed My webMethods Server user interfaces.
Administering My webMethods Server 10.3 49
5 Running My webMethods Server from the Command Line

DescriptionParameter
all - The standard set of features plus all components found inthe MWS/components folder.
Optional. Components in the SoftwareAG_directory\MWS\components directory to include in the newserver instance.
components.include
Optional. Components in the SoftwareAG_directory\MWS\components directory to exclude from the newserver instance.
components.exclude
Optional. Specifieswhether to overwrite the component files in theSoftwareAG_directory\MWS\server\serverName\deploydirectory
components.overwrite
that are older than the component files in the SoftwareAG_directory\MWS\components directory. Valid values are:
true - Overwrite component files in the \deploy directory.
false - Default. Do not overwrite component files in the \deploydirectory.
Usage Notes
Before creating a new server instance, use the Database Component Configurator to create aunique database or tablespace for the instance, as described in Installing Software AG Products.Not required when creating a node in a My webMethods Server cluster.
After creating a new server instance, initialize the instance using the init command. The firstinitialization of a new My webMethods Server instance takes several minutes to complete.After the first initialization, the server automatically shuts down.
Examples
To create a new instance with name test, running on port 8090, with an external MS SQLServer database with name my_wm_msql, installed on the server db_server:> mws new -Dserver.name=test -Dhttp.port=8090-Ddb.type=ms -Ddb.url=jdbc:wm:sqlserver://db_server:1433;DatabaseName=my_wm_msql;SelectMethod=direct;MaxPooledStatements=100-Ddb.username=mws_user -Ddb.password=password[Configuration output displayed in console window....]> mws -s test run
My webMethods Server connects to the database using the username mws_user, and thepassword password.
50 Administering My webMethods Server 10.3
5 Running My webMethods Server from the Command Line

initStarts My webMethods Server, initializes the My webMethods Server database, and then stopsthe server. Use this command after creating or updating a My webMethods Server instance.
Options
-p
-s
-d
-n
Parameters
Accepts Java system properties as parameters in the following format:-Dany.java.system.property=value
updateUpdates classpaths and deploys new or updated components.
Options
-p
-s
-w
Parameters
The following table lists the parameters that the update command accepts.
DescriptionParameter
Optional. Specify a new name for the cluster node that hosts theMywebMethods Server instance.
node.name
Optional. The type of database used by the server instance. Validvalues are:
db.type
ms - Microsoft SQL Server
oracle - Oracle
db2 - DB2
Administering My webMethods Server 10.3 51
5 Running My webMethods Server from the Command Line

DescriptionParameter
mysqlee - MySQL Enterprise Edition
mysqlce - MySQL Community Edition
Optional. The database connection URL. On Unix systems, enclosethe database URL parameter in double quotes, as follows:
db.url
"-Ddb.url=jdbc:wm:database://host:port;databaseName=name"
Optional. The class name of the JDBCdriver to usewhen connectingto the database. Required when using a JDBC driver different thanthe one supplied by Software AG
db.driver
Required for all external databases. User name of the database user.db.user
Required for all external databases. Password of the database user.db.password
Optional. Specifies whether to overwrite the component files in theSoftware AG_directory\MWS\server\serverName \deploy directory
components.overwrite
that are older than the component files in the SoftwareAG_directory\MWS\components directory. Valid values are:
true - overwrite component files in the deploy directory of theserver.
false - do not overwrite component files in the deploy directory.This is the default value.
Optional. Specifieswhether to update the generatedMywebMethodsServer classpath. Valid values are:
dont.update.classpath
true - do not update the server classpath.
false - update the server classpath. This is the default value.
deleteDeletes an existing instance of My webMethods Server.
Options
-p
-s
-w
52 Administering My webMethods Server 10.3
5 Running My webMethods Server from the Command Line

Parameters
The delete command does not accept any parameters.
Usage Notes
The delete command does not prompt for confirmation before deleting the instance. Use thecommand with extreme caution.
My webMethods Server Instance OperationCommandsThe following commands perform My webMethods Server instance management operations.
runStarts the server in the same console window.
Options
-p
-s
-n
-d
Parameters
The stop command accepts Java system properties as parameters in the following format:-Dany.java.system.property=value
startStarts the server in a new consolewindow.OnUNIX based operating systems the process is startedin background execution mode.
Options
-p
-s
-n
Administering My webMethods Server 10.3 53
5 Running My webMethods Server from the Command Line

-d
-w
Parameters
The stop command accepts Java system properties as parameters in the following format:-Dany.java.system.property=value
restartStops a running server and then starts it again.
Options
-p
-s
-n
-d
-w
Parameters
The stop command accepts Java system properties as parameters in the following format:-Dany.java.system.property=value
stopStops a running server.
Options
-p
-s
-n
-w
Parameters
The stop command accepts Java system properties as parameters in the following format:
54 Administering My webMethods Server 10.3
5 Running My webMethods Server from the Command Line

-Dany.java.system.property=value
pingReturns information about a running server instance, for example, server ports, roles, front endURL and initialization time. Returns Portal ping failed. if the server is stopped. The pingcommand requires authentication to execute.
Options
-s
-n
-w
Parameters
The following table lists the parameters that the ping command accepts.
DescriptionParameter
Required. The user name of the administrative My webMethodsServer user to authenticate the execution of the command.
mws_username
Required. The password of the administrative My webMethodsServer user to authenticate the execution of the command.
mws_password
Examples
To ping the server instance with name test, using the Administrator user with password manage:mws -s test ping Administrator manage
updatesinfoDisplays information about any fixes that have been installed to My webMethods Server, the MywebMethods Server CommonLibrary, or the user interfaces of installedwebMethods applications.
Options
-s
-n
Parameters
The updatesinfo command does not accept any parameters.
Administering My webMethods Server 10.3 55
5 Running My webMethods Server from the Command Line

My webMethods Server Instance ConfigurationCommandsThe following commands perform My webMethods Server instance configuration operations.
getconfigDownloads a configuration file from the My webMethods Server database. Specify the name ofthe configuration file as a parameter of the command, as follows:mws getconfig fileName
Formore information and a list of configuration files, stored in theMywebMethods Server database,see “Modifying Configuration Files Stored in the Database” on page 73.
putconfigUploads a configuration file to the My webMethods Server database. Specify the name of theconfiguration file as a parameter of the command, as follows:mws getconfig fileName
Formore information and a list of configuration files, stored in theMywebMethods Server database,see “Modifying Configuration Files Stored in the Database” on page 73.
exportExports My webMethods Server runtime data for migration.
Options
-s
Parameters
The following table lists the parameters that the export command accepts.
DescriptionParameter
Required. Full path to the descriptor file to use for exportingmigration data.
descriptor_filefull_path
Required. Full path to the folder to use to export runtime data.target_folder
Required. The user name of the administrative My webMethodsServer user to authenticate the execution of the command.
mws_username
56 Administering My webMethods Server 10.3
5 Running My webMethods Server from the Command Line

DescriptionParameter
Required. The password of the administrative My webMethodsServer user to authenticate the execution of the command.
mws_password
importImports runtime data from an existing My webMethods Server installation.
Options
-s
Parameters
The following table lists the parameters that the import command accepts.
DescriptionParameter
Required. Full path to the .properties file to import.info_properties_filefull_path
Required. The user name of the administrative My webMethodsServer user to authenticate the execution of the command.
mws_username
Required. The password of the administrative My webMethodsServer user to authenticate the execution of the command.
mws_password
My webMethods Server Service ManagementCommandsThe following commands administer and operate server instances when installing or using MywebMethods Server as a Windows service, or UNIX daemon.
installserviceThe installservice command registers My webMethods Server as a service on Windows, or adaemon on UNIX systems.
Options
-p
-s
-n
Administering My webMethods Server 10.3 57
5 Running My webMethods Server from the Command Line

-d
Parameters
OnWindows systems, the installservice command accepts Java systemproperties as parametersin the following format:-Dany.java.system.property=value
On UNIX systems, you must specify the user name of the user that installs the service.
uninstallserviceThe uninstallservice command unregisters My webMethods Server as a Windows service orUNIX daemon.
Options
-p
-s
Parameters
The command does not accept additional parameters.
startserviceApplies only to Windows. The startservice command starts a My webMethods Server instance,installed as a Windows service.
Options
-p
-s
Parameters
The startservice command does not accept any parameters.
stopserviceApplies only toWindows. Stops aMywebMethods Server instance, installed as aWindows service.
Options
-p
58 Administering My webMethods Server 10.3
5 Running My webMethods Server from the Command Line

-s
Parameters
The stopservice command does not accept any parameters.
restartserviceApplies only to Windows. Stops and then starts a My webMethods Server instance, installed as aWindows service.
Options
-p
-s
Parameters
The restartservice command does not accept any parameters.
My webMethods Server OSGi Profile CommandsThe following commands manage the OSGi profiles for My webMethods Server instances.
create-osgi-profileUses theMywebMethods Server bundles to create anOSGi profile for the specified server instance.The profile name is the name of the server instance, preceded by MWS_.
Options
-p
-s
Parameters
The create-osgi-profile command does not accept any parameters.
Usage Notes
Use the create-osgi-profile command to create a new OSGi profile for a server instance afterdeleting or deprecating a corrupt profile.
Administering My webMethods Server 10.3 59
5 Running My webMethods Server from the Command Line

update-osgi-profileUpdates the OSGi profile for the specified server instance. Resets the server name, the servicename, and the JAVA_HOME variable, and updates the OSGi bundles associated with the serverinstance.
Options
-p
-s
Parameters
The update-osgi-profile command does not accept any parameters.
Usage Notes
Use the update-osgi-profile commandwhen youmodify the configuration of a server instanceor install a new webMethods application to run on an existing server instance.
Before updating anOSGi profile,make a backup copy of the custom_wrapper.conf configurationfile.
deprecate-osgi-profileRenames the OSGi profile for the specified server instance to add a timestampwith date and timeand archive the profile. Equivalent to updating an OSGi profile and saving a backup copy.
Options
-p
-s
Parameters
The deprecate-osgi-profile command does not accept any parameters.
Usage Notes
When you deprecate an OSGi profile, you rename the profile and it is no longer associated withthe server instance. You can then use the create-osgi-profile command to create a new profile.
delete-osgi-profileDeletes the OSGi profile for the specified server instance.
60 Administering My webMethods Server 10.3
5 Running My webMethods Server from the Command Line

Options
-p
-s
Parameters
The delete-osgi-profile command does not accept any parameters.
Usage Notes
Use the delete-osgi-profile command to remove a corrupt OSGi profile, before creating anew profile for the instance.
Before deleting anOSGi profile,make a backup copy of the custom_wrapper.conf configurationfile.
Examples
mws -s testInstance delete-osgi-profile...[Returns confirmation]mws -s testInstance create-osgi-profile...[Returns confirmation]
The command line sample deletes, and then recreates the OSGi profile for the My webMethodsServer instance with name testInstance.
Start, Stop and Execute My webMethods ServerCommands on Multiple Server InstancesIf you want to start, stop, or execute a My webMethods Server command on all server instancesat one go, there are commands associated with all server instances, installed on a machine.
To start, stop, or execute a command on all server instances
1. At a command line prompt, type the following command to move to the command’s homedirectory:
cd Software AG_directory\MWS\bin
2. Type one the following commands:
The following table lists command syntax for executing My webMethods Server commands onmultiple server instances:
Administering My webMethods Server 10.3 61
5 Running My webMethods Server from the Command Line

CommandOperating systemPurpose
mwsall.batWindowsExecute a command on all server instances.The following commands are not supported:
mwsall.shUNIXrun
new
ant
startall.batWindowsStart all server instances. The server instancesare started consequently in alphabetical
startall.shUNIXorder. On Windows operating systems, thecommand starts a server instance as a serviceif it has a registered service, otherwise itstarts the instance as a process. On UNIXbased operating systems, the command startsthe instances as processes only.
stopall.batWindowsStop the server instances. The command callsmws.{bat|sh} stopfor all server instances.
stopall.shUNIX
Log Files for mws CommandsEvery time you issue one of the mws commands from the command line, My webMethods Servercreates a log file of information written to the console. The command name takes this form:
command-name_server-name.log
where:
command-name is the name of the mws command.
server-name is the name of the server instance affected by the command.
For example, if you issue this command:
mws -s alpha create-osgi-profile
The resulting log file has the name create-osgi-profile_alpha.log.
The log files are written to this location:
Software AG_directory \MWS\bin
When you issue an mws command and a log file for that command already exists, MywebMethodsServer completely overwrites the existing log file. If you want to maintain the old log file, makea backup copy of it before reissuing the command.
If the mws command is unsuccessful, one quickway to check the log file is to search for the existenceof this exit code:
62 Administering My webMethods Server 10.3
5 Running My webMethods Server from the Command Line

ExitCode: 13
Following that code, you should find themissing requirement, possibly amissing bundle or featureID. If you cannot find an obvious reason for the failure, be prepared to make a copy of the log fileavailable to Software AG Global Support.
Administering My webMethods Server 10.3 63
5 Running My webMethods Server from the Command Line

64 Administering My webMethods Server 10.3
5 Running My webMethods Server from the Command Line

6 Modifying Configuration Files
■ The Java Service Wrapper .............................................................................................. 66
■ Configuring JVM Settings for My webMethods Server .................................................. 69
■ Modifying Configuration Files Stored in the Database .................................................. 73
■ Configuring My webMethods Server to Run in 32-bit on Solaris, HP-UX, or Linux ........ 75
■ Configuring HTTP Listeners to Use a Single IP Address ................................................ 76
■ Configuring Whether Diagnostics Are Executed at Startup ........................................... 79
Administering My webMethods Server 10.3 65

The Java Service WrapperMywebMethods Server runs on the Software AG Common Platform, which in turn runs in a JavaVirtualMachine (JVM). The Java ServiceWrapper is an application developed by Tanuki Software,Ltd. It is a utility program that launches the JVM in which My webMethods Server runs.
In addition to launching the JVM, the Java Service Wrapper offers features for monitoring theJVM, logging console output, and generating thread dumps. For an overview of the Java ServiceWrapper, see Software AG Infrastructure Administrator's Guide.
The Java Service Wrapper Configuration FilesFor My webMethods Server, the configuration files for the Java Service Wrapper reside in thefollowing directory:
Software AG_directory \profiles\MWS_serverName\configuration
When you startMywebMethods Server, the properties in thewrapper configuration files determinethe JVM settings and the behavior of the logging and monitoring features of the Java ServiceWrapper.
The following table describes the properties that each file contains:
DescriptionFile name
Contains property settings that are installed by My webMethodsServer.
wrapper.conf
Do not modify the contents of this file unless asked to do so bySoftware AG.
Contains properties thatmodify the installed settings inwrapper.conf.custom_wrapper.conf
If you need to modify the property settings for the Java ServiceWrapper, you make your changes in this file.
Contains settings that are applied to the wrapper.conf file when MywebMethods Server is updated or upgraded. Do not modify this file.
wrapper.conf.template
The file is located here:
Software AG_directory \MWS\server\serverName\config\
JVM ConfigurationWhen the Java Service Wrapper launches the JVM, it provides configuration settings that, amongother things, specify the size of the Java heap, and the directories in the classpath.
66 Administering My webMethods Server 10.3
6 Modifying Configuration Files

The JVM Configuration Properties
The wrapper.java properties in the Java Service Wrapper configuration files determine theconfiguration of the JVM in which My webMethods Server runs.
The JVMproperty settings thatMywebMethods Server installs are suitable formost environments.However, you can modify these properties if the installed settings do not suit your needs. Forprocedures and additional information, see “Configuring JVM Settings for My webMethodsServer” on page 69.
The Wrapper LogMy webMethods Server has its own logging mechanism, described in “Controlling ServerLogging” on page 262. In addition, the Java Service Wrapper records console output in a log file.The log contains the output sent to the console by the wrapper itself and by the JVM in which MywebMethods Server runs. The wrapper log is especially useful when you run My webMethodsServer as aWindows service, because console output is normally not available to you in thismode.
The Java Service Wrapper log for My webMethods Server is located in the following file:
Software AG_directory \profiles\MWS_serverName\logs\wrapper.log
To view the log, open the log file in a text editor.
The Logging Properties
The wrapper.console and wrapper.log properties in thewrapper configuration files determine thecontent, format, and behavior of the wrapper log.
The logging settings that My webMethods Server installs are suitable for most environments.However, you can modify the following properties if the installed settings do not suit your needs.For procedures and additional information, see Software AG Infrastructure Administrator's Guide.
The following table lists the available logging properties:
ValueProperty
Maximum size to which the log can grow.wrapper.logfile.maxsize
Number of old logs to maintain.wrapper.logfile.maxfiles
Fault MonitoringThe Java Service Wrapper can monitor the JVM for the specified conditions and then restart theJVM or perform other actions when it detects these conditions.
The following table describes the fault-monitoring featuresMywebMethods Server uses or allowsyou to configure.
Administering My webMethods Server 10.3 67
6 Modifying Configuration Files

User configurable?Enabled?Feature
Yes. See the wrapper.ping properties in “ConfiguringMy webMethods Server Settings” on page 69.
YesJVM timeout
Yes. See the wrapper.check.deadlock properties in“Configuring Wrapper JVM Checks” on page 70.
NoDeadlock detection
Yes. See “Console Filtering Properties” on page 68.YesConsole filtering
Formore information about fault-monitoring options, see Software AG Infrastructure Administrator'sGuide.
Console Filtering Properties
The wrapper.filter properties in the wrapper configuration files determinewhether the wrappermonitors the console for specified messages. My webMethods Server installs pre-defined filtersthat monitor the console for certain messages. For information about the installed filters, see“Configuring JVM Out-of-Memory Checks” on page 71.
You can add additional filters to the Java Service Wrapper using the following properties. Forprocedures and additional information, see Software AG Infrastructure Administrator's Guide.
The following table lists the custom JVM properties that configure console filtering.
ValueProperty
String of text that you want to detect in theconsole output.
wrapper.filter.trigger.n
Action that occurs when the Java ServiceWrapper detects the string of text.
wrapper.filter.action.n
Flag (TRUE or FALSE) that specifieswhether theJava Service Wrapper processes wildcard
wrapper.filter.allow_wildcards.n
characters that appear inwrapper.filter.trigger.n.
Message that displays when the Java ServiceWrapper detects the string of text.
wrapper.filter.message.n
Generating a Thread DumpThe Java ServiceWrapper provides a utility for generating a thread dumpwhenMywebMethodsServer is running as a Windows service. A thread dump can help you locate thread contentionissues that can cause thread blocks or deadlocks.
For information about generating a thread dump using the JavaWrapper Service, see Software AGInfrastructure Administrator's Guide.
68 Administering My webMethods Server 10.3
6 Modifying Configuration Files

Configuring JVM Settings for My webMethods ServerYou can modify JVM settings for a My webMethods Server instance in the custom_wrapper.conffile.
To modify JVM settings
1. Open the custom_wrapper.conf file for the server instance in a text editor. You can find thefile at this location:
Software AG_directory \profiles\MWS_serverName\configuration\
2. Add or modify statements as needed and save the file.
3. Restart My webMethods Server.
Configuring My webMethods Server SettingsYou can use the custom_wrapper.conf file to configure the ping timeout for a My webMethodsServer instance. The following table lists the custom JVM poperties to add in thecustom_wrapper.conf file:
DescriptionParameter
Integer. The amount of time in seconds towait between two ping responses from the
wrapper.ping.timeout=value
JVM. The default value is 120. If set to 0, thewrapper will never time out, but a realindicator whether the server is suspendedwill not exist either.
Setting Initial and Maximum Memory LimitsYou can configure the initial and maximum amount of memory that is allocated by the JVM atstartup. The following table lists the initial and maximummemo limits, set by default by the JavaService Wrapper:
Value in megabytesParameter
128wrapper.java.initmemory=
1024wrapper.java.maxmemory=
To use the default values that are configured in the JVM itself, specify zero (0) in the propertiesof the custom_wrapper.conf file. For example:
Administering My webMethods Server 10.3 69
6 Modifying Configuration Files

wrapper.java.maxmemory=0
Note:If you specify a value for the wrapper.java.initmemorymemory property, make sure that it issmaller than the value of the wrapper.java.maxmemory property.
Raising the Maximum Memory Limit on UNIX
On UNIX or Linux systems, if My webMethods Server fails to initialize, you may need to increasethe maximum amount of available memory or the maximum open files limit. This need can occurif you have multiple language packs installed, or if there are multiple webMethods componentsinstalled on the server.
In the custom_wrapper.conf file, specify the maximum memory limit in megabytes. To doublethe maximum available memory, for example, change this value:wrapper.java.maxmemory=1024
to this:wrapper.java.maxmemory=2048
Each UNIX platform has its own method for configuring Open File limits. Here is an example onhow to increase the maximum Open Files limit parameters on Linux:ulimit -c unlimitedulimit -n 8192
Check with your administrator to make these changes on Linux or other UNIX platforms.
For information on editing this custom_wrapper.conf, see “Configuring JVM Settings for MywebMethods Server” on page 69.
Configuring Wrapper JVM ChecksThe Java Service Wrapper can perform internal detection of deadlock threads or out of memoryconditions within the JVM. By default, the deadlock detection is disabled in the My webMethodsServer service and if you want to use this functionality, you need to enable it manually in thecustom_wrapper.conf file.
The following table describes the additional parameters for configuring JVM checks:
DescriptionParameter
Boolean. Enables or disables JVM deadlockchecks. The default value is FALSE - deadlockchecking is disabled.
wrapper.check. deadlock=true|false
Integer. The deadlock detection interval inseconds. The default value is 60.
wrapper.check.deadlock. interval=interval
70 Administering My webMethods Server 10.3
6 Modifying Configuration Files

DescriptionParameter
String. The action to perform when a deadlockoccurs. The default value is RESTART.
wrapper.check.deadlock. action=action
String. The output of the wrapper. Valid valuesare:
wrapper.check.deadlock. output=output
FULL
SIMPLE
NONE
The default value is FULL.
Configuring JVM Out-of-Memory ChecksYou can configure the properties that control and resolve the out-of-memory conditions by filteringthe console output of the JVM. These properties use this syntax:wrapper.filter.element.<n>=parameter
The number n starts from one and increases by one for each consecutive element. As a rule, thechain of additional parameters must start at 1 and be consecutive. However, if you enablewrapper.ignore_sequence_gaps property, the sequence can be broken.
The following table lists the available parameters, their recommendedvalues, and the correspondingdescriptions.
DescriptionRecommended ValueParameter
Enables a query for anout-of-memory condition on theconsole output of the JVM.
java.lang.OutOfMemory Errorwrapper.filter. trigger.n=
Controls the action if theconfigured filter is met (an
RESTARTwrapper.filter. action.n=
out-of-memory conditionoccurs).
Controls the message that isdisplayed if the filter is met (an
The JVM has run out ofmemory.
wrapper.filter. message.n=
out-of-memory conditionoccurs).
Administering My webMethods Server 10.3 71
6 Modifying Configuration Files

Additional JVM ParametersThere are some parameters that do not relate to MywebMethods Server but to the JVM itself. Youset custom JVM parameters in the custom_wrapper.conf file for My webMethods Server, usingthe following syntax:wrapper.java.additional.n=parameter
The number n starts from one and increases by one for each additional element. As a rule, thechain of additional parameters must start at one and be consecutive. For example:# Java Additional Parameterswrapper.java.additional.1=-Dosgi.install.area="%OSGI_INSTALL_AREA%"wrapper.java.additional.2=-Declipse.ignoreApp=truewrapper.java.additional.3=-Dosgi.noShutdown=true
The following table describes some of the additional parameters, available for customizing JVMsettings:
DescriptionParameter
Starts the programwithout a graphicaluser interface window.
wrapper.java.additional.n=-DproxySet=true
The host name of theproxy server.
wrapper.java.additional.n=-Dhttp.proxyHost=host_name
Theport number on theproxy server.
wrapper.java.additional.n=-Dhttp.proxyPort=port_number
A user name used forauthentication.
wrapper.java.additional.n=-Dhttp.proxyUser=user_name
A password used forauthentication.
wrapper.java.additional.n=-Dhttp.proxyPassword=password
A list of hosts thatshould be reached
wrapper.java.additional.n=-Dhttp.nonProxyHosts=bypass_hosts
directly, bypassing theproxy. Entries areseparated by a verticalbar ( | ).
Configuring the Axis HTTP Client
Making multiple concurrent SOAP requests from a portlet in My webMethods Server to a webservice in Integration Server might result in longer response times, or request timeouts. In suchcases, you canmodify the connection settings of the built-in Axis client forMywebMethods Server,by including additional parameters in the custom_wrapper.conf file.
72 Administering My webMethods Server 10.3
6 Modifying Configuration Files

The following table lists the custom JVM parameters that you use o configure the Axis client inMy webMethods Server.
DescriptionParameter
Themaximumnumber of concurrent connectionsto a service on a host.
axisclient.DefaultMaxConnectionsPerHost
The default value is 10.
Themaximumnumber of active connections fora single client instance.
axisclient.MaxTotalConnections
The default value is 100.
For more information about modifying the custom_wrapper.conf file, see “The Java ServiceWrapper” on page 66.
Modifying Configuration Files Stored in the DatabaseMost of the server configuration files are stored in theMywebMethods Server database by default,instead of in the local file system. To edit anyMywebMethods Server configuration file, youmustdownload the file from the database, using the mws getconfig command. When you modify aconfiguration file, the My webMethods Server instance can be either running or stopped, but thedatabase must be running.
For more information about the configuration files that you can modify, see “Configuration FilesStored in the Database” on page 74.
To edit configuration files for My webMethods Server
1. At a command line prompt, type the following command tomove to the server’s bin directory:
cd Software AG_directory\MWS\bin
2. To retrieve a configuration file from theMywebMethods Server database, type this command:
mws getconfig fileName
where fileName is the name of the configuration file that you want to edit.
For example:mws getconfig cluster.xml
mws getconfig logging.properties
3. Open the downloaded configuration file in a text editor and modify it as needed.
You can find the file at this location:
Administering My webMethods Server 10.3 73
6 Modifying Configuration Files

Software AG_directory \MWS\server\serverName\config
4. To deploy the revised file to the My webMethods Server database, type this command:
mws putconfig fileName
5. Delete the file from the \serverName\config directory.
If you do not delete the file, the server instance will continue to use the local version of theconfiguration file.
6. Restart the node using this command:
mws -s serverName restart
Changes to configuration files are not applied until after a restart.
Configuration Files Stored in the DatabaseThe following table shows the files you can download using the mws getconfig command andtheir purpose.
PurposeConfiguration file
Increase cache size.cache.xml
Supply and store configuration data for each node in acluster.
cluster.xml
Modify properties of a web application.defaultPortletAppWeb.xml
List the portlets affected by the phase provider for thedefault cluster partition. If you have multiple cluster
defaultPartitionPortlets.properties
partitions, it is possible to have multiple portletsproperties files, each having the file namepartitionNamePortletsProperties.xml.
Configure e-mail servers.email.properties
Map mime types (Content types) to icons located in theui\images directory.
iconMap.properties
Configure the Jetty server.jetty.xml
Turn internal debugging on or off (Apache Log4J loggingpackage).
log4j.init.properties
Modify properties of theApache Log4J logging package.log4j.override.properties
Customize logging folders and patterns.logging.properties
Customize mime types.mimeTypes.properties
74 Administering My webMethods Server 10.3
6 Modifying Configuration Files

PurposeConfiguration file
Enable and disable the performance service.perfUtil.properties
Modify the server polling interval. If you have multiplecluster partitions, it is possible to have multiple phase
phaseProvider.xml
provider files, each having the file namepartitionNamePhaseProvider.xml.
Configure content services.storageConfig.xml
Configure the location of logs or the temp folder.systemPaths.properties
Store persisted system properties.systemProperties.properties
Modify the properties of a web application.defaultPortletAppWeb.xml
Configure email servers.email.properties
Configure single sign-on for a third-party identityprovider (IDP) using Security Assertion MarkupLanguage (SAML).
websso.properties
Note:File names and file contents are case sensitive.
Configuring My webMethods Server to Run in 32-biton Solaris, HP-UX, or LinuxOn Solaris, HP-UX, or Linux systems, it is necessary to specify whether the computer has a 32- or64-bit architecture. By default, My webMethods Server is configured to run in 64-bit mode. Youcan switch the server to 32-bit mode.
To configure My webMethods Server to run in 32-bit mode on Solaris or HP-UX
1. Use this command to stop My webMethods Server:
mws -option stop
Options are described in “Basic CommandLine Syntax forMywebMethods Server” on page 46.
2. Open this file in a text editor:
Software AG_directory /MWS/bin/setenv.sh
3. Locate this text:
rem to use 64 bit JVM uncomment next lineset JAVA_D64=-d64
Administering My webMethods Server 10.3 75
6 Modifying Configuration Files

and comment the second line:rem to use 64 bit JVM uncomment next linerem set JAVA_D64=-d64
4. Save and close the file.
5. Use this command to update the OSGi profile:
mws -option update-osgi-profile
6. Restart My webMethods Server.
Configuring HTTP Listeners to Use a Single IP AddressMy webMethods Server binds its listener ports on all available IP addresses. When you haveinstalled My webMethods Server on server hardware with multiple network interfaces, you canbind the HTTP listener ports to a single IP address.
Configuring Jetty Listeners to Use IP AddressesJetty creates several listening ports on the My webMethods Server.
Ports for HTTP and HTTPS
Random socket acceptor ports for HTTP and HTTPS
If you have installedMywebMethods Server on server hardwarewithmultiple network interfaces,you can bind the HTTP listener ports to a single IP address. Use this procedure to configure aspecific IP address to the port used by the Jetty listeners.
Configuring the Jetty listening ports requires specifying the IP addresses in the custom_wrapper.confconfiguration file.
To configure specific IP addresses to be used by Jetty listeners
1. Open the custom_wrapper.conf configuration file for the server instance in a text editor.
2. Add the following JVM property:
wrapper.java.additional.nnn=-Djetty.host=IP_address
where nnn is the consecutive number of the JVM property, and IP_address is the IP address tobind the HTTP listener ports.
3. Save the file and restart My webMethods Server.
76 Administering My webMethods Server 10.3
6 Modifying Configuration Files

Configuring an IP Address for the JCR Repository RMI ServerWhen using a Java Content Repository (JCR), the connection to the JCR is implemented using anRMI to communicate with My webMethods Server. The default JCR listener port is 10999.
If you have installedMywebMethods Server on server hardwarewithmultiple network interfaces,you can bind the HTTP listener ports to a single IP address.
In the custom_wrapper.conf file, specify a value for the following parameter:wrapper.java.additional.204=-Dmws.jcr.rmi.bind.address=IP_address|host_name
where IP_address or host_name is the IP address or host name of the JCR repository RMI serverlistener.
For information on editing this file, see “Configuring JVMSettings forMywebMethods Server” onpage 69.
Configuring IP Addresses in GLUE Web Services RegistryIf your instance of My webMethods Server has Central Configuration installed, the GLUE webservices registry was created to use a range of ports from 16000 to 16025. You configure the IPaddress in the GlueServiceRegistryProperties.xml file to use a specific IP address.
If you have installedMywebMethods Server on server hardwarewithmultiple network interfaces,you can bind the HTTP listener ports to a single IP address. Use this procedure to configure aspecific IP address to the port used by the GLUE web services registry.
To configure a specific IP address
1. Go the installation directory for My webMethods Server, navigate toMWS/server/default/config/engine, and open the GlueServiceRegistryProperties.xml file inan editor.
2. Look for the following property:
<entry key="service.address">0.0.0.0</entry>
3. Replace the value, 0.0.0.0, with the IP address.
Configuring My webMethods Server on Multi-Home MachinesIf you are configuring My webMethods Server on multi-home machines, that is machines thathave multiple network interfaces and IP addresses, use the following procedure to bind MywebMethods Server listeners to a single IP address.
To configure My webMethods Server on multi-home machines
Administering My webMethods Server 10.3 77
6 Modifying Configuration Files

1. Shut down My webMethods Server.
2. Bind the HTTP and HTTPS listeners to the IP address as described below. Perform the stepsfor each server instance.
a. Go to the Software AG_directory /profiles/MWS_instanceName/configuration directory, andopen the custom_wrapper.conf file in a text editor.
b. Add the following custom JVM property:
wrapper.java.additional.nnn=-Djetty.host=IP_address
where nnn is the consecutive number of the JVM property, and IP_address is the IP addressto bind the HTTP listener ports.
c. Save the custom_wrapper.conf file.
3. For each cluster node, go to the SoftwareAG_directory\MWS\server\serverName\config\enginedirectory, open the GlueServiceRegistryProperties.xml file and specify the IP address in thefollowing element:
<entry key="service.address">IP_address</entry>
4. For each cluster node, bind the JCR server to the IP address as follows:
a. Go to the Software AG_directory \profiles\MWS_serverName\configuration directory andopen the custom_wrapper.conf file.
b. Specify values for the following parameter:
wrapper.java.additional.204=-Dmws.jcr.rmi.bind.address=IP_address|host_name
where IP_address or host_name is the IP address or host name of the JCR repository RMIserver listener.
5. For each cluster node, bind the JMX server to the IP address as follows :
a. Go to the Software AG_directory\profiles\MWS\serverName\configuration\com.softwareag.pl atform.config.propsloaderdirectory and back up the com.softwareag.jmx.connector.pid-500number.properties file.
b. Open the file and add the following line:
host=IP_address
6. Restart My webMethods Server.
78 Administering My webMethods Server 10.3
6 Modifying Configuration Files
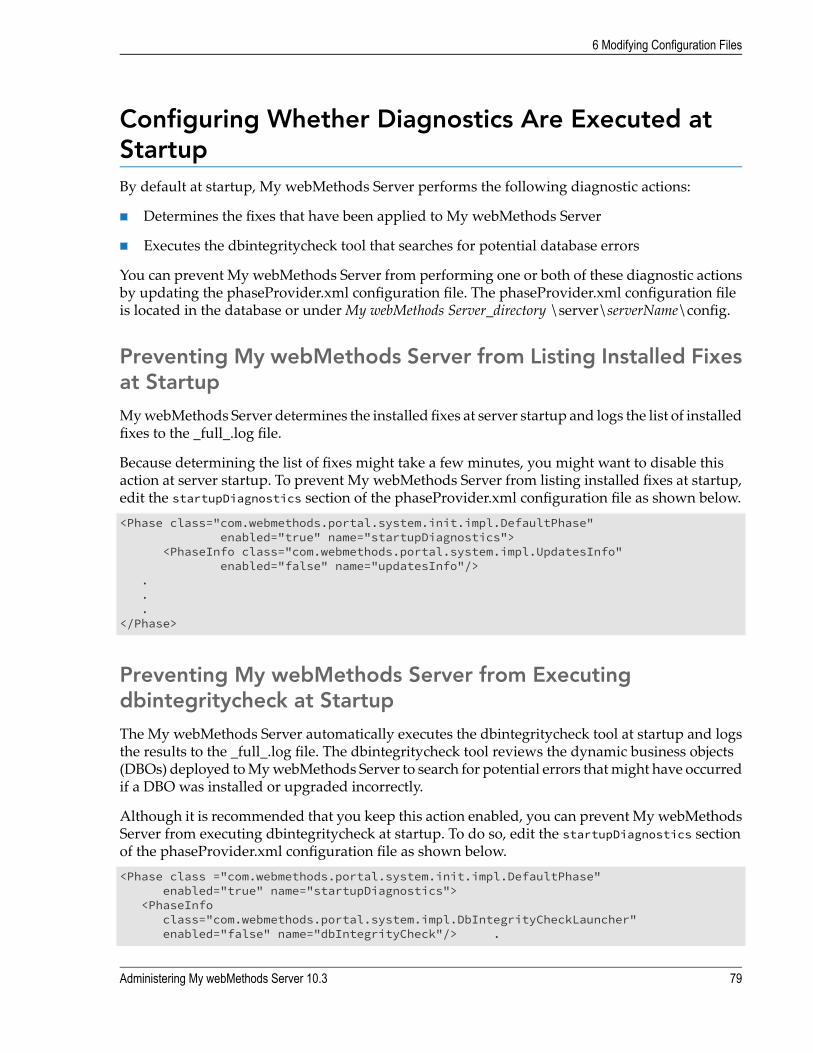
Configuring Whether Diagnostics Are Executed atStartupBy default at startup, My webMethods Server performs the following diagnostic actions:
Determines the fixes that have been applied to My webMethods Server
Executes the dbintegritycheck tool that searches for potential database errors
You can prevent My webMethods Server from performing one or both of these diagnostic actionsby updating the phaseProvider.xml configuration file. The phaseProvider.xml configuration fileis located in the database or underMy webMethods Server_directory \server\serverName\config.
Preventing My webMethods Server from Listing Installed Fixesat StartupMywebMethods Server determines the installed fixes at server startup and logs the list of installedfixes to the _full_.log file.
Because determining the list of fixes might take a few minutes, you might want to disable thisaction at server startup. To prevent My webMethods Server from listing installed fixes at startup,edit the startupDiagnostics section of the phaseProvider.xml configuration file as shown below.<Phase class="com.webmethods.portal.system.init.impl.DefaultPhase"
enabled="true" name="startupDiagnostics"><PhaseInfo class="com.webmethods.portal.system.impl.UpdatesInfo"
enabled="false" name="updatesInfo"/>...
</Phase>
Preventing My webMethods Server from Executingdbintegritycheck at StartupThe My webMethods Server automatically executes the dbintegritycheck tool at startup and logsthe results to the _full_.log file. The dbintegritycheck tool reviews the dynamic business objects(DBOs) deployed toMywebMethods Server to search for potential errors thatmight have occurredif a DBO was installed or upgraded incorrectly.
Although it is recommended that you keep this action enabled, you can prevent My webMethodsServer from executing dbintegritycheck at startup. To do so, edit the startupDiagnostics sectionof the phaseProvider.xml configuration file as shown below.<Phase class ="com.webmethods.portal.system.init.impl.DefaultPhase"
enabled="true" name="startupDiagnostics"><PhaseInfo
class="com.webmethods.portal.system.impl.DbIntegrityCheckLauncher"enabled="false" name="dbIntegrityCheck"/> .
Administering My webMethods Server 10.3 79
6 Modifying Configuration Files

.
.</Phase>
80 Administering My webMethods Server 10.3
6 Modifying Configuration Files
II My webMethods Administrator Functions
7 Managing My webMethods Configuration .................................................................... 83
8 Searches for Users, Groups, and Roles ........................................................................ 113
9 Managing Users and Groups ........................................................................................ 121
10 Managing Permissions ................................................................................................. 141
11 Managing Roles and Access to My webMethods ........................................................ 155
12 My webMethods Server Clustering .............................................................................. 171
Administering My webMethods Server 10.3 81

82 Administering My webMethods Server 10.3
II My webMethods Administrator Functions

7 Managing My webMethods Configuration
■ Managing Directory Services ......................................................................................... 84
■ Managing External Directory Services ........................................................................... 86
■ Managing External Data Sources ................................................................................. 103
■ Managing Email Settings ............................................................................................. 111
■ Managing Calendars .................................................................................................... 112
Administering My webMethods Server 10.3 83

Managing Directory ServicesAdirectory is similar to a database in that it contains a collection of entries (in this case, individuals),each of which has a set of attributes, such as names, email addresses, and so forth. A directoryservice provides a mechanism for delivering information about the entries in the directory.
My webMethods Server includes an internal directory service. However, if you are using anexternal directory (for example, if you are using Lightweight Directory Access Protocol (LDAP),you can configure My webMethods Server to also access user and group information from theexternal directory service.
Internal Directory Service
The internal directory service that is provided by default with your My webMethods Serverinstallation is called the system directory service. MywebMethods Server stores information aboutusers, groups, and roles that you define in this system directory service to the My webMethodsServer database. Use the systemdirectory service if you need tomaintain only amoderate numberof users and groups.
The following table lists the users and groups, defined by default in the system directory service:
DescriptionUser Name
The default administrator of My webMethods. This user can perform usermanagement functions andmanage external directory services. As installed,the user ID is “Administrator” and the password is “manage”.
MywebMethodsAdministrator
Important:Change the password for this user.
The system administrator forMywebMethods Server. This user canmanageMy webMethods Server, including analysis, configuration, content, and
System Admin
usermanagement. As installed, the user ID is “SysAdmin” and the passwordis “manage”. This administrator does not use the My webMethods userinterface. For more information about functions available to this account,see .
Important:Change the password for this user.
A user account that is used internally by My webMethods Server to storework done by a userwith administrative privilegeswhen that user is deleted
Deleted Items
from the system. As installed, the user account is DeletedItems and thepassword is “manage”.
Important:Change the password for this user.
84 Administering My webMethods Server 10.3
7 Managing My webMethods Configuration

DescriptionUser Name
The page designer for My webMethods Server. This user has privileges forMy webMethods Server similar to those of the system administrator. As
Designer
installed, the user ID is Designer and the password is “manage”. For moreinformation about functions performed by this account, see .
Important:Change the password for this user.
An anonymous user. This user can read pages that allow anonymous access,such as the login page. Otherwise, this user cannot read, modify, or delete
Guest
content unless permission is explicitly granted by an administrator. Asinstalled, the user ID for this user is Guest.
A user account that is used internally by My webMethods Server to invokeweb services. My webMethods Server uses this account for web service
webMethodsSystem
authentication from one server to another. As installed, the user account isWEBM_SYSUSER and the password is “manage”.
Important:Donot delete this user account. Change the password for this user. Changesto the password for this account must be provided to administrators forwebMethods applications that use it when communicating with MywebMethods Server.
A user account that is used internally by My webMethods Server forauthentication among servers in a cluster. As installed, the user account isWEBM_CLUSTERUSER and the password is “manage”.
webMethodsCluster
Important:Do not delete this user account. Change the password for this user on onenode of the cluster and then restart all nodes for the password to take effect.
For security reasons, youmust change the default passwords of the system users. For informationabout how to change passwords for these users, see “Editing Information for a User” on page 124.
External Directory Service
In addition to the system directory service, MywebMethods Server can support multiple externaldirectory services, allowing you to manage a much larger and diverse group of users. If yourcompany has one ormore directory services,MywebMethods Server can connect to those services.In addition, you can use a database as a directory service, or create custom services to connect adirectory provider to an external directory service inMywebMethods Server. Formore informationabout such services, see webMethods CAF and My webMethods Server Java API Reference.
Note:During login, conditions inwhich the role cache or group cache calculation involves user or groupsearches that take a long time can result in poor performance in My webMethods Server and in
Administering My webMethods Server 10.3 85
7 Managing My webMethods Configuration

LDAP servers to which it is connected. For more information, see “Configuring Role or GroupCache Lifecycle Calculation” on page 302.
Setting Up the Internal System Directory ServiceNo set up is required for the internal system directory service beyond configuring the MywebMethods Server database. Configuring the database was required during the installation ofMy webMethods Server, as described in Installing Software AG Products.
Managing External Directory Services
Configuring an External LDAP, ADSI, or ADAM Directory ServiceUse the following procedure to configureMywebMethods Server to use an external LDAP, ADSI,or ADAM directory service.
To configure an external LDAP, ADSI, or ADAM directory service
1. Navigate to the following page:
As My webMethods Administrator: Navigate > Applications > Administration > MywebMethods > Directory Services > Directory Services Administration.
As sysadmin:Administration > User Management > Directory Services Administration> Directory Services Administration.
2. On theCreate New Directory Service tab, select the directory service type from the followingoptions:
LDAP - Lightweight Directory Access Protocol.
ADSI - Active Directory Service Interfaces.
ADAM - Active Directory Application Mode.
3. Click Next.
4. Fill in the form to configure the new directory service.
For more information about the available configuration properties, see “LDAP, ADSI, andADAM Directory Service Properties” on page 87.
5. At the bottom of the page, click Finish.
Tip:
86 Administering My webMethods Server 10.3
7 Managing My webMethods Configuration

To test your configuration, perform a query to search for users or groups that are defined inthe external directory service. For information about how to perform a query, see “Searchingfor Existing Users, Groups, or Roles” on page 114.
LDAP, ADSI, and ADAM Directory Service Properties
When configuring an external directory service of type LDAP, ADAM, or ADSI, you can configurethe following properties.
In the General section:
The following table lists the directory service properties you configure in the General section:
DescriptionProperty
Required. The name to identify the external directory service.My webMethods Server uses this name to display the externaldirectory service in the user interface.
Name
A descriptive comment about the external directory service.Description
One or more keywords to use when searching for externaldirectory services.
Keywords
In the Cache section:
The following table lists the directory service properties you configure in the Cache section:
DescriptionProperty
Required. The number of database queries to cache. The defaultis 1000.
Cache Capacity
My webMethods Server deletes the cache entries when thenumber of cached queries reaches the specified capacity, startingfrom the oldest entries.
Required. The period of time for which queries remain in thecache unless the cache capacity is exceeded. The default is 1hour.
Cache Timeout
My webMethods Server deletes cache entries when the cachetimeout expires, even if the specified cache capacity is notreached.
My webMethods Server saves all cache in memory and clears all cache entries when restarted.
In the Connection Information section:
The following table lists the directory service properties you configure in the ConnectionInformation section:
Administering My webMethods Server 10.3 87
7 Managing My webMethods Configuration

DescriptionProperty
Enables or disables the directory service. The default is Yes.This service is enabled.
Service Enabled
Required. Themaximumnumber of connection errors to occurbefore disabling the service. The default is 10.
Connection Error Threshold
Attempt to reconnect to the directory server if the service isdisabled after reaching the connection error threshold or if the
Auto Reconnect
connection to the server is lost due to a network outage orplanned maintenance. Enabled by default.
The period of time (in seconds) to wait between subsequentattempts to reconnect. The default is 6.
Auto Reconnect Interval
Required. The URL for the external directory server using thefollowing syntax:
Provider URL
ldap://host_name:port_number
Required. The root distinguished name to use when queryingthe directory server. For example,ou=mywebMethods,o=webmethods.com
Base DN
The additional user DN to use when searching and loadingusers.
User DN
The additional group DN to use when searching and loadingusers.
Groups DN
Required. The distinguished name required to log in to theexternal directory server.
Security Principal
Required. The password required to log in to the externaldirectory server.
Security Credentials
The URL to another LDAP server that My webMethods Serveruses for failover if the primary LDAP server, specified in theProviderURLfield, fails. Separatemultiple valueswith spaces.
Failover URLs
Required. The maximum amount of time (in seconds) that anLDAP search query can run before it expires. The default is 0- the query does not expire.
Search Timeout
Unless you configure the connection timeout in thecustom_wrapper.conf file, My webMethods Server uses theSearch Timeout to define the timeout of a connection to anLDAP server. Formore information about configuring anLDAPserver connection timeout, see Administering My webMethodsServer “Configuring a Connection Timeout for an LDAPDirectory Service” on page 92.
88 Administering My webMethods Server 10.3
7 Managing My webMethods Configuration

DescriptionProperty
Required. Enables or disables the use of wildcard characters indirectory searches. The default isYes. Enable default wildcardsearches.
Enable Default WildcardSearches
Disabling wildcard searches might improve performance forlarge servers. When using wildcards, servers do not use anyinternal indexes for search performance.
Required. Indicates whether to query for group membershipacross all external directory services, configured in My
Enable Group Across DirectoryService
webMethods Server. When you enable this option, the searchqueries for group membership across all directory services,which degrades the login performance. The default is No.Group Across Directory Service.
For more information, see Administering My webMethodsServer“Group Membership Across Directory Services” onpage 93.
Required for Active Directory. Indicates whether to determinethe group membership of an Active Directory user with one
Enable GroupQuickSearch
query instead of a recursive search. When you enable thisoption, the search uses one query, which improves the loginperformance.. Users must belong either to an Active Directorysecurity group, or a regular group. The default is Disabled.
Applies only to Active Directory. Specify multiple ActiveDirectory sub-domain URLs, separated by spaces.
ActiveDirectory Domain URLs
In the Advanced Object Filters section:
The following table lists the directory service properties you configure in the Advanced ObjectFilters section:
DescriptionProperty
The LDAP filter that My webMethods Server applies to allqueries when searching for users. Use a technical LDAP query
User Object Filter
that limits the type of objects, exposed in My webMethodsServer.
Note:It is recommended that you examine the My webMethodsServer directory debug logs to ensure that the query isworkingcorrectly.
The LDAP filter that My webMethods Server applies to allquerieswhen searching for groups. Use a technical LDAPquery
Group Object Filter
Administering My webMethods Server 10.3 89
7 Managing My webMethods Configuration

DescriptionProperty
that limits the type of objects, exposed in My webMethodsServer.
Note:Examine the My webMethods Server directory debug logs toensure that the query is working correctly.
Enables or disables searches in nestedLDAPgroups. Thedefaultvalue is No. Do not use nested groups.
Use Nested Groups
Enables or disables the use of the Virtual List View control toretrieve a subset of objects for an LDAP query. The default
Use the Virtual List ViewControl
value is No. Do not use the VLV control. Applies only whenthe automatic configuration of LDAP server controls is disabled.
Enables or disables the use of the Server-Side Paging controlto page the results of an LDAP query. The default value is No.
Use Server Side Paging Control
Do not use the Paging control. Applies only when theautomatic configuration of LDAP server controls is disabled.
Enables or disables the use of the Server-Side Sorting controlto sort the results of an LDAP query in a particular order. The
Use Server Side Sorting Control
default value is No. Do not use the Soting control. Appliesonlywhen the automatic configuration of LDAP server controlsis disabled.
Enables or disables the automatic configuration of LDAP servercontrols by My webMethods Server. The default value is Yes.Autoconfigure the controls.
Automatically Configure ServerSide Controls
In the User Attributes section:
The following table lists the directory service properties you configure in the User Attributessection:
DescripionProperty
Required. The User Object Class attribute for the externaldirectory service. The default is person.
User Object Class
Required. The User ID attribute for the external directoryservice. The default is uid.
User ID
Required. The First Name attribute for the external directoryservice. The default is sn.
First Name
Required. The Last Name attribute for the external directoryservice. The default is givenName.
Last Name
90 Administering My webMethods Server 10.3
7 Managing My webMethods Configuration

DescripionProperty
Required. The Full Name attribute for the external directoryservice. The default is cn.
Full Name
Required. The Email Address attribute for the external directoryservice. The default is mail.
E-mail Address
Required. The Password attribute for the external directoryservice.
Password
The name of an attribute in the external directory service thatidentifies a user as disabled. The default is true.
User Disabled
The regular expression to use when evaluating the UserDisabled attribute for the external directory service.
User Disabled Value Regex
The name of the attribute to use as a universally uniqueidentification attribute of a user. Specify a string of maximum128 characters, for example cn or email.
UUID
Note:
If you change the value of UUID for an existing directoryservice, you must run the UserDirectory_UpdateUUID utilityto update the UUID value of directory service users.
Formore information, seeAdministeringMywebMethods Server“ConfiguringUniversallyUnique Identifier (UUID) forUsers” onpage 94.
In the Group Attributes section:
The following table lists the directory service properties you configure in the Group Attributessection:
DescriptionProperty
Required. The Group Object Class attribute for the externaldirectory service. The default is groupofuniquenames.
Group Object Class
Required. The Group ID attribute for the external directoryservice. The default is cn.
Group ID
Required. The GroupName attribute for the external directoryservice. The default is cn.
Group Name
Required. The Group Members attribute for the externaldirectory service. The default is uniquemember.
Group Members
Administering My webMethods Server 10.3 91
7 Managing My webMethods Configuration

DescriptionProperty
Required. The Group Email attribute for the external directoryservice. The default is mail.
Group E-mail
In the Connection Pool section:
The following table lists the directory service properties you configure in the Connection Poolsection:
DescriptionProperty
The minimum number of connections to the external directoryserver to keep open at all times. The default is 1.
Minimum Connections
Themaximumnumber of connections to the external directoryserver to keep open at all times. The default is 20.
Maximum Connections
The maximum amount of time to keep a connection to theexternal directory server open, before recycling the connection.
Maximum Connection Time
The server resets this value for each LDAP search to ensurethat an LDAP connection remains open during the searchprocess. The default is 10 minutes.
The time interval for cleaning up expired LDAP connections.The default is 1 minute.
Clean Up Interval
Note:In some LDAP implementations, the paging cookie is bound to a specific LDAP connection.Makesure that the value for the Maximum Connections property is large enough to handle concurrentLDAP searches and the value fo theMaximumConnection Time property is long enough to ensurethat searches can finish within the specified time range.
Configuring a Connection Timeout for an LDAP Directory Service
By default, My webMethods Server uses the value of the Search Timeout property to define thetimeout of a connection to an LDAP server. However, the primary purpose of the Search Timeoutproperty is to specify the timeout of an LDAP query.
In some cases you might need to specify a different connection timeout value than the value ofSearch Timeout. To do that, you can configure the-Dcom.webmethods.portal.portlet.wm_xt_ldapdirsvc.service.connection.timeout parameter inthe custom_wrapper.conf file of MywebMethods Server. The default value of the LDAP directoryservice connection timeout parameter is 10 seconds. If you do not configure the connection timeoutparameter and the value of Search Timeout is set to 0, My webMethods Server uses the defaultconnection timeout value of 10 seconds.
For more information about Search Timeout and about configuring an LDAP directory service,see “Configuring an External LDAP, ADSI, or ADAM Directory Service” on page 86.
92 Administering My webMethods Server 10.3
7 Managing My webMethods Configuration

To configure a connection timeout for an LDAP directory service
1. Go to Software AG_directory \profiles\MWS_serverName\configuration and open thecustom_wrapper.conf file in a text editor.
2. Add the following parameter:
wrapper.java.additional.number=-Dcom.webmethods.portal.portlet.wm_xt_ldapdirsvc.service.connection.timeout= time_in_seconds
where number is a unique sequential number depending on the already existing parameternumbers in the file.
3. Save the file and restart My webMethods Server.
Group Membership Across Directory Services
If you have multiple LDAP, ADSI, or ADAM directory services configured on My webMethodsServer, the server can query for groupmembership across all of the configured directory services.This feature is useful if Users need to be in a branch of the Directory Tree that is distant enoughfrom Groups that it is inefficient to have only one directory service mounted at a root thatencompasses both users and groups. Instead, you might configure two directory services. Oneservice points at the root of the User branchwhile the other points at the root of the Group branch.For example, you might have a directory structure similar to this:
o=MyCompany, ou=Americas, ou=US, ou=Groupso=MyCompany, ou=Americas, ou=US, ou=Userso=MyCompany, ou=Americas, ou=Mexico, ou=Groupso=MyCompany, ou=Americas, ou=Mexico, ou=Usersand so forth....
My webMethods Server would not perform well with a single directory service pointing too=MyCompany. Instead the administrator might create multiple directory services pointing toou=Americas and other regional OUs. But suppose that Groups can have members frommultipleregions, as might be common in large international organizations. In that case, it is possible forthe membership of a Group to span multiple directory services.
To make it possible to query for group membership across all configured directory services, setEnable Group Across Directory Service for each directory service to Yes. Enable Group AcrossDirectory Service.
Note:Enabling this feature can noticeably degrade login performance.
Enabling Universally Unique Identifier (UUID) Resolution
You can enable Universally Unique Identifier (UUID) resolution in My webMethods Server. Youmust install the UserDirectory_UpdateUUIDPortlet.war file before enablingUUID resolution. For
Administering My webMethods Server 10.3 93
7 Managing My webMethods Configuration

more information about installing theUserDirectory_UpdateUUIDPortlet.war file, see “ConfiguringUniversally Unique Identifier (UUID) for Users” on page 94.
To enable UUID resolution in My webMethods Server
1. To navigate to the correct page, do one of the following:
In My webMethods: Navigate > Applications > Administration > My webMethods >Directory Services.
As system administrator: Folders > Administrative Folders > Administration Dashboard> User Management > Directory Services Administration.
2. Click the Enable UUID Resolution tab.
3. Select the Enable UUID Resolution check box, and then click Apply.
Configuring Universally Unique Identifier (UUID) for Users
By default, the external directory service configured with My webMethods Server uses DN toidentify users. In this case, if a user is transferred from one organization unit to another, MywebMethods Server will not be able to recognize that user because of the change in the user's DN.
For example, if a user with commonName as James (cn=James) is working in the marketing unit(ou=marketing) of ABC organization (o=ABC), and if MywebMethods Server is configured to useLDAP, James's DN will be dn: cn=James,ou=marketing,o=ABC. If James is transferred to financeunit, the DN for James will be dn: cn=James,ou=finance,o=ABC. After the DN change, MywebMethods Serverwill not be able to recognize James. Even the roles inwhich James is amemberwill not be able to locate James in LDAP, and will throw "unable to get role members-cn=James,ou=marketing,o=ABC" warning.
You can configure My webMethods Server to use UUID for identifying users. My webMethodsServer system administratormust configureUUID at a time that is suitable for systemmaintenance.
Important:
If you have a large user base, the UserDirectory_UpdateUUID utility might take a long time tore-configure external user directorywithMywebMethods Server. To remove invalid user records,run the cleanup utility before you run the UserDirectory_UpdateUUID utility.
To configure My webMethods Server to use UUID for identifying users
1. Enable UUID resolution. For information about enabling UUID resolution, see “EnablingUniversally Unique Identifier (UUID) Resolution” on page 93.
2. Configure the external directory service to set the UUID property. For information aboutconfiguring an external directory service, see “Configuring an External LDAP,ADSI, or ADAMDirectory Service” on page 86.
94 Administering My webMethods Server 10.3
7 Managing My webMethods Configuration

Important:If you change the value of UUID property for an existing directory service, you must run theUserDirectory_UpdateUUID utility to update the UUID value of directory service users inMy webMethods Server.
3. Make sure the UserDirectory_UpdateUUIDPortlet.war file is inSoftware AG_directory\MWS\components\extras\userdirectory folder.
4. Navigate to Folders > Administrative Folders > Administration Dashboard > Configuration> Install Administration > Extras > userdirectory > UserDirectory_UpdateUUIDPortlet.war.
5. Click Install Component.
6. Navigate to Folders > System > Portlets > UserDirectory_UpdateUUIDPortlet and openthe UserDirectory_UpdateUUID utility portlet in a browser.
7. ClickUpdate UUID to update theUUIDvalue inMywebMethods Server for all the configureddirectory service users.
The UUID field value will be null for:
Invalid users
System users
DB users
Important:It is recommended that you run the UserDirectory_UpdateUUID utility only once.
Removing Invalid Users
MywebMethods Server cannot recognize userswho are deleted from adirectory service ormovedin a directory service. Such users are regarded as invalid users.
As system administrator, you can use the Cleanup_InvalidUsers utility to remove invalid usersfrom My webMethods Server. In addition to removing invalid users, the Cleanup_InvalidUsersutility removes memberships of invalid users from roles in My webMethods Server.
You should run the Cleanup_InvalidUsers utility before you run the UserDirectory_UpdateUUIDutility. For more information about the UserDirectory_UpdateUUID utility, see “ ConfiguringUniversally Unique Identifier (UUID) for Users” on page 94.
Important:If you have a large user base, running the Cleanup_InvalidUsers utility might take a long time.You should run the Cleanup_InvalidUsers utility at a time that is suitable for systemmaintenance.
To remove invalid users
Administering My webMethods Server 10.3 95
7 Managing My webMethods Configuration

1. Take a backup of My webMethods Server database.
2. Navigate to Folders > Administrative Folders > Administration Dashboard > Configuration> Install Administration > Extras > UserDirectory > UserDirectory_UpdateUUIDPortlet.war.
3. Click Install Component.
4. Navigate to Folders > System > Portlets > UserDirectory_UpdateUUIDPortlet, and clickCleanup_InvalidUsers.
5. In theDirectory Service Name field, type the name of a directory service configuredwithMywebMethods Server. You can type the single wildcard character * to specify all directoryservices configured with my My webMethods Server.
6. Select Only log invalid user entries and click Cleanup.
All invalid users are listed in the Software AG_directory \MWS\server\default\logs\_full_.logfile. Review the file to ensure that the listed users are not active MywebMethods Server users.
7. Select Log and remove invalid user entries and click Cleanup.
8. Restart My webMethods Server.
Configuring an External Database Directory ServiceUse the following procedure to configure My webMethods Server to use an external databasedirectory service.
Note:To use a database directory service, you must first connect to the database as an external datasource. For more information, see “Managing External Data Sources” on page 103.
To configure an external database directory service
1. To navigate to the correct page, do one of the following:
In My webMethods: Navigate > Applications > Administration > My webMethods >Directory Services > Create New Directory Service.
As system administrator: Administration > User Management > Directory ServicesAdministration > Create New Directory Service.
2. In Directory Type field, click Database:
3. Click Next.
96 Administering My webMethods Server 10.3
7 Managing My webMethods Configuration

4. On the Create Database Directory Service page, specify:
The following table lists the properties, required to configure an external database directory service:
DescriptionPropertySection
Required. A name to identify the external databasedirectory service.MywebMethods Server uses this
NameGeneral
name when it needs to identify the externaldatabase directory service in the user interface
Optional. Adescriptive comment about the externaldatabase directory service.
Description
Required. The name of the query field containingthe user ID value.
User IDAttributes
Required. The name of the query field containingthe distinguished name value for the user.
User DN
Required. The name of the query field containingthe user first name.
User First Name
Required. The name of the query field containingthe user last name.
User Last Name
Optional. The name of the query field containingthe user full name. If you do not supply an attribute,
User Full Name
the full name is derived from the User First Nameand User Last Name attributes.
Optional. The name of the query field containingthe user email address.
User E-mail
Optional. The name of an attribute in the externaldirectory service that identifies a user as beingdisabled.
User Disabled
Optional. A regular expression used to evaluate theUser Disabled attribute for the external directoryservice.
User Disabled ValueRegex
Required. The name of the query field containingthe group ID value.
Group ID
Required. The name of the query field containingthe distinguished name value for the user.
Group DN
Required. The name of the query field containingthe group name.
Group Name
Administering My webMethods Server 10.3 97
7 Managing My webMethods Configuration
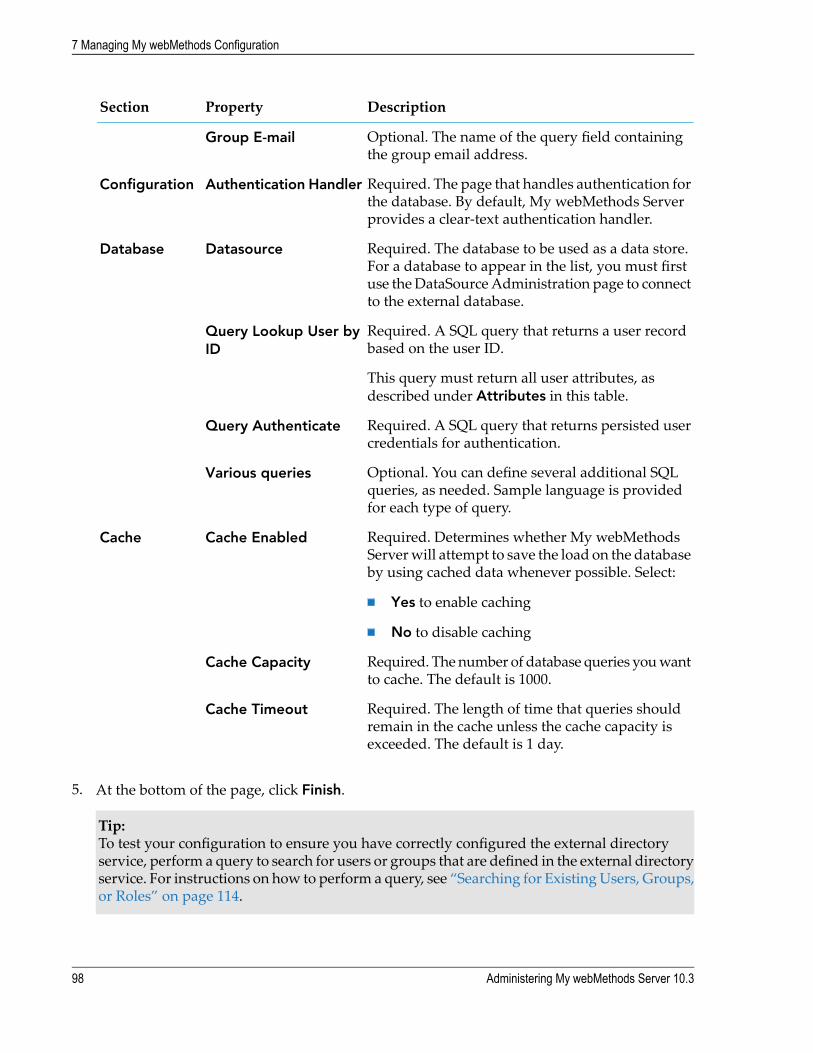
DescriptionPropertySection
Optional. The name of the query field containingthe group email address.
Group E-mail
Required. The page that handles authentication forthe database. By default, My webMethods Serverprovides a clear-text authentication handler.
Authentication HandlerConfiguration
Required. The database to be used as a data store.For a database to appear in the list, you must first
DatasourceDatabase
use theDataSourceAdministration page to connectto the external database.
Required. A SQL query that returns a user recordbased on the user ID.
Query Lookup User byID
This query must return all user attributes, asdescribed under Attributes in this table.
Required. A SQL query that returns persisted usercredentials for authentication.
Query Authenticate
Optional. You can define several additional SQLqueries, as needed. Sample language is providedfor each type of query.
Various queries
Required. Determines whether My webMethodsServerwill attempt to save the load on the databaseby using cached data whenever possible. Select:
Cache EnabledCache
Yes to enable caching
No to disable caching
Required. The number of database queries youwantto cache. The default is 1000.
Cache Capacity
Required. The length of time that queries shouldremain in the cache unless the cache capacity isexceeded. The default is 1 day.
Cache Timeout
5. At the bottom of the page, click Finish.
Tip:To test your configuration to ensure you have correctly configured the external directoryservice, perform a query to search for users or groups that are defined in the external directoryservice. For instructions on how to perform a query, see “Searching for ExistingUsers, Groups,or Roles” on page 114.
98 Administering My webMethods Server 10.3
7 Managing My webMethods Configuration

Allowing Externally Defined Users to Perform Actions from MywebMethodsBy configuring an external directory service, you provide My webMethods Server with theinformation it needs to connect to and retrieve information from the external directory service.After configuring the external directory service, users defined in the external directory servicewill be able to log into My webMethods but will not have permission to do anything else. You need totake the following additional steps to allow users to perform actions from My webMethods:
Create one or more LDAP query roles or database roles to identify the users who should begranted access toMywebMethods. Formore information about how to create roles for externaldirectory services, see “Creating a Role toDefine Externally DefinedUsers YouWant toAccessMy webMethods” on page 99.
Add the roles you have created to the My webMethods Users role. For more information, see“Adding a Role to the My webMethods Server Users Role” on page 100.
Creating a Role to Define Externally Defined Users You Want to Access MywebMethods
For each external directory service that you configure, create one or more roles that identify theusers or groups of users that you want to allow access to My webMethods Server.
For an LDAP, ADSI, or ADAM directory service, create an LDAP query role.
For a database directory service, create a database role.
To create a role to identify users who will be granted access to My webMethods
1. To navigate to the correct page, do one of the following:
In My webMethods: Navigate > Applications > Administration > System Wide > UserManagement > Roles > Add Role.
As system administrator: Administration Dashboard > User Management > ManageRoles > Add Role.
2. In the Role Name field, specify the name you want to assign to the new role, for example,“SystemX-My webMethods Users.
3. To specify the type of role you want to create, move it to the Selected Items box:
LDAP Query Role Provider—LDAP, ADSI, or ADAM directory service
Database Role Provider—database directory service
4. Click Create Role.
Administering My webMethods Server 10.3 99
7 Managing My webMethods Configuration

5. Specify themembership for the role. Formore information about how to define themembership:
For an LDAP, ADSI, or ADAM directory service, see “Adding an LDAP Query Role” onpage 160.
For a database directory service, see “Adding a Database Role” on page 163.
6. Click Save.
Adding a Role to the My webMethods Server Users Role
To grant those users who are identified by the roles you created access to My webMethods, addthe roles to the My webMethods Server Users role.
To grant users access to My webMethods
1. To navigate to the correct page, do one of the following:
In My webMethods: Navigate > Applications > Administration > System Wide > UserManagement > Roles.
As system administrator: Administration Dashboard > User Management > ManageRoles.
2. In the Keyword text box, type My webMethods Users, and click Search.
3. In the search results panel, click Edit for the My webMethods Users role.
4. Click the Members tab.
5. Click Edit Members.
6. Search for the principals you want to add and for each you want to make a member of the MywebMethods Users role, move the role name to the Selected panel.
7. After you have selected all roles that identify users you want to assign to the MywebMethodsUsers role, click Apply.
8. Click Save to make the membership changes to the My webMethods Users role.
Updating the Configuration for a Directory ServiceAfter you initially configure an external directory service or database directory service, youmightneed to update the values you specified for one or more of the properties. Use the followingprocedure to update the values of properties associated with a directory service.
100 Administering My webMethods Server 10.3
7 Managing My webMethods Configuration

To update the configuration for a directory service
1. To navigate to the correct page, do one of the following:
In My webMethods: Navigate > Applications > Administration > My webMethods >Directory Services > List Directory Services.
As system administrator: Administration Dashboard > User Management > DirectoryServices Administration > List New Directory Services.
2. On the List Directory Services panel, do one of the following:
Click the name of the directory service configuration you want to modify.
Click or in My webMethods for the directory service configuration and then clickProperties.
3. Make your changes to the properties for the directory service.
4. After making your changes, click Apply.
Updating the Search Order for Search Directory ServicesSome actions that you can performusingMywebMethods Server can result in the systemqueryingmultiple directory services. Use the following procedure to order your directory services to controlthe order in which My webMethods Server searches your directory services.
To update the order in which My webMethods Server searches external directory services
1. To navigate to the correct page, do one of the following:
In My webMethods: Navigate > Applications > Administration > My webMethods >Directory Services > Modify Directory Search Order.
As system administrator: Administration Dashboard > User Management > DirectoryServices Administration > Modify Directory Search Order.
MywebMethods Server searches the external directory services in the order they are listedin the Select list.
2. To reorder the list, move directory services up or down as needed.
3. After you have set the search order, click Apply.
4. Restart Integration Server for the changes to take affect.
Note:
Administering My webMethods Server 10.3 101
7 Managing My webMethods Configuration

Setting the search order does not affect the order in which My webMethods Server displaysdirectory services in lists throughout the user interface.
Disabling User AccountsYou can prevent users from logging intoMywebMethods Server based on the value of a specifiedattribute in an external directory service.
Note:webMethods products that use CommonDirectory Services for authentication, such as IntegrationServer and Optimize are affected by this feature. A user disabled in My webMethods Server isdisabled in those other products as well.
To disable user accounts for an external directory service.
1. To navigate to the correct page, do one of the following:
In My webMethods: Navigate > Applications > Administration > My webMethods >Directory Services > List Directory Services.
As system administrator: Administration Dashboard > User Management > DirectoryServices Administration > List New Directory Services.
2. On the List Directory Services panel, do one of the following:
Click the name of the directory service.
Click or in My webMethods for the directory service and then click Properties.
3. Locate the properties needed to disable user accounts.
For an LDAP, ADSI, or ADAM directory service, look in the User Attributes section.
For a database directory service, look in the Attributes section.
4. In the User Disabled field, type the name of the attribute in the external directory service thatwill determine the User Disabled status.
The exact value is dependent on the external directory service and the class of users you wantto disable.
5. In the User Disabled Value Regex field, type a regular expression to match against the valueof the User Disabled property. When the value matches, the user is disabled
6. After making your changes, click Apply.
102 Administering My webMethods Server 10.3
7 Managing My webMethods Configuration
Deleting a Directory Service ConfigurationIf you no longer want My webMethods Server to have access to users and groups defined in anexternal directory service, you can delete the configuration information for that external directoryservice using the following procedure.
To delete the configuration for an external directory service
1. To navigate to the correct page, do one of the following:
In My webMethods: Navigate > Applications > Administration > My webMethods >Directory Services > List Directory Services.
As system administrator: Administration Dashboard> User Management > DirectoryServices Administration > List Directory Services.
2. Click or inMywebMethods for the directory service configuration and then clickDelete.
Managing External Data SourcesOn the Data Source Administration page, you can connect to external data sources, such asdatabases, and make them available to My webMethods Server. Before you can create and use adatabase directory service, for example, you must configure the data source.
The Data Source Administration page supports connections to Microsoft SQL Server, Oracle, DB2Universal, Sybase Adaptive Server, or Informix databases. You can also configure ODBC andcustom connections.
Note:Before you configure a data source for connecting to DB2 Universal, Sybase Adaptive Server, orInformix databases, you must have a corresponding database driver for each respective databaseapplication. My webMethods Server distribution does not include database drivers for DB2Universal, Sybase Adaptive Server, or Informix databases.
Adding a Microsoft SQL Server Data SourceTo connect a Microsoft SQL Server data source to My webMethods Server, use the followingprocedure:
To add a new data source for Microsoft SQL Server databases
1. To navigate to the correct page, do one of the following:
In My webMethods: Navigate > Applications > Administration > My webMethods >Data Sources > Add DataSource.
Administering My webMethods Server 10.3 103
7 Managing My webMethods Configuration

As system administrator: Administration Dashboard > Configuration > DataSourceAdministration > Add DataSource.
2. Type a unique DataSource Name to be used by My webMethods Server on the ViewDataSources panel.
3. Type aDisplay Name to be usedwhen you identify a data source to use for a database directoryservice.
4. Select MS SQL Server from the Server Type list and click Next.
5. Type the SQL Server host name.
6. Type the port number used by the SQL Server. The default port is 1433.
7. Type the database name.
8. Type a valid SQL Server user name and password that, at a minimum, has READ access tothe database to which you will connect.
9. Click Submit.
Adding an Oracle Data SourceTo connect an Oracle data source to My webMethods Server, use the following procedure:
To add a new data source for Oracle databases
1. To navigate to the correct page, do one of the following:
In My webMethods: Navigate > Applications > Administration > My webMethods >Data Sources > Add DataSource.
As system administrator: Administration Dashboard > Configuration > DataSourceAdministration > Add DataSource.
2. Type a unique DataSource Name to be used by My webMethods Server on the ViewDataSources panel.
3. Type aDisplay Name to be usedwhen you identify a data source to use for a database directoryservice.
4. Select Oraclefrom the Server Type list and click Next.
5. Type the Oracle host name.
104 Administering My webMethods Server 10.3
7 Managing My webMethods Configuration

6. Type the port number on which the Oracle host is running. The default port is 1521.
7. Type the instance name (SID) for the database.
8. Type a valid Oracle database user name and password that, at a minimum, has READ accessto the database to which you will connect.
9. Click Submit.
Adding a DB2 Universal Data SourceTo connect a DB2 Universal data source to My webMethods Server, use the following procedure:
To add a new data source for DB2 Universal databases
1. To navigate to the correct page, do one of the following:
In My webMethods: Navigate > Applications > Administration > My webMethods >Data Sources > Add DataSource.
As system administrator: Administration Dashboard > Configuration > DataSourceAdministration > Add DataSource.
2. Type a unique DataSource Name to be used by My webMethods Server on the ViewDataSources panel.
3. Type aDisplay Name to be usedwhen you identify a data source to use for a database directoryservice.
4. SelectDB2 Universal from the Server Type list and click Next.
5. Type the DB2 host name.
6. Type the port number that DB2 is running on.
7. Type the instance name for the database.
8. Type a validDB2 user name andpassword that, at aminimum, has READaccess to the databaseto which you are connecting.
9. Click Submit.
Adding a Sybase Adaptive Server Data SourceTo connect a Sybase Adaptive Server data source to My webMethods Server, use the followingprocedure:
Administering My webMethods Server 10.3 105
7 Managing My webMethods Configuration

To add a new data source for Sybase Adaptive Server databases
1. To navigate to the correct page, do one of the following:
In My webMethods: Navigate > Applications > Administration > My webMethods >Data Sources > Add DataSource.
As system administrator: Administration Dashboard > Configuration > DataSourceAdministration > Add DataSource.
2. Type a unique DataSource Name to be used by My webMethods Server on the ViewDataSources panel.
3. Type aDisplay Name to be usedwhen you identify a data source to use for a database directoryservice.
4. Select Sybase Adaptive Server from the Server Type list and click Next.
5. Type the Sybase Server host name.
6. Type the port number that Sybase Server is running on.
7. Type the instance name for the database.
8. Type a valid Sybase Server user name and password that, at a minimum, has READ access tothe database to which you are connecting.
9. Click Submit.
Adding an Informix Data SourceTo connect a Informix data source to My webMethods Server, use the following procedure:
To add a new data source for Informix databases
1. To navigate to the correct page, do one of the following:
In My webMethods: Navigate > Applications > Administration > My webMethods >Data Sources > Add DataSource.
As system administrator: Administration Dashboard > Configuration > DataSourceAdministration > Add DataSource.
2. Type a unique DataSource Name to be used by My webMethods Server on the ViewDataSources panel.
106 Administering My webMethods Server 10.3
7 Managing My webMethods Configuration

3. Type aDisplay Name to be usedwhen you identify a data source to use for a database directoryservice.
4. Select Informix from the Server Type list and click Next.
5. Type the Informix host name.
6. Type the port number on which the Informix host is running.
7. Type the database name.
8. Type the Informix server name.
9. Type a valid Informix user name and password that, at a minimum, has READ access to thedatabase to which you are connecting.
10. Click Submit.
Adding a Generic ODBC Data Source
Note:MywebMethods Server can use anyODBC connection that ismanually configured at the operatingsystem level (such asWindows Server).MywebMethods Server uses a standard Java JDBC-ODBCbridge driver to connect to the ODBC data sources on the underlying operating system. ConsultyouMicrosoft vendor documentation for details on how to configure an ODBC data source at theoperating system level.
To connect a generic ODBC data source to My webMethods Server, use the following procedure:
To add a new data source for generic ODBC databases
1. To navigate to the correct page, do one of the following:
In My webMethods: Navigate > Applications > Administration > My webMethods >Data Sources > Add DataSource.
As system administrator: Administration Dashboard > Configuration > DataSourceAdministration > Add DataSource.
2. Type a unique DataSource Name to be used by My webMethods Server on the ViewDataSources panel.
3. Type aDisplay Name to be usedwhen you identify a data source to use for a database directoryservice.
4. Select Generic ODBC from the Server Type list and click Next.
Administering My webMethods Server 10.3 107
7 Managing My webMethods Configuration

5. Type the ODBC data source name that matches the ODBC data source configured at theoperating system level.
6. Type a valid user name and password that, at a minimum, has READ access to the databaseto which you are connecting.
7. Click Submit.
Adding a Custom Data Source
Note:This option is an advanced data source configuration and requires you to specify a valid JDBCdriver class name, connectionURL, user name, andpassword. Consult your vendor documentationto get specific instructions on where to locate the proper database drivers for the databaseapplication that you wish to connect to from the server.
To connect a custom data source to My webMethods Server, you need to declare the driver JARfile as a fragment of the com.webmethods.caf.server bundle and then use the My webMethodsServer user interface to add the datasource.
To add a new data source for a custom database
1. If My webMethods Server is running, stop it.
2. Copy the driver *.jar files into the Software AG_directory \MWS\lib directory.
3. In the Software AG_directory \MWS\lib directory, create a text file with the namedriver-name.bnd, where driver-name is the name of the driver .jar file.
For example, if you are using the oracle thin driver, ojdbc6.jar, the file name is ojdbc6.bnd.
4. In the file, provide instructions for the OSGi bundle conversion.
In the following example, replace the values in italics as appropriate. For Bundle-Version, it istypical to use the version number of the JAR file, but any unique number is valid. You can, infact, just use the value in this example:# attach as fragment to the caf.server bundleFragment-Host: com.webmethods.caf.serverBundle-SymbolicName: mws.jar.ojdbc6Bundle-Version: 0.9.0.v${tstamp}Include-Resource: ojdbc6.jar-exportcontents: *Bundle-ClassPath: ojdbc6.jarImport-Package: *;resolution:=optional
5. At a command line prompt, move to the server’s bin directory:
Software AG_directory\MWS\bin
108 Administering My webMethods Server 10.3
7 Managing My webMethods Configuration
6. Type this command:
mws.bat -s serverName update-osgi-profile
7. Restart your My webMethods Server instance.
8. To navigate to the correct page, do one of the following:
In My webMethods: Navigate > Applications > Administration > My webMethods >Data Sources > Add DataSource.
As system administrator: Administration Dashboard > Configuration > DataSourceAdministration > Add DataSource.
9. Type a unique DataSource Name to be used by My webMethods Server on the ViewDataSources panel.
10. Type aDisplay Name to be usedwhen you identify a data source to use for a database directoryservice.
11. Select Custom JDBC from the Server Type list and click Next.
12. Type the JDBC Connection class for the custom drivers you want to use for the data sourceconnection.
13. Type a valid connection URL.
14. Type a valid user name and password that, at a minimum, has READ access to the databaseto which you are connecting.
15. Click Submit.
Modifying a Data Source
Note:You cannot modify the default data source, which is the My webMethods Server database.
To modify a data source connection to My webMethods Server, use the following procedure:
To modify an existing data source
1. To navigate to the correct page, do one of the following:
In My webMethods: Navigate > Applications > Administration > My webMethods >Data Sources > View DataSources.
Administering My webMethods Server 10.3 109
7 Managing My webMethods Configuration

As system administrator: Administration Dashboard > Configuration > DataSourceAdministration > View DataSources.
2. Click ( inMywebMethods) for the data source youwant tomodify, and then clickModify.
3. On the first page of the Datasource Properties wizard, specify:
The following table lists the properties to configure when modifying an existing data source:
DescriptionField
Type a different unique data source name to be used by MywebMethods Server on the View DataSources panel.
Datasource Name
Type a different display name for the data source to be used whenyou identify a data source to use for a database directory service.
Display Name
From the list, select a different database type.Server Type
4. Click Next.
5. In the second page of the Datasource Properties wizard, modify one or more of the fieldsidentify the location, names, and passwords for the data source.
6. Click Submit.
Deleting a Data Source
Note:You cannot delete the default data source, which is the My webMethods Server database.
To delete a data source connection to My webMethods Server, use the following procedure:
To delete a data source
1. To navigate to the correct page, do one of the following:
In My webMethods: Administration > My webMethods > Data Sources > ViewDataSources.
As system administrator:Administration > Configuration > DataSource Administration> View DataSources.
2. Click or in My webMethods for the data source you want to modify, and then clickRemove.
110 Administering My webMethods Server 10.3
7 Managing My webMethods Configuration

Managing Email SettingsThe E-mail Administration page is used to configure the mail server settings used by the serverwhen processing email.
To configure an email server to send server notifications
1. Navigate to one of the following:
In My webMethods: Navigate > Applications > Administration > My webMethods >E-Mail Servers
As system administrator: Administration Dashboard > Configuration > E-mailAdministration.
2. On the E-mail Properties page, specify:
The following table lists the properties, required to configure e-mail notification settings for MywebMethods Server
DescriptionProperty
Identifies the email protocol to be used. The default and only valid valueis smtp.
Transport Protocol
Identifies the SMTP server. Specify the server's host name. For example:smtp.server.com. If you specify two or more hosts, type one address perline.
SMTP Hosts
Identifies the port number. Specify the SMTP server's port number. Forexample, 25.
SMTP Port
Optional. Identifies the user name that My webMethods Server is tosupply for authentication. If the SMTP server requires authentication,specify the user name to supply to satisfy the authentication challenge.
SMTP Username
Optional. Identifies the password associated with the SMTP Username.If the SMTP server requires authentication, specify the appropriatepassword.
SMTP Password
Optional. Indicates whether to use an encrypted SMTP connection (bymeans of TLS). If the SMTP server requires authentication, set to one ofthe following:
SMTP TLS Enabled
true TLS is enabled.
false (default) TLS is not enabled.
Defines the maximum period of time to wait for a response from theserver, specified in milliseconds. Default value is 60000.
SMTP Timeout
Administering My webMethods Server 10.3 111
7 Managing My webMethods Configuration

DescriptionProperty
Defines themaximumperiod of time for a given SMTP session, specifiedin milliseconds. Default value is 60000.
SMTP ConnectionTimeout
Optional. Indicateswhether to enable debugging for email activities.MywebMethods Server writes the debugging information to the MywebMethods Server logs. Set to one of the following:
SMTP DebugEnabled
true Debugging is enabled.
false (default) Debugging is not enabled.
Defines the default "From" name. Specify the default name to use in the"From" field of the email messages that My webMethods Server sendsusing the SMTP server.
From Name
Note:Text in this field is subject to the requirements of the RFC822 InternetText Message standard. For example, text in parentheses, as in"(Important)", is treated as a comment and is removedwhen themessageis created, and bracketed text, such as "[Status]", is treated as an optionalelement and is also removed.
Defines the default "From" email address. Specify the default emailaddress to use in the "From" field of the email messages that MywebMethods Server sends using the SMTP server.
From E-MailAddress
Optional. Identifies the skin to use when rendering My webMethodsServer email notifications. Specify a My webMethods Server skin.
Skin
Defines the email address of the My webMethods Server administrator.This is used as the 'from' address for administrative email messages senton behalf of the server.
Admin E-mailAddress
3. Click Save Settings.
Managing CalendarsSoftware AG Designer and My webMethods Server support the use of business calendars anduser calendars to assist with task definition, assignment, and behavior. Both business and usercalendars are set up and configured inMywebMethods Server. Each type of calendar is configuredseparately, and you can define business calendars only, user calendars only, or both.
User and business calendars are most often used by the Task Engine in the assignment andscheduling of tasks. For complete information about creating and managing user and businesscalendars, see webMethods Task Engine User’s Guide.
112 Administering My webMethods Server 10.3
7 Managing My webMethods Configuration

8 Searches for Users, Groups, and Roles
■ Searching for Existing Users, Groups, or Roles ............................................................ 114
■ Advanced Searches ...................................................................................................... 114
■ Working with Saved Searches ...................................................................................... 116
■ Exporting Search Results to a .csv File ......................................................................... 118
Administering My webMethods Server 10.3 113

Searching for Existing Users, Groups, or RolesYou can search for the following:
Users and groups defined in the internal system directory service
Users and groups defined in external directory services
Roles
To search for users, groups, or roles
1. To navigate to the correct page, do one of the following:
In My webMethods: Navigate > Applications > Administration > User Management >User_type > Search.
As system administrator: Administration Dashboard > User Management > ManageUser_type > Search.
where User_type is Users, Groups, or Roles.
2. For users and groups, from theName list select the directory servicewhere the users or groupsare defined.
If you select Any Directory, all directory services connected to the server are searched.
3. In the Keyword field of the Search panel, specify the search criteria, as follows:
To search for users, enter the first name, last name, e-mail address, or user ID.
To search for groups, enter the group name, group ID, or group e-mail address.
To search for roles, enter the ole name or the role ID.
The search is not case sensitive. If you leave the text box blank,MywebMethods Server returnsinformation for all entries in the selected directory service.
4. Click Go.
My webMethods Server displays the results in a table format.
For information on exporting the results of a search, see “Exporting Search Results to a .csv File” onpage 118.
Advanced SearchesAs a system administrator, you can perform an advanced search for users or groups, based onuser or group information and extended attributes. You cannot perform an advanced search forroles.
114 Administering My webMethods Server 10.3
8 Searches for Users, Groups, and Roles

To perform an advanced search for users or groups
1. To navigate to the correct page, do one of the following:
In My webMethods: Navigate > Applications > Administration > User Management >User_type > Search.
As system administrator: Administration Dashboard > User Management > ManageUser_type > Search.
where User_type is Users, Groups, or Roles.
2. For users or groups, from theDirectory Service list select the directory servicewhere the usersor groups are defined.
If you select Any Directory, all directory services connected to the server are searched.
3. For users, in the Core Attributes panel, fill in any of the following fields that are part of UserInformation:
The following table lists the core attributes for users:
DescriptionField
Type a first name for the saved search.First Name
Type a last name for the saved search.Last Name
Type a user ID for the saved search.User ID
Type a user email address for the saved search.E-mail Address
4. For groups, in the Core Attributes panel fill in any of the following fields that are part ofGroup Information:
The following table lists the core attributes for groups:
DescriptionField
Type a group name for the saved search.Group Name
Type a group ID for the saved search.Group ID
Type a group email address for the saved search.E-mail Address
5. In the Extended Attributes panel, choose an extended attribute by doing the following:
a. From the Attribute Provider list, choose an attribute provider.
For more information on attribute providers, see “Attribute Providers” on page 211.
Administering My webMethods Server 10.3 115
8 Searches for Users, Groups, and Roles

b. In the Attribute Value field, type or modify the value to be used in the saved search.
6. Click Go.
My webMethods Server displays the results in a table format.
For information on exporting the results of a search, see “Exporting Search Results to a .csv File” onpage 118.
Working with Saved SearchesIf you perform a particular search regularly, you can save search criteria that you can reuse.
Creating a Saved SearchTo create a saved search for a user, group, or role, follow these steps:
To create a saved search
1. To navigate to the correct page, do one of the following:
In My webMethods: Navigate > Applications > Administration > User Management >User_type > Search.
As system administrator: Administration Dashboard > User Management > ManageUser_type > Search.
where User_type is Users, Groups, or Roles.
2. For users and groups, in the Directory Service list choose the directory service that containsthe users you want to find.
If you select Any Directory, all directory services connected to the server are searched.
3. In the search field of the Search panel, specify one of the following:
All or part of the user ID - to search for users.
All or part of the group ID - to search for groups.
All or part of the role name - to search for roles.
4. Click Save.
5. In the Search Name field of the Save Searches dialog box, type a name by which you canidentify the search criteria and click OK.
116 Administering My webMethods Server 10.3
8 Searches for Users, Groups, and Roles

Using a Saved SearchYou can use a saved search to find users, groups, or roles that match the criteria.
To perform a saved search
1. To navigate to the correct page, do one of the following:
In My webMethods: Navigate > Applications > Administration > User Management >User_type > Saved.
As system administrator: Administration Dashboard > User Management > ManageUser_type > Saved.
where User_type is Users, Groups, or Roles.
2. In the Saved Search list, choose the name of the saved search and click Go.
Modifying a Saved SearchYou can modify an existing saved search.
To modify a saved search
1. To navigate to the correct page, do one of the following:
In My webMethods: Navigate > Applications > Administration > User Management >User_type > Saved.
As system administrator: Administration Dashboard > User Management > ManageUser_type > Saved.
where User_type is Users, Groups, or Roles.
2. In the Saved Search list, choose the name of the saved search to bemodified and clickDetails.
3. Do any of the following:
In the search field of the Saved panel, change the search criteria.
For users and groups, in the Directory Service list change the directory service in whichto perform the search.
For users, in theCore Attributes panel add, modify, or remove any of the following fields:
First Name
Last Name
Administering My webMethods Server 10.3 117
8 Searches for Users, Groups, and Roles
User ID
E-mail Address
The core user attributesmatch the user attribute fields on theUser Informationpanel, describedin “User Information” on page 125.
For groups, in the Core Attributes panel add, modify, or remove any of the followingfields:
Group Name
Group ID
E-mail Address
The core user attributes match the group attribute fields on the Group Information paneldescribed in “Group Information” on page 136.
In the Extended Attributes panel, choose an extended attribute by doing the following:
1. From the Attribute Provider list, choose an attribute provider.
For more information on attribute providers, see “Attribute Providers” on page 211.
2. In the Attribute Value field, type or modify the value to be used in the saved search.
4. To update the saved search, click Save.
Deleting a Saved SearchWhen you no longer need a saved search, you can delete it.
To delete a saved search
1. To navigate to the correct page, do one of the following:
In My webMethods: Navigate > Applications > Administration > User Management >User_type > Saved.
As system administrator: Administration Dashboard > User Management > ManageUser_type > Saved.
where User_type is Users, Groups, or Roles.
2. In the Saved Search list, choose the name of the saved search to be deleted and click Delete.
Exporting Search Results to a .csv FileYou can export search results to a comma-delimited text file (.csv file) if the search results panelincludes the Export Table function.
118 Administering My webMethods Server 10.3
8 Searches for Users, Groups, and Roles

After exporting search results to a .csv file, you can then import the .csv file into Microsoft Excel,Microsoft Access, or any other application that accepts the .csv file format.
To export search results
1. In the search results panel, click Export Table.
2. From the Character Encoding list, select the character encoding to use.
3. Click Export.
4. Use the file-download mechanism in your browser to browse to the location where you wantto save the .csv file.
Administering My webMethods Server 10.3 119
8 Searches for Users, Groups, and Roles

120 Administering My webMethods Server 10.3
8 Searches for Users, Groups, and Roles

9 Managing Users and Groups
■ About Managing Users and Groups ............................................................................. 122
■ Managing Users ........................................................................................................... 123
■ Managing User Data .................................................................................................... 133
■ Managing Groups ........................................................................................................ 135
Administering My webMethods Server 10.3 121

About Managing Users and GroupsYou canmanage users and groups asMywebMethodsAdministrator or as a system administrator(or as a user with administrator privileges, as described in “About Roles in My webMethodsServer” on page 156.
UsersTo access My webMethods, the system must have access to a definition for the user. To defineusers, you can:
Add users to the internal system directory service. You provide all information about theuser, for example the user ID the user is to supply to log into the system and the user’spassword. For information about how to manage users in the internal system directory, see“Managing Users” on page 123.
Access users already defined in external directory services. If your users are defined in oneor more external directory services, you can configure My webMethods Server to use theexternal directory services. As a result, those users can access and use My webMethods. Formore information, see “Managing External Directory Services” on page 86.
Note:With My webMethods Server, you can use a combination of users that are defined in both theinternal system directory service and external directory services.
GroupsYou can logically organize collections of users into groups, which allows you to identify a groupof users by a group name rather than identifying each user individually. For example, if you wantto assign a group of users to a role, you can simply assign the group containing the users to therole, rather than identifying each user individually.
To define a group, you can do the following:
Addgroups to the internal systemdirectory service. You provide information about the groupand define its membership. You can assign both individual users or other groups to be amembers. The users and groups that you assign to a group that is defined in the internal systemdirectory service must also be defined in the internal system directory service. That is, youcannot assign users or groups that are defined in an external directory service to aninternally-defined group. For information about how tomanage groups in the internal systemdirectory, see “Managing Groups” on page 135.
Access groups already defined in external directory services. If you want to use groups thatare defined in one or more external directory services, you can configure My webMethodsServer to use the external directory services. For more information, see “Managing ExternalDirectory Services” on page 86.
Note:
122 Administering My webMethods Server 10.3
9 Managing Users and Groups

With My webMethods Server, you can use a combination of groups that are defined in both theinternal system directory service and external directory services.
Managing Users
Adding UsersBefore a user can access and use My webMethods, you must either add the user to the internalsystem directory service or configureMywebMethods Server to use the external directory servicewhere the user is defined. For more information about configuring an external directory service,see “Managing External Directory Services” on page 86. The following procedure describes howto add a user to the internal system directory service.
Note:When aMywebMethodsAdministrator adds a new systemuser, that user is automatically addedto theMywebMethods Users role. When a system administrator adds a new user, that user is notautomatically added to the My webMethods Users role.
To add a user
1. To navigate to the correct page, do one of the following:
In My webMethods: Navigate > Applications > Administration > System-Wide > UserManagement > Users > Add User.
As system administrator: Administration Dashboard > User Management > ManageUsers > Add User.
2. Fill in the following fields for the user youwant to add to the internal system directory service:
The following table lists the required and optional fields to configure when adding a new user tothe system directory service:
DescriptionField
The user ID that youwant to assign to the user you are adding.MywebMethods Server uses the user ID when forming thedistinguished name (DN) for the user.
User ID
The user ID can be 1 through 226 characters and can contain onlyalphanumeric ASCII characters with no spaces. The user ID is notcase sensitive.
Note:My webMethods Server adds the user ID to the internal systemdirectory service using the case you specify. My webMethodsServer typically regards user IDs as case-insensitive; however, My
Administering My webMethods Server 10.3 123
9 Managing Users and Groups

DescriptionField
webMethods Server uses the case you specify for actions that arecase-sensitive, for example, HTTP authentication.
The password for the new user.Password
The same password you specified in the Password field.Confirm Password
The first name of the user you are adding. MywebMethods Serveruses the user’s first and last namewhen displaying the user’s nameon pages in the user interface.
First Name
The last name of the user you are adding.Last Name
(Optional) The email address for the user you are adding. MywebMethods Server uses the email address when it needs to senda notification to the user by means of an email message.
E-mail Address
3. Click Create.
Editing Information for a UserYou can edit the information for a user defined in the internal system directory service. If a useris defined in an external directory service, you can edit only My webMethods Server-specificinformation. You must update the external directory service directory to change settings that MywebMethods Server obtains from the external directory. For a list of the fields thatMywebMethodsServer maintains for a user, see“User Information” on page 125.
To edit a user
1. To navigate to the correct page, do one of the following:
In My webMethods: Navigate > Applications > Administration > System-Wide > UserManagement > Users.
As system administrator: Administration Dashboard > User Management > ManageUsers.
2. Search for the user you want to edit. For more information, see “Searching for Existing Users,Groups, or Roles” on page 114.
3. In the search results, click any link in the row of the user you want to edit or click .
4. Make the changes you want to the user’s information and click Save.
For a description of all the fields on each panel, including whether you can update a field orwhether a field is view-only, see “User Information” on page 125.
124 Administering My webMethods Server 10.3
9 Managing Users and Groups

Important:My webMethods Server displays the information grouped on various panels. After makingchanges to information on a single panel, be sure to click Save to save your changes beforeselecting another panel.
User InformationBothMywebMethods Administrator and sysadmin users can edit the information for a user. Userattributes on the Edit User page in My webMethods differ from sysadmin interfaces.
The following tables list the information that My webMethods Server maintains for a user.
Note:The Default setting for all locale attributes represents a null value.
User Information
The User Information section includes all attributes that you specify when adding a user to theinternal system directory service. You cannot edit the User Information attributes for users in anexternal directory service. This section is part of the user’s profile, and users can update some ofthe fields, for example the password and email address. The following table lists the attributes,that the User Information section includes:
DescriptionField
Required when adding a new user. The ID that a user supplies tolog in to My webMethods. You cannot update this field.
User ID
Required when adding a new user. The password that a user mustsupply to log in toMywebMethods.MywebMethods Servermasks
Password
this field in the user interface. To change the password for a user,update the Password and Confirm Password fields.
Requiredwhen adding a new user. The same as the Password field.Confirm Password
Required when adding a new user. The first name of the user,without the following special characters: >, ', ", and &.
First Name
Requiredwhen adding a newuser. The last name of the user,withoutthe following special characters: <, >, ', ", and &.
Last Name
The email address that My webMethods Server uses to sendnotifications to the user, without the following special characters:<, >, ', ", and &.
E-mail Address
The distinguished name for the user. My webMethods Servergenerates this value using the user information you provide. Youcannot update this field.
Distinguished Name (DN)
Administering My webMethods Server 10.3 125
9 Managing Users and Groups

DescriptionField
Applies only to users in the internal system directory. Indicateswhether the user is allowed to log in to My webMethods.
Login Disabled
User Attributes
The User Profile tab includes attributes that My webMethods Server maintains regardless of thedirectory service to which the user belongs. The following table lists the attributes that the UserProfile tab includes:
DescriptionField
The first name of the user from the User Information section. Youcannot edit this field on the User Profile tab. To change the firstname, edit the value in the User Information section.
First Name
The last name of the user from the User Information section. Youcannot edit this field on the User Profile tab. To change the lastname, edit the value in the User Information section.
Last Name
The middle name of the user.Middle Name
The title of the user, for example, Mr., Mrs., or Ms. If the title youwant to use is not available in the list, select Other, and enter acustom value.
Title
The suffix that appears after the name of the user, if applicable, forexample, Jr., Sr., PhD, III. If the suffix youwant to use is not availablein the list, select Other and enter a custom value.
Name Suffix
The language and locale for the user.Preferred Language/Locale
The street address for the user.Address 1Address 2
Additional information included when more than a postal code isrequired for the address of the user, for example, special instructions.
Custom Address
The city where the user is located.City
The state or province where the user is located.State/Province
The postal code for the user, for example, a ZIP Code if the user islocated in the United States.
Postal Code
The country where the user is located.Country/Region ID
The area code for the user.Phone 1 Area Code
The phone number for the user.Phone 1 Number
126 Administering My webMethods Server 10.3
9 Managing Users and Groups

DescriptionField
The extension at which the user can be reached, if applicable.Phone 1 Extension
The country code associated with the phone number of the user.Phone 1 Country Code
The date format that My webMethods uses when displaying dates.For more information about date formats, see the Javadoc forSimpleDateFormat.
Default Date Format
The time format that My webMethods uses when displaying time.For more information about time formats, see the Javadoc forSimpleDateFormat.
Default Time Format
The time zone that My webMethods uses when displaying times.Default Time Zone
The format that My webMethods uses when displaying numbers.For more information about number formats, see the Javadoc forDecimalDateFormat.
Default Number Format
The format that My webMethods uses when displaying currency.For more information about currency formats, see the Javadoc forDecimalDateFormat.
Default Currency Format
Displays Android device subscribed to receive mobile notificationsfor the user profile.
Android Subscription
Displays the iOS device subscribed to receive mobile notificationsfor the user profile.
iOS Subscription
Displays the date when the user profile was created. You cannotupdate this field.
Created Date
Displays the date when the user profile was last modified from theEdit User page. You cannot update this field.
Last Modified Date
The User Preferences tab lists preferences for the display of information in My webMethods.Users can update preferences from their profiles. For more information, seeWorking with MywebMethods. The following table lists the attributes, that the User Preferences tab includes.
DescriptionField
Indicates the start page for a profile. To modify, select one of thefollowing options:
Start Page
Application Page - an application page to open as a start page.
Workspace - a workspace to open as a start page.
Clear - restore the default settings.
Administering My webMethods Server 10.3 127
9 Managing Users and Groups

DescriptionField
The number of items to include on one page when displaying itemsin a table for this user.
Items Per Page
Indicates whetherMywebMethods Server closes all open tabs fromthe previous session when the user logs on again.
Close Open Tabs on Login
Indicates whether My webMethods Server opens the last active tabfrom the previous session when the user logs on again.
Open Last Active Tab onLogin
Indicates whether My webMethods Server displays a confirmationdialog box when the user deletes a workspace.
Show Delete WorkspaceConfirmation
Indicates whether My webMethods Server displays a confirmationdialog box when the user deletes a window from a workspace.
Show Delete WindowConfirmation
Indicates whether My webMethods Server displays a confirmationdialog box when the user closes all open tabs.
Show Close All TabsConfirmation
Indicates whether My webMethods Server automatically saves thecurrent workspace when the user navigates to another workspace.
Auto-Save whenNavigating to a DifferentWorkspace
The Roles tab displays the roles to which a user is assigned and the dynamic attributes associatedwith each role. For more information about roles and dynamic role attributes, see “CreatingRoles” on page 158 and “Defining Dynamic Attributes Associated with a Role” on page 166.
Note:If a user is assigned to dynamic roles, the list of roles might not always be completely accurate.My webMethods Server evaluates attributes and determines the roles to which a user belongswhen a user logs in toMywebMethods. If a change in user attributes occurs during a user session,and the user is no longer eligible to be a member of a role, My webMethods Server continues toconsider the user a member of the role until the next login.
The following table lists the attributes, that the Roles tab includes:
DescriptionField
The roles towhich the user is assigned, listed in order of precedence.Move roles up or down to reorder.
Role Precedence
The dynamic attributes associated with the selected role. Dynamicattributes providemore information about a role. For each attribute,the following information is available:
Role Member Attributes
Attribute - the display name that you specify when adding theattribute to the role.
Data Type - the data type of the attribute.
128 Administering My webMethods Server 10.3
9 Managing Users and Groups

DescriptionField
Role Value - the default value for the attribute. All users areassigned this value unless a user-specific value takes precedence.
User Value - the user-specific value for the attribute.
For example, for a “Customer Service” role, you can add a “Location”attribute to identify where the user assigned to the “CustomerService” role is located. For more information about modifying roleand user attributes, see “Defining Dynamic Attributes Associatedwith a Role” on page 166 and “Setting User-Specific Values forDynamic Attributes” on page 167.
The Calendar tab displays information about the user calendars for business or personal use. Forinformation about creating andmanaging user and business calendars, seewebMethods Task EngineUser’s Guide. The following table lists the attributes that the Calendar tab includes:
DescriptionField
The calendar to use as a business calendar.User Business Calendar
The calendar to use as a personal calendar.User Personal Calendar
The LDAP Attributes tab - If a user is defined in an external directory service, this tab lists a setof specific attributes from the external directory service. LDAP attributes must be set by thesysadmin. For more information, see “Exposing LDAP Attributes from an External DirectoryService” on page 215.
Database Attributes tab - If the user is defined in an external database directory service, this tablists a set of specific attributes from the external database directory service. Database attributesmust be set by the sysadmin. For more information, see “Exposing Database Attributes from anExternal Directory Service” on page 216.
The Groups tab displays the groups to which the user belongs, and allows modification of thegroupmembership for the user. The following table lists the attributes, that theGroups tab includes:
Field
Indicates the directory fromwhich My webMethods Server obtainsthe information about the group membership of the user.
Location
The group membership options, available for selection. Use thearrow buttons to move an option to the Selected Items field, andclick Apply to add the new group.
Group Membership
The groups towhich the user is assigned, if available. Use the arrowbuttons to move an option to the Group Membership field, andclick Apply to remove group membership for the user.
Selected Items
Administering My webMethods Server 10.3 129
9 Managing Users and Groups

Exporting User DataYou can export the profile data using the My webMethods user interface or an API call.
My webMethods Server exports personal data for a user in .json file format.
To export user data in My webMethods
1. Navigate to Applications > Administration > System-WIde > User Management > Users.
2. In the Users list, click the user name for the user for which you want to export profile data.
3. On the User Profile tab of the User Attributes section, click Export User Data.
Exporting User Data with the My webMethods Server REST API
To export the data for a user using the My webMethods Server REST API, make a GET request tothe following endpoint:http://server_url:8585/api/users/personalData/userID
Usage Notes
This API requires administrator privileges.
Examples
The URL to use to export the profile data of a user with ID myUser, from aMywebMethods Serverrunning on port 8585 of the host mws.company.com:http://mws.company.com:8585/api/users/personalData/myUser
Assigning a User to a GroupYou can assign users that you have defined in the internal system directory service to groups thatyou have also defined in the internal systemdirectory service. For information on creating groups,see “Adding Groups” on page 135.
Note:You cannot assign users that are defined in an external directory service to a group defined in theinternal systemdirectory. Similarly, you cannot assign users defined in the internal systemdirectoryservice to an externally-defined group. You can, however, assign both internal and external usersto a role. See “Managing Roles and Access to My webMethods” on page 155.
To assign a user in the system directory service to a group in the system directory service
130 Administering My webMethods Server 10.3
9 Managing Users and Groups

1. To navigate to the correct page, do one of the following:
In My webMethods: Navigate > Applications > Administration > System-Wide > UserManagement > Users.
As system administrator: Administration Dashboard > User Management > ManageUsers.
2. Search for the user that you want to assign to a group. For more information, see “Searchingfor Existing Users, Groups, or Roles” on page 114. Be sure to select system from theName list.
3. In the search results, click any link in the row of the user you want to edit or click .
4. Click Groups.
5. For each group to which the user should be a member, move it to the Selected Items box.
6. With all groups in the Selected Items box, click Save (Apply in system administration).
Disabling Login for a UserYou can deny a user defined in the internal system directory service the ability to log into MywebMethods Server. To disable login for users defined in an external directory service, see“Disabling User Accounts” on page 102.
Note:webMethods products that use CommonDirectory Services for authentication, such as IntegrationServer and Optimize are affected by this feature. A user disabled in My webMethods Server isdisabled in those other products as well.
To disable log-in for a user
1. To navigate to the correct page, do one of the following:
In My webMethods: Navigate > Applications > Administration > System-Wide > UserManagement > Users.
As system administrator: Administration Dashboard > User Management > ManageUsers.
2. Search for the user you want to edit. For more information, see “Searching for Existing Users,Groups, or Roles” on page 114.
3. In the search results, click any link in the row of the user you want to disable or click .
4. Select the Login Disabled option and click Save.
Administering My webMethods Server 10.3 131
9 Managing Users and Groups

Deleting a UserYou can remove users that you have previously defined in the internal system directory service.
To delete users from the internal system directory service
1. To navigate to the correct page, do one of the following:
In My webMethods: Navigate > Applications > Administration > System-Wide > UserManagement > Users.
As system administrator: Administration Dashboard > User Management > ManageUsers.
2. Search for the users that you want to delete. For more information, see “Searching for ExistingUsers, Groups, or Roles” on page 114. Be sure to select system from the Name list.
3. In the search results, select the check boxes beside the user IDs for the users youwant to delete,and click Delete.
Deleting a User with the My webMethods Server REST API
To delete a My webMethods user using the My webMethods Server REST API, make a DELETErequest to the following endpoint:http://server_url:8585/api/users/userID
Usage Notes
This API requires administrator privileges.
The LDAP and database user you delete with this APIwill be able to log in toMywebMethodsuntil removed from the external directory.
Examples
The URL to use when deleting the profile of a user with ID myUser, from aMywebMethods Serverrunning on port 8585 of the host mws.company.com:http://mws.company.com:8585/api/users/myUser
Locating a User’s Home Folder (System Administrator Only)A system administrator can locate and browse to a user's personal folders. Use this feature if itemsbecome unavailable to the user because of permissions changes, or to remove content when a useris no longer actively using the server.
132 Administering My webMethods Server 10.3
9 Managing Users and Groups

To locate a user’s Home folder
1. As system administrator:Administration Dashboard > User Management > Locate a User'sHome Folder.
2. Click Browse.
3. To select a user, move that user to the Selected Items box and click Select.
4. To open the home folder for the user you selected, click Apply.
Managing User DataData protection laws and regulations, such as the GDPR (General Data Protection Regulation)might require specific handling of user data, even after a user profile is removed.
To ensure user data integrity, MywebMethods Server stores timestamps for the initial registrationof a of a user profile in My webMethods, and the latest modification that occurred before thecurrent login session. Both timestamps are available for users and administrators to view as partof the user information for the profile. My webMethods users can review profile timestamps toensure that they are aware of all profile modifications.
When an administrator deletes a profile using the user interface or API, or when users delete theirown profiles, My webMethods Server clears all information about the user from the database andcache. However, since deleting a user account does not remove user identifying data that appearin log files, administrators can use the timestamps as a referencewhen cleaning upMywebMethodsServer log data.
Additionally, administrators can configure My webMethods Server to send e-mail notificationsto userswhen their profilewasmodified, either by the users or by an administrator, and determinethe level of detail that notification e-mails include.
For more information about GDPR and data protection configurations, see:
“Configuring GDPR Settings” on page 133
“User Information” on page 125
“Exporting User Data” on page 130
“Deleting a User” on page 132
“Controlling Server Logging” on page 262
Configuring GDPR Settings
You enable anddisableGDPR-compliant user data protection options from theGDPR Configurationpage in My webMethods.
Administering My webMethods Server 10.3 133
9 Managing Users and Groups

1. As Administrator, navigate to Applications > Administration > System-Wide > UserManagement > GDPR Configuration.
2. Check GDPR enabled to enable GDPR options.
3. Optionally, configure e-mail notifications by performing the following steps:
a. From the Select Notification Type drop-down list, select the user profile event, for whichyou want to configure e-mail notifications.
Available notification types are Update Notifications and Delete Notifications
b. From the Notification Enabled drop-down list, enable or disable e-mail notifications forthe event.
c. In the Notification Subject field, enter a custom subject, or leave the default text.
d. In the Notification Content field, modify the message body as required.
Strings enclosed in double braces are variables thatMywebMethods Server uses to includethe user names of My webMethods users in the message. The {{user}} variable denotesthe user that receives themessage, the {{actor}} variable - the user thatmakesmodificationsto the profile, and the {{changes}} variable - details about the profile modifications, ifconfigured. You can move the variables through the text, as in the following example:
Default message:Dear {{user}},Your personal data has been modified.{{changes}}The account was updated by user logged-in as {{actor}}.
Modified message:Hello {{user}},You are receiving this message because{{actor}} has modified your profile data.Modifications:{{changes}}
4. Optionally, configurewhat information to include about themodified profile attributes. Detailsreplace the {{changes}} variable in the notification message. The options are:
No details - Default. Do not include detailed information about modified attributes.
Include changed attribute names - Include only the names of modified attributes in thenotification message.
Include changed attribute with values - Include the names and values of modifiedattributes in the notification message.
134 Administering My webMethods Server 10.3
9 Managing Users and Groups

5. Click Save.
You configure notification settings and message texts separately for each notification type.
Managing Groups
Adding GroupsYou can define groups of users in the internal system directory service. To do so, first create thegroup. After the group is created, you can add members to the group.
To create a group
1. To navigate to the correct page, do one of the following:
In My webMethods: Navigate > Applications > Administration > System-Wide > UserManagement > Groups > Add Group.
As system administrator: Administration Dashboard > User Management > ManageGroups > Add Group.
2. Fill in the following fields for the group you want to add to the internal system directoryservice:
The following table lists the required and optional fields to configure when adding a new groupto the system directory service:
DescriptionField
An ID for the group. My webMethods Server uses this ID in thedistinguished name (DN) for the group.
Group ID
The group ID can be 1 through 255 characters and can contain onlyalphanumeric ASCII characters with no spaces. The group ID is notcase sensitive.
The name that you want to assign to the group you are adding. Thegroup name can be 1 through 255 characters.
Group Name
(Optional) The email address for the group you are adding.E-mail Address
3. Click Create.
Editing Group InformationYou can edit the information for a groupdefined in the internal systemdirectory service. If a groupis defined in an external directory service, youmust update the external directory service directory
Administering My webMethods Server 10.3 135
9 Managing Users and Groups

to change settings that My webMethods Server obtains from the external directory. For a list ofthe fields thatMywebMethods Servermaintains for a group, see “Group Information” on page 136.
To edit a group
1. To navigate to the correct page, do one of the following:
In My webMethods: Navigate > Applications > Administration > System-Wide > UserManagement > Groups.
As system administrator: Administration Dashboard > User Management > ManageGroups.
2. Search for the group youwant to edit. Formore information, see “Searching for ExistingUsers,Groups, or Roles” on page 114.
3. In the search results, click any link in the row of the group you want to edit or click .
4. Make the changes you want to the group information and click Save (Apply in systemadministration).
For a description of all the fields on each panel, including whether you can update a field orwhether a field is view-only, see “Group Information” on page 136.
Important:My webMethods Server displays the information grouped on various panels. After makingchanges to information on a single panel, be sure to click Save (Apply in system administration)to save your changes before selecting another panel.
Group Information
The following table lists the information that My webMethods Server maintains for a group. ThePanel column of the table lists the panel on the Edit Group page where the field is maintained.
DescriptionPanel
Attributes that you specify when you add a group.GroupInformation
DescriptionFields
The group ID assigned to a group. The group ID isdefinedwhen the group is added and cannot be changed.
Group ID
The group name for the group.Group Name
The email address for the group.E-mail Address
136 Administering My webMethods Server 10.3
9 Managing Users and Groups

DescriptionPanel
The distinguished name for the group. You cannotupdate this field.MywebMethods Server forms this fieldusing information defined for the group.
Distinguished Name(DN)
Groups to which the current group belongs.Groups
DescriptionFields
Identifies where My webMethods Server obtains theitems it displays in the left panel ofGroup Membershipfield.
Location
The left panel lists the items available to select.Group Membership
The right panel, Selected Items, lists the groups towhichthe group is assigned, if any.
Selected Items
You can use the Search field to help you search for andquickly locate an item in the Group Membership left
Search
panel. This is useful when the left panel contains moreitems than will display on a single page.
The members that are assigned to this group. The members can be users andother groups.
GroupMembers
DescriptionFields
Identifies where My webMethods Server obtains theitems it displays in the left panel of Group Membersfield.
Location
The left panel lists the items available to select.Group Members
The right panel, Selected Items, lists the users andgroups that are members of the group.
Selected Items
You can use the Search field to help you search for andquickly locate an item in theGroup Members left panel.
Search
This is useful when the left panel contains more itemsthan will display on a single page.
If the group is defined in an external directory service, this panel lists a set ofattributes from the external directory service. The fields on this panel are based
LDAPAttributes
on the external directory service. LDAP attributes must be set by the systemadministrator. See “Exposing LDAP Attributes from an External DirectoryService” on page 215.
If the user is defined in an external database directory service, this panel lists aset of attributes from the external database directory service. The fields on this
DatabaseAttributes
panel are based on the external database directory service. Database attributes
Administering My webMethods Server 10.3 137
9 Managing Users and Groups

DescriptionPanel
must be set by the system administrator; see “ExposingDatabaseAttributes froman External Directory Service” on page 216.
Managing Members of a GroupMembers of a group can be users or other groups. You can add members to a group defined inthe internal system directory service if they are also defined in the same directory service.
Note:Toworkwith users and groups defined in external directory services, use themechanismsprovidedby the external directory services.
To manage members in a group defined in the internal system service directory
1. To navigate to the correct page, do one of the following:
In My webMethods: Navigate > Applications > Administration > System-Wide > UserManagement > Groups.
As system administrator: Administration Dashboard > User Management > ManageGroups.
2. Search for the group youwant to edit. Formore information, see “Searching for ExistingUsers,Groups, or Roles” on page 114.
3. In the search results, click any link in the row of the group you want to edit or click .
4. Click Group Members.
5. To manage the members of the group, do any of the following:
To add users (in the system directory service) to the group, move them to the SelectedItems box.
To remove users from the group, move them from the Selected Items box.
To add groups (in the system directory service) to the group, move them to the SelectedItems box.
To remove groups from the group, move them from the Selected Items box.
6. When the Selected Items box lists all the members you want in the group, click Save (Applyin system administration).
138 Administering My webMethods Server 10.3
9 Managing Users and Groups

Making a Group a Member of Another GroupYou can make a group a member of another group as long as both groups are defined in theinternal system directory service. When one group becomes a member of a second group, allmembers of the first group also become members of the second group.
Note:You cannot assign groups that are defined in an external directory service to a group defined inthe internal system directory. Similarly, you cannot assign groups defined in the internal systemdirectory service to an externally-defined group. You can, however, assign both internal andexternal groups to a role. See “Managing Roles and Access to My webMethods” on page 155.
To make a group a member of another group
1. To navigate to the correct page, do one of the following:
In My webMethods: Navigate > Applications > Administration > System-Wide > UserManagement > Groups.
As system administrator: Administration Dashboard > User Management > ManageGroups.
2. Search for the group youwant to edit. Formore information, see “Managing External DirectoryServices” on page 86.
3. In the search results, click any link in the row of the group you want to edit or click .
4. Click Groups.
5. To manage the membership of the group in other groups, do either of the following:
To make the current group a member of other groups (in the system directory service),move the parent groups to the Selected Items box.
To remove the current group as a member of other groups, move the parent groups fromthe Selected Items box.
6. When the Selected Items box lists all the groups of which the current group should be amember, click Save (Apply in system administration).
Deleting GroupsYou can remove groups that you have previously defined in the internal system directory service.
Note:When you delete a group, the definition for the group is removed, but the individual membersof the deleted group (users and/or other groups) are not deleted.
Administering My webMethods Server 10.3 139
9 Managing Users and Groups

To delete groups from the internal system directory service
1. To navigate to the correct page, do one of the following:
In My webMethods: Navigate > Applications > Administration > System-Wide > UserManagement > Groups.
As system administrator: Administration Dashboard > User Management > ManageGroups.
2. Search for the groups you want to delete. For more information, see “Searching for ExistingUsers, Groups, or Roles” on page 114. Be sure to select system from the Name list.
3. In the search results, select the check boxes beside the names for the groups youwant to delete,and click Delete.
140 Administering My webMethods Server 10.3
9 Managing Users and Groups

10 Managing Permissions
■ Managing Permissions in My webMethods .................................................................. 142
■ Managing Access Privileges and Functional Privileges ................................................ 145
■ Managing Permissions for an Individual Resource ....................................................... 146
■ Using Security Realms .................................................................................................. 148
Administering My webMethods Server 10.3 141

Managing Permissions in My webMethodsThe My webMethods Administrator manages permissions for the following resources:
webMethods applications
Tasks
Workspaces
The System Administrator manages permissions for the following resources:
webMethodsapplications
Tasks
Workspaces
Content objects
Portlet types
Security realms
Both administrators can manage permissions for users, groups, and roles in any requiredcombination.
Note:Do not modify permissions for the built-in My webMethods Server roles from the PermissionsManagement page. Fixes you install to My webMethods Server subsequently might remove youchanges.
Adding PermissionsThe basic workflow in assigning permissions is to search for the resources on which to assignpermissions.
To assign permissions
1. To navigate to the correct page, do one of the following:
In My webMethods: Navigate > Applications > Administration > System-Wide >Permissions Management.
As system administrator: Administration Dashboard > Configuration > PermissionsManagement.
2. On the Search panel, from the Resource Type list, choose the resource type to be managed.
The following table lists the resources to which you can apply permissions:
142 Administering My webMethods Server 10.3
10 Managing Permissions

DescriptionResource type
webMethods applications that are installed in this instance of MywebMethods.
webMethodsApplications
Tasks associated with webMethods Task Engine.Tasks
Workspaces that have been created on this instance ofMywebMethods.Workspaces
(System administrator only) Any resource on this instance of MywebMethods Server, including files, folders, and pages.
Content Object
(System administrator only) Portlet types installed on this instance ofMy webMethods Server.
Portlet Types
(System administrator only) Security realms created on this instanceof My webMethods Server. For more information, see “Using SecurityRealms” on page 148.
Security Realm
3. If needed, apply a filter to narrow the search.
When you choose a Resource Type, a FILTER list appears with a defined set of filtering criteria.There are no filtering criteria for the webMethods Applications Resource Type because allinstalled applications are included.
a. From the FILTER list, choose the filtering criteria.
For example, Workspace Name.
b. Type a value to be searched for.
c. If you need to add an additional filtering criterion, click or (depending on what typeof administrator you are).
4. Click Search.
The results of the search appear in the Found list.
5. Move resources into the Selected list.
You can perform multiple searches to add resources to the list. Also, you can save searches tomake it easier to locate the same resources again. For more information, see “Working withSaved Searches” on page 116.
6. On the Edit Permissions panel, clickAdd Users/Groups/Roles, search for Principals andmovethem to the Selected list.
You can perform multiple searches to add Principals to the list. For more information, see“Searching for Existing Users, Groups, or Roles” on page 114.
Administering My webMethods Server 10.3 143
10 Managing Permissions

7. After all Principals have been selected, click Add.
The Permissions panel is displayed in a tree format containing the permissions that can begranted or denied for the Resource Type.
8. Click the Grant or Deny option for the settings, click OK, and then click Apply.
If neither option is selected, permissions for a setting will be determined from another source.
Modifying PermissionsYou can modify previously set permissions to server resources. You can modify permissions forusers, groups, or roles (Principals), or delete them entirely.
To modify permissions
1. To navigate to the correct page, do one of the following:
In My webMethods: Navigate > Applications > Administration > System-Wide >Permissions Management.
As system administrator: Administration Dashboard > Configuration > PermissionsManagement.
2. If you have a saved search for the resources to be modified, do the following:
a. Click the Saved tab, choose the saved search from the Saved Search list and click Search
b. Move the result of the search to the Selected list and click Next.
3. Otherwise search for the resources by doing the following:
a. On the Search panel, from the Resource Type list, choose the resource to be managed.
b. If needed, apply a one or more filters to narrow the search.
c. Click Search.
d. Move resources into the Selected list.
e. Click Next.
4. To modify permissions for a Principal, do the following:
a. In the Permissions column of the Edit Permissions panel, click the link for the user, group,or role.
144 Administering My webMethods Server 10.3
10 Managing Permissions

b. Modify permissions for the various settings as needed, and click OK.
5. To delete permissions for a user, group, or role, select the checkbox in that row and clickDelete.
6. Click Apply.
Managing Access Privileges and Functional PrivilegesPermissions in My webMethods are grouped under access privileges and functional privileges.
Access privileges govern the rights of a user, group, or role to view applications and features inthe Navigation panel, and access associated pages inMywebMethods. Granting access privilegesto a user also grants the user some functional privileges, and the user can both view and makechanges to applications and features.
Functional privileges determine the rights of a user, group, or role to make changes within anapplication or feature, for example, to create andmodify aworkspace.Granting functional privilegesrequires granting access privileges.
The list of access privileges and functional privileges is determined by which webMethodsapplications are installed. Both the My webMethods administrator and the system administratorcan grant or deny these privileges for users, groups, or roles.
Tip:If you need to set the same set of privileges for multiple users, groups, and roles, you shouldconsider aggregating all of them into a single role.
To manage access privileges and functional privileges
1. To navigate to the correct page, do one of the following:
In My webMethods: Navigate > Applications > Administration > System-Wide >Permissions Management.
As system administrator: Administration Dashboard > Configuration > PermissionsManagement.
2. On the Search panel, from the Resource Type list, select webMethods Applications.
By default, My webMethods applications are already included in the Selected list.
3. Click Next.
4. On the Manage Permissions panel, click Add.
5. Search for users, groups or roles, move them to the Selected list, and click Add.
Administering My webMethods Server 10.3 145
10 Managing Permissions

Note:You can add only users or groups, or roles in this action. You cannot mix the three principals.
The Permissions panel displays a tree list, containing the permissions that can be granted ordenied for Access Privileges and Functional Privileges.
6. In the tree list, select options as needed to assign Access Privileges and Functional Privileges.
Click Grant for each privilege that is to be granted.
Click Deny for each privilege that is to be denied.
Clear both options to neither explicitly grant or deny the privilege. Permissions will bedetermined from another source.
7. Click OK and then click Apply.
Managing Permissions for an Individual ResourceAs system administrator you can manage individual resources within My webMethods Server.You can control the access of any Principal (user, group, or role) to a server resource or a hierarchyof server resources. Denying access to a server resource also prevents a Principal from seeing theresource in server navigation, such as in any listing of the resource’s siblings or the contents ofthe resource's parent.
Note:The information in this topic relates tomanaging permissions to pages and other server resourcesyou develop that are not part of a webMethods application.
Viewing and Changing the Owner of a Server Resource
To view and change the owner of a server resource
1. For a server resource, such as a page, click or and then click Permissions.
2. Click the Owner tab.
The Owner panel shows the owner of the server resource.
3. To change the resource owner, do the following:
a. In the Keywords field, type a user ID, click Search, move the user to the Selected box,and click Apply.
b. Click Apply.
146 Administering My webMethods Server 10.3
10 Managing Permissions

Adding a Principal to the Permissions for a Server ResourceRemember that a Principal is a user, group, or role.
To add a Principal to the permissions for a server resource
1. For a server resource, such as a page, click or ) and then click Permissions.
2. On the Edit Permissions panel, click Add Users/Groups/Roles, search for Principals, andmove them to the Selected list.
You can perform multiple searches to add Principals to the list. For more information, see“Searching for Existing Users, Groups, or Roles” on page 114.
3. After all Principals have been selected, click Add.
The Permissions panel is displayed in a tree format containing the permissions that can begranted or denied for the resource.
4. In the tree list, select options as needed.
Click Grant to explicitly grant permission.
Click Deny to explicitly deny permission.
Clear both options to neither explicitly grant nor deny permission. Permissions will bedetermined from another source.
5. Click OK and then click Apply.
Modifying Permissions for a Server Resource
To modify the permissions for a server resource
1. For a server resource, such as a page, click or , and then click Permissions.
2. To modify permissions for a Principal, do the following:
a. In the Permissions column of the Edit Permissions panel, click the link for the Principal.
b. Modify permissions for the various settings as needed, and click OK.
Click Grant to explicitly grant permission.
Click Deny to explicitly deny permission.
Administering My webMethods Server 10.3 147
10 Managing Permissions

Clear both options to neither explicitly grant nor deny permission. Permissions will bedetermined from another source.
3. Click Apply.
Removing a Principal from Server Resource PermissionsRemember that a Principal is a user, group, or role.
To remove a Principal from the permissions for a server resource
1. For a server resource, such as a page, click or , and then click Permissions.
2. On the Edit Permissions panel, select the checkbox for a Principal and click Delete.
3. Click Apply.
Using Security RealmsAs a system administrator, when youmanage permissions, as described in “Managing Permissionsfor an Individual Resource” onpage 146, youdo so one resource at a time. Thismethod is satisfactoryfor small servers, but can be cumbersome as the number of pages and users increases. Securityrealms enable system administrators tomanage permissions for resources based on users, groups,or roles, making it easier to manage large servers. After a Security realm is applied to a resource,individually set permissions do not apply unless you specifically choose to set them.
For convenience, you can organize Security realms into folders called containers. The followingtable lists the Security realm containers that My webMethods Server provides by default:
Security realmsContainer
Security Realms that manage permissions for forums.Forum Realms
Security Realms thatmanage permissions forMywebMethods resources.My webMethodsSecurity Realms
Security Realms that manage permissions for My webMethods Serverresources
Portal Resources
You can create, rename, and remove containers on the Security Realms Administration page.
There are several default security realms that manage permissions for My webMethods Serverresources, all of which reside in the Portal Resources container. System administrators have theright to read, modify, or delete the server resources. Other users have permissions, described inthe following table:
148 Administering My webMethods Server 10.3
10 Managing Permissions

Managed PermissionsSecurity Realm
Administrative resources. Permits only server administrators toread, modify, or delete the resource.
Administrative Commands
Resources that manage users, group, and roles. Permits users toviewor execute the resource. Anonymous users are denied access.
Directory ManagementCommands
Resources that manage directory services. Permits users to viewor execute the pages. Anonymous users are denied access.
Directory Service Commands
Resources for the development and maintenance of pages andcontent. Members of the Developers group are granted the right
Portal Developer Commands
to read, modify, or delete the resource. Permits users to view orexecute the resource. Anonymous users are denied access.
Resources for interactingwith a server, such as logging in. Permitsall users, including anonymous users, to read or execute theresource, but not to modify or delete it.
Public Commands
Resources for interacting with a server after one has logged in.Permits userswho have logged in to read or execute the resource,but not tomodify or delete it. Anonymous users are denied access.
Restricted Commands
Resources that control the look and feel of the server. Permitsusers to view or execute the resource. Anonymous users aredenied access.
User Profile ManagementCommands
You create and manage Security Realms that you can use for your content on the Security RealmsAdministration page.
Creating a ContainerYou can create a container at the same level as the default containers or you can create a containerwithin a container.
To create a new container
1. As system administrator, click Administration > Configuration > Security RealmsAdministration.
2. On the Security Realms Administration page, do one of the following:
To create a new container at the current level, click theCreate New Container tab.
To create a nested container, click the name of an existing container, and then click theCreate New Container tab.
3. In the Name field of the Create New Container tab, type a display name for the container.
Administering My webMethods Server 10.3 149
10 Managing Permissions

4. (Optional) In the Description field, type a description.
5. Click Create Container.
Removing a Container
Important:If you remove a container, any Security Realms or other containers within it are also removed.
To remove a container
1. As systemadministrator, clickAdministration Dashboard > Configuration > Security RealmsAdministration.
2. Click for the container you want to remove, and then click Remove Container.
Renaming a ContainerTo rename a container, do the following:
To rename a container
1. As systemadministrator, clickAdministration Dashboard > Configuration > Security RealmsAdministration.
2. Click for the container you want to rename, and then click Modify Container.
3. In the Name field, type the new name.
4. (Optional) In the Description field, type a new description.
5. Click Update.
Creating a Security Realm
To create a new Security Realm
1. As systemadministrator, clickAdministration Dashboard > Configuration > Security RealmsAdministration.
2. Click the name of the container in which to create the Security Realm.
150 Administering My webMethods Server 10.3
10 Managing Permissions

Note:After you have created a Security Realm within a container, you cannot move it to anothercontainer.
3. Click Create New Security Realm.
4. In the Name field, type a display name for the Security Realm.
5. (Optional) In the Description field, type a description.
6. (Optional) To add an extended type, move it to the Selected Items box and click Select.
7. (Optional) To add an external policy provider, move it to the Selected Items box.
8. Click Create Security Realm.
9. Click for the new Security Realm, and then click Configure Permissions.
10. On the Edit Permissions panel, click Add Users/Groups/Roles, search for Principals, andmove them to the Selected list.
You can perform multiple searches to add Principals to the list. For more information, see“Searching for Existing Users, Groups, or Roles” on page 114.
11. After all Principals have been selected, click Add.
The Permissions panel is displayed in a tree format containing the permissions that can begranted or denied for the Security Realm.
12. In the tree list, select options as needed.
Click Grant to explicitly grant permission.
Click Deny to explicitly deny permission.
Clear both options to neither explicitly grant nor deny permission. Permissions will bedetermined from another source.
13. Click OK and then click Apply.
Removing a Security RealmTo remove a Security Realm, do the following:
To remove a Security Realm
Administering My webMethods Server 10.3 151
10 Managing Permissions

1. As systemadministrator, clickAdministration Dashboard > Configuration > Security RealmsAdministration.
2. Click the name of the container in which the Security Realm resides.
3. Click for the Security Realm you want to remove, and then click Remove Security Realm.
Renaming a Security RealmTo rename a Security Realm, do the following:
To rename a Security Realm
1. As systemadministrator, clickAdministration Dashboard > Configuration > Security RealmsAdministration.
2. Click the name of the container in which the security realm resides.
3. Click for the security realm you want to rename, and then click Modify Security Realm.
4. In the Name field, type the new name.
5. (Optional) in the Description field, type a new description.
6. Click Update.
Adding Resources to a Security RealmTo add resources to a Security Realm, do the following:
To add resources to a Security Realm
1. As systemadministrator, clickAdministration Dashboard > Configuration > Security RealmsAdministration.
2. Click the name of the container in which the security realm resides.
3. Click for the security realm you want to manage, and then click Manage Objects.
4. On the Manage Security Realm panel, click Add Portal Resource.
5. In the left panel, browse to a server resource to be added to the security realm.
152 Administering My webMethods Server 10.3
10 Managing Permissions
6. To have the security realmmanage a server resource, move the resource to the Selected Itemsbox and click Add Items.
Removing Resources from a Security RealmTo remove resources from a Security Realm, do the following:
To remove resources from a Security Realm
1. As systemadministrator, clickAdministration Dashboard > Configuration > Security RealmsAdministration.
2. Click the name of the container in which the security realm resides.
3. Click for the security realm you want to manage, and then click Manage Objects.
4. For the resource you want to remove, Click and then click Remove.
Administering My webMethods Server 10.3 153
10 Managing Permissions

154 Administering My webMethods Server 10.3
10 Managing Permissions

11 Managing Roles and Access to My webMethods
■ About Roles in My webMethods Server ....................................................................... 156
■ Granting Users Access to My webMethods and the My webMethods Users Role ...... 157
■ Creating Roles .............................................................................................................. 158
■ Editing Information for a Role ...................................................................................... 164
■ Deleting Roles .............................................................................................................. 165
■ Defining Dynamic Attributes Associated with a Role ................................................... 166
Administering My webMethods Server 10.3 155

About Roles in My webMethods ServerA role is a collection of users, groups, or other roles. A set of default roles is installed with MywebMethods Server. You can add users, groups, and other roles to this initial set.
The following table lists the default roles, available in My webMethods Server and the resourcesthese roles can access:
DescriptionDefault role
Provides access to all My webMethods Server resources. Bydefault, the SysAdmin and Designer users are members of thisrole.
Admin Role
Provides access to user management and other functions neededby theMywebMethods Administrator, who is a default memberof this role.
My webMethodsAdministrators
Provides access to theMywebMethods user interface for all usersofMywebMethods applications. By default, theMywebMethods
My webMethods Users
Server Administrator is a member of this role, but you must addall other users to it. For more information, see “Granting UsersAccess to My webMethods and the My webMethods UsersRole” on page 157.
The members assigned to a role can span across multiple directory services. That is, theirmembership can include users, groups, and roles defined in the internal directory service, as wellas, users and groups defined in external directory services. Themembership of a role can be static,like groups where each member is specifically assigned. However, you can also make themembership of a role dynamic. It is valid for roles to be recursive, making it possible for roles tobe members of each other.
The following table lists the different ways you can define the membership of a role, whether themembership is static or dynamic, and where to find more information about how to definemembership for each type of role:
Additional InformationStatic or DynamicDefining Membership
“Adding a Static Role” onpage 158
StaticSpecify the users, groups, and other rolesyou want to be members of the role
“Adding an LDAP QueryRole” on page 160
DynamicSpecify an LDAP query that queries anexternal directory service to determine theusers or groups assigned to the role
“Adding a Rule-Based Role” onpage 160
DynamicSpecify the criteria for a rule that MywebMethods Server executes to determinethe users and groups assigned to the role
156 Administering My webMethods Server 10.3
11 Managing Roles and Access to My webMethods

Additional InformationStatic or DynamicDefining Membership
“Adding a Database Role” onpage 163
DynamicSpecify a database query that queries adatabase directory service to determine theusers or groups assigned to the role
You can associate dynamic attributes with a role to provide more information about a role. Forexample, if there is a “Customer Service role, an administrator might add a “Location attribute toidentify where the user assigned to the “Customer Service role is located. When you add theattribute to the role, you assign it a value. This becomes the default value for the attribute.Continuing with the example, assume your main service center is in Ohio. As a result, when youadd the “Location attribute to the “Customer Service role, you assign it the value Ohio. You canalso assign user-specific values to a dynamic attribute. Once again, continuing with the example,assume you have a user that is a member of the “Customer Service role, but who is located inColorado rather than Ohio. You can assign that user a specific value of Colorado for the “Locationattribute in the “Customer Service role.
For more information about dynamic attributes, see:
“Setting User-Specific Values for Dynamic Attributes” on page 167
“Deleting Dynamic Attributes Assigned to a Role” on page 168
Granting Users Access to My webMethods and theMy webMethods Users RoleMy webMethods Server includes the My webMethods Users role, which is already defined foryou. The My webMethods Users role governs access to My webMethods. That is, a user must bea member of the My webMethods Users role for the system to allow the user to log into the userinterface. The My webMethods Users role is a static role; that is, the membership of the MywebMethods Users role is a specified list of users, groups, and other roles.
Users Defined in the Internal System Directory ServiceWhen you addusers to the internal systemdirectory service,MywebMethods Server automaticallyassigns the new users to the My webMethods Users role. You do not need to take any furtheraction.
Externally-Defined UsersYou can configure My webMethods Server to obtain information about users and groups fromexternal directory services. After configuring an external directory service, you need to take furtheraction to identify the externally-defined users that you want to be able to access MywebMethods.These users must be identified in the My webMethods Users role. For information about usingexternal directory services with My webMethods Server, see “Configuring an External LDAP,ADSI, or ADAMDirectory Service” on page 86 and “Allowing ExternallyDefinedUsers to PerformActions from My webMethods” on page 99.
Administering My webMethods Server 10.3 157
11 Managing Roles and Access to My webMethods

Creating RolesMy webMethods Server administrators can create different types of user roles. My webMethodsServer uses all roles, regardless of type, in the same manner, but role membership is identifieddifferently for each type.
The following table describes the types of roles you can create and how to identify rolemembershipfor each role type:
Identifying MembershipRole
Specify a collection of users, group, and roles that are members of the role youare creating. The membership of the role does not change unless you manually
Static Role
edit the role and change its membership. For more information, see “Adding aStatic Role” on page 158.
Note:This is similar to a group except that rolemembership can spanmultiple directoryservices.
Specify an LDAPquery. The users, groups, and roles thatmatch the query becomemembers of the role. Themembership of the role is dynamic based on the outcome
LDAP QueryRole
of the query at run time. For more information, see “Adding an LDAP QueryRole” on page 160.
Specify a rule thatMywebMethods Server executes to determine themembership.The users, groups, and roles that match the rule become members of the role.
Rule BasedRole
The membership of the role is dynamic based on the outcome of the executionof the rule at run time. Formore information, see “Adding a Rule-Based Role” onpage 160.
Specify a query for a database directory service. The users, groups, and roles thatmatch the query become members of the role. The membership of the role is
Database Role
dynamic based on the outcome of the query at run time. For more information,see “Adding a Database Role” on page 163.
Adding a Static RoleA static role is a simple collection of users, groups, and other roles.
To create a static role
1. To navigate to the correct page, do one of the following:
In My webMethods: Navigate > Applications > Administration > System-Wide > UserManagement > Roles > Add Role.
158 Administering My webMethods Server 10.3
11 Managing Roles and Access to My webMethods
As system administrator: Administration Dashboard > User Management > ManageRoles > Add Role.
2. In the Role Name field, type the name that you want to assign to the new role.
Valid role names can contain only letters, numbers, an underscore, or a space character.
3. To select the Static Role Provider, move that role provider to the Selected Items box.
4. Click Create Role.
Editing Members of a Static RoleTo edit the members of a static role, do the following:
To edit members in a static role
1. To navigate to the correct page, do one of the following:
In My webMethods: Navigate > Applications > Administration > System-Wide > UserManagement > Roles
As system administrator: Administration Dashboard > User Management > ManageRoles
2. Search for the static role to which you want to add members. For more information, see“Searching for Existing Users, Groups, or Roles” on page 114.
3. In the search results, click the role name or click .
4. On the Members panel, click Edit Members.
5. To add members, do the following:
a. Under Search For, choose the Users, Groups, or Roles option.
b. In the Keywords field, type a keyword representing the users, groups, or roles you wantto search for, and click Search.
c. Move one or more users, groups, or roles to the Selected box.
6. To delete members from the static role, move them from the Selected box.
7. Click Apply.
Administering My webMethods Server 10.3 159
11 Managing Roles and Access to My webMethods

Adding an LDAP Query RoleAn LDAP query role is based on an LDAP query to an external directory service. Any user orgroup that meets the requirements of the query is a member of the role.
To create an LDAP query role
1. To navigate to the correct page, do one of the following:
In My webMethods: Navigate > Applications > Administration > System-Wide > UserManagement > Roles > Add Role.
As system administrator: Administration Dashboard > User Management > ManageRoles > Add Role.
2. In the Role Name field, type the name you want to assign to the new role.
Valid role names can contain only letters, numbers, an underscore, or a space character.
3. To select the LDAP Query Role Provider, move that role provider to the Selected Items box.
4. Click Create Role.
5. In the LDAP Query field type a valid LDAP query.
6. Select the Simple Query option if the query in the LDAP Query field contains simplified LDAPquery syntax.
Unless you are creating a complex LDAP query, the query syntax can be cumbersome to use.With the Simple Query option, the syntax is filled in for you. For example, to find all personswhose manager has the user ID abrown, the simple query syntax is manager=abrown.
7. In LDAP Directory Service, click Browse.
8. Move the LDAP directory service to the Selected Items box and click Select.
9. In the Principal Type list, choose whether the query searches for Users or Groups.
10. To update the LDAP query, click Save (Apply in system administration).
Adding a Rule-Based RoleA rule-based role is based on a server rule. Any user, group, or role that matches the rule is amember of the role.
To create a rule-based role
160 Administering My webMethods Server 10.3
11 Managing Roles and Access to My webMethods

1. To navigate to the correct page, do one of the following:
In My webMethods: Navigate > Applications > Administration > System-Wide > UserManagement > Roles > Add Role.
As system administrator: Administration Dashboard > User Management > ManageRoles > Add Role.
2. In the Role Name field, type the name you want to assign to the new role.
Valid role names can contain only letters, numbers, an underscore, or a space character.
3. To select the Rule Based Role Provider, move that role provider to the Selected Items box.
4. Click Create Role.
5. Under the Match Criteria heading, select Match All Criteria Below or Match Any CriteriaBelow as the criteria for the rule-based role.
6. Fill in the appropriate match criteria for the rule-based role using the following guidelines:
User DN Value(s): A regular expression that matches any part of the current user's directorydistinguished name (DN). In the field, type the portions of the DN towhich youwant amatch.
For example, ou=Engineering.*ou=USmatches a user with the following DN:uid=joe,ou=Development,ou=Engineering,ou=Midwest,ou=US,o=webMethods
Domain Name Expression: A regular expression that matches any part of the name of thecurrent user's directory service as registered in My webMethods Server. In the field, type thedirectory service name to which you want a match.
For example, US (without quotes)matches a user from theUSCorporate directory service. Thisis a very effective way to govern the look and feel for users that may be in different userdirectories, such as partners.
Group DN and Role DN Expression:Aregular expression thatmatches any part of any groupor role of which the current user is amember. In the field, type the portions of the DN towhichyou want a match.
For example, ou=Engineeringmatches a user belonging to a group with the following DN:cn=portal,ou=Engineering,ou=Midwest,ou=US,o=webMethods.
User Attributes: One or more pairs of user attributes and their values from the user’s record.If you have more than one user attribute, the value set in Match Criteria determines howattributes are matched:
Match All Criteria Below - Each regular expression must match some part of thecorresponding attribute value for the current user.
Administering My webMethods Server 10.3 161
11 Managing Roles and Access to My webMethods

Match Any Criteria Below - Any regular expression in the list can match some part of thecorresponding attribute value for the current user.
For example, if the rule is configured to match all criteria, and the configured user attributepairs are listed in the following table:
ValueName
Bellevueoffice
(425) 564-0000telephonenumber
and the current user's attribute values are listed in the following table:
Value (current user)Name
Bellevueoffice
(206) 123-4567telephonenumber
the rule does not match the current user because it matches the office attribute value but notthe telephonenumber attribute value. If, however, the rule is configured to match any criteria,the preceding example rule does match the current user.
To create an attribute-value pair, click Add. At the prompt, type the attribute name and clickOK. At the prompt, type the value to be matched and click OK.
Request Headers: One or more pairs of HTTP header attributes and values. You can matchanything that appears within an HTTP header, such as the browser agent string or the kindsofMIME types the userwill accept. The rule can be a regular expression, or a simple text string.If you have more than attribute-value pair, the value set in Match Criteria determines howattributes are matched:
Match All Criteria Below - Each regular expression must match some part of thecorresponding attribute value for the request header.
Match Any Criteria Below - Any regular expression in the list must match some part ofthe corresponding attribute value for the request header.
For example, if the rule is configured to match all criteria, and the configured request headerpairs are listed in the following table:
ValueName
utf-8Accept-Charset
jaAccept-Language
and the request header values for the current user are listed in the following table:
162 Administering My webMethods Server 10.3
11 Managing Roles and Access to My webMethods

Value (current user)Name
ISO-8859-1,utf-8;q=0.7Accept-Charset
en-us,en;q=0.5Accept-Language
the rule does not match the current user because it matches the Accept-Charset header valuebut not the Accept-Language header value. If, however, the rule was configured to match anycriteria, the rule does match the current user.
To create an attribute-value pair, click Add. At the prompt, type the attribute name and clickOK. At the prompt, type the value to be matched and click OK.
Parent Resource: A resource that matches the current resource or a parent of the currentresource. To select a resource, click Browse to open the resource selector and select a resourceagainst which to match the rule.If you want match a resource that is referenced by an alias,you can optionally click Use Alias to select an existing alias on My webMethods Server.
Resource Type: A resource type that matches the current resource type. To select a resourcetype, click Browse to open the resource selector and select a resource type, from the ExtendedTypes folder, against which to match the rule.If you want match a resource type that isreferenced by an alias, you can optionally click Use Alias to select an existing alias on MywebMethods Server.
Resource Property: One or more pairs of resource properties and values. If you know theinternal name of a property associated with a resource, you can match it. If you have morethan one property-value pair, the value set in Match Criteria determines how properties arematched:
Match All Criteria Below - Each regular expression must match some part of thecorresponding attribute value for the request header.
Match Any Criteria Below - Any regular expression in the list must match some part ofthe corresponding attribute value for the request header.
For example, if you want to match files that are PDFs, the property-attribute pair ismimeType=pdf.
To create an property-value pair, click Add. At the prompt, type the attribute name and clickOK. At the prompt, type the value to be matched and click OK.
7. Click Apply.
Adding a Database RoleA database role is based on a query to a database directory service. Any user, group, or role thatmatches the rule is a member of the role.
Note:
Administering My webMethods Server 10.3 163
11 Managing Roles and Access to My webMethods

To create a database role, you must first connect to the database as an external data source. See“Managing External Data Sources” on page 103.
To create a database role
1. To navigate to the correct page, do one of the following:
In My webMethods: Navigate > Applications > Administration > System-Wide > UserManagement > Roles > Add Role.
As system administrator: Administration Dashboard > User Management > ManageRoles > Add Role.
2. In the Role Name field, type the name that you want to assign to the new role.
Valid role names can contain only letters, numbers, an underscore, or a space character.
3. To select the Database Role Provider, move that role provider to the Selected Items box.
4. Click Create Role.
5. From the Datasource list, select the database to be used as a data store.
6. If the role can include users, in the Query User field, type a SQL query that returns a recordfor a given user in the database who should be a member of the role.
The parameters to the query are:
{uid}—Principal unique ID
{dn}—Principal distinguished name
An example of a valid query is:select * from user-roles where roleID=‘Admin’ and userid=‘{uid}’
7. If the role can include groups, in theQuery Groupfield, type a SQLquery that returns a recordfor a given group in the database that should be a member of the role.
8. Click Save.
Editing Information for a RoleTo update the information for a role, perform the following procedure:
To edit a role
1. To navigate to the correct page, do one of the following:
164 Administering My webMethods Server 10.3
11 Managing Roles and Access to My webMethods

In My webMethods: Navigate > Applications > Administration > System-Wide > UserManagement > Roles
As system administrator: Administration Dashboard > User Management > ManageRoles
2. Search for the role that you want to edit. For more information, see “Searching for ExistingUsers, Groups, or Roles” on page 114.
3. In the search results, click the role name or click .
4. On each panel, edit the role information as required and click Save (Apply in systemadministration).
Important:My webMethods Server displays the information grouped on various panels. After makingchanges to information on a single panel, be sure to click Save (Apply in system administration)to save your changes before selecting another panel.
The following table lists the panels displayed for a role:
Additional InformationPanel
“Adding a Static Role” on page 158Role Information
“Adding an LDAP Query Role” on page 160
“Adding a Database Role” on page 163
“Defining Dynamic Attributes Associated with a Role” on page 166Dynamic Attributes
Deleting RolesIf you no longer need a role, you can delete it.
Note:When you delete a role, themembers of the role (users, groups, and/or other roles) are not deleted.
To delete a role
1. To navigate to the correct page, do one of the following:
In My webMethods: Navigate > Applications > Administration > System-Wide > UserManagement > Roles
As system administrator: Administration Dashboard > User Management > ManageRoles
Administering My webMethods Server 10.3 165
11 Managing Roles and Access to My webMethods

2. Search for the roles you want to delete. For more information, see “Searching for ExistingUsers, Groups, or Roles” on page 114.
3. In the search results, select the check boxes beside the roles youwant to delete, and clickDelete.
Defining Dynamic Attributes Associated with a RoleYou can associate dynamic attributes with a role. Some webMethods applications use dynamicattributes.
When you define the attribute in the role, you assign it a value. The value you assign to the roleis considered the default value. The default value is used for all users unless a user-specific valueis defined for the attribute.
To define a dynamic attribute for a role
1. To navigate to the correct page, do one of the following:
In My webMethods: Navigate > Applications > Administration > System-Wide > UserManagement > Roles
As system administrator: Administration Dashboard > User Management > ManageRoles
2. Search for the role. For more information, see “Searching for Existing Users, Groups, orRoles” on page 114.
3. In the search results, click the role name or click .
4. Click Dynamic Attributes.
5. Click Add Attribute.
6. On the Add an Attribute page, specify the following:
The following table lists the properties to configure when adding a dynamic role attribute:
DescriptionField
The internal name for the dynamic attribute. There are no restrictions onwhat characters you can use for this name.
Attribute Name
The name you want My webMethods Server to use when it displaysinformation about this attribute in the user interface.
Display Name
The data type of the attribute. Select a data type from the list.Data Type
166 Administering My webMethods Server 10.3
11 Managing Roles and Access to My webMethods

DescriptionField
The value you want assigned to the attribute. This is the default valuefor the attribute. This value will be used for all users assigned to this role
Value
unless a user-specific value is defined for the attribute. For moreinformation, see “SettingUser-SpecificValues forDynamicAttributes” onpage 167.
7. Click Save.
Setting User-Specific Values for Dynamic AttributesThe default value assigned to a dynamic attribute is the default for all users unless you assign auser-specific value for the attribute. To assign a user-specific value to a dynamic attribute, performthe following procedure.
To assign a user-specific value to a dynamic attribute
1. To navigate to the correct page, do one of the following:
In My webMethods: Navigate > Applications > Administration > System-Wide > UserManagement > Users.
As system administrator: Administration Dashboard > User Management > ManageUsers.
2. Search for the user for which you want to assign a user-specific value to a dynamic attribute.For more information, see “Searching for Existing Users, Groups, or Roles” on page 114.
3. In the search results, click any link in the row of the user or click .
4. Click Roles.
5. In the Role Member Attributes panel, locate the dynamic attribute for which you want toassign a user-specific value, and type the value in the User Value column.
Note that in the display the attributes are grouped by role; the role name appears before thelist of attributes assigned to the role.
6. Click Save(Apply in system administration).
Changing the Order of Dynamic Attributes Assigned to a RoleYou can change the order in which dynamic attributes display for a role. Changing the orderaffects only how the system displays the attributes in the Role Member Attributes panel for a
Administering My webMethods Server 10.3 167
11 Managing Roles and Access to My webMethods

user, but does not otherwise affect how the attributes are used by My webMethods Server or bywebMethods applications.
To change the order of dynamic attributes assigned to a role
1. To navigate to the correct page, do one of the following:
In My webMethods: Navigate > Applications > Administration > System-Wide > UserManagement > Roles
As system administrator: Administration Dashboard > User Management > ManageRoles
2. Search for the role. For more information, see “Searching for Existing Users, Groups, orRoles” on page 114.
3. In the search results, click the role name or click .
4. Click Dynamic Attributes and then click Change Attribute Order.
5. To reorder dynamic attributes, move them up or down as needed.
6. When the dynamic attributes are in the order you want, click Save (Apply in systemadministration).
Deleting Dynamic Attributes Assigned to a RoleIf you no longer want one or more dynamic attributes assigned to a role, you can delete them.
To delete one or more dynamic attributes assigned to a role
1. To navigate to the correct page, do one of the following:
In My webMethods: Navigate > Applications > Administration > System-Wide > UserManagement > Roles
As system administrator: Administration Dashboard > User Management > ManageRoles
2. Search for the role. For more information, see “Searching for Existing Users, Groups, orRoles” on page 114.
3. In the search results, click the role name or click .
4. Click Dynamic Attributes.
168 Administering My webMethods Server 10.3
11 Managing Roles and Access to My webMethods

5. Select the check boxes beside the dynamic attributes you want to delete, and click DeleteSelected Attributes.
6. Click Save.
Administering My webMethods Server 10.3 169
11 Managing Roles and Access to My webMethods

170 Administering My webMethods Server 10.3
11 Managing Roles and Access to My webMethods

12 My webMethods Server Clustering
■ How a My webMethods Server Cluster Works ............................................................. 172
■ Planning Your My webMethods Server Cluster ............................................................ 175
■ Considerations When Building a My webMethods Server Cluster .............................. 177
■ Modifying the Cluster Configuration ............................................................................ 178
■ Modifying Resource Locking Settings for a Cluster ..................................................... 188
■ Monitoring and Controlling Your Cluster ..................................................................... 189
■ Removing a Component from a Cluster ...................................................................... 193
■ Working with the cluster.xml File ................................................................................. 193
■ Creating a Cluster Node from an Image ...................................................................... 196
■ Partitioning Applications on Cluster Nodes ................................................................. 198
Administering My webMethods Server 10.3 171

How a My webMethods Server Cluster WorksAMywebMethods Server cluster is an active/active environment inwhichmultiple server instancesrun at the same time, sharing the My webMethods Server database. A My webMethods Servercluster achieves high scalability by distributing the workload amongmultiple servers. This modelis different from an active/passive environment, which makes use of a standby server. A MywebMethods Server cluster achieves high availability through the use of shared resources, allowingthe cluster to continue to function when a node is taken out of service.
To create a cluster, you need to install an instance of My webMethods Server on each machine inthe cluster. All nodes of the cluster share the sameMywebMethods Server database,which containsshared configuration information and data, stored by the system content service.
The system content service stores and retrieves files and objects published by webMethods usersand applications, running onMywebMethods Server. The system content service is installedwithMy webMethods Server and does not require additional configuration. Published content isavailable to all nodes in the cluster.
You should install the same set ofwebMethods applications (such as Task Engine),MywebMethodsuser interfaces, and language packs on each node in the cluster. If an application is not installedon a particular node, the components of the application are not functional on that node.
The nodes in the cluster exchange information when they run, using the following channels:
The My webMethods Server database - cluster bookkeeping is maintained this way.
HTTP - when a cluster node delegates the execution of a command to another node, it usesthe HTTP port of the target server.
The Universal Messaging server - MywebMethods Server nodes use the Universal Messagingserver to exchange JMS events for cache synchronization between the nodes.
Figure 1. Cluster architecture
172 Administering My webMethods Server 10.3
12 My webMethods Server Clustering

The Front End URLIn a production environment, all users and all webMethods applications that communicate withthe My webMethods Server cluster need to use the Front End URL established for the cluster,described in “Setting the Front End URL” on page 178. In addition, a production cluster shouldinclude the use of a load balancer or external web server, as shown in “High Availability in a MywebMethods Server Cluster” on page 173.
In practice, users log into the Front End URL through the load balancer. In turn, the load balancerdistributes calls to the nodes. A cluster can have only one Front End URL.
Note:The load balancer must be set up to use sticky sessions. A user session, once established, is routedto the same server machine until the session is closed.
When an HTTP request is issued to produce a My webMethods Server page, My webMethodsServer uses the actual host name and port number of that request, no matter how the request isrouted: directly or indirectly through the load balancer or web server. In these cases a Front EndURL is not necessary.
For several use cases, like generatingMywebMethods ServerURLs fromwithin email notificationsor creating links to tasks fromwithin Task Engine, Front EndURL configuration is required becauseno HTTP request is available at that time.
High Availability in a My webMethods Server ClusterBy itself, aMywebMethods Server cluster does not provide high availability. Youmust also ensurethe availability of data stored by the nodes in the cluster. To provide high availability, the databaseserver used by the My webMethods Server database must have a failover capability.
If the cluster uses the default system content service, it in turn uses the My webMethods Serverdatabase, so it is covered by the database server failover capability. However, if you use a networkcontent service, the network file storage device must have failover capability to support clusterhigh availability.
Any description of the configuration of third-party failover devices is beyond the scope of thisguide.
Figure 2. Requirements for a highly available My webMethods Server cluster
Administering My webMethods Server 10.3 173
12 My webMethods Server Clustering

Component Deployment in a My webMethods Server ClusterAMy webMethods Server cluster uses an asymmetrical mode of deploying components such asportlets or deployable packages.
In Asymmetrical component deployment mode, a component deployed to a node is notautomatically deployed to other nodes in the cluster. In Asymmetrical deployment mode, youneed to manually deploy a component locally to each node where it is needed. In this mode it ispossible to have different versions of a component running at the same time on different nodesof a cluster. Because component registration is centralized in theMywebMethods Server database,the registration is performed only once by the first node on which the component is deployed.Because of this dependency, changes made to a component that can affect component registrationor My webMethods Server taxonomy can potentially break other versions of the componentresiding on a different node. Some examples of changes to a component that can cause changesto the My webMethods Server database schema are:
Adding or removing a portlet preference.
Adding, removing, or changing a field in a DBO (Dynamic Business Object) table.
Adding, removing, or changing a field in a task type business data.
Adding, removing, or updating My webMethods Server taxonomy
Asymmetrical component deploymentmode enables you to deploy and test amodified componenton one or more nodes before deploying it to the entire cluster.
Cluster RolesThere are several cluster roles that can be assigned to a node in a cluster. These include:
The Auto Deploy cluster role allows for the automatic deployment of portlets that are copiedto the Software AG_directory \MWS\server\serverName\deploy directory (of a node that hasthe Auto Deploy role). A cluster can have multiple Auto Deploy nodes. This role is enabledby default, but is only needed if you want the automatic deployment capability. It is oftendesirable to have this role disabled in a production environment to reduce the possibility ofunauthorized modification of the server. This role does not affect cluster high availability.
TheNotification cluster role is responsible for formatting and sending email notifications, andnotifications that are sent to a user. A cluster can have multiple Notification nodes. TheNotification role is enabled by default, but is needed only if you use notifications in yourproduction environment. For example, if you are running Task Engine, users will not receivetask notifications if theNotification role is not enabled. For high availability it is recommendedthat you have more than one cluster node in this role. If all Notifications nodes go down,notification request messages continue to accumulate in the queue. No notifications aregenerated or delivered until one or more Notification nodes comes back online and startsprocessing them.
The Search role is responsible for indexing all content that is exposed to the embedded searchengine, maintaining the search index, and performing the searches. The Search role is enabled
174 Administering My webMethods Server 10.3
12 My webMethods Server Clustering

by default, and should be enabled on all cluster nodes where the search functionality will beneeded. The Search role is important to server operation and there are core features that willnot operate without it.
Permissions Management
Workspace Management and Add to Workspace
Each cluster node maintains a local copy of the search index, improving the performance andreliability of searches. If the search index becomes corrupted on one cluster node, you canremove that node from the load balancer while the search index is rebuilt on that node. In themeantime, the other nodes can continue servicing requests.
The Task engine cluster role is responsible for all Task Engine activities, such as queuing tasks,processing task rules, searching and retrieving task data. A cluster can have multiple TaskEngine roles. This role is enabled by default, but is needed only if you actually have TaskEngine running on your cluster. For high availability it is recommended that all nodes havethis role enabled unless a specific node is not included in the load balancer configuration andnever services end-user or Process Engine requests.
Guidelines for Assigning Specific Cluster RolesYou can assign cluster roles to each node in a cluster following the guidelines that follow. Anytime you change the roles assigned to a cluster node, you need to restart the node for theassignments to take effect.
The Auto Deploy, Task Engine, and Notification roles can be assigned to as many nodes asyou need.
Nodes that are running one ormore roles can be further broken down and separately clustered.This may be necessary if your scalability requirements warrant setting up additional clusterroles to handle increased traffic.
The configuration data for each node is stored in the cluster.xml file. It is possible to edit thedata for your cluster directly in the cluster.xml file, provided you know the proper datastructures and values for the properties of your cluster.For more information, see “Workingwith the cluster.xml File” on page 193.
Any changes to the cluster configuration will require each node to be restarted.
Planning Your My webMethods Server ClusterThe following diagram shows just one of many types of distributed deployments that can beconfigured with My webMethods Server.
Figure 3. A My webMethods Server Cluster Network Diagram
Administering My webMethods Server 10.3 175
12 My webMethods Server Clustering

The preceding diagram assumes that there will be three server machines operating in a cluster,each with its own cluster roles. The machines defined in the web tier include a hardware-basedload balancer and two web server machines. The following sections illustrate the process that anadministrator would work through to build a cluster.
The procedure for configuringApache in an external load-balancedweb server cluster configurationwith your deployment is explained in “Using My webMethods Server with Web Servers” onpage 43.
176 Administering My webMethods Server 10.3
12 My webMethods Server Clustering

Considerations When Building a My webMethodsServer ClusterConsider the following information when building a My webMethods Server cluster:
All servers in the cluster must use the sameMy webMethods Server database. Make sure thatyou use the same My webMethods Server database JDBC URL when you install each node inthe cluster.
You should install the same set of webMethods applications (such as Task Engine), MywebMethods User Interfaces, and language packs on each node in the cluster.
To build a My webMethods Server cluster, install each node in the cluster following theinstructions provided in Installing Software AG Products. You must provide the followinginformation:
The HTTP port number for each server instance. The default value is 8585. If you installtwo server nodes on the samemachine, youmust use a different HTTP port for each node.
The JDBC URL for the My webMethods Server database. The URL must include anyadditional properties needed to support database server failover.
The URL of the UniversalMessaging server or UniversalMessaging cluster to use as a JMSprovider. My webMethods Server nodes go in maintenance mode if you do not specify aUniversal Messaging URL, or the Universal Messaging server is unavailable. If you do notspecify a Universal Messaging URL during installation, you must log in as Administratorand configure the URL on the Cluster Administration page in My webMethods.
You can start the nodes in the cluster concurrently or one after the other, depending on yourneeds. The first time you start each node, it performs bootstrap activities and loads sharedconfiguration files from theMywebMethods Server database. The node is automatically addedto the cluster. You can also add nodes to a cluster manually, as described in “Adding a Nodeto a Cluster” on page 182.
Important:Do not make any cluster configuration changes while you are starting cluster nodes for thefirst time. If you do so, you may lose the configuration of the nodes that performself-configuration automatically when starting for the first time.
If the startup of a node completes successfully, you can open a browser window and log intoMy webMethods Server as system administrator to verify that the node is running correctly.
If you are building a production cluster, perform the following steps:
If you knowyouwill need a network content service, set it up as described in “Configuringa New Content Service” on page 307.
If you already have a load balancer or external web server set up, change the Front EndURL to point there as described in “Setting the Front End URL” on page 178.
Administering My webMethods Server 10.3 177
12 My webMethods Server Clustering

Modifying the Cluster ConfigurationYou can perform several functions to modify the configuration of a standalone server, a cluster,or a node in a cluster.
Setting the Front End URLAll users and all webMethods applications that communicate with the My webMethods Servercluster must use the Front End URL established for the cluster. By default, this value is the URLof the first node of the cluster. The URL can point to a load balancer or external web server. Acluster can have only one Front End URL.
To change the Front End URL for a cluster
1. Navigate to the correct page by doing one of the following:
In My webMethods: Navigate > Applications > Administration > My webMethods >Cluster Settings > Advanced or Clustered Configuration.
As system administrator: Administration Dashboard > Configuration > ClusterAdministration > Advanced or Clustered Configuration.
2. In the MwS Front End URL field, type a fully qualified URL:
http://host_name:port_number
OR
https://host_name:port_number if you want to access the cluster using only a secureconnection,
where port_numbermust have the same value as the MWS Front End Secure Port field.
3. To access secure My webMethods Server content, in the MWS Front End Secure Port field,type an HTTPS port number.
The default value is -1, whichmeans that no secure Front EndURL is configured for the cluster.
4. Click Submit.
5. Restart the My webMethods Server cluster.
Configuring the Connection to the Universal Messaging ServerBy default, My webMethods Server uses the Software AG Universal Messaging server as a JavaMessage Service (JMS) provider. However, the connection to the Universal Messaging server isnot configured by default. When you start a node in a My webMethods Server cluster for the first
178 Administering My webMethods Server 10.3
12 My webMethods Server Clustering

time, the node starts in maintenance mode. To exit maintenance mode, you must login to thecluster node, and configure the connection to the Universal Messaging server. When the othernodes in the cluster are accessible over the network, My webMethods Server automaticallypropagates the configuration. If My webMethods Server does not update the configuration of anode automatically, log in to the node and reload the cluster configuration from the ClusterAdministration page.
Note:A node in the cluster enters maintenance mode when the node loses connection to the UniversalMessaging server, and exits maintenance mode when the server becomes available.
To configure the connection to the Universal Messaging server
1. Navigate to the following page:
As My webMethods administrator: Navigate > Applications > Administration > MywebMethods > Cluster Settings.
As sysadmin: Administration Dashboard > Configuration > Cluster Administration.
2. On the Advanced or Clustered Configuration tab, specify the location of the UniversalMessaging server in the JNDI Provider URL field.
The default URL of the Universal Messaging server in a local installation is:nsp://localhost:9000
3. Click Submit.
Configuring Secure Connection to the Universal Messaging Server
You configure secure connection to Universal Messaging on the Advanced or ClusteredConfiguration tab of the Cluster Settings page in My webMethods, separately for each node inthe My webMethods Server cluster.
To configure SSL connection to the Universal Messaging server:
1. Log on to the cluster node as My webMethods Administrator.
2. Navigate to Applications > Administration > My webMethods > Cluster Settings >Advanced or Clustered Configuration.
3. On the Advanced or Clustered Configuration tab, click Advanced Settings.
4. In the SSL settings dialog, specify the following:
The following table lists the fields to configure to connect to Universal Messaging using SSL:
Administering My webMethods Server 10.3 179
12 My webMethods Server Clustering
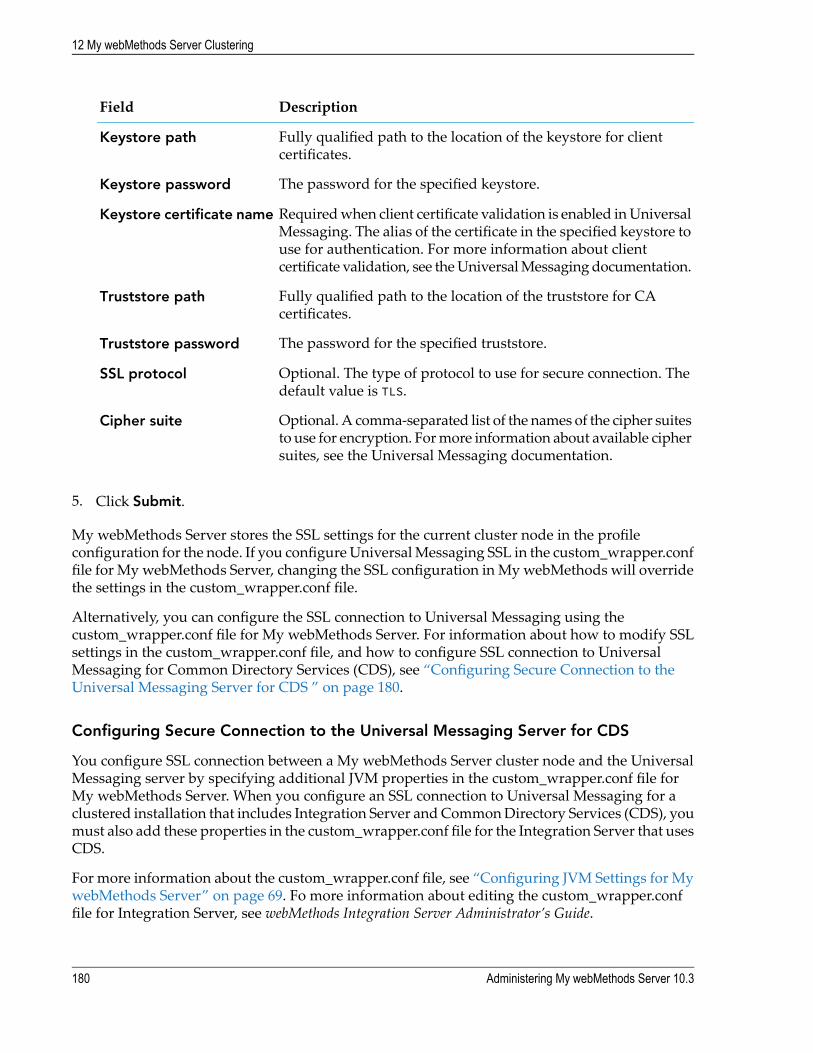
DescriptionField
Fully qualified path to the location of the keystore for clientcertificates.
Keystore path
The password for the specified keystore.Keystore password
Requiredwhen client certificate validation is enabled inUniversalMessaging. The alias of the certificate in the specified keystore to
Keystore certificate name
use for authentication. For more information about clientcertificate validation, see theUniversalMessagingdocumentation.
Fully qualified path to the location of the truststore for CAcertificates.
Truststore path
The password for the specified truststore.Truststore password
Optional. The type of protocol to use for secure connection. Thedefault value is TLS.
SSL protocol
Optional. A comma-separated list of the names of the cipher suitesto use for encryption. Formore information about available ciphersuites, see the Universal Messaging documentation.
Cipher suite
5. Click Submit.
My webMethods Server stores the SSL settings for the current cluster node in the profileconfiguration for the node. If you configureUniversalMessaging SSL in the custom_wrapper.conffile for My webMethods Server, changing the SSL configuration in My webMethods will overridethe settings in the custom_wrapper.conf file.
Alternatively, you can configure the SSL connection to Universal Messaging using thecustom_wrapper.conf file for My webMethods Server. For information about how to modify SSLsettings in the custom_wrapper.conf file, and how to configure SSL connection to UniversalMessaging for Common Directory Services (CDS), see “Configuring Secure Connection to theUniversal Messaging Server for CDS ” on page 180.
Configuring Secure Connection to the Universal Messaging Server for CDS
You configure SSL connection between a My webMethods Server cluster node and the UniversalMessaging server by specifying additional JVM properties in the custom_wrapper.conf file forMy webMethods Server. When you configure an SSL connection to Universal Messaging for aclustered installation that includes Integration Server andCommonDirectory Services (CDS), youmust also add these properties in the custom_wrapper.conf file for the Integration Server that usesCDS.
For more information about the custom_wrapper.conf file, see “Configuring JVM Settings for MywebMethods Server” on page 69. Fo more information about editing the custom_wrapper.conffile for Integration Server, see webMethods Integration Server Administrator’s Guide.
180 Administering My webMethods Server 10.3
12 My webMethods Server Clustering

The following table lists the JVM properties that you add to configure secure connection to theUniversal Messaging server for CDS:
DescriptionProperty
Fully qualified path to the location of thekeystore for client certificates.
nirvana.ssl.keystore.path
The password for the specified keystore.nirvana.ssl.keystore.pass
Required when client certificate validation isenabled inUniversalMessaging. The alias of the
nirvana.ssl.keystore.cert
certificate in the specified keystore to use forauthentication.
Fully qualified path to the location of thetruststore for CA certificates.
nirvana.ssl.truststore.path
The password for the specified truststore.nirvana.ssl.truststore.pass
The type of protocol to use for secure connection.If you do not specify a protocol for secure
nirvana.ssl.protocol
connection, My webMethods Server and CDSuse TLS.
Configuring Credentials to Connect to the Universal Messaging Server
By default, My webMethods Server and CDS use the mwsJMSAdmin user to connect to theUniversalMessaging server. CertainUniversalMessaging security settingsmight require explicitlygranting the mwsJMSAdmin user permissions for the messaging realm.
You can configure a specific My webMethods Server user to connect to Universal Messaging, bysetting the following system properties in the custom_wrapper.conf file for My webMethodsServer, or the custom_wrapper.conf file for the Integration Server instance that hosts CDS:
The following table lists the systemproperties for configuring credentials for connecting toUniversalMessaging.
DescriptionParameter
The name of the user to connect to the UniversalMessaging server.
lax.nl.env.PRINCIPAL
The password of the user to authenticate to theUniversal Messaging server.
lax.nl.env.PASSWORD
The user must be configured with proper access permissions for the Universal Messaging server.Formore information about theUniversalMessaging security settings, see theUniversalMessagingdocumentation.
Administering My webMethods Server 10.3 181
12 My webMethods Server Clustering

For more information about working with the custom_wrapper.conf file for My webMethodsServer, see “The Java Service Wrapper” on page 66.
For more information about working with the custom_wrapper.conf file for Integration Server,see webMethods Integration Server Administrator’s Guide.
The My webMethods Server Cluster ID
Multiple My webMethods Server clusters, or individual nodes can use the same UniversalMessaging Server. To identify that a node belongs to a cluster, My webMethods Server generatesa unique identifier for the cluster in the MWS Cluster ID field. My webMethods Server appendsthe MWS Cluster ID to JMS topics and queues to distinguish the messages, intended for a clusterwhen using Universal Messaging as a JMS provider. You cannot edit the MWS Cluster ID field.
Adding a Node to a ClusterA node is automatically added to the cluster when you start it for the first time. The new nodemust have the sameMywebMethods Server database as the other nodes in the cluster and shouldhave the same set of webMethods applications (such as Task Engine), My webMethods UserInterfaces, and language packs on each node in the cluster.
To add a node to a cluster
1. Install the cluster node following instructions provided in Installing Software AG Products. Youneed to provide the following information:
The HTTP port number for this server instance. The default value is 8585.
The JDBC URL for the My webMethods Server database used by the cluster. This URLshould include any additional properties needed to support database server failover.
2. Start the My webMethods Server instance.
The first time you start an additional node, it performs bootstrap activities and loads sharedconfiguration files from theMywebMethods Server database. The node is automatically addedto the cluster.
3. After the new node initializes, reload the cluster configuration on the Cluster Administrationpage, or restart the cluster, as described in “Restarting or Stopping All Nodes in a Cluster” onpage 191.
Modifying a Node in a ClusterYou can modify several properties for a node in a cluster or a standalone instance of MywebMethods Server. Common reasons to modify a node are to add security by specifying anHTTPS port, add support for an external web server, or change cluster roles. You can also modifythe properties of a cluster node or a standalone servermanually. See “Workingwith the cluster.xmlFile” on page 193.
182 Administering My webMethods Server 10.3
12 My webMethods Server Clustering

To modify a standalone server or a node in a cluster
1. To navigate to the correct page, do one of the following:
In My webMethods: Navigate > Applications > Administration > My webMethods >Cluster Settings > Advanced or Clustered Configuration.
As system administrator: Administration Dashboard > Configuration > ClusterAdministration > Advanced or Clustered Configuration.
2. For a standalone server or a node in the cluster, do any of the following.
In the HOST field, change the host name (including domain if appropriate) or IP addressof the machine where the node is to run.
The specified host name or IP address must resolve to the correct machine running thenode. It must be valid for all nodes in the cluster. See your network administrator forinformation about host names and network setup at your site.
In the HTTP PORT field, change the port number to be used by the HTTP listener.
This field must always have a valid port number.
In the HTTPS PORT field, type the port number to be used by the HTTPS listener.
A value of 0 (zero) in this field disables the listener.
Note:MywebMethods Server includes a sample HTTP certificate that you can use to set up andtest your HTTPS listener. The sample is located in the Software AG_directory\MWS\server\serverName\config\localhost.p12 file (see “Certificates Used for SecureConnections” on page 34). For production environments, be sure to obtain an actualCertificate from a qualified authority such as Verisign.
To select one or more roles for a node, select the check box for the role.
3. Click Submit.
4. Restart the cluster or standalone server for the changes to take effect, as described in “Restartingor Stopping All Nodes in a Cluster” on page 191 or “Restarting or Stopping Individual Nodesin a Cluster” on page 190.
Assigning a Search Role to a NodeThe Search role is enabled by default. You can assign the Search role to nodes on the cluster asneeded.
To assign the Search role to a node
Administering My webMethods Server 10.3 183
12 My webMethods Server Clustering

1. To navigate to the correct page, do one of the following:
In My webMethods: Navigate > Applications > Administration > My webMethods >Cluster Settings > Advanced or Clustered Configuration.
As system administrator: Administration Dashboard > Configuration > ClusterAdministration > Advanced or Clustered Configuration.
2. Select the Search option for nodes that are to be assigned the role and clear the option fornodes that should not have the Search role.
3. Restart the cluster or standalone server for the changes to take effect, as described in “Restartingor Stopping All Nodes in a Cluster” on page 191 or “Restarting or Stopping Individual Nodesin a Cluster” on page 190.
Renaming a NodeNodes in a cluster are automatically given node names when you add them to the cluster. MywebMethods Server displays the name of a cluster node in the Name column of the Advancedor Clustered Configuration page, and in the Node Name column of the Cluster Status andControl in My webMethods.
You can change the name of any node manually by doing the following:
To rename a node in a cluster
1. At a command line prompt on the machine that contains the node, move to the bin directoryof the server instance:
Software AG_directory \MWS\bin
2. To retrieve the cluster.xml file from theMywebMethods Server database, type this command:
mws getconfig cluster.xml
3. Open the cluster.xml file in a text editor.
You can find the file at this location:
Software AG_directory \MWS\server\serverName\config
4. In the cluster.xml file, change the name attribute of the Component element for this node andsave the file:
<Component class="com.webmethods.portal.system.cluster.impl.Server"enabled="true" name="nodeName">
5. To deploy the revised cluster.xml file to theMywebMethods Server database, at the commandline prompt type this command:
184 Administering My webMethods Server 10.3
12 My webMethods Server Clustering
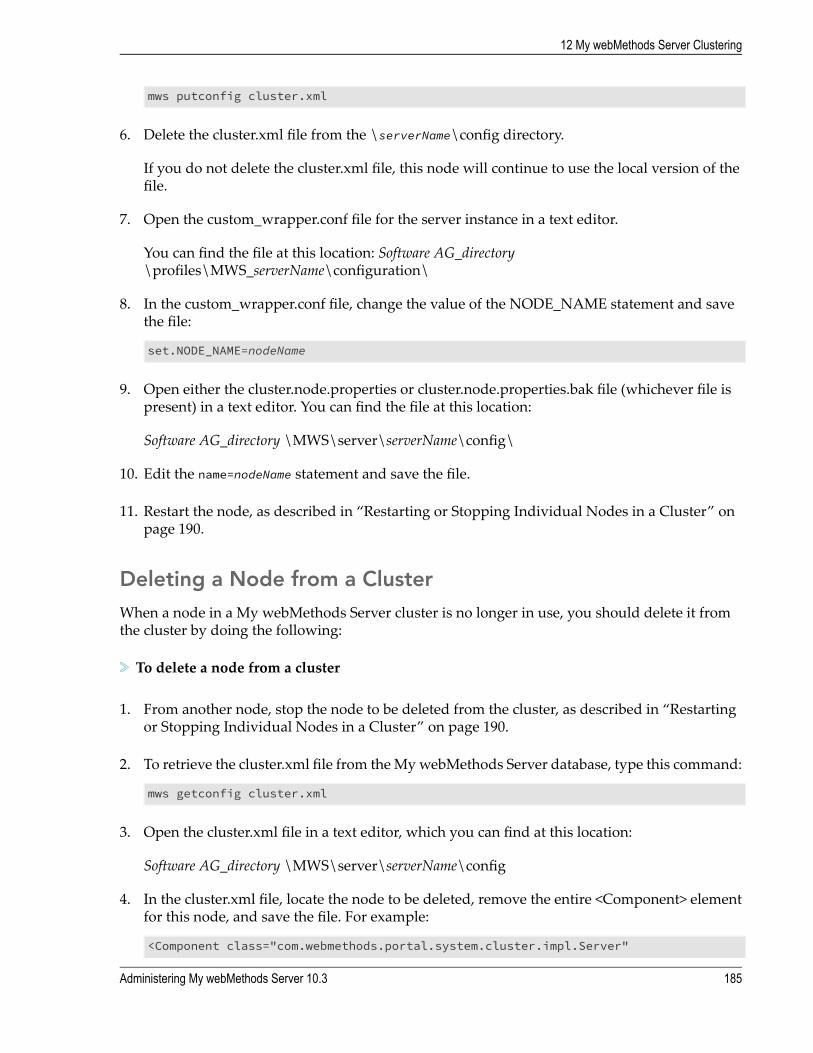
mws putconfig cluster.xml
6. Delete the cluster.xml file from the \serverName\config directory.
If you do not delete the cluster.xml file, this node will continue to use the local version of thefile.
7. Open the custom_wrapper.conf file for the server instance in a text editor.
You can find the file at this location: Software AG_directory\profiles\MWS_serverName\configuration\
8. In the custom_wrapper.conf file, change the value of the NODE_NAME statement and savethe file:
set.NODE_NAME=nodeName
9. Open either the cluster.node.properties or cluster.node.properties.bak file (whichever file ispresent) in a text editor. You can find the file at this location:
Software AG_directory \MWS\server\serverName\config\
10. Edit the name=nodeName statement and save the file.
11. Restart the node, as described in “Restarting or Stopping Individual Nodes in a Cluster” onpage 190.
Deleting a Node from a ClusterWhen a node in a My webMethods Server cluster is no longer in use, you should delete it fromthe cluster by doing the following:
To delete a node from a cluster
1. From another node, stop the node to be deleted from the cluster, as described in “Restartingor Stopping Individual Nodes in a Cluster” on page 190.
2. To retrieve the cluster.xml file from theMywebMethods Server database, type this command:
mws getconfig cluster.xml
3. Open the cluster.xml file in a text editor, which you can find at this location:
Software AG_directory \MWS\server\serverName\config
4. In the cluster.xml file, locate the node to be deleted, remove the entire <Component> elementfor this node, and save the file. For example:
<Component class="com.webmethods.portal.system.cluster.impl.Server"
Administering My webMethods Server 10.3 185
12 My webMethods Server Clustering
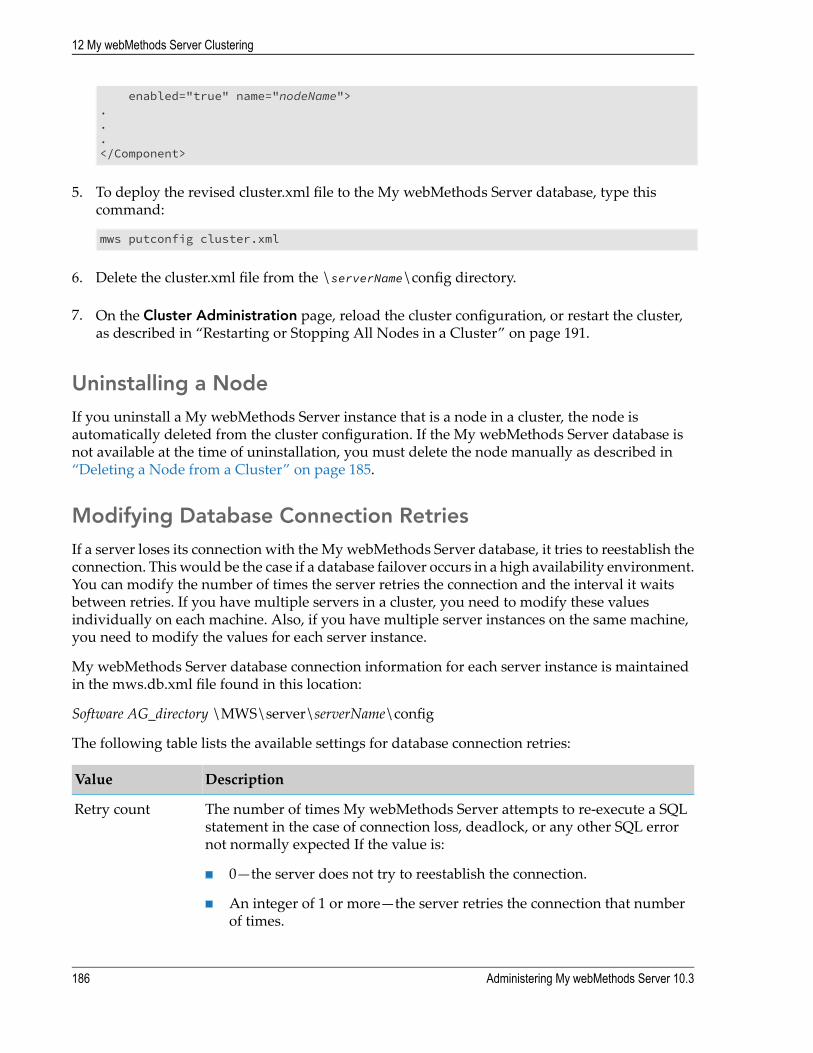
enabled="true" name="nodeName">...</Component>
5. To deploy the revised cluster.xml file to the My webMethods Server database, type thiscommand:
mws putconfig cluster.xml
6. Delete the cluster.xml file from the \serverName\config directory.
7. On the Cluster Administration page, reload the cluster configuration, or restart the cluster,as described in “Restarting or Stopping All Nodes in a Cluster” on page 191.
Uninstalling a NodeIf you uninstall a My webMethods Server instance that is a node in a cluster, the node isautomatically deleted from the cluster configuration. If the My webMethods Server database isnot available at the time of uninstallation, you must delete the node manually as described in“Deleting a Node from a Cluster” on page 185.
Modifying Database Connection RetriesIf a server loses its connection with the MywebMethods Server database, it tries to reestablish theconnection. This would be the case if a database failover occurs in a high availability environment.You can modify the number of times the server retries the connection and the interval it waitsbetween retries. If you have multiple servers in a cluster, you need to modify these valuesindividually on each machine. Also, if you have multiple server instances on the same machine,you need to modify the values for each server instance.
My webMethods Server database connection information for each server instance is maintainedin the mws.db.xml file found in this location:
Software AG_directory \MWS\server\serverName\config
The following table lists the available settings for database connection retries:
DescriptionValue
The number of times My webMethods Server attempts to re-execute a SQLstatement in the case of connection loss, deadlock, or any other SQL errornot normally expected If the value is:
Retry count
0—the server does not try to reestablish the connection.
An integer of 1 or more—the server retries the connection that numberof times.
186 Administering My webMethods Server 10.3
12 My webMethods Server Clustering

DescriptionValue
Typically, you should set the retry count to no more than three. If the serverneeds more than that number, there are problems with the connection orwith the database server.
The time in milliseconds the server waits between retries. The retry delayvalue should be large enough to allow for a failover to occur, and is dependenton the configuration of your database server.
Retry delay
Tomodify retry behavior for a singleMywebMethods Server database connection, do the following.
To modify database retry behavior for a server instance
1. Open the mws.db.xml file, which you will find at the following location, in a text editor:
Software AG_directory \MWS\server\serverName\config
2. To change the number of retries, for each node in the cluster, add the <RETRYCOUNT> elementto mws.db.xml within the <PARAMS></PARAMS> tags:
<RETRYCOUNT>2</RETRYCOUNT>
3. To change the number of milliseconds to delay between retries, for each node in the cluster,add the <RETRYDELAY> element to mws.db.xml within the <PARAMS></PARAMS> tags:
<RETRYDELAY>300</RETRYDELAY>
The combined elements might look like this:<PARAMS>
.
.
.<!-- retry count on error --><RETRYCOUNT>2</RETRYCOUNT><!-- delay in ms between retries --><RETRYDELAY>300</RETRYDELAY>
</PARAMS>
4. Save the file and restart the My webMethods Server instance.
5. Repeat this procedure for each node in the cluster.
Configuring My webMethods Server to use the database forJMS communicationYou can use the database as a JMS provider for communication between My webMethods Serverand the Common Directory Services component in Integration Server, or for My webMethods
Administering My webMethods Server 10.3 187
12 My webMethods Server Clustering

Server clusters that exchange a small number of JMS events. For more information, see“Considerations when using the database as a JMS provider” on page 188.
To configure My webMethods Server to use the database as a JMS provider
1. Retrieve the cluster.xml file from the My webMethods Server database using the getconfigcommand.
2. On the <Cluster> element, insert the useDbJms="true" attribute, as follows:
<Cluster useDbJms="true" clusterId="706790370
3. Save the file and execute the putconfig command to deploy the file to the database.
4. Delete the local copy of the cluster.xml file from the \serverName\config directory.
If you do not delete the cluster.xml file, this node will continue to use the local version of thefile. For more information about working with the cluster.xml file, see “Working with thecluster.xml File” on page 193.
Considerations when using the database as a JMS provider
My webMethods Server clusters and CDS require the use of a JMS provider for synchronizationbetween the nodes. The default JSMprovider for synchronization betweenMywebMethods Servernodes, and betweenMywebMethods Server and Integration Server when using CDS, is UniversalMessaging.
You can configure My webMethods Server to use the database as a JMS provider for clustersynchronization, as described in “Configuring My webMethods Server to use the database forJMS communication” on page 187. The following considerations apply when using the databaseas a JMS provider:
My webMethods Server uses the production database for cluster messaging. You cannotconfigure a separate datasource for JMS.
When the cluster nodes exchange a large number of events, the load on the production databaseincreases. This might affect overall cluster performance.
My webMethods Server does not provide JMS failover capability, and relies on the failovercapabilities of the JMS provider.
Modifying Resource Locking Settings for a ClusterWhen installing additional components in a My webMethods Server cluster, cluster nodes obtaindatabase locks on the resources that get updated. Component installationmight require a particularresource to remain locked for a significant amount of time. To ensure that concurrent attempts tolock a resource between cluster nodes do not result in timeouts, you can configure the lock validityand wait times, using the following additional JVM parameters in the custom_wrapper.conf filefor My webMethods Server:
188 Administering My webMethods Server 10.3
12 My webMethods Server Clustering
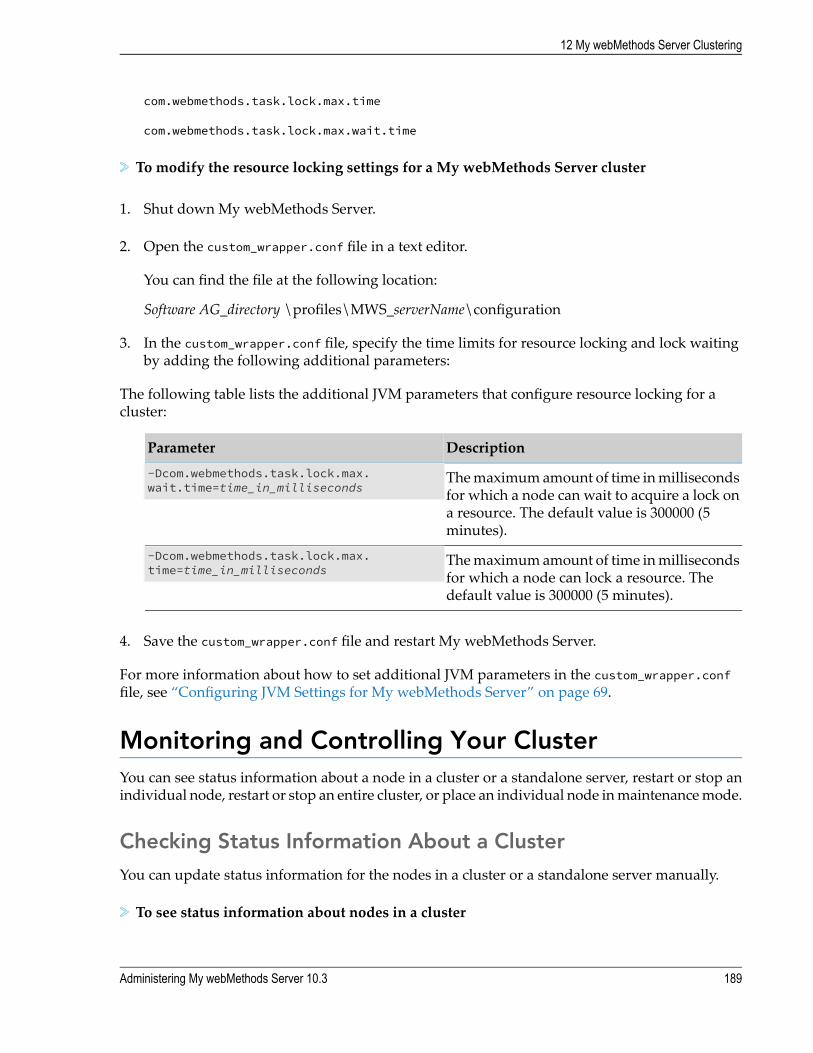
com.webmethods.task.lock.max.time
com.webmethods.task.lock.max.wait.time
To modify the resource locking settings for a My webMethods Server cluster
1. Shut down My webMethods Server.
2. Open the custom_wrapper.conf file in a text editor.
You can find the file at the following location:
Software AG_directory \profiles\MWS_serverName\configuration
3. In the custom_wrapper.conf file, specify the time limits for resource locking and lock waitingby adding the following additional parameters:
The following table lists the additional JVM parameters that configure resource locking for acluster:
DescriptionParameter
Themaximumamount of time inmillisecondsfor which a node can wait to acquire a lock on
-Dcom.webmethods.task.lock.max.wait.time=time_in_milliseconds
a resource. The default value is 300000 (5minutes).
Themaximumamount of time inmillisecondsfor which a node can lock a resource. Thedefault value is 300000 (5 minutes).
-Dcom.webmethods.task.lock.max.time=time_in_milliseconds
4. Save the custom_wrapper.conf file and restart My webMethods Server.
For more information about how to set additional JVM parameters in the custom_wrapper.conffile, see “Configuring JVM Settings for My webMethods Server” on page 69.
Monitoring and Controlling Your ClusterYou can see status information about a node in a cluster or a standalone server, restart or stop anindividual node, restart or stop an entire cluster, or place an individual node inmaintenancemode.
Checking Status Information About a ClusterYou can update status information for the nodes in a cluster or a standalone server manually.
To see status information about nodes in a cluster
Administering My webMethods Server 10.3 189
12 My webMethods Server Clustering

1. To navigate to the correct page, do one of the following:
In My webMethods: Navigate > Applications > Administration > My webMethods >Cluster Settings > Cluster Status and Control.
As system administrator: Administration Dashboard > Configuration > ClusterAdministration > Cluster Status and Control.
2. To update the status information on the Status and Control page, click Refresh.
The following table lists the fields that the Status and Control page displays:
DescriptionField
Indicator of whether the node is running or not. Click the icon for a node toupdate individual status. Click to update status for all nodes. The statusicons are:
The node is running
The node is stopped
The node name assigned to the node. If you click the node name, the browserconnects directly to the node using the current window. You can change thisname manually, as described in “Renaming a Node” on page 184.
NODE NAME
The cluster roles currently assigned to the node.ROLES
The time since the node was last started in days, hours, and minutes.UP TIME
The number of active users for the node. This number may not equal theexact number of logged-in users because it can include guest sessions andabandoned sessions.
ACTIVE USERS
Actions you can take on the node, as described in “Restarting or StoppingIndividual Nodes in a Cluster” on page 190.
ACTIONS
Restarting or Stopping Individual Nodes in a ClusterYou can restart or stop an individual node in a cluster.
To restart or stop individual nodes in a cluster
1. To navigate to the correct page, do one of the following:
In My webMethods: Navigate > Applications > Administration > My webMethods >Cluster Settings > Cluster Status and Control.
As system administrator: Administration Dashboard > Configuration > ClusterAdministration > Cluster Status and Control.
190 Administering My webMethods Server 10.3
12 My webMethods Server Clustering

2. For the node to be acted upon, do either of the following:
Click Restart.
The node is stopped, causing the icon to be displayed. After the node is restarted, theicon returns.
Click Shutdown.
The node is stopped. After you have stopped the node, you cannot restart it from this page.You need to start the My webMethods Server instance on the host machine.
Restarting or Stopping All Nodes in a ClusterYou can restart or stop all nodes in a cluster with a single command.
To restart or stop all nodes in a cluster
1. To navigate to the correct page, do one of the following:
In My webMethods: Navigate > Applications > Administration > My webMethods >Cluster Settings > Cluster Status and Control.
As system administrator: Administration Dashboard > Configuration > ClusterAdministration > Cluster Status and Control.
2. Do either of the following:
Click Restart Cluster.
The nodes are stopped and restarted one at a time beginning with the first node in thetable. If the first node is the one fromwhich you issue this command, the restart will beginwith the next node. Your node is restarted after all other nodes have restarted. The pagedoes not automatically refresh after the node is restarted. You should manually refreshthe browser after a minute or so. The login screen is displayed when the clustered is fullyrestarted.
Click Shutdown Cluster.
All nodes are stopped. To restart the nodes, you need to start the My webMethods Serverinstance on each host machine.
Placing a Cluster Node in Maintenance ModeYou can place an individual node in a cluster in maintenance mode to perform operations suchas diagnosing an issue, cleaning up the file system, or changing the server configuration.
WhenMywebMethods Server is inmaintenancemode, the behavior of the server differs dependingon the type of user:
Administering My webMethods Server 10.3 191
12 My webMethods Server Clustering
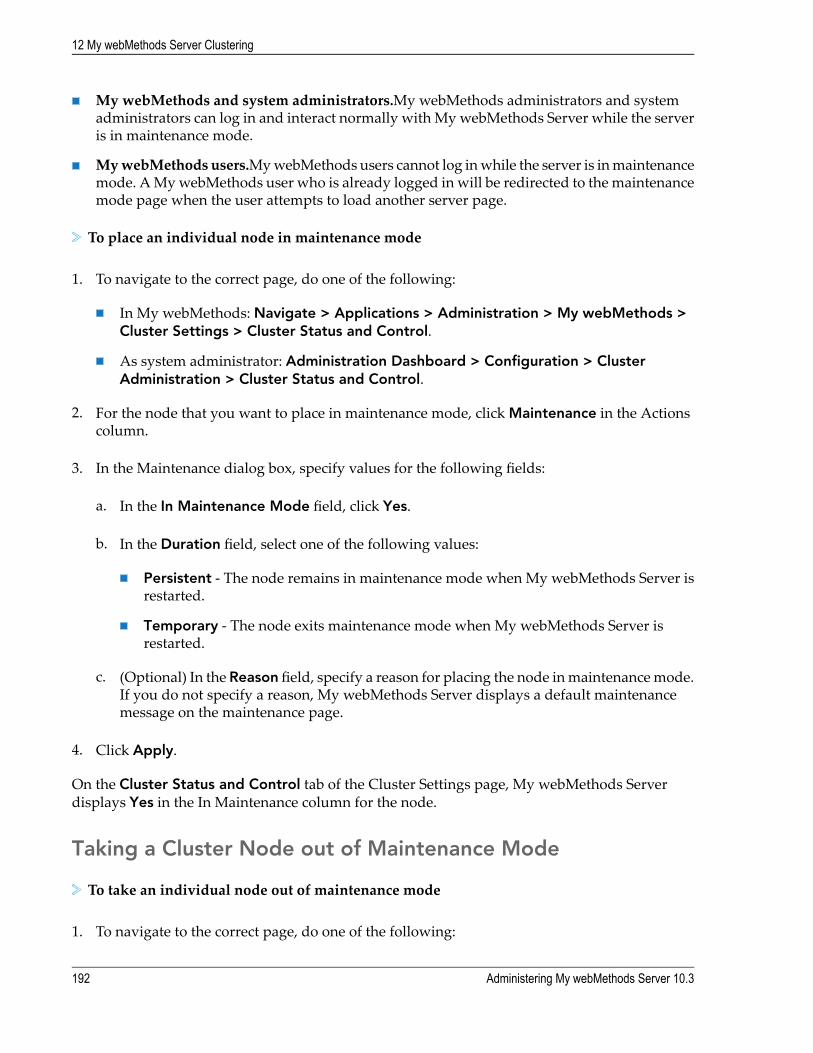
My webMethods and system administrators.My webMethods administrators and systemadministrators can log in and interact normally with MywebMethods Server while the serveris in maintenance mode.
MywebMethods users.MywebMethods users cannot log inwhile the server is inmaintenancemode. AMywebMethods user who is already logged in will be redirected to the maintenancemode page when the user attempts to load another server page.
To place an individual node in maintenance mode
1. To navigate to the correct page, do one of the following:
In My webMethods: Navigate > Applications > Administration > My webMethods >Cluster Settings > Cluster Status and Control.
As system administrator: Administration Dashboard > Configuration > ClusterAdministration > Cluster Status and Control.
2. For the node that you want to place in maintenance mode, click Maintenance in the Actionscolumn.
3. In the Maintenance dialog box, specify values for the following fields:
a. In the In Maintenance Mode field, click Yes.
b. In the Duration field, select one of the following values:
Persistent - The node remains in maintenance mode when My webMethods Server isrestarted.
Temporary - The node exits maintenance mode when My webMethods Server isrestarted.
c. (Optional) In the Reason field, specify a reason for placing the node inmaintenancemode.If you do not specify a reason, My webMethods Server displays a default maintenancemessage on the maintenance page.
4. Click Apply.
On the Cluster Status and Control tab of the Cluster Settings page, My webMethods Serverdisplays Yes in the In Maintenance column for the node.
Taking a Cluster Node out of Maintenance Mode
To take an individual node out of maintenance mode
1. To navigate to the correct page, do one of the following:
192 Administering My webMethods Server 10.3
12 My webMethods Server Clustering
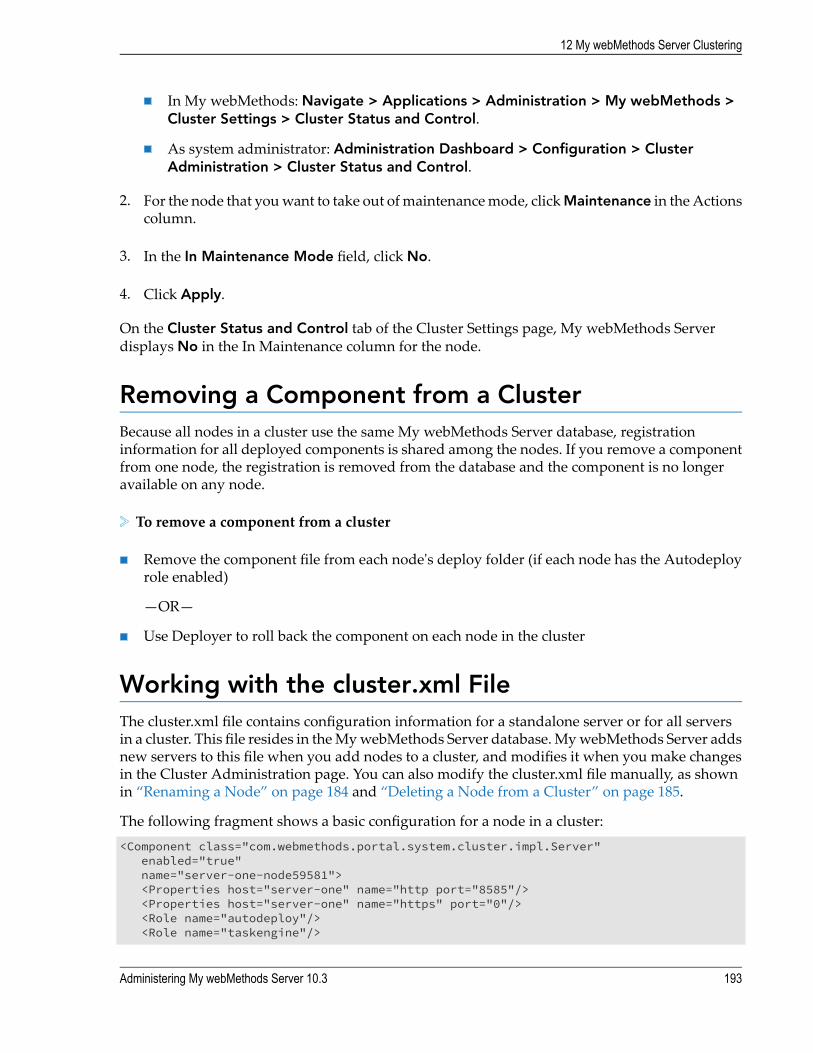
In My webMethods: Navigate > Applications > Administration > My webMethods >Cluster Settings > Cluster Status and Control.
As system administrator: Administration Dashboard > Configuration > ClusterAdministration > Cluster Status and Control.
2. For the node that youwant to take out ofmaintenancemode, clickMaintenance in theActionscolumn.
3. In the In Maintenance Mode field, click No.
4. Click Apply.
On the Cluster Status and Control tab of the Cluster Settings page, My webMethods Serverdisplays No in the In Maintenance column for the node.
Removing a Component from a ClusterBecause all nodes in a cluster use the same My webMethods Server database, registrationinformation for all deployed components is shared among the nodes. If you remove a componentfrom one node, the registration is removed from the database and the component is no longeravailable on any node.
To remove a component from a cluster
Remove the component file from each node's deploy folder (if each node has the Autodeployrole enabled)
—OR—
Use Deployer to roll back the component on each node in the cluster
Working with the cluster.xml FileThe cluster.xml file contains configuration information for a standalone server or for all serversin a cluster. This file resides in theMywebMethods Server database.MywebMethods Server addsnew servers to this file when you add nodes to a cluster, and modifies it when you make changesin the Cluster Administration page. You can also modify the cluster.xml file manually, as shownin “Renaming a Node” on page 184 and “Deleting a Node from a Cluster” on page 185.
The following fragment shows a basic configuration for a node in a cluster:<Component class="com.webmethods.portal.system.cluster.impl.Server"
enabled="true"name="server-one-node59581"><Properties host="server-one" name="http port="8585"/><Properties host="server-one" name="https" port="0"/><Role name="autodeploy"/><Role name="taskengine"/>
Administering My webMethods Server 10.3 193
12 My webMethods Server Clustering

<Role name="notification"/></Component>
The following table lists the properties, included in the sample fragment and describes their samplevalues:
Example valueProperty
server-one-node59581Node name
server-oneHost name
8585HTTP port
0—Indicates the HTTPS listener is disabled.HTTPS port
Indicates the cluster roles supported by this server are autodeploy, taskengine,and notification.
Roles
The following table lists the tasks that you perform by modifying the cluster.xml file:
DescriptionAction
Add a complete <Component> element to the file, as shown inthe preceding example. In this case, the node must already exist
Add a node
andmust use the sameMywebMethods Server database as othernodes in the cluster. The node name in the cluster.xml file mustagree with the node name in the custom_wrapper.conf file onthe host machine for that node, or must be specified in thecommand line used to start the node: mws -n nodeName start
Change the node name of a node.Rename a node
Edit any of the attributes for a node, including node name,HTTP,and HTTPS ports, and cluster roles.
Modify node attributes
Remove the complete <Component> element that defines thenode.
Delete a node
Edit the cluster properties, described in the cluster propertiestable.
Modify cluster configuration
The following table lists the cluster properties, you can configure using the cluster.xml file:
DescriptionProperty
The URL for the My webMethods Server cluster. Specifya fully qualified URL, for example:
frontEndUrl
http://host_name:port_number, orhttps://host_name:port_number. The default value is theURL of the first node of the cluster.
194 Administering My webMethods Server 10.3
12 My webMethods Server Clustering

DescriptionProperty
The HTTPS port that the My webMethods Server clusteruses for secure communication. The default value is -1,which means that no secure port is configured.
frontEndSecurePort
Enable or disable the distribution of JMS events betweenthe nodes of a cluster. Valid values are:
distributedEventsEnabled
true - enables JMS communication between the nodesin a cluster. Must be set to true for clusteredenvironments.
false - disables JMS communication between clusternodes. Use for standalone My webMethods Serverinstances only.
The default value for a clustered environment is true.
Editing the cluster.xml FileTo edit the cluster.xml file a My webMethods Server instance does not have to be running, butthe My webMethods Server database does.
To edit the cluster.xml file
1. At a command line prompt on anymachine that hosts a cluster node,move to the bin directoryof the server instance:
Software AG_directory \MWS\bin
2. To retrieve the cluster.xml file from theMywebMethods Server database, type this command:
mws getconfig cluster.xml
3. Open the cluster.xml file in a text editor.
You can find the file at this location:
Software AG_directory \MWS\server\serverName\config
4. Make a backup copy of the cluster.xml file.
5. Modify the contents of the cluster.xml file as needed.
6. To deploy the revised cluster.xml file to theMywebMethods Server database, at the commandline prompt type this command:
mws putconfig cluster.xml
Administering My webMethods Server 10.3 195
12 My webMethods Server Clustering

7. Delete the cluster.xml file from the \serverName\config directory.
If you do not delete the cluster.xml file, this node will continue to use the local version of thefile.
8. Restart the cluster, as described in “Restarting or StoppingAll Nodes in a Cluster” on page 191.
Backing Out of a Change to the cluster.xml FileIf you use the Cluster Administration page to make a change to a cluster.xml file that introducesan error, you can return to the previous configuration using the cluster.xml.bak file. A MywebMethods Server instance does not have to be running, but theMywebMethods Server databasedoes.
To back out of a change to the cluster.xml file
1. At a command line prompt on anymachine that hosts a cluster node,move to the bin directoryof the server instance:
Software AG_directory \MWS\bin
2. To retrieve the cluster.xml.bak file from the My webMethods Server database, type thiscommand:
mws getconfig cluster.xml.bak
3. Change the name of cluster.xml.bak to cluster.xml.
4. To deploy the revised cluster.xml file to theMywebMethods Server database, at the commandline prompt type this command:
mws putconfig cluster.xml
5. Delete the cluster.xml file from the \serverName\config directory.
If you do not delete the cluster.xml file, this node will continue to use the local version of thefile.
6. Restart the cluster, as described in “Restarting or StoppingAll Nodes in a Cluster” on page 191.
Creating a Cluster Node from an ImageOnemethod to create a cluster is to save an image of a machine with an installedMywebMethodsServer instance and other products, and move it to a new machine. This effort saves installationtime and results in an identical configuration on the new machine. It is recommended that youcreate an image of a fully initialized My webMethods Server instance instead of just a MywebMethods Server installation. The My webMethods Server instance becomes fully initialized
196 Administering My webMethods Server 10.3
12 My webMethods Server Clustering
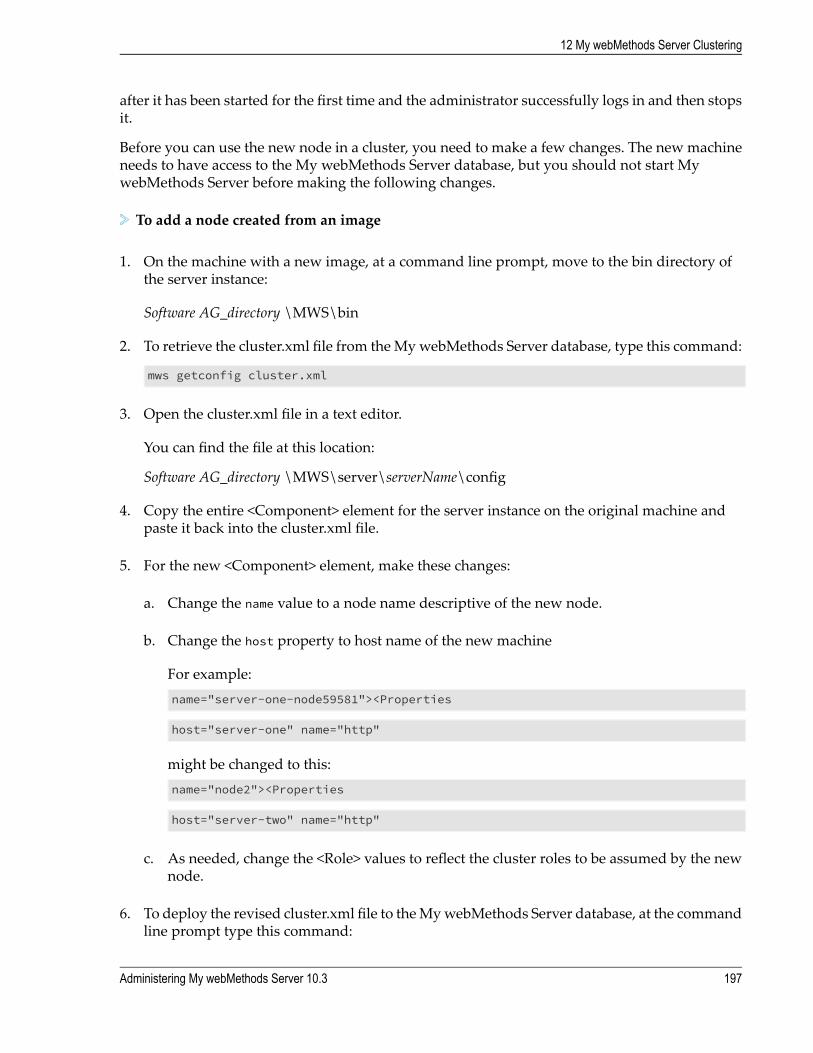
after it has been started for the first time and the administrator successfully logs in and then stopsit.
Before you can use the new node in a cluster, you need to make a few changes. The new machineneeds to have access to the My webMethods Server database, but you should not start MywebMethods Server before making the following changes.
To add a node created from an image
1. On the machine with a new image, at a command line prompt, move to the bin directory ofthe server instance:
Software AG_directory \MWS\bin
2. To retrieve the cluster.xml file from theMywebMethods Server database, type this command:
mws getconfig cluster.xml
3. Open the cluster.xml file in a text editor.
You can find the file at this location:
Software AG_directory \MWS\server\serverName\config
4. Copy the entire <Component> element for the server instance on the original machine andpaste it back into the cluster.xml file.
5. For the new <Component> element, make these changes:
a. Change the name value to a node name descriptive of the new node.
b. Change the host property to host name of the new machine
For example:name="server-one-node59581"><Properties
host="server-one" name="http"
might be changed to this:name="node2"><Properties
host="server-two" name="http"
c. As needed, change the <Role> values to reflect the cluster roles to be assumed by the newnode.
6. To deploy the revised cluster.xml file to theMywebMethods Server database, at the commandline prompt type this command:
Administering My webMethods Server 10.3 197
12 My webMethods Server Clustering

mws putconfig cluster.xml
7. Delete the cluster.xml file from the \serverName\config directory.
If you do not delete the cluster.xml file, this node will continue to use the local version of thefile.
8. Open the custom_wrapper.conf file for the server instance in a text editor. You can find thefile at this location:
Software AG_directory \profiles\MWS_serverName\configuration\
9. In the custom_wrapper.conf file, change the value of the NODE_NAME statement and savethe file:
set.NODE_NAME=nodeName
10. Start the My webMethods Server instance.
11. If the startup completes successfully, open a browser window and log into My webMethodsServer as SysAdmin, to verify it is running correctly.
12. Restart each node in the cluster.
You can restart nodes manually, or you can do so from within My webMethods Server, asdescribed in “Restarting or Stopping All Nodes in a Cluster” on page 191.
Partitioning Applications on Cluster NodesIn a My webMethods Server cluster, partitioning is the division of applications among nodes ofthe cluster. By configuring cluster partitions, you can control which applications run on a nodeandwhichdonot run. Partitioning is not the same as asymmetricalmode (“ComponentDeploymentin a MywebMethods Server Cluster” on page 174), which causes components to be deployed to anode manually. Partitioning controls the actual execution of components.
Why Would I Want Partitions?
There are several practical reasons why you might want to create partitions in your cluster:
Separation of clients
Through the use of load balancer rules, you can route one set of users to one node and anotherset of users to a different node. Users on a partition have access to only the set of applicationsyou choose to provide for them.
Better control over application management
Because you run certain applications only within one partition, it is easier to update anapplication while the rest of the cluster continues to operate normally.
198 Administering My webMethods Server 10.3
12 My webMethods Server Clustering

Cache stability and memory usage
If a particular node experiences slow performance due to heavy traffic, users on other nodesare not affected. In the current Task Engine architecture for example, tasks typically reside inan in-memory cache. The existence of too many task instances in the cache will overrun theavailable memory.
Guidelines for Partitions
There are a few things you should know about how partitions are created within a cluster:
By default, a cluster has a single partition. If there is only one partition, all nodes are part ofit, regardless of whether you have explicitly listed them as part of the partition.
Each node is part of a partition. Any nodes you have not specifically listed as part of a partitionbecome members of the last partition defined in the configuration files. See “Creating andModifying Partitions” on page 199.
Each partition is associatedwith a phaseProvider.xml file, which governs whether portlets areenabled or disabled. If a partition is not associated with a specific phase provider file, it isassociated with the default phase provider by default.
Creating and Modifying PartitionsBy default, there is one partition that includes all cluster nodes, as described in “The DefaultPartitionConfiguration” on page 202. To create ormodify additional partitions, you need tomodifythe partition configuration files.
My webMethods Server uses configuration files to manage partitioning on a cluster.
clusterPartitions.xml—Modify this file to add partitions to the cluster and assign nodes to eachpartition. See “The Cluster Partition File” on page 200.
partitionNamePhaseProvider.xml—Create and modify these files to specify whether portletsare enabled or disabled. See “The Phase Provider File” on page 200.
Each partition can have its own phase provider file. A partition that does not have a uniquephase provider associated with it uses the default phaseProvider.xml file.
partitionNamePortlets.properties—Create andmodify one of these files for each phase provider.This file lists the portlets affected by the phase provider for a specific partition. See “The PortletsProperties File” on page 201.
Each partition can have its ownportlets properties file. If all portlets in the partition are enabled,a portlets properties file is not required.
Note:File names and file contents are case sensitive.
My webMethods Server stores these configuration files in the My webMethods Server database.To get access to these files so you can modify them, see “Modifying Configuration Files Stored inthe Database” on page 73.
Administering My webMethods Server 10.3 199
12 My webMethods Server Clustering

The Cluster Partition File
The cluster partition file, clusterPartitions.xml, defines the partitions on the cluster and assignsnodes to each partition. The data structure for a partition in the clusterPartitions.xml file lookslike this:<ClusterPartitions>
<Partition name="partitionName"frontEndUrl="http://some.url.com"><Component name="componentName"></Component>
</Partition></ClusterPartitions>
where:
The table describes the expected values of configurable attributes in the clusterPartitions.xml file.
Is the name assigned to the partition. Other configuration files use thisname to identify the partition.
partitionName
An alternate Front End URL.some.url.com
The frontEndUrl attribute is optional, allowing the partition to use adifferent Front End URL than the cluster as a whole. If you omit thisattribute, the partition uses the frontEndUrl value in the cluster.xml file.
The name of a component (a cluster node) that is part of the partition.The component name is the same as the component name in thecluster.xml file.
componentName
Entries in clusterPartitions.xml conform to the following rules:
There is one Partition element for each partition in the cluster. There is always at least onePartition element.
Each Component element represents a cluster node that is a member of the partition. There canbe zero or more nodes specified for a partition.
If there is only one Partition element in the file, all cluster nodes aremembers of that partition,regardless of whether they are represented by a Component element.
Any cluster node not specifically represented within a Partition element is automatically amember of the last partition defined in the file.
The Phase Provider File
A phase provider file, partitionNamePhaseProvider.xml, determines whether portlets are enabledor disabled for a partition. Each partition can have its own phase provider file. A partition thatdoes not have a unique phase provider associated with it uses the default phaseProvider.xml file.The portion of the phase provider file that applies to this topic is in the portlet phase nested insidethe CoreServices phase:
200 Administering My webMethods Server 10.3
12 My webMethods Server Clustering

<!-- All services come on line --><Phase name="CoreServices" enabled="true"
class="com.webmethods.portal.system.init.impl.DefaultPhase">..
<PhaseInfo name="portlet" enabled="true"class="com.webmethods.portal.service.portlet.impl.PortletProvider"initFile="config:/adminPortlets.properties"initFileComponentsEnabled="false"
/>..
/>
where:
The following table describes the expected values of configurable attributes in the phase providerfile.
Specifies the portlets properties file containing a list ofportlets to be affected by the phase provider for thepartition.
initFile
Specifies whether the portlets listed in the partitionportlets properties file are to be enabled or disabled:
initFileComponentsEnabled
false: The listed portlets will be disabled.
true: The listed portlets are the only ones that willbe enabled.
In the example above, the portlets properties file is adminPortlets.properties and theinitFileComponentsEnabled attribute is false, meaning that file contains a list of portlets to bedisabled.
The initFile and initFileComponentsEnabled attributes are not required. If you omit theseattributes, all portlets are enabled in the partition.
Note:To create a new phase provider file for a partition, make a copy of the default phaseProvider.xmlfile and make changes as needed.
The Portlets Properties File
The portlets properties file, partitionNamePortlets.properties, lists the portlets affected by the phaseprovider for a specific partition. For development or testing purposes, you can override the phaseprovider for individual portlets.
The structure of the portlets properties file is simple. Each portlet resides on a separate line,followed by the = sign, as shown in this example:wm_task_chart___taskchart=wm_task_search___taskinboxsearchbar=
Administering My webMethods Server 10.3 201
12 My webMethods Server Clustering

wm_task_search___taskinboxsearchresults=wm_task_search___tlmsearchresults=wm_task_search___tlmsearchquery=
A portlets properties file is not required for a partition in which all portlets are enabled. In thiscase, you can omit the initFile and initFileComponentsEnabled attributes in the phase providerfile, which would otherwise manage use of the portlets properties file.
Temporarily Overriding the Phase Provider File
For development or testing, you can temporarily override the default behavior of the phase providerfor an individual file by prefixing a + or - sign to the = sign, as follows:
+=: Enables the portlet, regardless of the phase provider.
-=: Disables the portlet, regardless of the phase provider.
Say, for example, the initFileComponentsEnabled attribute is false, which causes all portlets listedin the portlets properties file to be disabled. To enable any portlet in the list above, change = to +=,such as this:wm_task_search___processsearchbar+=
When you later remove the + sign, the portlet will be disabled along with the other portlets in thelist.
The Default Partition Configuration
By default, there is one partition, named default, that includes all cluster nodes. The set ofconfiguration files for the default partition is:
clusterPartitions.xml—In the default state, this file defines only the default partition.
phaseProvider.xml—This phase provider file supports the default partition. These attributesare set:initFile="config:/defaultPartitionPortlets.properties"initFileComponentsEnabled="false"/>
defaultPartitionPortlets.properties—This file is empty by default.
In the default configuration, all portlets in the default partition are enabled.
Example: Creating Cluster Partitions
The following procedure shows the creation of cluster partitions by editing configuration files.This procedure is intended as a demonstration and is not a real-world example. Prior to thisprocedure, a cluster exists, having five nodes:
default
node2
202 Administering My webMethods Server 10.3
12 My webMethods Server Clustering
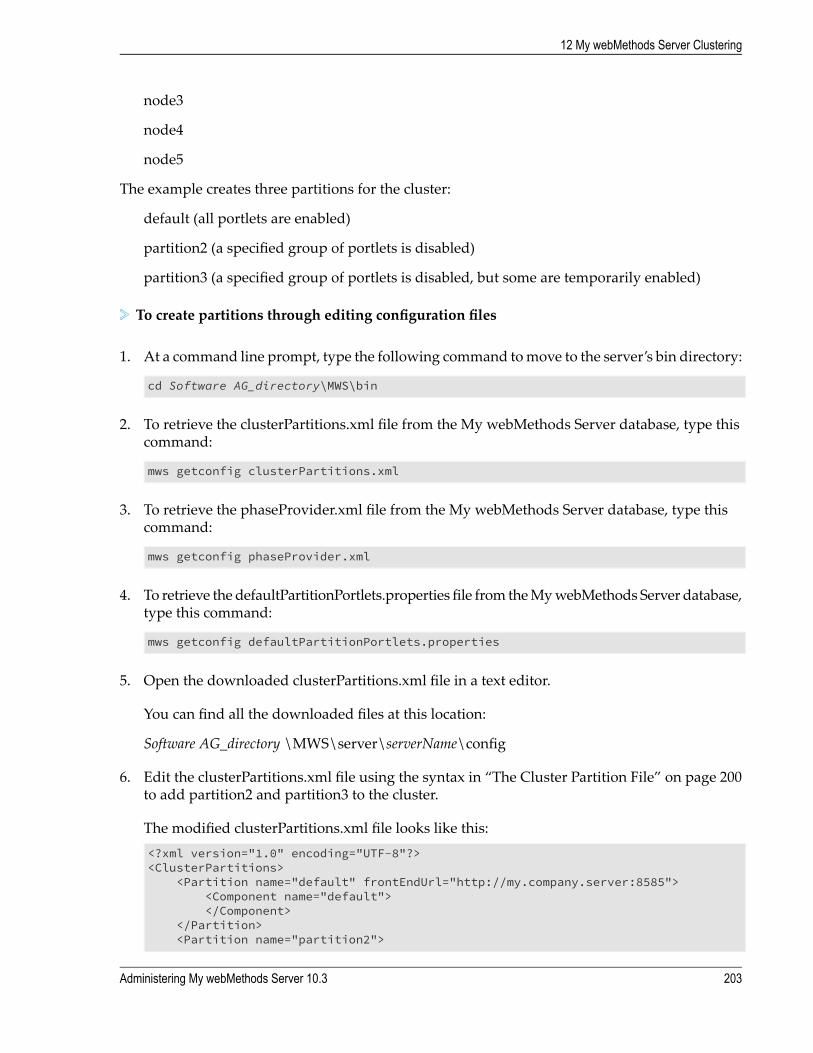
node3
node4
node5
The example creates three partitions for the cluster:
default (all portlets are enabled)
partition2 (a specified group of portlets is disabled)
partition3 (a specified group of portlets is disabled, but some are temporarily enabled)
To create partitions through editing configuration files
1. At a command line prompt, type the following command tomove to the server’s bin directory:
cd Software AG_directory\MWS\bin
2. To retrieve the clusterPartitions.xml file from the My webMethods Server database, type thiscommand:
mws getconfig clusterPartitions.xml
3. To retrieve the phaseProvider.xml file from the My webMethods Server database, type thiscommand:
mws getconfig phaseProvider.xml
4. To retrieve the defaultPartitionPortlets.properties file from theMywebMethods Server database,type this command:
mws getconfig defaultPartitionPortlets.properties
5. Open the downloaded clusterPartitions.xml file in a text editor.
You can find all the downloaded files at this location:
Software AG_directory \MWS\server\serverName\config
6. Edit the clusterPartitions.xml file using the syntax in “The Cluster Partition File” on page 200to add partition2 and partition3 to the cluster.
The modified clusterPartitions.xml file looks like this:<?xml version="1.0" encoding="UTF-8"?><ClusterPartitions>
<Partition name="default" frontEndUrl="http://my.company.server:8585"><Component name="default"></Component>
</Partition><Partition name="partition2">
Administering My webMethods Server 10.3 203
12 My webMethods Server Clustering

<Component name="node2"></Component><Component name="node3"></Component>
</Partition><Partition name="partition3"></Partition>
</ClusterPartitions>
Based on this file:
The default partition contains the default node
partition2 contains node2 and node3
partition3 contains node4 and node5 (the last partition in the file contains all nodes notspecifically assigned to other partitions)
7. Save and close the clusterPartitions.xml file.
As a result, the default partition is established according to the “The Default PartitionConfiguration” on page 202, with all portlets enabled.
8. Make a copy of phaseProvider.xml and name it partition2PhaseProvider.xml.
9. Open the partition2PhaseProvider.xml file in a text editor.
10. In the portlet phase nested inside the CoreServices phase, changedefaultPartitionPortlets.properties to partition2Portlets.properties so the file lookslike this:
<PhaseInfo name="portlet" enabled="true"class="com.webmethods.portal.service.portlet.impl.PortletProvider"initFile="config:/partition2Portlets.properties"initFileComponentsEnabled="false"/>
The phase provider now points to partition2Portlets.properties. BecauseinitFileComponentsEnabled is set to false, portlets listed in that file will be disabled.
11. Save and close the partition2Portlets.properties file.
12. Make a copy of defaultPartitionPortlets.properties and name it partition2Portlets.properties.
13. Open the partition2Portlets.properties file in a text editor and add a list of the portlets that areto be disabled in partition2.
For example:# These portlets will not be initialized.wm_task_chart___taskchart=wm_task_search___taskinboxsearchbar=wm_task_search___taskinboxsearchresults=wm_task_search___tlmsearchresults=wm_task_search___tlmsearchquery=
204 Administering My webMethods Server 10.3
12 My webMethods Server Clustering

In the user interface, these portlets have the following uses:
taskchart displays Task Charts
tlmsearchquery displays Task List Management
The remaining portlets display My Inbox
14. Save and close the partition2Portlets.properties file.
As a result, certain portlets will be disabled on partition2 (node2 and node3).
Note:The procedure steps for partition3 demonstrate how to temporarily override a phase providerfile. As a result, the steps are abbreviated because they largely duplicate the steps for partition2.
15. Make a copy of phaseProvider.xml and name it partition3PhaseProvider.xml.
16. In partition3PhaseProvider.xml change, defaultPartitionPortlets.properties topartitionPortlets.properties.
17. Make a copy of partition2Portlets.properties and name it partition3Portlets.properties.
As a result, partition3 is configured to disable the same portlets as partition2.
18. In partition3Portlets.properties, prefix the = at the end of the last two portlets with a +.
For example:# These portlets will not be initialized.wm_task_chart___taskchart=wm_task_search___taskinboxsearchbar=wm_task_search___taskinboxsearchresults=wm_task_search___tlmsearchresults+=wm_task_search___tlmsearchquery+=
Note:The choice of portlets is arbitrary for this example.
As a result, partition3 (node4 and node5) has the same portlets disabled as partition2, but asubset of the portlets are enabled.
19. To deploy the new and revised files to theMywebMethods Server database, type this commandfor each file:
mws putconfig fileName
20. Delete all of these files from the \serverName\config directory.
If you do not delete the files, cluster will continue to use the local version of the configurationfile.
Administering My webMethods Server 10.3 205
12 My webMethods Server Clustering

21. Restart each node in the cluster using this command:
mws - serverName restart
Changes to configuration files are not applied until after a restart.
Verifying That the Components Are Disabled
To verify that portlets are disabled in the scenario described in “Example: Creating ClusterPartitions” on page 202, you would take the following general actions.
1. In the clusterPartitions.xml file, assign a separate frontEndUrl attribute for each partition.
2. Browse to the Front End URL of the default partition2 and log in as My webMethodsAdministrator.
3. In the navigation pane, click Task List Management.
This choice corresponds to these portlets:wm_task_search___tlmsearchresults=wm_task_search___tlmsearchquery=
The Task List Management displays without errors
4. Browse to the Front End URL of partition2 and log in as My webMethods Administrator.
5. In the navigation pane, click Task List Management.
Because the portlets are disabled, you will see an error.
Viewing Partitions in the My webMethods Server User InterfaceTo create and modify partitions, you need to use the configuration files described in “CreatingandModifying Partitions” on page 199. But you can view information about existing partitions inthe My webMethods Server User Interface.
To view information about partitions
1. To navigate to the correct page, do one of the following:
In My webMethods: Navigate > Applications > Administration > My webMethods >Cluster Settings > Cluster Partitions.
As system administrator: Administration Dashboard > Configuration > ClusterAdministration > Cluster Partitions.
The following table lists the information that the Cluster Partitions page displays:
206 Administering My webMethods Server 10.3
12 My webMethods Server Clustering

PurposeColumn Name
The partition name as defined in the cluster partition file. You can clickthe partition name to display a pagewith information about the partition.
Name
The Front End URL used by the partition.Front End URL
The number of nodes in the partition.Nodes
The rule applied to the partition by the phase provider file, whichdetermines whether components are Enabled or Disabled.
Partition Rule
The number of components (web applications and portlets) in thepartition that are managed by the portlets properties file. The status of
ManagedComponents
managed components can differ from the Partition Rule set by the phaseprovider file. For status of individual components, see “TheComponentsTab of the Partition Page” on page 207.
— A link to the page containing specific information about thepartition.
Detail
2. To find information about a specific partition, click the Name column or .
The Nodes Tab of the Partition Page
The Nodes tab of a partition page contains information about the nodes that are part of thatpartition. The information on this tab reflects the nodes defined in the cluster partition file.
The following table lists the information that My webMethods Server displays on the Nodes tab:
PurposeColumn
The name assigned to the node, as defined in the cluster partition file.Name
The name of the host machine on which the node resides.Host
The HTTP port used by the node.HTTP Port
The port used by the HTTPS listener of the node. A value of 0 indicates theHTTPS listener is disabled.
HTTPS Port
The Components Tab of the Partition Page
The Components tab of a partition page contains information about the web applications andportlets that are part of that partition. The information on this tab reflects the settings you havecreated in the phase provider and partition properties files for the partition.
There are two tree views, depending on how you want to list the components:
Categories - lists components by category.
Administering My webMethods Server 10.3 207
12 My webMethods Server Clustering

Portlets - lists components in order, regardless of category.
To switch between the two views, choose the Category Tree View option or the Portlet TreeView option.
The following table describes the details that My webMethods Server displays for the availablecomponents:
PurposeColumn
A tree view of components. Expand a node to reveal the portlets that are partof the web application.
Component
(Portlets tree view only) The name of the category to which a componentbelongs. Examples are Administration and Communication.
Category
The name of the component as it is installed inMywebMethods Server. Thisname is different from the descriptive nameused in theComponent column.
Name
The status of the component. The status icons are:Status
The component is enabled in this partition.
The component is disabled in this partition.
208 Administering My webMethods Server 10.3
12 My webMethods Server Clustering
III System Administrator Functions
13 Attribute Providers ....................................................................................................... 211
14 Managing Security ....................................................................................................... 221
15 Analysis, Reporting, and Troubleshooting ................................................................... 261
16 My webMethods Server Configuration ........................................................................ 279
17 Managing My webMethods Server Content ................................................................ 305
18 Managing the User Interface ........................................................................................ 313
19 Working with the Common Directory Services API ...................................................... 335
20 Sending Mobile Notifications from My webMethods Server ....................................... 341
Administering My webMethods Server 10.3 209

210 Administering My webMethods Server 10.3
III System Administrator Functions

13 Attribute Providers
■ What are Attribute Providers? ...................................................................................... 212
■ Using Attribute Providers ............................................................................................. 213
■ Managing the Display of Principal Attribute Providers ................................................ 217
Administering My webMethods Server 10.3 211
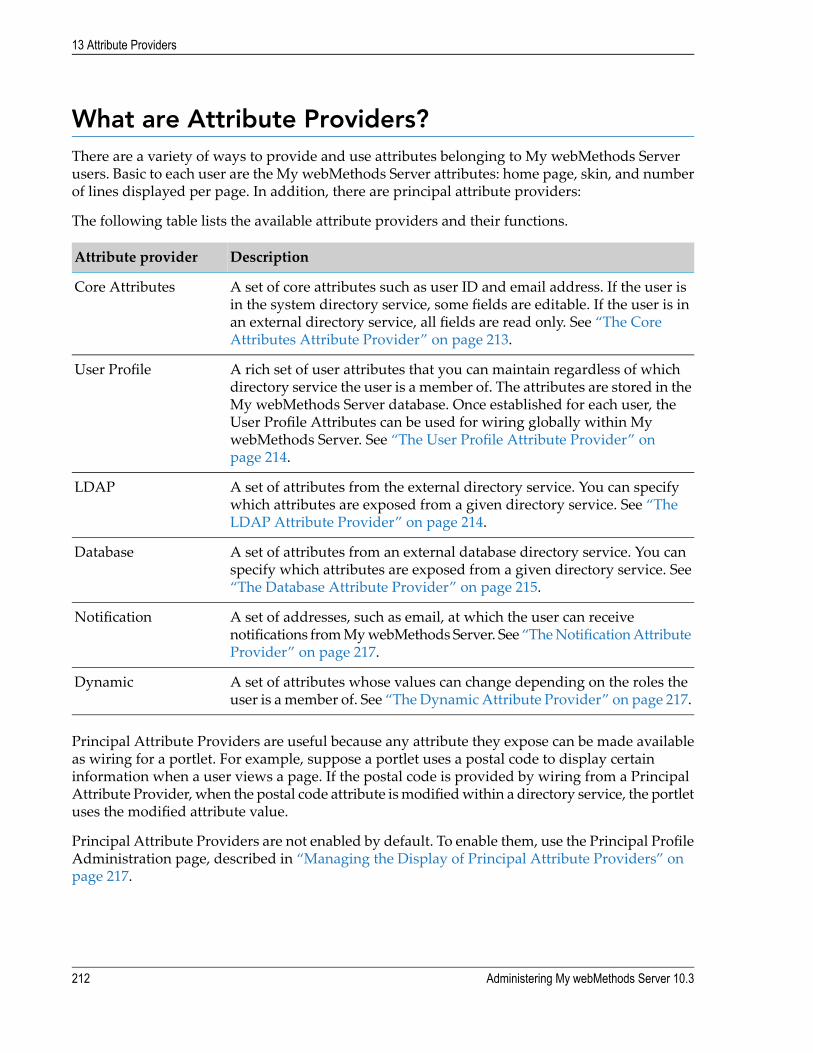
What are Attribute Providers?There are a variety of ways to provide and use attributes belonging to My webMethods Serverusers. Basic to each user are the My webMethods Server attributes: home page, skin, and numberof lines displayed per page. In addition, there are principal attribute providers:
The following table lists the available attribute providers and their functions.
DescriptionAttribute provider
A set of core attributes such as user ID and email address. If the user isin the system directory service, some fields are editable. If the user is in
Core Attributes
an external directory service, all fields are read only. See “The CoreAttributes Attribute Provider” on page 213.
A rich set of user attributes that you can maintain regardless of whichdirectory service the user is a member of. The attributes are stored in the
User Profile
My webMethods Server database. Once established for each user, theUser Profile Attributes can be used for wiring globally within MywebMethods Server. See “The User Profile Attribute Provider” onpage 214.
A set of attributes from the external directory service. You can specifywhich attributes are exposed from a given directory service. See “TheLDAP Attribute Provider” on page 214.
LDAP
A set of attributes from an external database directory service. You canspecify which attributes are exposed from a given directory service. See“The Database Attribute Provider” on page 215.
Database
A set of addresses, such as email, at which the user can receivenotifications fromMywebMethods Server. See “TheNotificationAttributeProvider” on page 217.
Notification
A set of attributes whose values can change depending on the roles theuser is a member of. See “The Dynamic Attribute Provider” on page 217.
Dynamic
Principal Attribute Providers are useful because any attribute they expose can be made availableas wiring for a portlet. For example, suppose a portlet uses a postal code to display certaininformation when a user views a page. If the postal code is provided by wiring from a PrincipalAttribute Provider, when the postal code attribute ismodifiedwithin a directory service, the portletuses the modified attribute value.
Principal Attribute Providers are not enabled by default. To enable them, use the Principal ProfileAdministration page, described in “Managing the Display of Principal Attribute Providers” onpage 217.
212 Administering My webMethods Server 10.3
13 Attribute Providers

Using Attribute ProvidersThe Profile page for a user, group, or role displays the various sets of attributes as well asmemberships in groups or roles. Depending on the directory service to which a user or groupbelongs, you can edit some attributes, or expose them for use in global wiring.
To see an example of the Profile page, as a system administrator, in the standard links, click MyProfile. The page displayed is the Profile page for SysAdmin.
To see the Profile page for any user, group, or role, follow this search procedure:
To find the Profile page for a user, group, or role
1. As system administrator: Administration Dashboard > User Management > ManageUser_type > Search.
where User_type is Users, Groups, or Roles.
2. Search for the user you want to edit. For more information, see “Searching for Existing Users,Groups, or Roles” on page 114.
3. In the search results, click any link in the row of the user, group, or role, or click .
The Profile page for the user, group, or role is displayed.
The Core Attributes Attribute ProviderThe Core Attributes Attribute Provider contains a set of attributes such as user ID and emailaddress. Some fields are editable, depending on directory service membership.
User Information Panel
For individual users, the contents of the Core Attributes Attribute Provider appears on the Profilepage as the User Information panel. For users in the system directory service, some fields, suchas the email address, are editable. To edit information in this panel, see “Editing Information fora User” on page 124.
For members of external directory services, this information is not editable, but it is available forthe global wiring feature described in “Wiring a Principal Attribute to a Portlet Property” onpage 364.
Group Information Panel
For groups, the contents of the Core Attributes Attribute Provider appears on the Profile page asthe Group Information panel. For groups in the system directory service, some fields, such as theemail address, are editable. To edit information in this panel, see “Editing Group Information” onpage 135.
Administering My webMethods Server 10.3 213
13 Attribute Providers

For groups in external directory services, this information is not editable but it is available for theglobalwiring feature described in “Wiring a Principal Attribute to a Portlet Property” on page 364.
Role Information Panel
For roles, the contents of the Core Attributes Attribute Provider appears on the Profile page as theRole Information panel. The fields are not editable, but the information is available for the globalwiring feature described in “Wiring a Principal Attribute to a Portlet Property” on page 364.
The User Preferences Attribute ProviderUser preferences are basic to any user of My webMethods Server. A My webMethods ServerAdministrator, system administrator, or the individual user (if given permission) can edit thesebasic attributes. To edit user preferences, see “Editing Information for a User” on page 124.
The User Profile Attribute ProviderTheUser ProfileAttribute Provider has a rich set of user attributes that you canmaintain regardlessof which directory service the user is amember of. The attributes are stored in theMywebMethodsServer database. Once established for each user, the User Profile Attributes can be used with theglobalwiring feature described in “Wiring a Principal Attribute to a Portlet Property” on page 364.
A My webMethods Server Administrator, system administrator, or the individual user (if givenpermission) can edit the User Profile attributes. You need to enter the user profile attributesindividually for each user, or allow the user to do so. You can use all of the attributes or a subsetthat is appropriate to your needs. To edit the User Profile attributes, see “Editing Information fora User” on page 124.
The LDAP Attribute ProviderThe LDAP Attribute Provider displays a specified set of attributes from the external directoryservice to which a user or group belongs. The attributes displayed in the LDAP Attributes panelare not editable but they are available for the global wiring feature described in “Wiring a PrincipalAttribute to a Portlet Property” on page 364.
Note:If the LDAPAttribute Provider is not enabled by default. See “Managing the Display of PrincipalAttribute Providers” on page 217.
This attribute provider is not applicable to users or groups in the system directory service. Similarattributes are included in the User Profile Attribute Provider described in “The User ProfileAttribute Provider” on page 214.
Displaying the LDAP Attribute Provider
You cannot modify the contents of the LDAP Attributes panel on a Profile page, but you candisplay it if needed. To search for the Profile page of a user or group, see “Searching for ExistingUsers, Groups, or Roles” on page 114.
214 Administering My webMethods Server 10.3
13 Attribute Providers

Exposing LDAP Attributes from an External Directory Service
The LDAPAttributes Provider displays user attributes that are exposed froman external directoryservice. You can expose selected attributes that are then available for the global wiring feature.
To expose LDAP attributes from an external directory service
1. As system administrator: Folders > System > Service* > Directory > Principal AttributeProviders > Provider_type.
where Provider_type is User Principal Attribute Providers or Group Principal AttributeProviders.
* You might have to click Next multiple times to find Service displayed in the table.
2. For Ldap Attributes, click , and then click Properties.
You should now be on the Properties of LDAP Attributes page.
3. Under LDAP Attribute Names, click Add.
4. Type the attribute name exactly as it is used in the external directory service and click OK.
For example, the attribute name for email on a particular directory service might be mail.
5. Under LDAP Attribute Titles, click Add.
6. Type a display name for the attribute for use within My webMethods Server and click OK.
For example, for the mail attribute, you might type a display name of Email.
7. If you havemultiple LDAP attributes, make sure the order in the LDAP Attribute Names andLDAP Attribute Titles lists are the same.
The order in which attributes and titles appear in the lists determine the order in which theyare displayed in the Ldap Attributes panel on the Profile page.
8. Click Apply.
The Database Attribute ProviderThe Database Attribute Provider displays a specified set of attributes from the external databasedirectory service to which a user or group belongs. The attributes displayed in the DatabaseAttributes panel are not editable but they are available for the global wiring feature described in“Wiring a Principal Attribute to a Portlet Property” on page 364.
Note:
Administering My webMethods Server 10.3 215
13 Attribute Providers

If theDatabaseAttribute Provider is not enabled by default. See “Managing theDisplay of PrincipalAttribute Providers” on page 217.
This attribute provider is not applicable to users or groups in the system directory service. Similarattributes are included in the User Profile Attribute Provider described in “The User ProfileAttribute Provider” on page 214.
Displaying the Database Attribute Provider
You cannot modify the contents of the Database Attributes panel on a Profile page, but you candisplay it if needed. To search for the Profile page of a user or group, see “Searching for ExistingUsers, Groups, or Roles” on page 114.
Exposing Database Attributes from an External Directory Service
The Database Attributes Provider displays user or group attributes that are exposed from anexternal database directory service. You can expose selected attributes that are then available forthe global wiring feature.
To expose database attributes from an external database directory service
1. As system administrator: Folders > System > Service* > Directory > Principal AttributeProviders >Provider_type.
where Provider_type is User Principal Attribute Providers or Group Principal AttributeProviders.
* You might have to click Next multiple times to find Service displayed in the table.
2. For Database Attributes, click , and then click Properties.
You should now be on the Properties of Database Attributes page.
3. Under Attribute Names, click Add.
4. Type the attribute name exactly as it is used in the external database directory service and clickOK.
Important:An attribute used here must be returned by the Query Lookup User by ID attribute in thedatabase directory service. See “Configuring an External Database Directory Service” onpage 96.
For example, the attribute name for postal code on a particular directory service might bezipcode.
5. Under Attribute Titles, click Add.
216 Administering My webMethods Server 10.3
13 Attribute Providers

6. Type a display name for the attribute for use within My webMethods Server and click OK.
For example, for the zipcode attribute, you might type a display name of Zip Code.
7. If you have multiple database attributes, make sure the order in the Attribute Names andAttribute Titles lists are the same.
The order in which attributes and titles appear in the lists determine the order in which theyare displayed in the Database Attributes panel on the Profile page.
8. Click Apply.
The Notification Attribute ProviderThe Notification Attribute Provider allows you to specify the various addresses at which a usercan receive notifications.A My webMethods Server Administrator, system administrator, or theindividual user (if given permission) can edit these basic attributes. To edit user preferences, see“Editing Information for a User” on page 124.
Note:The Notification Attribute Provider is not enabled by default. See “Managing the Display ofPrincipal Attribute Providers” on page 217.
User preferences are basic to any user of My webMethods Server. A My webMethods ServerAdministrator, system administrator, or the individual user (if given permission) can edit these.To edit user preferences and notifications, see “Editing Information for a User” on page 124.
The Dynamic Attribute ProviderThe Dynamic Attribute Provider allows you to provide an attribute for a role. A user, group, orrole that is amember of a role has all dynamic attributes of the role. If a user is amember ofmultipleroles, and multiple roles have attributes with the same key, you can determine which role willhave precedence. In addition, you can assign an attribute value to a user, overriding the attributevalues provided by roles. Dynamic attributes are available for the global wiring feature describedin To edit user preferences, see “Editing Information for a User” on page 124.
Note:TheDynamicAttribute Provider is valid only for roles. Users and groups have dynamic attributesbased on roles of which they are members.
For information on functions you can perform on dynamic attributes, see “Defining DynamicAttributes Associated with a Role” on page 166.
Managing the Display of Principal Attribute ProvidersIf all principal attribute providers were displayed on a profile page by default, the page would becrowded and potentially difficult to read. On the Principal Profile Administration page, you can
Administering My webMethods Server 10.3 217
13 Attribute Providers

choose which principal attribute providers to display on a profile page and the order in whichthey appear. You can set principal attribute providers for users, groups, and roles.
The following table lists the available principal attribute provider lists and the profile pages thateach list applies to:
Profile pageList
The Profile page for a user. By default, the Core AttributesProvider is displayed as the User Information panel. Other
USER Attribute Providers
default attribute providers are Groups, Roles, and UserPreferences. You can add any Principal Attribute Providerapplicable to an individual user.
The Profile page for a group. By default, the Core AttributesProvider is displayed as the Group Information panel. The
GROUP Attribute Providers
default attribute providers are Groups andGroupMembers. Youcan add any Principal Attribute Provider applicable to a group.
The Profile page for a role. By default, the Core AttributesProvider is displayed as the Role Information panel. The otherdefault attribute provider is Dynamic Attributes.
ROLE Attribute Providers
You can perform the following actions on the Principal Profile Administration page:
Add a principal attribute provider to the profile page.
Rearrange the position of principal attribute providers on the profile page.
Remove a principal attribute provider from the profile page.
Adding a Principal Attribute ProviderTo add a Principal Attribute Provider to a Profile page, use the following procedure.
To add a Principal Attribute Provider to a Profile page
1. As systemadministrator:Administration Dashboard > User Management > Principal ProfileAdministration.
2. In the USER, GROUP, or ROLE Attribute Providers area, click Add.
3. To specify the Principal Attribute Provider want to add, move it to the Selected Items boxand click Select.
4. At the bottom of the page, click Apply.
218 Administering My webMethods Server 10.3
13 Attribute Providers

Changing the Display Order for Principal Attribute ProvidersTo change the order in which Principal Attribute Providers appear on a Profile page, use thefollowing procedure.
To change the display order for Principal Attribute Providers
1. As systemadministrator:Administration Dashboard > User Management > Principal ProfileAdministration.
2. In the USER, GROUP, or ROLE Attribute Providers area, To reorder Principal AttributeProviders, move them up or down as needed.
The first attribute provider in the list has the left-most position on the Profile page, followedby the second attribute provider, and so on.
3. At the bottom of the page, click Apply.
Removing a Principal Attribute ProviderTo remove a Principal Attribute Provider from a Profile page, use the following procedure.
To remove a Principal Attribute Provider from a Profile page
1. As systemadministrator:Administration Dashboard > User Management > Principal ProfileAdministration.
2. In theUSER,GROUP, or ROLE Attribute Providers area, select a Principal Attribute Providerfrom the list and then click Remove.
3. At the bottom of the page, click Apply.
Administering My webMethods Server 10.3 219
13 Attribute Providers

220 Administering My webMethods Server 10.3
13 Attribute Providers

14 Managing Security
■ About My webMethods Server Security ....................................................................... 222
■ Managing Authentication ............................................................................................. 233
■ Configuring Kerberos Authentication .......................................................................... 236
■ Configuring NTLM Authentication ............................................................................... 240
■ Configuring NTLMv2 Authentication ........................................................................... 241
■ Configuring OAuth 2.0 Authentication ........................................................................ 243
■ Clearing Session Passwords from Memory .................................................................. 246
■ Retaining Session Passwords in Memory ..................................................................... 246
■ Turning On or Off Auto Complete for Usernames and Passwords .............................. 247
■ Controlling the Number of Failed Login Attempts ...................................................... 248
■ Controlling Login IP Ranges ......................................................................................... 248
■ Encrypting Passwords for Global Environment Variables ............................................ 251
■ Allowing Context Impersonation ................................................................................. 251
■ Using Password Complexity Policies ............................................................................ 252
■ Working with Response Header Rules ......................................................................... 255
Administering My webMethods Server 10.3 221
About My webMethods Server SecurityMy webMethods Server has many functions that contribute to its overall security infrastructure.When discussing security, it is always necessary to separate the discussion of authentication (Auth)from Authorization (AZ). While they are almost always related, the two concepts are distinct andwork together to contribute to an overall security solution.
Authentication is defined as an assurance that a party to some computerized transaction is not animpostor. Authentication typically involves using a password, certificate, PIN, or other informationthat can be used to validate identity. The goal of authentication is to simply verify that “you arewho you say you are.”
Authorization is defined as the process of determining, by evaluating applicable access controlinformation,whether a party is allowed to have the specified types of access to a particular resource.Usually, authorization is in the context of authentication. Once a party is authenticated, that partymay be authorized to perform different types of activities.
MywebMethods Server provides built-in infrastructure for both authentication and authorization.My webMethods Server is also designed in a way that allows it to be extended so that existingsecurity infrastructure can be re-used and leveraged for both authentication and authorization.
In My webMethods Server, you can apply both authentication and authorization to the entireserver or to individual server resources, which include folders, pages, portlets, links, documents,files, or custom objects.
Server AuthenticationMy webMethods Server supports many different ways for users to identify themselves. Thesedifferent methods are called Authentication Schemes. These schemes are simply different waysto gather user credentials and validate their authenticity.
Forms Authentication
Forms authentication is the default authentication scheme for My webMethods Server. Thisauthentication scheme presents a form to a user and gathers the necessary credentials that arepassed to the server by means of a form POST (data is passed to the server’s standard input). It issimple to customize the form or page that is used for authentication. It is also easy to presentdifferent forms and pages based on a wide variety of different criteria. For example, it is verylikely that youwouldwant to provide different login experiences for users accessing a server frommobile devices than for users accessing the server from a browser.
Anonymous Authentication
The anonymous authentication scheme is used when you do not want to challenge users forcredentials. My webMethods Server honors an anonymous request and establishes a session withthe server as a special Guest user, but the user is never prompted for credentials. The anonymousauthentication scheme is used for unprotected areas of the server that might be public facing anddo not contain sensitive information. By associating the request with a session and a user ID of
222 Administering My webMethods Server 10.3
14 Managing Security

Guest, an administrator can extend behaviors of anonymous access by controlling permissions ofthe Guest user. Guest is one of the default users installed as part of the system directory service.It is also possible to track session activity of anonymous users for reporting requirements.
Basic Authentication
Basic authentication is one of the original andmost compatible authentication schemes for programsusing HTTP as a transport mechanism. Unfortunately, it is also one of the least secure, as it sendsthe username and password unencrypted to the server. The credentials are typically passed in asHTTP header parameters. The user experience for basic authentication is a popup window thatrenders in the native windowing system. For example, when you use basic authentication onWindows, a Windows dialog box opens to prompt the user for credentials before the request canbe honored.
Kerberos Authentication
Kerberos is a network authentication protocol that allows secure communication between clientsand My webMethods Server over a non-secure network. The Kerberos authentication schemeprovides mutual authentication for clients and My webMethods Server, and validates identityusing symmetric encryption and a trusted third-party key distribution center (KDC).
You can configureMywebMethods Server to useKerberos authentication integratedwithWindowsauthentication for single sign-on.With this authentication scheme, a validMywebMethods Serveruser, already authenticated by Windows can access My webMethods Server without providingadditional credentials.
To configure single sign-onusingKerberos andWindows authentication, see “ConfiguringKerberosAuthentication” on page 236.
NTLM Authentication
NTLM (Windows NT LANManager) is an authentication protocol used in various Microsoftnetwork protocol implementations and supported by the NTLM Security Support Provider(NTLMSSP). Originally used for authentication and negotiation of secureDCE/RPC,NTLM is alsoused throughout Microsoft's systems as an integrated single sign-on mechanism. On Windowsdeployments, when NTLM is set up and configured as an authentication scheme for MywebMethods Server, users do not need to re-authenticate for server resources if they are alreadylogged into a Windows domain. You can choose either NTLM or NTLM version 2 (NTLMv2)authentication.
To use NTLM authentication you need to explicitly specify the Primary Domain Controller forthe domain, as described in “Configuring NTLM Authentication” on page 240.
To use NTLMv2, you need to purchase the Jespa Java software library from IOPLEX Software.For information on configuringNTLMv2, see “ConfiguringNTLMv2Authentication” on page 241.
Note:You can use either the webMethods NTLM authentication or NTLMv2, but not both at the sametime.
Administering My webMethods Server 10.3 223
14 Managing Security

HTTP Header Authentication
My webMethods Server can be configured to accept External HTTP authentication credentialsfrom third-party security and access control products (such as Computer Associates, Oblix, andso forth). These credentials are case sensitive, depending on platform andweb server and aremostlikely to be headers such as sm_user or SM_USER.
When you configure and set up HTTP header authentication within My webMethods Server, theserver uses credentials from a third-party authentication engine. Typically, these third parties usea security agent to intercept the request prior its getting to the server. The basic flow of events inthis request is:
1. The user attempts to go to a server resource.
2. Prior to connecting to the server, if the third-party security agent does not see the propercredentials, the agent redirects the user to a mechanism that gathers credentials.
3. The user provides the credentials and is then redirected back to the server resource.
4. The server reads the appropriate HTTP header and maps the user appropriately.
To configure this interaction between the server and the third-party security agent, you needto take these actions.
5. After My webMethods Server installation, configure the third-party product to protect theserver, which typically involves creating a policy that protects the server URL.
6. Verify that the server and the third-party security product are configured to look at the samedirectory store. For more information on directory services, see “Managing External DataSources” on page 103.
7. Configure the server to look for the rightHTTP header. Formore information, see “ConfiguringExternal Configuration Credentials” on page 284.
Note:In the case of SiteMinder from Computer Associates, it is also necessary to specify the LogoutURI in SiteMinder. In the SiteMinder Administrator applet, modify the logoutURI attributeto be '/?method=logout' (without the quotes)
Important:The HTTP Header Authentication Administration page should only be enabled if you areusing a third-party security provider. After the page is enabled, the server acts as though allusers have been authenticated.
Extended and Extensible Authentication Schemes
MywebMethods Server provides hooks for developers to provide their own custom authenticationschemes. To develop a custom authentication scheme, create a portlet, implement the correct
224 Administering My webMethods Server 10.3
14 Managing Security
interfaces, and register it with the server. Once created, the new authentication scheme participatesin the security infrastructure just like any other authentication scheme that is provided as part ofMy webMethods Server.
My webMethods Server has a concept of a default authentication scheme that is applied to anentire deployment. A newly configured server uses forms as its default authentication scheme.The server challenges initial requests for protected resources with a form requiring the user totype a user name and password.
At any time, you can change the default authentication scheme for a server to one of the registeredauthentication schemes. Formore information, see “Specifying aDefaultAuthentication Scheme” onpage 234.
Every server resource can have an authentication scheme that overrides the setting for the entiredeployment. For example, you might have one set of pages and portlets that are completelyanonymous and others that require user credentials to be presented. You would do this byassociating the anonymous authentication scheme with the resources that do not requireauthentication. For information onmanaging authentication schemes for individual server resources,see “Assigning an Authentication Scheme to a Server Resource” on page 234.
Extending Login and Splash Page Behavior
Tounderstand the login process and flowof events, it helps to analyze an example of howa systemadministrator would extend a deployment to have custom login page behavior. The following setof steps uses the concepts of anonymous access, forms-based authentication, and login pages toform a solution. Some of the steps require developer knowledge.
1. Design a page that has a login portlet on it. Once the page is created, set the authenticationscheme of the page to “anonymous” so everyone can get to the page and be presented withthe login portlet.
Optionally, you can set access rights on other parts of the page so that the login page hasdifferent appearances, depending on the identities of users. To address even broaderrequirements of personalizing the login page, it is also easy to set up custom login pages basedon rules themselves.
2. After setting the authentication scheme of the page to anonymous, make sure the login portletitself can be seen by a Guest user. For more information about the Guest user, see “ManagingDirectory Services” on page 84.
You may also want to modify the look and feel of the page by removing title bars, addingexplicit instructions, or implementing other business requirements.
3. You can control where a user is redirected after login. In the Properties page for the loginportlet, modify the Login Target property to the page where the user is redirected. Keep inmind that the Login Target be static or it can be an alias. If you use an alias like/user.current.start.page, you can alternatively set up start page rules to govern different startpages based on information about the user logging in.
Administering My webMethods Server 10.3 225
14 Managing Security

It is also possible to redirect a request, if not authenticated, to go to the appropriate login page.To do so, modify the Redirect URI property of the authentication scheme assigned to the page.When an unauthenticated user requests the page, the user is redirected to the specified page.As with login targets, a redirect URI can be either static or an alias.
Making a Custom Authenticator Available to Integration Server
If you implement a custom authenticator portlet to be usedwith a database directory service forMywebMethods Server, and if Integration Server is configured to use Common Directory Services,you need to take additional steps to enable authentication for users logging into Integration Server.
To make a custom authenticator available to Integration Server
1. Stop all webMethods components.
2. Open the custom authenticator .pdp file using the .zip extractor of your choice.
3. Extract the /WEB-INF/lib/custom_authenticator.jar from the .pdp (the name will vary withthe naming convention of your custom component).
4. Tomake the customauthenticator available to all Integration Server instances, copy the extracted.jar file into this location:
Integration Server_directory /lib/jars/
5. To make the custom authenticator available to a specific Integration Server instance, copy theextracted .jar file into this location:
Integration Server_directory /instances/serverName/lib/jars/
6. Modify Common Directory Services configuration files by doing the following:
a. Locate the following .jar file:
Software AG_directory \common\lib\wm-mws-library.jar
b. Extract these two files from the wm-mws-library.jar file.
initPortlets.propertiesinitXTypes.properties
c. Open each of these files in a text editor and use this syntax to add the name of the customauthenticator portlet as the last line of the file:
custom_authenticator=
Use the other portlet names in these files as examples.
d. Save each file and repackage them both in the wm-mws-library.jar file.
226 Administering My webMethods Server 10.3
14 Managing Security

7. Restart all webMethods components.
Security Assertion Markup Language
MywebMethods Server supports single sign-on through the SecurityAssertionMarkup Language(SAML), an XML-based framework for the exchange of security information. Using SAML, anapplication on a target computer grants access based on an assertion from the source computer.
My webMethods Server can be the calling program, or Security Provider, or can be configured toauthenticate the user sign-on for a target web application. Formore information, see “ConfiguringMy webMethods Server Single Sign-On” on page 290.
MywebMethods Server supports third-party identity provider (IDP) initiated single sign-on. Youcan configure My webMethods Server to use SAML 2.0 for exchanging authentication andauthorization data between My webMethods Server (Service Provider) and a third-party IDP. Inthis case, MywebMethods Server will be a SAML consumer and the third-party identity provider(IDP) will be the SAML authority. For information about configuring third-party IDP initiatedsingle sign-on, see “Configuring Single Sign-On for Using a Third-Party Identity Provider” onpage 294.
OAuth 2.0 Authentication
You can configure an OAuth 2.0 authentication flow in My webMethods Server, and log in to MywebMethods with credentials from an external identity provider, such as Google, Twitter, orSalesforce. In this authentication flow, My webMethods Server uses the OAuth 2.0 protocol withthe OpenID Connect identity layer as an authentication and authorization method.
When logging in using the OAuth 2.0 authentication flow, My webMethods Server redirects youto the authorization endpoint of the external identity provider, for example the GoogleAuthorization Server,where you supply your credentials. After authentication, the identity providerredirects you back to a My webMethods Server endpoint. My webMethods Server acquires IDandAccess tokens from the provider, validates the ID token, and requests a list of UserInfo claims.Based on the claims returned by the provider, My webMethods Server registers an internal useraccount and associates the account with a login session.
To configure OAuth 2.0 and OpenID Connect authentication flow in My webMethods Server, see“Configuring OAuth 2.0 Authentication” on page 243.
Server AuthorizationAfter a user request has been authenticated by the server, it is usually necessary to do someauthorization checks to make sure that the user making the request has the necessary privilege toact on that resource. InMywebMethods Server, themost commonway to do authorization checksis by evaluating Access Control Lists (ACLs). ACLs can be associated with every kind of serverresource, such as pages, portlets, and so forth.
More advanced concepts like verbs andmechanics (groupings of business logic) are server resourcesaswell, and therefore also participate in the ACL evaluationmodel. This feature allows developersto programmatically lock down capabilities of the server.
Administering My webMethods Server 10.3 227
14 Managing Security

To understand the authorization engine in My webMethods Server, look at the composition of anACL. An ACL is a list of Access Control Entries (ACEs). An ACE is a simple structure containingan element called a Principal and an element called a Right Set.
A Principal is a user, group or role. The following table lists examples of principals:
ExamplePrincipal
Myles PerkinsUser
Members of the Perkins familyGroup
A role definition that resolves to Myles, such as, “Users who have the ‘Job Titleattribute value set to ‘Product Manager.’
Role
Right Sets are groupings of actions that can be performed on a server resource. An example of aRight Set is “Grant the ability to read. Right Sets themselves are broken down into two distinctparts, Capabilities and Settings. Different types of server resources have different Capabilitiesassociated with them. For example, pages have Capabilities that include “Add Portlet To Page”while folders have Capabilities that include “Create Sub Folder” and “Can Read Items in thisFolder.”
The other part of a Right Set, the Setting, can have four possible values: DELEGATE, DENY,GRANT or NONE. Each Capability that makes up a Right Set has a Setting value. Right Sets aremade up of many Capability-Setting pairings. Here is an example of a Right Set:DENY + create sub folder
GRANT + read
This particular Right Set is made up of two Capability-Setting pairings. If associated with a folderresource, this Right Set is resolved to deny a Principal the ability to create sub folders but grantthe ability to actually read the folder.
The effects of each setting are described in the following table:
EffectSetting
Denies the access to perform the capability.DENY
Explicitly grants access to perform the capability.GRANT
Explicitly grants access and gives the right to assign the capability toanother Principal.
DELEGATE
Provides no explicit Setting. Authorization for this server resource willbe determined from another source.
NONE
The following figure shows the relationships described in this section.
Figure 4. Anatomy of an ACL
228 Administering My webMethods Server 10.3
14 Managing Security
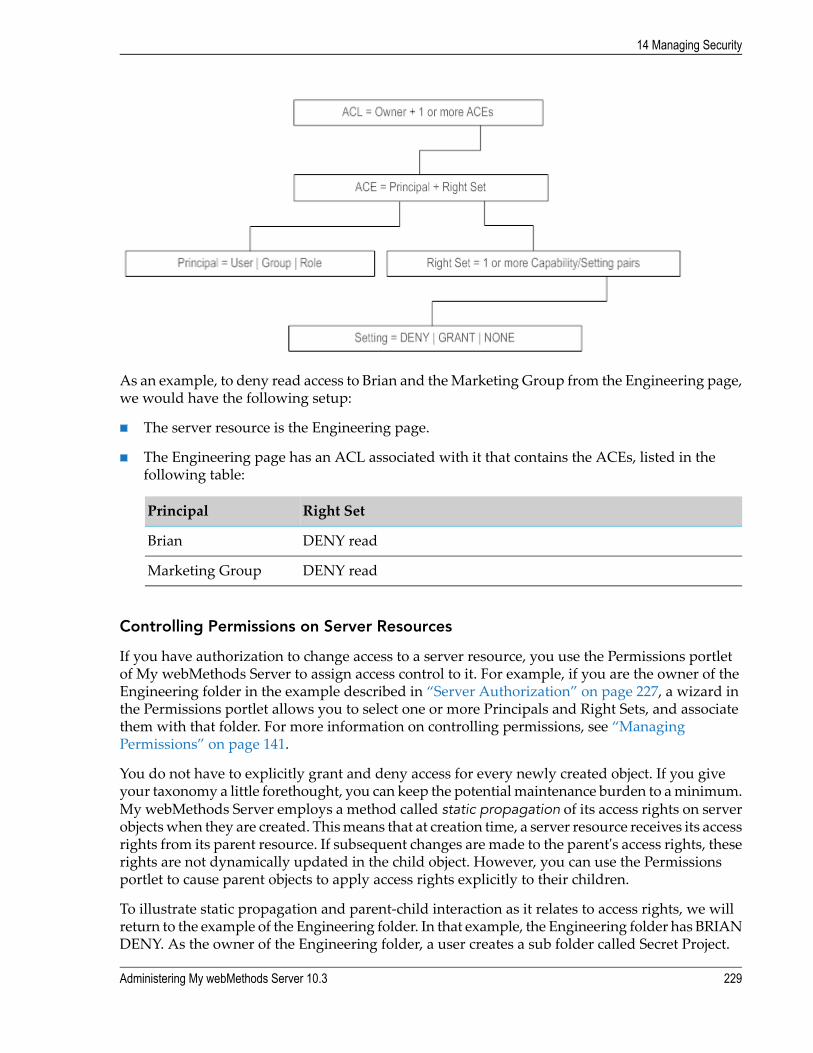
As an example, to deny read access to Brian and theMarketing Group from the Engineering page,we would have the following setup:
The server resource is the Engineering page.
The Engineering page has an ACL associated with it that contains the ACEs, listed in thefollowing table:
Right SetPrincipal
DENY readBrian
DENY readMarketing Group
Controlling Permissions on Server Resources
If you have authorization to change access to a server resource, you use the Permissions portletof My webMethods Server to assign access control to it. For example, if you are the owner of theEngineering folder in the example described in “Server Authorization” on page 227, a wizard inthe Permissions portlet allows you to select one or more Principals and Right Sets, and associatethem with that folder. For more information on controlling permissions, see “ManagingPermissions” on page 141.
You do not have to explicitly grant and deny access for every newly created object. If you giveyour taxonomy a little forethought, you can keep the potentialmaintenance burden to aminimum.My webMethods Server employs a method called static propagation of its access rights on serverobjectswhen they are created. Thismeans that at creation time, a server resource receives its accessrights from its parent resource. If subsequent changes are made to the parent's access rights, theserights are not dynamically updated in the child object. However, you can use the Permissionsportlet to cause parent objects to apply access rights explicitly to their children.
To illustrate static propagation and parent-child interaction as it relates to access rights, we willreturn to the example of the Engineering folder. In that example, the Engineering folder has BRIANDENY. As the owner of the Engineering folder, a user creates a sub folder called Secret Project.
Administering My webMethods Server 10.3 229
14 Managing Security

Because of static propagation, the new Secret Project folder has BRIAN DENY at the time ofcreation. If the owner goes back and changes the permissions of the Engineering Folder to allowBrian access, Brian still does not have access to the Secret Project sub folder.
Authorization DeterminationNow that you have a background in the concepts of making an authorization decision, you cansee how access is actually determined at run time. When a server resource is requested, the serverevaluates the ACL associated with that resource against the context in which the current requestis generated. If a user requests access to a page, the ACL for that page is evaluated to determinewhether the user request should be honored.
There are a few simple rules in determining authorization that handle a large percentage of anyconflicts that may arise:
DENY always takes precedence over Allow (It is good to be paranoid in dealingwith security)
Users always take precedence over groups and roles
To illustrate these rules and how they are applied to resolve conflict, we return to the exampleEngineering folder. In the following example, there are three ACE entries in the ACL associatedwith the Engineering folder:BRIAN + DENY READ
MARKETING GROUP + DENY READ
BRIAN + GRANT READ
If Brian is a member of the Marketing group (and even if he wasn't) he is denied access to theEngineering folder. The user-based ACE takes precedence over the group-based ACE so theMARKETINGGROUPACEhas no effect. Subsequently, the conflict between BRIANbeing grantedand denied access is resolved by denying access because DENY always wins.
Lists, pages, child objects and Searches
Asmentioned earlier, a Principal can be a user, group, or role. Information about a Principal comesfrom a directory service. My webMethods Server has an embedded system directory service,described in “Managing Directory Services” on page 84, as well as the ability to tie to externaldirectory servers. Examples of these external directory servers areActiveDirectory, LDAP servers,ADAM, and an RDBMS. In addition, group and role information for My webMethods Serverauthorization decisions is determinedwhen a user logs into the server. If a user's groupmembershipchanges during an active session, the change is not reflected in the server until the user logs outand logs back in. For more information about users, groups, roles, and directory services, see“Managing Users and Groups” on page 121.
Security Realms
MywebMethods Server provides a feature called Security Realms to augment its security model.Security Realms are collections of server resources that share the same ACL. The use of Security
230 Administering My webMethods Server 10.3
14 Managing Security
Realms makes it possible to easily manage permissions on large numbers of server resources. Byadding the resources directly to a Security Realm, a system administrator can add Principalinformation to that realm to control access.
Security Realms become very useful if you have a large number of server resources and only afew access levels. For example, you may have a large customer-facing server that has a largenumber of portlets, pages and areas of taxonomy. However, this server may only have three levelsof access that need tomanaged: Gold, Silver and Bronze.With each level represented by a SecurityRealmwith the appropriate pages, portlets and taxonomy elements in them, a system administratorneeds only to add a new customer to the appropriate Security Realm, granting the customer thecorrect level of access. Likewise, changing a customer from one level to another is a simple one-stepoperation.
Used in the appropriate deployments, Security Realms add value, not only by minimizing theadministrative burden, but by greatly reducing the number of underlying records required tosupport the security model. For example, assume a server has 500,000 server resources and youare managing permissions for 50 users, all of whom have the same access:
Managing permissions by ACL requires 25 million records in the My webMethods Serverdatabase.
Managing permissions by Security Realm uses one Security Realm and one role with 50members, requiring a total of three records in the My webMethods Server database.
It should be noted that if a server resource is added to a Security Realm, the Security Realm accesscontrol has precedence over an individual ACL and authentication scheme for that resource.
For information on managing Security Realms, see “Using Security Realms” on page 148.
Server Verbs and Access Control
A server verb is an operation such as publishing, deleting, updating, subscribing, and settingpermissions, which is available through the My webMethods Server API. As noted earlier, serververbs are server resources that can also participate in the security model of the server. In this way,one can control granular access to server capabilities programmatically as well as through theAdministrativeDashboard. It should be noted that server verbs typically have two levels of securitychecks, performed in this order:
1. Does the user have access to the server verb itself?
2. Does the user have the rights to the resource upon which the server verb is trying to act?
A system administrator can control access to server verbs using the Security RealmsAdministrativepage. My webMethods Server ships with default Security Realms to help administrators manageaccess to different server capabilities. For information about the default Security Realms, see “UsingSecurity Realms” on page 148.
Figure 5. Authorization Decisions in My webMethods Server
Administering My webMethods Server 10.3 231
14 Managing Security

232 Administering My webMethods Server 10.3
14 Managing Security

Managing AuthenticationAn authentication scheme is away to gather user credentials and validate their authenticity.WithinMy webMethods Server, you can manage authentication for a server as a whole by specifying adefault authentication scheme. As delivered, the forms authentication scheme is the default forall server resources. In addition, every server resource can have an authentication scheme thatoverrides the setting for the entire deployment.
Note:A Security realm always takes precedence over an authentication scheme.
The following table lists the authentication schemes that My webMethods Server uses:
DescriptionScheme
Allows unrestricted access to a server resource. Used for unprotected areasof the server that might be public facing and do not contain sensitive
Anonymous
information. Because a user is not challenged for credentials, the anonymousauthentication scheme is appropriate for login pages.
Presents a form to an unauthenticated user and gathers the necessarycredentials that are passed to the server. The forms authentication scheme is
Forms
the default for all server resources because it redirects unauthenticatedrequests to a default login page.
Typically passes credentials asHTTP header parameters. The user experiencefor basic authentication is a popup window that renders in the nativewindowing system.
Basic
Enables single sign-on for users onWindows.MywebMethods Server users,already authenticated by Windows, need not login again to access My
Kerberos
webMethods Server. For more information, see “Configuring KerberosAuthentication” on page 236.
Accepts external HTTP authentication credentials from third-party securityand access control products (such as Computer Associates, Oblix, and so
HTTP Header
forth). After this authentication scheme is enabled, the server ignores all otherauthentication schemes. For more information, see “Configuring ExternalConfiguration Credentials” on page 284.
Used for authentication in various Microsoft network protocolimplementations.OnWindowsdeployments,when theNTLMauthentication
NTLM
scheme is the default for a server, users do not need to re-authenticate forserver resources if they are already logged into aWindows domain. Formoreinformation on NTLM authentication, see:
“Configuring NTLM Authentication” on page 240
“Configuring NTLMv2 Authentication” on page 241
Administering My webMethods Server 10.3 233
14 Managing Security

DescriptionScheme
Supports single sign-on (SSO) through the Security Assertion MarkupLanguage (SAML). Using SAML, an application on a target computer grants
SAML
access based on an assertion from the source computer. Formore informationabout SSO, see “Configuring My webMethods Server Single Sign-On” onpage 290.
Allows users to login to My webMethods and access layered applications orother server resources, using credentials from a third-party identity provider.
OAuth 2.0
For more information, see “Configuring OAuth 2.0 Authentication” onpage 243.
Specifying a Default Authentication SchemeWhen My webMethods Server is initialized, the forms authentication scheme is the default. theforms authentication scheme redirects unauthenticated requests to a default login page. You canchange the default authentication scheme for My webMethods Server to one of the registeredauthentication schemes.
Note:Do not use this procedure if you intend to use the httpHeader authentication scheme to acceptcredentials from third-party security providers. Instead, use the HTTP Header AuthenticationAdministration page, described in “Configuring External ConfigurationCredentials” on page 284.
To change the default authorization scheme for My webMethods Server
1. As system administrator, click Administration Dashboard >Configuration > AliasManagement.
2. On the Keyword tab, type auth.scheme.default and click Search.
3. Click for auth.scheme.default.
4. On the Update Alias panel, click Browse and browse to Folders > System > AuthenticationSchemes.
5. Move the appropriate authentication scheme to Selected Items and click Select.
6. Click Update.
Assigning an Authentication Scheme to a Server ResourceEvery server resource can have an authentication scheme that overrides the default authenticationscheme forMywebMethods Server. The specific procedure depends onwhether or not the resource
234 Administering My webMethods Server 10.3
14 Managing Security
is a member of a Security Realm. The valid authentication schemes are described in “ManagingAuthentication” on page 233.
To assign an authentication scheme for an individual server resource
1. As system administrator:Home > Folders and then navigate to the individual server resource.
2. Click , and then click Permissions.
3. Click the Security Realm tab.
4. If the Security Realm Name field displays No Security Realm Assigned, do the following:
a. Click the Authentication tab.
b. From the Authentication Scheme list, choose the authentication scheme to apply to theserver resource and click Apply.
5. If the Security Realm Name field displays a Security Realm name, do the following:
a. Copy the Security Realm name, paste it into the input field of the page banner, and clickSearch.
As an alternative, you can navigate to Folders > Administrative Folders > AdministrationDashboard > Configuration > Security Realms Administration to locate the SecurityRealm.
b. Click and then click Permissions.
c. Click the Authentication tab.
d. From the Authentication Scheme list, choose the authentication scheme to apply to theSecurity Realm and click Apply.
Redirecting a User After LoginBy default, when a user logs into a server, redirects the user to the same page. You can alter theLogin Target property of the login portlet so a successful login redirects the user to a page of yourchoosing.
To redirect a user to another page after login
1. At the right edge of the title bar for the login portlet, click and then click Properties.
2. For the Login Target property, do one of the following:
Administering My webMethods Server 10.3 235
14 Managing Security
Click Browse and then move the target page to the Selected Items box and click Select.
Click Use Alias, and then type the alias of the page to which the user should be redirectedin the Alias Name field. Click Test to determine if the alias is valid and the alias target isthe correct one. If the alias is correct, click Select.
Note:If you type /user.current.start.page, the user is redirected to the start page defined bystart-page rules.
3. Click Apply.
Redirecting an Unauthenticated RequestUsing the forms authentication scheme, an unauthenticated request to a protected server resourceresults in the user being redirected to a default login page. Alternatively, you can redirect the userto a target of your choosing, whether it is a custom login page or a page that provides unprotectedcontent.
To redirect an unauthenticated request to a different page
1. As systemadministrator, clickAdministration > Folders > System > Authentication Schemes.
2. Click for the default authentication scheme, and then click Properties.
By default, the forms authentication scheme redirects unauthorized requests to the defaultlogin page. You can verify that an authorization scheme is the default by looking at theProperties page. The Aliases list contains the auth.scheme.default alias.
3. In the Performs Redirect list of the Properties page for the authentication scheme, make sureYes, this performs a redirect is selected.
4. Under Redirect URI, do one of the following:
Click Browse, and then move the target page to the Selected Items box and click Select.
ClickUse Alias, and then type the name of the alias to which the user should be redirectedin the Alias Name field. Click Test to determine if the alias is valid and the alias target isthe correct one. If the alias is correct, click Select.
5. Click Apply.
Configuring Kerberos AuthenticationPerform the following high-level steps to enable single sign-on for My webMethods Server withWindows Integrated Authentication and Kerberos:
236 Administering My webMethods Server 10.3
14 Managing Security

1. Configure Active Directory, and the Windows Server that hosts Active Directory as the KDCfor Kerberos authentication
2. Configure a directory service for the Active Directory, and Kerberos authentication in MywebMethods Server
3. Configure web clients for single sign-on with Kerberos.
If authenticating a request using SSOwith Kerberos fails, for example, because an exception occurswhen processing theKerberos token,MywebMethods Server uses the default forms authenticationscheme and redirects unauthorized requests to the login page. If you change the defaultauthentication scheme or the target page for unauthorized requests, My webMethods Server usesthe new default scheme, or page.
When your environment includes multiple web clients, you can configure only specific clients touse Kerberos authentication. Unconfigured web clients display a blank page when the Kerberosauthentication scheme is used for logging in to My webMethods Server. In this case, users canrefresh the web clients to use the default authentication scheme and log in using the login page.
Configuring Windows Server and Active Directory for KerberosAuthenticationPerform the following steps to configure Active Directory as the key distribution center (KDC)for Kerberos authentication. Unless indicated otherwise, perform the steps on theWindows Servermachine that hosts Active Directory.
To configure Active Directory as the key distribution center for Kerberos authentication
1. Configure a user account for the Kerberos principal in Active Directory. Do not select anyencryption. The default encryption is RC4.
2. Create a Service Principal Name (SPN) and a keytab file using the ktpass command line utilityand the following command:
ktpass -out <Keytab_File_Name>.keytab -princHTTP/<FQDN_of_Active_Directory_Server>@<Domain_Name> -mapUser<FQDN_of_Active_Directory_Server>@<FQDN_of_MWS_Server_Machine> -mapop
set<MWS_Server_User_Password> -crypto all -ptype KRB5_NT_PRINCIPAL -kvno 0
Example:ktpass -out MWS_Kerberos_User.keytab -princ HTTP/[email protected] [email protected] set -pass pass12345 -crypto all-pType KRB5_NT_PRINCIPAL -kvno 0
Where MWS_Kerberos_User is the name of the keytab file, Bob is the user, and SPARTA.RNDLAB.LOCis the fully qualified domain name of the AD server.
3. Copy the keytab file to any directory of the machine that hosts My webMethods Server.
Administering My webMethods Server 10.3 237
14 Managing Security

4. Verify that the keytab file is created correctly by executing the following java command from<JAVA_INSTALL> /jre/bin:
kinit -J-Dsun.security.krb5.debug=true -k-t <Keytab_file_absolute_path> HTTP/<FQDN_of_Active_Directory_Server>
Configuring My webMethods Server for Kerberos AuthenticationUse the following procedure to configure My webMethods Server for Kerberos authentication.
To configure My webMethods Server for Kerberos authentication
1. Log in toMywebMethods Server asAdministrator and configure LDAP for theActiveDirectoryconfigured for Kerberos authentication server or create client user accounts inMywebMethodsServer. Even the user account for the Windows server machine must be included in LDAP orMy webMethods Server user accounts.
For information about configuring LDAP, see “Configuring an External LDAP,ADSI, orADAMDirectory Service” on page 86.
2. Edit and save the Software AG_directory \profiles\MWS_default\configuration\jaas.conf fileto include the code below to the end of the file:
spnego-server{com.sun.security.auth.module.Krb5LoginModule requireddoNotPrompt=trueprincipal="HTTP/<FQDN_of_Active_Directory_Server>"useKeyTab=truekeyTab="<Keytab_file_absolute_path>"storeKey=trueisInitiator=falsedebug=false;};
3. Edit and save the Software AG_directory\profiles\MWS_default\configuration\custom_wrapper.conf file to include the propertiesmentioned below:
wrapper.java.additional.602=-Dsun.security.krb5.debug=falsewrapper.java.additional.603=-Djavax.security.auth.
useSubjectCredsOnly=false
4. Restart My webMethods Server.
5. Log in to My webMethods Server as system administrator.
6. Navigate to Configuration > KerberosAuthentication Administration and provide theappropriate values for the Realm (specify all the machines managed by KDC) and the KDCserver.
238 Administering My webMethods Server 10.3
14 Managing Security

7. Navigate toConfiguration > Alias Management and change the default authentication schemefor My webMethods Server to Kerberos. For instructions, see “Specifying a DefaultAuthentication Scheme” on page 234.
8. Restart My webMethods Server.
Configuring Web Clients to Use Kerberos Authentication
Configure Internet Explorer to Support Kerberos Authentication
To configure Internet Explorer
1. In Internet Explorer, navigate to Tools > Internet Options.
2. Click Security and do the following:
a. Select Local Intranet zone.
b. Click Sites.
c. Clear the Automatically detect intranet network checkbox.
d. Select all these options:
Include all local (intranet) sites not listed in other zones
Include all sites that bypass the proxy server
Include all network paths (UNCs)
e. ClickAdvancedand ensure that theWindows Server address is listed in the Websites list.
For the Windows Server address, see “ConfiguringWindows Server and Active Directoryfor Kerberos Authentication” on page 237.
f. Click Close and OK to return to the Security screen.
g. To set the security level, click Custom level and scroll to User Authentication in SecuritySettings, and select Automatic logon only in Intranet zone, if not already selected.
3. If you have a proxy server configured, include the server domain by doing the following:
a. InConnections > LAN Settings > Proxy Server, selectUse a proxy server for your LAN.
b. Click Advanced > Exceptions, add Active Directory domain name.
Administering My webMethods Server 10.3 239
14 Managing Security
Configure Mozilla Firefox to Support Kerberos Authentication
To configure Mozilla Firefox
1. Enter about:config in the address bar and press Enter.
2. Scroll down to network.negotiate-auth.trusted-uris and double-click it.
3. Add or change the existing value to add the configured the Windows server domain name tothe trusted URIs list. Use comma-separated list of URIs.
Configure Google Chrome to Support Kerberos Authentication
To configure Google Chrome
1. Start Google chrome in command line by using Chrome.exe--auth-server-whitelist="*.Active_Directory_Domain_Name” command.
Configuring NTLM AuthenticationUsing NTLM authentication, a user who has logged into a Windows domain does not have tore-authenticate to log in to a server. A Primary Domain Controller is a Microsoft Windows serverresponsible for handling all accounts in a domain. To useNTLMauthentication, youmust explicitlyspecify the Primary Domain Controller in the NTLM Authentication Scheme.
To specify a Primary Domain Controller for NTLM authentication
1. If you have NTLMv2 authentication configured, you need to disable it. For more information,see “Disabling NTLMv2 Authentication” on page 242.
2. As system administrator, click Administration Dashboard > Configuration > NTLMAuthentication Administration.
3. In theDomain Controller Namefield of the Properties page, type the hostname of the PrimaryDomain Controller and click Submit.
Disabling NTLM AuthenticationIf you have NTLM enabled, you need to disable it before configuring NTLMv2.
To disable NTLM Authentication
240 Administering My webMethods Server 10.3
14 Managing Security

1. As system administrator, click Administration Dashboard > Configuration > NTLMAuthentication Administration.
2. In theDomain Controller Name field, delete all characters including spaces and click Submit.
Configuring NTLMv2 AuthenticationTo use NTLM version 2 (NTLMv2), you need to purchase and install latest version of the JespaJava software library from IOPLEX Software.
To configure NTLMv2 authentication
1. If you have NTLM authentication configured, you need to disable it. For more information,see “Disabling NTLM Authentication” on page 240.
2. Install and configure the Jespa Java software library, as described in the documentation providedwhen you download Jespa.
The Jespa library should be located here:
Software AG_directory /MWS/lib/
3. Stop My webMethods Server.
4. Extract jcifs-1.3.17.jar from wm_ntlmv2authadmin.pdp, which you can find at this location:
Software AG_directory /MWS/components/admin/configuration/ wm_ntlmv2authadmin.pdp
5. Copy jespa-1.1.11.jar from the Jespa Java software library and jcifs-1.3.17.jar to this location:
Software AG_directory /MWS/lib
6. From the command line, run mws update.
7. Restart My webMethods Server.
8. As system administrator, click Administration Dashboard > Configuration > NTLMv2Authentication Administration.
9. In the NTLMv2 Enabled field, make sure Yes, NTLMv2 is enabled is set.
10. Configure the properties in the remaining fields according to the information provided in theJespa documentation.
11. If you want to test the configuration, select Yes, test configuration before save.
Administering My webMethods Server 10.3 241
14 Managing Security

12. Click Submit.
13. To make sure the new library is configured:
a. At a command line prompt, type the following command to move to the server’s bindirectory:
cd Software AG_directory\MWS\bin
b. Type mws stop.
c. Type mws update.
d. Type mws start.
Disabling NTLMv2 AuthenticationIf you have NTLMv2 enabled, you need to disable it before configuring NTLM.
To disable NTLMv2 Authentication
1. As system administrator, click Administration Dashboard > Configuration > NTLMv2Authentication Administration.
2. In the NTLMv2 Enabled field, make sure No, NTLMv2 is disabled is set and click Submit.
3. Delete the Jespa and Java CIFS libraries from this location:
Software AG_directory /MWS/lib/ext
4. To de-reference the libraries and reconfigure the server:
a. At a command line prompt, type the following command to move to the server’s bindirectory:
cd /Software AG_directory\MWS\bin
b. Type mws stop.
c. Type mws update.
d. Type mws start.
242 Administering My webMethods Server 10.3
14 Managing Security
Configuring OAuth 2.0 AuthenticationWith the OAuth 2.0 authentication scheme, users can log in to My webMethods using accountsfrom Google , Twitter, Salesforce, or another identity provider that supports the OAuth 2.0 andOpen IDConnect protocols and exposes a discovery service. You can controlwhat server resources,or layered products the users can access, based on user roles and role attributes. You configurethe user roles to accept claims, submitted by the identity provider to determine user membershipdynamically at login. You can configuremultipleOAuth 2.0 services for different identity providersin My webMethods Server.
Users and Roles for External Accounts
By default, My webMethods Server creates a new system user for each external account, that logsin using the OAuth 2.0 authentication scheme. These system users are assigned to a default rolenamed OAuthSinkRole. You can create and configure a custom role to use for assigning OAuth2.0 authenticated users. Formore information aboutMywebMethods Server roles, see “ManagingRoles and Access to My webMethods” on page 155.
Optionally, you can also create a custom service that registers internal users for the external useraccounts. For more information, webMethods CAF and My webMethods Server Java API Reference.
Configuring an Authentication Flow over OAuth 2.0 and OpenIDConnectTo enable users to log in to MywebMethods with credentials from third-party identity providers:
1. Register My webMethods Server with the authorization server/identity provider. For moreinformation, see “RegisteringMywebMethods Server with an Identity Provider” on page 243.
2. Configure an OAuth 2.0 service in My webMethods Server. For more information, see “Configuring an OAuth 2.0 Service” on page 244.
3. Customize the My webMethods login page, or create a custom login page that redirects usersto the identity provider. For more information, see “Customizing the My webMethods LoginPage for OAuth 2.0 Authentication” on page 245.
Registering My webMethods Server with an Identity ProviderSee the official documentation of your authorization server/identity provider for information howto registerMywebMethods Server as a client application. Youwill need the following informationfrom your registration with the identity provider to configure an OAuth 2.0 service in MywebMethods Server later:
The URL of the discovery service of your OpenID Connect Provider
The OAuth 2.0 client identifier for My webMethods Server
The OAuth 2.0 client secret for My webMethods Server
Administering My webMethods Server 10.3 243
14 Managing Security

The redirection URLs, preregistered at the OpenID Connect Provider
The access claim that allows registering users in My webMethods Server
Configuring an OAuth 2.0 ServiceBoth Administrator and sysadmin users can add, remove, or modify OAuth 2.0 services.
To configure a new OAuth 2.0 service
1. Navigate to the OAuth2 Administration page and click the Add OAuth Configuration tab.
As sysadmin: Folders > My webMethods Applications > Fabric Tasks > Administration> My webMethods > OAuth2 Administration
As Administrator: Applications > Administration > My webMehods > OAuth2Administration
2. On the Add OAuth Configuration tab, specify:
The following table lists the properties, required to configure an OAuth service:
DescriptionField
Required. The name of the OAuth 2.0 service.Name
Required. Select an option from the drop-down list toenable or disable the OAuth 2.0 service. By default,newly created services are enabled.
Service Enabled
Required. The URL of the discovery service of theOpenID Connect provider, from your registration withthe provider.
Discovery Document URL
Required. The OAuth 2.0 client identifier, valid at theauthorization server, from your registration with theprovider.
OAuth 2.0 Client Identifier
Required. The client secret to use for OAuh 2.0authorization, from your registrationwith the provider.
OAuth 2.0 Client Secret
Required. The scope of the requested authorization, asdefined by OpenID Connect. The default is
OpenID Connect Scopes
openid,profile,email. For more information aboutavailable scopes, see the identity providerdocumentation.
Required. The My webMethods Server URL that youprovided when registering with the identity provider.
Redirection URI
244 Administering My webMethods Server 10.3
14 Managing Security

DescriptionField
Required. The name of the OpenID Connect provider.My webMethods Server displays this name on the
OpenID Connect Provider Name
preconfigured Login with provider_name button. Formore information, see “Customizing the MywebMethods Login Page for OAuth 2.0Authentication” on page 245.
Optional. The access claim that allows registering usersinMywebMethods Server. Formore information about
Access Claim
available claims, see the identity providerdocumentation.
Optional. The name of a custom service that createsinternalMywebMethods users for the external accounts,
User Service Name
authenticated using the OAuth 2.0 flow. For moreinformation about users and roles in the OAuth 2.0authentication flow, see “Configuring OAuth 2.0Authentication” on page 243.
Optional. The name of the role to inject with customOAuth attributes. My webMethods users that
Role Name
authenticate using the OAuth 2.0 flow will be assignedto this role. The default is OAuthSinkRole.
Optional. The list of claims to add to the membershipattributes of the role. Specify a comma-separated list of
Role Members Attribute
claims. For more information about available claims,see the identity provider documentation.
3. Click Submit.
When you submit the configuration, My webMethods Server generates an authentication URL inthe Auth URL field. This URL is required to add the OAuth 2.0 configuration as a login option.For more information about adding OAuth 2.0 authentication to the My webMethods login page,see “Customizing the My webMethods Login Page for OAuth 2.0 Authentication” on page 245.
Customizing the My webMethods Login Page for OAuth 2.0AuthenticationYou can add a login button with the name of the external provider to the default login options onthe My webMethods. The provider name on the button is the same as the OpenID ConnectProvider Name that you specified on the Add OAuth2 Configuration tab.
To add an OAuth 2.0 login option
Administering My webMethods Server 10.3 245
14 Managing Security

1. As sysadmin, navigate to Folders > System > Portlets > Administration > OAuth ProviderConfigurations.
2. ClickTools > Edit page, and thendrag the Login portlet to theOAuth Provider Configurationspage.
3. If required, modify the portlet preferences and save your changes.
Modify the login page rules to display theOAuthConfiguration towhich you added a login portletas the default My webMethods login page. For more information about login page rules, see“Creating Login Page Rules” on page 317.
Clearing Session Passwords from MemoryBy default, when a user logs in, the password is stored until the user logs out or until the sessiontimes out. You can, however, cause My webMethods Server to clear passwords from memoryimmediately after the login is completed. This setting clears all passwords presented to MywebMethods Server; you cannot clear passwords on a case-by-case basis.
To clear session passwords from memory
1. As system administrator, click Administration > Folders > System > Managers >sessionManager > default > validate.
2. At Configuration XML, click Edit.
3. In the Edit Text Area, change this text:
clearPassword= false
to this:clearPassword= true
4. To save the file and close the editor, click Update.
5. Click Apply.
This setting remains until you change it, even if you stop and restart My webMethods Server.
Retaining Session Passwords in Memory
To retain session passwords in memory
246 Administering My webMethods Server 10.3
14 Managing Security

1. As system administrator, click Administration > Folders > System > Managers >sessionManager > default > validate.
2. At Configuration XML, click Edit.
3. In the Edit Text Area, change this text:
clearPassword= true
to this:clearPassword= false
4. To save the file and close the editor, click Update.
5. Click Apply.
Turning On or Off Auto Complete for Usernames andPasswordsWhen a user logs on to My webMethods Server, the browser allows the user to remember theusername and password. You can configure the My webMethods Server login portlet to turn onor off the auto complete functionality. By default, auto complete is turned on.
To turn on or off auto complete for usernames and passwords
1. As system administrator, go to Folders > My webMethods Applications > webMethodsApplication Data > My webMethods Login Page.
2. Append ?layout=details to the end of theMywebMethods Server URL in the browser addressbar to display the login portlet.
3. Click for the login portlet and select Properties.
4. Do one of the following:
To turn off auto complete for usernames and passwords, clear the Allow Auto Completecheck box.
To turn on auto complete for usernames and passwords, select the Allow Auto Completecheck box. The check box is selected by default.
5. Click Apply.
Administering My webMethods Server 10.3 247
14 Managing Security

Controlling the Number of Failed Login AttemptsMy webMethods Server controls the number of failed login attempts it will allow before ittemporarily locks the user account. On the Failed Logins Administration, system administratorscan configure the maximum number of failed login attempts for My webMethods users, and theperiod of time for which My webMethods Server suspends subsequent login attempts.
Changes on the Failed Logins Administration page affect all logins to the server.
To control the number of failed login attempts
1. As system administrator, click Administration Dashboard > Configuration > Failed LoginsAdministration.
2. In the Configure Failed Logins Behavior section, specify:
The following table lists the properties to configure to control the number of failed login attempts:
DescriptionProperty
The time interval in milliseconds between subsequent checksfor failed login attempts. The default is 30000.
Window Duration
The maximum number of login attempts during the windowduration. The default is 10.
Max Attempts in Window
The time interval in milliseconds for which the user will belocked out of the server. The default is 30000.
Lockout Duration
3. Click Apply.
Controlling Login IP RangesYou can use the Lockdown portlet to control the IP ranges from which users are allowed to log into My webMethods Server. Up to four different IP ranges are allowed. The portlet does not takeinto account the credentials of the person logging in or any authenticationmechanism.Upon beingunable to log in, the user is redirected to an error page of your choosing. This portlet is useful fora site that allows guest access only, or one that is to be access only from a secure location.
Important:If youmake an error in configuring IP ranges, youmay not be able to log in to correct the problem.To correct the problem, you need to have physical access to themachine onwhichMywebMethodsServer is running.
248 Administering My webMethods Server 10.3
14 Managing Security

Deploying the Lockdown PortletThe Lockdown portlet is not deployed automatically when you initialize MywebMethods Server.The portlet is included in a My webMethods Server installation, but you must deploy it beforeuse.
To deploy the Lockdown portlet
1. Locate the Lockdown portlet within the webMethods installation directory at this location:
\ Software AG_directory \MWS\components\extras\security\wm_lockdown.pdp
2. Copy the wm_lockdown.pdp file to the deploy directory for the server instance:
\ Software AG_directory \MWS\server\serverName\deploy
My webMethods Server detects the presence of the portlet and automatically deploys it.
Configuring the Lockdown PortletAfter deploying the Lockdown Portlet to My webMethods Server, you can modify the portletconfiguration.
To configure the Lockdown portlet
1. As system administrator, click Administration > Folders > System > Portlets >Administration > Portal Lockdown Administration.
2. For Error page property, select the page to redirect users to when their login attempt fails, byclicking one of the following buttons:
Browse - in the Select Portal Resource dialog window, move the target page to theSelected Items box and click Select.
Use Alias - in theAlias Name field, type the alias of the target page. Click Test to determineif the alias is valid and the alias target is the correct one. If the alias is correct, click Select.
3. (Optional) In the E-mail Address for Login Notification field, type an email address to whichMy webMethods Server should send a notification if a login is attempted from a disallowedIP address.
4. Specify up to four IP ranges fromwhich users are allowed to log into MywebMethods Server.
For each range, provide a value in the Start IP Range and End IP Range fields.
5. On the Is Active field, choose the True option.
Administering My webMethods Server 10.3 249
14 Managing Security

6. Click Submit.
The lockdown takes effect immediately.
Disabling the Lockdown Portlet in My webMethods ServerIf you can log in toMywebMethods Server as system administrator, you can disable the Lockdownportlet by doing the following.
To disable the Lockdown portlet in My webMethods Server
1. As system administrator, click Administration > Folders > System > Portlets >Administration > Portal Lockdown Administration.
2. On the Is Active field, choose the False option.
3. Click Submit.
Disabling the Lockdown Portlet ManuallyIf you cannot log in toMywebMethods Server as system administrator, you need to have physicalaccess to the machine on which My webMethods Server is installed, and modify theportal.properties file. Everything in this file is set as a system property, read after the MywebMethods Server starts but prior to initialization of portlets.
To disable the Lockdown portlet manually
1. On the machine where My webMethods Server is installed, locate this file:
\ Software AG_directory \MWS\server\serverName\config\portal.properties
2. Open the portal.properties file in an editor and add the following line at the end of the file:
lockdown.disable=false
For example, with a descriptive comment included:#======================
# Lockdown Portlet
lockdown.disable=false
3. Restart My webMethods Server.
Note:
250 Administering My webMethods Server 10.3
14 Managing Security

After you have corrected the IP address range problem, you cannot reactivate the Lockdownportlet until you remove this line from the portal.properties file.
Encrypting Passwords for Global EnvironmentVariablesYou can encrypt password fields for custom entries in Global Defaults environment variables.
To encrypt password fields for Global Defaults environment variables
1. As systemadministrator, clickAdministration Dashboard > Configuration > CAF ApplicationRuntime Configuration.
2. In the result titlebar, click .
3. In the Password Env-Entry Names field, type the name of a custom environment entry afterthe existing entries, separated by a comma, and click Save:
For example, wsclient-password,jcr/systemPassword,My_Password
4. Click Configure Global Defaults.
5. In the tree view, click Environment Entries, and then click Add New Entry.
6. In theName field, type the name of the custom environment entry (for example, My_Password)and click Add It.
7. Type a password value in the newly created environment entry and click Apply.
If you have correctly configured the environment entry, the password is masked as you type itinto the field. In addition, the password value is encrypted before it is stored in the database.
If the consumer of the password value needs to get the original value back (for example, to log into some external server) it is possible to use the CipherUtil.decrypt(value) Java API to get theoriginal value back. For information about the CipherUtil class, see webMethods CAF and MywebMethods Server Java API Reference.
Allowing Context ImpersonationThere may be cases in which you want to allow a user to impersonate another user. For example,impersonation is used by the default Java Content Repository (JCR) Client. The JCR session iscreated as a system user (SysAdmin by default) with a known password and then the JCR sessionuses impersonation to switch to the real current user. This impersonation makes it possible forthe current user to log into the JCR repository.
Administering My webMethods Server 10.3 251
14 Managing Security
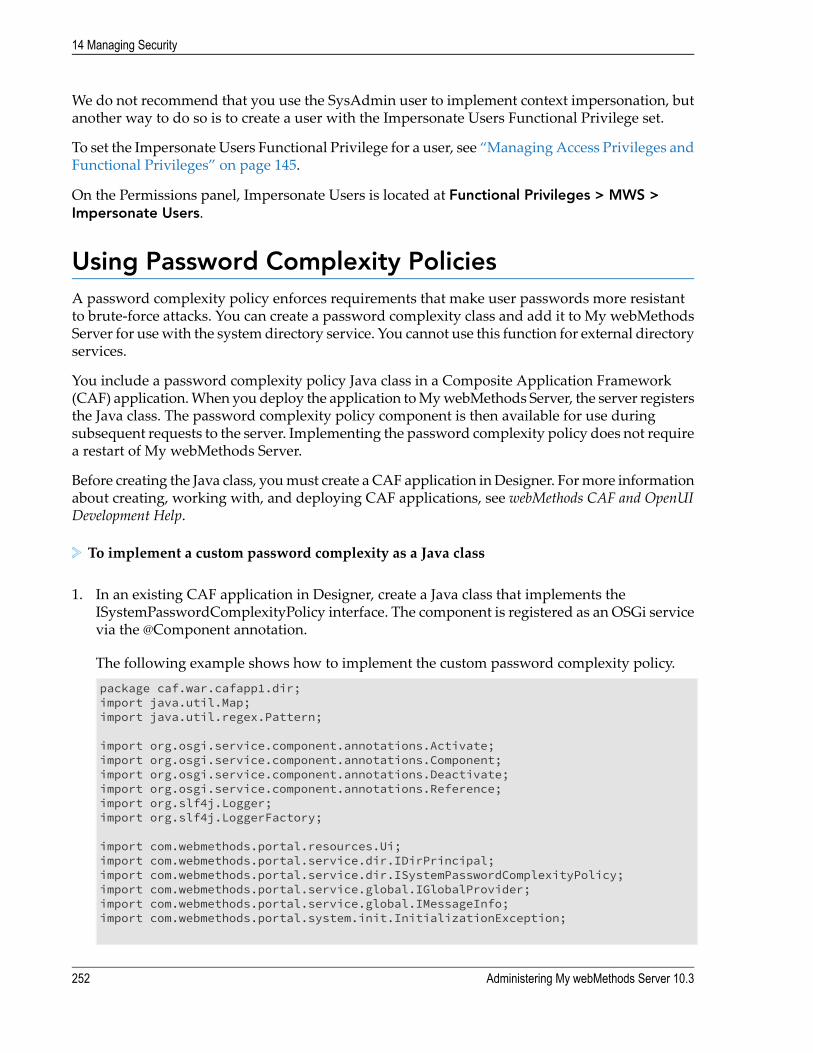
We do not recommend that you use the SysAdmin user to implement context impersonation, butanother way to do so is to create a user with the Impersonate Users Functional Privilege set.
To set the Impersonate Users Functional Privilege for a user, see “Managing Access Privileges andFunctional Privileges” on page 145.
On the Permissions panel, Impersonate Users is located at Functional Privileges > MWS >Impersonate Users.
Using Password Complexity PoliciesA password complexity policy enforces requirements that make user passwords more resistantto brute-force attacks. You can create a password complexity class and add it to My webMethodsServer for usewith the systemdirectory service. You cannot use this function for external directoryservices.
You include a password complexity policy Java class in a Composite Application Framework(CAF) application.When you deploy the application toMywebMethods Server, the server registersthe Java class. The password complexity policy component is then available for use duringsubsequent requests to the server. Implementing the password complexity policy does not requirea restart of My webMethods Server.
Before creating the Java class, youmust create a CAF application inDesigner. Formore informationabout creating, working with, and deploying CAF applications, see webMethods CAF and OpenUIDevelopment Help.
To implement a custom password complexity as a Java class
1. In an existing CAF application in Designer, create a Java class that implements theISystemPasswordComplexityPolicy interface. The component is registered as an OSGi servicevia the @Component annotation.
The following example shows how to implement the custom password complexity policy.package caf.war.cafapp1.dir;import java.util.Map;import java.util.regex.Pattern;
import org.osgi.service.component.annotations.Activate;import org.osgi.service.component.annotations.Component;import org.osgi.service.component.annotations.Deactivate;import org.osgi.service.component.annotations.Reference;import org.slf4j.Logger;import org.slf4j.LoggerFactory;
import com.webmethods.portal.resources.Ui;import com.webmethods.portal.service.dir.IDirPrincipal;import com.webmethods.portal.service.dir.ISystemPasswordComplexityPolicy;import com.webmethods.portal.service.global.IGlobalProvider;import com.webmethods.portal.service.global.IMessageInfo;import com.webmethods.portal.system.init.InitializationException;
252 Administering My webMethods Server 10.3
14 Managing Security

/*** Custom implementation of password complexity policy*/
@Component (service = {
ISystemPasswordComplexityPolicy.class},property = {
"name:String=CustomSystemPasswordComplexityPolicy1"},immediate = true
)public class CustomSystemPasswordComplexityPolicy1 implements
ISystemPasswordComplexityPolicy {private Logger logger = LoggerFactory.getLogger(getClass());
//references to other servicesprivate IGlobalProvider gp = null;
/*** Reference injection of the other OSGi service*/@Referenceprotected void bindGlobalProvider(IGlobalProvider globalProvider) {
if (logger.isTraceEnabled()) {logger.trace("Bound IGlobalProvider");
}
this.gp = globalProvider;}
/*** Activation of OSGi declaritive service* @param config the configuration properties of the OSGi service* @throws InitializationException if activation fails*/@Activateprotected void activate(Map<String,Object> config) throws
InitializationException {if (logger.isInfoEnabled()) {
logger.info("Activating service");}
}
/*** Deactivation of OSGi declaritive service*/@Deactivateprotected void deactivate() {
if (logger.isInfoEnabled()) {logger.info("Deactivating service");
}}
/*** Check the candidate password to make sure the value satisfies the
complexity* requirements. If the password is not complex enough, this method
should throw* an {@link InvalidPasswordException} with the reason. If no exception
Administering My webMethods Server 10.3 253
14 Managing Security

is thrown* the password is valid.** @param candidatePassword the password to check* @throws InvalidPasswordException if the password is not valid*/
@Overridepublic void checkPasswordForNewUser(String candidatePassword)
throws InvalidPasswordException {if (candidatePassword == null || candidatePassword.length() < 6) {
IMessageInfo messageInfo = gp.getMessageInfo(Ui.class,"password.too.short", null);
String msg = messageInfo.getLocalizedMessage(false);throw new InvalidPasswordException(msg);
}
boolean hasUpper = !candidatePassword.toLowerCase().equals(candidatePassword);boolean hasLower = !candidatePassword.toUpperCase().equals(candidatePassword);if (!(hasUpper && hasLower)) {
IMessageInfo messageInfo = gp.getMessageInfo(Ui.class,"password.mix.case", null);
String msg = messageInfo.getLocalizedMessage(false);throw new InvalidPasswordException(msg);
}
boolean hasNumberOrSpecialChar = Pattern.matches(".*[\\W\\d]+.*$",candidatePassword);
if (!hasNumberOrSpecialChar) {IMessageInfo messageInfo = gp.getMessageInfo(Ui.class,
"password.special.char", null);String msg = messageInfo.getLocalizedMessage(false);throw new InvalidPasswordException(msg);
}}
/*** Check the candidate password to make sure the value satisfies the
complexity* requirements. If the password is not complex enough, this method
should throw* an {@link InvalidPasswordException} with the reason. If no exception
is thrown* the password is valid.** @param user the user whose password is being checked.* @param candidatePassword the password to check* @throws InvalidPasswordException if the password is not valid*/
@Overridepublic void checkPasswordForExistingUser(IDirPrincipal user,
String candidatePassword) throws InvalidPasswordException {checkPasswordForNewUser(candidatePassword);
}
/*** Return how long a password is valid (in milliseconds) before it
expires. The user* will not be able to login after this time duration has expired
and the user must be* reset by an administrator or a custom reset password page.
254 Administering My webMethods Server 10.3
14 Managing Security

** @param user the user to get the expiration value for.* @return return -1 for no password expiration, or the duration (in ms)*/@Overridepublic long getPasswordExpirationDuration(IDirPrincipal user) {
try {if ("sysadmin".equals(user.getName())) {
return -1; //don't expire the sysadmin password.}
} catch (Exception e) {logger.warn(e.getMessage(), e);
}return 1 * 60 * 60 * 1000; //1 hour
}
/*** Returns a description of the expected pattern a password must have.
This text* is displayed on the create user and update user pages of the UI.** @return password descriptive text.*/@Overridepublic String getPasswordPatternText() {
IMessageInfo messageInfo = gp.getMessageInfo(Ui.class,"password.complexity.description", null);
return messageInfo.getLocalizedMessage(false);}
}
2. Deploy the application to My webMethods Server.
3. To open the My webMethods Server Directory Services page, go tohttp://hostname:port/webm.apps.config.directory.service.admin,where hostname is the hostnameof My webMethods Server and port is the port number of My webMethods Server.
4. On the List Directory Services tab, click the system directory service.
5. In the Password Complexity Class field, select the name of the Java class that you created inthe CAF application, and then click Apply.
6. Debug and test the Java class.
7. If required, make further changes to the Java class and repeat steps 2 and 6 until the classworks as expected.
Working with Response Header RulesMy webMethods Server enables you to create and manage rules that govern the HTTP responsemessages that are sent after receiving and interpreting a request message.
Administering My webMethods Server 10.3 255
14 Managing Security

Viewing Response Header Rules
To view response header rules
1. As system administrator: Administrative Folders > Administration Dashboard > UserInterface > Manage Response Header Rules.
2. Click the View Rules tab if it is not already selected.
Available rules are displayed in the Rule Name list. The list is empty if no rules are defined. Thefollowing information appears for each rule:
The rule name. This is a clickable link that opens theModify Rulewhere you can view the ruleconditions and make changes to the rule.
A description of the rule as entered by the rule creator.
Whether or not the rule is currently enabled.
Creating a Response Header Rule
To create a response header rule
1. As system administrator: Administrative Folders > Administration Dashboard > UserInterface > Manage Response Header Rules.
2. Click the Create Rule tab.
3. Do the following:
Type a name for the rule in the Rule Name field.
Type a description of the rule in the Description field.
If you want the rule to be enabled upon creation, select the Enabled check box.
If you do not want the rule to be enabled upon creation, clear the Enabled check box.
4. In the Condition field, use the available condition element buttons to define a conditionexpression for the rule. The following condition elements are available:
Current User(s)
Group/Role Membership
User Attributes
Request
256 Administering My webMethods Server 10.3
14 Managing Security
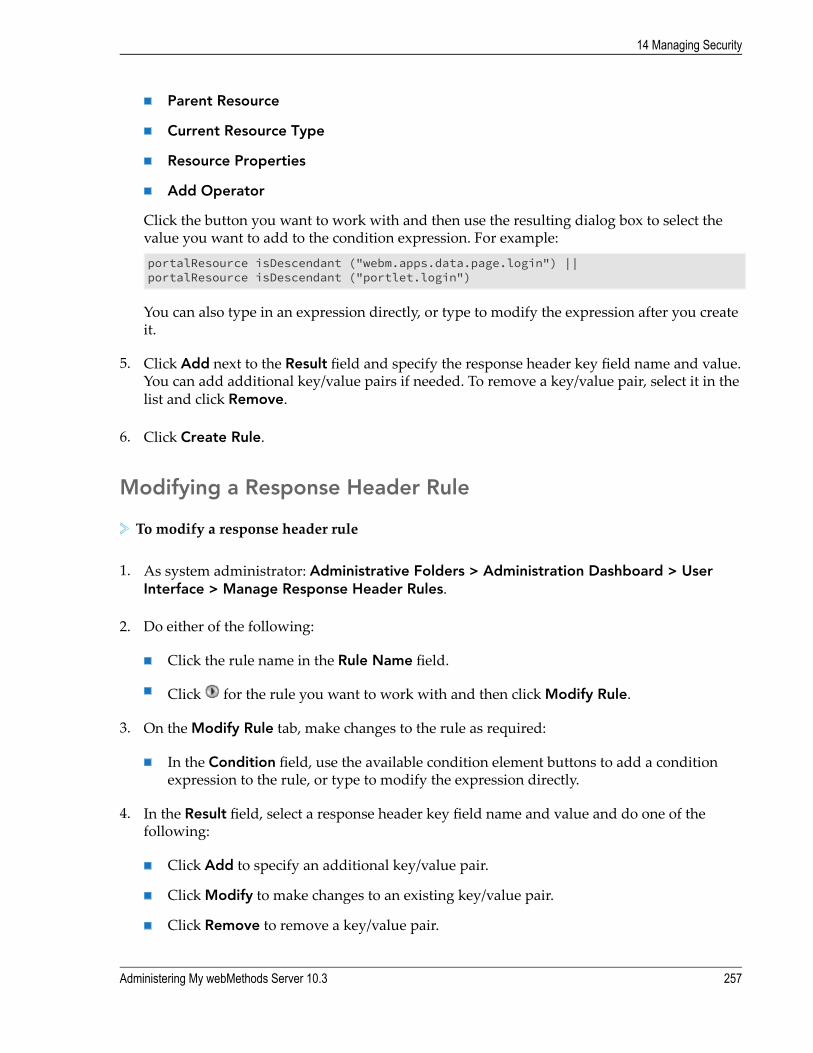
Parent Resource
Current Resource Type
Resource Properties
Add Operator
Click the button you want to work with and then use the resulting dialog box to select thevalue you want to add to the condition expression. For example:portalResource isDescendant ("webm.apps.data.page.login") ||portalResource isDescendant ("portlet.login")
You can also type in an expression directly, or type to modify the expression after you createit.
5. Click Add next to the Result field and specify the response header key field name and value.You can add additional key/value pairs if needed. To remove a key/value pair, select it in thelist and click Remove.
6. Click Create Rule.
Modifying a Response Header Rule
To modify a response header rule
1. As system administrator: Administrative Folders > Administration Dashboard > UserInterface > Manage Response Header Rules.
2. Do either of the following:
Click the rule name in the Rule Name field.
Click for the rule you want to work with and then click Modify Rule.
3. On the Modify Rule tab, make changes to the rule as required:
In the Condition field, use the available condition element buttons to add a conditionexpression to the rule, or type to modify the expression directly.
4. In the Result field, select a response header key field name and value and do one of thefollowing:
Click Add to specify an additional key/value pair.
Click Modify to make changes to an existing key/value pair.
Click Remove to remove a key/value pair.
Administering My webMethods Server 10.3 257
14 Managing Security

5. Click Modify Rule.
Copying a Response Header RuleYou can copy a rule to create a new rule in the Manage Response Header Rules page. When youcopy a rule, you provide a name and description for the new rule, and the rule condition andresult information is copied from the original rule into the new rule.
Note:When you copy a rule, the setting of the Enabled check box in the original rule is also copied intothe new rule. If the Enabled check box is selected in the original rule, the new copied rule will beenabled as soon as you create it.
To copy a response header rule
1. As system administrator: Administrative Folders > Administration Dashboard > UserInterface > Manage Response Header Rules.
2. Click for the rule you want to work with and then click Copy Rule.
3. On the Copy Rule tab, type a name and description for the new rule.
4. Click Copy the Rule.
Removing a Response Header Rule
To remove a response header rule
1. As system administrator: Administrative Folders > Administration Dashboard > UserInterface > Manage Response Header Rules.
2. Click for the rule you want to work with and then click Remove Rule.
3. Click OK in the confirmation dialog box to remove the rule.
Changing the Response Header Rule Evaluation Order
To change the response header rule evaluation order
1. As system administrator: Administrative Folders > Administration Dashboard > UserInterface > Manage Response Header Rules.
258 Administering My webMethods Server 10.3
14 Managing Security

2. Click the Change Rule Evaluation Order tab.
3. In the Evaluation Order list, select a rule name and use the arrow buttons to the right to movethe selected rule up or down in the evaluation order.
4. Click Update Rule.
Changing the Default Internet Explorer Compatibility SettingBy default, My webMethods Server sets the compatibility mode for Internet Explorer to IE8. Formore information about the Internet Explorer compatibility mode in My webMethods Server, see“About the Default Response Header Rules” on page 259.
To change the Internet Explorer document compatibility setting.
1. As system administrator: Administrative Folders > Administration Dashboard > UserInterface > Manage Response Header Rules.
2. Locate the IE - parameter for compatibility mode rule and do either of the following:
Click the rule name in the Rule Name field.
Click for the rule you want to work with and then click Modify Rule.
3. Click Update next to the Result field, edit the Value field, and click Apply.
The default value is IE-8.
4. Click Update Rule.
About the Default Response Header RulesThe following table lists the response header rules, available in a typical My webMethods Serverinstallation:
DescriptionRule Name
Enabled by default. This rule guards against cross-site scripting andclickjacking attacks on the Login page by implementing the
Login Page Deny NonSame-Origin Framing
X-Frame-Options HTTP response header. This header indicateswhether or not a browser should be allowed to render a page in a<frame> or <iframe>, thus ensuring that content is not embeddedinto other sites. The key/value pair is:X-Frame-Options SAMEORIGIN
Administering My webMethods Server 10.3 259
14 Managing Security

DescriptionRule Name
The page can only be displayed in a frame of the same origin as thepage itself.
Disabled by default. This is a more stringent Login pageanti-cross-site scripting and clickjacking rule. The key/value pair is:
Login Page Deny AllFraming
X-Frame-Options DENY
In this case, the page cannot be displayed in a frame, regardless ofthe site attempting to do so.
Enabled by default. This setting sets the standard document typefor Internet Explorer in rendering HTML pages. The default valueis IE8.
IE - parameter forcompatibility mode
Basic support for the X-Frame-Options header response is available in these (and later) browserversions:
Chrome 4.1.249.1042
Firefox 3.6.9
Gecko 1.9.2.9
Internet Explorer 8.0
Opera 10.5
Safari 4.0
260 Administering My webMethods Server 10.3
14 Managing Security

15 Analysis, Reporting, and Troubleshooting
■ About Analysis, Reporting, and Troubleshooting ........................................................ 262
■ Controlling Server Logging .......................................................................................... 262
■ Viewing Logging Messages ......................................................................................... 274
■ Managing Security Audit Logging ............................................................................... 274
■ Monitoring Real-Time User Activity .............................................................................. 275
■ Collecting Data About Server Events ........................................................................... 275
■ Collecting Data About Database Changes .................................................................. 277
■ My webMethods Server Diagnostic Tools ................................................................... 278
Administering My webMethods Server 10.3 261

About Analysis, Reporting, and TroubleshootingMywebMethods Server provides administrators with a number of tools for analyzing, reporting,managing, and maintaining server deployment.
Controlling Server LoggingAsMywebMethods Server runs, it collects logging information for a variety of categories, for webapplications, and for portlet applications. Logging information is collected in two stages, Loggerand Output.
Logger stage allows you to define the level of messages you want to collect for each category,web application, and portlet application.
Output stage determines the level of messages that youwantMywebMethods Server to writeto the console and the log files.
You can control each stage independently. The logger threshold takes precedence over an outputthreshold. IfMywebMethods Server discards a loggingmessage because it does notmeet a loggerthreshold, and is therefore not collected for a category or application, that message cannot bewritten to the output, that is, it cannot be written to the console or a log file.
Use the Logging Configuration page to control logging for the server. For more information, see“About LoggingThresholds” onpage 262 and “Setting Logger andOutput Thresholds” onpage 264.
As My webMethods Server writes log messages to the output log files, the files will grow in size.Periodically, the My webMethods Server rolls over to a new set of files, making it easier to locatea specific date and to discard old log files as needed. For more information about the output logfiles, how often My webMethods Server rolls over files, and how you can control the rollover, see“About the Log-File Rollover Period” on page 266 and “Modifying the Log-File Rollover Period” onpage 268.
About Logging ThresholdsDefine logging thresholds to control the log messages that My webMethods Server collects. Eachlog message is assigned a log level. A threshold indicates the log level of messages you want MywebMethods Server to collect. My webMethods Server logs messages that have the level youspecify and all higher levels. As a result, by setting thresholds, you can limit the growth of logfiles. Set lower log levels when you want to collect more information and higher log levels whenyou want to collect less information.
The following table describes the levels, from the lowest level to the highest:
DescriptionLog level
Set a threshold to this level if you want the logs to contain messages of all levels.This level provides the most detail; however, log files grow quickly.
TRACE
262 Administering My webMethods Server 10.3
15 Analysis, Reporting, and Troubleshooting
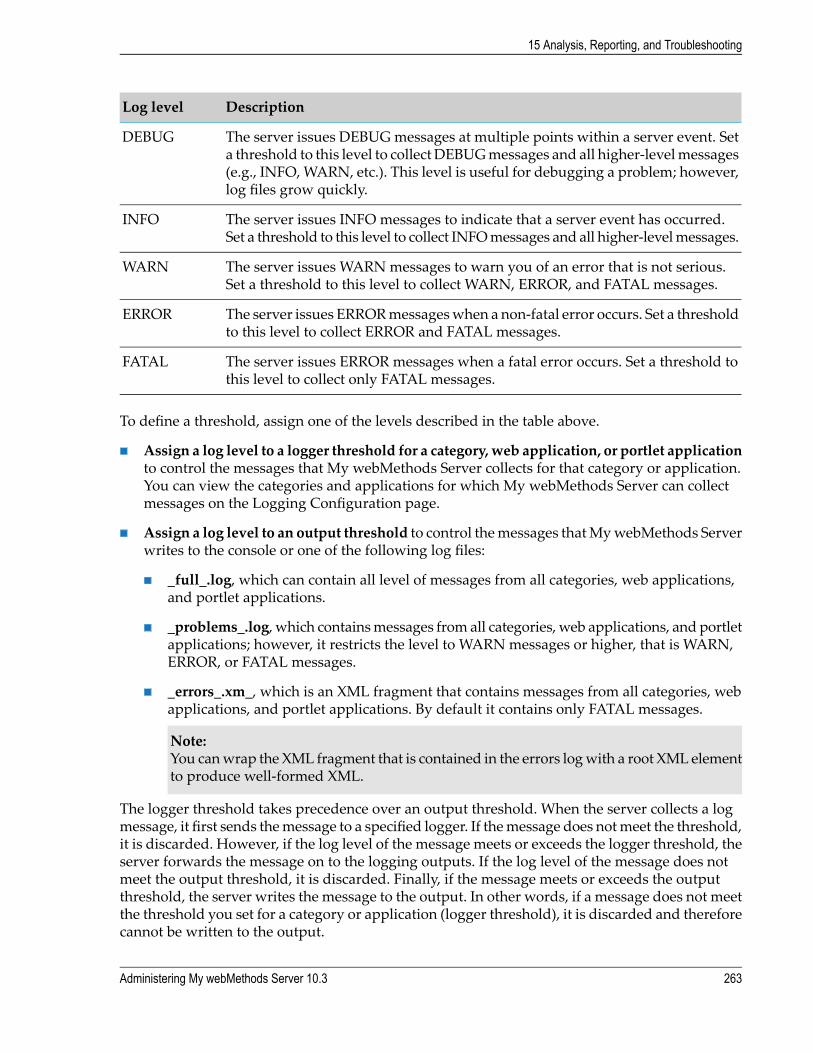
DescriptionLog level
The server issues DEBUGmessages at multiple points within a server event. Seta threshold to this level to collect DEBUGmessages and all higher-levelmessages
DEBUG
(e.g., INFO,WARN, etc.). This level is useful for debugging a problem; however,log files grow quickly.
The server issues INFO messages to indicate that a server event has occurred.Set a threshold to this level to collect INFOmessages and all higher-levelmessages.
INFO
The server issues WARN messages to warn you of an error that is not serious.Set a threshold to this level to collect WARN, ERROR, and FATAL messages.
WARN
The server issues ERRORmessageswhen a non-fatal error occurs. Set a thresholdto this level to collect ERROR and FATAL messages.
ERROR
The server issues ERROR messages when a fatal error occurs. Set a threshold tothis level to collect only FATAL messages.
FATAL
To define a threshold, assign one of the levels described in the table above.
Assign a log level to a logger threshold for a category, web application, or portlet applicationto control the messages that My webMethods Server collects for that category or application.You can view the categories and applications for which My webMethods Server can collectmessages on the Logging Configuration page.
Assign a log level to an output threshold to control themessages thatMywebMethods Serverwrites to the console or one of the following log files:
_full_.log, which can contain all level of messages from all categories, web applications,and portlet applications.
_problems_.log, which containsmessages from all categories, web applications, and portletapplications; however, it restricts the level to WARN messages or higher, that is WARN,ERROR, or FATAL messages.
_errors_.xm_, which is an XML fragment that contains messages from all categories, webapplications, and portlet applications. By default it contains only FATAL messages.
Note:You canwrap the XML fragment that is contained in the errors logwith a root XML elementto produce well-formed XML.
The logger threshold takes precedence over an output threshold. When the server collects a logmessage, it first sends themessage to a specified logger. If themessage does notmeet the threshold,it is discarded. However, if the log level of the message meets or exceeds the logger threshold, theserver forwards the message on to the logging outputs. If the log level of the message does notmeet the output threshold, it is discarded. Finally, if the message meets or exceeds the outputthreshold, the server writes the message to the output. In other words, if a message does not meetthe threshold you set for a category or application (logger threshold), it is discarded and thereforecannot be written to the output.
Administering My webMethods Server 10.3 263
15 Analysis, Reporting, and Troubleshooting

Setting Logger and Output ThresholdsYou can set both logger thresholds and output thresholds on the Logging Configuration page.
Note:When you update the thresholds on the Logging Configuration page, the settings are permanentuntil you update them again. If you want My webMethods Server to temporarily use debugsettings that last only until the server is shut down, you can start the server using the -d startupoption. For more information, see “Temporarily Setting Debug Thresholds” on page 264.
To set a logger or output threshold
1. As system administrator, click Administration Dashboard > Analysis > LoggingConfiguration.
2. For each category, web application, and/or portlet application you want to modify, in theLogger Threshold column, select the log level to the lowest level of message you want toaccept.
3. For each output threshold you want to modify, in the Output Threshold list, select the loglevel to the lowest level of message you want to accept.
Tip:To set all logger thresholds or output thresholds to the same logging level, click to the rightof the Logger Threshold or Output Threshold label and then select the log level to use.
4. Click Apply.
Temporarily Setting Debug Thresholds
By default, the server configuration uses a java system property (logj4.default.log.level) to set thelogging threshold for several categories to the WARN threshold. When you start the server withthe -d startup option, the logj4.default.log.level variable is set to DEBUG. As a result, the servercollects messages for the categories at the DEBUG threshold until the server is shut down. Usethis the -d startup option to run the server in debug mode. This is an easy way to temporarilyincrease the log level for many categories to perform troubleshooting.
The following section of the logging configuration shows the categories that are affected by the-d startup option:# default level controled by -d=DEBUG otherwise =WARNlog4j.category.Framework=${log4j.default.log.level}log4j.category.frameworkInit=${log4j.default.log.level}log4j.category.dataAccess=${log4j.default.log.level}log4j.category.jsp=${log4j.default.log.level}log4j.category.jsf=${log4j.default.log.level}log4j.category.directory=${log4j.default.log.level}log4j.category.portlet=${log4j.default.log.level}
264 Administering My webMethods Server 10.3
15 Analysis, Reporting, and Troubleshooting

log4j.category.classManager=${log4j.default.log.level}log4j.category.taglibs=${log4j.default.log.level}log4j.category.mail=${log4j.default.log.level}log4j.category.search=${log4j.default.log.level}log4j.category.messaging=${log4j.default.log.level}log4j.category.notifications=${log4j.default.log.level}log4j.category.schedule=${log4j.default.log.level}log4j.category.version=${log4j.default.log.level}log4j.category.task=${log4j.default.log.level}log4j.category.webservice=${log4j.default.log.level}log4j.category.wsclient=${log4j.default.log.level}
For instructions for how to start the server using the -d startup option, see “Basic Command LineSyntax for My webMethods Server” on page 46.
Exporting Threshold Settings to a FileYou can export your logger and output threshold settings to a file named log4.override.properties.Then later, you can import them from the log4.override.properties file into a My webMethodsServer database.
You might want to export your threshold settings if you want to save a backup copy or if youwant to use the same settings in another My webMethods Server instance that is not in the samecluster.
To export threshold settings
1. As system administrator, click Administration Dashboard > Analysis > LoggingConfiguration.
2. Click Export.
3. If you want to open the file in a text editor to view it before saving:
a. Select the Open with option.
b. Select the text editor you want to use to view the file.
c. Click OK.
MywebMethods Server downloads the file from the database and opens it in the selectededitor.
d. Use the text editor save function to save the file.
4. If you want to save the file without opening it:
a. Select Save File.
Administering My webMethods Server 10.3 265
15 Analysis, Reporting, and Troubleshooting
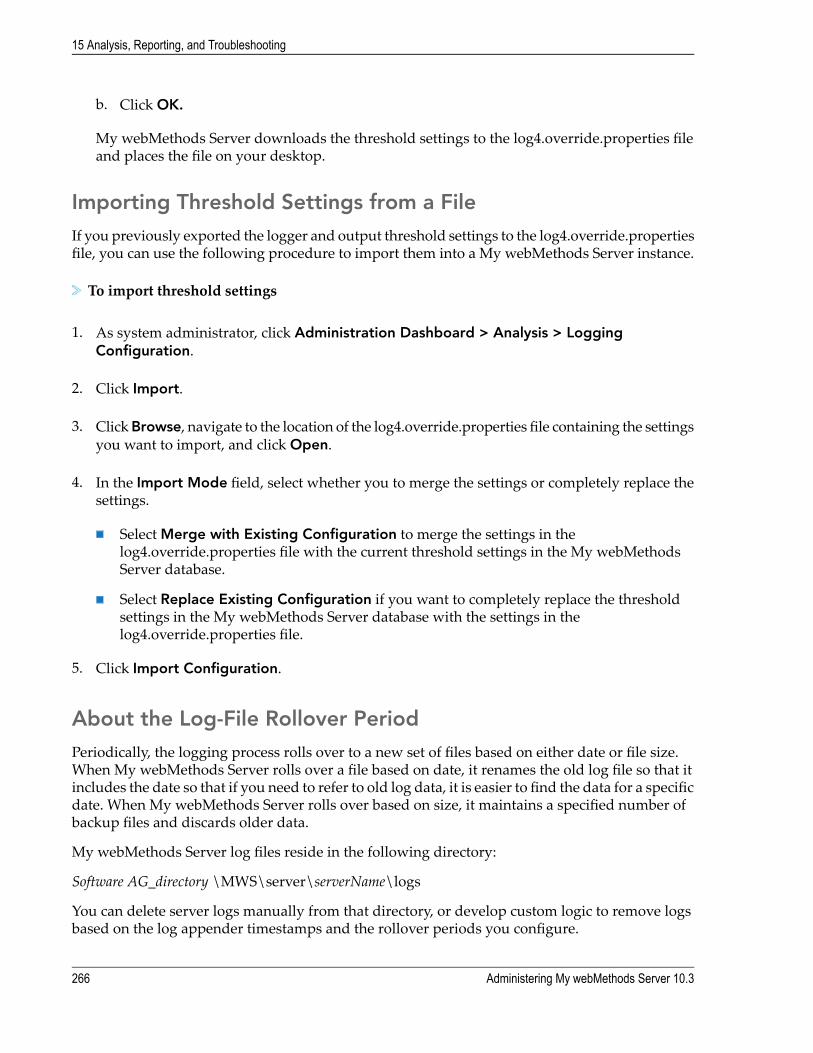
b. Click OK.
My webMethods Server downloads the threshold settings to the log4.override.properties fileand places the file on your desktop.
Importing Threshold Settings from a FileIf you previously exported the logger and output threshold settings to the log4.override.propertiesfile, you can use the following procedure to import them into a My webMethods Server instance.
To import threshold settings
1. As system administrator, click Administration Dashboard > Analysis > LoggingConfiguration.
2. Click Import.
3. ClickBrowse, navigate to the location of the log4.override.properties file containing the settingsyou want to import, and click Open.
4. In the Import Mode field, select whether you to merge the settings or completely replace thesettings.
Select Merge with Existing Configuration to merge the settings in thelog4.override.properties file with the current threshold settings in the My webMethodsServer database.
Select Replace Existing Configuration if you want to completely replace the thresholdsettings in the My webMethods Server database with the settings in thelog4.override.properties file.
5. Click Import Configuration.
About the Log-File Rollover PeriodPeriodically, the logging process rolls over to a new set of files based on either date or file size.When My webMethods Server rolls over a file based on date, it renames the old log file so that itincludes the date so that if you need to refer to old log data, it is easier to find the data for a specificdate. When My webMethods Server rolls over based on size, it maintains a specified number ofbackup files and discards older data.
My webMethods Server log files reside in the following directory:
Software AG_directory \MWS\server\serverName\logs
You can delete server logs manually from that directory, or develop custom logic to remove logsbased on the log appender timestamps and the rollover periods you configure.
266 Administering My webMethods Server 10.3
15 Analysis, Reporting, and Troubleshooting

The following table lists the log files that My webMethods Server creates and the default rolloverperiod for the logs.
Default rollover periodDefault contentsLog file
Daily at midnightLog messages from all categoriesand all enabled thresholds (for
_full_.log
When the log is rolled over, the past dayslogmessages are rolled over into a file that
example, TRACE, DEBUG, INFO,WARN, ERROR, and FATAL).
is named to reflect the date of the loginformation it contains:
_full_.yyyy-MM-dd.log
You can customize how often MywebMethods Server rolls over this log.
Daily at midnightWARN, ERROR, and FATAL logmessages from all categories.
_problems_.log
When the log is rolled over, the past dayslogmessages are rolled over into a file thatis named to reflect the date of the loginformation it contains:
_problems_.yyyy-MM-dd.log
You can customize how often MywebMethods Server rolls over this log.
When the log size reaches 100 MBDEBUG level log messages fromthe install
install.log
When the log is rolled over, the old logmessages are rolled over into a backup filethat uses the following naming convention,where N is a number.
install.N.log
For example, the first time the log is rolledover, the backup log is named install.1.log.By default, My webMethods Servermaintains up to three backups.
You can customize themaximum size limitfor this file beforeMywebMethods Serverrolls it over and how many backup filesthe server maintains.
Daily at midnightCAF application log messagescaf.log
When the log is rolled over, the past dayslogmessages are rolled over into a file that
Administering My webMethods Server 10.3 267
15 Analysis, Reporting, and Troubleshooting

Default rollover periodDefault contentsLog file
is named to reflect the date of the loginformation it contains:
caf.yyyy-MM-dd.log
You cannot customize how often MywebMethods Server rolls over this log.
When the log size reaches 5 MBLog messages from DDLstatements execution for creating,
schema.log
When the log is rolled over, the old logmessages are rolled over into a backup file
modifying, or deleting x-typeobjects
that uses the following naming convention,where N is a number.
schema.N.log
For example, the first time the log is rolledover, the backup log is namedschema.1.log. By default,MywebMethodsServer maintains up to ten backups.
You can customize themaximum size limitfor this file beforeMywebMethods Serverrolls it over and how many backup filesthe server maintains.
This log is not rolled overAn XML fragment of FATAL logmessages from all categories
_errors_.xm_
You can wrap the XML fragmentthat is contained in the errors logwith a root XML element toproduce well-formed XML.
For information about how to customize the rollover periods, see “Modifying the Log-File RolloverPeriod” on page 268.
Modifying the Log-File Rollover PeriodMy webMethods Server maintains the settings for how to roll over the log files in the MywebMethods Server database. As a result, if you are running the server in the cluster, all serverinstances use the same rollover settings. To update the rollover settings, you can have MywebMethods Server download the settings to a local file named log4j.init.properties file, modifythe rollover periods in the downloaded file, and then upload the changes back to the database.
If My webMethods Server rolls over the log file based on:
Date and time, (used for the _full_.log and _problems_.log files)
268 Administering My webMethods Server 10.3
15 Analysis, Reporting, and Troubleshooting

The rollover configuration is controlled by the appender typeorg.apache.log4j.DailyRollingFileAppender. To update the rollover period, you identify a newDatePattern for the appender. The following table describes the DatePatterns you can use toconfigure log rollover:
Rollover TimeDate Pattern
At the beginning of each month'.'yyyy-MM
For example, for the _full_.log if you set the DatePattern to‘.’yyyy-MM, at midnight on January 31, 2010, My webMethodsServer copies the log data to the file _full_.2010-01.log. MywebMethods Server logs messages for the month of February tothe _full_.log file until it is rolled over the next month.
At the first day of each week. The first day of the week dependson the locale.
'.'yyyy-ww
For example, assume the first day of the week is Sunday and thatfor the _problems_.log you set the DatePattern to '.'yyyy-ww. OnSaturday midnight, May 15, 2010, My webMethods Server copiesthe log data for the 19th week of the year to the file_problems_2010-19.MywebMethods Server logsmessages for the20th week of 2010 to the _problems_.log file until it is also rolledover the next week.
At midnight each day.'.'yyyy-MM-dd
For example, for the _full_.log if you set the DatePattern to'.'yyyy-MM-dd, atmidnight on February 22, 2010,MywebMethodsServer copies the log data to the file _full_2010-02-22. MywebMethods Server logs messages for February 23, 2010 to the_full_.log file until it is also rolled over the next day.
Twice each day, at noon and midnight.'.'yyyy-MM-dd-a
For example, for the _problems_.log if you set the DatePattern to'.'yyyy-MM-dd-a, at noon on February 22, 2010, My webMethodsServer copies the log data to the file _problems_2010-02-22-A.M.My webMethods Server logs messages for the afternoon ofFebruary 22, 2010 to the _problems_.log file until it is rolled overat midnight into the file _problems_2010-02-22-P.M. Then, MywebMethods Server logs messages for February 23, 2010 to the_problems_.log file.
Every hour of each day.'.'yyyy-MM-dd-HH
For example, for the _full_.log if you set the DatePattern to'.'yyyy-MM-dd-HH, at approximately 11:00 A.M. on February 22,2010,MywebMethods Server copies the log data for the 10 o’clockhour to the file _full_2010-02-22-10. My webMethods Server logs
Administering My webMethods Server 10.3 269
15 Analysis, Reporting, and Troubleshooting
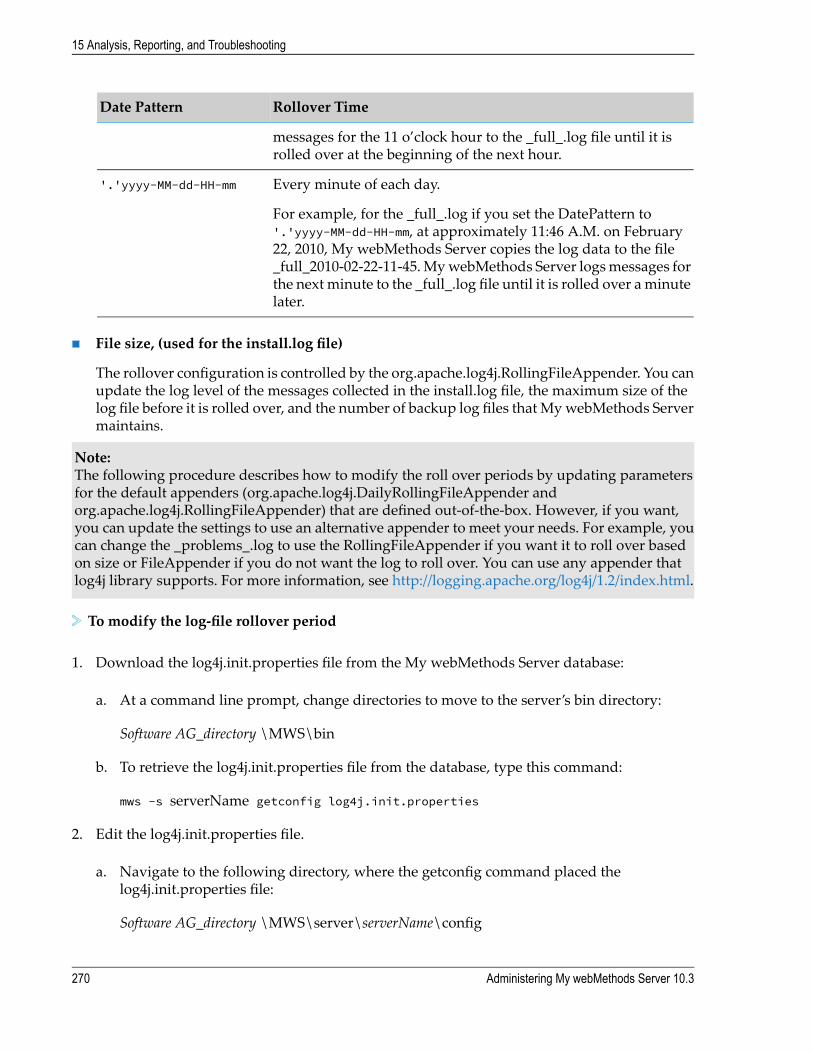
Rollover TimeDate Pattern
messages for the 11 o’clock hour to the _full_.log file until it isrolled over at the beginning of the next hour.
Every minute of each day.'.'yyyy-MM-dd-HH-mm
For example, for the _full_.log if you set the DatePattern to'.'yyyy-MM-dd-HH-mm, at approximately 11:46 A.M. on February22, 2010, My webMethods Server copies the log data to the file_full_2010-02-22-11-45.MywebMethods Server logsmessages forthe next minute to the _full_.log file until it is rolled over aminutelater.
File size, (used for the install.log file)
The rollover configuration is controlled by the org.apache.log4j.RollingFileAppender. You canupdate the log level of the messages collected in the install.log file, the maximum size of thelog file before it is rolled over, and the number of backup log files that MywebMethods Servermaintains.
Note:The following procedure describes how to modify the roll over periods by updating parametersfor the default appenders (org.apache.log4j.DailyRollingFileAppender andorg.apache.log4j.RollingFileAppender) that are defined out-of-the-box. However, if you want,you can update the settings to use an alternative appender to meet your needs. For example, youcan change the _problems_.log to use the RollingFileAppender if you want it to roll over basedon size or FileAppender if you do not want the log to roll over. You can use any appender thatlog4j library supports. For more information, see http://logging.apache.org/log4j/1.2/index.html.
To modify the log-file rollover period
1. Download the log4j.init.properties file from the My webMethods Server database:
a. At a command line prompt, change directories to move to the server’s bin directory:
Software AG_directory \MWS\bin
b. To retrieve the log4j.init.properties file from the database, type this command:
mws -s serverName getconfig log4j.init.properties
2. Edit the log4j.init.properties file.
a. Navigate to the following directory, where the getconfig command placed thelog4j.init.properties file:
Software AG_directory \MWS\server\serverName\config
270 Administering My webMethods Server 10.3
15 Analysis, Reporting, and Troubleshooting

b. Open the log4j.init.properties file in a text editor.
3. To modify the rollover settings for the _full_.log file:
a. Locate the following portion of the file:
log4j.appender.rootFile=org.apache.log4j.DailyRollingFileAppender
log4j.appender.rootFile.DatePattern='.'yyyy-MM-dd
log4j.appender.rootFile.File=${log4j.logging.dir}/_full_.log
b. Update the date pattern to define when you want the _full_.log file to rollover.
4. To modify the rollover settings for the _problems_.log file:
a. Locate the following portion of the file:
log4j.appender.rootErrorsFile=org.apache.log4j.DailyRollingFileAppender
log4j.appender.rootErrorsFile.DatePattern='.'yyyy-MM-dd
log4j.appender.rootErrorsFile.File=${log4j.logging.dir}/_problems_.log
b. Update the date pattern to define when you want the _problems_.log file to rollover.
5. To modify the rollover settings for the install.log file:
a. Locate the following portion of the file:
log4j.appender.installFile=org.apache.log4j.RollingFileAppender
log4j.appender.installFile.threshold=DEBUG
log4j.appender.installFile.MaxFileSize=100MB
log4j.appender.installFile.MaxBackupIndex=3
log4j.appender.installFile.File=${log4j.logging.dir}/install.log
b. To change the size limit of the file, update the value on thelog4j.appender.installFile.MaxFileSize line to specify an alternativemaximumfile size.
c. To change the number of backups that you want My webMethods Server to maintain,update the value on the log4j.appender.installFile.MaxBackupIndex line.
It is recommended that you do not update the log4j.appender.installFile.threshold line tochange the threshold level for the install.log. Because the installation process issues INFOmessages, if you raise the threshold, no messages will be logged.
Administering My webMethods Server 10.3 271
15 Analysis, Reporting, and Troubleshooting

6. To modify the rollover settings for the schema.log file:
a. Locate the following portion of the file:
log4j.appender.DDLSchemaFileAppender=org.apache.log4j.RollingFileAppender
log4j.appender.DDLSchemaFileAppender.threshold=INFO
log4j.appender.DDLSchemaFileAppender.MaxFileSize=5MB
log4j.appender.DDLSchemaFileAppender.MaxBackupIndex=10
log4j.appender.DDLSchemaFileAppender.File=${log4j.logging.dir}/schema.log
log4j.appender.DDLSchemaFileAppender.layout=org.apache.log4j.PatternLayout
log4j.appender.DDLSchemaFileAppender.layout.ConversionPattern=${log4j.mes
sage.pattern}
b. To change the size limit of the file, update the value on thelog4j.appender.DDLSchemaFileAppender.MaxFileSize line to specify an alternativemaximumfile size.
c. To change the number of backups that you want My webMethods Server to maintain,update the value on the log4j.appender.DDLSchemaFileAppender.MaxBackupIndex line.
7. Save the log4j.init.properties file.
8. Deploy the revised file to the My webMethods Server database:
a. At a command line prompt, change directories to move to the server’s bin directory:
Software AG_directory \MWS\bin
b. To write the log4j.init.properties file back to the database, type this command:
mws -s serverName putconfig log4j.init.properties
c. Delete the local copy of the log4j.init.properties file.
If you do not delete the file, the server instance will continue to use the local version of thefile.
9. Restart the cluster.
Changes do not take effect until the cluster is restarted.
272 Administering My webMethods Server 10.3
15 Analysis, Reporting, and Troubleshooting

Changing the Default Logging DirectoryBy default, logs for a server instance reside in this location:
Software AG_directory \MWS\server\serverName\logs
You can change the location of this directory by modifying the systemPaths.properties file.
Changing the default logging directory
1. Download the systemPaths.properties file from the My webMethods Server database:
a. At a command line prompt, change directories to move to the server’s bin directory:
Software AG_directory \MWS\bin
b. To retrieve the systemPaths.properties file from the database, type this command:
mws -s serverName getconfig systemPaths.properties
2. Open, in a text editor, the systemPaths.properties file, which you will find in this location:
Software AG_directory \MWS\server\serverName\config
3. Modify this line to point to the new location of the logs directory, and save the file:
system.path.logs=root:/logs
4. Deploy the revised file to the My webMethods Server database:
a. At a command line prompt, change directories to move to the server’s bin directory:
Software AG_directory \MWS\bin
b. To write the systemPaths.properties file back to the database, type this command:
mws -s serverName putconfig systemPaths.properties
c. Delete the local copy of the systemPaths.properties file.
If you do not delete the file, the server instance will continue to use the local version of thefile.
5. Restart the server instance.
Changes do not take effect until the server is restarted.
Administering My webMethods Server 10.3 273
15 Analysis, Reporting, and Troubleshooting

Viewing Logging MessagesThe Log Viewer page allows you to view the latest messages in the _full_.log, _problems_log, and_errors_.xm files.
For the Log Viewer page to be useful, you need to make sure you are collecting the right messagesfor your needs. Use the Logging Configuration page to set message collection criteria. For moreinformation, see “About Logging Thresholds” on page 262 and “Setting Logger and OutputThresholds” on page 264.
To view logging messages
1. As system administrator, click Administration Dashboard > Analysis > Log Viewer.
2. Select the number of lines that you want to view.
3. Select from which log you want to view messages.
4. Click Refresh Now.
Managing Security Audit LoggingBy default, My webMethods Server performs audit logging on all auditable events. Using theAudit Administration page, you can enable or disable audit logging, or choose which events areto be logged. By default, audit logging is enabled and all available auditable events are logged.
My webMethods Server writes the audit log to the audit.log file, which resides in the followingdirectory:
Software AG_directory \MWS\server\serverName\logs
To manage security audit logging
1. As system administrator, click Administration Dashboard > Configuration > AuditAdministration.
2. To enable or disable audit logging:
a. To enable audit logging, select Enable Auditing.
This is the default setting.
b. To disable audit logging, clear Enable Auditing.
3. In the Auditable column, select events to be logged and clear events that are not to be logged.
274 Administering My webMethods Server 10.3
15 Analysis, Reporting, and Troubleshooting

Selected events are not logged if audit logging is disabled.
4. Click Apply.
The changes take effect immediately.
Monitoring Real-Time User ActivityThe Session Monitor page can be used to monitor real-time user activity for a server deploymentand send status messages to active users by means of E-mail. For active users, a systemadministrator can accomplish two important functions:
view a user's profile information
send the user E-mail directly from within this page
To view all active server sessions
1. As system administrator, click Administration Dashboard > Analysis > Session Monitor.
2. (Optional) On the list of active sessions, click a user's name to view that user's profile.
3. (Optional) On the list of active sessions, click .
If you have an E-mail client installed on the machine you are working on, an E-mail messagewindow is displayed allowing you to compose and send an E-mail to the selected user. If theuser does not have a valid E-mail address in User Information, the To field is empty.
Collecting Data About Server EventsThe Events Collector page collects data about events on the server so they can be used by otherpages.
When deployed on a server, the Events Collector page captures information about certain typesof server events and places them in the server database. The page can capture the following events:
Login and logout.
Get events, such as when a user browses a page.
Operation events, such as when an object is created, updated, moved, or deleted.
For each event, the page collects information on the user associated with the event, the date andtime of the event, the host name of themachine, andwhere possible, information about the operationbeing performed.
To take advantage of data collected by this page, another page performs a query against the serverdatabase, and then displays the results on a page. You can find examples of pages that performthese queries on the Software AG TECHcommunity website at
Administering My webMethods Server 10.3 275
15 Analysis, Reporting, and Troubleshooting

http://techcommunity.softwareag.com. To try one or more of these pages, you need to take thefollowing actions:
1. Deploy the Events Collector page and the sample pages on the server.
2. Configure the Events Collector page.
3. Populate a page with the sample portlets that display server events.
Sample pages include portlet source code so you can import the portlets into SoftwareAGDesignerand see how they function. For an example of the database schema used by the Events Collectorpage for placing data into the server database, see “Events CollectorDatabase Schema” on page 277.
Deploying the Events Collector PageThe Events Collector page is part of a standard My webMethods Server installation but is notdeployed by default. Before you can use the page, you must first deploy it on the server.
To deploy the Events Collector Configuration page on a server
1. Locate the Events Collector Configuration page at this location in the My webMethods Serverdirectory structure:
Software AG_directory \MWS\components\extras\analysis\wm_eventscollector.pdp
2. Copy the wm_eventscollector.pdp file and paste it into the Deploy directory:
Software AG_directory \MWS\server\server_name\deploy
where server_name is the name of the server. After several seconds, the page is automaticallydeployed on the server.
Configuring the Events Collector Configuration PageBy default, the Events Collector Configuration page is ready to begin collecting data on events assoon as you deploy it, but you may want to change how long data is kept, or to disable the page.
To configure the Events Collector Configuration page
1. As system administrator, click Administration Dashboard > Analysis > Events CollectorConfiguration.
Note:If you cannot find the Events Collector Configuration page in the Analysis folder, it may notbe deployed. For more information, see “Deploying the Events Collector Page” on page 276.
2. Check or clear the Collection Enabled check box to enable or disable the collection of serverevent data.
276 Administering My webMethods Server 10.3
15 Analysis, Reporting, and Troubleshooting

By default, data collection is enabled.
3. In the Keep Data for list, select how long to keep server event data.
Choices range from One Day to One Year. The default is One Month.
4. Click Apply.
Events Collector Database SchemaThe Events Collector page uses the following database schema.tblwEvents (main table where events data is being collected)
idEvent - Primary keyidType - Foreign key to tblwEventTypes. Stores the type
of an event.idHost - Foreign key to tblwEventHosts. Stores the host
where the event occurs.timestamp - Time stamp of an event, defined as the number of
milliseconds since epoch(java.lang.System.currentDateMillis()).
userID - Database ID of the user who performed an operation.thingID_1 - object_1. For example, for Get type events this is
the database ID of the object being viewed.thingID_2 - object_2. Used in rare cases where two objects are
involved, for example when an object is created.Then object_1 is the database ID of the container,and object_2 is the database ID of an object thatwas created.
action - Used for Login events: 1 - user logged in, 2 - userlogged out.
tblwEventHosts (stores mapping between hostID and hostname)idHost - Host id.hostname - Actual host name where the event occurs.
tblwEventTypes (stores mapping between eventID and eventTypeName)idType - Event type ID.
eventType - Event type name.Possible eventType name values:
com.webmethods.portal.event.add.impl.CreateEvent- New object is created.
com.webmethods.portal.event.impl.GetEvent- Object is being browsed.
com.webmethods.portal.event.system.impl.LoginEvent- User logs in/out.
com.webmethods.portal.event.modify.impl.UpdateEvent- Object is updated.
com.webmethods.portal.event.remove.impl.DeleteEvent- Object is deleted.
Collecting Data About Database ChangesYou can collect logging information about DDL statements execution to the My webMethodsServer database. All data about database changes is collected and written to the schema.log file.
Administering My webMethods Server 10.3 277
15 Analysis, Reporting, and Troubleshooting
You canfind the setting for logging database changes information on theAdministrationDashboard> Analysis > Logging Configuration page.
For more information on setting up the logging thresholds, see “Controlling Server Logging” onpage 262.
For more information on how to view the collected data, see “Viewing Logging Messages” onpage 274.
My webMethods Server Diagnostic ToolsYou can use theMywebMethods Server diagnostic tools to capture and analyze data about serveroperation. The My webMethods Server diagnostic tools have two types of tools, diagnosticcommand line tools and diagnostic portlets. This topic contains a brief overview of the diagnostictools. For complete information, see Diagnosing My webMethods Server.
With the diagnostic command line tools, you can do the following:
Use the threaddump tool to capture data on thread execution for servers on a local or remotesystem
Use the envcapture tool to capture environment-specific server information to be provided toSoftware AG Global Support for troubleshooting assistance
Use the envdiff tool to compare XML files that result from the capture of environment-specificserver information
Use the memorydump tool to capture server memory allocation information
Use the loganalyzer tool to identify and analyze issues reported in the errors.log file
With the diagnostic portlets you can do the following:
Use the thread Dump tool to monitor thread execution deadlocks in server threads
Use the Performance Analysis tool to measure and analyze the performance of services andcustom portlets or applications using an embedded performance-monitoring service
Use the Performance Statistics tools to display statistic and analysis information about theperformance of various server actions, which are grouped by categories
Use the LogAnalysis tools to read and analyze log files createdwithin the server in accordancewith the log4j mechanism
Use theMemoryMonitor tool tomonitor thememory usage of the Java VirtualMachine (JVM)and send notifications to administrators when the configured threshold limits are reached
278 Administering My webMethods Server 10.3
15 Analysis, Reporting, and Troubleshooting

16 My webMethods Server Configuration
■ About My webMethods Server Configuration ............................................................. 280
■ Managing Aliases ......................................................................................................... 280
■ Configuring External Configuration Credentials .......................................................... 284
■ Deploying My webMethods Server Components ........................................................ 287
■ Configuring My webMethods Server Single Sign-On .................................................. 290
■ Configuring My webMethods Server Cache ................................................................ 298
■ Displaying System Information ..................................................................................... 303
Administering My webMethods Server 10.3 279

About My webMethods Server ConfigurationMy webMethods Server provides administrators with a number of tools that can be used to helpconfigure your server. You perform these functions after installing and configuring a MywebMethods Server instance.
Managing AliasesThe Alias Management page lets you manage URL aliases as server objects. With this page, youcan create, view, modify, or delete custom URL aliases and create more friendly URLs for variousparts of your server.
For example, if you want to create an area of the server for the Sales Department, and you havealready created a folder for the Sales team in your server’s Public Folders, it might be referencedby a non-intuitive URL such as: http://server:port/meta/default/folder/0000002216
To make it easier for the Sales team to remember the location of the Sales server, you can use theAlias Management page to create a more user friendly URL such as: http://server:port/Sales
Creating an Alias to a Server Resource on the Properties PageYou can create an alias for a server resource on the Properties page of the server resource:
To create an alias to a server resource on the Properties page
1. As system administrator, navigate to the page where the server resource is located.
2. On the server resource, click and then click Properties.
3. On the Alias field of the Properties page, click Add.
4. Type an alias name for the server resource and click OK.
Do not include spaces in your alias name, or the alias will not function properly.
5. Click Apply.
Creating an Alias to a Server Resource on the Alias ManagementPageYou can create an alias for a server resource on the Alias Management page:
To create an alias to a server resource on the Alias Management page
280 Administering My webMethods Server 10.3
16 My webMethods Server Configuration

1. As system administrator, click Administration Dashboard > Configuration > AliasManagement.
2. Click Create.
3. In the Alias Name field, type the name for the new alias you want to create, for example Sales.
Do not include spaces in the alias name.
4. For Target, select one of the following targets for the new alias:
Resource - targets a server resource, such as a folder, a portlet or an item. To specify theresource, clickBrowse andmove the resource to the Selected Items box, then click Select.
Path - targets an external resource, such as anURL. Specify the path to the external resource,for example http://www.softwareag.com.
Note:When using server resources for alias targets, you can use theAppend this string field to passparameters or invoke a server command on the resource that the alias references.
5. Click Add Alias.
6. Confirm that your alias behaves as expected by browsing to the user-friendly URL for yournew alias.
By default, when you create an alias, it is appended to the root URL for your server. Forexample, if you create an alias called Sales, you can access the new alias by typing the URLhttp://server:port/Sales.
Searching for AliasesYou can use the Alias Management page to search for existing aliases. The page places searchresults in a list from which you can modify or delete aliases, or view target resources.
Tip:In the alias search field, you can use a single wildcard character (*) to substitute for text anywherewithin the name.
Performing a Simple Alias Search
To search for aliases, use the following procedure.
To perform a simple search for aliases
1. As system administrator, click Administration Dashboard > Configuration > AliasManagement > Search.
Administering My webMethods Server 10.3 281
16 My webMethods Server Configuration

2. Type the name of the alias you want to find.
To specifically include or exclude system aliases from search criteria, see “Specifically Includingor Excluding System Aliases” on page 282.
3. Click Go.
All aliases that match the search appear in a table.
Specifically Including or Excluding System Aliases
To include or exclude system aliases during a search, use the following procedure.
To include or exclude system aliases during a search
1. As system administrator, click Administration Dashboard > Configuration > AliasManagement > Search.
2. Type the name of the alias you want to find.
3. Click Refine.
4. In the Include System Aliases list, choose one of the following:
Yes - to include system aliases in the search
No - to exclude system aliases from the search
5. Click Go.
6. To close the refined search panel, click Close.
Performing an Advanced Alias Search
To perform an advanced search for aliases, use the following procedure.
To perform an advanced search for aliases
1. As system administrator, click Administration Dashboard > Configuration > AliasManagement > Advanced.
2. Type the name of the alias you want to find.
3. For Include System Aliases, select one of the following options:
Yes - Default. Includes system aliases in the search.
282 Administering My webMethods Server 10.3
16 My webMethods Server Configuration

No - Excludes system aliases from the search.
4. For Alias Target, do one of the following:
Click Browse, and then move the target resource to the Selected Items box and clickSelect.
ClickUse Alias, and then type the alias of the target resource in theAlias Name field. ClickTest to determine if the alias is valid and the alias target is the correct one. If the alias iscorrect, click Select.
5. Click Go.
Using Saved Alias SearchesYou can save an alias search for regular use. Using saved alias searches is similar to using savedsearches for users, groups, or roles, except they are performed from this location:
As system administrator, click Administration Dashboard > Configuration > AliasManagement.
For more information about saved searches for users, groups, or roles, see “Working withSaved Searches” on page 116.
Modifying an Alias to Point to a Different Server ResourceTo modify an alias to point to a different server resource, follow these steps:
To modify an existing alias to point to a different server resource
1. As system administrator, click Administration Dashboard > Configuration > AliasManagement.
2. Use the Alias Search panel to find the alias you want to modify.
3. In the search results, click for the alias to be modified.
4. On the New Target panel, select one of the following targets for the new alias:
Resource - targets a server resource, such as a folder, a portlet or an item. To specify theresource, clickBrowse andmove the resource to the Selected Items box, then click Select.
Path - targets an external resource, such as anURL. Specify the path to the external resource,for example http://www.softwareag.com.
Note:When using server resources for alias targets, you can use theAppend this string field to passparameters or invoke a server command on the resource that the alias references.
Administering My webMethods Server 10.3 283
16 My webMethods Server Configuration

5. Click Update.
Deleting an AliasTo delete an alias, use the following procedure.
To delete an existing alias
1. As system administrator, click Administration Dashboard > Configuration > AliasManagement.
2. Use the Alias Search panel to find the alias you want to modify.
3. In the search results, click for the alias to be deleted.
4. In the search results, select the check boxes beside the alias youwant to delete, and clickDelete.
Configuring External Configuration CredentialsTheHTTPHeaderAuthenticationAdministration page allows systemadministrators to configureMy webMethods Server to accept external HTTP authentication credentials from third partysecurity and access control products such as SiteMinder (Computer Associates) or Oblix. Thesecredentials are case-sensitive and, depending on the platform and web server, will most likely besm_user or SM_USER.
Enabling Authentication
Important:The HTTP Header Authentication Administration page should only be enabled if you are usinga third-party security provider. After the page is enabled, the server acts as though all users havebeen authenticated.
To accept authentication from a third party security and access control product
1. As system administrator, click Administration Dashboard > Configuration > HTTP HeaderAuthentication Administration.
2. For User Header Name, type sm_user or SM_user.
3. Select the Enable HTTP Header Authentication check box.
4. If appropriate, in the Logout URL field, type the URL to which the user is redirected afterlogging out of the server.
284 Administering My webMethods Server 10.3
16 My webMethods Server Configuration

5. Click Submit.
6. Configure the third party security and access control software as directed in your vendor’sproduct documentation.
Note:To properly configure an external security and access control product, both My webMethodsServer and the third party product must point to the same directory server instance.
Checking Logs for HTTP Header Authentication ProblemsIf you are having a problem in getting HTTP Header authentication on to work properly, you cancheck log files to assist in diagnosing the problem. Logmessages for HTTPHeader authenticationare assigned to the portalLogin category. Before you can display HTTP Header authenticationlogging messages, you need to change the logging threshold values. The default thresholds forwriting to the console, the _full.log file, and the portalLogin.log file are set to the INFO log levelbut HTTP Header authentication logging messages use the DEBUG log level, which is lower.
Server log files reside in the Software AG_directory \MWS\server\serverName\logs directory. Forinformation on controlling the collection of logs, see “Viewing Logging Messages” on page 274.For information on searching for log messages, see “Viewing Logging Messages” on page 274.
Setting Login Logging Thresholds
You need to set both the category and output settings to DEBUG if youwant the loggingmessagesto be written to the output. For information on setting logging thresholds, see “Controlling ServerLogging” on page 262.
To set category and output thresholds for HTTP Header authentication
1. As systemadministrator, clickAdministration Dashboard > Analysis > Logging Configuration> Logging Thresholds.
2. In the Category Threshold list, select the DEBUG log level for any or all of the followinglogging categories:
The following table lists the available logging categories:
DescriptionLogging category
Controls the output for the console and the _full.log fileroot
Controls the output for the portalLogin.log fileportalLogin
3. In theOutput Threshold list, select the DEBUG log level for any or all of the following loggingoutput types:
Administering My webMethods Server 10.3 285
16 My webMethods Server Configuration

The following table lists the available logging outputs:
DescriptionLogging output
Controls the output for logging messages sent to the consoleConsole
Controls the output for logging messages sent to the _full.log file_full.log
Controls the output for loggingmessages sent to the portalLogin.logfile
portalLogin
4. Click Apply.
Checking HTTP Header Authentication Logs for Problems
With HTTP Header authentication enabled, the server acts as though all users have beenauthenticated. With this in mind, the log messages will reveal one of three likely outcomes, asdescribed in the following sections.
The Login is Successful
Messages for a successful login using HTTP Header authentication look similar to the followingexample:Date_and Time (portalLogin : DEBUG) - HttpHeaderHandler Auth Handler
looking for: user_name
Date_and Time (portalLogin : DEBUG) - Found userID: user_name
where user_name is the name of the user who logged in under HTTP Header authentication.
HTTP Header Authentication is Disabled
If you have not enabledHTTPHeader authentication, the logmessage looks similar to the followingexample:Date_and Time (portalLogin : DEBUG) - HttpHeaderHandler Auth Handler is
not enabled
To enable HTTP Header authentication, see “Enabling Authentication” on page 284.
The Problem Rests with the Third-Party Site
If the third-party site is not configured correctly, HTTPHeader authenticationwill fail. The resultinglog message looks similar to the following example:Date_and Time (portalLogin : DEBUG) - HttpHeaderHandler Auth Handler
looking for:
286 Administering My webMethods Server 10.3
16 My webMethods Server Configuration

Date_and Time (portalLogin : DEBUG) - No value found!
Deploying My webMethods Server ComponentsSystem administrators have the following options available to them when installing servercomponents, such as portlets or DBOs, on a server.
Through the Install Administration page on the Administration Dashboard.
Through theDeploy folder on the server’s File System. This folder allows system administratorsand developers to copy or paste a newly developed portlet package (such as a portlet, CAFapplication, Task application, or deployable package) into a specific directory that is periodicallypolled by the server. If the server detects new deployable components in this folder, thesecomponents are automatically retrieved and installed on the server. You have the option toconfigure the polling interval that specifies how often the server will poll the Deploy directoryto detect any new components.
Modifying the Polling IntervalIf your organization is developing multiple portlets, this installation method may be moreconvenient than manually installing portlets one at a time. The default file system location for theDeploy folder is:
Software AG_directory \MWS\server\serverName\deploy
Note:Polling can be turned on or off by modifying the PhaseProvider.xml configuration file on theserver's file system. Use the following instructions to modify the polling interval.
To modify the polling interval
1. At a command line prompt, type the following command tomove to the server’s bin directory:
cd Software AG_directory\MWS\bin
2. To retrieve the phaseProvider.xml file from the My webMethods Server database, type thiscommand:
3. Navigate to the following location:
Software AG_directory \MWS\server\serverName\config
4. Open the phaseProvider.xml configuration file in a text editor or equivalent XML editingfacility. Locate the following XML fragment:
<Phase name="deploySync" enabled="true"class="com.webmethods.portal.system.init.impl.MasterServerPhase">
<PhaseInfo name="startTimedSyncDeploy" enabled="true"
Administering My webMethods Server 10.3 287
16 My webMethods Server Configuration

class="com.webmethods.portal.bizPolicy.biz.install.impl.
SyncDeployService" interval="5" />
</Phase>
5. To turn polling off, change the enabled attribute from true to false.
6. To change the polling interval, modify the interval attribute to the desired value. The defaultsetting is 5 seconds.
Note:This setting will not have an impact on overall performance
7. Save the file.
8. To deploy the revised file to the My webMethods Server database, type this command:
mws putconfig fileName
9. Delete the file from the \serverName\config directory.
If you do not delete the file, this server instance will continue to use the local version of theconfiguration file.
10. Restart your server instance.
Installing a Portlet Using the Deploy FolderTo use the Deploy folder to install a portlet on a server, do the following.
To install a portlet using the Deploy folder
Copy and paste the server component(s) that you want to deploy into the deploy directory.
Note:If any server component fails to deploy, the server will automatically create a Failed directoryon the server’s file system in the Deploy folder. All components that do not install properlywill be copied into the Failed directory.
Installing Portlets or Other Deployable Server ComponentsTo use the Install Administration page to install portlets or other deployable server components,do the following
To install a portlet or other deployable server component
288 Administering My webMethods Server 10.3
16 My webMethods Server Configuration

1. As system administrator, click Administration Dashboard > Configuration > InstallAdministration.
2. Click Install New Component.
3. Choose Local or Network Location or Remote Location.
4. Do either of the following:
If the deployable component resides on your local file system, click Browse and navigateto the location.
If the deployable component is in a remote location, type the complete path to thecomponent.
5. Click Next.
6. Review the Component Info Summary and then click Install.
If the component is installed successfully, you will get a confirmation message verifying thatthe install succeeded.
Note:If a component install fails, that component is automatically uninstalled. Be sure to check yourlog files to troubleshoot the installation failure.
Uninstalling Portlets or Other Deployable Server ComponentsBefore you uninstall a component, determine how its removal will affect all of its instances on auser’s page. Uninstalling will break any page that contains specific portlet instances of the portletthat was uninstalled, and disrupt any portlets that may be wired to that portlet using the portletwiring feature.
For example, you are notwarned aboutwiring relationshipswhen removing a portlet that iswiredto another portlet.
You may want to change the portlet’s status property to Hidden or Disabled to phase out theportlet before you uninstall it. After users are informed of the impending uninstall and haveremoved it from their page, it will then be safe to uninstall it.
Important:When an uninstalled portlet’s instances are broken, it causes errors on each page on which thatportlet is being used. It also may remove the data for a portlet and its instances, the configurationfiles, the portlet database tables, and the portlet packaging files. Reinstalling will not restore thebroken references caused by uninstalling a portlet.
To uninstall a component using the Install Administration page
Administering My webMethods Server 10.3 289
16 My webMethods Server Configuration

1. As system administrator, click Administration Dashboard > Configuration > InstallAdministration.
2. On the tree list, select one ormore components to be uninstalled, clickUninstall Selected, andclick Next.
3. To confirm the uninstall action, click Uninstall.
Configuring My webMethods Server Single Sign-OnSingle sign-on (SSO) enables a user to log into one application and then use other applicationswithout having to log into each one separately. My webMethods Server supports single sign-onthrough the Security Assertion Markup Language (SAML), an XML-based framework for theexchange of security information. Using SAML, an entity on a target computer grants access basedon an assertion from the source computer that the user is logged into the source computer. Youneed to add the certificate used in signing the assertion to the truststore on the target instance ofMy webMethods Server. For more information, see “Importing CA Certificates” on page 32.
My webMethods Server can provide a single sign-on capability in the following ways:
Between a source server and one or more target servers
Between a server and other webMethods applications that have single sign-on capability
Between a server and a third-party application that supports SAML
Between a server and a third-party identity provider (IDP)
(Deprecated) Between a server, an Artifact Receiver that authenticates the user sign-on, anda target web application
Using this model, one server is the source, providing a central login for users. Links on pages onthe source server point to any number of SAML-capable entities. Also, a target server can acceptassertions from any number of servers as long as the truststore of the target server has the certificateof the source server.
To take advantage of single sign-on, a usermust be known on both the source server and the targetentity. Inmost cases, common knowledge of a user is provided by use of the same directory service.
Configuring a Server as a Target for Single Sign-OnA server can be a target for only one single sign-on source at a time.
To configure a server to be a target for single sign-on
1. As system administrator, click Administration Dashboard > Configuration > SAMLAuthentication Administration.
290 Administering My webMethods Server 10.3
16 My webMethods Server Configuration

2. On the Properties page, specify:
The following table lists the properties, required to configure a server as a target for single sign-on:
DescriptionProperty
(Deprecated) If this is a SAML connectionwith anotherwebMethodsserver, do not change the default value SAMLart. If this is a SAML
Artifact ParameterName
connection to a third-party source, type the artifact parameter nameused by the third-party application.
The HTTP request parameter name where the server will look forthe SAML assertion value. The default value is SAMLResponse.
Assertion ParameterName
(Deprecated—used with the Artifact Parameter Name) Type theURI of the SAML security provider (source). If this is a connection
Security Provider URI
with another webMethods server, use this syntax:server:port/services/SAML
where server is the host where the source server is running and portis the server port number. The default port number is 8585.
3. Click Submit.
Setting SAML Links on a Source ServerOn any page, you can add a link to a SAML target entity, such as a server. If the target acceptsSAML assertions from the source server, when a known user clicks the link, no login credentialsare required. If the target entity does not accept SAML assertions from the source server, or if theuser is not known on the target entity, login credentials may be required.
(Deprecated—valid only with a SAML Artifact Receiver) Under the SAML specification, anintermediary called an artifact receiver can perform authentication on behalf of the target webapplication. In such a case, the SAML source requires two URLs: one for the Artifact Receiver andone for the target web application. You can place one or more SAML links on any page you havepermission to edit.
You can place one or more SAML links on any page you have permission to edit.
To create a SAML link on a source page
1. In the upper right-hand corner of the page, click and click Edit Page.
2. In the Root list of the Available Portlets panel, click Links.
3. In the Links list of the Available Portlets panel, drag the wm_xt_ssolink portlet and drop itonto the page at the location where you want to add the link.
Administering My webMethods Server 10.3 291
16 My webMethods Server Configuration
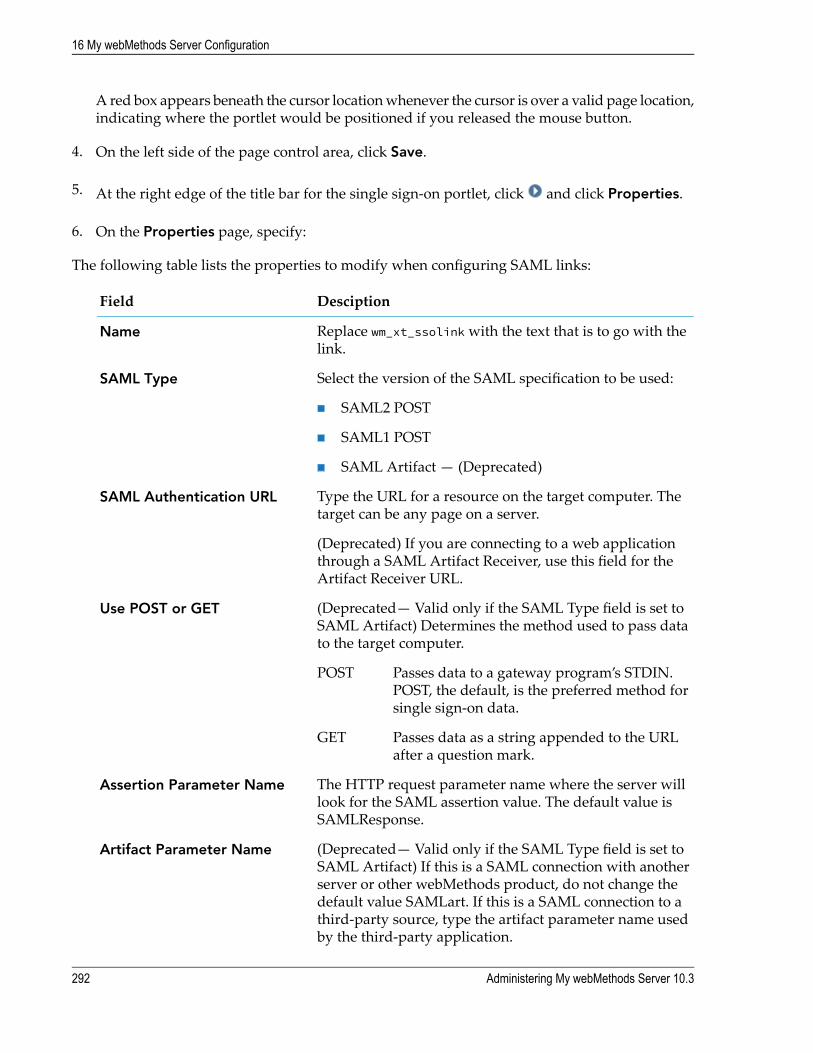
A red box appears beneath the cursor locationwhenever the cursor is over a valid page location,indicating where the portlet would be positioned if you released the mouse button.
4. On the left side of the page control area, click Save.
5. At the right edge of the title bar for the single sign-on portlet, click and click Properties.
6. On the Properties page, specify:
The following table lists the properties to modify when configuring SAML links:
DesciptionField
Replace wm_xt_ssolinkwith the text that is to go with thelink.
Name
Select the version of the SAML specification to be used:SAML Type
SAML2 POST
SAML1 POST
SAML Artifact — (Deprecated)
Type the URL for a resource on the target computer. Thetarget can be any page on a server.
SAML Authentication URL
(Deprecated) If you are connecting to a web applicationthrough a SAML Artifact Receiver, use this field for theArtifact Receiver URL.
(Deprecated— Valid only if the SAML Type field is set toSAML Artifact) Determines the method used to pass datato the target computer.
Use POST or GET
Passes data to a gateway program’s STDIN.POST, the default, is the preferred method forsingle sign-on data.
POST
Passes data as a string appended to the URLafter a question mark.
GET
The HTTP request parameter name where the server willlook for the SAML assertion value. The default value isSAMLResponse.
Assertion Parameter Name
(Deprecated— Valid only if the SAML Type field is set toSAML Artifact) If this is a SAML connection with another
Artifact Parameter Name
server or other webMethods product, do not change thedefault value SAMLart. If this is a SAML connection to athird-party source, type the artifact parameter name usedby the third-party application.
292 Administering My webMethods Server 10.3
16 My webMethods Server Configuration

DesciptionField
(Deprecated) If you have typed theURL for a SAMLArtifactReceiver in the SAML Authentication URL field, type the
Application Target URL
URL for a web application. Otherwise, leave this fieldempty.
7. Click Apply.
Configuring Profiles for SAMLUnder the Security Infrastructure (SIN), you can configure the security properties that are setduring server startup. The configuration file com.softwareag.sso.pid.properties is located in theSoftware AG_directory /profiles/profile/configuration/com.softwareag.platform. config.propsloaderdirectory.
The default configuration is:com.softwareag.security.idp.keystore.keyalias=ssoscom.softwareag.security.idp.SSOassertion.lifeperiod=5com.softwareag.security.idp.keystore.type=JKScom.softwareag.security.idp.assertion.skew=30com.softwareag.security.idp.truststore.location=/common/conf/
platform_truststore.jkscom.softwareag.security.idp.truststore.password=managecom.softwareag.security.idp.keystore.location=/common/conf/keystore.jksenabled=falsecom.softwareag.security.idp.keystore.password=managecom.softwareag.security.idp.truststore.keyalias=ssoscom.softwareag.security.idp.assertion.lifeperiod=300com.softwareag.security.idp.truststore.type=JKS
Configuring truststores and keystores
The configuration allows you to specify the location of truststore and keystore files relative to theinstallation directory:com.softwareag.security.idp.keystore.location=/common/conf/keystore.jkscom.softwareag.security.idp.truststore.location=/common/conf/
platform_truststore.jks
To use absolute paths for configuring truststore and keystore files, add these two properties tothe configuration file:com.softwareag.security.idp.keystore.location.isabsolute=truecom.softwareag.security.idp.truststore.location.isabsolute=true
Administering My webMethods Server 10.3 293
16 My webMethods Server Configuration

Time Skew
If a SAML assertion is issued on one physical machine and validated on another, but the twomachines are not synchronized with a time server, the validation phase may fail. By default, SINallows a time skew of 30 seconds.
To modify the time skew value, use the following property:com.softwareag.security.idp.assertion.skew=n
where n is the time in seconds.
Ehcache Configuration
SIN uses Ehcache to ensure that a single sign-on (SSO) assertion cannot be used more than onetime. The default time to live of an SSO assertion in Ehcache is 120 seconds. The location of theEhcache configuration file relative to the installation directory is defined in the SIN configurationfile using this property:com.softwareag.security.idp.ehcache.location=/ehcachesin.xml
Touse an absolute path for location of the ehcachesin.xml file, add this property to the configurationfile:com.softwareag.security.idp.ehcache.location.isabsolute=true
To modify the time Ehcache time-to-live value, use the following property:com.softwareag.security.idp.ehcache.ttl=n
where n is the time in seconds.
Configuring Single Sign-On for Using a Third-Party IdentityProviderYou can use My webMethods Server as a SAML consumer and a third-party identity provider(IDP) as the SAML authority for enabling IDP initiated single sign-on (SSO).
To configure SSO using a third-party IDP
1. Ensure that My webMethods Server is configured to use a secure HTTPS port.
2. Set the properties in the websso.properties file. For information about setting properties in thefile, see “Setting Properties in the websso.properties File” on page 296.
3. Import the IDP's certificate to the My webMethods Server truststore to ensure that MywebMethods Server trusts the valid messages received from a trusted IDP source. Use theJVM's keytool command. For information about importing certificates to theMywebMethodsServer truststore, see “Importing CA Certificates” on page 32.
294 Administering My webMethods Server 10.3
16 My webMethods Server Configuration

4. Start My webMethods Server.
On startup, My webMethods Server creates two metadata files in the Software AG_directory\MWS\server\serverName\config directory: SPMetadata.xml and IDPMetadata.xml.
5. To register the Service Provider (My webMethods Server) with the external identity provider,copy the Software AG_directory \MWS\server\serverName\config\SPMetadata.xml file fromMy webMethods Server to the IDP sever.
The identity provider uses the endpoint location of the My webMethods Server instance fromthe SPMetdata.xml file and lists My webMethods Server as a service provider.
6. By default, Software AG supports encrypted assertions. Replace the following default JCEpolicy files in Software AG_directory \jvm\operating_system\jre\lib\security folder with thelatest JCE files:
local_policy.jar
US_export_policy.jar
7. Restart My webMethods Server.
8. Verify IDP initiated single sign-on.
If you are using Mircrosoft ADFS (Active Directory Federation Services) as the third-partyIDP, see “Verifying IDP (Mircrosoft ADFS) Initiated Single Sign-On” on page 295.
Verifying IDP (Mircrosoft ADFS) Initiated Single Sign-On
1. Type the IDP’s SSO URL in a browser and log in using valid IDP credentials.
2. Select the My webMethods Server instance registered in Mircrosoft ADFS.
IDP redirects the user with the authentication response to My webMethods Server andsends a SAML response token as a POSTparameter toMywebMethods Server using SAMLPOST binding.
MywebMethods Server validates the SAML response based on the signature details presentin the SAML response. The signature on the assertion is validated using the public key ofthe identity provider available in the metadata file.
MywebMethods Server processes the SAML response and verifies the user details presentin the token. The user ID is the agreed identity between My webMethods Server (SP) andIDP. If the user ID is registered in My webMethods Server, My webMethods Serverauthorizes the user access.
3. Check if you can access My webMethods Server without providing login credentials again.
Administering My webMethods Server 10.3 295
16 My webMethods Server Configuration

Setting Properties in the websso.properties File
You set the properties required for single sign-on using a third-party identity provider (IDP) inthe websso.properties file.
To set properties in the websso.properties file
1. At a command line prompt, type the following command to access the bin directory of theserver:
cd Software AG_directory\MWS\bin
2. Type the following command to retrieve the websso.properties file from the My webMethodsServer database:
mws.{sh|bat} -s serverName getconfig websso.properties
3. Open the websso.properties file in a text editor. You can find the file at the following location:
Software AG_directory \MWS\server\serverName\config\
4. Set the properties in the websso.properties file. For more information about each property, see“Property Setting for Single Sign-On Using a Third-Party IDP” on page 296.
5. Type the following command to save the websso.properties file in theMywebMethods Serverdatabase:
mws.{sh|bat} -s serverName putconfig websso.properties
6. Delete the websso.properties file from the following location:
Software AG_directory \MWS\server\serverName\config\
If you do not delete the file, the server will continue to use the local version of thewebsso.properties file at this location.
7. Restart My webMethods Server.
Property Setting for Single Sign-On Using a Third-Party IDP
In the Software AG_directory \MWS\server\serverName\config\websso.properties file, providethe values required for single sign-on using a third-party IDP.
The following table lists the properties, required to configure single sign-on with a third-partyidentity provider in My webMethods Server:
296 Administering My webMethods Server 10.3
16 My webMethods Server Configuration

DescriptionProperty
The keystore used for SSO communication usingSAML2.0.
SSO_KEYSTORE
My webMethods Server stores the keystores inSoftware AG_directory\MWS\server\serverName\config\security directory.The value of SSO_KEYSTORE can be an absolute path or apath relative to the config directory.
The default keystore, localhost.p12, is present in theconfig\security directory.
The keystore password.SSO_KEYSTORE_PASSWORD
The keystore password can be in plain text or encrypted.For information about password encryption, see“Generating an Encrypted Password” on page 35.
The keystore type.SSO_KEYSTORE_TYPE
It can be JKS or PKCS12.
The alias name to be used for signing the SAML response.SSO_SIGN_ALIAS
The password for signing alias.SSO_SIGN_ALIAS_PASSWORD
The alias name to be used for SAML response encryption.SSO_ENCRYPT_ALIAS
The password for alias encryption.SSO_ENCRYPT_ALIAS_PASSWORD
The default alias name in case the signing alias(SSO_SIGN_ALIAS) and encryption alias
SSO_DEFAULT_ALIAS
(SSO_ENCRYPT_ALIAS) are same. If you specify a value forSSO_DEFAULT_ALIAS, then the password for default aliasis assumed to be same as the keystore password.
If you specify signing alias and encryption alias, youneed not specify the default alias. If you specify a valuefor SSO_DEFAULT_ALIAS, the values set for the followingproperties are ignored:
SSO_SIGN_ALIAS
SSO_SIGN_ALIAS_PASSWORD
SSO_ENCRYPT_ALIAS
SSO_ENCRYPT_ALIAS_PASSWORD
The URL of the Identity Provider's metadata file.SSO_IDP_METADATA_URL
Administering My webMethods Server 10.3 297
16 My webMethods Server Configuration

Example Property Settings in websso.properties File
SSO_KEYSTORE=config/security/localhost.p12SSO_KEYSTORE_PASSWORD={AES}Y5IgMqjfvkgbg7p5VUZztw\=\=SSO_KEYSTORE_TYPE=PKCS12SSO_SIGN_ALIAS=localhostSSO_SIGN_ALIAS_PASSWORD={AES}Y5IgMqjfvkgbg7p5VUZztw\=\=SSO_ENCRYPT_ALIAS=localhostSSO_ENCRYPT_ALIAS_PASSWORD={AES}Y5IgMqjfvkgbg7p5VUZztw\=\=SSO_DEFAULT_ALIAS=localhostSSO_IDP_METADATA_URL="http://example.org/metadata.xml"
Configuring My webMethods Server CacheYou modify the default cache settings for My webMethods Server components using the CacheConfiguration portlet. The Cache Configuration portlet is not installed by default. For moreinformation about how to install MywebMethods Server portlets, see “Installing Portlets or OtherDeployable Server Components” on page 288.
For information about how to configure cache settings with the cache.xml file, see “ModifyingCache Settings in the cache.xml File” on page 300
For information about how to configure cache settings for individual OSGi components, see“Modifying Cache Settings in the cache.xml File” on page 300
To configure My webMethods Server cache
1. As sysadmin, navigate to Folders > Administrative Folders > Administration Dashboard> Configuration > Cache Configuration.
2. If the cache type you want to configure is not listed on the first page, click Next.
3. In the Cache Max Size field, enter the new maximum cache size for the cache type that youwant to configure.
4. Optionally, review the Cache Detailed Report.
The Cache Detailed Report displays detailed information about each cache entry. For moreinformation about cache types and cache attributes, see “Cache Types andCacheAttributes” onpage 299.
5. Click Apply.
Cache settings, configured on one instance are automatically propagated across the MywebMethods Server cluster.
298 Administering My webMethods Server 10.3
16 My webMethods Server Configuration

Cache Types and Cache Attributes
Cache Types
The following table lists the cache types, available on theCache Configuration portlet. Some cachetypes are read-only.
DescriptionCache Name
Non-transient cache for storing the access permissions of a user.AccessCache
Non-transient cache for storing alias keys.AliasCache
Transient cache for storing BPM process definitions.BpmProcessDefinitionCache
Transient cache for storing BPM process instances.BpmProcessInstanceCache
Transient cache for refreshing xtype containers.ContainerCache
Non-transient cache for storing the groups ofwhich a principalis a member.
GroupCache
Non-transient cache for storing invalid login attempt dataInvalidLoginsCache
Non-transient cache for storing JMS transaction data.JMSTransactionCache
Non-transient cache for storing objects, used by portlets.PortletTransientData
Non-transient cache for storing rendered HTML fragments.PresentationCache
Non-transient cache for storing the roles of which a principalis a member.
RoleCache
Transient cache for storing task data.TaskDataCache
Transient cache for storing the ThingIDs of My webMethodsServer objects.
ThingCache
Transient cache for storing the relations between ThingIDs andobjects.
ThingRelationCache
Transient cache for storing the access permissions of a user.Transient cache for AliasCache
Transient cache for storing alias keys.Transient cache forPresentationCache
Cache Attributes
The following table lists the cache attributes, available in the detailed cache report for cache typeson the Cache Configuration portlet. Some attributes are specific to cache types.
Administering My webMethods Server 10.3 299
16 My webMethods Server Configuration

DescriptionCache Attribute
The number of items stored in the cache.Cache size
The maximum number of items to keep in the cache.Maximum size
The number of valid entries, stored in the cache. Valid entriesare items that resolve to objects.
Valid entries
The number of invalid entries, stored in the cache. Invalidentries are items that do not resolve to objects.
Invalid entries
The number of items that have reached the expiration time.Expired entries
The number of items that have an expiration time.Expirable entries
The number of items found in the cache.Cache hits
The number of items not found in the cache.Cache misses
The total number of cache entries that have dependencies.Total dependencies
The number of entries that have dependencies to other itemsin the cache.
Entries with dependencies
Modifying Cache Settings in the cache.xml FileYou use the cache.xml file for detailed configuration of My webMethods Server cache types. Thecache.xml file is stored in the My webMethods Server database. Changes to the cache.xml fileapply to all nodes in a My webMethods Server cluster.
The default storage location for a local copy of the file is Software AG_directory\MWS\server\serverName\config. To configure a My webMethods Server instance to use a copyof the cache.xml file, stored in a non-default location, add the following JVM property in thecustom_wrapper.conf file for the instance:-Dcom.webmethods.mws.cachemanager.configfile=path
where path is the path to the directory that contains the cache.xml file. Formore information aboutconfiguring JVM properties, see “Configuring JVM Settings for My webMethods Server” onpage 69.
Unless you specify custom settings in the cache.xml file, cache settings are applied using the OSGiproperties of each cache type, stored in the OSGI-INF/ directory of the component jar for the type.You can configure cache settings individually for each component, as described in “ModifyingCache Settings with Custom Property Files” on page 301.
To modify cache settings in the cache.xml
1. In a command line prompt, navigate to the bin directory of the server:
300 Administering My webMethods Server 10.3
16 My webMethods Server Configuration

Software AG_directory\MWS\bin
2. Retrieve the cache.xml file from the My webMethods Server database using the getconfigcommand:
mws getconfig cache.xml
3. Open the cache.xml file in a text editor and edit cache settings as required.
The default download location of the cache.cml file is Software AG_directory\MWS\server\serverName\config.
4. Save and close the file.
5. To deploy the updated file to the My webMethods Server database, type the followingcommand:
mws putconfig cache.xml
6. Delete the file local copy of the cache.xml file from the serverName\config directory.
If you do not delete the copy, this server instance will continue to use the local version of theconfiguration file.
7. Restart the node using the restart command:
mws -s serverName restart
Changes to configuration files apply after restarting the server.
Modifying Cache Settings with Custom Property FilesYou can create a .property file and configure cache setting individually for the OSGi componentsof each cache type that My webMethods Server supports. Settings, specified in a property fileapply to a single cache type, and only on the current node. Settings, specified in the cache.xml filefor My webMethods Server override individual cache configurations in .property files.
To modify cache settings using property files
1. In a text editor, create a .properties file with the same name as the fully-qualified name of thecache class.
2. Add the required properties in key=value pairs, each pair on a separate row, without quotesand delimiters.
3. Save the properties file in the following location:
SoftwareAG_directory\profiles\MWS_instanceName\configuration\com.softwareag.platform.config.propsloader
Administering My webMethods Server 10.3 301
16 My webMethods Server Configuration

Example
To configure the alias cache for My webMethods Server:
1. Create a file with name com.webmethods.portal.service.cache.impl.AliasCache.properties.
2. Set themaximum size of the of the alias cache to 1002222 entries by adding the following entryin the file: maxSize=1002222
3. Save the com.webmethods.portal.service.cache.impl.AliasCache.properties file in the\profiles\MWS_default\configuration\com.softwareag.platform.config.propsloaderdirectory.
Configuring Role or Group Cache Lifecycle CalculationBy default, the role cache or group cache for a user is recalculated on every user login. Conditionsin which the calculation involves user or group searches that take a long time can result in poorperformance in My webMethods Server and the LDAP servers to which it is connected. Aconfiguration option in the cache.xml file enables the role cache or group cache to be persistedacross user logins, causing large performance improvements.
Because the roles are no longer calculated at user login, this optimization modifies the dynamicrole capability. With the default setting, where the roles are calculated at user login, the user gainsor loses role changes at that time.With the new setting, if a dynamic query role changes the results,the user does not immediately get the change. Role changes made by the system administratorwill, however, be recognized. In this mode, static roles function correctly with the new setting.Dynamic roles do not return expected changes until an administrator changes role membershipor adds a description, or until the various caches time out.
Under optimization, becauseMywebMethods Server does not control group definition, theGroupcache is not updated until the cache entry times out or a system restart occurs. If users changegroup membership frequently, group cache optimization may not be desirable. The choice ofwhether to perform role cache or group cache recalculation at login is a trade-off betweenperformance and functionality.
For more information about modifying the cache.xml file for My webMethods Server, see“Modifying Cache Settings in the cache.xml File” on page 300
To configure role cache or group cache lifecycle calculation
1. Retrieve the cache.xml file from the My webMethods Server database.
2. Open the cache.xml file in a text editor and locate the cache.
Role cache:<cache name="RoleCache"class="com.webmethods.portal.service.cache.impl.RoleCache"
maxSize="1000"defaultCacheTimeout="3600000"roleCacheLifecycle="0"isClustered="true"
302 Administering My webMethods Server 10.3
16 My webMethods Server Configuration
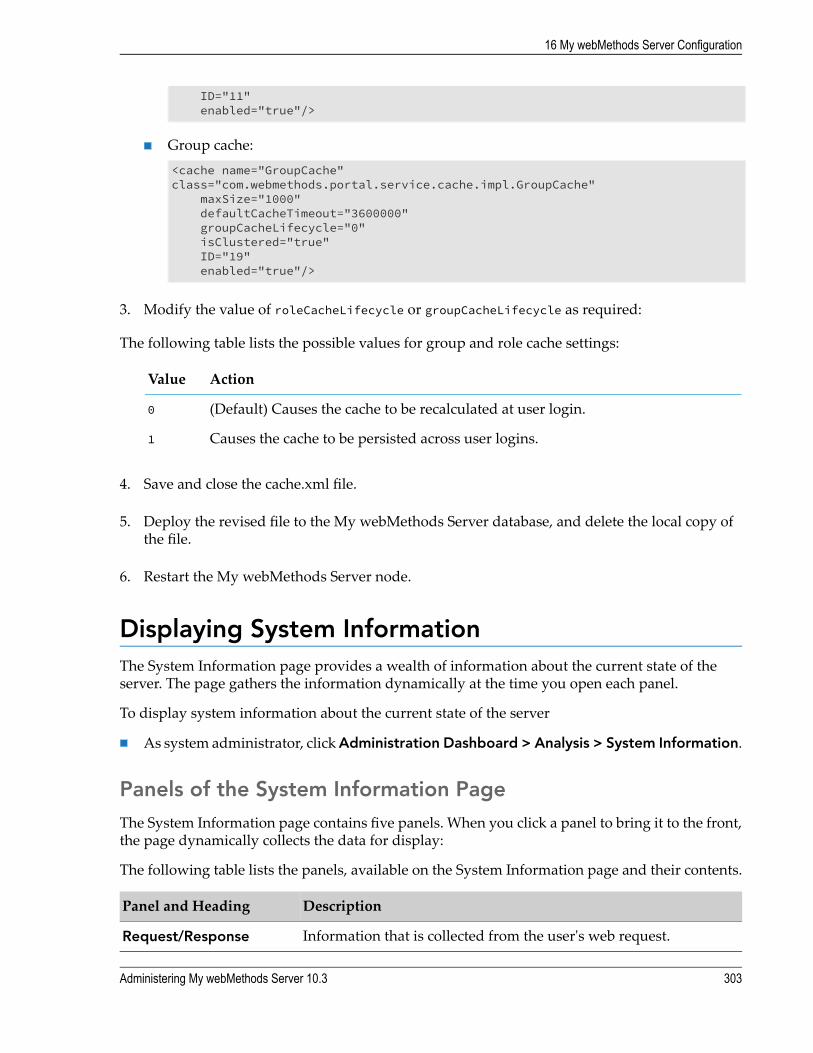
ID="11"enabled="true"/>
Group cache:<cache name="GroupCache"class="com.webmethods.portal.service.cache.impl.GroupCache"
maxSize="1000"defaultCacheTimeout="3600000"groupCacheLifecycle="0"isClustered="true"ID="19"enabled="true"/>
3. Modify the value of roleCacheLifecycle or groupCacheLifecycle as required:
The following table lists the possible values for group and role cache settings:
ActionValue
(Default) Causes the cache to be recalculated at user login.0
Causes the cache to be persisted across user logins.1
4. Save and close the cache.xml file.
5. Deploy the revised file to the My webMethods Server database, and delete the local copy ofthe file.
6. Restart the My webMethods Server node.
Displaying System InformationThe System Information page provides a wealth of information about the current state of theserver. The page gathers the information dynamically at the time you open each panel.
To display system information about the current state of the server
As system administrator, clickAdministration Dashboard > Analysis > System Information.
Panels of the System Information PageThe System Information page contains five panels. When you click a panel to bring it to the front,the page dynamically collects the data for display:
The following table lists the panels, available on the System Information page and their contents.
DescriptionPanel and Heading
Information that is collected from the user's web request.Request/Response
Administering My webMethods Server 10.3 303
16 My webMethods Server Configuration

DescriptionPanel and Heading
Typical cgi-bin parameters describing the requested path.Request Information
Incoming HTTP headers.Request Headers
Incoming HTTP parameters on the URL.Request Parameters
Attributes (objects) stored on the current request.Request Attributes
Miscellaneous information, such as encoding and locale, collectedfrom the request.
Response Information
User session information.Session Misc
Attributes (objects) stored on the user’s session.Session Attributes
The current locale of the user.Locale Information
Various information used to render requests for this user.Presentation Data
Portlet Controller Session objects associated with this user.Session Attributes
Portlet Controller Request objects associatedwith this user's request.Request Attributes
Information shared throughout the server (across all users).Application Attributes
Environment variables, such as Classpath and path.System Information
Information about the current front-end server.Server Information
Servlet object information.Context Information
304 Administering My webMethods Server 10.3
16 My webMethods Server Configuration
17 Managing My webMethods Server Content
■ Migrating My webMethods Server Content ................................................................. 306
■ Managing Content Storage .......................................................................................... 306
■ Publishing Portlets as an Administrator ........................................................................ 309
■ Rebuilding the Search Index ........................................................................................ 310
■ Adding Custom JAR Files ............................................................................................ 311
Administering My webMethods Server 10.3 305

Migrating My webMethods Server ContentTheContentMigrationWizard page enables system administrators tomigrate server content fromone server instance to another, such as from development to staging to production.
This page can be used tomigrate the following types of server content: documents, folders, externallinks, internal links (using aliases), pages (including layouts), portlets, Dynamic Business Objects(DBOs), permissions, subscriptions, and portlet wiring properties.
Content Migration ConsiderationsContent migration involves two distinct activities: exporting the content from the source serverinstance, followed by importing the content on the target server instance. Before performing theseactions, consider the following:
Migrating portlets andDBOs: If you are developing or installing any portlets on a developmentserver and want to migrate pages that contain instances of these portlets, you must deploythem on the target server before migrating any pages or published instances of the portletsthat were developed or installed on the development server instance.
Migrating published content: Content published to the Content Management system can bemigrated from one server instance to another. If you are using your development environmentto configure permissions on items published to the content management system, you have theoption to migrate the permissions as well.
Migrating links: To properly migrate internal links with references to other objects, such asa link from one page to another, create aliases for these links instead of using the base URL.
For example, if you want to publish a link to an existing page, such as a Sales page that hasthe following as its initial URL:http://server/meta/default/folder/0000002132
Create an alias that points to this URL, but has a more friendly URL such as the following:http://server/Sales
Migrating permissions and subscriptions: To properlymigrate permissions and subscriptionsfrom a source to target server instance, be sure that both servers are pointing to the samedirectory services.
Managing Content StorageSystem administrators use the Content Service page to manage the storage locations availablefor publishing content to the server. Published content is physically stored in the locationsconfigured in the content service. It typically resides on a separate file server for backup purposesand to provide failover capability and high availability in a My webMethods Server cluster.
306 Administering My webMethods Server 10.3
17 Managing My webMethods Server Content

My webMethods Server stores the binary content of a file in a content service (either system ornetwork) when you:
Publish a file to the server
Update a file
Check in a new version of a versioned file
The binary content is physically stored in the content service for as long as the file object exists inMy webMethods Server. The binary content is marked for deletion when you delete thecorresponding file object on My webMethods Server, but the actual file is not deleted until theregularly scheduled purging period. Typically, My webMethods Server purges deleted objects at2 A.M. server time.
When you set a new default content service, all new content is directed to that service, but contentstored in an existing service continues to be accessed from that service.
Content ServicesThe default system content service stores files in theMywebMethods Server database. You cannotmodify the system content service configuration.
If users of My webMethods Server store large files (1 MB or larger) or a large number of files, thesystem content service may not be adequate for your file storage needs. In such cases, you shouldconfigure a network content service to provide higher capacity. My webMethods Server supportsnetwork file storage by the use of a file system.
On Windows, the file system content service uses a UNC (Uniform Naming Convention) path toconnect to a network file storage device. On UNIX, the network file storage must be mounted asa local resource. To support cluster high availability, the network file storage device should providefailover support.
For information on configuring a network content service, see “Configuring a New ContentService” on page 307.
Configuring a New Content Service
To configure a new Content Service for the server repository
1. As system administrator:Administration Dashboard > Content > Content Service > CreateNew Content Service.
2. In the Service Name field, type a name for your new content service and click Next.
The service name is limited from 1 to 255 characters and can contain only alphanumeric ASCIIcharacters with no spaces.
3. Type a physical storage location for your content service.
Administering My webMethods Server 10.3 307
17 Managing My webMethods Server Content

OnWindows, use a valid UNC path. The path is not case-sensitive. For example:\\server\volume\directory\
On UNIX, use the path to the location of a mounted network storage, for example:/mounted_location/folder
Note:The sample paths assume that your network administrator has provided the proper securitysettings to allow all servers in a cluster to have read/write access to the network file system.If MywebMethods Server runs as aWindows service, make sure the user account fromwhichyou run the service has the required access privileges for the network file system.
4. Click Submit.
5. Optionally, to make the new content service the default content service, click and then clickSet As Default.
Importing Content from a Content Service
To import content from an existing content service
1. As system administrator: Administration Dashboard > Content > Content Service > ViewContent Services.
2. Locate the content service to which you want to migrate the contents of an existing contentservice, click and then click Import Content.
3. For the Target Folder property, do one of the following:
Browse, and then move the target page to the Selected Items box and click Select.
Use Alias, and then type the alias of the page to which the user should be redirected tn theAlias Name. Click Test to determine if the alias is valid and the alias target is the correctone. If the alias is correct, click Select.
4. Click Import.
Setting the Maximum Size for Content
To set the maximum file size for content published to the server repository
1. As system administrator: Administration Dashboard > Content > Content Service > SetPublish Constraints.
308 Administering My webMethods Server 10.3
17 Managing My webMethods Server Content

2. In the Max Publish Size (MB) field, type a maximum publish size (in Megabytes).
3. Click Apply.
Specifying Allowed File Extensions for ContentBy default, there are no restrictions on the type of file that can be stored in the server repository.However, it is possible to limit the file types that can be stored.
To specify the allowed file extensions for content
1. As system administrator: Administration Dashboard > Content > Content Service > SetPublish Constraints.
2. In the Allowed File Extensions field, enter a comma-delimited list of file extensions that areallowed.
The default value of * allows the use of any file type. As an example of allowed file extensions,you might see the following list:
zip,doc,xsl,ppt,pdf,gif,jpg,png
3. Click Apply.
Publishing Portlets as an AdministratorThe Publish page provides system administrators with expanded publishing capabilities that aregenerally not exposed to most users. The Publish page allows administrators to publish manydifferent types of content such as files, folders, forms, links, and specific portlet instances. Youcan also publish custom content types such as Dynamic Business Objects or Custom Forms fromthis page.
To publish content using the Publish page
1. As system administrator: Administration > Content > Publish.
2. Select the corresponding option for the content type you wish to publish. The default optionsare: File, Folder, Form (for DBOs only), Link, and Portlet.
3. For a given content type, select one of the options from the drop down menu.
Note:If you previously created any custom objects that are based on any given content type, theywill now show up as options in the drop down menu for the respective content type. As anexample, the RSS Feed option under the Folder content type is a Dynamic Business Object. It
Administering My webMethods Server 10.3 309
17 Managing My webMethods Server Content
was created to extend the Folder object type with custom attributes and business logic forpublishing RSS syndicated news feeds to a folder object type.
4. Click Next.
5. From the Location heading, click Browse to select a parent folder location for the content itemyou are publishing.
Note:You can optionally click Use Alias if you want to publish the content item to a location thatis referenced by an existing alias.
6. Click Next.
7. Enter a name for the content item you are publishing.
8. (Optional) Enter a description for the content item you are publishing.
9. Depending on the type of content you are publishing, fill in any Extended Properties for thegiven content type (such as. RSS Feed URL for an RSS Feed content item).
10. Click Next.
11. Click Finish.
Rebuilding the Search IndexThe Search Administration page allows system administrators to rebuild the search index for theLucene search engine that is offered with My webMethods Server.
Rebuilding the search index will re-index all content that was previously published to the serverand update the default search indexes again. A system administrator might need to do this if thesearch index somehow becomes corrupted and search stops working.
Tip:If your server has a lot of content published to the content management system, this operationcan take a long time to run. You should run this operation at off-peak hours.
To rebuild the search index
1. As system administrator: Administration > Configuration > Search Administration.
2. Click Start Rebuild.
310 Administering My webMethods Server 10.3
17 Managing My webMethods Server Content

Adding Custom JAR FilesMy webMethods Server runs in an Open Services Gateway initiative (OSGi) framework. You canadd custom JAR files to the server instance, which converts those JAR files into OSGi bundles. Ifa JAR file is to be a fragment of another bundle, you can provide instructions in a bind file.
The following procedure describes how to add custom JAR files and how to attach a JAR file as afragment bundle. Formore information on bundles, see theOSGi Service PlatformCore Specification.
To add custom JAR files
1. Copy the JAR file to this location:
Software AG_directory /MWS/lib
2. If the JAR file is to be a fragment of another bundle, do the following:
a. Create a file with the name jar_file_name.bnd where jar_file_name is the name of thecustom JAR file, without the .jar extension.
b. In the bind file, add the instructions on how to bind the JAR file. For example:
# attach as fragment to the caf.server bundleFragment-Host: com.webmethods.caf.server
c. Place the bind file in the same directory where you placed the JAR file:
Software AG_directory /MWS/lib
3. Run the update command for the server instance.
Software AG_directory/MWS/bin/mws.[bat | sh] update
Administering My webMethods Server 10.3 311
17 Managing My webMethods Server Content

312 Administering My webMethods Server 10.3
17 Managing My webMethods Server Content

18 Managing the User Interface
■ Locale Administration ................................................................................................... 314
■ What Are Server Rules? ................................................................................................ 314
■ Creating Locale Rules ................................................................................................... 315
■ Creating Login Page Rules ........................................................................................... 317
■ Creating Start Page Rules ............................................................................................ 320
■ Creating Rendering Rules ............................................................................................ 322
■ Modifying a Rule .......................................................................................................... 324
■ Copying a Rule ............................................................................................................. 326
■ Managing the Evaluation Order for Rules .................................................................... 326
■ Removing a Rule .......................................................................................................... 327
■ Managing Skin Rules .................................................................................................... 327
■ Managing Shell Rules ................................................................................................... 330
Administering My webMethods Server 10.3 313

Locale AdministrationMy webMethods Server uses several decision points to determine the locale for a user, in thisorder:
1. The locale preference of the user, if specified in the User Profile. For more information, see“User Information” on page 125.
2. The Locale Rules. For more information, see “Creating Locale Rules” on page 315
3. The browser locale preference.
4. The system locale of the computer where the server is running, which is the default.
The Locale Administration page allows you to set the default locale rules for My webMethodsServer when they are not determined by other rules, as described in “Creating Locale Rules” onpage 315.
Note:If you want to run My webMethods Server as a daemon service in a Linux environment, in theSoftware AG_directory /profiles/MWS_instanceName/bin/sagmws_version script file, set the localein the LANG variable, for example: export LANG=es_ES.UTF-8.
To set the default My webMethods Server locale rule
1. As system administrator: Administration > User Interface > Locale Administration.
2. From the Locale list, choose the locale to be used as the default rule forMywebMethods Server.
3. Click Apply.
What Are Server Rules?MywebMethods Server uses rules to control a variety of user activities, fromwhich page they useto log into the server, to the appearance of the pages they see. Using rules, you can define defaultbehaviors for the entire application or you can dynamically control the experience of a given user,group, or role.
The following table describes the types of rules that you can create in My webMethods.
DescriptionRule type
Rules that allow you to dictate what locale should be used for a usersession if it is not defined in the user profile. For more information aboutcreating a locale rule, see “Creating Locale Rules” on page 315.
Locale rules
Rules that determine what login page should be used. You can, forexample, redirect users to different login pages, depending on whether
Login page rules
314 Administering My webMethods Server 10.3
18 Managing the User Interface

DescriptionRule type
they are inside or outside the firewall. For more information aboutcreating a login page rule, see “Creating Login Page Rules” on page 317.
Rules that determine what start page should be used. The start page isthe page to which the server redirects users after log in. For more
Start page rules
information about creating a start page rule, see “Creating Start PageRules” on page 320.
Rules that determine what renderer should be used.Renderers are userinterface formatting capabilities that can be assigned to specific server
Rendering rules
objects by defining rendering rules. You can define rendering rules forvirtually any server object type. Rendering rules are useful in providinga consistent look and feel for common object types that can be invokedthrough explicit rule definitions. For more information about creating arendering rule, see “Creating Rendering Rules” on page 322.
Rules that determine what skin should be used. A skin is an installableMy webMethods Server component that defines the look and feel of the
Skin rules
user interface. Skin rules definewhat skin should be displayed for a givenuser, group, or server resource. For example, if a server serves bothemployees and customers, and there are requirements for a different setof graphics, colors, and fonts for each distinct user population, you canuse skin rules to assign the corresponding skin to a given user group.For more information about creating a skin rule, see “Creating SkinRules” on page 328.
Rules that determine what shell should be used. A shell is an installablecomponent that generates the My webMethods Server header, footer,
Shell rules
and portlet title bars. Shell rules define what shell elements should bedisplayed for a given user, group, or role. For example, if a server servesboth employees and customers, you can use shell rules to assign thecorresponding shell to a given user group. For more information aboutcreating a shell rule, see “Creating Shell Rules” on page 330.
In addition, you can use rules for the creation of roles, which are collections of users, groups, andother roles. You can create a rule-based role that defines members based on the same types ofcriteria as are used for the rule types. For information, see “Adding a Rule-Based Role” on page 160.
Creating Locale RulesThe Manage Locale Page Rules page allows you to define rules that dictate what locale should beused for a user session if it is not defined in the user profile.
To create a new locale rule
Administering My webMethods Server 10.3 315
18 Managing the User Interface

1. As system administrator:Administration > User Interface > Manage Locale Rules > CreateNew Rule.
2. In the Name field, type a name for the rule.
3. (Optional) In the Description field, type a description for the new rule.
4. Unless you want to disable the rule during creation, leave Is Enabled selected.
5. To add a condition for individual users, click Current User(s) and do the following:
a. In the Keywords field, type a keyword representing the users you want to search for, andclick Search.
b. Move one or more users to the Selected box and click Apply.
6. To add a condition based on group or role membership, click Group / Role Membership anddo the following:
a. Under Search For, choose the Groups or Roles option.
b. In theKeywords field, type a keyword representing the groups or roles youwant to searchfor, and click Search.
c. Move one or more groups or roles to the Selected box and click Apply.
7. To add a condition based on user attributes, click User Attributes, in the Pick User Attributelist, choose a user attribute, and click Apply.
For more information about the user attributes in the list, see “User Information” on page 125.
8. To add a condition based on global session attributes, clickGlobal Session anddo the following:
a. In theGlobal Session Attribute Name field, type the name of the global session attribute.
b. (Optional) In the Variable Value field, type a value for the global session attribute.
c. Click Apply.
9. To add a condition based on the request header, click Request and do the following:
a. Choose the expression, and click Submit.
b. In the Condition field, complete the expression.
316 Administering My webMethods Server 10.3
18 Managing the User Interface

For example, assume that you want to match any HTTP GET request. The wizard moves#{request.method} into the Condition field and you type the remainder:#{request.method} == "GET"
10. To add a condition that matches the current resource or a parent of the current resource, clickParent Resource and then do the following:
a. To find children of a resource, click the name of the resource.
b. To select a resource, click the option button to the left of the resource.
c. Click Apply.
11. To add a condition that matches the current resource type, click Current Resource Type,choose the resource type and do the following:
a. To find children of a resource, click the name of the resource.
b. To select a resource, click the option button to the left of the resource.
c. Click Apply.
12. To add a condition for a resource property and a value associated with it, click ResourceProperties, and do the following:
a. In the Property Name field, type the property name.
b. In the Property Value field, type the property value.
c. Click Apply.
For example, if you want to match files that are PDFs, the property name is mimeType and theproperty value is pdf.
13. From the Result list, choose the locale to be used for the rule.
14. Click Create Rule.
Creating Login Page RulesTheManage Login Page Rules page allows you to define rules that dictate what login page shouldbe used. Login page rules can be defined to dynamically set the default login page for a given fora given user, group, or role.
To create a new login page rule
Administering My webMethods Server 10.3 317
18 Managing the User Interface

1. As system administrator: Administration > User Interface > Manage Login Page Rules >Create New Rule.
2. In the Name field, type a name for the rule.
3. (Optional) In the Description field, type a description for the new rule.
4. Unless you want to disable the rule during creation, leave Is Enabled selected.
5. To add a condition for individual users, click Current User(s) and do the following:
a. In the Keywords field, type a keyword representing the users you want to search for, andclick Search.
b. Move one or more users to the Selected box and click Apply.
6. To add a condition based on group or role membership, click Group / Role Membership anddo the following:
a. Under Search For, choose the Groups or Roles option.
b. In theKeywords field, type a keyword representing the groups or roles youwant to searchfor, and click Search.
c. Move one or more groups or roles to the Selected box and click Apply.
7. To add a condition based on user attributes, clickUser Attributes, on the Pick User Attributelist, choose a user attribute, and click Apply.
For more information about the user attributes in the list, see “User Information” on page 125.
8. To add a condition based on global session attributes, clickGlobal Session anddo the following:
a. In theGlobal Session Attribute Name field, type the name of the global session attribute.
b. (Optional) In the Variable Value field, type a value for the global session attribute.
c. Click Apply.
9. To add a condition based on the request header, click Request and do the following:
a. Choose the expression, and click Submit.
b. In the Condition field, complete the expression.
318 Administering My webMethods Server 10.3
18 Managing the User Interface

For example, assume that you want to match any HTTP GET request. The wizard moves#{request.method} into the Condition field and you type the remainder:#{request.method} == "GET"
10. To add a condition that matches the current resource or a parent of the current resource, clickParent Resource and then do the following:
a. To find children of a resource, click the name of the resource.
b. To select a resource, click the option button to the left of the resource.
c. Click Apply.
11. To add a condition that matches the current resource type, click Current Resource Type,choose the resource type and do the following:
a. To find children of a resource, click the name of the resource.
b. To select a resource, click the option button to the left of the resource.
c. Click Apply.
12. To add a condition for a resource property and a value associated with it, click ResourceProperties, and do the following:
a. In the Property Name field, type the property name.
b. In the Property Value field, type the property value.
c. Click Apply.
For example, if you want to match files that are PDFs, the property name is mimeType and theproperty value is pdf.
13. In the Result field, type an alias for the login page, or to browse to the page, click Pick and dothe following:
a. To find children of a resource, click the name of the resource.
b. To select a resource, click the option button to the left of the resource.
c. Click Apply.
14. Click Create Rule.
Administering My webMethods Server 10.3 319
18 Managing the User Interface

Creating Start Page RulesThe Manage Start Page Rules page allows system administrators to define rules that dictate whatstart page should be used. The start page is the page towhich the server redirects users after log-in.Start page rules can be defined to dynamically set the default start page for a given for a givenuser, group, or role.
To create a new start page rule
1. As system administrator: Administration > User Interface > Manage Start Page Rules >Create New Rule.
2. In the Name field, type a name for the rule.
3. (Optional) In the Description field, type a description for the new rule.
4. Unless you want to disable the rule during creation, leave Is Enabled selected.
5. To add a condition for individual users, click Current User(s) and do the following:
a. In the Keywords field, type a keyword representing the users you want to search for, andclick Search.
b. Move one or more users to the Selected box and click Apply.
6. To add a condition based on group or role membership, click Group / Role Membership anddo the following:
a. Under Search For, choose the Groups or Roles option.
b. In theKeywords field, type a keyword representing the groups or roles youwant to searchfor, and click Search.
c. Move one or more groups or roles to the Selected box and click Apply.
7. To add a condition based on user attributes, click User Attributes, in the Pick User Attributelist, choose a user attribute, and click Apply.
For more information about the user attributes in the list, see “User Information” on page 125.
8. To add a condition based on global session attributes, clickGlobal Session anddo the following:
a. In theGlobal Session Attribute Name field, type the name of the global session attribute.
b. (Optional) In the Variable Value field, type a value for the global session attribute.
320 Administering My webMethods Server 10.3
18 Managing the User Interface

c. Click Apply.
9. To add a condition based on the request header, click Request and do the following:
a. Choose the expression, and click Submit.
b. In the Condition field, complete the expression.
For example, assume that you want to match any HTTP GET request. The wizard moves#{request.method} into the Condition field and you type the remainder:#{request.method} == "GET"
10. To add a condition that matches the current resource or a parent of the current resource, clickParent Resource and then do the following:
a. To find children of a resource, click the name of the resource.
b. To select a resource, click the option button to the left of the resource.
c. Click Apply.
11. To add a condition that matches the current resource type, click Current Resource Type,choose the resource type and do the following:.
a. To find children of a resource, click the name of the resource.
b. To select a resource, click the option button to the left of the resource.
c. Click Apply.
12. To add a condition for a resource property and a value associated with it, click ResourceProperties, and do the following:
a. In the Property Name field, type the property name.
b. In the Property Value field, type the property value.
c. Click Apply.
For example, if you want to match files that are PDFs, the property name is mimeType and theproperty value is pdf.
13. In the Result field, type an alias for the start page, or to browse to the page, click Pick and dothe following:
a. To find children of a resource, click the name of the resource.
Administering My webMethods Server 10.3 321
18 Managing the User Interface

b. To select a resource, click the option button to the left of the resource.
c. Click Apply.
14. Click Create Rule.
Creating Rendering RulesTheManage Rendering Rules page allows system administrators to configure rendering rules forspecific server objects, such as a folder, page, portlet, and so forth. For example, an administratorwhowants all folders to display a detailed view of content can create a rendering rule that appliesa “details” renderer to all folder objects. For each of the types of conditions you can apply in thefollowing procedure, you can add multiple instances, one at a time.
To create a new Rendering rule
1. As system administrator: Administration > User Interface > Manage Rendering Rules >Create New Rule.
2. In the Name field, type a name for the rule.
Example: folder-thumbnails view (for image files).
3. (Optional) In the Description field, type a description for the new rule.
4. Unless you want to disable the rule during creation, leave Is Enabled selected.
5. To add a condition for individual users, click Current User(s) and do the following:
a. In the Keywords field, type a keyword representing the users you want to search for, andclick Search.
b. Move one or more users to the Selected box and click Apply.
6. To add a condition based on group or role membership, click Group / Role Membership anddo the following:
a. Under Search For, choose the Groups or Roles option.
b. In theKeywords field, type a keyword representing the groups or roles youwant to searchfor, and click Search.
c. Move one or more groups or roles to the Selected box and click Apply.
322 Administering My webMethods Server 10.3
18 Managing the User Interface

7. To add a condition based on user attributes, clickUser Attributes, on the Pick User Attributelist, choose a user attribute, and click Apply.
For more information about the user attributes in the list, see “User Information” on page 125.
8. To add a condition based on global session attributes, clickGlobal Session anddo the following:
a. In theGlobal Session Attribute Name field, type the name of the global session attribute.
b. (Optional) In the Variable Value field, type a value for the global session attribute.
c. Click Apply.
9. To add a condition based on the request header, click Request and do the following:
a. Choose the expression, and click Submit.
b. In the Condition field, complete the expression.
For example, assume that you want to match any HTTP GET request. The wizard moves#{request.method} into the Condition field and you type the remainder:#{request.method} == "GET"
10. To add a condition that matches the current resource or a parent of the current resource, clickParent Resource and then do the following:
a. To find children of a resource, click the name of the resource.
b. To select a resource, click the option button to the left of the resource.
c. Click Apply.
11. To add a condition that matches the current resource type, click Current Resource Type,choose the resource type and then do the following:.
a. To find children of a resource, click the name of the resource.
b. To select a resource, click the option button to the left of the resource.
c. Click Apply.
12. To add a condition for a resource property and a value associated with it, click ResourceProperties, and do the following:
a. In the Property Name field, type the property name.
Administering My webMethods Server 10.3 323
18 Managing the User Interface

b. In the Property Value field, type the property value.
c. Click Apply.
For example, if you want to match files that are PDFs, the property name is mimeType and theproperty value is pdf.
13. On the Result list, choose the target renderer.
The renderer you select will be applied to all server objects that meet the evaluation criteriayou define in the following steps. For example, the thumbnails renderer is useful for displayingthumbnail views for images that are published to the server.
14. Click Create Rule.
Modifying a RuleAfter a rule exists, you can modify any portion of it that is editable.
To modify a rule
1. As system administrator:Administration > User Interface > Manage rule-type Rules > ViewRules.
where rule-type contains the rule you want to modify.
2. For the rule you want to modify, click and then click Modify Rule.
3. Do any of the following:
In the Name field, type a new name for the rule.
(Optional) In the Description field, type a new description for the rule.
To disable the rule, clear Is Enabled.
To modify a condition for individual users, click Current User(s) and do the following:
1. In the Keywords field, type a keyword representing the users you want to search for,and click Search.
2. Move one or more users to the Selected box and click Apply.
Tomodify a condition based on group or rolemembership, clickGroup / Role Membershipand do the following:
1. Under Search For, choose the Groups or Roles option.
324 Administering My webMethods Server 10.3
18 Managing the User Interface

2. In the Keywords field, type a keyword representing the groups or roles you want tosearch for, and click Search.
3. Move one or more groups or roles to the Selected box and click Apply.
To modify a condition based on user attributes, click User Attributes, in the Pick UserAttribute list, choose a user attribute, and click Apply.
Formore information about the user attributes in the list, see “User Information” onpage 125.
To modify a condition based on global session attributes, click Global Session and do thefollowing:
1. In the Global Session Attribute Name field, type the name for the global sessionattribute.
2. (Optional) In the Variable Value field, type a new value for the global attribute.
3. Click Apply.
To modify a condition based on the request header, click Request and do the following:
1. Choose the expression, and click Submit.
2. In the Condition field, complete the expression.
For example, assume that you want to match any HTTP GET request. The wizard moves#{request.method} into theConditionfield and you type the remainder: #{request.method}== "GET"
Tomodify a condition thatmatches the current resource or a parent of the current resource,click Parent Resource and then do the following:
1. To find children of a resource, click the name of the resource.
2. To select a resource, click the option button to the left of the resource.
3. Click Apply.
To modify a condition that matches the current resource type, click Current ResourceType, choose the resource type and do the following:.
1. To find children of a resource, click the name of the resource.
2. To select a resource, click the option button to the left of the resource.
3. Click Apply.
Tomodify a condition for a resource property and a value associatedwith it, clickResourceProperties, and do the following:
1. In the Property Name field, type the property name.
2. In the Property Value field, type the property value.
3. Click Apply.
Administering My webMethods Server 10.3 325
18 Managing the User Interface

Modify the Result as needed field as needed.
4. Click Update Rule.
Copying a RuleIf you want to create a rule that is similar to an existing one, you can do so by copying the existingrule.
To copy a rule
1. As system administrator:Administration > User Interface > Manage rule-type Rules > ViewRules.
where rule-type contains the rule you want to copy.
2. For the rule you want to copy, click and then click Copy Rule.
3. Type a name for the new rule.
4. (Optional) Type a description for the new rule.
5. Click Copy The Rule.
You can then modify the new rule, as described in “Modifying a Rule” on page 324.
Managing the Evaluation Order for RulesWhen a user requests a server resource, the server uses rules to determine how to fill the request.For example, perhaps the look and feel of the page is dependent onwhether the user is a companyemployee or a customer. The server evaluates the skin rules to determine which skin to apply, inthis order:
1. If there are multiple skin rules, the skin associated with the first rule that matches the userapplies.
2. If none of the rules match the user, or if there are no skin rules, the default skin assigned inthe User Preferences tab of the user’s Profile page applies.
3. If no skin is assigned on the Profile page, the default skin for the server applies.
Changing the Order or Rule EvaluationIf there are multiple skin rules, you can determine the order in which they are evaluated.
To change the order in rules are evaluated
326 Administering My webMethods Server 10.3
18 Managing the User Interface

1. As system administrator: Administration > User Interface.
2. Click the name of the set of rules you want to manage.
3. Click Change Rule Evaluation Order.
4. To reorder rules, move them up or down as needed.
The first rule in the list is searched first, followed by the second, and so on.
5. Click Update.
Removing a RuleTo remove a rule, use the following procedure.
To remove a rule
1. As system administrator:Administration > User Interface > Manage rule-type Rules > ViewRules.
where rule-type contains the rule you want to remove.
2. For the rule you want to remove, click and then click Remove Rule.
Managing Skin RulesA skin is an installable My webMethods Server component that defines the look and feel of theMy webMethods Server user interface. A skin modifies the images, fonts, colors, and other subtlestylable aspects of HTML content, but it does not modify the HTML content in any functionalway.
A developer creates new custom skins to accomplish many different functions. Some of theseinclude:
Branding the server with corporate, partner, or departmental logos.
Aligning the color scheme with corporate, partner, or departmental colors.
Developers create skins with the Skin Administration page and customize them as needed. Formore information about how to customize skins, see “Customizing Skins” on page 399.
My webMethods Server offers a variety of ways to configure personalization rules that dictatewhat skin is displayed for a given user, group, or resource. You can explicitly assign a particularskin to a specific user or set up rules that dynamically assign a skin based on a variety of criteria.
The Manage Skin Rules page allows you to define rules that dictate what skins can be used byusers, groups, or roles. This page allows a system administrator to create, modify, or remove rules,
Administering My webMethods Server 10.3 327
18 Managing the User Interface
and change the evaluation order of a list of rules that are evaluated for each user every time theuser logs in.
Creating Skin RulesTo create a new skin rule, use the following procedure.
To create a new skin rule
1. As system administrator: Administration > User Interface > Manage Skin Rules > CreateNew Rule.
2. In the Name field, type a name for the rule.
3. (Optional) In the Description field, type a description for the new rule.
4. Unless you want to disable the rule during creation, leave Is Enabled selected.
5. To add a condition for individual users, click Current User(s) and do the following:
a. In the Keywords field, type a keyword representing the users you want to search for, andclick Search.
b. Move one or more users to the Selected box and click Apply.
6. To add a condition based on group or role membership, click Group / Role Membership anddo the following:
a. Under Search For, choose the Groups or Roles option.
b. In theKeywords field, type a keyword representing the groups or roles youwant to searchfor, and click Search.
c. Move one or more groups or roles to the Selected box and click Apply.
7. To add a condition based on user attributes, click User Attributes, in the Pick User Attributelist, choose a user attribute, and click Apply.
For more information about the user attributes in the list, see “User Information” on page 125.
8. To add a condition based on global session attributes, clickGlobal Session anddo the following:
a. In theGlobal Session Attribute Name field, type the name of the global session attribute.
b. (Optional) In the Variable Value field, type a value for the global session attribute.
328 Administering My webMethods Server 10.3
18 Managing the User Interface
c. Click Apply.
9. To add a condition based on the request header, click Request and do the following:
a. Choose the expression, and click Submit.
b. In the Condition field, complete the expression.
For example, assume that you want to match any HTTP GET request. The wizard moves#{request.method} into the Condition field and you type the remainder:#{request.method} == "GET"
10. To add a condition that matches the current resource or a parent of the current resource, clickParent Resource and then do the following:
a. To find children of a resource, click the name of the resource.
b. To select a resource, click the option button to the left of the resource.
c. Click Apply.
11. To add a condition that matches the current resource type, click Current Resource Type,choose the resource type and then do the following:.
a. To find children of a resource, click the name of the resource.
b. To select a resource, click the option button to the left of the resource.
c. Click Apply.
12. To add a condition for a resource property and a value associated with it, click ResourceProperties, and do the following:
a. In the Property Name field, type the property name.
b. In the Property Value field, type the property value.
c. Click Apply.
For example, if you want to match files that are PDFs, the property name is mimeType and theproperty value is pdf.
13. On the Result list, choose the target skin.
14. Click Create Rule.
Administering My webMethods Server 10.3 329
18 Managing the User Interface

Managing Shell RulesA shell is an installable component of My webMethods Server. A shell is segment is a special kindof page that generates the My webMethods Server header, footer, and portlet title bars.
Where regular portlets produce the primary content of a page, a shell provides the structure thatframes that primary content. Common web page idioms such as banners, standard links, andsearch boxes appear in a shell.
A developer creates new custom shells to accomplish many different functions, such as:
Adding a row of links to other corporate web sites below the page banner
Changing the default search box to one that searches the corporate catalogue
Adding a left-hand navigation bar to every page.
You can set upmany different criteria to determinewhich shell is used for a particular user request.My webMethods Server offers a variety of ways to configure personalization rules that dictatewhat shell is displayed for a given user, group, or resource.
Note:Unlike skins, you cannot explicitly assign a particular shell to a specific user. You need to userules that dynamically assign a shell based on a variety of criteria.
The Manage Shell Rules page allows you to define rules that dictate what shells can be used byusers, groups, or roles. This page allows a system administrator to create, modify, or remove rules,and change the evaluation order of a list of rules that are evaluated for each user every time theuser logs in.
Creating Shell RulesTo create a new shell rule, use the following procedure.
To create a new shell rule
1. As system administrator: Administration > User Interface > Manage Shell Rules > CreateNew Rule.
2. In the Name field, type a name for the rule.
Example: folder-thumbnails view (for image files).
3. (Optional) In the Description field, type a description for the new rule.
4. Unless you want to disable the rule during creation, leave Is Enabled selected.
5. To add a condition for individual users, click Current User(s) and do the following:
330 Administering My webMethods Server 10.3
18 Managing the User Interface

a. In the Keywords field, type a keyword representing the users you want to search for, andclick Search.
b. Move one or more users to the Selected box and click Apply.
6. To add a condition based on group or role membership, click Group / Role Membership anddo the following:
a. Under Search For, choose the Groups or Roles option.
b. In theKeywords field, type a keyword representing the groups or roles youwant to searchfor, and click Search.
c. Move one or more groups or roles to the Selected box and click Apply.
7. To add a condition based on user attributes, click User Attributes, in the Pick User Attributelist, choose a user attribute, and click Apply.
For more information about the user attributes in the list, see “User Information” on page 125.
8. To add a condition based on global session attributes, clickGlobal Session anddo the following:
a. In theGlobal Session Attribute Name field, type the name of the global session attribute.
b. (Optional) In the Variable Value field, type a value for the global session attribute.
c. Click Apply.
9. To add a condition based on the request header, click Request and do the following:
a. Choose the expression, and click Submit.
b. In the Condition field, complete the expression.
For example, assume that you want to match any HTTP GET request. The wizard moves#{request.method} into the Condition field and you type the remainder:#{request.method} == "GET"
10. To add a condition that matches the current resource or a parent of the current resource, clickParent Resource and then do the following:
a. To find children of a resource, click the name of the resource.
b. To select a resource, click the option button to the left of the resource.
c. Click Apply.
Administering My webMethods Server 10.3 331
18 Managing the User Interface
11. To add a condition that matches the current resource type, click Current Resource Type,choose the resource type and then do the following:.
a. To find children of a resource, click the name of the resource.
b. To select a resource, click the option button to the left of the resource.
c. Click Apply.
12. To add a condition for a resource property and a value associated with it, click ResourceProperties, and do the following:
a. In the Property Name field, type the property name.
b. In the Property Value field, type the property value.
c. Click Apply.
For example, if you want to match files that are PDFs, the property name is mimeType and theproperty value is pdf.
13. In the Result list, choose the target shell.
The renderer you select will be applied to all server objects that meet the evaluation criteriayou define in the following steps. For example, the thumbnails renderer is useful for displayingthumbnail views for images that are published to the server.
14. Click Create Rule.
Setting Shells for RequestsTo set a specific shell for a request, a developer creates a link to a server resource and adds a shellparameter to the link. The shell parameter value should be an alias to the target shell.
For example, the URL for a link to the public folder with the extranet shell is/folder.public?shell=shell.extranet.When users follow the link, they view the public folder framedwith the specified extranet shell. When users click another link from the public folder page, theyreturn to whatever shell they were using before, provided the link does not also have a shellparameter.
Setting Shells for Sessions
To set a specific shell for a session, sometimes referred to as a sticky shell because the setting isretained for the duration of the session, a developer creates a link to the forceShell command. Thiscommand takes a returnUrl parameter, which redirects a user to the specified URL once the shellhas been set.
332 Administering My webMethods Server 10.3
18 Managing the User Interface

For example, the URL for a link to the public folder with a sticky extranet shell is/?command=forceShell&shellURI=shell.extranet&returnUrl=folder.public. When users follow thelink, they view the public folder now framed with the extranet shell. When users click anotherlink from the public folder page, provided the link does not have a shell parameter, they see thatpage still framed with the extranet shell.
Administering My webMethods Server 10.3 333
18 Managing the User Interface

334 Administering My webMethods Server 10.3
18 Managing the User Interface

19 Working with the Common Directory Services
API
■ Managing User Information with the Common Directory Service API ......................... 336
■ About the Common Directory Services API ................................................................. 337
■ Prerequisites ................................................................................................................. 337
■ CDS Code Examples .................................................................................................... 338
Administering My webMethods Server 10.3 335

Managing User Information with the CommonDirectory Service APIMywebMethods Server provides several directory service options formanaging users and groups:
My webMethods system directory. This is an internal My webMethods Server user directory,available by default in all installations of My webMethods Server. You can access informationin this directory server using the My webMethods user interface and the Common DirectoryServices (CDS) API. Both read and write access are available.
LDAP (Lightweight Directory Access Protocol). My webMethods enables you to define oneor more external LDAP user directories. For a list of supported directory server products, seeSystem Requirements for Software AG Products. You can access information in this directoryserver using theMywebMethods user interface and the CDSAPI. Only read access is available.
Database. My webMethods Server also enables you to authenticate users against a databasedirectory, which is a set of RDBMS tables and an SQL configuration to access these tables. Youcan implement a custom authentication module to extend authentication against a databasedirectory. You can access information in this directory server using the My webMethods userinterface and the CDS API. Only read access is available.
My webMethods Server and applications and services running within it can access the userinformation contained in these directories, and you can configure external applications and servicesthat have access to My webMethods Server to use this data.
In addition to working with users and groups in a directory service, you can access and maintainrole information, which is maintained separately in the My webMethods Server database.
For example, you can:
Configure other suite applications, such as webMethods Integration Server, to authenticateusers from any of the above user directory options instead of from a user directory unique toIntegration Server.
Configure a process step in a business process to call a Java service to obtain user attributesfrom the directory service or role membership from theMywebMethods Server database, andpass that data into the process pipeline.
Configure a Java service to assign a user to a role programmatically.
The CDS API offers support for the following:
Search and discovery of users, groups, and roles.
Support for LDAP search controls for large directories.
Create and update users and groups in the system directory. All other external directories areread-only.
Delete users and groups from the system directory.
Create, update, and delete roles in My webMethods Server.
336 Administering My webMethods Server 10.3
19 Working with the Common Directory Services API

Read custom attributes from LDAP and database directories.
Read and write custom profile attributes for users, groups, and roles (that is, attributes whichare not managed by external directories).
For information about the CommonDirectory Services API, see the com.webmethods.sc.directoryand com.webmethods.sc.mwspackages in thewebMethods CAF andMywebMethods Server Java APIReference.
About the Common Directory Services APIWhen connected to the same My webMethods Server database and Universal Messaging server,CDS behaves very much like a My webMethods Server cluster instance and participates in alldistributed caching across the cluster. When a system directory user is updated, the change willbe detected by all CDS instances within a few minutes.
Directory services are defined and managed in My webMethods Server, by logging in to MywebMethods as either SysAdmin or as Administrator. For more information about working withdirectory services, see “ManagingDirectory Services” onpage 84 and “ManagingExternalDirectoryServices” on page 86.
In addition to working with the CDS API, you can use the My webMethods interface to performall directory management activities:
User, group, and role management. For more information, see .
Authentication management. For more information, see “Managing Security” on page 221.
Implementation of attribute providers. For more information, see “Attribute Providers” onpage 211.
PrerequisitesBefore you can work with the CDS API, you must take the following actions:
Create the database tables for My webMethods Server using the webMethods DatabaseComponent Configurator. This is usually carried out immediately after installation.
Create and initialize the My webMethods Server instance.
Initialize CDS with a JDBC connection to the My webMethods Server database schema. Formore information, see “Initializing Common Directory Services” on page 338.
Configure a Universal Messaging server to use as a JMS provider from the ClusterAdministration page in My webMethods after installing My webMethods Server, or whencreating a new instance using the My webMethods Server command line utility or SoftwareAG Command Central.
Administering My webMethods Server 10.3 337
19 Working with the Common Directory Services API

Class Path ConsiderationsTo use CDS in a stand-alone application, in addition to providing the correct JDBC connectioninformation, all CDS .jar files must be present in the class path of the external application runningCDS. To ensure that these .jar files are available, include all .jar files from Software AG_directory/common/lib and /common/lib/ext (assuming you have a standard installation ofMywebMethodsServer and Integration Server).
Initializing Common Directory ServicesWhen the CDS API is accessed from within My webMethods Server (from a CAF application forexample), or from Integration Server, CDS is already initialized and no further action is needed.If you want to use the CDS API from an external application or service that has access to MywebMethods Server, the CDS API must be explicitly initialized from the external application orservice.
You initialize Common Directory Services by invoking thecom.webmethods.sc.mws.MWSLibrary.init() static method. The input parameters are expectedas Java system properties and must describe a JDBC connection URL to a MywebMethods Serverdatabase schema. Instead of using remote call backs to My webMethods Server, the CDS APIconnects to this schema and reads all configuration and principal information.
Here is sample code showing how to initialize CDS using the MWSLibrary class:System.setProperty(MWSLibrary.SYSTEM_PROP_DB_DRIVER,"com.wm.dd.jdbc.sqlserver.SQLServerDriver"); // JDBC Driver Class
System.setProperty(MWSLibrary.SYSTEM_PROP_DB_URL,"jdbc:wm:sqlserver://localhost:1433;DatabaseName=webm82_dev");
// JDBC Connection URL
System.setProperty(MWSLibrary.SYSTEM_PROP_DB_USER, "webm82_dev");// DB username
System.setProperty(MWSLibrary.SYSTEM_PROP_DB_PASSWORD, "password");// DB
password
MWSLibrary.init();
CDS Code Examples
List All RolesIDirectorySession session =DirectorySystemFactory.getDirectorySystem().createSession();
List roles = session.listRoles();
for (IDirectoryRole role: roles) {
338 Administering My webMethods Server 10.3
19 Working with the Common Directory Services API

String roleID = role.getID();
String roleName = role.getName();
String roleDN = role.getDN();
}
Lookup a User by Name and Fetch all AttributeIDirectorySession session =DirectorySystemFactory.getDirectorySystem().createSession();
IDirectoryUser user = (IDirectoryUser) session.lookupPrincipalByName("user1", IDirectoryPrincipal.TYPE_USER);
Map attributes = user.getAllAttributes();
Authenticate UserIDirectorySession session =DirectorySystemFactory.getDirectorySystem().createSession();
IDirectoryUser user = session.authenticateUser("username", "password");
Create Static Role and Add User as a MemberIDirectorySession session =DirectorySystemFactory.getDirectorySystem().createSession();
IDirectoryUser user = (IDirectoryUser) session.lookupPrincipalByName("user1", IDirectoryPrincipal.TYPE_USER);
IDirectoryRole role = session.createRole(IDirectoryRole.STATIC_ROLE_TYPE,"roleName", Collections.EMPTY_MAP);
session.addPrincipalToRole(user.getID(), role.getID());
Administering My webMethods Server 10.3 339
19 Working with the Common Directory Services API

340 Administering My webMethods Server 10.3
19 Working with the Common Directory Services API

20 Sending Mobile Notifications from My
webMethods Server
■ Sending Push Notifications to Mobile Devices ............................................................ 342
■ Configuring Push Notifications in My webMethods Server .......................................... 343
Administering My webMethods Server 10.3 341

Sending Push Notifications to Mobile DevicesYou can configureMywebMethods Server to send push notifications for events to users onmobiledevices.
My webMethods Server uses different push notification service providers for sending messagesto client applications, depending on themobile operation system. The default notification providerfor Android applications is Google Cloud Messaging, and the default notification provider forApple is iStore. Before you can send push notification messages from My webMethods Server,you must register your mobile application with the respective service provider.
When a device running the mobile applications registers with the respective push notificationprovider, the provider issues a registration ID for the device. The device sends the registration IDto My webMethods Server, together with details about the events to which to subscribe. MywebMethods Server stores the device ID and event subscription details in the server database.When a relevant event occurs,MywebMethods Server pushes amessage to the notification serviceprovider, with the device registration ID. The push notification service provider sends themessageto the registered device. If a mobile application user uses multiple devices to connect, MywebMethods Server sends the notification to each registered device.
My webMethods Server uses REST to push notifications to Google Cloud Messaging, and SSL topush notifications to iStore.
342 Administering My webMethods Server 10.3
20 Sending Mobile Notifications from My webMethods Server

MywebMethods Server provides an out-of the-box implementation to send push notifications forTask Engine events toMobile Business Console users onmobile devices.With this implementation,My webMethods Server sends a notification each time a user, or a role or group that the userbelongs to, is assigned or delegated a task. To send push notifications for a custom mobileapplication, you must do the following:
Implement custom event handlers for the event types forwhich youwant to send notifications.For more information, see webMethods CAF and OpenUI Development Help.
Create a custom service to push notifications through the publishNotification API in MywebMethods Server. For more information, see webMethods CAF and My webMethods ServerJava API Reference.
Register the application with the push notification service. For more information about howto register with the push notification service provider, see the provider documentation.
Configure the mobile push notification options in My webMethods Server, as described in“Configuring Push Notifications in My webMethods Server” on page 343.
Configuring Push Notifications in My webMethodsServerYou configure push notifications in My webMethods Server after you register your mobileapplication with the push notification service for the respective operating system.
1. As sysadmin, navigate to Folders > Adminisrative Folders > Administration Dashboard >Configuration > Mobile Push Notification Administration.
2. Click Add New App.
3. On the Mobile App Config page, specify the name of your mobile application and theapplication details.
For Android applications:
The following table lists the properties, required for Android applications:
DescriptionField
The endpoint of the sendAPI from your registrationwithGoogleCloud Messaging.
End Point URL
TheOAuth authorization token for your application, as registeredwith the Google Cloud Messaging.
OAuth
For iOS applications:
The following table lists the properties, required for iOS applications:
Administering My webMethods Server 10.3 343
20 Sending Mobile Notifications from My webMethods Server

DescriptionField
The URL of the Apple Push Notification service from yourregistration with iStore.
Host Name
The number of the port to use for SSL communication with theiStore push notification service. The default port number is 2195.
Port Number
The full path to the location of the SSL certificate from yourregistration with iStore.
Certificate Path
The password to use to connect to iStore.Password
4. Click Submit.
344 Administering My webMethods Server 10.3
20 Sending Mobile Notifications from My webMethods Server

IV Server Page Development
21 Managing Pages in My webMethods Server ................................................................ 347
22 Managing Workspaces in My webMethods Server ...................................................... 377
23 Customizing Skins ........................................................................................................ 399
24 Working with Shells in My webMethods Server ........................................................... 425
Administering My webMethods Server 10.3 345

346 Administering My webMethods Server 10.3
IV Server Page Development

21 Managing Pages in My webMethods Server
■ About Page Development ........................................................................................... 348
■ About Custom Folders and Pages ............................................................................... 348
■ About Customizing the My webMethods Navigation .................................................. 365
■ About Customizing the My webMethods Look-And-Feel ............................................ 370
■ Building a Simple Front-End Page to My webMethods ............................................... 374
■ Creating Links for Single Sign-On ................................................................................ 375
Administering My webMethods Server 10.3 347
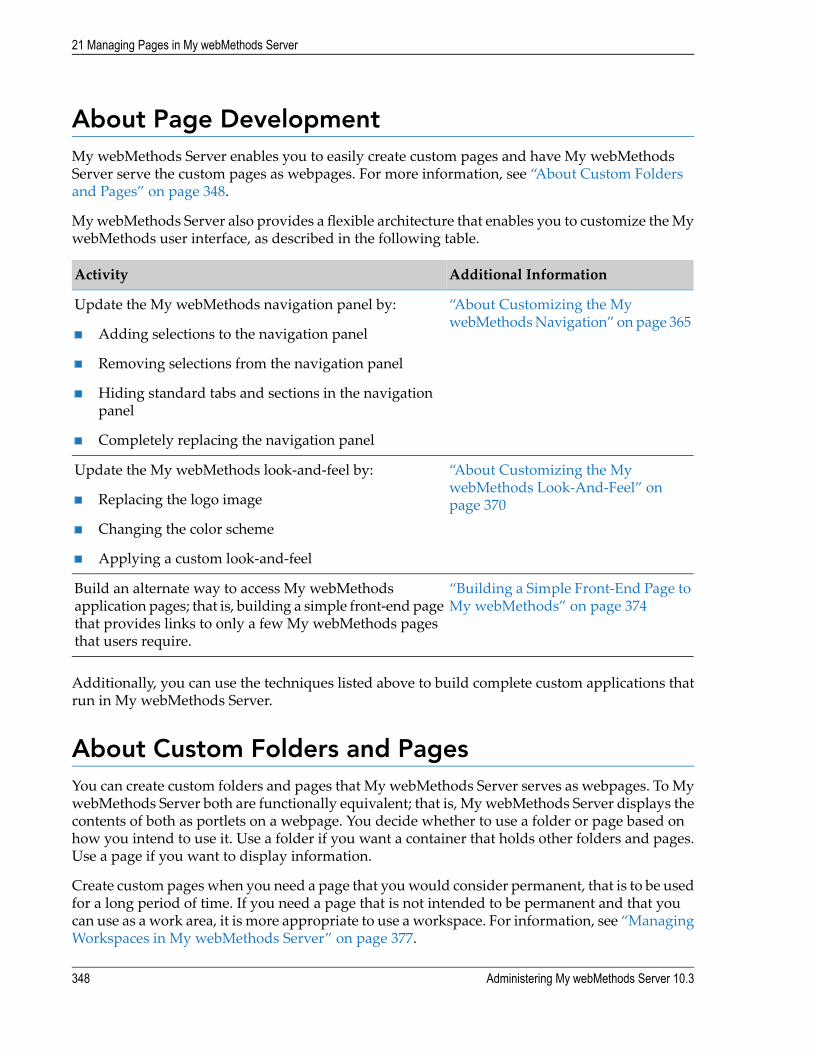
About Page DevelopmentMy webMethods Server enables you to easily create custom pages and have My webMethodsServer serve the custom pages as webpages. For more information, see “About Custom Foldersand Pages” on page 348.
MywebMethods Server also provides a flexible architecture that enables you to customize theMywebMethods user interface, as described in the following table.
Additional InformationActivity
“About Customizing the MywebMethodsNavigation” on page 365
Update the My webMethods navigation panel by:
Adding selections to the navigation panel
Removing selections from the navigation panel
Hiding standard tabs and sections in the navigationpanel
Completely replacing the navigation panel
“About Customizing the MywebMethods Look-And-Feel” onpage 370
Update the My webMethods look-and-feel by:
Replacing the logo image
Changing the color scheme
Applying a custom look-and-feel
“Building a Simple Front-End Page toMy webMethods” on page 374
Build an alternate way to access My webMethodsapplication pages; that is, building a simple front-end pagethat provides links to only a few My webMethods pagesthat users require.
Additionally, you can use the techniques listed above to build complete custom applications thatrun in My webMethods Server.
About Custom Folders and PagesYou can create custom folders and pages that My webMethods Server serves as webpages. To MywebMethods Server both are functionally equivalent; that is, MywebMethods Server displays thecontents of both as portlets on a webpage. You decide whether to use a folder or page based onhow you intend to use it. Use a folder if you want a container that holds other folders and pages.Use a page if you want to display information.
Create custom pageswhen you need a page that youwould consider permanent, that is to be usedfor a long period of time. If you need a page that is not intended to be permanent and that youcan use as a work area, it is more appropriate to use a workspace. For information, see “ManagingWorkspaces in My webMethods Server” on page 377.
348 Administering My webMethods Server 10.3
21 Managing Pages in My webMethods Server
To add content to a page, you drag and drop portlets on to the page. You can position the portletswhere you want, size them, and set their properties. You can make the page dynamic by usingwiring:
You can wire the property of one portlet to the property of another. By doing so, when theproperty in the source portlet is set, the change is automatically reflected in the destinationportlet.
You can wire information about the user accessing the custom page to portlet properties. Forexample, if you have a portlet that displays the weather, you canwire the postal code attributefrom a user profile to the postal code property of the weather portlet. As a result, when theuser displays the page, My webMethods Server automatically uses the postal code from theuser’s profile to set the postal code property of the weather portlet and the user’s local weatherdisplays.
Creating Custom PagesCreate portal pages by logging intoMywebMethods using the SysAdmin user account or anotheruser account that is a member of the Admin role. To build a page, youmust switch to page editingmode. In page editing mode, the system administrator user interface changes to display a Toolstab on the left and the custom page on the right. The Tools tab lists portlets that you can add tothe custom page.
To create a custom page
1. As system administrator, navigate to the folder where the new page is to reside. If the folderyou want to use does not exist, create it.
If you want to add the page to the My webMethods Applications navigation, navigate toa location within:
Folders > My webMethods Applications > Fabric Tasks
If you want to add the page to a different taxonomy, it is recommended that you use alocation within either of the following:
Folders (root folder)
Folders > Public Folders
2. In the folder title bar, click , and then New > Page.
3. In the New Page window, do the following:
a. In the Name field, type the name of the new page.
b. In the Description field, optionally type a description of the new page.
c. Click Create.
Administering My webMethods Server 10.3 349
21 Managing Pages in My webMethods Server

4. Open the new page you just created by clicking the link for the page.
5. In the page title bar, click , and then Edit Page to switch to page editing mode.
6. Set the page properties. For instructions, see “Page Properties” on page 351 and “Setting PageProperties” on page 352.
7. Define the page layout. For instructions, see “Controlling the Page Layout” on page 353.
8. Build the page by performing the tasks listed in the following table:
Additional InformationTask
“Adding Portlets to a Page” on page 357Add portlets by dragging portlets from theTools tab on to the page canvas.
“Positioning Portlets on a Page” on page 358Position the portlets on the page.
“Modifying Portlet Properties” on page 361Set the portlet properties.
“Managing Portlet Aliases” on page 362Optionally, set up portlet aliases.
“Wiring the Property of One Portlet to theProperty ofAnother” on page 363 and “Wiring
Optionally, wire the portlets.
a Principal Attribute to a Portlet Property” onpage 364
9. In the page title bar, click Save.
To make your new page available, you can:
Provide the page URL so that users can access it directly. Make the URL simpler by assigningthe page an alias. For example, if you assign the page the alias “MyCustomPage”, users canenter the following URL where host_name is the My webMethods Server host name andport_number is its port number.
http://www.host_name:port_number/MyCustomPage
For more information about how to assign aliases, see “Setting Page Properties” on page 352.
Add the page to the My webMethods navigation so that users can select it from there. Formore information, see “Adding Selections to the My webMethods Navigation” on page 366.
Editing an Existing PageAfter you initially create a page, you can open the page in page editing mode at any time to makeadditional changes to it.
To edit an existing page
350 Administering My webMethods Server 10.3
21 Managing Pages in My webMethods Server

1. As system administrator, navigate to and open the page you want to edit.
2. In the page title bar, click , and then Edit Page to switch to page editing mode.
3. In page editing mode, do one of the following:
The following table lists editing options for an existing page, and where to find more informationabout each option:
Additional InformationTask
“Page Properties” on page 351 and “SettingPage Properties” on page 352
Update the page properties, for example, tochange the name of the page.
“Controlling the Page Layout” on page 353Change the page layout.
“Adding Portlets to a Page” on page 357Add more portlets to the page.
“Removing Portlets from a Page” on page 357Remove portlets from the page
“Positioning Portlets on a Page” on page 358Reposition the portlets on the page
“Modifying Portlet Properties” on page 361Update portlet properties.
“Managing Portlet Aliases” on page 362Set up portlet aliases.
“Wiring the Property of One Portlet to theProperty ofAnother” on page 363 and “Wiring
Wire the portlets.
a Principal Attribute to a Portlet Property” onpage 364
4. In the page title bar, click Save.
Page Properties
The General tab for a page displays the properties, listed in the following table:
DescriptionProperty
The name of the page.Name
An optional description of the page.Description
Optional keywords that you assign to a page for your own use.Out-of-the-box, My webMethods Server does not provide functionality that
Keywords
uses the keywords.However, you canwrite custom code that takes advantageof the keywords. For example, you might create custom search code thatallows you to search based on the keywords.
The owner of the page. Click the link to view the owner’s profile.Owner
Administering My webMethods Server 10.3 351
21 Managing Pages in My webMethods Server

DescriptionProperty
The date and time when the page was created.Created On
The date and time the page was last updated.Modified On
Aliases assigned to the page.Aliases
For instructions for how to set the properties, see “Setting Page Properties” on page 352. Forinformation about the Layout tab, see “Controlling the Page Layout” on page 353.
Setting Page Properties
Use the following procedure to set properties for a page. For a description of the properties, see“Page Properties” on page 351.
To set page properties
1. As system administrator, navigate to and open the page for which you want to set properties.
2. In the page title bar, click , and then Edit Page to switch to page editing mode.
3. Click Properties.
4. On the General tab, specify:
The following table lists the page properties, available on the General tab and their functions:
ActionPropertyTask
Type a new name in the Name field.NameChange the name of the page
Type a description in the Description.DescriptionChange or add a description ofthe page
In the Keywords field, type one ormore keywords separated by commas.
KeywordsAssign keywords to the page
To add an alias:AliasesAssign aliases to the page
a. Click Add.
b. In the text box, type the alias nameyou want to add.
c. Click OK.
To update an alias:
a. Select the alias youwant to change.
352 Administering My webMethods Server 10.3
21 Managing Pages in My webMethods Server

ActionPropertyTask
b. Click Edit.
c. In the text box, type the updatedalias name.
d. Click OK.
To remove an alias:
a. Select the alias youwant to remove.
b. Click Remove.
5. Click OK.
6. In the page title bar, click Save.
Controlling the Page LayoutTo define how the portlets within a page can be positioned, define the page layout. There are twotypes of layouts:
Column layout. In this layout, all the portlets in a page are aligned in columns. Portlets cannotoverlap within a column. You can define a page to have one, two, three, or four columns. Thedefault for a new page is a two column layout.
Each column has a single row. You can add additional rows to a column by dragging the Rowtool into the column. For more information about using rows, see “Adding RowsWhen Usinga Column Layout” on page 356 and “Removing Rows When Using a Column Layout” onpage 356.
Free Form layout. In this layout, you can place portlets on the page in any location. Portletscan overlap and even completely cover one another.
For instructions for adding portlets to a page, see “Adding Portlets to a Page” on page 357. Forinstructions for how to position portlets within a page, see “Positioning Portlets on a Page” onpage 358.
To define the layout of a page
1. As system administrator, navigate to and open the page for which you want to define thelayout.
2. In the page title bar, click , and then Edit Page to switch to page editing mode.
3. Click Properties.
Administering My webMethods Server 10.3 353
21 Managing Pages in My webMethods Server

4. Select the Layout tab.
5. Use the View As list to indicate whether you want to view column, row, and portlet bordersand hidden portlet title bars.
Select End User if you do notwant to view borders or hidden title bars.
Select Expert User if you want to view borders and hidden title bars.
Borders are helpful when you are positioning portlets. Also, if you set a portlet’s propertiesso that the title bar is hidden, you must view the page as an expert user to re-display thetitle bar so that you can take action on that portlet, for example, to move it or access itsproperties.
Note:The setting to view as an expert is temporary. If you leave the edited page, when youreturn, the view will be as an end user again.
Note:The View As Expert check box at the top of the page serves the same purpose as the View Asproperty. If you select Expert User in the View As property, My webMethods Serverautomatically selects the View As Expert check box when you save the properties. Similarly,if you select End User in the View As property, My webMethods Server automatically clearsthe View As Expert check box when you save the properties.
6. Set the Editable Canvas property based on whether you want users to be able to repositionand/or resize portlets on the page.
Select the Editable Canvas check box if you want users to be able to reposition and resizeportlets on the page.
Clear the Editable Canvas check box if you do not want users to be able to reposition andresize portlets on the page.
Clearing the Editable Canvas check box prevents end users from inadvertently changingthe layout while using the page. If you select a free form layout for the page, a user caninadvertently change the page simply by clicking a portlet.
Note:When the Editable Canvas check box is selected, users can change the layout. This is trueeven when users are denied edit permissions, although they are prevented from saving thoseedits. However, when the Editable Canvas check box is cleared, all users are prevented fromchanging the layout.
7. From the Columns list, select layout that you want to use for the page.
8. If you select One Column, Two Columns, Three Columns, or Four Columns, you can setadditional properties for each column in the layout.
354 Administering My webMethods Server 10.3
21 Managing Pages in My webMethods Server

a. In the Attributes field, optionally specify attributes for the column for your own use.Out-of-the-box, My webMethods Server does not provide functionality that uses theattributes. However, you can write custom code that takes advantage of the attributes.
b. In the Width field type the percentage of the page to use for the column. By default thepercentages are set for evenly spaced columns.
c. Select the Word Wrap check box if you want the server to attempt to wrap long text lineswithin portlets to fit the column size. Clear the check box if you do not want long lines towrap.
Allowing long lines to wrap helps to better fit portlets within columns.
d. From theHorizontal Alignment list select how the portlets should be aligned horizontallyin the column. By default, the server left aligns the portlets in each column.
e. From the Vertical Alignment list select how the portlets should be aligned vertically inthe column. By default, the server aligns the portlets at the top of each column.
f. To apply a CSS class to the column, in the CSS Class field, type the name of the class,omitting the leading period. For example, type nav for the “.nav” class.
Specify a CSS class defined by a CSS style sheet included in the page, either the CSS stylesheet that is:
Used by the current skin
Included with a custom portlet in the page content or the current shell
g. To apply a style to the column, in the CSS Style field, type any style that is valid for usein a CSS file. For example, if you type border: 1pt dashed red, a dashed red line appearsas a column border.
h. To apply a background image to the column, in the Skin Background Image field, typethe name of the image file from the current skin.
You specify the name of the skin property. For example, to use the main logo image fromthe skin, type images/logo.gif. Determine the skin property name for an image by accessingthe skin editor (via theAdministration Dashboard > User Interface > Skin Administrationportlet) and locating the image in the Images page. The skin property is "images/" followedby the property name, such as "images/logo.gif".
Note:To apply an image that is not in the current skin, specify the standard CSSbackground-image property in the CSS Style field. You can also specify properties in theCSS Style field to control how the background is displayed, such as whether it repeats, iscentered, scrolls with the page, etc.
9. Click OK.
Administering My webMethods Server 10.3 355
21 Managing Pages in My webMethods Server

10. In the page title bar, click Save.
Adding Rows When Using a Column LayoutBy default, when you set the layout of a page to use a column layout, the page has a single rowin each column. The portlets you add to a column are aligned vertically based on the verticalalignment you specify for the column. However, you might want to add additional rows to oneor more columns.
To add a row to a column on a page
1. As system administrator, navigate to and open the page to which you want to add a row.
2. In the page title bar, click , and then Edit Page to switch to page editing mode.
3. Select the View As Expert check box so that you can see the borders and title bars of the rowsthat you add to the page.
4. In the Tools tab, expand the Layout item to reveal the Row tool.
5. Drag the Row tool into the column where you want it.
The system displays a red box beneath the cursor position to indicate where the row wouldbe positioned if you released the mouse button.
6. Click Save.
Removing Rows When Using a Column LayoutIf you added rows to a column in the layout and no longer want the row, you can remove it.
To remove rows from a column
1. As system administrator, navigate to and open the page from which you want remove a row.
2. In the page title bar, click , and then Edit Page to switch to page editing mode.
3. Select the View As Expert check box so that you can see the borders and title bars of the rowson the page.
4. If the row contains any portlets that you want to preserve, drag them out of the row into a toa different location on the page.
5. In the title bar of the row, click .
356 Administering My webMethods Server 10.3
21 Managing Pages in My webMethods Server

6. Click Save.
Adding Portlets to a PageYou can add as many portlets as you want to a page. You can also add the same portlet multipletimes. Where you can position a portlet on a page depends on the page layout. For moreinformation, see “Controlling the Page Layout” on page 353 and “Positioning Portlets on a Page” onpage 358.
To add portlets to a page
1. As system administrator, navigate to and open the page to which you want to add portlets.
2. In the page title bar, click Edit Page to switch to page editing mode.
In page editing mode, the Tools tab on the left lists the portlets you can add to a page. Manyof the portlets listed in the Tools tab are described in theMywebMethods Server Portlet Reference.
3. If you want to view the column, row, and portlet borders to help with the placement of yourportlets, select the View As Expert check box. Clear the check box when you no longer wantto view the borders.
4. In the Tools tab select the portlet you want to add and drag it on to the page.
The system displays a red box beneath the cursor position to indicate where the portlet wouldbe positioned if you released the mouse button.
5. Click Save.
Removing Portlets from a PageTo remove a portlet from a page, use the following procedure.
To remove a portlet from a page
1. As system administrator, navigate to and open the page from which you want to removeportlets.
2. In the page title bar, click , and then Edit Page to switch to page editing mode.
3. If the title bar of the portlet you want to remove is hidden, select the View As Expert checkbox so that you can see the title bar.
4. In the title page of the portlet that you want to delete, click , and then Delete.
Administering My webMethods Server 10.3 357
21 Managing Pages in My webMethods Server

5. Click Save.
Positioning Portlets on a PageWhere you can position portlets on a page depends on the page layout.
When using a column layout (e.g., Three Columns), the layout forces the portlets to be alignedwithin the columns. You can move portals up and downwithin a column or from one columnto another.
When using a free form layout, you can move portlets anywhere within the page. Portlets donot have to be aligned and can overlap one another.
For instructions for how to define the page layout, see “Controlling the Page Layout” on page 353.
To position a portlet on a page
1. As system administrator, navigate to and open the page you want to update.
2. In the page title bar, click , and then Edit Page to switch to page editing mode.
3. If the title bar of the portlet you want to reposition is hidden, select the View As Expert checkbox so that you can see the title bar.
4. Move your cursor over the title bar of the portlet you want to reposition until the systemdisplays the move cursor.
5. Click and drag the portlet to the new location.
The system displays a red box beneath the cursor position to indicate where the portlet wouldbe positioned if you released the mouse button.
6. Click Save.
Portlet Properties
General Tab
My webMethods Server displays portlet properties in regular view mode and in page editingmode. The following table list the portlet properties, available on the General tab.
DescriptionPropertySection
Name of the portlet that appears in the portlet title bar.NameGeneral
Optional description of the portlet.Description
358 Administering My webMethods Server 10.3
21 Managing Pages in My webMethods Server

DescriptionPropertySection
Optional keywords that you assign to a portlet for your own use.Out-of-the-box, My webMethods Server does not provide
Keywords
functionality that uses the keywords. However, you can writecustom code that takes advantage of the keywords.
Display to use for the portlet when you navigate to the portletitselfwhereMywebMethods Server displays a page that containsonly the portlet.
Full Page ViewDisplay
Display to use for the portlet when you navigate to the page thatcontains the portlet.
Portlet View
The user name of the user that added the portlet to the page.OwnerMaintenance
The date and time the portlet was added to the page.Created On
The date and time the portlet was last updated.Modified On
Optional aliases assigned to the portlet. For more information,see “Managing Portlet Aliases” on page 362.
Aliases
Preferences Tab
The Preferences tab contains properties that are specific to the portlet and that usually define theinformation that My webMethods Server displays in the portlet. For example, for the HTML Texttool, you can specify the text to display in the portlet on the Preferences tab.
To view the Preferences tab, you must view the properties from page editing mode. Not allportlets use a Preferences tab.
Layout Tab
The Layout tab contains properties that dictate how My webMethods Server is to display theportlet. To view the Layout tab, you must view the properties from page editing mode.
The following table lists the typical properties that are included on the Layout tab.
DescriptionPropertySection
How wide to make the portlet. Specify the number ofpixels to use for the portlet width.
WidthSize andPositioning
How tall tomake the portlet. Specify the number of pixelsto use for the portlet height.
Height
HowMywebMethods Server positions the portlet whenrendering the page. If Auto Position is toggled:
Auto Positioned
Administering My webMethods Server 10.3 359
21 Managing Pages in My webMethods Server

DescriptionPropertySection
On: MywebMethods Server automatically positionsthe portlet, ignoring any positioning informationstored with the portlet.
Off: My webMethods Server uses positioninginformation stored with the portlet to determinewhere to place the portlet on the page. As a result,MywebMethods Server uses the location fromwhenthe page was last saved.
Whether you want My webMethods Server to displaythe portlet title bar. Select the check box to display thetitle bar; clear the check box to hide the title bar.
TitlebarDisplay
Note:If you hide the title bar, when editing the page, selectView As Expert to temporarily view the title bar so thatyou can manipulate the portlet on the page.
Whether you want My webMethods Server to displaythe portlet border. Select the check box to display theborder; clear the check box to hide the border.
Border
Note:If you hide the border, when editing the page, selectView As Expert to temporarily view the border to helpyou as you position and/or resize the portlet.
Whether you want My webMethods Server to initiallydisplay the portlet as minimized when it displays the
Minimized
page that contains the portlet. Users can restore theportlet to view its contents.
A CSS class to apply to the portlet. Type the name of theclass, omitting the leading period. For example, type navfor the “.nav” class.
CSS Class
Specify a CSS class defined by a CSS style sheet includedin the page, either the CSS style sheet that is:
Used by the current skin
Included with a custom portlet in the page contentor the current shell
A style to apply to the portlet. Type any style that is validfor use in a CSS file. For example, if you type border:
CSS Style
1pt dashed red, a dashed red line appears as a portletborder.
360 Administering My webMethods Server 10.3
21 Managing Pages in My webMethods Server

DescriptionPropertySection
Abackground image to use for the portlet. Type the nameof the image file from the current skin.
Skin BackgroundImage
You specify the name of the skin property. For example,to use the main logo image from the skin, typeimages/logo.gif. Determine the skin property name foran image by accessing the skin editor (via theAdministration Dashboard > User Interface > SkinAdministration portlet) and locating the image in theImages page. The skin property is "images/" followed bythe property name, such as "images/logo.gif".
Note:To apply an image that is not in the current skin, specifythe standardCSS background-image property in theCSSStyle field. You can also specify properties in the CSSStyle field to control how the background is displayed,such as whether it repeats, is centered, scrolls with thepage, etc.
Metadata Tab
The Metadata tab contains properties that are specific to the portlet and that usually define theinformation that My webMethods Server displays in the portlet.
To view the Metadata tab, youmust view the properties from page editing mode. Not all portletsuse a Preferences tab.
Wiring Tab
Use the Wiring tab to wire the values of the properties. To view the Wiring tab, you must viewthe properties frompage editingmode. Formore information aboutwiring properties, see “Wiringthe Property of One Portlet to the Property of Another” on page 363 and “Wiring a PrincipalAttribute to a Portlet Property” on page 364.
Modifying Portlet PropertiesConfigure portlet properties to specify display settings for the portlet and define how the portletfunctions. You configure the properties for a portlet independently from the properties of the pageon which the portlet resides.
To modify portlet properties
1. As system administrator, navigate to and open the page containing the portlets you want toupdate.
Administering My webMethods Server 10.3 361
21 Managing Pages in My webMethods Server

2. In the page title bar, click , and then Edit Page to switch to page editing mode.
3. If the title bar of the portlet you want to update is hidden, select the View As Expert checkbox so that you can see the title bar.
4. In the portlet title bar, click , and then Properties.
5. Make the changes youwant to the properties. For information about the properties, see “PortletProperties” on page 358.
6. At the bottom of the portlet, click Apply.
7. Click Save.
Tip:If the title bar of the portlet you want to update is visible, you can update the portlet’s propertywithout switching to page editing mode. To view a portlet’s properties while in regular viewmode, in the portlet title bar click , and then Properties.
Managing Portlet AliasesYou can assign aliases to individual portlets. An alias is a new or simpler name for a portlet. Byassigning an alias to a portlet, My webMethods Server recognizes the alias when it appears in aURL and automatically redirects a user to the portlet.
Use the aliases to access the portlets directly. Aliases are also useful to page developers whenbuilding multi-portlet applications; developers can use the aliases to allow one portlet tocommunicate with another.
To add, edit or remove portlet aliases
1. As system administrator, navigate to and open the page containing the portlets you want toupdate.
2. In the page title bar, click , and then Edit Page to switch to page editing mode.
3. If the title bar of the portlet you want to update is hidden, select the View As Expert checkbox so that you can see the title bar.
4. In the portlet title bar, click , and then Properties
5. To add an alias:
a. In the Aliases section of the Properties page, click Add.
362 Administering My webMethods Server 10.3
21 Managing Pages in My webMethods Server
b. Type the portlet alias that you want to add in the text box.
c. Click OK.
6. To change an existing alias:
a. In the Aliases section of the Properties page, select the alias you want to update and clickEdit.
b. Type the new portlet alias in the text box.
c. Click OK.
7. To remove an alias, in the Aliases section of the Properties page, select the alias you want toremove and click Remove.
8. At the bottom of the page, click Apply.
9. Click Save.
Tip:If the title bar of the portlet youwant to update is visible, you canworkwith portlet aliaseswithoutswitching to page editing mode. To view a portlet’s properties while in regular viewmode, in theportlet title bar click , and then click Properties.
Wiring the Property of One Portlet to the Property of AnotherYou can connect, orwire, any property of any portlet on a page to any property of any other portlet.When you wire one property to another, whenever the page is rendered, the server automaticallysets the value of the destination property to the value of the source property. This feature allowsyou to quickly create a composite application out of several different portlets.
For example, if you create a page with two portlets, one a search form and one a search resultsdisplay, you can wire the search form value (the source value) to the results display input value(the destination value). When a user enters some information into the search form and submits it,the server updates the results display to the results of that search.
To wire one portlet to another
1. As system administrator, navigate to and open the page containing the portlet you want towire.
2. In the page title bar, click , and then Edit Page to switch to page editing mode.
3. Decide which portlet is the wiring source and which is the wiring destination.
Administering My webMethods Server 10.3 363
21 Managing Pages in My webMethods Server
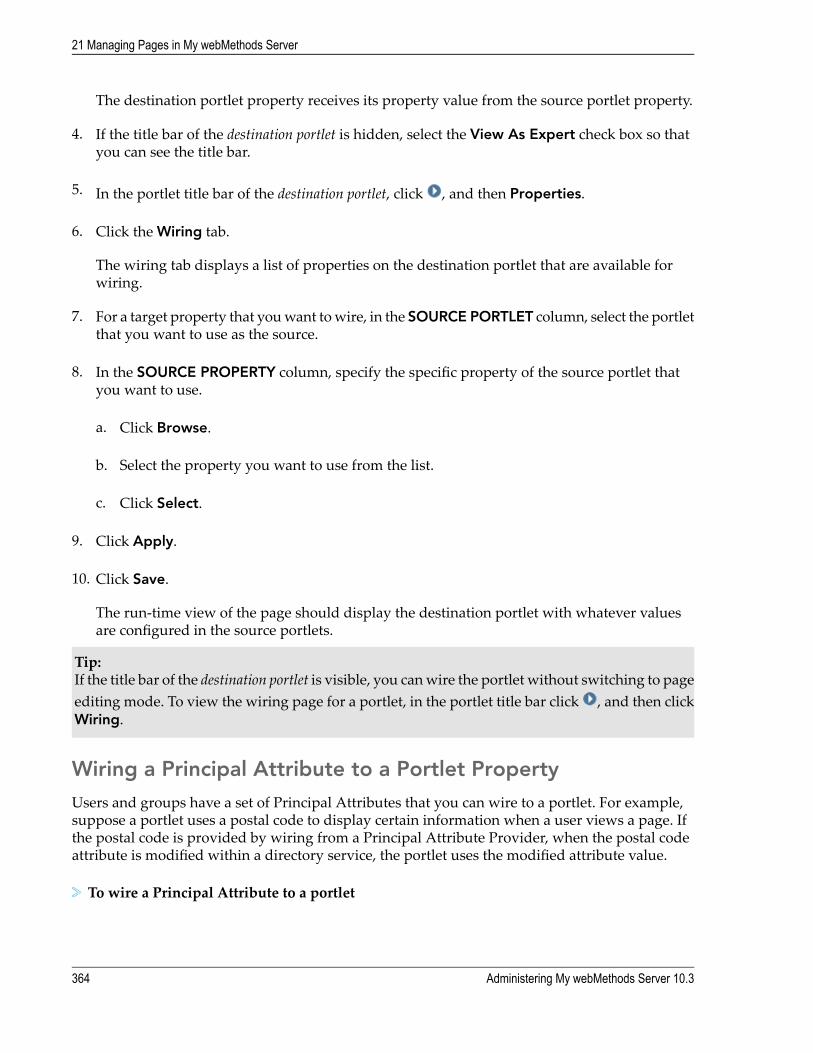
The destination portlet property receives its property value from the source portlet property.
4. If the title bar of the destination portlet is hidden, select the View As Expert check box so thatyou can see the title bar.
5. In the portlet title bar of the destination portlet, click , and then Properties.
6. Click the Wiring tab.
The wiring tab displays a list of properties on the destination portlet that are available forwiring.
7. For a target property that youwant towire, in the SOURCE PORTLET column, select the portletthat you want to use as the source.
8. In the SOURCE PROPERTY column, specify the specific property of the source portlet thatyou want to use.
a. Click Browse.
b. Select the property you want to use from the list.
c. Click Select.
9. Click Apply.
10. Click Save.
The run-time view of the page should display the destination portlet with whatever valuesare configured in the source portlets.
Tip:If the title bar of the destination portlet is visible, you canwire the portlet without switching to pageediting mode. To view the wiring page for a portlet, in the portlet title bar click , and then clickWiring.
Wiring a Principal Attribute to a Portlet PropertyUsers and groups have a set of Principal Attributes that you can wire to a portlet. For example,suppose a portlet uses a postal code to display certain information when a user views a page. Ifthe postal code is provided by wiring from a Principal Attribute Provider, when the postal codeattribute is modified within a directory service, the portlet uses the modified attribute value.
To wire a Principal Attribute to a portlet
364 Administering My webMethods Server 10.3
21 Managing Pages in My webMethods Server

1. As system administrator, navigate to and open the page containing the portlet you want towire.
2. In the page title bar, click , and then Edit Page to switch to page editing mode.
3. If the title bar of the portlet is hidden, select the View As Expert check box so that you can seethe title bar.
4. In the portlet title bar of the portlet, click , and then Properties.
5. Click the Wiring tab.
6. For a target property that you want to wire, in the SOURCE PORTLET column, select Other.
The Select Portlet Resource window opens.
7. Click Global Wiring Data.
8. Move Use Profile Wiring to the Selected Items box and click Select.
The Select Portlet Resource window closes.
9. In the SOURCE PROPERTY column, specify the specific property to use for the source.
a. Click Browse.
The Select Wired Property window opens.
b. Select the property you want to use from the list.
c. Click Select.
10. Click Apply.
11. Click Save.
The portlet is nowwired to use the attribute value belonging to the user who viewing the pageon which the portlet resides.
Tip:If the title bar of the portlet is visible, you can wire the portlet without switching to page editingmode. To view the wiring page for a portlet, in the portlet title bar click , and then click Wiring.
About Customizing the My webMethods NavigationTo customize the My webMethods navigation panel, you can:
Administering My webMethods Server 10.3 365
21 Managing Pages in My webMethods Server

Add selections to the Applications section of the navigation panel. You can add:
Additional pages to the Monitoring or Administration subsections
New folders of pages to the Applications section
The folder becomes a new subsectionwithin theApplications section. The items containedin the folder become selections within the new subsection.
Formore information, see “Adding Selections to theMywebMethodsNavigation” on page 366.
Remove selections from the Monitoring or Administration subsections of the Applicationssection of the navigation panel. For more information, see “Removing Selections from the MywebMethods Navigation” on page 367.
Hide standard tabs and sections of the navigation panel.
You can hide the Navigate tab completely. If you show the Navigate tab, you can hide eitherthe Applications and/or Workspaces sections that are on the Navigate tab. You can also hidethe Tools tab completely. For more information, see “Hiding Standard Tabs and Sections ofthe My webMethods Navigation” on page 368.
Completely replace theApplications section of theMywebMethods navigationwith a customtaxonomy. Formore information, see “Replacing theMywebMethodsApplicationNavigationwith Your Own Taxonomy” on page 369.
Adding Selections to the My webMethods Navigation
System administrators can add custom pages or folders of pages to the Applications section ofthe My webMethods navigation.
To add selections to the Applications section of the My webMethods navigation
1. Create the custom folder or custom page that you want to add to the navigation panel. Formore information, see “About Custom Folders and Pages” on page 348 and “Creating CustomPages” on page 349.
When creating the folder or page, save it in one of the following locations:
To add a page to the Monitoring subsection of the Applications section, add it to:
Folders > My webMethods Applications > Fabric Tasks > Monitoring
To add a page to the Administration subsection of the Applications section, add it to:
Folders > My webMethods Applications > Fabric Tasks > Administration
To add a folder to create a new, custom subsection within the Applications section, add itto:
Folders > My webMethods Applications > Fabric Tasks
366 Administering My webMethods Server 10.3
21 Managing Pages in My webMethods Server

To add a page to a custom subsection, add the page to the folder you are using for thesubsection. For example, if you add a folder named “Custom Pages”, then you can add apage to the following location:
Folders > My webMethods Applications > Fabric Tasks > Custom Pages
2. As system administrator, navigate to and open the folder or page you want to add to thenavigation panel.
3. In the page title bar, click Properties.
4. Select the Is Task Folder check box to indicate that youwantMywebMethods Server to displaythe page in the My webMethods navigation panel.
5. Select the Is Openable check box if you want My webMethods Server to automatically opena page in a new tab when a user navigates to it from the navigation panel.
6. Click Apply to close the Properties page.
You can set Access Privileges for the page in the same manner you set Access Privileges for anyother My webMethods page.
Removing Selections from the My webMethods NavigationSystem administrators can remove both custompages and folders, as well as, out-of-the box pagesfrom the Applications section of the My webMethods navigation.
To remove custom pages and/or folders, you can:
Permanently remove them by deleting them from their location within Folders > MywebMethods Applications > Fabric Tasks
Temporarily hide them so that My webMethods does not display them in the navigation,by clearing the Is Task Folder check box in the page or folder’s properties.
To remove out-of-the-box pages, it is recommended that you clear the Is Task Folder checkbox in the page’s properties rather than deleting the pages.
To remove either one or both of the out-of-the-boxMonitoring orAdministration subsections,update the properties of Folders > System > Shell Sections > Noodle Shell LeftNav >Leftnav. Formore information, see “Hiding Standard Tabs and Sections of theMywebMethodsNavigation” on page 368.
To remove selections from the Applications section of the My webMethods navigation
1. As system administrator, navigate to and open Folders > My webMethods Applications >Fabric Tasks.
Administering My webMethods Server 10.3 367
21 Managing Pages in My webMethods Server

2. To permanently remove a custom folder or page, delete it by clicking in the title bar of thefolder or page.
3. To hide a custom folder, custom page, or out-of-the-box page:
a. Open the properties for the folder or page by selecting , and then Properties in the titlebar of the folder or page.
b. Clear the Is Task Folder check box.
c. Click Apply.
Hiding Standard Tabs and Sections of the My webMethodsNavigationSystem administrators can configure the properties of the left navigation page that is used for MywebMethods navigation to:
Completely hide the Navigate tab or Tools tab
Hide either or both of the Applications section or Workspaces section that are displayed onthe Navigate tab.
To hide standard tabs and/or sections of the My webMethods navigation
1. As system administrator, navigate to the following location:
Folders > System > Shell Sections > Noodle Shell Leftnav > Leftnav
2. In the row for the Leftnav page, click , and then Properties.
3. In the Portlet Preferences section of the page, select or clear the following check boxes toshow or hide tabs and sections:
The following table lists the display options, available on the Portlet Preferences secion:
DescriptionCheck box
Hides or shows the Workspaces section of the Navigate tab.Show Workspaces
Hides or shows the Applications section of the Navigate tab.Show Applications
Hides or shows the Tools tab.Show Tools
Hides or shows the Navigate tab.Show Navigate
4. Click Apply.
368 Administering My webMethods Server 10.3
21 Managing Pages in My webMethods Server

Replacing the My webMethods Application Navigation withYour Own Taxonomy
System administrators can completely replace the Applications section of the My webMethodsnavigation panel with a custom taxonomy.
To create a custom taxonomy, you create an alternative applications root page that contains thetaxonomy you want to use. Then you configure the properties for the Leftnav page that MywebMethods uses for its navigation panel to point to your new application root.
To replace the My webMethodsApplications taxonomy with a custom taxonomy
1. As system administrator, create a new page to use as the application root. It is recommendedthat you create the page within either of the following locations.
Folders
Folders > Public Folders
When creating the page, assign it a name that you want to appear in the navigation panel. Thename you assign will be the new name of the Applications section.
2. Assign an alias to the new application root page.
a. In the row for the new application root page, select , and then Properties.
b. In the Aliases field, click Add.
c. In the text box, assign the alias you want to give the new application root and click OK.
d. Click Apply.
3. Build the taxonomy within the new applications root page.
To add a subsection to the taxonomy, add a page or folder to use as a container. Assign ita name that you want to use for the name of the subsection within the taxonomy.
To add a page that displays information, add a page. Assign it a name that you want toappear in the taxonomy.
For more information about creating custom folders and pages, see “About Custom Foldersand Pages” on page 348 and “Creating Custom Pages” on page 349.
4. Configure the properties of the Leftnav page that My webMethods Server uses for the MywebMethods navigation to point it to the new, custom application root.
a. Navigate to the following location:
Administering My webMethods Server 10.3 369
21 Managing Pages in My webMethods Server

Folders > System > Shell Sections > Noodle Shell Leftnav > Leftnav
b. In the row for the Leftnav page, select , and then Properties.
c. In the Applications Root field, type the name of the alias you assigned to the applicationsroot page you created.
d. Click Apply.
Modifying the Bean Expiration PolicyBy default, when a My webMethods user returns to a previous folder, such as a Task Inbox, thefolder refreshes itself and unsaved changes to the folder are lost. System administrators canmodifythe bean expiration policy for a Fabric folder or a workspace template so it displays existing datawhen users return to the tab that contains it. Once set, the policy applies any time a user displaysthat folder or workspace in My webMethods.
To modify bean expiration policy
1. As system administrator do one of the following:
For Fabric folders navigate to Folders > My webMethods Applications > Fabric Tasks.
Folders that allow the you to modify the bean expiration policy are identified by theicon.
For workspace templates navigate to Folders > System > Templates > WorkspaceTemplates > Default Workspace Template.
2. In the Fabric folder title bar or in the DefaultWorkspace Template, click Tools > Properties.
3. In the beanExpirePolicy field, type do_not_expire.
4. Click Apply.
Make this change individually for each folder you want to modify.
About Customizing the My webMethodsLook-And-FeelSystem administrators can change the My webMethods look-and-feel by updating the skin thatMy webMethods uses. To customize the My webMethods look-and-feel, you can:
Change the Software AG logo, for example, to display your own corporate logo.
Change the colors that are used in the My webMethods user interface.
370 Administering My webMethods Server 10.3
21 Managing Pages in My webMethods Server

Completely customize the My webMethods look-and-feel by using a custom shell and skin.
Replacing the Logo in the My webMethods User InterfaceSystem administrators can change the images used in the My webMethods user interface byupdating the images in the skin that My webMethods uses. To change the Software AG logo thatappears at the top of the interface, update the logo.gif image. For more information about skins,see “Customizing Skins” on page 399.
My webMethods uses the “Noodle - Twilight” skin. It is recommended that you do not updatethe “Noodle - Twilight” skin, but rather make a copy of it, update the copy, then configure theMy webMethods to use the modified copy of the skin.
To replace the logo in the My webMethods user interface
1. Make a copy of the “Noodle - Twilight” skin.
a. As system administrator, navigate to Folders > Administrative Folders > AdministrationDashboard > User Interface > Skin Administration.
b. Click the Create New Skin link at the top of the page.
c. On the Create New Skin page, specify the following:
The following table lists the information you must provide when creating new skins:
DescriptionField
A short name that contains only letters, numbers, and the underscorecharacter. My webMethods Server uses this name internally.
System Name
A descriptive name that My webMethods Server uses when it displaysthe skin name in the user interface.
Display Name
Noodle - TwilightParent Skin
d. Click Save.
2. Edit the properties for the new skin by selecting , and then Edit.
3. Click the Images tab.
4. Update the image for the logo.gif image. For instructions, see “Replacing Images in a Skin” onpage 405.
5. Configure My webMethods so that it uses the updated skin.
Administering My webMethods Server 10.3 371
21 Managing Pages in My webMethods Server

a. Navigate to Folders > Administrative Folders > Administration Dashboard > UserInterface > Manage Skin Rules.
b. Click the My webMethods link to open the skin rule that My webMethods uses.
c. On the Modify Rules tab, in the Results list, select the new skin.
d. Click Update Rule.
Changing the Color Scheme of the My webMethods UserInterfaceSystemadministrators can change the colors used in theMywebMethods user interface by updatingthe colors in the skin that My webMethods uses. For more information about skins, see“Customizing Skins” on page 399.
My webMethods uses the “Noodle - Twilight” skin. It is recommended that you do not updatethe “Noodle - Twilight” skin, but rather make a copy of it, update the copy, then configure theMy webMethods to use the modified copy of the skin.
To change the colors in the My webMethods user interface
1. Make a copy of the “Noodle - Twilight” skin.
a. As system administrator, navigate to Folders > Administrative Folders > AdministrationDashboard > User Interface > Skin Administration.
b. Click the Create New Skin link, which is at the top of the page.
c. Complete the fields for the new skin.
The following table lists the required fields to configure when creating a new skin for MywebMethods:
DescriptionField
A short name that contains only letters, numbers, and the underscorecharacter. My webMethods Server uses this name internally.
System Name
A descriptive name that My webMethods Server uses when displayingthe skin name in the user interface.
Display Name
Noodle - TwilightParent Skin
d. Click Save.
372 Administering My webMethods Server 10.3
21 Managing Pages in My webMethods Server

2. Edit the properties for the new skin by clicking , and then Edit.
3. Click the Colors tab.
4. Update the colors. For instructions, see “Replacing Colors Using a Color Picker” on page 407.
5. Configure My webMethods so that it uses the updated skin.
a. Navigate to Folders > Administrative Folders > Administration Dashboard > UserInterface > Manage Skin Rules.
b. Click the My webMethods link to open the skin rule that My webMethods uses.
c. On the Modify Rules tab, in the Results list, select the new skin.
d. Click Update Rule.
Applying a Custom Skin and Shell to My webMethodsSystem administrators can completely change the look-and-feel ofMywebMethods by configuringit to use a custom skin and shell.
To apply a custom skin and shell to My webMethods
1. Create the custom shell you want to use. For instructions, see “Working with Shells in MywebMethods Server” on page 425.
2. Create the custom skin youwant to use. For instructions, see “Customizing Skins” on page 399.
3. Configure My webMethods so that it uses your custom shell:
a. Navigate to Folders > Administrative Folders > Administration Dashboard > UserInterface > Manage Shell Rules.
b. Click the My webMethods link to open the shell rule that My webMethods uses.
c. On the Modify Rules tab, in the Results list, select the name of your custom shell.
d. Click Update Rule.
4. Configure My webMethods so that it uses your custom skin:
a. Navigate to Folders > Administrative Folders > Administration Dashboard > UserInterface > Manage Skin Rules.
Administering My webMethods Server 10.3 373
21 Managing Pages in My webMethods Server

b. Click the My webMethods link to open the skin rule that My webMethods uses.
c. On the Modify Rules tab, in the Results list, select the name of your custom skin.
d. Click Update Rule.
Building a Simple Front-End Page to My webMethodsIf you have users that need access to only a fewMy webMethods pages and you want to simplifytheir access to those pages, you can build a simple page that provides links to only the pages theusers require.
The links you include in the front-end page can use URLs that use a page alias. Some MywebMethods application pages are assigned aliases out-of-the-box. If an application page that youwant to use does not have an alias, you can assign one to the page. After an alias is assigned, asan alternative to selecting the page from the My webMethods navigation panel, you can navigatedirectly to it by entering a URL that uses the page alias.
To build a simple front-end page to My webMethods
1. Determine the application pages that you want to include in the front-end page.
2. For each application page, determine its page an alias or assign one if the page does not havean alias.
a. As system administrator, navigate to the following:
Folders > My webMethods Applications > Fabric Task
b. Further navigate to and open the Application page you want.
c. In the page title bar, click , and then Properties
d. In the Aliases section of the screen, note the page alias. If there is no page alias, assign one.
e. Click Apply to close the Properties page.
3. Build a webpage that includes links to the Application pages. Use the following for the URLwhere:
host_name and port_number are the host name and port number of the My webMethodsServer
alias is the alias name of the application page
http://host_name:port_number/alias
374 Administering My webMethods Server 10.3
21 Managing Pages in My webMethods Server

For example if the host name and port ofMywebMethods Server is “mws.company.com:8585”and youwant to access the Tasks Inbox page,which has the alias “webm.apps.workflow.inbox”,use the following URL:
http://mws.company.com:8585/webm.apps.workflow.inbox
Creating Links for Single Sign-OnSingle sign-on is the ability for a user to log into one application and then use other applicationswithout having to log into each one separately. My webMethods Server supports single sign-onthrough the Security Assertion Markup Language (SAML), an XML-based framework for theexchange of security information.
To take advantage of single sign-on, a usermust be known on both the source server and the targetentity. Inmost cases, common knowledge of a user is provided by use of the same directory service.For more information on configuring a server to be used as a target for single sign-on, see“Configuring My webMethods Server Single Sign-On” on page 290.
On any page, you can add a link to a SAML target entity, such as a server. If the target acceptsSAML assertions from the source server, when a known user clicks the link, no login credentialsare required. If the target entity does not accept SAML assertions from the source server, or if theuser is not known on the target entity, login credentials may be required.
Under the SAMLspecification, an intermediary called an artifact receiver canperformauthenticationon behalf of the target web application. In such a case, the SAML source requires two URLs: onefor the Artifact Receiver and one for the target web application.
You can place one or more SAML links on any page you have permission to edit.
To create a SAML link on a source page
1. In the upper right-hand corner of the page, click , and then Edit Page.
2. In the Root list of the Available Portlets panel, click Links.
3. In the Links list of theAvailable Portlets panel, drag the Single Sign-on Link portlet and dropit onto the page at the location where you want to add the link.
A red box appears beneath the cursor locationwhenever the cursor is over a valid page location,indicating where the portlet would be positioned if you released the mouse button.
4. On the left side of the page control area, click Save.
5. At the right edge of the title bar for the single sign-on portlet, click , and then Properties.
6. In the Properties specify:
Administering My webMethods Server 10.3 375
21 Managing Pages in My webMethods Server

The following table lists the properties that you specify to configure the Single Sign-On Linkportlet:
DescriptionProperty
Replace Single Sign-on Linkwith the text that is to go withthe link.
Name
Type the URL for a resource on the target computer. Thetarget can be any page on a server. If you are connecting to
SAML Authentication URL
a web application through a SAML Artifact Receiver, usethis field for the Artifact Receiver URL.
Determines the method used to pass data to the targetcomputer.
Use POST or GET
Passes data to a gateway program’s STDIN.POST, the default, is the preferred method forsingle sign-on data.
POST
Passes data as a string appended to theURL aftera question mark.
GET
If this is a SAML connection with another server or otherwebMethods product, do not change the default value
Artifact Parameter Name
SAMLart. If this is a SAMLconnection to a third-party source,type the artifact parameter name used by the third-partyapplication.
If you have typed the URL for a SAML Artifact Receiver inthe SAML Authentication URL field, type the URL for awebapplication. Otherwise, leave this field empty.
Application Target URL
7. Click Apply.
376 Administering My webMethods Server 10.3
21 Managing Pages in My webMethods Server

22 Managing Workspaces in My webMethods Server
■ About Workspaces ....................................................................................................... 378
■ Administration Tasks for Workspaces .......................................................................... 378
■ Expert User Features for Workspace Development ..................................................... 382
■ Workspace Actions You Can Perform from the Workspace Management Page ......... 388
■ About the My webMethods Tools Navigation ............................................................. 395
Administering My webMethods Server 10.3 377

About WorkspacesWorkspaces are pages that users create and use as work areas for some specific purpose. Usersbuild the content of the workspace by dragging portlets on to the workspace. For example, usersmight create a workspace to gather information about an issue they need to solve. They mightattach files to the workspace related to the issue by adding the Attachments tool to the workspace.If they have a screen shot that illustrates the issue, theymight add the Image tool to theworkspace.
Users can also share workspaces with other users so that multiple users can work together. Forexample, a user might add the Attachments tool to the workspace so that the users sharing theworkspace can upload and share files. The owner of theworkspace sets the permissions that dictatethat actions that other users sharing the workspace can perform.
Users can create as many workspaces as they need. When the workspace is no longer needed, forexample because the issue for which it was established is resolved, users can simply delete theworkspace.
For more information about the basic use of workspaces, such as, creating workspaces, sharingworkspaces, and adding portlets to workspaces, seeWorking with My webMethods.
System administrators and My webMethods administrators can restrict or enhance the a user’sworkspace functionality. For more information, see “Administration Tasks for Workspaces” onpage 378.
To restrict functionality, an administrator can set users’ permissions to deny functionality thatthey are granted out-of-the-box. For example, you can deny the functional privilege that allowsa user to create new workspaces.
To enhance functionality, an administrator can set users’ permissions to grant functionalitythat they are not granted out-of-the-box. For example, you can grant:
The functional privilege that makes a user an expert user. Expert users have access toadditional properties and menu actions that aid in developing workspaces. For moreinformation, see “Expert User Features for Workspace Development” on page 382.
Access to the Navigate > Applications > Administration > System-Wide > WorkspaceManagement page from which a user can perform actions against workspaces. For moreinformation, see “Workspace Actions You Can Perform from theWorkspace ManagementPage” on page 388.
Additionally, systemadministrators can customize the Tools tab of theMywebMethods navigation.For more information, see “About the My webMethods Tools Navigation” on page 395.
Administration Tasks for WorkspacesSystem administrators and My webMethods administrators can enhance or restrict the a user’sworkspace functionality by performing the following tasks:
378 Administering My webMethods Server 10.3
22 Managing Workspaces in My webMethods Server

Grant users access to theNavigate >Applications >Administration > System-Wide >WorkspaceManagement page, which allows users to search for and take action on workspaces. For moreinformation, see “Allowing Users to Access the Workspace Management Page” on page 379.
Prohibit users from performing basic workspace actions, such as viewing workspaces andcreatingworkspaces. Formore information, see “Workspace Functional Privileges” on page 380and “Controlling the Workspace Functions a User Can Perform” on page 381.
Grant users Expert Workspace Development privileges, giving them additional functionalitythat they can usewhen buildingworkspaces. Formore information, see “Workspace FunctionalPrivileges” onpage 380, “Controlling theWorkspace Functions aUserCanPerform”onpage 381,and “Expert User Features for Workspace Development” on page 382.
Remove the Workspaces section of the My webMethods navigation for all users. For moreinformation, see “Hiding Standard Tabs and Sections of the My webMethods Navigation” onpage 368.
Customize the taxonomy displayed on the Tools tab of the My webMethods navigation. Formore information, see “Customizing the My webMethods Workspace Tools” on page 396.
If a system administrator needs to take action to fix or delete a user’s workspace and cannot doso via the Navigate > Applications > Administration > System-Wide > Workspace Managementpage, they can attempt to correct the problem by accessing it in the user’s personal folder. MywebMethods Server stores each workspace in the personal folder of the user who created theworkspace. For example, if the user “jsmith” creates a workspace, you can use the systemadministrator user interface to navigate to the workspace in Folders > Users > jsmith's Root Folder> Workspaces.
Allowing Users to Access the Workspace Management PageMy webMethods includes the Navigate > Applications > Administration > System-Wide >Workspace Management page that allows users to take actions against workspaces. For adescription, see “WorkspaceActionsYouCanPerform from theWorkspaceManagement Page” onpage 388.
By default, onlyMywebMethods administrators have access to theWorkspaceManagement page;end users do not. However, end users can perform many of the same actions from the right-clickmenu in the Workspaces section of the My webMethods navigation and from the menu on thetab of an open workspace. The workspace actions that are only available via the WorkspaceManagement page are:
Searching for workspaces.
Exporting workspaces to a file.
Importing workspaces that were previously exported to a file.
System administrators andMywebMethods administrators can assign permissions to allowusers,groups, and/or roles to access the Workspace Management page.
To allow users access the Workspace Management page
Administering My webMethods Server 10.3 379
22 Managing Workspaces in My webMethods Server

1. Navigate to the Permissions Management page.
In My webMethods: Navigate > Applications > Administration > System-Wide >Permissions Management.
As system administrator: Folders > Administrative Folders > Administration Dashboard> Configuration > Permissions Management.
2. Use the Permissions Management page to select the users, groups, and/or roles to which youwant to grant access and to set the access privilege to the Workspace Management Page.
When setting privileges, in the Permissions tree select the following:
Access Privileges > Administration > System-Wide > Workspace Management
For instructions for how to use the Permissions Management page to set access privileges, see“Managing Access Privileges and Functional Privileges” on page 145.
Workspace Functional PrivilegesWorkspace functional privileges govern the actions that users can take against workspaces. Systemadministrators andMywebMethods administrators can change the default permissions for users,groups, and/or roles. Formore information, see “Controlling theWorkspace Functions a User CanPerform” on page 381.
The following table lists the workspace functional privileges, available in My webMethods andtheir default settings:
DescriptionDefault SettingFunctional Privilege
Controls whether users can view workspaces.GrantedViewWorkspaces
MywebMethods Server does not display the Workspacessection on the Navigate tab of the My webMethodsnavigation when a user is denied the View Workspacesfunctional privilege.
Note:Even when the View Workspaces functional privilege isdenied, if users have access to theWorkspaceManagementpage, they can search for and open workspaces. For moreinformation, see “AllowingUsers to Access theWorkspaceManagement Page” on page 379 and “Opening aWorkspace” on page 390.
Controls whether users can add portlets to a workspace.GrantedEdit Workspaces
My webMethods Server does not display the Tools tab ofthe My webMethods navigation when a user is denied theEdit Workspaces functional privilege.
380 Administering My webMethods Server 10.3
22 Managing Workspaces in My webMethods Server

DescriptionDefault SettingFunctional Privilege
Note:Even when the Edit Workspaces functional privilege isdenied, users can still set workspace properties, repositionportlets in a workspace, set portlet properties, and deleteportlets from workspaces.
Controls whether users can create new workspaces.GrantedCreate Workspaces
My webMethods Server does not display the New tab inMy webMethods when a user is denied the CreateWorkspaces functional privilege.
Controls whether users can import workspaces that werepreviously exported to a file.
GrantedImport Workspaces
MywebMethods Server does not display the Import buttonon theWorkspaceManagement pagewhen a user is deniedthe Import Workspaces functional privilege.
Provides users with extra functionality that they can usewhen building workspaces and pages. Users with Expert
DeniedExpert WorkspaceDevelopment
Workspace Development functional privilege have accessto additional properties and menu actions. For moreinformation, see “Expert User Features for WorkspaceDevelopment” on page 382.
Controlling the Workspace Functions a User Can PerformSystem administrators and My webMethods administrators can use the following procedure togrant or deny users, groups, and/or roles the functional privileges described in “WorkspaceFunctional Privileges” on page 380.
To grant or deny users workspace functional privileges
1. Navigate to the Permissions Management page.
In My webMethods: Navigate > Applications > Administration > System-Wide >Permissions Management.
As system administrator: Folders > Administrative Folders > Administration Dashboard> Configuration > Permissions Management.
2. Use the Permissions Management page to select the users, groups, and/or roles with whichyou want to work and to grant or deny the functional privileges.
Administering My webMethods Server 10.3 381
22 Managing Workspaces in My webMethods Server

To grant or deny workspace functional privileges, navigate to the following part of thePermissions tree and grant or deny the privileges described in “Workspace FunctionalPrivileges” on page 380.
Functional Privileges > General
For instructions for how to use the PermissionsManagement page to set functional privileges,see “Managing Access Privileges and Functional Privileges” on page 145.
Expert User Features for Workspace DevelopmentExpert users are users who have been assigned the Expert Workspace Development functionalprivilege. For instructions on how administrators can assign this functional privilege, see“Controlling the Workspace Functions a User Can Perform” on page 381.
Expert users have access to additional:
Workspace properties to better manage the layout of a workspace. For more information, see“Workspace Properties for Expert Users” on page 382.
Properties for portlets in a workspace to better manage the content of portlets and how theyappear on the workspace. For example, expert users can set up a portlet so that its title bardoes not display. For more information, see “Portlet Properties for Expert Users” on page 385.
Portlet menu actions to:
Indicate that you want My webMethods Server to position a portlet when rendering theworkspace
Set permissions for portlets
For more information, see “Portlet Menu Options for Expert Users” on page 387.
Note:Expert users also see these additional properties and portlet menu options when working withregular pages, not just workspaces.
Workspace Properties for Expert Users
General Tab
The workspace properties on the General tab are identical for users with and without the ExpertWorkspaceDevelopment privilege. For information about theseworkspace properties, seeWorkingwith My webMethods.
Layout Tab
The Layout tab is available for both users with and without the Expert Workspace Developmentprivilege, but some of the properties are only available for expert users.
382 Administering My webMethods Server 10.3
22 Managing Workspaces in My webMethods Server

The following table describes the workspace properties on the Layout tab:
DescriptionAvailable forProperty
This property indicates whether you want to viewcolumn, row, and portlet borders and hidden portlettitle bars.
expert usersView As
SelectEnd User if you do notwant to viewbordersor hidden title bars.
Select Expert User if you want to view bordersand hidden title bars.
Borders are helpful when you are positioningportlets. Also, if you set a portlet’s properties sothat the title bar is hidden, youmust view the pageas an expert user to re-display the title bar so thatyou can take action on that portlet, for example,to move it or access its properties.
This property indicates whether you want usersviewing the workspace to be able to reposition and/orresize portlets.
expert usersEditable Canvas
Clear the Editable Canvas check box to prevent usersfrom inadvertently changing the layout while usingthe workspace. If you select a free form layout for theworkspace, a user can inadvertently change the pagesimply by clicking a portlet.
Note:When theEditable Canvas check box is selected, userscan change the layout. This is true even when usersare denied permissions to edit a workspace, althoughthey are prevented from saving those edits. However,when the Editable Canvas check box is cleared, allusers are prevented from changing the layout.
This property specifies the layout to use for theworkspace. The layout defines how the portletswithin
all usersColumns
a workspace can be positioned. You can define eithera:
Column layout. In this layout, all the portlets in aworkspace are aligned in columns. Portlets cannotoverlap within a column. You can define aworkspace to have one, two, three, or fourcolumns.
Administering My webMethods Server 10.3 383
22 Managing Workspaces in My webMethods Server

DescriptionAvailable forProperty
Free Form layout. In this layout, you can placeportlets on the workspace in any location. Portletscan overlap and even completely cover oneanother. This is the default for a new workspace.
When using a column layout, this property specifiesattributes for the column that you can use for your
expert usersAttributes
ownuse.Out-of-the-box,MywebMethods Server doesnot provide functionality that uses the attributes.However, you can write custom code that takesadvantage of the attributes.
When using a column layout, this property specifiesthe percentage of the workspace to use for the widthof the column.
all usersWidth
When using a column layout, this property specifieswhether you want to wrap long text lines withinportlets to fit the column size.
all usersWord Wrap
When using a column layout, this property specifieshow the portlets should be aligned horizontally in thecolumn.
all usersHorizontalAlignment
When using a column layout, this property specifieshow the portlets should be aligned vertically in thecolumn.
all usersVertical Alignment
When using a column layout, this property specifiesa CSS class to apply to the column. Type the name of
expert usersCSS Class
the class, omitting the leading period. For example,type nav for the “.nav” class.
Specify a CSS class defined by a CSS style sheetincluded in the workspace, either the CSS style sheetthat is:
Used by the current skin
Included with a custom portlet in the workspacecontent or the current shell
When using a column layout, this property specifiesa style to apply to the column. Type any style that is
expert usersCSS Style
valid for use in a CSS file. For example, if you typeborder: 1pt dashed red, a dashed red line appears asa portlet border.
384 Administering My webMethods Server 10.3
22 Managing Workspaces in My webMethods Server
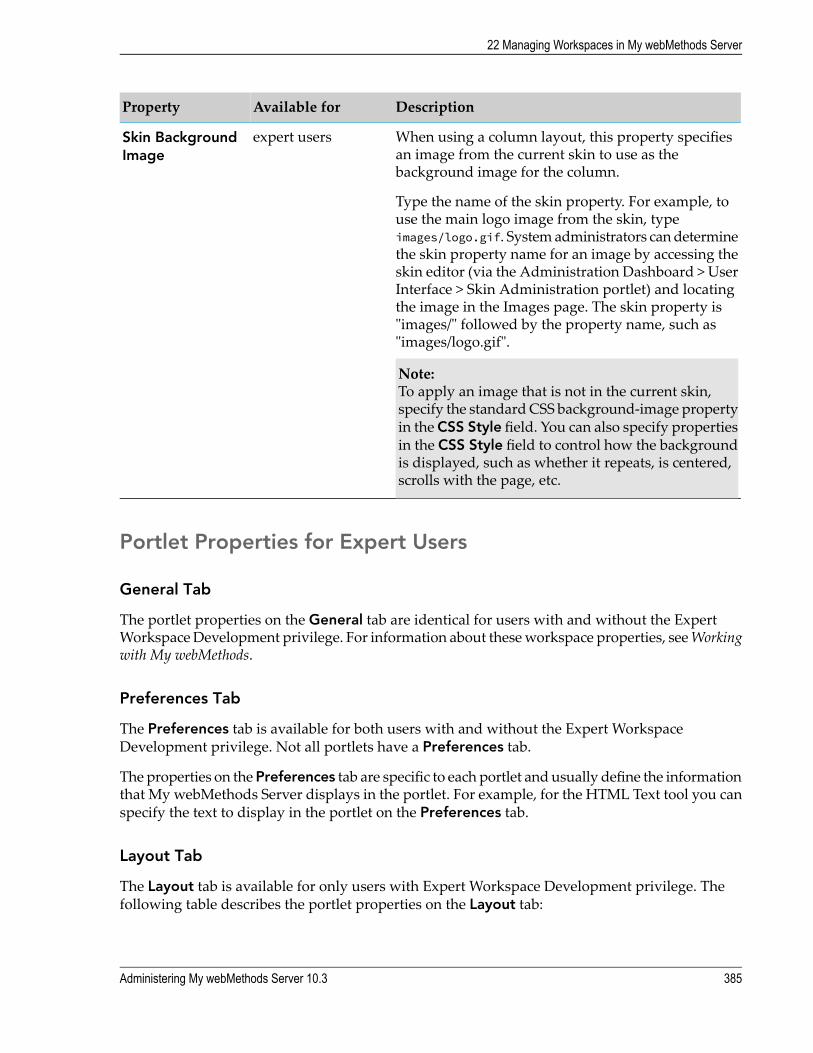
DescriptionAvailable forProperty
When using a column layout, this property specifiesan image from the current skin to use as thebackground image for the column.
expert usersSkin BackgroundImage
Type the name of the skin property. For example, touse the main logo image from the skin, typeimages/logo.gif. Systemadministrators candeterminethe skin property name for an image by accessing theskin editor (via the Administration Dashboard > UserInterface > Skin Administration portlet) and locatingthe image in the Images page. The skin property is"images/" followed by the property name, such as"images/logo.gif".
Note:To apply an image that is not in the current skin,specify the standardCSS background-image propertyin the CSS Style field. You can also specify propertiesin the CSS Style field to control how the backgroundis displayed, such as whether it repeats, is centered,scrolls with the page, etc.
Portlet Properties for Expert Users
General Tab
The portlet properties on the General tab are identical for users with and without the ExpertWorkspaceDevelopment privilege. For information about theseworkspace properties, seeWorkingwith My webMethods.
Preferences Tab
The Preferences tab is available for both users with and without the Expert WorkspaceDevelopment privilege. Not all portlets have a Preferences tab.
The properties on thePreferences tab are specific to each portlet and usually define the informationthat My webMethods Server displays in the portlet. For example, for the HTML Text tool you canspecify the text to display in the portlet on the Preferences tab.
Layout Tab
The Layout tab is available for only users with Expert Workspace Development privilege. Thefollowing table describes the portlet properties on the Layout tab:
Administering My webMethods Server 10.3 385
22 Managing Workspaces in My webMethods Server

DescriptionProperty
Attributes for your own use. Out-of-the-box, My webMethods Server doesnot provide functionality that uses the attributes. However, you can writecustom code that takes advantage of the attributes.
Attributes
How wide to make the portlet. Specify the number of pixels to use for theportlet width.
Width
How tall to make the portlet. Specify the number of pixels to use for theportlet height.
Height
Whether you want My webMethods Server to display the portlet title bar.Select the check box to display the title bar; clear the check box to hide thetitle bar.
Titlebar
Note:If you hide the title bar, use the View As property, which is on the Layouttab of the workspace properties, to temporarily view the title bar so that youcan manipulate the portlet on the workspace.
Whether you want My webMethods Server to display the portlet border.Select the check box to display the border; clear the check box to hide theborder.
Border
Note:If you hide the title bar, use the View As property, which is on the Layouttab of the workspace properties, to temporarily view the title bar so that youcan manipulate the portlet on the workspace.
Whether you want My webMethods Server to initially display the portlet asminimized when it displays the workspace that contains the portlet. Userscan restore the portlet to view its contents.
Minimized
A CSS class to apply to the portlet. Type the name of the class, omitting theleading period. For example, type nav for the “.nav” class.
CSS Class
Specify a CSS class defined by a CSS style sheet included in the workspace,either a CSS style sheet that is:
Used by the current skin
Included with a custom portlet in the workspace content or the currentshell
A style to apply to the portlet. Type any style that is valid for use in a CSSfile. For example, if you type border: 1pt dashed red, a dashed red lineappears as a portlet border
CSS Style
An image from the current skin to use as the background image for the portlet.Skin BackgroundImage
386 Administering My webMethods Server 10.3
22 Managing Workspaces in My webMethods Server

DescriptionProperty
Type the name of the skin property. For example, to use the main logo imagefrom the skin, type images/logo.gif. Expert users can ask systemadministrators for information about the properties available. Systemadministrators can determine the skin property name for an image byaccessing the skin editor (via the Administration Dashboard > User Interface> Skin Administration portlet) and locating the image in the Images page.The skin property is "images/" followed by the property name, such as"images/logo.gif".
Note:To apply an image that is not in the current skin, specify the standard CSSbackground-image property in the CSS Style field. You can also specifyproperties in theCSS Style field to control how the background is displayed,such as whether it repeats, is centered, scrolls with the page, etc.
Metadata Tab
The Metadata tab is available only users with Expert Workspace Development privilege. Theproperties on theMetadata tab are specific to each portlet and usually define the information thatMy webMethods Server displays in the portlet.
Portlet Menu Options for Expert UsersExpert users can access additional menu actions by clicking in the title bar of a portlet. Thefollowing table lists the portletmenu actions that are available only for userswith ExpertWorkspaceDevelopment privilege.
DescriptionAction
Defines how My webMethods Server positions the portlet when renderingthe workspace. If Auto Position is toggled:
Auto Position
On: MywebMethods Server automatically positions the portlet, ignoringany positioning information stored with the portlet.
Off: My webMethods Server uses positioning information stored withthe portlet to determine where to place the portlet on the workspace. Asa result, My webMethods Server uses the location from when theworkspace was last saved.
Sets permissions for how users can interact with the portlet on the page. Formore information about the permissions and how to set them, see “Managing
Permissions
Permissions for an Individual Resource” on page 146 and “Using SecurityRealms” on page 148.
Administering My webMethods Server 10.3 387
22 Managing Workspaces in My webMethods Server

Workspace Actions You Can Perform from theWorkspace Management PageUse theNavigate >Applications >Administration > System-Wide >WorkspaceManagement pageto perform actions against workspaces. By default, only My webMethods administrators haveaccess to theWorkspaceManagement page.MywebMethods administrators can grant other usersaccess to the Workspace Management page. For more information, see “Allowing Users to Accessthe Workspace Management Page” on page 379.
Performing a Keyword Search for WorkspacesUse this search to findworkspaces by specifying text found in the names, description, or keywordsof the workspaces. If you want to specify detailed search criteria, see “Performing an AdvancedSearch for Workspaces” on page 389.
You can find workspaces for which you are the owner or shared workspaces for which you haveat least ViewOnly permissions.MywebMethods administrators can search forworkspaces ownedby any users.
Note:For more information about sharing workspaces, see “Sharing a Workspace” on page 392. Formore information about workspace permissions, seeWorking with My webMethods.
To perform a keyword search for workspaces
1. InMywebMethods:Navigate > Applications > Administration > System-Wide > WorkspaceManagement.
2. Click the Keyword search tab if it is not already displayed.
Tip:For instructions for how to use the Advanced tab, see “Performing an Advanced Search forWorkspaces” on page 389. For instructions for how to use the Saved and Options tabs, seeWorking with My webMethods.
3. In the text box, type one or more strings that are contained in the names of the workspacesyou want to find.
Formore information about how to specify keywords and using special characters, seeWorkingwith My webMethods.
4. Click Search.
My webMethods Server displays the search results in the Results panel (below the Searchpanel).
388 Administering My webMethods Server 10.3
22 Managing Workspaces in My webMethods Server

Performing an Advanced Search for WorkspacesUse an advanced search to specify detailed criteria to search for workspaces.
You can find workspaces for which you are the owner or shared workspaces for which you haveat least ViewOnly permissions.MywebMethods administrators can search forworkspaces ownedby any users.
Note:For more information about sharing workspaces, see “Sharing a Workspace” on page 392. Formore information about workspace permissions, seeWorking with My webMethods.
To perform an advanced search for workspaces
1. InMywebMethods:Navigate > Applications > Administration > System-Wide > WorkspaceManagement.
2. Click the Advanced search tab if it is not already displayed.
Tip:For instructions for how to use the Keyword tab, see “Performing a Keyword Search forWorkspaces” on page 388. For instructions for how to use the Saved and Options tabs, seeWorking with My webMethods.
3. In the Keywords field, optionally type text found in the names, description, or keywords ofthe workspaces you want to find.
4. To specify detailed criteria, specify each criterion you want to use:
a. From the list, select a criterion you want to use:
The following table lists the available search criteria, and how to configure each criterion:
ConfigurationCriterion
In the text box, type a string contained in the names of theworkspacesyou want to find.
Name
In the text box, type a string contained in the descriptions of theworkspaces you want to find.
Description
In the text box, type a string contained in the keywords of theworkspaces you want to find.
Keyword
In the text box, type a string contained in the aliases assigned to theworkspaces that you want to use to find.
Alias
Select the type of workspaces you want to find from the list.Type
Administering My webMethods Server 10.3 389
22 Managing Workspaces in My webMethods Server

ConfigurationCriterion
Owner a. Click Browse.
b. Use the Select Users window to search for and select the userswhose workspaces you want to find. For instructions on how tosearch for users, seeWorking with My webMethods.
c. Click Apply.
In theDate Range list, select the date range youwant to use to searchfor workspaces that were created within the date range you specify.
Created Date
In theDate Range list, select the date range youwant to use to searchforworkspaces that weremodifiedwithin the date range you specify.
Modified Date
b. To add another criterion, select Add and repeat this step.
5. In the Search Condition list, select:
AND if youwantMywebMethods Server to search forworkspaces thatmeet all the criteriayou specify.
OR if you wantMywebMethods Server to search for workspaces that meet any the criteriayou specify.
6. Click Search.
Opening a WorkspaceTo view a workspace, you can open it in a new tab.
To open a workspace
1. Search for theworkspaces that youwant to open. For instructions, see “Performing a KeywordSearch for Workspaces” on page 388.
2. In the search results in the row for a workspace you want to open, click and select OpenIn New Tab.
Adding a Workspace to Your Navigation
You can add workspaces to the Workspaces section of your My webMethods navigation. Afteradding a workspace, you can open it by simply clicking on its name in the navigation.
When you add a workspace, you select the folder where you want the workspace to appear. Bydefault, the Workspaces section of the navigation has two folders, Recently Added and My
390 Administering My webMethods Server 10.3
22 Managing Workspaces in My webMethods Server

Workspaces. You can add additional folders. For instructions for how to add additionalworkspacefolders and also how to removeworkspaces from the navigation, seeWorking withMywebMethods.
To add workspaces to your navigation
1. Search for the workspaces with which you want to work. For instructions, see “Performing aKeyword Search for Workspaces” on page 388 or “Performing an Advanced Search forWorkspaces” on page 389.
2. You can add workspaces to your navigation by performing either of the following:
In the search results, select the check box beside each workspace that you want to add toyour navigation, and click Add to Navigation.
In the row for a workspace you want to add to your navigation, click and select Addto Navigation.
3. In the Add to Navigation window, select the folder to which you want to add the workspace.
4. Click Apply.
Deleting a WorkspaceIf you no longer need aworkspace, you can delete it. If youwant to save a backup of theworkspacebefore deleting it, you can export it to a file first. For instructions, see “ExportingWorkspaces” onpage 394.
To delete workspaces
1. Search for theworkspaces that youwant to delete. For instructions, see “Performing aKeywordSearch for Workspaces” on page 388 or “Performing an Advanced Search for Workspaces” onpage 389.
2. If you want to notify users that share the workspace about the deletion, select the Notifycollaborators when a workspace is deleted check box.
3. You can delete workspaces by performing either of the following:
In the search results, select the check box beside each workspace that you want to delete,and click Delete.
In the row for a workspace you want to delete, click and select Delete Workspace.
Renaming a WorkspaceUse the following procedure to rename a workspace.
Administering My webMethods Server 10.3 391
22 Managing Workspaces in My webMethods Server

To rename a workspace
1. Search for the workspaces that you want to rename. For instructions, see “Performing aKeyword Search for Workspaces” on page 388 or “Performing an Advanced Search forWorkspaces” on page 389.
2. In the search results in the row for aworkspace youwant to rename, click and selectRenameWorkspace.
3. In the Rename Workspace window, type a new name in the New Name field.
4. Click Apply.
Sharing a WorkspaceYou can shareworkspaceswith other users, groups, or roles. For details about sharingworkspaces,including permissions you can assignwhen sharing aworkspace, seeWorking withMywebMethods.
To share a workspace
1. Search for theworkspaces that youwant to share. For instructions, see “Performing aKeywordSearch for Workspaces” on page 388 or “Performing an Advanced Search for Workspaces” onpage 389.
2. In the search results in the row for a workspace you want to share, click and select ShareWorkspace.
3. In the Workspace Sharing window click Add.
4. Use the Select Principal(s) window to search for and select the users, groups, and roles withwhom you want to share the workspace. When you are done, click Apply to close the SelectPrincipal(s) window. For more information about using the Select Principal(s) window tosearch for users, groups, and/or roles, seeWorking with My webMethods.
For each selected user, group, and/or role, My webMethods adds a row to the WorkspaceSharing window.
5. For each user, group, and/or role that you selected, select the permissions you want to assignthat user, group, or role from the list in the Permissions column. For more information aboutthe permissions you can assign, seeWorking with My webMethods.
6. If you want to notify the users affected by this change, select the Notify collaborators whenthe workspace is shared or unshared check box.
7. Click Apply.
392 Administering My webMethods Server 10.3
22 Managing Workspaces in My webMethods Server

Unsharing WorkspacesUse the following procedure when you no longer want to share a workspace with a user, group,or role.
To unshare a workspace
1. Search for the workspaces that you no longer want to share. For instructions, see “Performinga Keyword Search for Workspaces” on page 388 or “Performing an Advanced Search forWorkspaces” on page 389.
2. In the search results in the row for a workspace you want to unshare, click and select ShareWorkspace.
3. In the Workspace Sharing window, select the check box for the users, groups, and/or roleswith which you no longer want to share access to the workspace.
4. If you want to notify the users affected by this change, select the Notify collaborators whenthe workspace is shared or unshared check box.
5. Click Delete and then Apply.
Setting the Properties of a WorkspaceUse the following procedure to view and/or set the general properties for a workspace.
To set workspace properties
1. Search for the workspaces with which you want to work. For instructions, see “Performing aKeyword Search for Workspaces” on page 388 or “Performing an Advanced Search forWorkspaces” on page 389.
2. In the search results in the row for the workspace for which you want to set properties, clickand select Properties.
3. In the Workspace Properties window, update the general properties.
For a description of the general properties, seeWorking with My webMethods.
4. Click Apply.
Administering My webMethods Server 10.3 393
22 Managing Workspaces in My webMethods Server

Exporting WorkspacesYou can export workspaces to save a copy of a workspace in a file. You can then import theworkspace into the same or another My webMethods Server.
You can use the export/import functionality if you want to migrate a workspace from one MywebMethods Server to another. You might also want to export a workspace to save a copy beforedeleting a workspace; if you decide you need it again in the future, you can then import it fromthe file.
To export workspaces
1. Search for the workspaces you want to export. For instructions, see “Performing a KeywordSearch for Workspaces” on page 388 or “Performing an Advanced Search for Workspaces” onpage 389.
2. In the search results, select the check box beside each workspace that you want to export, andclick Export.
3. In the ExportWorkspaceswindow, specify a file name for the file thatwill contain the exportedworkspaces.
4. If you also want to include information about how the workspaces are shared so thatinformation is set when you later import the workspaces, select the Include Shared Settingscheck box.
5. Click Apply.
6. In the File Download window, click Save.
7. In the Save As window, select the location where you want to save the exported workspacesfile and click Save.
Importing WorkspacesIf you have previously exported workspaces to a file, you can import them into My webMethodsServer.
MywebMethods Server imports theworkspace into the personal folder of the user that performedthe import. It is possible for multiple users to import the same workspace. Each time a workspaceis imported, My webMethods Server creates a copy of the workspace, with all its content, intoeach user’s personal folder. A user’s personal folder is located within Folders > Users; you canview it using the system administrator user interface.
To import workspaces
394 Administering My webMethods Server 10.3
22 Managing Workspaces in My webMethods Server

1. InMywebMethods:Navigate > Applications > Administration > System-Wide > WorkspaceManagement.
2. In the Result panel, click Import.
3. In the Import Workspaces window, click Browse.
4. In the Choose File to Upload window, navigate to and select the .cdp file that contains theworkspaces you want to import and click Open.
5. In the Import Workspaces window, click Apply.
About the My webMethods Tools NavigationTo add content to a workspace, you add tools to the workspace. The Tools tab in the MywebMethods navigation lists the tools that you can add. You add a tool by dragging it onto theworkspace canvas. For more information about adding content to a workspace, seeWorking withMy webMethods.
When you add a tool to a workspace, My webMethods adds a new portlet to the workspace thatis specific to the added tool. Out-of-the-box, several tools are provided for end users. Forinformation, see “Workspace Tools Available by Default” on page 395.
System administrators can replace the existing tools taxonomy with a custom taxonomy, whichcan include additional tools or have some of the standard tools removed. For more information,see “Customizing the My webMethods Workspace Tools” on page 396.
Workspace Tools Available by DefaultMy webMethods provides tools for the end user to incorporate into a workspace. The tools areavailable in theWorkspace Tools section of the Tools tab in theMywebMethods navigation pane.For a description of the workspace tools and their behavior, seeWorking with My webMethods.
The following table lists the workspace tools that are available by default:
UsageTool
Enables the user to attach files to a workspace.Attachments
Enables the user to add links to other workspaces and to web sites.Bookmarks
Enables the user to find identification information about other MywebMethods users.
Directory Browser
Enables the user to add formatted text to a workspace.HTML Text
Enables the user to add an image to a workspace.Image
Administering My webMethods Server 10.3 395
22 Managing Workspaces in My webMethods Server
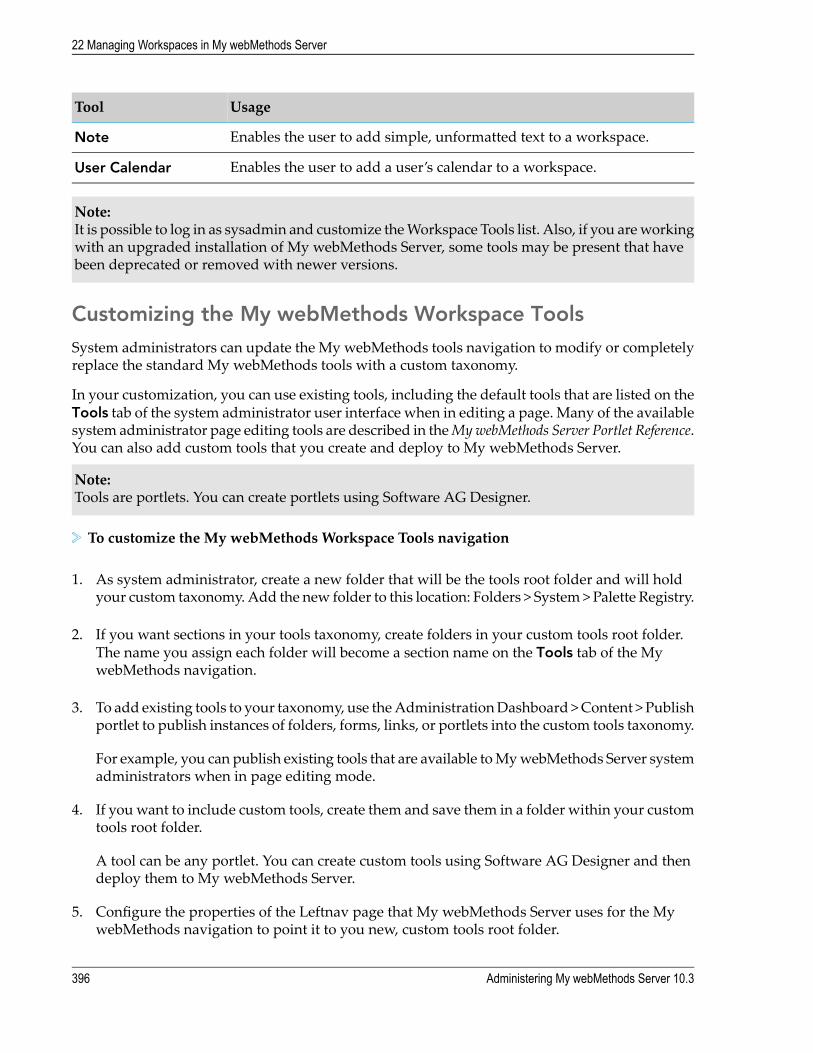
UsageTool
Enables the user to add simple, unformatted text to a workspace.Note
Enables the user to add a user’s calendar to a workspace.User Calendar
Note:It is possible to log in as sysadmin and customize theWorkspace Tools list. Also, if you areworkingwith an upgraded installation of My webMethods Server, some tools may be present that havebeen deprecated or removed with newer versions.
Customizing the My webMethods Workspace ToolsSystem administrators can update the My webMethods tools navigation to modify or completelyreplace the standard My webMethods tools with a custom taxonomy.
In your customization, you can use existing tools, including the default tools that are listed on theTools tab of the system administrator user interface when in editing a page. Many of the availablesystem administrator page editing tools are described in theMywebMethods Server Portlet Reference.You can also add custom tools that you create and deploy to My webMethods Server.
Note:Tools are portlets. You can create portlets using Software AG Designer.
To customize the My webMethods Workspace Tools navigation
1. As system administrator, create a new folder that will be the tools root folder and will holdyour custom taxonomy. Add the new folder to this location: Folders > System > Palette Registry.
2. If you want sections in your tools taxonomy, create folders in your custom tools root folder.The name you assign each folder will become a section name on the Tools tab of the MywebMethods navigation.
3. To add existing tools to your taxonomy, use theAdministrationDashboard >Content > Publishportlet to publish instances of folders, forms, links, or portlets into the custom tools taxonomy.
For example, you can publish existing tools that are available toMywebMethods Server systemadministrators when in page editing mode.
4. If youwant to include custom tools, create them and save them in a folder within your customtools root folder.
A tool can be any portlet. You can create custom tools using Software AG Designer and thendeploy them to My webMethods Server.
5. Configure the properties of the Leftnav page that My webMethods Server uses for the MywebMethods navigation to point it to you new, custom tools root folder.
396 Administering My webMethods Server 10.3
22 Managing Workspaces in My webMethods Server

a. Navigate to this location: Folders > System > Shell Sections >Noodle Shell Leftnav > Leftnav.
b. In the row for the Leftnav page, select , and then Properties.
c. In the Tools Root field, type the name you assigned your custom tools root folder.
Note:The name you specify in the Tools Root field must be a folder or page that resides inFolder > System > Palette Registry.
d. Click Apply.
Administering My webMethods Server 10.3 397
22 Managing Workspaces in My webMethods Server

398 Administering My webMethods Server 10.3
22 Managing Workspaces in My webMethods Server

23 Customizing Skins
■ What Are Skins? ........................................................................................................... 400
■ Creating and Modifying a New Skin ............................................................................ 402
■ Using the Skin Administration Page ............................................................................. 405
■ Make-up of a Skin Package .......................................................................................... 414
Administering My webMethods Server 10.3 399

What Are Skins?
The look and feel of a page is encapsulated in a skin. You can associate a skin with a particularuser or group, in which case they view the contents of a page using that skin. You can associate askin with a particular folder hierarchy. All users who view pages within that hierarchy view themusing the skin.
When you customize a skin, you can modify its look, such as to:
Brand the page with your own corporate logo
Change the color scheme to match your corporate colors
Adopt a look and feel similar to the one used within your company
As a system administrator, you can perform simple customization of skin properties (images,colors, and fonts) using the Skin Administration page of My webMethods Server. To performmore sophisticated customization, you need to directly edit the components that define the skin.
My webMethods Server offers a variety of ways to configure personalization rules that dictatewhat skin is displayed for a given user, group, or resource. See “Managing Skin Rules” on page 327.
How Skins Use InheritanceA skin can inherit properties from a parent skin. When you create a customized skin, first makea copy of an existing skin. Through inheritance, you need only identify the ways the custom skinis different from its parent.
Inheritance for skins follows these rules:
A skin can have only one parent, but the parent skin can also have a parent. In this way, a skincould have a list of ancestors from which it inherits properties.
A parent skin can have any number of children that inherit properties from it.
Each skin has a skin.properties.xml file that lists the properties the skin does not inherit fromits parent. In turn, if this skin has a child skin, the child inherits these modified properties.
The skin.properties.xml file also can contain a “parent” property that identifies the parent ofthe skin.
In addition to the properties in the skin.properties.xml file, a child also inherits the stylesheetsand HTML fragments of the parent skin.
If a skin does not have a parent identified in the skin.properties.xml file, it inherits the propertiesof the My webMethods Server default skin, which is identified by the skin.default alias.
Choosing How Much Customization to UseWhen you customize skins, the preferredmethod is to create a new skin inherited from an existingskin and thenmodify the new skin. Do notmodify the skins that are installedwithMywebMethods
400 Administering My webMethods Server 10.3
What Are Skins?

Server. When you create a new skin and then export it for editing outside the server, you can thendeploy it to every server where it is to be used.
You can use one or more of the following techniques to do customization from the simple to thecomplex:
Modify fonts, colors, and images
The Skin Administration page enables you to create and delete custom skins, and modify theuse of images, colors, and fonts. This is the only method of customization you can use withoutexporting a skin and editing files that make up the skin package. See “Using the SkinAdministration Page” on page 405.
Even if you plan to make more extensive modifications, you can create a custom skin, makechanges to fonts, colors, or images in the Skin Administration page, and then export the skinfor further editing.
Use an extended.css file (“Cascading Style Sheet Definitions” on page 420) to modify skinproperties you cannot manage with the Skin Administration page.
This customization is suitable if you want to make small modifications to existing propertiesin a skin package. To use an extended.css file, you need to define it in the skin.properties fileof the skin.
Use a skin.properties.xml file “The Skin Properties File” on page 415) if you want to modifyvalues of existing properties but are not adding new properties to the custom skin.
For example, you can change the value for a font or color already defined in a parent skin. Inthis case, the skin.properties.xml file overrides properties in the parent skin, but continues touse the CSS of the parent.
Use an extended.csi file (dynamic CSS file) (“Cascading Style Sheet Definitions” on page 420)to add new CSS classes to the custom skin. To use an extended.csi file, you need to define itin the skin.properties file of the skin.
Using an extended.csi file to create new classes is the simplest way to add new styles to acustom skin.
For definitions of CSS and dynamic CSS files, see “Cascading Style Sheets” on page 420
To create a new skin from an existing skin, see “Creating andModifying aNew Skin” on page 402.
To export a skin from to your computer for editing, see “Exporting a Skin to Your Computer” onpage 403.
How Do I Know What to Modify?If modifications to a custom skin package are to be more extensive than you can achieve using theSkin Administration page (fonts, colors, and images), you need to know what properties or CSSclasses you want to modify from among the hundreds of properties that exist in a skin package.One way to do this is to use a browser developer tool such as the Firebug Add-on for MozillaFirefox.
Administering My webMethods Server 10.3 401
What Are Skins?

Open My webMethods Server in the browser and navigate to a page that uses the skin packageyou want to examine. Using the developer tool, you can explore the user interface and determinethe CSS classes used to display it. With this knowledge, you override values in the parent skinthrough the use of extended.css or extended.csi files in the custom skin.
Creating and Modifying a New SkinAs a system administrator, you can create a skin with the Skin Administration page. After youhave created the new skin, you can customize it using the SkinAdministration page or bymanuallyediting the skin package.
To create a new skin
1. As system administrator:Administration Dashboard > User Interface > Skin Administration> Create New Skin.
2. In the System Name field, type a short name that contains only letters, numbers, and theunderscore character.
This name is used internally by the server.
3. In the Display Name field, type the skin title that you want users to see.
This name has no character restrictions.
4. From the Parent Skin list, choose the skin fromwhich the new skinwill inherit any unspecifiedproperties.
The system default skin is selected by default.
5. Click Create.
A new skin initially inherits all of its properties (colors, fonts, and images) from its parent.You can modify the new skin, changing just a single property, such as adding a new headerlogo, or you canmodify the skin to create a radical new look and feel with completely differentcolors, fonts, and images.
Having created a new skin, you can begin to customize it by doing one or more of the following:
Modify the use of images, colors, and fonts, described in “Using the Skin AdministrationPage” on page 405.
Note:You should make any planned changes in the Skin Administration page before using either ofthe manual editing techniques.
Export the skin for manual editing, described in “Exporting a Skin to Your Computer” onpage 403.
402 Administering My webMethods Server 10.3
What Are Skins?

Import the skin into Designer for manual editing, described in “Using Designer to ModifySkin Packages” on page 404.
Example:
Assume you want to create a new skin from the parent skin Pearls.
1. As system administrator:Administration Dashboard > User Interface > Skin Administration> Create New Skin.
2. In the System Name field, type a name such as wm_skin_carbon.
3. In the Display Name field, type the skin title, Carbon Sailing Skin.
4. From the Parent Skin list, choose the Pearls skin.
This is the skin from which the new skin will inherit any unspecified properties.
5. Click Create.
Exporting a Skin to Your ComputerIf you intend to modify a skin package using the Skin Administration page (“Using the SkinAdministration Page” on page 405), you should do so before performing manual editing.
As a system administrator, you can use the Skin Administration page to export a skin package toyour computer for manual editing. The skin package is a zip file with a .skin file extension.
Tip:Another way to perform manual editing on a skin package is to import the skin into Designer.See “Using Designer to Modify Skin Packages” on page 404.
To export a skin
1. As system administrator:Administration Dashboard > User Interface > Skin Administration> Create New Skin.
2. Click the Tools icon for the skin to be exported and then click Export.
3. Choose the Save File option and click OK.
My webMethods Server downloads the file to the default download destination for yourbrowser.
4. Unzip the skin package so you can perform manual editing.
Administering My webMethods Server 10.3 403
What Are Skins?

Using Designer to Modify Skin PackagesIf you intend to modify a skin package using the Skin Administration page, you should do sobefore exporting the file and performing manual editing.
One way to modify files in a custom skin package is to import the skin into Software AGDesignerand make changes in the UI Development perspective. You can export the skin package directlyfromMywebMethods Server, edit CSS, dynamic CSS, or XML files, and then deploy the skin backto the server without unzipping the skin package.
Note:This topic is not intended to provide details of working in Software AG Designer. For specificinformation on working in the MWS Admin and Servers views of Designer, see the CompositeApplication Framework online help.
To modify custom skin packages in Designer
1. In the MWS Admin view of the UI Development perspective, connect to the instance of MywebMethods Server (create a data provider) that contains the custom skin package.
TheMWSAdmin view contains a tree view of folders and otherMywebMethods Server assets.
2. Expand the Skins folder, right-click the custom skin package and click Import/Export > ExtractAsset into Project.
3. In the Extract Asset into Project wizard, click New.
4. In the Project Name field, type the name of the skin package exactly as it appears in theMWSAdmin view and click Finish twice.
Designer creates an MWS Skin Project and extracts the assets of the skin package into it.
5. Use either the Navigator view or Project Explorer view to locate CSS, dynamic CSS, or XMLfiles in the skin project, and open the files in a text editor.
6. To deploy the skin package to an instance of My webMethods Server, use the Servers view toconnect to the server and then publish the skin package.
To test the skin package, you need to create a skin rule that will trigger the use of the customskin. See “Managing Skin Rules” on page 327.
Note:Do not test the skin package using the Preview Server in Designer. That server instance doesnot have the skin rules needed to properly display the skin.
Using this technique, you can make incremental changes and publish the results to the serverperiodically for confirmation. Associate the custom skinwith a test page so you can performdesignwork without affecting other users.
404 Administering My webMethods Server 10.3
What Are Skins?

Using the Skin Administration PageThe Skin Administration page of MywebMethods Server enables you to create and delete customskins, and modify the use of images, colors, and fonts. To use the Skin Administration page, youmust either have the system administrator grant you permission to access the page, or you mustlog in as the system administrator.
If youwant to domore extensive customization than is available through the Skin Administrationpage, you may still find it convenient to create the custom skin on this page before makingmodifications.
My webMethods Server applies any changes that you make to images, colors, or fonts to theskin.properties.xml file that is part of the skin package.
Deleting a SkinAs a system administrator, you can delete a skin with the Skin Administration page.
To delete a skin
1. As systemadministrator:Administration Dashboard > User Interface > Skin Administration.
2. To delete a skin, click the Tools icon and then click Delete.
Replacing Images in a SkinThe skin of a page contains images, such as logos, that help shape the appearance and structureof the page. Using the Skin Administration page, you can replace images in a skin with imagesfrom your local drive, images from an existing skin, or images from a website.
To replace an image in a skin
1. As systemadministrator:Administration Dashboard > User Interface > Skin Administration.
2. To modify a skin, click and then click Edit.
3. Click Images.
4. Click the skin property for the image you want to replace.
The property is highlighted with a red box.
5. Depending on the source of the image, do one of the following:
Administering My webMethods Server 10.3 405
What Are Skins?

On the local drive - in the Picker panel, click Choose File. Browse to the new image, clickOpen, and then click Upload. To replace the image, click .
Part of an existing skin - in the Select palette list, select the skin from which you want tocopy the image. Select the new image and click .
On a website - in the Select palette list, select URL, type the website URL and click OK.Select the new image and click .
6. Click Preview.
The preview demonstrates how your changes have affected the skin.
Tip:To preview a page other thanMy Folders, MyHome Page, or Public Folders, see “Previewinga Page Elsewhere on the Server” on page 413.
7. Close the Preview window and click Save.
Example:
Assume you have the Carbon Sailing skin installed and want to change from the webMethodslogo to the Carbon Sailing logo, carbon-logo.png, which exists on your local file system.
1. As systemadministrator:Administration Dashboard > User Interface > Skin Administration.
2. Click for the Carbon Sailing Skin and click Edit.
3. Click Images.
4. Click the logo.gif skin property.
The property is highlighted with a red box.
5. In the Picker panel, click Choose File, browse to the carbon-logo.png image, click Open, andthen click Upload.
The new image appears in the Picker panel.
6. To replace the image, click .
7. In a similarway, select thebanner-bg.gifproperty and replace the imagewith the carbon-bg.jpgfile.
The resulting combination results in a complete banner.
8. In the Preview panel, choose My Home Page from the list and click Preview.
9. Close the Preview window and click Save.
406 Administering My webMethods Server 10.3
What Are Skins?

Replacing Colors Using a Color PickerThere are a number of different color settings in a skin that affect different parts of a page. Tochange settings, you select colors in the skin editor, apply the colors to skin properties, and previewyour changes.
To replace the color of a skin property using a color picker
1. As systemadministrator:Administration Dashboard > User Interface > Skin Administration.
2. To modify a skin, click the Tools icon and then click Edit.
3. Click Colors.
4. Click the skin property for which you want to replace the color.
The skin property is highlighted with a red box.
5. In the Picker panel, click the color to be used as a replacement.
The selected color appears in the horizontal bar at the bottom of the Picker panel, and thehexadecimal value appears in the # field at the top.
Tip:If you know the hexadecimal value of the replacement color, you can type it directly in the #field.
6. To save a color to the Scratchpad panel, click the down arrow directly beneath the Pickerpanel.
Tip:If you want lighter and darker shades of a particular color for use in foregrounds andbackgrounds, save the color in the Scratchpad panel and, in the vertical bar on the right edgeof the Picker panel, click above or below the original color. Save multiple colors to theScratchpad.
7. To set the color for a skin property, click from either the Picker panel or the Scratchpadpanel.
8. At the bottom of the page, click Preview.
The preview demonstrates how your changes have affected the skin.
Tip:If the page is not in one of the folders labeled My Folders, My Home Page, or Public Folders,see “Previewing a Page Elsewhere on the Server” on page 413.
Administering My webMethods Server 10.3 407
What Are Skins?

9. Close the Preview window.
10. Click Save.
Example:
Assume you have created the Carbon Sailing skin as described in “Creating andModifying aNewSkin” on page 402 and want to change the colors used for buttons.
1. As system administrator:Administration Dashboard > User Interface > Skin Administration.
2. To modify a skin, click and then click Edit.
3. Click Colors.
4. Click the button - button text skin property.
5. In the Color field of the Picker panel, replace the default color (BUTTON if the parent skin isPearls) by typing FFFFFF.
6. Click from the Picker panel.
The check box in the Inherited column is cleared, indicating this skin property is no longerinherited from the parent skin.
7. Click the button-bg - button background skin property.
8. In the Picker panel, replace the default color by typing 9EB6C7.
9. Click from the Picker panel.
10. In a similar way, replace the remaining button color properties with the following values:
The following table lists the values to supply for each skin property:
ValueProperty
668899button-border - button border
BBDDEEbutton-border-light - button border
FFFFFFbutton-hover - button text
4C7499button-hover-bg - button background
395874button-hover-border - button border
ABC9D8button-hover-border-light - button border
C5C7C7button-disabled - disabled button text
FFFFFFbutton-disabled-bg - disabled button background
C5C7C7button-disabled-border - disabled button border
408 Administering My webMethods Server 10.3
What Are Skins?

11. At the bottom of the page, click Preview.
The following table displays the preview results for the modified button properties:
Default button:
New color:
New hover color:
Final button:
The final button includes font changes made in “Replacing Fonts Using a Picker” on page 410.
12. Click Save.
Replacing Colors from a Skin or WebsiteYou can replace the color of a skin property using color values from an existing skin or from awebsite.
To replace the color of a skin property using a color from a skin or a website
1. As systemadministrator:Administration Dashboard > User Interface > Skin Administration.
2. To modify a skin, click the Tools icon and then click Edit.
3. Click Colors.
4. Click the skin property for which you want to replace the color.
The skin property is highlighted with a red box.
5. Depending on the source of the color, do one of the following:
Part of an existing skin - In the Select palette list, select the skin from which you want tocopy the color. Select the new image and click .
On a website - In the Select palette list, select URL, type the website URL and click OK.Select the new color and click .
6. At the bottom of the page, under the Preview heading, click Preview.
The preview demonstrates how your changes have affected the skin.
Tip:
Administering My webMethods Server 10.3 409
What Are Skins?
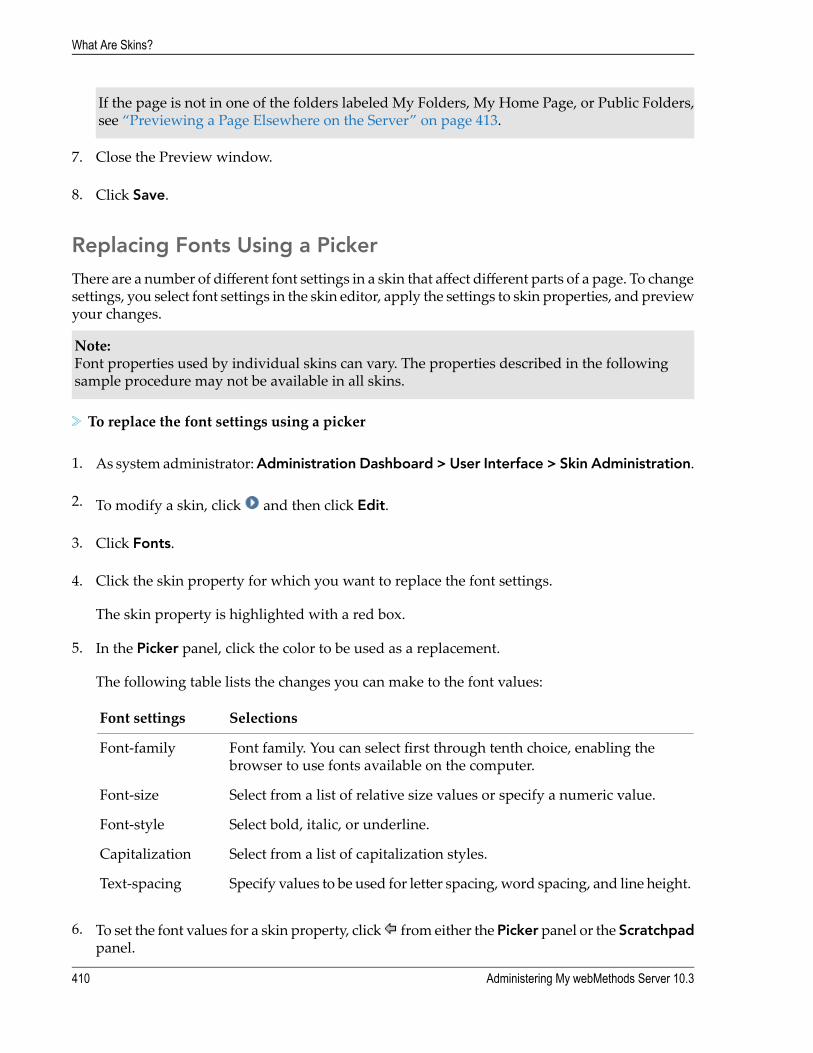
If the page is not in one of the folders labeled My Folders, My Home Page, or Public Folders,see “Previewing a Page Elsewhere on the Server” on page 413.
7. Close the Preview window.
8. Click Save.
Replacing Fonts Using a PickerThere are a number of different font settings in a skin that affect different parts of a page. To changesettings, you select font settings in the skin editor, apply the settings to skin properties, and previewyour changes.
Note:Font properties used by individual skins can vary. The properties described in the followingsample procedure may not be available in all skins.
To replace the font settings using a picker
1. As systemadministrator:Administration Dashboard > User Interface > Skin Administration.
2. To modify a skin, click and then click Edit.
3. Click Fonts.
4. Click the skin property for which you want to replace the font settings.
The skin property is highlighted with a red box.
5. In the Picker panel, click the color to be used as a replacement.
The following table lists the changes you can make to the font values:
SelectionsFont settings
Font family. You can select first through tenth choice, enabling thebrowser to use fonts available on the computer.
Font-family
Select from a list of relative size values or specify a numeric value.Font-size
Select bold, italic, or underline.Font-style
Select from a list of capitalization styles.Capitalization
Specify values to be used for letter spacing,word spacing, and line height.Text-spacing
6. To set the font values for a skin property, click from either the Picker panel or the Scratchpadpanel.
410 Administering My webMethods Server 10.3
What Are Skins?

7. At the bottom of the page, click Preview.
The preview demonstrates how your changes have affected the skin.
Tip:If the page is not in one of the folders labeled My Folders, My Home Page, or Public Folders,see “Previewing a Page Elsewhere on the Server” on page 413.
8. Close the Preview window.
9. Click Save.
Example:
Assume you have created the Carbon Sailing skin as described in “Creating andModifying aNewSkin” on page 402 and want to change the font values used for buttons.
1. As system administrator:Administration Dashboard > User Interface > Skin Administration.
2. To modify a skin, click and then click Edit.
3. Click Fonts.
4. Click the button - button text skin property.
5. Under Font-family, in the Primary list, select the Tahoma font.
6. In the Primary list, select the sans-serif.
7. Under Font-style, select Bold.
8. Click from the Picker panel.
The check box in the Inherited column is cleared, indicating this skin property is no longerinherited from the parent skin.
9. At the bottom of the page, click Preview.
The following table displays the preview results for the modified button properties:
Default button:
New font value:
Final button:
The final button includes color changes made in “Replacing Colors Using a Color Picker” onpage 407.
10. Click Save.
Administering My webMethods Server 10.3 411
What Are Skins?

Replacing Fonts from a Web SiteIn controlling the font families used by a skin, you have the choice of designing the style yourselfor selecting a set of font families used by another Web site. The following procedure presents ascenario describing how you might go about capturing and using families from another site.
Note:Font properties used by individual skins can vary. The properties described in the followingsample procedure may not be available in all skins.
To replace the font families used by a skin with the font families used by another Web site
1. As systemadministrator:Administration Dashboard > User Interface > Skin Administration.
2. To modify a skin, click the and then click Edit.
3. Click Fonts.
4. On the Select palette list, select URL, type the Web site URL and click OK.
The Palette displays a list of font families derived from the Web site.
5. In the Palette on the lower-right side of the page, find a line that seems to represent the normalbody text of the Web site, and select it.
This action should result in several font families being listed in the Picker panel. If not, trysome other lines in the palette that look like normal body text.
6. Click directly above the Palette.
This action saves the font information to the Scratchpad panel for later use.
7. In the line you just created in Scratchpad panel, select the text in the edit field and rename itto something meaningful, such as my regular text.
8. In the Skin Properties list on the left side of the page, select the regular skin property.
The regular skin property is highlighted with a red box, meaning it is selected for editing.
9. To set the regular skin property, click from the Scratchpad panel.
This action sets the regular skin property with the value selected in the Scratchpad panel.
10. In the Skin Properties list on the left side of the page, select the bold skin property.
The bold skin property is highlighted with a red box.
412 Administering My webMethods Server 10.3
What Are Skins?

11. In the Scratchpad panel, select my regular text.
Because the my regular text scratchpad item was already the active item in the Scratchpadpanel (with a dark red border around it), selecting it againmakes it the active item for the page(with a bright red border around it), and loads the my regular text font information back intothe Picker panel.
12. In the Font-style area of the Picker panel, select the Bold check box.
13. Click from the Picker panel.
This action sets the bold skin property with the value in the Picker panel.
14. In the Skin Properties list, click the small skin property.
15. In the Scratchpad panel, select my regular text.
16. In the Font-size area of the Picker panel, do one of the following:
Select Relative size, and then change the value in the list to be a size smaller than theexisting size
SelectNumeric size, and then edit the number in the field to be a value two or three smallerthan the existing size
17. Click the arrow directly to the left of the Picker panel.
18. In the Skin Properties list, select the medium skin property.
19. In the Scratchpad panel, select my regular text.
20. In the Preview list at the bottom of the page, choose Public folders and then click Preview.
The preview demonstrates how your changes have affected the skin.
Tip:If the page is not in one of the folders labeled My Folders, My Home Page, or Public Folders,see “Previewing a Page Elsewhere on the Server” on page 413.
21. Close the preview window.
22. Click Save.
Previewing a Page Elsewhere on the ServerYou can preview a page other than My Folders, My Home Page, or Public Folders in the skineditor.
Administering My webMethods Server 10.3 413
What Are Skins?

To preview a page elsewhere on the server
1. Make changes to skin properties within Skin Administration.
2. In the Preview list at the bottom of the page, choose URL.
3. Open a newbrowserwindow, navigate to the server, navigate to the page youwant to preview.
4. In the Address bar of the browser, select the URL and type CTRL+C to copy it.
5. Return to the Script Prompt dialog from the first browser and paste in the URL by typingCTRL+V.
6. Click OK.
7. Click Preview.
Make-up of a Skin PackageThere are two ways to make a skin package available for editing.
“Exporting a Skin to Your Computer” on page 403
“Using Designer to Modify Skin Packages” on page 404
With a skin package exposed for editing, you can see the files and directories that make up thepackage:
The skin.properties.xml file describes the components implemented by the skin. You canmodify fonts, colors, and images using the Skin Administration page, but for other skincomponents, you need to edit the skin properties file directly. For more information, see “TheSkin Properties File” on page 415.
If you have created a new skin in My webMethods Server but not yet made any changes, theonly property in the file may be the parent skin from which all properties are inherited.
The skinDeploy.xml file contains deployment information for the skin package. For moreinformation, see “The Skin Deployment File” on page 419.
The css directory. Cascading Style Sheets (CSS) describe the properties that make up a skin.A generated CSS for a skin is derived from the skin.properties.xml file as modified by otherstyle sheet files. For more information, see “Cascading Style Sheets” on page 420.
If you have created a new skin inMywebMethods Server but not yet made any changes, theremay be no Cascading Style Sheets in the directory because all properties are inherited fromthe parent skin. If you add or modify stylesheets, you should place them in this directory.
The components directory. This directory contains proprietary files you are not likely tomodifyas part of a skin package.
414 Administering My webMethods Server 10.3
What Are Skins?

The images directory. If you add or modify images used in the skin, you should place themin this directory.
The Skin Properties FileThe skin.properties.xml file describes the components implemented by the skin. Any changes youmake to a skin using the Skin Administration page (“Using the Skin Administration Page” onpage 405) are reflected in the skin.properties.xml file for the skin. The base.csi file for a skin referencesthe properties in the skin.properties.xml file for use when My webMethods Server generates thebase.css file.
The Importance of the Skin Properties File
The base.csi file for a skin references properties defined in the skin.properties.xml file. MywebMethods Server uses the base.csi file to generate the base.css file that governs how the skin isdisplayed. This is a powerful mechanism that enables you to create new skins based on a commonancestor by specifying images, fonts, and colors in a new skin.properties.xml file without havingto re-create a new stylesheet for each skin.
In the following examples, the Pearls skin is the a parent. No CSS (.css or .csi) change is requiredin the custom skin.
Replacing images
You can change the banner background image in a custom skin by modifying the value of theimages/banner-bg.gif property in the skin.properties.xml file for the custom skin.
The following table lists the properties that you modify when replacing images:
ContentsFile
<property><name>images/banner-bg.gif</name><value>images/dot.gif</value><description>banner background</description>
</property>
parentskin.properties.xml
background-image: url(@skin images/banner-bg.gif;);parent base.csi
<property><name>images/banner-bg.gif</name><value>images/carbon-bg.jpg</value>
</property>
childskin.properties.xml
Also, see “How do I replace one image with another?” on page 418.
Globally replacing fonts
You can globally change the fonts used in a custom skin by modifying the value of thefonts/regular property in the skin.properties.xml file for the custom skin.
Administering My webMethods Server 10.3 415
What Are Skins?

The following table lists the properties that you modify when replacing fonts:
ContentsFile
<property><name>fonts/regular</name><value>font-family: tahoma, sans-serif;
font-size: 0.7em;</value><description>standard text</description>
</property>
parentskin.properties.xml
@skin fonts/regular;parent base.csi
<property><name>fonts/regular</name><value>font-family: Georgia, 'Times New Roman',
Times, serif; font-size: 1em; font-size: 0.7em;</value><description>standard text</description>
</property>
childskin.properties.xml
Globally replacing colors
You can globally change the colors used in a custom skin. In this example, thecolors/section-body-border property controls the color of row borders. One change in theskin.properties.xml file for the custom skin, affects seven properties in the base.csi file.
The following table lists the properties that you modify when replacing colors:
ContentsFile
<property><name>colors/section-body-border</name><value>#ccc</value><description>row border</description>
</property>
parentskin.properties.xml
.tbl {border: @skin sizes/section-body-border;
solid @skin colors/section-body-border;;..
}
parent base.csi
<property><name>colors/section-body-border</name><value>#dfe6ec</value><description>row border</description>
</property>
childskin.properties.xml
Also, see “How do I modify colors?” on page 418.
416 Administering My webMethods Server 10.3
What Are Skins?

Making Entries in a Skin Properties File
If you edit the skins.properties.xml filemanually, you do not need to include components inheritedfrom one of the skin’s ancestors. Rather, you need only include modifications to inheritedcomponents. A good way to see the properties that describe a skin is to export the parent skinpackage using the method described in “Exporting a Skin to Your Computer” on page 403, unzipthe skin package, and examine the skin.properties.xml file.
Note:Modifying the skin properties in the skins.properties.xml file requires CSS expertise.
The skin.properties.xml file is made up of property elements, each describing a component of theskin. The property elements have this format:<property>
<name>property_name</name><value>property_value</value><description>optional_description</description>
</property>
The following guidelines apply to the property element:
If the value is the same as the name, you can omit the value.
The description is optional.
You can add comments using standard XML comment syntax:<!-- This is a comment -->
A skin component can have multiple properties associated with it. For example, the banner thatappears at the top of a My webMethods Server page has over twenty properties that determineits appearance, such as:
Color, position, and padding of the background
Color, font, and weight of link text, selected links, including hover characteristics
Images and their positioning
To see the properties that describe a skin, export the pearls skin package using themethoddescribedin “Exporting a Skin to Your Computer” on page 403, unzip the skin package, and examine theskin.properties.xml file. The following examples describe a few ways to modify properties.
How do I specify a parent skin?
To make the development of a custom skin easier, you need to specify a parent skin from whichthe custom skin inherits its properties. A skin can have only one parent skin. In the followingexample, the skin.properties.xml file specifies the pearls skin package as the parent of the customskin:<!-- parent skin; all unspecified properties are inherited --><property>
Administering My webMethods Server 10.3 417
What Are Skins?

<name>parent</name><value>skin.wm_skin_pearls</value><description>parent skin</description>
</property>
How do I replace one image with another?
To replace one imagewith another, you first need tomove a copy of the new image into the imagesdirectory for the skin package. Then you need to locate the property for the image in theskins.properties.xml file.
For example, perhaps you want to rebrand the page by changing the logo image that appears inthe left side of the banner. The new image has the name my_logo.png.<!-- images -->
<property><name>images/logo.gif</name><value>images/my_logo.png</value><description>header logo</description>
</property>
How do I modify colors?
The topic “Replacing Colors Using a Color Picker” on page 407 shows several colors modified inthe Skin Administration page. The same changes look like this in the skin.properties.xml file.<property>
<name>colors/button</name><value>#FFFFFF</value><description>button text</description>
</property><property>
<name>colors/button-bg</name><value>#9EB6C7</value><description>button background</description>
</property><property>
<name>colors/button-border</name><value>#668899</value><description>button border</description>
</property><property>
<name>colors/button-border-light</name><value>#BBDDEE</value><description>button border</description>
</property><property>
<name>colors/button-hover</name><value>#FFFFFF</value><description>button text</description>
</property><property>
<name>colors/button-hover-bg</name><value>#4C7499</value><description>button background</description>
418 Administering My webMethods Server 10.3
What Are Skins?

</property><property>
<name>colors/button-hover-border</name><value>#395874</value><description>button border</description>
</property><property>
<name>colors/button-hover-border-light</name><value>#ABC9D8</value><description>button border</description>
</property><property>
<name>colors/button-disabled</name><value>#C5C7C7</value><description>disabled button text</description>
</property><property>
<name>colors/button-disabled-bg</name><value>#FFFFFF</value><description>disabled button background</description>
</property><property>
<name>colors/button-disabled-border</name><value>#C5C7C7</value><description>disabled button border</description>
</property>
How do I add Cascading Style Sheets?
You can addmultiple style sheets to a skin.properties.xml file. For more information, see “AddingStylesheets to a Skin Package” on page 423.
The Skin Deployment FileThe skinDeploy.xml file contains deployment information for the skin package. This deploymentinformation is contained entirely as attributes of the root wm_xt_skin element.
Note:It is unnecessary to make any modifications to this file for a newly created custom skin package.
The following table lists the attributes of the wm_xt_skin element in the skinDeploy.xml file
DescriptionAttribute
The name of the skin package.name
A comma-separated list of aliases to the skin as used by MywebMethods Server.
alias
The display name for the skin as it appears in the user interface.description
The version number of the skin. When you modify and releasethe skin package, you should increment the minor versionnumber.
version
Administering My webMethods Server 10.3 419
What Are Skins?
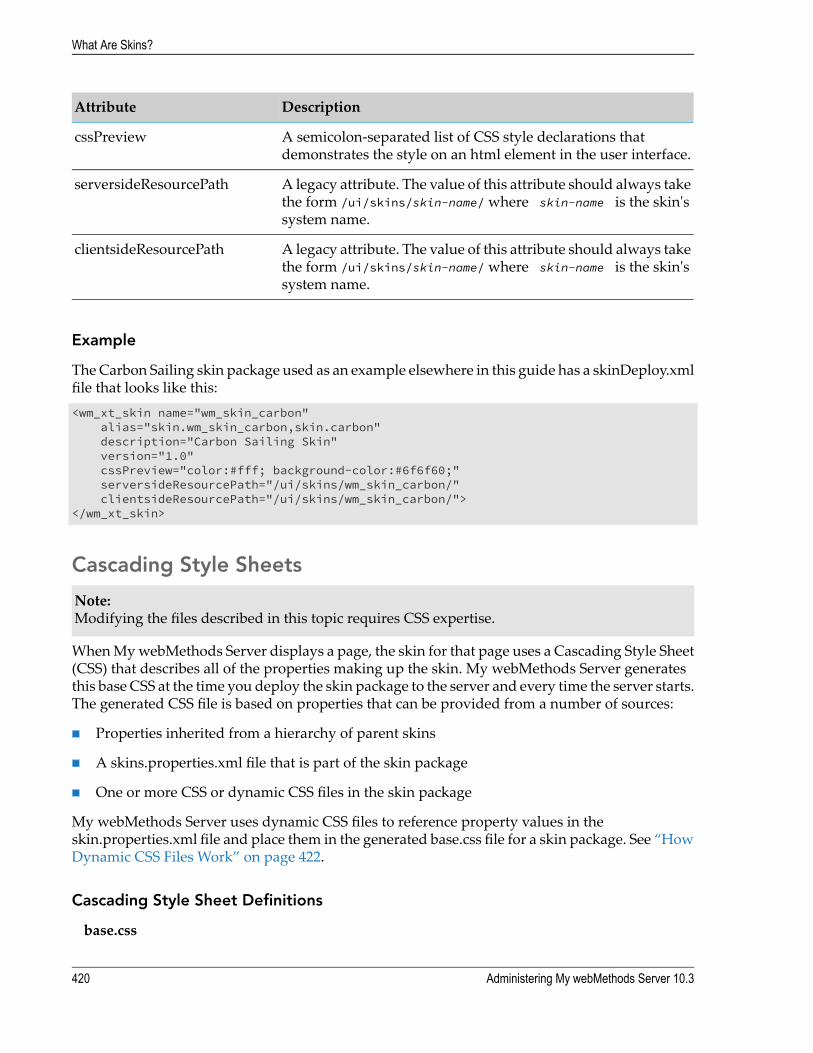
DescriptionAttribute
A semicolon-separated list of CSS style declarations thatdemonstrates the style on an html element in the user interface.
cssPreview
A legacy attribute. The value of this attribute should always takethe form /ui/skins/skin-name/where skin-name is the skin'ssystem name.
serversideResourcePath
A legacy attribute. The value of this attribute should always takethe form /ui/skins/skin-name/where skin-name is the skin'ssystem name.
clientsideResourcePath
Example
TheCarbon Sailing skin package used as an example elsewhere in this guide has a skinDeploy.xmlfile that looks like this:<wm_xt_skin name="wm_skin_carbon"
alias="skin.wm_skin_carbon,skin.carbon"description="Carbon Sailing Skin"version="1.0"cssPreview="color:#fff; background-color:#6f6f60;"serversideResourcePath="/ui/skins/wm_skin_carbon/"clientsideResourcePath="/ui/skins/wm_skin_carbon/">
</wm_xt_skin>
Cascading Style Sheets
Note:Modifying the files described in this topic requires CSS expertise.
WhenMywebMethods Server displays a page, the skin for that page uses a Cascading Style Sheet(CSS) that describes all of the properties making up the skin. My webMethods Server generatesthis base CSS at the time you deploy the skin package to the server and every time the server starts.The generated CSS file is based on properties that can be provided from a number of sources:
Properties inherited from a hierarchy of parent skins
A skins.properties.xml file that is part of the skin package
One or more CSS or dynamic CSS files in the skin package
My webMethods Server uses dynamic CSS files to reference property values in theskin.properties.xml file and place them in the generated base.css file for a skin package. See “HowDynamic CSS Files Work” on page 422.
Cascading Style Sheet Definitions
base.css
420 Administering My webMethods Server 10.3
What Are Skins?

The primary CSS for a skin package. A base.css file most often exists only as a generated CSSfile, having been defined by other sources in the skin package or its parent. The base.css can bemodified by one or more extended CSS or dynamic CSS files. It is not recommended that youcreate a base.css file for a custom skin package, but if you do so, define it in theskin.properties.xml file. You cannot define both a base.css file and a base.csi file in the samecustom skin package.
extended.cssA secondary CSS for a skin package. Entries in the extended CSS file override the base.css file.You can have multiple extended CSS files, such as to provide browser-specific CSS values.Extended CSS files, each with a different name, are defined in the skin.properties.xml file.
base.csiA dynamic CSS file that references properties in the skin.properties.xml file (“How DynamicCSS FilesWork” on page 422). As a result of the base.csi file, the generated base.css file containsproperties from the skin.properties.xml file. The skin.properties.xml file for a top-level skinpackage (one that has no parent) describes all properties that make up a skin. If there is nobase.csi file in a skin package, it is inherited from a parent skin. The base.csi file is defined inthe skin.properties.xml file. You cannot define both a base.css file and a base.csi file in the samecustom skin package.
extended.csiA secondary dynamic CSS file for a skin package (“HowDynamic CSS FilesWork” on page 422).Entries in the extended.csi file override the base.csi file. You can have multiple extended.csifiles, such as to provide browser-specificCSS values. the extended.csi files, eachwith a differentname, are defined in the skin.properties.xml file.
How Do I Choose Which Type of Stylesheet to Modify?
Use these guidelines in determining which stylesheet to use:
Use an extended.css file tomake selectedmodifications to a custom skin that is not significantlydifferent from the parent skin on which it is based. An extended.css file overrides:
The base.css or base.csi file in the parent skin package
If you define an extended.csi file for a custom skin, the classes in it override only thecorresponding classes in the base.css or base.csi file of the parent skin.
Use an extended.csi file to change selected references to a skin.properties.xml file, either in thecustom skin package or in its parent. An extended.csi file overrides:
The base.csi file in the parent skin package
The base.csi file in the custom skin package, if you have created one.
Using an extended.csi file to create new classes is the simplest way to add new styles to acustom skin.
As an alternative to defining extended.css files in the skin.properties.xml file, you can useimport statements to include them in an extended.csi file. For example, the following statementscause two CSS files to be included during generation of the base.css for a skin:
Administering My webMethods Server 10.3 421
What Are Skins?

@import url(@skin css/general.css;);�" @import url(@skin css/dialog_styles.css;);�
Use a base.csi file if you have made extensive modifications to the skin.properties file in thecustom skin package that require a revised set of references. A base.csi file is required in anyskin package that does not have a parent skin package.
If you define a base.csi file for a custom skin, it completely overrides any base.css or base.csifile in the parent skin. If the custom base.csi file contains a subset of the classes defined for theparent skin, the generated base.css file will contain only that same subset of classes.
How Dynamic CSS Files Work
My webMethods Server replaces skin property references in a dynamic CSS file with propertyvalues in the skin.properties.xml file and places them in the generated base.css file for a skinpackage. A top-level skin package (one that has no parent) typically has no base.css file, insteadusing the base.csi file to create the generated base.css file.
Used in custom skin packages, this featuremakes it possible to create new skins based on a commonancestor by simply specifying skin properties in a new skin.properties.xml file. If youmake simplemodifications to the skin.properties.xml file that do not require changes to the dynamic CSS file,you can use the base.csi file inherited from the parent skin. If you make more extensivemodifications, you may have to create an extended.csi file to properly reference the changed oradded properties.
Note:Modifying the files described in this topic requires CSS expertise.
Dynamic CSS files make use of at-rules (or @rules) to reference properties in the localskin.properties.xml file or properties inherited from the parent skin. For example, if your base.csifile contains this rule:body {
@skin fonts/regular;color: @skin colors/text;;background-color: @skin colors/text-bg;;direction: @skin dir/text;;}
and the skin.properties.xml files contains these property definitions:<property>
<name>fonts/regular</name><value>font-family: trebuchet; font-size: 20px;</value>
</property><property>
<name>colors/text</name><value>#000</value>
</property><property>
<name>colors/text-bg</name><value>#fff</value>
</property><property>
<name>dir/text</name>
422 Administering My webMethods Server 10.3
What Are Skins?

<value>ltr</value></property>
the generated base.css file will contain this rule:body {
font-family: trebuchet; font-size: 20px;color: #000;background-color: #fff;direction: ltr;
}
If you create a base.csi or extended.csi file for use with a skin package, you need to declare it inthe skin.properties.xml file, as described in “Adding Stylesheets to a Skin Package” on page 423.
Adding Stylesheets to a Skin Package
You can use CSS and dynamic CSS files to modify the generated base.css file for a skin package.To add a CSS or dynamic CSS file to a skin package, you define it in the skin.properties.xml filefor the custom skin package. Each stylesheet is defined in a property element having this form:<property>
<name>css/name.css</name><value>css/name.extension</value><description>optional description</description>
</property>
If the file name in the <value> element is the same as the <name> element, you can omit the <value>element.
If the skin.properties.xml file does not have property element for a stylesheet, it inherits thestylesheet in the parent skin.
Note:When you add or modify a stylesheet, you should place it in the css directory of the skin package.
Example: base.css
Note:We do not recommend that you create a base.css file for use in a custom skin package. However,you can use the syntax here to compare with the examples that follow.
You can have only one base.css element in the skin.properties.xml file. In the following example,you could omit the <value> element because it is identical to the <name> element.<property>
<name>css/base.css</name><value>css/base.css</value>
</property>
Administering My webMethods Server 10.3 423
What Are Skins?

Example: base.csi
If you want to make extensive changes that override the base.csi file of a parent skin, you mightcreate a new base.csi file and define it in the custom skin package. In this case, the <name> elementis base.css and the <value> element is base.csi, as shown here:<property>
<name>css/base.css</name><value>css/base.csi</value>
</property>
Example: extended.css or extended.csi
The rules for extended.css and extended.csi files are the same as those for base.css:<property>
<name>css/extended.css</name><value>css/extended.css</value>
</property>
or:<property>
<name>css/extended.css</name><value>css/extended.csi</value>
</property>
Example: Multiple extended.css or extended.csi Files
A skin.properties.file can have properties for multiple extended.css or extended.csi files at thesame time. One use for this capability is to provide browser-specific properties.<property>
<name>css/extended.css</name><value>css/extended.csi</value>
</property>
<property><name>css/ie6.css</name><value>css/ie6.csi</value><description>special ie6 stylesheet rules</description>
</property>
<property><name>css/ie7.css</name><value>css/ie7.csi</value><description>special ie7 stylesheet rules</description>
</property>
424 Administering My webMethods Server 10.3
What Are Skins?

24 Working with Shells in My webMethods Server
■ What Are Shells? .......................................................................................................... 426
■ Creating a New Shell .................................................................................................... 426
■ Modifying a Shell .......................................................................................................... 427
■ Inserting Extra Tags into the HTML <head> Element ................................................. 428
■ Using an Alias with a Shell Section ............................................................................... 428
■ Deleting a Shell ............................................................................................................ 429
■ Making an Empty Shell Section .................................................................................... 429
Administering My webMethods Server 10.3 425

What Are Shells?My webMethods Server derives the content and layout of the header and footer of a page fromthe content and layout of the current shell's Header and Footer folders. When the server rendersone page, it is actually displaying the contents of up to five folders at once: the shell's Header, theshell's Leftnav, the requested page, the shell's Rightnav, and the shell's Footer. The server displaysthe content of the requested page as individual portlets, but it renders the content of shell sectionswithout title bars, borders, or additional spacing. You can apply Cascading Style Sheet (CSS)classes and styles to the rows and columns that compose the shell sections, as well as specify theexact dimensions of those rows and columns, to further customize the layout of the shell.
The Titlebar shell section applies a title bar to each portlet on the page, which includes the displayname and buttons for controlling the portlet. You can hide the Titlebar shell section individuallyfor each portlet.
You can create and modify a shell with the Shell Administration page. To use the ShellAdministration page, you must either have the system administrator grant you permission toaccess the portlet, or you must log in as the system administrator.
Creating a New ShellThe first step in constructing a new shell is to create it using an existing shell as a parent. A newshell initially inherits all of its properties from its parent. These properties (or shell sections) are:Header, Footer, Leftnav, Rightnav, and Titlebar. You can replace any of these sections with a new,custom shell section.
To create a new shell
1. As systemadministrator:Administration Dashboard > User Interface > Shell Administration> Create New Shell.
2. In the Name field, type a name for the shell.
This name has no character restrictions.
3. (Optional) In the Description field, type a description of the shell.
The description appears in the list of shells on the Shell Administration page.
4. From theParent Shell list, choose the shell fromwhich the new shellwill inherit any unspecifiedproperties.
The system default shell is selected by default.
5. Click Create.
426 Administering My webMethods Server 10.3
24 Working with Shells in My webMethods Server
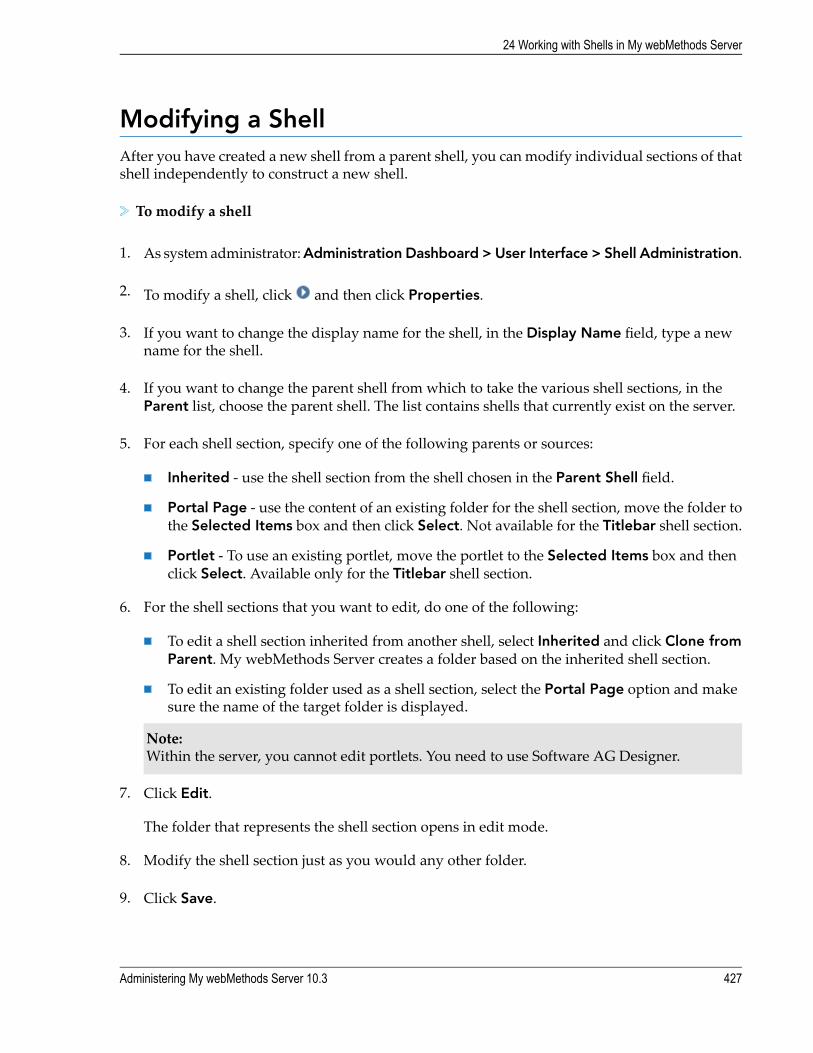
Modifying a ShellAfter you have created a new shell from a parent shell, you can modify individual sections of thatshell independently to construct a new shell.
To modify a shell
1. As systemadministrator:Administration Dashboard > User Interface > Shell Administration.
2. To modify a shell, click and then click Properties.
3. If you want to change the display name for the shell, in the Display Name field, type a newname for the shell.
4. If you want to change the parent shell from which to take the various shell sections, in theParent list, choose the parent shell. The list contains shells that currently exist on the server.
5. For each shell section, specify one of the following parents or sources:
Inherited - use the shell section from the shell chosen in the Parent Shell field.
Portal Page - use the content of an existing folder for the shell section, move the folder tothe Selected Items box and then click Select. Not available for the Titlebar shell section.
Portlet - To use an existing portlet, move the portlet to the Selected Items box and thenclick Select. Available only for the Titlebar shell section.
6. For the shell sections that you want to edit, do one of the following:
To edit a shell section inherited from another shell, select Inherited and click Clone fromParent. My webMethods Server creates a folder based on the inherited shell section.
To edit an existing folder used as a shell section, select the Portal Page option and makesure the name of the target folder is displayed.
Note:Within the server, you cannot edit portlets. You need to use Software AG Designer.
7. Click Edit.
The folder that represents the shell section opens in edit mode.
8. Modify the shell section just as you would any other folder.
9. Click Save.
Administering My webMethods Server 10.3 427
24 Working with Shells in My webMethods Server

Inserting Extra Tags into the HTML <head> ElementYou can insert JavaScript libraries and stylesheets into the <head> element of a shell. The validHTML tags are <link>, <meta>, <script>, and <style>.
To insert into the HTML <head> element
1. As systemadministrator:Administration Dashboard > User Interface > Shell Administration.
2. To modify a shell, click and then click Properties.
3. In the Extra Tags for HTML <head> field, type the HTML tags that add custom code to theshell. For example:
<link href="default.css" rel="stylesheet" type="text/css"
4. Click Save.
Using an Alias with a Shell SectionIf a folder has an alias, you can use the alias to select it for use as a shell section. For informationabout using aliases with folders, see “Managing Aliases” on page 280.
To select a shell section using an alias
1. As systemadministrator:Administration Dashboard > User Interface > Shell Administration.
2. To modify a shell, click and then click Edit.
3. In the shell section you want to associate with an alias, click Use Alias.
4. In the Alias Name field of the server resource selector, type the alias of the folder you want touse for this shell section.
5. To determine if the server can find the alias, click Test.
6. If the server correctly resolves the alias, click Select.
7. If needed, you can clone this folder or edit it directly, as described in “Modifying a Shell” onpage 427.
8. Click Save.
428 Administering My webMethods Server 10.3
24 Working with Shells in My webMethods Server

Deleting a ShellAfter it is no longer needed, you can delete a shell.
To delete a shell
1. As systemadministrator:Administration Dashboard > User Interface > Shell Administration.
2. To delete a shell, click , and then click Delete.
Making an Empty Shell SectionA shell always has the four folders that make up the shell sections. You may, however, want ashell design in which one or more of the shell sections is empty and takes up no space in thedisplay. A shell section is empty if it contains no portlets and has no formatting informationassociated with it. In the default shells provided with My webMethods Server, the Leftnav andRightnav shell sections display as being empty.
You cannot edit the Titlebar shell section as you do the others. To hide the title bar, you need toset the Titlebar attribute for individual portlets to No.
To make a shell section (other than a Titlebar) empty
1. As systemadministrator:Administration Dashboard > User Interface > Shell Administration.
2. To modify a shell, click , and then click Edit.
3. In the Alias Name field of the resource selector, type the alias shell.section.blank.
4. To determine if the server can find the alias, click Test.
5. If the server correctly resolves the alias, click Select.
6. Click Save.
Administering My webMethods Server 10.3 429
24 Working with Shells in My webMethods Server

430 Administering My webMethods Server 10.3
24 Working with Shells in My webMethods Server

V Using Command Central to Manage My
webMethods Server
25 Administering My webMethods Server ........................................................................ 433
26 Using the Command Line to Manage My webMethods Server ................................... 449
27 Authenticating My webMethods Server ....................................................................... 463
Administering My webMethods Server 10.3 431

432 Administering My webMethods Server 10.3
V Using Command Central to Manage My webMethods Server
25 Administering My webMethods Server
■ Administering My webMethods Server Instances ........................................................ 434
■ Configuring My webMethods Server Ports .................................................................. 437
■ Configuring Directory Services ..................................................................................... 438
■ Configuring My webMethods Server Email ................................................................. 444
■ Working with My webMethods Server Environment Variables .................................... 446
■ Monitoring KPIs of My webMethods Server Instances ................................................. 447
■ Using Trusted Authentication to Connect to My webMethods Server ........................ 447
Administering My webMethods Server 10.3 433
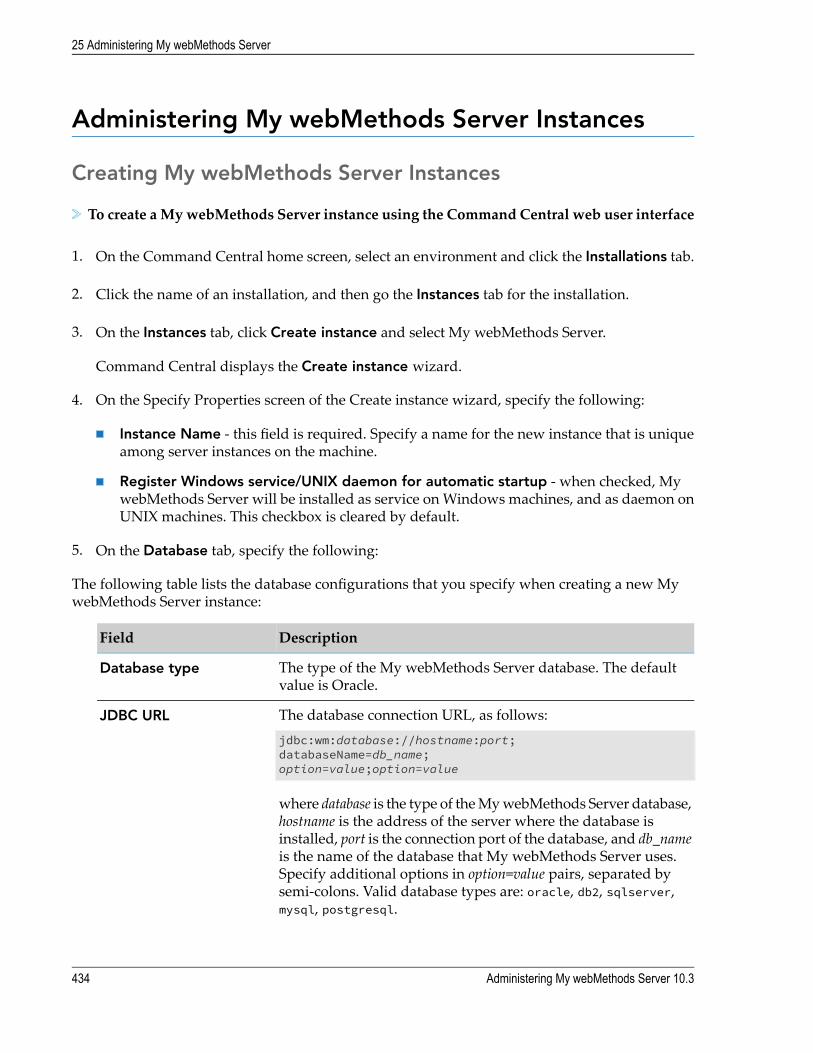
Administering My webMethods Server Instances
Creating My webMethods Server Instances
To create aMywebMethods Server instance using the Command Central web user interface
1. On the Command Central home screen, select an environment and click the Installations tab.
2. Click the name of an installation, and then go the Instances tab for the installation.
3. On the Instances tab, click Create instance and select My webMethods Server.
Command Central displays the Create instance wizard.
4. On the Specify Properties screen of the Create instance wizard, specify the following:
Instance Name - this field is required. Specify a name for the new instance that is uniqueamong server instances on the machine.
Register Windows service/UNIX daemon for automatic startup - when checked, MywebMethods Server will be installed as service onWindows machines, and as daemon onUNIX machines. This checkbox is cleared by default.
5. On the Database tab, specify the following:
The following table lists the database configurations that you specify when creating a new MywebMethods Server instance:
DescriptionField
The type of the My webMethods Server database. The defaultvalue is Oracle.
Database type
The database connection URL, as follows:JDBC URL
jdbc:wm:database://hostname:port;databaseName=db_name;option=value;option=value
where database is the type of theMywebMethods Server database,hostname is the address of the server where the database isinstalled, port is the connection port of the database, and db_nameis the name of the database that My webMethods Server uses.Specify additional options in option=value pairs, separated bysemi-colons. Valid database types are: oracle, db2, sqlserver,mysql, postgresql.
434 Administering My webMethods Server 10.3
25 Administering My webMethods Server

DescriptionField
Example:jdbc:wm:sqlserver://localhost:1433;databaseName=WMDB
The name of the user to connect to the database.Database user
The password for connecting to the database.Password
The driver class name of the JDBC driver. Required when usinga JDBC driver different than the one supplied by Software AG.
JDBC driver class
6. On the Ports tab, specify the following:
The following table lists the port configurations that you specify when creating a new MywebMethods Server instance:
DescriptionField
Optional. TheHTTPport onwhich the new server instance listens.The default port number is 8585.
HTTP port
Optional. The HTTPS port on which the new server instancelistens. The default port number is 8586.
HTTPS port
Optional. The Java debug port for the new server instance. Thedefault port number is 10033.
Debug port
Optional. The JMX port for the new server instance. The defaultport number is 5002.
JMX port
7. When creating a new instance as a node in a My webMethods Server cluster, on the Clustertab of the Create instance wizard, specify the following:
Cluster node name - the name of the cluster node. Specify a name unique for the cluster.Do not include spaces in the name.
JNDI provider URL - the URL of the Universal Messaging server to use as a JMS provider.
8. Click Next, review the summary of the configuration and then click Finish to create the newMy webMethods Server instance.
Updating My webMethods Server InstancesYou update the server instance after you install new components, or modify the configuration ofthe instance, for example, when adding the instance to a My webMethods Server cluster.
Toupdate aMywebMethods Server instance using theCommandCentralweb user interface
Administering My webMethods Server 10.3 435
25 Administering My webMethods Server

1. On the Instances tab for your installation, select the instance to update by clicking on theinstance icon.
2. From the drop-down menu of the gear button, select Update instance.
3. Update the instance configuration as required, and clickNext. You can configure the following:
The following table lists the configurations that you specifywhen updating a newMywebMethodsServer instance:
DescriptionField
Optional. The name of the server node that hosts the instance ina My webMethods Server cluster. Use this field to rename anexisting server node. Do not include spaces in the node name.
Node name
Optional. Connection URL for the My webMethods Serverdatabase.
JDBC URL
Optional. The name of the user to connect to theMywebMethodsServer database.
Database user
Optional. The password for connecting to the My webMethodsServer database.
Password
4. Review the instance configuration and click Finish.
Deleting My webMethods Server Instances
To delete aMywebMethods Server instance using the Command Central web user interface
1. On the Instances tab for your installation, select the instance to delete by clicking on the instanceicon.
2. Click Remove to delete the instance.
3. Click OK to confirm the deletion.
Pausing and Resuming the Operation of a My webMethodsServer InstanceYou can pause and resume the operation ofMywebMethods Server instances using the CommandCentral web user interface, and command-line interface. When you pause a My webMethodsServer instance formCommandCentral, the instance entersmaintenancemode.When an instanceis in maintenance mode, the My webMethods login page displays a notification, and onlyAdministrator or sysadmin users can log on.
436 Administering My webMethods Server 10.3
25 Administering My webMethods Server

For more information about pausing and resuming My webMethods Server instances using thecommand-line interface, see “LifecycleActions forMywebMethods Server-ENGINE” on page 454.
To pause or resume a My webMethods Server instance using the Command Central webuser interface
1. On the Instances tab of your installation, click the status icon for the instance to pause orresume.
2. From the Lifecycle Actions drop down menu, select the required action.
3. Click OK to confirm the action.
Configuring My webMethods Server Ports
Configuring My webMethods Server Ports in Command CentralMy webMethods Server listens for client requests on one or more ports. When a port receives amessage or request, My webMethods Server invokes the appropriate services. Each port isconfigured to work with a specific protocol. You can associate HTTP or HTTPS with one or moreadditional ports as needed. By default, My webMethods Server is pre-configured with HTTP at8585.
The MWS_default component is the OSGi profile. The My webMethods Server component is thestandard profile for the server instance. You can edit configuration settings for theMywebMethodsServer component, but you cannot add or delete them.
Perform the following procedure to configure aMywebMethods Server port, using the CommandCentral web user interface.
To configure My webMethods Server ports
1. In the Environments pane, select the environment in which you want to view the MywebMethods Server instance.
2. Select the Instances tab.
3. Expand the MWS_instanceName node containing the My webMethods Server instance youwant to configure.
4. Click My webMethods Server in the name column.
5. Select the Configuration tab. Make sure My webMethods Server is selected in the left pane.
6. Select Ports from the drop-down list box.
Administering My webMethods Server 10.3 437
25 Administering My webMethods Server

7. Test and Save the port.
Editing Port SettingsPerform the following procedure to change the server port settings, using the Command Centralweb user interface.
To enable or disable a port
1. Select the My webMethods Server environment from the Environments pane, then click theMy webMethods Server instance you want to edit from the Instances tab.
2. Click the Configuration tab.
3. Select Ports in the drop-down list.
4. Click the number of the port youwant to edit and click Edit. The port settings are now editable.Make the necessary changes to the port settings.
5. Test and Save the changes.
Configuring Directory ServicesMywebMethods Server includes an internal directory with default system users. If you are usingan external directory (for example LDAP), you can configureMywebMethods Server to also accessuser and group information from that directory through an external directory service. You cancreate a directory service and connect My webMethods Server to an external LDAP, ADSI, orADAM sever using the Command Central web user interface.
To configure an external directory service
1. In the Environments pane, select the environment of theMywebMethods Server instance youwant to configure.
2. Select the Instances tab.
3. Expand the MWS_instanceName node of the My webMethods Server instance.
4. Click My webMethods Server.
5. Select the Configuration tab. Make sure My webMethods Server is selected in the left pane.
6. Select LDAP from the drop-down list.
438 Administering My webMethods Server 10.3
25 Administering My webMethods Server

7.Click , and select the type of directory service to add from the following options:
LDAP - Lightweight Directory Access Protocol.
ADSI - Active Directory Service Interfaces.
ADAM - Active Directory Application Mode.
8. Fill in the form to configure the directory service.
Formore information about available settings, see “LDAP,ADSI, andADAMDirectory ServiceProperties” on page 439.
9. Test and Save the directory service configuration.
LDAP, ADSI, and ADAM Directory Service PropertiesWhen configuring an external directory service of type LDAP, ADAM, or ADSI, you can configurethe following properties.
In the General section:
The following table lists the directory service properties you configure in the General section:
DescriptionProperty
Required. The name to identify the external directory service.My webMethods Server uses this name to display the externaldirectory service in the user interface.
Name
A descriptive comment about the external directory service.Description
One or more keywords to use when searching for externaldirectory services.
Keywords
In the Cache section:
The following table lists the directory service properties you configure in the Cache section:
DescriptionProperty
Required. The number of database queries to cache. The defaultis 1000.
Cache Capacity
My webMethods Server deletes the cache entries when thenumber of cached queries reaches the specified capacity, startingfrom the oldest entries.
Administering My webMethods Server 10.3 439
25 Administering My webMethods Server

DescriptionProperty
Required. The period of time for which queries remain in thecache unless the cache capacity is exceeded. The default is 1hour.
Cache Timeout
My webMethods Server deletes cache entries when the cachetimeout expires, even if the specified cache capacity is notreached.
My webMethods Server saves all cache in memory and clears all cache entries when restarted.
In the Connection Information section:
The following table lists the directory service properties you configure in the ConnectionInformation section:
DescriptionProperty
Enables or disables the directory service. The default is Yes.This service is enabled.
Service Enabled
Required. Themaximumnumber of connection errors to occurbefore disabling the service. The default is 10.
Connection Error Threshold
Attempt to reconnect to the directory server if the service isdisabled after reaching the connection error threshold or if the
Auto Reconnect
connection to the server is lost due to a network outage orplanned maintenance. Enabled by default.
The period of time (in seconds) to wait between subsequentattempts to reconnect. The default is 6.
Auto Reconnect Interval
Required. The URL for the external directory server using thefollowing syntax:
Provider URL
ldap://host_name:port_number
Required. The root distinguished name to use when queryingthe directory server. For example,ou=mywebMethods,o=webmethods.com
Base DN
The additional user DN to use when searching and loadingusers.
User DN
The additional group DN to use when searching and loadingusers.
Groups DN
Required. The distinguished name required to log in to theexternal directory server.
Security Principal
440 Administering My webMethods Server 10.3
25 Administering My webMethods Server

DescriptionProperty
Required. The password required to log in to the externaldirectory server.
Security Credentials
The URL to another LDAP server that My webMethods Serveruses for failover if the primary LDAP server, specified in theProviderURLfield, fails. Separatemultiple valueswith spaces.
Failover URLs
Required. The maximum amount of time (in seconds) that anLDAP search query can run before it expires. The default is 0- the query does not expire.
Search Timeout
Unless you configure the connection timeout in thecustom_wrapper.conf file, My webMethods Server uses theSearch Timeout to define the timeout of a connection to anLDAP server. Formore information about configuring anLDAPserver connection timeout, see Administering My webMethodsServer “Configuring a Connection Timeout for an LDAPDirectory Service” on page 92.
Required. Enables or disables the use of wildcard characters indirectory searches. The default isYes. Enable default wildcardsearches.
Enable Default WildcardSearches
Disabling wildcard searches might improve performance forlarge servers. When using wildcards, servers do not use anyinternal indexes for search performance.
Required. Indicates whether to query for group membershipacross all external directory services, configured in My
Enable Group Across DirectoryService
webMethods Server. When you enable this option, the searchqueries for group membership across all directory services,which degrades the login performance. The default is No.Group Across Directory Service.
For more information, see Administering My webMethodsServer“Group Membership Across Directory Services” onpage 93.
Required for Active Directory. Indicates whether to determinethe group membership of an Active Directory user with one
Enable GroupQuickSearch
query instead of a recursive search. When you enable thisoption, the search uses one query, which improves the loginperformance.. Users must belong either to an Active Directorysecurity group, or a regular group. The default is Disabled.
Applies only to Active Directory. Specify multiple ActiveDirectory sub-domain URLs, separated by spaces.
ActiveDirectory Domain URLs
In the Advanced Object Filters section:
Administering My webMethods Server 10.3 441
25 Administering My webMethods Server

The following table lists the directory service properties you configure in the Advanced ObjectFilters section:
DescriptionProperty
The LDAP filter that My webMethods Server applies to allqueries when searching for users. Use a technical LDAP query
User Object Filter
that limits the type of objects, exposed in My webMethodsServer.
Note:It is recommended that you examine the My webMethodsServer directory debug logs to ensure that the query isworkingcorrectly.
The LDAP filter that My webMethods Server applies to allquerieswhen searching for groups. Use a technical LDAPquery
Group Object Filter
that limits the type of objects, exposed in My webMethodsServer.
Note:Examine the My webMethods Server directory debug logs toensure that the query is working correctly.
Enables or disables searches in nestedLDAPgroups. Thedefaultvalue is No. Do not use nested groups.
Use Nested Groups
Enables or disables the use of the Virtual List View control toretrieve a subset of objects for an LDAP query. The default
Use the Virtual List ViewControl
value is No. Do not use the VLV control. Applies only whenthe automatic configuration of LDAP server controls is disabled.
Enables or disables the use of the Server-Side Paging controlto page the results of an LDAP query. The default value is No.
Use Server Side Paging Control
Do not use the Paging control. Applies only when theautomatic configuration of LDAP server controls is disabled.
Enables or disables the use of the Server-Side Sorting controlto sort the results of an LDAP query in a particular order. The
Use Server Side Sorting Control
default value is No. Do not use the Soting control. Appliesonlywhen the automatic configuration of LDAP server controlsis disabled.
Enables or disables the automatic configuration of LDAP servercontrols by My webMethods Server. The default value is Yes.Autoconfigure the controls.
Automatically Configure ServerSide Controls
In the User Attributes section:
The following table lists the directory service properties you configure in the User Attributessection:
442 Administering My webMethods Server 10.3
25 Administering My webMethods Server

DescripionProperty
Required. The User Object Class attribute for the externaldirectory service. The default is person.
User Object Class
Required. The User ID attribute for the external directoryservice. The default is uid.
User ID
Required. The First Name attribute for the external directoryservice. The default is sn.
First Name
Required. The Last Name attribute for the external directoryservice. The default is givenName.
Last Name
Required. The Full Name attribute for the external directoryservice. The default is cn.
Full Name
Required. The Email Address attribute for the external directoryservice. The default is mail.
E-mail Address
Required. The Password attribute for the external directoryservice.
Password
The name of an attribute in the external directory service thatidentifies a user as disabled. The default is true.
User Disabled
The regular expression to use when evaluating the UserDisabled attribute for the external directory service.
User Disabled Value Regex
The name of the attribute to use as a universally uniqueidentification attribute of a user. Specify a string of maximum128 characters, for example cn or email.
UUID
Note:
If you change the value of UUID for an existing directoryservice, you must run the UserDirectory_UpdateUUID utilityto update the UUID value of directory service users.
Formore information, seeAdministeringMywebMethods Server“ConfiguringUniversallyUnique Identifier (UUID) forUsers” onpage 94.
In the Group Attributes section:
The following table lists the directory service properties you configure in the Group Attributessection:
Administering My webMethods Server 10.3 443
25 Administering My webMethods Server

DescriptionProperty
Required. The Group Object Class attribute for the externaldirectory service. The default is groupofuniquenames.
Group Object Class
Required. The Group ID attribute for the external directoryservice. The default is cn.
Group ID
Required. The GroupName attribute for the external directoryservice. The default is cn.
Group Name
Required. The Group Members attribute for the externaldirectory service. The default is uniquemember.
Group Members
Required. The Group Email attribute for the external directoryservice. The default is mail.
Group E-mail
In the Connection Pool section:
The following table lists the directory service properties you configure in the Connection Poolsection:
DescriptionProperty
The minimum number of connections to the external directoryserver to keep open at all times. The default is 1.
Minimum Connections
Themaximumnumber of connections to the external directoryserver to keep open at all times. The default is 20.
Maximum Connections
The maximum amount of time to keep a connection to theexternal directory server open, before recycling the connection.
Maximum Connection Time
The server resets this value for each LDAP search to ensurethat an LDAP connection remains open during the searchprocess. The default is 10 minutes.
The time interval for cleaning up expired LDAP connections.The default is 1 minute.
Clean Up Interval
Note:In some LDAP implementations, the paging cookie is bound to a specific LDAP connection.Makesure that the value for the Maximum Connections property is large enough to handle concurrentLDAP searches and the value fo theMaximumConnection Time property is long enough to ensurethat searches can finish within the specified time range.
Configuring My webMethods Server EmailPerform the following procedure to configureMywebMethods Server email, using the CommandCentral web user interface.
444 Administering My webMethods Server 10.3
25 Administering My webMethods Server

To configure email
1. Select the My webMethods Server environment from the Environment pane, then click theinstance from the Instances tab.
2. Click the Configuration tab.
3. Select Email in the drop-down list.
Command Central displays the My webMethods Server SMTP Server Configuration.
4. Click Edit.
5. In Connection Basics, specify:
The following table lists the basic connection configurations:
DescriptionField
The SMTP server's host name. For example: smtp.server.com.Server Name
The SMTP server's port number.Port
The default name to use in the From field of the email messagessent by the server.
Sender Name
The default email address to use in the From field of the emailmessages sent by the server.
Sender Email
6. Expand Advanced Settings and specify:
The following table lists the advanced email configurations:
DescriptionField
Optional. The user name thatMywebMethods Server has to supplyfor authentication. If the SMTP server requires authentication,specify the user name.
SMTP Username
Optional. The password associated with the SMTP Username. Ifthe SMTP server requires authentication, specify the appropriatepassword.
SMTP Password
7. Click Test and Save the email settings.
Administering My webMethods Server 10.3 445
25 Administering My webMethods Server

Working with My webMethods Server EnvironmentVariables
Considerations when Configuring My webMethods ServerVariables in Command CentralYou should consider the followingnaming conventionswhen configuringMywebMethods Serverenvironment variables:
The length of the variable name and value must not exceed 255 characters.
Variable names are case-sensitive.
No restrictions for special characters apply to the variable name.
Configuring My webMethods Server VariablesWhen adding a My webMethods Server environment variable in the Command Central userinterface, select one of the following Custom types:
Default. Creates variables without secure fields.
Secure. Creates password variables whose values are encrypted by My webMethods Server.
The following table lists the fields to complete when adding or editing My webMethods Serverglobal environment variables in the Command Central user interface:
DescriptionField
Required. The name of theMywebMethods Server global environmentvariable. My webMethods Server uses the key to refer to the
Key
environment variable while performing environment variablesubstitution.
Note:The Key field is disabled when editing a variable.
Required. The data type of the My webMethods Server globalenvironment variable.
Type
Note:The Type field is disabled when editing a variable.
The value of the My webMethods Server global environment variable.Value
When you add or edit a secure environment variable, the value youspecify in this field is hidden. After you save the environment variable,the Value field remains empty.
446 Administering My webMethods Server 10.3
25 Administering My webMethods Server

Important:After you edit or delete an environment variable, the webMethods applications using the variableare automatically restarted.
Monitoring KPIs of My webMethods Server Instances
To view the KPIs of My webMethods Server instances in the Command Central web userinterface
1. On the Environments pane, select the environment you want to monitor.
2. Click the Instances tab.
3. Select the My webMethods Server you want to monitor.
4. Click the Overview tab.
TheMonitoring section in theDashboard shows the KPIs of theMywebMethods Server instance.
The following table lists the KPIs that My webMethods Server returns:
Maximum ValueCritical ValueMarginal ValueName
At least 100, or highwater mark.
95% of maximum80% of maximumNumber of usersessions
(Highwatermark is thehighest value everreached.)
As configured.95% of maximum80% of maximumJDBC connection poolsize (maximumnumber of connectionsto JDBC)
At least 10 seconds, orhigh water mark.
90% of maximum50% of maximumAverage response time(in milliseconds)
Using Trusted Authentication to Connect to MywebMethods ServerBy default Command Central version 9.8 and higher uses SAML-based trusted authenticationwhen connecting to My webMethods Server. You do not need to perform any operation to enablethis functionality.
Administering My webMethods Server 10.3 447
25 Administering My webMethods Server

However, if you change the value of theAssertion Parameter Name field in theMywebMethodsServer administration web user interface, you must configure an additional Java parameter,MWS.SAML.paramname, in the custom_wrapper.conf file of the PlatformManager that managestheMywebMethods Server run-time component. TheMWS.SAML.paramnameparameter specifiesthe changed Assertion Parameter Name value. For more information about setting the AssertionParameter Name value, see Administering My webMethods Server.
To configure the MWS.SAML.paramname parameter in PlatformManager
1. Go to the Software AG_directory \profiles\SPM\configuration directory and open thecustom_wrapper.conf file in a text editor.
2. Add the following parameter:
wrapper.java.additional.number=-DMWS.SAML.paramname=assertionParameterName
where number is a unique sequential number depending on the already existing parameternumbers in the file, and assertionParameterName is the modified value of the AssertionParameter Name field in the My webMethods Server administration user interface.
3. Save the file and restart Platform Manager.
448 Administering My webMethods Server 10.3
25 Administering My webMethods Server

26 Using the Command Line to Manage My
webMethods Server
■ Commands that My webMethods Server Supports ..................................................... 450
■ Configuration Types that My webMethods Server-ENGINE Supports ........................ 452
■ Lifecycle Actions for My webMethods Server-ENGINE ............................................... 454
■ My webMethods Server Instance Management ........................................................... 455
■ Run-time Monitoring Statuses for My webMethods Server-ENGINE .......................... 459
■ Run-time Monitoring States for My webMethods Server ............................................. 460
Administering My webMethods Server 10.3 449

Commands that My webMethods Server SupportsThe following table lists all Platform Manager commands that My webMethods Server supports,and where to find additional information about each command.
Additional InformationCommands
For general information about the command, seeSoftware AG Command Central Help.
sagcc create configuration data
ForMywebMethods Server-specific information aboutusing this command, see “Configuration Types thatMywebMethods Server-ENGINE Supports” on page 452.
For general information about the command, seeSoftware AG Command Central Help.
sagcc delete configuration data
For general information about the command, seeSoftware AG Command Central Help.
sagcc get configuration data
ForMywebMethods Server-specific information aboutusing this command, see “Configuration Types thatMywebMethods Server-ENGINE Supports” on page 452.
For general information about the command, seeSoftware AG Command Central Help.
sagcc update configuration data
For general information about the command, seeSoftware AG Command Central Help.
sagcc get configuration instances
For general information about the command, seeSoftware AG Command Central Help.
sagcc list configuration instances
ForMywebMethods Server-specific information aboutusing this command, see “Configuration Types thatMywebMethods Server-ENGINE Supports” on page 452.
For general information about the command, seeSoftware AG Command Central Help.
sagcc get configuration types
ForMywebMethods Server-specific information aboutusing this command, see “Configuration Types thatMywebMethods Server-ENGINE Supports” on page 452.
For general information about the command, seeSoftware AG Command Central Help.
sagcc list configuration types
ForMywebMethods Server-specific information aboutusing this command, see “Configuration Types thatMywebMethods Server-ENGINE Supports” on page 452.
450 Administering My webMethods Server 10.3
26 Using the Command Line to Manage My webMethods Server

Additional InformationCommands
For general information about the command, seeSoftware AG Command Central Help.
sagcc exec configuration validationcreate
ForMywebMethods Server-specific information aboutusing this command, see “Configuration Types thatMywebMethods Server-ENGINE Supports” on page 452.
For general information about the command, seeSoftware AG Command Central Help.
sagcc exec configuration validationdelete
For general information about the command, seeSoftware AG Command Central Help.
sagcc exec configuration validationupdate
ForMywebMethods Server-specific information aboutusing this command, see “Configuration Types thatMywebMethods Server-ENGINE Supports” on page 452.
For general information about the command, seeSoftware AG Command Central Help.
sagcc create instances
ForMywebMethods Server-specific information aboutusing the command, see “Creating a My webMethodsServer Instance” on page 455.
For general information about the command, seeSoftware AG Command Central Help.
sagcc delete instances
For general information about the command, seeSoftware AG Command Central Help.
sagcc list instances supportedproducts
For general information about the command, seeSoftware AG Command Central Help.
sagcc update instances
ForMywebMethods Server-specific information aboutusing the command, see “Updating a MywebMethodsServer Instance” on page 458.
For general information about the command, seeSoftware AG Command Central Help.
sagcc get inventory components
For general information about the command, seeSoftware AG Command Central Help.
sagcc list inventory components
For general information about the command, seeSoftware AG Command Central Help.
sagcc update inventory components
For general information about the command, seeSoftware AG Command Central Help.
sagcc exec lifecycle
Administering My webMethods Server 10.3 451
26 Using the Command Line to Manage My webMethods Server

Additional InformationCommands
ForMywebMethods Server-specific information aboutusing this command, see “Lifecycle Actions for MywebMethods Server-ENGINE” on page 454.
For general information about the command, seeSoftware AG Command Central Help.
sagcc get monitoring
ForMywebMethods Server-specific information aboutusing this command, see:
“Run-timeMonitoring Statuses forMywebMethodsServer-ENGINE” on page 459
“Run-time Monitoring States for My webMethodsServer” on page 460
Configuration Types that My webMethodsServer-ENGINE SupportsThe My webMethods Server-ENGINE run-time component supports creating instances of theconfiguration types listed in the following table:
Use to configure...Configuration Type
Full URL to My webMethods Server.COMMON-ADMINUI
If the My webMethods Server HTTP port is enabled, usethe following format where hostname is the MywebMethods Server host name and httpport is the MywebMethods Server HTTP port number.
http://hostname:httpport
If the My webMethods Server HTTPS port is enabled andthe HTTP port is not enabled, use the following formatwhere hostname is the My webMethods Server host nameand httpsport is the My webMethods Server HTTPS portnumber.
https://hostname:httpsport
Settings for a My webMethods Server cluster. You canconfigure the load balancer, JMS provider, and node roles for
COMMON-CLUSTER
a My webMethods Server cluster. For information about thefields and the values to specify, see Administering MywebMethods Server.
452 Administering My webMethods Server 10.3
26 Using the Command Line to Manage My webMethods Server

Use to configure...Configuration Type
Important:Any changes to the cluster configuration take effect only afteryou restart the node.
The default connection pool for the My webMethods Serverdatabase connection. You can use the command line interfaceto edit the pool, but not delete it.
COMMON-JDBC
You can also add, update, or delete additional custom JDBCpools that custom Composite Application Framework (CAF)applications running on My webMethods Server use.
Note:You can manage instances of this configuration type usingthe command line interface, but not the Command Centraluser interface.
Keystores for My webMethods Server. You can edit thekeystores thatMywebMethods Server uses for itsHTTPSportto provide your own keystores.
COMMON-KEYSTORES
Note:You can manage instances of this configuration type usingthe command line interface, but not the Command Centraluser interface.
Settings for managing internal users of a My webMethodsServer instance. COMMON-LOCAL-USERS-userId supports
COMMON-LOCAL-USERS
configuring the details for each user. For information aboutthe fields and values to specify, see Administering MywebMethods Server.
The My webMethods Server HTTP and HTTPS ports.COMMON-PORTS
When adding, editing, and removing ports, keep the followingin mind:
Ensure at least an HTTP or an HTTPS port is defined.
You can only delete the HTTPS port if the HTTP port isdefined. If you delete the HTTPS port, you can later addit again.
You can only delete the HTTP port if the HTTPS port isdefined. If you delete the HTTP port, you can later add itagain.
There are no restrictions with regards to editing portnumbers.
Administering My webMethods Server 10.3 453
26 Using the Command Line to Manage My webMethods Server

Use to configure...Configuration Type
Note:You can also manage ports in the Command Central userinterface if the ports are enabled. After enabling the ports inMywebMethods ServerClusterAdministration and restartingMywebMethods Server, the ports are visible in the CommandCentral user interface.
Settings for sending e-mail messages.COMMON-SMTP
Truststores for My webMethods Server. You can edit thetruststores that My webMethods Server uses for its HTTPSport to provide your own truststores.
COMMON-TRUSTSTORES
Note:You can manage instances of this configuration type usingthe command line interface, but not the Command Centraluser interface.
Global environment variables for My webMethods Server.COMMON-VARS
Lifecycle Actions for My webMethods Server-ENGINEYou can perform lifecycle operations forMywebMethods Server using the SoftwareAGCommandCentral command-line utility, or web user interface. For more information about using the webuser interface, see “Pausing andResuming theOperation of aMywebMethods Server Instance” onpage 436.
For general information about the sagcc exec lifecycle command, see Software AG CommandCentral Help.
The following table lists the actions My webMethods Server-ENGINE supports with the sagccexec lifecycle command and the status that the My webMethods Server run-time componentreturns when an action is executed:
DescriptionAction
Puts the run-time component inmaintenancemode.When successful,the run-time status is set to NOT_READY.
pause
Takes the run-time component out of maintenance mode. Whensuccessful, the run-time status is set to ONLINE.
resume
For more information about the run-time statuses that the My webMethods Server-ENGINErun-time component reports, see “Run-time Monitoring Statuses for My webMethodsServer-ENGINE” on page 459.
454 Administering My webMethods Server 10.3
26 Using the Command Line to Manage My webMethods Server

My webMethods Server Instance Management
Creating a My webMethods Server InstanceThe following table lists the parameters to includewhen creating aMywebMethods Server instanceusing the Command Central instance management commands:
DescriptionParameterCommand
Required. The product ID of the installed MywebMethods Server.
MwsProgramFilessagcccreateinstances
Required. The name of the new My webMethodsServer instance. The default name is default.
instance.name=name
Optional, but recommended. Specifies the ID of thefix repository, registered inCommandCentral,which
fixRepository=repoID
you used to install fixes during the initial productinstallation. If you use this parameter, CommandCentral re-installs the fixes from this repositoryrequired for the new product instance you arecreating.
Note that if you do not include this parameter,Command Central does not apply fixes on the newproduct instance.
Required. The type of database used by the newserver instance. Specify one of the followingdatabases:
db.type=type
sqlserver or ms - Microsoft SQL Server
oracle - Oracle
db2 - DB2
mysqlee - MySQL Enterprise Edition
mysqlce - MySQL Community Edition
postgresql - PostgreSQL
Required. The connection URL for the database.Enclose the url value in double quotes.
db.url="url"
Required. The user name assigned to the MywebMethods Server database.
db.username=name
Administering My webMethods Server 10.3 455
26 Using the Command Line to Manage My webMethods Server

DescriptionParameterCommand
Required. The password of the My webMethodsServer database user.
db.password=password
Optional. Specifies whether to install a new MywebMethods Server instance as an application or aservice. Valid values are:
[install.service={true|false}]
true - install as a service.
false - install as an application (default).
Optional. The class name of the JDBC driver used toconnect to the My webMethods Server database.
db.driver=name
Optional. The name of the cluster node thatwill hostthe new server instance. The default name is master.
node.name=name
Optional. The port number onwhich the new serverinstance listens. The default port number is 8585.
http.port=port
Optional. The https port on which the new serverinstance listens. A value of 0 disables the listener.
https.port=port
Optional. The Java debug port for the new serverinstance. The default port number is 10033.
debug.port=port
Optional. The JMX port for the new server instance.The default port number is 5002.
jmx.port=port
Optional. The set of component features configuredwith the new server instance. Specify one of thefollowing values:
server.features={core|default|fabric|all}
core - The minimum set of features needed tosupport development of JSR 168 portlets usingSoftware AG Designer. This value indicates apure runtime, with a single skin and shell, andno administration or configuration features.
default - The standard set of My webMethodsServer features, but without the additionalfeatures or development tools found in theSoftware AG_directory \MWS\ componentsdirectory. This is the default value.
fabric - The default My webMethods Servertaxonomy with all installed My webMethodsServer user interfaces.
456 Administering My webMethods Server 10.3
26 Using the Command Line to Manage My webMethods Server

DescriptionParameterCommand
all - The standard set of features plus allcomponents found in the Software AG_directory\MWS\components directory.
Optional. Components in the Software AG_directory\MWS\components directory to include in the newserver instance.
components.include=name
Optional. Components in the Software AG_directory\MWS\components directory to exclude from thenew server instance.
components.exclude=name
Optional. Specifies whether to overwrite thecomponent files in the Software AG_directory
components.overwrite=
{true|false} \MWS\server\serverName\deploy directory thatare older than the component files in theSoftware AG_directory\MWS\components directory.Valid values are:
true - overwrite component files in the \deploydirectory.
false - do not overwrite component files in the\deploy directory. This is the default value.
Examples When Executing on Command Central
To create a new instance for an installed My webMethods Server with instance name “test1”,database type “sqlserver”, database user name “mws”, database password “mws”, anddatabaseURL “jdbc:wm:sqlserver://localhost:1433;databaseName=testDB” in the installationwith aliasname “local”:sagcc create instances local MwsProgramFiles instance.name=test1db.type=sqlserver db.username=mws db.password=mwsdb.url="jdbc:wm:sqlserver://localhost:1433;databaseName=testDB"
To create a new instance for an installed My webMethods Server with instance name “test1”,database type “sqlserver”, database user name “mws”, database password “mws”, databaseURL “jdbc:wm:sqlserver://localhost:1433;databaseName=testDB”, database driver“com.wm.dd.jdbc.sqlserver.SQLServerDriver”, http port “9595”, and JMX port “7000” in theinstallation with alias name “local”:sagcc create instances local MwsProgramFiles instance.name=test1db.type=sqlserver db.username=mws db.password=mwsdb.url="jdbc:wm:sqlserver://localhost:1433;databaseName=testDB"db.driver=com.wm.dd.jdbc.sqlserver.SQLServerDriver http.port=9595jmx.port=7000
To create a new instance for an installed My webMethods Server with instance name “test1”,http port “9595”, and JMX port “7000” in the local installation and register the instance as a
Administering My webMethods Server 10.3 457
26 Using the Command Line to Manage My webMethods Server

service. The new My webMethods Server instance uses an external database with databasetype “sqlserver”, database user name “mws”, database password “mws”, database URL“jdbc:wm:sqlserver://localhost:1433;databaseName=testDB” and database driver“com.wm.dd.jdbc.sqlserver.SQLServerDriver”:sagcc create instances local MwsProgramFiles instance.name=test1db.type=sqlserver db.username=mws db.password=mwsdb.url="jdbc:wm:sqlserver://localhost:1433;databaseName=testDB"db.driver=com.wm.dd.jdbc.sqlserver.SQLServerDriver http.port=9595jmx.port=7000 install.service=true
Examples When Executing on Platform Manager
To create a new instance for an installed My webMethods Server with instance name “test1”,database type “sqlserver”, database user name “mws”, database password “mws”, anddatabaseURL “jdbc:wm:sqlserver://localhost:1433;databaseName=testDB”:sagcc create instances MwsProgramFiles instance.name=test1db.type=sqlserver db.username=mws db.password=mwsdb.url="jdbc:wm:sqlserver://localhost:1433;databaseName=testDB"
To create a new instance for an installed My webMethods Server with instance name “test1”,database type “sqlserver”, database user name “mws”, database password “mws”, databaseURL “jdbc:wm:sqlserver://localhost:1433;databaseName=testDB”, database driver“com.wm.dd.jdbc.sqlserver.SQLServerDriver”, http port “9595”, and JMX port “7000”:sagcc create instances MwsProgramFiles instance.name=test1db.type=sqlserver db.username=mws db.password=mwsdb.url="jdbc:wm:sqlserver://localhost:1433;databaseName=testDB"db.driver=com.wm.dd.jdbc.sqlserver.SQLServerDriver http.port=9595jmx.port=7000
Updating a My webMethods Server InstanceThe following table lists the parameters to include when updating a My webMethods Serverinstance using the sagcc update instances command:
DescriptionParameter
Required. The ID of the My webMethods Server instancethat you want to update. For example:MwsProgramFiles-test1.
MwsProgramFiles-
Optional. Specifies whether to overwrite the componentfiles in the Software AG_directory
components.overwrite={true|false}
\MWS\server\serverName\deploydirectory that are olderthan the components files in the Software AG_directory\MWS\components directory. Valid values are:
true - overwrite component files in the \deploydirectory.
458 Administering My webMethods Server 10.3
26 Using the Command Line to Manage My webMethods Server

DescriptionParameter
false - do not overwrite component files in the \deploydirectory. This is the default value.
Optional. Specifies whether to update the generated MywebMethods Server classpath. Valid values are:
dont.update.classpath={true|false}
true - do not update the server classpath.
false - update the server classpath. This is the defaultvalue.
Optional. The path to the platform installation directory.The default path is Software AG_directory .
platformdir=path
Optional. The name of the cluster node that hosts the MywebMethods Server instance. Specify a new value torename the cluster node when updating the instance.
node.name=name
Optional. The time interval in seconds to wait for thecommand to complete before terminating the attempt toexecute the command.
timeout=number
Formore information about using the sagcc update instances command, see Software AGCommandCentral Help.
Deleting a My webMethods Server InstanceYou can delete a My webMethods Server instance using the sagcc delete instances command.Formore information about using the sagcc delete instances command, see Software AGCommandCentral Help.
Run-time Monitoring Statuses for My webMethodsServer-ENGINEThe following table lists the run-time statuses that theMywebMethods Server-ENGINE run-timecomponent can return in response to the sagcc get monitoring state command, and themeaningof each run-time status:
MeaningRun-time Status
The My webMethods Server-ENGINE run-time component is running.ONLINE
The run-time component indicates ONLINE when the profile JVM isrunning and that the My webMethods Server port is responding.
Administering My webMethods Server 10.3 459
26 Using the Command Line to Manage My webMethods Server

MeaningRun-time Status
TheMywebMethods Server-ENGINE run-time component is not runningdue to some failure, and attempts to start it again have failed.
ERROR
The run-time component indicates ERRORwhenMywebMethods Servercannot connect to the database, or fails to install a component.
The My webMethods Server-ENGINE run-time component is not ready.NOT_READY
The run-time component indicates NOT_READY when the server is inmaintenance mode.
The My webMethods Server-ENGINE run-time component is starting.STARTING
The run-time component indicates STARTINGwhen the server starts forthe first time, or is starting and reports an HTTP 503 status.
The My webMethods Server-ENGINE run-time component is stopped.STOPPED
The status of TheMywebMethods Server-ENGINE run-time componentcannot be determined.
UNKNOWN
Run-time Monitoring States for My webMethodsServerIn response to the sagcc get monitoring state command, My webMethods Server providesinformation about key performance indicators (KPIs). The following table lists the KPIs, valid forMy webMethods Server:
DescriptionKPI
Use this KPI to monitor the number of active user sessions so thatyou can take corrective actions if the number approaches a criticalvalue.
Number of user sessions
Marginal is 80 active user sessions.
Critical is 95 active user sessions.
Maximum is 100 or more active user sessions.
Use this KPI to monitor the number of active connections in theJDBC pool so that you can take corrective actions if the number ofconnections approaches a critical value.
Number of activeconnections in the JDBCpool
Marginal is 90 active connections.
Critical is 95 active connections.
Maximum is 100 or more active connections.
460 Administering My webMethods Server 10.3
26 Using the Command Line to Manage My webMethods Server
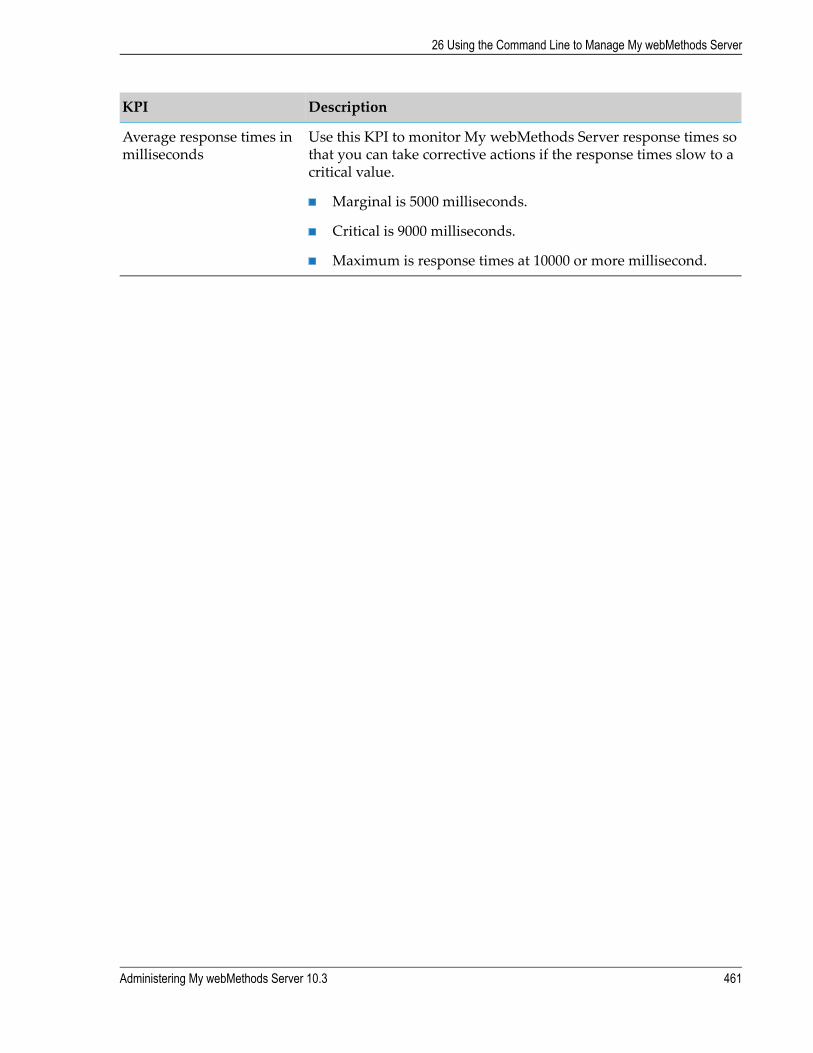
DescriptionKPI
Use this KPI to monitor My webMethods Server response times sothat you can take corrective actions if the response times slow to acritical value.
Average response times inmilliseconds
Marginal is 5000 milliseconds.
Critical is 9000 milliseconds.
Maximum is response times at 10000 or more millisecond.
Administering My webMethods Server 10.3 461
26 Using the Command Line to Manage My webMethods Server

462 Administering My webMethods Server 10.3
26 Using the Command Line to Manage My webMethods Server

27 Authenticating My webMethods Server
■ Changing the Authentication Mode for My webMethods Server ................................ 464
■ Changing the Administrator User Password for My webMethods Server in CommandCentral .......................................................................................................................... 464
■ Using Unix Shell Scripts to Change Connection Credentials for Managed Products ... 465
■ Verifying the Outbound Authentication Settings ......................................................... 465
■ Accessing Administrative Interfaces Through Command Central ................................ 465
Administering My webMethods Server 10.3 463

Changing the Authentication Mode for MywebMethods ServerBy default, in Command Central the Authentication mode for run-time components that supporttrusted authentication is set to Trusted.
On the instance Overview tab, click in the Authentication field to change the authenticationmode using the Authentication Mode dialog box.
When you specify the authentication mode for an instance, that authentication mode is also setfor all layeredproduct instances of themain product instance.However, changing the authenticationmode for the OSGI profile of My webMethods Server does not change the authentication modefor the My webMethods Server run-time component that belongs to that OSGI profile.
To use basic authentication, you must change the authentication mode for a run-time componentto Fixed User. CommandCentral uses basic authenticationwith a fixed user to communicatewithPlatformManager.With Fixed User authentication, the authentication credentials for the PlatformManager will be fixed.
Changing the Administrator User Password for MywebMethods Server in Command CentralYou change the Administrator password for a product managed by Command Central in theCommandCentral web user interface. After changing the Administrator password for amanagedproduct in Command Central, the outbound credentials are updated automatically.
To change theAdministrator user password forMywebMethods Server inCommandCentral
1. In the Environments pane in Command Central, select the environment that contains themanaged product instance.
2. In the Instances table, select theMywebMethods Server component underMWS-instanceName,for example MWS-default.
3. On the Configuration tab, select Users.
4. On the Users page, click Administrator.
5. Click Edit and specify the new password for Administrator.
464 Administering My webMethods Server 10.3
27 Authenticating My webMethods Server

Using Unix Shell Scripts to Change ConnectionCredentials for Managed ProductsYou can use the following sample Unix shell script to configure basic authentication credentialsfor product components managed by Command Central.NODE_ALIAS=localUSERNAME=AdministratorPASSWORD=secretRCID=integrationServer-default# RCID=MwsProgramFiles-default# RCID=Universal-Messaging-nirvana# RCID=OSGI-CTP# RCID=OSGI-InfraDC
sagcc get configuration data $NODE_ALIAS $RCID COMMON-LOCAL-USERS-Administrator
-o administrator.xmlsed "s,/>,><Password>${PASSWORD}</Password></User>,g" administrator.xml >
administrator_new.xmlsagcc update configuration data $NODE_ALIAS $RCID COMMON-LOCAL-USERS-Administrator -o administrator_new.xml
# verify connectionsagcc get monitoring runtimestatus $NODE_ALIAS $RCID -e ONLINE
Verifying the Outbound Authentication SettingsUse the following steps to verify that Command Central is configured with the correct outboundauthentication settings.
To verify that Command Central is configured with the correct user credentials
1. In Command Central, on the Overview tab for the product component, click . Check thatthe product status is Online and the JVM KPIs are updated.
2. On the Logs tab, check the product log for authentication errors.
Accessing Administrative Interfaces ThroughCommand CentralIn Command Central, single sign-on (SSO) is designed to manage webMethods products usingan administrative link without any post-installation configuration. When performing advancedconfiguration tasks, you might need to access the product's primary administrative interface.Command Central provides a link to the administrative interface on the Instances Overview pagefor eachmanaged product. For example, when you click theMywebMethods link on theOverview
Administering My webMethods Server 10.3 465
27 Authenticating My webMethods Server

page of a My webMethods Server instance, Command Central redirects the browser to thecorresponding My webMethods URL.
Important:Use only one CommandCentral instance tomanage a landscape. You cannot access the CommandCentral web user interface for a Command Central instance from another Command Centralinstance.
For information about generating and configuring customSSOand SAML certificates for SoftwareAGCommonPlatform-basedproducts, see the SoftwareAGSecurity Infrastructure documentation.
466 Administering My webMethods Server 10.3
27 Authenticating My webMethods Server