myflock.com/extremeyouth.com administrator...
TRANSCRIPT

Administrator Guide
MyFlock.com/eXtremeYouth.com Administrator GuideApril, 2014
Page 1

Administrator Guide
Getting Started...................................................................................4Administrator Login.............................................................................4Selecting a Site Theme........................................................................6Adding Page Content...........................................................................7Automated Image Slider.....................................................................15Registering a New Domain Name.........................................................19Redirecting an Existing Domain Name...................................................19Adding Members................................................................................19Uploading a List of Members...............................................................21Uploading your Logo..........................................................................22Enable/Disable Features.....................................................................24Announcements................................................................................26Newsletter........................................................................................26Calendar..........................................................................................28Survey Administration........................................................................31Communication Center.......................................................................32Email Church/Youth Members..............................................................32Phone Caller.....................................................................................38Forum Maintenance...........................................................................40Prayer Board Maintenance..................................................................42Event Management............................................................................43Charts.............................................................................................44Member Manager...............................................................................49Add Member(s).................................................................................49Add Family.......................................................................................51Edit Member(s).................................................................................56Custom Fields...................................................................................59Member Reporting.............................................................................60Reset Member(s) Password.................................................................62Member Spotlight..............................................................................63Member Profile Status........................................................................64Manage Groups.................................................................................65Track Attendance...............................................................................73Export/Mail Merge.............................................................................77Contributions....................................................................................79Record/Edit Contributions...................................................................79View Donations.................................................................................81Manage Funds...................................................................................82Manage Pledges................................................................................84Contribution Charts............................................................................86Donor Ranges...................................................................................88Donation Statements.........................................................................89
Page 2

Administrator Guide
Sermons/Media.................................................................................90Upload Sermon Notes.........................................................................90Upload Files/Forms............................................................................94Streaming Services............................................................................96Outreach........................................................................................106Manage Admin................................................................................114Manage Administrators.....................................................................114Change Administrators Info...............................................................116Change Church/youth Info................................................................116
Page 3

Getting Started
Immediately after you sign up with MyFlock.com or eXtremeYouth.com, yourinitial web site will be created. You will receive a welcome email that includes a link to the location of your site, a link to your administration control panel, and your administration login and password.
We recommend that you complete the following tasks within a few days of creating your site:
1. Begin to customize your site and add content/information.2. Add your members to your site so they can login and begin completing profiles and interacting with others in your church or youth’s online community
You can access your site from the link in the welcome email.
Administrator Login
You can begin to customize your site immediately by logging in as the administrator. You can login via the link in the email or from your site by choosing the “admin login” link in the admin area of your site.
Click on the Launch Admin Panel button:
4

and login to the Admin Control Panel using your admin login (email address) and password:
Once successfully logged in, you will be able to access all the features on theadministration control panel. If you have forgotten your password, you can click the “I forgot my admin password” and the system will email you your password.
5

Selecting a Site Theme
To change the design of all the pages within your site, choose the “Select Site Theme” and select the radio button of the desired design. You can preview how your site will appear in each design by clicking on the thumbnail image. To advance to other theme designs, either select the >> arrows, or a particular page number. Once you select a theme, hit the submit button at the bottom of the page to update the design of all the pages within your site. The content of the pages will not be affected; only the theme design of the site will be updated.
If you have a custom design you would like to use, select the “custom design”radio button and enter the code you were provided for the custom design.
6

Adding Page Content
Select the “Site Manager” to modify and add pages to your site.
7
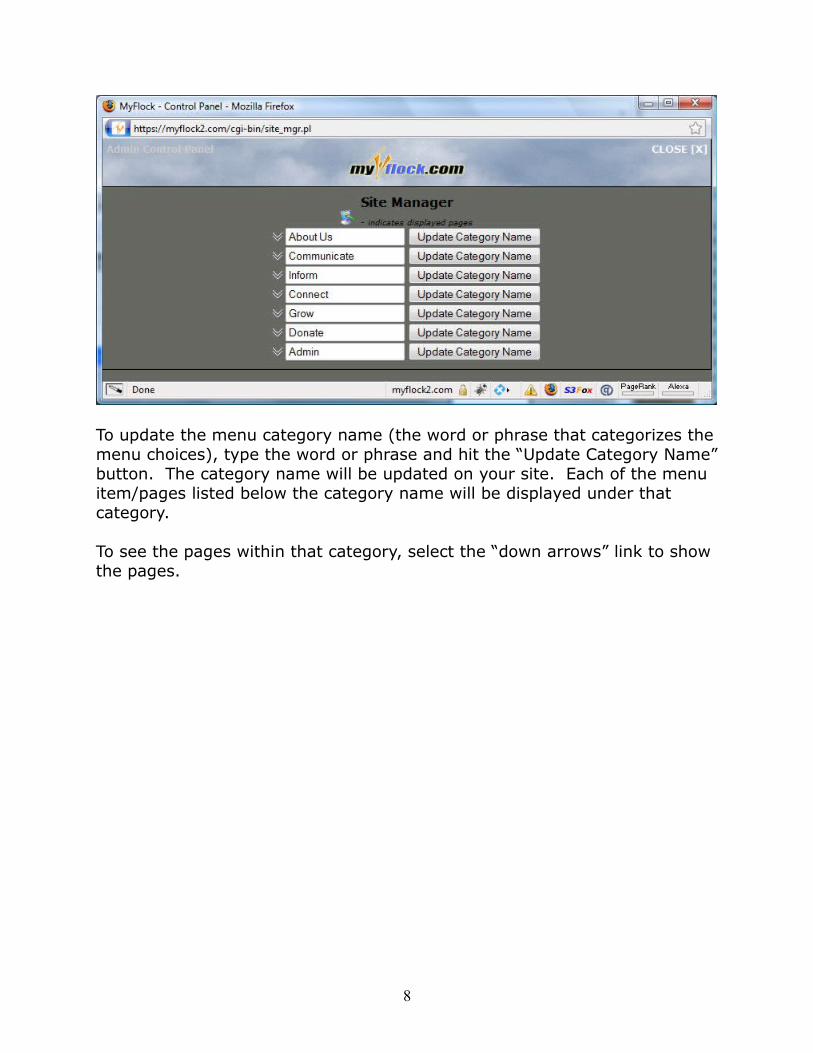
To update the menu category name (the word or phrase that categorizes themenu choices), type the word or phrase and hit the “Update Category Name”button. The category name will be updated on your site. Each of the menu item/pages listed below the category name will be displayed under that category.
To see the pages within that category, select the “down arrows” link to show the pages.
8

To add a page to your site, hit the edit icon (pencil and paper) next to the “add page here” listing. This will open the page editor for a new page. To edit an existing page, hit the edit icon next to the page listing. This will show the page editor listed below.
To move a page within the category, hit either the up or down arrow to movethe page within the category.
9

After you select the page you wish to edit or add, you should enter/update the page/link title. The page title must not be blank. You should then selectwhether you wish to use an automated page, a link to another site or page within your site, or define a custom page.
If you elect to use an automated page, you must select one of the automated pages from the drop down menu. If you elect to link to another address, you must enter the full address (including the http://). If you elect to edit or create a custom page, select the third radio button and edit/createthe custom page using the built in page editor.
You can create the custom page by selecting one of the layout styles by selecting the template icon on the editor panel. A palette of layouts will be displayed for you to choose from. Select one of the layout styles from the palette. Please note that when you select a layout from the palette, any previous content on the page will be automatically removed if you select thatoption.
10

Once you select the layout style, your editor will contain sample information in that layout style.
11

To edit the text, simply highlight the text and use the editor icons to manipulate the text. You can mouse over each icon to get a text description of each button.
To edit or insert photographs or images, click the image icon (top row, 2nd from the left).
12

The image properties window will appear as shown above. You can type the URL of a known image into the URL area, or more often hit the “Browse Server” button to upload or select images from your gallery.
13

To select an image in your gallery, just click on the image. To upload additional photos and images, select the “Browse” button to navigate to photos on your computer’s hard drive. You can upload .gif, .jpg, and .png images to the server. Your photos should be less than 600 pixels wide. A good tool for re-sizing photos can be found at snipshot.com.
Once you upload a photo, it will appear in your gallery for selection.
Select the photo to manipulate it within the image properties window.
14

You can resize the photo here and designate border spacing, text alignments, and preview the photo. When happy with the image, click the “OK” button to put the image into your page’s content.
Within the editor, you can re-size the image by selecting it and dragging the corner handles to resize.
You can enter text into the integrated text editor. All text entered will be published on the web site page when you hit submit or the “save” icon on the editor. The menu bar for the editor has features that also allow you to create links to other web sites. You can also cut and paste text from other applications into the editor. Only text and text formatting may be pasted into this area.
Automated Image Slider
You can include an automated slide show on any page within your site. To do this click the “Update Image Slider” link on the page editing screen. Once
15

you click that link a new window will open with the image slider editor whereyou can upload pictures and change the order of pictures. Your photos should be sized to 750 x 350 pixels and be in the .jpg, .png or .gif format forbest results. The editor looks as follows:
To add photos to the image slider click “browse” and a window will open to choose image files from your computer.
Once you chose a picture (remember for best results the image should already be 750 x 350 pixels) and click “open” the window will close and click “upload” on the image slider editor page. You can do this with as many pictures as you would like. For these instructions we have uploaded three pictures. Once all the pictures you would like are uploaded you can change the order by clicking the green arrows (in green box in image below), you
16

can delete photos by clicking the red “x” (in red box in image below), or you can add a caption or a hyperlink to the picture by clicking the notepad (in a yellow box in the image below).
Once you are finished editing your image slider you can close the Slider Manager window and check the box on the home page editing screen to include the image slider on that page.
17
Check this box!

Below the custom page editor, you can elect whether or not you want to make the custom page private (viewable by Members Only). You can also elect to include an announcements summary and link, a newsletter article headlines and links, the daily verse, and the quick poll on your page. If you select the “Display” check box, the appropriate content will be listed on the page when saved.
18

Registering a New Domain Name
To register a domain, send an email to [email protected] with your top 3 domain name choices (some choices may not be available). Please be sure to include the name of your church/youth. We will register the available domain name and make sure that it is pointed to your MyFlock online community site. Your billing information must be current with JSL Solutions (parent company) before we will be able to register the domain name. The cost of registering a domain name is typically $15/year. For every free trial site that you activate the premium site, we will register your domain for free(1st year). Once registered, your domain name will start resolving to your site within 24 to 48 hours.
Redirecting an Existing Domain Name
If you have already registered a domain name and wish to have your MyFlock/eXtremeYouth site appear when that domain name is entered, you will need to update your domain name server (dns) records. Only the authorized administrative contact and/or technical contact for the registered domain name can update the dns records. This is typically the person that registered the domain name.
Your dns records should be updated as follows:
freedns1.registrar-servers.comfreedns2.registrar-servers.comfreedns3.registrar-servers.comfreedns4.registrar-servers.comfreedns5.registrar-servers.com
After updating your dns records, send an email to [email protected] indicating your MyFlock church name and your domain name. We will update our records to complete the site redirection. Once updated, your domain name will start resolving to your site within 24 to 48 hours.
Another option is to transfer your domain name over to our service. Please send an email to [email protected] if you wish to transfer a domain name toour system. If you transfer your domain to our service, we will take care of all the technical aspects as well as ensuring that your domain name is renewed each year. The cost is typically $15/year.
Adding Members
19

Select the “Add Members” link on the admin control panel to add members to your site. Once members have been added, they will automatically receive an email notification (if selected) and be able to login to the private secure online community. Members will have the ability to login to the system and complete a profile as well as access other private tools (memberdirectory, prayer board, Top 10 Most Like Me, etc.) within the online community. Individuals that are added and designated as “non-members” will not be able to login to the private side of the community nor will they be listed in the member directory. Although “non-members” will be visible to the administrator and be able to receive communications from the administration control panel. You may also designate the member as the head of household. When members are designated as the head of household, a family record is created in the system. You can then associate other family members to the family in the system. If you elect to notify the new member via email using the check box, they will receive an email welcoming them to your online community with links to the site and encouraging words for them to participate in the online community.
20
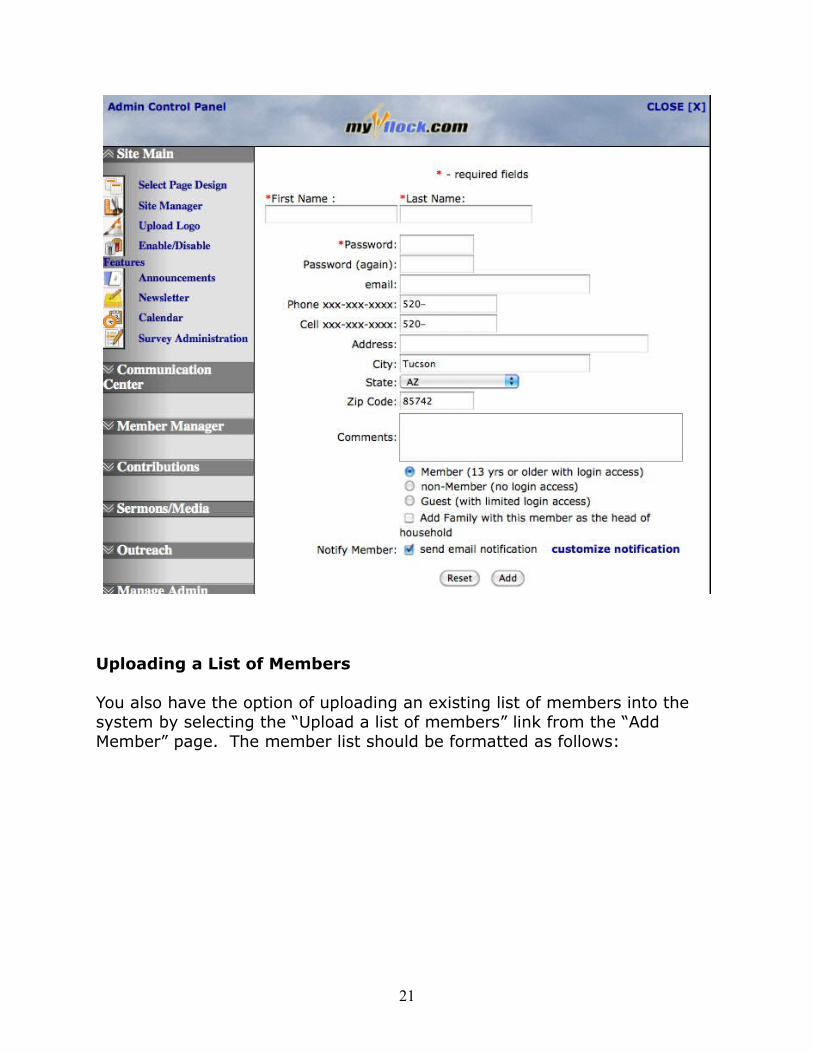
Uploading a List of Members
You also have the option of uploading an existing list of members into the system by selecting the “Upload a list of members” link from the “Add Member” page. The member list should be formatted as follows:
21

Once you upload the initial file, the system will display a screen showing howthe records will be imported into the system. Please make sure that the data is correct. For example, make sure all the last names are in the last name column, the first names in the column marked first name, the phone numbers are in the correct columns, etc. Once you’ve validated the format of the file, hit the upload button to upload the member list into the system. Please note that the list of members will be added to the existing list of members (member replacements will not occur).
Uploading your Logo
22

You can upload your own custom logo to be displayed on the site by selecting the “Upload Logo” link on the administration control panel.
Your logo will be saved in a “.gif” format and be approximately 70 pixels tall.
23

If you wish to resize your logo, you may do this using any image editing program. If you are using Microsoft Windows, Microsoft Paint will be available on your computer. Open the image in Microsoft Paint and adjust the size of the image using the “stretch/skew” menu item.
Another great tool for resizing and cropping images easily can be found at http://SnipShot.com. You can edit and resize your photos online and save them to your hard drive easily.
Note – not all design templates make use of the logo area on the page.
Enable/Disable Features
You can enable and disable features on your web site by selecting the “Enable/Disable Features” link on your administration control panel. Items that are not checked will not appear on your web site. To enable the features, simply check the box and submit the form.
24
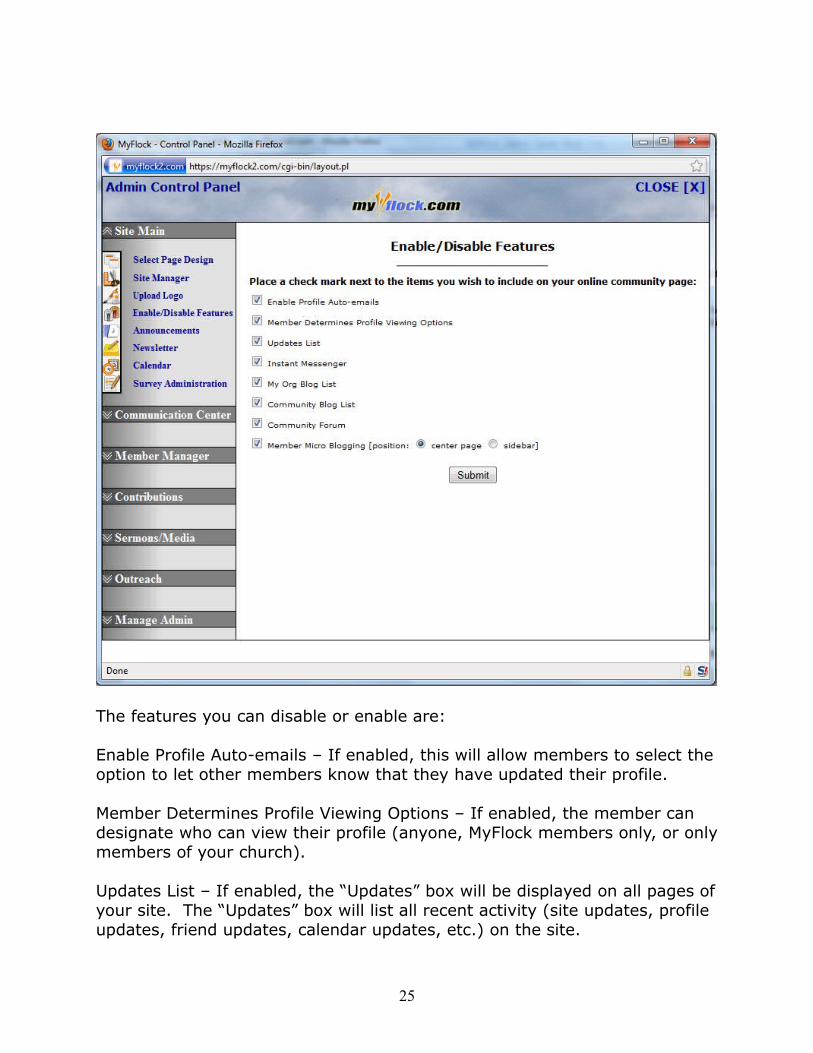
The features you can disable or enable are:
Enable Profile Auto-emails – If enabled, this will allow members to select theoption to let other members know that they have updated their profile.
Member Determines Profile Viewing Options – If enabled, the member can designate who can view their profile (anyone, MyFlock members only, or onlymembers of your church).
Updates List – If enabled, the “Updates” box will be displayed on all pages ofyour site. The “Updates” box will list all recent activity (site updates, profile updates, friend updates, calendar updates, etc.) on the site.
25
Instant Messenger – If enabled, the “who's online” box will be displayed on all pages of your site.
My Org Blog List – If enabled, the list of updated blog entries from members of your ministry will be displayed on all pages.
Community Blog List – If enabled, the list of updated blog entries of any ministry are displayed on all pages.
Community Forum-If enabled, a link to the “all churches” forum area will be present in your churches forum. If disabled, this link will no longer show up.
Member MicroBlogging – If enabled, when your members are logged into your site their picture or name will appear at the center of the page with a text entry box (labeled “what are you doing now?”) that allows your members to micro-blog.
Announcements
You update your announcements on your site using the text editor under the “announcements” link found on the administration control panel. You may type directly into the editor or cut and paste from another program.
Newsletter
You can create an unlimited number of articles to include in your newsletter. You can also create a custom masthead image for your newsletter if you prefer. The masthead image will be a “.gif” image that is less than 500 pixels wide.
Each newsletter article may include a photograph. The newsletter photograph will be a “.jpg” image that is less than 400 pixels wide.You will upload your images, then complete the body of the article by either typing into the text editor, or cutting and pasting from another application into the editor.
26

When you have completed editing the article, you will hit the “Preview” button to view your article.
27

If satisfied with the article, hit the “save article” button, or return to edit another article. You can have up to 20 articles in the newsletter.
Calendar
To edit your calendar click on the Calendar link on the admin control panel.
28

To edit a date click on the day you would like to edit and a button will appearthat says “add event on *date*”. Click on this button and a screen resembling the one below will appear.
29

Complete the form with the appropriate information. Remember that you can use the description area complete with photos and text to enhance your event entry.
When creating recurring events, you enter the number (zero will not enable recurring) and select either days, weeks, months, etc. and enter an “until” date (entering “forever” will repeat indefinitely). You also have the option ofentering the recurring option for the first, second, third, etc. day of the week.
30

Survey Administration
Click on Survey Administration under Site Design and Context to edit your survey. A screen resembling the one below will appear.
Type your survey question in the large box near the top (as indicated by the red arrow).
31

Type all of the possible answers to the question in the boxes marked Answer #1, Answer # 2, etc. If you have less than nine possible answers, just leavethe higher numbered answers blank. Once you are satisfied with your answers and questions press the Submit button. Now your poll has been edited and placed on the home page.
Checking the “Remove prior poll results” will remove all votes that had been previously recorded to the existing survey.
Checking the “Do not post a survey” box will remove the existing survey andclear all votes that had been cast for any survey.
Communication Center
Email Church/Youth Members
To e-mail church/youth members click on the e-mail church/youth members link under Communication Center.
32

Follow the instructions on the page.
Enter the body of your email in the text editor block. You can also edit the “from” address that the email will be sent from. Any address can be used and will be listed in the “from” area of the email.
To send the message to only certain groups in the church/youth, click the “Only Selected Groups” radio button.
To choose the groups you wish to email, scroll down to the bottom of the screen where your groups are listed.
33
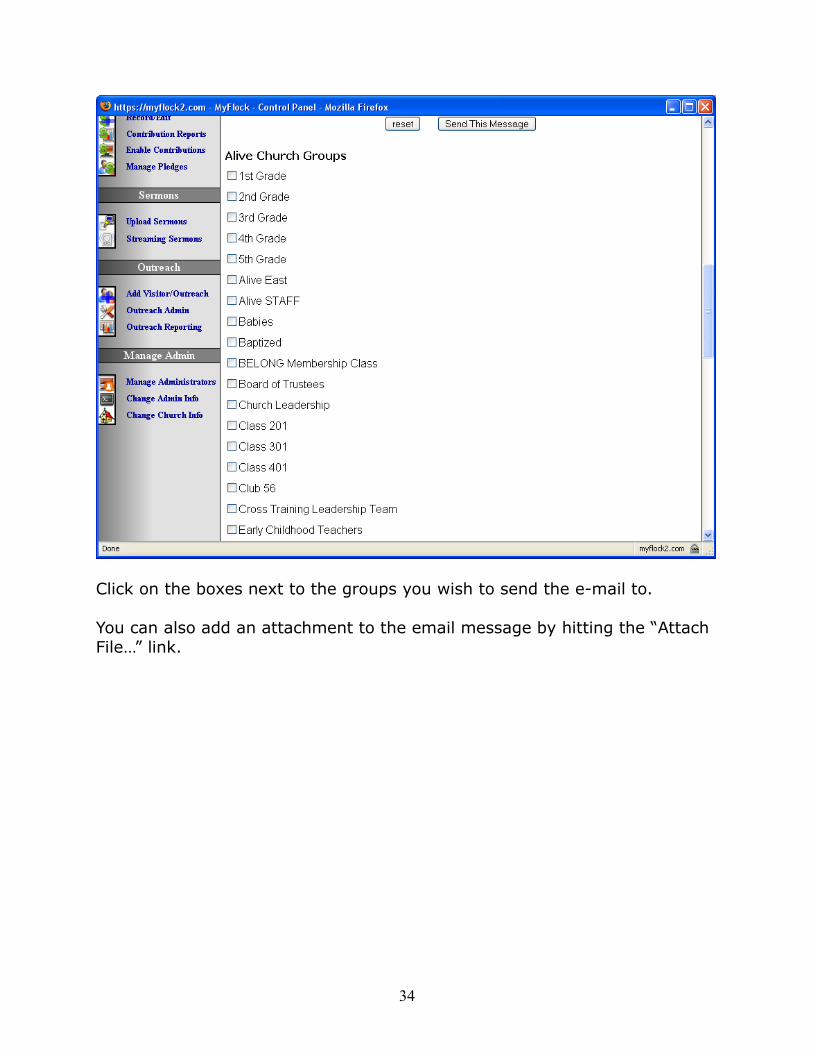
Click on the boxes next to the groups you wish to send the e-mail to.
You can also add an attachment to the email message by hitting the “Attach File…” link.
34

Browse on your hard drive to locate the file you wish to attach. The file should be less than 1Mb. Once you have uploaded the attachment file, closethe upload attachment window.
When finished typing the message and typing the subject click “Send This Message Now”. To edit the groups, see the “Manage Groups” instructions in this document.
To send the email to all church/youth members, select the “email all members” radio button. To include those listed as visitors in your member directory, check the “include visitors” box. Those listed as visitors and gueststo your online community will receive the email.
Email Newsletter
To e-mail your newsletter, click “Email newsletter” under the Communication Center. A screen resembling the one below will appear.
35

Follow the instructions on the screen to send out the newsletter.
You can preview your newsletter by selecting the “Click here to View your Newsletter” link.
Click on the boxes next to the groups you wish to send the newsletter to. When finished typing the message and typing the subject click Send the Newsletter.
To edit the groups, see the “Manage Groups” instructions in this document.
To send the newsletter to all church/youth members, select the “email all members” radio button. To include those listed as visitors in your member directory, check the “include visitors” box. To include those on your outreach list, check the “include outreach” box.
The newsletter is sent as an html document (with embedded images) to all recipients.
36

Send Text Messages
To send text messages, click the “Send Text Messages” link under the Communication Center. That will bring up a screen that looks like this.
Select the group of people you wish to send the text message to. If you would like to send it to just a few specific groups, check the “Only Selected Groups *Your Church Groups* checked below”. Then, type your message in the box below. Please note you are limited to 140 characters in this message. Then check the church groups that you would like to send to and
37

click the “Send SMS Text Message”. This will send the Text Messages out. You will then get an email confirming that the messages were sent.
Note – The mass text message tool works for those that have entered a cell phone number and identified their carrier on their personal profile.
Phone Caller
Click Phone Caller under Communication Center to call everyone in your church/youth automatically. A screen like the one below will appear.
To send the message to only certain groups in the church/youth click the radio button next to Only Selected Church/youth Groups. Choose the groups you wish to contact via the phone call.
38

Click on the boxes next to the groups you wish to send the message to. Afteryou have decided who to send the message to click continue. A screen like the one below will appear.
39

Follow the instructions on the page to send your message.
Remember that the phone calling system is a third party company. They willcharge you for each phone call delivered at an average cost of approximately10 cents per call. For help with the phone caller system, please contact the CallingPost.org company.
Forum Maintenance
Click Forum Administrators under Communication Center to establish your church/youth group administrators/moderators. A screen like the one below will appear.
40

To remove an administrator, click the remove button.
To add an administrator, select their name from the drop down list and hit the “Add” button. There is no limit to the number of people that can be added as forum administrators/moderators.
Once a person has been established as a forum administrator/moderator, they will have additional functionality within the church/youth group forum. They can add additional forums, delete forums, delete topics, and delete individual postings. The administrator must visit the forum and use the tool links to perform the administrator/moderator activities.
A sample “edit forum”, “delete forum”, “new forum” links are shown below:
41

Prayer Board Maintenance
The Prayer Board is a specialized topic within the forum area. As the administrator, you have access to the prayer board forum with additional capabilities to edit or remove any prayer board topics or listings. Simply access the prayer board and use the links to remove or edit prayer board listings.
The prayer board is unique in that anytime a new prayer request is posted tothe prayer board, each member of the prayer team (see manage groups) willreceive an email alerting them that a new prayer request has been posted. The email will contain a link to the prayer request within the prayer board.
As members reply to the prayer board posts, the original prayer request poster will receive an email indicating that someone has responded to their prayer request.
42

Event Management
Click on Event Management under Communication Center to edit and create event sign-up forms for your church/youth. A screen like the one below will appear.
Type the event information in the space provided. In the “Event PayPal email”field put the e-mail of the paypal account that will be receiving the payments. Entering a PayPal email account will enable the PayPal button onthe event signup page. If you do not wish to accept payments online, leave the PayPal field blank. The “Max Registrants” field will limit the number of registrants when you enter a value in this field. As individuals register for the event, the system will calculate the remaining number of spots based on your “Max Registrants” entry and disable the registration form for new members when the value is reached. If you do not wish to limit the number of registrants, then leave this field blank. When complete, press submit.
43

You are limited to 8 events at one time. To delete an event (and all signups), check the “Delete Event” box at the bottom of the event and hit the Submit button
To manage event signups, click the “manage Event sign ups” link.
Every person that has registered for the event will be listed. You have the option of marking individuals as “paid” by selecting the check box and hittingthe submit button. You can delete individuals from event registrations by checking the “Delete” box and hitting the submit button.
Charts
Click Charts under Communication Center to create charts of data within your church. A screen like the one below will appear.
44
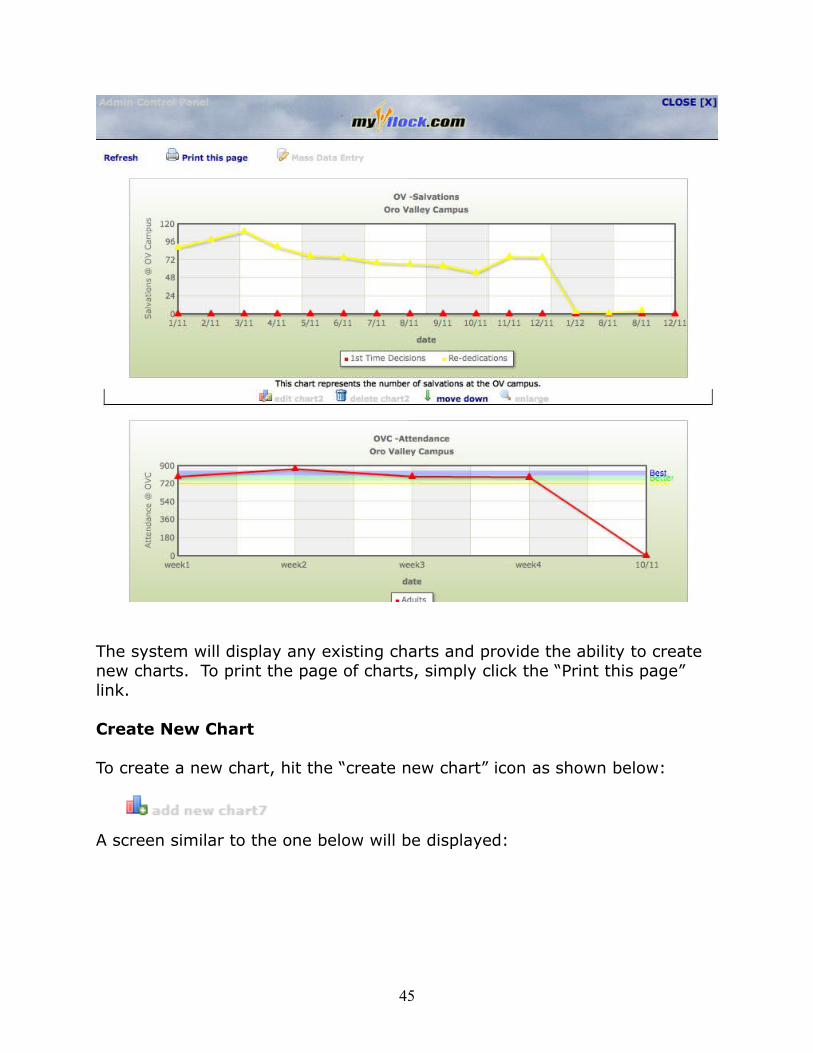
The system will display any existing charts and provide the ability to create new charts. To print the page of charts, simply click the “Print this page” link.
Create New Chart
To create a new chart, hit the “create new chart” icon as shown below:
A screen similar to the one below will be displayed:
45

Complete the fields Chart Title, Chart Sub-Title, X-axis Label, Series Label and comment as desired (not all fields are required). You can select whetheryou would like a bar chart or a line chart created by selecting the appropriate radio button.
Enter Chart Data
You have three options for entering data into your chart. You can select to manually enter data, select from a list of automated data based on your church record in the MyFlock management system. You also have the optionof uploading data from a csv formatted MS Excel file.
Manually Entering Chart Data
46

To manually enter data, just begin typing into the appropriate fields. Values for the X column are normally date based entries (August, September, October, etc.) while the Series column values are normally numeric values. Enter the Series name for each series of data you wish to enter.
If you wish to enter more than one series of data, hit the “show more columns” link and additional columns will be listed where you can enter additional series names and series data. Do not skip series, but add series from the left to to right. Any blank series will not be included.
After you have completed entering data for 5 rows and you need more rows,hit the “more rows” link to add blank rows for data entry. After you enter data and save it, your chart will update at the top of the screen.
Automated Data
To automatically load data, select the automated data option and select either weekly donations, monthly donations, annual donations, or new visitors. The donations values will be automatically extracted from your contribution records in the MyFlock system. The system will retrieve up to twelve of your most recent records. The new visitors records will be automatically retrieved from your outreach system and show the number of first time visitors per weekend.
Once loaded, you can edit the automated data as you wish. If you have created manual data and wish to load automated data, the system will overwrite the manual data with the automated data, which you can then edit.
Upload Data
To load data from your hard drive, select the upload data option and hit submit. A screen as follows will appear:
47

You should have your data in a csv formatted file (you can save your data from MS Excel using the “.csv” file format option). You should have 3 columns of data for upload as shown above. Please be sure that none of youdata fields contain commas as that will impact your data load. Browse to the file on your hard drive and hit the Upload Data button to upload the datato the server. Once uploaded, the chart will be automatically created.
Mass Data Entry
Click the “Mass Data Entry” link on the chart panel to display a screen similar to the one below:
Enter the X Axis value (typically a date) and then enter corresponding valuesacross all of your charts for that particular X Axis value. This will allow you to update multiple charts and values from a single data entry screen. When complete entering values, hit the “Add Values” button to update all of the
48

corresponding charts. You also have the ability to hide particular charts fromthis input screen by hitting the “hide” link. To restore visibility to all available charts, hit the “unhide all” link at the top of the page.
Chart Zones
You can input ranges of data to support goals or indicate desired levels of performance. You can have as many zones as you wish on a chart. The zone ranges should be consistent with the data ranges that are included on the chart, otherwise the chart zones will not be depicted. Below is an example of a chart with zones depicted (note the Better and Best ranges).
To create zones on your chart, simply enter the minimum and maximum values for a range and select a color band for your zone range. You can provide a zone label (optional) which will also be depicted on your chart.
Member Manager Add Member(s)
To add a member press Add Member under Member Manager. A screen like the one below will appear.
49

Enter the information into the fields. The fields marked with the red * are required.
Select whether the person is a member or non-member. Members will be allowed to login to the members area of the web site and included in the Members directory. Non-members will be listed in the admin member directory and are available to receive communications, but are not able to login to the private area of the online community.
You may also designate the member as the head of household. When members are designated as the head of household, a family record is created in the system. You can then associate other family members to the family in the system.
To send the person you are adding an e-mail letting them know you added them to your member list, check the “send email notification” box. The email will be sent in the following format:
50

============== sample email ================Joe Member,
Welcome to the Alive Church online community.
We want you to take a few moments to become familiar with the community so youcan take advantage of everything it has to offer.
On the Alive Church online community you can get to know others in our congregation, keep informed of Alive Church events, interact with others, and grow closer to God.
Take a moment right now to login and complete your personal profile so others at Alive Church can get to know you too.
A good overview of some things the Alive Church online community has to offer can be found at:
http://myflock2.com/flash.html
Your online community is located at:
http://myflock2.com/cgi-bin/menu.pl?churchid=church1
Your initial password is:
banana
If you have any questions, don't hesitate to contact me at [email protected].
See You Online,
Your Alive Church Online Community Administrator
============== sample email ================
Add Family
Press Add Family under member Manager. A screen like the one below will appear.
51

In order to add a family record, the head of household must have been already added as a member. In the designated area, enter the last name of the head of household. You may also enter portions of the name to find all members with those letters in their last name. The system will return a list of all matching members as shown below:
52
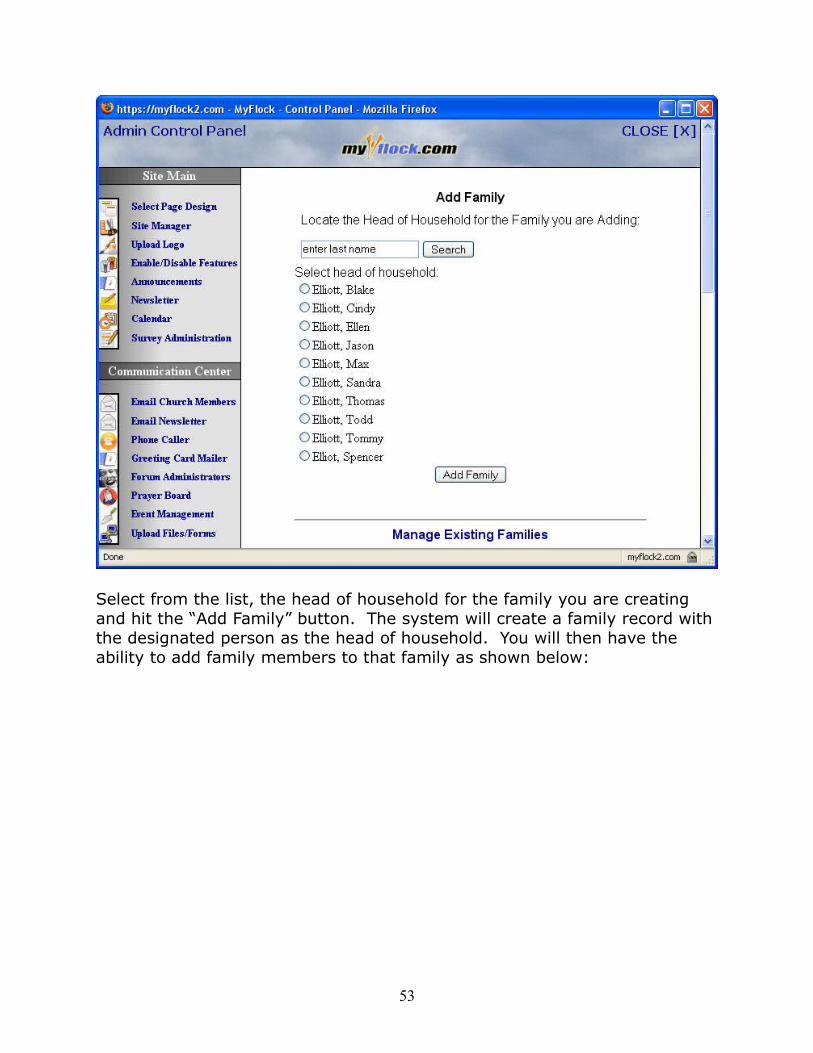
Select from the list, the head of household for the family you are creating and hit the “Add Family” button. The system will create a family record with the designated person as the head of household. You will then have the ability to add family members to that family as shown below:
53

Enter the last names of the members that are a part of this family in the designated area and hit the “Search” button. The system will return a list of all matching members.
54

Check the box of the appropriate family members and use the drop down listto indicate their relationship in the family. Once you have selected all the appropriate members, hit the “Add Selected Members to the xxxx Family”. Those members will be added to the family.
55

You can also remove and/or edit existing family members from this screen. When removing a member from the family, the member is removed from thefamily, but his/her individual records are retained on the system. If you delete the member from the system, he/she will also be removed from the family.
To edit the family information, click on the link titled “edit info” under the family record. Remember that the family information is the same as the head of household information (eg – updating the head of household information will update the family information).
Edit Member(s)
Press edit member(s) under member Manager. A screen like the one below will appear.
56

You have the option of viewing all members (individuals) or viewing all family records in the system.
To delete a member, select delete from the “edit members/family” screen, then press go. Their profile, photo, and other member information will also be deleted.
To view, create, or update a member’s photo, select the “Add Pic” or “See Pic”link. You will be able to upload a photo for the member using the “Add Pic” link. You can update a member’s profile by clicking on the “edit profile” link. The system will log you in as that member and allow you to update their profile.
57

To edit a person click the edit radio button and click go. The system will return a screen similar to the “Add Members” screen. A sample screen is shown below:
Member information is organized into tabs (General Info, Family, Groups, Custom Fields, Profile, and Welcome Email). To update the general information just make the necessary updates and click the “Save” button. To update the memer's family information, simply click on the Family tab where the existing family information will be displayed. You also have the ability to update the family information from this tab. The member's existing group memberships is managed from the Groups tab. Custom field values can be entered on the Custom Fields tab, the member's profile information can be updated from the profile tab. You also have the ability tosend the member the welcome email which will send an email to the member with login and password instructions.
58

The “envelope #” is used for the contribution section of the MyFlock system. The envelope number will default to the member number, but can be updated to any number you desire. Guests can login to the online community and allowed access to all the social networking tools except the online directory and the member map.
Custom Fields
Custom fields values can be updated for each member from the edit member(s) area.
The “Manage Custom Fields” link will allow you to manage the custom fields for your entire organization. Clicking the link will take you to a screen similar to the one below:
59

Simply enter values for the Custom Fields you wish to include within your organization. You can enter up to 20 Custom Field Names. Where no valuesare entered, those fields will not be utilized in the system. Wherever you have field names entered, those field names will appear for each member in the system. On the “edit member(s)” panel, you can enter values for each of the custom fields you have defined.
Member Reporting
Selecting the “Member Reporting” link from the administration panel within the Member Management section will present a screen similar to the one below:
60

The system will present menu options for each of the fields in the system. The custom fields will be displayed with options for each of the potential values entered into the system. You can expand the sections below (ie – Work, Education, etc.) by selecting the down arrow to show the fields available.
To perform a search, simply select the desired values from the appropriate menu areas. The system will query the member database for members that meet all of the criteria selected. For example, to search all the men that livein a particular zip code, you would select “male” from the gender menu and the particular zip code of interest. A screen similar to the one below will be displayed:
61
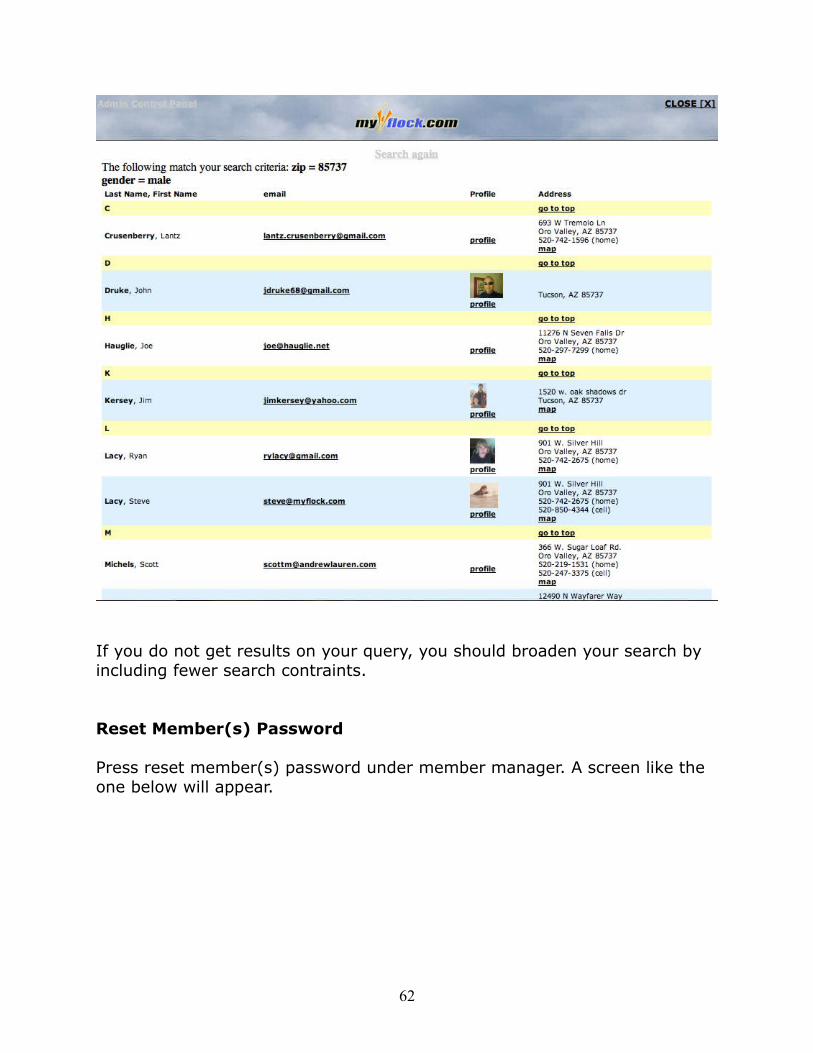
If you do not get results on your query, you should broaden your search by including fewer search contraints.
Reset Member(s) Password
Press reset member(s) password under member manager. A screen like the one below will appear.
62

To change one or more member’s password, find their name on the screen and then enter the new password. Only fields that have a new password entered will be changed. When complete, press submit.
You should notify the member that you have changed the password for the member.
Member Spotlight
The “Member Spotlight” will highlight a member of your congregation by placing their profile under the Member Spotlight area. Only members of your congregation can view the member spotlight.
To create a member spotlight, press “Member Spotlight” under Member Manager, a screen like the one below will appear.
63

Choose a member to be the spotlight by selecting the member name from the drop down list and then press submit. You may want to select membersto spotlight that have a photo stored in the system.
Member Profile Status
This function will let you as the administrator know who has and hasn’t completed their profile. It will also allow you to quickly send a friendly reminder to those members that still need to complete their profile.
Click on “Member Profile Status” under Member manager to see the members in your flock who have not completed their profile and those that have. A screen like the one below will appear.
64

To send an e-mail to all the people who have not completed their profile press send e-mail reminder. You will have the ability to edit a preformatted message to be sent to those members encouraging them to login and complete their profile. Manage Groups
You can create groups for tracking purposes as well as communication lists. You can create as many groups as you wish and associate from one to all of your members to a particular group.
To create and manage groups, click Manage Groups under member Manager.A screen like the one below will appear.
65
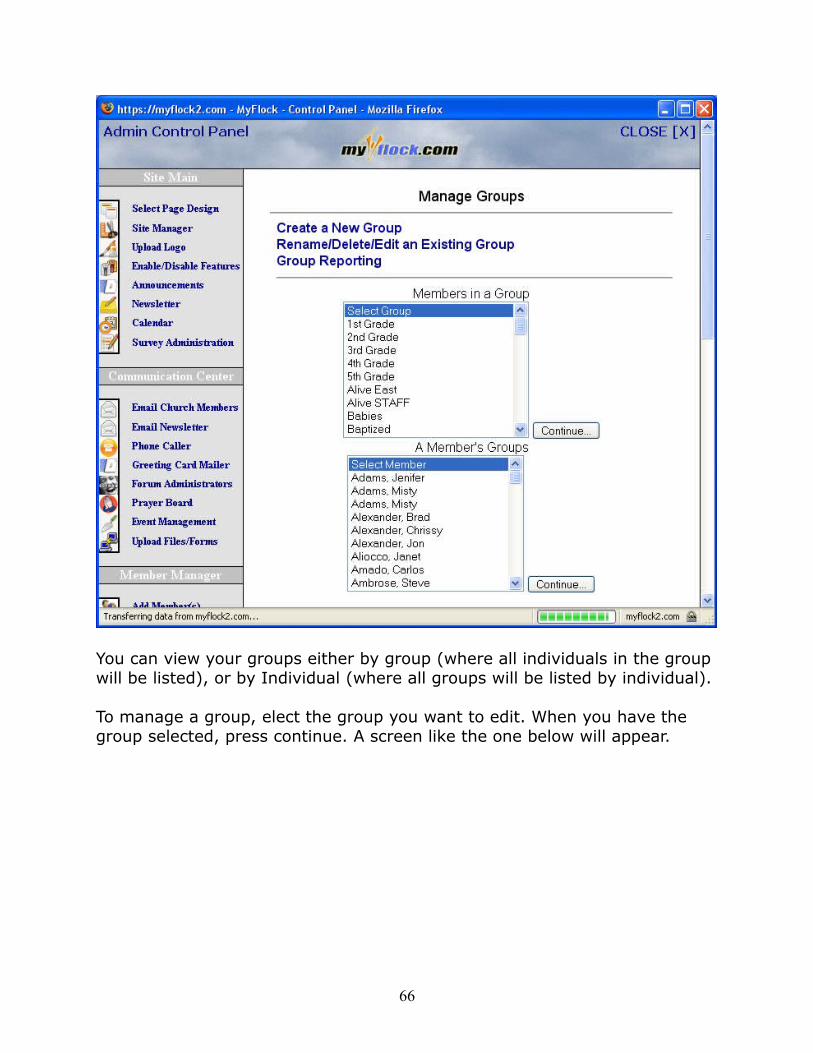
You can view your groups either by group (where all individuals in the group will be listed), or by Individual (where all groups will be listed by individual).
To manage a group, elect the group you want to edit. When you have the group selected, press continue. A screen like the one below will appear.
66

The system will list all the individuals within that group. To remove an individual from the group, click the remove button next to their name. To add a member to the group, select the person(s) you would like to add (cntrl-click for multiple selections) and then press add.
To view the groups by individual, select a member. A screen similar to the one below will appear.
67
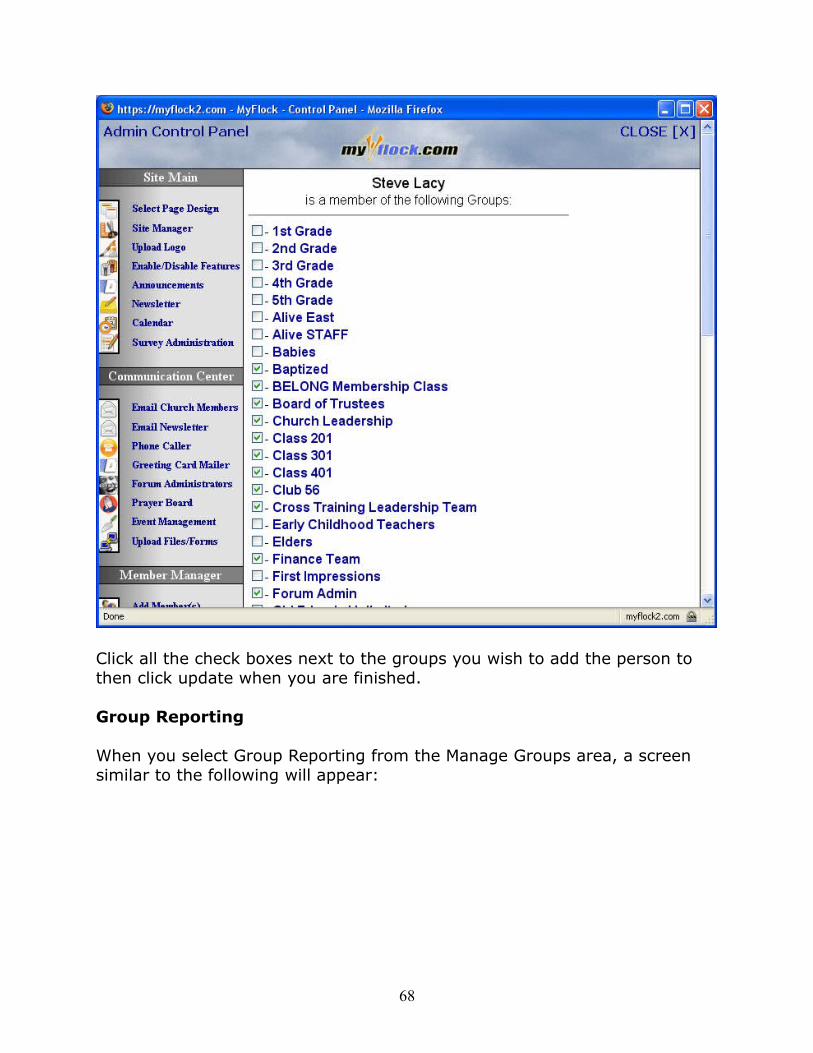
Click all the check boxes next to the groups you wish to add the person to then click update when you are finished.
Group Reporting
When you select Group Reporting from the Manage Groups area, a screen similar to the following will appear:
68

You can select the groups you wish to report on and select whether you wantto report on people that belong or do not belong to the checked groups. A screen similar to the one below will be presented based on your selections:
69

Rename/Delete/Edit Groups:
You can rename existing groups by clicking on the link titled “Rename/Delete/Edit an existing Group” and the following screen will appear:
70

Just hit the rename or remove icon to rename or remove a group. Please note that if you remove a group, you will not be removing the individuals from the system, only the group identifying will be removed.
You can also set the group to display on the member directory group filter menu. This menu will allow members viewing your member directory to select the group and the directory will be filtered to include only members ofthat group.
71

Reserved Group Names
The following group names are created automatically by the system and should not be renamed or deleted:
Prayer Team – the system uses this group to automatically notify members that have elected to be a part of the prayer team whenever a prayer requestis posted on the prayer board.
Forum Admin – the system uses this group to identify those that have administration priveleges in the forum.
Visitor Follow Up – the system uses this group to identify those that are on the visitor follow up team within the Outreach tools.
72

Track Attendance
You can track the attendance to any event. You first add the event, then editthe event to track attendance.
Select the desired group, then select “Create new event” and click “Continue”to add an event. The screen below will appear.
73

Enter the event name and press submit when finished. You may enter any event name.
The event will be created and you will have the option of recording attendance for this event or returning to the attendance home screen. When you select the “record attendance” option a screen similar to the one below will appear.
74

In the example above, simply check the boxes for those in attendance and when complete, hit the “Record” attendance button. You also have the ability to rename the event if you desire prior to recording the attendance. A printer friendly option is also provided if you wish to print the page and take it to the event to record your attendance on paper prior to recording your attendance in the system.
To report attendance on any group, simply select the group and choose the “Attendance Reporting” option and select “Continue”. A report similar to the one below will be presented.
75

76
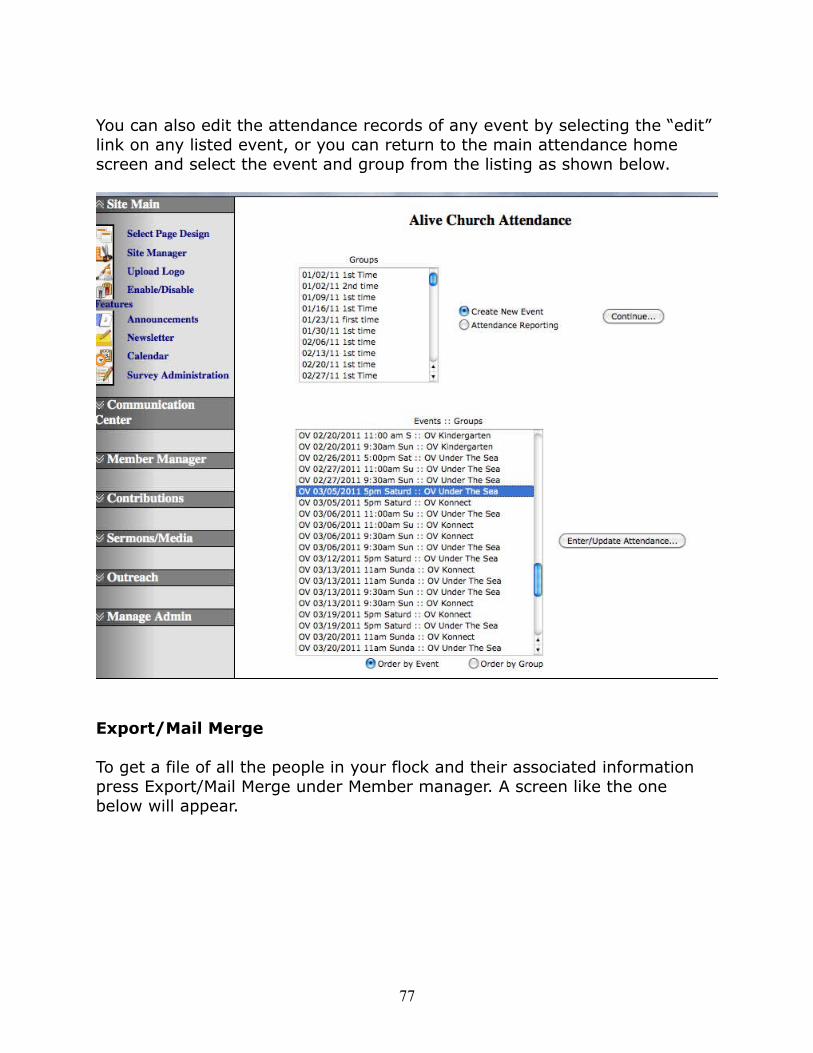
You can also edit the attendance records of any event by selecting the “edit” link on any listed event, or you can return to the main attendance home screen and select the event and group from the listing as shown below.
Export/Mail Merge
To get a file of all the people in your flock and their associated information press Export/Mail Merge under Member manager. A screen like the one below will appear.
77

Select who you would like to include in this list (see Phone caller for more help). Now click continue and a screen like the one below will appear.
78

Follow the instructions on screen to create and download your list to your computer. Once downloaded to your computer, you may use popular programs to create mailing labels, letters, form letters, etc. using the mail merge function within that program. Microsoft Word is a very popular tool for mail merge functions.
Contributions Record/Edit Contributions
To edit and record individual contributions press Add Donation under contributions. A screen like the one below will appear.
79

You may change or set the financial password by clicking on the “Change Administration Financial Password” link. Type in the financial password and then press submit. A screen like the one below will appear if you entered the right password.
To add new contributions press “Record/Edit Unposted Contributions”. A screen like the one below will appear.
80

Enter the check number of the check and then press tab to go to the next line or just click the line below. In the Amount line type in the amount of money that was donated (do not enter any special characters). Then tab to the next line and choose the fund you wish to record the contribution toward.
Press tab or click the next line and use the up and down arrows to select themember that made the contribution. You may also jump within the list by typing the first letter of the last name of the person. You can also begin typing the name in the list and it will jump to that name.
After choosing name press tab or click on the Comment box. Enter a comment if you wish. When complete, press “submit” to record the contribution.
View Donations
81

To view existing donations in a list, select the “View Donations” link on the admin panel. A screen similar to the one below will appear:
You can edit any of the existing contributions by clicking on the contribution line you wish to edit.
You can also filter the list using the filter options at the bottom of the screen. For example, you can enter a date range, select a fund or member, or any combination thereof. Hit the view donations button to see matching contributions.
Manage Funds
If you would like to add a new fund or edit or delete an old one press Manage Funds. A screen like the one below will appear in a separate window if you press “Manage Funds”.
82

To add a new fund, select the “Add Fund” link. The screen below will appear:
83

If you would like to edit a fund press the edit link next to the fund you wouldlike to edit. The fund will appear in the Fund name box for editing. When complete, press the button to save your changes. To delete a fund press the delete button and confirm that you wish to delete the fund.
Manage Pledges
Click on “Manage Pledges” to open a screen that resembles the one below.
84

Select the frequency of the pledge, enter the amount, select the fund and member and select the start and end dates as well as the optional comment.Hit Submit when complete to record the pledge.
View Pledges
To view and edit existing pledges, select the “View Pledges” link. A screen similar to the one below will be displayed:
85

Select a pledge to edit a particular pledge. You can filter the pledges using the controls at the bottom.
Contribution Charts
To view contribution reports, select the “View Charts” link on the admin panel and a screen similar to the one below will appear:
86
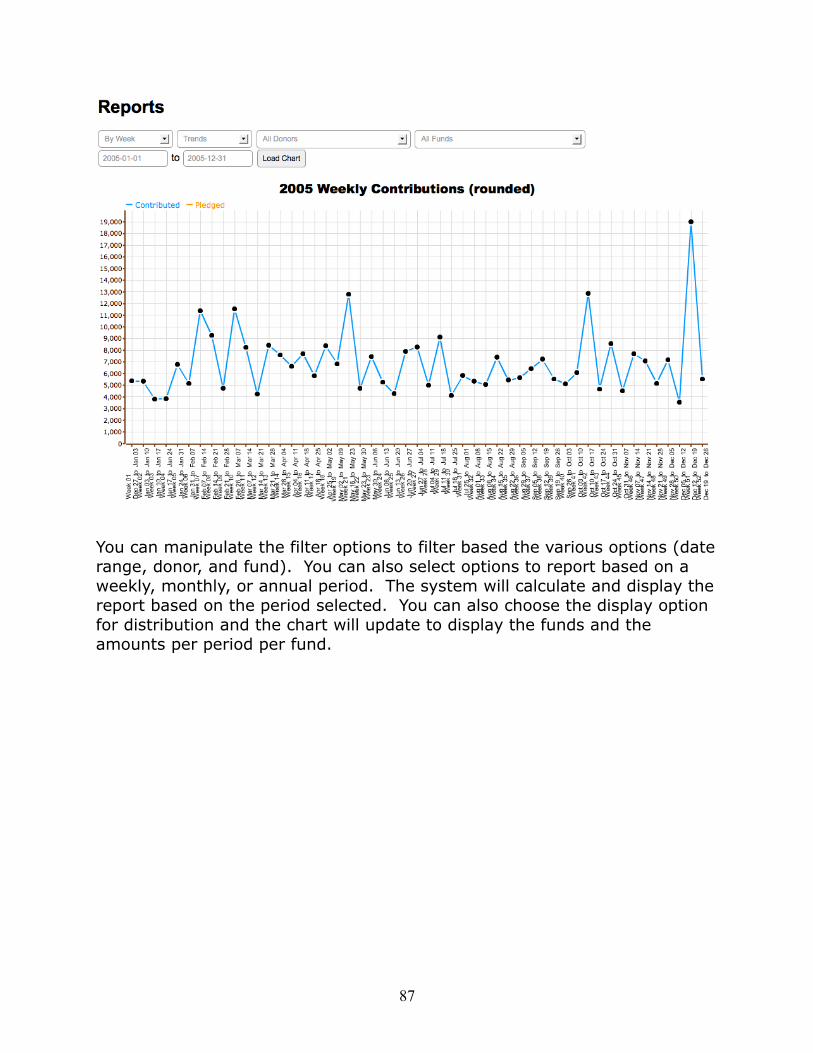
You can manipulate the filter options to filter based the various options (daterange, donor, and fund). You can also select options to report based on a weekly, monthly, or annual period. The system will calculate and display thereport based on the period selected. You can also choose the display option for distribution and the chart will update to display the funds and the amounts per period per fund.
87

Donor Ranges
The Donor Ranges report will allow you to view the ranges of donors based on a monthly donation average. The report will allow you to specify a date range as well as a monthly average donation amount and show you the results by donor as shown below:
88

The system also provides a link to show all members that have never donated.
Donation Statements
The donation statements link will allow you to print your annual giving statements for your members. Simply select the year, the donor and click the “View Statement” button and a screen similar to the following will appear:
89

Sermons/Media
Upload Sermon Notes
To upload and delete sermon notes click Upload Sermon under Sermons. A screen like the one below will appear.
90

There is a new feature that allows you to decide whether you want the coverflow to display on your admin control panel. In the screen shot above the cover flow is hidden. Clicking the button that says “Display Cover Flow” will show the cover flow like in the screen below.
91

Clicking “Disable Cover Flow” it will become hidden. If you are using InternetExplorer, the cover flow tool will not appear, for all other browsers you will see the cover flow tool if you wish to display it.
To upload sermon notes or other media either enter the media URL or select the “1. Upload new media” link. If you are uploading new media, a window as follows will appear.
92

Select “Add files” and navigate to the location of your file on your hard drive.Once located, click the “Start upload” button to upload your content. Please note that your file should be less than 100 Mb and be in Microsoft Word, PowerPoint, pdf, mp3, mp4, wma, wmv, or html format. Once uploaded closethe window.
Next select “2. Select uploaded media” or you could select “Select previouslyuploaded streaming files here”. A screen like the one below will pop up.
Select the media you want from the drop down menu and click the Select button. The window will close and the URL for you file will appear in the URL block.
Depending on the type of file uploaded, default artwork for the media content will appearonce the file is uploaded. If you prefer to upload your own artwork, you may do so by clicking the “upload custom artwork” link. A window similar to the one below will appear. Your custom artwork should be 150 x 150 pixels and in the jpg, gif, or png format.
Navigate to the location of your artwork on your hard drive by selecting the “Choose File” button and select your artwork. Hit the “Upload” button to
93

upload your artwork. Once uploaded, click the link that says “click here to continue” and the window will close. Your artwork will be previewed on yourmedia upload window.
Enter a title in the Media/Sermon Title area and hit the “Add Media to Library” button to add your media. Once uploaded, your media will appear in the cover flow tool.
Note that if you have less than 3 articles in your media library, the album artwork may not display properly.
To delete sermon notes, click the check box next to the sermons you wish todelete and press Delete Selected.
Upload Files/Forms
Click Upload Files/Forms under Sermons/Media to delete and add new files or forms. A screen like the one below will appear.
94

Click on the arrow folder at the top to upload new files. A new screen that looks like the one below will pop up.
95

Select Add files to find any files you would like to add to the site and then press Start upload. The file to upload must be less than 100Mb in size. You may upload up to 50 files to this area. After 50 files have been uploaded, you must remove a file in order to upload an additional file. To delete existing files, click the red X's next to the files you would like to delete.
It is also possible to add folders within the file upload area. To create a new folder, type the folder's new name into the text box directly below the uploadarrow, as shown below, and hit enter. To add files to a folder, click the uploadarrow placed next to the folder's name and follow the procedures for uploading files. You can place folders inside folders by repeating the steps to creating a folder inside the text box associated with the new folder.
To delete folders, click the red X next to the folder's name. Be careful; deleting a folder will also delete any files saved inside of it. You cannot movefiles among folders. To move files, they must be reuploaded in a different location and the originals deleted.
You can copy a file's location by right clicking on a link and selecting Copy Location/Link.
Every file uploaded will be available for download on your web site with a link to each file in the Forms/Download area.
Streaming Services
MyFlock.com provides the ability to broadcast your services live on the web using their web tools. MyFlock.com provides the web page for visitors to view the service as well as the capabilities for your administrator to manage the online viewing experience. MyFlock.com does not provide the video feedfor the video broadcast. You will need to contract separately with one of
96
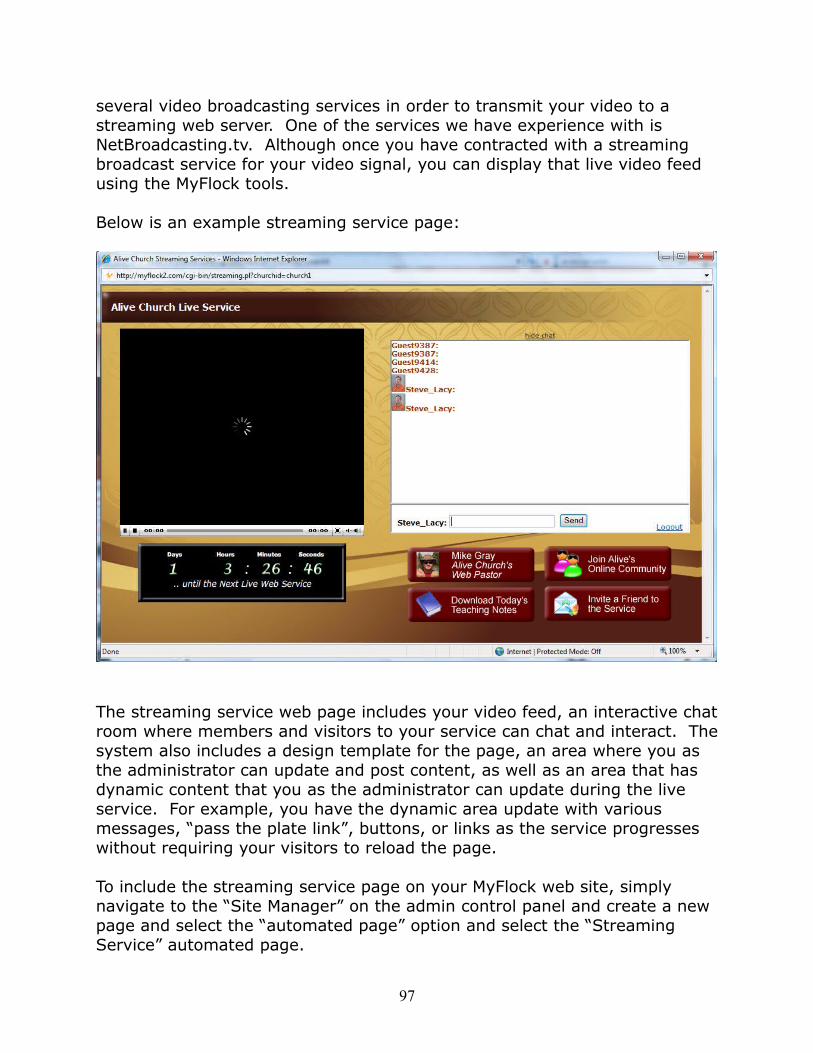
several video broadcasting services in order to transmit your video to a streaming web server. One of the services we have experience with is NetBroadcasting.tv. Although once you have contracted with a streaming broadcast service for your video signal, you can display that live video feed using the MyFlock tools.
Below is an example streaming service page:
The streaming service web page includes your video feed, an interactive chatroom where members and visitors to your service can chat and interact. Thesystem also includes a design template for the page, an area where you as the administrator can update and post content, as well as an area that has dynamic content that you as the administrator can update during the live service. For example, you have the dynamic area update with various messages, “pass the plate link”, buttons, or links as the service progresses without requiring your visitors to reload the page.
To include the streaming service page on your MyFlock web site, simply navigate to the “Site Manager” on the admin control panel and create a new page and select the “automated page” option and select the “Streaming Service” automated page.
97

When you select the streaming services link from the admin control panel, a screen similar to the one below will appear:
At the top of the page, the system indicates the various zones of your streaming web service page. As the administrator, you have control over thepage template design, the Active Dynamic Zone, the Static Zone content, your service times, the video stream URL, as well as the type of video playerused on your site.
Selected Design Template
98

You can select from an ever growing list of streaming service web site designs by selecting the “Choose a different Design” link. A window similar to the one below will be presented:
Your currently selected design template will be preselected. In order to change to a different web page design, simply select the radio button below the desired design and hit the submit button. You may also navigate to other pages of designs by selecting the appropriate page numbers. Once a design is selected, new visitors to your streaming services page will see that particular design. If you need a custom design created, we can provide that for a small fee (contact [email protected]).
Add Service Times
To add a streaming service time, enter the appropriate information in the service time area as shown below:
99

And hit the “Add” button. The service time will be added. To edit or delete aservice time, select the appropriate icon next to the service time you wish tomodify.
Streaming Player
You have the option of selecting one of many video players on your web site.There are both Windows Media Player based players as well as Flash based players to choose from. Simply select the “edit” link next to the player and the following window will open:
100

Select the desired player and hit the “Update Player” button to update your player. Please note that the Windows Media player is compatible with Windows Media streams and the Flash players are compatible with Flash formatted video streams. You should ensure that you select the appropriate type of player for your video stream.
101

Video Stream URL
Enter the URL provided by your streaming video service provider. If you are using a flash based streaming service provider, be sure to append the URL with the streaming file name information as follows:
rtmp://your_video_stream_URL/&file=your_streaming_file_name.flv
Static Zone
You have editorial control over the static area of the streaming web service page. To edit this area, select the “edit” link and the following window will appear:
102

You can enter information into the Static Area Content editor as you desire. You can use the editor to input links, buttons, graphics, text or whatever youdesire to appear on this area of your streaming service web page. Please ensure that the content in this area is no larger than 475 x 140 pixels (if youkeep your content to fit in the window without scrolling, you will be fine). If your content exceeds these dimensions, it may be necessary for your viewers to scroll to see the content. When you have completed the edit of this area, hit the “Update Content” button to save the information. The information will be automatically posted to your streaming service page when new visitors arrive at that page.
Active Dynamic Zone
When you select the Active Dynamic Zone edit button, the following screen will appear:
103

This window contains all of the dynamic content blocks that you have created. To edit an existing dynamic content block, select the edit link and another window will open with that content in the online editor. You can editthat content to add links, text, insert graphics, etc. To delete an active
104

content block, select the delete link. The system will ask you to confirm the deletion, then it will permanently remove that dynamic content block. To add additional dynamic content blocks, hit the “add new active content” link at the bottom of this page.
To activate a new dynamic block on your streaming services web page, select the radio button adjacent to the desired block you wish to activate, and hit the “Activate Selected” button at the top or bottom of this page. Once activated, the streaming services web page will automatically update the web page with this content (without requiring the viewer to refresh the page). This dynamic content area is useful to update during the live service in order to “pass the plate”, or identify worship songs, or provide the ability to download sermon notes, etc. You can have as many dynamic content blocks as you desire and can update them as often as you like during the liveservice.
Also included in this area is a dynamic web service countdown clock. Once you have entered your service times, the countdown clock will automatically countdown to the next service. Once the service has begun, the countdown clock will show that the service has begun. It will remain in this “service hasbegun” mode for 30 minutes after the service has begun. It will then automatically begin counting down to the next service.
105

Administrator Guide
Outreach
Our outreach system is provided free of charge as part of the MyFlock.com suite. It provides you with an easy-to-use, online visitor attendance control panel, and makes keeping track of your ministry's visitors' attendance easy and secure. The following pages will lead you through recording visitors and attendance, and ultimately adding prospective visitors to the member database, so they can take an active part in your MyFlock.com or StreamingChurch.tv community!
Add Visitor
To use the outreach system, you must first record visitors in the database. This will only have to be done once per visitor. After they are in the database, they will remain there until membership. On the sidebar of your admin panel, simply click Add Visitor, and you will be provided with a form similar to the following:
This system is built under the assumption that you--the church administrator--already have a means of recording new visitors at your church. Many churches have sign-in sheets for visitors, or contact cards, or the like. This outreach system provides a means for you to digitize your current system, and phase each week's data into the MyFlock.com servers. From here, we provide means of tracking follow-ups.
Page 106

Administrator Guide
Fill out as much information as you know. Most fields are not required, so don't worry if you don't know the visitor's entire life inside and out. This information will solely represent the information you collect at your church already.
Follow Ups
To assign a volunteer to a visitor, click Assign Follow-Up on the sidebar to your left. A form similar to the following will appear.
Page 107

Administrator Guide
Simply assign each visitor to a volunteer, and then rest easy! The volunteer will do the rest. Once a volunteer is assigned to a visitor, all of that volunteer's assignments will be visible on the View Visitors portal. Additionally, these visitors will be coupled with every follow up they have been given, every recorded visit to your church, and various comments that have been recorded. The following page demonstrates an example View Visitors page.
Page 108

Administrator Guide
As you will notice in the above screenshot, there is a link that says "Record another attendance or follow-up!" This link will only appear when the visitor is due for another follow-up. By default, a visitor will be due for a follow-up once every 7 days. Furthermore, they will be flagged as ready for membership after 3+ follow-ups. As an administrator, however, you can change these settings.
Page 109

Administrator Guide
For a volunteer or administrator (administrators are also able to follow up with visitors, if they want to) actually recording the follow up is very simple. Simply click on the "Record another attendance or follow-up!" link as it appears. A form similar to that on the following page will appear.
Simply enter any comments regarding the follow-up that are worth noting. Also, for the sake of record-keeping, indicate the type of follow-up that was made, and the date that the actual follow-up occurred. This may not necessarily be the same as the date which the record was made. Submit the form, and you're done!
Page 110

Administrator Guide
Membership
The goal of this outreach system is twofold. Most obviously, it is simply to help visitors feel welcome in the church, and to convince them to continue attending. However, the ultimate idea is to convert visitors into members that are capable of logging into your church site, and contributing as active members.
After a visitor has been followed up with at least the minimum required for membership (as designated in your settings) an option to make them a member will appear on the View Visitors page. Once the option is clicked, a form similar to the following will appear.
Page 111

Administrator Guide
Assign a password for the visitor, and you're done! We assume you'll agree on a password beforehand, but it can be something random that you expect them to change after logging in for the first time. After this, the visitor will no longer be a visitor, and as such, will not be accessible through the outreach system.
Page 112
Administrator Guide
Page 113

Administrator Guide
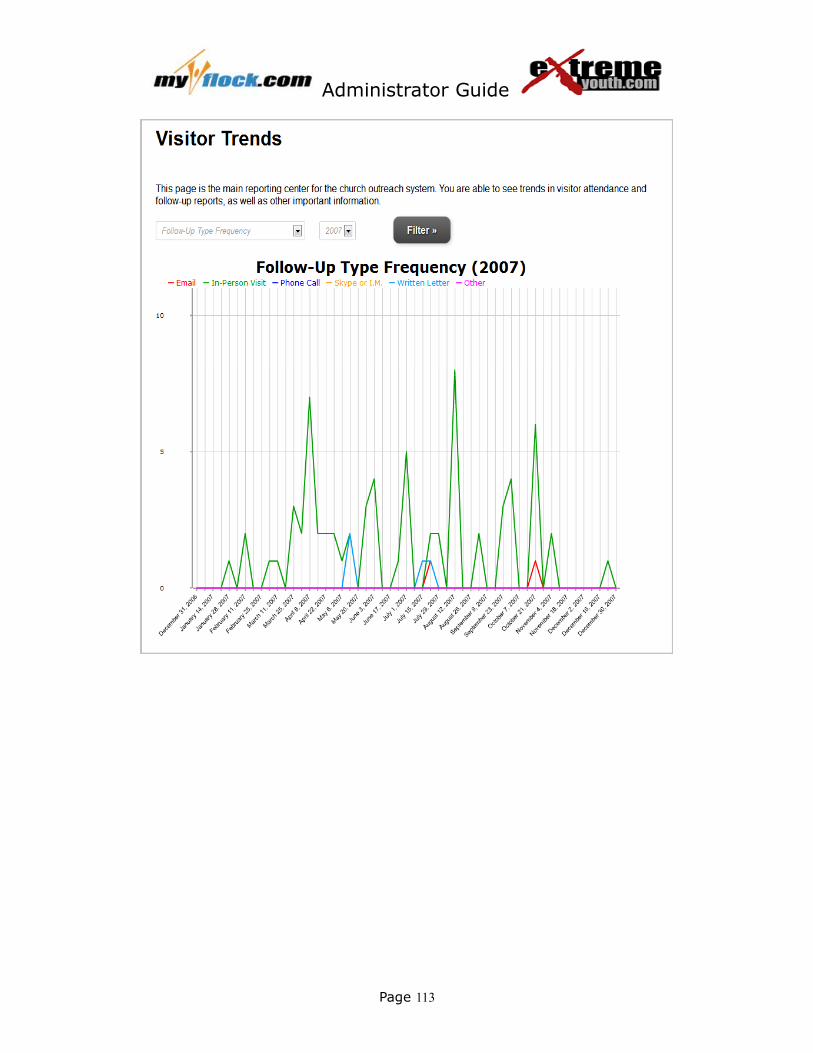
Trends
We also provide a simple system for watching outreach trends. There are 163 different types of trends to view, though we do not expect you to need them all. This is provided as a convenience, but is by no means necessary for you to make good use of the outreach system.
Manage Admin Manage Administrators
To manage administrators click “Manage Administrators” under Manage Admin. A screen like the one below will appear.
Page 114

Administrator Guide
On this page you can add new administrators by pressing add new administrator. A screen like the one below will appear.
Type the name, e-mail address, and password of the administrator you are adding. By clicking on the boxes you can limit what this administrator is allowed to do. When finished, press Add Administrator. The system will automatically send the new administrator as well as the main administrator an email with information for accessing the administration control panel.
To edit what an administrator may do or change his/her password, click Manage Administrator and click the boxes of the boxes you want the administrator to be allowed to do. When finished, press Update Administrator.
Page 115

Administrator Guide
Change Administrators Info
To change your administrator information press “Change Administrators Info”under Manage Admin. A screen like the one below will appear.
Enter the information you wish to update (administration email address and/or password). When complete, press “Update Admin Info”.
Change Church/youth Info
To change your church/youth information (name, address, phone, etc.) press “Change Church/youth Info” under Admin Management. A screen like the one below will appear.
Page 116

Administrator Guide
Fill in the blanks that you wish to change and click display on the lines you wish to display. The fields checked to display will appear on each page of theweb site. When complete, press “Update My Church/youth Info”.(MyFlock Only)
Page 117