adobe flash cs 6 - mason...
TRANSCRIPT
Adobe Flash CS 6
Topics: • Vectors,Shapesand Graphics• Layers• Gradient• Text
Level 2

15
Note:Like most things in Flash, animation does not require any ActionScript. However, you can create animation with Action-Script if you choose.
FLASH CS6
Types of animationprovides several ways to create animation and special effects. Each method provides you with different possibilities for creating engaging animated content.
Flash supports the following types of animation:
Motion tweensUse motion tweens to set properties for an object, such as position and alpha transparency in one frame and again in another frame. Flash then interpolates the property values of the frames in between. Motion tweens are useful for animation that consists of continuous motion or transformation of an object. Motion tweens appear in the Timeline as a contiguous span of frames that can be selected as a single object by default. Motion tweens are powerful and simple to create.
Classic tweensClassic tweens are like motion tweens, but are more complex to create. Classic tweens allow for some specific animated effects not possible with span-based tweens.Inverse Kinematics poses (deprecated with Flash Professional CC)Inverse kinematic poses allow you to stretch and bend shape objects and link groups of symbol instances to make them move together in naturalistic ways. Once you have added bones to a shape or a group of symbols, you can change the position of the bones or symbols in different keyframes. Flash interpolates the positions in the in-between frames.
Shape tweensIn shape tweening, you draw a shape at one specific frame in the Timeline, and change that shape or draw another shape at another specific frame. Flash Pro then interpolates the intermediate shapes for the frames in between, creating the animation of one shape morphing into another.
Frame-by-frame animationThis animation technique lets you specify different art for each frame in the Timeline. Use this technique to create an effect that is like the frames of a film being played in rapid succession. This technique is useful for complex animation where the graphic elements of each frame must be different.

16
FLASH CS6
About frame rates
The frame rate, the speed the animation is played at, is measured in number of frames per second (fps). A frame rate that’s too slow makes the animation appear to stop and start; a frame rate that’s too fast blurs the details of the animation. A frame rate of 24 fps is the default for new Flash documents and usually gives the best results on the web. The standard motion-picture rate is also 24 fps.
The complexity of the animation and the speed of the computer playing the animation affect the smoothness of the playback. To determine optimum frame rates, test your animations on a variety of computers.
Because you specify only one frame rate for the entire Flash Pro document, set this rate before you begin creating animation.
Identifying animations in the Timeline
Flash Pro distinguishes tweened animation from frame-by-frame animation in the Timeline by displaying different indicators in each frame that contains content.
The following frame content indicators appear in the Timeline:
A span of frames with a blue background indicates a motion tween. A black dot in the first frame of the span indicates that the tween span has a target object assigned to it. Black diamonds indicate the last frame and any other property keyframes. Property keyframes are frames that contain property changes explicitly defined by you. You can choose which types of property keyframes to display by right-clicking (Windows) or Command-clicking (Macintosh) the motion tween span and choosing View Keyframes > type from the context menu. Flash displays all types of property keyframes by default. All other frames in the span contain interpolated values for the tweened properties of the target object.

17
FLASH CS6
A hollow dot in the first frame indicates that the target object of the motion tween has been removed. The tween span still contains its property keyframes and can have a new target object applied to it.
A span of frames with a green background indicates an inverse kinematics (IK) pose layer. Pose layers contain IK armatures and poses. Each pose appears in the Timeline as a black diamond. Flash interpolates the positions of the armature in the frames in be-tween poses.
A black dot at the beginning keyframe with a black arrow and blue background indicates a classic tween.
A dashed line indicates that the classic tween is broken or incomplete, such as when the final keyframe is missing.
A black dot at the beginning keyframe with a black arrow and a light green background indicates a shape tween.
A black dot indicates a single keyframe. Light gray frames after a single keyframe contain the same content with no changes. These frames have a vertical black line and a hollow rectangle at the last frame of the span.
About layers in tweened animationEach scene in a Flash Pro document can consist of any number of Timeline layers. Use layers and layer folders to organize the contents of an animation sequence and separate animated objects. Organizing them in layers and folders prevents them from erasing, connecting to, or segmenting each other when they overlap. To create animation that includes tweened movement of more than one symbol or text field at once, place each object on a separate layer. You can use one layer as a background layer to contain static artwork and use additional layers to contain one separate animated object.
When you create a motion tween, Flash Pro converts the layer containing the object you selected to tween into a tween layer. The tween layer has a tween icon next to the layer name in the Timeline.
If other objects are present on the same layer as the tweened object, Flash Pro adds new layers above or below the original layer as needed. Any objects that existed below the tweened object on its original layer move to a new layer below the original layer. Any objects that were above the tweened object on its original layer move to a new layer above the original layer. Flash Pro inserts these new layers between any pre-existing layers in the Timeline. In this way Flash Pro preserves the original stacking order of all the graphic objects on the Stage.
A tween layer can contain only tween spans (contiguous groups of frames containing a tween), static frames, blank keyframes, or empty frames. Each tween span can contain only a single target object and an optional motion path for the target object. Because you cannot draw in a tween layer, create additional tweens or static frames on
18
FLASH CS6
other layers and then drag them to the tween layer. To place frame scripts on a tween layer, create them on another layer and drag them to the tween layer. A frame script can only reside in a frame outside the motion tween span itself. In general, it is best to keep all frame scripts on a separate layer that contains only ActionScript.
When a document has several layers, tracking and editing the objects on one or more of them can be difficult. This task is easier if you work with the contents of one layer at a time. To hide or lock layers you are not currently working on, click the Eye or Lock icon next to the layer name in the Timeline. Using layer folders can help you organize layers into manageable groups.
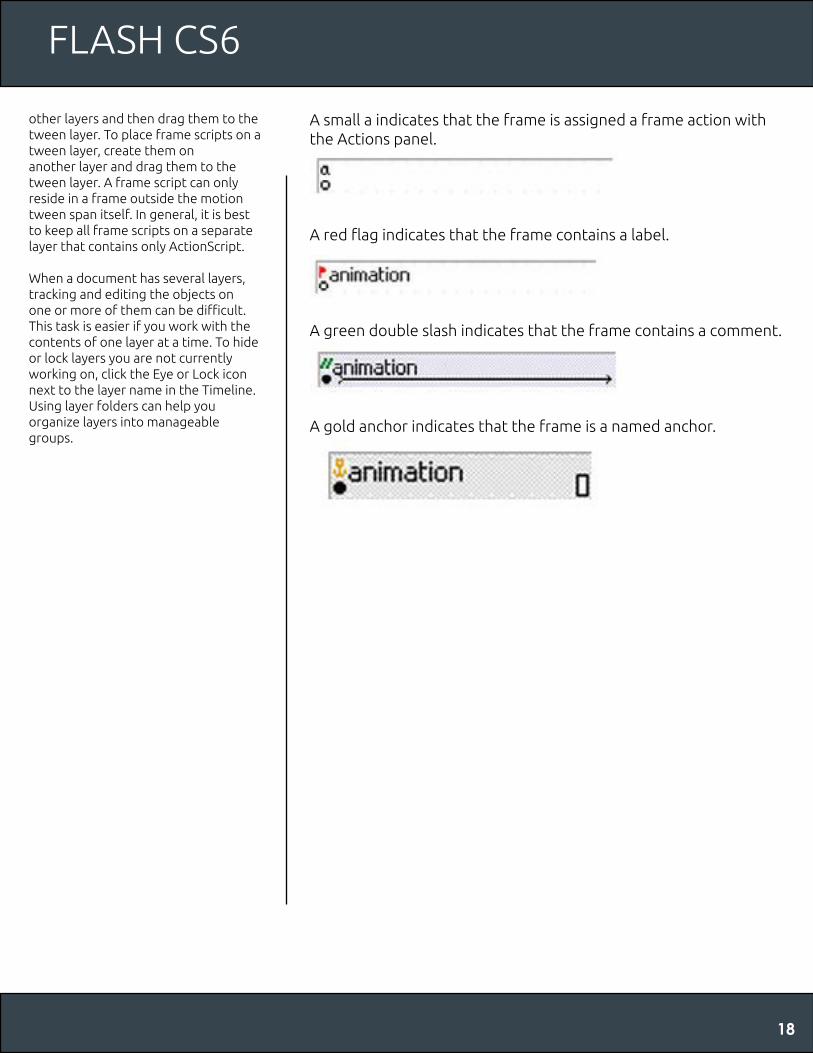
A small a indicates that the frame is assigned a frame action with the Actions panel.
A red flag indicates that the frame contains a label.
A green double slash indicates that the frame contains a comment.
A gold anchor indicates that the frame is a named anchor.

19
FLASH CS6
About drawing
The drawing tools in Adobe® Flash® Professional let you create and modify lines and shapes for the artwork in your documents. The lines and shapes you create in Flash Professional are all lightweight vector graphics, which help keep your FLA file size small.
Before you draw and paint in Flash Professional, it is important to understand how Flash Professional creates artwork, and how drawing, painting, and modifying shapes can affect other shapes on the same layer.
Vector and bitmap graphicsComputers display graphics in either vector or bitmap format. Understanding the difference between the two formats helps you work more efficiently. Using Flash Professional, you can create and animate compact vector graphics. Flash Professional also imports and manipulates vector and bitmap graphics that were created in other applications.
Vector graphicsVector graphics describe images by using lines and curves, called vectors, that also include color and position properties. For example, the image of a leaf is described by points through which lines pass, creating the leaf’s outline. The color of the leaf is determined by the color of the outline and the color of the area enclosed by the outline.When you edit a vector graphic, you modify the properties of the lines and curves that describe its shape. Move, resize, reshape, and change the color of a vector graphic without changing the quality of its appearance. Vector graphics are resolution independent; that is, they can be displayed on output devices of varying resolutions without losing any quality.

20
FLASH CS6
Bitmap graphicsBitmap graphics describe images using colored dots, called pixels, arranged in a grid. For example, the image of a leaf is described by the specific location and color value of each pixel in the grid, creating an image in much the same manner as a mosaic.
When you edit a bitmap graphic, you modify pixels rather than lines and curves. Bitmap graphics are resolution dependent, because the data describing the image is fixed to a grid of a particular size. Editing a bitmap graphic can change the quality of its appearance. In particular, resizing a bitmap graphic can make the edges of the image ragged as pixels are redistributed within the grid. Displaying a bitmap graphic on an output device that has a lower resolution than the image itself also degrades its quality.
PathsWhenever you draw a line or shape in Flash, you create a line called a path. A path is made up of one or more straight or curved segments. The beginning and end of each segment is denoted by anchor points, which work like pins holding a wire in place. A path can be closed (for example, a circle), or open, with distinct end-points (for example, a wavy line).You change the shape of a path by dragging its anchor points, the direction points at the end of direction lines that appear at anchor points, or the path segment itself.
Components ofa pathA. Selected (solid) endpointB. Selected anchor pointC. Unselected anchor pointD. Curved path segmentE. Direction pointF. Direction line.
21
FLASH CS6
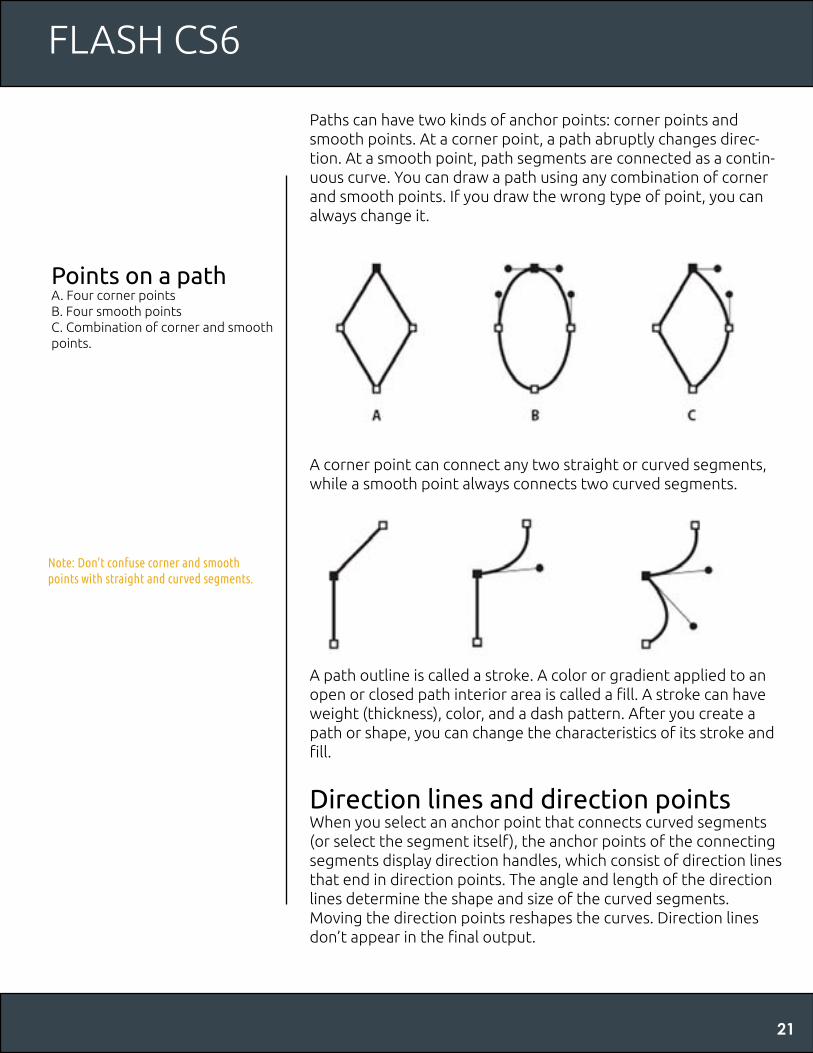
Paths can have two kinds of anchor points: corner points and smooth points. At a corner point, a path abruptly changes direc-tion. At a smooth point, path segments are connected as a contin-uous curve. You can draw a path using any combination of corner and smooth points. If you draw the wrong type of point, you can always change it.
A corner point can connect any two straight or curved segments, while a smooth point always connects two curved segments.
A path outline is called a stroke. A color or gradient applied to an open or closed path interior area is called a fill. A stroke can have weight (thickness), color, and a dash pattern. After you create a path or shape, you can change the characteristics of its stroke and fill.
Direction lines and direction pointsWhen you select an anchor point that connects curved segments (or select the segment itself), the anchor points of the connecting segments display direction handles, which consist of direction lines that end in direction points. The angle and length of the direction lines determine the shape and size of the curved segments. Moving the direction points reshapes the curves. Direction lines don’t appear in the final output.
Points on a pathA. Four corner pointsB. Four smooth pointsC. Combination of corner and smooth points.
Note: Don’t confuse corner and smooth points with straight and curved segments.
22
FLASH CS6
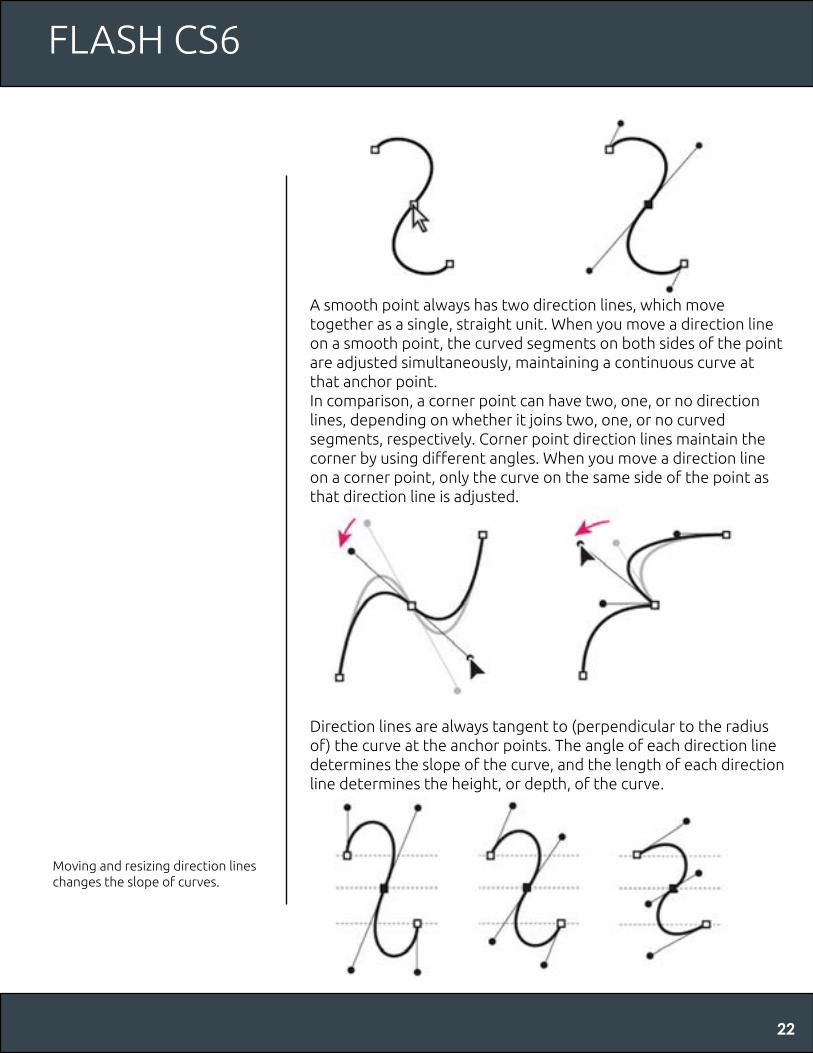
A smooth point always has two direction lines, which move together as a single, straight unit. When you move a direction line on a smooth point, the curved segments on both sides of the point are adjusted simultaneously, maintaining a continuous curve at that anchor point.In comparison, a corner point can have two, one, or no direction lines, depending on whether it joins two, one, or no curved segments, respectively. Corner point direction lines maintain the corner by using different angles. When you move a direction line on a corner point, only the curve on the same side of the point as that direction line is adjusted.
Direction lines are always tangent to (perpendicular to the radius of) the curve at the anchor points. The angle of each direction line determines the slope of the curve, and the length of each direction line determines the height, or depth, of the curve.
Moving and resizing direction lines changes the slope of curves.

23
FLASH CS6
Drawing modes and graphic objects
In Flash Professional, you can create several different kinds of graphic objects by using different drawing modes and drawing tools. Each kind has its own advantages and disadvantages. By understanding the capabilities of the different graphic object types, you can make good decisions about which types of objects to use in your work.
Merge Drawing modeThe default drawing mode automatically merges shapes that you draw when you overlap them. When you draw shapes that overlap each other in the same layer, the top-most shape cuts away the part of the shape underneath it that it overlaps. In this way, drawing shapes is a destructive drawing mode. For example, if you draw a circle and overlay a smaller circle on top of it, and then select the smaller circle and move it, the portion of the second circle that overlaid the first circle is removed.
When a shape has both a stroke and a fill, they are considered separate graphic elements that can be selected and moved independently.
Note: In Flash Professional, graphic objects are items on the Stage. Flash lets you move, copy, delete, transform, stack, align, and group graphic objects. “Graphic objects” in Flash are different from “ActionScript objects,” which are part of the ActionScript® programming language. Do not confuse the two uses of the term “objects.” For more information on objects in the programming language, see About Data Types in Learning ActionScript 2.0 in Adobe Flash, or Data types in the ActionScript 3.0 Developer’s Guide.
Enter Merge Drawing mode• Select the Merge Drawing option in
the Tools panel.• Select a drawing tool from the
Tools panel and draw on the StageNote: By default, Flash Professional uses the Merge Drawing mode.

24
FLASH CS6
Object Drawing modeCreates shapes referred to as drawing objects. Drawing objects are separate graphic objects that do not automatically merge together when overlaid. This lets you overlap shapes without altering their appearance if you move them apart, or rearrange their appearance. Flash Professional creates each shape as a separate object that you can individually manipulate.
When a drawing tool is in Object Drawing mode, the shapes you create with it are self-contained. The stroke and fill of a shape are not separate elements, and shapes that overlap do not alter one another. When you select a shape created using Object Drawing mode, Flash Professional surrounds the shape with a rectangular bounding box to identify it.
Note: Set preferences for contact sensitivity when selecting shapes created using the Object Drawing mode.
Enter Object Drawing mode• To draw shapes using Object
Drawing mode, you must explicitly enable it.
• Select a drawing tool that supports Object Drawing mode (the Pencil, Line, Pen, Brush, Oval, Rectangle, and Polygon tools).
• Select the Object Drawing button
from the Options category of the Tools panel, or press the J key to toggle between the Merge and Object Drawing modes. The Object Drawing button toggles between the Merge and Object Drawing modes. You can set preferences for contact sensitivity when you select shapes created with Object Draw-ing mode.
• Draw on the Stage.
Convert a Merge Drawing mode created shape to an Object Drawing mode shape• Select the shape on the Stage.• To convert the shape into an Object
Drawing mode shape, select Modify > Combine Objects > Union. After conversion, the shape is treated like a vector-based drawing object that does not alter its appearance by interacting with other shapes.
Note: To join two or more shapes into a single, object-based shape, use the Union command.

25
FLASH CS6
Primitive objectsPrimitive objects are shapes that let you adjust their characteristics in the Property inspector. You can precisely control the size, corner radius, and other properties of the shape at any time after you have created it without having to draw it from scratch.
Overlapping shapesWhen you draw a line across another line or painted shape in Merge Drawing mode, the overlapping lines are divided into seg-ments at the intersection points. To select, move, and reshape each segment individually, use the Selection tool.
When you paint on top of shapes and lines, the portion underneath is replaced by whatever is on top. Paint of the same color merges together. Paint of different colors remains distinct. To create masks, cutouts, and other negative images, use these features.
For example, the following cutout is made by moving the ungrouped kite image onto the green shape, deselecting the kite, and then moving the filled portions of the kite away from the green shape.Making a cutout with the kite image.To avoid inadvertently altering shapes and lines by overlapping them, group the shapes or use layers to separate them.

26
FLASH CS6
Text Layout Framework (TLF)LF text, introduced in Adobe Flash Professional CS5, enables you to add text to a FLA file using a new text engine called the Text Layout Framework (TLF). TLF supports a wider array of rich text layout features and fine control of text attributes. TLF text allows greater control of text than the previous text engine, now called “classic text.”
Compared to classic text, TLF text provides additional charac-ter styles, including leading, ligatures, highlight color, underline, strikethrough, case, digit case, and more. It also includes additional paragraph styles, including multicolumn support with gutter width, last-line justification options, margins, indents, paragraph spacing, and container padding values.
Using TLF text, you can control additional Asian text attributes, including Tate Chu Yoko, Mojikumi, Kinsoku Shori, and Leading model. You can also apply attributes such as 3D rotation, color effects, and blend modes to TLF text without placing it in a movie clip symbol.
TLF text can flow across multiple text containers. These containers are called threaded or linked text containers. It enables you to create right-to-left text for Arabic and Hebrew scripts. It also supports bi-directional text where right-to-left text can contain elements of left-to-right text. This is important for embedding
When creating text, it is important to understand the following:
• TLF text is the default text type in Flash Professional.
• There are two types of TLF text containers: point text and area text. A point text container’s size depends solely on the text it contains, whereas an area text container’s size is independent of the amount of text it contains. Point text is the default. To change a point text container to area text, resize it with the Selection tool or double-click the small circle at the bottom right of the container’s bounding box.
• TLF text requires that you specify ActionScript 3 and Flash Player 10 or later in the publish settings of your FLA file. For more information, see the section titled Publish settings in the Flash documenta-tion.
27
FLASH CS6
English words or Arabic numerals within Arabic/Hebrew text:The Property inspector has three display modes when using TLF text, depending on the current type of text selection:
• Text tool mode when the Text tool has been selected in the Tools panel and no text is selected in the Flash document
• Text object mode when an entire text block is selected on the Stage
• Text edit mode when a text block is being edited
You can create three types of text blocks with TLF text, depending on how you want the text to behave at runtime:
• Read only: Text cannot be selected or edited when it’s published as a SWF file.
• Selectable: Text is selectable and can be copied to the Clipboard but is not editable. This setting is the default for TLF text.
• Editable: Text is selectable and can be edited.
GradientsA gradient is a multicolor fill in which one color gradually changes into another color. You can apply up to 15 color transitions in a single gradient fill. A gradient allows you to create a smooth color gradation across one or more objects. You can name and save a gradient as a swatch to make it easy to apply the gradient to multiple objects in the same project.
Using Adobe Flash Professional, you can create two types of gradients:
Linear gradients change color along a single axis (horizontal or vertical)Radial gradients change color in an outward direction starting from a central focal pointYou can adjust the direction of a gradient, its colors, the location of the focal point, and many other properties using the Gradient Transform tool.
TLF text requires a specific ActionScript library to be available to Flash Player at runtime. If this library is not already present on the playback computer, Flash Player automatically downloads it.Note: TLF text cannot be used as a mask. To create a mask with text, use classic text.

28
FLASH CS6
To apply a gradient, follow these steps:
Select an object on the Stage.Open the Color panel (Window > Color) and choose a gradient type from the Type menu. The gradient definition bar appears, with pointers below the bar indicating the colors in the gradient.Click the bar and then click the color pointers to select a new color.Click and drag pointers off the bar to remove them from the gradient.
29
FLASH CS6
Create or edit a gradient fill
A gradient is a multicolor fill in which one color gradually changes into another color. Flash Pro lets you apply up to 15 color transitions to a gradient. Creating a gradient is a good way to create a smooth color gradation across one or more objects. You can save a gradient as a swatch to make it easy to apply the gradient to multiple objects. Flash Pro can create two types of gradients:
• To change a color in the gradient, select one of the color pointers below the gradient definition bar (the triangle at the top of the selected color pointer will turn black). Then click in the color space pane that appears above the gradient bar. Drag the Brightness slider to adjust the lightness of the color.
• To add a pointer to the gradient, click on or below the gradient definition bar. Select a color for the new pointer, as described in the previous step.
• You can add up to 15 color pointers, letting you create a gradient with up to 15 color transitions.
• To reposition a pointer on the gradient, drag the pointer along the gradient definition bar. Drag a pointer down and off of the gradient definition bar to remove it.
• To save the gradient, click the triangle in the upper-right corner of the Color panel, and select Add Swatch from the menu.
• The gradient is added to the Swatches panel for the current document.
• To transform the gradient, such as to make a vertical gradient instead of a horizontal one, use the Gradient Transform tool. See Transform gradient and bitmap fills for more information.
Note: When you select a linear or radial gra-dient, the Color panel also includes two other options if you are publishing for Flash Player 8 or later. First, the Overflow menu is enabled below the Type menu. Use the Overflow menu to control the colors applied past the limits of the gradient. Second, the gradient definition bar appears, with pointers below the bar indi-cating the colors in the gradient.
(Optional) From the Overflow menu, select an overflow mode to apply to the gradient: Extend (the default mode), Reflect, or Repeat.
(Optional) To create an SVG-compliant (Scalable Vector Graphics) linear or radial gradient, select the Linear RGB check box. This will allow the gradient to look smooth when scaled to differ-ent sizes after it is first applied.

30
FLASH CS6
Wrap-up By the end of this workshop, you should be able to:
• Understand the different drawing modes in Flash CS6.• How to create and edit a gradient fill.• Understand what TLF is.