advanced drafting and customization - freeyvonet.florent.free.fr/serveur/cours catia/catia...
TRANSCRIPT
Student Notes:
Advanced Drafting and Customization����������
Copyright DASSAULT SYSTEMES 1
Cop
yrig
ht D
AS
SA
ULT
SY
STE
ME
S
Advanced Drafting and Customization
CATIA V5 TrainingExercises
Version 5 Release 19January 2009
EDU_CAT_EN_DRA_AX_V5R19
Student Notes:
Advanced Drafting and Customization����������
Copyright DASSAULT SYSTEMES 2
Cop
yrig
ht D
AS
SA
ULT
SY
STE
ME
S
Table of Contents (1/2)
Exercise - The Plate 4Design Intent: The Plate 5Design Process: The Plate 6Do It Yourself 7
Exercise - The Pivot 12Design Intent: The Pivot 13Design Process: The Pivot 14Do It Yourself 15
Exercise - Generating dimensions 28Design Intent: Generating dimensions 29Design Process: Generating dimensions 30Do It Yourself 31
Exercise - Using filtering techniques 39Design Intent: Using Filtering Techniques 40Design Process: Using Filtering Techniques 41Do It Yourself 42
Exercise - Geometry and Free Text in VBScript 50Design Intent: Geometry and Free Text in VB Script 51
Student Notes:
Advanced Drafting and Customization����������
Copyright DASSAULT SYSTEMES 3
Cop
yrig
ht D
AS
SA
ULT
SY
STE
ME
S
Table of Contents (2/2)
Exercise - Filling in Title Blocks 54Design Intent: Filling in Title Blocks 55Do It Yourself 56
Student Notes:
Advanced Drafting and Customization����������
Copyright DASSAULT SYSTEMES 4
Cop
yrig
ht D
AS
SA
ULT
SY
STE
ME
S
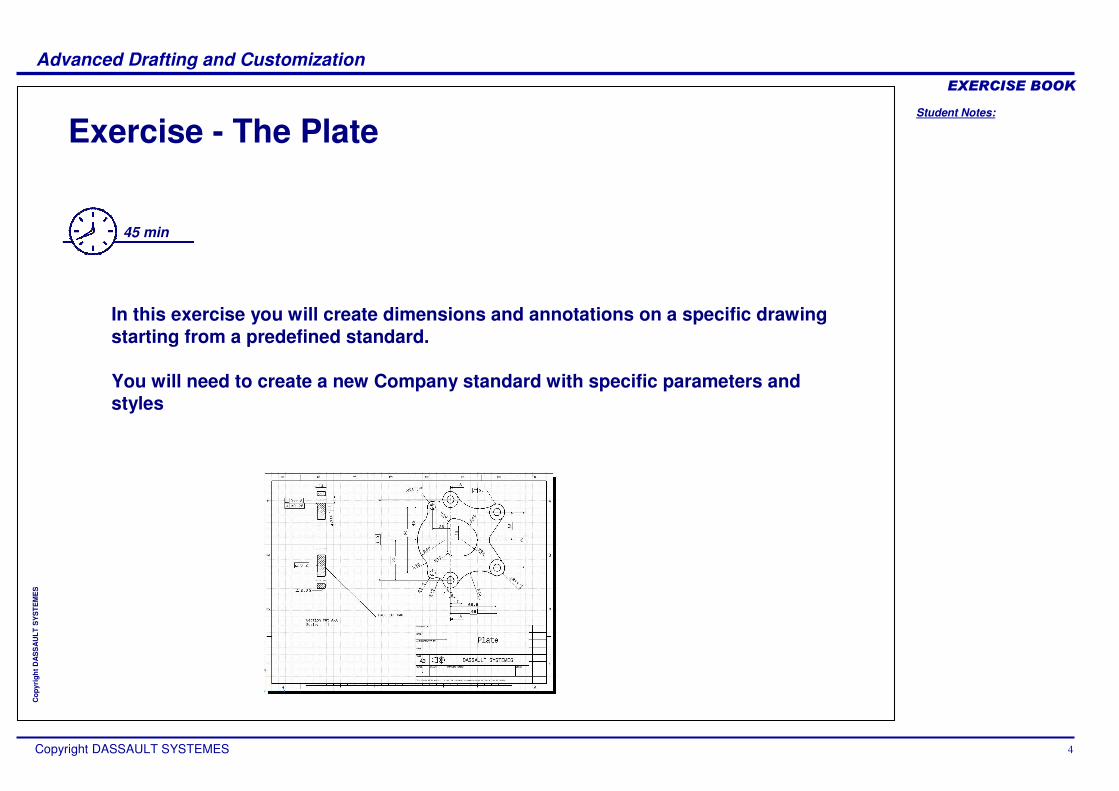
Exercise - The Plate
45 min
In this exercise you will create dimensions and annotations on a specific drawing starting from a predefined standard.
You will need to create a new Company standard with specific parameters and styles
Student Notes:
Advanced Drafting and Customization����������
Copyright DASSAULT SYSTEMES 5
Cop
yrig
ht D
AS
SA
ULT
SY
STE
ME
S
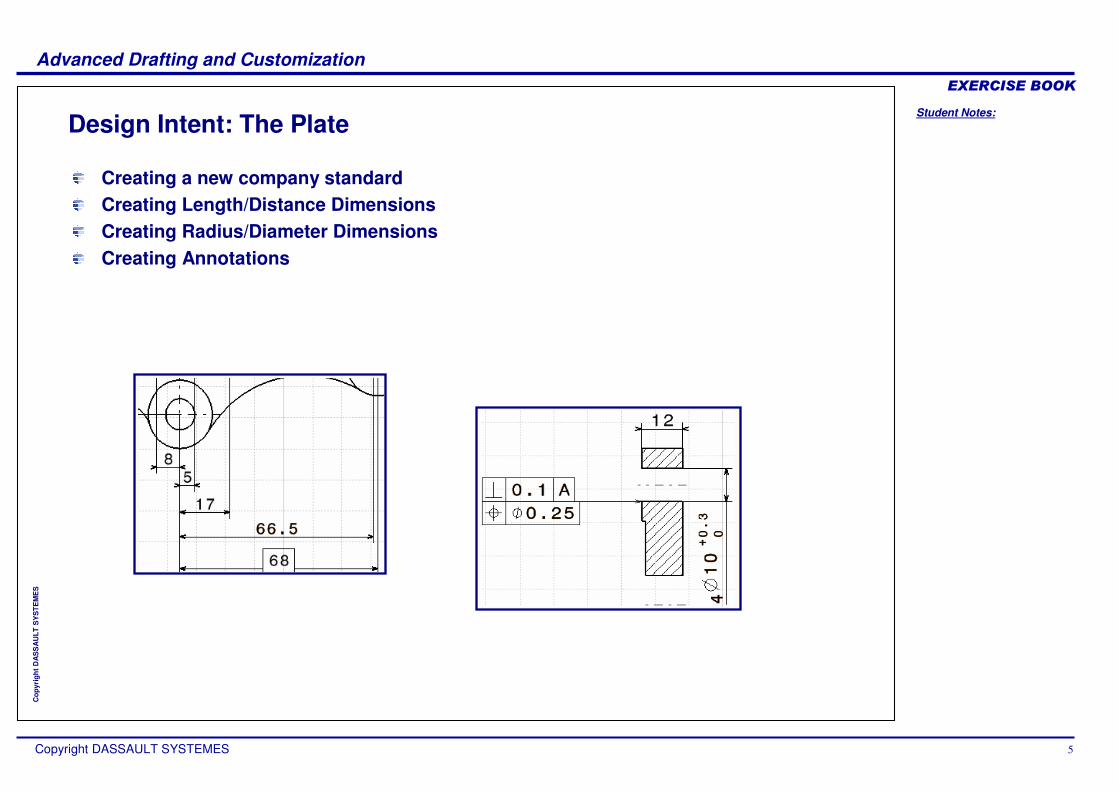
Design Intent: The Plate
Creating a new company standardCreating Length/Distance DimensionsCreating Radius/Diameter DimensionsCreating Annotations
Student Notes:
Advanced Drafting and Customization����������
Copyright DASSAULT SYSTEMES 6
Cop
yrig
ht D
AS
SA
ULT
SY
STE
ME
S
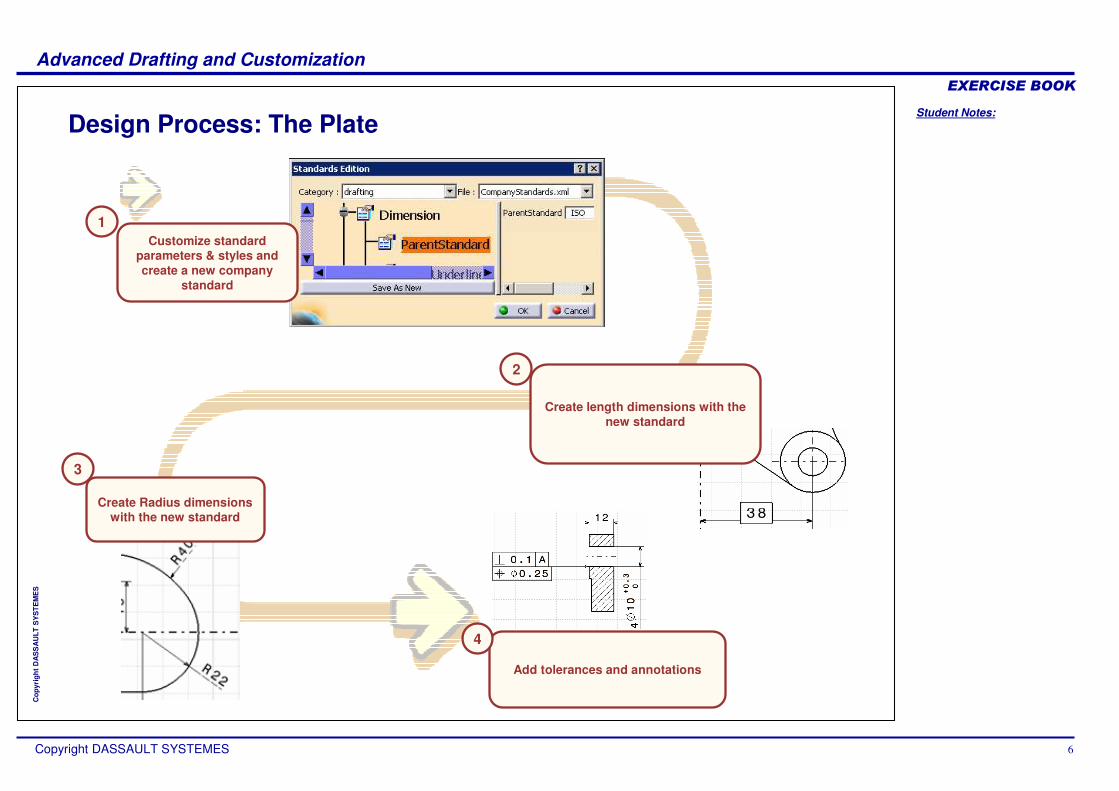
Design Process: The Plate
1
Create length dimensions with the new standard
2
3
Add tolerances and annotations
4
Create Radius dimensions with the new standard
Customize standard parameters & styles and create a new company
standard
Student Notes:
Advanced Drafting and Customization����������
Copyright DASSAULT SYSTEMES 7
Cop
yrig
ht D
AS
SA
ULT
SY
STE
ME
S
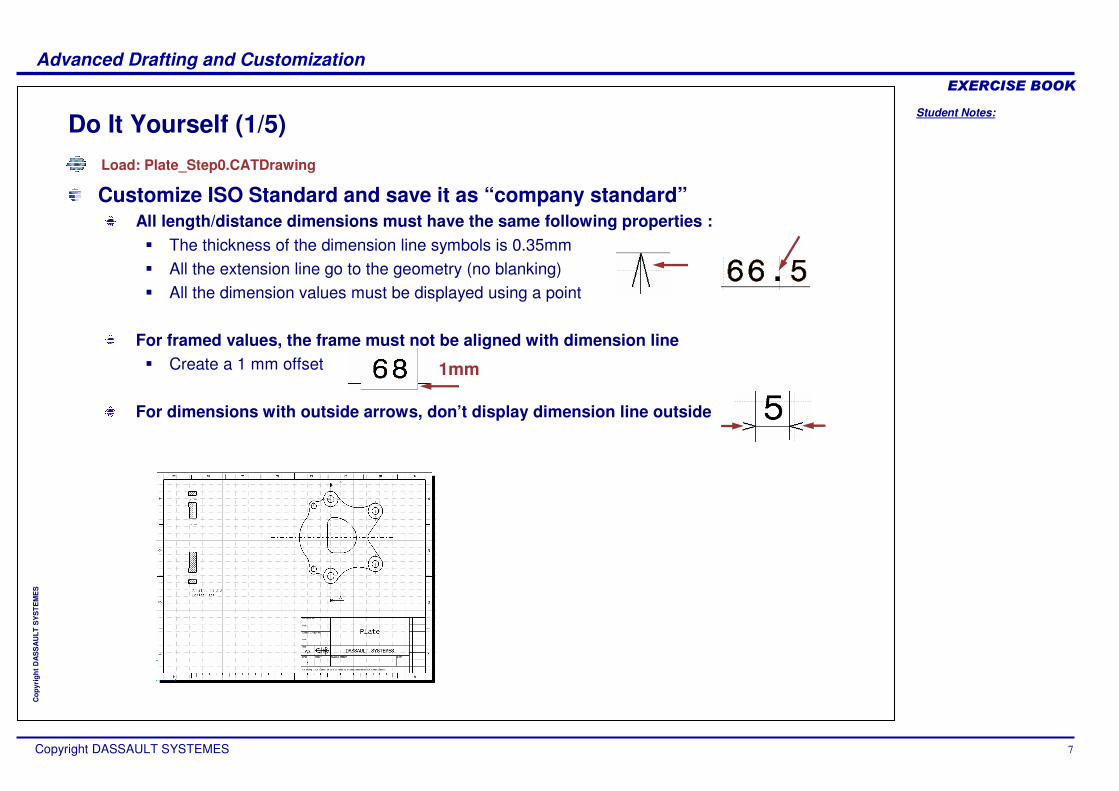
Do It Yourself (1/5)
1mm
Load: Plate_Step0.CATDrawing
Customize ISO Standard and save it as “company standard”All length/distance dimensions must have the same following properties :� The thickness of the dimension line symbols is 0.35mm� All the extension line go to the geometry (no blanking)� All the dimension values must be displayed using a point
For framed values, the frame must not be aligned with dimension line� Create a 1 mm offset
For dimensions with outside arrows, don’t display dimension line outside
Student Notes:
Advanced Drafting and Customization����������
Copyright DASSAULT SYSTEMES 8
Cop
yrig
ht D
AS
SA
ULT
SY
STE
ME
S
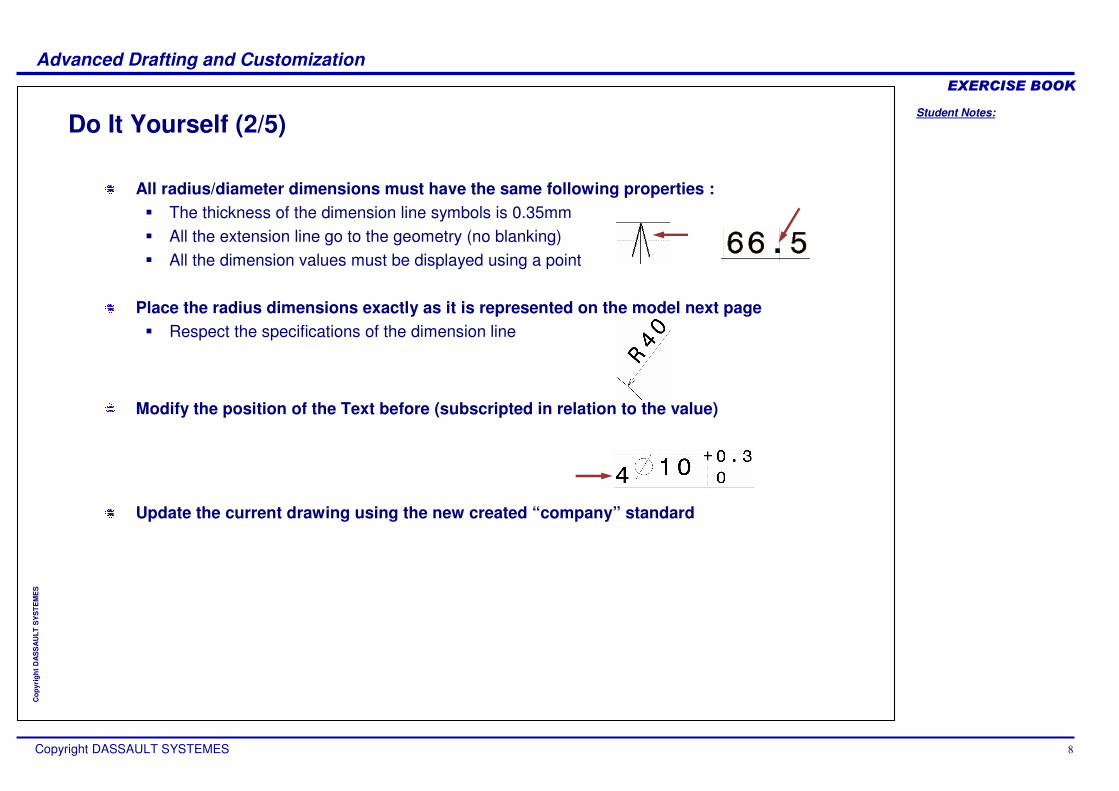
All radius/diameter dimensions must have the same following properties :� The thickness of the dimension line symbols is 0.35mm� All the extension line go to the geometry (no blanking)� All the dimension values must be displayed using a point
Place the radius dimensions exactly as it is represented on the model next page� Respect the specifications of the dimension line
Modify the position of the Text before (subscripted in relation to the value)
Update the current drawing using the new created “company” standard
Do It Yourself (2/5)
Student Notes:
Advanced Drafting and Customization����������
Copyright DASSAULT SYSTEMES 9
Cop
yrig
ht D
AS
SA
ULT
SY
STE
ME
S
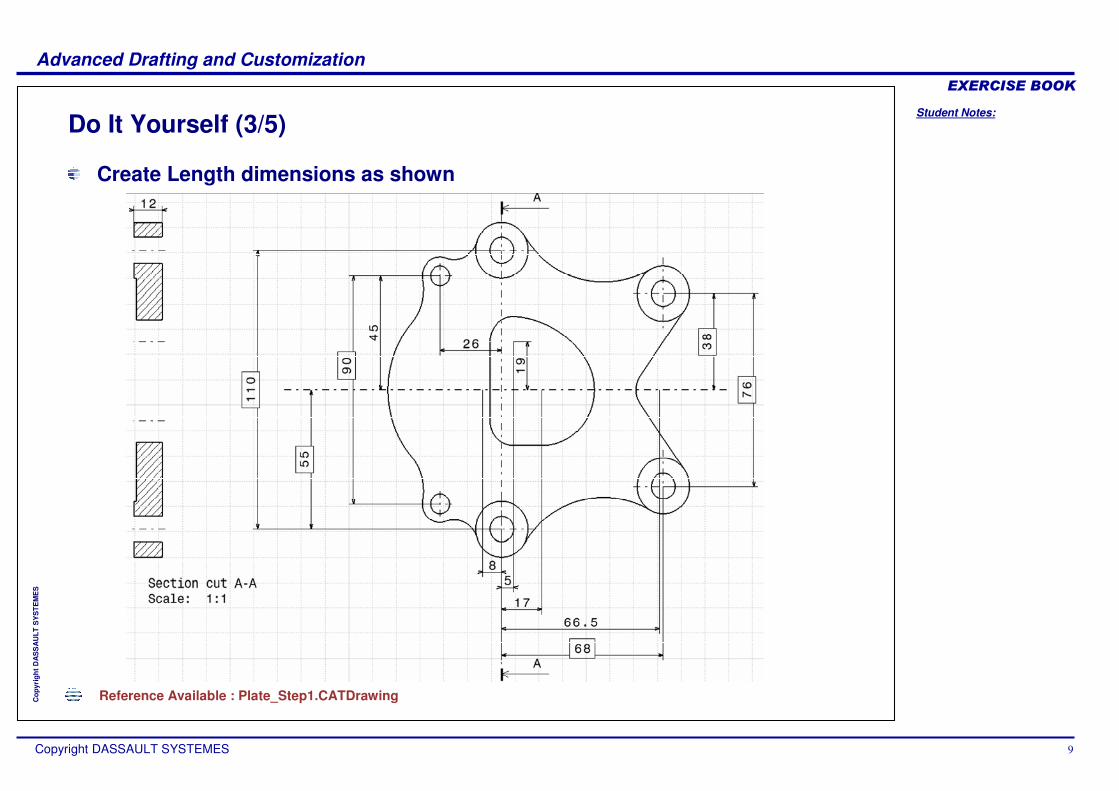
Do It Yourself (3/5)
Reference Available : Plate_Step1.CATDrawing
Create Length dimensions as shown
Student Notes:
Advanced Drafting and Customization����������
Copyright DASSAULT SYSTEMES 10
Cop
yrig
ht D
AS
SA
ULT
SY
STE
ME
S
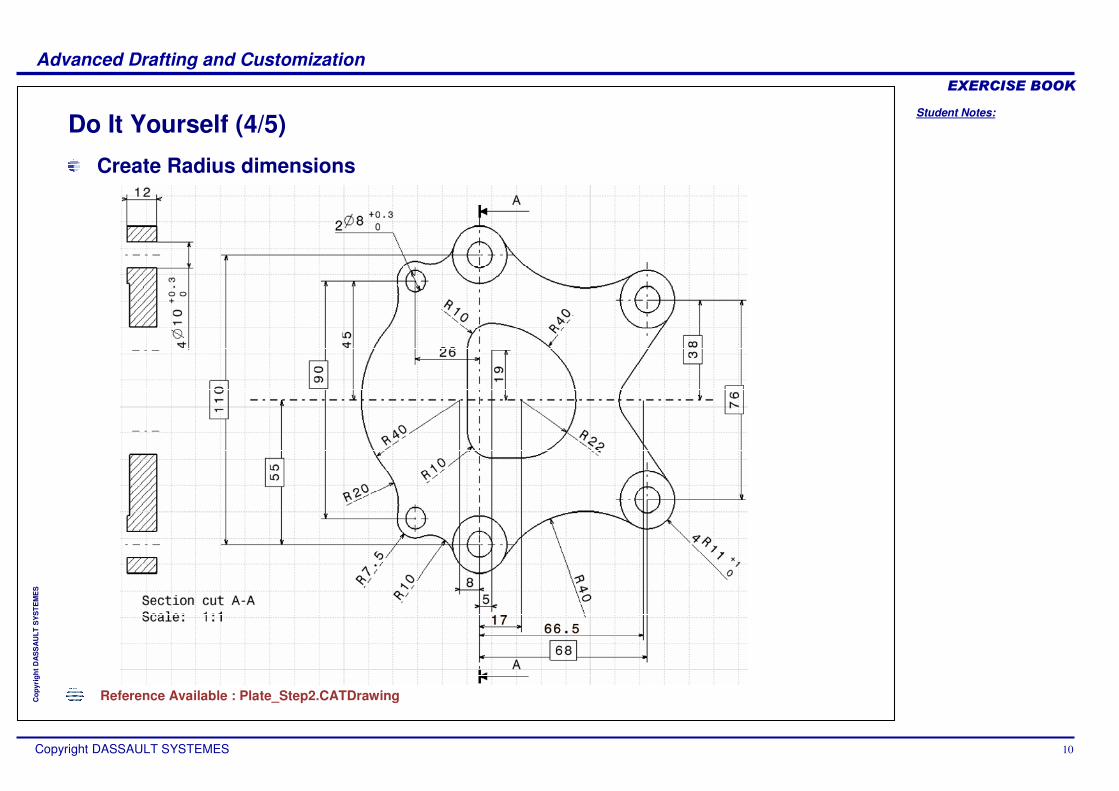
Do It Yourself (4/5)
Reference Available : Plate_Step2.CATDrawing
Create Radius dimensions
Student Notes:
Advanced Drafting and Customization����������
Copyright DASSAULT SYSTEMES 11
Cop
yrig
ht D
AS
SA
ULT
SY
STE
ME
S
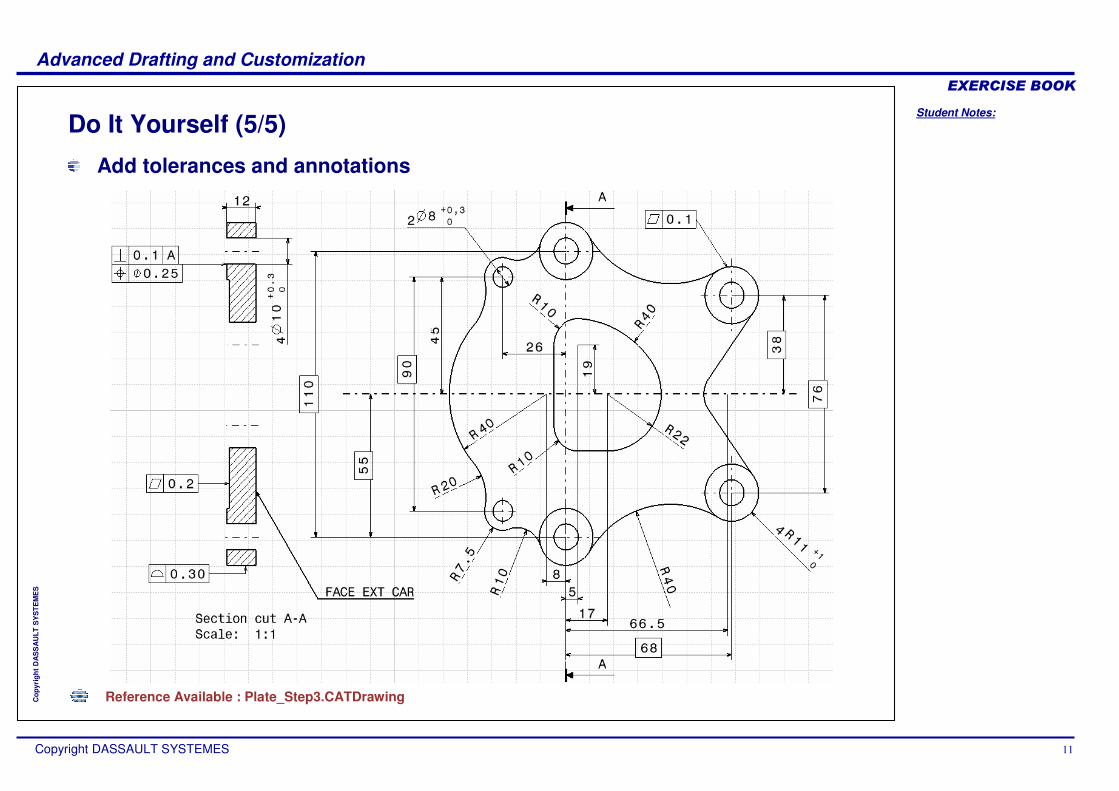
Do It Yourself (5/5)
Reference Available : Plate_Step3.CATDrawing
Add tolerances and annotations
Student Notes:
Advanced Drafting and Customization����������
Copyright DASSAULT SYSTEMES 12
Cop
yrig
ht D
AS
SA
ULT
SY
STE
ME
S
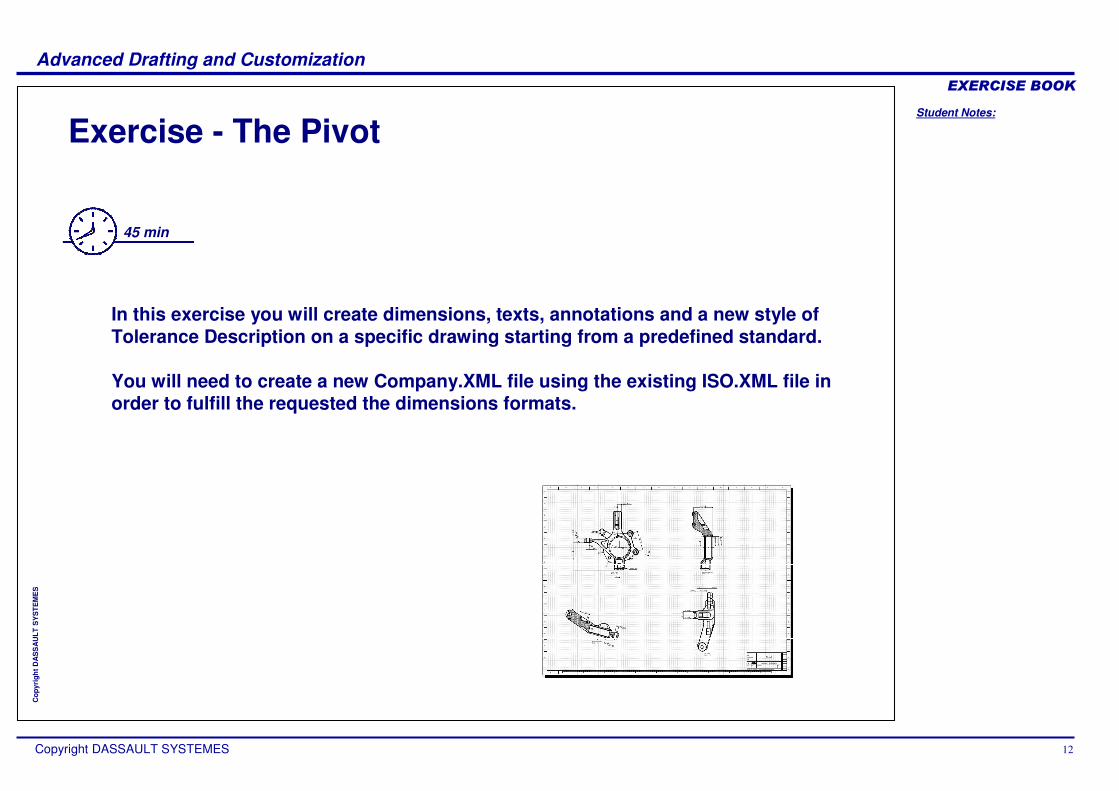
Exercise - The Pivot
45 min
In this exercise you will create dimensions, texts, annotations and a new style of Tolerance Description on a specific drawing starting from a predefined standard.
You will need to create a new Company.XML file using the existing ISO.XML file in order to fulfill the requested the dimensions formats.
Student Notes:
Advanced Drafting and Customization����������
Copyright DASSAULT SYSTEMES 13
Cop
yrig
ht D
AS
SA
ULT
SY
STE
ME
S
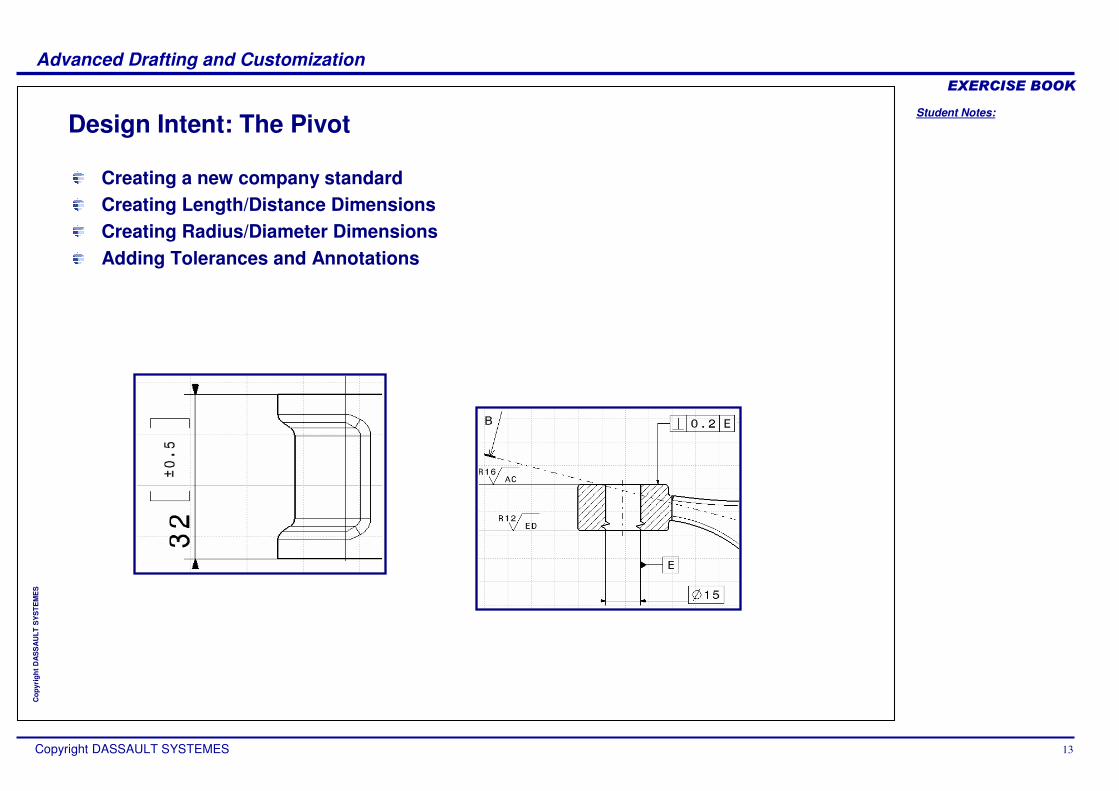
Design Intent: The Pivot
Creating a new company standardCreating Length/Distance DimensionsCreating Radius/Diameter DimensionsAdding Tolerances and Annotations
Student Notes:
Advanced Drafting and Customization����������
Copyright DASSAULT SYSTEMES 14
Cop
yrig
ht D
AS
SA
ULT
SY
STE
ME
S
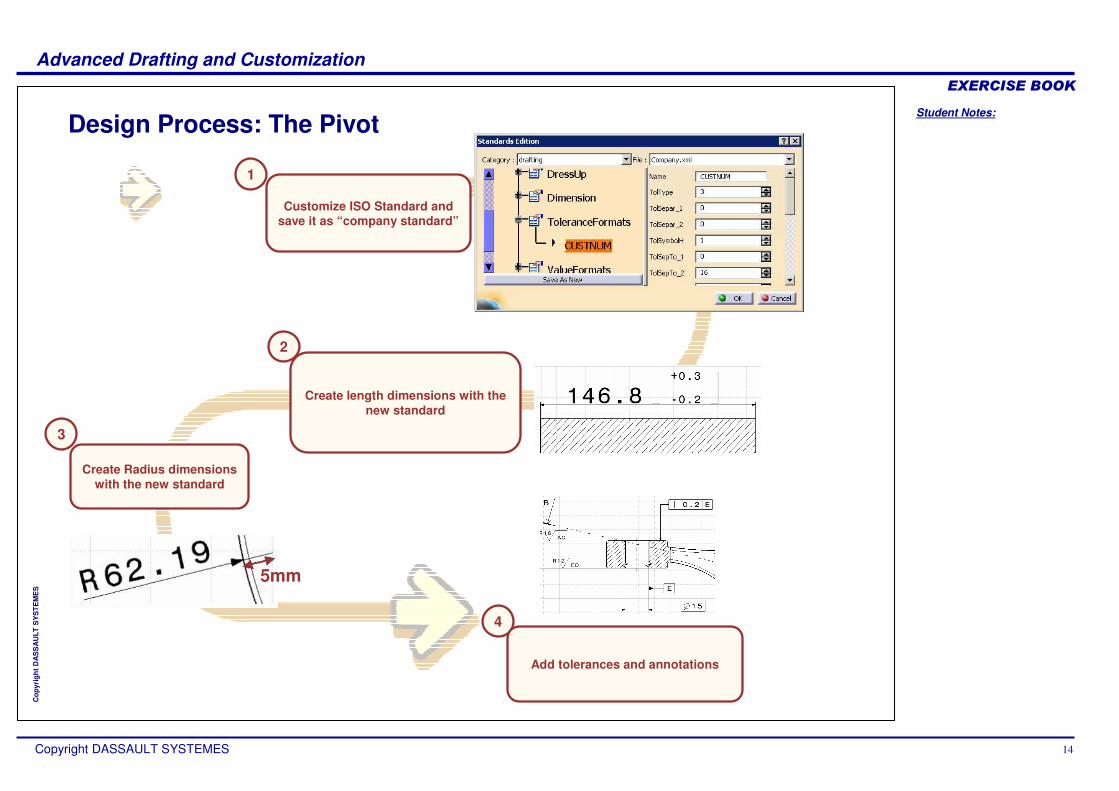
Design Process: The Pivot
Customize ISO Standard and save it as “company standard”
1
2
3
4
Add tolerances and annotations
Create Radius dimensions with the new standard
Create length dimensions with the new standard
5mm

Student Notes:
Advanced Drafting and Customization����������
Copyright DASSAULT SYSTEMES 15
Cop
yrig
ht D
AS
SA
ULT
SY
STE
ME
S
Do It Yourself (1/13)Load: Pivot_Step0.CATDrawing
Customize ISO Standard and save it as “company standard”Add a new style of Tolerance description called CUSTNUM with the following properties :� Ratio between the height of the tolerance and the height of the dimension value must be 0.5� Ratio between the height of the symbol and the height of the dimension value must be 2� Anchor point on the dimension-value is the middle� Anchor point on the tolerance is the middle� Vertical distance between two tolerance values is 1mm (horizontal value is 0mm)� Vertical distance between the dimension value and the tolerance is 0.5mm (horizontal value
is 0mm)� Display of the tolerance values trailing zeros has same behavior as for the dimension value� Display of the plus/minus symbol and the common value� Display of the tolerance value equal to zero with no sign� Display brackets as separators
Student Notes:
Advanced Drafting and Customization����������
Copyright DASSAULT SYSTEMES 16
Cop
yrig
ht D
AS
SA
ULT
SY
STE
ME
S
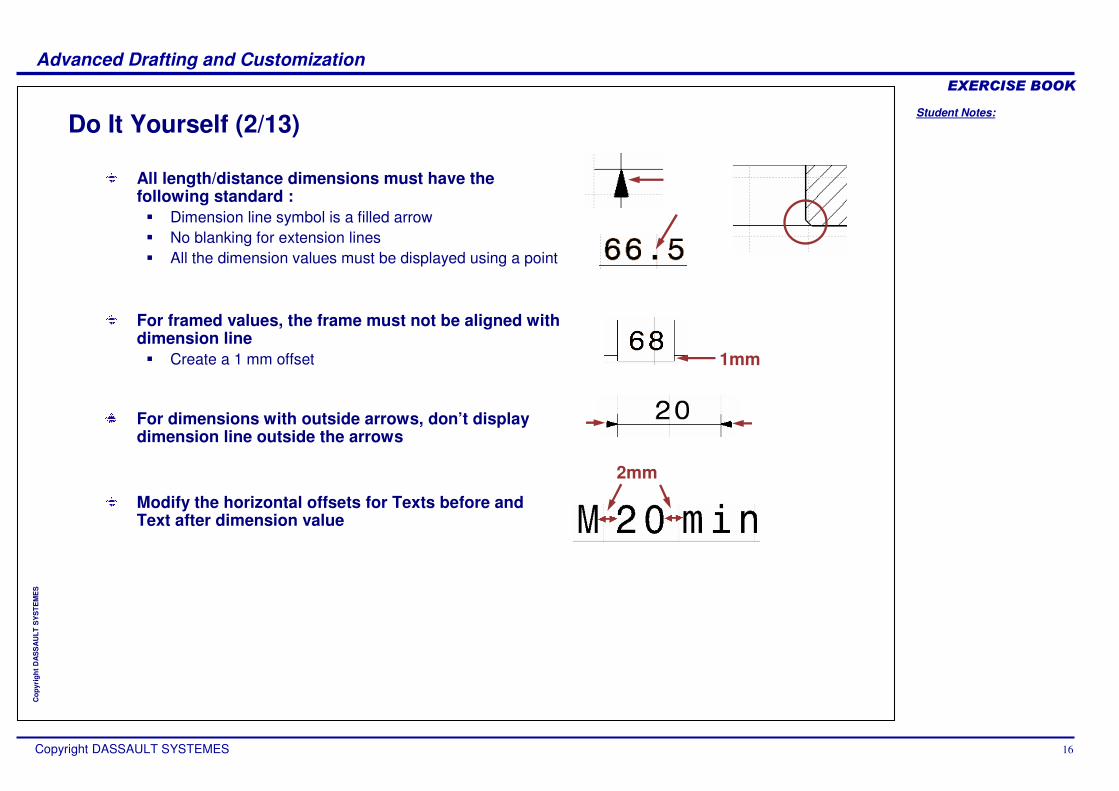
Do It Yourself (2/13)
2mm
1mm
All length/distance dimensions must have the following standard :� Dimension line symbol is a filled arrow� No blanking for extension lines� All the dimension values must be displayed using a point
For framed values, the frame must not be aligned with dimension line� Create a 1 mm offset
For dimensions with outside arrows, don’t display dimension line outside the arrows
Modify the horizontal offsets for Texts before and Text after dimension value
Student Notes:
Advanced Drafting and Customization����������
Copyright DASSAULT SYSTEMES 17
Cop
yrig
ht D
AS
SA
ULT
SY
STE
ME
S
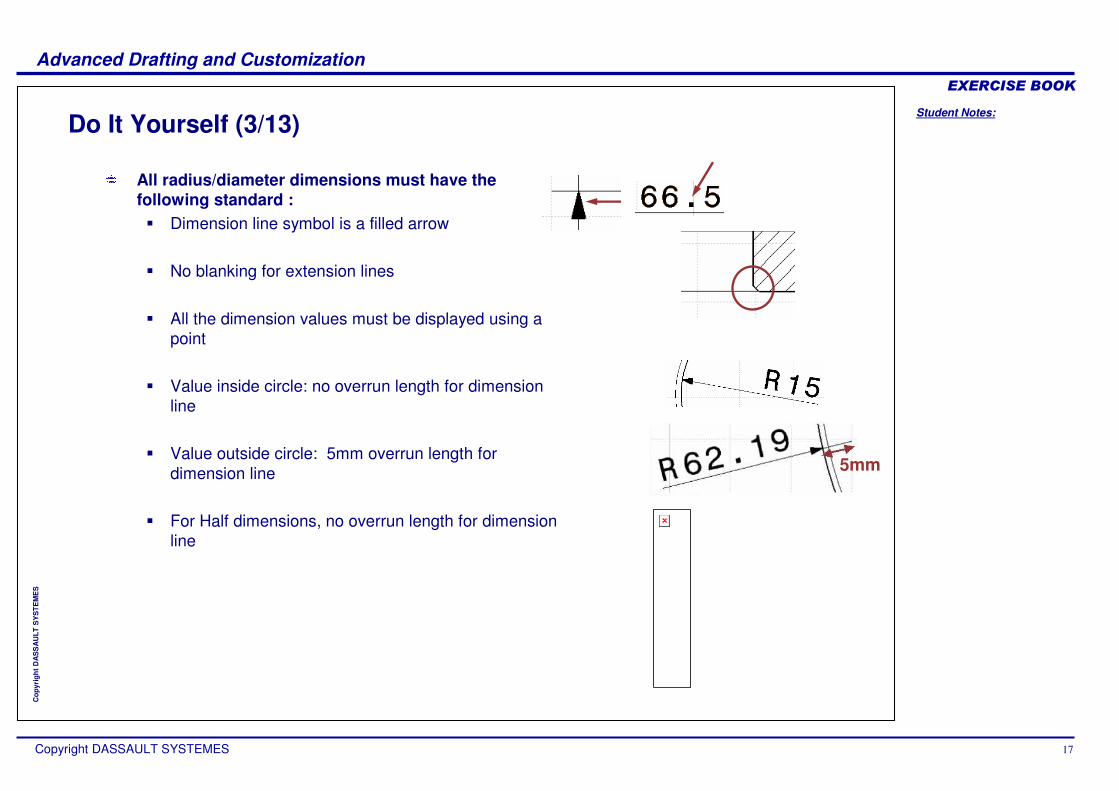
Do It Yourself (3/13)
5mm
All radius/diameter dimensions must have the following standard :� Dimension line symbol is a filled arrow
� No blanking for extension lines
� All the dimension values must be displayed using a point
� Value inside circle: no overrun length for dimension line
� Value outside circle: 5mm overrun length for dimension line
� For Half dimensions, no overrun length for dimension line
Student Notes:
Advanced Drafting and Customization����������
Copyright DASSAULT SYSTEMES 18
Cop
yrig
ht D
AS
SA
ULT
SY
STE
ME
S
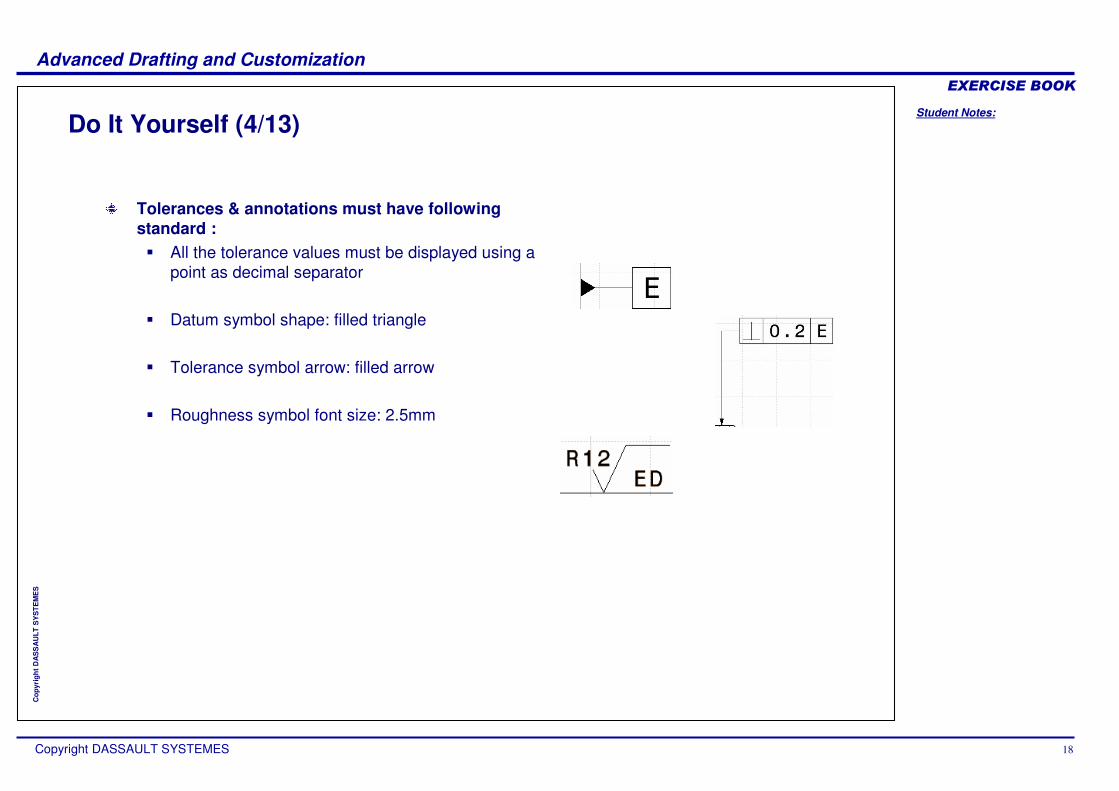
Do It Yourself (4/13)
Tolerances & annotations must have following standard :� All the tolerance values must be displayed using a
point as decimal separator
� Datum symbol shape: filled triangle
� Tolerance symbol arrow: filled arrow
� Roughness symbol font size: 2.5mm
Student Notes:
Advanced Drafting and Customization����������
Copyright DASSAULT SYSTEMES 19
Cop
yrig
ht D
AS
SA
ULT
SY
STE
ME
S
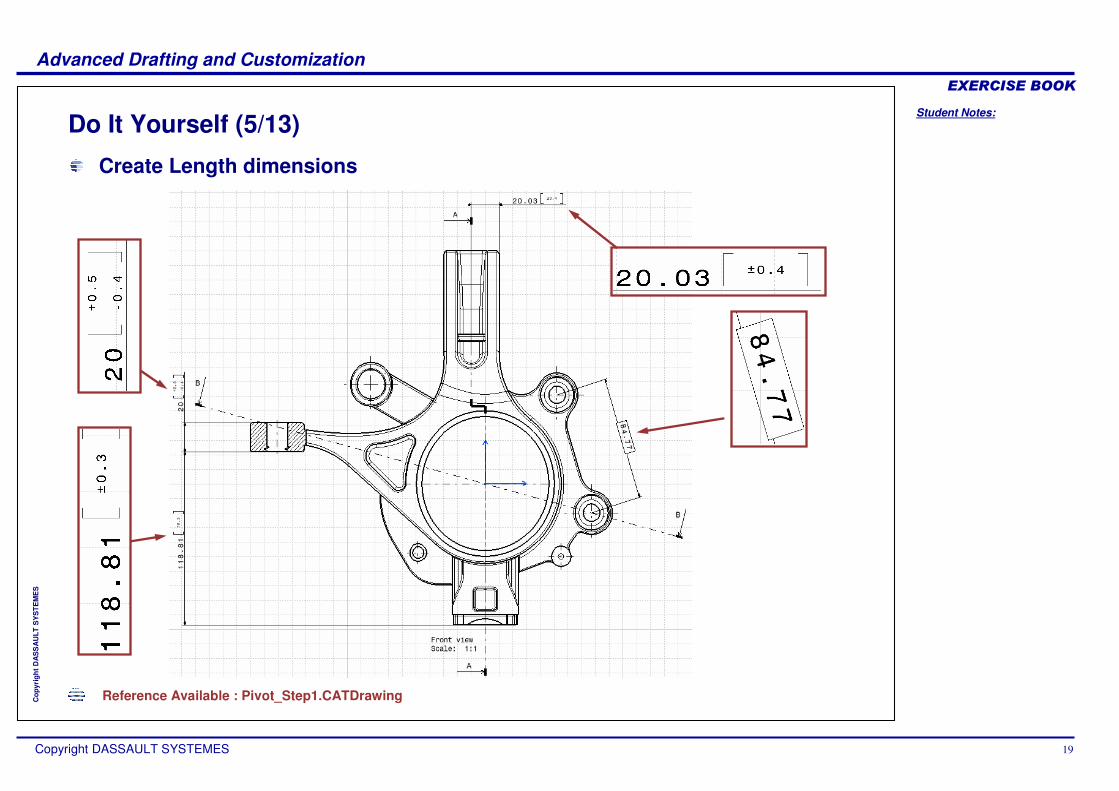
Do It Yourself (5/13)
Reference Available : Pivot_Step1.CATDrawing
Create Length dimensions
Student Notes:
Advanced Drafting and Customization����������
Copyright DASSAULT SYSTEMES 20
Cop
yrig
ht D
AS
SA
ULT
SY
STE
ME
S
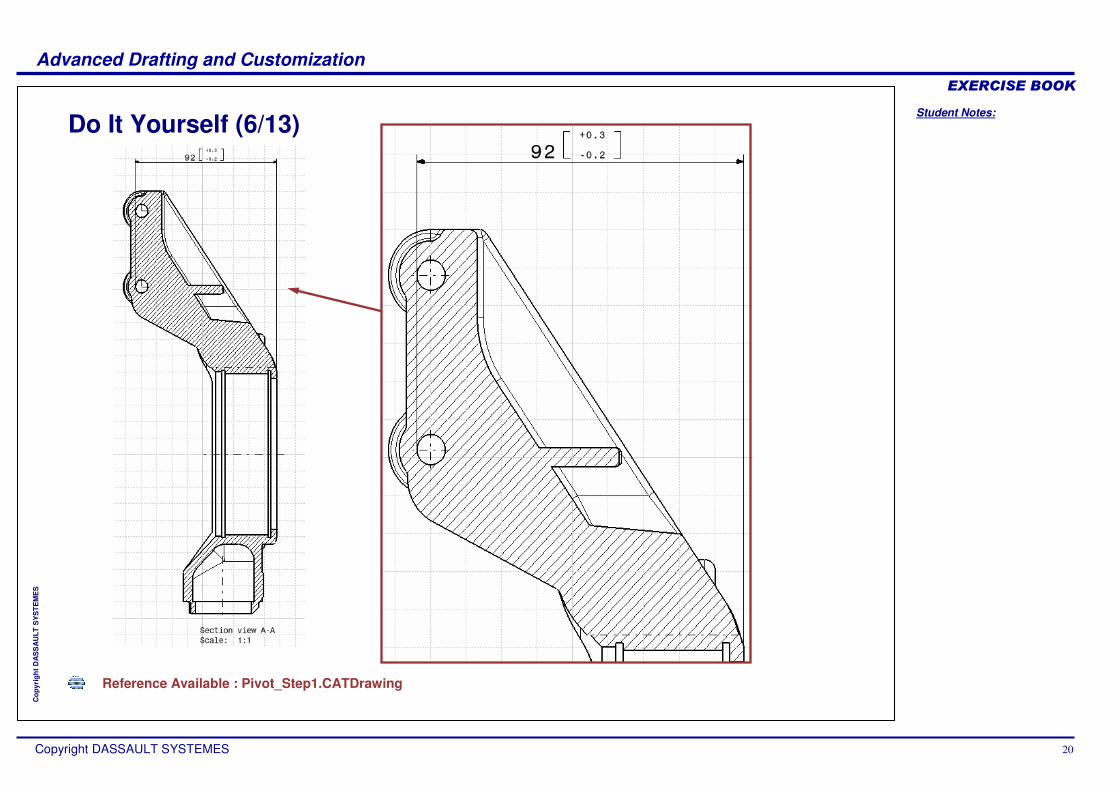
Do It Yourself (6/13)
Reference Available : Pivot_Step1.CATDrawing
Student Notes:
Advanced Drafting and Customization����������
Copyright DASSAULT SYSTEMES 21
Cop
yrig
ht D
AS
SA
ULT
SY
STE
ME
S
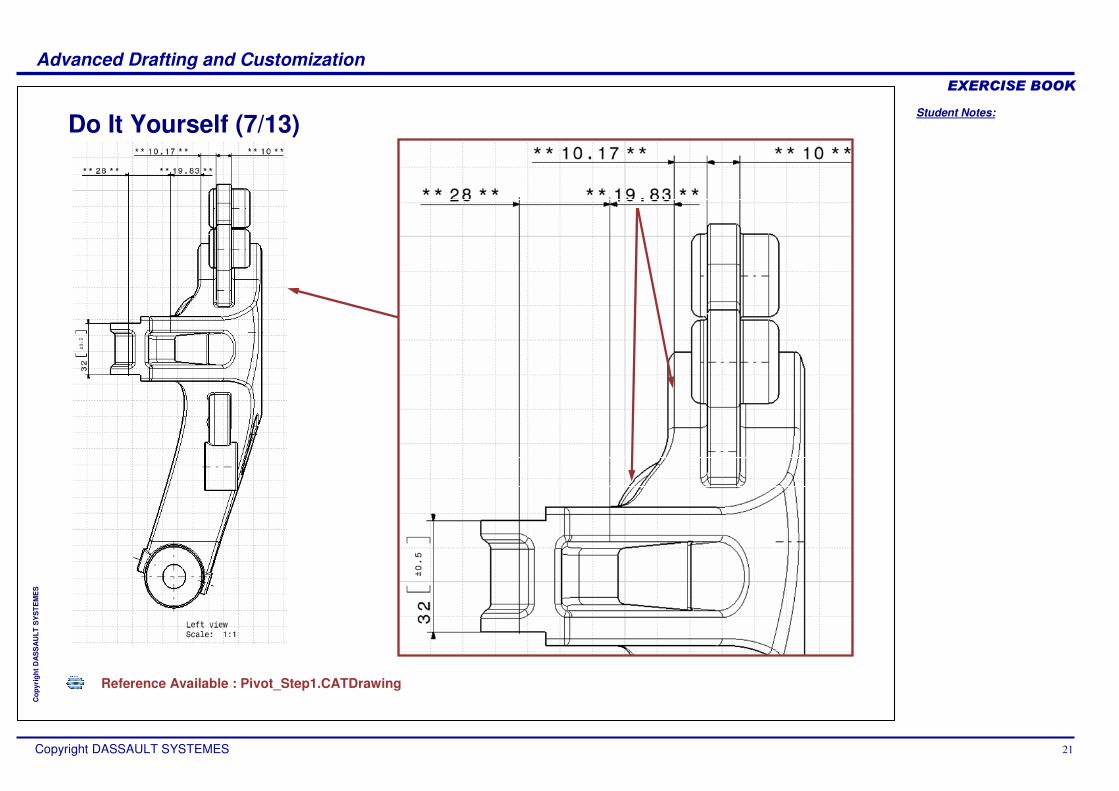
Do It Yourself (7/13)
Reference Available : Pivot_Step1.CATDrawing
Student Notes:
Advanced Drafting and Customization����������
Copyright DASSAULT SYSTEMES 22
Cop
yrig
ht D
AS
SA
ULT
SY
STE
ME
S
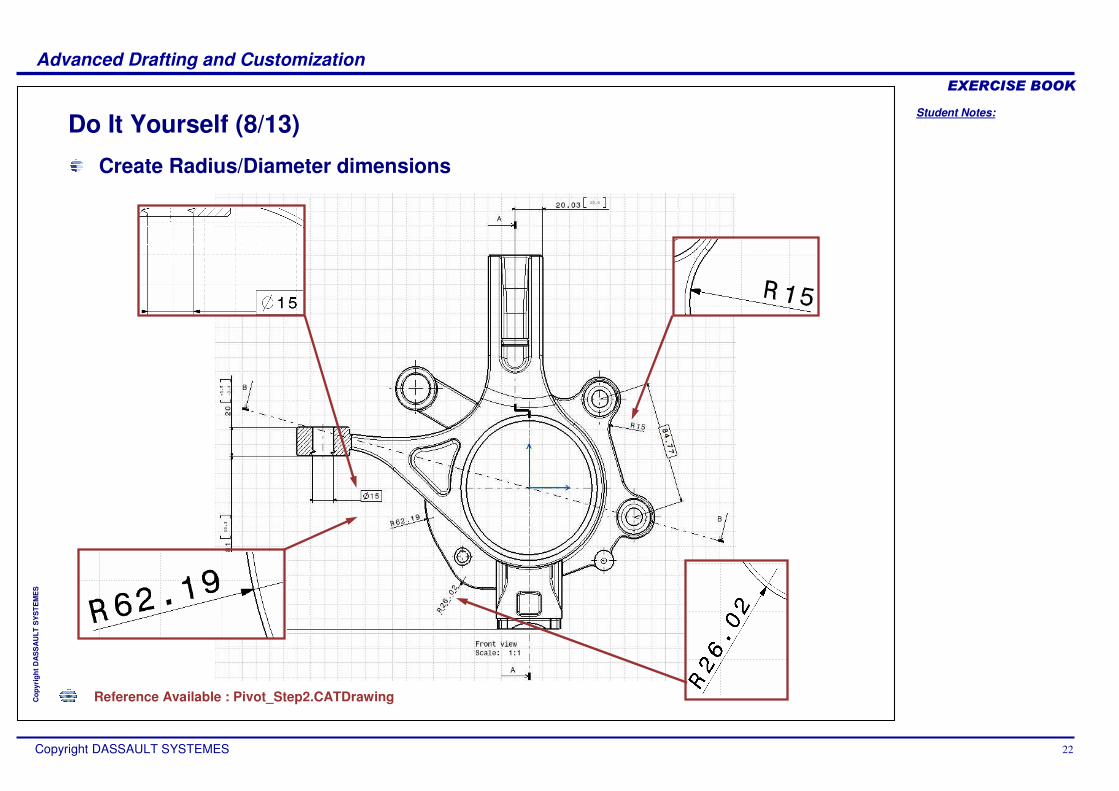
Do It Yourself (8/13)
Reference Available : Pivot_Step2.CATDrawing
Create Radius/Diameter dimensions
Student Notes:
Advanced Drafting and Customization����������
Copyright DASSAULT SYSTEMES 23
Cop
yrig
ht D
AS
SA
ULT
SY
STE
ME
S
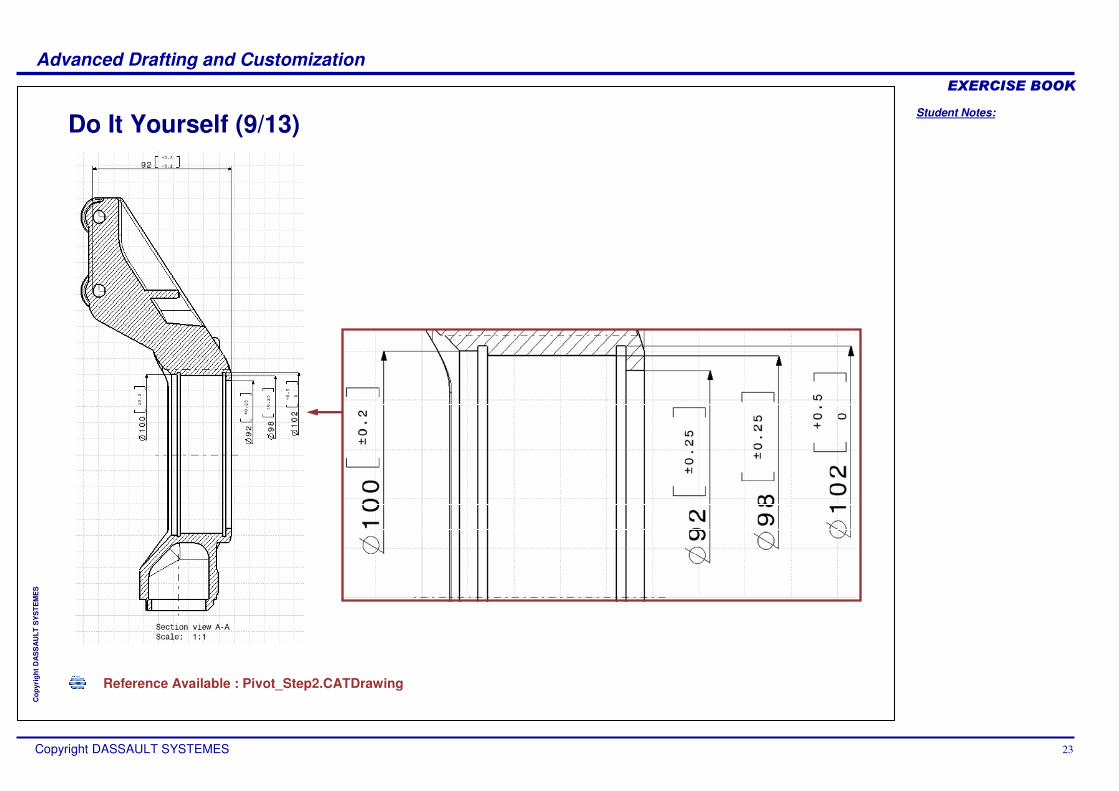
Do It Yourself (9/13)
Reference Available : Pivot_Step2.CATDrawing
Student Notes:
Advanced Drafting and Customization����������
Copyright DASSAULT SYSTEMES 24
Cop
yrig
ht D
AS
SA
ULT
SY
STE
ME
S
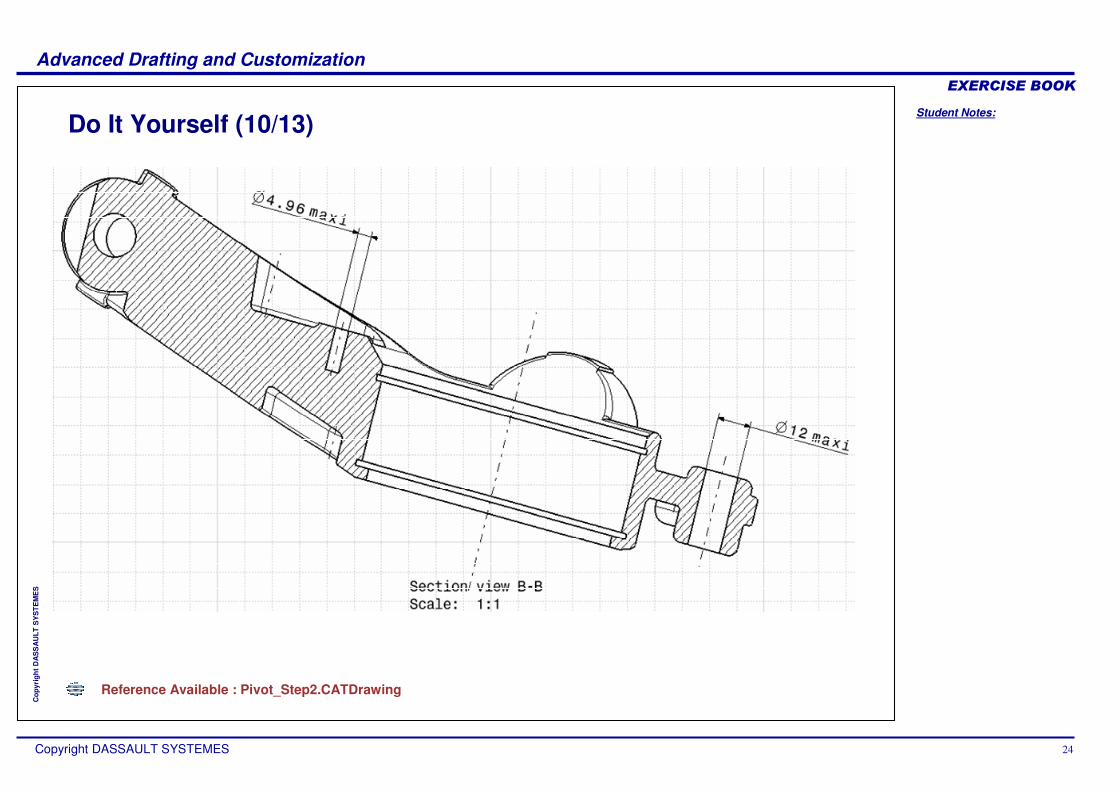
Do It Yourself (10/13)
Reference Available : Pivot_Step2.CATDrawing
Student Notes:
Advanced Drafting and Customization����������
Copyright DASSAULT SYSTEMES 25
Cop
yrig
ht D
AS
SA
ULT
SY
STE
ME
S
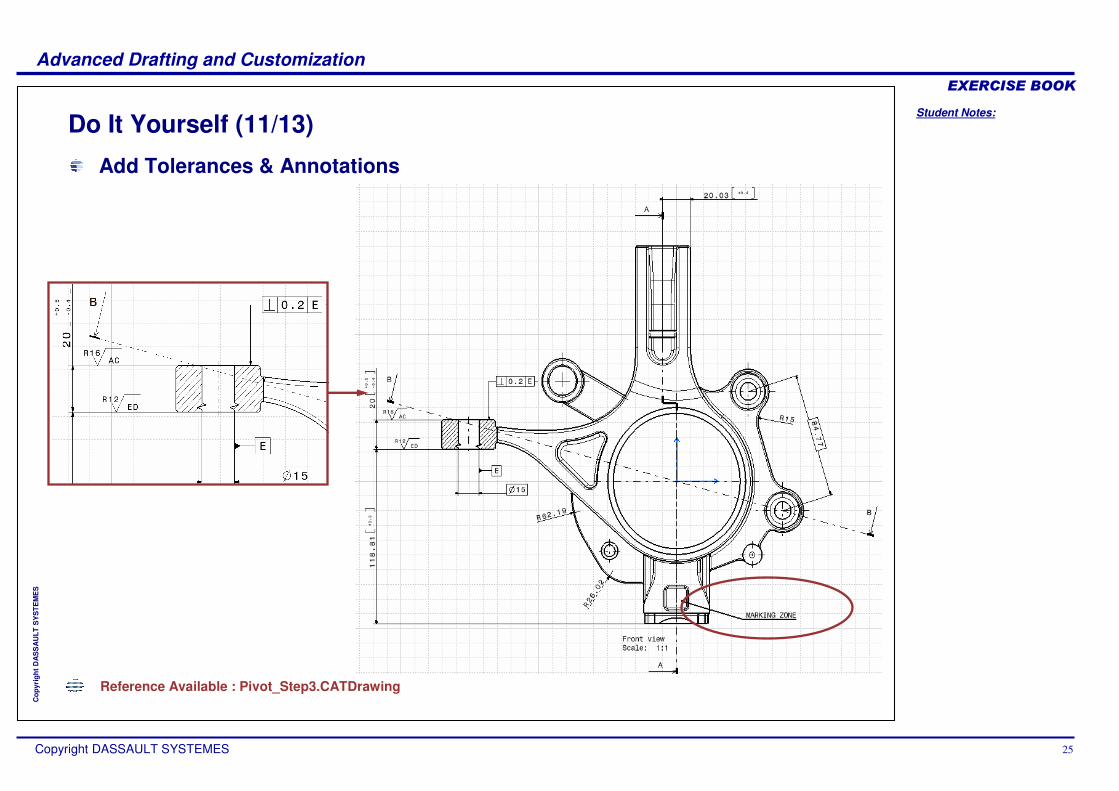
Do It Yourself (11/13)
Reference Available : Pivot_Step3.CATDrawing
Add Tolerances & Annotations
Student Notes:
Advanced Drafting and Customization����������
Copyright DASSAULT SYSTEMES 26
Cop
yrig
ht D
AS
SA
ULT
SY
STE
ME
S
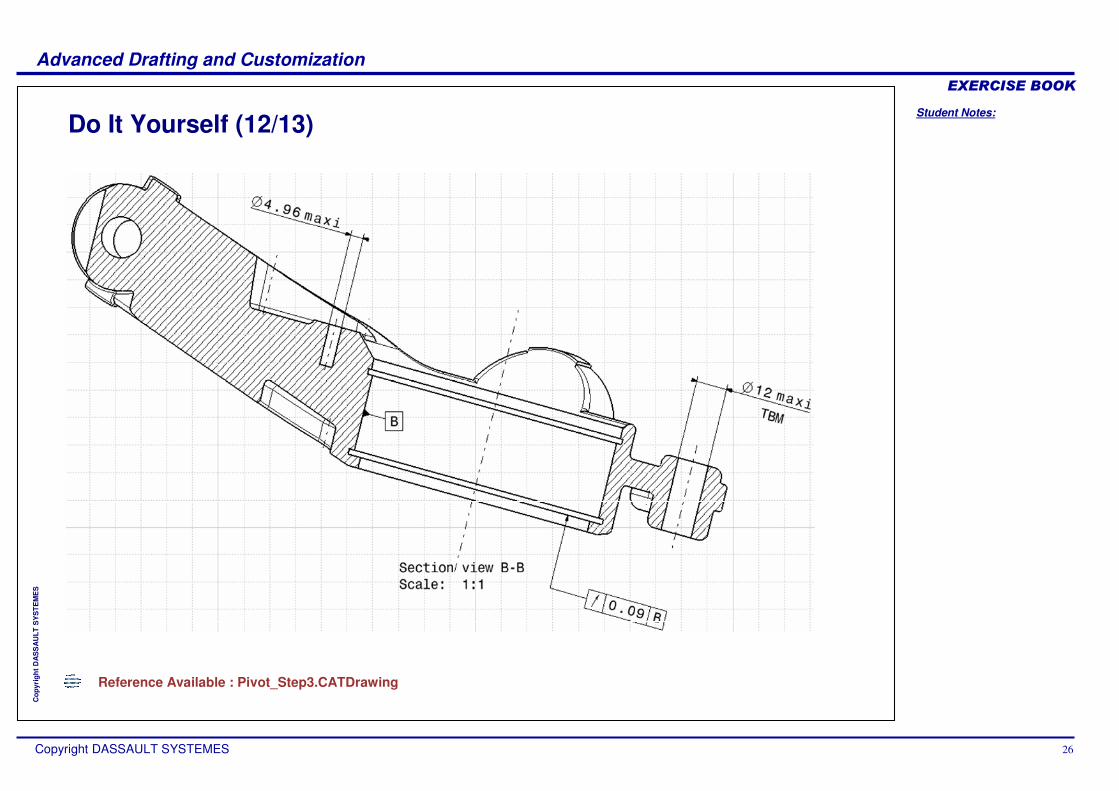
Do It Yourself (12/13)
Reference Available : Pivot_Step3.CATDrawing
Student Notes:
Advanced Drafting and Customization����������
Copyright DASSAULT SYSTEMES 27
Cop
yrig
ht D
AS
SA
ULT
SY
STE
ME
S
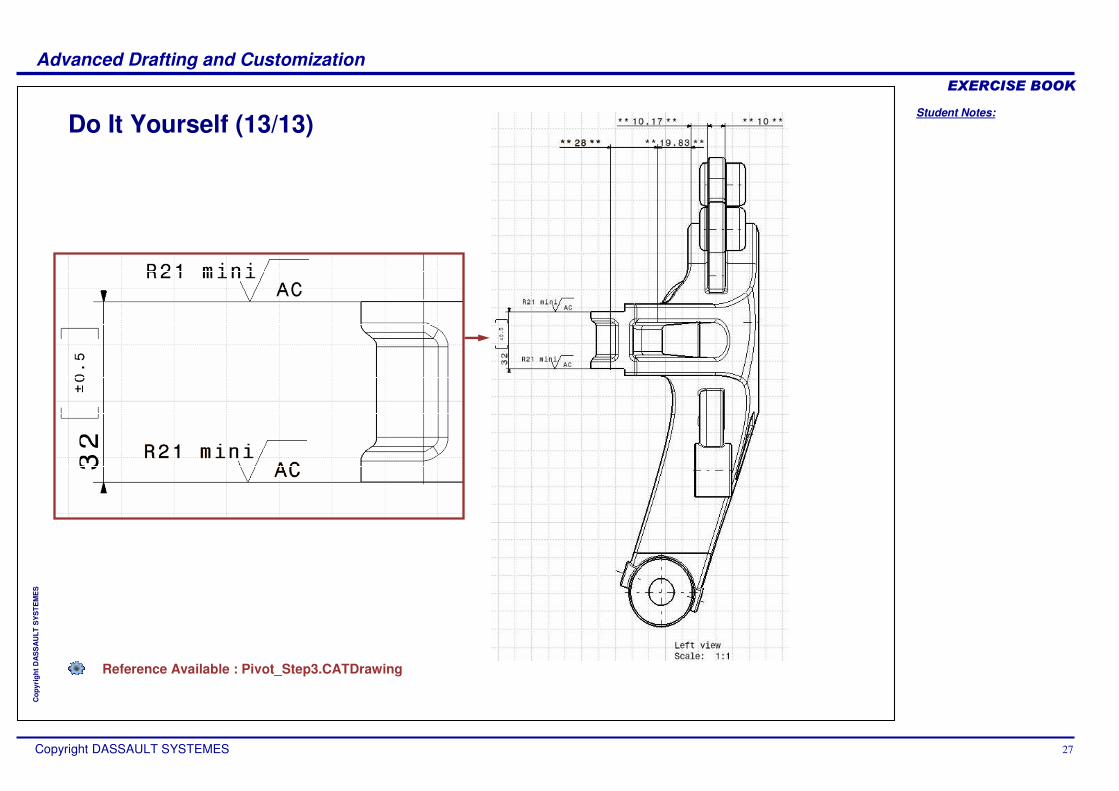
Do It Yourself (13/13)
Reference Available : Pivot_Step3.CATDrawing
Student Notes:
Advanced Drafting and Customization����������
Copyright DASSAULT SYSTEMES 28
Cop
yrig
ht D
AS
SA
ULT
SY
STE
ME
S
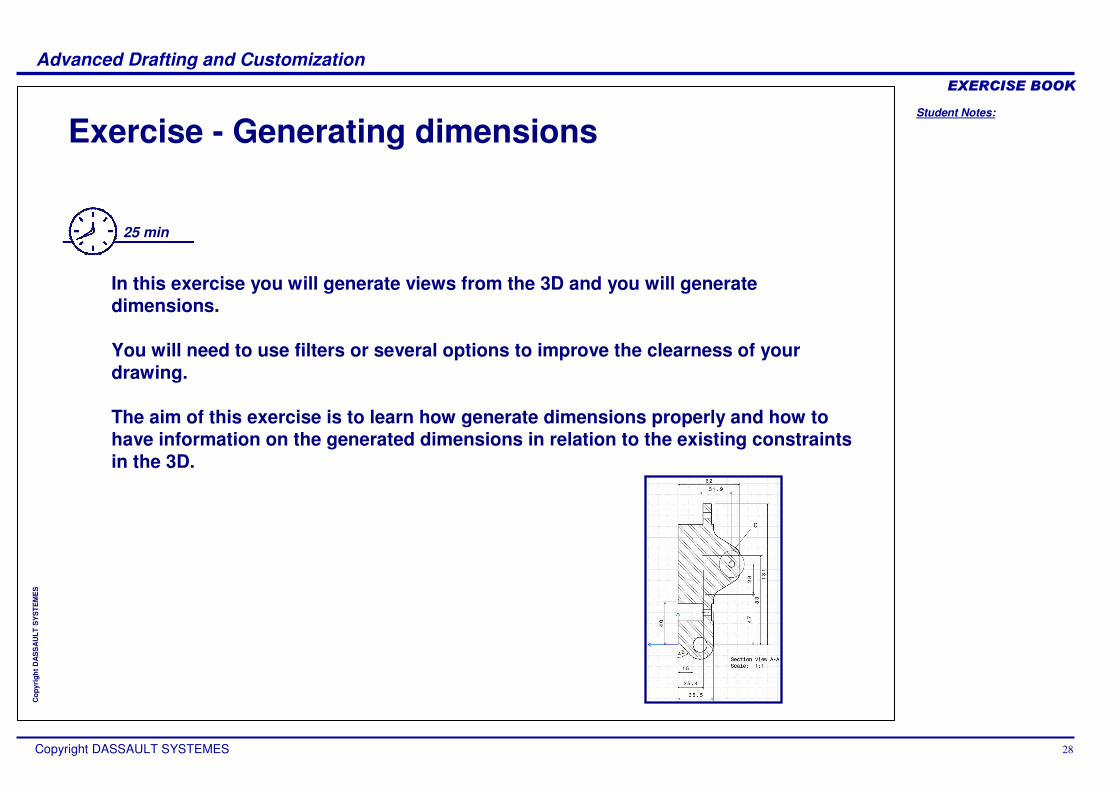
Exercise - Generating dimensions
25 min
In this exercise you will generate views from the 3D and you will generate dimensions.
You will need to use filters or several options to improve the clearness of your drawing.
The aim of this exercise is to learn how generate dimensions properly and how to have information on the generated dimensions in relation to the existing constraints in the 3D.
Student Notes:
Advanced Drafting and Customization����������
Copyright DASSAULT SYSTEMES 29
Cop
yrig
ht D
AS
SA
ULT
SY
STE
ME
S
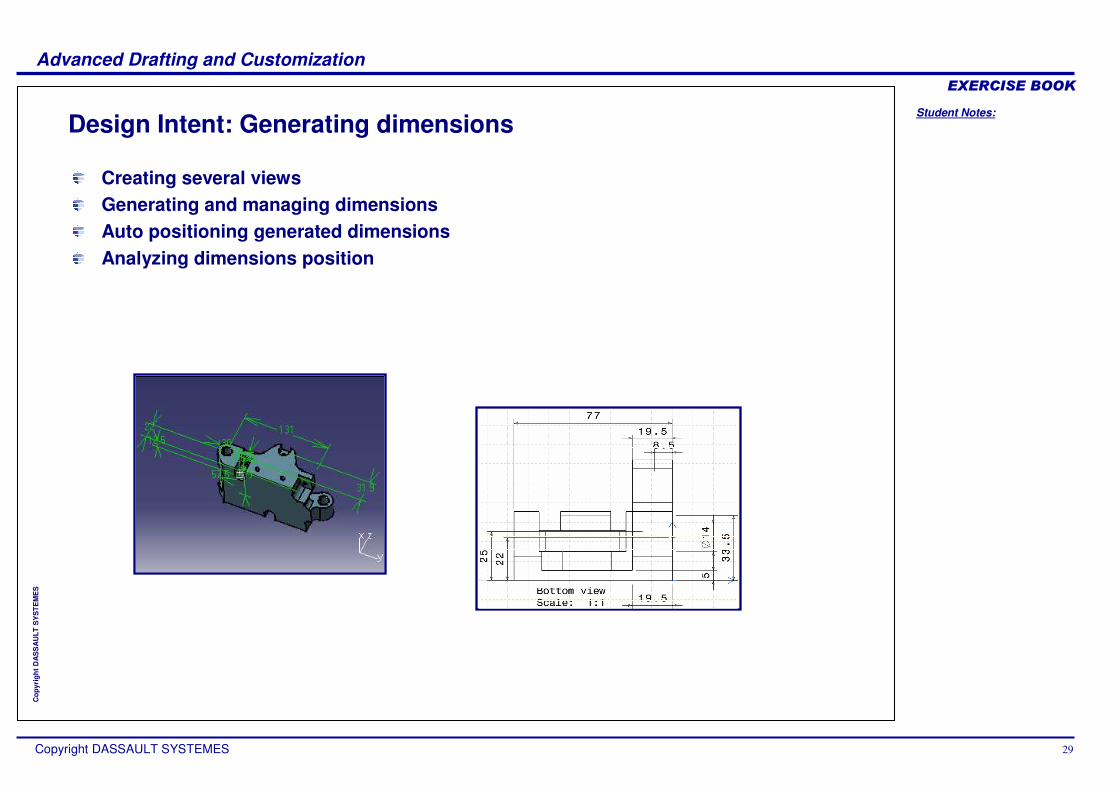
Design Intent: Generating dimensions
Creating several viewsGenerating and managing dimensionsAuto positioning generated dimensionsAnalyzing dimensions position

Student Notes:
Advanced Drafting and Customization����������
Copyright DASSAULT SYSTEMES 30
Cop
yrig
ht D
AS
SA
ULT
SY
STE
ME
S
Design Process: Generating dimensions
Creating views, section views, section cut.
1
Generating and managing dimensions by using filters and
transfer of views.
2
Analyzing generated dimensions.
3
Transferring dimensions and Auto positioning generated
dimensions.
4Analyzing dimensions
position.
5

Student Notes:
Advanced Drafting and Customization����������
Copyright DASSAULT SYSTEMES 31
Cop
yrig
ht D
AS
SA
ULT
SY
STE
ME
S
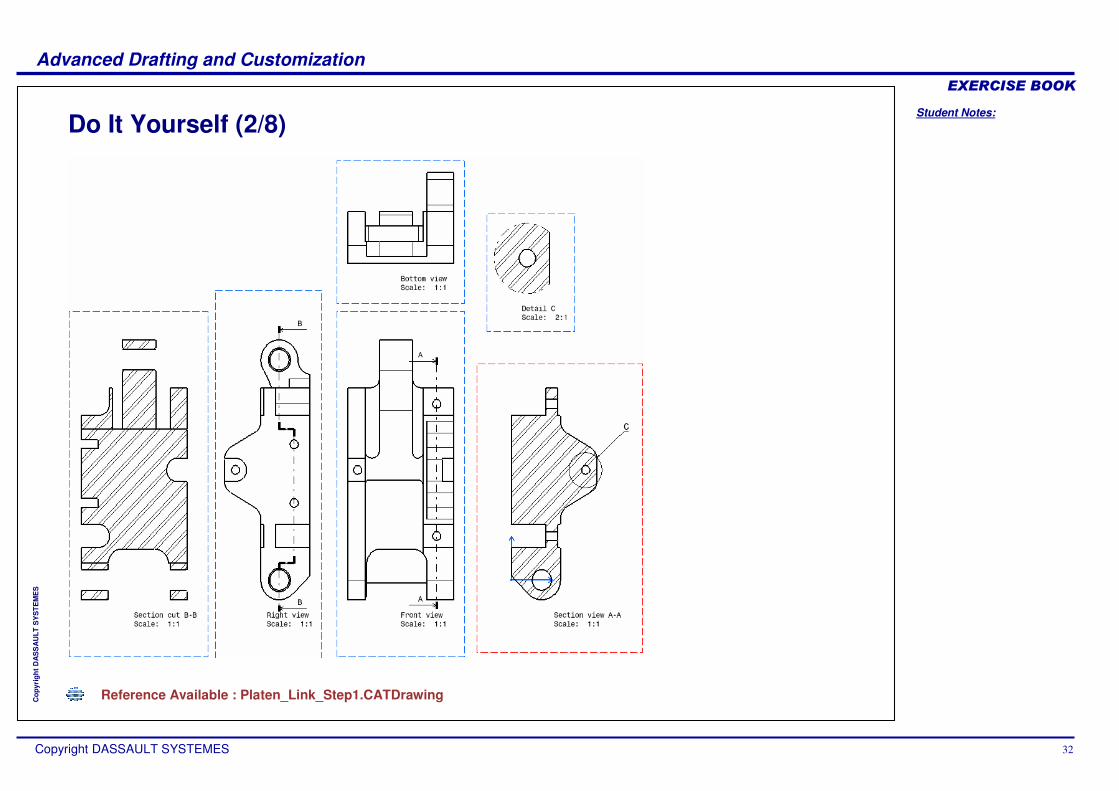
Do It Yourself (1/8)
Load: Platen_Link.CATPart
Details of the drawing next page
Generate automatically Front, Bottom and Right views in an A2 ISO format drawing.
Add a section view and a section cut.
Create a detail view.
Student Notes:
Advanced Drafting and Customization����������
Copyright DASSAULT SYSTEMES 32
Cop
yrig
ht D
AS
SA
ULT
SY
STE
ME
S
Do It Yourself (2/8)
Reference Available : Platen_Link_Step1.CATDrawing
Student Notes:
Advanced Drafting and Customization����������
Copyright DASSAULT SYSTEMES 33
Cop
yrig
ht D
AS
SA
ULT
SY
STE
ME
S
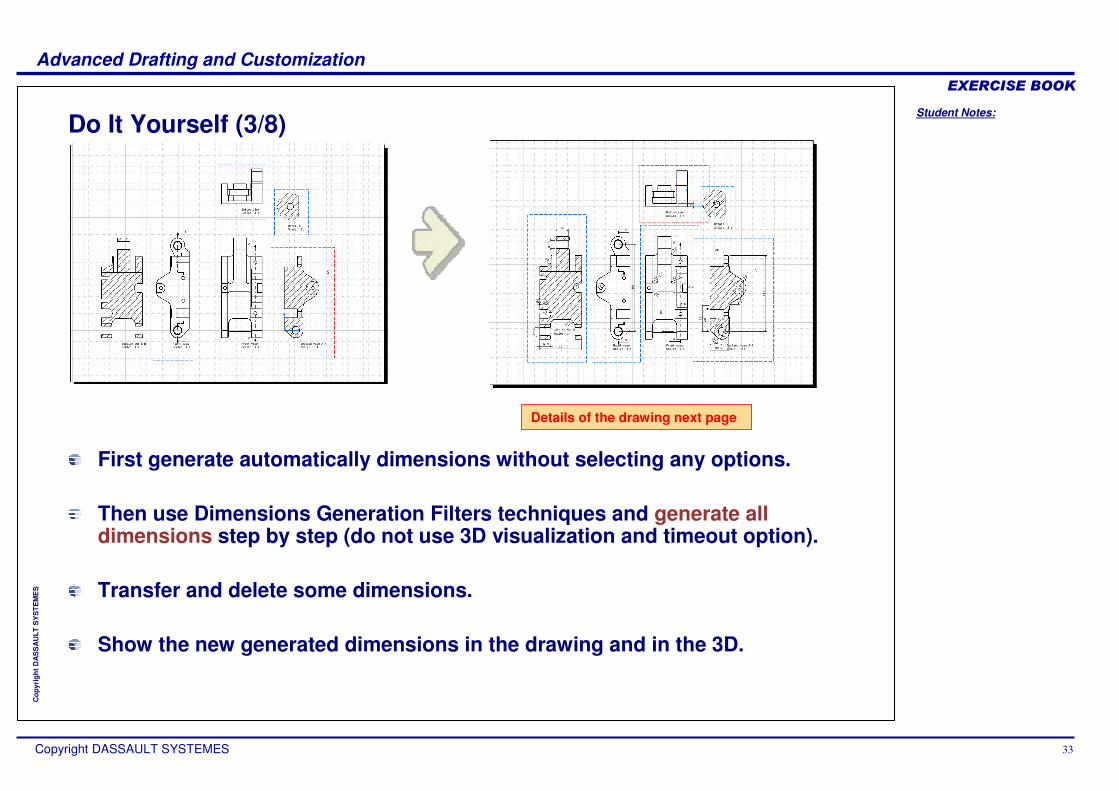
Do It Yourself (3/8)
Details of the drawing next page
First generate automatically dimensions without selecting any options.
Then use Dimensions Generation Filters techniques and generate all dimensions step by step (do not use 3D visualization and timeout option).
Transfer and delete some dimensions.
Show the new generated dimensions in the drawing and in the 3D.
Student Notes:
Advanced Drafting and Customization����������
Copyright DASSAULT SYSTEMES 34
Cop
yrig
ht D
AS
SA
ULT
SY
STE
ME
S
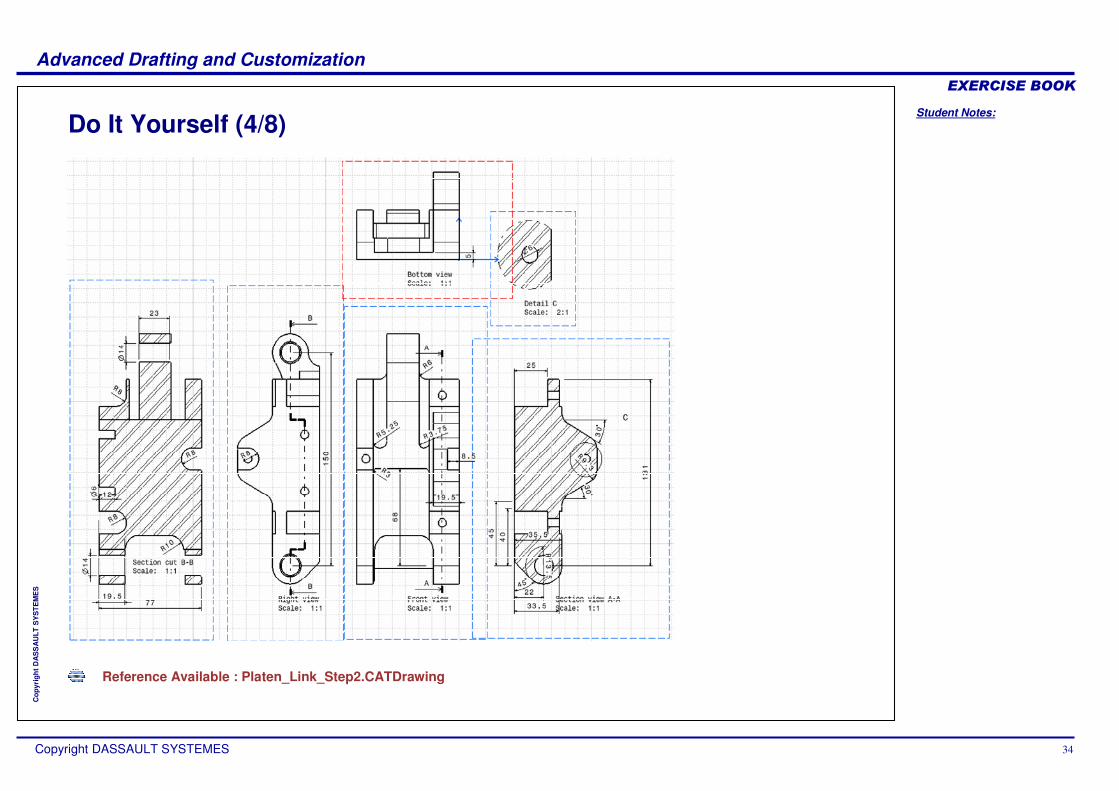
Do It Yourself (4/8)
Reference Available : Platen_Link_Step2.CATDrawing
Student Notes:
Advanced Drafting and Customization����������
Copyright DASSAULT SYSTEMES 35
Cop
yrig
ht D
AS
SA
ULT
SY
STE
ME
S
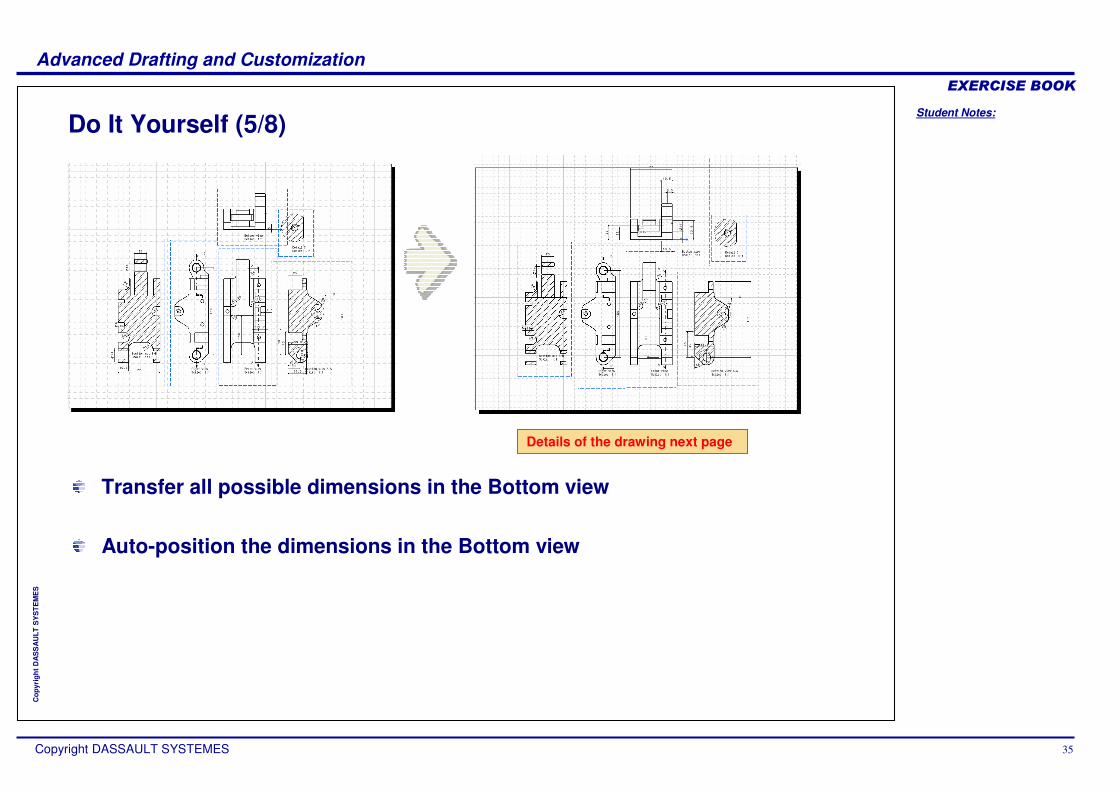
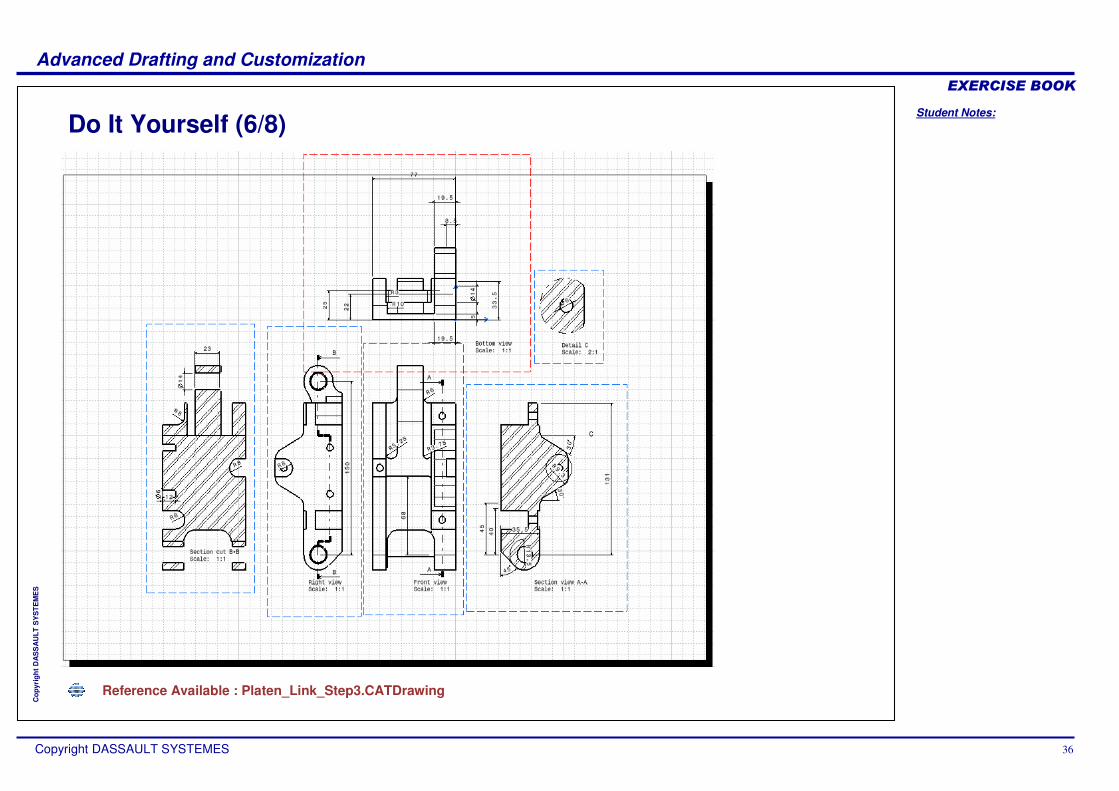
Do It Yourself (5/8)
Details of the drawing next page
Transfer all possible dimensions in the Bottom view
Auto-position the dimensions in the Bottom view
Student Notes:
Advanced Drafting and Customization����������
Copyright DASSAULT SYSTEMES 36
Cop
yrig
ht D
AS
SA
ULT
SY
STE
ME
S
Do It Yourself (6/8)
Reference Available : Platen_Link_Step3.CATDrawing
Student Notes:
Advanced Drafting and Customization����������
Copyright DASSAULT SYSTEMES 37
Cop
yrig
ht D
AS
SA
ULT
SY
STE
ME
S
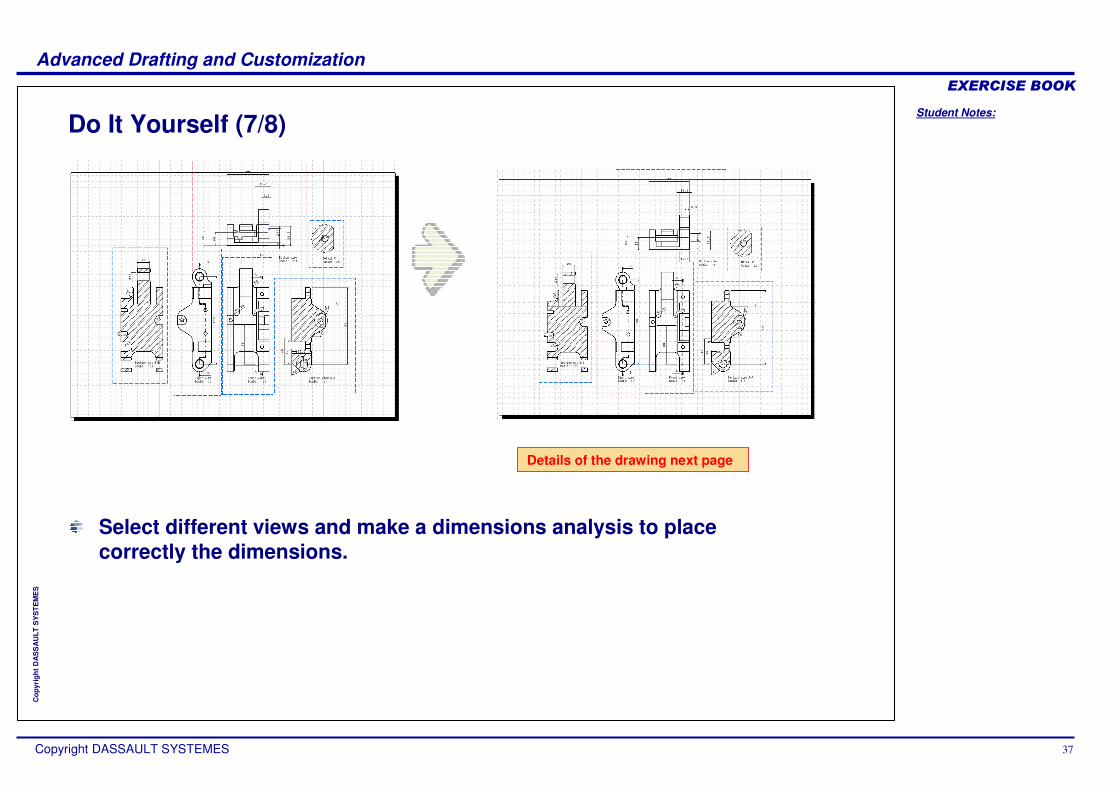
Do It Yourself (7/8)
Details of the drawing next page
Select different views and make a dimensions analysis to place correctly the dimensions.
Student Notes:
Advanced Drafting and Customization����������
Copyright DASSAULT SYSTEMES 38
Cop
yrig
ht D
AS
SA
ULT
SY
STE
ME
S
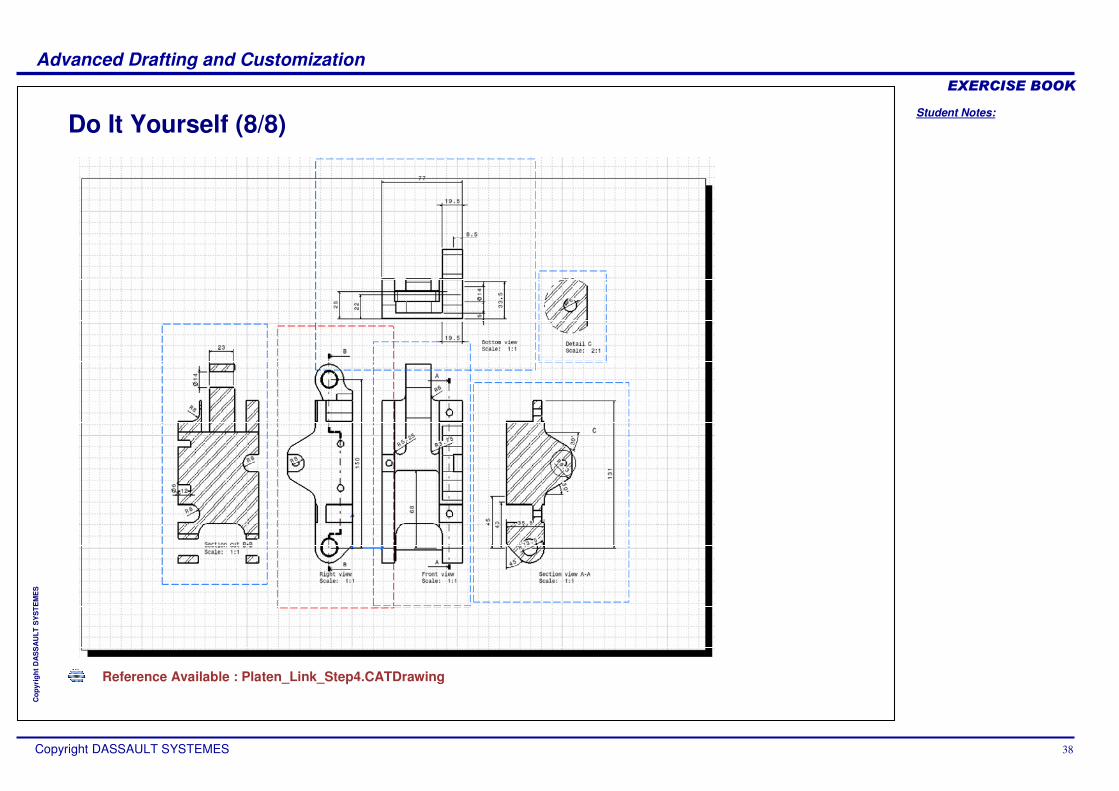
Do It Yourself (8/8)
Reference Available : Platen_Link_Step4.CATDrawing
Student Notes:
Advanced Drafting and Customization����������
Copyright DASSAULT SYSTEMES 39
Cop
yrig
ht D
AS
SA
ULT
SY
STE
ME
S
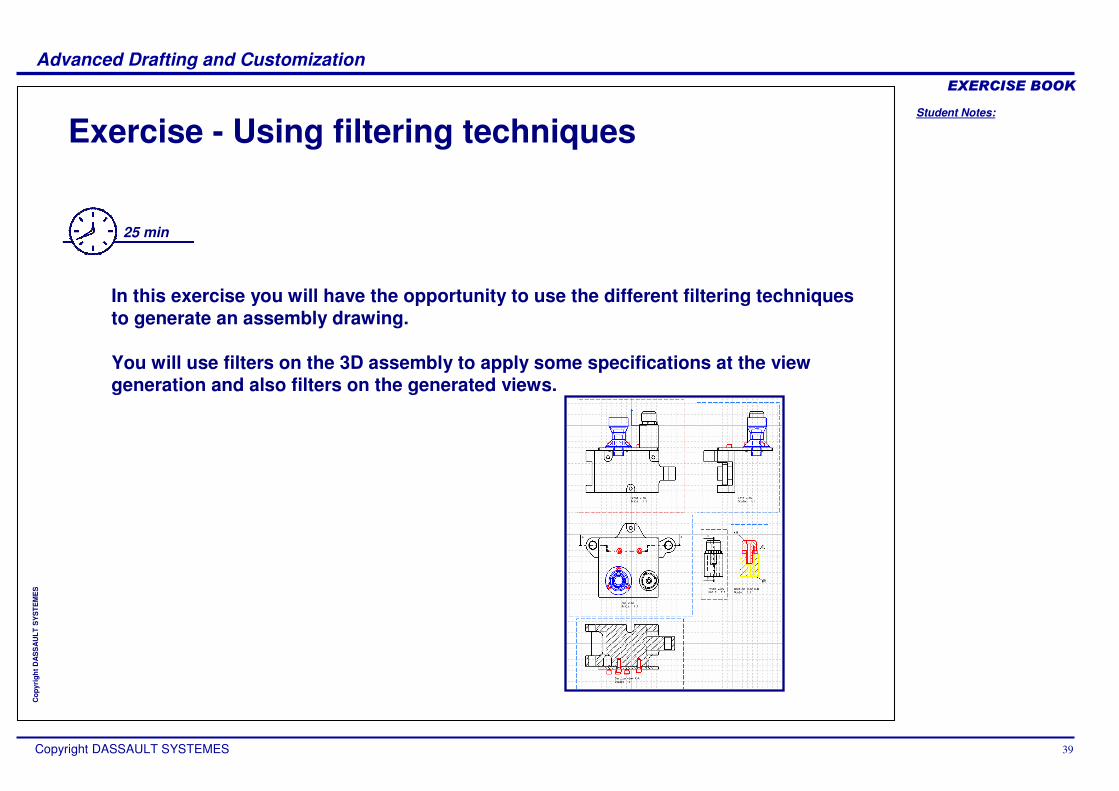
Exercise - Using filtering techniques
25 min
In this exercise you will have the opportunity to use the different filtering techniques to generate an assembly drawing.
You will use filters on the 3D assembly to apply some specifications at the view generation and also filters on the generated views.
Student Notes:
Advanced Drafting and Customization����������
Copyright DASSAULT SYSTEMES 40
Cop
yrig
ht D
AS
SA
ULT
SY
STE
ME
S
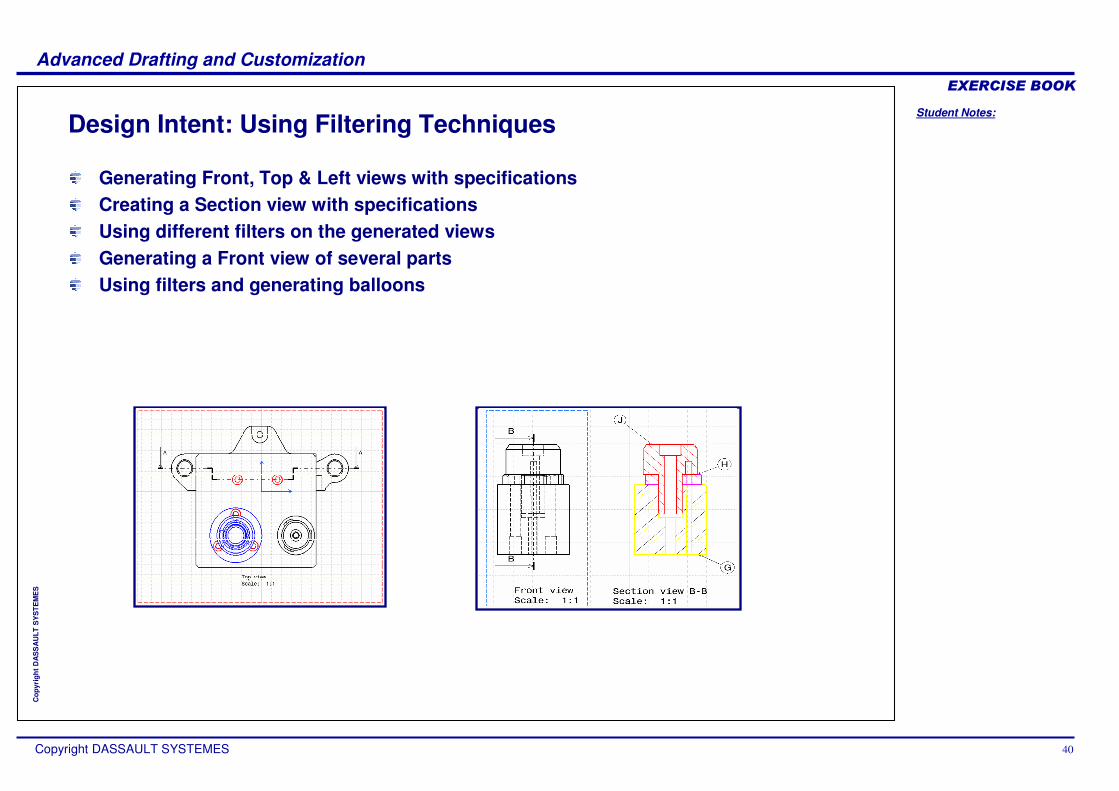
Design Intent: Using Filtering Techniques
Generating Front, Top & Left views with specificationsCreating a Section view with specificationsUsing different filters on the generated views Generating a Front view of several partsUsing filters and generating balloons
Student Notes:
Advanced Drafting and Customization����������
Copyright DASSAULT SYSTEMES 41
Cop
yrig
ht D
AS
SA
ULT
SY
STE
ME
S
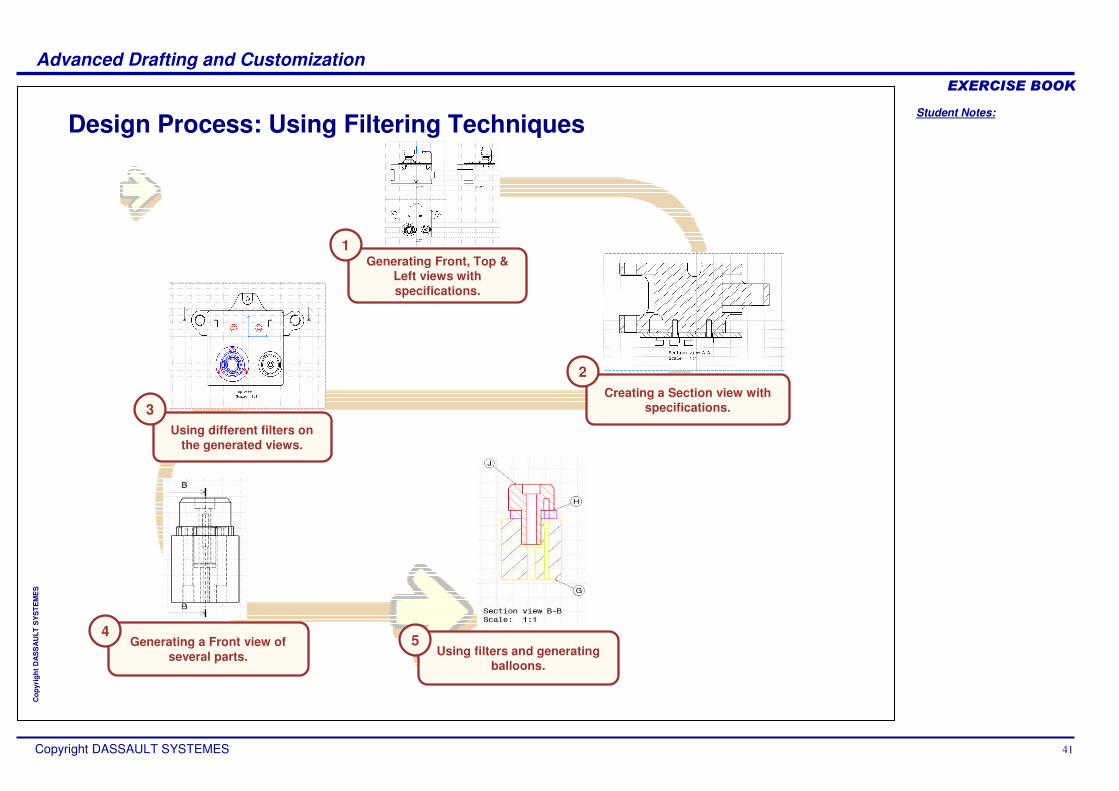
Design Process: Using Filtering Techniques
Generating Front, Top & Left views with specifications.
1
Creating a Section view with specifications.
2
Using different filters on the generated views.
3
Generating a Front view of several parts.
4Using filters and generating
balloons.
5
Student Notes:
Advanced Drafting and Customization����������
Copyright DASSAULT SYSTEMES 42
Cop
yrig
ht D
AS
SA
ULT
SY
STE
ME
S
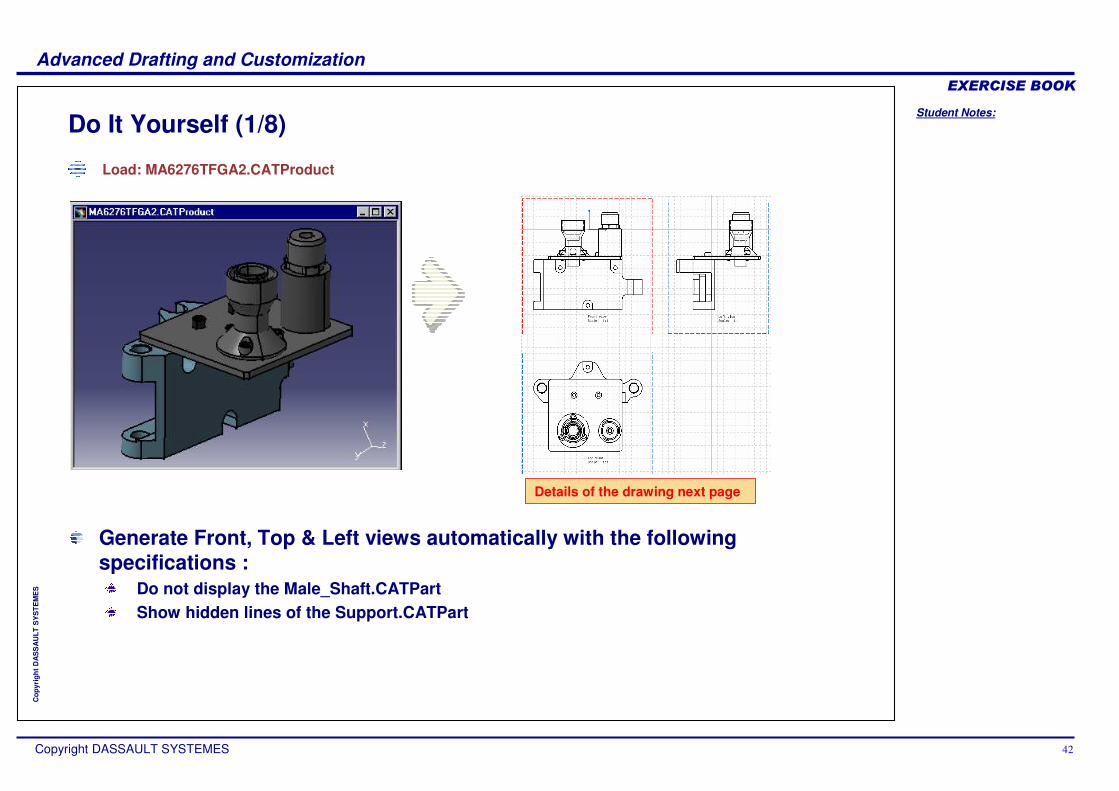
Do It Yourself (1/8)
Load: MA6276TFGA2.CATProduct
Details of the drawing next page
Generate Front, Top & Left views automatically with the following specifications :
Do not display the Male_Shaft.CATPartShow hidden lines of the Support.CATPart
Student Notes:
Advanced Drafting and Customization����������
Copyright DASSAULT SYSTEMES 43
Cop
yrig
ht D
AS
SA
ULT
SY
STE
ME
S
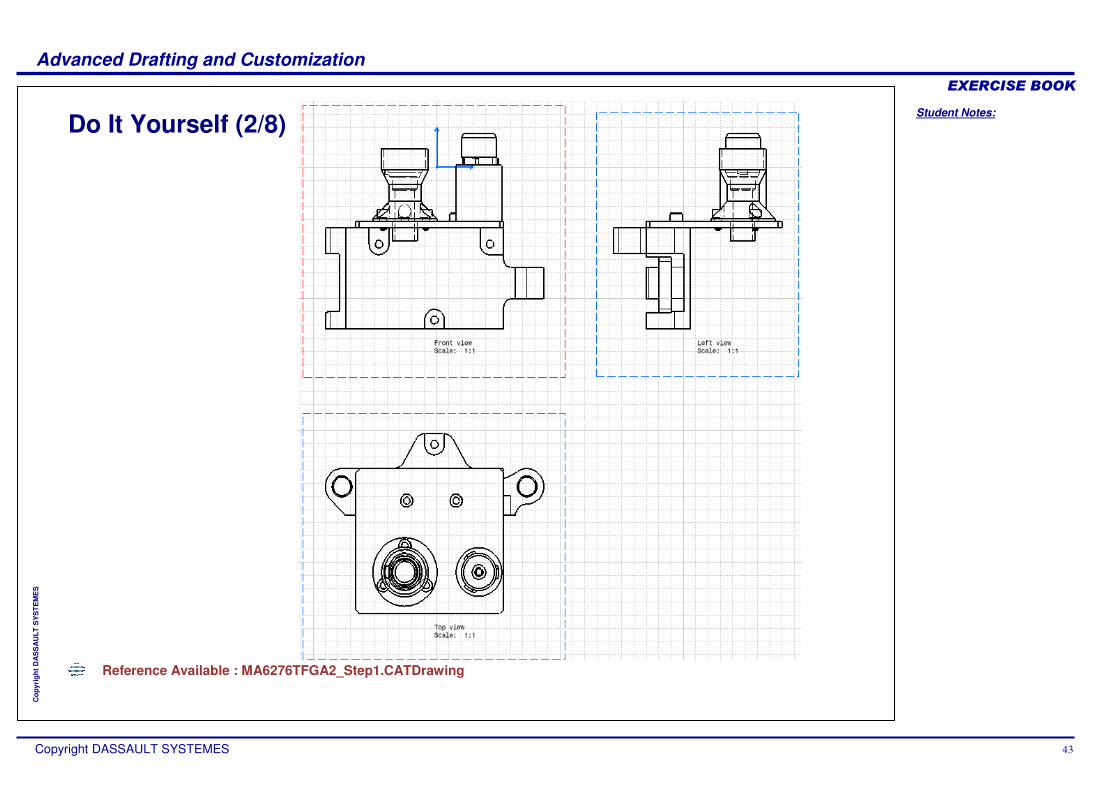
Do It Yourself (2/8)
Reference Available : MA6276TFGA2_Step1.CATDrawing
Student Notes:
Advanced Drafting and Customization����������
Copyright DASSAULT SYSTEMES 44
Cop
yrig
ht D
AS
SA
ULT
SY
STE
ME
S
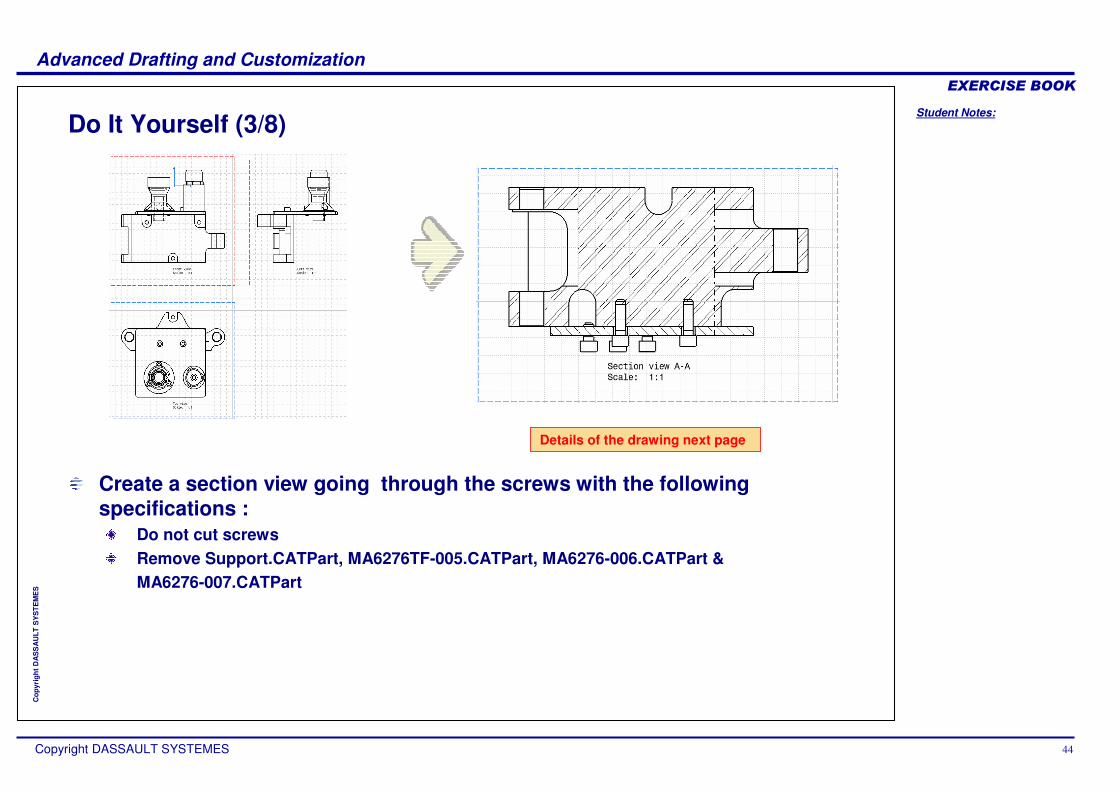
Do It Yourself (3/8)
Details of the drawing next page
Create a section view going through the screws with the following specifications :
Do not cut screwsRemove Support.CATPart, MA6276TF-005.CATPart, MA6276-006.CATPart &MA6276-007.CATPart
Student Notes:
Advanced Drafting and Customization����������
Copyright DASSAULT SYSTEMES 45
Cop
yrig
ht D
AS
SA
ULT
SY
STE
ME
S
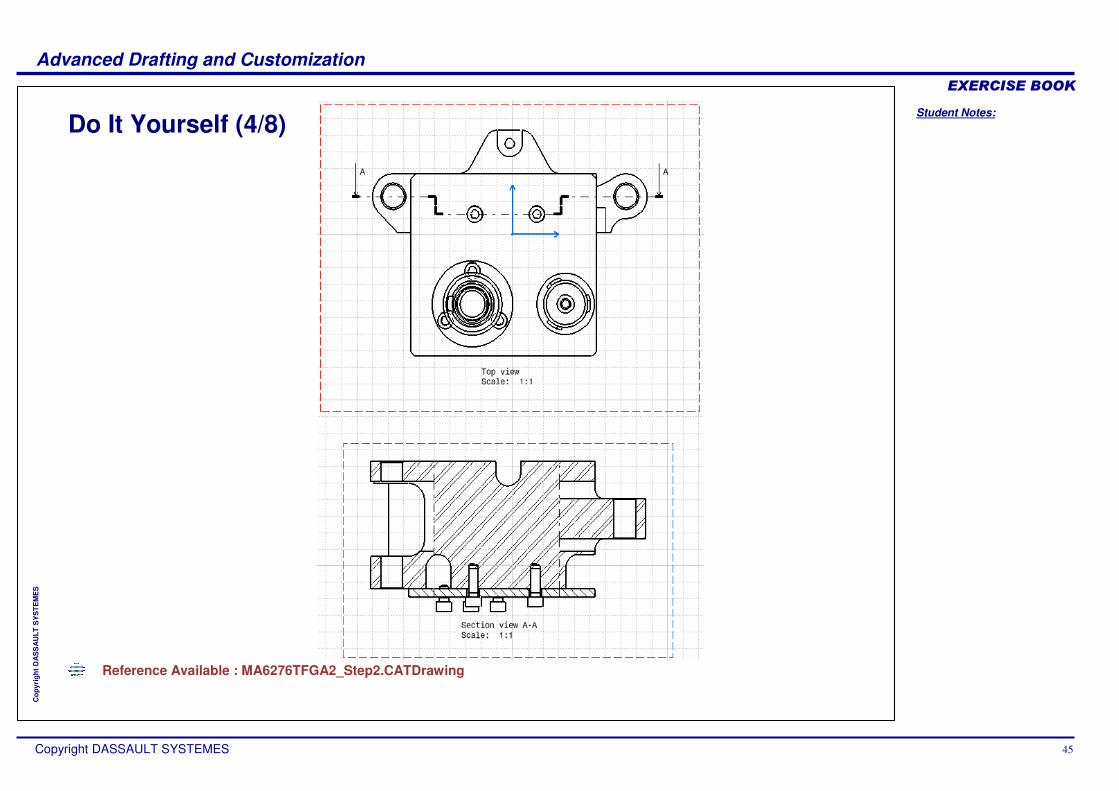
Do It Yourself (4/8)
Reference Available : MA6276TFGA2_Step2.CATDrawing
Student Notes:
Advanced Drafting and Customization����������
Copyright DASSAULT SYSTEMES 46
Cop
yrig
ht D
AS
SA
ULT
SY
STE
ME
S
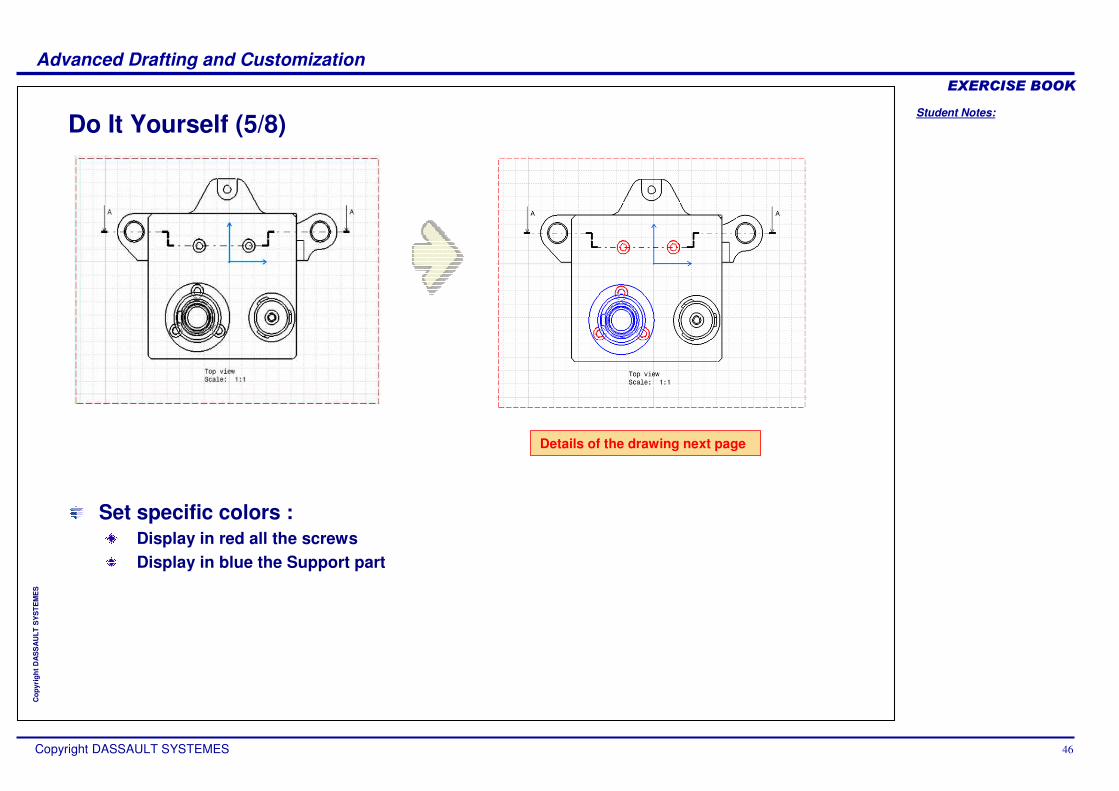
Do It Yourself (5/8)
Details of the drawing next page
Set specific colors :Display in red all the screwsDisplay in blue the Support part
Student Notes:
Advanced Drafting and Customization����������
Copyright DASSAULT SYSTEMES 47
Cop
yrig
ht D
AS
SA
ULT
SY
STE
ME
S
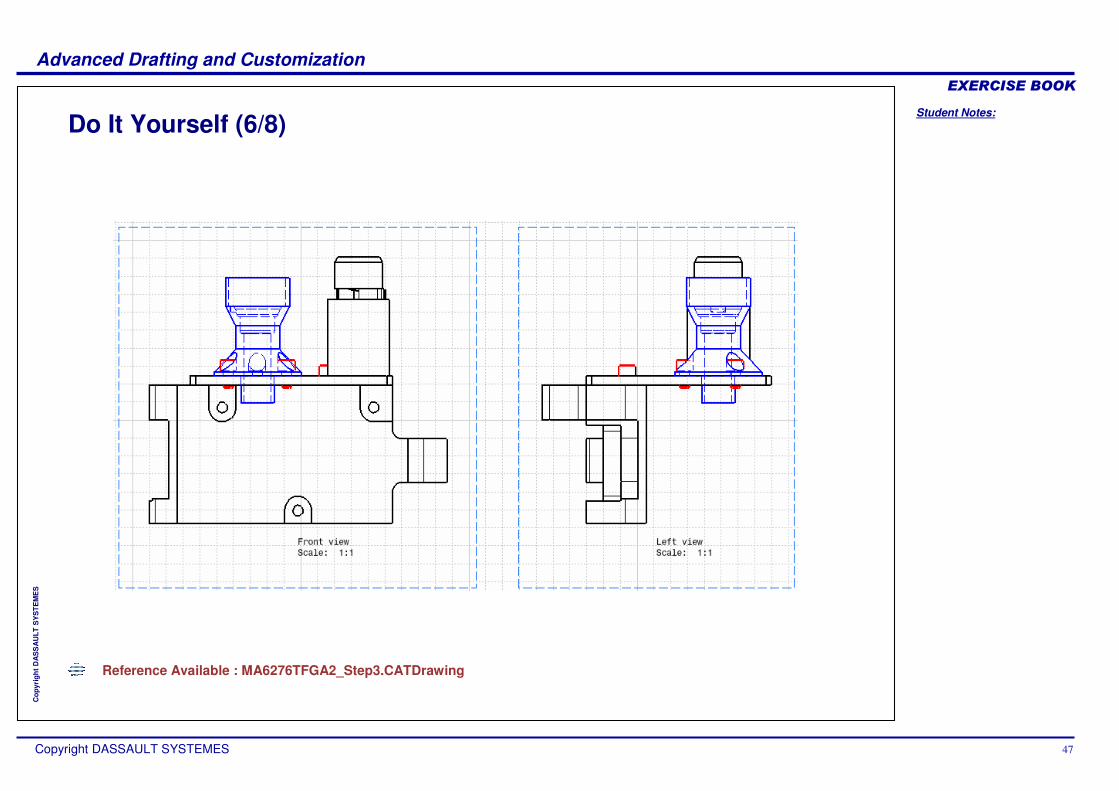
Do It Yourself (6/8)
Reference Available : MA6276TFGA2_Step3.CATDrawing
Student Notes:
Advanced Drafting and Customization����������
Copyright DASSAULT SYSTEMES 48
Cop
yrig
ht D
AS
SA
ULT
SY
STE
ME
S
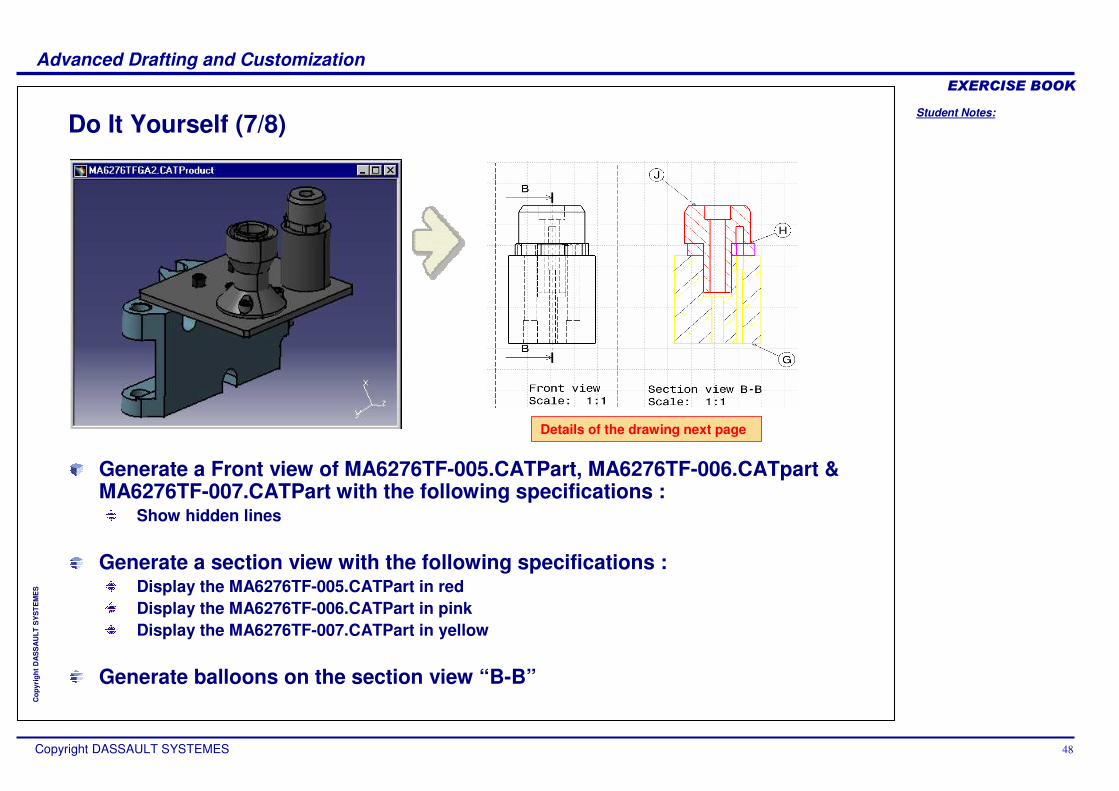
Do It Yourself (7/8)
Details of the drawing next page
Generate a Front view of MA6276TF-005.CATPart, MA6276TF-006.CATpart & MA6276TF-007.CATPart with the following specifications :
Show hidden lines
Generate a section view with the following specifications :Display the MA6276TF-005.CATPart in redDisplay the MA6276TF-006.CATPart in pinkDisplay the MA6276TF-007.CATPart in yellow
Generate balloons on the section view “B-B”
Student Notes:
Advanced Drafting and Customization����������
Copyright DASSAULT SYSTEMES 49
Cop
yrig
ht D
AS
SA
ULT
SY
STE
ME
S
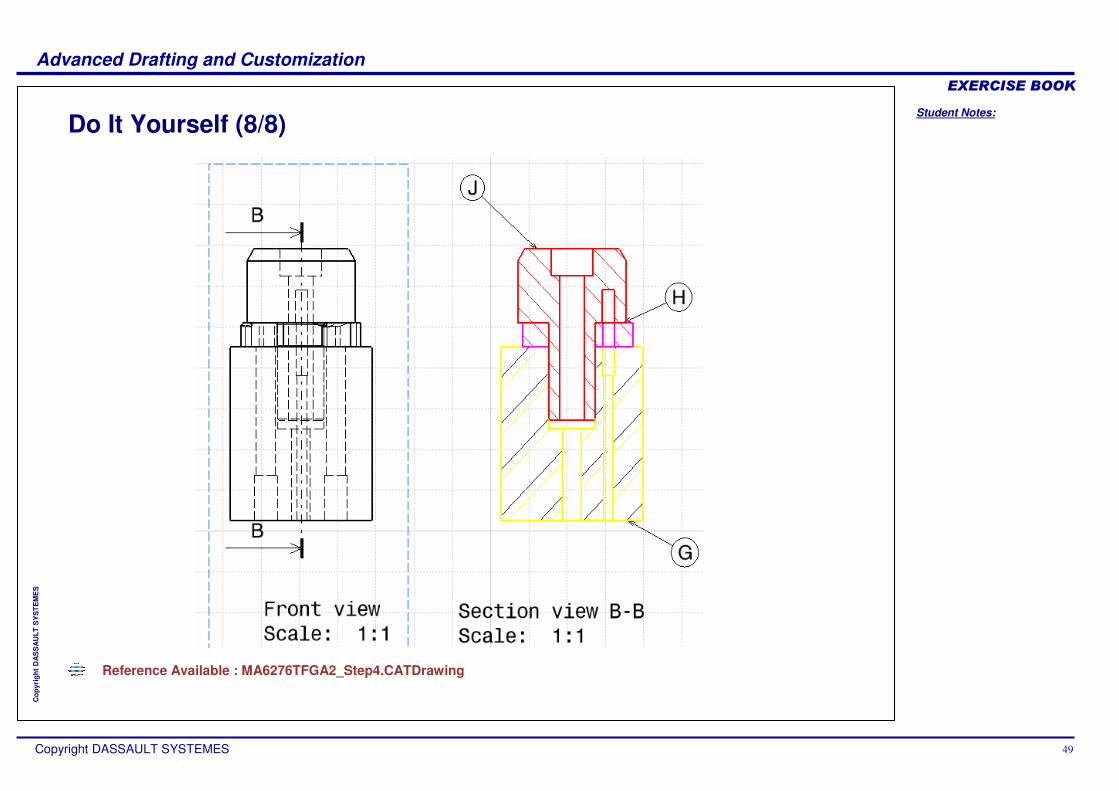
Do It Yourself (8/8)
Reference Available : MA6276TFGA2_Step4.CATDrawing
Student Notes:
Advanced Drafting and Customization����������
Copyright DASSAULT SYSTEMES 50
Cop
yrig
ht D
AS
SA
ULT
SY
STE
ME
S
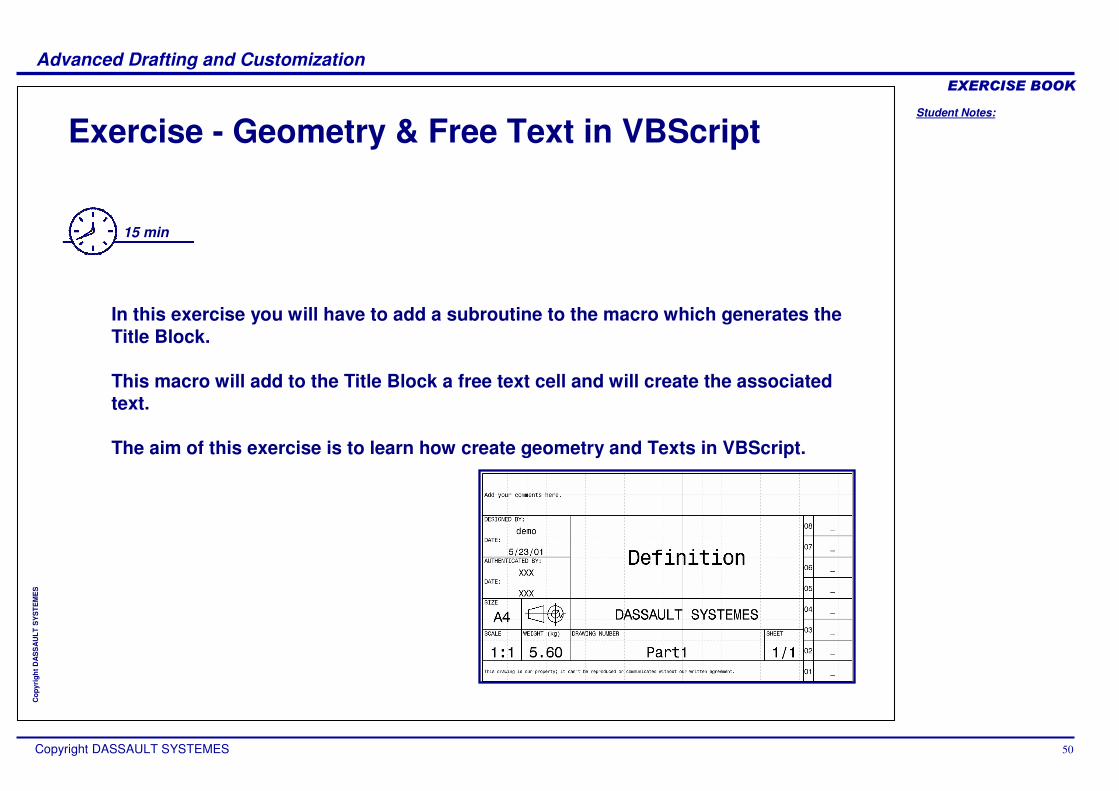
Exercise - Geometry & Free Text in VBScript
15 min
In this exercise you will have to add a subroutine to the macro which generates the Title Block.
This macro will add to the Title Block a free text cell and will create the associated text.
The aim of this exercise is to learn how create geometry and Texts in VBScript.
Student Notes:
Advanced Drafting and Customization����������
Copyright DASSAULT SYSTEMES 51
Cop
yrig
ht D
AS
SA
ULT
SY
STE
ME
S
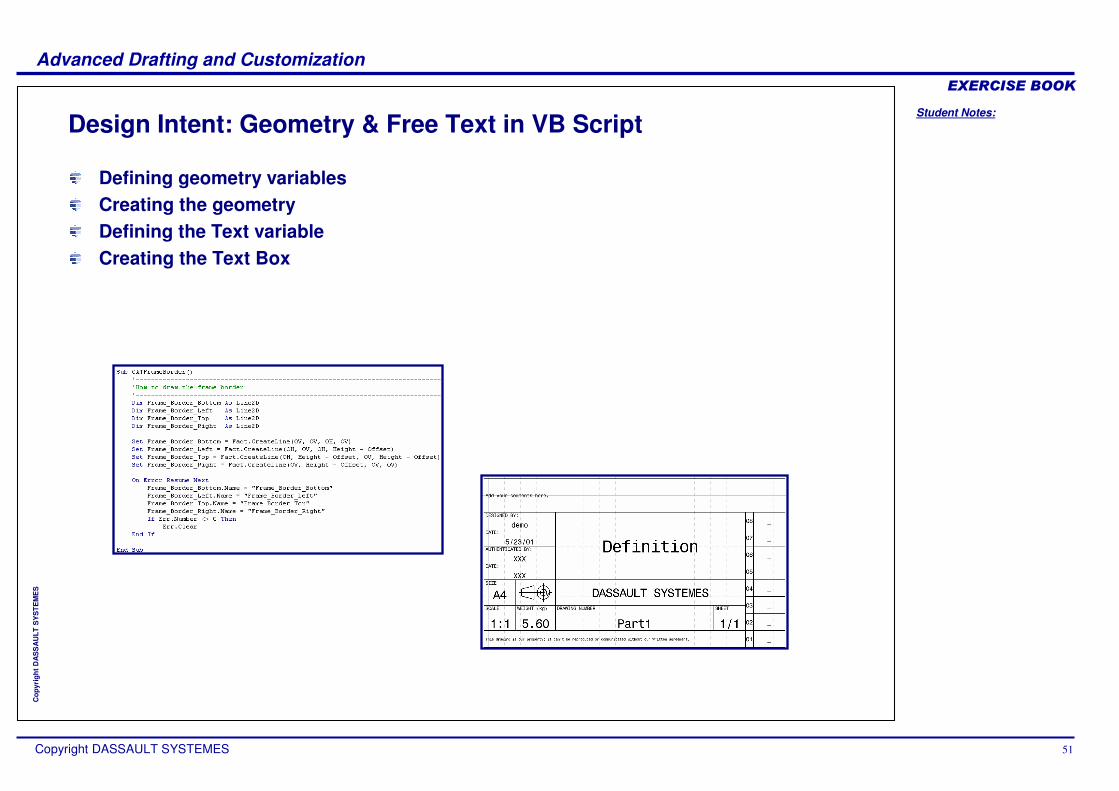
Design Intent: Geometry & Free Text in VB Script
Defining geometry variablesCreating the geometryDefining the Text variable Creating the Text Box
Student Notes:
Advanced Drafting and Customization����������
Copyright DASSAULT SYSTEMES 52
Cop
yrig
ht D
AS
SA
ULT
SY
STE
ME
S
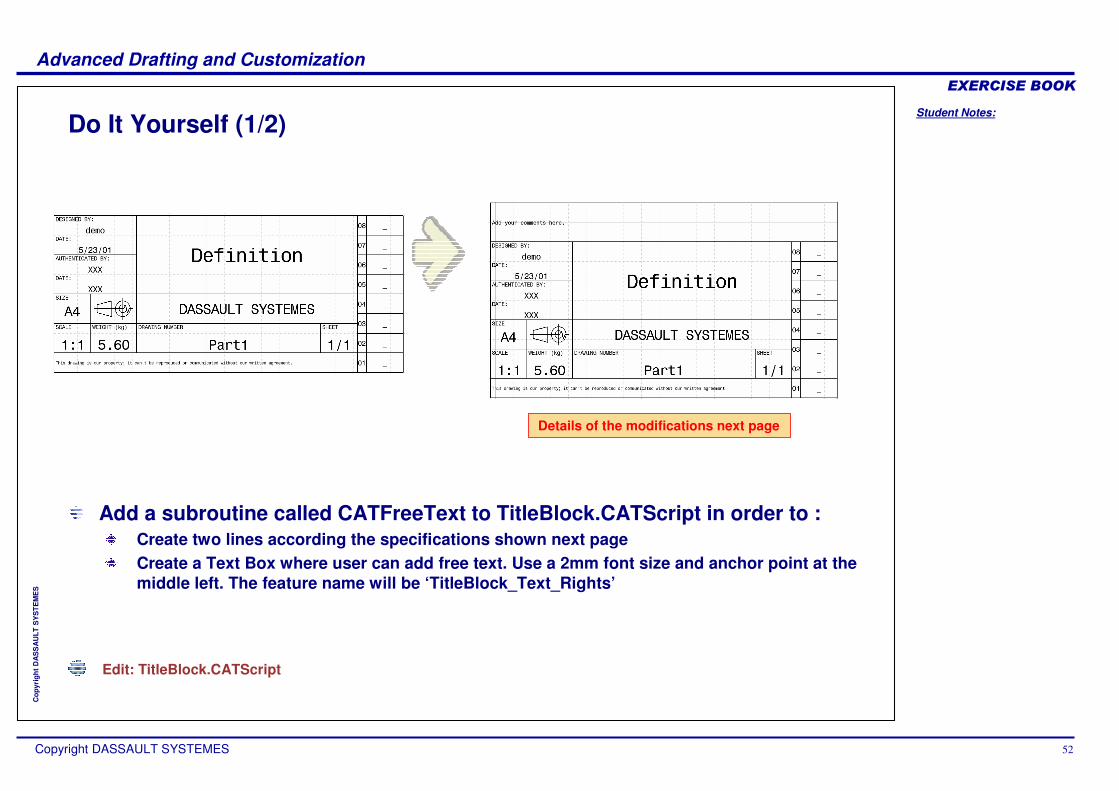
Do It Yourself (1/2)
Edit: TitleBlock.CATScript
Details of the modifications next page
Add a subroutine called CATFreeText to TitleBlock.CATScript in order to :Create two lines according the specifications shown next pageCreate a Text Box where user can add free text. Use a 2mm font size and anchor point at the middle left. The feature name will be ‘TitleBlock_Text_Rights’
Student Notes:
Advanced Drafting and Customization����������
Copyright DASSAULT SYSTEMES 53
Cop
yrig
ht D
AS
SA
ULT
SY
STE
ME
S
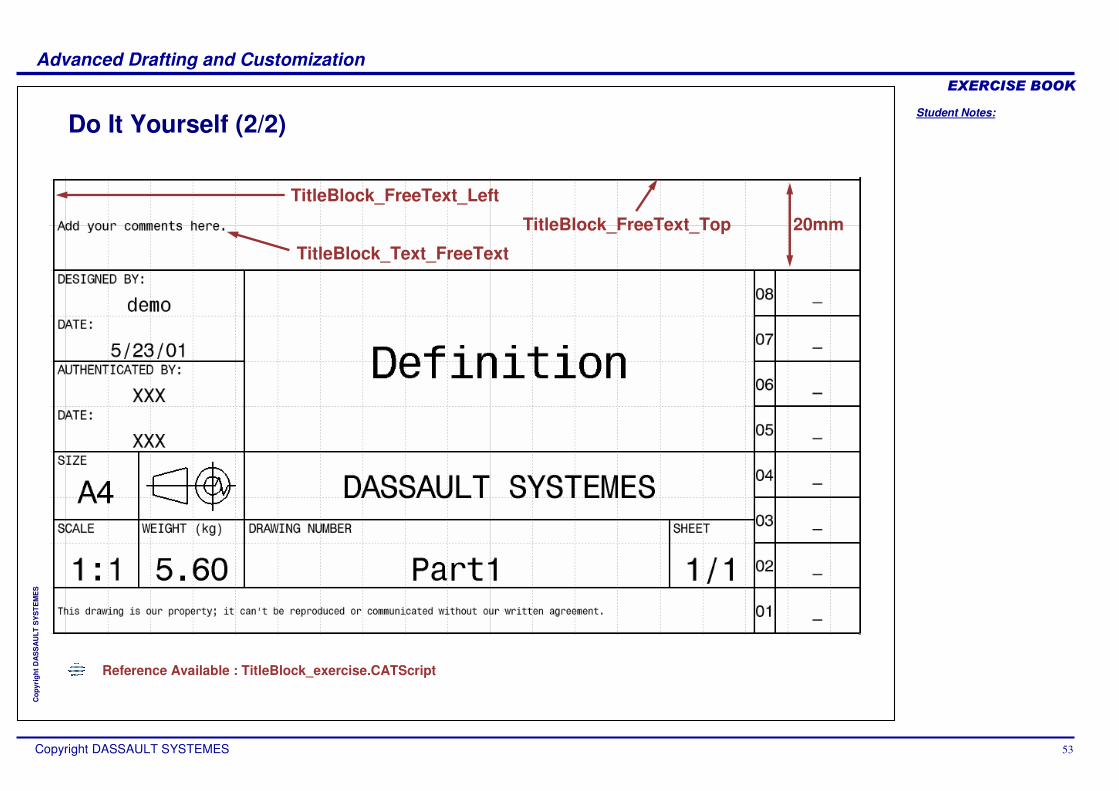
Do It Yourself (2/2)
Reference Available : TitleBlock_exercise.CATScript
TitleBlock_FreeText_Left
TitleBlock_FreeText_Top
TitleBlock_Text_FreeText
20mm
Student Notes:
Advanced Drafting and Customization����������
Copyright DASSAULT SYSTEMES 54
Cop
yrig
ht D
AS
SA
ULT
SY
STE
ME
S
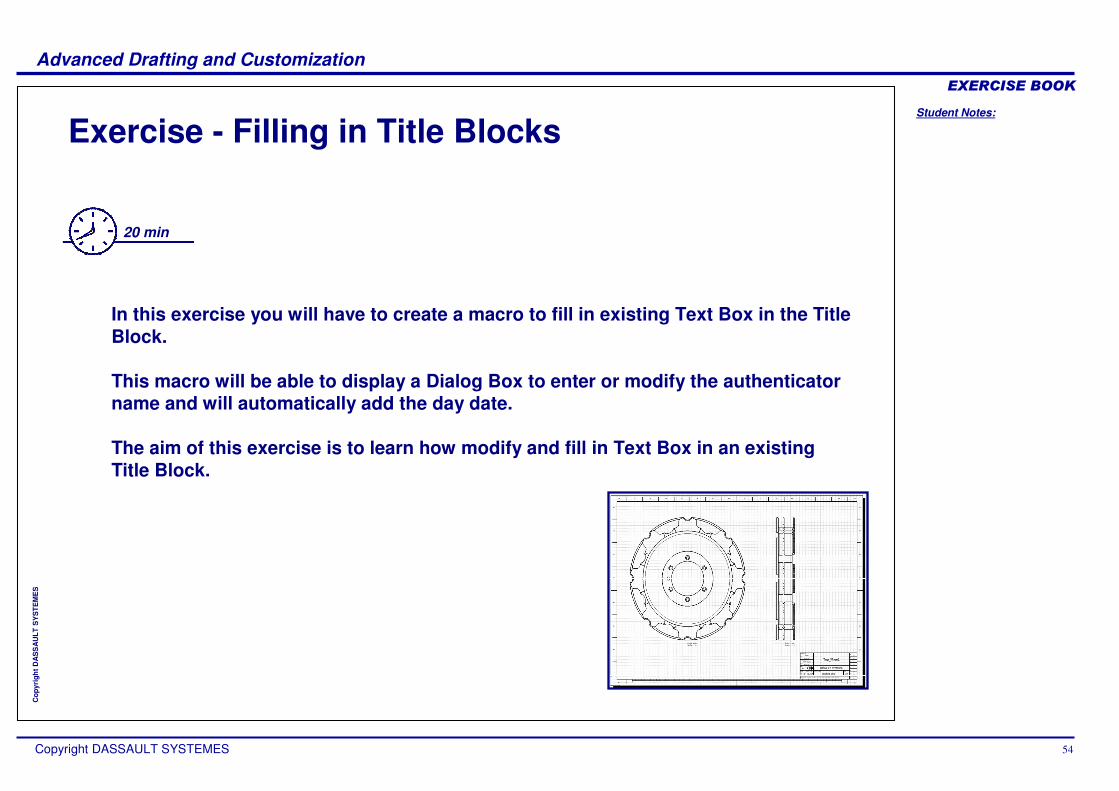
Exercise - Filling in Title Blocks
20 min
In this exercise you will have to create a macro to fill in existing Text Box in the Title Block.
This macro will be able to display a Dialog Box to enter or modify the authenticator name and will automatically add the day date.
The aim of this exercise is to learn how modify and fill in Text Box in an existing Title Block.
Student Notes:
Advanced Drafting and Customization����������
Copyright DASSAULT SYSTEMES 55
Cop
yrig
ht D
AS
SA
ULT
SY
STE
ME
S
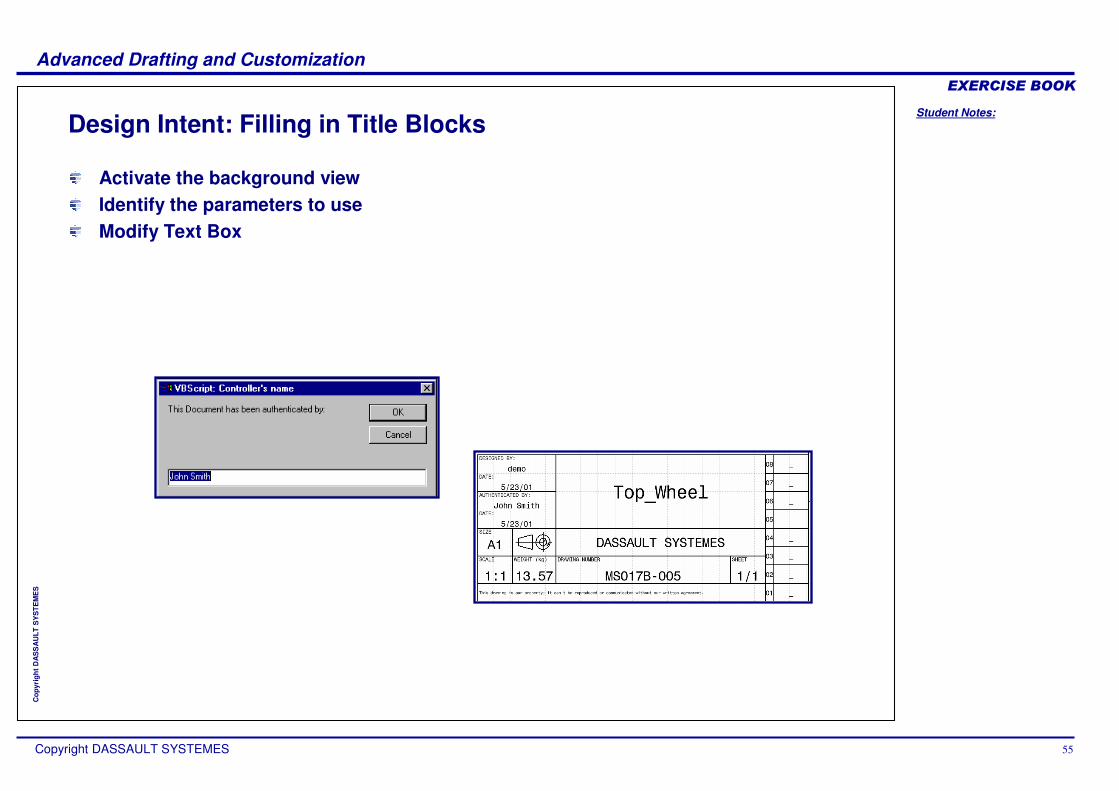
Design Intent: Filling in Title Blocks
Activate the background viewIdentify the parameters to useModify Text Box
Student Notes:
Advanced Drafting and Customization����������
Copyright DASSAULT SYSTEMES 56
Cop
yrig
ht D
AS
SA
ULT
SY
STE
ME
S
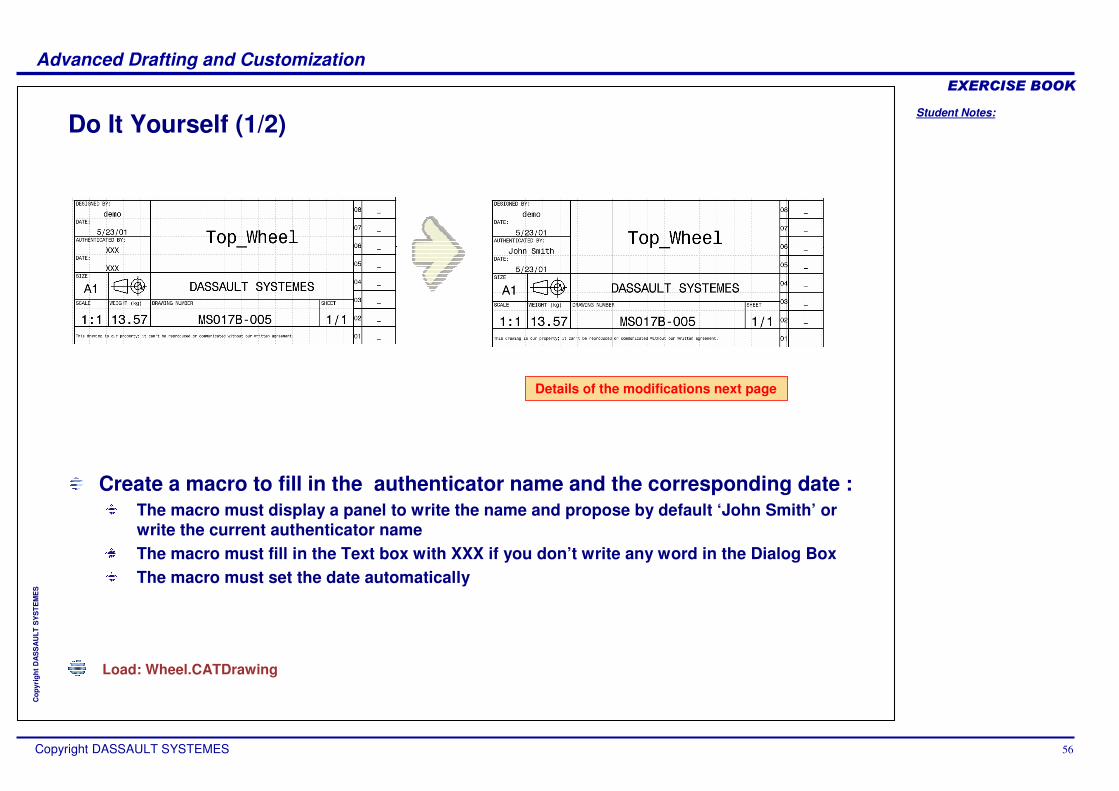
Do It Yourself (1/2)
Load: Wheel.CATDrawing
Details of the modifications next page
Create a macro to fill in the authenticator name and the corresponding date :The macro must display a panel to write the name and propose by default ‘John Smith’ or write the current authenticator nameThe macro must fill in the Text box with XXX if you don’t write any word in the Dialog BoxThe macro must set the date automatically
Student Notes:
Advanced Drafting and Customization����������
Copyright DASSAULT SYSTEMES 57
Cop
yrig
ht D
AS
SA
ULT
SY
STE
ME
S
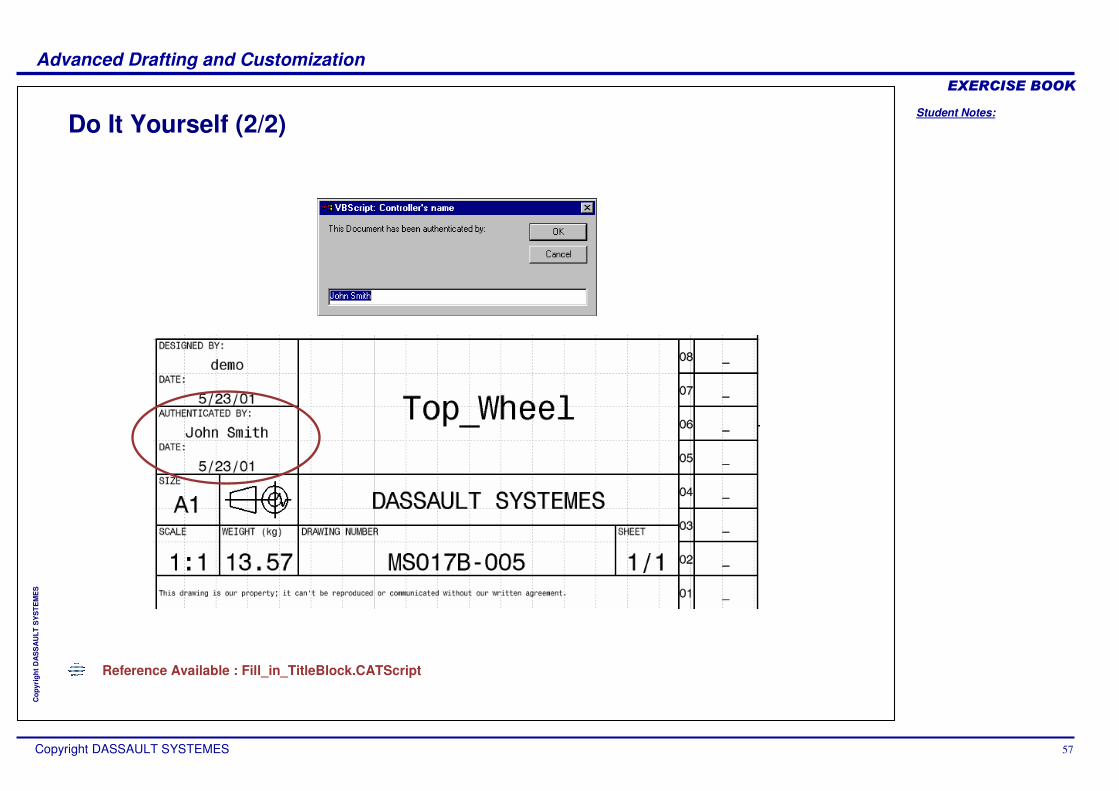
Do It Yourself (2/2)
Reference Available : Fill_in_TitleBlock.CATScript