animating characters using bones - credo interactive · pdf fileanimating characters using...
TRANSCRIPT

|Prev|Menu|Next|Back| p. 1
|Prev|Menu|Next|Back| p. 1
Life Forms & Cinema 4D:Animating Characters using Bones
TutorialAbout the Tutorial
Tutorial: Animating with Bones and Single Mesh (animating with segmented models are at the end o this tutorial)This tutorial explains the most effective way of animating single-skin meshes in Cinema 4D using motion data from Life Forms.
Sample files are provided for each part of the tutorial so that you can enter the tutorial at any step. Even though the tutorials span several pages they are actually quite short. We don’t expect that each tutorial to take more than 45 minutes.
Note: This tutorial was tested with Cinema 4D 5.27, and with BioVision BVH plug-in v1.6 from Maxon Inc., and 3DS plug-ins dated 10/12/99 from Credo Interactive Inc. Our latest .3DS is downloadable from ur website. www.char-actermotion.com.
For the tutorials you need:• Cinema 4D XL 5.27 plus latest BioVision Plug-ins.The latest version as of Janu-
ary 29th, 1998 is version 1.6. You may contact Maxon Inc.• Life Forms Studio 3.5. The demo version of Life Forms 3.5 can also be used.
The demo is available on our website.• Sample files from Credo Interactive Inc. You can download the sample files for
this tutorial from Credo’s website. • The latest 3DS plugins and BVH - all downloadable from our website.
ImportantBefore attempting this tutorial please move the Life Forms 3DS and BVH plug-ins to the Lifeforms/ Plug-in folder. Should copy over old plugins.
Overview of Process:

|Prev|Menu|Next|Back| p. 2
|Prev|Menu|Next|Back| p. 2
• Create a low rez segmented version of your high rez single skin mesh in C4D. The low rez model is fully articulated: linked, proper hierarchy, pivots set correctly for all the joints. You can create this from geometry like our sam-ple file (3back.c4d), or duplicate your mesh and cut it up but decrease the number of polygons.
• Export the low rez model as a .3DS to Lifeforms and animate it. In this tuto-rial’s case we will apply a premade animation to it and export it as a BVH.
• Then in C4D file that contains only the mesh, we will import the BVH and attach it to the mesh. The mesh file we supplied is Evemesh.c4d. The BVH will come in as a skeleton based upon the dimesnions of the low rez model with motion data and we will attach that to the mesh. See movie The Walk.AVI in the downloaded tutorial files.
Part 1: Creating the Dummy to fit a MeshIn the case that you want to get your mesh from Poser.Pose it in a good skinning pose (legs and arms spread). Export it as a DXF and import it into C4D. Set the DXF preferences first to be Connected by Layer. This way it will come in as one object. Set the different import DXF options, and you should be able to import it again segmented and a lower resolution. This could be used for your low rez segmented version. Or you can import in the mesh, set it to be Y up, and model geometry to represent mesh with segments as if you were creating a skeleton. Link, parent, set pivots that rotate the joints properly and test it out by rotating all joints. This will avoid problems later.
Key PointKey PointKey PointBecause we will generate a skeleton for our mesh based on the Low Rez dimensions, it is very important that the LowRez fits the mesh properly.
Using the supplied tutorial files. We created files located in the downloaded tutorial folder to allow you to skip time consuming steps like modelling to allow you to get to the actual interfacing of C4D and Lifeforms.
1 Open 3Back.C4DChoose File menu > Open. Find and select 3Back.C4D. Click Open.You will now see a segmented model that we created that fits our mesh.
2 Export 3Back from Cinema 4D as 3DS file• In the 3D Studio Preferences dialog box, check that the Factor field
contains a scale of 1.

|Prev|Menu|Next|Back| p. 3
|Prev|Menu|Next|Back| p. 3
• Choose File menu > Save As > 3D Studio R4. • Name the file and click Save.
Results: 3back.3ds.
3 Import 3back.3ds in Life Forms• Choose File menu > Open. • In the Open dialog box, select All Files from the File type menu. • Browse and find 3back.3ds and click Open.
Part 3: Animating and Exporting a Skeleton from life FormsIn this part, we will paste existing animation to 3 back and export just the keyframes from 3Back as a BioVision BVH file. This creates a skeleton which we can attach to the Mesh in Cinema 4D.
There are many ways to animate in Life Forms. You can:
• apply premade animations from the PowerMoves series, from the Animation Gallery that comes with every package of Life Forms.
• use the Walk Generator.• keyframe an animation from scratch.
Since this a tutorial about how to use Life Forms motion data in Cinema 4D, we won’t go into detail about animating. Instead let’s just use the premade The Walk.lfa animation. If you want to learn about keyframing in Lifeforms refer to the Lifeforms tutorial on the web
ImportantFrame1 must contain the 3Back model in the same position as the mesh model, Eve. This is because Frame 1 sets the skinning pose at Frame 0 in Cinema 4D. The skinning pose is the pose that you use to attach a skeleton to a mesh.
1 Open Lifeforms• In Life Forms, choose File menu > New.
2 Import in the 3Back.3ds• In Life Forms, choose Figure menu > Import. Set the File Type to
All files and browse to find 3back.3ds. Click open and it will appear in the Stage window. The Stage is for playback.
3 Change Height and Scale.• Go to Figure > Height and Scale. Change to 1.7
|Prev|Menu|Next|Back| p. 4
|Prev|Menu|Next|Back| p. 4
4 Open the Browser to Paste Animation• Select your model in the stage if it is not already. It will be high-
lighted.• Choose File menu > Browser. This allows for navigating through
presaved animations and pasting to models.• In the Open dialog box, Find and select The Walk.lfa.• Click Paste.
• An animation will be pasted to your model. If a dialogue window comes up asking to change frame rate choose YES.
• You can preview by palying back in the stage. Use the panel to hit play and stop. The first keyframe is for attaching the mesh to the bones. That keyframe is needed for one time only. When you render, don’t include it. The next time you animate with these files, you won’t need it because the mesh is already skinned to the bones.
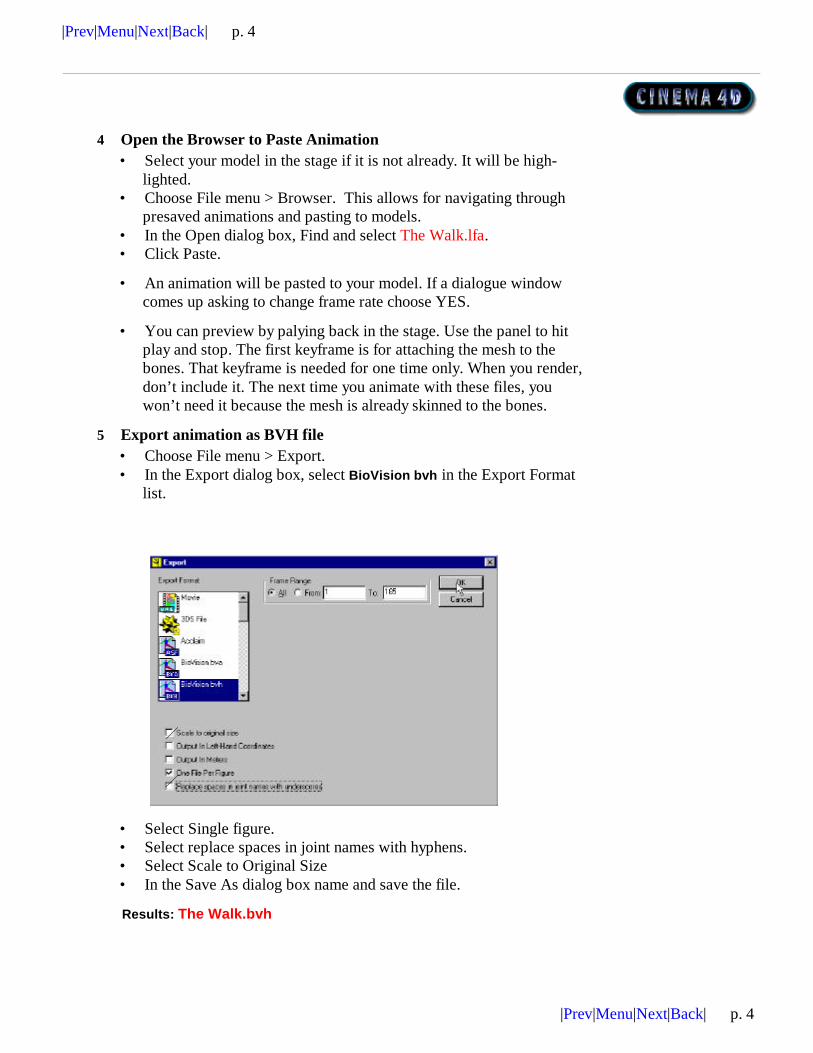
5 Export animation as BVH file• Choose File menu > Export.• In the Export dialog box, select BioVision bvh in the Export Format
list.
• Select Single figure.• Select replace spaces in joint names with hyphens. • Select Scale to Original Size• In the Save As dialog box name and save the file.
Results: The Walk.bvh
|Prev|Menu|Next|Back| p. 5
|Prev|Menu|Next|Back| p. 5
Part 4: Importing the Skeleton into Cinema 4DWe will now import the animation to Cinema 4D as a BioVision BVH file. Cinema 4D XL has a plug-in which enables it to import this file type. Before proceeding check that you have the latest BVH plug-in Cinema 4D’s Plugin folder.
1 In Cinema 4D, open EveMesh.c4d.
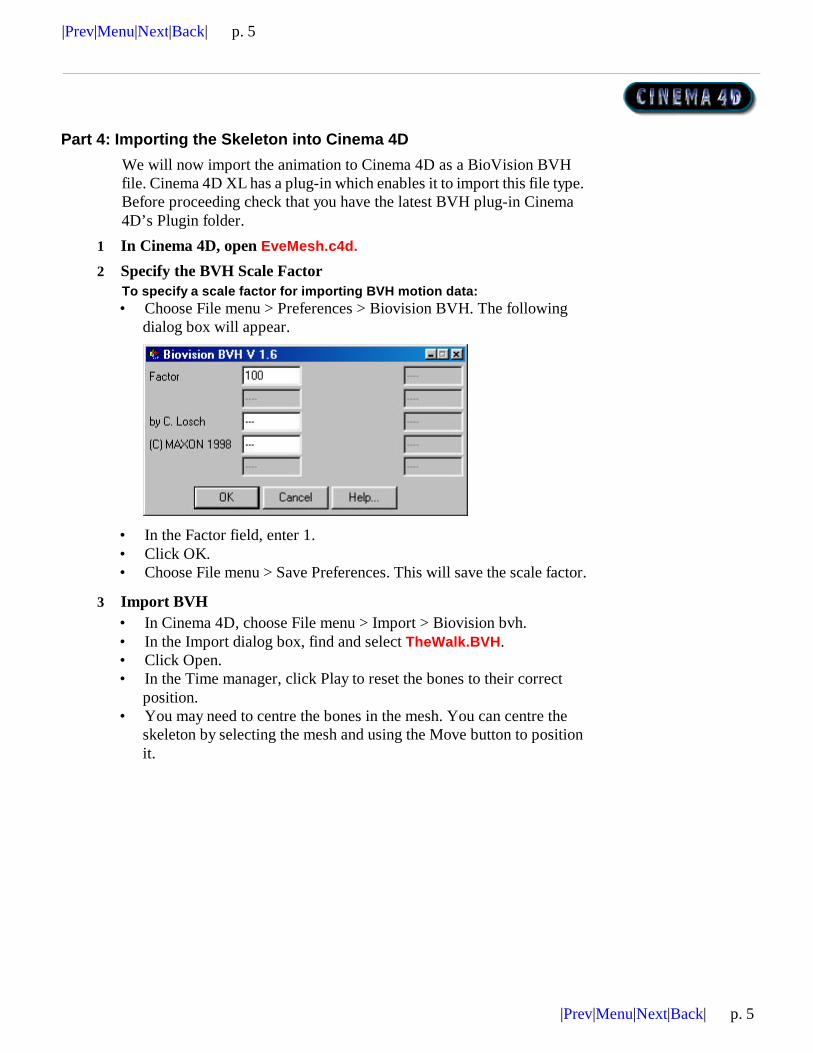
2 Specify the BVH Scale FactorTo specify a scale factor for importing BVH motion data:• Choose File menu > Preferences > Biovision BVH. The following
dialog box will appear.
• In the Factor field, enter 1.• Click OK.• Choose File menu > Save Preferences. This will save the scale factor.
3 Import BVH• In Cinema 4D, choose File menu > Import > Biovision bvh. • In the Import dialog box, find and select TheWalk.BVH. • Click Open.• In the Time manager, click Play to reset the bones to their correct
position.• You may need to centre the bones in the mesh. You can centre the
skeleton by selecting the mesh and using the Move button to position it.

|Prev|Menu|Next|Back| p. 6
|Prev|Menu|Next|Back| p. 6
You should now see:.
Part 5: Fixing the Skeleton to the MeshNow, we need to attach the bones to the mesh so that it will deform the mesh. To attach the bones to the mesh, you need to group Eve and the im-ported BVH skeleton, and then use the Fix Bones command.
1 Go to Frame 0In the Time Manager go to frame 0. This is the skinning pose.
2 Drag Hips of the Skeleton to the top level• Open the Object Manager. • Expand the Skeleton’s hierarchy.

|Prev|Menu|Next|Back| p. 7
|Prev|Menu|Next|Back| p. 7
• Click on Hips, the first bone in the Skeleton. Then drag it up and to the left so that Hips is now at the top level in the hierarchy as shown.
3 Delete the Skeleton• In the Object manager, click on Skeleton.• When Skeleton is selected press the Delete key.You should now see the following:
4 Group Hips and Mesh• Collapse the hierarchies in the Object manager.• Choose Function menu > Object Group.
|Prev|Menu|Next|Back| p. 8
|Prev|Menu|Next|Back| p. 8
• Now drag the cursor until the selection marquee encloses Hips and Mesh as shown.
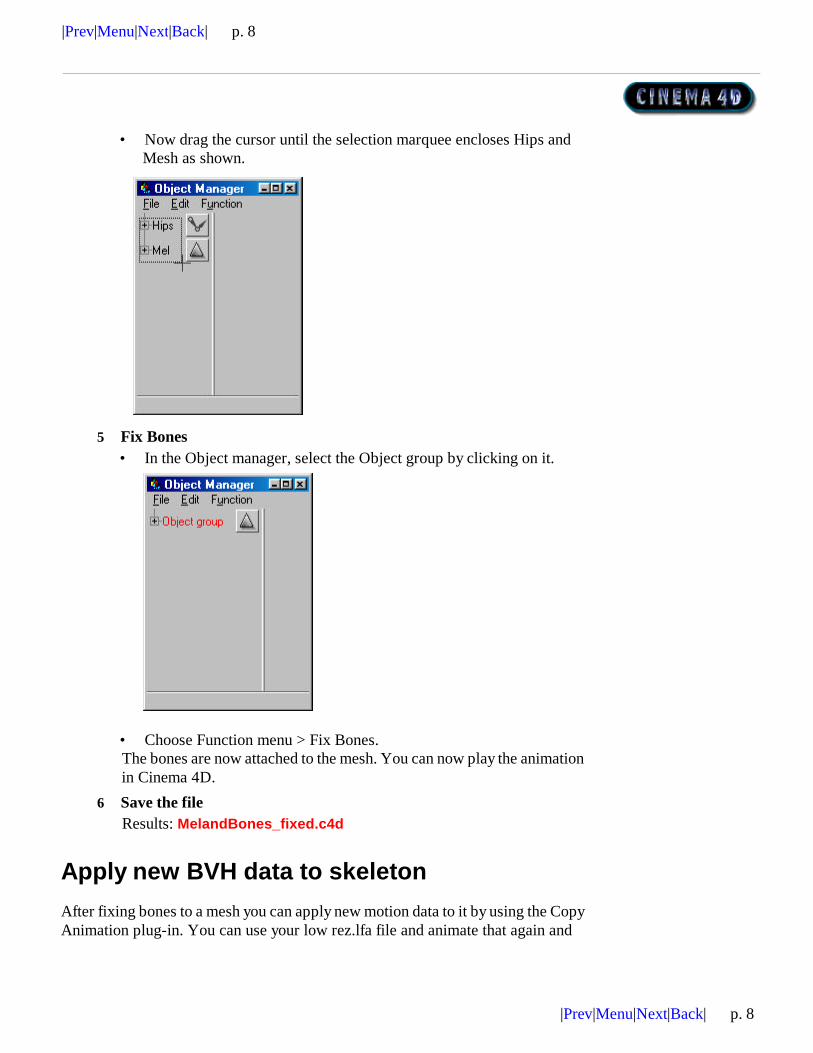
5 Fix Bones• In the Object manager, select the Object group by clicking on it.
• Choose Function menu > Fix Bones.The bones are now attached to the mesh. You can now play the animation in Cinema 4D.
6 Save the fileResults: MelandBones_fixed.c4d
Apply new BVH data to skeletonAfter fixing bones to a mesh you can apply new motion data to it by using the Copy Animation plug-in. You can use your low rez.lfa file and animate that again and

|Prev|Menu|Next|Back| p. 9
|Prev|Menu|Next|Back| p. 9
bring it back into C4D as a BVH and use the copy animation plugin to copy that animation from the new skeleton to the skeleton that is attached.
To copy BVH motion to an existing skeleton 1 Choose File menu > Import > Biovision bvh.
2 In the Import dialog box, locate and select the file. Click OK.
3 In the Object manager, click on Skeleton to expand it’s hierarchy.
4 Rename the root of the Skeleton• In the Object manager, expand Skeleton.• Double-click on Hips, and rename it to Hips2.
5 Choose Tools menu > Plug-in > Copy Animation. This opens a dialog box.
Note If Copy Animation does not appear in this menu, this means that the CopyAnimation plug-in is not installed. See info at end of tutorial.
6 In the Source field enter Hips2.

|Prev|Menu|Next|Back| p. 10
|Prev|Menu|Next|Back| p. 10
7 In the Target field enter Hips.
8 Moving the animation down• In the Object manager, click on Hips to select it.• Choose Tools menu > Option > Animation. You will now see the ani-
mation’s path as shown below.
• In the Tool panel, unselect Object Tool button. • In the Action panel, select the Y axis lock/unlock button.• In the Action panel, select the Move Active Element button.• Drag the path down.
9 Adjusting Bone StrengthYou can improve the way the bones deform the mesh by adjusting the bone strength (See p. 178, Cinema 4D Reference manual). Suggested function values for Eve are as follows• for Hips — 1/r10• for all other objects — 1/r2.
Object Tool
Move ActiveElement
Buttons
Y axis Lock/unlock

|Prev|Menu|Next|Back| p. 11
|Prev|Menu|Next|Back| p. 11
Final NotesThis brings us to the end of this tutorial. We’ve learnt exactly how to:
• export customized skeleton from Life Forms• how to attach the skeleton to a mesh in Cinema 4D, and• how to apply motion data to the skeleton.
You can use this process to animate other single-skin and segmented characters in Cinema 4D.
User GuideEnabling File import/export capabilitiesIn Life Forms
You enable Life Forms to import and export 3DS and BVH files when the following plug-ins are correctly installed.
In Windows: 3DS.in.dll, 3DS.out.dll, bvh.out.dll
On the Macintosh: 3DS.in, 3DS.out and bvh.out.
To install plug-ins for Life Forms1 Move the plug-in files into the Plug-in folder in the Life Forms 3.5 folder.
2 Restart Life Forms if it is running.
In Cinema 4D XL
Commands for importing and working with motion data from BioVision bvh files will not be available unless the following plug-in files are correctly installed:
• BVH.cob• CopyAnimation.cob• ReduceKeys.cob
Cinema 4D’s plug-ins for working with motion capture data are part of the sample file provided for this tutorial. Also included is a Readme.pdf provided by Maxon Inc. You will find more information about Maxon’s ReduceKeys, and CopyAnimation plug-ins there.
|Prev|Menu|Next|Back| p. 12
|Prev|Menu|Next|Back| p. 12
To install plug-ins for Cinema 4D1 Create a new folder called “Plugin” in the Cinema 4D folder, if there isn’t
one there already.
2 Move the following files to the Cinema 4D / Plugin folder:
• BVH.cob• BVA.cob• CopyAnimation.cob• ReduceKeys.cob
Importing and Exporting 3DS files (segmented) from Life FormsThe 3DS file format stores both model geometry and motion data. This file format transfers models and motion between Cinema 4D and Life Forms. This is the process for segmented models.
To open a 3DS file in Life Forms1 In Life Forms, choose File menu > Open.
2 In the Open dialog box, select 3DS in the File types menu. Browse and se-lect the 3DS file you want to open. Click Open.
To export 3DS files from Life Forms1 Choose File menu > Export.
2 Select 3D Studio Max icon from the Export Format list.
3 In the Export dialog box, enter the range of keyframes you want to export.
4 Do NOT check the Merge checkbox.
5 Check the Scale to original size checkbox if you have scaled any model in Life Forms.
6 Check the Export all position keys for root joint. This option exports a key for the root joint for every frame of the animation. This option is recom-mended.
7 Click OK. Name and Save the 3DS file that will be exported.

|Prev|Menu|Next|Back| p. 13
|Prev|Menu|Next|Back| p. 13
Importing and Exporting 3DS files from Cinema 4DWhen importing 3DS files into Cinema 4D we recommend that you apply a scale factor of 2.54. This conversion ratio for converting inches to centimetres is needed for importing models from 3DS files. Similarly, we recommend that you apply this scale factor when you export 3DS files.
To set 3DS scale factor for import and export1 Choose File menu > Preferences > 3D Studio.
2 In the Preferences dialog box, enter 2.54 in the Factor field.
Problems that might Occur
Pelvis Axis wrong direction upon import. Select the Pelvis in the Figure Menu window and go to Edit > Set axis and hold down your mouse and a drop down menu will appear of axis directions. Set the axis to be going up. Lifeforms determines the direction of axis according to the length of the geometry. For the Pelvis it usually is going the wrong way and must always be checked and set right.
Default in C4D is 24 frames per second. Lifeforms mocap is 30 fps. Change one or the other.
Copyright 1999 by Credo Interactive Inc.Cinema 4D is a trademark of Maxon Inc.
Life Forms and PowerMoves is a trademark of Credo Interactive Inc.