bones tutorial - toon boom...
TRANSCRIPT
Bones Tutorial

Legal Notices
Corporate Headquarters5530 St. Patrick, Suite 2210Montreal, QuebecCanada H4E 1A8Tel: (514) 278-8666Fax: (514) 278-2666
toonboom.com
DisclaimerThe content of this manual is covered by a specific limited warranty and exclusions and limit of liability under the applicable License Agreement as supplemented by the special terms and conditions for Adobe®Flash® File Format (SWF). Please refer to the License Agreement and to those special terms and conditions for details.
The content of this manual is the property of Toon Boom Animation Inc. and is copyrighted.
Any reproduction in whole or in part is strictly prohibited. For additional copies of this manual, please contact Toon Boom Animation Inc. at the Corporate Headquarters address.
Copyright © 2012 by Toon Boom Animation Inc. All rights reserved.
TrademarksToon Boom Studio® is a trademark owned by Toon Boom Animation Inc. All other trademarks are the property of their respective owners.
CreditsDocumentation Development: Peter Cawthorne
Content Development: Marie-Eve Chartrand, Anouk Whissell, Shabana Ali
Art Development: Marie-Eve Chartrand, Anouk Whissell, Shabana Ali, Tania Gray, Natalia Solari, Annie Rodrigue
Publication DateJuly 2012
Published by Toon Boom Animation Inc.
ETUT101TBS70EN
1
Contents
Introduction ................................................................................................................................................................... 2Documentation ........................................................................................................................................................... 3
Toon Boom Studio - How To? ................................................................................................................................ 3Workout Series ................................................................................................................................................... 3Video Lessons ..................................................................................................................................................... 3Tutorials .............................................................................................................................................................. 3Articles ................................................................................................................................................................ 4Templates ........................................................................................................................................................... 4
Remember to Register Toon Boom Studio ............................................................................................................ 4Get Help! ................................................................................................................................................................ 5
Knowledge Base ................................................................................................................................................. 5User Forum ......................................................................................................................................................... 5Animation Glossary ............................................................................................................................................. 5
Bones Tutorial............................................................................................................................................................... 6About the Skeleton Effect ......................................................................................................................................... 7
Bone Tools Toolbar ............................................................................................................................................... 8Setup Mode ....................................................................................................................................................... 8Animation Mode ................................................................................................................................................ 9
Choosing Your Character ........................................................................................................................................ 11Planning and Preparing Your Character .............................................................................................................. 11
Adding the Skeleton ................................................................................................................................................. 13Robo-Skeleton Templates .................................................................................................................................... 13
Choosing Your Robo-Skeleton Template from the Library .............................................................................. 13Importing Your Robo-Skeleton into Your Scene .............................................................................................. 15Adding Your Own Character to the Robo-Skeleton Template ........................................................................ 16
Building the Skeleton ............................................................................................................................................ 20Adding Bones .................................................................................................................................................. 20Setting Up the Bones ...................................................................................................................................... 24 Setting the Influence Area .............................................................................................................................. 27Parenting Bone Chains .................................................................................................................................... 30Unparenting Bone Chains ................................................................................................................................. 32
Animating the Skeleton ........................................................................................................................................... 33Reassembling the Character ................................................................................................................................ 33Ordering Limbs .................................................................................................................................................... 34
Character on a Single Drawing Layer .............................................................................................................. 34Character with Limbs on Different Drawing Layers ......................................................................................... 35
Hiding Bones ....................................................................................................................................................... 35Animating Bones .................................................................................................................................................. 35
Onion Skin Toolbar .......................................................................................................................................... 38Blocking the Body’s Position ........................................................................................................................... 38Deleting Keyframes ......................................................................................................................................... 39Removing All Keyframes ................................................................................................................................... 39
Adjusting the Velocity and Functions .................................................................................................................. 39Disabling a Bone Animation ................................................................................................................................ 40
Skeleton Effect Properties ....................................................................................................................................... 41Preferences .............................................................................................................................................................. 43
2
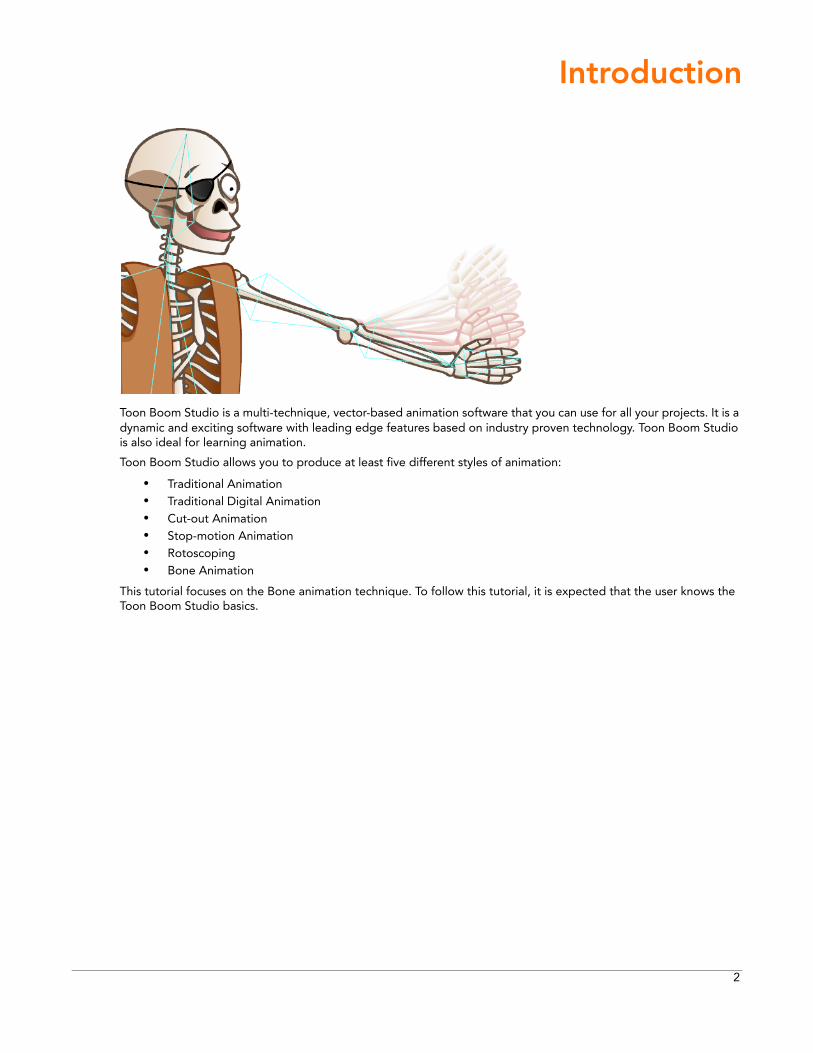
Introduction
Toon Boom Studio is a multi-technique, vector-based animation software that you can use for all your projects. It is a dynamic and exciting software with leading edge features based on industry proven technology. Toon Boom Studio is also ideal for learning animation.
Toon Boom Studio allows you to produce at least five different styles of animation:
• Traditional Animation• Traditional Digital Animation• Cut-out Animation• Stop-motion Animation• Rotoscoping • Bone Animation
This tutorial focuses on the Bone animation technique. To follow this tutorial, it is expected that the user knows the Toon Boom Studio basics.
3
Toon Boom Studio Bones Tutorial
DocumentationIn addition to this tutorial, there are other useful documents available. Learn how to use Toon Boom Studio with our easy-to-use documentation package:
• Integrated HelpIn Toon Boom Studio, select Help > Toon Boom Studio Help to open the help system in your default browser.
• Context-Sensitive Help (Tooltips)To get a short description of a menu command or toolbar button, select Help > What’s This and click on the item. A tooltip pop-up window opens with the description of the item you clicked on.
Documentation and additional tutorials for Toon Boom Studio are available on the Web via the Toon Boom website’s How To section.
Select Help > Toon Boom on the Web to open the Toon Boom website in your default Web browser.
Toon Boom Studio - How To?Toon Boom’s How To tools, available at www.toonboom.com, help you to broaden your Toon Boom Studio and general animating skills. Choose from basic to advanced tools to take your animation know-how to the next level. You can also open the How To page from Toon Boom Studio:
Select Help > Toon Boom on the Web to open the Toon Boom website in your default Web browser.
Workout Series
The Toon Boom Animation Workout Series is a dedicated program of exercises designed to help you develop the skills and techniques necessary to get the most out of Toon Boom Studio.
Video Lessons
The Toon Boom Studio Training Video is the perfect way to get first-hand instructions on how to use the software. Nearly one-hour long, these Training Videos cover all aspects of the user interface, content creation, artwork import, animation techniques (traditional and keyframe), scene planning and special effects.
Tutorials
Video and print tutorials will get you started and introduce you to the application one step at a time.
Toon Boom Studio Bones Tutorial
4
Articles
These valuable tips and application ideas can be used to familiarize and help you understand the creative potential of Toon Boom Studio.
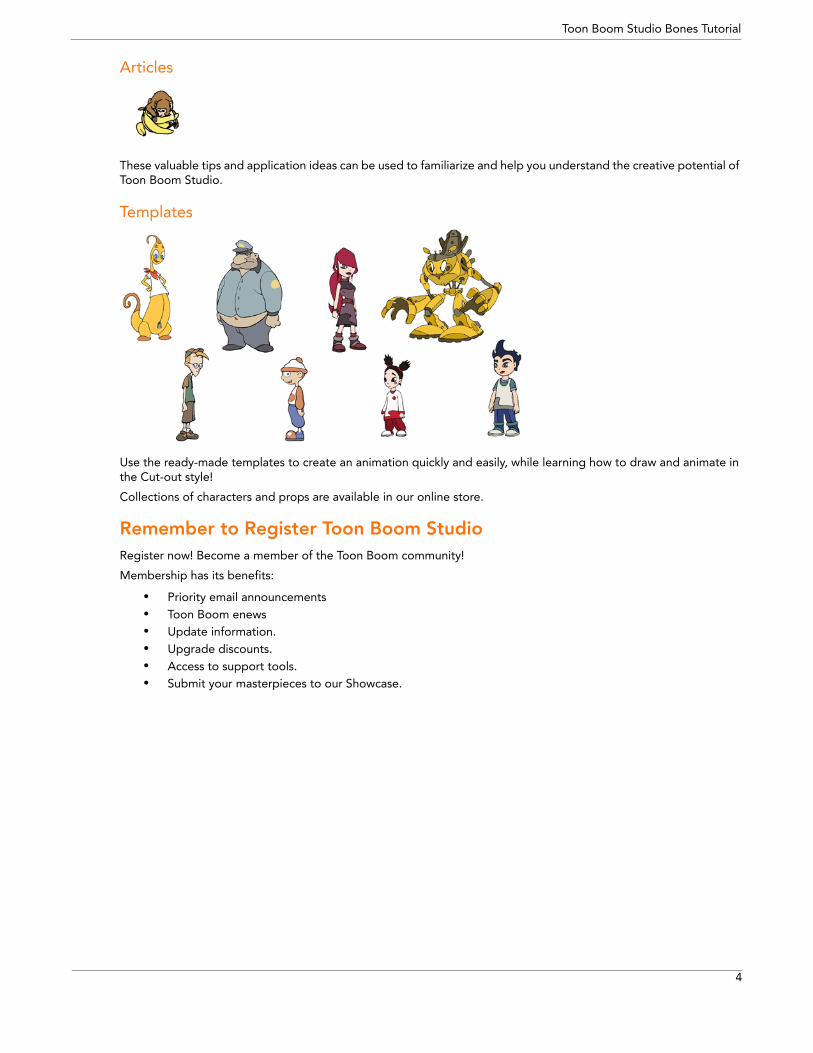
Templates
Use the ready-made templates to create an animation quickly and easily, while learning how to draw and animate in the Cut-out style!
Collections of characters and props are available in our online store.
Remember to Register Toon Boom StudioRegister now! Become a member of the Toon Boom community!
Membership has its benefits:
• Priority email announcements• Toon Boom enews• Update information.• Upgrade discounts.• Access to support tools.• Submit your masterpieces to our Showcase.
5
Toon Boom Studio Bones Tutorial
Get Help!
Knowledge BaseFind answers to your Toon Boom Studio questions in the Knowledge Base on our website at: http://www.toonboom.com/support/kb/categories/Toon-Boom-Studio.
User ForumRegistered Toon Boom Studio members can access and post on the User Forum. Or view the Forum content as a guest.
Animation GlossaryA comprehensive glossary of terms is available on the Toon Boom website. Access it through the Knowledge Base at:
http://www.toonboom.com/support/kb/.
Toon Boom Studio Bones Tutorial
6
Bones Tutorial
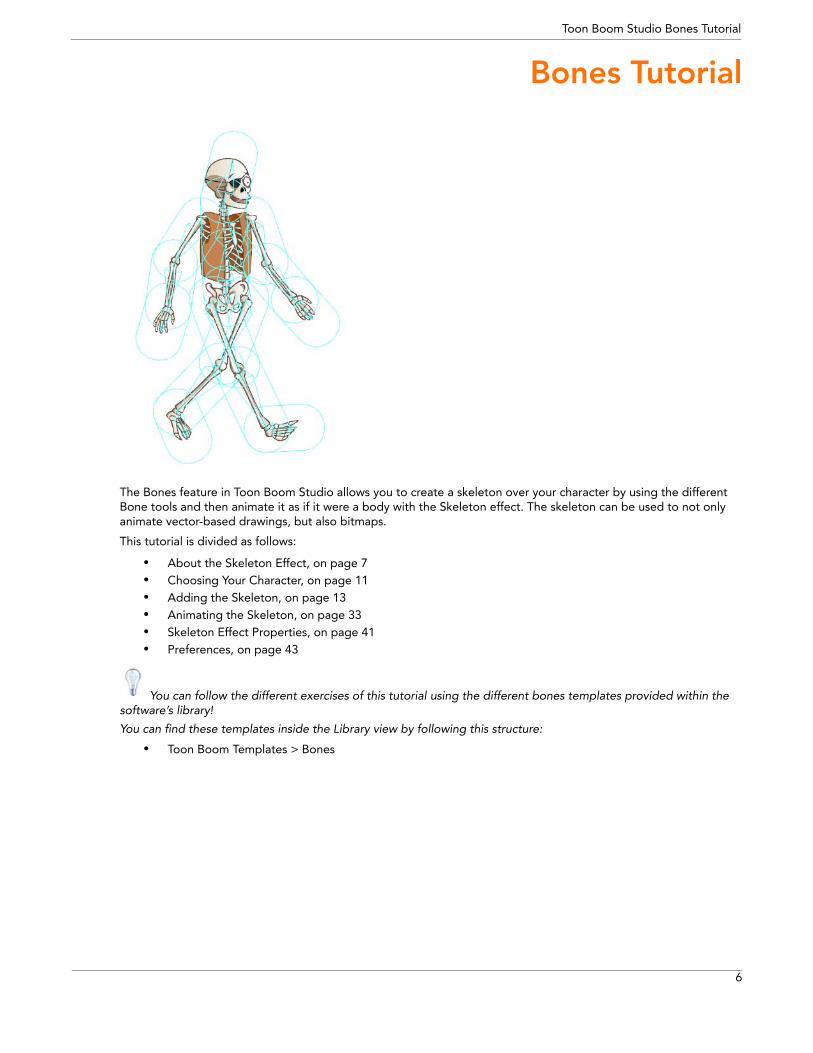
The Bones feature in Toon Boom Studio allows you to create a skeleton over your character by using the different Bone tools and then animate it as if it were a body with the Skeleton effect. The skeleton can be used to not only animate vector-based drawings, but also bitmaps.
This tutorial is divided as follows:
• About the Skeleton Effect, on page 7• Choosing Your Character, on page 11• Adding the Skeleton, on page 13• Animating the Skeleton, on page 33• Skeleton Effect Properties, on page 41• Preferences, on page 43
You can follow the different exercises of this tutorial using the different bones templates provided within the software’s library!
You can find these templates inside the Library view by following this structure:
• Toon Boom Templates > Bones
Toon Boom Studio Bones Tutorial
7
About the Skeleton Effect
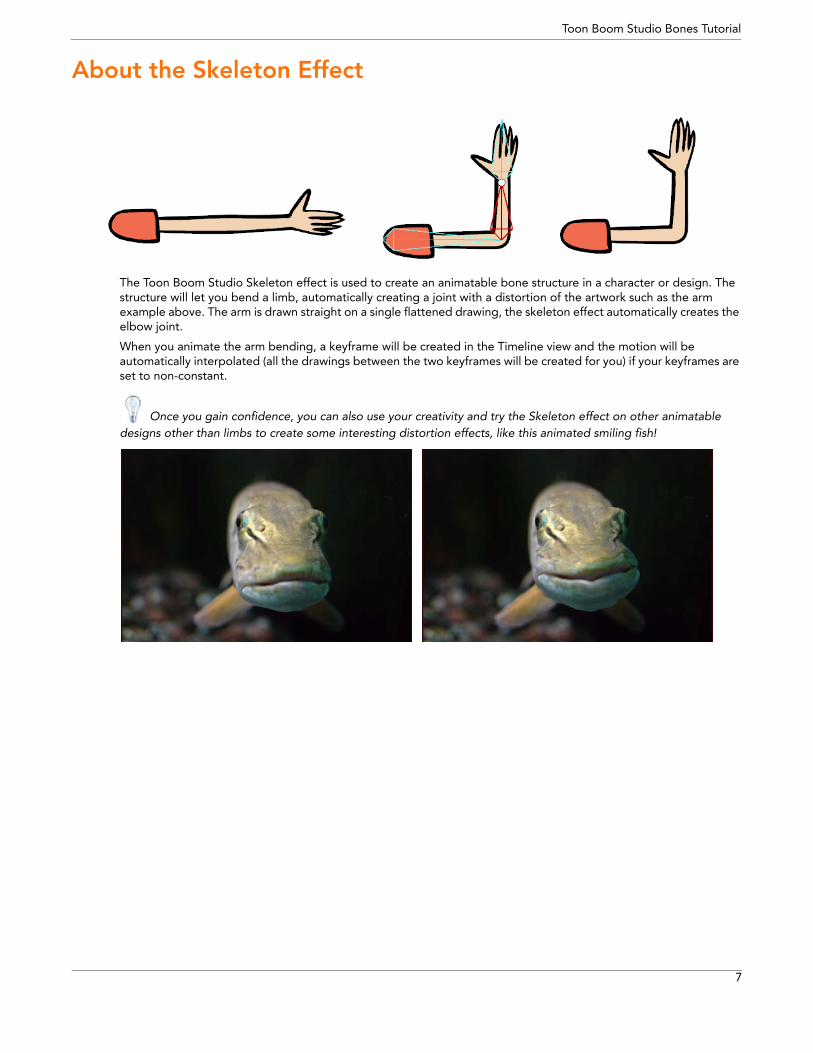
The Toon Boom Studio Skeleton effect is used to create an animatable bone structure in a character or design. The structure will let you bend a limb, automatically creating a joint with a distortion of the artwork such as the arm example above. The arm is drawn straight on a single flattened drawing, the skeleton effect automatically creates the elbow joint.
When you animate the arm bending, a keyframe will be created in the Timeline view and the motion will be automatically interpolated (all the drawings between the two keyframes will be created for you) if your keyframes are set to non-constant.
Once you gain confidence, you can also use your creativity and try the Skeleton effect on other animatable designs other than limbs to create some interesting distortion effects, like this animated smiling fish!
Toon Boom Studio Bones Tutorial
8
Bone Tools Toolbar
By default, the Bone Tools toolbar is located just below the Sceneplanning Tools toolbar on the left side of the application. Use these tools to create, set up and animate your bone structure. You have two types of tools, setup mode tools and an animation mode tool.
It is very important to understand that when selecting a Bone tool, the camera display and Skeleton Effect will automatically switch to either setup mode or animation mode.
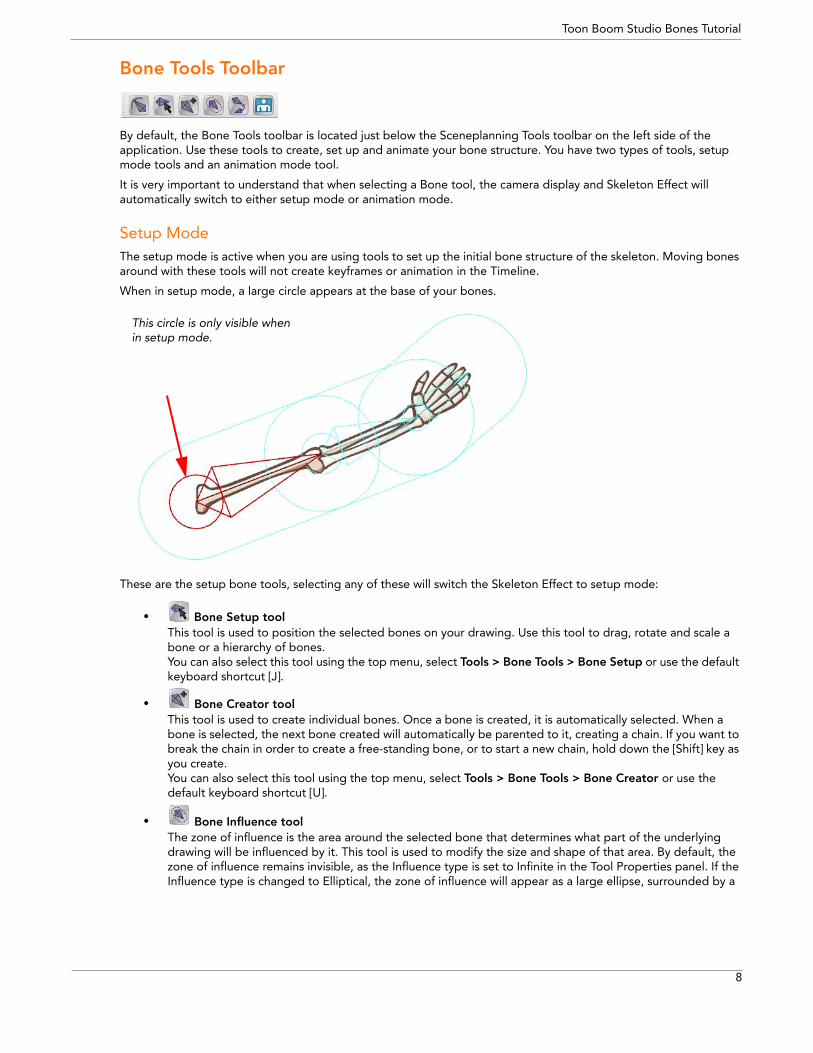
Setup Mode The setup mode is active when you are using tools to set up the initial bone structure of the skeleton. Moving bones around with these tools will not create keyframes or animation in the Timeline.
When in setup mode, a large circle appears at the base of your bones.
These are the setup bone tools, selecting any of these will switch the Skeleton Effect to setup mode:
• Bone Setup tool This tool is used to position the selected bones on your drawing. Use this tool to drag, rotate and scale a bone or a hierarchy of bones. You can also select this tool using the top menu, select Tools > Bone Tools > Bone Setup or use the default keyboard shortcut [J].
• Bone Creator tool This tool is used to create individual bones. Once a bone is created, it is automatically selected. When a bone is selected, the next bone created will automatically be parented to it, creating a chain. If you want to break the chain in order to create a free-standing bone, or to start a new chain, hold down the [Shift] key as you create.You can also select this tool using the top menu, select Tools > Bone Tools > Bone Creator or use the default keyboard shortcut [U].
• Bone Influence tool The zone of influence is the area around the selected bone that determines what part of the underlying drawing will be influenced by it. This tool is used to modify the size and shape of that area. By default, the zone of influence remains invisible, as the Influence type is set to Infinite in the Tool Properties panel. If the Influence type is changed to Elliptical, the zone of influence will appear as a large ellipse, surrounded by a
This circle is only visible when in setup mode.

Toon Boom Studio Bones Tutorial
9
bounding box, around the selected bone. The Bone Influence tool can be used to move the square points on the bounding box in order to reshape the elliptical zone of influence.
You can also select this tool using the top menu; select Tools > Bone Tools > Bone Influence.
• Bone Parent tool This tool is used to parent different bone chains to one another.You can also select this tool using the top menu, select Tools > Bone Tools > Bone Parent.
• Connect character setup modeThis tool is primarily used with the Robo-Skeleton templates. Each template has a layer named “Envelope” in its Skin Group. Click the Connect character set-up mode button to see the envelope zones appear and to see the character revert to Set-up mode, where its body parts are typically separated and spread apart.To have this command work with your own creations, create your own templates and set the layer type of your envelope drawing to Envelope in the Layer Properties panel.
You can also select this tool from the top menu by selecting Tools > Bone Tools > Show-Hide.
Refer to the Adding the Skeleton topic to learn how to use these tools.
Animation Mode
The animation mode is automatically active when you select the Bone Manipulator tool. This means that the Camera view will display the current pose of the bone structure at the selected frame and any manipulation you make will create a keyframe in your Timeline and be animated.
When in animation mode, you will notice that the large circle seen at the base of the bones in setup mode disappears.
• Bone Manipulator tool This tool is used to animate your bone structure. You can drag, squash, stretch, rotate or scale a selected bone chain, creating an animation keyframe in your Timeline.
Layer name
There is no circle displayed when in animation mode.
Toon Boom Studio Bones Tutorial
10
You can also select this tool from the top menu, select Tools > Bone Tools > Bone Manipulator or use the default keyboard shortcut [H].
Refer to the Animating the Skeleton topic to learn more about this tool.
Toon Boom Studio Bones Tutorial
11
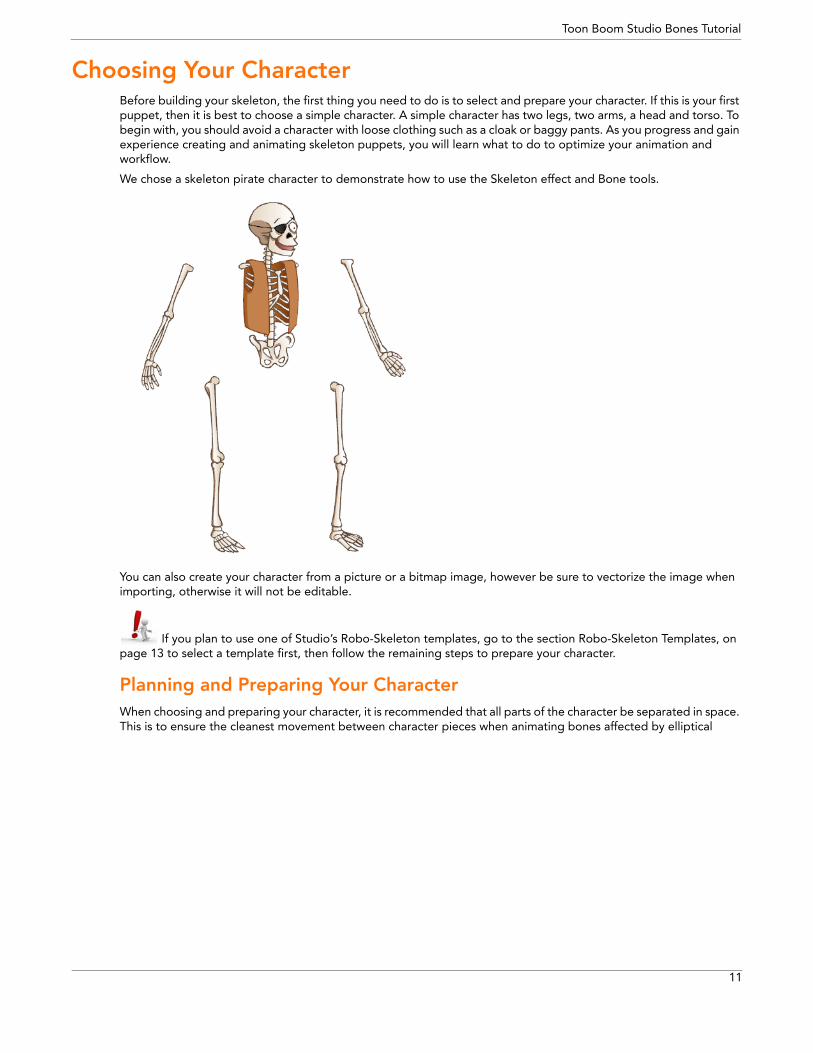
Choosing Your Character Before building your skeleton, the first thing you need to do is to select and prepare your character. If this is your first puppet, then it is best to choose a simple character. A simple character has two legs, two arms, a head and torso. To begin with, you should avoid a character with loose clothing such as a cloak or baggy pants. As you progress and gain experience creating and animating skeleton puppets, you will learn what to do to optimize your animation and workflow.
We chose a skeleton pirate character to demonstrate how to use the Skeleton effect and Bone tools.
You can also create your character from a picture or a bitmap image, however be sure to vectorize the image when importing, otherwise it will not be editable.
If you plan to use one of Studio’s Robo-Skeleton templates, go to the section Robo-Skeleton Templates, on page 13 to select a template first, then follow the remaining steps to prepare your character.
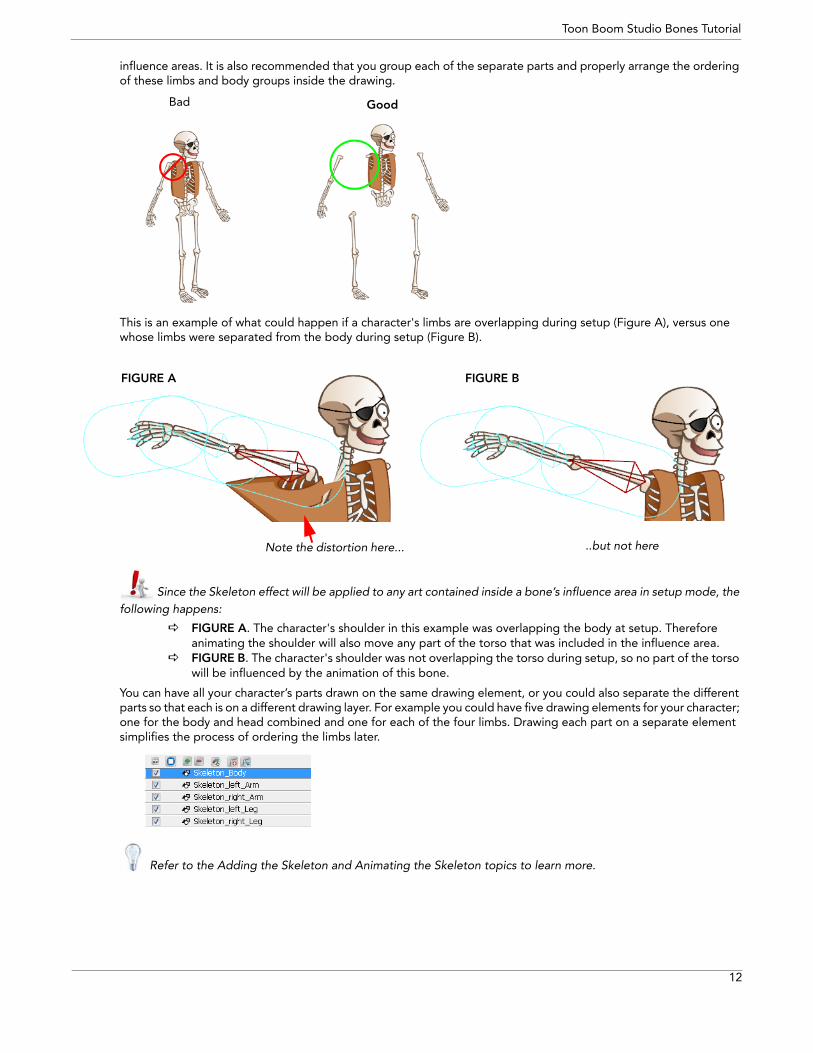
Planning and Preparing Your Character When choosing and preparing your character, it is recommended that all parts of the character be separated in space. This is to ensure the cleanest movement between character pieces when animating bones affected by elliptical
Toon Boom Studio Bones Tutorial
12
influence areas. It is also recommended that you group each of the separate parts and properly arrange the ordering of these limbs and body groups inside the drawing.
This is an example of what could happen if a character's limbs are overlapping during setup (Figure A), versus one whose limbs were separated from the body during setup (Figure B).
Since the Skeleton effect will be applied to any art contained inside a bone’s influence area in setup mode, the following happens:
FIGURE A. The character's shoulder in this example was overlapping the body at setup. Therefore animating the shoulder will also move any part of the torso that was included in the influence area.
FIGURE B. The character's shoulder was not overlapping the torso during setup, so no part of the torso will be influenced by the animation of this bone.
You can have all your character’s parts drawn on the same drawing element, or you could also separate the different parts so that each is on a different drawing layer. For example you could have five drawing elements for your character; one for the body and head combined and one for each of the four limbs. Drawing each part on a separate element simplifies the process of ordering the limbs later.
Refer to the Adding the Skeleton and Animating the Skeleton topics to learn more.
GoodBad
FIGURE A FIGURE B
Note the distortion here... ..but not here
Toon Boom Studio Bones Tutorial
13
Adding the SkeletonWhen it comes to adding bones to your drawing or drawings, you have two options to choose from. You can choose one of Studio’s pre-made Robo-Skeleton templates that has an animated sequence built-in, or you can build your own skeleton. If you choose to create your own skeleton, you will have the freedom to make your own animated sequences.
• Robo-Skeleton Templates, on page 13• Building the Skeleton, on page 20
Robo-Skeleton Templates
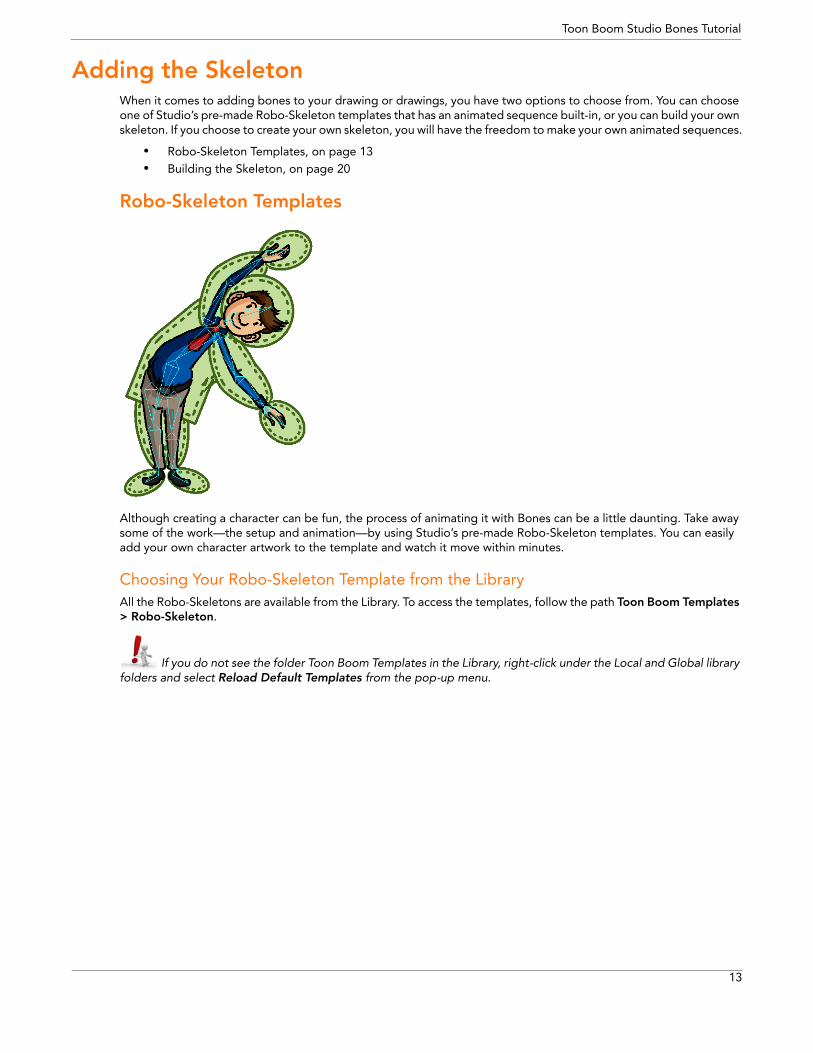
Although creating a character can be fun, the process of animating it with Bones can be a little daunting. Take away some of the work—the setup and animation—by using Studio’s pre-made Robo-Skeleton templates. You can easily add your own character artwork to the template and watch it move within minutes.
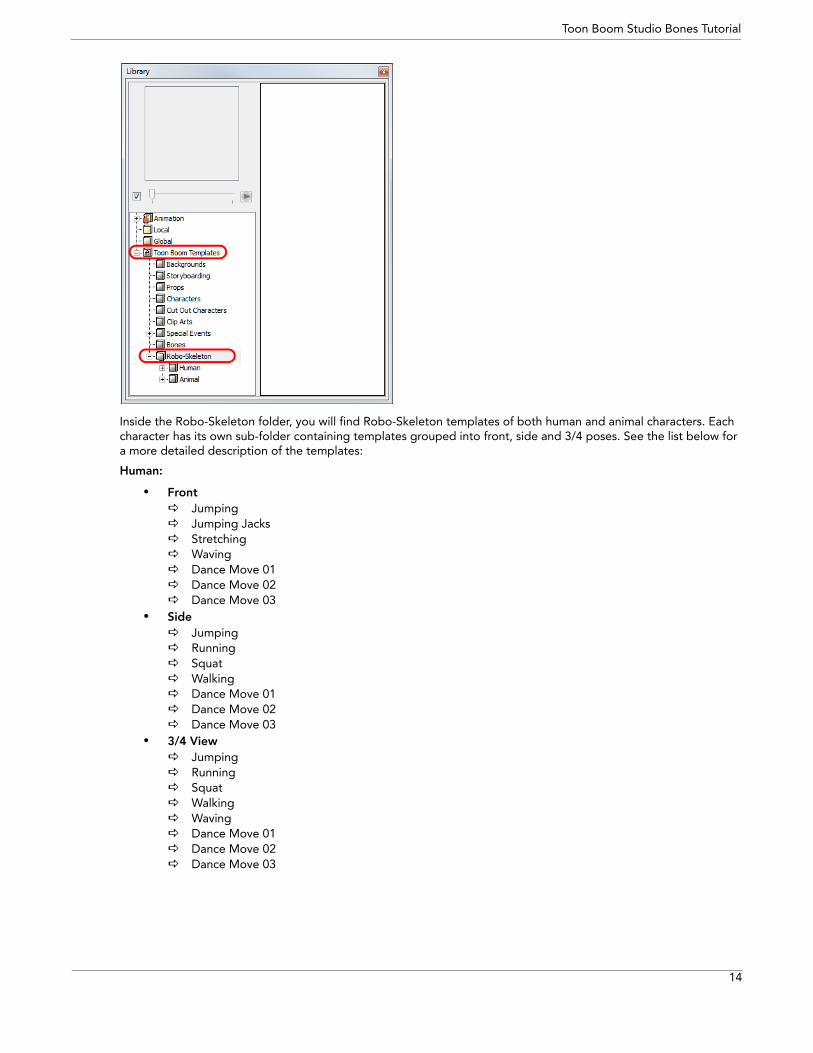
Choosing Your Robo-Skeleton Template from the LibraryAll the Robo-Skeletons are available from the Library. To access the templates, follow the path Toon Boom Templates > Robo-Skeleton.
If you do not see the folder Toon Boom Templates in the Library, right-click under the Local and Global library folders and select Reload Default Templates from the pop-up menu.
Toon Boom Studio Bones Tutorial
14
Inside the Robo-Skeleton folder, you will find Robo-Skeleton templates of both human and animal characters. Each character has its own sub-folder containing templates grouped into front, side and 3/4 poses. See the list below for a more detailed description of the templates:
Human:
• Front Jumping Jumping Jacks Stretching Waving Dance Move 01 Dance Move 02 Dance Move 03
• Side Jumping Running Squat Walking Dance Move 01 Dance Move 02 Dance Move 03
• 3/4 View Jumping Running Squat Walking Waving Dance Move 01 Dance Move 02 Dance Move 03
Toon Boom Studio Bones Tutorial
15
Animal:
• Front Sitting Stretching Tilting Head Walking
• Side Jumping Running Sitting Sniffing Stretching Walking
• 3/4 View Jumping Running Sitting Stretching Tilting Head Walking
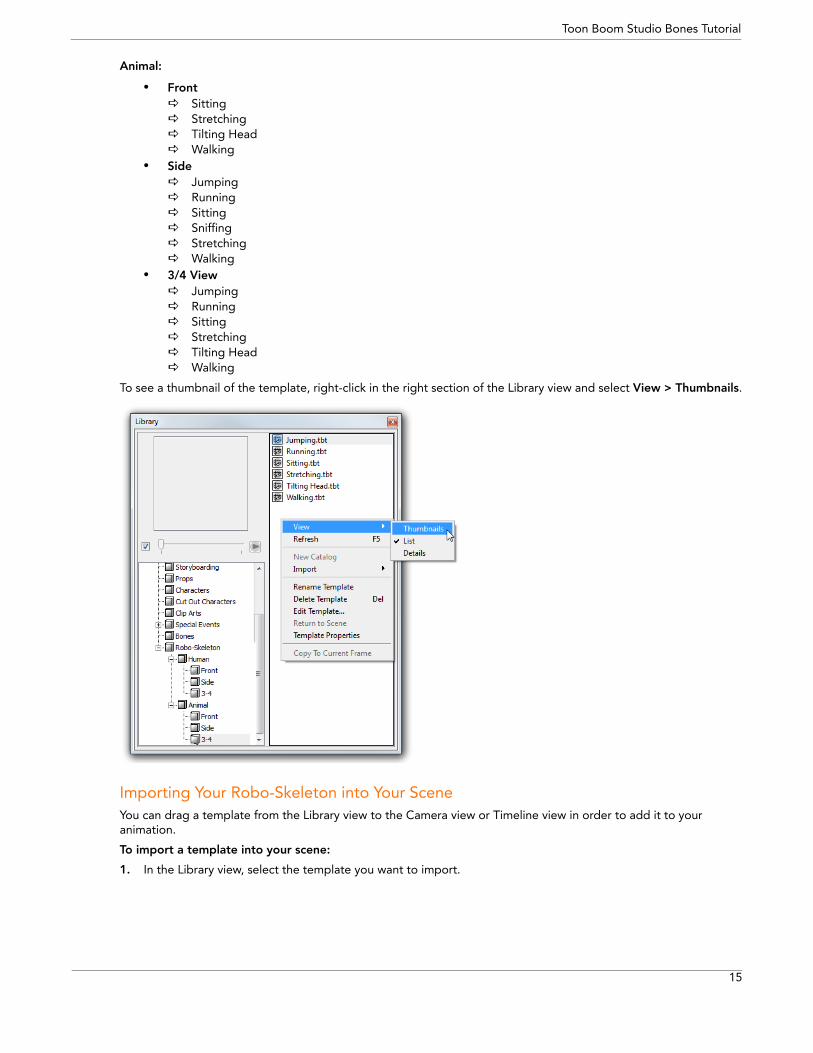
To see a thumbnail of the template, right-click in the right section of the Library view and select View > Thumbnails.
Importing Your Robo-Skeleton into Your SceneYou can drag a template from the Library view to the Camera view or Timeline view in order to add it to your animation.
To import a template into your scene:
1. In the Library view, select the template you want to import.
Toon Boom Studio Bones Tutorial
16
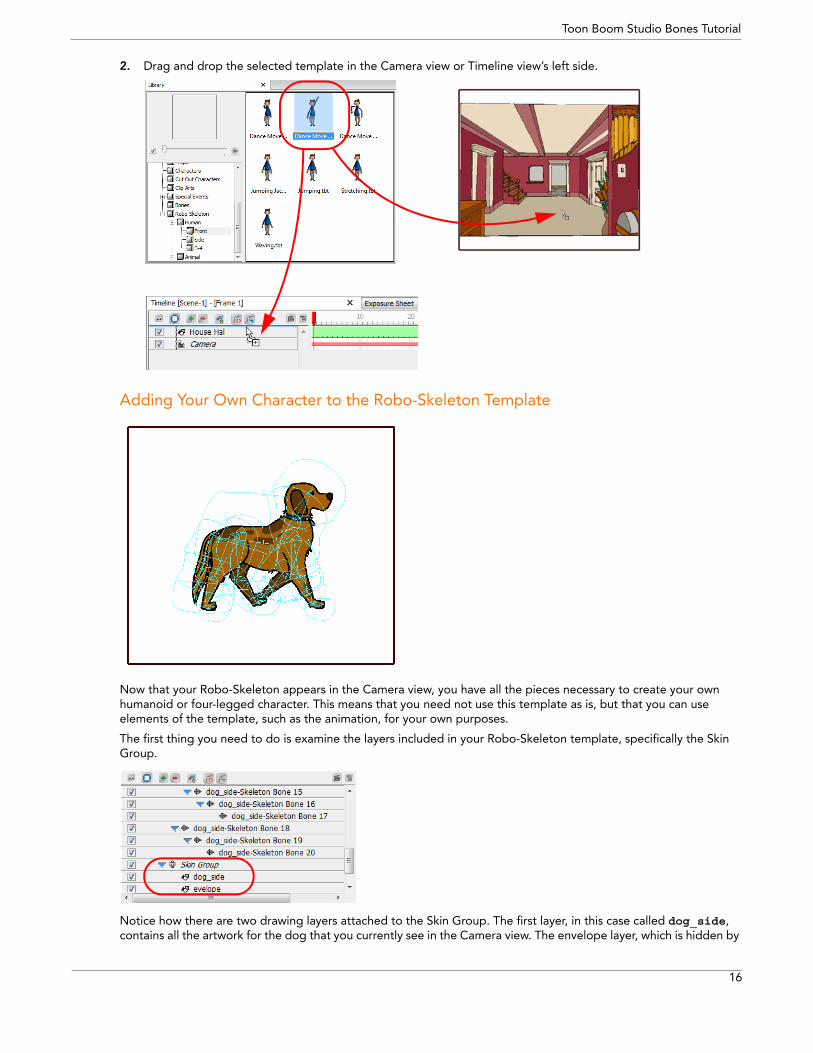
2. Drag and drop the selected template in the Camera view or Timeline view’s left side.
Adding Your Own Character to the Robo-Skeleton Template
Now that your Robo-Skeleton appears in the Camera view, you have all the pieces necessary to create your own humanoid or four-legged character. This means that you need not use this template as is, but that you can use elements of the template, such as the animation, for your own purposes.
The first thing you need to do is examine the layers included in your Robo-Skeleton template, specifically the Skin Group.
Notice how there are two drawing layers attached to the Skin Group. The first layer, in this case called dog_side, contains all the artwork for the dog that you currently see in the Camera view. The envelope layer, which is hidden by
Toon Boom Studio Bones Tutorial
17
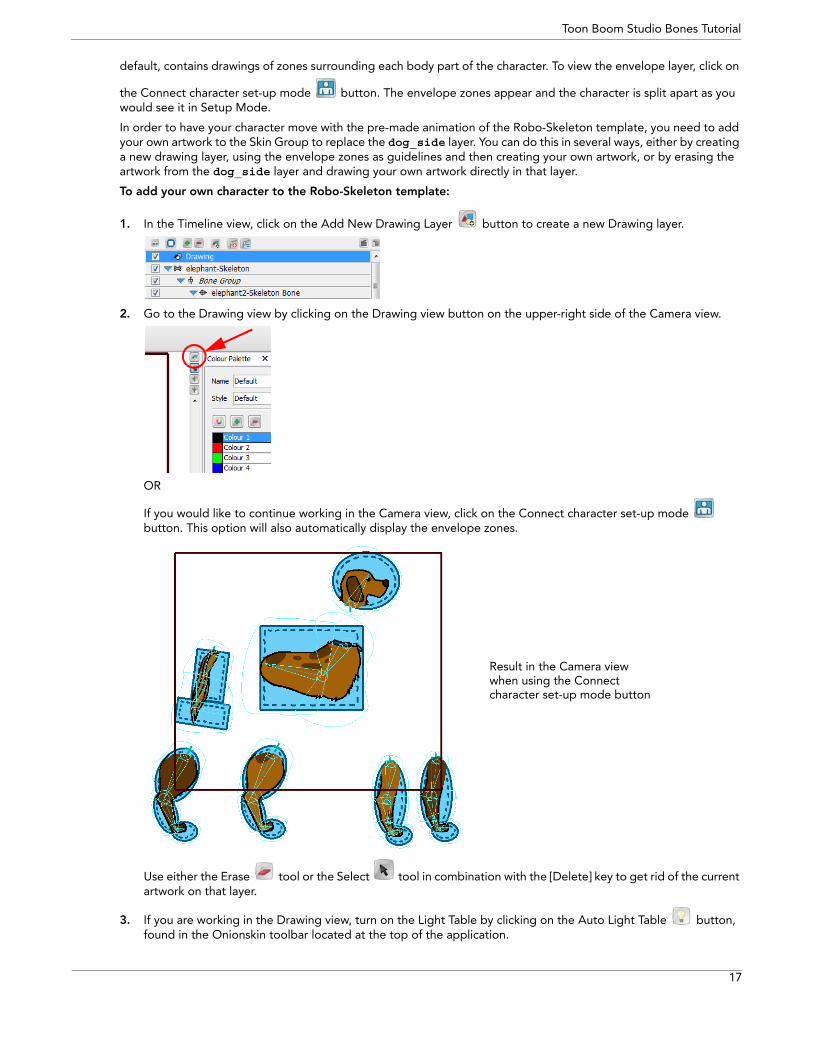
default, contains drawings of zones surrounding each body part of the character. To view the envelope layer, click on
the Connect character set-up mode button. The envelope zones appear and the character is split apart as you would see it in Setup Mode.
In order to have your character move with the pre-made animation of the Robo-Skeleton template, you need to add your own artwork to the Skin Group to replace the dog_side layer. You can do this in several ways, either by creating a new drawing layer, using the envelope zones as guidelines and then creating your own artwork, or by erasing the artwork from the dog_side layer and drawing your own artwork directly in that layer.
To add your own character to the Robo-Skeleton template:
1. In the Timeline view, click on the Add New Drawing Layer button to create a new Drawing layer.
2. Go to the Drawing view by clicking on the Drawing view button on the upper-right side of the Camera view.
OR
If you would like to continue working in the Camera view, click on the Connect character set-up mode button. This option will also automatically display the envelope zones.
Use either the Erase tool or the Select tool in combination with the [Delete] key to get rid of the current artwork on that layer.
3. If you are working in the Drawing view, turn on the Light Table by clicking on the Auto Light Table button, found in the Onionskin toolbar located at the top of the application.
Result in the Camera viewwhen using the Connectcharacter set-up mode button
Toon Boom Studio Bones Tutorial
18
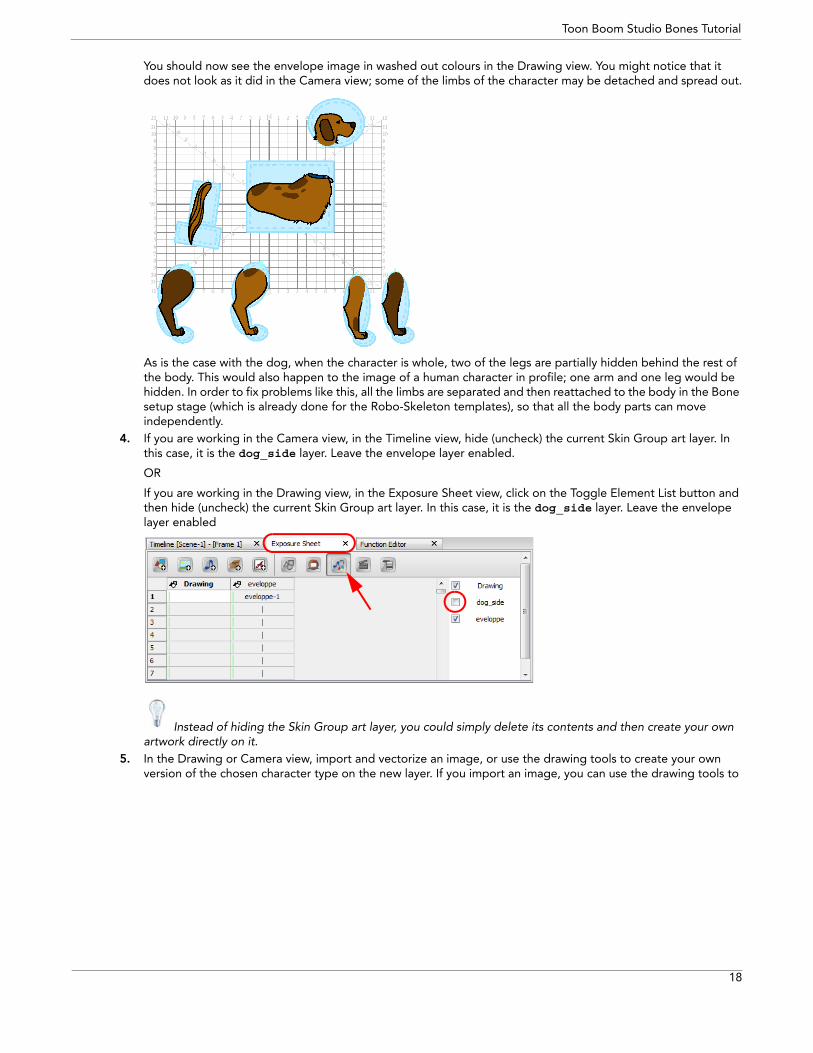
You should now see the envelope image in washed out colours in the Drawing view. You might notice that it does not look as it did in the Camera view; some of the limbs of the character may be detached and spread out.
As is the case with the dog, when the character is whole, two of the legs are partially hidden behind the rest of the body. This would also happen to the image of a human character in profile; one arm and one leg would be hidden. In order to fix problems like this, all the limbs are separated and then reattached to the body in the Bone setup stage (which is already done for the Robo-Skeleton templates), so that all the body parts can move independently.
4. If you are working in the Camera view, in the Timeline view, hide (uncheck) the current Skin Group art layer. In this case, it is the dog_side layer. Leave the envelope layer enabled.
OR
If you are working in the Drawing view, in the Exposure Sheet view, click on the Toggle Element List button and then hide (uncheck) the current Skin Group art layer. In this case, it is the dog_side layer. Leave the envelope layer enabled
Instead of hiding the Skin Group art layer, you could simply delete its contents and then create your own artwork directly on it.
5. In the Drawing or Camera view, import and vectorize an image, or use the drawing tools to create your own version of the chosen character type on the new layer. If you import an image, you can use the drawing tools to
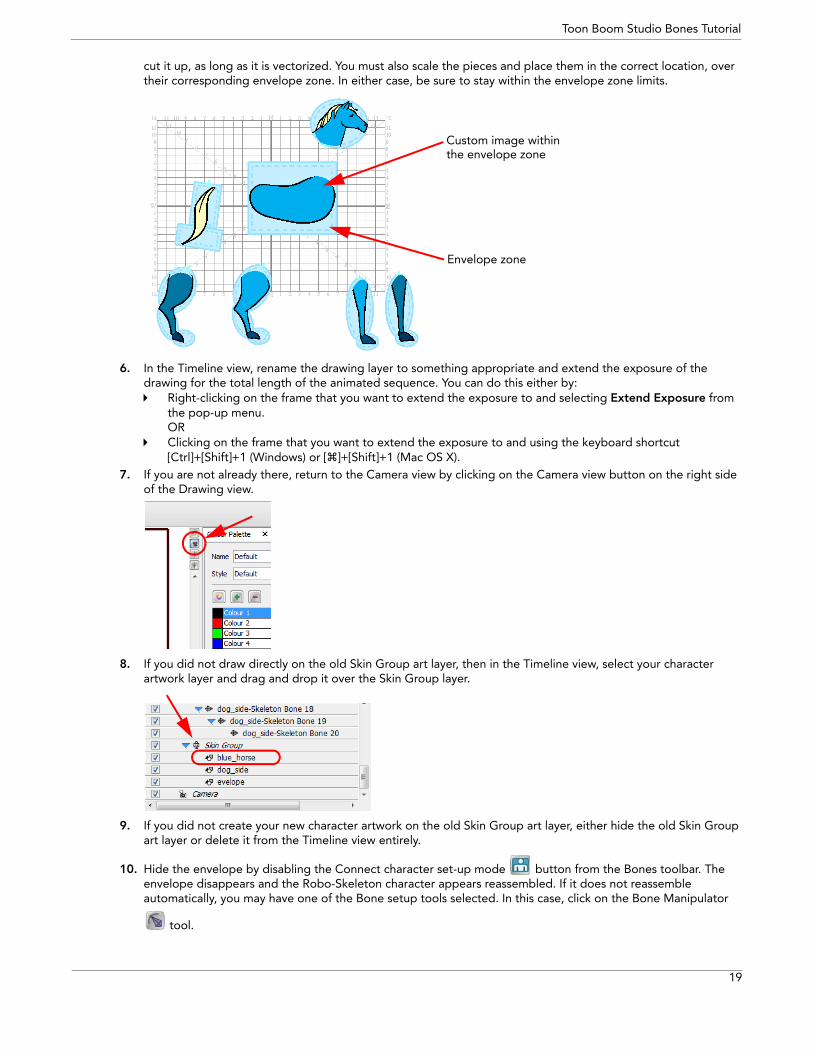
Toon Boom Studio Bones Tutorial
19
cut it up, as long as it is vectorized. You must also scale the pieces and place them in the correct location, over their corresponding envelope zone. In either case, be sure to stay within the envelope zone limits.
6. In the Timeline view, rename the drawing layer to something appropriate and extend the exposure of the drawing for the total length of the animated sequence. You can do this either by: Right-clicking on the frame that you want to extend the exposure to and selecting Extend Exposure from
the pop-up menu.OR
Clicking on the frame that you want to extend the exposure to and using the keyboard shortcut [Ctrl]+[Shift]+1 (Windows) or []+[Shift]+1 (Mac OS X).
7. If you are not already there, return to the Camera view by clicking on the Camera view button on the right side of the Drawing view.
8. If you did not draw directly on the old Skin Group art layer, then in the Timeline view, select your character artwork layer and drag and drop it over the Skin Group layer.
9. If you did not create your new character artwork on the old Skin Group art layer, either hide the old Skin Group art layer or delete it from the Timeline view entirely.
10. Hide the envelope by disabling the Connect character set-up mode button from the Bones toolbar. The envelope disappears and the Robo-Skeleton character appears reassembled. If it does not reassemble automatically, you may have one of the Bone setup tools selected. In this case, click on the Bone Manipulator
tool.
Envelope zone
Custom image withinthe envelope zone
Toon Boom Studio Bones Tutorial
20
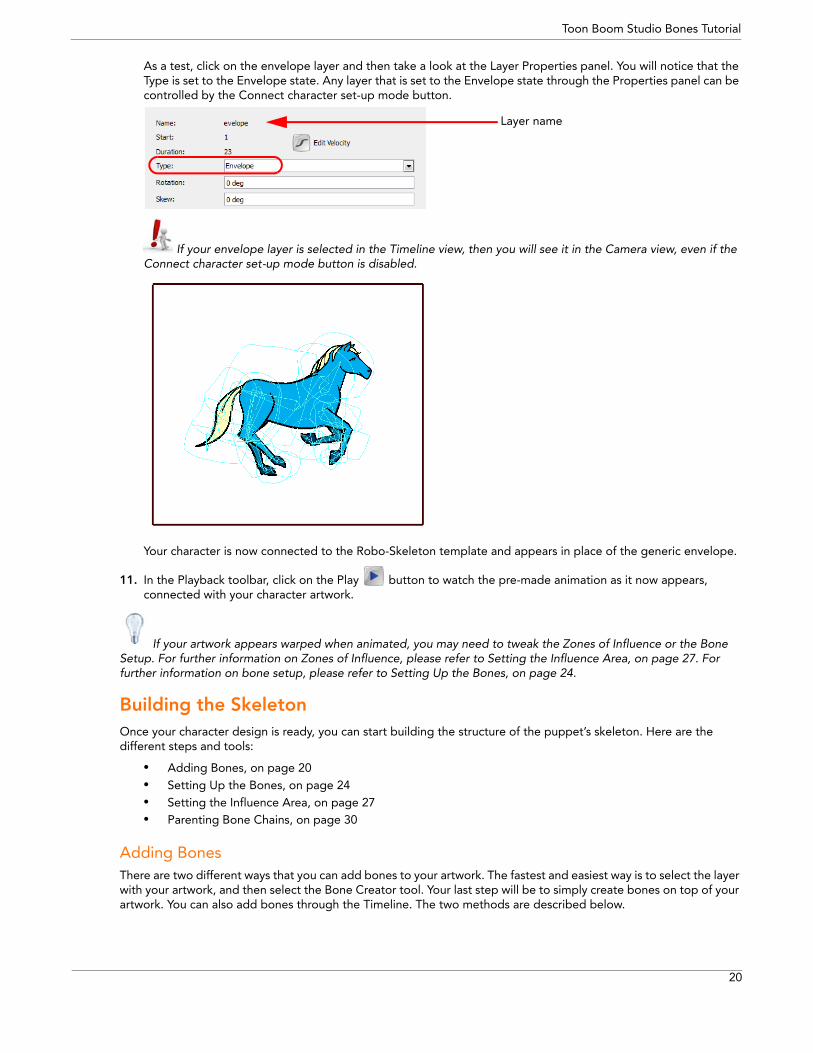
As a test, click on the envelope layer and then take a look at the Layer Properties panel. You will notice that the Type is set to the Envelope state. Any layer that is set to the Envelope state through the Properties panel can be controlled by the Connect character set-up mode button.
If your envelope layer is selected in the Timeline view, then you will see it in the Camera view, even if the Connect character set-up mode button is disabled.
Your character is now connected to the Robo-Skeleton template and appears in place of the generic envelope.
11. In the Playback toolbar, click on the Play button to watch the pre-made animation as it now appears, connected with your character artwork.
If your artwork appears warped when animated, you may need to tweak the Zones of Influence or the Bone Setup. For further information on Zones of Influence, please refer to Setting the Influence Area, on page 27. For further information on bone setup, please refer to Setting Up the Bones, on page 24.
Building the SkeletonOnce your character design is ready, you can start building the structure of the puppet’s skeleton. Here are the different steps and tools:
• Adding Bones, on page 20• Setting Up the Bones, on page 24• Setting the Influence Area, on page 27• Parenting Bone Chains, on page 30
Adding Bones There are two different ways that you can add bones to your artwork. The fastest and easiest way is to select the layer with your artwork, and then select the Bone Creator tool. Your last step will be to simply create bones on top of your artwork. You can also add bones through the Timeline. The two methods are described below.
Layer name
Toon Boom Studio Bones Tutorial
21
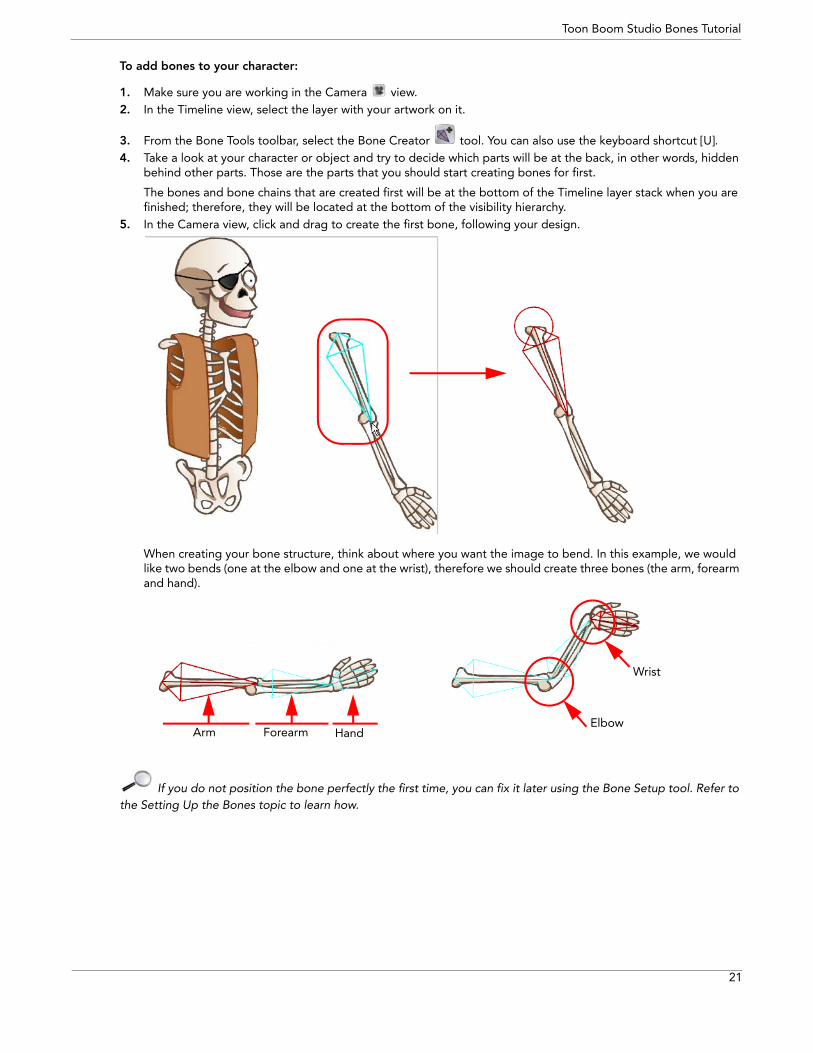
To add bones to your character:
1. Make sure you are working in the Camera view.2. In the Timeline view, select the layer with your artwork on it.
3. From the Bone Tools toolbar, select the Bone Creator tool. You can also use the keyboard shortcut [U].4. Take a look at your character or object and try to decide which parts will be at the back, in other words, hidden
behind other parts. Those are the parts that you should start creating bones for first.
The bones and bone chains that are created first will be at the bottom of the Timeline layer stack when you are finished; therefore, they will be located at the bottom of the visibility hierarchy.
5. In the Camera view, click and drag to create the first bone, following your design.
When creating your bone structure, think about where you want the image to bend. In this example, we would like two bends (one at the elbow and one at the wrist), therefore we should create three bones (the arm, forearm and hand).
If you do not position the bone perfectly the first time, you can fix it later using the Bone Setup tool. Refer to the Setting Up the Bones topic to learn how.
Arm Forearm Hand
Wrist
Elbow
Toon Boom Studio Bones Tutorial
22
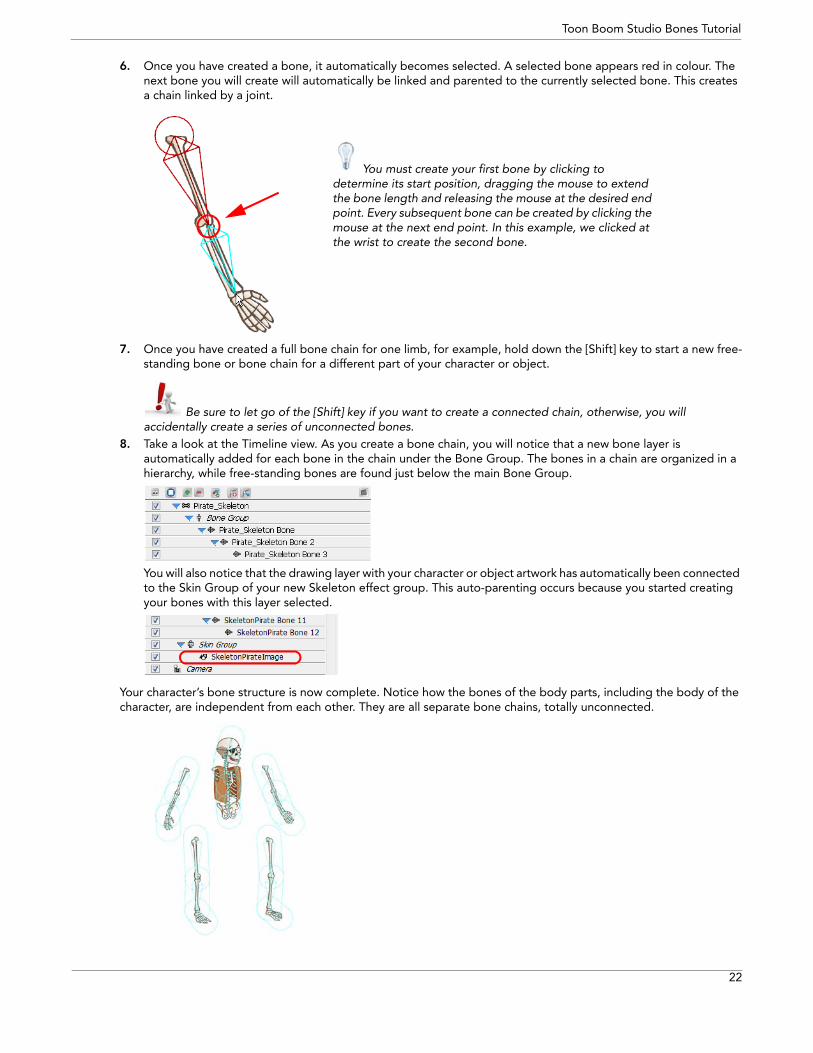
6. Once you have created a bone, it automatically becomes selected. A selected bone appears red in colour. The next bone you will create will automatically be linked and parented to the currently selected bone. This creates a chain linked by a joint.
7. Once you have created a full bone chain for one limb, for example, hold down the [Shift] key to start a new free-standing bone or bone chain for a different part of your character or object.
Be sure to let go of the [Shift] key if you want to create a connected chain, otherwise, you will accidentally create a series of unconnected bones.
8. Take a look at the Timeline view. As you create a bone chain, you will notice that a new bone layer is automatically added for each bone in the chain under the Bone Group. The bones in a chain are organized in a hierarchy, while free-standing bones are found just below the main Bone Group.
You will also notice that the drawing layer with your character or object artwork has automatically been connected to the Skin Group of your new Skeleton effect group. This auto-parenting occurs because you started creating your bones with this layer selected.
Your character’s bone structure is now complete. Notice how the bones of the body parts, including the body of the character, are independent from each other. They are all separate bone chains, totally unconnected.
You must create your first bone by clicking to determine its start position, dragging the mouse to extend the bone length and releasing the mouse at the desired end point. Every subsequent bone can be created by clicking the mouse at the next end point. In this example, we clicked at the wrist to create the second bone.
Toon Boom Studio Bones Tutorial
23
Adding Bones from the Timeline ViewAnother way to add bones to your artwork is to add a Skeleton Effect to your Timeline view and then connect your character’s artwork to it.
To add a Skeleton effect:
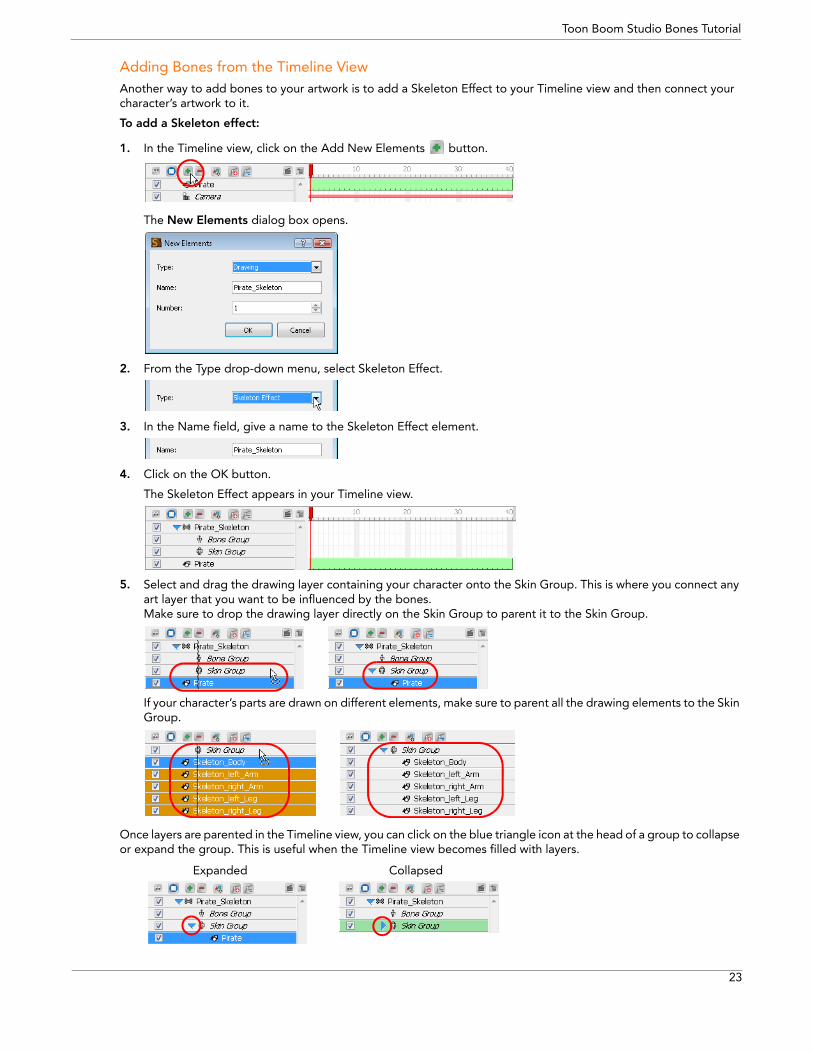
1. In the Timeline view, click on the Add New Elements button.
The New Elements dialog box opens.
2. From the Type drop-down menu, select Skeleton Effect.
3. In the Name field, give a name to the Skeleton Effect element.
4. Click on the OK button.
The Skeleton Effect appears in your Timeline view.
5. Select and drag the drawing layer containing your character onto the Skin Group. This is where you connect any art layer that you want to be influenced by the bones. Make sure to drop the drawing layer directly on the Skin Group to parent it to the Skin Group.
If your character’s parts are drawn on different elements, make sure to parent all the drawing elements to the Skin Group.
Once layers are parented in the Timeline view, you can click on the blue triangle icon at the head of a group to collapse or expand the group. This is useful when the Timeline view becomes filled with layers.
Expanded Collapsed

Toon Boom Studio Bones Tutorial
24
You can add any drawing layer to the Skin Group or remove any drawing layer from it at any time. You can also save a bone structure in your library as a template and then reuse it with other character designs!
6. From the Bone Tools toolbar, select the Bone Creator tool. You can also use the keyboard shortcut [U].7. Take a look at your character or object and try to decide which parts will be at the back, in other words, hidden
behind other parts. Those are the parts that you should start creating bones for first.
The bones and bone chains that are created first will be located at the bottom of the Timeline layer stack when you are finished, and therefore will be at the bottom of the visibility hierarchy.
8. In the Camera view, click and drag to create the first bone, following your design.9. Once you have created a bone, it automatically becomes selected. A selected bone appears red in colour. The
next bone you will create will automatically be linked and parented to the currently selected bone. This creates a chain linked by a joint.
10. Once you have finished creating the bone structure on a first limb, in the Timeline view, select the top layer of the Skeleton Effect; this will let you start the bone structure for the next limb. Then, repeat steps 8 and 9 until a bone structure is created for each of the body parts.
Setting Up the Bones Once you start creating bones you can, at any time, modify them in setup mode to optimize their positioning without creating an animation.
To modify bones using the Bone Setup tool:
1. From the Bones Tools toolbar, select the Bone Setup tool. You can also use the keyboard shortcut [J].2. In the Camera view, select the bone you want to modify.
The selected bone becomes red and two control handles appear.
Toon Boom Studio Bones Tutorial
25
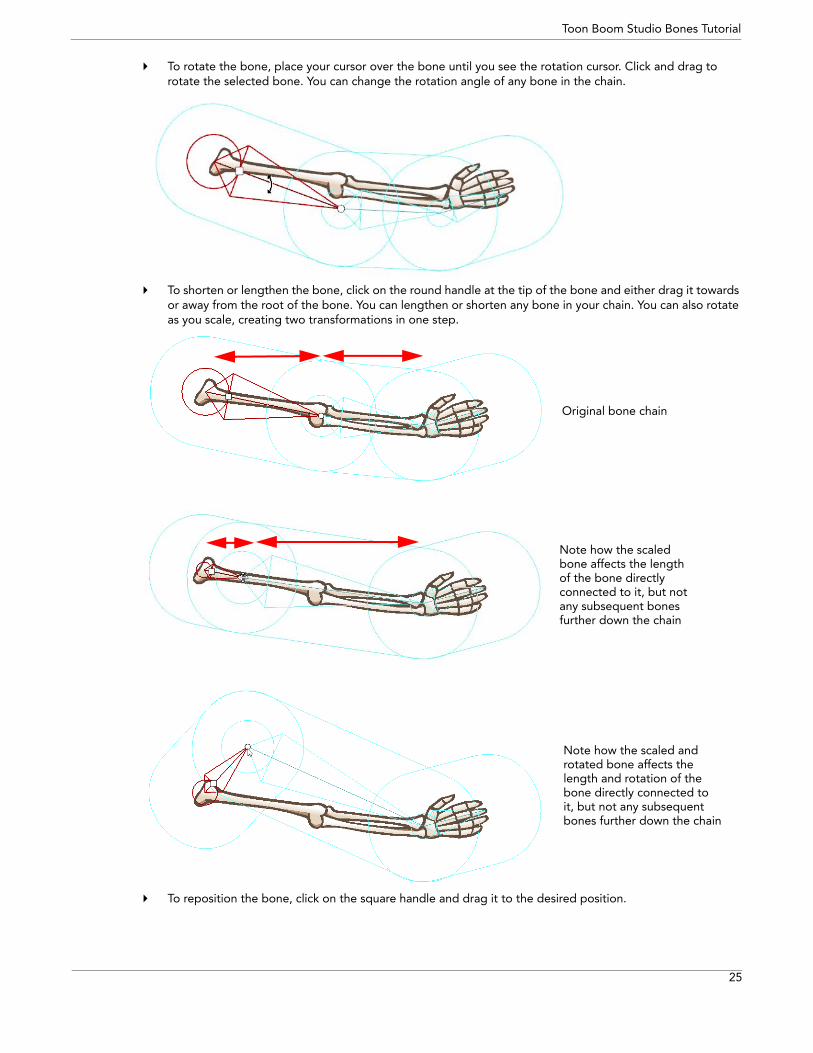
To rotate the bone, place your cursor over the bone until you see the rotation cursor. Click and drag to rotate the selected bone. You can change the rotation angle of any bone in the chain.
To shorten or lengthen the bone, click on the round handle at the tip of the bone and either drag it towards or away from the root of the bone. You can lengthen or shorten any bone in your chain. You can also rotate as you scale, creating two transformations in one step.
To reposition the bone, click on the square handle and drag it to the desired position.
Original bone chain
Note how the scaledbone affects the lengthof the bone directlyconnected to it, but notany subsequent bonesfurther down the chain
Note how the scaled androtated bone affects thelength and rotation of thebone directly connected toit, but not any subsequentbones further down the chain
Toon Boom Studio Bones Tutorial
26
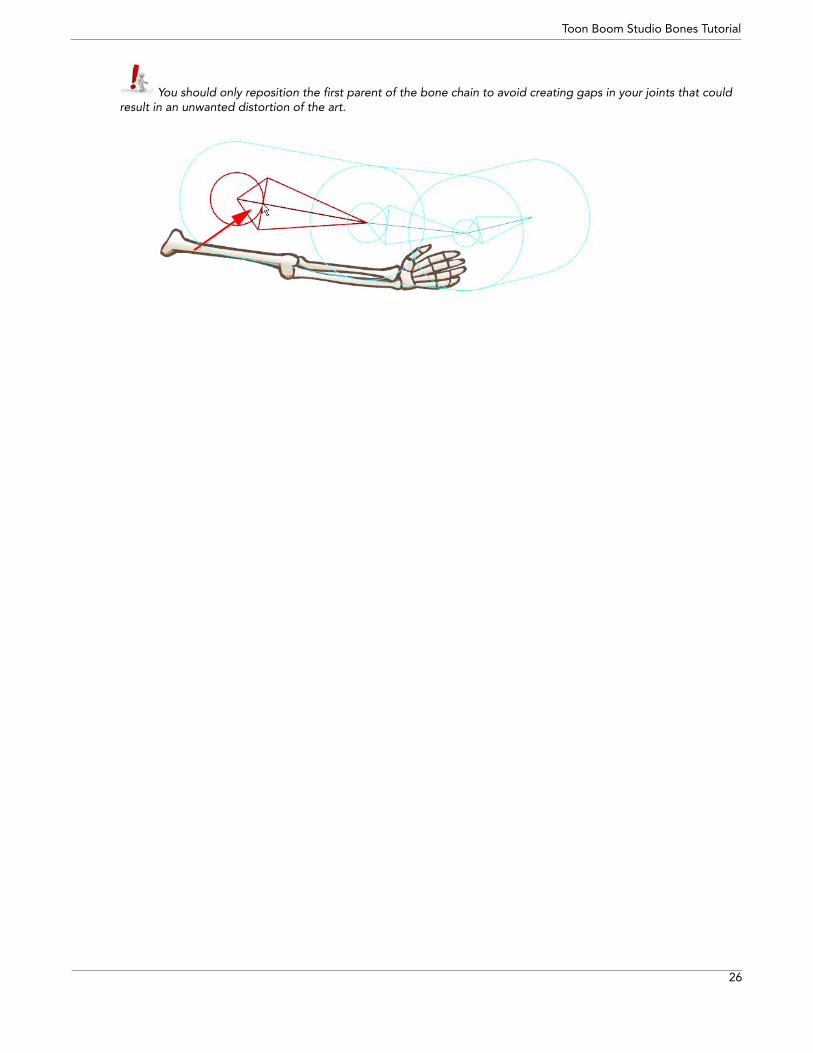
You should only reposition the first parent of the bone chain to avoid creating gaps in your joints that could result in an unwanted distortion of the art.
Toon Boom Studio Bones Tutorial
27
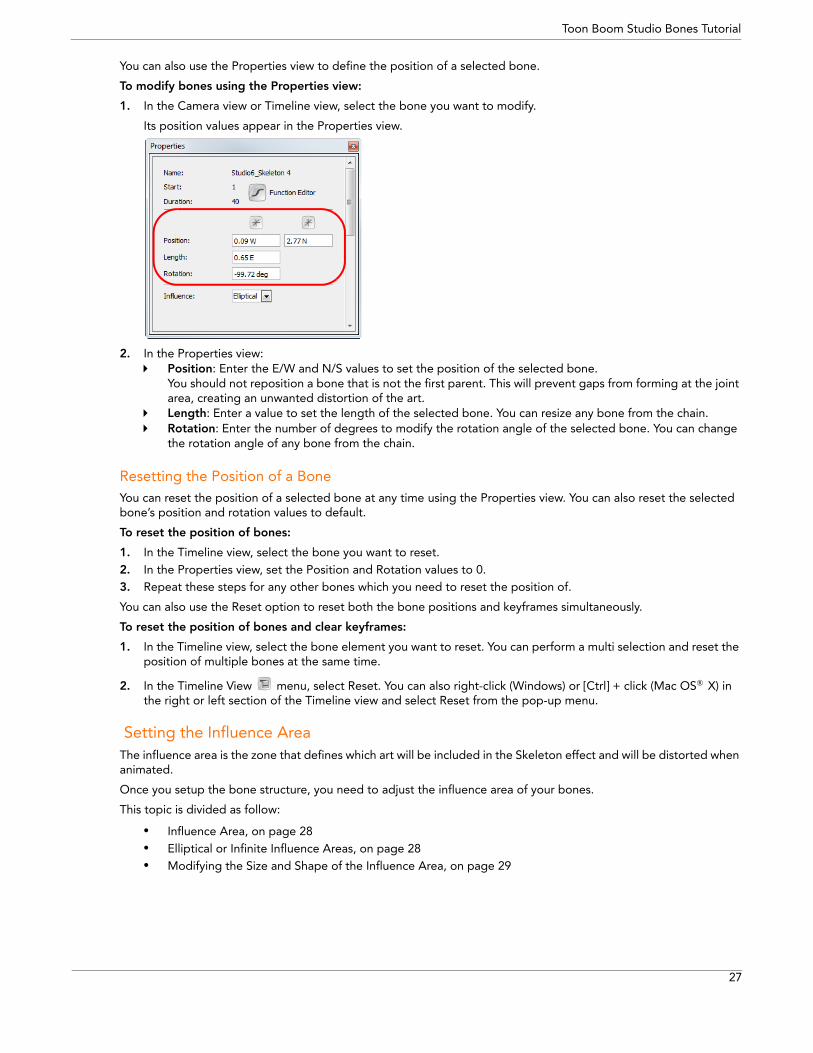
You can also use the Properties view to define the position of a selected bone.
To modify bones using the Properties view:
1. In the Camera view or Timeline view, select the bone you want to modify.
Its position values appear in the Properties view.
2. In the Properties view: Position: Enter the E/W and N/S values to set the position of the selected bone.
You should not reposition a bone that is not the first parent. This will prevent gaps from forming at the joint area, creating an unwanted distortion of the art.
Length: Enter a value to set the length of the selected bone. You can resize any bone from the chain. Rotation: Enter the number of degrees to modify the rotation angle of the selected bone. You can change
the rotation angle of any bone from the chain.
Resetting the Position of a BoneYou can reset the position of a selected bone at any time using the Properties view. You can also reset the selected bone’s position and rotation values to default.
To reset the position of bones:
1. In the Timeline view, select the bone you want to reset.2. In the Properties view, set the Position and Rotation values to 0.3. Repeat these steps for any other bones which you need to reset the position of.
You can also use the Reset option to reset both the bone positions and keyframes simultaneously.
To reset the position of bones and clear keyframes:
1. In the Timeline view, select the bone element you want to reset. You can perform a multi selection and reset the position of multiple bones at the same time.
2. In the Timeline View menu, select Reset. You can also right-click (Windows) or [Ctrl] + click (Mac OS® X) in the right or left section of the Timeline view and select Reset from the pop-up menu.
Setting the Influence Area The influence area is the zone that defines which art will be included in the Skeleton effect and will be distorted when animated.
Once you setup the bone structure, you need to adjust the influence area of your bones.
This topic is divided as follow:
• Influence Area, on page 28• Elliptical or Infinite Influence Areas, on page 28• Modifying the Size and Shape of the Influence Area, on page 29
Toon Boom Studio Bones Tutorial
28
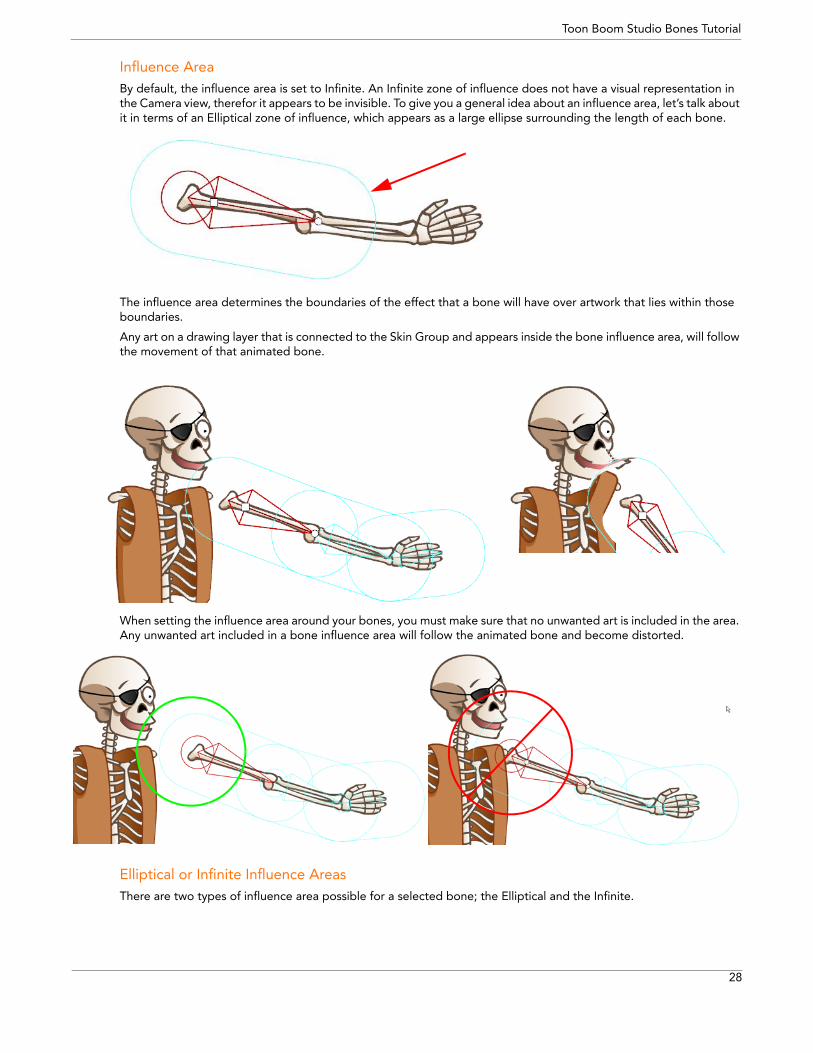
Influence AreaBy default, the influence area is set to Infinite. An Infinite zone of influence does not have a visual representation in the Camera view, therefor it appears to be invisible. To give you a general idea about an influence area, let’s talk about it in terms of an Elliptical zone of influence, which appears as a large ellipse surrounding the length of each bone.
The influence area determines the boundaries of the effect that a bone will have over artwork that lies within those boundaries.
Any art on a drawing layer that is connected to the Skin Group and appears inside the bone influence area, will follow the movement of that animated bone.
When setting the influence area around your bones, you must make sure that no unwanted art is included in the area. Any unwanted art included in a bone influence area will follow the animated bone and become distorted.
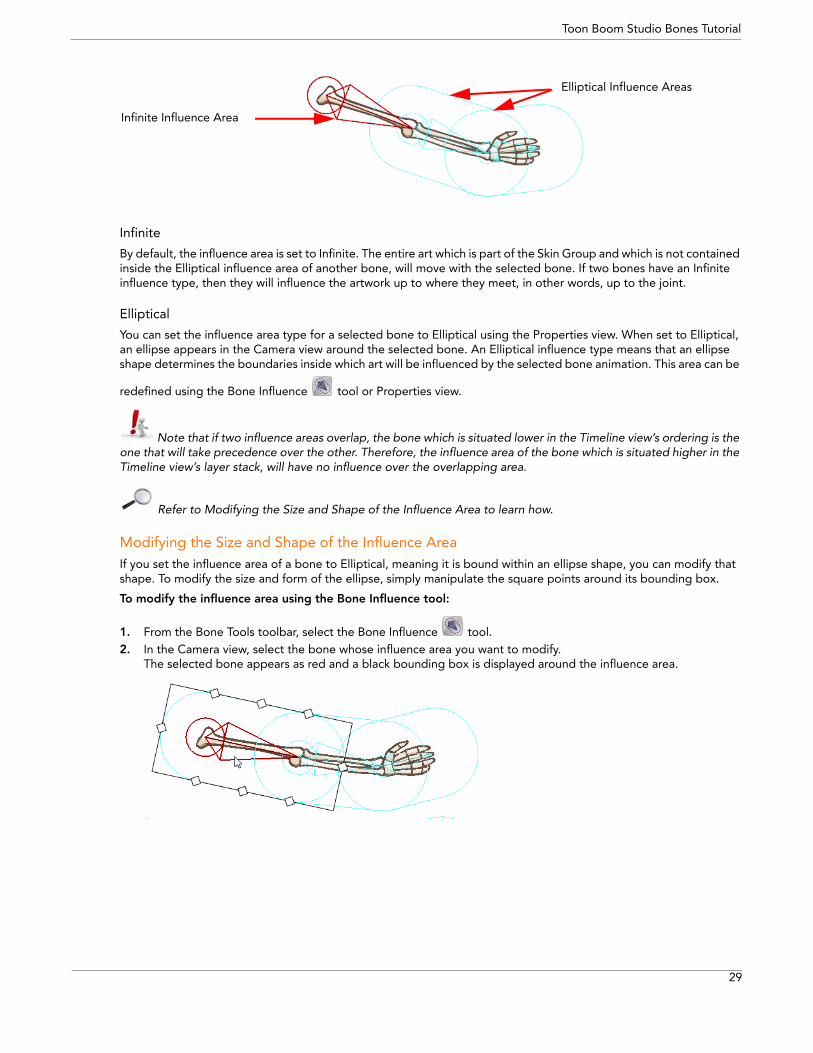
Elliptical or Infinite Influence Areas There are two types of influence area possible for a selected bone; the Elliptical and the Infinite.
Toon Boom Studio Bones Tutorial
29
Infinite
By default, the influence area is set to Infinite. The entire art which is part of the Skin Group and which is not contained inside the Elliptical influence area of another bone, will move with the selected bone. If two bones have an Infinite influence type, then they will influence the artwork up to where they meet, in other words, up to the joint.
Elliptical
You can set the influence area type for a selected bone to Elliptical using the Properties view. When set to Elliptical, an ellipse appears in the Camera view around the selected bone. An Elliptical influence type means that an ellipse shape determines the boundaries inside which art will be influenced by the selected bone animation. This area can be
redefined using the Bone Influence tool or Properties view.
Note that if two influence areas overlap, the bone which is situated lower in the Timeline view’s ordering is the one that will take precedence over the other. Therefore, the influence area of the bone which is situated higher in the Timeline view’s layer stack, will have no influence over the overlapping area.
Refer to Modifying the Size and Shape of the Influence Area to learn how.
Modifying the Size and Shape of the Influence Area If you set the influence area of a bone to Elliptical, meaning it is bound within an ellipse shape, you can modify that shape. To modify the size and form of the ellipse, simply manipulate the square points around its bounding box.
To modify the influence area using the Bone Influence tool:
1. From the Bone Tools toolbar, select the Bone Influence tool.2. In the Camera view, select the bone whose influence area you want to modify.
The selected bone appears as red and a black bounding box is displayed around the influence area.
Elliptical Influence Areas
Infinite Influence Area
Toon Boom Studio Bones Tutorial
30
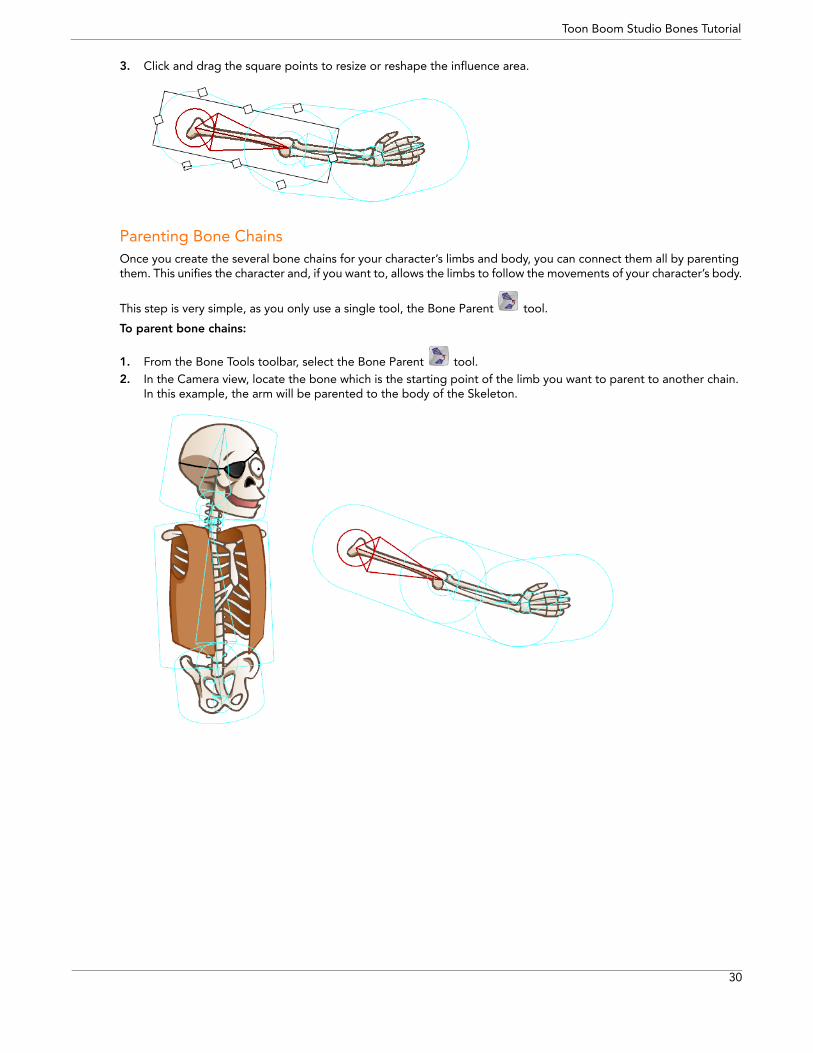
3. Click and drag the square points to resize or reshape the influence area.
Parenting Bone Chains Once you create the several bone chains for your character’s limbs and body, you can connect them all by parenting them. This unifies the character and, if you want to, allows the limbs to follow the movements of your character’s body.
This step is very simple, as you only use a single tool, the Bone Parent tool.
To parent bone chains:
1. From the Bone Tools toolbar, select the Bone Parent tool.2. In the Camera view, locate the bone which is the starting point of the limb you want to parent to another chain.
In this example, the arm will be parented to the body of the Skeleton.
Toon Boom Studio Bones Tutorial
31
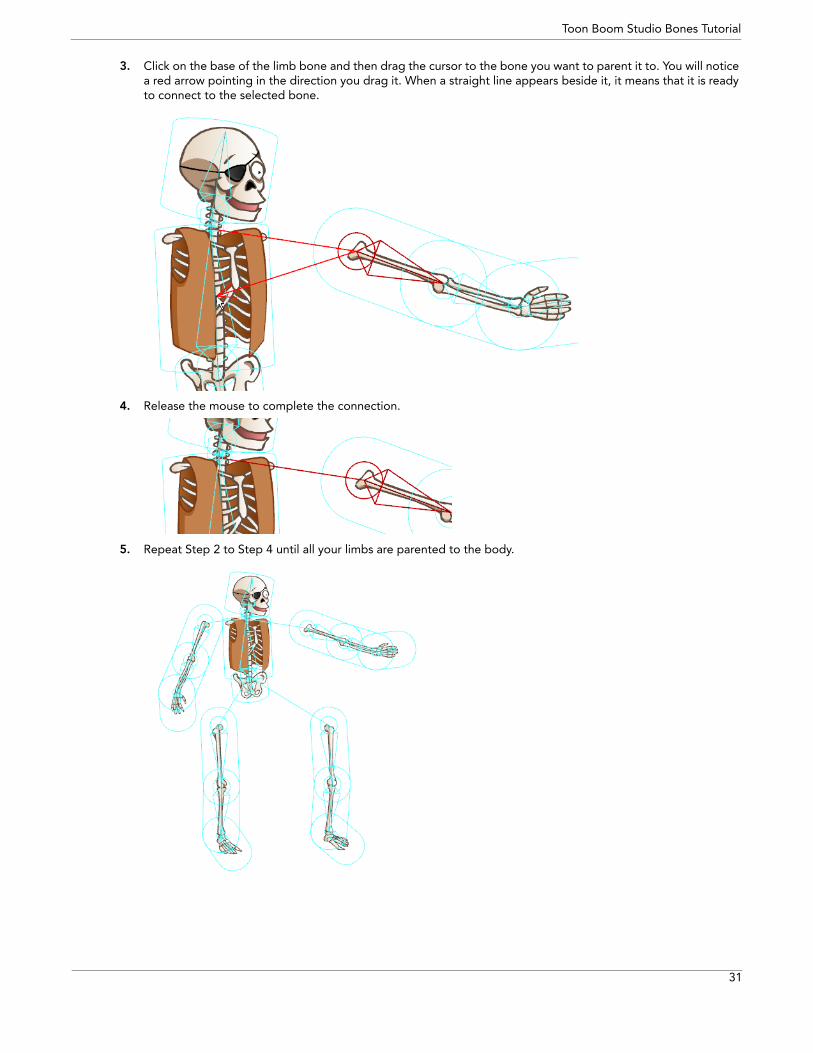
3. Click on the base of the limb bone and then drag the cursor to the bone you want to parent it to. You will notice a red arrow pointing in the direction you drag it. When a straight line appears beside it, it means that it is ready to connect to the selected bone.
4. Release the mouse to complete the connection.
5. Repeat Step 2 to Step 4 until all your limbs are parented to the body.
Toon Boom Studio Bones Tutorial
32
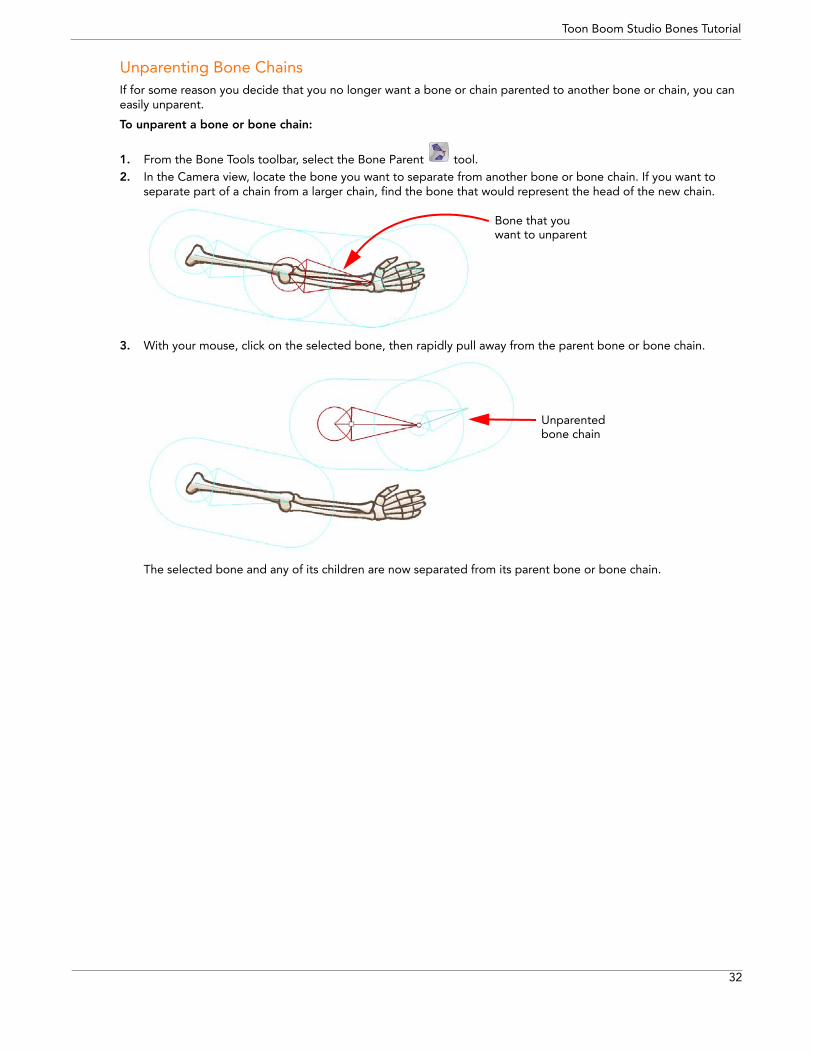
Unparenting Bone Chains If for some reason you decide that you no longer want a bone or chain parented to another bone or chain, you can easily unparent.
To unparent a bone or bone chain:
1. From the Bone Tools toolbar, select the Bone Parent tool.2. In the Camera view, locate the bone you want to separate from another bone or bone chain. If you want to
separate part of a chain from a larger chain, find the bone that would represent the head of the new chain.
3. With your mouse, click on the selected bone, then rapidly pull away from the parent bone or bone chain.
The selected bone and any of its children are now separated from its parent bone or bone chain.
Bone that youwant to unparent
Unparentedbone chain
Toon Boom Studio Bones Tutorial
33
Animating the Skeleton Once you have finished creating your character’s skeleton, it is time to switch to the Bone Manipulator tool, reconnect the limbs to the body and animate it.
• Reassembling the Character, on page 33• Ordering Limbs, on page 34• Hiding Bones, on page 35• Animating Bones, on page 35• Disabling a Bone Animation, on page 40
Reassembling the Character The first step is to reassemble the character so that the limbs do not appear spread apart, as in Setup mode.
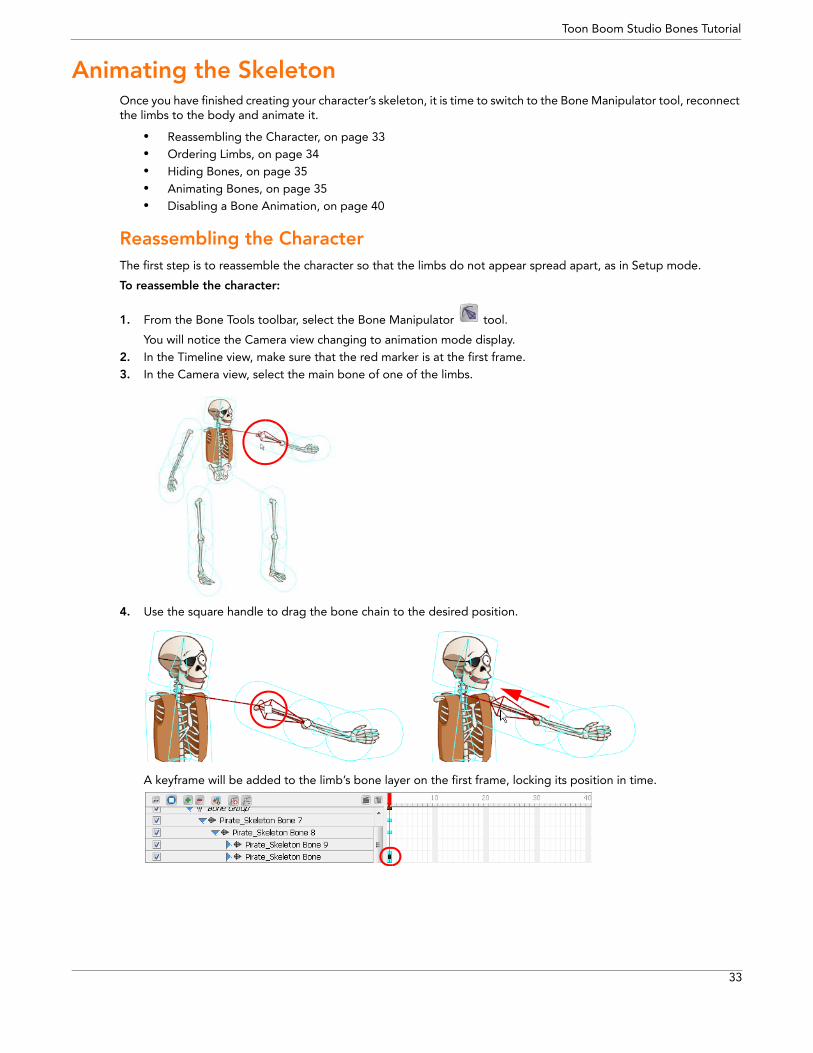
To reassemble the character:
1. From the Bone Tools toolbar, select the Bone Manipulator tool.
You will notice the Camera view changing to animation mode display.2. In the Timeline view, make sure that the red marker is at the first frame.3. In the Camera view, select the main bone of one of the limbs.
4. Use the square handle to drag the bone chain to the desired position.
A keyframe will be added to the limb’s bone layer on the first frame, locking its position in time.
Toon Boom Studio Bones Tutorial
34
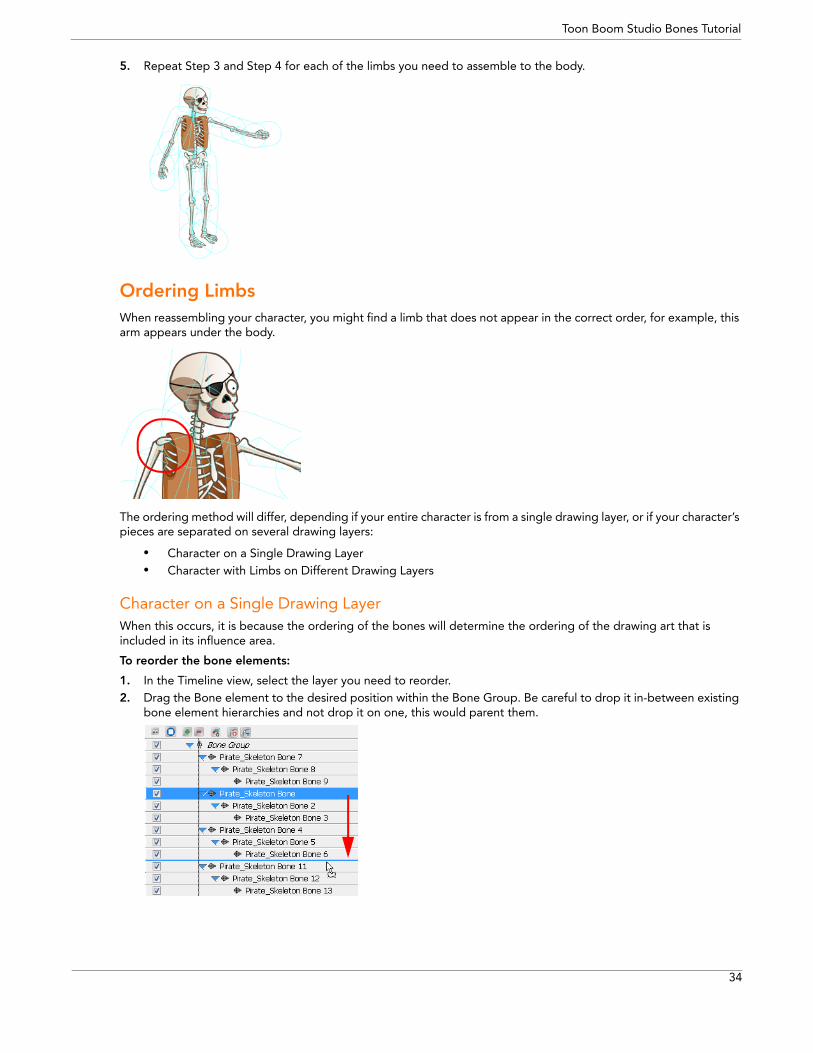
5. Repeat Step 3 and Step 4 for each of the limbs you need to assemble to the body.
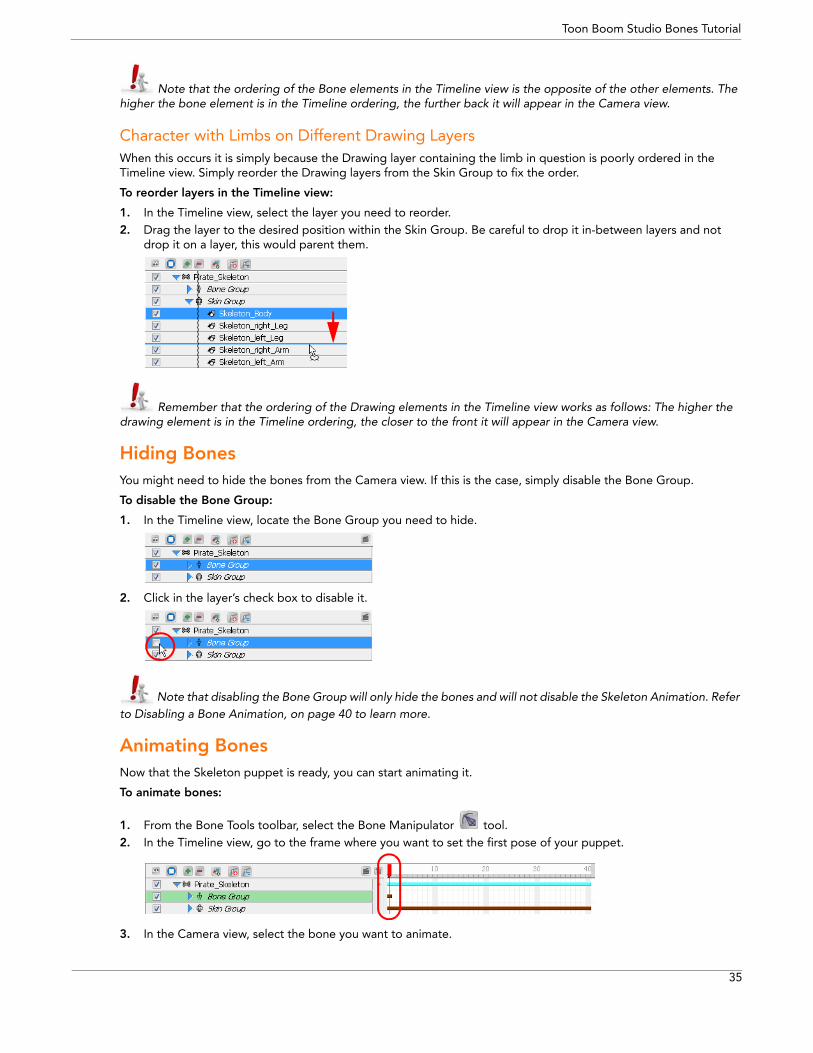
Ordering Limbs When reassembling your character, you might find a limb that does not appear in the correct order, for example, this arm appears under the body.
The ordering method will differ, depending if your entire character is from a single drawing layer, or if your character’s pieces are separated on several drawing layers:
• Character on a Single Drawing Layer• Character with Limbs on Different Drawing Layers
Character on a Single Drawing Layer When this occurs, it is because the ordering of the bones will determine the ordering of the drawing art that is included in its influence area.
To reorder the bone elements:
1. In the Timeline view, select the layer you need to reorder.2. Drag the Bone element to the desired position within the Bone Group. Be careful to drop it in-between existing
bone element hierarchies and not drop it on one, this would parent them.
Toon Boom Studio Bones Tutorial
35
Note that the ordering of the Bone elements in the Timeline view is the opposite of the other elements. The higher the bone element is in the Timeline ordering, the further back it will appear in the Camera view.
Character with Limbs on Different Drawing Layers When this occurs it is simply because the Drawing layer containing the limb in question is poorly ordered in the Timeline view. Simply reorder the Drawing layers from the Skin Group to fix the order.
To reorder layers in the Timeline view:
1. In the Timeline view, select the layer you need to reorder.2. Drag the layer to the desired position within the Skin Group. Be careful to drop it in-between layers and not
drop it on a layer, this would parent them.
Remember that the ordering of the Drawing elements in the Timeline view works as follows: The higher the drawing element is in the Timeline ordering, the closer to the front it will appear in the Camera view.
Hiding Bones You might need to hide the bones from the Camera view. If this is the case, simply disable the Bone Group.
To disable the Bone Group:
1. In the Timeline view, locate the Bone Group you need to hide.
2. Click in the layer’s check box to disable it.
Note that disabling the Bone Group will only hide the bones and will not disable the Skeleton Animation. Refer to Disabling a Bone Animation, on page 40 to learn more.
Animating Bones Now that the Skeleton puppet is ready, you can start animating it.
To animate bones:
1. From the Bone Tools toolbar, select the Bone Manipulator tool.2. In the Timeline view, go to the frame where you want to set the first pose of your puppet.
3. In the Camera view, select the bone you want to animate.
Toon Boom Studio Bones Tutorial
36
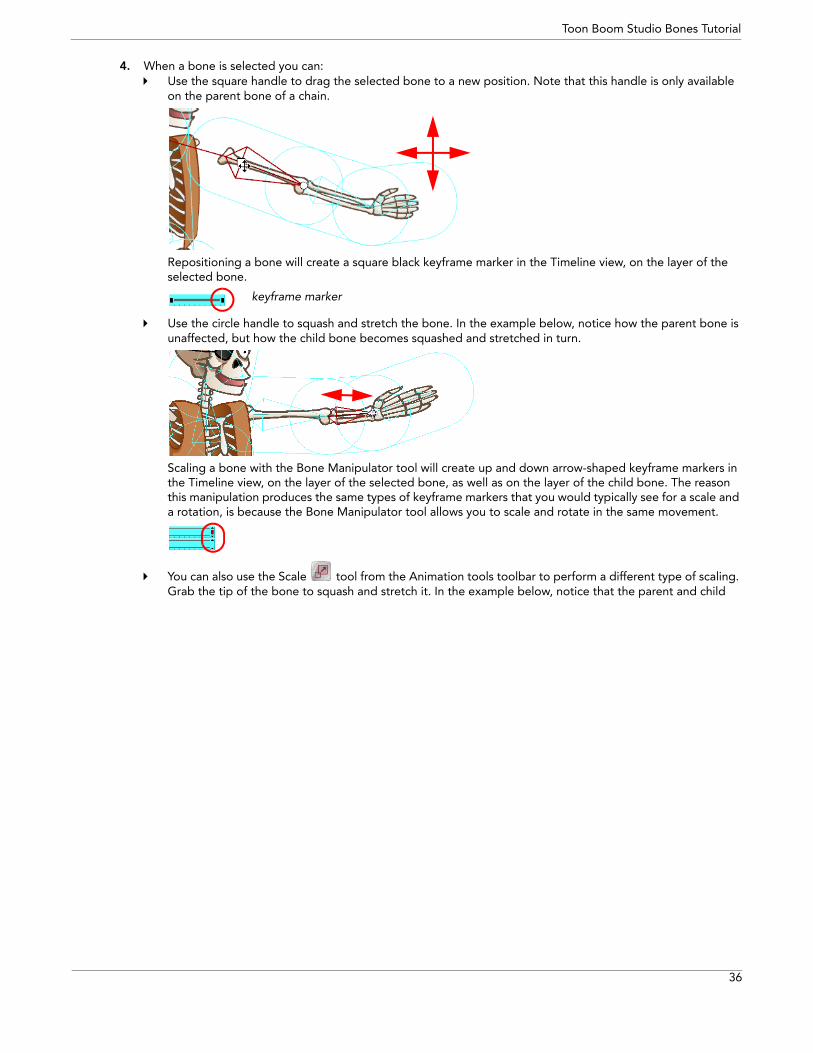
4. When a bone is selected you can: Use the square handle to drag the selected bone to a new position. Note that this handle is only available
on the parent bone of a chain.
Repositioning a bone will create a square black keyframe marker in the Timeline view, on the layer of the selected bone.
Use the circle handle to squash and stretch the bone. In the example below, notice how the parent bone is unaffected, but how the child bone becomes squashed and stretched in turn.
Scaling a bone with the Bone Manipulator tool will create up and down arrow-shaped keyframe markers in the Timeline view, on the layer of the selected bone, as well as on the layer of the child bone. The reason this manipulation produces the same types of keyframe markers that you would typically see for a scale and a rotation, is because the Bone Manipulator tool allows you to scale and rotate in the same movement.
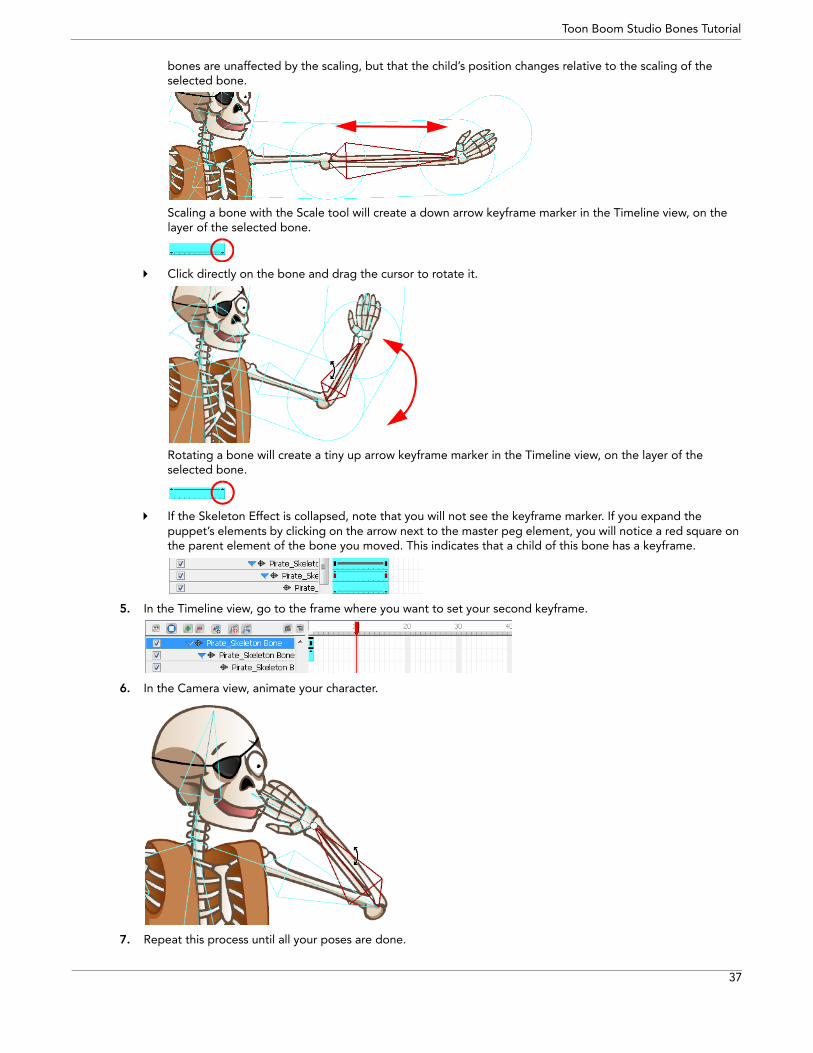
You can also use the Scale tool from the Animation tools toolbar to perform a different type of scaling. Grab the tip of the bone to squash and stretch it. In the example below, notice that the parent and child
keyframe marker
Toon Boom Studio Bones Tutorial
37
bones are unaffected by the scaling, but that the child’s position changes relative to the scaling of the selected bone.
Scaling a bone with the Scale tool will create a down arrow keyframe marker in the Timeline view, on the layer of the selected bone.
Click directly on the bone and drag the cursor to rotate it.
Rotating a bone will create a tiny up arrow keyframe marker in the Timeline view, on the layer of the selected bone.
If the Skeleton Effect is collapsed, note that you will not see the keyframe marker. If you expand the puppet’s elements by clicking on the arrow next to the master peg element, you will notice a red square on the parent element of the bone you moved. This indicates that a child of this bone has a keyframe.
5. In the Timeline view, go to the frame where you want to set your second keyframe.
6. In the Camera view, animate your character.
7. Repeat this process until all your poses are done.
Toon Boom Studio Bones Tutorial
38
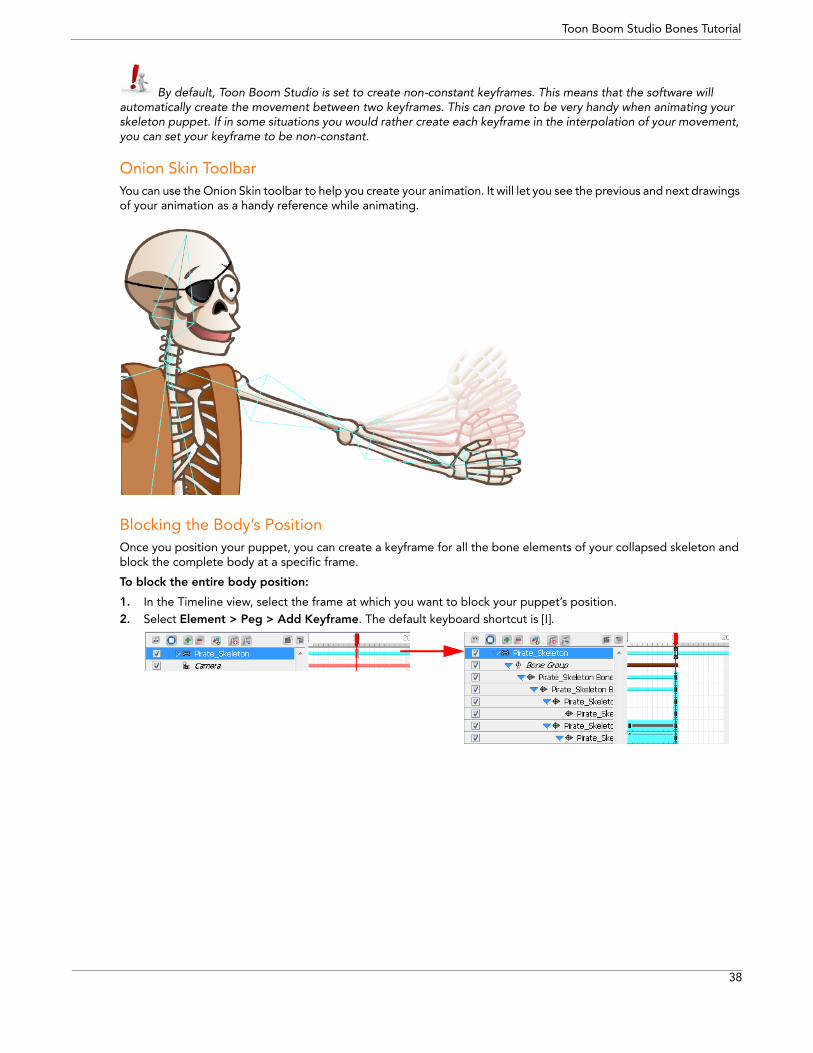
By default, Toon Boom Studio is set to create non-constant keyframes. This means that the software will automatically create the movement between two keyframes. This can prove to be very handy when animating your skeleton puppet. If in some situations you would rather create each keyframe in the interpolation of your movement, you can set your keyframe to be non-constant.
Onion Skin Toolbar You can use the Onion Skin toolbar to help you create your animation. It will let you see the previous and next drawings of your animation as a handy reference while animating.
Blocking the Body’s Position Once you position your puppet, you can create a keyframe for all the bone elements of your collapsed skeleton and block the complete body at a specific frame.
To block the entire body position:
1. In the Timeline view, select the frame at which you want to block your puppet’s position.2. Select Element > Peg > Add Keyframe. The default keyboard shortcut is [I].
Toon Boom Studio Bones Tutorial
39
Deleting Keyframes To delete keyframes:
1. In the Timeline view, select the keyframe you want to remove.2. Select Element > Peg > Remove Keyframe. The default keyboard shortcut is [Ctrl]+[R] (Windows) or []+[R]
(Mac OS X).
The selected keyframe will be deleted.
If you select a keyframe on a collapsed layer, all the keyframes for all of that frame’s collapsed elements will be removed.
Removing All KeyframesYou can use the Remove All Keyframes option if you need to delete all the keyframes on one or many selected bone elements.
To remove all keyframes:
1. In the Timeline view, select the bone elements you wish to remove all the keyframes from. You can select many elements at once.
2. In the Timeline View menu, select Remove All Keyframes. You can also right-click (Windows) or [Ctrl] + click (Mac OS® X) in the right side of the Timeline view, and select Remove All Keyframes from the pop-up menu.
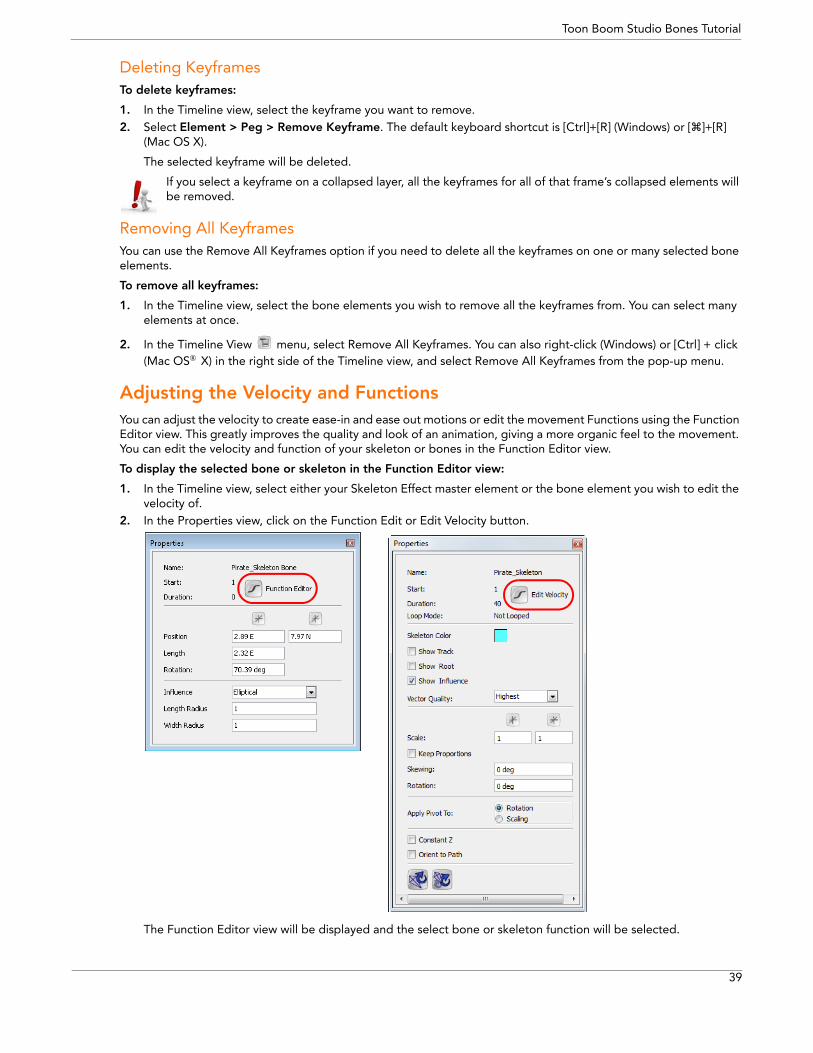
Adjusting the Velocity and Functions You can adjust the velocity to create ease-in and ease out motions or edit the movement Functions using the Function Editor view. This greatly improves the quality and look of an animation, giving a more organic feel to the movement. You can edit the velocity and function of your skeleton or bones in the Function Editor view.
To display the selected bone or skeleton in the Function Editor view:
1. In the Timeline view, select either your Skeleton Effect master element or the bone element you wish to edit the velocity of.
2. In the Properties view, click on the Function Edit or Edit Velocity button.
The Function Editor view will be displayed and the select bone or skeleton function will be selected.
Toon Boom Studio Bones Tutorial
40
To learn more about the Skeleton Effect Properties view options, refer to:
• Skeleton Effect Properties, on page 41
To learn more about the Bone element Properties view options, refer to:
• Setting Up the Bones, on page 24• Setting the Influence Area, on page 27
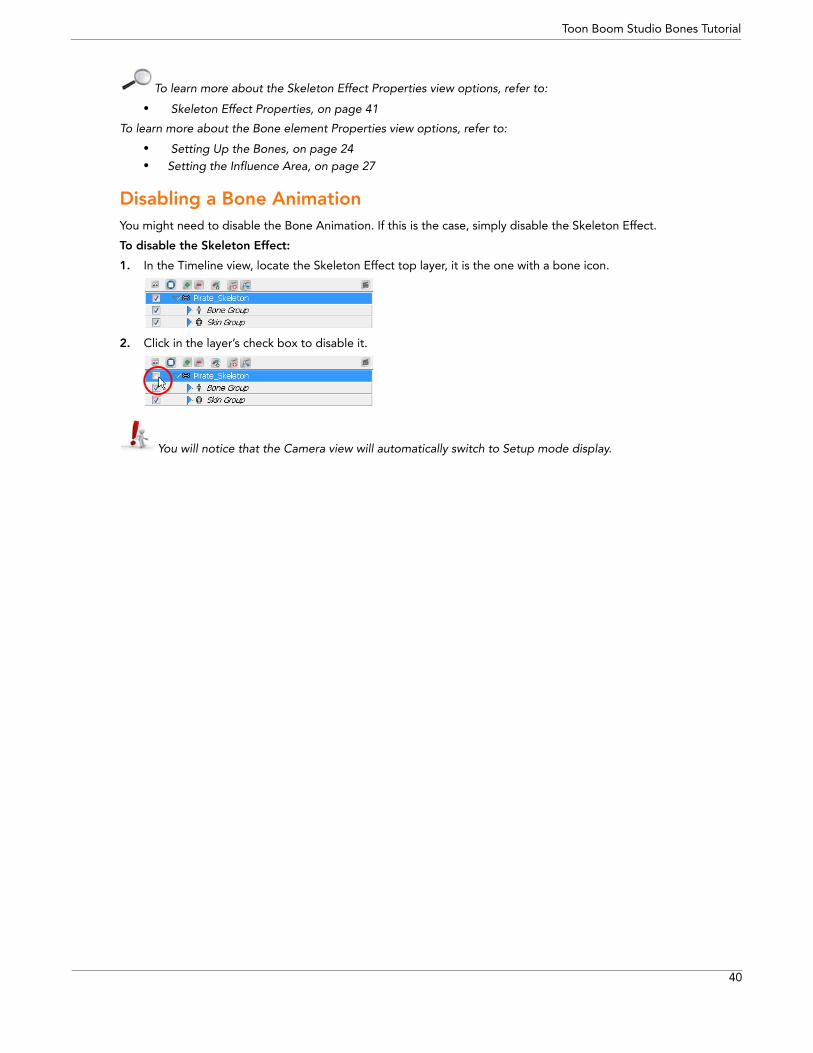
Disabling a Bone Animation You might need to disable the Bone Animation. If this is the case, simply disable the Skeleton Effect.
To disable the Skeleton Effect:
1. In the Timeline view, locate the Skeleton Effect top layer, it is the one with a bone icon.
2. Click in the layer’s check box to disable it.
You will notice that the Camera view will automatically switch to Setup mode display.
Toon Boom Studio Bones Tutorial
41
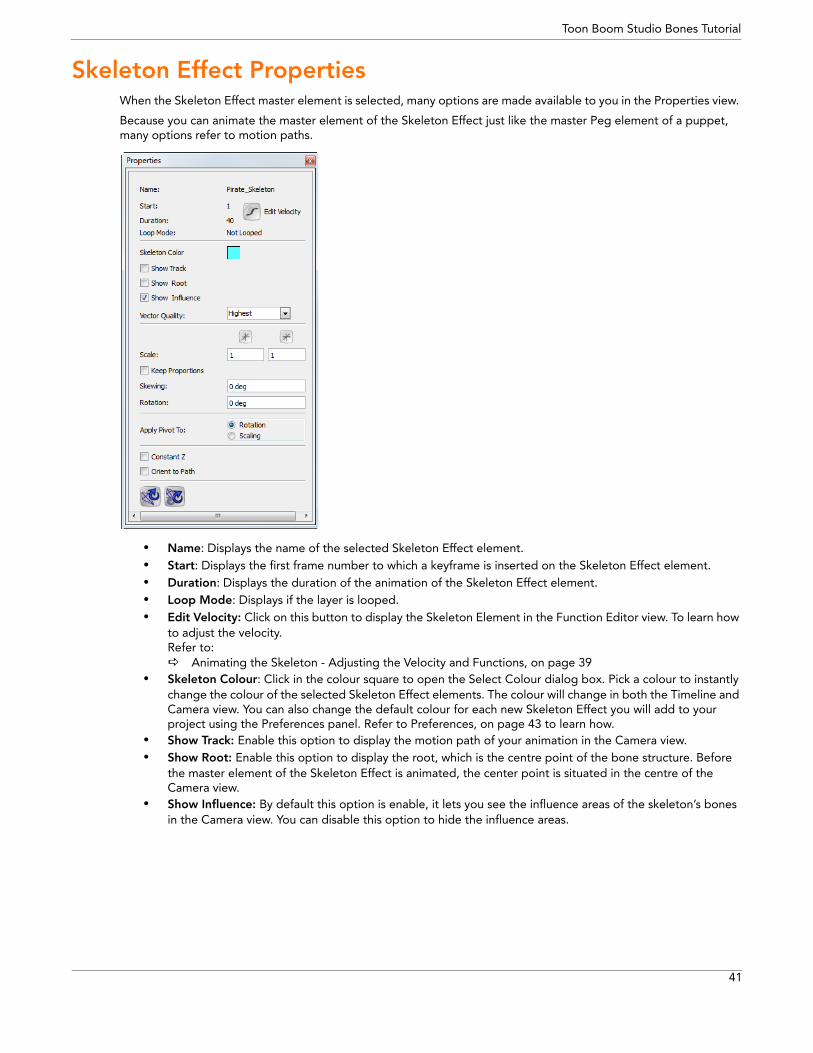
Skeleton Effect Properties When the Skeleton Effect master element is selected, many options are made available to you in the Properties view.
Because you can animate the master element of the Skeleton Effect just like the master Peg element of a puppet, many options refer to motion paths.
• Name: Displays the name of the selected Skeleton Effect element.• Start: Displays the first frame number to which a keyframe is inserted on the Skeleton Effect element.• Duration: Displays the duration of the animation of the Skeleton Effect element.• Loop Mode: Displays if the layer is looped.• Edit Velocity: Click on this button to display the Skeleton Element in the Function Editor view. To learn how
to adjust the velocity. Refer to: Animating the Skeleton - Adjusting the Velocity and Functions, on page 39
• Skeleton Colour: Click in the colour square to open the Select Colour dialog box. Pick a colour to instantly change the colour of the selected Skeleton Effect elements. The colour will change in both the Timeline and Camera view. You can also change the default colour for each new Skeleton Effect you will add to your project using the Preferences panel. Refer to Preferences, on page 43 to learn how.
• Show Track: Enable this option to display the motion path of your animation in the Camera view. • Show Root: Enable this option to display the root, which is the centre point of the bone structure. Before
the master element of the Skeleton Effect is animated, the center point is situated in the centre of the Camera view.
• Show Influence: By default this option is enable, it lets you see the influence areas of the skeleton’s bones in the Camera view. You can disable this option to hide the influence areas.
Toon Boom Studio Bones Tutorial
42
• Vector Quality: Choosing the vector quality level of your skeleton will either improve or depreciate the result of the bone distortion effect. Highest High Medium Low
• Scale: Type in the desired width and height scaling values: 1 = 100%. You can also use the Scale tool from the Sceneplanning toolbar.
• Keep Proportions: Enable this option to keep proportions when scaling the skeleton.
• Skewing: Type in the desired skewing angle value. You can also use the Skew tool from the Sceneplanning Tools toolbar.
• Rotation: Type in the desired rotation angle value. You can also use the Rotate tool from the Sceneplanning Tools toolbar.
• Apply Pivot to: Select to which transformation you want to apply the pivot to. Rotation Scaling
• Constant Z: This option is disabled by default, which means that when you create a motion path along the Z-axis, the automatic interpolation calculates the X, Y and Z axis values. When it is enabled, the interpolation calculates the X and Y axis values and will keep the Z-axis value as constant.
• Orient to Path: Enable this option to force the element connected to the path to follow the motion path.
• Copy Resting Position to Current Frame - use this button to bring the skeleton and artwork back to the set-up position only on the currently selected frame. You can then reparent and setup the bones and their corresponding artwork in a new formation.
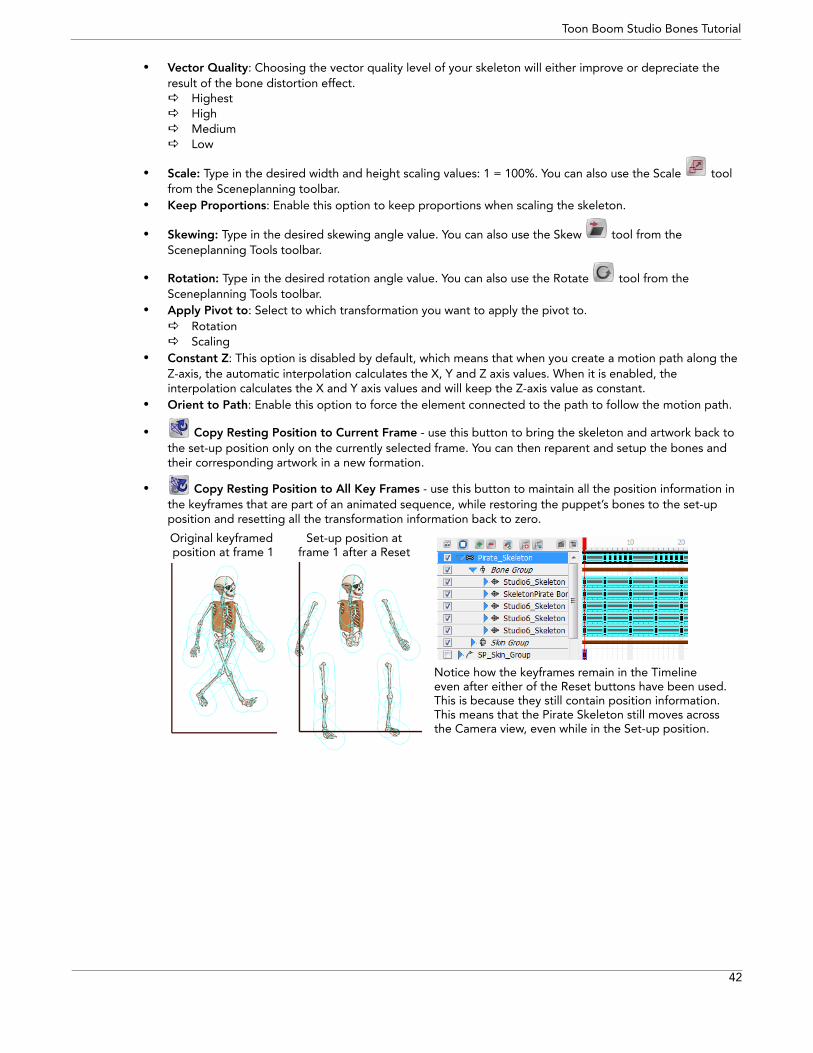
• Copy Resting Position to All Key Frames - use this button to maintain all the position information in the keyframes that are part of an animated sequence, while restoring the puppet’s bones to the set-up position and resetting all the transformation information back to zero.
Original keyframed position at frame 1
Set-up position at
Notice how the keyframes remain in the Timelineeven after either of the Reset buttons have been used.This is because they still contain position information.This means that the Pirate Skeleton still moves acrossthe Camera view, even while in the Set-up position.
frame 1 after a Reset
Toon Boom Studio Bones Tutorial
43
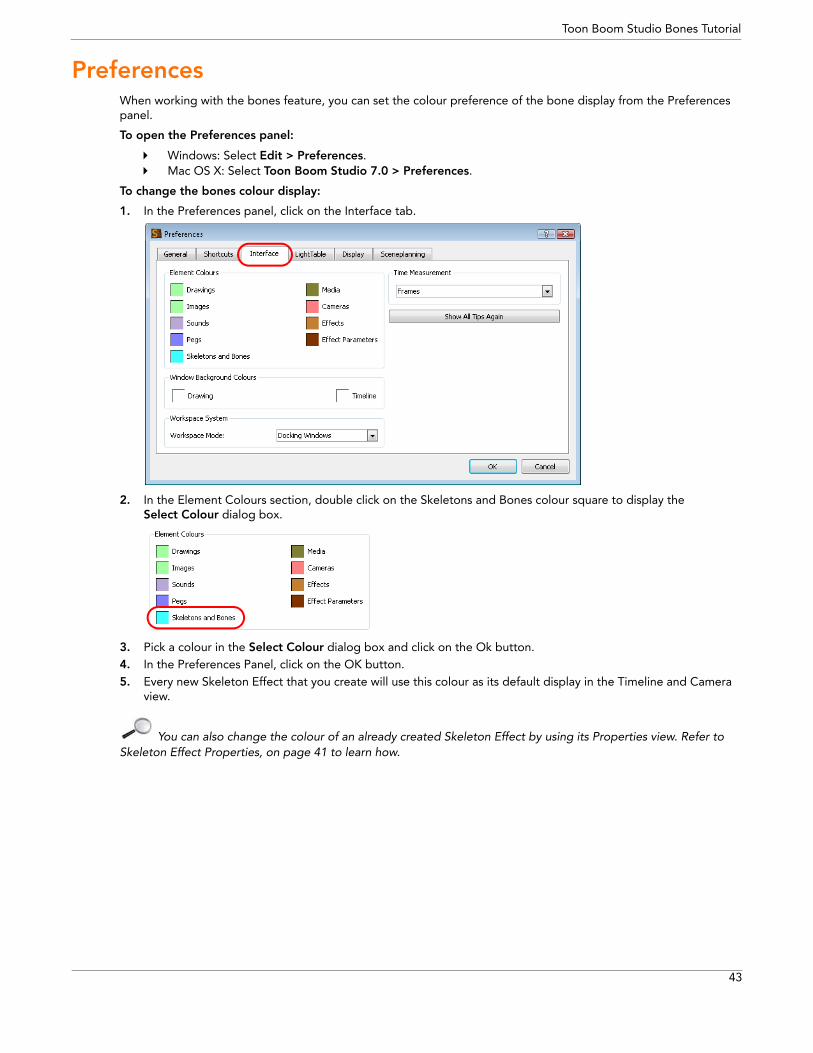
Preferences When working with the bones feature, you can set the colour preference of the bone display from the Preferences panel.
To open the Preferences panel:
Windows: Select Edit > Preferences. Mac OS X: Select Toon Boom Studio 7.0 > Preferences.
To change the bones colour display:
1. In the Preferences panel, click on the Interface tab.
2. In the Element Colours section, double click on the Skeletons and Bones colour square to display the Select Colour dialog box.
3. Pick a colour in the Select Colour dialog box and click on the Ok button.4. In the Preferences Panel, click on the OK button.5. Every new Skeleton Effect that you create will use this colour as its default display in the Timeline and Camera
view.
You can also change the colour of an already created Skeleton Effect by using its Properties view. Refer to Skeleton Effect Properties, on page 41 to learn how.