ansur impulse 4000 - fluke corporationassets.fluke.com/manuals/ansur___umeng0000.pdfansur impulse...
TRANSCRIPT

Ansur Impulse 4000 Plug-In
Users Manual
February 2007 © 2007 Fluke Corporation, All rights reserved. All product names are trademarks of their respective companies.


i
Table of Contents
Chapter Title Page
1 Introduction ......................................................................................... 1-1
Ansur Software .................................................................................................. 1-1 Ansur Plug-ins ............................................................................................... 1-1 About This Manual........................................................................................ 1-1
Impulse 4000 Plug-In......................................................................................... 1-2 Additional References........................................................................................ 1-2
Software Updates........................................................................................... 1-2 Terms and Abbreviations .............................................................................. 1-2
2 Getting Started .................................................................................... 2-1 Installing and Using the Impulse 4000 Plug-In ................................................. 2-1
System Requirements .................................................................................... 2-1 Installing the Impulse 4000 Plug-In .............................................................. 2-1 Entering License Key .................................................................................... 2-2 Uninstalling the Plug-In ................................................................................ 2-3
Ansur Main Window ......................................................................................... 2-4 Test Explorer ................................................................................................. 2-4 Test Elements ................................................................................................ 2-4
Plug-In Preferences............................................................................................ 2-5 General Preferences....................................................................................... 2-6 Communications Preferences ........................................................................ 2-6
3 Impulse 4000 Tests ............................................................................. 3-1 Ansur Test Guides ............................................................................................. 3-1 Defibrillator Tests .............................................................................................. 3-2
Energy Measurement Test ............................................................................. 3-2 Charge Time Test (MAXE)........................................................................... 3-2 Cardioversion Sync Time Test ...................................................................... 3-3 Pulse Repetition Test ..................................................................................... 3-3 Running Pacemaker Tests ............................................................................. 3-4
Pacer Parameter Test................................................................................. 3-4 Pacer Refractory Test ................................................................................ 3-4
Running ECG Waveform Simulation Tests .................................................. 3-5 Normal Sinus Wave Simulation................................................................ 3-5

Ansur Impulse 4000 Plug-In Users Manual
ii
Arrhythmia Wave Advisory Test .............................................................. 3-5 Performance Wave Simulation.................................................................. 3-6
ECG R Peak Detection Test .......................................................................... 3-6
4 Impulse 4000 Test Templates............................................................. 4-1 Building Test Templates .................................................................................... 4-1 Test Templates and Test Elements .................................................................... 4-1 Creating Test Templates .................................................................................... 4-1
Test Element Properties................................................................................. 4-2 General Setup ............................................................................................ 4-2 Apply When Tab ....................................................................................... 4-3 Expected Results ....................................................................................... 4-3 Custom Setup ............................................................................................ 4-4 Test Guide Settings ................................................................................... 4-4
Using Defibrillator Test Elements ..................................................................... 4-5 Energy Measurement Test ............................................................................. 4-5 Charge Time Test (MAXE)........................................................................... 4-5 Cardioversion Sync Time Test ...................................................................... 4-6 Pulse Repetition Test ..................................................................................... 4-6
Using Pacemaker Test Elements........................................................................ 4-7 Pacer Parameter Test ..................................................................................... 4-7 Pacer Refractory Test .................................................................................... 4-7
Using ECG Waveform Simulation Test Elements............................................. 4-8 Normal Sinus Wave Simulation .................................................................... 4-8 Arrhythmia Wave Advisory Test .................................................................. 4-8 Performance Wave Simulation...................................................................... 4-10 ECG R Peak Detection Test .......................................................................... 4-10
iii
List of Tables
Table Title Page
4-1. Energy Measurement Test Elements...................................................................... 4-5 4-2. Custom Setup Parameters Available for Energy Measurement Test ..................... 4-5 4-3. MAXE Charge Time Test Measurement ............................................................... 4-5 4-4. Custom Setup Parameters for MAXE Tests........................................................... 4-6 4-5. Cardioversion Sync Time Test Measurements....................................................... 4-6 4-6. Parameters for Cardioversion Sync Time Tests ..................................................... 4-6 4-7. Pulse Repetition Test Measurements ..................................................................... 4-6 4-8. Pulse Repetition Test Measurement Parameters .................................................... 4-7 4-9. Pacer Parameter Test Measurements...................................................................... 4-7 4-10. Pacer Parameter Test Custom Parameters.............................................................. 4-7 4-11. Pacer Refractory Measurements............................................................................. 4-8 4-12. Pacer Refractory Custom Parameters..................................................................... 4-8 4-13. Normal Sinus Wave Simulation Custom Parameters............................................. 4-8 4-14. Arrhythmia Wave Advisory Test Custom Parameters ........................................... 4-9 4-15. Performance Wave Simulation Custom Parameters .............................................. 4-10 4-16. ECG R Peak Detection Test Custom Parameters ................................................... 4-10

Ansur Impulse 4000 Plug-In Users Manual
iv

v
List of Figures
Figure Title Page
2-1. Ansur Registration Screen–License Key................................................................ 2-3 2-2. Removing Impluse 4000 Plug-in............................................................................ 2-3 2-3. Impulse 4000 Main Application Window.............................................................. 2-4 2-4. Impluse 4000 Test Explorer Window .................................................................... 2-5 2-5. Defibrilator Analyzer Preferences.......................................................................... 2-6 3-1. Ansur Test Guide Window..................................................................................... 3-1 3-2. Defibrillator Charge and Discharge Test Results................................................... 3-4 4-1. Test Template with Seleted Test Element.............................................................. 4-2 4-2. User-Definable Parts of the General Setup Tab ..................................................... 4-2 4-3. Expected Results Options for User Input ............................................................... 4-3 4-4. Changing the Operand in Expected Results ........................................................... 4-3 4-5. Add or Delete Limits Pop-up Menu....................................................................... 4-4 4-6. Custom Setup Page for Energy Measurement Test Elements ................................ 4-4

Ansur Impulse 4000 Plug-In Users Manual
vi

1-1
Chapter 1 Introduction
Ansur Software Ansur Executive test automation software is the backbone of all Fluke Biomedical test systems. The Ansur Executive manages your test procedures by allowing both manual and visual automated test sequences. The software works hand-in-hand with Fluke Biomedical analyzers and simulators, creating a seamless integration for:
• Visual inspections • Preventive maintenance • Work procedures • Performance tests • Safety tests
Ansur Plug-ins Ansur software utilizes plug-in modules to work with a wide array of Fluke Biomedical instruments. The plug-in module is a software interface to the Ansur Executive test program. Plug-ins provide test elements used by Ansur Executive. This gives you the benefit of using the same user interface for all analyzers and simulators supported by an Ansur plug-in. When you purchase a new Fluke Biomedical analyzer or simulator, you can update your existing Ansur software by installing a new plug-in. Each plug-in module allows you to work only with the options and capabilities you need for the instrument you are testing.
About This Manual This users manual is designed to assist the reader in using the Ansur Impulse 4000 plug-in with the Ansur Executive software. The manual covers all features specific to the plug-in. Familiarity with both Ansur software and Microsoft Windows and their features will greatly help you design and use tests for the Ansur Impulse 4000 Analyzer.

Impulse 4000 Plug-In Users Manual
1-2
Impulse 4000 Plug-In The Ansur Impulse 4000 plug-in provides remote access to the Impulse 4000 Defibrillator and Transcutaneous Pacemaker Analyzer, referred to throughout this document as the “Analyzer.” In addition to the general test plug-ins, specialized plug-ins address all test requirements for specific instruments.
Note The operators manual for the Ansur Impulse 4000 Analyzer fully explains its capabilities and use.
Create and use Ansur test procedures by incorporating existing Ansur Impulse 4000 test elements with new ones. You can customize tests to analyze specific performance requirements. There are unique test elements for each of the tests and simulations typically run on the Analyzer.
Additional References In addition to this manual, you may find answers to questions using the Analyzer or PC from the following sources:
• Fluke Biomedical Impulse 4000 Operating and Service Manual • Fluke Biomedical Ansur Test Executive Users Manual • Microsoft Windows User’s Guide
Software Updates Updates for Ansur are published on the Fluke Biomedical website, http://www.flukebiomedical.com.
Terms and Abbreviations The following terms and abbreviations are used in this manual.
Term Description
Ansur Ansur is a software suite using plug-ins to perform test and inspection procedures in conjunction with several Fluke Biomedical test instruments.
DUT Device Under Test–the equipment subjected to a test using the Analyzer.
Impulse 4000 Defibrillator and Transcutaneous Pacemaker Analyzer from Fluke Biomedical.
Plug-In Add-on software program that extends Ansur so that it can perform tests on a specific Fluke Biomedical test instrument.
Test Element A test element is an Ansur construct that encapsulates test configuration and results. A test template is built of several test elements.
Test Guide A test guide is a window displayed by Ansur or any of its plug-ins when a test element is being performed.
Test Template
A test template is an Ansur file containing a set of test elements defining how a particular DUT is to be tested. A test template can also contain instructions on how to perform service, preventive maintenance, repair and other tasks on a DUT.
Test Record A test record is an Ansur file containing the results of a performed test template. The test record can be printed as a test report.

2-1
Chapter 2 Getting Started
Installing and Using the Impulse 4000 Plug-In This chapter helps you install and use the Impulse 4000 plug-in together with the Ansur Executive test software and an Impulse 4000 Analyzer.
Note You do not need an Analyzer in order to create test templates and experiment with a lot of the functionality available in Ansur and the Impulse 4000 plug-in. However, you will not be able to perform any actual tests without the Analyzer connected to your computer.
System Requirements The following are recommended minimum requirements for installation:
• Microsoft Windows 2000 or Windows XP operating system • Fluke Biomedical Ansur V2.4.0 or newer • 50MB of available hard drive for software • Hard drive space (from 20k to several megabytes) for result and template files
Installing the Impulse 4000 Plug-In The Impulse 4000 plug-in must be installed on your computer before you can use the features described in this user manual.
Note You must have Ansur version 2.4.0 or newer to use the Impulse 4000 plug-in. You will not be able to install the plug-in unless Ansur software is already installed.
If you do not have the Ansur software, contact your local Fluke Biomedical representative or refer to the Fluke Biomedical web-site (http://www.flukebiomedical.com) for information on how to obtain both Ansur and the Impulse 4000 plug-in software.
Impulse 4000 Plug-In Users Manual
2-2
Obtain the Impulse 4000 plug-in by downloading it to your computer from the Fluke Biomedical website, and then follow the steps outlined here. 1. Open Windows Explorer and browse to the saved the Impulse 4000 plug-in
installation program. The installation program is usually named Ansur Impulse 4000 plug-in Vn.n.n.msi where n.n.n is the plug-in version number.
Note If you are downloading the Impulse 4000 plug-in from the Fluke Biomedical web site, you can also select to run the installation without first downloading.
2. Double-click the installation program. The installation extracts the plug-in elements and displays the welcome dialog box.
3. Click Next. 4. When the license agreement displays, select the checkbox for “I accept the terms in
the license agreement,” then click Next. 5. Accept the displayed default destination folder by clicking Next.
Note If you have installed Ansur using a different destination folder than the default, be sure you use the same folder for the Impulse 4000 plug-in. In order to change the destination folder during installation, click Change.
6. Click Install to begin installation. A progress bar indicates the Ansur Impulse 4000 Plug-In installation status. This takes a few minutes, concluding when the window displays the dialog box and Finish button.
7. Click Finish. With the Impulse 4000 plug-in installed on your computer, the plug-in will be loaded the next time Ansur starts up.
Entering License Key When using the plug-in for the first time, you will be prompted to enter your software license key provided by Fluke Biomedical at the time of purchase.
Note You can create test templates without a license key by using the demonstration mode. Demonstration mode allows many of the tasks described in this user manual. However, you will not be able to save or print test records without licensing the plug-in.
1. Double-click the Ansur icon on your desktop. Alternatively, you can run Ansur from the Programs folder on the start menu by selecting Start | Programs | Fluke | Ansur.
Note The license key dialog box shown in Figure 2-1 appears at startup if a license key has not yet been entered for the plug-in.

Getting Started Installing and Using the Impulse 4000 Plug-In 2
2-3
eur001.bmp
Figure 2-1. Ansur Registration Screen–License Key
2. Enter the business or institution name and the plug-in license key. Since the license key is derived from the establishment name, it is required that both strings match the license information provided by Fluke Biomedical.
Note This information is case sensitive and space sensitive. If you already have entered your establishment name in the past, then this field is already filled in for you
3. Click OK to start Ansur. 4. If you do not have a license key, click the Demo button to start Ansur in
demonstration mode. 5. Clicking Cancel will prevent the plug-in from being loaded
Uninstalling the Plug-In Uninstall the Impulse 4000 plug-in using the “Add or Remove Programs” utility in the Windows Control Panel. 1. Go to Start | Control Panel, and then double-click Add or Remove Programs. 2. Locate and then select the entry, as shown in Figure 2-2, named Ansur Impulse
4000 Plug-In.
eur005.bmp
Figure 2-2. Removing Impulse 4000 Plug-in

Impulse 4000 Plug-In Users Manual
2-4
3. With the entry highlighted, click Remove to uninstall the Impulse 4000 Plug-in. 4. Click Yes to verify that you want to remove the plug-in from your computer. A dialog box with a progress bar displays while the Impulse 4000 plug-in is removed from your computer. The plug-in has been completely removed when it is no longer listed in the Add or Remove Programs window.
Ansur Main Window At start up, Ansur software displays the main application window shown in Figure 2-2. Create and edit test templates from this main window. For detailed information about creating test templates, refer to Chapter 4 in this manual.
Test Explorer The left pane of the main window, called the Test Explorer, displays the installed plug-ins available in the Ansur Executive.
eur002.bmp
Figure 2-3. Impulse 4000 Main Application Window
Look in the Test Explorer to verify that the plug-in has been loaded properly following installation. If the Impulse 4000 Defibrillator Analyzer is listed, the plug-in correctly loaded during start up.
Test Elements To expand the list and view the available plug-in test elements, you can either click on the + (plus) symbol to the left of the plug-in or double-click on the Impulse 4000 Defibrillator Analyzer plug-in. Expanding the plug-in displays the list of test elements, as shown in the Test Explorer window in Figure 2-4.

Getting Started Plug-In Preferences 2
2-5
eur003.bmp
Figure 2-4. Impulse 4000 Test Explorer Window
Plug-In Preferences The plug-in preferences allow you to select default settings that best suit your normal Impulse 4000 instrument use. Defaults typically handle most performance testing requirements. Use the procedures following, however, if you need to change any settings. 1. Start the Ansur software program and click Tools | Options to display the
Preferences window shown in Figure 2-5.
eur004.bmp
Figure 2-5. Defibrillator Analyzer Preferences

Impulse 4000 Plug-In Users Manual
2-6
2. Click Impulse 4000 Defibrillator Analyzer to display the Impulse 4000 preferences. 3. Ansur must be restarted for any changes in preferences take effect.
General Preferences The Analyzer Preferences window opens with the General tab displayed. In this window, you can change the Pacer Refratory time, that is, the time to wait during the Pacer Refractory Test. Tests with low pulses-per-minute may require additional wait time; make adjustments accordingly.
Communications Preferences Use the Communications tab to set preferences for the timeout threshold. The timeout threshold is the maximum time allowed for communications to be initiated before triggering an error.

3-1
Chapter 3 Impulse 4000 Tests
Ansur Test Guides Perform Impulse 4000 Analyzer tests with the Ansur software Test Guide. This manual includes tests unique to the plug-in for the Impulse 4000 Analyzer. For overall information on selecting and executing tests with Ansur software, please refer to the latest version of the Ansur Executive User Manual. When you open a Test template file for the Impulse 4000 plug-in, the TEST GUIDE window opens. The example in Figure 3-1 shows the TEST GUIDE panes for an Energy Measurement test. The left pane displays either the default explanation or one you have entered when creating a custom template. The right-side pane provides step-by-step directions for the test being performed. In this example, the screen directs you to set the energy level for the DUT, in this case a defibrillator, and then press Start to begin the test. Analyzer measurements appear in the bottom pane.
eur006.bmp
Figure 3-1. Ansur Test Guide Window

Impulse 4000 Plug-In Users Manual
3-2
Defibrillator Tests The Impulse 4000 plug-in allows you to test defibrillator performance using a PC running the Ansur software. At the conclusion of each test procedure, Ansur software collects the results of the tests to display or store on a PC.
Note The Impulse 4000 must be on Main Menu 1 before starting any tests. If the Impulse 4000 is on any other menu, serial communications cannot be established.
Energy Measurement Test The energy measurement test verifies the accuracy of the energy delivered by the defibrillator. First connect the defibrillator to the Analyzer (refer to the Impulse 4000 User Manual for connection instructions) and set defibrillator to the energy setting displayed in the information block on the right side of the test guide. For example, Figure 3-1 shown earlier displays an energy setting with both high and low limits (in Joules). 1. Click Start in the TEST GUIDE toolbar (see Figure 3-1). 2. Charge the defibrillator.
Ansur software configures the Analyzer for the defibrillator test, indicating the status in a Test Results window. Wait for Ansur to finish configuring the Analyzer.
3. When configuration is complete, a window displays with the prompt “Defibrillate now.”
4. Discharge the defibrillator. 5. The TEST GUIDE displays the test results immediately.
Charge Time Test (MAXE) The MAXE measures how long it takes to charge the defibrillator to a specified energy level. This test uses the defibrillator’s maximum energy level available. The steps for this test are similar to the Energy Measurement test. The difference is that this test times how long it takes to perform the charge and discharge, and thus the prompts differ. Connect the defibrillator to the Analyzer. Set defibrillator to the energy level indicated in the information block on the right side of the main TEST GUIDE window. 1. Click Start in the TEST GUIDE toolbar to start the MAXE test. 2. A progress window displays “Please wait…” while the Ansur software configures the
Analyzer. 3. Once configuration completes its routines, a 5 second countdown starts. Wait for the
countdown to complete before charging the defibrillator. 4. Begin charging the defibrillator when warning “START CHARGE NOW…” appears
on your computer screen. 5. As soon as charging is complete, discharge the defibrillator. Test results appear in the
TEST GUIDE results pane.

Impulse 4000 Tests Defibrillator Tests 3
3-3
Cardioversion Sync Time Test This test determines the ability of the defibrillator to synchronize the discharge of its output pulse with a simulated ECG waveform that is being generated from the Impulse 4000 Analyzer. Connect the defibrillator to the Analyzer and set defibrillator to the energy setting indicated in the TEST GUIDE settings pane. The Analyzer outputs an ECG waveform to the defibrillator for this test. 1. Click Start in the test guide toolbar. 2. Wait for Ansur to finish configuring the Analyzer. 3. Begin charging the defibrillator when prompted by the “START CHARGE NOW…”
message. 4. Discharge the defibrillator as soon as the defibrillator indicates charging is complete. 5. Results of the test appear in the TEST GUIDE results pane.
Pulse Repetition Test The pulse repetition test verifies that the defibrillator can deliver in less than 5 minutes at its maximum energy level 15 discharges into a 50-ohm resistive load. Ensure that the defibrillator and Analyzer are properly connected, and set the defibrillator to the energy level specified in the information block on the right side of the TEST GUIDE settings pane. 1. Click Start in the TEST GUIDE toolbar. 2. Ansur configures the Analyzer for the test selected, displaying the “Please wait...”
message. 3. Ansur will start a 5 minute (300 second) timer, indicated by the “Charge and shock!”
message shown below.
4. Charge and discharge the defibrillator 15 times. The test counts down automatically
while you manually charge and discharge the defibrillator. 5. Ansur ends the test automatically once the fifteenth discharge is detected. The Test
results pane, as shown in Figure 3-2, displays a status bar indicating that the defibrillator PASSED the test.

Impulse 4000 Plug-In Users Manual
3-4
eur013.bmp
Figure 3-2. Defibrillator Charge and Discharge Test Results
Running Pacemaker Tests Pacemaker tests are used to test the basic operation of external transcutaneous pacemakers by measuring various pacemaker outputs and timing.
Pacer Parameter Test The pacer parameter test measures peak current and pulses per minute delivered by a pacemaker. Connect a pacemaker to the Analyzer. Instructions for this are provided in the Impulse 4000 Operating and Service Manual.
Note Specify in your test procedure if you are using a TQA load adapter or the Impulse 4000 internal 50-ohm load.
1. On the pacemaker, set the pacer rate and pacer output current. The TEST GUIDE settings pane indicates the pacemaker current level to be used.
2. Click Start in the TEST GUIDE toolbar. 3. When the Analyzer completes its measurements, Ansur retrieves the results and
displays them in the TEST GUIDE. 4. Click Next in the toolbar to proceed, or click Start to re-run the test.
Pacer Refractory Test This test checks the ability of the pacemaker to interact with cardiac activity when the pacemaker is in demand mode. The Ansur program retrieves the Pulsed Refractory Period (PRP) and the Sensed Refractory Period (SRP) timings as measured by the Analyzer. Connect the pacemaker to the Analyzer, following the instructions provided in the Impulse 4000 Operating and Service Manual.

Impulse 4000 Tests Defibrillator Tests 3
3-5
Note Specify in the test procedure whether you are using a TQA load adapter or the Impulse 4000 internal 50-ohm load.
1. On the pacemaker, set the pacer rate and pacer output current using information specified in the lower right side pane of the TEST GUIDE.
2. Click Start in the test guide toolbar. Ansur starts the test, which takes 2 minutes (120 seconds) to complete. The default duration of 120 seconds can be changed in the Preferences dialog box.
3. The Test results window shown below displays the timer countdown.
1. When the Analyzer has completed measurements, Ansur retrieves the results and
displays them in the TEST GUIDE. 2. Click Next in the toolbar to proceed to additional tests, or click Start to repeat this
test.
Running ECG Waveform Simulation Tests The ECG Waveform tests verify the correct operation of an ECG monitor.
Normal Sinus Wave Simulation The Analyzer can generate a normal sinus wave between 30 and 300 beats per minute for output to a defibrillator ECG monitor. Make sure you have followed the directions provided by the ECG equipment manufacturer to connect the ECG leads from the ECG monitor to the Analyzer. 1. Click Start in the TEST GUIDE toolbar. 2. Wait for activity to appear on the ECG monitor. 3. This short test concludes automatically after a few seconds, as specified by the test
procedure. If the test duration is set to run indefinitely, click Stop (in the toolbar) to conclude the test.
4. Click on the Test passed checkbox or Test failed checkbox to record the observed result of the test.
Arrhythmia Wave Advisory Test This test typically verifies the shock advisory capability of a defibrillator in response to various arrhythmia waveforms. Connect the device under test (DUT) to the Analyzer. Set up the shock advisory on the defibrillator, if applicable. 1. Click Start in the TEST GUIDE window. Wait for activity to appear on the ECG
monitor and verify the shock advisory was correct.

Impulse 4000 Plug-In Users Manual
3-6
2. The test concludes automatically after a few seconds, as specified by the test procedure.
3. If you set the test to run indefinitely, click on Stop at any time to end the test. 4. Click on the checkbox Test passed or checkbox Test failed to record the test result
based on what you observed on the monitor.
Performance Wave Simulation The Performance Wave simulation tests the integrity of a defibrillator monitor using a variety of additional waveform shapes such as square, triangle, sine, and pulse. Refer to the “Normal Sinus Wave Simulation” test earlier in this manual for the instructions in running this test.
ECG R Peak Detection Test The ECG R Peak Detection test determines if the defibrillator can detect an R Wave at a given threshold of width and amplitude. Beats per minute is fixed at 60 during this test. This test can be set up to test a single R-wave width and amplitude, or can cycle through several widths or several amplitudes. Connect the DUT to the Analyzer. 1. Click Start in the TEST GUIDE toolbar. 2. Wait for activity to appear on the ECG monitor. Monitor the simulated R-Wave
width and amplitude on the front panel of the Analyzer. 3. The test automatically concludes based on the duration set in the test template, as
well as the number of defined values to be included in the test. 4. Click on the Test passed checkbox or Test failed checkbox to record the observed
test results.

4-1
Chapter 4 Impulse 4000 Test Templates
Building Test Templates Customize Ansur Impulse 4000 plug-in test elements using its test templates. This chapter introduces the template capabilities of the Impulse 4000 Plug-in, and provides guidance for customizing test templates. More detailed information on creating Ansur test templates can be found in the most recent version of the Ansur Executive User Manual.
Test Templates and Test Elements Create, modify and review test templates and test records using Ansur’s main application window as a template editor. The Impulse 4000 plug-in provides ten test elements that can be used to build new test procedures. These test elements are accessible in Ansur’s Test Explorer. Tests denoted by a light blue icon indicate that the Analyzer will automatically provide the test result data to Ansur as they are completed. Tests denoted by a yellow icon indicate that the result data will need to be manually entered into Ansur by the user.
Creating Test Templates Begin building a test template by dragging a test element from the Test Explorer (left pane) into the Test Template (right pane) area of the Ansur application window, as displayed in Figure 4-1. In the following illustration, the highlighted element shows the Impulse 4000 Energy Measurement Test as the first test step to be performed.

Ansur Impulse 4000 Plug-In Users Manual
4-2
eur016.bmp
Figure 4-1. Test Template with Selected Test Element
Test Element Properties Tabs available in the middle of the Template window allow you to define the test elements properties. Clicking on one of the test elements in the test template highlights the test element and the test element properties. The test element properties consists of multiple pages that are described in the section following.
General Setup The General Setup tab opens a screen allowing you to enter a name for the test. In the example in Figure 4-2, the name given is “IMPULSE4000 Energy Measurement Test.” In the space below the name, you can enter the procedures and instructions to be followed when conducting the test.
eur017.bmp
Figure 4-2. User-Definable Parts of the General Setup Tab

Impulse 4000 Test Templates Creating Test Templates 4
4-3
Apply When Tab Use the “Apply when” tab to assign report levels, standards, and service events to Test Elements. For more information about this feature, see the Ansur Executive User Manual.
Expected Results Select the Expected Results tab to view or change the measurement limits for tests. The Expected Results page is unavailable when test elements do not return measurement data. Figure 4-3 is an example of expected results.
eur018.bmp
Figure 4-3. Expected Results Options for User Input
Expected Results Operand Menu Define how Ansur will calculate the limit values for certain measurements using the Operand menu (see Figure 4-4). Click in the Operand field to change the operand with a drop-down menu. The operand can be set to any of the following:
• Y An absolute value • X + Y an offset where the limit is calculated as preset value + specified limit • X + (X * Y%) calculated as a percentage deviance from the preset value
eur019.bmp
Figure 4-4. Changing the Operand in Expected Results
When the operand is not an absolute limit, the (dynamic) icon appears on the left column as shown in the preceding illustration. This indicates the limit will be calculated when the test is run.

Ansur Impulse 4000 Plug-In Users Manual
4-4
Adding and Deleting Limits Add or delete limits by right clicking on one of the rows of the expected results page and selecting from the pop-up menu as shown in Figure 4-5.
eur020.bmp
Figure 4-5. Add or Delete Limits Pop-up Menu
Custom Setup Use the Custom setup tab to view and define the parameters used in tests. Test elements have unique custom setups for capabilities, for example, those shown in Figure 4-6.
eur021.bmp
Figure 4-6. Custom Setup Page for Energy Measurement Test Elements
Test Guide Settings The Test Guide settings provide a way to control whether or not certain test elements can be skipped altogether or marked as Not Applicable (NA) while the tests run. If a setting is enabled, the corresponding NA or Skip buttons on the toolbar are available.
eur022.bmp
The Skip and NA buttons are enabled by default. De-select either or both of the checkboxes (shown in the previous Figure 4-6) to disable the NA and Skip options.
Impulse 4000 Test Templates Using Defibrillator Test Elements 4
4-5
Using Defibrillator Test Elements Several test elements provided by the Impulse 4000 plug-in allow user configuration.
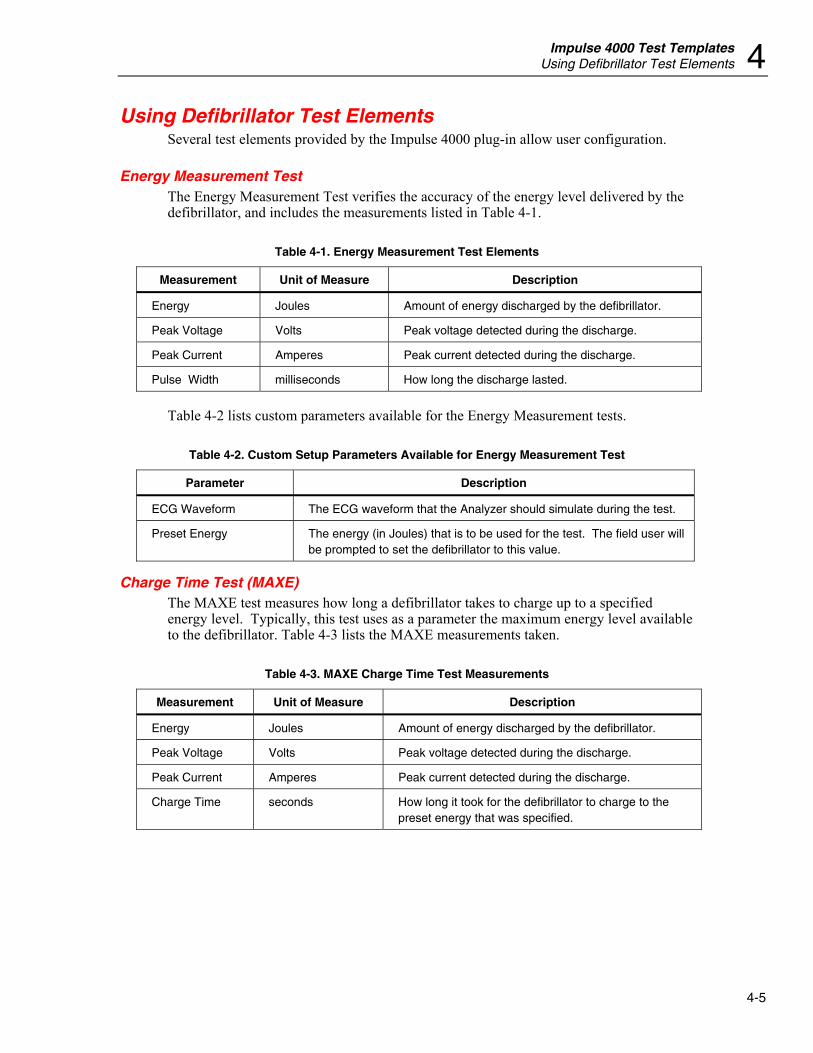
Energy Measurement Test The Energy Measurement Test verifies the accuracy of the energy level delivered by the defibrillator, and includes the measurements listed in Table 4-1.
Table 4-1. Energy Measurement Test Elements
Measurement Unit of Measure Description
Energy Joules Amount of energy discharged by the defibrillator.
Peak Voltage Volts Peak voltage detected during the discharge.
Peak Current Amperes Peak current detected during the discharge.
Pulse Width milliseconds How long the discharge lasted.
Table 4-2 lists custom parameters available for the Energy Measurement tests.
Table 4-2. Custom Setup Parameters Available for Energy Measurement Test
Parameter Description
ECG Waveform The ECG waveform that the Analyzer should simulate during the test.
Preset Energy The energy (in Joules) that is to be used for the test. The field user will be prompted to set the defibrillator to this value.
Charge Time Test (MAXE) The MAXE test measures how long a defibrillator takes to charge up to a specified energy level. Typically, this test uses as a parameter the maximum energy level available to the defibrillator. Table 4-3 lists the MAXE measurements taken.
Table 4-3. MAXE Charge Time Test Measurements
Measurement Unit of Measure Description
Energy Joules Amount of energy discharged by the defibrillator.
Peak Voltage Volts Peak voltage detected during the discharge.
Peak Current Amperes Peak current detected during the discharge.
Charge Time seconds How long it took for the defibrillator to charge to the preset energy that was specified.

Ansur Impulse 4000 Plug-In Users Manual
4-6
Custom parameters available for the MAXE tests include those listed in Table 4-4.
Table 4-4. Custom Setup Parameters for MAXE Tests
Parameter Description
ECG Waveform The ECG waveform that the Analyzer should simulate during the test.
Preset Energy The energy (in Joules) that is to be used for the test. For this test it is typically the maximum energy that the defibrillator can generate. The field user will be prompted to set the defibrillator to this value.
Cardioversion Sync Time Test The Cardioversion Sync Time test determines the ability of the defibrillator to synchronize the discharge of its output pulse with a simulated ECG waveform being generated by the Analyzer. Cardioversion Sync Time test measurements are listed in Table 4-5.
Table 4-5. Cardioversion Sync Time Test Measurements
Measurement Unit of Measure Description
Energy Joules Amount of energy discharged by the defibrillator.
Peak Voltage Volts Peak voltage detected during the discharge.
Peak Current Amperes Peak current detected during the discharge.
Cardio Delay Time
milliseconds The delay between the top of the ECG wave and the discharging of the defibrillator pulse.
The Cardioversion Sync Time custom parameters shown in Table 4-6 include energy and waveform type.
Table 4-6. Parameters for Cardioversion Sync Time Tests
Parameter Description
ECG Waveform The ECG waveform the Analyzer should simulate during the test.
Preset Energy The energy (in Joules) that is to be used for the test. The field user will be prompted to set the defibrillator to this value.
Pulse Repetition Test This test allows the user to check if the defibrillator can deliver 15 discharges into a 50-ohm resistive load at the maximum energy level in a time of less than 5 minutes. Table 4-7 lists the Pulse Repetition Test measurements.
Table 4-7. Pulse Repetition Test Measurements
Measurement Unit of Measure Description
Energy Joules Amount of energy discharged by the defibrillator.
Pulse Count Number of discharges detected during the test. Should be equal to 15 if the test is run through to completion.

Impulse 4000 Test Templates Using Pacemaker Test Elements 4
4-7
Custom parameters available for the Pulse Repetition Test Measurements include those listed in Table 4-8.
Table 4-8. Pulse Repetition Test Measurement Parameters
Parameter Description
Battery Operated Checkbox to document the test to be performed with battery, not mains, power.
Preset Energy Energy (in Joules) used for the test. This is maximum energy the defibrillator can generate for this test; field user prompted to set defibrillator to this value.
Using Pacemaker Test Elements Pacemaker tests confirm the basic operation of external transcutaneous pacemakers by measuring various pacemaker outputs and timing.
Pacer Parameter Test The parameter test measures peak current delivered by the pacemaker, as well as the pulse width and pulses per minute. Tables 4-9 and 4-10 list the Pacer Test measurements and parameters.
Table 4-9. Pacer Parameter Test Measurements
Measurement Unit of Measure Description
Pacer Rate Pulses/minute Number of pacer pulses detected by the Analyzer during the test.
Pacer Current Amperes Peak current detected during the test.
Pacer Width milliseconds Pacer pulse width as measured by the Analyzer.
Table 4-10. Pacer Parameter Test Custom Parameters
Parameter Description
Adapter Defines load used for the test. A TQA pacemaker module can be selected or the default internal 50-ohm load can be used.
Load If TQA module is selected for the adapter, define which TQA load to use for the test. Selection list shows each load supported by the adapter.
Preset Pacer Rate Expected pacer rate; field user prompted to set pacemaker to this rate.
Preset Pacer Amplitude
Expected pacer amplitude; field user prompted to set the pacemaker output current to this value.
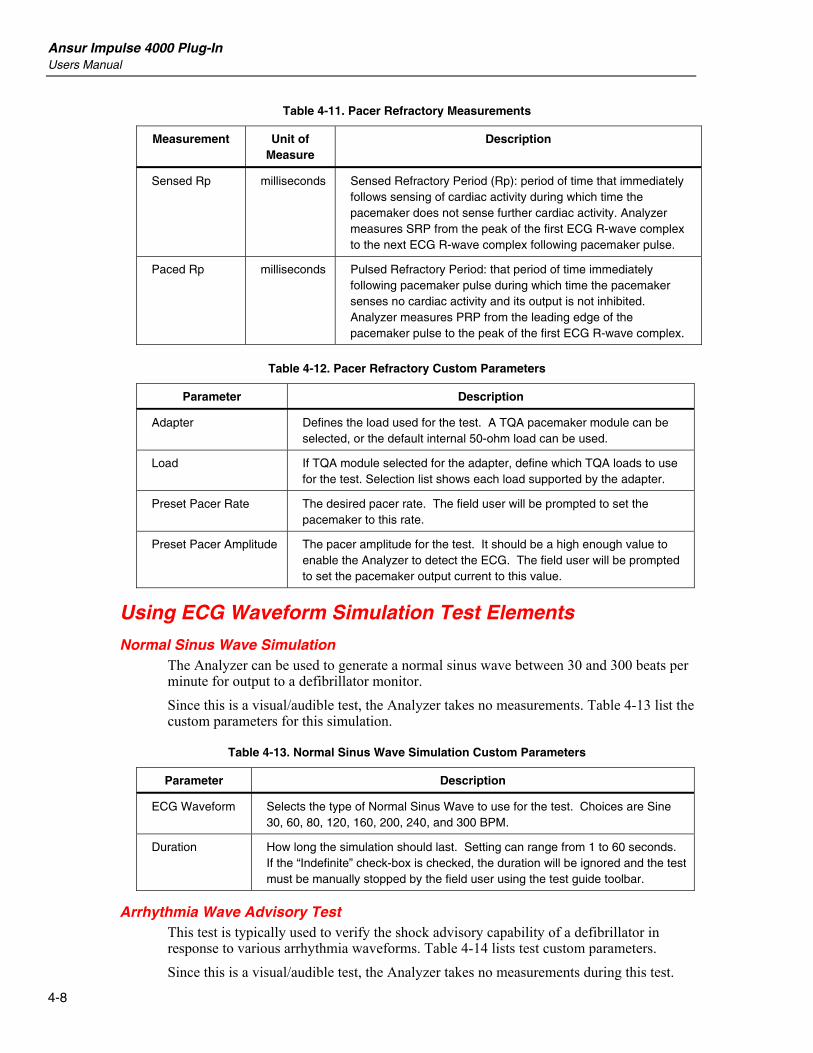
Pacer Refractory Test This test checks the ability of the pacemaker to interact with cardiac activity when the pacemaker is in demand mode. Ansur will retrieve the Pulsed Refractory Period (PRP) and the Sensed Refractory Period (SRP) timings as measured by the Analyzer. Tables 4-11 and 4-12 list the Pacer Refractory test measurements and custom parameters.
Ansur Impulse 4000 Plug-In Users Manual
4-8
Table 4-11. Pacer Refractory Measurements
Measurement Unit of Measure
Description
Sensed Rp milliseconds Sensed Refractory Period (Rp): period of time that immediately follows sensing of cardiac activity during which time the pacemaker does not sense further cardiac activity. Analyzer measures SRP from the peak of the first ECG R-wave complex to the next ECG R-wave complex following pacemaker pulse.
Paced Rp milliseconds Pulsed Refractory Period: that period of time immediately following pacemaker pulse during which time the pacemaker senses no cardiac activity and its output is not inhibited. Analyzer measures PRP from the leading edge of the pacemaker pulse to the peak of the first ECG R-wave complex.
Table 4-12. Pacer Refractory Custom Parameters
Parameter Description
Adapter Defines the load used for the test. A TQA pacemaker module can be selected, or the default internal 50-ohm load can be used.
Load If TQA module selected for the adapter, define which TQA loads to use for the test. Selection list shows each load supported by the adapter.
Preset Pacer Rate The desired pacer rate. The field user will be prompted to set the pacemaker to this rate.
Preset Pacer Amplitude The pacer amplitude for the test. It should be a high enough value to enable the Analyzer to detect the ECG. The field user will be prompted to set the pacemaker output current to this value.
Using ECG Waveform Simulation Test Elements
Normal Sinus Wave Simulation The Analyzer can be used to generate a normal sinus wave between 30 and 300 beats per minute for output to a defibrillator monitor. Since this is a visual/audible test, the Analyzer takes no measurements. Table 4-13 list the custom parameters for this simulation.
Table 4-13. Normal Sinus Wave Simulation Custom Parameters
Parameter Description
ECG Waveform Selects the type of Normal Sinus Wave to use for the test. Choices are Sine 30, 60, 80, 120, 160, 200, 240, and 300 BPM.
Duration How long the simulation should last. Setting can range from 1 to 60 seconds. If the “Indefinite” check-box is checked, the duration will be ignored and the test must be manually stopped by the field user using the test guide toolbar.
Arrhythmia Wave Advisory Test This test is typically used to verify the shock advisory capability of a defibrillator in response to various arrhythmia waveforms. Table 4-14 lists test custom parameters. Since this is a visual/audible test, the Analyzer takes no measurements during this test.

Impulse 4000 Test Templates Using ECG Waveform Simulation Test Elements 4
4-9
Table 4-14. Arrhythmia Wave Advisory Test Custom Parameters
Parameter Description
ECG Waveform
Selects the type of Arrhythmia waveform to use for the test. Choices are:
• AFIB1: Atrial fibrillation 1, course
• AFIB2: Atrial fibrillation 1, fine
• AFLUT: Atrial flutter
• SINA: Sinus arrhythmia
• 1DB: First degree AV block
• 2DB1: Second degree AV block, type 1, Wenckebach
• 2DB2: Second degree AV block, type 2
• 3DB: Third degree AV block
• PVC1: Premature Ventricular Contractions, type 1
• PVC2: Premature Ventricular Contractions, type 2
• MultifocalPVC: Multifocal Premature Ventricular Contractions
• PairofPVC: Pair of couplet PVCs
• Bigeminy: Bigeminy
• Trigeminy: Trigeminy
• RUN5PVC Run of 5 PVCs
• RUN11PVC: Run of 11 PVCs
• Vent120: Ventricular rhythm 120 BPM
• VTC130: Ventricular tachycardia 130 BPM
• VTC175: Ventricular tachycardia 175 BPM
• VTC180: Ventricular tachycardia 180 BPM
• VTC185: Ventricular tachycardia 185 BPM
• VTC220: Ventricular tachycardia 220 BPM
• VFIB1: Ventricular fibrillation 1, course
• VFIB2: Ventricular fibrillation 2, fine
• ASY1: Asystole 1, some movement
• ASY2: Asystole 2, flat
• ASN: Asynchronous, continuous, transvenous paced
• DM1: Demand 1, mostly paced, transvenous paced
• DM2: Demand 2, mostly normal, transvenous paced
• AVS: Atrioventricular sequential, transvenous paced
• NCA: Noncapture, transvenous paced
• NFU: Nonfunctional, transvenous paced
• TQASYS: Asystole, transcutaneous paced
• TQBRAD: Bradycardia, transcutaneous paced
• TQDEM: Demand, transcutaneous paced
• TQNC: Noncapture, transcutaneous paced
Duration How long the simulation should last. Setting can range from 1 to 60 seconds. With check-box Indefinite selected, duration ignored and test must be manually stopped by field user (Stop in TEST GUIDE toolbar).
Transvenous Paced Spike width
Only used for AVS and NCA arrhythmia waveforms to define the width of the atrial pacemaker spike.
Transvenous Paced Spike amplitude
Only used for AVS and NCA arrhythmia waveforms to define the amplitude of the atrial pacemaker spike.

Ansur Impulse 4000 Plug-In Users Manual
4-10
Performance Wave Simulation The Performance Wave simulation can be used to test the integrity of a defibrillator monitor with a variety of additional waveform shapes, such as square, triangle, sine and pulse. Tables 4-15 list the custom parameters for this simulation. Since this is a visual/audible test, the Analyzer takes no measurements during this test.
Table 4-15. Performance Wave Simulation Custom Parameters
Parameter Description
ECG Waveform Selects the type of Waveform to use for the test. Choices are:
• Zero: (no output)
• Square: 2 Hz
• Pulse: 4-second pulse
• Sine: 0.05, 0.5, 1, 10, 25, 30, 40, 50, 60, 100, 125, 150 Hz
Wave form type choices (cont.):
• Square: 1 kHz
• Triangle: 2 Hz
Duration How long the simulation should last. Setting can range from 1 to 60 seconds. If checkbox Indefinite selected, duration will be ignored and user must stop test manually using the TEST GUIDE toolbar.
Lead Source Specify the reference lead type. Select between Type I or Type II.
ECG R Peak Detection Test The ECG R Peak Detection test is used to determine that the defibrillator can detect an R Wave at a given threshold of width and amplitude. Beats per minute is fixed at 60 during this test. This test can be set up to test a single R-wave width and amplitude, or can cycle through several widths or several amplitudes. Table 4-16 lists the custom parameters for this test. Since this is a visual/audible test, the Analyzer takes no measurements during this test.
Table 4-16. ECG R Peak Detection Test Custom Parameters
Parameter Description
Width Specifies threshold width (in milliseconds) to use for the R-Wave detection: choose 8, 12, 20, 40, 60, 80, 100, 120, 140, 180, and 200 milliseconds.
Amplitude Specifies the threshold amplitude (in millivolts) to use for the R-Wave detection. Choices range from 0.05 to 5.5 millivolts.

Impulse 4000 Test Templates Using ECG Waveform Simulation Test Elements 4
4-11
Table 4-16. ECG R Peak Detection Test Customer Parameters (cont.)
Parameter Description
Auto Increment Options The auto increment feature allows you to start the test at beginning values, and then automatically increment either the width or the amplitude upwards through all the rest of the higher values.
No auto increment: Indicates that you just want to test against a single width and amplitude.
Width auto increment: Indicates that you just want to test against the specified width and amplitude, followed by further iterations with each of the higher width thresholds.
Amplitude auto increment: Indicates that you just want to test against the specified width and amplitude, followed by further iterations with each of the higher amplitude thresholds.
Duration How long (in seconds) that each test increment should last. If no auto increment option will be used, then a single iteration will be run for the duration specified.

Ansur Impulse 4000 Plug-In Users Manual
4-12