a&p 1 histology lab week 1 in-lab guide epithelial tissue id:...
TRANSCRIPT
A&P 1 Histology Lab Week 1
In-lab Guide – Epithelial Tissue ID: Cuboidal and Columnar
Please move through this as quickly as you can! Remember…you are just trying to get to high power quickly! Have one person talk through the guide, while another person works the scope. Pick the person with the most experience to operate your scope. I do not care about your ability to use a microscope. Have a third person find the “Cuboidal Epithelium” and “Columnar Epithelium” table in a Lab book or Lecture book. Remember: there are spare lecture books in the lab room. Make sure everyone in your group looks into the microscope when I direct it! I will be walking around the room, helping you.

#1
#2
Step 1. ID Simple and Stratified Cuboidal Epithelium Navigator: Read this aloud: Before we begin, I want to teach you about glands, and what you are looking at. The numbers in red refer to the numbers on the images.
Both Simple & Stratified Cuboidal Epithelium are found in glands. Glands are often shaped like tennis balls (1). So when we cut through them, they often look like tiny rings at low power (2). That is because we have cut through a structure that is very much like a tennis ball … thick wall, with an obvious lumen. Sometimes the lumen will be filled with fluid (3). Sometimes, a gland will have a little of both tissue types: simple and stratified cuboidal… the simple is a single layer, whereas the stratified is found in “clumps” (4)! Both tissue types secrete! So, it is easier to study both types of cuboidal at the same time, instead of separating "simple" form "cuboidal". However, the easy part of this tissue is that you only really have to identify GLANDS, which is a structure (or organ) big enough to see at very low power! Before we look at the slide, notice four things on the images:
1. Not all rings look the same, but they still look like rings. We will see that today (2 & 5). 2. Cuboidal cells do not look very “cube-shaped”. But … who cares…we see a bunch of “square-ish” cells forming a ring (5). 3. Not all glands look like rings, but we won’t be seeing that until A&P2. By then, you’ll recognize the tissue. 4. Other things can look like rings. Especially blood vessels. That is why I had you look at them when we did “simple squamosal” on the lung slide (6). Notice the flat cells making the ring, comparing their shape to the glandular cells.
1
2
3
4
5
6

#3
#4
Go get 2 slides:
Thyroid gland Trachea
Hold the thyroid gland slide up to the light. It should look something like this: There might be some other stuff on the slide…ignore it! This is the first time you’ve seen an organ that doesn’t have a lumen in the center! Endocrine glands, like the thyroid, are not visceral organs! Make sure the scanning objective lens is pointing down (“4x” which is 40x total magnification).
Clip the thyroid slide onto the microscope stage. Look and make sure your tissue is directly under the objective lens … if it is not, move the tray using the knobs until it is! Look in and focus, using the course focus knob to get it close to focus, then the fine focus knob in order to get the edges as crisp as you can. Move to the center of the gland. Your slide will look one of two ways:
The truth is, this low magnification is fine for identifying this tissue. You see rings, and that they are glands, so you know it is cuboidal epithelium. The “clumpy” stuff is stratified.
The difference is how the stain they used stained the
secretion found in the lumen.
2.
1.
2.
1.
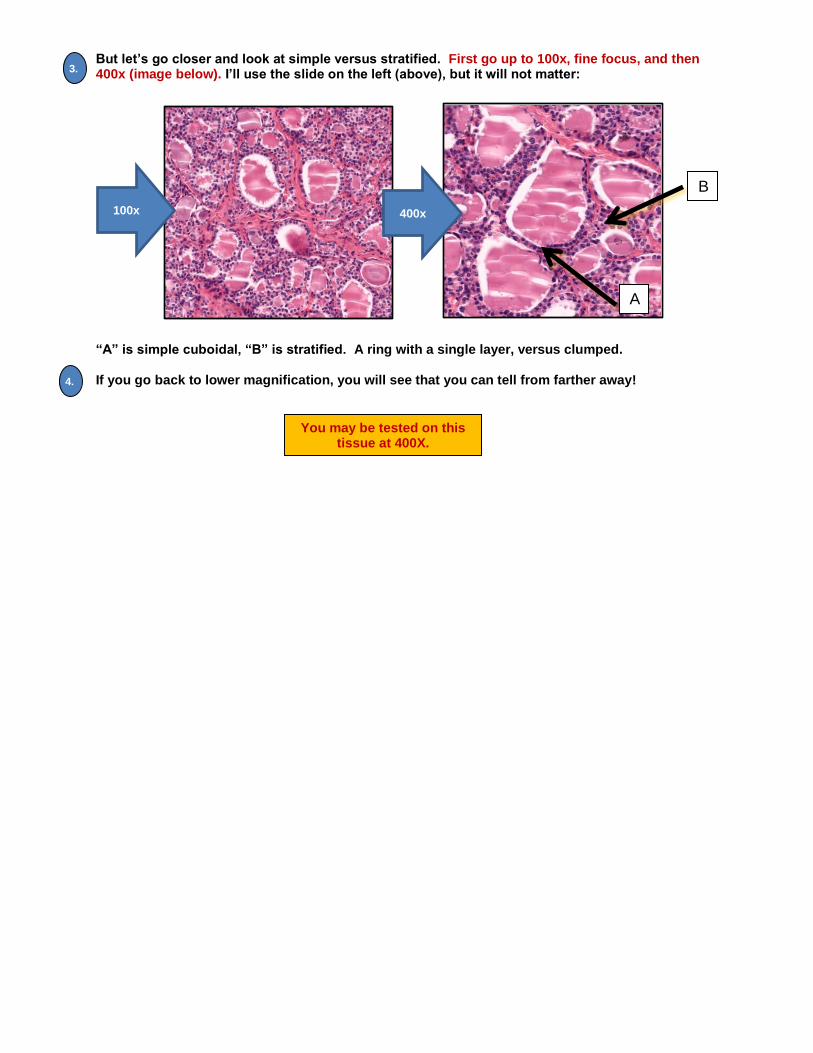
But let’s go closer and look at simple versus stratified. First go up to 100x, fine focus, and then 400x (image below). I’ll use the slide on the left (above), but it will not matter: “A” is simple cuboidal, “B” is stratified. A ring with a single layer, versus clumped. If you go back to lower magnification, you will see that you can tell from farther away!
B
A
100x 400x
You may be tested on this tissue at 400X.
4.
3.

#5
OK, that was easy, because the thyroid is mostly glandular. Nothing much else to see. What if we look at a visceral organ that contains glands, but other tissues as well? Will we still recognize it?
That’s why we got the trachea slide: Go ahead and hold the trachea slide up to the light, letting everyone see it before putting it in the scope. Decide if your slide looks like version “A” or version “B” below. Follow the numbers on the image: Discuss where you think the lumen is on your slide. Notice that there is always more than one tissue on the slide, so you are going to have to move the stage & slide around to see what you want to see!
Here, we want to see the submucosa, which is deep to the mucosa. Do not go to the mucosa, or you will be looking at the wrong tissue! Move the stage so that the pointer is on the glands in the submucosa. Increase magnification, adjusting fine focus, until it looks something like the accompanying image “C”. Do you see that these are “square-ish” cells forming rings? On your slide, can you pick out some “simple” versus “stratified”? Use image “D” if you need help.
Now do Image B
C
D
2.
1.
4.
3.
Version A Small mammal
Start HERE
Version B Human
Start HERE

In the videos, I told you to come up with a “descriptor term” for each slide. Take out a clean piece of paper and label it “Stratified squamous epithelium”. Make a drawing of the tissue, if you’d like. Under it, write down your Descriptor Term and the magnification you need to study.
A lot of people think the tissue (not a cell!) looks like a bunch of tires: Under that, write down a representative location for this tissue Write down any extra information your instructor wants you to know (special cell names, etc.). If the answer is "none", just write that!
Hang on to your trachea slide for the next tissue!
Put the thyroid slide back in its tray!
5.

#1
#2
#3
Step 2. ID Both Simple Columnar and Ciliated Pseudostratified Columnar Tissues
Have someone in your group read the following out loud, while the others read along:
Opening Paragraph (we'll be referring to this later)
Both types of columnar tissue are used by organs that do a lot of absorbing and/or secreting. The elongated cells have an active role in these processes. Both types may have special cells called "goblet cells".
The very elongated columnar cells are usually easy to tell from far away (low power). However, we usually need to go to higher power to tell if it is simple or pseudostratified! First, let's find the "Simple columnar" and "Pseudostratified Columnar" tables in either our lecture or lab book. Look at the image in your book. Find where they indicate the cell you should be looking for. Also note the goblet cells, microvilli, cilia and basement membranes. We are going to look at these two slides side-by-side. Make sure there are 2 microscopes at your station. Go and get a slide from the small intestines tray. Your intestines slide will look one of 2 ways:
After inspecting your slide, follow the steps below: Put the middle “intestine tube” or “intestine strip” under the 4x objective lens. ID where the lumen is on the section you will be using. This will have simple columnar in the mucosal layer. Put the pointer on the mucosal layer. It will probably have some pseudostratified, also, so do not get confused if you zoom into some of that. You trachea slide should still be in your other scope. This will have ciliated pseudostratified columnar in the mucosa.
The 3 areas of the small intestines. Slide is from a small mammal, so they got the whole tube on the slide.
The 3 areas of the small intestines. Slide is from a large mammal, so they only put part of the tube on the slide.
The side with the villi is
towards the lumen!
Villi
2.
1.

On both slides, zoom into either middle or high power, whichever gives you the best view of the cells in the mucosa. This might be different for different slides, depending on the size of the animal. Also…the mucosa can be facing any direction …. Up, down, right, left. On the simple columnar slide, note that the nuclei are in a fairly straight row, whereas on the pseudostratified slide the nuclei look “bouncy”. Compare to image below:
On both slides, note basement membrane, microvilli in a brush border or cilia, and goblet cells. Then, go back to the next lowest power and note as many of those structures as you can!
Ciliated Pseudostratified
with lumen below
Simple with
lumen above
Recall: it is likely you can see some pseudostratified
on your intestines slide!
3.
4.
5.
You may be tested on this tissue at 100x or 400X.

In the videos, I told you to come up with a “descriptor term” for each slide. Take out a clean piece of paper and label it “Stratified squamous epithelium”. Make a drawing of the tissue, if you’d like. Under it, write down your Descriptor Term and the magnification you need to study. Many people like “books on a bookshelf”:
Under that, write down a representative location for this tissue. If your instructor mentioned any, make sure you write them down!
6.
Simple columnar
Books on a shelf