assembly instructions - national tree
TRANSCRIPT

Assembly Instructions
FOR INDOOR USE ONLY
IMPORTANT: It is recommended that you retain the carton for storage purposes. If you will dispose of the carton, please write the product information found on the carton in spaces at bottom of this page, for future reference.
CONTENTS Branch Shaping Instructions . . . . . . . . . . . . . . . . . . . . 2 Assembly Instructions . . . . . . . . . . . . . . . . . . . . . . . . . 3 Pre-Lit Tree Connections . . . . . . . . . . . . . . . . . . . . . . . 3 Dual Color® Lights Operation . . . . . . . . . . . . . . . . . . . . 4 Bulb Replacement . . . . . . . . . . . . . . . . . . . . . . . . . . . . 4 Fuse Replacement . . . . . . . . . . . . . . . . . . . . . . . . . . . 4 Storage . . . . . . . . . . . . . . . . . . . . . . . . . . . . . . . . . . . . . 4
Scan this with your smart phone to be directed to assembly videos.
A Tree Assembly and Shaping Video is available online. Please visit the Customer Service tab at www.nationaltree.com to view.
1
RETAIN FOR YOUR RECORDS:
Tree Item No.: UPC Code: 729083
Store Where Purchased: Purchase Date:
LIMITED WARRANTY FOR ARTIFICIAL CHRISTMAS TREES
PLEASE REGISTER YOUR PRODUCT New product registration can only be completed online
at nationaltree.com/customer-service.html.
Please read this warranty thoroughly and familiarize yourself with its restrictions and requirements. National Tree Company warrants its 6.5 ft. and taller trees against manufacturer-only defects for a period of five (5) years from the date of purchase indicated on your sales receipt. (White Trees, one year). Manufactured defective parts will be repaired or replaced. Trees that are pre-lit with incandescent lights, including those with PowerConnect™, are warranted for a period of two (2) years from date of purchase. Trees that are pre-lit with low voltage LED lights, including those with PowerConnect™, are warranted for a period of three (3) years from date of purchase (see below). This Warranty does not apply to trees that are used as display trees in the store. This warranty is only valid on purchases made from authorized NTC retailers. National Tree Company does not warranty tree stands that break due to stress from tipping or moving of fully assembled/ decorated tree. This tree is for indoor use only. Outdoor use of this tree voids the warranty.
PRE-LIT TREES LIMITED WARRANTY: National Tree Company warrants the incandescent light sets on its pre-lit trees against manufacturer-only defects in material or workmanship for a period of two (2) years from date of purchase: three (3) years for low voltage LED-lit trees. Culpability of Company is limited to replacement of defective light set only.
National Tree Company warrants the PowerConnect™ system against manufacturer-only defects in material or workmanship for a period of two (2) years for incandescent lights; three (3) years for low voltage LED lights. Please contact customer service for assistance. To have the Warranty placed into effect, completed online registration of product is required with inclusion of sales receipt noting purchase date and place. New product registration can only be completed online at www.nationaltree.com. Shipping Costs under PRE-LIT WARRANTY TERMS: Please note the following terms regarding shipping of product for warranty service: 1) National Tree Company will pay the cost of shipping (to our facility and back to customer), under warranty terms, during the first season of use. Receipt dated prior to December 25 of purchase year constitutes first season of use. Please note that it is the responsibility of the customer to obtain a box of the smallest possible size and shape to securely contain the part being shipped. 2) After the second season of use, the customer will be responsible for cost of delivery to our facility. National Tree Company will pay the return cost delivery of parts repaired due to manufacturing defect. Customer will be responsible for return shipping cost of any parts repaired due to misuse or neglect. 3) All shipping costs to and from our facility for warranty service after the third season of use will be the responsibility of the customer.
REQUIREMENTS FOR WARRANTY SERVICE: Customers are required to contact National Tree Company for AUTHORIZATION OF RETURN prior to shipping product for warranty service. To receive authorization of return, email us at: [email protected] or call 1-888-494-PART (7278). Information required will include: product item number, UPC bar code number, name of store where purchased, a detailed description of the problem, and your address and phone number. At the discretion of National Tree Company, you may either receive a replacement part or be instructed as to which part(s) to ship prepaid to National Tree for our inspection and determination and/or possible repair. Replacement or repair as prov ided by this limited warranty is our exclusive remedy to the consumer and does not place National Tree Company liable for any incidental or consequential damages.
IMPORTANT NOTES: Removing factory attached functioning or non-functioning light strings from any section of your pre-lit tree will void the warranty. Please retain the product carton for storage purposes and/or for use in the event of warranty service for product shipment. Keep product away from heat and moisture. This limited warranty does not cover damage resulting from accident, misuse, abuse, negligence, or normal wear. In these instances, parts can be purchased at a reasonable fee plus shipping charges.
IMPORTANT: SAVE YOUR SALES RECEIPT. It will be needed when requesting
warranty service.
WARNING: This product may contain materials that are harmful if ingested by children or pets. CHOKING HAZARD: Small pieces may fall from tree and could become choking hazards.
Adult supervision is advised.
SAVE THESE INSTRUCTIONS
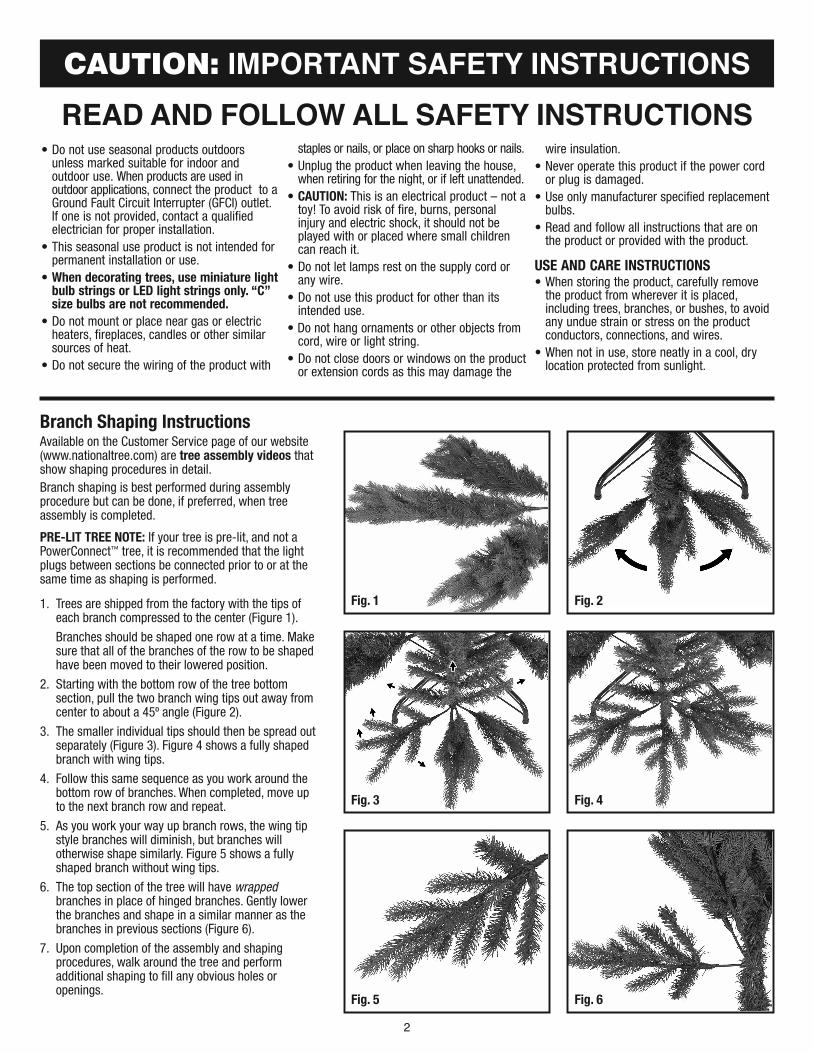
Fig. 1 Fig. 2
Fig. 3 Fig. 4
Fig. 5 Fig. 6
Branch Shaping Instructions Available on the Customer Service page of our website (www.nationaltree.com) are tree assembly videos that show shaping procedures in detail. Branch shaping is best performed during assembly procedure but can be done, if preferred, when tree assembly is completed.
PRE-LIT TREE NOTE: If your tree is pre-lit, and not a PowerConnect™ tree, it is recommended that the light plugs between sections be connected prior to or at the same time as shaping is performed.
1. Trees are shipped from the factory with the tips of each branch compressed to the center (Figure 1).
Branches should be shaped one row at a time. Make sure that all of the branches of the row to be shaped have been moved to their lowered position.
2. Starting with the bottom row of the tree bottom section, pull the two branch wing tips out away from center to about a 45º angle (Figure 2).
3. The smaller individual tips should then be spread out separately (Figure 3). Figure 4 shows a fully shaped branch with wing tips.
4. Follow this same sequence as you work around the bottom row of branches. When completed, move up to the next branch row and repeat.
5. As you work your way up branch rows, the wing tip style branches will diminish, but branches will otherwise shape similarly. Figure 5 shows a fully shaped branch without wing tips.
6. The top section of the tree will have wrapped branches in place of hinged branches. Gently lower the branches and shape in a similar manner as the branches in previous sections (Figure 6).
7. Upon completion of the assembly and shaping procedures, walk around the tree and perform additional shaping to fill any obvious holes or openings.
READ AND FOLLOW ALL SAFETY INSTRUCTIONS• Do not use seasonal products outdoors
unless marked suitable for indoor and outdoor use. When products are used in outdoor applications, connect the product to a Ground Fault Circuit Interrupter (GFCI) outlet. If one is not provided, contact a qualified electrician for proper installation.
• This seasonal use product is not intended for permanent installation or use.
• When decorating trees, use miniature light bulb strings or LED light strings only. “C” size bulbs are not recommended.
• Do not mount or place near gas or electric heaters, fireplaces, candles or other similar sources of heat.
• Do not secure the wiring of the product with
staples or nails, or place on sharp hooks or nails. • Unplug the product when leaving the house,
when retiring for the night, or if left unattended. • CAUTION: This is an electrical product – not a
toy! To avoid risk of fire, burns, personal injury and electric shock, it should not be played with or placed where small children can reach it.
• Do not let lamps rest on the supply cord or any wire.
• Do not use this product for other than its intended use.
• Do not hang ornaments or other objects from cord, wire or light string.
• Do not close doors or windows on the product or extension cords as this may damage the
wire insulation. • Never operate this product if the power cord
or plug is damaged. • Use only manufacturer specified replacement
bulbs. • Read and follow all instructions that are on
the product or provided with the product.
USE AND CARE INSTRUCTIONS • When storing the product, carefully remove
the product from wherever it is placed, including trees, branches, or bushes, to avoid any undue strain or stress on the product conductors, connections, and wires.
• When not in use, store neatly in a cool, dry location protected from sunlight.
CAUTION: IMPORTANT SAFETY INSTRUCTIONS
2
3
BOTT
OMM
IDDL
ETO
PBO
TTOM
MID
DLE
TOP
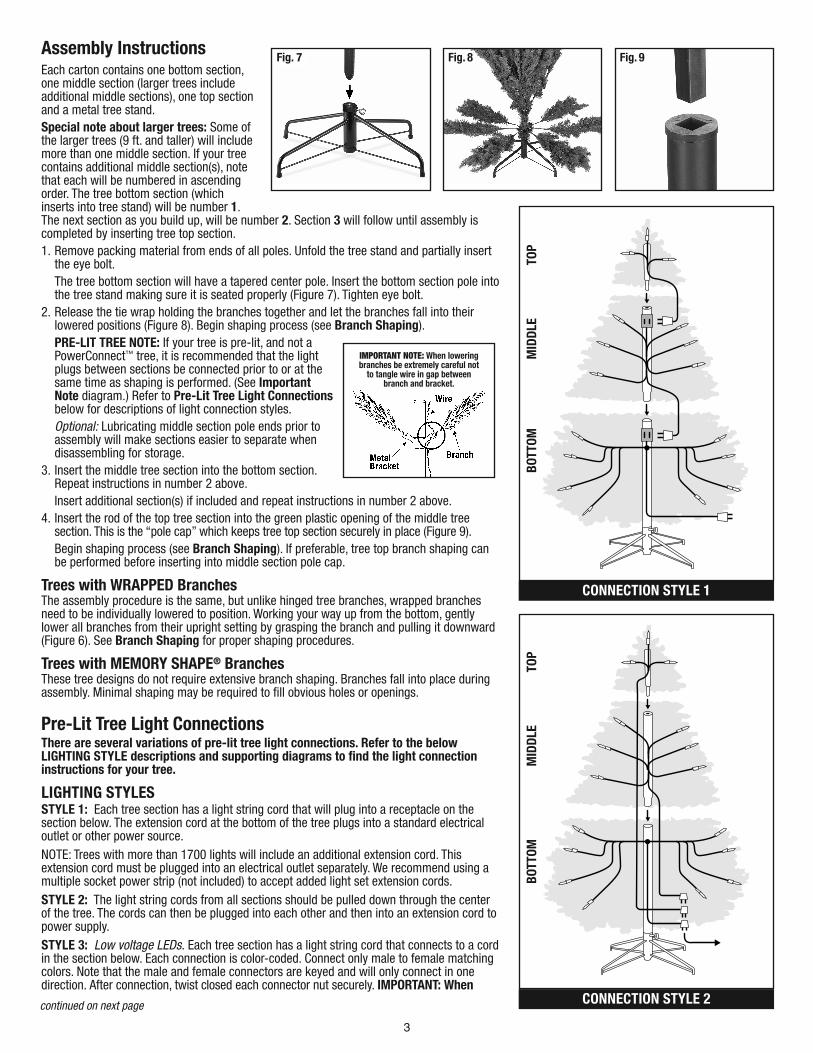
Each carton contains one bottom section, one middle section (larger trees include additional middle sections), one top section and a metal tree stand. Special note about larger trees: Some of the larger trees (9 ft. and taller) will include more than one middle section. If your tree contains additional middle section(s), note that each will be numbered in ascending order. The tree bottom section (which inserts into tree stand) will be number 1. The next section as you build up, will be number 2. Section 3 will follow until assembly is completed by inserting tree top section. 1. Remove packing material from ends of all poles. Unfold the tree stand and partially insert
the eye bolt. The tree bottom section will have a tapered center pole. Insert the bottom section pole into the tree stand making sure it is seated properly (Figure 7). Tighten eye bolt.
2. Release the tie wrap holding the branches together and let the branches fall into their lowered positions (Figure 8). Begin shaping process (see Branch Shaping). PRE-LIT TREE NOTE: If your tree is pre-lit, and not a PowerConnect™ tree, it is recommended that the light plugs between sections be connected prior to or at the same time as shaping is performed. (See Important Note diagram.) Refer to Pre-Lit Tree Light Connections below for descriptions of light connection styles. Optional: Lubricating middle section pole ends prior to assembly will make sections easier to separate when disassembling for storage.
3. Insert the middle tree section into the bottom section. Repeat instructions in number 2 above. Insert additional section(s) if included and repeat instructions in number 2 above.
4. Insert the rod of the top tree section into the green plastic opening of the middle tree section. This is the “pole cap” which keeps tree top section securely in place (Figure 9). Begin shaping process (see Branch Shaping). If preferable, tree top branch shaping can be performed before inserting into middle section pole cap.
Trees with WRAPPED Branches The assembly procedure is the same, but unlike hinged tree branches, wrapped branches need to be individually lowered to position. Working your way up from the bottom, gently lower all branches from their upright setting by grasping the branch and pulling it downward (Figure 6). See Branch Shaping for proper shaping procedures.
Trees with MEMORY SHAPE® Branches These tree designs do not require extensive branch shaping. Branches fall into place during assembly. Minimal shaping may be required to fill obvious holes or openings.
Pre-Lit Tree Light Connections There are several variations of pre-lit tree light connections. Refer to the below LIGHTING STYLE descriptions and supporting diagrams to find the light connection instructions for your tree.
LIGHTING STYLES STYLE 1: Each tree section has a light string cord that will plug into a receptacle on the section below. The extension cord at the bottom of the tree plugs into a standard electrical outlet or other power source. NOTE: Trees with more than 1700 lights will include an additional extension cord. This extension cord must be plugged into an electrical outlet separately. We recommend using a multiple socket power strip (not included) to accept added light set extension cords. STYLE 2: The light string cords from all sections should be pulled down through the center of the tree. The cords can then be plugged into each other and then into an extension cord to power supply. STYLE 3: Low voltage LEDs. Each tree section has a light string cord that connects to a cord in the section below. Each connection is color-coded. Connect only male to female matching colors. Note that the male and female connectors are keyed and will only connect in one direction. After connection, twist closed each connector nut securely. IMPORTANT: When
Assembly Instructions
IMPORTANT NOTE: When lowering branches be extremely careful not
to tangle wire in gap between branch and bracket.
Fig. 7 Fig. 9Fig. 8
CONNECTION STYLE 1
CONNECTION STYLE 2continued on next page

National Tree Company 2 Commerce Drive, Cranford, NJ 07016 USA www.nationaltree.com
Bulb Replacement Instructions 1. Unplug light string from power source. 2. Pull up on the Base Lock™ unlatching the bulb
from the bulb socket. Gently pull the bulb straight out (Figure 15).
3. Before inserting the new bulb into socket, make sure that the two wires on either side of the bulb base are straight up and flush with the base (diagram at right).
4. Carefully insert new bulb into socket and push down Base Lock until it snaps into place (Figure 16).
Fig. 15
Fig. 16
Fig. 17
Fuse Replacement Instructions 1. Unplug light string from power source. 2. Slide the fuse access cover away from cord side
(in direction of arrow, Figure 18) exposing fuses. 3. Remove fuses from compartment and examine.
Replace burnt out fuse with new one. 4. Close fuse compartment by sliding access cover
back in towards cord side of plug (Figure 19).
Fig. 18
Fig. 19
Storage Gently compress the tips back into the center of each tree branch. Raise all branches to original upright position taking care not to place undue pressure on the attached ends of the branches. Secure the section branches together with tie wrap (if included). When disassembling tree, a twisting motion will help to separate the sections from each other. All tree parts can be replaced in carton and should be stored in a cool, dry place.
Low Voltage LED Bulb Replacement Instructions (Figure 17) 1. Unplug light string from power source. 2. Pull up on the Base Lock™ unlatching the bulb from
the bulb socket. Gently pull the bulb straight out. 3. Carefully insert new bulb into socket (bulb is keyed
and only goes in one way) and push down Base Lock until it snaps into place.
The foot switch operates the functions of the lights. There are ten functions, each one is activated with the press of the foot switch. Functions occur in the following order: steady warm white; twinkle warm white; steady multicolor; twinkle multicolor; steady pastel; fading warm white to multicolor; random fading; fading warm white; fading multicolor; flashing warm white to multicolor. Light functions always follow this sequence. NOTE: Trees lit with Dual Color® Infinity LED Lights® have nine functions, twinkle function is removed.
DUAL COLOR® Lights Operation (if equipped)
BOTT
OMM
IDDL
ETO
P
CONNECTION STYLE 4
Note: Not all low voltage LED trees include foot switch
Low Voltage
LEDs
NOTE: Fuse failure is sometimes a reason for non-functioning light strings. The fuses are found in the light string plug. If one is burnt out, replace it with a spare fuse included in the accessories bag.
disassembling for storage, disconnect only color-coded connections. Leave all other wire connections intact. NOTE: The assembled transformer plug and foot pedal cord will be contained in a plastic bag and attached to a bottom branch of the lower tree section. STYLE 4: PowerConnect. These trees do not require the connection of light strings between sections. Electrical connections are made when each section is assembled. During tree assembly or disas-sembly, DO NOT DISCONNECT any of the factory connected light strings that are located on the center pole or within the tree. Low Voltage LEDs NOTE: The assembled transformer plug and foot pedal cord will be contained in a plastic bag and attached to a bottom branch of the lower tree section
BOTT
OMM
IDDL
ETO
P
Note: Not all low voltage LED trees include foot switch
CONNECTION STYLE 3
4

Instrucciones de Montaje
PARA USO EN INTERIORES SOLAMENTE
IMPORTANTE: Se recomienda conservar la caja para almacenar el producto. Si vas a desechar la caja, anota la información del producto que aparece en los espacios de la parte inferior de esta página para consultas en el futuro.
CONTENIDO Instrucciones para dar forma a las ramas . . . . . . . . . 2 Instrucciones de ensamblaje . . . . . . . . . . . . . . . . . . . 3 Conexiones del árbol pre-iluminado . . . . . . . . . . . . . 3 Funcionamiento de las luces Dual Color® . . . . . . . . . 4 Instrucciones para remplazo de lámparas . . . . . . . . 4 Instrucciones para remplazo de fusibles . . . . . . . . . 4 Almacenaje . . . . . . . . . . . . . . . . . . . . . . . . . . . . . . . . . 4
Escanear este código con su celular para dirigirse al video de instrucción.
El video de como ensamblar y dar forma al árbol esta disponible en internet. Visite nuestro servicio al cliente en: www.nationaltree.com.
5
GUARDE EN SUS ARCHIVOS:
Código Unviersal del Producto (UPC) 729083 No de Estilo del Árbol Fecha de compra
Tienda en la que se compró
GARANTÍA LIMITADA DE ÁRBOLES DE NAVIDAD ARTIFICIALES
REGISTRA TU PRODUCTO El registro del producto nuevo sólo puede hacerse en línea
en nationaltree.com/customer-service.html
Por favor lee con atención esta garantía para conocer en detalle sus restricciones y requisitos. National Tree Company ofrece garantía por sus árboles de 6.5 pies o mas altos contra defectos del fabricante solamente por un período de cinco (5) años partiendo de su fecha de compra indicada en su recibo (Árboles blancos, un año). Los defectos atribuidos al fabricante se repararán o reemplazarán. Los árboles preiluminados con luces incandescentes, incluidos los que tienen PowerConnect™, tienen una garantía de dos (2) años a partir de la fecha de compra. Los árboles preiluminados con luces LED, incluidos los que tienen PowerConnect™, tienen una garantía de tres (3) años a partir de la fecha de compra (ver más abajo). Esta garantía no es aplicable a árboles usados para exhibición en las tiendas. Esta garantía sólo es válida en compras realizadas en tiendas autorizadas NTC. National Tree Company no garantiza bases de árboles que se rompen debido a la tensión al volcar o mover el árbol completamente ensamblado / decorado. Este árbol es para uso en interiores solamente. El uso en exteriores de este árbol anula su garantía.
GARANTÍA LIMITADA DE ÁRBOLES PRE-ILUMINADOS National Tree Company cubre bajo garantia las luces incandescentes en sus árboles pre-iluminados contra defectos de materiales o mano de obra del fabricante por un período de dos (2) años a partir de la fecha de compra: tres (3) años para árboles iluminados con luces LED. La responsabilidad de la compañía se limita exclusivamente al reemplazo de las guías de luces.
National Tree Company cubre bajo garantia el sistema PowerConnect™ contra defectos solo de fabricante en material o mano de obra por un período de dos (2) años para luces incandescentes; tres (3) años para luces LED. Póngase en contacto con el servicio al cliente para obtener ayuda. Para hacer uso de la garantía se requiere el registro del producto en nuestro sitio web incluyendo su recibo de compra adjunto con su fecha de compra clara y nombre de la tienda. Los registros de nuevos productos pueden efectuarse únicamente en línea en www.nationaltree.com. Costos de envió bajo los términos de garantía PRE-INLUMINADOS: Por favor note las siguientes condiciones con respecto al envió de un producto por servicio de garantía: 1) National Tree Company pagará el costo del envío (hacia nuestras instalaciones y de vuelta al cliente), bajo condiciones de garantía, durante la primera temporada de uso. Recibo con fecha anterior al 25 de diciembre del año de compra constituye la primera temporada de uso. Por favor note que es responsabilidad del cliente obtener una caja de tamaño y forma lo más pequeña posible para asegurar bien la pieza a ser enviada. 2) Después de la segunda temporada de uso, el cliente asumirá el costo de envío hacia nuestras instalaciones. National Tree pagará el costo del envió de regreso de la pieza reparada por defectos del fabricante. El cliente asumirá el costo de envió de regreso de la pieza reparada por causa de mal uso o negligencia. 3) Todos los costos de envío hacia y desde nuestras instalaciones bajo servicio de garantía luego de la tercera temporada de uso correrán por cuenta del cliente.
REQUERIMEINTOS PARA EL SERVICIO DE GARANTÍA: Los clientes deberán contactar a National Tree Company para obtener AUTORIZACIÓN EN LA DEVOLUCIÓN del producto antes de enviar el mismo por servicio de garantía. Para obtener una autorización de devolución deberá enviar un correo electrónico a la dirección [email protected] o llamar al 1-888-494-PART (7278). La información requerida deberá incluir: número de artículo del producto, código de barra UPC, nombre de la tienda donde compro el producto, descripción detallada del problema, su dirección y número telefónico. A discreción de National Tree Company, podrá recibir una pieza de repuesto o instrucciones sobre qué pieza(s) deberá enviar a National Tree con su envió prepago para que podamos inspeccionarla(s), determinar el problema y/o posible reparación. Los reemplazos o reparaciones que ofrece esta garantía limitada son nuestros únicos recursos para el consumidor y no representan responsabilidad alguna por parte de National Tree Company con respecto daños incidentales o consecuentes.
NOTA IMPORTANTE: Remover guías de luces instaladas de fábrica que estén funcionando o que no funcionen de cualquier sección de su árbol pre-iluminado anulara su garantía. Por favor retenga la caja original del producto para su almacenamiento y/o para el uso de la misma para ser usada en el evento de tener que enviar su árbol por servicio de garantía. Mantenga el producto alejado del calor y la humedad. Esta garantía limitada no cubre daños causados por accidentes, el uso indebido, la negligencia o el desgaste normal. En dichos casos, pueden adquirirse piezas de repuesto a un costo razonable más cargos de envío.
CONSERVE ESTAS INSTRUCCIONES
IMPORTANTE: CONSERVE SU RECIBO DE
COMPRA. Lo necesitará cuando requiera asistencia de garantía.
ADVERTENCIA: Este producto puede contener materiales que son dañinos si son ingeridos por niños o mascotas. PELIGRO DE ASFIXIA: Pequeñas piezas pueden caer del árbol y pueden convertirse en un peligro de asfixia. Se recomienda supervisión de un adulto.

6
Fig. 1 Fig. 2
Fig. 3 Fig. 4
Fig. 5 Fig. 6
Instrucciones para dar forma a las ramas En la página de Servicio al Cliente de nuestro sitio web (www.nationaltree.com) hay disponibles tres videos de ensamblaje, que muestran detalladamente el procedimiento para dar forma a las ramas. Es mejor dar forma a las ramas durante el ensamblaje, pero si se prefiere puede hacerse también al concluir el ensamblaje.
NOTA SOBRE EL ÁRBOL PREILUMINADO: Si tu árbol está pre-iluminado y no es PowerConnect™, se recomienda conectar los enchufes de luces entre secciones antes de dar o mientras se da forma a las ramas.
1. Los árboles se envían de fábrica con la punta de cada rama comprimida hacia el centro (Figura 1). Se debe dar forma sólo a las ramas de una fila a la vez. Asegura que todas las ramas de una fila adquieran forma moviéndolas hacia abajo.
2. Comenzando por la fila más baja de la sección inferior del árbol, hay que tirar de las puntas en forma de ala de las ramas de los extremos para alejarlas del centro en ángulo de unos 45º (Figura 2).
3. Las puntas independientes más pequeñas deben extenderse por separado (Figura 3). La Figura 4 muestra una rama con puntas en forma de ala que ya tiene forma.
4. Sigue la misma secuencia mientras trabajas en la fila inferior de ramas. Cuando termines, continúa con la siguiente fila de ramas y repite el procedimiento.
5. A medida que asciendes disminuirá el número de ramas con puntas en forma de ala, pero las ramas tendrán forma similar. La Figura 5 muestra una rama sin puntas en forma de ala que ya tiene forma
6. La sección superior del árbol tiene ramas envueltas en lugar de abisagradas (fijas). Baja las ramas con cuidado para darles forma de manera similar a las ramas de las secciones anteriores (Figura 6).
7. Una vez terminado el ensamblaje y el proceso de dar forma a las ramas, camina alrededor del árbol y retoca para cubrir los espacios o aberturas evidentes.
LEA Y OBSERVE TODAS LAS INSTRUCCIONES DE SEGURIDAD• No use productos de temporada al aire libre a
menos que se indique que son aptos para usar en interiores y al aire libre. Cuando los productos se usan en aplicaciones al aire libre, conecte el producto a un interruptor de circuito de fallas con conexión a tierra (GFCI). Si no se ha proporcionado un GFCI, consulte a un electricista calificado para realizar una instalación correcta.
• Este producto de uso estacional no está previsto para instalación o uso permanente.
• Cuando decore su árbol, use set de luces con lámparas miniatura o lámparas LED solamente. Lámparas de tamaño “C” no son remendadas.
• No debe montarse ni colocarse cerca de estufas a gas o eléctricas, chimeneas, velas u otras fuentes similares de calor.
• No fije los cables del producto con grampas o
clavos, y no lo coloque sobre ganchos filosos o clavos.
• No permita que las lámparas se apoyen sobre el cordón eléctrico o sobre ningún cable.
• Desenchufe el producto al irse de la casa, al retirarse por la noche, o al dejarlo sin atender.
• ATENCIÓN: Éste es un producto eléctrico – ¡no es un juguete! Para evitar riesgos de incendio, quemaduras, lesiones personales y choque eléctrico, no se debe jugar con el producto ni dejarlo al alcance de niños pequeños.
• No use este producto para ningún fin que no sea el indicado.
• No cuelgue adornos u otros objetos del cable, cordón o cable de luces.
• No cierre las puertas o ventanas sobre el pro-ducto o sobre los cables de extensión, pues esto puede dañar el aislamiento de los cables.
• Nunca haga funcionar este producto si el cable eléctrico o el enchufe están dañados.
• Use solamente las bombillas de recambio especificadas por el fabricante.
• Lea y siga todas las instrucciones que están en el producto o que se entregan con éste.
INSTRUCCIONES DE USO Y CUIDADO • Cuando guarde el producto, quítelo
cuidadosamente del lugar donde estaba colocado, incluidos los árboles, ramas o arbustos, a fin de evitar todo esfuerzo indebido sobre los conductores, conexiones y alambres del producto.
• Cuando el producto esté fuera de uso, guárdelo cuidadosamente en un lugar fresco y seco, protegido contra la luz solar.
ATENCIÓN: INSTRUCCIONES DE SEGURIDAD IMPORTANTES

7
Cada caja contiene una sección inferior, una media (los árboles más grandes incluyen secciones medias adicionales), una superior y una base metálica para el árbol. Nota especial sobre los árboles más grandes: Algunos árboles más grandes, de 9 pies (2.7 m) o más altos, incluyen más de una sección media. Si tu árbol tiene más de una sección media, recuerda que cada una estará numerada en orden ascendente. La sección inferior del árbol (que se inserta en la base) será la número 1. La siguiente sección, a medida que se compone, será la número 2. La siguiente será la sección 3 y así hasta completar el ensamblaje insertando la sección superior del árbol. 1. Retira el material de empaque de los extremos de todos los postes. Despliega la base del árbol
e inserta parcialmente la armella. La sección inferior del árbol tendrá un poste central ahusado. Inserta el poste de la sección inferior dentro de la base para árbol asegurando que encaje bien (Figura 7). Aprieta la armella.
2. Suelta los amarres que mantienen las ramas unidas y deja que estas caigan hasta las posiciones más bajas (Figura 8). Comienza el proceso de dar forma (ver Cómo Dar Forma a las Ramas) NOTA SOBRE EL ÁRBOL PREILUMINADO: Si tu árbol está pre-iluminado y no es PowerConnect™, se recomienda conectar los enchufes de luces entre secciones antes de dar o mientras se da forma a las ramas. (Ver el diagrama Nota Importante). Consulta las Conexiones de Luz de Árbol Pre-iluminado que aparecen abajo para ver las descripciones de estilos correspondientes. Opcional: Lubricar los extremos del poste de la sección media antes del ensamblaje facilitará la separación de las secciones cuando se vaya a desmontar el árbol para guardarlo.
3. Inserta la sección media del árbol dentro de la sección inferior. Repite las instrucciones en el número 2 más arriba. Inserta cualquier sección adicional, si corresponde, y repite las instrucciones dadas en el número 2 más arriba.
4. Inserta la vara de la sección superior del árbol dentro de la abertura de plástico verde de la sección media. Esta es la “tapa de poste” que mantiene la sección superior del árbol asegurada en su lugar (Figura 9). Comienza el proceso de dar forma (ver Cómo Dar Forma a las Ramas) Si es preferible, puede darse forma a las ramas de la parte superior del árbol antes de insertarla en la tapa de poste de la sección media.
Árboles con ramas ENVUELTAS El proceso de ensamblaje es el mismo, pero a diferencia de las ramas abisagradas (fijas) las ramas envueltas deben bajarse una a una hasta su posición. Desde la sección inferior comienza con cuidado a doblar hacia abajo todas las ramas que están en posición vertical; agárralas y hala hacia abajo (Figura 6). Consulta Cómo Dar Forma a las Ramas para los procedimientos adecuados correspondientes.
Árboles con ramas MEMORY SHAPE® Estos diseños de árboles no requieren mucho trabajo para dar forma a las ramas. Las ramas caen en su lugar durante el ensamblaje. Puede que se necesite algo de trabajo para llenar los espacios y aberturas evidentes.
Conexiones de luces del árbol pre-iluminado Hay algunas variantes de conexiones de luces de árbol pre-iluminado. Consulta las descripciones de estilo de ILUMINACIÓN y los diagramas de ayuda para instrucciones sobre conexión de luces de tu árbol. ESTILOS DE ILUMINACIÓN ESTILO 1: Cada sección de árbol tiene una guirnalda de luces que puede enchufarse en un receptáculo de la sección inferior. La extensión eléctrica en la parte inferior del árbol puede enchufarse en un tomacorriente estándar o cualquier otra fuente de corriente eléctrica. NOTA: Los árboles con más de 1700 luces incluyen una extensión eléctrica adicional. Este cable de extensión debe enchufarse en un tomacorriente separado. Se recomienda utilizar receptores de enchufes múltiples (no incluidos) para conectar los cables de extensión que se agreguen. ESTILO 2: Los cables de las guirnaldas de luces de todas las secciones deben pasarse hacia abajo a través del centro del árbol. Enseguida pueden conectarse los cables entre sí y a continuación, a una extensión eléctrica enlazada a fuente de corriente. ESTILO 3: Luces LED de bajo voltaje. Cada sección del árbol tiene un cable que se conecta a un receptor en la sección inferior. Cada conexión está codificada por colores. Conecte solo los conectores masculinos a los receptores femeninos. Ten en cuenta que los conectores macho y hembra están enchavetadas y sólo se ajustarán en un sentido. Después de conectar, gira cada tuerca de conector
Instrucciones de ensamblaje
NOTA IMPORTANTE: Al bajar las ramas deberá tener mucho cuidado de no enganchar el cable en los espacios
entre las ramas y los soportes.
Fig. 7 Fig. 9Fig. 8
continúa en la siguiente página
PART
E IN
FERI
ORPA
RTE
MED
IAPA
RTE
SUPE
RIOR
PART
E IN
FERI
ORPA
RTE
MED
IAPA
RTE
SUPE
RIOR
ESTILO 1
ESTILO 2

PRINTED IN CHINA US VER. 2-20National Tree Company 2 Commerce Drive, Cranford, NJ 07016 USA www.nationaltree.com
Instrucciones Para Remplazo de Lámparas 1. Desenchufe el cordón eléctrico de la fuente de energía. 2. Jale de la traba de bombillas (si se incluye) para soltar la
bombilla del casquillo. Levante delicada-mente la bombilla hacia arriba (Figura 15).
3. Antes de insertar la nueva bombilla en el casquillao, asegúrese de que los dos cables a los lados de la base de la bombilla estén levan-tados y al ras con la base (diagrama de la derecha).
4. Inserte cuidadosamente una bombilla nueva en el casquillo y oprima la traba de bombillas (si se incluye) hasta que encaje en su lugar haciendo un chasquido (Figura 16).
Fig. 15
Fig. 16
Fig. 17
Instrucciones Para Remplazo de Fusibles 1. Desenchufe el cable de las luces. 2. Deslice la cubierta de acceso a los fusibles para apartarla
del lado del cable eléctrico (en la dirección de la flecha, Figura 18) y poder ver los fusibles.
3. Retire los fusibles del compartimiento y examínelos. Reemplace todo fusible quemado con uno nuevo.
4. Para cerrar el compartimiento de fusibles, deslice la cubierta de acceso hacia el lado del enchufe del cable eléctrico (Figura 19).
Fig. 18
Fig. 19
Almacenaje Presiona ligeramente las puntas hacia el centro de cada rama del árbol. Dobla hacia arriba todas las ramas de cada sección para colocarlas en su posición vertical original sin ejercer mucha presión sobre los extremos fijos de ellas. Asegura las ramas de cada sección juntándolas con amarres (si se incluyen). Al desmontar el árbol, un movimiento giratorio ayudará a separar las secciones unidas. Las tres partes pueden volver a colocarse en su caja y guardarse en un lugar fresco y seco.
Instrucciones Para Remplazo de Lámparas (LED de bajo voltaje) Figura 17 1. Desconecte el cable principal de cualquier fuente de energía. 2. Levante hacia arriba la pestaña de bloqueo liberando así la
lámpara del conector. Remueva la lámpara gentilmente directo hacia afuera.
3. Inserte una nueva lámpara cuidadosamente dentro del conector (la lámpara está diseñada para conectar en un único sentido) y presione la pestaña de bloqueo nuevamente en su lugar de origen.
El interruptor de pie controla las funciones de las luces. Hay 10 funciones. Cada una se activa pisando dicho interruptor. El orden de las funciones es: Luces estáticas blancas cálido; parpadeo blanco calido; luces estáticas multicolor; parpadeo multicolor; luces estáticas pastels; luces desvanecedoras de blanco cálido a multicolor; luces desvanecedoras aleatorias; luces desvanecedoras blanco cálido; luces desvanecedoras multicolores; centelleante de blanco cálido a multicolor. Las funciones de las luces siempre siguen la secuencia. NOTA: Los árboles iluminados con Dual Color® Infinity LED Lights® tienen nueve funciones, no incluye la función de destellos.
Operación de Luces DUAL COLOR® (si está equipado)
PART
E IN
FERI
ORPA
RTE
MED
IAPA
RTE
SUPE
RIOR
ESTILO 4
No todos los árboles de bajo voltaje incluyen interruptor de pie
Luces LED de bajo voltaje
NOTA: Problemas en los fusibles es usualmente la razón del mal funcionamiento de las luces. Los fusibles son encuentra en el enchufe de las luces. Si uno quemado, reemplácelo con el fusible extra en la bolsa de accesorios.
PART
E IN
FERI
ORPA
RTE
MED
IAPA
RTE
SUPE
RIOR
No todos los árboles de bajo voltaje incluyen interruptor de pie
ESTILO 3
8
para asegurar. IMPORTANTE: Al desarmar el árbol para guardarlo, desconecte solo las conexiones codificadas por colores. Deje todas las demás conexiones de cables intactas. NOTA: El transformador verde y el cable del pedal se encuentran conectados dentro de una bolsa de plástico en una rama de la sección inferior del árbol. ESTILO 4: PowerConnect. Estos árboles no requieren conexión de guirnaldas de luces entre secciones. Las conexiones eléctricas se hacen cuando cada sección está ensamblada. Al ensamblar o desmontar el árbol, NO desconectes ninguna de las guirnaldas de luces conectadas de fábrica en el poste central o dentro del árbol. Luces LED de bajo voltaje NOTA: El transformador verde y el cable del pedal se encuentran conectados dentro de una bolsa de plástico en una rama de la sección inferior del árbol.