atd-5203 30 gallon pressurized oil drain … 30 gallon pressurized oil drain tank assembly &...
TRANSCRIPT
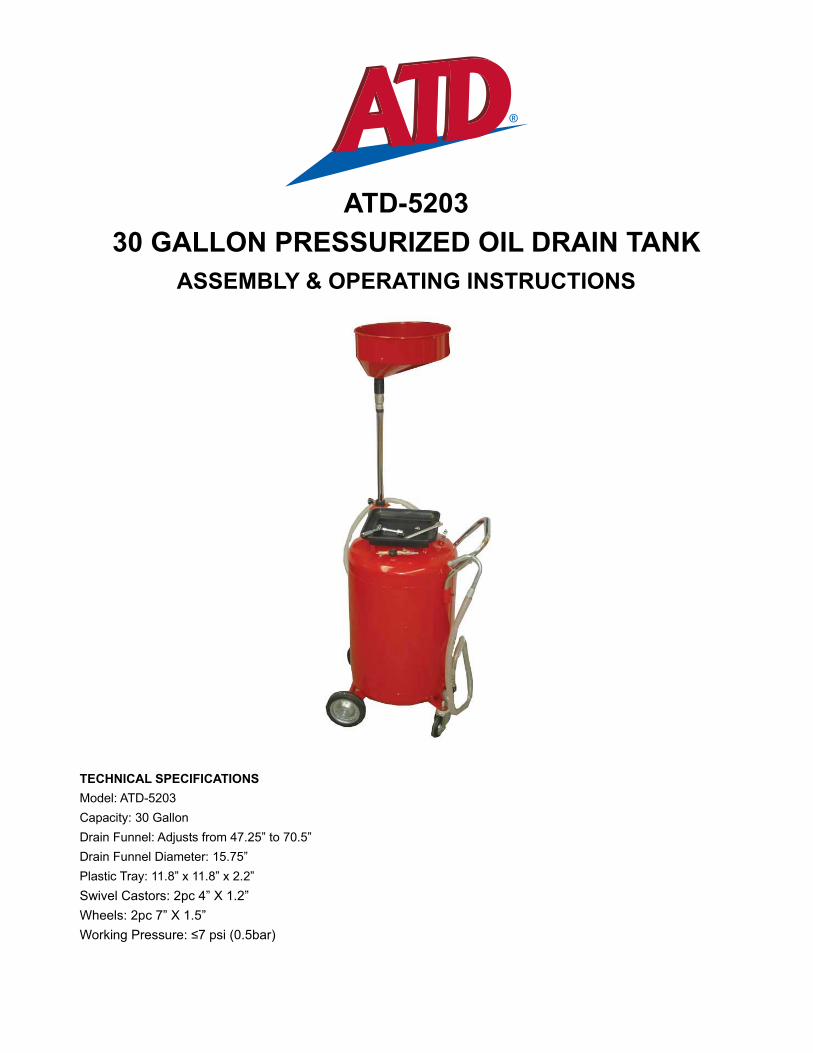
ATD-520330 GALLON PRESSURIZED OIL DRAIN TANK
ASSEMBLY & OPERATING INSTRUCTIONS
TECHNICAL SPECIFICATIONS Model: ATD-5203 Capacity: 30 Gallon Drain Funnel: Adjusts from 47.25” to 70.5” Drain Funnel Diameter: 15.75” Plastic Tray: 11.8” x 11.8” x 2.2” Swivel Castors: 2pc 4” X 1.2” Wheels: 2pc 7” X 1.5” Working Pressure: ≤7 psi (0.5bar)
IMPORTANT READ ALL INSTRUCTIONS BEFORE USING THIS PRODUCT.READ AND UNDERSTAND ALL SAFETY WARNINGS AND PRECAUTIONS CONTAINED IN THIS MANUAL. KEEP THIS INSTRUCTION FOR FUTURE REFERENCE.
Warning: When using product, basic safety precautions should always be followed to reduce the risk of personal injury and damage to equipment. Warning: The warnings cautions, and instructions discussed in this instruction manual cannot cover all possible conditions and situations that may occur. It must be understood by the operator that common sense and caution are factor which cannot be built into this product, but must be supplied by the operator.
INSPECTION Check for worn parts, air leaks, and damaged, loose or missing parts before operating. Check tank operation by connecting air to air nipple and closing ball valve. Verify that there is sufficient air flow coming from nozzle/hose assembly. An annual tank/component inspection is recommended.
READ ALL INSTRUCTIONS BEFORE USING THIS PRODUCT 1. Keep Work area clean. Cluttered areas invite injuries. 2. Observe work area conditions. Keep area well lighted. 3. Store idle equipment. When not in use, the product must be stored in a safe and clean location. Always lock
up products and keep out of reach of children. 4. Use the right product for the job. There are certain applications for which the product was designed. DO
NOT modify the product and DO NOT use the product for a purpose for which it was not intended. 5. Check for damaged parts. Before using any product, any part that appears damaged should be carefully
checked to determine that it will operate properly and perform its intended function. Check for any broken or damaged parts and any other conditions that may affect its operation. Replace or repair damaged or worn parts immediately.
6. Replacement parts and accessories. When servicing, use only identical replacement parts. Use of any other parts will void the warranty.
7. DO NOT operate product if under the influence of alcohol or drugs. 8. DO NOT exceed the product’s working pressure of 7 psi (0.5bar) 9. Only use on a flat surface capable of supporting the product and its maximum load. 10. Dress safely. Non-skid footwear or safety boots should be used when working with the product. DO NOT
wear loose clothing or jewelry as they can become caught in moving parts. Wear a protective hair covering to prevent long hair from becoming caught in moving parts.
11. DO NOT allow children in the work area. 12. Always check hardware and assembled parts after assembling. All connections should be checked and
hardware tightened. 13. DO NOT overreach. Keep proper footing and balance at all times to prevent tripping, falling and injury. 14. Always secure the wheels and casters in place while operating the product. 15. Know and obey city and state laws for proper disposal of oil. Dispose of oil properly in accordance with
all local laws and regulations.
SPECIFIC PRODUCT WARNING AND PRECAUTIONS Note: This Product is to be used only for transporting oil. DO NOT use to transport any other liquid. 1. Always disconnect equipment from its air supply source and release all compressed air from the
system before performing any service or maintenance. 2. Never leave this product unattended while operating or evacuating oil. 3. Never use this equipment near open flame or heat sources. 4. Always raise Drain Bowl and close ball valve (8#) before evacuating oil. Never attempt to pressurize the
tank with the ball valve open. 5. If the bleeder valve ever relieves any air pressure from the tank, remove the unit from service immediately
and contact a qualified service technician. 6. If used oil does not evacuate from tank upon pressurization, check that ball valves are fully in the correct
positions. If this does not correct the problem, removed the unit from service and contact a qualified service technician.
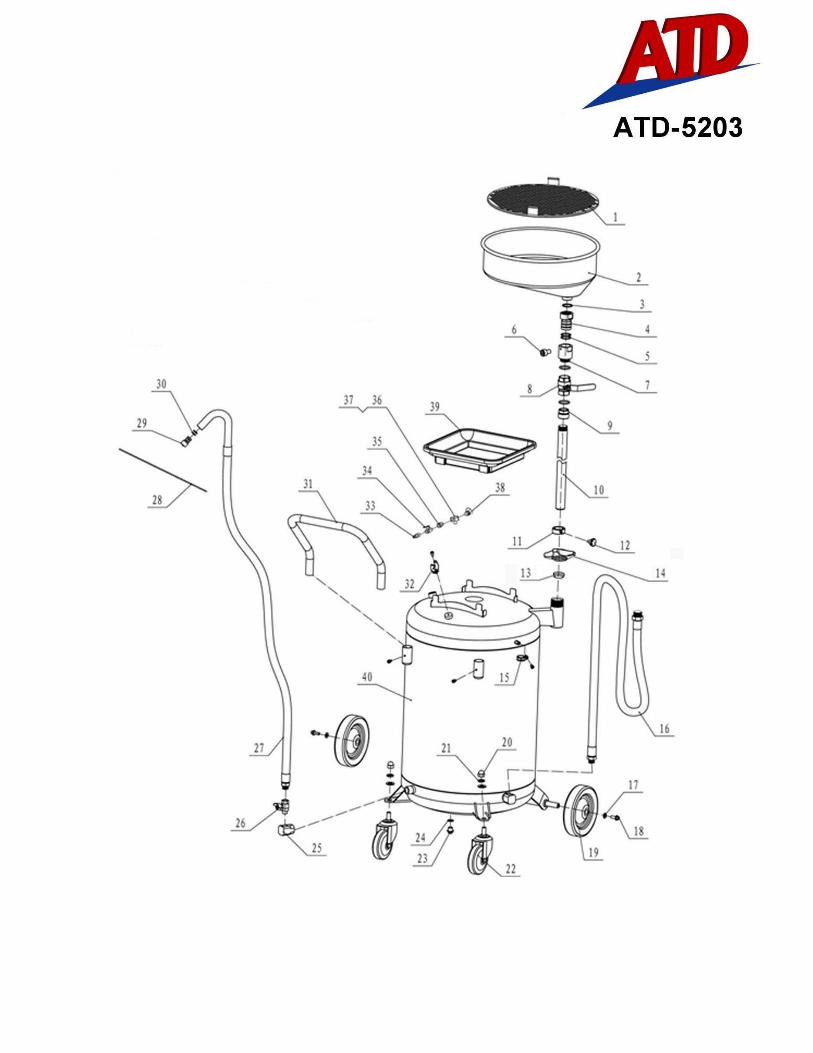
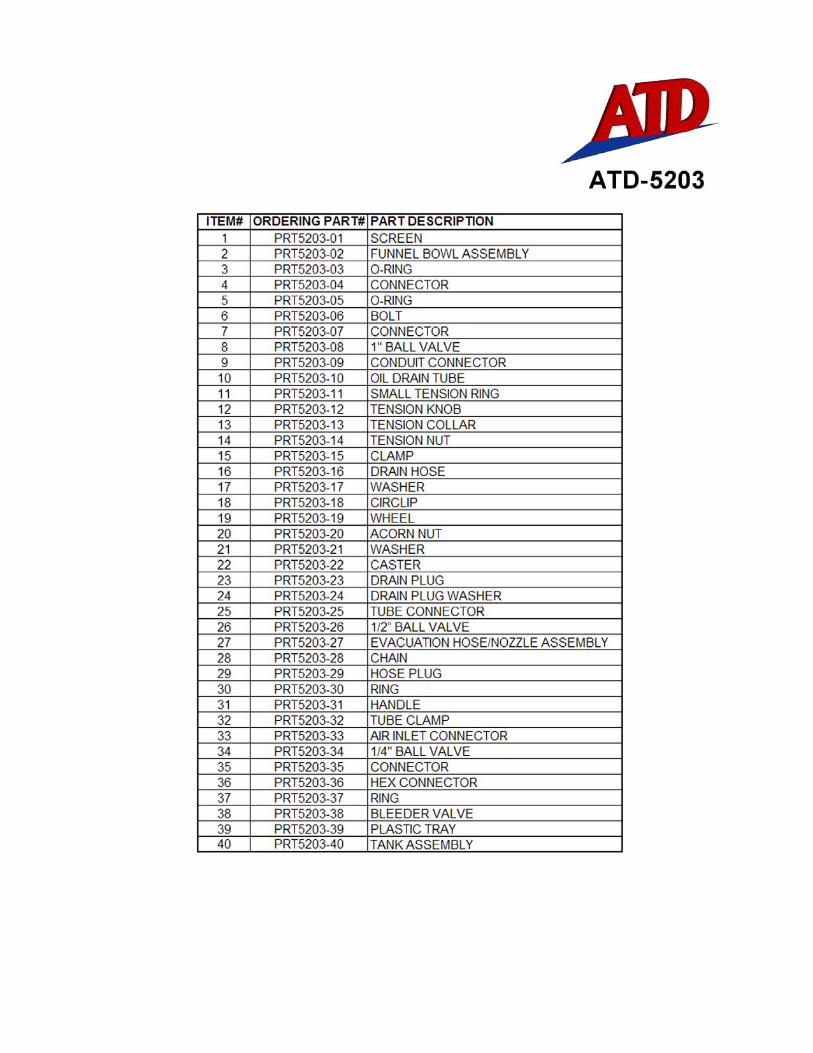
ASSEMBLY This unit requires some assembly before use. It is important that you read the entire manual to become familiar with the product BEFORE you assemble and use the product. Before operating the tool, be sure that you have all parts described in parts list in and assembly diagram located on the last pages of this manual. 1. Slide two wheels (#19) onto each end of the axle located at the base of the Tank (#40), secure with washer
and circlip (#17 & #18). 2. Insert the bolts on top of the casters (#22) into the flange plates. Slide flat washer (#21) and thread nut (#20)
onto bolt. Tighten securely. 3. Insert handle (#31) into the two slots on the side of the oil tank (#40). Tighten down handle screws. 4. Attach the valve assembly (#6, #7 & #8) to the oil pipe (#10). 5. Attach the funnel assembly (#1, #2, #3, #4 & #5) to valve assembly. 6. Slide drain tube (#10) up through the tube holder, slide the tension collar (#13) onto the tube and seat it down
inside of the tube holder. Slide the tension nut (#14) over the tube and thread it onto the tube holder. Tightening this nut should increase tension on the tube, holding it in place. Slide the second tension collar and nut (#11 & #12) onto the tube over the first tension nut assembly. When tightened, this will provide a stop, in case the oil pan should slide downwards. Tighten snugly, but do not over tighten as these tension collars are both used for adjusting the height of the oil drain pan. Now, attach the funnel and valve assembly (#1, #2, #3, #4 & #5) to the top of the drain tube.
7. Snap plastic tray (#39) onto the tabs provided on top of the oil tank. 8. Check all connections to hoses and valves to ensure that there will be no leaks. 9. Check to make sure all hardware is secured tightly. Also check to make sure the wheels rolls properly before
using your oil drain tank.
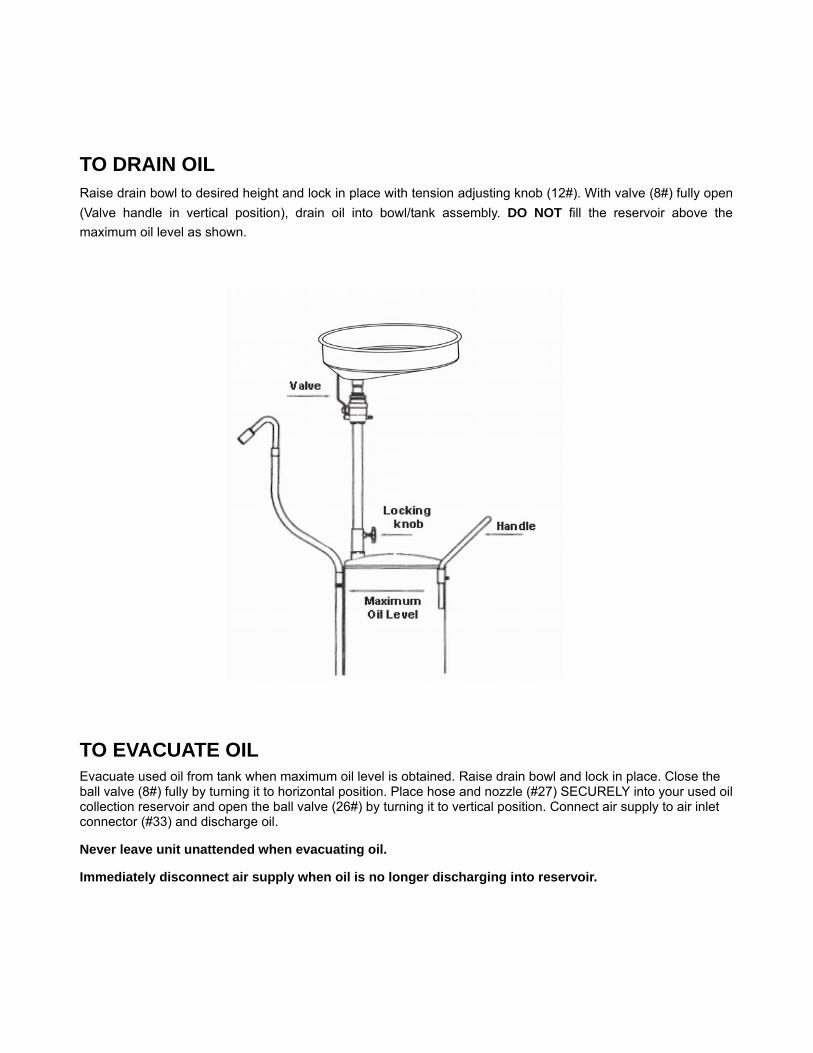
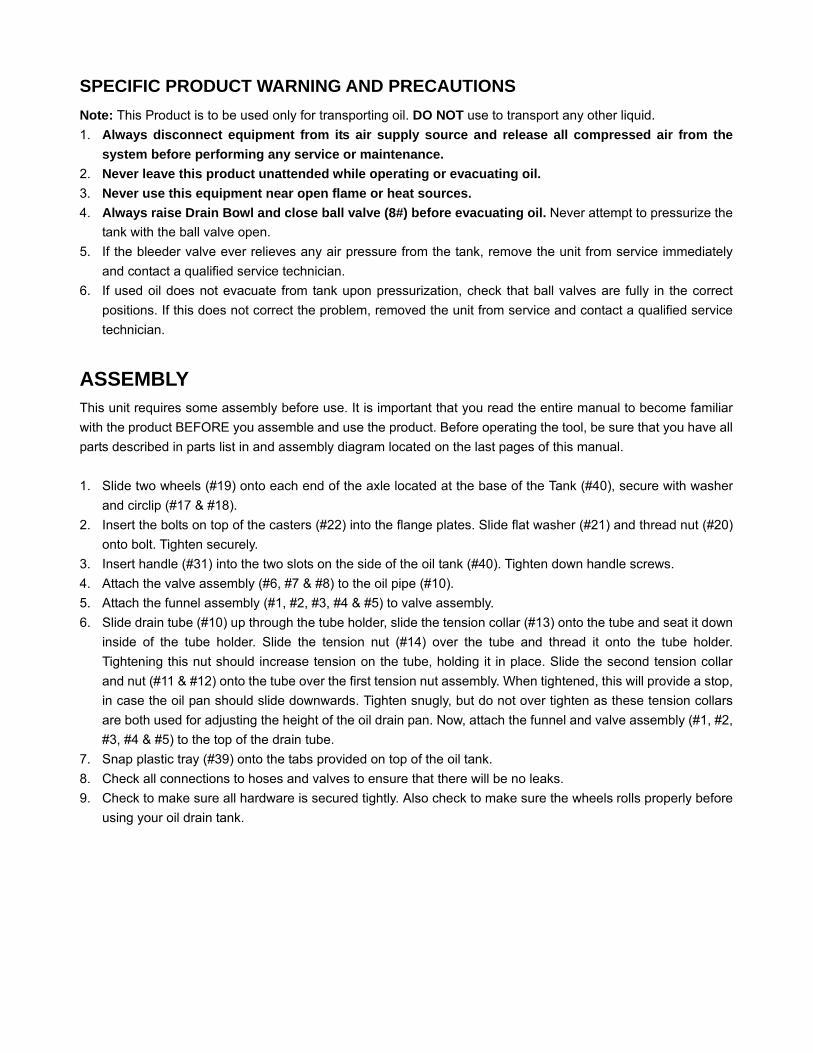
TO DRAIN OIL Raise drain bowl to desired height and lock in place with tension adjusting knob (12#). With valve (8#) fully open (Valve handle in vertical position), drain oil into bowl/tank assembly. DO NOT fill the reservoir above the maximum oil level as shown.
TO EVACUATE OIL Evacuate used oil from tank when maximum oil level is obtained. Raise drain bowl and lock in place. Close the ball valve (8#) fully by turning it to horizontal position. Place hose and nozzle (#27) SECURELY into your used oil collection reservoir and open the ball valve (26#) by turning it to vertical position. Connect air supply to air inlet connector (#33) and discharge oil.
Never leave unit unattended when evacuating oil.
Immediately disconnect air supply when oil is no longer discharging into reservoir.

TO TRANSPORT TANK With ball valve (#8) fully open (valve handle in vertical position), lower drain bowl to desired height.
Always use the tank handle to transport the tank assembly. Always grasp the handle with two hands while moving the load. Do not pull unit by the funnel, tube or hoses.
CLEANING AND MAINTENANCE 1. Before each use, examine the general condition of the entire oil drain system. Inspect air hoses for damage.
Check for loose screws, misalignment, binding of moving parts, improper mounting, broken parts and any other condition that may affect its safe operation. If abnormal noise or vibration occurs, turn off the air compressor immediately and have the problem corrected before further use. Refer to “Warnings and precautions sections. DO NOT use a damaged product.
2. CAUTION: Always disconnect this product from its air supply, and release all compressed air from the system before performing any cleaning, servicing maintenance.
3. Keep the outside of the equipment free of oil grease. Use only a mild soap and damp cloth when cleaning. DO NOT use a flammable or combustible solvent.
4. Before and during each use, inspect the oil indicator level. DO NOT fill tank above maximum oil level. PLEASE READ THE FOLLOWING CAREFULLY THE MANUFACTURER AND/OR DISTRIBUTOR HAS PROVIDED THE PARTS DIAGRAM IN THIS MANUAL AS A REFERENCE TOOL ONLY. NEITHER THE MANUFACTURER NOR DISTRIBUTOR MAKES ANY REPRESENTATION OR WARRANTY OF ANY KIND TO THE BUYER THAT HE OR SHE IS QUALIFIED TO MAKE ANY REPAIRS TO THE PRODUCT OR THAT HE OR SHE IS QUALIFIED TO REPLACE ANY PARTS OF THE PRODUCT. IN FACT, THE MANUFACTURER AND/OR DISTRIBUTOR EXPRESSLY STATES THAT ALL REPAIRS AND PARTS REPLACEMENTS SHOULD BE UNDERTAKEN BY A CERTIFIED AND LICENSED TECHNICIAN AND NOT BY THE BUYER. THE BUYER ASSUMES ALL RISK AND LIABILITY ARISING OUT OF HIS OR HER REPAIRS TO THE ORIGINAL PRODUCT OR REPLACEMENT PARTS THERETO, OR ARISING OUT OF HIS OR HER INSTALLATION OF REPLACEMENT PARTS THERETO.