badminton coach educationcoaches’ manual
TRANSCRIPT

BADMINTON COACH EDUCATION
COACHES’ MANUAL
LEVEL 1


BWF BADMINTON COACH EDUCATION COACHES’ MANUAL LEVEL 1 Published by: BADMINTON WORLD FEDERATION Unit 1, Level 29 Naza Tower, Platinum Park 10 Persiaran KLCC 50088 Kuala Lumpur Tel +603 2631 9188 Fax +603 2631 9688 Email: [email protected] Website: bwfcorporate.com © Badminton World Federation First edition published November 2011 Second edition published September 2017
ISBN National Centre – National Library of Malaysia
ISBN 978-967-15281-7-4
All rights reserved. No part of this publication may be reproduced, distributed, or transmitted without the prior written permission of the BWF. Printed by Fussian Advertising & Printing Sdn. Bhd. Kuala Lumpur

ACKNOWLEDGEMENTS The BWF would like to acknowledge and thank the following individuals and organisations who have made a significant contribution to the development of this resource and the other components of the BWF Level 1 Coach Education Course. MATERIALS WRITERS
• Mike Woodward • Lyndon Williams (Module 13: Coaching Players with Disabilities)
EDITORS
• Ian Wright & Sharon Springer CONTINENTAL CONFEDERATIONS
• Badminton Africa www.bcabadminton.org • Badminton Asia www.badmintonasia.org • Badminton Europe www.badmintoneurope.com • Badminton Pan Am www.badmintonpanam.org • Badminton Oceania www.oceaniabadminton.org
COVER PHOTO CREDIT: BWF/BADMINTONPHOTO
MORE INFORMATION The resources for BWF Coach Level 1 are available in different languages. The material can be downloaded from the BWF Education website: bwfeducation.com BADMINTON WORLD FEDERATION Unit 1, Level 29 Naza Tower, Platinum Park 10 Persiaran KLCC 50088 Kuala Lumpur Tel +603 2631 9188 Fax +603 2631 9688 [email protected] Website: bwfcorporate.com

TABLE OF CONTENT MODULE 1 OVERVIEW 01. BWF Coaching Framework 1
02. Course Content 2
03. Video Clips 3
04. Badminton Basics 4
05. Aim of the Game 5
06. Rules of the Game 5
07. Why Badminton Appeals 5
08. Elite Level Badminton 6
09. Olympic & Paralympic Games 6
10. The Origins of Badminton 7
11. Regulating Badminton Worldwide 7
12. BWF Vision, Mission, Goals 8
MODULE 2 COACHING PRINCIPLES 01. Introduction 9
02. Positive Benefits of Badminton Participation 9
03. Supporting Positive Experiences 9
04. Role of the Coach 10
05. Responsibilities of Coaches 10
06. Importance of a Coaching Philosophy 11
07. Establishing your Coaching Philosophy 12
08. Coaching Styles 12
09. Summary 13
10. Self-Assessment Questions 14
MODULE 3 COACHING PROCESS 01. Introduction - Coaching Process 15
02. Step 1 - Planning 16
a. Why Plan? “Failing to plan is planning to fail” 16
b. Risk Assessment 17

c. Collecting Player Information 18
d. Register 19
e. Observe and Analyse 20
f. Goal Setting 21
g. Session Planning 23
03. Step 2 - Delivery 24
a. Effective Badminton Sessions 24
b. Learning Styles 25
c. Face to face Communication 26
d. Questioning 27
e. Feedback 28
f. Demonstration 29
g. Methods of Developing Skills 30
h. Stages of Motor Learning 31
i. Managing Practice 32
j. Group Management 33
k. Designing progressive practices 33
l. Feeding Skills 35
m. Holding the Shuttle 36
n. Hand feeding 36
o. Underarm Hand Feed 37
p. “Flat” fast feed 37
q. Overarm Hand Feed 38
r. Racket Feeding – Multi-feed 38
s. Racket Feeding –Rallying 38
04. Step 3 - Reviewing and Step 4 - Evaluating your Coaching 39
05. Summary and Self-Evaluation: The Coaching Process 41
06. Self-Assessment Questions 42
MODULE 4 COACHING CHILDREN 01. Introduction 44
02. Children Mature at Different Rates 44
03. Importance of the ‘Growth Spurt’ 45
04. Adapting the Sport 45
05. Summary 46
06. Self-Assessment Questions 46

MODULE 5 PERFORMANCE FACTORS 01. Performance in Badminton 47
02. The Importance of ‘Early’ to Badminton Performance 47
03. Factors Affecting Badminton Performance 48
04. Stages of Player Development 48
05. Self-Assessment Questions 50
MODULE 6 PERFORMANCE FACTOR 1 - TECHNICAL (MOVEMENT SKILLS) 01. Introduction 51
02. Components of Badminton Movements 51
03. Split-Step 53
04. Approach and Recovery 57
05. Movements and Associated Hitting 61
06. Movement Patterns 64
07. Summary 70
08. Self-Assessment – Movement Skills 71
MODULE 7 PERFORMANCE FACTOR 2 - TECHNICAL (HITTING SKILLS) 01. Introduction 73
02. Introduction of Hitting Techniques – Children / Beginners 74
03. Biomechanical Principles 74
04. Catching and Throwing 75
05. Games for Throwing and Catching 76
06. Developing Striking Skills 77
07. Hitting with the Hand 77
08. Hitting with a Very Short Grip 78
09. Hitting with a Long Grip 78
10. Basic Strokes 84
11. Introduction to Serving 85
a. Backhand Flick Serve 86
b. Backhand Low Serve 88
c. Forehand Flick Serve 90
d. Forehand Low Serve 92

e. Forehand High Serve 94
12. Introduction to Forecourt Strokes 96
a. Backhand Net Shot 97
b. Forehand Net Shot 99
c. Backhand Net Lift 101
d. Forehand Net Lift 103
e. Backhand Net Kill 105
f. Forehand Net Kill 107
13. Introduction to Midcourt Strokes 109
a. Block Off the Body 110
b. Backhand Drive 112
c. Forehand Drive 114
14. Introduction to Rearcourt Strokes 116
a. Forehand Clear 117
b. Forehand Smash 119
c. Forehand Dropshot 121
d. Pulled Forehand Dropshot 123
e. Backhand Clear 125
f. Backhand Pulled Dropshot 127
15. Summary – Performance factor 1: Technical (Hitting Skills) 129
16. Self-Assessment – Hitting Skills 130
MODULE 8 PERFORMANCE FACTOR 3 - TACTICAL 01. Badminton Defined 132
02. Badminton “Situations” 132
03. Importance of ‘Early’ to Badminton Performance 132
04. Tactics Defined 133
05. Related Coaching Skills 134
06. Base Position 135
07. Singles Tactics 136
08. Doubles Tactics 148
09. Mixed Doubles Tactics 170
10. Self-Assessment Questions 180

MODULE 9 PERFORMANCE FACTOR 4 - PHYSICAL 01. Introduction 182
02. Physical Fitness 182
03. Motor Fitness Components 184
04. Warm-up 185
05. Pulse Raising Exercises 186
06. Mobility Exercises 187
07. Balance 189
08. Quickness/Speed 191
09. Knock-up 193
10. Cool-down 194
11. Summary 196
12. Self-Assessment Questions 197
MODULE 10 PERFORMANCE FACTOR 5 - SPORT PSYCHOLOGY 01. Introduction 199
02. Sports Psychology – Key Areas 200
03. Commitment 201
04. Confidence 202
05. Control 202
06. Concentration 202
07. Cohesion 203
08. Summary 203
09. Self-Assessment Questions 204

MODULE 11 PERFORMANCE FACTOR 6 - LIFESTYLE
01. Introduction 205
02. Lifestyle Factors Defined 205
03. Injury Prevention 206
04. Injury Management 207
05. R. I. C. E 207
06. Self-Assessment questions 208
MODULE 12 COMPETITION 01. Introduction 209
02. Knock-out Competitions 209
03. League Competitions 211
04. Ladder Systems 212
05. Pyramid Systems 213
06. Club Match-Play 214
MODULE 13 COACHING PLAYERS WITH DISABILITIES 01. Introduction to the Module 215
02. Introduction to Para-Badminton 216
03. Para-Badminton Coaching 217
04. Introduction to Badminton for Players with Intellectual Disabilities (ID) 235
05. Coaching Players with Intellectual Disabilities (ID) 236
06. Introduction to Badminton for the Deaf 236
07. Coaching Deaf Players 237
08. Conclusion: Good Coaching Practice 238
09. Summary 239
10. Self-Assessment Questions 240

BADMINTON COACH EDUCATION
COACHES’ MANUAL LEVEL 1
MODULE 1OVERVIEW

BADMINTON WORLD FEDERATION Unit 1, Level 29 Naza Tower, Platinum Park 10 Persiaran KLCC 50088 Kuala Lumpur Tel +603 2631 9188 Fax +603 2631 9688 [email protected]
MODULE 1 OVERVIEW 01. BWF Coaching Framework 1 02. Course Content 2 03. Video Clips 3 04. Badminton Basics 4 05. Aim of the Game 5 06. Rules of the Game 5 07. Why Badminton Appeals 5 08. Elite Level Badminton 6 09. Olympic Games Sport 6 10. The Origins of Badminton 7 11. Regulating Badminton Worldwide 7 12. BWF Vision, Mission, Goals 8

1
BAD
MIN
TON
CO
ACH
ED
UC
ATIO
N ►
C
OAC
HES
MAN
UAL
►
LE
VEL
1 M
OD
ULE
1 ►
O
VER
VIEW
01. BWF COACHING FRAMEWORKWelcome to the BWF Level 1 Coaches’ Manual, which is designed to support candidates studying for the BWF Level 1 Coach Award. This award sits within a framework that is outlined in the table below.
COURSE / AWARD
TARGET GROUP
FORMAT CONTENT OUTCOMES / ASSESSMENT
SCHOOLS BADMINTON TEACHING CERTIFICATE (SHUTTLE TIME)
Current or training teachers (physical education or classroom).
8-hour course:• One-day format, or • 8 one-hour modules,
or• blended learning
(online componentplus a four-hour face-to-face session)
Basic badminton skills and knowledge - technical, physical and tactical elements – and how to deliver safe and fun badminton sessions for children.
Ability to plan and deliver safe, structured and fun badminton activities and sessions.
Assessed by course tutors.
COACH LEVEL 1
Motivated candidates with basic badminton experience / knowledge; PE teachers with badminton teaching certificate.
• Four-day course, or• 2 x two-day course
with guided coaching practice in between, or
• blended learning(online prerequisiteplus two-day face-to-face session)
Can also be adapted to Olympic Solidarity Technical Course format.
Basic coaching principles.
How to coach - Level 1 – basic coaching methodology.
What to coach - Level 1 - technical, tactical, physical and psychological elements.
Planning and delivery of progressive coaching sessions (for badminton and/or para-badminton).
Demonstration of basic coaching competencies through effective planning, delivery, review and evaluation of linked coaching sessions.
Safe management of group activities.
Assessed by course tutor.
COACH LEVEL 2
Level 1 coaches or equivalent.
Players with national / international badminton experience (Fast-Track Course).
Minimum six days tutored activities, plus tasked and guided coaching practice and planning.
Can also be adapted to Olympic Solidarity Technical Course format.
Coaching principles.
How to coach - Level 2 coaching techniques.
What to coach - Level 2 - technical, tactical, physical and psychological elements with underpinning scientific principles and knowledge.
Planning and delivery of annual training and competition programmes for individual badminton players.
Ability to construct and deliver annual training and competition plans.
Design of individual training plans and programmes underpinned by sports science principles.
Effective management of groups of players up to elite performance level.
Assessed by course tutor.
COACH LEVEL 3
Level 2 coaches or equivalent with minimum of 3 years’ coaching experience.
Five days of highly interactive applied sessions, involving discussion, debate and reflection on practice.
Significant post-course follow-up work with tutor applied to coach’s professional context.
Player development pathways – what they are and why they are important.
Advanced planning and delivery for a specialized audience within the pathway, including:
• youth development• elite performance
Demonstration of how to work within and/or implement a player development pathway.
Effective management of player development for target group (youth development or elite athletes).
Assessed by a panel of relevant coaching experts.
COACH LEVEL 4
Highly experienced coaches with experience of managing programmes.
University-level study of approved specialist subject.
Long study of an agreed area of research to demonstrate competence.
Advanced-level long-term planning, delivery and management in chosen area of expertise.
Application of sports science research, innovation and best practice.
Demonstration of long-term developmental programmes and planning in specialist area, including research and innovative practice.
Long study of an agreed area of research to demonstrate competence.
Assessed by external panel of relevant coaches / sports scientists with badminton experience.
COACH EDUCATORS (TUTORS / TRAINERS)
Coaches with existing experience in coach development, or very experienced coaches with relevant competences.
Course length appropriate to the level of award.
Relevant to the level of award – such as:
• Shuttle Time Tutor• Shuttle Time Trainer• Level 1 Coach
Education Tutor• Level 2 Coach
Education Tutor
Ability to deliver to adult coaches and PE teachers, catering to various learning styles and incorporating various teaching / learning techniques.
Ability to provide timely and honest feedback and appropriate follow up.
High level of communication skills.
Assessed by external assessor.

2
BAD
MIN
TON
CO
ACH
ED
UC
ATIO
N ►
C
OAC
HES
MAN
UAL
►
LE
VEL
1 M
OD
ULE
1 ►
O
VER
VIEW
02. COURSE CONTENT The content is outlined in the table of contents for this Coaches’ Manual – however, the table below provides a brief summary of the content of module. MODULE TITLE BRIEF DESCRIPTION
MODULE 1 Overview Background to the coaching framework and badminton.
MODULE 2 Coaching Principles The role of the coach, coaching philosophy, coaching styles.
MODULE 3 Coaching Process Planning, delivery, review and evaluation of coaching sessions and sequences.
MODULE 4 Coaching Children Coaching children, maturation, and adapting the sport for children.
MODULE 5 Performance Factors Factors affecting performance in badminton.
MODULE 6 Performance Factor 1 - Technical - Movement Skills
Movement patterns and techniques in badminton. Video clips on Movement Skills.
MODULE 7 Performance Factor 2 - Technical - Hitting Skills
All the basic strokes in badminton - the techniques and the contexts of when these are most used. Video clips on serving, forecourt, midcourt and rearcourt strokes.
MODULE 8 Performance Factor 3 - Tactical Combining the technical elements of the game with tactical elements - the strategies to win. Video clips on single, doubles and mixed doubles tactics.
MODULE 9 Performance Factor 4 - Physical Physical demands of badminton and preparation for play. Video clips on components of fitness, warm up and cool down.
MODULE 10 Performance Factor 5 - Sports psychology
A brief overview of sport psychology and using psychology in preparation and competition.
MODULE 11 Performance Factor 6 - Lifestyle Lifestyle factors influencing performance on court.
MODULE 12 Competition The main kinds of competitions - knockout, leagues, ladder systems, pyramid systems and club match play.
MODULE 13 Coaching Players with Disabilities Adaptations in coaching to support players with disabilities, as well as an overview of the characteristics of each disability sport class. Video clips on various aspects of coaching wheelchair and standing players (movement, service, rotation, progressive practices).
Video material is available to support the content of Modules 6, 7, 8, 9 and 13. These video clips can be viewed on the BWF website at bwfeducation.com/video-clips/. The clips demonstrate the technical elements of badminton covered in Level 1 - Movement Skills, Hitting Skills, Tactical and Physical elements of badminton, as well as how these different skills can be implemented in para-badminton training.

3
BAD
MIN
TON
CO
ACH
ED
UC
ATIO
N ►
C
OAC
HES
MAN
UAL
►
LE
VEL
1 M
OD
ULE
1 ►
O
VER
VIEW
03. VIDEO CLIPS
The table below is a summary of the 55 video clips and the module and content area they link to. These clips can be viewed online at bwfeducation.com/video-clips/
MODULE / CONTENT VIDEO CLIP TITLE
MODULE 6 PERFORMANCE FACTOR 1 TECHNICAL - MOVEMENT SKILLS
• Introduction • Movement cycle - Start phase • Movement cycle - Approach phase • Movement cycle - Hitting phase • Movement cycle - Recovery phase • Movement patterns - Forehand forecourt • Movement patterns - Backhand forecourt • Movement patterns - Forehand rearcourt • Movement patterns - Backhand rearcourt
MODULE 7 PERFORMANCE FACTOR 2 TECHNICAL - HITTING SKILLS - STROKES
• Introduction • Biomechanics • Grips • Forehand low serve • Forehand flick serve • Forehand high serve • Backhand low serve • Backhand flick serve • Forehand net shot • Forehand net lift • Forehand net kill • Backhand net shot • Backhand net lift • Backhand net kill • Backhand block off body • Backhand drive • Forehand drive • Forehand clear • Forehand smash • Forehand dropshot • Forehand pulled dropshot • Backhand clear • Backhand pulled dropshot
MODULE 8 PERFORMANCE FACTOR 3 TACTICAL
• Tactics introduction • Singles introduction • Singles serve and return • Singles rallying • Doubles introduction • Women’s doubles serve and return • Women’s doubles rallying • Men’s doubles serve and return • Men’s doubles rallying • Mixed doubles introduction • Mixed doubles serve and return • Mixed doubles rallying
MODULE 9 PERFORMANCE FACTOR 4 PHYSICAL
• Components of fitness • Warm-up • Cool-down
MODULE 13 BADMINTON COACHING FOR PLAYERS WITH DISABILITIES
• Para-badminton match play • Standing movement exercises • Standing progressive practices • Wheelchair movement exercises • Wheelchair service • Wheelchair progressive practices • Wheelchair doubles rotation • Wheelchair physical exercises

4
BAD
MIN
TON
CO
ACH
ED
UC
ATIO
N ►
C
OAC
HES
MAN
UAL
►
LE
VEL
1 M
OD
ULE
1 ►
O
VER
VIEW
04. BADMINTON BASICS
Badminton is: • a net game. • played on a rectangular court. • a volleying game, with rallies beginning with an underarm serve. • a game that has five disciplines – singles (men / women), doubles (men / women and mixed). Singles badminton involves serving diagonally into a long, narrow service box. Rallying then continues on a long court with the border on the first side line.
The shuttle is served diagonally into the opponents ‘service box’.
The shaded part shows the area of play for singles. A shuttle that lands outside this area means a point is won / lost.
Doubles badminton involves serving diagonally into a shorter, wider service box than in singles badminton. After the serve, rallying takes place on the whole court area.
The shuttle is served diagonally into a shorter, wider service box in doubles.
After the serve, doubles rallies are played on the whole court area.
For players with a disability, court sizes are adapted according to the category of player under the para-badminton classification system. For more details of this, download the Laws of Badminton from the BWF website.
5
BAD
MIN
TON
CO
ACH
ED
UC
ATIO
N ►
C
OAC
HES
MAN
UAL
►
LE
VEL
1 M
OD
ULE
1 ►
O
VER
VIEW
05. AIM OF THE GAME The aim of the game is to score points by:
• landing the shuttlecock in your opponent’s court. • forcing your opponent to hit the shuttlecock out of the court area. • forcing your opponent to hit the shuttlecock into the net. • striking your opponent’s body with the shuttle.
06. RULES OF THE GAME The complete set of rules – Laws of Badminton and Regulations governing the sport, can be downloaded from the BWF website – bwfcorporate.com/regulations/
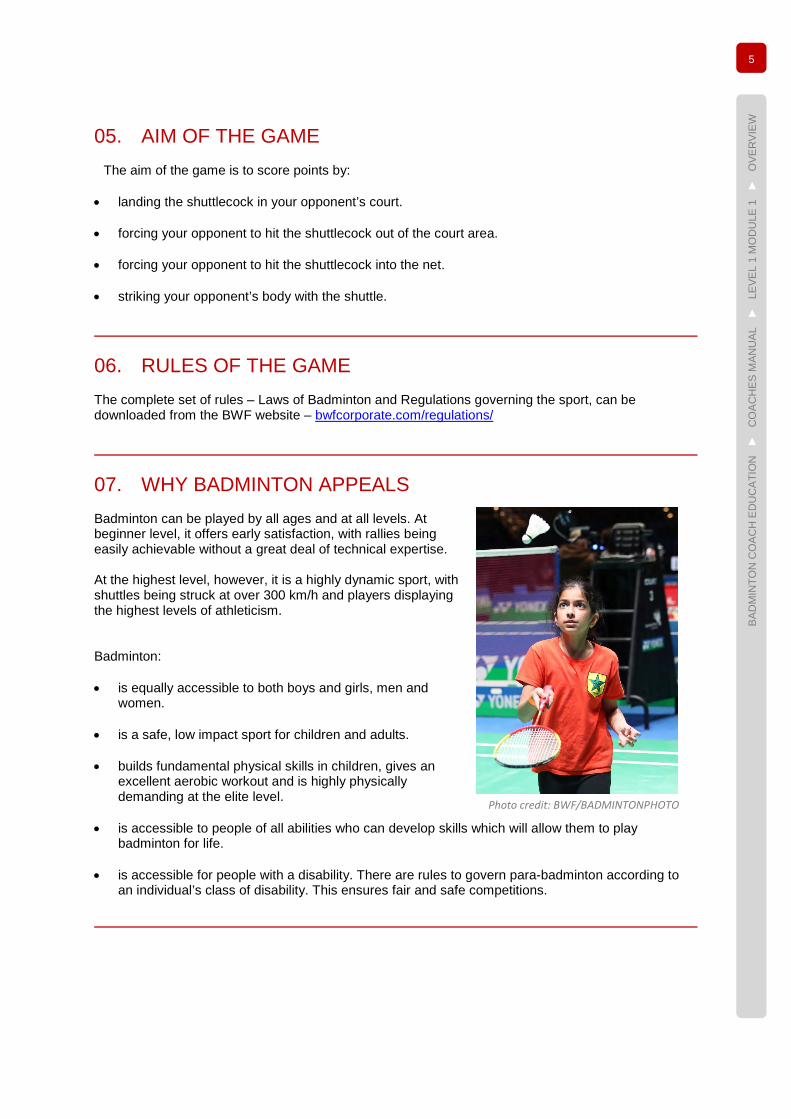
07. WHY BADMINTON APPEALS Badminton can be played by all ages and at all levels. At beginner level, it offers early satisfaction, with rallies being easily achievable without a great deal of technical expertise. At the highest level, however, it is a highly dynamic sport, with shuttles being struck at over 300 km/h and players displaying the highest levels of athleticism. Badminton: • is equally accessible to both boys and girls, men and
women. • is a safe, low impact sport for children and adults. • builds fundamental physical skills in children, gives an
excellent aerobic workout and is highly physically demanding at the elite level.
• is accessible to people of all abilities who can develop skills which will allow them to play
badminton for life. • is accessible for people with a disability. There are rules to govern para-badminton according to
an individual’s class of disability. This ensures fair and safe competitions.
Photo credit: BWF/BADMINTONPHOTO

6
BAD
MIN
TON
CO
ACH
ED
UC
ATIO
N ►
C
OAC
HES
MAN
UAL
►
LE
VEL
1 M
OD
ULE
1 ►
O
VER
VIEW
08. ELITE LEVEL BADMINTON At the highest levels of badminton, the sport requires extraordinary fitness, technical ability, perception and predictive skills, as well as extremely fast reaction times. Players at the top level require extraordinary physical ability including: • aerobic stamina • agility • strength • explosive power • speed At the top levels, badminton is a very technical sport, requiring high levels of motor coordination, sophisticated racquet movements and precision when under pressure. Badminton is also a game where tactics and deception are very important.
09. OLYMPIC & PARALYMPIC GAMES Since 1992, badminton has been a Summer Olympic Games sport. Altogether 15 medals are available in Olympic badminton – gold, silver and bronze for each of the five disciplines: • men's singles • women's singles • men's doubles • women's doubles • mixed doubles
Badminton players from each region (Asia, Africa, Europe, Oceania and Pan America) compete at the Olympic Games. Since 1992, players from China, Korea, Indonesia, Malaysia, Denmark, Great Britain, the Netherlands, Spain, India, Russia, and Japan have won medals at Olympic Games badminton events. Beginning with the 2020 Games in Tokyo, para-badminton has also been included in the Paralympic sport programme.
Photo credit: BWF/BADMINTONPHOTO
Photo credit: BWF/BADMINTONPHOTO

7
BAD
MIN
TON
CO
ACH
ED
UC
ATIO
N ►
C
OAC
HES
MAN
UAL
►
LE
VEL
1 M
OD
ULE
1 ►
O
VER
VIEW
10. THE ORIGINS OF BADMINTON Although the exact origins of badminton are unclear, games based on a shuttlecock and a battledore were played in China, Japan, India, Siam and Greece over 2000 years ago. Between 1856 and 1859 a game known as ‘battledore and shuttlecock’ started to evolve into the modern game of badminton at “Badminton House”, the Duke of Beaufort’s country estate in England. Similar games were played in Poona India around this time and a badminton code of conduct was drawn up in 1877. The aim of battledore and shuttlecock played at “Badminton House” was to keep the shuttlecock in the air for as long as possible by hitting the shuttle between two or more people. The reverse is true today. The aim now is to finish a rally as quickly as possible by scoring winning points against your opponent. In 1893, the Badminton Association of England was formed to administer the game internationally from England.
11. REGULATING BADMINTON WORLDWIDE The International Badminton Federation (IBF) was established in 1934 and consisted of nine founding members – badminton associations from Canada, Denmark, England, France, Ireland, Netherlands, New Zealand, Scotland and Wales. In 2006 the IBF changed its name to the Badminton World Federation (BWF). The BWF is the world governing body for badminton, recognised by the International Olympic Committee (IOC). In 2011 the Para-Badminton World Federation formally merged with the BWF, bringing both sports under the same umbrella of governance and emphasizing the message of “one sport, one team”. The BWF supports this philosophy through the incorporation of badminton and para-badminton in its competition and development activities. BWF’s members are, with a few exceptions, the national governing bodies for badminton. These are organised into five confederations under the IOC system, with each Continental Confederation representing one of the five Olympic rings – Africa, Asia, Europe, Oceania and Pan America. CONTINENTAL CONFEDERATIONS • Badminton Africa www.bcabadminton.org • Badminton Asia www.badmintonasia.org • Badminton Europe www.badmintoneurope.com • Badminton Pan Am www.badmintonpanam.org • Badminton Oceania www.oceaniabadminton.org

8
BAD
MIN
TON
CO
ACH
ED
UC
ATIO
N ►
C
OAC
HES
MAN
UAL
►
LE
VEL
1 M
OD
ULE
1 ►
O
VER
VIEW
12. BWF VISION, MISSION, GOALS The BWF works closely with National Badminton Associations and the five Continental Confederations for badminton and promotes, presents, develops, and regulates the sport worldwide. VISION • Making badminton a leading global sport accessible to all – giving every child a chance to play for
life. MISSION • To lead and inspire all stakeholders, deliver
entertainment through exciting events to drive fan experience, and create innovative, impactful and sustainable development initiatives.
GOALS The BWF goals are to: • Publish and promote the BWF Statutes and its
Principles. • Encourage the formation of new Members, strengthen the bonds between Members and resolve
disputes between Members. • Control and regulate the game, from an international perspective, in all countries and continents. • Promote and popularise badminton worldwide. • Support and encourage the development of badminton as a sport for all. • Organise, conduct and present world-class badminton events. • Maintain an Anti-Doping Programme and ensure compliance with the World Anti-Doping Agency
(WADA) Code.
Photo credit: BWF/BADMINTONPHOTO

BADMINTON COACH EDUCATION
COACHES’ MANUAL LEVEL 1
MODULE 2COACHING PRINCIPLES

BADMINTON WORLD FEDERATION Unit 1, Level 29 Naza Tower, Platinum Park 10 Persiaran KLCC 50088 Kuala Lumpur Tel +603 2631 9188 Fax +603 2631 9688 [email protected]
MODULE 2 COACHING PRINCIPLES 01. Introduction 9 02. Positive Benefits of Badminton Participation 9 03. Supporting Positive Experiences 9 04. Role of the Coach 10 05. Responsibilities of Coaches 10 06. Importance of a Coaching Philosophy 11 07. Establishing your Coaching Philosophy 12 08. Coaching Styles 12 09. Summary 13 10. Self-Assessment Questions 14
LEARNING OUTCOMES
By the end of this module, coaches will be able to: • identify the positive benefits of badminton participation; • explain the role of the coach in creating a positive badminton experience; • list the roles and responsibilities of a BWF coach; • identify their own philosophy of coaching; • compare the characteristics of autocratic and democratic coaching styles.

9
BAD
MIN
TON
CO
ACH
ED
UC
ATIO
N ►
C
OAC
HES
’ MAN
UAL
►
LE
VEL
1 M
OD
ULE
2 ►
C
OAC
HIN
G P
RIN
CIP
LES
01. INTRODUCTION The sport of badminton has the potential to provide a very positive effect on participants. Coaches play a very big role in creating an environment where these positive effects can be developed. However, in order to do this, coaches need to have a clear understanding of their own roles and responsibilities. Effective coaches are aware of their own coaching philosophy and style, but can also adapt this if required to meet the needs of the participants.
02. POSITIVE BENEFITS OF BADMINTON PARTICIPATION Badminton offers the opportunity for lifelong participation in a sport. It offers a large number of benefits which can be listed under the headings of physical, social, emotional and intellectual.
BENEFITS OF BADMINTON
PHYSICAL SOCIAL EMOTIONAL INTELLECTUAL
• health and fitness benefits
• friendship • shared
experiences • working in a
group
• fun • sense of
achievement • confidence • sporting behaviour
• problem solving • skill development
03. SUPPORTING POSITIVE EXPERIENCES Unfortunately, as with any sport, there is the possibility for badminton to have a negative effect upon people, such as injury, obsessive behaviour, loss of confidence and poor sporting behaviour. Whilst many of these factors are within the control of the player, the coach can have a significant influence on whether the badminton experience is positive or negative. Warming up and cooling down, putting personal development before winning, encouraging sporting behaviour, and creating an environment where everyone works together are all ways in which the coach can have a positive effect.
Photo credit: BWF/BADMINTONPHOTO
Photo credit: BWF/BADMINTONPHOTO

10
BAD
MIN
TON
CO
ACH
ED
UC
ATIO
N ►
C
OAC
HES
’ MAN
UAL
►
LE
VEL
1 M
OD
ULE
2 ►
C
OAC
HIN
G P
RIN
CIP
LES
04. ROLE OF THE COACH An effective coach has to undertake a number of roles, many of which are interlinked. The diagram below includes typical roles that a coach might have to fulfil.
05. RESPONSIBILITIES OF COACHES Coaches are in a very powerful position and carry with them a significant responsibility. These responsibilities are wide-ranging and can be grouped under the following:
RESPECTING PARTICIPANTS COACHING RESPONSIBLY
BUILDING AND MAINTAINING RELATIONSHIPS RESPECTING THE SPORT
RESPECTING PARTICIPANTS
PRINCIPLE
Coaches should recognise that every person has value and is worthy of respect.
• Treat people equally, whatever their gender, race, playing potential, colour, sexual orientation, political beliefs, economic status, age, disability, etc.
• Promote the rights of participants, including aspects such as confidentiality, sharing of decision making and fairness of procedures.
• Work with others in a way that allows participants to maintain their dignity. • Build mutual support among fellow coaches, officials, players, teachers and family members.

11
BAD
MIN
TON
CO
ACH
ED
UC
ATIO
N ►
C
OAC
HES
’ MAN
UAL
►
LE
VEL
1 M
OD
ULE
2 ►
C
OAC
HIN
G P
RIN
CIP
LES
COACHING RESPONSIBLY
PRINCIPLE
Coaches should engage in activities that will maximise the benefits and minimise the risks to society in general and players in particular.
• Act in the best interests of athlete’s development as a whole person. • Recognise the power inherent in their coaching role. • Be aware of their own personal values and how this affects their coaching practice. • Acknowledge the limitations of their discipline. • Accept the responsibility to work with other coaches and professionals in sport. • Commit to continuous professional development in order to keep their coaching practice up to
date. • Develop the coaching profession by exchange of knowledge and experiences with others within
the sport.
BUILDING AND MAINTAINING RELATIONSHIPS
PRINCIPLE
Coaches are expected to build and maintain effective relationships.
• Reflect on their own coaching philosophy and how this influences their interactions with others in sport.
• Recognise that players are part of a complex system of relationships, which affects their actions, their interactions, and their understanding of what goes on around them.
• Communicate honestly and openly with players, participants, parents, teachers, other coaches. • Fulfil commitments that are made. • Avoid exploiting relationships in a way that restricts their ability to act in the best interest of
others. • Declare conflicts of interest - seek to manage them in a way that respects the best interests of
those involved. • Encourage players to build and maintain effective relationships with others.
RESPECTING THE SPORT
PRINCIPLE
Coaches should recognise, act on and promote the value of badminton for players and for society in general.
• Maintain the highest standards of personal presentation and conduct. • Discourage the use of drugs, recreational or performance enhancing. • Act on and promote positive values related to coaching in general and badminton specifically,
such as fair play, self-discipline, integrity, personal development, challenging yourself. • Respect both the letter and spirit of the laws that govern badminton and promote the same
respectful approach amongst players, parents, teachers and other coaches. • Respect officials and other coaches.
06. IMPORTANCE OF A COACHING PHILOSOPHY A coaching philosophy can be defined as:
“the set of personal principles and beliefs that form the foundations of your coaching delivery.”
For example, honesty might be a personal principle that underpins your coaching delivery.
Photo credit: BWF/BADMINTONPHOTO

12
BAD
MIN
TON
CO
ACH
ED
UC
ATIO
N ►
C
OAC
HES
’ MAN
UAL
►
LE
VEL
1 M
OD
ULE
2 ►
C
OAC
HIN
G P
RIN
CIP
LES
All coaches have a coaching philosophy – personal principles and beliefs that have been formed as a result of their personality, upbringing, education and life experiences. For many coaches, this coaching philosophy exists subconsciously. It is there, but coaches have little appreciation of how it influences their delivery – in effect the coach has little “self-awareness”. The issues surrounding this are: • Coaches who lack self-awareness are probably unaware of their coaching strengths and
weaknesses. This means they are less likely to make maximum use of those coaching strengths, or seek to address their coaching weaknesses.
• Coaches will lack the ability to make conscious decisions to adapt their style. This is a weakness,
since not all players, parents, coaches are involved in badminton for the same reasons. The coach has to be able to adapt to meet the needs of others involved in the sport, especially the players!
Taking time to decide on your coaching philosophy can help by: • raising your own self-awareness; • appreciating your strengths and developing your weaknesses; • adapting your delivery to the differing needs of the players. All of these can contribute to making you a better coach.
07. ESTABLISHING YOUR COACHING PHILOSOPHY Completing the following questions and tasks can help you to clearly establish your own coaching philosophy. • Describe the personal principles and beliefs by which you live your life. • How would you describe your coaching style and how it is influenced by your personal principles
and beliefs? • What do others say about your personal principles/coaching style? • How do you communicate your coaching philosophy to others within the sport (e.g. players,
parents etc.)? • What personal strengths do you have that help your coaching? • What are the weaknesses of your coaching and how are you seeking to improve them? • What are the needs of the people you coach – i.e. what do they want to get out of badminton? • How do you adapt your personal principles and coaching style to meet the needs of others?
08. COACHING STYLES
There are many different coaching styles that can be used, but they all tend to fall between the two extremes of autocratic and democratic coaching styles. Autocratic coaching involves the coach defining what needs to be done and how to do it. The coach does a lot of telling in this style and players have no involvement in decision-making. The advantages of this approach for the coach are that it is easier to control and often quicker. The disadvantage for the players is that
Photo credit: BWF/BADMINTONPHOTO
Photo credit: BWF/BADMINTONPHOTO

13
BAD
MIN
TON
CO
ACH
ED
UC
ATIO
N ►
C
OAC
HES
’ MAN
UAL
►
LE
VEL
1 M
OD
ULE
2 ►
C
OAC
HIN
G P
RIN
CIP
LES
this approach does not develop their own problem-solving and decision-making skills. Democratic coaching is where the coach allows the players to take more ownership of what they need to develop and how to go about doing it. The advantage of this approach is that it develops the self-reliance of players, improving their problem solving and decision making. The disadvantage is that this can be slower and harder for the coach to manage, as it involves a more flexible approach and greater use of questioning skills.
Different styles may need to be used depending on the size of group, the experience of players, and the situation.
09. SUMMARY Badminton can offer a wide range of positive benefits to players of all ages. Badminton coaches play an important role in helping to establish and maintain a positive badminton environment. To support the creation of this positive environment, BWF coaches should adhere to the BWF Coaches Code of Conduct, the content of which is consistent with the roles and responsibilities sections of this document. In order to improve, BWF coaches should: • be aware of different coaching styles; • develop their own self-awareness by considering their own
personal philosophy; • adapt their coaching style to the needs of the different
participants within badminton.
Photo credit: BWF/BADMINTONPHOTO

14
BAD
MIN
TON
CO
ACH
ED
UC
ATIO
N ►
C
OAC
HES
’ MAN
UAL
►
LE
VEL
1 M
OD
ULE
2 ►
C
OAC
HIN
G P
RIN
CIP
LES
10. SELF-ASSESSMENT QUESTIONS
1 The possible social benefits available in badminton are:
Self-confidence
Friendship, shared experiences, working in a group
Health and fitness
Fun
2 Tick 3 of the following choices that describe areas of responsibility for a coach.
Respect for participants
Coaching responsibly
Respect for the sport
Promoting a win-at-all-costs attitude
3 Tick 3 of the following choices that describe benefits of establishing your coaching philosophy.
Identifying personal coaching strengths
Letting players know what you demand
Identifying personal coaching weaknesses
Improving self-awareness
4 Tick one benefit of a democratic coaching style.
The coach controls everything
Players develop their self-reliance
Players are told what to do by the coach
Coach controls how to achieve goals

BADMINTON COACH EDUCATION
COACHES’ MANUAL LEVEL 1
MODULE 3COACHING PROCESS

MODULE 3 COACHING PROCESS
01. Introduction - Coaching Process 15 02. Step 1 - Planning 16
a. Why Plan? “Failing to plan is planning to fail.” 16 b. Risk Assessment 17 c. Collecting Player Information 18 d. Register 19 e. Observe and Analyse 20 f. Goal Setting 21 g. Session Planning 23
03. Step 2 - Delivery 24
a. Effective Badminton Sessions 24 b. Learning Styles 25 c. Face-to-Face Communication 26 d. Questioning 27 e. Feedback 28 f. Demonstration 29 g. Methods of Developing Skills 30 h. Stages of Motor Learning 31 i. Managing Practice 32 j. Group Management 33 k. Designing Progressive Practices 33 l. Feeding Skills 35 m. Holding the Shuttle 36 n. Hand Feeding 36 o. Underarm Hand Feed 37 p. “Flat” Fast Feed 37 q. Overarm Hand Feed 38 r. Racket Feeding – Multi-feed 38 s. Racket Feeding –Rallying 38
04. Step 3 - Reviewing and Step 4 - Evaluating your Coaching 39 05. Summary and Self-Evaluation: The Coaching Process 41 06. Self-Assessment Questions 42

BADMINTON WORLD FEDERATION Unit 1, Level 29 Naza Tower, Platinum Park 10 Persiaran KLCC 50088 Kuala Lumpur Tel +603 2631 9188 Fax +603 2631 9688 [email protected]
LEARNING OUTCOMES By the end of this module, coaches will be able to: • explain the purpose of the coaching process model; • list in order the elements of the coaching process model; • describe the skills used within each element of the coaching process model.

15
BAD
MIN
TON
CO
ACH
ED
UC
ATIO
N ►
C
OAC
HES
’ MAN
UAL
►
LE
VEL
1 M
OD
ULE
3 ►
C
OAC
HIN
G P
RO
CES
S
01. INTRODUCTION - COACHING PROCESS The Coaching Process is a four-stage model that helps coaches to: • plan effective sessions.
• deliver effective sessions. • review what they have delivered. • evaluate the quality of delivery.
This approach is relevant to the coaching of all players, including those players with disabilities. INCLUSIVITY The BWF Coach Education programme is designed to be inclusive, in that the content can be implemented with all ages, abilities and disabilities. The practices in this manual can be adapted for use with players with disabilities by applying the solid coaching principles and practices described in Modules 2 and here in Module 3. In addition, Module 13 offers some specific guidelines on “Coaching Players with Disabilities”, aimed at providing coaches with an understanding of different disability sport classes and some of the implications for training. However, the most important thing for coaches to keep in mind is that they are fundamentally helping players develop through the application of good coaching skills.

16
BAD
MIN
TON
CO
ACH
ED
UC
ATIO
N ►
C
OAC
HES
’ MAN
UAL
►
LE
VEL
1 M
OD
ULE
3 ►
C
OAC
HIN
G P
RO
CES
S
02. STEP 1 - PLANNING
a. Why Plan? “Failing to plan is planning to fail.” A good plan can provide the following advantages: • Sets goals against which the effectiveness of a session/series of sessions can be evaluated. • Identifies resources required to be successful. • Improves time management within the session. • Provides alternatives. • Improves safety. • Can be used by other coaches.

17
BADMINTON COACH EDUCATION ► COACHES’ MANUAL ► LEVEL 1 MODULE 3 ► COACHING PROCESS
b. Risk Assessment A risk assessment is simply a careful examination of what could cause harm to people, so that you can decide if you have taken enough precautions or can do more to prevent harm. Risk assessments involve five simple stages and should be conducted at each facility in which coaching is taking place. Provided the facility does not change its procedures on a regular basis, conducting risk assessments every six months should be sufficient.
VENUE: ASSESSMENT
COMPLETED BY:
Step 1 What are the hazards?
Step 2 Who might be harmed and how?
Step 3 What is the level of risk (1 = very low, 5 = very high)?
Step 4 What are you already doing?
Step 5 What further action is necessary?
Step 6 How will you put the assessment into action?
Action by whom
Action by when
Done

18
BAD
MIN
TON
CO
ACH
ED
UC
ATIO
N ►
C
OAC
HES
’ MAN
UAL
►
LE
VEL
1 M
OD
ULE
3 ►
C
OAC
HIN
G P
RO
CES
S
c. Collecting Player Information PLAYER REGISTRATION FORM Club/Group name
Surname
First name(s)
Title M/F? Date of Birth
Home address
Telephone (Home)
Telephone (Mobile)
Emergency Contact Number
e-mail:
I would describe my ethnic origin as:
Has a doctor ever said that you have a heart condition and should only do physical activity if medically cleared to do so?
Yes No
Do you ever feel pain in your chest when you do physical activity? Yes No
Do you ever feel pain in your chest when you are not doing physical activity? Yes No
Do you ever feel faint or have spells of dizziness? Yes No
Do you have a joint problem that could be made worse by exercise? Yes No
Have you ever been told you have high blood pressure? Yes No
Are you currently taking any medication that your coach should be made aware of? If so, what?
Yes No
Are you pregnant or have you had a baby in the last 6 months? Yes No
Is there any other reason why you should not participate in physical activity? If so what? Yes No
Do you consider yourself to have a physical or intellectual disability? If so, please give details
Yes No
If you have answered yes to any of the above questions, contact your doctor before you participate and follow their advice.
If you have answered no to all the questions, you can be reasonably sure about participating immediately in badminton, but build up gradually if you are not used to physical exercise.
If your health changes so you would answer yes to any of the above questions, inform the coach and/or doctor immediately.
I have read, understood and completed the information requested above
Signature
Emergency Contact: this section is to be completed only if the above player is under 16
Full Name
Relationship with player
Address (if different from above) Telephone (Home)
Telephone (Mobile)

19
BAD
MIN
TON
CO
ACH
ED
UC
ATIO
N ►
C
OAC
HES
’ MAN
UAL
►
LE
VEL
1 M
OD
ULE
3 ►
C
OAC
HIN
G P
RO
CES
S
d. Register A register is necessary for a number of reasons, including: • Safety (in the event of fire evacuation then you would need to take the register). • Selection (if you are basing your selection on attendance at training). • Finance (if you use the register to monitor the payment of session fees). Note the column marked (***) – this should be used to discretely indicate players with medical issues. COURSE/GROUP VENUE
COACHES FACILITY MANAGER (AND CONTACT NUMBER)
NAME OF PLAYER *** ATTENDANCE DATES

20
BADMINTON COACH EDUCATION ► COACHES’ MANUAL ► LEVEL 1 MODULE 3 ► COACHING PROCESS
e. Observe and Analyse The first session with an individual or group of players is mainly to give the coach an opportunity to observe the players and analyse their performance. The table below offers some advice on how observation and analysis can be used effectively to help decide how best to then support the development of the players in future training sessions.
OBSERVATION ANALYSIS
• Use a combination of predictable practices and game play. • Have a system of observation so you focus on one part of the game at a time (e.g. footwork, posture and balance, racket skills, tactical awareness and
decision making). • Observe from different places to get a complete picture of what is occurring. • Discipline yourself to note down only what you observe, without making judgements of right or wrong.
Compare what you observe to the “ideal tactical model” and choose the most important areas to work on.
PLAYER NAME FOOTWORK POSTURE AND BALANCE RACKET SKILLS TACTICAL SKILLS
By the end of the training period, the player(s) will be able to:

21
BAD
MIN
TON
CO
ACH
ED
UC
ATIO
N ►
C
OAC
HES
’ MAN
UAL
►
LE
VEL
1 M
OD
ULE
3 ►
C
OAC
HIN
G P
RO
CES
S
f. Goal Setting Having observed and analysed the player’s performance, you then need to prioritise what to work on and set goals. Goal setting is important because it helps to: • Focus training • Motivate
• Monitor player progress • Monitor coaching effectiveness
Two useful guidelines for writing effective goals are: • Start each goal by writing “By the end of [stated date/time], the player will be able to ………..” • Make sure your goal uses a “doing” word, such as demonstrate, perform, explain, compare, select,
construct, etc. Useful goals tend to have the characteristics described in the diagram below.
The table overleaf includes some typical goals, written on the basis of a player evaluation. When goal-setting for a group, you may have to prioritise, setting goals that benefit the group as a whole.

22
BADMINTON COACH EDUCATION ► COACHES’ MANUAL ► LEVEL 1 MODULE 3 ► COACHING PROCESS
OBSERVATION ANALYSIS
• Use a combination of predictable practices and game play. • Have a system of observation so you focus on one part of the game at a time (e.g. footwork, posture and balance, racket skills, tactical awareness and decision
making). • Observe from different places to get a complete picture of what is occurring. • Discipline yourself to note down only what you observe, without making judgements of right or wrong.
Compare what you observe to the “ideal tactical model” and choose the most important areas to work on.
PLAYER NAME FOOTWORK POSTURE AND BALANCE RACKET SKILLS TACTICAL SKILLS
Peter Escobar • Links moves with split-step
• Use chassé steps a lot • Lunge to backhand
net “twisted”
• Keeps arm by body on lunge
• Body very upright on split-step
• Trunk drops on lunge
• Has a large variety of overhead shots
• Long swing hitting off body
• Plays defensively at singles, reacting to opponent’s decisions
• Lunge with knee/foot in line - improve upper body posture/arm position
• Develop more attacking options in singles
By the end of the training period, Peter will be able to: • consistently perform a stable lunge to the net with correct knee/foot alignment in a predictable rally • consistently perform a stable lunge to the net with relaxed but controlled upper body posture in a predictable rally • recognise and exploit opportunities to pressurise opponents by reducing height on strokes played to the rearcourt in matchplay

23
BAD
MIN
TON
CO
ACH
ED
UC
ATIO
N ►
C
OAC
HES
’ MAN
UAL
►
LE
VEL
1 M
OD
ULE
3 ►
C
OAC
HIN
G P
RO
CES
S
g. Session Planning Having decided on the goal or goals to be worked towards, we need to consider how we can achieve those goals. We do this by planning sessions. Below is one type of session plan. You should aim for a level of detail that if another coach picked up your plan they could run the session based on your plan. The goals you set for each session should help the player work towards the goals set for the training period. VENUE Badminton Sports Club,
Sea of Tranquillity DATE: TIME: DURATION
23/02/25: 19.00: 1 hour
GROUP / CLUB / INDIVIDUAL
Individual
ADDITIONAL EQUIPMENT
SAFETY CHECK (NOTE ANY ACTIONS)
No problems
GOALS FOR SESSION By the end of the session, the players will be able to: • perform a consistent, stable lunge with correct knee/foot position when striking a hand fed
shuttle • appreciate the use of height to create attacking opportunities when lifting from the net on the
bh side
TITLE DESCRIPTION GOAL NO. TIME
Warm-up Brief series of jogging/chasse/cross-behind movements. Squats of gradually increasing depth, progressing to lunging, balancing shuttle on head to promote good posture
1 5m
BH lift – focus on lunge
Bh lift off hand feed, promoting good knee/foot alignment. Gradually increase range of movement into stroke if quality of lunge sustained
1 15m
BH lift – height of lift
Partner hand feeds shuttle from forecourt, player lifts (maintain good lunge position). Feeder runs back to catch shuttle in rearcourt. Player gradually decreases height to make it more difficult for feeder to make the catch
2 15m
BH lift – Play rally out
Players play net shots to each other (not too tight). Player playing backhand net shots can decide when they want to lift (either straight or cross) – once lift played then Play the Rally Out (PRO). Lifting player scores 3 points if they win rally in their next two shots. Discuss the advantages/disadvantages of different heights of lift.
2
15m
Cooldown and summary
Jog with arms stretches at same time. Lower body stretches sat on floor whilst discussing the session
10m
REVIEW • Warm-up was longer (10m) • Body Language of players positive • Feedback re PRO practice was positive
EVALUATE
• Need to rotate practice partners more often to help group to work together • Ask more open questions to support players thinking for themselves

24
BAD
MIN
TON
CO
ACH
ED
UC
ATIO
N ►
C
OAC
HES
’ MAN
UAL
►
LE
VEL
1 M
OD
ULE
3 ►
C
OAC
HIN
G P
RO
CES
S
03. STEP 2 - DELIVERY
a. Effective Badminton Sessions Delivery of effective badminton sessions involves applying a wide range of coaching skills, including: • considering the learning styles of the players • communication skills • feedback • questioning skills • skill development • time management • group management • feeding skills
An effective coach will use these skills to meet the needs of the players, irrespective of those players’ physical or mental capacity.

25
BAD
MIN
TON
CO
ACH
ED
UC
ATIO
N ►
C
OAC
HES
’ MAN
UAL
►
LE
VEL
1 M
OD
ULE
3 ►
C
OAC
HIN
G P
RO
CES
S
b. Learning Styles If our coaching is to be effective, it is important to consider the preferred learning style of the players. There are many different learning style models, but a simple model that is easily applied to sport is the “VAK” model which includes:
• Visual Learners • Auditory Learners • Kinaesthetic learners
More information about the characteristics of these learners is included in the diagram below. CHARACTERISTICS COACHING APPLICATION
KINAESTHETIC LEARNERS
• Learn by doing • Like moving • Sport is attractive to this
group
• Provide lots of opportunity to do
• Encourage practical experimentation
CHARACTERISTICS COACHING APPLICATION
AUDITORY LEARNERS
• Respond well to verbal instruction
• Like and respond well to explanation
• Provide short but precise explanations
• Associate key words with skills
• Associate good technique with sound of a well-struck shuttle
• Use question and answer • Encourage discussion
CHARACTERISTICS COACHING APPLICATION
VISUAL LEARNERS
• Learn through seeing others perform a skill
• Good at visualising themselves performing a skill
• Provide accurate demonstrations
• Perform silent demonstrations
• Encourage watching of video
• Use pictures to reinforce coaching points
• Encourage players to visualise themselves performing a skill
• Use mirrors if possible • Remove other visual
distractions

26
BAD
MIN
TON
CO
ACH
ED
UC
ATIO
N ►
C
OAC
HES
’ MAN
UAL
►
LE
VEL
1 M
OD
ULE
3 ►
C
OAC
HIN
G P
RO
CES
S
INCLUSIVE TIP Studying how people learn is equally relevant for players with a disability. Work hard to discover the best way to help people learn – ask them what they prefer and adapt your coaching accordingly. c. Face-to-Face Communication Face-to-face communication skills provide the foundation on which an effective coaching session is built. Communication is a two-way process. The diagram below lists the different communication skills that can be used, along with some tips on how to use these skills effectively.
INCLUSIVE TIP To meet the needs of deaf players, speak normally and make sure they can see you when using explanations so they can:
• lip read. • watch your expressions and body language. • see you demonstrate / show techniques.

27
BADMINTON COACH EDUCATION ► COACHES’ MANUAL ► LEVEL 1 MODULE 3 ► COACHING PROCESS
d. Questioning Effective questioning is a very important coaching skill because it: • encourages players to think for themselves; • supports more permanent learning; • stimulates discussion.
Questioning can be broadly divided into closed and open questions
Effective questioning requires a lot of practice and it develops over time. However, the results in terms of developing players who can think, solve problems, and learn more quickly are very rewarding once this coaching skill is mastered.
DEFINITION CHARACTERISTICS BEGIN WITH
WHERE THEY ARE USEFUL EXAMPLE
CLO
SED
QU
ESTI
ON
S
Questions that can be: • answered with either a
single word or short phrase
• invite answers that tend to come from a restricted number of possible responses
• Easy to answer • Quick to answer • Provide facts • Questioner keeps
control
• Do • Would • Are • Will • If
As opening questions Are you ready to start the session?
Gaining clarification So you want to focus on learning to smash the shuttle?
For establishing a positive frame of mind
Will you concentrate fully?
For finishing
So you’re ready to focus on this practice now?
OPE
N Q
UES
TIO
NS
An open question invites: • longer answers • a wide variety of possible
responses
• makes the respondent think more deeply about their response
• results in the expression of opinions and feelings
• control handed over to the respondent
• What • Why • How
To support thinking and learning
What strokes could you play from that position?
To invite opinions How would you deal with this situation?
To encourage problem solving What practices could we use to improve this stroke?
To encourage discussion What other methods could we use to practice that stroke?

28
BAD
MIN
TON
CO
ACH
ED
UC
ATIO
N ►
C
OAC
HES
’ MAN
UAL
►
LE
VEL
1 M
OD
ULE
3 ►
C
OAC
HIN
G P
RO
CES
S
e. Feedback Feedback can be defined as:
“providing information about the result of a process or activity.” The importance of feedback in coaching can be judged by a well-recognised principle that “without feedback there is no learning”. Feedback can be obtained from two categories – intrinsic and extrinsic feedback.
INTRINSIC FEEDBACK
Once a player has some basic knowledge about a skill, then they have a visual picture of what the action should look and feel like. Their own attempts at that skill are then quite naturally compared to that “ideal model” – its look and feel. As soon as possible, coaches should help player to use this feedback to correct themselves because it encourages the player to develop themselves and not become dependent upon the coach. The key aspect of this example is that the coach is encouraging the player to develop the ability to self-correct, rather than simply telling all the time.
EXTRINSIC FEEDBACK
This feedback is called external because it does not come from the player. Whilst building a player’s ability to develop their own use of internal feedback is preferable, there are times when it is necessary for the coach to provide additional external feedback. An example might be beginners who lack the mental model of what a particular correct technique looks or feels like, so they have little to compare their own performance to. To provide effective external feedback: • Observe the practice from a number of different positions. • Allow time for players to use their own internal feedback first. • Ask questions to encourage the player to use their own internal feedback first. • Limit feedback to 1-2 simple and specific points. • Give the feedback in a positive manner, for example by:
o Making a positive statement (e.g. “you are reaching up really well”). o Giving the constructive feedback (e.g. “if you use more forearm rotation
you will be able to hit harder”). o Making a positive statement (“keep reaching up as well because you’ve
made great progress in that area”).

29
BADMINTON COACH EDUCATION ► COACHES’ MANUAL ► LEVEL 1 MODULE 3 ► COACHING PROCESS
f. Demonstration Since so much learning is done by visual means, the importance of accurate demonstrations by a coach cannot be underestimated.
DEMONSTRATIONS USED TO SOURCES OF DEMONSTRATION
HINTS AND TIPS FOR DEMONSTRATION
A visual performance of a desired practical skill.
• Give the players a correct mental picture of a technique/tactic which they can compare their performance against
• Highlight a specific element of technique or tactics
• Motivate
• A competent player • The coach • Video • Pictures
• Plan your demonstrations. • Make sure players can give full attention (not facing distractions). • Make demonstrations specific to the point you want to make. • Let players observe from racket side mainly, but also allow observations from a
variety of places. • Demonstrate silently to allow the visual information to work without interference. • Demonstrate with the shuttle so players can see the resulting flight. • Then demonstrate without the shuttle so players focus on the shape of the shot. • Demonstrate the practice you want the players to perform. • After demonstration, reinforce verbally with 1-2 simple key points and questions. • Invite questions. • During the session, small shadowed demonstrations can provide valuable
reminders for individual players.

30
BAD
MIN
TON
CO
ACH
ED
UC
ATIO
N ►
C
OAC
HES
’ MAN
UAL
►
LE
VEL
1 M
OD
ULE
3 ►
C
OAC
HIN
G P
RO
CES
S
g. Methods of Developing Skills There are many coaching methods that can be used to develop skills. The table below lists some of the most used methods.
COACHING METHOD
DESCRIPTION EXAMPLE ADVANTAGE DISADVANTAGE
SHAPING
• Players are shown the whole technique and then they try it.
• Coach advises on adjustments but allows players to complete whole movement.
• Coach demonstrates a backhand overhead.
• Player tries. • Coach focuses
player on use of upper/lower arm rotations in the stroke.
Maintains the flow of the whole skill. This is useful when elements of the skill are so closely linked that to break the elements up too much would disrupt that flow.
May leave player with too many things to think about at once.
WHOLE –PART - WHOLE
• Players are shown whole technique, then they try it.
• Coach isolates one element of the skill to practice.
• Players practice isolated element of skill.
• Elements are put back into whole skill.
• Players try whole skill.
• Coach demonstrates split-step, chassé, lunge and chassé as method of movement into and out of forehand forecourt. Players try it.
• Coach isolates chassé movement and practices this with the players.
• Whole skill is practiced again.
Allows players to focus on a specific element.
If elements of the skill are too interlinked this can disrupt flow.
CHAINING
Players are shown basic technique then elements of the skill are added in a progressive, logically sequenced manner.
• A forehand overhead hit is taught, focussing on the arm action only.
• A sideways stance is added to this.
• Weight transfer is added to this.
• Movement backwards into stroke is added to this.
• Movement forwards out of the stroke is added to this.
A useful way to build movement skills around a hitting action.
If elements of the skill are too interlinked this can disrupt flow.

31
BAD
MIN
TON
CO
ACH
ED
UC
ATIO
N ►
C
OAC
HES
’ MAN
UAL
►
LE
VEL
1 M
OD
ULE
3 ►
C
OAC
HIN
G P
RO
CES
S
h. Stages of Motor Learning Motor learning can be defined as “the process by which people acquire movement skills”. There are many different theories about how people acquire movement skills. Some knowledge of these theories can be useful for coaches as they can adapt their coaching delivery to meet the learning needs of the player. One basic model that describes the stages of motor learning was suggested by Fitts and Posner (1967). They split learning of new motor tasks into 3 stages. These stages are described in the table below, along with examples of how coaching might change for players in those particular stages of learning.
NAME OF PHASE
DESCRIPTION OF PHASE COACHING INFORMATION
COGNITIVE
• The “beginner” phase. • A short phase of learning. • The player is working out “what to
do” in their mind. • This stage is finished when:
o the player has established a mental picture of the skill;
o they are able to perform a basic version of the skill.
In the cognitive phase: • Keep things simple. • Provide accurate demonstrations. • Use minimal teaching points –
just enough. • Use short, precise explanations. • Give positive feedback.
ASSOCIATIVE
• The intermediate phase. • The longest phase of learning. • The player is building on their
mental picture of a skill, focusing on improving the shape and flow of the newly acquired, basic skill.
• Provide progressive practices that gradually increase in complexity and speed.
• Only move on through the practices if the quality of skill production is being maintained.
• Encourage players to evaluate their own performance (internal feedback), with additional external feedback from the coach where necessary.
AUTONOMOUS
• The expert, automatic phase • The task can be completed without
giving too much attention to it. • The player is able to give attention
to other aspects, so as the position of their opponent, during execution of the skill.
• Provide challenging practices, with skills produced:
o in game-like practices; o at full match speed.
Reference: FITTS, P.M. and POSNER, M.I. (1967) HUMAN PERFORMANCE. Oxford, England: Brooks and Cole

32
BAD
MIN
TON
CO
ACH
ED
UC
ATIO
N ►
C
OAC
HES
’ MAN
UAL
►
LE
VEL
1 M
OD
ULE
3 ►
C
OAC
HIN
G P
RO
CES
S
i. Managing Practice There are many ways in which practice can be managed. As a starting point, you may want to consider the structure suggested below and then experiment as you become more experienced and confident.
SECTION CONTENT EXAMPLE
I INTRODUCTION A very brief introduction to the skill, often no more than simply naming the skill.
“We’re going to look at playing a backhand net shot”.
D DEMONSTRATION Provide an accurate, silent demonstration of the stroke, striking the shuttle.
Coach, competent player or video demonstrates a backhand net shot so players can see the flight of the shuttle.
Provide an accurate, silent, shadowed demonstration of the stroke.
Coach or competent player shadows a backhand net shot so players can form a mental picture of the shape of the shot.
E EXPLANATION Brief explanation highlighting 1-2 key points, then check that players know what to do.
• “Focus on thumb grip and pushing action”.
• “Working in pairs, one hand feeder and one hitter”.
• “What are the two points you are focusing upon?”
A ACTIVITY • Activity begins. • Coach observes. • Coach evaluates. • Feedback delivered individually
or to group. • Coach adjusts practices –
harder or easier – as required.
• Coach provides reinforcement by: o asking two players to repeat the
two key teaching points; o providing a shadowed
demonstration for one player. • Adjust practice for four better players
so they are practicing stroke in a rally.
S SUMMARY Coach brings group together to discuss the practice.
Coach questions players: • What were the key teaching
points? • What other things had they tried
which worked for them? • If they were to practice this again,
what would they want to do differently?

33
BAD
MIN
TON
CO
ACH
ED
UC
ATIO
N ►
C
OAC
HES
’ MAN
UAL
►
LE
VEL
1 M
OD
ULE
3 ►
C
OAC
HIN
G P
RO
CES
S
j. Group Management The following guideline will help you coach groups as effectively as possible.
PREPARATION A well-prepared session can help maintain focus within the group.
GROUP RULES Establish a series of rules so that the players know the boundaries for acceptable and non-acceptable behaviour. Particular attention should be given to:
Safety Respect for all Fair play and sporting behaviour 100% effort
Make sure that there the consequences of breaking the code of conduct (e.g. taking ‘time out’ at the side of the court) are clearly understood.
BRINGING THE WHOLE GROUP TOGETHER • Establish a consistent area where you bring the group together to talk together. • Stress the importance of coming together quickly so time is not wasted – set up a practice to
stress this. • Only bring the group together where there is a common message to put across.
DEMONSTRATIONS • Place the group so they are not distracted while watching demonstrations. • For racket skills, try and place the group so they are usually on the racket side (however,
consider if there is merit in allowing players to also view from different angles).
BE SENSITIVE TO LEARNING STYLES WITHIN THE GROUP • Be aware that the group will contain players who have a preference for visual, auditory and
kinaesthetic learning. • Place emphasis on seeing and doing.
GROUP DYNAMICS • Rotate practice partners regularly so the group becomes used to helping each other. • If a player is good at a skill, use them to demonstrate. This is a confidence boost for the player
and motivating for the group (“If they can do it then I should be able to”). • Consider giving more responsibility to potentially disruptive children. • Be inclusive – integrate players with disabilities into the sessions.
BALANCING GROUP/INDIVIDUAL NEEDS • Give equal attention to all individuals within the group. • Help players to work at different levels. k. Designing Progressive Practices Badminton practices should be delivered at all times in a tactical context. By this we mean that when players are taught a skill, there is a clear link between what they are learning and how it can be applied to the game itself. This increases players understanding and is more motivating. A tactical context can be given by:
• explanation • demonstration • experimentation

34
BAD
MIN
TON
CO
ACH
ED
UC
ATIO
N ►
C
OAC
HES
’ MAN
UAL
►
LE
VEL
1 M
OD
ULE
3 ►
C
OAC
HIN
G P
RO
CES
S
Progressive practices should be designed from:
• simple to complex • slow to fast • predictable to unpredictable
The following list may help give you a range of ideas of how to develop a skill progressively.
Tactical Context
Tact
ical
con
text
Tact
ical
con
text
Progression Predictable Slow Simple
Shadow the stroke by copying the coach.
Shadow the stroke without the coach leading.
Practice the hitting part of the stroke using a suspended shuttle.
Practice the hitting part of the stroke by striking a hand-fed shuttle.
Practice the hitting part of the stroke off a racket-fed shuttle.
Using a racket-fed shuttle, gradually increase the amount of movement into and out of the stroke.
Build the stroke into a simple predictable rally.
Build the stroke into an unpredictable rally, when the player is unsure when they will have to play the stroke.
Design a practice where a rally is played until the key stroke is played - the rally is then played out to a conclusion (“PRO” rally – play the rally out).
Play a game but award bonus points when the stroke is played successfully, either winning the rally itself or setting up a winner.
Progression Unpredictable Fast Complex
Tactical context
How quickly players move through the progression depends on how quickly they learn. The key is not to progress through the practices until they are reasonably competent at each level. Also note that when coaching a group, a skilful coach will build to a point where the group may be working at the same skill, but some of the players will be using different levels of practice depending on their own skill level. This is known as differentiation.

35
BAD
MIN
TON
CO
ACH
ED
UC
ATIO
N ►
C
OAC
HES
’ MAN
UAL
►
LE
VEL
1 M
OD
ULE
3 ►
C
OAC
HIN
G P
RO
CES
S
l. Feeding Skills Feeding can be defined as:
“the ability to deliver a shuttle in a way that gives the player realistic practice opportunities.”
Feeding can involve: • Hand feeding • Racket feeding – multifeed • Racket feeding – rallying Whatever the type of feeding used, consider the following.
SAFETY To avoid injury, especially eye injuries, make sure you feed from a safe position. This sometimes means you have to compromise a little on where you feed from.
FLIGHT PATH Make the flight path of the feed as similar to the game as possible. For example, use an overhead throw from the rearcourt to forecourt in order to mimic the flight path of a dropshot.
PACE It is impossible to throw a shuttle with the same pace as a shuttle struck with a racket. So where pace is required, use racket feeding as soon as possible.
TIME OF FLIGHT Make sure the time of flight of the feed is sufficient for players to practice the skill. For example, as a player is moving more and more into a net shot, the feeder may need to move slightly further backwards to allow time for this whilst they learn the skill.
RATE OF FEED Make sure the rate of delivery of the feed is slow enough that the players have sufficient time to:
• reflect on their previous attempt; • prepare properly for the next attempt.
POWER OF THE FEED The feeder has the shuttle, which is what the player is keen to hit. The feeder can help reinforce coaching by not delivering the shuttle until a particular aspect of technique has been demonstrated (e.g. correct grip, correct racket carriage). If the feeder stares at the incorrect area, then this can be a very powerful way of encouraging the player to self-correct.

36
BAD
MIN
TON
CO
ACH
ED
UC
ATIO
N ►
C
OAC
HES
’ MAN
UAL
►
LE
VEL
1 M
OD
ULE
3 ►
C
OAC
HIN
G P
RO
CES
S
m. Holding the Shuttle An efficient way to hold a lot of shuttles is to cradle them in your non-throwing arm as shown in the picture opposite. Note how the shuttles are held with the cork of the shuttle pointing down.
Shuttles can be delivered with the hand underneath the shuttle. In this case, make sure the fingers support the whole of the shuttle (including the cork) to give control.
Shuttles can also be delivered with the hand over the shuttle.
n. Hand Feeding ADVANTAGES OF HAND FEEDING DISADVANTAGES OF HAND FEEDING
• Generally easier than racket feeding. • Can give the player a lot of practice
opportunities in a short space of time. • Possible to mimic downward shots (overarm
throw) and upwards shots (underarm throw). • With some training, players can feed well. • Overhead feeding can also benefit overhead
hitting action.
• Difficult to put pace on the shuttle. • Player doesn’t have opportunity to read
shuttle coming off a racket. • Hand feed to practice an overhead is quite
difficult to do accurately. • Hand feed to practice an overhead provides
only a limited opportunity for player to pick up the flight of the shuttle.
• May need access to a lot of shuttles.

37
BAD
MIN
TON
CO
ACH
ED
UC
ATIO
N ►
C
OAC
HES
’ MAN
UAL
►
LE
VEL
1 M
OD
ULE
3 ►
C
OAC
HIN
G P
RO
CES
S
o. Underarm Hand Feed Deliver underarm feeds with a long arm swing.
To gain height and accuracy for practicing overheads: • Stand with a wide stance. • Bend the knees, then straighten. • Throw from the shoulder, with long
backswing. • Place shuttle in air. • Finish with hand high.
p. “Flat” Fast Feed “Flat” fast feeds are often easier to deliver with the hand over the top of the shuttle.

38
BAD
MIN
TON
CO
ACH
ED
UC
ATIO
N ►
C
OAC
HES
’ MAN
UAL
►
LE
VEL
1 M
OD
ULE
3 ►
C
OAC
HIN
G P
RO
CES
S
q. Overarm Hand Feed Use overarm hand feeding to mimic overarm strokes.
Use overarm hand feeding to help develop good habits for your overhead hitting action, such as:
• adopting a sideways stance. • loading the rear leg. • transferring weight from rear to front leg
(commit hip forwards). • reaching high.
r. Racket Feeding – Multi-feed Cradle the shuttle as previously described.
Take the first shuttle by the cork using the thumb and first finger.
Place the shuttle in front/to side of body. ‘Cock’ the wrist.
Strike the shuttle.
s. Racket Feeding – Rallying Whilst multifeeding can be used productively in training, ultimately the sport is played with one shuttle, so make sure a considerable part of the training you deliver is with one shuttle.
Vary the pace depending on the stage of learning of the player, for example when learning to play a smash off the body.
Vary the height of the feed, for example giving more time when the player is learning a footwork pattern.
Slowly introduce an element of doubt. For example: • Player lifts straight. • Coach dropshots straight. • This continues until coach plays a clear. • Player returns with a clear. • Dropshots and lifts continue until coach plays next clear.

39
BAD
MIN
TON
CO
ACH
ED
UC
ATIO
N ►
C
OAC
HES
’ MAN
UAL
►
LE
VEL
1 M
OD
ULE
3 ►
C
OAC
HIN
G P
RO
CES
S
04. STEP 3 - REVIEWING AND STEP 4 - EVALUATING YOUR COACHING
Reviewing and evaluating forms a major part of a coach’s development, as they help the coach to learn what aspects of delivery went well and what could be improved. This helps coaches to deliver increasingly effective sessions as they become more experienced. Reviewing and evaluating can take place at the end of sessions, or at the end of a coaching programme. REVIEW Tips for reviewing effectively include: • Simply describe what happened in the session, without making judgements about whether things
were good, bad, etc. • Focus comments on what:
o was actually delivered. o the players did. o you did as a coach.
• Write brief comments in the review box at the end of each session. EVALUATION Tips for effective evaluation include: • Were the session goals achieved? • How would you change the content of the session in the future? • How would you change your coaching practice? • Avoid statements such as “bad”, “good”, “poor”, “excellent” which do not impart any really useful
information.

40
BAD
MIN
TON
CO
ACH
ED
UC
ATIO
N ►
C
OAC
HES
’ MAN
UAL
►
LE
VEL
1 M
OD
ULE
3 ►
C
OAC
HIN
G P
RO
CES
S
EXAMPLE OF REVIEW AND EVALUATION AT THE END OF A SESSION VENUE Badminton Sports Club,
Sea of Tranquillity DATE: TIME: DURATION
23/02/25: 19.00: 1 hour
GROUP / CLUB / INDIVIDUAL
Individual
ADDITIONAL EQUIPMENT
SAFETY CHECK (note any actions)
No problems
GOALS FOR SESSION By the end of the session, the players will be able to:
1. perform a consistent, stable lunge with correct knee/foot position when striking a hand fed shuttle
2. appreciate the use of height to create attacking opportunities when lifting from the net on the bh side
TITLE DESCRIPTION GOAL NO.
TIME
Warm-up Brief series of jogging/chasse/cross-behind movements. Squats of gradually increasing depth, progressing to lunging, balancing shuttle on head to promote good posture
1
5m
BH lift – focus on lunge
Bh lift off hand feed, promoting good knee/foot alignment. Gradually increase range of movement into stroke if quality of lunge sustained
1
15m
BH lift – height of lift
Partner hand feeds shuttle from forecourt, player lifts (maintain good lunge position). Feeder runs back to catch shuttle in rearcourt. Player gradually decreases height to make it more difficult for feeder to make the catch
2 15m
BH lift – Play rally out
Players play net shots to each other (not too tight). Player playing backhand net shots can decide when they want to lift (either straight or cross) – once lift played then Play the Rally Out (PRO). Lifting player scores 3 points if they win rally in there next two shots. Discuss the advantages/disadvantages of different heights of lift.
2
15m
Cooldown and summary
Jog with arms stretches at same time. Lower body stretches sat on floor whilst discussing the session
10m
REVIEW • Warm-up was longer (10m) • Body Language of player was positive • Feedback re PRO practice was positive
EVALUATE
• Ask more open questions to support player thinking for themselves • Player achieved goals set

41
BAD
MIN
TON
CO
ACH
ED
UC
ATIO
N ►
C
OAC
HES
’ MAN
UAL
►
LE
VEL
1 M
OD
ULE
3 ►
C
OAC
HIN
G P
RO
CES
S
05. SUMMARY AND SELF-EVALUATION: THE COACHING PROCESS
The coaching process is a four-stage procedure consisting of ‘plan’, ‘deliver’, ‘review’ and ‘evaluate’. Used correctly, the coaching process will help coaches to: • devise progressive sessions that support players’ improvement.
• learn from and improve their own coaching practice.
Each stage involves coaches using different skills which are summarised in the table below.
PLAN DELIVER REVIEW EVALUATE
• Assessing risks • Collecting player
information • Creating a register • Planning process • Observing and
analysing • Goal setting • Session planning
• Learning styles • Communication skills • Questioning
technique • Feedback • Demonstration • Skill development • Managed practices • Progressive
practices • Group management • Feeding skills
Think back and describe what happened: • Session content • What the players did • What the coach did
Decide: • If goals were
achieved
• How would you change session content?
• How would you change your coaching?
Good coaching is based on meeting the players’ needs. Coaches should apply this principle to all players, including those with disabilities, adapting their coaching practice as required.

42
BAD
MIN
TON
CO
ACH
ED
UC
ATIO
N ►
C
OAC
HES
’ MAN
UAL
►
LE
VEL
1 M
OD
ULE
3 ►
C
OAC
HIN
G P
RO
CES
S
06. SELF-ASSESSMENT QUESTIONS
1 The 4 components of the coaching process, in the correct order are:
Plan, deliver, evaluate and review
Review, plan, deliver and evaluate
Deliver, review, plan, evaluate
Plan, deliver, review and evaluate
2 The 3 main types of learner are: Visual, Kinaesthetic and Copying
Auditory, Visual and Kinaesthetic
Doing, Hearing and Kinaesthetic
Auditory, Listening and Doing
3 Messages can be delivered by: Non-verbal communication
Para-verbal communication
Verbal communication
All the above
4 Open questions tend to: Encourage answers of only “yes”
Encourage a wide variety of possible responses
Encourage answers of only “no”
Encourage answers of “yes” or “no”
5 Skills are best developed: Simple-complex, slow-fast, predictable-unpredictable
Complex-simple, slow-fast, predictable-unpredictable
Simple-complex, fast-slow, predictable-unpredictable
Simple-complex, slow-fast, unpredictable-predictable
6 “The power of the feed” is concerned with:
Speeding up the feed to make players work harder
Holding the shuttle with the thumb inside
Slowing the rate of feed
Delaying a feed until a correct technical point is established

43
BAD
MIN
TON
CO
ACH
ED
UC
ATIO
N ►
C
OAC
HES
’ MAN
UAL
►
LE
VEL
1 M
OD
ULE
3 ►
C
OAC
HIN
G P
RO
CES
S
7 A coach that encourages players to use their own intrinsic feedback:
Is helping those players think for themselves
Gives the players lots of verbal instruction
Tells the players what to do
Explains a great deal
8 The autonomous stage of learning: Is the expert phase of learning
Is the beginner phase of learning
Requires the player to put a lot of attention into how they produce a shot
Is the intermediate phase of learning
9 Reviewing a session involves: Listing what was good in the session
Describing what happening in a session
Deciding what you would do differently next time
Listing what was bad in the session
10 Evaluating a sessions involves: Listing what was good in the session
Describing what happening in a session
Deciding what you would do differently next time
Listing what was bad in the session

BADMINTON COACH EDUCATION
COACHES’ MANUAL LEVEL 1
MODULE 4COACHING CHILDREN

BADMINTON WORLD FEDERATION Unit 1, Level 29 Naza Tower, Platinum Park 10 Persiaran KLCC 50088 Kuala Lumpur Tel +603 2631 9188 Fax +603 2631 9688 [email protected]
MODULE 4 COACHING CHILDREN 01. Introduction 44 02. Children Mature at Different Rates 44 03. Importance of the ‘Growth Spurt’ 45 04. Adapting the Sport 45 05. Summary 46 06. Self-Assessment Questions 46
LEARNING OUTCOMES By the end of this module, coaches will be able to: • appreciate the influence that coaches can have over a child’s development; • recognise potential differences between children maturing at different rates; • appreciate the importance of the ‘growth spurt’ in children’s development.
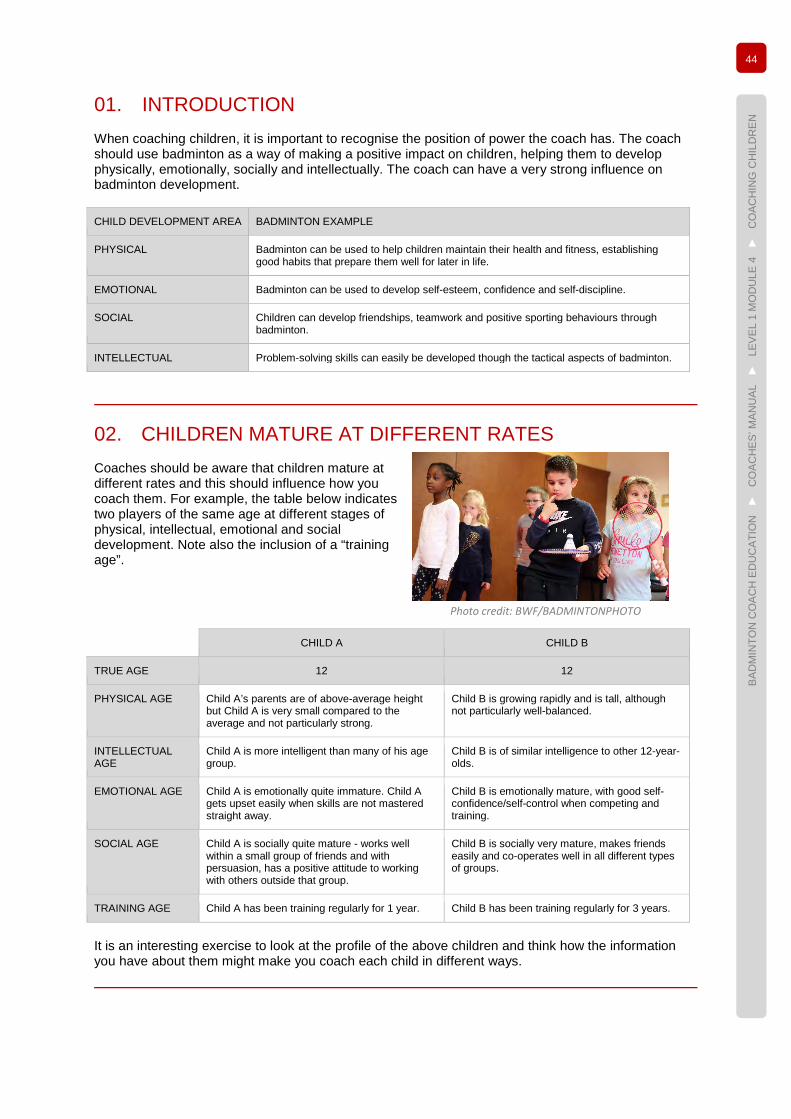
44
BAD
MIN
TON
CO
ACH
ED
UC
ATIO
N ►
C
OAC
HES
’ MAN
UAL
►
LE
VEL
1 M
OD
ULE
4 ►
C
OAC
HIN
G C
HIL
DR
EN
01. INTRODUCTION When coaching children, it is important to recognise the position of power the coach has. The coach should use badminton as a way of making a positive impact on children, helping them to develop physically, emotionally, socially and intellectually. The coach can have a very strong influence on badminton development. CHILD DEVELOPMENT AREA BADMINTON EXAMPLE
PHYSICAL Badminton can be used to help children maintain their health and fitness, establishing good habits that prepare them well for later in life.
EMOTIONAL Badminton can be used to develop self-esteem, confidence and self-discipline.
SOCIAL Children can develop friendships, teamwork and positive sporting behaviours through badminton.
INTELLECTUAL Problem-solving skills can easily be developed though the tactical aspects of badminton.
02. CHILDREN MATURE AT DIFFERENT RATES Coaches should be aware that children mature at different rates and this should influence how you coach them. For example, the table below indicates two players of the same age at different stages of physical, intellectual, emotional and social development. Note also the inclusion of a “training age”. CHILD A CHILD B
TRUE AGE 12 12
PHYSICAL AGE Child A’s parents are of above-average height but Child A is very small compared to the average and not particularly strong.
Child B is growing rapidly and is tall, although not particularly well-balanced.
INTELLECTUAL AGE
Child A is more intelligent than many of his age group.
Child B is of similar intelligence to other 12-year-olds.
EMOTIONAL AGE Child A is emotionally quite immature. Child A gets upset easily when skills are not mastered straight away.
Child B is emotionally mature, with good self-confidence/self-control when competing and training.
SOCIAL AGE Child A is socially quite mature - works well within a small group of friends and with persuasion, has a positive attitude to working with others outside that group.
Child B is socially very mature, makes friends easily and co-operates well in all different types of groups.
TRAINING AGE Child A has been training regularly for 1 year. Child B has been training regularly for 3 years.
It is an interesting exercise to look at the profile of the above children and think how the information you have about them might make you coach each child in different ways.
Photo credit: BWF/BADMINTONPHOTO

45
BAD
MIN
TON
CO
ACH
ED
UC
ATIO
N ►
C
OAC
HES
’ MAN
UAL
►
LE
VEL
1 M
OD
ULE
4 ►
C
OAC
HIN
G C
HIL
DR
EN
03. IMPORTANCE OF THE ‘GROWTH SPURT’ Somewhere between the ages of 10 and 16, children will experience a period of rapid growth. This is known as the ‘growth spurt’. Important facts about the growth spurt that can influence coaching are:
• Some children will experience the start of the growth spurt earlier (10 would be early) or later (14 would be late).
• Girls tend to experience the growth spurt earlier than boys.
• The 2-3 years prior to the growth spurt is a period where great improvements can be made in the development of sporting skills, due to the relative stability of the child’s body and the increased maturity of their nervous system.
• During the growth spurt, children may experience balance and co-ordination challenges. It is important to reassure them that this phase is temporary.
• Children may be more vulnerable to injury during the growth spurt because: o reduced balance and co-ordination means falls or incorrect technique could occur; o growth plates in bones made of softer cartilage are potential sites for injury; o there may be losses in flexibility.
Coaches can help players during the growth spurt by:
• being patient; • encouraging good technique; • avoiding excessive repetition in practices that could lead to more overuse injuries; • encouraging flexibility; • wherever possible, playing on appropriate surfaces.
04. ADAPTING THE SPORT One way in which children have fun when they begin a sport is through experiencing success. This is not necessarily the success of winning, but the success of learning new skills in an effective manner. Badminton can be adapted in a number of ways to help young children learn skills more effectively, and these are listed below. ADAPTATION ADVANTAGES
SHORTER RACKETS
• Easier to control a shorter lever. • The object being struck is not so far from the mid-line of the body, which children will find
easier.
LOWER NET • Strokes around the net can be played with the same shape as the child would be expected to produce as an adult (e.g. net shot around shoulder height).
• Children more likely to hit down.
SLOWER OBJECT BEING STRUCK
• In the early stages, hitting balloons allows children to experience success and have time to think about grips, grip changes and the shapes of strokes (e.g. forearm rotation).
MODIFIED RULES • Occasionally altering the rules can help players acquire a skill more effectively. Examples could be:
o alternating serves so both children get an equal amount of serving practice when playing against each other;
o allowing second serves so children get “another go” if they are not successful at first; o giving bonus points for winning a rally with a particular stroke.
Photo credit: BWF/BADMINTONPHOTO

46
BAD
MIN
TON
CO
ACH
ED
UC
ATIO
N ►
C
OAC
HES
’ MAN
UAL
►
LE
VEL
1 M
OD
ULE
4 ►
C
OAC
HIN
G C
HIL
DR
EN
05. SUMMARY These are key points in this module: • When coaching children, it is important to
recognise the coach has a highly responsible role. A badminton coach can make a positive contribution to a child’s physical, emotional, intellectual and social development.
• Children mature at different rates and it is important to take this into consideration, adapting your coaching accordingly.
• Older children experience a growth spurt which can affect their enjoyment and progress. Careful attention by the coach can assist the child in maintaining their enjoyment, reduce the chance of injury, and support their further development.
06. SELF-ASSESSMENT QUESTIONS
1 Solving a tactical issue in singles would be an example of a child developing what type of skill through badminton?
Physical
Social
Emotional
Intellectual
2 Which of the following is not true?
Boys generally mature before girls.
The ‘growth spurt’ can cause a loss in flexibility.
Balance can be affected during the ‘growth spurt'.
Excessive, repetitious practices can lead to overuse injuries.
3 The growth plates, which are potential sites of injury during the growth spurt, are made of:
Muscle
Bone
Ligament
Cartilage
4 A child’s emotional age takes into consideration:
How intelligent they are compared to children of similar age
How tall they are compared to children of similar age
How long they have been training for
Their moods, temperament etc. compared to children of similar age
5 Badminton can be adapted to help children learn by:
Using shorter rackets
Lowering the net
Altering the rules
All the above
Photo credit: BWF/BADMINTONPHOTO


BADMINTON COACH EDUCATION
COACHES’ MANUAL LEVEL 1
MODULE 5PERFORMANCE FACTORS

BADMINTON WORLD FEDERATION Unit 1, Level 29 Naza Tower, Platinum Park 10 Persiaran KLCC 50088 Kuala Lumpur Tel +603 2631 9188 Fax +603 2631 9688 [email protected]
MODULE 5 PERFORMANCE FACTORS 01. Performance in Badminton 47 02. The Importance of ‘Early’ to Badminton Performance 47 03. Factors Affecting Badminton Performance 48 04. Stages of Player Development 48 05. Self-Assessment Questions 50
LEARNING OUTCOMES By the end of this module, coaches will be able to: • define the five performance factors that underpin successful participation in badminton; • identify different stages of player development.

47
BAD
MIN
TON
CO
ACH
ED
UC
ATIO
N ►
C
OAC
HES
’ MAN
UAL
►
LE
VEL
1 M
OD
ULE
5 ►
PE
RFO
RM
ANC
E FA
CTO
RS
01. PERFORMANCE IN BADMINTON To perform well at badminton, players have to cope with three broad types of situations, which can be labelled:
• attacking • neutral • defensive
These situations are related to how high the shuttle is when it is being struck. These situations are represented in the illustration below.
02. THE IMPORTANCE OF ‘EARLY’ TO BADMINTON PERFORMANCE
Striking the shuttle ‘early’, in terms of both height and closeness to the net, means players will: • find themselves in attacking situations more often, with a greater number of opportunities to strike
the shuttle downwards into their opponent’s court; • be able to exert more pressure on their opponents by giving them less time; • have more options as to the type of strokes that can be played.
Defensive
Neutral situations
Attacking
Early

48
BAD
MIN
TON
CO
ACH
ED
UC
ATIO
N ►
C
OAC
HES
’ MAN
UAL
►
LE
VEL
1 M
OD
ULE
5 ►
PE
RFO
RM
ANC
E FA
CTO
RS
03. FACTORS AFFECTING BADMINTON PERFORMANCE Within badminton, performance factors can be defined as:
“the elements of training that influence a player’s capacity to perform effectively.” In order to develop optimally, a player needs to address five key performance factors:
PERFORMANCE FACTOR
EXAMPLES
TECHNICAL How to move and hit the shuttle.
TACTICAL Decision making, depending upon awareness.
PHYSICAL Strength, speed, endurance, flexibility, etc.
PSYCHOLOGICAL Self-reliance, confidence, control, concentration, commitment.
LIFESTYLE Balance of activities, time management, parents, nutrition, injury management.
Whilst it helps to organise coaching information under these five separate headings, they are very much interlinked. For example: • To have the endurance to last a long match (physical factor) requires correct nutrition (lifestyle
factor). • Better movement and hitting (technique) improves options for attack (tactics). • Adapting to the opponent’s strokes (tactics) requires concentration and calmness under pressure
(psychology).
04. STAGES OF PLAYER DEVELOPMENT To develop as much as possible, not only do we need to consider the five performance factors, but also the stage of development of the player. A model which considers not only the five performance factors, but also the stage of development of the player is shown overleaf. This document is useful to the coach because it identifies what factors to emphasise at which stage when helping to develop players.

49
BADMINTON COACH EDUCATION ► COACHES’ MANUAL ► LEVEL 1 MODULE 5 ► PERFORMANCE FACTORS
TECHNICAL TACTICAL PHYSICAL PSYCHOLOGICAL LIFESTYLE
MID-CHILDHOOD • 6 – 9 M • 6 - 8 F
• Movements (split-step, travelling, lunging, jumping)
• Striking skills (forearm rotation focus) - underarm and overarm
• Introduction to modified games (small court, no net – low net, modified shuttles)
• Singles • Personal spatial awareness
(reach)
• Focus on ABCs (agility, balance, co-ordination and speed)
• Warm-ups and cool-downs as means to control group
Introduction to: • basic laws of the game • ethics of the game
• Parental focus – introduction to simple rules and ethics of the sport
LEARNING TO PLAY • 9 – 12 M • 8 – 11 F
• Linking of movements into distinct sport-specific patterns
• Form hitting techniques into wide ranging, deceptive strokes
• Transition from modified games to full court
• Singles bias with gradual introduction to level doubles
• Planned, graduated introduction to competition
• Spatial awareness (height, width + depth) to support decision making
• Problem-solving approach with conditioned games
• Basic introduction to physical conditioning (but not formalised programmes)
• Gradual introduction of formalised warm-up and cool-down in later stages of period
Develop a positive attitude towards: • yourself • others in the sport • the sport itself
• Parent education programme (e.g., long-term plan, parent-coach-player roles, communication, etc.)
TRAINING TO TRAIN • 12-16 M • 11-15 F
• Consistent production of movement patterns and strokes sustained under increasingly unpredictable training environments and when competing with peers
• Address personal development areas
• Spatial, self, opponent and partner awareness supporting decision making
• Problem-solving approach with conditioned games
• Singles bias with development of specific doubles tactics (mixed in latter stages of period)
• Introduction to development of four S’s (stamina, speed, suppleness and strength)
• Gradual move to formalised physical training programmes once emotionally mature
• Implicit mental training embedded in practice
• Focus on development of self-resilience
• Support under four Cs: o Control o Confidence o Concentration o Commitment
• Increased expectation of players to take responsibility for own lifestyle choices and control (parent to player transition)
TRAINING TO COMPETE • 16 -18 M • 15 – 17 F
• Consistent production of movement patterns and stroke shapes in competition against peers (at higher speeds)
• Address personal development areas
• Introduce periodised technical training
• Match pre-planning • Post-match analysis • Video analysis • Implementation of match plans
against specific opponents • Introduction of periodised
approach to tactical training • Working with coaches at events
• Increased move to periodised physical training
• Individualised training programme
• Likely involvement of strength/conditioning experts
• Gradual exposure to more explicit psychological training, possibly led by specialists
• Player takes major role in lifestyle choices and management (diet, time-management, education/ training balance, training diary, tournament plan, equipment etc.)
TRAINING TO WIN • 18 + M • 17+ F
• Periodised and individual training programmes

50
BAD
MIN
TON
CO
ACH
ED
UC
ATIO
N ►
C
OAC
HES
’ MAN
UAL
►
LE
VEL
1 M
OD
ULE
5 ►
PE
RFO
RM
ANC
E FA
CTO
RS
05. SELF-ASSESSMENT QUESTIONS
1 How many factors affect performance in badminton?
4
6
5
3
2 What is the order of the developmental phases? Number them from 1 to 4.
Train to Win
Train to Compete
Learn to Play
Train to Train
BADMINTON COACH EDUCATION
COACHES’ MANUAL LEVEL 1
MODULE 6PERFORMANCE FACTOR 1 TECHNICAL (MOVEMENT SKILLS)

BADMINTON WORLD FEDERATION Unit 1, Level 29 Naza Tower, Platinum Park 10 Persiaran KLCC 50088 Kuala Lumpur Tel +603 2631 9188 Fax +603 2631 9688 [email protected]
MODULE 6 PERFORMANCE FACTOR 1 - TECHNICAL (MOVEMENT SKILLS) 01. Introduction 51 02. Components of Badminton Movements 51 03. Split-Step 53 04. Approach and Recovery 57 05. Movements Associated with Hitting 61 06. Movement Patterns 64 07. Summary 70 08. Self-Assessment – Movement Skills 71
LEARNING OUTCOMES
By the end of this module, coaches will be able to: • list the components of effective badminton movement; • organise the components of effective movement using the movement cycle model; • describe practices to train the components of badminton movement; • link the components of badminton movement into recognised patterns; • describe methods of training movement patterns.

51
BAD
MIN
TON
CO
ACH
ED
UC
ATIO
N ►
C
OAC
HES
’ MAN
UAL
►
LE
VEL
1 M
OD
ULE
6 ►
PE
RFO
RM
ANC
E FA
CTO
R 1
- TE
CH
NIC
AL (M
OVE
MEN
T SK
ILLS
)
01. INTRODUCTION Badminton is a high-speed sport played on a relatively small court against an opponent who will, amongst other things, be trying to force you off-balance and out of position. For these reasons, badminton players need to be able to move quickly and efficiently if they are to compete well within the sport.
02. COMPONENTS OF BADMINTON MOVEMENTS If you watch a high level badminton game and focus on the movements performed by the player, you will see the same movements being repeated many times over. These movement components are listed below:
• Split-step • Running steps • Chassé • Cross-behind • Hop/pivot • Lunge • Jump • Landing
Training these movement components in isolation is useful, but eventually they need to be integrated so that the players can flow around the court effectively. A useful way to put these components together is in a model known as the “movement cycle” (shown overleaf). The movement cycle has four parts: • START, which happens in response to your opponent’s hit and allows you to move off towards
the shuttle; • APPROACH, which includes the methods you would then use to travel across the court
towards the shuttle; • HIT, or more precisely the movements your body performs as you hit; • RECOVER, involving methods you would use to travel in a direction that anticipates your
opponent’s reply.
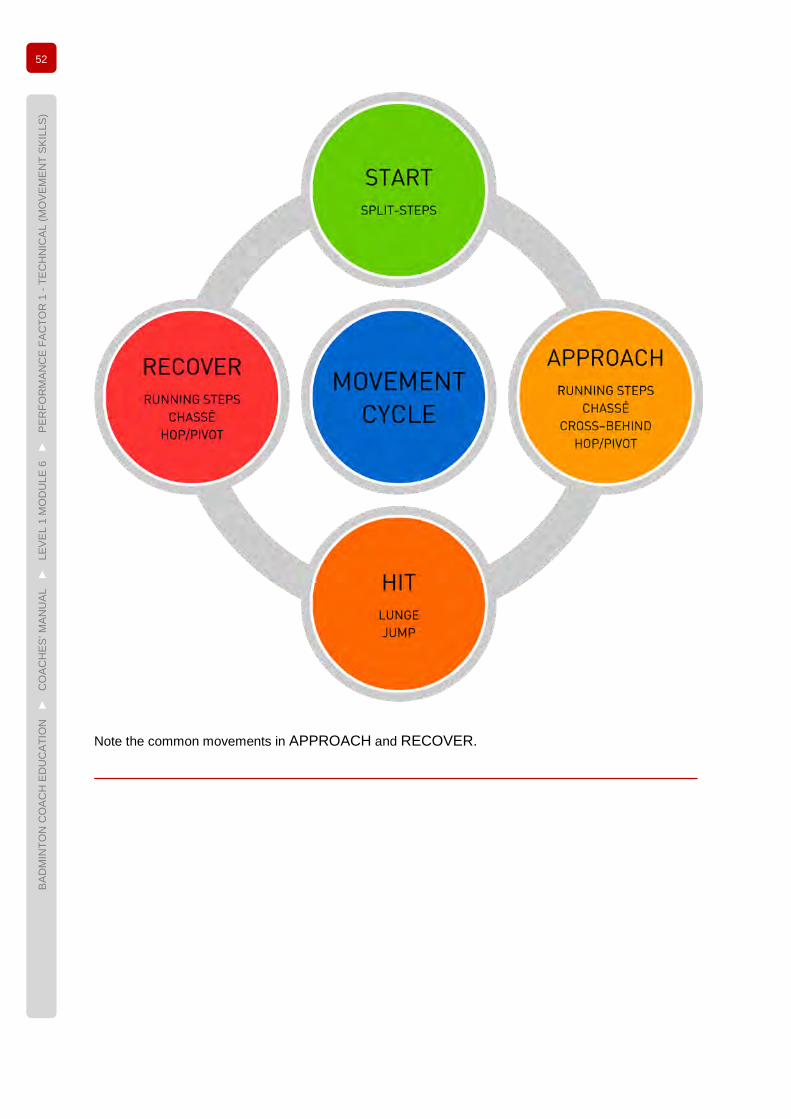
52
BAD
MIN
TON
CO
ACH
ED
UC
ATIO
N ►
C
OAC
HES
’ MAN
UAL
►
LE
VEL
1 M
OD
ULE
6 ►
PE
RFO
RM
ANC
E FA
CTO
R 1
- TE
CH
NIC
AL (M
OVE
MEN
T SK
ILLS
)
Note the common movements in APPROACH and RECOVER.
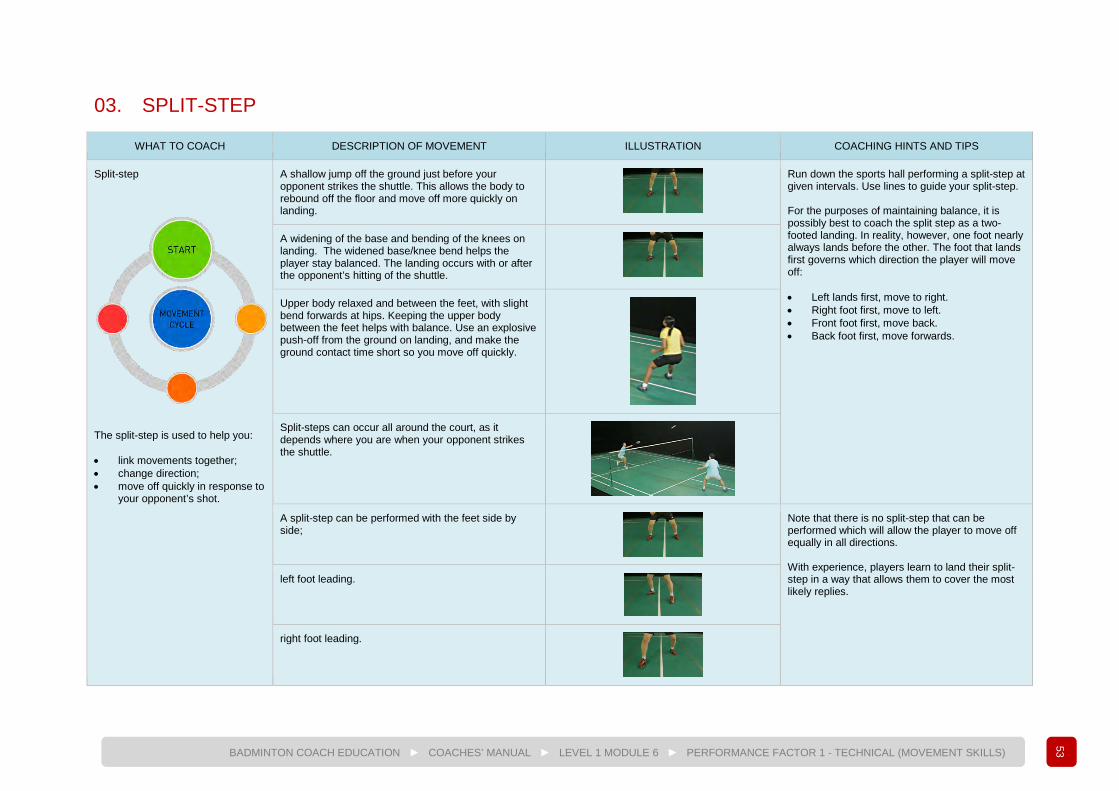
53
BADMINTON COACH EDUCATION ► COACHES’ MANUAL ► LEVEL 1 MODULE 6 ► PERFORMANCE FACTOR 1 - TECHNICAL (MOVEMENT SKILLS)
03. SPLIT-STEP
WHAT TO COACH DESCRIPTION OF MOVEMENT ILLUSTRATION COACHING HINTS AND TIPS
Split-step
The split-step is used to help you: • link movements together; • change direction; • move off quickly in response to
your opponent’s shot.
A shallow jump off the ground just before your opponent strikes the shuttle. This allows the body to rebound off the floor and move off more quickly on landing.
Run down the sports hall performing a split-step at given intervals. Use lines to guide your split-step. For the purposes of maintaining balance, it is possibly best to coach the split step as a two-footed landing. In reality, however, one foot nearly always lands before the other. The foot that lands first governs which direction the player will move off: • Left lands first, move to right. • Right foot first, move to left. • Front foot first, move back. • Back foot first, move forwards.
A widening of the base and bending of the knees on landing. The widened base/knee bend helps the player stay balanced. The landing occurs with or after the opponent’s hitting of the shuttle.
Upper body relaxed and between the feet, with slight bend forwards at hips. Keeping the upper body between the feet helps with balance. Use an explosive push-off from the ground on landing, and make the ground contact time short so you move off quickly.
Split-steps can occur all around the court, as it depends where you are when your opponent strikes the shuttle.
A split-step can be performed with the feet side by side;
Note that there is no split-step that can be performed which will allow the player to move off equally in all directions. With experience, players learn to land their split-step in a way that allows them to cover the most likely replies.
left foot leading.
right foot leading.

54
BADMINTON COACH EDUCATION ► COACHES’ MANUAL ► LEVEL 1 MODULE 6 ► PERFORMANCE FACTOR 1 - TECHNICAL (MOVEMENT SKILLS) HOW TO COACH: PRACTICES FOR THE SPLIT-STEP
PRACTICE ILLUSTRATIONS COACHING HINTS AND TIPS
Split-step on the spot.
Coach marches.
Coach split-step (side to side).
Coach split step (one foot forwards).
Coach split step (other foot forwards).
Give players the opportunity to lead each other in pairs, or one player leads the group rather than the coach doing it.
Player marches.
Player split-step (side to side).
Player split step
(one foot forwards).
Player split step
(other foot forwards).
Split-step response to tapped shuttle.
Coach holds racket and shuttle.
Coach taps shuttle in front.
Coach taps shuttle out to one side.
Coach taps shuttle to other side.
This could be developed by allowing players to move off having performed the split-step.
Player marches.
Player split-step (side to side).
Player split-step
(right foot forwards).
Player split-step
(left foot forwards).
The group marches on the spot, with the coach facing them holding a racket and shuttle.
When the coach taps the shuttle with the racket directly in front, then the players should perform a split-step with their feet going out to the sides.
If the coach taps to the left then the players should do a split- step with the right foot forwards.
If the coach taps to the right then the players should do a split-step with the left foot forwards.

55
BADMINTON COACH EDUCATION ► COACHES’ MANUAL ► LEVEL 1 MODULE 6 ► PERFORMANCE FACTOR 1 - TECHNICAL (MOVEMENT SKILLS)
HOW TO COACH: PRACTICES FOR THE SPLIT-STEP
PRACTICE ILLUSTRATIONS COACHING HINTS AND TIPS
Tramline split-steps.
1
2
3
4
• Although this should be done slowly to begin with, encourage the players to perform this as quickly as possible, as soon as possible.
• Imagining the ground is hot can sometimes encourage players to use a short ground contact time.
• Players should learn how to do this forwards and backwards.
• Working in pairs, one player can shout “change” or clap when they want the player to change direction.
Split-step, with the right foot forwards and landing in the back tramlines. Make players keep their bodies within their base of support and drive off rear leg.
Drive off left foot and place in tramlines next to right foot.
Move right foot out of tramlines.
Perform a shallow jump and pivot, establishing a new split step with the left foot in the tramlines.
Split-step shuttle catch.
A
B
A
B
A
B
A
B
• By catching two-handed in front of the body, players are encouraged not to lean but rather to use their legs to drive quickly into position.
• This can be developed into one-handed catching to either side of the body, but make sure that: o the split-step is maintained; o any leaning of the upper body is not
excessive.
• Player A stands opposite player B.
• Player A has a shuttle in hand.
• Player A throws a shuttle underarm to the side of player B.
• Player B does a split-step and pushes off to intercept the shuttle.
• Player B chasses to help mover into position.
• Player B catches the shuttle two-handed in front of their body.

56
BADMINTON COACH EDUCATION ► COACHES’ MANUAL ► LEVEL 1 MODULE 6 ► PERFORMANCE FACTOR 1 - TECHNICAL (MOVEMENT SKILLS) HOW TO COACH: PRACTICES FOR THE SPLIT-STEP
PRACTICE ILLUSTRATIONS COACHING HINTS AND TIPS
Split-step down the hall.
Gradually reduce the amount of time spent in the split-step position, encouraging a short ground contact time and a fast drive away off the mark.

57
BADMINTON COACH EDUCATION ► COACHES’ MANUAL ► LEVEL 1 MODULE 6 ► PERFORMANCE FACTOR 1 - TECHNICAL (MOVEMENT SKILLS)
04. APPROACH AND RECOVERY
WHAT TO COACH DESCRIPTION OF MOVEMENT ILLUSTRATION COACHING HINTS AND TIPS
APPROACHING AND RECOVERING Many of the movements used to approach the shuttle are the same as those used to recover having struck the shuttle. It is beneficial to be able to perform movements forwards, backwards and sideways.
Running steps.
• When running forwards: o the feet hit the ground heel then toe; o strides tend to be longer.
• When running backwards: o stay on your toes; o strides tend to be quick and short.
Forwards Backwards
Chassé • One foot chases the other, but
never quite catches it. • Chassés can be performed with
feet at 90o to each other. • Chassés can be performed with
feet parallel to each other (side steps).
• If done well the player will skim quickly across the ground.
• Encourage short ground contact times, as though the ground is hot.
• Pick a point on the wall ahead to concentrate on. If the point on the wall stays “still” then the player’s head will be staying level, helping that player to skim across the ground.
• Chassés normally occur singly or in pairs, so keep this in mind when practicing. Using chassés for long distances (e.g. the diagonals of the court) is a slow method and should be discouraged.
Cross–behind • The non-racket leg passes behind
the racket leg.
It is very rare for more than one cross-behind movement to be performed at a time.
Hop/Pivot • Hops are little jumps that take off
on one foot then land on the same foot. Often in badminton the hop is combined with a pivoting movement.
Hops can be about gaining height; however, they are often used to cover distance, particularly when a hop and pivot are combined.

58
BADMINTON COACH EDUCATION ► COACHES’ MANUAL ► LEVEL 1 MODULE 6 ► PERFORMANCE FACTOR 1 - TECHNICAL (MOVEMENT SKILLS) HOW TO COACH: PRACTICES FOR APPROACHING AND RECOVERING
All the practices below can be included within the warm-up phase.
PRACTICE ILLUSTRATIONS COACHING HINTS AND TIPS
Arm action for running.
Although it is rare to have to use too many running steps in a row, when it is needed then the running needs to be as effective as possible. An effective arm action contributes to that effectiveness.
• Work on the spot. • Hold hands so arms are bent to 90o. • Palms turned inwards. • Relaxed shoulders. • Perform alternating arm action. • Maintain 90o elbow angle. • Front hand reaches eye level. • Back hand finishes level with hip.
This can also be performed in a seated position.
Quick knee lifts. In quick knee lifts, one foot should be going over the hurdle and one should be below it. In other words, both feet should be moved downwards, so lilac foot is over hurdle but red foot is at the side of it.
This encourages a fast, sharp knee lift, which is important during the acceleration phase of running. This is very relevant to badminton where acceleration off the mark is crucial.
• Walking forwards. • After three steps, raise one knee
quickly in the air to 45o. The opposite hand should also raise up at the same time.
• Run alongside a small set of hurdles. • One foot works alongside the hurdles. • One foot works over the hurdles. • Use quick knee lifts and powerful arm
action. • Return in the opposite direction to work
both feet.
• Run over a small set of hurdles. • Use quick knee lifts and powerful arm
action. • Lead with one leg all the way (one leg
travels over the hurdle first each time). • Repeat leading with the other leg.

59
BADMINTON COACH EDUCATION ► COACHES’ MANUAL ► LEVEL 1 MODULE 6 ► PERFORMANCE FACTOR 1 - TECHNICAL (MOVEMENT SKILLS)
HOW TO COACH: PRACTICES FOR APPROACHING AND RECOVERING
All the practices below can be included within the warm-up phase.
PRACTICE ILLUSTRATIONS COACHING HINTS AND TIPS
Running forwards and backwards.
• Forwards running will involve longer strides than backwards running.
• Stand in the back tramlines with a side-on stance. • Run to the low service line.
• Run backwards to return to the back tramlines. • Arc the run slightly to result in a sideways stance.
Tramline Chassé. 1
2
3
4
• Although this should be done slowly to begin with, encourage the players to perform this as quickly as possible, as soon as possible.
• Imaging the ground is hot can sometimes encourage players to use a short ground contact time
• Players should learn how to do this forwards and backwards.
• Working in pairs, one player can shout “change” or clap when they want the player to change direction.
Split-step, with the right foot forwards and landing in the back tramlines. Encourage players to keep their bodies within their base of support.
Drive off left foot and place in tramlines next to right foot.
Move right foot out of tramlines.
Perform a shallow jump and pivot, establishing a new split-step with the left foot in the tramlines.
Chassé

60
BADMINTON COACH EDUCATION ► COACHES’ MANUAL ► LEVEL 1 MODULE 6 ► PERFORMANCE FACTOR 1 - TECHNICAL (MOVEMENT SKILLS) HOW TO COACH: PRACTICES FOR APPROACHING AND RECOVERING
All the practices below can be included within the warm-up phase.
PRACTICE ILLUSTRATIONS COACHING HINTS AND TIPS
Cross-behind.
• If used facing the net, keep watching the tape in order to keep your head still.
• Make sure you practice this both forwards and backwards.
• Although in a rally it is nearly always the racket leg that crosses behind, in training and warm-up it is advisable to work both sides.
Work your way along the court, performing a series of “Z” shapes using cross-behind steps.
Pivot/hop.
• This can be turned into a race against other players.
• Working in groups of 3, players can pass the shuttles rather than picking them up from the floor.
• Learn to pivot on both legs and also in both directions (clockwise and anticlockwise).
• Place one foot on a marker (as indicated by the green circle above).
• Place three shuttles on the ground which can be reached by performing a lunge.
• Reach down and pick up a shuttle, then pivot/hop around the foot which is located on the marker.
• Place shuttle down on the ground. • Pivot back round to collect the next shuttle. • Repeat until all three shuttles finish behind you.

61
BADMINTON COACH EDUCATION ► COACHES’ MANUAL ► LEVEL 1 MODULE 6 ► PERFORMANCE FACTOR 1 - TECHNICAL (MOVEMENT SKILLS)
05. MOVEMENTS ASSOCIATED WITH HITTING
WHAT TO COACH DESCRIPTION ILLUSTRATION COACHING HINTS AND TIPS
Movements associated with hitting.
LUNGING • Lunging is, in effect, a
large stride. The pictures to the right show where and when the lunge is used on the court.
• Most lunging is done on the racket leg, but some non-racket leg lunging does happen.
• The lead foot points towards the shuttle.
• Lead leg, knee and foot point of contact in the same direction to protect knee/ankle joints.
• Turn out rear foot to help with balance and range of movement.
• Bend rear knee to reduce strain on knee.
• Extend rear arm for balance. At the net, when performing net kills, net shots and lifts.
In the midcourt, when the shuttle is at the side of the body.
In therearcourt, when the shuttle is behind the striking player.
JUMPING BASICS Jumping can be defined as a movement involving an extended flight phase where both feet are off the ground. Jumps can be split into the preparation, flight and landing phases.
1
2 3 4
• An effective squat movement is a worthwhile movement to learn as it helps jumping technique.
• Feet pointing forwards, heels down throughout.
• Sit back, bending at the ankles, knees and hips.
• Chest up. • Aim to get the back and shins
parallel. • Bend at the ankles, knees and hips to pre-stretch leg muscles and help in force production.
• At the same time, swing the arms back and downwards.
• Keep chest up.
• Swing the arms forwards and upwards.
• Extend at the hips, knees and ankles.
• Direct force downwards into the ground.
• Extend all joints fully.
• Land on balls of feet first.
• Bend ankles, knees and hips on landing to absorb force.
• Keep chest up.
JUMPING VARIATIONS Apart from a basic jump involving taking off and landing, a number of other variations are possible.
Two feet to two feet.
Two feet to one foot.
One foot to two feet.
One foot to one foot (same foot – hopping).
One foot to other foot (bounding).
All jumps can be performed in 3 directions: • Side to side; • Forwards and backwards; • Rotationally.

62
BADMINTON COACH EDUCATION ► COACHES’ MANUAL ► LEVEL 1 MODULE 6 ► PERFORMANCE FACTOR 1 - TECHNICAL (MOVEMENT SKILLS)
HOW TO COACH: PRACTICES FOR LUNGES
PRACTICE DESCRIPTIONS COACHING HINTS AND TIPS
Creating a lunge shape.
• Use a wide stance. • Toes of front foot against wall. • Rear foot at 900 to front foot. • Rear arm extended for balance.
• Sink down, bending both knees. • Rear heel raises slightly.
A more advanced lunge would be to start with feet side-by-side and step into the lunge, then recover.
• Use of a wall can stop knee going too far.
• Complete three on one leg, three on the other.
Lunging with good posture.
• Stand upright with feet together. • Balance a shuttle on the head.
• Step forwards into a lunge position. • Keep the shuttle on the head.
• Return from the lunge position. • Keep the shuttle on the head.
• This is fun. • Balancing the shuttle
encourages the player to keep their trunk upright.
• When stepping into the lunge, encourage a straight leg phase.
Lunging and reaching.
• Stand opposite a training partner, holding a shuttle.
• Both players lunge forwards and the shuttle is passed between the two players.
• Return to the starting position and repeat on other leg.
• Encourage good range of movement.
• Encourage upright trunk position.
• Encourage use of extended rear arm for balance.
Lunging and striking.
• Player stands with feet at 900 to each other.
• Partner stands opposite holding a shuttle.
• Shuttle is thrown gently. • Player lunges forwards to strike shuttle.
• Partner catches shuttle. • Player returns to the start.
• This can be done on the forehand or backhand side.
• It can be used to practice lunging forwards or to the side.
• It can be done on-court over the net.

63
BADMINTON COACH EDUCATION ► COACHES’ MANUAL ► LEVEL 1 MODULE 6 ► PERFORMANCE FACTOR 1 - TECHNICAL (MOVEMENT SKILLS)
HOW TO COACH: PRACTICES FOR JUMPING
PRACTICE DESCRIPTIONS COACHING HINTS AND TIPS
Clock jumps.
• Many variations possible. • Experiment with different one- and
two-footed combinations. • Can involve players always facing
forwards, or turning in midair. • Players can work in pairs or small
groups.
• Stand in the centre of an imaginary/marked out clock.
• Squat down in preparation for the jump.
• Coach calls out a time (e.g. 3 o’clock). • Player jumps out in that direction.
• Coach calls out “centre”. • Player jumps back to centre of clock
face.
Tramline jumps.
• Experiment with different one- and two-footed combinations.
• To make it harder, jump across rear tramlines.
• Stand facing a partner next to the side tramlines of the court.
• Squat down to prepare for the jump.
• Both players jump sideways across the tramlines.
• Make good use of arms.
• Land on the balls of the feet. • Bend ankles, knees and hips to control
landing.
Jump and catch.
• Two players stand opposite each other. • One holds a shuttle.
• Player throws a shuttle high for partner to jump and catch two-handed.
• Land on balls of feet first. • Bend ankles, knees and hips to control
landing.
• Experiment with different one- and two-footed combinations.
• Throw in a predictable, then unpredictable patterns.
Jump and pivot.
• Player stands with feet together facing the net in the rear tramlines.
• Step back to load rear leg. • Rear foot should be at 900 to
front foot.
• Jump and rotate in the air. • Feet change places.
• Land rear foot then front foot. • Rear foot lands at 900 to front
foot.
• Throwing a ball to a partner, or against a wall, can be a useful way to make this more interesting.

64
BADMINTON COACH EDUCATION ► COACHES’ MANUAL ► LEVEL 1 MODULE 6 ► PERFORMANCE FACTOR 1 - TECHNICAL (MOVEMENT SKILLS) 06. MOVEMENT PATTERNS
WHAT TO COACH DESCRIPTION ILLUSTRATION COACHING HINTS AND TIPS
MOVEMENT PATTERNS In order to move around the court effectively, it is necessary to put together the movement components in specific patterns. These patterns can be quite personal and often depend on the exact situation. This section, therefore, contains some common patterns, but not all those that can occur.
Move to backhand forecourt.
• Promote short ground contact time on chassé.
• Make sure lunge has good range of movement, with a phase when the front leg is straight.
• Promote good upper-body
posture.
Split-step.
Chassé. Lunge. Step back or chassé back.
Split-step.
Running step. Lunge. Chassé/step back.
Split-step. Non-racket leg lead.
Hop/pivot around non-racket leg.
Lunge. Chassé/step back.

65
BADMINTON COACH EDUCATION ► COACHES’ MANUAL ► LEVEL 1 MODULE 6 ► PERFORMANCE FACTOR 1 - TECHNICAL (MOVEMENT SKILLS)
WHAT TO COACH DESCRIPTION ILLUSTRATION COACHING HINTS AND TIPS
MOVEMENT PATTERNS In order to move around the court effectively, it is necessary to put together the movement components in specific patterns. These patterns can be quite personal and often depend on the exact situation. This section, therefore, contains some common patterns, but not all those that can occur.
Move to backhand rearcourt.
• Make sure the pivot/hop covers some distance so it helps the player to move into the corner of the court.
Split-step.
Pivot/hop around the non-racket leg.
Jump and turn in the air – strike the shuttle while off the ground.
Chassé or running step.
• The running steps backwards should follow a slightly curved path, helping the player get side-on to the shuttle when they hit it.
Split-step.
Backwards running steps.
Jump and turn in the air - strike the shuttle while off the ground.
Chassé/step back.
• The more under pressure you are, the deeper the lunge becomes when you are hitting.
Split-step.
Chassé back. Turn your back on the net.
Half-lunge. Pivot/spin rapidly back into court.

66
BADMINTON COACH EDUCATION ► COACHES’ MANUAL ► LEVEL 1 MODULE 6 ► PERFORMANCE FACTOR 1 - TECHNICAL (MOVEMENT SKILLS) WHAT TO COACH DESCRIPTION ILLUSTRATION COACHING HINTS AND TIPS
MOVEMENT PATTERNS In order to move around the court effectively, it is necessary to put together the movement components in specific patterns. These patterns can be quite personal and often depend on the exact situation. This section, therefore, contains some common patterns, but not all those that can occur.
Movement to forehand forecourt.
• Promote short ground contact time on chasse.
• Make sure lunge has good range of movement, with a phase when the front leg is straight.
• Promote good upper-body posture.
Split-step. Racket leg leads.
Chassé. Lunge. Chassé and/or step back (shown).
Split-step.
Running step. Lunge. Chassé and/or step back.
Split-step. Racket leg leads.
Cross-behind. Lunge. Chassé and/or step back.

67
BADMINTON COACH EDUCATION ► COACHES’ MANUAL ► LEVEL 1 MODULE 6 ► PERFORMANCE FACTOR 1 - TECHNICAL (MOVEMENT SKILLS)
WHAT TO COACH DESCRIPTION ILLUSTRATION COACHING HINTS AND TIPS
MOVEMENT PATTERNS In order to move around the court effectively, it is necessary to put together the movement components in specific patterns. These patterns can be quite personal and often depend on the exact situation. This section, therefore, contains some common patterns, but not all those that can occur.
Move to forehand rearcourt.
• The more under pressure you are, the deeper the lunge becomes when you are hitting.
Split-step.
Cross-behind. Lunge. Chassé (shown) or pivot.
• This tends to be a straight-line movement, moving directly into the forehand rearcourt corner.
Split-step. Chassé. Jump out – strike shuttle while in the air.
Chassé.
• The split step and chassé tend to create an arcing shape, allowing the player to get more side-on to the shuttle.
Split-step.
Chassé back.
Jump and turn in the air – strike shuttle while off the ground.
Chassé/running steps.

68
BADMINTON COACH EDUCATION ► COACHES’ MANUAL ► LEVEL 1 MODULE 6 ► PERFORMANCE FACTOR 1 - TECHNICAL (MOVEMENT SKILLS) HOW TO COACH: MOVEMENT PATTERNS
The previous movement practices have focussed on working on particular components of movement (split step, jumps, chassé) in relative isolation. This section makes some suggestions on how movement patterns, which link these components, can be taught. Because of the size and complexity of this area, it is not feasible to cover every movement pattern in this resource. However, the “chaining” method suggested below can equally be applied to coaching movement patterns in all areas of the court. Basically, it involves starting with the hit and gradually linking movement into and out of the stroke.
PRACTICE DESCRIPTION COACHING HINTS AND TIPS
Lunge. • Stand just behind low service line and step into a lunge.
• Play a forehand net shot from a hand-fed shuttle.
• Encourage a good range of movement on lunge.
• Check knee and foot of leading leg pointing in same direction (towards likely point of impact of shuttle).
Chassé and lunge. • Stand with a wide stance, front foot just behind the low service line.
• Chassé. • Front foot steps out into lunge.
• Complete lunge, hitting a forehand net shot as the lunge is completed.
• Promote chassé as a quick movement, with a short ground contact time.
Split-step, chassé and lunge.
• Walk towards forecourt.
• Split-step with racket foot leading.
• Chasse • Front foot steps out
into lunge.
• Complete lunge, hitting a forehand net shot as the lunge is completed.
• Walking into split-step makes the split-step more realistic to the game.
• Promote split-step as an explosive movement with short ground contact time.
• Maintain relaxed but upright posture.
Split-step, chassé, lunge and chassé recovery.
• Walk towards forecourt. • Split-step with racket foot leading.
• Chasse. • Front foot steps out
into lunge.
• Complete lunge, hitting a forehand net shot as the lunge is completed.
• Chassé back once. • Maintain good posture in recovery.

69
BADMINTON COACH EDUCATION ► COACHES’ MANUAL ► LEVEL 1 MODULE 6 ► PERFORMANCE FACTOR 1 - TECHNICAL (MOVEMENT SKILLS)
HOW TO COACH: MOVEMENT PATTERNS
With more experienced groups, an alternative approach to chaining is to allow them to copy a whole movement cycle.
PRACTICE DESCRIPTION COACHING HINTS AND TIPS
Performing a whole movement cycle.
Coach demonstrates a movement pattern and players watch. • Let group observe from different positions.
Coach leads a movement pattern and players copy. • Having your back to group makes it easier for them to copy. Fault correction takes place at the next stage.
• Allow left-handers to face you so they can mirror your movement.
Players perform a movement pattern with no coach to copy.
Players perform a movement pattern and strike a suspended shuttle. Useful for overhead strokes.
Players perform a movement pattern and strike a shuttle fed to them. Give as much attention to the quality of recovery.
Linking movement cycles.
The natural progression from this is to link movement patterns together, either by shadowing court movements or performing practices with a shuttle.

70
BAD
MIN
TON
CO
ACH
ED
UC
ATIO
N ►
C
OAC
HES
’ MAN
UAL
►
LE
VEL
1 M
OD
ULE
6 ►
PE
RFO
RM
ANC
E FA
CTO
R 1
- TE
CH
NIC
AL (M
OVE
MEN
T SK
ILLS
)
07. SUMMARY The components of effective badminton movement are:
• Split-step • Running steps • Chassé • Cross-behind • Hop/pivot • Lunge • Jump • Landing
These components can be organised into a movement cycle, as shown below:
Each movement cycle is triggered by the opponent striking the shuttle. There are numerous ways in which the components can be put together by a player. This resource suggests a number of movement cycles which form a good basis to begin. Badminton movement can be trained by:
• working on the individual movement components in isolation; • chaining the components so they link to create a full movement cycle; • working on a movement cycle as a whole; • linking movement cycles together.

71
BAD
MIN
TON
CO
ACH
ED
UC
ATIO
N ►
C
OAC
HES
’ MAN
UAL
►
LE
VEL
1 M
OD
ULE
6 ►
PE
RFO
RM
ANC
E FA
CTO
R 1
- TE
CH
NIC
AL (M
OVE
MEN
T SK
ILLS
)
08. SELF-ASSESSMENT – MOVEMENT SKILLS
1 The movement cycle has four elements, listed in which order?
Hit-Approach-Start-Recover
Start-Hit-Approach-Recover
Recover-Approach-Hit-Start
Start-Approach-Hit-Recover
2 Which two parts of the movement cycle contain similar movements?
Approach and Recovery
Hit and Start
Start and Recovery
Hit and Approach
3 Which movement is not used to approach the forehand forecourt?
Running step
Chassé
Pivot on non-racket foot
Cross-behind
4 Lunges can occur when striking the shuttle:
In the rearcourt
In the forecourt
In the midcourt
All the above
5 An effective squatting shape involves:
Back and shins parallel
Heels off the ground
Weight through toes
Head looking down
6 A split-step: Involves a widening of the base
Helps to link movements
Helps to actively push off from the ground
All the above
7 “One foot chases the other one but never quite catches it” is a description of:
Chassé
Running step
Cross-behind
Hop

72
BAD
MIN
TON
CO
ACH
ED
UC
ATIO
N ►
C
OAC
HES
’ MAN
UAL
►
LE
VEL
1 M
OD
ULE
6 ►
PE
RFO
RM
ANC
E FA
CTO
R 1
- TE
CH
NIC
AL (M
OVE
MEN
T SK
ILLS
) 8 The balance during a
lunge to the net can be improved by:
Extending the rear arm
Keeping the distance between rear and front foot small
Leaning the body forwards
Keeping both feet pointing forwards
9 Jumping technique can be improved by:
Keeping the arms by the side throughout the jump
Keeping the arms extended above the head throughout the jump
Swinging the arms back and down then extending above the head
Keeping the arms crossed throughout the jump
10 The approach phase to a backhand overhead involves:
A hop/pivot around non-racket leg
Cross-behind
Lunge
Split-step

BADMINTON COACH EDUCATION
COACHES’ MANUAL LEVEL 1
MODULE 7PERFORMANCE FACTOR 2TECHNICAL (HITTING SKILLS)

MODULE 7 PERFORMANCE FACTOR 2 - TECHNICAL (HITTING SKILLS) 01. Introduction 73 02. Introduction of Hitting Techniques – Children / Beginners 74 03. Biomechanical Principles 74 04. Catching and Throwing 75 05. Games for Throwing and Catching 76 06. Developing Striking Skills 77 07. Hitting with the Hand 77 08. Hitting with a Very Short Grip 78 09. Hitting with a Long Grip 78 10. Basic Strokes 84 11. Introduction to Serving 85
a. Backhand Flick Serve 86 b. Backhand Low Serve 88 c. Forehand Flick Serve 90 d. Forehand Low Serve 92 e. Forehand High Serve 94
12. Introduction to Forecourt Strokes 96 a. Backhand Net Shot 97 b. Forehand Net Shot 99 c. Backhand Net Lift 101 d. Forehand Net Lift 103 e. Backhand Net Kill 105 f. Forehand Net Kill 107
13. Introduction to Midcourt Strokes 109 a. Block Off the Body 110 b. Backhand Drive 112 c. Forehand Drive 114
14. Introduction to Rearcourt Strokes 116 a. Forehand Clear 117 b. Forehand Smash 119 c. Forehand Dropshot 121 d. Pulled Forehand Dropshot 123 e. Backhand Clear 125 f. Backhand Pulled Dropshot 127
15. Summary – Performance Factor 1: Technical (Hitting Skills) 129 16. Self-Assessment – Hitting Skills 130

BADMINTON WORLD FEDERATION Unit 1, Level 29 Naza Tower, Platinum Park 10 Persiaran KLCC 50088 Kuala Lumpur Tel +603 2631 9188 Fax +603 2631 9688 [email protected]
LEARNING OUTCOMES By the end of this module, coaches will be able to: • list the basic biomechanical principles that underpin effective hitting; • describe practices to develop catching and throwing; • list the different types of grips used in badminton and describe activities/practices to develop
them; • describe different badminton strokes, including:
o where they are played; o when they are played; o why they are played; o what they look like; o how to practice them.

73
BAD
MIN
TON
CO
ACH
ED
UC
ATIO
N ►
C
OAC
HES
’ MAN
UAL
►
LE
VEL
1 M
OD
ULE
7 ►
PER
FOR
MAN
CE
FAC
TOR
2 -
TEC
HN
ICAL
(HIT
TIN
G S
KILL
S)
01. INTRODUCTION This section will cover biomechanical principles. This looks briefly at the importance of bending and straightening, rotating, and force generation when striking a badminton shuttle. CATCHING, THROWING AND STRIKING SKILLS Prior to learning how to strike a shuttle, children need to acquire catching, throwing and striking skills. This allows them to develop: • effective tracking skills (watching an approaching object); • hand-eye-foot co-ordination, allowing them to catch successfully; • throwing skills, which underpin the hitting skills that are developed later; • hitting skills with the hand. GRIPS Once basic sending and receiving skills have been established, the introduction of a racket means that children have to learn to grip the racket correctly in a number of different situations. STROKES This section will introduce a wide range of strokes used in badminton. For each stroke, there will be guidance on: • where the shot is played from and to; • when the shot is used; • why the shot is used; • what the stroke looks like; • how to practice it. For each stroke the aim should be to:
• make sure players appreciate that stroke’s tactical usage; • promote technical correctness; • provide different levels of practice so players can succeed whatever their current playing level; • provide practices that are fun and motivational.

74
BAD
MIN
TON
CO
ACH
ED
UC
ATIO
N ►
C
OAC
HES
’ MAN
UAL
►
LE
VEL
1 M
OD
ULE
7 ►
PER
FOR
MAN
CE
FAC
TOR
2 -
TEC
HN
ICAL
(HIT
TIN
G S
KILL
S)
02. INTRODUCTION OF HITTING TECHNIQUES – CHILDREN / BEGINNERS
Although there is no absolutely definite order in which strokes should be introduced, coaches may find the follow guidelines useful when working with beginners/young children. 1. Backhand serve. 2. Backhand forecourt strokes, including lifts, net kills and net shots. 3. Forehand forecourt strokes, including lifts, net kills and net shots. 4. Forehand high serves. 5. Backhand midcourt strokes (drives, blocks and pushes). 6. Forehand midcourt strokes (drives, blocks and pushes). 7. Forehand overheads. 8. Forehand and backhand overhead pulled dropshots. The rationale behind this suggested order is: • Backhands tend to be emphasised first because the actions are generally short and easier to time; • Forecourt strokes are mainly underarm, which is the easiest starting point and it also prepares the
players for overhead hitting and practice.
03. BIOMECHANICAL PRINCIPLES There are four key areas that underpin hitting skills in badminton. These are:
BACKSWINGS
To generate significant force, strokes require a backswing. BACKSWINGs stretch muscles. Those muscles then recoil rapidly in response to that stretch, adding power to the forward swing of the stroke.
COORDINATION: BIG MUSCLES TO SMALL MUSCLES
Hitting the shuttle in badminton is the result of muscle forces producing a series of co-ordinated joint movements in the body. The final force generated is greatest when the forces have started with big muscles and finished with smaller muscles.
ROTATION
Rotation of the whole body.

75
BAD
MIN
TON
CO
ACH
ED
UC
ATIO
N ►
C
OAC
HES
’ MAN
UAL
►
LE
VEL
1 M
OD
ULE
7 ►
PER
FOR
MAN
CE
FAC
TOR
2 -
TEC
HN
ICAL
(HIT
TIN
G S
KILL
S)
Rotation of the upper arm.
External Rotation
Internal Rotation
Rotation of the lower arm.
Lower arm: supination
(external rotation)
Lower arm: pronation (internal
rotation)
BENDING AND STRAIGHTENING
Bending and straightening of joints is also an important part of stroke production. Bending forms an element of the backswing, and straightening is involved in the forwards swing as you reach for the shuttle to strike it.
Bent arm
Straightened arm
04. CATCHING AND THROWING Working on throwing and catching helps children develop the skill to: • watch an object in flight carefully; • put their body and hands in the correct position to intercept that object. These skills underpin the eventual development of hitting skills. The table below explains a number of practices that can be undertaken to develop throwing and catching skills. ROLLING AND STOPPING
Young children can gain from rolling a ball to each other as this: • Helps them learn the importance of watching an object travelling towards them and how this can help
them collect that object successfully. • Allows them to experiment with applying different levels of force so the ball can travel different
distances successfully.
UNDERARM THROWS
• Throw different types and weights of objects. • Experiment with the feel of pushing, flicking and throwing objects, including shuttles, to compare the
different levels of control and flight paths that can be achieved. • Try both forehand throws (with the palm of the hand leading) and backhand throws (with the back of
the hand leading). • Devise games involving underarm throwing, such as underarm throwing golf where a number of
different underarm throws are used to deliver a shuttle into a target (e.g., a hoop).

76
BAD
MIN
TON
CO
ACH
ED
UC
ATIO
N ►
C
OAC
HES
’ MAN
UAL
►
LE
VEL
1 M
OD
ULE
7 ►
PER
FOR
MAN
CE
FAC
TOR
2 -
TEC
HN
ICAL
(HIT
TIN
G S
KILL
S)
UNDERARM CATCHES
Encourage watching the approaching object carefully and catching with palms up (little fingers together). Begin with catches directly in front of the body and then progress to: • catches on either side of body; • one-handed catches.
OVERHEAD THROWS
Encouraging children to learn effective overhead throwing techniques is very important, since this action is the basis of forehand overhead hitting. Progress this skill by working in pairs and throwing: • seated and cross-legged; • kneeling on both knees with bottom against heels; • kneeling on both knees with bottom off heels; • kneeling on one knee (right knee if a right hander); • stood square on; • stood side on with feet together; • stood side on with feet apart; • stood with feet together, take a step back and use drive from rear leg to help throw; • stood with feet together, take a step back and use drive from rear leg to help throw. Step through
immediately after throw delivered; • stood with feet together, take a step back and use drive from rear leg to help throw. Take off as you
throw, rotate and land. This helps children to appreciate how to use their bodies to generate forces when throwing.
OVERARM CATCHES
Encourage catching with palms up (thumbs together). Begin with catches directly in front of the body and then progress to: • catches on either side of body; • one-handed catches.
05. GAMES FOR THROWING AND CATCHING
These are fun games that encourage the development of throwing and catching skills. INTERCEPTION GAMES
• Dividing a group into two teams of no more than five. • Working within an agreed area, each team aims to keep possession of a weighted shuttlecock. • Contact between players is not allowed and once a player has caught the object they cannot move off
that spot until they have thrown the object to another member of their team. • This game can be used to improve overhead throwing by building rules that encourage good
technique. For example, you lose possession if the overhead thrower does not get side-on before they throw.
THROWMINTON
• Two players can compete against each other using a weighted shuttle on half a court. • The shuttle is thrown backwards and forwards across the net, with the aim being to land the object in
your opponent’s court or force them to make an error (e.g., into the net). • Once the shuttle has been caught the player must throw the shuttle back from where they caught it. • If the shuttle is in the front half of the court it needs to be returned with an underarm throw. If caught in
the rearcourt the shuttle should be returned with an overarm throw. • This game can be used to improve overhead throwing by building rules that encourage good
technique. For example, when throwing overhead the player must rotate in the air as they hit (kicking through). If they do not, they lose the point.
• Team versions of this game on a full court can be devised by the players.

77
BAD
MIN
TON
CO
ACH
ED
UC
ATIO
N ►
C
OAC
HES
’ MAN
UAL
►
LE
VEL
1 M
OD
ULE
7 ►
PER
FOR
MAN
CE
FAC
TOR
2 -
TEC
HN
ICAL
(HIT
TIN
G S
KILL
S)
06. DEVELOPING STRIKING SKILLS Catching and throwing involve the hands directly interacting with an object. Striking with a racket requires the player to adjust so the object being struck interacts with the racket face, which is some distance from the hand. Practices, therefore, should help the player to make this transition.
07. HITTING WITH THE HAND
Hitting with the hand is a development of throwing and catching. It requires you to watch the flying object carefully and adjust your feet and hands so the hand can strike that object successfully.
Working alone and using the palm of the hand, strike a soft ball or balloon in the air. Experiment hitting with one hand, then the other, then alternate. Experiment with keeping the object in the air whilst doing tricks (e.g., get down on the floor and back up again).
Working alone and using the back of the hand, strike a soft ball or balloon in the air. Experiment hitting with one hand, then the other, then alternate. Experiment with keeping the object in the air whilst doing tricks (e.g., get down on the floor and back up again).
Working alone, keep a soft ball or balloon in the air using the palms and backs of both hands. Try to make up a sequence of tricks.
Holding a soft ball or balloon above your head, reach up with the other hand and rotate the arm so you can see your palm. Then strike the ball out of your hand using your palm. Promote a follow-through that finishes so the player can see the back of their hand (forearm pronated).
Using a soft ball or balloon, rally with a partner using the palms and the backs of the hand. This can be done seated or standing.

78
BAD
MIN
TON
CO
ACH
ED
UC
ATIO
N ►
C
OAC
HES
’ MAN
UAL
►
LE
VEL
1 M
OD
ULE
7 ►
PER
FOR
MAN
CE
FAC
TOR
2 -
TEC
HN
ICAL
(HIT
TIN
G S
KILL
S)
08. HITTING WITH A VERY SHORT GRIP
Hitting with a very short grip helps players achieve success because the object they wish to strike is still relatively close to the hand when it is struck.
• Holding a racket near the “T” with the back of the hand upwards.
• Keep a balloon, soft ball or shuttle in the air using forearm rotation.
• Holding a racket near the “T” with the first finger below and along the frame.
• Keep a balloon, soft ball or shuttle in the air using forearm rotation.
• Holding a racket near the “T” with the first finger below and along the frame. Touch a shuttle with the strings of the racket.
• Take the racket head back using forearm rotation.
• Strike the shuttle using forearm rotation (the player can see the back of their hand).
09. HITTING WITH A LONG GRIP
For training exercises using a long grip, refer to the section on “grips”. GRIPS - INTRODUCTION To play badminton effectively, the ability to grip the racket appropriately in a large variety of situations is essential. The following guidelines are useful when coaching grips in badminton: • Grips should be relaxed. This gives various advantages, including easier grip changes, improved
power, reduced fatigue and increased deception.

79
BAD
MIN
TON
CO
ACH
ED
UC
ATIO
N ►
C
OAC
HES
’ MAN
UAL
►
LE
VEL
1 M
OD
ULE
7 ►
PER
FOR
MAN
CE
FAC
TOR
2 -
TEC
HN
ICAL
(HIT
TIN
G S
KILL
S)
• A tightening of the grip will naturally occur on impact. This tightening is more apparent in powerful
strokes (e.g., drives) than soft shots (e.g., net shots).
• Grips need continual adjustment depending on whether the shuttle is:
o in front, at the side or behind the player; o on the backhand and forehand side.
• Grips can also be long and short.
o Long grips are better for reach and also for power. For example, most rearcourt strokes
will use a long grip. When using the long grip, the bottom of the hand will be resting gently against the base of the racket handle, which is widened slightly to prevent the hand slipping off the racket.
o Short grips are often used for quick movements or when more control is required.

80
BAD
MIN
TON
CO
ACH
ED
UC
ATIO
N ►
C
OAC
HES
’ MAN
UAL
►
LE
VEL
1 M
OD
ULE
7 ►
PER
FOR
MAN
CE
FAC
TOR
2 -
TEC
HN
ICAL
(HIT
TIN
G S
KILL
S)
A) BASIC GRIP - WHAT TO COACH The basic grip is used to play strokes where the shuttle is level with the player, on both the forehand and backhand sides. The thumb and first finger of the hand creates a “v” shape on the racket handle. The position of the bottom of the “v” is important and is shown in the illustrations below. The basic grip is also called the “v” grip.
BASIC GRIP: LEVEL WITH PLAYER
BASIC GRIP: CLOSE UP BASIC GRIP: THE POSITION OF THE
BOTTOM OF THE “V”
INTRODUCTORY PRACTICES FOR “V” GRIP – HOW TO COACH
• Keep the shuttle up in the air as many times as possible with the palm of the hand upwards.
• Keep the shuttle up in the air as many times as possible with the palm of the hand upwards. Between each shot, pass the racket around the body once, twice or three times!
• Keep the shuttle up in the air as many times as possible with the palm of the hand upwards. Between each shot, pass the racket:
o under one leg; o under one leg, then the other.
• Keep the shuttle up in the air as many times as possible with the palm of the hand upwards. Strike the shuttle under one leg, under the other leg or round the back.
• Working with a partner, keep the shuttle up in the air as many times as possible with the palm of the hand upwards. Players take alternate shots.
• Working with a partner, strike the shuttle backwards and forwards across a line to each other with the palm of the hand ‘leading’.
• Strike a suspended object (balloon, fluff ball, shuttle) above the head using a basic grip. Use a throwing action and the aim is to hit the shuttle above/slightly in front of the striking shoulder (right shoulder for a right hander).

81
BAD
MIN
TON
CO
ACH
ED
UC
ATIO
N ►
C
OAC
HES
’ MAN
UAL
►
LE
VEL
1 M
OD
ULE
7 ►
PER
FOR
MAN
CE
FAC
TOR
2 -
TEC
HN
ICAL
(HIT
TIN
G S
KILL
S)
B) THUMB GRIP - WHAT TO COACH The thumb grip is used to play basic backhand strokes in front of the body. Examples include net shots, net lifts, net kills, backhand serves and backhand drives (when struck in front of the body). The thumb is placed at the back of the racket handle, with a slight gap between the hand and the racket handle.
THUMB GRIP: LONG SHOT THUMB GRIP: CLOSE-UP THUMB GRIP: THUMB POSITION
THUMB GRIP - HOW TO COACH
INTRODUCTORY PRACTICES FOR THE THUMB GRIP
• Establish the thumb grip on top of the racket handle. • Turn the hand over so the knuckles are upwards.
• Keep the shuttle up in the air as many times as possible with the back of the hand leading (thumb committed under the racket handle).
• Keep the shuttle up in the air as many times as possible with the back of the hand leading (thumb held firmly under the racket handle). Between each shot, pass the racket around the body once, twice or three times!
• Keep the shuttle up in the air as many times as possible with the back of the hand leading (thumb under the racket handle). Between each shot, pass the racket:
o under one leg; o under one leg, then the other.
• Keep the shuttle up in the air as many times as possible with the back of the hand leading (thumb placed under the racket handle). Between each stroke, go down on one knee, the other knee, sit down, lie down, and then get back up.
• Working with a partner, keep the shuttle up in the air as many times as possible with the back of the hand leading (thumb placed under the racket handle). Players take alternate shots.
• Working with a partner, strike the shuttle backwards and forwards across a line to each other with the back of the hand leading (thumb placed under the racket handle).

82
BAD
MIN
TON
CO
ACH
ED
UC
ATIO
N ►
C
OAC
HES
’ MAN
UAL
►
LE
VEL
1 M
OD
ULE
7 ►
PER
FOR
MAN
CE
FAC
TOR
2 -
TEC
HN
ICAL
(HIT
TIN
G S
KILL
S)
C) CORNER GRIP - WHAT TO COACH The corner grip is an alternative used for backhand strokes when the shuttle is level with or slightly behind the player. These strokes include backhand drives and blocks (when the shuttle is at the side of the body), backhand clears, backhand dropshots and backhand smashes.
CORNER GRIP: LONG SHOT CORNER GRIP: CLOSE-UP CORNER GRIP: THUMB POSITION
INTRODUCTORY PRACTICES FOR THE CORNER GRIP – HOW TO COACH
With your back to the net, strike a suspended object from slightly behind the body, either at shoulder height or above head height.
With your back to the net, strike a hand-fed shuttle from slightly behind the body, either at shoulder height or above head height.
Racket feed a shuttle so that the player can strike the shuttle from slightly behind the body with their back to the net.

83
BAD
MIN
TON
CO
ACH
ED
UC
ATIO
N ►
C
OAC
HES
’ MAN
UAL
►
LE
VEL
1 M
OD
ULE
7 ►
PER
FOR
MAN
CE
FAC
TOR
2 -
TEC
HN
ICAL
(HIT
TIN
G S
KILL
S)
D) PANHANDLE GRIP - WHAT TO COACH The panhandle grip is used for:
• backhand strokes when the shuttle is well behind the player (e.g., backhand dropshots); • forehand strokes when the shuttle is well in front of the player (e.g., net kills).
PANHANDLE GRIP: LONG SHOT
PANHANDLE GRIP: CLOSE UP
PANHANDLE GRIP: POSITION OF BOTTOM OF “V” SHAPE WHERE THUMB AND FIRST FINGER MEET
INTRODUCTORY PRACTICES FOR THE PANHANDLE GRIP – HOW TO COACH
For panhandle practices at the forehand net, refer to practices for net kills.
For panhandle practices in the deep backhand, refer to pulled backhand dropshots.
E) INTRODUCTORY PRACTICES FOR GRIP CHANGES – HOW TO COACH
Keep a shuttle in the air 5 times using a “basic grip” (forehand), then another 5 times using a thumb grip (backhand). Gradually reduce this to 4, 3, 2 and 1 hits so you finish alternating your grip after each shot.
Strike a hand-fed shuttle back to a practice partner. Do this 5 times with a basic grip on the forehand, then 5 times with a thumb grip on the backhand. Gradually reduce this to 4, 3, 2 and 1 hits so you finish alternating your grip after each shot.
Use a basic grip and a forehand overhead action to strike a suspended shuttle, then run forwards and strike a hand-fed shuttle using a thumb grip.
Use a basic grip and a forehand overhead action to strike a suspended shuttle, then turn and use a corner grip to strike the same object using a backhand overhead hit.
Use a panhandle grip to strike a hand-fed shuttle down at the net (forehand net kill). Change to a thumb grip and strike a hand-fed shuttle down at the net (backhand net kill).

84
BAD
MIN
TON
CO
ACH
ED
UC
ATIO
N ►
C
OAC
HES
’ MAN
UAL
►
LE
VEL
1 M
OD
ULE
7 ►
PER
FOR
MAN
CE
FAC
TOR
2 -
TEC
HN
ICAL
(HIT
TIN
G S
KILL
S)
10. BASIC STROKES This section will introduce a wide range of strokes used in badminton. For each stroke, there will be guidance on: • where the shot is played from and to; • when the shot is used; • why the shot is used; • what the stroke looks like (including preparation, backswing, forward swing and follow-through) • how to practice it; • hints, tips and variations (including spins, slices and opportunity for deception). A color-coded table is used throughout the strokes section.
WHERE THE STROKE GOES WHEN THE STROKE IS USED WHY THE STROKE IS USED
WHAT THE STROKE LOOKS LIKE
PREPARATION
BACKSWING FORWARD SWING FOLLOW-THROUGH
HOW TO INTRODUCE THE STROKES
HINTS, TIPS AND VARIATIONS
A) DECEPTION Being able to trick your opponent is a major part of badminton. Wherever possible, strokes should be made to look the same as other related shots to keep your opponent guessing. This will be reflected in the technical information given throughout. B) HITTING AND MOVEMENT Although this section concentrates on the actual striking of the shuttle, it is important to integrate movement into the exercises as soon as possible. Refer to the section on Skill Development for ideas on integrating hitting and movement together, placing particular attention on the use of chaining. C) STRAIGHT AND CROSS-COURT STROKES Strokes can also be hit straight or cross-court. Cross-courts strokes can be achieved by: • taking the shuttle out in front of the body; • changing the grip to alter the position of the racket face; • bending the wrist to alter the position of the racket face; • slicing the shuttle.

85
BAD
MIN
TON
CO
ACH
ED
UC
ATIO
N ►
C
OAC
HES
’ MAN
UAL
►
LE
VEL
1 M
OD
ULE
7 ►
PER
FOR
MAN
CE
FAC
TOR
2 -
TEC
HN
ICAL
(HIT
TIN
G S
KILL
S)
11. INTRODUCTION TO SERVING Because of the laws of the game, the server is restricted in what they can do with regards to serving. The laws relevant to serving are listed below. Note that this is correct at the time of writing, but coaches should keep up to date with any changes to the laws of the game via the BWF website. In a correct service: • neither side shall cause undue delay to the delivery of the service once the server and the receiver
are ready for the service. On completion of the backward movement of server’s racket head, any delay in the start of the service, shall be considered to be an undue delay;
• the server and the receiver shall stand within diagonally opposite service courts without touching the boundary lines of these service courts;
Singles service boxes (long and thin)
Doubles service boxes (short and fat)
• some part of both feet of the server and the receiver shall remain in contact with the surface of the
court in a stationary position from the start of the service until the service is delivered; • the server’s racket shall initially hit the base of the shuttle; • the whole shuttle shall be below the server’s waist at the instant of being hit by the server’s racket.
The waist shall be considered to be an imaginary line round the body, level with the lowest part of the server’s bottom rib;
• the shaft of the server’s racket at the instant of hitting the shuttle shall be pointing in a downward
direction; • the movement of the server’s racket shall continue forwards from the start of the service until the
service is delivered; • the flight of the shuttle shall be upwards from the server’s racket to pass over the net so that, if not
intercepted, it shall land in the receiver’s service court (i. e. on or within the boundary lines), and in attempting to serve, the server shall not miss the shuttle.
Once the players are ready for the service, the first forward movement of the server’s racket head shall be the start of the service. Once started, the service is delivered when the shuttle is hit by the server’s racket or, in attempting to serve, the server misses the shuttle. The server shall not serve before the receiver is ready. However, the receiver shall be considered to have been ready if a return of the service is attempted. In doubles, during the delivery of service, the partners may take up any positions within their respective courts, which do not unsight the opposing server or receiver.

86
BADMINTON COACH EDUCATION ► COACHES’ MANUAL ► LEVEL 1 MODULE 7 ► PERFORMANCE FACTOR 2 - TECHNICAL (HITTING SKILLS)
a. Backhand Flick Serve
WHERE THE SHUTTLE GOES WHEN WE USE IT WHY WE USE IT
To follow the laws of the game, the shuttle must travel from one service box to the diagonally opposite service box. Singles flick serves can go to the back line. Doubles flick serves must land within the inner doubles service line.
You use backhand flick serves at the start of the rally, hitting from a defensive/neutral situation.
You aim to force your opponent backwards and make them off-balance by making them believe you are going to serve low.
WHAT TO COACH
PREPARATION • Stance can vary, but most common is
with the racket foot forwards, close to the "T" on the court.
• Use a short, relaxed thumb grip (for doubles).
• Place the racket out in front of the body.
• Place shuttle on racket.
BACKSWING • Bend wrist and rotate forearm slightly. • Take the racket back a short distance. • Open the racket face.
FORWARD SWING • Accelerate the racket head forwards. • Flick the shuttle out of the hand.
FOLLOW-THROUGH • Momentum of racket continues arm rotation.

87
BADMINTON COACH EDUCATION ► COACHES’ MANUAL ► LEVEL 1 MODULE 7 ► PERFORMANCE FACTOR 2 - TECHNICAL (HITTING SKILLS)
HOW TO COACH - INTRODUCTORY PRACTICES FOR A BACKHAND FLICK SERVE
Strike the shuttle from the hand into a target area (hoop, bucket etc.) without a net. Make sure the distance is sufficient to encourage a flicking action.
In small teams, use a backhand flick serving technique into target areas, with each area achieving a score (e.g., one point = large target, 5 points = medium target, 10 points = small target). Having struck the shuttle, run forwards to collect the shuttle and return to the back of the queue. Count up your own score to compare to your teammates, or add up your team score to compare to other teams after a set time (e.g., 3 minutes). Make sure the distance is sufficient to encourage a flicking action.
Two players stand on opposite sides of the net. They place a target close to the rear service line of their service box. The two players then have alternate backhand flick serves, scoring how many times they hit the target. After a set time (e.g., 3 minutes), scores are compared to find a winner. If it’s a draw, hit the shuttle in the air and whichever way it points is the winner. Winners move up the hall, losers move down the hall to take on a new opponent.
Play a game where only backhand flick serves are allowed. Consider: • allowing players two attempts, so if they hit the first serve out or into the net then they get another go; • rotating serves, so everyone gets an equal amount of serving practice; • having the receiver stand in different positions and carry their racket in different positions. The server must adjust where they place their flick serve (e.g., wide, to centre, etc.).
HINTS, TIPS AND VARIATIONS • Make flick serves look like your low serve to confuse your opponent. • In singles, backhand flick serves can be delivered with a longer grip and deeper in the court.

88
BADMINTON COACH EDUCATION ► COACHES’ MANUAL ► LEVEL 1 MODULE 7 ► PERFORMANCE FACTOR 2 - TECHNICAL (HITTING SKILLS)
b. Backhand Low Serve
WHERE THE SHUTTLE GOES WHEN WE USE IT WHY WE USE IT
To follow the laws of the game, the shuttle must travel from one service box to the diagonally opposite service box. Backhand low serves pass close to the top of the net and land at the front of the diagonally opposite service box.
Used in doubles and men’s singles to start the rally, from a defensive/neutral situation.
• Restrict your opponent’s opportunity to attack.
• Help create attacking opportunities for
yourself.
WHAT TO COACH
PREPARATION • Stance can vary, but most common is with the
racket foot forwards, close to the "T" on the court.
• Use a short, relaxed thumb grip (for doubles). • Place the racket out in front of the body. • Place shuttle on racket.
BACKSWING • Take the racket back a short distance. • Open racket face slightly.
FORWARD SWING • Push through the shuttle. • Strike the shuttle out of the hand.
FOLLOW-THROUGH • Continue pushing action. • Bring racket up to threaten service reply.

89
BADMINTON COACH EDUCATION ► COACHES’ MANUAL ► LEVEL 1 MODULE 7 ► PERFORMANCE FACTOR 2 - TECHNICAL (HITTING SKILLS)
HOW TO COACH - INTRODUCTORY PRACTICES FOR A BACKHAND LOW SERVE
Strike the shuttle from the hand into a target area (hoop, bucket etc.) without a net.
In small teams, use a backhand low serving technique into target areas, with each area achieving a score (e.g., one point = large target, 5 points = medium target, 10 points = small target). Having struck the shuttle, run forwards to collect the shuttle and return to the back of the queue. Count up your own score to compare to your teammates, or add up your team score to compare to other teams after a set time (e.g., 3 minutes).
Two players stand on opposite sides of the net. They place a target close to the front service line of their service box. The two players then have alternate backhand serves, scoring how many times they hit the target. After a set time (e.g., 3 minutes), scores are compared to find a winner. If it’s a draw, hit the shuttle in the air and whichever way it points is the winner. Winners move up the hall, losers move down to take on a new opponent.
Play a game where only backhand low serves are allowed. Consider: • allowing players two attempts, so if they hit the first serve out or into the net then they get another go; • rotating serves, so everyone gets an equal amount of serving practice; • having the receiver stand in different positions and carry their racket in different positions. The server must adjust where they place their low serve (e.g., wide, to centre, at the player, etc.).
HINTS, TIPS AND VARIATIONS • Make low serves look like your flick serve to confuse your opponent. • Serve mainly to the centre in doubles, so you can cover returns to both sides equally. However, also develop the skill to vary serves along the front service line to keep your opponent guessing
and disrupt their favourite returns. • Serve slightly further into court in singles to restrict the opportunity for your opponent to play tight shots to the net. • In singles, backhand low serves can be delivered with a longer grip and deeper in the court.

90
BADMINTON COACH EDUCATION ► COACHES’ MANUAL ► LEVEL 1 MODULE 7 ► PERFORMANCE FACTOR 2 - TECHNICAL (HITTING SKILLS)
c. Forehand Flick Serve
WHERE THE SHUTTLE GOES WHEN WE USE IT WHY WE USE IT
To follow the laws of the game, the shuttle must travel from one service box to the diagonally opposite service box. Singles flick serves can go to the back line.
You use forehand flick serves at the start of the rally when you are in a defensive/neutral situation. They are mainly used in women’s singles, but can be used in any event.
You aim to force your opponent backwards and make them off-balance by making them believe you are going to low serve.
WHAT TO COACH
PREPARATION • Sideways stance within service box. • Basic grip. • Racket and shuttle in elevated
position. • Weight on rear leg.
BACKSWING • Begin transfer of weight forwards. • Drop the shuttle to the side/in front • Lower the racket. • Bend the wrist and supinate the forearm.
FORWARD SWING • Continue weight transfer to front foot. • Swing racket forwards. • Accelerate racket head by pronating
forearm and straightening wrist. • Strike hard through the shuttle – in front
and to side of body.
FOLLOW-THROUGH • Momentum carries racket through high and long.

91
BADMINTON COACH EDUCATION ► COACHES’ MANUAL ► LEVEL 1 MODULE 7 ► PERFORMANCE FACTOR 2 - TECHNICAL (HITTING SKILLS)
HOW TO COACH - INTRODUCTORY PRACTICES FOR A FOREHAND FLICK SERVE
Forehand serves are slightly more challenging than backhand serves because they involve striking a dropping shuttle. This challenge is addressed in the practices described below.
In order for players to experience immediate success: • encourage them to use a basic grip; • place the shuttle onto the strings of the racket. (The player will need to bend forwards slightly to achieve this.); • create a short backswing by cocking the wrist; • flick the shuttle out of the hand.
• In small teams (e.g., groups of 3), each player carries a shuttle in their non-racket hand and waits behind the back line of the court. • In turn the players run forwards to where a shuttle tube is placed on the court. From an upright standing position, players aim to drop the shuttle into the tube. • If they miss the tube, they pick up the shuttle and return to the back of the queue. Once all shuttles are in the tube, it is emptied and the team carries on trying to improve their score. • The game finishes at an agreed set time.
Putting the previous two practices together, players aim to gradually: • increase the distance the shuttle is dropped; • increase the length of swing; • increase the amount of weight transfer.
Two players stand on opposite sides of the net. They place a target close to the rear service line of their service box. The two players then have alternate forehand flick serves, scoring how many times they hit the target. After a set time (e.g., three minutes) scores are compared to find a winner. If it’s a draw, hit the shuttle in the air and whichever way it points is the winner. Winners move up the hall, losers move down the hall to take on a new opponent.
Play a game where only forehand flick serves are allowed. Consider: • allowing players two attempts, so if they hit the first serve out or into the net then they get another go; • rotating serves, so everyone gets an equal amount of serving practice; • having the receiver stand in different positions and carry their racket in different positions. The server must adjust where they place their flick serve (e.g., wide, to centre, etc.).
HINTS, TIPS AND VARIATIONS • Make your low and flick serves look the same in order to confuse your opponent and force them off-balance.

92
BADMINTON COACH EDUCATION ► COACHES’ MANUAL ► LEVEL 1 MODULE 7 ► PERFORMANCE FACTOR 2 - TECHNICAL (HITTING SKILLS)
d. Forehand Low Serve
WHERE THE SHUTTLE GOES WHEN WE USE IT WHY WE USE IT
To follow the laws of the game, the shuttle must travel from one service box to the diagonally opposite service box. Low serves travel to the front of your opponent’s service box.
Used mainly in women’s singles to start the rally, from a defensive/neutral situation.
Restrict your opponent’s opportunity to attack. Help create attacking opportunities for yourself.
WHAT TO COACH
PREPARATION • Sideways stance within service box. • Basic grip. • Racket and shuttle held high. • Weight on rear leg.
BACKSWING • Begin transfer of weight forwards. • Drop the shuttle to the side/in front. • Lower the racket. • Bend the wrist and supinate the forearm.
FORWARD SWING • Swing racket forwards. • Maintain bent wrist. • Strike shuttle in front/to side. • Push through the shuttle.
FOLLOW-THROUGH • Bring racket to ready position.

93
BADMINTON COACH EDUCATION ► COACHES’ MANUAL ► LEVEL 1 MODULE 7 ► PERFORMANCE FACTOR 2 - TECHNICAL (HITTING SKILLS)
INTRODUCTORY PRACTICES FOR A FOREHAND LOW SERVE
Forehand serves are slightly more challenging than backhand serves because they involve striking a dropping shuttle. This challenge is addressed in the practices described below.
• In order for players to experience immediate success, encourage them to use a basic grip and place the shuttle onto the strings of the racket. The player will need to bend forwards slightly to achieve this.
• Create a short backswing by bending the wrist and supinating the forearm. • Maintaining this cocked wrist position, the player pushes through the shuttle.
• In small teams (e.g., groups of 3), each player carries a shuttle in their non-racket hand and waits behind the back line of the court. • In turn the players run forwards to where a shuttle tube is placed on the court. From an upright standing position players aim to drop the shuttle into the tube. • If they miss the tube they pick up the shuttle and return to the back of the queue. • Once all shuttles are in the tube, it is emptied and the team carries on trying to improve their score. Stop the game at a set time.
Putting the previous two practices together, players aim to gradually: o Increase the distance the shuttle is dropped; o Increase the length of swing;
• To aid wait transfer, push the rear hip forwards followed fluently by the forward movement of the racket.
Target practices • Using the above action, push the shuttle into targets placed 4 – 6 metres away from the server. Do not use a net.
• Two players stand on opposite sides of the net. • They place a target close to the front service line of their service box. • The two players then have alternate forehand low serves, scoring how many times they hit the target. • After a set time (e.g., 3 minutes) scores are compared to find a winner. If it’s a draw, hit the shuttle in the air and whichever way it points is the winner. Winners move up the hall, losers move
down to take on a new opponent.
Play a game where only forehand low serves are allowed. Consider:
o allowing players two attempts, so if they hit the first serve out or into the net then they get another go; o rotating serves, so everyone gets an equal amount of serving practice; o having the receiver stand in different positions and carry their racket in different positions. The server must adjust where they place their low serve (e.g., wide, to centre, at the player, etc.).
HINTS, TIPS AND VARIATIONS • Make your low, flick and high serves look the same to confuse your opponent. • Vary where you serve to create challenges for the opponent. • In singles, serve slightly further into the court to restrict your opponent playing tight to the net.

94
BADMINTON COACH EDUCATION ► COACHES’ MANUAL ► LEVEL 1 MODULE 7 ► PERFORMANCE FACTOR 2 - TECHNICAL (HITTING SKILLS)
e. Forehand High Serve
WHERE THE SHUTTLE GOES WHEN WE USE IT WHY WE USE IT
To follow the laws of the game, the shuttle must travel from one service box to the diagonally opposite service box. High serves travel to the rear of your opponent’s service box, dropping vertically. High serves also tend to be towards the centre of the court, which restricts the angles of return that can be stuck by the receiver.
The forehand high serve is used in singles to begin the rally, from a neutral/defensive position. Forehand high serves are used in women’s singles and sometimes in men’s singles.
• As a variation (creating a different challenge to low or flick serves).
• Forces player to look up more, so they can be
less aware of the server’s position.
WHAT TO COACH
PREPARATION • Adopt a sideways stance within
service box. • Basic grip. • Racket and shuttle in elevated
position. • Weight on rear leg.
BACKSWING • Begin transfer of weight forwards. • Drop the shuttle to the side/in front. • Lower the racket. • Bend the wrist and supinate the forearm.
FORWARD SWING • Continue weight transfer to front foot. • Swing racket forwards. • Accelerate racket head by pronating
forearm and straightening wrist. • Strike under shuttle – hard, in front and to
side of body.
FOLLOW-THROUGH • Momentum carries racket through high
and long.

95
BADMINTON COACH EDUCATION ► COACHES’ MANUAL ► LEVEL 1 MODULE 7 ► PERFORMANCE FACTOR 2 - TECHNICAL (HITTING SKILLS)
HOW TO COACH - INTRODUCTORY PRACTICES - FOREHAND HIGH SERVE
In order to develop a forehand high serve, it is recommended to learn a flick serve first, then develop a longer swing and hit more underneath the shuttle.
In order for players to experience immediate success, encourage them to use a basic grip and place the shuttle onto the strings of the racket. The player will need to bend forwards slightly to achieve this. Create a short backswing by cocking the wrist and then, maintaining this bent wrist position, the player flicks the shuttle.
In small teams (e.g., groups of 3), each player carries a shuttle in their non-racket hand and waits behind the back line of the court. In turn the players run forwards to where a shuttle tube is placed on the court. From an upright standing position players aim to drop the shuttle into the tube. If they miss the tube, they pick up the shuttle and return to the back of the queue. Once all shuttles are in the tube, it is emptied and the team carries on trying to improve their score. The game finishes at an agreed set time.
Putting the previous two practices together, players aim to gradually: • increase the distance the shuttle is dropped; • increase the length of swing. Many players will eventually start their swing with a high racket carriage; • increase the amount of weight transfer.
• Set targets in the rearcourt. • Make targets larger for weaker players, small for better players.
Play a game where only forehand high serves are allowed. Consider: o allowing players two attempts, so if they hit the first serve out or into the net then they get another go; o alternating serves, so everyone gets an equal amount of serving practice;
• Serve must achieve a certain height, possibly judged by a “height umpire” or judging against a point on the sports hall wall. If the serve does not reach the agreed height, then the point is lost.
HINTS, TIPS AND VARIATIONS • Some players do not need to carry their racket so high at the beginning, preferring to start with the racket well back, wrist bent and forearm supinated.

96
BADMINTON COACH EDUCATION ► COACHES’ MANUAL ► LEVEL 1 MODULE 7 ► PERFORMANCE FACTOR 2 - TECHNICAL (HITTING SKILLS)
12. INTRODUCTION TO FORECOURT STROKES Forecourt strokes are defined as those that are played from an area between the net and the low service line. This is indicated by the red shaded area on the diagram below. A player on the right of the court will play forecourt strokes from this red area.
Forecourt strokes include: • Backhand and forehand net lifts, which can be an attacking, defensive or neutral (rally-building) option. • Backhand and forehand net shots, which tend to be more attacking in nature. • Backhand and forehand net kills, which are definitely an attacking option.
Of course there are times when these strokes can be played from other parts of the court (for example, lifts and net shots from the midcourt). However, when starting off as a player or coach, it is useful to organise the strokes under the heading of “forecourt strokes” to give a starting structure for their delivery. These sections focus on the basic straight versions of these strokes. However, cross-court versions can be developed by applying the principles outlined in the section on how to hit cross-court strokes.

97
BADMINTON COACH EDUCATION ► COACHES’ MANUAL ► LEVEL 1 MODULE 7 ► PERFORMANCE FACTOR 2 - TECHNICAL (HITTING SKILLS)
a. Backhand Net Shot
WHERE THE SHUTTLE GOES WHEN WE USE IT WHY WE USE IT
Net shots travel from forecourt to forecourt as close to top of the net as possible.
When we are in the forecourt and the shuttle has dropped below tape height (defensive/neutral area).
• To bring opponent forwards, creating possible opportunities in the rearcourt.
• To force the opponent to lift, and in doing
so, create an attacking opportunity.
WHAT TO COACH
PREPARATION • Use a basic grip. • Hold racket out in front of body.
BACKSWING • Establish relaxed thumb grip. • Use a relaxed reach. • Rotate arm. • Present racket strings to shuttle.
FORWARD SWING • Use momentum of whole body. • Push through shuttle.
FOLLOW-THROUGH • Bring racket up ready to anticipate
opponent's next stroke.

98
BADMINTON COACH EDUCATION ► COACHES’ MANUAL ► LEVEL 1 MODULE 7 ► PERFORMANCE FACTOR 2 - TECHNICAL (HITTING SKILLS)
HOW TO COACH - INTRODUCTORY PRACTICES FOR A BACKHAND NET SHOT
• Establish a thumb grip, with racket held out in front of body. • Partner hand feeds shuttles. • Player pushes shuttles gently into the air. • Player aims to land shuttles on a target – no net.
• Establish a thumb grip, with racket held out in front of body. • Partner hand feeds shuttles over net. • Player pushes shuttles gently back over net. • Recover racket to start position.
• Player A stands in the rearcourt and hand feeds a shuttle over the net to Player B. • Player B uses a backhand net shot, aiming to land the shuttle into the forecourt. • Player A moves forwards to catch the shuttle, but only after the shuttle is struck. • Player B has 10 attempts and scores one point if they force Player A to step into the forecourt, three points if they land the shuttle in the forecourt. • To involve more players, have two feeders and two hitters who alternate.
• Players A and B have a continuous net rally, backhand to backhand. • Players experiment with spinning the shuttles, with the emphasis being on a right to left action.
• Form two teams of 3-4 players, with the teams facing each other across the net. • Players take alternating backhand net shots, rotating towards the centre of the court after each shot. • The shuttle is out if it lands beyond the low service line.
HINTS, TIPS AND VARIATIONS When closer to the net, spinning the shuttle on net shots makes it difficult for the opponent to return the shuttle. This can be achieved by hitting across the bottom of the shuttle in a slightly curved path. Shuttles spin more naturally if the racket is moved from right to left under the shuttle, although they can be made to spin the other way as well.

99
BADMINTON COACH EDUCATION ► COACHES’ MANUAL ► LEVEL 1 MODULE 7 ► PERFORMANCE FACTOR 2 - TECHNICAL (HITTING SKILLS)
b. Forehand Net Shot
WHERE THE SHUTTLE GOES WHEN WE USE IT WHY WE USE IT
Net shots travel from forecourt to forecourt as close to top of the net as possible.
When we are in the forecourt and the shuttle has dropped below tape height (defensive/neutral area).
• To bring opponent forwards, creating possible opportunities in their rearcourt.
• To force the opponent to lift, and in doing so, create an attacking opportunity.
WHAT TO COACH
PREPARATION • Use a basic grip. • Hold racket out in front of body.
BACKSWING • Use a relaxed reach. • Rotate arm. • Present racket strings to shuttle.
FORWARD SWING • Use momentum of whole body. • Push through shuttle.
FOLLOW-THROUGH • Bring racket up ready to anticipate
opponent's next stroke.

100
BADMINTON COACH EDUCATION ► COACHES’ MANUAL ► LEVEL 1 MODULE 7 ► PERFORMANCE FACTOR 2 - TECHNICAL (HITTING SKILLS)
HOW TO COACH - INTRODUCTORY PRACTICES FOR A FOREHAND NET SHOT
• Establish a basic grip, with racket held out in front of body. • Partner hand feeds shuttles. • Player pushes shuttles gently into the air. • Aims to land shuttles on a target – no net.
• Establish a basic grip, with racket held out in front of body. • Partner hand feeds shuttles over net. • Player pushes shuttles gently back over net. • Recover racket to start position.
• A stands in the rearcourt and hand feeds a shuttle over the net to B. • B uses a forehand net shot, aiming to land the shuttle into the forecourt. • A moves forwards to catch the shuttle, but only after the shuttle is struck. • B has 10 attempts and scores one point if they force A to step into the forecourt, three points if they land the shuttle in the forecourt. • To involve more players, have two feeders and two hitters who alternate.
• Players A and B have a continuous net rally, forehand to forehand. • Players experiment with spinning the shuttles, with the emphasis being on a right to left action.
• Form two teams of 3-4 players, the teams facing each other across the net. • Players take alternating backhand net shots, rotating towards the centre of the court after each shot. • The shuttle is out if it lands beyond the low service line.
HINTS, TIPS AND VARIATIONS Spinning the shuttle on net shots makes it difficult for the opponent to return the shuttle. This can be achieved by hitting across the bottom of the shuttle in a slightly curved path. Shuttles spin more naturally if the racket is moved from right to left under the shuttle, although they can be made to spin the other way as well.

101
BADMINTON COACH EDUCATION ► COACHES’ MANUAL ► LEVEL 1 MODULE 7 ► PERFORMANCE FACTOR 2 - TECHNICAL (HITTING SKILLS)
c. Backhand Net Lift
WHERE THE SHUTTLE GOES WHEN WE USE IT WHY WE USE IT
Net lifts travel from the forecourt to the rearcourt. Attacking lifts travel just high enough to beat your opponent’s racket. Defensive lifts go higher.
• When you are in the forecourt and the shuttle has dropped just below tape height when you strike it (into the neutral area) – this creates opportunity for attacking lift.
• When you are in the forecourt and the
shuttle has dropped well below tape height (into your defensive area) – a defensive lift may be necessary.
• Attacking lifts aim to get the shuttle behind your opponent to force a weaker return.
• Higher defensive lifts push your opponent
back and allow more time for the player playing the stroke to recover their position and balance.
WHAT TO COACH
PREPARATION • Use a basic grip. • Hold racket out in front of body.
FOREHAND SWING • Establish a thumb grip. • Use a relaxed reach. • Rotate arm inwards. • Use a slight bend of elbow.
FORWARD SWING • Reach and rotate arm outwards. • Hit through shuttle.
FOLLOW-THROUGH • Racket momentum causes arm to rotate
outwards as it relaxes.

102
BADMINTON COACH EDUCATION ► COACHES’ MANUAL ► LEVEL 1 MODULE 7 ► PERFORMANCE FACTOR 2 - TECHNICAL (HITTING SKILLS)
HOW TO COACH - INTRODUCTORY PRACTICES FOR A BACKHAND NET LIFT
• Using a soft ball, hit against wall with control. Allow the ball to bounce each time and focus on the use of the thumb, forearm rotation and a flicking action. • Progress to:
1. volleying the ball against the wall. 2. volleying a shuttle against the wall.
• Player A stands in the forecourt and hand feeds a shuttle over the net to Player B. • Player B uses a backhand net lift, aiming to land it in the rearcourt. • Player A can move back to catch the shuttle, but:
1. they can only move back once the shuttle is struck; 2. they cannot turn their back on the net.
• Player B has 10 attempts and scores one point if they force Player A to step into the rear tramlines, three points if they land the shuttle in the rear tramlines. • To involve more players, have two feeders and two hitters who alternate. • The game can also be expanded to include straight and cross-court lifts.
• Predictable rallies that can be used to develop backhand lifting skills include: 1. Two players - one player lifts and one player performs dropshots 2. Three players – dropshot, netshot, netshot, lift, then repeat 3. Two players – clear, dropshot, net shot, lift, then repeat
• Two players play net shots against each other. • When ready, one player plays a backhand net lift. • The rally is then played to a conclusion.
HINTS, TIPS AND VARIATIONS • Cross-court lifts are a slightly shorter action as you are hitting the side of the shuttle. Straight lifts are a little longer so you can get underneath the shuttle. • Very defensive, high lifts tend to have a very long action with more elbow bend. • Make your lifts look like net shots wherever possible.

103
BADMINTON COACH EDUCATION ► COACHES’ MANUAL ► LEVEL 1 MODULE 7 ► PERFORMANCE FACTOR 2 - TECHNICAL (HITTING SKILLS)
d. Forehand Net Lift
WHERE THE SHUTTLE GOES WHEN WE USE IT WHY WE USE IT
Net lifts travel from the forecourt to the rearcourt. Defensive lifts go higher. More attacking lifts travel just high enough to beat your opponent’s racket.
• When you are in the forecourt and the shuttle has dropped below well below tape height as you strike it (in your defensive area).
• When you are in the forecourt and the
shuttle has dropped just below tape height when you strike it (in your neutral area).
• Higher defensive lifts push your opponent back and allow more time for the player playing the stroke to recover their position and balance.
• Attacking lifts aim to get the shuttle behind
your opponent to force a weaker return.
WHAT TO COACH
PREPARATION • Use a basic grip. • Hold racket out in front of body.
BACKSWING • Use a relaxed reach. • Rotate arm outwards. • Bend wrist.
FORWARD SWING • Straighten wrist. • Hit through the shuttle.
FOLLOW-THROUGH • Racket momentum causes arm to rotate
inwards as it relaxes.

104
BADMINTON COACH EDUCATION ► COACHES’ MANUAL ► LEVEL 1 MODULE 7 ► PERFORMANCE FACTOR 2 - TECHNICAL (HITTING SKILLS)
HOW TO COACH - INTRODUCTORY PRACTICES FOR A FOREHAND NET LIFT
• Using a soft ball, hit against wall with control. Allow the ball to bounce each time and focus on the use of the basic grip, wrist and forearm rotation and a flicking action. Progress to: 1. volleying the ball against the wall. 2. volleying a shuttle against the wall.
• Player A stands in the forecourt and hand feeds a shuttle over the net to player B. • Player B uses a forehand net lift, aiming to land it in the rearcourt. • Player A can move back to catch the shuttle, but:
1. they can only move back once the shuttle is struck; 2. they cannot turn their back on the net.
• Player B has 10 attempts and scores one point if they force Player A to step into the rear tramlines, three points if they land the shuttle in the rear tramlines. • To involve more players, have two feeders and two hitters who alternate. • The game can also be expanded to include straight and cross-court lifts.
• Predictable rallies that can be used to develop forehand lifting skills include: 1. Two players- one player lifts and one player performs dropshots (1). 2. Three players– dropshot, netshot, netshot, lift, then repeat. 3. Two players– clear, dropshot, net shot, lift, then repeat.
• Two players play net shots against each other. • When ready, one player plays a forehand net lift. • The rally is then played to a conclusion.
HINTS, TIPS AND VARIATIONS • Cross-court lifts are a slightly shorter action as you are hitting the side of the shuttle. Straight lifts are a little longer so you can get underneath the shuttle. • Very defensive, high lifts tend to have a very long action, with more movement from the shoulder. • Make your lifts look like net shots wherever possible in preparation for the stroke.

105
BADMINTON COACH EDUCATION ► COACHES’ MANUAL ► LEVEL 1 MODULE 7 ► PERFORMANCE FACTOR 2 - TECHNICAL (HITTING SKILLS)
e. Backhand Net Kill
WHERE THE SHUTTLE GOES WHEN WE USE IT WHY WE USE IT
Net kills travel from the forecourt to the midcourt of your opponent in a rapid downwards direction. Kills can be directed into space or into the body of your opponent.
Backhand net kills are used when you are in the forecourt and the shuttle is above tape height at the point of impact (your attacking zone).
Backhand net kills are used to try to win the rally, or to force your opponent to play another weak return.
WHAT TO COACH
PREPARATION • Use a basic grip. • Hold racket out in front of body.
BACKSWING • Establish thumb grip. • Raise and bend elbow. • Rotate lower arm inwards.
FORWARD SWING • Straighten arm. • Rotate lower arm outwards.
FOLLOW-THROUGH • Racket momentum causes arm to
rotate outwards as it relaxes. • Recover racket quickly to anticipate a
return.

106
BADMINTON COACH EDUCATION ► COACHES’ MANUAL ► LEVEL 1 MODULE 7 ► PERFORMANCE FACTOR 2 - TECHNICAL (HITTING SKILLS)
HOW TO COACH - INTRODUCTORY PRACTICES FOR A BACKHAND NET KILL
• Copy the coach, then shadow the stroke without the coach to copy. • Shadow the stroke with eyes closed to get a feel for the stroke.
• Hand feed a shuttle for player to practice net kill (no net). • Make sure feeder is in a safe position and players instructed not to strike shuttle at feeder. • “Catcher” can be added – player catches shuttle (in a shuttle tube?). Catcher returns shuttle immediately to feeder to repeat cycle.
• Repeat the above practice but over a net (lower net for younger players).
• Vary feed so players make choices between net kill and net shot.
HINTS, TIPS AND VARIATIONS • Close to the net, the action is very short. • When the shuttle is close to the net, you sometimes have to hit across the shuttle to avoid striking the net. • Consider killing the shuttle into the body of the opponent, as well as straight and cross-court.

107
BADMINTON COACH EDUCATION ► COACHES’ MANUAL ► LEVEL 1 MODULE 7 ► PERFORMANCE FACTOR 2 - TECHNICAL (HITTING SKILLS)
f. Forehand Net Kill
WHERE THE SHUTTLE GOES WHEN WE USE IT WHY WE USE IT
Net kills travel from the forecourt to the midcourt of your opponent in a rapid downwards direction. Kills can be directed into space or into the body of your opponent.
Forehand net kills are used when you are in the forecourt and the shuttle is above tape height at the point of impact (your attacking zone).
Forehand net kills are used to try to win the rally, or to force your opponent to play another weak return.
WHAT TO COACH
PREPARATION • Use a basic grip. • Hold racket out in front of body.
BACKSWING • Adjust grip to panhandle. • Bend elbow. • Rotate upper and lower arm outwards.
FORWARD SWING • Reach forwards by straightening elbow. • Rotate upper and lower arm inwards. • Hit powerfully downwards.
FOLLOW-THROUGH • As arm relaxes, racket momentum
causes further arm rotation inwards. • Recover racket quickly to anticipate a
return.

108
BADMINTON COACH EDUCATION ► COACHES’ MANUAL ► LEVEL 1 MODULE 7 ► PERFORMANCE FACTOR 2 - TECHNICAL (HITTING SKILLS)
HOW TO COACH - INTRODUCTORY PRACTICES FOR A FOREHAND NET KILL
• Copy the coach, then shadow the stroke without the coach to demonstrate. • Shadow the stroke with eyes closed to get a feel for the stroke.
• Hand feed a shuttle for player to practice net kill (no net). • Make sure feeder is in a safe position and players instructed not to strike shuttle at feeder. • “Catcher” can be added – player catches shuttle (in a shuttle tube?). Catcher returns shuttle immediately to feeder to repeat cycle.
• Repeat above practice but over a net (lower net for younger players).
• Vary feed so players make choices between net kill and net shot.
HINTS, TIPS AND VARIATIONS • Close to the net, the action is very short. • When the shuttle is close to the net, you sometimes have to hit across the shuttle to avoid striking the net. • Consider killing the shuttle into the body of the opponent, as well as straight and cross-court.

109
BADMINTON COACH EDUCATION ► COACHES’ MANUAL ► LEVEL 1 MODULE 7 ► PERFORMANCE FACTOR 2 - TECHNICAL (HITTING SKILLS)
13. INTRODUCTION TO MIDCOURT STROKES Midcourt strokes are defined as those that are played from the middle third of the court. This is indicated by the red shaded area on the diagram below. A player on the right of the court will play midcourt strokes from this red area.
Midcourt strokes covered here include: • backhand and forehand drive, which can be an attacking or neutral (rally-building) option; • backhand blocks off the body, which can also be an attacking or neutral (rally-building) option.
Of course there are times when these strokes can be played from other parts of the court (for example, drives from the rearcourt). However, when starting off as a player or coach, it is useful to organise the strokes under the heading of “midcourt strokes” to give a starting structure for their delivery.

110
BADMINTON COACH EDUCATION ► COACHES’ MANUAL ► LEVEL 1 MODULE 7 ► PERFORMANCE FACTOR 2 - TECHNICAL (HITTING SKILLS)
a. Block Off the Body
WHERE THE SHUTTLE GOES WHEN WE USE IT WHY WE USE IT
Backhand blocks off the body travel from the midcourt to the forecourt/midcourt of your opponent.
Backhand blocks are used when you are in defensive situations, returning a smash to the body. They are used mainly in doubles and less frequently in singles.
Backhand blocks can be used to: • restrict the opponent’s opportunity to
attack. • create an attacking opportunity by striking
the block into space and forcing the opponent to hit their next shot upwards.
WHAT TO COACH
PREPARATION • Use a basic grip. • Hold racket out in front of body.
BACKSWING • Establish relaxed thumb grip. • Move elbow forwards. • Bend elbow. • Open racket face (upper and lower arm
rotation, bent wrist).
FORWARD SWING • Extend elbow. • Keep racket face open to hit slightly
underneath shuttle. • Push through shuttle. • (In this photo, player steps in on racket
foot – not always possible).
FOLLOW-THROUGH • Racket momentum causes arm to rotate
outwards as it relaxes. • Re-establish basic grip and racket
position in front of body.

111
BADMINTON COACH EDUCATION ► COACHES’ MANUAL ► LEVEL 1 MODULE 7 ► PERFORMANCE FACTOR 2 - TECHNICAL (HITTING SKILLS)
HOW TO COACH - INTRODUCTORY PRACTICES FOR A BACKHAND BLOCK
• Copy the coach and shadow the stroke. • Shadow the stroke without the coach. • Shadow the stroke with eyes closed – “feel the stroke”.
• Overhead hand feed shuttle and block shuttle back to feeder.
• Block shuttles back to each other (no net).
• Player in forecourt hits down to body of player in midcourt who blocks this back. • Repeat with four players so blocking players must block cross-court off a straight shot, straight off a cross-court shot.
HINTS, TIPS AND VARIATIONS • To lift the shuttle, aim to strike underneath the shuttle and hit it harder. • To drive the shuttle, hit flatter and harder.

112
BADMINTON COACH EDUCATION ► COACHES’ MANUAL ► LEVEL 1 MODULE 7 ► PERFORMANCE FACTOR 2 - TECHNICAL (HITTING SKILLS)
b. Backhand Drive
WHERE THE SHUTTLE GOES WHEN WE USE IT WHY WE USE IT
Backhand drives are flat shots that tend to travel from midcourt to midcourt or rearcourt of your opponent.
Backhand drives tend to be used in neutral situations when the shuttle is neither high enough to attack downwards, nor low enough to use upwards defensive strokes. As well as on the backhand side, backhand drives are also used when the shuttle is directly in front of the body.
Backhand drives can be used to: • restrict the opponent’s opportunity to attack. • create an attacking opportunity for the
player striking the drive by hitting into space or into the body of the opponent.
WHAT TO COACH
PREPARATION • Use a basic grip. • Hold racket out in front of body.
BACKSWING • Retain basic grip if striking at the side of the
body, adjust to thumb grip if striking in front (as in this example).
• Move elbow up, forwards and bent. • Rotate upper and lower arm inwards.
FORWARD SWING • Straighten elbow. • Rotate lower arm outwards. • Hit hard through the shuttle.
FOLLOW-THROUGH • Recovery racket quickly using a rebound
action and get ready for the next shot.

113
BADMINTON COACH EDUCATION ► COACHES’ MANUAL ► LEVEL 1 MODULE 7 ► PERFORMANCE FACTOR 2 - TECHNICAL (HITTING SKILLS)
HOW TO COACH - INTRODUCTORY PRACTICES FOR A BACKHAND DRIVE
• Copy the coach shadowing the stroke. • Shadow the stroke without the coach. • Shadow the stroke with eyes closed – “feel the stroke”.
• Strike a suspended shuttle with a backhand drive action.
• Strike a hand-fed shuttle with a flat action, no net (take care that feed is slightly to side of hitter and on non-racket side to reduce chance of being struck by the shuttle).
• Players drive shuttle backwards and forwards to each other with no net.
• From the net, feeder throws downward with an overhead action, immediately dropping down behind the net. Player drives shuttle back straight or cross-court.
HINTS, TIPS AND VARIATIONS • You can play this by bringing the racket foot across the body, which might be necessary if the shuttle is very wide. • A corner grip can be used to hit a drive when the shuttle is at the side of the player or when you wish to play the shuttle cross-court. • Less time will mean you will not be able to pronate the forearm so much – the angle between the arm and racket will be greater. • The drive action is shorter if struck in front of the body. • Soften the hit to block to the net.

114
BADMINTON COACH EDUCATION ► COACHES’ MANUAL ► LEVEL 1 MODULE 7 ► PERFORMANCE FACTOR 2 - TECHNICAL (HITTING SKILLS)
c. Forehand Drive
WHERE THE SHUTTLE GOES WHEN WE USE IT WHY WE USE IT
Forehand drives are flat shots that tend to travel from midcourt to midcourt or rearcourt of your opponent.
Forehand drives tend to be used in neutral situations when the shuttle is neither high enough to attack downwards, nor low enough to use upwards defensive strokes.
Forehand drives can be used to: • restrict the opponent’s opportunity to
attack. • create an attacking opportunity for the
player striking the drive by hitting into space or into the body of the opponent.
WHAT TO COACH
PREPARATION • Use a basic grip. • Hold racket out in front of body.
BACKSWING • Retain basic grip if striking at the side of the
body, adjust to panhandle if striking in front (as in this example).
• Use raised but bent elbow. • Rotate upper and lower arm outwards. • Bend wrist.
FORWARD SWING • Straighten elbow. • Rotate upper and lower arm inwards. • Strike in front of body (panhandle grip)
or side of body (basic grip).
FOLLOW-THROUGH • Rotation of forearm will continue after
impact. • Recover racket quickly in preparation
for next shot.

115
BADMINTON COACH EDUCATION ► COACHES’ MANUAL ► LEVEL 1 MODULE 7 ► PERFORMANCE FACTOR 2 - TECHNICAL (HITTING SKILLS)
HOW TO COACH - INTRODUCTORY PRACTICES FOR A FOREHAND DRIVE
• Copy the coach shadowing the stroke. • Shadow the stroke without the coach. • Shadow the stroke with eyes closed – “feel the stroke”.
• Strike a suspended shuttle using a forehand drive action.
• Strike a hand-fed shuttle with a flat action with no net (take care that feed is slightly to side of hitter and on non-racket side to reduce chance of being struck by the shuttle).
• Players drive shuttle backwards and forwards to each other with no net.
• From the net, feeder throws downwards with an overhead action, immediately dropping down behind net. Player drives shuttle back straight or cross-court.
HINTS, TIPS AND VARIATIONS • A panhandle grip can be used to hit a drive when the shuttle is further in front of you. • Less time will mean you will not be able pronate the forearm so much – the angle between the arm and racket will be greater. • Soften the hit to block to the net.

116
BADMINTON COACH EDUCATION ► COACHES’ MANUAL ► LEVEL 1 MODULE 7 ► PERFORMANCE FACTOR 2 - TECHNICAL (HITTING SKILLS)
14. INTRODUCTION TO REARCOURT STROKES Rearcourt strokes are defined as those that are played from the back third of the court. This is indicated by the red shaded area on the diagram below. A player on the right of the court will play rearcourt strokes from this red area.
Rearcourt strokes covered here include: • forehand clears, which can be attacking, defending or neutral (rally-building); • forehand smashes, which are attacking; • forehand dropshots, which can be attacking, defending or neutral (rally-building); • backhand clears, which are defensive; • forehand and backhand pulled dropshots, which are neutral (rally-building).

117
BADMINTON COACH EDUCATION ► COACHES’ MANUAL ► LEVEL 1 MODULE 7 ► PERFORMANCE FACTOR 2 - TECHNICAL (HITTING SKILLS)
a. Forehand Clear
WHERE THE SHUTTLE GOES WHEN WE USE IT WHY WE USE IT
Clears go from your rearcourt to the rearcourt of your opponent. Attacking clears travel at a height just out of reach of your opponent’s racket. More defensive clears are slightly higher.
Clear are used when we are in position in the rearcourt.
Clears push your opponent back, creating space in the forecourt. Attacking clears aim to place the shuttle behind the opponent, creating pressure and potentially weaker returns. Defensive clears allow the person playing the stroke more time to recover their balance and court position.
WHAT TO COACH
PREPARATION • Basic grip. • Racket in overhead ready position. • Front arm up. • Sideways stance.
BACKSWING • Drive up and forwards off rear leg. • Push rear hip forwards. • Rear shoulder and elbow move upwards and
forwards. • Upper and lower arm rotate outwards. • Front arm pulls in to control body rotation.
FORWARD SWING • Upper and lower arm rotate inwards. • Reach to strike shuttle powerfully
above/slightly in front of racket shoulder. • Rear leg overtakes front leg (after
impact).
FOLLOW-THROUGH • Racket momentum causes arm to
rotate inwards as it relaxes. • Rear foot lands to become the new
front foot.

118
BADMINTON COACH EDUCATION ► COACHES’ MANUAL ► LEVEL 1 MODULE 7 ► PERFORMANCE FACTOR 2 - TECHNICAL (HITTING SKILLS)
HOW TO COACH - INTRODUCTORY PRACTICES FOR A FOREHAND CLEAR
• Hold the racket at the “T”. • Hold shuttle above/slightly in front of the racket shoulder. • Place the racket handle at the side of the shuttle. • Using forearm rotation, strike the shuttle out of the hand.
• Suspend a shuttle at a relaxed hitting height. • Hold the racket using a basic grip. • Reach up and place racket face on the shuttle. • Rotate forearm to point bottom of grip to shuttle. • Create angle between forearm and racket. • Reverse rotation and strike the shuttle.
• Suspend a shuttle at a relaxed hitting height. • Hold the racket using a basic grip. • Adopt a sideway stance and a relaxed ready position. • Push rear hip forwards, commit elbow up and forwards and use forearm rotation to point bottom of grip to shuttle. Create an angle between racket and forearm. • Reverse rotation, reach and strike the shuttle.
• Suspend a shuttle at a relaxed hitting height. • Hold the racket using a basic grip. • Form a relaxed ready position and step back to load rear leg. • Push aggressively upwards and forwards off rear leg. • Jump and throw racket head at the shuttle. • Kick through and land back foot – front foot in quick succession.
• Repeat any of the above using a hand-fed shuttle.
HINTS, TIPS AND VARIATIONS • “Holding” the stroke slightly between the backswing and forwards swing can help deceive your opponent as it affects their movement.

119
BADMINTON COACH EDUCATION ► COACHES’ MANUAL ► LEVEL 1 MODULE 7 ► PERFORMANCE FACTOR 2 - TECHNICAL (HITTING SKILLS)
b. Forehand Smash
WHERE THE SHUTTLE GOES WHEN WE USE IT WHY WE USE IT
Smashes go from your rearcourt to the midcourt of your opponent. Smashes can be struck into space, or into the body of the opponent.
We use smashes when hitting down from our attacking zone.
A forehand smash is a shot used in an attempt to win the rally, or to force a very weak return.
WHAT TO COACH
PREPARATION • Use a V-grip. • Adopt a relaxed ready position. • Step back to load rear leg, sideways
stance.
BACKSWING • Jump and begin rotating in the air, elbow up-
forwards, supinate forearm (“brush your hair”). • Create angle between arm and racket.
FORWARD SWING • Continue rotation in the air, throw racket
head powerfully (pronate forearm). • Reach up to strike shuttle. Impact in
front of striking shoulder.
FOLLOW-THROUGH • Finish rotation and land. • Relaxation allows continued forearm
rotation. • Racket stays in front of body.

120
BADMINTON COACH EDUCATION ► COACHES’ MANUAL ► LEVEL 1 MODULE 7 ► PERFORMANCE FACTOR 2 - TECHNICAL (HITTING SKILLS)
HOW TO COACH - INTRODUCTORY PRACTICES FOR A FOREHAND SMASH
• The basic practices for forehand overhead hitting actions will all be of benefit to a player performing a forehand overhead smash.
• Suspend a shuttle at a relaxed hitting height. • Hold the racket using a basic grip. • Form a relaxed ready shape and step back to load rear leg. • Push aggressively upwards and forwards off rear leg. • Jump and throw racket head at the shuttle. • Strike the shuttle in front of you and visualise hitting the shuttle down. • Kick through and land back foot – front foot in quick succession.
• Hold the racket using a basic grip. • Form a relaxed ready position and step back to load rear leg. • Using an underarm action, a feeder places a shuttle high in the air. • Push aggressively upwards and forwards off rear leg. • Jump and throw racket head at the shuttle. • Strike the shuttle in front of you and hit the shuttle down.
• Use a racket feed and repeat the above practice. • Add in targets to encourage steeper and more accurate hits.
• Smash – block – block – lift.
• Play a game of singles or doubles. If the rally is won with a smash, or the shot after a smash, then three points are scored rather than one.
HINTS, TIPS AND VARIATIONS • Vary the pace of smashes to deceive your opponent and make them mistime their returns. • Smash into space or as an alternative, into the body.

121
BADMINTON COACH EDUCATION ► COACHES’ MANUAL ► LEVEL 1 MODULE 7 ► PERFORMANCE FACTOR 2 - TECHNICAL (HITTING SKILLS)
c. Forehand Dropshot
WHERE THE SHUTTLE GOES WHEN WE USE IT WHY WE USE IT
Dropshots go from your rearcourt to the forecourt of your opponent. Longer drops tend to land just beyond the low service line. Shorter dropshots land between the low service line and the net.
Dropshots are used when we are in the attacking rearcourt zone.
We use dropshots to: • make space in the rearcourt. • make our opponent off-balance. • encourage our opponent to lift.
WHAT TO COACH
PREPARATION • Use a basic grip. • Hold racket in overhead ready
position. • Bring front arm up. • Establish sideways stance.
BACKSWING • Drive up and forwards off rear leg. • Push rear hip forwards. • Rear shoulder/elbow move. • Upper and lower arm rotate outwards.
FORWARD SWING • Upper and lower arm rotate inwards. • Reach to strike shuttle above/ slightly in
front of striking shoulder. • Just prior to hitting rotation of arm stops -
push through the shuttle.
FOLLOW-THROUGH • Rear foot lands to become the new
front foot.

122
BADMINTON COACH EDUCATION ► COACHES’ MANUAL ► LEVEL 1 MODULE 7 ► PERFORMANCE FACTOR 2 - TECHNICAL (HITTING SKILLS)
HOW TO COACH - INTRODUCTORY PRACTICES FOR A FOREHAND DROPSHOT
• The basic practices for forehand overhead hitting actions will all be of benefit to a player performing a forehand dropshot.
• Suspend a shuttle at a relaxed hitting height. • Hold the racket using a basic grip. • Form a relaxed overhead ready position and step back to load rear leg. • Push aggressively upwards and forwards off rear leg. • Jump and throw, then slow the racket head just before striking the shuttle.
• Hold the racket using a basic grip. • Form a relaxed overhead ready position and step back to load rear leg. • Using an underarm action, a feeder places a shuttle high in the air. • Push aggressively upwards and forwards off rear leg. • Jump and throw, then slow the racket head just before striking the shuttle.
• Use a racket feed and repeat the above practice. • Add in targets to encourage steeper and more accurate hits.
• Dropshot – lift – dropshot – lift.
• Play a game of singles or doubles. If the rally is won with a dropshot, or the shot after a dropshot, then three points are scored rather than one.
HINTS, TIPS AND VARIATIONS • The above example shows a deceptive dropshot, where being aggressive with your body and speed of racket head in the first stages of the stroke puts your opponent off-balance by making
them think it is a clear or smash. • Experiment with slicing the shuttle both right to left and left to right to increase the range and deception of your overhead strokes.

123
BADMINTON COACH EDUCATION ► COACHES’ MANUAL ► LEVEL 1 MODULE 7 ► PERFORMANCE FACTOR 2 - TECHNICAL (HITTING SKILLS)
d. Pulled Forehand Dropshot
WHERE THE SHUTTLE GOES WHEN WE USE IT WHY WE USE IT
Pulled forehand dropshots go from your rearcourt to the front of your opponent’s midcourt, with the shuttle being drawn towards (but not into) the middle of the court.
Pulled forehand dropshots tend to be used in defensive situations, when the shuttle is behind you in the forehand corner.
Pulled forehand dropshots are used to relieve pressure, restricting your opponent’s ability to attack the shuttle by: • making it more difficult to play tight to
the net.
• restricting the angle of return of your opponent.
WHAT TO COACH
PREPARATION • Carry racket with racket head above
hand. • Bend elbow. • Turn racket in hand towards a thumb
grip (more turn if you want to hit cross-court).
BACKSWING • Rotate upper and lower arm outwards. • Maintain bent elbow.
FORWARD SWING • Straighten arm (relaxed reach). • Rotate upper and lower arm inwards. • Aim to get racket hand underneath shuttle. • Just prior to striking, reduce arm rotation
and push through shuttle. • Impact slightly behind player.
FOLLOW-THROUGH • Complete pushing through shuttle. • Use follow-through to help you turn
quickly to face the net.

124
BADMINTON COACH EDUCATION ► COACHES’ MANUAL ► LEVEL 1 MODULE 7 ► PERFORMANCE FACTOR 2 - TECHNICAL (HITTING SKILLS)
HOW TO COACH - INTRODUCTORY PRACTICES FOR A FOREHAND PULLED DROPSHOT
• Copy the coach shadowing the stroke. • Shadow the stroke without the coach. • Shadow the stroke with eyes closed – “feel the stroke”.
• Stand sideways to a net or a wall. • Shadow the stroke. • Use the net/wall to help keep the racket head above the hand on the forward pull.
• Suspend a shuttle. • Stand with the shuttle slightly behind and to your side. • Step towards the shuttle then strike it. • Recover to starting position.
• Racket feed single shuttle over net. • Turn and step into stroke. • Strike shuttle. • Turn back to face net. • Feed new shuttle.
HINTS, TIPS AND VARIATIONS • Experiment with changing your grip to change the racket face so you can play both straight and cross-court shots.

125
BADMINTON COACH EDUCATION ► COACHES’ MANUAL ► LEVEL 1 MODULE 7 ► PERFORMANCE FACTOR 2 - TECHNICAL (HITTING SKILLS)
e. Backhand Clear
WHERE THE SHUTTLE GOES WHEN WE USE IT WHY WE USE IT
Backhand clears go from your rearcourt to the rearcourt of your opponent.
A backhand clear is used when the player is in a neutral or defensive situation.
Backhand clears are used to create time for the striking player to turn and re-establish a balanced position on the court.
WHAT TO COACH
PREPARATION • Use a basic grip or corner grip (turn
to panhandle if deeper). • Approach with elbow down, racket
head up.
BACKSWING • Maintain bent elbow. • Start to raise elbow and drop the racket head
(upper/low arm rotates inwards). • Make sure backswing flows immediately into
forward swing.
FORWARD SWING • Straighten arm (relaxed reach).
Rotate upper/lower arm outwards. • Impact at side/slightly behind player,
with hand below the shuttle. • "Punch" the shuttle, hitting hard but
stopping hand immediately on impact.
FOLLOW-THROUGH • Hand stops, but racket head continues
as racket bends. • As hand relaxes, racket rebounds
backwards.

126
BADMINTON COACH EDUCATION ► COACHES’ MANUAL ► LEVEL 1 MODULE 7 ► PERFORMANCE FACTOR 2 - TECHNICAL (HITTING SKILLS)
HOW TO COACH - INTRODUCTORY PRACTICES FOR A BACKHAND CLEAR
• Copy the coach shadowing the stroke. • Shadow the stroke without the coach. • Shadow the stroke with eyes closed – “feel the stroke”.
• Suspend a shuttle. • Stand with back to net, shuttle slightly behind you. • Strike the shuttle. • Turn back to face the net.
• Stand with back to wall. • Begin backswing. • Strike a hand-fed shuttle into the wall. • Turn back to face the wall.
• Racket feed single shuttle over net. • Turn your back to the net. • Strike shuttle. • Turn back to face net.
HINTS, TIPS AND VARIATIONS • Experiment with changing your grip and bending the wrist, and in doing so, changing the racket face so you can play both straight and cross-court clears. • This can be changed in a backhand smash by bending the wrist more on the forward swing to bring the shuttle down more.

127
BADMINTON COACH EDUCATION ► COACHES’ MANUAL ► LEVEL 1 MODULE 7 ► PERFORMANCE FACTOR 2 - TECHNICAL (HITTING SKILLS)
f. Backhand Pulled Dropshot
WHERE THE SHUTTLE GOES WHEN WE USE IT WHY WE USE IT
Backhand dropshots travel from the rearcourt to the front of the midcourt (just beyond the low service line).
Pulled backhand dropshots tend to be used in defensive situations, when the shuttle is behind you in the backhand corner.
Pulled backhand dropshots are used to relieve pressure, restricting your opponent’s ability to attack the shuttle by: • making it more difficult to play tight to the
net. • restricting the angle of return of your
opponent.
WHAT TO COACH
PREPARATION • Use a corner grip (panhandle if deeper). • Approach with elbow down, racket head
up.
BACKSWING • Maintain bent elbow. • Start to raise elbow and drop the racket
head (upper/low arm rotates inwards). • Make sure backswing flows immediately
into forward swing (this position is not held).
FORWARD SWING • Straighten arm (relaxed reach). • Rotate upper/lower arm outwards. • Just prior to striking, reduce arm rotation
and push through shuttle. • Impact slightly behind player, with hand
below the shuttle.
FOLLOW-THROUGH • Complete pushing through shuttle and
use racket momentum to help you turn quickly into court.

128
BADMINTON COACH EDUCATION ► COACHES’ MANUAL ► LEVEL 1 MODULE 7 ► PERFORMANCE FACTOR 2 - TECHNICAL (HITTING SKILLS)
HOW TO COACH - INTRODUCTORY PRACTICES FOR A BACKHAND PULLED DROPSHOT
• Copy the coach shadowing the stroke. • Shadow the stroke without the coach. • Shadow the stroke with eyes closed – “feel the stroke”.
• Stand sideways to a net or a wall. • Shadow the stroke. • Use the net/wall to help keep the racket head above the hand on the forward pull.
• Suspend a shuttle. • Stand with back to net, shuttle behind you. • Step towards the shuttle then strike it. • Turn back to face the net.
• Racket feed single shuttle over net. • Turn your back to the net. • Strike shuttle. • Turn back to face net. • Feed new shuttle.
HINTS, TIPS AND VARIATIONS • The deeper the shuttle, or the more you wish to hit cross-court, the more you turn the grip to a panhandle position. • Plant the leading foot (right foot for a right hander) with or slightly before impact, allowing you to turn out of the stroke quickly.

129
BAD
MIN
TON
CO
ACH
ED
UC
ATIO
N ►
C
OAC
HES
’ MAN
UAL
►
LE
VEL
1 M
OD
ULE
7 ►
PER
FOR
MAN
CE
FAC
TOR
2 -
TEC
HN
ICAL
(HIT
TIN
G S
KILL
S)
15. SUMMARY – PERFORMANCE FACTOR 2: TECHNICAL (HITTING SKILLS)
The areas covered in the hitting-skills section are: • the basic biomechanical principles that underpin effective hitting; • practices to develop catching and throwing; • the different types of grips used in badminton and practices to develop them; • the different badminton strokes, including:
o where they are played; o when they are played; o why they are played; o what they look like; o how to practice them.
Since variety and deception are very important tactical tools for a badminton player, encourage experimentation, especially slicing the shuttle overhead and spinning the shuttle at the net. Basic methods to introduce these skills have been suggested, but these will be developed in more detail in the BWF Level 2 Coach Course. The most closely related parts of the handbook are:
• movement and body skills; • devising progressive practices.
Below is a short series of multiple-choice questions where you can check what you have remembered from the hitting-skills section.

130
BAD
MIN
TON
CO
ACH
ED
UC
ATIO
N ►
C
OAC
HES
’ MAN
UAL
►
LE
VEL
1 M
OD
ULE
7 ►
PER
FOR
MAN
CE
FAC
TOR
2 -
TEC
HN
ICAL
(HIT
TIN
G S
KILL
S)
16. SELF-ASSESSMENT – HITTING SKILLS
1 The grip to use for a forehand clear is:
thumb grip
corner grip
basic grip
universal grip
2 In preparation for strokes, grips should be:
relaxed
tight
loose
short
3 In the backswing of a forehand overhead the elbow should:
stay low
go across the body (left to right)
move around the head
go up and forwards
4 Backhand low serves involve striking a:
shuttle from the hand
dropped shuttle
thrown shuttle
a wobbling shuttle
5 On the backswing of a forehand lift, the backswing is best described as:
swinging from shoulder
reaching, bending wrist and supinating the forearm
taking racket head behind body
pushing the shuttle
6 The impact point for a backhand overhead is:
in front of the player
slightly behind the player
below the waist
directly above the head of the player
7 The grip for a backhand overhead is:
thumb grip
corner or basic grip
very short grip
universal grip

131
BAD
MIN
TON
CO
ACH
ED
UC
ATIO
N ►
C
OAC
HES
’ MAN
UAL
►
LE
VEL
1 M
OD
ULE
7 ►
PER
FOR
MAN
CE
FAC
TOR
2 -
TEC
HN
ICAL
(HIT
TIN
G S
KILL
S)
8 On striking a forehand net shot, the racket head should be:
level with the hand
above the hand
below the hand
behind the hand
9 Shuttles spin more at the net if they are hit:
Right to left
Left to right
Right to left (forehand), left to right (backhand)
Left to right (forehand), right to left (backhand)
10 In preparing for a forehand overhead, to gain more power in the preparation phase:
In a sideways stance, bring the rear leg forwards
Adopt a square stance (parallel to net)
In a sideways stance, step back to load rear leg
In a sideways stance, keep both feet still

BADMINTON COACH EDUCATION
COACHES’ MANUAL LEVEL 1
MODULE 8 PERFORMANCE FACTOR 3 TACTICS

BADMINTON WORLD FEDERATION Unit 1, Level 29 Naza Tower, Platinum Park 10 Persiaran KLCC 50088 Kuala Lumpur Tel +603 2631 9188 Fax +603 2631 9688 [email protected]
MODULE 8 PERFORMANCE FACTOR 3 - TACTICAL 01. Badminton Defined 132 02. Badminton “Situations” 132 03. Importance of ‘Early’ to Badminton Performance 132 04. Tactics Defined 133 05. Related Coaching Skills 134 06. Base Position 135 07. Singles Tactics 136 08. Doubles Tactics 148 09. Mixed Doubles Tactics 170 10. Self-Assessment Questions 180
LEARNING OUTCOMES
By the end of this module, coaches will be able to: • define the sport of badminton, including the aims of the game; • define tactics, including the identification of key underpinning concepts; • suggest basic tactical practices that heighten awareness and decision-making skills for:
1. singles play; 2. level doubles (men’s and women’s); 3. mixed doubles.

132
BAD
MIN
TON
CO
ACH
ED
UC
ATIO
N
►
CO
ACH
ES’ M
ANU
AL
►
LEVE
L 1
MO
DU
LE 8
►
PE
RFO
RM
ANC
E FA
CTO
R 3
- TA
CTI
CS
01. BADMINTON DEFINED Badminton is: • a net game; • played on a rectangular court; • a volleying game, with rallies beginning with an underarm serve.
The aim of the game is to score points by: • landing the shuttlecock in your opponent’s court • forcing your opponent to hit the shuttlecock out of the court • forcing your opponent to hit the shuttlecock into the net • striking your opponent’s body with the shuttle
02. BADMINTON “SITUATIONS” To perform well at badminton, players have to cope with three broad types of situations, which can be labelled: • attacking • neutral • defensive These situations are related to how high the shuttle is when it is being struck and how close the shuttle is to the net. These situations are represented in the illustration below. To be successful at badminton, players will have to make decisions about the type of stoke being played and this will largely be decided by the situation they are in: defensive, neutral or attacking
03. IMPORTANCE OF ‘EARLY’ TO BADMINTON PERFORMANCE
Striking the shuttle ‘early’, in terms of both height and closeness to the net, means players will: • find themselves in attacking situations more often, with a greater number of opportunities to strike
the shuttle downwards into their opponent’s court; • be able to exert more pressure on their opponents by giving them less time; • have more options as to the type of strokes that can be played.
Defensive
Neutral situations
Attacking
Early
Net

133
BAD
MIN
TON
CO
ACH
ED
UC
ATIO
N
►
CO
ACH
ES’ M
ANU
AL
►
LEVE
L 1
MO
DU
LE 8
►
PE
RFO
RM
ANC
E FA
CTO
R 3
- TA
CTI
CS
04. TACTICS DEFINED Tactics can be defined as:
“the capacity to make effective decisions based on awareness of the situation.”
From this definition we can see that tactics consists of two linked components:
Tactical awareness is mainly about being able to ‘read’ each situation on the court, whereas decision making is reacting to the information that you have read. The two components that make up tactics are further expanded in the table below.
TACTICAL AWARENESS (READ)
SPACE SELF OPPONENT PACE PARTNER
• Using width effectively.
• Using depth effectively.
• Using height effectively.
• My personal strengths.
• My personal weaknesses.
• Awareness of position on court.
• Awareness of state of balance.
• What they are good at?
• What they are not good at?
• What they are trying to do against me?
• Is the pace I am hitting at helping me to win?
• What are their strengths?
• What are their weaknesses?
• Where are they on the court?
DECISION MAKING (REACT)
• Decisions made prior to matches, for example deciding on a game plan. • Decisions made between rallies, for example a change of tactic based the outcome of
previous rallies. • Decisions made between strokes in a rally, for example where to move to in order to
anticipate your opponent’s return shot.
Tactics
Awareness (read)
Decision making(react)

134
BAD
MIN
TON
CO
ACH
ED
UC
ATIO
N
►
CO
ACH
ES’ M
ANU
AL
►
LEVE
L 1
MO
DU
LE 8
►
PE
RFO
RM
ANC
E FA
CTO
R 3
- TA
CTI
CS
05. RELATED COACHING SKILLS There are two coaching skills that can be very effective when developing the tactical skills of players. PROBLEM-SOLVING EXERCISES Since tactics involves players responding to the challenges presented by their opponent, it makes sense that players developing problem-solving skills will help them to progress their tactical skills. Practices that help the players to work out the answers for themselves, rather than the coach telling the players the answers, are highly effective.
QUESTIONING SKILLS Always telling players the answers to challenges actually reduces their ability to develop tactically, as it means the coach is solving problems for them. Effective questioning therefore is a great coaching tool that helps players to develop problem-solving skills as it encourages them to come up with their own answers.

135
BAD
MIN
TON
CO
ACH
ED
UC
ATIO
N
►
CO
ACH
ES’ M
ANU
AL
►
LEVE
L 1
MO
DU
LE 8
►
PE
RFO
RM
ANC
E FA
CTO
R 3
- TA
CTI
CS
06. BASE POSITION The ‘base position’ can be defined as:
“the court position from which you are best able to deal with your opponent’s probable replies.” Other keys facts about the base position include:
• the base is a fluid position, not a set point on the court; • the base position is where the player will perform a split step, timed with the opponent striking
the shuttle.

136
BADMINTON COACH EDUCATION ► COACHES’ MANUAL ► LEVEL 1 MODULE 8 ► PERFORMANCE FACTOR 3 - TACTICS
07. SINGLES TACTICS Men’s and women’s singles share some of the basic tactical approaches, such as use of space, playing to your strengths, exploiting your opponent’s weaknesses, etc. Men’s singles generally is more attacking, which is generally a reflection on their additional speed and power. This means there is less clearing in men’s singles (with more hitting down) and low serves are used much more. Women’s singles requires a slightly more patient approach to creating attacking opportunities. WHAT TO COACH: Singles High Serve • The singles high serve is used
mainly in women’s singles. It forces your opponent to the back, restricting the effectiveness of any attack, and gives the server time to react to the next shot.
• High serves are used less in men’s singles, especially at the top level, as they can attack this serve more explosively.
The high serve is usually directed towards the centre of the court, allowing the server to cover the angles of return more effectively.
After serving high, take up a position slightly to the same side you have served to. This helps you cover the straight returns, which are not in the air as long as cross-court returns.
HOW TO COACH: Singles High Serve
HOW TO COACH
• Mark target areas in the rearcourt that encourage players to hit both deep and to the centre. Make the target deeper and smaller for more competent players. This can be turned into a competition if alternating serves are used.
• Play a game where only high serves are allowed. Use alternating serves so each player gets an equal amount of serving practice. • Mark targets on the court (e.g. using tape) encouraging players to serve centrally and deep. Play a game where only high serves are allowed. Use
alternating serves so each player gets an equal amount of serving practice. If the serve is left and lands outside the target, the point is lost.

137
BADMINTON COACH EDUCATION ► COACHES’ MANUAL ► LEVEL 1 MODULE 8 ► PERFORMANCE FACTOR 3 - TACTICS WHAT TO COACH:
Return of High Serve
When receiving a good-length high serve in women’s singles, flatter attacking clears, as played by the far side player in this photo, can be used to exert pressure and make your opponent off-balance. Straight clears are easier to follow up than cross-court clears. Clears also give the receiver more time to respond to the next stroke.
If the high serve is short, smashes can be used effectively. Straight smashes are easier to follow up than cross-court.
Dropshots can also be used to attack a short high serve. Cross-court dropshots are a useful contrast to the straight smash, but be aware that a greater distance is required to follow-up.
HOW TO COACH: Return of High Serve
HOW TO COACH
• Play a game of singles where one player serves 10 times and then the other player serves 10 times. Rallies are played as usual but two points are awarded if a rally is won when a particular stroke (e.g. straight clear) is used to return serve. This can be used to raise awareness of using particular returns of serve effectively.
• Players work in a group of three, with one player standing outside the court. The remaining two players play singles normally to five points, but if a player wins the rally with a smash return of serve, or their next shot, they win the match. The player who is off court will therefore have their turn if:
o one player reaches five points – the loser of the game will be replaced; o one player wins a rally with a smash return of serve or their next shot.
• Players are restricted to using only two possible returns of serve (e.g. a straight clear and a cross-court dropshot). Players otherwise play as normal. At the end of the game the coach facilitates a discussion with each player as to the effectiveness of those returns against that particular opponent.

138
BADMINTON COACH EDUCATION ► COACHES’ MANUAL ► LEVEL 1 MODULE 8 ► PERFORMANCE FACTOR 3 - TACTICS
WHAT TO COACH: Singles Low Serves Low serves, especially backhand low serves, are used a great deal in men’s singles. Forehand low serves are used more as a variation in women’s singles. Low serves can force the opponent to lift the shuttle.
Low singles serves are usually delivered to the centre of the court to reduce the receiver’s angles of return.
As a variation low serves can be directed more towards the receiver. This can disrupt their preferred return of serve.
HOW TO COACH: Singles Low Serves
HOW TO COACH
• Set targets on both sides of the net, near the front of the service box and towards the centre of the court. Players have alternate serves, with the winner being the player that hits the target the most times in three minutes. This can be adapted so winners then challenge other winners in the hall for a further three minutes.
• Play a singles game where only low serves are allowed. Receivers should start the rally from their normal receiving position and not break the rules by moving before the serve is delivered. Players can alternate serves as a way to make sure each player gets an equal amount of practice. Some variation, serving to the centre and at the player, should be encouraged.

139
BADMINTON COACH EDUCATION ► COACHES’ MANUAL ► LEVEL 1 MODULE 8 ► PERFORMANCE FACTOR 3 - TACTICS WHAT TO COACH:
Return of Low Singles Serve
Net shots can be effective in forcing a lift which you can attack. Consider: ● taking it early; ● making it look like a lift; ● spinning the shuttle; ● using the centre to cover the angles of return.
Lifts have a better margin for error than net shots. Aim to put your opponent under pressure by placing the shuttle behind them and into the rearcourt corners. To do this: ● take the shuttle early; ● make it look like a net shot; ● use just enough height to be out of reach of your opponent; ● aim for the rearcourt corners.
HOW TO COACH: Return of Low Singles Serve
HOW TO COACH
• Place a marker halfway down the net in the centre of the court. A singles game is then played where only low serves are allowed. An umpire watching the match calls “fault” if any return of serve is struck below the marker on the net. This encourages the receiver to take the shuttle early when receiving a low singles serve.
• Play a normal game but award a bonus point if a rally is won when a particular return of serve is used.

140
BADMINTON COACH EDUCATION ► COACHES’ MANUAL ► LEVEL 1 MODULE 8 ► PERFORMANCE FACTOR 3 - TACTICS
WHAT TO COACH: Singles Flick Serve Flick serves are used in singles as a variation, in particular as a surprise after a period of low serving.
The aim of the flick serve is to make the receiver off-balance when they play their return.
Flick serves are often served wide in order to try to force a predictable straight return.
HOW TO COACH: Singles Flick Serve
HOW TO COACH
Play a singles game where only low and flick serves are allowed, with a bonus point being awarded if a rally is won when a flick serve was used at the start of the rally.

141
BADMINTON COACH EDUCATION ► COACHES’ MANUAL ► LEVEL 1 MODULE 8 ► PERFORMANCE FACTOR 3 - TACTICS WHAT TO COACH:
Return of Singles Flick Serve
If off balance and hitting down, focus on a good downward angle and accuracy. Reducing the power will help this and also give the receiver more time to recover ready for the next shot.
Straight clears can be used as a return to a wide flick serve, but focus on hitting a good depth. Clears give you more time to recover your position.
Take care using cross-court replies off a flick serve, especially if off-balance, as they are difficult to follow up.
HOW TO COACH: Return of Singles Flick Serve
HOW TO COACH EXAMPLES
• Start a rally with a flick serve, a controlled downward straight shot and a cross-block. Then play the rally out. • Start with a flick serve, straight clear then play the rally out. • Play a game where the players alternate their flick serves. Award bonus points for a rally won with a particular return (e.g. straight smash). Receivers should
start from their normal position and not move until the serve is delivered. Receivers could be asked to start slightly further forwards.

142
BADMINTON COACH EDUCATION ► COACHES’ MANUAL ► LEVEL 1 MODULE 8 ► PERFORMANCE FACTOR 3 - TACTICS
WHAT TO COACH: Singles Neutral Play (1)
In singles play there are parts of rallies where neither player is clearly on the attack. During these periods of neutral play both players should aim to move their opponent around the court in order to exploit any space they create. Patience is an important part during neutral phases of play.
Straight shots on the whole allow you to stay more in control because they involve recovering to a base that is closer from where you have hit your last stroke. Of course this does not mean you should not use cross-court strokes, but you should be confident you can position yourself to deal with your opponent's reply when using them.
During neutral play use the corners of the court to move your opponent around.
HOW TO COACH: Singles Neutral Play (1)
HOW TO COACH EXAMPLES
• Play rallies where players are encouraged to use a high percentage of straight shots, followed by a period of normal play. The coach then leads a discussion on the possible advantages and disadvantages of straight and cross-court strokes.
• Two players compete at singles with each player being observed by a partner. The observer records how many strokes intended to reach the rearcourt (lifts and clears) would have reached the back tramlines if left. After one game players are given the feedback (e.g. 8 out of 15 clears would have landed in the back tramlines). The players play again and try to improve their statistics.
• Play a game where the corners of the court are marked. Competitive games are played where strokes that land outside these corners are classed as out. Coach leads a discussion on the use of this exercise and any situations where use of the corners may not be so appropriate (see next section).

143
BADMINTON COACH EDUCATION ► COACHES’ MANUAL ► LEVEL 1 MODULE 8 ► PERFORMANCE FACTOR 3 - TACTICS WHAT TO COACH:
Singles Neutral Play (2)
Against players who do not recover well after each stroke, consider making them travel long diagonals across the court. Beware however that this tactic: ● involves you hitting cross-court, so you should be sure that you can cover the reply; ● may not be good against an opponent with good straight line speed.
Getting the player to change direction can be a useful tactic to make a player off-balance. This can involve a player: ● turning through 90 degrees (shown above); ● returning to the same corner.
Sometimes playing tight across the net, but slightly more into court, can be useful as it removes the opportunity for the opponent to play tight, spinning net shots. Consider on occasions playing to the centre of the net so you can cover the angles of return equally.
HOW TO COACH: Singles Neutral Play (2)
HOW TO COACH EXAMPLES
• Let two players play singles. Instruct one player to use a tactic of making their opponent cover long diagonals as much as possible. The other player should be asked to guess the tactic being used and combat it accordingly. At the end of the game players discuss the tactic and its relative effectiveness against different types of opponent.
• Let two players play singles. Instruct one player to use a tactic of making their opponent return to the same corner as much as possible. The other player should be asked to guess the tactic being used and combat it accordingly. At the end of the game players discuss the tactic and its relative effectiveness against different types of opponent.
• Play a game of singles where the forecourt area (from the net to the low service line) is out. Place two markers about 3 metres apart in the centre of the net. Players must play all net shots through this “gate”. At the end of the game players discuss playing off the net and using the centre of the net.

144
BADMINTON COACH EDUCATION ► COACHES’ MANUAL ► LEVEL 1 MODULE 8 ► PERFORMANCE FACTOR 3 - TACTICS
WHAT TO COACH: Singles Attack
Moving a player away from an area of weakness, then attacking that area can be a useful tactic. In the above example the nearside player hits to other corners, eventually exploiting the forehand forecourt of their opponent.
Once an attacking opportunity has been established, then there is often an increase in pace. In the above example the far side player responds to a short lift with fast movement backwards and hard-hitting, downward shots.
The more under pressure your opponent, the further forwards you should make your base. In the above example the nearside player has played a tight, early net shot which pressurises their opponent, so they stay further forwards. A lift from the far side player would have to be very high and would lack depth. This allows the nearside player to stay forwards and look for the opportunity to net kill.
HOW TO COACH: Singles Attack
HOW TO COACH EXAMPLES
Play a game where you get a bonus point if you win a point with a stroke to a particular corner of the court or with the next stroke after playing to that corner.

145
BADMINTON COACH EDUCATION ► COACHES’ MANUAL ► LEVEL 1 MODULE 8 ► PERFORMANCE FACTOR 3 - TACTICS WHAT TO COACH:
Rearcourt Singles Defence
When the shuttle is behind you in the rearcourt, a good-length clear can bring you back into the rally. Cross-court clears can also be used, but this is riskier as it is more difficult to hit a good length and it is harder to cover the next shot.
When the shuttle is behind you in the rearcourt, a pulled dropshot can bring you back into the rally. This has the advantage of restricting your opponent's ability to attack. The dropshot should be placed a little deeper in court to restrict the opponent's ability to play tight to the net. Backhand pulled dropshots can also be used in the same way. Cross-court dropshots can also be used as a variation, but these are harder to follow up.
HOW TO COACH: Rearcourt Singles Defence
HOW TO COACH EXAMPLES
Player ‘A’ strikes the shuttle from the one corner near the net to player ‘B’ who is in the midcourt, slightly cross-court to player ‘B’. This continues until player ‘A’ decides to play a straight flat lift into the rearcourt. Player ‘B’ then replies with a clear or pulled dropshot and they play the rally out. This practice can be developed by designing different starts to the rally – anything can be used which results in one player having to play a stroke from slightly behind them in the rearcourt.

146
BADMINTON COACH EDUCATION ► COACHES’ MANUAL ► LEVEL 1 MODULE 8 ► PERFORMANCE FACTOR 3 - TACTICS
WHAT TO COACH: Midcourt Singles Defence
A cross-court block off a straight smash means the follow-up is more difficult for the player using the smash.
A straight block off a cross-court smash means the follow-up is more difficult for the player using the smash.
HOW TO COACH: Midcourt Singles Defence
HOW TO COACH EXAMPLES
• Two players start a rally and create a situation where player ‘A’ has the opportunity to play a straight smash. Player ‘B’ should respond mainly to a straight smash with a cross-court block, although they can occasionally play other types of return. Players then play the rally out.
• Two players start a rally and create a situation where player ‘A’ has the opportunity to play a cross-court smash. Player ‘B’ should respond mainly to a cross-court smash with a straight block, although they can occasionally play other types of return. Players then play the rally out.

147
BADMINTON COACH EDUCATION ► COACHES’ MANUAL ► LEVEL 1 MODULE 8 ► PERFORMANCE FACTOR 3 - TACTICS WHAT TO COACH:
Forecourt Singles Defence
In the forecourt, lifts should be of good depth, with sufficient height to clear the opponent's racket and allow enough time for the lifting player to recover their position. Straight lifts are easier to recover from than cross-court lifts as the base required to cover the next shot is closer.
HOW TO COACH: Forecourt Single Defence
HOW TO COACH EXAMPLES
Play a game of singles where only straight lifts are allowed. After one set, change so that both straight and cross-court lifts are allowed. Then discuss the use of these strokes in singles.

148
BADMINTON COACH EDUCATION ► COACHES’ MANUAL ► LEVEL 1 MODULE 8 ► PERFORMANCE FACTOR 3 - TACTICS
08. DOUBLES TACTICS INTRODUCTION Men’s and women's doubles share many of the same characteristics. In particular, both use front and back as their attacking formation and side by side as their defensive formation. Men’s doubles does, however, tend to be more explosive and clearing the shuttle is relatively rare. The ability to serve and return effectively is crucial in men’s doubles. Women’s doubles is less explosive and relies more on patient rally building to break down opponent's defences. The longest rallies in badminton tend to occur in women’s doubles. WHAT TO COACH: Low Serving in Women’s Doubles (1)
In women's doubles, the server delivers from close to the "T" on the court, with her partner stood centrally in the midcourt.
Low serves are generally delivered to the centre to cut down the possible angles of return.
• For variation, low serves can also be directed towards the receiver. This can disrupt her preferred way of returning serve.
• Occasionally you may serve wide into the tramlines, but this is a higher risk strategy as it makes the serving pair open to a straight return into space.
HOW TO COACH: Low Serving in Women’s Doubles (1)
HOW TO COACH EXAMPLES
Play women’s doubles games where only low serves are allowed. Service receivers should: • receive from their normal position; • obey the rules by not moving before the serve is struck; • be sensible about returns (e.g. not hitting hard at the head of the server); • adjust their receiving position (i.e. slightly wider, slightly more central); • carry their racket in different positions (wider on forehand, in front of body, wider on backhand).
Servers should vary where they serve to in response to the different positions and racket carriage of the receiver.

149
BADMINTON COACH EDUCATION ► COACHES’ MANUAL ► LEVEL 1 MODULE 8 ► PERFORMANCE FACTOR 3 - TACTICS WHAT TO COACH:
Low Serving in Women’s Doubles (2)
Following the low serve, the server should look to cover any net replies.
The server should also look to anticipate pushed replies to the mid- and rearcourt. This usually involves choosing one side to cover.
The server's partner is responsible for covering returns to mid- and rearcourt.
HOW TO COACH: Low Serving in Women’s Doubles (2)
HOW TO COACH EXAMPLES
Play women’s doubles games where only low serves are allowed. Service receivers should: • receive from their normal position; • obey the rules by not moving before the serve is struck; • be sensible about returns (e.g. not hitting hard at the head of the server). The game is scored as normal, apart from the serving team being able to score two points if they win a rally with the 3rd shot of the rally.

150
BADMINTON COACH EDUCATION ► COACHES’ MANUAL ► LEVEL 1 MODULE 8 ► PERFORMANCE FACTOR 3 - TACTICS
WHAT TO COACH: Receiving Low Serves Women’s Doubles (1)
If the receiver plays a net reply to the serve, she should seek to dominate the net and kill any further net shots from the server.
Straight returns of serve to the midcourt should be followed by an attempt to intercept any straight replies.
Similarly, on playing a straight return to the rearcourt, the receiver should look to intercept any straight replies.
HOW TO COACH: Receiving Low Serves Women’s Doubles (1)
HOW TO COACH EXAMPLES
Play women’s doubles games where only low serves are allowed. Service receivers should: • receive from their normal position; • obey the rules by not moving before the serve is struck; • be sensible about returns (e.g. not hitting hard at the head of the server).
The game is scored as normal, apart from the receiving team being able to score two points if they win a rally with the 4th shot of the rally.

151
BADMINTON COACH EDUCATION ► COACHES’ MANUAL ► LEVEL 1 MODULE 8 ► PERFORMANCE FACTOR 3 - TACTICS
WHAT TO COACH: Receiving Low Serves Women’s Doubles (2)
The receiver may choose to attack into the body of the server's partner, in which case she should prepare to cover both sides for a possible reply.
If the receiver plays an inaccurate return, she may have to retreat off the net to a side-by-side formation.
HOW TO COACH: Receiving Low Serves in Women’s Doubles (2)
HOW TO COACH EXAMPLES
• Play a women’s doubles game where only low serves are allowed. Service receivers should:
o receive from their normal position; o obey the rules by not moving before the serve is struck; o be sensible about returns (e.g. not hitting hard at the head of the server).
The game is scored as normal, apart from the receiving team being able to score two points if they win a rally with the 4th shot of the rally. • Play women’s doubles, but no rally is allowed to go on longer than five shots. After five shots, the rally is stopped and the point awarded to the doubles team
on the attack/in control of the rally. Some lets may occur.

152
BADMINTON COACH EDUCATION ► COACHES’ MANUAL ► LEVEL 1 MODULE 8 ► PERFORMANCE FACTOR 3 - TACTICS
WHAT TO COACH: Women’s Doubles Flick Serve
Flick serves can be used as a useful variation, pushing the receiver back and often forcing her to hit the shuttle when off-balance. Wide serves are often more difficult to deal with, especially out to the forehand side.
Wide flick serves often draw a predictable straight reply, which can be anticipated by the server's partner.
Following a wide flick serve that has clearly deceived the receiver, the server may find she is able to stay closer to the net as a full-length cross-court clear is unlikely.
HOW TO COACH: Women’s Doubles Flick Serve
HOW TO COACH EXAMPLES
Play a game with a higher-than-normal percentage of flick serves. Bonus points awarded to the serving team when they win rallies with a flick serve.

153
BADMINTON COACH EDUCATION ► COACHES’ MANUAL ► LEVEL 1 MODULE 8 ► PERFORMANCE FACTOR 3 - TACTICS WHAT TO COACH:
Women’s Doubles Flick Serve Return
If flicked wide and on-balance, smash at the straight player or between the two players. A dropshot placed between the two players is also a useful variation.
If flicked to the centre and on-balance, smash at the retreating server or between the two players. A dropshot placed between the two players is once again an option.
When returning a flick that has put the receiver off-balance consider using a half smash, dropshot or straight clear, all of which give more time for the receiver to regain her balance.
HOW TO COACH: Women’s Doubles Flick Serve Return
HOW TO COACH EXAMPLES
Play a game with a higher-than-normal percentage of flick serves. Bonus points awarded to either team if they win a rally that began with a flick serve.

154
BADMINTON COACH EDUCATION ► COACHES’ MANUAL ► LEVEL 1 MODULE 8 ► PERFORMANCE FACTOR 3 - TACTICS
WHAT TO COACH: Women’s Doubles Rallying – Rearcourt Attack
When attacking in women's doubles, the main responsibility of the rear player is to: • cover the mid- and rearcourt; • be patient, waiting for good attacking
opportunities; • set up attacking opportunities for the front
player.
The rear player uses: • steep dropshots to pressurise their opponents; • shots to the middle of the two players to cut
down the angles of return (shown above); • smashes, most often at the straight player or
to the middle of the two players, to force a weak return or hit a winner;
• cross-court drops and smashes as a variation; • clears for variation.
Players will rotate positions if: • there is a good opportunity to follow their own
attack positively and • the front player has read the situation and
commits more centrally to cover other areas of the court.
HOW TO COACH: Women’s Doubles Rallying – Rearcourt Attack
HOW TO COACH EXAMPLES
• One player works hard in the rearcourt, playing dropshots between two players in a side-by-side formation. The two players lift to move the rearcourt player across the back line.
• Work in doubles formations, one pair front and back (attacking) and the other side by side (defending). The defending pair moves the rearcourt player around. This player responds with dropshots between the two defending players. One defending player then lifts deliberately shorter and wide, giving the opportunity for the rearcourt player to:
o smash; o follow in to the net.
The forecourt player moves across to allow the rearcourt player to follow up her smash. Players then play the rally out.
• Bonus points for rearcourt strokes that are winners, force an error or create a winner for the front player on the next shot. • Place two markers on the net so the net is split into thirds. Place a further one marker in the centre of the net. ( -------●--------●--------●---------). Play a normal
game of doubles but dropshots from the left rearcourt must go through the ●---------● “gate”, dropshots from right should go through the ●---------● “gate”.

155
BADMINTON COACH EDUCATION ► COACHES’ MANUAL ► LEVEL 1 MODULE 8 ► PERFORMANCE FACTOR 3 - TACTICS WHAT TO COACH:
Front Player Attack (1)
When attacking at women's doubles, the main responsibility of the front player is to: • cover the mid- and forecourt; • take the shuttle early; • intercept drives and pushes; • hit winners; • maintain the attack.
When the shuttle is lifted to the rearcourt, the front player should take up a midcourt position on the same side of the court as the shuttle. This "channel attack" position is most effective when the attack is directed at the straight player or to the middle, as it can create a 2 vs 1 situation.
HOW TO COACH: Front Player Attack (1)
HOW TO COACH EXAMPLES
• Players are given a number or letter (1 and 2 on one side of the net, A and B on the other side of the net). These players all begin in side-by-side positions. No shuttles are involved in this practice. The coach calls out a number, then a letter, then a number, then a letter (e.g. 1, A, 1, B, 2, B etc.). When the number or letter is called out, that player moves to one side in the rearcourt and her partner takes up a front “channel attack” position. The opposing pair should automatically form a side-by-side position.
• With four players on the court, two on each side in side-by-side positions, one player “serves” a shuttle high (i.e. a straight lift) to one side and the receiving pair move automatically into a “channel attack” position. The rally is then played to a conclusion.
• Players can be encouraged to design short openings to rallies that help players form “side-by-side” and “channel attack” positions, and then the players play the rally out.

156
BADMINTON COACH EDUCATION ► COACHES’ MANUAL ► LEVEL 1 MODULE 8 ► PERFORMANCE FACTOR 3 - TACTICS
WHAT TO COACH: Front Player Attack (2)
When her partner is using dropshots, the front player should move in to the net to threaten and prevent any attempted net replies. The front player will know a dropshot has been played by the movement of the opposition.
When the rear player has an opportunity to follow her own attack into the midcourt and forecourt, the front player can show she is ready for this by moving more to the centre line of the court, or even into the other half court. This allows her to cover the area of the court left by the advancing rearcourt player (team on the left).
HOW TO COACH: Front Player Attack (2)
HOW TO COACH EXAMPLES
• Two players form a front-and-back (attacking) formation and two players form a side-by-side, defensive formation. One player works hard in the rearcourt, playing dropshots between the 2 other players in a side-by-side formation. The two players continually lift to move the rearcourt player across the back line. The front player moves forwards to cover the net each time a dropshot is played (see first photo above) and moves slightly back when the shuttle is lifted.
• Work in doubles formations, one pair front and back (attacking) and the other side by side (defending). The defending pair moves the rearcourt player around. This player responds with dropshots between the two defending players. One defending player then lifts deliberately shorter and wide, giving the opportunity for the rearcourt player to:
o smash; o follow in to the net.
The forecourt player moves across to allow the rearcourt player to follow up her smash. Players then play the rally out.

157
BADMINTON COACH EDUCATION ► COACHES’ MANUAL ► LEVEL 1 MODULE 8 ► PERFORMANCE FACTOR 3 - TACTICS WHAT TO COACH:
Women’s Doubles Defence (1)
When defending in women's doubles, players create a side-by-side formation.
For wider lifts, the pair move across together towards the same side as the shuttle has been lifted. This allows them to deal more effectively with straight or down-the-middle replies from the attacker, which are the most frequent returns.
If one attacker is under some pressure in a rearcourt corner, both players can move further forwards. The cross-court player can take up a more advanced position: • because cross-court strokes will take longer to
reach her, so she will have more time to react; • to anticipate a dropshot to the centre.
HOW TO COACH: Women’s Doubles Defence
HOW TO COACH EXAMPLES
• Players are given a number or letter (1 and 2 on one side of the net, A and B on the other side of the net). These players all begin in side-by-side positions. No shuttles are involved in this practice. The coach calls out a number, then a letter, then a number, then a letter (e.g. 1, A, 1, B, 2, B etc.). When the number or letter is called out, that player moves to one side in the rearcourt and her partner takes up a front “channel attack” position. The opposing pair should automatically form a side-by-side position.
• The coach can encourage the side-by-side players to:
o move slightly across to the same side as that of the opposition rearcourt player (see 2nd photo above); o stay slightly further forwards in the case of the cross-court player.
• One player works hard in the rearcourt, playing dropshots between the players in a side-by-side formation. The two players lift to move the rearcourt player
across the back line. The side-by-side pair adjusts their positions by:
o moving across as a pair towards the same side as the shuttle is lifted; o in the case of the cross-court player, taking up a more advanced position depending on the degree of pressure on the rearcourt player.

158
BADMINTON COACH EDUCATION ► COACHES’ MANUAL ► LEVEL 1 MODULE 8 ► PERFORMANCE FACTOR 3 - TACTICS
WHAT TO COACH: Women’s Doubles Defence (2)
The defenders should use blocks and drives into space in order to turn defence into attack. The blocking or driving player should aim wherever possible to move forwards to cover the net and force a lift off her counter-attacking stroke.
On some occasions, especially if the block is cross-court, it may be better for the blocking player’s partner to move forwards.
When lifting, either from the net or midcourt, consider: • hitting cross-court lifts off straight attacking
shots; • straight lifts off cross-court attacking shots.
This tends to move the attacking team around more and can make it more difficult to sustain the attack.
HOW TO COACH: Women’s Doubles Defence (2)
HOW TO COACH EXAMPLES
• Play a game of doubles but no-one is allowed to lift off smashes. Players have to be creative to turn defence into attack; • Play games where players:
o can only lift cross-court off straight attacking shots; o can only lift straight off cross-court attacking shots.
The coach should then lead a discussion on the strengths and weaknesses of such an approach.

159
BADMINTON COACH EDUCATION ► COACHES’ MANUAL ► LEVEL 1 MODULE 8 ► PERFORMANCE FACTOR 3 - TACTICS WHAT TO COACH:
Low Serving in Men’s Doubles (1)
In men's doubles, the server delivers from close to the "T" on the court, with his partner positioned centrally in the midcourt.
Low serves are generally delivered to the centre to cut down the possible angles of return.
• For variation, low serves can also be directed towards the receiver. This can disrupt his preferred way of returning serve.
• Occasionally you may serve wide into the tramlines, but this is a higher risk strategy as it makes the serving pair open to a straight return into space.
HOW TO COACH: Low Serving in Men’s Doubles (1)
HOW TO COACH EXAMPLES
Play a men’s doubles games where only low serves are allowed. Service receivers should: • receive from their normal position; • obey the rules by not moving before the serve is struck; • be sensible about returns (e.g. not hitting hard at the head of the server); • adjust their receiving position (i.e. slightly wider, slightly more central); • carry their racket in different positions (wider on forehand, in front of body, wider on backhand). Servers should vary where they serve to in response to the different positions and racket carriage of the receiver.

160
BADMINTON COACH EDUCATION ► COACHES’ MANUAL ► LEVEL 1 MODULE 8 ► PERFORMANCE FACTOR 3 - TACTICS
WHAT TO COACH: Low Serving in Men’s Doubles (2)
Following the low serve, the server should look to cover any net replies.
The server should also look to anticipate pushed replies to the mid- and rearcourt. This usually involves choosing one side to cover.
The server's partner is responsible for covering returns to mid- and rearcourt.
HOW TO COACH: Low Serving in Men’s Doubles (2)
HOW TO COACH EXAMPLES
• Play men’s doubles games where only low serves are allowed. • Service receivers should:
o receive from their normal position; o obey the rules by not moving before the serve is struck; o be sensible about returns (e.g. not hitting hard at the head of the server).
• The game is scored as normal, apart from the serving team being able to score two points if they win a rally with the 3rd shot of the rally.

161
BADMINTON COACH EDUCATION ► COACHES’ MANUAL ► LEVEL 1 MODULE 8 ► PERFORMANCE FACTOR 3 - TACTICS WHAT TO COACH:
Receiving Low Serves in Men’s Doubles (1)
If the receiver plays a net reply to the serve, he should seek to dominate the net and kill any further net shots from the server.
Straight returns of serve to the midcourt should be followed by an attempt to intercept any straight replies.
Similarly, on playing a straight return to the rearcourt, the receiver should look to intercept any straight replies.
HOW TO COACH: Receiving Low Serves in Men’s Doubles (1)
HOW TO COACH EXAMPLES
• Play men’s doubles games where only low serves are allowed. • Service receivers should:
o receive from their normal position; o obey the rules by not moving before the serve is struck; o be sensible about returns (e.g. not hitting hard at the head of the server).
• The game is scored as normal, apart from the receiving team being able to score two points if they win a rally with the 4th shot of the rally.

162
BADMINTON COACH EDUCATION ► COACHES’ MANUAL ► LEVEL 1 MODULE 8 ► PERFORMANCE FACTOR 3 - TACTICS
WHAT TO COACH: Receiving Low Serves in Men’s Doubles (2)
The receiver may choose to attack into the body of the server's partner, in which case he should prepare to cover both sides for a possible reply.
If the receiver plays an inaccurate return, he may have to retreat off the net to a side by side formation.
HOW TO COACH: Receiving Low Serves in Men’s Doubles (2)
HOW TO COACH EXAMPLES
• Play men’s doubles games where only low serves are allowed.
• Service receivers should:
o receive from their normal position; o obey the rules by not moving before the serve is struck; o be sensible about returns (e.g. not hitting hard at the head of the server).
The game is scored as normal, apart from the receiving team being able to score two points if they win a rally with the 4th shot of the rally. • Play men’s doubles but no rally is allowed to go on longer than five shots. After five shots the rally is stopped and the point awarded to the doubles team on
the attack/in control of the rally. Some lets may occur.

163
BADMINTON COACH EDUCATION ► COACHES’ MANUAL ► LEVEL 1 MODULE 8 ► PERFORMANCE FACTOR 3 - TACTICS WHAT TO COACH
Men’s Doubles Flick Serve
Flick serves can be used as a useful variation, pushing the receiver back and often forcing him to hit the shuttle when off-balance. Wide serves are often more difficult to deal with, especially out to the forehand side.
Wide flick serves often draw a predictable straight reply, which can be anticipated by the server's partner.
HOW TO COACH Men’s Doubles Flick Serve
HOW TO COACH EXAMPLES
Play a game with a higher-than-normal percentage of flick serves. Bonus points awarded to the serving team when they win rallies with a flick serve.

164
BADMINTON COACH EDUCATION ► COACHES’ MANUAL ► LEVEL 1 MODULE 8 ► PERFORMANCE FACTOR 3 - TACTICS
WHAT TO COACH Men’s Doubles Flick Serve Return
If flicked wide and on-balance, smash at the straight player or between the two players. A dropshot placed between the two players is also a useful variation.
If flicked to the centre and on-balance, smash at the retreating server or between the two players. A dropshot placed between the two players is once again an option.
When returning a flick that has put the receiver off-balance consider using a half smash or dropshot, both of which give more time for the receiver to regain his balance.
HOW TO COACH: Men’s Doubles Flick Serve Return
HOW TO COACH EXAMPLES
Play a game with a higher-than-normal percentage of flick serves. Bonus points are awarded to either team if they win a rally that began with a flick serve.

165
BADMINTON COACH EDUCATION ► COACHES’ MANUAL ► LEVEL 1 MODULE 8 ► PERFORMANCE FACTOR 3 - TACTICS WHAT TO COACH
Men’s Doubles Rallying – Rearcourt Attack
When attacking at men's doubles, the main responsibility of the rear player is to: • cover the mid- and rearcourt; • be patient, waiting for good attacking
opportunities; • set up attacking opportunities for the front
player; • hit winners.
The rear player uses: • steep dropshots to pressurise their opponents; • shots to the middle of the two players to cut
down the angles of return (shown above); • smashes, most often at the straight player or
to the middle of the two players, to force a weak return or hit a winner;
• cross-court drops and smashes as a variation.
Players will rotate positions if: • there is a good opportunity to follow their own
attack positively and • the front player has read the situation and
commits more centrally to cover other areas of the court.
HOW TO COACH Men’s Doubles Rallying – Rearcourt Attack
HOW TO COACH EXAMPLES
• One player works hard in the rearcourt, playing dropshots between two players in a side-by-side formation. The two players lift to move the rearcourt player across the back line.
• Work in doubles formations, one pair front and back (attacking) and the other side by side (defending). The defending pair moves the rearcourt player around. This player responds with dropshots between the two defending players. One defending player then lifts deliberately shorter and wide, giving the opportunity for the rearcourt player to:
o smash; o follow in to the net.
The forecourt player moves across to allow the rearcourt player to follow up his smash. Players then play the rally out.
• Bonus points for rearcourt strokes that are winners, force an error or create a winner for the front player on the next shot.
• Place two markers on the net so the net is split into thirds. Place a further one marker in the centre of the net. ( -------●--------●--------●---------). Play a normal game of doubles but dropshots from the left rearcourt must go through the ●---------● “gate”, dropshots from right should go through the ●---------● “gate”.

166
BADMINTON COACH EDUCATION ► COACHES’ MANUAL ► LEVEL 1 MODULE 8 ► PERFORMANCE FACTOR 3 - TACTICS
WHAT TO COACH Men’s Doubles - Front Player Attack (1)
When attacking at men's doubles, the main responsibility of the front player is to: • cover the mid- and forecourt; • take the shuttle early; • intercept drives and pushes; • hit winners; • maintain the attack.
When the shuttle is lifted to the rearcourt, the front player should take up a midcourt position on the same side of the court as the shuttle. This "channel attack" position is most effective when the attack is directed at the straight player or to the middle, as it can create a 2 vs 1 situation.
HOW TO COACH: Men’s Doubles - Front Player Attack (1)
HOW TO COACH EXAMPLES
• Players are given a number or letter (1 and 2 on one side of the net, A and B on the other side of the net). These players all begin in side-by-side positions. No shuttles are involved in this practice. The coach calls out a number, then a letter, then a number, then a letter (e.g. 1, A, 1, B, 2, B etc.). When the number or letter is called out, that player moves to one side in the rearcourt and his partner takes up a front “channel attack” position. The opposing pair should automatically form a side-by-side position.
• With four players on the court, two on each side in side-by-side positions, one player “serves” a shuttle high (i.e. a straight lift) to one side and the receiving pair move automatically in to a “channel attack” position. The rally is then played to a conclusion.
• Players can be encouraged to design short openings to rallies that help players form “side by side” and “channel attack” positions, and then the players play the rally out.

167
BADMINTON COACH EDUCATION ► COACHES’ MANUAL ► LEVEL 1 MODULE 8 ► PERFORMANCE FACTOR 3 - TACTICS WHAT TO COACH:
Men’s Doubles - Front Player Attack (2)
When his partner is using dropshots, the front player should move in to the net to threaten and prevent any attempted net replies. The front player will know a dropshot has been played by the movement of the opposition.
When the rear player has an opportunity to follow his own attack into the midcourt and forecourt, the front player can show he is ready for this by moving more to the centre line of the court, or even into the other half court. This allows him to cover the area of the court left by the advancing rearcourt player.
HOW TO COACH: Men’s Doubles - Front Player Attack (2)
HOW TO COACH EXAMPLES
• Two players form a front-and-back (attacking) formation and two players form a side-by-side, defensive formation. One player works hard in the rearcourt, playing dropshots between the two other players in a side-by-side formation. The two players continually lift to move the rearcourt player across the back line. The front player moves forwards to cover the net each time a dropshot is played (see first photo above) and moves slightly back when the shuttle is lifted.
• Work in doubles formations, one pair front and back (attacking) and the other side by side (defending). The defending pair moves the rearcourt player around. This player responds with dropshots between the two defending players. One defending player then lifts deliberately shorter and wide, giving the opportunity for the rearcourt player to:
o smash; o follow in to the net.
The forecourt player moves across to allow the rearcourt player to follow up his smash. Players then play the rally out.

168
BADMINTON COACH EDUCATION ► COACHES’ MANUAL ► LEVEL 1 MODULE 8 ► PERFORMANCE FACTOR 3 - TACTICS
WHAT TO COACH Men’s Doubles Defence (1)
When defending in men's doubles, players create a side-by-side formation.
For wider lifts the pair move across together towards the same side as the shuttle has been lifted. This allows them to deal more effectively with straight or down-the-middle replies from the attacker, which are the most frequent returns.
If one attacker is under some pressure in a rearcourt corner, both players can move further forwards. The cross-court player can take up a more advanced position: • because cross-court strokes will take longer to
reach him, so he will have more time to react; • to anticipate a dropshot to the centre.
HOW TO COACH Men’s Doubles Defence (1)
HOW TO COACH EXAMPLES
• Players are given a number or letter (1 and 2 on one side of the net, A and B on the other side of the net). These players all begin in side-by-side positions. No shuttle is involved in this practice. The coach calls out a number, then a letter, then a number, then a letter (e.g. 1, A, 1, B, 2, B etc.). When the number or letter is called out, that player moves to one side in the rearcourt and his partner takes up a front “channel attack” position. The opposing pair should automatically form a side-by-side position.
• The coach can encourage the side-by-side players to:
o move slightly across to the same side as that of the opposition rearcourt player (see 2nd photo above); o stay slightly further forwards in the case of the cross-court player.
• One player works hard in the rearcourt, playing dropshots between the players in a side-by-side formation. The two players lift to move the rearcourt player
across the back line.
• The side-by-side pair adjusts their positions by:
o moving across as a pair towards the same side as the shuttle is lifted; o in the case of the cross-court player, taking up a more advanced position depending on the degree of pressure on the rearcourt player.

169
BADMINTON COACH EDUCATION ► COACHES’ MANUAL ► LEVEL 1 MODULE 8 ► PERFORMANCE FACTOR 3 - TACTICS
WHAT TO COACH Men’s Doubles Defence (2)
The defenders should use blocks and drives into space in order to turn defence into attack. The blocking or driving player should aim wherever possible to move forwards to cover the net and force a lift off his counter-attacking stroke.
On some occasions, especially if the block is cross-court, it may be better for the blocking player’s partner to move forwards.
When lifting, either from the net or midcourt, consider: • hitting cross-court lifts off straight attacking
shots; • straight lifts off cross-court attacking shots.
This tends to move the attacking team around more and can make it more difficult to sustain the attack.
HOW TO COACH Men’s Doubles Defence (2)
HOW TO COACH EXAMPLES
• Play a game of doubles but no-one is allowed to lift off smashes. Players have to be creative to turn defence into attack.
• Play games where players:
o can only lift cross-court off straight attacking shots; o can only lift straight off cross-court attacking shots.
The coach should then lead a discussion on the strengths and weaknesses of such an approach.

170
BADMINTON COACH EDUCATION ► COACHES’ MANUAL ► LEVEL 1 MODULE 8 ► PERFORMANCE FACTOR 3 - TACTICS
09. MIXED DOUBLES TACTICS
INTRODUCTION Mixed has many of the tactical characteristics of level doubles. The major difference is that the female player has less power than the male player. For this reason players aim to create situations where the female player can dominate the forecourt and midcourt, whereas the male player aims to dominate the mid- and rearcourt. WHAT TO COACH: Man Low Serving in Mixed Doubles (1)
When the man serves from the right court, the women takes up a net position slightly to the left in the forecourt.
When the man serves from the left court, the women can also take up a position slightly to the left in the forecourt.
When the man serves from the left court, the women can also take up a position slightly to the right. This can disrupt the receiver's replies, particularly if they return straight a lot.
Low serves are generally delivered to the centre to restrict possible angles of return, or towards the receiver for variation. Following the serve, the man covers replies to the midcourt and rearcourt.
HOW TO COACH: Man Low Serving in Mixed Doubles (1)
HOW TO COACH EXAMPLES
Play a mixed game and experiment with the woman’s starting position when the man is serving from the left. Sometimes start with the woman on the left, sometimes start on the right.

171
BADMINTON COACH EDUCATION ► COACHES’ MANUAL ► LEVEL 1 MODULE 8 ► PERFORMANCE FACTOR 3 - TACTICS WHAT TO COACH
Woman Low Serving in Mixed Doubles (2)
When the woman serves, her partner takes up a central position on the court.
Low serves are generally delivered to the centre to restrict possible angles of return, or towards the receiver for variation. Wide serves can be used occasionally as a variation.
Following the serve, the woman covers replies to the forecourt and midcourt.
HOW TO COACH: Woman Low Serving in Mixed Doubles (2)
HOW TO COACH EXAMPLES
• Play a mixed doubles game where only low serves from the women players are allowed. • Service receivers should:
o receive from their normal position; o obey the rules by not moving before the serve is struck; o be sensible about returns (e.g. not hitting hard at the head of the server); o adjust their receiving position (i.e. slightly wider, slightly more central); o carry their racket in different positions (wider on forehand, in front of body, wider on backhand).
• Servers should vary where they serve to in response to the different positions and racket carriage of the receiver.

172
BADMINTON COACH EDUCATION ► COACHES’ MANUAL ► LEVEL 1 MODULE 8 ► PERFORMANCE FACTOR 3 - TACTICS
WHAT TO COACH: Mixed Doubles - Woman Returning Low Serve (1)
If the female player is returning at mixed, then her partner takes up a central position in the court.
When returning serve to the net the woman should look to move in and dominate the forecourt.
HOW TO COACH: Mixed Doubles - Woman Returning Low Serve (1)
HOW TO COACH EXAMPLES
Play a game where only the women players are receiving serve. Also consider placing an emphasis on a particular type of return (straight, cross-court, rearcourt, etc.). Encourage discussion with partners about the effectiveness of particular replies and each player’s responsibilities after each reply.
WHAT TO COACH Mixed Doubles - Woman Returning Serve (2)
If returning straight to the mid- or rearcourt, the woman should anticipate the straight replies.
The women can push returns into the body of the server's partner. Depending on the quality of her return she should attempt to cover both replies to the net and midcourt pushes.
HOW TO COACH Mixed Doubles - Woman Returning Serve (2)
HOW TO COACH EXAMPLES
Play a game where only the women players are receiving serve. Also consider placing an emphasis on a particular type of return (straight, cross-court, rearcourt etc.). Encourage discussion with partners about the effectiveness of particular replies and each player’s responsibilities after each reply.

173
BADMINTON COACH EDUCATION ► COACHES’ MANUAL ► LEVEL 1 MODULE 8 ► PERFORMANCE FACTOR 3 - TACTICS WHAT TO COACH:
Mixed Doubles - Man Returning Low Serve
When the male is returning serve at mixed, his female partner usually stands alongside him.
The male player will play many returns to the midcourt or rearcourt, as this allows time for him to move back to cover his own mid- and rearcourt. Straight returns may also allow him to cover the third shot of the rally more often. Returns to the net, cross-court and at the body of the opposition can be used as variations.
The male looks to play returns which allow the female player to move forwards, however the female player should be aware that she may have to assist in the rearcourt.
If the return of serve has created a lot of pressure, the male player should stay in to try and finish the rally or create a good winning opportunity for his partner.
HOW TO COACH: Mixed Doubles - Man Returning Serve
HOW TO COACH EXAMPLES
Play a game where only the men players are receiving serve. Also consider placing an emphasis on a particular type of return (straight, cross-court, rearcourt, etc.). Encourage discussion with partners about the effectiveness of particular replies and each player’s responsibilities after each reply.

174
BADMINTON COACH EDUCATION ► COACHES’ MANUAL ► LEVEL 1 MODULE 8 ► PERFORMANCE FACTOR 3 - TACTICS
WHAT TO COACH: Flick Serves in Mixed Doubles
Wide flick serves can be used in mixed, mainly against the woman to force her into the rearcourt. If the woman serves the flick, she should retreat slightly from the net. How far she retreats depends on the serve's effectiveness - the more off-balance the receiver and the later they take the shuttle the more the server can stay closer to the net.
Flick serves to the centre can also be used as a variation.
If the man flicks, then his partner wherever possible should move to a cross-court position. This allows that player more time to deal with the cross-court replies and more opportunity to stay closer to the net.
HOW TO COACH: Flick Serves in Mixed Doubles
HOW TO COACH EXAMPLES
Play a game with a higher-than-normal percentage of flick serves. Bonus points are awarded to either team if they win a rally that began with a flick serve.

175
BADMINTON COACH EDUCATION ► COACHES’ MANUAL ► LEVEL 1 MODULE 8 ► PERFORMANCE FACTOR 3 - TACTICS WHAT TO COACH
Mixed Doubles – Returning Flick Serve
If flicked wide, attack the straight player's body or aim between the two players. Taking some pace off the stroke allows more recovery time. Alternatively, clear to the woman if possible.
If flicked wide down the centre, attack to the centre or at the body of the woman. Once again, taking some pace off the stroke allows more recovery time. Alternatively, clear cross-court to allow more time to recover into court.
HOW TO COACH Mixed Doubles – Returning Flick Serves
HOW TO COACH EXAMPLES
Play a game where there is a high proportion of flick serves, especially to the woman player. Experiment with a variety of returns. Discuss with partner and coach the effectiveness of different replies and the responsibilities of each player after the reply has been made (e.g. which court areas they would need to cover).

176
BADMINTON COACH EDUCATION ► COACHES’ MANUAL ► LEVEL 1 MODULE 8 ► PERFORMANCE FACTOR 3 - TACTICS
WHAT TO COACH: Mixed Doubles Rallying – Attack (1)
When attacking, the preferred formation in mixed is front and back, with the man covering the mid- and rearcourt, where his additional power is useful.
Women should look to move forwards and dominate the mid- to forecourt.
During rallies, be patient and play with accuracy and steep angles - wait for a good opportunity to attack where more pace and power can be injected.
HOW TO COACH: Mixed Doubles Rallying – Attack (1)
HOW TO COACH EXAMPLES
One pair starts side by side; one pair starts front and back. The shuttle is delivered high and deep to one corner. Players then play the rally out. Encourage discussion between pairs and use questioning to highlight aspects of good attacking practice (e.g. formation, patience, injection of pace, etc.).

177
BADMINTON COACH EDUCATION ► COACHES’ MANUAL ► LEVEL 1 MODULE 8 ► PERFORMANCE FACTOR 3 - TACTICS WHAT TO COACH:
Mixed Doubles Rallying – Attack (2)
Play a higher percentage of attacking strokes that are directed: • at the straight player who has less time to
react; • between the two players to cut down the
angles of return (see above). Cross-court strokes should be used for variation.
Attacking clears can be useful to force the woman into the rearcourt where her reduced power may be exploited.
Make sure, however, that "playing on the woman" is not overdone and gives the attack away, particularly if the strokes are drawing the women into forecourt situations she can dominate.
HOW TO COACH: Mixed Doubles Rallying – Attack (2)
HOW TO COACH EXAMPLES
One pair starts side by side; one pair starts front and back. The shuttle is delivered high and deep to one corner. Players then play the rally out. Encourage discussion between pairs and use questioning to highlight aspects of good attacking practice (e.g. formation, patience, injection of pace, etc.).
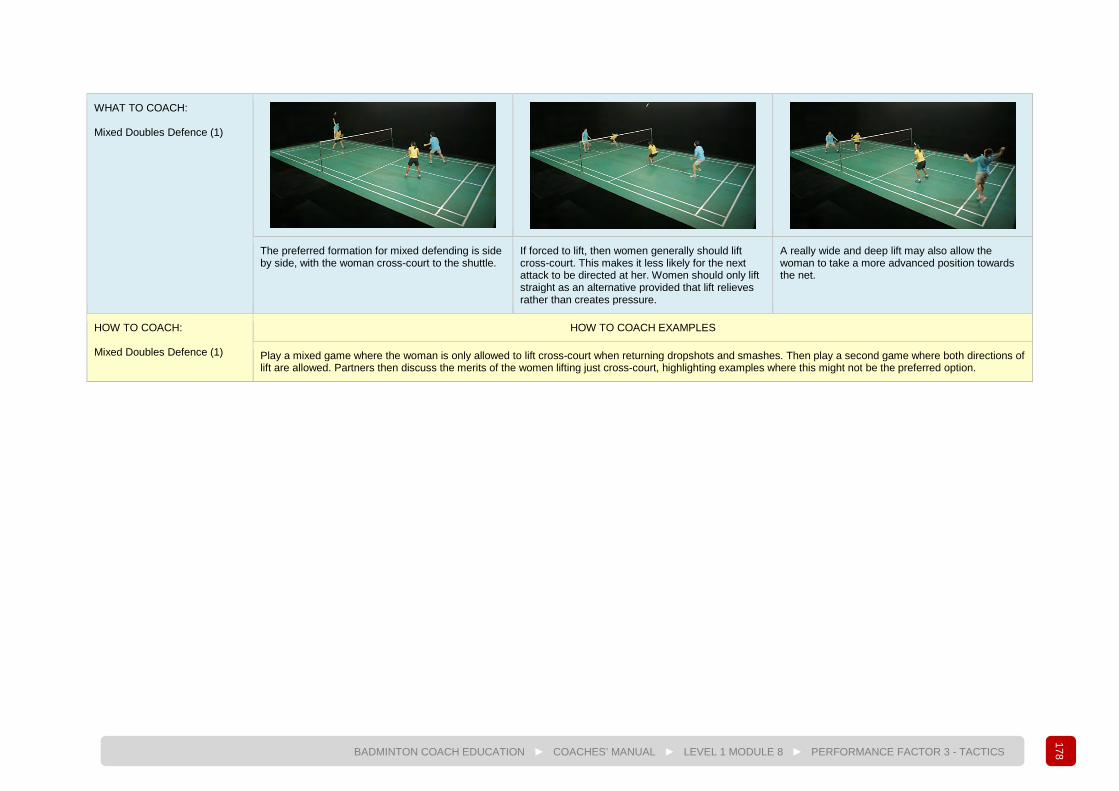
178
BADMINTON COACH EDUCATION ► COACHES’ MANUAL ► LEVEL 1 MODULE 8 ► PERFORMANCE FACTOR 3 - TACTICS
WHAT TO COACH: Mixed Doubles Defence (1)
The preferred formation for mixed defending is side by side, with the woman cross-court to the shuttle.
If forced to lift, then women generally should lift cross-court. This makes it less likely for the next attack to be directed at her. Women should only lift straight as an alternative provided that lift relieves rather than creates pressure.
A really wide and deep lift may also allow the woman to take a more advanced position towards the net.
HOW TO COACH: Mixed Doubles Defence (1)
HOW TO COACH EXAMPLES
Play a mixed game where the woman is only allowed to lift cross-court when returning dropshots and smashes. Then play a second game where both directions of lift are allowed. Partners then discuss the merits of the women lifting just cross-court, highlighting examples where this might not be the preferred option.

179
BADMINTON COACH EDUCATION ► COACHES’ MANUAL ► LEVEL 1 MODULE 8 ► PERFORMANCE FACTOR 3 - TACTICS WHAT TO COACH:
Mixed Doubles Defence (2)
Men usually lift straight, allowing them to take any resulting straight attack. Men should only lift cross-court as an alternative provided that lift relieves rather than creates pressure.
Pushes and blocks should be used extensively off smashes to turn defence into attack, especially into the midcourt areas just behind the opposition front player.
HOW TO COACH: Mixed Doubles Defence (2)
HOW TO COACH EXAMPLES
• Play a mixed game where the man is only allowed to lift straight when returning dropshots and smashes (note he can still play blocks and pushes in any direction). Then play a second game where both directions of lift are allowed. Partners then discuss the merits of the men lifting just straight, highlighting examples where this might not be the preferred option.
• Play a game where lifting off smashes is not allowed.

180
BAD
MIN
TON
CO
ACH
ED
UC
ATIO
N
►
CO
ACH
ES’ M
ANU
AL
►
LEVE
L 1
MO
DU
LE 8
►
PE
RFO
RM
ANC
E FA
CTO
R 3
- TA
CTI
CS
10. SELF-ASSESSMENT QUESTIONS
1 Four types of awareness that players need to have to support their decision making in singles badminton are:
Spatial, speed, balance, self
Opponent, partner, balance, fatigue
Spatial, self, opponent and pace
Strength, spatial, speed, surroundings
2 Base can defined as:
The centre of the court
The court position from which you are best able to deal with your opponent’s probable replies
The “T”
The back tramlines
3 Hitting very high to the back of your opponent’s court:
Gives both you and your opponent time to get into position
Gives you less time to get in position
Gives your opponent a good opportunity to intercept early
Gives your opponent less time to get in position
4 The more under pressure your opponent is the more you:
Move your base backwards
Move your base forwards
Keep your racket down
Make your base diagonally opposite them
5 In doubles, smashes are generally directed more:
At the centre of the court and also the cross-court player
Between the players and also at the straight player
Equally at cross-court player and the straight player
Down the centre of the court only
6 In order to make your low serve more effective, you can:
Serve to the centre all the time
Vary your serve along the low service line
Serve wide all the time
Change your service action on each stroke
7 In order to help develop tactical problem-solving skills, coaches should:
Tell players as much as they can
Explain as much as possible
Demonstrate the answers as much as possible

181
BAD
MIN
TON
CO
ACH
ED
UC
ATIO
N
►
CO
ACH
ES’ M
ANU
AL
►
LEVE
L 1
MO
DU
LE 8
►
PE
RFO
RM
ANC
E FA
CTO
R 3
- TA
CTI
CS
Use questioning skills to encourage problem solving
8 The two elements that define tactics are awareness and:
Decision making
Listening to the coach
Hitting mainly straight shots
Attacking all the time
9 The preferred attacking formation for mixed doubles is:
Man at front, woman at the back
Side by side, man taking straight shot
Woman at the front, man at the back
Side by side, with cross-court player in an advanced position
10 After returning a low serve straight to the midcourt in men’s doubles, that receiver should cover:
The cross-court replies to the midcourt
The rearcourt - straight
The rearcourt - crosscourt
The straight replies to net and midcourt

BADMINTON COACH EDUCATION
COACHES’ MANUAL LEVEL 1
MODULE 9 PERFORMANCE FACTOR 4 PHYSICAL

BADMINTON WORLD FEDERATION Unit 1, Level 29 Naza Tower, Platinum Park 10 Persiaran KLCC 50088 Kuala Lumpur Tel +603 2631 9188 Fax +603 2631 9688 [email protected]
MODULE 9 PERFORMANCE FACTOR 4 - PHYSICAL 01. Introduction 182 02. Physical Fitness 182 03. Motor Fitness Components 184 04. Warm-up 185 05. Pulse Raising Exercises 186 06. Mobility Exercises 187 07. Balance 189 08. Quickness/Speed 191 09. Knock-up 193 10. Cool-down 194 11. Summary 196 12. Self-Assessment Questions 197
LEARNING OUTCOMES
By the end of this module, coaches will be able to: • recognise the key components of fitness that underpin badminton performance; • identify appropriate methods for training of the key components of fitness for different groups; • construct appropriate warm-ups and cool-downs.

182
BAD
MIN
TON
CO
ACH
ED
UC
ATIO
N ►
C
OAC
HES
’ MAN
UAL
►
LE
VEL
1 M
OD
ULE
9 ►
PE
RFO
RM
ANC
E FA
CTO
R 3
PH
YSIC
AL
01. INTRODUCTION When beginning to play badminton the physical demands of the sport are not high. As hitting skills develop, however, physical demands rapidly increase. At the highest levels of play, fitness levels are very high, with matches requiring multiple bursts of strenuous activity for up to an hour or more. It is beyond the scope of this section to provide the coach with the knowledge and skills required to design and supervise fitness programmes. This will be developed in Level 2. However, this section will give coaches: • an overview of the components of fitness that underpin success in badminton; • the knowledge required to construct appropriate warm-ups and cool-downs.
02. PHYSICAL FITNESS Physical fitness can be defined as “the capacity of a player to complete physical tasks”. Physical fitness can be divided into various components, as shown below, and these are detailed in the table overleaf. Physical Fitness Components
• Body Composition
• Strength
• Flexibility
• Endurance
• Speed

183
BADMINTON COACH EDUCATION ► COACHES’ MANUAL ► LEVEL 1 MODULE 9 ► PERFORMANCE FACTOR 4 - PHYSICAL
PHYSICAL FITNESS
COMPONENT
DEFINITION RELEVANCE TO BADMINTON COACHING ADVICE
BODY COMPOSITION
What the body is made up of. Successful badminton players tend to have low body fat levels and muscular legs, helping them to move powerfully/quickly.
• Body fat levels are controlled by a combination of diet and exercise. • Coaches should be sensitive to giving dietary advice, particularly to children
and young people. If in doubt, seek professional advice.
STRENGTH • MAXIMAL STRENGTH The greatest force that a player can generate in a single effort.
• Badminton players do not need to demonstrate extreme maximal strength.
• However, above-average leg strength is desirable to help players generate power.
• In the 6 - 9 age group, strength training should not be a priority. • In the 9 - 13 phase, strength training is once again not a major priority and if
it is introduced the focus should be: o on good technique and creating stability in the body; o on bodyweight exercises, supplemented by Swiss ball,
medicine ball and elasticated band work. • Correct weight training techniques, with light weights, can be introduced in
the later stages of puberty. • Training with heavier weights should only be undertaken:
o after the growth spurt has been completed; o after a period of technical lifting training has been completed; o under qualified supervision.
• Upper body strength is an important part of training for wheelchair players for reasons of technique/ injury prevention.
• STRENGTH ENDURANCE The capacity of muscles to maintain repeated strong contractions without experiencing fatigue.
• Badminton players have to repeat movements many times over during a game (e.g. lunging, striking the shuttle) so strength endurance is important.
• ELASTIC STRENGTH The ability of muscles to generate force at high speed after rapid pre-stretching.
• Elastic strength is often referred to as “power”.
• Badminton players need high levels of elastic strength/power.
• Powerful forward swings of the racket are preceded by rapid stretching in the backswing.
FLEXIBILITY • The range and ease of movement around a joint.
Badminton players need good flexibility to: • Reach up and out for the shuttle; • Maintain good technique; • Generate forces effectively; • Avoid injury.
• Mobility training (dynamic flexibility) encourages maintenance of full ranges of movement and should be promoted at all times.
• Static flexibility stretching can be gradually introduced around 11 years of age, then maintained as a permanent part of training.
• Static stretches should be held for 15 – 60 seconds.
ENDURANCE • The capacity of the body to withstand fatigue.
• Endurance relies on the cardiovascular and respiratory systems supplying oxygen/ nutrients and removing carbon dioxide/waste products.
• Helps players to last in long games. • Supports recovery between rallies. • Supports recover between matches and training
sessions.
• Formalised endurance training will become most effective if introduced around the age of 13.
• Running and, as a second choice, cycling for durations of 20 – 40 minutes, 2-3 times per week can bring about significant training benefits.
SPEED • The capacity to move the whole body (or parts of the body) rapidly.
Players have to be able to move at speed to: o take the shuttle ‘early’ and pressure your
opponent; o retrieve the strokes of your opponent.
• Speed training should be a focus in most stages of badminton training, although correct movement skills should be established first as a foundation.

184
BADMINTON COACH EDUCATION ► COACHES’ MANUAL ► LEVEL 1 MODULE 9 ► PERFORMANCE FACTOR 4 - PHYSICAL
03. MOTOR FITNESS COMPONENTS In addition to physical fitness, there are also four motor fitness components that are generally more badminton specific. MOTOR FITNESS
COMPONENT DEFINITION RELEVANCE TO BADMINTON COACHING ADVICE
DYNAMIC BALANCE
• The capacity of a player to keep their centre of gravity over a constantly changing base of support.
A player with good dynamic balance is able to maintain stability even when moving quickly. Such a player uses less energy when moving, will perform better technically and their opponent will find it more difficult to force them off-balance.
• Dynamic balance training is appropriate at all stages of players’ development.
• One-legged exercises, exercises with eyes closed, keeping steady head positions, maintaining good posture and sports-specific agility drills can all help to improve dynamic balance.
• Amputees and players with cerebral palsy may have balance issues that require additional training or adaptations to traditional exercises.
QUICKNESS The capacity to react to and accelerate in response to an opponent’s stroke.
Badminton players have to react quickly to their opponent’s stroke, either by:
• pushing rapidly off the ground; • manipulating their racket quickly.
• Quickness should be a focus in most stages of badminton training, although this training should be built on a foundation of correct movement skills being established first.
CO-ORDINATION • Co-ordination is the capacity to time sequential movements of the body effectively.
• Co-ordination in badminton is often known as “eye-hand-foot co-ordination”.
Badminton requires the player to co-ordinate different parts of the body: • to change position in response to the shuttle flight; • to execute their desired stroke effectively.
• Co-ordination training is effectively the same as technical training (hitting and movement).
• In the 6 - 9 age group, focussing on generic co-ordination skills such as throwing, catching, jumping and methods of travelling is desirable.
• Sports-specific co-ordination should be focussed upon during the 9 - 13 phase in order to establish appropriate hitting and movement skills early in their development.
AGILITY The capacity to change direction rapidly whilst retaining balance.
The relatively small court and fast, volleying nature of badminton means that it is a sport where high levels of agility are necessary to succeed.
• Generic activities such as stopping and starting, changing direction, jumping/landing and different methods of travelling with the 6 -9 age group is desirable to underpin more sports-specific development.
• More sports-specific agility training should be included in all future stages of development, including shadowing of sports-specific movement patterns, movement during predictable then unpredictable rallies, etc.

185
BADMINTON COACH EDUCATION ► COACHES’ MANUAL ► LEVEL 1 MODULE 9 ► PERFORMANCE FACTOR 4 - PHYSICAL
04. WARM-UP The aim of the warm-up is to take the player from a resting body situation to the physical and mental state required to perform effectively in the main part of the session.
W A R M
U P
REASONS TO WARM UP Reduce the chance of injury
Increase blood flow
Increase muscle temperature
Assist in skill development
Mentally prepare the player
Rehearse skills used in match play
FACTORS THAT INFLUENCE WHAT YOU INCLUDE
What is the main content of the session?
What is the age/experience of the player?
What is the environment like?
What space is available?
What equipment is available?
How many players are there?
WHAT YOU MIGHT INCLUDE * Pulse Raiser
Mobiliser
Balance
Quickness
Agility
Knock-up
• Not all the above elements will be included in every warm-up. The coach should treat this list as a menu, selecting only those elements that take
the player from rest to the physical and mental state required to perform effectively in the main part of the session.

186
BADMINTON COACH EDUCATION ► COACHES’ MANUAL ► LEVEL 1 MODULE 9 ► PERFORMANCE FACTOR 4 - PHYSICAL
05. PULSE RAISING EXERCISES
• Pulse raising exercises should last around 3 – 10 minutes. • The warmer the environment the shorter this section can be.
TITLE DESCRIPTION NOTES
RUNNING FORWARDS AND BACKWARDS
• Players run forwards and backwards on the court, facing the net at all times.
By adding in arm movements, many variations of this can be achieved. Consider doing swimming actions with the arms as a variation for children.
CHASSÉ • Facing the front of the court, players perform a chassé action across the width of the court.
CHASSÉ (ZIG-ZAG)
• Facing the net, players move towards the net, forming a series of “Z” shapes as they do so.
• One foot chases the other one, but never quite catches it.
• Focus on “skimming across the ground”. • Make the movement rhythmical. • Repeat the movement backwards to the
rear of the court.
To help create a faster, “skimming” effect, watch the net tape closely. Try to make sure that the tape is not moving up or down. If the tape is appearing to stay still, then your head is staying level and you will be skimming across the ground.

187
BADMINTON COACH EDUCATION ► COACHES’ MANUAL ► LEVEL 1 MODULE 9 ► PERFORMANCE FACTOR 4 - PHYSICAL
06. MOBILITY EXERCISES When performing mobility exercises in warm-up: • focus on the control of movements; • after starting, gradually increase the speed and range of movement.
TITLE EFFECT DESCRIPTION NOTES
HEEL RAISES • Works calves through a good range of movement
• Mobilises ankles
• On the spot, raise the heels of each foot off the ground in an alternating fashion.
HEEL FLICKS • Stretches front of thigh
• Mobilises knee
• Stand with feet wide apart, hands on hips. • Rock from one foot to the other and bring the heel of the non-weighted foot
towards the buttock each time.
Can be performed running forwards with feet close together.
WALKING BOWS
• Stretches back of thigh
• Mobilises hip
• Place one foot slightly in front of the other. • Keep the front leg straight. • Bend the rear knee. • Bend forwards at the hip and place hands briefly on rear thigh. • Keep back flat (chest up). • Repeat left foot, right foot etc. moving forwards as you do so.
• Gradually increase the amount bent at hip.
• Keep chest up (avoid curving back).
STRAIGHT LEG SWING
• Stretches back of thigh
• Mobilises hip
• Stand on one foot with hands on hips. • Swing suspended leg backwards and forwards. • Keep swinging leg as straight as possible. • Start low and slow and gradually build speed and range of movement. • Keep upper body and head as still as possible by focussing on a stationary
point.
• Provided the upper body is controlled and the head kept still, this is also excellent for maintaining dynamic balance.

188
BADMINTON COACH EDUCATION ► COACHES’ MANUAL ► LEVEL 1 MODULE 9 ► PERFORMANCE FACTOR 4 - PHYSICAL
SIDE LEG SWINGS
• Stretches inner/ outer thigh and gluteals
• Mobilises hip (side to side)
• Stand on one foot with hands on hips. • Swing other leg from left to right with straight leg. • Keep upper body/head as still as possible by focussing on a stationary point.
• Provided the head/upper body is kept still, this is also excellent for maintaining dynamic balance.
LUNGES • Mobiles knees and hips
• Co-ordinates stretching of leg muscles
• Stand with wide stance, one foot well in front of the other. • Imagine feet placed on two railway lines. • Extend arms out to sides for balance. • Sink down, bending both knees. • Complete 3 then change to other leg.
• This can be made harder by starting in a standing position, lunging forwards and returning to the standing start position.
SQUATS • Mobiles knees and hips
• Co-ordinates stretching of leg muscles
• Stand with feet around shoulder width apart. • Bending slightly from the hips first, carry on adopting the squat position by
keeping feet flat on the floor when descending.
• Sit back. • Bend with good range of
movement.
TRUNK TWISTS
• Stretches muscles of the back
• Mobilises spine
• Hold racket out in front with two hands. • Stand with wide stance. • Keep hips facing forwards. • Rotate out to left then right.
• Gradually increase the range and speed of movement.
SIDE BENDS • Stretches muscles of the back
• Mobilises the spine
• Hold racket above the head with two hands. • Stand with wide stance. • Keep hips facing forwards. • Alternate bending to one side then the other.
• Gradually increase the range and speed of movement.

189
BADMINTON COACH EDUCATION ► COACHES’ MANUAL ► LEVEL 1 MODULE 9 ► PERFORMANCE FACTOR 4 - PHYSICAL
07. BALANCE Balance exercises should focus on actions that replicate the demands of the sport. STRAIGHT LEG SWING
• Stand on one foot with hands on hips. • Swing suspended leg backwards and forwards. • Keep swinging leg as straight as possible. • Start low and slow and gradually build speed and range of
movement. • Keep upper body and head as still as possible by focussing
on a stationary point.
• Provided the upper body is controlled and the head is kept still, this is excellent for maintaining dynamic balance.
• Challenge the body to perform these leg swings with the arms in different positions, such as arms held high above the head.
SIDE LEG SWINGS
• Stand on one foot with hands on hips. • Swing other leg from left to right with straight leg. • Keep upper body/head as still as possible by focussing on a
stationary point.
• Provided the upper body is controlled and the head is kept still, this is excellent for maintaining dynamic balance.
• Challenge the body to perform these leg swings with the arms in different positions, such as arms held high above the head.
LUNGES • Start from a standing position, hands on hips and feet together.
• Lunge forwards with one foot. • Return to start position and repeat on other leg. • Focus on keeping body in upright position.
• Repeat lunges but experiment with upper body movement, including:
o rotating the trunk to left or right; o bending sideways to left or right.
• This challenges the body to maintain a strong lunge position whilst the upper body is moving in different ways.

190
BADMINTON COACH EDUCATION ► COACHES’ MANUAL ► LEVEL 1 MODULE 9 ► PERFORMANCE FACTOR 4 - PHYSICAL
JUMPS • 2 feet to 2 feet • Complete jumps in a sequence (e.g. side to side as
shown) • Land toe-heel
• When beginning, pause on landing to establish balance. • As you learn, reduce pause time and jump off immediately on
landing. • Examples shown are side to side only. Variations which also
need to be used are:
o forwards and backwards; o rotating; o combinations.
• 2 feet to 1 foot
• 1 foot to 2 feet
• 1 foot to other foot (bounding)
• 1 foot to same foot (hopping)

191
BADMINTON COACH EDUCATION ► COACHES’ MANUAL ► LEVEL 1 MODULE 9 ► PERFORMANCE FACTOR 4 - PHYSICAL
08. QUICKNESS/SPEED NAME DESCRIPTION ILLUSTRATION NOTES
FAST FEET • Stand with both feet in the tramlines facing a training partner. • On a signal (e.g. a shuttle striking a racket, a hand clap, etc.)
the players move their feet out to the sides of the tramlines 3 times in a row as quickly as they can.
• First to finish wins.
• This can be done alone, but the element of competition tends to increase quickness.
• Stand alongside a training partner, facing the rear tramlines of the court.
• On a signal (e.g. a shuttle striking a racket, a hand clap, etc.) the players step into and out of the tramlines 3 times as quickly as they can.
• This can be done alone but the element of competition tends to increase quickness.
• Players can step into and out of the tramlines rather than jump.
LADDER WORK
• Stand on right foot at the side of the ladder. • Drive off right foot. • Step into the ladder (left-right). • Step out the ladder onto left foot. • Drive off left foot. • Step into ladder (right-left). • Step out ladder onto right foot.
• Chant is “drive-1-2-drive-1-2-drive-1-2”. • Repeat footwork backwards. • Can be done without a ladder just using the tramlines. • Many other footwork patterns can be designed using a
ladder/tramlines.
FAST FEET/ MOVE OFF
• Perform 3 fast feet movements, with feet moving in and out of the tramlines.
• On the 3rd repetition, with the feet landing outside the tramlines, the player drives off the ground and sprints forwards.
• Repeat the exercise, but run backwards.

192
BADMINTON COACH EDUCATION ► COACHES’ MANUAL ► LEVEL 1 MODULE 9 ► PERFORMANCE FACTOR 4 - PHYSICAL
HIT SHUTTLE WITH THE HAND
• Stand facing the coach, who holds 8 -12 shuttles. • The coach delivers the shuttles in rapid succession and the
player aims to strike the shuttles with their hand.
• Marking some of the shuttles so they are black. • Players aim to hit the white shuttle and move out of the way of the black shuttles.
AGILITY LIE DOWN, GET UP, MOVE!
• Players lie flat on their back in the forecourt, feet pointing to the low service line.
• On a signal, players get up and sprint to rear line.
• Think of variations, such as: o Lying on back, arms across chest. Player are not allowed to use arms or elbows to help get up; o Lying on front.
SHADOWING
• Prior to singles match play, shadowing should involve using the whole court. • Shadowing prior to a training session should include movements relevant to the main session content (e.g., forecourt,
midcourt, rearcourt).

193
BADMINTON COACH EDUCATION ► COACHES’ MANUAL ► LEVEL 1 MODULE 9 ► PERFORMANCE FACTOR 4 - PHYSICAL
09. KNOCK-UP KNOCK-UP CONTEXT ILLUSTRATION NOTES
MATCH PLAY
• Knock-ups for match play should ideally allow you to practice the strokes and movements necessary to succeed in that event. Singles knock-ups should cover the whole court.
• Doubles knock-ups should include a greater amount of hitting off the body and practice of serve/return situations.
TRAINING • Knock-ups prior to training should include elements of the main part of the session. This allows the coach to observe how players perform a skill and informs how they then coach that skill in the main part of the session.

194
BADMINTON COACH EDUCATION ► COACHES’ MANUAL ► LEVEL 1 MODULE 9 ► PERFORMANCE FACTOR 4 - PHYSICAL
10. COOL-DOWN The key facts about cool-down are included in the table below. SECTION OF COOL-DOWN WHY WE DO IT THE BENEFITS NOTES
Steady aerobic exercise of 5 -15 minutes which gradually reduces in intensity. An example would be gentle jogging, reducing to a normal walk.
Helps remove fluids pooled in and around the muscles.
This is thought to assist in reducing muscle stiffness.
The more intense the exercise the more this section is important, as it assists your body to return to resting levels in a controlled manner. Exercise bikes are also useful for this. Gradually reducing heart rate and blood
pressure. Reduces the chances of fainting.
Assists in the removal of lactic acid (a product of intense exercise).
Lactic acid transported to the liver can be reconverted to a useful source of energy.
Static stretching of muscles, holding for 15 -30 seconds.
Returns muscles to their normal resting length. Static stretching in cool-down helps to prevent muscles gradually shortening over time. If muscles are allowed to shorten over time, this can result in impaired technique and greater chance of injury.
Focus on deep breathing and relaxation, which helps you to stretch more effectively.

195
BAD
MIN
TON
CO
ACH
ED
UC
ATIO
N ►
C
OAC
HES
’ MAN
UAL
►
LE
VEL
1 M
OD
ULE
9 ►
PE
RFO
RM
ANC
E FA
CTO
R 4
- PH
YSIC
AL
Lower calf (Soleus) Upper calf (Gastrocnemius)
Front of thigh (Quadriceps) Rear of thigh (Hamstrings)
Groin (Short Adductors) Groin (Long Adductors)
Buttocks (Gluteals) Trunk rotations (1)
Trunk Rotations (2) Side Bends
Chest (Pectorals) Back of arm (Triceps)
Shoulder stretch

196
BAD
MIN
TON
CO
ACH
ED
UC
ATIO
N ►
C
OAC
HES
’ MAN
UAL
►
LE
VEL
1 M
OD
ULE
9 ►
PE
RFO
RM
ANC
E FA
CTO
R 4
- PH
YSIC
AL
11. SUMMARY • The physical condition of the player is one of five performance factors that influences how that
player will perform.
• There are nine components of fitness that need to be developed in order to be successful at badminton. These can be split into:
o five physical fitness components (body composition, strength, speed, endurance, flexibility);
o four motor fitness components (agility, quickness, dynamic balance and co-ordination).
• Different fitness components can be emphasised at different stages of development in order to bring about optimal improvement.
• Warm-ups should precede both training and match play. The exact components of a warm-up can vary depending upon the:
o environment; o developmental stage of the player/group; o content of the main part (e.g. training, competition, etc.); o equipment available; o number of players.
• Cool-downs should be used at the end of training or competition. An effective cool-down:
o returns muscles to their normal resting length; o helps remove fluids pooled in and around the muscles; o gradually reduces heart rate and blood pressure; o assists in the removal of lactic acid (a product of intense exercise).

197
BAD
MIN
TON
CO
ACH
ED
UC
ATIO
N ►
C
OAC
HES
’ MAN
UAL
►
LE
VEL
1 M
OD
ULE
9 ►
PE
RFO
RM
ANC
E FA
CTO
R 4
- PH
YSIC
AL
12. SELF-ASSESSMENT QUESTIONS
1 The component parts of a cool-
down are: Dynamic stretches then static stretches
Aerobic exercise then dynamic stretches
Dynamic stretches then aerobic exercise
Aerobic exercise then static stretches
2 The 4 types of motor fitness are: Co-ordination, dynamic balance, quickness, agility
Strength, co-ordination, quickness, agility
Co-ordination, dynamic balance, endurance, agility
Flexibility, speed, co-ordination, quickness
3 Straight leg swings are used to train:
Speed
Endurance
Strength
Mobility
4 “The capacity to change direction rapidly whilst retaining balance” is the definition of:
Agility
Strength
Flexibility
Body Composition
5 In cool-down, static stretches should be held for:
0 – 5 seconds
15 – 30 seconds
5 – 10 seconds
1 – 2 minutes
6 Ladder work is an opportunity to train:
Flexibility
Strength
Power
Quickness
7 As well as mobility, straight leg swings can also train:
Endurance
Strength
Quickness
Dynamic balance

198
BAD
MIN
TON
CO
ACH
ED
UC
ATIO
N ►
C
OAC
HES
’ MAN
UAL
►
LE
VEL
1 M
OD
ULE
9 ►
PE
RFO
RM
ANC
E FA
CTO
R 4
- PH
YSIC
AL
8 The aerobic system relies on the bloodstream to provide:
Fats and carbohydrates
Carbon dioxide
Proteins and minerals
Carbon dioxide and vitamins
9 This picture shows a player stretching his:
Upper calf
Triceps
Chest
Gluteals


BADMINTON COACH EDUCATION
COACHES’ MANUAL LEVEL 1
MODULE 10 PERFORMANCE FACTOR 5 SPORT PSYCHOLOGY

BADMINTON WORLD FEDERATION Unit 1, Level 29 Naza Tower, Platinum Park 10 Persiaran KLCC 50088 Kuala Lumpur Tel +603 2631 9188 Fax +603 2631 9688 [email protected]
MODULE 10 PERFORMANCE FACTOR 5 - SPORT PSYCHOLOGY 01. Introduction 199 02. Sports Psychology – Key Areas 200 03. Commitment 201 04. Confidence 202 05. Control 202 06. Concentration 202 07. Cohesion 203 08. Summary 203 09. Self-Assessment Questions 204
LEARNING OUTCOMES
By the end of this module, coaches will be able to: • define sports psychology; • appreciate the boundaries for different applications of sports psychology; • list the key areas that make up sports psychology; • identify methods by which sports psychology can be used in their own coaching practice.

199
BAD
MIN
TON
CO
ACH
ED
UC
ATIO
N ►
C
OAC
HES
’ MAN
UAL
►
LE
VEL
1 M
OD
ULE
10
►
PER
FOR
MAN
CE
FAC
TOR
5 -
SPO
RT
PSY
CH
OLO
GY
01. INTRODUCTION Sports psychology can be defined as:
“the mental processes and behaviours of individuals and groups within sport”. Sports psychology has a huge influence over sporting performance, affecting technique, tactics, physical conditioning and training. Coaches should use sports psychology to: • help people enjoy the sporting experience and use it to enhance their quality of life; • improve performance.
Practitioners within sports psychology can be divided into three areas of clinical, coaching and research. These areas are represented in the diagram above. • Clinical sports psychology is practiced by highly trained people with high levels of academic
qualifications and experience in sports psychology. Skills they possess include counseling skills and they are usually licensed by recognised controlling professional bodies. They are usually involved in work where players need support to resolve disorders (e.g. emotional, personality, etc.) that inhibit progress within their sport. This is not within the scope of work of the sports coach.
• Research sports psychology involves the use of research tools such as observation, questionnaires, interviews, experiments, etc. to increase the understanding of sports psychology concepts. Often these researchers work with academic establishments such as universities. Coaches sometimes become involved in this type of work, but often to work with researchers rather than leading the process.
• Coaching sports psychology involves coaches applying basic psychological principles though their normal coaching practice. Their knowledge of sports psychology may have been gained from part of an educational course, within a coaching award or by their own private study. Coaches are often hesitant about sports psychology, being much more comfortable in the areas of technical, tactical and physical development. However, all coaches use psychology to differing degrees within their coaching practice.

200
BAD
MIN
TON
CO
ACH
ED
UC
ATIO
N ►
C
OAC
HES
’ MAN
UAL
►
LE
VEL
1 M
OD
ULE
10
►
PER
FOR
MAN
CE
FAC
TOR
5 -
SPO
RT
PSY
CH
OLO
GY
• The following guidelines might prove useful:
o Only use sports psychological approaches that are relatively straightforward and which you feel comfortable with. For example, most coaches feel comfortable with the use of goal setting in their coaching;
o Embed the use of sports psychology within your normal coaching practice wherever possible;
o Avoid attempting to use clinical sports psychology techniques. If you work with players that require help of this nature, seek professional assistance;
o Avoid straying into the world of research sport psychology unless: o you have the required qualifications and/or experience; o you are working alongside qualified/experienced researchers.
02. SPORTS PSYCHOLOGY – KEY AREAS The diagram below lists different psychological concepts under the headings of control, confidence, commitment, concentration and cohesion. Note that many of the concepts overlap and interact with each other.
The Level 2 course details the above, however certain concepts will be developed here to:
• illustrate how psychology can be applied within coaching practice; • demonstrate how many of the concepts are interlinked.

201
BAD
MIN
TON
CO
ACH
ED
UC
ATIO
N ►
C
OAC
HES
’ MAN
UAL
►
LE
VEL
1 M
OD
ULE
10
►
PER
FOR
MAN
CE
FAC
TOR
5 -
SPO
RT
PSY
CH
OLO
GY
Note that a useful starting point for the coach is to ask the question, “Is the player OK or not?” If the answer is “no”, you can then choose the type of psychological approach, integrated within your own coaching practice, to help that player.
03. COMMITMENT When the ‘drive’ to achieve comes from external sources, then this is described as extrinsic motivation. A player who is extrinsically motivated will be driven by factors such as: • Praise/approval from parents, coaches,
friends, etc. • Winning trophies • Earning money
• Publicity • Selection
When the drive to achieve comes from internal sources, then this is described as intrinsic motivation. A player who is intrinsically motivated will be driven by factors such as: • Enjoyment of training and competition • Being with friends
• Personal improvement • Getting fit
Most players will have a mixture of extrinsic and intrinsic factors that motivate them. Issues can arise, however, if balance shifts too much towards extrinsic motivation because the drivers are largely out of control of the player, which can make the situation very stressful. For example, you may play very well and lose. Intrinsically motivated players play in a less stressed environment because they have a great deal of control over what they are trying to achieve. The key point for the coach here is to promote intrinsic rather than extrinsic motivators. Goal setting is a very effective method of motivating players and focusing players on the intrinsic factors that the players can control. Effective goal setting, including the ‘SMARTER’ principles of goal setting, have been dealt with in the Coaching Process section of this resource. However, the type of goals being set will have a major influence over whether the player becomes intrinsically or extrinsically motivated. Goals can be classified as process goals or outcome goals.
PROCESS GOALS These are goals that deal with personal improvement of technical, physical, tactical, psychological, or lifestyle factors. They are often short-term and support the development of intrinsic motivation.
OUTCOME GOALS These are goals that are concerned with winning or doing better than someone else. They are often long-term goals and support the development of extrinsic motivation.
CONTROLLABLE Process goals are highly controllable and can be used to set targets to support a player’s improvement.
NOT CONTROLLABLE Outcome goals are not controllable as they are dependent upon other people. They are usually concerned with selection, winning, achieving a ranking, etc.
EXAMPLE By the end of the session, I will be able to play a straight backhand overhead dropshot consistently off a predictable hand feed. During this tournament I will use deep breathing between points.
EXAMPLE By the end of September 2018, I will be the national singles champion.

202
BAD
MIN
TON
CO
ACH
ED
UC
ATIO
N ►
C
OAC
HES
’ MAN
UAL
►
LE
VEL
1 M
OD
ULE
10
►
PER
FOR
MAN
CE
FAC
TOR
5 -
SPO
RT
PSY
CH
OLO
GY
In order to promote intrinsic motivation, the coach should encourage the player to set process goals which the players can exert a lot of control over. This is not to say that players will not set themselves outcome goals (they probably will). However the coach should encourage focus upon the processes that: • help the player to improve; • reduce pressure by placing little emphasis on the outcomes which are uncontrollable.
04. CONFIDENCE Players tend to expect a lot from themselves and often coaches, parents and teachers also (often unintentionally) increase the level of expectation. The problem with expectations is that they: • are usually linked to outcomes; • mean players are continually making judgements about their performance (e.g., win/lose,
good/bad, etc.); • increase pressure; • undermine confidence.
Coaches can help players become more confident by helping to direct them away from expectations and focus on processes, which they can control.
05. CONTROL During games, players can become nervous and anxious. This is particularly the case for players who tend to have high expectations of themselves. Such players are likely to be making continual judgements about their own and their opponents’ performance. One way to improve this situation is to use techniques that can help players to relax between points. Deep breathing can be used to bring about a calming effect. Try the following procedure: 1. Stand with your arms by your sides. 2. Focus your mind on the centre of your body. 3. Breathe in deeply from the stomach. 4. Breathe out and release any tension from your upper body: head, face, neck, shoulders and chest. 5. Repeat the process. 6. Consider saying a word in your mind that accurately describes the state you are aiming to achieve
(e.g., relax, calm, cool, etc.). The following points are worthwhile considering when using this technique: • Learn the skill first in practice, then employ in a game; • Between rallies you might only have time for one breath using this technique, but that can still be
effective in releasing tension; • When using this technique, it is quite difficult to think of anything else, so it is a good way to clear
your mind.
06. CONCENTRATION Imagery can be used to help players concentrate on a particular aspect that can benefit their game. A simple example would be a coach who is working with a player who makes a lot of errors out of the side of the court. The coach asks the player to visualise a court with second set of tramlines inside the first set. The player needs to work hard to “see” this court within his or her mind. The coach then asks

203
BAD
MIN
TON
CO
ACH
ED
UC
ATIO
N ►
C
OAC
HES
’ MAN
UAL
►
LE
VEL
1 M
OD
ULE
10
►
PER
FOR
MAN
CE
FAC
TOR
5 -
SPO
RT
PSY
CH
OLO
GY
the player to visualise this slightly narrower court, and play singles as if playing on this court. The coach then monitors the matches to evaluate the effectiveness of the coaching technique over time.
07. COHESION In order to create an effective training environment, coaches frequently have to use techniques to get groups of people to work well together. Examples could include: • the creation of club codes of conduct that are decided upon by the group in order to bring about a
consistent approach to training; • the involvement of parents in the above process; • regular rotation of groups and practice partners during practices.
08. SUMMARY Sports psychology can be defined as:
“the mental processes and behaviours of individuals and groups within sport”. Sports psychology can be split into three areas of: • clinical sports psychology; • research sports psychology; • coaching sports psychology.
Coaches will work mainly in the last area and should give careful consideration to involving themselves in clinical and research sports psychology without the necessary training or professional assistance. However, coaches can use sports psychology techniques successfully, particularly if integrated within their natural coaching practice. Sports psychology is a vast subject that contains many different theories, concepts and techniques which in many cases are inter-related. One framework that can be used to organise these theories, concepts and techniques is to list them under the headings of: • Cohesion • Commitment • Concentration • Confidence • Control

204
BAD
MIN
TON
CO
ACH
ED
UC
ATIO
N ►
C
OAC
HES
’ MAN
UAL
►
LE
VEL
1 M
OD
ULE
10
►
PER
FOR
MAN
CE
FAC
TOR
5 -
SPO
RT
PSY
CH
OLO
GY
09. SELF-ASSESSMENT QUESTIONS
1 Sports psychology can be defined as:
The physical processes and behaviours of individuals within sport
The working relationships between parents, coaches and players
The mental processes and behaviours of individuals and groups within sport
The ability to control attitude on court
2 Sports psychology can be split into:
Clinical, Exercise and Physiology
Research, Coaching and Clinical
Exercise, Coaching and Research
Research, Coaching and Technique
3 Breathing techniques can be used to improve:
Cohesion
Commitment
Confidence
Control
4 Imagery can be used to improve:
Commitment
Cohesion
Concentration
Control
5 Rotating practice partners can be used to improve:
Cohesion
Control
Confidence
Commitment

BADMINTON COACH EDUCATION
COACHES’ MANUAL LEVEL 1
MODULE 11 PERFORMANCE FACTOR 6 LIFESTYLE

BADMINTON WORLD FEDERATION Unit 1, Level 29 Naza Tower, Platinum Park 10 Persiaran KLCC 50088 Kuala Lumpur Tel +603 2631 9188 Fax +603 2631 9688 [email protected]
MODULE 11 PERFORMANCE FACTOR 6 - LIFESTYLE 01. Introduction 205 02. Lifestyle Factors Defined 205 03. Injury Prevention 206 04. Injury Management 207 05. R.I.C.E 207 06. Self-Assessment Questions 208
LEARNING OUTCOMES
By the end of this module, coaches will be able to: • identify the lifestyle factors that can affect performance.

205
BAD
MIN
TON
CO
ACH
ED
UC
ATIO
N ►
C
OAC
HES
’ MAN
UAL
►
LE
VEL
1 M
OD
ULE
11
►
PER
FOR
MAN
CE
FAC
TOR
6 -
LIFE
STYL
E
01. INTRODUCTION A player may demonstrate excellent technical, tactical, physical and psychological skills when playing badminton, but complete players must also manage other areas of their lifestyle in order to help them perform at their best. These lifestyle factors are summarised briefly in the table below. Further development of lifestyle factors and their influence on performance is included in the BWF Level 2 course.
02. LIFESTYLE FACTORS DEFINED
LIFESTYLE FACTOR
NOTES
PARENTS Parents have a significant influence on the lifestyle of their children. Issues like diet, sleeping patterns, balancing commitments (for example, sport and education) are all factors that are largely controlled by the parents rather than the children.
TIME MANAGEMENT
The more involved in a sport you become, the more important it is to plan in order to manage time effectively. Weekly, monthly and annual plans become important in order that an effective balance can be achieved between sport, education, work, family, social commitments, relaxation, etc.
NUTRITION
The main components of diet (carbohydrates, fats, proteins, minerals, vitamins and water) need to be balanced correctly in order to provide the body with what it needs to help: • growth and repair • weight management • health maintenance • sporting performance
The most important source of energy for sporting performance is carbohydrates.
INJURY PREVENTION
The best way to manage injuries is to take as many practical steps as possible to prevent them from happening! Correct technique, warming up, cooling down, correct clothing and equipment can all assist in helping to prevent injuries. More details of this are provided later in this section.
INJURY MANAGEMENT
Should injuries occur, being able to manage those injuries so recovery is effective is essential to both health and continued sports participation. More details of this are provided later in this section.
206
BAD
MIN
TON
CO
ACH
ED
UC
ATIO
N ►
C
OAC
HES
’ MAN
UAL
►
LE
VEL
1 M
OD
ULE
11
►
PER
FOR
MAN
CE
FAC
TOR
6 -
LIFE
STYL
E
03. INJURY PREVENTION INTRODUCTION The best way of dealing with injuries is to take as many steps as possible to prevent them from happening. The table below provides advice that is useful in this area. SHOES
• Wear appropriate court shoes with a non-slip sole to minimise the risk of injuries due to slipping on court.
• Avoid playing in sports shoes that have a raised sole, such as running shoes, as these can increase the risk of spraining an ankle.
• Replace shoes as often as possible, as older shoes will give less support to the foot. • Tie laces properly and make sure laces are not so long that they can cause players to trip. • If possible, try not to wear new shoes for short periods of time (for example around the house) before
wearing them on-court.
CLOTHING • Wear clothing that gives a free range of movement. Apart from inhibiting technique, tight clothing of certain materials can chafe the skin.
TRACKSUITS
• Where the environment is cold, wear a tracksuit between games to keep warm, as warm muscles are less vulnerable to injury.
• Some tracksuit bottoms have zips down the sides of the legs. These help when taking off a tracksuit, but make sure the zips are fastened if you knock-up in your tracksuit to help avoid the possibility of tripping.
JEWELLERY • Wearing some jewellery when playing is ok, provided it does not create an unacceptable risk. For example, stud earrings may be ok, but long earrings could create more of an injury risk.
RACKETS
• Use a non-slip racket grip and change this regularly. A slippery grip can: o represent a hazard for your partner, your opponent and spectators; o mean you have to grip your racket harder, increasing the possibility of muscle strain and tennis
elbow. • Check for cracking in the racket shaft – racket heads travel through the air at up to 300kph, so it’s
better to use a racket handle that stays connected to the racket head!
WARM-UP
• Warming muscles through general aerobic activity (jogging, skipping, etc.) prior to playing is necessary, as warm muscles will be less vulnerable to injury than cold muscles.
• Dynamic stretches (e.g. lunges), involving a gradual increase in range and speed of movement, are also advisable in warm-up. Forwards and backwards, side to side and rotational movements should be incorporated.
COOL-DOWN
• At the end of games, light jogging that gradually reduces in speed to a gentle walk is advisable to help various mechanisms of the body return to resting levels. Static stretches help return muscles back to their original resting length, thereby reducing the opportunity for muscles to become progressively shorter over time.
ON-COURT
• Wherever possible try not to play on hard surfaces. If this is unavoidable then vary the practices to reduce the strain on particular joints and muscles.
• Having a slip mat (a piece of towelling dampened with water) at the side of court can be useful to clean the bottom of your shoes. This can be useful when a floor is slippery because of dirt. Rub off excess fluid before entering the court.
• Remove stray shuttles (“ankle-breakers”) from the court surface or the court surrounds as they are potentially dangerous.
• When you are the front player in doubles, it is important that you do not turn around fully to see what your partner is doing if the shuttle passes you, as this greatly increases the risk of getting hit in the eye with a shuttle.
TECHNIQUE • Using a relaxed grip to help reduce the chance of tennis elbow occurring.
• When lunging, point the foot in the direction of the probable shuttle impact point and bend the knee in the same direction.
• Learn to squat properly as this helps you to jump and land more safely. Create a position where the back is parallel to your shins.

207
BAD
MIN
TON
CO
ACH
ED
UC
ATIO
N ►
C
OAC
HES
’ MAN
UAL
►
LE
VEL
1 M
OD
ULE
11
►
PER
FOR
MAN
CE
FAC
TOR
6 -
LIFE
STYL
E
04. INJURY MANAGEMENT There are many different types of injuries that can occur and each of those injuries requires professional diagnosis and treatment. This section therefore is only intended to give a broad overview of the subject. If in any doubt regarding injuries, seek medical advice from professionally qualified physiotherapists. TYPES OF INJURY Injuries can basically be divided into two categories: • Acute injuries are usually caused by a specific event such as a fall, twist or impact from an object
such as a racket or shuttle. Typical acute badminton injuries would be sprained ankles, pulled muscles and impact injuries of the eye.
• Chronic injuries are overuse injuries that develop over time. Examples in badminton would be
patella tendonitis (just below the knee-cap) and tennis elbow.
05. R.I.C.E The most basic advice for managing injury is to follow a procedure known as “R.I.C.E.”.
R REST
It is very important to stop as soon as injuries occur because trying to “play through it” will:
• increase the extent of the injury; • increase the recovery time; • risk creating another injury.
I ICE
Icing the affected area:
• reduces pain; • slows the workings of the cells in the area; • reduces the number of cells that might die off in that area.
Do not apply ice directly to the skin, or apply for longer than 15 minutes as this can damage the tissues further. After an hour, ice can be applied again for 15 minutes.
C COMPRESSION
Compression, using for example a suitable elastic bandage, can greatly reduce swelling. This is important because the less swelling there is, the shorter the recovery time.
E ELEVATION
Elevating the injured body part means gravity also helps to keep the fluids that cause swelling away from the injured part.
Having followed the R.I.C.E procedure, seek qualified medical advice and follow their guidelines, particularly in relation to completing rehabilitation exercises for the required period of time.

208
BAD
MIN
TON
CO
ACH
ED
UC
ATIO
N ►
C
OAC
HES
’ MAN
UAL
►
LE
VEL
1 M
OD
ULE
11
►
PER
FOR
MAN
CE
FAC
TOR
6 -
LIFE
STYL
E
06. SELF-ASSESSMENT QUESTIONS
1 Which of the following is a lifestyle factor that can influence sporting performance?
Tactics
Technique
Physical training
Time management
2 The most important source of energy for sporting performance is:
Carbohydrates
Fats
Proteins
Water
3 An example of a chronic injury would be:
Impact injury to the eye
Sprained ankle
Patella Tendonitis
Pulled muscle

BADMINTON COACH EDUCATION
COACHES’ MANUAL LEVEL 1
MODULE 12 COMPETITION

BADMINTON WORLD FEDERATION Unit 1, Level 29 Naza Tower, Platinum Park 10 Persiaran KLCC 50088 Kuala Lumpur Tel +603 2631 9188 Fax +603 2631 9688 [email protected]
MODULE 12 COMPETITION 01. Introduction 209 02. Knock-Out Competitions 209 03. League Competitions 211 04. Ladder Systems 212 05. Pyramid Systems 213 06. Club Match-Play 214
LEARNING OUTCOMES
By the end of this module, coaches will be able to:
• organise competitions in a range of formats.

209
BAD
MIN
TON
CO
ACH
ED
UC
ATIO
N ►
C
OAC
HES
’ MAN
UAL
►
LE
VEL
1 M
OD
ULE
12
►
CO
MPE
TITI
ON
01. INTRODUCTION Participation in badminton can have many benefits, including enjoyment, making friends, and fitness. For many people, however, the opportunity to compete is a major motivator for their involvement in sport. This section will outline how to organise competitions in a number of formats.
02. KNOCK-OUT COMPETITIONS Knock-out competitions are useful if you have a lot of entries but little time in which to complete the competitions. In this format, however, many players will get very few games. This type of tournament is easiest to organise if the entry numbers are 2, 4, 8, 16, 32, 64 or 128, with competitors being selected randomly and placed in order in the draw. Adaptations to this basic knockout format include: • If faced with a number other than 2, 4, 8, 16, 32, 64 and 128 then it is necessary for some players
to be given a bye, where they do not play in the first round. So if you have 14 entries, you would have to have 2 first round byes to make that number up to 16.
• The best players can be seeded, based on their previous results. These players are placed in separate parts of the draw before the main draw takes place. Provided they win their earlier matches, they will not meet until the later stages of the tournament.
An example of a draw with 14 competitors and 4 seeds is shown overleaf. Note that: • players A, P, I and H are seeded so if they win their matches they will not meet until the later
stages of the tournament; • Player A and Player P gets byes in the first round (i.e., they have no match) because there are
only 14 entries; • Each match is given a number, which helps the tournament organiser to schedule matches.

210
BADMINTON COACH EDUCATION ► COACHES’ MANUAL ► LEVEL 1 MODULE 12 ► COMPETITION
FIRST ROUND SECOND ROUND SEMI-FINAL FINAL
MATCH NUMBER
PLAYERS SCORE MATCH NUMBER
PLAYERS SCORE MATCH NUMBER
PLAYERS SCORE
MATCH NUMBER
PLAYERS WINNER AND SCORE
Player A (seed 1) 7 Player A
11 13
------------
1 Player C
Player D
2 Player E 8
Player F
3 Player G
Player H (seed 4)
4 Player I (seed 3) 9 12
Player J
5 Player K
Player L
6 Player M 10
Player N
------------- Player P
Player P (seed 2)

211
BAD
MIN
TON
CO
ACH
ED
UC
ATIO
N ►
C
OAC
HES
’ MAN
UAL
►
LE
VEL
1 M
OD
ULE
12
►
CO
MPE
TITI
ON
03. LEAGUE COMPETITIONS League competitions involve every player playing against everyone else in the league. This format has the advantage of giving all the players the same number of matches. As an example, the table below shows a league format for 5 players.
PLAY
ER A
PLAY
ER B
PLAY
ER C
PLAY
ER D
PLAY
ER E
MAT
CH
ES
WO
N
MAT
CH
ES
LOST
GAM
ES W
ON
GAM
ES L
OST
GAM
ES
DIF
FER
ENC
E
FIN
AL
RAN
KIN
G
PLAYER A
PLAYER B
PLAYER C
PLAYER D
PLAYER E
In a league format such as this, matches can be played as follows:
SERIES 1 SERIES 2 SERIES 3 SERIES 4 SERIES 5
A v B
A v C A v E A v bye A v D
C v D
E v B Bye v C D v E B v bye
E v bye
Bye v D D v B B v C C v E
Note how player A is always placed first in the series, then the remaining players (including the bye) rotate clockwise one place to create a new series of matches. B is shown in bold and italics to demonstrate this clockwise rotation. In the event of a tie, when one player wins the same number of matches, there needs to be an agreement as to which player will be judged to be the winner. Methods to calculate this include:
• Games difference • Points difference • The result of the match between the two tied players
In the league format, the number of matches to be completed rises considerably with the number of entries. The table below provides a useful list indicating the number of matches that need to be completed depending on the number of competitors.

212
BAD
MIN
TON
CO
ACH
ED
UC
ATIO
N ►
C
OAC
HES
’ MAN
UAL
►
LE
VEL
1 M
OD
ULE
12
►
CO
MPE
TITI
ON
NUMBER OF TEAMS TOTAL NUMBER OF MATCHES
NUMBER OF ROUNDS MATCHES PER TEAM
3 3 3 2
4 6 3 3
5 10 5 4
6 15 5 5
7 21 7 6
8 28 7 7
9 36 9 9
10 45 9 9
11 55 11 10
12 66 11 11
13 78 13 12
14 91 13 13
04. LADDER SYSTEMS A ladder system is a type of league where players are ranked according to their playing ability, with lower-ranked players having the opportunity to challenge players above them. If the lower-ranked player wins, they can replace the person they have defeated. So in the example below, player D challenges player A, and if player D wins they swap places.
1. Player A 1. Player D
2. Player B 2. Player B
3. Player C 3. Player C
4. Player D 4. Player A
5. Player E 5. Player E
6. Player F 6. Player F
7. Player G 7. Player G
8. Player H 8. Player H
9. Player I 9. Player I

213
BAD
MIN
TON
CO
ACH
ED
UC
ATIO
N ►
C
OAC
HES
’ MAN
UAL
►
LE
VEL
1 M
OD
ULE
12
►
CO
MPE
TITI
ON
05. PYRAMID SYSTEMS Pyramid systems are a type of ladder system, but with different numbers of players at each level. Players can:
• challenge others on the same level as themselves (with the winner moving up); • challenge players above them (and if they win they swap places, as in the ladder system).
PLAYER A
PLAYER B PLAYER C PLAYER D
PLAYER E PLAYER F PLAYER G PLAYER H PLAYER I
PLAYER J
PLAYER K PLAYER L PLAYER M PLAYER N PLAYER O PLAYER P

214
BADMINTON COACH EDUCATION ► COACHES’ MANUAL ► LEVEL 1 MODULE 12 ► COMPETITION 06. CLUB MATCH-PLAY
Many clubs run “club nights” when players attend to compete against other players within the club. The diagram below demonstrates one way in which you might manage this using a pegboard system. This can be adapted to meet the individual needs of clubs.
ASHINGTON BADMINTON CLUB
COURT 1 COURT 2 COURT 3 COURT 4 1ST COURT WAITING 2ND COURT WAITING
Club Members attending the club night (pick from 7 players)
• As members arrive at the club night, they place their pegs on the bottom rung of the pegboard (red = women, blue = men) in order of arrival. • The first player on the bottom rung selects themselves and three more players to play against from a total of seven players (or whatever number you
prefer). • These four pegs are placed on Court 1 and the match commences. • The remaining pegs on the bottom row are slid to the left. • This process continues until all four courts are occupied, plus the 1st and 2nd waiting courts. • As a match finishes, the four players move their names to the end of the bottom row and the players in the “1st court waiting” group are moved to the
available court. • Although this example shows four courts and involves doubles matches, it is easy to adapt this for singles or for fewer/more courts.


BADMINTON COACH EDUCATION
COACHES’ MANUAL LEVEL 1
MODULE 13COACHING PLAYERSWITH DISABILITIES

BADMINTON WORLD FEDERATION Unit No.1, Level 29 Naza Tower No 10 Persiaran KLCC 50088 Kuala Lumpur Tel +603 2631 9188 Fax +603 2631 9688 [email protected]
MODULE 13 COACHING PLAYERS WITH DISABILITIES 01. Introduction to the Module 215 02. Introduction to Para-Badminton 216 03. Para-Badminton Coaching 217 04. Introduction to Badminton for Players with Intellectual Disabilities (ID) 235 05. Coaching Players with Intellectual Disabilities 236 06. Introduction to Badminton for the Deaf 236 07. Coaching Deaf Players 237 08. Conclusion: Good Coaching Practice 238 09. Summary 239 10. Self-Assessment Questions 240
LEARNING OUTCOMES
By the end of this module, coaches will be able to: • explain what it means to apply an inclusive approach to disability coaching; • mention some good coaching practices that apply equally to both disabled and able-bodied
players; • list the different sport classes included in para-badminton; • give examples of adaptations to technical, tactical and physical aspects of training for different
para-badminton sport classes; • explain some adaptations to coaching delivery that can help support deaf players and players
with intellectual disabilities.
**Special thanks and photo credit to Alan Spink for the para-badminton photos used in this module.

215
BAD
MIN
TON
CO
ACH
ED
UC
ATIO
N ►
C
OAC
HES
’ MAN
UAL
►
LE
VEL
1 M
OD
ULE
13
►
DIS
ABIL
ITY
BAD
MIN
TON
01. INTRODUCTION TO THE MODULE INTRODUCTION This module aims to strengthen coaches’ knowledge and practice in working with the various groups that make up disability badminton. This includes:
• para-badminton (for players with a physical disability) • badminton for those with an intellectual disability • badminton for the deaf
It is very important to note that this module is meant to supplement the coaching practices and principles discussed throughout this Level 1 manual. As such, the contents should be used in conjunction with the other modules and will make frequent reference to them. The module has been designed as an integrated element of the manual, in keeping with the inclusive approach that BWF has taken to disability badminton. In short, disability badminton IS badminton, and coaching players with disabilities essentially requires the application of good coaching skills. All of the elements discussed in Module 2 - Coaching Principles (around the roles and responsibilities of the coach, coaching philosophy and coaching style) equally apply to coaching players with disabilities. Along the same lines, the areas addressed in Module 3 - Coaching Process (around planning, observing players, communication, feedback and group management) should always be applied, with any group of players. This module will offer a look at each individual sport class in terms of the five performance factors previously examined in Modules 5 - 11: Technical (Movement and Hitting), Tactical, Physical, Psychological, and Lifestyle. Because coaches will always need to apply the core principles from those modules, the discussion around the five performance factors here will focus on highlighting any relevant differences or special considerations for the sport class in question.
WHO IS THIS MODULE FOR? This module is designed to complement the key coaching principles outlined in this Level 1 resource, to help coaches adapt and develop effective coaching practices in working with players with disabilities. As such, coaches whose previous contact has been with able-bodied players can use this module to help them build on their prior knowledge and experience in order to work confidently and effectively with players with disabilities. Along the same lines, coaches whose previous experience has been with disability badminton can equally benefit from the general approach to coaching practices and principles adopted throughout this Level 1 resource. It is important to understand that coaches of all levels will have the potential to work effectively with players with disabilities. While this module will provide some specific information about coaching players from different sport classes, along with examples of how to adapt certain exercises according to the needs of the players, these can only be used in conjunction with the sound coaching principles already outlined in this resource. The physical, social, emotional and intellectual benefits of badminton participation discussed earlier in this resource are equally positive for players with disabilities. The collection of player information, along with the observation and analysis of new players, also addressed earlier, will help coaches understand the limitations and challenges faced by players with disabilities. In general, by understanding and adhering to the BWF coaching principles and process, and by taking into account the various performance factors, coaches will be able to create positive badminton experiences for all

216
BAD
MIN
TON
CO
ACH
ED
UC
ATIO
N ►
C
OAC
HES
’ MAN
UAL
►
LE
VEL
1 M
OD
ULE
13
►
DIS
ABIL
ITY
BAD
MIN
TON
players involved. The same principle applies to the use of the Level 2 and Level 3 Coach Education resources. Once again, good disability coaching is good badminton coaching.
02. INTRODUCTION TO PARA-BADMINTON BACKGROUND TO PARA-BADMINTON Badminton for disabled players was recognised in 1995 with the establishment of the International Badminton Association for the Disabled (IBAD). In 2009, the name of the organisation was changed to the Para-Badminton World Federation (PBWF). Then in 2011, it was fully integrated into the Badminton World Federation (BWF). The integration of para-badminton under the BWF was a key step in its becoming a Paralympic sport. Other key actions in the successful bid for Paralympic inclusion were:
• strengthening of participation and talent progression pathways • streamlining of the sport classes from the original twelve down to six • consolidation of the anti-doping programme • raising of the profile of para-badminton through a series of promotional videos with players
As a result, the sport is recognised by the International Paralympic Committee and has been included in the Paralympic sport programme beginning with the Tokyo 2020 Paralympic Games. Para-badminton athletes compete in men’s and women’s singles, men’s and women’s doubles, and mixed doubles events, in six different sport classes (see below for more information on the classes). Players are allocated sport classes depending on their level of impairment. This is determined through a detailed procedure known as classification. CLASSIFICATION Classification is a process that puts an athlete into a sport class or a group for competition. It is intended to provide a framework for fair competition and to ensure that the strategies, skills and talent of players are what determine competitive success. Players MUST undergo player evaluation/classification before competing at their first international tournament. The classification process involves a medical examination as well as on-court badminton activities to help classifiers determine what badminton movements the athlete can perform and with what degree of difficulty. For more information about the classification process and player status, as well as the “Minimal Impairment Criteria” for each of the sport classes, please see the Para-Badminton Classification Regulations, which can be downloaded at bwfcorporate.com/regulations/. The BWF para-badminton classification system has the following sport classes:
• Wheelchair Sport Classes – WH 1 and WH 2 • Standing Sport Classes – SL 3, SL 4 and SU 5 • Short Stature Sport Class – SS 6
Note that for each para-badminton sport class, the higher the number, the less disabled the player.

217
BAD
MIN
TON
CO
ACH
ED
UC
ATIO
N ►
C
OAC
HES
’ MAN
UAL
►
LE
VEL
1 M
OD
ULE
13
►
DIS
ABIL
ITY
BAD
MIN
TON
WH 1 WH 2 SL 3
SL 4 SU 5 SS 6 .
For examples of match play in the different sport classes, please see the accompanying video resources, which can be accessed at bwfeducation.com/video-clips/. SPORT CLASS This module will look at each sport class in detail, outlining the specific characteristics of the class, the type of impairments included, and the implications for training. The establishing of specific sport classes helps ensure fair and competitive play across all disabilities. Specifying the range of disability within a sport class allows a greater number of players to compete within that class. This ensures more dynamic competition, larger draws in events, and players with a wider variety of impairments competing against each other.
03. PARA-BADMINTON COACHING This section will provide a brief introduction to each sport class, offering some general information and discussing the different performance factors in relation to the class in question. In each case, the focus is limited to the specific information that should be taken into account for that class, rather than on repeating information that is already included elsewhere in the manual. As such, there are frequent reminders to keep in mind the principles that have been presented with regard to coaching in general or to other sport classes. This will allow coaches to keep the aim on coaching badminton, while at the same time identifying the adaptations they may need to make for a given player or group of players. Previous mention was made of the Para-Badminton Classification Regulations (Appendix 6 of the Para-Badminton Competition Regulations), which can be downloaded at bwfcorporate.com/regulations/. They are a good source of more information about the different types of physical impairments, along with the associated health conditions and how these may present according to the sport class in question.

218
BAD
MIN
TON
CO
ACH
ED
UC
ATIO
N ►
C
OAC
HES
’ MAN
UAL
►
LE
VEL
1 M
OD
ULE
13
►
DIS
ABIL
ITY
BAD
MIN
TON
WHEELCHAIR 1 & 2 (WH 1 & WH 2) Overview of the Sport Classes Wheelchair para-badminton is played on an adapted court, as can be seen in the diagrams below. Important points to keep in mind are that for wheelchair classes (in both singles and doubles), the area from the front service line to the net is always “out”, and the area behind the doubles back service line is “out” on the serve. The singles court includes half the area covered by the doubles court. Court diagrams for both singles and doubles are shown below.
WHEELCHAIR 1 & 2 SINGLES COURT
WHEELCHAIR 1 & 2 DOUBLES COURT

219
BAD
MIN
TON
CO
ACH
ED
UC
ATIO
N ►
C
OAC
HES
’ MAN
UAL
►
LE
VEL
1 M
OD
ULE
13
►
DIS
ABIL
ITY
BAD
MIN
TON
Generally the difference between wheelchair 1 (WH 1) and wheelchair 2 (WH 2) is the level of upper-body/core function. Players in WH 1 (the more disabled of the wheelchair classes) tend to have less core function/strength and therefore less stability and balance. In contrast, players in WH 2 may have full use of the core and possibly some upper-leg strength to provide greater balance and range of movement. This difference can be seen in the photos below.
WH 1 WH 2 The following are some of the impairments found within WH 1 and WH 2:
• Spinal cord injury (quadra/paraplegia) • Spina bifida • Amputation • Scoliosis • Cerebral palsy • Stroke or brain injury • Multiple sclerosis • Muscular dystrophy
While WH 1 and WH 2 play in separate singles events, it should be noted that in wheelchair doubles, a WH 1 player can play with either another WH 1 player or a WH 2 player (but a WH 2 player CANNOT play with another WH 2 in BWF-sanctioned events). Overview of Performance Factors Relevant to this Sport Class As previously mentioned, the wheelchair classes compete on an adapted court for singles (“half”) and doubles (“full”). The use of the hands for both movement and hitting technique creates unique challenges for these classes. The development of players’ physical ability also provides a new set of challenges for both players and coaches. It is important to note that wheelchair players should play on a hard floor (wood or composite) to allow for greater speed and movement. Playing on portable rubber courts results in too much give and the chair wheels will sink into the court, thus making movement and generation of speed difficult. Performance Factor 1 – Technical (Movement Skills) A unique skill required in wheelchair para-badminton is the ability to hold both the racket and the wheel, and to be able to push/pull equally on both sides. It is possible that a player’s impairment may also result in a reduced grip on the racket/chair. Players often use gloves to assist with this.

220
BAD
MIN
TON
CO
ACH
ED
UC
ATIO
N ►
C
OAC
HES
’ MAN
UAL
►
LE
VEL
1 M
OD
ULE
13
►
DIS
ABIL
ITY
BAD
MIN
TON
Players should always hold their rackets during every training routine, as one of the major skills in wheelchair development is the ability to have the racket in hand while driving the wheel forward or backward, as can be seen in the photos below.
Player holding racket while driving backward
The ability to use both hands in tandem and also slightly “off” tandem is important to either keep moving straight or to change direction slightly. Another key ability is to “feather” the wheel, using slight touches on one side to make the chair change direction slightly. The use of bodyweight is crucial in order to improve speed and braking. Bodyweight should move forward when driving forward, and then towards the back when driving backwards. This is essential in order to develop skills around hard braking and changing direction. Players also need to be able to move their hands back to the wheels as quickly as possible after hitting to ensure good recovery.
The setup of the chair for each individual is essential. Players must be strapped in at the feet and thighs to prevent any lower-body movement (see bwfcorporate.com/regulations/ for the most updated version of the regulations). Additional straps may be used for increased stability. It is also important that the seat be horizontal or angled backwards. It cannot be angled forwards. This can be seen in the diagram below.
Hands off tandem
Strapping is mandatory at thighs and feet

221
BAD
MIN
TON
CO
ACH
ED
UC
ATIO
N ►
C
OAC
HES
’ MAN
UAL
►
LE
VEL
1 M
OD
ULE
13
►
DIS
ABIL
ITY
BAD
MIN
TON
Performance Factor 2 – Technical (Hitting Skills)
As mentioned in the previous section, wheelchair players need to be able to hold both the racket and the wheel and be able to push/pull equally on both sides, but they also need to strike shuttles at different angles while maintaining control of the movement of the chair. Because they are sitting in a wheelchair, players are unable to move into a side-on position for overhead strokes. However, shoulder and upper-body movement backwards and into the preparation phase should be incorporated as appropriate. Core strength, flexibility and level of impairment will determine to what degree this is possible. Through the hitting phase, there is little upper-body rotation, with the power being generated mainly by the rotation of the shoulder and arm.
Recovery is then made by moving the hands back to the wheels as quickly as possible. All the strokes within the wheelchair game require the same technical skills as with able-bodied players, but without the use, or with minimal use, of core and lower body. The same principle of early preparation, grip and hitting phase should be followed for all forehand and backhand strokes. Please refer back to the hitting sequences from Module 7 for more detail. Below are two examples of hitting sequences for a wheelchair player. The same elements described in Module 7 can be easily observed here.
Overhead hitting sequence
Backhand hitting sequence
Understanding the range of players’ impairments will allow coaches to adapt standard techniques. For example, the restrictions of the chair and the players’ ability to rotate their hips in the chair can limit overhead preparation. Depending on their core strength, players will be able to take the elbow and shoulder varying distances behind them in preparation. WH 1 players (more disabled) generally have high backs on their chairs for support, and this restricts movement of the core/shoulder, whereas WH 2 players (less disabled, with more core strength) generally have lower backs on their chairs and can rotate their upper bodies to a much greater degree. Even though wheelchair singles is played on half court, there is still the opportunity to play slices and a variety of strokes to create space and opportunities for winning shots. Early preparation and the development of deception should also be encouraged, just as when coaching able-bodied players. Using the diagonals in half court means players will have to cover maximum distances, and this will require them to stretch out wide and also play round-the-head or backhand shots.
Shoulder rotation (front view)
Shoulder rotation (side view)

222
BAD
MIN
TON
CO
ACH
ED
UC
ATIO
N ►
C
OAC
HES
’ MAN
UAL
►
LE
VEL
1 M
OD
ULE
13
►
DIS
ABIL
ITY
BAD
MIN
TON
Regarding service, players may serve both forehand and backhand. The chair must be static on the delivery of the service. Whereas with able-bodied players the shuttle must be struck below the waist, for wheelchair players the shuttle must be struck below the armpit.
Different views of wheelchair service delivery
Performance Factor 3 – Tactical Singles – As wheelchair matches are played in a reduced area, with the area from the front service line to the net always being out, this affects both the strokes that are played and the tactical decisions that are made. The clear, drop and forecourt block/lift become the main strokes used. The depth of clears and lifts is key in moving opponents to the rear to allow players to establish an attacking base. This movement of the opponent to the rear helps create openings at the front of the court, and therefore patience and the ability to play long rallies, often with a large percentage of shots to the rearcourt, is crucial. Doubles – Because wheelchairs are unable to move sideways without turning, the doubles game has tended to result in players concentrating on their half of the court, moving forward and backward. However, as the sport progresses and players become stronger and faster, with a greater variety of strokes, we may see increased rotation of pairs. It is important for players to be able to cross and rotate, and the ability to cover a partner who is deep in the rearcourt by moving forward and slightly across (as per able-bodied doubles) is essential in preventing simple forecourt winners. Also, as players develop and are better able to move across the back of the court, especially in the WH 2 class (less disabled), we may see greater rearcourt coverage, as well as players being able to stretch further on both forehand and around the head. As with any doubles pair, the understanding between players is vital in knowing whether to move across or not. Below is one example of a rotation sequence in wheelchair mixed doubles, but again, players and coach will need to work together to determine how the pair can best cover the court. The sequence below describes the rotation of the far pair (in red).

223
BAD
MIN
TON
CO
ACH
ED
UC
ATIO
N ►
C
OAC
HES
’ MAN
UAL
►
LE
VEL
1 M
OD
ULE
13
►
DIS
ABIL
ITY
BAD
MIN
TON
As previously mentioned, a wheelchair doubles pair can be made up by a WH 1 and a WH 2 player or by two WH 1 players (a WH 2 player CANNOT play with another WH 2 in a BWF-sanctioned event). This also creates variations in the pair, as their strengths and weaknesses will be different, and it is not unusual to see the WH 2 (less disabled player) covering a greater area in both doubles and mixed. It is essential that coaches understand the strengths and weaknesses of both players and are able to create appropriate tactical strategies. Performance Factor 4 – Physical As mentioned in the Technical section, the use of the arms for both movement and hitting technique is the main challenge in the wheelchair classes. Just like in standing badminton, where players will use long and short steps, slow and fast leg movements, and stop and recovery techniques, wheelchair players also have to deliver long and short, as well as fast and slow pulls and pushes, in addition to
Player moves to rearcourt. Partner moves forward, towards centre line.
Opponent responds to dropshot with straight block.
Rear player changes sides while moving forward.
Players are now fully rotated. Front player moves across, to cover straight block.

224
BAD
MIN
TON
CO
ACH
ED
UC
ATIO
N ►
C
OAC
HES
’ MAN
UAL
►
LE
VEL
1 M
OD
ULE
13
►
DIS
ABIL
ITY
BAD
MIN
TON
developing techniques for stopping and recovering. Wheelchair players will need to build dynamic speed for initial movement from the base, as well as endurance for long rallies. Due to different levels of core strength, players will display varying levels of upper-body mobility, as well as a range of movement/reach. Recovery to an upright position when athletes lean forward/sideways will differ for WH 1 and WH 2 players, with WH 2 players being able to balance and return to position more effectively due to their greater core strength. Players often keep their non-racket hand on the wheel while striking the shuttle to maintain balance and aid recovery in both the rearcourt and forecourt. Depending on their level of impairment, players will have varying degrees of movement from the waist. Those with little or no use of their stomach muscles will find it harder to stretch forward and back without using the non-racket hand to pull themselves back up into position. Those players with stronger stomach muscles are able to stretch directly back and recover, as well as being able to reach further forward. Coaches should also be aware of the difference in the height of the back of the chair. WH 2 players and those that have the ability to reach far backwards (i.e., stomach control) will generally use chairs with a lower back, as can be seen in the photos below.
WH 1 - higher back WH 2 - lower back Because wheelchair players cannot turn fully sideways, they must use their shoulders to generate a lot of the initial power for overhead strokes. It is not unusual for wheelchair players to develop shoulder injuries, and a significant amount of time will be spent on developing strength and flexibility and improving upper-body range of movement.
Other Performance Factors – Psychology & Lifestyle Some players in this category will be able to walk and will only work in the chair when playing para-badminton; however, the majority of players are full-time chair users. This means that planning and preparation is crucial for the logistics surrounding training and competition. Greater time is required for transportation and movement, with accessible facilities being required. Players will have a day chair (right) and a sports chair (left). Maintenance and upkeep of the sports chair for competition is vital. This includes correct tyres/ pressure etc. as well as having the chair adapted correctly (seat height, back height etc.) for the player. Players will be able to determine their best setup over time and through training and practice. _________________________________________________________________________________
Sports chair and day chair

225
BAD
MIN
TON
CO
ACH
ED
UC
ATIO
N ►
C
OAC
HES
’ MAN
UAL
►
LE
VEL
1 M
OD
ULE
13
►
DIS
ABIL
ITY
BAD
MIN
TON
STANDING LOWER 3 (SL 3) Overview of the Sport Class Standing Lower 3 (SL 3) is played on an adapted court for singles (see the diagram below) and on a standard full court for doubles. Standing Lower 3 players have impairments in one or both lower limbs and face difficulties with balance in walking and running.
STANDING LOWER 3 (SL 3) SINGLES COURT
The following are some types of impairments found within SL 3:
• Above-knee amputation • Congenital limb deficiency • Cerebral palsy • Polio • Spina bifida
Similar to wheelchair doubles, there are restrictions on the SL doubles pairings that can be made. These will be discussed in greater detail in the tactical section.

226
BAD
MIN
TON
CO
ACH
ED
UC
ATIO
N ►
C
OAC
HES
’ MAN
UAL
►
LE
VEL
1 M
OD
ULE
13
►
DIS
ABIL
ITY
BAD
MIN
TON
Overview of Performance Factors Relevant to this Sport Class This sport class has a variety of impairments. Some players will have leg amputations and require a prosthetic lower limb. Some players use a crutch, which is also allowed (although this is not very common). Others will have a weaker side, which may affect both the lower and upper body. There are no upper-body prosthetics allowed in this class or any other para-badminton class. Performance Factor 1 – Technical (Movement Skills) SL 3 singles is played on an adapted court (commonly referred to as “half court”), as shown above. This can induce longer rallies, with clears, drops and net shots being the predominant strokes. Players need to be patient and train to move efficiently in a straight line. The base position is usually side-on, favouring one side, depending on which leg/limb is stronger and/or how the player is able to move most effectively. Players may often have to develop lunging on the non-racket leg and this will affect movement towards the shuttle, as well as recovery. Range of movement of a limb may be affected and this will in turn affect balance and stability. With doubles, the sideways and angled movement required for playing on a full court (unlike singles) provides another challenge for good preparation and recovery. Players may or may not be able to follow accepted patterns as per able-bodied players and this will depend entirely on their impairment. Coaches will need to work with players to determine what they can and cannot do, and what strategies partners will need to use. It is common for many players NOT to rotate at all in the rearcourt. In SL 3 singles we see a variety of rearcourt techniques and this is dependent on the player’s impairment, strong and weak limb, or prosthetic. Economy and efficiency of movement are essential, as rallies can be very long, and able limbs may fatigue at a faster rate than impaired limbs due to possible over-dependency on the non-affected limb. Performance Factor 2 – Technical (Hitting Skills) Hitting techniques are the same as with able-bodied players. Again, refer to Module 7 for a review of the elements involved in the hitting sequence. However, in this sport class, it is important to understand that sometimes preparation and recovery differ due to the impairment. For example, some players are able to rotate at the rear of the court and some are not. Some players are able to lunge on their racket leg and some are not. However, the grip, racket preparation, hitting action and recovery should, where possible, remain the same. This can clearly can be seen in the sequence below.
Lunging on non-racket leg

227
BAD
MIN
TON
CO
ACH
ED
UC
ATIO
N ►
C
OAC
HES
’ MAN
UAL
►
LE
VEL
1 M
OD
ULE
13
►
DIS
ABIL
ITY
BAD
MIN
TON
Overhead hitting sequence
If players have difficulty using their non-racket arm, they may have to adapt the way they present the shuttle before serving. They may use the weakened limb or the racket hand itself in cases of grip problems.
Performance Factor 3 – Tactical Singles – SL 3 singles is played in a reduced area. As mentioned before, this may induce longer rallies, consisting of predominantly clears, drops and net shots, mainly as there are fewer gaps to hit winning shots. Smashes can be used to induce weak returns and also to raise the tempo of the game. As players become stronger, we may see rallies shorten and more smashes being introduced. Doubles – In men's doubles (SL3-SL4 sport class), it is possible that two SL 3 players will team up to create a pairing; however, regulations allow for an SL 3 and an SL 4 player to make up a stronger pairing. In women's and mixed doubles, there is a single standing sport class (SL3-SU5) for each, with a maximum of 8 class points per pair. This means that an SL 3 player can pair up with an SL 4 or SU 5 player. Please consult the Para-Badminton Competition Regulations for a more detailed explanation of possible doubles pairings. In any of these cases, this will present certain tactical challenges, as players will have different disabilities and each will have different strengths and weaknesses. It is likely that an SL
SL 3 service delivery

228
BAD
MIN
TON
CO
ACH
ED
UC
ATIO
N ►
C
OAC
HES
’ MAN
UAL
►
LE
VEL
1 M
OD
ULE
13
►
DIS
ABIL
ITY
BAD
MIN
TON
3 player will have weaker movement, but not necessarily weaker stroke production. Once again, it is important that coach and players communicate and experiment to determine how the pair can best work together. Performance Factor 4 – Physical Players with an amputation (above the knee, in the case of SL 3) will have a dominant leg, as do those with a disability like cerebral palsy. Developing both sides of a player’s body and attempting to reduce the imbalance will help develop the player’s movement skills. Players’ ability to understand and develop their use of prosthetic or impaired limbs is key to their movement. Players with a weaker lower limb may find that the dominant leg, taking on the majority of work, will fatigue faster due to having to compensate for the impairment. Players must learn to load the impaired limb to try and reduce the imbalance and assist the stronger limb.
Players using prosthetics often develop pain or soreness around the stump. This may influence the training intensity and recovery periods adopted. There is a certain amount of stress being put through the limb to the prosthetic. Coaches must ensure they communicate with players to understand their difficulties with prosthetics and any discomfort when playing and/or training. Coaches should also note that the use of prosthetic limbs causes a great deal of perspiration to build up between the limb and the prosthetic, so players may need breaks to dry off their limbs and refit before continuing. During matches, players are allowed an “appropriate” time to remove, clean, and replace prosthetics, as they often work loose with sweat and movement.
Other Performance Factors – Psychological & Lifestyle Please refer to the general guidelines outlined in Module 10 – Sport Psychology and Module 11 – Lifestyle. _________________________________________________________________________________

229
BAD
MIN
TON
CO
ACH
ED
UC
ATIO
N ►
C
OAC
HES
’ MAN
UAL
►
LE
VEL
1 M
OD
ULE
13
►
DIS
ABIL
ITY
BAD
MIN
TON
STANDING LOWER 4 (SL 4) Overview of the Sport Class This sport class has no adaptions with regard to court size. Players may have impairment in one or both lower limbs, which will be less than in SL 3, and they will have minimal impairment in balance.
The following are some types of impairments found within SL 4:
• Below-knee amputation • Congenital limb deficiency • Cerebral palsy • Polio • Spina bifida As mentioned in the SL 3 overview, there are restrictions on the pairings that can be made in doubles. These are discussed in greater detail in the tactical section. Overview of Performance Factors Relevant to this Sport Class This sport class involves a variety of impairments. Some players will have amputations and require prosthetic limbs. The amputation in this case will be below the knee. Others will have a weaker side affecting the lower limb (as a result of polio or cerebral palsy, for example). Players will have the ability to move forwards, backwards and sideways. Due to amputations or leg strength on a weaker side, players may have to adapt standard movement patterns and may also fatigue quicker on one side than the other. Performance Factor 1 – Technical (Movement Skills) SL 4 singles is played on a full court, and as such, full-court movement is required. As in SL 3, players may have to learn to lunge on the non-racket leg, which will affect movement towards the shuttle, as well as recovery. Players with shorter below-knee prosthetics are often able to lung on the prosthetic and adopt recognised movement patterns. However, whether players are able to follow standard patterns or not will depend on the nature of their impairment. For example, players may not be able to extend the non-racket arm for balance. Again, as with SL 3, range of movement of a limb may be affected, which will in turn affect balance and stability.

230
BAD
MIN
TON
CO
ACH
ED
UC
ATIO
N ►
C
OAC
HES
’ MAN
UAL
►
LE
VEL
1 M
OD
ULE
13
►
DIS
ABIL
ITY
BAD
MIN
TON
Variety of lunging patterns for SL 4
Performance Factor 2 – Technical (Hitting Skills) The challenges around hitting skills for SL 4 players are basically the same as for SL 3 players. (Refer to the SL 3 section for further information.) Performance Factor 3 – Tactical Singles – Like able-bodied players, SL 4 players can focus on playing to opponents’ weak areas, which may be technical as well as physical, depending on the disability. They should also be aware that players with certain disabilities will fatigue faster than others. Doubles – Doubles regulations do not allow two male SL 4 players to compete as a pair in the SL3-SL4 sport class. As such, an SL 4 player must form a partnership with an SL 3 player, unless he chooses to move up to the SU 5 sport class. As mentioned in the SL 3 section, women's doubles forms a unique standing sport class (SL3-SU5), as does mixed. The challenges facing such combinations are outlined in the SL 3 section.
Performance Factor 4 – Physical The discussion in SL 3 around the importance of developing both sides of the player’s body to reduce any imbalance also applies to SL 4. See the “Physical” section of SL 3 for more detail. SL 4 players may also have a progressive weakness in a lower limb, which may fatigue faster. They may also have balance issues. Module 9 of this resource provides some introductory exercises for training balance, and these can also be implemented with para-badminton players. For a more in-depth treatment on how balance works and how to improve it, the Coach Education Level 2 manual (Module 8) will also be quite useful. Again, the issues discussed around the use of prosthetics in SL 3 (regarding soreness, intensity, perspiration) apply to SL 4 players as well. It should be noted that there is a wide variety of prosthetic limbs, and players may not always be able to obtain the best fit for their disability and the sport. This is a developing field and there is still a lot of work to be done in this area. Other Performance Factors – Psychological & Lifestyle Please refer to the general guidelines outlined in Module 10 – Sport Psychology and Module 11 – Lifestyle. _________________________________________________________________________________

231
BAD
MIN
TON
CO
ACH
ED
UC
ATIO
N ►
C
OAC
HES
’ MAN
UAL
►
LE
VEL
1 M
OD
ULE
13
►
DIS
ABIL
ITY
BAD
MIN
TON
STANDING UPPER 5 (SU 5) Overview of the Sport Class There is no adaptation to court size. This sport class is the least impaired of the standing categories, with players having impairments only in the upper limbs. It is the category that is closest physically and visually to able-bodied badminton.
The following are some types of impairments found within SU 5:
• Upper-limb amputation (above or below elbow) • Congenital limb deficiency • Cerebral palsy • Polio • Stroke • Brachial plexus injury Overview of Performance Factors Relevant to this Sport Class This sport class has only upper-body impairments, mainly to the non-racket hand/arm. As in other sport classes, players are not allowed to use any upper-body prosthetics. Performance Factor 1 – Technical (Movement Skills) Players’ movement is generally as per able-bodied players, with only concerns for balance depending on the disability (e.g., amputation, shorter non-racket arm).
Different upper-body conditions within SU 5
Performance Factor 2 – Technical (Hitting Skills) Hitting techniques are the same as per able-bodied players. As with SL 3 and SL 4, there may be some differences required in preparation and recovery due to the impairment, but where possible the

232
BAD
MIN
TON
CO
ACH
ED
UC
ATIO
N ►
C
OAC
HES
’ MAN
UAL
►
LE
VEL
1 M
OD
ULE
13
►
DIS
ABIL
ITY
BAD
MIN
TON
grip, preparation, hitting action and recovery should remain the same. Again, please refer back to the hitting sequences outlined in Module 7 of this resource. Players who are unable to use their non-racket arm will have to adapt the way they present the shuttle before serving. They may use the shortened limb or the racket hand itself in cases of full amputation or grip problems.
Variety of service-delivery techniques for SU 5
Performance Factor 3 – Tactical Singles - Like able-bodied players, SU 5 players should aim to play to opponents’ weak areas, which may be technical as well as physical, depending on the disability. Doubles - In men's doubles, there is an SU 5 sport class, which is also open to SL 3 and SL 4 players. This means that possible pairings include two SL 3 players, two SL 4 players, two SU 5 players, or any combination of these. As explained in the SL 3 section, there is a single standing sport class (SL3-SU5) for women's doubles, and another for mixed doubles, with a maximum class point of 8. This means that an SU 5 player can only partner an SL 3 player, but an SL 4 player can partner another SL 4 or an SL 3 player. It is also possible for two SL 3 players to play together. This will clearly have an effect on the strength and physical ability of the pair. Where the partners are from different sport classes (SU 5 with SL 4 or SL 3), please refer to the “Tactical” section of SL 3, as the same principles will apply. Again, please consult the Para-Badminton Competition Regulations for the most updated version of the regulations regarding pairings.
Performance Factor 4 – Physical This sport class has only upper-body impairments, and as such, the main issues will relate to balance in the upper body. Training of the unaffected lower limbs will be the same as with able-bodied players. Other Performance Factors – Psychological & Lifestyle Please refer to the general guidelines outlined in Module 10 – Sport Psychology and Module 11 – Lifestyle. _________________________________________________________________________________
SL3-SU5 mixed doubles pair

233
BAD
MIN
TON
CO
ACH
ED
UC
ATIO
N ►
C
OAC
HES
’ MAN
UAL
►
LE
VEL
1 M
OD
ULE
13
►
DIS
ABIL
ITY
BAD
MIN
TON
SHORT STATURE (SS 6) Overview of the Sport Class This sport class plays on a full court with no adaptions. There are over 200 types of restricted growth that are grouped together as “short stature”. Players in the male dwarf class may not exceed a height of 145 centimetres or an arm length of 66 centimetres. The sum of standing height and arm length must not exceed 200 centimetres. In the women’s class, player height must not exceed 137 centimetres, and arm length cannot exceed 63 centimetres. The sum of the standing height and arm length must not exceed 190 centimetres. Please refer to the most updated version of the BWF Para-Badminton Classification Regulations, which can be downloaded at bwfcorporate.com/regulations/.
Overview of Performance Factors Relevant to this Sport Class There are a number of different body types within the SS 6 category and this will have implications on movement and flexibility, among other areas.
Performance Factor 1 – Technical (Movement Skills) Court speed is crucial in SS 6. Due to their stature and the necessity to cover the full court, players will often dive to cover ground and recover shots. It is important to be aware of this and incorporate it into training. There will be a lot more running (more strides) between strokes, but footwork patterns as per able-bodied players are still incorporated. The ability to dive and recover is currently seen mainly in men’s singles and doubles. Performance Factor 2 – Technical (Hitting Skills) Hitting techniques are the same as with able-bodied players. However, in this sport class, overhead hitting techniques can vary due to limb length and flexibility, with some players’ overhead action looking more “round armed”. Also, with underarm strokes and racket length, sometimes lifts have to be taken further to the side to allow for the full swing. This is especially true with beginner players, and it is often appropriate to use shorter rackets in the initial stages. Stroke taken to the side in SS 6

234
BAD
MIN
TON
CO
ACH
ED
UC
ATIO
N ►
C
OAC
HES
’ MAN
UAL
►
LE
VEL
1 M
OD
ULE
13
►
DIS
ABIL
ITY
BAD
MIN
TON
Performance Factor 3 – Tactical Singles – Due to the stature of the players, the smash has less of an angle. However, the flatter smash is used to pressure and turn the opponent and often obtains a return to the net area. Many games have longer rallies and require patience and effective movement of the shuttle around the opponent’s court. Drops and slices to bring a player in to the net, along with deep, attacking clears and flat lifts are very evident in this sport class. Doubles – Rallies can be very long, so patience and the ability to move the shuttle to the corners is essential. Performance Factor 4 – Physical Players in the short stature class may have skeletal and joint stability problems. Some players will have conditions that affect the spine, and the constant jumping involved in badminton is something that should be taken into account, as this may affect players physically. Jumping or bounding exercises should be used sparingly and specifically; they should also involve discussion with the players, in order to ensure that such exercises are appropriate for them. It is not uncommon for players in the SS 6 class to have quite lax joints in the elbows, hips, and knees, which may affect stability and recovery. Coaches should be aware of such conditions when planning and implementing any movement or reaction exercises, as this is where the limbs will be placed under the greatest stress. Bowed legs (see picture) are not unusual, which also can result in ankle stress. In all cases, it is vital that the coach discuss needs and limitations with the players and adapt training sessions as necessary. It should also be noted that SS 6 players have small hands, and grips should be adapted accordingly. Other Performance Factors – Psychological & Lifestyle Please refer to the general guidelines outlined in Module 10 – Sport Psychology and Module 11 – Lifestyle.

235
BAD
MIN
TON
CO
ACH
ED
UC
ATIO
N ►
C
OAC
HES
’ MAN
UAL
►
LE
VEL
1 M
OD
ULE
13
►
DIS
ABIL
ITY
BAD
MIN
TON
04. INTRODUCTION TO BADMINTON FOR PLAYERS WITH INTELLECTUAL DISABILITIES (ID)
BACKGROUND TO INTELLECTUAL DISABILITY There are many forms of intellectual disabilities and these are often described in different ways in different countries. The definition of intellectual disability offered by Special Olympics focuses on limitations in cognitive functioning and skills involving communication, social interaction and self-care. They stress that this will affect children’s development and rate of learning, making reference to the American Association of Intellectual and Developmental Disabilities threshold of an IQ of around 70 or lower. Following are some examples of conditions that might affect players with ID:
• Down syndrome • Autism spectrum disorders (including Asperger syndrome) • Fragile X syndrome • Fetal alcohol syndrome
There are many conditions falling under the general category of ID, each with its own set of challenges. The range of players’ abilities can be compared to the degree of variety found in mainstream badminton, and as such, the communication skills required when coaching players with ID are also quite varied. It is the quality of this communication that is key when coaching in this category and will determine how successful the player-coach partnership is.
BADMINTON FOR PLAYERS WITH INTELLECTUAL DISABILITIES There are badminton clubs around the world that promote badminton for players with ID, either as part of overall club activities or catering specifically to the ID population. On a worldwide level, the largest sports organisation for people with ID is Special Olympics, involving 169+ countries and over 4.7 million athletes. Badminton has been part of Special Olympics since 1995, and in 2015, the BWF signed an agreement with Special Olympics International facilitating joint efforts in promoting badminton for players with ID. Special Olympics includes a variety of events for competition in badminton, including individual skills competition, as well as singles, doubles and mixed events. For more information on the available events, please visit http://www.specialolympics.org/Sections/Sports-and-Games/Coaching_Guides/ Badminton.aspx. Athletes in each event are grouped by age, gender and ability through a process known as “divisioning”. This is aimed to promote fair competition and allow all participants the opportunity to be successful. For more details about how the process works, please visit the Special Olympics website at http://www.specialolympics.org/divisioning/.
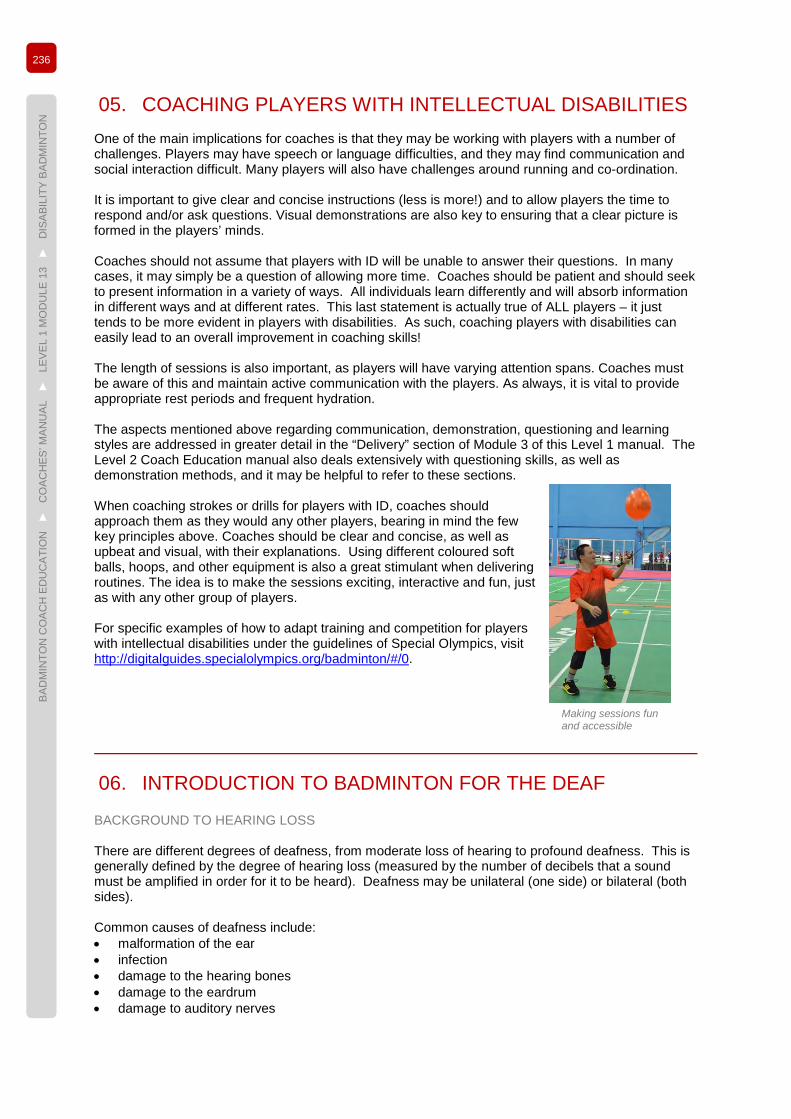
236
BAD
MIN
TON
CO
ACH
ED
UC
ATIO
N ►
C
OAC
HES
’ MAN
UAL
►
LE
VEL
1 M
OD
ULE
13
►
DIS
ABIL
ITY
BAD
MIN
TON
05. COACHING PLAYERS WITH INTELLECTUAL DISABILITIES One of the main implications for coaches is that they may be working with players with a number of challenges. Players may have speech or language difficulties, and they may find communication and social interaction difficult. Many players will also have challenges around running and co-ordination. It is important to give clear and concise instructions (less is more!) and to allow players the time to respond and/or ask questions. Visual demonstrations are also key to ensuring that a clear picture is formed in the players’ minds. Coaches should not assume that players with ID will be unable to answer their questions. In many cases, it may simply be a question of allowing more time. Coaches should be patient and should seek to present information in a variety of ways. All individuals learn differently and will absorb information in different ways and at different rates. This last statement is actually true of ALL players – it just tends to be more evident in players with disabilities. As such, coaching players with disabilities can easily lead to an overall improvement in coaching skills! The length of sessions is also important, as players will have varying attention spans. Coaches must be aware of this and maintain active communication with the players. As always, it is vital to provide appropriate rest periods and frequent hydration. The aspects mentioned above regarding communication, demonstration, questioning and learning styles are addressed in greater detail in the “Delivery” section of Module 3 of this Level 1 manual. The Level 2 Coach Education manual also deals extensively with questioning skills, as well as demonstration methods, and it may be helpful to refer to these sections. When coaching strokes or drills for players with ID, coaches should approach them as they would any other players, bearing in mind the few key principles above. Coaches should be clear and concise, as well as upbeat and visual, with their explanations. Using different coloured soft balls, hoops, and other equipment is also a great stimulant when delivering routines. The idea is to make the sessions exciting, interactive and fun, just as with any other group of players. For specific examples of how to adapt training and competition for players with intellectual disabilities under the guidelines of Special Olympics, visit http://digitalguides.specialolympics.org/badminton/#/0.
06. INTRODUCTION TO BADMINTON FOR THE DEAF BACKGROUND TO HEARING LOSS There are different degrees of deafness, from moderate loss of hearing to profound deafness. This is generally defined by the degree of hearing loss (measured by the number of decibels that a sound must be amplified in order for it to be heard). Deafness may be unilateral (one side) or bilateral (both sides). Common causes of deafness include: • malformation of the ear • infection • damage to the hearing bones • damage to the eardrum • damage to auditory nerves
Making sessions fun and accessible

237
BAD
MIN
TON
CO
ACH
ED
UC
ATIO
N ►
C
OAC
HES
’ MAN
UAL
►
LE
VEL
1 M
OD
ULE
13
►
DIS
ABIL
ITY
BAD
MIN
TON
Hearing loss may be: • conductive - meaning that vibrations do not pass from the outer ear to the inner ear • sensorineural - meaning that there is a dysfunction in the inner ear, the cochlea, the auditory
nerve, or there is brain damage • a combination of both Deafness may be pre-lingual (onset before acquiring spoken language) or post-lingual (after speech is acquired). Lip-reading and/or sign language may be used in communication, but it is also important to be aware that sign language may vary from country to country. BADMINTON FOR DEAF PLAYERS While many deaf players participate in mainstream clubs, there are also deaf badminton clubs around the world, some of which welcome hearing players as well. There are local, national and regional badminton competitions for the deaf, as well as multi-sport games. The Deaflympics, an elite-level competition held every four years, are one of the longest-running multi-sport events. The first games were held in Paris in 1924, with 148 athletes from 9 countries. At the 2017 games, this had grown to over 3,000 athletes from 97 countries. Badminton was incorporated in the Deaflympics in 1985. The games were originally known as the “International Silent Games”, and then the “World Games for the Deaf”, with the name “Deaflympics” being formally adopted in 2001. As defined by the Deaflympics General Regulations, participation in the games is restricted to persons who are: 1. deaf, defined as a hearing loss of at least 55dB in the better ear (3 tone frequency average of 500,
1,000 and 2,000 Hertz, ANSI 1969 standard); 2. citizens of a nation member of the ICSD; and 3. not using hearing aids or external cochlear implant aids during any Deaflympics event.
For more information regarding the Deaflympics, please visit their website at: http://www.deaflympics.com.
07. COACHING DEAF PLAYERS For players with different degrees of hearing loss/deafness, their main challenges involve sound and communication. They will be able to watch either a coach’s demonstration or the coach’s mouth to pick up the communication, but they will rarely be able to do both at the same time. This has implications for coaches when working with this sport class. Clear and concise demonstrations are essential, as deaf players are generally visual learners. The more they can see the better they will understand. Coaches should be aware that they may sometimes find themselves coaching a group where only some players are deaf, while at other times they may be leading sessions where all players have different levels of hearing loss. Many deaf players will use interpreters or signers, who will join them in the sessions. It is important that all those involved – players, assistant coaches and interpreters – understand the dynamics of the group and what each other’s roles are before starting any session. For example, an interpreter/signer may not be aware of the safety aspects of being in and around a court when players are in action. KEY CONCERNS FOR THE COACH WHEN DELIVERING TO DEAF PLAYERS If players rely on lip-reading, they must be able to see the coach clearly (focusing on the mouth). The coach should speak clearly (suitable volume) and be sure to face all the players when giving instructions (which is general good practice anyway). The interpreter/signer also needs to hear the communication clearly!

238
BAD
MIN
TON
CO
ACH
ED
UC
ATIO
N ►
C
OAC
HES
’ MAN
UAL
►
LE
VEL
1 M
OD
ULE
13
►
DIS
ABIL
ITY
BAD
MIN
TON
After any demonstration/communication, the coach should ensure that everyone understands. A simple “thumbs-up” (or other culturally appropriate gesture) from everyone could be used as the sign that confirms this. If players, assistant coaches, or helpers ask questions, the coach should repeat the question before answering it, to make sure that everyone has heard/seen it. Players with hearing loss have a wide variety of ability to hear sound, and therefore their ability to hear the striking of the shuttle (point of impact) can also vary. Players with good hearing will use this impact sound as a key to react in many situations. Players with hearing loss must be able to focus more on the visual picture of their opponent / feeder / coach. This will have implications for how the coach demonstrates and feeds to players with hearing loss. Clear visual explanations of strokes and of how they intend to feed (using racket or hand feed) must be understood by the player. Coaches may also decide to learn a few simple words in sign language, which will help with communication. Even having a pen and notepad on hand to write things down can be helpful if there are communication issues and no signer support is available. Coaches must be aware that their mouth provides the visual for deaf players to understand what they are saying and that they should speak naturally (without over-exaggerating the words) and concentrate on clear, concise communication. It is important to bear in mind that full beards can interfere with lip-reading, as can mumbling, or fiddling with things near the mouth while talking. Clearer communication naturally assists all players, including those with full hearing! Coaches should consider the position of the group when demonstrating. Players must be able to see the coach’s face as well as the demonstration. They should try to avoid having other activities in the background, or keep the group facing away from such activities where possible. The use of additional equipment such as shuttle tubes, cones, balloons, etc. should be incorporated to stimulate the visual aspects of a session. Creating visual signs can help convey messages to the group: stop, left, right, up, down, etc. For example: raising and waving a shuttle tube could be a signal for the group to stop. It is important to remember that deaf players are not usually limited by their physical ability to undertake routines/training. This means that the coach’s communication and demonstration skills will have a great effect on a player’s development. Finally, communication should be directed to the PLAYER (not the interpreter). It is important NOT to over-emphasise words or change the rhythm of speech, as rhythm is often the key to understanding what has been said. It is fine, however, to over-emphasise the demonstration itself, which will generally benefit all players in helping them focus on the most important aspects.
08. CONCLUSION: GOOD COACHING PRACTICE Whether you are working with para-badminton players, players with ID, or deaf players, disability badminton IS badminton. The key is to remember that you are coaching players and that your goal is to achieve the best development possible for those players by setting appropriate exercises and routines. Work with their strengths and weaknesses and build suitable on- and off-court programmes to allow them to reach their full potential. Enjoy the challenge of working with players and identifying what they need to achieve their goals.
• Everything you have learned in your coaching preparation and experience still applies to disability badminton.
• You already have the skills needed to coach players, who may happen to have disabilities. • Focus on coaching the performer, NOT the disability.

239
BAD
MIN
TON
CO
ACH
ED
UC
ATIO
N ►
C
OAC
HES
’ MAN
UAL
►
LE
VEL
1 M
OD
ULE
13
►
DIS
ABIL
ITY
BAD
MIN
TON
• Communicate openly with players to get their feedback – never be afraid to ask. • Observe what the players can and cannot do, and use this information to develop appropriate
routines and exercises. • Show your enthusiasm – if you are enjoying your session, the players will too! • Make sure your instructions are clear and concise, and verify that players have heard and/or
understood them. • Work with your players’ abilities rather than their disabilities. • Do not hesitate to be creative in designing new exercises based on your interaction with the
players.
09. SUMMARY Badminton for players with disabilities includes:
• para-badminton (for players with physical disabilities); • badminton for players with intellectual disabilities (ID); • badminton for the deaf.
Coaches who work with players with disabilities first and foremost need to apply the sound coaching skills they would use with any other population (for example, observing what players can and cannot do, planning accordingly, using effective communication, setting goals, etc.). Standard best practice delivery techniques, such as avoiding distractions around the court, making sure players can see the coach, making demonstrations extremely clear, and checking for understanding, will be especially helpful with deaf and ID populations. An understanding of the different sport classes in para-badminton will give coaches a better idea of the typical challenges players in each class face and how to support them. It will also help them identify any variations in the rules/court dimensions and the resulting implications for training. Para-badminton sport classes are:
• WH 1 – Wheelchair 1 • WH 2 – Wheelchair 2 • SL 3 – Standing Lower 3 • SL 4 – Standing Lower 4 • SU 5 – Standing Upper 5 • SS 6 – Short Stature
It is helpful to remember that the higher the number of the sport class, the less disabled the player. The most important thing to remember is that disability badminton IS badminton. Coaching players with disabilities requires the same skills as coaching able-bodied players, and more in-depth knowledge of the disability in question will only help to apply those skills more effectively.

240
BAD
MIN
TON
CO
ACH
ED
UC
ATIO
N ►
C
OAC
HES
’ MAN
UAL
►
LE
VEL
1 M
OD
ULE
13
►
DIS
ABIL
ITY
BAD
MIN
TON
10. SELF-ASSESSMENT QUESTIONS
1 Which of the following populations are included in para-badminton? (Tick all that apply.)
Wheelchair players
Players with Down syndrome
Amputees
Players with cerebral palsy
2 How many sport classes are there in para-badminton?
Eight
Four
Five
Six
3 Which area of the court is never in play for wheelchair badminton?
The area behind the back service line for doubles
The side alley of the doubles court
The area from the front service line to the net
None of the above
4 Standing lower classes may need to: (Tick all that apply.)
lunge on the “non-standard” leg
avoid using the impaired limb
adopt different recovery patterns after a shot
hit shots without turning side-on
5 Upper-body prosthetics are allowed in: (Tick all that apply.)
Standing Upper 5
Standing Lower 4
Standing Lower 3
None of the above
6 Short-stature players use: (Tick all that apply.)
A smaller court
A lower net
A standard court
A different scoring system
7 Which of the following should coaches avoid doing when working with players with ID?
Giving long explanations of exercises
Checking to make sure players have understood
Making sessions lively and entertaining
Giving players time to process information
8 Which of the following are helpful for deaf players?
Being able to see the coach’s mouth
Clear visual demonstrations of strokes/exercises
Visual signals for group to stop, gather, etc.
All of the above

BADMINTON WORLD FEDERATIONUnit No.1, Level 29Naza TowerNo 10 Persiaran KLCC50088 Kuala Lumpur
Tel: +603 2631 9188Fax: +603 2631 9688