bayeux stitch
TRANSCRIPT

ayeux stitch, which takes its namefrom the famous tapestry on which itis used, is an Anglo-Saxon variation
of an ancient technique known as laidwork.In this stitch, originally for reasons ofeconomy, threads are laid across the surfaceof the fabric and then held down with
another laid thread and a couching stitch,leaving a minimum of threads on the reverseside.
This technique is surprisingly easy tolearn and, once the basic method has beenmastered, lends itself to a huge variety ofdevelopments with which Anglo-Saxon
This Anglo-Saxontechnique is
surprisingly easy tolearn and can be
developed in numerousways
B
Workshop
PHOTOS BY IAN COLE
by Jan Messent
�����y����������������������������������������������������������������������������������������������������������������������������������������������������������������������������������������������������������������������������������������������������������������������������������������
12
This stitchedpiece wasworked as anexperiment inshading, usingonly finecrewel wools inthe traditionaltechnique,includingoutlines (alsosee page 16).

13
Workshop
embroiderers, all women at that time, wouldnot have been familiar.
The original materials, linen and wool,were all hand-made and dyed with plantdyes. Nowadays we have a far greater rangeof fabrics and threads at our disposal and soexperiments with the technique can produceexciting and unusual results. In learninghow to develop a technique, first identify itscomponents and then decide how they canbe changed.
0n the Bayeux Tapestry, only one colourwas used for the three elements: the threadslaid on the surface, the second set of threadslaid at intervals across them, and the tinycouching stitch used to hold the two layerstogether.
Not only can we use a different colour foreach part but we can also use differentthread thicknesses, fibres, random-dyed andmetal threads. We can also work in differentdirections and on a huge variety of fabricsnot known to the Anglo-Saxons.
Using a frame
The use of a frame is essential when workingBayeux stitch developments because the laidthreads require an even tension over larger-than-usual areas. Any kind of frame will doas long as the fabric stays drum-tightthroughout. If it slackens, tighten it.
Background fabrics
Because of the way the stitch is made, coarsefabrics create problems where the needle mayemerge through the same hole as it wentdown, and vice versa. So choose medium-weight fabrics that are fairly closely wovenrather than open-weave ones. Calico is ideal,as are other cottons, linen, silk and somesynthetic fibres.
To give the background extra body, Irecommend an under-layer of fine cotton-calico which is framed-up with the top layerand treated as one piece. This makes it easierto place the stitches very close together, tohide the beginnings and ends of the threads,and for finishing-off the ends of a stitch.
Threads
Originally, the same kind of thread was usedfor each part of the stitch and for the
outlining. However, the laid threads on thebottom layer will cover the shape moreefficiently and quickly when they are thickerthan the couching thread and holding stitch.
All the threads must at some stage bepulled through the fabric, even the couchedthreads that are laid on the top, so smooththreads are best. The thickness of the toplaid thread will produce different results, asit will either mask the colour of thelower laid thread or allow it to showthrough. Generally speaking, I usedoubled or thick threads for the bottomlayer and finer ones on top.
The colour and type of fibre being used,whether it is shiny or matt, plain orvariegated, whether it reflects the light wellor absorbs it, all affect the look of thefinished piece. Light reflection is importantas the stitch has a strong directional elementand the colour of the threads changesaccording to the direction of the light on it.Be aware of this and use it to advantage.
Make use of wools, linens, cottons(stranded and single), synthetics, silks, andany combination of these. Matt and shinythreads are equally useful, as are random-dyed (variegated) threads and metallicthreads, in skeins or on reels, whether forhand or machine embroidery. Remember thatdifferent threads can be mixed together inthe needle.
Ultimately, the thickness and type ofthread will depend upon the scale of thework: fine threads for small-scale pieces,coarser threads (and fabric) for large-scalepieces. Experiment to see what works best.
Needles
Use whatever size crewel needle isappropriate for the thread; keep a range ofsizes handy for different thicknesses andpurposes.
The outline
Traditionally, each shape was outlined witha variation of stem stitch called ‘outlinestitch’. The outline can be worked eitherbefore or after the filling, thoughtraditionally the outlines were always madefirst. Today, either stem or outline stitch maybe used, or even no outline at all.
Outline stitchOutline stitch is made in thesame way as stem stitchexcept that here the thread isheld to the left instead of tothe right, creating a twist tothe stitch in the oppositedirection. The point of theneedle comes out at the headof the previous stitch, not atan angle to it.

14
5 To finish off a thread, run the needlebetween the two layers of fabric, eitheronto a part of the design that has not yetbeen filled or beneath a filled part. Bringthe thread up and snip the end off close tothe surface, being careful not to snip anysurrounding stitches. Press the cut endwith a finger to make it disappearthrough to the back. A backstitch on thereverse side will also help to secure it.
Note: leave enough room at the sides for thetop threads to tighten up as the stab stitchesare worked, otherwise the shape may becomedistorted.
Bayeux stitch
To begin, work a fewrunning stitches towardsthe point where the firststitch will start (thesestitches will be covered bythe laid threads).1 Bring the needle up from
the reverse side to thesurface and take thethread across to the otherside of the shape, asshown. This makes thefirst stitch, which shouldlie firmly – withoutlooking pulled – uponthe fabric. Now bringthe needle up againas close aspossible to theplace where itwent down,not acrossthe back of the fabric.Unlike satin stitch, allthe stitches lie on thesurface, not on thereverse side.
2 Insert the needle at theother side of the shape,keeping the stitches soclose that no fabricshows between them.
3 Bring the needle upagain close to where itwent down, ready tomake the next stitch.
4 When the shape iscovered, bring the needleup at the side of theshape ready to laythreads across in theopposite direction to the
stitches, and at intervals, as shown. Eachtop laid thread is now couched (i.e. helddown) by tiny stab stitches in which theneedle enters and emerges at the sameplace. Couch each thread down as soon asit is laid, returning to the same side of theshape each time, ready to begin the nextline. Continue in this way until the wholeshape is couched down with cross-wisethreads.
Workshop
1
2
3
4
Bayeux stitch
CurvesOne way to deal with curves is to work thelaid stitches in sections, as shown. The toplaid thread and couching stitch should beplaced in slightly radiating lines so that thejoins between the sections are covered.
DirectionAs long as the bottom threads are close andparallel to each other, they can be laid in anydirection. The top laid threads should be evenlyspaced at right-angles to these, and thecouching stitches arranged equally apart. Thetop laid threads generally dictate the directionunless the top thread is very fine or the bottomlayer is striped. Experiment.
15
Variations on Bayeux stitch
Once you have learned the basic stitch, youwill want to develop it. Try some of theseideas on your sample.• Leave some of the shapes void.• Use a painted/patterned background
fabric and allow parts of this to show inthe voided areas.
• Spread out the lower laid threads to allowthe background to show.
• Vary the spacing of the small couchingstitches. Work them in pairs or in groupsof three.
• Vary the thickness of the threads, usingboth matt and shiny ones together.
• Try out different tones of colour on thesame shape, laying dark on light and viceversa. As with paint, pale blue on palegreen will produce turquoise: try out othermixtures. Even the stab stitch will createanother colour, as will metallic threads.
• Use tiny beads with the stab stitch.• Outlining is your own choice. Use it for
extra sharpness (as seen on the deerdesigns).
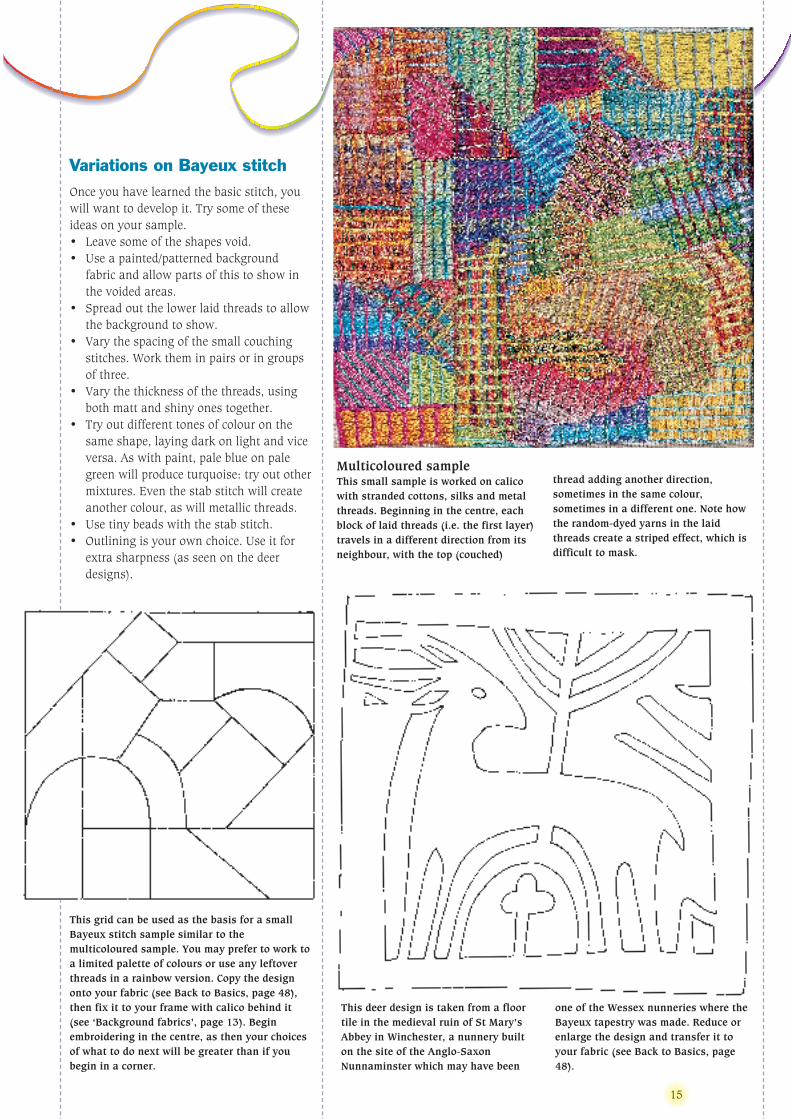
Multicoloured sample This small sample is worked on calicowith stranded cottons, silks and metalthreads. Beginning in the centre, eachblock of laid threads (i.e. the first layer)travels in a different direction from itsneighbour, with the top (couched)
thread adding another direction,sometimes in the same colour,sometimes in a different one. Note howthe random-dyed yarns in the laidthreads create a striped effect, which isdifficult to mask.
This grid can be used as the basis for a smallBayeux stitch sample similar to themulticoloured sample. You may prefer to work toa limited palette of colours or use any leftoverthreads in a rainbow version. Copy the designonto your fabric (see Back to Basics, page 48),then fix it to your frame with calico behind it(see ‘Background fabrics’, page 13). Beginembroidering in the centre, as then your choicesof what to do next will be greater than if youbegin in a corner.
This deer design is taken from a floortile in the medieval ruin of St Mary’sAbbey in Winchester, a nunnery builton the site of the Anglo-SaxonNunnaminster which may have been
one of the Wessex nunneries where theBayeux tapestry was made. Reduce orenlarge the design and transfer it toyour fabric (see Back to Basics, page48).

To achieve the shaded effectshown: 1 Begin stitching with one
shade (a) in the needle.2 Next, mix shades (a) and
(b) together in the needle.3 Change to shade (b).
On fabric as coarse as this, afiner-weave backing fabricholds the thread if the needlehas to come back up throughthe same hole as it went down.
Canvaswork sampleWorked on coarse 10 holes tothe inch single canvas, thissample combines tent stitchwith Bayeux stitch usingwools, perle cottons and thickmetal threads. This coarsecanvas made it possible to useslubbed wool to give aninteresting texture, but theuncompromising grid of thecanvas was no help with theplacing of stitches. However,the random placing of thecouching stitches and theirregular spacing of the topthreads created some veryattractive areas.
St Mary’s Tile 2Size: 25 cm square
A larger version of the deerwas worked in wools, strandedcottons, slub cottons andrandom-dyed threads. Thebackground is worked usingthe same multi-directionalmethod shown on the smallsample, and the shading isachieved by changing the toneof the laid threads and thecouching threads verygradually in certain areas.Often, both tones were used inthe needle at the same time(see St Mary’s Tile 1). Shadingcan also be achieved by closingup the position of the tinycouching stitches, or openingthem out. On the central tree,the top laid stitches andcouching stitches were notworked. The background fabricis linen backed withunbleached calico.
16
Workshop
St Mary’s Tile 1 (see page 12)Size: 17 cm square